
WALKTHROUGH MENU
- General Tips
- Chapter One: The Secret Room
- Chapter Two: The First Journey
- Chapter Three: Strange Places
- Chapter Four: The Hidden Stash
- Chapter Five: Under the Water
- Chapter Six: The Christmas Eve
- Chapter Seven: There’s No Place like Home
- Chapter Eight: The Secret
GENERAL TIPS
- This is a Hidden Object Game. The mini-games are a variety of puzzles. The story is about Gregory, whose family has kept a secret for many generations, and a mysterious suit of armor.
- There is no timer.
- If you make too many incorrect clicks in a row, the cursor will dance away for a few seconds.
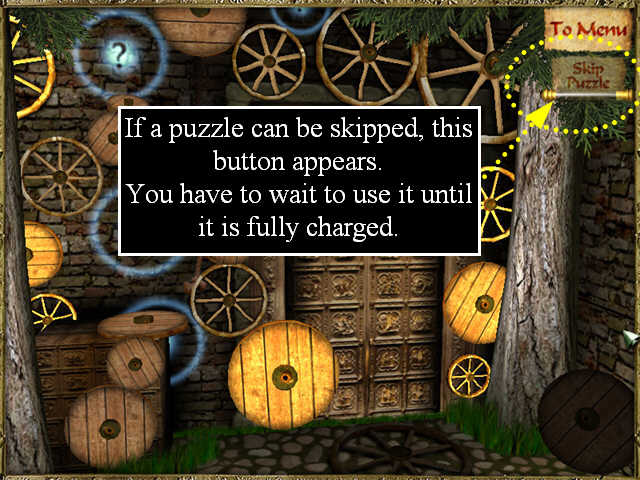
- You can skip any mini-game by clicking on the Skip button once it is fully charged. However, you cannot skip the puzzles that occur during a Hidden Object scene.
- In each Chapter, you will unlock anywhere from 3 to 6 locations. You can do these locations in any order.
- The Chapter will end when you go to the Location Map.
- You can see the name of the Chapter you are in by looking in the lower left corner of the Choose Player Menu.
- A few of the items that you will collect are tools that can be used later in the game, like a camera or night-vision goggles. These items will go into your inventory tray at the bottom of the screen.
- Some scenes include puzzles that you must solve before you can collect an item. You will have to look around the scene for clues. You should also check your inventory for items that might help. You cannot skip these puzzles.
- Near the end of each Chapter, a mini-game will start. You can skip these mini-games by waiting until the SKIP meter in the upper right corner is fully charged and then clicking on it.
- The puzzles and mini-games have no instructions—figuring out what to do is part of the challenge.
- If you encounter an area that sparkles in the scene, click on it. If no puzzle starts automatically, you will probably have to use something from your inventory to continue there.
- The game will autosave every time you exit. This process can take a minute or more, so although it may seem like the game has frozen on exit, just be patient and it will finish saving and shut down.
- If you leave the game in the middle of a Hidden Object scene, when you return you will have to start the scene from the beginning with a new Find List.
- You can use the Options Menu to adjust the volume for the music and the special effects as you like.
- Several scenes can be panned horizontally or vertically. Look for arrows on the edges of the scene to move slightly in that direction.
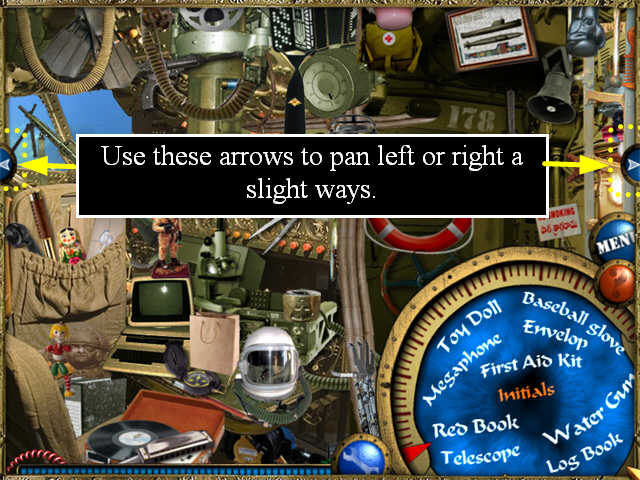
- When a scene can be panned, sometimes items become hidden behind the Find List. You may need to pan part-way up or down to see them.
- To return an item to your inventory when you are done with it, right-click.
- Some Hidden Object scenes also have bonus batteries in them. Collect these for additional hints in the future.
- The line of blue lights along the bottom of the screen tells you how many hints you have left. Each hint takes about 5 lights.
- When you click on the hint button, an eyepiece will appear that will show you the exact location of an item. The item it finds will have its name highlighted in the Find List.
- If you are in a scene that can be panned and you use a hint and the object is in the other part of the scene, you will still see the hint finder mechanism appear. Quickly pan to the other part of the scene to see what it is pointing to.
- Items that are written in orange on the Find List are Inventory Items that you will collect to use in future scenes. These might be tools or clues to future puzzles. They will go into your Inventory Tray for future use.
- Your Find List may differ. The batteries, Inventory Items, and puzzles will be the same for all players.
- There are a few localization issues in the game, where the words chosen don’t exactly match the pictures. Here are some examples: “parabaloid” = satellite dish receiver, “hieroglyphics” = Chinese characters, “missile” = bomb, “breast drill” = hand drill, “diving hat” = diver’s helmet. We have detailed these in the walkthrough.
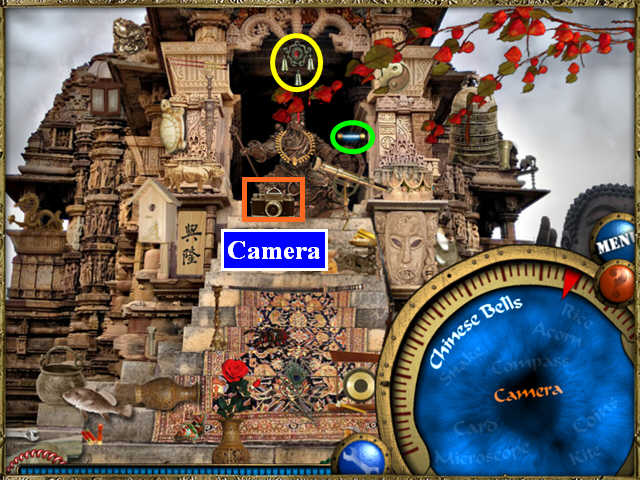
Chapter One: The Secret Room
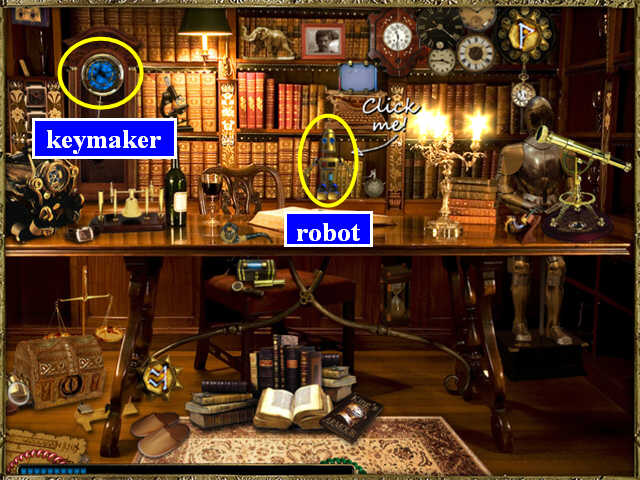
- The game will guide you to click on the small robot in the center of the scene and the blue “Keymaker” on the clock on the left. The Keymaker then turns into your Find List for the rest of the game.
- Collect the items from the Find List. Also get the two bonus Batteries.
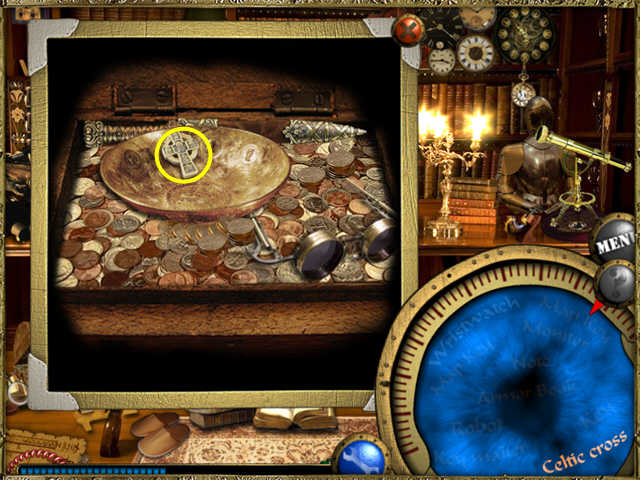
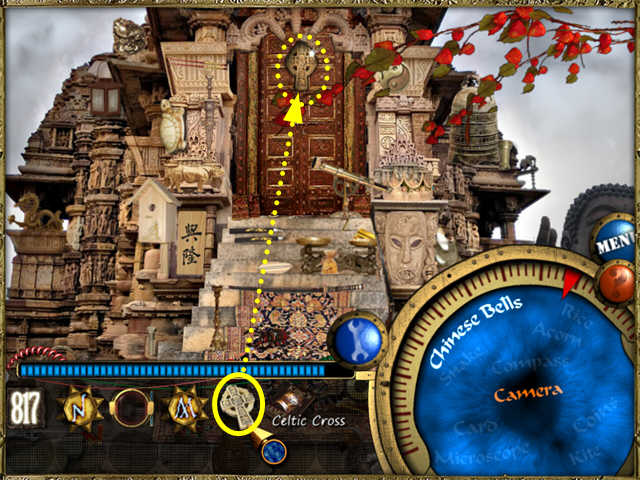
- Use the Key from your inventory to unlock the Chest on the left.
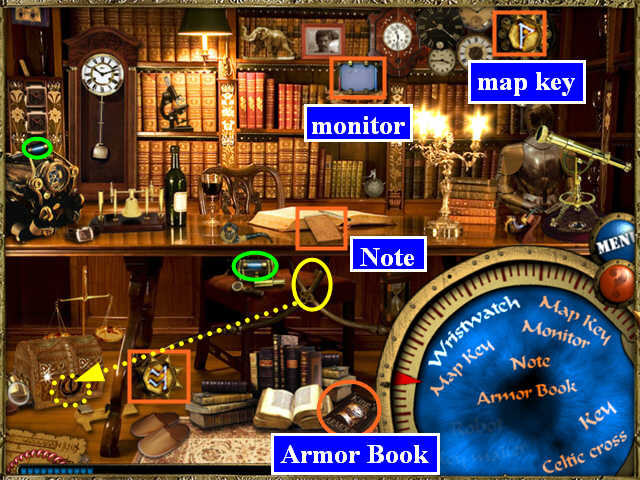
- Collect the Celtic Cross.
- The Keymaker uses the items you found to make a Map Key, which is a gold medal with a rune on it. This will go into your inventory along with the Map Keys you already found in the scene.
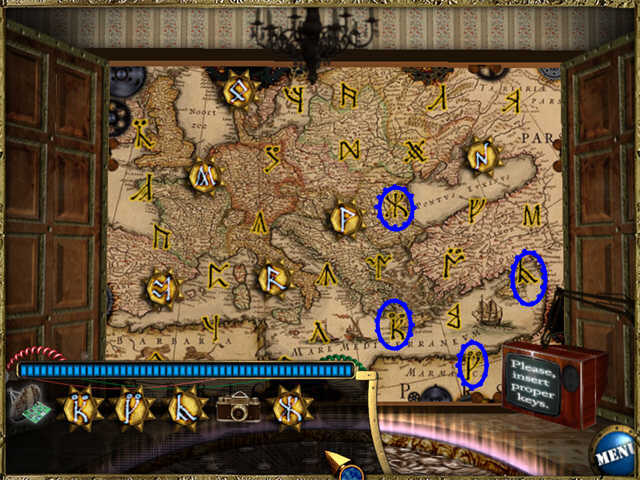
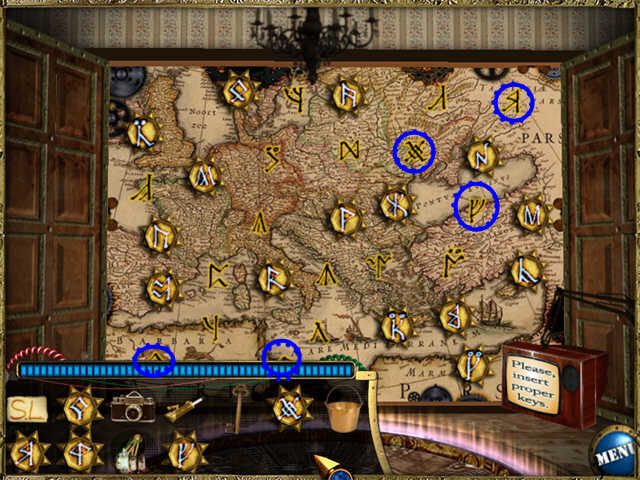
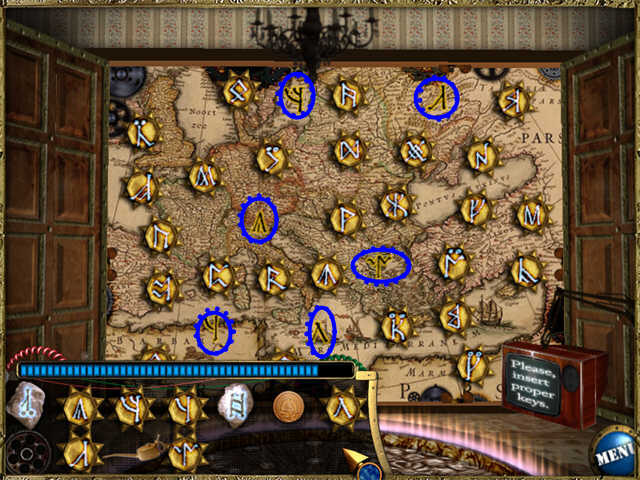
- The game will show you a location map. Take the Map Keys from your inventory and place them on the matching runes on the map.
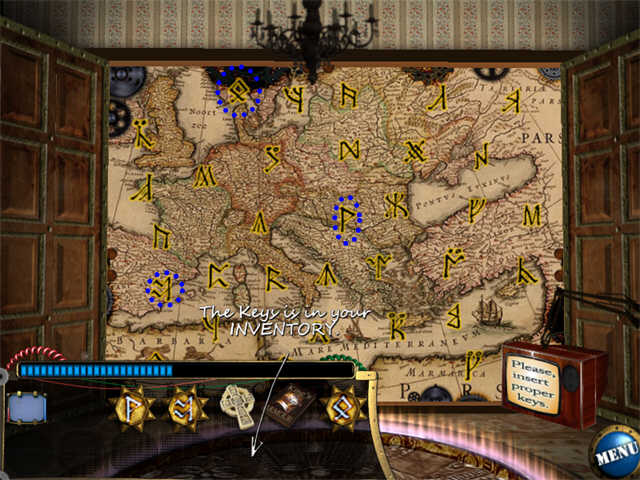
- This unlocks those locations. You may now click on any unlocked location to go there. For the rest of the walkthrough, we will work the available locations from left to right.
Chapter Two: The First Journey
Location: The Mayan Valley
- Open the inventory tray and click on the Monitor. It will turn your cursor into a monitor view which will allow you to see the runes.
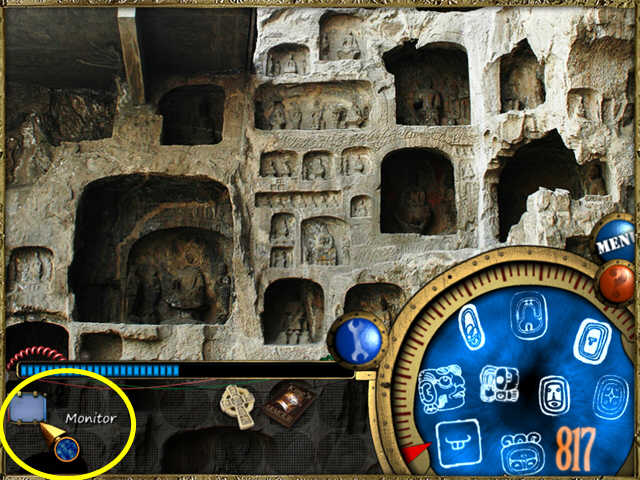
- Move the monitor around the screen and search for the items on the Find List. Here is a composite screenshot.

Location: The Forest in Costa Rica
- Collect the items from the Find List.
- The Hedgehog is hidden in the fog just to the left of the Find List.
- The Missile is a green bomb like the kind dropped from an airplane.
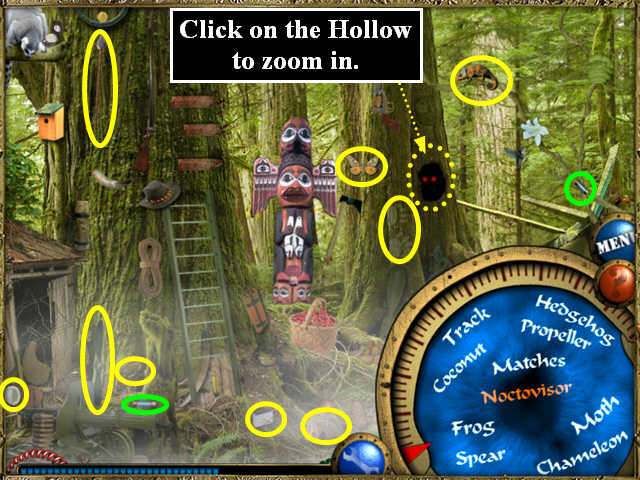
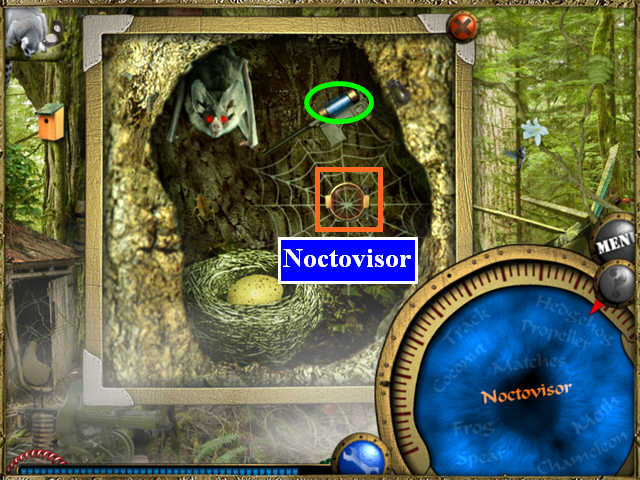
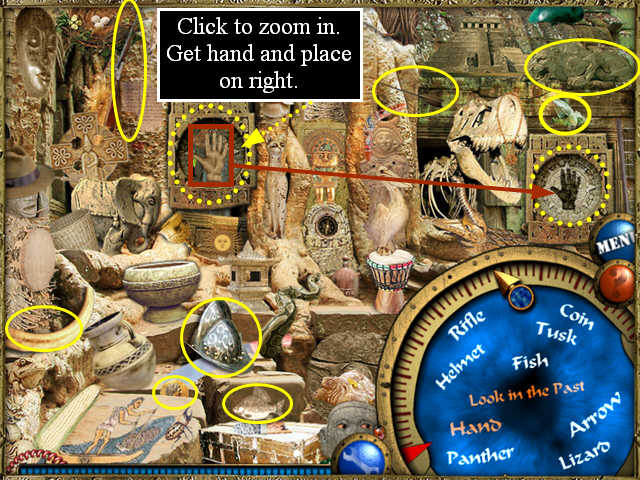
- Click on the Hollow in the tree to zoom in and collect more items.
Location: Somewhere in China
- Collect the items from the Find List.
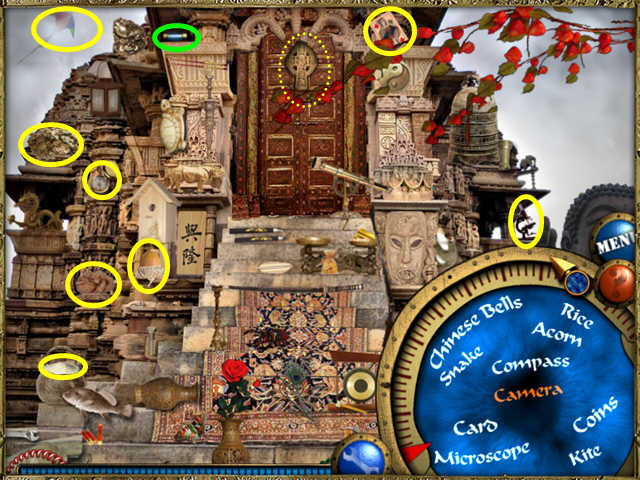
- Use the Celtic Cross from your inventory to open the door.
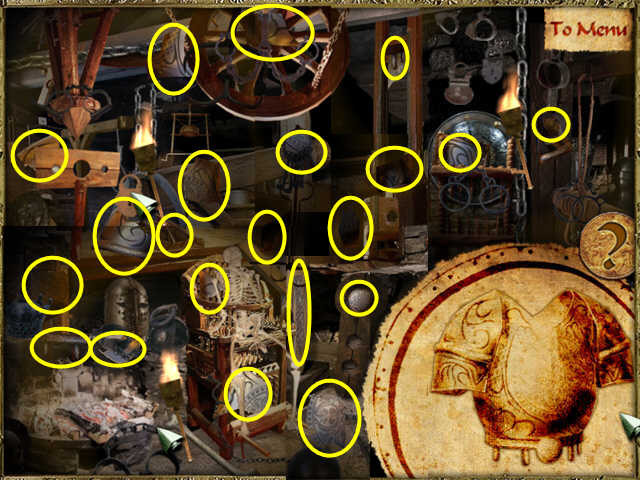
Puzzle: Wheels and Gears
- You must find wheels in the scene that you can place into the mechanism to unlock the door.
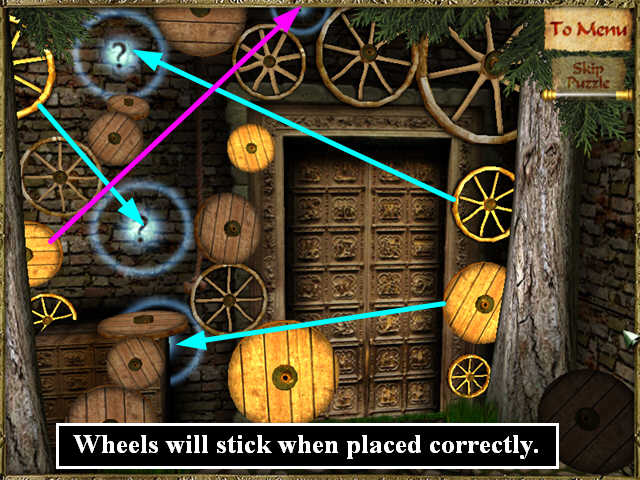
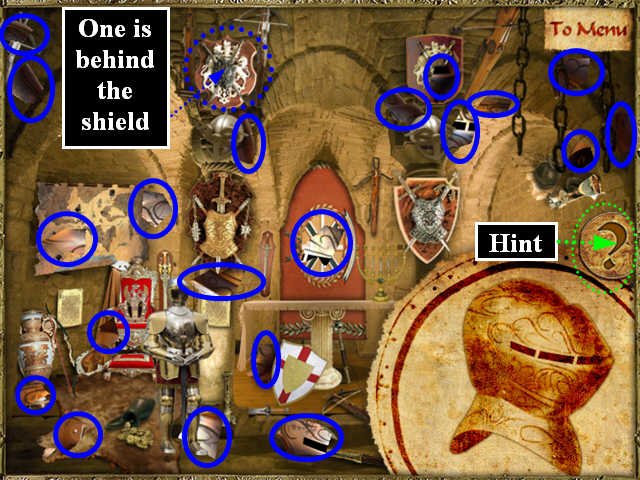
- When the door opens, you will be able to collect the broken pieces of the helmet from the magic armor.
- As you collect the pieces, they will fill in the picture of the Knight’s Helmet in the lower right so you can see how much more you need.
- If you need a hint, click on the ? next to the Helmet picture. It will recharge, but slowly.
- Click on the shield marked in the screenshot to move it and find one more piece.
- The Location Map will appear.
- Click on your inventory tray and place the Map Keys collected in this chapter.
Chapter Three: Strange Places
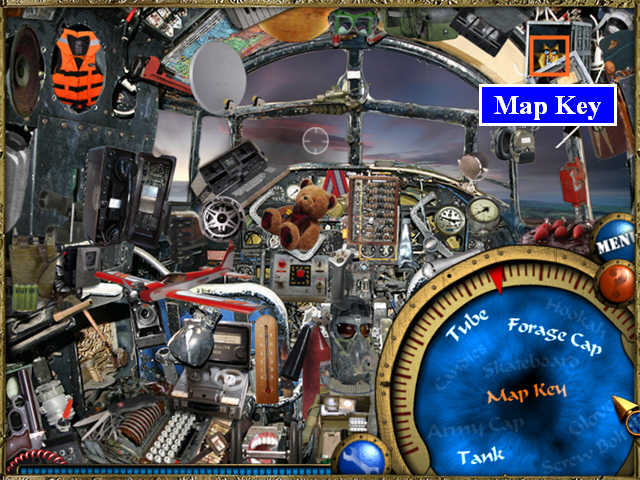
Location: The First Flight
- Collect the items from the Find List.
- Different players will have different items on the Find List.
- The Tank and the Plane are toys.
- The Tube is like a silver tube of toothpaste without a label.
- The cake is chocolate with strawberries on top.
- The Forage Cap is a knit cap in the upper right.
- The Parabaloid is a satellite dish receiver in the upper left.
- The Dictaphone is a small black tape recorder on the left.
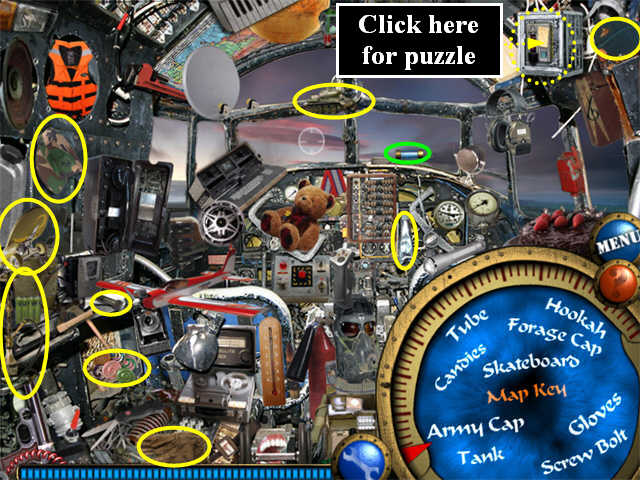
Puzzle: The First Flight Light Switches
- When you click on the area that sparkles on the upper right, you will trigger a puzzle.
- This puzzle cannot be skipped.
- You must use the switches to light individual segments of the red lights so that they form a number.
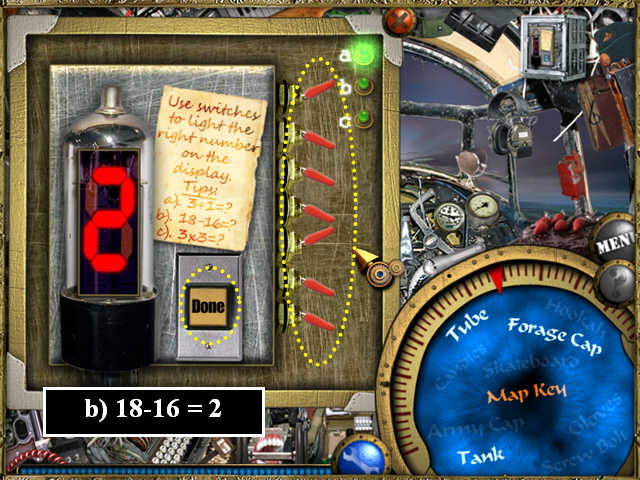
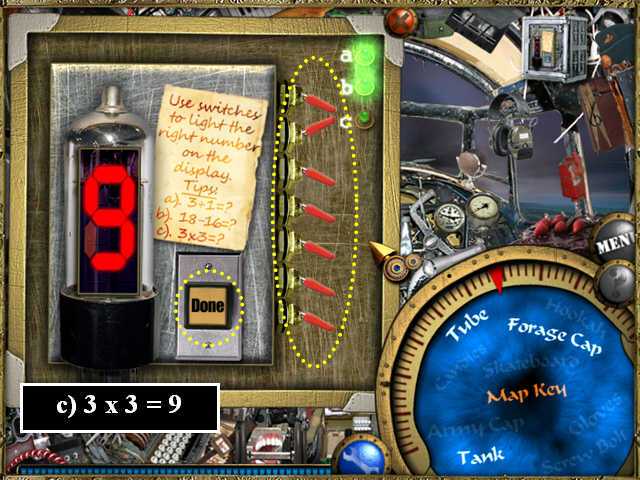
- The numbers you have to use are the answers to the math problems on the note: 3+1 = 4, 18-16 = 2, 3 x 3 = 9.
- When you have the switches the way you want them, click DONE to submit your answer.
- If you are correct, the green light next to the letter in the upper corner will light up.
- Here are the 3 solutions.
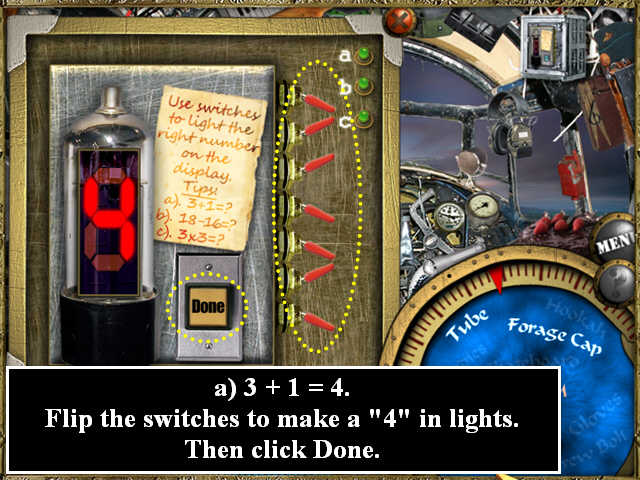
- When this puzzle is complete, a Map Key will be revealed. Collect it.
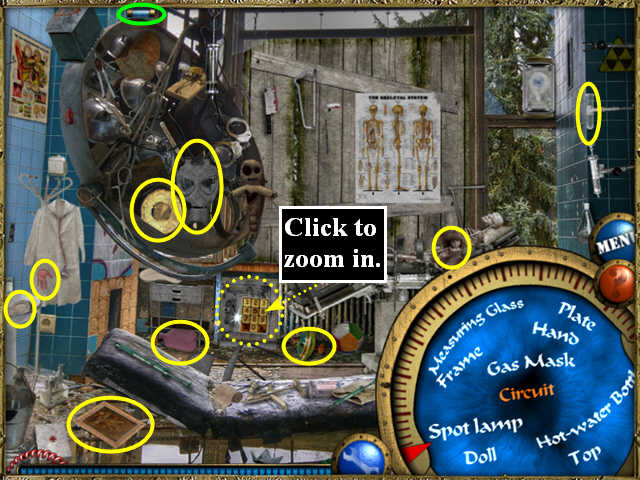
Location: The Abandoned Lab
- Collect the items from the Find List.
- Different players will have different items on the Find List.
- The Boat is the origami item at the bottom center of the scene.
- The Measuring Glass is a test tube in the upper right.
- The Spot Lamp is a gold disc near the center of the scene.
- To collect the Frame lying on the floor, make sure you click on the edge of the frame, not on the book in the center.
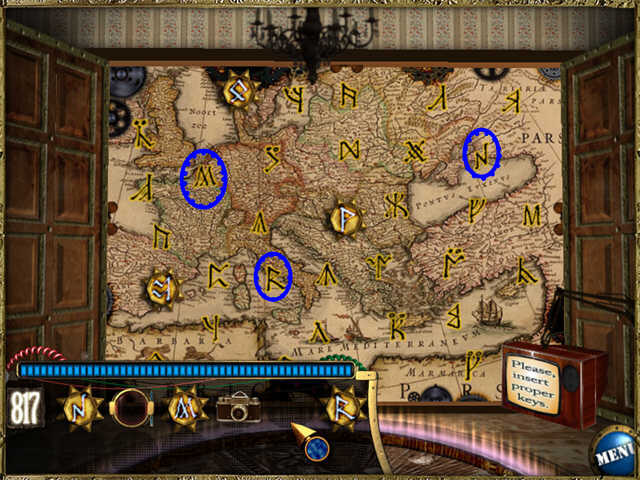
Puzzle: The Safe in the Abandoned Lab
- When you click on the area that sparkles on the upper right, you will trigger a puzzle.
- This puzzle cannot be skipped.
- You must enter a code to open the safe and retrieve the Circuit.
- Check in your inventory—there is a 3 digit number there.
- Enter that as the code by pressing 8 1 7.
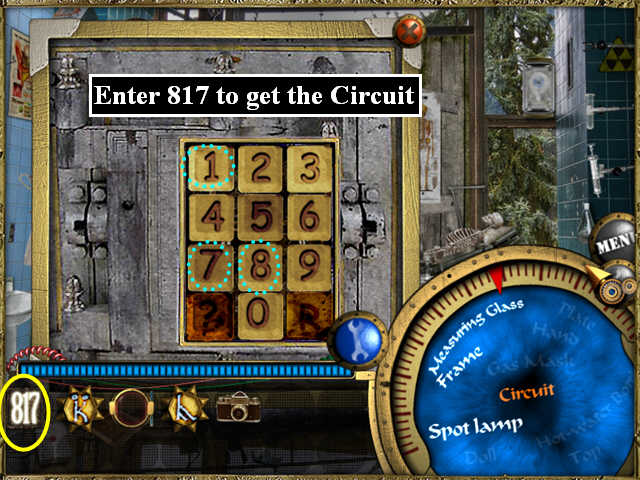
- The safe will open and you can collect the Circuit.
Location: The Dark Place
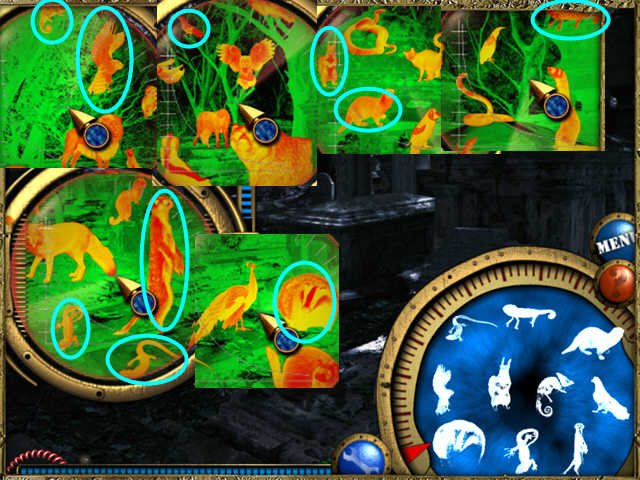
- Open the inventory tray and click on the Noctovisor. It will turn your cursor into a night vision view which will allow you to see the runes.
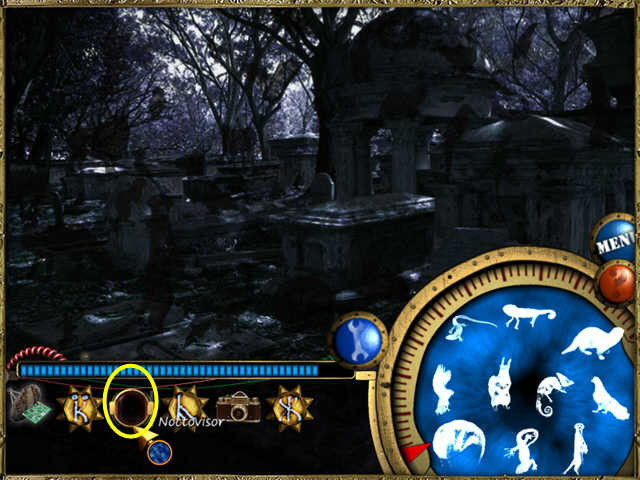
- Move the noctovisor around the screen and search for the items on the Find List. Center the cross-hairs on the animal you want to click on.
- Here is a composite screenshot.
Puzzle: Entering the Smithy
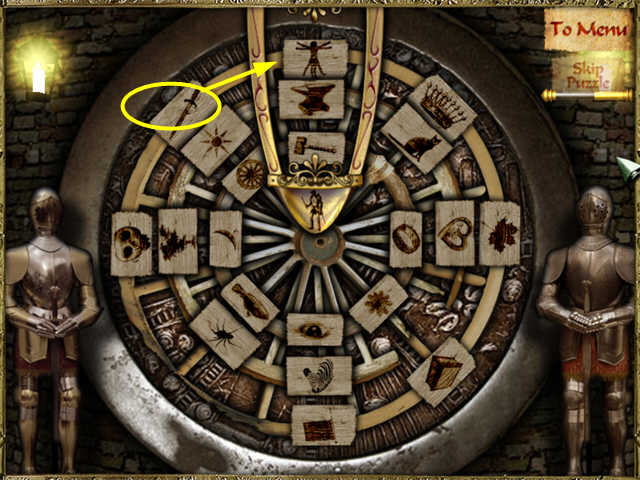
- You must find turn the picture wheels until you have 3 at the top that have to do with the Smithy.
- The solution, from top to bottom, is Sword, Hammer, Anvil.
- When you have all 3 in place you will unlock the door.
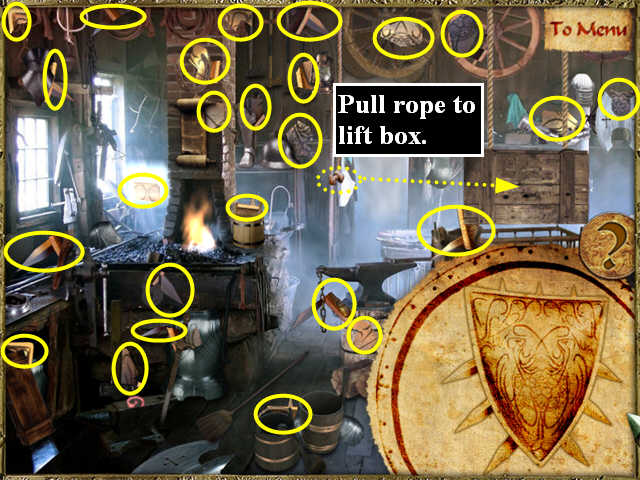
- When the door opens, you will be able to collect the broken pieces of the shield from the magic armor.
- As you collect the pieces, they will fill in the picture of the Knight’s Shield in the lower right so you can see how much more you need.
- If you need a hint, click on the ? next to the Shield picture. It will recharge, but slowly.
- Click on the rope marked in the screenshot to lift the box on the right and find one more piece.
- The Location Map will appear.
- Click on your inventory tray and place the Map Keys collected in this chapter.
Chapter Four: The Hidden Stash
Location: Hollywood, the Shooting Area
- Gregory remarks that this is private property, so they can’t actually take anything.
- His girlfriend reminds him they have a camera, so they can take pictures. This will work.
- Open your inventory tray and take the camera. For the rest of the location, your cursor will act as a camera.
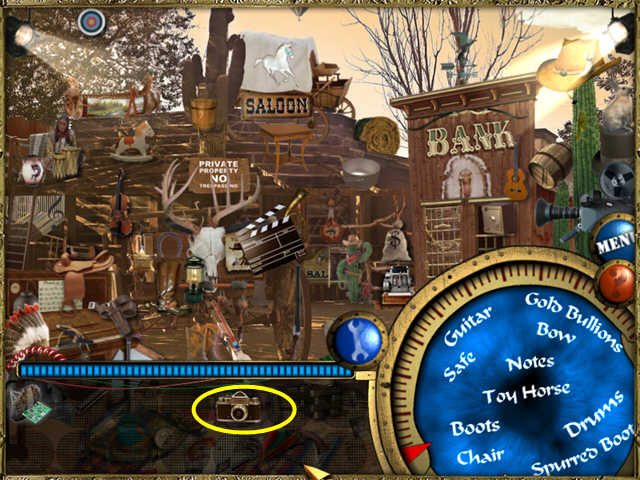
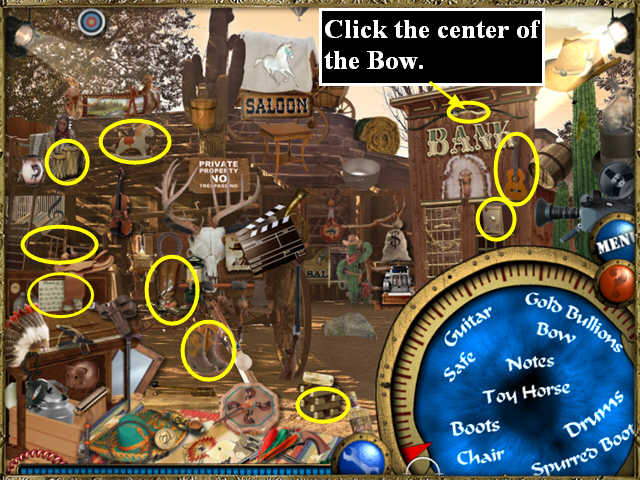
- Collect the items on the Find List.
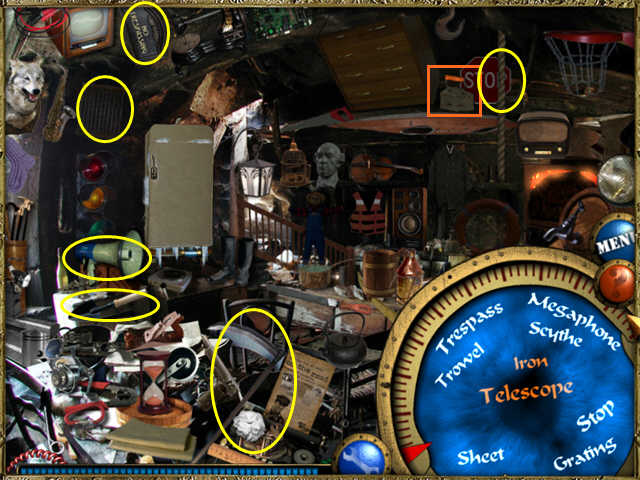
Location: The Abandoned Room
- Collect the items on the Find List.
- Iron and Telescope are two different items.
- “Trespass” is a No Trespassing sign in the upper left.
- “Megaphone” is an electronic megaphone, or bullhorn, on the left.
- “Sheet” is a newspaper.
- “That’s the Card!” should be “That’s the ticket!” It just means you did things correctly.
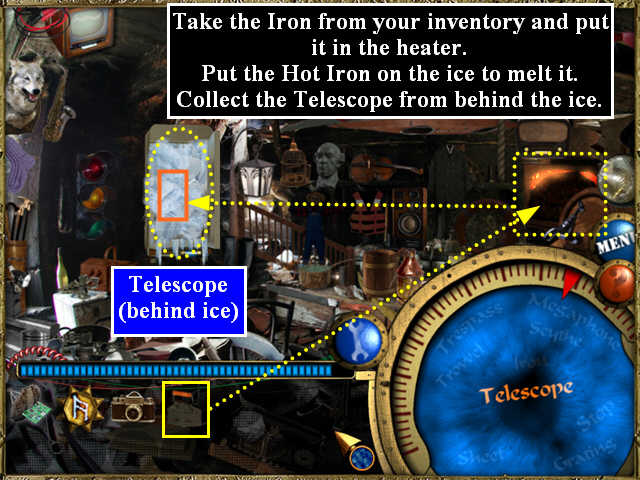
- Click on the refrigerator. It will open, but it is iced over.
- Open your inventory tray.
- Take the iron and put it in the room heater on the right.
- Put the hot iron on the ice in the refrigerator to melt it.
- Now you can collect the Telescope.
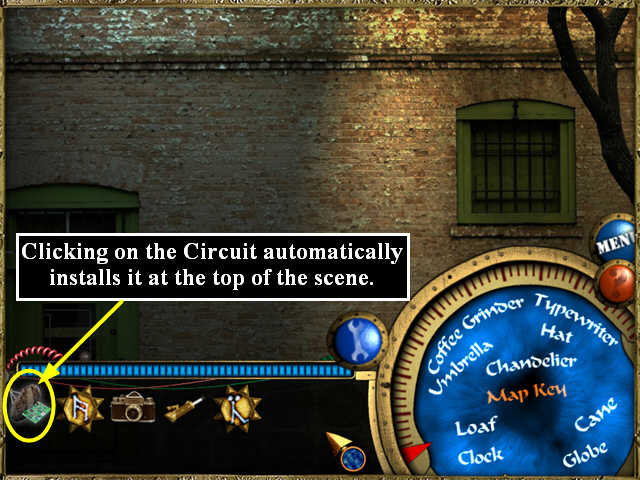
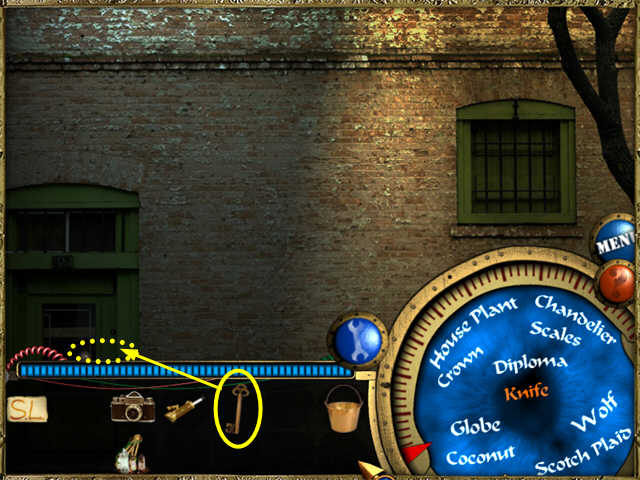
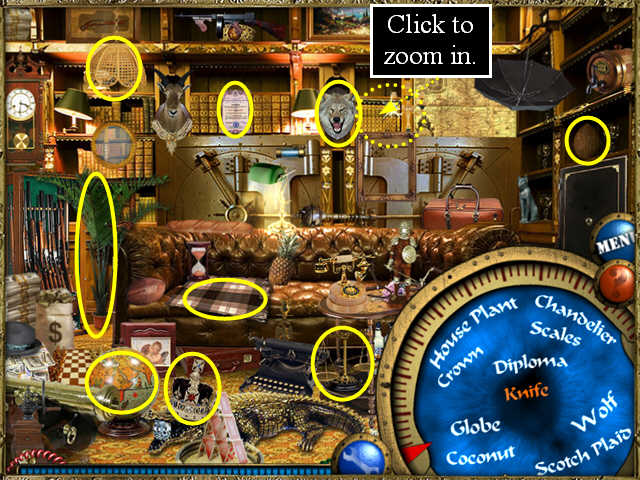
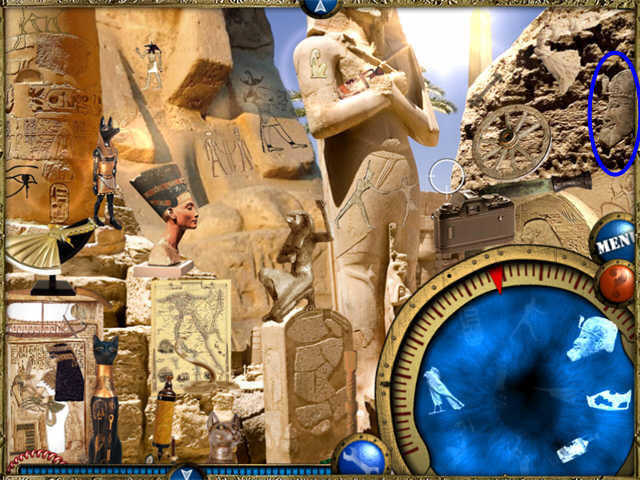
Location: Great-grandfather’s Stash
- The door is locked.
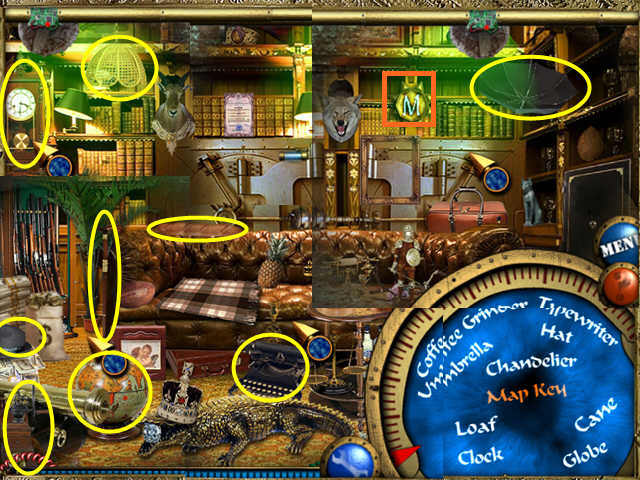
- Open the inventory tray and click on the Circuit. It’s not clear why this works, but it does. The circuit will go to the top of the screen. It will turn your cursor into a viewer which will allow you to access part of the room at a time.
- Move the cursor around the screen and search for the items on the Find List.
- The Frame is just to the right and below the Wolf.
- The Giant Jewel is in the alligator’s mouth.
- The Scotch Plaid is the tartan blanket on the couch.
- The Chandelier is the wicker lamp hanging from the ceiling.
- Here is a composite screenshot.
Location: The Attic in our Cottage
- Collect the items on the Find List.
- The Breast Drill is a hand drill in the upper left.
- The Spinning Rod is a fishing rod at the very top of the scene.
- The Cloth Pin is a clothes pin on the left side.
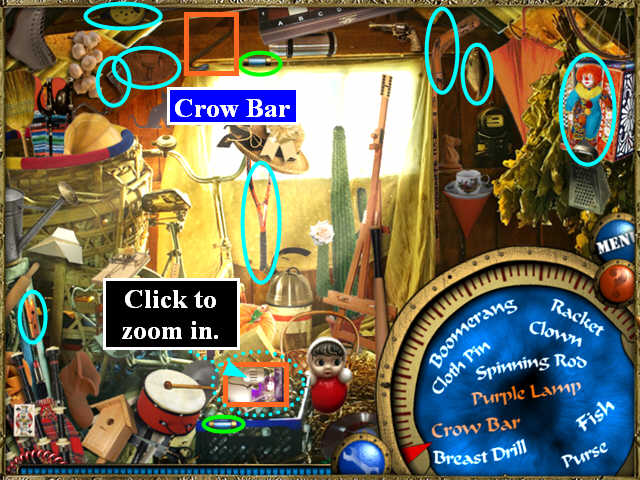
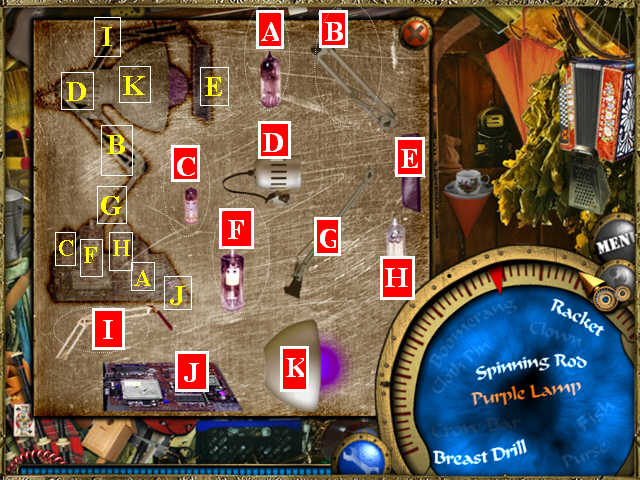
- Click on the Purple Lamp to zoom in and open a puzzle.
- This puzzle cannot be skipped.
- Take the pieces of the lamp on the right and assemble them on the left as shown.
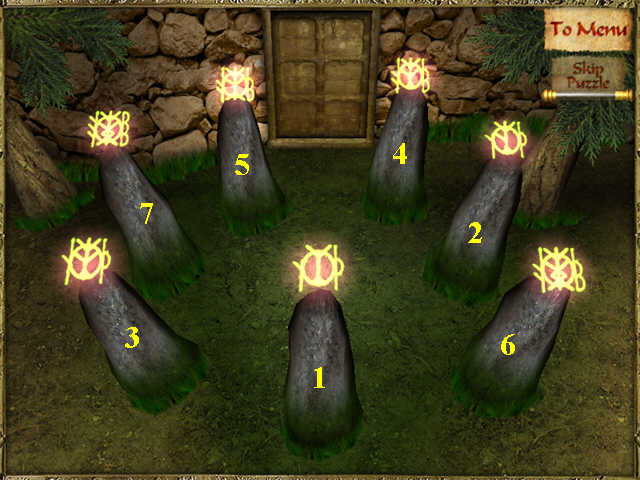
Puzzle: Entering the Wizard’s Asylum
- You must find click on the columns in a specific sequence.
- If you click on the next column in the sequence, it will light up.
- If you click on an incorrect column, all the lights will turn off and you have to start over from the beginning.
- Solution:
- When the door opens, you will be able to collect the broken pieces of the boots from the magic armor.
- As you collect the pieces, they will fill in the picture of the Knight’s Boots in the lower right so you can see how much more you need.
- If you need a hint, click on the ? next to the Boot picture. It will recharge, but slowly.
- Click on the shield marked in the screenshot to find one more piece.
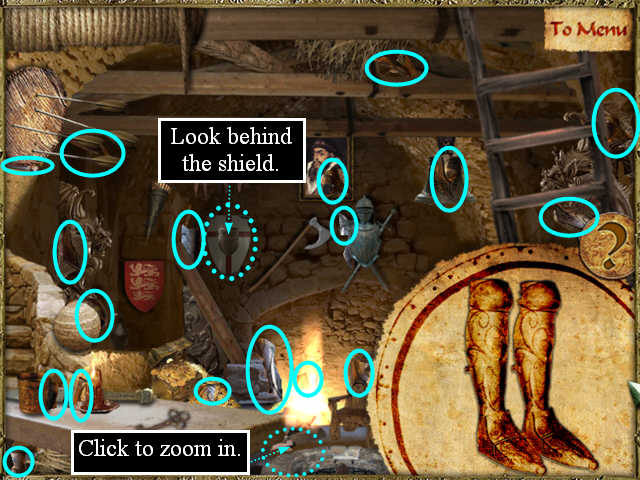
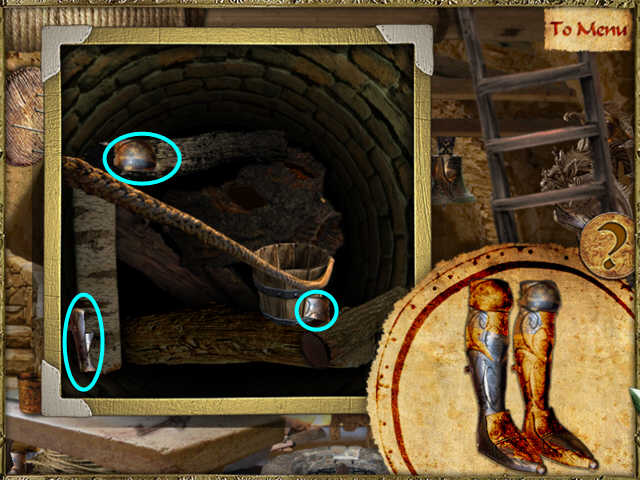
- Click near the well to zoom in and find more pieces.
- The Location Map will appear.
- Click on your inventory tray and place the Map Keys collected in this chapter.
Chapter Five: Under the Water
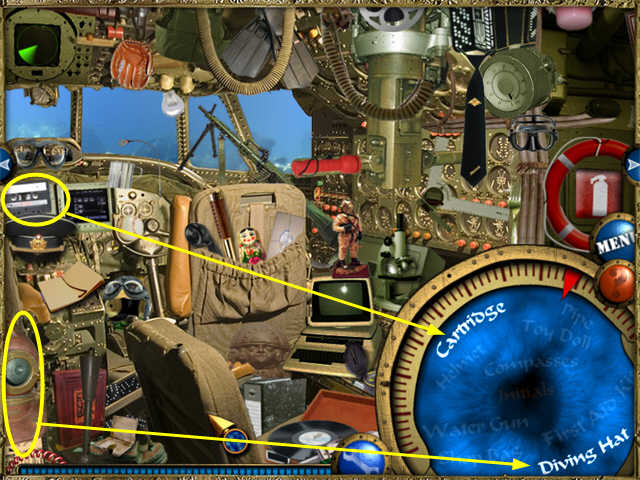
Location: Uncle’s Submarine
- Collect the items on the Find List.
- You will need to pan to the left to find some of the items.
- The Helmet is a helmet that looks more like an astronaut’s.
- The Diving Hat is an old fashioned diver’s helmet.
- The Cartridge is a tape cassette.
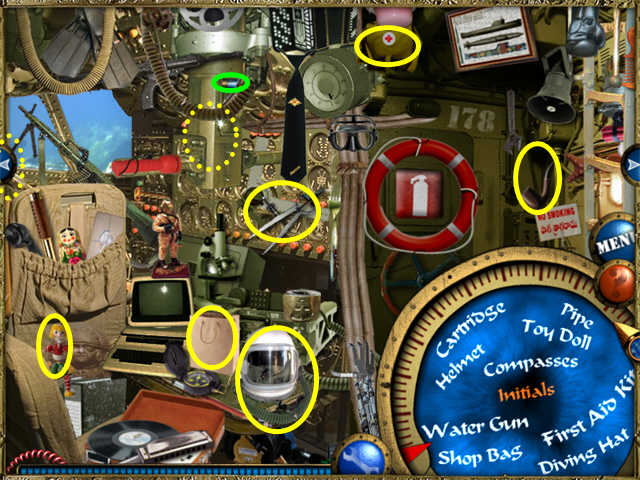
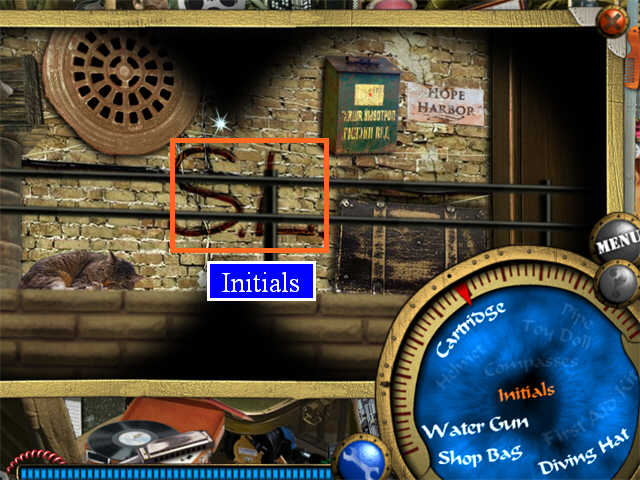
- When you click on the sparkle area, you will zoom in.
- Click on the initials “S.L.”
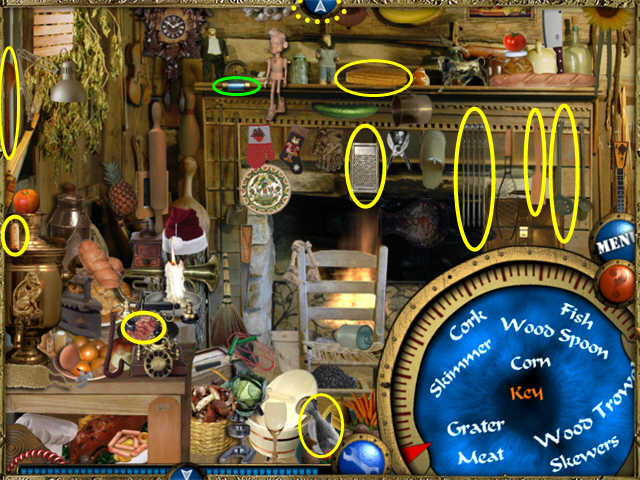
Location: The Kitchen
- Collect the items on the Find List.
- You will need to pan up to find some of the items.
- The Wood Trowel is a wooden spatula hanging from the fireplace.
- The Hatchet is a cleaver.
- The Meat is in a pan behind the telephone on the left.
- The Wooden Man is a Pinocchio type doll sitting on the mantel.
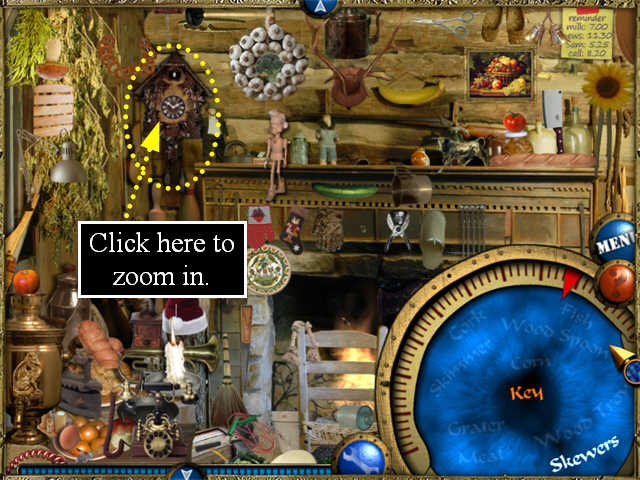
Puzzle: Kitchen Cuckoo Clock
- Click on the Cuckoo Clock to zoom in.
- This will open the puzzle. This puzzle cannot be skipped.
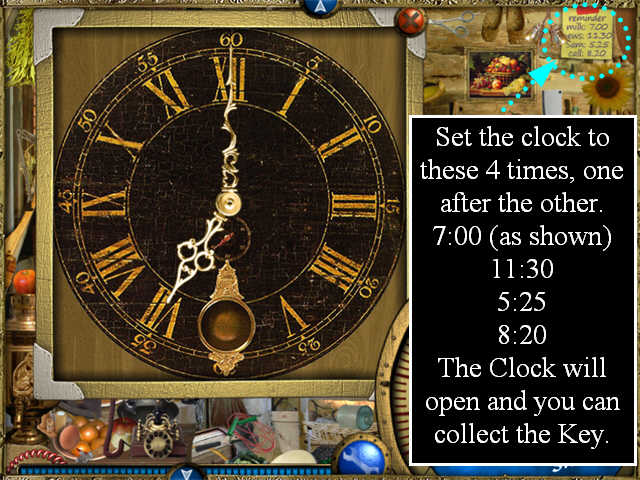
- Now you need to set the clock to each of the 4 times in the note on the far right.
- When you do, the Clock will open and you can collect the Key.
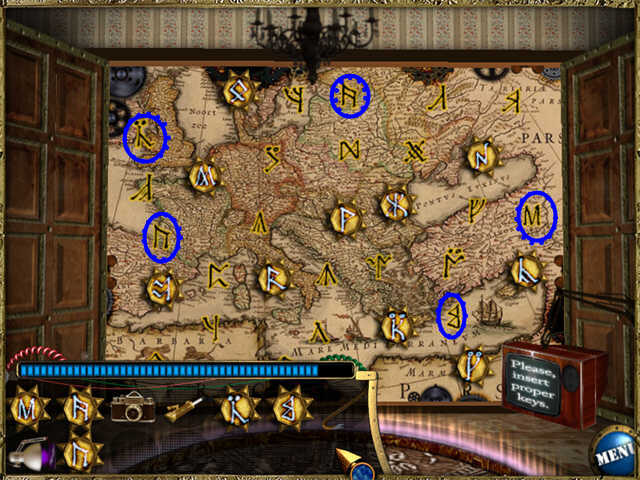
Location: The Old Castle
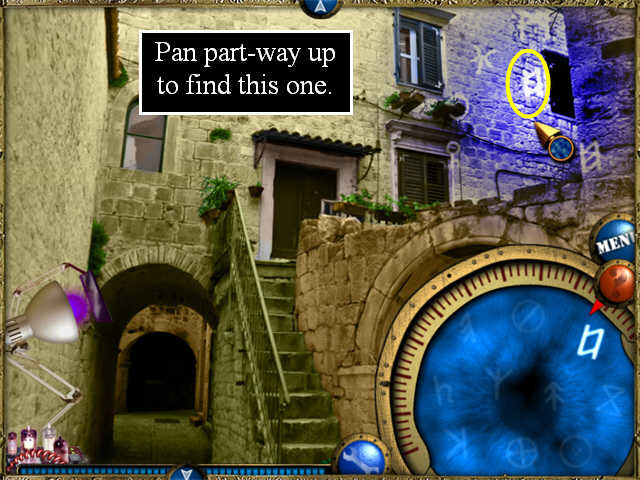
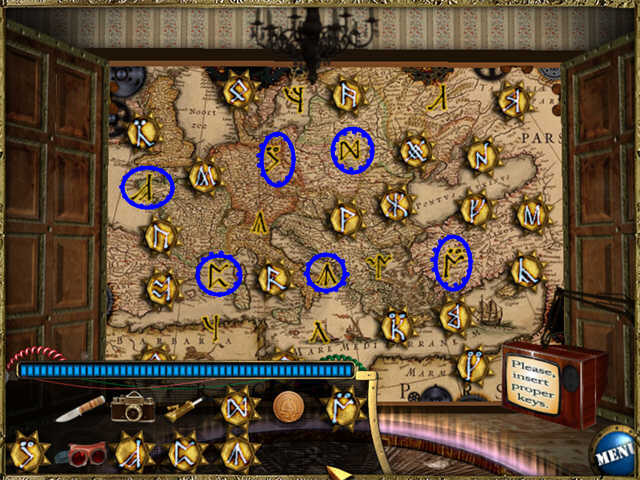
- Open the inventory tray and click on the ultraviolet lamp. It will allow you to see the runes.
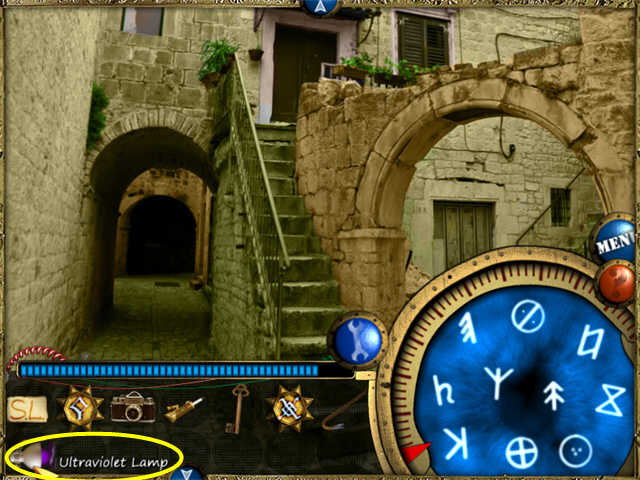
- Move the cursor around the screen and search for the items on the Find List.
- You will need to pan up, as there are many runes on the top story.
- Here is a composite screenshot.
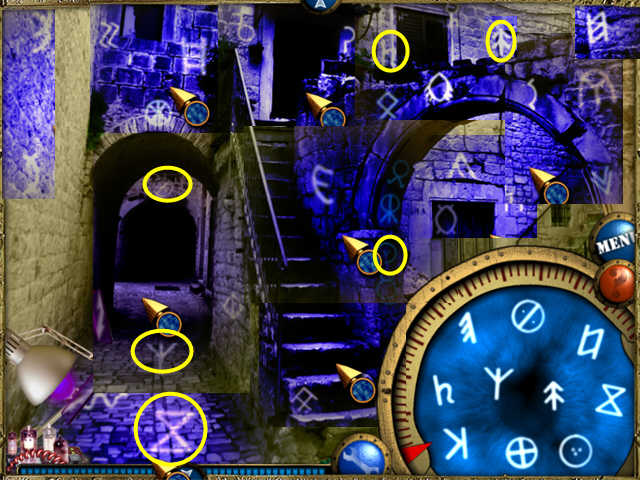
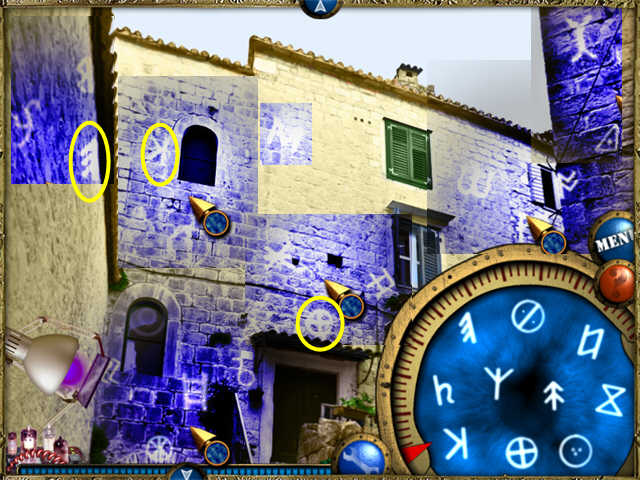
- Depending on the symbols on your Find List, you may also need to pan half-way up to find the symbols that are hidden by the Find List in the top position.
Location: The Italian Street
- Collect the items that are on the Find List.
- The Tower is the small Leaning Tower of Pisa figurine in the center bottom of the scene.
- The Fireman’s Hat is a Fireman’s Helmet underneath the bench on the left.
- The watermelon is also underneath the bench.
- The Cook’s Hat is a Chef’s Hat.
- When you click on the sparkle area, nothing happens.
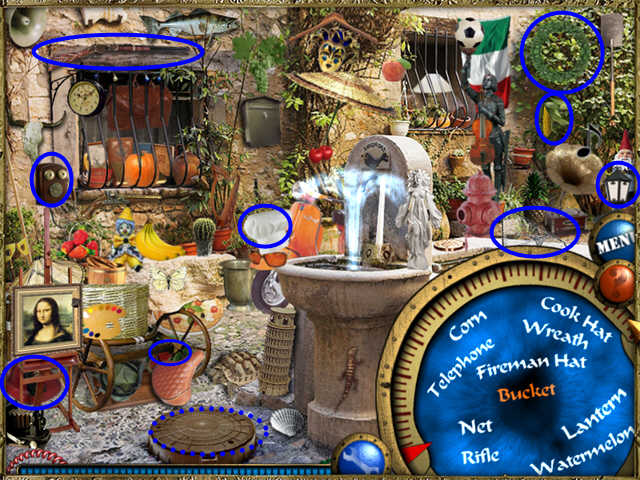
- Take the Crow Bar from your inventory and use it to open the manhole cover.
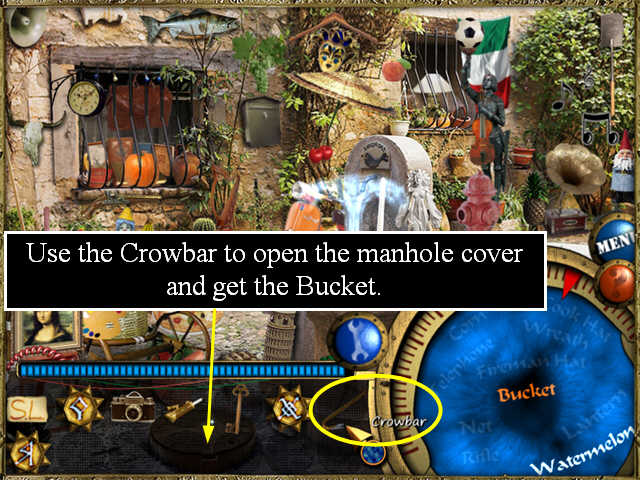
- You will get a zoom scene. Collect the Empty Bucket.
Location: Cambodian Ruins
- Collect the items that are on the Find List.
- The lizard looks like a green leaf above the black hand tile on the right.
Puzzle: Cambodian Tile
- Click on the circular tile in the center as marked in the screen shot to zoom in.
- This will open the puzzle. This puzzle cannot be skipped.
- Turn the rings to form the picture as shown in the screenshot.
- After the first one, the rings will lock in place when positioned correctly.
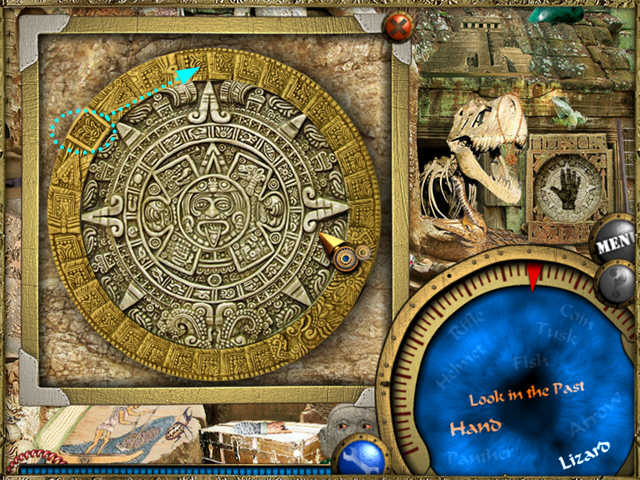
- After the puzzle is completed, the tile will rise, revealing the Hand.
- Collect the Hand. It will go into your inventory.
- Open your inventory, get the Hand, and place it on the black hand tile on the right.
- The black hand tile will rise, revealing the “View the Past” item.
- Collect it.
Puzzle: Entering the Room of Torment
- You must find balance the two sides of the scale.
- Take the piece from the far right side of each pan and move it to the other one. You can place it anywhere on the pan.
- Solution:
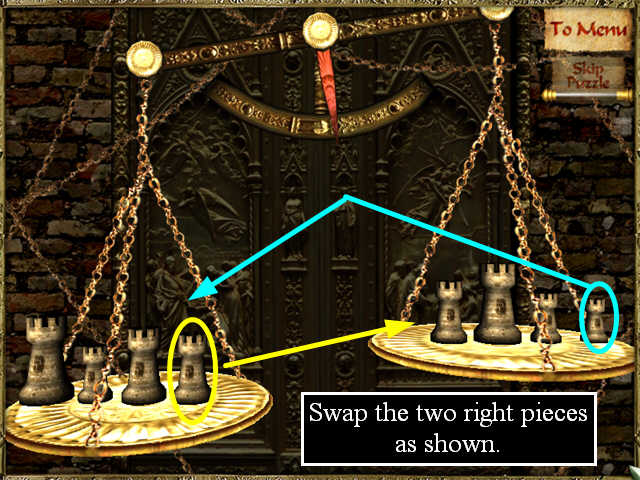
- When the door opens, the room is dark.
- Take the torch from the right and use it to light the room as you look around.

- Collect the broken pieces of the breastplate from the magic armor.
- As you collect the pieces, they will fill in the picture of the Knight’s Breastplate in the lower right so you can see how much more you need.
- If you need a hint, click on the ? next to the Breastplate picture. It will recharge, but slowly.
- The Location Map will appear.
- Click on your inventory tray and place the Map Keys collected in this chapter.
Chapter Six: The Christmas Eve
Location: Great-grandfather’s Stash II
- Gregory’s girlfriend comments that this time they have the key.
- Take the Key from your inventory and use it on the door.
- Collect the items on the Find List.
Puzzle: Great-grandfather’s Books
- Click on the books in the upper right to zoom in.
- This will open the puzzle. This puzzle cannot be skipped.
- You must click on the individual books in the sequence shown in the screen shot to open the secret compartment.
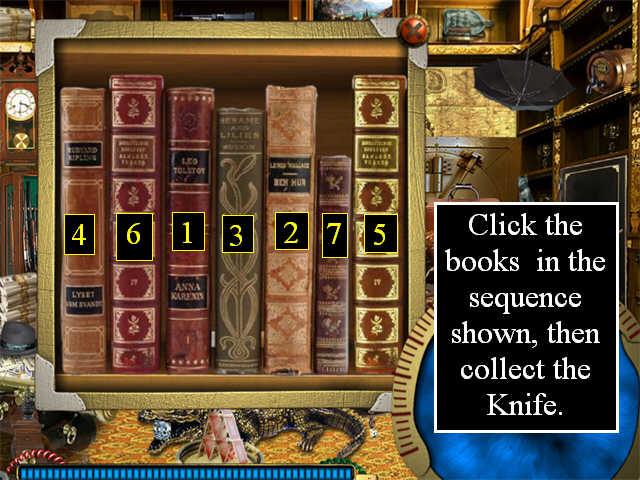
- When you finish, the compartment will open, revealing the Knife.
- Collect it.
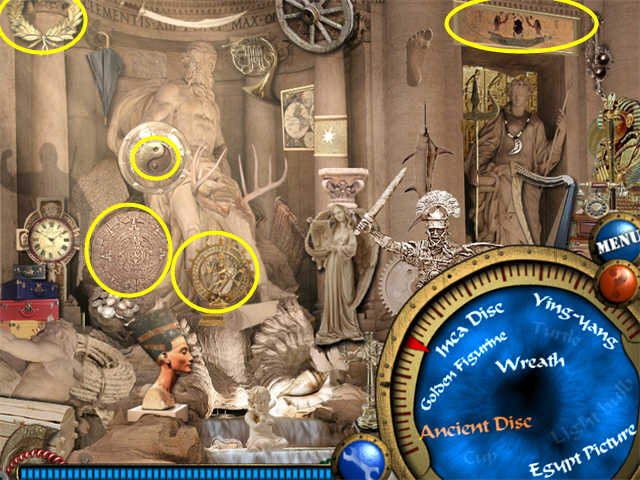
Location: The Roman Waterfall
- Collect the items on the Find List.
- You will need to pan up to find some of the items.
- The Ninja is a shadow on the left wall after you pan upwards.
- Ying-yang should be yin yang. It is in the center of a shield after you pan up.
- The Wreath is a gold laurel wreath at the very top left after you pan up.
- The Inca Disc is actually a Mayan Calendar on the left after you pan up.
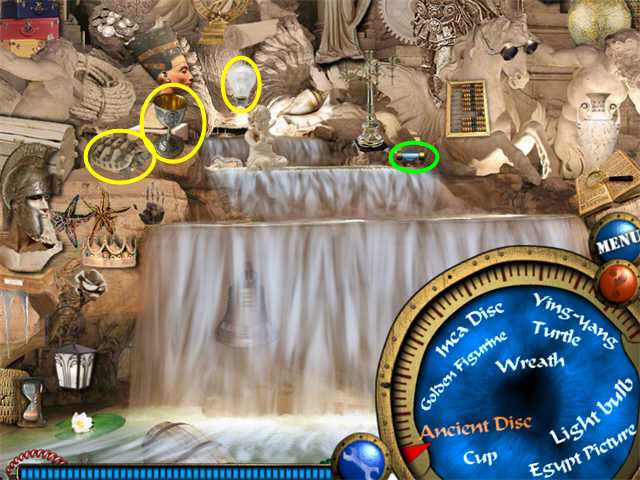
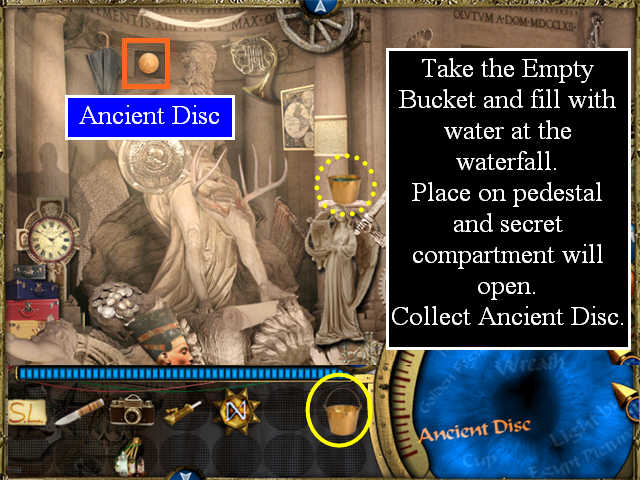
- Open your inventory and take the Empty Bucket.
- Get water from the waterfall in the lower view.
- Pan up.
- Put the bucket with water on the pedestal that sparkles.
- A secret compartment will open in the top left wall, revealing the Ancient Disc.
- Collect it.
Location: Greatgrandpa’s First Nursery
- The little robot reminds Gregory that he has a “Look into the Past” device.
- Open your inventory tray and take the device. For the rest of the location, as you move the cursor around you will reveal a view of the way the room used to look.
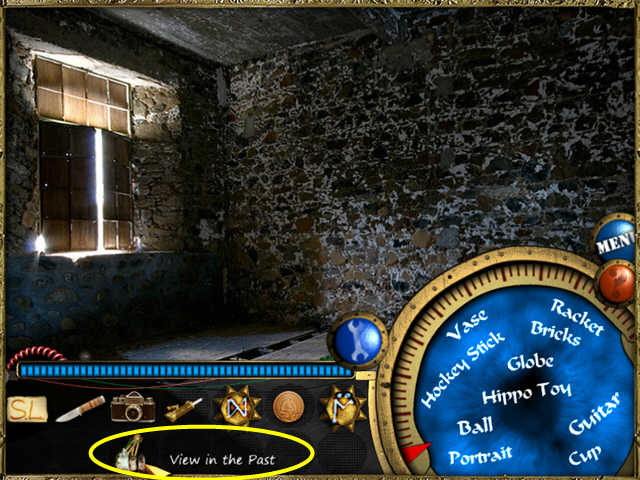
- Collect the items on the Find List. Apparently the image is supposed to look like an old family movie, but it can be quite hard to see some of the items. You may need to shift the viewer slightly to one side or the other to try and improve contrast.
- Bricks are blocks.
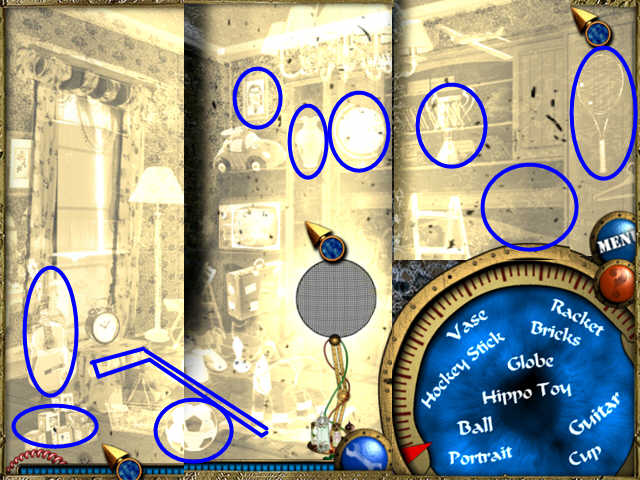
- The Cup is a large trophy cup on the shelves.
- The hockey stick is leaning on the small table with the alarm clock, with the handle going down to the floor.
- The Portrait is the picture in a frame on the back wall.
- The Hippo toy is a large stuffed toy just above the Find List, but it became almost translucent in some angles.
- This is a composite screenshot.
Location: The Flight Back
- Collect the items on the Find List.
- The canister is gray with a black top on the far left of the scene.
- The Sight is the target circle on the windshield.
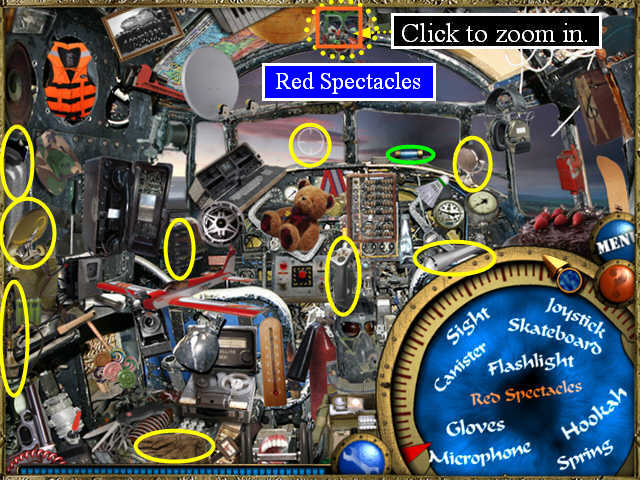
Puzzle: The Flight Back Red Spectacles
- Click on the sparkle area to zoom in.
- This will open a puzzle. The puzzle cannot be skipped.
- Reassemble the Red Spectacles as shown.
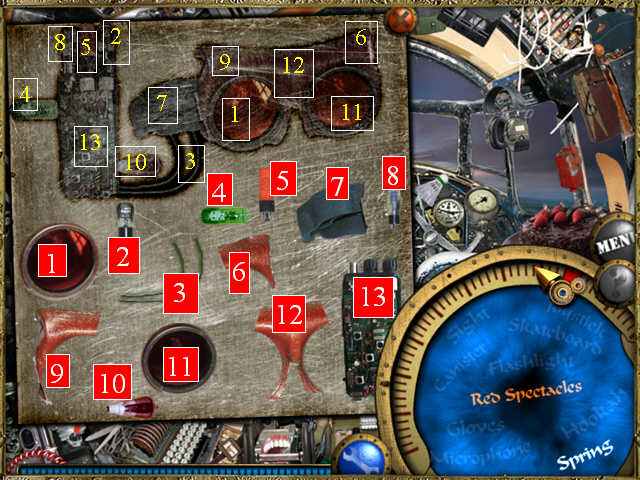
- After you complete the puzzle, click one more time on the Red Spectacles in the main scene to collect them.
Location: Christmas
- Collect the items on the Find List.
- The Christmas Candy is a green and white candy cane that the snowman in the center is holding.
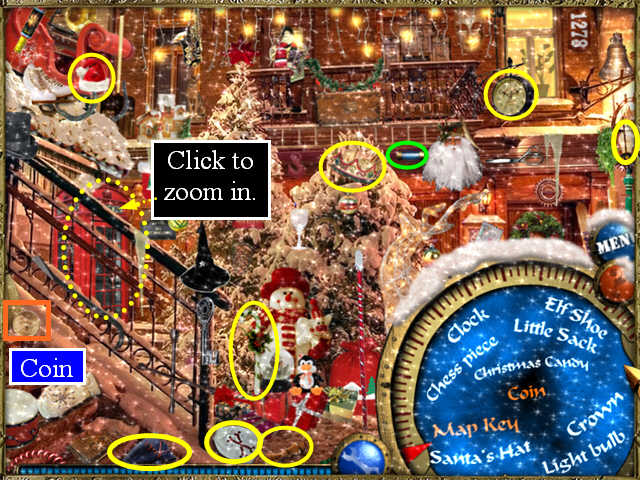
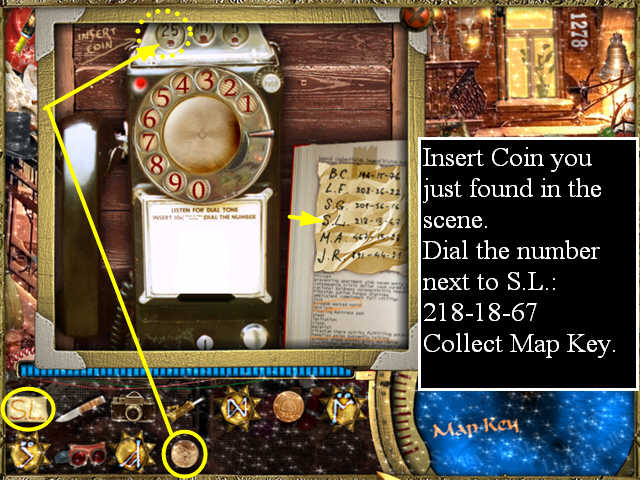
Puzzle: Christmas Phone Call
- Click on the sparkle area over the red phone booth to zoom in.
- This will open a puzzle. The puzzle cannot be skipped.
- Open your inventory and take out the Coin you just picked up in the scene.
- Insert the coin in the coin slot.
- Now you need to dial a number. There is a list with initials on the right.
- Remember the initials you found in the submarine scene? S.L.
- Dial the number that is next to S.L. on the note: 218-18-67.
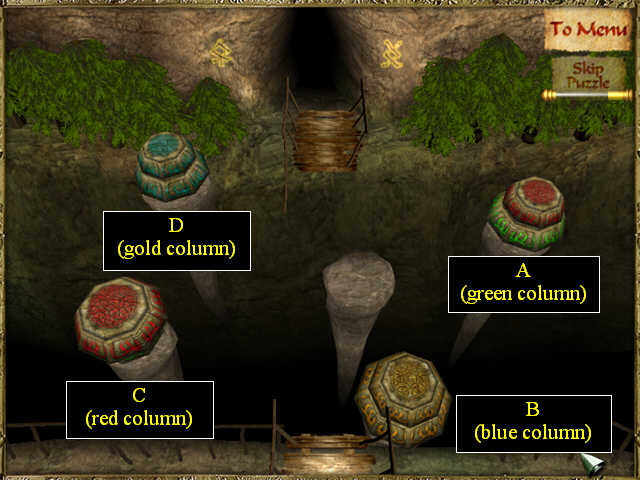
Puzzle: Across the Fathomless Precipice
- This is a Towers of Hanoi variant.
- You must stack the two discs of the same color on the column that they match.
- The small disc must be on top of the large disc when you finish.
- Note that because the column color matters, not only do you have to fix the red and green discs, you also have to swap the gold and blue discs.
- To move a disc, click on it. It will go to the right side of the screen.
- Now click on the place where you want to put it.
- You may put any disc on any other disc, but they may only be stacked two high.
- You may also put any disc on any empty column.
- We will letter the columns A, B, C, D going clockwise around the circle.
- Take the small red disc from A and put it in the Center.
- Take the big red disc from C and put it in the Center.
- Take the small green disc from C and put it on A. (green column complete)
- Take the big red disc from Center and put it on C.
- Tae the small red disc from Center and put it on C. (red column complete)
- This completes the first stage.
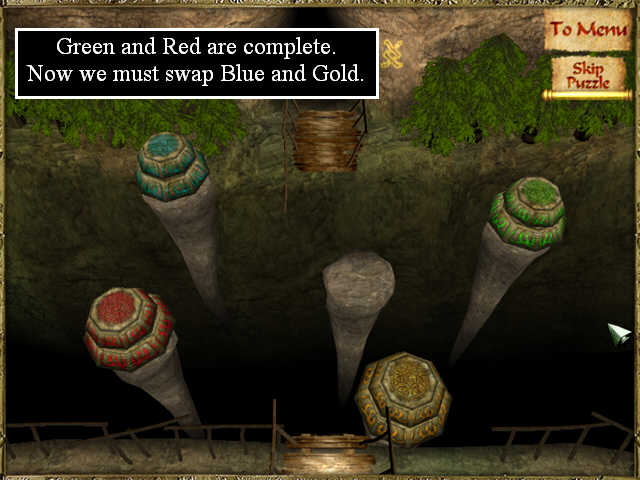
- Now we have to swap the blue and gold discs.
- Take the small gold disc from B and put it in the Center.
- Take the large gold disc from B and put it in the Center.
- Take the small blue disc from D and put it on B.
- Take the large blue disc from D and put it on B.
- Take the large gold disc from Center and put it on D.
- Stop here. Do NOT put the small gold disc from Center on D yet, or you can’t get the blue discs right.
- Instead, take the large Blue disc from B and put it on D.
- Take the small blue disc from B and put it on Center.
- Take the large blue disc from D and put it on B.
- Take the small blue disc from Center and put it on B.
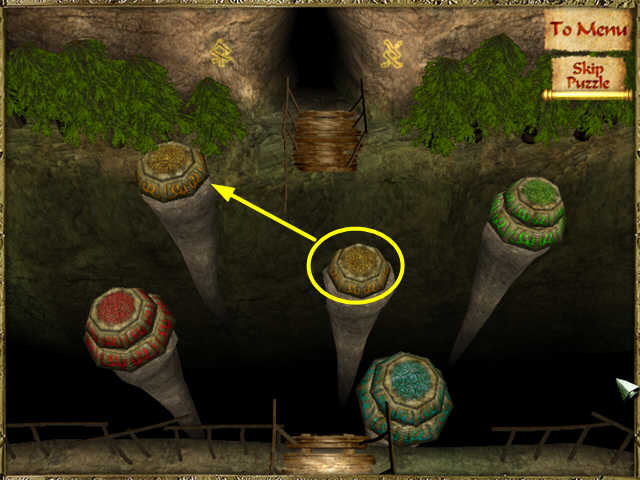
- Take the small gold disc from Center and put it on D.
- You will be able to cross the precipice.
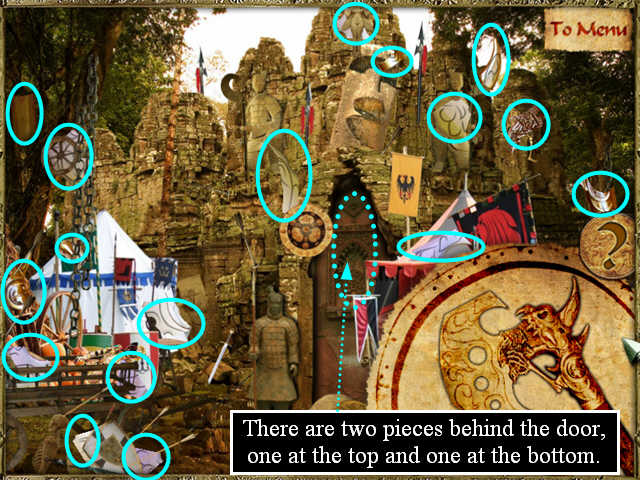
- Collect the broken pieces of the axe blade from the magic armor.
- As you collect the pieces, they will fill in the picture of the Knight’s Axe Blade in the lower right so you can see how much more you need.
- If you need a hint, click on the ? next to the Axe Blade picture. It will recharge, but slowly.
- Some pieces are gold and some are silver.
- There are two pieces behind the center door, one at the very top and one at the very bottom.
- The Location Map will appear.
- Click on your inventory tray and place the Map Keys collected in this chapter.
Chapter Seven: There’s No Place Like Home
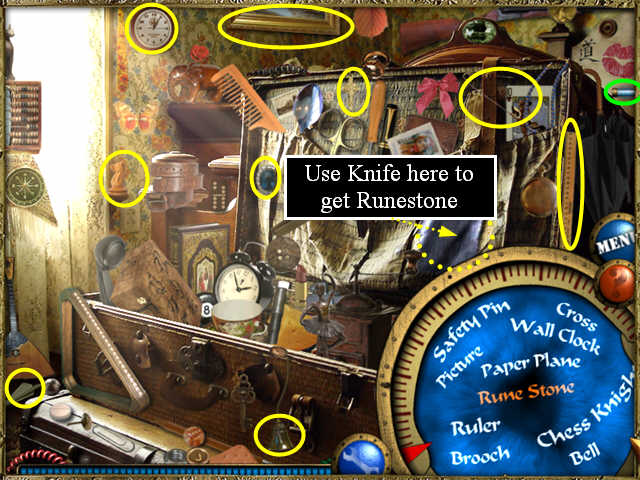
Location: One of Hotel Rooms
- Collect the items that are on the Find List.
- The Picture is the framed painting on the wall. You can only see the bottom edge of it.
- Use the Knife from your inventory to cut the cloth that sparkles.
- Click one more time to zoom in and get Rune Stone.
Location: Near the Czech Brewery
- Collect the items that are on the Find List.
- Chamomile looks like a daisy.
- The little bell is by the car.
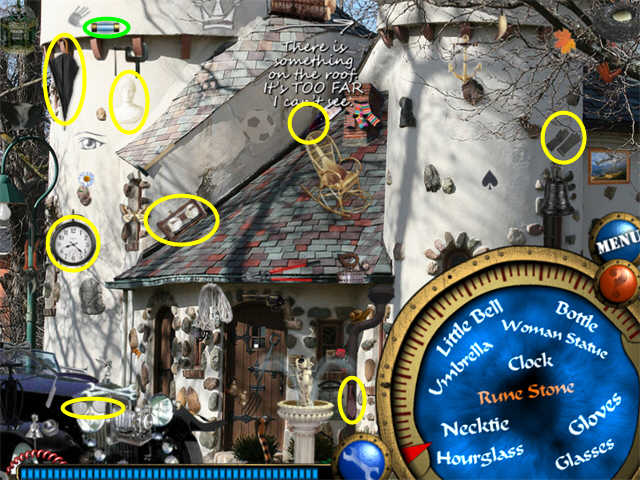
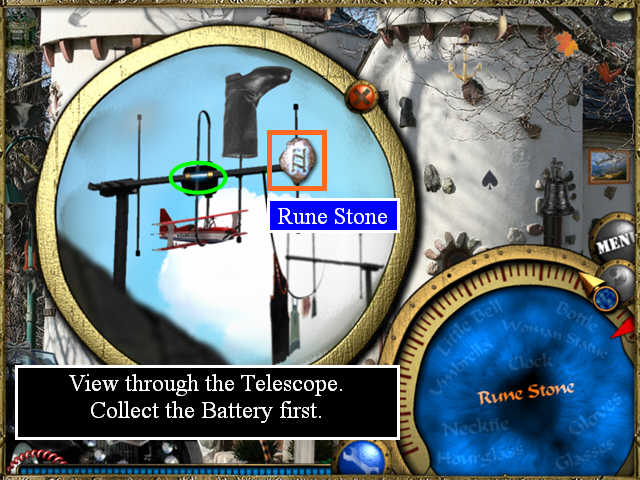
- Open your inventory and take out the Telescope. You need it to see what is on the roof.
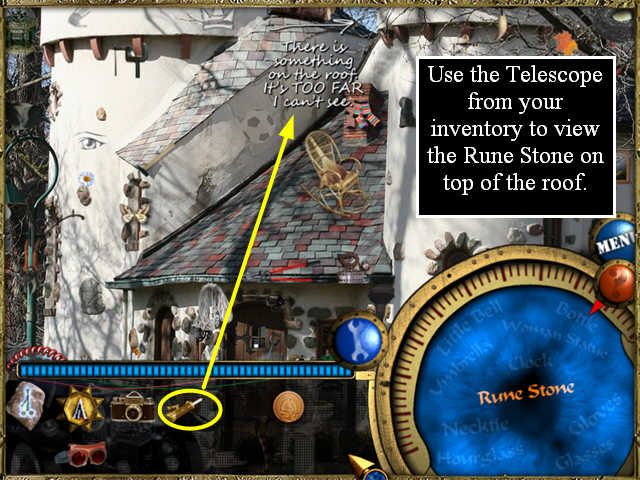
- Collect the Battery first, or the scene will close and you won’t get it.
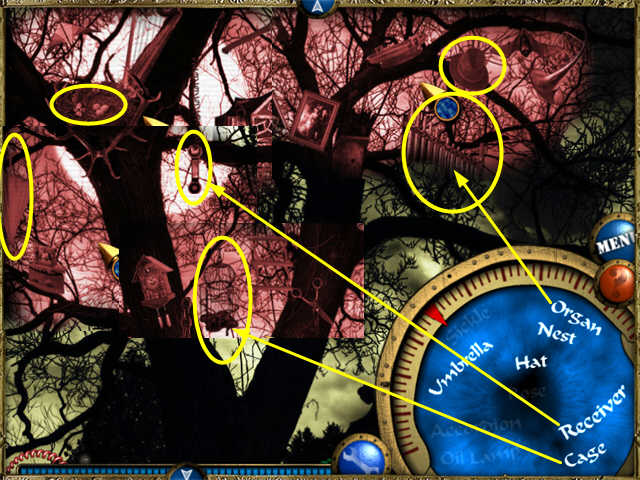
Location: The Cemetery in Scotland
- Open the inventory tray and click on the Red Goggles. They will give you a night-vision view of the scene.
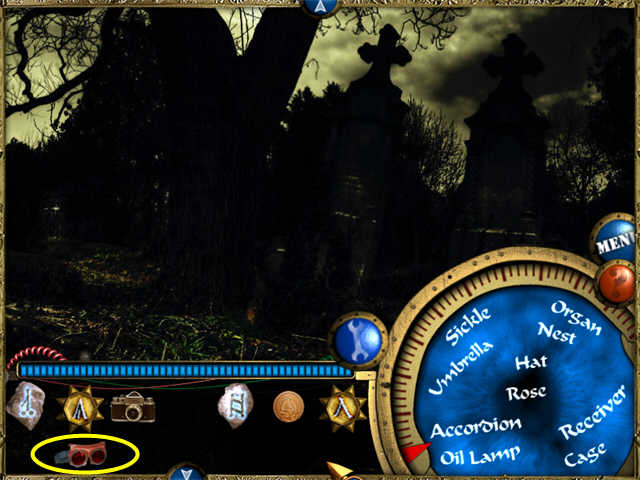
- Move the cursor around the screen and search for the items on the Find List.
- You will have to pan up to find some of the items.
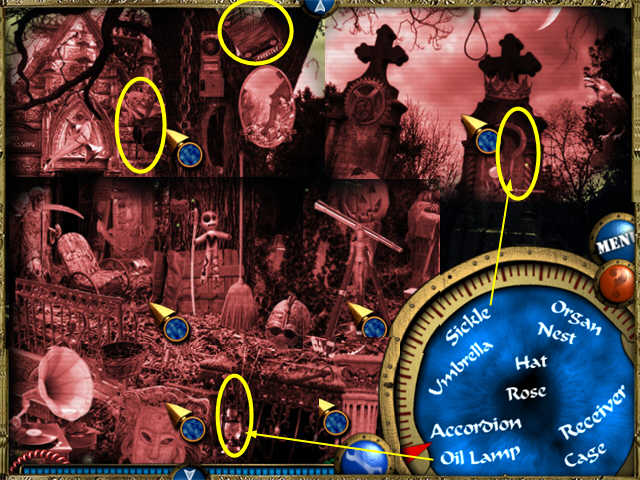
- There are two sickles in the shot. The one that counts is on the tombstone on the far right.
- There are two oil lamps in the shot. The one that counts is the lantern near the center of the bottom edge.
- The Cage is an ornate wicker birdcage hanging in the tree midway up.
- The Organ is about the same size as the accordion, and is in the tree on the top right.
- The Receiver is a telephone receiver hanging from the tree in the center.
- The chessboard is just behind the Find List in the upper shot. You will have to pan partway down if this is on your Find List.
- Here is a composite screenshot.
Location: The Forest House
- Collect the items that are on the Find List.
- You will have to pan up to find some of the items.
- Several of the items on this location are half-way up, so you may need to pan up and then pan partway down again.
- The WC Pan is a toilet.
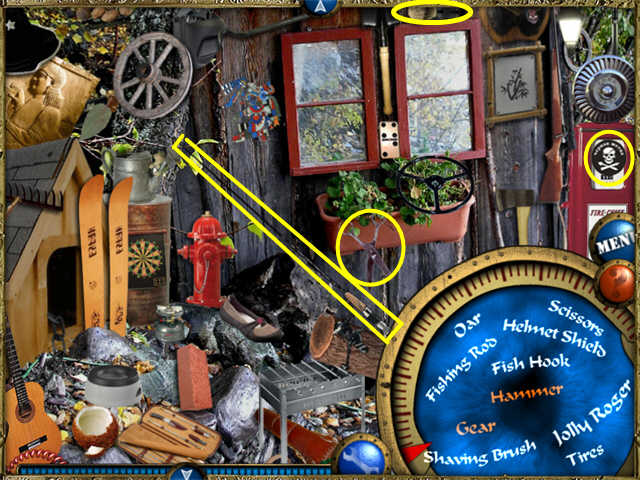
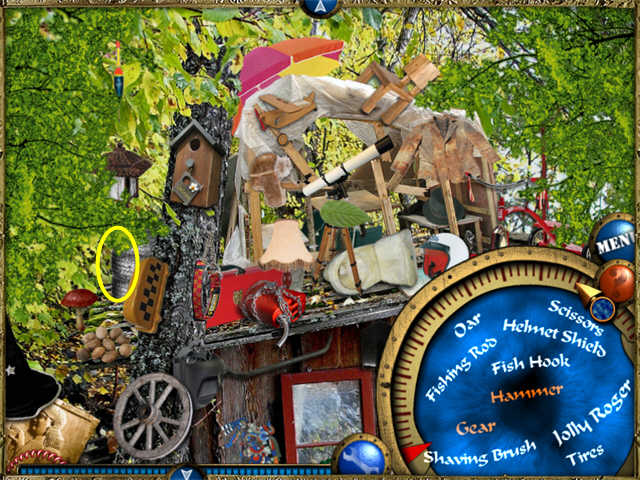
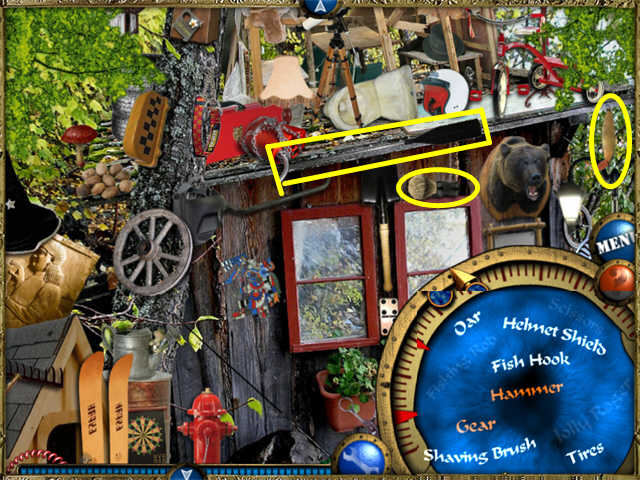
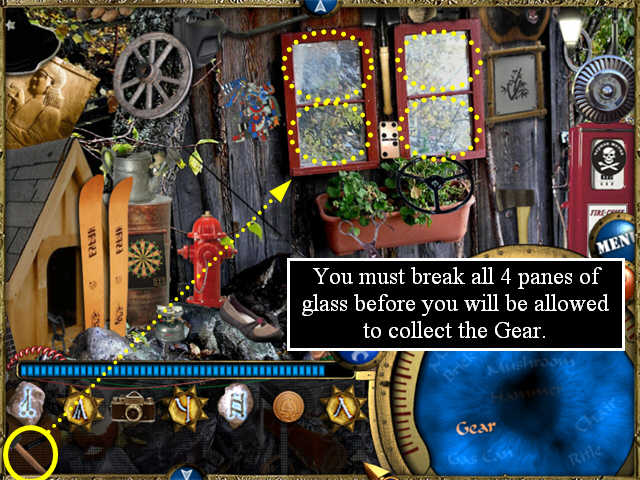
- Click on the Doghouse to zoom in.
- The Hammer is on the wall at the back of the Doghouse.
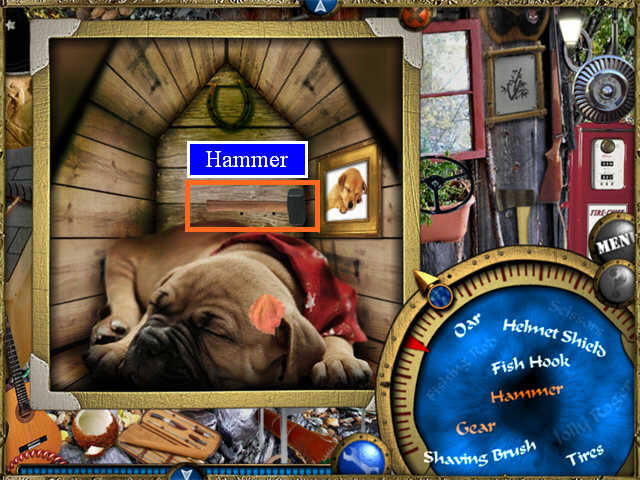
- Take the Hammer from your inventory and use to break all four panes of glass in the window. Only after you break all four will you be allowed to collect the Gear.
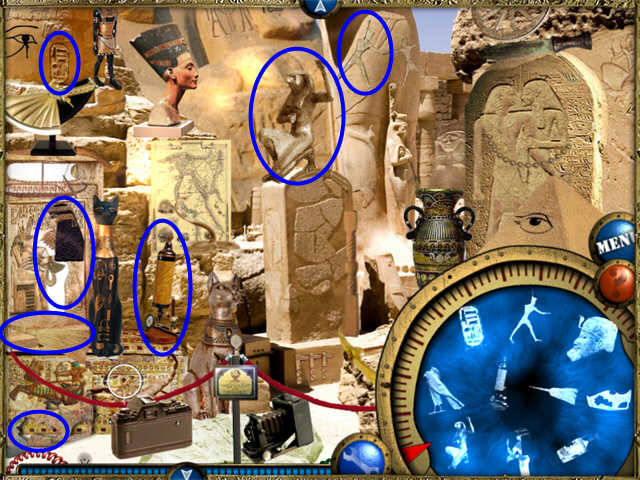
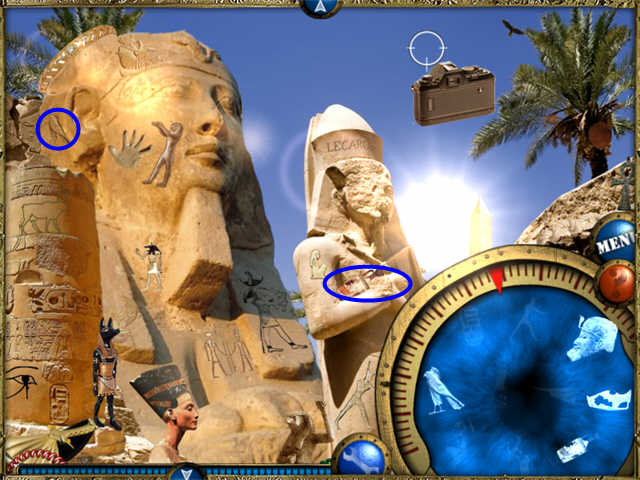
Location: The Tourist Area, Egypt
- Gregory’s girlfriend says “We can’t touch anything here.”
- Open your inventory and take out the camera.
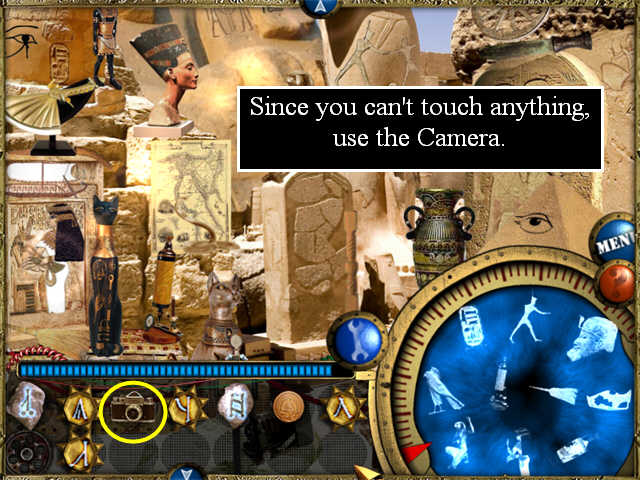
- Collect the items that are on the Find List.
- You will have to pan up to find some of the items.
- Several of the items on this location are half-way up, so you may need to pan up and then pan partway down again.
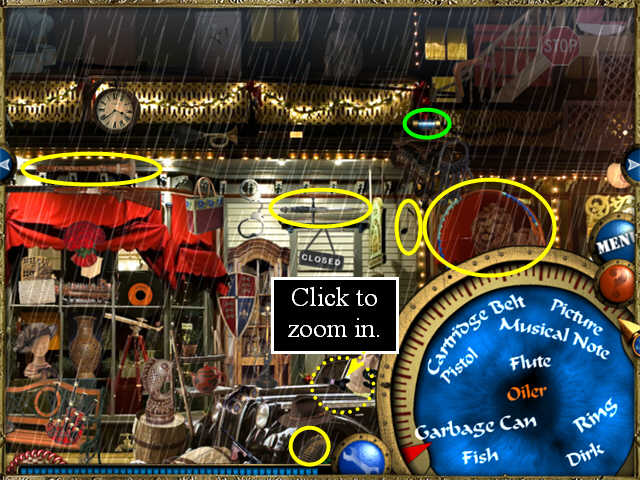
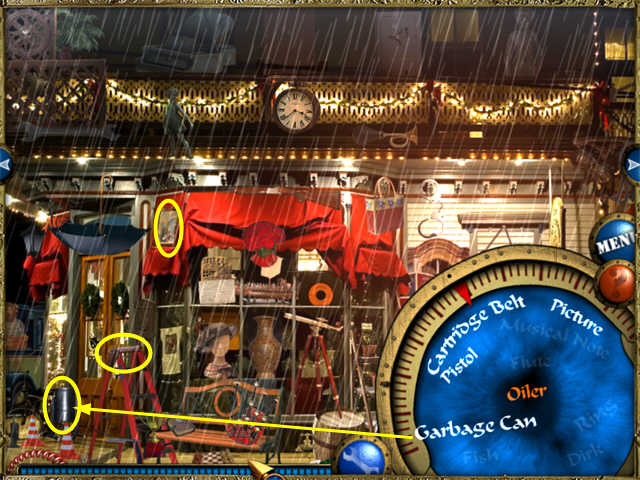
Location: New York, Some Street
- Collect the items that are on the Find List.
- Depending on the items on your Find List, you may have to pan left to find some of them.
- Ring is a large hoop, like a hula hoop.
- Flute is a recorder.
- The Cartridge Belt is on the front tire of the car. You may have a hard time collecting it until you’ve completed the puzzle.
- Oiler is an oil can.
Puzzle: New York Turn Signal Puzzle
- Click on the sparkle area over the car to zoom in.
- This will open a puzzle. The puzzle cannot be skipped.
- You can move the central lever right or left by clicking on the arrows next to it.
- You must move it in the sequence that matches the arrows on the dashboard.
- See the screenshot for the solution.
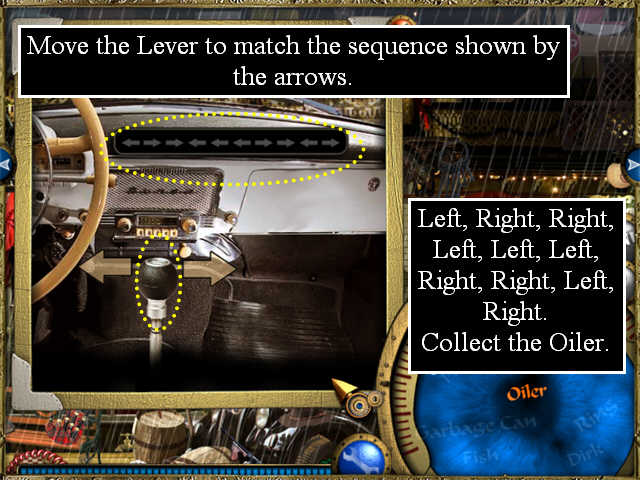
- Collect the Oiler.
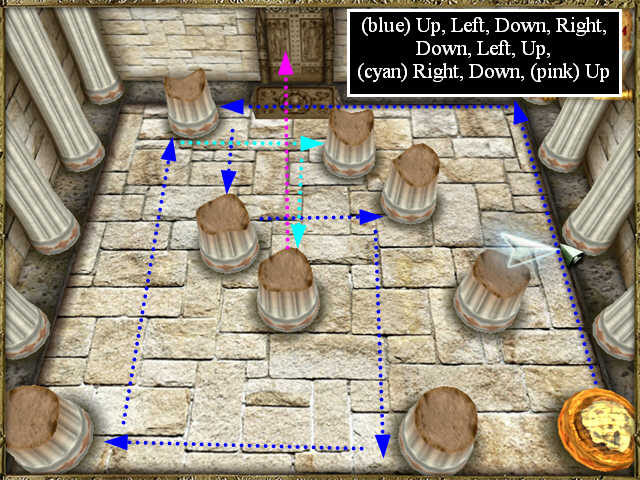
Puzzle: Entering the Throne Room
- This is a tilt table.
- You must use the 4 arrows to tilt the table so the ball hits the pegs and eventually rolls into the door on the far side.
- You cannot stop the ball half way.
- Solution:Up, left, down, right, down, left, up, right, down, up
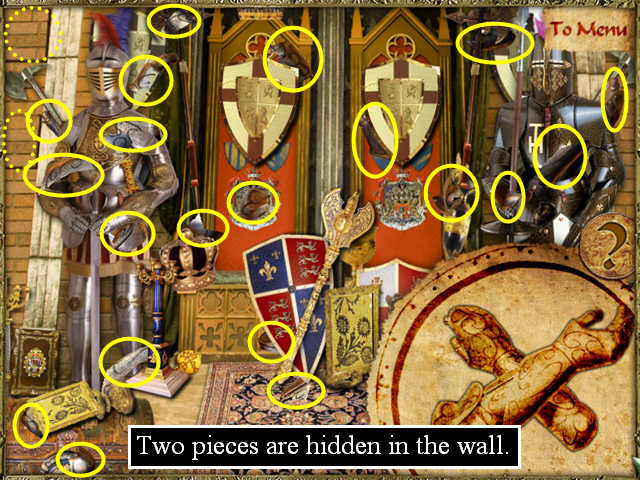
- When the door opens, you will be able to collect the broken pieces of the gloves from the magic armor.
- As you collect the pieces, they will fill in the picture of the Knight’s Gloves in the lower right so you can see how much more you need.
- If you need a hint, click on the ? next to the Gloves picture. It will recharge, but slowly.
- Two pieces are hidden in the wall.
- The Location Map will appear.
- Click on your inventory tray and place the Map Keys collected in this chapter.
Chapter Eight: The Secret
Puzzle: Entering the Hidden Underground
- Take the Gear from your Inventory and put it place.
- Take the Oiler and use it on the rusty gear until all the rust is gone.
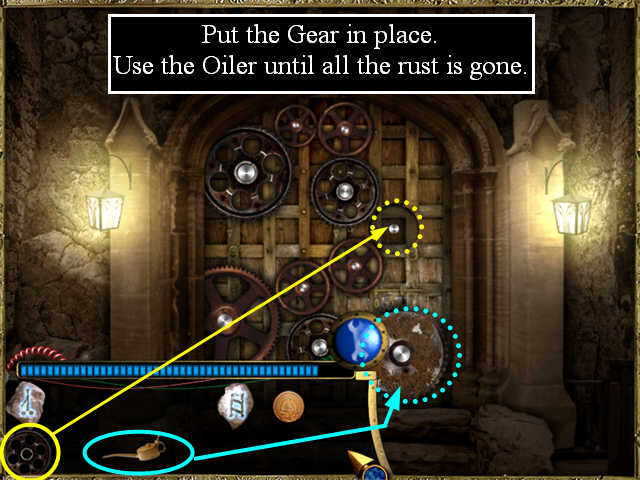
- The door will open, revealing a second door.
- Take the Ancient Disc from your inventory and put it in place.
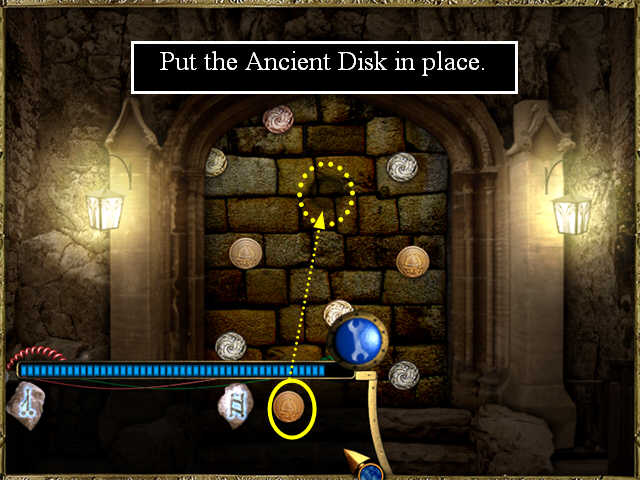
- A third door appears.
- Take the two Rune Stones from your inventory and place as shown.
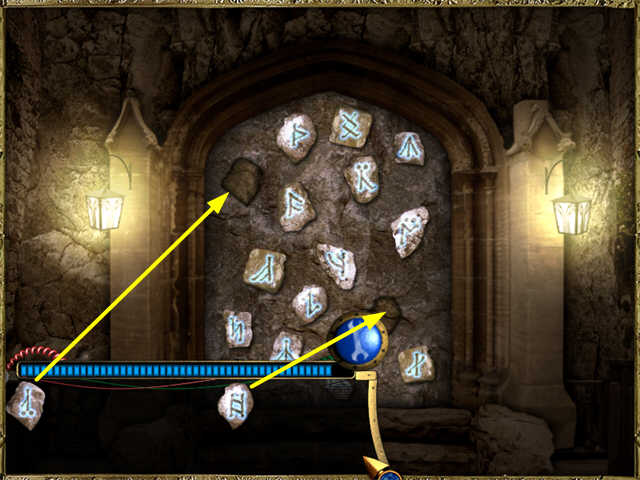
- Watch the ending.
Created at: 2010-06-17