

Walkthrough Menu
- General Tips & Information
- The Small Island
- Madame Staff
- The Railway Station
- The Museum
- Pusto's House
- The Island of Cradle
- The Underwater Cave
- Return to The Island of Cradle
General Tips & Information
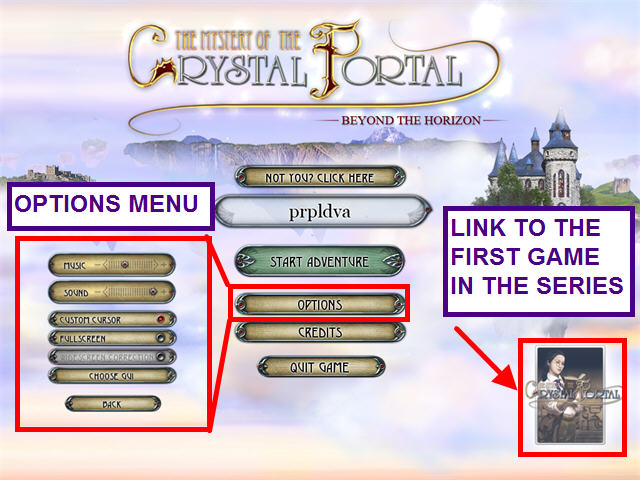
- From the Main Screen you may manage player profiles.
- The Options Menu allows for the adjustment of music and sounds volume.
- You may play this game in windowed or full screen mode.
- You may disable the custom cursor.
- You may play this game in Casual or Advanced Mode.
- Choose the Casual Mode for relaxing play where the hints and skips recharge fast.
- Items will highlight as a clue to your next move.
- Choose the Advanced Mode for more of a challenge!
- You cannot change modes after you start the game.
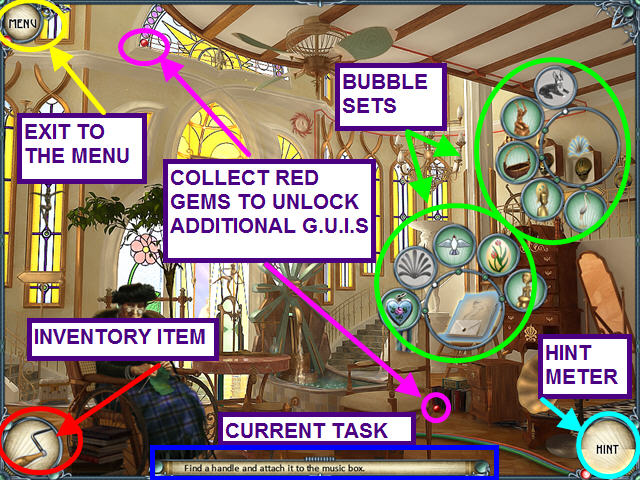
- Selecting Key Items will activate Hidden Object Bubbles, instead of a list.
- Find an item and place it on the matching bubble.
- This may activate additional items in the ring of bubbles.
- Collect the red gems throughout the game to unlock GUIs (graphical user interfaces).
- GUIs are the frames around the scenes that have the hints, tasks, etc.
- Inventory items are found in the lower left circle.
- Your current task is shown in the bottom bar.
- Click on the Hint Button in the lower right corner, once the meter is full, to locate an object.
The Small Island
- After traveling through the portal, you arrive at a string of floating islands.
- You have the option of some interactive help in the beginning.
- Igor is waiting on the small island.
- Select the Key Item, cauldron, and find the items needed to activate the cauldron.
- Once the cauldron is brewing, the pavilion gate will unlock.
- Click on the gate.
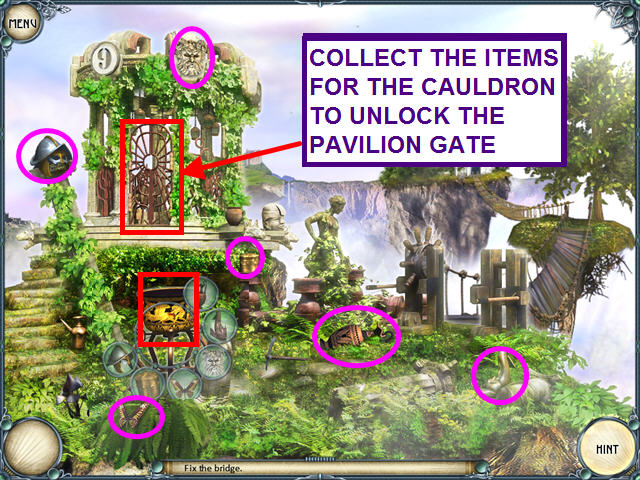
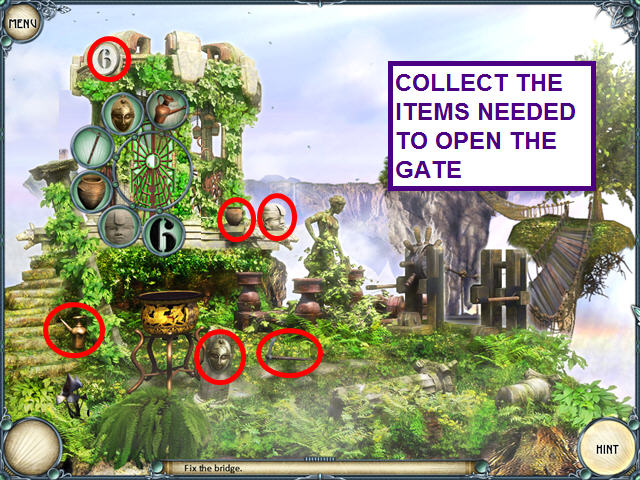
- Collect the items needed to open the gate.
- Click on the gate to enter the pavilion.
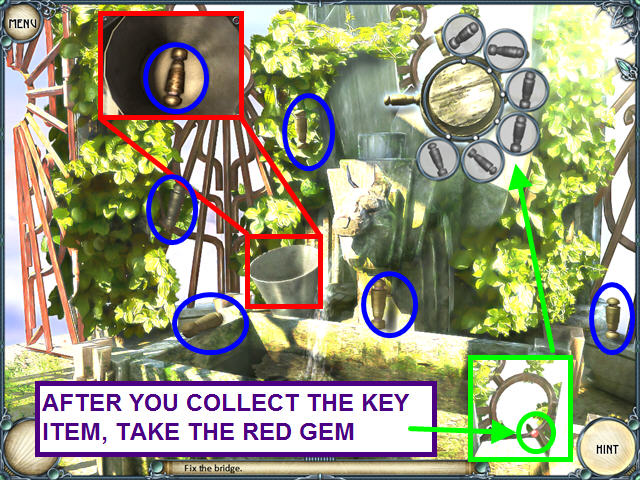
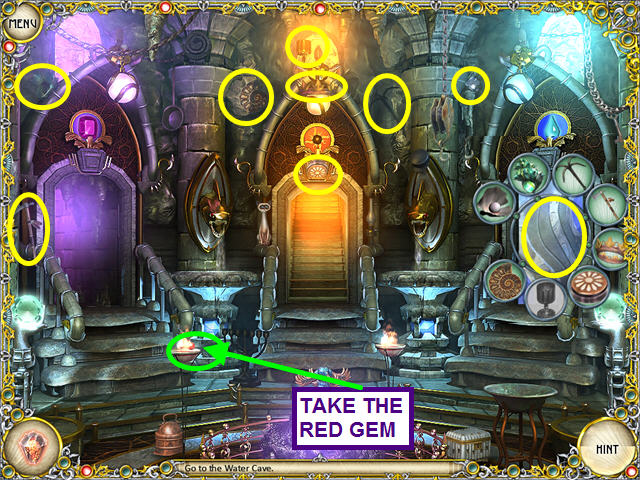
- Click on the broken wheel and collect the needed items.
- Look inside the bucket for one of the pieces.
- After you take the WHEEL, collect the red gem.
- Exit the pavilion by clicking on the highlighted door on the left.
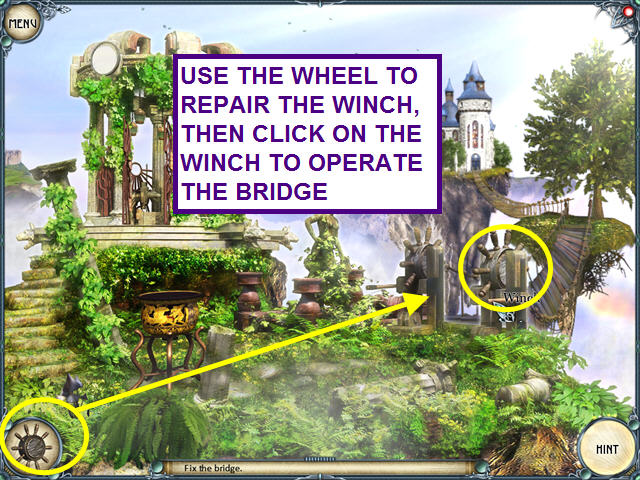
- Take the WHEEL from your inventory and place it into the winch.
- Click on the winch to repair the bridge.
Madame Staff
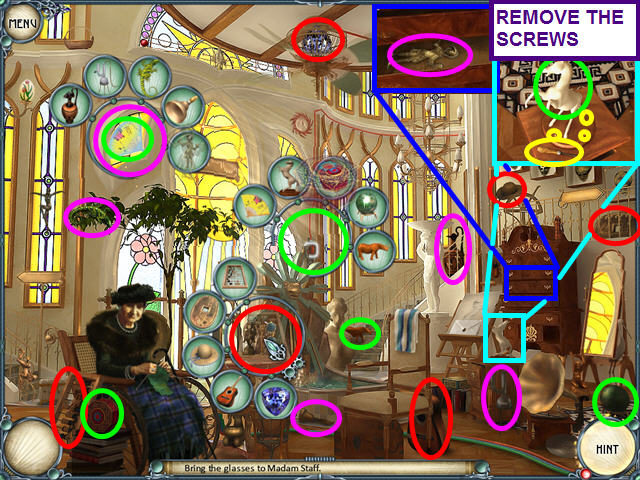
- This scene has three interdependent Key Items.
- Select Madame Staff's glasses from the table to activate the item bubbles.
- Try to take the diamond from the ceiling fan.
- Click on the red switch to activate a bubble set.
- Try to collect the hand fan to activate a bubble set.
- Locate the items for the fan's bubble set.
- Look inside the eterge drawers to find the statue.
- You can now take the fan for the light switch.
- Find the remaining items for the light switch bubble set.
- Go to the close-up of the horse figurine.
- Remove the screws with the screwdriver; then take the figurine.
- Now that the ceiling fan is off, find the remaining items for the glasses bubble set.
- Give Madame Staff her GLASSES.
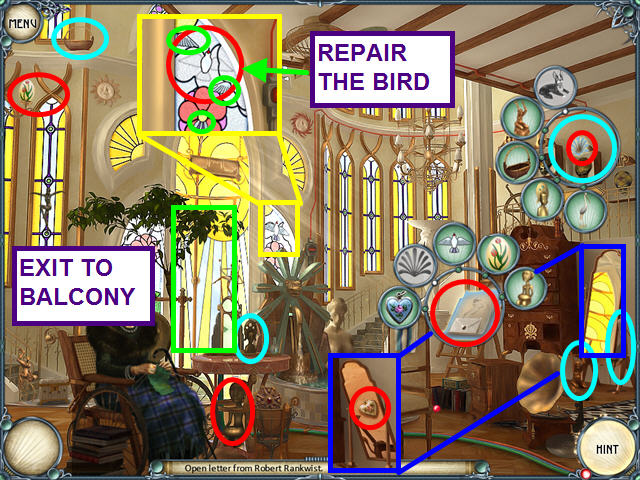
- Select the easel to activate a bubble set.
- Try to take the decoration on the upper right to activate another bubble set.
- Taking the crane figurine on the lower right will move the mirror, making the locket visible.
- Click on the stained glass bird and replace the wings and tail.
- Collect all the items for both bubbles, except the dog figurine and the decoration.
- Look at the jewelry box on the far left to learn you need a key.
- Exit through the center door to the balcony.
- Select the music box, and the symbol on the head, to activate two bubble sets.
- Look in the bucket to find the toy elephant.
- Locate the rest of the items needed for the symbol on the head.
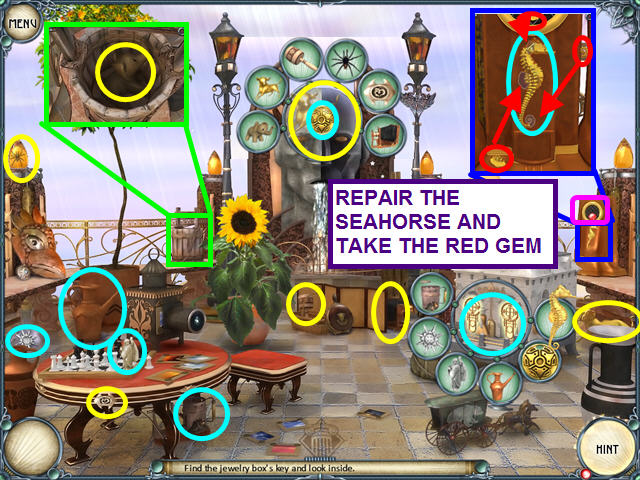
- Take the red gem from above the seahorse.
- Look at the close-up of the seahorse and drag; pieces to repair it.
- Locate the rest of the items needed for the music box.
- Click on the music box to learn you need a crank.
- Return to the hall via the exit at the bottom center.
- Take the two red gems.
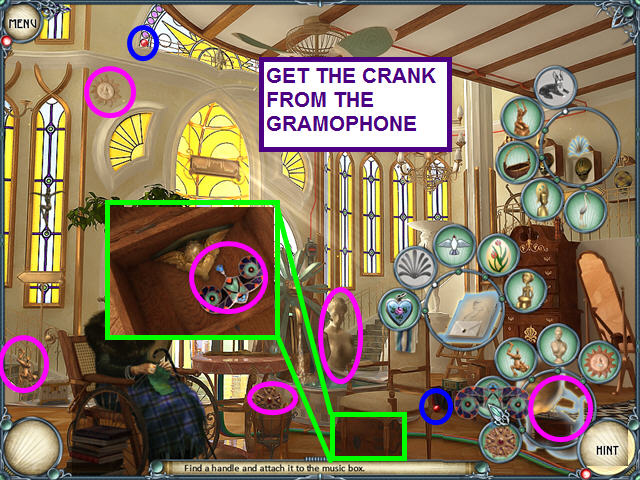
- Select the gramophone to activate a bubble set.
- Look in the wooden box to find the decoration.
- Locate the remaining items on the gramophone.
- Click on the gramophone to view its close-up.
- Take the HANDLE; return to the balcony.
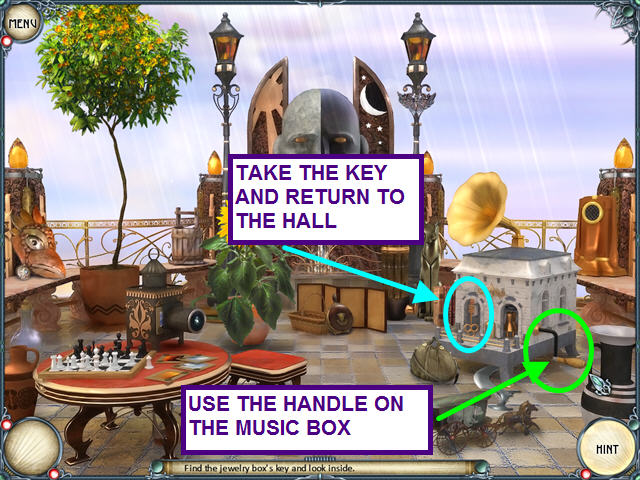
- Take the HANDLE from your inventory and use it on the music box.
- Click on the handle to activate the music box.
- Take the KEY and return to the hall.
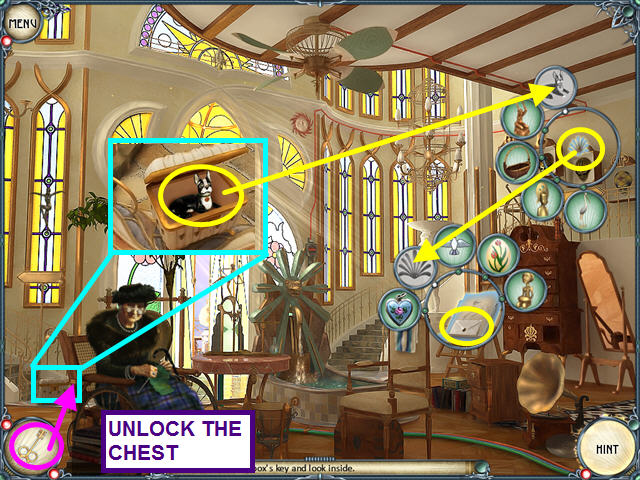
- Take the KEY from inventory and unlock the chest.
- Use the dog figurine on the decoration bubble set.
- Use the decoration on the letter bubble set.
- Click on the letter to read it.
- Your father has determined that you cannot return the way you came.
- He is in the library, searching for a way home.
- Madame Staff asks you to prepare tea.
- Exit to the kitchen on the left.
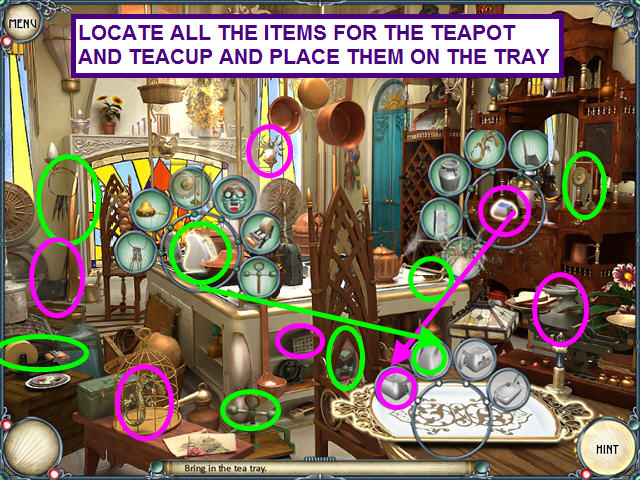
- Select the tea tray to find you need four pieces.
- Activate the bubble sets on the teacup and the teapot.
- Locate all the items for the teacup and teapot.
- Place the teapot and teacup on the tray.
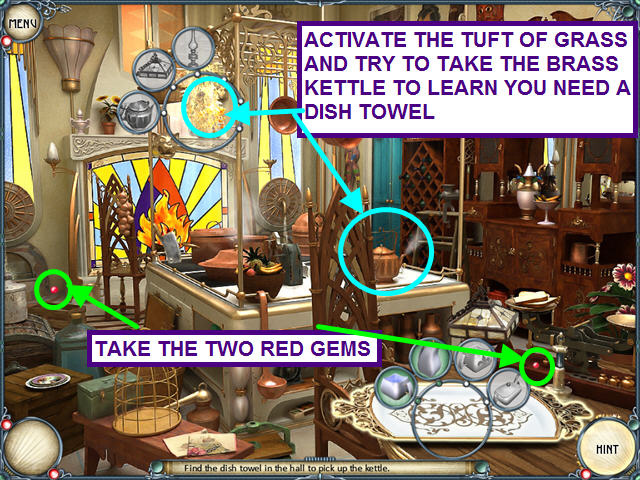
- Activate the bubble set on the hanging tuft of grass.
- Try to take the brass kettle to learn you need a DISH TOWEL.
- Take the two red gems.
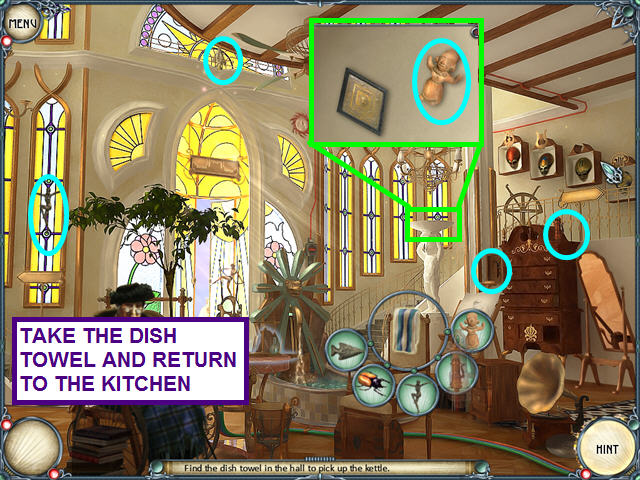
- Exit to the Hall.
- Click on the DISH TOWEL to activate the bubble set.
- Look inside the bowl of the statue to find the clay figurine.
- Locate the remaining items.
- Take the DISH TOWEL and return to the kitchen.
- Use the DISH TOWEL on the copper pot.
- Place all the needed items into the bubble set.
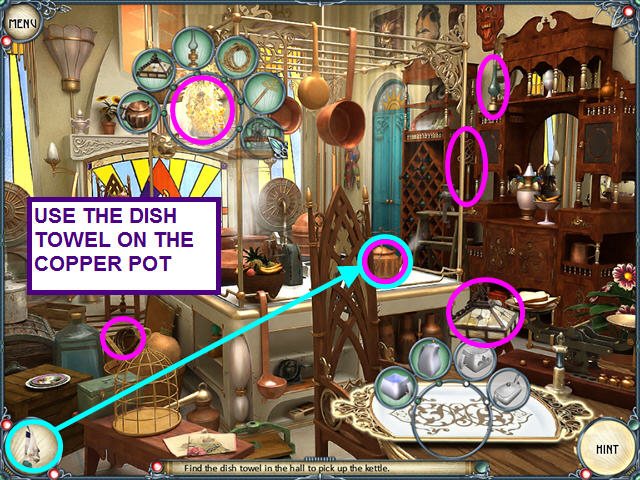
- Click on the sugar bowl that was behind the tuft of grass to activate the bubble set.
- Activate the bubble set on the cup that was behind the copper pot.
- Open the cupboard and take the cheese.
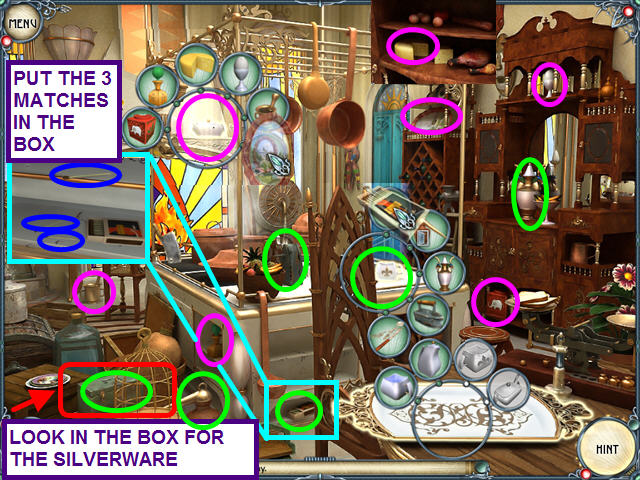
- Look at the close-up of the metal box on the lower left to find the silverware.
- Look at the close-up of the matches; place the 3 matches back into the box.
- Locater the remainder of the bubble set items.
- Place the sugar bowl and the cup on the TEA SET.
- Take the TEA SET and exit to the Hall.
- Place the TEA SET on the table to the right of Madame Staff.
- She says your father has gone to the only place that may have an answer.
- Exit the hall and go to Igor's room on the upper right.

- You’ll need SUNFLOWER SEEDS to catch Igor’s bird.
- Take the two red gems; you should notice the GUI change.
- Try to exit Igor's room to the left.
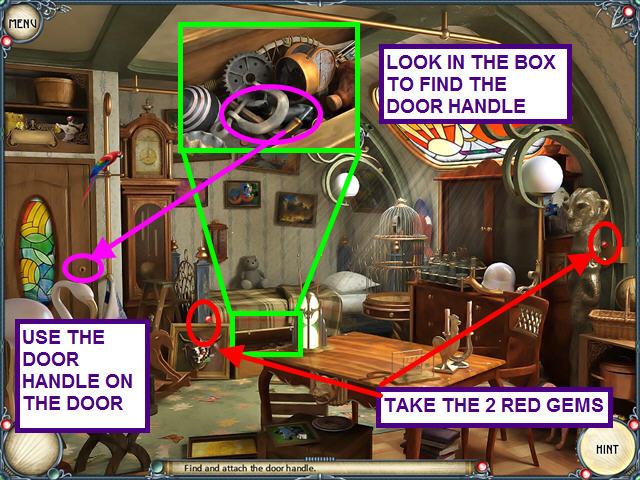
- Look in the box, on the floor by the bed, and take the DOOR HANDLE.
- Use the DOOR HANDLE on the hole in the door.
- Open the door and exit to the hall.
- Use the center exit to return to the balcony.
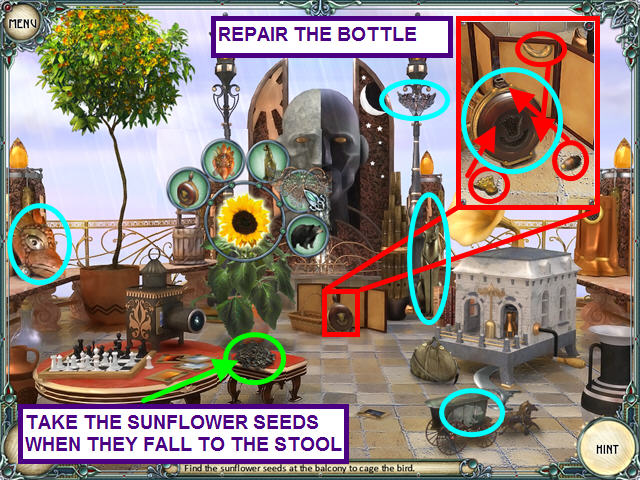
- Select the sunflower to trigger the bubble set.
- Look at the close-up of the bottle.
- Repair the bottle by replacing the three loose decorations.
- Locate the remaining items for the sunflower.
- Once they fall to the stool, take the SUNFLOWER SEEDS.
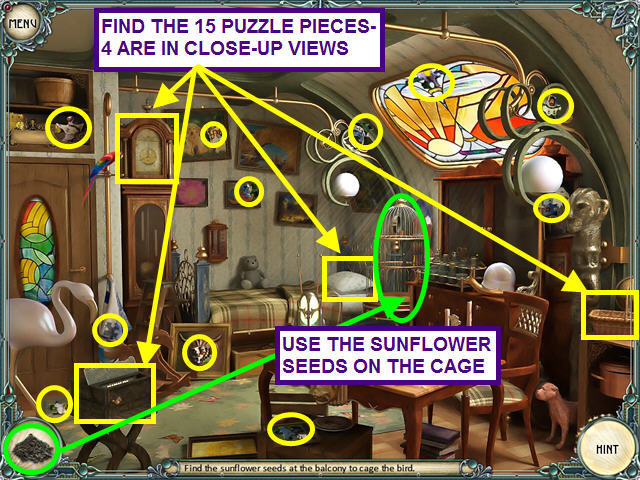
- Exit the balcony and return to Igor's room.
- Use the SUNFLOWER SEEDS on the cage to catch the parrot.
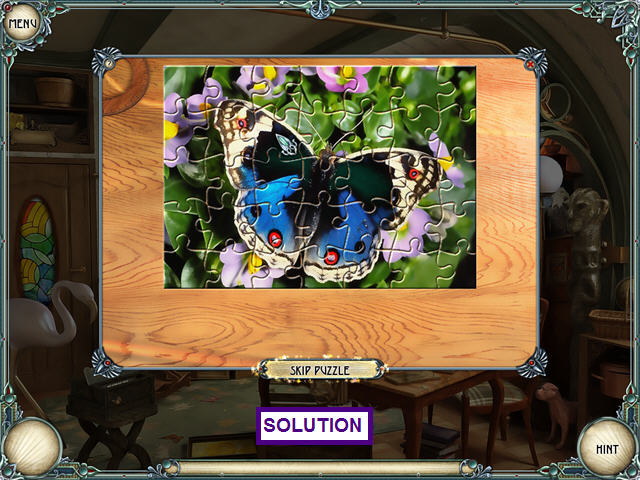
- Locate the 15 puzzle pieces.
- Four of the pieces are in the close-up views of the pillow, grandfather clock, basket on the right, and case on the left.
- Click on the pile of puzzle pieces on the table to trigger a mini-game.
- The object of the mini-game is to restore the picture.
- Left-click to pick-up/place pieces in this jigsaw style puzzle.
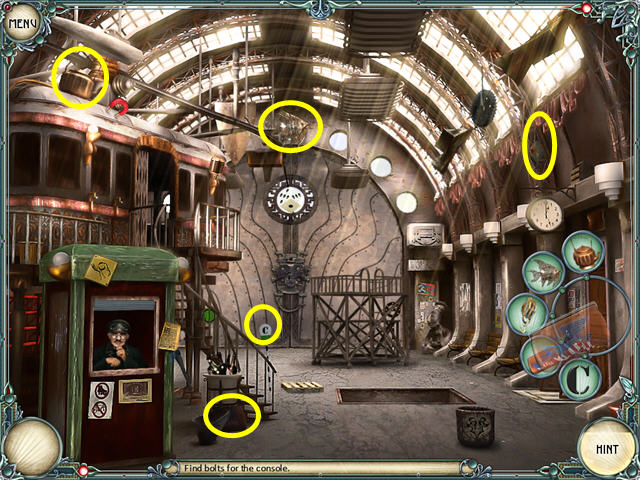
The Railway Station
- Activate the bubble sets on the whistle and the empty cargo crate.
- Locate all the suitcases.
- Once the cargo crate is full, and sinks below ground, the gramophone becomes visible.
- Look at the close-up of the alarm clock.
- Replace the two hands and bell to repair the clock.
- Find the remaining items for the whistle.
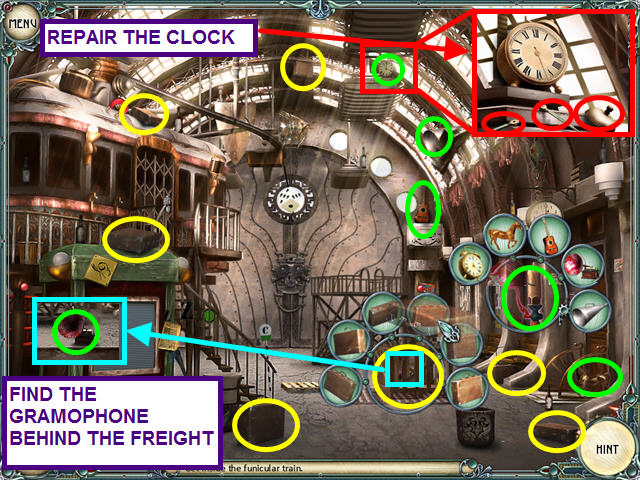
- Take the two red gems.
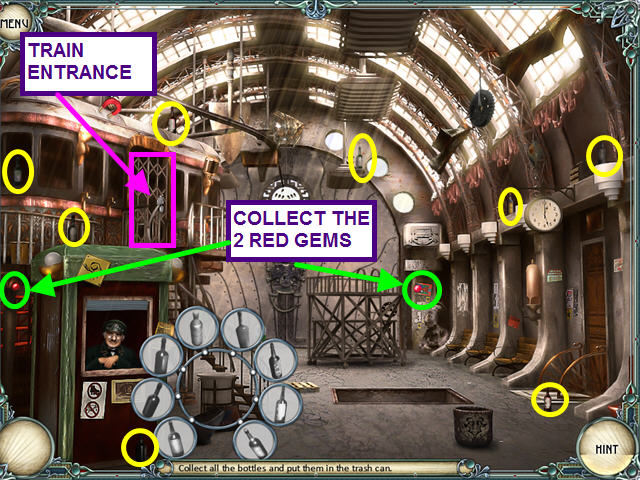
- Select the trash bin to activate the bubble set.
- Collect the eight bottles.
- Enter the train.
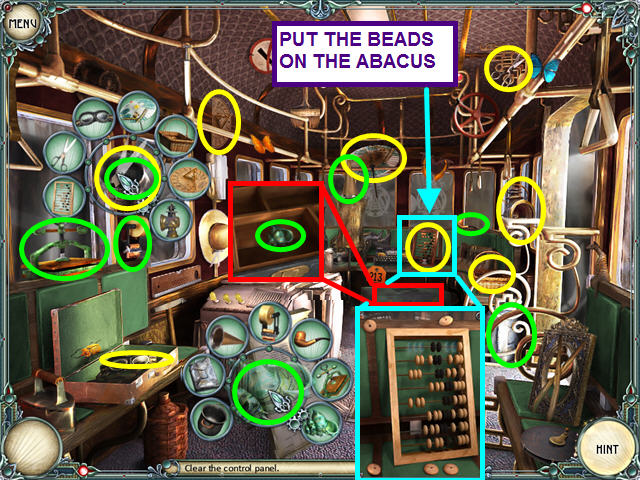
- The control panel is covered in debris.
- Select the bulletin board and the hanging pot to activate bubble sets.
- Look at the close-up of the abacus; replace the beads.
- Locate the shell in the trunk.
- Find the remaining items.
- Click on the control panel to discover all the bolts are missing.
- Exit the train car to the station.
- Click on the door to the engine room to activate a bubble set.
- Locate all the items.
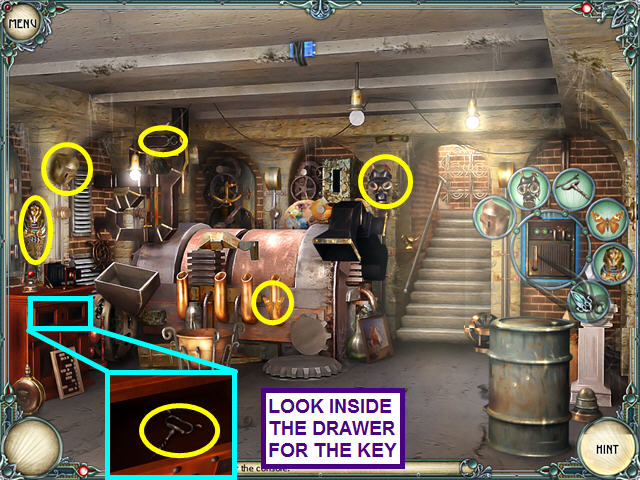
- Click on the right door to enter the engine room.
- Click on the electrical panel to trigger a bubble set.
- Look in the drawer to find the key.
- Locate the remaining items.
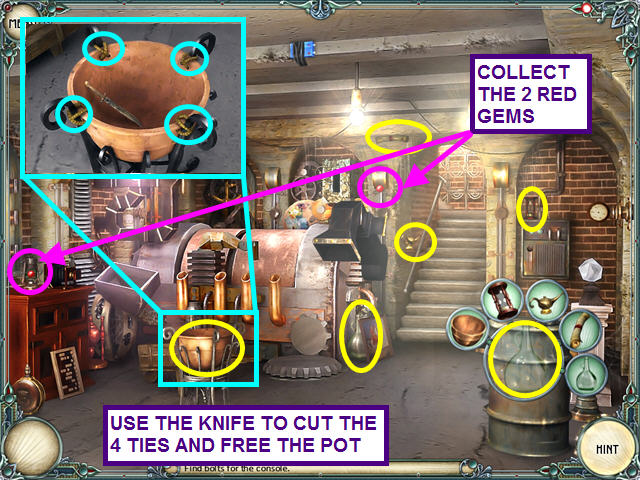
- Select the barrel to trigger a bubble set.
- Take the two red gems.
- Look at the close-up of the pot.
- Cut the four ties with the knife.
- Find the remaining items.
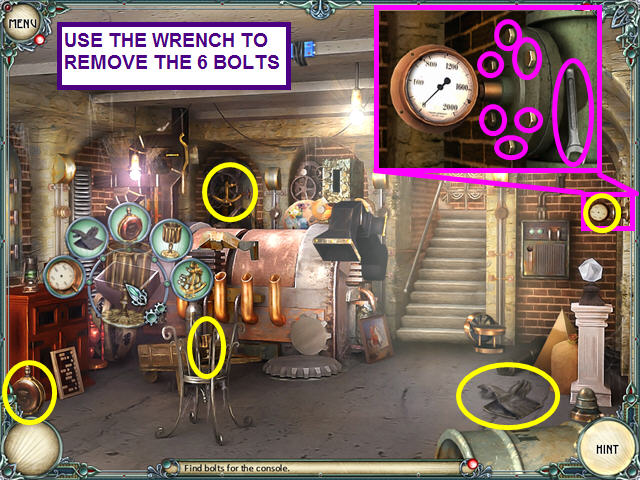
- Select the bell mouth to trigger a bubble set.
- Look at the close-up of the gauge.
- Remove the six bolts with the wrench.
- Find the remaining items.
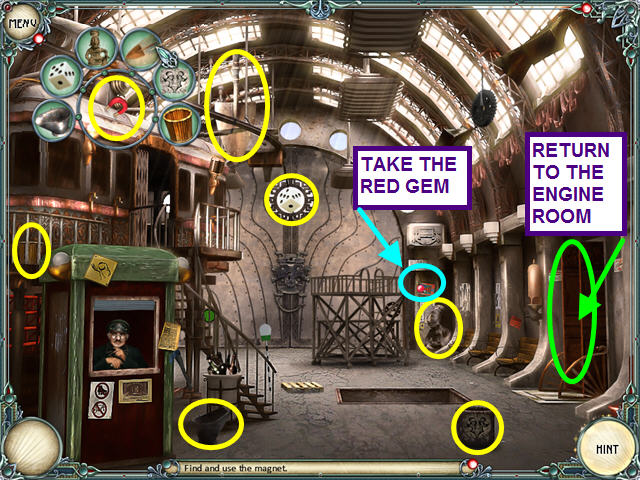
- Exit the engine room.
- Click on the magnet to trigger a bubble set.
- Locate all the needed items.
- The MAGNET will automatically go into your inventory.
- Take the red gem and return to the engine room.
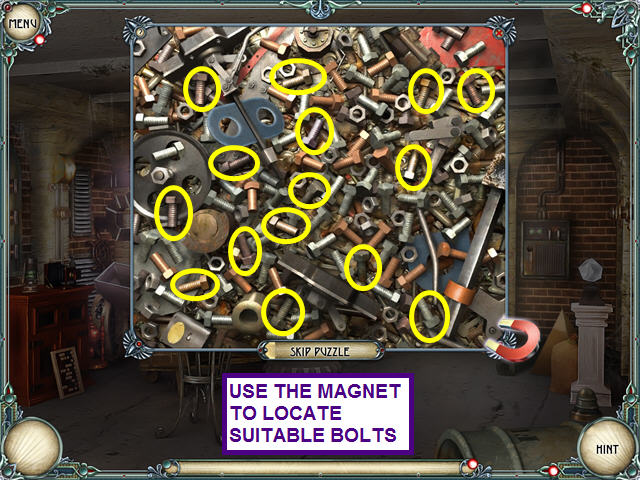
- Use the MAGNET from your inventory on the pile of rubbish on the floor.
- Click on the pile of rubbish to trigger a mini-game.
- The object of this mini-game is to use the MAGNET to find the bolts for the control panel.
- Move the magnet over the bolts.
- If a bolt begins to shake, click to capture it before it runs away.
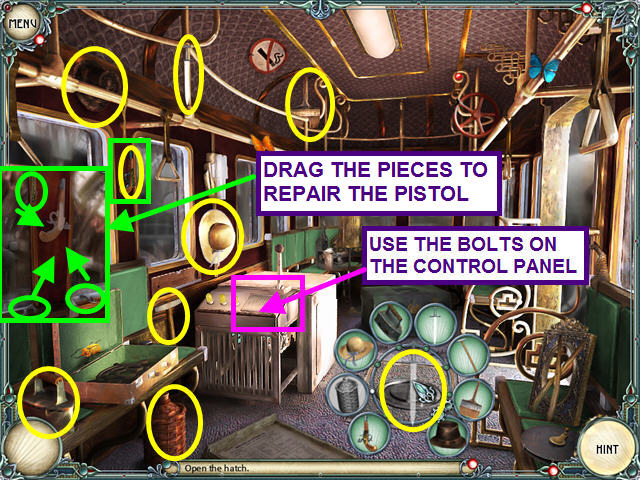
- Exit the engine room and return to the train car.
- Use the bolts on the control panel, but the car will not start.
- Click on the floor hatch to trigger a bubble set.
- Look at the close-up of the pistol; repair it with the three pieces.
- Locate the remaining items.
- Open the hatch and discover you are missing a battery.
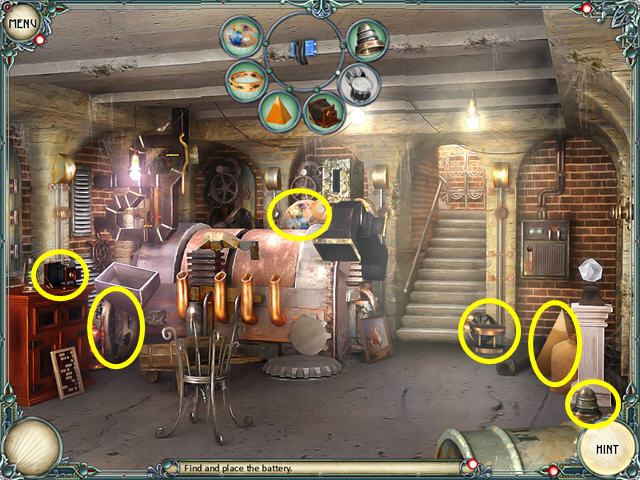
- Exit the car and return to the engine room.
- Click on the BATTERY taped to the ceiling to trigger a bubble set.
- Collect the needed items.
- The BATTERY will automatically go into your inventory.
- Exit the engine room and return to the rail car.
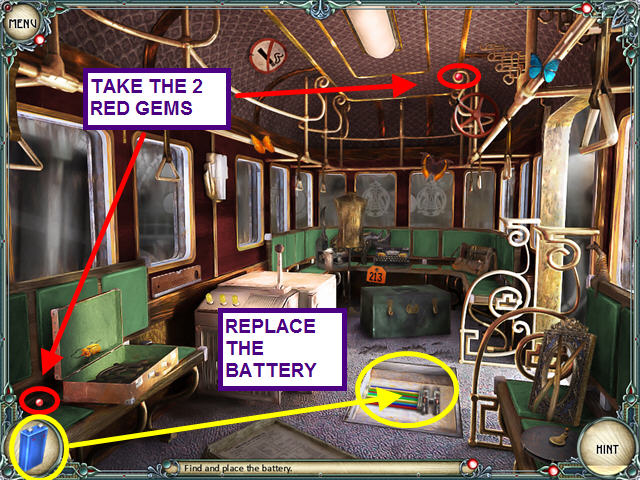
- Take the two red gems.
- Use the BATTERY from your inventory in the hatch.
- Exit the rail car and return to the station.
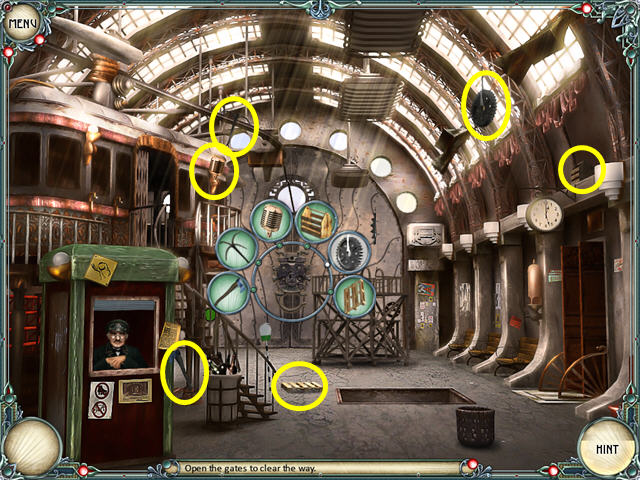
- Click on the gate latch to trigger a bubble set.
- Collect all the items to open the gate.
The Museum
- A giant hungry spider is blocking the entrance to the museum.
- Select the BLANKET to activate a bubble set.
- Look at the close-up of the iron.
- Replace the loose parts to repair the iron.
- Locate the remaining items needed.
- Throw the BLANKET from your inventory onto the spider.
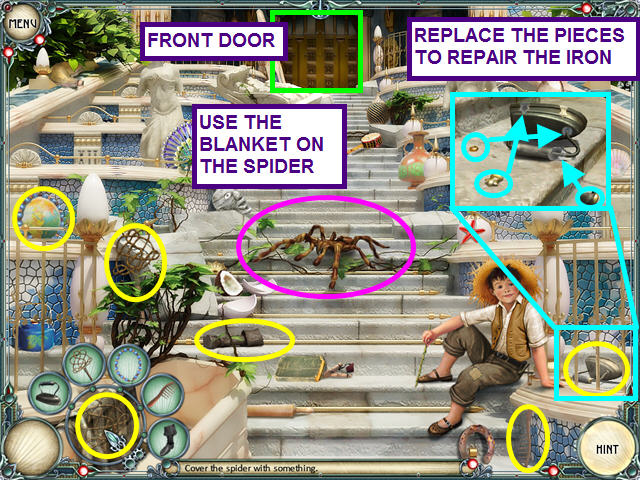
- Click on the front door to activate a mini-game.
- Find the sequence of switches to open the door.
- Find the first switch that moves a square on the door.
- Select another switch to raise the next square.
- If the first square falls, you have chosen incorrectly.
- Press the first switch and try another to find the second switch.
- Find the sequence through trial and error.
- Most mini-games are random, your solution may vary.
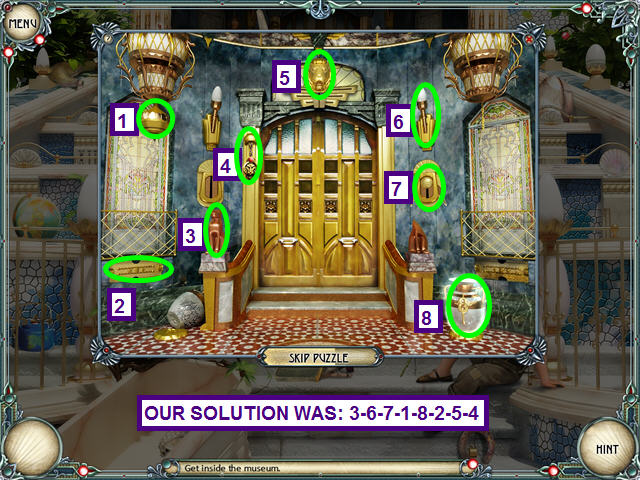
- Click on the door to enter the museum.
- Select the elevator and the dolphin to activate bubble sets.
- Once you collect all the items for the dolphin, it will rise and the wave piece for the elevator will become visible.
- Collect the remaining items needed.

- Take the red gem.
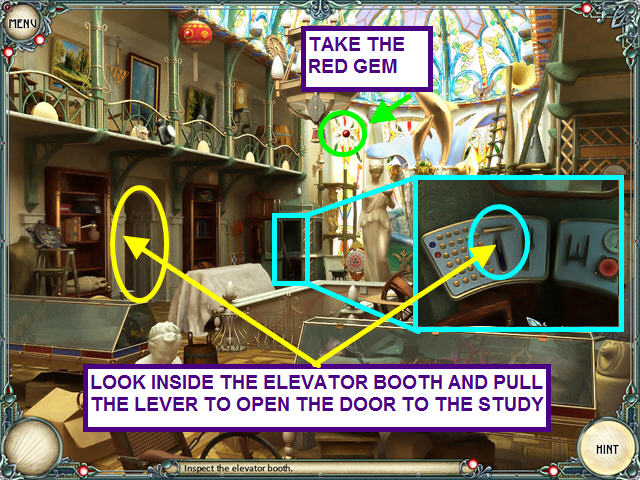
- Look inside the elevator booth.
- Pull the lever to open the study door.
- Click on the study door to exit the hall.
- Talk to your father.
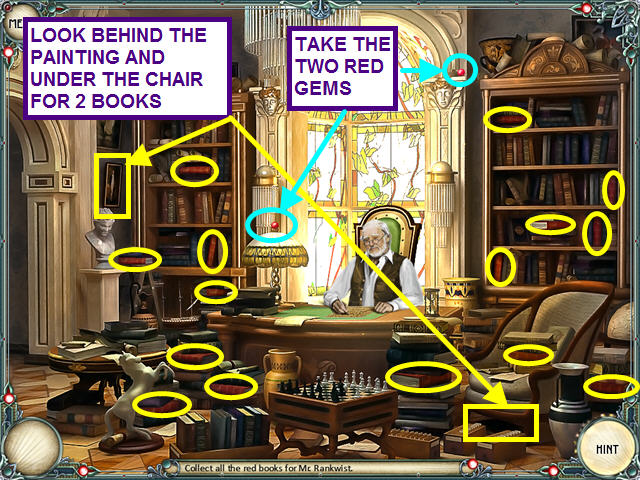
- Take the two red gems.
- Look at the close-up of the painting on the left to find a RED BOOK.
- Look under the right chair to find a RED BOOK.
- Collect the remaining RED BOOKS.
- Give the RED BOOKS to your father.
- Exit the study through the left door.
- Select the right display case to activate a bubble set.
- Click on the bust next to the left display case.
- Exit to the front of the museum.
- Click on the crowned head and the bull's head to activate two bubble sets.
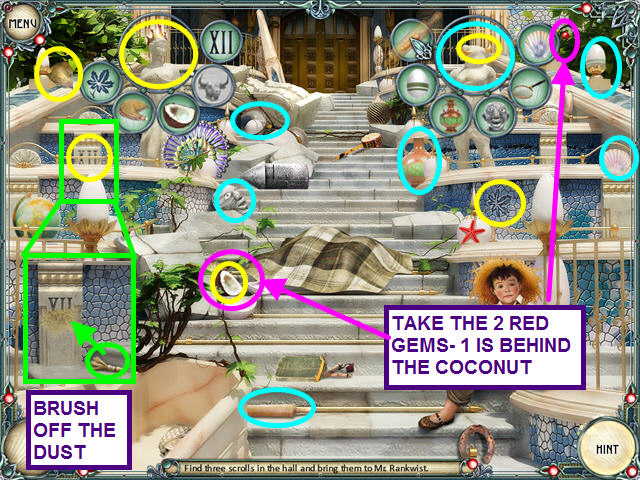
- Look at the close-up of the Roman numerals; use the brush to dust off the dirt.
- Collect all the items needed.
- The CROWN will go into your inventory automatically.
- Take the two red gems. One was behind the coconut.
- Click on the door to re-enter the hall.
- Place the crown on the bust.
- Look at the close-up of the checkerboard; replace the tiles.
- Collect all the items in the bubble set.

- Take the SCROLL from the right display case.
- Click on the left display case to activate a bubble set.
- Collect all the items.

- Take the SCROLL from the left display case.
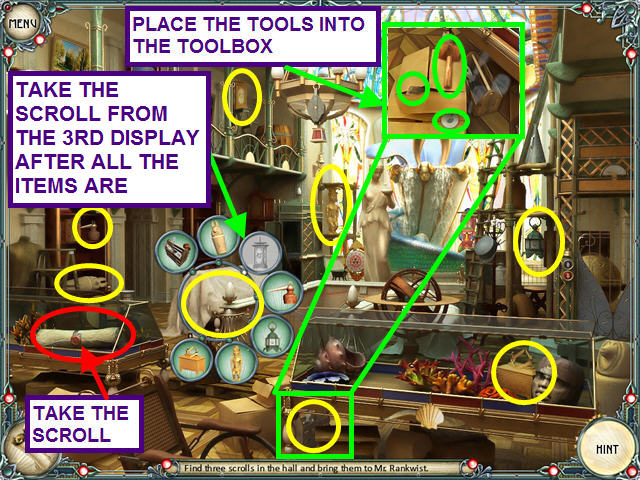
- Click on the sheet covered display case to activate a bubble set.
- Look at the close-up of the tool box; replace the three tools.
- Collect all the items.
- Take the SCROLL from the third display case and return to the study.
- Give the SCROLLS to your father and he will give you the basement KEY.
- Exit to the hall.
- Use the KEY on the gate to the basement stairs and exit the hall.
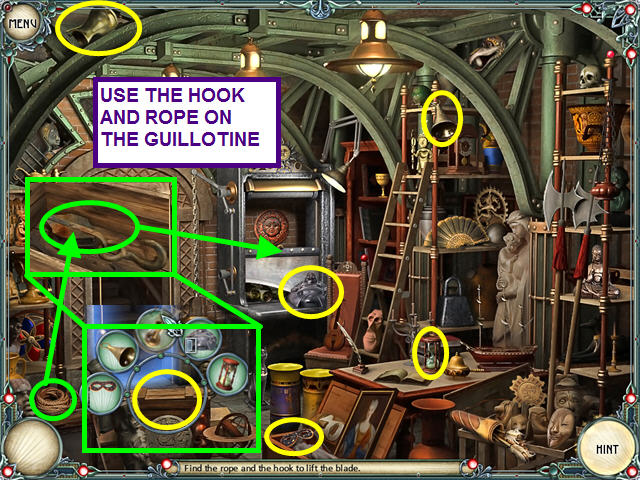
- Take the ROPE.
- Select the wood crate to trigger a bubble set.
- Collect all the needed items.
- Look inside the crate and take the HOOK; it will automatically combine with the ROPE.
- Use the ROPE & HOOK on the guillotine.
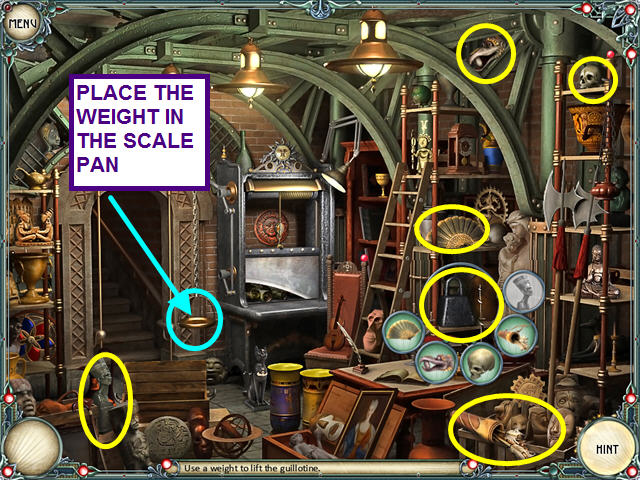
- Select the WEIGHT to activate a bubble set.
- Locate all the items needed.
- The WEIGHT will go into your inventory.
- Place the WEIGHT on the scale pan.
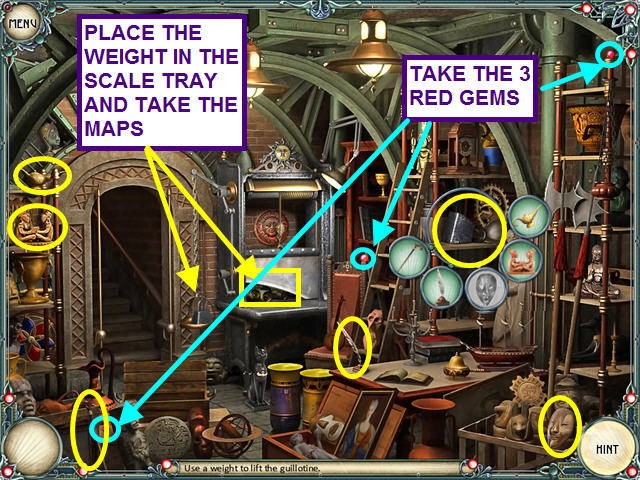
- Select the WEIGHT on the shelf to trigger a bubble set.
- Take the three red gems.
- Locate all the items needed.
- The WEIGHT will go into your inventory.
- Place the WEIGHT on the scale pan.
- Once the guillotine blade lifts, take the MAPS.
- Exit the basement and return to the study.
- Give the MAPS to your father.
- Exit the study, and the hall, to return to the entrance.
- Talk to the boy.
- Click on the door to return to the hall.
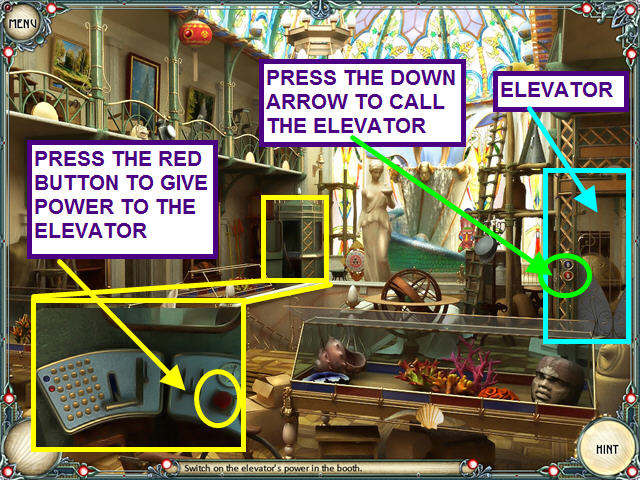
- Try the elevator on the right.
- Look inside the control booth on the left.
- Push the red power button.
- Press the down arrow to call the elevator.
- Enter the elevator to travel to the roof.
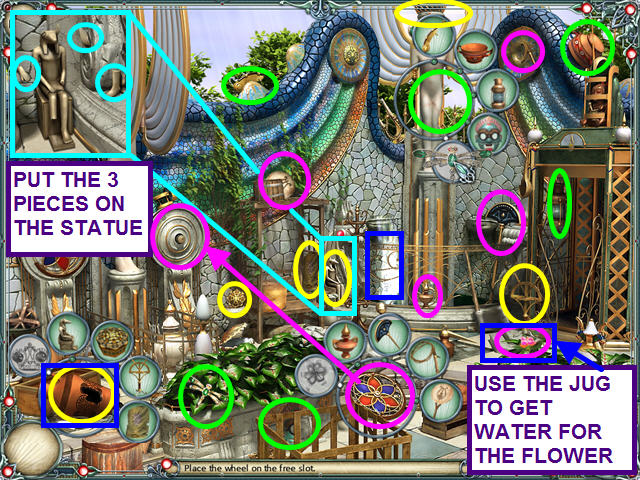
- Select the stained glass WHEEL, the broken JUG, and the fountain statue to trigger bubble sets.
- Try to take the pink flower on the right.
- Look at the close-up of the Egyptian statue; replace the missing pieces.
- Collect all the items for the statue to free the crown.
- Collect all the items for the JUG.
- The JUG will go into your inventory.
- Use the JUG on the fountain to get water.
- Pour water onto the pink flower.
- Collect all the items for the WHEEL.
- Place the WHEEL onto the right control.
- Exit the roof and return to the basement.
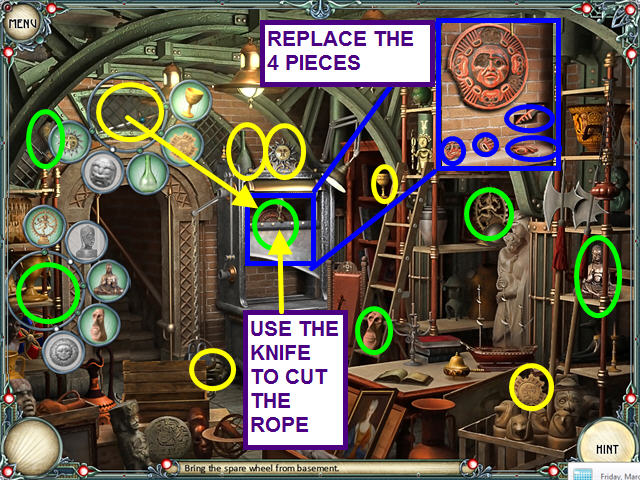
- Select the WHEEL and the KNIFE in the grate to trigger bubble sets.
- Collect all the items needed to free the KNIFE.
- Use the KNIFE to cut the rope on the guillotine.
- Look at the close-up of the clay plaque; replace the four pieces.
- Find the remaining needed items.
- After the bookcase moves, take the WHEEL.
- Exit the basement and return to the roof.
- Look at the broken wheel to learn you need a tool to remove the wheel.
- Select the AXE and the upper right statue to trigger bubble sets.
- Look at the close-up of the sun disc; remove the six arms holding the face in place.
- Find the remaining items for the statue, then the AXE.
- Use the AXE to remove the broken wheel.
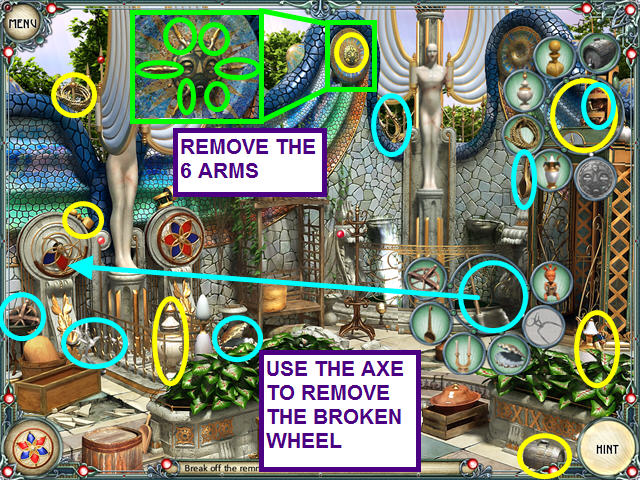
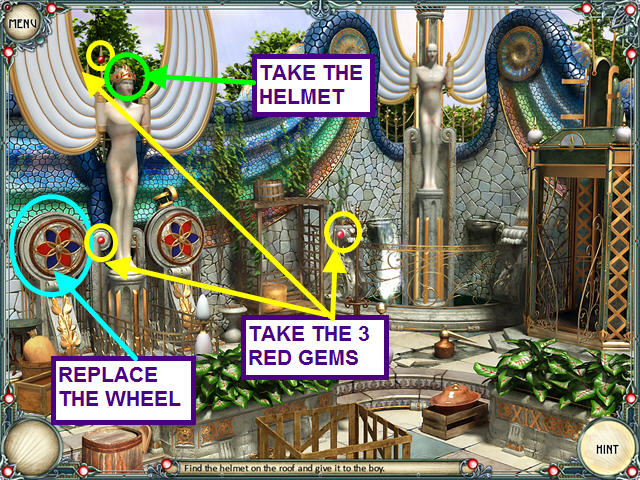
- Place the WHEEL on the left control.
- Take the three gems.
- Take the HELMET from the left statue.
- Exit the roof and return to the entrance stairs.
- Give the HELMET to the boy.
Pusto's House
- Knock on the front door.
- Select the crate on the right to open a bubble set.
- Select the broken crate in front of the fountain to trigger a bubble set.
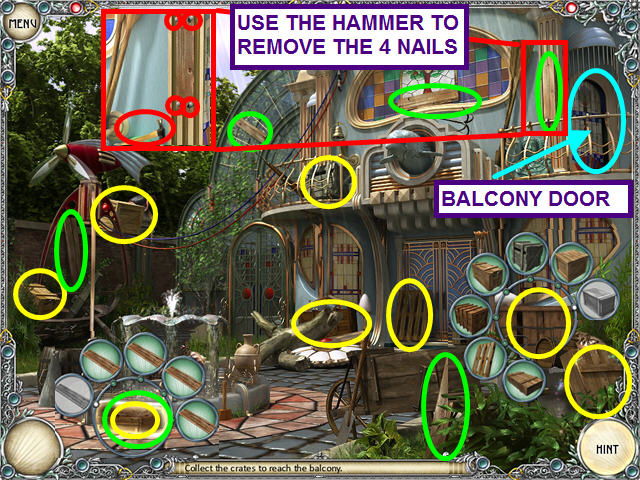
- Look at the close-up of the board by the balcony door.
- Use the hammer to remove the four nails.
- Collect the remaining boards and crates.
- Exit the yard through the balcony window.
- Select the red valve at the base of the tank to show the bubble set.
- Start collecting the needed items.
- Click on the upper left statuette to see another bubble set.
- Collect all the items on the statuette and the items needed for the red valve.
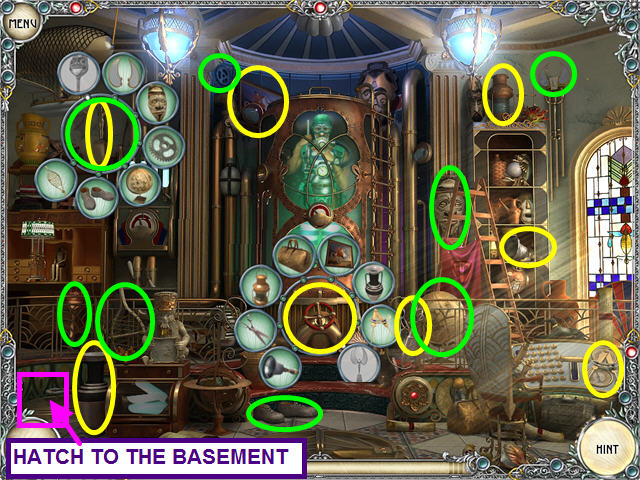
- Select the basement hatch on the left to trigger a bubble set.
- Collect the toy doll and take the red gem that was behind it.
- Take the other two red gems.
- Collect the items for the hatch.
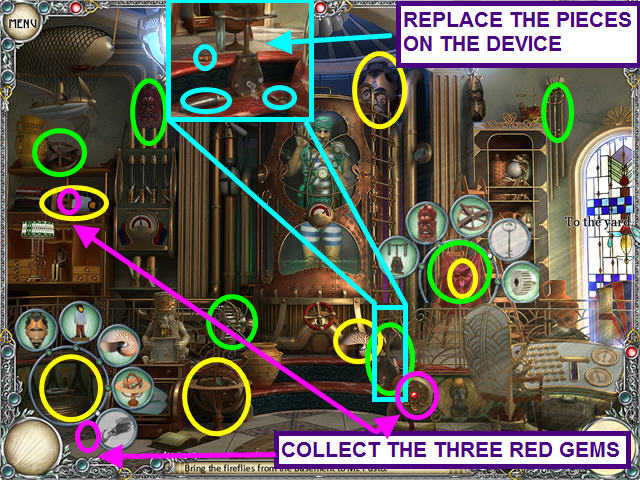
- Select the cloth for another bubble set.
- Look at the close-up of the device; replace the three pieces.
- After all the items are found for the cloth, it will fall away revealing the pulley.
- Find the remaining items to open the basement hatch.
- Exit the room by clicking on the hatch.
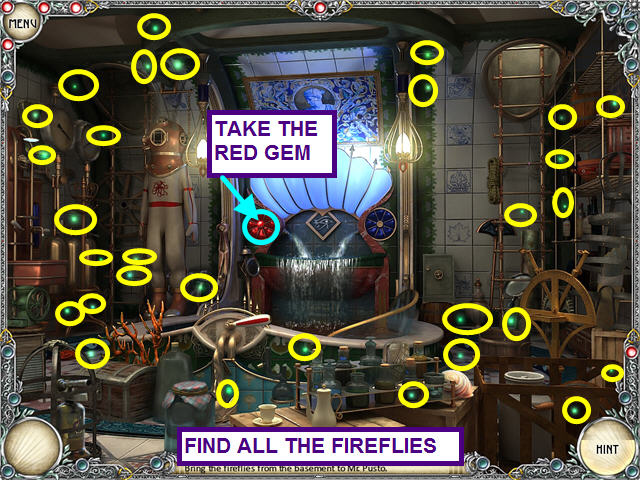
- Click on all the fireflies to capture them.
- The FIREFLIES will go into a jar in your inventory.
- Take the red gem.
- Exit the basement and return to Pusto upstairs.
- Take the FIREFLIES from inventory and give them to Pusto.
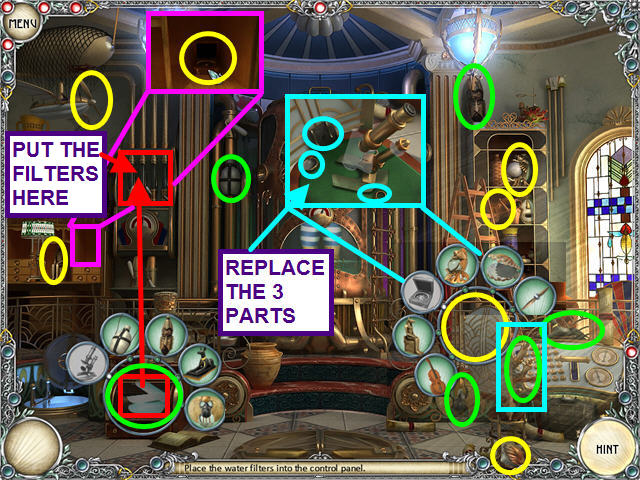
- Select the WATER FILTERS on the lower left, and the chair on the right, to activate two bubble zones.
- Look in the cubbyhole to find the compass.
- Locate all the items for the chair.
- Once the chair turns around, look at the close-up of the microscope.
- Replace the three parts on the microscope.
- Locate the remaining items for the WATER FILTERS.
- Take the WATER FILTERS and place them into the device.
- Exit to the yard through the right door.
- Click on the gate to the workshop to view the bubble set.
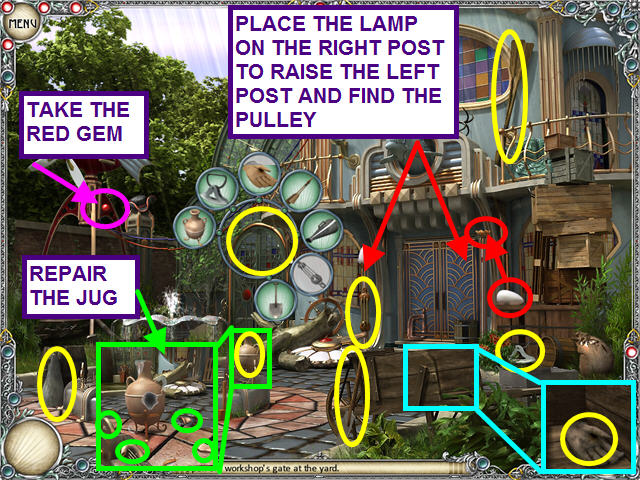
- Look in the wheelbarrow to find the gloves.
- Look at the close-up of the jug; replace the four pieces.
- Take the egg-shaped LAMP bulb and place it on the post to the right of the main door.
- This will make the left post rise and you can take the pulley.
- Locate the remaining needed items.
- Take the red gem.
- Exit the yard through the workshop gate.
- Look at the bathymobile to learn it is missing COPPER PLATING.
- Select the COPPER PLATING to see the bubble set.
- Collect the five wrenches.
- Place the COPPER PLATING on the hole in the bathymobile.
- Take the red gem.
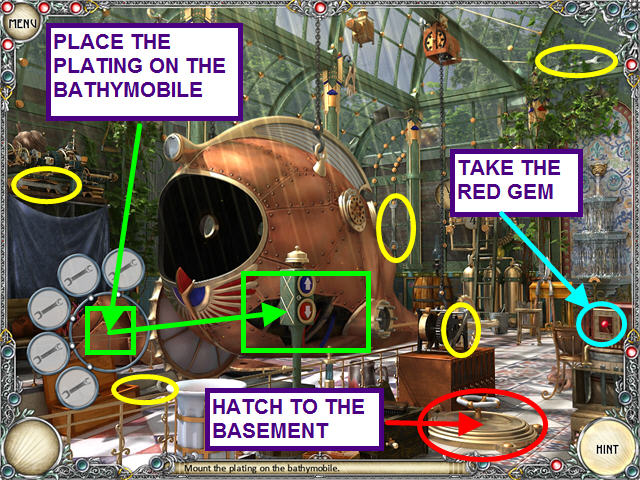
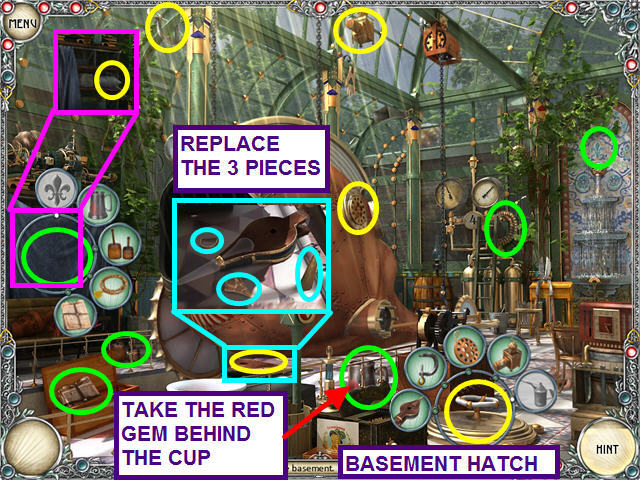
- Select the basement hatch to see the bubble set.
- Restore the bellows by replacing the three pieces.
- Collect all the items until only the oil can is remaining.
- Click on the cloth covered shelf to reveal a bubble set.
- Take the red gem from behind the silver tankard.
- Find all the items; take the oil can when the cloth moves.
- Use the oil can on the hatch bubble set.
- Click on the hatch to exit the workshop.
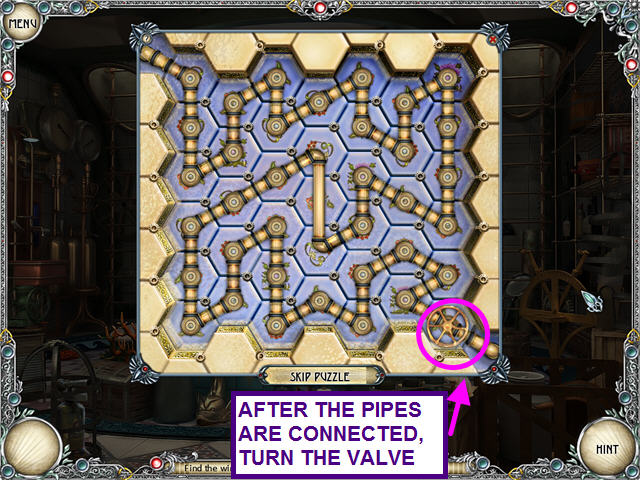
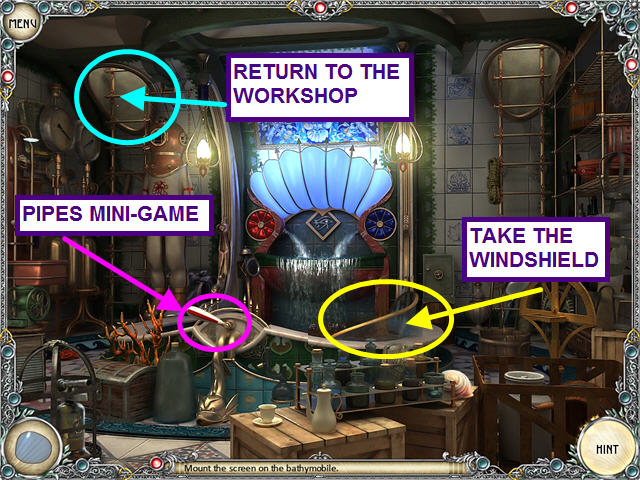
- Click on the red handle at the end of the tub to trigger a mini-game.
- The object of this mini-game is to connect all the pipes and activate the water flow.
- Left-click on each pipe to rotate.
- When all the pipes are connected, turn the valve in the lower right corner.
- Take the windshield from the tub.
- Exit to the workshop, using the ladder and hatch on the left.
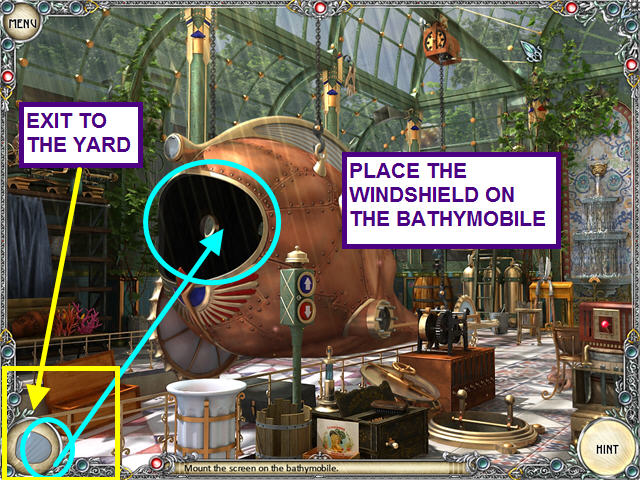
- Take the windshield from your inventory and place it on the bathymobile.
- Now you need to replace the missing wheel.
- Exit to the yard in the lower left corner.
- Look at the white wheel in the yard.
- Exit the yard and return to the basement.
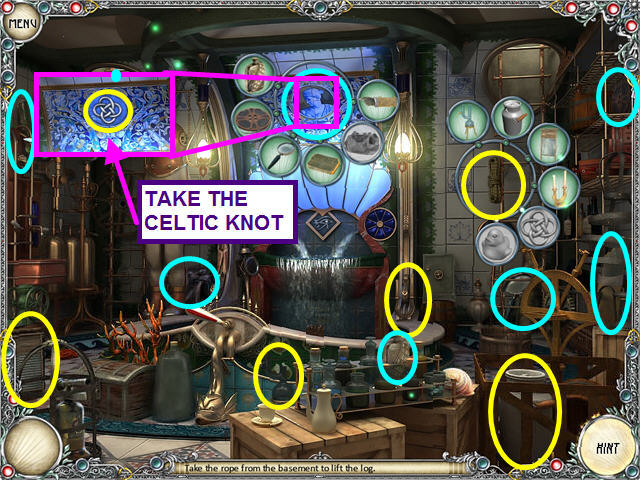
- Click on the rope hanging on the right ladder to bring up a bubble set.
- Collect the items until the Celtic knot and the yellow duck remain.
- Select the stained glass panel over the tub for a bubble set.
- Collect all the items to reveal the Celtic knot.
- Select the sink on the left for a new bubble set.
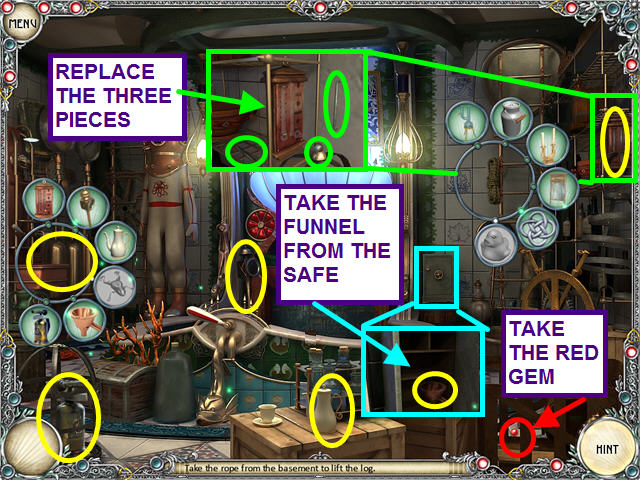
- Look in the safe and take the funnel.
- Look at the close-up of the thermometer; replace the three parts.
- Find the remaining items (except for the frog).
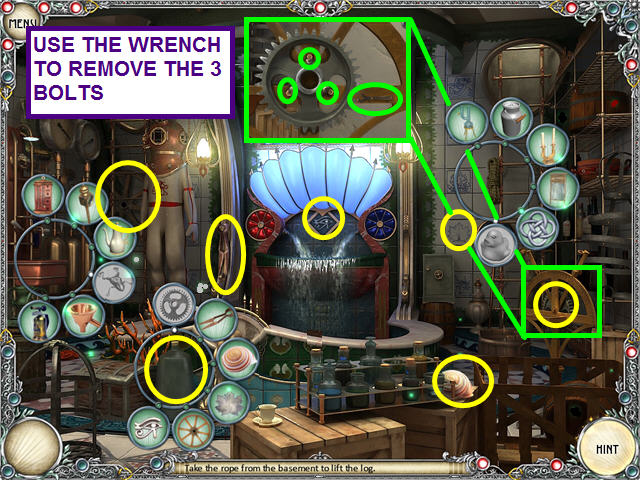
- Select the large bottle at the end of the tub to activate a bubble set.
- Look at the close-up of the gear; use the wrench to remove the three bolts.
- Find the items needed to complete the bottle bubble set.
- Take the frog from the bottle and complete the sink bubble set.
- Take the yellow duck from the sink and complete the rope bubble set.
- The ROPE will go into your inventory.
- Exit the basement and return to the yard.
- Use the ROPE on the log; the turbine will lift the log.
- Take the WHEEL and return to the workshop.
- Place the WHEEL on the bathymobile.
- You need a helm, so exit and return to the yard.
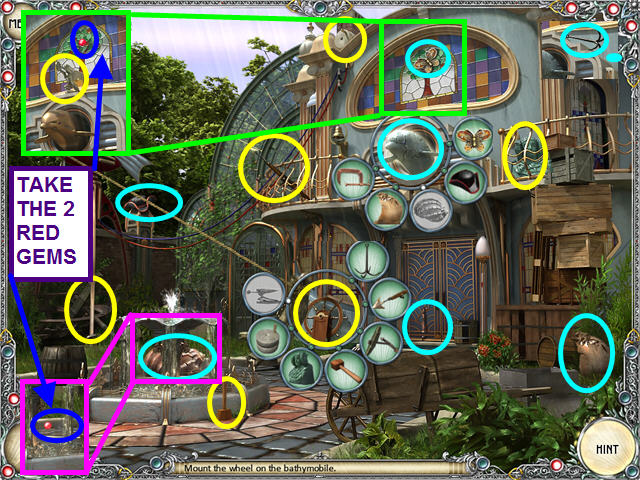
- Select the steering HELM to see the bubble set.
- Collect all the items except the emblem.
- Click on the dolphin above the door for an additional bubble set.
- Locate all the items for the dolphin.
- Use the emblem on the HELM bubble set and it will go into your inventory.
- Take the two red gems that were revealed after taking the butterfly and the shell.
- Exit the yard and return to the workshop.
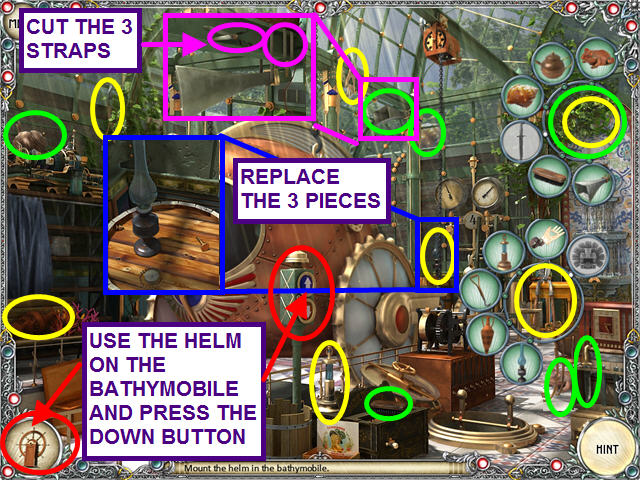
- Take the HELM from your inventory and place it on the bathymobile.
- Press the down button to lower the bathymobile.
- The rope in the yard is preventing the turbine from lowering the bathymobile.
- Select the GARDEN SHEARS to see the bubble set.
- Look at the close-up of the lamp; replace the three items.
- Collect all the items (except the carved face).
- Select the vines on the upper right.
- Look at the close-up of the megaphone; use the scissors to cut the straps.
- Return the carved head to the bubble set; the GARDEN SHEARS will go into your inventory.
- Exit the workshop to the yard.
- Take the GARDEN SHEARS from your inventory and cut the rope.
- Return to the workshop and press the down button.
The Island of Cradle
- Click on the left crystal, and the symbol of Shiva above it, to trigger the bubble sets.
- Locate all the items for the Shiva symbol, then the left crystal.
- Take the two red gems.
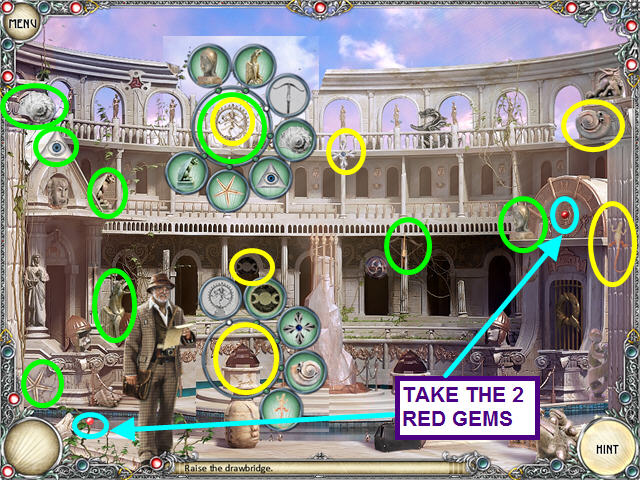
- Click on the right crystal and the dragon figurine above it to trigger the bubble sets.
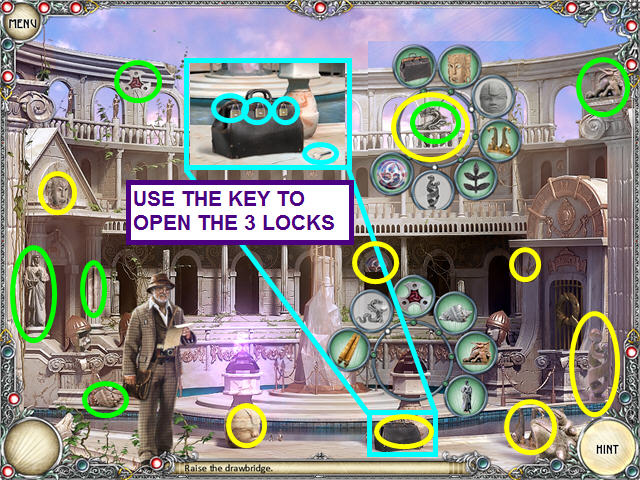
- Look at the close-up of the bag; use the key to open the three locks.
- Locate all the items for the dragon, then the right crystal.
- Now that the drawbridge is repaired, enter the left door to the crypt.
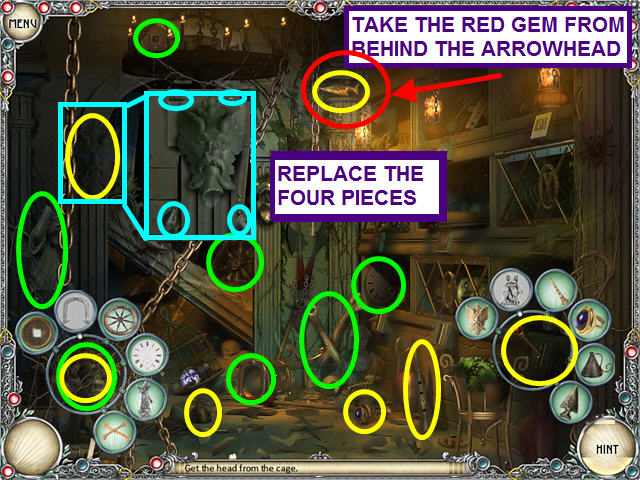
- Select the lever and the gargoyle to display bubble sets.
- Collect all the items for the gargoyle.
- Look at the close-up of the carved face on the wall; replace the four pieces.
- Collect the remaining items to work the lever.
- Take the red gem that was behind the arrowhead.
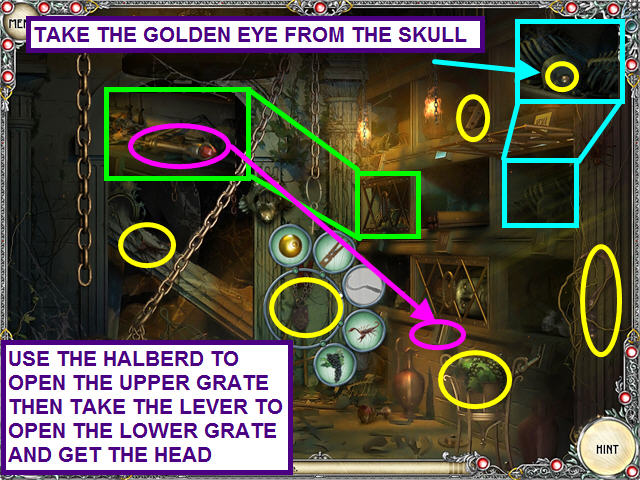
- Select the locked HALBERD to trigger a bubble set.
- Look in the niche and take the golden eye from the skull.
- Locate the remaining items.
- Take the HALBERD from your inventory; use it on the upper grate.
- Take the lever; use it on the lower grate.
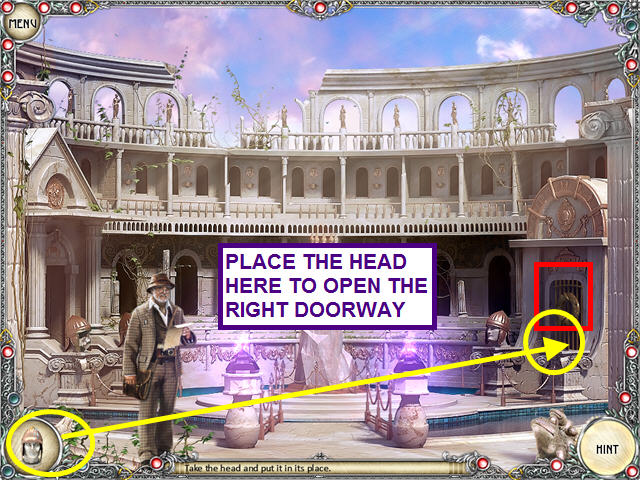
- Take the HEAD and exit to the square.
- Place the HEAD next to the right doorway.
- Now that the right doorway is open, exit the square.
- Inside the room, you meet the Localian.
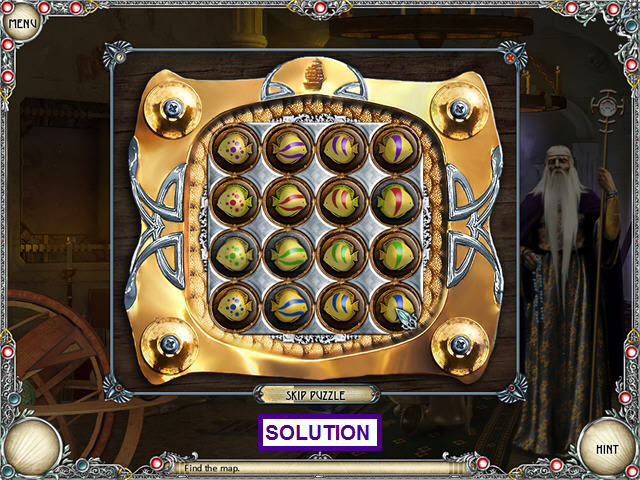
- Look at the box on the left for a mini-game.
- Place all the fish into the grid.
- Place the same color in each row and the same symbol in each column.
- Select the large vase in the center, and the coin on the wall, to activate bubble sets.
- Look at the close-up of the mini-game box to find a scroll.
- Find all the items for both bubble sets.
- Take the red gem.
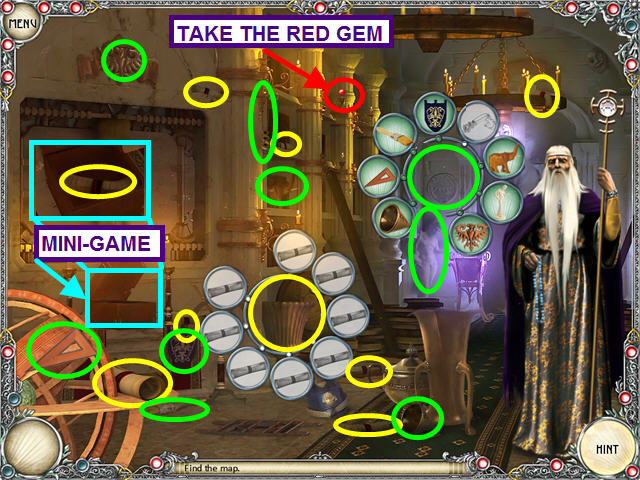
- Click on the mapdesk on the left wall to see a bubble set.
- Look at the grate; use the screwdriver to remove the four screws.
- Find the remaining items except for the ankh.
- Exit the room and go to the crypt.
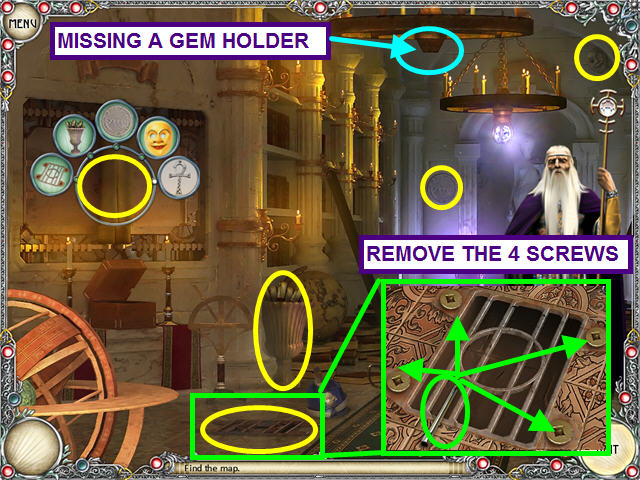
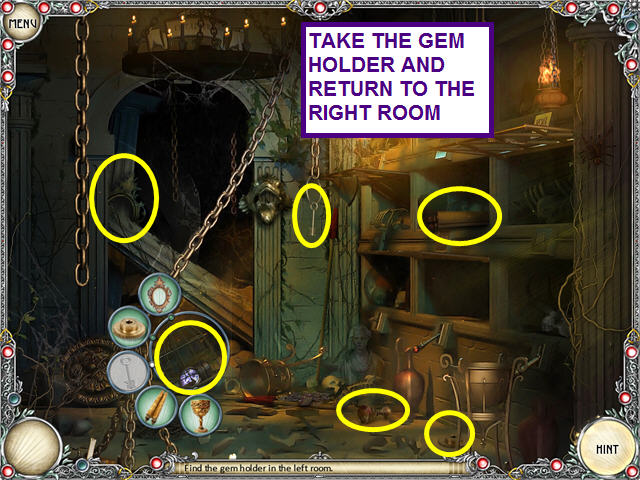
- Click on the GEM HOLDER to see the bubble set.
- Locate all the items in the bubble set.
- Take the GEM HOLDER and return to the right room.
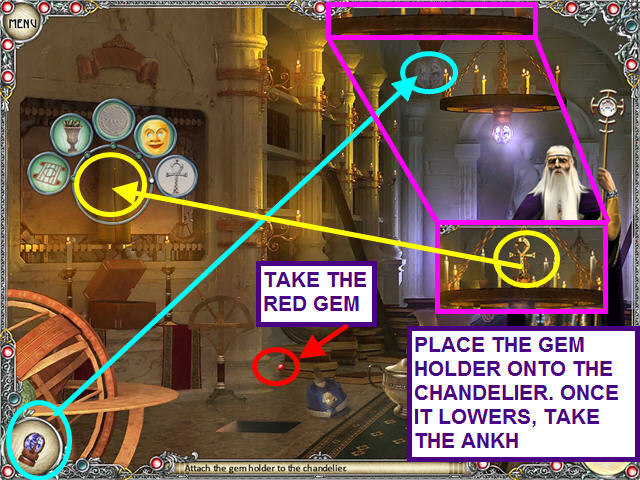
- Place the GEM HOLDER onto the chandelier.
- Once the chandelier lowers, take the ankh and use it on the bubble set.
- The mapdesk opens to show the next destination.
The Underwater Cave
- After another journey in the bathymobile, you arrive at the caves.
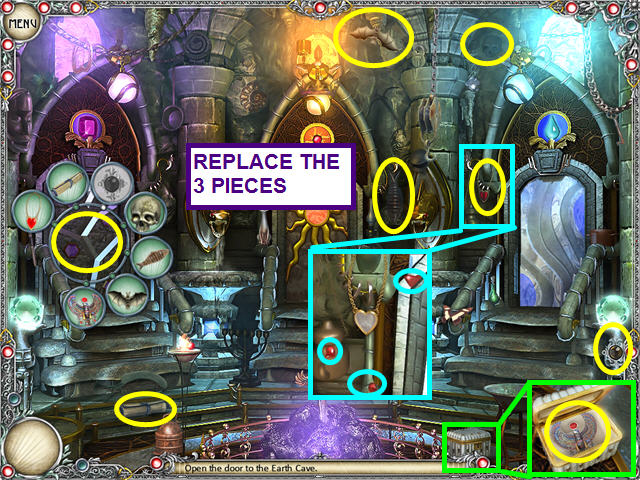
- Select the left door to open the bubble set.
- Look at the close-up of the necklace; replace the three pieces.
- Look inside the small chest to find the winged ornament.
- Locate the remaining items to open the Earth door.
- Enter the Earth door.
- You need to wake the Earth spirit.
- Select the STONE HAMMER and the gold cat to open bubble sets.
- Find all the items for the cat.
- Look at the close-up of the cat; use the key to open the three locks.
- Find the remaining items for the STONE HAMMER.
- Take the STONE HAMMER from your inventory and use it on the gong.
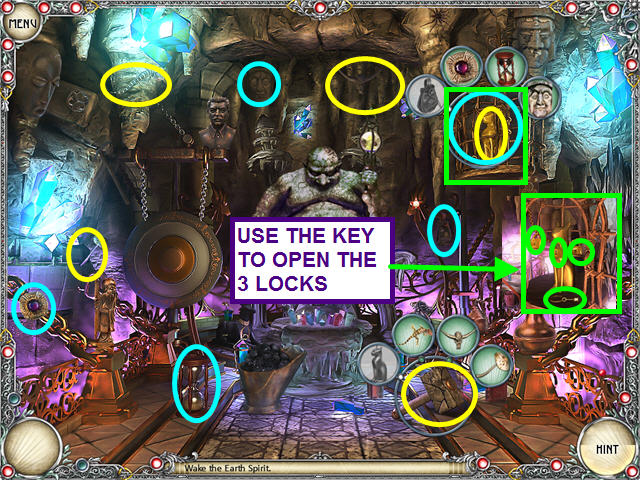
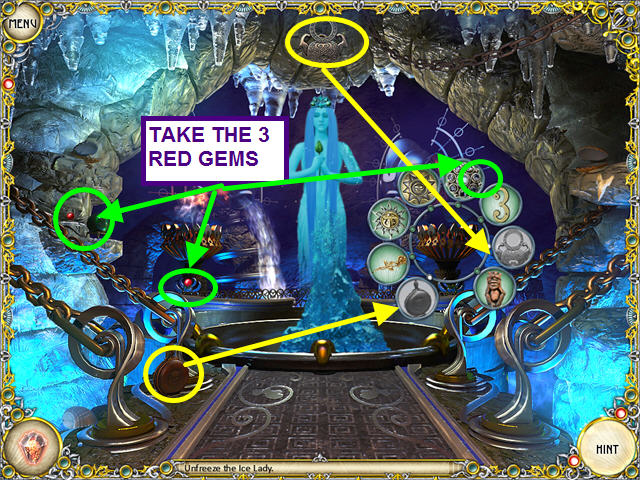
- Take the three red gems.
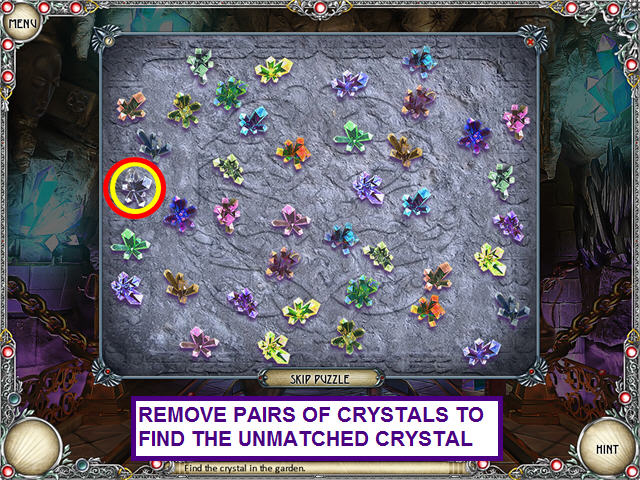
- Click on the crystal garden in front of the Earth Spirit for a mini-game.

- Find the crystal without a match.
- Select matching pairs of crystals to remove them from the board.
- Exit to the main chamber.
- Select the center door to open the bubble set.
- Look at the close-up of the butterfly; remove the four pins.
- Collect all the items to open the center door.
- Take the red gem that was behind the lock and the one above the center door.
- Click on the center door to enter the Fire Cave.
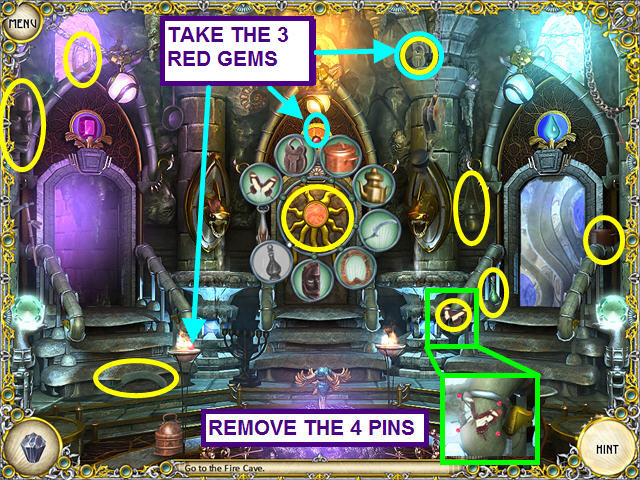
- Select the fire brazier and the dynamite for their bubble sets.
- Look at the close-up of the mosaic; replace the three pieces.
- Find the items for the dynamite.
- Collect all the items for the fire brazier.
- Collect the three red gems, one of which is behind the bust.
- Exit the Fire Cave and return to the Earth Cave.
- Select the bucket of coal and the bronze bust to trigger bubble sets.
- Collect all the items and the COAL will go into your inventory.
- Exit the Earth Cave and return to the Fire Cave.

- Place the COAL in the brazier.
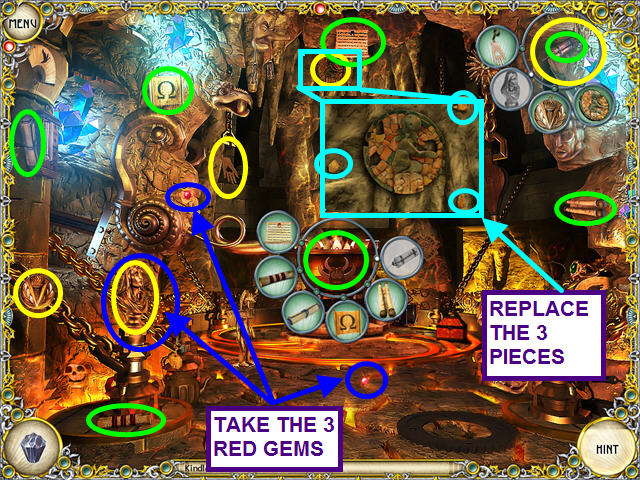
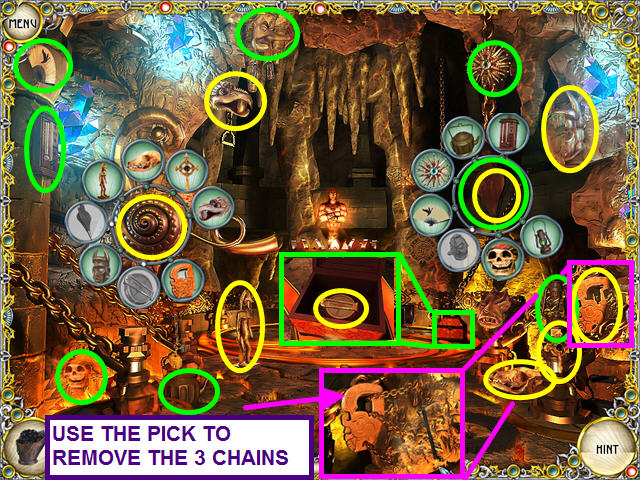
- Select the wind head on the left and the bellows on the right for bubble sets.
- Look inside the small box to find the compass.
- Look at the close-up of the metal carving; use the pick to remove the three chains.
- Locate the remaining items.
- The Fire spirit agrees to charge the CRYSTAL.
- Give the CRYSTAL from your inventory to the Fire spirit.
- Exit to the main cave.
- Select the right door to see the bubble set.
- Collect all the needed items.
- Take the red gem.
- Enter the door to the Water Cave.
- Select the right burner to open a bubble set.
- Collect the items needed.
- Once the circular mask is uncovered at the upper top, click on it for a bubble set.
- Look at the close-up of the left clam shell to find the pin.
- Locate all the items for the mask bubble set.
- You should have all but two of the right burner's bubble set.
- Select the left burner and the large fish on the left to see the bubble sets.
- Look at the close-up of the turtle trivet; replace the three pieces.
- Look at the close-up of the right clam shell and take the ring.
- Look at the close-up of the sun symbol over the right burner; replace the three rays.
- Finish collecting the items for the left burner and the large fish.
- The tongs needed for the large fish are behind the purse.
- You can now locate the canteen, which was behind the large fish.
- The ornamental ring needed for the right burner is also now available.
- Take the three red gems.
- Give the CRYSTAL to the Water spirit.
- Exit to the main cave.
- Click on the rock pedestal for a mini-game.
- Light up all the teeth at the same time.
- Number the teeth 1 through 8, starting at the top, and go clockwise.
- Press 1-2-3-4-5-6-7-8 to light all the teeth.
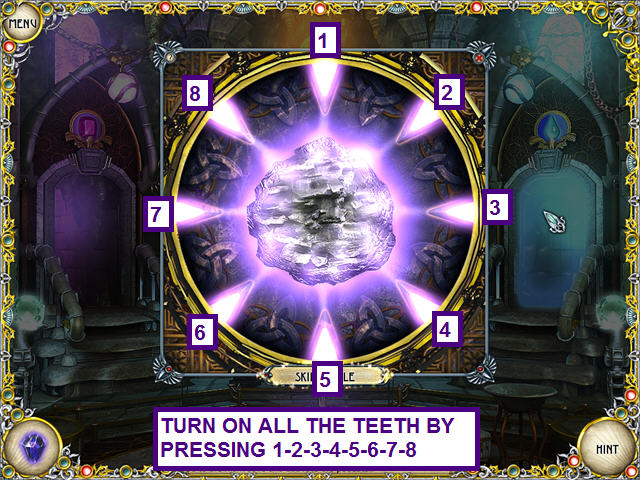
- Place the CRYSTAL on the activated pedestal.
- Take the crystal once it is charged.
- You will leave to return to the Island of Cradle.
Return to the Island of Cradle
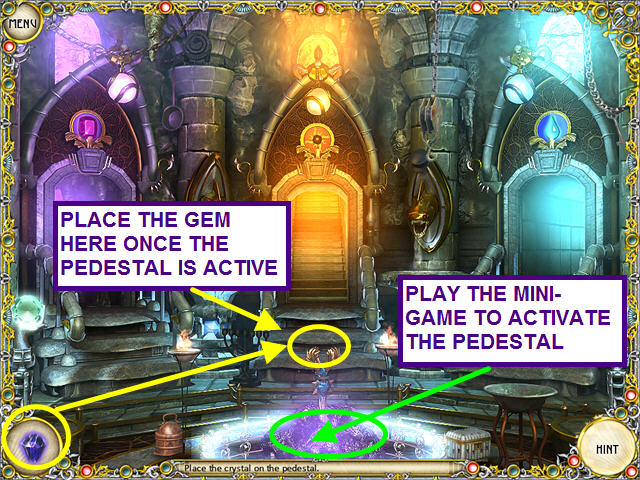
- Click on the central pillar to activate the bubble set.
- Look at the close-up of the horse emblem; replace the three pieces.
- Find the remaining items to activate the pillar.
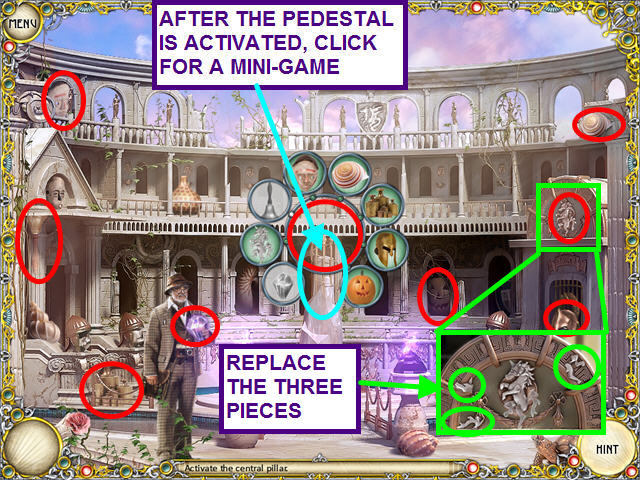
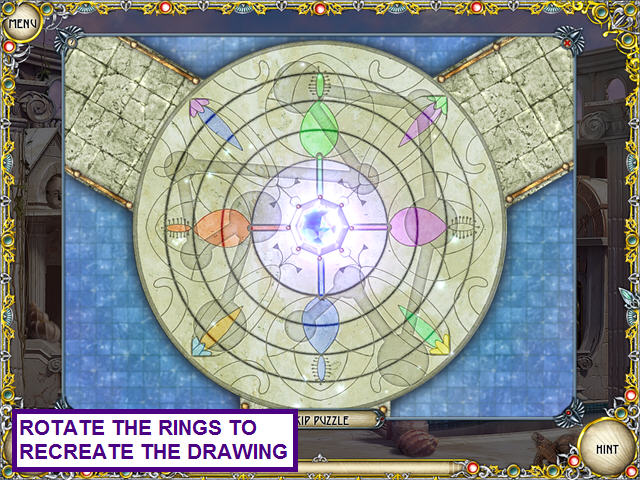
- Select the crystal for a mini-game.
- Rotate the rings to restore the picture.
- Left-click on a ring to make it rotate.
- The outer ring does not move; start with the next ring in.
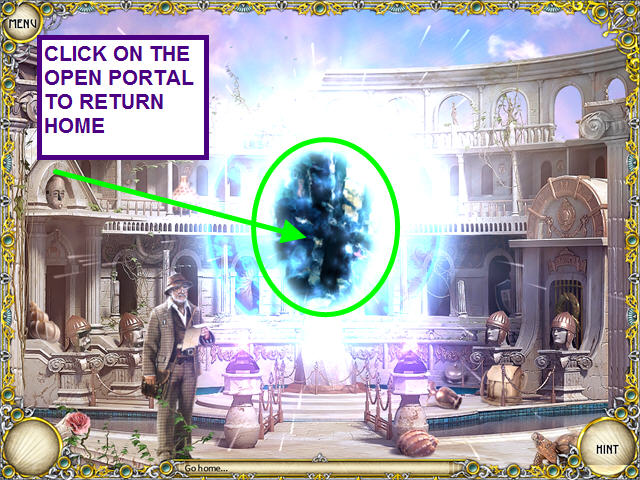
- Click on the open portal to go home.
- Not long after their return home, Nichole's father thinks he has found a way to reactivate the portal ...
Created at: 2010-04-01