
WALKTHROUGH MENU
- General Tips
- Chapter One: The House
- Chapter Two: The Bastille
- Chapter Three: The Bank
- Chapter Four: The Abbey
- Chapter Five: Return to the Bank
- Chapter Six: Return to the Bastille
- Chapter Seven: Return to the Abbey
GENERAL TIPS
- This is a Hidden Object Adventure Game. The mini-games are a variety of puzzles. The story is about Gregory, whose family has kept a secret for many generations, and a mysterious suit of armor.
- There is no timer.
- If you make too many incorrect clicks in a row, the cursor will dance away for a few seconds.
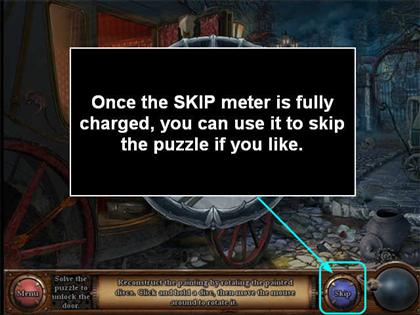
- You can skip any mini-game by clicking on the Skip button once it is fully charged.
- If you click on the name of any object on the Find List, its silhouette will appear in the crystal ball on the far right. This does not use up a hint.
- Although there is an attempt to make the objects relevant to the scene and most of them are the right color, the scale varies wildly. So a corkscrew might be four feet long while a hammer is tiny.
- If an object on the Find List is in blue, that means you must another Key Object in the scene and then use it to find the object with the blue name.
- There is no inventory tray. Key Items must be used immediately in the scene where you find them.
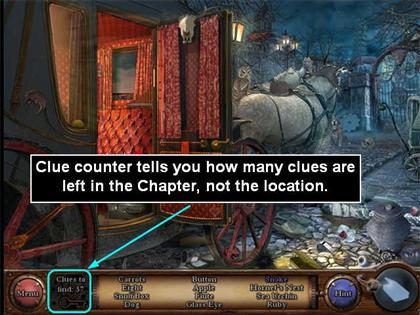
- In each Chapter, you will unlock anywhere from 3 to 6 locations. The clue counter in the lower left tells you how many clues you have left to find in the Chapter.
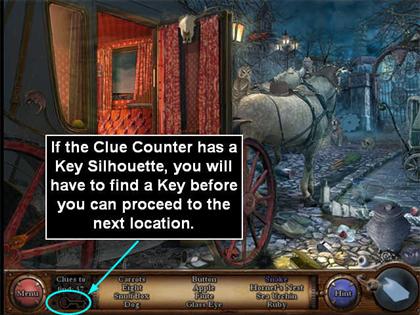
- If there is a Key silhouette below the clue counter, that means there is also a Key to be found in the scene that will help you unlock the next location. You may find this at any time during the scene.
- Most Locations have 12 clues at a time, but you may have to revisit a location more than once during a Chapter and get a new Find List there. This will be obvious from the gameplay.
- If you encounter an area that sparkles in the scene, it either means you should use a Key Item there or there is a lock there is a location there that you will be able to explore later.
- Not all locations are locked.
- The games will autosave every time you exit.
- You can use the Options Menu to adjust the volume for the music and the special effects as you like.
Chapter One: The House
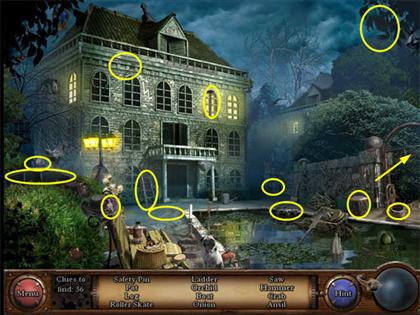
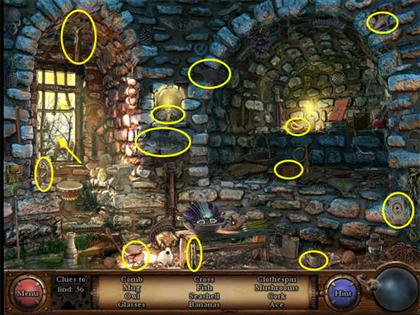
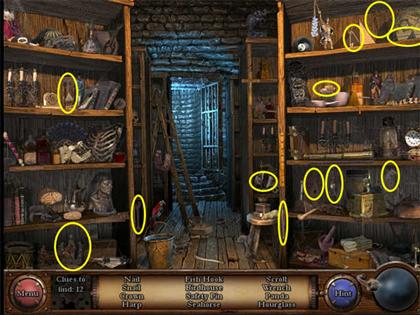
The Square outside Mercedes’ House
- Collect the items on the Find List.
- Take the flute from the door of the coach and use it on the basket in the lower right. The snake will appear so you can collect it.
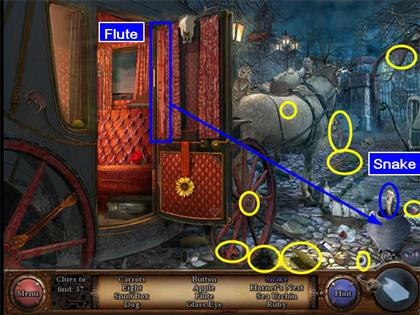
- Take the key from the coach and use it on the locked gate the courtyard.
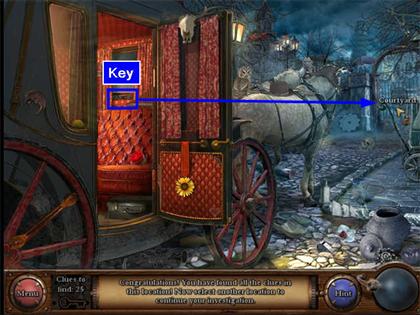
- This will trigger a puzzle.
- Rotate the rings until you have completed the picture of the flower.
- You don’t have to worry about orientation—it will turn itself rightside up once it is complete and the gate will unlock.

- Go through to the Courtyard.
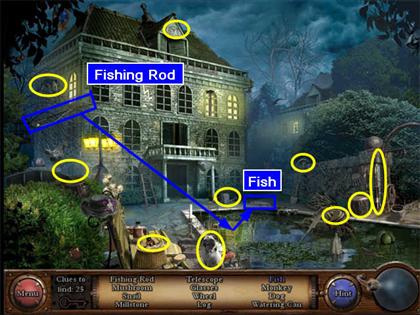
The Courtyard
- Take the Fishing Rod from the branch on the left and use it on the pond.
- A fish will jump out at the back of the pool. Collect it.
- Collect the objects on the Find List.
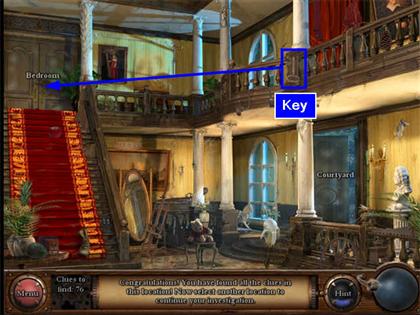
- Take the Key off the roof and use it to unlock the Hall.
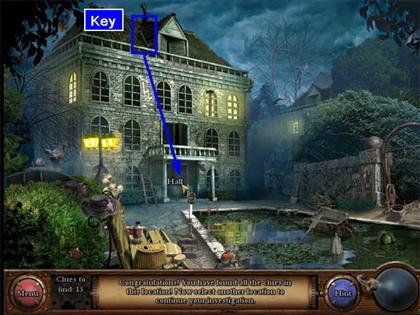
- This will trigger a puzzle.
- Flip the pegs until all the suns are lit. The starting position is random.
- Go through to the Hall.
The Hall
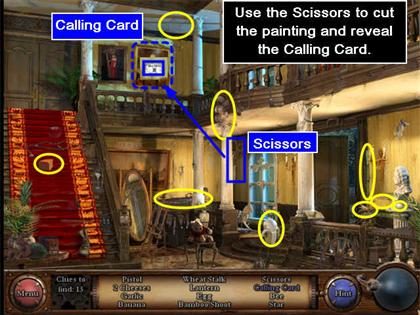
- Take the Fishing Scissors from the lower right and use it on the painting of the man on the landing. The Calling Card will be revealed.
- Collect the Calling Card.
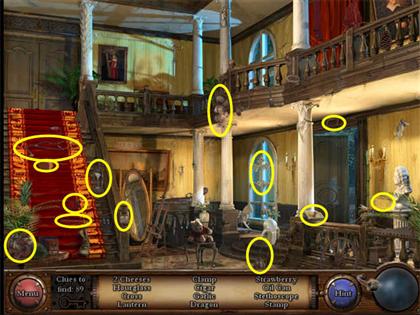
- Collect the items on the Find List.
- You will see a cut scene with a private detective, then return to the Hall to search for Mercedes’ Diary.
- Collect the items on the Find List.
- Some of the objects will be the same as the first time.
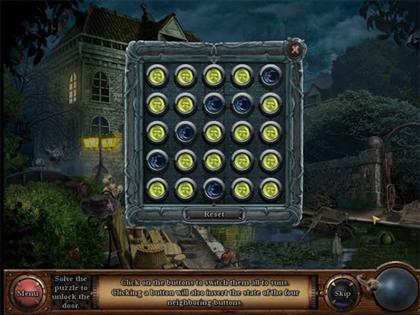
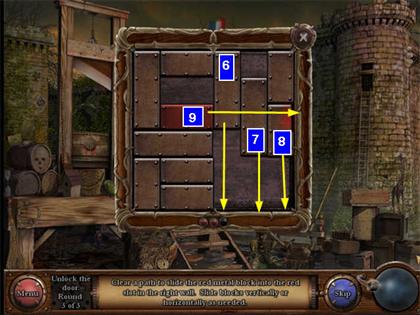
- Take the key from the top right and use it to unlock the door.
- This will trigger a puzzle. “Color” means Sun or Moon.
- Click the buttons in the sequence shown in the screenshot.
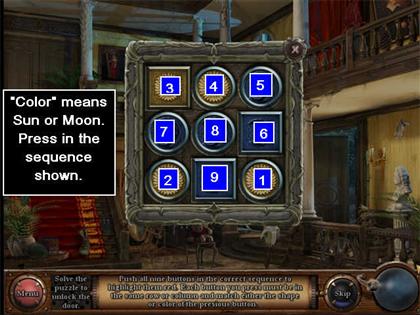
- Go through to the Bedroom.
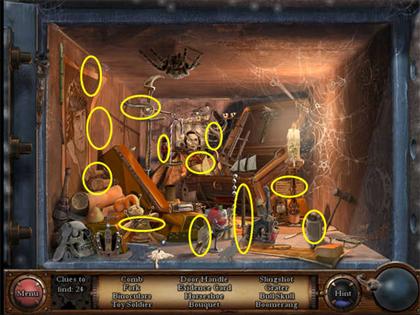
The Bedroom
- Find the matches and light the candles.
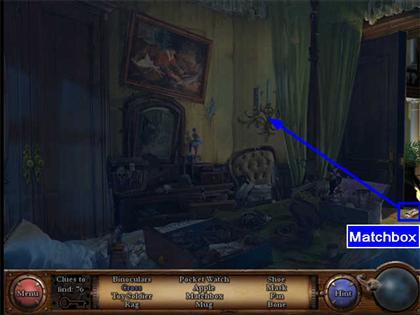
- Collect the items on the Find List.
- The mask is hard to see, but it is on the pillow on the left.
- The pink Fan is in the jewelry box behind the Pocket Watch.
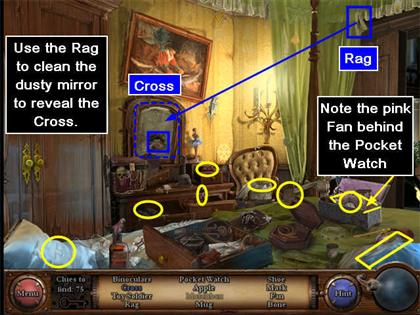
- Take the Rag from the top right of the screen and use it to clean the dusty mirror.
- The Cross is a reflection in the mirror.
- Take the Key that is hanging beneath the candles and use it to open the Closet.
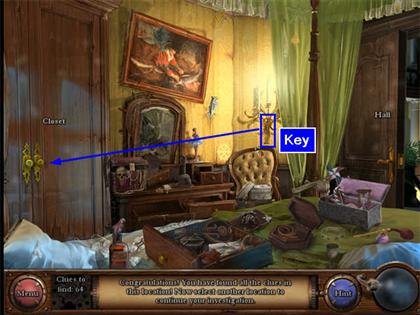
The Closet
- Collect the items on the Find List.

- This will trigger a jigsaw puzzle.

The Courtyard
- Collect the items on the Find List. Some of them will be the same as the first time.
- Go back through the gate to the Square.
The Square
- Collect the items on the Find List. Some of them will be the same as the first time.
- When you are done, click on the Suitcase in the coach to zoom in.
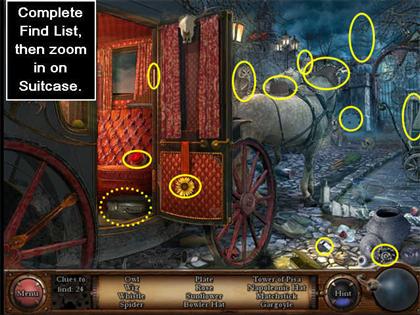
The Suitcase
- Collect the items on the Find List.
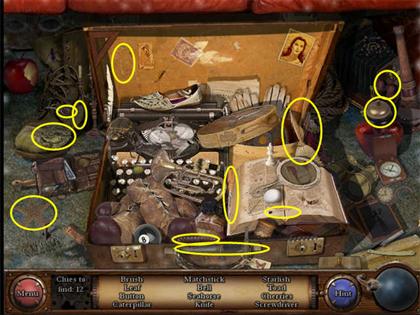
- You will see a cut scene. The private detective will examine the page from Mercedes’ diary that you found in the closet. He tells you the name of the gendarme who was following her.
- He suggests you visit the Bastille.
Chapter Two: The Bastille
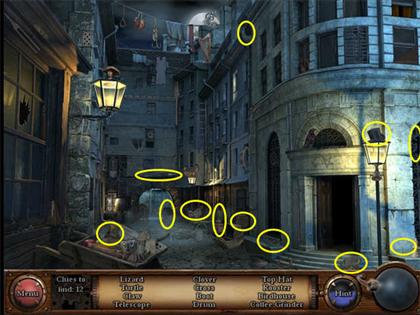
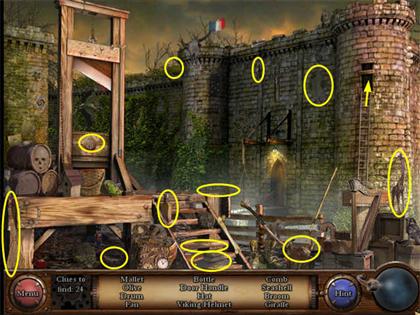
Execution Square
- Collect the items on the Find List.
- The Spider moves up and down beneath the platform. If it’s not there, just wait, it will come back.
- Take the ladder from the left edge of the scene and use it on the Cell window on the right side of the Bastille.
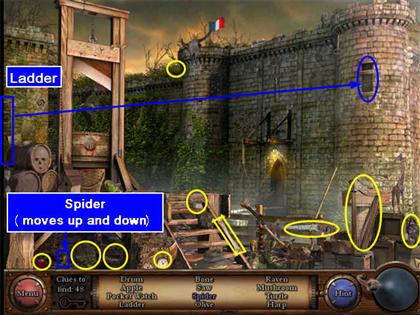
- Enter the Cell.
The Cell
- Collect the items on the Find List.
- When you are finished, go back out the window to return to Execution Square.
Execution Square
- Take the key from the top of the fort and use it to open the Gendarmes’ Office.
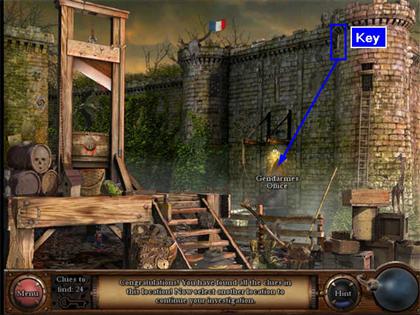
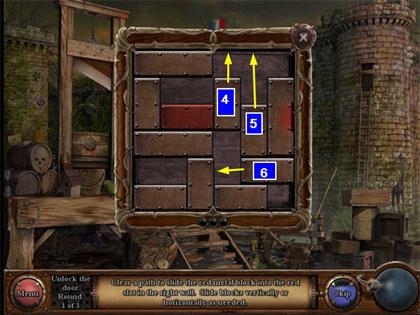
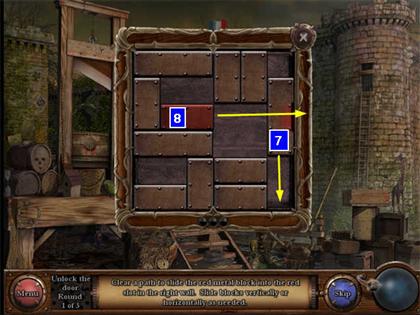
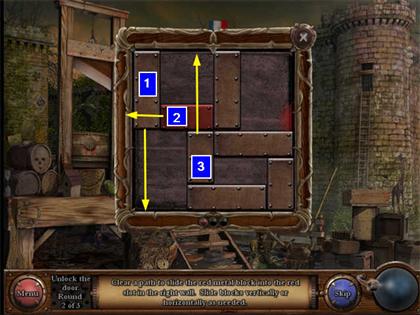
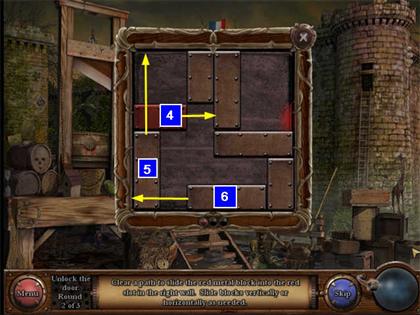
- This will trigger a puzzle. You must complete 3 different slider puzzles.
Solution 1:

Solution 2:
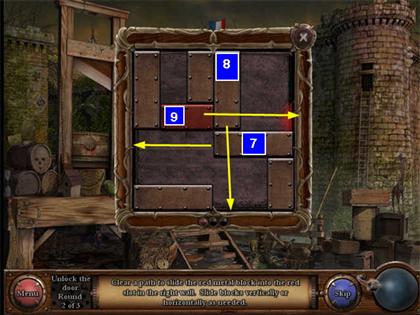
Solution 3:
- Enter the Gendarmes Office.
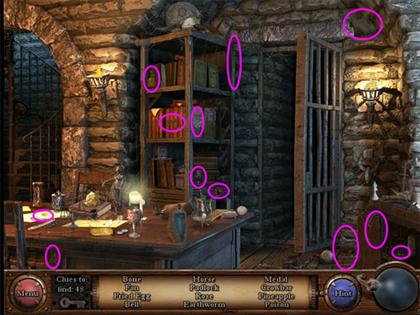
The Gendarmes Office
- Collect the items on the Find List.
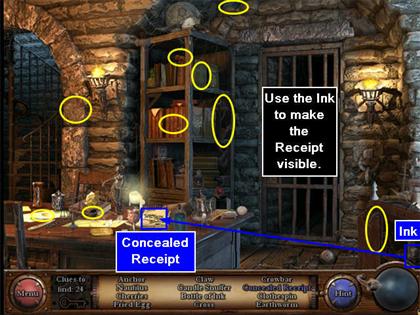
- Take the Ink from the shelf on the lower right and use it on the blank paper on the desk.
- This will reveal the Concealed Receipt. Collect it.
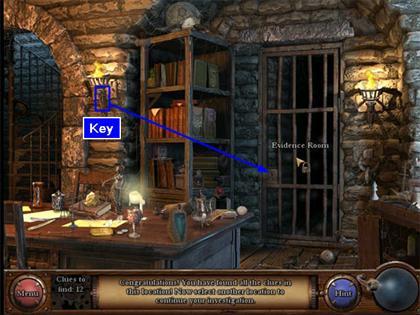
- Take the Key from below the torch on the left and use it to unlock the Evidence Room.
- This will trigger a pipes puzzle.
Solution:
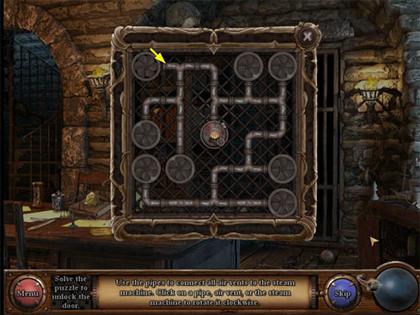
- Enter the Evidence Room.
The Evidence Room
- Collect the items on the Find List.
- When you are done, you will see a cut scene. Monte Cristo will deduce that 3 corrupt families are involved.
Chapter Three: The Bank
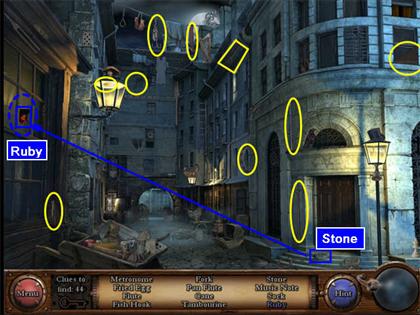
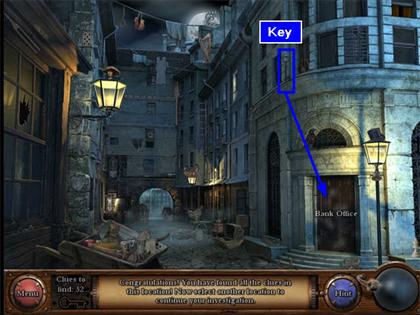
The Street
- Collect the items on the Find List.
- Use the Stone from the steps in front of the Bank to break the window on the upper left and get the Ruby.
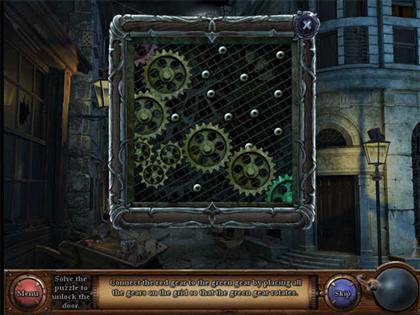
- Take the Key from the upper right and use it to open the door to the Bank.
- This will trigger a gears puzzle.
Solution:
- Enter the Bank Office.
The Bank Office
- Collect the items on the Find List.
- Take the Hammer from the right side of the desk and use it to break the piggy bank on the left side of the desk. Then collect the Safe Code.
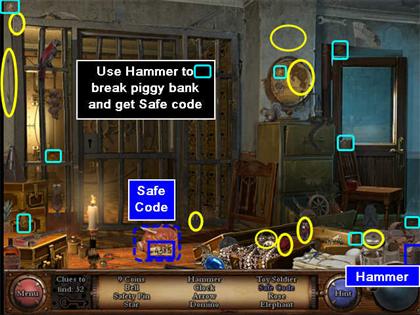
- Take the Key from the Chair and use it to open the gate to the Safe Cage.
- Enter the Safe Cage.
- Click on the Safe.
- This will trigger a puzzle. Just enter the code you found inside the piggy bank.
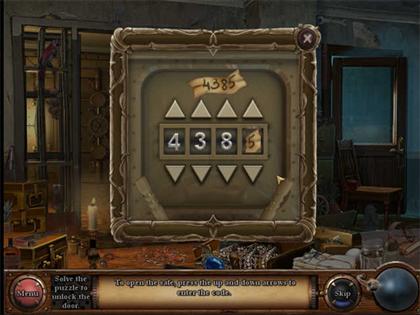
- Enter the Safe.
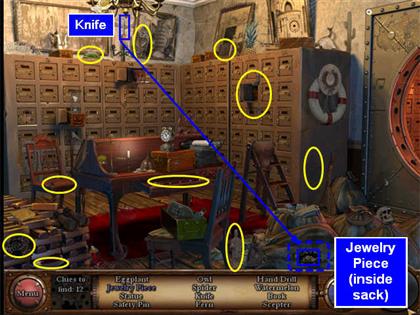
The Safe
- Collect the items on the Find List.
- Use the Knife in the candelabra at the top of the scene to cut open the sack that sparkles on the lower right. This will reveal the Jewelry Piece.
- Collect the Jewelry Piece.
- Watch the cut scene. The suspect is Father Jean.
Chapter Four: The Abbey
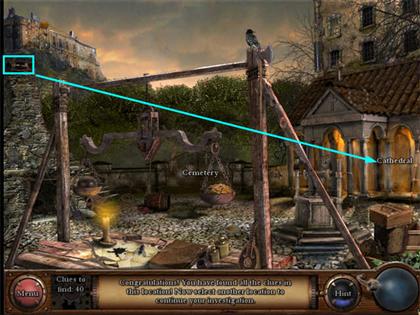
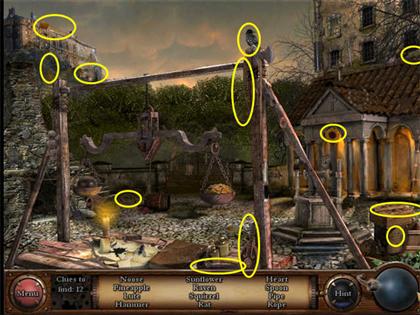
The Abbey Yard
- Collect the items on the Find List.
- The scissors are up on the building on the right, not the cutting tool on the table in the front.
- Use the Well Handle on the right side of the Well (where it sparkles). The Bucket will appear at the lower left of the well.
- Use the Bucket to put out the fire on the left side of the scene.
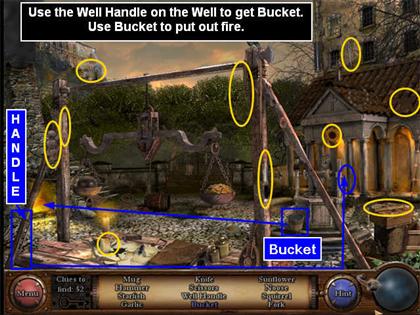
- Get the Key from the upper left of the scene.
- Use it to unlock the Cathedral.
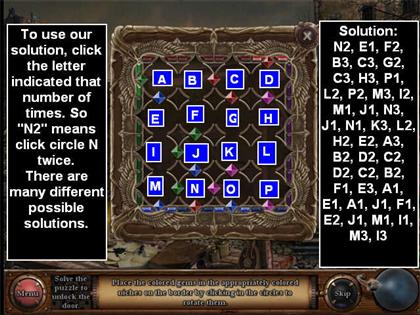
- This will trigger a puzzle. There are many possible solutions.
- See the screenshot for one. Remember to click in the center of a circle to rotate it, not on the jewels.
- There are many possible solutions. Here is one:
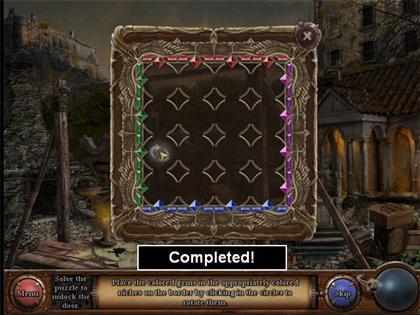
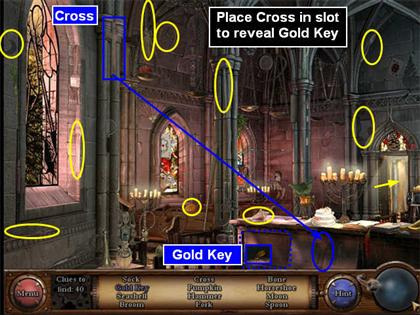
- Enter the Cathedral.
- Collect the items on the Find List.
- Place the Cross from the upper left on the slot in front of the altar. A panel on the left of the slot will slide open to reveal the Gold Key. Collect it.
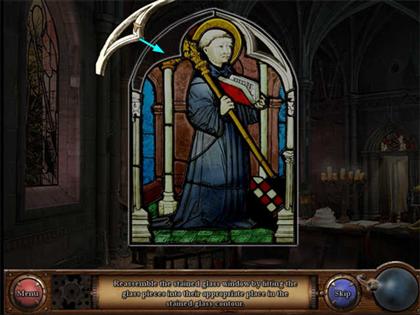
- Click on the doorway at the back to return to the Abbey yard.
- This will trigger a jigsaw puzzle.
- Enter the Abbey Yard.
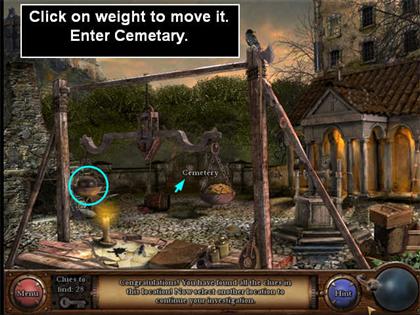
The Abbey Yard
- Click on the weight to tilt the scales. Now you can enter the Cemetery.
- Click on the Cemetery gate to enter.
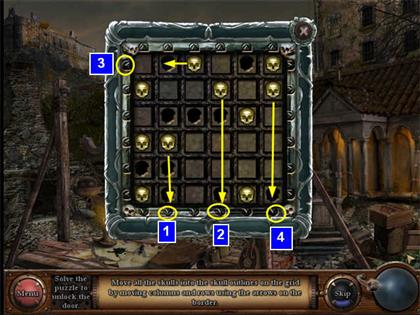
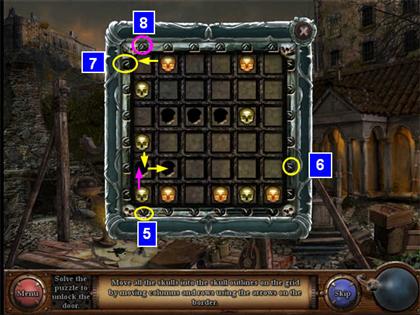
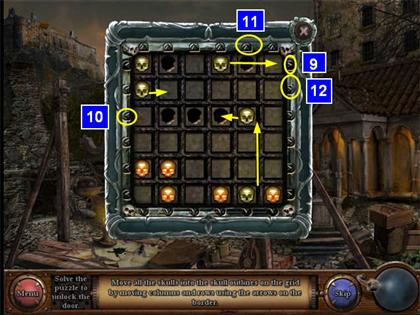
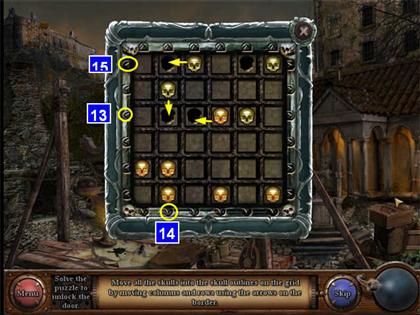
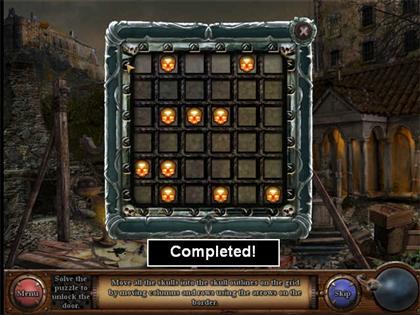
- This will trigger a puzzle.
- The Skulls glow when they are in a slot, but they do not lock in place.
- Any Skull can be placed in any slot.
- Study the screenshots to see the goal of each move. Click the indicated arrows until the goal is achieved.
- There are many possible solutions. Here is one.
- Enter the Cemetery.
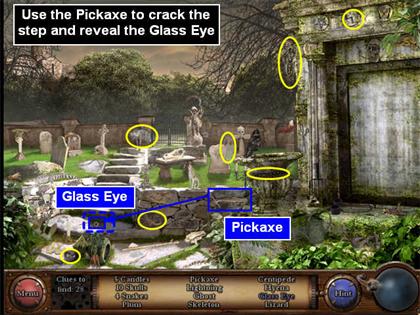
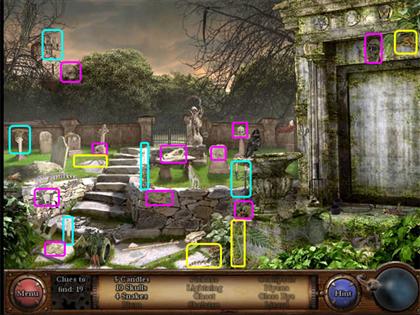
The Cemetery
- Collect the items from the Find List.
- The Ghost is the little angel towards the back.
- The Skeleton is hanging from the monument at the top center.
- Take the pickaxe from just to the left of the fountain and use it to break open the cracked step. This will reveal the Glass Eye. Collect it.
- Watch the cut scene. It is time to return to the Bank.
Chapter Five: Return to the Bank
The Bank Office
- Collect the items on the Find List.
- Walk into the Safe.
The Safe
- Collect the items on the Find List.
- Remember that the safe deposit key you found in the Cathedral said B. I. V.
- B means row B (2nd from the top) and IV is column 4 (IV).
- Click on the Safe Deposit Box to zoom in.
The Safe Deposit Box
- Collect the items on the Find List.
- You learn that you will have to find the Knife in the Evidence Room at the Bastille.
- Go back out to the Bank office, then through the door to the square (the street in front of the Bank).
The Street
- Collect the Items on the Find List.
- The Cross is a pattern in the window grate on the far right.
- Watch the cut scene.
Chapter Six: Return to the Bastille
The Gendarmes Office
- Collect the items on the Find List.
- Walk into the Evidence Room.
- Before you can enter you will have to match the silhouette of an item with its name on the Find List. There’s no penalty if you get it wrong, you just get a different item to look for.

- Continue until you have enough to pass, then enter the Evidence Room.
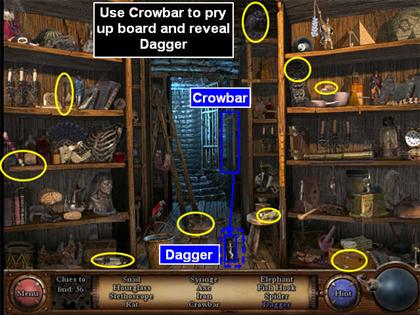
The Evidence Room
- Collect the items on the Find List.
- The Spider is very hard to see. It’s on the righthand set of shelves, 2nd shelf from the top, in the dark corner above the idol.
- Take the Crowbar from the right side of the doorframe and use it to pry open the loose board on the floor. This will reveal the Dagger. Collect it.
- A puzzle will start. This is a pairs matching card game, except that the pairs are items that go together logically, not that are identical.
- The matches are:Spool of Thread and Needle Flowers and Watering Can Spoon and Fork Moon and Sun (brass ornaments) Birdcage and Parrot Skull and Bone Violin and Bow (the bow is a black stick) Heart and Spade (like card suits) Key and Padlock Typewriter and Typewriter Key Envelope and Postage Stamp Mouse and Mousetrap Matchbox and Lantern Cannonball and Cannon Horseshoe and Horse Boat and Oar Fish and Fish hook Carrot and Rabbit
- When you have finished, go back to the Gendarmes Office, then back outside to Execution Square.
Execution Square
- Collect the Items on the Find List.
- Climb the ladder to the Cell.
The Cell
- Collect the items on the Find List.
- Watch the cut scene.
- You will be automatically taken to the Cemetery at the Abbey.
Chapter Seven: Return to the Abbey
The Cemetery
- Collect the items on the Find List.
- Use the Shovel to dig up the grave.
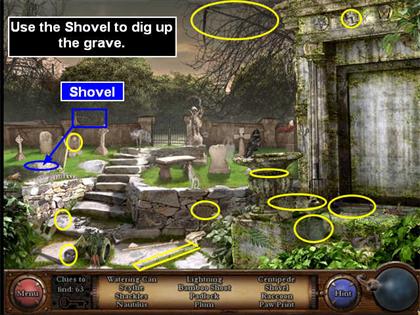
- Click on the grave to zoom in.
The Grave
- Collect the items on the Find List.
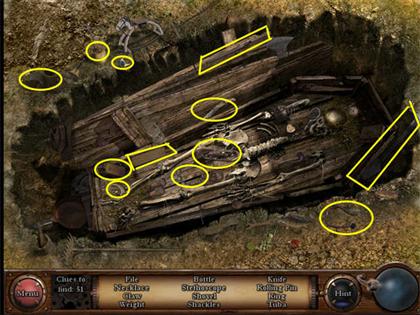
- You will automatically be returned to the Cemetery view.
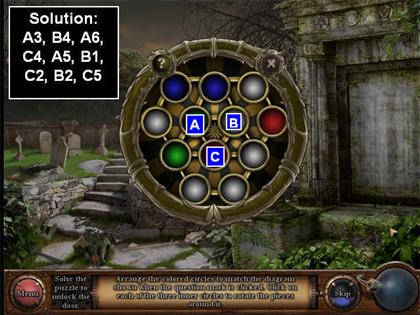
- Take the Key from the fountain and use it on the Tomb.
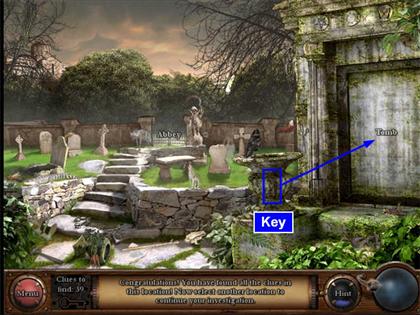
- This will trigger a puzzle.
- You must click on the ? in the upper left corner to see what pattern you’re trying to make.
- You can only click on the 3 center buttons, which we have marked A, B, and C.
- Each of the center buttons rotates a different set of dots.
- There are many solutions. See the screenshot for one.
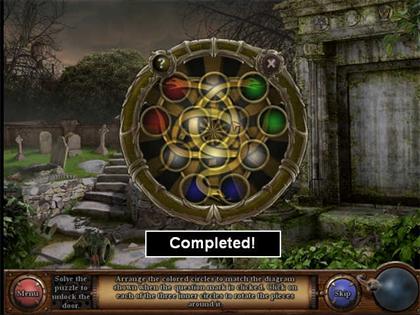
- Enter the Tomb.
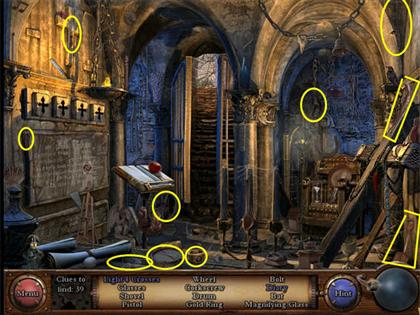
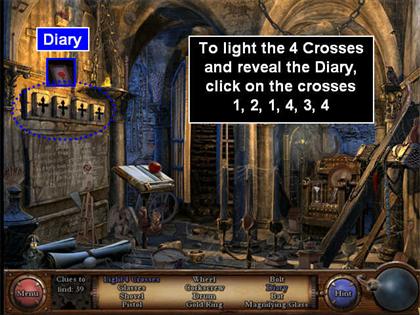
The Tomb
- Collect the items shown on the Find List.
- The Corkscrew is very large and is hanging from the ceiling in the top right corner.
- To light the 4 Crosses and reveal the diary, click on the crosses in the order shown in the screenshot. (There are many other possible solutions as well.)
- Collect the Diary.
- Now you have the evidence you need. Click once to clear the diary picture.
- Go out the doors to the Cemetery.
- Walk through the gate to the Abbey Yard.
- Go into the Cathedral.
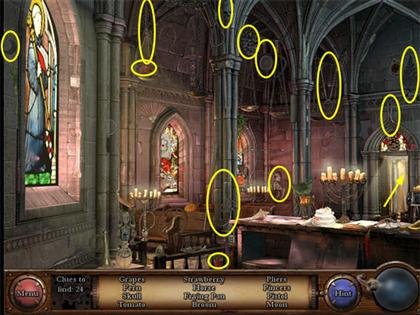
The Cathedral
- Collect the items on the Find List.
- Go out the door to the Abbey Yard.
The Abbey Yard
- This is the last location. Collect the items on the Find List.
- Watch the ending.
Created at: 2009-11-05