
Walkthrough Menu
- General Tips
- Chapter 1: Destroy the First Pearl
- Chapter 2: Destroy the Second Pearl
- Chapter 3: Destroy the Third Pearl
- Chapter 4: Destroy the Last Pearl and Save the City!
General Tips
- This walkthrough is written playing Normal Mode, if you wish for a more challenging game you can choose the Advanced Mode.
- You may use the Goal List (G) to direct you through the game.
- Sparkling areas indicate a Hidden Object Scene (HOS) which is available by zooming in.
- Once you have triggered a HOS an item list will populate at the bottom of the screen. Collect all of the items in the list to complete the scene and receive a needed Inventory Item.
- Usable Items will be placed in your Inventory Bar (I). Use the arrows (green) to scroll through your inventory when you have a lot of items.
- Your cursor will change shapes to indicate possible actions. A 'closed hand' indicates an item that can be picked up, a 'magnifying glass' means you can zoom into the scene.
- If your cursor changes to a 'pointing arrow' you can interact with the scene and an 'arrow' shows you the path to a new scene.
- To return to a previous scene move your cursor just above your inventory and click on the arrow.
- Once you pick up your Journal (J) you can use it to review clues that you have picked up along the way.
- If you find yourself stuck, you can use the Hint (H) button for Hidden Object locations or clues to what your next step is.
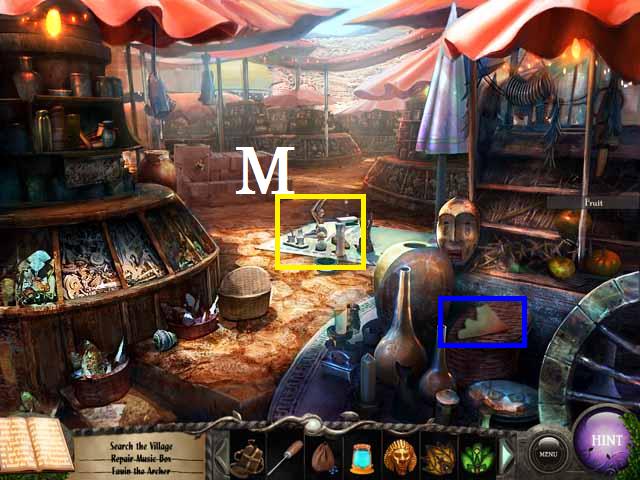
- Click on the Menu (M) button to exit, pause, or resume the game. You can also adjust your options (sound, music, and screen size).
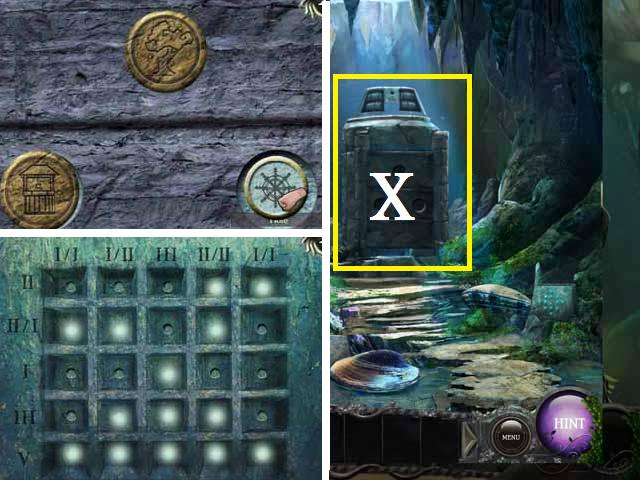
- If you are stuck in a mini-puzzle you can use the question mark button (X) for help or you can use the Skip Button (S) once it is full.
- Throughout the entire game you can collect STORY PIECES to unlock an achievement.
- Once you have collected enough STORY PIECES you can go into your Journal and click on the Story tab to assemble the pages as you go. We will cover this at the end of this walkthrough.
Chapter 1: Destroy the First Pearl
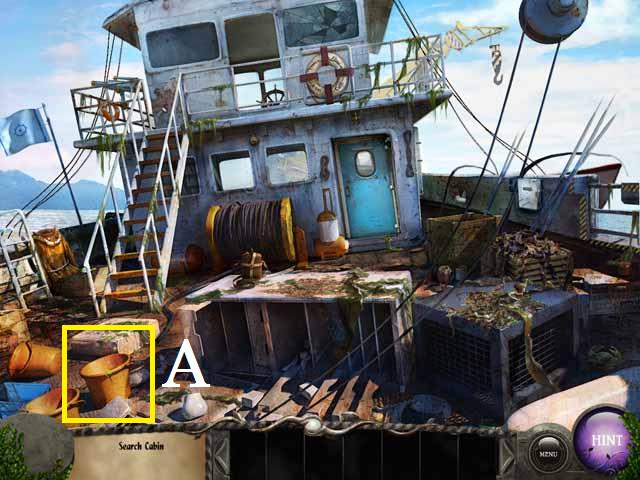
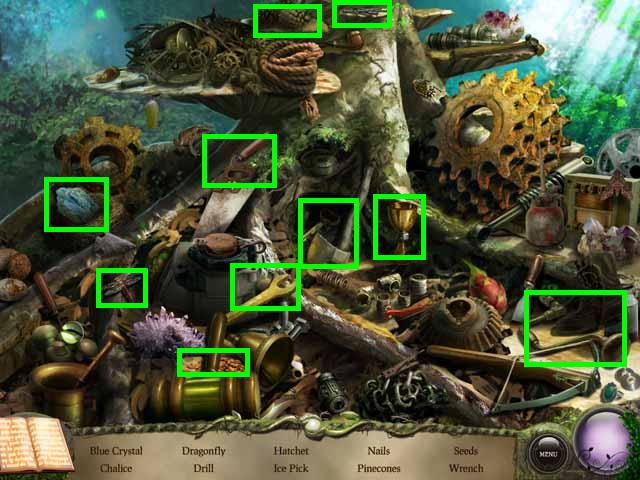
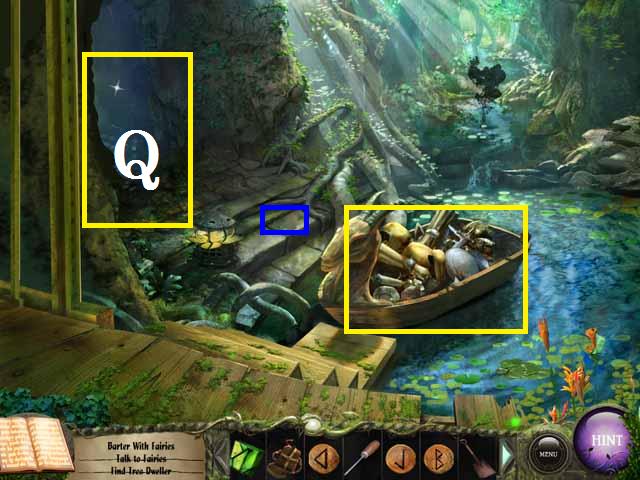
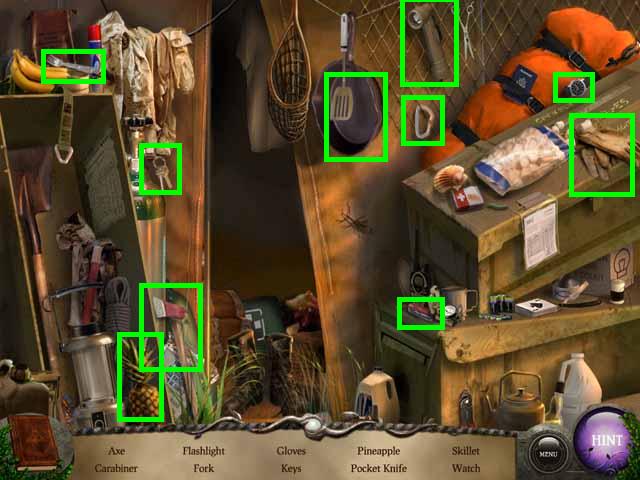
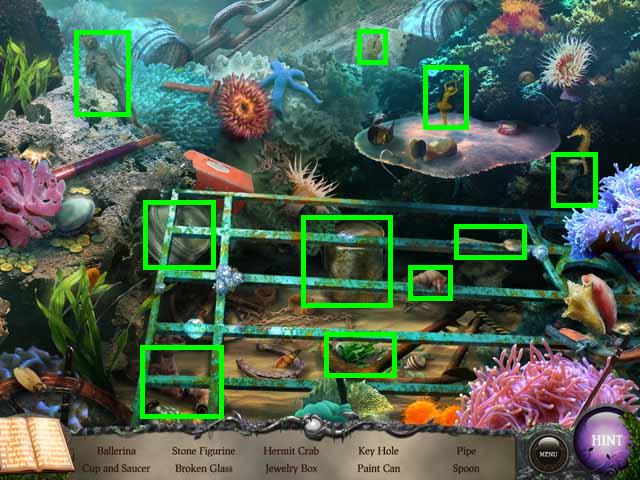
- Zoom into the sparkling bucket (A) to trigger a Hidden Object Scene.
- Pick up all of the items (green) in the list to receive the KEYS.
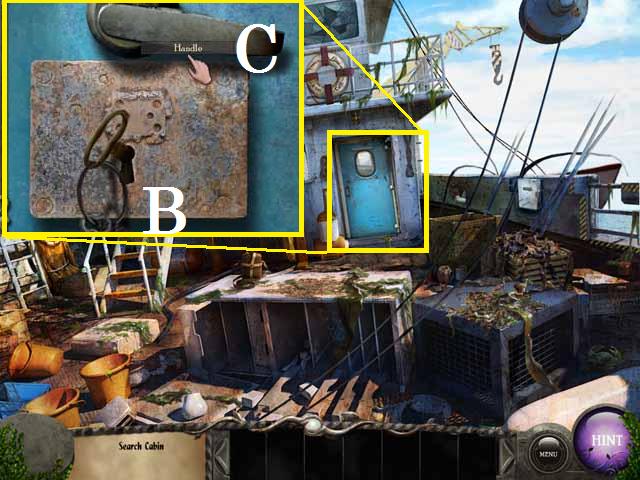
- Zoom into the Cabin Door; place the KEYS into the keyhole (B) then turn the handle (C).
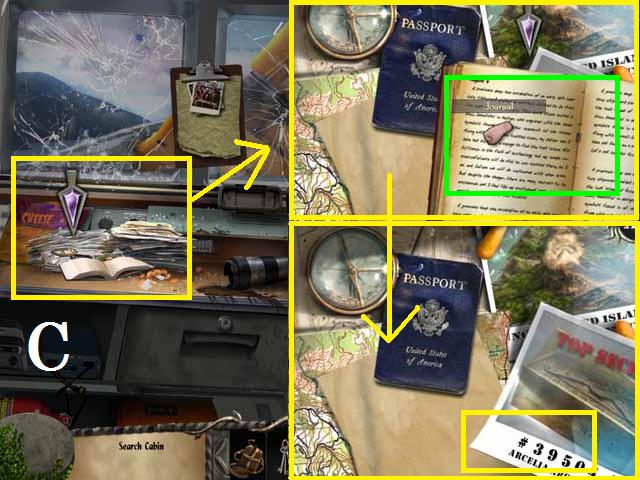
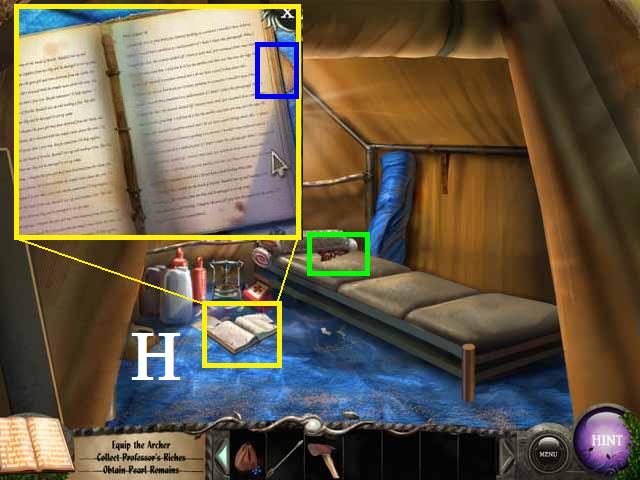
- Zoom into the papers on the desk and pick up the JOURNAL (C); pay attention to the numbers on the bottom of the 'Top Secret' photo under the JOURNAL.

- Exit the Cabin and pick up the CANTEEN (green) then zoom into the control box (E).
- Set the numbers, by clicking on each one, to 39504 (F) to match those from the photo in the Cabin.
- Open the control box and flip the switch (1).
- Zoom back into the control box and pick up the STORY PIECE (blue).
- Go ahead and zoom into the Scuba Gear (G) then close the window.
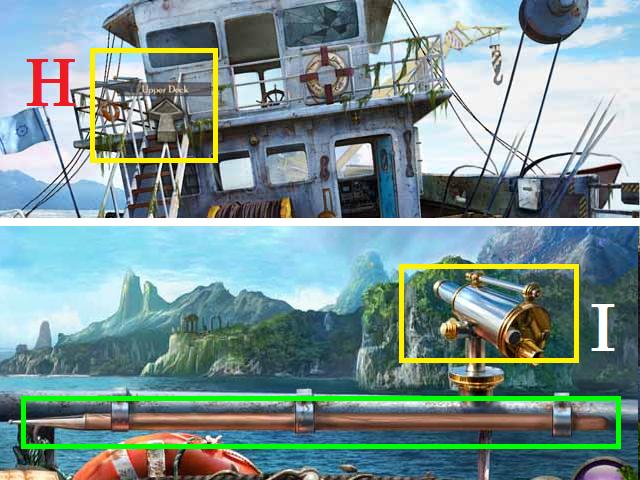
- Go upstairs to the top deck (H) and pick up the BOAT HOOK (green) and zoom into the telescope (I) then go back downstairs.
- Zoom back into the now sparkling bucket to trigger a HOS.
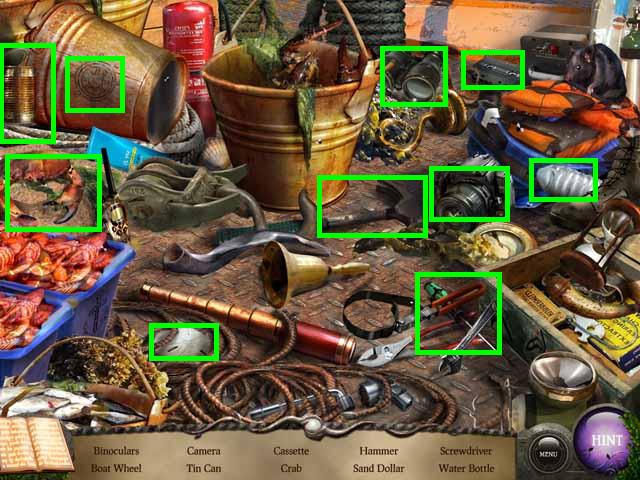
- Pick up all of the items (green) to receive the SCREWDRIVER.
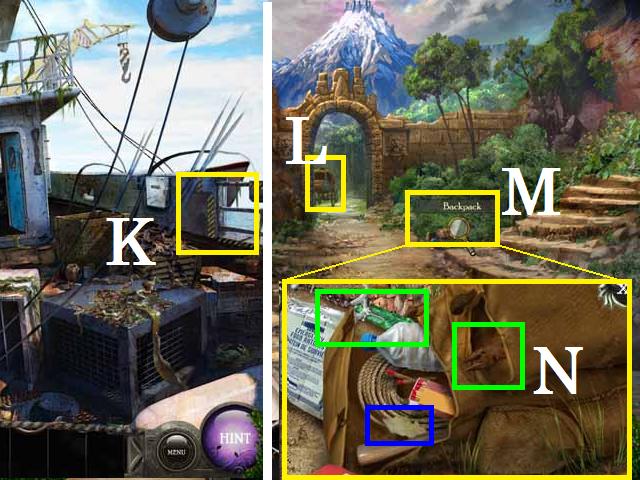
- Exit the boat to the right (K) to go to the Beach.
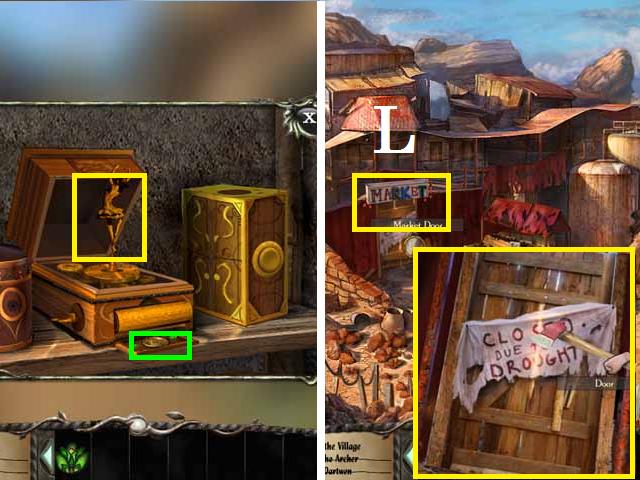
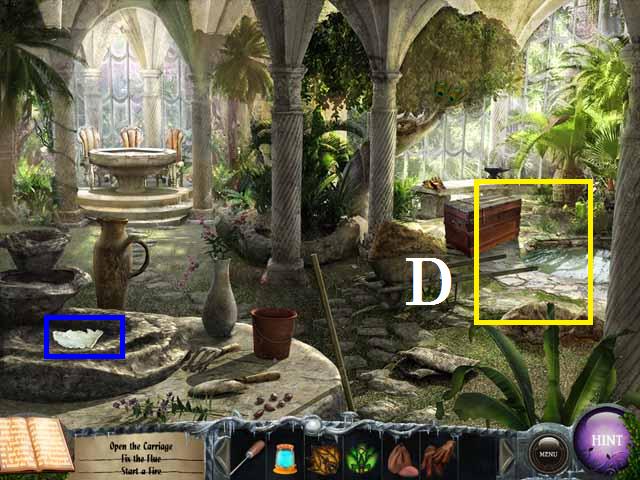
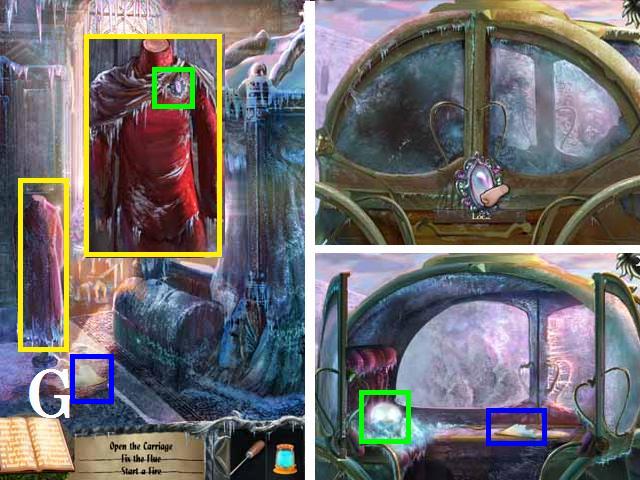
- Zoom into the carriage (L) and click through the dialogue. After you receive the book you can 'skip' the story development or watch it all the way through.
- Back up one scene to the beach and click on the bushes (M) to reveal the book bag and zoom in.
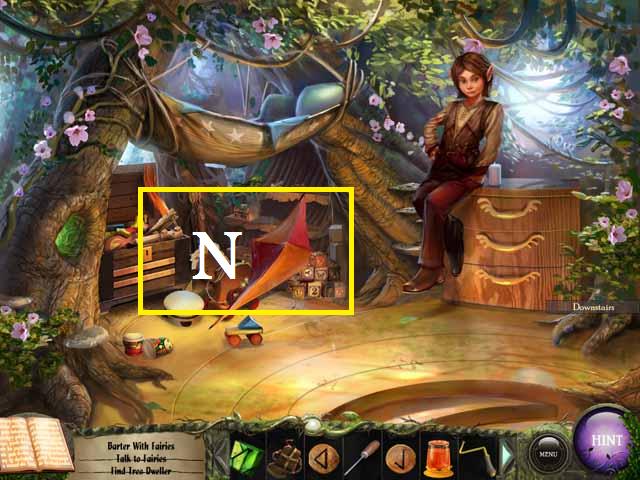
- Open the pocket (N) then pick up the PLIERS (green), the STORY PIECE (blue), and the EMERALD DAGGER (green) then close the window.
- Once the dialogue is over, return to the boat and enter the Cabin.
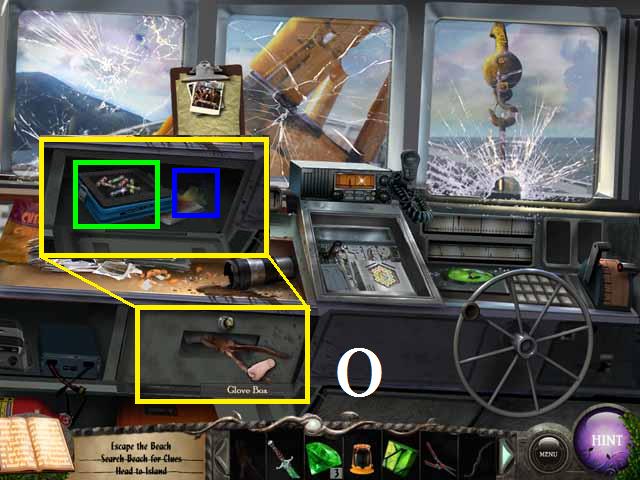
- Place the KEYS in the glove box (O) then use the PLIERS on the broken KEYS.
- Pick up the FUSES (green) and the PIECE (blue).
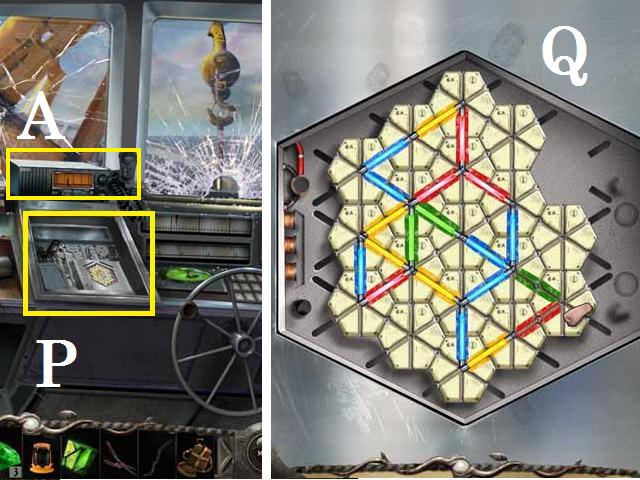
- Open the Fuse Box (P) with the SCREWDRIVER and drop in the FUSES.
- Rearrange the blocks until all of the color fuses are lit. See the screenshot (Q) for a solution.
- Click on the radio (A).
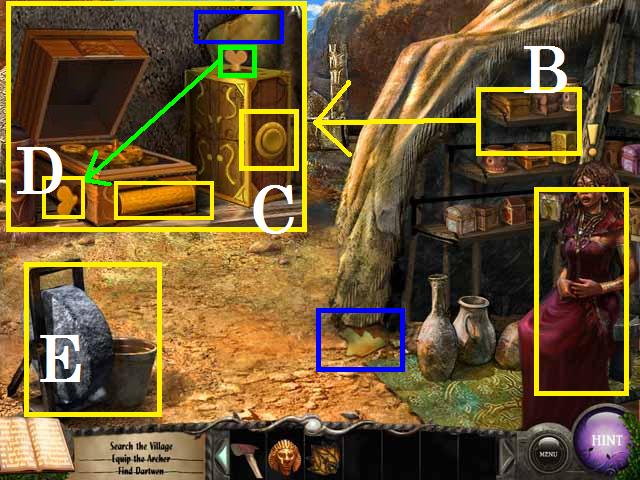
- Return to the beach and take the path to the left towards the Village.
- Pick up the GEMSTONE (green) and the PIECE (blue) then return to the beach.
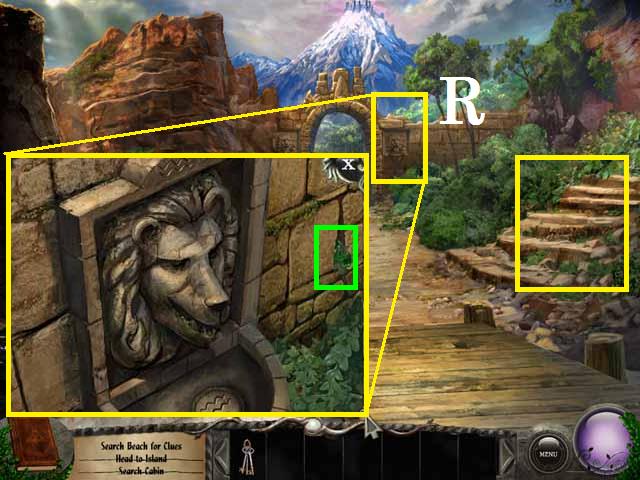
- Zoom into the lion head (R) to the right of the gate and pick up the GEMSTONE (green).
- Take the stairs on the right to the Cove.
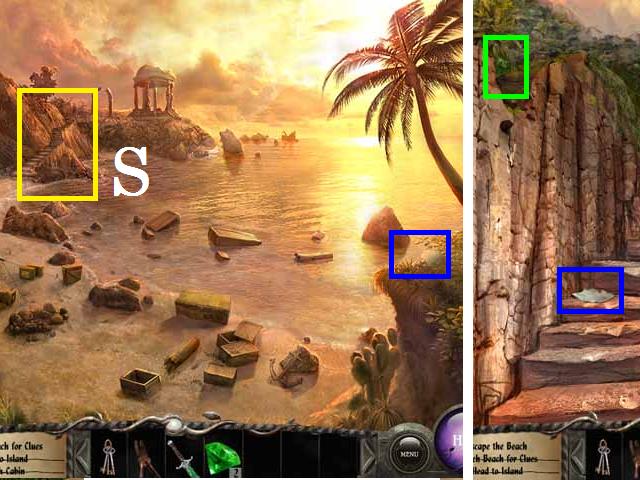
- Pick up the PIECE (blue).
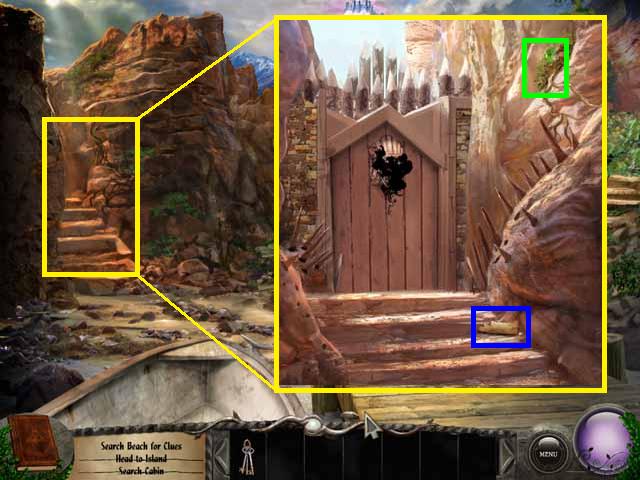
- Take the stairs (S) towards the Temple.
- Pick up the PIECE (blue) and the GEMSTONE (green) then proceed up the stairs to the Temple.
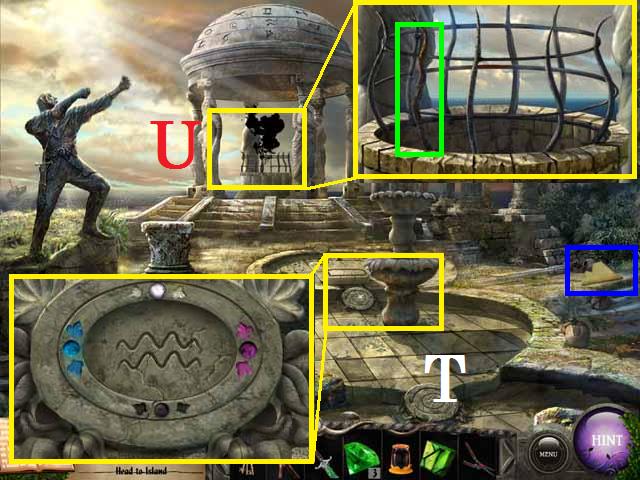
- Pick up the PIECE (blue).
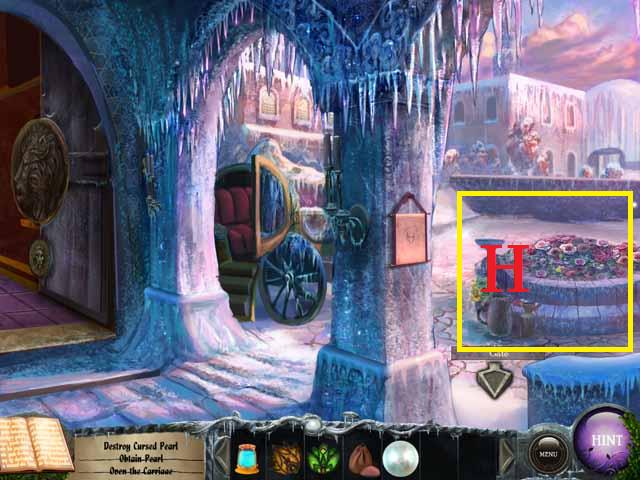
- Zoom into the fountain (T) then close the window.
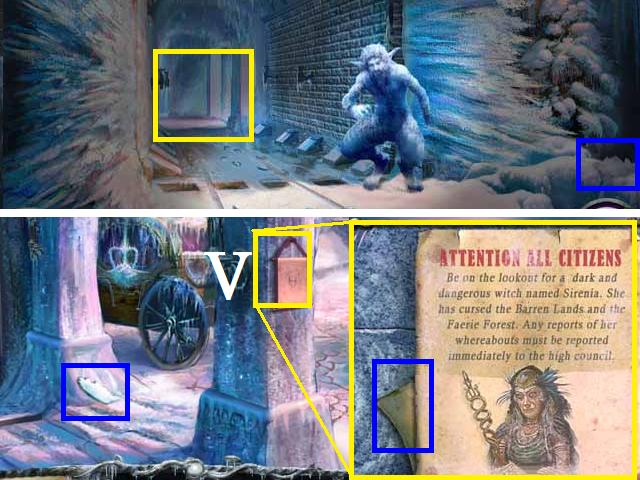
- Zoom into the temple (U) and pick up the METAL BAR (green).
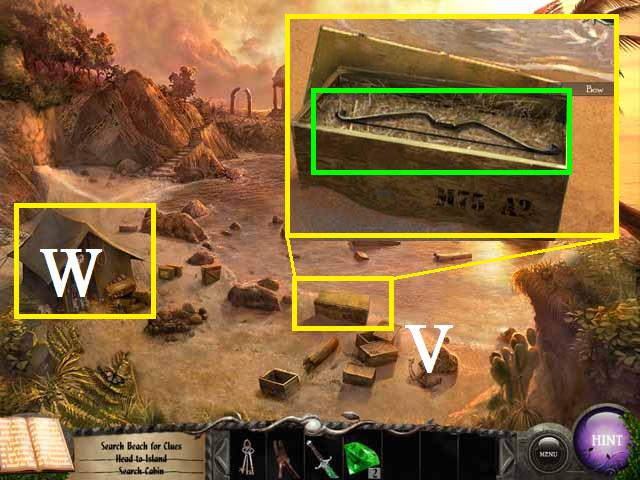
- Return to the Cove, open the crate (V) with the METAL BAR and pick up the BOW (green).
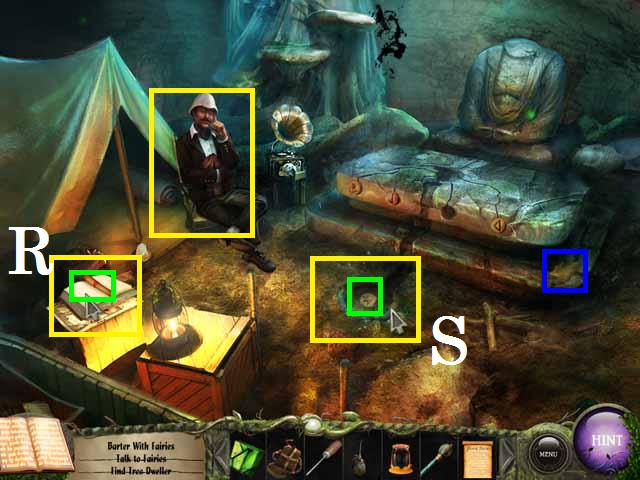
- Enter the tent (W) and click on the man.
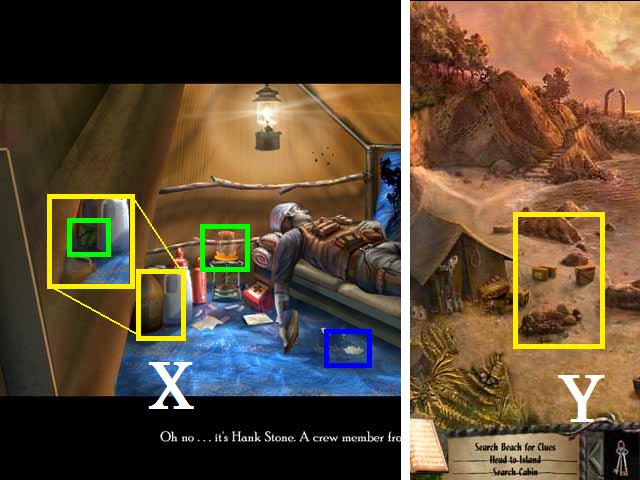
- Move the jug (X).
- Pick up the PIECE (blue), the GREEN TILE (green), and the EMPTY BEAKER (green).
- Zoom into the sparkling area just to the right of the tent (Y) to trigger a HOS.
- Pick up all of the items to receive the SHEARS.
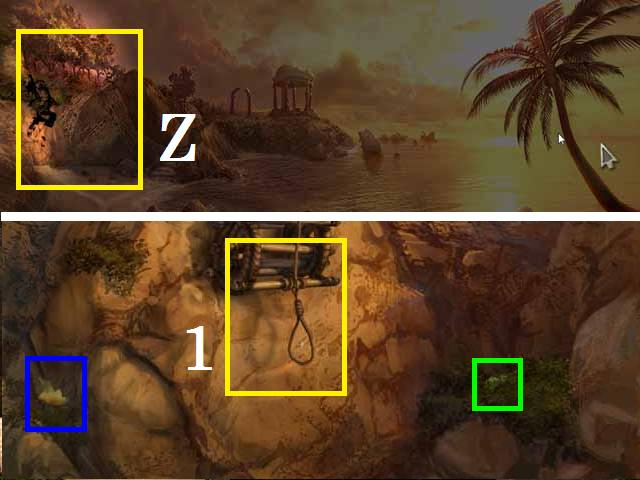
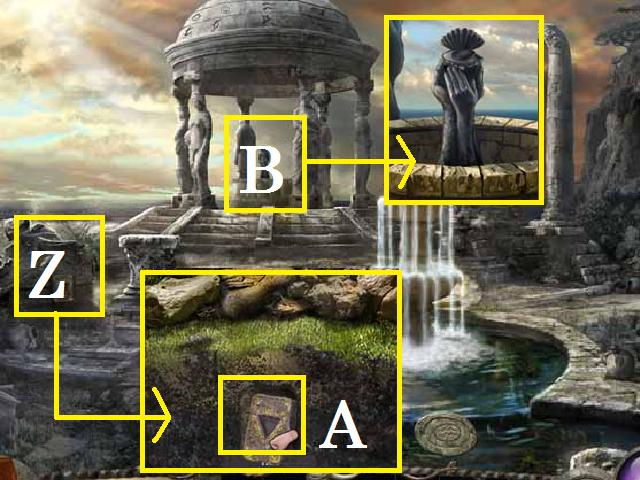
- Zoom into the area (Z) just left of the stairs to get to the Rope.
- Pick up the GEMSTONE (green) and the PIECE (blue).
- Pull the rope (1) down with the BOAT HOOK and use it to get to the Cliff Top.
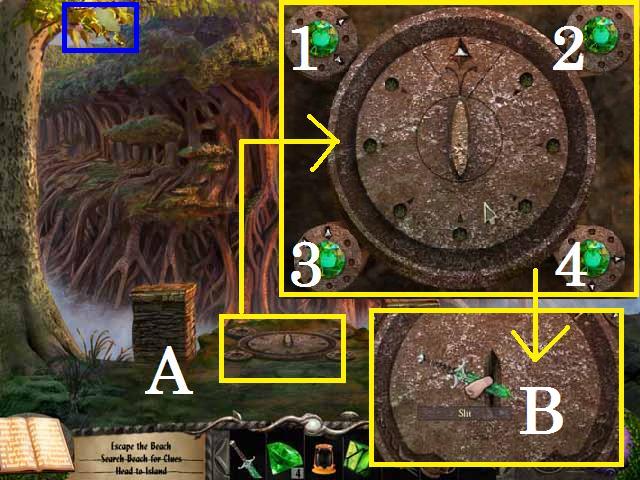
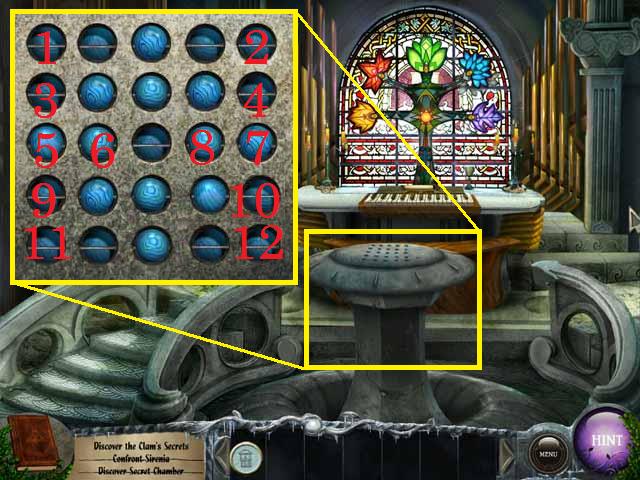
- Pick up the PIECE (blue) then zoom into the pedestal (A) and place all of the GEMSTONES in the available spaces as shown in the screenshot.
- To open the portal click the GEMSTONES (1-4) in the following order: 3, 1, 4, 1, 4, 2, 2, and 3.
- Zoom back into the pedestal and place the EMERALD DAGGER in the slot (B).
- Go through the green portal to the Tree Top.
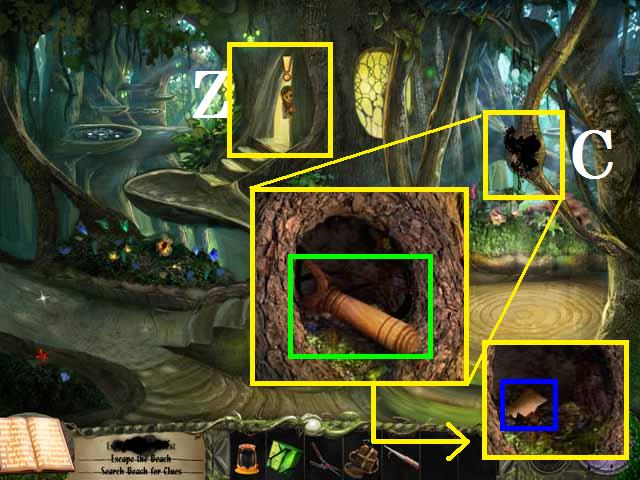
- Zoom into the tree branch (C) and pick up the SLINGSHOT (green) then the PIECE (blue).
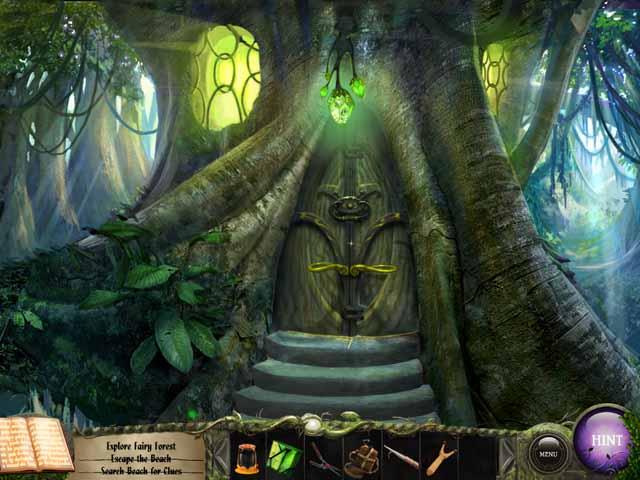
- Click on the Elf (Z) then move towards the Door.
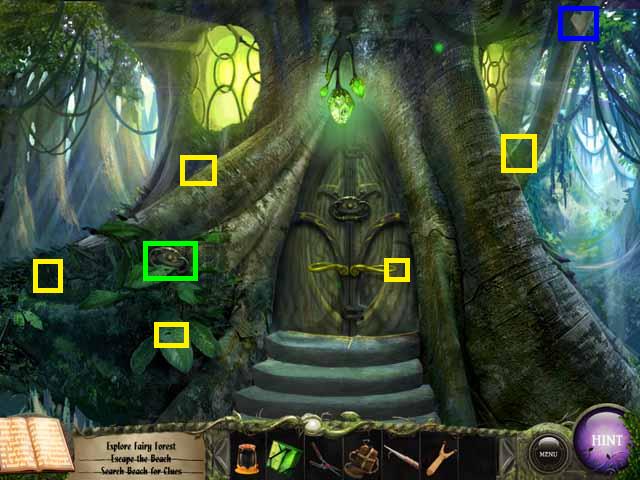
- Pick up the PIECE (blue) and knock on the door.
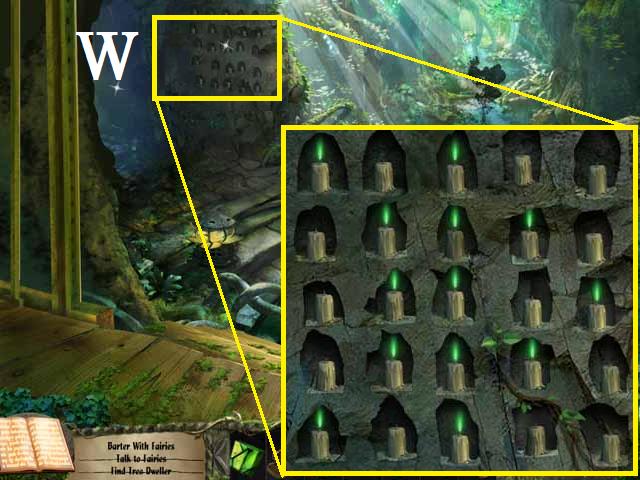
- Pick up all five of the FIREFLYS (yellow) (Hint: they all stay in the same place but light up at different times) and place them in the light (D) above the door then knock again.
- Pick up the now available DOOR KNOCKER (green).
- Move back on scene and grab the WINDOW (green) with the BOAT HOOK.
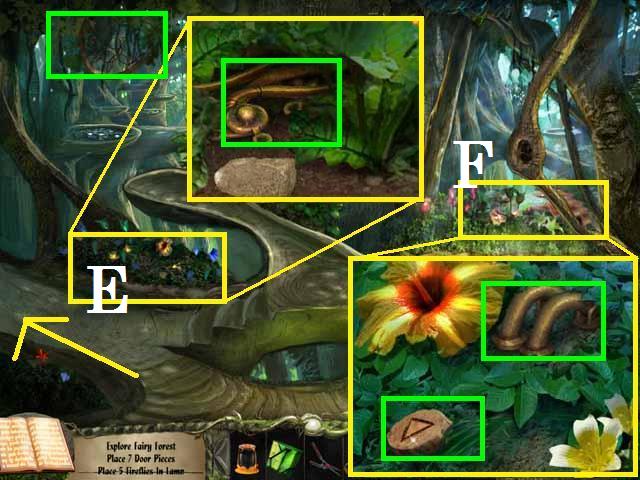
- SHEAR the flowers (E) on the left, click two times, and then pick up the DOOR HANDLE (green).
- SHEAR the flowers on the right (F) to pick up the DOOR CLASP (green) and the RUNE (green).
- Take the path to the left towards the Elevator.
- Pick up the PIECE (blue).
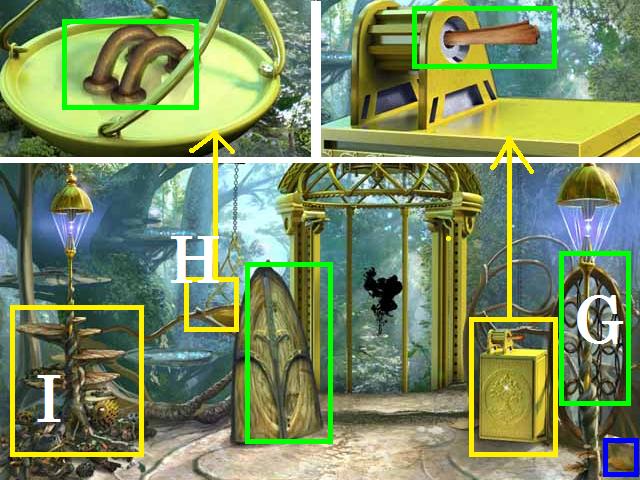
- Pick up the WINDOW and DOOR (green) then zoom into the elevator control box (G) and pick up the GROW POTION RECIPE (green).
- Zoom into the scale (H) and pick up the DOOR CLASP (green).
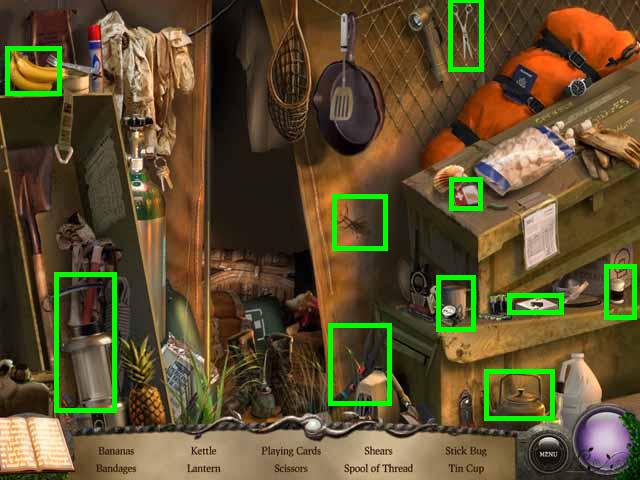
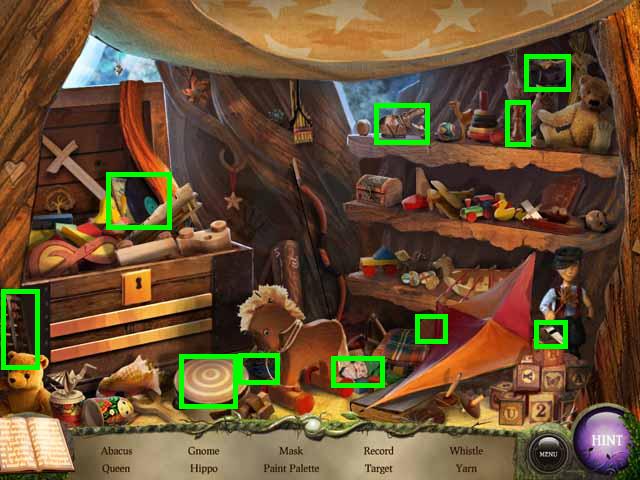
- Zoom into the junk pile (I) to trigger a HOS.
- After you have picked up all of the items you will receive the ICE PICK.
- Return to the door and place the RIGHTWINDOW, LEFT WINDOW, and the DOOR.
- Place the both DOOR CLASPS, the DOOR HANDLE, and the KNOCKER as shown in the screenshot then knock on the door and go up the stairs.
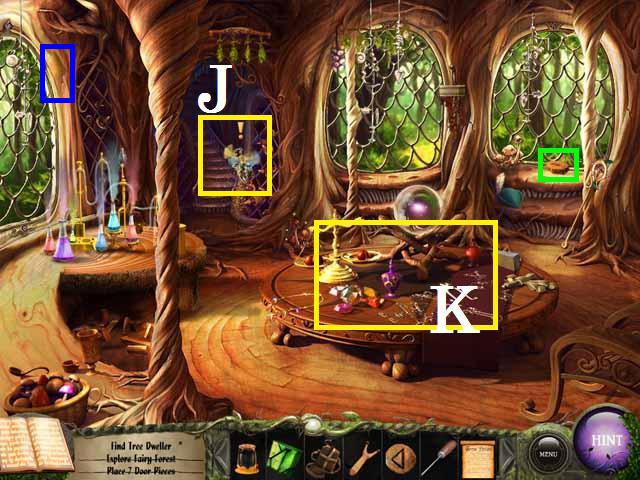
- Pick up the PIECE (blue) and the RUNE (green) then zoom into the Fairies (J). Click through the dialogue.
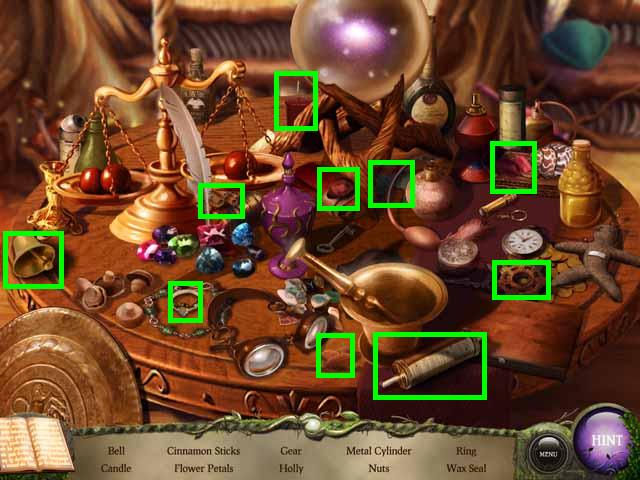
- Zoom into the now sparkling table (K) to trigger a HOS.
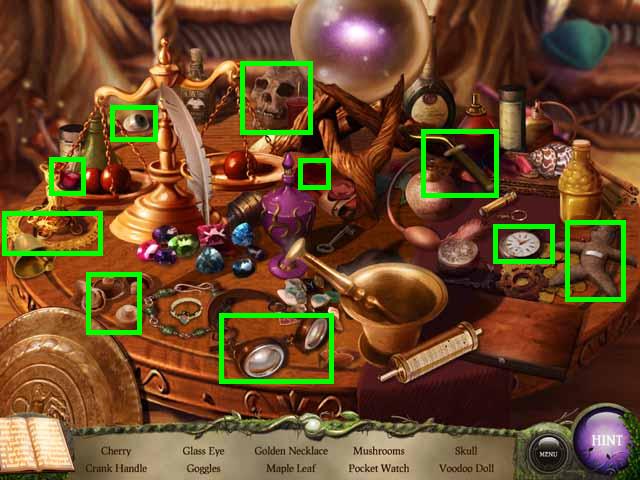
- Pick up all of the items to receive the CRANK HANDLE.
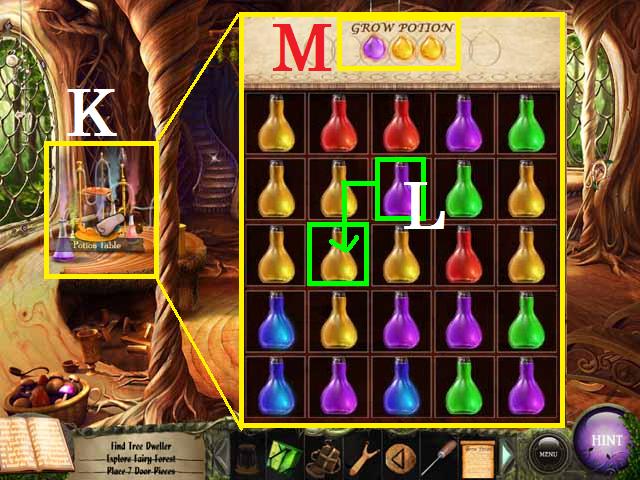
- Place the EMPTY BEAKER on the counter (K) followed by the GROW POTION RECIPIE.
- Click on a beaker (L) that matches the first color in the potion (M) above. You must then click on the next color but the beaker needs to be just above, below, or on either side of the one you just chose.
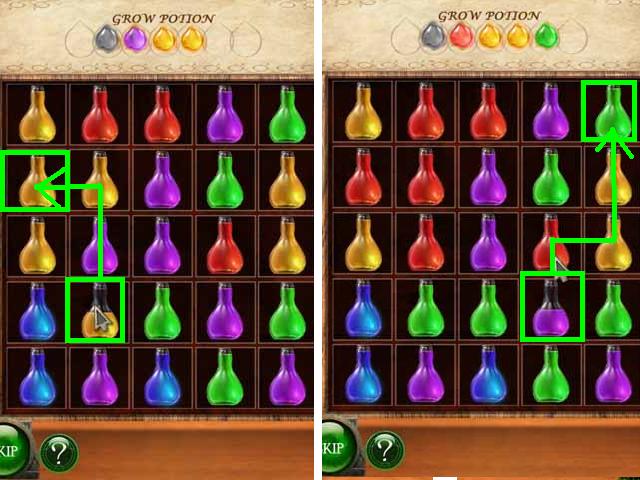
- Repeat until you receive the GROW POTION. See the screenshots for possible solutions.
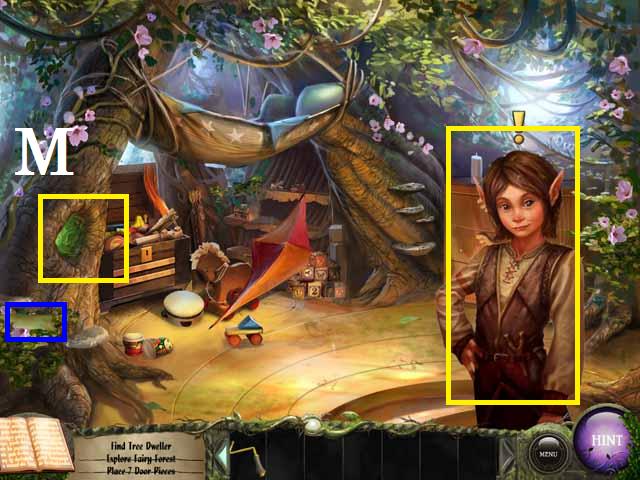
- Go up the stairs in, the back of the room, to get to Dartwen’s Room and click on him.
- Pick up the PIECE (blue).
- Zoom into the Tree Notch (M).
- Pick up the RUNE (green) and the PIECE (blue).
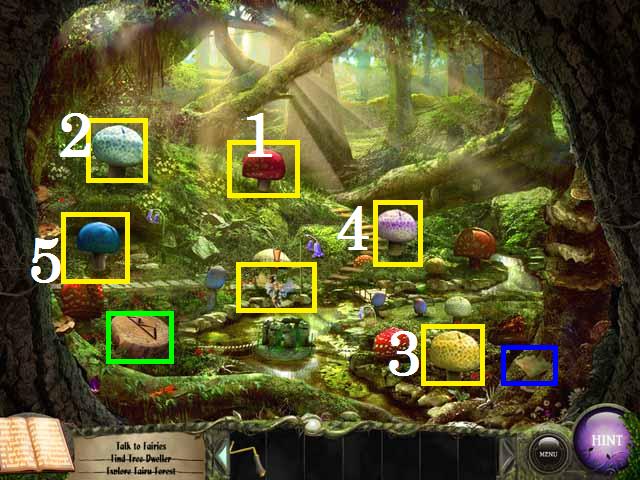
- Click on the fairies then shoot the mushrooms with the SLINGSHOT in the following order; 1, 2, 3, 4 and 5. (Hint: You can see the sparkle of the fairies behind the mushroom they are currently hiding behind).
- If you mess up, click on the fairies to restart the game.
- Click through the dialogue to receive the SMALL WEIGHT.
- Click on the Fairies again and move through the dialogue.
- Exit back one scene and zoom into the area under the hammock (N) to trigger a HOS.
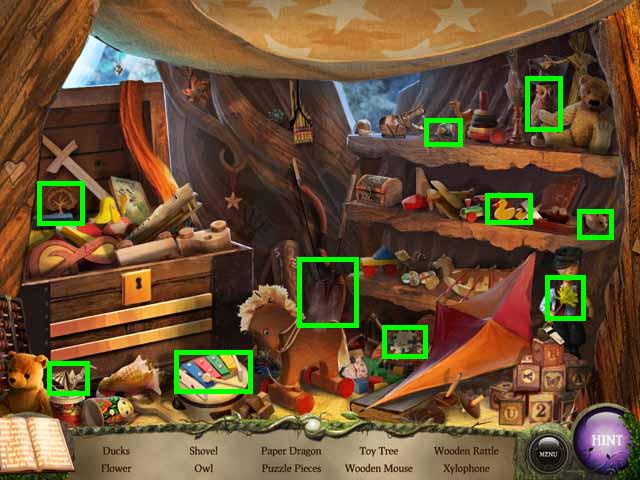
- Pick up all of the items to receive the SHOVEL.
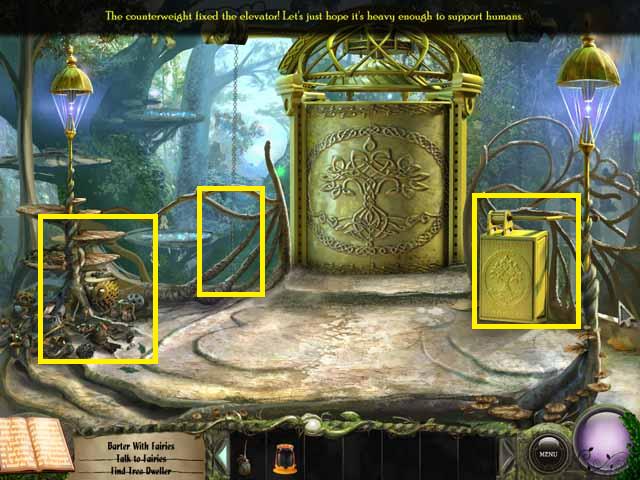
- Go back to the Elevator and zoom into the scale.
- Place the WEIGHT followed by the GROW POTION in the scale and zoom into the elevator control box.
- Place the CRANK HANDLE and turn it.
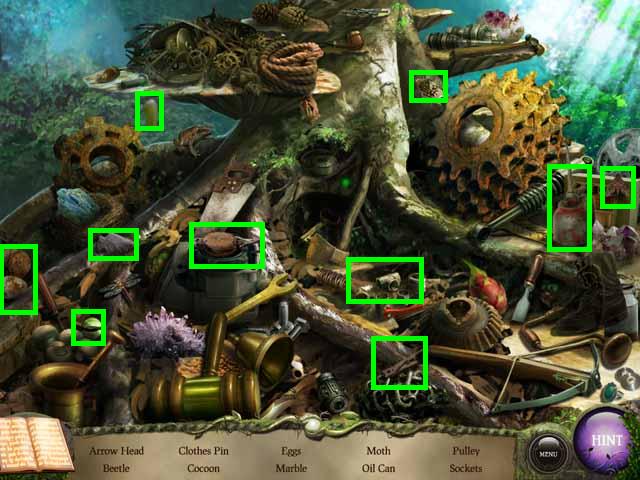
- Zoom into the junk pile to trigger a HOS and receive the OIL CAN.
- Take the Elevator down, pick up the PIECE (blue) and take the path to the left (Q).
- Zoom into the man and click through the dialogue.
- Pick up the PIECE (blue) and zoom into the book (R).
- Pick up the SHRINK POTION RECIPE (green) from inside the book.
- SHOVEL the dirt (S) in front of the Alter and pick up the RUNE (green).

- Exit back one scene and zoom into the boat to trigger a HOS to receive the SCEPTER.
- Return to the Tree top and go back inside.
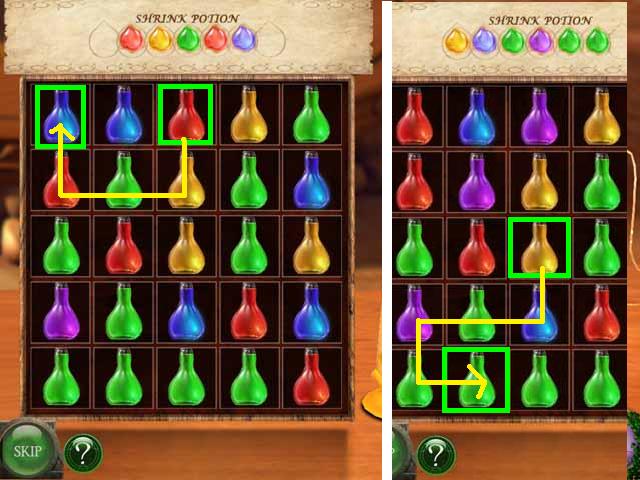
- Place the EMPTY BEAKER on the counter followed by the SHRINK RECIPE.
- Solve the puzzle the same way as with the GROW RECIPE to get the SHRINK POTION.

- See the screenshot for possible solutions.
- Go back to Dartwens room and zoom into the area under the hammock to trigger a HOS and receive the RECORD.
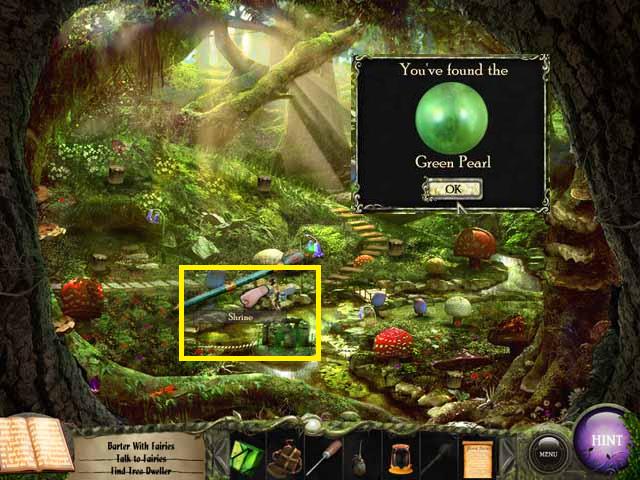
- Go through the Tree Notch and place the SCEPTER next to the fairies followed by the SHRINK POTION.
- Zoom into the fairies and click through the dialogue to receive the GREEN PEARL.
- Exit back out of Dartwens room and zoom back into the table to trigger a HOS and receive the METAL CYLINDER.
- Go back down the Elevator and through the path on the left.
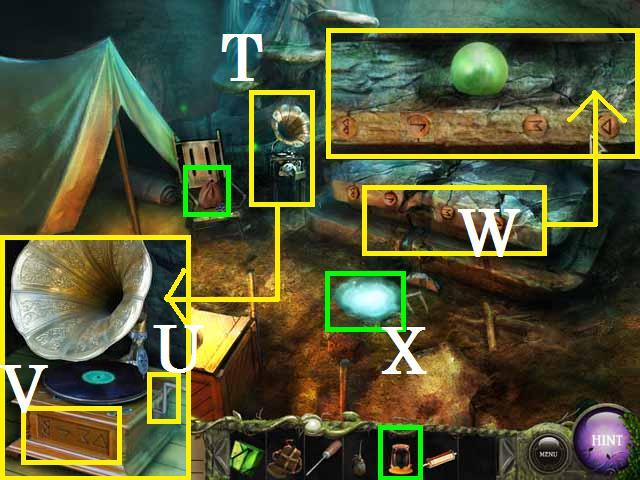
- Place the RECORD on the player (T) and turn the handle (U) to reveal the correct positions of the RUNES.
- Zoom into the Alter (W) and drop all four RUNES on it. It does not matter what order as they place themselves.
- Place the PEARL on the Alter and rotate all of the RUNS by clicking on them until they match the orientation shown on the record player.
- Pick up the BAG of STONES (green) and fill the EMPTY BEAKER with the GREEN LIQUID (X).
Chapter 2: Destroy the Second Pearl
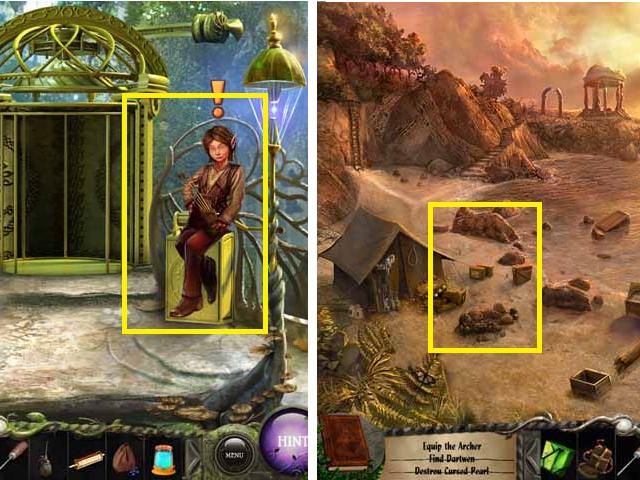
- Go back up the Elevator and click on Dartwen to receive the ARROW.
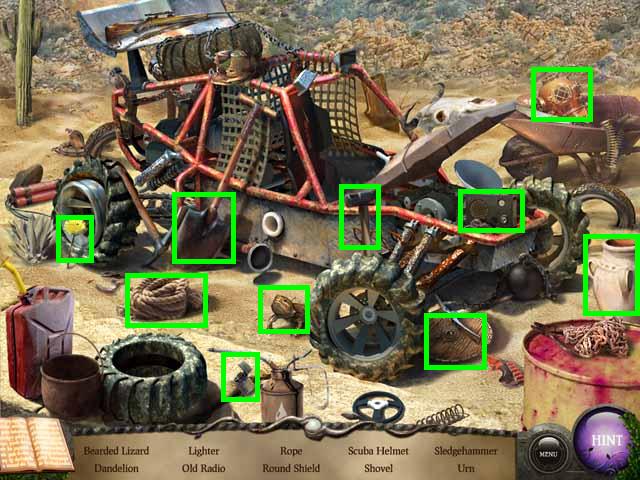
- Return to the Cove and zoom into the area to the right of the tent to trigger a HOS and receive the DULL AXE.
- Go back into the tent and zoom into the journal (H) to pick up the PIECE (blue).
- Pick up the RED LEAF (green).
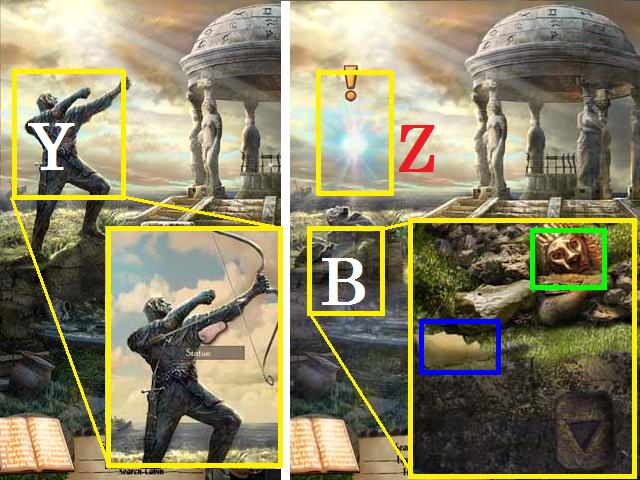
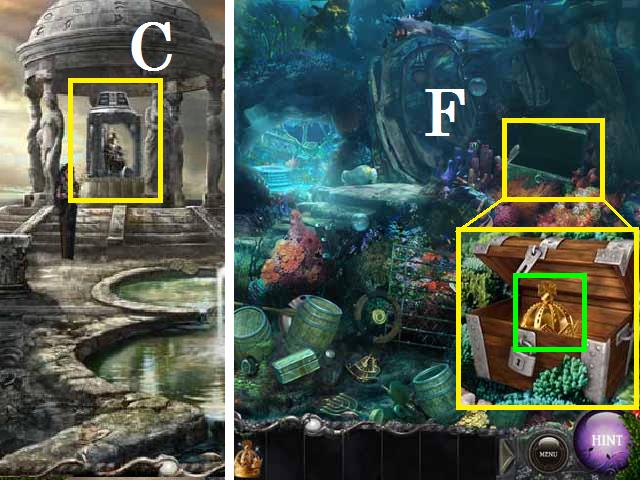
- Go up the stairs to the Temple and zoom into the statue (Y).
- Place the BOW then the ARROW in the statues arms.
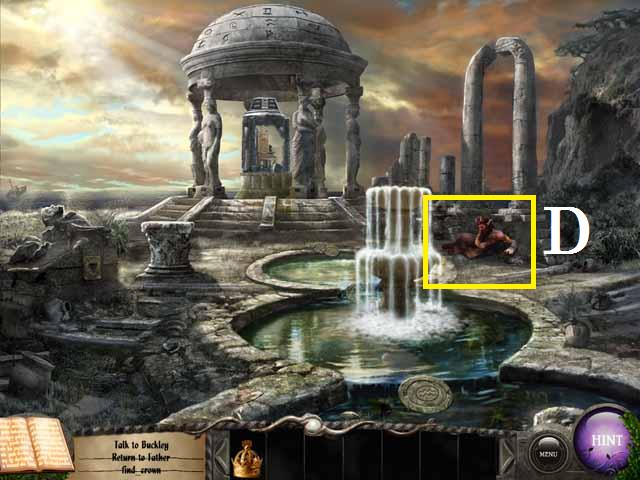
- Zoom into the Ghost (Z) and click through the dialogue.
- Zoom into the rubble (B) and pick up the PIECE (blue) and the LION HEAD (green).
- Return to the Beach and take the path to the right towards the village.
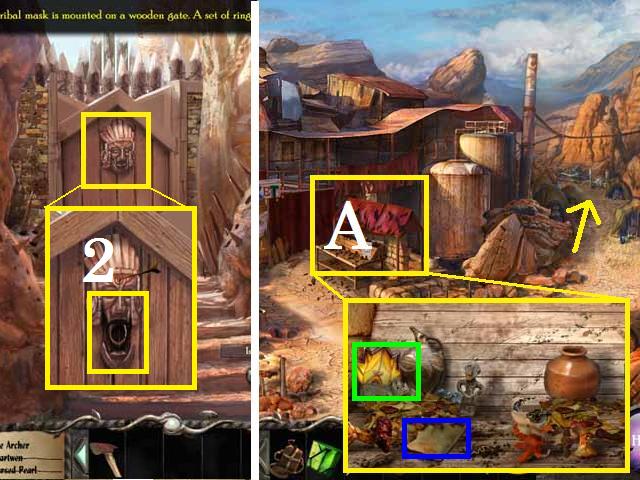
- Zoom into the gate and pull the handle (2).
- Go through the now open gate.
- Zoom into the table (A) and pick up the PIECE (blue) and the YELLOW LEAF (green).
- Take the path to the right towards the Well.
- Pick up the PIECE (blue).
- Click on the woman then zoom into the shelf (B) behind her.
- Pick up the PIECE (blue).
- Push the button (C) on the box and pick up the TURN KEY (green).
- Place the TURNKEY on the music box (D) and turn it.
- Place the METAL CYLINDER as shown in the screenshot.
- Zoom into the grind stone (E) and OIL it.
- Sharpen the AXE with the stone then move forward to the Well.
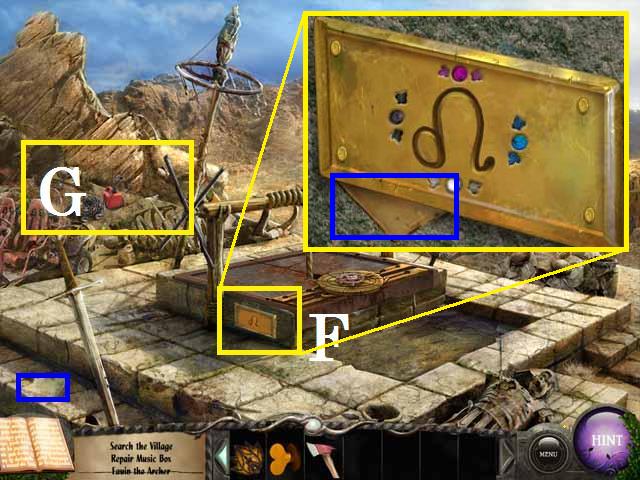
- Pick up the PIECE (blue).
- Zoom into the plaque (F) on the well then and pick up the PIECE (blue) then close the window.
- Zoom into the sparkling area, to the top right of the well (G), to trigger a HOS.
- Pick up all of the items to receive the SCUBA HELMET.

- Return to the Boat and zoom back into the Scuba Gear.
- Place the SCUBA HELMET then use the path to go out the other side of the boat.
- Pick up the PIECE (blue) and go into the water.
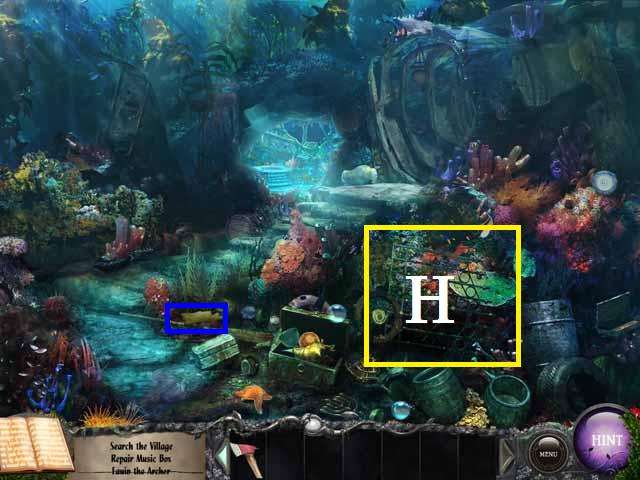
- Pick up the PIECE (blue) and zoom into the gate (H) to trigger a HOS.
- After completing the HOS you will receive the BALLERINA TOP.
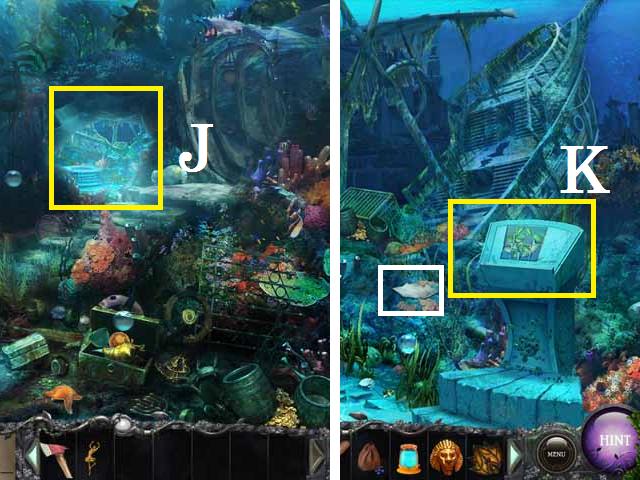
- You can go ahead and go through the cave (J) to enter the Sunken Ship.
- Pick up the PIECE (white) and place the GREEN TILE on the control panel (K).
- Rotate each tile, by clicking on them, until you have the correct orientation to make the picture as shown in the screenshot.
- Pick up the GREEN LEAF (green).
- Return to the Village and go back to the woman.
- Zoom back into the shelf and place the BALLERINA TOP on the music box.
- Turn the KEY then pick up the TELESCOPE LENS (green) from the now open drawer.
- You can return to the Boat now, but first I stepped back one scene and zoomed into the wooden gate (L) to the Market.
- Use the sharpened AXE to open the gate.
- Go through the gate and pick up the PIECE (blue).
- Zoom into the sparkling area (M) to trigger a HOS.
- Pick up all of the items to receive the BELLOWS.
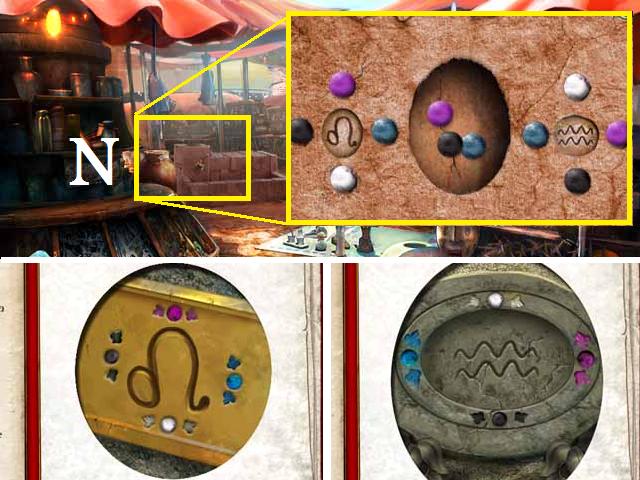
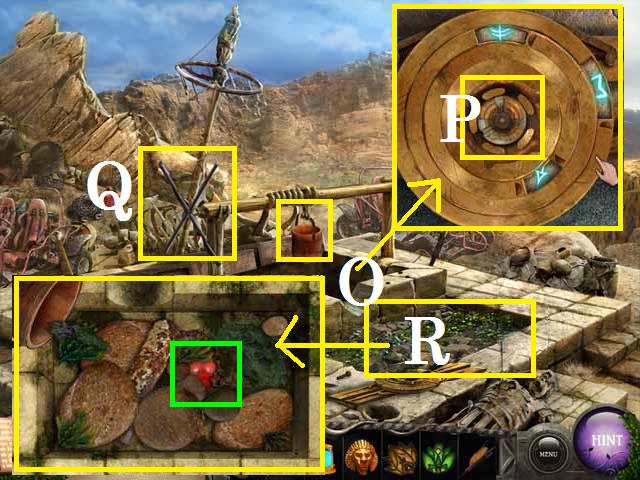
- Place the BAG of STONES on the pedestal (N).
- You can find the solution to the stone placements in your journal, as long as you had zoomed into the fountain at the Temple and the plaque at the Well.
- Place the stones as shown in the screenshot.
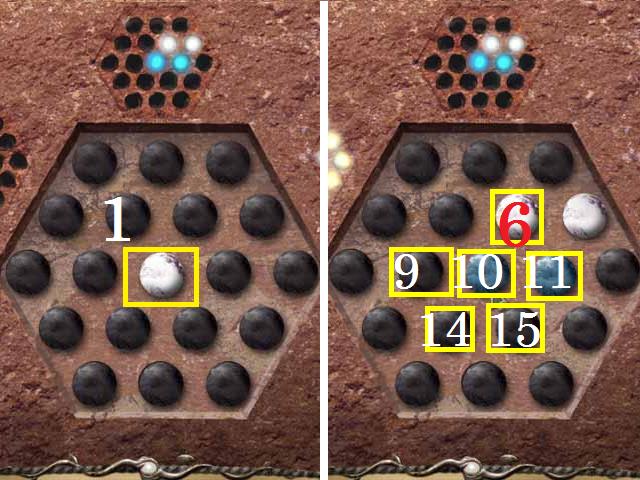
- Zoom back into the pedestal.
- Click the (1) button three times to move the white marble to the middle position as shown in the screen shot.
- NOTE: The starting positions do change the solutions are also not necessarily the shortest solutions.
- For the next set, hit the buttons in the following sequence to arrange the marbles as shown in the screenshot: 6, 6, 14, 15, 15, 9, 10, 11, 9, 10, 15, 15, and 15.
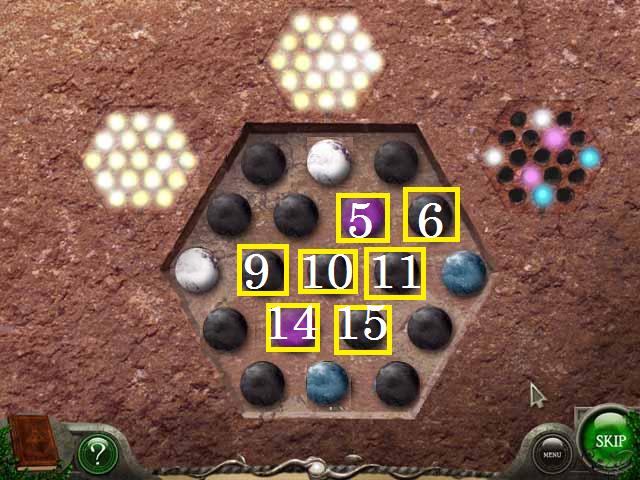
- Solve the last puzzle by using the following order: 11, 11, 11, 15, 15, 15, 11, 11, 11, 14, 9, 14, 14, 10, 14, 14, 14, 14, 10, 10, 10, 10, 5, 5, 5, 6, 6, 10, 10, 10, 10, 14, 14, 14, 14, 15, 14, 14, 15, 15, 14, 14, 15, 15, 15, 15, 15, 14, 14, 15, 15, 15, and 15.
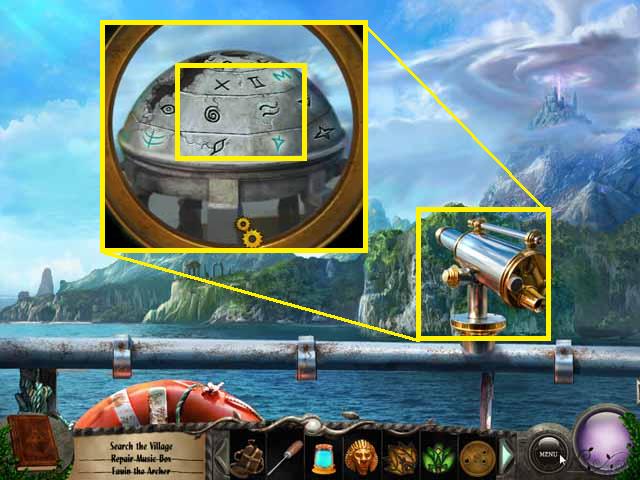
- Return to the Boat and go upstairs.
- Place the LENS in the telescope and click on the symbols so they will be added to your Journal.
- Return to the Well and zoom into the lock (O).
- Click on the dials to reveal the symbols that you saw through the telescope, as shown in the screenshot, then turn the handle (P).
- Once the well is open, turn the handle (Q) to raise the bucket then dump it out.
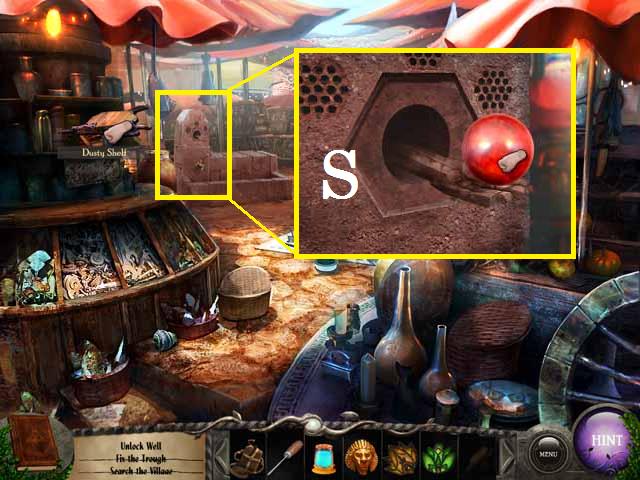
- Zoom into the muck (R) that dumped out of the bucket and remove all of seaweed, moss, and rocks until you reveal the RED PEARL (green).
- Return to the Market and place the PEARL in the hand (S) on the pedestal to receive the BAG of DUST.
Chapter 3: Destroy the Third Pearl

- Return to the Well and fill the CANTEEN from it then go to the Beach.
- Zoom into the lion head (U) on the left and fill it with the water from the CANTEEN.
- Go to the Temple and fill the CANTEEN, from the now full fountain, then return to the Beach.
- Zoom into the lion head (T) on the right and fill with water from the CANTEEN.
- Go through the gate once it is opened.
- Pick up the PIECE (blue) and move through the tunnel towards the palace.
- Pick up the PIECE (blue).
- Zoom into the poster (V) and pick up the PIECE (blue).

- Zoom into the Door and unscramble the lion dial (W) by clicking on the rings until they align with the lion facing the left.
- Once the lion opens, set the dial so that a 'V' is at the top or north position, a 'III' is at the bottom or south position, with a 'IV' on the right and a 'I' on the left then click the handle (B).
- You can find the above solution in your Journal if you replaced the fuses and got the radio working on the Boat.
- Zoom into the carriage (X) then close the pop-up window and enter the place through the door.
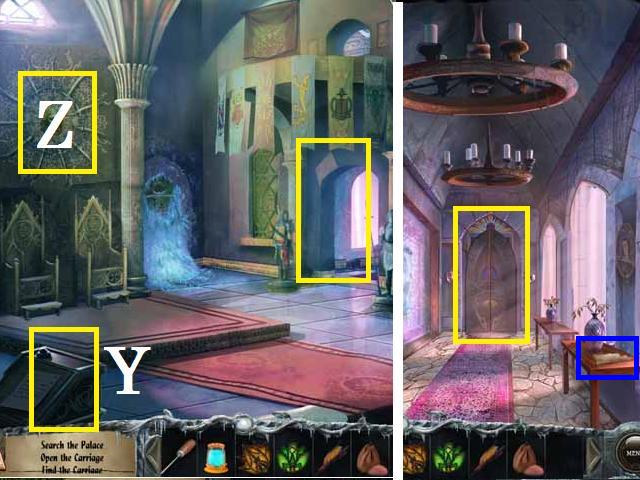
- Zoom into the pedestal (Y) pay attention to the poem then close the window.
- Zoom into the swords (Z) above the throne and place the LION HEAD in the middle. We will come back to this after we have the next PEARL.
- Move down the hallway to the right.
- Pick up the PIECE (blue) and go through the door at the end of the hallway to enter the Kitchen.
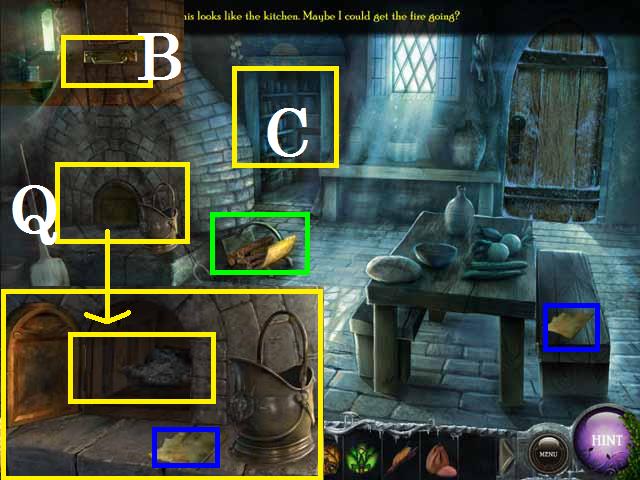
- Pick up the PIECE (green) and the WOOD STACK (green).
- Zoom into the fireplace (Q), pick up the PIECE (blue) and place the WOOD in the oven.
- Stoke the fire with the BILLOWS then zoom into the top of the fireplace and close the flue (B).
- Zoom into the sparkling pantry (C) to trigger a HOS.
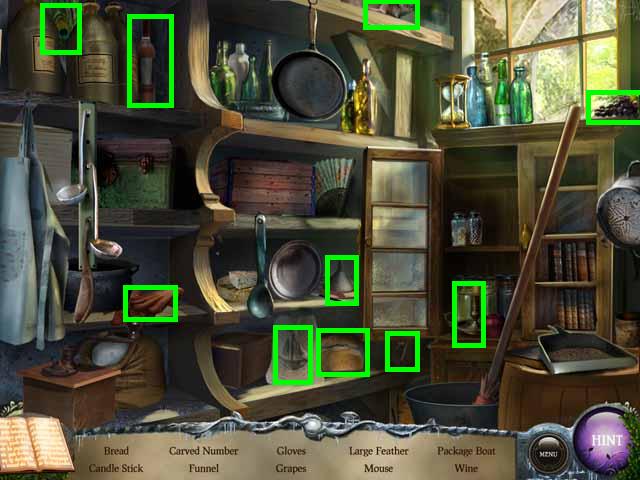
- Complete the HOS and receive the GLOVES.
- Go through the door to the Greenhouse out the back of the kitchen.
- Pick up the PIECE (blue) then zoom into the sparkling pond (D) to trigger a HOS.
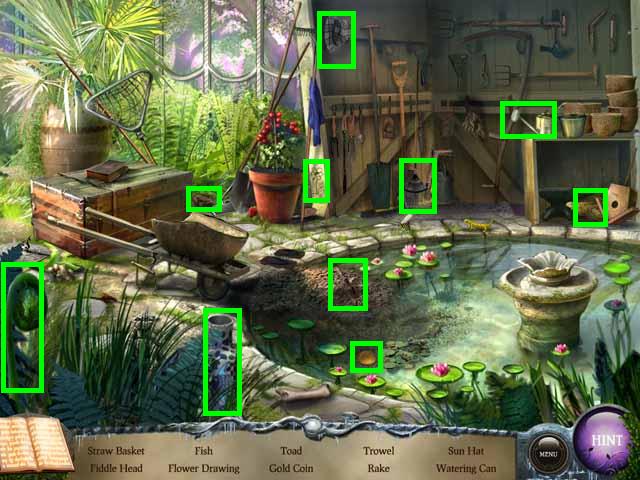
- Receive the TROWEL after completing the HOS.
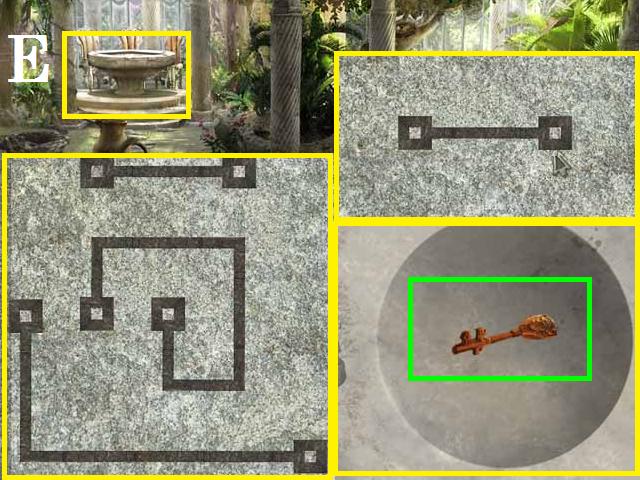
- Zoom into the table (E). Rotate the shapes to link them together so that there are no open ends. See the screenshots for the solutions.
- Pick up the KEY (green) and return to the Kitchen.
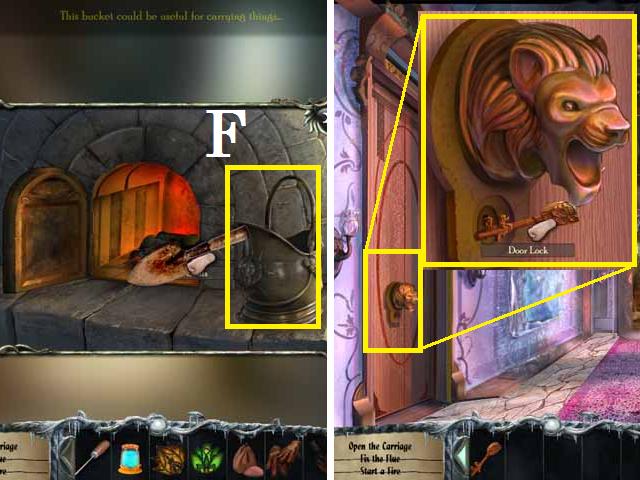
- Zoom back into the fireplace and scoop up some COALS with the TROWL.
- Pick up the BUCKET (F) after filling it with COALS.
- Return to the Hallway and open the door to the Bedroom with the KEY and enter the room.
- Pick up the PIECE (blue) and zoom into the mannequin (G).
- Remove the BROACH (green) using the ICE PICK and exit the palace.
- Zoom into the carriage and melt the ice with the BUCKET.
- Place the BROACH in the lock to open the doors.
- Pick up the PIECE (blue) then WHITE PEARL (green) with the GLOVES.
- Zoom into the sparkling flowers (H) to trigger a HOS.
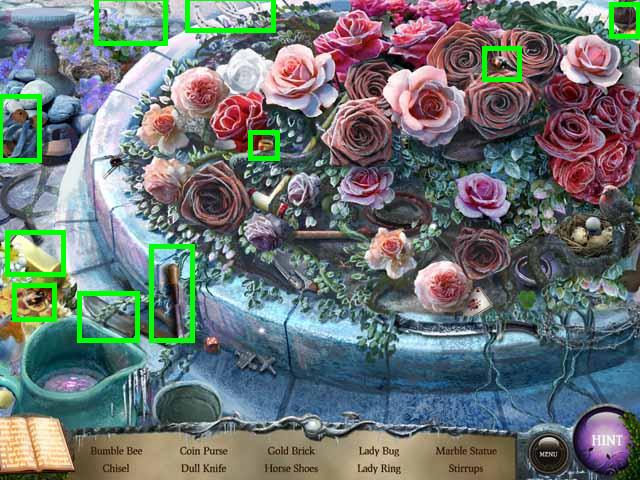
- Complete the HOS and receive the CHISEL.
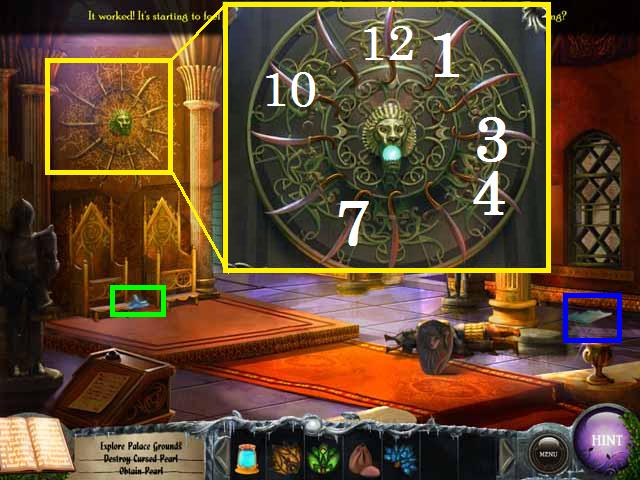
- Enter the Palace and zoom back into the swords above the throne.
- Using the poem, click on the first sword (1) (Hint: number 1 is at the 1 o’clock position) the seventh (7), and then the fourth (4) sword.
- Place the PEARL in the lions open mouth then hit the third (3) sword, the twelfth (12), and tenth (10) sword to destroy the PEARL.
- Pick up the PIECE (blue) and the CRYSTAL (green).
Chapter 4: Destroy the Last Pearl and Save the City!
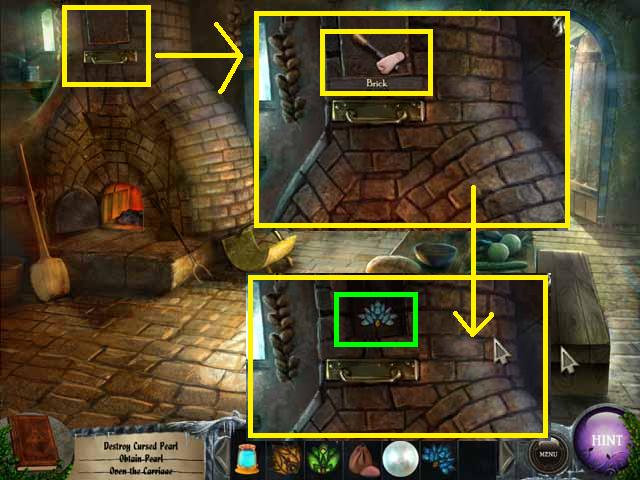
- Go back to the KITCHEN and zoom into the top of the fireplace.
- Remove the BRICK with the CHISEL then pick up the BLUE LEAF (green).

- Zoom into the painting (I), in the Hallway, to pick up the PIECE (blue) and the VIOLET LEAF (green).
- Enter the bedroom and zoom into the chest (J) to trigger a HOS.
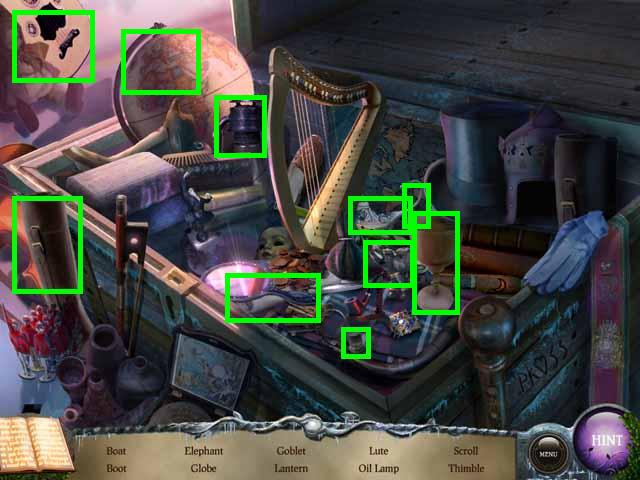
- Complete the HOS and receive the MUSIC SCROLL.
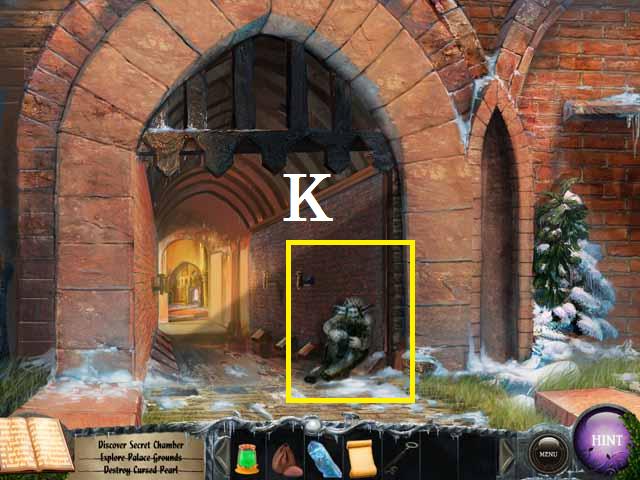
- Go back the Front Gate and click on the Satyr (K) to receive the KEY.
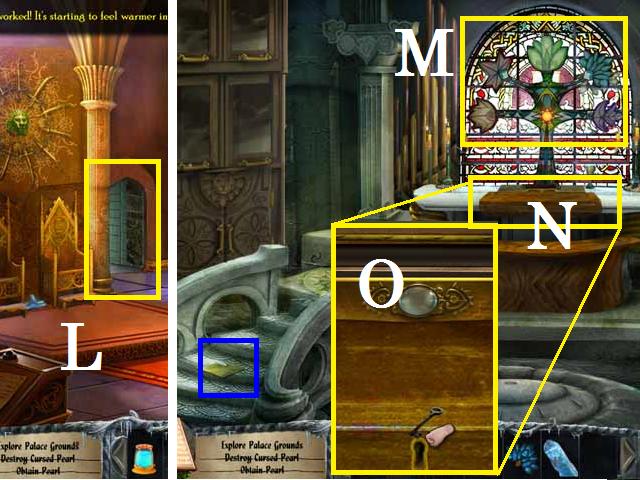
- Return to the Throne Room and go through the door (L) to the Sanctuary.
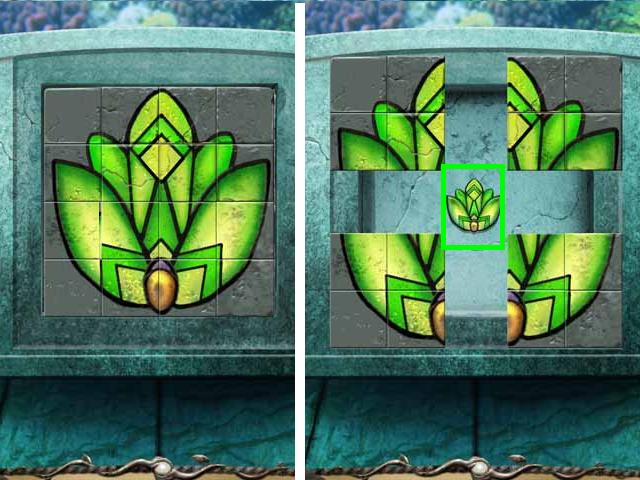
- Zoom into the glass window (M) and place all of the GLASS LEAVES in the matching spaces.
- Zoom into the organ (N) and open it with the KEY then place the MUSIC SCROLL (O).
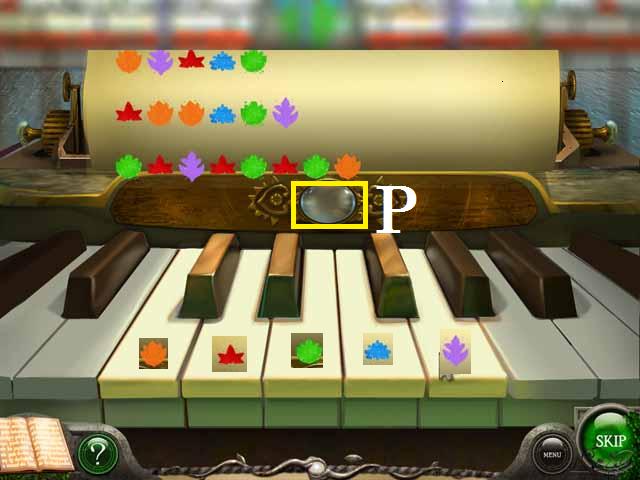
- When you hit a key its color will appear in the keyhole (P). Play the keys that match the colors on the MUSIC SCROLL.
- Once you have successfully played all of the notes return to the Boat and go underwater.
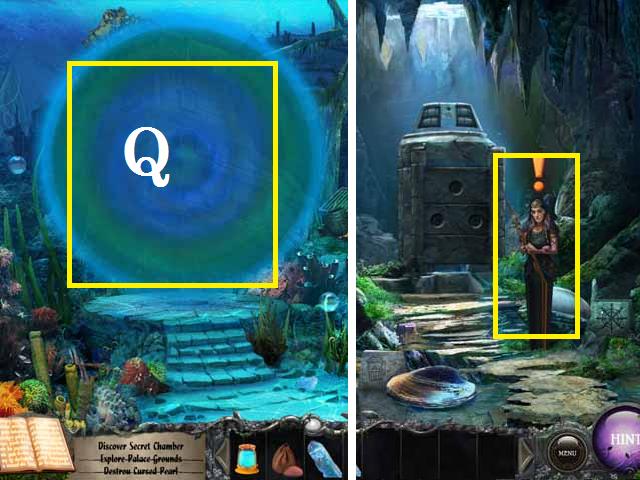
- Go to the Sunken Boat and use the now open portal (Q).
- Click on Sirenia and move through the dialogue.
- Pick up the PIECE (blue).
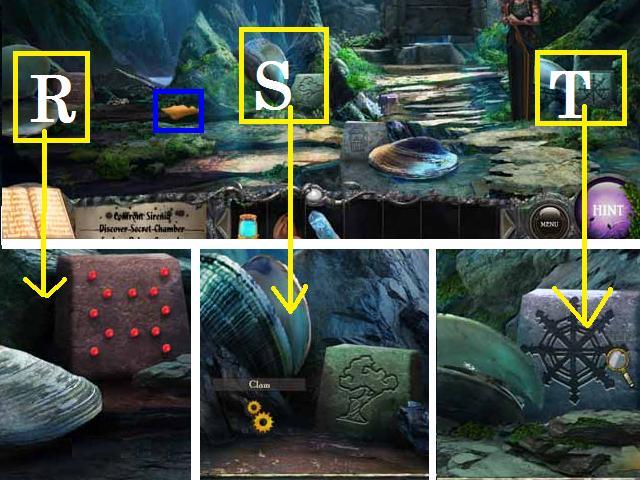
- Place the BAG of DUST into the far left open clamshell (R).
- Place the BLUE LIQUID in the middle clamshell (S).
- Zoom into the far left clamshell (T) and place the CRYSTAL.
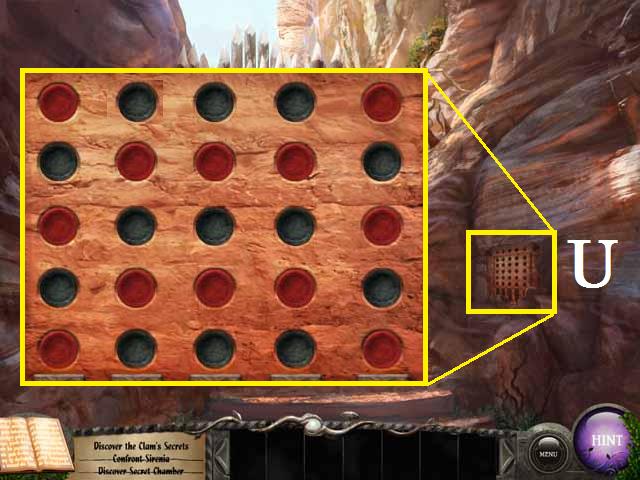
- Return to the Beach and take the path to the left.
- Zoom into the revealed board (U) in the wall. Using the red and black checkers recreate the pattern from the far left clamshell, as shown in the screenshot, to receive the EMBLEM. (Hint: You will need to fill all of the open spots using the black checkers as the negative space).
- Return to the Palace and enter the room behind the throne.
- Zoom into the podium (V).
- Set the pattern to match the far right clamshell to receive another EMBLEM. One solution is to click the marbles in order of 1-12 as seen in the screenshot.
- Return to the Tree Top and take the Elevator down.
- Zoom into the candles (W) on the wall and light them to match the middle clamshell. The candles only stay lit for about 20 seconds so you need to act fast and may need to relight a few.
- After you have the third EMBLEM return to the Underwater City.
- Zoom back into the podium (X) and place the EMBLEMS in their matching slots.
- Light the squares, one click turns the light on and one turns it off, to match the pattern as shown in the screenshot.

- Move back 2 scenes and zoom into the clam (Y).
- Pop the bubbles to recreate the pattern of the lit squares from the podium as shown in the screenshot. (Hint: the bubbles will repopulate so if you take longer to bust all of them you may need to re-pop some).
- Pick up the PEARL (green).
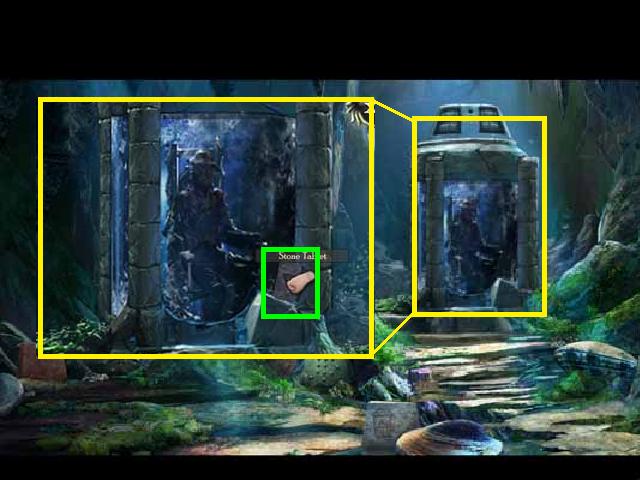
- Return to the Underwater City, zoom back into the podium and pick up the STONE TABLET (green).
- Return to the Temple, zoom into the statue ruble (Z) and place the STONE TABLET in the slot (A).
- Zoom into the temple and place the PEARL in the risen clamshell (B).
- Once your dad has risen, click on him (C) and move through the dialogue to receive the KEY.
- Return to the Boat and go underwater to the first scene.
- Zoom into the chest (F) and unlock with the KEY.
- Pick up the CROWN (green) and return to the Temple.
- Skip the story development and click through the dialogue.
- Zoom into the Satyr (D).
- Congratulations you have defeated Sirenia and restored the city!
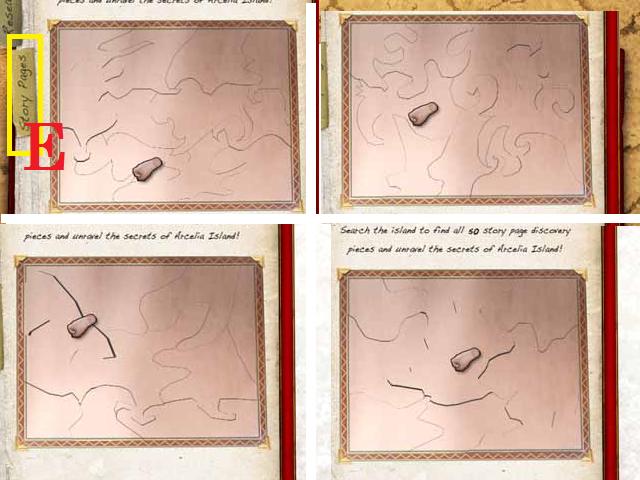
- You can open your Journal and click on the Story Tab (E). Drag and drop the PIECES to the page on the left to assemble the puzzles.
- You can rotate the pieces by holding the right click over each piece until it is correctly oriented.
- Once a piece has been correctly placed you cannot pick it back up. (Hint: Start with the corners then fit all of the edge pieces first).
Created at: 2011-08-27