

Walkthrough Menu
- General Tips
- Chapter 1: Cemetery and Bedroom
- Chapter 2: Hallway and Ballroom
- Chapter 3: Waterfall and War Room
- Chapter 4: Dining Room and Basement
- Chapter 5: Kitchen and Lydia’s Room
- Chapter 6: Dining Room and Kitchen Revisited
- Chapter 7: Secret Room and Stained Glass Doors
- Chapter 8: Library and Underground Bedroom
- Chapter 9: Library Revisited
- Chapter 10: Anti-fever Medicine Ingredients
- Chapter 11: Anti-fever Medicine Preparation
- Chapter 12: The Finale
General Tips
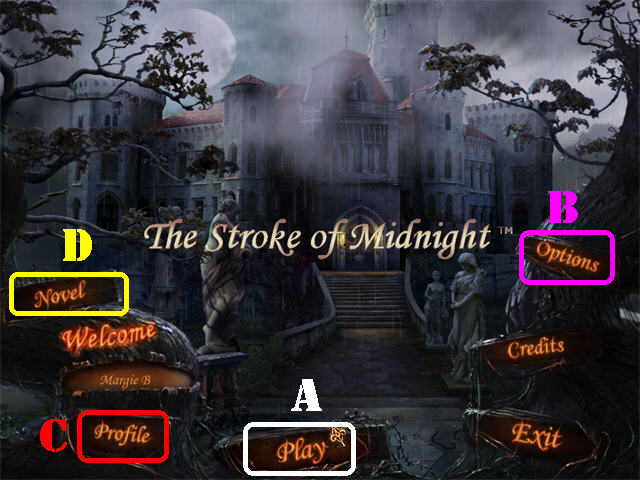
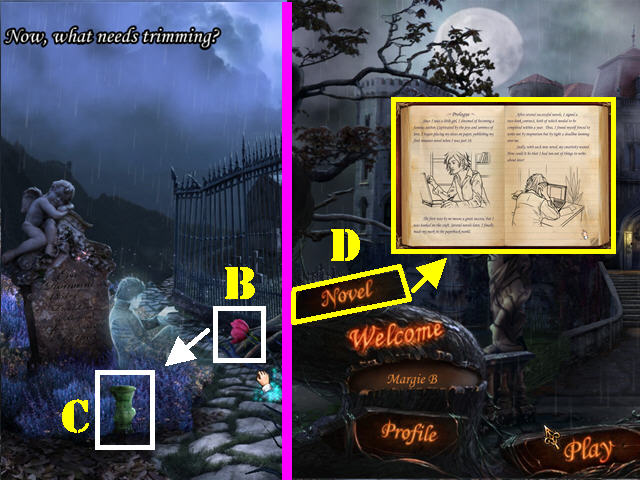
- Click on Play (A) to begin your adventure.
- The Options (B) button lets you adjust screen and sound.
- Click on Profile (C) to add or delete a player.
- The Novel (D) will not be available until the end of the game.
- The Hand Icon allows you to pick up Inventory Items.
- This game does not have an inventory tray. Inventory items can be used as soon as you pick them up.
- You can right-click on an inventory item to drop it back where you found it in most cases.
- To use an inventory item, click it onto the area in which you see the cursor flash red.
- Your cursor will glow red when it hovers over an important item in any scene; click on the item to read an important clue.
- Hints are unlimited and recharge automatically.
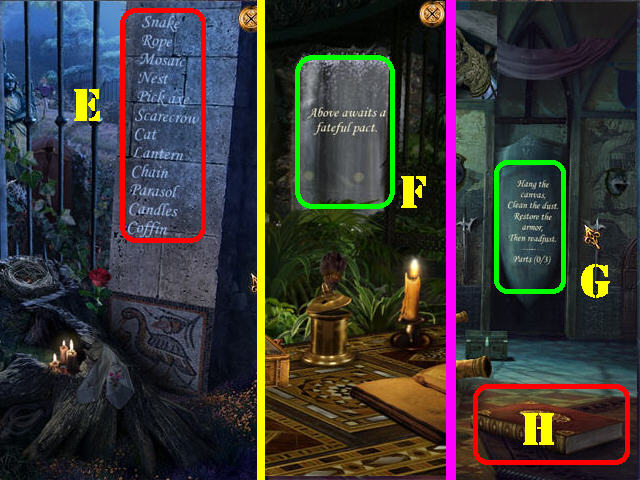
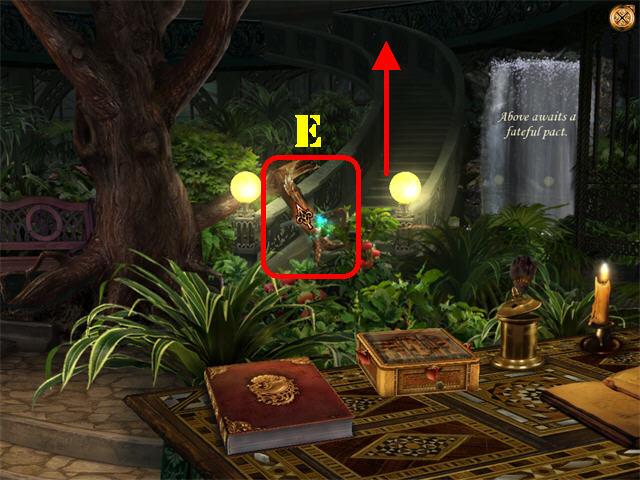
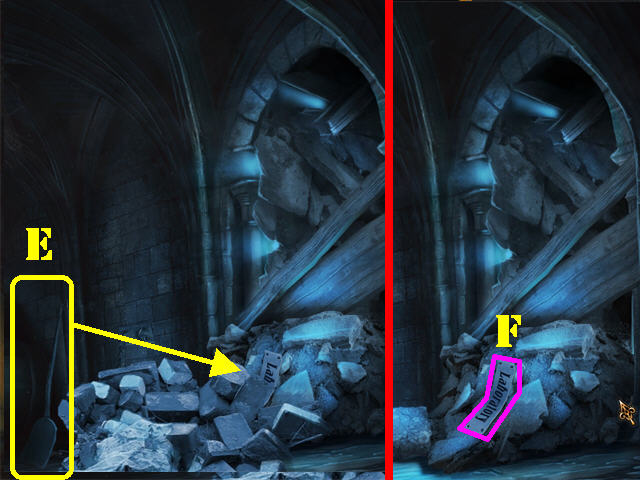
- The list items (E) for Hidden Object scenes can be found in various parts of the scene: the top, the bottom, on a wall, etc.
- To use a Hint in a Hidden Object scene, click on the list item to view its location (E). The game shows a small circle around a part of the item.
- Clicking randomly in a search scene will cause your cursor to move around wildly.
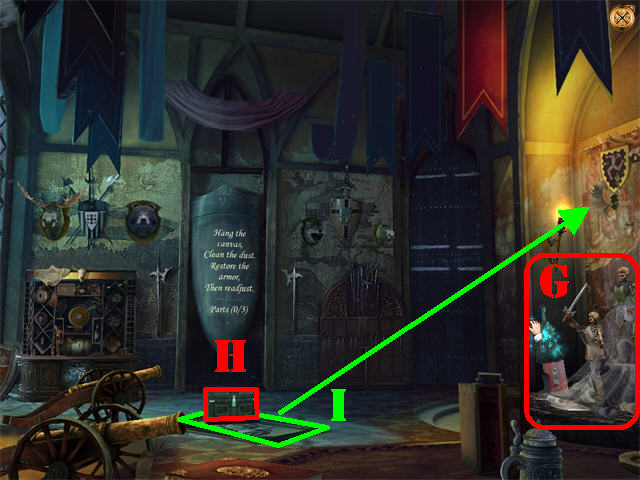
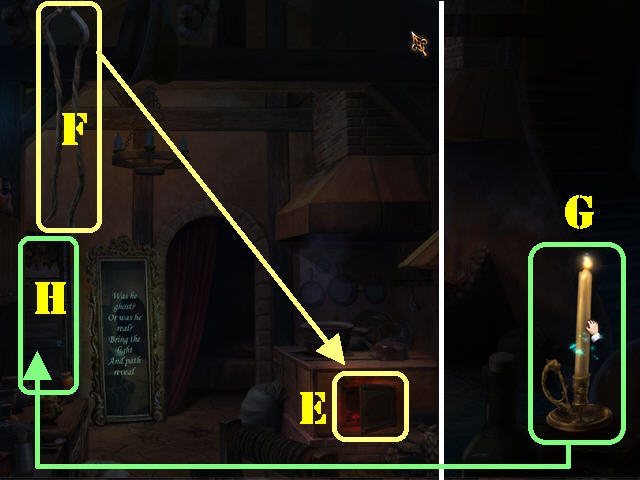
- The Hint system in this game comes in stages. You can read messages in mirrors, waterfalls, walls, and so on, regarding your next task (F and G).
- Zoom into those messages to learn hints about what to do next. Click on the zoom-in message once more to get exact details of what to do next.
- You can skip puzzles once the “Skip Puzzle” icon appears in the lower right corner.
- The Diary (H) can be located in different parts of any scene. Open it to read parts of the story and receive clues for some of the puzzles.
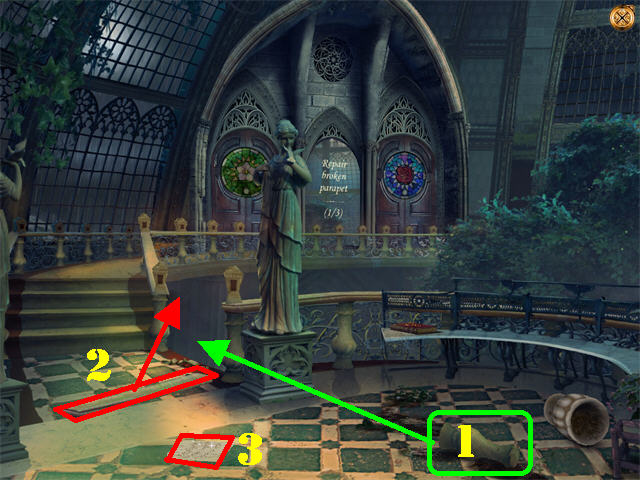
Chapter 1: Cemetery and Bedroom
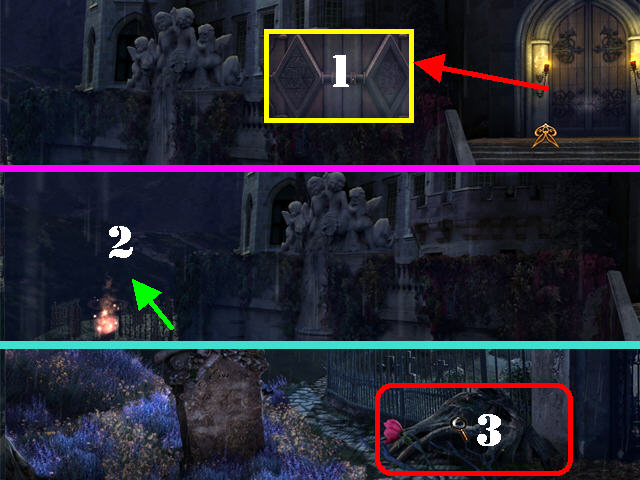
- Head toward the front door and knock on it (1).
- Zoom out and head left toward the cemetery (2).
- Zoom into the sparkly logs to trigger a Hidden Object Scene (3).
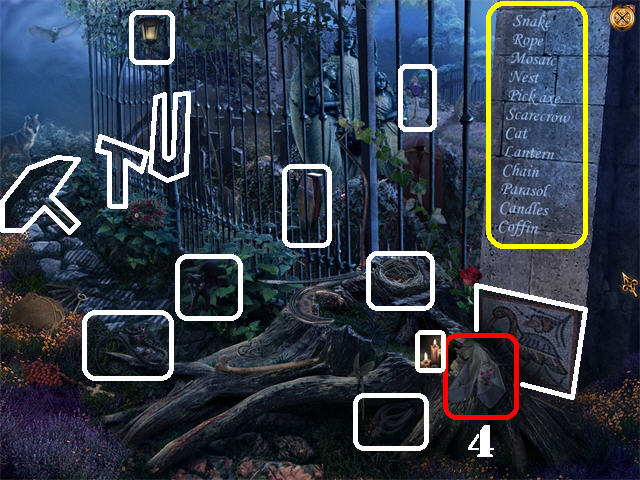
- Take the SCARF (4) in the lower right to add it to your cursor.
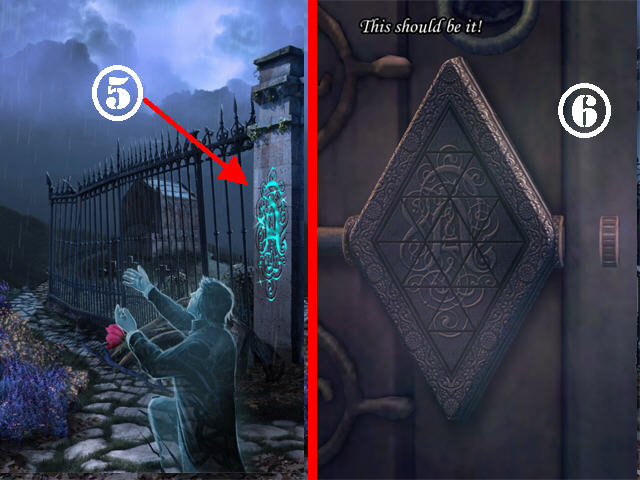
- Place the SCARF on the stone engraving on the pillar to clean it. Note the letter A engraving that appears (5).
- Head back toward the front door.
- Click on the tiles to switch the image to resemble the one on the pillar you just cleaned (6).
- You will enter the house as soon as the puzzle is solved.
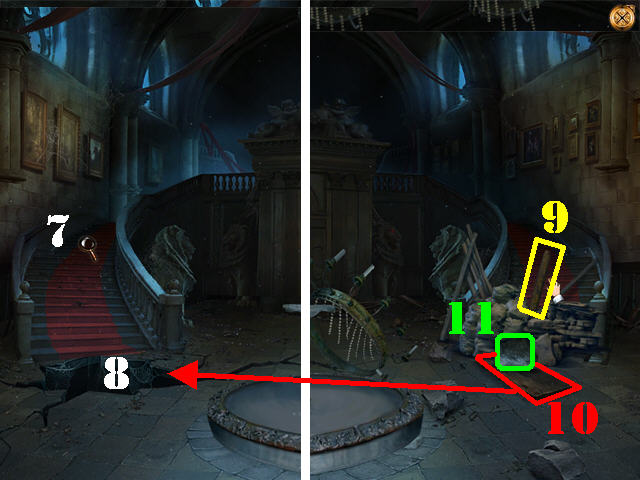
- Pan to the left; touch the steps (7) and the gap (8) in front of the steps.
- Pan to the right; click on the plank (9), the WOODEN BOARD (10), and the BOULDER (11).
- Take the PLANK (9) and place it on the BOULDER (11).
- Take the WOODEN BOARD (10) stuck under the boulder.
- Drag the WOODEN BOARD over to the gap by the left staircase (8).
- Go up the left staircase.
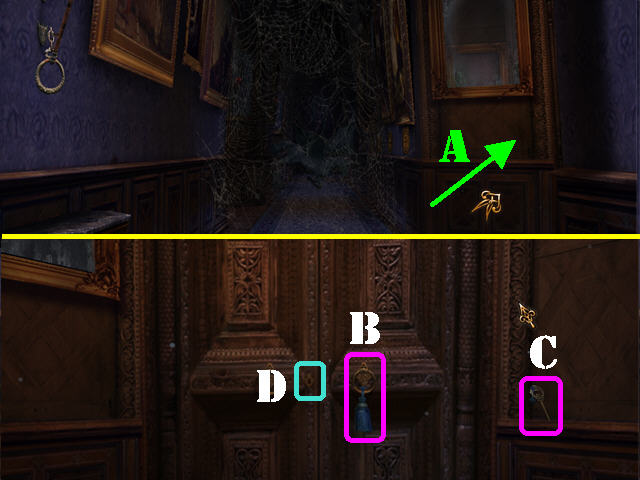
- Head right toward the first door (A).
- Grab the TASSEL (B) and place it on the KEY (C).
- Place the KEY in the lock (D) and go into the bedroom.
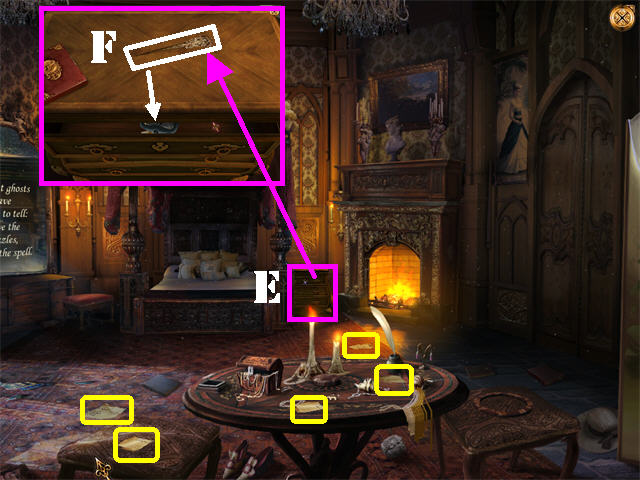
- Zoom into the nightstand by the bed (E).
- Try to open the top drawer; it’s stuck.
- Drag the LETTER OPENER (F) over the top of the stand to pry open the drawer.
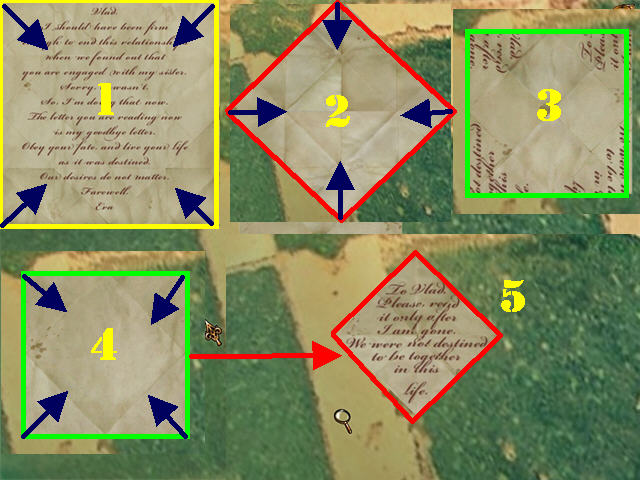
- Click on the PAPER SCRAPS inside the drawer.
- If you try to assemble them right away you will notice there are some missing pieces. Zoom out of the drawer.
- Pick up the 5 MISSING SCRAPS marked in yellow.
- The game will zoom into the nightstand.
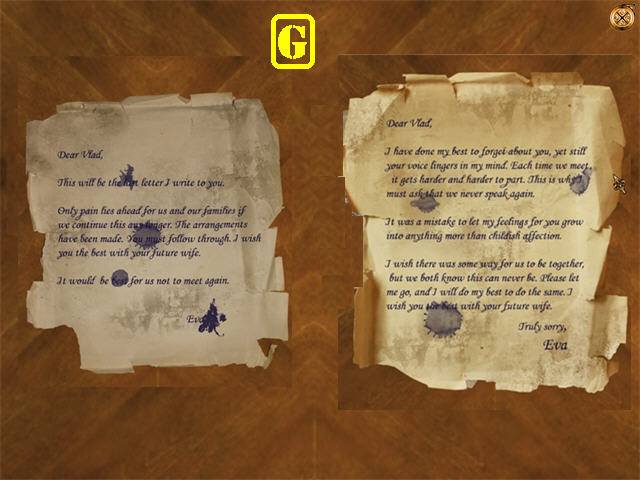
- Assemble the scraps to form 2 separate letters.
- Correct pieces will lock in place.
- Please look at the screenshot for the solution (G).
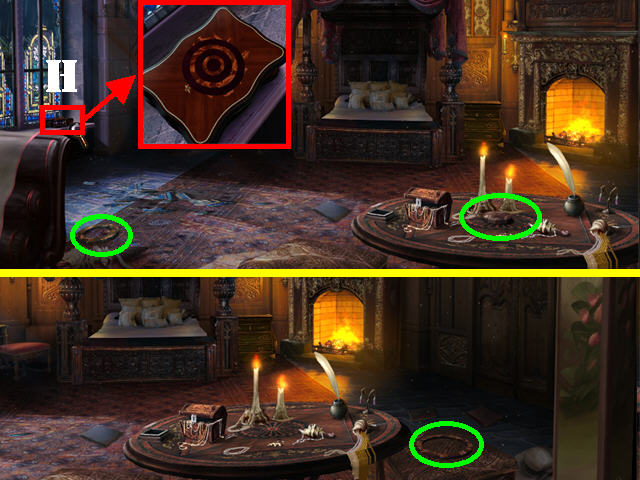
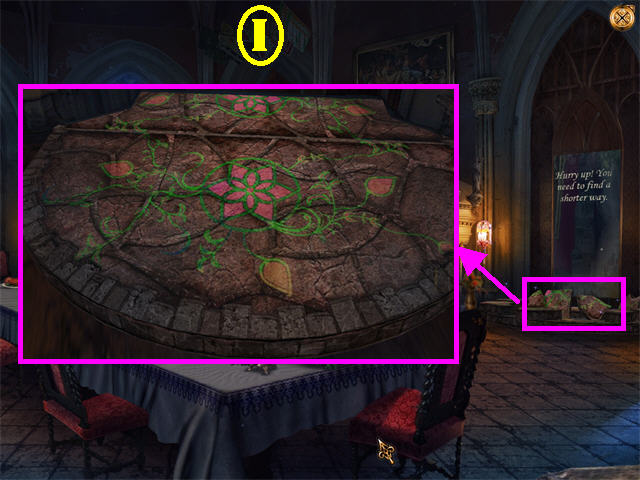
- Pan all the way to the left; zoom into the locked box by the window.
- Click on the locked box and pan out (H).
- Pick up the 3 CIRCLES marked in green and the pieces will be placed on the box.
- Arrange the circles as shown in the screenshot (I).
- Click on the ROSE in the box.
- Pan to the right; go through the right door.
Chapter 2: Hallway and Ballroom
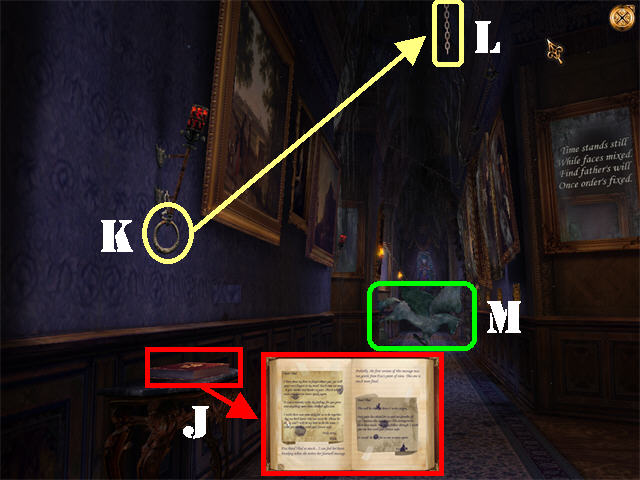
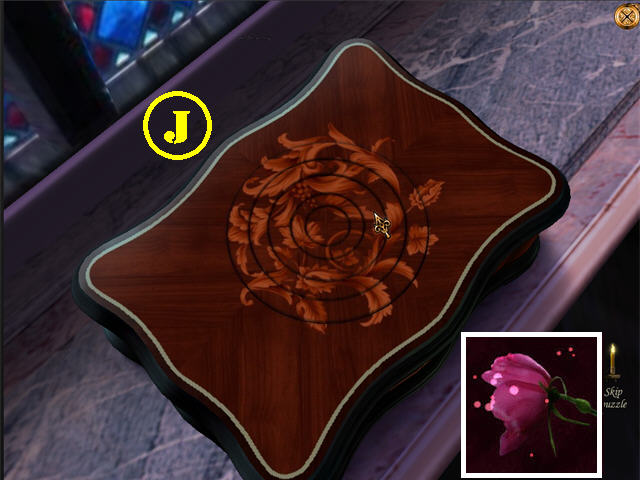
- Open the diary on the left (J).
- Drag the RING (K) on the left onto the chain hanging from the ceiling (L).
- Pull the chain to lift the large statue blocking the hallway (M).
- Head forward to activate a search scene.
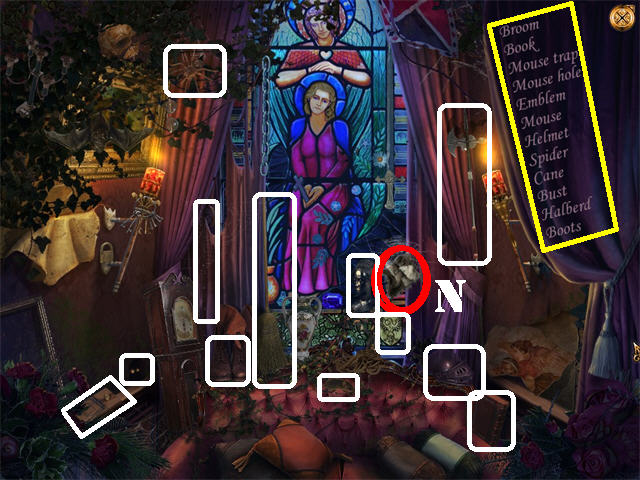
- Look for all the items on the list.
- Take the FEATHER DUSTER (N) by the stained glass window.
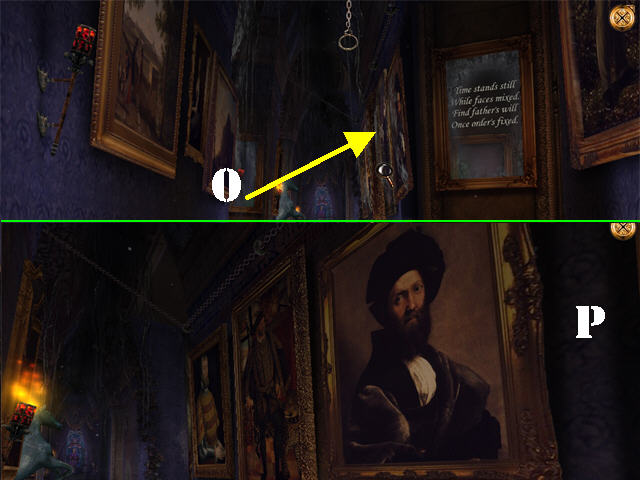
- Zoom into the portraits on the right side of the wall (O).
- Clean the 5 portraits with the FEATHER DUSTER.
- Click on 2 portraits to swap their positions when the hand icon is present ( not all portraits can be moved).
- The solution is random (P).
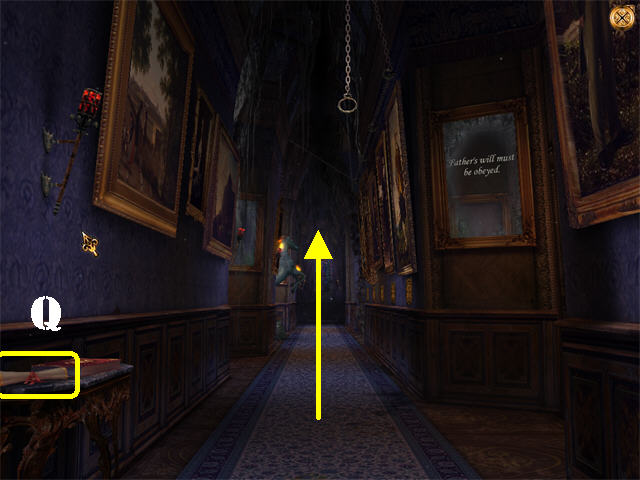
- Grab the SCROLL (Q) on the left to add a diary page.
- Go forward to enter the next scene.
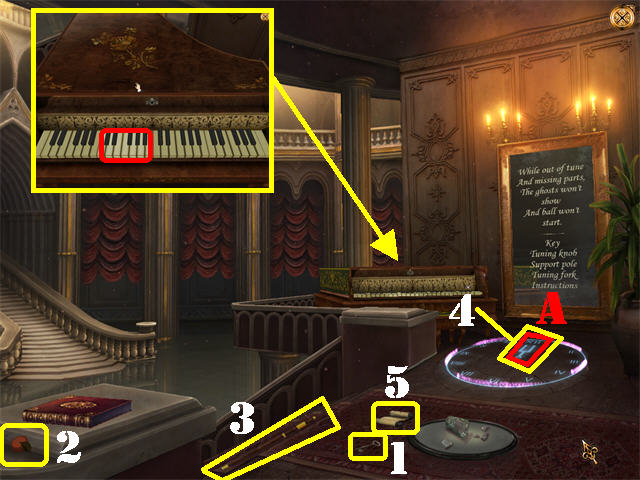
- Click on the number 12 on the CLOCK (A) on the ground.
- Pick up the KEY (1), TUNING KNOB (2), SUPPORT POLE (3), TUNING FORK (4), and INSTRUCTIONS (5) on the ground.
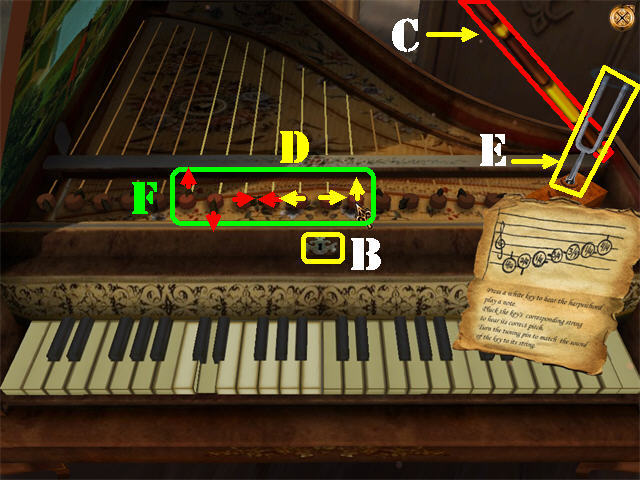
- Drag the KEY to the lock (B).
- Open the cover.
- Place the SUPPORT POLE inside the cover (C).
- Put the TUNING PIN in the empty slot (D).
- Place the TUNING FORK into the holder on the right (E).
- Change the TUNING PINS so they face in the same directions as the instructions (F).
Chapter 3: Waterfall and War Room
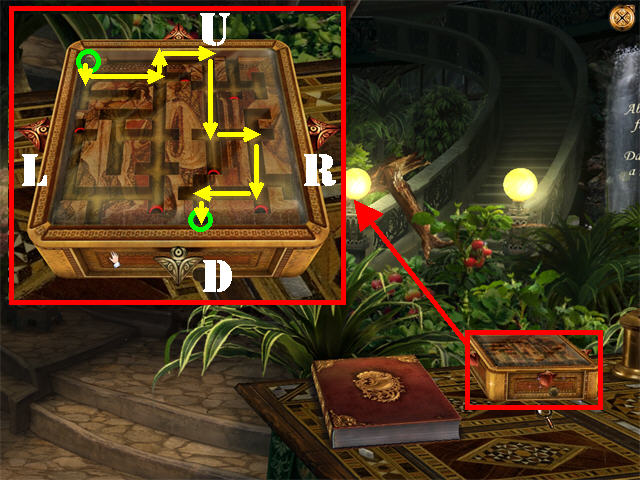
- Zoom into the locked box to trigger a puzzle.
- Click on the arrows in this order, turning at the intervals shown in the screenshot: D, R, U, R, D, R, D, L, D.
- If you fall into one of the red holes, the puzzle will reset.
- The BALL will land on the table after the puzzle has been solved.
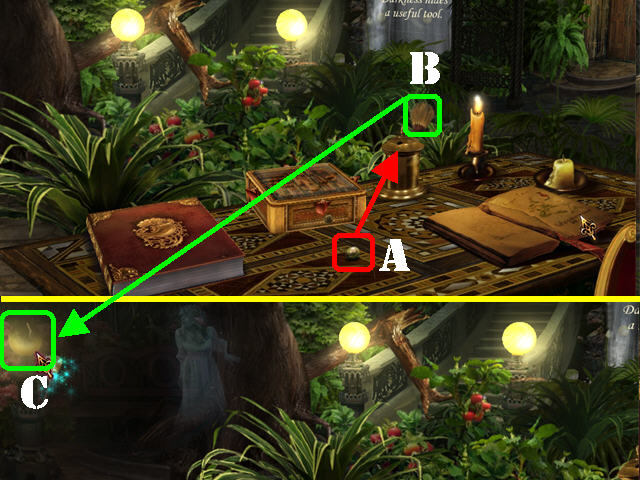
- Drag the BALL (A) over to the cup next to it.
- Take the BRUSH (B) and pan to the left side of the scene; clean the dim light (C) with the BRUSH.
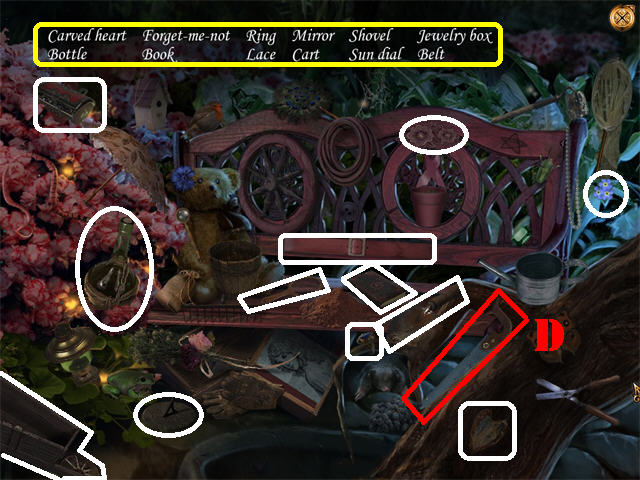
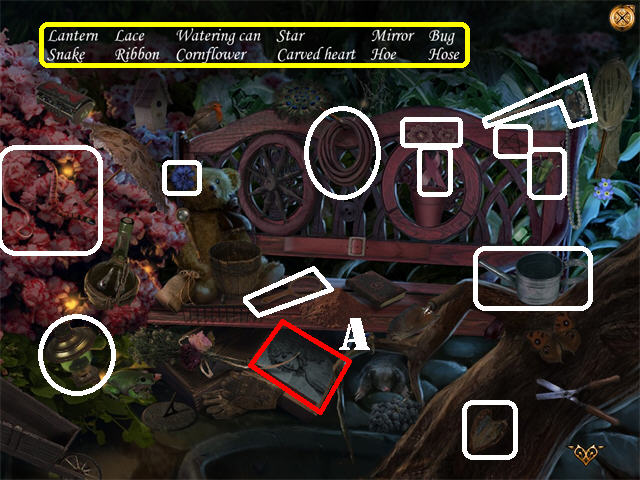
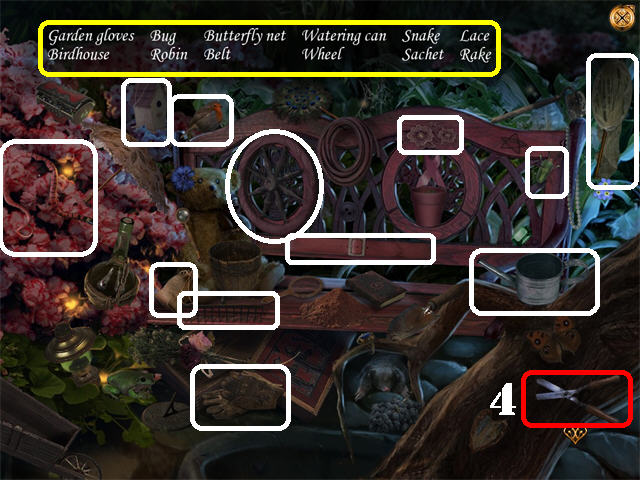
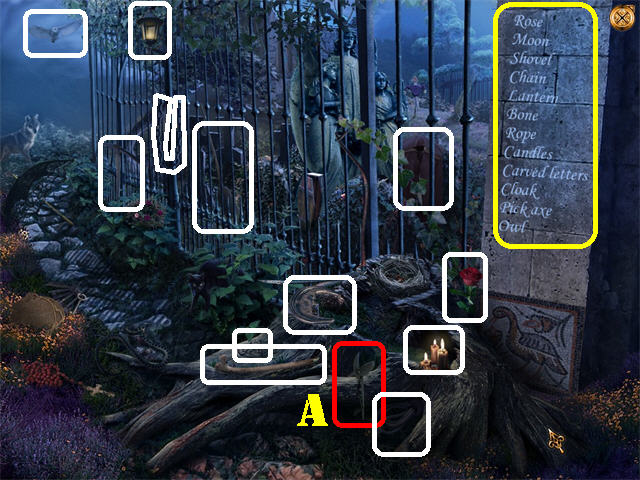
- Zoom into the bench on the left to trigger a search scene.
- Look for all the items on the list.
- Take the GARDEN SAW (D).
- Cut the fallen tree limb by the stairs with the GARDEN SAW (E).
- You can now go up the steps.

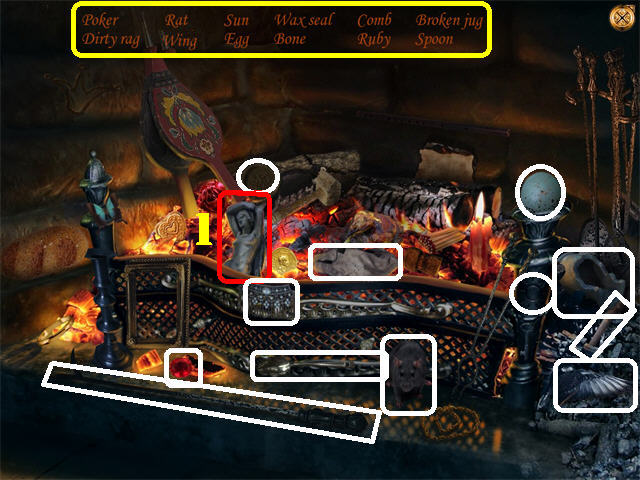
- Give the BONE (A) to the stuffed dog (B) on the right to automatically grab the KEY from its mouth.
- Place the KEY in the keyhole on the cabinet (C) to drop 2 wine glasses on the table.
- Grab the WINE BOTTLE (D) and pour it into the 2 WINE GLASSES (E).

- Zoom into the sparkly cabinet on the left to trigger a search scene.
- Look for all the items on the list.
- Take the WHISK BROOM (F).
- Pan to the right.
- Dust the dirty armor 3 times with the WHISK BROOM (G).
- Move the BOX (H) and click on the RUG (I) to add it behind the armor suits, it will show you where each piece belongs.
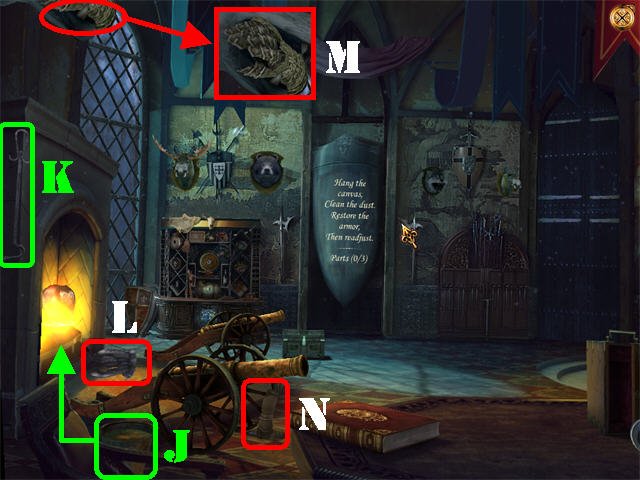
- Pan to the left.
- Throw the BUCKET OF WATER (J) into the fire.
- Use the POKER (K) to retrieve the armor piece from the fire.
- Click on the ARMOR PIECE that falls in front of the fireplace (L).
- Pick up the 2 ARMOR PIECES marked in red (M and N).
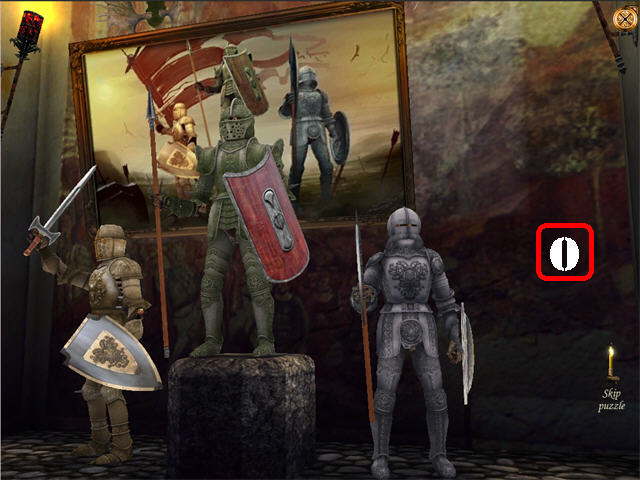
- Zoom into the armors and assemble them as shown in the screenshot (O).
- Some pieces are already on the statues; make sure you move them to the right spots.
- Go out the door.
Chapter 4: Dining Room and Basement
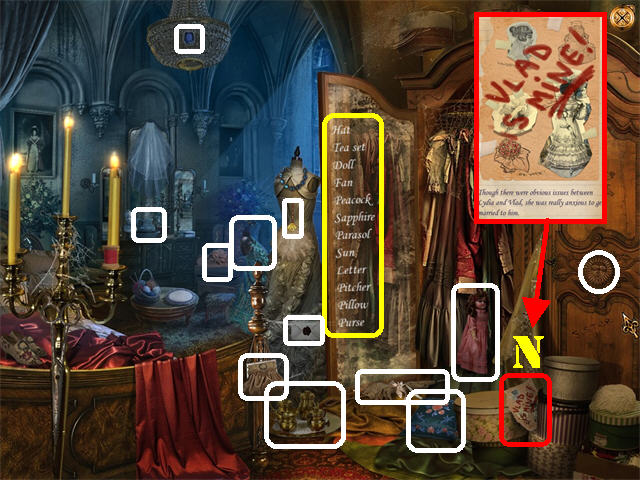
- Pan left and click on the ghost by the bench to trigger a search scene.
- Look for all the items on the list.
- Click on the PORTRAIT (A).
- Go through the right door.
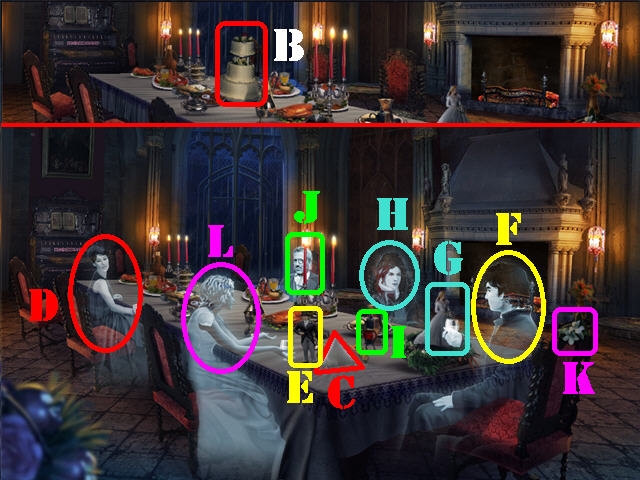
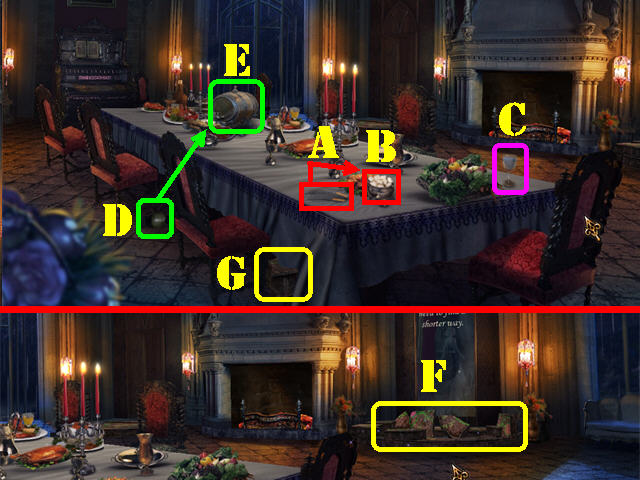
- Click on the WEDDING CAKE (B) on the table for the ghosts to appear and a task to appear on the mirror.
- Grab the HANDKERCHIEF (C) on the table and give it to the MOTHER GHOST (D) at the end of the table.
- Give the RELUCTANT GROOM DOLL (E) on the table to VLAD (F).
- Place the EAGER BRIDE DOLL (G) on the GHOST on the right (H).
- Give the WINE CARAFE (I) to the FATHER (J) so he can toast.
- Give the CORSAGE (K) to the lady GHOST (L) on the left.
- The game will focus in on the letter at the end of the table.
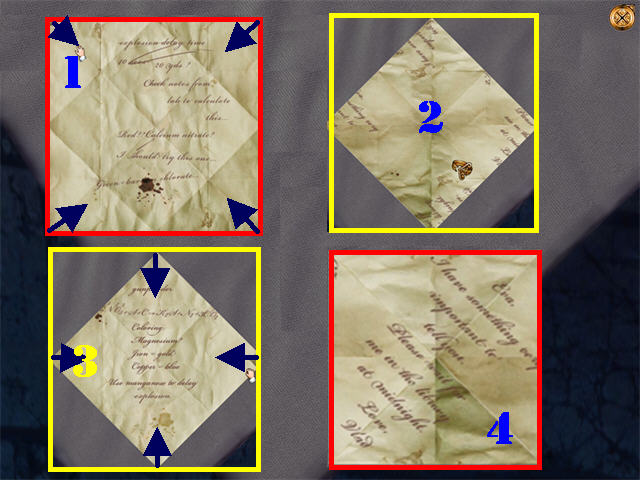
- Check out our video solution!
- The paper should be facing in the same direction of Fig. 1.
- Fold in all 4 corners of Fig. 1 by clicking on each corner when the hand icon appears.
- Fig. 2 shows the folded paper; flip it over so it resembles Fig. 3. Place your cursor in the center of the page and click when the gold arrow appears to flip it.
- Fold in all 4 corners in Fig. 3.
- Fig. 4 shows the final image; click on it.
- You will be transported to the Basement.
- Grab the VALVE TAP (A) on the right.
- Pan to the left; place the VALVE TAP on the barrel (B).
- Grab the EMPTY BUCKET (C) on the left and place it below the valve tap.
- Click on the tap to fill the bucket.
- Drag the FILLED BUCKET over to the fire on the right to extinguish it (D).
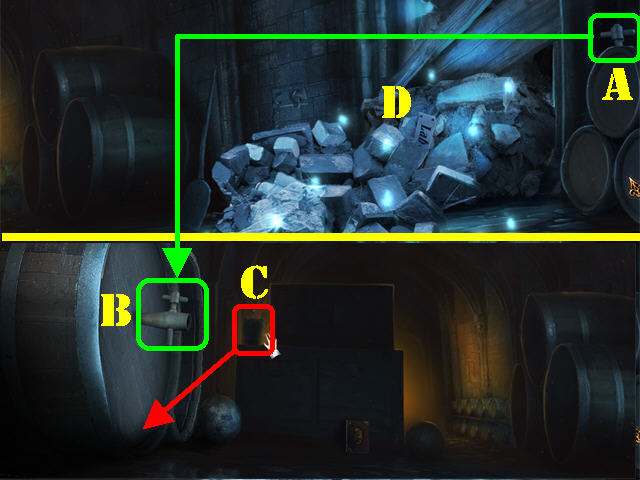
- Drag the SHOVEL (E) over to the debris on the right and click on the debris twice to remove it.
- Click on the LABORATORY SIGN (F) in the debris.
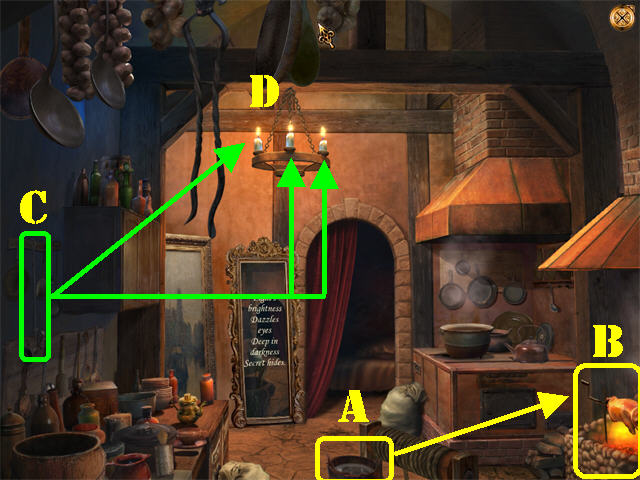
Chapter 5: Kitchen and Lydia’s Room
- Place the POKER (G) in the fire.
- Put some WOOD (H) in the fire. The light from the fire reveals a bucket in the corner.
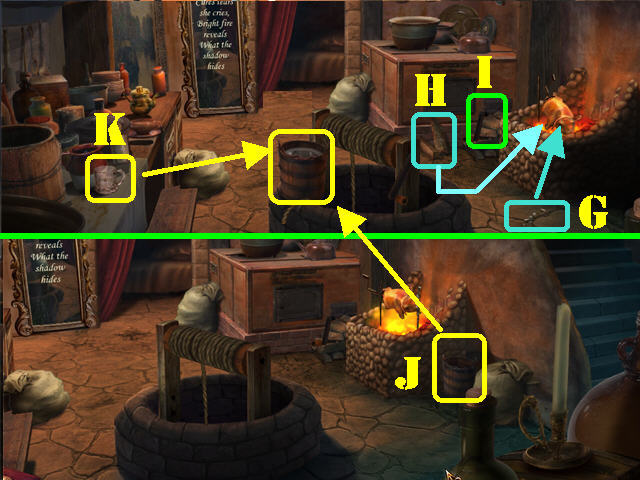
- Grab the HANDLE (I) by the fireplace and place it on the well.
- Grab the BUCKET (J) next to the fireplace and drag it to the well.
- Click twice on the well to lower and raise the bucket, filling it with water.
- Drag the GLASS (K) over to the filled bucket.
- You are transported back to the Hallway.
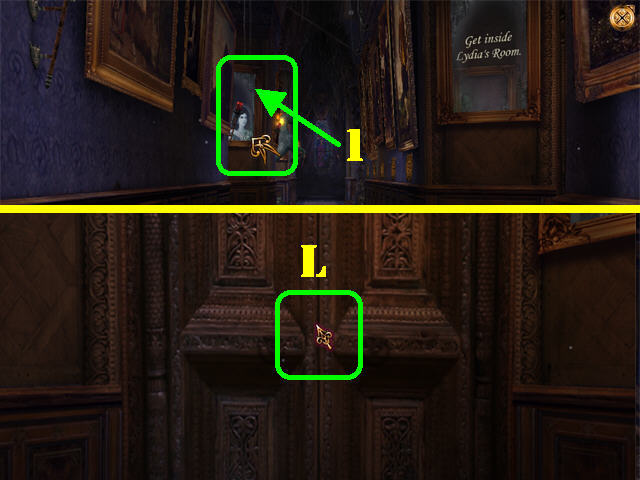
- Head left toward the picture of Lydia’s ghost (1).
- Knock on the door (L).
- Click down and head forward to access a search scene.
- Look for all the items on the list.
- Grab the DOOR HANDLE (M) in the lower right.
- Head toward Lydia’s door on the left.
- The DOOR HANDLE will be automatically placed on the door.
- Click on the door to access a search scene.
- Look for all the items on the list.
- Grab the ALBUM PAGE (N) in the lower right.
- You will view the diary; exit that view to return to the dining room.
Chapter 6: Dining Room and Kitchen Revisited
- You are transported back to the Dining Room.
- Examine the fireplace to trigger a search scene.
- Look for all the items on the list.
- Take the STATUE (1) in the lower center and it will land outside the fireplace.
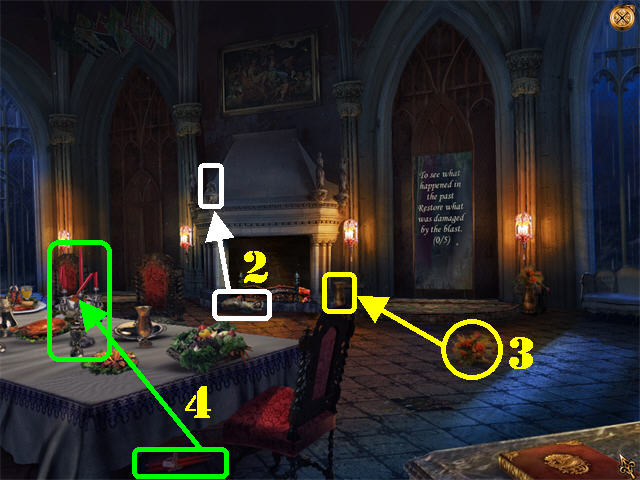
- Place the STATUE (2) above the left side of the fireplace.
- Drag the FLOWERS (3) into the VASE by the fireplace.
- Place the CANDLES (4) below the table onto the CANDELABRA on the table.
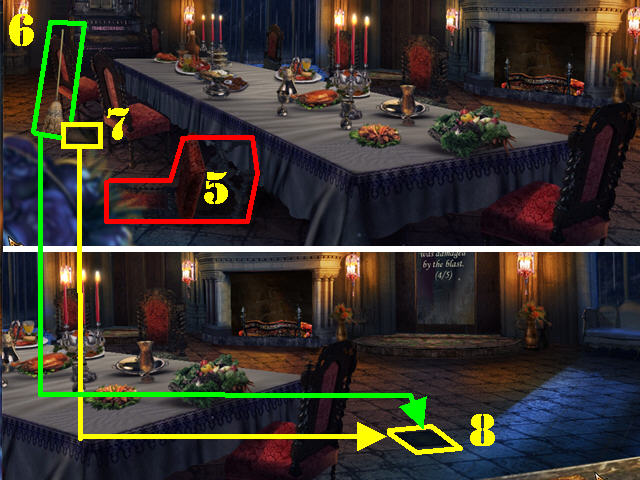
- Click on the CHAIR (5) on the ground to put it back in place.
- Drag the BROOM (6) over to the patch of dirt on the right (8).
- Place the TILE (7) in the spot you just swept (8).
- Go into the kitchen through the door next to the fireplace.
- Click on the well twice to fill the WATER BUCKET (A).
- Place the WATER BUCKET into the fireplace (B).
- Take the CANDLE SNUFFER (C) on the left side of the wall and place it over the 3 CANDLES (D) in the upper left.
- Open the oven door (E).
- Grab the TONGS (F) in the upper left and place them in the oven to grab a hot coal.
- Pan to the right; place the HOT COAL on the CANDLE (G) in the corner.
- Drag the LIT CANDLE over to the secret door (H) next to the mirror to burn it down.
Chapter 7: Secret Room and Stained Glass Doors
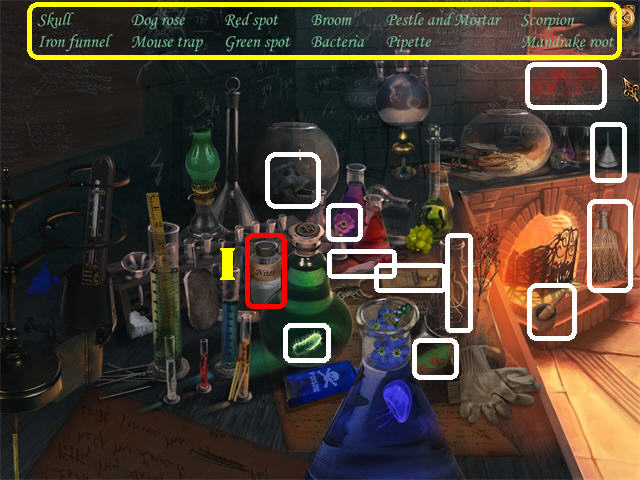
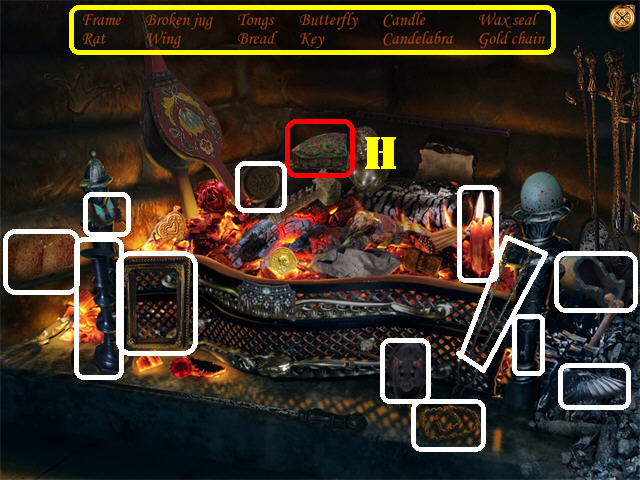
- Zoom into the beakers on the left to trigger a search scene.
- Look for all the items on the list.
- Click on the NITER (I) to add it to the table.
- Click on the 2 WEIGHTS marked in red to have them placed upon the table.
- Grab the COAL (J) by the fireplace.
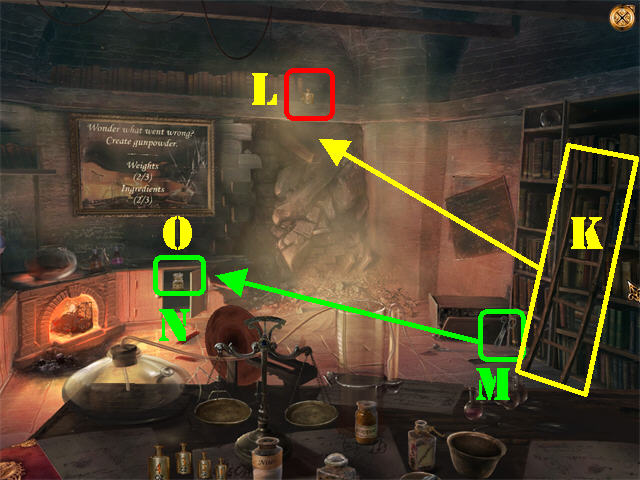
- Grab the LADDER (K) on right and place it over the doorway; take the third WEIGHT (L).
- Use the SCISSORS (M) in the lower right to cut the knot on the cabinets (N).
- Open the cabinet; click on the SULFUR (O).
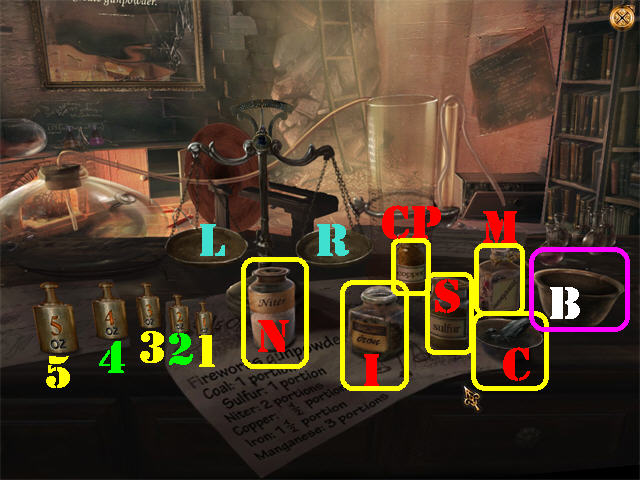
- Follow the recipe on the table. If you make a mistake, you can pick up another piece of COAL next to the fireplace.
- To add an ingredient to the scale; pick it up and click on the scale the number of portions you want added, then right-click the item to remove it from your cursor.
- Check out our video solution!
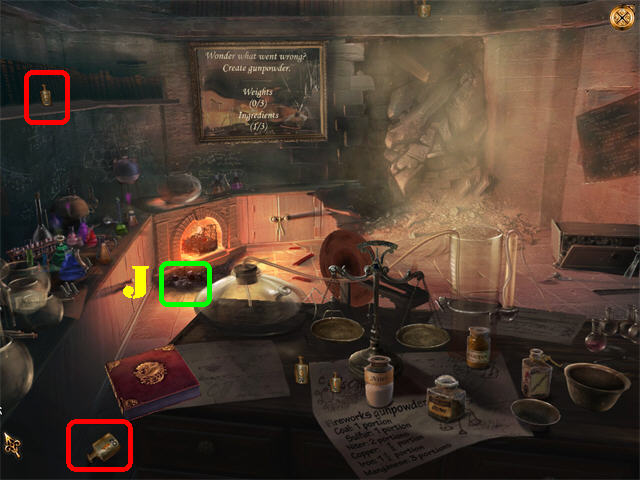
- Place 1 COAL (C) on the right scale (R) and the 2 OZ WEIGHT on the left scale (L).
- Place the COAL in the large bowl (B).
- Place 2 SULFURS on the right scale (R) and the 2 OZ WEIGHT on the left scale (L).
- Place the SULFUR in the large bowl (B).
- Place 4 NITERS (N) on the right scale (R) and the 4 OZ WEIGHT on the left scale (L).
- Place the NITER in the large bowl (B).
- Place 1 COPPER (CP) on the right scale (R) and the 1 OZ WEIGHT on the left scale (L).
- Place the COPPER in the large bowl (B).
- Place 3 IRONS (I) on the right scale (R) and the 1 OZ WEIGHT, and the 2 OZ WEIGHT, on the left scale (L).
- Place the IRON in the large bowl (B).
- Place 6 MANGANESE (M) on the right scale (R) and the 5 OZ WEIGHT, and the 1 OZ WEIGHT, on the left scale (L).
- Place the MANGANESE in the large bowl (B).
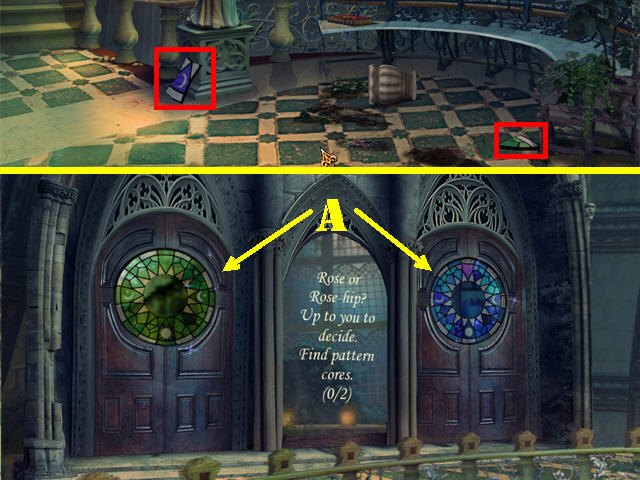
- Pick up the 2 STAINED GLASS PIECES marked in red on the floor.
- Zoom into the stained glass doors in the back of the scene.
- Place the mirror shards found on the ground into the appropriate door.
- You should also move the pieces already on the door to the correct window. Click on 2 pieces in the same position on opposite doors to swap them.
- Please look at the screenshot for the solution (A).
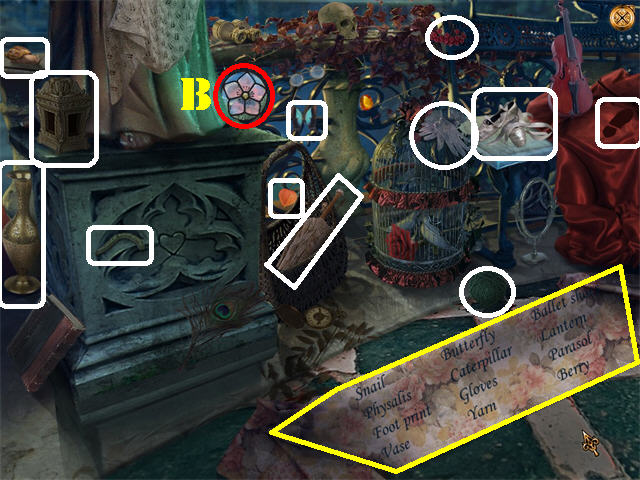
- Zoom into the area by the bottom of the statue to trigger a search scene.
- Look for all the items on the list.
- Click on the STAINED GLASS (B).
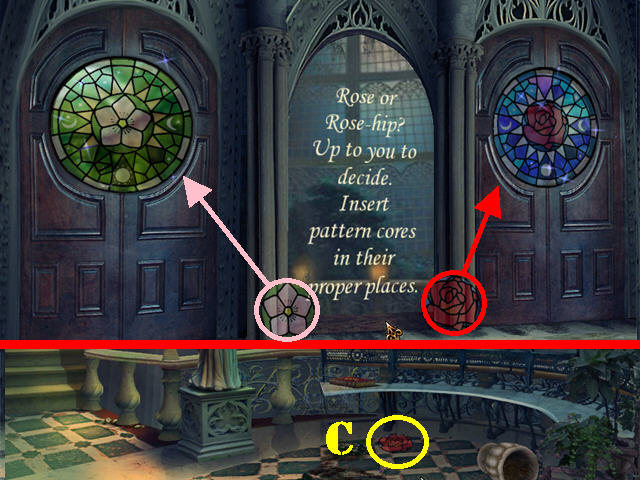
- Grab the STAINED GLASS (C) on the ground.
- The game automatically zooms into the doors.
- Place the PINK STAINED GLASS on the left door.
- Place the RED ROSE STAINED GLASS on the right door.
- Go through the left door.
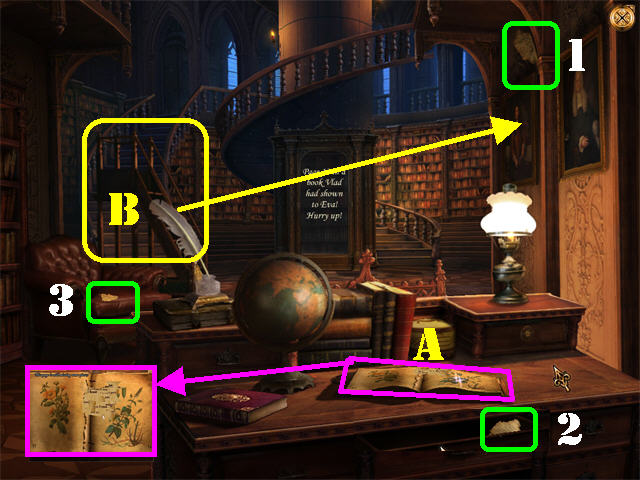
Chapter 8: Library and Underground Bedroom
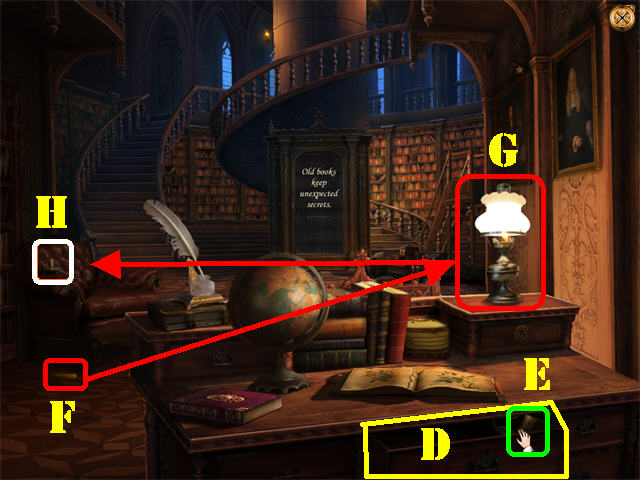
- Open the drawer (D); click on the CANDLEHOLDER (E) and it will land by the red chair on the left.
- Drag the CANDLE (F) by the chair over to the LAMP (G) to light it.
- Place the LIT CANDLE in the CANDLEHOLDER (H) by the chair.
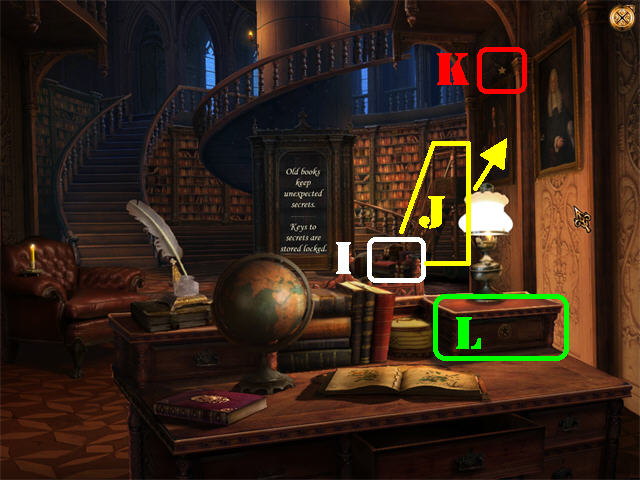
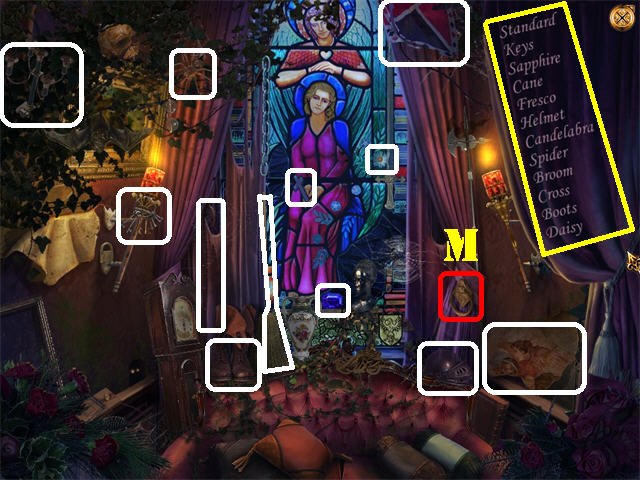
- Zoom into the left bookcase; click on the books.
- Pan to the right.
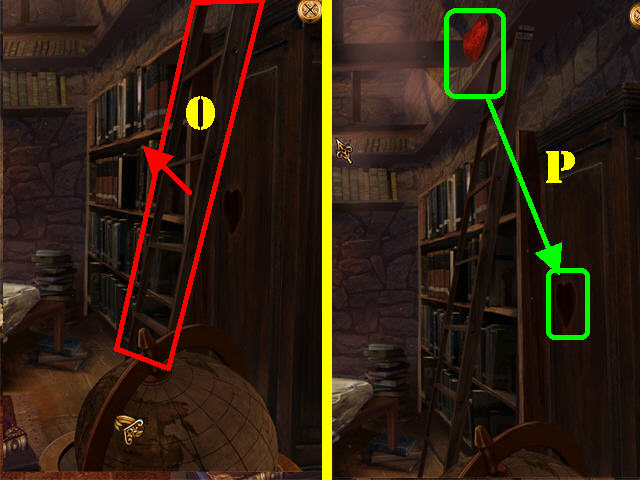
- Remove the BOOKS (I) from the bottom of the ladder.
- Move the LADDER (J) to the right bookcase.
- Take the KEY (K) above the ladder.
- Place the KEY into the locked drawer (L).
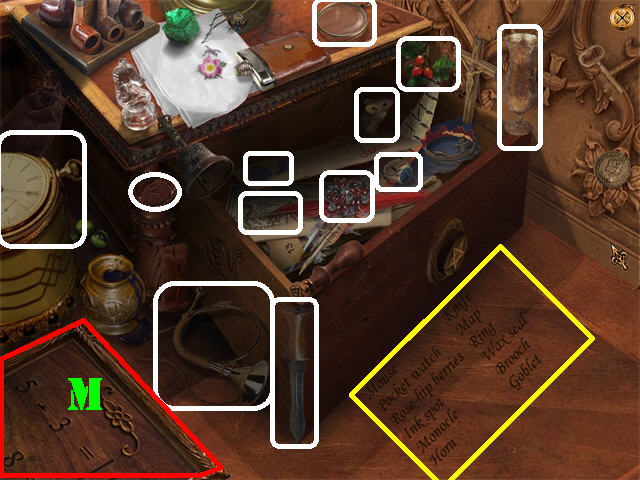
- Zoom into the locked drawer to activate a search scene.
- Look for all the items on the list.
- Click on the CODE BOARD (M) in the lower left.
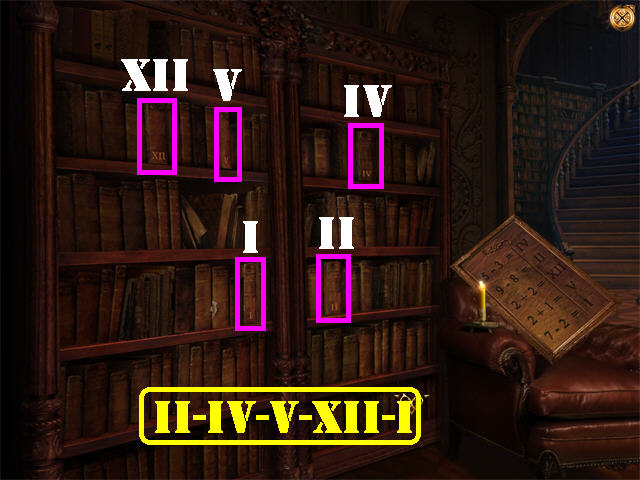
- You will be taken to the zoom-in scene of the left bookcase.
- The CODE BOARD has the following engravings:
- 5-3 = IV.
- 9-8 = II.
- 2+2 = XII.
- 2+1 = V.
- 7-2 = I.
- Once you solve the equations {for example; 2 + 1 (3) = V} it will tell you in which order to touch the books.
- To solve the puzzle click on the books in the following order: II, IV, V, XII, I.
- Go through the secret door.

- Click on the 4 BLOODY HANDPRINTS marked in yellow.
- Pan to the right.
- Turn the GLOBE once; click on the BLOODY HANDPRINT marked in yellow.
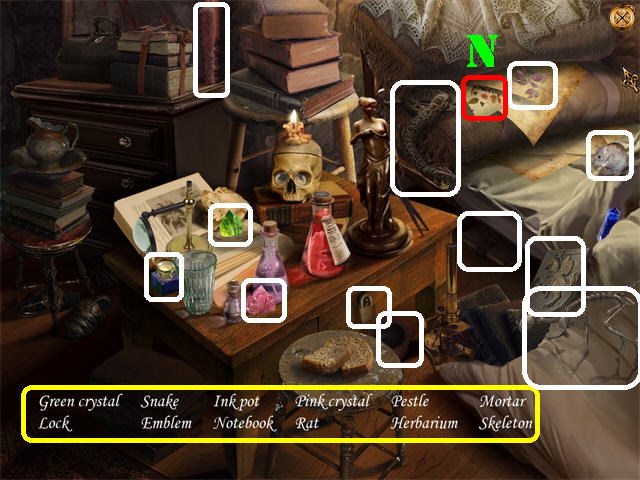
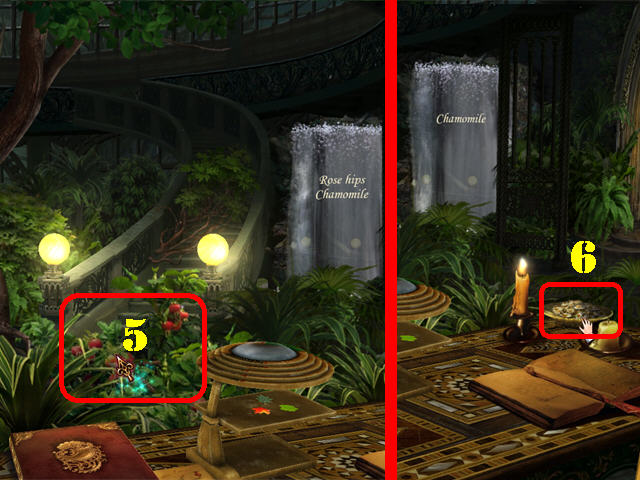
- Zoom into the small table by the bed to activate a search scene.
- Look for all the items on the list.
- Take the ROSE-HIP IMAGE (N).
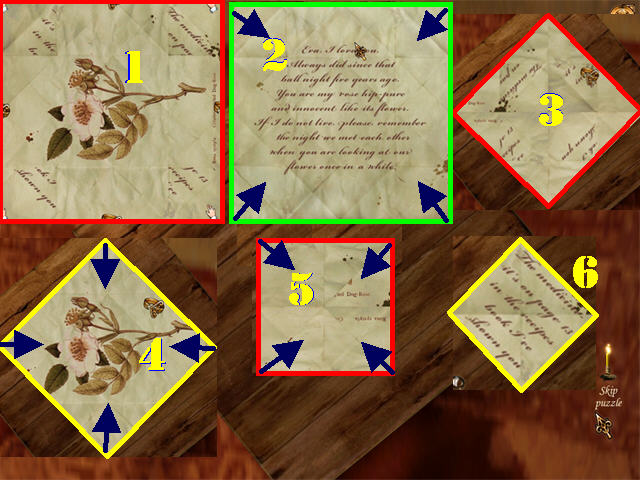
- The napkin should be facing in the same direction of Fig. 1.
- Flip over Fig. 1 so it is facing the same direction of Fig. 2.
- Fold in all 4 corners of Fig. 2 by clicking on each corner when the hand icon appears.
- Fig. 3 shows the folded napkin; flip it over so it resembles Fig. 4.
- Fold in all 4 corners in Fig. 4; Fig. 5 shows the folded napkin.
- Fold in all 4 corners of Fig. 5.
- Check out our video solution!
- Fig. 6 shows the final image. Click on the napkin to read the diary page.
- Place the LADDER (O) on the right bookcase.
- Take the HEART (P) in the upper right and place it over the recess on the door.
Chapter 9: Library Revisited
- Zoom into the book on the table (A).
- Zoom out to look for the scraps of paper.
- Drag the LADDER (B) over to the right side; take the SCRAP (1) in the upper right.
- Open the drawer in the lower right; take the SCRAP (2).
- Grab the SCRAP (3) on the chair.
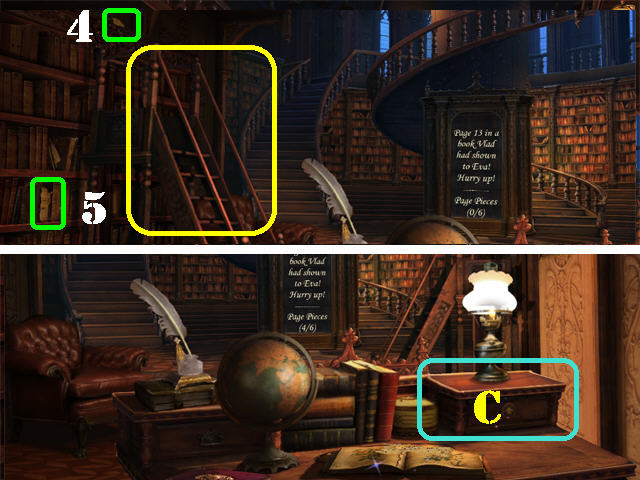
- Drag the LADDER over to the left side; take the SCRAP (4).
- Grab the SCRAP (5) by the books.
- Click on the closed drawer twice (C) to activate a search scene.

- Look for all the items on the list.
- Take PAGE 13 from inside the drawer (D).
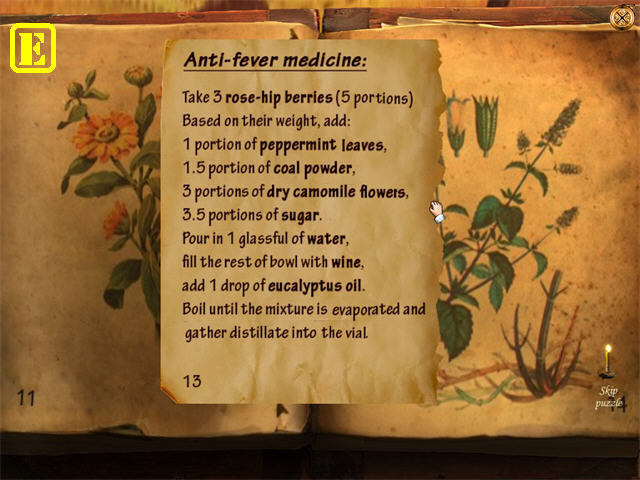
- Assemble the ANTI-FEVER MEDICINE paper as shown in the screenshot (E).
- Correct pieces will lock in place.
- Follow the ghost up the staircase.
Chapter 10: Anti-fever Medicine Ingredients
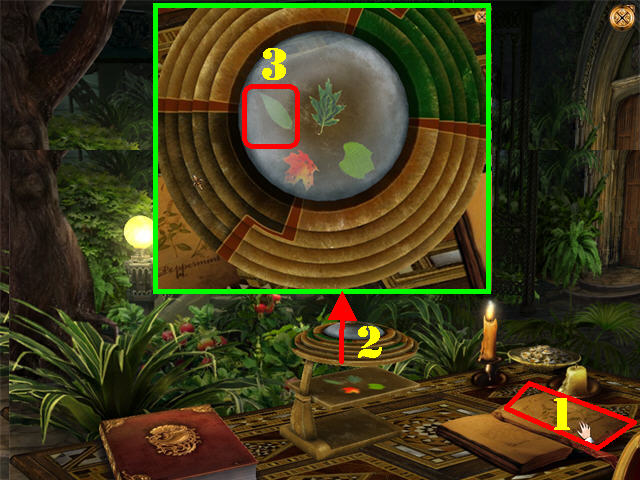
- Click on the PEPPERMINT PAGE on the right (1).
- Zoom into the puzzle on the table (2).
- Check out our video solution!
- Focus the lens as shown in the screenshot. The solution is random.
- Click on the PEPPERMINT LEAF (3) on the left.
- Zoom into the bench to activate a search scene.
- Look for all the items on the list.
- Grab the CLIPPERS (4).
- Remove the ROSE-HIPS with the CLIPPERS (5).
- Take the CHAMOMILLE FLOWERS (6) from the lower right.
- Follow the ghost right.
- Use the TONGS (A) to grab the SUGAR (B) from the bowl.
- Grab the GLASS OF WATER (C) on the table.
- Drag the WINE GLASS (D) on the ground over to the barrel (E) to obtain the WINE.
- Click on the area below the mirror; you need to find some more floor tiles (F).
- Grab the DECORATIVE FLOOR TILE (G) below the table.
- Zoom into the fireplace to activate a search scene.
- Look for all the items on the list.
- Grab the DECORATIVE FLOOR TILE (H).
- Zoom into the area below the mirror to activate the puzzle.
- Assemble the tiles as shown in the screenshot (I).
- Follow the ghost through the mirror.
Chapter 11: Anti-fever Medicine Preparation
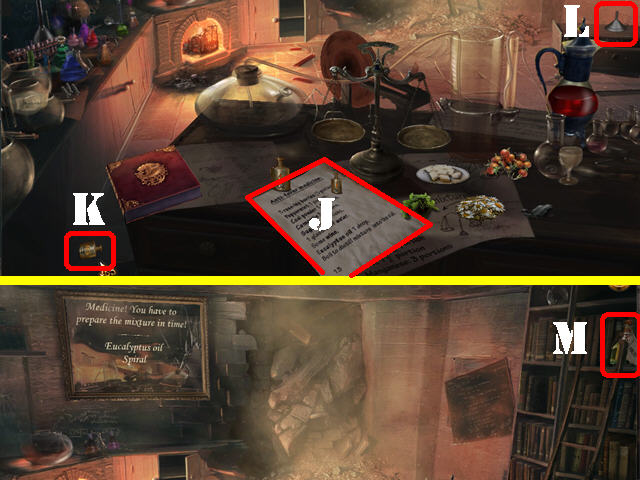
- Click on the RECIPE on the table to trigger tasks (J).
- Take the 0.5 OZ WEIGHT (K) in the lower left.
- Grab the FUNNEL (L) on the right.
- Place the LADDER on the right side of the scene.
- Take the EUCALYPTUS OIL (M) in the upper shelf.

- Examine the flasks on the left to trigger a search scene.
- Grab the SPIRAL (N) on the right.
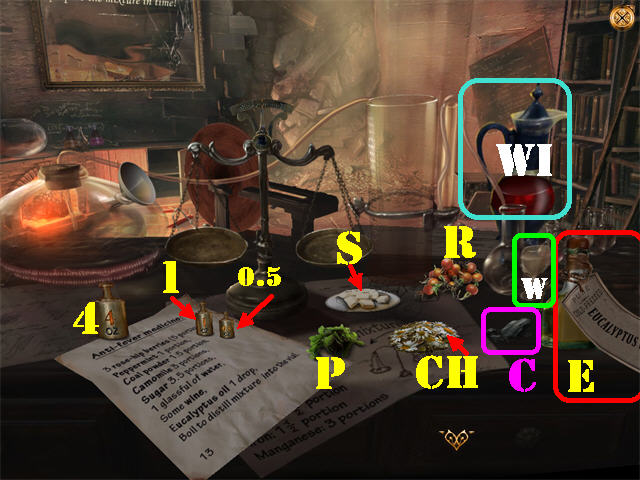
- Place 3 ROSE-HIP BERRIES (R) on the right side of the scale. Put the 4 OZ WEIGHT and the 1 OZ WEIGHT on the left scale.
- Put the ROSE-HIP BERRIES into the large GLASS CONTAINER (G) on the left.
- Place 2 PEPPERMINTS (P) on the right scale. Put the 1 OZ WEIGHT on the left scale.
- Put the PEPPERMINT into the large GLASS CONTAINER (G) on the left.
- Place 3 COAL POWDERS (C) on the right side of the scale. Put the 1 OZ WEIGHT and the 0.5 OZ WEIGHT on the left scale.
- Put the COAL POWDER into the large GLASS CONTAINER (G) on the left.
- Place 6 CHAMOMILES (CH) and the 1 OZ WEIGHT on the right side of the scale. Put the 4 OZ WEIGHT on the left scale.
- Put the CHAMOMILES into the large GLASS CONTAINER (G) on the left.
- Place 7 SUGAR CUBES (S) and the 0.5 OZ WEIGHT on the right scale. Put the 4 OZ WEIGHT on the left scale.
- Put the SUGAR CUBES into the large GLASS CONTAINER (G) on the left.
- Drag the GLASS OF WATER (W) over to the large GLASS CONTAINER (G).
- Drag the WINE CARAFE (WI) over to the large GLASS CONTAINER (G) and click on it once.
- Drag the EUCALYPTUS OIL (E) to the large GLASS CONTAINER (G) and click once.
- Check out our video solution!
- Follow the ghost on the right.
Chapter 12: The Finale
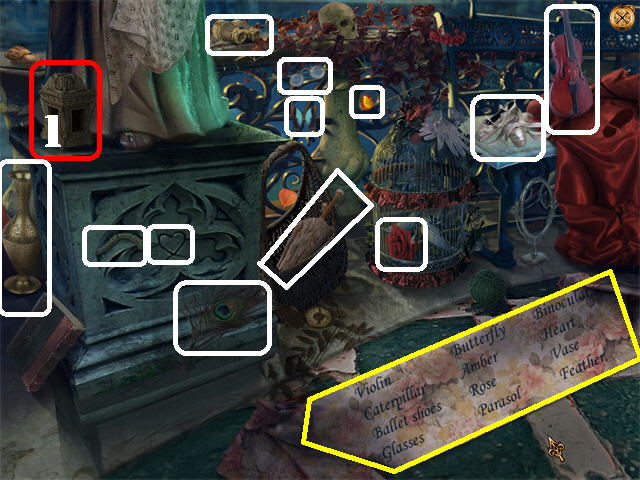
- Examine the area below the statue to trigger a search scene.
- Look for all the items on the list.
- Take the LANTERN in the upper left (1).
- The LANTERN you obtained from the search scene will automatically fix the top part of the broken railing.
- Grab the 2 PIECES on the ground and place them as shown in the screenshot.
- Click on the NOTE (3) on the ground.
- Follow these instructions to complete this puzzle.
- Check out our video solution!
- Make sure the page is facing the same direction as in Fig. 1 and then fold in each of the 4 corners.
- Fold the 4 corners of Fig. 2 so it resembles the image in Fig. 3.
- Flip Fig. 3 so it resembles the image in Fig. 4.
- Fold the 4 corners of Fig. 4.
- Fig. 5 shows the final image; click on the paper to place it in your diary.
- You will be taken back to the cemetery.
- Examine the tree roots to trigger a search scene.
- Look for all the items on the list.
- Take the PRUNING SHEARS (A) in the lower right.
- Cut the ROSE (B) with the PRUNING SHEARS.
- Place the ROSE in the VASE (C).
- After the credits, you will be asked to enter your name in the Novel (D). Flip through the pages to read the whole story.
- If you exit the game, you can go to the Main Menu and click on Novel to continue reading.
- Congratulations! You’ve Completed The Stroke of Midnight!
Created at: 2011-01-21