
Walkthrough Menu
- General Tips
- Chapter 1: Break Out
- Chapter 2: Hard Road
- Chapter 3: Sleeping Village
- Chapter 4: Who Are You?
- Chapter 5: Tomorrow’s Dream
- Chapter 6: Hole in the Sky
- Chapter 7: Wheel of Confusion
- Chapter 8: Children Of The Sea
- Chapter 9: Into The Void
- Chapter 10: Call Of The Wild
- Chapter 11: The Warning
- Chapter 12: The Wizard
General Tips
- You may play this game in full screen or windowed mode by pressing “Alt + Enter”.
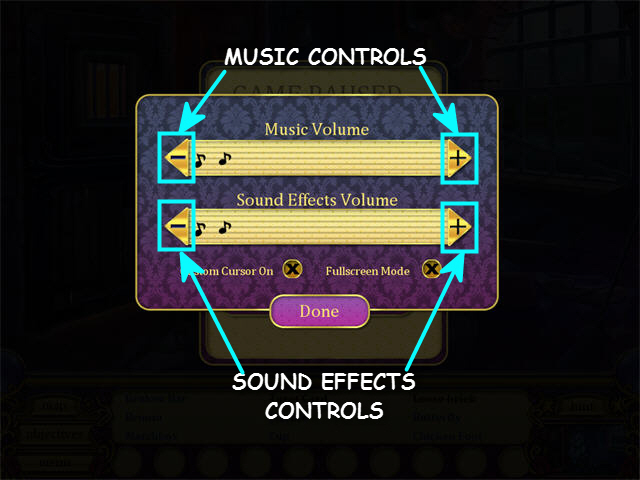
- From the option menu you can adjust a variety of settings like screen mode, cursor style, music and sound volume.
- Each room is full of items you need to find.
- Blue items can be found right away.
- Grey items in italics cannot be found yet; you must do something before they become available.
- Crossed out items have been found.
- Inventory items can be picked up in any of the scenes in the game.
- The inventory items will be stored in the tray at the bottom of each scene.
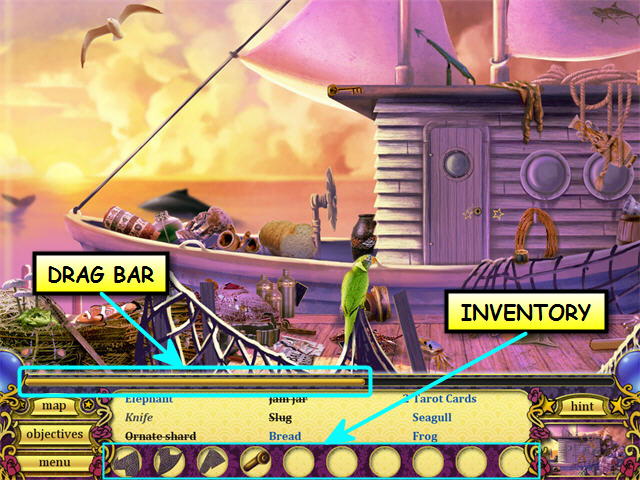
- You can use an inventory item by picking it up and click it onto the area you wish to use it in.
- When your cursor turns into a magnifying glass it means it is an area of interest. Clicking on that item will access a mini-game, let you find more hidden objects or allow you to use inventory items.
- When you see stars in an environment it means you can use an inventory item in that location.
- Some scenes are bigger than the active screen.
- You can move the cursor to the left or right of the screen to access the whole scene or drag the horizontal bar between the crystals on each side of the screen.
- The shining lights inside of the two crystals indicate how many objects there are to be found on that side of the screen.
- The number and intensity of the lights will become greater the more objects there are off screen.
- You can only travel through doors that are not locked.
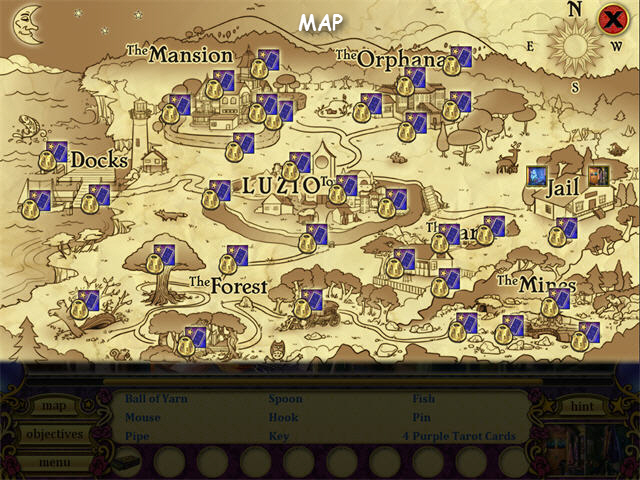
- Click on the map button to access an area map of the whole game.
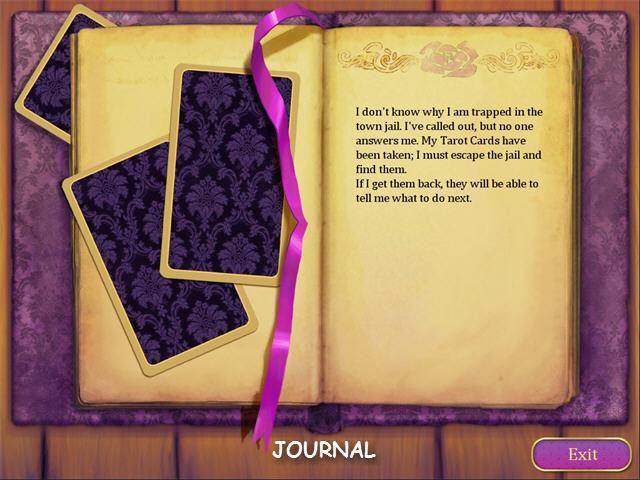
- Click on the objectives button to access a journal.
- Hints are unlimited but they need to recharge before they can be used again.
- You can skip any cut scene by pressing the skip button.
Chapter 1: Break Out
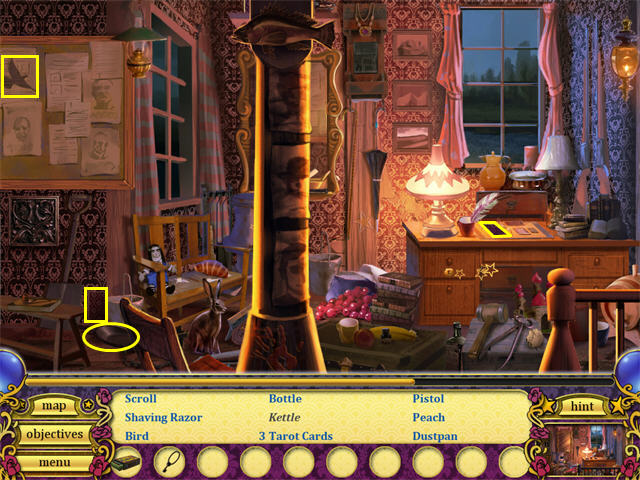
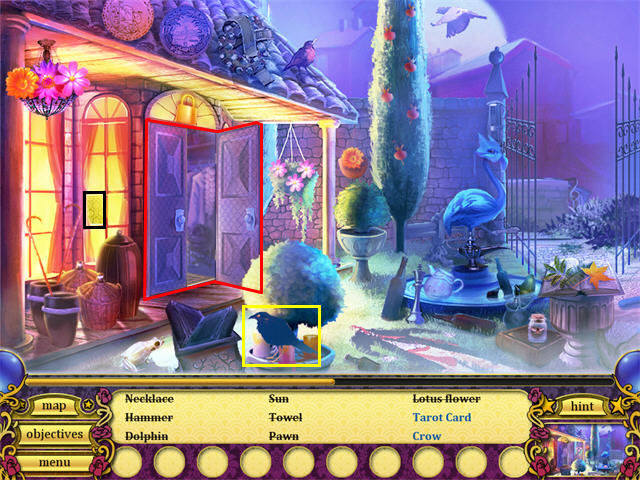
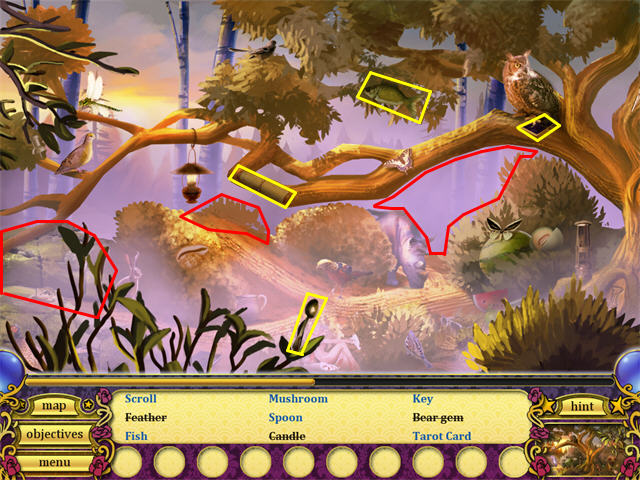
The Jail Cell
- The game starts with a cut scene.
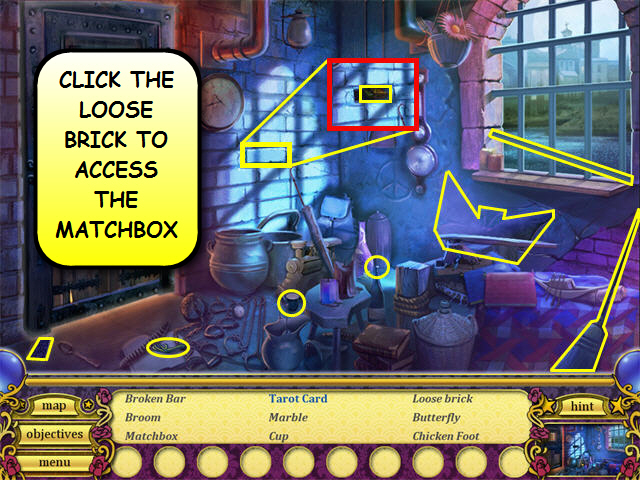
- Pick up the TAROT CARD from the floor.
- Click on the loose brick to find the MATCHBOX.
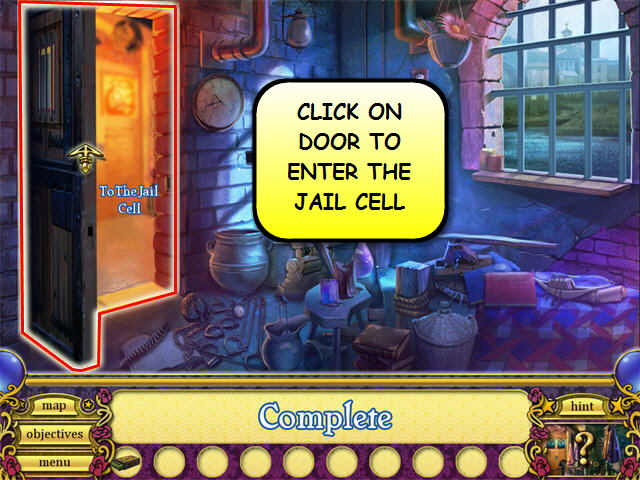
- After finding all the hidden objects in the scene click on the door.
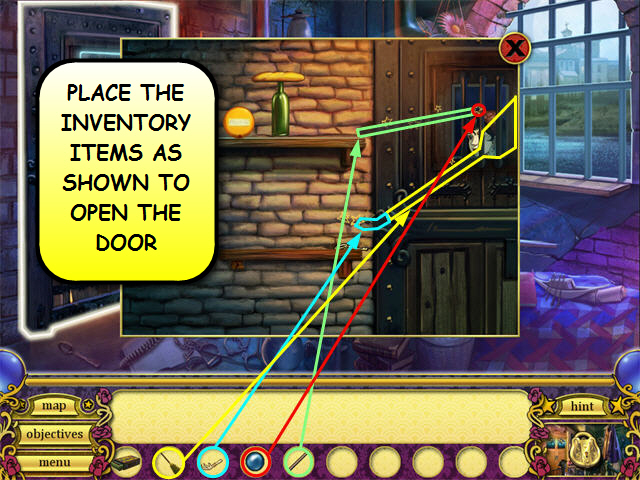
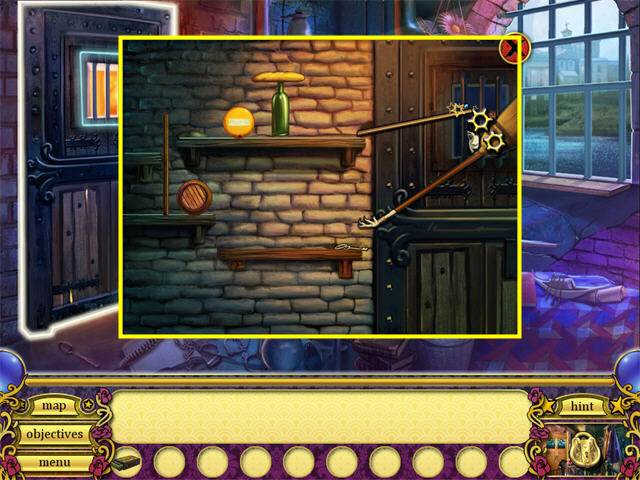
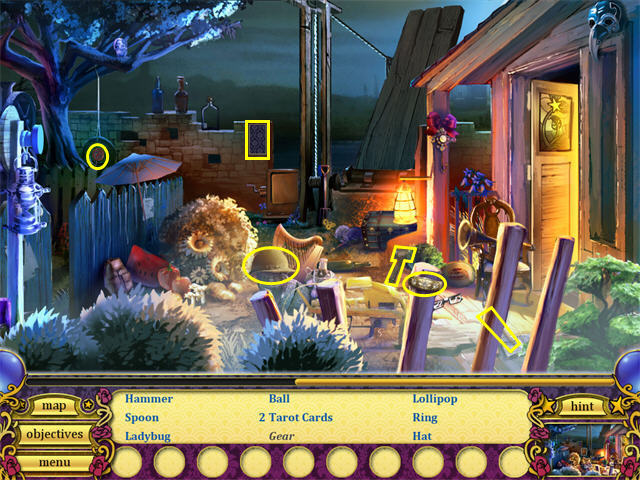
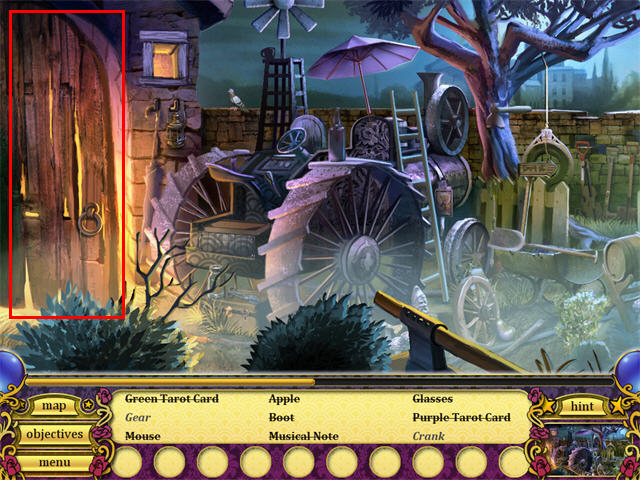
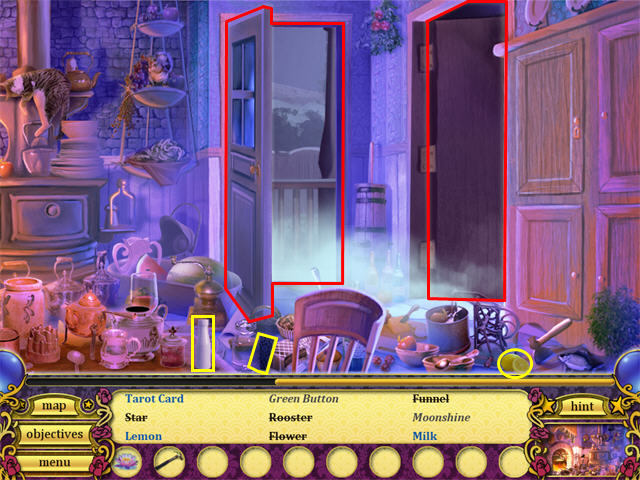
- One at a time, pick up the BROKEN BAR, the BROOM, the CHICKEN FOOT and the MARBLE from the inventory and place them as shown in the following screenshot.
- Proceed to the next room by clicking on the door.
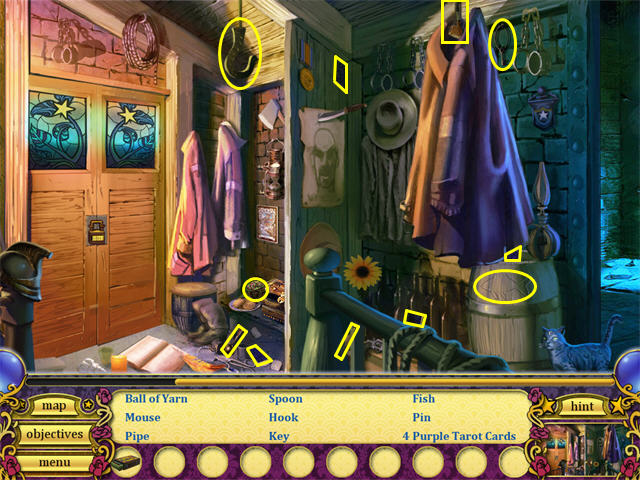
The Jail Entrance
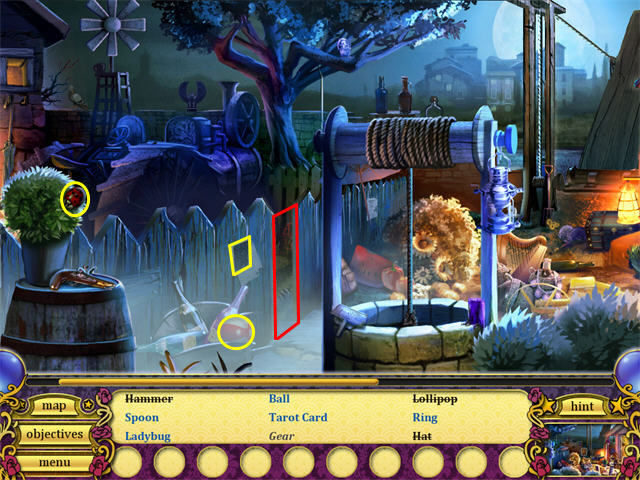
- Find all the hidden objects in the scene.
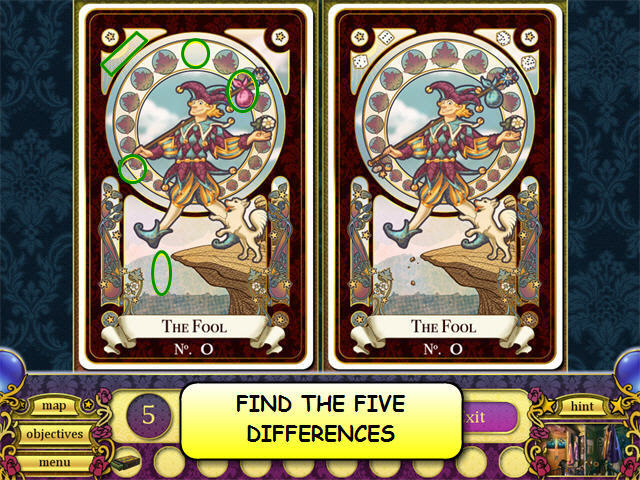
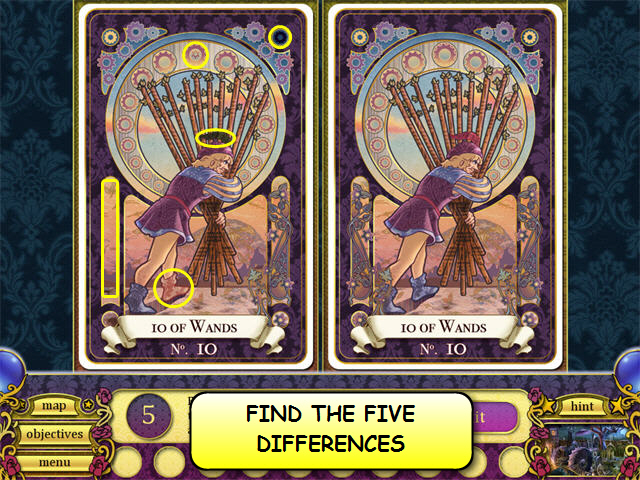
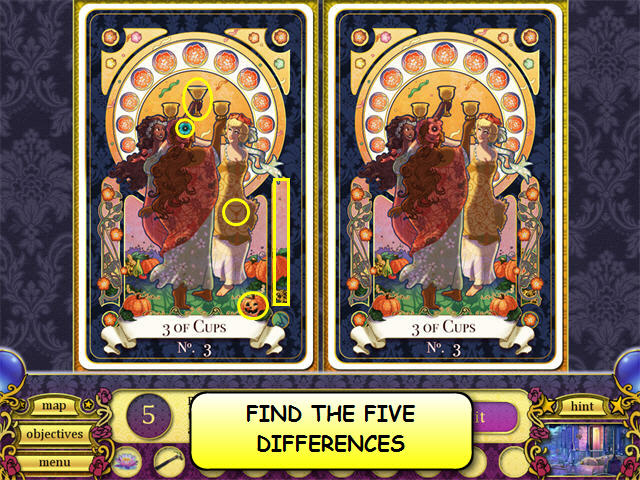
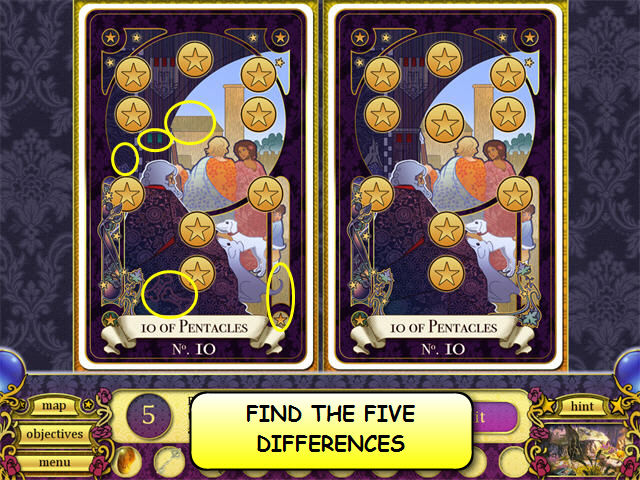
- Click on the flashing card to access a mini-game.
- Find the five differences.
- You can click either card.
- Finding all the differences in the card reveals the following fortune: By boiling water in the kettle, you will find the secret combination.
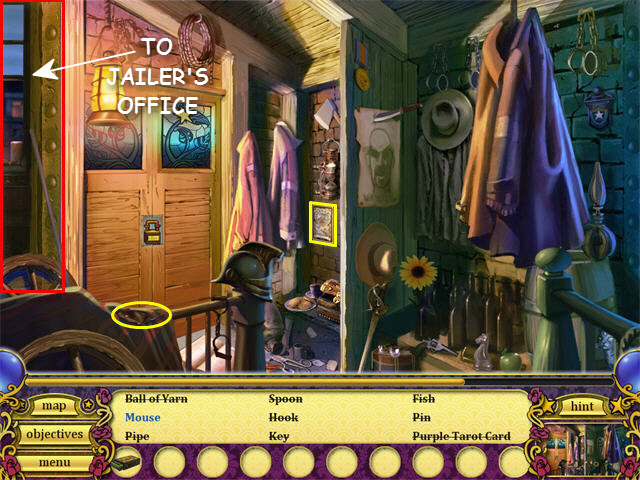
- Head to the Jailer’s Office.
Jailer’s Office
- Find all the hidden objects in the scene.
- Pick up the KEY from the inventory and use it on the desk’s drawer.
- Grab the KETTLE from the desk’s drawer.
- Pick up the MATCHES from the inventory and use them on the furnace.
- Pick up the KETTLE from the inventory and place it on the furnace.
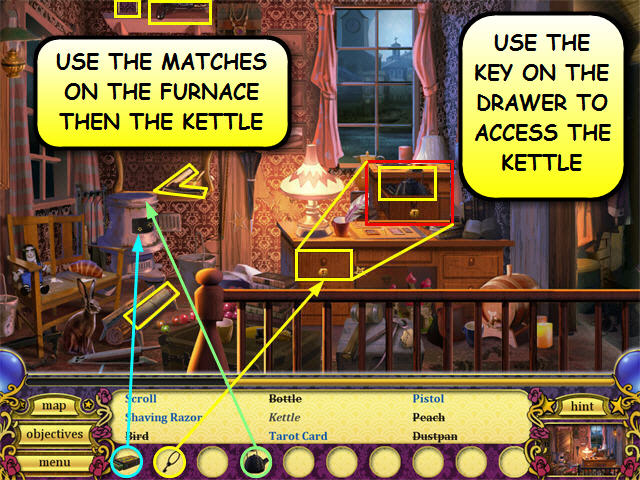
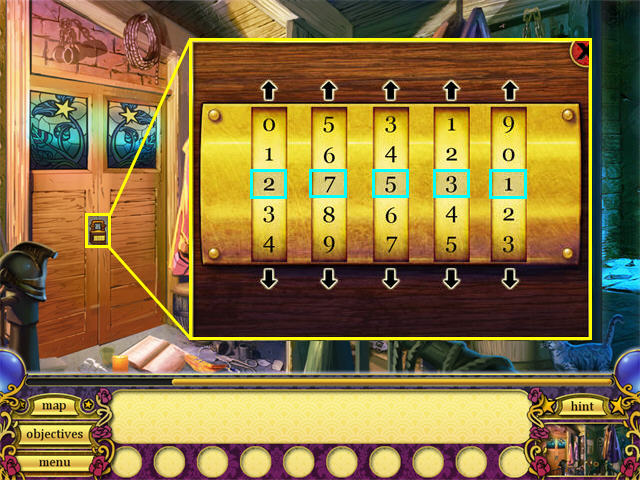
- Use the numbers now visible in the mirror to open the combination lock in the Jail Entrance.
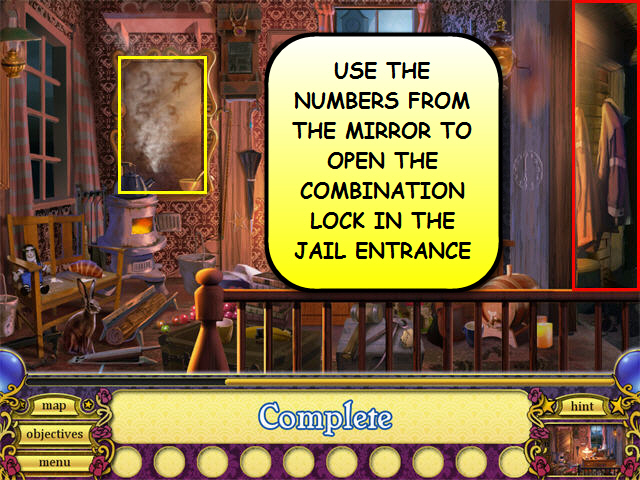
- Head back to the Jail Entrance, click on the combination lock and enter: 27531
- Click on the opened door to access the Jail Exterior.
Chapter 2: Hard Road
The Jail Exterior
- Click anywhere on the screen several times to watch the cut scene or click the exit button to skip it.
- Find all the hidden objects in the scene.
- Click on the opening in the fence to access the Farm Exterior
The Farm Exterior
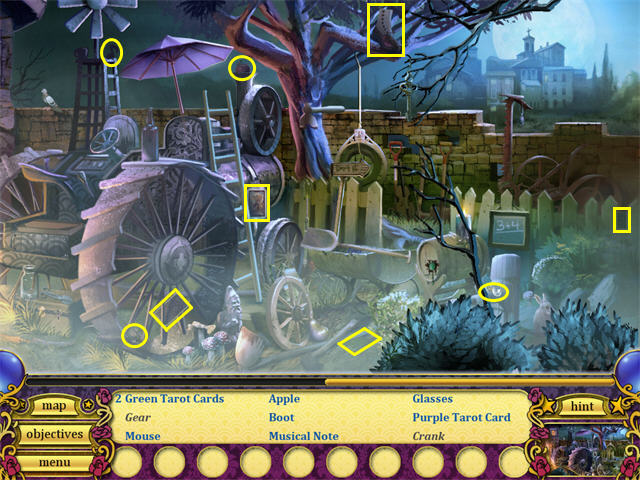
- Find all the hidden objects in the scene.
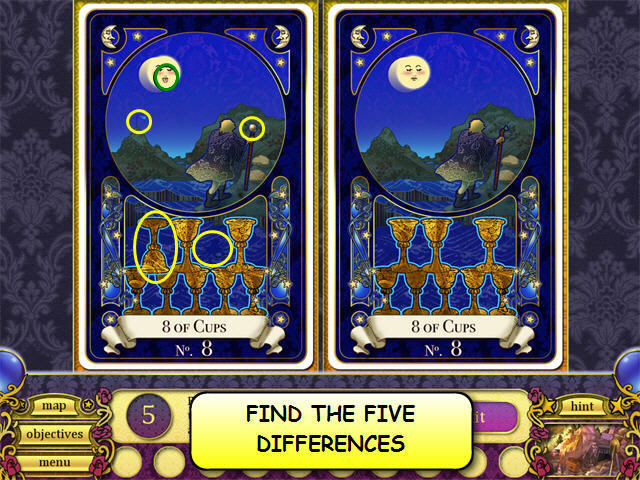
- Click on the flashing card to access a mini-game.
- Find the five differences.
- You can click either card.
- Finding all the differences in the card reveals the following fortune: Move the horse away from the ladder to find your way into the Hayloft.
- Click on the door to get to the Stable.
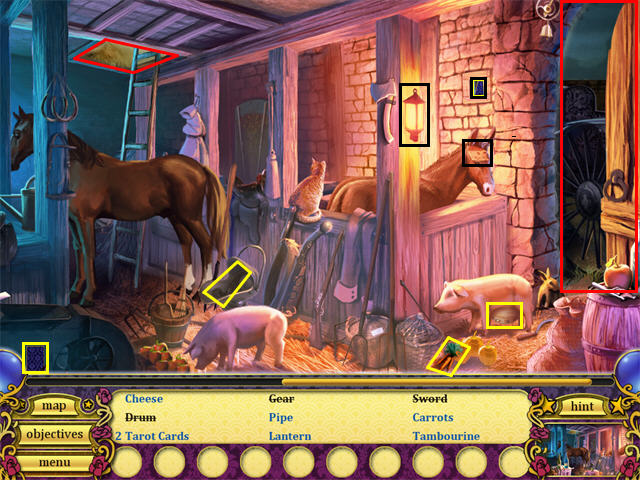
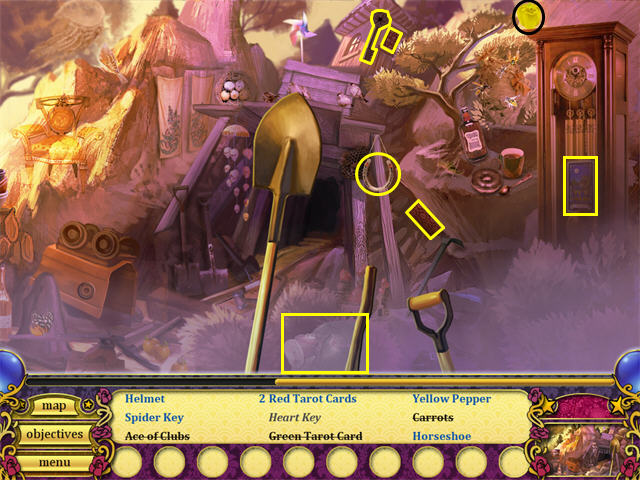
The Stable
- Find all the hidden objects in the scene.
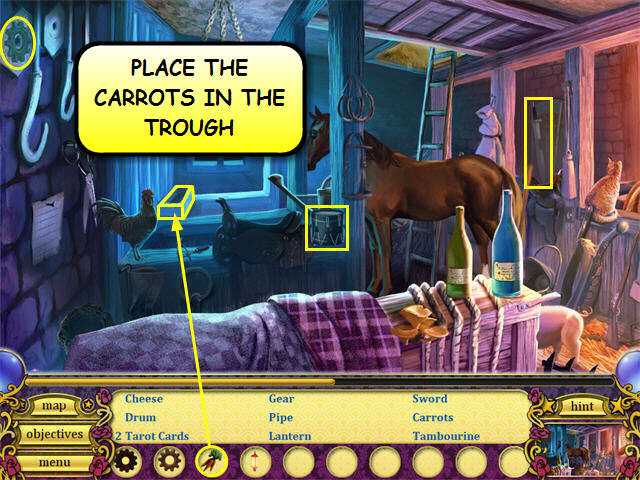
- Pick up the CARROTS from the inventory and place them in the trough.
- Click on the opening at the top of the stairs to access the Hayloft.
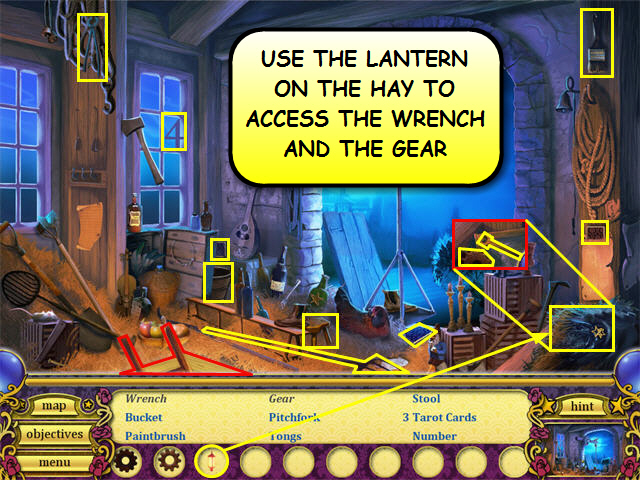
The Hayloft
- Find all the hidden objects in the scene.
- Pick up the LANTERN from the inventory and click the hay in the lower right corner.
- Grab the GEAR and the WRENCH.
- Head back to the Stable and then to the Farm Exterior.
- Pick up the WRENCH from the inventory and click on the compartment in the back of the tractor.
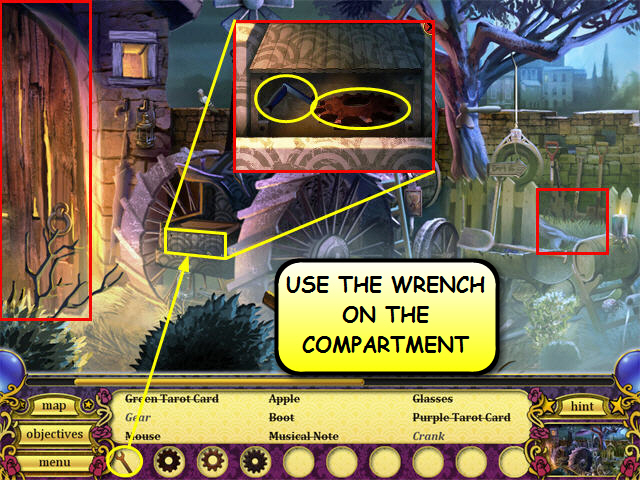
- Click it again to find a GEAR and a HAND CRANK.
- Head back to the Jail Exterior.
- Pick up the HAND CRANK from the inventory and click it at the top of the well.
- Grab the GEAR from the bucket.

- Click on the bridge mechanism.
- One at a time, grab the GEARS from the inventory and place them inside the bridge mechanism as shown in the following screenshot.
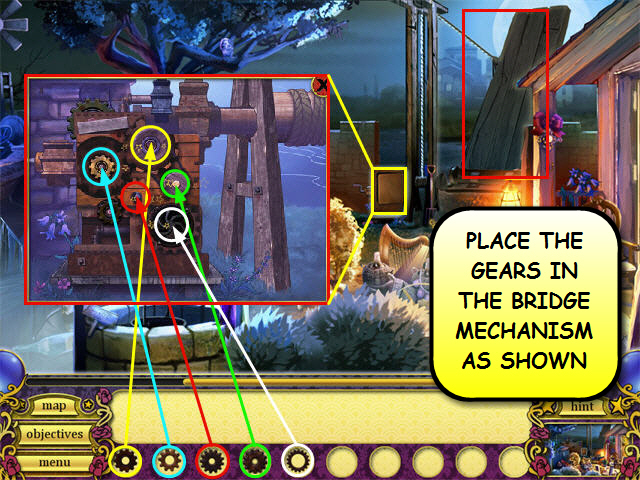
- Click on the bridge to go to East Town.
Chapter 3: Sleeping Village
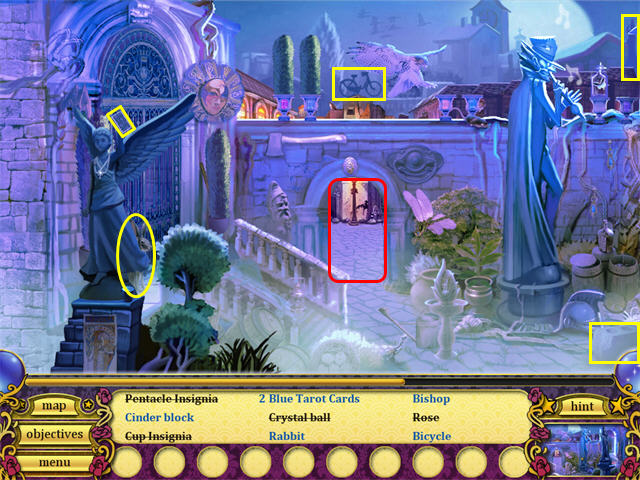
East Town
- Click anywhere on the screen several times to watch the cut scene or click the exit button to skip it.
- Find all the hidden objects in the scene.
- Head to Town Center.
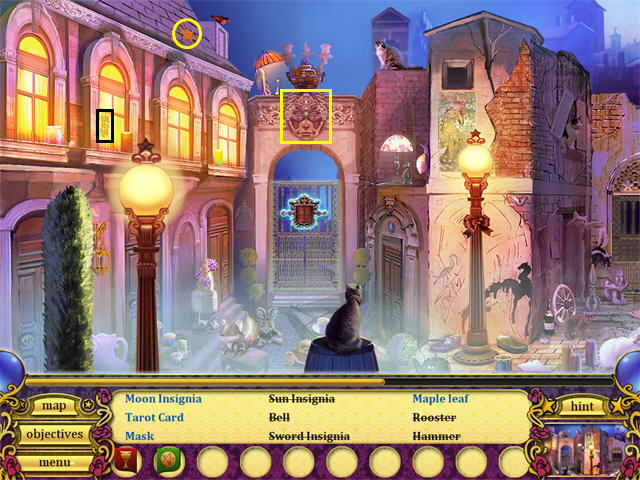
Town Center
- Find all the hidden objects in the scene.
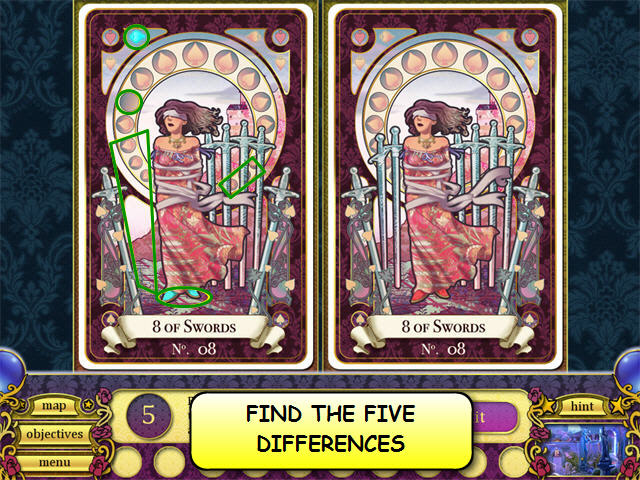
- Click on the flashing card to access a mini-game.
- Find the five differences.
- You can click either card.
- Finding all the differences in the card reveals the following fortune: Destroy the barrels to find what’s missing.
- Head to North Town.
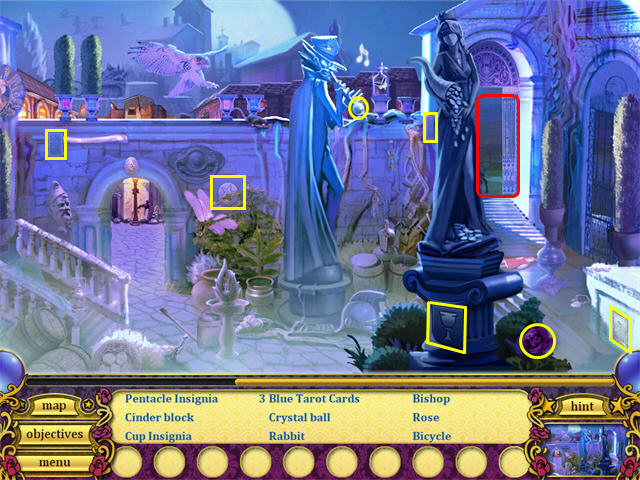
North Town
- Find all the hidden objects in the scene.
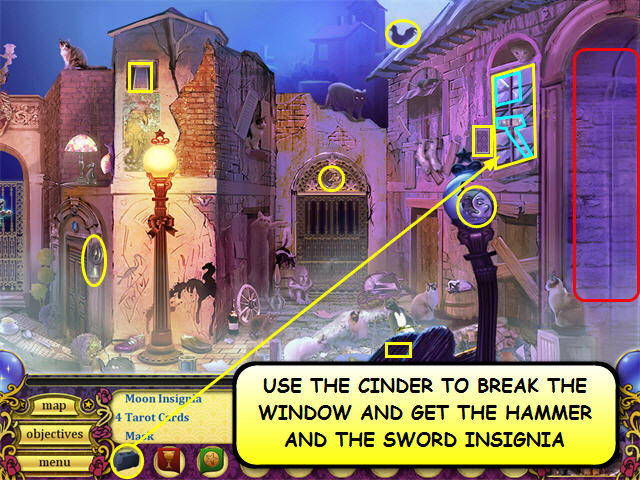
- Pick up the CINDER BLOCK from the inventory and use it to break the window on the top right corner of the building.
- Grab the HAMMER and the SWORD INSIGNIA.
- Head back to Town Center and then to East Town.
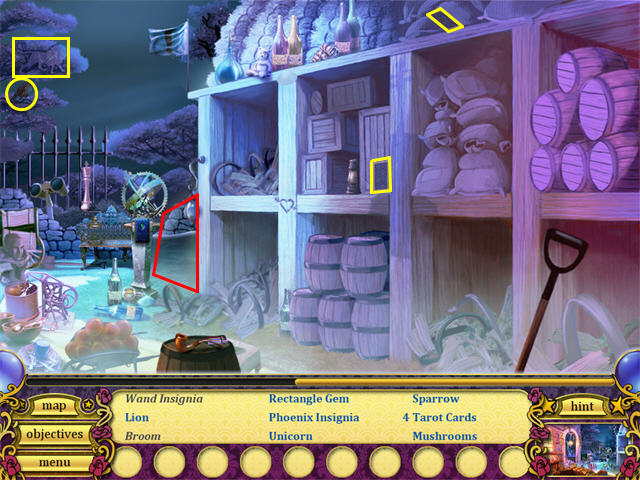
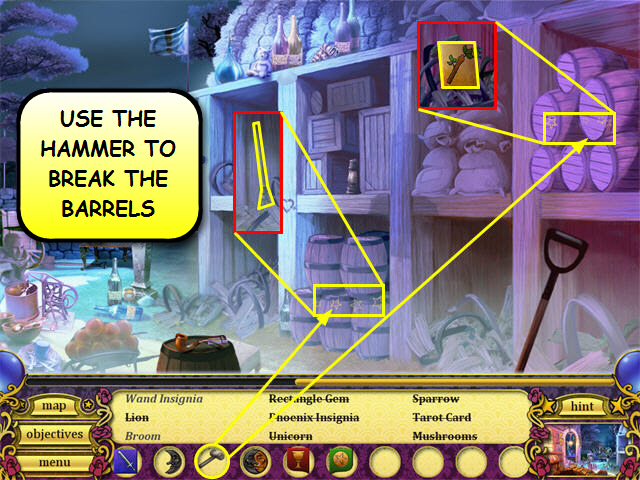
- Pick up the HAMMER from the inventory and use it to break the barrels.
- Grab the BROOM and the WAND INSIGNIA.
- Head back to Town Center and then to North Town.
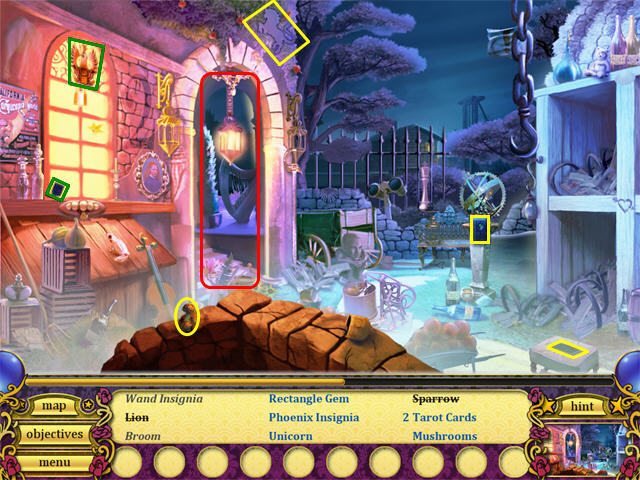
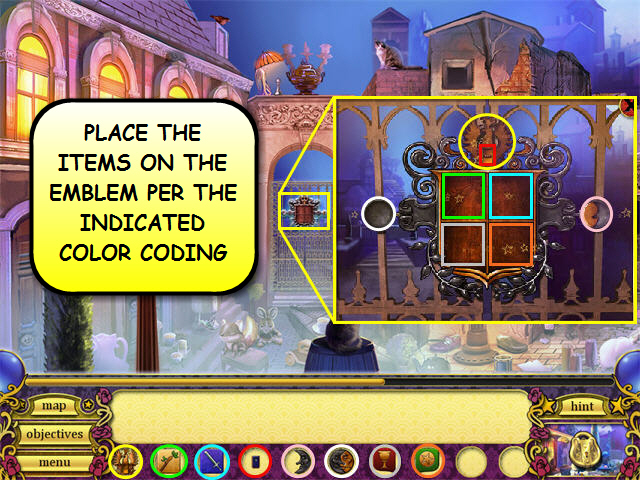
- Click on the emblem that’s on the door to the Mansion Exterior.
- One at a time, grab the IRON PHOENIX, the WAND GLYPH, the SWORD GLYPH, the RECTANGULAR GEM, the SMILING MOON, the SMILING SUN, the CUP GLYPH and the PENTACLE GLYPH from the inventory and place them as shown in the following screenshot.
- Head to the Mansion Exterior.
Chapter 4: Who Are You?
The Mansion Exterior
- Click anywhere on the screen several times to watch the cut scene or click the exit button to skip it.
- Find all the hidden objects in the scene.
- Head to the Mansion Entrance.
The Mansion Entrance
- Find all the hidden objects in the scene.
- Head to the Mansion Kitchen.
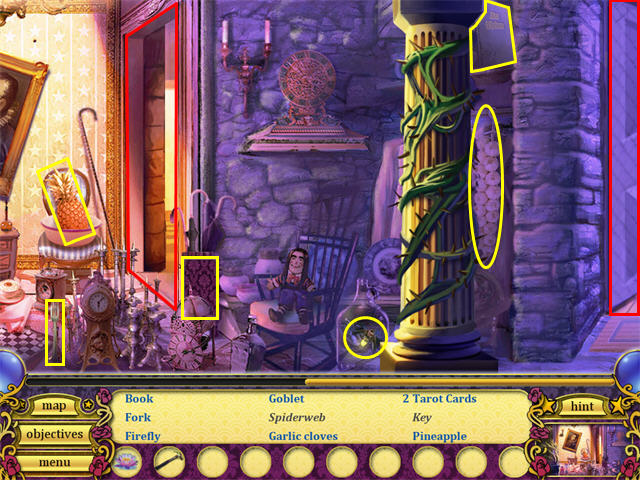
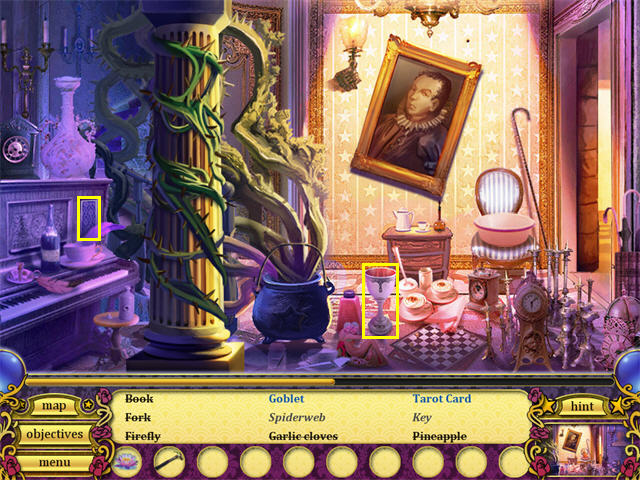
The Mansion Kitchen
- Find all the hidden objects in the scene.
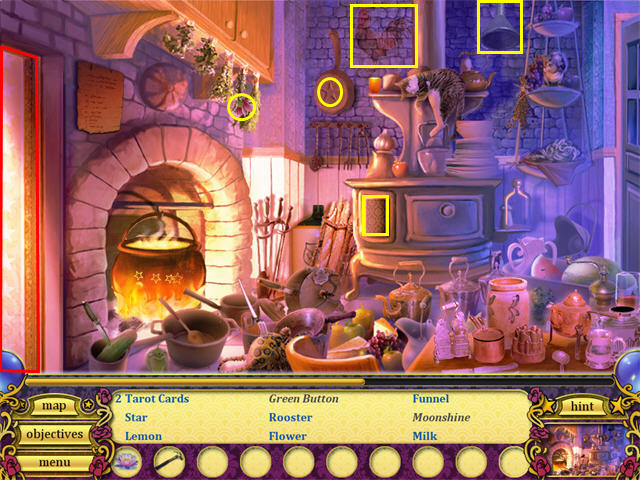
- Head to the Mansion Yard.
The Mansion Yard
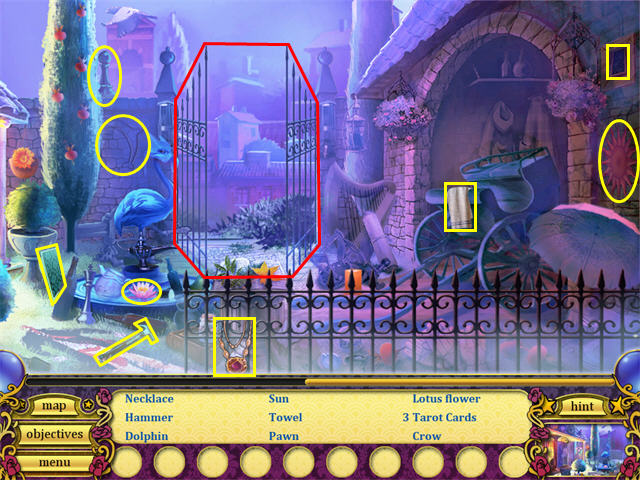
- Find all the hidden objects in the scene.
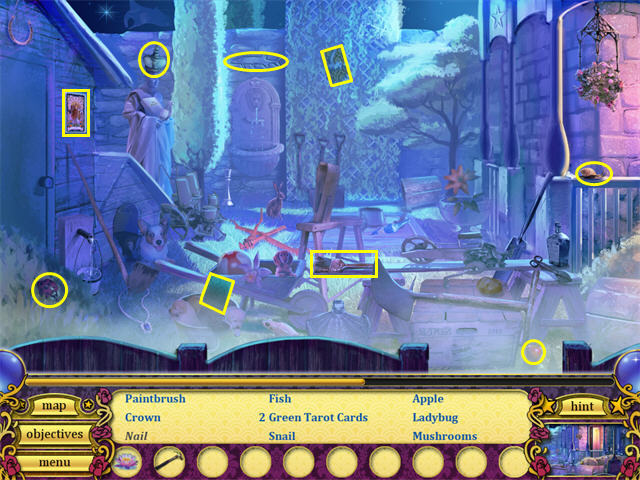
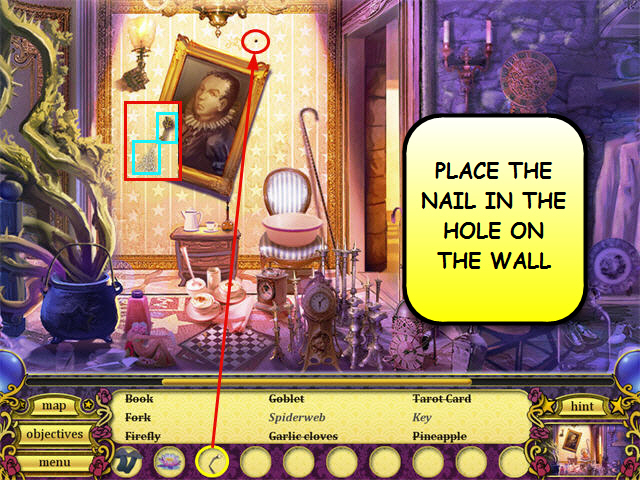
- Pick up the HAMMER from the inventory, click the RUSTY NAIL and grab it.
- Click on the flashing card to access a mini-game.
- Find the five differences.
- You can click either card.
- Finding all the differences in the card reveals the following fortune: The magical brew in the kitchen will clear the way upstairs. Use the recipe on the wall to create it.
- Head to the Mansion Kitchen and then to the Mansion Entrance.
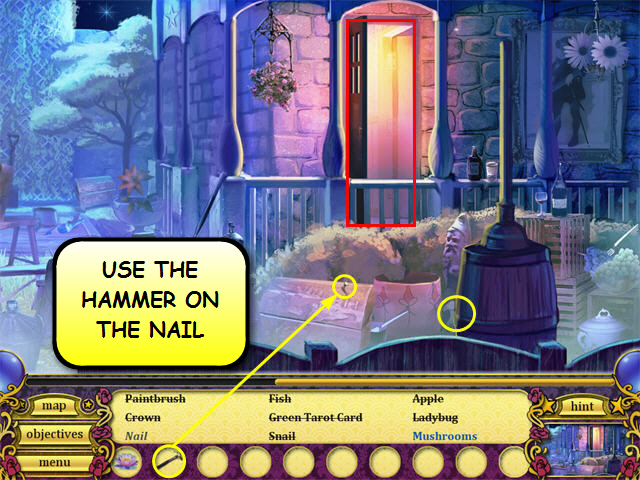
- Pick up the RUSTY NAIL from the inventory and click on the hole in the wall.
- Grab the SMALL METAL KEY and the SILK SPIDERWEB.
- Head to the Mansion Kitchen.
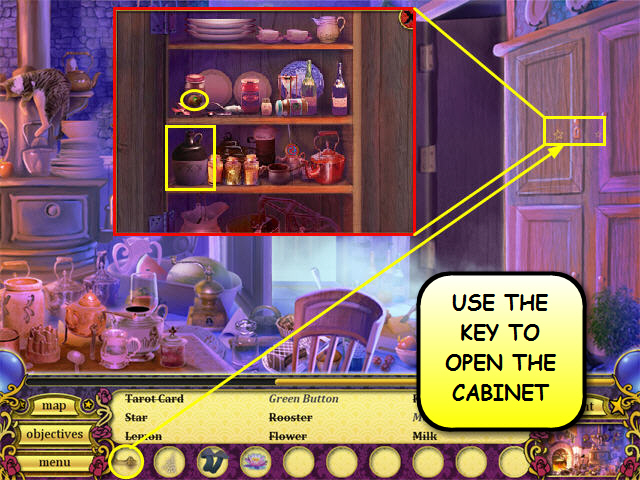
- Pick up the SMALL METAL KEY from the inventory and use it on the cabinet.
- Grab the GREEN BUTTON and the MOONSHINE.
- Enter the Mansion Child’s Room.
The Mansion Child’s Room
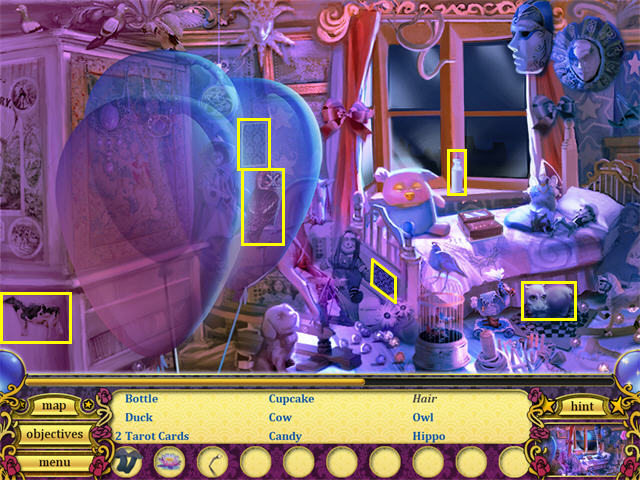
- Find all the hidden objects in the scene.
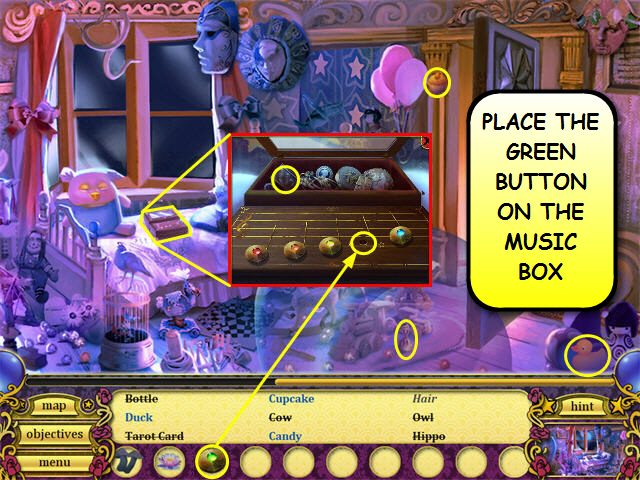
- Click on the music box that’s on the bed.
- Pick up the GREEN BUTTON from the inventory and click the hole in the music box.
- Grab the HAIR and go back to the Mansion Kitchen.
- Head back to the Mansion Kitchen.
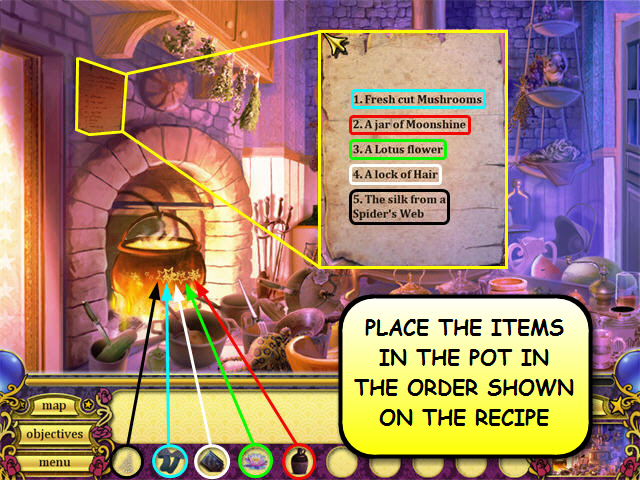
- Place the cursor over the recipe on the wall to see the list of ingredients needed to make the magical brew that will clear the way upstairs.
- One at a time and in the following order, pick up the MUSHROOMS, the MOONSHINE, the LOTUS FLOWER, the HAIR and the SILK SPIDERWEB and place them in the pot.
- Return to the Mansion Entrance and after a brief moment the plant blocking the staircase is removed.
- Enter the Mansion Den.
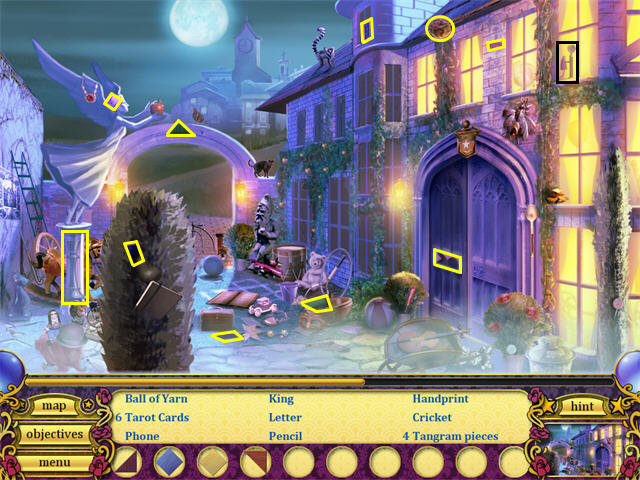
Chapter 5: Tomorrow’s Dream
The Mansion Den
- Click anywhere on the screen several times to watch the cut scene or click the exit button to skip it.
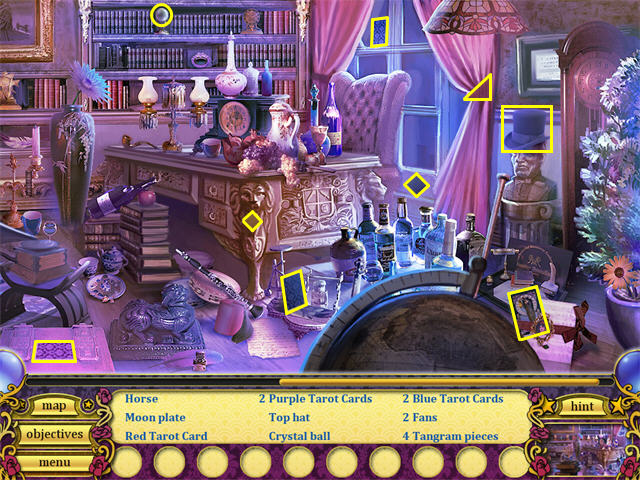
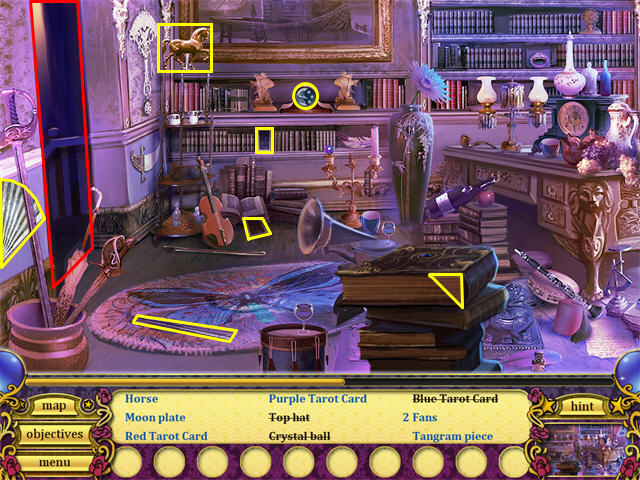
- Find all the hidden objects in the scene.
- Click on the flashing card to access a mini-game.
- Find the five differences.
- You can click either card.
- Finding all the differences in the card reveals the following fortune: Look outside for more Tangrams hidden in pillars and on bricks.

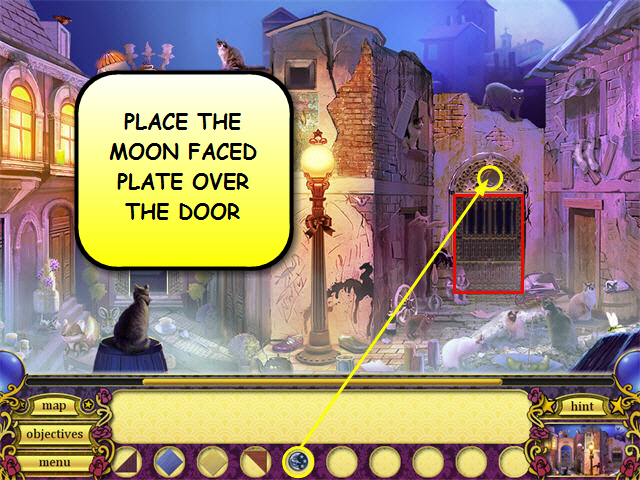
- Head to the Mansion Entrance, then the Mansion Exterior and back to North Town.
- Pick up the MOON FACED PLATE and use it over the door to the Orphanage Exterior.
- You can watch the cut scene or skip it by clicking on the skip button.
The Orphanage Exterior
- Find all the hidden objects in the scene.

- Click on the flashing card on the door to the Orphanage Lunchroom.
- One at a time pick up the TANGRAMS PIECES from the inventory and place them as shown in the following screenshot.

- Enter the Orphanage Lunchroom.
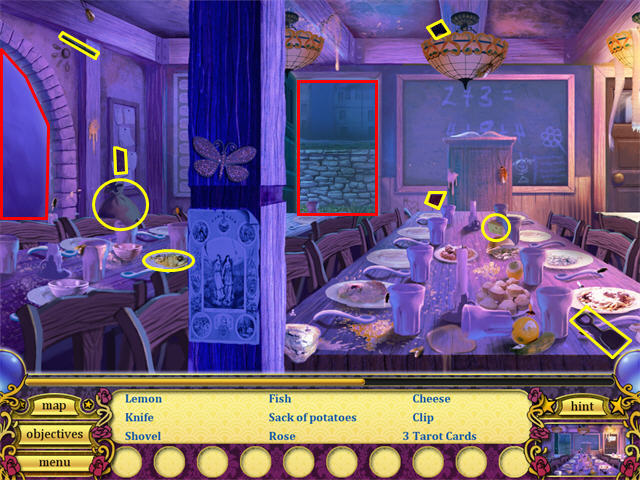
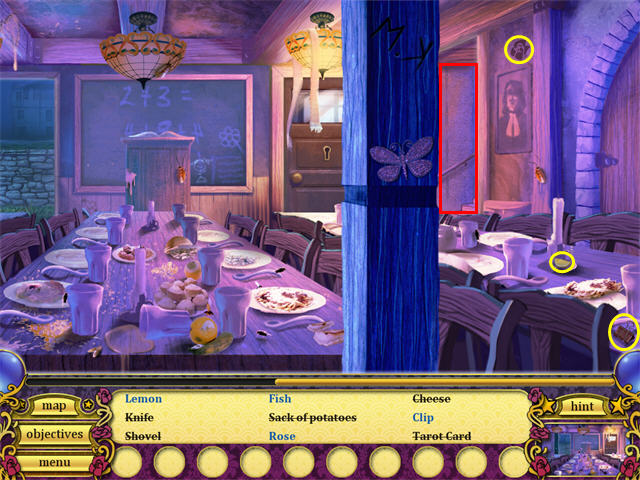
Chapter 6: Hole in the Sky
The Orphanage Lunchroom
- Click anywhere on the screen several times to watch the cut scene or click the exit button to skip it.
- Find all the hidden objects in the scene.
- Enter the Orphanage Playground.
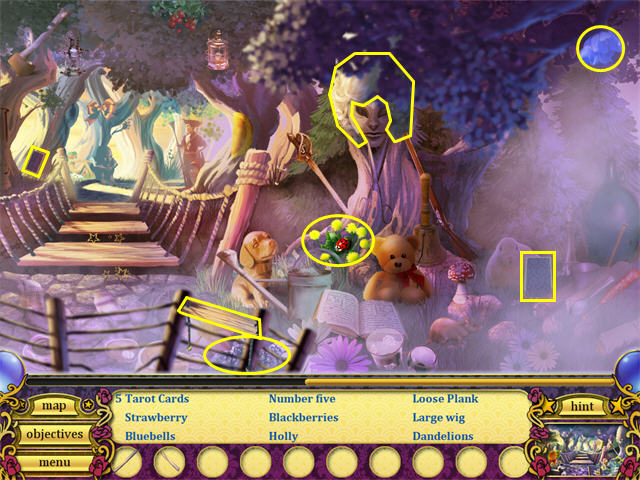
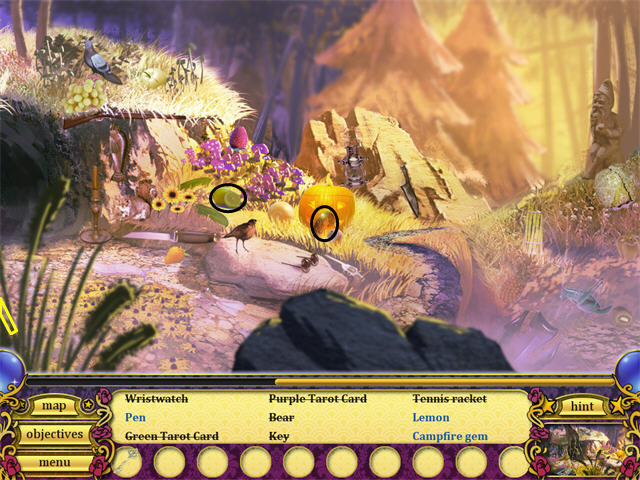
The Orphanage Playground
- Find all the hidden objects in the scene.
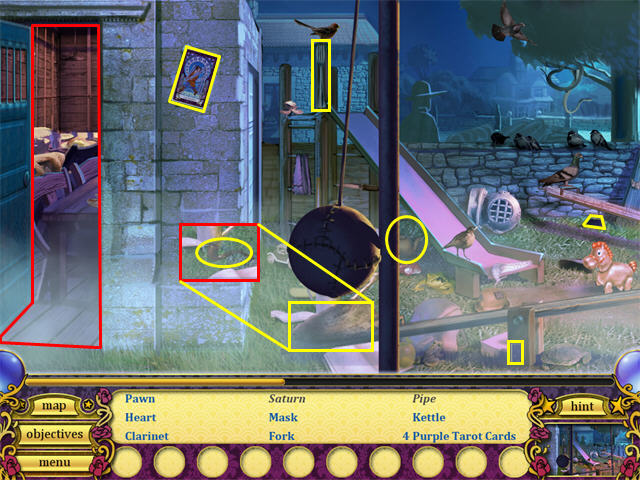
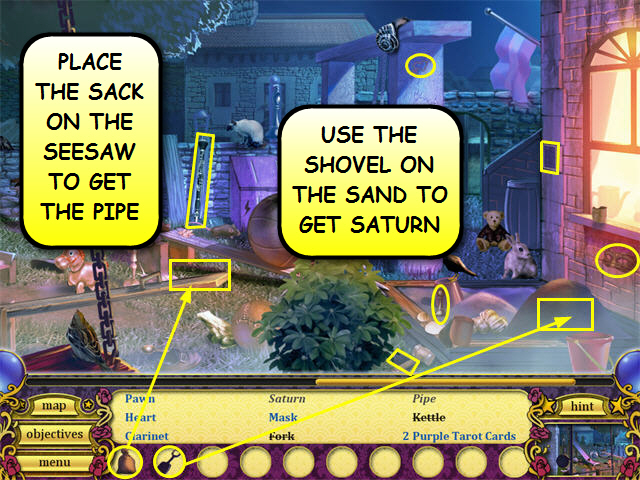
- Pick up the SACK from the inventory, place it on the seesaw and grab the PIPE.
- Pick up the SHOVEL from the inventory, use it on the pile of sand and grab SATURN.
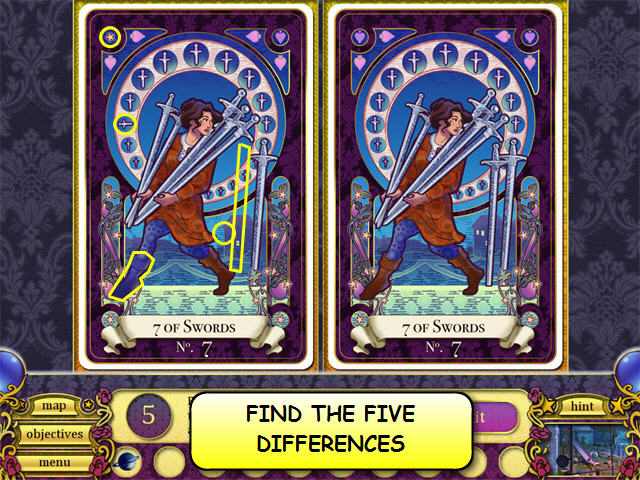
- Click on the flashing card to access a mini-game.
- Find the five differences.
- You can click either card.
- Finding all the differences in the card reveals the following fortune: The magical door knocker that allows entry to the headmaster’s room is missing. Find it to open the door.
- Head back to the Orphanage Lunchroom and then enter the Orphanage Bunkhouse.
The Orphanage Bunkhouse
- Find all the hidden objects in the scene.
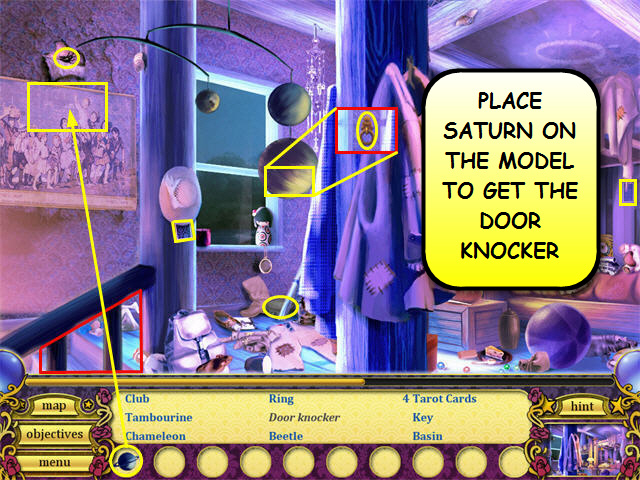
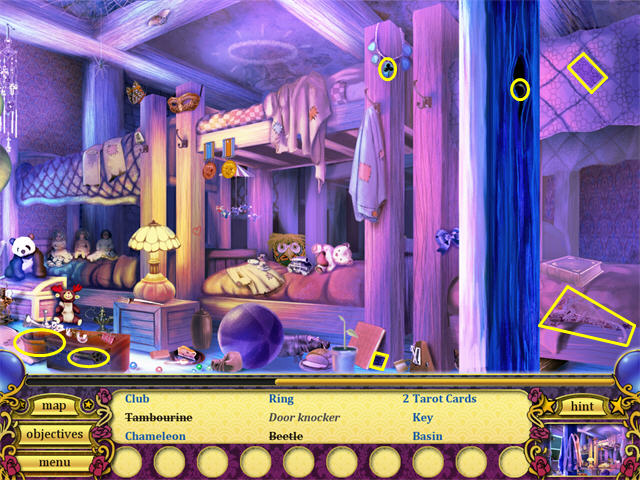
- Pick up SATURN from the inventory, use it on the solar system model and grab the DOOR KNOCKER.
- Head back to the Orphanage Lunchroom.
- Pick up the DOOR KNOCKER from the inventory and use it on the door to the Orphanage Headmaster’s Room.
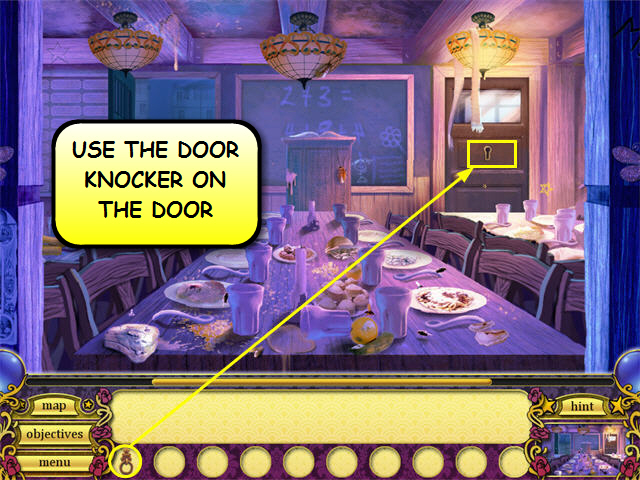
- Enter the Orphanage Headmaster’s Room.
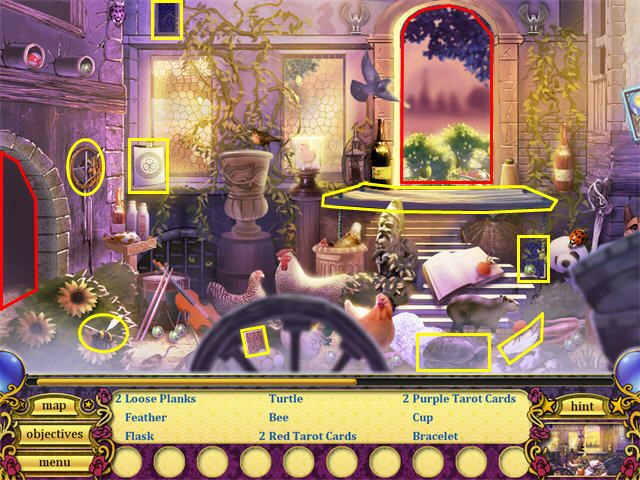
Chapter 7: Wheel of Confusion
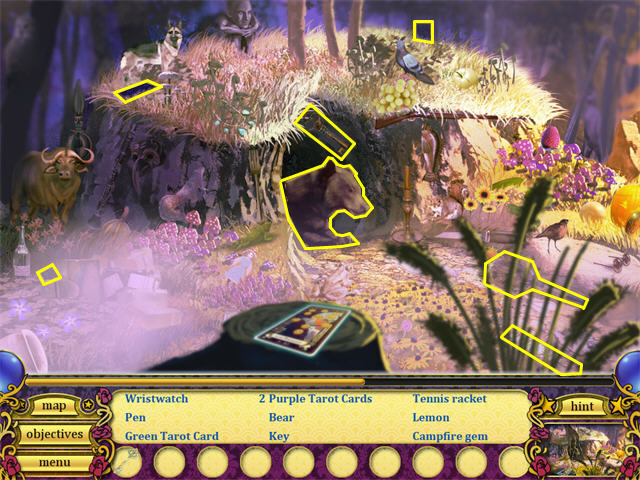
The Orphanage Headmaster’s Room
- Click anywhere on the screen several times to watch the cut scene or click the exit button to skip it.
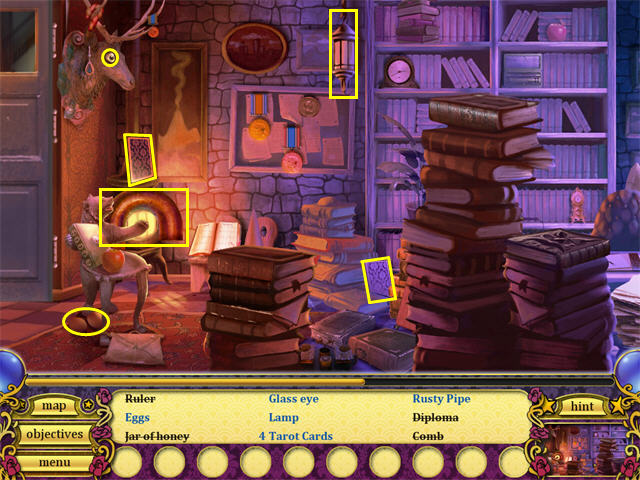
- Find all the hidden objects in the scene.

- Head back to the Orphanage Lunchroom, then the Orphanage Exterior, then the North Town, and then to Town Center.
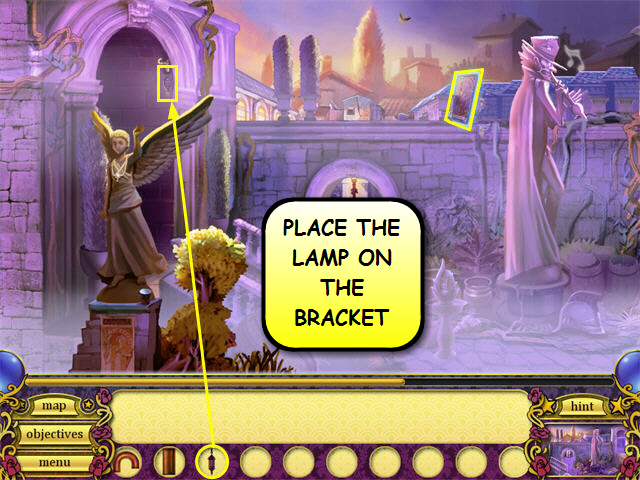
- Pick up the LAMP from the inventory; use it on the entrance to West Town.
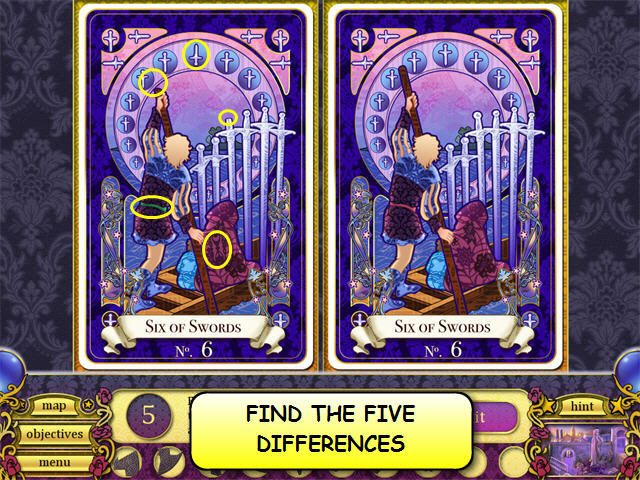
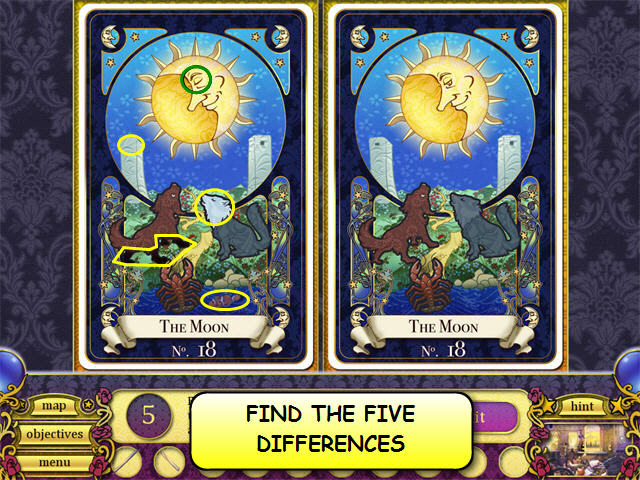
- Click on the flashing card to access a mini-game.
- Find the five differences.
- You can click either card.
- Finding all the differences in the card reveals the following fortune: Lower the bridge by placing the pipes in the Piston Box.
- Head to West Town.
West Town
- Find all the hidden objects in the scene.
- Click on the hydraulic gearbox.
- Pick up the PIPES from the inventory and place them in the hydraulic gearbox as shown in the following screenshot.
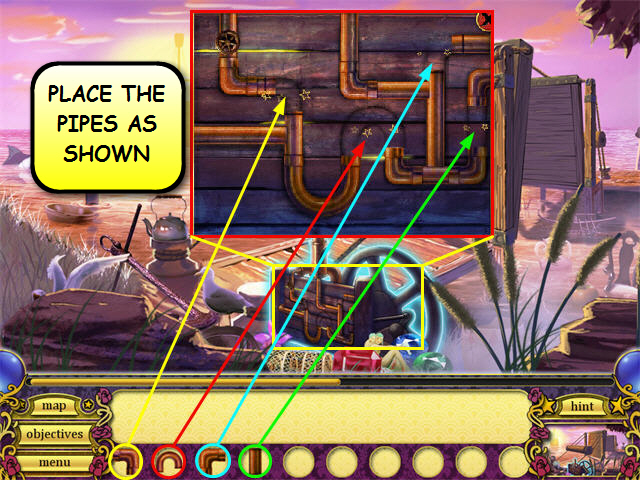
- Head to the Dock Gate.
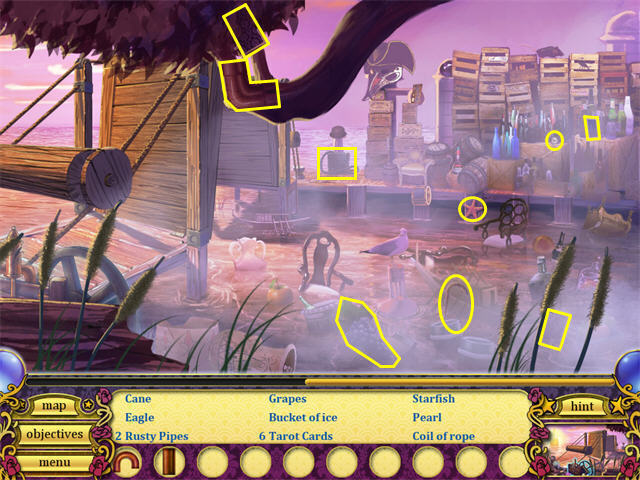
Chapter 8: Children Of The Sea
Dock Gate
- Click anywhere on the screen several times to watch the cut scene or click the exit button to skip it.
- Find all the hidden objects in the scene.
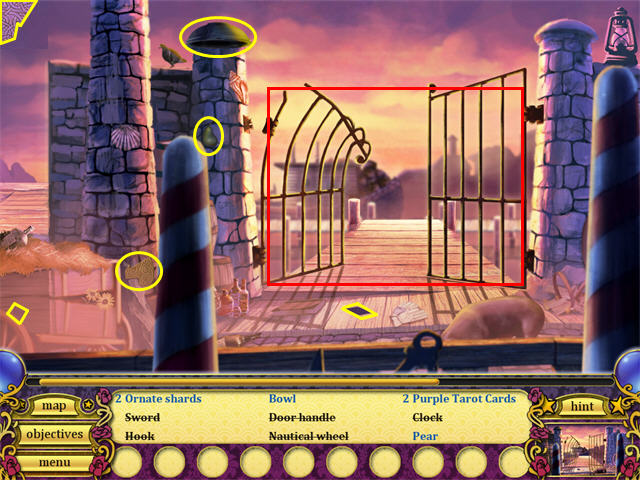
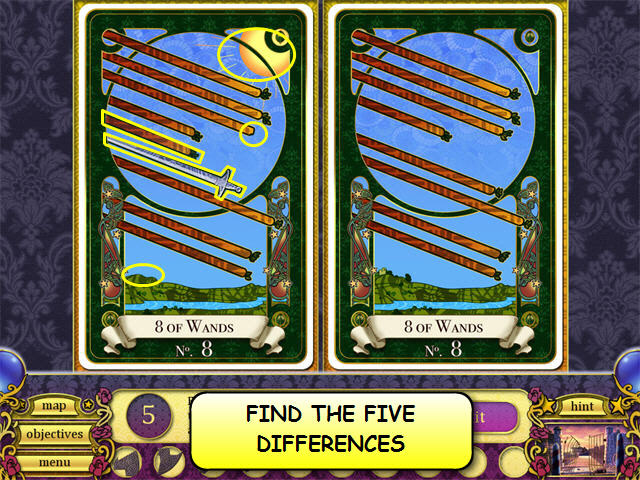
- Click on the flashing card to access a mini-game.
- Find the five differences.
- You can click either card.
- Finding all the differences in the card reveals the following fortune: Find the shards scattered around the docks to unlock the path to South Town.
- Head to the Pier.
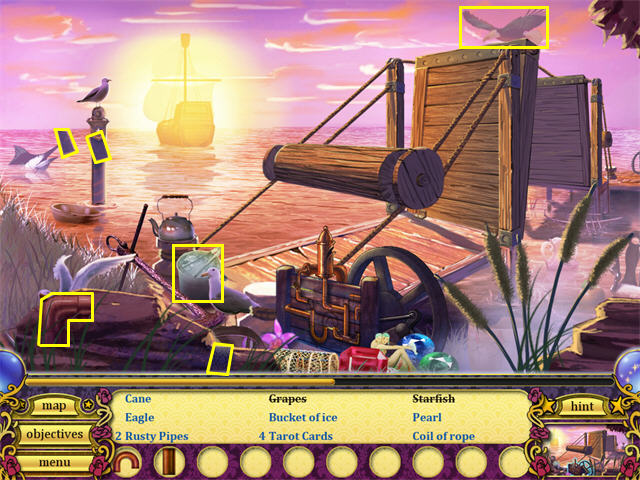
The Pier
- Find all the hidden objects in the scene.
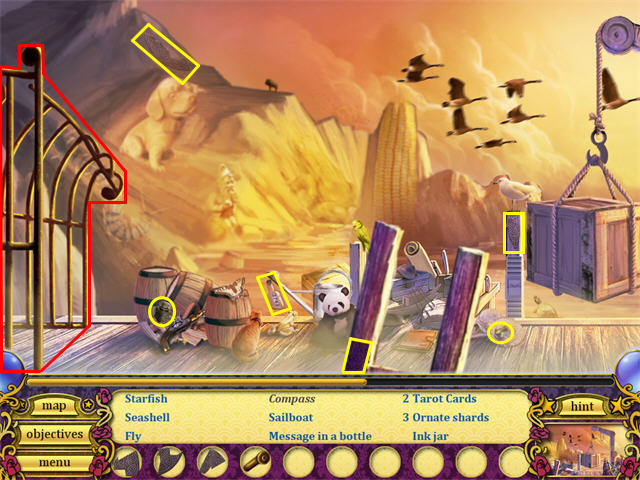
- Enter the Boat
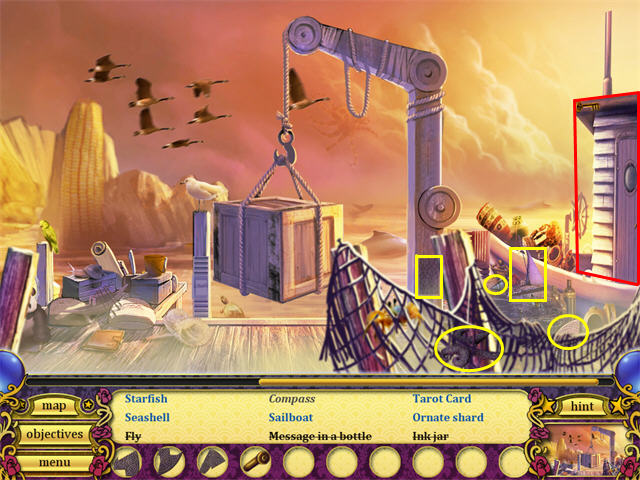
The Boat
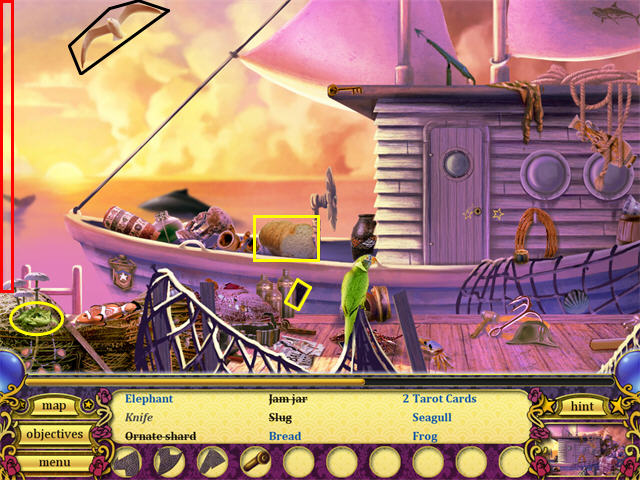
- Find all the hidden objects in the scene.
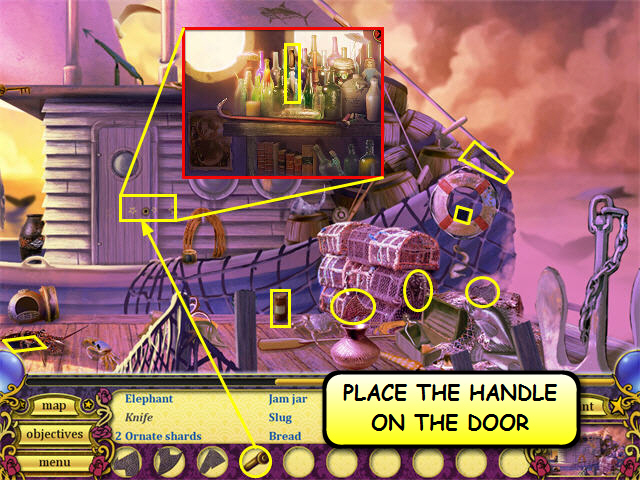
- Pick up the DOOR HANDLE from the inventory and use it on the boat’s door.
- Click on the boat’s door and grab the KNIFE.
- Return to the Pier.
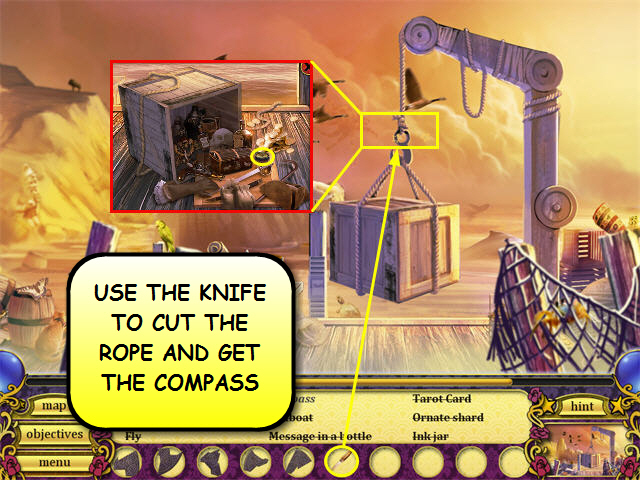
- Pick up the KNIFE from the inventory and use it on the rope holding the crate.
- Click on the crate and grab the COMPASS.
- Head back to the Dock Gate, then to West Town and then to Town Center.
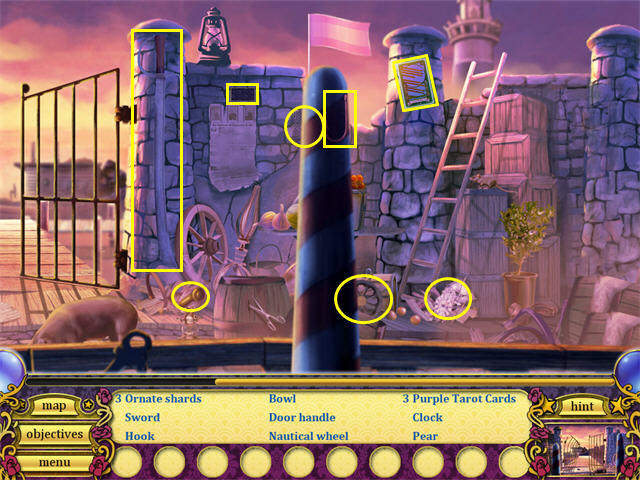
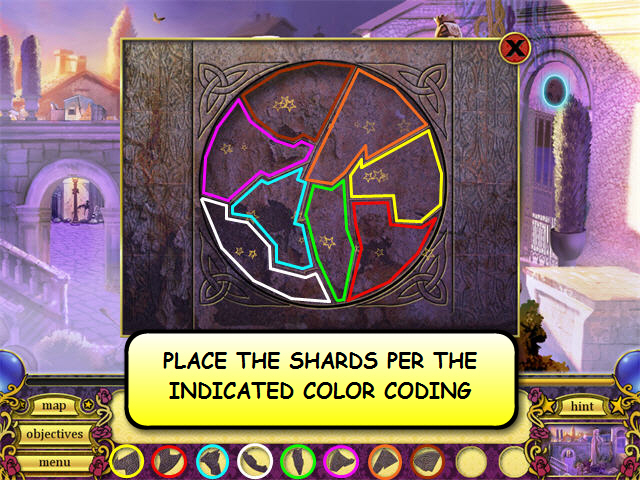
- Click on the circle on top of the entrance to South Town.

- One at a time pick up the ORNATE STONE SHARDS from the inventory and place them as shown in the following screenshot.
- Head to South Town.
Chapter 9: Into The Void
South Town
- Click anywhere on the screen several times to watch the cut scene or click the exit button to skip it.
- Find all the hidden objects in the scene.

- Click on the flashing card to access a mini-game.
- Find the five differences.
- You can click either card.
- Finding all the differences in the card reveals the following fortune: The panda bear hides a secret card.
- Head to the Forest Entrance.
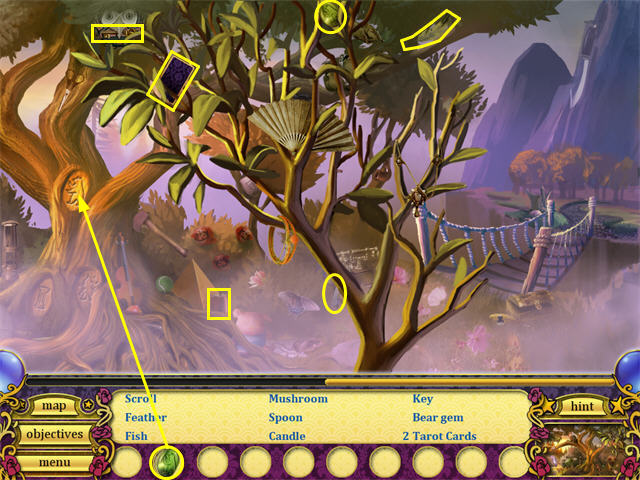
The Forest Entrance
- Find all the hidden objects in the scene.

- Pick up the WOODEN PLANKS from the inventory and place them on the bridge.
- Head to the Oak Tree.
Chapter 10: Call Of The Wild
Oak Tree
- Click anywhere on the screen several times to watch the cut scene or click the exit button to skip it.
- Find all the hidden objects in the scene.
- Pick up the BEAR INSIGNIA from the inventory and place it on the Oak Tree.
- Head to the Bear’s Den.
The Bear’s Den
- Find all the hidden objects in the scene.
- Click on the flashing card to access a mini-game.
- Find the five differences.
- You can click either card.
- Finding all the differences in the card reveals the following fortune: To unblock your path, move the cart out of the way.
- Return to the Oak Tree.
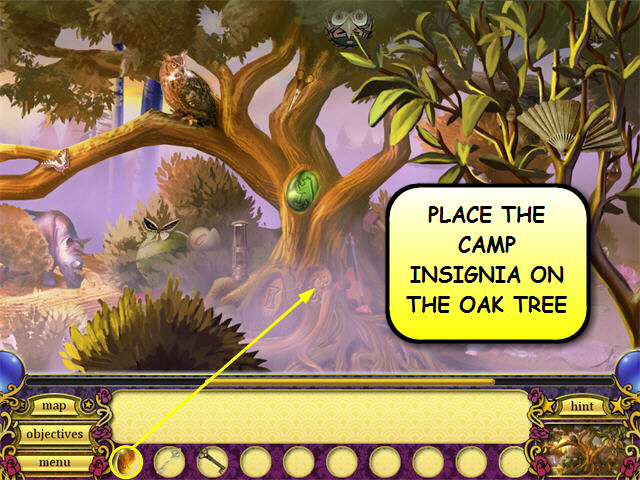
- Pick up the CAMP INSIGNIA from the inventory and place it on the Oak Tree.
- Head to the Forest Camp.
The Forest Camp
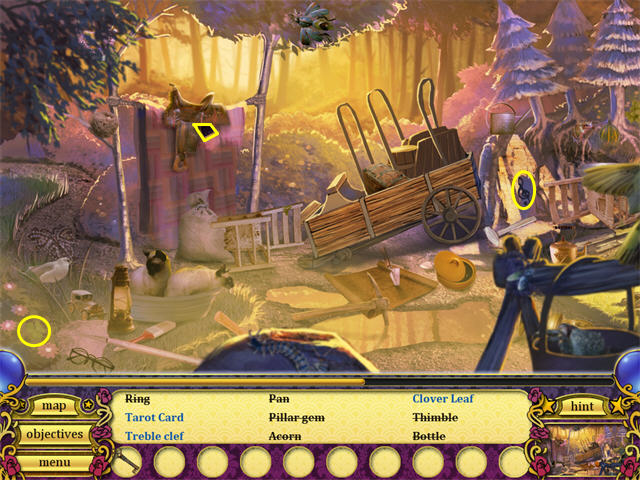
- Find all the hidden objects in the scene.
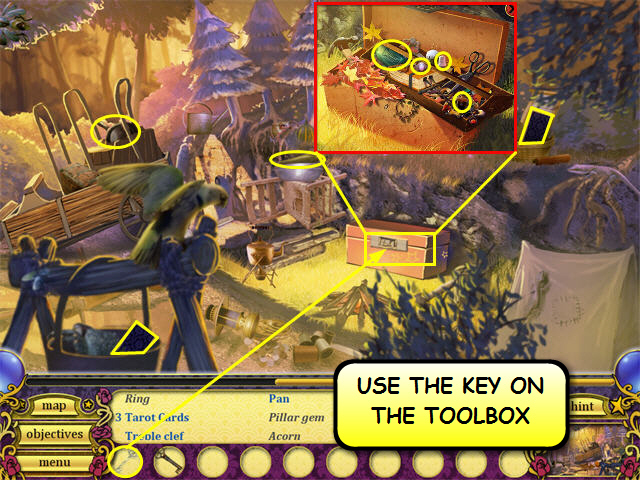
- Pick up the TOOLBOX KEY from the inventory and use it on the toolbox.
- Click on the tool box and find the rest of the hidden objects.
- Head back to the Oak Tree.
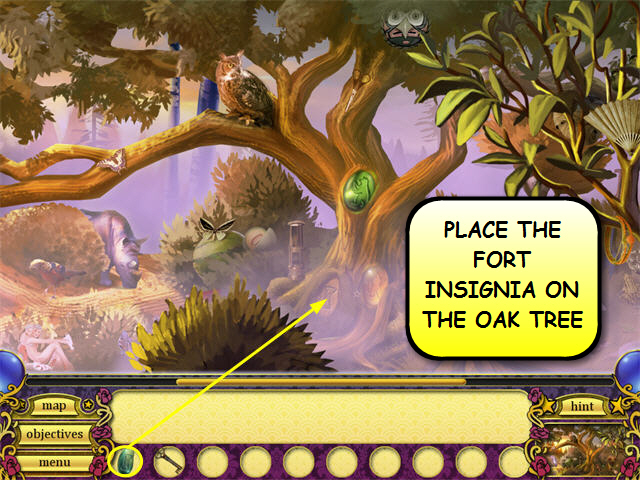
- Pick up the FORT INSIGNIA from the inventory and place it on the Oak Tree.
- Head to the Fort Ruins.
The Fort Ruins
- Find all the hidden objects in the scene.
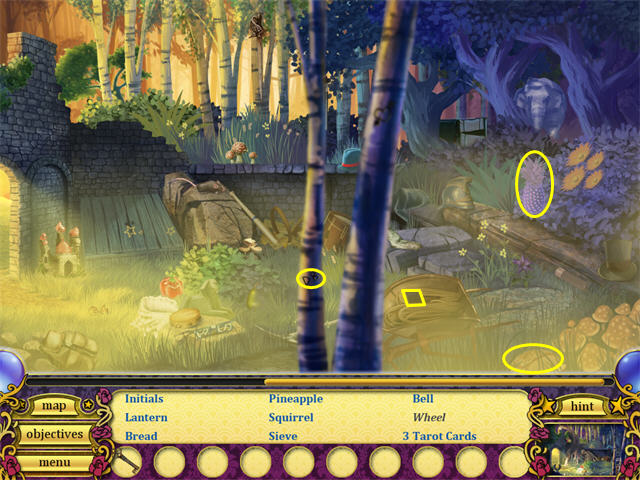
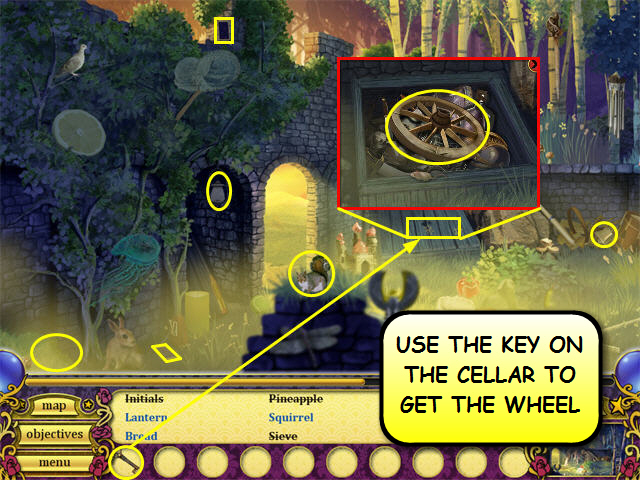
- Pick up the CELLAR KEY from the inventory and use it on the cellar.
- Click on the cellar and grab the WHEEL.
- Return to the Oak Tree and go to the Forest Camp.
- Pick up the WHEEL from the inventory and use it on the wagon.
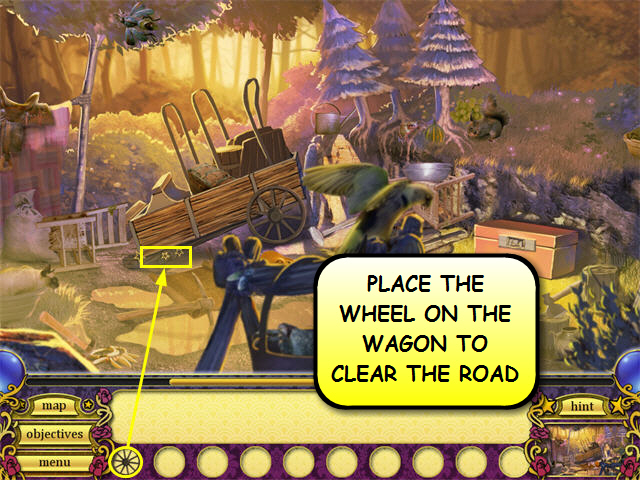
- Take the road to the Mine Mouth.
Chapter 11: The Warning
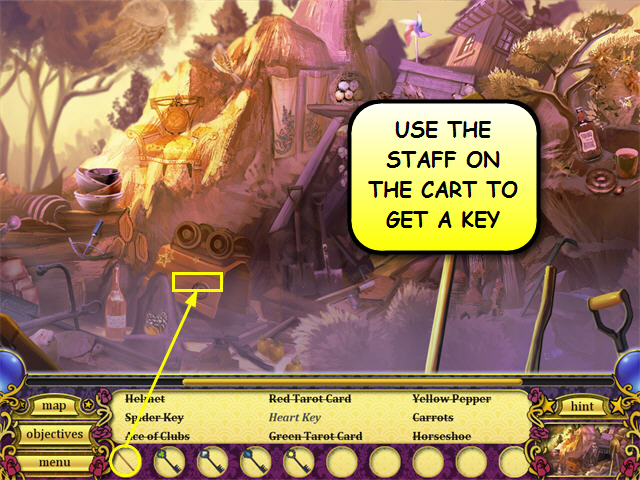
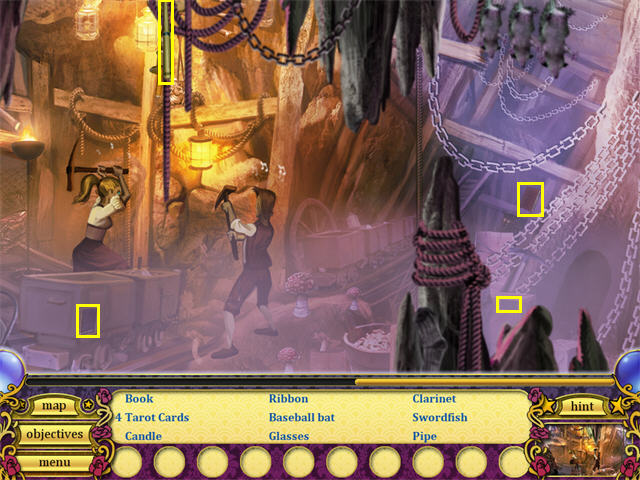
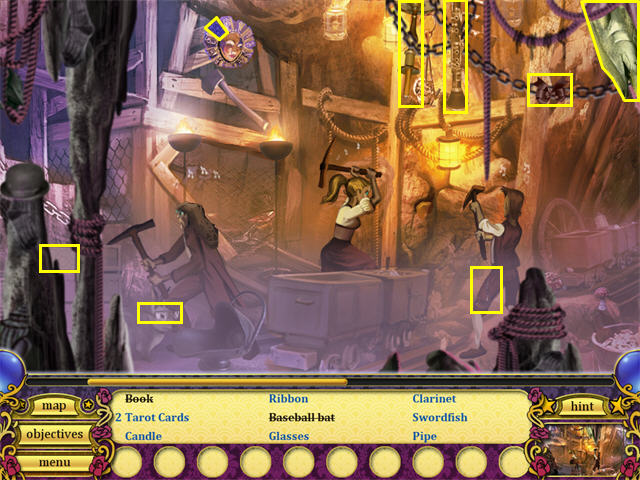
The Mine Mouth
- Click anywhere on the screen several times to watch the cut scene or click the exit button to skip it.
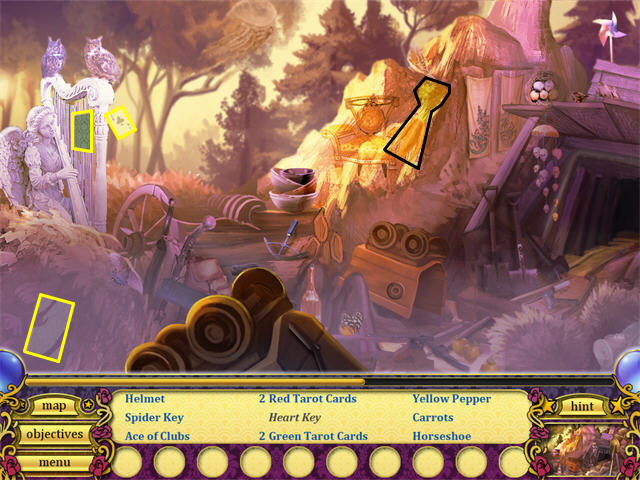
- Find all the hidden objects in the scene.
- Click on the flashing card to access a mini-game.
- Find the five differences.
- You can click either card.
- Finding all the differences in the card reveals the following fortune: Place each key with the like-colored lock on the door near the Hermit’s room to face your final challenge.
- Enter the Messy Cart
The Messy Cart
- Find all the hidden objects in the scene.
- Head to the Hermit’s Room.
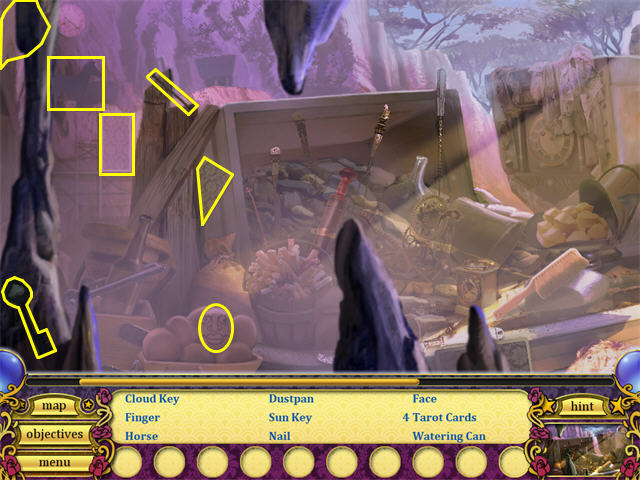
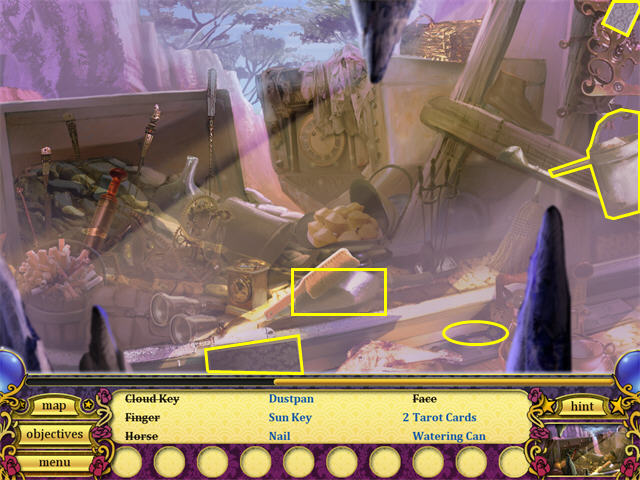
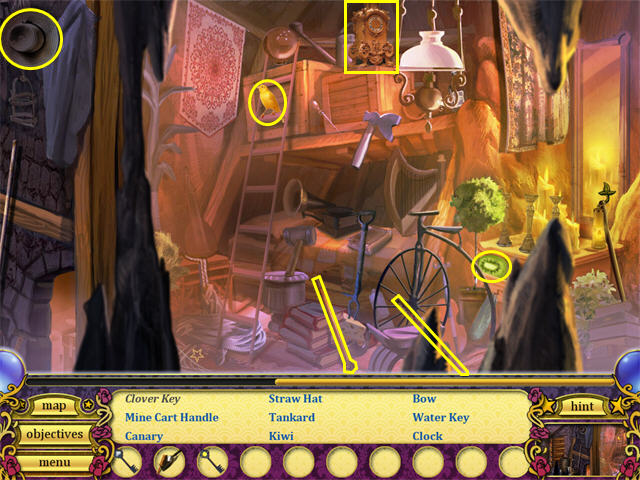
The Hermit’s Room
- Find all the hidden objects in the scene.
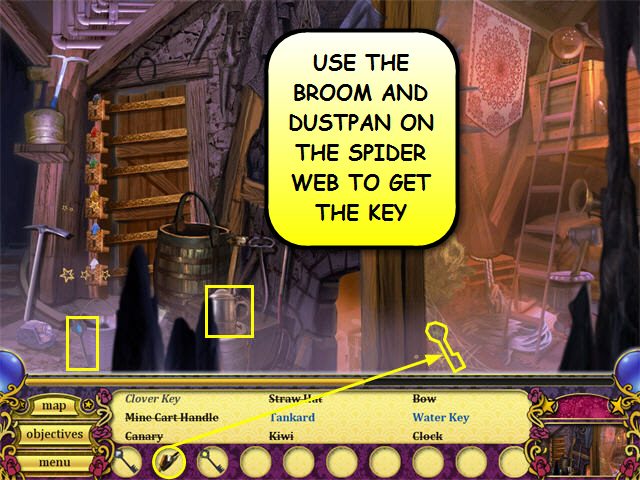
- Pick up the BROOM and DUSTPAN from the inventory and use it on the spider web to get the KEY.
- Head back to the Messy Cart and then to the Mine Mouth.
- Pick up the STAFF from the inventory and use it on the cart to get a KEY.
- Return to the Messy Cart and then to the Hermit’s Room.
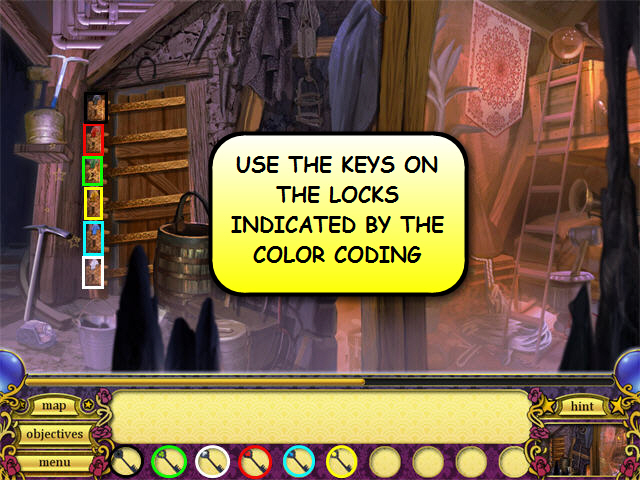
- Pick up the color coded keys from the inventory and place them on the matching locks.
- Enter the Dig Site
Chapter 12: The Wizard
The Dig Site
- Click anywhere on the screen several times to watch the cut scene or click the exit button to skip it.
- Find all the hidden objects in the scene.
- Click on the Wizard and you will be presented with the option to play a very simple card’s game.
- The objective is to find the Devil’s card after the Wizard shuffles the cards on the table.
- After you beat him four times you will get the final cut scene.
Created at: 2010-02-22