
Walkthrough Menu
- General Tips
- 1: Prologue
- 2: the Case Against Scrooge (future)
- 3: the Case Against Scrooge (present)
- 4: the Case Against Scrooge (past)
- 5: Scrooge’s Secret (present)
- 6: Belle’s Story (past)
- 7: Belle’s Story (present)
- 8: Belle’s Story (future)
- 9: Epilogue
General Tips
- This is a Hidden Object Adventure game.
- There is no timer.
- Throughout the game you are playing as Marley, the partner of Ebenezer Scrooge.
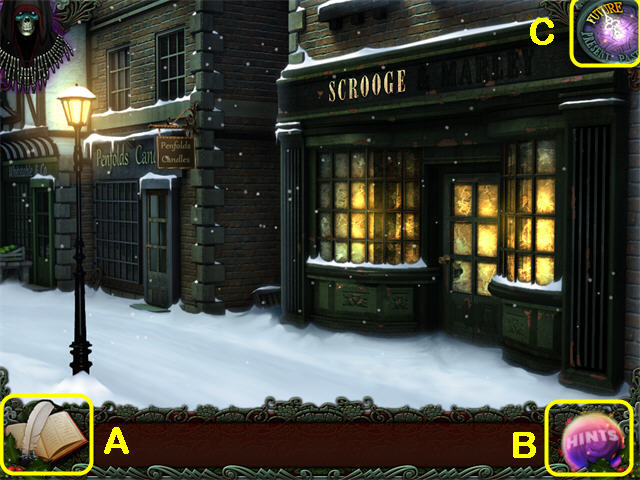
- The LEDGER (A) lets you pause or return to the Main Menu.
- Use the HINTS icon (B) for a Hint. Hints are unlimited, but take a few seconds to recharge.
- The Time Indicator (C) shows whether you are in the past, present, or future.
- The game autosaves automatically.
- The Find List for the Hidden Object Scenes will be different for different players, but the Key Items will be the same for everyone.
- If you make too many incorrect clicks in a row, the cursor will dance away momentarily.
- Arrows show exits from the scene.
- A Magnifying Glass is a place where you can zoom in, usually a Hidden Object Scene.
- The Eyeglasses indicate an object you can examine to get a text clue. Text clues appear at the top of the screen.
- The Hands cursor appears when you can collect an item in a main scene.
- When you use a HINT in a Hidden Object Scene one item will be circled briefly.
- When you use a HINT in a main scene, it will circle one “hot spot”. However, you may need to collect a Key Item elsewhere before you can use it.
- If you use a HINT in a main scene and there is nothing more to do there at that time, you will get a text clue telling you to check other locations. You may need to come back later, though.
- A white sparkle in a main scene shows an area you can investigate further.
- Instructions for mini-games appear at the top of the screen.
- Skip a mini-game by clicking the SKIP button once it has recharged.
1: Prologue
- You have been murdered! You will now play as Marley’s Ghost. Begin by going upstairs.
- Examine the Upstairs Office Door. It is locked.
- Continue right to the Attic.
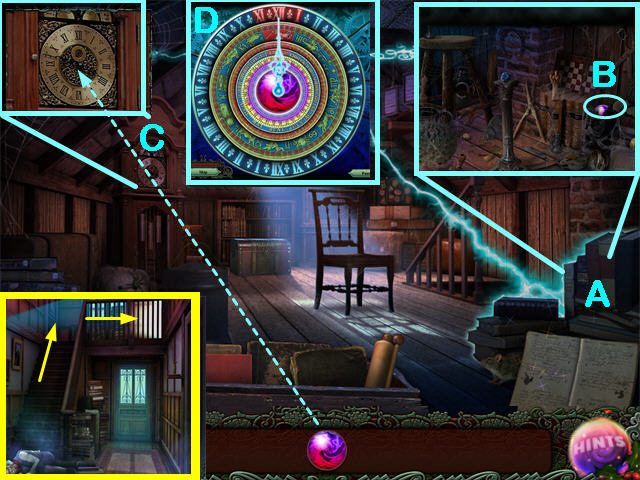
- Talk to the Ghost of Christmas Future.
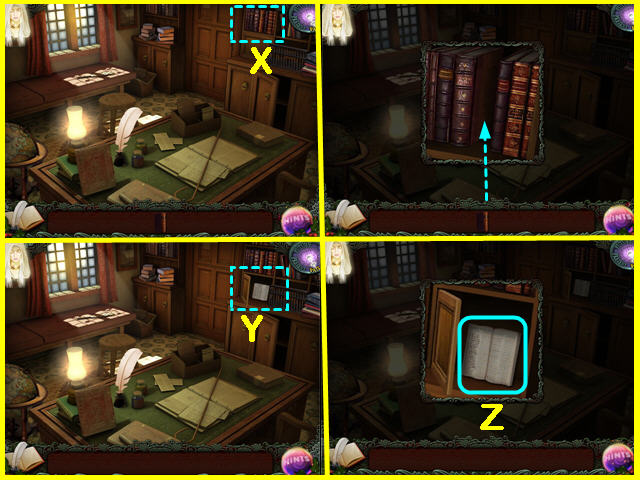
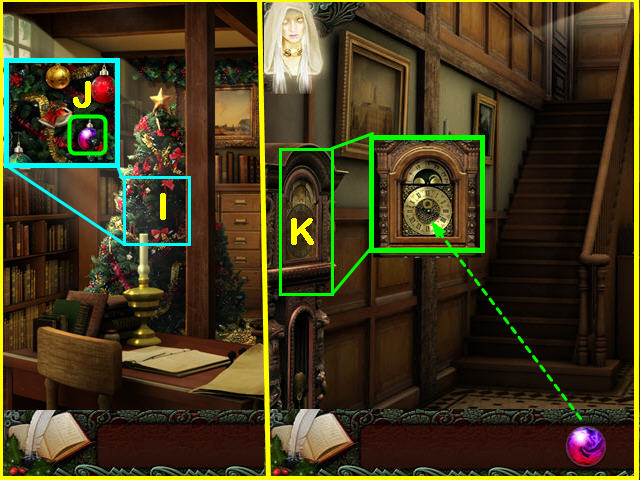
- Zoom in on the Books (A) to do the Hidden Object Scene and collect the TIMESTONE (B).
- The Lantern Oil is the spilled brown liquid in the center of the scene.
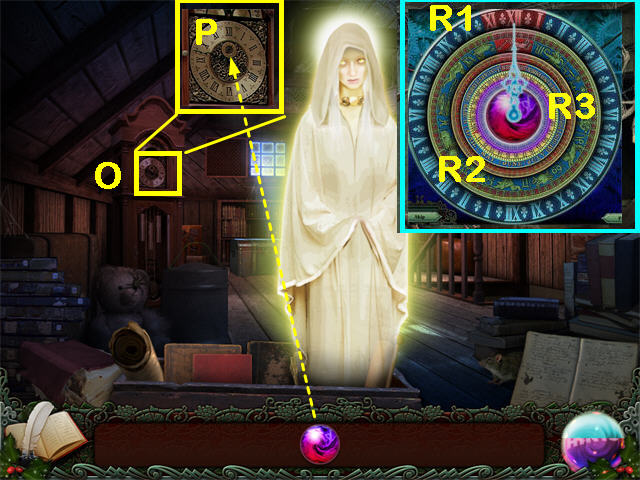
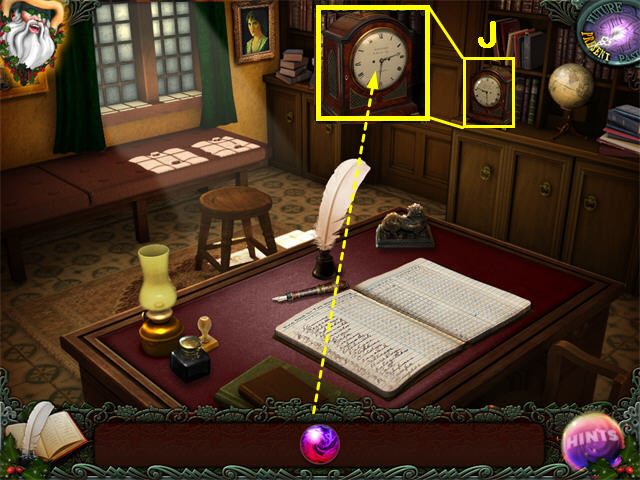
- Zoom in on the Grandfather Clock (C).
- Put the TIMESTONE on the Grandfather Clock.
- Click on each of the small clock hands until it is pointing straight up. Repeat with the big clock hand(D).
2: The Case Against Scrooge (future)
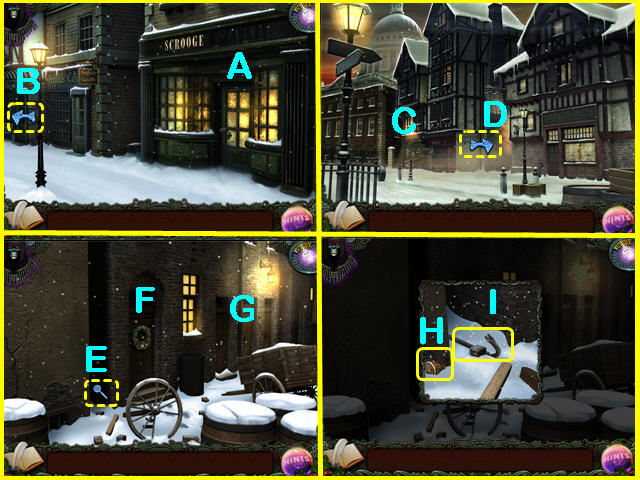
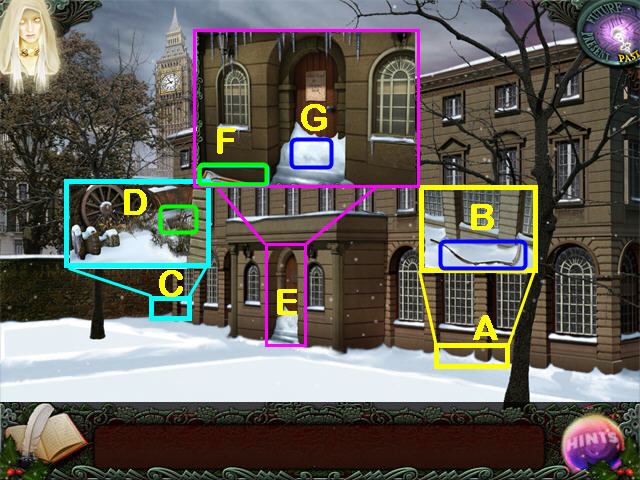
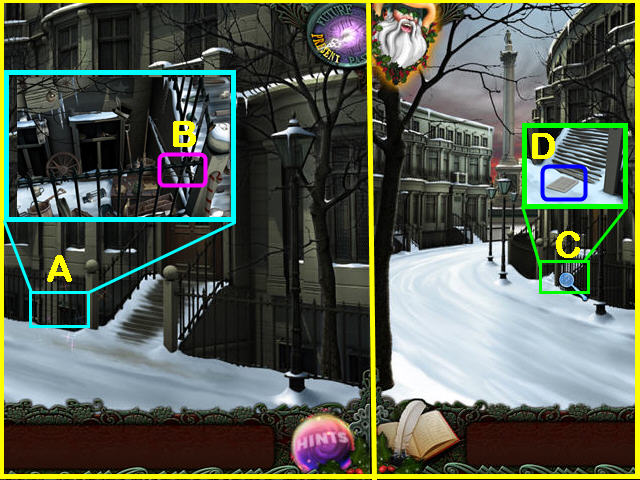
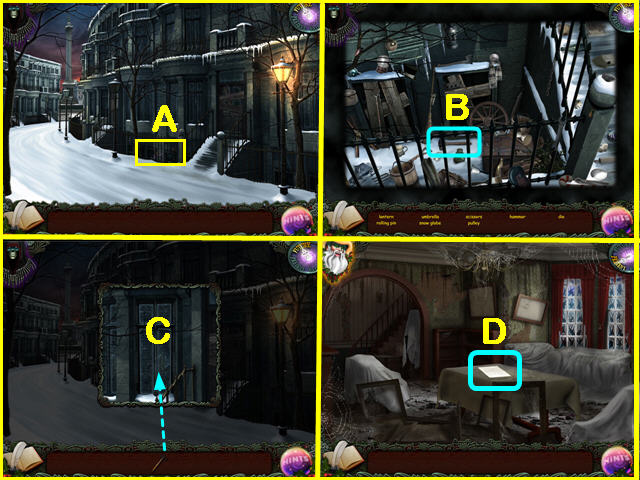
- You are in front of the Accounting Building (A) in the future. The sign just says SCROOGE.
- Go left (B) to the Main Street. You can see the Poultry Shop (C) straight ahead.
- Go right (D) to the Side Street.
- You can see the Alley (E), the Cratchit House (F) and the Outhouse (G).
- Zoom in on the Alley (E). Collect the DOOR KNOB (H) and the CROWBAR (I).
- Zoom in on the Outhouse Door (G). It is frozen solid.
- Go forward to enter the Cratchit House (F).
- Examine the Dinner on the Table, the Stove without a Handle, the Crutch, and the Painting. That is all you can do here now.
- Go down to the Side Street.
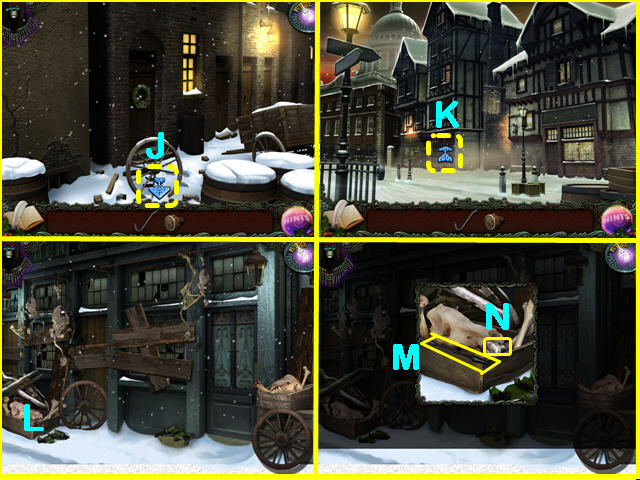
- Go down (J) to the Main Street.
- Go forward (K) to the Poultry Shop.
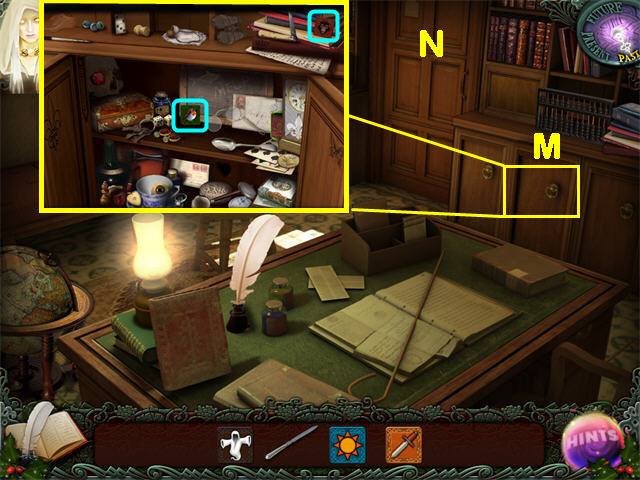
- Zoom in on the Crate (L) and collect the IRON DOORKNOB (N) and the CAST IRON POKER (M).
- Return to the Main Street.
- Go right to the Alley.
- Enter the Cratchit House.
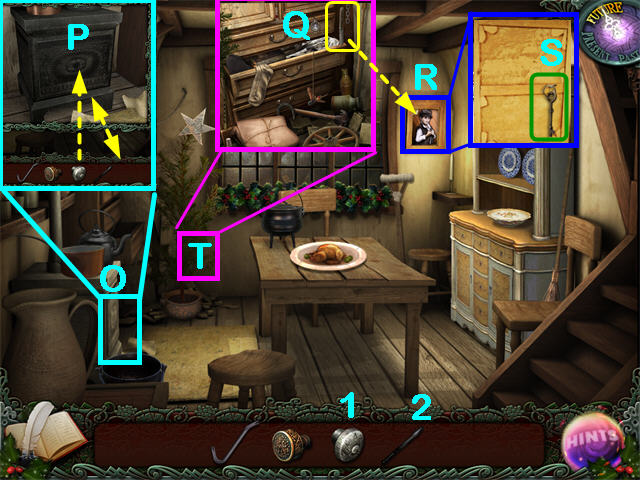
- Zoom in on the Stove (O) and use the CAST IRON DOORKNOB (1) from the Crate outside the Poultry Shop to open it (P).
- Put the CAST IRON POKER (2) from the Crate outside the Poultry Shop into the fire, then remove it again.
- There is now a Hidden Object Scene by the Christmas Tree (T).
- Zoom in and do the scene to collect the KNIFE (Q).
- Zoom in on the Picture (R) on the wall.
- Use the KNIFE from the Christmas Tree Hidden Object Scene to remove the Painting.
- Collect the OUTHOUSE KEY (S).
- .Exit to the Side Street.
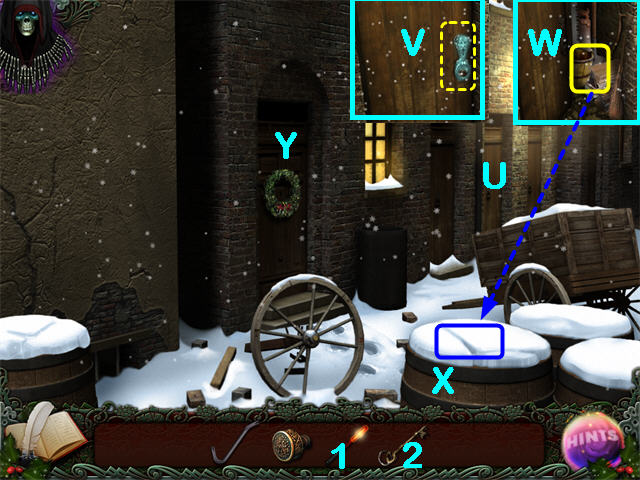
- Zoom in on the Outhouse Door (U).
- Use the HOT POKER (1) from the Stove on the frozen lock (V).
- Use the OUTHOUSE KEY (2) from the Painting at the Cratchit House to open it (V).
- Collect the BUCKET (W).
- Use the BUCKET to collect some SNOW (X).
- Enter the Cratchit House (Y).
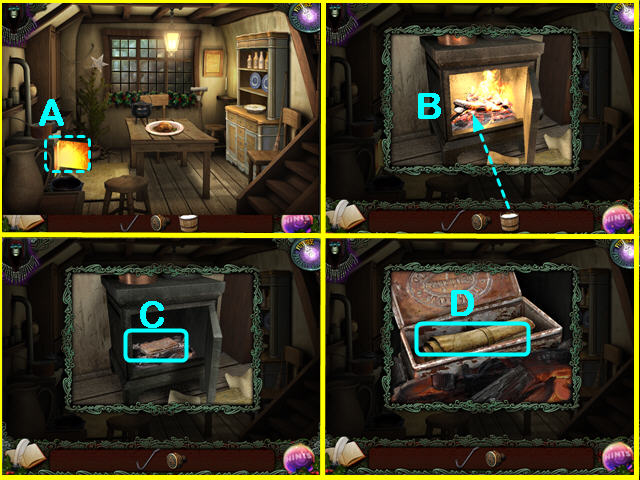
- Zoom in on the Stove (A).
- Use the BUCKET OF SNOW on the Fire (B) in the Stove.
- Zoom in on the BOX (C). It will open.
- Collect the SCROLL (D).
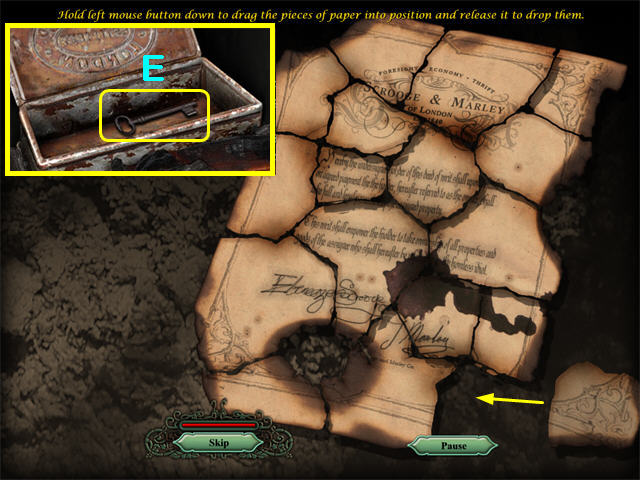
- This will trigger a jigsaw puzzle. Reassemble the pieces. They do not rotate.
- Pieces will lock into place when set correctly.
- Collect the POULTRY SHOP KEY (E).
- Go down to the Side Street.
- Go down to the Main Street.
- Go forward to the Poultry Shop.

- Use the CROWBAR (1) from the Alley to remove the Boards (F) on the shop.
- Use the DOORKNOB (2) from the Alley on the Door (G).
- Use the POULTRY SHOP KEY (3) from the Stove to unlock the door.
- Enter the Poultry Shop.
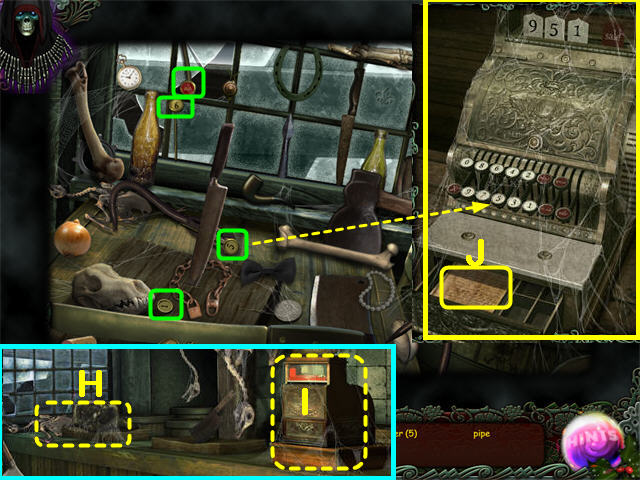
- Zoom in on the counter (H) to do the Hidden Object Scene to collect the CASH REGISTER KEYS (green).
- Zoom in on the Cash Register (I).
- Put the CASH REGISTER KEYS on the Cash Register so the numbers go from right to left.
- Read the DOCUMENT (J). It says the Church didn’t have money for Christmas Turkeys.
- The Ghost will take you to the Graveyard.
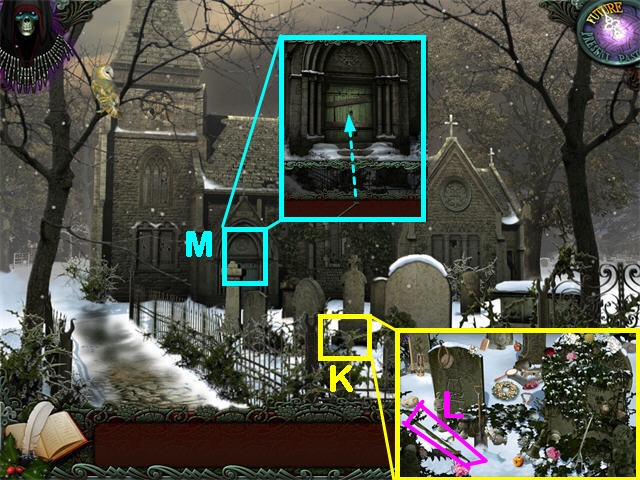
- Zoom in on the Cemetery (K) to do the Hidden Object Scene and collect the IRON RAILING (L).
- Zoom in on the Church Door (M).
- Use the IRON RAILING to open the Door.
- Enter the Church.
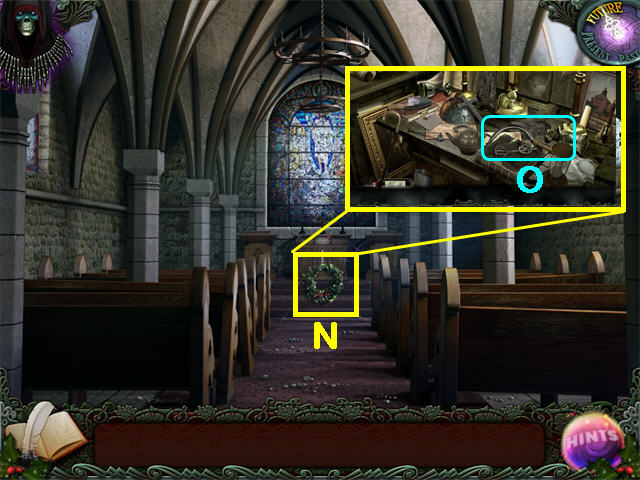
- Zoom in on the Wreath (N) to do the Hidden Object Scene to collect the SICKLE (O).
- Exit to the Graveyard.
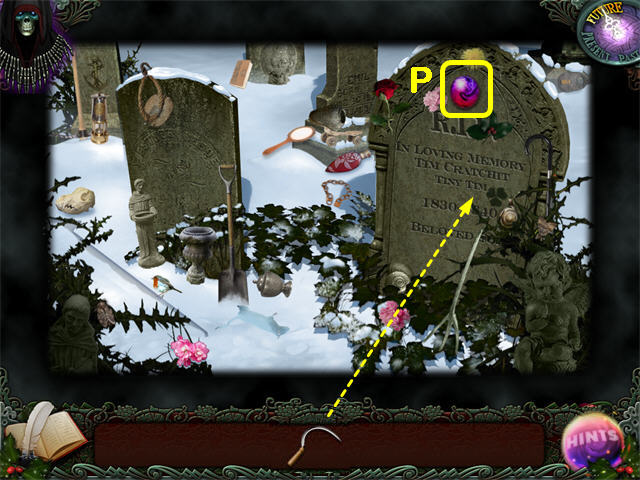
- Zoom in on the Cemetery. Use the SICKLE from inside the Church on the right Headstone.
- You will find Tiny Tim’s gravestone. Collect the TIMESTONE (P).
- The Ghost will return you to the Poultry Shop.
- Enter the Poultry Shop.
- Don’t do anything until the lightning flashes and the Ghost of Christmas Present appears and tells you what to do.
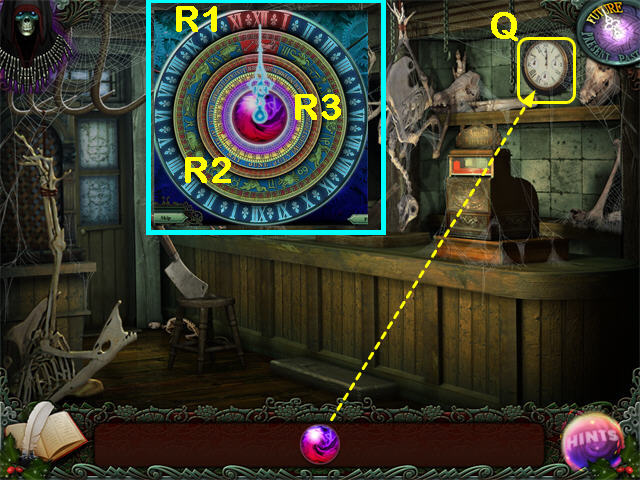
- Zoom in on the Clock (Q).
- Put the TIMESTONE from the Graveyard on the Clock.
- This will trigger a mini-game.
- Click on each ring until the red sections are all at the top of the clock.
- There are three rings on the clock.
- R1 is the outermost ring with roman numerals.
- R2 is the second ring in, with zodiac pictures.
- R3 is the third ring in, with the names of the months.
- Solution: set R2, then R1, then R2. If necessary, set R3 last.
3: the Case Against Scrooge (present)
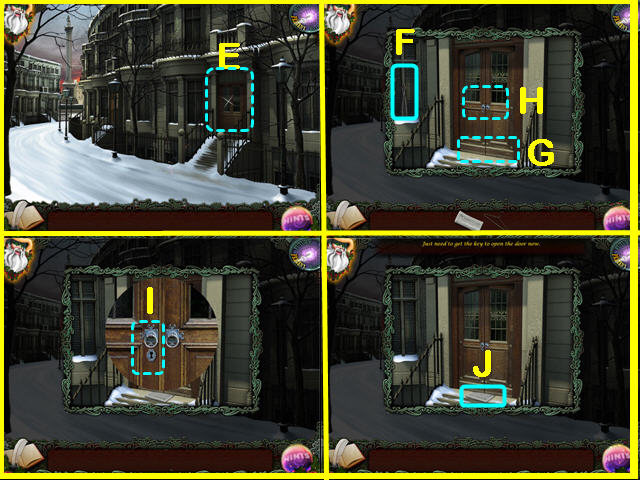
- Exit to the front of the Poultry Shop.
- Go down twice to the company Building. The sign again says SCROOGE and MARLEY.
- Examine the door. You are locked out, but you remember that Cratchit should have a Key.
- Go left to the Main Street, then right to the side street.
- Enter the Cratchit House.
- Zoom in on the picture.
- Collect the KEY (A) to the Company Building.
- Return to the Company Building.
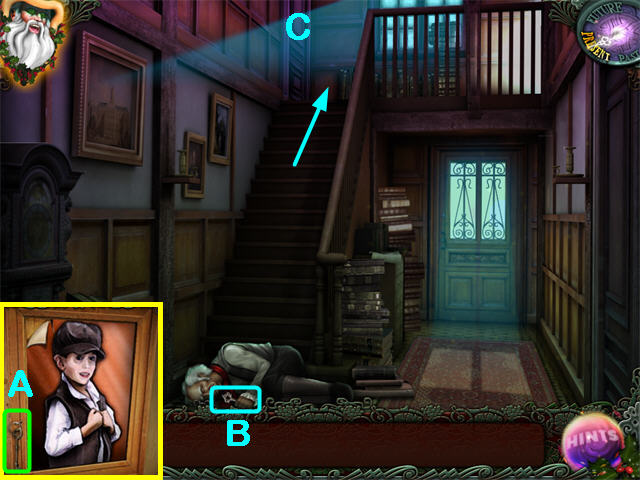
- Use the KEY from the painting in the Cratchit House on the door and go in.
- Collect the UPSTAIRS OFFICE KEY (B) from Marley’s hand.
- Go upstairs.
- Use the UPSTAIRS OFFICE KEY on the door (C) on the left.
- Go in.
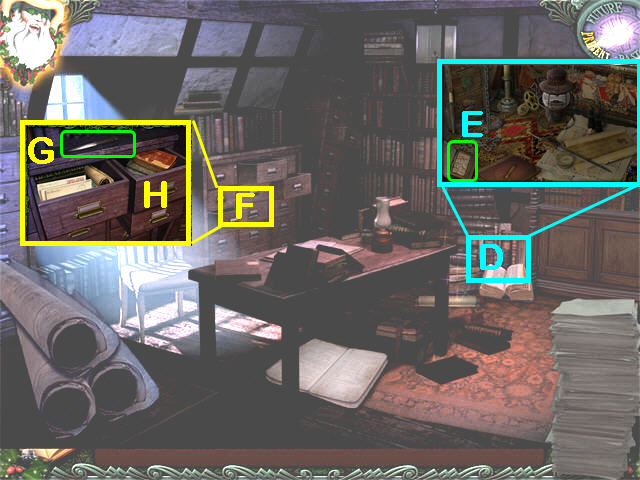
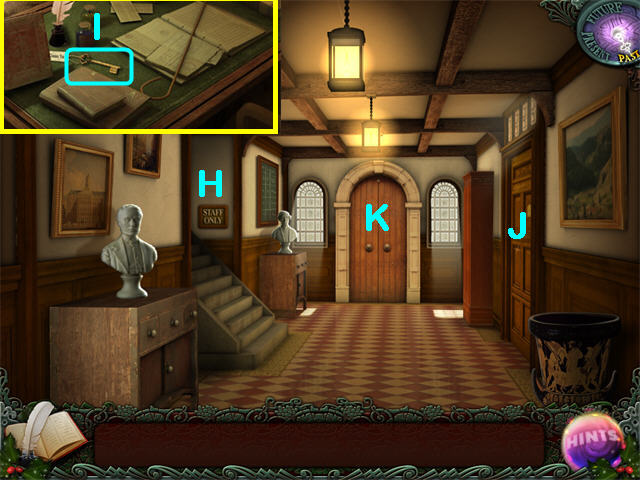
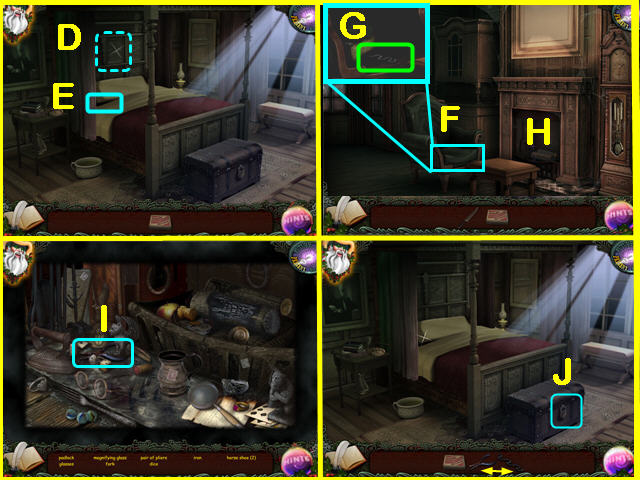
- Zoom in on the Books (D) to do the Hidden Object Scene and collect the MATCHES.
- Click on the Book in the lower left (E) to reveal the MATCHES.
- Zoom in on the Filing Cabinet (F).
- Collect the LETTER OPENER (G).
- Examine the right side of the File Cabinet (H). It’s jammed.
- That’s all you can do at this time.
- Go down to the Upper Landing.
- Go right to the Attic.
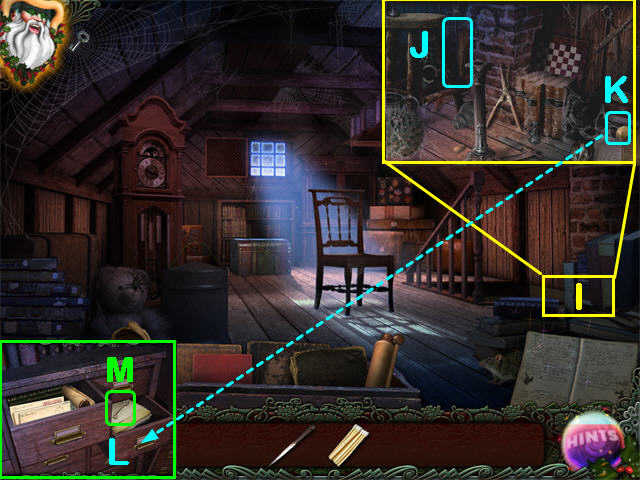
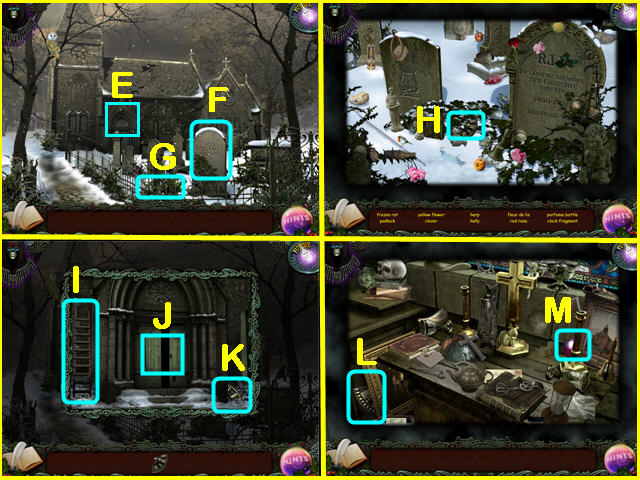
- Zoom in on the Books (I) to do the Hidden Object scene and collect the BROOMHEAD (J) and the BEESWAX POLISH (K).
- Return to the Upstairs Office.
- Zoom in on the File Cabinet.
- Use the BEESWAX POLISH on the righthand Drawer (L) and collect the KEY (M) to the Downstairs Office.
- Go downstairs.
- Use the KEY to the Downstairs Office from Filing Cabinet on the Door on the right side of the Hallway.
- Enter.
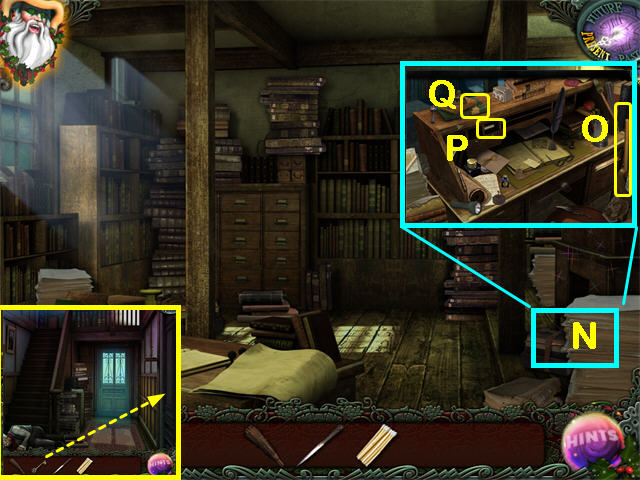
- Zoom in on the Papers (N) to do the Hidden Object Scene and collect the BROOM HANDLE (O), CANDLE (P), and the BLACK SAFE KEY (Q).
- Exit to the Hallway.

- Light the CANDLE (6) from the Downstairs Office with the MATCHES (3) from the Upstairs Office.
- Put the LIT CANDLE in the Wall Sconce (R).
- Zoom in on the Secret Panel (S).
- Open the Secret Panel (T) with the LETTER OPENER (2) from the Filing Cabinet..
- This is the Safe, but so far you only have one KEY. You’ll have to come back later.
- Put the two parts of the BROOM together. (The BROOMHEAD (4) from the Upstairs Office and the BROOM HANDLE (1) from the Downstairs Office).
- Go up and right to the Attic.

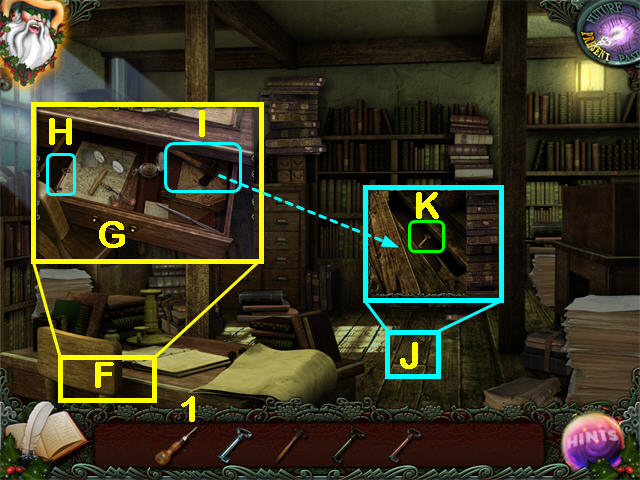
- Use the BROOM on the Web on the upper left to knock down the CHEST KEY (A).
- Collect the CHEST KEY (B).
- Use it on the Trunk (C) at the back of the scene.
- Zoom in to do the Hidden Object Scene and collect the silver SAFE KEY (D) and the SCREWDRIVER(E).
- Go to the Downstairs Office.
- Zoom in on the Desk (F).
- Use the SCREWDRIVER (1) from the Attic Trunk to open the Drawer (G).
- Collect the Brass SAFE KEY (H) and the HAMMER (I).
- Zoom in on the loose Floorboard (J).
- Use the HAMMER to remove the Floorboard.
- Collect the Gold SAFE KEY (K).
- Exit to the Hallway.
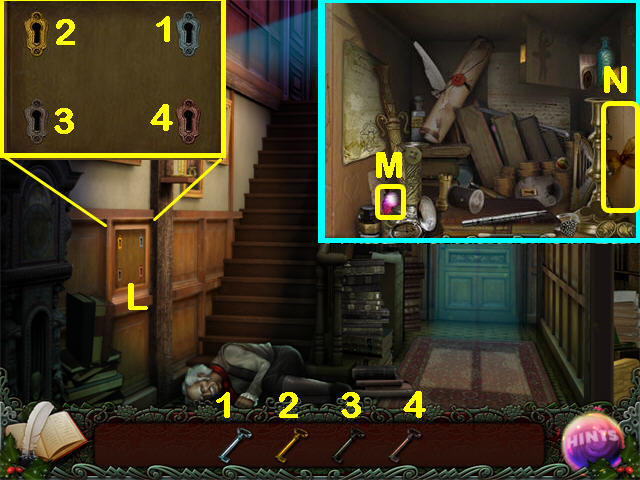
- Before you can open the Safe, you must have put the LIT CANDLE in the Wall Sconce and removed the Secret Panel with the LETTER OPENER.
- You need 4 SAFE KEYS: the Black Key from the Desk in the Downstairs Office, the Silver Key from the Attic Chest, the Brass Key from the Desk Drawer in the Downstairs Office, and the Gold Key from under the Loose Floorboard in the Downstairs Office.
- Zoom in on the Safe (L).
- Put each KEY in the matching slot.
- Complete the Hidden Object Scene to collect the TIMESTONE (M).
- The only Heart which counts is the one scratched on the left wall.
- Read the DEEDS (N).
- Return to the Attic and wait for the Ghost of Christmas Past to appear.
- After the Ghost appears, zoom in on the Grandfather Clock (O).
- Put the TIMESTONE from the Safe in the Hallway on the Clock Face (P).
- This will trigger a mini-game. From now on all the Clock mini-games have the same rules and the same standard solution.
- Standard Clock Solution:
- Click on the small hand until it points straight up.
- Click on the big hand until it points straight up..
- There are three rings on the clock. Line them up so the red sections are at the top.
- R1 is the outermost ring with roman numerals.
- R2 is the second ring in, with zodiac pictures.
- R3 is the third ring in, with the names of the months.
- Solution: set R2, then R1, then R2, then R3.
4: the Case Against Scrooge (past)
- The Ghost of Christmas Past will take you to the Boarding School.
- Zoom in on the ground (A) below the windows on the right and collect the SCYTHE (B).
- Zoom in on the left corner (C) of the building.
- Use the SCYTHE you just got to clear the weeds.
- Collect the SHOVELHEAD (D).
- Zoom in on the Door (E).
- Collect the SHOVEL HANDLE (F).
- Combine the SHOVEL HANDLE and the SHOVEL HEAD to make the SHOVEL.
- Use the SHOVEL to clear the Snow (G) from the steps in the zoom scene and enter the Boarding School.
- Examine the door on the right. It goes to the classroom, but it’s locked.
- The door straight ahead (K) returns to the front yard.
- Go up the steps to the Staff Room (H).
- Take the CLASSROOM KEY (I) off the desk.
- Examine the Cupboards—they’re locked.
- A Book is missing from the Shelf.
- Use the Door in the upper right between the bookcases to leave the room and return to the Hallway.
- Use the CLASSROOM KEY from the Staffroom Desk on the Classroom Door (J).
- Enter.
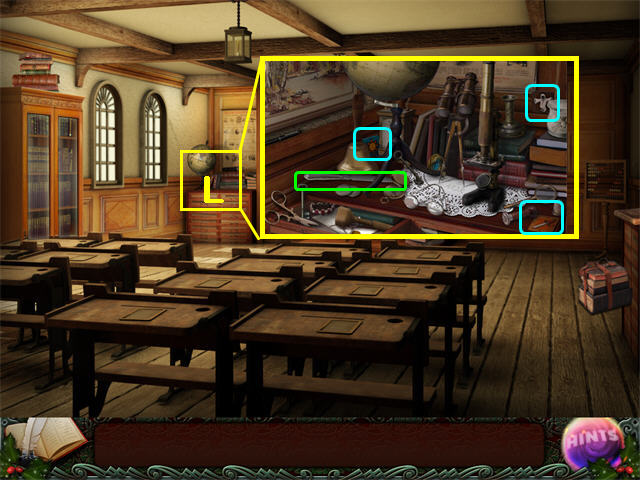
- Zoom in by the Globe (L) to complete the Hidden Object Scene and collect the SUN TILE, GHOST TILE, SWORD TILE, and the PAPERKNIFE.
- Examine the Chalkboard. You need Chalk.
- Examine the Lectern. You need to complete the Chalkboard.
- Examine the Bookcase. It is locked.
- Go back upstairs to the Staff Room.
- Use the PAPERKNIFE from the Classroom to open the Cabinets (M).
- Zoom in on the Cabinets (M) to do the Hidden Object Scene and collect the BIRD TILE and the MONKEY TILE.
- Exit through the Door (N). Go downstairs and enter the Classroom.
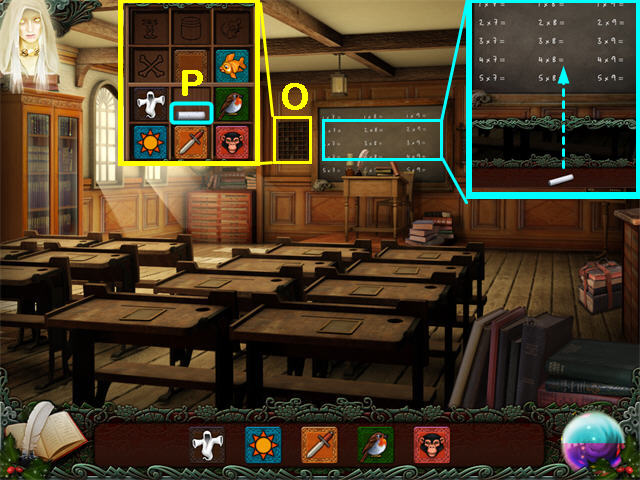
- Zoom in on the Tileboard (O) on the left side of the Chalkboard.
- You need two tiles from the cupboard in the Staff Room and 3 tiles from the Hidden Object Scene by the Globe in this room.
- Match the tiles: Monkey + Bananas; Bird + Nest; Sword + Shield, Sun + Moon; Ghost + Cemetery.
- Collect the CHALK (P).
- Zoom in on the Chalkboard and use the CHALK. This will open the mini-game.
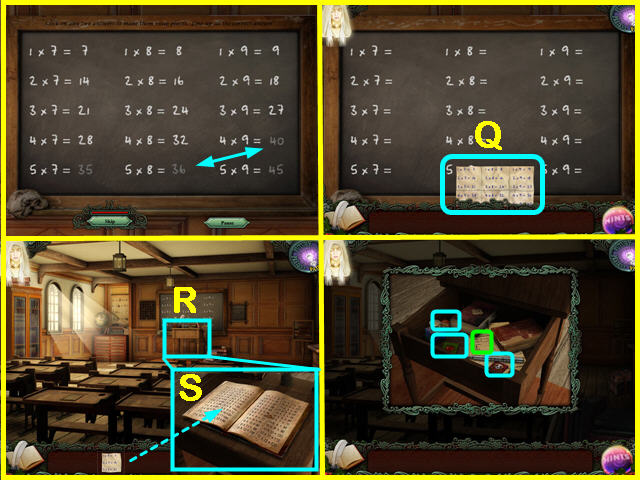
- Swap two solutions at a time until all the equations are correct.
- Find exact pairs if you can, but you are allowed to swap any two answers whether the solutions are correct or not so the puzzle is easier than it looks.
- Collect the ANSWER PAPER (Q).
- Zoom in on the Lectern (R).
- Put the ANSWER PAPER on the BOOK (S).
- Read the School Report (green).
- Collect the 4 tiles.
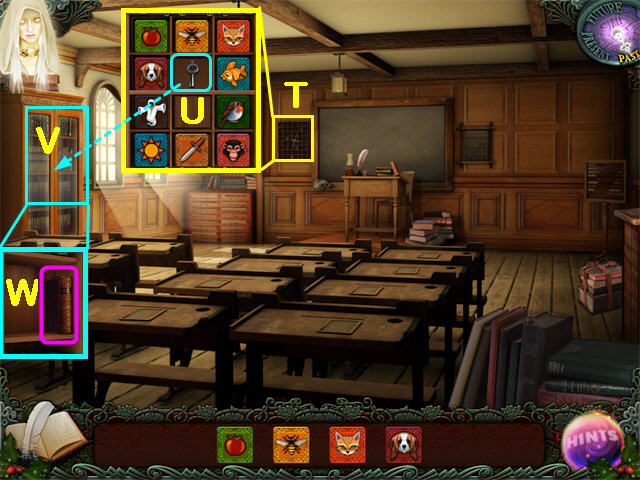
- Zoom in on the Tileboard (T) to the left of the Chalkboard.
- Put the Tiles in place: Apple + Fruit Basket; Bee + Honey; Cat + Mouse; Dog + Bone.
- Collect the BOOKCASE KEY (U).
- Zoom in on the Bookcase (V).
- Use the BOOKCASE KEY.
- Collect the BOOK (W).
- Go upstairs to the Staff Room.
- Zoom in on the Bookcase (X).
- Put the BOOK in place.
- This will open the Secret Hatch (Y).
- Zoom in and read the School Register (Z).
- The Ghost will take you to the Scrooge Family Home.
- Go inside.
- Go upstairs to the Bedroom.
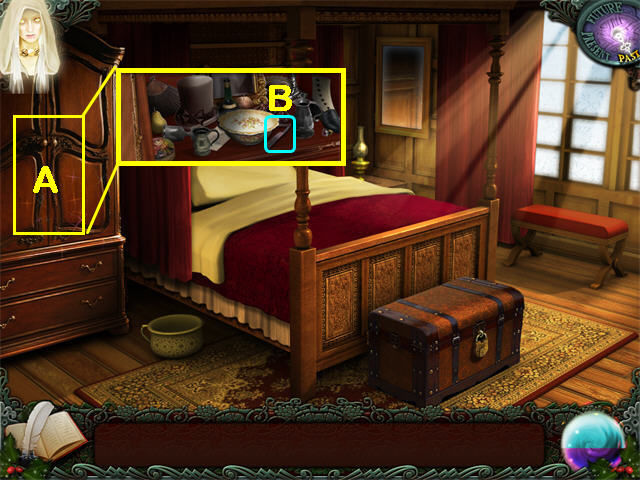
- Zoom in on the Wardrobe (A)to do the Hidden Object Scene and collect the RAZOR (B).
- The Drawer is locked. You will have to come back when you have the key.
- Go downstairs.
- Enter the Dining room on the right.
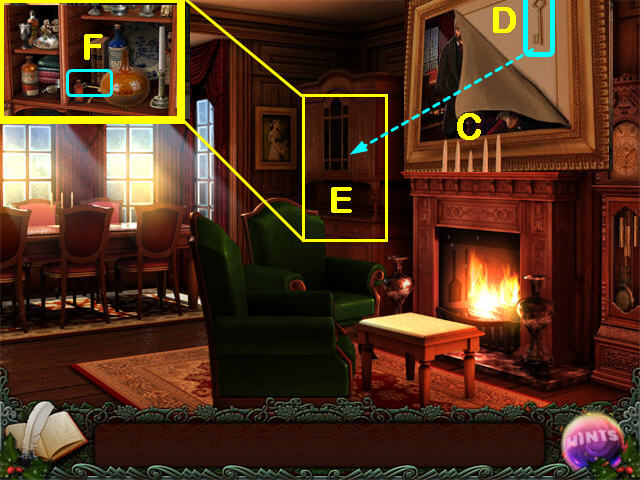
- Examine the Painting (C) over the fireplace.
- Use the RAZOR from the Bedroom on the Painting.
- Collect the CABINET KEY (D).
- Zoom in on the Cabinet (E) just to the left.
- Use the CABINET KEY from behind the Painting.
- Complete the Hidden Object Scene and collect the SMALL DRAWER KEY (F).
- Go back upstairs to the Bedroom.

- Zoom in on the Wardrobe (G).
- Use the SMALL DRAWER KEY from the Cabinet in the Dining Room to open the Drawer (H).
- Complete the Hidden Object Scene and collect the TIMESTONE (I) and read the Diary (J.
- Go downstairs to the Dining room.
- Zoom in on the Clock (K).
- Put the TIMESTONE on the Clock face.
- This will trigger the Clock mini-game. For the standard solution, see the end of Chapter 3.
5: Scrooge’s Secret (present)
- You are in the present in the Scrooge Family Home.
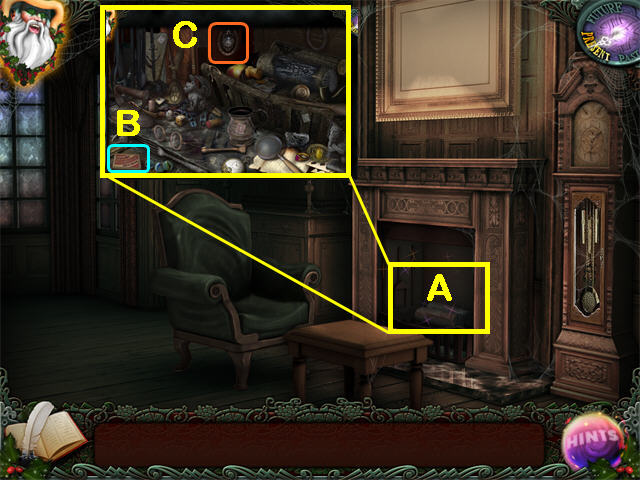
- Zoom in on the Fireplace (A) to do the Hidden Object Scene and collect the BOX OF MATCHES (B).
- The Wishbone doesn’t count as a bone.
- The Brooch (C) is on the back wall.
- Zoom in on the Green Chair. Its springs are broken.
- Exit left to the Hallway.
- Go upstairs to the Bedroom.
- Zoom in on the headboard (D). A piece is missing.
- Zoom in on the Pillow. Collect the KITCHEN KNIFE (E).
- Go downstairs and enter the Dining Room.
- Use the KITCHEN KNIFE from under the pillow on the Green Chair (F).
- Collect the SPRING (G).
- Zoom in on the Fireplace (H) to do the Hidden Object Scene and collect the PLIERS (I).
- Go upstairs.
- Use the PLIERS from the Fireplace on the SPRING from the Green Chair to straighten it, creating a lockpick. Use the LOCKPICK on The Chest (J) at the end of the Bed.
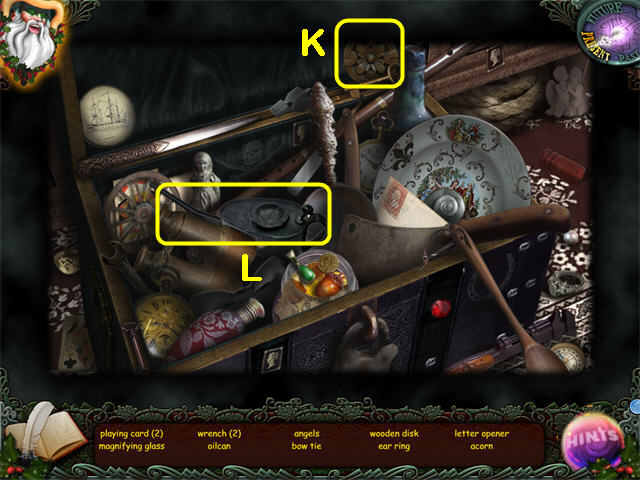
- Zoom in on the Chest to do the Hidden Object Scene and collect the WOODEN DISK (K) and the can of LAMP OIL (L).
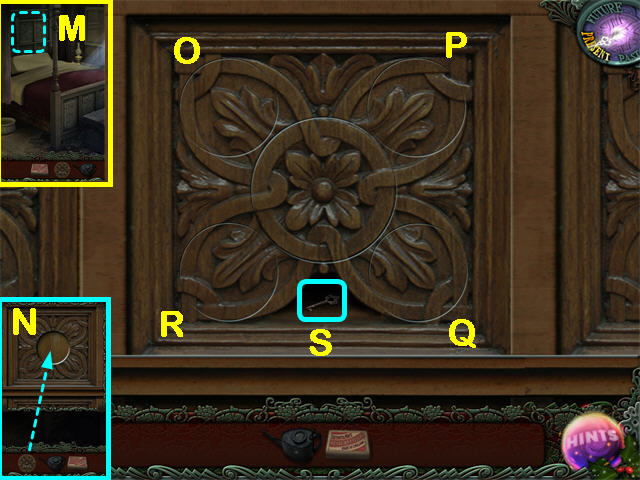
- Zoom in on the Headboard (M) and put the WOODEN DISK in place (N).
- This will trigger a mini-game. There are many possible solutions. Here is one: (P), 4 clicks - (Q), 3 clicks - (R), 4 clicks - (O): 7 clicks - (P), 7 clicks - (Q), 7 clicks - (R), 7 clicks.
- Collect the CELLAR KEY (S).
- Go downstairs.

- Zoom in on the Window.
- Use the CELLAR KEY from the Headboard in the Upstairs Bedroom to open the Cellar Door (T).
- Put the OIL in the LANTERN (U) and then collect it.
- Combine the LANTERN and the MATCHES in your inventory to make a lit OIL LAMP.
- Zoom in on the back wall (V).
- Click the OIL LAMP on the dark scene and it will brighten.
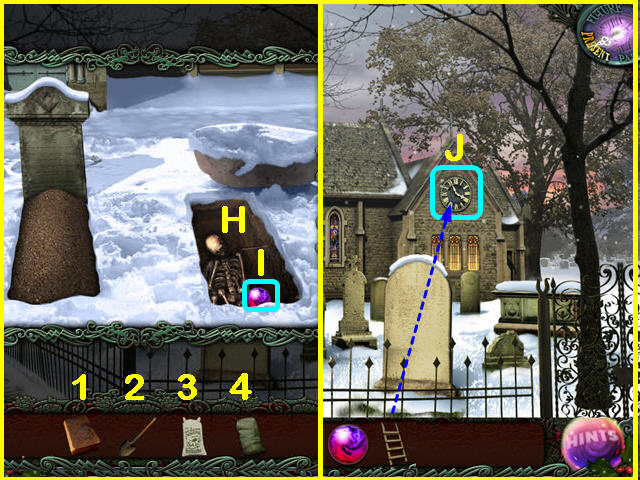
- Complete the Hidden Object Scene and collect the SACK (W).
- Put the SACK on the Skeleton (X).
- The Ghost will now take you to the Cemetery.
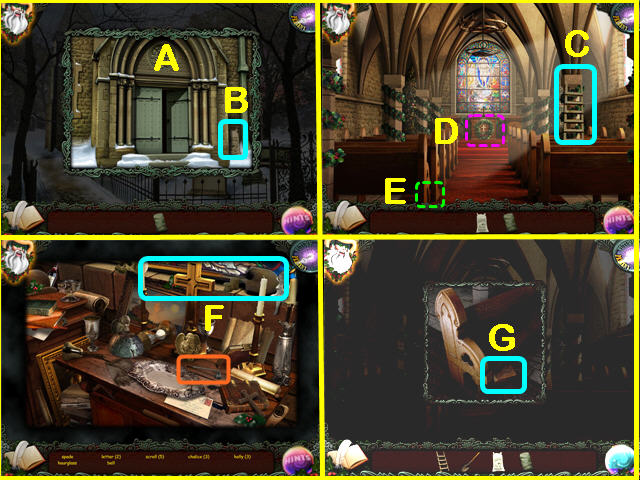
- Zoom in on the door (A).
- Collect the bag of SALT (B).
- Enter the Church.
- Collect the LADDER (C).
- Zoom in on the Altar (D) to do the Hidden Object Scene and collect the SPADE (F).
- The “Extinguisher” is a candle extinguisher with a long handle (orange).
- Zoom in on the Pew (E) on the left.
- Collect the PRAYER BOOK (G).
- Exit to the Graveyard.
- Zoom in on the Cemetery. The ground is frozen.
- Put the SALT (3) from the Church Door on the Grave (H).
- Dig with the SPADE (2) from inside the Church.
- Put the SACK (4) into the Grave.
- Put the PRAYER BOOK (1) from the Pew into the Grave.
- Mr. Scrooge will tell you some more about Ebenezer.
- Collect the TIMESTONE (I) from the Grave.
- Use the LADDER from inside the Church on the Church Clock (J).
- Zoom in on the Church Clock.
- Put the TIMESTONE on the Clock face.
- This will trigger the Clock mini-game. For the standard solution, see the end of Chapter 3.
6: Belle’s Story (past)
- You are back in the past. You are in front of the Accounting Building, which says FEZZIWIG ACCOUNTANTS.
- Enter the building.
- Go right into the Downstairs Office.
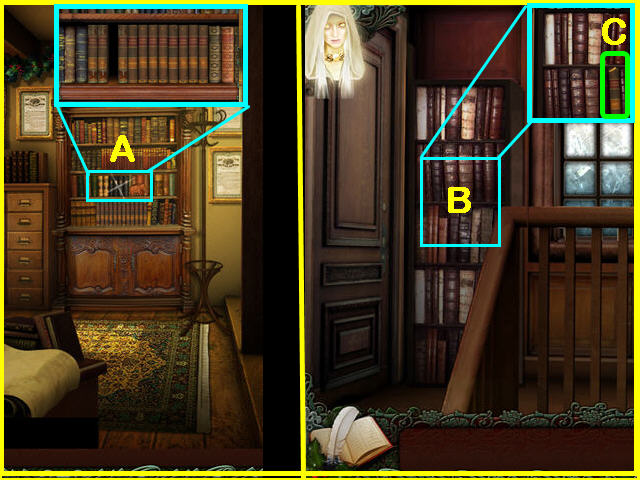
- Zoom in on the Bookcase (A). An ACCOUNT BOOK is missing.
- Exit to the Hallway, then go upstairs.
- Zoom in on the Bookcase (B) and collect the ACCOUNT BOOK (C).
- Go downstairs and enter the Downstairs Office.
- Zoom in on the Bookcase (A) and put the ACCOUNT BOOK back on the shelf.
- This will trigger a mini-game.
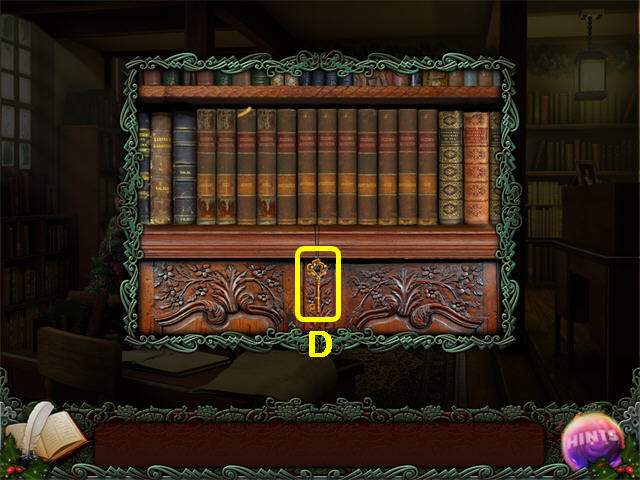
- Swap two books at a time until they are all in calendar order, January – December.
- The books light up when they are placed correctly.
- Zoom in on the bookcase again and collect the KEY (D) to the Upstairs Office.
- Go upstairs and use the KEY you just found to open the Door on the left.
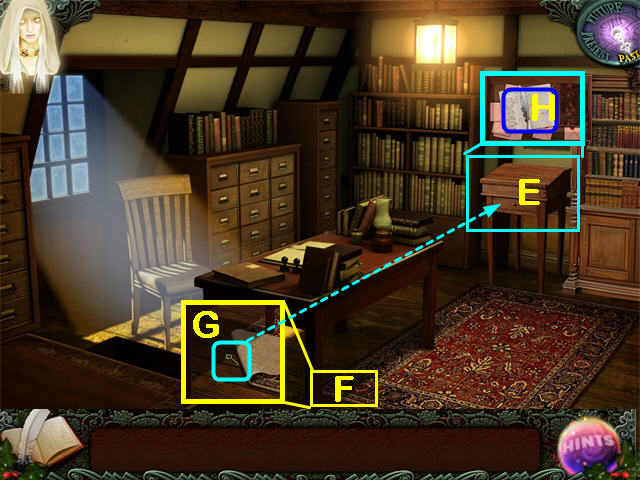
- Zoom in on the small desk (E) against the wall. It’s locked.
- Zoom in on the Rug (F). Lift the Rug up, then collect the DESK KEY (G).
- Zoom in on the small desk (E) and use the DESK KEY from under the rug to open it.
- Read the missing Ledger pages (H).
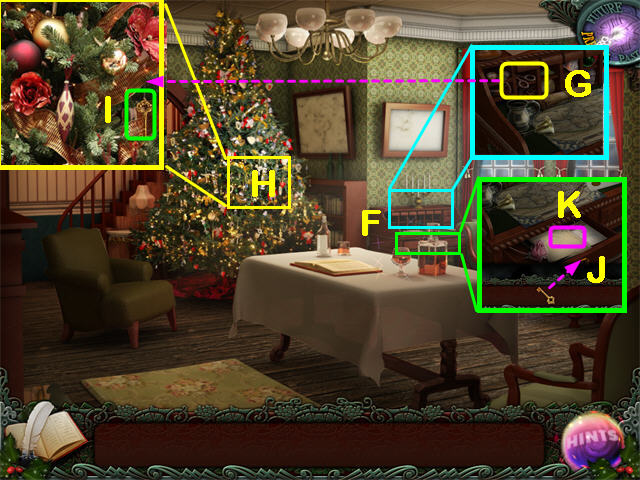
- Go to the Downstairs Office and zoom in on the Christmas Tree (I).
- Collect the TIMESTONE (J).
- Exit to the Hallway.
- Zoom in on the Clock (K).
- Put the TIMESTONE on the Clock face.
- This will trigger the Clock mini-game. For the standard solution, see the end of Chapter 3.
7: Belle’s Story (present)
- You are in the present, in front of Belle’s home.
- Zoom in on the Hidden Object Scene on the left of the steps (A) and do it to collect the WIRE COAT HANGER (B).
- Zoom in on the steps (C) to the left of Belle’s House. Collect the NEWSPAPER (D).
- Zoom in on Belle’s Door (E).
- Take the PLIERS (F).
- Put the NEWSPAPER under the door (G) to catch the key when it falls..
- Use the PLIERS on the WIRE COAT HANGER to get a STRAIGHT COAT HANGER.
- Zoom in on the Lock (H).
- Use the STRAIGHT COAT HANGER on the Keyhole (I).
- Pull out the NEWSPAPER (J) and collect the KEY.
- Use the KEY on the Door to enter.
- Zoom in on the Desk (F) to do the Hidden Object Scene and collect the SCISSORS (G).
- Zoom in on the Christmas Tree (H).
- Use the SCISSORS from the Desk to trim the branches on the right side of the zoom scene and reveal a KEY (I).
- Zoom in on the Desk again and use the KEY from the Christmas Tree to unlock the Drawer (J).
- Read the DEEDS (K).
- The Ghost will take you to Belle’s Orphanage.
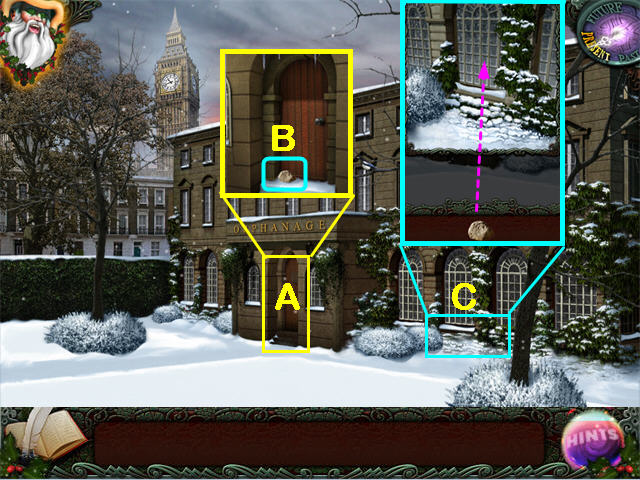
- Zoom in on the Door (A) and collect the ROCK (B).
- Zoom in on the Window (C) on the right. Use the ROCK to break the Window.
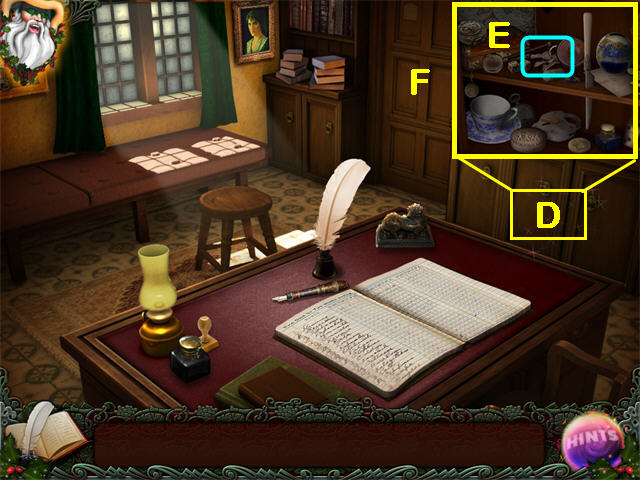
- You are in the old Staff Room, which is now Bella’s office.
- Zoom in on the Cupboards (D) to do the Hidden Object Scene and collect the BUNCH OF KEYS (E).
- Exit through the Door (F).
- Zoom in on the Door on the right and use the KEYS to open it.
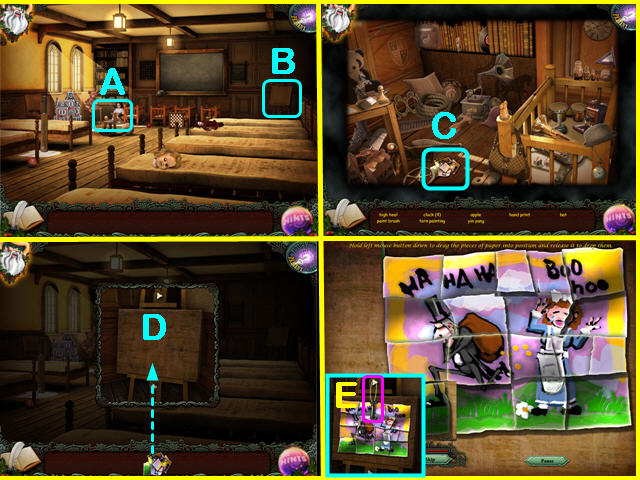
- The old Classroom is now a Dormitory.
- Zoom in on the Toy Area (A) to do the Hidden Object Scene and collect the TORN PAINTING (C).
- Zoom in on the Easel (B).
- Put the TORN PAINTING on the Easel (D).
- Reassemble the painting.
- Zoom in on the Easel (B) again and collect the KEY (E).
- Return to Belle’s office.
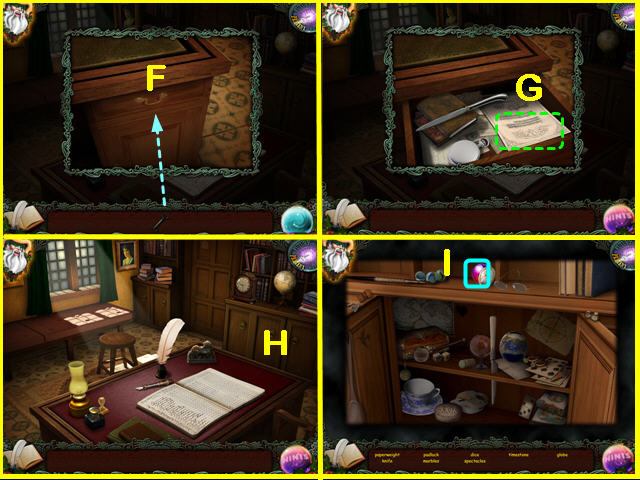
- Zoom in on the right side of the desk.
- Use the SMALL KEY from the Easel in the Dormitory to open the Drawer (F).
- Read the Contract (G).
- Zoom in on the Cabinet (H) to do the Hidden Object Scene and collect the TIMESTONE (I).
- Zoom in on the Clock (J).
- Put the TIMESTONE on the Clock face.
- This will trigger the Clock mini-game. For the standard solution, see the end of Chapter 3.
8: Belle’s Story (future)
- You are in the future in front of the Orphanage.
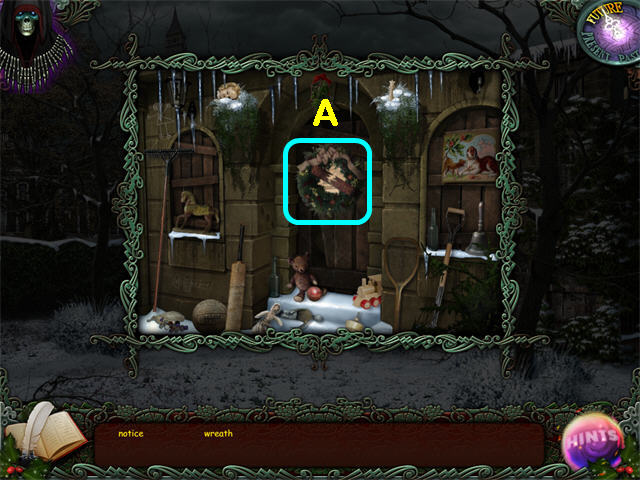
- Zoom in on the door. Remove the Wreath (A) and read the Notice underneath..
- The Ghost will take you to Belle’s house.
- Zoom in to the left (A) of the steps to do the Hidden Object Scene and collect the HAMMER (B).
- Zoom in on the Window (C) to the left of the door.
- Use the Hammer to break the Window.
- Zoom in twice on the Note (D).
- The Ghost will take you to the Graveyard.
- Read Belle’s Tombstone (F).
- Zoom in on the Cemetery (G).
- Complete the Hidden Object Scene and collect the CLOCK FRAGMENT (F).
- Zoom in on the Church Door (E) and collect the LADDER (I) and another CLOCK FRAGMENT (J).
- Enter the Church (K).
- Zoom in on the Wreath to do the Hidden Object Scene and collect the CLOCK FRAGMENT (L) and the TIMESTONE (M).
- Exit to the Graveyard.
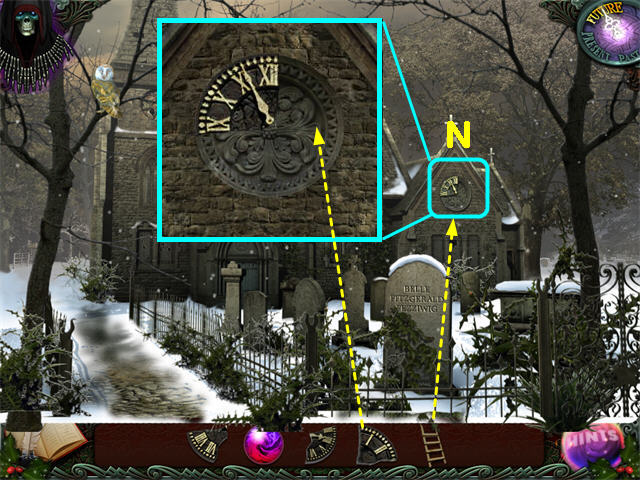
- Put the LADDER from the Church Door on the Church Clock (N).
- Zoom in on the Clock.
- Put the CLOCK FRAGMENTS (from the Cemetery, the Church Door, and the Wreath Hidden Object Scene) on the Clock face.
- Put the TIMESTONE on the Clock face.
- This will trigger the Clock mini-game. For the standard solution, see the end of Chapter 3.
9: Epilogue
- Find the forward arrow near Scrooge and click there to confront him.
- Watch the ending.
Created at: 2010-12-07