

Walkthrough Menu
- Introduction
- Prologue
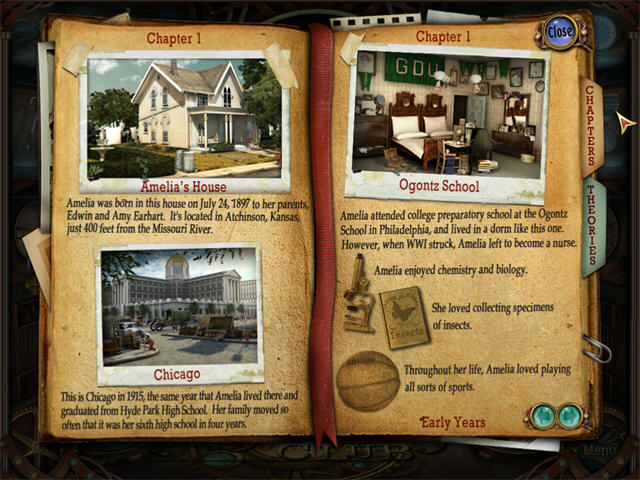
- Chapter One: Early Years
- Chapter Two: Flying Machines
- Chapter Three: Setting Records
- Chapter Four: World Traveler
- Chapter Five: Final Voyage
Introduction
Tips & Information
- The options menu allows for the adjustment of music and sounds volume.
- You may play this game in windowed or full screen mode.
- You may disable the custom cursor.
- From the main screen you may manage player profiles.
- You will have the option of a mini-tutorial once you start Chapter One.
- The hidden object list is in the bottom center bar.
- Items that are hidden or require a tool are in blue print.
- Hints are unlimited, but you must wait for the meter to refill.
- You may skip mini-games.
- When the cursor changes to a puzzle piece, some tool or action is required to reveal the object.
- The eye icon indicates that you must take a close look.
- The hand icon shows that you must pick up an item.
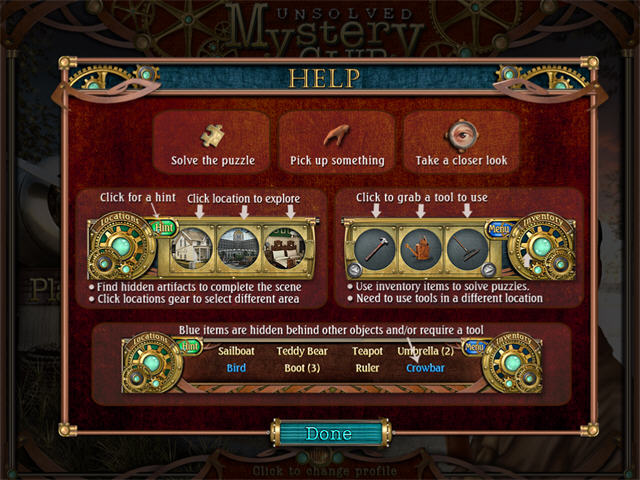
- The hidden object list is in the bottom center bar.
- Items that are hidden, or require a tool, are in blue print.
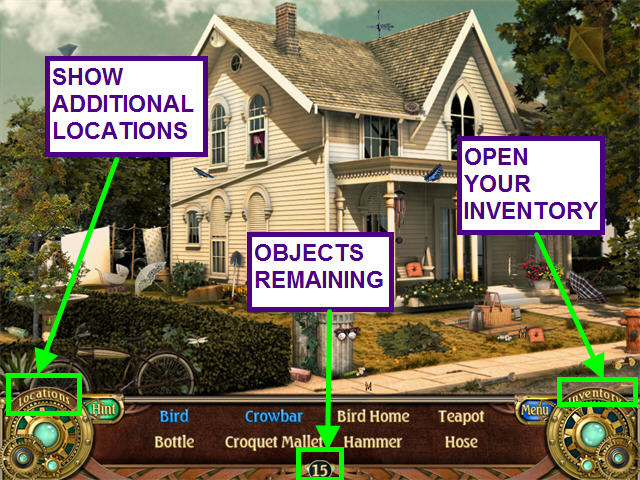
- Click on the Locations gear to show available areas.
- Click on the Inventory gear to show available tools.
- The number at the bottom center of the screen pertains to the number of objects remaining in a scene.
- Access the journal by clicking on its icon in the lower right corner when you are in the vault.
- You can review all the previously visited locations and theories.
Prologue
The Vault
- After a long search, you may have found the warehouse for the Unsolved Mystery Club!
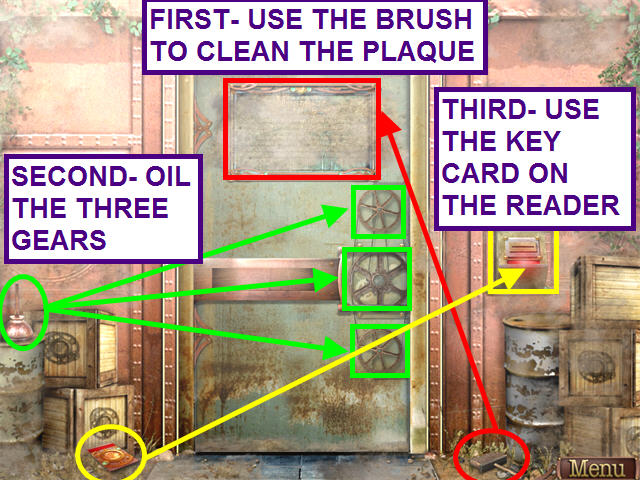
- Take the BRUSH from the ground; use it several times on the door plaque.
- Read the plaque to discover that you have indeed located the Club's warehouse.
- Take the OIL CAN from the left and oil the gears on the door.
- Take the KEY CARD from the lower left and use it on the card reader to open the door.
- Click on the open doorway to enter the warehouse.
- Inside you are greeted by your guide, Henry Hudson.
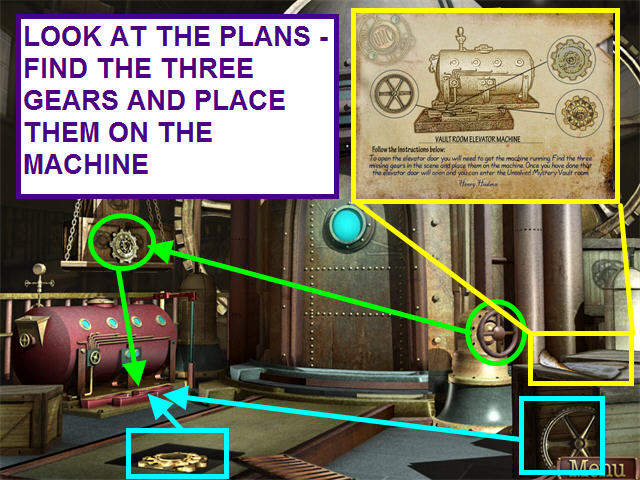
- You need to repair the elevator machine.
- Look at the plans on the right to learn the machine is missing three GEARS.
- Open the right crate and the floor grate to find two of the GEARS.
- Turn the valve on the right to raise the cargo on the left, revealing the third GEAR.
- Place the GEARS on the machine to open the elevator.
- Click on the open door to progress.
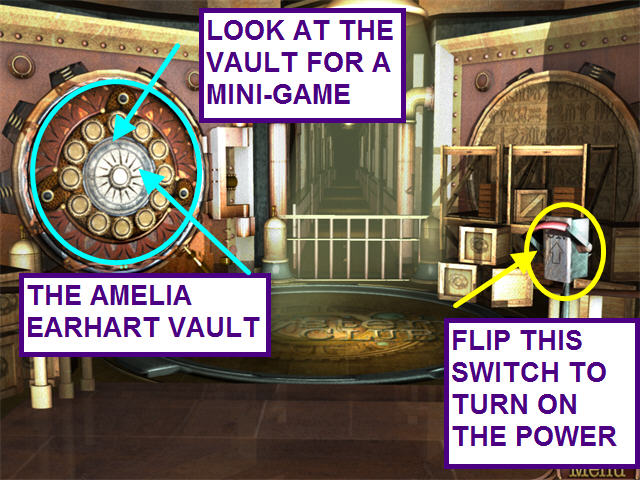
- Flip the large switch on the right to illuminate the darkened room.
- The vault on the right is covered in ancient Egyptian hieroglyphs regarding prehistoric visitors from other worlds! But that is an adventure for another day.
- Look at the left vault to trigger a mini-game.
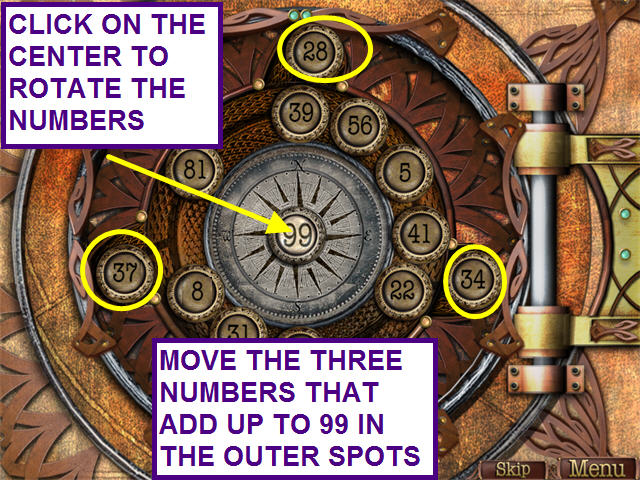
- Amelia Earhart and 98 other women founded the first woman's flying club called the 99's in 1929.
- Find the three numbers that add up to 99.
- Click on the center 99 to rotate the numbers.
- When a number is lined up with one of the three outer spaces, click on it to move it to the space.
Chapter One: Early Years
Newsreels
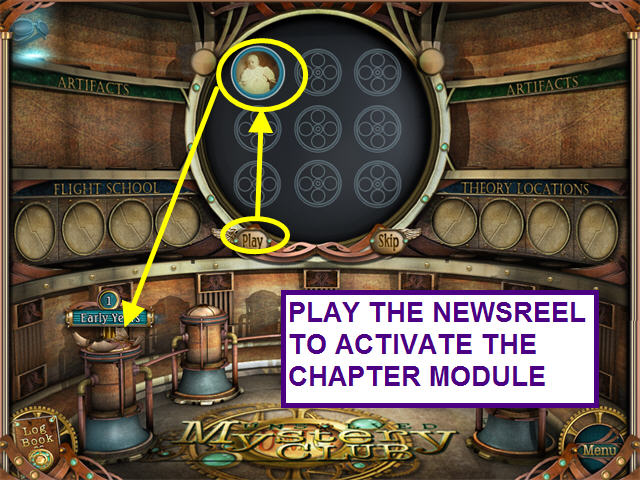
- Click the newsreel footage to trigger the chapter module. (You may skip the newsreels.)
- Select the Chapter One module on the left.
- Locate the hidden objects in each of the three locations.
- You will have to travel back and forth between locations.
- When you locate tools, return to previous locations to uncover the blue items.
- Each location also has a hidden historic artifact.
- Tools will be marked in red; artifacts will be marked in yellow.
- You’ll repeat this process for each chapter module.
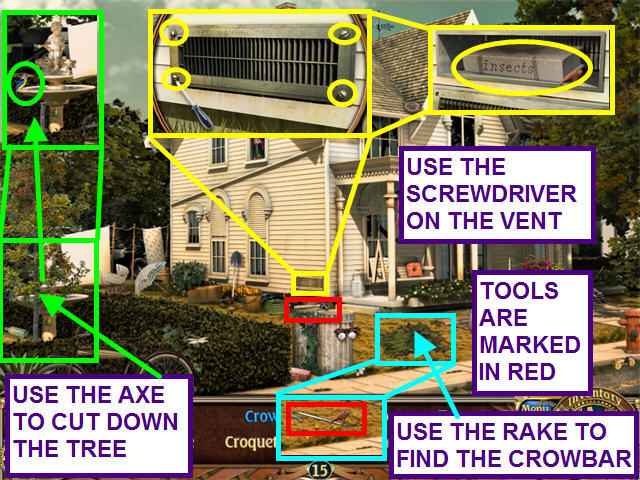
Earhart House
- Use the AXE found at Ogontz School to chop down the tree and find the bird.
- Use the RAKE found at Chicago, Illinois to rake the leaves and find the CROWBAR.
- The HAMMER is found in this scene's hidden object list.
- For the hidden artifact, use the SCREWDRIVER found at Ogontz School on the vent.
- Put the tip of the SCREWDRIVER on each of the screws and click.
- Take the INSECT COLLECTION.
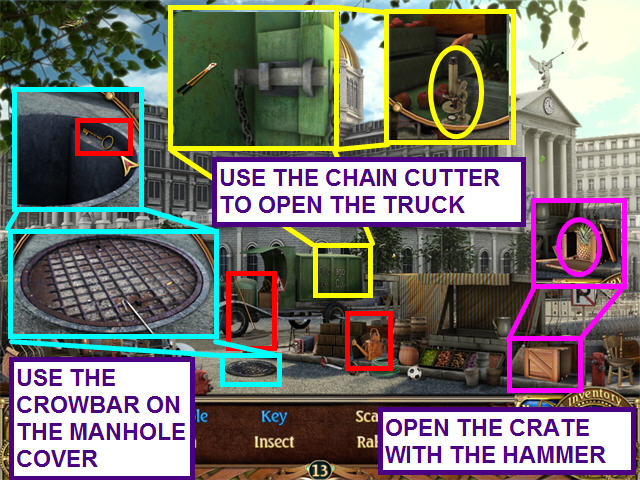
Chicago, Illinois
- Find the RAKE and the WATER CAN in this scene's hidden object list.
- Use the HAMMER found at the Earhart House to open the crate on the right and find the pineapple.
- Use the CROWBAR found at the Earhart House to open the manhole and find the KEY.
- Look at the close-up of the truck; use the CHAIN CUTTER to open the door.
- Take the MICROSCOPE.
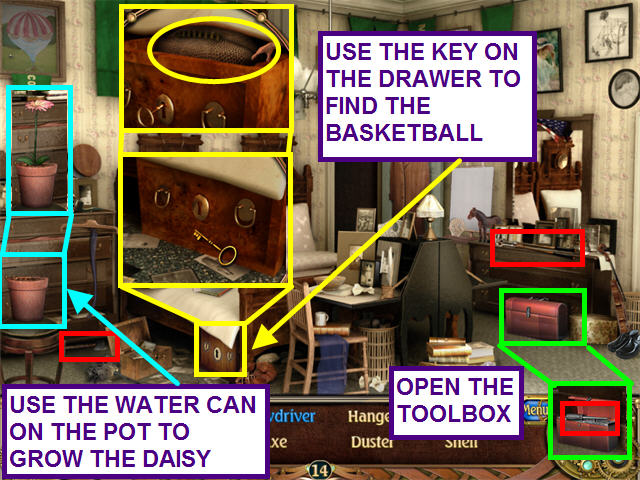
Ogontz School
- Open the toolbox and find the SCREWDRIVER.
- Take the CHAIN CUTTER from the dresser.
- Take the AXE from under the bureau.
- Use the WATER CAN found in Chicago, Illinois on the clay pot to grow the daisy.
- The KEY found in Chicago, Illinois will open the drawer under the bed.
- Take the BASKETBALL.
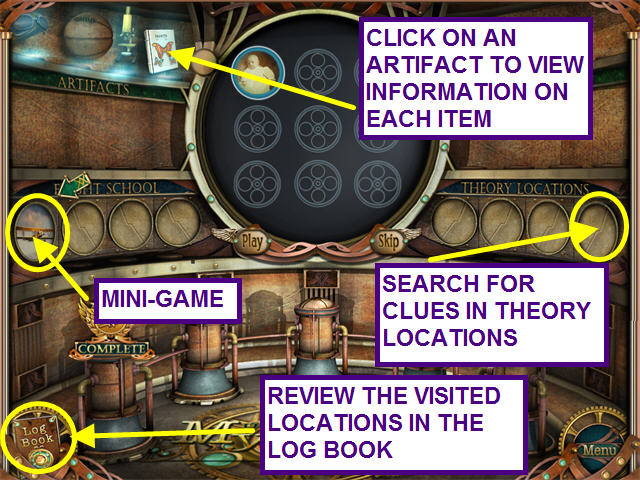
- Back in the vault, you can review information about the locations you’ve visited and artifacts you’ve found in the log book.
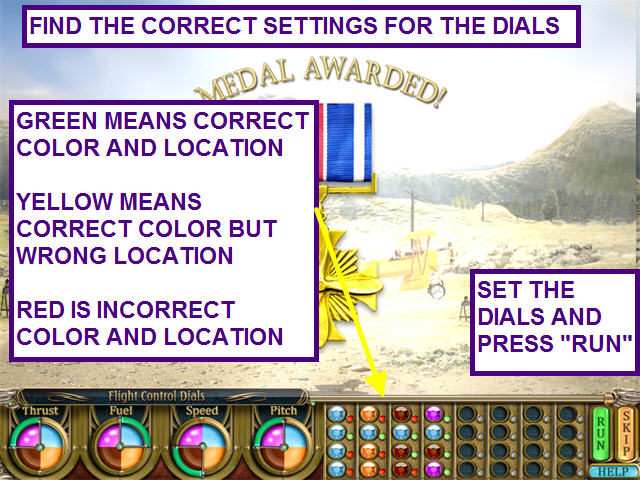
- Click on the first airplane in the flight school section for a mini-game.
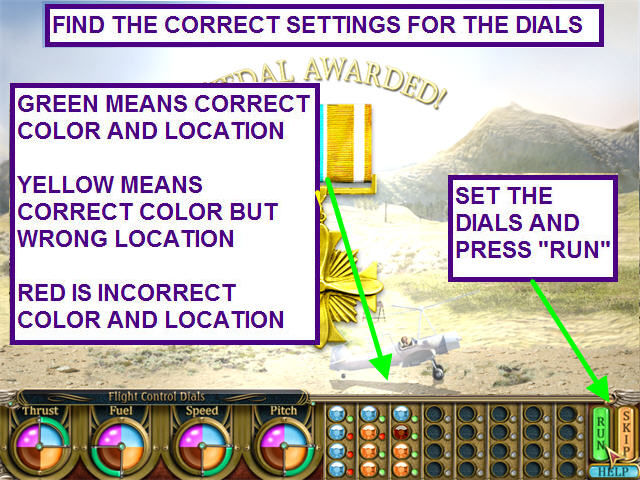
- Select the correct color settings for each of the four dials.
- Set the dials and press “RUN” to test your selection.
- Green indicates that the color and location are correct.
- Yellow means the color is correct, but the location is wrong.
- Red indicates that both color and location are incorrect.
- You will have eight chances to correctly determine the color combination.
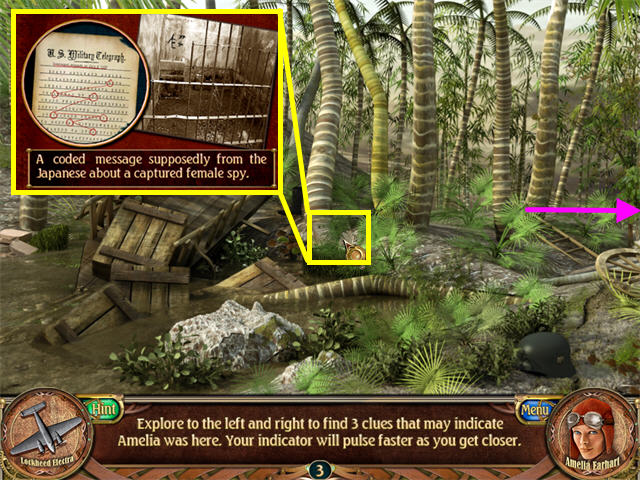
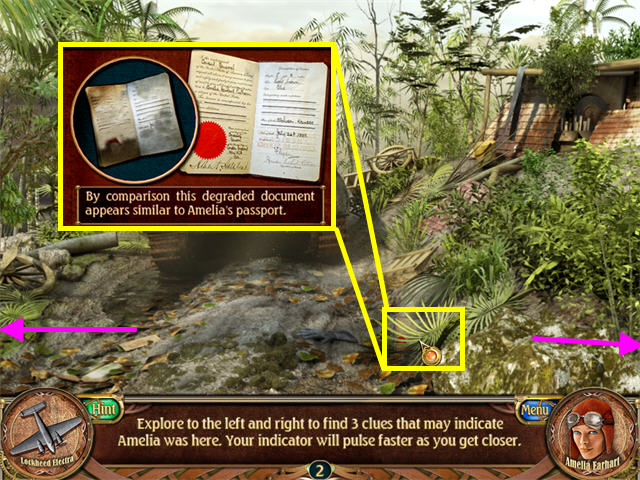
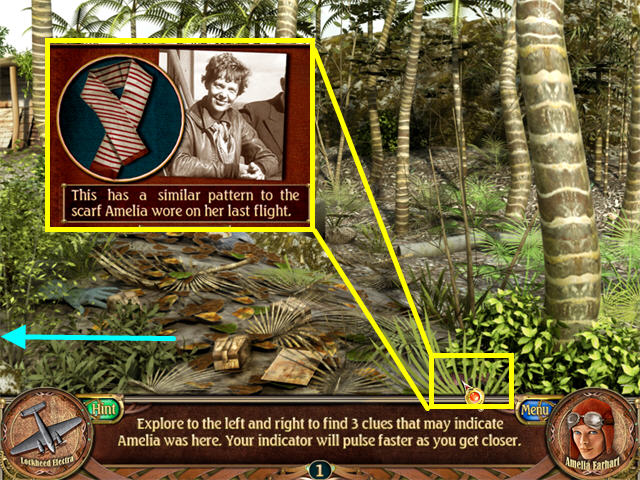
- Back in the vault, you can view a newsreel on one of the disappearance theories.
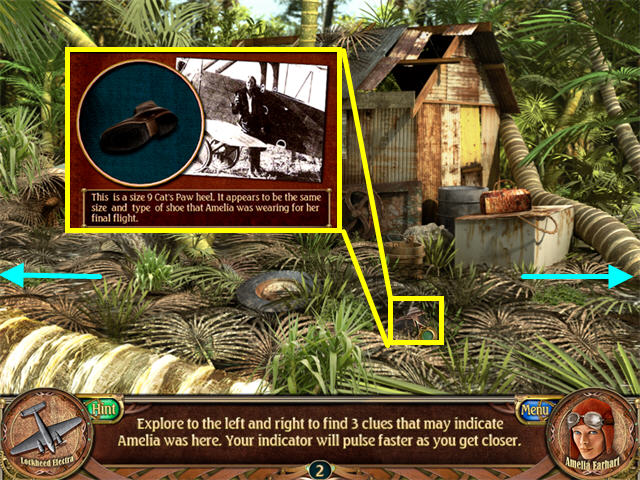
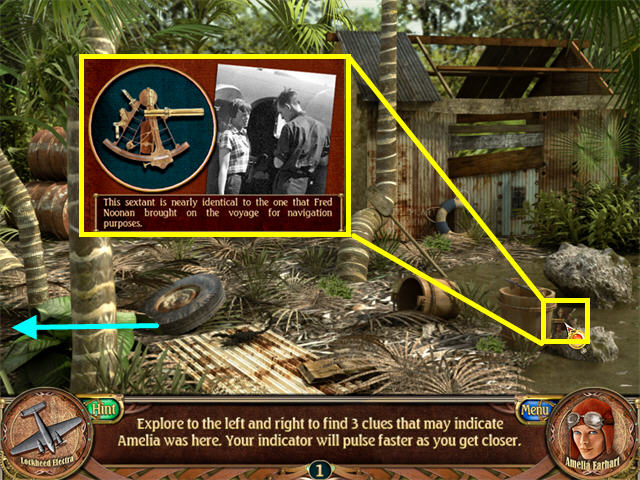
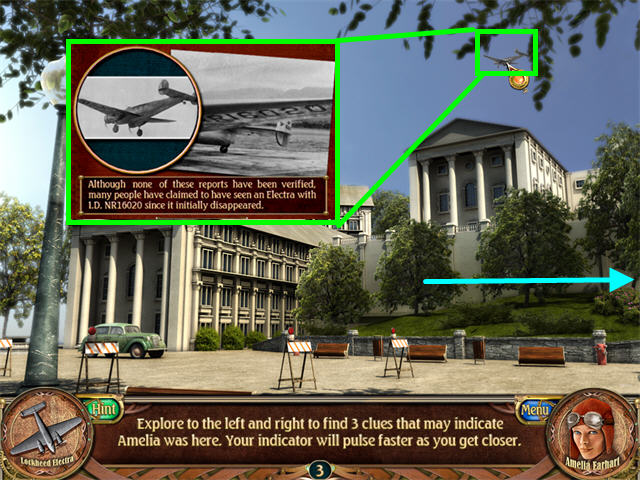
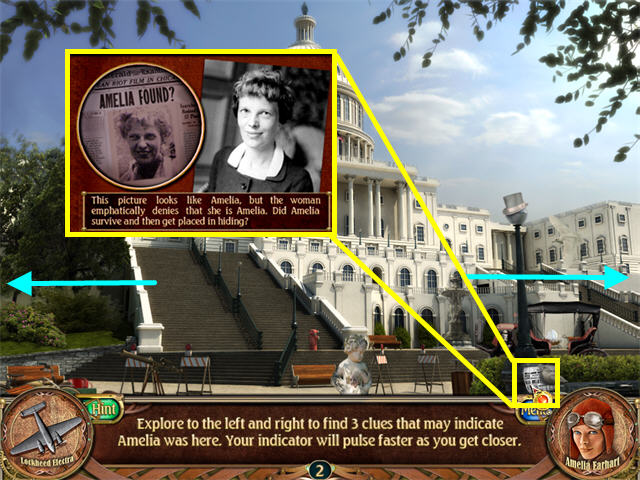
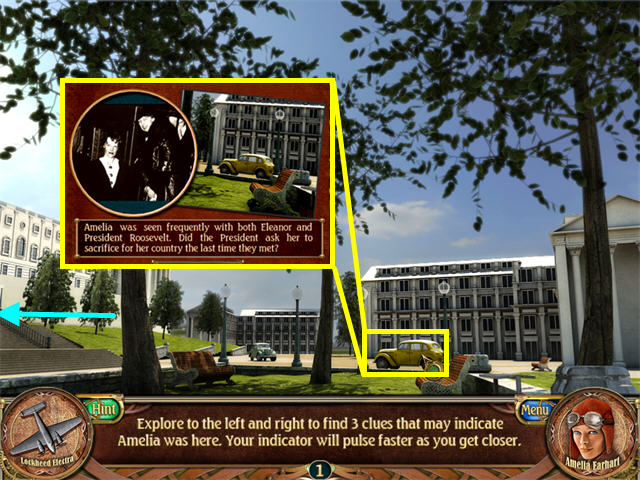
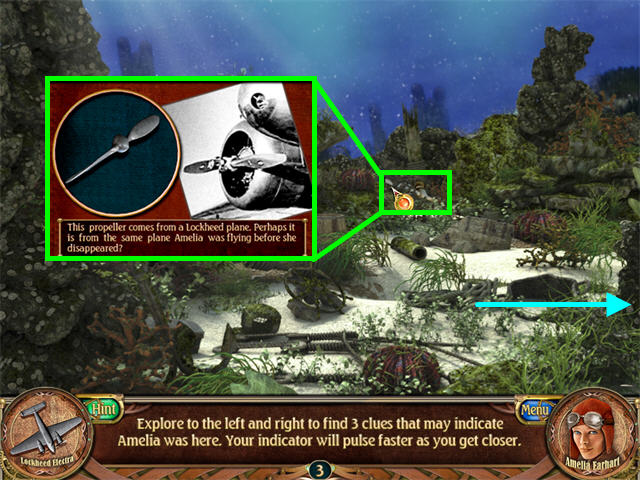
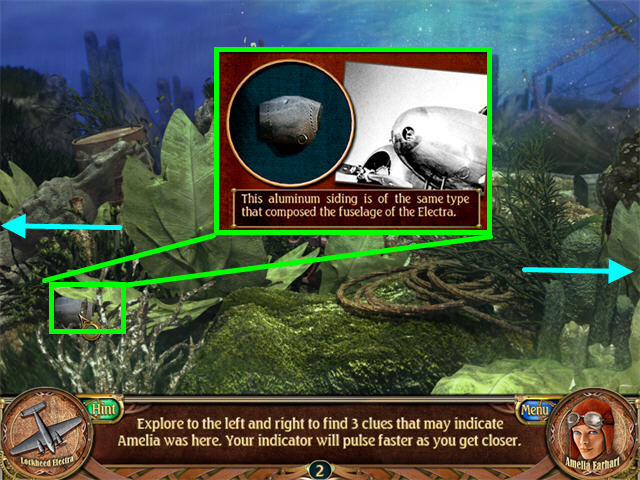
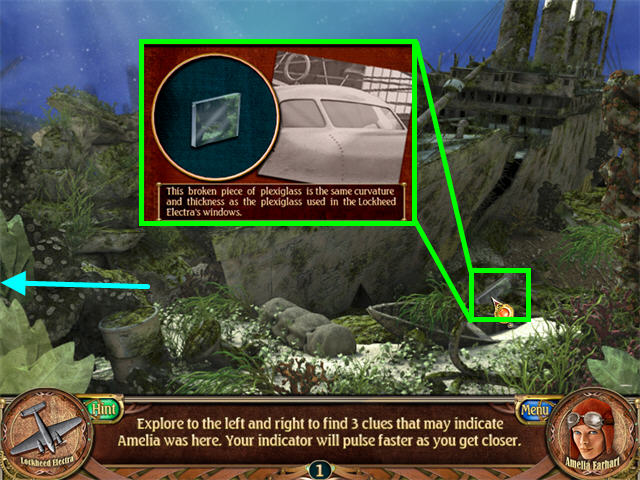
- Select the theory location on the right to look for clues.
- Scroll to the left and right to find the three clues.
- The jewel in the cursor will rapidly blink red when you are near an object.
Chapter Two: Flying Machines
Newsreels
- Click the newsreel footage to trigger the chapter module. (You may skip the newsreels.)
- Now select the Chapter Two module on the left.
- Locate the hidden objects in each of the three locations.
- You will have to travel back and forth between locations.
- When you locate tools, return to previous locations to uncover the blue items.
- Each location also has a hidden historic artifact.
- Tools will be marked in red; artifacts will be marked in yellow.
- You’ll repeat this process for each chapter module.
Electra Airplane
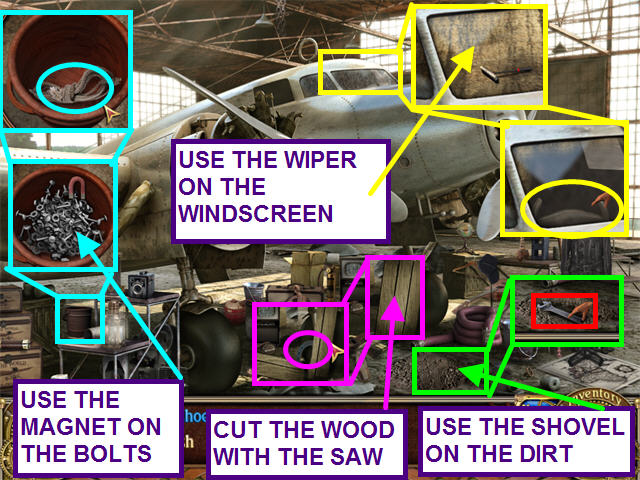
- Look at the close-up of the bucket; use the MAGNET from Spadina Hospital to find the rope.
- Use the SHOVEL found at the Vega Airplane to find the WRENCH in the dirt pile.
- Cut the piece of wood with the SAW from the Vega Airplane to find the horseshoe.
- For the hidden artifact, look at the close-up of the plane's windscreen; use the WIPER found at Spadina Hospital to clean the glass.
- Take the PLANE YOKE.
Vega Airplane
- Locate the SHOVEL, BLOW TORCH, and SAW.
- Use the SCISSORS found at Spadina Hospital to cut open the burlap bag and find the LETTER OPENER.
- The hidden artifact is in the narrow box on the right; use the WRENCH from the Electra Airplane to open the latch.
- Take the AIRPLANE PROPELLER.

Spadina Hospital
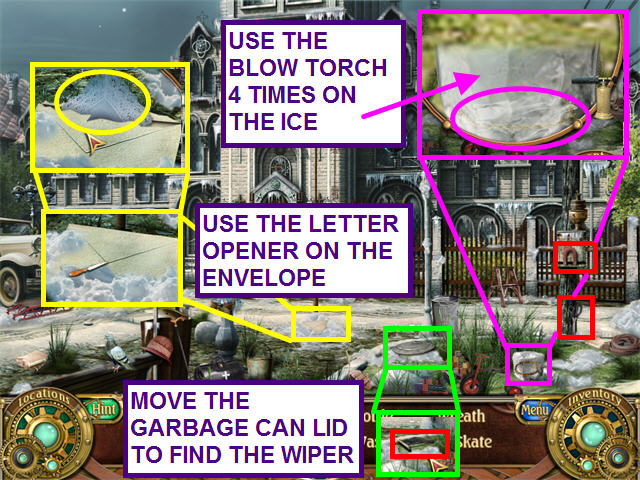
- Locate the SCISSORS and the MAGNET.
- Move the garbage can lid to find the WIPER.
- Use the BLOW TORCH from the Vega Airplane on the block of ice four times to find the necklace.
- Look at the close-up of the envelope; use the LETTER OPENER found at the Vega Airplane to find the hidden artifact.
- Take the HANDKERCHIEF.
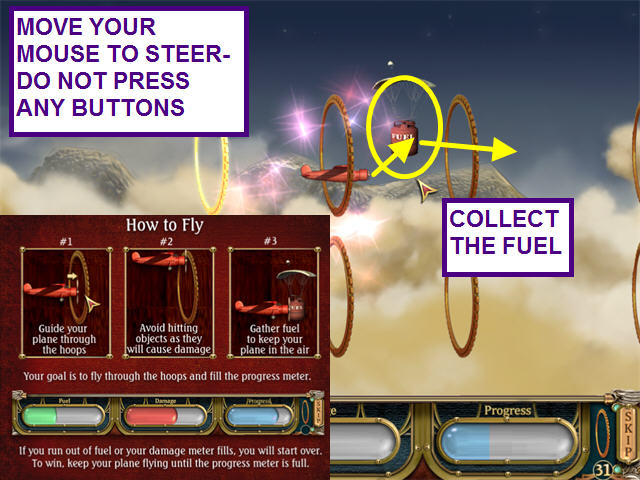
- Back in the vault, select the second flight school icon for a mini-game.
- Guide the plane through the hoops without running out of gas or sustaining too much damage.
- Collect fuel by flying into the gas cans.
- Guide the plane by moving your mouse; do not press any mouse buttons.
- Once the progress meter fills, you are finished.
- Should you run out of gas or take too much damage, the game will reset.
- For part one, fly through the hoops and collect the fuel.
- During part two, you will also fly though the hoops and at the end, fly upside down on your return.
- Move your mouse to the left to fly upside down.
- For part three, you will need to avoid flying obstacles.
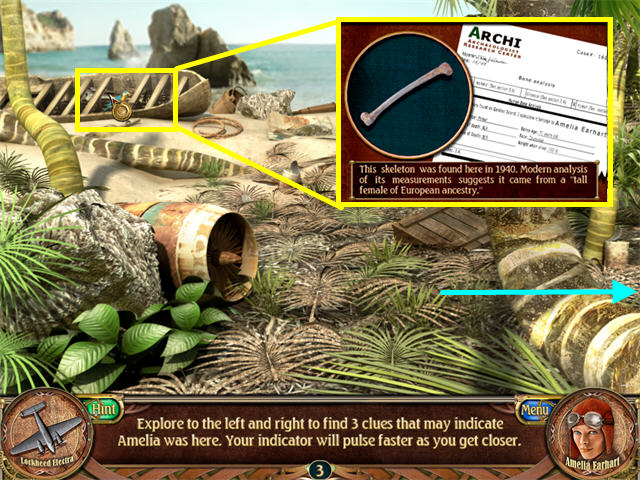
- Back in the vault, you can view another newsreel on one of the theories.
- Now select the theory location on the right to look for clues.
- Scroll to the left and right to find the three clues.
- The jewel in the cursor will rapidly blink red when you are near an object.
Chapter Three: Setting Records
Newsreels
- Click the newsreel footage to trigger the chapter module. (You may skip the newsreels.)
- Now select the Chapter Three module on the left.
- Locate the hidden objects in each of the three locations.
- You will have to travel back and forth between locations.
- When you locate tools, return to previous locations to uncover the blue items.
- Each location also has a hidden historic artifact.
- Tools will be marked in red; artifacts will be marked in yellow.
- You’ll repeat this process for each chapter module.
Autogyro
- Click on the barrel to find the AXE.
- Take the CLOCK HANDS and the SAFE DIAL.
- Look at the close-up of the piggy bank; use the HAMMER found in Wales, England to smash the bank.
- Take the DIAMOND RING hidden artifact.

Hawaii, America
- Take the hat to find the CAN OPENER.
- Use the DOOR KNOB from Wales, England on the door to find the mop.
- The BOX CUTTERS from Wales, England will open the cardboard box so you can take the NET.
- The hidden artifact is in the case with the chains.
- Use the AXE from the Autogyro on the case to find the DESIGNER LABEL.
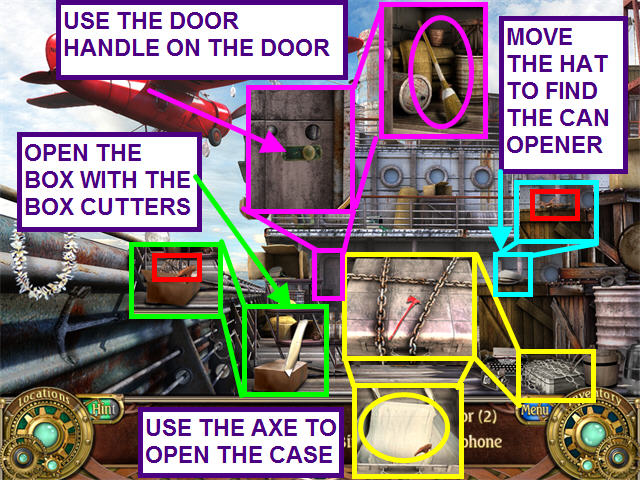
Wales, England
- Take the BOX CUTTER and the DOOR KNOB.
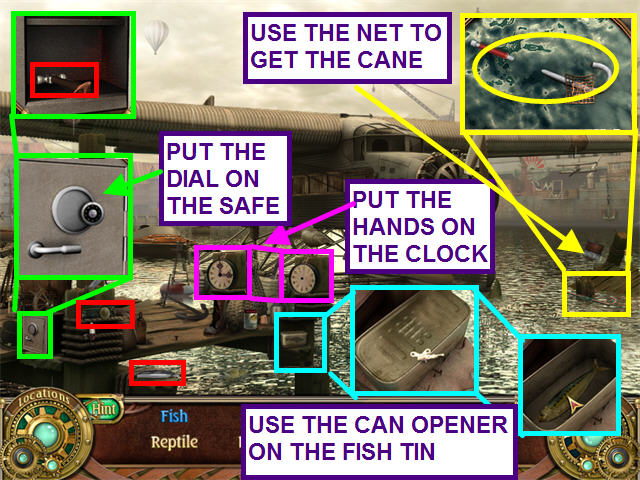
- Use the SAFE DIAL found at the Autogyro on the safe to find the HAMMER.
- Use the CAN OPENER from Hawaii, America to open the can and find the fish.
- Use the CLOCK HANDS found at the Autogyro on the clock face to make the clock.
- For the artifact, use the NET found in Hawaii, America to retrieve the CANE.
- Back in the vault, select the third flight school icon.
- Select the correct color settings for each of the four dials.
- Set the dials and press “RUN” to test your selection.
- Green indicates that the color and location are correct.
- Yellow means the color is correct, but the location is wrong.
- Red indicates that both color and location are incorrect.
- You will have 8 chances to correctly determine the color combination.
- Back in the vault, you can view a newsreel on one of the disappearance theories.
- Now select the third theory location on the right to look for clues.
- Scroll to the left and right to find the three clues.
- The jewel in the cursor will rapidly blink red when you are near an object.
Chapter Four: World Traveler
Newsreels
- Click the newsreel footage to trigger the chapter module. (You may skip the newsreels.)
- Now select the Chapter Two module on the left.
- Locate the hidden objects in each of the three locations.
- You will have to travel back and forth between locations.
- When you locate tools, return to previous locations to uncover the blue items.
- Each location also has a hidden historic artifact.
- Tools will be marked in red; artifacts will be marked in yellow.
- You’ll repeat this process for each chapter module.
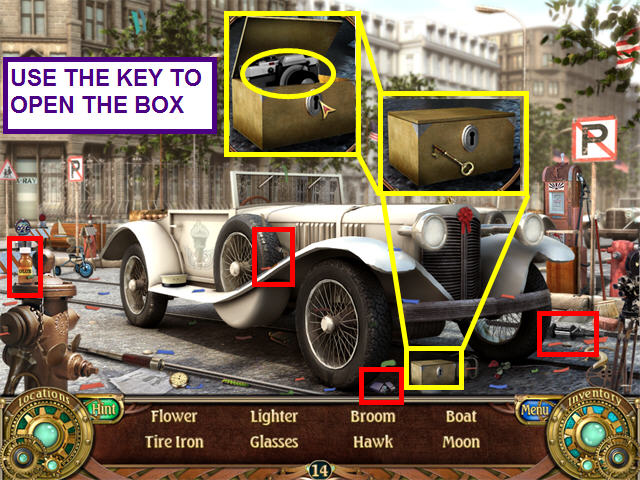
New York, America
- Find the LIGHTER, GLUE, BARBELL, and TIRE IRON.
- Use the KEY found on Ford Island to open the box with the hidden artifact.
- Take the CAMERA.
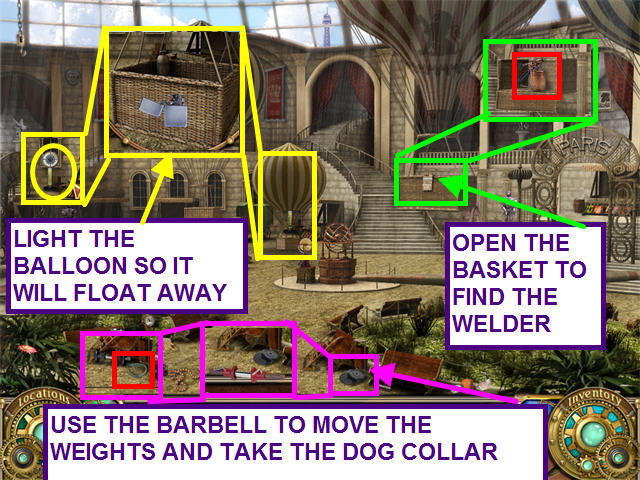
Paris, France
- Click on the rightmost hot air balloon's side to find the WELDER.
- Use the BARBELL found in New York, America to move the weights aside revealing the DOG COLLAR.
- For the hidden artifact, use the LIGHTER from New York, America on the small center balloon.
- Once the balloon floats away, take the 99 EMBLEM.
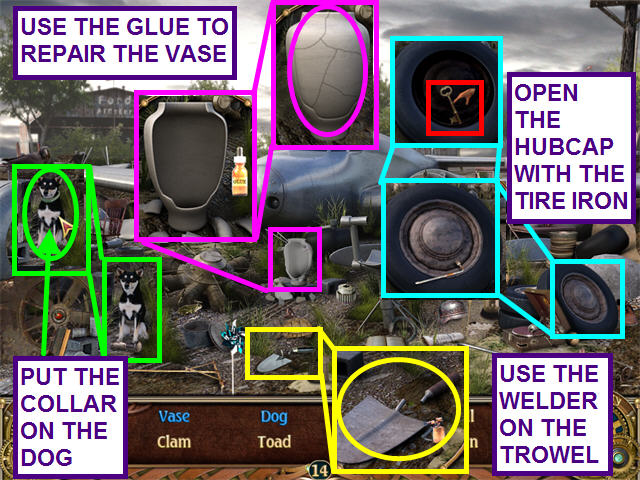
Ford Island, America
- Use the DOG COLLAR from Paris, France on the dog.
- Use the GLUE from New York, America to repair the vase.
- Open the hubcap with the TIRE IRON from New York, American and take the KEY.
- The hidden artifact is the TROWEL.
- Use the WELDER from Paris, France to repair the TROWEL.
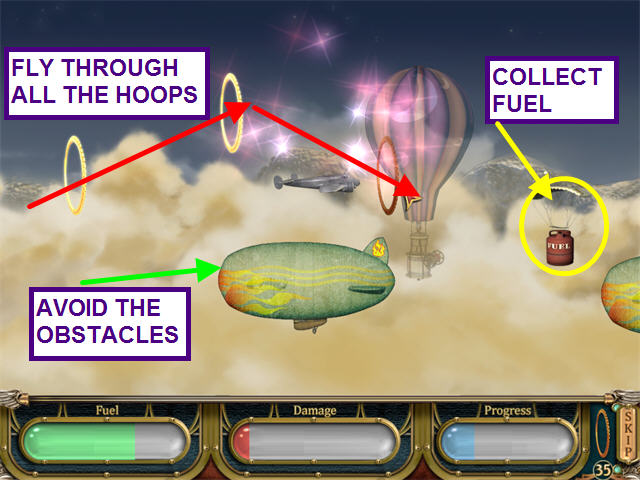
- Guide the plane through the hoops without running out of gas or sustaining too much damage.
- Collect fuel by flying into the gas cans.
- Move your mouse to guide the plane; do not press any mouse buttons.
- Once the progress meter fills, you are finished.
- Should you run out of gas or take too much damage, the game will reset.
- For part one, fly through all the hoops and collect the fuel.
- During parts two and three, you will also fly though the hoops, some of which you will need to fly through upside down on your return.
- Move your mouse to the left to fly upside down.
- Back in the vault, you can view a newsreel on one of the disappearance theories.
- Select the fourth theory location on the right to look for clues.
- Scroll to the left and right to find the three clues.
- The jewel in the cursor will rapidly blink red when you are near an object.
Chapter Five: Final Voyage
Newsreels
- Click the newsreel footage to trigger the chapter module. (You may skip the newsreels.)
- Now select the Chapter Two module on the left.
- Locate the hidden objects in each of the three locations.
- You will have to travel back and forth between locations.
- When you locate tools, return to previous locations to uncover the blue items.
- Each location also has a hidden historic artifact.
- Tools will be marked in red; artifacts will be marked in yellow.
- You’ll repeat this process for each chapter module.
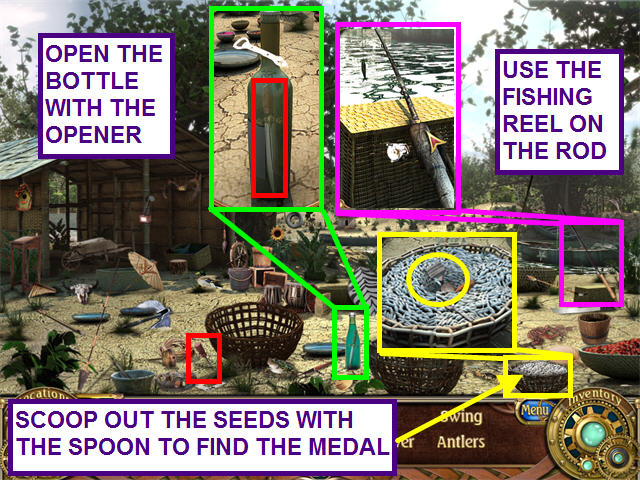
Assab, Eritea
- Take the SCREWDRIVER.
- Use the FISHING REEL from Rangoon, Burma on the rod to find the fish.
- Open the bottle with the BOTTLE OPENER from Carapito, Venezuela; take the KNIFE.
- The hidden artifact is found using the SPOON from Caripito, Venezuela on the bowl of white seeds.
- Take the MEDAL.
Caripito, Venezuela
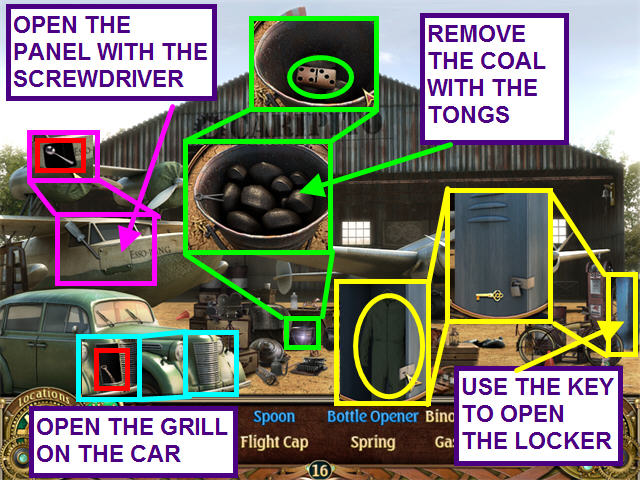
- Open the grill on the car to find the BOTTLE OPENER.
- Use the SCREWDRIVER you found in Assab, Eritea to open the panel on the plane and find the SPOON.
- Use the TONGS from Rangoon, Burma to remove coal from the bucket and uncover the domino.
- Open the locker with the KEY from Rangoon, Burma to find the hidden artifact.
- Take the COVERALLS.
Rangoon, Burma
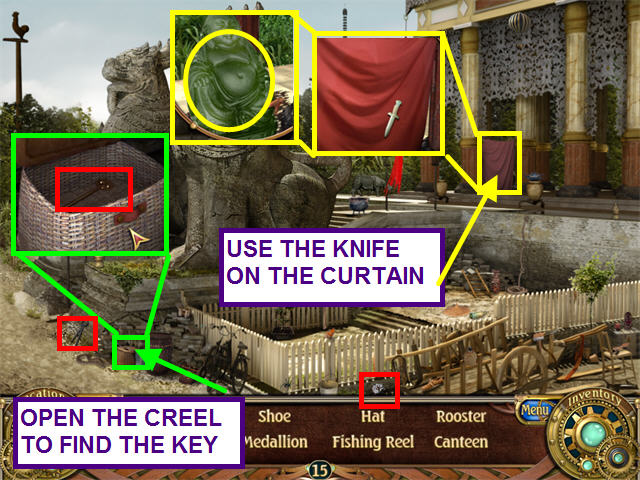
- Take the TONGS and the FISHING REEL.
- Open the fishing creel and take the KEY.
- Use the KNIFE from Assab, Eritea on the curtain to find the hidden artifact.
- Take the Buddha STATUE.
- Back at the vault again, review the log book and the theories you have investigated.
- Close the log book by clicking on the blue button in the upper right.
- You may also review the artifacts and news reels.
- Select the Vote module that has appeared in the center of the vault.

- Click on the box with the theory that you believe is correct.
Created at: 2010-04-23