

Walkthrough Menu
- General Tips & Information
- Chapter One: Business Trip
- Chapter Two: Following Jim's Trail
- Chapter Three: In the Boiler Room
- Chapter Four: The Art Collection
- Chapter Five: A Pleasant Encounter
- Chapter Six: Groundsman Brandon
- Chapter Seven: An Unexpected Telegram
- Chapter Eight: Discoveries From the Master's Book
- Chapter Nine: Rover's Savings
- Chapter Ten: So Close, Yet So Far
- Chapter Eleven: Mr. Rockwell's Arrival
- Chapter Twelve: Vampire Encyclopedia
- Chapter Thirteen: New Plan of Action
- Chapter Fourteen: Blood Type
- Chapter Fifteen: Down in the Basement
- Chapter Sixteen: Malgray Golf Club
- Chapter Seventeen: Up in the Attic
- Chapter Eighteen: A Trap For Brandon
- Chapter Nineteen: A Family Secret
- Chapter Twenty: DNA Testing
- Chapter Twenty-one: An Old St. Bernard's Fortune
- Chapter Twenty-two: The Castle Security System
- Chapter Twenty-three: The Cure-It-All
- Chapter Twenty-four: Farewell Malgray Castle
General Tips & Information
- From the main screen you may manage player profiles.
- The options menu allows for the adjustment of music and sounds volume.
- You can disable the custom cursor in the options menu as well.
- You may play this game in windowed or full screen mode.
- Your game is saved at the completion of each chapter.
- You can replay any completed chapter at anytime.
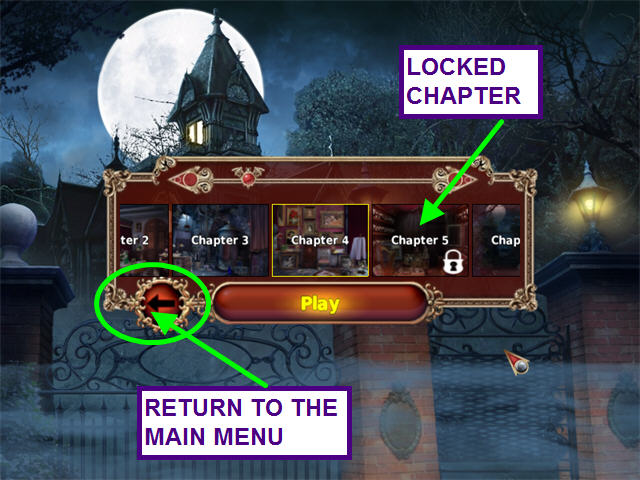
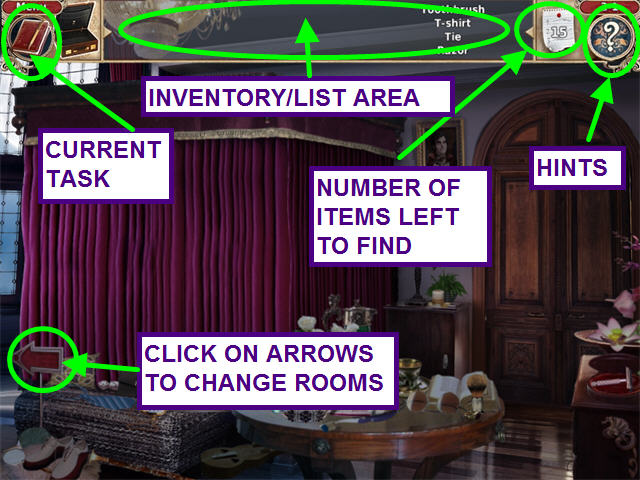
- Read the journal in the upper left corner for the current goal.
- Inventory items are in the upper section of the screen.
- Hints are unlimited and refill at a moderate rate.
- You may skip some mini-games once the skip-meter fills.
- Other mini-games will give you hints, but no skips.
Chapter One: Business Trip
- Glenfield the butler greets you upon your arrival at Malgray Castle.
- You learn that the floor plan had been torn up by Mr. Johnson.
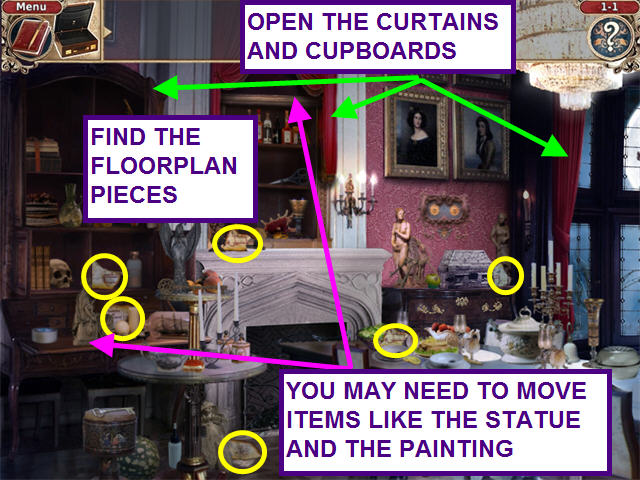
- Collect the 6 pieces of the floor plan.
- One piece is behind the lower right cabinet door.
- After finding all the floor plan pieces, bubbles appear showing the inventory need to free the item.
- Open all the drapes and cabinet doors.
- Move the statues and the painting above the fireplace.
- Take the TAPE from behind the statue and place it into the matching bubble.
- Take the SCISSORS from behind the painting and place it into the matching bubble.
- Take the GLUE from the floor and place it into the bubble.
- If you found these items before finishing the note, left-click once to pick up and left click again to place into inventory.
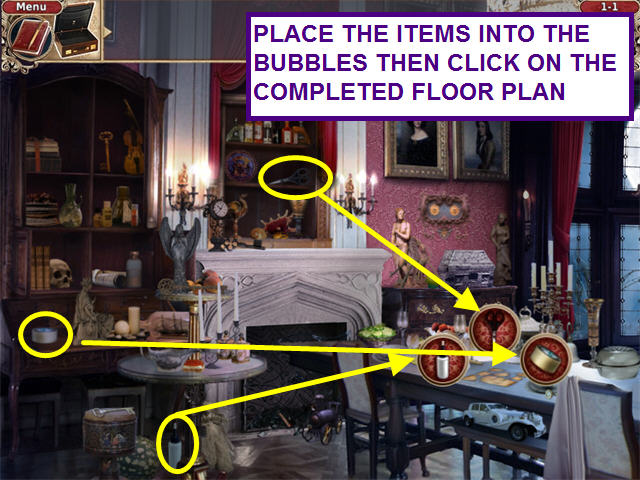
- Click on the completed floor plan.
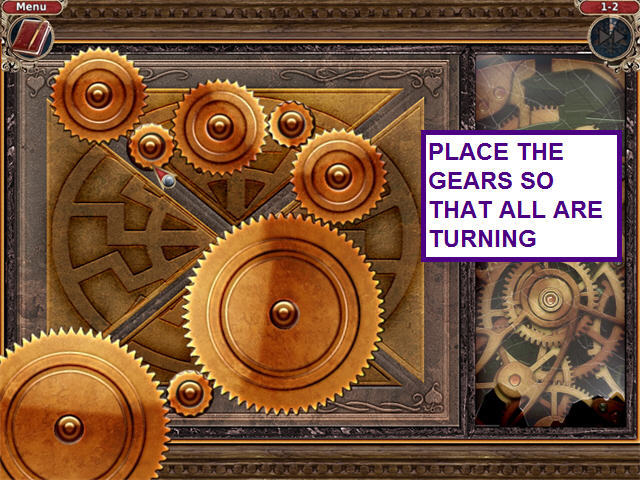
- Glenfield tells you the key to the guest room is in the jewelry box.
- To open the box, place the gears onto the spindles so that all are turning.
- Left-click to take or place a gear.
Chapter Two: Following Jim's Trail
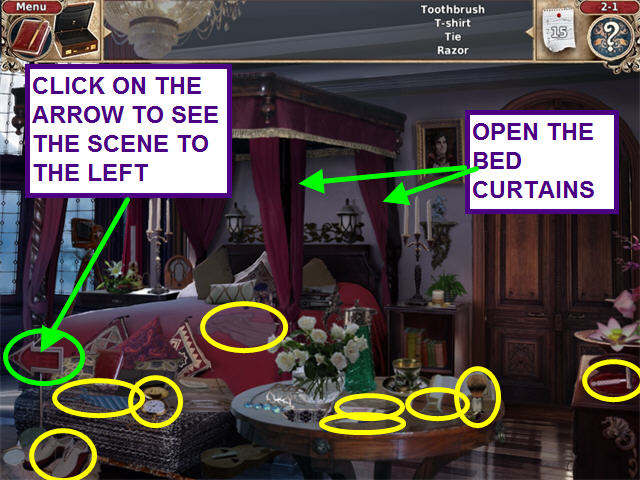
- The maid has been unable to remove Mr. Johnson's belongings.
- Find most of the items on the list.
- The remainder are in the next scene.
- Click on the arrow on the left, center to turn.
- Locate the remainder of the items on the list.
- The note is found behind the briefcase.
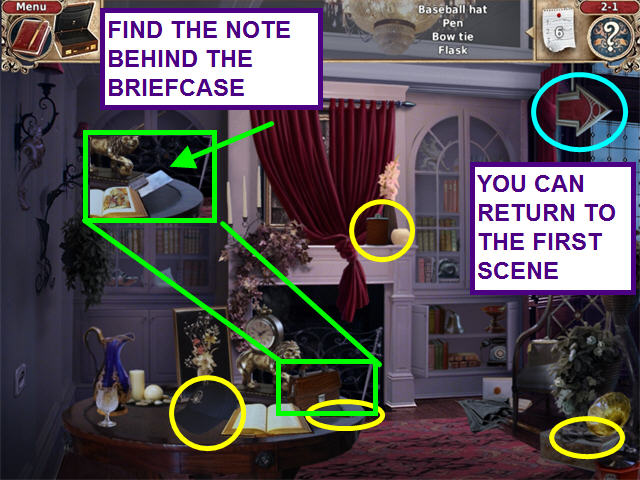
- The note is from John.
- He locked a monster in the bathroom and hid the key.
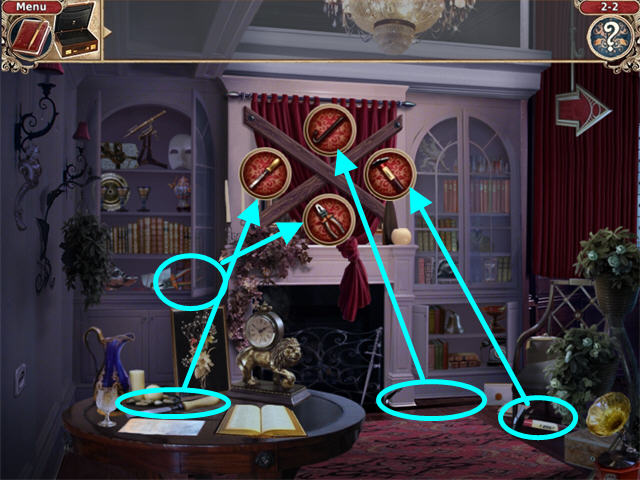
- Click on the planks over the fireplace.
- Locate the tools needed to remove the planks and place them in the bubbles.
- Open the right door to the left cabinet for find the PLIERS.
- The CHISEL is on the table.
- Find the CROWBAR on the floor, just to the right of the fireplace.
- Move the locked box on the right to find the HAMMER.
- Move the edge of the rug back and take the RAZOR
- Use the RAZOR to cut open the drapes over the fireplace.
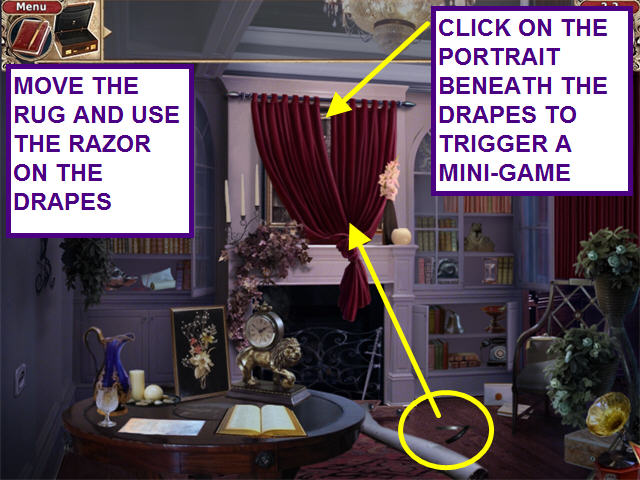
- Click on the painting to trigger a mini-game.
- Left-click on the tiles to rotate them back into position.
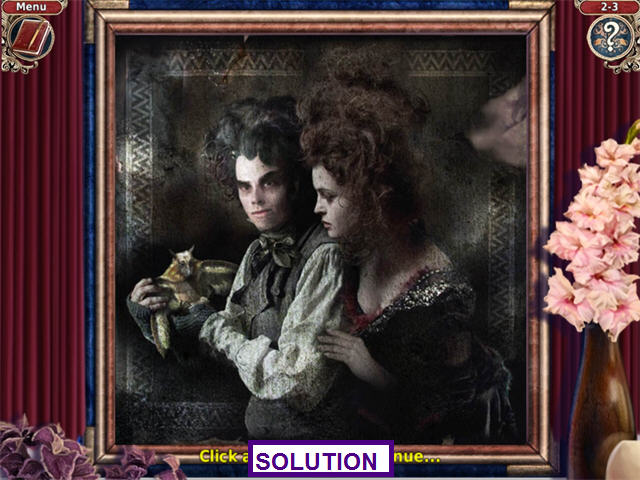
- Click on the painting to reveal the secret area and click on the chest.
- You need to put the numbers back into the lock.
- Click on the painting to return it to over the fireplace.
- Open the cabinet doors.
- Find all the numbers and place then into the lock.
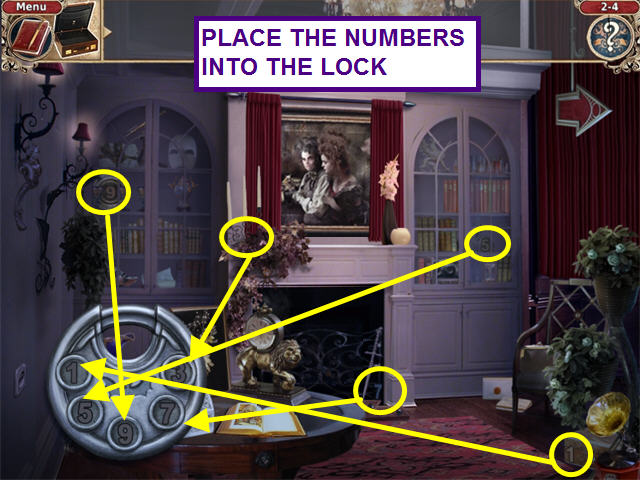
- Take the KEY from the open box and place into your inventory.
- Click on the right arrow to return to the bedroom.
- Use the KEY on the bathroom door.
- Inside the bathroom is the talking ghost of a Saint Bernard named Rover.
- He recommends you get the boiler started if you want a shower.
Chapter Three: In the Boiler Room
- Glenfield insists there are no ghosts.
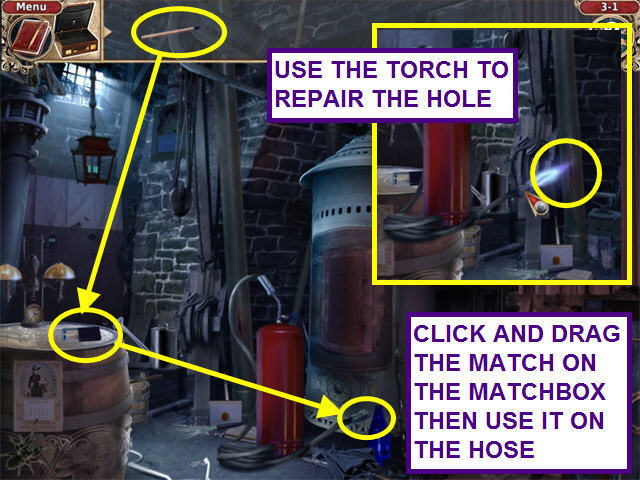
- In the boiler room move the panel on the right and click on the red tank to move it near the hole in the pipe.
- Move the bucket to find the key.
- Use the key on the chest.
- Take the nozzle from the chest and use it on the top of the tank.
- Take the hose from atop the barrel and use it on the nozzle.
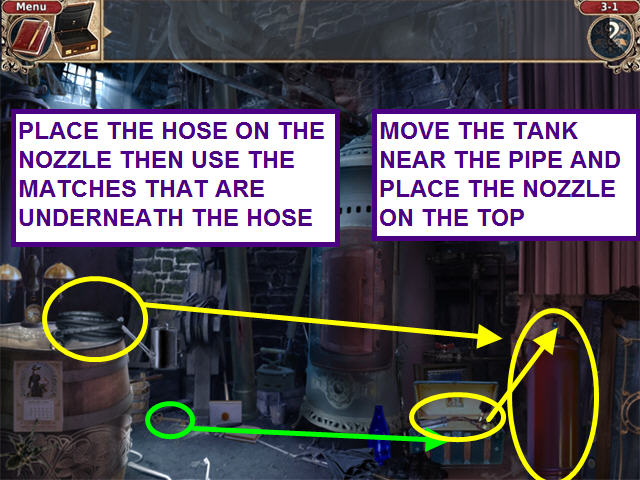
- Left-click to pick up a match.
- Left-click, hold and drag the match across the matchbook, then move it to the end of the hose and click.
- Pick up the tank and move it so that the lighted end is over the hole in the pipe then click to repair the pipe.
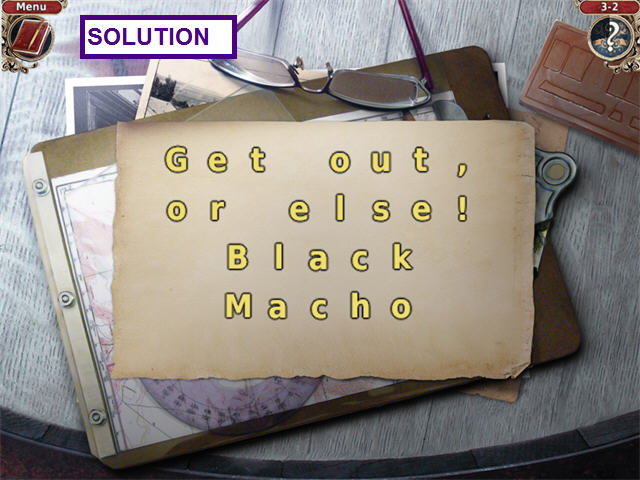
- Someone slipped a strange postcard under the door.
- The object of this mini-game is to decode the message.
- Click on two letters to swap places.
- The solution reads, “Get out, or else! Black Macho.”
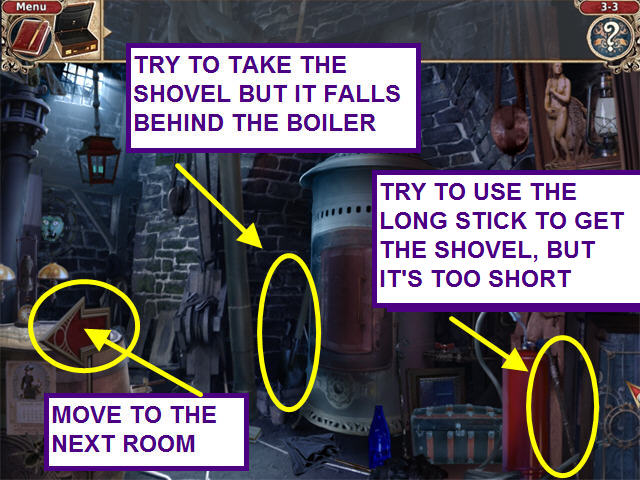
- Click on the RED TANK to move it out of the way.
- Try to take the SHOVEL, but it falls behind the boiler.
- Take the LONG STICK by the RED TORCH but it does not work.
- Click on the left arrow to move to the next room.
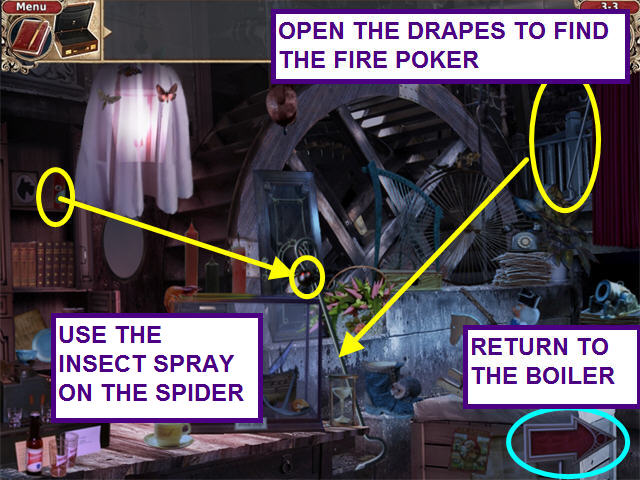
- Open the drapes on the upper right and take the FIRE POKER.
- It falls down to the lower level, but there is a spider on it.
- Open the left cabinet to find the INSECT SPRAY.
- Use the INSECT SPRAY on the spider.
- Take the FIRE POKER.
- Click on the right arrow to return to the boiler room.
- Use the FIRE POKER behind the boiler to get the shovel.
- Take the SHOVEL.
- Use the SHOVEL on the coal and place some into the boiler.
- Take PAPERS from the right shelf-they will move to the floor in front of the boiler.
- Click on the PAPERS once to crumple a few.
- Place 3 crumpled PAPERS into the boiler.
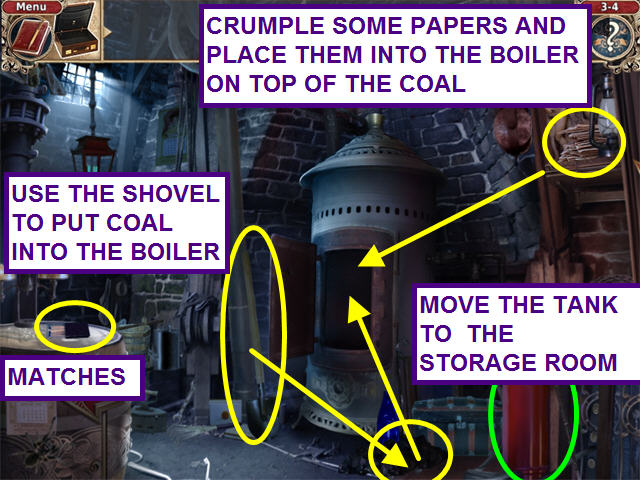
- Try to light a match and you will be warned to move the RED TANK to the storage room.
- Take the red tank and put it into inventory.
- Click on the left arrow to move to the storage room.
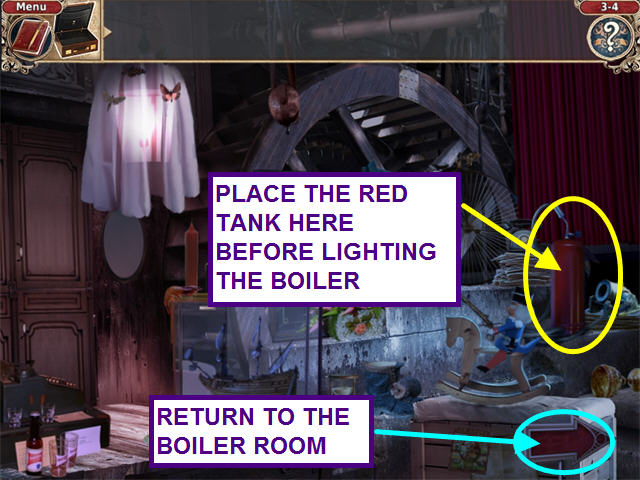
- Place the RED TANK on the lower right.
- Click on the right arrow to return to the boiler room.
- To light a match, first left-click once to pick it up.
- Left-click, hold and drag the match across the matchbook, then move it to the boiler's open door and click.
Chapter Four: The Art Collection
- In order to inspect all the paintings you need to get the pulleys working.
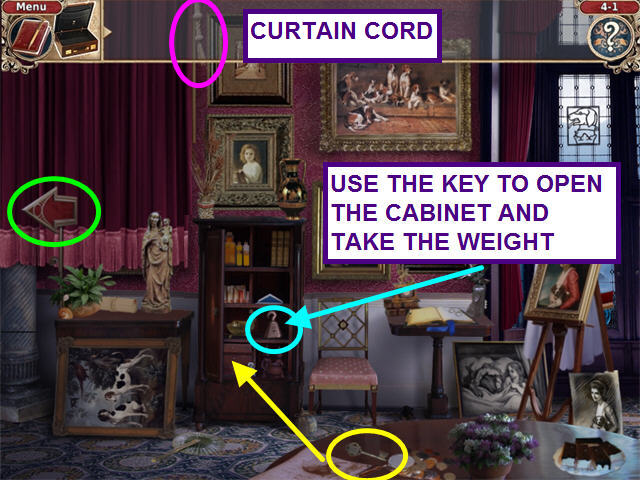
- Move the paper on the table.
- Take the KEY and open the cabinet.
- Take the WEIGHT.
- Click on the left arrow.
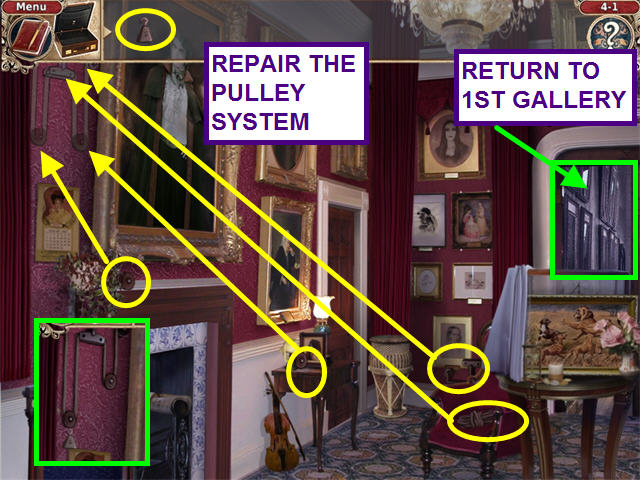
- Locate the 2 PULLEYS, CORD, BRACKET and place them in the pulley system.
- Take the WEIGHT from your inventory and hang it from the left pulley.
- Click on the pulley system to operate it.
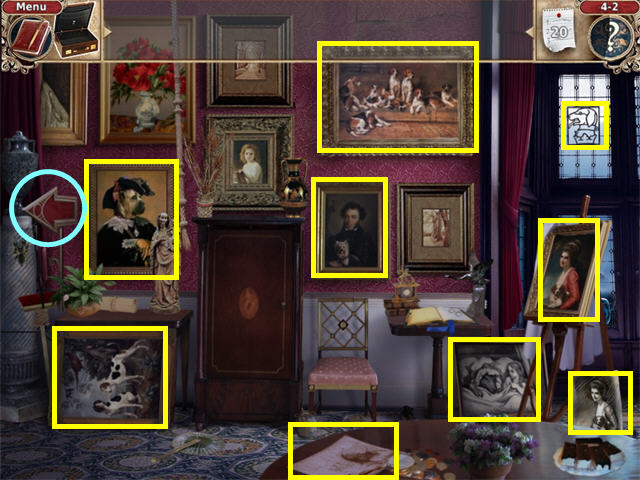
- Click on the right doorway to return to the first gallery.
- Pull the curtain cord.
- Glenfield tells you there were 20 pieces of art with dogs.
- Take the 9 pieces of art with dogs.
- Make note of the safe.
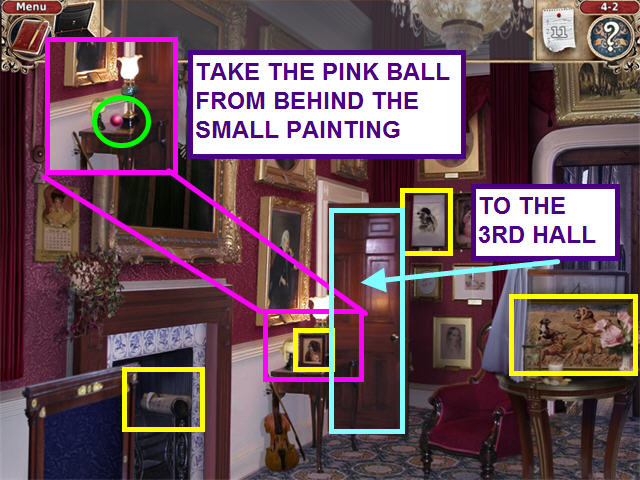
- Press the left arrow button to move to the 2nd hall.
- Collect the 4 pieces of art with dogs.
- Take the PINK BALL that was behind the small painting.
- Click on the door on the right to move to the 3rd Hall.
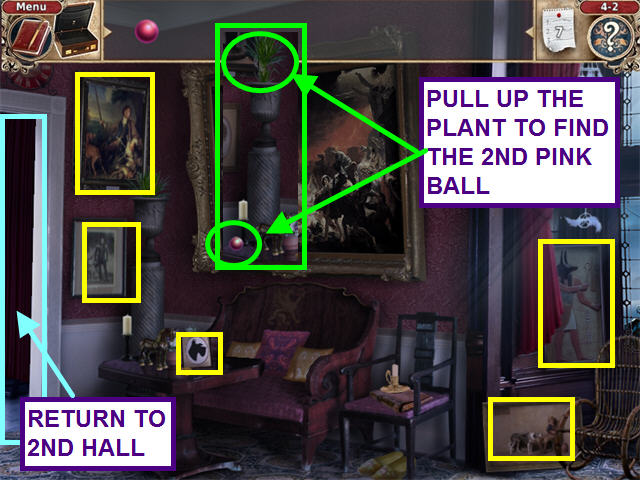
- Collect the 5 paintings with dogs.
- Pull on the plant to make a PINK BALL fall to the table.
- Take the PINK BALL.
- Click on the left door to return to the 2nd hall.
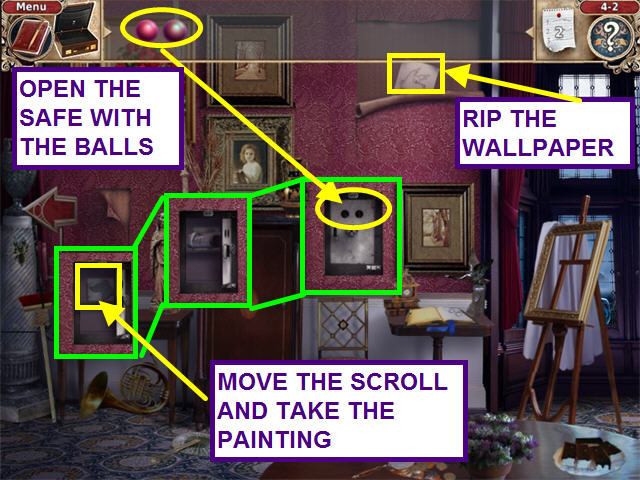
- Take the right door and enter the 1st hall.
- Rip the wallpaper and take the art.
- Use the PINK BALLS to open the safe.
- Move the scroll and take the last piece of art.
- Rover appears and warns you to take a closer look at some of the paintings.
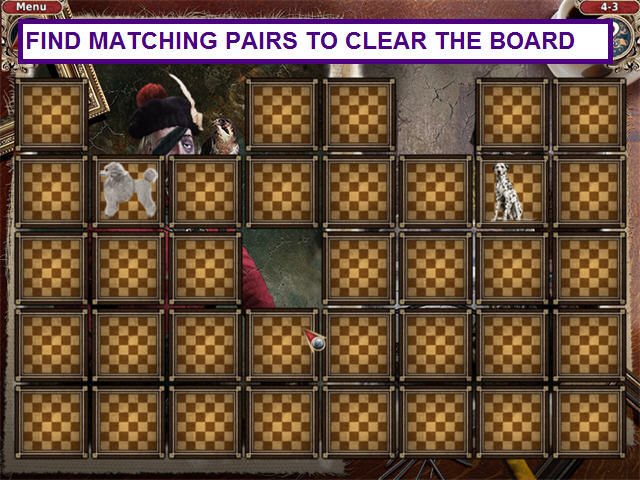
- In this memory match game, find matching pairs by selecting two cards at a time.
- Clear the board by finding all the matches.
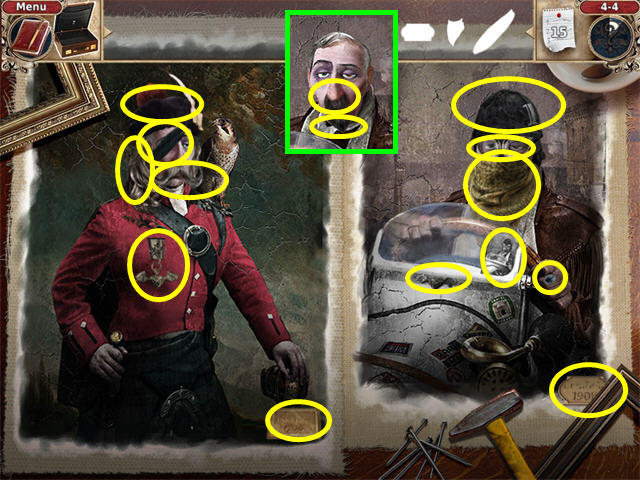
- Find the items based on their silhouettes.
- The butler, Glenfield is in 100 year old paintings.
- Rover warns you to check out the storeroom.
Chapter Five: A Pleasant Encounter
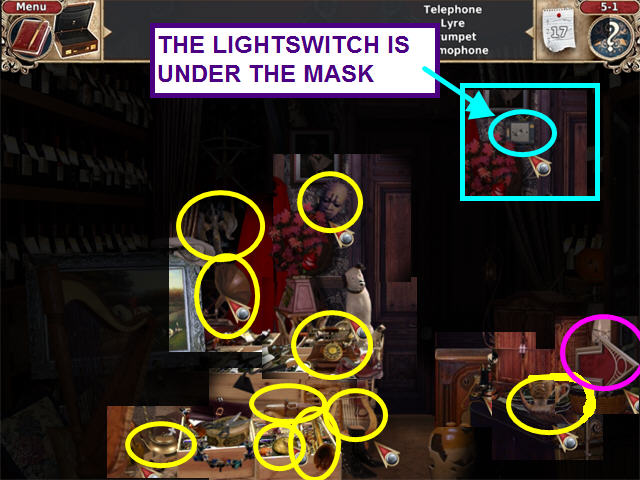
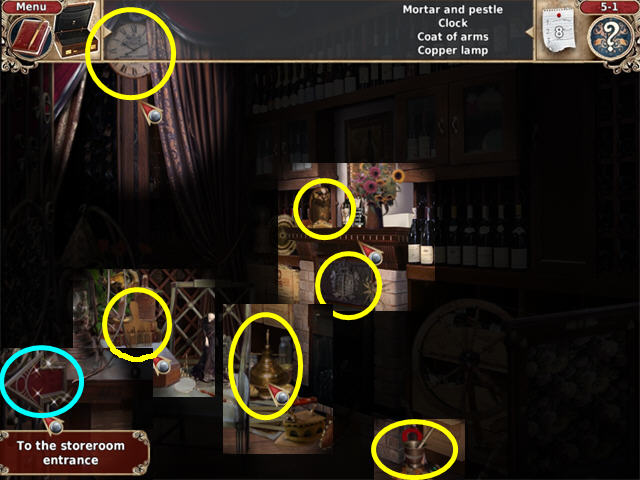
- The lights are out in the storeroom.
- Locate the hidden objects on the list using the flashlight.
- The hidden objects are in two rooms.
- Click on the arrows to move between each room.
- Under the mask, the final object in the list, you will find the light switch.
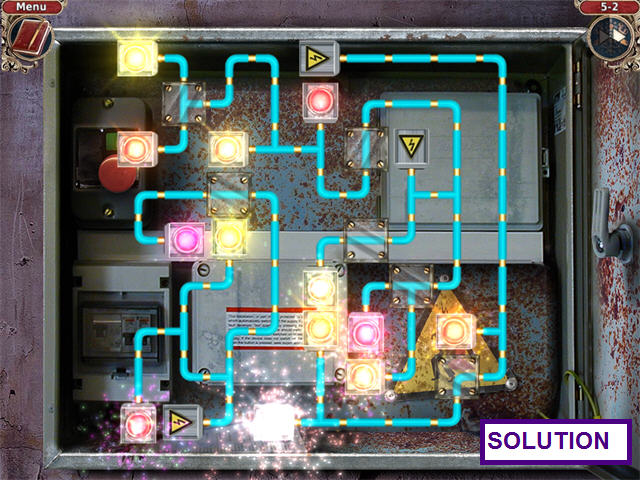
- Click on the light switch for a mini-game.
- The object of this mini-game is to connect all the wires and make all the lights work.
- Click on each piece of wire to rotate it into place.
- The grounds-keeper's daughter arrives and says she was sent by the dog to find his bowl.
- Her name is Ellen and she tells you that it is not wine in the bottles and not to try them.
- Move the harp and rip the painting open.
- We have to make friends with the cat.
- Catch the mouse that is running near the bottom center of the screen.
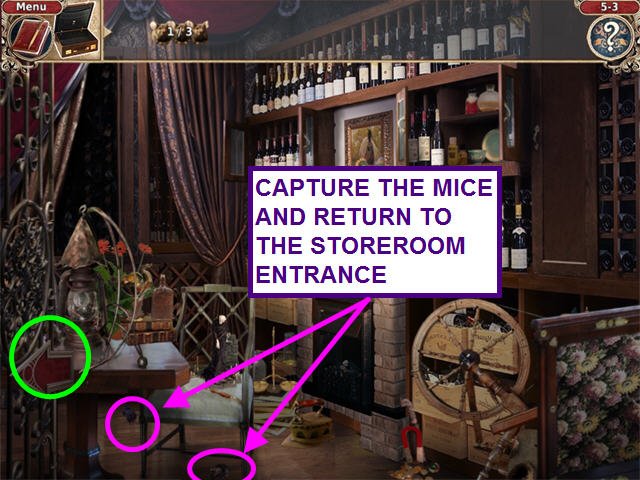
- Click on the right arrow to move to the main storeroom.
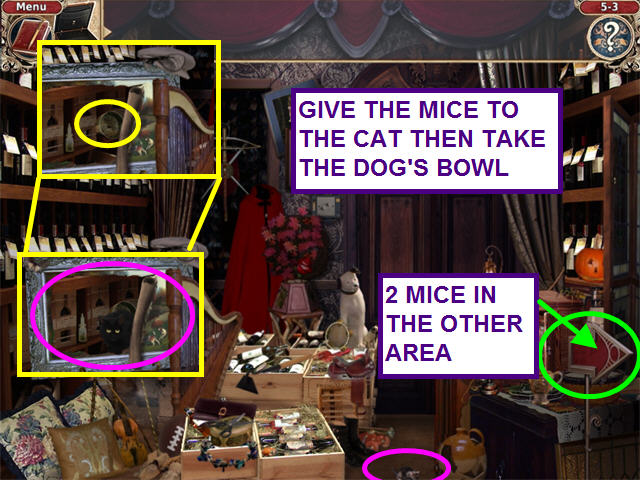
- Capture the two mice running on the floor.
- Click on the left arrow to return to the storeroom entrance.
- Give the mice to the cat and it will leave.
- Take the dogs bowl that was behind the cat.
- The bowl is quite filthy and needs to be cleaned.
- Click on the left arrow and return to the storeroom entrance.
- Move the pillow in the lower left corner to find the large piece of cloth.
- Click on the cloth and it will move to the low center area.
- Take the scissors and cut a small piece of cloth.
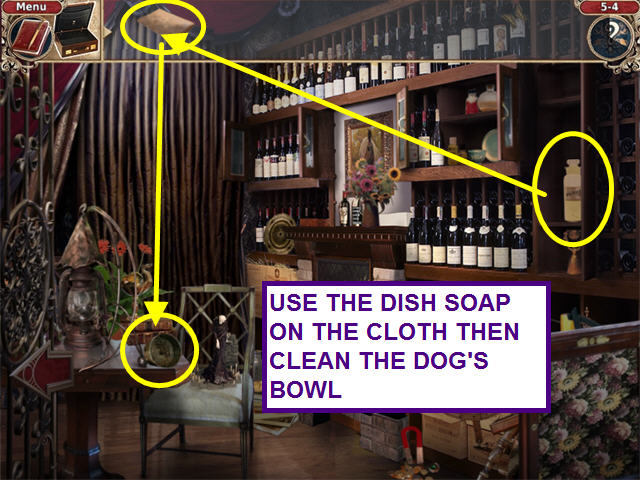
- Take the cloth and return to the main storeroom.

- Open the right cabinet and move the statue.
- Take the dish washing liquid and combine it with the cloth.
- Use the cloth on the dog's bowl.
Chapter Six: Groundsman Brandon
- Intrigued by Ellen, Michael heads out to meet her father.
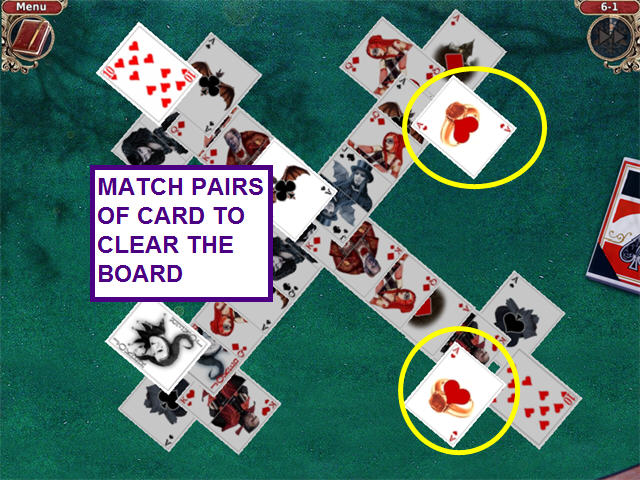
- Michael runs into Ellen first, who is playing a solitaire game.
- The object of the game is to make pairs of cards until the board is cleared.
- There are also jokers to use if there are no matching cards on top.
- Usable cards will appear brighter.
- Ellen's father appears and he is not happy.
- Enter the door on the upper left.
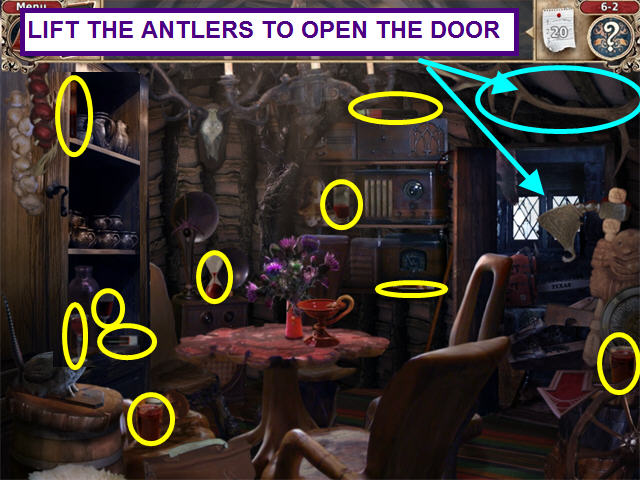
- Help Ellen find all the vessels of blood.
- There are 10 in this room.
- Lift the antlers to unlock the storeroom.
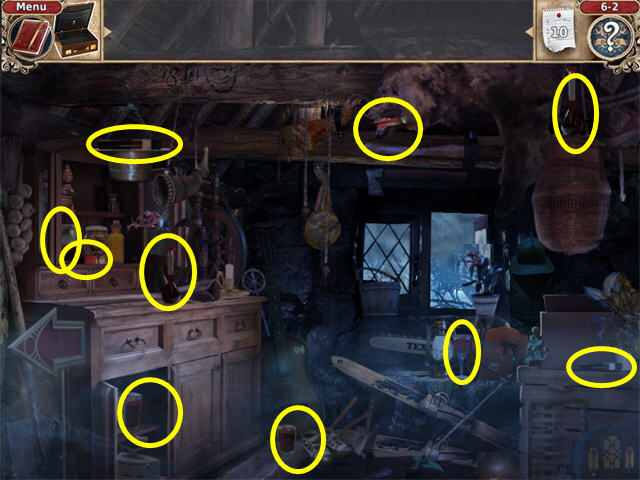
- Enter the storeroom and find the remaining 10 vessels of blood.
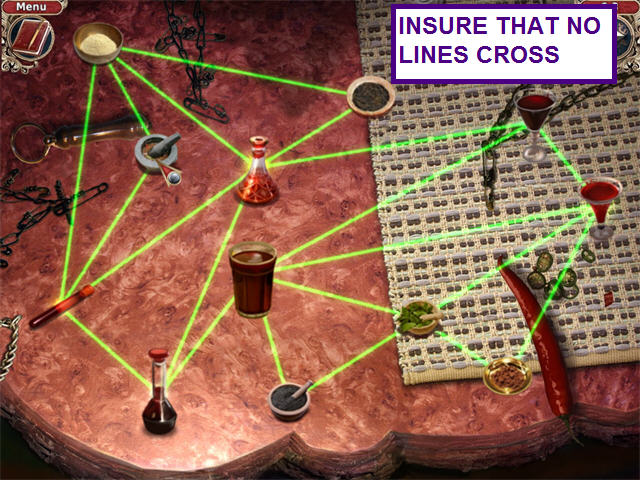
- To calm her father down Ellen wants to infuse the blood with herbs.
- Complete the ritual by making sure that no lines cross in this strings puzzle.
- Click and drag an object to move it.
- When asking about Glenfield, you learn his Internet dating name is Black Macho!
- Glenfield sent you the threatening note.
Chapter Seven: An Unexpected Telegram
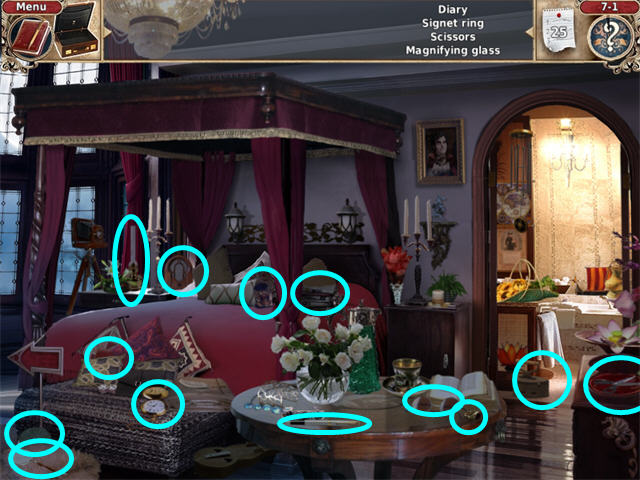
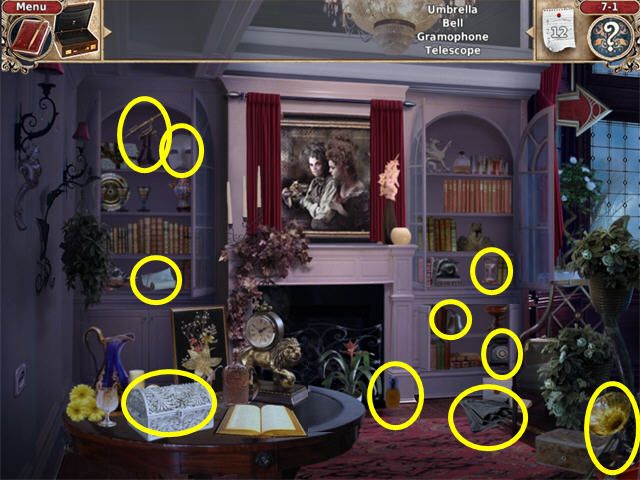
- The maid has hidden away a telegram to hide it from the spirits.
- Locate all the hidden objects on the list.
- You will find the items in two locations.
- Use the arrows to move in between rooms.
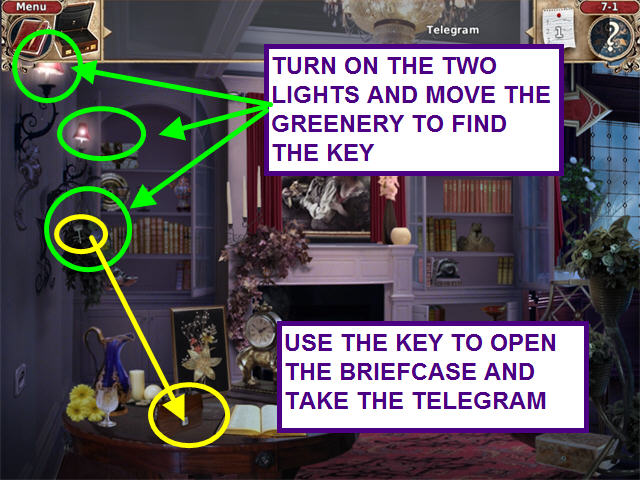
- Turn on the two wall lamps and move the greenery to find the KEY.
- Use the KEY to open the briefcase and take the TELEGRAM.
- Take the TELEGRAM from the table to trigger a mini-game.
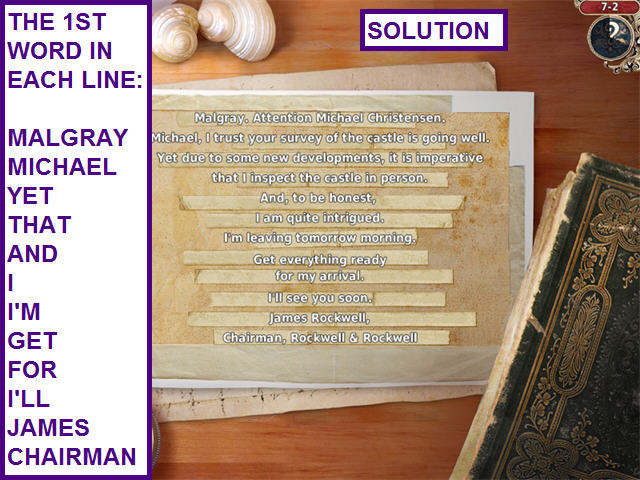
- The object of this mini-game is to put the lines of the message in proper order.
- Click on two lines to swap positions.
Chapter Eight: Discoveries From the Master's Book
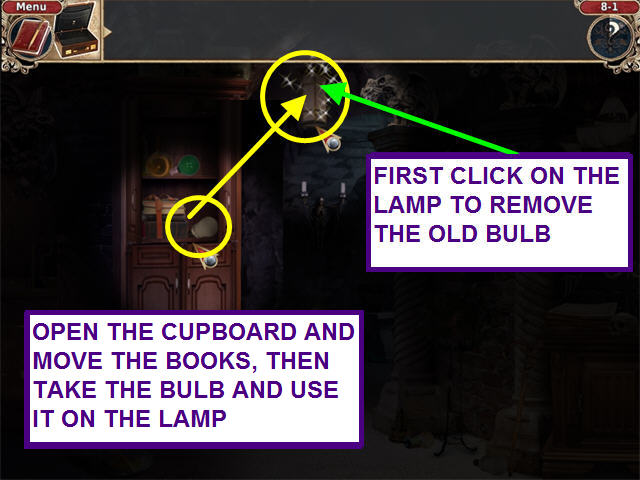
- Michael want to finish his appraisal before his boss arrives so he heads to the basement.
- All the lights are out.
- Click on the overhead lamp to remove the bad bulb.
- Open the left cabinet and move the books.
- Take the bulb and us if in the lamp.
- You need to put the photograph back in order.
- Click on two pieces to swap locations.
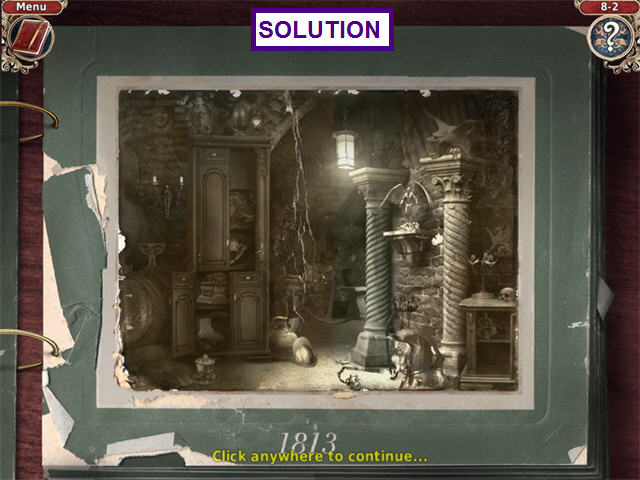
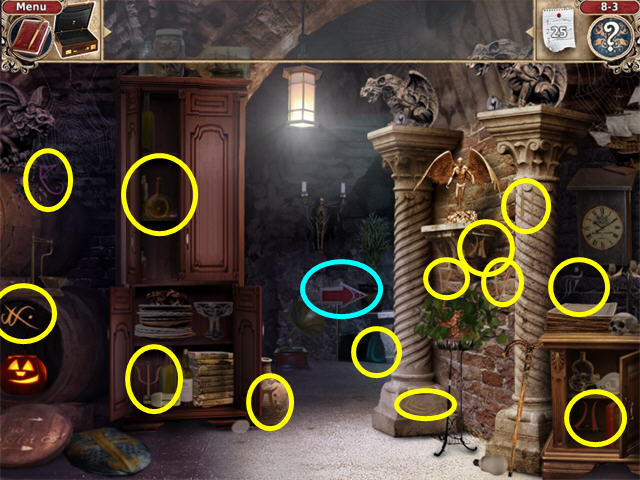
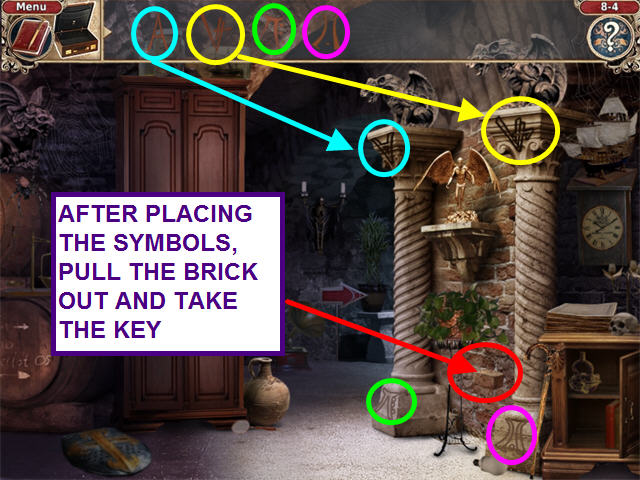
- The only thing that has changed from the photograph is the symbols on the walls.
- The maid says they are the code to gain access to the master's books.
- You will find 13 in the room with the gargoyles.
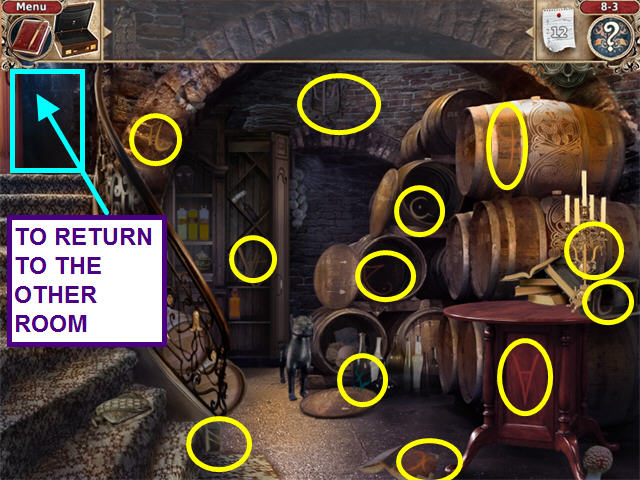
- Click on the arrow to go to the wine cellar.
- Collect the remaining 12 symbols.
- Click on the door way to return to the gargoyle room.
- Take the RUNES from your inventory and place them in the matching spots on the columns.
- Once the brick comes out of the wall, click on it to remove it from the wall
- Take the KEY that is hidden inside and return to the wine cellar.
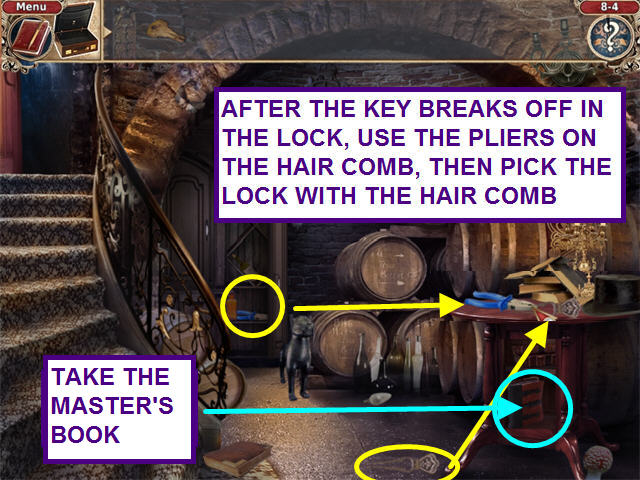
- Use the KEY on the small cabinet on the right.
- It does not unlock.
- Click on the the KEY and it breaks off in the lock.
- Take the HAIR COMB from under the book.
- It will go automatically to the top of the cabinet.
- Take the PLIERS from the large cabinet and use them on the HAIR COMB.
- Use the HAIR COMB to pick the lock and take the MASTER'S BOOK.
- Everyone we have met so far at the castle seems to be a vampire.
Chapter Nine: Rover's Savings
- Find the bottles that the money is hidden in and pour it on the table.
- Money is hidden in 3 places.
- The large blue vase is too heavy to pour out the money.
- Combine the MAGNET and the ROPE and use it on the blue vase.
- Take the 3 piles of MONEY and walk to the right.
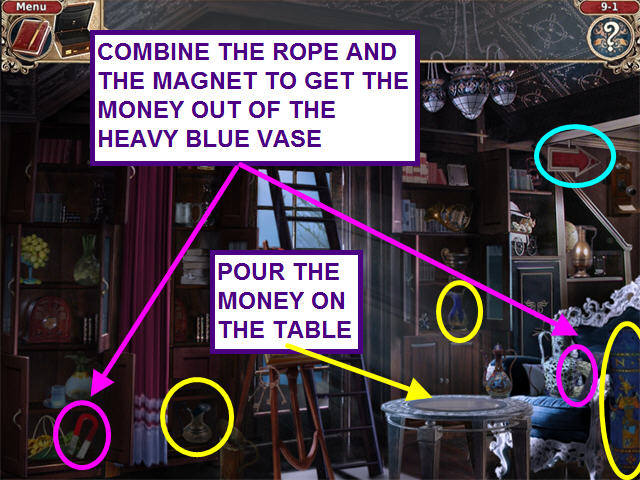
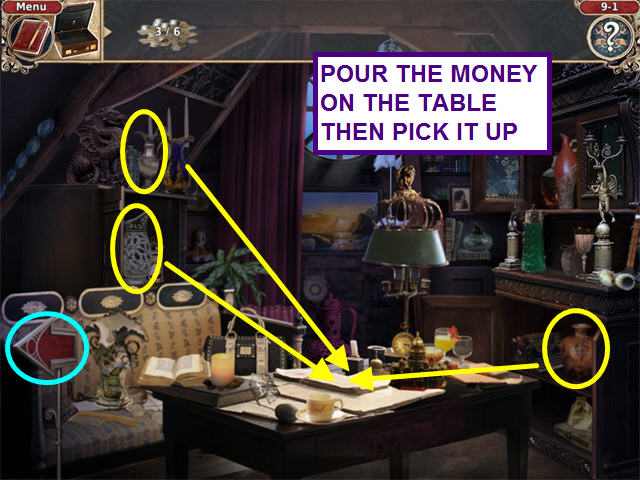
- Pour the MONEY from the three vases on the the table.
- Take the three piles of MONEY.
- Walk to the left and place the six combined piles of MONEY on the circular table.
- Rover needs all the jewelry boxes.
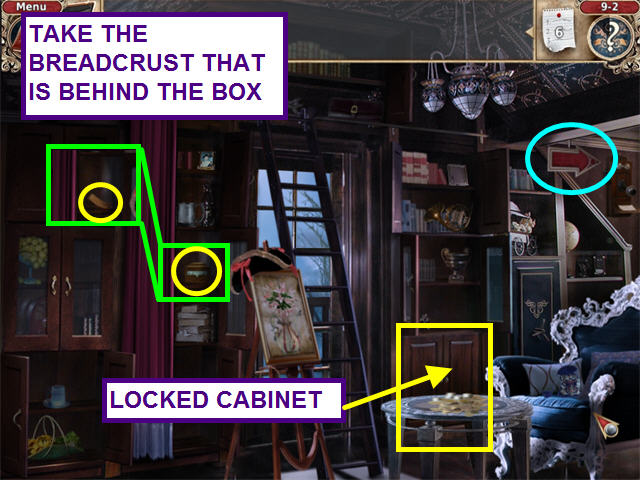
- Walk to the left and make note of the locked lower cabinet.
- Open the drape and cabinet to the left of the window and take the jewelry box.
- Take the PIECE OF BREAD that was behind the jewelry box.
- Walk right to the next room by clicking on the arrow.
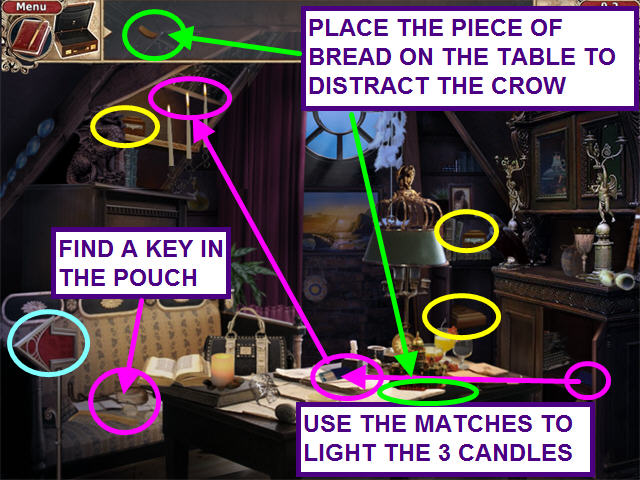
- Look in the lower right cabinet for some matches.
- They will automatically go to the table.
- Use the matches to light the 3 candles on the upper left.
- Place the PIECE OF BREAD on the table to distract the crow.
- Take the 3 jewelry boxes.
- Look in the pouch on the couch to find a key.
- Click on the left arrow and return to the other room.
- Use the KEY to unlock the lower right cabinet and take 2 boxes.
- Rover remembers two more boxes that are on the chessboard.
- The object of this mini-game is to slide the chess pieces around and move the two boxes to the exit.
- Please watch the video for a step-by-step solution for this puzzle.
Chapter Ten: So Close, Yet So Far
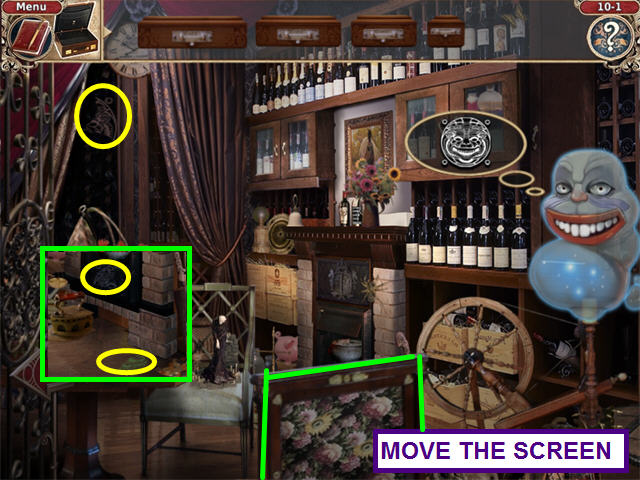
- Rover wants you to hid the JEWELRY BOXES in the storeroom, behind the screen.
- Move the screen and clean off the shelf.
- Oops, you dropped a vase and the ghost inside wants you to find the 5 pieces to his symbol.
- Move the screen to find two pieces.
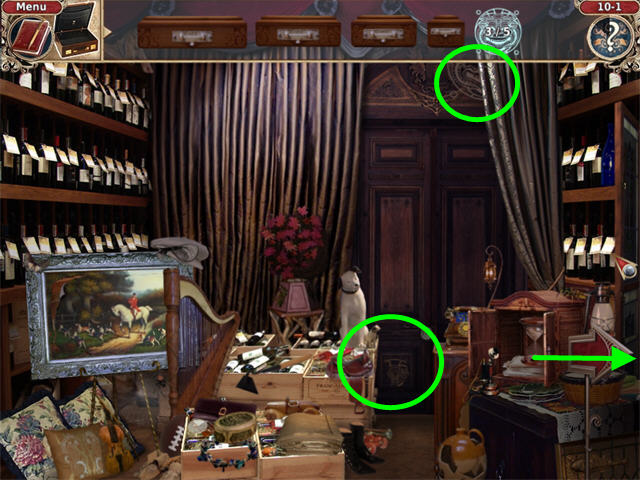
- On piece is on the window, behind the drape.
- Click on the left arrow to move to the storeroom entrance.
- Walk to the left to find the other 2 pieces.
- One is at the bottom of the door and the other is at the very top of the door.
- Click on the right arrow and use the SYMBOL on the ghost.
- Move the screen and place the BOXES from your inventory onto the shelf from largest to smallest.
- This will trigger a Hanoi Towers mini-game.
- The object of this mini-game is to move the pile of boxes from the left to the right.
- You may only move one box at a time, and a box can only rest atop a smaller box or the floor.
- Please watch the video for a step-by-step solution for this puzzle.
- You meet the mistress of the castle, another ghost.
- She warns you to remember that you will need a kind heart.
- Time to get out of this locked room.
- Walk right to the storeroom.
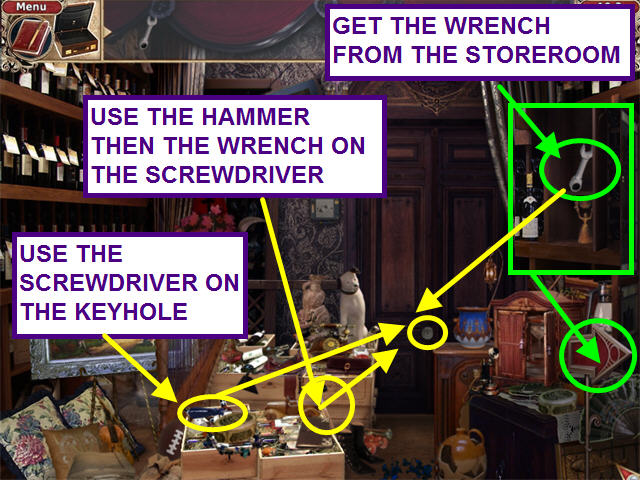
- Open the cabinet to the right of the fireplace and take the WRENCH.
- Return to the storeroom entrance.
- Find the SCREWDRIVER and place it into the keyhole.
- Find and use the HAMMER on the SCREWDRIVER.
- Take the WRENCH from your inventory and use it on the SCREWDRIVER.
Chapter Eleven: Mr. Rockwell's Arrival
- Michal's boss, Mr. Rockwell has arrived and knows about the vampires.
- He wants Michael to see his health report, but has torn it to pieces.
- Put the report together jigsaw-style.
- Left-click to pick-up or place.
- Adjacent pieces will lock together.
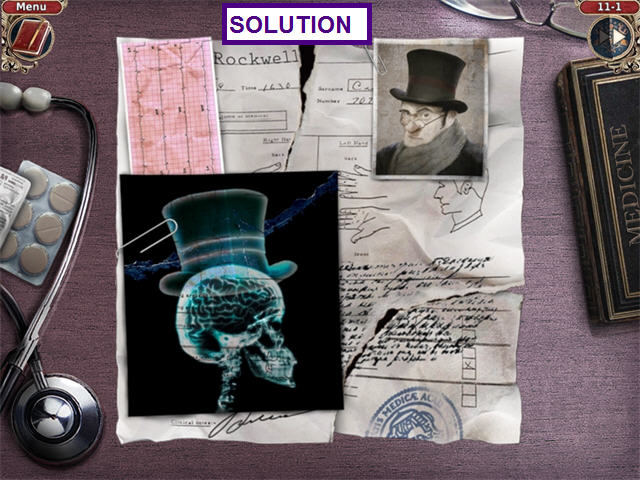
- The doctors have given Mr. Rockwell only given him 2 months to live.
- He wants you to research to see if becoming a vampire will rid him of the sickness.
- Ellen was heading to the library but first must gather some books.
- Locate the 10 books in this room and click on the grate in front of the fireplace.
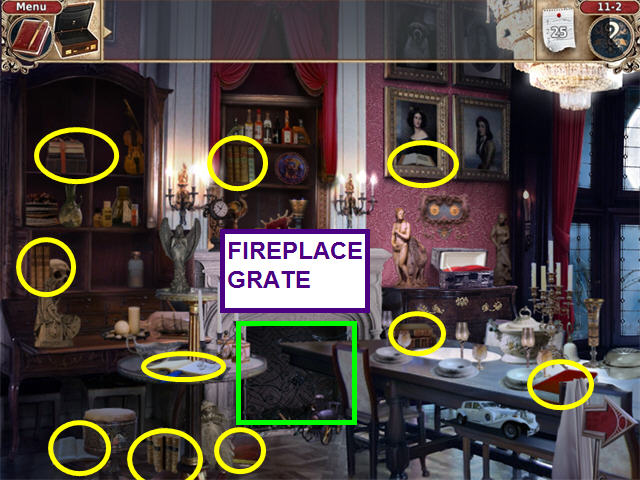
- Click on the fireplace to see the close-up.
- Take the 4 books and exit the closeup by clicking on the left arrow.
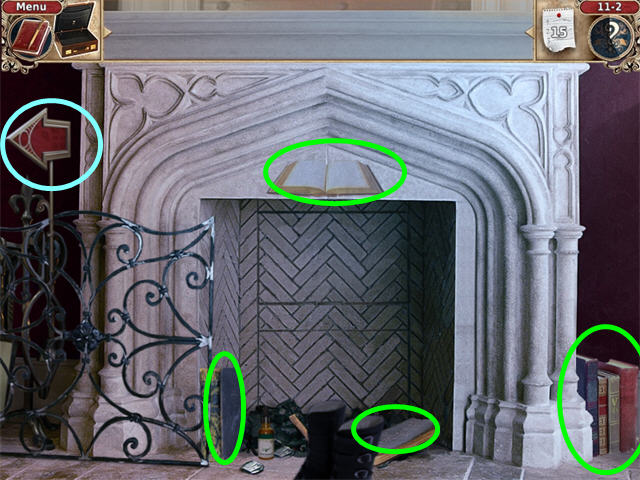
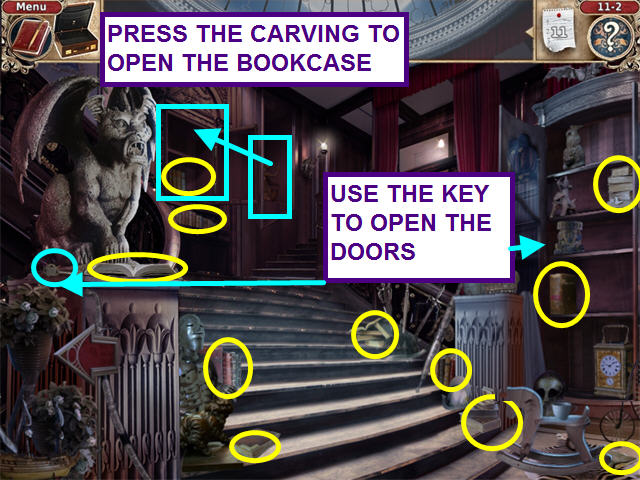
- Select the right arrow to move to the staircase.
- Press the upper wall carving to open the hidden bookcase.
- Take the key from the left newel to open the glass doors on the right bookcase.
- Collect the 11 books.
- The illustrations have fallen out of one of the books.
- Restore the icons to the correct positions.
- Place all the icons on the left that relate to vampires.
- On the right will go the icons the relate to vampire hunters and protection.
- Click on two icons to swap positions.
- You can only swap with the opposite side.

Chapter Twelve: Vampire Encyclopedia
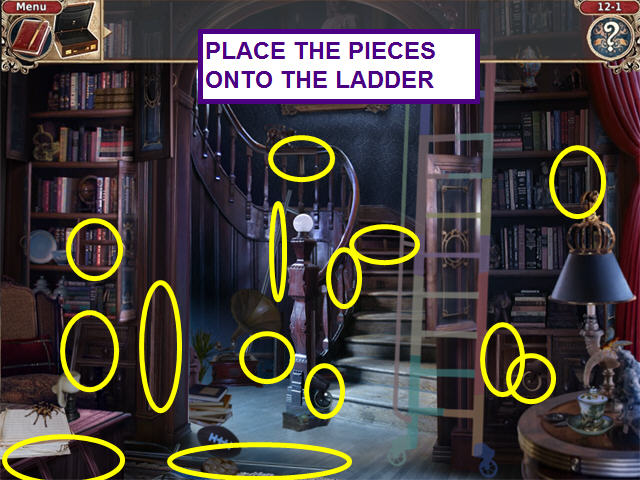
- The vampires are hoping their missing heir will show up before the castle can be sold.
- The Encyclopedia is on the top shelf, but the ladder broken.
- Find all the pieces and place then on the ladder to rebuild it.
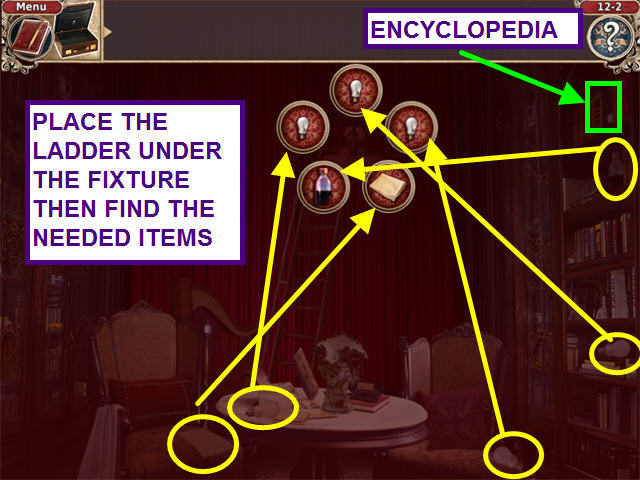
- Now, to find a green book while everything is red.
- Place the ladder under the chandelier and click on the fixture to show the bubble of needed items.
- With the lights back to normal, take the green encyclopedia from the upper right shelf.
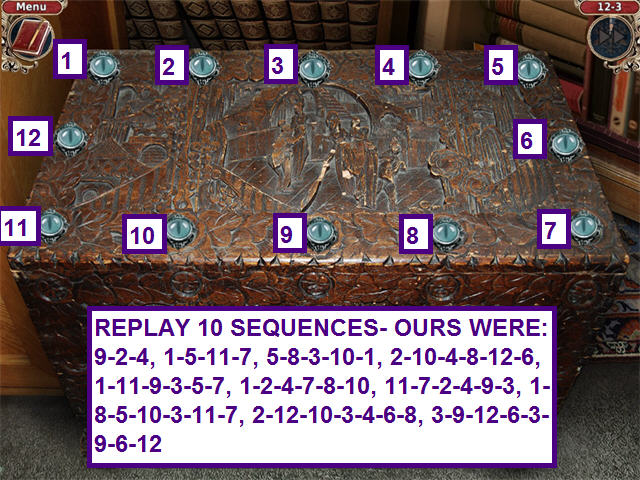
- The ghost of Lord Margrave appears.
- He tells you where the medical records of all the vampires are and helps you with the code.
- In this Simon-like mini-game, repeat the sequences as they are played.
- There are 10 sequences to repeat.
- These were our sequences, yours may vary:9-2-4 1-5-11-7 5-8-3-10-1 2-10-4-8-12-6 1-11-9-3-5-7 1-2-4-7-8-10 11-7-2-4-9-3 1-8-5-10-3-11-7 2-12-10-3-4-6-8 3-9-12-6-3-9-6-12
Chapter Thirteen: New Plan of Action
- Mr. Rockwell has taken your room and wants you to remove your things.
- Locate 14 items in the bedroom.
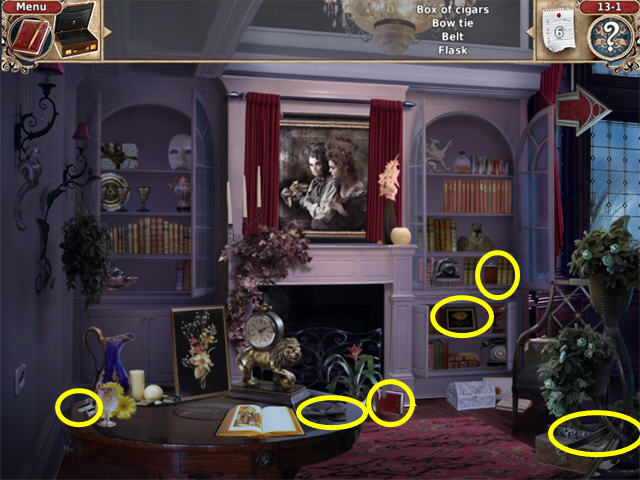
- Click on the left arrow to go to the sitting room.
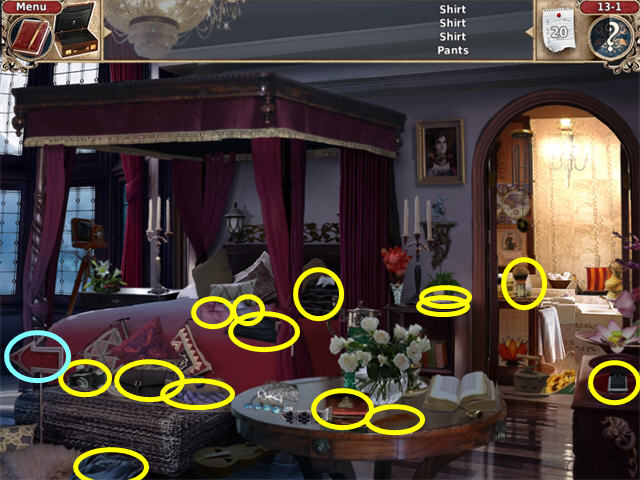
- Locate the remaining 6 items.
- Rockwell wants Glenfield to help but he is busy.
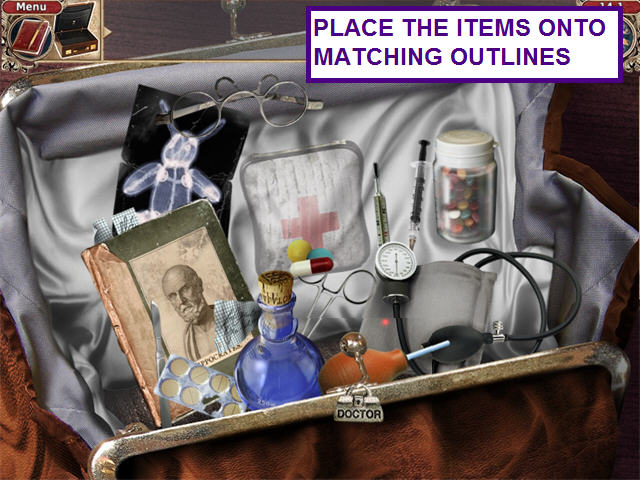
- Michael needs to finish packing his suitcase.
- Drag the items from the left onto the matching outline inside the suitcase.

- After talking to Glenfield, you learn that the vampire and human must have matching blood types.
- Mr. Rockwell thinks his is on the test results.
- In the bathroom, take the TOWEL and the WET TEST RESULTS.
- Find the HAIR DRYER on the bed and the KEY and the end of the bed.
- Click on the left arrow to go to the sitting room.
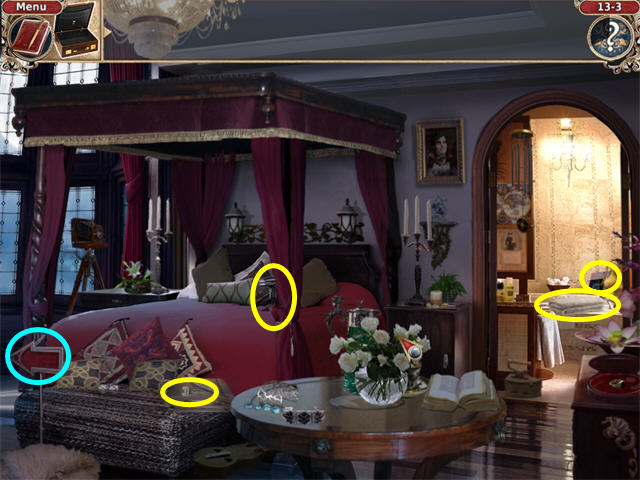
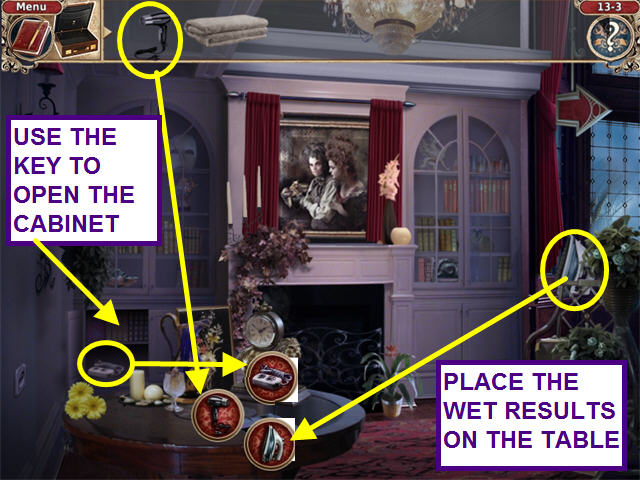
- Place the WET TEST RESULTS on the table.
- Click on the RESULTS to bring up the items bubbles.
- Use the key to open the lower left cabinet and take the EXTENSION CORD.
- Place the EXTENSION CORD and the HAIR DRYER into the bubbles.
- Pull the right drape.
- Take the IRON and place it in the matching bubble.
- Finally, place the towel on the WET TEST RESULTS.
- Rockwell's blood type is not on the results.
- You learn that he has a nurse coming tomorrow and she will be able to type his blood.
Chapter Fourteen: Blood Type
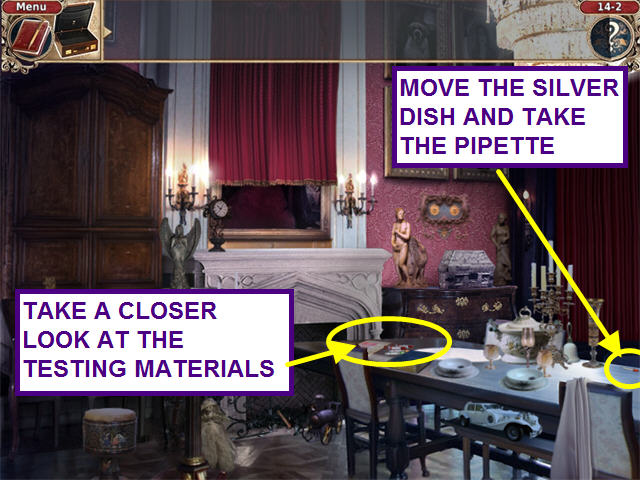
- Nurse Laura agrees to type the inhabitants blood, but needs help packing her equipment.
- Place the items from the edges into her bag onto matching outlines.
- Move the silver dish on the lower right and take the PIPETTE.
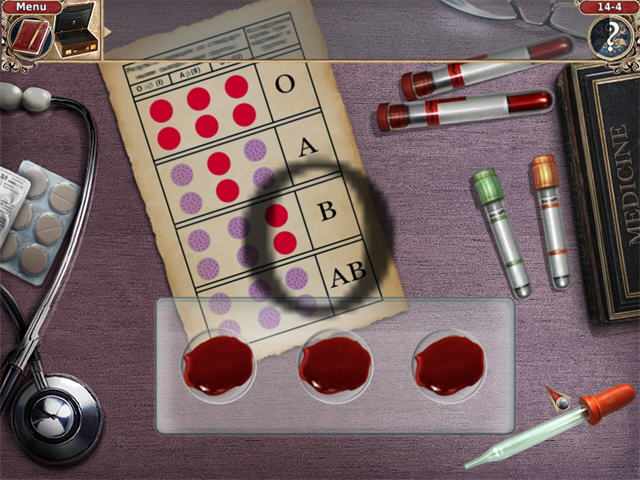
- Click on the testing supplies to take a closer look.
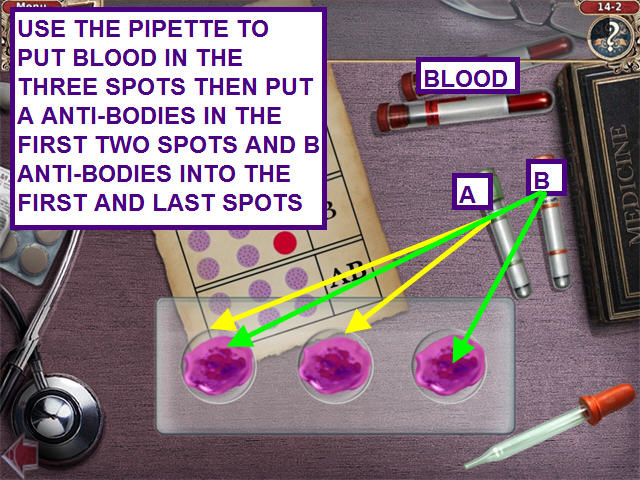
- Use the PIPETTE to collect some blood from the vial.
- Place 3 drops of blood onto the slide using the pipette.
- Use the pipette to take some Type A Antibodies and place drops into the first two samples on the slide.
- Use the pipette to take some Type B Antibodies and place drops into the first and last samples on the slide.
- Click on the slide and compare it with the chart.
- Mr. Rockwell is type AB.
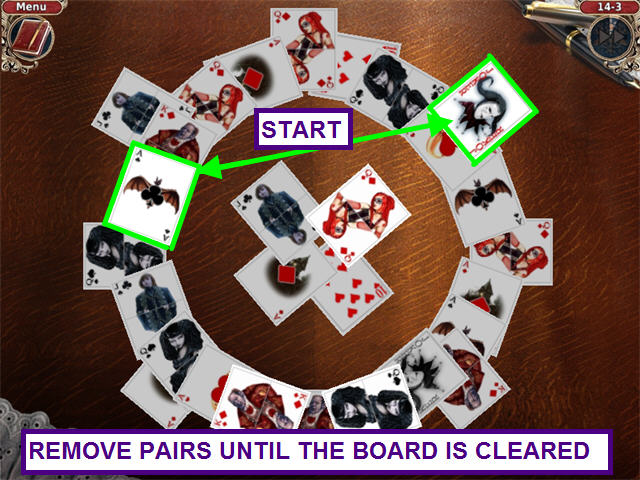
- Ellen agrees to help you collect samples from the vampires if you win a game of Magic solitaire.
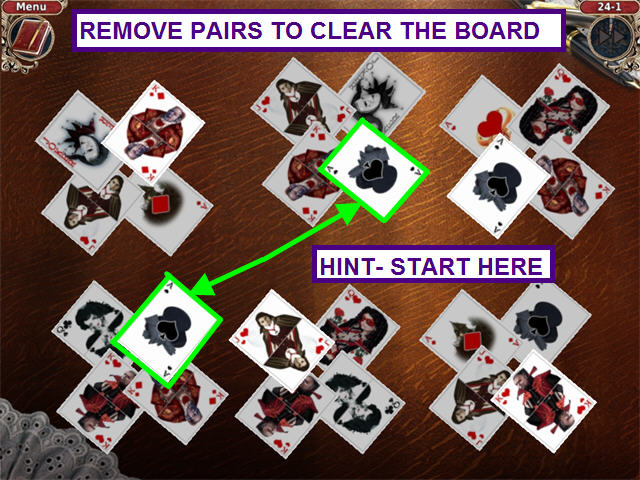
- Remove pairs of cards from the tableau until the board is clear.
- Click on matching pairs of card to remove them from the board.
- If you get stuck use the joker.
- If you run out of moves, the solitaire game will start over.
- Hint- start with the Joker and the Ace of Clubs.
- Time to test Ellen's blood.
- Use the PIPETTE to collect some blood from the vial.
- Place 3 drops of blood onto the slide using the pipette.
- Use the pipette to take some Type A Antibodies and place drops into the first two samples on the slide.
- Use the pipette to take some Type B Antibodies and place drops into the first and last samples on the slide.
- Click on the slide and compare it with the chart.
- Ellen is type O.
- The nurse is concerned that Ellen's blood is like that of a corpse's.
Chapter Fifteen: Down in the Basement
- You ask Mary to help you collect the bold samples, but she needs help herself.
- Find the 25 pieces of silverware.
- Locate the 12 pieces in the gargoyle room.
- Click on the right arrow to move to the next scene.

- Locate the remaining pieces of silverware.
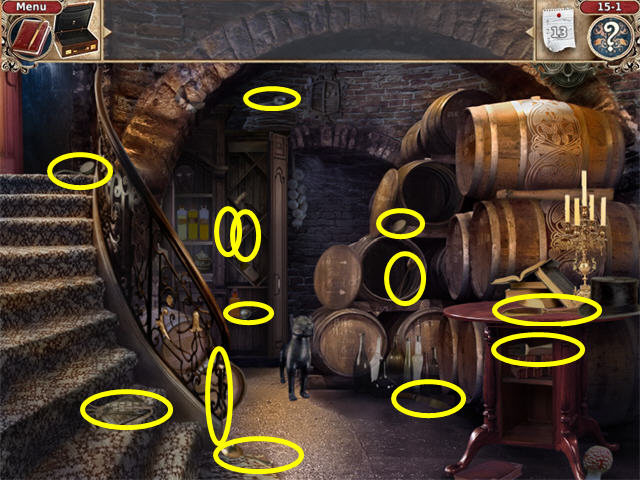
- Mary needs a box to carry the silverware.
- Click on the lower left barrel to bring up items bubbles.
- Find the SAW and the HANDLE and place them into the bubbles.
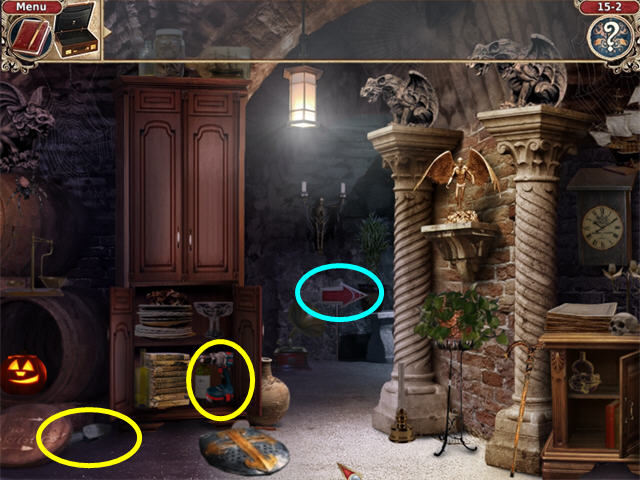
- Use the door on the upper left to walk to the gargoyle room.
- Find the DRILL and the HAMMER HEAD.
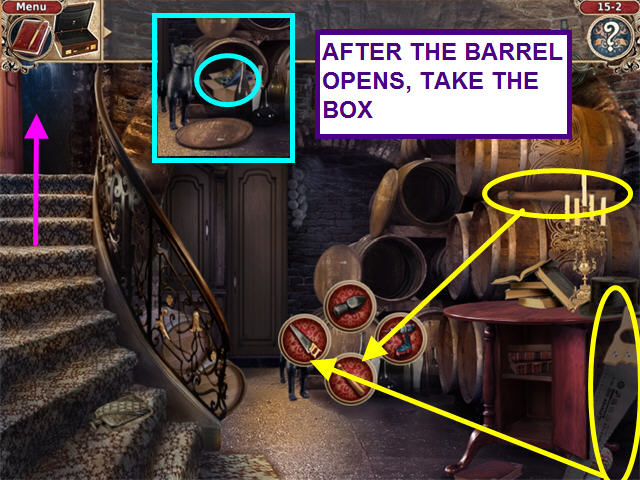
- Click on the right arrow to return to the barrel.
- Place both items into the bubbles.
- When the barrel lid falls off, take the box.
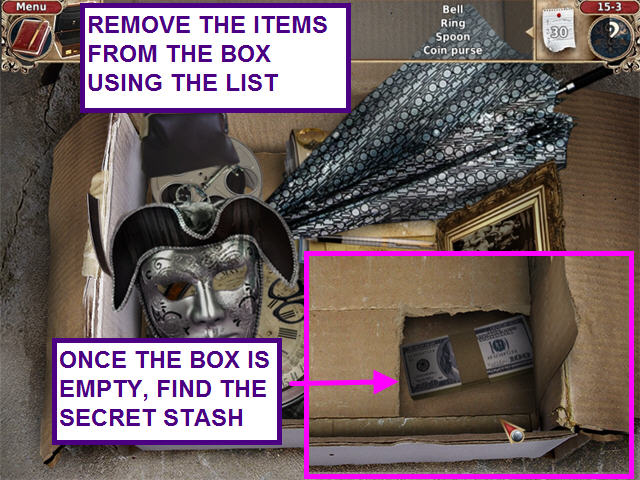
- Remove the items from the box using the hidden objects list.
- Once the box is empty, pull the ribbed cardboard to find the secret stash.
Chapter Sixteen: Malgray Golf Club
- Get on Ellen's fathers good side by helping find his golf equipment.
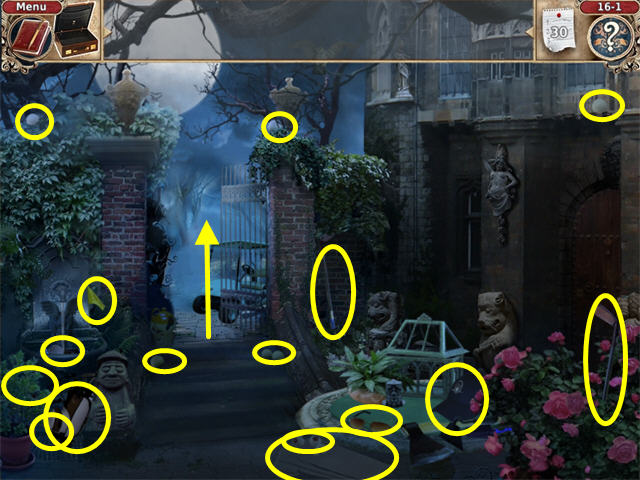
- Find 16 of the 30 items in the courtyard.
- Open the gate and walk to the next scene.
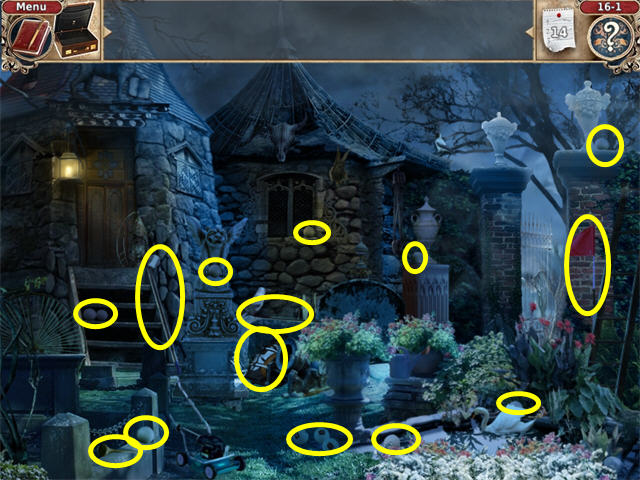
- Locate the remaining 14 items.
- Ellen say her father is always complaining about not having anyone to play golf with him.
- In this mini-game, you have three golf holes to shoot.
- Click on the golf ball, hold, drag, aim and release.
- The longer the green arrow the harder the ball is hit.
- Complete each hole to progress.

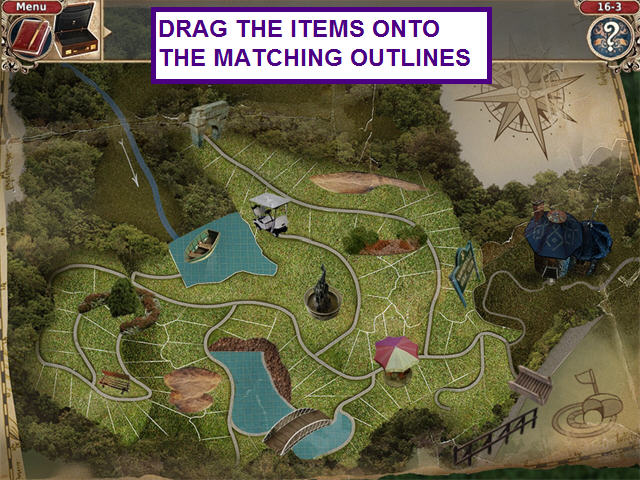
- Ellen's father also needs help designing his new golf course.
- Drag the items from the left onto the matching outlines.
- Ellen's father is not to happy to see the “city boy” in his yard and attacks.
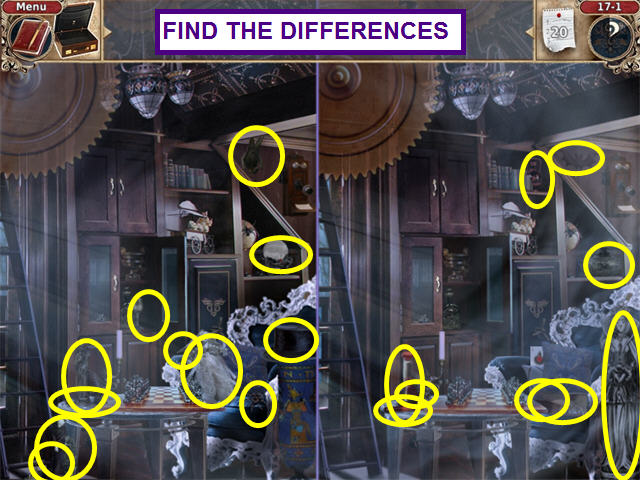
Chapter Seventeen: Up in the Attic
- Michael wakes with a groggy head.
- Find the differences between the two pictures.
- You can click on the left or the right.
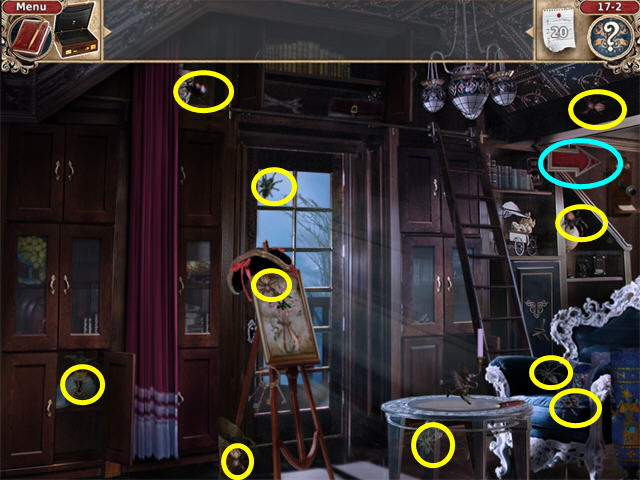
- Glenfield finds you and says that Ellen's father, Brandon is out of control.
- He suggests finding yellow spiders to control him.
- Find 10 spiders in this location.
- Click the right arrow to move to the next location.
- Open the drape and turn on the lamp.
- Collect the remaining ten spiders.
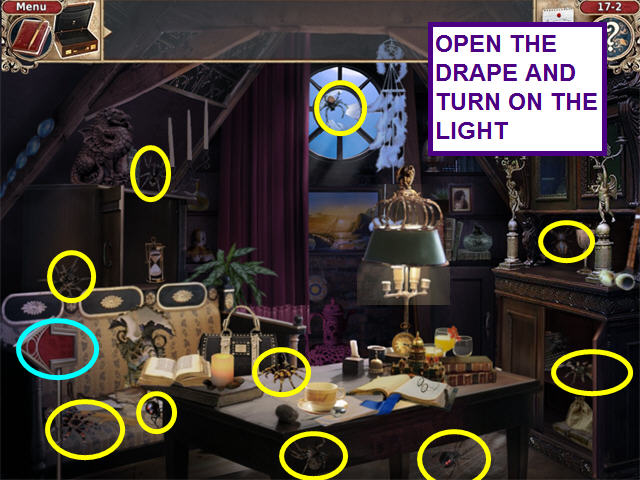
- Glenfield suggest you hurry to the basement.
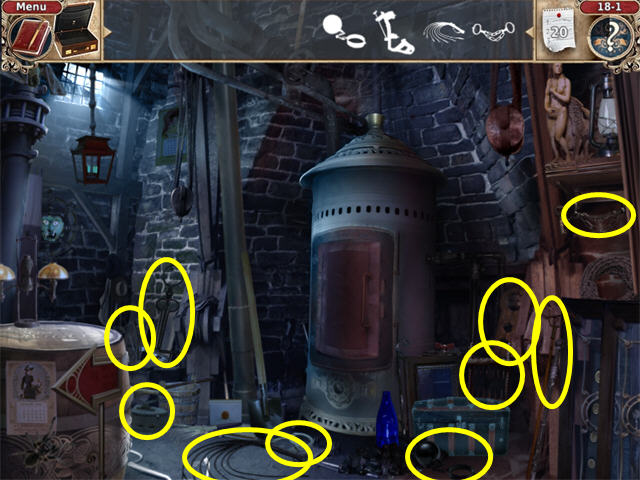
Chapter Eighteen: A Trap For Brandon
- You find Laura has been tied up by Brandon.
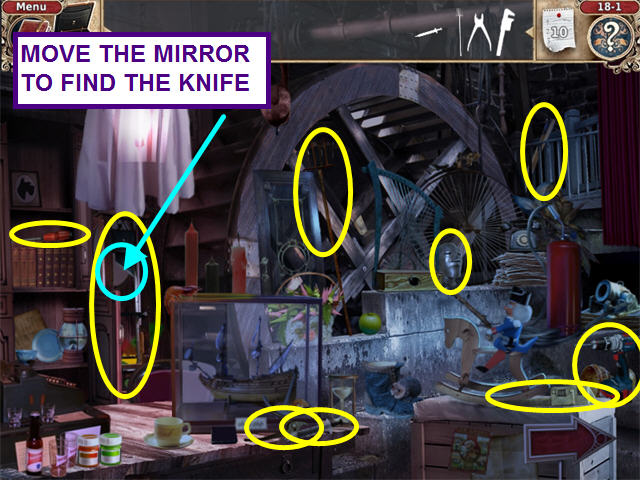
- You need to search for a sharp knife.
- Locate items from their silhouette.
- Locate 10 items in the boiler room.
- Click the left arrow to move to the storage room.
- Locate the remaining 10 items from their silhouette.
- You will have to move the mirror and click on the KNIFE.
- It will go to the front counter, where you can take it.
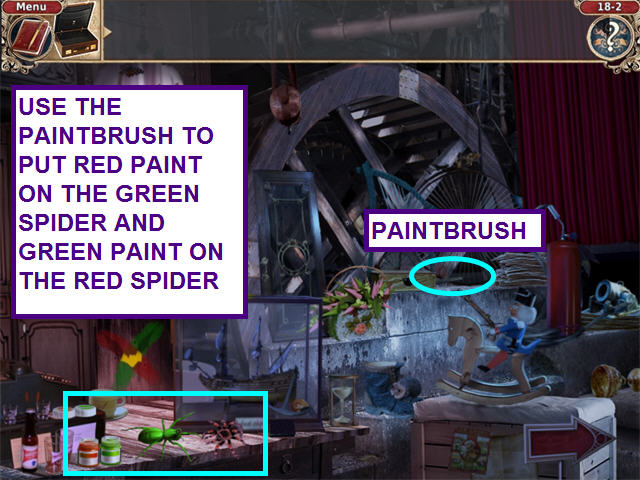
- After freeing Laura, walk left to the storeroom.
- Place the two spiders on the counter.
- Remove the lids on the two paint containers.
- Locate the paint brush.
- Use the paintbrush in the green paint and paint the red spider.
- Use the paintbrush in the red paint and paint the green spider.
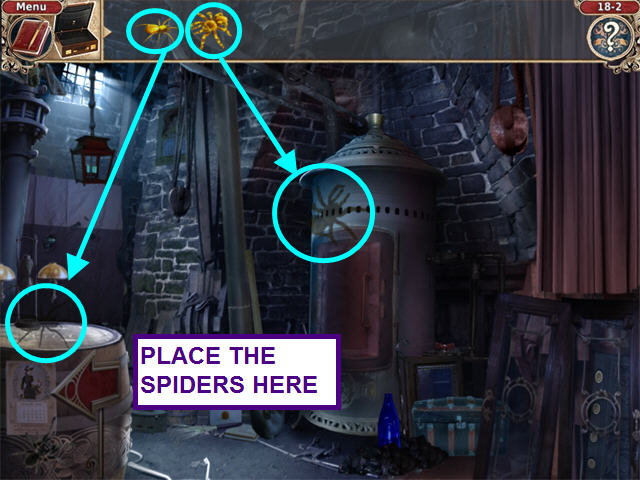
- Take both spiders and return to the boiler room.
- Place the spiders on the boiler and the barrel.
- Brandon walks in, sees the spiders and faints.
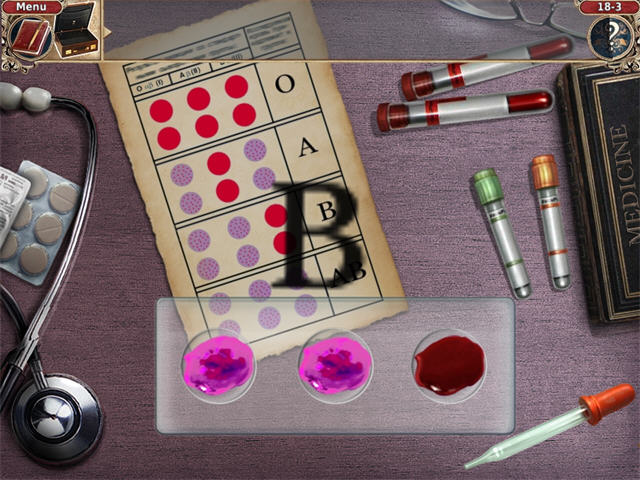
- Michael tells Laura to get a blood sample.
- Use the PIPETTE to collect some blood from the vial.
- Place 3 drops of blood onto the slide using the pipette.
- Use the pipette to take some Type A Antibodies and place drops into the first two samples on the slide.
- Use the pipette to take some Type B Antibodies and place drops into the first and last samples on the slide.
- Click on the slide and compare it with the chart.
- Brandon is type B.
Chapter Nineteen: A Family Secret
- Michael finds a letter confessing that a child left on the doorstep was the son of the Lord's sister.
- Search for the scrolls for the family tree.
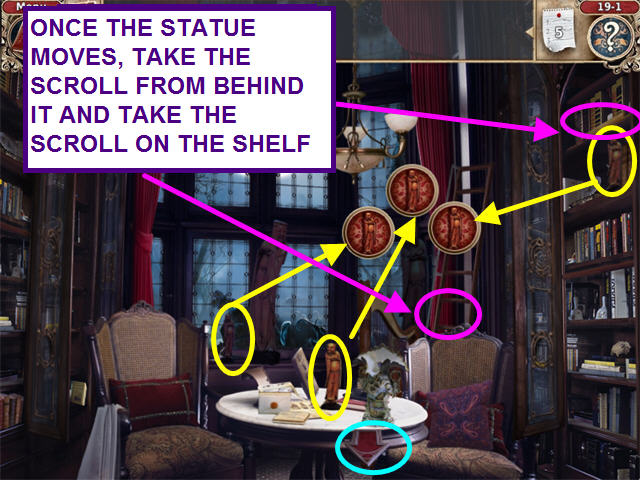
- Open the drapes and click on the right statue.
- Find the three smaller statues and place them in the bubbles.
- After the statue moves, take the scroll that was behind the statue.
- Take the scroll from the upper right shelf.
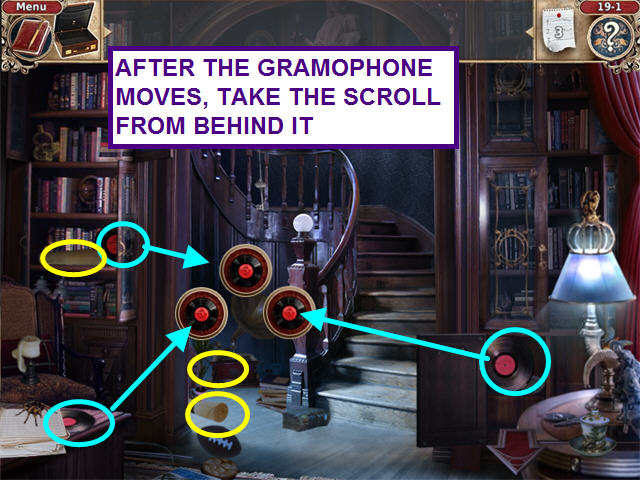
- Click on the down arrow to move to the next room.
- Click on the gramophone to activate the items bubbles.
- Find the three records and place them in the bubbles.
- After the gramophone moves, take the scroll from behind it.
- Locate the remaining two scrolls.
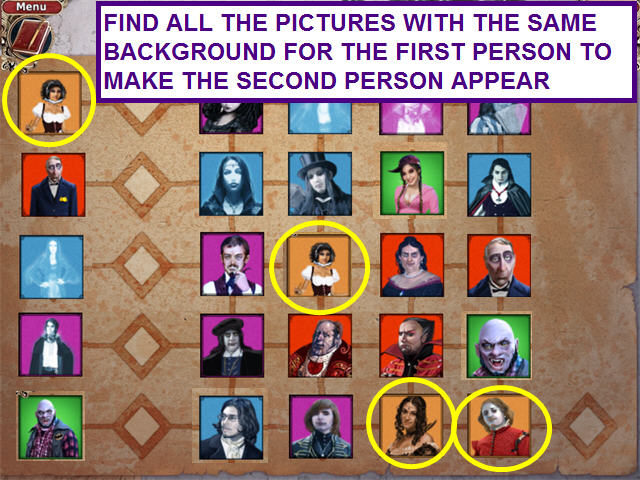
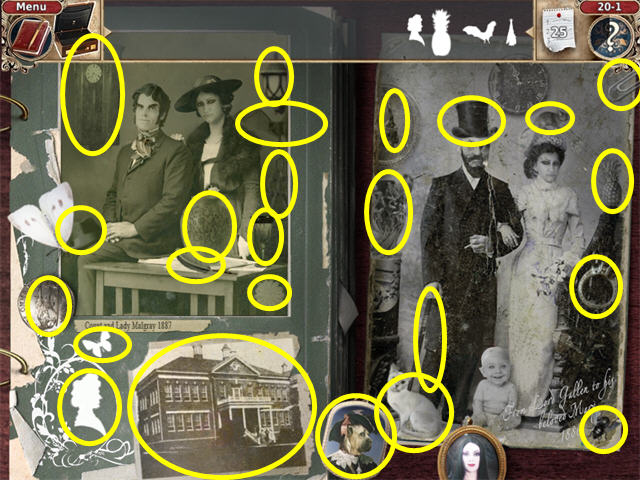
- Complete the family tree.
- First find Mary's picture.
- Notice the color of the background.
- Find all the pictures with the peach background and Glenfield's picture will appear.
- His background color is red.
- Find all the pictures with red backgrounds.
- Continue until all of the family tree is filled in.
- Note- the placement of the picture is random- your solution may vary.
- Brandon has no ancestors.
- Brandon was the baby left on the door step so long ago.
- Michael calls for a meeting.
- It seems that Glenfield knows nurse Laura as Red Devil from his Internet dating site.
- She convinced him to reveal his blood type.
- Glenfield tells Michael the information is on his dog tags in a jewelry box.
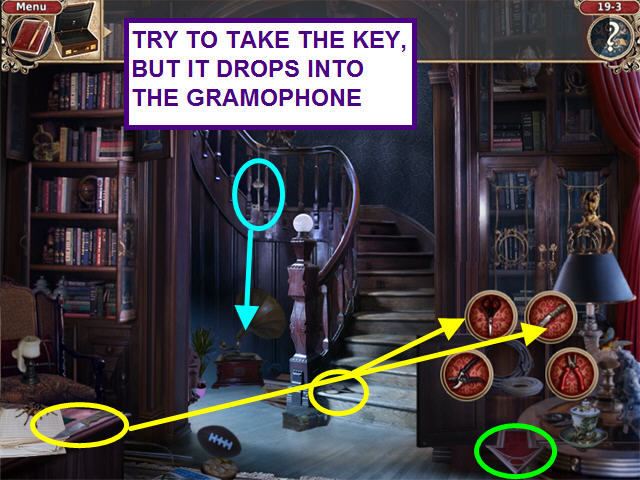
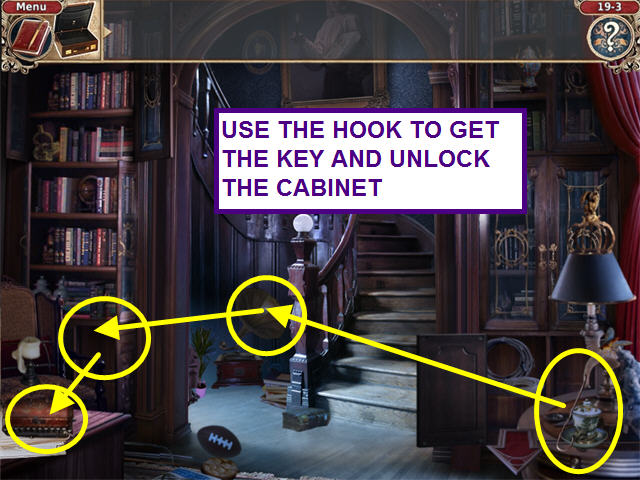
- Try to take the KEY from the banister but it falls into the gramophone.
- Try to take the KEY from the gramophone, but you can't reach it.
- Click on the wire in the lower right cabinet to make the items need bubbles appear.
- Collect the KNIFE and the SCISSORS and place them into their matching bubbles.
- Click on the down arrow to move to the other room.
- Locate the WIRE CUTTERS and the PLIERS.
- Click on the down arrow to return to the parlor.
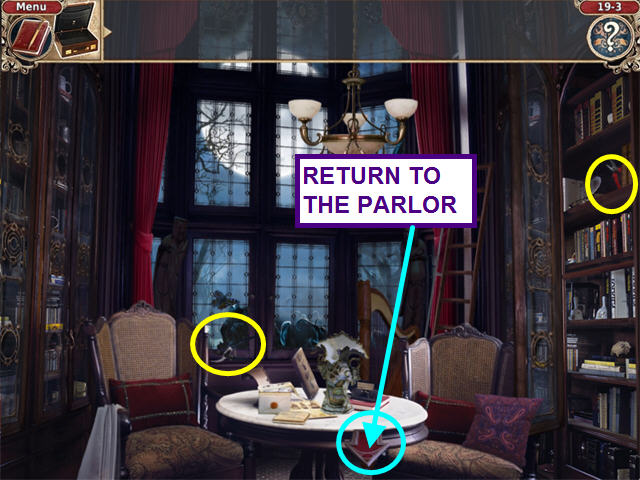
- Place the WIRE CUTTERS and the PLIERS into the bubbles.
- Take the WIRE HOOK and use it on the gramophone to retrieve the KEY.
- Use the KEY on the locked cabinet and take the JEWELRY BOX.
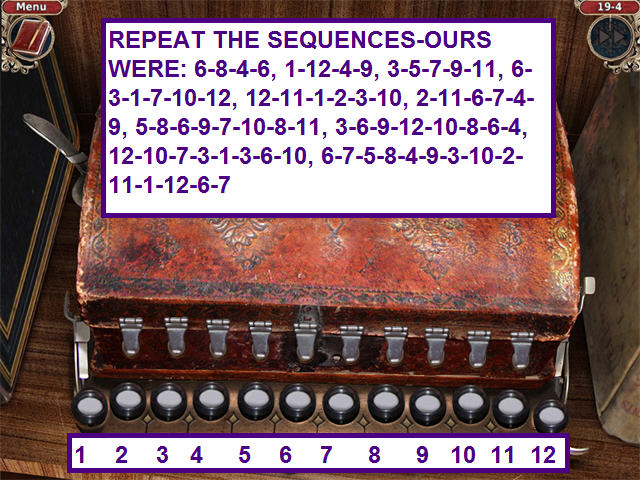
- Repeat the sequences to open the jewelry box.
- In this Simon-like mini-game, repeat the sequences as they are played.
- There are 10 sequences to repeat.
- These were our sequences, yours may vary:6-8-4-6 1-12-4-9 3-5-7-9-11, 6-3-1-7-10-12 12-11-1-2-3-10 2-11-6-7-4-9 5-8-6-9-7-10-8-11 3-6-9-12-10-8-6-4 12-10-7-3-1-3-6-10 6-7-5-8-4-9-3-10-2-11-1-12-6-7
- Glenfield has type AB blood!
Chapter Twenty: DNA Testing
- In return for revealing the true Malgray heir, you request that your boss be “inoculated” against any disease.
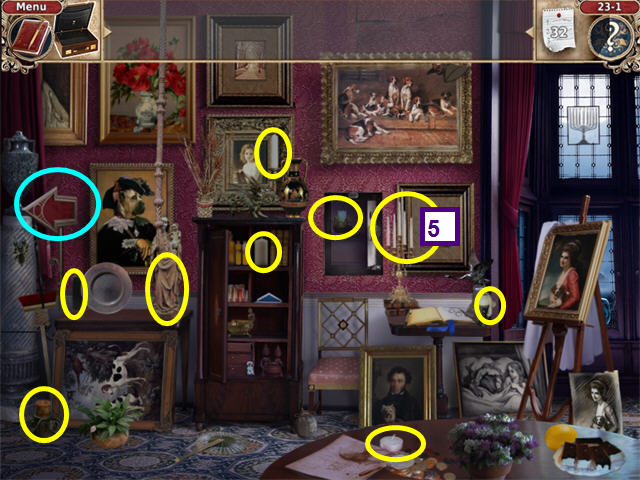
- To convince Lord Malgray, find the items using their silhouettes.
- Lord Malgray is not 100% convinced and wants a DNA test.
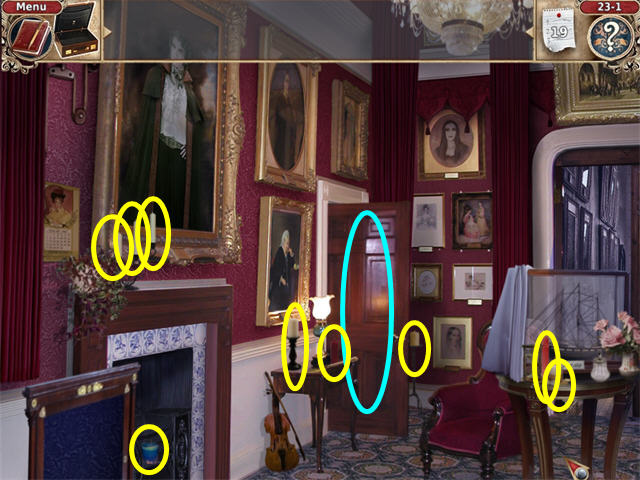
- Click on the right arrow to go to the staircase.
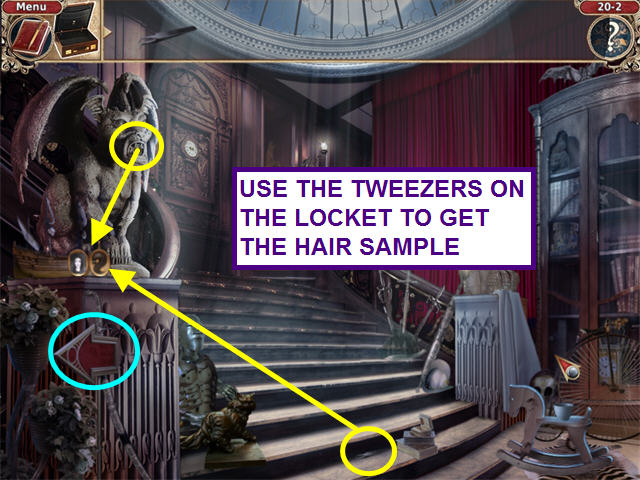
- Find the LOCKET in the gargoyle's mouth.
- Click on the LOCKET to open.
- Click on the locket once more to bring up an item bubble.
- Take the TWEEZERS from the stairs and place it in the bubble to get the HAIR SAMPLE.
- Click on the left arrow to return to the other room.
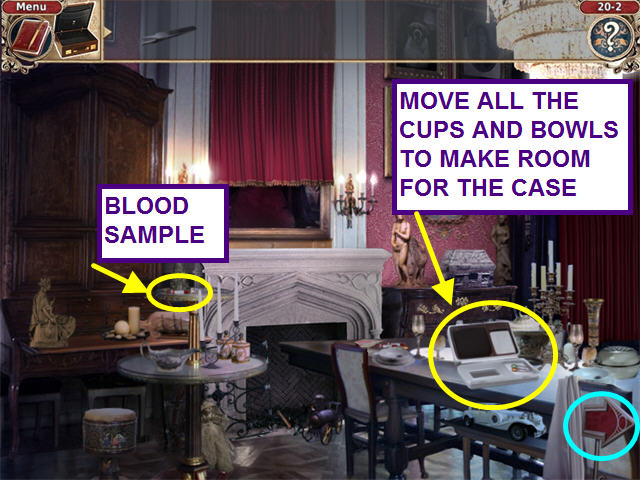
- Move all the cups and bowls on the table to clear a space.
- Click on the silver case to move it to the table.
- Click on the case again to open it.
- Take the BLOOD SAMPLE from just to the left of the fireplace.
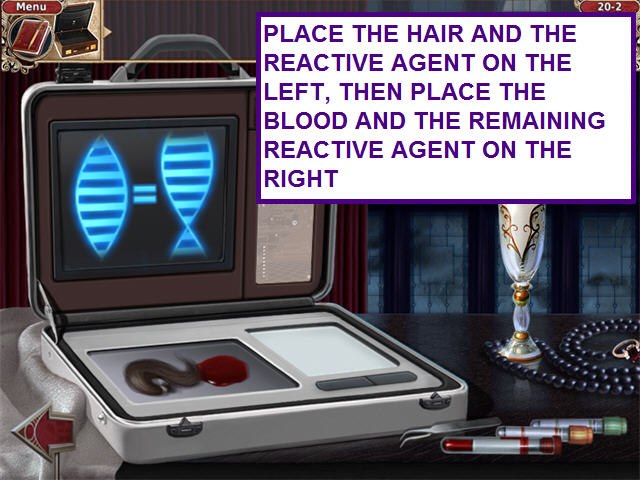
- Click on the silver case to see a close-up.
- Place the HAIR SAMPLE on the plate and add the reactive agent.
- Place the BLOOD SAMPLE on the plate and add the reactive agent.
- They match!
- The Malgrays are very grateful that you have found their heir.
- Now they can depart this world and rest after they speak with Brandon.
- They will uphold their end of the bargain and “cure” Mr. Rockwell.
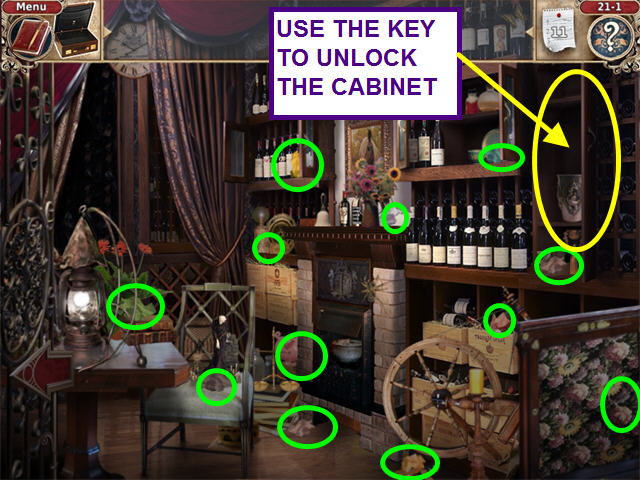
Chapter Twenty-one: An Old St. Bernard's Fortune
- Rover has decided to leave with his masters and wants to draw up a will.
- Help him collect all the previous drafts.
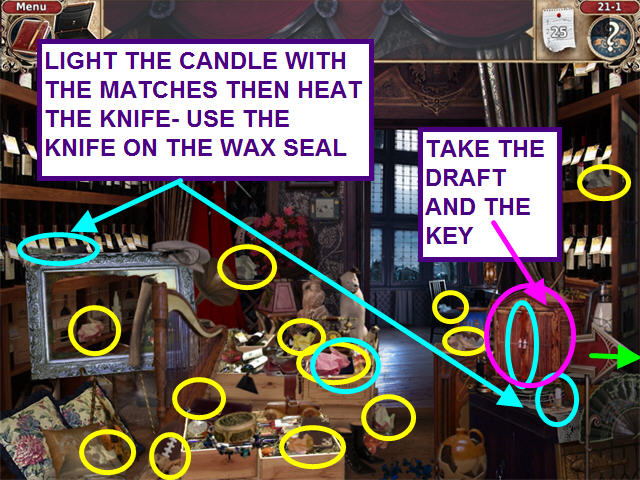
- Locate the 12 DRAFTS in the room.
- Use the MATCHES to light the CANDLE.
- Heat the KNIFE on the CANDLE.
- Use the HEATED KNIFE on the wax seal of the cabinet.
- Take the DRAFT and the KEY.
- Click on the right arrow to move to the other room.
- Use the KEY to unlock the cabinet on the right.
- Locate the remaining DRAFTS.
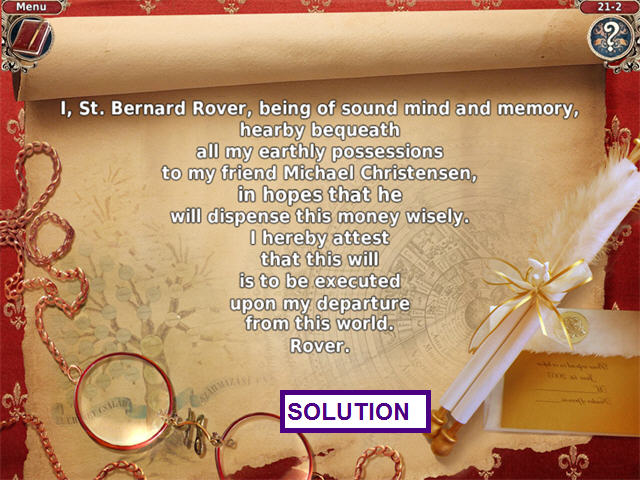
- Edit the will by arranging the lines of text in the correct order.
- Click on two lines to swap positions.
- Time to get Rover's money out.
- This will trigger a Hanoi Towers mini-game.
- The object of this mini-game is to move the pile of boxes from the right to the left.
- You may only move one box at a time, and a box can only rest atop a smaller box or the floor.
- Please watch the video for a step-by-step solution for this puzzle.
Chapter Twenty-two: The Castle Security System
- The alarm is sounding and only Rover knew how to turn it off.
- Click on the right arrow to visit the stairs.
- Locate the DUCT TAPE, PEN and PHILLIP'S SCREWDRIVER.
- Click on the left arrow to return to the parlor.
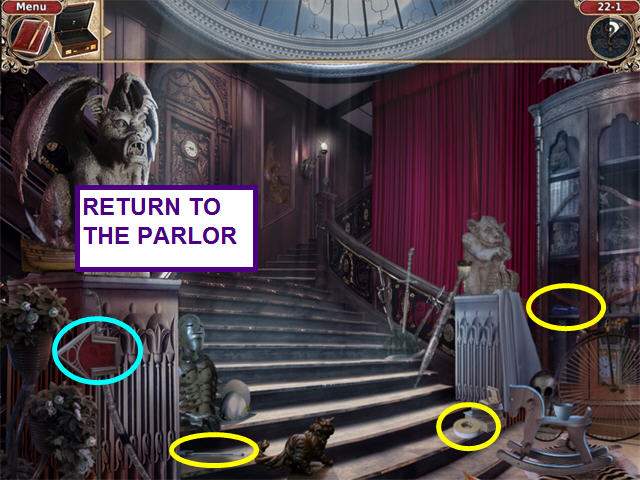
- Take the SLOTTED SCREWDRIVER.
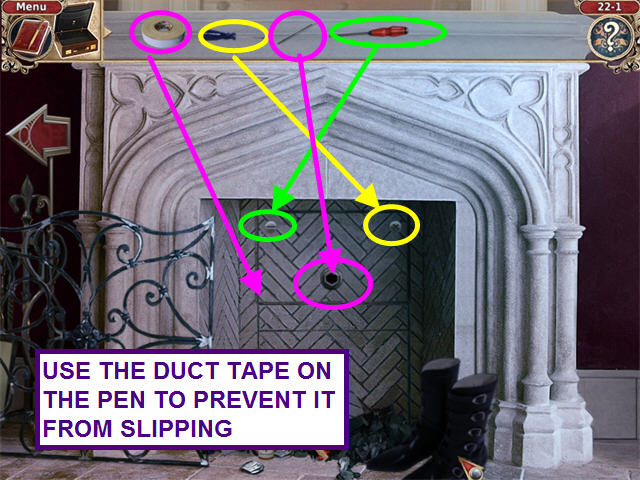
- Click on the fireplace to see the close-up.

- Take the SLOTTED SCREWDRIVER and remove the three small squares.
- Use the SLOTTED SCREWDRIVER to remove the upper left screw.
- Use the PHILLP'S SCREWDRIVER to remove the upper right screw.
- Use the PEN in the lower fastener, but its too slippery.
- Use the DUCT TAPE on the pen.
- Click on the PEN to open the panel.
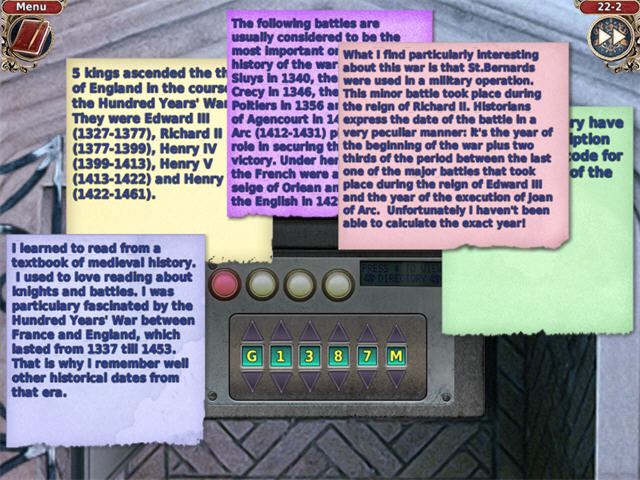
- Rover left several clues to help solve the code.
- The far left paper indicates that the first and last letters of the code should be G and M for Glenfield and Mary.
- The Hundred years war started in 1337 plus 2/3's the difference between the death of Joan of Arc in 1431 and the battle of Poitiers in 1356 equals 1387. (1337 + 50 = 1387)
- Enter G1387M into the alarm panel.
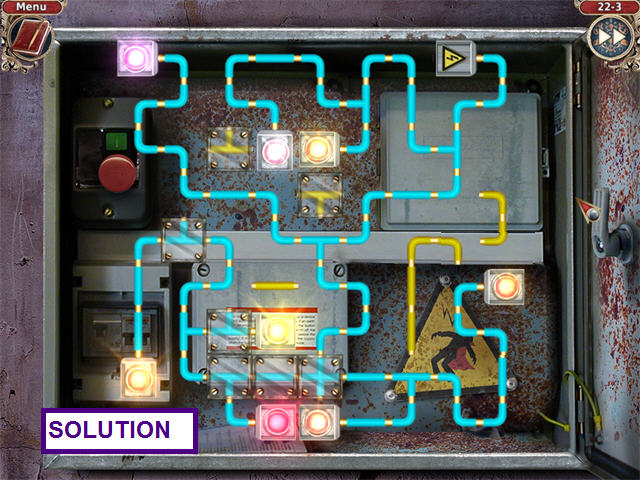
- Repair the alarm wiring by fixing all the connections.
- Click on a wire to rotate into position.
- Ensure all the lights are on.
Chapter Twenty-three: The Cure-It-All
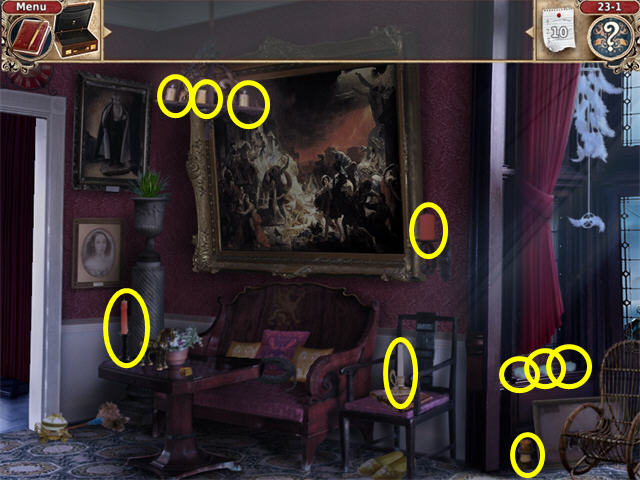
- For the ritual, we need to collect candles and bats.
- Let's start with the candles.
- Locate 13 candles in the first hall.
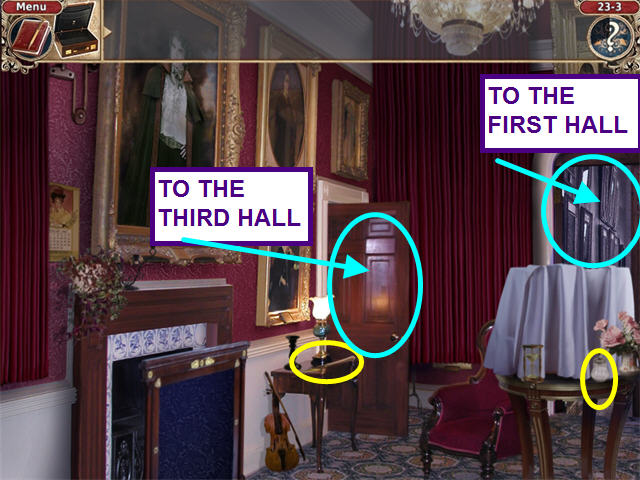
- Click on the left arrow to walk to the second hall.
- Locate 9 candles in the second hall.
- Click on the left door to travel to the third hall.
- Locate the 10 candles in the third hall.
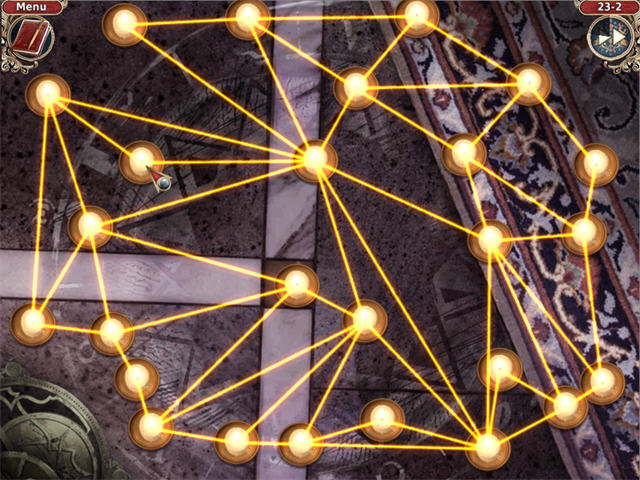
- Now the candles must be properly arranged.
- Move the candles so that no strings are crossing.
- Now, to catch a bat.
- Walk left to the second hall.
- Take the KNIFE and the SUGAR DISPENSER.
- Take the left door to the third hall.
- Take the STRING.
- Return to the first hall.
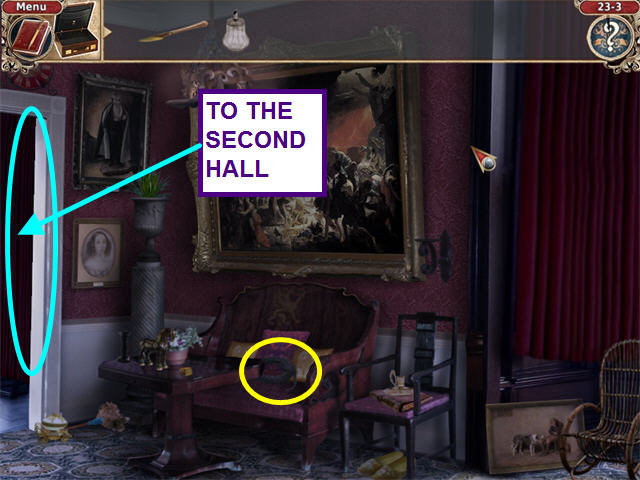
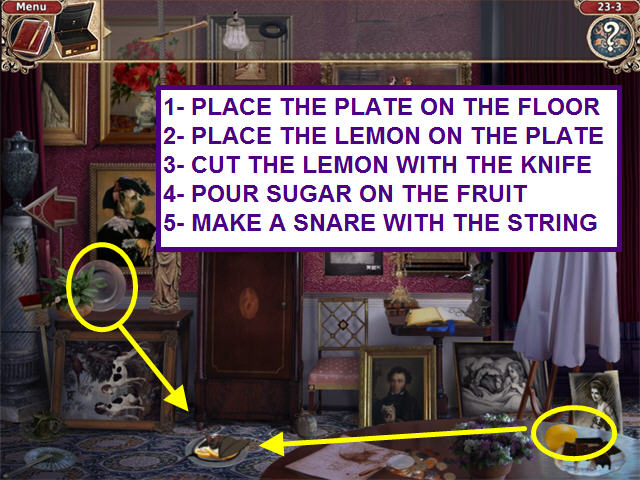
- Place the silver PLATE on the floor.
- Take the LEMON from the table and place it on the PLATE.
- Cut the LEMON with the KNIFE.
- Pour SUGAR on the LEMON.
- Make a snare with the STRING.
- Glenfield performs the ritual and Mr. Blackwell is now a vampire!
Chapter Twenty-four: Farewell Malgray Castle
- Ellen insists on another round of magic solitaire to tell your future.
- Remove pairs of cards to clear the board.
 Congratulations! You have just completed Vampireville!
Created at: 2010-03-15