

Walkthrough Menu
- General Tips
- Chapter 1: Arrival at Limmeridge
- Chapter 2: The Gazebo
- Chapter 3: Return to Limmeridge
- Chapter 4: The Chapel
- Chapter 5: Blackwater Park
- Chapter 6: The Labyrinth
General Tips
- Choose Casual Mode or Expert Mode at the beginning of the game.
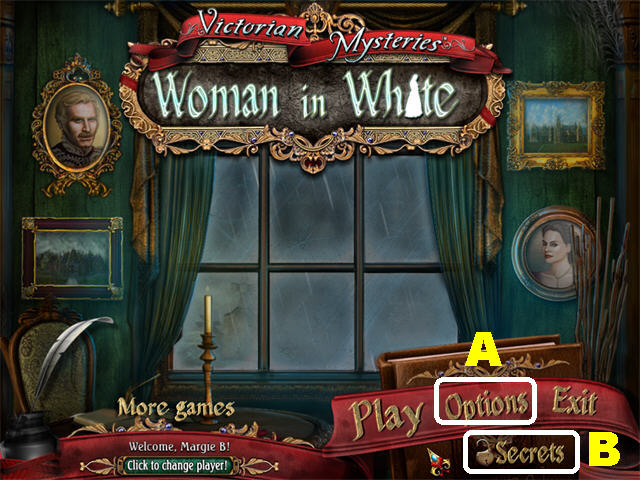
- Click on Options (A) to adjust sound, music and screen size.
- The Secrets Lock (B) will be available in the main menu once you complete your adventure.
- If you click randomly in a Hidden Object Scene, your cursor will move wildly around the scene.
- Your cursor changes into a magnifying glass, when you can zoom into an area, and a hand, when you can pick up an inventory item.
- The hints in the game are unlimited, but you have to wait for them to recharge in order to use them again.
- When you use a hint in a Hidden Object Scene a circle appears over a random item from your list.
- Hints used in regular scenes will show you what you need to do next, or tell you if there is nothing else left to do in that scene.
- Mini-games can be skipped once the skip bar is filled in yellow.
- To view instructions for a mini-game, click on the “?” in the upper left.
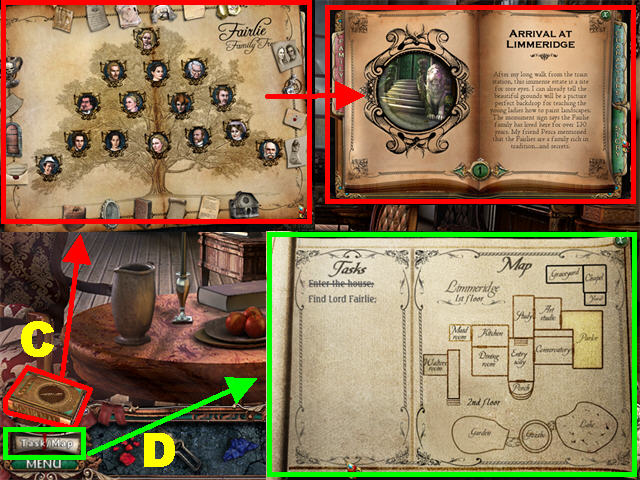
- The Journal (C) is located in the lower left corner of each scene; click on it to view the list of characters, read the story, or view the Family Tree.
- Click on any of the picture icons in the Family Tree section to view that character’s bio. As you meet new people and uncover new secrets in the game they will be added to the Journal.
- If you don’t pick up all the Journal pieces in the scene, you can go back to an area to grab them if those locations are still available. Otherwise, you will have to replay the game to obtain them.
- Picking up Journal pieces does not affect the outcome of the game, just the availability of parts of the story.
- Click on any of the mementos surrounding the edges of the Family Tree to view that part of the story.
- Click on the Task/ Map Tab (D) below the Journal to view your current tasks. The map highlights your exact location in yellow.
Chapter 1: Arrival at Limmeridge
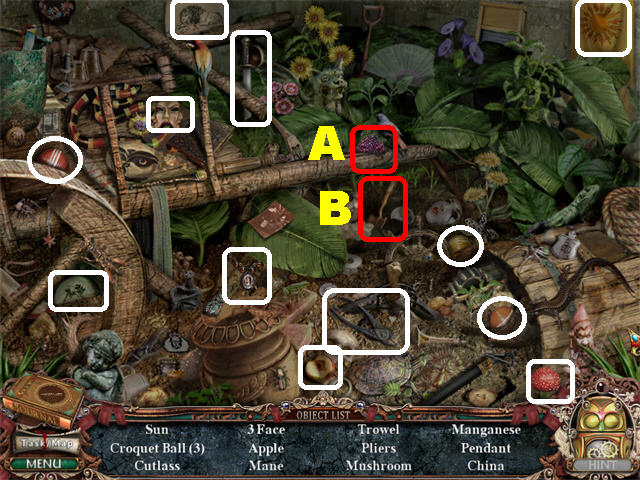
- Click on the sparkly area in the lower left to trigger a Hidden Object Scene.
- The MANGANESE (A) and the TROWEL (B) will be added to inventory.
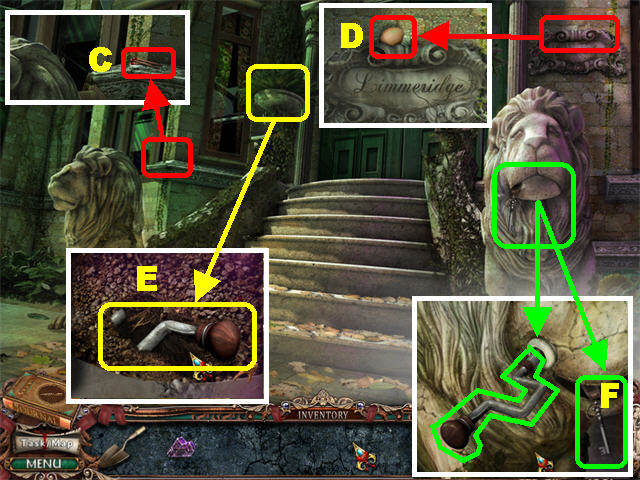
- Zoom into the window above the lion’s head; grab the MATCHES (C).
- Take a closer look at the sign in the upper right; take EGG 1/5 (D).
- Zoom into the potted plant on the left; use the TROWEL to dig up the CRANK (E).
- Zoom into the right lion; place the CRANK on the side of the lion’s face.
- Click on the crank; take the ENTRY KEY (F).
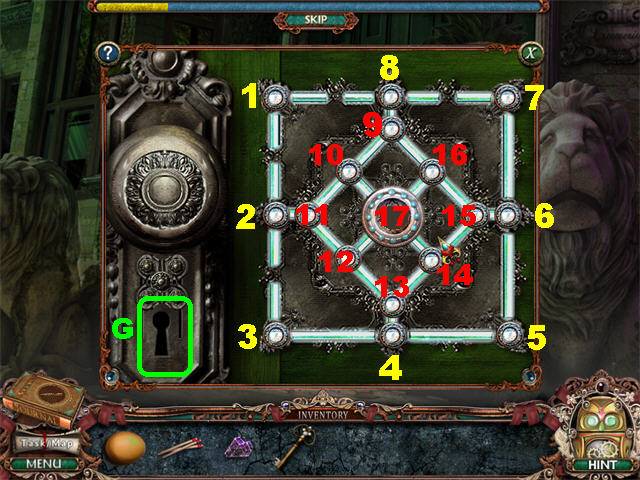
- Take a closer look at the lock on the door.
- Click on the pins in order to trace the pattern across the lock.
- Each time you click on a pin, all possible moves are highlighted. You can only click on each pin once.
- Please look at the screenshot for the solution.
- Place the ENTRY KEY (G) in the lock after the puzzle has been solved.
- Go through the door to access the Entrance Hall.
- Talk to Marian.
- Go up the steps.
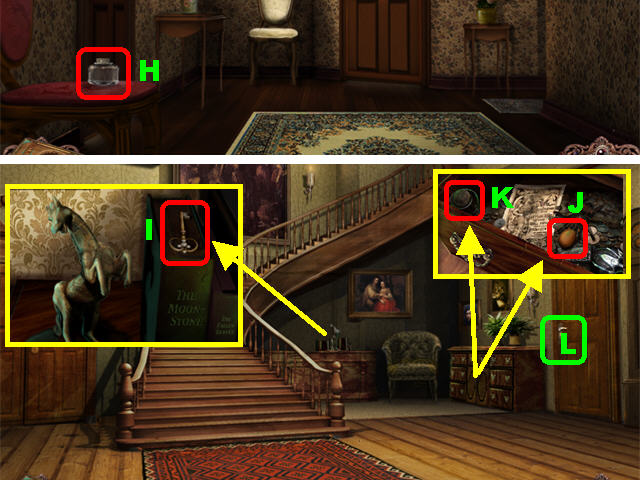
- Take the EMPTY PAINT JAR 1/5 (H) on the left.
- Click down.
- Zoom into the books by the staircase; take the CONSERVATORY KEY (I).
- Zoom into the bureau on the right and open the top drawer; grab the EGG 2/5 (J) and the EMPTY PAINT JAR 2/5 (K).
- Zoom into the lock (L) on the right door; place the CONSERVATORY KEY in the lock, turn the key and go through the door.
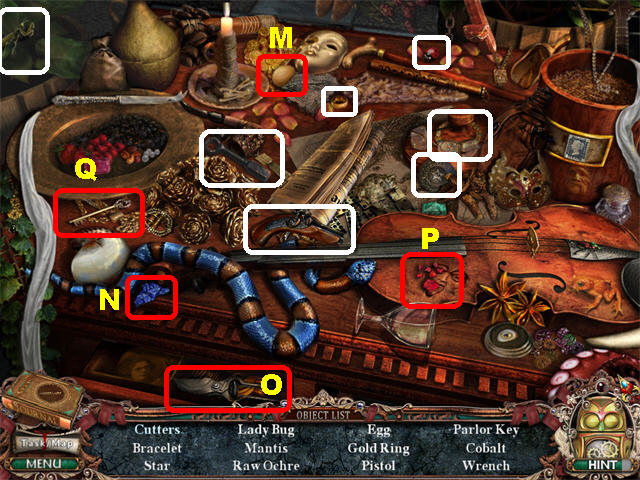
- Click on the sparkly area by the table to trigger a Hidden Object Scene.
- Open the bottom drawer; take the CUTTERS.
- The EGG 3/5 (M), COBALT (N), CUTTERS (O), RAW OCHRE (P), and the PARLOR KEY (Q) will be added to inventory.
- Return to the Limmeridge Entrance.
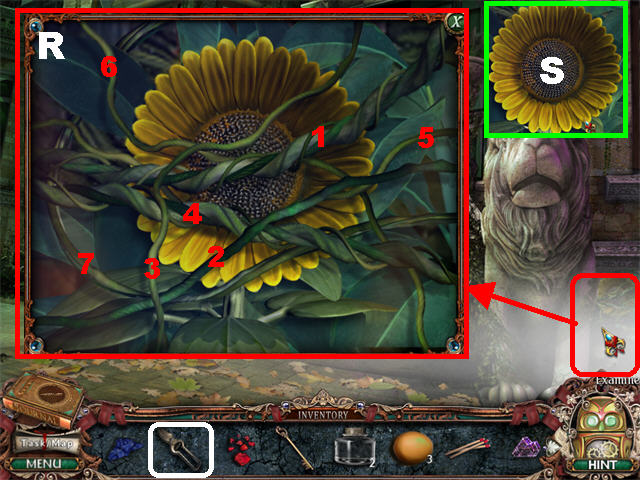
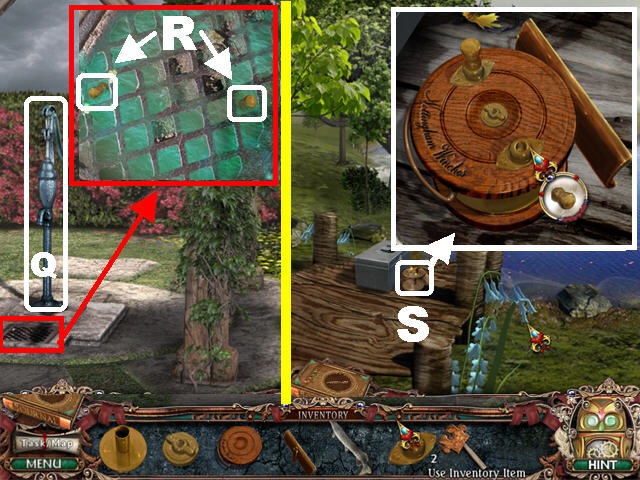
- Zoom into the area in the lower right corner.
- Use the CUTTERS to remove the topmost vines until they are all removed.
- Please look at the screenshot for the solution (R).
- Take the SEEDS (S) in the center of the flower.
- Return to the Conservatory.
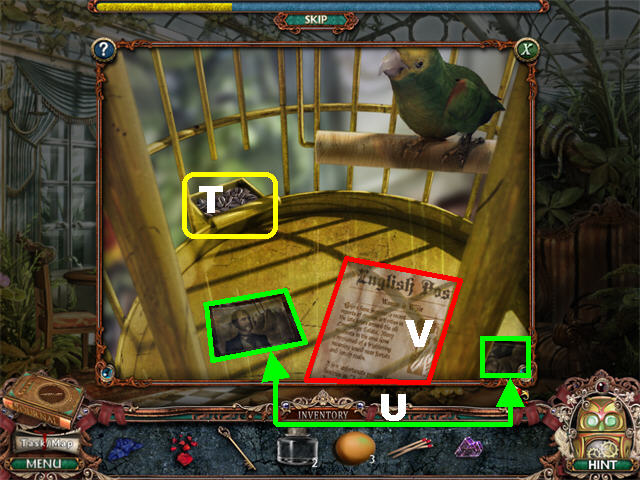
- Zoom into the birdcage; place the SEEDS in the feeder (T).
- Click on two matching documents to eliminate them (U) until no pairs are left.
- Pick up the NEWSPAPER ARTICLE at the bottom of the cage (V).
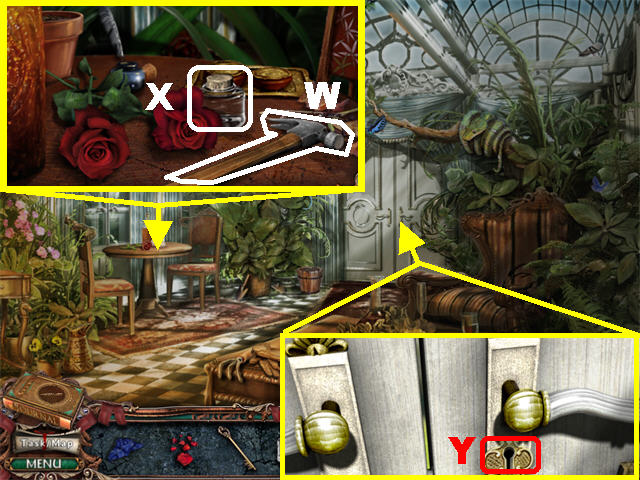
- Zoom into the table; grab the HAMMER (W) and the EMPTY PAINT JAR 3/5 (X).
- Zoom into the door; place the PARLOR KEY into the lock, turn the key and go through the door (Y).
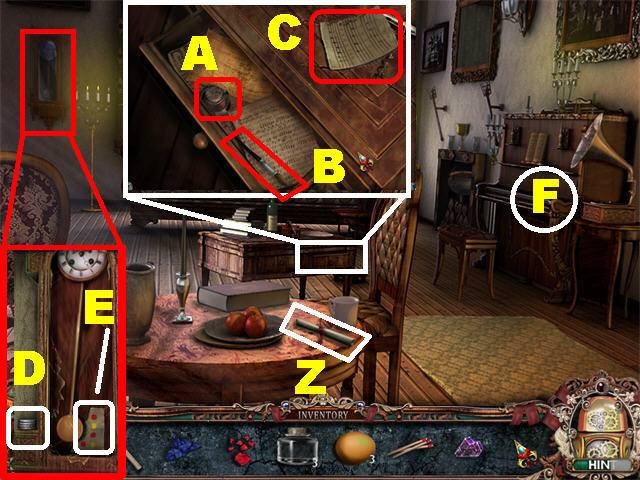
- Grab the PROFESSOR PESCA NOTE (Z) on the table.
- Zoom into the coffee table; take the EMPTY PAINT JAR 4/5 (A), PAINTBRUSH (B), and the PAGE (C).
- Zoom into the clock in the upper left; grab the SILVER COINS (D).
- Break the glass with the HAMMER; move the pendulum and take the PAINT KEY (E).
- Take a closer look at the piano on the right (F).
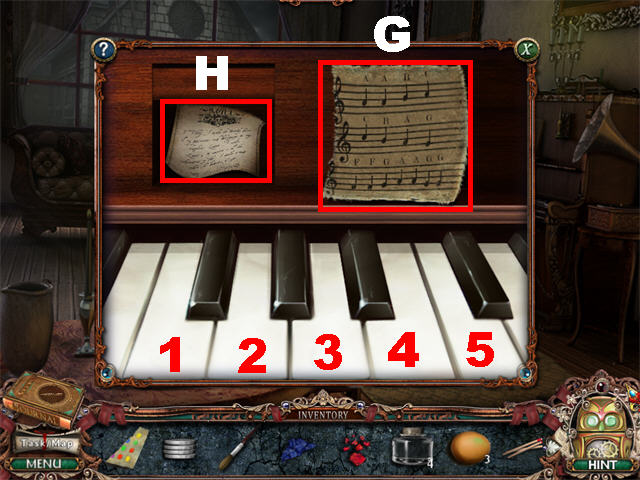
- Place the PAGE (G) above the piano to trigger a puzzle.
- Duplicate the 3 musical sequences shown on the keys.
- The First Sequence is 3, 3, 4, 5.
- The Second Sequence is 5, 4, 3, 2.
- The Third Sequence is 1, 1, 2, 3, 3, 2, 2.
- Grab the FAIRLIE WILL (H) on the left after the puzzle has been solved.
- Go left towards the Art Studio.
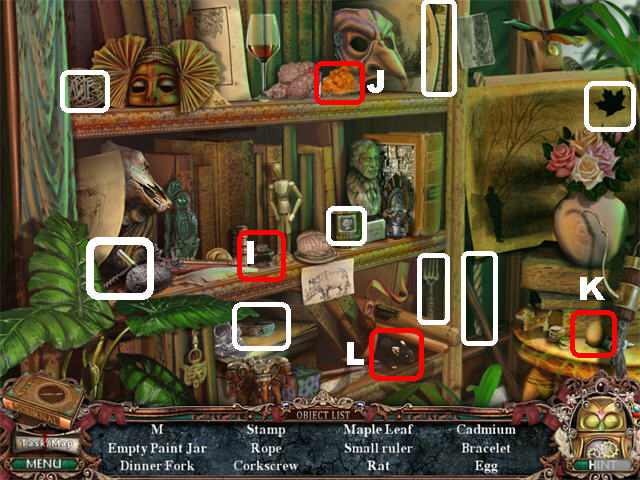
- Play the Hidden Object Scene by the bookcase.
- The EMPTY PAINT JAR 5/5 (I), CADMIUM (J), EGG 4/5 (K), and the RAT (L) will be added to inventory.
- Return to the Conservatory.
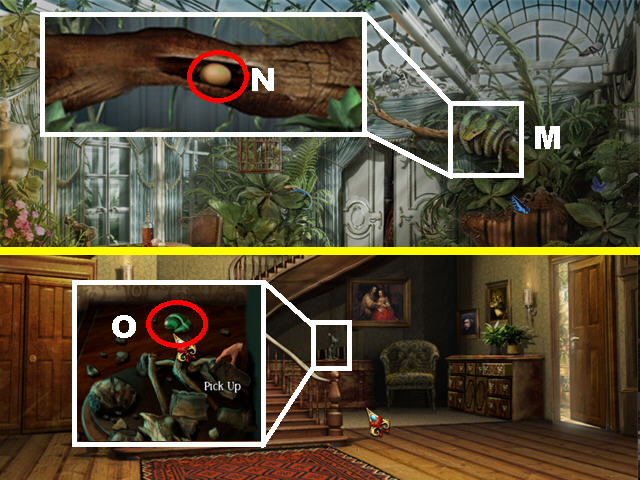
- Zoom into the snake (M) in the upper right; feed it the RAT.
- Grab the EGG 5/5 (N) after the snake leaves.
- Return to the Entrance Hall.
- Zoom into the books by the staircase; break the horse with the hammer and grab the MALACHITE (O).
- Return to the Art Studio.
- Zoom into the table by the window.
- Using the diagram in the upper left, mix some paint colors and place them in their appropriate jars.
- Place the 5 EMPTY PAINT JARS on top of their matching colored circles on the table.
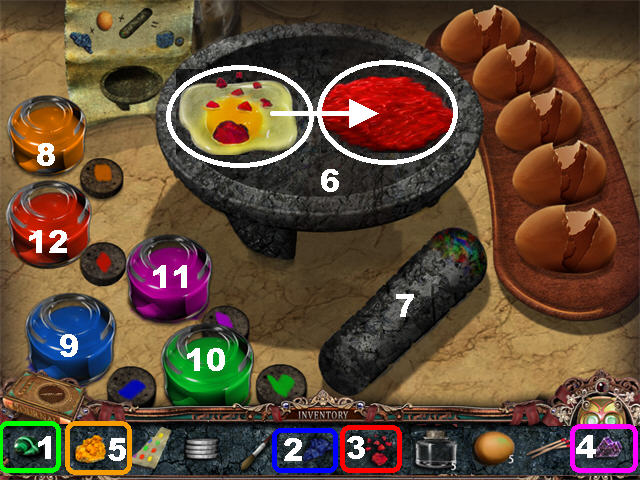
- Pick up one of the stones from inventory, MALACHITE (1), COBALT (2), RAW OCHRE (3), MANGANESE (4) or CADMIUM (5), and place it in the MORTAR (6) followed by an EGG.
- Use the PESTLE (7) to mix the ingredients.
- Grab the EMPTY PAINT JAR that matches the color you mixed and place it in the mortar to collect it.
- Repeat all the steps above until all 5 colors have been mixed and placed in their jars.
- Pick up the following colors to place them in your inventory: ORANGE PAINT JAR (8), BLUE PAINT JAR (9), GREEN PAINT JAR (10), PURPLE PAINT JAR (11), and RED PAINT JAR (12).
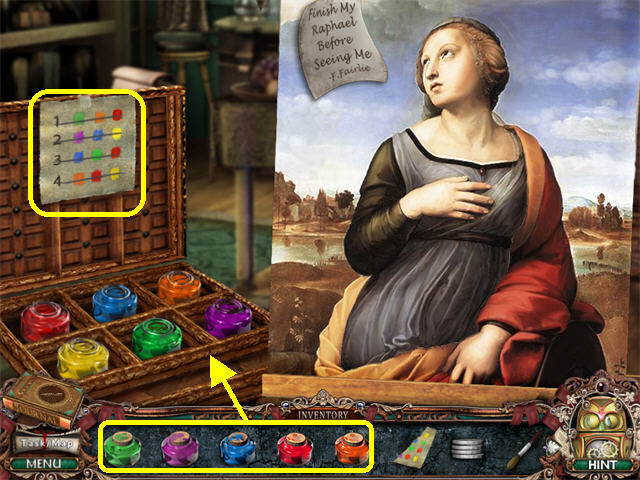
- Zoom into the painting on the right.
- Place the PAINT KEY on the torn half, above the open case.
- Place the BLUE, ORANGE, GREEN, PURPLE, and RED PAINT JARS in the empty slots in the case (the yellow paint jar is already in the case).
- Dip the PAINTBRUSH into the paint jars, according to the color scheme on the paint key, and place the filled paintbrush anywhere on the painting.
- After each set of colors has been entered correctly, the appropriate line will be marked off on the paint key.
- The First Sequence is Green, Orange, Red.
- The Second Sequence is Purple, Blue, Yellow.
- The Third Sequence is Blue, Green, Red.
- The Fourth Sequence is Orange, Red, Yellow.
- Take the RAPHAEL PAINTING after all sequences have been entered to add it to your Journal.
- The door to the Study on the left is now unlocked; go through it.
- Talk to Lord Fairlie; he asks you to find the coins.
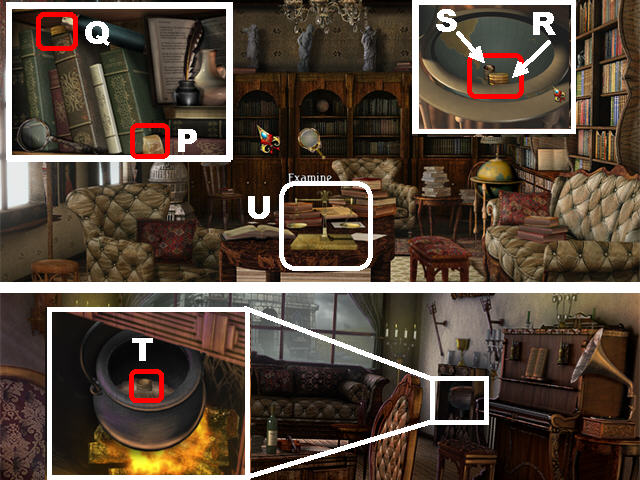
- Zoom into the second bookcase against the back wall; take the COINS IN WAX (P) and the GOLD COINS (Q).
- Zoom into the globe on the right to open it; take the other GOLD COINS (R) and the BRONZE COINS (S).
- Return to the Parlor.
- Zoom into the fireplace; place the MATCHES on the firewood.
- Place the COINS IN WAX in the cauldron; take the BRONZE COINS (T).
- Return to the Study; zoom into the scale on the table (U).
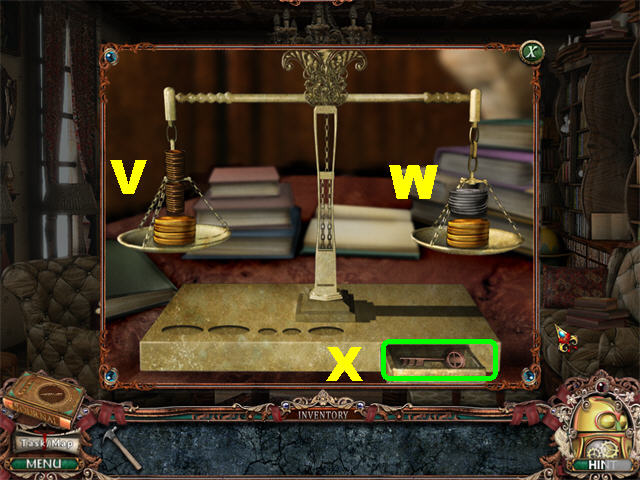
- Place the 2 GOLD COINS, 2 BRONZE COINS, and the SILVER COINS at the base of the scale.
- Balance the scales by placing 1 GOLD COIN and 2 BRONZE COINS in the left scale (V); and placing 1 GOLD COIN and the SILVER COINS in the right scale (W).
- Grab the BEDROOM KEY (X) on the base after the puzzle has been solved.
- Return to the Entrance Hall; go up the staircase to reach the Upstairs Hallway.
- Talk to Marian.
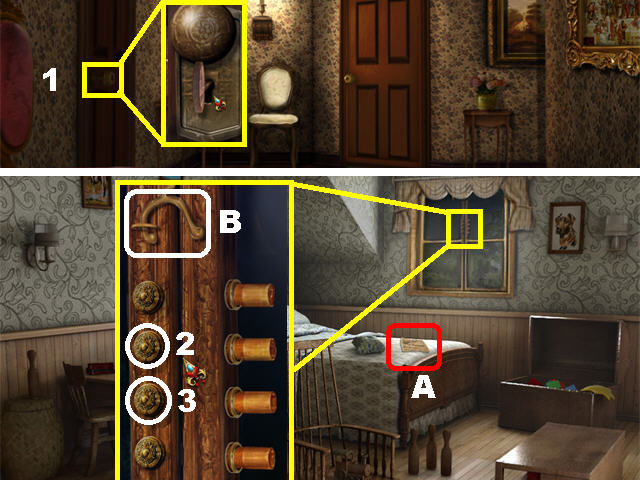
- Zoom into the left door; place the BEDROOM KEY in the lock (1), turn the key and go into the Bedroom.
- Grab the FIRST LESSON’S NOTE (A) on the bed to add it to your Journal.
- Zoom into the window; click on BUTTONS 2 and 3, on the left, to solve the lock.
- Open the latch (B) to view the Gazebo.
Chapter 2: Gazebo
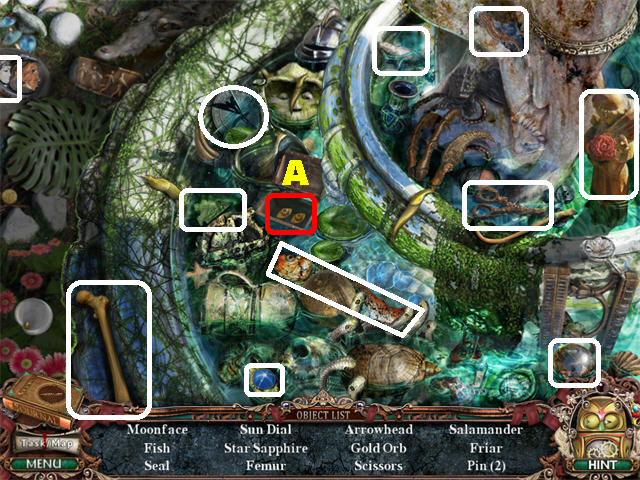
- Play the Hidden Object Scene on the right.
- Open the chest on the left and take the 2 PINS (A) inside; they will be added to inventory at the end of your search.
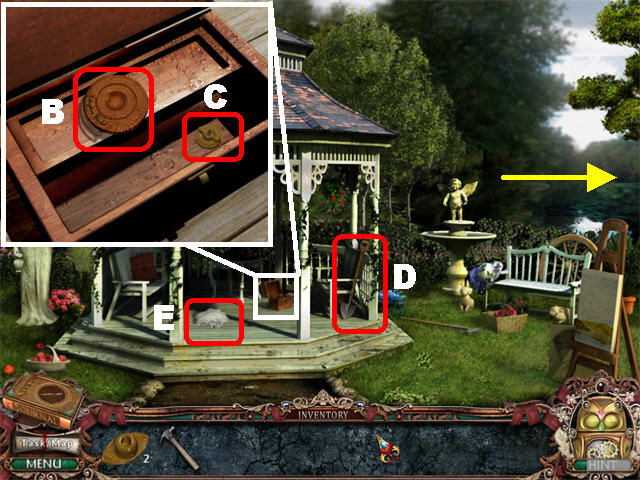
- Zoom into the box in the gazebo; take the TOP (B) and the TOP SCREW (C).
- Take the SHOVEL (D) on the right.
- Grab the WHITE SHAWL (E) inside the gazebo.
- Go right, towards the Lake.
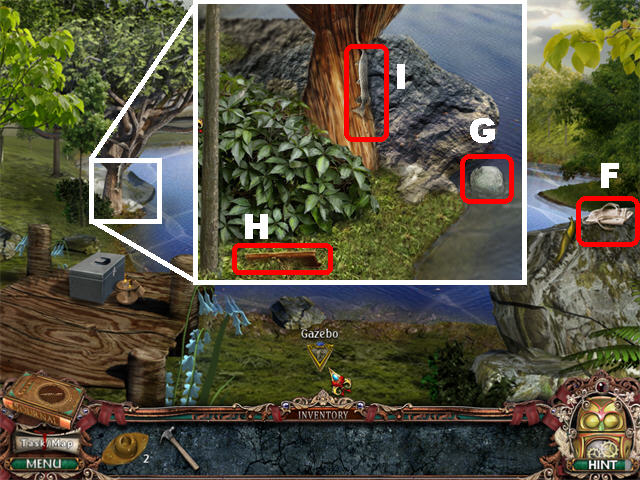
- Talk to Pesca; he needs help finding the parts of the reel.
- Click on the MISSING APRON on the right (F) to add it to your Journal.
- Zoom into the tree; take STONE 1/3 (G), the ROD CONNECTOR (H), and the FISH (I).
- Click down and head towards the upper left to access the Garden.
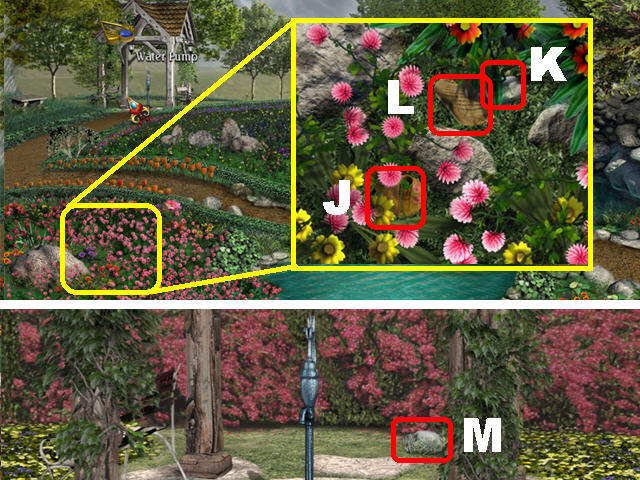
- Examine the lower left side of the field: grab the SPOOL HANDLE (J), STONE 2/3 (K), and GLYDE’S TELEGRAM will be added to your Journal (L).
- Go left towards the Water Pump.
- Take STONE 3/3 (M) in the back.
- Click down to return to the Garden.
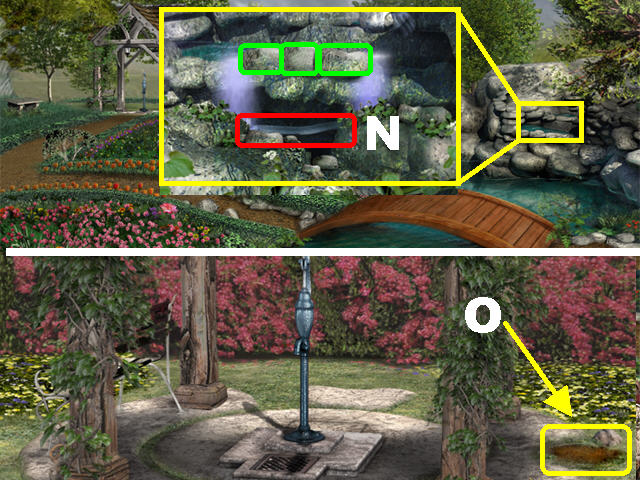
- Zoom into the waterfall on the right.
- Place the 3 STONES on top of the waterfall (marked in green); take the HANDLE (N).
- Go left towards the Water Pump.
- Place the SHOVEL in the hole in the ground on the right; click on the hole to trigger a puzzle (O).
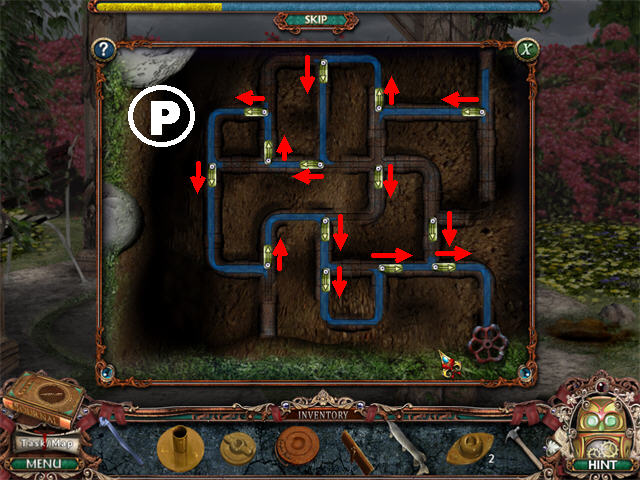
- Turn the levers as shown in the screenshot to restore the water flow (P).
- Place the HANDLE on the pump (Q); click on the handle to turn the water on.
- Zoom into the grate in front of the pump; the water level has risen. Take the 2 KNOBS (R).
- Return to the Lake.
- Zoom into the pier (S).
- Trigger a mini-game by placing the rod pieces in the following order: SPOOL HANDLE, ROD CONNECTOR, TOP, TOP SCREW, 2 PINS, and the 2 KNOBS above the 2 Pins.
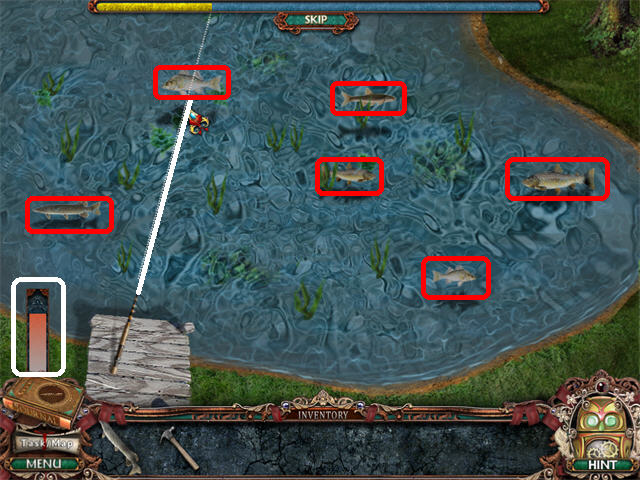
- Drag the rod around to the correct position so you can catch some fish.
- Click on the rod when the power meter on the left is in the right position. The fuller the meter is, the longer your reach will be.
- Once you catch all the fish, a box will appear in the water. Use the method described above to reel in the box.
- Click on the box once you catch it to activate a puzzle.
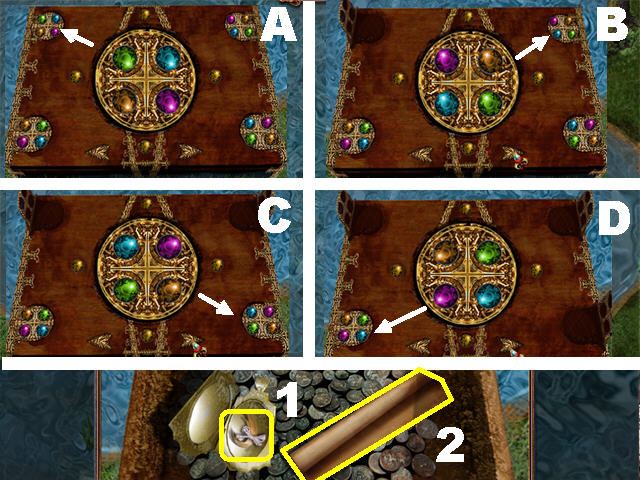
- Use the arrows at the bottom to move the large circle in the middle so it matches one of the 4 patterns in the corner of the box.
- Click on the center of the box after you have your first correct pattern and the matching latch will open.
- Going in either a clockwise or counterclockwise motion, click on the next pattern on the box to open the next latch.
- Once all 4 latches are open, the box will open.
- Open the small box on the left; take the LOCK OF HAIR, which will be added to the Journal (1), and the SCROLL (2).
- Return to the Gazebo; talk to Marian and Laura.
Chapter 3: Return to Limmeridge
- You return to the Parlor; talk to Marian.
- Return to the Entrance Hall and take the left door to access the Dining Room.
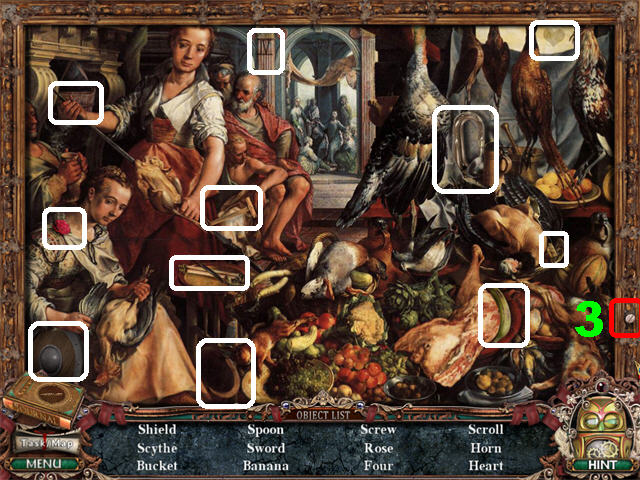
- Play the Hidden Object Scene by the sparkly painting.
- The SCREW (3) will be added to inventory.
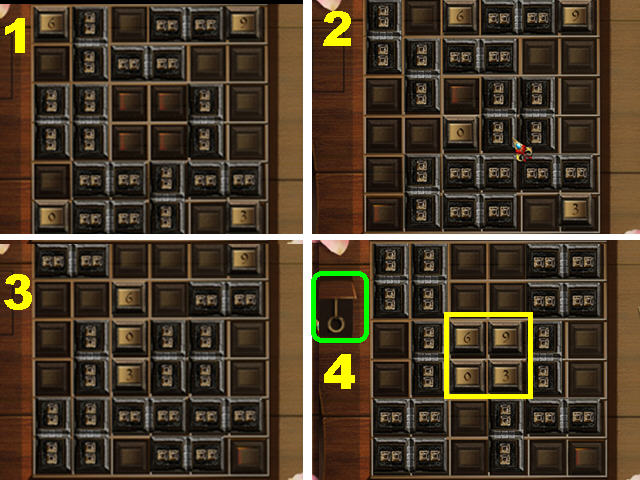
- Zoom into the small left table to trigger a puzzle.
- You must drag all the blocks out of the way so you can move all 4 numbers to the center of the puzzle. The numbers can be placed in any order.
- Please look at the screenshot for the solution.
- Grab the CUPBOARD KEY (4) in the upper left after the puzzle has been solved.
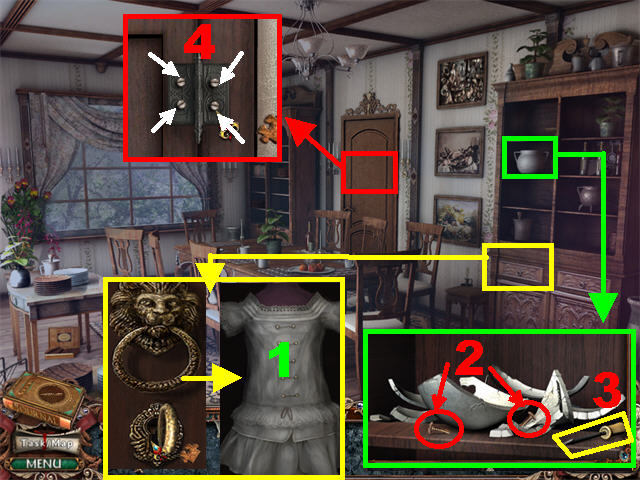
- Zoom into the bottom of the cupboard on the right; place the CUPBOARD KEY in the lock, turn the key and take the CHILD’S DRESS (1) to add it to your Journal.
- Zoom into the cupboard’s glass doors; break the vase with the HAMMER and take the 2 SCREWS (2) and the SCREWDRIVER (3).
- Take a closer look at the door; place the 3 SCREWS on the hinges.
- Tighten the 4 SCREWS (one is already in place) using the SCREWDRIVER (4).
- Go through the door to access the Breakfast Nook.
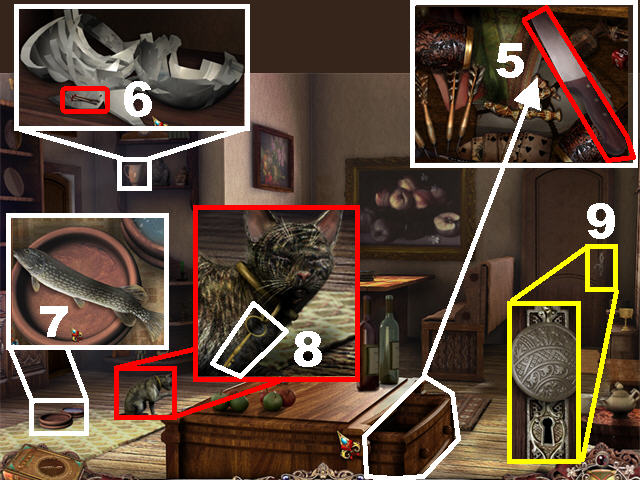
- Zoom into the bottom drawer; take the KNIFE (5).
- Take a closer look at the shelf in the upper left; break the vase with the HAMMER and take the MATCHES (6).
- Zoom into the cat bowls on the ground: place the FISH in the empty bowl and cut it with the KNIFE (7).
- Click on the cat so it can eat the fish.
- Zoom in on the cat; take the MAID’S KEY (8) from its neck.
- Zoom into the right door (9); place the MAID’S KEY in the lock, turn the key and go in.
- Play the Hidden Object Scene below the bed.
- The RUNG (10) will be added to inventory.
- Zoom into the bottom right drawer; take the GIFT FROM PG (11) to add it to the Journal.
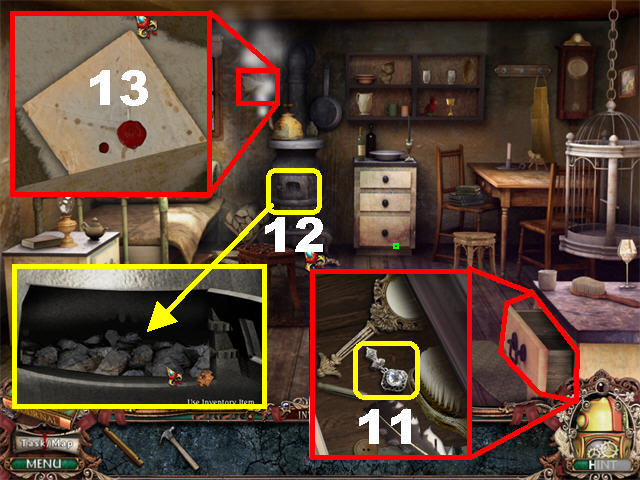
- Zoom into the oven, open the lid; place the MATCHES on the coal (12).
- Grab the ENVELOPE (SECRET INSTRUCTIONS) above the steam coming from the teapot (13).
- Talk to the Maid.
- Go to the Parlor; talk to Laura.
Chapter 4: The Chapel
- One RUNG and the HAMMER will be in your inventory at the beginning of this chapter.
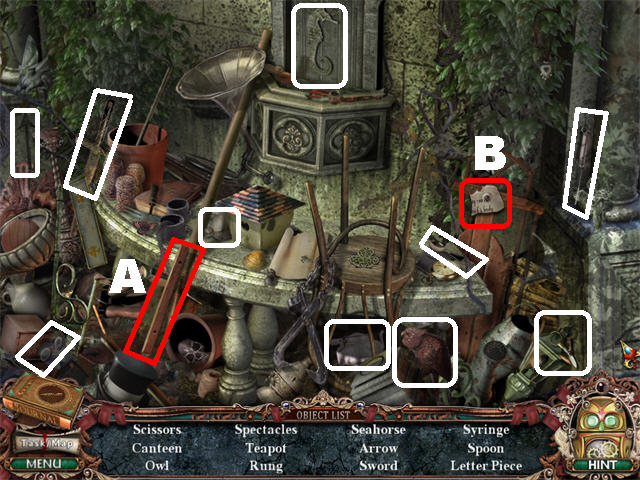
- Play the Hidden Object Scene on the side of the chapel.
- The RUNG (A) and the LETTER PIECE (B) will be added to inventory.
- Take the LETTER PIECE (C) in the lower right.
- Take the LETTER PIECE (D) close to the ladder.
- Take the RUNG (E) on the right side of the ground.
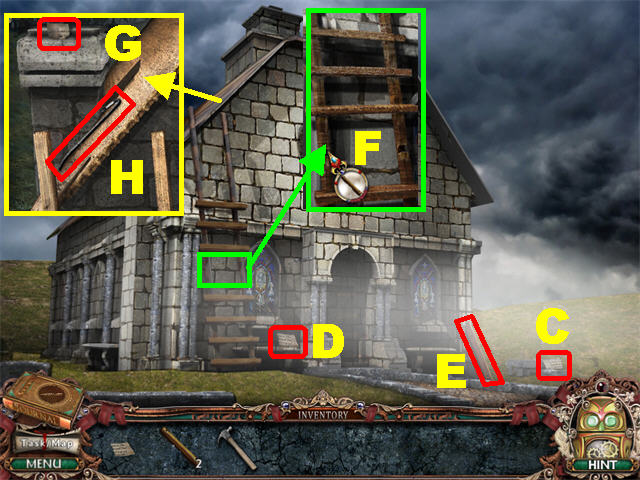
- Zoom into the ladder on the side of the chapel.
- Place the 3 LADDER RUNGS in the empty sections of the ladder (F).
- Zoom into the area directly above the ladder; take the LETTER PIECE (G) and the CROWBAR (H).
- Go inside the Chapel; talk to Marian.
- Take the 2 LETTER PIECES marked in red.
- Take a closer look at the dresser in the back.
- Put the 6 LETTER PIECES on the table.
- Arrange the letter pieces on the table; correct pieces will lock into place.
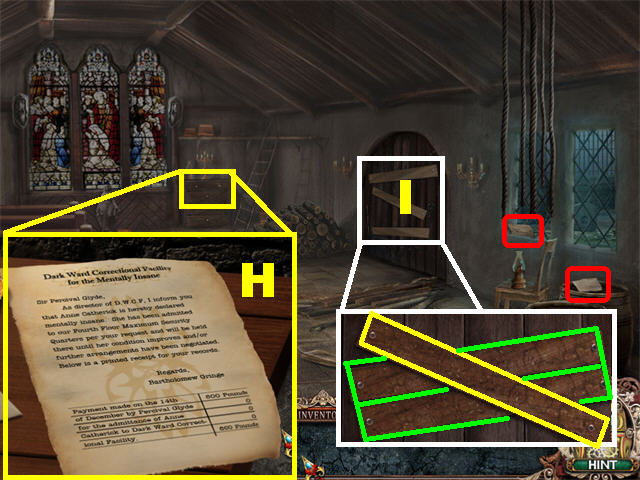
- Take the LETTER FROM ASYLUM to add it to your Journal (H).
- Zoom into the right door; remove the 3 boards (starting with the top one) using the CROWBAR (I).
- Go through the door to access the Graveyard.

- Zoom into the grave; take the BEWARE OF PERCIVAL note to add it to your Journal (J).
- Go through the gate on the left (K).
Chapter 5: Blackwater Park
- The HAMMER is in your inventory at the beginning of the chapter.
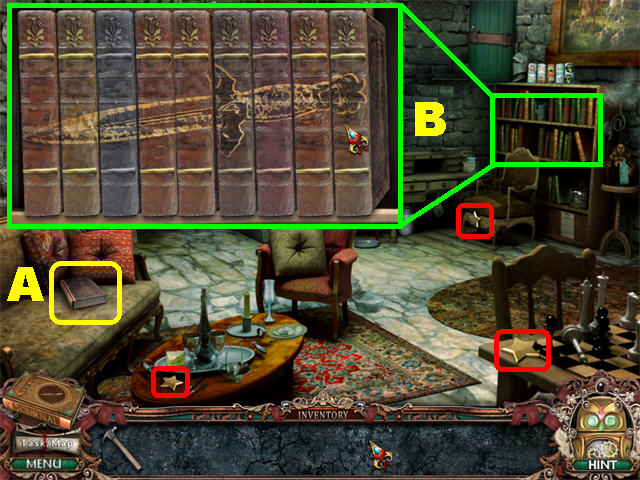
- Grab the BOOK (A) on the couch.
- Take the 3 STARS marked in red.
- Zoom into the bookcase on the right; place the BOOK in the empty slot.
- Click on any 2 books to swap their positions until they form the image shown in the screenshot (B).
- Go through the secret room that opened on the left after the books have been arranged correctly.
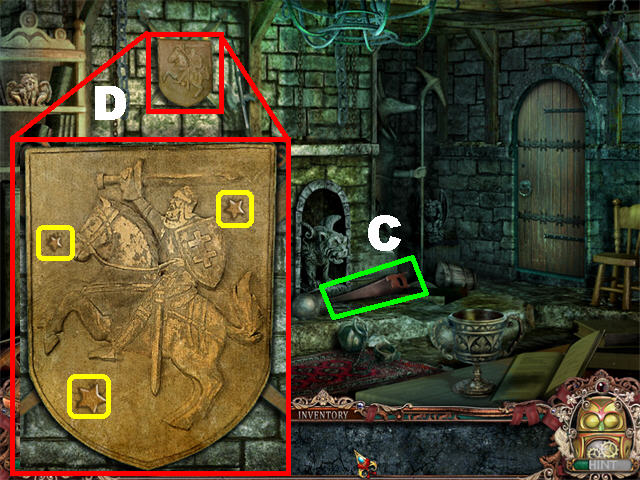
- Grab the SAW (C) on the ground.
- Zoom into the shield on the wall; place the 3 STARS in the empty slots.
- Take the SHIELD (D).
- Click down.
- Zoom into the right door; cut the board with the SAW.
- Go through the door to access the Kitchen.
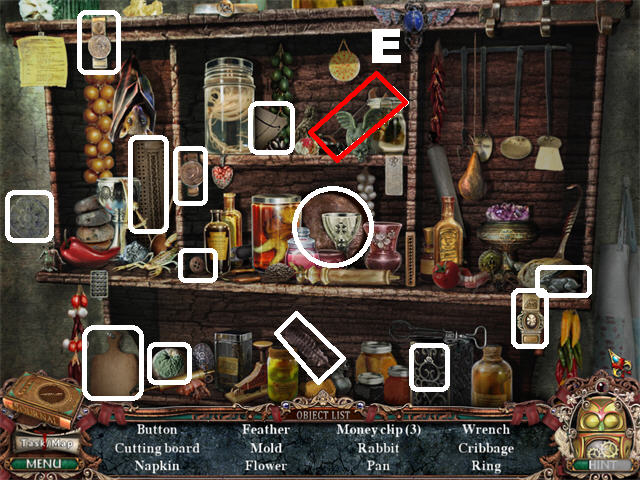
- Play the Hidden Object Scene in the upper right.
- The WRENCH (E) will be added to inventory.

- Zoom into the left drawer; take the ANCHOR (F) and the SCREWDRIVER (G).
- Zoom in below the sink; take the MOON (H).
- Pick up the LETTER FROM COUNT FOSCO (I), on the table, to add it to your Journal.
- Go left to reach the Hallway; talk to Marian.
- Go through the left door to access the Bathroom.
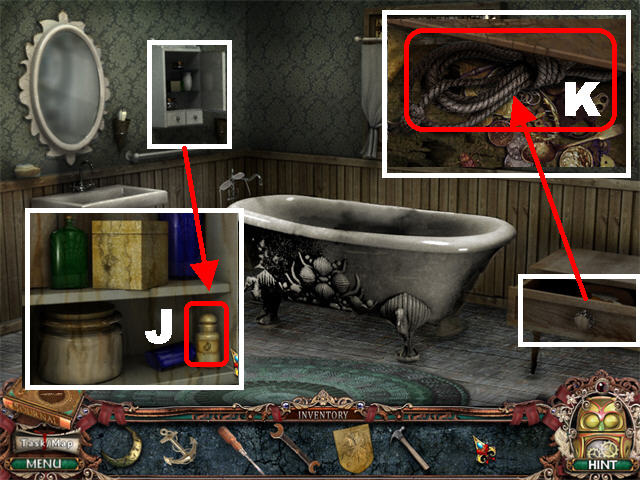
- Take a closer look at the medicine cabinet; take the ACID bottle (J).
- Zoom into the drawer; take the ROPE (K).
- Click down from the Bathroom and go right, into the Study.
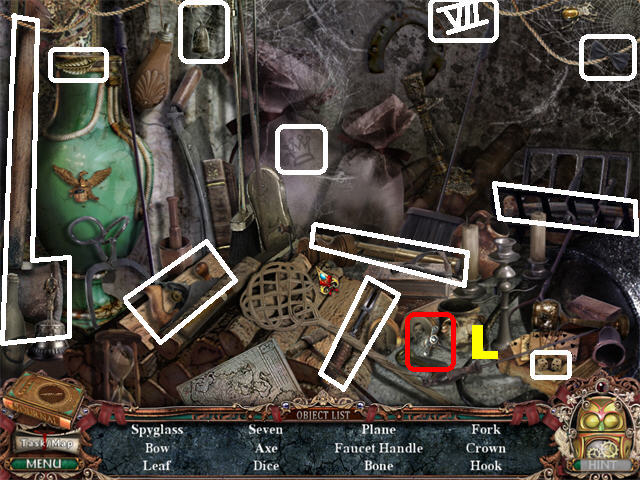
- Play the Hidden Object Scene in the Study’s fireplace.
- The FAUCET HANDLE (L) will be added to inventory.
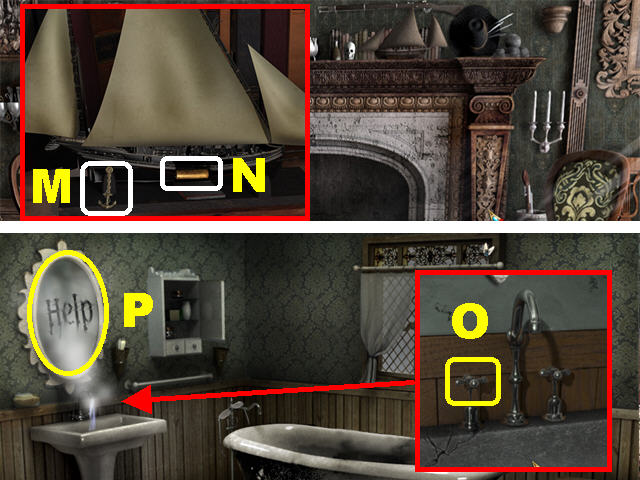
- Zoom into the sailboat above the fireplace; place the ANCHOR (M) in the lower left side of the boat and grab the SMALL WEIGHT (N).
- Return to the Bathroom.
- Zoom into the sink and place the FAUCET HANDLE on the faucet (O).
- Place the WRENCH on the faucet to turn it on; “HELP” appears on the foggy mirror above.
- Click on the MIRROR MESSAGE (P) to enter it into your Journal.
- Click down and go forward, towards the Entryway.
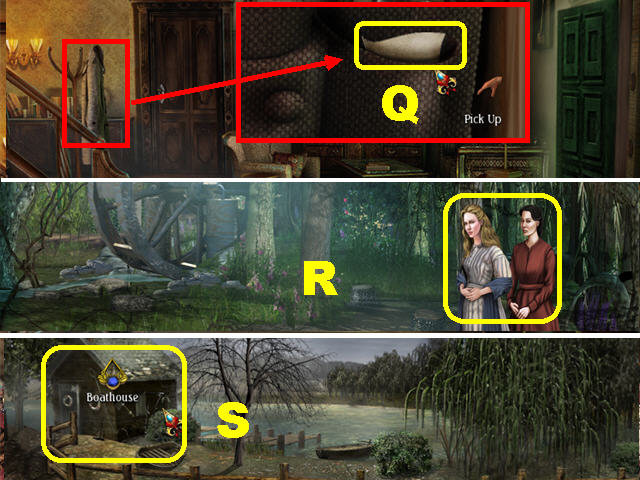
- Zoom into the coat pocket on the left; take the DEBT NOTICE (Q) in the pocket to add it to your Journal.
- Go through the right door to access the Courtyard, forward to the Road, and right, towards the Forest (R).
- Talk to Laura.
- Click down and go left towards the Boathouse (S).
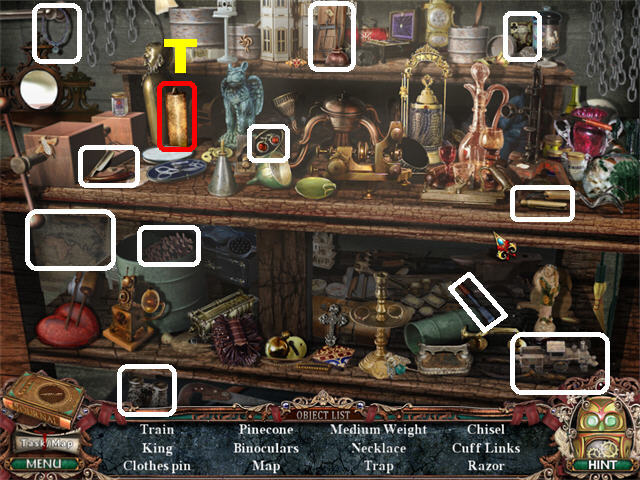
- Play the Hidden Object Scene on the right.
- The MEDIUM WEIGHT (T) will be added to inventory.
- Zoom into the barrel; take the SECRET NOTE (U) to add it to your Journal.
- Return to the Entryway in the house. Go through left door to access the Trophy Room.
- Place the ROPE on the hook in the chandelier; pull on the rope and take the HOOK (V) that falls to the ground.
- Exit this room and go up the left staircase to reach the Upstairs Hallway.

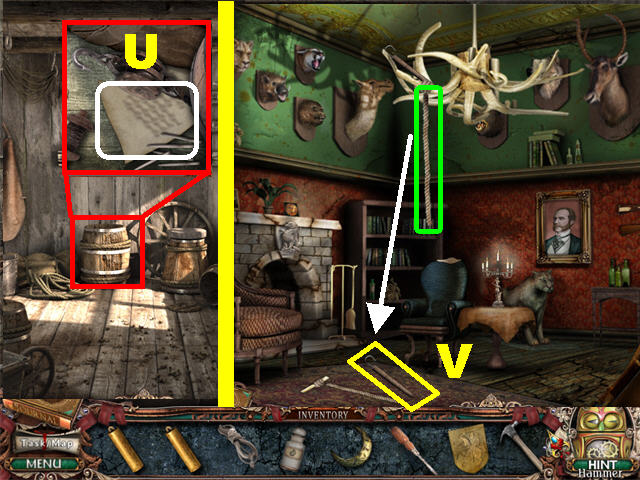
- Use the HOOK to pull down the ladder on the hatch in the ceiling; click on the hatch to activate a Hidden Object Scene.
- The OWL (W) will be added to inventory.
- Go right to access the East Hallway and head right, into the Master Bedroom.
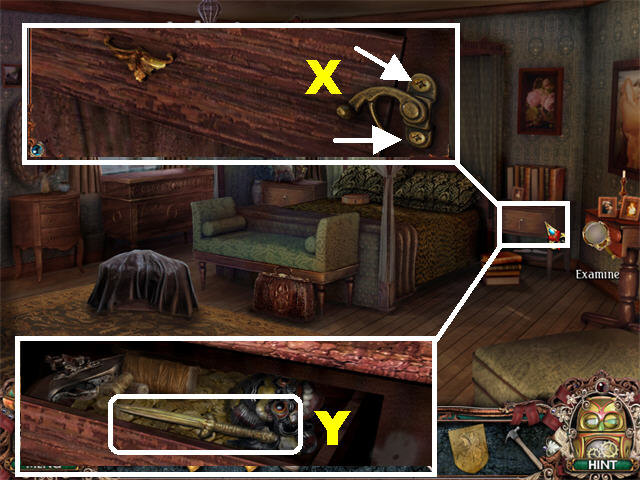
- Zoom into the right drawer; remove the SCREWS (X) on the latch with the SCREWDRIVER and grab the DAGGER (Y) inside the drawer.
- Exit the room and go forward into the Balcony to view a cutscene. You will be taken to Marian’s Room; talk to Marian.
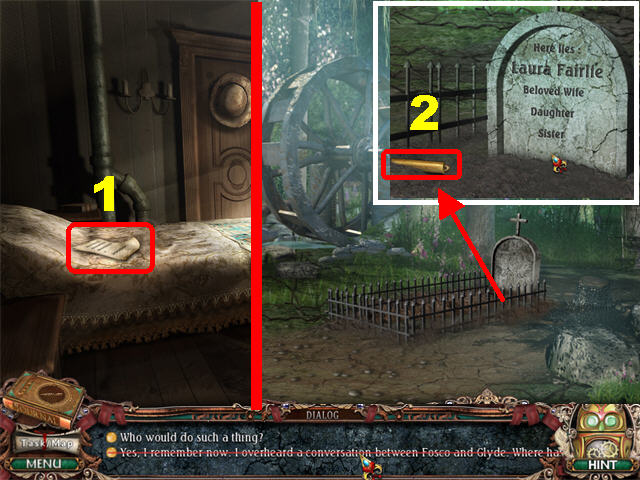
- Take the SOMETHING IS WRONG (1) page on the bed to add it to your Journal.
- Click down.
- Return to the Forest; talk to the Maid and then Marian.
- Zoom into the grave; take the LARGE WEIGHT (2).
- Return to the Entryway.
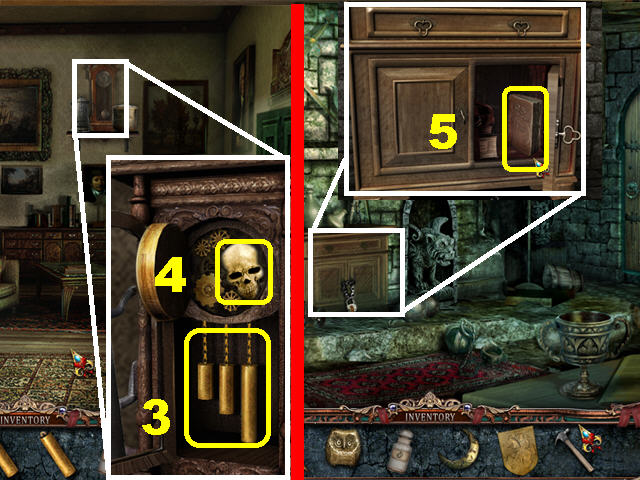
- Zoom into the clock; place the WEIGHT, MEDIUM WEIGHT, and LARGE WEIGHT on the chains (3).
- Take the SKULL (4).
- Click down 3 times; enter the Secret Room on the left.
- Zoom into the cabinet; pour the ACID on the lock and take the BOOK OF DEATH (5) to add it to your Journal.
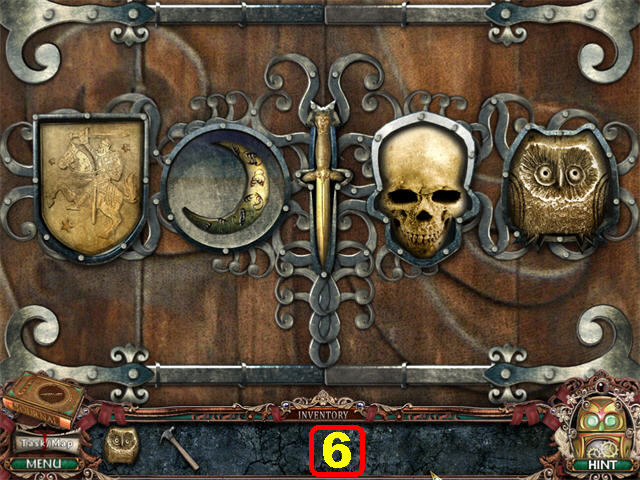
- Zoom into the right door.
- Place the SHIELD, MOON, DAGGER, SKULL, and OWL into their matching slots (6).
- You are taken to the stairway entrance.
Chapter 6: The Labyrinth
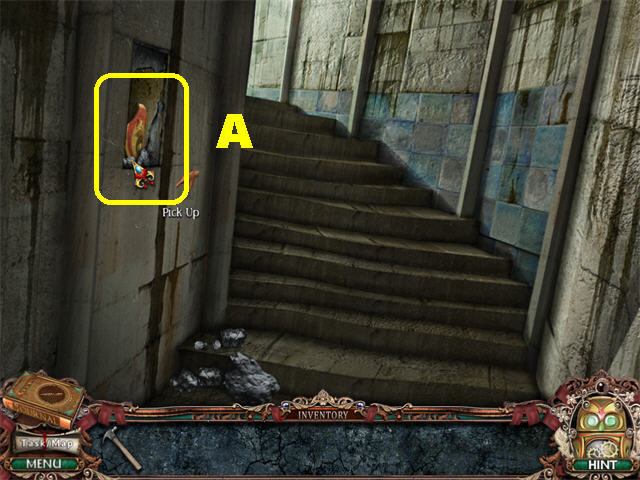
- Break the stone on the left with the HAMMER and take the WING (A).
- Go up the steps twice to reach the Labyrinth.
- Talk to Dr. Gringe.
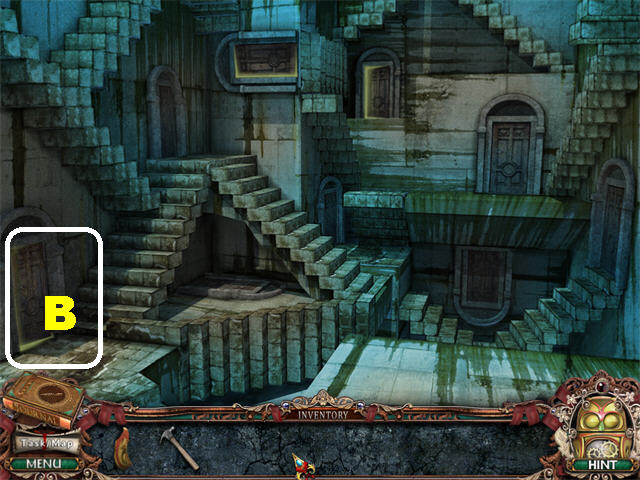
- You will now have to navigate yourself through the Labyrinth. The doors you choose are random.
- If you go through the wrong door, you will be taken back to the last correct door you chose.
- The next set of screenshots shows you the doors you were asked to go through on two different occasions, but that is not a guarantee that you will get either of those doors.
- Go through the lower left door (B).
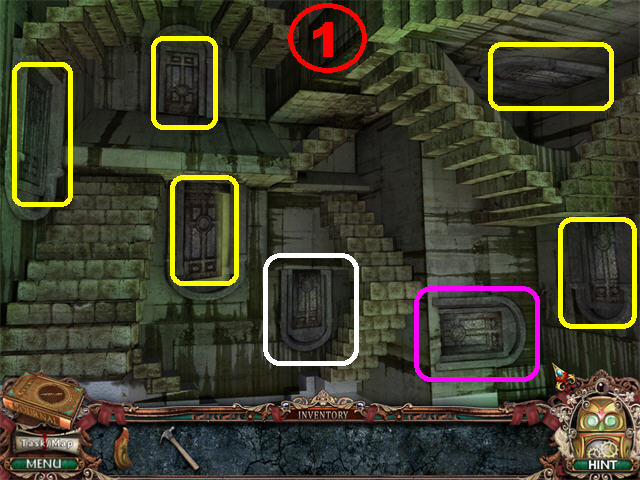
- The doors marked in white and purple are the doors that were entered on two different occasions.
- The doors marked in yellow represent all the doors you can choose (1).
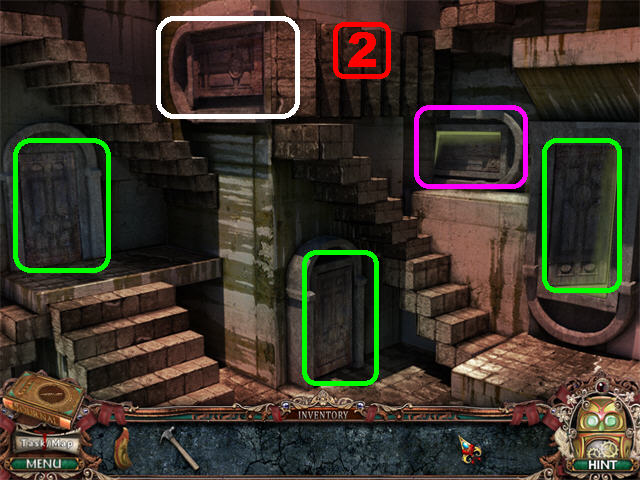
- The doors marked in white and purple are the doors that were entered on two different occasions.
- The doors marked in green represent all the doors you can choose (2).
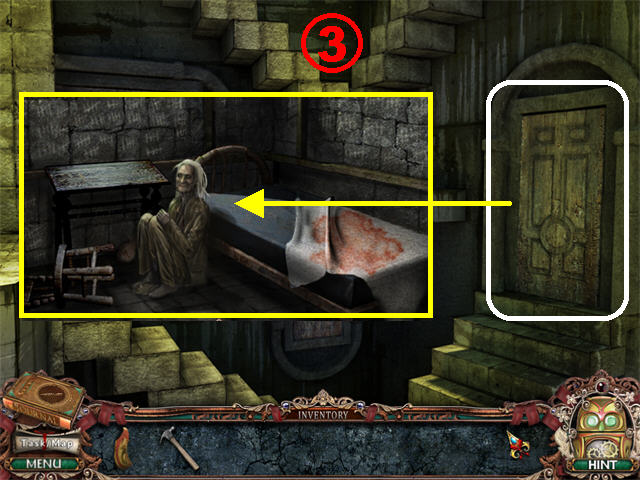
- Go through the right door, or whichever door you choose first, to talk to the Female Patient (3).
- Exit the room.
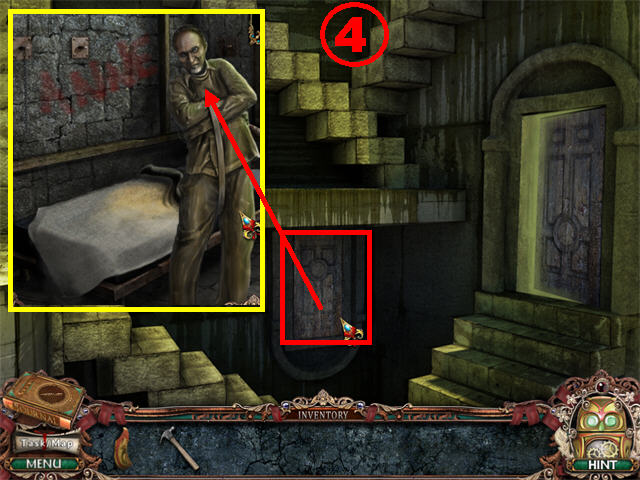
- Go through the Middle Door, or whichever door you choose second, and talk to the Male Patient (4).
- Exit the Room.
- Take the left door, or the last door left for you to choose, to access the Hallway (5).
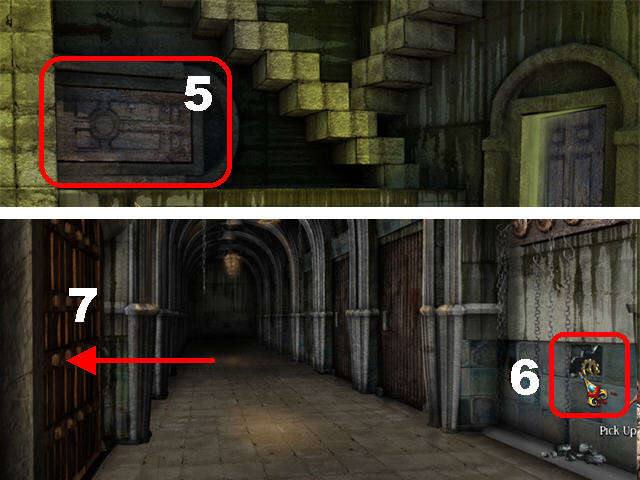
- Break the lower right part of the wall with the HAMMER; grab the GEAR (6).
- Go into the left door to access the Director’s Office (7).
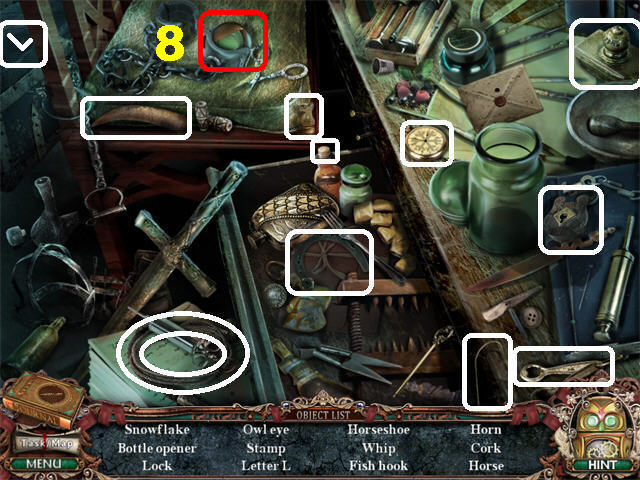
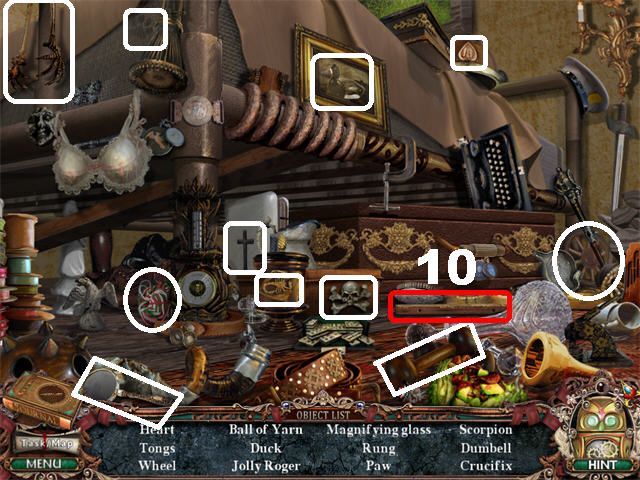
- Play the Hidden Object Scene on the coffin.
- The OWL EYE (8) will be added to inventory.
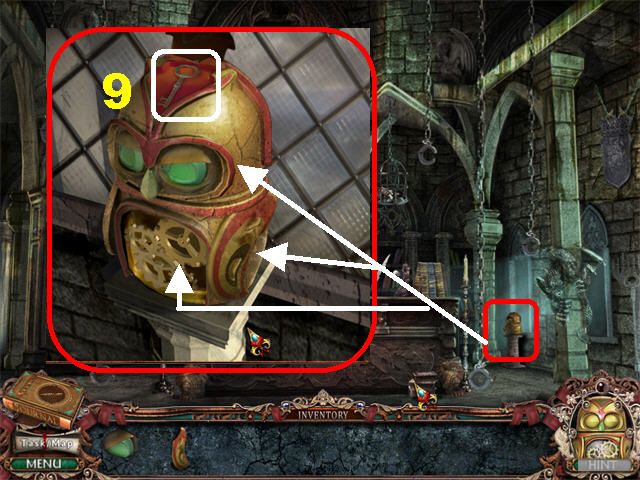
- Zoom into the owl in the lower right.
- Place the WING, GEAR, and the OWL EYE on the Owl; grab the KEY (9).
- Click down.
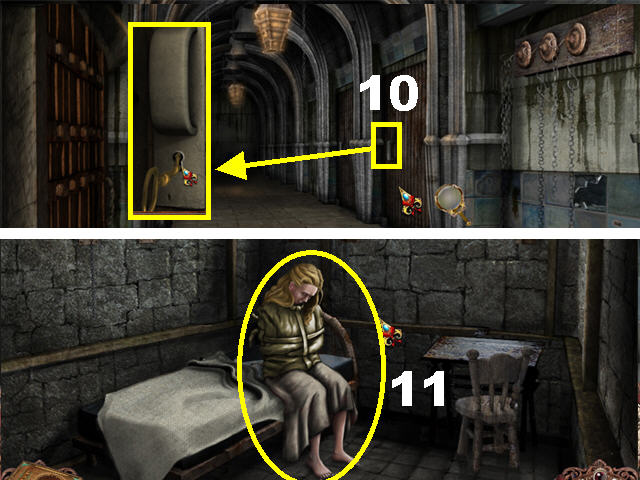
- Zoom into the right door; open the lock with the KEY, turn the key and go inside the Cell (10).
- Click on Laura Fairlie (11).
- The Secrets Lock has been unlocked in the main menu.
- Congratulations! You have completed Victorian Mysteries: The Woman in White!
Created at: 2010-09-17