

Walkthrough Menu
- General Tips
- Chapter 1: The Forest
- Chapter 2: The Old House
- Chapter 3: The Frozen Steppes
- Chapter 4: The Cemetery
- Chapter 5: Sealing Chaos
General Tips
- This is the Official Guide for Mystery Age: Liberation of Souls.
- This guide will not mention each time you have to zoom into a location; the screenshots will show each zoom scene.
- We will use the acronym HOP for Hidden-object puzzles. Interactive items will be color-coded and some will be numbered; please follow the numbers in sequence.
- The HOP lists may be random; our lists may vary from yours.
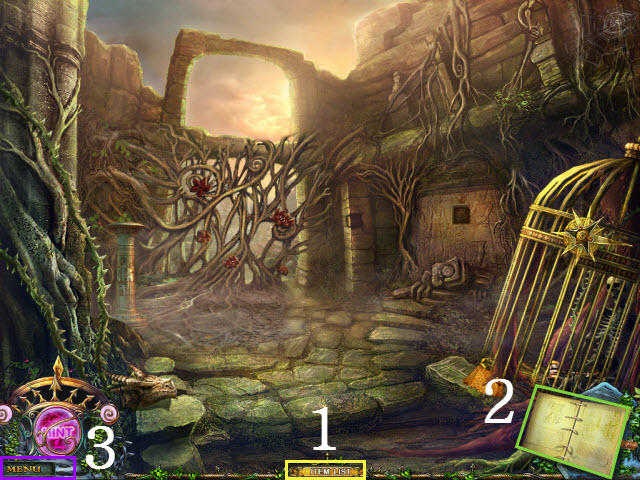
- The Inventory items are stored here (1).
- The Journal (2) will show your current objectives and also enable you to access the Tasks and Map tabs.
- Access the Main Menu here to adjust the Sound and Screen Settings and to Exit the game (3).
Chapter 1: The Forest
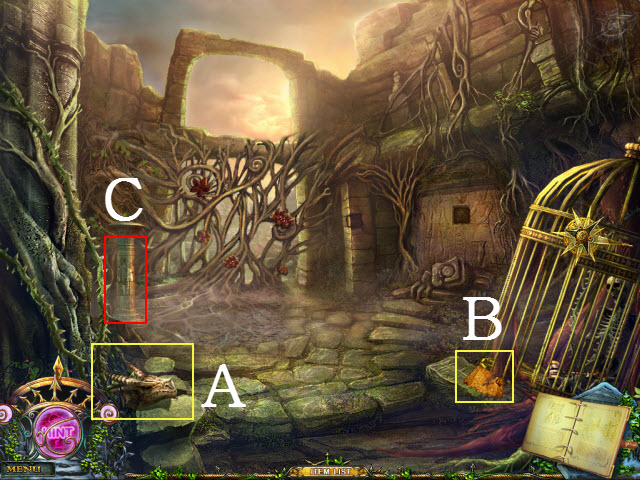
- Take the DRAGON HEAD (A).
- Take the parchment (B).
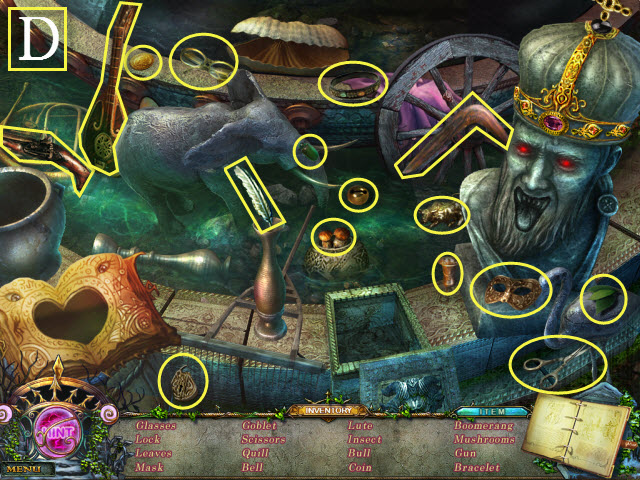
- Examine the pillar to activate a mini-game (C).
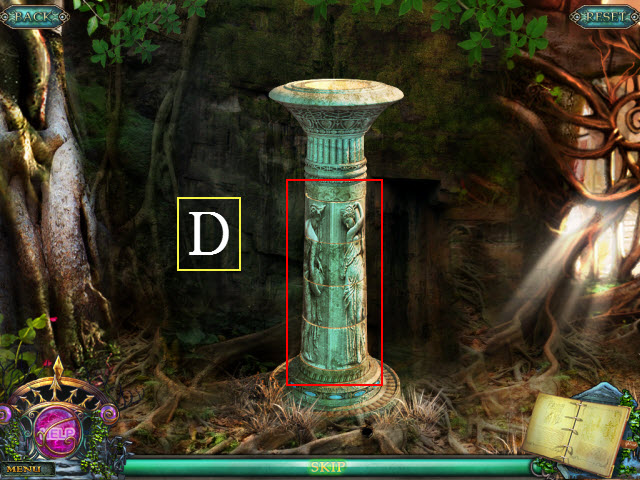
- To complete the mini-game, align the stones to form a completed image.
- Please see the screenshot for the solution (D).
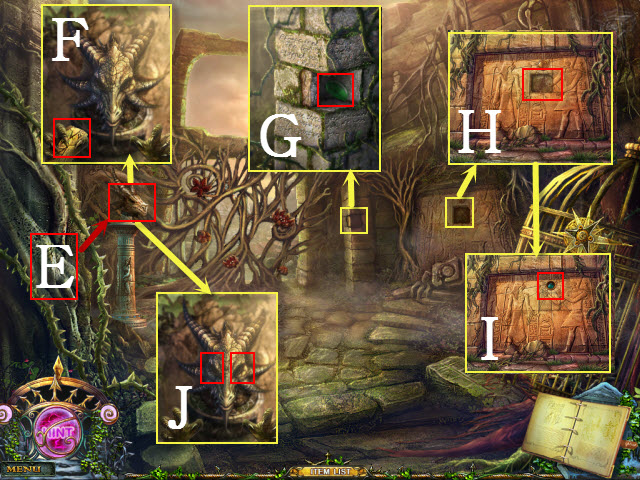
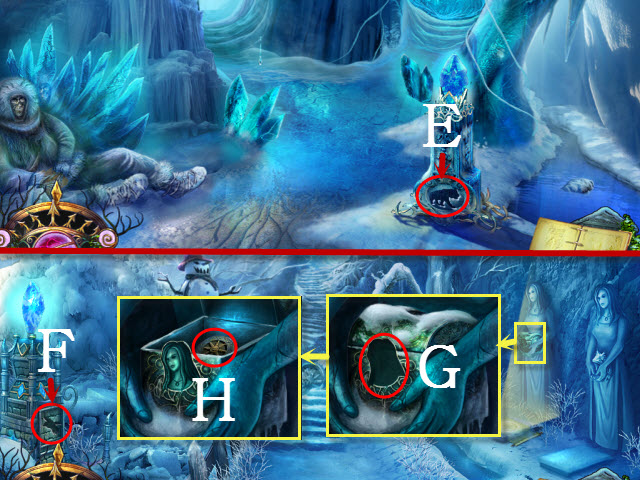
- Place the DRAGON HEAD on the pedestal (E).
- Examine the dragon head; take the MURAL PIECE (F).
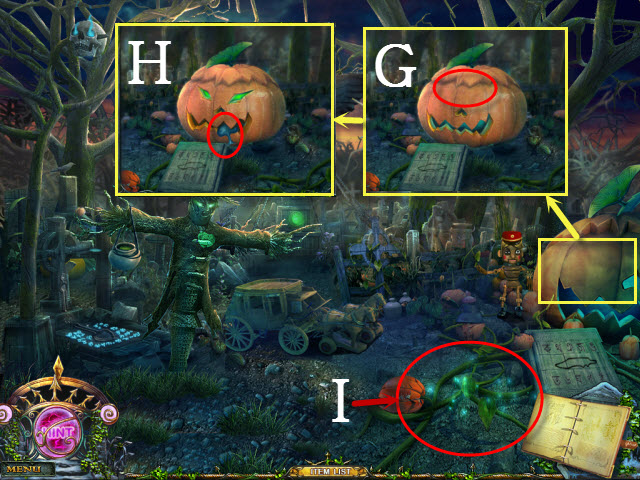
- Examine the pillar; move the stone three times and take the LEFT EYE (G).
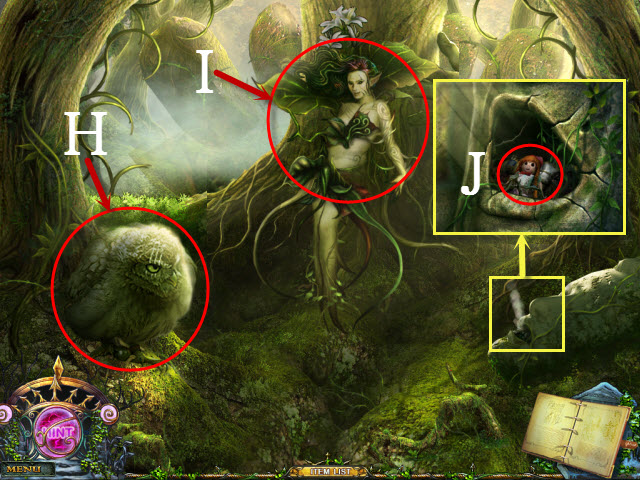
- Examine the mural; place the MURAL PIECE in the space (H).
- Take the RIGHT EYE (I).
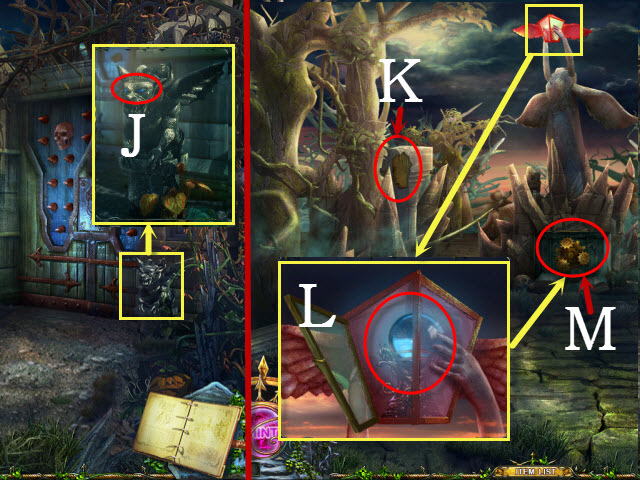
- Examine the dragon head; place the LEFT EYE and the RIGHT EYE in the sockets (J).
- Walk forward.
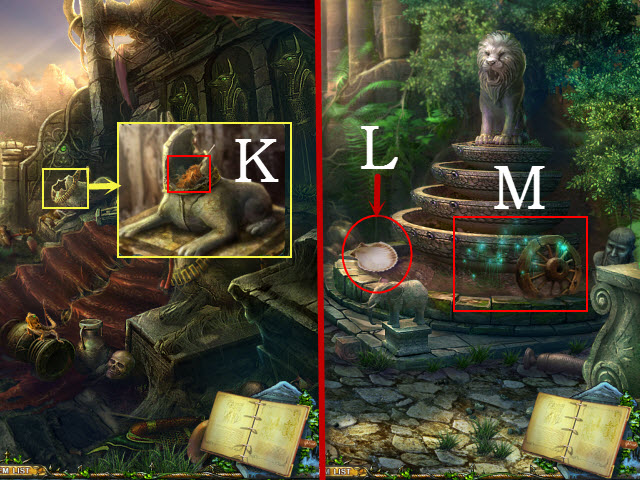
- Examine the statue; take the DUSTER (K).
- Walk forward.
- Take the BIG SHELL (L).
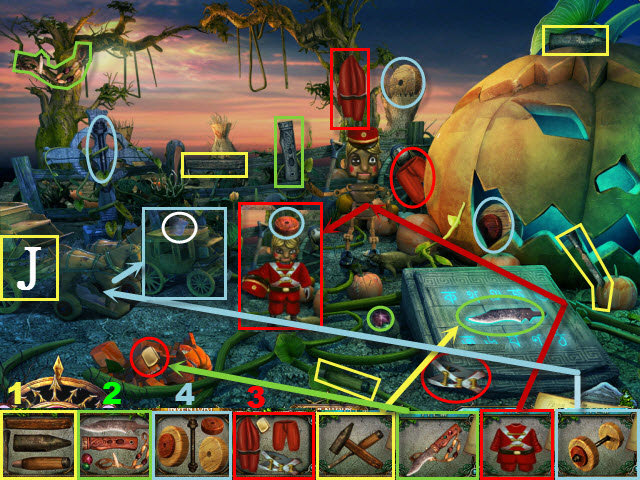
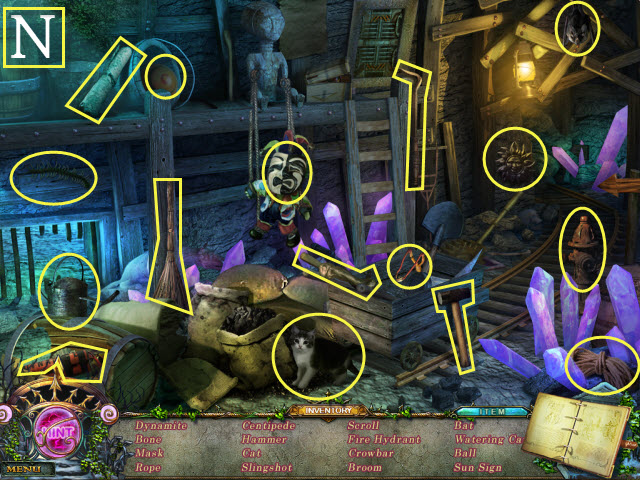
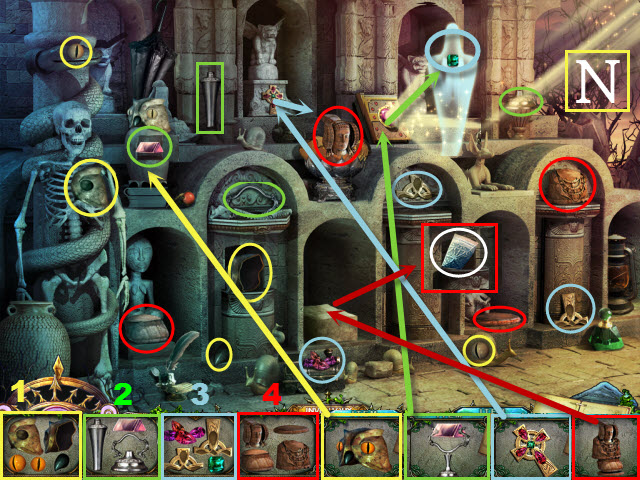
- Examine the wheel to activate a HOP (M).
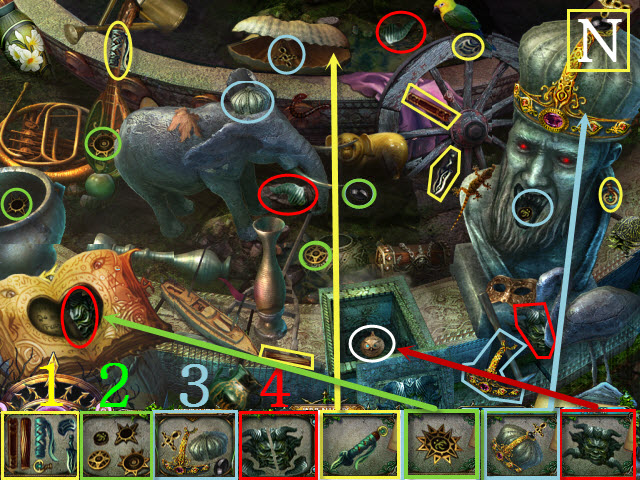
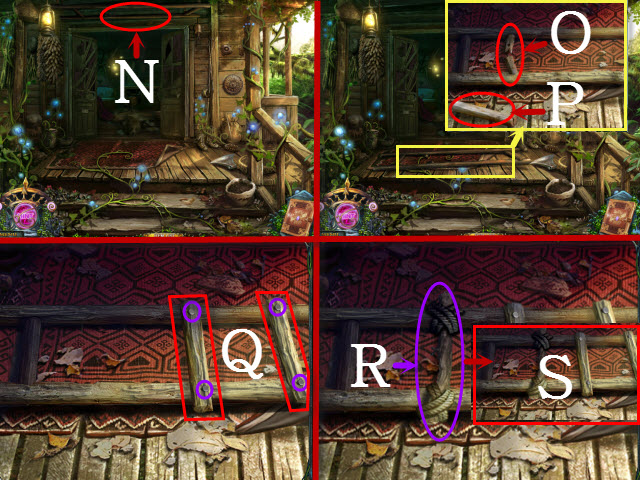
- Play the HOP (N).
- You receive the NECKLACE.
- Walk forward.
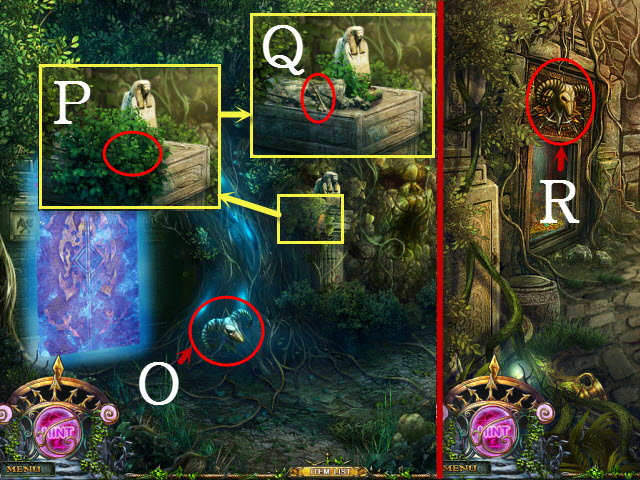
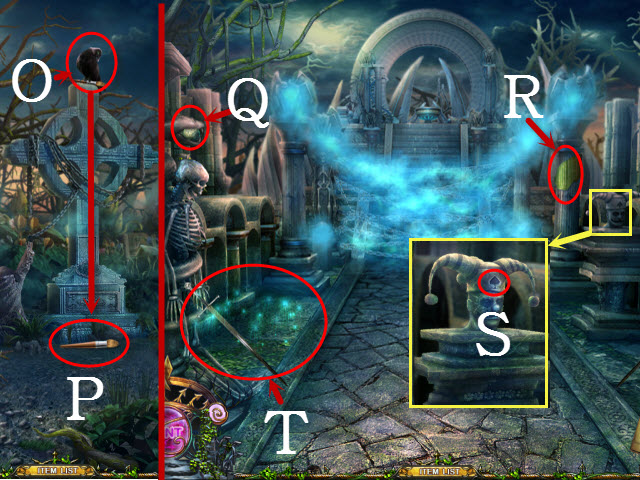
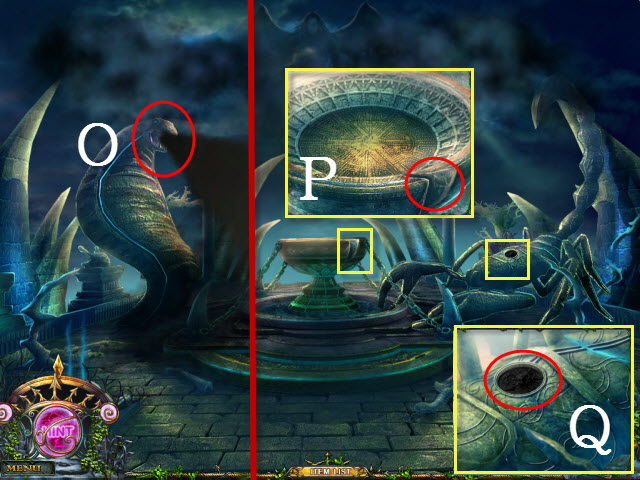
- Take the SHEEP SKULL (O).
- Examine the leaves and move them twice (P); take the KEY (Q).
- Walk down twice.
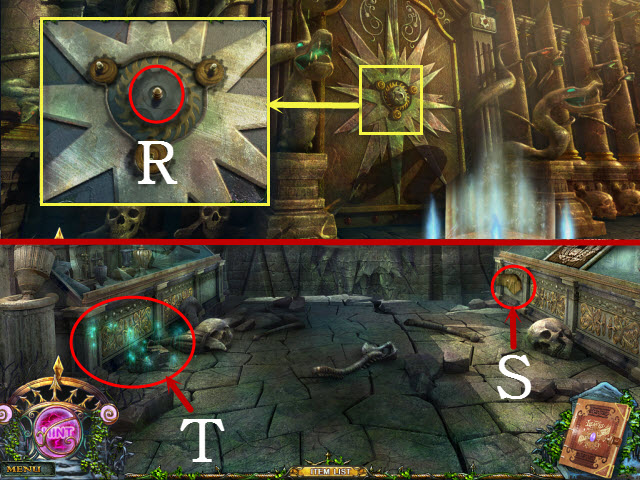
- Place the SHEEP SKULL in the engraving (R).
- Walk left to the Treasury.
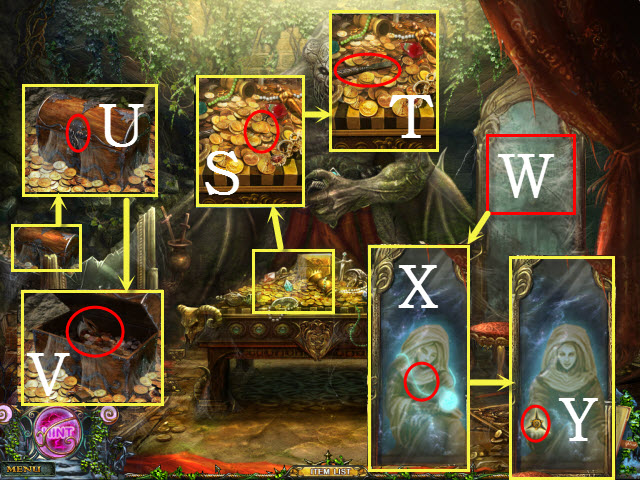
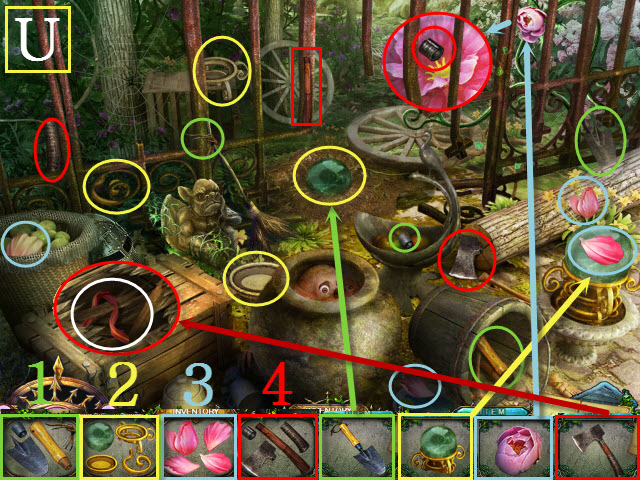
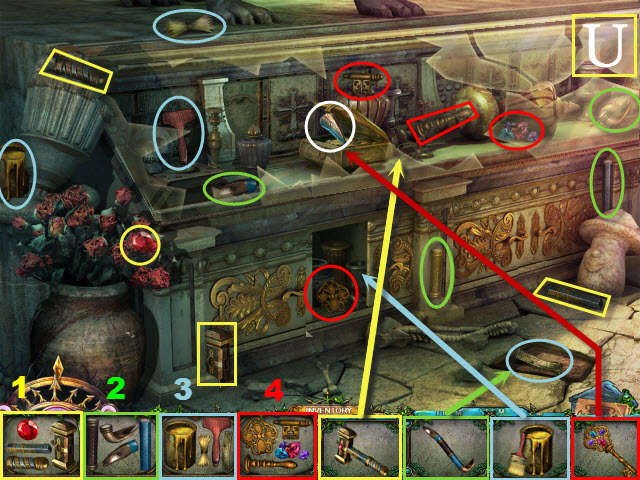
- Examine the treasure and move the three sets of coins (S); take the CHISEL (T).
- Examine the chest; place the key in the lock and open it (U).
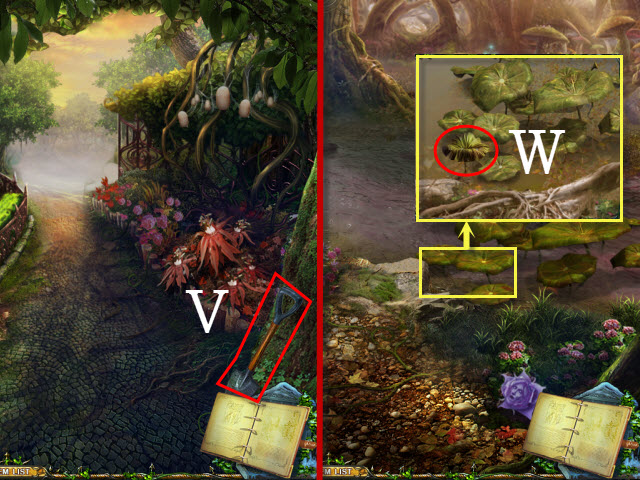
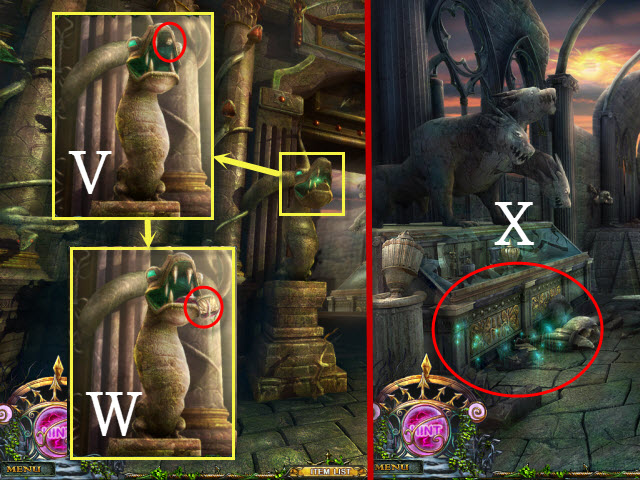
- Take the SICKLE EMBLEM (V).
- Use the DUSTER on the mirror (W).
- Give the NECKLACE to the lady (X).
- Take the CAGE KEY (Y).
- Walk down twice.
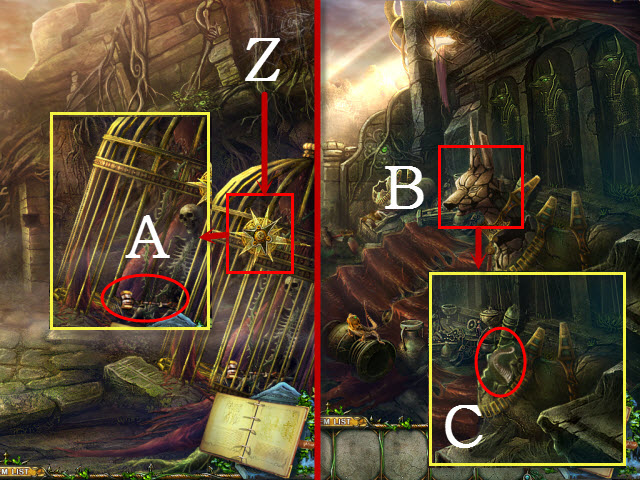
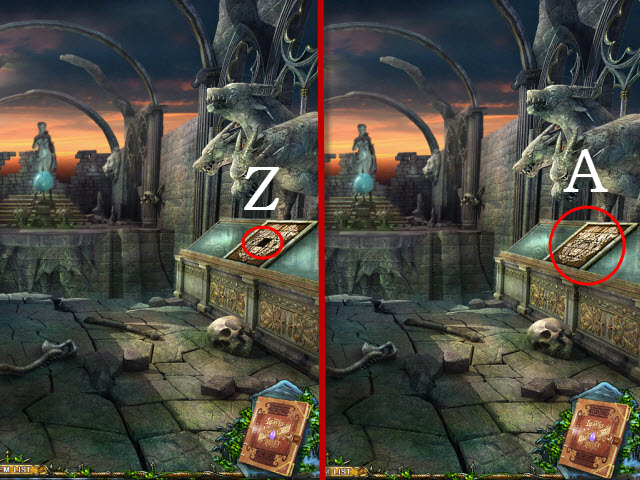
- Place the CAGE KEY in the slot; open the cage (Z).
- Take the HAMMER (A).
- Walk forward once.
- Use the HAMMER on the statue head three times (B).
- Take the HORN (C).
- Walk left.
- Examine the statue; place the HORN in the slot (D).
- Use the CHISEL to get the ENERGY CRYSTAL (E).
- Walk down.
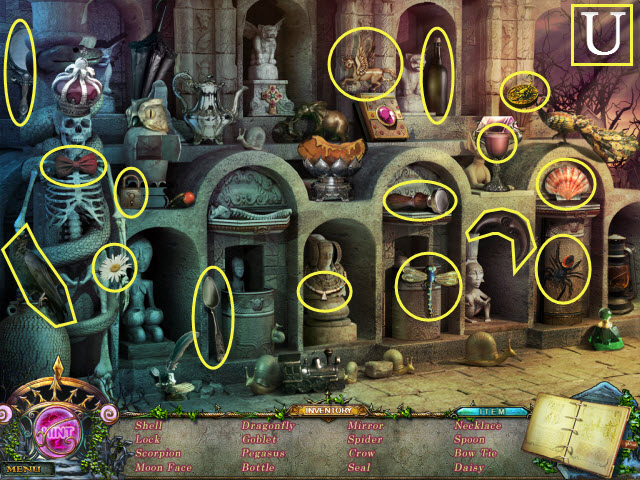
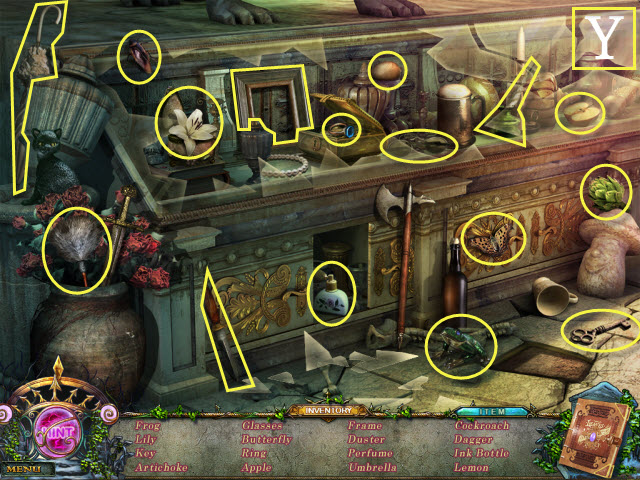
- Examine the antiques to activate a HOP (F).
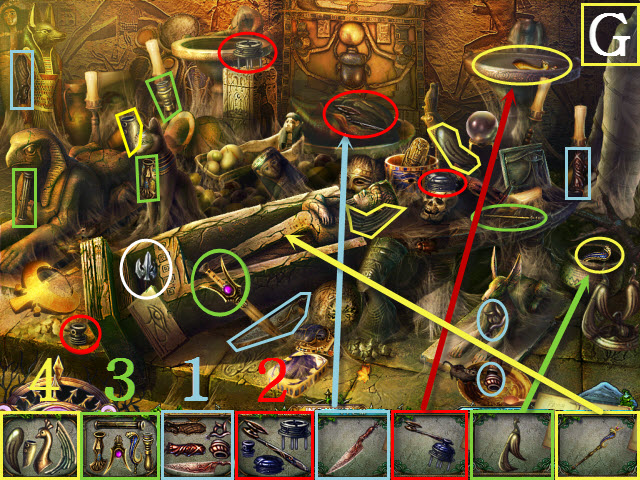
- Play the HOP (G).
- You receive the TRIDENT EMBLEM.
- Walk forward twice to the Guardian Door.
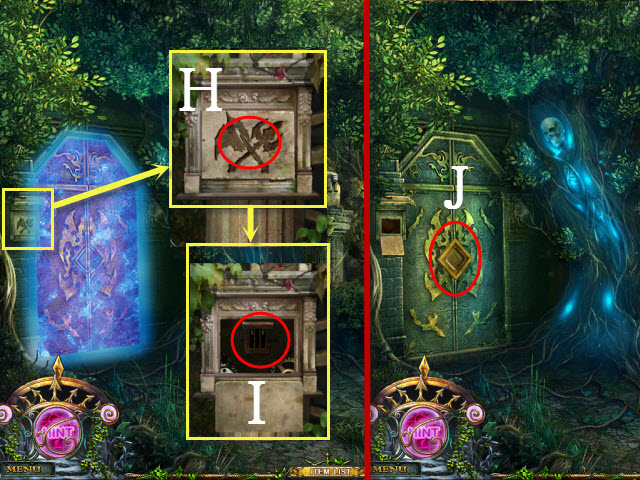
- Examine the lock; place the SICKLE EMBLEM and the TRIDENT EMBLEM in the niche (H).
- Open the compartment; pull the lever (I).
- Place the ENERGY CRYSTAL in the slot (J).
- Enter the doorway to the Guardian Chamber.
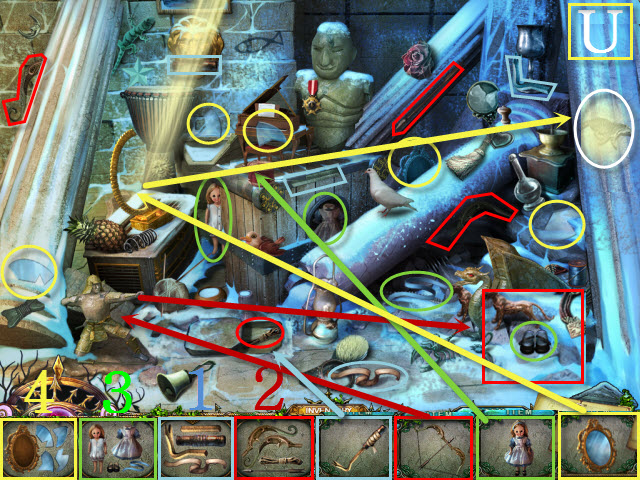
- Walk down three times; examine the antiques to activate a HOP.
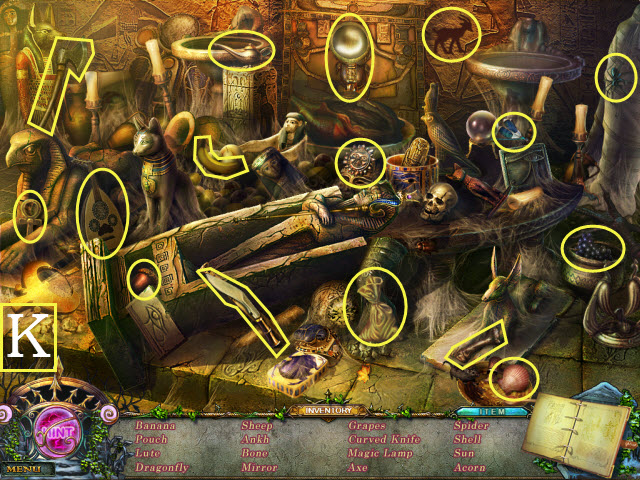
- Play the HOP (K).
- You receive the SHARP KNIFE.
- Walk forward twice.
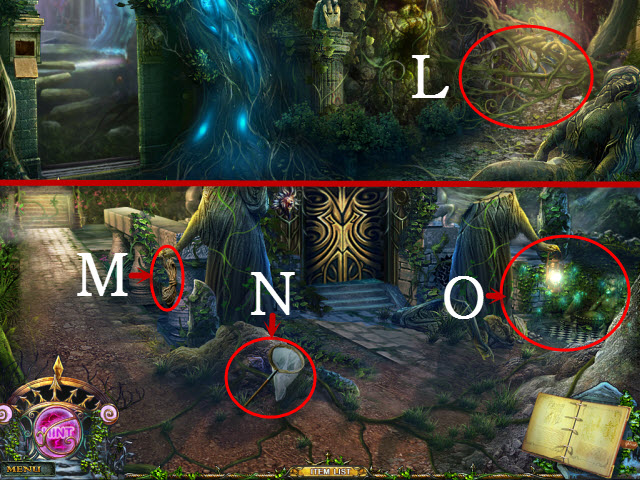
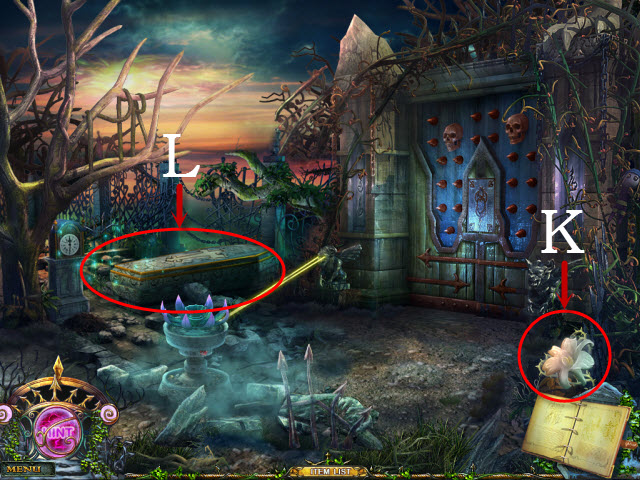
- Use the SHARP KNIFE on the vines twice (L).
- Walk forward.
- Pick up the ROPE (M).
- Take the BUTTERFLY NET (N).
- Examine the grass to activate a HOP (O).
- Play the HOP (P).
- You receive the DAGGER.
- Walk forward.
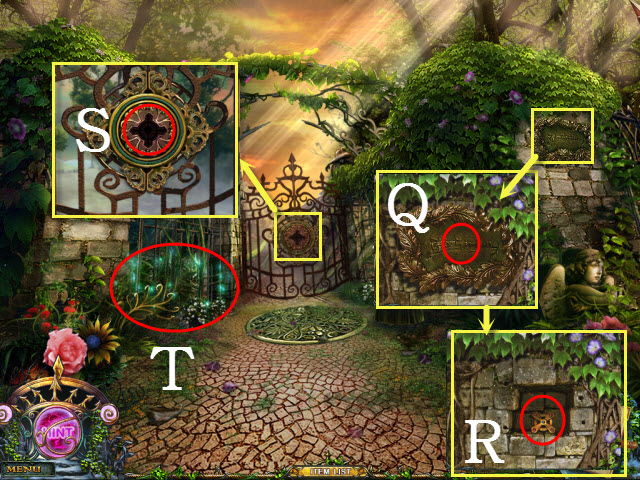
- Examine the tablet and use the CHISEL on it (Q); take the GARDEN KEY (R).
- Examine the gate; place the GARDEN KEY in the slot (S).
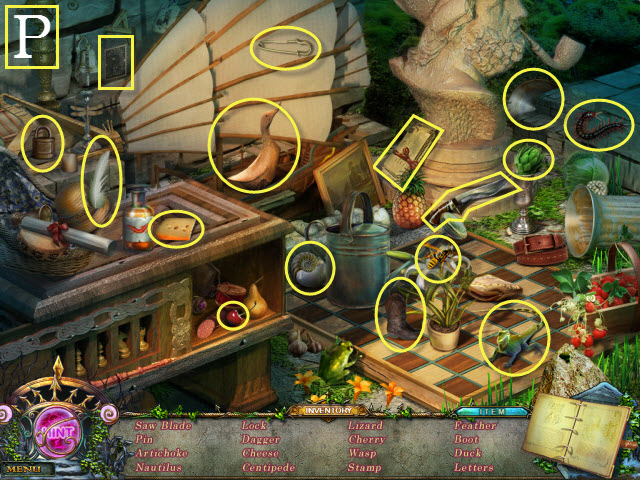
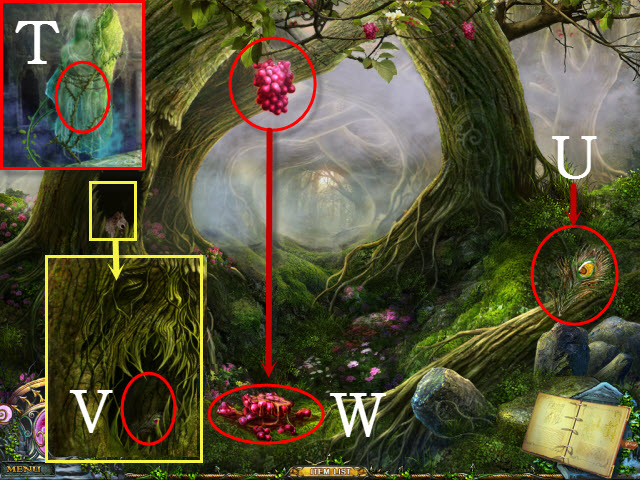
- Examine the fence to activate a HOP (T).
- Play the HOP (U).
- You receive the LACE.
- Walk forward to the Garden.
- Take the SHOVEL (V).
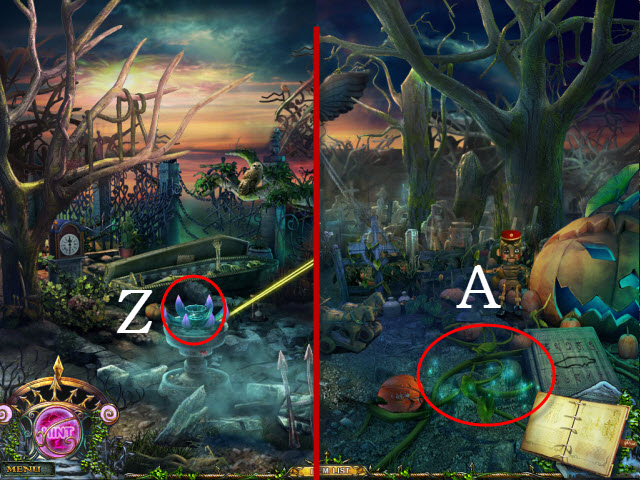
- Walk forward to the River.
- Examine the lily pads; take the POLLUTED LEAF (W).
- Walk left to the Front Yard; examine under the porch to activate a HOP.

- Play the HOP (X).
- You receive the TWEEZERS.
- Walk forward to the Porch.
Chapter 2: The Old House
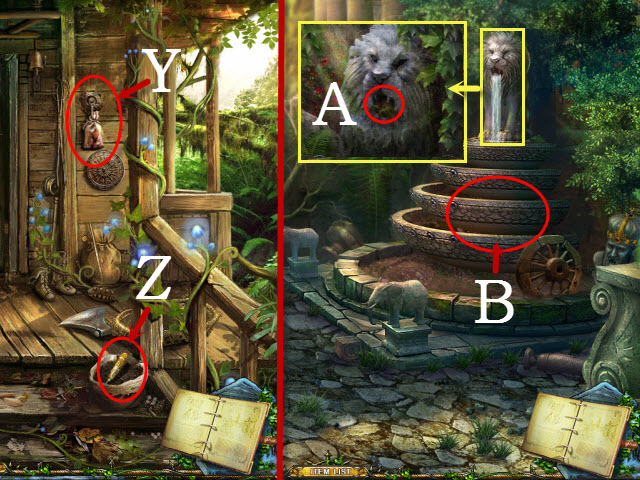
- Take the HERB SEEDS (Y).
- Open the bag; take the AWL (Z).
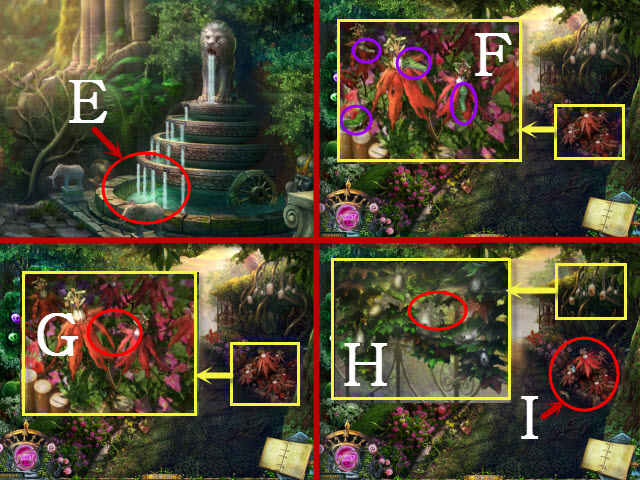
- Return to the Garden; walk down three times to the Fountain.
- Examine the statue; use the AWL on the lion's mouth (A).
- Examine the fountain to activate a puzzle (B).
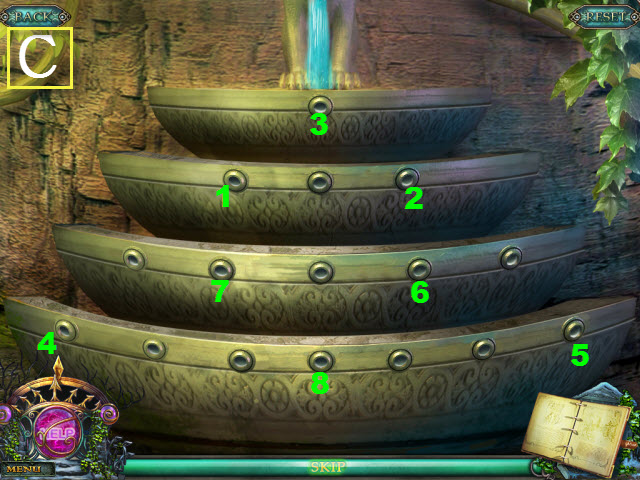
- To solve the puzzle, select the nozzles so that water flows out of all of them simultaneously. Selecting one nozzle will trigger others.
- Please see the screenshot for the solution (C).
- Examine the wheel to activate a HOP.
- Play the HOP (D).
- You receive the BOOMERANG.
- Use the BIG SHELL on the fountain to get the WATER (E).
- Return to the Garden.
- Examine the wilted flowers; use the TWEEZERS on the four caterpillars (F).
- Use the WATER on the flowers (G).
- Examine the cocoons; take the COCOONS (H).
- Use the BUTTERFLY NET on the butterflies to receive the MAGIC BUTTERFLIES (I).
- Return to the Front Yard.
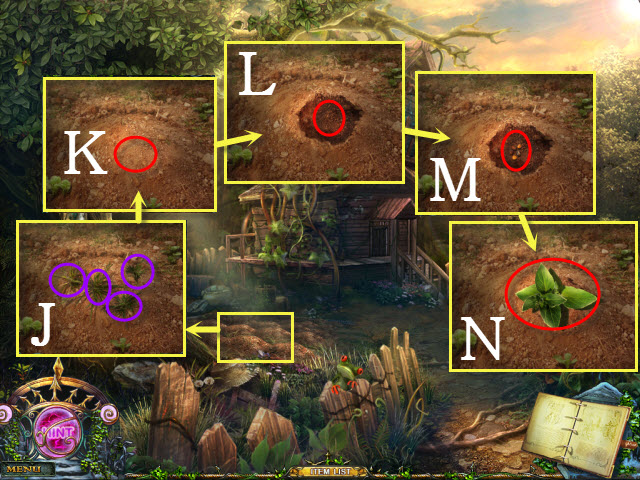
- Examine the soil; select the four weeds (J).
- Use the SHOVEL on the soil twice (K).
- Place the HERB SEEDS in the hole (L).
- Select the soil; use the WATER on it (M).
- Take the HEALING HERB (N).
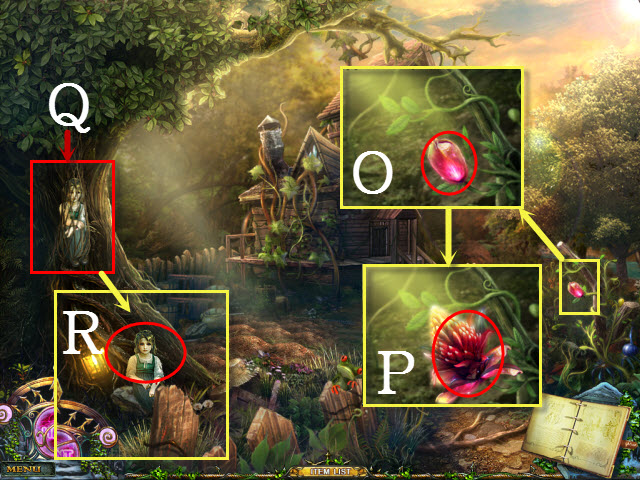
- Examine the fruit; use the MAGIC BUTTERFLIES on it (O).
- Take the PHOENIX FLOWER (P).
- Use the DAGGER on the net (Q).
- Give the HEALING HERBS to Abby (R).
- You receive the ABBY.
- Walk down three times.
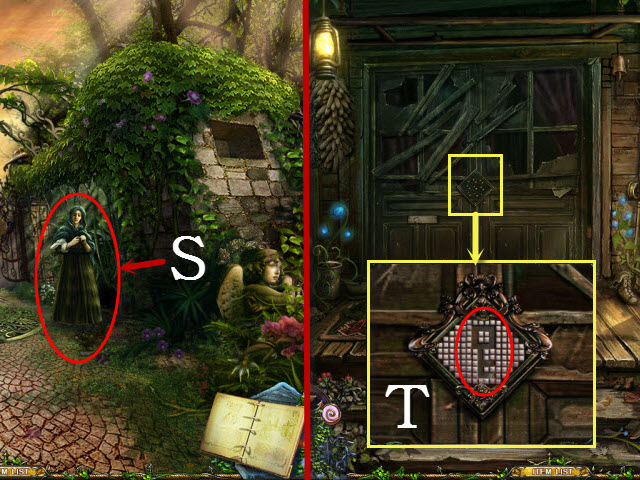
- Give Abby to the woman (S).
- You receive the KEY SHAPE.
- Return to the Porch.
- Examine the lock; place the KEY SHAPE on it to activate a mini-game (T).
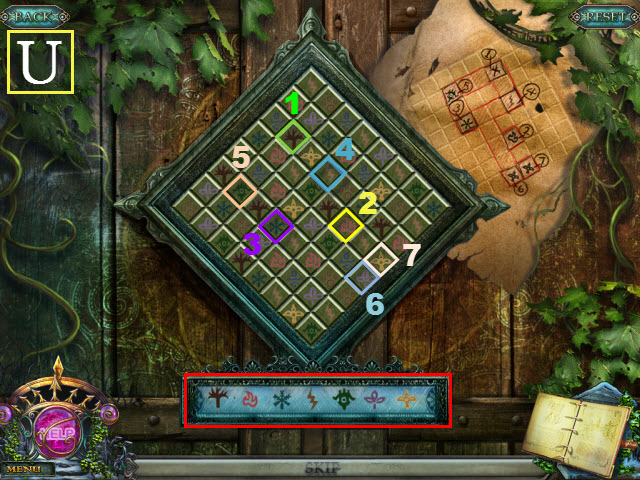
- To solve the mini-game, select the corresponding symbols on the note in the order shown.
- Please see the screenshot for the solution (U).
- Enter the door; examine the blanket to activate a HOP.
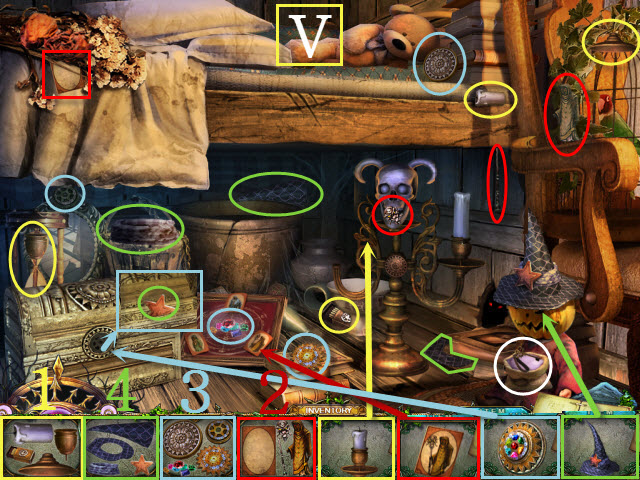
- Play the HOP (V).
- You receive the DRAWER KEY.
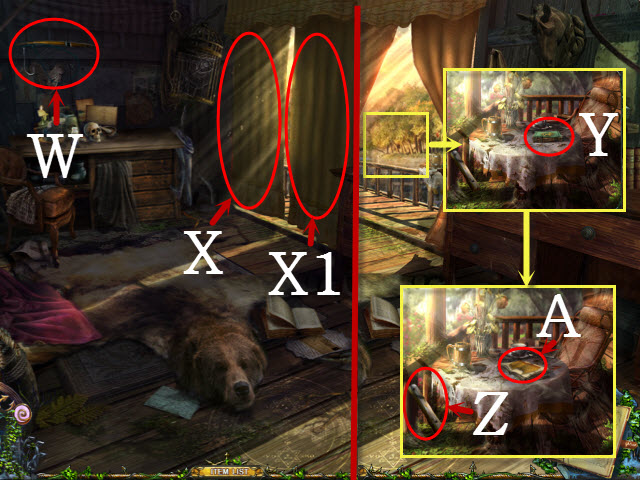
- Take the FISHING ROD (W).
- Open the curtain (X).
- Place the LACE with the curtain (X1).
- Examine the balcony; open the book (Y).
- Take the 1st WOOD (Z).
- Take the 1st PARCHMENT PIECE (A).
- Examine the drawers; take the UMBRELLA (B).
- Open the drawer; take the SCREWDRIVER (C).
- Place the DRAWER KEY in the lock; open the drawer (D).
- Take the HAMMER AND NAILS (E).
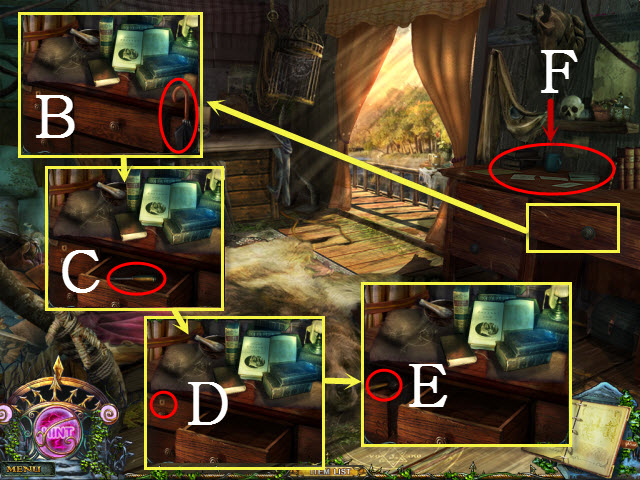
- Examine the desk to activate a mini-game (F).
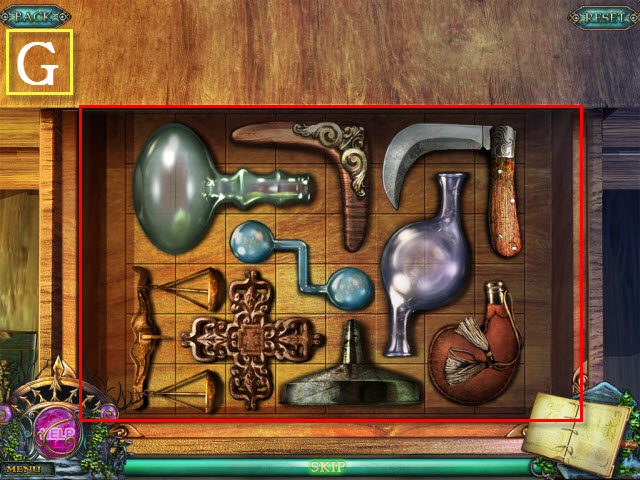
- To solve the mini-game, place all of the objects into the drawer.
- Please see the screenshot for the solution (G).
- Walk down twice; examine under the porch to activate a HOP.
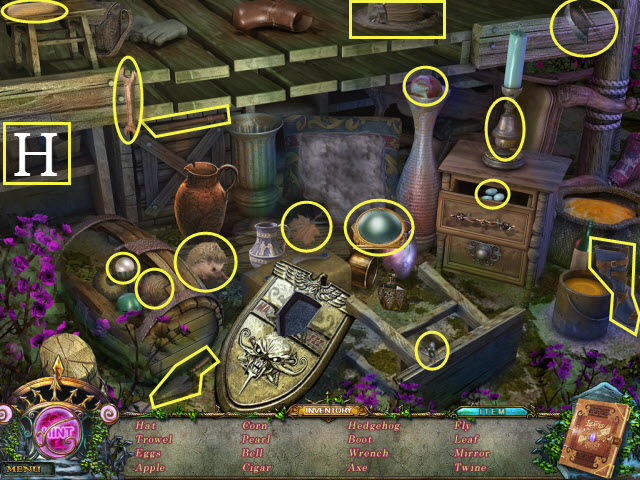
- Play the HOP (H).
- You receive the AXE.
- Walk down.
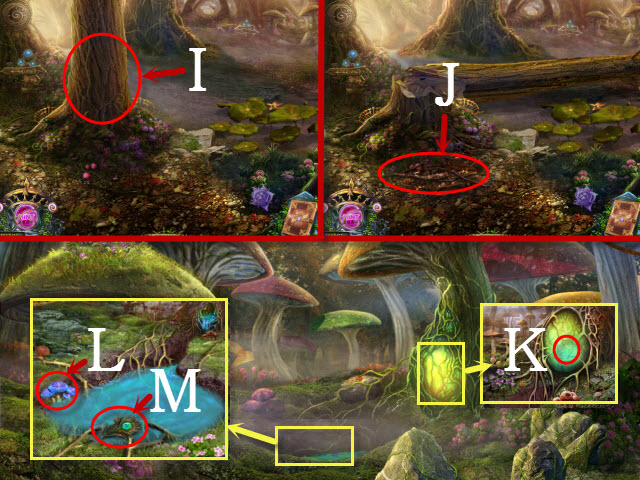
- Use the AXE on the tree twice (I).
- Take the BRANCH (J).
- Walk right to the Mushroom Patch.
- Examine the mushroom; use the DAGGER on it (K).
- Examine the pool; take the BLUE MUSHROOMS (L).
- Take the 1st PEACOCK FEATHER (M).
- Return to the Porch.
- Use the UMBRELLA on the ladder (N).
- Examine the ladder; move the splintered wood (O).
- Take the 2nd WOOD (P).
- Place the 1st WOOD and the 2nd WOOD on the ladder; use the HAMMER AND NAILS on each piece of wood twice (Q).
- Place the BRANCH and the ROPE with the branch (R); take the LADDER. (S).
- Return to the Guardian Chamber.
- Give the PHOENIX FLOWER to the Forest Guardian (T).
- You receive the MAGIC GEM.
- Return to the River; walk forward.
- Take the 2nd PEACOCK FEATHER (U).
- Select the squirrel and examine the tree; take the 3rd PEACOCK FEATHER (V).
- Use the BOOMERANG on the fruit; take the RED FRUIT (W).
- Walk down twice.
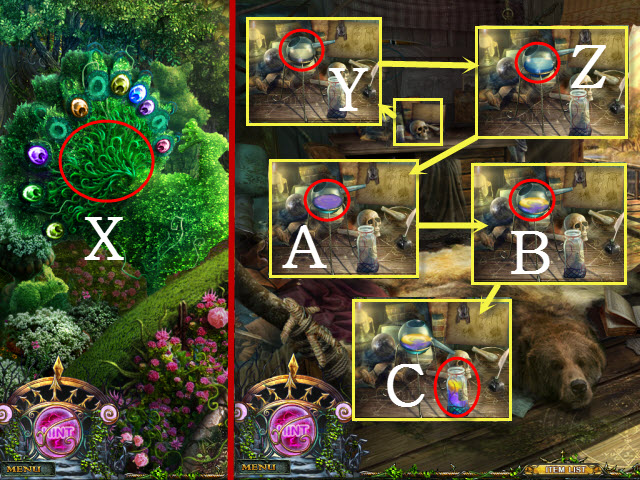
- Place the 1st PEACOCK FEATHER, the 2nd PEACOCK FEATHER, and the 3rd PEACOCK FEATHER on the peacock to receive the PEACOCK SOUL (X).
- Return to the Old House.
- Examine the flask; place the BLUE MUSHROOM in it (Y).
- Place the POLLUTED LEAF in the flask (Z).
- Place the RED FRUIT in the flask (A).
- Select the flask (B).
- Take the POTION (C).
- Return to the Mushroom Patch.
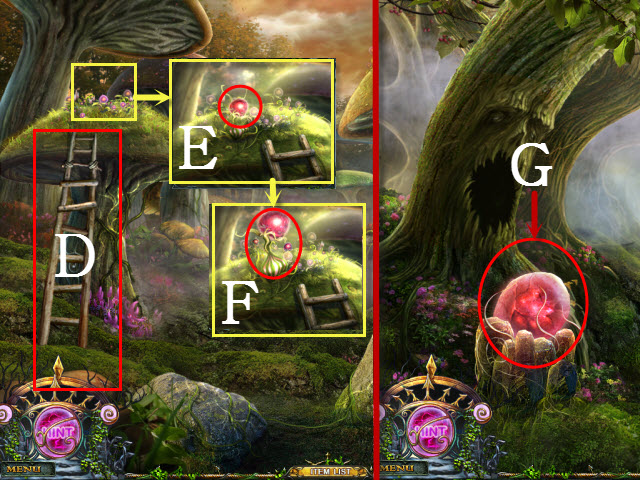
- Place the LADDER with the mushroom (D).
- Examine the mushroom; use the POTION on the plant (E).
- Take the MAGIC FRUIT (F).
- Walk down; walk forward.
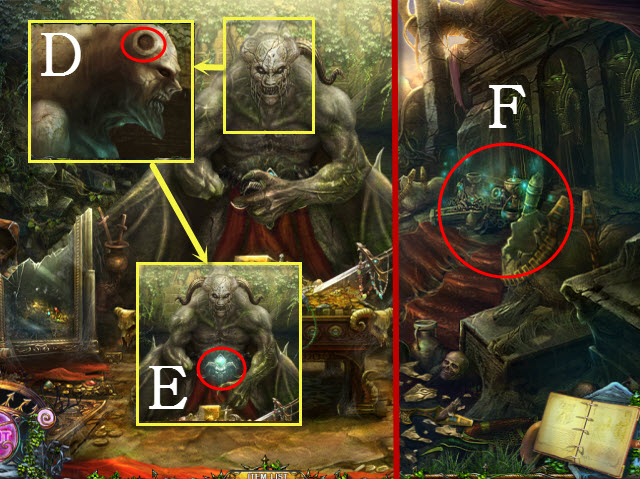
- Place the PEACOCK SOUL on the egg (G).
- Walk forward.
- Give the MAGIC FRUIT to the evil owl (H).
- Use the MAGIC GEM on the Forest Guardian (I).
- You receive the FOREST GUARDIAN'S SOUL.
- Examine the statue; take the DOLL (J).
- Walk down twice.
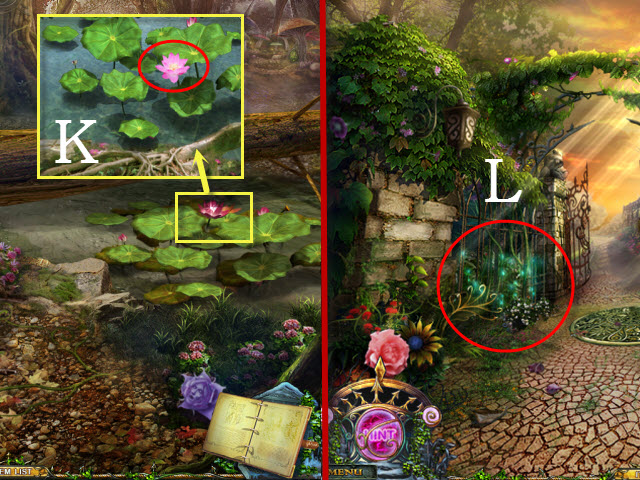
- Examine the lily pads; take the LOTUS (K).
- Walk down twice; examine the fence to activate a HOP (L).
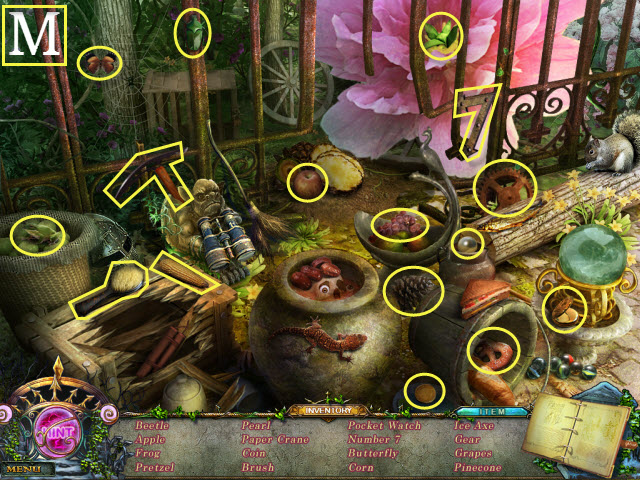
- Play the HOP (M).
- You receive the ICE AXE.
- Walk down.
Chapter 3: The Frozen Steppes
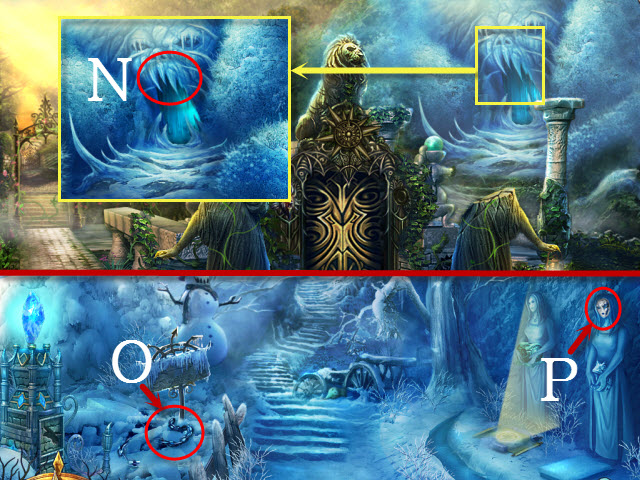
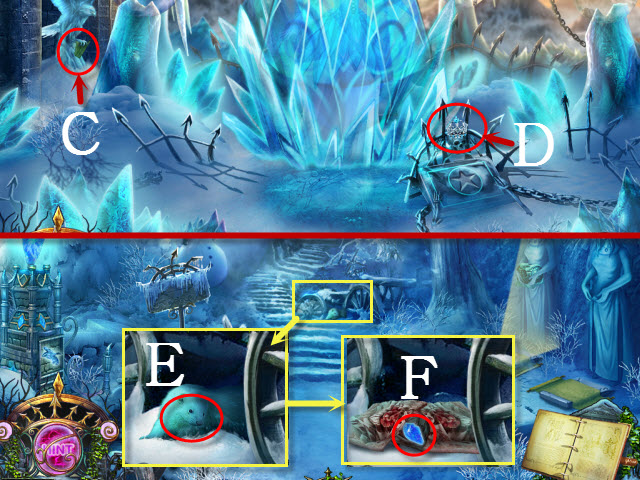
- Examine the ice cave; use the ICE AXE on the icicles (N).
- Walk right to the Frozen Steppes.
- Take the CHAIN (O).
- Take the MASK (P).
- Walk forward.
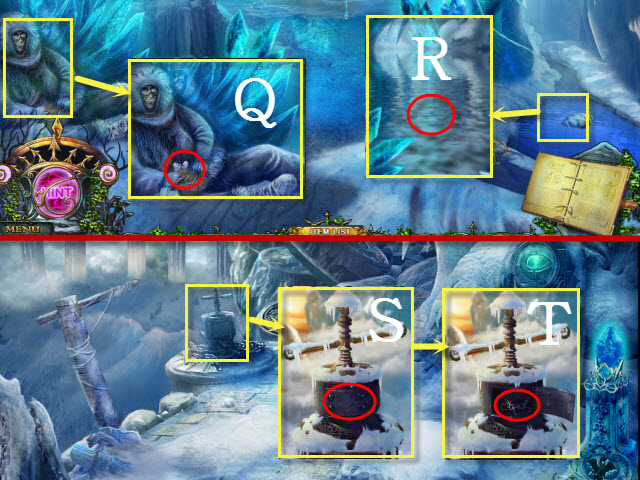
- Examine the skeleton; take the 1st SNOWFLAKE (Q).
- Examine the water; use the FISHING ROD on the water to receive the TORTOISE (R).
- Walk forward.
- Examine the contraption; use the SCREWDRIVER on the panel (S).
- Place the CHAIN in the compartment (T).
- Walk forward; examine the pillars to activate a HOP.
- Play the HOP (U).
- You receive the TIGER.
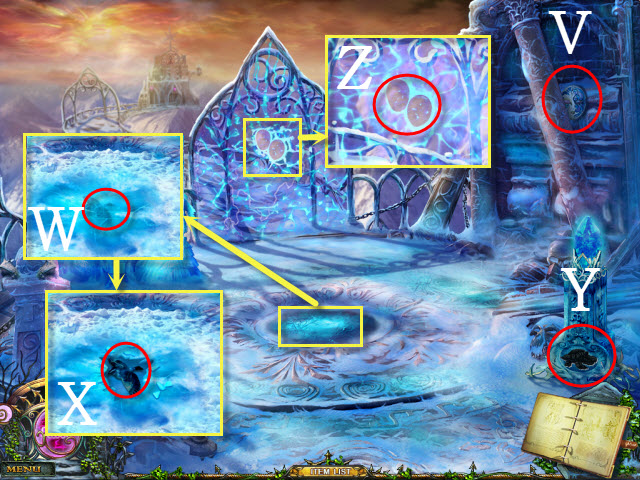
- Take the 2nd MASK (V).
- Examine the ice; use the ICE AXE on it (W).
- Take the SPARROW (X).
- Place the TORTOISE in the pillar (Y) to receive the 2nd SNOWFLAKE.
- Examine the gate; place the 1st MASK and the 2nd MASK in the slots (Z).
- Walk forward to the Icy Throne.
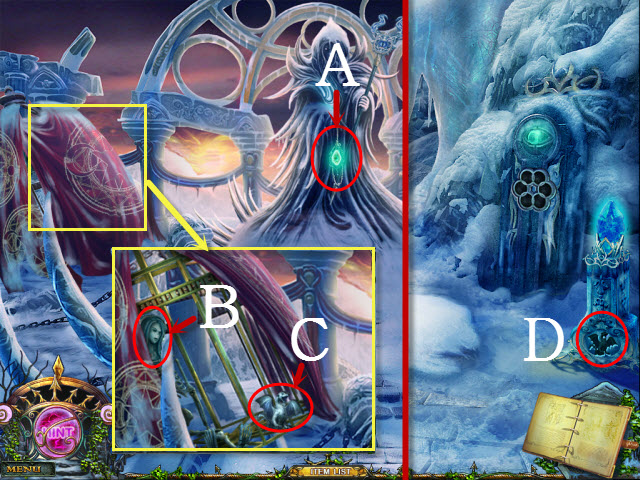
- Take the 1st ENERGY CRYSTAL (A).
- Move the blanket and examine the cage; take the KEY (B) and the DRAGON (C).
- Walk down twice.
- Place the DRAGON in the slot to receive the 3rd SNOWFLAKE (D).
- Walk down.
- Place the TIGER in the slot to receive the 4th SNOWFLAKE (E).
- Walk down.
- Place the SPARROW in the slot to receive the 5th SNOWFLAKE (F).
- Examine the statue; place the KEY in the slot (G).
- Take the MAGIC SIGN (H).
- Return to the Icy Throne.
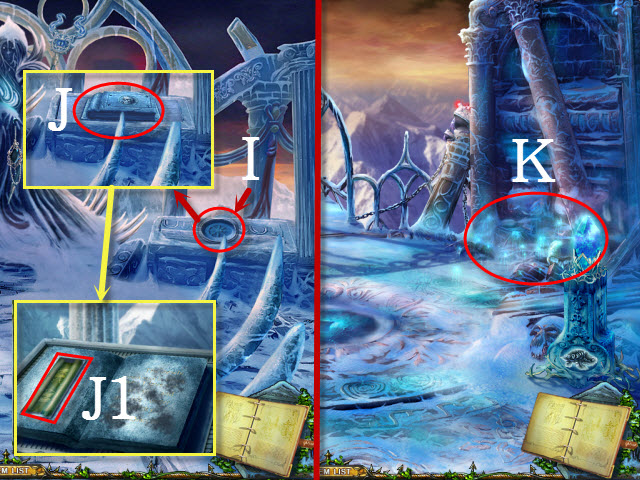
- Place the MAGIC SIGN on the chest (I).
- Examine the book and open it (J).
- Take the STATUE SCROLL (J1).
- Walk down.
- Examine the pillars to activate a HOP (K).
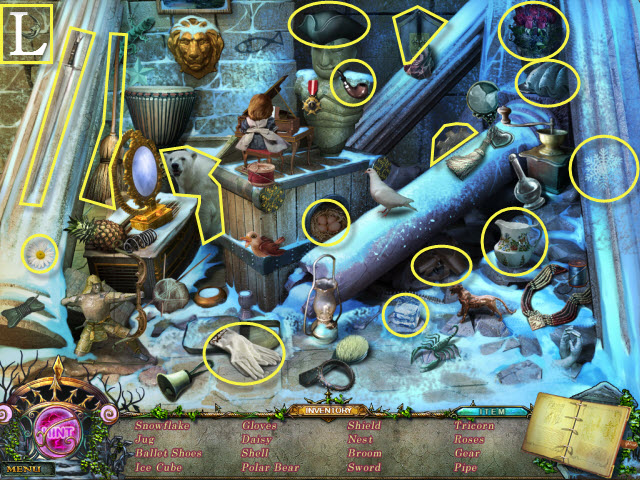
- Play the HOP (L).
- You receive the GEAR.
- Return to the Frozen Steppes.
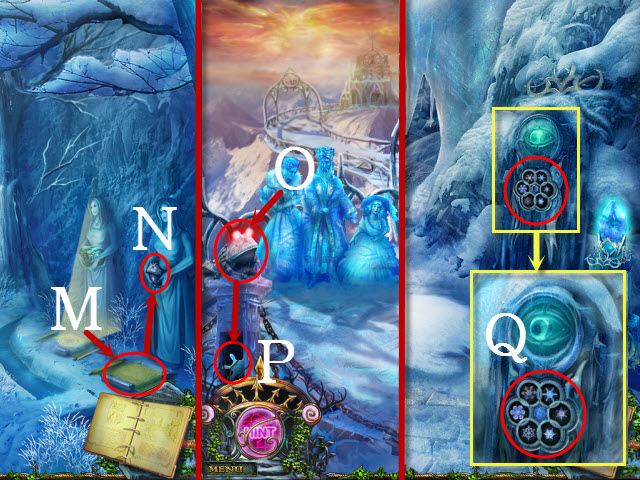
- Move the snow; place the STATUE SCROLL on the slab (M).
- Take the ICE TOAD (N).
- Walk forward three times.
- Place the ICE TOAD on the pedestal (O); take the 6th SNOWFLAKE (P).
- Walk down.
- Examine the machine; place the 1st SNOWFLAKE, the 2nd SNOWFLAKE, the 3rd SNOWFLAKE, the 4th SNOWFLAKE, the 5th SNOWFLAKE, and the 6th SNOWFLAKE in the slots (Q).
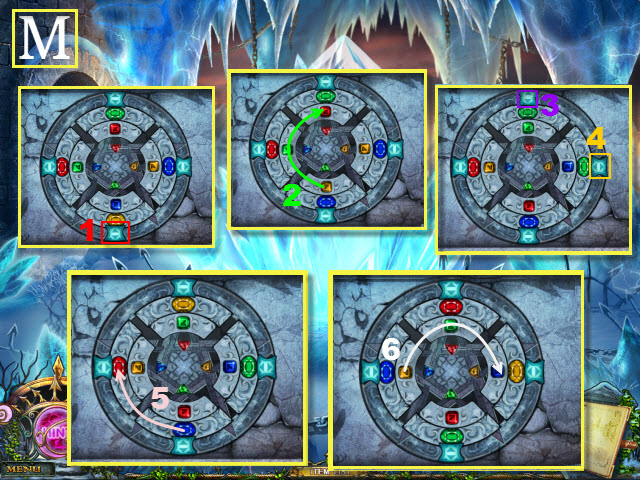
- Examine the machine to activate a puzzle.
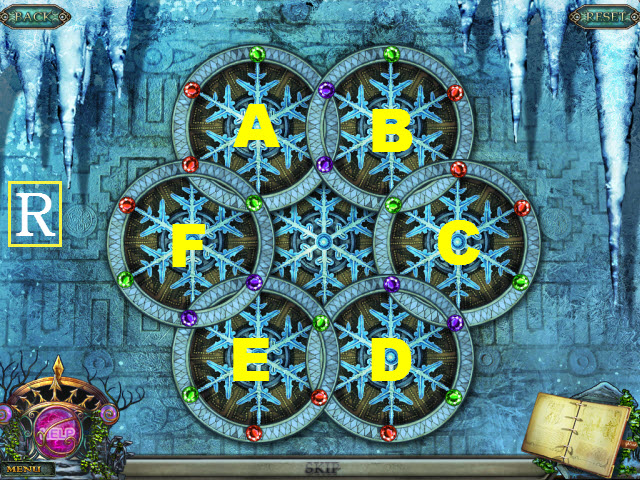
- To solve the puzzle, adjust the dials so the purple gems are at each end of the center snowflake.
- Please see the screenshot for the solution: Dx5, Fx5, and Bx5 (R).
- Walk right to the Skull Cave.
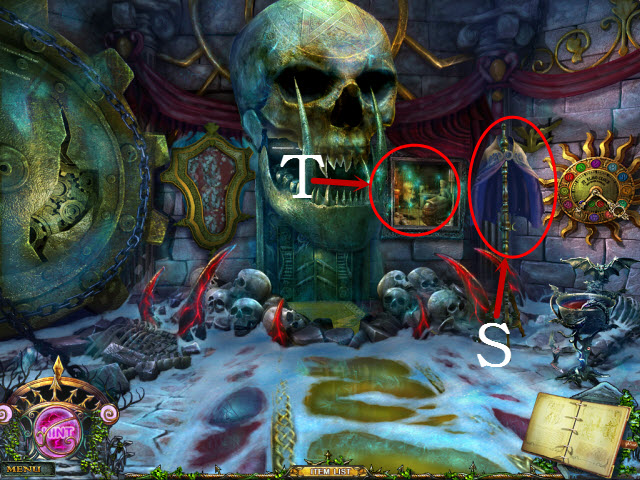
- Take the CLOAK (S).
- Move the curtain; examine the wall to activate a HOP (T).
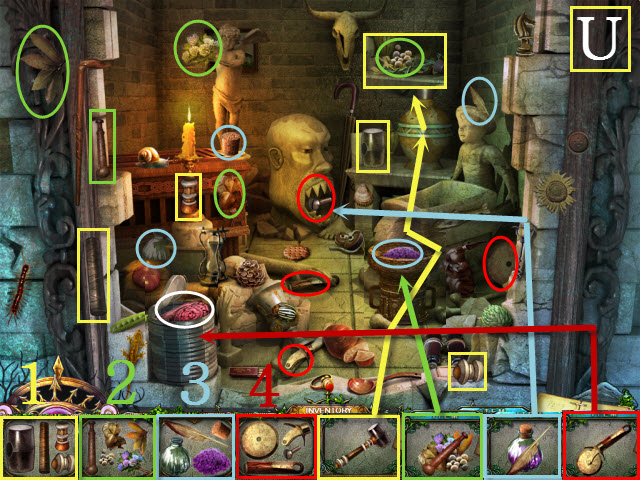
- Play the HOP (U).
- You receive the BLANKET.
- Examine the clock to activate a mini-game.
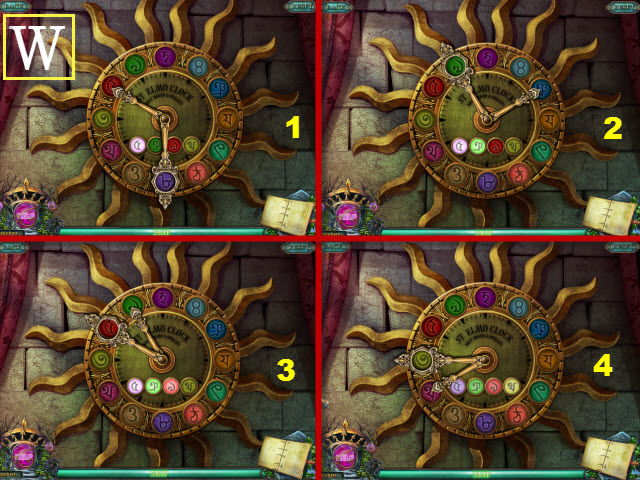
- To solve the mini-game, arrange the clock hands according to each clue. The big hand corresponds to colors and the small hand corresponds to the symbols; making a mistake will reset the puzzle.
- Please see the screenshot for the solution (W).

- Examine the wall; move the shield (X).
- Use the ICE AXE on the ice (Y).
- Place the GEAR on the notch (Z).
- Pull the switch (A).
- Take the SUN SYMBOL (B).
- Walk forward.
- Take the 2nd PARCHMENT PIECE (C).
- Take the CROWN (D).
- Return to the Frozen Steppes.
- Examine the cart; give the BLANKET to the creature (E).
- Take the 2nd ENERGY CRSYTAL (F).
- Walk forward three times.
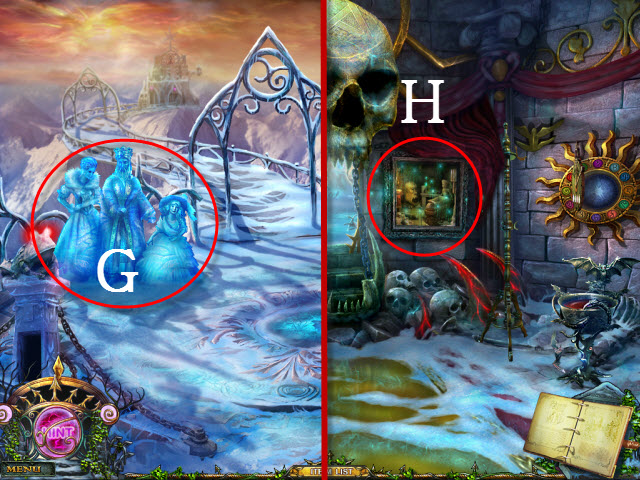
- Give the DOLL, the CLOAK, and the CROWN to the frozen people (G).
- You receive the 3rd ENERGY CRYSTAL.
- Return to the Skull Cave.
- Examine the wall to activate a HOP (H).
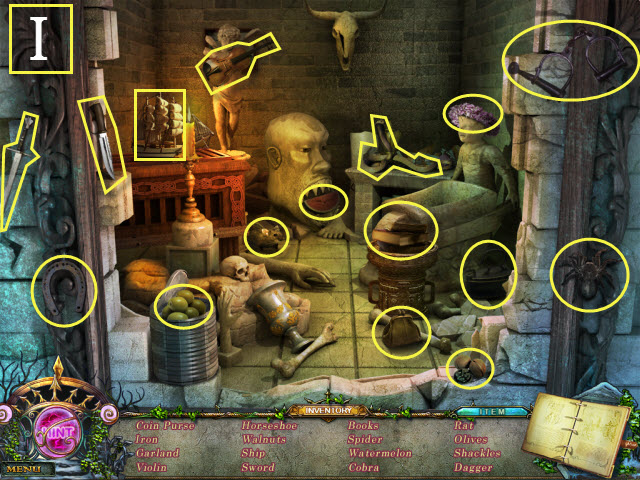
- Play the HOP (I).
- You receive the STAR.
- Walk forward.
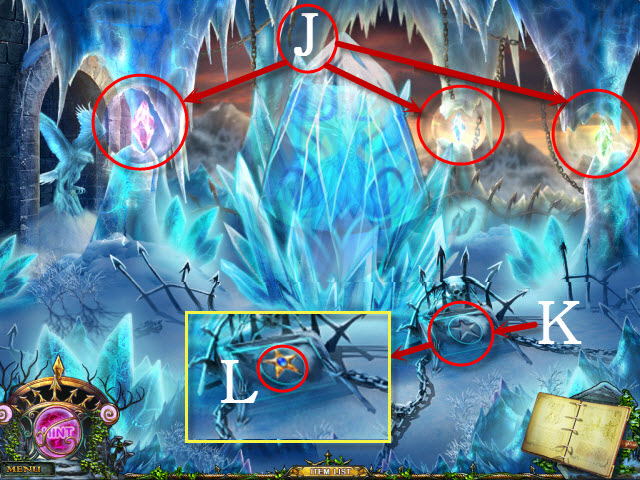
- Place the 1st ENERGY CRYSTAL, the 2nd ENERGY CRYSTAL, and the 3rd ENERGY CRYSTAL in the orbs (J).
- Place the STAR on the book (K).
- Examine the star to activate the puzzle (L).
- To solve the puzzle, select the outer buttons to swap the gem colors on each side; rotate the inner and outer discs so that each of the button colors match on each side.
- Please see the screenshot for the solution (M).

- Use the SUN SYMBOL on the ice Guardian (N).
- You receive the ICE GUARDIAN'S SOUL.
- Take the GOLDEN LION (O).
- Return to the Guardian Chamber; you will receive the TEAR (P).
- Walk down; walk forward to the Golden Door.
Chapter 4: The Cemetery

- Examine the gate; place the GOLDEN LION in the slot (Q).
- Enter the doorway.
- Open the sack; take the CLAY (R).
- Take the SKELETON (S).
- Place the SKELETON with the gargoyle (T).
- Take the CRANK (U).
- Walk forward to the Mask Room.

- Take the CRYSTAL FLOWER (V).
- Examine the mine cart to activate a HOP (W).
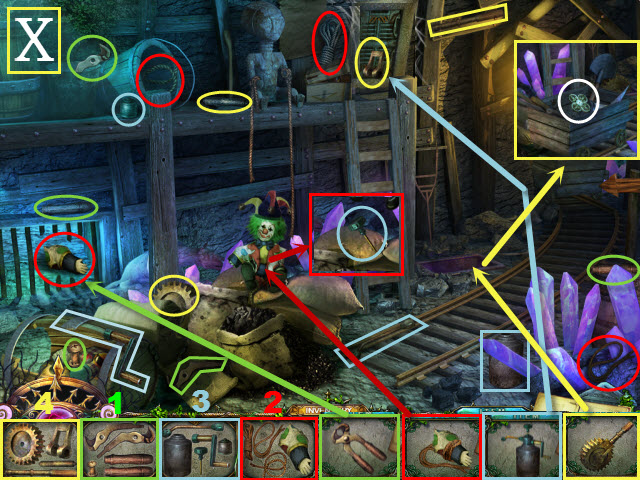
- Play the HOP (X).
- You receive the RING SIGN.

- Examine the gear; place the CRANK in the skeleton's hand (Y).
- Walk forward.
- Examine the pillar; take the KNIFE (Z).
- Examine the tombstone; place the CLAY in the slot (A).
- Take the HEART-SHAPED-CLAY (B).
- Walk left to the Cemetery Gate.
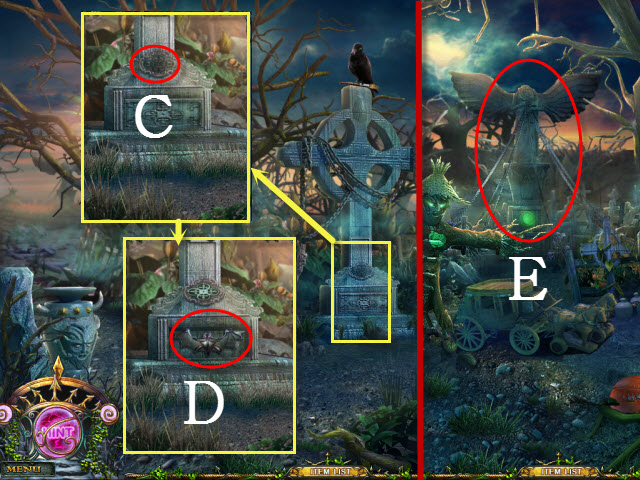
- Examine the headstone; place the RING SIGN in the engraving (C).
- Take the BAT SIGN (D).
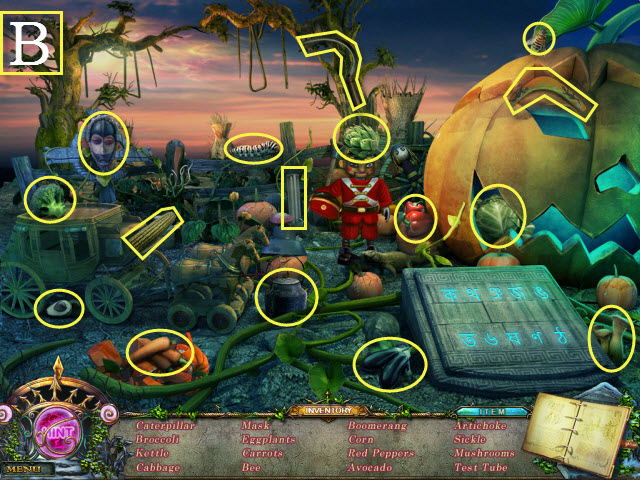
- Walk left to the Pumpkin Patch.
- Examine the statue to activate a mini-game (E).
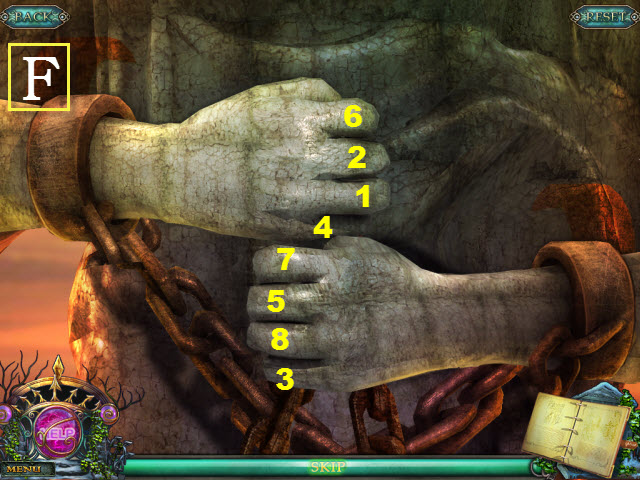
- To complete the mini-game, select the eight fingers in the correct order. Choosing the wrong finger will reset the puzzle.
- Please see the screenshot for the solution (F).
- Examine the pumpkin; use the KNIFE on it (G).
- Take the SPADE (H).
- Examine the vines to activate a HOP (I).
- Play the HOP (J).
- You receive the GLASS SHARD.
- Walk down twice; walk right.
- Take the LILY TOTEM (K).
- Examine the coffin to activate a HOP (L).
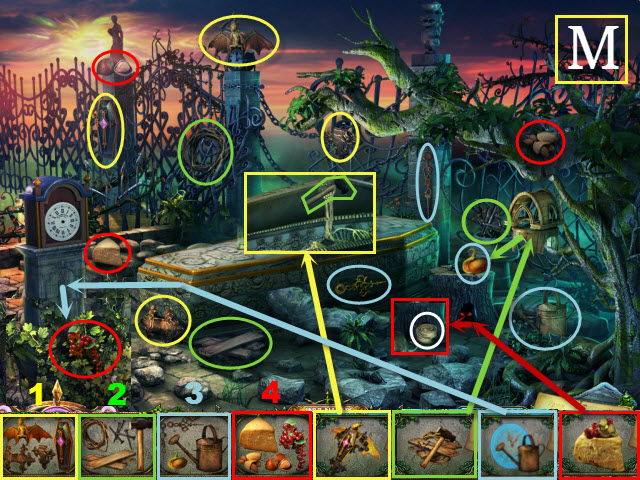
- Play the HOP (M).
- You receive the BELT.
- Walk down twice.
- Examine the mine cart to activate a HOP.
- Play the HOP (N).
- You receive the SLINGSHOT.
- Walk forward; walk left.
- Use the SLINGSHOT on the crow (O).
- Take the WRITING BRUSH (P).
- Walk down; walk forward to the Hall of the Dead.
- Take the STONE BALL (Q).
- Take the 3rd PARCHMENT PIECE (R).
- Examine the jester; place the SPADE in the cap (S).
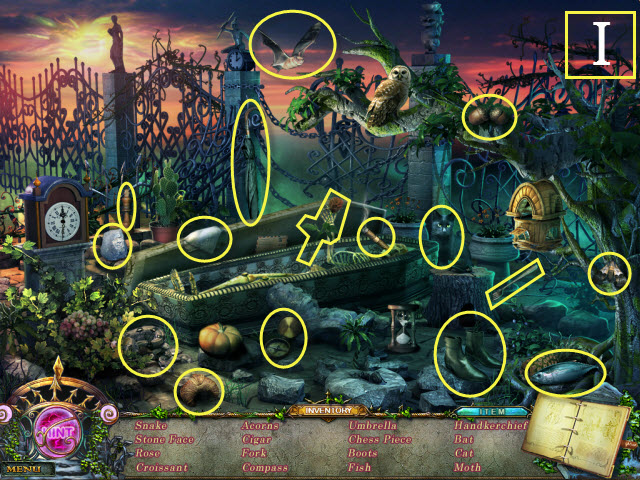
- Examine the sword to activate a HOP (T).
- Play the HOP (U).
- You receive the GOLDEN SCORPION.
- Return to the Pumpkin Patch.

- Examine the grave; place the CLAY-SHAPED-HEART, the LILY TOTEM, and the TEAR in the slots (V).
- Take the KIND HEART (W).
- Give the KIND HEART to the scarecrow (X).
- Place the COCOON and the LOTUS in the pot to receive the LOTUS TOTEM (Y).
- Walk down twice; walk right.
- Place the LOTUS TOTEM on the device (Z).
- Return to the Pumpkin Patch.
- Examine the vines to activate a HOP (A).
- Play the HOP (B).
- You receive the TEST TUBE.
- Return to the Skull Cave.
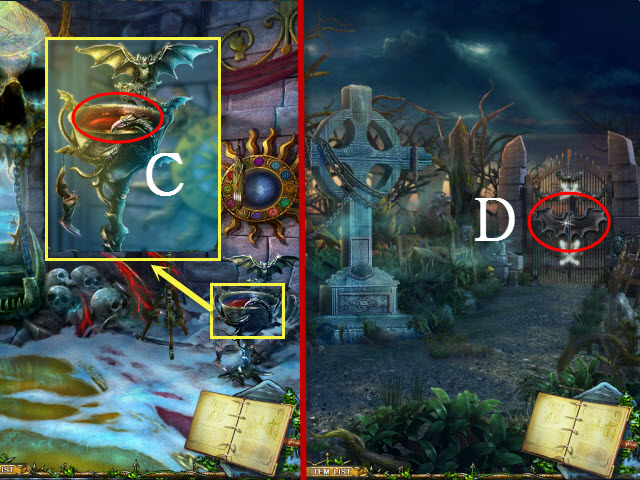
- Examine the chalice; use the TEST TUBE on the blood to get the BAT BLOOD (C).
- Return to the Cemetery Gate.
- Place the BAT SIGN and the BAT BLOOD on the gate (D).
- Enter the gate.
Chapter 5: Sealing Chaos
- Examine the container and open it; place the CRYSTAL FLOWER in it (E).
- Examine the gears; place the BELT on them (F).
- Examine the flower; use the WRITING BRUSH with it to receive the COLOR PEN (G).
- Walk down twice and then right; examine the coffin to activate a HOP (H).
- Play the HOP (I).
- You receive the CRYSTAL BALL.
- Examine the gargoyle; use the COLOR PEN on its eyes (J).
- Enter the doorway.
- Take the 4th PARCHMENT PIECE (K).
- Examine the lantern and open it; place the CRYSTAL BALL in it and close the lantern (L).
- Take the GEARS (M).
- Return to the Hall of the Dead; examine the sword to activate a HOP.
- Play the HOP (N).
- You receive the CHALICE PIECE.
- Walk forward.
- Place the STONE BALL in the cobra's mouth (O).
- Examine the chalice; place the CHALICE PIECE on the crack (P).
- Examine the scorpion; place the GOLDEN SCORPION in the slot (Q).
- You receive the DARK GUARDIAN'S SOUL.
- Return to the Guardian Chamber; walk forward to the Sanctuary of Chaos.
- Examine the door; place the GEARS on the notches (R).
- Walk forward.
- Take the 5th PARCHMENT PIECE (S).
- Examine the display case to activate a HOP (T).
- Play the HOP (U).
- You receive the SNAKE TOOTH.
- Walk down.
- Examine the statue; place the SNAKE TOOTH in its mouth (V).
- Take the JIGSAW PIECE (W).
- Walk forward.
- Examine the display case to activate a HOP (X).
- Play the HOP (Y).
- You receive the MASK.
- Place the JIGSAW PIECE in the slot (Z).
- Examine the board to activate a puzzle (A).
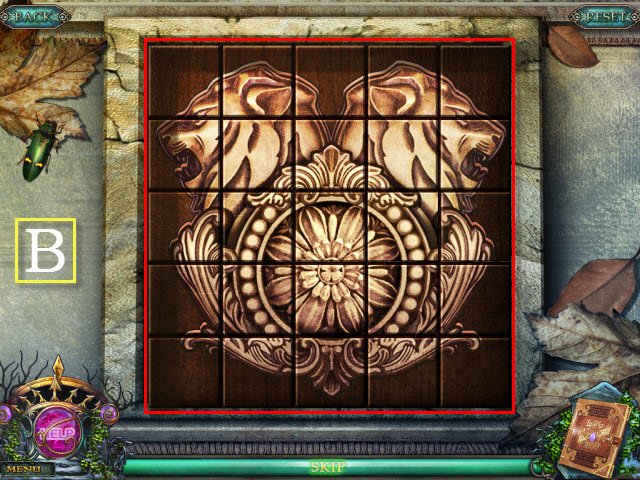
- To solve the puzzle, arrange the pieces so they create a completed image.
- Please see the screenshot for the solution (B).
- Return to the Mask Room.
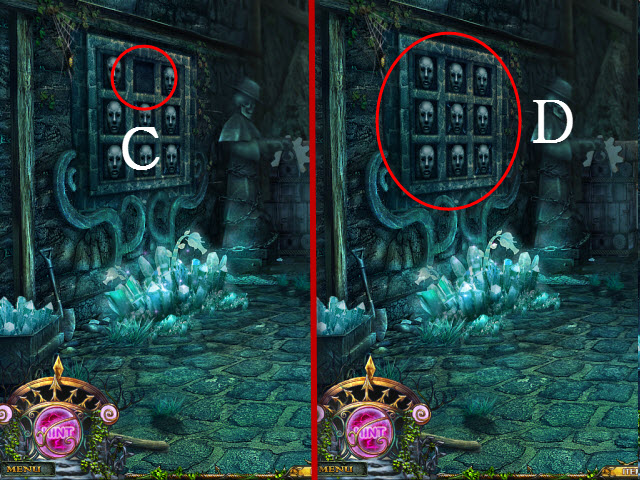
- Place the MASK in the empty space (C).
- Examine the masks to activate a puzzle (D).
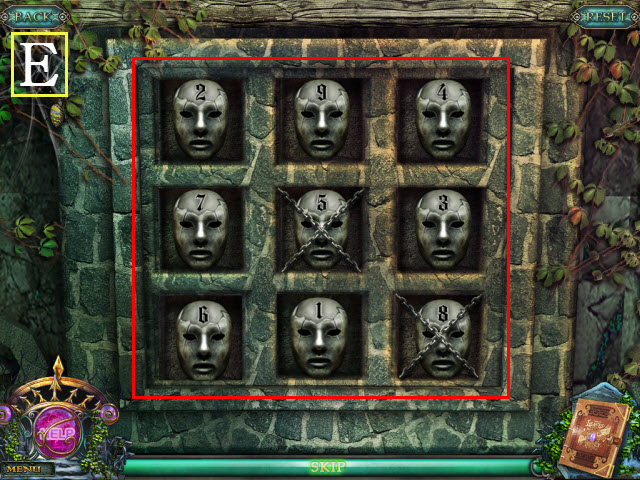
- To solve the puzzle, arrange the masks so the numbers add up to the same amount for each row, vertically, horizontally, and diagonally. The masks with chains may not be moved.
- Please see the screenshot for the solution (E).

- Take the 6th PARCHMENT PIECE (F).
- Walk down.
- Examine the cabinet; place the GLASS SHARD, the 1st PARCHMENT PIECE, the 2nd PARCHMENT PIECE, the 3rd PARCHMENT PIECE, the 4th PARCHMENT PIECE, the 5th PARCHMENT PIECE, and the 6th PARCHMENT PIECE on the mirror (G).
- You receive the MAGICAL PARCHMENT.
- Return to the Sanctuary of Chaos.
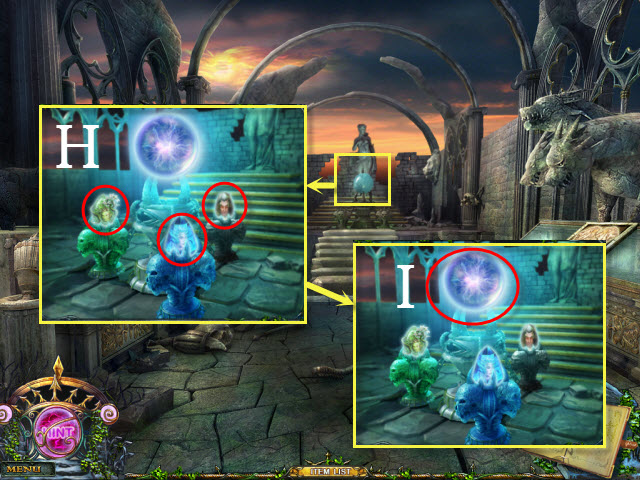
- Examine the orb; place the DARK GUARDIAN'S SOUL, the FOREST GUARDIAN'S SOUL, and the ICE GUARDIAN'S SOUL on the pedestals (H).
- Examine the chaos orb; use the MAGICAL PARCHMENT on it (I).
- Congratulations, you have completed Mystery Age: Liberation of Souls.
Created at: 2013-09-23