
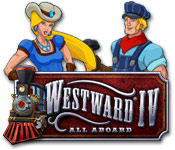
WALKTHROUGH MENU
- TOP 25 TIPS TO GET YOU STARTED (No Spoilers)
- GENERAL TIPS (No Spoilers)
- General Tips: Basic Gameplay
- General Tips: The Info Bar
- General Tips: People and Animal Characters
- General Tips: The 5 Elements
- General Tips: Gold
- General Tips: Food
- General Tips: Water
- General Tips: Coal
- General Tips: Wood
- LIST OF ALL QUESTS WITH TIPS FOR EACH (Spoilers)
- TROPHIES AND SECRET ITEMS (Spoilers)
- All Fossil Locations (Spoilers)
Introduction
- This walkthrough is divided into four sections. We know that many Westward players like to be completely unspoiled even about the names of towns and the number of Quests, so we’ve organized this Blog Walkthrough to make it easy for you to find what you’re looking for.
- The first section, Top 25 Tips, has no spoilers, but should give you lots of ideas about how to get the most out of the game, with helpful guides on everything from walking through water to getting Deputies to shoot deer for food.
- The second section, General Tips, also has no spoilers. It will give you more details about the 5 Elements (gold, coal, wood, water, and food), how to increase the Experience and Happiness your town has, and more.
- The third section starts with our List of all Quests. The List is organized by Mission to make things easy to find. There are tips for every Quest, including discussion of the most common reason players get stuck. If you’re stuck on a specific Quest, go to this list, then go to the Mission section that covers it.
- Finally, the fourth section is Trophies and Secret Items. Information on all Secret Items in the game (including Hats), with instructions on how to unlock them.
- We know that much of the fun of the Westward Series is challenging yourself, so even if you’ve gotten stuck and want help, you may not want everything revealed all at once! We hope you’ll find this guide helpful.
TOP 25 TIPS TO GET YOU STARTED (No Spoilers)
- Westward IV is a rich and complex strategy game that offers you many choices at every stage of gameplay. Here is a list of our top 25 tips—even if you’re an experienced Westward player, you should find something here of interest.
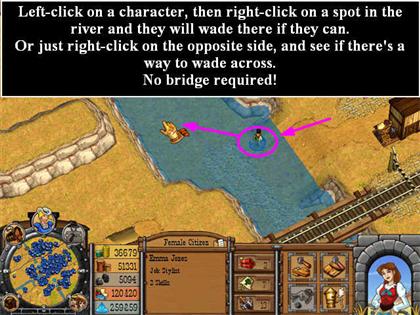
#1 If you’re not sure how to get somewhere, see if your character knows the way.
- Left-click on the person you want to move, then right-click on the place you want to go to.
- This is how many players first discover that characters can wade across most rivers (no bridge required) as long as they can find a river bank with a shallow slope.
#2 Differences between the two main characters in Westward IV.
- The male and female main characters get the same Quests, but may get them in a different order. More importantly, they have different maps and scenery. So if you are posting in the forums, make sure you specify if you are playing as Anne or Henry. What Anne finds in the Northeast, Henry may find in a different town in the South.
#3 Other than that, the two main characters, called Heroes, are very similar to each other—and very different from everyone else.
- Your Hero cannot die. If their health bar goes all the way to zero, they just fall unconscious for a few seconds, then get up again. Other gunfighters, including Deputies, Sheriffs, Bandits, and Bounty Hunters all leave the game if their health goes to zero.
- Also, all names other than the Turner family, even names associated with Quests, are randomly generated in the game.
- So my Dog might be called Rover and yours is called Fluffy, even though they are important in the same Quest.
- But Turner family members will always be Winton, Sal, Henry, and Anne.
#4 Your Hero can’t get a horse—but doesn’t need one, as they move faster than everyone else, even a mounted gunfighter.
- So if you select a group of characters and send them to another spot in town, it’s very likely that your hero will arrive slightly in front of the group. If your hero will need backup when they arrive, you may want to pick a meeting spot a little ways away from your ultimate destination to give slower travelers time to catch up.
#5 Heroes can’t do everything.
- Like gunfighters, your Hero does not require food or housing from the town, presumably because they can hunt. Unlike gunfighters, your Hero can also do some work—using a pickaxe on visible gold or coal, cutting fallen logs, fishing, picking berries, and repairing buildings. However, your hero can’t do anything that requires going inside a building, so they can’t work in a mine or a store or a bank. You need Citizens for that.
#6 Keep Everyone Busy—and Most Citizens Employed.
- A Deputy who’s just standing around in case bandits come can be used to pick up loose wood, gold, or coal or to hunt deer and rabbits and then pick up the meat for food.
- He won’t pick berries or fish, but he will open crates and pick up apples.
- Whenever he’s finished, the Deputy will just stand where he finished until you select him again.
- An employed citizen can be sent to do a chore like picking berries or fishing or chopping a fallen log and then will automatically return to his/her job. This can be really useful. Say you have a Citizen working in a mine and you’re running low on food. You might want to have the Citizen pick berries or go fishing knowing they’ll return to the mine as soon as the food source is tapped out. Meanwhile your deputy can hunt and your Hero might be walking to another part of town.
#7 This is a Quest-based game, with over 75 Quests spread out over the various towns.
- Some are required. Some are optional. Some are secret and you may not find them the first time you play.
- You can also keep playing even after you “beat the game” (finish all required Quests in order) to earn more trophies and unlock secret Quests.
#8 Always read the Quest Log (marked with an inkwell in the Info Bar at the top of the screen) to get more information about the requirements for your current Quests.
- Tasks are added to the Quest List in the order your character finds out about them, not the order in which they have to be completed.

#9 The 5 Elements (water, gold, coal, wood, and food) are town resources, so anything one character earns in town goes into the communal account.
- This also means your Hero can’t carry gold or wood from one town to another.
- One town can ship goods to another, though, so as long as the trains keep running new supplies will arrive occasionally.
- You can change which goods you want to receive by training by clicking on the Train Station in the current town.
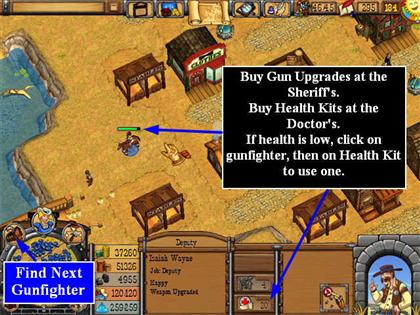
#10 The only thing that travels with you is knowledge (the kind you unlock in the “store” in the top info bar) and Health Kits that you can buy at any doctor.
- You can carry up to 20 Health Kits at one time. To find out how many Health Kits you have, click on any gunfighter.
#11 Except for your Main Town (marked by a railroad station on the map in the top info bar), you can only visit each town once.
- When you complete the required Quests in an Expansion Town, you will be asked if you want to return to town (your Main Town) or continue playing, and you will see a scorecard that tells you if there are any unfinished Optional Quests or Hidden Objects that you haven’t found yet. Once you leave, you can’t come back, so if have things uncompleted, continue playing until you’re completely satisfied with what you’ve done in the Expansion Town.
#12 Don’t rush home to the Main Town if things are going well in an Expansion Town.
- There is one more reason why you might want to continue. You can’t take gold or coal back with you to the main town, but you can take two things that you buy with gold: Health Kits bought at any doctor, and Knowledge bought in the “store” in the top info bar. You may want to stay in the Expansion Town for awhile and spent gold you’ve earned there before traveling back.
#13 If you have a General Store and a Market Place, you have a renewable Element (wood) you can trade for gold, food, or coal.
- This is true in both the Main Town and the Expansion Towns. Have your lumberjacks plant new tree seeds before the Lumber Camp runs out of wood—that keeps them employed and boosts their seniority.
- Treat planting seeds like any other chore. Highlight an employed lumberjack, click on a packet of tree seeds in your inventory, and pick a planting location (green circle) near the current Lumber Camp. And once you’ve planted tree seeds, you’ll also eventually get apples on the ground that you can pick up.
- You can also start a new forest in any flat area. Plant tree seeds and build a Lumber Camp there.
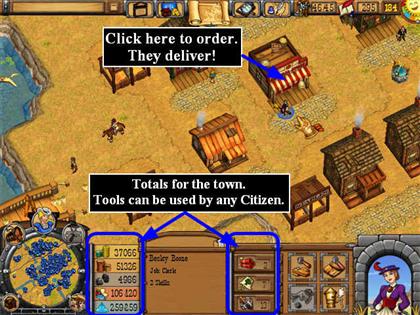
#14 The General Store and the Market Place deliver!
- You don’t have to send a citizen or your Hero to these buildings to place an order. Just move your cursor to the building, click on it, and you can order whatever you need. It will go into the town’s inventory as soon as you buy it.
- You can sell things in the same way at the Market Place.
- If you don’t have anyone working at the store, click on the nearest citizen who’s not doing something critical, click on the Whistle icon in the lower right corner, and they’ll quit their current job. Drag them to the building where you need them working and you can immediately place your order—you don’t have to wait for them to walk over. As soon as you’ve bought/sold what you need, click on the Citizen again, have them quit the shop, and re-employ them at their old job.
- We often built the General Store, Market Place, and Doctor’s Office close to a farm as these are mostly part-time jobs.
#15 Game Animals are another renewable resource—but there’s a catch.
- Once you’ve caught all the Fish in one area, just leave it alone for a little while. The Fish will eventually come back. This is true whether you just have a Citizen fishing from the river bank or build a Fish Hut.
- Your Hero and gunslingers can also hunt Deer and Rabbits for food. A new animal will show up in the same quadrant when you kill one. The catch is that it may not be the same kind of animal!
- And even more important is the fact that there is a limit to the total number of game animals a quadrant can hold.
- For example, on Anne’s map the Southwest quadrant of the Main Town will have bears, rabbits, and wolves. No deer. If you need a wolf for a Quest and you don’t see one there, you probably have to kill a bear or a rabbit to reduce the animal population so a wolf can appear.
- But the animals that appear are random, so you may have to kill 2 or 3 of the animals you don’t want to get the one you do.
- Or if you’re in an Expansion Town and you notice deer in the Southeast quadrant you may send a deputy there to hunt for food. He kills the first few (+5 food or more each!). Then all you see are rabbits. If you want more deer to show up, you have to shoot some of the rabbits first.
#16 Save a Coal Mine in your Main Town until you’ve gotten almost to the end of the game.
- There are 3 optional Quests that show up towards the very end that require a working Coal Mine, not just a store of coal. If you’ve exhausted all your mines, you can’t complete those Quests.
- Remember you can always buy coal at the Market Place, so you won’t run out as long as you have enough wood to trade.
#17 Plan your firefighting strategy before you build housing.
- When a worker’s home catches on fire, they will travel from their work and head to put out the fire. They’re still employed at the job, so they’ll return there automatically once the fire is out. That’s a good thing if they live close to their work. But if their house is all the way on the other side of town, it may burn down before they get there, and meanwhile you’ve lost the work they would have done.
#18 There are two good firefighting strategies.
- One is to build houses close to where you’ll be employing people. This works well at times where there aren’t a lot of Bandits, or where you can afford to also build a Sheriff’s office and employ extra deputies. Citizens won’t fight bandits (the Citizens just run away and hide), but Bandits will destroy buildings, including homes.
- The other strategy is to build homes and shops in a town center, close together, and use shopkeepers to put out fires as soon as they happen. Or once you have a lot of food coming in, to have an extra farm with 6 farmers near the houses, and use those farmers to put out fires and repair houses. The point of this strategy is to use Citizens who don’t live in the houses but who work close by to put out the fires.
- The first strategy works automatically. The second requires your intervention to assign Citizens to put out the fires, but it may be more efficient. Either will work; just know which one you’re using.
#19 Keep your important buildings repaired, but know which ones don’t matter.
- Buildings, including houses, can be damaged by fire, Bandits, or earthquakes. Just like a gunfighter who loses some health in a fight, clicking on a building will show you its green bar and tell you what it will cost to repair it.
- If you don’t repair a building, three things happen. First, your town will lose some happiness points. Second, a building which is partially damaged will produce less output. And finally, eventually enough damage will occur (health goes to zero) that the building will fall down altogether. You can usually salvage a few things from the wreckage, but you’ll have lost most of the value of the building.
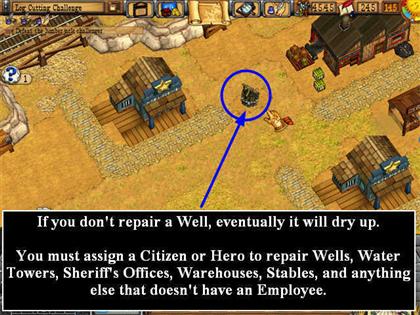
- Wells and water towers that become too damaged can’t be used for putting out fires or watering crops, so keep them in good repair. No one “owns” them, so you’ll have to drag citizens to them from time to time to do repairs.
- Damaged Farms, Ranches, and Mines will produce less output, so keeping them repaired is also important.
- Exhausted mines are useless to you, but they will get damaged and they do drag down the town’s happiness. Once a mine is exhausted, go ahead and demolish it. No more repair costs or fires there! To demolish a building, click on it, then click on the bomb icon in the upper right. No TNT purchase required.
- Luxury items like Potted Plants and Flowerboxes are usually cheaper to replace than to repair.
- And if you’re desperately in need of wood for some reason, you can demolish a building you don’t need and salvage some wood from it.
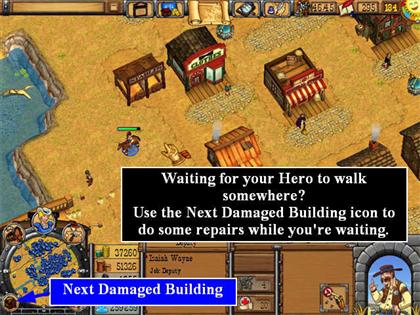
- You can find the next building to be repaired by clicking on the damaged building icon in the lower left. If you are waiting for your Hero to walk across town, this is a great use of time—just click through the damaged buildings and assign citizens to repair them while you’re waiting for the Hero to arrive.
#20 Use the fortification upgrade to limit damage from earthquakes and fires.
- You have to buy the fortification knowledge in the “shop” in the Info Bar at the top of the screen, then upgrade a Lumber Camp. From then on all the buildings in your town will be stronger. And besides, you need upgraded Lumber Camp to build bridges anyway, so it’s a win-win.
- Once the Lumber Camp is upgraded, click on it again to see the Fortification button and how much it will cost.
- Click on the Fortification button apply the fortification to all the buildings in the town.
- You only have to buy the upgrade in the Info “Shop” once, but you will have to use the Fortification button on one upgraded Lumber Camp in each new town you want to have fortified buildings.
#21 Trial and Error.
- Say you’ve been working on a Quest in a Expansion Town and you realize you chose the wrong strategy. You should have built a General Store earlier so you could buy TNT to get to a different part of the map. Most of the time, if you click on the Menu button in the Info Bar at the top of the screen, you’ll see an option to “Restart the Quest.” This will take you back to the beginning of that particular Quest.
- Alternatively, you can load from a Save file, assuming you saved one to begin with.
- Many experienced Westward players create a Save File when things are going great. If you complete a difficult task but you’re still not done with the overall Quest, a Save file will let you return to that mid-way point, instead of going all the way back to the beginning of the Quest.
- So in general you don’t need to create a Save File at the start of a new Quest in the same town—you can use Restart Quest for that.
- We do recommend creating a Save File of your Main Town each time before you click on the Map in the Info Bar at the top of the screen to travel to a new Expansion Town. Although the Menu does offer a Return to Town option, that won’t help if some of your deputies died while you were in the Expansion Town.
#22 If one is good, three is better.
- You can build multiples of most buildings in Westward, and you will find that many of the secret products and trophies require having, say, 3 of Building X employed by a skilled Citizen.
- Similarly, while it’s great to have a skilled Miner working in a Coal Mine, having a skilled Miner working at the Blacksmith will bring extra benefits.
- And having a Citizen with 2, 3, or 4 skills may unlock more secrets.
- So once you have things going well in the main town, you will probably want to crosstrain citizens so they develop more skills.
- The only exception to this tip is the two buildings that have "talk bubbles"--the Blacksmith and the Market Place. You should only have one of these buildings in your Main Town or the game can get confused.
#23 Sometimes Happiness is as much about what you don’t have as what you do.
- Need to increase your town’s happiness? A variety of good things will help—different kinds of food, different kinds of buildings, hiring a Sheriff and Deputies, buying luxury items like street lights and potted plants. All good.
- Multiples of the same item, like two potted plants, will increase happiness for each item—but only for the first few.
- If you find yourself stuck against a number and just can’t go higher, you may have to remove some negatives. Repairing damaged buildings is a good start.
- And, as a pro tip, you may have to get rid of some of the Bounty Hunters. Each one you have costs your town one Happiness point. (The Citizens like Deputies, but don’t trust Bounty Hunters.)
- Unfortunately you can’t just fire them. The only way to get rid of them is for them to die. Send one alone against a Bear or a group of 3 Bandits, and eventually the Bounty Hunter’s health will go to zero. Sad, but true.
- Check your town’s statistics by clicking on the Town Stats button in the Info Bar at the top of the screen, and it will show all the plus and minus factors currently affecting the town’s happiness.
#24 Know your limits—but don’t hurry to expand them.
- This isn’t a spoiler because the game will give you this tip automatically. A town can have only 20 citizens until you hire a Sheriff. Then it can have 35 until you hire a Mayor. And then it maxes out at 45 regular Citizens (the kind who require housing).
- But that doesn’t mean you should rush to hire a Sheriff or a Mayor. Not hiring them right away gives you time to get ready for the influx of Citizens to come.
- Usually when you build a house, it means new Citizens will arrive to occupy it. But if your town is at its current population limit, you can build new housing in advance to get ready for the new people who will come.
- You can also wait until your current citizens have become skilled farmers to increase the food production, or build additional warehouses and fill them with berries, apples, fish, and game before the new Citizens arrive.
- Only the Sheriff and the Mayor increase the population ceiling. If you just need more gunfighters, build a Sheriff’s station, but only hire Deputies until you’re ready for the new Citizens a Sheriff will attract.
#25 Enjoy the Experience.
- Many of the knowledge items in the “shop” in the Info Bar at the top of the screen require Experience Points to purchase. How can you increase your experience? By doing more things!
- The optional Quests in the Market Place in your Main Town are a good place to get experience.
- But in addition, every skill a Citizen earns is worth an experience point, so if you can spare an Experienced Farmer and send them to work at the Market Place for awhile, they can earn an Experience Point when they become an Experienced Salesclerk.
- Citizens can earn the salesclerk skill at the Market Place, Hat Shop, Clothing Shop, or the Bank. Oddly, working at the General Store does NOT earn this skill.
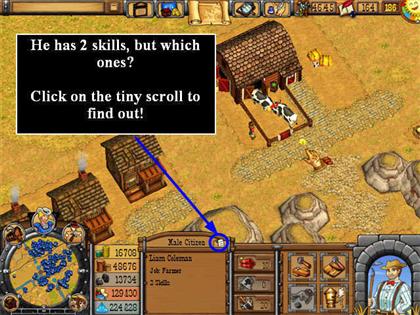
- To see which skills a Citizen has, click on them, then click on the tiny scroll to see their skill details.
- And, sure, once you have the Train Station upgrade you can pay a guy to go deal with those repetitive maintenance tasks, like stopping train bandits or repairing tracks between Expansion Towns.
- But when he does it, your Main Town doesn’t gain experience points, and when you do it, you do.
GENERAL TIPS
General Tips: Basic Gameplay
- This is a Strategy game with some Sim elements. You control the actions of your Hero (Anne or Henry Turner), Citizens in your Town, Gunslingers (Sheriff, Deputy, and Bounty Hunters), and sometimes an animal like a Dog or a pet Rat.
- From time to time you will be assigned a Quest. Some Quests are required and some are optional, meaning you can complete the game even if you don’t complete that Quest.
- There are over 75 Quests available in the game. (Exactly how many would be a spoiler, but if you want a full count, see the Quest List at the top of the spoiler section.)
- In addition to the Quests, each town must provide its Citizens with Food and Housing. If Citizens go hungry or homeless for too long, they will first stop work to protest and then leave town. However, new Citizens will arrive to replace them as long as there is housing available.
- Use the mouse scroll or the +/- buttons to zoom in or out as you view the scene.
- If you hold down the space bar and move the mouse, you can rotate your character’s view of a scene. This is sometimes helpful when locating an item behind a building. However, you have to return to the main view to have the character move or pick up things.
- Click on the Menu Icon in the Info Bar at the top of the screen to access the game menu. You use this menu to save your current game or exit altogether.
General Tips: The Info Bar
- Understanding the Info Bar is essential to the game.
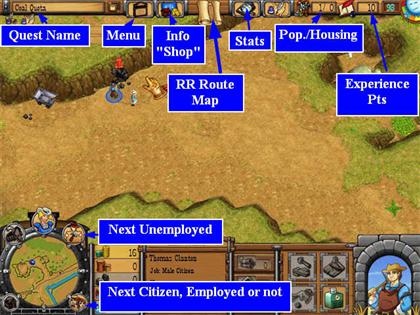
- On the far left is the name of one of your current Quests. You may be working on more than one at once, however.
- Just below that is the name of a task for that Quest.
- The next icon is a signboard that represents the Menu. Click on this to access Save or Load, to Quit, or to look at the Trophy room.
- The icon with gold coins is the Info “Shop.” You will have to purchase the knowledge to do some things in the game, like how to fortify buildings or how to build a stables. You only have to purchase this knowledge once in the game, and then your character retains it.
- Then when you to actually build a stables, you use the regular build options next to the character’s picture at the bottom of the screen.
- If you try to build something you don’t have the info for yet, the game will remind you to visit the “Shop” first.
- The Scroll in the center of the Info Bar is the Railroad Route Map. This is how you go from your Main Town to another Town. Click on the scroll, then click on the town that is in green.
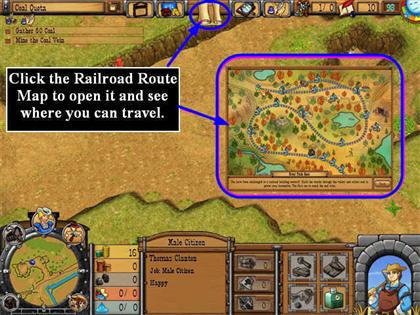
- Usually only one other Expansion Town will be available to travel to.
- You may visit each Expansion Town only once.
- Some “railroad maintenance” incidents occur on the track in between towns. They’ll be marked with a broken rail or railway holdup icon.
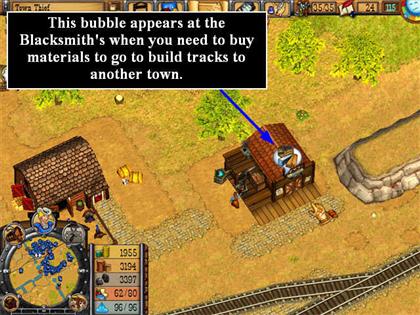
- If there are notes at the bottom of the map, read them carefully, because it means there’s something you have to do in your Main Town before you can travel to another town. Usually this means you have to go to the Blacksmith in your Main Town and purchase supplies to build tracks. These tracks will be built automatically when you purchase the supplies, and then you’ll be able to use the Route Map again.
- Sometimes it means that the tracks by the station in your Main Town have been damaged. In that case you’ll have to find the damage and assign Citizens or your Hero to repair it before your train can leave the station.
- The Magnifying Glass icon on the Info Bar is for the Town Statistics. This will give you a summary of all the information about the current town, including how many gunfighters you have, how many buildings of each type, and what is adding or subtracting from your town’s Happiness.
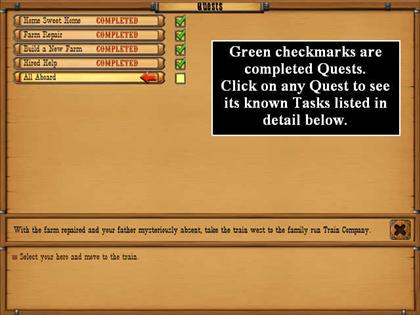
- The Ink Well icon opens up the Quest List. Make sure you read this, as it often includes information about what tasks you need to do for each Quests, and it will remind you of optional Quests you have started but not completed.
- The two numbers to the right of the dancing couple tell you how many Citizens you control in the current town, and how many housing slots you have available for them. This does not count your Hero, gunfighters, or visitors. Just Citizens. If there are more Citizens than Housing slots, you’d better build more Housing fast, or the homeless Citizens will first go on strike, then leave town. If there are fewer Citizens than Housing slots, you can expect some more Citizens to arrive soon, so you may want to check to make sure you have enough Food and Water for the higher population.
- The next number is the number of Experience Points you have available to spend in the Info “Shop.” This number will go up as you complete Quests and earn skills, and go down as you spend the points.
- The number on the far right in cyan is the Happiness points, and the sun to its right is a Happiness Meter. In general you’ll need 100 points to have a Happy town, and 200 points to have a very happy town.
- Learning to use the Info Bar is critical to overall success in the game. Whether it’s checking town stats to see what’s affecting your town’s happiness, checking the Info “Shop” to determine what knowledge you’ll need to acquire next, or viewing the Quest List for details on required tasks, it’s what you’ll use to plan long-term strategy and prepare for emergencies before they happen.
General Tips: People and Animal Characters
- There are 5 kinds of people characters in the game: your Hero, Citizens, Gunfighters, Visitors, and Bandits.
- You control the actions of your Hero, Citizens who work for you, and Gunfighters (Sheriff, Deputies, and Bounty Hunters).
- Citizens can pick up loose items like gold nuggets, pick up objects needed for Quests, fish, pick berries, chop logs, put out fires, and work inside buildings including mines, stores, and farms. They can use the three town tools: TNT, apple seeds, and the irrigation tool. They will run away from Bandits if they get too close. They can buy clothes and hats.
- If a Citizen gets sick, they will quit their job and wander around a complain. They will eventually heal themselves. If you need them to heal faster, you can drag them to an employed doctor’s to buy snake oil at $5 per ¼ bar of health.
- If a Citizen is hungry or homeless for too long, they will leave town.
- A homeless Citizen who is protesting can be assigned to build their own new house. They won’t do anything else until they get a house.
- Citizens (and only Citizens) can become skilled as a Miner, Woodcutter, Salesclerk, and Farmer. They earn a skill by working in a building associated with that skill for a certain period of time.
- They keep any skills they’ve earned, so they can eventually earn all 4 skills if you keep moving them from job to job.
- Skilled Citizens are more productive, and there are also other benefits you can unlock.
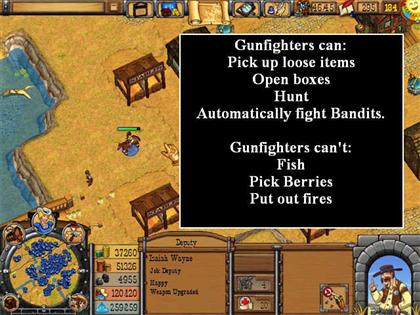
- Gunfighters can pick up loose items like gold nuggets, shoot animals, shoot Bandits, shoot some buildings. They cannot fish, pick berries, work in buildings, or put out fires. They will shoot back at Bandits that are shooting at them. They will shoot at game animals if you click on the animal. They cannot use the town tools. They cannot carry objects needed for Quests. They can buy clothes and hats. They can ride horses (drag one to a stables to give them a horse).
- Gunfighters do not get sick, but they will lose health during battles with Bandits and game animals. They will not heal on their own. You can drag them to an employed doctor’s to buy snake oil at $5 per ¼ bar of health. Or you can apply a “Health Kit” for $40 for about the same amount of healing. The advantage of the Health Kit is that it can be applied at any time, even during a battle. You can buy up to 20 Health Kits at any Doctor’s office.
- Gunfighters do not need the town to provide them with shelter or food.
- Deputies and Sheriffs are gunfighters who are also Lawmen. They are a permanent part of your town.
- Bounty Hunters are freelance gunfighters will arrive in town and ask for work. It’s up to you whether to hire them or not.
- In earlier titles in the series, you had to go to a Saloon to hire a Bounty Hunter. In Westward IV, they will just arrive on the train or you will find them camped out on the edges of town.
- If they arrive on the train, they will ask you for work and tell you what it costs to hire them.
- Sometimes a Bounty Hunter will bring a dog. If you hire the Bounty Hunter, the Dog will work for free.
- To see how many gunfighters you currently have in town, check the Town Stats in the Info Bar at the top of the screen.
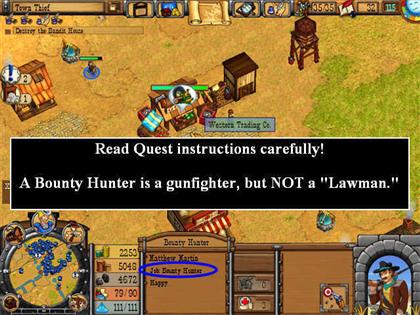
- Read Quest and Trophy instructions carefully. If they specify “Lawmen,” only Deputies and Sheriffs will count.
- Your Hero can pick up loose items like gold nuggets, pick up objects needed for Quests, fish, shoot animals, pick berries, chop logs, put out fires, and use the town tools. They cannot work inside a building. They cannot buy clothes. They will shoot back at Bandits that are shooting at them. Your Hero walks faster than anyone else, even a gunfighter on a horse.
- Your Hero does not need the town to provide housing or shelter.
- If your Hero’s health goes to zero, they will go unconscious for awhile, but then recover. Heroes can use the snake oil at a doctor’s office, but cannot use a Health Kit. If you need your Hero to be at full health to complete a task, it’s usually easiest to just send them alone against a bear or a couple of Bandits so they will get knocked out and then regenerate at full strength.
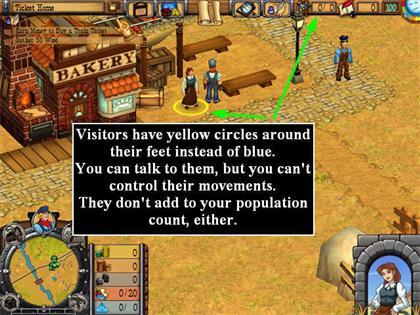
- Visitors are people that your Hero can talk to, but whose movements you don’t control. They will have a yellow circle around their feet if you click on them.
- Some visitors can be converted to Citizens after you talk to them or help them in some way.
- Late in the game one permanent Visitor will arrive who will be available for hire to work on railroad maintenance tasks. He will show up in your population count as a homeless person, but he will not accept a house if you build one for him. He must just sleep at the Train Yard.
- Bandits are enemies who will shoot at your Hero or Gunfighters if they see them and are close enough. They will not shoot at Citizens or Visitors, but they will damage buildings.
- Dogs that belong to your town can be controlled like any gunfighter. They will kill rats and attack Bandits. They cannot carry objects or pick things up.
- One of the Buffalo involved with a specific Quest can be controlled like a dog. Click on it, and it will move where you tell it to. You’ll know when you see it.
- In some of the Quests you will be able to make friends with a Rat (usually by feeding it), and then it will act under your control. You will be able to direct it where to go, even if you don’t accompany it.
- You cannot chain most actions in Westward. If you want to have a character you control go to two places and you click on both, the character will skip the first one and go directly to the second.
- However, you can chain build commands. Click on a character, click on build, and do the normal process to have them start building something. Then go ahead and do a build command for a 2nd building for the same character. You can do this for at least 4 buildings in a row. This can be very helpful in some of the timed Quests.
General Tips: The 5 Elements
- There are 5 common Elements that the town can collect: water, food, coal, gold, and wood. In general you will try to have a balance in these, unless you have a specific Quest that requires a lot of one of them.
- The 5 Elements belong to the town, so you can’t carry them from one two to another.
- You can check your Town Stats in the Info Bar at the top of the screen at any time to see whether you are producing or using more of any of the 5 elements.
General Tips: Gold
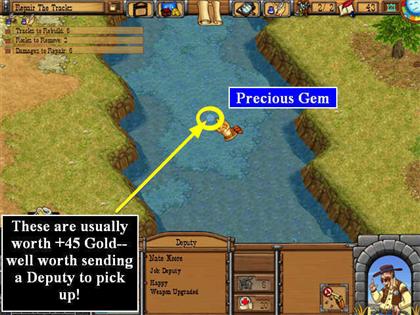
- All money gets added to your gold tally, so this includes actual gold you collect, diamonds (“precious gems”), and the value of goods that you sell.
- Gold can be found as loose nuggets on the ground, visible rocks with gold veins that can be broken up with a pickaxe, or by building a Gold Mine.
- Citizens can collect all 3 forms. Heroes can collect loose nuggets or break up visible rocks. Gunfighters can pick up loose nuggets or precious gems, but won’t use a pickaxe.
- Once a Gold Mine is exhausted, it can’t be replenished, so go ahead and demolish it to avoid future fires there.
General Tips: Food
- There are many different sources of food in the game. Apples can be found loose on the ground in areas where trees have been planted. Potatoes are sometimes found when digging holes.
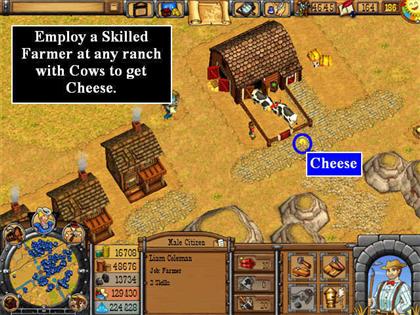
- Farms and Ranches provide food. A Bakery and a Butcher Shop add more varieties. An upgraded Ranch with cows produces cheese.
- Visible fish can be caught by dragging any Citizen to the riverbank and clicking on the fish where the cursor has turned into a pickaxe. Or you can build a Fishing Hut for higher production.
- Rabbits and Deer can be shot for meat.
- Berry bushes can be picked for a very quick source of food.
- Food can also be bought at the Market Place if you have built one.
- In some Quests the train will automatically deliver food, but you have to have the storage capacity to hold it.
- Citizens can pick up loose food, dig holes, work at Farms and Ranches, pick berries, and Fish. They cannot hunt because they don’t have guns.
- Your Hero can pick up loose food, dig holes, pick berries, Fish, and hunt. They can’t work at Farms or Ranches.
- Gunfighters can pick up loose food, including apples, and hunt. Deer are worth +5 food or more, so having a deputy hunt can be very helpful in situations where food is scarce. Gunfighters cannot pick berries. They will open crates but will not dig.
- If you are depending on hunting, remember that each area of the map has a max animal population. If you have seen Deer in an area before but now there are nothing but Rabbits, you will have to shoot some of the Rabbits before you will get more Deer.
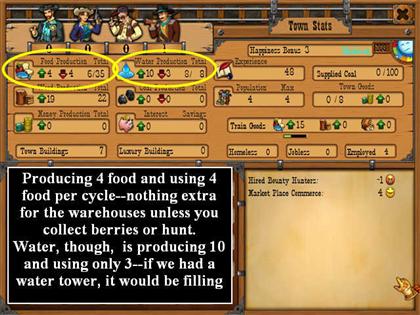
- Look at the Town Stats to see how you are doing on Food production. In general you need one unit of food production for each Citizen. When you have more than that, you start filling the warehouses.
- One unskilled Farmer can generally support 3 citizens (including the Farmer) with food. One skilled Farmer can support 4. But you can always supplement with berries, apples, fishing, and hunting.
- We recommend one warehouse for each 4 Citizens. This will get you through times of plague without problem. (The “plague” is actually a blight that affects food production, not people.)
- If you have reached your max food storage, don’t collect any more—it just gets wasted. So if you have a capacity of 20 and you see some apples, don’t pick them up until the amount has fallen again and there is room in the warehouse for them.
- A farm adds 5 to your food storage capabilities.
- In some Quests, the easiest thing to do is to buy food at the Market Place whenever you run low.
- Your Citizens will tell you when they start to get hungry. They will continue working for another couple of minutes. Eventually they will leave town. However, as long as you have the housing new Citizens will arrive to replace them. This may be OK in some of the Quests in Expansion Towns.
- Once you start developing Skills in your main town, you don’t want to lose any Citizens, so keep a close eye on your food reserves.
- If a Farm or Ranch gets damaged, its production will go down.
- The more types of food you have, the happier your town will be.
- To switch a Farm from one kind of food to another, first assign someone to work on a row, then click on the row to see the choices of crops that can be grown there.
- You can do the same thing with a Ranch—just click on the pens to switch from one animal to another.
- You can buy the information on how to grow new crops or animal types in the Info “Shop” in the Info Bar at the top of the screen.
- Once you learn how to grow a new kind of food, you take that knowledge with you to every town you visit.
- Some crops/animals may be secret at the beginning of the game. To see if there are any of these and how to get them, see the Secret Items spoiler section at the end of this guide.
General Tips: Water
- Water is essential for Farms and Ranches, but Citizens don’t care as long as they have food.
- Wells produce new water. Water towers store extra water from the Wells. So a Well is like a Farm and a Water Tower is like a warehouse, just for water.
- In general you will need one Well for each Farm/Ranch, plus one Well for each 4 buildings (including Houses).
- If you build something in an isolated area, it will need a Well or a Water Tower for fire safety.
- Water Towers are essential to keep farms producing during droughts. This is where you have some choices. If you build more warehouses so you store extra food, your Citizens will complain during a drought but you’ll still have enough water.
- On the other hand, if you have a fire during a drought, the Warehouses with food don’t help you.
- We recommend adding Water Towers to store 1/3 to ½ of your total Well capacity, once you have a lot of gold and wood and can spare the resources. So if you have 80 water from wells, you’d need 4 water towers to get through a drought.
- Water towers and Wells can be damaged by earthquakes or Bandits.
- If you don’t repair a Well, it will eventually go dry.
General Tips: Coal
- Coal is needed to keep the train running, for factories, and for a few special Quests.
- Coal can be found as loose nuggets on the ground, in visible veins that can be worked with a pickaxe, or below ground in Coal Mines.
- Citizens can collect all 3 forms of Coal. Your Hero can pick up loose nuggets or work on visible veins. Gunfighters can pick up loose nuggets.
- Coal can also be bought and sold if you have a Market Place.
- A working Coal Mine is required in your Main Town for a few special requests that appear late in the game.
- We highly recommend leaving one Coal Mine unworked until after you have visited all the Question marks on the Railroad Route Map in order to be able to meet these requests, and then wait until you get a Quest that requires it.
General Tips: Wood
- Wood can be found as loose pieces on the ground, as logs that can be cut, or by building a Lumber Camp and assigning Citizens to it.
- Wood is a renewable resource—you can buy Tree Seeds if you have a General Store and plant new trees, either near an existing Lumber Camp or in any flat area.
- Citizens can collect all 3 forms of wood. Your Hero can collect loose pieces or saw a log that is lying on the ground. Gunfighters can only collect loose pieces.
- After you have been to Woodinville, you will have the ability to Upgrade your Lumber Camp so that it can produce the long lengths of wood needed to build bridges.
- Wood can be bought and sold if you have a Market Place. Because wood is a renewable resource, it is most common to grow extra to sell and use it to get Gold, Coal, and even Food.
General Tips: Missions and Quests
- Required Quests are organized into “Missions.” When you have completed all of the required Quests in a location, you will get a scorecard asking you if you want to leave the location or if you want to continue playing there so you can complete optional Quests or find Hidden Object fossils.
- Players may encounter Quests in a slightly different order within the Mission, but each overall Mission should be the same for everyone.
LIST OF ALL QUESTS WITH TIPS FOR EACH (Spoilers)
- This section begins with a list of all Quests, organized by Mission, in the approximate order they’ll occur in the game. So just start from the top and scan down until you find the one you’re looking for, then use the Mission link to go directly to the detail section for its Mission.
- Make sure you read the Mission overview in the detail section, as it may contain important information that applies to all Quests in that location.
- Different players will complete the Quests in different order, so we have listed the optional Quests alphabetically within each Mission to make them easier to find when reading the Strategy Guide.
- Not sure what Quest you’re playing? The name of the Quest will appear in the Quest List on the Info Bar at the top of the screen in your game so you can be sure you’re looking for the right one.
- If you are looking for information about Hidden Object Fossils, see the Archaeological Discovery Quest in the optional Quests for the Main Town.
- Quests that start with the word A are alphabetized under A. Quests that start with the word The are alphabetized under T.
- The number of Hidden Object Fossils in each Mission location is listed after its name.
TICKET HOME MISSION (TUTORIAL) (0)
- Movement Tutorial Quest, required (Ticket Home)
- Selection Tutorial Quest, required (Ticket Home)
- Lasso Selection Quest, required (Ticket Home)
- Ticket Home Quest, required (Ticket Home)
HOME SWEET HOME MISSION (TUTORIAL) (0)
- Home Sweet Home Quest (Home Sweet Home)
- Farm Repair Quest, required (Home Sweet Home)
- Build a Farm Quest, required (Home Sweet Home)
- Hired Help Quest, required (Home Sweet Home)
- All Aboard Quest, required (Home Sweet Home)
BANDIT HOLD UP MISSION (TUTORIAL) (0)
- Train Heist Quest, required (Bandit Holdup Tutorial)
- Coal Quota Quest, required (Bandit Holdup Tutorial)
MAIN TOWN MISSION (4)
- Up and Running Quest, required (Main Town)
- Railroad Expansion Quest, required (Main Town)
- Kidnapped Sibling Quest, required (Main Town)
- Railroad Repair Quest, required (Main Town)
- Train Heist Bounty Quest, required (Main Town)
- Uncle’s Secret Deal Quest, required (Main Town)
- River Cleanup Quest, required (Main Town)
- Railroad Repo Quest, required (Main Town)
- Final Showdown Quest, required (Main Town)
- A Dog’s Treasure Quest, optional (Main Town)
- A Fish’s Treasure Quest, optional (Main Town)
- A Rat’s Treasure Quest, optional (Main Town)
- Archaeological Discovery Quest, Hidden Object Quest, optional (Main Town)
- Bake Off Quest, optional (Main Town)
- Buffalo Rustler Quest, optional (Main Town)
- Extra Help Quest, optional (Main Town)
- Extra Supplies Quest, optional (Main Town)
- Farmer’s Plight Quest, optional (Main Town)
- Fishing Club Quest, optional (Main Town)
- Fur Trader Quest, optional (Main Town)
- Gold Mine Cave-in Quest, required (Main Town)
- In Need of Supplies Quest, optional, (Main Town)
- Joe Jack Jebediah Jr. (A Job with Animals), optional (Main Town)
- Log Cutting Challenge, optional (Main Town)
- Mad Hatter Quest, optional (Main Town)
- Market Place Challenges, optional (Main Town)
- Town Thief Quest, optional (Main Town)
- Tree House Help, optional (Main Town)
- Will Work for Skills, optional (main Town)
RAILROAD BLOCKAGE MISSION (1)
- Railroad Bypass Quest, required (Railroad Blockage)
- Optional: Bandit Bounty Quest, optional (Railroad Blockage) Feed the Lumberjack Quest, optional (Railroad Blockage)
NOISE ORDINANCE MISSION (1)
- Noise Ordinance Quest, required (Noise Ordinance)
- Optional: Help for Hire Quest, optional (Noise Ordinance)
WOODINVILLE MISSION (1)
- Lumber Town Quest, required (Woodinville)
- Rat Problem Quest, required (Woodinville)
- Bridge the River Quest, required (Woodinville)
- Lumber Order Quest, required (Woodinville)
- Starving Civilians Quest, required (Woodinville)
- Food So Far Quest, required (Woodinville)
- Stranded Lumberjack Quest, required (Woodinville)
RODENT FLU MISSION (1)
- Rodent Flu Quest, required
- Optional: R.O.U.S. Quest, optional
RAILROAD DEFENSE MISSION (2)
- Defend the Engine Quest (Railroad Defense Mission)
- Repair the Track Quest, required (Railroad Defense Mission)
THE LAST COAL MINER MISSION (1)
- Timely Arrival Quest, required (Last Coal Miner Mission)
- Optional: Fortify Defenses Quest, optional (Last Coal Miner) Lost Companion Quest, required (Last Coal Miner Mission)
BROCKWAY MISSION (2)
- Strike a Deal Quest, required (Brockway)
- Will Work For Cash Quest, required (Brockway)
- Will Work For Healthcare Quest, required (Brockway)
- Will Work For Safety Quest, required (Brockway)
- Will Work For Sleep Quest, required (Brockway)
- Optional: Deputy Hungry Too Quest, optional (Brockway)
HOSTAGE RESCUE MISSION (3)
- Lost Father Quest, required (Hostage Rescue Mission)
- Rescue Operation, required (Hostage Rescue Mission/blue door)
- Pressure Plates (Hostage Rescue Mission)
- The Kings Key (Hostage Rescue Mission/red key)
- Bricked Up Cave Quest, required (Hostage Rescue Mission)
- Weak Rocks Quest, required (Hostage Rescue Mission/green key)
REAL ESTATE RAMPAGE MISSION (2)
- Real Estate Rampage Quest, Required
LANDLORD LOOPHOLES MISSION (3)
- Landlord Loopholes Quest, Required
OGDENVILLE MISSION (2)
- Ogdenville Quest, required (Ogdenville)
- Air Pollution Quest, required (Ogdenville)
- Polluted River Quest, required (Ogdenville)
- Cave Troubles Quest, required (Ogdenville)
- Town Remodel Quest, required (Ogdenville)
FATHER RANSOM MISSION (1)
- Father Ransom Quest, required*
- Father Rescue Quest, required*
- Railroad Swap Quest, required (Father Ransom)
- *You will play either Father Ransom or Father Rescue, but not both.
WRONG SIDE MISSION (3)
- Unstoppable Flood Quest, Required (Wrongside)
- Shaky Dam, Required (Wrongside)
HAVERBROOK MISSION (3)
- Haverbrook Quest, required
- Optional: Wolf Market Quest, optional (Haverbrook)
GREAT TRAIN RACE MISSION (3)
- Train Race Quest, required
VOLCANO VALLEY MISSION (Secret Location) (3)
- Volcano Valley Quest, optional
- Detailed Tips for each Mission begin here.
TICKET HOME MISSION
- Your first mission is Ticket Home, a series of four required tutorial Quests.
- At the end of the Mission you will have earned enough money to buy a ticket home to the Turner Family farm.
- Movement Tutorial Quest, required (Ticket Home Mission)
- Talk to the Citizen.
- They will give you a Key. Note that there is no visible inventory tray in this game, you just get credit for having any important items.
- Move your Hero to the Train Conductor. The gate will open automatically for you because the game knows you have the Key.
- Now you will need to earn money for a ticket.
- Collect items for the Citizen as requested. Notice that even in the tutorial you have some choice about which activities to do.
- The big red arrow will appear during Required Tasks to show you where you place items.
- Continue with the requested tasks.
- Selection Tutorial Quest, required (Ticket Home Mission)
- Additional tutorial material.
- Lasso Selection Quest, required (Ticket Home Mission)
- If you have difficulty dragging the mouse for character selection, you can also try double-clicking on a character and that will select all of the characters of the same type that are on the screen.
- Ticket Home Quest, required (Ticket Home Mission)
- Since this is the last required task for this mission, you will see a Mission Complete screen.
HOME SWEET HOME MISSION
- In this tutorial, you begin to learn about building, repairs, and employment.
- There are five required Quests.
- Home Sweet Home Quest, required (Home Sweet Home)
- Sometimes a Quest has the same name as the Mission.
- This tutorial is teaching you how to look for someone offscreen.
- Farm Repair Quest, required (Home Sweet Home)
- Part of the Home Sweet Home tutorial mission.
- Build A Farm Quest, required (Home Sweet Home)
- An important tutorial. Farms need wells, and buildings can be demolished.
- Hired Help Quest, required (Home Sweet Home)
- Another important tutorial—outcomes aren’t always what you expect, and people may still do some work while they’re waiting for a home to be built.
- All Aboard Quest, required (Home Sweet Home)
- This Quest is slightly misleading. Once the tutorials are over, you can’t travel by just getting on the train—you have to use the Railroad Route Map in the Info Bar at the top of the screen.
BANDIT HOLD UP MISSION
- In this tutorial mission, you learn how to fight Bandits, repair track, mine for coal and use TNT.
- Train Heist Quest, required (Bandit Hold-up Tutorial)
- Part of the Bandit Hold Up Tutorial Mission. Note that there is a similar repeating Quest called Train Heist Bounty Quest, so make sure you’ve found the part of the Strategy Guide that you’re looking for. This one is a one-time Quest without hostages.
- Goal: help the deputy fight off the bandits, then figure out how to repair the damaged tracks so the train can get moving.
- You will have to also complete the Coal Quota Quest so the Coal Miners will give you TNT you can use on the boulders blocking the tracks.
- Use the TNT by the boulders on the track. Because this is a required Quest, the game will have a large red arrow pointing to exactly where you should use the TNT.
- Drag your Hero to the damaged tracks, and they will automatically begin repairing them.
- When the Quest is complete, you will automatically travel to your Main Town.
- Coal Quota Quest, required (Bandit Hold-up Tutorial)
- Goal: Help the miners collect 50 pieces of coal. This will require building a Coal Mine, but they have lost their supplies.
- Start by talking to the first miner, then offering to help him collect 50 pieces of coal.
- You can begin by having the hero or the miner or both clear the visible coal vein.
- When you get down to where you need to build a Coal Mine, the first miner will talk to you again.
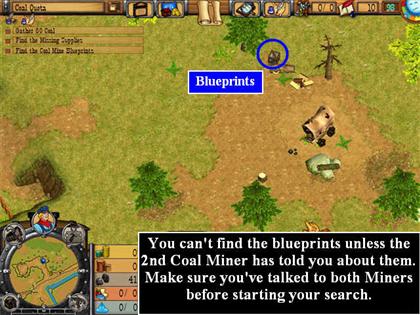
- After that, talk to the second Coal Miner. He will tell you that the supplies were lost in the hills.
- Search for the supply wagon. When you find it, tear down the wagon (drag your Hero to the wagon and they will automatically begin work). Collect everything you find.
- Look around the area for additional boxes. You should find the Coal Mine blueprints in a blue crate, but only if the second Coal Miner has already told you about them.
- Once you find the blueprints, you will need to click on the Info “shop” button in the Info Bar at the top of the page, then buy the Coal Mine knowledge. The game will guide you in how to do this.
- Go back to the Miners.
- Build the Coal Mine. Either the Hero or the miner can do it.
- Assign the miners to it until there is enough coal to meet the quota. This number varies slightly from game to game.
- Even though a Coal Mine can use 3 workers, your Hero cannot work inside a building, so they can’t work at the mine. Instead, you can have the hero walk around and pick up any loose coal that is one the ground.
- Once the quota is reached, the miners will tell you you can take some TNT and it will appear on the ground.
- Collect it and it will go into your tools inventory.
- Remember there is no pick-up chaining in Westward. If you click on the first TNT and then the 2nd before your Hero gets to the 1st one, they will just go straight to the 2nd one. You have to right-click on one, wait for the Hero to collect, then right-click on the next one.
- Now you can go back to the engine and complete the main Quest.
- Most common problem: you didn’t talk to the miners in the right order, so they haven’t told you about the supplies in the hills. Until they do, you won’t find the Coal Mine blueprints.
MAIN TOWN MISSION
- Your Main Town is different from any other location, because you will come back here after each visit to a Satellite Town.
- For that reason you don’t actually have a single Mission with a scorecard here. But you do have a set of required Quests that will be played through over the course of the whole game.
- There are also many optional Quests that you may play or not as you choose.
- We have listed the required Quests in the general order in which they occur, and the optional Quests alphabetically.
- Note that you always need to do the railroad maintenance Quests, but they can occur randomly.
- Even once you beat the game by completing all the required Quests, you may continue playing to earn trophies and do optional Quests.
Up and Running Quest, required (Main Town)
- Initial Goal: get more information about your father.
- Subsequent Goal: get the train running again.
- Strategy: Repair damage and build up the town so it can produce the 5 Elements again (coal, food, water, gold, and wood).
- Walk towards the town until you see a railroad worker. They will tell you they are too busy to talk.
- Help them repair the damaged track.
- Eventually the worker will lead you to the railroad station, where you will find the Chief Engineer. Both the Train Yard (left) and the Train Station (right) have been damaged.
- At this point the real game begins. You have many ways of solving most of the Quests. Remember to provide food, water, and housing for your workers. It’s up to you which Quests you’ll do first.
- Note there are a total of 5 Coal Mines and 5 Gold Mines in your Main Town.
- We strongly recommend leaving one Coal Mine undeveloped until near the end of the game, as there are several optional Quests that show up very late that require a working Coal Mine to complete.
- So just don’t develop more than 4 Coal Mines until you’ve visited all the Question marks on the Railroad Route map, and you’ll be fine.
- To complete the Up and Running Quest, you will have to build a house for the Chief Engineer, get a Coal Mine operational, repair the Train Yard and the Train Station, employ someone at the Train Yard, and produce enough coal to keep the Train Yard supplied. That’s the minimum needed, but the game will guide you to also build a Warehouse, Gold Mine, a Well, a Farm, and a Lumber Yard.
- You’ll want to hire at least 8 workers, so you’ll also end up building some housing.
- It’s likely that you’ll complete the Gold Mine Cave-in Quest and the Farmer’s Plight Quest as part of gathering the 5 Elements for your town.
- It’s not clear whether the Extra Supplies Quest is required before you finish the Up and Running Quest, but it’s a good idea to do it anyway as you can use the extra supplies at the beginning.
Railroad Expansion Quest, Required (Main Town)
- This is the Quest where you will use the Railroad Route Map in the center of the Info Bar at the top of the screen to travel to other towns.

- Keep checking the Quest Log and it will give you details about what you need to do to get to the next town on the map.
- Note that sometimes you will need to repair tracks or bridges in your Main Town (on the Main Town map), and sometimes you will need to use the Railroad Route Map to travel to a repair that’s needed further down the line.
- You will not be allowed to take any of the 5 Elements with you when you travel to other towns using the map.
- For some Quests, you will get to take your gunfighters, and you can carry up to 20 Health Kits with you.
- In addition, anything you’ve bought in the Info “Shop” will be valid in every town you visit. So if you’ve learned how to grow Corn in your Main Town, you’ll be able to grow Corn in any Expansion Towns you go to. This will be essential for completing some of the Expansion Quests, but we’ll discuss those issues under the specific Quests involved.
- It will take you about 2/3 of the game to finish the Railroad Expansion Quest. It’s up to you how many of the Optional Quests you do during that time.
Kidnapped Sibling Quest, required (Main Town)
- A group of Bandits have kidnapped your Sibling.
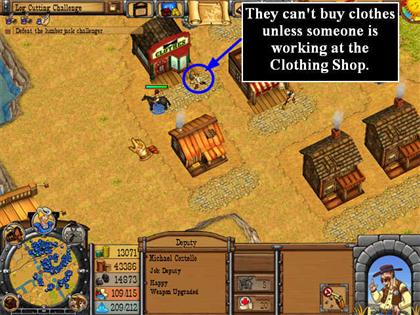
- Take 3 Lawmen to the Clothing Shop and disguise them in civilian clothes. Make sure they have upgraded weapons and are at full health.
- There are conflicting reports as to whether gunfighters on horseback can wear the civilian clothes. We were only able to make it work with ones without horses.
- Normally a Deputy will buy a new hat, but not new clothes. For this Quest, they will buy new clothes. Just select a Deputy and drag them to the Clothing Shop.
- Make sure the Clothing Shop is employed, or they won’t be able to buy anything.
- Only Lawmen count for this Quest, so they must be Deputies or the Sheriff, not Bounty Hunters.
- Once you have 3 Lawmen in civilian clothes, find the place on the Main Town map where your sibling is tied up. That’s where you need to go.
- Take your Hero and your 3 disguised lawmen to the area.
- If you bring any other gunfighters or dogs, have them wait out of sight.
- Have the Hero walk up to the gate.
- Select the 3 disguised gunmen as a group and have them walk up behind the Hero. They'll say "We're in position, boss." when they're in the right spot.
- The Bandit will come open the gate to get the ransom.
- Also keep an eye on the health of your gunfighters. Select the whole group, and you will see their character pictures with a health bar above each one at the bottom of the screen.
- Click on any character whose health is below 50%, then give them a Health Kit. You can even buy more Health Kits during the battle by clicking on any employed doctor’s office , but you shouldn’t need to.
Railroad Repair Quest, required (Main Town)
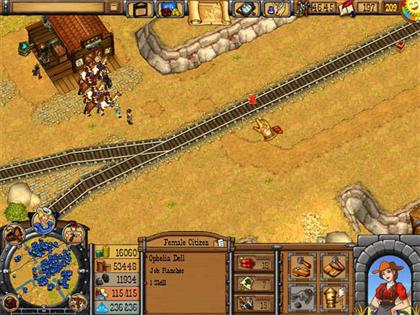
- This Quest is triggered when there is damage to the tracks between towns. You will have to use the Railroad Route Map in the center of the Info Bar at the top of the screen to get there.
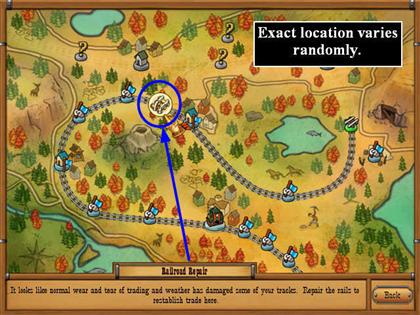
- This Quest will repeat multiple times, randomly. You will be rewarded with experience points each time you complete it.
- If you get tired of doing these, after you have upgraded the Train Yard a person will appear who will offer to do this for you for a fee, usually $100 or $200, each time it occurs. You can pay him to do it or do it yourself.
- There is a trophy that you will get for completing 10 of the maintenance Quests (Railroad Repair and ), so if you want that trophy you’ll need to do 10 yourself.
- There are many different strategies for doing this Quest. There is no time limit on it.
- You are going to take your gunfighters with you from your Main Town, so make sure they are in good health before you go. You will need at least 4.
- Bandits are going to come through continuously in groups of two and attack the train engine from both sides.
- As soon as you arrive, station your gunfighters except for the Hero right in front of the engine. If you have at least 6, you can put them in two groups of 3, one on each side near the front of the engine.
- A very simple, straightforward method is to build a Lumber Camp and start one citizen doing that. Have the other build a well and a Farm and start working on the Farm.
- Your Hero should build a warehouse and work on collecting Gold and wood. Have any of the 3 collect berries whenever your run too low on food.
- Eventually build a doctor’s office near the farm, then a General Store. The Farmer can take of all 3 of these.
- The other citizen can collect wood and gold.
- Eventually you need to build a Blacksmith’s, but you don’t need to employ anyone there.
- If there is someone offering to repair a bridge or a tunnel, you’ll have them do that later in the Quest when you have more resources.
- If your deputies need a health booth, drag them one at a time to the doctor’s office, since this is cheaper than health kits. Later in the game when you have a lot of money in your Main Town you can buy 20 Health Kits and bring them with you. Then you probably won’t need a doctor’s office during the repair Quest.
- Make sure your gunfighters pick up any gold dropped by the Bandits, and this will help pay for their health care.
- Once you have everything, your Hero can repair the tracks.
- There are many other ways to do this—some players like to build housing and get more workers and do things faster. But food and space to build is generally limited in these Quests, and you can do it with just 2 Citizens as long as you’re patient.
Train Heist Bounty, Required (Main Town)
- Note that there is a similarly named Quest in the Bandit Hold-up Tutorial Mission, called Train Heist. That one does not have hostages, this one does. Make sure you’re checking the part of the Strategy Guide you’re looking for.
- You just need a strong posse to handle those Bandits!
- Take at least 9 gunfighters, all at full Health with upgraded guns, and 20 Health kits.
- Rescue each group of Hostages and clear away the Bandits from the Engine, and the Quest is complete.
- This mission will repeat with variations throughout the game.
- Because it occurs in between towns, you get to take the gunfighters from your Main Town with you.
Uncle’s Secret Deal Quest, required (Main Town)
- This is triggered when Uncle Sal arrives in town and asks to speak to you.
- Although it seemed like a very bad idea to us, pay the Uncle the money he asks for to move the plot forward.
- Take note here: any time you can’t employ someone at the Railroad Freight Yard in the Main Town, it means the Turner Family does not own the railroad. (Cue ominous music…)
River Cleanup Quest, required (Main Town)
- There are two river pollution Quests: River Cleanup in the Main Town and Polluted River in Ogdenville. Check to make sure you have the part of the Strategy Guide you need for your current Quest.
- This Quest occurs fairly late in the game. You may need to do the Train Station Upgrade to trigger it.
- You will have to locate 7 toxic waste barrels and carry them to the man across the river who buys and sells anything.
- Remember that you can have regular Citizens, not just your Hero, carry these.
- Most are easy to find.
- If you are trying to get one in the river and you are blocked by a bridge from wading to it, you may need to demolish the bridge, walk up and get the barrel, walk up on to the land again, and then rebuild the bridge so you can carry it across to the peddler..
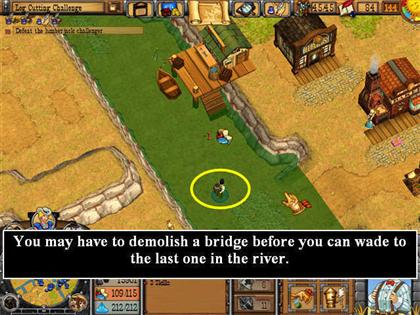
- Here are the locations for Anne. All 7 barrels are in the river on the west side of town, but you have to approach them from different sides:#1 Northwest. The barrel is in the river just south of the railroad bridge that crosses over to the west. You will be able to wade to it as long as you have already built bridges connecting to the peddler’s camp in the west (which you need to do anyway since you are going to take the barrels to him), so try left-clicking on your hero, then right-clicking on the barrel and seeing if Anne can find her way there. We’re going to start with this one because if you can’t get to it, you probably can’t get to the peddler either. #2 The barrel is in the river in the next pond south of #1. You will be able to wade to it from the west side. #3 Northwest. The barrel is in the river in the same pond as #2, just a bit further south. You will be able to wade to it from the west side. #4 Northwest. The barrel is in the river just north of the railroad bridge that crosses over to the west. You should be able to wade to it easily. #5 Northwest. The barrel is in the river further north than #2. This is the barrel most people have the hardest time with, because you’ve probably built a bridge in the way (or even right over the barrel so you can’t see it). Go to the right side of the river bank. Demolish the bridge that’s in the way. Wade to the barrel, pick it up, then return to the right side of the river bank. Rebuild the bridge so you can carry the barrel to the peddler. #6 Look on the west side of the map where the river turns to the west. In the river just past a little channel (too narrow to walk through) is the next barrel. You will have to come at it from the south. First you may have to use TNT on a boulder on land that is blocking access to the path to the shore. Once you can get to the shore, you should be able to wade into the river and pick up the barrel. #7 Look in the river right up against the western boundary of town. You should be able to wade to this after you have removed the boulder mentioned under #6.
Railroad Repo Quest, required (Main Town)
- The main story takes place through a series of required Quests: Up & Running, Railroad Expansion, Kidnapped Sibling, Uncle’s Secret, Railroad Repo, and Final Showdown.
- To trigger the Quest, begin by going near the two Bandits who are standing by the tracks at the town’s edge. You will find out that one of them likes cheese.
- You must have more than 40 citizens in the town and a happiness of at least 180 to meet the "high value" requirement.

- You can get one of your Ranches to produce cheese if you haven’t already. Upgrade the Ranch, switch one pen to Cows, and employ a skilled Farmer there. The cheese will appear on the ground outside the pen.
- Take the cheese to the Bandit, and he will tell you more. There’s still a chance to save Turner Railroad!
- Now you must increase the value of the town because you’re going to “sell” it to get the entry fee for the big train race. Don’t worry, though—you’ll get it all back at the end.
Final Showdown Quest, required (Main Town)
- This is the last required Quest, and after it you will officially “beat the game.” However, you can keep playing to find Hidden Objects, do optional Quests, earn trophies, and even unlock a secret location: Volcano Valley.
- You won the race, and the Turner Family owns the town again, so you have all your resources.
- Your relatives are going to go check on the Expansion Towns and make sure everything is OK there.
- All you have to do is track down and defeat all the bandits that are attacking the town and rescue your Uncle Sal.
- This is triggered by winning the Train Race in an Expansion Town.
- Begin by employing someone at the Train Station and Train Yard again so trains can start running.
- If somehow you go this far without upgrading the Train Yard, go ahead and do it now as well.
- Make sure all Railroad Disasters have been handled and all tracks are in good repair.
- You will not need to use the Railroad Route Map unless there’s a Railroad Disaster (Repair Tracks or Hostage issue)—your relatives will handle that.
- If you need more deputies, just build more Sheriff’s stations, and hire more. Upgrade their weapons and build stables so they’re all on Horseback.
- Station at least 4 gunfighters at every entrance to the town, including bridges and the two ends of the railroad track.
- Eventually your father and your sibling will report back, but your Uncle Sal is missing and Bandits have surrounded the town!
- Now take a group of at least 7 gunfighters including your Hero and attack each of the groups of Bandits who are standing by very large crates.

- Before opening the crates, heal all the gunfighters with Health Kits. (The crates have more bandits inside, except for the one that has Uncle Sal.)
- If you see a Bandit Attack icon on the left side of the screen, click on it—you may need to move some of your gunfighters over to protect buildings in the town.
- Remember that Dogs will also fight Bandits.
- Eventually you will win the challenge and rescue Uncle Sal.
- He’ll tell you there’s a train loaded with TNT headed for the town! You’ve got to head it off!
- Talk to your father several times and you’ll come up with a plan.
- You’ll need to buy SuperTNT at the Blacksmith (click on the bubble to see the materials requirements, although at this stage you should have everything).
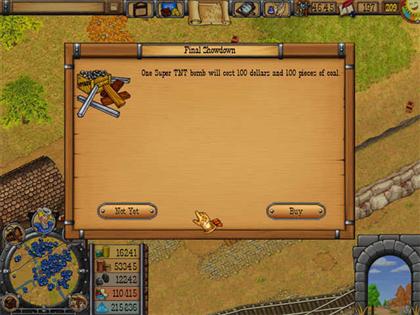
- Place three of them on the tracks where the big red arrow is. This should be near where you gave the Bandit the cheese.
- The train will blow up, and you will “beat the game.”
- This will unlock the Crown for the Hat Shop and the Pioneer Trophy.
- The Credits will roll, but you’ll be able to continue playing afterwards.
- Note: some people find that during this Quest for some reason the Quest List loses track of the Mad Hatter Quest, particularly if you haven’t completed it yet. It becomes grayed out with ???’s instead of its name. Don’t worry—it will come back later and you can complete it then.
- In order to continue playing Optional Quests at this point, don’t forget to repair the tracks again!
A Dog's Treasure, optional (Main Town)
- There are three related “Treasure” Quests: Dog, Fish, and Rat. For each you must find a key and a chest that have a matching animal symbol.
- Once you have opened all 3 chests (in any order), you will unlock the Deerstalker/Sherlock Holmes hat in the Hat Shop.
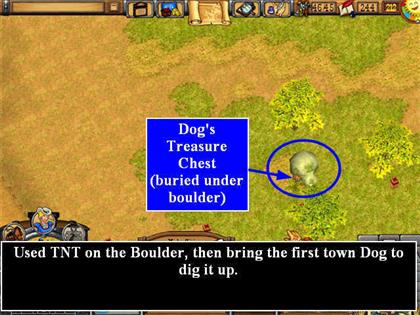
- For the Dog’s treasure, look for a boulder that is clearly lying over most of one of the places where you usually dig.
- Blow up the boulder with TNT.
- Now get the Dog who was the original dog in town. You may have more than one Dog, because sometimes a Bounty Hunter will bring one with him, and they all look alike. It’s easiest to just bring all the dogs you can find with you.
- To locate Dogs, click through the Next Gunfighter button in the lower left—Dogs count as gunfighters because they’ll attack Bandits.
- Dig up the hole. This reveals a treasure chest.
- Drag the dog to the chest. If you have more than one dog, you can just drag them all.
- Now you must follow that dog and it will lead you to more holes. You have to dig those up.
- Eventually you will be told that you found a Key.
- Go back to the treasure chest and right-click on it, and you will end the Quest.
A Fish's Treasure, optional (Main Town)
- There are three related “Treasure” Quests: Dog, Fish, and Rat. For each you must find a key and a chest that have a matching animal symbol.
- Once you have opened all 3 chests (in any order), you will unlock the Deerstalker/Sherlock Holmes hat in the Hat Shop.
- To find the Fish’s treasure, locate the lake in the Main Town that has a fishing pier already built on it. There will be a covered wagon wreck not too far from it, and a fish swimming in the pond.
- Now look along the river (for Anne, it is to the South) until you find a dome shaped rock that looks a little like a stone igloo down in the river. This is a tunnel entrance.
- Above that on the riverbank will be a big boulder, the regular kind. Blow this up with TNT, and it will reveal a dark black hole. This is the entrance to the tunnel.
- To go in the tunnel, just right-click on it, and your Hero will jump down the tunnel and come out in the river.
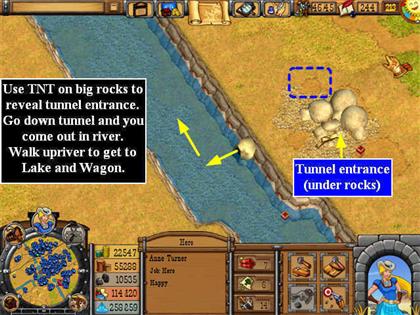
- Now you can walk up to the lake.
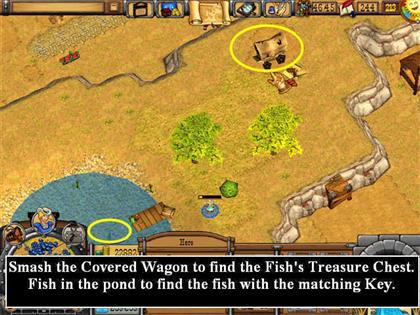
- Fish off the pier until you catch a Fish that has a Key. The Key will automatically be credited to you.
- Walk to the covered wagon and smash it, revealing a treasure chest.
- Right-click on the chest, and it will open.
A Rat's Treasure, optional (Main Town)
- There are three related “Treasure” Quests: Dog, Fish, and Rat. For each you must find a key and a chest that have a matching animal symbol.
- Once you have opened all 3 chests (in any order), you will unlock the Deerstalker/Sherlock Holmes hat in the Hat Shop.
- For this Quest you will need Cheese. Where do you get Cheese in the main town? From a Ranch that has Cows. Just wait and eventually a yellow block of cheese will appear on the ground by the Ranch.
- Look for another tunnel rock that looks like a stone igloo. For Anne, this is in the upper right.
- Place 3 blocks of cheese there. A rat will come out and eat all 3 and get very fat. When it does, you can tell it has a key on its neck.
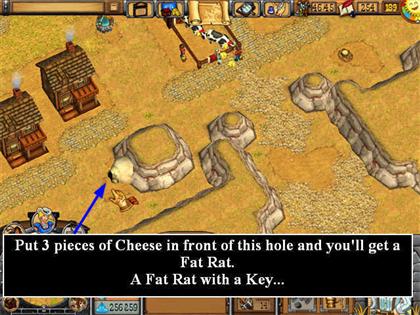
- Right-click on the rat and you will be credited with the key.
- Now look for a tree that is clearly planted over one of the holes you usually dig up. For Anne this is also in the upper right, but even closer to the boundary line.
- Blow up the tree with TNT, and you will a hole you can dig.
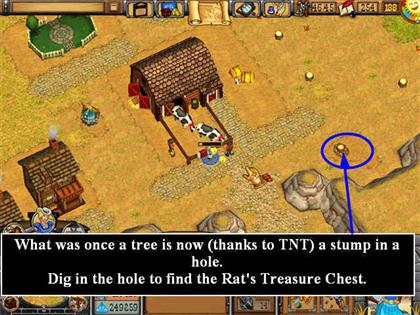
- Dig up the hole, and you will find a treasure chest.
- Right-click on the chest after finding the Rat’s Key and you will get credit for completing the Quest.
Archaeological Discovery Hidden Object Quest, optional (Main Town)
- This is an optional Quest, but most people really like the reward—your very own dinosaur! You won’t get it until you’ve collected all 36 of the Hidden Fossils, and that will mean visiting all the Expansion Towns, so it can’t happen until the very end of the game.
- Remember that you cannot return to an Expansion Town once you leave it, so if you want the Dinosaur, stay long enough to collect all the Hidden Object Fossils.
- To trigger the Quest, talk to Arizona Bones, the visitor archaeologist who is digging at a camp site. Note that as a visitor you cannot control or move Dr. Bones.
- After you talk to him the first time, you just have to collect the Fossils as you go along.
- Don’t waste time while Bandits are shooting at you picking up Fossils! You’ll have plenty of time at the end of each Mission to do so.
- At the end of each Mission, the Mission scorecard will tell you how many Hidden Objects you found out of the total at that location.
- If the scorecard says you found them all (including a score of “0/0”) click the COMPLETE button.
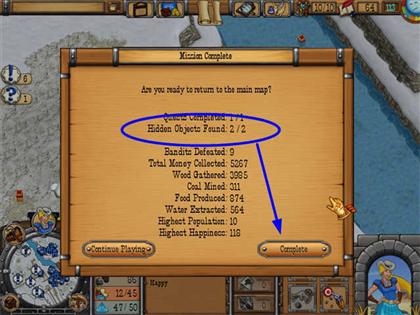
- If the scorecard says you still have some to find, click the CONTINUE PLAYING button to stay in the same location and look for them.
- Here are the locations of all the fossils for Anne. They will be in different map quadrants for Henry, but similar geography.
- You will need TNT to access many of them.
- You may have to use TNT on a tree rather than a boulder to find some.
- The scorecard at the end of each mission will tell you if you missed any Hidden Object Fossils. If so, choose CONTINUE PLAYING to return to that location and keep searching.
- Although each person playing the game will only have a chance to pick up 36 fossils, there are 37 in the game, depending on whether you choose Anne’s Plan or Henry’s Plan towards the end of the game. (You can choose either plan as either character.) So you will be able to collect 3A or 3B, but not both.
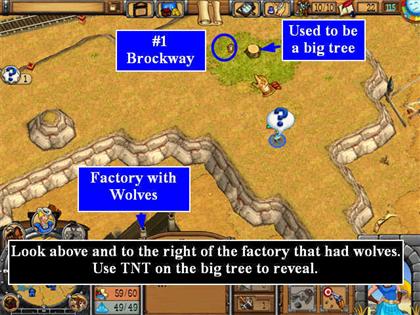
- Fossil Locations:#1. Brockway. Northwest on a table under the tree that is above and to the right of the factory that had wolves. You will have to zoom in to see it. To get there, look to the left of this factory. There is a hill that you can walk up. It looks like you are going outside the town limits, but you’ll be able to get there. Just walk to the big tree, zoom in, and pick up the fossil.
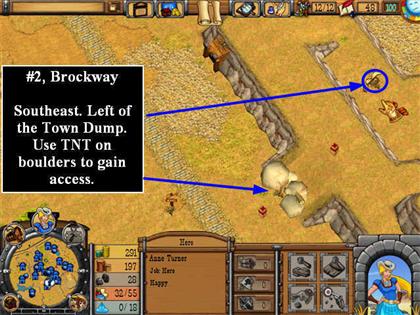
- #2. Brockway. Southeast on the plateau that runs along the left side of the Town Dump where you put the toxic waste. Use TNT on the boulders on the ramp on the far left side of that plateau.
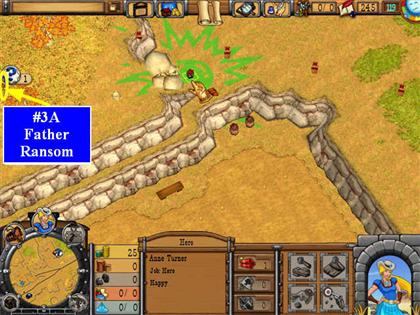
- #3A. Father Ransom Mission/Father Ransom Quest: Behind the stockade that held the SuperTNT. Use TNT on the boulders as shown to get access. (This fossil will only be available if you choose to ransom Father.)
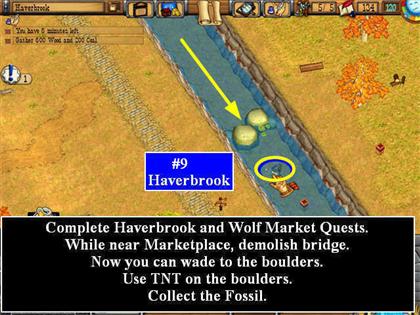
- #3B. Father Ransom Mission/Father Rescue Quest: Northeast in the lake. After you take your party to the big red arrow, the main Quest will be complete for this mission. Choose Continue Playing. Now have your hero walk to the lake and pick up the fossil. (This fossil will only be available if you choose to fight to rescue Father.) #4. Great Train Race Mission: In the North, walk along the river towards the falls with the river on your left. You’ll see the fossil under a log on your right. Note that you don’t need a bridge to get here. #5. Great Train Race Mission: Southwest (towards center) in a canyon with a covered wagon. You will need TNT to gain access to the canyon, so you will have to build a General Store. #6. Great Train Race Mission: Southeast in the lake (you may have to fish first). #7. Haverbrook Mission: North near the boundary line behind a log by a boulder. You enter through the section where the wolf was, then walk up to the right. Chop the log to get access. #8. Haverbook Mission: Northeast across the river, on the north side of the island where the man with the market place is. You need to walk to the riverbank from the town side, then build a bridge going south to get to the fossil. #9. Haverbrook Mission: Southeast in the river behind some rocks. You can wade there from the town side, but you may need to demolish the bridge you used to get to where the Market Place was. Use TNT on the boulder in the river to get access. You may have to catch the fish before you can pick up the fossil.
- #10. Hostage Rescue Mission: Southeast behind a small fence. You will have to use TNT on the fence to remove it.
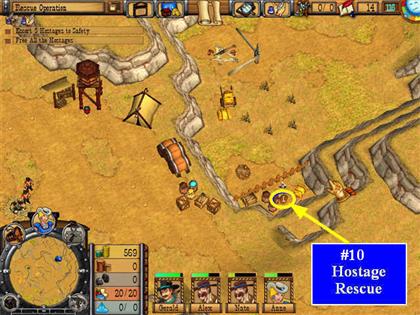
- #11. Hostage Rescue Mission: Northwest by the bear. To get there, you need to go back to King’s hideout in the southwest. Look for a boulder you can blow up in the top left corner of King’s hideout. Once you remove the boulder with TNT, you can walk up along the western border of the town and get to the area where the fossil is.
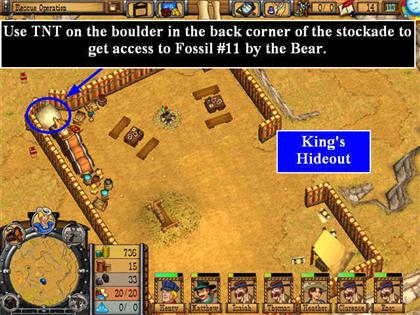
- #12. Hostage Rescue Mission: Northeast on a table where two Bandits are behind a green door (so you need the green key). #13. Landlord Loopholes Mission: Northwest in canyon. Use TNT on the boulder to the east of the Base Camp (where the tent is) and you can walk into an area by the pond. On the left of the pond, the path up the hill is blocked by boulders. Use TNT there and you can walk to the fossil at the south end of the plateau. #14. Landlord Loopholes Mission: Southwest by a bush (defeat Bandits, then use TNT on boulder); #15. Landlord Loopholes Mission: Southeast across the river by a rock. You will have to first use TNT to blow up a boulder just south of the Base Camp. You can then build a bridge across the river to the south (there’s only one place where the bridge will work, so just move your cursor to find it). Once you’re across the river, you can see the fossil by the river, but a log is in the way. Remove the log by chopping it.
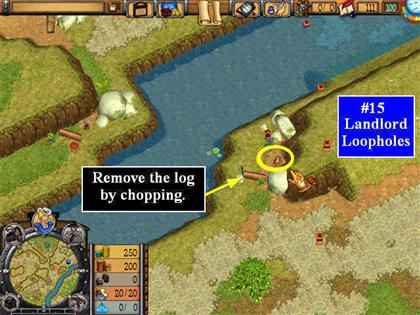
- #16A. Main Town for Anne: Next to Arizona Bones (dig in the hole). #17A. Main Town for Anne: Northwest by a rock with a log. You will have to wait until you can cross the river to get to it. #18A. Main Town for Anne: There is a pond in the center of the map with falls below it. Just west of the pond is a canyon with a gold mine in it. Fossil #18 is just behind a boulder next to the gold mine. To get to it, look left of the falls for a passage into the canyon blocked by boulders. You will have to use TNT to remove the boulders, then you can walk to the fossil.
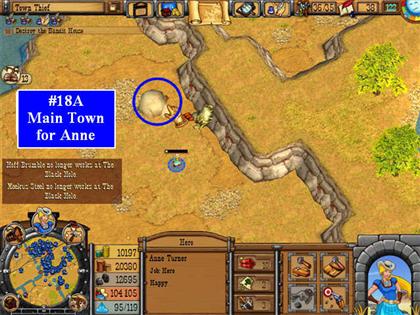
- #19A. Main Town for Anne: Southwest in the Bandit hideout where you rescue the Buffalo. #16B. Main Town for Henry: Next to Arizona Bones (dig in the hole). #17B. Main Town for Henry: Northeast by a rock with a log. This is just to the southeast of a large quarry, right near the boundary. You will be able to walk to it, but not until you’ve cleared out a Bandit hideout that’s on the path. #18B. Main Town for Henry: Northwest across the river. Find where the railroad tracks cross the river on the west side of town. You will see the peddler’s tent there. Just north of that is a pond. Then north of the pond is a canyon with a gold mine. The fossil is just behind a boulder next to the gold mine. You have to enter the canyon from the north side by blowing up some boulders with TNT. #19B. Main Town for Henry: West across the river in the Bandit hideout where you rescue the Buffalo. #20. Noise Ordinance Mission: There is a river on the east side of town. Walk north with the river on your right, just past where the railroad crosses the river. You will come to a Bandit camp with two Bandits. (You may want to bring a Bounty Hunter for help.) Kill the Bandits and you will find the fossil on a table in their camp. #21. Ogdenville Mission: Northwest in 3 trees. Walk up to the Old Quarry where you dropped the toxic waste barrels, then go up a hill on the north side of the quarry. Now walk left. You will come to a fence. Use TNT on the fence, then go up onto the plateau (west of the Old Quarry) and collect the fossil. #22. Ogdenville Mission: Southeast across the river. You will need to build a bridge just east of where the fossils are so you can cross. #23. Railroad Blockade Mission: Find where the railroad crosses the river in the Northeast. Look just above there on the land beside rock with 3 trees and you will see the fossil. To get there, have your Hero wade across the river to where some boulders are blocking a ramp that is just to the south of where the railroad crosses the river. Use TNT on the boulders in the river and you’ll be able to walk up to the fossil. #24. Railroad Defense Mission: East just below the tracks on a little hill. Use TNT on boulders below for access. #25. Railroad Defense Mission: You can see the fossil south across the river. Walk across the bridge in the west and then you will be able to walk down to the fossil.
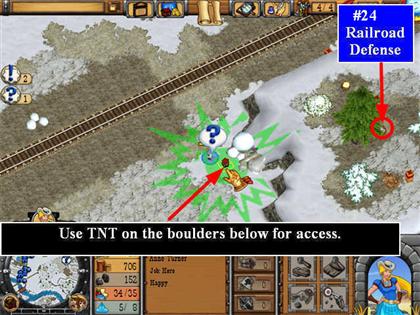
- #26. Real Estate Rampage Mission: Northwest by 3 trees. You have to wade up river to get to this, then use TNT to remove the boulders blocking access. The problem is that you probably already built east-west bridge that prevents you from wading far enough north. Make sure you don’t have anyone scheduled to walk across the bridge. Click on the bridge, then on the bomb icon to demolish it. Now you can have any Citizen or your Hero who is on the west side of the river wade north, use the TNT, and collect the fossil. If you still need the bridge, just wait until your character is back on the bank, then rebuild it. #27. Real Estate Rampage Mission: Southeast by 3 trees. You can see this just above the Gold Mine that exists when you arrive in town. To get there, though, you must first build a bridge to the east across the river towards the Bandits’ camp. Kill the Bandits. Walk down a ramp on the right side of the camp so that you are by a Coal vein. Build a second bridge going south. Once the second bridge is built you can walk to the fossil. Note that this second bridge is a bit tricky to place. Look for a place right across from the hill you’ll walk up. #28. Rodent Flu Mission: Northeast. You must go to the Southeast and then build two bridges going north. You will be able to see the Fossil in the Northeast, but you will need TNT to remove a boulder that is in the way.
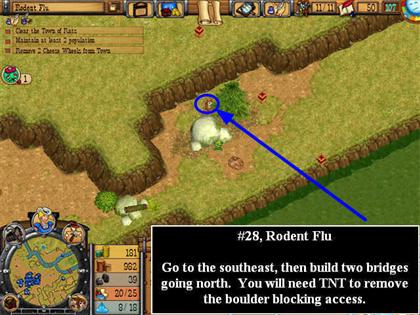
- #29. The Last Coal Miner Mission: Southeast by the dog. Look in the Southeast and you will see a dog trapped in a canyon. You need to use TNT to blow up the fence, then go in and get the fossil and the dog. #30. Volcano Valley Mission: North at the Bandit camp. You will be able to get to this once you’ve used the TNT to open the pathway for #30. #31. Volcano Valley Mission: Northeast by a rock. You can see this fossil clearly, but initially you can’t get to it. You will have to use TNT to remove some black boulders to walk north into an area with more trees, then use TNT again to remove black boulders that are blocking the pathway over the lava to the fossil. #32. Volcano Valley Mission: Southeast below the railroad tracks. #33. Woodinville Mission: Northeast. Find the railroad tracks that cross the river going east. Look north above them on the right side of the river. You have to take a roundabout way to get here. First build the river going south onto the center island. Then build the bridge going west. From here you will be able to wade through the river and come up in the south east quadrant. (You have to do this BEFORE you build a bridge to collect the big cache of supplies you can see in the south.) Once you have made your way to the land in the southeast quadrant, you then have to build a bridge going north to get to the last island in the northeast. From here it doesn’t look like you should be able to walk to the fossil, since your character will have to go outside the town limits, but you’ll find that it is possible. Once you have crossed the last bridge north onto the last island, just left-click on your hero, then right-click near the fossil and your character will find the way.
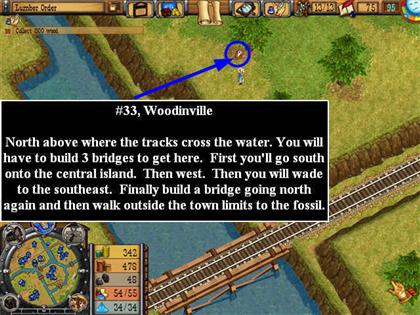
- #34. Wrong Side Mission: Look in the West for a boulder with a purple flower to the left of it. The fossil is under a tree to the left of the flower. It’s much easier to see if you zoom in. #35. Wrong Side Mission: In the north you will see a small pit with some coal deposits and a metal wagon used in mines. The fossil is in the wagon. You will have to use TNT to remove the fence blocking the entrance to the pit, so you will need to build a General Store if you haven’t already. #36. Wrongside Mission: Southeast across the river by train track. Find the place in the east where there the tracks cross the river. You will need to walk along the bank just above the river and find a place to build a bridge going south to reach the fossil.
Bake Off Quest, optional (Main Town)
- Build a bakery and employ the baker there.
- This is triggered by the arrival in town of the Citizen who wants to be a baker.
- When the time comes that you need apples, you will find them on the ground near the Lumber Camp after you have planted tree seeds there. They look more triangular, like peaches. Anyone can harvest them. They will count as food and also inspire the Baker to make pies.
- Apples that you find in baskets also count.
- A working bakery will automatically sell the Bakery Good at the train station every time a train comes in, and will also produce the pink baked good boxes that you may find a use for later on.
Buffalo Rustler Quest, optional (Main Town)
- First go find the man who is standing out in a round green field with some Buffalo.
- Talk to him. One of his Buffalos has been stolen by Bandits. This will trigger the Quest.
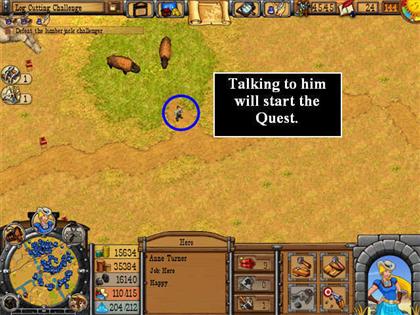
- Search the map, and you will locate a group of Bandits who have the Buffalo penned up.
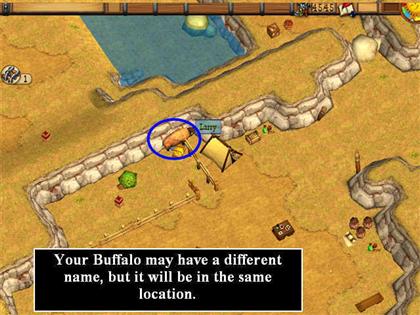
- Take a group of gunfighters and go kill the Bandits.
- There is a Hidden Object Fossil underneath the berry bush in the buffalo’s pen—take it.
- Then click on the Buffalo, and you will find you can control him just like you would a dog.
- Walk with the Buffalo back to the green field and the Quest will be complete.
- The man will also give you an important tip—Buffalo like the stuff that comes in pink Bakery boxes.
- If you’ve completed the Bake-off Quest and picked up apples, eventually the Baker will produce these pink boxes and they will be lying on the ground next to the Bakery.
- Any time it’s convenient (there’s no hurry) take two pink boxes to the very center of the green field where the man was with the Buffalo before.
- There won’t be a red arrow because this is an optional task, but the patch of grass is slightly greener there.
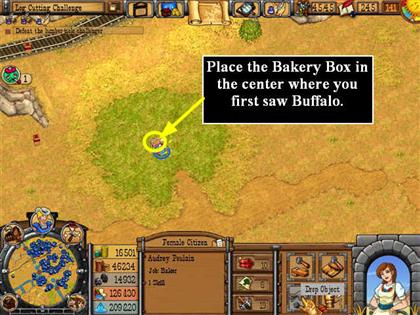
- After you leave two boxes, eventually a Buffalo will appear. At that point you will be able to have Buffalo on any upgraded ranch you own that has a Skilled Farmer working there.
- To add Buffalo to a ranch, employ a Skilled Farmer there, then click on the Pen. You’ll be able to choose Buffalo now!
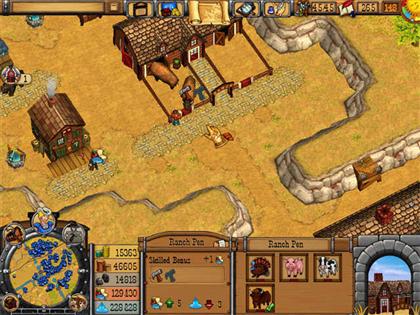
- Note that if you leave the Bakery boxes before you have an upgraded Ranch with a skilled Farmer, you’ll have to wait for that prerequisite to be filled before the Buffalo will even appear.
- If you have the Ranch and the Farmer working there, though, and it’s been longer than 3 minutes, check the placement of the boxes to make sure they’re in the center of the green field.
- A working bakery will automatically sell the Bakery Good at the train station every time a train comes in, and will also produce the pink baked good boxes you need to eventually add Buffalo to your ranches.
Extra Help Quest, required (Main Town)
- Two brothers will arrive in town. One wants to work at a Gold Mine.
- The other wants to farm, but he wants to farm something other than radishes. Go to the Info “Shop” on Info Bar at the top of the screen and purchase the knowledge to grow another crop, either Corn or Tomatoes.
- Now go to any farm you own. Click on a row of crops that has a farmer employed there. (It can be the brother if that’s easiest.) It does not need to be an upgraded farm.
- You will be allowed to choose the crop to grow in that row. Choose anything other than radishes and put the brother to work there if he isn’t already and the Quest will be complete.
Extra Supplies Quest, required (Main Town)
- This is a required Quest. However, there’s no time limit, and you can do other things first if you like. You’re going to be searching for crates of supplies that are unusually full, though, so it’s worth doing some digging.
Farmers Plight Quest, required (Main Town)
- At the end you will be able to build a Coal Mine on the site. You must first build a farm, and most likely you will want to build houses for additional workers also.
- A good rule of thumb is to build 1 Well for each farm or ranch, plus 1 Well for each four buildings (for fire prevention).
- 1 unskilled Farmer can feed 3 Citizens. 1 skilled Farmer can feed 4 Citizens. However, this early in the game there are a lot of supplementary sources around like berry bushes. Keep an eye on your food supplies, and supplement as necessary.
Fishing Club Quest, optional (Main Town)
- This Quest is optional, but it is specific to this one person. His/her name will be different for different players, but it will be very clear that what is desired is a fishing club building, and to be employed there.
- The Quest is triggered by the arrival of this person.
- You can build this anywhere you see 3 fish swimming in a river and the ground is flat enough to build on. For Anne, the closest one is on the Northwest side of the Main Town, near the groves of trees there.
- Once all the Fish are caught, just have the Citizen quit that job and go someplace else for awhile. They can come back later when the fish return.
- There are at least 3 places in the Main Town where you can build Fishing Huts, but not all of them are immediately accessible.
- Note that this Quest can only be completed by making this one person happy, so it’s best to do it right away when they show up. If they leave town before they are employed at a Fishing Hut, you can never complete the Quest.
- On the other hand, if they are employed at the Fishing Hut and then later leave town because of hunger or homeless, you still get credit for the Quest, although it will be grayed out on the Quest List.
Fur Trader Quest, optional (Main Town)
- The Fur trader is a visitor who will ask you for a succession of animal skills. All you have to do is have your Hero (or another gunfighter) shoot the required animals in your Main Town.
- Animals shot in Expansion Towns don’t count.
- Animals shot before they’re asked for don’t count.
- Remember that in Westward game animals will spawn in the same quadrant, but there is a cap on the total number of game animals any quadrant can hold at one time. So if you’re looking for Deer, you need to be in a quadrant where Deer live.
- And if you’re in the right quadrant but there are none of the type of animal you need, you’ll need to shoot some of the other types to make room in the quota for them.
- The most common problem with this Quest is people who say they can’t find any Wolves. The Wolves will appear in the same quadrant as the Bears. (For Anne, this is the lower left.) Once Bears appear, many players stop shooting them, because they are much harder to kill than Wolves or Deer. But you have to kill the Bears to reduce the animal population so new animals can come in.
- 3 Deputies with upgraded weapons on horses can kill a Bear very quickly, so you may want to wait to finish this Quest until late in the game when you have a lot of lawmen.
- As soon as you acquire enough pelts of one type, the Fur Trader will ask to speak to you again. Click on their conversation bubble and you will automatically be credited with the furs.
Gold Mine Cave-In Quest, optional (Main Town)
- This will not be triggered until you’ve completed Farmers Plight and talked to the Gold Miner.
- Your reward is permission to build a Gold Mine on the site.
In Need of Supplies Quest, optional (Main Town)
- This is triggered when Visitors show up at the town limits asking for food and wood. The amount they request will take almost all your food, so make sure you’ve identified an unpicked berry bush and are ready to send your Hero or a Citizen to it as soon as you’ve given the supplies to the visitors.
Joe Jack Jebediah Jr. (A Job with Animals), optional (Main Town)
- Although this Quest is named for one person, the person’s name may be different for different players.
- They will ask for a job with animals, “that I can really sink my teeth into.”
- What they want is to work at a Butcher Shop.
- But before you can build a Butcher Shop, you need to have a working, upgraded Ranch.
- Work quickly on this one—like the Bakery and the Fishing Club, only satisfying this one person will fulfill the Quest.
Log Cutting Challenge, optional (Main Town)
- Once you have three upgraded lumber camps in town, a visitor will appear at the town limits (for Anne, this is in the Southeast quadrant) and challenge you to a bet—that he can split any log you put in front of him or he will pay you $200.
- There are three logs near him. You can try any of those, but he will be able to split them all.
- Instead, search all around the Main Town map until you find a gray stump. (For Anne, this will be in the Northwest.) The Quest is not triggered until the visitor arrives, so if you’ve already found the heavy log and moved it somewhere else, you’ll just have to search for it again. It’s the only gray stump.
- Have a Citizen or your Hero pick it up, and they will remark that it is very heavy—that’s how you know it’s the right one. It’s really petrified wood!
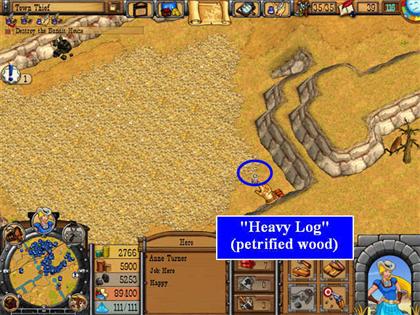
- Have someone carry it over to the visitor (this may be all the way the other side of town) and drop it in front of him. He won’t be able to split it, and you will win the bet.
- There’s no rush on this—the visitor will wait as long as it takes you to find the correct log.
- Your reward will be unlocking a secret “building”—the log statue.
- Building a log statue is a two-step process. First have anyone choose it from the BUILD 3 tab and “build it” where you like. It will just look like a regular big log.
- Now drag either an experienced woodcutter or your Hero over to it, and they will sculpt it.
- The woodcutter will make a bear statue.
- The Hero will make a Jackalope.
- You can make as many statues as you like, but once you have one of each, you will earn the Sculptor trophy.
Mad Hatter Quest, optional (Main Town)
- You can complete this before or after you “beat the game.”
- The Quest is triggered when the Hat Designer shows up at the Hat Shop.
- They want you to bring them various models to inspire their new creation.
- Pay very close attention to the requirements—a Deputy is not the same as a Bounty Hunter, for example.
- A Skilled Miner means a Citizen with the Mining skill—they don’t have to be currently working in a mine.
- If you try to complete this at the same time that Bandits are attacking your town, you may find the Citizens run away and then head back to where they’re employed instead of walking all the way to the Hat Shop. So it’s a little easier to complete in quieter times.
- At the end you will receive the Chicken’s Nest Hat for the Hat Shop.
Market Place Challenges, optional (Main Town)
- Once you have a Market Place in the Main Town, you will have the option to do Quests there. These Quests are all timed. There are 10 of them.
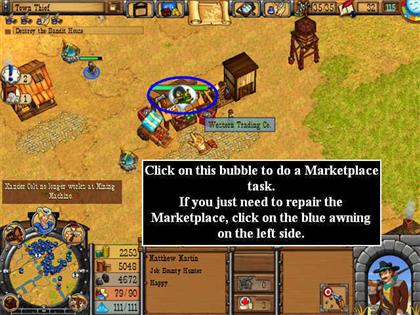
- Some of them will not unlock until after you have gone to other towns and returned.
- Once you have completed all 10 of these Quests, you will unlock the Indian Dress in the clothes shop.
- The amounts and times vary randomly, as well as the order in which you get requests, so if you get one that seems impossibly hard, you can just leave and try it again and you may get an easier set-up.
- As a general tip, don’t turn in what you’ve collected until the very end of your time for that stage. Use the extra time to continue building resources and getting ready for what’s to come. This is the key to many of the Quests.
- Although you can’t chain most actions in Westward, you can chain building. So if you know you will want to have a Citizen build several things in a row, give them all the instructions one right after another, then move on to the next citizen. This can save you precious seconds.
- Time doesn’t start until you talk to the visitor, so you might want to just look around first and see where everything is. Slow clickers in particular may find this helpful.
- Don’t collect food you don’t have a place to store. It wastes time as well as resources you may need later.
- It is faster to get gold/coal/wood by picking it up from the ground or doing the things the things a character can do with a pickaxe than it is to use the buildings (Lumber Camp, mines, farm), but the buildings provide steady long-term output.
- If you need to employ people quickly, a Coal Mine employs 3 while a Gold Mine only employs 2.
- The Quest giver will give you a 10 second warning with a ! balloon on the left side of the screen. Just click on that to immediately talk to the person and turn in the requirements. You don’t have to walk back to them.
- You may get cave-ins, but fire is rarely a problem in these Quests, so don’t worry about that when building. Build whatever is close and convenient—you want to save travel steps for every character you can.
- It is almost always best to have storage capacity of 5 greater than the goal requirement. That way if one of your Citizens or farms requires food or water when the time runs out, you’re still OK.
- People do get sick during these Quests. It’s not worth building a doctor’s office—they will recover on their own. Just remember you have to re-employ them when they recover.
- Sick people may still be well enough to pick things up. This is a good use of their time if you’re walking them over to another destination. You can find them quickly again by using the Next Unemployed button.
- Stay patient! Some of these Quests are quite difficult, and the randomness means there’s no one right way. Do the best you can, restart if one becomes impossible, and eventually you’ll get them all.
Town Thief, optional (Main Town)
- There’s a thief in town! (Not a Bandit.) Grab some Deputies and do a house to house search. Eventually they will find the thief.
- Send at least 3 Deputies together, as you will encounter more than one bad guy.
- Drag one of the Deputies onto each house you want to search. Eventually you will find the thief.
- At this point the instructions say to “destroy the Bandit Hideout,” but they really mean to destroy the house that the Town Thief was hiding in.
- Don’t remember which one it is? That’s easy—it’s the only one that won’t have a Demolish button when you click on it, because you don’t control it.
- How to demolish it? Not obvious, but it’s a good technique to know—have two or three Deputies fire at the house, and it will be demolished. This will also work with other Bandit buildings later, including tents.
- You don’t have to demolish this right away to win the Quest. Just do it eventually, and the Quest will be completed.
Tree House Help, optional (Main Town)
- This isn’t about a Tree House at all, but rather a big tree that is blocking the entrance to a regular house.
- You will need TNT to get rid of the tree, which means you will need to have a General Store where you can buy it. After that, it’s simple.
- The Quest is triggered by walking close to the person who is standing by the house.
Will Work for Skills, optional (Main Town)
- Remember we suggested you keep a Coal Mine in reserve for the end of the game? This is one of the Quests that require it.
- A Visitor will arrive who wants to learn two skills—farming and mining.
- First employ him at a farm until he becomes a skilled farmer.
- Now build that last Coal Mine and employ just this Citizen there until he has become a skilled Miner. This completes the Quest.
RAILROAD BLOCKAGE MISSION
- Now that you’ve had a little practice repairing track, you’re going to go one step further and learn to replace whole sections.
- There is one required Quest, and two optional ones.
Railroad Bypass Quest, required (Railroad Blockage)
- Make sure you check the Quest name on your Quest List to find the part of the Strategy Guide you need. There are several similar Quests.
- This is a tutorial Quest to teach you how to replace as well as repair tracks.
- Look around the scene. There are 3 people fairly near your Hero, a bunch of Bandits aways off
- There are also some buildings already built, including a Blacksmith, a Market Place, and a Lumber Camp.
- Start out by talking to the first Citizen. He explains the problem—you need to build a Railroad Bypass to get around the Bandits.
- Start the first Citizen collecting gold with a pickaxe wherever convenient.
- Go talk to the second Citizen. (There will be a large red arrow by them.) Once you talk to them, they go to work at the Blacksmith’s.
- Now walk around and pick up available supplies in the immediate area.
- As soon as you have enough wood, build a warehouse.
- Continue collecting supplies as you walk over to talk to the Lumberjack.
- Complete the Feed the Lumberjack Quest. Pick berries if necessary.
- Now go talk to the shopkeeper. This is a Market Place, but in this Quest only, it also sells TNT and Irrigation Tools. Remember you can also buy food at the Market Place if you’re short.
- Now you have a working Lumber Camp and an employee there.
- Build a Well, a Farm, and a House. Just make sure you don’t build in a section you’ll want to run track through later!
- Employ both of the new Citizens who arrive at the Farm. This is a slower method than some other solutions, but it solves the Food issue very simply.
- Now you need Gold and Coal. Employ someone at each Mine.
- You can employ the Blacksmith at the Coal Mine while you clear out the Bandits.
- The Market Place is already employed in a tutorial mode to teach you how to buy TNT and irrigation tools.
- Begin the Bandit Bounty optional Quest. If you don’t there will be a constant stream of Bandits attacking you as you try to rebuild the tracks.
- Station the Bounty Hunter near the tracks.
- Begin building new track.
- Since this is a tutorial, you’ll purchase the TNT and Irrigation tools by click on the exclamation point bubble above the shopkeeper’s head, instead of on the store itself.
- When a Bandit attacks, have your Hero engage them first, then bring up the Bounty Hunter from the side.
- You can use the two Health Kits that the Bounty Hunter had in his camp for him if his health starts to run low.
- Eventually one of the Bandits will probably blow up one section of track, but that’s OK.
- Check the Bandit Hideout—have the gates opened? If so, take the Bounty Hunter and go in and kill all 3 Bandits. Again, have your Hero go first to start the fight, then have the Bounty Hunter attack from the side.
- Once the Bandits are dead, collect all the available items in the camp, then go back and finish building the By-Pass.
- Note that TNT will take out boulders or trees.
- You don’t need to do anything about tree stumps—you can build right over those.
Bandit Bounty Quest, optional (Railroad Blockage)
- To complete this Quest, you need to talk to all the visitors you can before you go after the Bandits.
- That means you’ll need to get TNT from the General Store to gain access.
- Now you’ll have some help taking on the Bandits.
- Attack the Bandit hideout. When you’re finished there, regroup.
Feed the Lumberjack Quest, optional (Railroad Blockage)
- This is a tutorial to show you that sometimes when you meet a visitor’s requirements you get not just an employee, but a whole new building.
- Once you give the lumberjack the food, the Quest is complete and you have use of the Lumber Camp.
- The easiest way to feed him is just to use the initial supplies available when you get off the train.
NOISE ORDINANCE MISSION
- You will get three chances to complete the Noise Ordinance required Quest without waking the Mayor (dropping the Super TNT). There is also an optional Quest.
Noise Ordinance Quest, required (Noise Ordinance)
- This Quest is simple once you understand how it works, and almost impossible until you do, so many players get frustrated at the beginning. But you can do it once you know the trick.
- The Mayor will take a nap and there will be a large red arrow in front of him. You need to place 3 Super TNT explosives there. They’ll all go off at once once you have the 3, and you’ll have completed the Quest.
- The Super TNT is available from a stockade where it is being guarded. You’ll be able to get it by trading other resources.
- The hard part is moving it from the stockade to the red arrow. If Bandits get too close to whoever is carrying it, that person will drop the Super TNT, and you’ll have to go back to the stockade to get another one.
- Also, only a Citizen will be allowed to carry the SuperTNT. They will drop it in order to run away from the Bandits.
- There seem to be an unlimited supply of Bandits in this Quest, so you can’t just send your Hero in to kill all the Bandits first.
- The game will always force your Citizen to drop the first SuperTNT, so don’t worry about that. Just keep playing so you can move 3 more.
- The key to success is to recognize two facts. First, if the Bandits are looking away from you, you can sneak past them.
- Second, there are two pathways from the stockade to the Mayor—one above the stockade and one below.
- Knowing this gives you two possible strategies. If you want to have the Hero act as a bodyguard for the Citizen who carries the Super TNT, the fact that the Hero can move more quickly than anyone else makes the “sneak by” strategy work pretty well along the upper pathway. Have the Citizen pick up the Super TNT at the stockade, then move just a few inches at a time. The Hero needs to go first, and kill any Bandits who are turned towards you before the Citizen gets too close. It is critical that you be able to observe the Bandits, so you know when they are turned away from you.
- The other way is quicker. First send your Hero along the bottom pathway and kill the Bandit that is closest to the stockade.
- Then have your Hero walk back along the bottom pathway and kill one more Bandit near the Bandit camp. These two Bandits will not be replaced.
- Now you’re ready to get the SuperTNT.
- Send your Hero into the center of the upper pathway, where they will draw the attention of the Bandits. Most of the Bandits will get into a gunfight with the Hero, who will keep having their health drop to zero, but it won’t matter. They’ll recover, and the Bandits will tend to stay in the same area.
- Meanwhile, take a Citizen and have them sneak along the lower pathway. They will need to hide behind trees and go around the outer edges to avoid the Bandits, but there will only be 1 or 2 Bandits left in this section so it’s very doable. Get the Super TNT from the stockade, and have the Citizen sneak back along the same lower path. Keep the citizen along the left edge of the scene as much as possible.
- Just as in the first method, only move an inch or two at a time so you always know where the Bandits are.
- When there are Bandits too close to the last stretch of road back to the town, have your Hero walk back in that direction to distract them, then walk back towards the center of the upper path again.
- Then your Citizen can sneak all the way back to the town.
- There are also Bounty Hunters that you can hire to help distract the Bandits, but you really don’t need them if you use either of these two methods.
Help For Hire Quest, optional (Noise Ordinance)
- To complete this Quest, you need to hire any one of the three Bounty Hunters.
WOODINVILLE MISSION
- This is a busy mission, with 7 required tasks. Most are designed to teach you all about getting across rivers, whether it’s by bridge or by walking.
- You’ll also learn some different ways of providing food for your Citizens.
- If you think you’re supposed to be going to Woodinville, but you can’t figure out how to get here, you probably need to click on the Railroad Route Map in the Info Bar at the top of the screen. If Woodinville is green, you can just click on it to go there. If it’s not, there will be notes at the bottom of the map telling you what you need to do first.
Lumber Town Quest, required (Woodinville)
- This is basically a tutorial on how to upgrade Lumber Camps and build bridges. You’ll need to do the standard development—build a Lumber Camp, mine gold, build a well and a farm.
- Learn to build a bridge, and then build more Lumber Camps.
Rat Problem Quest, required (Woodinville)
- Your Hero (or any other gunfighter) can kill rats by shooting them.
Bridge the River Quest, required (Woodinville)
- You need an upgraded Lumber Camp.
- A bridge can be built anywhere there is a flat enough space on both sides.
- To rotate the bridge before building it, click on the small bridge icon with the arrow near the BUILD tab.
Lumber Order Quest, required (Woodinville)
- This tutorial is designed to teach you that sometimes you need to have your character wade across a river, then build a bridge back to the other side to get to a place that you couldn’t reach by walking or using TNT.
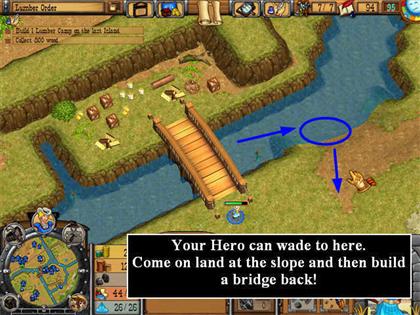
- If you ever get stuck and can’t figure out how to get somewhere, see if your character knows. Left-click on the character, then right-click on the spot to get there. If there’s a way, your character will take it.
Starving Civilians Quest, required (Woodinville)
- The purpose of this Quest is to encourage you to look for multiple sources of food, including fishing, picking berries, and hunting as well as farming and picking up loose supplies.
Stranded Lumberjack Quest, required (Woodinville)
- The purpose of this tutorial Quest is to teach you how to build bridges that run horizontally instead of vertically.
- Remember that you must have an upgraded Lumber Camp in order to build bridges, but it doesn’t matter where the camp is relative to the bridge itself. It just has to be in town somewhere.
- Begin by selecting someone to build the bridge, choose build, and the bridge icon.
- Look carefully—you will see the large “ghost” image of the bridge and also a small bridge icon with an arrow below it, close to the Build tab.
- Click on the icon and the bridge will rotate 90 degrees.
- Now place the “ghost” where you want to build it and click as usual.
Food So Far Quest, required (Woodinville)
- Talk to the people in the house across the river.
- After you provide them with food, they will work for you—but now you will continue to have to feed them.
- This might be a good time to look into fishing, as it produces a lot of food more quickly than farming, although for a limited time.
RODENT FLU MISSION
- One required Quest, one optional Quest, and a whole lot of cheese!
Rodent Flu Quest, required
- You must search the town to find 10 pieces of cheese.
- Although you can kill rats by shooting them, the only way to complete this Quest is to use the cheese plan.
- You will need TNT, so build a General Store if you haven’t already.
- You will also need an upgraded Lumber Camp so you can build a bridge. That’s the only way to get the cheese that is in the river, there are no sloping banks on the town side.
- One piece is in the park in the center of the town. You don’t have to blow it up, just walk into the park to get it.
- Here are the cheese locations:1. in the park 2. by a stump as you walk to the canyon, 3. in a small canyon with a Gold Mine, 4. near a berry bush by a bunch of trees, 5. east near a tree by the river, 6. northeast by the river, 7. by some Bandits (you have to defeat them to get the cheese), 8. in the river (you have to come at it from the far side), 9. above the Gold Mine that is across the river, 10. below the lake.
- Have your Hero or a Citizen carry the cheese to a canyon that has a pile of logs and a tree flanking it on hills above the canyon.
- The canyon is blocked by a boulder, so you will first have to use TNT on the boulder.
- Drop the cheese at the far end of the canyon. One rat will come for each piece of cheese you drop.
- When you have 10 pieces of cheese with 10 rats, use TNT on the tree at the front of the canyon, and it will fall and knock down the logs to block the entrance.

R.O.U.S Quest, optional
- R.O.U.S. stands for Rodent of Unusual Size.
- This Quest is triggered by talking to the people at the Ranch. They will tell you about the missing necklace.
- While you are shooting rats in the North of town, you will probably notice a very large one with a long red tail. This is the one that took the necklace. (The Quest list calls it “a giant red rat” but it’s a black rat with a red tail.)
- Kill it, and you will get a message about it probably having buried the necklace.
- Dig all the holes in the area, and you should get credit for having the necklace.
- Go back and talk to the people at the Ranch to complete the Quest.
- The people at the Ranch will not accept the necklace until after you have killed the big rat.
RAILROAD DEFENSE MISSION
- There are two required Quests: Defend the Engine and Repair the Tracks.
Defend the Engine Quest (Railroad Defense Mission)
- The Railroad Defense Engine has two required Quests: Defend the Engine and Repair the Tracks. Defend the Engine is exactly what it sounds like, but Repair the Tracks is more complicated.
- Make sure your gunfighters are at full health, have upgraded weapons, and have 20 Health Kits before you leave for this Mission.
- It’s a good idea to have at least 6 gunfighters, but 9 are even better.
- Put your gunfighters around the Engine. If its health goes to zero, you lose the Quest.
- The Bandits will mostly attack in pairs, so 3 of your gunfighters can cover each side of the Engine while you monitor the Hero and the Citizens doing the Repair the Track Quest at the same time.
- If Bandits attack other areas of the location while you’re working, send some gunfighters to help out.
- When you have fewer gunfighters, you should also build a Doctor’s Office so you can treat them locally.
- This Mission will repeat many times over the game. The terrain will be different, and so will the exact number and type of repairs required.
- Because this Mission takes place between towns, you get to bring your Main Town gunfighters with you.
- After you do this the first time, a similar Quest will repeat randomly as the Repair Tracks Quest.
- Some versions have an optional Quest, Hired Help, where you just hire some of the local Bounty Hunters.
Repair the Track Quest, required (Railroad Defense Mission)
- There are several Quests that involve repairing tracks, so make sure you have the one you’re looking for. This one is part of the Railroad Defense Mission.
- Because this Mission takes place between towns, you get to bring your Main Town gunfighters with you.
- This Quest’s title is misleading, because you don’t just have to repair the tracks (which doesn’t require any materials)—you have to completely rebuild parts of them. So you’re going to need Coal, a Blacksmith (but it doesn’t have to be employed), and a General Store for TNT.
- Any place where you use TNT to clear a boulder, you’ll have to first repair the tracks (just drag your Hero or a Citizen over to the damaged area) and then probably build a patch piece to connect to it.
- You will also need irrigation tools, because part of the railroad bed isn’t just the normal gravel—it’s under the geometric pattern that requires the tool to clear.
- If you get a message that the site is obstructed and you don’t see a problem, you may need to use the irrigation tool.
- Talk to the Engineer by the bridge—they will tell you what they need to do those repairs.
- All of which means you need a real town with the 5 Elements: water, food, gold, coal, and lumber.
- As long as you brought enough gunfighters, there’s no real rush.
- Just keep a close eye on the Engine, too—if its health goes to zero, you lose the Quest.
- There are many ways to do this. A slow and steady way uses just the two original Citizens you start out with.
- Have one Citizen work at the Farm, and then work part-time at a General Store and Doctor’s office built near-by.
- The other Citizen can get Wood and Gold.
- The Hero repairs the track and does anything extra.
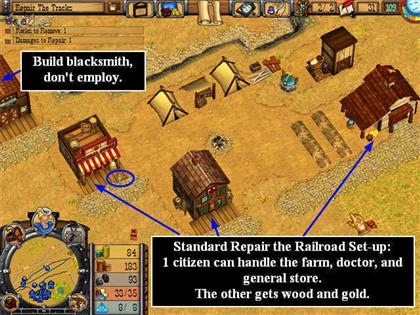
- The gunfighters should collect gold each time they kill Bandits—that will pay for their medical treatment if you have them walk to the Doctor’s instead of just using Health Kits.
- After you complete this the first time, a similar Quest will repeat randomly as the Repair Railroad Tracks Quest.
THE LAST COAL MINER MISSION
- Each town is responsible for maintaining its own train station. If the tracks within the town’s limits aren’t kept repaired, trains won’t arrive. And if there’s no coal, trains won’t stop, because they can’t refuel.
- The main goal for the Required Quest is to keep the trains running. There is one required Quest and two optional Quests.
- Also you’ll get more experience with Westward Hallmark—overlapping Quests. Remember to keep checking the task list for ideas about what you need to do for still-open Quests.
Timely Arrival Quest, required (Last Coal Miner Mission)
- You must have one working Coal Mine while 6 trains arrive, one after the other.
- First, don’t start the Quest until you have at least 10 gunfighters, all in top health, and bring 20 health kits with you.
- As soon as you get to the location, choose one Coal Mine to defend. You only need one, and this is a good time for “all the eggs in one basket” strategy.
- Hire citizens for all the normal tasks—farm, Gold Mine, wood.
- Build a doctor’s office.
- Then all you have to do is keep enough gunfighters alive to protect the one mine.
- The Bandits won’t bother your Citizens, although they may try to damage your buildings.
Fortify Defenses Quest, optional (Last Coal Miner mission)
- This one is a little confusing, because it has nothing to do with the fortification upgrade.
- You can do it after the Timely Arrival Quest if you prefer, you may not need the Bounty Hunter if you only try to defend one mine.
- You must hire at least 2 of the 3 Bounty Hunters to get credit for the Quest.
Lost Companion Quest, optional (Last Coal Miner mission)
- This one’s easy—go get the guy’s dog. It’s stuck in a canyon.
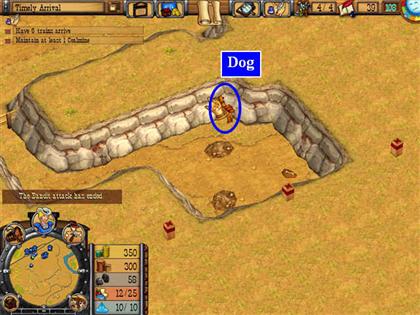
- Use TNT to remove the fence.
- And pick up the Hidden Object Fossil while you’re there.
- You must bring the dog back to the owner to complete the Quest.
- Select both the Dog and your Hero and it will walk along with you.
BROCKWAY MISSION
- You will have complete freedom of choice here for how you solve a set of five interlocking required missions. Some are easier than others.
Strike a Deal Quest, required (Brockway)
- Brockway has a lot of people on strike. You have to get them all working again and also deliver one green box from each factory to the train station. There are four separate Quests, and you can do them in any order.
- To trigger each Quest, talk to the striking workers.
- To trigger to the overall Quest, talk to the Mayor.
- To complete the Strike a Deal Quest, you must have satisfied all the striking workers AND fulfilled the backlog of 3 orders (one from each factory).
- Once a factory is employed again, it will eventually produce a bright green box.
- Have a citizen or your Hero pick up the box and deliver it to the train station.
- The Quest will be completed when a train arrives to pick up the boxes.
Will Work For Sleep Quest, required (Brockway)
- Brockway has a lot of people on strike. You have to get them all working again and also deliver one green box from each factory to the train station. There are four separate Quests for the striking workers, and you can do them in any order.
- To trigger each Quest, talk to the striking workers.
- These workers just require housing.
- Build it, and the Quest will be solved.
Will Work For Cash Quest, required (Brockway)
- As soon as you pay them what they ask, they’ll go back to work.
Will Work For Safety Quest, required (Brockway)
- You need to kill the wolves, which you can do on your own, and the Bear, for which you’ll need help.
- 3 gunfighters together can kill the bear.
Will Work For Healthcare Quest, required (Brockway)
- You must find all the glowing green boxes and dispose of them in the Town Dump.
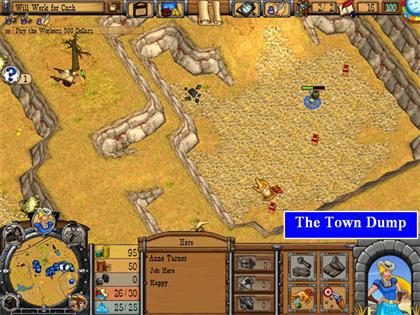
- The boxes are: #1. By the workers who give you this Quest; #2. To the left of the house that is next to that factory; #3. Buried in the cemetery; #4. In the pond below the factory (first you have to catch the fish, then wade in and pick it up); #5. Inside a berry bush to the Southeast of the pond (pick all the berries and you’ll see it); #6. Inside a well (use TNT to blow up the well)
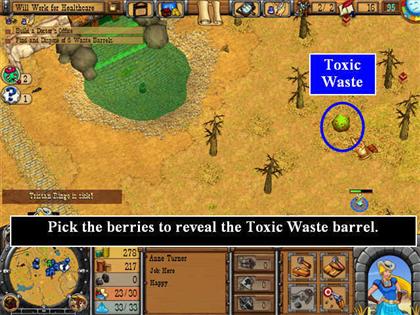
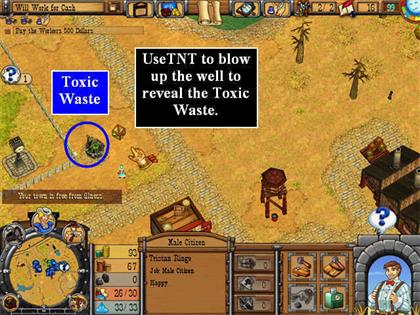
- Build a Doctor’s Office and employ it for this Quest.
- Have your Hero or a Citizen take each box to the canyon.
Deputy Hungry Too , optional (Brockway)
- Most gunfighters hunt their own food—perhaps the toxic waste killed off all the game?
- Give him the food he wants, and the Quest will be complete.
HOSTAGE RESCUE MISSION
- This is an overview of the entire mission, how to get it started, and a suggested order for freeing the hostages.
- Note that you will not be allowed to start the Hostage Rescue Mission at all unless you have at least 5 gunfighters (Sheriff, Deputies, or Bounty Hunters). If you need more, build another Sheriff’s Office in your Main Town and hire some Deputies. However, we recommend taking 10.
- Make sure all of your gunfighters have upgraded weapons and maximum health before you leave.
- It’s also a good idea to take at 20 Health Kits with you. Health Kits can be bought at any employed Doctor’s Office and can be used by any Gunfighter except the Hero, who doesn’t need them.
- When you are ready to start, click on the Railroad Travel Map in the Info Bar at the top of the screen. Hostage Rescue is a special location, not part of the regular railroad route, marked by a Bandit face icon.
- Your sibling will travel with you and act as an extra gunfighter.
- Each set of Hostages is held in a stockade with a colored door. You will need to find the Key that matches that door.
- When there is more than one door of the same color, the same key will open them all.
- Once you have a Key, you just have to walk to a door of that color to open it.
- Each time you find Hostages, you must escort them to the town limits. If you encounter Bandits, your gunfighters will engage and the Hostages will run away.
- You will often be able to get information from the hostages who are being held, so it’s worthwhile going directly to a stockade to talk to them, then leaving again if you need to find a key or some other method of opening the door.
- It is very useful here to create a group that is just the Hostages, using [ctrl+1]. That way if they do run away, you can get them all back quickly by pressing 1, then doing a right-click where you want them to regroup.
- The TNT in the center keeps regenerating, so you can go back and get more as needed.
- Warning: if all your gunfighters die AND your hero’s health goes to zero, you will lose the Quest even though your Hero will regenerate. This is the only time in the game when this happens.
- There are six required Quests for the Hostage Rescue Mission: Lost Father, Rescue Operation (blue key), Pressure Plates, The King’s Key, Bricked Up Cave, and Weak Rocks. Some of them depend on completing others.
- It’s best to start with the Rescue Operation Quest, so start by trying to talk to the hostages behind the blue door.
- At the end of each Quest, we will put the Quest we recommend you do next, although you can try them in any order and see what happens.
- The Lost Father Quest will be automatically completed when you’ve done the others.
Lost Father Quest, required (Hostage Rescue Mission)
- If you are trying to figure out how to start the “Rescue the Hostages” task in the Main Town, or if you want general tips for this Mission, see the entry for Hostage Rescue Mission.
- This Quest is a red herring.
- You came here to try to find information about your father, but no one knows anything.
- The Quest will be automatically completed when you’ve had a chance to talk to all the hostages.
Rescue Operation, required (Hostage Rescue Mission/blue key)
- If you are trying to figure out how to start the “Rescue the Hostages” task in the Main Town, or if you want general tips for this Mission, see the entry for Hostage Rescue Mission.
- Fight your way to the blue door and try to talk to the hostages.
- The Blue Key is in a treasure chest directly to the left of the stockade.
- Walk through the blue door in the stockade. It will open because you have the key.
- Fight the remaining two Bandits and rescue the hostages.
- Now you will be able to walk through any other blue gates because you have the blue key.
- Escort the hostages to the town limits (big red arrow). This is where you will take all the hostages you free.
- This Quest will remain in incomplete status until you have done all of the other required Quests for the Hostage Rescue Mission, freed all of the hostages, and taken them all to the edge of town.
- We recommend doing the Pressure Plates Quest next.
Pressure Plates (Hostage Rescue Mission)
- If you are trying to figure out how to start the “Rescue the Hostages” task in the Main Town, or if you want general tips for this Mission, see the entry for Hostage Rescue Mission.
- There are two pressure plates, one on each side of the stockade. No key is required for this Quest.
- You must send one person to stand on each side to open the stockade and free the hostages.
- While you’re here, pick up the TNT that’s on the ground inside the stockade.
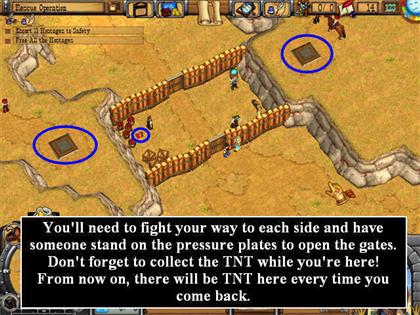
- From now on, every time you come through here you will be able to get more TNT.
- Escort the hostages to the sign at the edge of town.
- We recommend doing the Kings Key (red door) Quest next.
The Kings Key (Hostage Rescue Mission/red key)
- If you are trying to figure out how to start the “Rescue the Hostages” task in the Main Town, or if you want general tips for this Mission, see the entry for Hostage Rescue Mission.
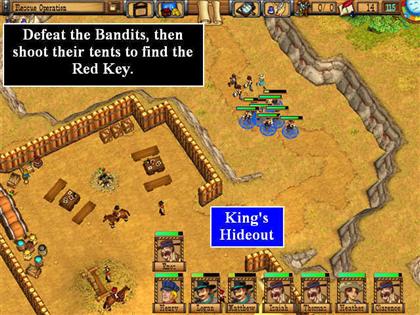
- The Red Key is inside the King’s Tent. This Bandit has his hide-out in the Southwest.
- Have your gunfighters fire at the tent to destroy it, and the Red Key will be revealed.
- Before you leave, notice the rocks in the upper left corner of this compound. You will need to come back later with TNT for those so you can get to one of the Hidden Object Fossils.
- Take the red key and fight your way up to the stockade with the red door.
- Free the hostages.
- Escort the hostages to the sign at the edge of town.
- We recommend doing the Bricked Up Cave Quest next.
Bricked Up Cave Quest, required (Hostage Rescue Mission)
- If you are trying to figure out how to start the “Rescue the Hostages” task in the Main Town, or if you want general tips for this Mission, see the entry for Hostage Rescue Mission.
- The Hostages will tell you the cave is bricked up.
- Look for what looks like a mine with a red door to the left of that area. That is the bricked-up cave.
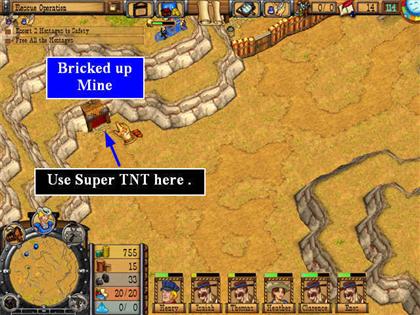
- You must get the SuperTNT from the bandits. Regular TNT won’t work.
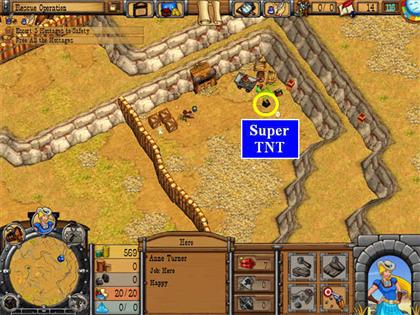
- Place it in front of the bricked-up mine to blow it open.
- You can come back later to continue with other Quests.
- Meanwhile, escort these Hostages to the edge of town.
- We recommend doing the Weak Rocks Quest next.
Weak Rocks Quest, required (Hostage Rescue Mission/green key)
- If you are trying to figure out how to start the “Rescue the Hostages” task in the Main Town, or if you want general tips for this location, see the entry for Hostage Rescue Mission.
- You must complete the Bricked Up Cave Quest and the King’s Key Quest before you can complete this one.
- The green key is in a treasure chest in the enclosure that has mounted Bandits.
- You need to have some help for this one.
- First, use TNT to blow the rocks where the hostages in Bricked Up Cave were.
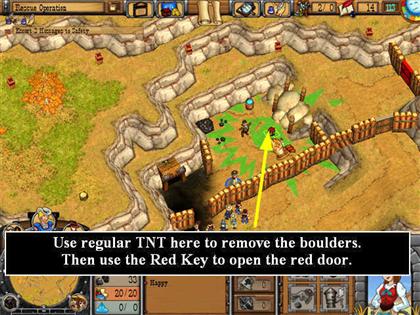
- Sneak close to the area where you want to enter.
- Make a Save File now!
- Go through the Red Door. (If you don’t have the Red Key yet, you need to complete the King’s Key Quest first.)
- Make sure everyone is at full health.
- Send in 3 gunfighters first.
- Then send your Hero to immediately open the Treasure Chest and get the Key. Your hero walks faster than anyone else, so they have the best chance of getting in and out again.
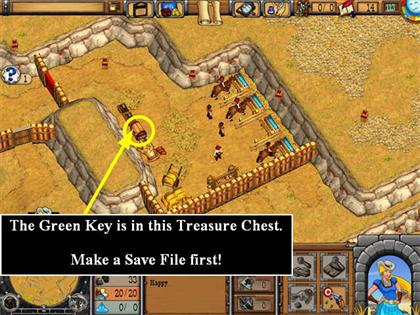
- Have your Hero run back out the gate.
- As long as your Hero gets out alive, you can continue the Quest.
- You can now take your remaining gunfighters and go to the green door and fight the Bandits there.
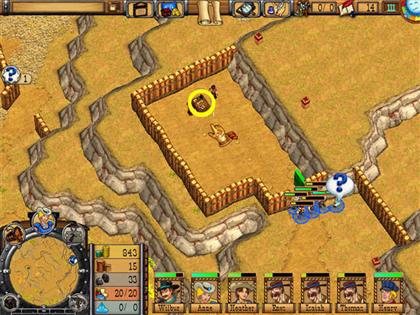
REAL ESTATE RAMPAGE MISSION
- This mission has just one required Quest.
Real Estate Rampage Quest, Required
- This one is fun, because it feels impossible until you catch on to the real “loophole.”
- Of course you can buy a building. But you’ll quickly find that the Mayor is going to buy it right back again!
- Instead, just build your own buildings.
- Buy the Mayor’s as you can afford them, and then demolish them (that’s the loophole—you just have to buy them, you don’t have to own them as long as the Mayor doesn’t either).
- Meet all the other goals in the regular fashion, and you’ll soon get through the Quest.
LANDLORD LOOPHOLES MISSION
- There is just one required Quest in this Mission.
Landlord Loopholes Quest, Required
- Talk to the man to start the Quest. He will tell you its requirements.
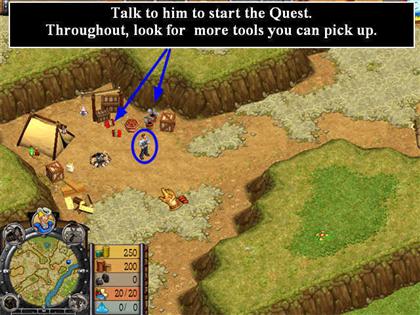
- There are 20 TNT and 20 irrigation tools hidden around this location, so try to find as many as you can.
- Some will be inside berry bushes.
- Some will only appear after you’ve blown up boulders.
- Whenever you place TNT, try to blow up as many boulders as possible.
- You need to have 20 buildings and 15 Citizens, but as long as you stay away from the Bandits, there’s no real rush.
- There are many ways to solve this.
- It’s somewhat easier if you use the first TNT to open the path to the larger rocky area where you can get another TNT and you’ll have more space to build.
- Build a Lumber Camp near the pond so you can have a lumberjack fish when necessary.
- You will tend to run short of food in this Quest, so don’t pick any up if you don’t have a place to store it.
- Since there are fewer places to build, this is a good time to consider upgrading Houses to provide more housing without needing more land (each upgraded House can take one more person).
- Wells count as buildings, as do warehouses and Lumber Camps.
- Eventually you will need a General Store (for more TNT) and a Sheriff’s Office.
- Don’t try to take on the Bandits until you have gunfighters to help.
- This is a Quest where patience pays off. Don’t build housing for people you won’t have food for.
- The buildings don’t have to be unique types for this Quest. We solved it by building 1 Farm, 1 General Store, 2 Lumber Camps, 3 Warehouses, 4 Wells, 2 Gold Mines, 6 Houses and 1 Sheriff’s Office.
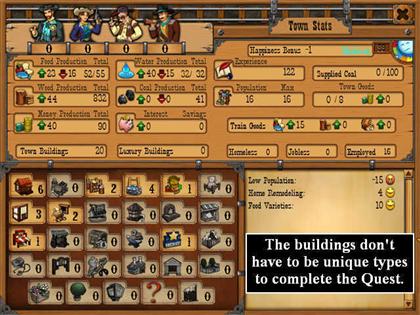
OGDENVILLE MISSION
- There are five Ogdenville Quests: Ogdenville, Air Pollution, Cave Troubles, Polluted River, and Town Remodel. Regardless of the order you do them in, talk to all Citizens you pass to get them working again.
- You will automatically start with the Ogdenville Quest, which is an umbrella Quest for the Mission.
- We highly recommend then going on to Air Pollution because it’s fast and easy and will prevent some of the sickness in the town.
Ogdenville Quest, required (Ogdenville)
- The Ogdenville Quest itself is just an umbrella Quest. You need to talk to the Mayor to find out what’s going on, then complete the other 4 Quests.
- As long as the population never drops to 0, you will complete the Ogdenville Quest automatically when the other 4 are completed.
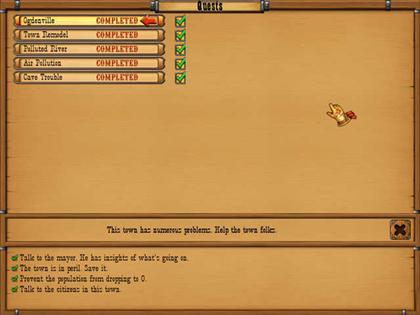
Air Pollution Quest, required (Ogdenville)
- Demolish all the factories except one. The air will get cleaner as you go.
- To demolish a building, click on it, then click on the Bomb icon. This does not require any TNT.
Polluted River Quest, required (Ogdenville)
- There are two river pollution Quests: River Cleanup in the Main Town and Polluted River in Ogdenville. Check to make sure you have the part of the Strategy Guide you need for your current Quest.
- You must find and collect 10 grey toxic waste barrels and dispose of them.
- To dispose of them, you are going to take them to “the old Quarry,” which looks like a canyon filled with gravel.
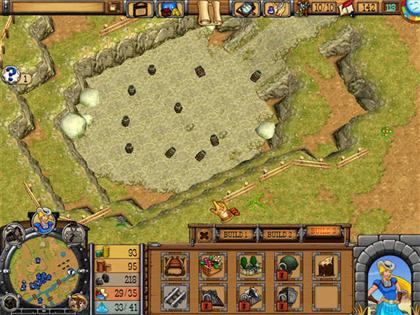
- You’re going to need a General Store if you don’t already have one, because you need a lot of TNT in this town.
- Some of the barrels are inside crates.
- Some are on land.
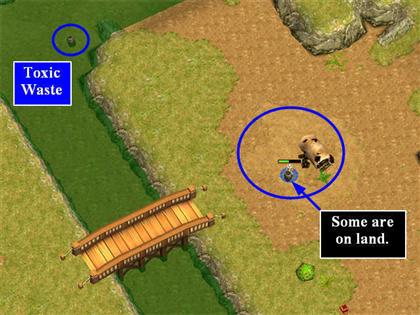
- You will need TNT to open the fence to the quarry.
- Either a Citizen or your Hero can carry the barrels to the quarry and drop them.
- Here are the first six locations: #1. (pond) Northeast, in the pond. #2. (pond) Northeast, in the pond (yes, there are two there) #3. (land) by a small wagon near a factory that is just a little south of the pond #4. (river) Southeast in the river by a submerged coal mine #5. (river) Start at the submerged coal mine and look a little to the left, just east of the easternmost bridge #6. (land) next to a small white fence that is just below the Town Hall
- For the remaining ones you will have to build a bridge going from West to East.
- Start by walking to the westmost bridge. Cross the river going South.
- Now look to the east. You want to build a horizontal (West-East) bridge across that river. You will be able to see a covered wagon across on the other side. Build this bridge (which means you'll have to have upgraded a lumber camp, but you'll need to do that anyway for the cave-in Quest).
- Now walk across the bridge to the east.
- Here are the remaining barrels: #7. (land) Right next to the Covered Wagon. Now look just to the north and you'll see a ramp going down into the river. #8. (river) This one is in the river just left of the ramp. #9 (river) Go in the river and wade to the right of the ramp and you'll find another one right where the river turns. #10 (river) Go in the river, wade to the left of the ramp and continue up into the little channel that runs north into the town. You can see this channel on the small map--it's about half the width of a regular river.
Cave Troubles, required (Ogdenville)
- To solve the Cave-ins, you have to have the Fortification Upgrade.
- If you don’t already have the knowledge, buy it at the Info “Shop” in the Info Bar at the top of the screen.
- Upgrade a Lumber Camp.
- Then click on the upgraded Lumber Camp a second time and buy the Fortification option. This will fortify all the buildings in town at once, including the caves.
- Since you now have an upgraded Lumber Camp, you can build a bridge to get to the second Hidden Object Fossil, which is across the river.
Town Remodel Quest, required (Ogdenville)
- Repair all the buildings in town. Use the Next Damaged Building button to find them quickly.
- Build a Park.
- Increase town happiness to 120 (the cyan number in the upper right of the screen).
FATHER RANSOM MISSION
- To begin this Quest, you will get a task in the main town to talk to your sibling.
- To find them, click through the Next Gunfighter icon. All Turner family members are listed as gunfighters.
- Talk to your sibling and decide on a plan.
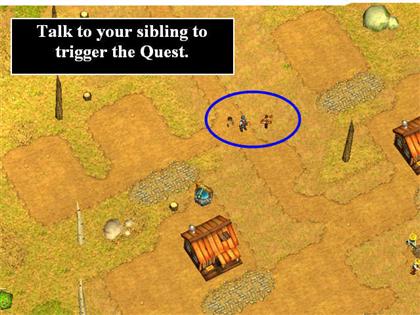
- If you are playing as Anne, Anne will want to ransom and Henry will want to fight.
- If you are playing as Henry, Anne will want to fight and Henry will want to ransom.
- You will decide to either pay the ransom, or to fight.
- If you decide to pay the ransom, you will then do the required Father Ransom Quest and the required Railroad Swap Quest.
- If you decide to fight, you will do the required Father Rescue Quest instead.
- Before you attempt this Quest, make sure all your gunfighters are at full health and have upgraded weapons. It’s a good idea to have at least 6 on horseback.
- Buy 20 Health Kits at a Doctor’s office before you leave the Main Town.
- Your Hero should also be at full health. They can’t use a Health Kit, but they can buy Snake Oil by going to a Doctor’s, just like any sick Citizen.
- If you choose to fight, you must have at least 8 gunfighters to take with you, but we recommend taking 12.
- When you are ready to go, choose the special Bandit Hide-out location on the Railroad Route Map in the Info Bar at the top of the screen.

- You will automatically start either the Father Ransom Quest or the Father Rescue Quest depending on whether you chose to pay or fight.
Father Ransom Quest, required unless you are doing the Father Rescue Quest
- Father Ransom and Father Rescue are two different Quests. Make sure you’re looking at the right one in the guide, as they have very different solutions.
- This is triggered by choosing to pay the ransom for your father instead of going in shooting.
- You can get this Quest whether your Hero is Anne or Henry—it just depends on the plan you chose.
- When you arrive, you will see the main group of Bandits, and the one who wants the ransom.
- Leave the gunfighters back at the starting point and go talk to the Bandit.
- Surprise—he took the money, but won’t give you your father yet. He wants more money.
- Leave. Now you have to figure out how to prevent the 3:15 train from running over your father.
- From now on you want to move very carefully along the edges of the scene to keep any Bandits from seeing you. You are going to move only your Hero for most of the Quest—leave the gunfighters at their arrival point.
- At this point you must complete the Railroad Swap Quest before you can talk to the Bandit again.
- Once that Quest is completed, sneak back to your original position.
- Go confront the Bandit with just your hero.
- The train will crash and your gunfighters will join the fight.
- Take the gunmen and defeat all the Bandits.
- You should still have 1 TNT left. If you need more, you’ll need to pick up the weight on the switch again and go back to the center stockade to get more TNT.
- Go back behind the stockade where the Bandits had the SuperTNT, blow up the rocks, and collect the Hidden Object Fossil.
- Now get everyone together back at the place where you started. You will see a big red arrow, and you can take everyone there to return to town.
Railroad Swap Quest, required (Father Ransom)
- This is a subordinate Quest in the Father Ransom Quest.
- Your goal is to find a way to switch the 3:15 train from one track to another.
- Walk along the bottom of the scene. You will see a place where there is a heavy weight (remember the ones from Pressure Plates?).
- Continue past that point, then sneak up along the right and grab the weight. That’s all you want for now.

- Walk past the place with a bunch of rats.
- Very carefully sneak up along the right side of the scene.
- Along the top you can see, from left to right, a Bandit guarding some cheese, an empty stockade with some TNT, and a stockade with two Bandits guarding some super TNT.
- Carefully edge up along the very right, so you are on the hill above the right side of the stockade with the two Bandits. Now you will be able to overhear them saying that they are afraid of rats.
- Come back down to the middle of the scene, out of sight of the Bandits.
- Sneak across to the left, then go up to the stockade with the TNT.
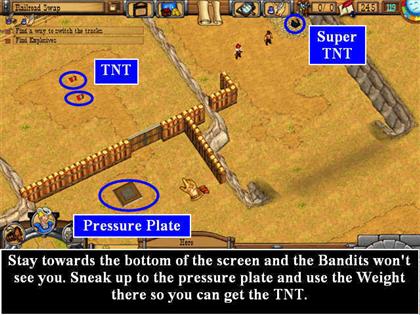
- Put the weight on the pressure plate and the gate to that stockade will open.
- Go in and collect two TNT. They will automatically go into your Tools Inventory.
- Go back out and pick up the weight again.
- Sneak back down into the middle of the scene.
- Where the two tracks come together, you will see another pressure plate.
- Put the weight on it. This throws the switch, so now the 3:15 train will run along the track to the Bandits’ main hideout, not the track where your father is lying.
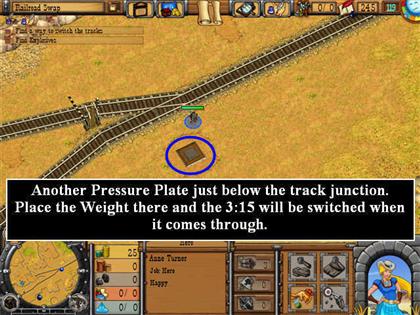
- You still need to fix the tracks. Use the TNT to blow up the rocks, then repair the tracks. This will not alert the Bandits.
- Your Hero will also note that they need 3 units of Super TNT to derail the train altogether.
- Sneak back up near the stockade with the TNT.
- Watch carefully. Sometimes the Bandit with the cheese turns his back and walks off the left.
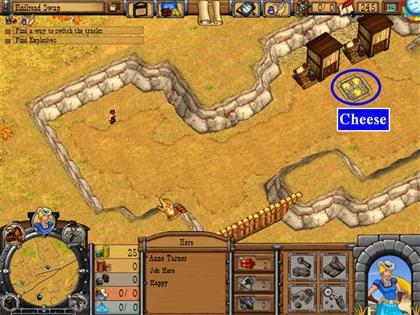
- Wait until he has started walking away, then run up, grab one piece of cheese, and head back to the center.
- Carefully go over to the rats (stay towards the bottom of the scene) and drop the cheese.

- You will make one rat very happy. Now he is your friend.
- At this point you can control the rat just like you do a dog.
- Start by using the lasso selection method and have the two of you, carefully, move slowly up the right side, then back up onto the hill just above the stockade on the right.
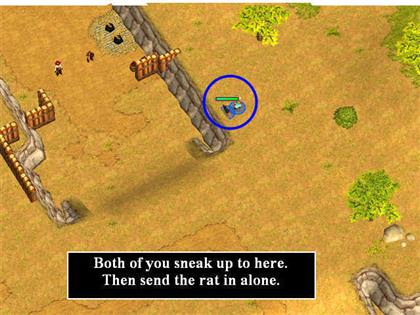
- Now send the rat in by itself. Make it go all the way in towards the Bandits.
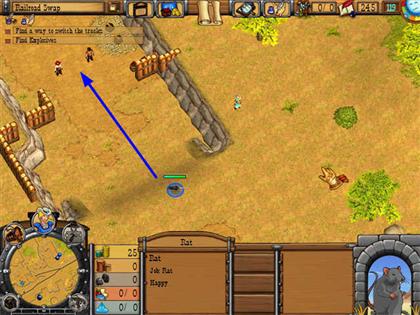
- If you sent the rat far enough in, the Bandits will turn and run towards the far end of the Stockade, then enter the little alcove on the left.
- Once they’re in the alcove, run in and get just one Super TNT.
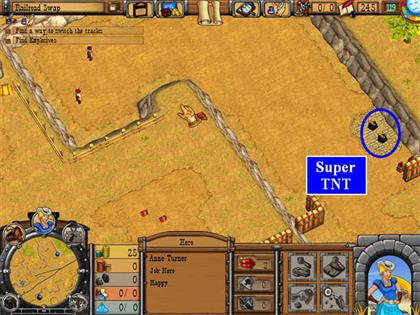
- Go back down into the center, work your way along above the tracks, and drop the super TNT next to the wooden fence at the end of the tracks.
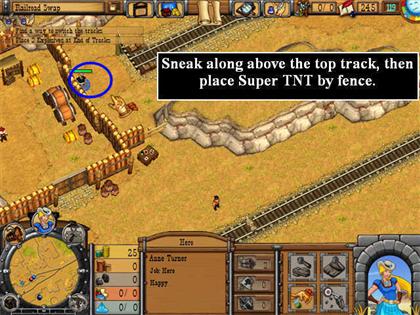
- You will need to repeat this whole process again—taking cheese, sending in the rat, taking the Super TNT, and placing it by the tracks.
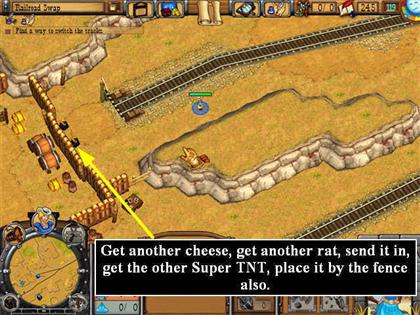
- Now go all the way back along the tracks to the switch, then sneak back down to the bottom of the scene.
- Work your way back along the bottom to the far left. You will continue with Father Ransom Quest.
Father Rescue Quest, required unless you are doing the Father Ransom Quest
- This is triggered by choosing to fight instead of pay the ransom for your father.
- You can get this Quest whether your Hero is Anne or Henry—it just depends on the plan you chose.
- You wake up to find yourself trapped in a stockade inside the Bandit hideout.
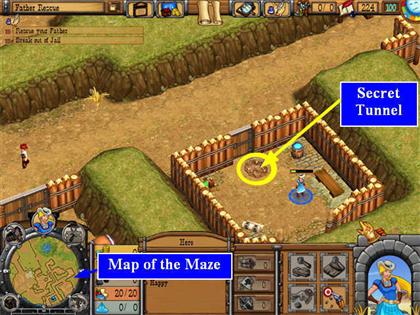
- Your Posse is trapped in a different stockade off to the right.
- Your father is behind held under guard up to the left.
- This Quest is played in two stages.
- In the first stage, your Hero is on their own. They must find TNT, guns, and a weight to open the Pressure Plates.
- If your Hero’s health goes to zero during this stage, you lose the Quest and have to start over.
- If your Hero is not at 100% Health when you start, choose the RETURN TO TOWN option from the Menu Icon in the Info Bar at the top of the screen, and visit the Doctor’s to buy snake oil until you’re back to 100%.
- All of the Bandits walk regular patrols, so you will be able to avoid some of them just by watching their patterns. Some you will have to fight.
- First, though, take some time to look around the entire location. There is a small Map in the lower left of your screen that shows you the layout of the Bandit Hideout.
- We’ve blown it up here, and we know it’s a bit blurry, but locate these items. They’re all you need to solve the Quest.
- TNT in the stockade to the right of your Cell.
- Guns in the center, but behind a boulder. Perhaps that TNT would be useful.
- Your Posse trapped off to the right.
- Your Father trapped off to the left.
- A Weight in the upper right corner.
- And a Hidden Object Fossil in the Lake in the North, that you should pick up before you go back to town.
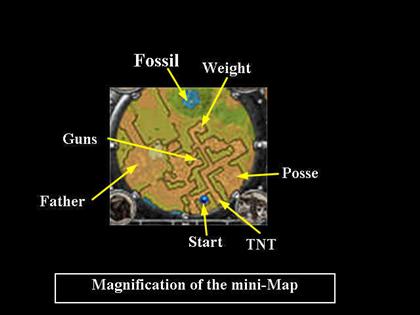
- Start by digging the hole in your cell. It’s a tunnel!
- Wait until the guard who walks to the left goes all the way into the stockade on the left of your cell, then come out through the tunnel.
- You will have to click on your Hero again after they come through the tunnel, or they won’t move.
- Quickly go and fight the Bandit in the stockade on the right of your cell. There is also TNT there, and you’ll need it.
- This will almost certainly attract the Bandit from the stockade on the left of your cell. You’ll probably need to kill them, too.
- Collect the TNT.
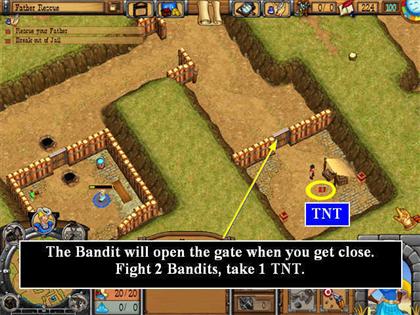
- Now you’re in the lower part of the hideout. There are no other Bandits who will patrol here, so you’re safe for awhile.
- Go talk to your Posse. They need guns, and a way to get out of their cell.
- The next part is tricky, because your health is probably very low after fighting two Bandits, and you have to get through without going to zero until your posse is free.
- There is a gate between this section of the compound and the upper right section.
- If you step on the pressure plate next to it, it will open.
- You want to do that, and run as quick as you can up to the first left turn, then take that and come down a pathway to where there is a boulder blocking access to the guns.

- Unfortunately, there’s a Bandit that comes out and patrols this corridor.
- You have to be patient. (You may want to make a Save File here.)
- Move your Hero to the right of the pressure plate.
- Wait until the Bandit has gone into the stockade on the right, then step on the pressure plate and then very quickly move up the corridor and down again to the boulder in front of the guns.
- Use the TNT on the boulder. The Bandits won’t hear it.
- Take the guns.
- Return back towards the long corridor. Hide where the patrolling Bandit can’t see you.
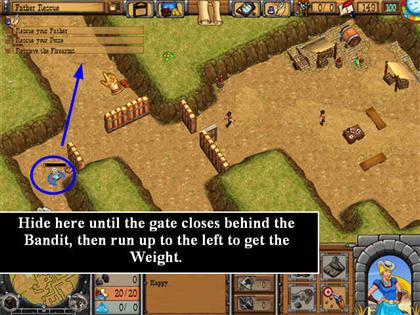
- This time when the Bandit goes into the stockade and the door closes, quickly move up to your character’s left, which is all the way up into the top right corner of the hideout.
- There is a weight here that will open the pressure plate locks, and no guards! Take the weight.
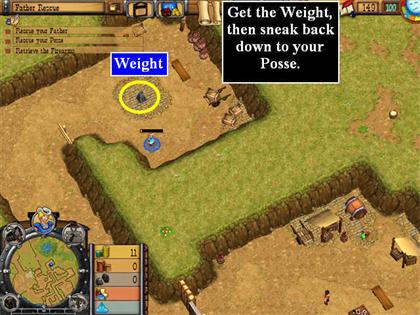
- Now all you have to do is sneak back down to where your posse is.
- Put the weight on one plate and stand on the other and the posse will be freed.
- Make a Save File.
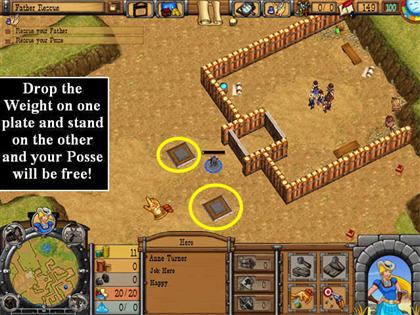
- This begins stage two. From now, it’s back to normal rules—if your Hero’s health goes down to zero, then they will just regenerate while the posse keeps on fighting.
- As long as you brought enough gunfighters, the next part is simple. Just battle your way all the way to where your Father is, and free him.
- Go back to where you used the TNT to get the guns, then continue along that path to the left, and then up to the big battle.
- To complete the Father Rescue Quest, you must escort your Father to the big red arrow with is out the top of that stockade.
- Choose CONTINUE PLAYING instead of COMPLETE because there is a Hidden Object Fossil to collect here.
- Leave your Posse and your Father at the exit, and walk to the lake in the Northeast by continuing North from the red arrow and then going right. (Or you can just left-click on your Hero and right click on the lake, and they’ll find their way there.)
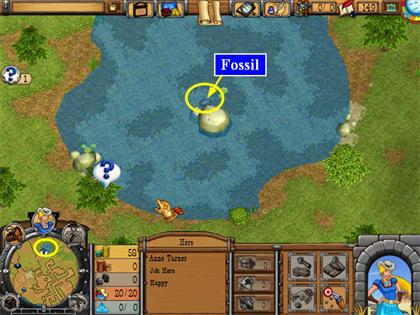
- Pick up the Fossil in the lake and you’re ready to COMPLETE.
WRONGSIDE MISSION
- Two required Quests, both with a “race against time” aspect.
Unstoppable Flood Quest, Required (Wrongside)
- This is triggered by talking to the people.
- Your goal is to move everyone from the first town to a new town that you will build up above the dam (so it won’t get flooded).
- There are many ways to do this, but one of the easiest is to build two Lumber Camps, two Gold Mines, and a Market Place. Then keep buying food at the Market Place (it’s quicker than growing it).
- You need to meet the requests of everyone who will have to be moved. They’ll tell you exactly what they want.
Shaky Dam Quest, Required (Wrongside)
- Now you need to get a second group of citizens to move, while continuing to supply the Citizen shoring up the dam with what is needed.
- Just continue with the strategy from the Unstoppable Flood Request Quest.
- Remember you can also buy wood at the Market Place if you’re desperate.
- You need to meet the requests of everyone who will have to be moved.
- Many players seem to have trouble with the potted tree request. We were able to meet it instantly by first building an upgraded house. Then placing a potted tree in front of its sidewalk and just to the left. Then building another house to the left of the first. So placing the potted tree first before building the house seemed to work the best.
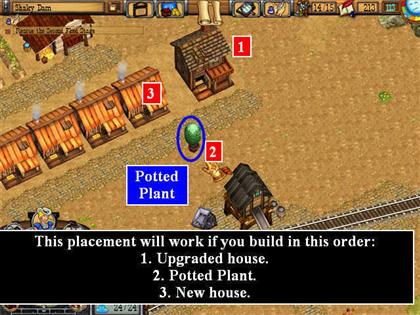
- Ultimately you need to have a bank, blacksmith, butcher, clothing shop, upgraded house, a house with a potted tree in front of it, market, park, and an upgraded ranch.
HAVERBROOK MISSION
- This Mission has one quite difficult Required Quest, and one easy Optional Quest.
Haverbrook Quest, required
- This level consists of two timed stages, both very difficult.
- The amounts you have to earn in each stage vary randomly. If you get one where you are asked for 600 wood it will be much harder than if you’re only asked for 500, but it’s up to you if you want to try restarting for an easier number.
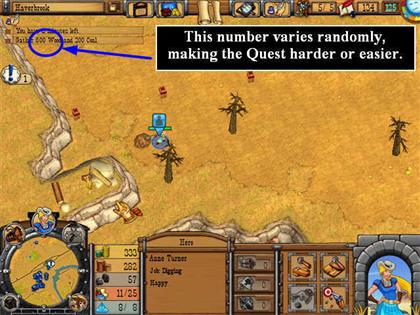
- The first stage is easier than the second, so use any extra time you have in the first to go ahead and get ready for the second.
- Don’t worry about fires. In fact, you may want to demolish buildings to get the extra wood and gold in them.
- Once the Quest gets started, immediately start the Hero on a Gold Mine.
- Use the next citizen button to find people.
- Demolish the Doctor’s, the Bakery, and the building next to that, but keep the General Store.
- This immediately leaves the people unemployed, which is good.
- Have them collect the stuff left from the demolished buildings if they can do so quickly, otherwise leave it for the Deputy to pick up later.
- Buy one TNT at the General Store, then demolish it also, and have the citizen pick up the leftovers.
- Now you have to decide how you want to get food for this crew. You have 3 choices.
- If you’re a quick clicker, send one citizen to fish over by the fossil and use the Deputy to hunt and gather resources.
- If you’re not a quick clicker, you may not be able to have the Deputy hunt fast enough. Instead, you can use him to pick up things that are a long way to walk, and then you have a choice between using the farm or just gathering berries and fishing as needed. Even if you decide not to use the farm, don’t demolish it, as it counts for 5 food storage even if it’s not employed.
- Immediately start one Citizen on coal, two on a Lumber Camp, one on a Gold Mine, and one on building a warehouse. Then build another Lumber Camp in the southeast.
- Your deputy can walk through town picking up stuff. Then head him up North to get stuff there.
- At some point use the TNT on the area where the wolf is. Don’t bother with the wolf now, but send the Deputy down to pick up the two precious gems on the far left of this area.
- Even if the Deputy kills the wolf, don’t stop to pick up the Hat yet—just focus on the things you absolutely need.
- Keep gathering wood and coal and gold.
- You will NOT need to build a Coal Mine with this strategy. Just get it from veins and picking it up.
- Don’t turn anything in until the very end of the time.
- Ideally, you should either have a Gold Mine built or be ready to build one.
- Once the Deputy is done collecting all the loose resources, send him down to the Southeast to shoot Deer and Rabbits for food.
- Employ people at the Lumber Camps, but then have then chop the logs first—it’s faster.
- Save at the end of the first stage if you’re happy with it—the second stage is harder and you may have to try it a few times.
- Once you get to the second stage, it’s all about the gold. Leave two people on lumber in the camp near the pond—they can also fish, pick berries, and build warehouses there.
- If you kept the farm you’ll need to build 4 warehouses so you’ll have 65 total capacity.
- If you didn’t, you can try to get by with a capacity of 60, but then you need to have someone picking berries or fishing right up to the last minute to bring in food in case someone else is eating at just the wrong time.
- After you finish this required Quest, move on to the optional Wolf Market Quest by choosing CONTINUE PLAYING on the mission screen.
Wolf Market Quest, optional (Haverbrook)
- This is an optional Quest, but there is a hidden object fossil here so most people will want to do it.
- You can do it before or after you complete the required Haverbrook Quest. We recommend doing it after.
- The Quest is triggered when you talk to the visitor who is standing outside the Market Place.
- Because you need to be able to build bridges to get to him, you may want to wait to do it until you have completed Haverbrook, which is a timed Quest.
- The man will tell you that a wolf took his hat. If you bring him the hat, he will let you shop at his Market Place.
- You will find the wolf off by itself on one of the other parts of the map. (Northwest for Anne).
- You will have to use TNT to remove a fence into the area if you haven’t already done so.
- When you kill it, it will drop a small brown hat on the ground.
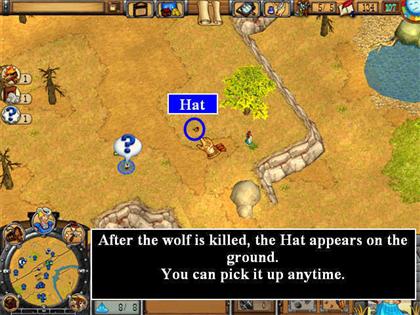
- Collect the hat and you will get credit for having it.
- You can collect the hat before you officially start this Quest, since it will appear whenever you kill that wolf.
- Once you’ve collected the hat, when you talk to the man you will complete the Quest.
- You can wade into the water from the Market Place side, but you won’t be able to get past the bridge unless you demolish it. Just make sure you don’t demolish it until you’ve completed both of the Quests and you have a character in the river ready to go get the fossil.
GREAT TRAIN RACE MISSION
- You have one more chance to save Turner Railroad. Make sure you’re prepared!
- Repair any damaged buildings and get your Town Happiness to 200 to set the value for your town.
- Do not leave your Main Town until you have purchased the Pick Axe upgrade in the “Info Shop.”
- You also need to get the Train Yard Upgrade so your trains run faster.
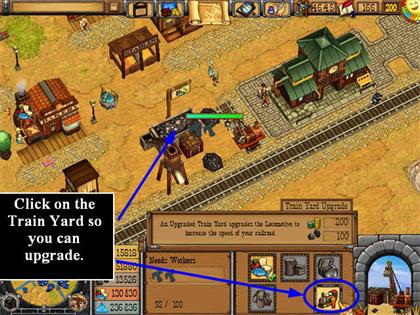
- When you are ready, use the Railroad Route Map to select the Train Race destination.
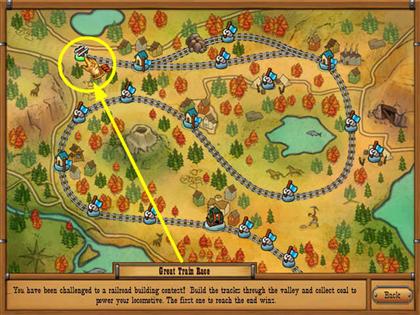
- This will automatically start the required Train Race Quest.
Train Race Quest, Required
- This isn’t directly timed, but the other side is working at the same you are and if they finish before you do, you lose.
- You have rocks on your side and they don’t, so you will have to have some help to win.
- The key to winning this is to have at least one Citizen help your Hero build tracks. The other side will only use one person to build tracks regardless of how many you use.
- Also, you will need TNT which is located in another section of the map under some trees. It’s hard to see unless you’re looking at maximum zoom. We sent a Citizen to pick it up while the Hero continued to build tracks.
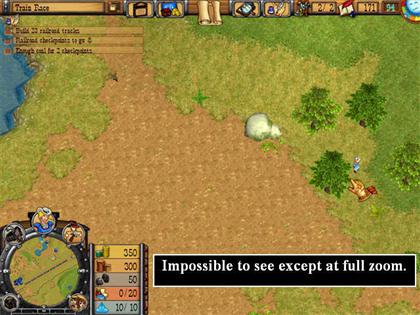
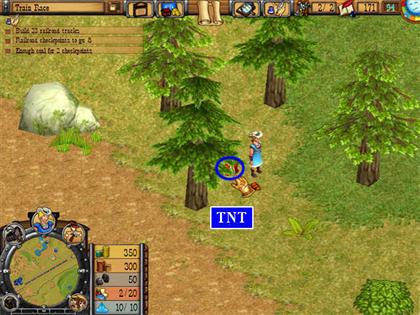
- You will need a lot of gold and a lot of wood to build the tracks.
- You do not need to employ anyone at the blacksmith’s, but you should upgrade the pickaxes so your Gold Mines are more productive.
- There are many ways to solve this. Here’s one strategy.
- Immediately have your Hero build a warehouse near the Citizen’s tents.
- Send one Citizen to build a Well and a Farm.
- Send the other Citizen to build a Lumber Camp near the lake where you can fish from the shore.
- First they will need to clear away a berry bush that is in the way.
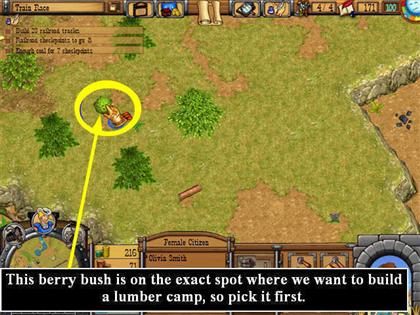
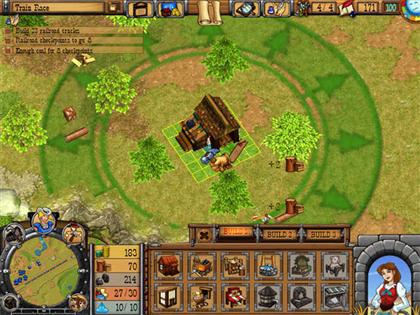
- Try to keep all of these buildings pretty close together.
- Immediately have your Hero build two houses near the Farm. This will give you a total of 6 Citizens. Build for convenience, not aesthetics.
- You really want your first two Citizens to become a skilled Farmer and a skilled Woodcutter respectively, so try to leave them on those jobs.
- Send the 3rd and 4th Citizens one each to the two Gold Mines that are pretty close together.
- Send the 5th Citizen to pick up the TNT, and then have them use it on the rocks that are blocking the track.
- Have the 6th Citizen fish off the river without building a Fishing Hut. They can also collect berries.
- The Hero can work on collecting coal since it’s near the tracks and they walk fast.
- Once the area near the Lumber Camp is fished out, you can send the 6th Citizen to the farther gold area and also have them fish (they will need to build a Fishing Hut), or you can keep them closer to the main center and have them work on gold or wood.
- Your Hero should stay close to the tracks, but can collect berries, collect coal, chop wood, or mine gold which is nearby.
- Try to keep your Hero close to the next section they will build.
- Every time you have enough materials to build tracks, do so.
- The Citizen who brought the TNT can build from that end while your Hero builds from the Engine end.
- If they have any time waiting for resources, have them collect items that are close to the tracks.
- You do not need to have a working Coal Mine—there’s enough coal in the visible veins.
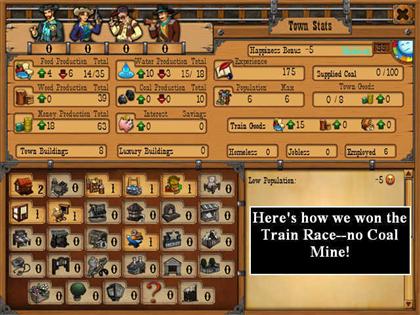
- You do not need to build the tracks in order, so take advantage of that. You can have people working on different sections.
- Keep an eye on the requirements. As soon as you have enough wood to make all the track you’ll need, switch that person to either gold mining or collecting food or building tracks.
- As long as you get one skilled Farmer, one skilled Woodcutter, and one skilled Miner out of your Citizens, you should be OK.
- Try to limit the amount of extra walking around that anyone does.
- When the announcement comes that the other team is “at the Final Checkpoint,” that doesn’t mean they won—it means there are still a few tracks to build. You can still win at this point by assigning 2 or 3 people to build tracks.
- With this approach, we found we ran shortest on food and gold, but had plenty of coal and wood.
- You can also try building 3 houses so you have 8 Citizens altogether. But we found it wasn’t worth the outlay in materials for the House.
- If you are a quick clicker, you may want to build a Market Place instead of a farm and assign more people to woodcutting from the beginning. Then you can trade wood for gold and gold for food. But slower clickers are probably better off having a Farm.
VOLCANO VALLEY MISSION
- Congratulations on discovering the secret location! This optional Quest will challenge your skills, and require you to rethink some of your standard strategies.
Volcano Valley Quest, optional
- This Quest is triggered when you blow up some large rocks in your main town and reveal a tunnel with a short length of railroad track coming out of it.
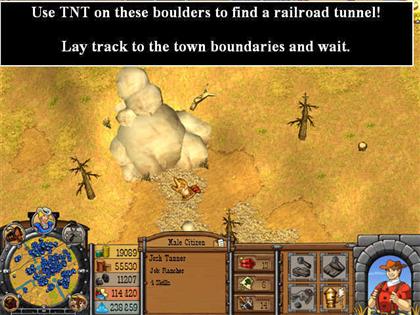
- Add more track until you reach the town limits.
- Eventually Harris Pilton will arrive and ask you to build him a town with at least 15 unique buildings, 10 Citizens, and 180 happiness in his location.
- Use the Railroad Route Map in the Info Bar at the top of the screen to get there.
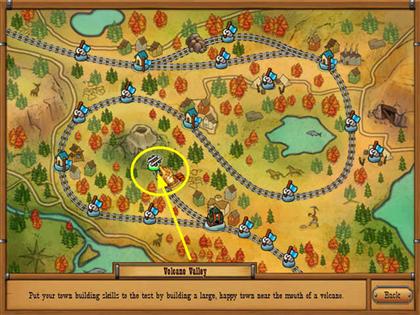
- When you arrive there, it’s sitting on a live volcano!
- You can build wells, but they don’t generate new water—they just hold water that comes in by train. So it’s better to build Water Towers.
- The key to this is to stay focused and work quickly.
- The task note in the upper left in the screen will act as a countdown counter—it will always tell you how many you have remaining to the goal, which is helpful.
- Ideally you will want 14 to 16 citizens. Try to build in the area near the existing water towers, although you will have a Gold Mine and a Lumber Camp in other areas.
- Build buildings that add to happiness as well as employment—a Bakery, Hat Shop, a Clothing Shop, a Market Place, a Town Hall and a Bank. You can also add buildings that add Happiness indirectly through food variety, like a Butcher Shop.
- Never fully employ a Farm or Ranch—they use more water then, and water is your scarcest resource.
- Build a Sheriff’s office and hire deputies. These add to happiness and they don’t need food.
- Keep an eye on the housing meter. If one of your houses burns down, you will need to rebuild it quickly.
- Damaged buildings reduce happiness, so try to keep repairs up.
- As soon as practical, build a Market Place. Then you’ll be able to buy food by selling lumber.
- Don’t grow watermelon!
- You will also need a General Store for TNT, tree seeds, and irrigation tools.
- Station at least one deputy in the area where the Deer are and have him hunt them for food.
- If the tracks become damaged, repair them quickly or the water won’t arrive by train.
- This means you will need a blacksmith’s, although it doesn’t have to be employed.
- To get to the Hidden Object fossils, you will need to use TNT on some black rocks.
- Don’t bother trying to build bridges—they’ll just burn. Instead, look for black boulders you can blow up with TNT.
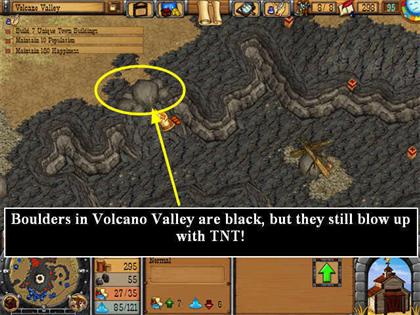
- Try adding more Sheriff’s offices and hiring more Deputies to increase happiness.
- This is a Quest where you may want to save midway several times, whenever you get to where you’re feeling good about things. The volcano rocks drop randomly, and if one takes out your Market Place, you may not be able to recover, but you may not want to go all the way back to the beginning of the Quest, either.
TROPHIES AND SECRET OBJECTS
- There are two secret produce items.
- Watermelon: have a water level of at least 86 in any town. (Note: watermelon require more water than other crops)
- Peas: find the canyon in your main town where there is one Coal Mine and the ground is covered in gravel. Irrigate the entire canyon. Build a farm and upgrade it. Assign a skilled Farmer. You will now be able to grow peas.
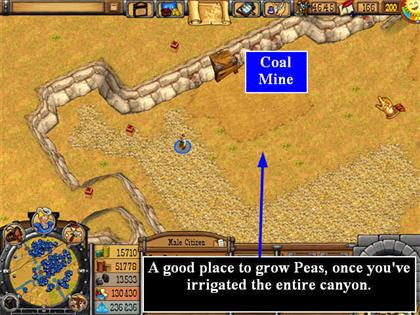
- There is one secret ranch animal.
- Buffalo: follow the instructions in the Buffalo Quest.
- There are 8 Hats in the Hat Shop
- Top Hat—when you build the Hat Shop
- Leaf Beanie—when you build your first Lumber Camp
- Banana Hat—for growing all 5 kinds of produce at the same time.
- Chicken Nest Hat—for completing the Mad Hatter Quest
- Deer Stalker Hat—for completing the 3 Treasure Quests (Dog’s Treasure, Rat’s Treasure, Fish’s Treasure)
- Diving Bell Hat—for building 3 Fishing Huts
- Crown—for completing the Final Showdown Quest
- British Wig—for having a Mayor who has all 4 skills
- There are 4 outfits in the Clothing Shop
- Men’s suit—when you build the Clothing Shop
- Women’s dress—when you build the Clothing Shop
- Saloon Dress—when your town reaches a Happiness of 200
- Indian Dress—when you complete all 10 Market Quests in the Main Town
- There are two secret buildings
- Wooden Log Statue—when you complete the Log Cutting Challenge Quest
- Clock Tower. You will need Iron Bars for this, so your Main Town must be producing the Iron Town Good. You must also have 3 Factories. A visitor will arrive who will offer to give you blueprints for “a modern marvel.” Collect iron bars from the ground by the Blacksmith (they look like small wood rods), then take them to the Visitor and drop them. Now any Citizen or your Hero can build the Secret Clock Post from the Build 3 tab.
- There are 8 secret Town Goods that you can sell at your train station in the Main Town
- Produce Town Good: you have an employed Farm
- Meat Town Good: you have an employed Butcher Shop
- Miracle Cure Town Good: you have an employed Doctor and you have a Skilled Farmer employed at a Fishing Hut
- Fertilizer Town Good: you have an employed upgraded Ranch and two Stables
- Factory Town Good: Have a Citizen with both woodcutter and mining skills employed at a Factory and a Citizen with both woodcutter and mining skills employed at an upgraded Lumber Camp
- Iron Town Good (this also means your blacksmith will produce Iron Bars): you have a skilled Miner employed at the Blacksmith’s and another skilled Miner at a working Coal Mine and you upgraded Pickaxes (a Blacksmith upgrade)
- Bakery Town Good: you have a Bakery and you have collected apples (to get apples, you have to plant tree seeds that you buy at the General Store, or find baskets of apples in town)
- Bonds: You have a Mayor who has all 4 skills (this also gets you the British Wig in the Hat Shop) and you have skilled Salesclerks working at two Banks. The Bonds will appear after they start collecting taxes.
- The complete list of all Fossil locations is in the Archaeological Discovery Quest.
- There are 24 Trophies.
- They are listed in the order they appear on the Trophy Shelf.
- Settler Trophy: Complete the Game Tutorials
- Pioneer Trophy: Beat the Game (Complete the Final Showdown Quest)
- Disaster Challenge Trophy: Complete the Sandbox Disaster Challenge
- Railroad Challenge Trophy: Complete the Sandbox Railroad Challenge
- Architect Trophy: Purchase all the Locked Items in the Game
- Carpenter Trophy: Upgrade the Clock Tower, Farm, House, Lamp Post, Lumber Camp, Ranch, and Train Yard.
- Trader Trophy: Sell 4 Different Town Goods at the Same Time. (Click on the Train Station to see what you’re currently selling.)
- Merchant Trophy: You must have all 8 Town Good Products in stock at the time that a train arrives at the Station. To see which you have, click on the Train Station. To find out how to get each, see the list of Products above. If you’ve ever had all 8, the most common problem seems to be with the Miracle Cure—if your Fishing Hut has run out of fish just before the train arrived, you won’t get the trophy because the Miracle Cure won’t be in stock. Just employ another one and try for the next train.
- Farmer Trophy: Unlock and Grow all 5 Crops at the Same Time.
- Rancher Trophy: Unlock and Raise all 4 Ranch Animals at the Same Time.
- Decorator Trophy: Unlock all 8 Hats. (Click on the Hat Shop to see what you have.)
- Fashionista Trophy: Unlock all 4 Clothes. (Click on the Clothing Shop to see what you have.)
- Renovator Trophy: Have 5 Upgraded Houses at the Same Time.
- Detective Trophy: Have 5 Lawmen on Horseback with upgraded guns. Only Deputies and Sheriffs count, Bounty Hunters do not.
- Stylist Trophy: Have 10 Citizens wearing New Clothes from the Clothing Shop.
- Doctor Trophy: Cure 50 Citizens of Illness.
- Collegiate Trophy: Train 20 Citizens with at least 1 Skill each in 1 town.
- Professor Trophy: Train at least 1 Citizen in all 4 Skills.
- Sentinel Trophy: Complete 10 of the Railroad Disasters that happen between towns. Only the Repair Tracks and Railroad Holdups count. If you pay the guy at the train station to take care of one, it doesn’t count towards the 10—your Hero has to be present.
- Lumberjack Trophy: Cut down 50 Trees.
- Landscaper Trophy (secret): Build 5 Parks, then upgrade each 3 times until they have Gnomes in them. To upgrade a Park, just drag any Citizen to it. The first upgrade is a bird bath, the second is a flamingo, and the third is a Gnome.
- Sculptor Trophy (secret): Build 1 each of a Jackelope wooden statue and a Bear wooden statue. See the Wooden Log Statue above for details.
- Pirate Trophy: Open all 3 of the Treasure Chests (see A Dog’s Treasure Quest, a Fish’s Treasure Quest, and a Rat’s Treasure Quest).
- Archaeologist Trophy: Find all 36 of the Hidden Object Fossils. And surprise—you’ll get a dinosaur to go with it!
Created at: 2009-12-08