

Walkthrough Menu
- Game Basics
- Walkthrough: Act I
- Walkthrough: Act II
- Walkthrough: Act III
- Side-quests
- Dream Creatures
- Skill Tree
- Items
- Crafting
- Memory Teleportals
- Start Journey+
Game Basics
To walk around, left-click with your mouse on the desired location, or use the arrow keys. Optionally, hold the left mouse button to follow the mouse. To access the menu, click on the icons at the bottom of the screen, or right-click or press the Escape button. Then use the mouse or the arrow keys to scroll through menu options, and left-click or press Space or Enter to make a selection. Right-click or press Escape to close the menu.Interaction
To talk to a person, click on them with the mouse or approach them using the arrow keys and press Space or Enter. Use the same technique to open doors and chests, and to pick up items or read signs and notices. The mouse icon changes as it moves over people or objects that allow interaction. A speech bubble indicates you can talk to a person; a hand icon indicates you can pick up or manipulate an object; a magnifying glass indicates something that can be read; a sword indicates you can battle with a monster. When a message appears on the screen, left-click or press Space or Enter after you have finished reading, to close the message box and continue the game.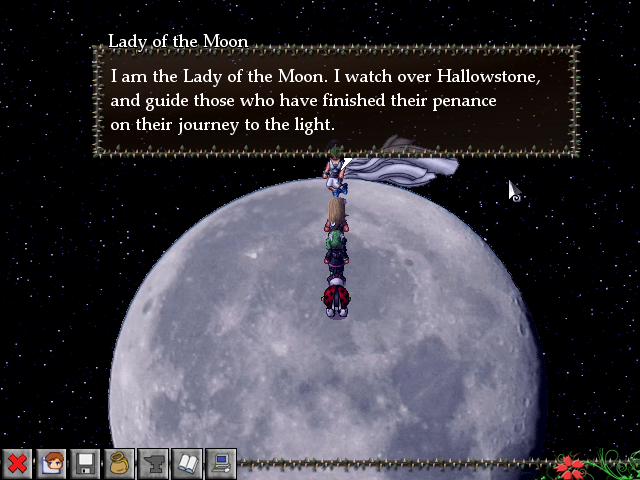
Saving and Loading Games
Saved games are stored separately for multiple accounts on the same PC. To save a game, click the Save icon on the bottom toolbar, or right-click or press Escape to open the menu, and select Quick Save. Optionally, select Help & Options and then Save. Then choose a save slot and click or press Space or Enter. To load a game, open the menu (right-click) and choose Load. Select your saved game.NPCs
An NPC is a character that is not controlled by you (Not-Player-Controlled). Towns and cities are filled with NPCs. They give valuable information and side-quests. Now let’s move on to the walkthrough. That section guides you through the main storyline of the game – giving tips and tricks along the way. For details on side-quests, see that respective section in the strategy guide. A map is provided most of the time to help you on your way. (Note: Maps exclude tree graphics for an increased visibility of where to go.) Also, only important treasure chests will be mentioned. To collect everything, however, you’ll have to explore the areas more on your own. For accurate locations of collectable items such as the broadcasting frequencies, see their respective sections. The frequencies can be found at the Side-Quests section, and Rose Petal Points at the Start Journey+ section. Also take note of the Dream Creatures section if you’re playing with Melrose as a Summoner. Enjoy!Walkthrough: Act I
Let’s get started!
After starting the game, you can begin a Start Journey, Continue an old one or Quit. Since you are reading this, I assume this is your first playthrough, so select Start Journey! After watching the intro you will find yourself at the Montas College. Go out of the computer library. Just a little bit down is a storage room. Walk inside and open the chest for some items. Now go north. You will stumble upon a girl – Anna – at the exit. She provides a side-quest. Leave the school after completing it or not. Tip! At the west and east of the school’s exit are doors that you can’t see. They’re indicated by blue arrows. Just walk up to them and press Enter or the Spacebar, or click on them with the mouse (and Melrose will walk up to them and go through). Go down to the bus stop and take a ride downtown. At Downtown Rowmo go west until you reach the Historical Museum. Go inside. There will be a lady in purple running around at the entrance. She provides another side-quest. Leave the museum when finished here. Head back to the bus stop and take a ride to Movearlane. Go down two streets and turn right. The house with the red roof and the rose in the garden is where Melrose lives with her parents (see the map below). Go inside.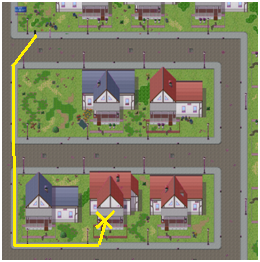 After the cutscenes you will find yourself in the basement. Pop up the main menu with Escape and select Crafting (the little anvil icon). Select the Wood, Glue and Blue Paint and craft the Castle Roof. Check out the castle. Now you can select your class. If this is your first playthrough you can only choose between a warrior and a paladin. Otherwise you could also play as a summoner.
Warrior: Starts out with ‘Sharp Slash’. Higher resistance against ‘Blinded’. Higher physical damage.
Paladin: Starts out with ‘Prayer’ (which cannot be bought in the skill tree). Higher resistance against ‘Muted’. Higher physical defense.
Summoner: Starts out with ‘Sharp Slash’ and ‘Prayer’. Higher resistance against ‘Confused’. Able to summon all dream creatures throughout the game.
After the cutscenes you will find yourself in the basement. Pop up the main menu with Escape and select Crafting (the little anvil icon). Select the Wood, Glue and Blue Paint and craft the Castle Roof. Check out the castle. Now you can select your class. If this is your first playthrough you can only choose between a warrior and a paladin. Otherwise you could also play as a summoner.
Warrior: Starts out with ‘Sharp Slash’. Higher resistance against ‘Blinded’. Higher physical damage.
Paladin: Starts out with ‘Prayer’ (which cannot be bought in the skill tree). Higher resistance against ‘Muted’. Higher physical defense.
Summoner: Starts out with ‘Sharp Slash’ and ‘Prayer’. Higher resistance against ‘Confused’. Able to summon all dream creatures throughout the game.
Step into the dream world
After making your choice, a short tutorial battle initiates. Then the game skips 12 hours ahead in time. What happened? Where is Melrose? How did she get there? Go north-east and turn right. Open the chest. Go back and north-west. Fight the Dream Wings. Continue to the next area. Tip! To craft the game’s best armor – Relic Armor – at the end of the game, you’ll have to keep the first set of armor that each character receives! For Melrose this is the ‘White …’ series. See the map. First open the chest at the yellow X. Continue east to the next area. You’ll meet the fairy godmother on the way, and she’ll give you the powers to summon the dream creature Star.
In the next area you’ll find that you can’t continue due to a dead end. Go back to the previous area and go to the red X. Check the orb. Go back to the next area and you’ll be able to cross. Here is your first battle against multiple enemies.
After the fight be sure to collect all the items from the chests. Continue and you’ll meet the fairy godmother again. Go north, open the chests and go to the next area. Now before you do anything else, save and use items to get your HP to max. Walk to the top of the red star and a boss battle will initiate against the Portal Demon. His attack pattern is 3x Void > Demon Flame >. After he does three Voids, use Defend so Demon Flame deals little damage. On the first turn, summon Star. Keep your HP up with items. After defeating him, everything turns dark and you’ll get to fight him again. This time Void will be replaced with Suction, which might inflict ‘Muted’ on you. So summon Star as soon as possible – before he can mute you.
Portal Demon (form 1)
HP: 25, Attack: 4, Defense: 3, Magic Def: 8
Skills:
Suction
Demon Flame
Portal Demon (form 2)
HP: 37 Attack: 4, Defense: 0, Magic Def: 8
Skills:
Void (inflicts ‘Muted’)
Demon Flame
Once you defeat it, a cutscene will occur and the game jumps back 12 hours into the past again. You’re back at Movearlane. Go to the bus stop and take a ride to the Montas College. Go to the computer library. On the way, a long cutscene occurs which takes you to the Historic Museum. In this cutscene, you will have the choice to slap Marlotte or Maxine – two bullies from school. Who you slap has an influence on a boss fight later on in the game, so be sure to remember who you slapped. After Mary leaves, pick up the crowbar on the left side of the desk. Talk to the guard and tell him you heard something. The guard will move to the door. Walk behind his back and click on him / check him to hit him with the crowbar when he’s looking down at the door. You’ll only have a few seconds to hit him from behind before he walks back, so move fast! Now pick up the iDream and leave the room.
See the map. First open the chest at the yellow X. Continue east to the next area. You’ll meet the fairy godmother on the way, and she’ll give you the powers to summon the dream creature Star.
In the next area you’ll find that you can’t continue due to a dead end. Go back to the previous area and go to the red X. Check the orb. Go back to the next area and you’ll be able to cross. Here is your first battle against multiple enemies.
After the fight be sure to collect all the items from the chests. Continue and you’ll meet the fairy godmother again. Go north, open the chests and go to the next area. Now before you do anything else, save and use items to get your HP to max. Walk to the top of the red star and a boss battle will initiate against the Portal Demon. His attack pattern is 3x Void > Demon Flame >. After he does three Voids, use Defend so Demon Flame deals little damage. On the first turn, summon Star. Keep your HP up with items. After defeating him, everything turns dark and you’ll get to fight him again. This time Void will be replaced with Suction, which might inflict ‘Muted’ on you. So summon Star as soon as possible – before he can mute you.
Portal Demon (form 1)
HP: 25, Attack: 4, Defense: 3, Magic Def: 8
Skills:
Suction
Demon Flame
Portal Demon (form 2)
HP: 37 Attack: 4, Defense: 0, Magic Def: 8
Skills:
Void (inflicts ‘Muted’)
Demon Flame
Once you defeat it, a cutscene will occur and the game jumps back 12 hours into the past again. You’re back at Movearlane. Go to the bus stop and take a ride to the Montas College. Go to the computer library. On the way, a long cutscene occurs which takes you to the Historic Museum. In this cutscene, you will have the choice to slap Marlotte or Maxine – two bullies from school. Who you slap has an influence on a boss fight later on in the game, so be sure to remember who you slapped. After Mary leaves, pick up the crowbar on the left side of the desk. Talk to the guard and tell him you heard something. The guard will move to the door. Walk behind his back and click on him / check him to hit him with the crowbar when he’s looking down at the door. You’ll only have a few seconds to hit him from behind before he walks back, so move fast! Now pick up the iDream and leave the room.
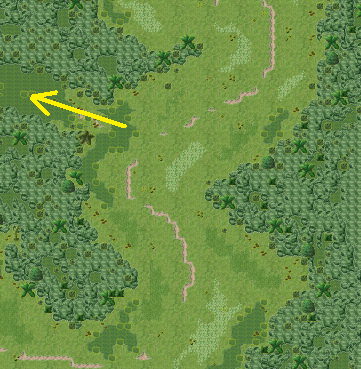
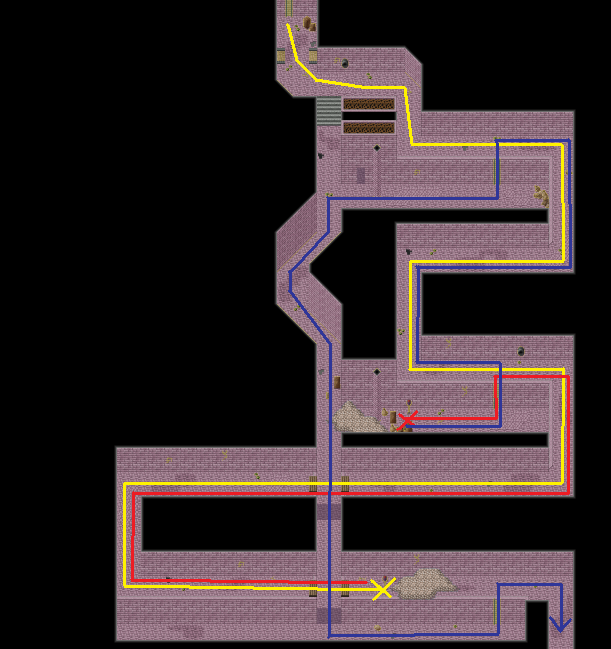
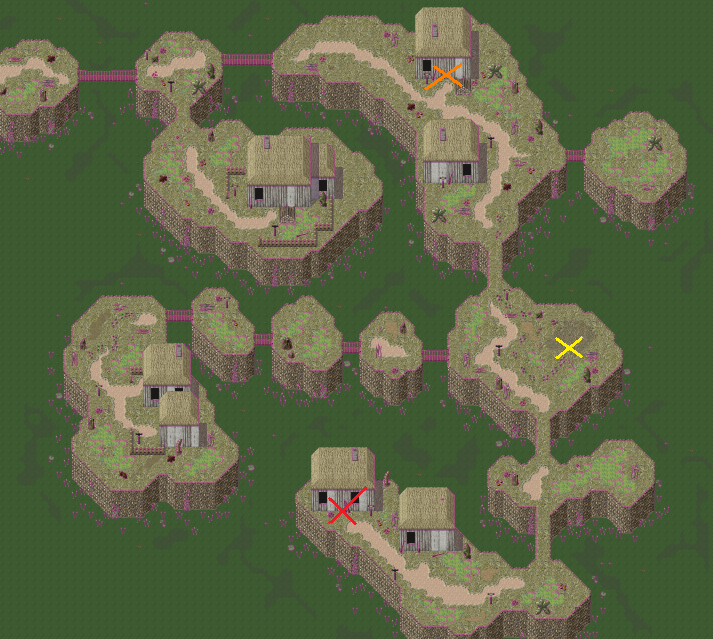
 Oops! You’re spotted by the guards. The following is a mini-game in which you have to get to the museum’s entrance without getting spotted by a guard. Guards will spot you if you come too close. See the map on the right. The yellow arrows indicate the movement of guards. The red X is where you start.
Move down a little. Wait for the guard on your right to move to the right. Go right and turn straight up. Go right and avoid the vertically moving guard. Now move all the way down. Make sure that the guard that walks in the corner there is at the bottom-left of his path. He’ll be standing still there for a while (near the big statue). While he’s there, sneak past his back and exit the museum.
Tip! If you’re having trouble with the puzzle, you’ll have the option to skip the puzzle after being caught four times.
Oops! You’re spotted by the guards. The following is a mini-game in which you have to get to the museum’s entrance without getting spotted by a guard. Guards will spot you if you come too close. See the map on the right. The yellow arrows indicate the movement of guards. The red X is where you start.
Move down a little. Wait for the guard on your right to move to the right. Go right and turn straight up. Go right and avoid the vertically moving guard. Now move all the way down. Make sure that the guard that walks in the corner there is at the bottom-left of his path. He’ll be standing still there for a while (near the big statue). While he’s there, sneak past his back and exit the museum.
Tip! If you’re having trouble with the puzzle, you’ll have the option to skip the puzzle after being caught four times.
Back to the future
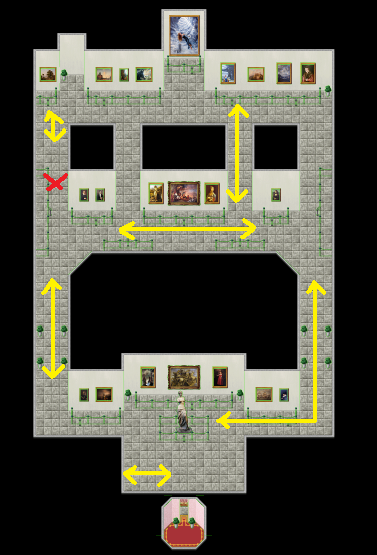
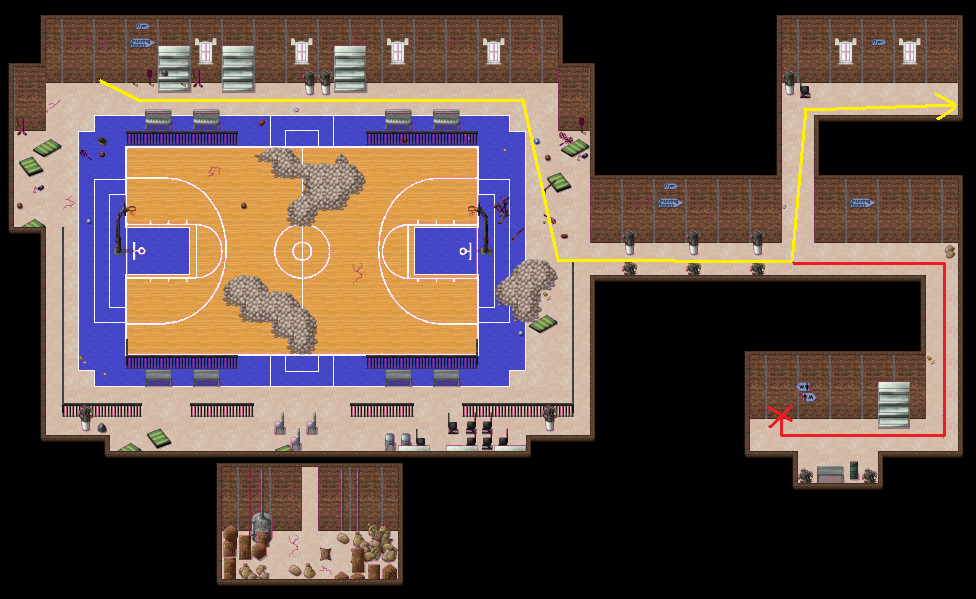
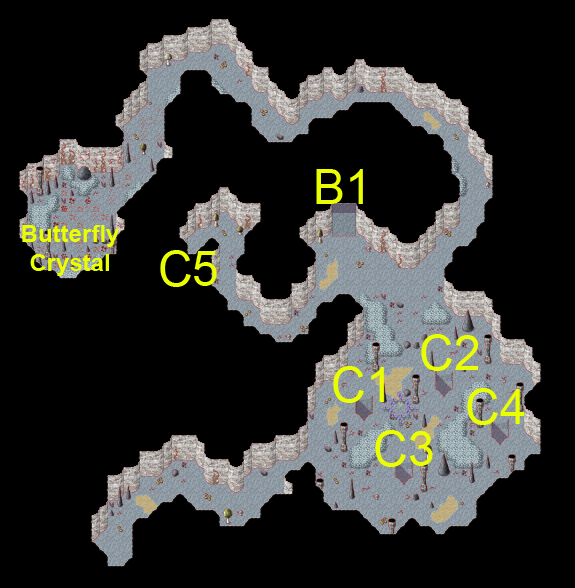
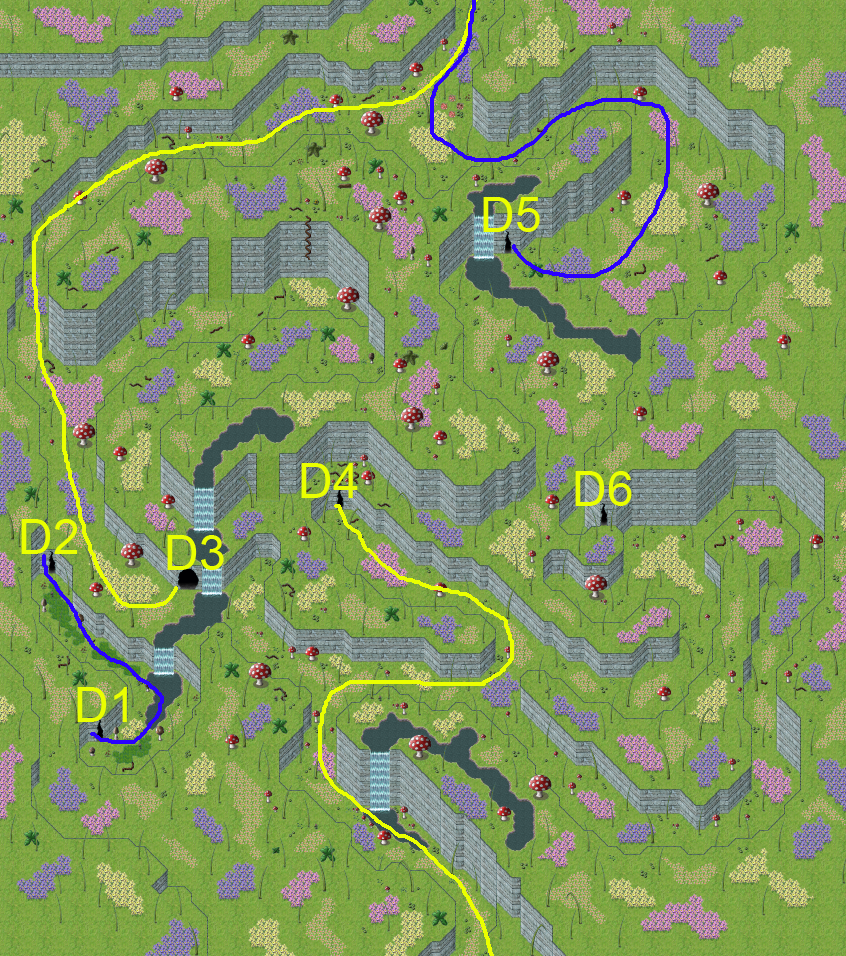
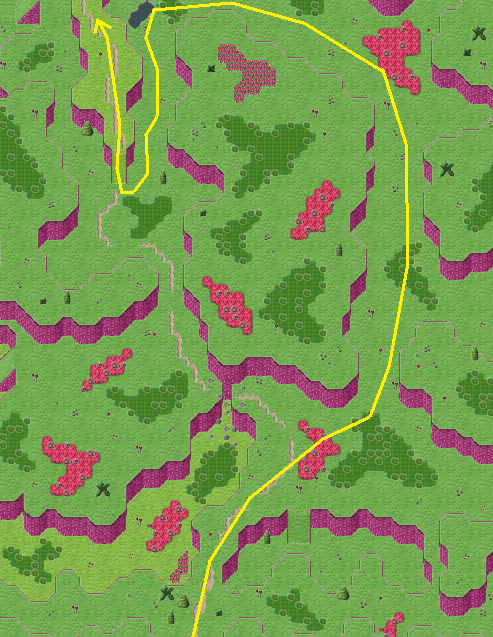
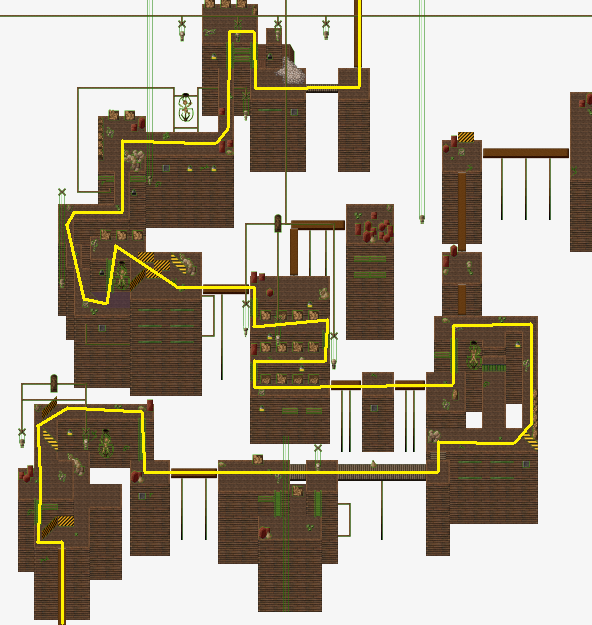
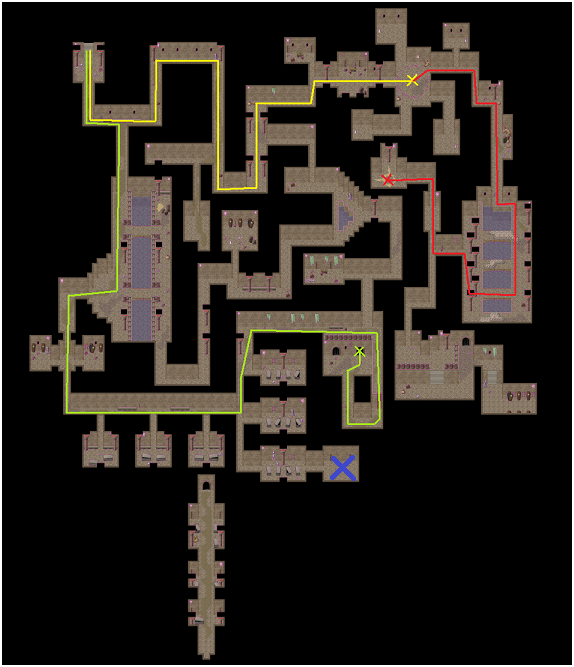
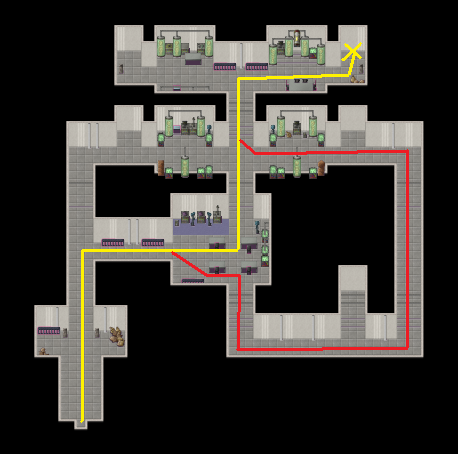
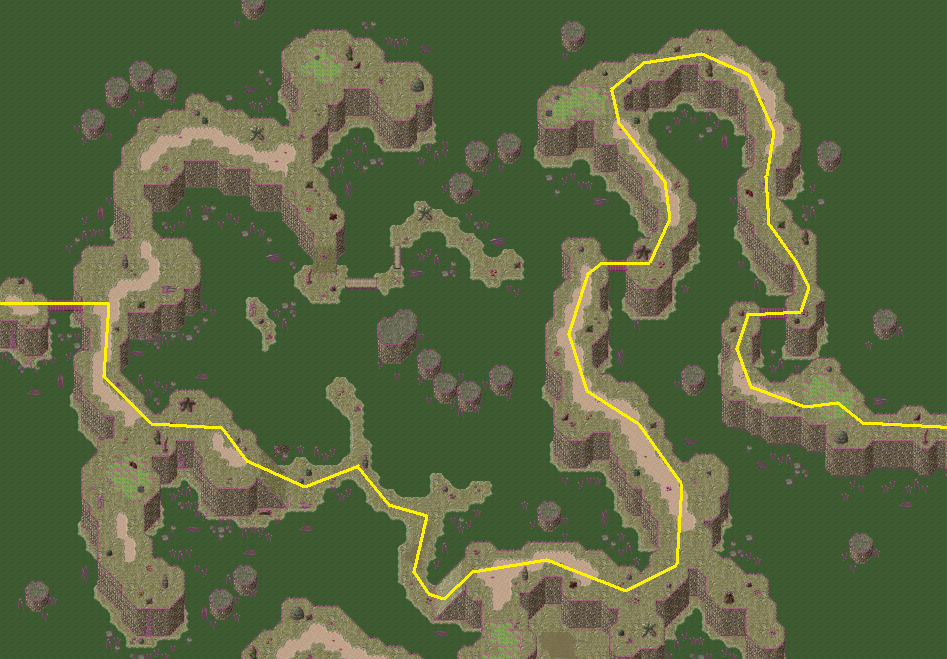
After another cutscene, the game jumps ahead 2 hours in time and everything is chronologically back on track again. Go to the left and exit the computer library. You’ll be at Candy Mountain. This area is pretty straightforward – just follow the ‘path’. The gingerbread man that is close to where you start out (a little to the north-east of you) gives you a side-quest. Don’t forget to open the blue chest that you’ll come across in the second area– you won’t be able to return here later! When you’ve reached the south-eastern part of the second map, a cutscene occurs that takes you back to the dream world version of the Montas College. Go to the exit of the school. On your way you’ll find a portal on the ground. Stepping on it fully heals you for free. At the cafeteria to the west are two treasure chests. See the image below. The yellow crosses indicate the treasure chests, and the line the path you have to take to get there.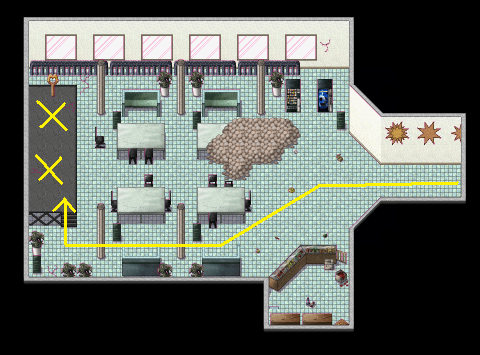 After picking them up, go back and head east. Go straight ahead until you’re at the gym. Leave the building through the hole in the wall at the top. Maps are provided below for guiding you there – just follow the yellow line. When the line splits into a red line as well, follow that one to find a treasure chest containing a Drawing Salve and two Sweet Salves.

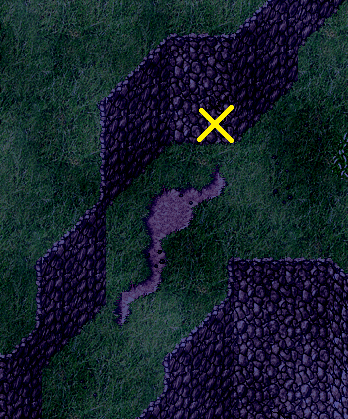
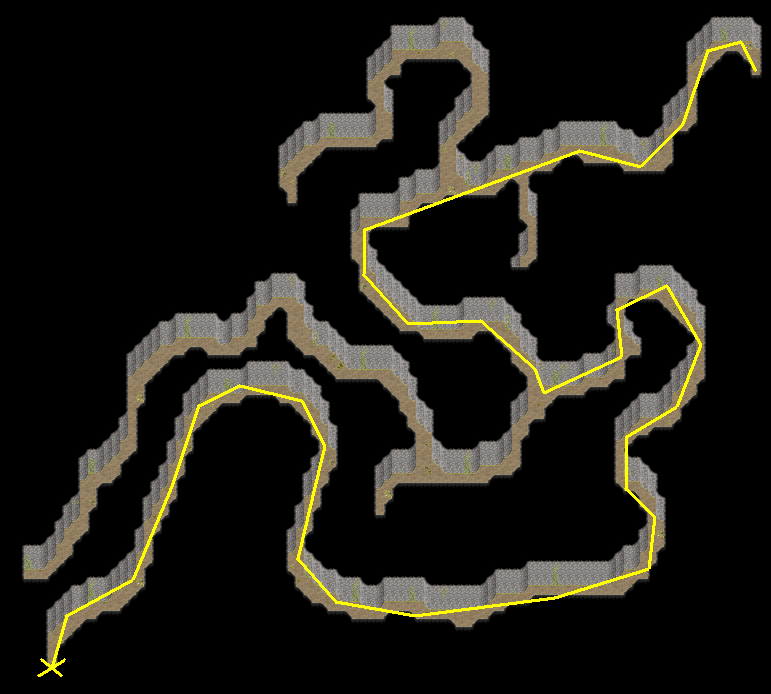
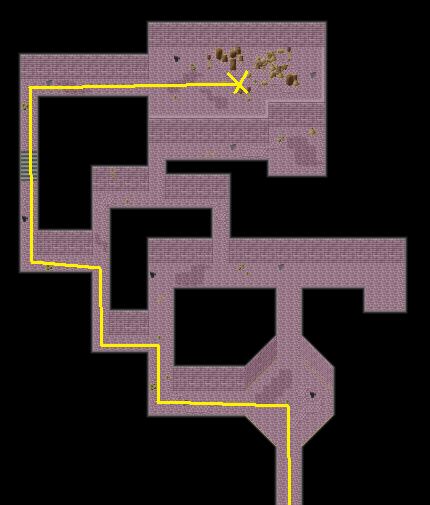
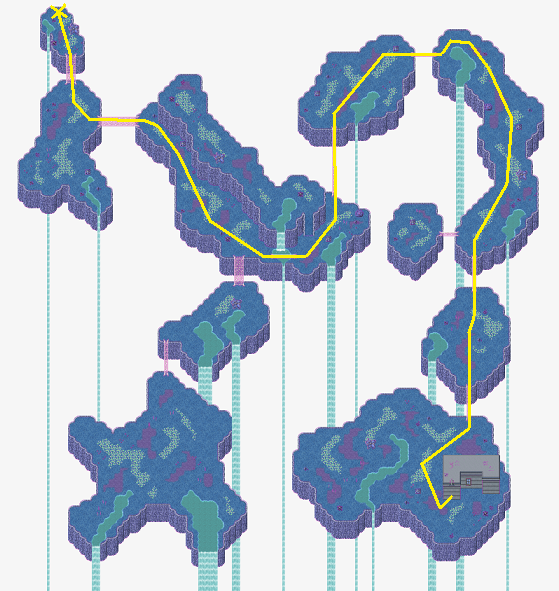
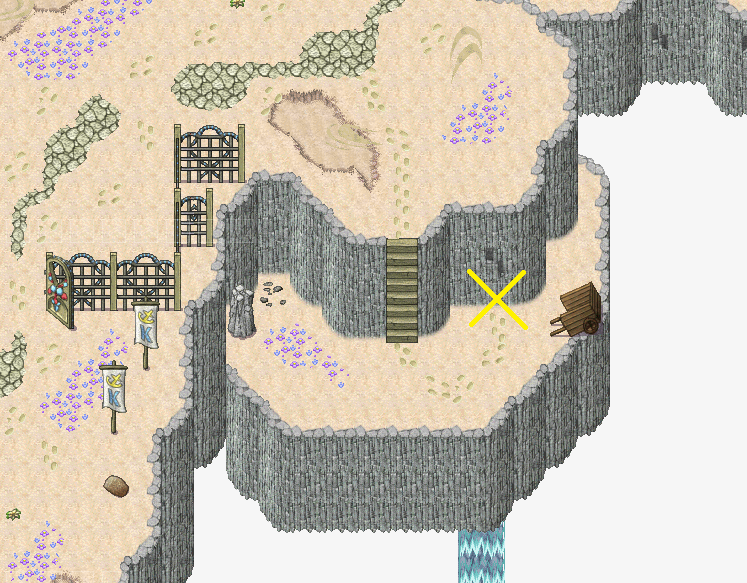
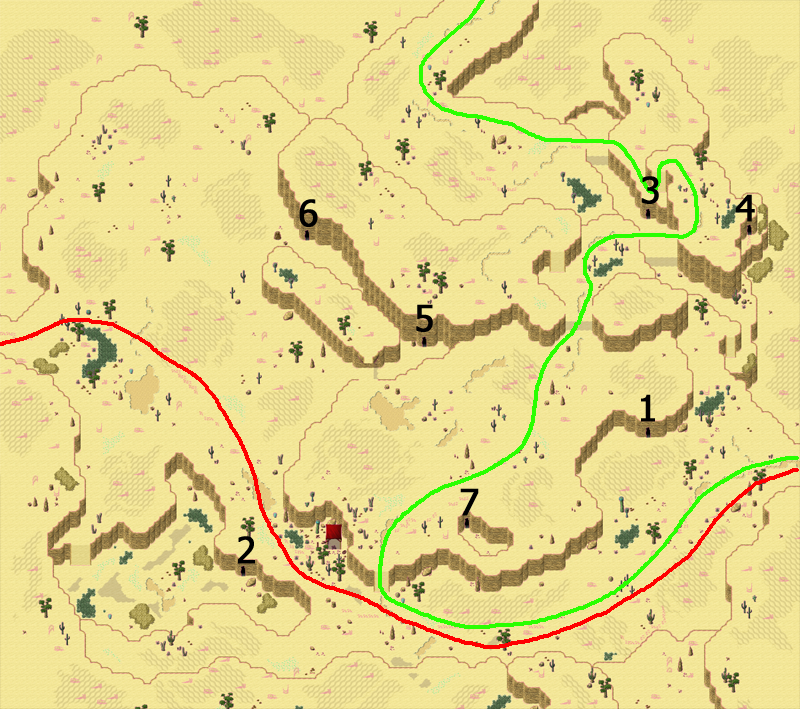
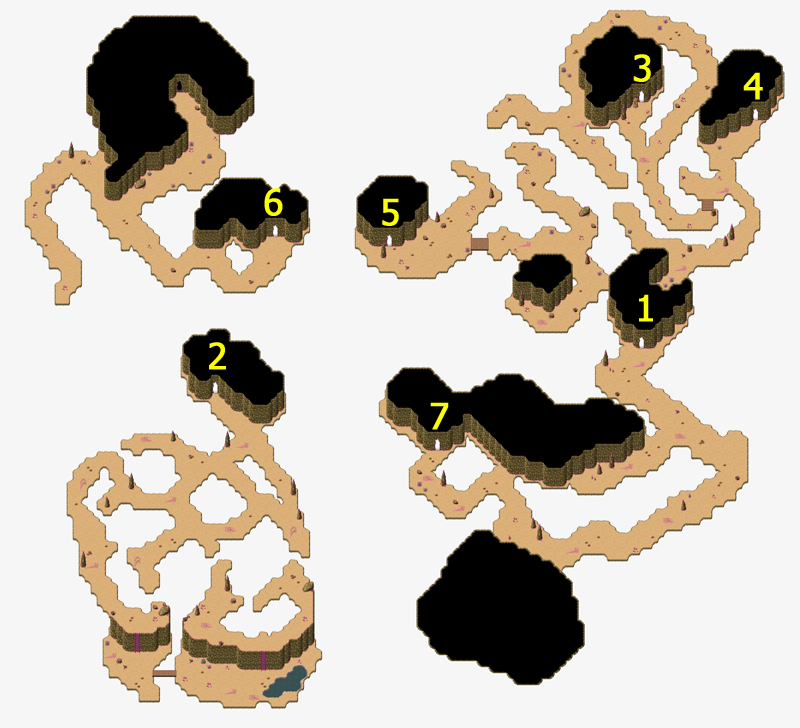
 You’ll be at the Worldmap. Go north-west and walk into the mountain passageway. This will take you to the Crystal Hills. This area is quite large, but you can just follow the little path of sand to reach the next area. Open the treasure chest near the sign up ahead. There’s another chest a little to the north-east of here. You won’t have to go up the hill for that one. There’s also a hidden cave entrance there. See the cross on the image at the right for an indication. Inside are some goodies.
 Go back and go up the hill. There will be another free healing portal. Walk onto it to heal.
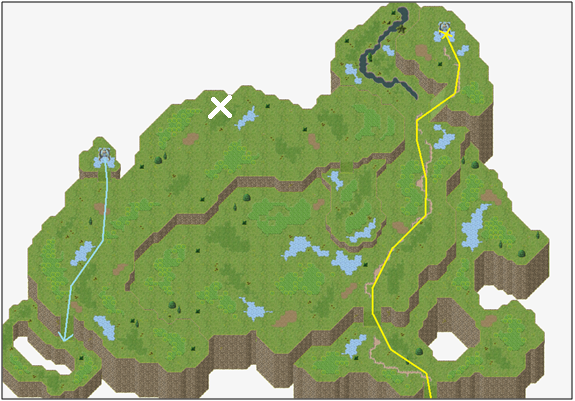
After exploring (or if you don’t want to explore) follow the dirt road to a blue device. I’ve provided maps below. Don’t mind the blue line on the first map yet Step onto the portal to be teleported to the next area.
Go back and go up the hill. There will be another free healing portal. Walk onto it to heal.
After exploring (or if you don’t want to explore) follow the dirt road to a blue device. I’ve provided maps below. Don’t mind the blue line on the first map yet Step onto the portal to be teleported to the next area.
First area
 The red cross indicates a Memory Teleportal. You should unlock it now while you’re here. It will make returning here for the main quest much easier later on. See the Memory Teleportals section of this guide for more information.
Second area
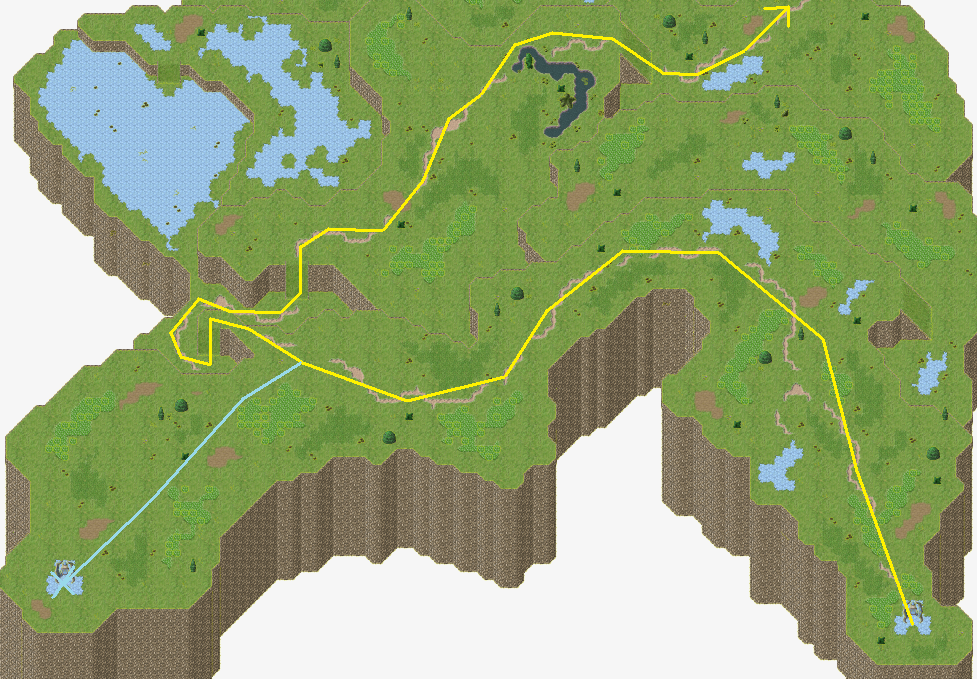 Continue following the dirt road. When it takes you down a hill, don’t go down if you want some extra goodies. Instead, follow the blue line on the map below: go south-west and take the teleporter back to the first map. Go south-west, following the blue line, and you’ll reach a circular island. Open the chests. Head back. Follow the dirt road until you reach the Misty Hills. Enter the inn.
Speak to all the people at the inn. Eventually a girl enters and talks to the innkeeper. She manages to get a room, and then so do you. Go up the stairs and enter your room at the bottom-right. You can also go out on the balcony and enjoy the beautiful view. In your room, walk up to the lamp and turn it on. Check your bed. Turn the light off again and check your bed again. You’ll go to sleep.
After a rather frightening dream followed by a disastrous cutscene, you’ll find yourself outside the inn. Talk to the people around. After speaking with the woman, you can leave the area at the north-west. But first open the chest behind the inn on the right. Go to the next area, and go north. Update your equipment at the merchant if you haven’t found all the upgrades yourself in treasure chests yet.
Continue following the dirt road. When it takes you down a hill, don’t go down if you want some extra goodies. Instead, follow the blue line on the map below: go south-west and take the teleporter back to the first map. Go south-west, following the blue line, and you’ll reach a circular island. Open the chests. Head back. Follow the dirt road until you reach the Misty Hills. Enter the inn.
Speak to all the people at the inn. Eventually a girl enters and talks to the innkeeper. She manages to get a room, and then so do you. Go up the stairs and enter your room at the bottom-right. You can also go out on the balcony and enjoy the beautiful view. In your room, walk up to the lamp and turn it on. Check your bed. Turn the light off again and check your bed again. You’ll go to sleep.
After a rather frightening dream followed by a disastrous cutscene, you’ll find yourself outside the inn. Talk to the people around. After speaking with the woman, you can leave the area at the north-west. But first open the chest behind the inn on the right. Go to the next area, and go north. Update your equipment at the merchant if you haven’t found all the upgrades yourself in treasure chests yet.
Follow the yellow brick road
Move on through the worldmap and you’ll be in the Anatta Woods. Now would be a good time to train Melrose a bit by using that free healing portal on the ground there. Dragonflies give excellent experience points. To the west is a whole area that you should explore for loot and treasure. There is are too many random chests here to mention them all. See the map of the area below to get an overview of the area. Be careful of the south-western part of the area – it’s dangerously infested with the Dragonflies.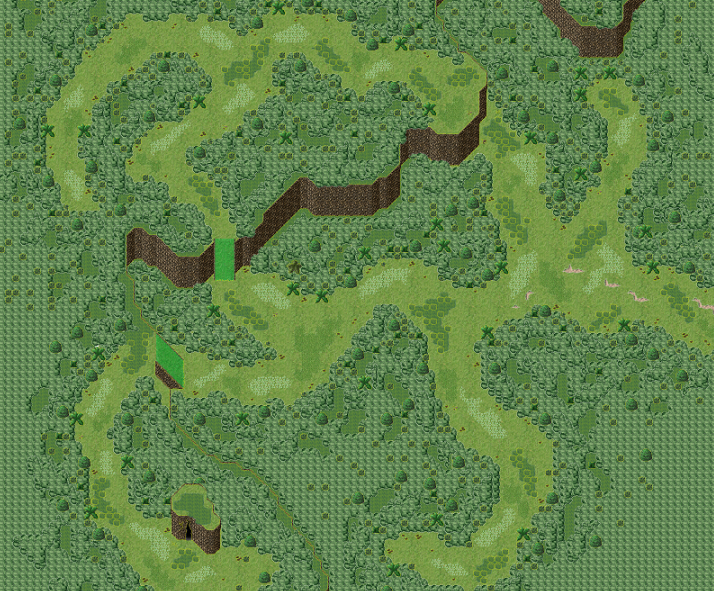 When you’re ready, go back to the healing portal and follow the forest path east. On your left will be a hidden path leading to the Heart Station. Open the blue chest there. Then follow the hidden path into the forest. Go up the stairs and accept Lady Anatta’s quest. You can trade broadcasting frequencies to her for a side-quest. See the picture below to get an exact location of the hidden path.
 There’s also a Memory Teleportal at Lady Anatta. These can be unlocked using Memory Orbs to allow teleportation between the different Memory Teleportals. Its use costs one Recollection Orb.
Continue following the path. There will be a cutscene where a character named Hellena is introduced and a boss battle takes place against the Myriophobius.
There’s also a Memory Teleportal at Lady Anatta. These can be unlocked using Memory Orbs to allow teleportation between the different Memory Teleportals. Its use costs one Recollection Orb.
Continue following the path. There will be a cutscene where a character named Hellena is introduced and a boss battle takes place against the Myriophobius.
 Myriophobius
HP: 74, Attack: 10, Defense: 9, Magic Def: 8
Skills:
Centi-Strike
This is quite a tough boss battle. Melrose can deal the most damage in this battle, so have Hellena use restorative items and the Clover Bombs most of the time. When the Myriophobius starts flashing white, immediately use Defend as it is preparing for the Centi-Strike skill. It deals a lot of damage if the target isn’t defending.
After defeating the Myriophobius you’ll receive a short tutorial on the game’s skill tree system, where you can buy and upgrade skills. See the skill tree section in this guide for more information and the path I suggest taking. Making clever choices at the skill tree will make your life a lot easier. However, feel free to experiment in any way you like! That’s all part of the fun. The game is designed so that if you buy the wrong skills, you’ll still be able to defeat the bosses using another strategy.
The road up ahead is flooded. Directly west of there is a hidden forest path. Take it and you’ll reach the worldmap again. Head north-west to the Butterfly Hills.
Tip! From now on you’ll be able to reach the Herb Cave. It is an area to the east of Anatta Woods. From the cave where you met Hellena, go directly east and you will find a hidden forest path. Follow it east until you reach the worldmap. Continue north-east and you’ll find the Herb Cave. The enemies here are still much too difficult, but you can avoid them and take the treasure from the chests there. You can get some very powerful equipment. If you’re having trouble with the next few boss fights, you should try this.
Beneath the hills are the Butterfly Caves. Both areas are quite complex, so there are maps provided below. Follow the yellow line to get to the Ladybug Village. On your way in the first area you’ll be stopped by an obstacle – there are butterflies in the way and you must get Dragonfly Droppings. Before explaining what to do, here are the maps:
Myriophobius
HP: 74, Attack: 10, Defense: 9, Magic Def: 8
Skills:
Centi-Strike
This is quite a tough boss battle. Melrose can deal the most damage in this battle, so have Hellena use restorative items and the Clover Bombs most of the time. When the Myriophobius starts flashing white, immediately use Defend as it is preparing for the Centi-Strike skill. It deals a lot of damage if the target isn’t defending.
After defeating the Myriophobius you’ll receive a short tutorial on the game’s skill tree system, where you can buy and upgrade skills. See the skill tree section in this guide for more information and the path I suggest taking. Making clever choices at the skill tree will make your life a lot easier. However, feel free to experiment in any way you like! That’s all part of the fun. The game is designed so that if you buy the wrong skills, you’ll still be able to defeat the bosses using another strategy.
The road up ahead is flooded. Directly west of there is a hidden forest path. Take it and you’ll reach the worldmap again. Head north-west to the Butterfly Hills.
Tip! From now on you’ll be able to reach the Herb Cave. It is an area to the east of Anatta Woods. From the cave where you met Hellena, go directly east and you will find a hidden forest path. Follow it east until you reach the worldmap. Continue north-east and you’ll find the Herb Cave. The enemies here are still much too difficult, but you can avoid them and take the treasure from the chests there. You can get some very powerful equipment. If you’re having trouble with the next few boss fights, you should try this.
Beneath the hills are the Butterfly Caves. Both areas are quite complex, so there are maps provided below. Follow the yellow line to get to the Ladybug Village. On your way in the first area you’ll be stopped by an obstacle – there are butterflies in the way and you must get Dragonfly Droppings. Before explaining what to do, here are the maps:


 Backtrack to the cave at the Anatta Woods where you encountered Hellena. Enter the cave entrance there and follow the path indicated by the yellow line on the map below.
 You’ll reach a small cave with some Dragonflies and a pile of droppings. Defeat the dragonflies and pick up the droppings. Then go back to the obstacle at the Butterfly Hills and you’ll be able to cross. Proceed to the Ladybug Village. From there, you can backtrack following the blue line to get to Butterfly Queen Ayumi. By doing her quest you receive her as a dream creature to summon, which is very useful later on. I suggest doing this before the following boss fight at the Ladybug Village: Queen Ayumi has a skill that heals poison, and the following boss likes to inflict that a lot.
At the Ladybug Village, go north and cross the river. To your right will be two mushroom houses. A ladybug is moving between them. Wait a bit if you don’t see him, because he goes inside one of the houses for a while. Talk to him once he comes out. After the cutscene, head north and save at the Memory Orb Vendor. Buy items and prepare for a boss fight. Move further north and fight the Troll Toddler.
You’ll reach a small cave with some Dragonflies and a pile of droppings. Defeat the dragonflies and pick up the droppings. Then go back to the obstacle at the Butterfly Hills and you’ll be able to cross. Proceed to the Ladybug Village. From there, you can backtrack following the blue line to get to Butterfly Queen Ayumi. By doing her quest you receive her as a dream creature to summon, which is very useful later on. I suggest doing this before the following boss fight at the Ladybug Village: Queen Ayumi has a skill that heals poison, and the following boss likes to inflict that a lot.
At the Ladybug Village, go north and cross the river. To your right will be two mushroom houses. A ladybug is moving between them. Wait a bit if you don’t see him, because he goes inside one of the houses for a while. Talk to him once he comes out. After the cutscene, head north and save at the Memory Orb Vendor. Buy items and prepare for a boss fight. Move further north and fight the Troll Toddler.
 Troll Toddler
HP: 225, Attack: 13, Defense: 9, Magic Def: 9
Skills:
Hard Hit
Troll Spit: inflicts ‘Poisoned’
Equipping accessories that protect against ‘Poisoned’ is a good idea for this fight. If he proves too difficult, you can try doing Butterfly Queen Ayumi’s quest first –
she cures ‘Poisoned’. Don’t forget to defend when he’s flashing white. After the fight, head up north to reach the worldmap.
Troll Toddler
HP: 225, Attack: 13, Defense: 9, Magic Def: 9
Skills:
Hard Hit
Troll Spit: inflicts ‘Poisoned’
Equipping accessories that protect against ‘Poisoned’ is a good idea for this fight. If he proves too difficult, you can try doing Butterfly Queen Ayumi’s quest first –
she cures ‘Poisoned’. Don’t forget to defend when he’s flashing white. After the fight, head up north to reach the worldmap.
The Gate of Seasons
 Blue cross: Gate of Seasons Yellow cross: Marionette Factory
Red cross: Lands of Love / Valentown Red arrow: To the Sweet Tower
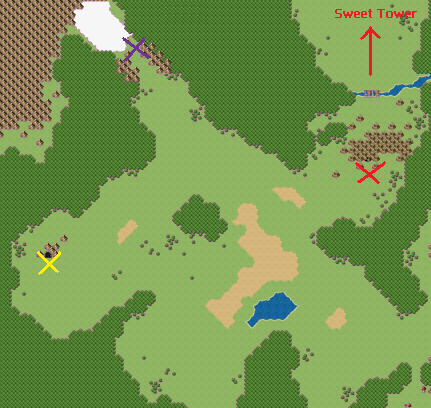
First head to the Gate of Seasons and check it. You’ll see that you need to collect five marionette parts. After the cutscene, you can go either to the Marionette Factory or Valentown. I suggest going to Valentown first. Go to the Lands of Love. Travel north-west to reach Valentown. The people here are quite offensive and rude here. It’s because the Love Engine is broken and no longer sends out love. You’ll need to fix it, so the woodworker in town becomes nice again and will give you one of the marionette parts. After fixing the engine, various side-quests will become available in the town. Check out the Side-Quest Section for more information on them.
Upgrade your equipment and buy items at the Memory Orb vendor, which is near the watermill in the center of the town. You’ll also have to speak with the village woodworker. He lives at the eastern side of the town. When ready, go north and leave Valentown. Continue going north through the Lands of Love. Follow the yellow line on the map displayed below to reach the Sweet Tower (though I suggest going around collecting items from chests first).
Blue cross: Gate of Seasons Yellow cross: Marionette Factory
Red cross: Lands of Love / Valentown Red arrow: To the Sweet Tower
First head to the Gate of Seasons and check it. You’ll see that you need to collect five marionette parts. After the cutscene, you can go either to the Marionette Factory or Valentown. I suggest going to Valentown first. Go to the Lands of Love. Travel north-west to reach Valentown. The people here are quite offensive and rude here. It’s because the Love Engine is broken and no longer sends out love. You’ll need to fix it, so the woodworker in town becomes nice again and will give you one of the marionette parts. After fixing the engine, various side-quests will become available in the town. Check out the Side-Quest Section for more information on them.
Upgrade your equipment and buy items at the Memory Orb vendor, which is near the watermill in the center of the town. You’ll also have to speak with the village woodworker. He lives at the eastern side of the town. When ready, go north and leave Valentown. Continue going north through the Lands of Love. Follow the yellow line on the map displayed below to reach the Sweet Tower (though I suggest going around collecting items from chests first).
 The Sweet Tower is slightly complex to explore. Once inside, you’ll see a ladder going down. That leads to the Love Engine, where you have to go later. But first you must unlock a gate down there. Go up until you see a door on your right that you cannot access. Go up the stairs again. Push the boulder there into the hole in the center of the room. Go down the stairs and push the boulder into the hole at the door. You’ll be able to go outside. Use the arrow keys to maneuver around the circular balcony. Go to the left and flip the switch. Go back inside.
Go up until you see a sparkly key laying on the left (where a pig runs across the room). Pick it up. Don’t forget the skill upgrade point, too. Continue up until you see nine torch-looking objects. Check a torch to turn it on or off. Change the torches in such a way so that the fire forms a + shape, and the torches in the outer corners are off. Go up the stairs and travel through the portal. Go down the stairs and outside. Go down the ladder and open the chest. Go back up and jump down the balcony there. Jump down again and flip the switch. Jump down again.
Now go back inside the Sweet Tower and down the ladder this time. You’ll be at the Love Engine Dungeon.
The Sweet Tower is slightly complex to explore. Once inside, you’ll see a ladder going down. That leads to the Love Engine, where you have to go later. But first you must unlock a gate down there. Go up until you see a door on your right that you cannot access. Go up the stairs again. Push the boulder there into the hole in the center of the room. Go down the stairs and push the boulder into the hole at the door. You’ll be able to go outside. Use the arrow keys to maneuver around the circular balcony. Go to the left and flip the switch. Go back inside.
Go up until you see a sparkly key laying on the left (where a pig runs across the room). Pick it up. Don’t forget the skill upgrade point, too. Continue up until you see nine torch-looking objects. Check a torch to turn it on or off. Change the torches in such a way so that the fire forms a + shape, and the torches in the outer corners are off. Go up the stairs and travel through the portal. Go down the stairs and outside. Go down the ladder and open the chest. Go back up and jump down the balcony there. Jump down again and flip the switch. Jump down again.
Now go back inside the Sweet Tower and down the ladder this time. You’ll be at the Love Engine Dungeon.
 First follow the yellow line and flip the switch at the end. Follow the red line back and flip the switch there. Follow the blue line off the map. Turn right and go through the doorway.
See the map below. Follow the yellow line and flip the switch. Don’t forget to open the chests as usual. Go back the way you came.
First follow the yellow line and flip the switch at the end. Follow the red line back and flip the switch there. Follow the blue line off the map. Turn right and go through the doorway.
See the map below. Follow the yellow line and flip the switch. Don’t forget to open the chests as usual. Go back the way you came.
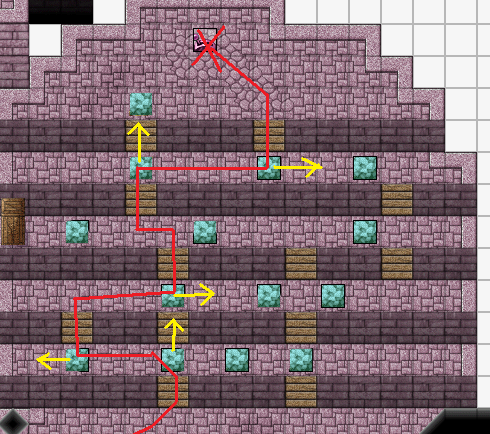
 Go south, down the ladder and follow the hallway. Flip the switch on your way. Turn north when possible, go up the leader and through the doorway. You’ll be at the engine room.
This area is split in two parts: west and east, both with a puzzle you need to solve. The puzzle on the right involves pushing boulders. See the picture below for the order in which you must push the boulders to reach the switch at the top. The red line indicates how you must walk.
Go south, down the ladder and follow the hallway. Flip the switch on your way. Turn north when possible, go up the leader and through the doorway. You’ll be at the engine room.
This area is split in two parts: west and east, both with a puzzle you need to solve. The puzzle on the right involves pushing boulders. See the picture below for the order in which you must push the boulders to reach the switch at the top. The red line indicates how you must walk.
 Now for the left puzzle. Stand on the shiny portal on the floor. Press the number keys 1 to 5 on your keyboard to move the platforms above. Each number moves two portals. See the table below for what numbers move what platforms. All platforms are seen from above (so the first platform is the most north one).
Number key #1 : Platform 1: left & Platform 3: right
Number key #2 : Platform 2: left & Platform 4: right
Number key #3 : Platform 3: left & Platform 5: right
Number key #4 : Platform 4: left & Platform 1: right
Number key #5 : Platform 5: left & Platform 2: right
Press the number keys in this order:
3 >3 >3 >1 >5 >4
Move over the platforms to the top and flip the switch. Now go back and around and go all the way north to the engine. Approach it for a cutscene. Afterwards, it’s time to travel to the top of the Sweet Tower. But before you leave the engine room, buy a lot of healing items and Wake-Up Salves. If you slapped Maxine back at the Montas College, buy a lot of Vitamin Pills. Leave the Love Engine Dungeon. Before you leave though, if you’re a Summoner, you might want to unlock Cupido. For a how-to, see the Dream Creatures section of this strategy guide.
Once you’ve gone through the portal in the Sweet Tower again and are outside, go up the ladder this time. Go inside and up the stairs until you see a doorway through which you can go outside. Outside, open the chest on your left and then head up the ladder. Jump down the balcony on your right. Open the chest and go inside. Open the chest there, and then jump down the hole. Go back up the stairs and outside again. This time climb to the top of the tower. Before going there, heal your allies and save. Then head onwards for a cutscene and a boss fight. The boss fight is against Marlottephobius or Maxinephobius, depending on who you slapped back at the Montas College in the real world. Your foe is the girl you slapped.
Now for the left puzzle. Stand on the shiny portal on the floor. Press the number keys 1 to 5 on your keyboard to move the platforms above. Each number moves two portals. See the table below for what numbers move what platforms. All platforms are seen from above (so the first platform is the most north one).
Number key #1 : Platform 1: left & Platform 3: right
Number key #2 : Platform 2: left & Platform 4: right
Number key #3 : Platform 3: left & Platform 5: right
Number key #4 : Platform 4: left & Platform 1: right
Number key #5 : Platform 5: left & Platform 2: right
Press the number keys in this order:
3 >3 >3 >1 >5 >4
Move over the platforms to the top and flip the switch. Now go back and around and go all the way north to the engine. Approach it for a cutscene. Afterwards, it’s time to travel to the top of the Sweet Tower. But before you leave the engine room, buy a lot of healing items and Wake-Up Salves. If you slapped Maxine back at the Montas College, buy a lot of Vitamin Pills. Leave the Love Engine Dungeon. Before you leave though, if you’re a Summoner, you might want to unlock Cupido. For a how-to, see the Dream Creatures section of this strategy guide.
Once you’ve gone through the portal in the Sweet Tower again and are outside, go up the ladder this time. Go inside and up the stairs until you see a doorway through which you can go outside. Outside, open the chest on your left and then head up the ladder. Jump down the balcony on your right. Open the chest and go inside. Open the chest there, and then jump down the hole. Go back up the stairs and outside again. This time climb to the top of the tower. Before going there, heal your allies and save. Then head onwards for a cutscene and a boss fight. The boss fight is against Marlottephobius or Maxinephobius, depending on who you slapped back at the Montas College in the real world. Your foe is the girl you slapped.

 Marlottephobius
HP: 650, Attack: 22, Defense: 10, Magic Def: 12
Skills:
Beat Down: All targets, high damage
Wheel Kick
Cursed Power: Increases strength, but poisons herself
Maxinephobius
HP: 400, Attack: 20, Defense: 10, Magic Def: 12
Skills:
Dark Pulse: Single target, decreases max HP and max MP
Snare of Envy: All targets, inflicts ‘Stunned’, ‘Weakened’, ‘Clumsy’, ‘Slowed’ and
‘Feeble’.
Sinful Flare
Heal: Heals herself
Marlottephobius strategy: It is of great importance to defend when Marlotte is flashing white. Beat Down deals a lot of damage when you’re not defending. You should first focus entirely on offense. Get her HP down to below 50% (which is dealing 325 damage points). From then on she will also use Cursed Power. Switch to a defensive strategy and keep everyone’s HP up at all times. When she uses Cursed Power, with everything she does, she will decrease her HP. Eventually she will kill herself. Just stay alive and deal damage every now and then if you have a chance to do so safely.
Maxinephobius strategy: Maxine can apply a lot of negative status effects on you. Try to get rid of these as fast as possible by using Vitamin Pills. Also, defend when she’s flashing white. Defending when she uses Dark Pulse or Snare of Envy decreases the chance of receiving a status effect.
After defeating her and watching the cutscene, you’ll receive the Engine Heart. Go back to where you first encountered Marlotte/Maxine at the Love Engine Dungeon and place the heart. It will start working, and everyone in Valentown will be kind and loving again! Now return to Valentown. Speak to the village woodworker. He will give you a Marionette Body. You can also trade Puppet Wood and Puppet Strings to him (received from defeating marionettes at the Marionette Factory) for Ebony Strings. These items can be used on the boss there. It will inflict ‘Muted’ on him – which otherwise is a very difficult feat to accomplish.
Now it’s time to head to the Marionette Factory. The entrance appears to be blocked, but you can maneuver through it. Or simply use the mouse and click above it for Melrose to find her way automatically. See the map below for directions on the next area. Before continuing to the next area, however, head to the most north-eastern part of the area and open the chest there for a Left Marionette Arm.
The enemies here lay as harmless marionettes on the floor. When approaching them, they will come alive and chase you. Only some marionettes do this – most of them stay lifeless.
In the next area you can unlock Pinoch if you’re a summoner. See the Dream Creatures section for more details. Follow the yellow line on the map below to reach the next area. The red line takes you to Pinoch. However, for now, follow it to the most north-eastern part of the area. Open the chest there for a Right Marionette Arm.
Marlottephobius
HP: 650, Attack: 22, Defense: 10, Magic Def: 12
Skills:
Beat Down: All targets, high damage
Wheel Kick
Cursed Power: Increases strength, but poisons herself
Maxinephobius
HP: 400, Attack: 20, Defense: 10, Magic Def: 12
Skills:
Dark Pulse: Single target, decreases max HP and max MP
Snare of Envy: All targets, inflicts ‘Stunned’, ‘Weakened’, ‘Clumsy’, ‘Slowed’ and
‘Feeble’.
Sinful Flare
Heal: Heals herself
Marlottephobius strategy: It is of great importance to defend when Marlotte is flashing white. Beat Down deals a lot of damage when you’re not defending. You should first focus entirely on offense. Get her HP down to below 50% (which is dealing 325 damage points). From then on she will also use Cursed Power. Switch to a defensive strategy and keep everyone’s HP up at all times. When she uses Cursed Power, with everything she does, she will decrease her HP. Eventually she will kill herself. Just stay alive and deal damage every now and then if you have a chance to do so safely.
Maxinephobius strategy: Maxine can apply a lot of negative status effects on you. Try to get rid of these as fast as possible by using Vitamin Pills. Also, defend when she’s flashing white. Defending when she uses Dark Pulse or Snare of Envy decreases the chance of receiving a status effect.
After defeating her and watching the cutscene, you’ll receive the Engine Heart. Go back to where you first encountered Marlotte/Maxine at the Love Engine Dungeon and place the heart. It will start working, and everyone in Valentown will be kind and loving again! Now return to Valentown. Speak to the village woodworker. He will give you a Marionette Body. You can also trade Puppet Wood and Puppet Strings to him (received from defeating marionettes at the Marionette Factory) for Ebony Strings. These items can be used on the boss there. It will inflict ‘Muted’ on him – which otherwise is a very difficult feat to accomplish.
Now it’s time to head to the Marionette Factory. The entrance appears to be blocked, but you can maneuver through it. Or simply use the mouse and click above it for Melrose to find her way automatically. See the map below for directions on the next area. Before continuing to the next area, however, head to the most north-eastern part of the area and open the chest there for a Left Marionette Arm.
The enemies here lay as harmless marionettes on the floor. When approaching them, they will come alive and chase you. Only some marionettes do this – most of them stay lifeless.
In the next area you can unlock Pinoch if you’re a summoner. See the Dream Creatures section for more details. Follow the yellow line on the map below to reach the next area. The red line takes you to Pinoch. However, for now, follow it to the most north-eastern part of the area. Open the chest there for a Right Marionette Arm.
 In the next area, had north and get the Left Marionette Leg from the chest at the dead end. Go back around head north-east. You’ll come across a Memory Orb Vendor. Heal yourself and buy a lot of items. There’s a boss battle coming up. Proceed when ready.
 Merinthophobius
HP: 750, Attack: 20, Defense: 11, Magic Def: 12
Skills:
Repair
Mass Wind-Up
This boss battle is very difficult if you’re not prepared. Before attempting it, I suggest getting a lot of Ebony Strings from the woodworker at Valentown. Alone, the Merinthophobius is not that strong. The problem lies with the marionettes that he summons during the battle. Keep those at bay while killing the Merinthophobius first. The boss has two skills at his disposal that greatly recover (and even revive) the marionettes. Therefore it is important to keep it ‘Muted’ with the Ebony Strings. Some useful skills for this battle are Hellena’s skills that target all enemies: Torrent, Shroud, etc. They are weak to Lightning, and Freeze is a recommended skill as well.
After winning the battle, follow the path and open the chests there for a Marionette Head. Now it’s time to go back to the Gate of Seasons and open it. Go north and hop onto the hot air balloon. Congratulations, you’ve made it through Act I of the game!
Merinthophobius
HP: 750, Attack: 20, Defense: 11, Magic Def: 12
Skills:
Repair
Mass Wind-Up
This boss battle is very difficult if you’re not prepared. Before attempting it, I suggest getting a lot of Ebony Strings from the woodworker at Valentown. Alone, the Merinthophobius is not that strong. The problem lies with the marionettes that he summons during the battle. Keep those at bay while killing the Merinthophobius first. The boss has two skills at his disposal that greatly recover (and even revive) the marionettes. Therefore it is important to keep it ‘Muted’ with the Ebony Strings. Some useful skills for this battle are Hellena’s skills that target all enemies: Torrent, Shroud, etc. They are weak to Lightning, and Freeze is a recommended skill as well.
After winning the battle, follow the path and open the chests there for a Marionette Head. Now it’s time to go back to the Gate of Seasons and open it. Go north and hop onto the hot air balloon. Congratulations, you’ve made it through Act I of the game!
Walkthrough: Act II
This act begins at the Mirrorcle Caves.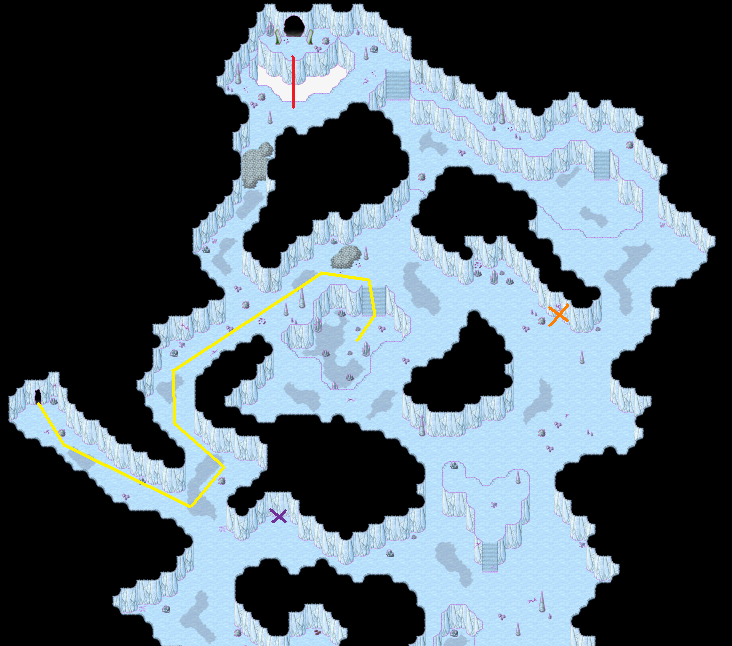 Purple cross: Humpty Houdini (see the Dream Creatures section for more details)
Orange cross: The exit from Mirrorcle Caves once unlocked.
Red line: A bridge that appears later.
Follow the yellow area to proceed to the next area. Follow the tunnel and check the mirror. A mini-game will initiate. The goal is to move each Melrose on a separate portal at the center. Use the arrow keys to move them around. Follow these steps to solve the puzzle in the least amount of steps possible:
Down x2
Left
Down
Right x8
Down
Left x2
You can repeat this mini-game to receive great rewards!
At the other side of the mirror is a maze. You must reach the end of it by traveling through mirrors and touching orbs to raise curtains that are in the way. See the images below to see which mirror takes you where, and where the orbs are. Yellow numbers indicate working mirrors. These teleport you to the same number somewhere else on the map. Purple numbers indicate broken mirrors. You can’t travel back through them.
Purple cross: Humpty Houdini (see the Dream Creatures section for more details)
Orange cross: The exit from Mirrorcle Caves once unlocked.
Red line: A bridge that appears later.
Follow the yellow area to proceed to the next area. Follow the tunnel and check the mirror. A mini-game will initiate. The goal is to move each Melrose on a separate portal at the center. Use the arrow keys to move them around. Follow these steps to solve the puzzle in the least amount of steps possible:
Down x2
Left
Down
Right x8
Down
Left x2
You can repeat this mini-game to receive great rewards!
At the other side of the mirror is a maze. You must reach the end of it by traveling through mirrors and touching orbs to raise curtains that are in the way. See the images below to see which mirror takes you where, and where the orbs are. Yellow numbers indicate working mirrors. These teleport you to the same number somewhere else on the map. Purple numbers indicate broken mirrors. You can’t travel back through them.
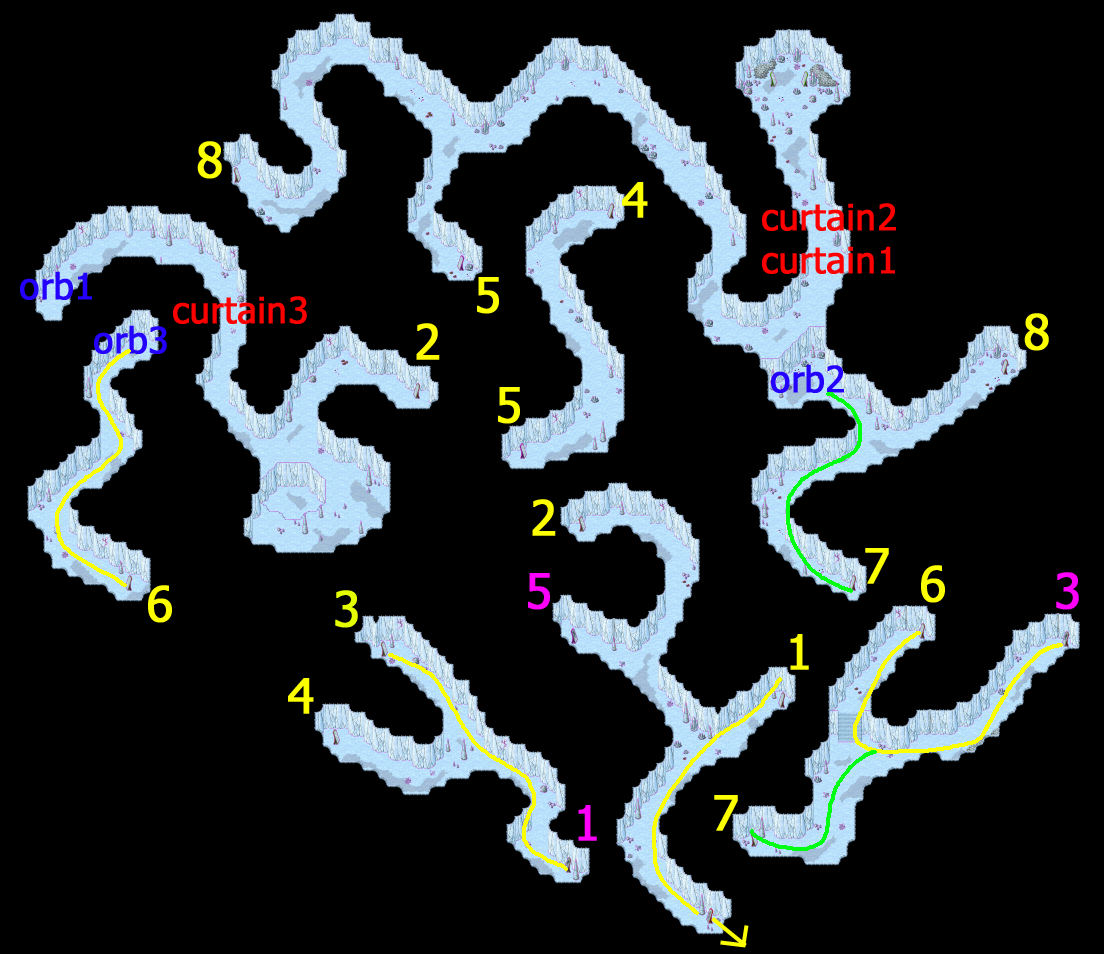 Note: Crystal Hounds can drop a Crystal Shard, which is used in a side-quest later on. You may want to get it now, instead of returning later.
Follow the yellow line all the way to orb 3. Touch it. Go back through mirror 6 and follow the green line to touch orb 2. Go further through mirror 8. Follow the tunnel and go through mirror 5. Go through mirror 2 and touch orb 1 at the end of the tunnel. Go all the way back to the beginning.
Now follow the yellow line again. When it splits into a green line, follow that one. Go into mirror 8. Follow the tunnel. Don’t go into mirror 5 this time. Instead go all the way to the end. There will be two mirrors – you can go through either one, it won’t matter. Go through the large cave entrance right above you.
You’ll be at the next puzzle. The puzzle here involves turning the mirrors around to redirect the ray of light. First you must redirect the ray of light onto the blue treasure chest and open it to receive some items, including an Uncharged Crystal (for a side-quest in Valentown) and a Glowing Spike. Then redirect the ray of light onto the spiky pillar right of the chest. Once you’ve done that, leave the area. See the two pictures below. (To reach the spiky pillar, you just have to change a few mirrors at the end.)
Note: Crystal Hounds can drop a Crystal Shard, which is used in a side-quest later on. You may want to get it now, instead of returning later.
Follow the yellow line all the way to orb 3. Touch it. Go back through mirror 6 and follow the green line to touch orb 2. Go further through mirror 8. Follow the tunnel and go through mirror 5. Go through mirror 2 and touch orb 1 at the end of the tunnel. Go all the way back to the beginning.
Now follow the yellow line again. When it splits into a green line, follow that one. Go into mirror 8. Follow the tunnel. Don’t go into mirror 5 this time. Instead go all the way to the end. There will be two mirrors – you can go through either one, it won’t matter. Go through the large cave entrance right above you.
You’ll be at the next puzzle. The puzzle here involves turning the mirrors around to redirect the ray of light. First you must redirect the ray of light onto the blue treasure chest and open it to receive some items, including an Uncharged Crystal (for a side-quest in Valentown) and a Glowing Spike. Then redirect the ray of light onto the spiky pillar right of the chest. Once you’ve done that, leave the area. See the two pictures below. (To reach the spiky pillar, you just have to change a few mirrors at the end.) Redirecting the ray of light to the spiked pillar:
 Take a look at the first map of the Mirrorcle Caves. The red line has now become a bridge. Cross it and go to the orange cross. Go through the cave exit (to the right is a close-up picture of the exit) and follow the tunnel to leave the Mirrorcle Caves. At the exit is a Memory Teleportal you should unlock. This will make it easier to return later to unlock Humpty Houdini if you’re playing as a Summoner. Leave and you’ll be at the Cursed Valley. Save, heal up and buy items at the Memory Orb Vendor. There’s a boss fight coming up!

 Mr. Purr
HP: 650, Attack: 21, Defense: 17, Magic Def: 13
Skills:
Cat Call
Triple Bite
Paralyze: Inflicts ‘Paralyzed’ and ‘Weakened’.
Snapping Cat
HP: 50, Attack: 13, Defense: 17, Magic Def: 13
The Snapping Cats are very easy to take down. Mr. Purr, however, uses Cat Call to revive them. This may seem only bad, but it can be used to your advantage. When Mr. Purr uses Cat Call, it means he is casting that instead of something worse such as Paralyze or Triple Bite. Thus if you assign one character to killing Snapping Cats all the time, while the other two allies focus on Mr. Purr and healing, it will make Mr. Purr less dangerous. This boss fight should not be too difficult. Hellena’s Freeze is a good choice, as is summoning Queen Ayumi to help Diamond heal everyone.
Mr. Purr
HP: 650, Attack: 21, Defense: 17, Magic Def: 13
Skills:
Cat Call
Triple Bite
Paralyze: Inflicts ‘Paralyzed’ and ‘Weakened’.
Snapping Cat
HP: 50, Attack: 13, Defense: 17, Magic Def: 13
The Snapping Cats are very easy to take down. Mr. Purr, however, uses Cat Call to revive them. This may seem only bad, but it can be used to your advantage. When Mr. Purr uses Cat Call, it means he is casting that instead of something worse such as Paralyze or Triple Bite. Thus if you assign one character to killing Snapping Cats all the time, while the other two allies focus on Mr. Purr and healing, it will make Mr. Purr less dangerous. This boss fight should not be too difficult. Hellena’s Freeze is a good choice, as is summoning Queen Ayumi to help Diamond heal everyone.
The Wizard & Witch of Oz
After the fight, head west to the Cursed Forest. Follow the road until it splits in two. You can go left and open some treasure chests. Return, go north and turn right. Follow the road north. You’ll arrive at the worldmap. Walk to the castle. Keep heading north. Once there, enter through the door and you’ll be at the Mighty Wizard’s Castle. After the cutscene, go left and through the door. Follow the hallway to the right for a broadcasting frequency. To the north is a spider web blocking the way. Head through the right door for some treasure chests. Then head through the left door. There’s a hidden doorway at the top of the room. Go through it. Open the chests there. They give you a lot of material for crafting bombs (see the Crafting section of this strategy guide). Leave the room through the door on the right. Proceed through the hallway until you reach another door. Go inside and open the chest there for a Switch Handle. Now go all the way back to the entrance of the castle. This time head east. Follow the hallway until you see a switch with no handle on your right. Insert the Switch Handle you just found. Flip the switch and a bridge will appear. Go south and down the stairs. You’ll be at the Memory of Study. Follow the yellow line on the map above. Pull the switch at the yellow cross. Follow the green line (pushing the boulder on your way) and go up the ladder at the end. Walk on the bookshelves, following the red line. At the end, pull the switch.
Now go all the way back along the green line. At the center of the area you will see that a switch has appeared. Pull it and you can go into the hidden passageway below. Follow the hallway until you reach a library. Check the top-right shelf (at the blue cross on the map) for the Modern History of Earth book.
Go back to the entrance of the castle and approach the magical doorknob statue. After a lengthy cutscene you’ll be at the wizard’s bedroom. You have a new goal: traveling to Witch Way to convince Lisetrix to revive the Mighty Wizard Luzeste, so he can help Melrose leave the dream world. Leave the castle and go all the way back south until you’re able to turn left. Follow the road west until you reach the next area. Buy the latest weapons and items at the Memory Orb Vendor. Going south here leads to Kairo, but let’s not go there yet. First head north to Hallowstone.
There are a lot of side-quests here. See the Side-Quests section for more details. Follow the road. When it splits up, take the right path. Follow it all the way around to the north-west. Talk to the guard there. Follow the path back down and go north-west this time. Go down the hill to the graveyard. Enter the Catacombs there.
Follow the yellow line on the map above. Pull the switch at the yellow cross. Follow the green line (pushing the boulder on your way) and go up the ladder at the end. Walk on the bookshelves, following the red line. At the end, pull the switch.
Now go all the way back along the green line. At the center of the area you will see that a switch has appeared. Pull it and you can go into the hidden passageway below. Follow the hallway until you reach a library. Check the top-right shelf (at the blue cross on the map) for the Modern History of Earth book.
Go back to the entrance of the castle and approach the magical doorknob statue. After a lengthy cutscene you’ll be at the wizard’s bedroom. You have a new goal: traveling to Witch Way to convince Lisetrix to revive the Mighty Wizard Luzeste, so he can help Melrose leave the dream world. Leave the castle and go all the way back south until you’re able to turn left. Follow the road west until you reach the next area. Buy the latest weapons and items at the Memory Orb Vendor. Going south here leads to Kairo, but let’s not go there yet. First head north to Hallowstone.
There are a lot of side-quests here. See the Side-Quests section for more details. Follow the road. When it splits up, take the right path. Follow it all the way around to the north-west. Talk to the guard there. Follow the path back down and go north-west this time. Go down the hill to the graveyard. Enter the Catacombs there.
 At the blue cross is Wravyn’s grave. Check it out if you’re a Summoner. See the Dream Creatures section in this guide for more information.
Follow the green line to the Hills of the Crying Moon.
At the blue cross is Wravyn’s grave. Check it out if you’re a Summoner. See the Dream Creatures section in this guide for more information.
Follow the green line to the Hills of the Crying Moon.
 If you’re a Summoner and want to unlock Wravyn, you’re going to need ten Voice Crests from Enochlophobia. You may want to get some already, or at least keep them for alter.
Follow the yellow line to The Moon. Talk with the Lady of the Moon there. She will tell you to get Moonbat Food. Go all the way back to Hallowstone and leave to the Cursed Forest. This time go south to Kairo. You’ll be at the worldmap. Head south-west and then south. You’ll be at the Bridge to the Sky. Follow the road and talk to the lady at the desk. Then walk up the waterfall to enter Kairo – the floating market city. There are a lot of side-quests here as well. I particularly suggest doing the Tradecenter quests. The Tradecenter is on the north-western most island. There’s also a hidden cave. See the picture below for its location.
If you’re a Summoner and want to unlock Wravyn, you’re going to need ten Voice Crests from Enochlophobia. You may want to get some already, or at least keep them for alter.
Follow the yellow line to The Moon. Talk with the Lady of the Moon there. She will tell you to get Moonbat Food. Go all the way back to Hallowstone and leave to the Cursed Forest. This time go south to Kairo. You’ll be at the worldmap. Head south-west and then south. You’ll be at the Bridge to the Sky. Follow the road and talk to the lady at the desk. Then walk up the waterfall to enter Kairo – the floating market city. There are a lot of side-quests here as well. I particularly suggest doing the Tradecenter quests. The Tradecenter is on the north-western most island. There’s also a hidden cave. See the picture below for its location.
 Go to the most north-western house on the main island (the first one you’re on). Talk to the man there.
Go south to the market square. There will be a man with short dark hair, no shirt and a backpack on walking around. Give him the package. Return to the man who gave you the quest and he will give you Moonbat Food. Before we leave Kairo, however, it’s time to help Diamond. There are four NPCs with information regarding the trolls, and you have to speak to them all.
Main/first island : A black man with a green hat and a long black coat.
Main/first island : A man with a long black coat and long brown hair in a
ponytail.
Market/second island : The Kairo guard with short greenish hair, standing near the
skeleton.
Market/second island : The man with short spiky dark hair and green/orange clothes
standing at a wrecked market stand.
After speaking to them all, a short cutscene occurs and you can leave Kairo. Head back to Hallowstone. This time upon entering, you will encounter Jack. He promises to take Melrose back to the real world. They are to meet him at the Catacombs. Go there after buying a lot of items (this is important!). This time, follow the yellow line I provided on that area’s map above. At the cross is a puzzle that involves pushing boulders into the four holes in the rooms surrounding the clock on the floor. See the table below for the solution.
Reddish brown rock
Morning
Push into the north-eastern hole.
Grayish blue rock
Evening
Push into the south-western hole.
Blue rock
Night
Push into the north-western hole
Yellowish green rock
Day
Push into the south-eastern hole.
The idea behind this puzzle is that for the dead, the time of awakening and sleep is reversed. They live during the night and sleep during the day. Thus the boulder representing the evening and thus the beginning of sleeping is pushed into the hole at the time of 6-7 ‘o clock. In reality this is the morning – the rise of the sun – the time that the undead must go to sleep. And so on.
After solving the puzzle, follow the red line. When you’re left of the room with the water and bridges and go north, a boulder will roll at you. Immediately run south, following the hallway. Get out of the way as soon as possible, and the boulder will crash. If it hits you instead, you will be taken back to the entrance of the room with the water and bridges. After dodging the boulder, go back and follow the red line. You’ll meet Jack.
Go to the most north-western house on the main island (the first one you’re on). Talk to the man there.
Go south to the market square. There will be a man with short dark hair, no shirt and a backpack on walking around. Give him the package. Return to the man who gave you the quest and he will give you Moonbat Food. Before we leave Kairo, however, it’s time to help Diamond. There are four NPCs with information regarding the trolls, and you have to speak to them all.
Main/first island : A black man with a green hat and a long black coat.
Main/first island : A man with a long black coat and long brown hair in a
ponytail.
Market/second island : The Kairo guard with short greenish hair, standing near the
skeleton.
Market/second island : The man with short spiky dark hair and green/orange clothes
standing at a wrecked market stand.
After speaking to them all, a short cutscene occurs and you can leave Kairo. Head back to Hallowstone. This time upon entering, you will encounter Jack. He promises to take Melrose back to the real world. They are to meet him at the Catacombs. Go there after buying a lot of items (this is important!). This time, follow the yellow line I provided on that area’s map above. At the cross is a puzzle that involves pushing boulders into the four holes in the rooms surrounding the clock on the floor. See the table below for the solution.
Reddish brown rock
Morning
Push into the north-eastern hole.
Grayish blue rock
Evening
Push into the south-western hole.
Blue rock
Night
Push into the north-western hole
Yellowish green rock
Day
Push into the south-eastern hole.
The idea behind this puzzle is that for the dead, the time of awakening and sleep is reversed. They live during the night and sleep during the day. Thus the boulder representing the evening and thus the beginning of sleeping is pushed into the hole at the time of 6-7 ‘o clock. In reality this is the morning – the rise of the sun – the time that the undead must go to sleep. And so on.
After solving the puzzle, follow the red line. When you’re left of the room with the water and bridges and go north, a boulder will roll at you. Immediately run south, following the hallway. Get out of the way as soon as possible, and the boulder will crash. If it hits you instead, you will be taken back to the entrance of the room with the water and bridges. After dodging the boulder, go back and follow the red line. You’ll meet Jack.
Christina’s legacy
The game switches over to another character, set in a strange comatose world. This area is very straightforward, but every now and then the path splits and there will be a riddle. Depending on the answer of the riddle, you must follow the red or blue flowers. Follow the blue flowers if the answer has an uneven amount of letters, and the red flowers if it has an even amount. Spaces do not count. If you follow the wrong trail, you’ll end up back at the start. In order I’ll post each riddle, the solution and the path to take. Puzzle #1: HEAD HEELS The answer is ‘head over heels’: 13 letters; follow the blue flowers. Puzzle #2: M1LLION The answer is ‘one in a million’: 13 letters; follow the blue flowers. (Note: If you follow the red flowers, you’ll find another puzzle. This is a nonsense puzzle: regardless of the answer, it’ll be wrong.) Puzzle #3: ICE^3 The answer is ‘ice cube’: 7 letters; follow the blue flowers. Puzzle #4: ________ read ________ The answer is: ‘read between the lines’: 19 letters; follow the blue flowers. Puzzle #5: Are bite –b This puzzle is slightly different. If you remove the b as it says so in the puzzle, you will have ‘are ite’. When pronounced, it sounds like ‘a right’. Thus go around the hole above along the right side. Puzzle #6: The sky burns when the soul is blue. This one is also a bit different. The puzzle is basically saying that blue is wrong. So follow the red flowers. However, on the right side of this ‘island’ (near the water) is an item (Dreams About a Fairytale) that you should pick up for a side-quest in Valentown. Puzzle #7: The colors are reversed. This actually isn’t a puzzle. It just means that from now on, you must follow the blue flowers when the answer has an even amount of letters, and the red flowers when the answer has an uneven amount of letters (they’re basically reversed). Puzzle #8: . ____ RANGE The answer is ‘point blank range’: 15 letters, follow the red flowers (colors are reversed). That was the last puzzle. Follow the path to the end and step on the black portal.Caretech
After a long cutscene, you’ll be back at the real world – at the Sewers! As usual, however, things did not turn out as expected. In the real world, a villain named Oflas wants to capture Melrose and examine her brain. You must launch a surprise attack on him by going to his HQ through the sewers. Simply follow Christina, fighting Buzzers on the way. Don’t forget to pick up chests here and then. At the end, go up the ladder to Caretech.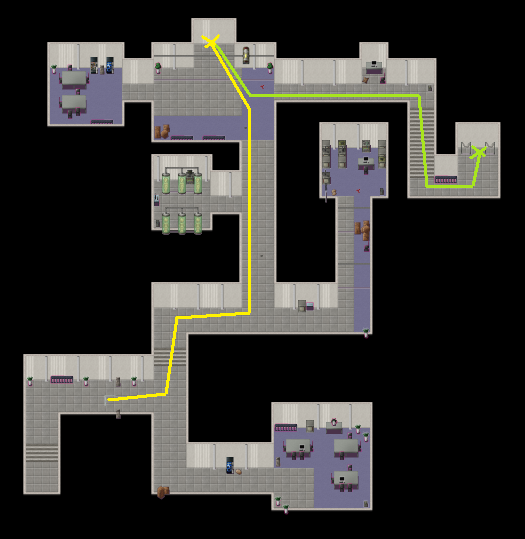 Follow the yellow line, fighting some solders on the way, and go through the door. Fight the soldiers and check the computer. Go back outside and follow the green line to the next area.
 Follow the yellow line. If you want, you can avoid a fight by taking a detour along the red line. Prepare for a fight against three soldiers at the yellow cross. After beating them, go through the door. After the cutscene, you’ll be back at the dream world and Christina will be a new addition to the team. Right away you can upgrade a lot at her skill tree.
Becoming a hero
Go to the north-western gate at Hallowstone and leave. You’ll be at Deadpoint. It’s time to save Diamond’s village. Head north-west to the worldmap. Go west to reach the Desert of Solitude. This is a very large area with a lot of open spaces. Follow the line on the map below. You should take a stop at the Memory Orb Vendor at the red tent to upgrade your equipment.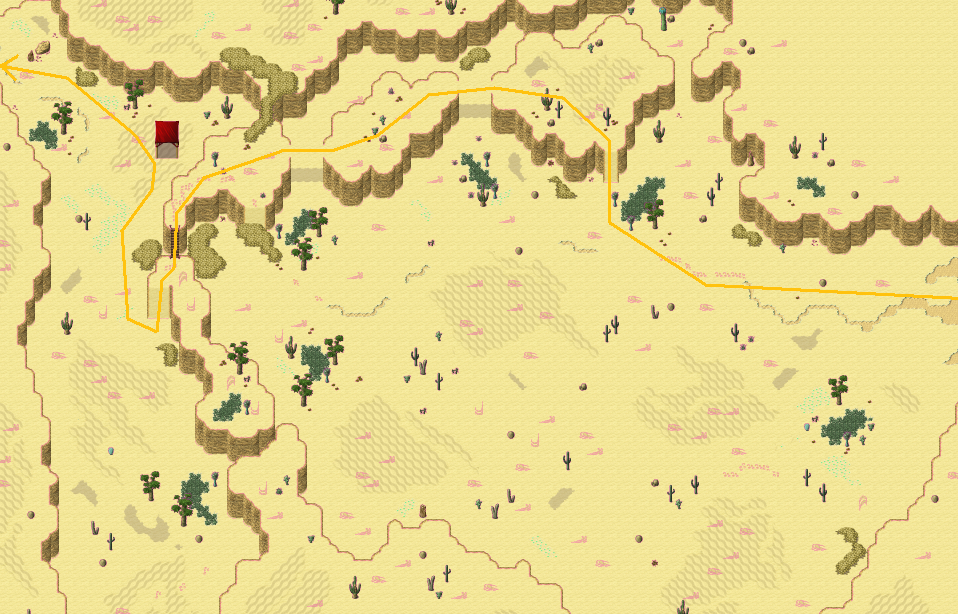 In this second part of the desert, there will be a lot of cave entrances leading to the Quicksand Caves. It is not required to go there, but I suggest exploring and gathering the items from chests. Now you’ll be able to do the first two Kairo Tradecenter quests. The reward for the second one is the Troll Killer: a weapon for Diamond that is very useful in the next boss fight. It requires a Shaving Knife from the Xyrophobia in the Quicksand Caves. You should get it now. See the Side-Quests section for more details.
To the north is the Oasis, where you can find a Memory Orb Vendor and a side-quest. See the maps below for an overview of the desert/cave web.
In this second part of the desert, there will be a lot of cave entrances leading to the Quicksand Caves. It is not required to go there, but I suggest exploring and gathering the items from chests. Now you’ll be able to do the first two Kairo Tradecenter quests. The reward for the second one is the Troll Killer: a weapon for Diamond that is very useful in the next boss fight. It requires a Shaving Knife from the Xyrophobia in the Quicksand Caves. You should get it now. See the Side-Quests section for more details.
To the north is the Oasis, where you can find a Memory Orb Vendor and a side-quest. See the maps below for an overview of the desert/cave web.
 The numbers connect the desert with the cave. Follow the green line to reach the Oasis. Follow the red line to get to the Troll Village, which is where you have to go.
(Note: North-west of cave exit 6 is the Keeper of Loneliness for unlocking the dream creature Genie. See the Dream Creatures section for more information.)
The numbers connect the desert with the cave. Follow the green line to reach the Oasis. Follow the red line to get to the Troll Village, which is where you have to go.
(Note: North-west of cave exit 6 is the Keeper of Loneliness for unlocking the dream creature Genie. See the Dream Creatures section for more information.)
 At the Troll Village is a Memory Orb Vendor that you should use to heal and buy items from. When ready, approach the village entrance for a cutscene. Afterwards, enter the village and maneuver yourself to the north-western part. You can avoid fighting all trolls, except the two guarding the prison. After defeating those two, check the prison door. After the cutscene, leave the village and head back to Deadpoint. This time go north all the way through the worldmap to the Swamp.
 There’s a part of swamp below the map displayed, where you can find some additional treasure chests. You might also want to get Gasweed from the Cacophobia for a Tradecenter quest while you’re here. Follow the yellow line to reach Witch Way.
 First head to the yellow cross. This is where Lisetrix’s invisible house stands. Follow the footprints and check where they disappear to find the door. Inside, talk to Lisetrix. Then go back outside and head to the house with the orange cross at the north. Talk to the witch inside. Now go to the house with the red cross and talk to the witch inside there. When ready with Witch Way, head back through the Swamp to Deadpoint. There is no Memory Teleportal in Witch Way, so you’ll have to go by foot.
The creature in the jungle
You must go back to Valentown. I suggest using the Memory Teleportal at the entrance of Hallowstone to travel to a place near Valentown. Once in Valentown, go north-west into the cave entrance. You’ll be at a cliff. Check the statue of St. Mary Musea to receive Mary Musea’s Blessing. Go back to Deadpoint and head north-west to the worldmap. Instead of going west to the desert, head north to Fureta Jungle. With the blessing, you’ll be able to enter the jungle.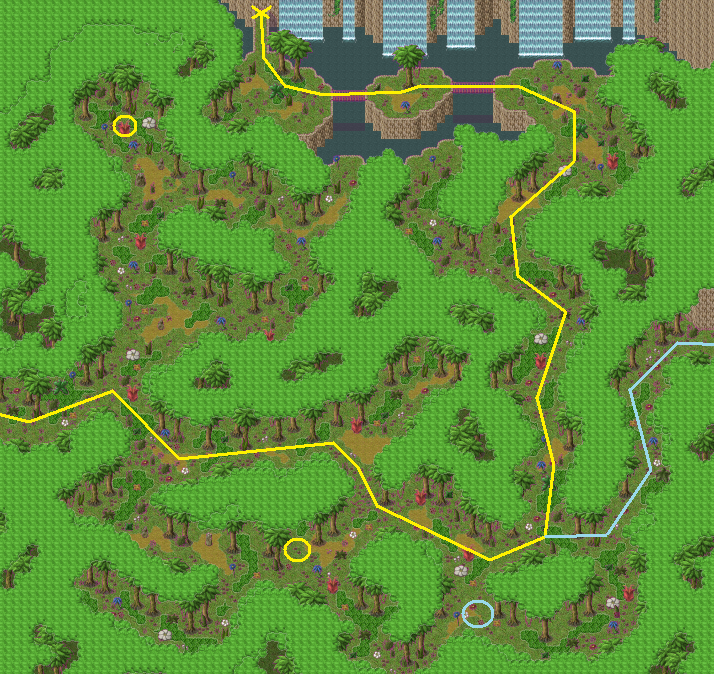 Yellow circles: Yellow flowers (for a side-quest in Lekora / Meylin Underwater Town)
Blue Circle: Memory Teleportal
The blue line takes you to a tree village called Lekora, where a lot of side-quests can be accessed. You can go there already if you want to. Otherwise, follow the yellow line to the Caves of Creativity. This area is very straightforward and small. Just follow the path until you reach Amagdyla’s Lair. Speak to him. You will have to find three ingredients for him, so he can make the cure for Lisetrix’s hex: a Wite Crystal Zard, Scottna Rooot and Dragon Toooth. Below the location of each item is given.
Yellow circles: Yellow flowers (for a side-quest in Lekora / Meylin Underwater Town)
Blue Circle: Memory Teleportal
The blue line takes you to a tree village called Lekora, where a lot of side-quests can be accessed. You can go there already if you want to. Otherwise, follow the yellow line to the Caves of Creativity. This area is very straightforward and small. Just follow the path until you reach Amagdyla’s Lair. Speak to him. You will have to find three ingredients for him, so he can make the cure for Lisetrix’s hex: a Wite Crystal Zard, Scottna Rooot and Dragon Toooth. Below the location of each item is given.
Wite Crystal Zard
Do you remember the Crystal Hills from back at the beginning of the game? You’ll have to go back there. The second area (the one before reaching the Misty Hills Inn) has a crystal area in the north-west. Follow the yellow line on the map below from the Misty Hills Inn to get there.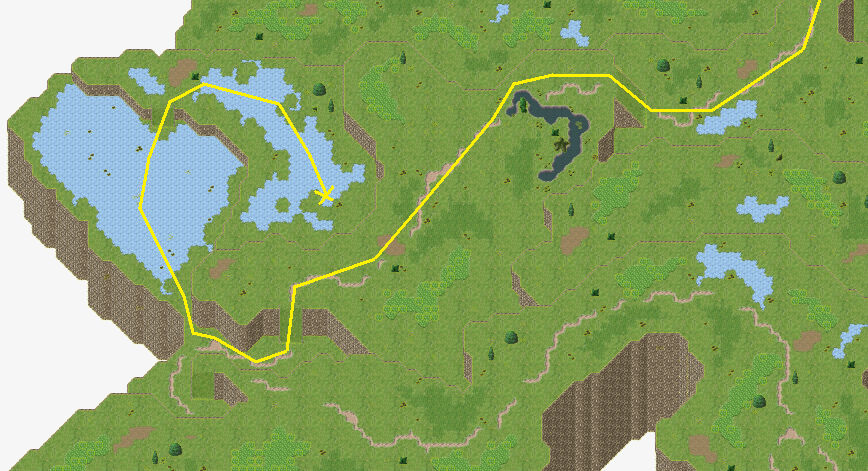 Open the blue chest to receive the Wite Crystal Zard. Beware of the Crystal Cockatrices. They’re quite strong.
Scottna Rooot
Go to the outside of the cave where you met Hellena in the Anatta Woods. Directly to the right from there is a hidden forest path. Go inside and turn south. Follow the path north-east and you’ll reach the worldmap. Go all the way north-east to the Herb Cave.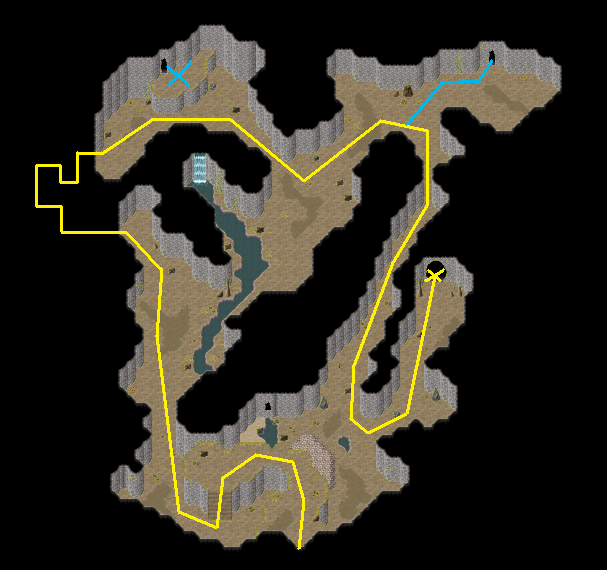 Inside, go north-west until you see a Sphinx. Talk to it. The answer to his riddle is ‘Face’. After answering it correctly, the rock blocking the cave entrance up ahead breaks. The rock to the east also breaks, revealing a blue chest with the broadcasting frequency Infiltration inside. Head to the next area and follow the yellow line on the map below. There’s a hidden little route at the north-west, as you can see. Follow the exact directions of the yellow line there to go through it.
Optionally, follow the blue line through a short tunnel complex to get to the blue cross on the cliff at the north-west. There’s a chest there with a lot of items.
Once you’ve followed the yellow line and entered the next area, open the chest there to receive the Scottna Rooot.
Inside, go north-west until you see a Sphinx. Talk to it. The answer to his riddle is ‘Face’. After answering it correctly, the rock blocking the cave entrance up ahead breaks. The rock to the east also breaks, revealing a blue chest with the broadcasting frequency Infiltration inside. Head to the next area and follow the yellow line on the map below. There’s a hidden little route at the north-west, as you can see. Follow the exact directions of the yellow line there to go through it.
Optionally, follow the blue line through a short tunnel complex to get to the blue cross on the cliff at the north-west. There’s a chest there with a lot of items.
Once you’ve followed the yellow line and entered the next area, open the chest there to receive the Scottna Rooot.
Dragon Toooth
Go to the worldmap where you can go to the Ladybug Village, Marionette Factory, Gate of Seasons and Lands of Love. Follow the yellow line on the map below to reach the Mountain Pass at the yellow cross.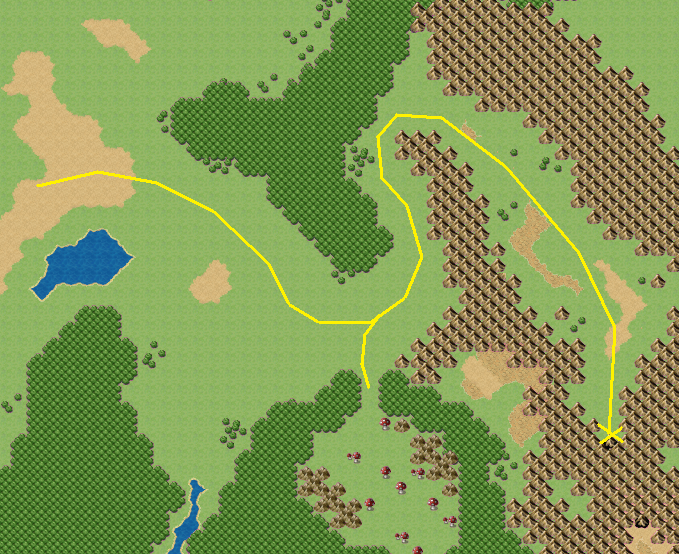 At the Mountain Pass, go south-east a little and you will soon see a green dragon. Fight and defeat it for the Dragon Toooth. Explore the rest of the area for equipment pieces and items.
Agents arrive
Bring all three ingredients to Amagdyla for a cutscene. Melrose’s memory has been erased! What can you do? You must go to the Aztec Temple to recover her memory. Follow the path through the Fureta Jungle. There is no other way to go but to the Aztec Temple. On your way in the first area of the jungle you will come across a blue chest. Be sure to open it and get the Fureta Jungle broadcasting frequency, because after restoring Melrose’s memory there will be no way to get it. After a long walk, you’ll reach the Aztec Temple. Go inside. Head down the stairs and heal and upgrade your weapons at the Memory Orb Vendor. Proceed through the doorway. Now to reach the Memory Chamber where you can recover Melrose’s memory, you must solve two puzzles. Let’s first do the one that does not involve fighting Phobius. Follow the yellow line on the map below to reach the Violence-Burns-Eyes Hall.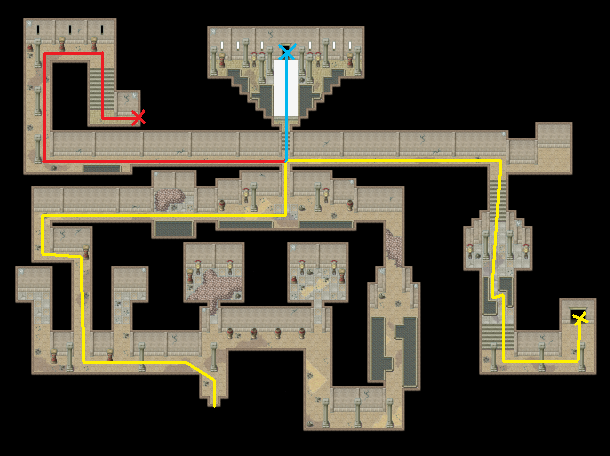 For this puzzle, you must push light-filtering wheels into the ray of lights. The wheels remove their respective color from the ray of light they are in. Thus by rolling the blue wheel into a white ray of light, the color will become yellow (the opposite of blue on the color wheel). The white wheels filter white and thus make the overall color darker.
First make left ray of light dark turquoise and the right ray red. Enter the now opened door at the top and flip the switch. A new wheel will have appeared at the puzzle, which is required to make the combination for opening the other door.
Make the left ray of light yellow and the right ray dark blue. Go through the door, flip the switch and open the chest.
If you’re still having trouble, here’s the simple solution:
First round: Push the top four wheels into the ray of light at their own side.
Second round: Push the white, red and green wheel into the right ray of light. Push the blue one into the left ray of light.
You’ve now successfully solved this puzzle. Go back outside and follow the red line on the map above this time. This new area is a huge maze, with in the center a boss fight and switch.
See the map below for direction on how to get there. You should explore the entire maze for the various treasure chests, though. Also, you might want to get a Stone Feather from the Stone Dolls while you’re here. It is required in a Tradecenter quest.
For this puzzle, you must push light-filtering wheels into the ray of lights. The wheels remove their respective color from the ray of light they are in. Thus by rolling the blue wheel into a white ray of light, the color will become yellow (the opposite of blue on the color wheel). The white wheels filter white and thus make the overall color darker.
First make left ray of light dark turquoise and the right ray red. Enter the now opened door at the top and flip the switch. A new wheel will have appeared at the puzzle, which is required to make the combination for opening the other door.
Make the left ray of light yellow and the right ray dark blue. Go through the door, flip the switch and open the chest.
If you’re still having trouble, here’s the simple solution:
First round: Push the top four wheels into the ray of light at their own side.
Second round: Push the white, red and green wheel into the right ray of light. Push the blue one into the left ray of light.
You’ve now successfully solved this puzzle. Go back outside and follow the red line on the map above this time. This new area is a huge maze, with in the center a boss fight and switch.
See the map below for direction on how to get there. You should explore the entire maze for the various treasure chests, though. Also, you might want to get a Stone Feather from the Stone Dolls while you’re here. It is required in a Tradecenter quest.
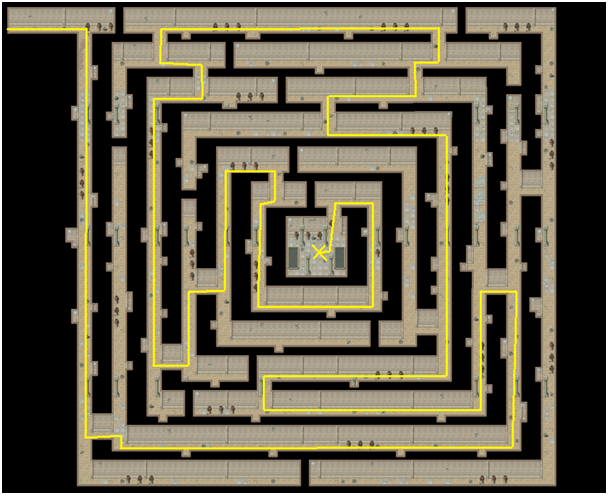 Once you’re at a center, a boss fight against the Jaguar Guardian will occur.
 Jaguar Guardian
HP: 2500, Attack: 37, Defense: 34, Magic Def: 20
Skills:
Aztec Prayer
Holy
Stop: All targets, inflicts ‘Stunned’
Throw Out: Inflicts ‘Clumsy’, ‘Slowed’ and ‘Feeble’
Knock-Out Smash: Inflicts ‘Asleep’ and ‘Paralyzed’
The Jaguar Guardian also has two rat minions. They’re quite weak, though, compared to the Jaguar Guardian. The Jaguar Guardian’s strength lies in his various immobilizing skills. He can slow you down, paralyze you, put you to sleep and stun you. Equipping accessories that defend against such status effects works well here.
After the fight, flip the switch and head all the way back. This time, follow the blue line to the Memory Chamber. Jump up the platforms to your reflection in the wall and check it. Your memories will be restored! The agents appear again, however. After the cutscene, leave the Aztec Temple.
Jaguar Guardian
HP: 2500, Attack: 37, Defense: 34, Magic Def: 20
Skills:
Aztec Prayer
Holy
Stop: All targets, inflicts ‘Stunned’
Throw Out: Inflicts ‘Clumsy’, ‘Slowed’ and ‘Feeble’
Knock-Out Smash: Inflicts ‘Asleep’ and ‘Paralyzed’
The Jaguar Guardian also has two rat minions. They’re quite weak, though, compared to the Jaguar Guardian. The Jaguar Guardian’s strength lies in his various immobilizing skills. He can slow you down, paralyze you, put you to sleep and stun you. Equipping accessories that defend against such status effects works well here.
After the fight, flip the switch and head all the way back. This time, follow the blue line to the Memory Chamber. Jump up the platforms to your reflection in the wall and check it. Your memories will be restored! The agents appear again, however. After the cutscene, leave the Aztec Temple.
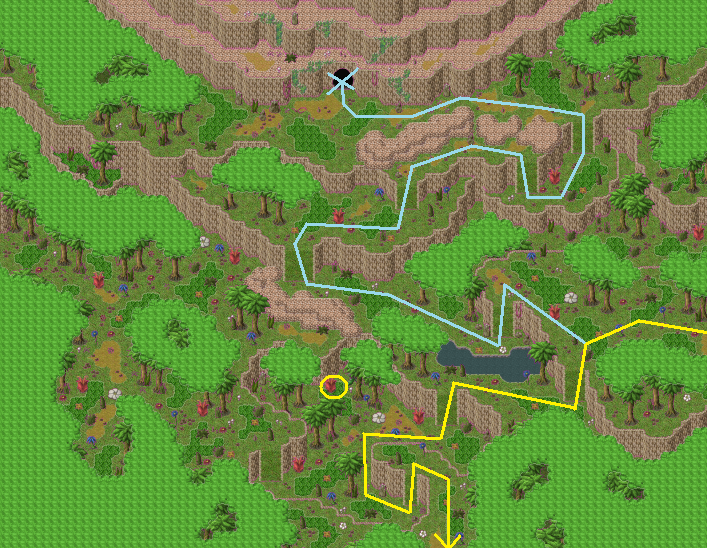 The yellow circle indicates the third yellow flower. Follow the yellow line. Talk with the man there and go up to Lekora. Upgrade your equipment at the Memory Orb Vendor. Go all the way west, down the big ladder and to the east. Enter the large building. Talk to the NPC at the center top – she is the tribe leader. She’ll tell you that Amagdyla has been taken to Mt. Drago. Leave the village and follow the yellow line back. When it splits off into the blue line, follow that one into the Lava Caves.
Walkthrough: Act III
Welcome to the third and final act of Whisper of a Rose! Tension has risen and new villains have been introduced. How will it all come to an end?To the rescue
This part of the Lava Caves is very simple. Just head north and leave to the Volcano. The Lava Golem enemies here are quite difficult, so take care approaching them. Save before each battle.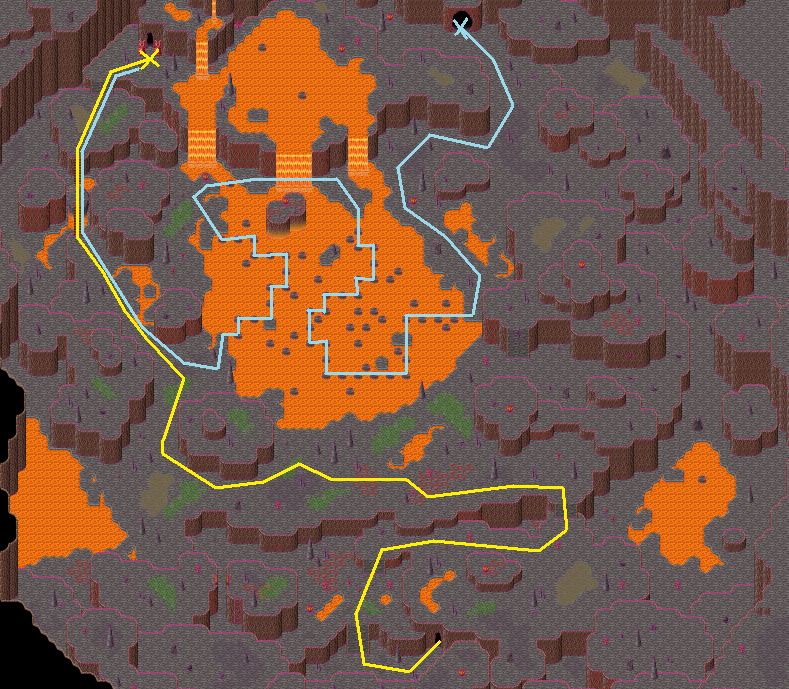 Follow the yellow line and touch the orb. Go into the cave entrance there to the Lava Caves. Go north and turn right. Upgrade weapons and heal at the Memory Orb Vendor. Open the blue chest for a Castle of Coals broadcasting frequency. Now keep following the tunnel until you’re at the center of the tunnel complex. On the way you have to jump over rocks in the lava. Also, the second time you have to jump across the lava, there’s a waterfall behind which you can move to open the chest.
At the center, touch the orb. Go all the way back outside and touch the orb there again. You will receive a Blessing of Willpower, required to pass the next area. To the right you can move behind the waterfall to open the chest. Now follow the blue line to Vestyrka.
Approach the dead end and rocks will rise from the lava. Move up into the city. This is the last big city in the game where you can access a lot of side-quests. I suggest completing them before moving on with the storyline. See the Side-Quests section for more details. There is also a Memory Orb Vendor and Memory Teleportal.
When ready, head north into the cave entrance to reach Mt. Drago. As usual there are some important chests in this area, so explore. Follow the yellow line on the map below to reach the next cutscene and boss fight. Before heading up the hill, be sure to heal, save the game and prepare.
Follow the yellow line and touch the orb. Go into the cave entrance there to the Lava Caves. Go north and turn right. Upgrade weapons and heal at the Memory Orb Vendor. Open the blue chest for a Castle of Coals broadcasting frequency. Now keep following the tunnel until you’re at the center of the tunnel complex. On the way you have to jump over rocks in the lava. Also, the second time you have to jump across the lava, there’s a waterfall behind which you can move to open the chest.
At the center, touch the orb. Go all the way back outside and touch the orb there again. You will receive a Blessing of Willpower, required to pass the next area. To the right you can move behind the waterfall to open the chest. Now follow the blue line to Vestyrka.
Approach the dead end and rocks will rise from the lava. Move up into the city. This is the last big city in the game where you can access a lot of side-quests. I suggest completing them before moving on with the storyline. See the Side-Quests section for more details. There is also a Memory Orb Vendor and Memory Teleportal.
When ready, head north into the cave entrance to reach Mt. Drago. As usual there are some important chests in this area, so explore. Follow the yellow line on the map below to reach the next cutscene and boss fight. Before heading up the hill, be sure to heal, save the game and prepare.
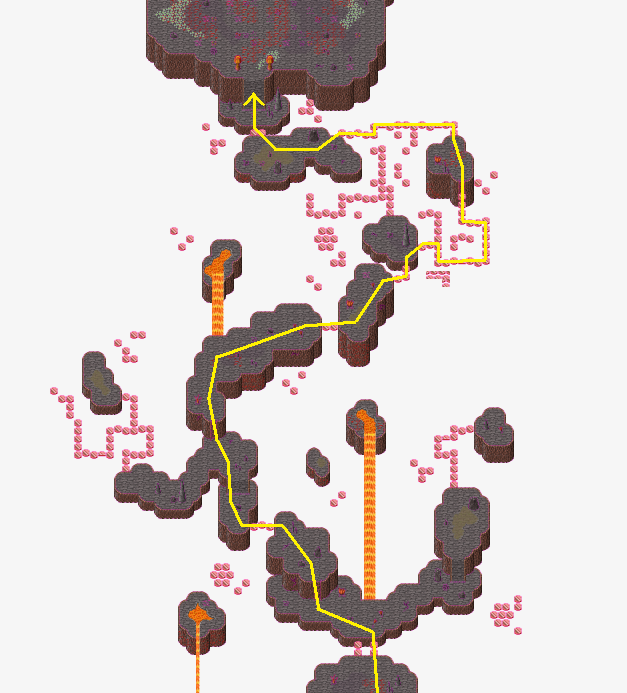 You’ll be fighting not against Lenin himself, but against a dragon he summons. The dragon is a more difficult version of the one you fought before at the Mountain Pass.
 Fire Dragon
HP: 3700, Attack: 45, Defense: 37, Magic Def: 20
Skills:
Aero Cone: Inflicts ‘Weakened’, ‘Clumsy’ and ‘Stunned’
Strength Up: Increases attack
Wing Blast: All targets, inflicts ‘Blinded’
Fire Breath: All targets
Terror Breath: All targets, inflicts ‘Stunned’ and ‘Slowed’
The dragon uses Fire Breath every third turn. He uses Wing Blast the first turn and Terror Breath the second. Time your Defend actions carefully to protect from these attacks. Both Aero Cone and Wing Blast are wind-based attacks and Fire Breath if fire-based. Thus it helps a lot to equip your allies with fire and wind resistant accessories. If you have it unlocked, use Melrose’s Dispelling Sword immediately after the dragon uses Strength Up. Also, it is weak to piercing and water attacks. If you have Hellena’s Torrent or Geyser unlocked, now is the time to use it. Christina’s Nails and Laser skills also work very well here.
After the boss fight, Lenin flees with Amagdyla. Heal and buy a lot of items at the Memory Orb Vendor. Buy a lot of Vitamin Pills for the coming boss fight. When ready, save and head into the portal. A cutscene with the next boss fight will occur.
Fire Dragon
HP: 3700, Attack: 45, Defense: 37, Magic Def: 20
Skills:
Aero Cone: Inflicts ‘Weakened’, ‘Clumsy’ and ‘Stunned’
Strength Up: Increases attack
Wing Blast: All targets, inflicts ‘Blinded’
Fire Breath: All targets
Terror Breath: All targets, inflicts ‘Stunned’ and ‘Slowed’
The dragon uses Fire Breath every third turn. He uses Wing Blast the first turn and Terror Breath the second. Time your Defend actions carefully to protect from these attacks. Both Aero Cone and Wing Blast are wind-based attacks and Fire Breath if fire-based. Thus it helps a lot to equip your allies with fire and wind resistant accessories. If you have it unlocked, use Melrose’s Dispelling Sword immediately after the dragon uses Strength Up. Also, it is weak to piercing and water attacks. If you have Hellena’s Torrent or Geyser unlocked, now is the time to use it. Christina’s Nails and Laser skills also work very well here.
After the boss fight, Lenin flees with Amagdyla. Heal and buy a lot of items at the Memory Orb Vendor. Buy a lot of Vitamin Pills for the coming boss fight. When ready, save and head into the portal. A cutscene with the next boss fight will occur.
 Lenin Levious
HP: 3000, Attack: 40, Defense: 37, Magic Def: 20
Skills:
Dark Pulse: Inflicts ‘Poisoned’
Gravity Blow: Inflicts ‘Weakened’, ‘Clumsy’, ‘Slowed’ and ‘Feeble’
Gravity Well: All targets, inflicts ‘Weakened’, ‘Clumsy’, ‘Slowed’ and ‘Feeble’
Implode: Very high damage
Soul Snare: All targets, inflicts ‘Confused’
Lenin has lower HP and physical attack than the Fire Dragon, but his skills are more powerful. Every third turn, there’s a higher chance for Lenin to use Soul Snare. When Lenin’s HP is above 70%, he does not perform Gravity Well and Implode. Below 70%, he starts using Gravity Well. Below 40% HP, he starts using Implode as well. Below 20% HP, he only uses Implode, Gravity Well and Dark Pulse. The first two are his strongest skills. Therefore it is important to take that last 20% HP down as soon as possible. If you have a hard time defeating Lenin, you might want to keep track of his HP so you can heal before getting his HP down below 20%.
Soul Snare is a very powerful skill as well. It is highly suggested to craft Yellow Earrings (for protection against ‘Confused’) and equip them before the fight. Lenin is not entirely resistant to ‘Confused’ and ‘Asleep’, so if you want to you can try to apply those two status effects to him using bombs or skills.
Lenin Levious
HP: 3000, Attack: 40, Defense: 37, Magic Def: 20
Skills:
Dark Pulse: Inflicts ‘Poisoned’
Gravity Blow: Inflicts ‘Weakened’, ‘Clumsy’, ‘Slowed’ and ‘Feeble’
Gravity Well: All targets, inflicts ‘Weakened’, ‘Clumsy’, ‘Slowed’ and ‘Feeble’
Implode: Very high damage
Soul Snare: All targets, inflicts ‘Confused’
Lenin has lower HP and physical attack than the Fire Dragon, but his skills are more powerful. Every third turn, there’s a higher chance for Lenin to use Soul Snare. When Lenin’s HP is above 70%, he does not perform Gravity Well and Implode. Below 70%, he starts using Gravity Well. Below 40% HP, he starts using Implode as well. Below 20% HP, he only uses Implode, Gravity Well and Dark Pulse. The first two are his strongest skills. Therefore it is important to take that last 20% HP down as soon as possible. If you have a hard time defeating Lenin, you might want to keep track of his HP so you can heal before getting his HP down below 20%.
Soul Snare is a very powerful skill as well. It is highly suggested to craft Yellow Earrings (for protection against ‘Confused’) and equip them before the fight. Lenin is not entirely resistant to ‘Confused’ and ‘Asleep’, so if you want to you can try to apply those two status effects to him using bombs or skills.
Mother & child
After defeating Lenin and watching the cutscene, open the chests in that area and go through the portal on the left. You’ll be at the beautiful Light to the Sky. Follow the path into the Dream Door. It takes you to the Beaches of Freedom. There are a lot of broadcasting frequencies to be found in this area, so take your time exploring. Follow the yellow line on the map below to reach the next area. You’ll pass by a cave entrance with pirate symbols on your way. You can’t go in yet, as you have Amagdyla with you. But remember the location, as that’s where we will be going next.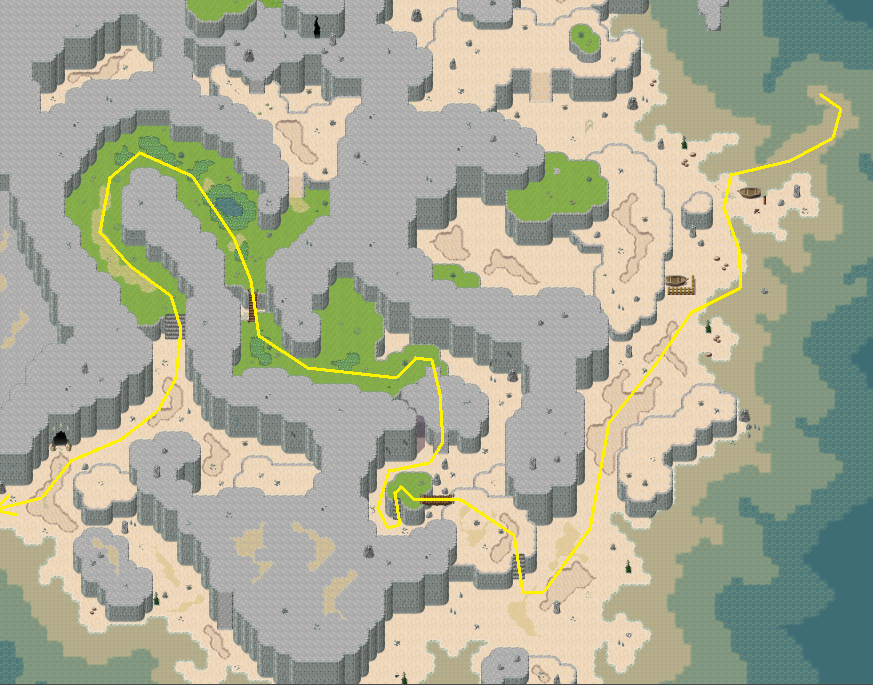 In the next area, head up to Eley. If you have unlocked the summoning Queen Ayumi, a boss battle will follow after going up the ladder. However, there’s a Memory Orb Vendor in Eley before that. Enter the small village and heal, save and buy items at the Memory Orb Vendor if you have the boss battle coming up. When ready, head up the ladder and you’ll leave Amagdyla there, while you chase after Thom at Melrose’s Cerebral Cortex.
The boss battle is against the Demon Wraith: a stronger version of the Demon Eyes faced back in the Butterfly Caves. It is accompanied by two crabs. The battle shouldn’t be too hard.
Afterwards, loot the treasure chests around Eley and backtrack to the pirate-looking cave entrance. It leads to the Pirate Cove.
Going right at the entrance leads to a Memory Teleportal. Follow the path south, then east and then north-east to the next area. There’s a chest containing a Strategian’s Jacket north-west from the big lake.
In the next area, take the bridge to the west across the water. Head north. There’s a tunnel on your left leading to a treasure room. It’s guarded by four pirates, but the reward of 800 Memory Orbs and two broadcasting frequencies is well worth it. Especially considering the fee of 2000 Memory Orbs coming up: the captain of the pirate ship to the north will give you a ride to the Cerebral Cortex for this large fee. After paying him, you’ll be on the ship out in the open sea.
It will take a little bit of time for the ship to reach the destination. Meanwhile, you can pick up upgrade points and chat with Hellena, Diamond and Christina. Once you reach the destination, you’ll magically find yourself underwater at the Meylin Underwater Town. You can climb up the seaweed on the cliff to return to the Pirate Cove. From now you’ll be able to take the ship ride for free.
In the next area, head up to Eley. If you have unlocked the summoning Queen Ayumi, a boss battle will follow after going up the ladder. However, there’s a Memory Orb Vendor in Eley before that. Enter the small village and heal, save and buy items at the Memory Orb Vendor if you have the boss battle coming up. When ready, head up the ladder and you’ll leave Amagdyla there, while you chase after Thom at Melrose’s Cerebral Cortex.
The boss battle is against the Demon Wraith: a stronger version of the Demon Eyes faced back in the Butterfly Caves. It is accompanied by two crabs. The battle shouldn’t be too hard.
Afterwards, loot the treasure chests around Eley and backtrack to the pirate-looking cave entrance. It leads to the Pirate Cove.
Going right at the entrance leads to a Memory Teleportal. Follow the path south, then east and then north-east to the next area. There’s a chest containing a Strategian’s Jacket north-west from the big lake.
In the next area, take the bridge to the west across the water. Head north. There’s a tunnel on your left leading to a treasure room. It’s guarded by four pirates, but the reward of 800 Memory Orbs and two broadcasting frequencies is well worth it. Especially considering the fee of 2000 Memory Orbs coming up: the captain of the pirate ship to the north will give you a ride to the Cerebral Cortex for this large fee. After paying him, you’ll be on the ship out in the open sea.
It will take a little bit of time for the ship to reach the destination. Meanwhile, you can pick up upgrade points and chat with Hellena, Diamond and Christina. Once you reach the destination, you’ll magically find yourself underwater at the Meylin Underwater Town. You can climb up the seaweed on the cliff to return to the Pirate Cove. From now you’ll be able to take the ship ride for free.
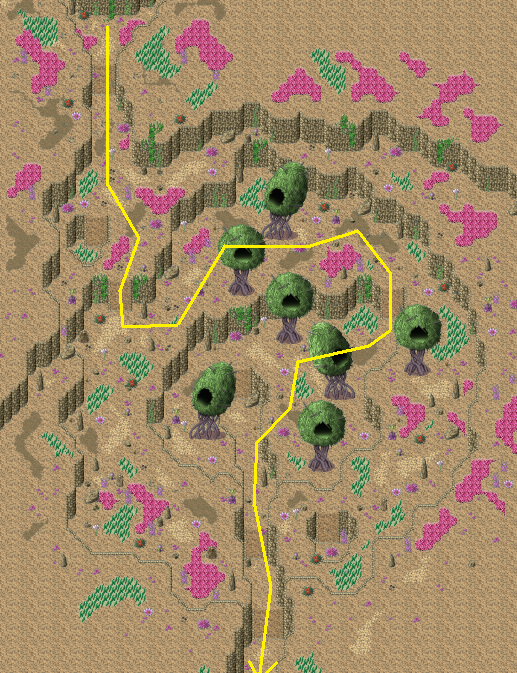 Follow the yellow line on the map provided above to reach the Cerebral Cortex. Continue following the path. Before going down the hill again, save, heal and prepare for two difficult boss fights in a row. In the first one, the status effect ‘Poisoned’ will be inflicted a lot on you and your allies. Therefore I suggest equipping two party members with an accessory that defends against this. Melrose already has her Ring of the Rose ready for equipping. Go down and a cutscene occurs. Thom transforms into Thom Toxicas and attacks you.
 Thom Toxicas
HP: 4000, Attack: 48, Defense: 38, Magic Def: 22
Skills:
Injection: Inflicts ‘Poisoned’, ‘Stunned’ and ‘Paralyzed’
Acid Spray: All targets, inflicts ‘Poisoned’
Toxic Burn: High damage, inflicts ‘Poisoned’, ‘Blinded’, ‘Muted’, ‘Weakened’, ‘Clumsy’,
‘Slowed’ and ‘Feeble’
As you can see, Toxic Burn is a powerful skill that renders the target extremely weak. Fortunately, he only uses it when his HP is below 50%. And he only uses Acid Spray with HP below 80%. On the first turn he uses Injection, so you might want to have everyone defend as their first action. Thom is actually one of the very few bosses in the game that isn’t resistant to Diamond’s Quick Halt. Cast this skill when Thom is flashing white to interrupt his skill/attack.
Summoning Queen Ayumi for this battle will greatly help you remove ‘Poisoned’ from everyone after one of his skills.
After defeating Thom, Lisetrix appears and murders him. Lisetrix turns mad, and you have to fight her with being able to heal up and save your game in-between battles.
Thom Toxicas
HP: 4000, Attack: 48, Defense: 38, Magic Def: 22
Skills:
Injection: Inflicts ‘Poisoned’, ‘Stunned’ and ‘Paralyzed’
Acid Spray: All targets, inflicts ‘Poisoned’
Toxic Burn: High damage, inflicts ‘Poisoned’, ‘Blinded’, ‘Muted’, ‘Weakened’, ‘Clumsy’,
‘Slowed’ and ‘Feeble’
As you can see, Toxic Burn is a powerful skill that renders the target extremely weak. Fortunately, he only uses it when his HP is below 50%. And he only uses Acid Spray with HP below 80%. On the first turn he uses Injection, so you might want to have everyone defend as their first action. Thom is actually one of the very few bosses in the game that isn’t resistant to Diamond’s Quick Halt. Cast this skill when Thom is flashing white to interrupt his skill/attack.
Summoning Queen Ayumi for this battle will greatly help you remove ‘Poisoned’ from everyone after one of his skills.
After defeating Thom, Lisetrix appears and murders him. Lisetrix turns mad, and you have to fight her with being able to heal up and save your game in-between battles.
 Lisetrix [brown]
HP: 3500, Attack: 40, Defense: 41, Magic Def: 21
Skills:
Curse: Inflicts ‘Stunned’, ‘Poisoned’, ‘Confused’ and ‘Aging’
Hex: Inflicts ‘Paralyzed’, ‘Weakened’, ‘Clumsy’, ‘Slowed, ‘Feeble’, ‘Broken Defense’, ‘Broken Magic Def.’, ‘Broken Health P.’ and ‘Broken Magic P.’
Magic Shield: Gives ‘Magic Shield’ and ‘Melee Shield’
Break: All targets, removes positive states
Force Throw: Inflicts ‘Stunned’
Ultimate Firehex: All targets, extremely high fire damage
Earth: Inflicts ‘Stunned’
Heal: Recovers some HP
Lisetrix [red]
HP: 3500, Attack: 40, Defense: 42, Magic Def: 23
Skills:
All the above, except ‘Earth’.
Fireball: Inflicts ‘Weakened’ and ‘Feeble’
Lisetrix [green]
HP: 3500, Attack: 40, Defense: 42, Magic Def: 24
Skills:
All the above, except ‘Earth’ and ‘Fireball’
Wind: Inflicts ‘Blinded’ and ‘Muted’
Lisetrix [black]
HP: 3500, Attack: 40, Defense: 40, Magic Def: 22
Skills:
Ultimate Firehex: All targets, extremely high fire damage
Lisetrix has four different forms between which she switches. You can identify her current form by looking at the color of her glow. The first three forms use the same set of skills, except one. The fourth form only uses her most powerful skill. The other major difference between the forms are the different weaknesses and strengths to damage types. By taking advantage of her current weakness, the fight becomes a lot easier. Below is an overview of her weaknesses/strengths.
Brown form
Weak to: Wind
Strong to: Earth, water, fire
Green form
Weak to: Fire
Strong to: Wind, earth, water
Red form
Weak to: Water
Strong to: Wind, earth, fire
Black form
Weak to: Light, electricity
Strong to: Wind, earth, water, fire (but only a little bit)
Every third turn she will switch between the first three forms. When her HP is below 16%, she switches into her black form. This is by far the most dangerous one. Once she is in this form, you must try to defeat her as soon as possible. Two Ultimate Firehexes in a row are almost a guaranteed Game Over. Hellena’s Lightning and Christina’s Static Discharge will work very effectively. It is also suggested to wear fire resistant accessories during this fight – to protect against the Ultimate Firehex. At least two party members should have them equipped.
Another trick is to use Melrose’s Elemental Shield. As most of Lisetrix’s skills are elemental based, this will greatly reduce the damage taken.
After finally defeating Lisetrix (who easily makes it into the top 3 of this game’s most difficult bosses), watch the well-deserved cutscene.
Lisetrix [brown]
HP: 3500, Attack: 40, Defense: 41, Magic Def: 21
Skills:
Curse: Inflicts ‘Stunned’, ‘Poisoned’, ‘Confused’ and ‘Aging’
Hex: Inflicts ‘Paralyzed’, ‘Weakened’, ‘Clumsy’, ‘Slowed, ‘Feeble’, ‘Broken Defense’, ‘Broken Magic Def.’, ‘Broken Health P.’ and ‘Broken Magic P.’
Magic Shield: Gives ‘Magic Shield’ and ‘Melee Shield’
Break: All targets, removes positive states
Force Throw: Inflicts ‘Stunned’
Ultimate Firehex: All targets, extremely high fire damage
Earth: Inflicts ‘Stunned’
Heal: Recovers some HP
Lisetrix [red]
HP: 3500, Attack: 40, Defense: 42, Magic Def: 23
Skills:
All the above, except ‘Earth’.
Fireball: Inflicts ‘Weakened’ and ‘Feeble’
Lisetrix [green]
HP: 3500, Attack: 40, Defense: 42, Magic Def: 24
Skills:
All the above, except ‘Earth’ and ‘Fireball’
Wind: Inflicts ‘Blinded’ and ‘Muted’
Lisetrix [black]
HP: 3500, Attack: 40, Defense: 40, Magic Def: 22
Skills:
Ultimate Firehex: All targets, extremely high fire damage
Lisetrix has four different forms between which she switches. You can identify her current form by looking at the color of her glow. The first three forms use the same set of skills, except one. The fourth form only uses her most powerful skill. The other major difference between the forms are the different weaknesses and strengths to damage types. By taking advantage of her current weakness, the fight becomes a lot easier. Below is an overview of her weaknesses/strengths.
Brown form
Weak to: Wind
Strong to: Earth, water, fire
Green form
Weak to: Fire
Strong to: Wind, earth, water
Red form
Weak to: Water
Strong to: Wind, earth, fire
Black form
Weak to: Light, electricity
Strong to: Wind, earth, water, fire (but only a little bit)
Every third turn she will switch between the first three forms. When her HP is below 16%, she switches into her black form. This is by far the most dangerous one. Once she is in this form, you must try to defeat her as soon as possible. Two Ultimate Firehexes in a row are almost a guaranteed Game Over. Hellena’s Lightning and Christina’s Static Discharge will work very effectively. It is also suggested to wear fire resistant accessories during this fight – to protect against the Ultimate Firehex. At least two party members should have them equipped.
Another trick is to use Melrose’s Elemental Shield. As most of Lisetrix’s skills are elemental based, this will greatly reduce the damage taken.
After finally defeating Lisetrix (who easily makes it into the top 3 of this game’s most difficult bosses), watch the well-deserved cutscene.
Overcoming fears
Head back to Eley and speak with Amagdyla. The fairy godmother will appear, opening up a portal to Sadrin’s Desert. Once you complete that area, you can no longer go back to free exploration in the dream world. Therefore it is important to wrap up any last links and side-quests you still want to complete. You can now go to the Marionette Factory to receive a side-quest from Rake. I highly suggest getting the Cursed Ring from the fourth Tradecenter quest at Kairo as well. When you’re ready, head into the portal. Sadrin’s Desert is large and complex, so I’ve provided a map below.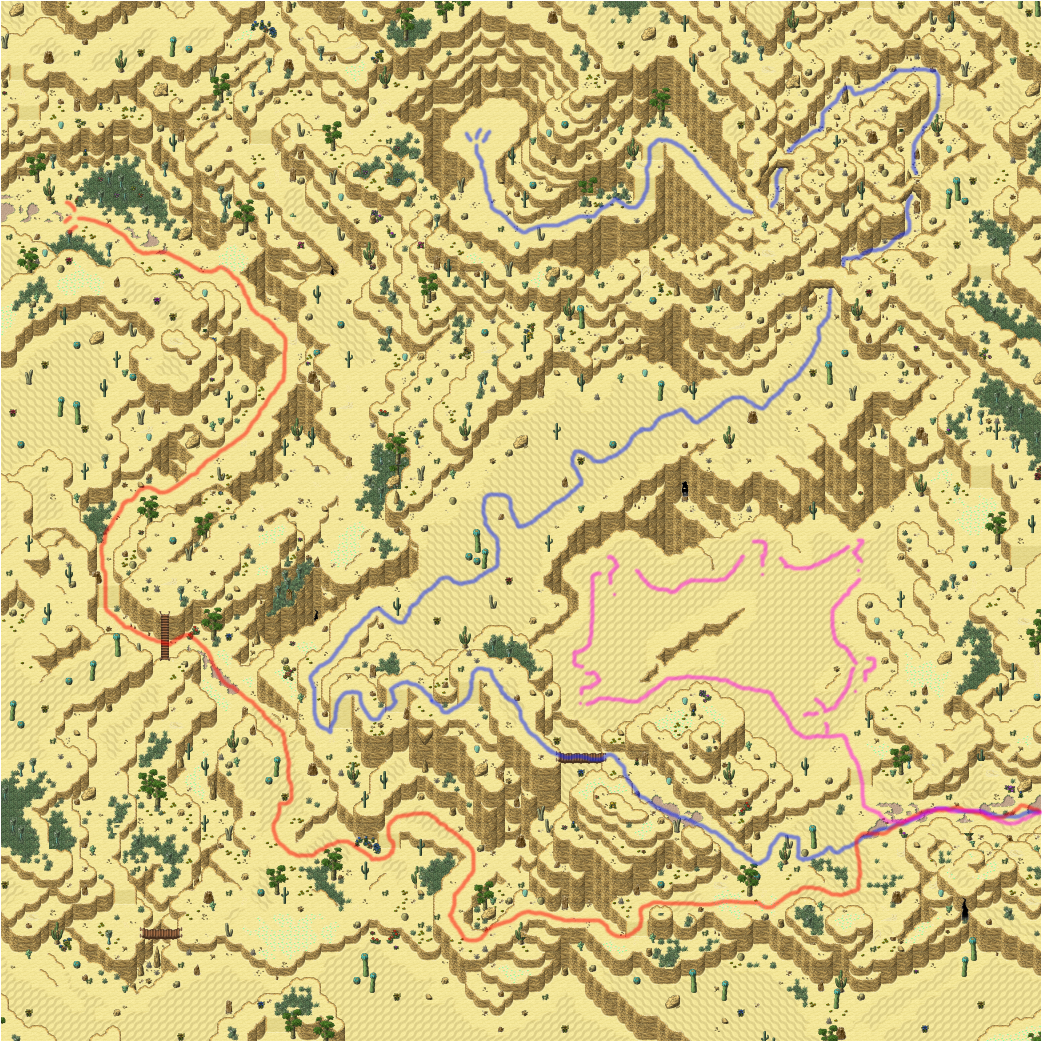 The red line takes you to the skeleton. The pink line leads to some treasure chests. Follow the blue line to reach Sadrin. Talk to him and he will take you to the Phobius Core. There is no turning back now!
Coulroz appears. After the cutscene, he turns into a door. Go inside and you’ll be at the Circus of Forgotten Souls. Upgrade your equipment at the Memory Orb Vendor. Buy a lot of healing items and prepare for the boss battle coming up. Equip Hellena or Diamond with the Cursed Ring if you have it. It will decrease their physical damage, but protect against darkness. As all of the skills in the upcoming boss fight are darkness-based, it will help you greatly.
When ready, approach Coulroz at the top. It’s time for the showdown!
The red line takes you to the skeleton. The pink line leads to some treasure chests. Follow the blue line to reach Sadrin. Talk to him and he will take you to the Phobius Core. There is no turning back now!
Coulroz appears. After the cutscene, he turns into a door. Go inside and you’ll be at the Circus of Forgotten Souls. Upgrade your equipment at the Memory Orb Vendor. Buy a lot of healing items and prepare for the boss battle coming up. Equip Hellena or Diamond with the Cursed Ring if you have it. It will decrease their physical damage, but protect against darkness. As all of the skills in the upcoming boss fight are darkness-based, it will help you greatly.
When ready, approach Coulroz at the top. It’s time for the showdown!

 Coulroz
HP: 3500, Attack: 50, Defense: 40, Magic Def: 21
Skills:
Chained Souls: All targets, inflicts ‘Chained’
Phobius Pit
Consumption of Light: Removes all positive states
Clichephobius
HP: 1300, Attack: 44, Defense: 40, Magic Def: 21
Skills:
Trick Attack: Inflicts ‘Clumsy’
At first, Coulroz will only be using a regular attack. Once his HP is below 90%, he will start using Phobius Pit. Below 50% HP, he will also use Consumption of Light. When all the Clichephobia’s HP are below 50%, he will use Chained Souls, too.
The trick of this fight is crowd control. Alone, Coulroz isn’t too difficult. But together with all the Clichephobia, it becomes difficult. Whilst Coulroz is resistant, as most other bosses, to the status effects ‘Blinded’ and ‘Asleep’, the Clichephobia aren’t. Use Hellena’s Shroud and Sleep Pollen skills to take care of them while you attack Coulroz. Meanwhile, you should assign someone to take down a Clichephobius. Unless all four are hurt, Coulroz won’t use the powerful Chained Souls skill.
Coulroz
HP: 3500, Attack: 50, Defense: 40, Magic Def: 21
Skills:
Chained Souls: All targets, inflicts ‘Chained’
Phobius Pit
Consumption of Light: Removes all positive states
Clichephobius
HP: 1300, Attack: 44, Defense: 40, Magic Def: 21
Skills:
Trick Attack: Inflicts ‘Clumsy’
At first, Coulroz will only be using a regular attack. Once his HP is below 90%, he will start using Phobius Pit. Below 50% HP, he will also use Consumption of Light. When all the Clichephobia’s HP are below 50%, he will use Chained Souls, too.
The trick of this fight is crowd control. Alone, Coulroz isn’t too difficult. But together with all the Clichephobia, it becomes difficult. Whilst Coulroz is resistant, as most other bosses, to the status effects ‘Blinded’ and ‘Asleep’, the Clichephobia aren’t. Use Hellena’s Shroud and Sleep Pollen skills to take care of them while you attack Coulroz. Meanwhile, you should assign someone to take down a Clichephobius. Unless all four are hurt, Coulroz won’t use the powerful Chained Souls skill.
Back to the real world
After defeating Coulroz, the fairy godmother will appear and congratulate you. Now it is time to stop Farah from destroying the real world. After a long cutscene in which Caretech is destroyed, you’ll find yourself on a rooftop with Farah. Before the battle, you’re able to go into the main menu, use items, change equipment and save the game. Farah
HP: 1400, Attack: 44, Defense: 40, Magic Def: 21
Skills:
Flash of Pride: Inflicts ‘Blinded’ and ‘Muted’
Rain of Sloth: All targets, inflicts ‘Slowed’ and ‘Broken Magic P.’
As you can see from the stats above, Farah should pose no real threat. In this form, that is. After fighting Farah in his human form, he transforms into the Iron Angel and you must fight him again. Therefore it is important to save your items and energy for the next battle. Heal up before KO’ing him.
Farah is weak to piercing, magic and fire damage. He is slightly resistant to water. He is not fully resistant to ‘Weakness’, ‘Clumsy’, ‘Slowed’ and ‘Feeble’. Take advantage of this. He always uses Rain of Sloth in the first turn, so defend as your first action (if he hasn’t used Rain of Sloth yet).
You won’t be able to go into the main menu before fighting the Iron Angel.
Farah
HP: 1400, Attack: 44, Defense: 40, Magic Def: 21
Skills:
Flash of Pride: Inflicts ‘Blinded’ and ‘Muted’
Rain of Sloth: All targets, inflicts ‘Slowed’ and ‘Broken Magic P.’
As you can see from the stats above, Farah should pose no real threat. In this form, that is. After fighting Farah in his human form, he transforms into the Iron Angel and you must fight him again. Therefore it is important to save your items and energy for the next battle. Heal up before KO’ing him.
Farah is weak to piercing, magic and fire damage. He is slightly resistant to water. He is not fully resistant to ‘Weakness’, ‘Clumsy’, ‘Slowed’ and ‘Feeble’. Take advantage of this. He always uses Rain of Sloth in the first turn, so defend as your first action (if he hasn’t used Rain of Sloth yet).
You won’t be able to go into the main menu before fighting the Iron Angel.
 Iron Angel
HP: 4400, Attack: 53, Defense: 42, Magic Def: 22
Skills:
Flash of Pride: Inflicts ‘Blinded’ and ‘Muted’
Rain of Sloth: All targets, inflicts ‘Slowed’ and ‘Broken Magic P.’
Iron Angel
Shield of Greed: Gives‘Magic Shield’, ‘Melee Shield’ and ‘Accuracy Up’
Punishment: All targets, high damage, inflicts ‘Stunned’, ‘Broken Health P.’ and ‘Broken Magic P.'
When his HP is below 30%, he will use Punishment once. It’s important that everyone defends when he uses this skill, so keep track of his HP a bit. Also, he will warn you before he uses the skill by saying something. On the first turn, he will always use Shield of Greed (and then every 5th turn). Use Melrose’s Dispelling Sword to remove his positive states. Every 3rd turn there’s a higher chance for him to use Iron Angel – a powerful single target skill. Have characters with low defense/HP defend when this skill is coming up.
The Iron Angel is weak to blunt attacks, so use Christina’s regular attacks and Hammer. If you’re still having trouble, equip accessories that protect against electricity (for Punishment) or darkness (Rain of Sloth).
Iron Angel
HP: 4400, Attack: 53, Defense: 42, Magic Def: 22
Skills:
Flash of Pride: Inflicts ‘Blinded’ and ‘Muted’
Rain of Sloth: All targets, inflicts ‘Slowed’ and ‘Broken Magic P.’
Iron Angel
Shield of Greed: Gives‘Magic Shield’, ‘Melee Shield’ and ‘Accuracy Up’
Punishment: All targets, high damage, inflicts ‘Stunned’, ‘Broken Health P.’ and ‘Broken Magic P.'
When his HP is below 30%, he will use Punishment once. It’s important that everyone defends when he uses this skill, so keep track of his HP a bit. Also, he will warn you before he uses the skill by saying something. On the first turn, he will always use Shield of Greed (and then every 5th turn). Use Melrose’s Dispelling Sword to remove his positive states. Every 3rd turn there’s a higher chance for him to use Iron Angel – a powerful single target skill. Have characters with low defense/HP defend when this skill is coming up.
The Iron Angel is weak to blunt attacks, so use Christina’s regular attacks and Hammer. If you’re still having trouble, equip accessories that protect against electricity (for Punishment) or darkness (Rain of Sloth).
The final confrontation
After the fight followed by a dramatic cutscene, you’ll be at the Land of Lost Memories. This is the last area where you can fight monsters, level up and access a Memory Orb Vendor. The monsters here drop crafting materials to make bombs, which is useful for boss fights such as the next one. North-west is a blue chest containing three broadcasting frequencies. To the north is the Twilight Lookout, where you must go next. At the Twilight Lookout, speak to the fairy godmother. Open the chest to your left and buy as many items as possible from the Memory Orb Vendor. If you don’t have enough Memory Orbs, go back and fight monsters until you do. Healing is free here, so you should have no problem doing so. When ready to face the final boss, go into the portal. Agraphobius
HP: 9000, Attack: 60, Defense: 42, Magic Def: 23
Skills:
Eruption of Wrath: Very high damage
Penetration of Lust: Inflicts ‘Poisoned’ and ‘Confused’, but gives ‘Phys Dmg. Up’
Deceit: Inflicts ‘Stunned’, ‘Blinded’, ‘Muted’, ‘Weakened’, ‘Clumsy’, ‘Slowed’, ‘Feeble’,
‘Broken Defense’ and ‘Broken Magic Def.’
Storm of Envy: All targets, inflicts ‘Stunned’
Rain of Sloth: All targets, inflicts ‘Slowed’ and ‘Broken Magic P.’
This is going to be the most difficult fight of the game. Agraphobius has no weaknesses, and is highly resistant to all status effects. Every attack he does deals major damage and will require one or two allies to immediately heal the damage. The only bright side here is that he is not very fast, and is hard to miss with attacks.
On the first turn he will always deal a regular attack. This gives you the chance to start out with casting positive states such as Diamond’s Acceleration. Until his HP reaches 90%, he will only use ‘Rain of Sloth’. After, he will also start using ‘Eruption of Wrath’ and ‘Penetration of Lust’. He starts using ‘Deceit’ below 70% HP, and ‘Storm of Envy’ below 50% HP. Stormy of Envy and Rain of Sloth are his only skills that target all allies, and are both not exceptionally strong, which helps a lot. (Storm of Envy takes a long time to charge, so take advantage of this by defending.)
Eruption of Wrath, Penetration of Lust, Deceit and Rain of Sloth are all darkness based. Therefore it is recommended to equip as many darkness resistant accessories as possible. Other recommended accessories are those that protect against electricity and those that are resistant to ‘Stunned’ or ‘Confused’.
Overall this is a test of endurance. Keep your allies healthy and keep dealing damage. Don’t forget to summon Queen Ayumi (if Melrose isn’t a Summoner – otherwise summon a stronger dream creature). There’s a 20% chance of inflicting ‘Muted’ on him with skills, so if you’ve got Laughing Bombs, be sure to use them. If you manage to mute Agraphobius, it will help a lot.
After defeating Agraphobius, watch the ending. Make sure to your game when given the chance. Congratulations! You’ve completed Whisper of a Rose!
Now what? You’ve unlocked the Start Journey+ feature! This adds a lot of extra’s to the game. Check out this strategy guide’s Start Journey+ section for more information.
Side-quests
Below is an overview of all side-quests in the game. To make things easier, they have been placed into orderly tables.
Who
The NPC or event that starts the quest.
What
The short quest description that is displayed in your Diary.
How
Quests that you should or have to complete before starting this one.
Walkthrough
A full walkthrough on completing this quest.
Some quests in the game are off the records. These can be found in the Secrets section of this strategy guide. Quests that are directly related to the main storyline can be found at the Walkthrough section.
Agraphobius
HP: 9000, Attack: 60, Defense: 42, Magic Def: 23
Skills:
Eruption of Wrath: Very high damage
Penetration of Lust: Inflicts ‘Poisoned’ and ‘Confused’, but gives ‘Phys Dmg. Up’
Deceit: Inflicts ‘Stunned’, ‘Blinded’, ‘Muted’, ‘Weakened’, ‘Clumsy’, ‘Slowed’, ‘Feeble’,
‘Broken Defense’ and ‘Broken Magic Def.’
Storm of Envy: All targets, inflicts ‘Stunned’
Rain of Sloth: All targets, inflicts ‘Slowed’ and ‘Broken Magic P.’
This is going to be the most difficult fight of the game. Agraphobius has no weaknesses, and is highly resistant to all status effects. Every attack he does deals major damage and will require one or two allies to immediately heal the damage. The only bright side here is that he is not very fast, and is hard to miss with attacks.
On the first turn he will always deal a regular attack. This gives you the chance to start out with casting positive states such as Diamond’s Acceleration. Until his HP reaches 90%, he will only use ‘Rain of Sloth’. After, he will also start using ‘Eruption of Wrath’ and ‘Penetration of Lust’. He starts using ‘Deceit’ below 70% HP, and ‘Storm of Envy’ below 50% HP. Stormy of Envy and Rain of Sloth are his only skills that target all allies, and are both not exceptionally strong, which helps a lot. (Storm of Envy takes a long time to charge, so take advantage of this by defending.)
Eruption of Wrath, Penetration of Lust, Deceit and Rain of Sloth are all darkness based. Therefore it is recommended to equip as many darkness resistant accessories as possible. Other recommended accessories are those that protect against electricity and those that are resistant to ‘Stunned’ or ‘Confused’.
Overall this is a test of endurance. Keep your allies healthy and keep dealing damage. Don’t forget to summon Queen Ayumi (if Melrose isn’t a Summoner – otherwise summon a stronger dream creature). There’s a 20% chance of inflicting ‘Muted’ on him with skills, so if you’ve got Laughing Bombs, be sure to use them. If you manage to mute Agraphobius, it will help a lot.
After defeating Agraphobius, watch the ending. Make sure to your game when given the chance. Congratulations! You’ve completed Whisper of a Rose!
Now what? You’ve unlocked the Start Journey+ feature! This adds a lot of extra’s to the game. Check out this strategy guide’s Start Journey+ section for more information.
Side-quests
Below is an overview of all side-quests in the game. To make things easier, they have been placed into orderly tables.
Who
The NPC or event that starts the quest.
What
The short quest description that is displayed in your Diary.
How
Quests that you should or have to complete before starting this one.
Walkthrough
A full walkthrough on completing this quest.
Some quests in the game are off the records. These can be found in the Secrets section of this strategy guide. Quests that are directly related to the main storyline can be found at the Walkthrough section.
Regular Side-Quests
Who Yasmine (at Historical Museum) What Find horse painting How N/A Walkthrough In the north-west of the museum is a painting with a horse. Check the sign. Talk with Yasmine again. Reward: Candy Cane, 2x Chocolate Bar Who Anna (at Montas College) What Find Anna’s mp4-player How N/A Walkthrough Go west into the next area. Pick up the mp4-player laying on the ground at the left, and return it to Anna. Reward: Moss Agate Ring Who Gingerbread Man (at Candy Mountain) What Catch crow How N/A Walkthrough Follow the path until you reach another area to the east. Go south and you’ll see a crow, but it will fly away. Head north-east, up the hill and follow the path until you see the crow running around in the grass. Chase after him until you catch him. Return to the Gingerbread Man. Reward: Candy Cane, Skill Unlock Point Who Butterfly Queen Ayumi (at the Butterfly Caves) What Retrieve Butterfly Crystal How N/A Walkthrough See the Dream Creatures section for unlocking Queen Ayumi. Who Ellar (at Valentown) What Pick flower How N/A Walkthrough In Valentown, head north-west. There will be a cave entrance. Go inside and you’ll be at a cliff. At the top-right will be a flower that looks different from the others. Pick it up and return it to Ellar. Reward: Bronze Ore, Steel Ore Who Lady Yasmine (at Valentown) What Retrieve novels How N/A Walkthrough Much later in the game you will be in a cartoon area playing as Christina. In that area is a novel laying on the ground. Pick it up and return it to Yasmine later. Reward: Pink Nugget Who Ellen (at Valentown) What Get revival crystal How Complete ‘Retrieve Butterfly Crystal’ Walkthrough First you need to find an Uncharged Crystal. It is in the blue chest in the Mirrorcle Caves in the room with all the mirrors that you have to move around. Take the crystal to Butterfly Queen Ayumi in the Butterfly Caves. After doing her quest, she will charge the crystal with revival powers, turning it into a Charged Crystal. Go back to Ellen. She will tell you to take the Crystal to her boyfriend’s soul at the Love Engine Dungeon. Go to the Love Engine Dungeon. Go through the first doorway that you come across (to the east of the door leading to the engine). To the north-east is her boyfriend’s spirit, guarded by some Phobia. Defeat the Phobia, pick up the spirit and return to Ellen. Reward: Love Ribbon Who me (Melrose) What Cut metal pipe open How Complete ‘Find something to cut pipes’ Walkthrough Use the Metal Saw received from the “Find something to cut pipes” quest to cut open the pipe next to the engine in the Love Engine Dungeon, where you first encountered Marlotte or Maxine in the dream world. There’s a visible budge in the pipe to the right of the engine’s core. Check it after receiving the Metal Saw. Reward: Ancient Weapon Who Woman (at Hallowstone) What Retrieve stolen grave How N/A Walkthrough Go to the graveyard and check out the ashes laying on the ground where once a grave stood. Then go and find the fire mage in the village. He will tell you he is innocent. Go to the storage tower and go up the stairs. Talk to the woman. She will confess the crime and return you the tombstone. Return it to the woman who started this quest. Reward: 300 Memory Orbs Who Skeleton (at Hallowstone) What Collect 10 zombie arms How N/A Walkthrough Go out into the Cursed Forest and defeat Zombies until you have collected 10 Zombie Arms. Reward: Holy Orb Who Man (at Hallowstone) What Find a pink nugget How Complete ‘Retrieve novels’ Walkthrough Receive the Pink Nugget from the ‘Retrieve novels’ quest and bring it to him. Reward: Moonblue Ring Who Naylie (at Hallowstone) What Deliver a letter How N/A Walkthrough Go to Valentown. Enter the house at the bottom center of the village. Talk to the man and deliver the letter. Return to Naylie. Reward: Silver Bow Who The Death (at Hallowstone) What Find six runaway souls How N/A Walkthrough Spread throughout the game are six runaway souls in the form of skeletons. Talk to each of them and then return to the Death. Their locations are: Catacombs: All the way directly south from the entrance. Hills of the Crying Moon: Follow the path all the way north, then west and then south all the way. Kairo: On the busy market island at the top. Swamp: All the way south-east. Pirate Cove: To the north-west of the giant lake you find in the first area of the Pirate Cove. Sadrin’s Desert: The most north-western part of this area. It’s a complicated area, so it might take a while to find it. (Note: You can talk to them before receiving this Quest, and it will still count.) Reward: Merlin’s Orb Who Wravyn’s grave (at Catacombs) What Collect 10 voice crests How N/A Walkthrough See the Dream Creatures section for unlocking Wravyn. Who Man (at Kairo, Star Guide) What Find a sky orb How Complete ‘Find a lava golem’s eye’ Walkthrough After receiving the Sky Orb from the quest defined above, give it to this man. Reward: Starmap Who Man (at Kairo) What Deliver a package How Talk to the guard at the north-west exit of Hallowstone. Then talk to the Lady of the Moon at the Hills of the Crying Moon. Walkthrough Go south to the market square. There will be a man with short dark hair, no shirt and a backpack on walking around. Give him the package. Return to the man who gave you the quest. Reward: Moonbat Food Who Grey-haired man (at Oasis) What Find thief How N/A Walkthrough Check out the boy and girl at the north-west in the village. Talk to the grey-haired man again. Go back to the boy and girl. Talk to the grey-haired man. Reward: Memory of Benevolence Who Woman (at Lekora) What Collect 3 flower powders How N/A Walkthrough There are three yellow flowers in the Fureta Jungle. You have to check each of them. Their locations are: - North-west in the first area (the one you entered from the world map). - At the center-south of the same area. - In the second area of the Fureta Jungle, on your way to Lekora (down the hill). You can also check the maps of the Fureta Jungle in Act II of the walkthrough in this strategy guide. Go back to the woman. Reward: 400 Memory Orbs Who Woman (at Lekora) What Take a picture How N/A Walkthrough Approach the Aztec Temple in the Fureta Jungle. Return to the woman. Reward: Golden Lamp Who Woman (at Lekora) What Find a cookbook How N/A Walkthrough In the second area of the Aztec Temple. See the map below.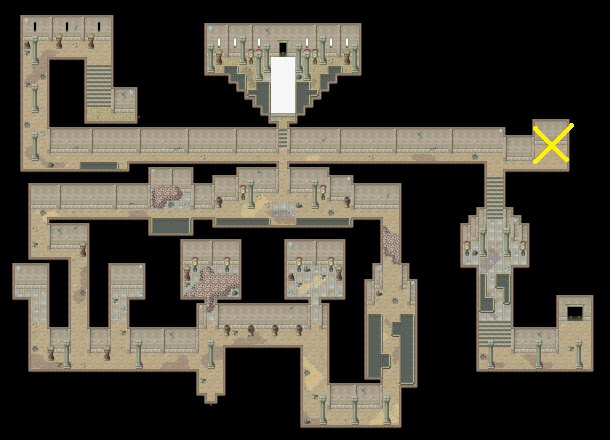 Reward: Ruby Necklace
Who
Woman (at Lekora)
What
Fix broken vases
How
N/A
Walkthrough
Go to the top of the Violence-Burns-Eyes-Hall in the Aztec Temple. There will be two broken vases. Check them. Go back to the woman.
Reward: Poison Bow
Who
Woman (at Lekora)
What
Find wedding ring
How
N/A
Walkthrough
Defeat Weed Monkeys at the Fureta Jungle until they drop a Wedding Ring. Return it to the woman.
Reward: Plate Armor Ring
Who
Man (at Vestyrka)
What
Find something to cut pipes
How
N/A
Walkthrough
Go to the leader of the mining operations. He lives in the north-west building. He will give you a metal saw. Return to the man.
Reward: Flame Earring
Who
Witch (at Vestyrka)
What
Use 5 golem rocks
How
N/A
Walkthrough
Defeat Lava Golems until you have 5 Golem Rocks. Go to the Volcano and enter the Lava Gaves through the north-western cave entrance, where you had to go earlier to get access into Vestyrka. Follow the tunnel all the way. Eventually you’ll see a short staircase leading down to a small lava pool on your left. Go there and throw the rocks in. Return to the witch.
Tip! It is recommended to start both this and the quest below at the same time, as both require an item dropped from Lava Golems that will only drop while the quest is active.
Reward: Yellow Necklace
Who
Fire mage (at Vestyrka)
What
Find a lava golem’s eye
How
N/A
Walkthrough
Defeat Lava Golems until you find a Lava Golem’s Eye. It is an extremely rare drop, so it’s probably a good idea to wait with this quest until you’re strong enough to kill Lava Golems faster. Return to the fire mage once you have it.
Reward: Sky Orb
Who
Meylin (at Meylin Underwater Town)
What
Find a Fureta flower
How
Complete ‘Collect 3 flower powders’
Walkthrough
Go back to the yellow flowers in Fureta Jungle, where you had to go for the ‘Collect 3 flower powders’ quest. Pick one of them and return to the Meylin for your reward.
Reward: Excalibur
Who
Rake (at Marionette Factory)
What
Find the perfect wood
How
Rake doesn’t appear at the Marionette Factory until the fairy godmother opens up a
portal at Eley leading to Sadrin’s Desert at the end of the game.
Walkthrough
Rake’s at the entrance hall of the Marionette Factory. Talk to him. Go into the factory. Go to the 2nd area. Follow the path. Go east when possible and continue heading north-east. Eventually you can’t go more north-east. On this platform is a treasure chest. Check the top-left marionette laying on the ground. It will be the perfect wood. Take it back to Rake.
Reward: Sagittarius Bow
Reward: Ruby Necklace
Who
Woman (at Lekora)
What
Fix broken vases
How
N/A
Walkthrough
Go to the top of the Violence-Burns-Eyes-Hall in the Aztec Temple. There will be two broken vases. Check them. Go back to the woman.
Reward: Poison Bow
Who
Woman (at Lekora)
What
Find wedding ring
How
N/A
Walkthrough
Defeat Weed Monkeys at the Fureta Jungle until they drop a Wedding Ring. Return it to the woman.
Reward: Plate Armor Ring
Who
Man (at Vestyrka)
What
Find something to cut pipes
How
N/A
Walkthrough
Go to the leader of the mining operations. He lives in the north-west building. He will give you a metal saw. Return to the man.
Reward: Flame Earring
Who
Witch (at Vestyrka)
What
Use 5 golem rocks
How
N/A
Walkthrough
Defeat Lava Golems until you have 5 Golem Rocks. Go to the Volcano and enter the Lava Gaves through the north-western cave entrance, where you had to go earlier to get access into Vestyrka. Follow the tunnel all the way. Eventually you’ll see a short staircase leading down to a small lava pool on your left. Go there and throw the rocks in. Return to the witch.
Tip! It is recommended to start both this and the quest below at the same time, as both require an item dropped from Lava Golems that will only drop while the quest is active.
Reward: Yellow Necklace
Who
Fire mage (at Vestyrka)
What
Find a lava golem’s eye
How
N/A
Walkthrough
Defeat Lava Golems until you find a Lava Golem’s Eye. It is an extremely rare drop, so it’s probably a good idea to wait with this quest until you’re strong enough to kill Lava Golems faster. Return to the fire mage once you have it.
Reward: Sky Orb
Who
Meylin (at Meylin Underwater Town)
What
Find a Fureta flower
How
Complete ‘Collect 3 flower powders’
Walkthrough
Go back to the yellow flowers in Fureta Jungle, where you had to go for the ‘Collect 3 flower powders’ quest. Pick one of them and return to the Meylin for your reward.
Reward: Excalibur
Who
Rake (at Marionette Factory)
What
Find the perfect wood
How
Rake doesn’t appear at the Marionette Factory until the fairy godmother opens up a
portal at Eley leading to Sadrin’s Desert at the end of the game.
Walkthrough
Rake’s at the entrance hall of the Marionette Factory. Talk to him. Go into the factory. Go to the 2nd area. Follow the path. Go east when possible and continue heading north-east. Eventually you can’t go more north-east. On this platform is a treasure chest. Check the top-left marionette laying on the ground. It will be the perfect wood. Take it back to Rake.
Reward: Sagittarius Bow
Lady Anatta’s Broadcasting Frequencies
A few side-quests in the game involve a lot of work, but yield great rewards. This is one of them. Lady Anatta can be found at the Heart Station. This is a secret area at the Anatta Woods. When you enter from the Misty Hills, take a right turn and go north. On your left will be a hidden path leading into the forest. Follow this path and you’ll be at the Heart Station. Lady Anatta has lost all her broadcasting frequencies and asks you to find them for her. Each frequency represents a song from the game’s soundtrack. Once returned, you can listen to them at the Heart Station. But the real reward comes from returning all broadcasting frequencies: the Mystical Music Score. When used with the Panflute (found in a chest at the Aztec Temple), Melrose (as a Summoner) receives the all-powerful summoning Pan. If Melrose it not a Summoner, it fully heals the party. It can be used this way for ten times. Below are the locations of all broadcasting frequencies. Conveniently, there’s a teleport point at the Heart Station, so returning there should be no problem. #83.50 Beaches of Freedom Beaches of Freedom: north-west from the portal to the Dream Door #85.00 Ambushed Mt. Drago: a bit north-east from the entrance #86.50 an army of One Desert of Solitude: north-east (must travel through the Quicksand Caves to get there) #89.00 Aztec Temple Aztec Temple: east in the rectangular maze #90.00 Bustle of the City Montas College: in the dream world, west at the cafeteria #92.00 Castle of Coals Lava Caves: at the Memory Orb Vendor #94.50 Caves Fureta Jungle: 1st area, center #95.50 Chase Anatta Woods: 1st area, north-east #97.00 Classic Recollections Historical Museum: in the dream world #99.00 Crossing Borders Butterfly Caves: go through the cave entrance to the west of the boulder puzzle #100.50 Cry of the Wolf Crystal Hills: 1st area, north-west (must use a portal in the 2nd area to get there) #102.00 Cursed Forest Cursed Forest: all the way north-west on a hill #103.00 Danger Ahead Mighty Wizard’s Castle: eastern wing #105.00 Dark Innocence Swamp: south-east #106.50 Desert Dance Quicksand Caves: Keeper of Loneliness #107.50 Dreams Beaches of Freedom: north-west, on a cliff #108.00 era of peace Beaches of Freedom: north-west, on a cliff #109.50 Everlasting Beaches of Freedom: 1st area, near a wooden Memories bridge #111.00 Fureta Jungle Fureta Jungle: east of the Caves of Creativity, after Melrose’s memory is erased Important: This frequency can no longer be found after restoring Melrose’s memory at the Aztec Temple. #112.50 Ghastly Witches Pirate Cove: 2nd area, west at the treasure chamber #113.00 Ghost Town Catacombs: south-east #115.00 Here Comes The Princess Candy Mountain: 2nd area, on the hill at the center Important: This area and thus the frequency can no longer be accessed after leaving. #116.50 Infiltration Herb Cave: 1st area, within a rock at the center-north that breaks after solving the sphinx’s puzzle #118.00 Inner Spirit Beaches of Freedom: 1st area, near a wooden bridge #119.50 Kairo Desert of Solitude: north-east (must travel through the Quicksand Caves to get there) #120.00 Late-Night Visitors Marionette Factory: 2nd large area, south-east,near Pinoch (must go north-east first) #122.00 Lisetrix Cerebral Cortex: at the center #123.50 Love Sweet Tower: at the top of the tower, jump off the balcony on the right and go back into the tower #125.00 MachineGO Land of Lost Memories: north-west #126.50 memories Beaches of Freedom: center-north, near a cave entrance #128.00 Mirrorcle Caves Mirrorcle Caves: in the locked chest at the ray of light / mirrors puzzle room #129.50 Movearlane Gate of Seasons #131.50 Never Forget Vestyrka: north-east #132.00 PlotX Pirate Cove: 2nd area, west at the treasure chamber #134.00 Revelations And Myths Light to the Sky #135.50 Rose at Dawn Cerebral Cortex: at the center #137.00 Rose at Night Land of Lost Memories: north-west #138.00 Sacred Grace Butterfly Hills: 1st area, must travel through caves from the 2nd area (see map)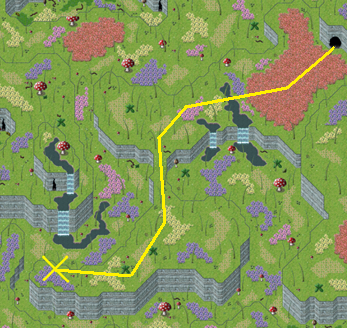 #139.50 Seize The Day
Mighty Wizard’s Castle: Memory of Study
#141.00 Simple Walls
Love Engine Dungeon: go through the first doorway you come across (it’s to the east of the doorway to the engine)
#142.50 Six Feet Under
Catacombs: south-east
#144.00 Stagefright
Land of Lost Memories: north-west
#145.50 The Beast Arrives
Mt. Drago: where the dragon is fought
#147.50 The Jewel
Hills of the Crying Moon: north-east
#147.00 The Moon
Hills of the Crying Moon: south-west
#149.00 The Scent of Destruction
Mighty Wizard’s Castle: Memory of Study
#150.50 THE UNFORGIVABLE
Cerebral Cortex: at the center
#151.00 The Whisper of a Rose
Ladybug Village: east
#152.50 To where the Wind blows
Beaches of Freedom: 2nd area, west of the entrance to Eley
#154.50 Twilight Scene
Desert of Solitude: north-east (must travel through the Quicksand Caves to get there)
#156.00 When your tears fall down
Mirrorcle Caves: the narrow tunnel leading outside
#139.50 Seize The Day
Mighty Wizard’s Castle: Memory of Study
#141.00 Simple Walls
Love Engine Dungeon: go through the first doorway you come across (it’s to the east of the doorway to the engine)
#142.50 Six Feet Under
Catacombs: south-east
#144.00 Stagefright
Land of Lost Memories: north-west
#145.50 The Beast Arrives
Mt. Drago: where the dragon is fought
#147.50 The Jewel
Hills of the Crying Moon: north-east
#147.00 The Moon
Hills of the Crying Moon: south-west
#149.00 The Scent of Destruction
Mighty Wizard’s Castle: Memory of Study
#150.50 THE UNFORGIVABLE
Cerebral Cortex: at the center
#151.00 The Whisper of a Rose
Ladybug Village: east
#152.50 To where the Wind blows
Beaches of Freedom: 2nd area, west of the entrance to Eley
#154.50 Twilight Scene
Desert of Solitude: north-east (must travel through the Quicksand Caves to get there)
#156.00 When your tears fall down
Mirrorcle Caves: the narrow tunnel leading outside
Kairo’s Tradecenter
At the north-west in Kairo is a Tradecenter. Here you can embark on a series of quests to find items for them. In this section I will give the location of each item, as well as the reward for finding it. It is recommended to get the required items while you’re in that area already for the main quest, instead of returning later. You cannot change the order in which the quests are given. New quests are available gradually throughout the game. Find Crystal Shard Where A common drop from Crystal Hounds at the Mirrorcle Caves. Reward Mirror Eye Find Shaving Knife Where A rare drop from Xyrophobia at the Quicksand Caves near the Desert of Solitude. Reward Troll Killer Find Gasweed Where An extremely rare drop from Cacophobia at the Swamp near Witch Way. Reward Warrior’s Ribbon Find Stone Feather Where An extremely rare drop from Stone Dolls at the Aztec Temple. Reward Cursed Ring Find Slice of Pudding Where A common drop from Magic Putties at the Caves of Creativity near Fureta Jungle. Reward Winged Comb Find Starmap Where Received from completing the quest ‘Find a sky orb’ for the man at the Star Guide in Kairo. Reward Weakness CircletDream Creatures
The game features many magnificent dream creatures that can be summoned. Only two, however, can be unlocked by Melrose as a Warrior or Paladin – Star and Queen Ayumi. To unlock the others, Melrose must be a Summoner. If the respective quest is done as a Warrior or Paladin, a reward is mostly still given, but in the form of Memory Orbs or an item. The list below is in order from weakest to strongest. The stronger the dream creature, the faster its presence consumes Melrose’s MP. A dream creature’s power depends on Melrose’s level.Star
 A close friend to the fairy godmother. Thanks to its cheap cost, this dream creature is excellent to summon for regular battles.
Quest
Star is received in the Dreamworld from the fairy godmother by following the storyline.
Skills
Starstrike: A regular attack.
A close friend to the fairy godmother. Thanks to its cheap cost, this dream creature is excellent to summon for regular battles.
Quest
Star is received in the Dreamworld from the fairy godmother by following the storyline.
Skills
Starstrike: A regular attack.
Queen Ayumi
 Butterfly queen Ayumi resides in the Butterfly Caves, guarding over the kingdom of the butterflies and her castle. Her restoring powers make her a great choice for regular and boss battles alike. Her Mirror Break skill tends to only work on regular enemies, though.
Quest
Queen Ayumi is found at her castle in the Butterfly Caves. Enter the Butterfly Hills from the Ladybug Village. Go east and follow the ‘path’. There will be a cave entrance next to a river. Go inside. Go west and follow the tunnel south. Go back outside. Go south and enter the caves again. Follow the tunnel and eventually you’ll reach Queen Ayumi.
She’ll request you to find a crystal stolen by a man, who has now turned into a monster by the curse. Enter the Butterfly Caves anywhere in the bottom area of the Butterfly Hills (the area that you enter from the worldmap). The best cave entrance is this one:
Butterfly queen Ayumi resides in the Butterfly Caves, guarding over the kingdom of the butterflies and her castle. Her restoring powers make her a great choice for regular and boss battles alike. Her Mirror Break skill tends to only work on regular enemies, though.
Quest
Queen Ayumi is found at her castle in the Butterfly Caves. Enter the Butterfly Hills from the Ladybug Village. Go east and follow the ‘path’. There will be a cave entrance next to a river. Go inside. Go west and follow the tunnel south. Go back outside. Go south and enter the caves again. Follow the tunnel and eventually you’ll reach Queen Ayumi.
She’ll request you to find a crystal stolen by a man, who has now turned into a monster by the curse. Enter the Butterfly Caves anywhere in the bottom area of the Butterfly Hills (the area that you enter from the worldmap). The best cave entrance is this one:
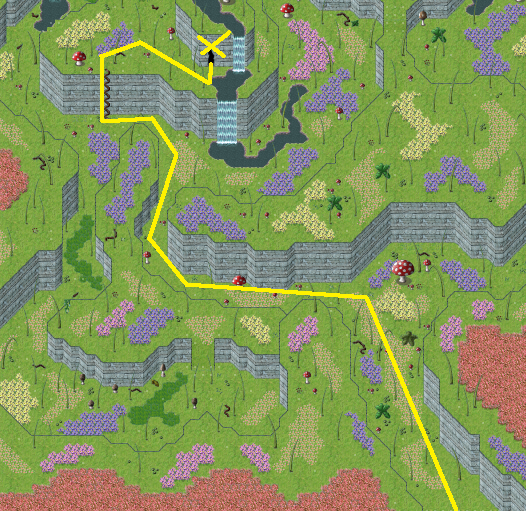 You’ll have to climb up the vine to get there. After going inside, go down the hill, head south-west and go down another hill. Go west and go down that hill there. Now you will be at a boulder puzzle. Go north-east and follow the tunnel to reach the Demon Eyes. Defeat him (he is quite strong) and return the crystal to Lady Ayumi. She will reward you with her dream creature powers, regardless of Melrose’s class.
Skills
Butterfly Blessing: Gradually cures an ally’s HP.
Mirror Break: Deals damage and may decrease physical defense.
Poisona: Cures an ally’s Poisoned state.
You’ll have to climb up the vine to get there. After going inside, go down the hill, head south-west and go down another hill. Go west and go down that hill there. Now you will be at a boulder puzzle. Go north-east and follow the tunnel to reach the Demon Eyes. Defeat him (he is quite strong) and return the crystal to Lady Ayumi. She will reward you with her dream creature powers, regardless of Melrose’s class.
Skills
Butterfly Blessing: Gradually cures an ally’s HP.
Mirror Break: Deals damage and may decrease physical defense.
Poisona: Cures an ally’s Poisoned state.
Cupido
 Cupido is great for applying negative status effects on the enemy. He is also quite cheap, which makes him a good choice for regular battles.
Quest
At the Love Engine Dungeon’s engine (where the two puzzles are) is a chest containing a Switch Handle. Open it and go out of this room. Head south and turn west. Follow the corridor. Insert the Switch Handle into the switch and open the gate. Continue. In this next room, you must pull the correct switch. All other switches will open the respective prison, releasing a bunch of Phobius.
The correct switch is the one at the number that corresponds with the amount of water pipes in the dungeon. There are 3. Flip the switch, head up and talk to the Cupido at the top. He will grant you his powers if you’re a Summoner. Otherwise, you receive 50 Memory Orbs.
Skills
Arrow of Love: Deals regular damage and may inflict Weakened, Clumsy, Slowed, Feeble or Confusion.
Cupido is great for applying negative status effects on the enemy. He is also quite cheap, which makes him a good choice for regular battles.
Quest
At the Love Engine Dungeon’s engine (where the two puzzles are) is a chest containing a Switch Handle. Open it and go out of this room. Head south and turn west. Follow the corridor. Insert the Switch Handle into the switch and open the gate. Continue. In this next room, you must pull the correct switch. All other switches will open the respective prison, releasing a bunch of Phobius.
The correct switch is the one at the number that corresponds with the amount of water pipes in the dungeon. There are 3. Flip the switch, head up and talk to the Cupido at the top. He will grant you his powers if you’re a Summoner. Otherwise, you receive 50 Memory Orbs.
Skills
Arrow of Love: Deals regular damage and may inflict Weakened, Clumsy, Slowed, Feeble or Confusion.
Pinoch
 Pinoch is very similar to Star. The only difference is that Pinoch attacks much faster.
Quest
Pinoch is at the Marionette Factory – the second big area (not counting the entrance hall). In the second area, head north-east and follow the path south. There will be a large group of marionettes there, so beware. It is a mini-boss fight. After the battle, continue and you will see Pinoch. You can only unlock him if you are a Summoner. If not, you receive no reward.
Skills
Attack: A regular attack.
Pinoch is very similar to Star. The only difference is that Pinoch attacks much faster.
Quest
Pinoch is at the Marionette Factory – the second big area (not counting the entrance hall). In the second area, head north-east and follow the path south. There will be a large group of marionettes there, so beware. It is a mini-boss fight. After the battle, continue and you will see Pinoch. You can only unlock him if you are a Summoner. If not, you receive no reward.
Skills
Attack: A regular attack.
Leprechaun
 The second-to-best dream creature in the game for defensive strategies.
Quest
This dream creature can simply be bought in Melrose’s Skill Tree if she is a Summoner and you have a Rose Petal Point to clear the way up.
Skills
Lucky Positive state: Gives an ally a random positive status effect (Speed Up, Accuracy Up, Physical Defense Up, Physical Damage Up, Magic Defense Up or Magic Damage Up).
The second-to-best dream creature in the game for defensive strategies.
Quest
This dream creature can simply be bought in Melrose’s Skill Tree if she is a Summoner and you have a Rose Petal Point to clear the way up.
Skills
Lucky Positive state: Gives an ally a random positive status effect (Speed Up, Accuracy Up, Physical Defense Up, Physical Damage Up, Magic Defense Up or Magic Damage Up).
Wravyn
 Wravyn is a real damage dealer. His attack power is high, but so is his cost. He is best used for boss fights.
Quest
In a southern part of the Catacombs is Wravyn’s grave. Check it. Now go to the Lady of the Moon at the Hills of the Crying Moon. If you aren’t currently doing the quest to get moonbat food, she will assist you in reviving Wravyn.
Go out and defeat Enochlophobia until you have 10 Voice Crests. Bring them to the Lady of the Moon and she will turn them into a Warcry Crest. Go back to the grave and check it. If you’re a Summoner, you will unlock Wravyn. If you’re not, nothing happens.
Skills
Fire Breath: Deals high damage to a single enemy.
Mass Breath: Deals high damage to all enemies.
Wravyn is a real damage dealer. His attack power is high, but so is his cost. He is best used for boss fights.
Quest
In a southern part of the Catacombs is Wravyn’s grave. Check it. Now go to the Lady of the Moon at the Hills of the Crying Moon. If you aren’t currently doing the quest to get moonbat food, she will assist you in reviving Wravyn.
Go out and defeat Enochlophobia until you have 10 Voice Crests. Bring them to the Lady of the Moon and she will turn them into a Warcry Crest. Go back to the grave and check it. If you’re a Summoner, you will unlock Wravyn. If you’re not, nothing happens.
Skills
Fire Breath: Deals high damage to a single enemy.
Mass Breath: Deals high damage to all enemies.
Humpty (Dumpty) Houdini
 This dream creature’s focus is on avoiding damage with its hocus pocus.
Quest
Do the first and second Tradecenter quest to receive a Mirror Eye. Go to the Mirrorcle Caves. South of where you first entered the Mirrorcle Caves will be a reflection of Humpty Houdini in the wall. Check it and use the Mirror Eye. If you’re a Summoner, he will grant you his powers. If not, you will receive 150 Memory Orbs.
Skills
Blinding Illusion: May inflict Blinded on all enemies.
Evasive Illusion: Increases an ally’s evasion with the Blink status effect.
Trick Attack: May Stun an enemy.
This dream creature’s focus is on avoiding damage with its hocus pocus.
Quest
Do the first and second Tradecenter quest to receive a Mirror Eye. Go to the Mirrorcle Caves. South of where you first entered the Mirrorcle Caves will be a reflection of Humpty Houdini in the wall. Check it and use the Mirror Eye. If you’re a Summoner, he will grant you his powers. If not, you will receive 150 Memory Orbs.
Skills
Blinding Illusion: May inflict Blinded on all enemies.
Evasive Illusion: Increases an ally’s evasion with the Blink status effect.
Trick Attack: May Stun an enemy.
Unicorn
 Unicorn is the best dream creature for defensive strategies. She can restore HP, MP and revive. If there is nothing to restore, she can also deal high damage to the enemy. She’s an excellent choice for boss fights, and is quite beautiful, too.
Quest
This dream creature can simply be bought in Melrose’s Skill Tree if she is a Summoner and you have a Rose Petal Point to clear the way up.
Skills
Ray of Light: Deals high damage to a single enemy.
Heal: Restores an ally’s HP.
Refresh: Restores an ally’s MP.
Holy Touch: Revives a knocked-out ally.
Unicorn is the best dream creature for defensive strategies. She can restore HP, MP and revive. If there is nothing to restore, she can also deal high damage to the enemy. She’s an excellent choice for boss fights, and is quite beautiful, too.
Quest
This dream creature can simply be bought in Melrose’s Skill Tree if she is a Summoner and you have a Rose Petal Point to clear the way up.
Skills
Ray of Light: Deals high damage to a single enemy.
Heal: Restores an ally’s HP.
Refresh: Restores an ally’s MP.
Holy Touch: Revives a knocked-out ally.
Genie
 The Genie is perhaps the most powerful dream creature for regular battles: his Wish of Death can instantly kill an enemy. It is a good idea to summon Genie for regular battles that are too tough.
Quest
Do the “Take a picture” quest for a woman at Lekora. She will reward you with a Golden Lamp. Travel to the Quicksand Caves at the Desert of Solitude. There you will find a cave with the Keeper of Loneliness. Place the Golden Lamp on the portal beneath the Keeper. If you’re a Summoner, this will free the Genie from the lamp – giving his powers to you. If you’re not a Summoner, nothing happens.
Skills
Wish of Death: May instantly kill an enemy. Does not work on bosses.
Flash Trick: Deals high damage to a single enemy.
Silence: May inflict Muted on all enemies.
The Genie is perhaps the most powerful dream creature for regular battles: his Wish of Death can instantly kill an enemy. It is a good idea to summon Genie for regular battles that are too tough.
Quest
Do the “Take a picture” quest for a woman at Lekora. She will reward you with a Golden Lamp. Travel to the Quicksand Caves at the Desert of Solitude. There you will find a cave with the Keeper of Loneliness. Place the Golden Lamp on the portal beneath the Keeper. If you’re a Summoner, this will free the Genie from the lamp – giving his powers to you. If you’re not a Summoner, nothing happens.
Skills
Wish of Death: May instantly kill an enemy. Does not work on bosses.
Flash Trick: Deals high damage to a single enemy.
Silence: May inflict Muted on all enemies.
Pan
 Pan is overall the strongest dream creature in the game. All his skills effect either all enemies or all allies, making him the best crowd-control summoning in the game. He is best used for fights against a lot of enemies.
Quest
Collect all broadcasting frequencies for Lady Anatta. She will reward you with a Mystical Music Score. Now collect the Panflute from a chest outside of the Violence-Burns-Eyes-Hall in the Aztec Temple. Go into your Items menu and use the Mystical Music Score. By playing the tune on the panflute, Pan will be unlocked if you’re a Summoner. If you’re not, all allies will be fully restored. This can be done ten times before the Panflute breaks.
Skills
Song of Purity: Restores some HP of all allies.
Song of Peace: May inflict Asleep on all enemies.
Song of Nature: Deals damage to all enemies and may inflict Poisoned.
Song of Earth: Deals high damage to all enemies.
Pan is overall the strongest dream creature in the game. All his skills effect either all enemies or all allies, making him the best crowd-control summoning in the game. He is best used for fights against a lot of enemies.
Quest
Collect all broadcasting frequencies for Lady Anatta. She will reward you with a Mystical Music Score. Now collect the Panflute from a chest outside of the Violence-Burns-Eyes-Hall in the Aztec Temple. Go into your Items menu and use the Mystical Music Score. By playing the tune on the panflute, Pan will be unlocked if you’re a Summoner. If you’re not, all allies will be fully restored. This can be done ten times before the Panflute breaks.
Skills
Song of Purity: Restores some HP of all allies.
Song of Peace: May inflict Asleep on all enemies.
Song of Nature: Deals damage to all enemies and may inflict Poisoned.
Song of Earth: Deals high damage to all enemies.
Skill Tree
In this section you will find a map of each character’s skill tree. I will also give the suggested path to take, to make things easier in the game. But first, an introduction of the skill tree system. The skill tree is a major gameplay element in Whisper of a Rose. In the skill tree you can buy new skills and upgrade already purchased ones using Skill Points collected throughout the game. There are three types of points. Most skills require one of these points to buy.
 These points are used to upgrade skills. The higher the upgrade, the more points it costs.
 These are extremely rare points used to remove locks in the skill tree (indicated with ‘RPL’ on the pictures below). They are shared amongst all allies. Thus if one ally uses a Rose Petal Point, it is also subtracted from the points of every other ally. See the Start Journey+ section of this strategy guide for more information on how to find them.
Your current amount of points is displayed at the bottom left of the skill tree screen. Use the arrow keys to move around the skill tree. Move next to a skill/upgrade to view its details. Press the Enter key to purchase it.
The upgrades that are next to the skill will enhance that particular skill. View the details at the top of the screen to find out what each upgrade does. After a skill or upgrade is purchased, it becomes transparent and can be moved through.
These are extremely rare points used to remove locks in the skill tree (indicated with ‘RPL’ on the pictures below). They are shared amongst all allies. Thus if one ally uses a Rose Petal Point, it is also subtracted from the points of every other ally. See the Start Journey+ section of this strategy guide for more information on how to find them.
Your current amount of points is displayed at the bottom left of the skill tree screen. Use the arrow keys to move around the skill tree. Move next to a skill/upgrade to view its details. Press the Enter key to purchase it.
The upgrades that are next to the skill will enhance that particular skill. View the details at the top of the screen to find out what each upgrade does. After a skill or upgrade is purchased, it becomes transparent and can be moved through.
 For an overview of purchased skills and upgrades, go to the respective character’s skill menu, as can be seen in the picture above.
Melrose
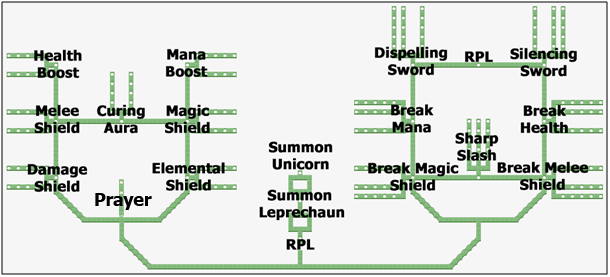 Note: The Prayer upgrades can only be reached when playing as a Paladin or Summoner.
Each skill costs 1 Skill Unlock Point to unlock, except the Summon Unicorn skill, which costs 3.
Note: The Prayer upgrades can only be reached when playing as a Paladin or Summoner.
Each skill costs 1 Skill Unlock Point to unlock, except the Summon Unicorn skill, which costs 3.
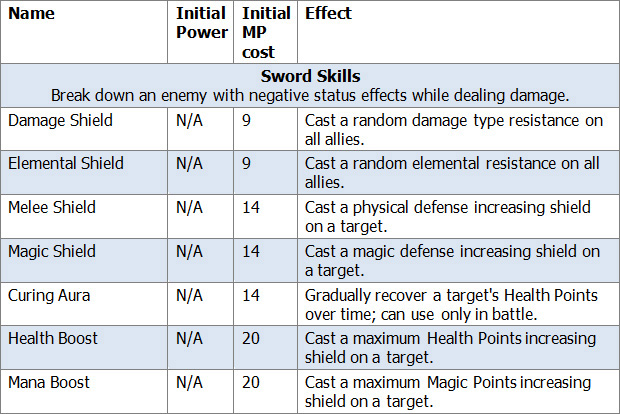

 Suggested path in chronological order:
Break Melee Shield >Break Health >Silencing Sword
This skill has a good side-effect of decreasing the target’s physical defense, whilst dealing a lot of damage (especially when fully upgraded). Max out Silencing Sword as it helps you silence the bosses and deal significant damage.
Elemental Shield >Magic Shield >Curing Aura
The second skill is very useful against bosses that use a lot of magic skills. The third skill is an excellent healing skill, because it gradually recovers HP and can thus be applied before the actual damage is taken.
Break Magic Shield >Break Mana >Dispelling Sword
Whilst the first two aren’t Melrose’s best skills, the third one is one of her best. Melrose is the only ally capable of removing an enemy’s positive states. This is particularly useful in boss fights against enemies that give themselves positive status effects. You should get this skill for the fights at the end of the game.
Melee Shield >Health Boost
Once the damage and HP numbers start getting higher, the Health Boost skill becomes particularly useful. Apply it early on in a boss fight and heal. You’ll have much more HP. This is very useful for surviving strong attacks. (Note: You may want to go for this path first instead, if you slapped Marlotte in the real world. It is a real lifesaver against her Beatdown skill.)
When playing as a Summoner, it is recommended to unlock Summon Leprechaun and Summon Unicorn as soon as possible.
Suggested path in chronological order:
Break Melee Shield >Break Health >Silencing Sword
This skill has a good side-effect of decreasing the target’s physical defense, whilst dealing a lot of damage (especially when fully upgraded). Max out Silencing Sword as it helps you silence the bosses and deal significant damage.
Elemental Shield >Magic Shield >Curing Aura
The second skill is very useful against bosses that use a lot of magic skills. The third skill is an excellent healing skill, because it gradually recovers HP and can thus be applied before the actual damage is taken.
Break Magic Shield >Break Mana >Dispelling Sword
Whilst the first two aren’t Melrose’s best skills, the third one is one of her best. Melrose is the only ally capable of removing an enemy’s positive states. This is particularly useful in boss fights against enemies that give themselves positive status effects. You should get this skill for the fights at the end of the game.
Melee Shield >Health Boost
Once the damage and HP numbers start getting higher, the Health Boost skill becomes particularly useful. Apply it early on in a boss fight and heal. You’ll have much more HP. This is very useful for surviving strong attacks. (Note: You may want to go for this path first instead, if you slapped Marlotte in the real world. It is a real lifesaver against her Beatdown skill.)
When playing as a Summoner, it is recommended to unlock Summon Leprechaun and Summon Unicorn as soon as possible.
Hellena
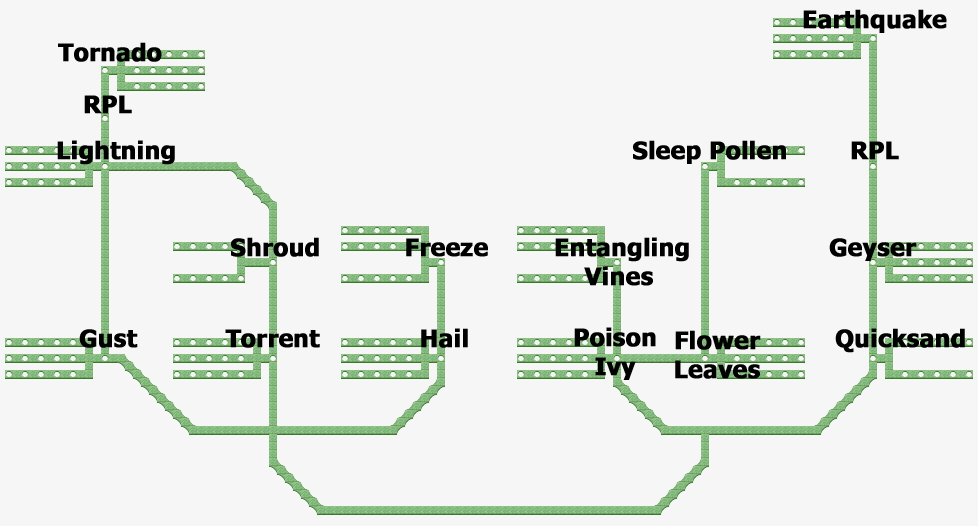
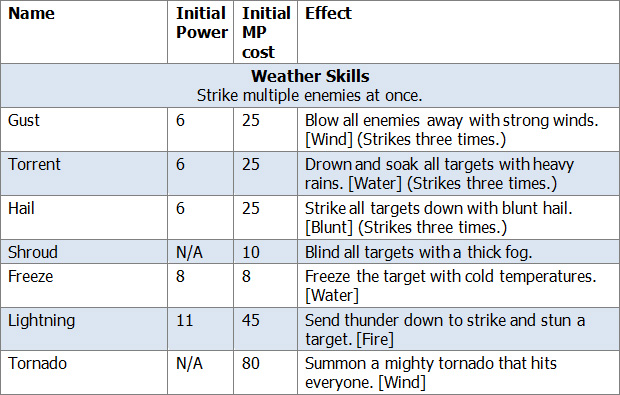
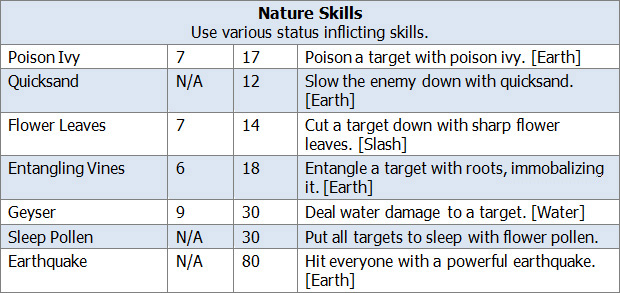 Suggested path in chronological order:
Gust >Lightning
Lightning is Hellena’s strongest single-target skill. It’s wise to unlock and upgrade it early.
Hail >Freeze
Freeze is a strong skill against bosses. It does not deal as much damage as Lightning, but is much cheaper.
Torrent >Shroud
Shroud inflicts ‘Blinded’ to all targets. This is particularly useful in fights against multiple enemies, such as the boss fight in the Marionette Factory.
Poison Ivy >Flower Leaves
Flower Leaves is a simple skill that deals slash damage. Its cost is low, yet the damage is higher than Hellena’s standard attack. When upgraded fully, this skill should replace Hellena’s regular attack, unless the enemy is weak against magic (the regular attack’s damage type).
The other skills are nicely balanced, so it doesn’t really matter in which order you unlock those.
When playing Start Journey+, after unlocking Lightning, either unlock Tornado or follow this path:
Quicksand >Geyser >Earthquake
Max out Tornado or Earthquake as both are very powerful skills that take care of even bosses in a few hits. However, because it also hits the heroes, Diamond must always immediately follow it up with Healing Breeze.
Suggested path in chronological order:
Gust >Lightning
Lightning is Hellena’s strongest single-target skill. It’s wise to unlock and upgrade it early.
Hail >Freeze
Freeze is a strong skill against bosses. It does not deal as much damage as Lightning, but is much cheaper.
Torrent >Shroud
Shroud inflicts ‘Blinded’ to all targets. This is particularly useful in fights against multiple enemies, such as the boss fight in the Marionette Factory.
Poison Ivy >Flower Leaves
Flower Leaves is a simple skill that deals slash damage. Its cost is low, yet the damage is higher than Hellena’s standard attack. When upgraded fully, this skill should replace Hellena’s regular attack, unless the enemy is weak against magic (the regular attack’s damage type).
The other skills are nicely balanced, so it doesn’t really matter in which order you unlock those.
When playing Start Journey+, after unlocking Lightning, either unlock Tornado or follow this path:
Quicksand >Geyser >Earthquake
Max out Tornado or Earthquake as both are very powerful skills that take care of even bosses in a few hits. However, because it also hits the heroes, Diamond must always immediately follow it up with Healing Breeze.
Diamond
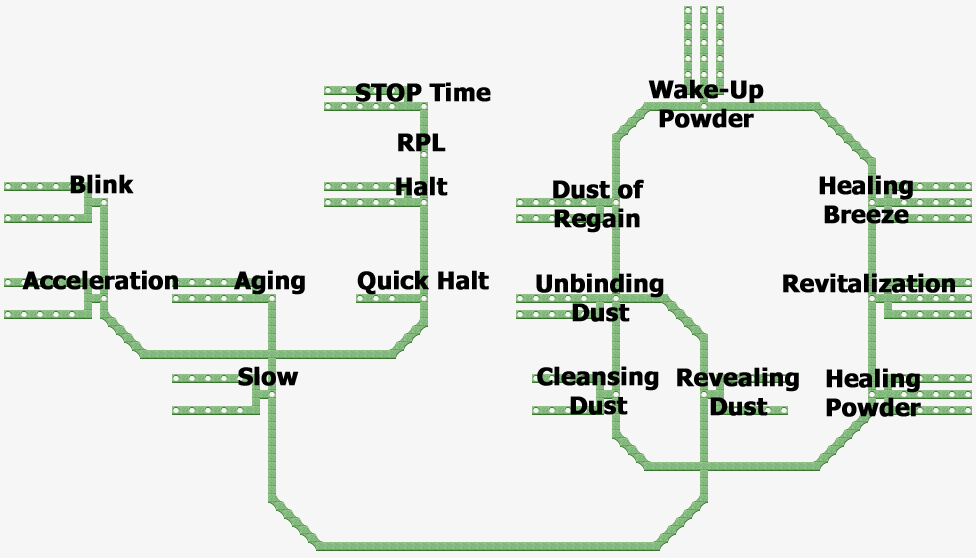
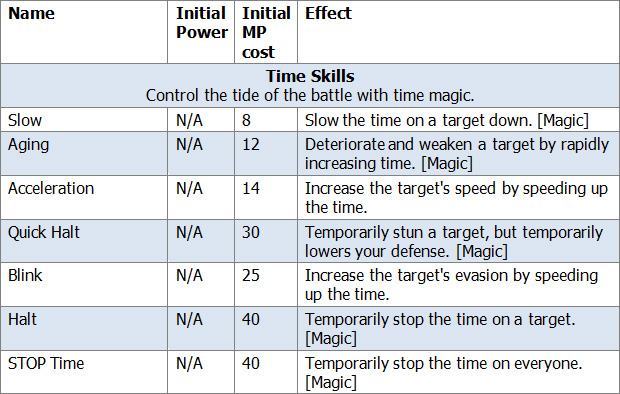
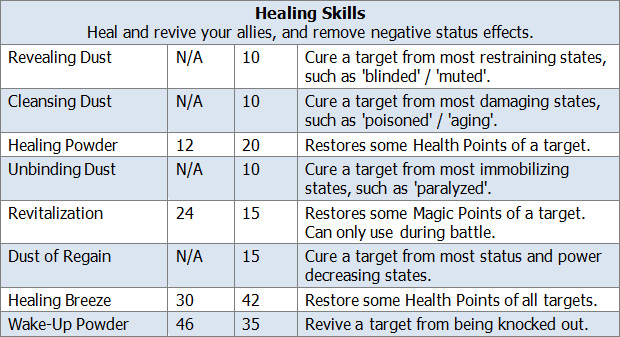 Suggested path in chronological order:
Healing Powder >Revitalization >Healing Breeze >Wake-Up Powder
This should be the order in which you unlock Diamond’s skills. He has various extremely useful skills, but these are the most vital. Healing Powder and Healing Breeze are necessary to heal your allies. Revitalization recovers the target’s MP, which is extremely useful. It takes a bit longer than using an item, but it saves you the money. Wake-Up Powder revives a KO’d ally. It is very useful. It is recommended to first upgrade Healing Breeze, then Wake-Up Powder and then Revitalization.
Slow >Quick Halt
The latter is a fast casted skill that temporarily inflicts ‘Stunned’ on the target. If used when the target is flashing white in preparation of a skill, it will interrupt the skill! This is an extremely useful method to stop enemies from using powerful skills. It tends to not work on bosses, though.
Cleansing Dust / Revealing Dust >Unbinding Dust >Dust of Regain
All these skills are very useful, and save you the Memory Orbs that otherwise would have been used buying the respective cures.
Acceleration >Blink
The first skill greatly increases the speed of the ally on which it is cast. The latter makes the targeted ally virtually impossible to hit with physical attacks. Both are very useful.
Suggested path in chronological order:
Healing Powder >Revitalization >Healing Breeze >Wake-Up Powder
This should be the order in which you unlock Diamond’s skills. He has various extremely useful skills, but these are the most vital. Healing Powder and Healing Breeze are necessary to heal your allies. Revitalization recovers the target’s MP, which is extremely useful. It takes a bit longer than using an item, but it saves you the money. Wake-Up Powder revives a KO’d ally. It is very useful. It is recommended to first upgrade Healing Breeze, then Wake-Up Powder and then Revitalization.
Slow >Quick Halt
The latter is a fast casted skill that temporarily inflicts ‘Stunned’ on the target. If used when the target is flashing white in preparation of a skill, it will interrupt the skill! This is an extremely useful method to stop enemies from using powerful skills. It tends to not work on bosses, though.
Cleansing Dust / Revealing Dust >Unbinding Dust >Dust of Regain
All these skills are very useful, and save you the Memory Orbs that otherwise would have been used buying the respective cures.
Acceleration >Blink
The first skill greatly increases the speed of the ally on which it is cast. The latter makes the targeted ally virtually impossible to hit with physical attacks. Both are very useful.
Christina
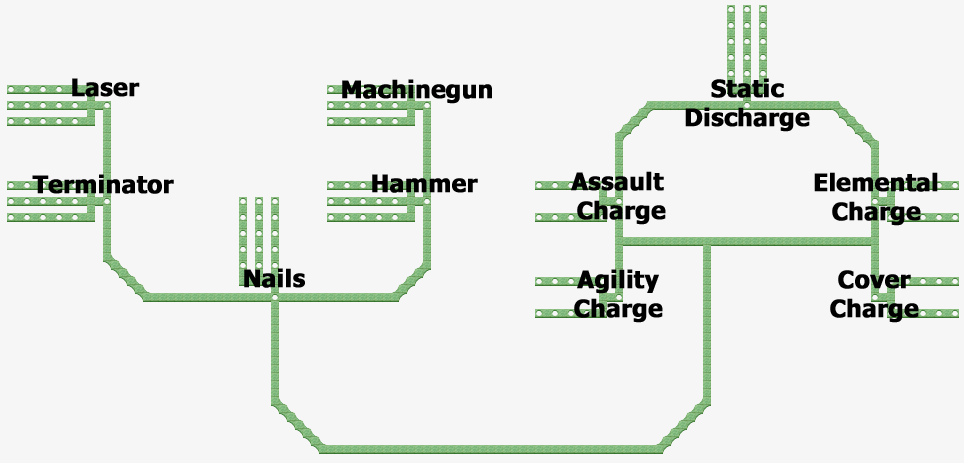
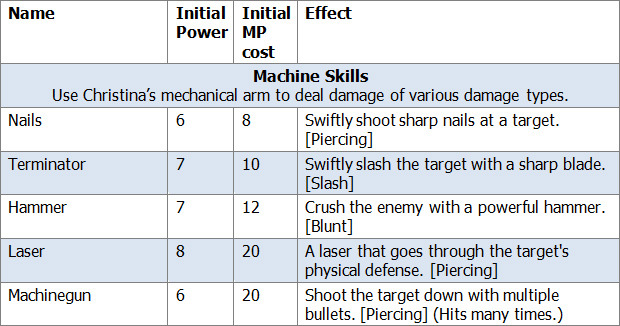
 Suggested path in chronological order:
Assault Charge >Static Discharge >Agility Charge
The first skill nicely increases all damage that she deals. The latter is one of her most powerful skills and may even inflict ‘Paralyzed’ on the enemy. These two skills are a deadly combination. Agility Charge makes Christina a lot faster.
Nails >Terminator >Laser
The main point of Christina’s skills is that they deal different types of damage. Use this to your advantage: exploit the enemy’s weaknesses. Therefore all her skills are equally useful. The third one is the most interesting, though. Just like Melrose’s Sharp Slash, it ignores the target’s physical defense. This skill is very strong against enemies with a high defense, such as the Lava Golems that roam near Vestyrka.
Suggested path in chronological order:
Assault Charge >Static Discharge >Agility Charge
The first skill nicely increases all damage that she deals. The latter is one of her most powerful skills and may even inflict ‘Paralyzed’ on the enemy. These two skills are a deadly combination. Agility Charge makes Christina a lot faster.
Nails >Terminator >Laser
The main point of Christina’s skills is that they deal different types of damage. Use this to your advantage: exploit the enemy’s weaknesses. Therefore all her skills are equally useful. The third one is the most interesting, though. Just like Melrose’s Sharp Slash, it ignores the target’s physical defense. This skill is very strong against enemies with a high defense, such as the Lava Golems that roam near Vestyrka.
Items
In this section are lists of items available in the game. They exclude key items and items used solely for quests. Consumption Items Drawing Salve I (Price: 3): Heals HP by 15 points. Drawing Salve II (Price: 4): Heals HP by 20 points. Drawing Salve III (Price: 6): Heals HP by 40 points. Drawing Salve IV (Price: 13): Heals HP by 70 points. Drawing Salve V (Price: 28): Heals HP by 120 points. Drawing Salve VI (Price: 44): Heals HP by 220 points. Drawing Salve VII (Price: 74): Heals HP by 400 points. Drawing Salve VIII (Price: 142): Heals HP by 1000 points. Wake-Up Salve I (Price: 13): Revives from KO; heals HP by 25 points and recovers MP by 10 points. Wake-Up Salve II (Price: 39): Revives from KO; heals HP by 60 points and recovers MP by 20 points. Wake-Up Salve III (Price: 84): Revives from KO; heals HP by 120 points and recovers MP by 30 points. Wake-Up Salve IV (Price: 140): Revives from KO; heals HP by 200 points and recovers MP by 40 points. Wake-Up Salve V (Price: 220): Revives from KO; heals HP by 500 points and recovers MP by 60 points. Sweet Salve (Price: 3): Recovers MP by 20 points. Glitter Salve (Price: 12): Recovers MP by 40 points. Magic Salve (Price: 25): Recovers MP by 70 points. Dream Salve (Price: 100): Recovers MP by 120 points. Antidote (Price: 3): Cures ‘Poisoned’. Eyedrops (Price: 3): Cures ‘Blindness’. Mint (Price: 3): Cures ‘Muted’. Glass of Water (Price: 3): Cures ‘Confused’. Alarm Clock (Price: 3): Cures ‘Asleep’. Coffee (Price: 3): Cures ‘Paralyzed’. Vitamin Pill (Price: 25): Cures ‘Weakened’, ‘Clumsy’, ‘Slowed’ and ‘Feeble’. Wulf Spit (Price: N/A): Heals HP by 10 points. Small Herbs (Price: N/A): Heals HP by 15 points. Butterfly Powder (Price: N/A): Revives from KO; heals HP by 20%. Ladybug Dust (Price: N/A): Heals HP by 20 points and recovers MP by 10 points. Necromancer Dust (Price: N/A): Heals HP by 15 points and recovers MP by 30 points. Dragonfly Egg (Price: N/A): Heals HP by 15 points and recovers MP by 5 points. Honey (Price: N/A): Gives ‘Magic Dmg. Up’. Italian Sandwich (Price: N/A): Heals HP by 100 points. Chocolatemilk (Price: N/A): Cursed ‘Broken Defense’, ‘Broken Magic Def’, ‘Broken Health P.’ and ‘Broken Magic P.’. Healthy Salad (Price: N/A): Heals HP by 50% and cures ‘Weakened’, ‘Clumsy’, ‘Slowed’ and ‘Feeble’. Cheeseburger (Price: N/A): Heals HP by 600 points, but decreases MP by 70% points. Walnut Ice (Price: N/A): Heals HP by 100 points and gives ‘Healing’. Candy Cane (Price: N/A): Heals HP by 200 points. Cherry Cake (Price: N/A): Heals HP by 200 points and gives ‘Speed Up’. Strawberry Ice (Price: N/A): Recovers MP by 70 points and gives ‘Phys Def. Up’ and ‘Magic Def. Up’. Chocolatebar (Price: N/A): Heals HP by 50% and cures ‘Poisoned’, ‘Muted’, and ‘Asleep’. Mint Milkshake (Price: N/A): Recovers MP by 80% and gives ‘Speed Up’ and ‘Mana Boost’. Espresso (Price: N/A): Cursed ‘Asleep’ and ‘Slowed’ and gives ‘Speed Up’ and ‘Accuracy Up’. Strawberry Wine (Price: N/A): Recovers MP by 70%. Cherry Wine (Price: N/A): Recovers MP by 80% and gives ‘Magic Dmg. Up’. Grape Wine (Price: N/A): Recovers MP by 100% and gives ‘Magic Dmg. Up’. Crystal Apple (Price: N/A): Permanently increases max HP by 15 points. Frozen Fish (Price: N/A): Permanently increases magic damage by 1. Blessed Berries (Price: N/A): Permanently increases max MP by 10 points.Bombs
Bombs are thrown at an enemy target during battle. Clover Bomb (Price: 4): Deals low damage. Laughing Bomb (Price: 20): Deals medium damage. Inflicts ‘Muted’. Smart Bomb (Price: 20): Deals medium damage. Inflicts ‘Weakened’,‘Clumsy’ and ‘Slowed’. Sleep Bomb (Price: 20): Deals medium damage. Inflicts ‘Asleep’. Sulfur Bomb (Price: 20): Deals medium damage. Inflicts ‘Blinded’.Weapons
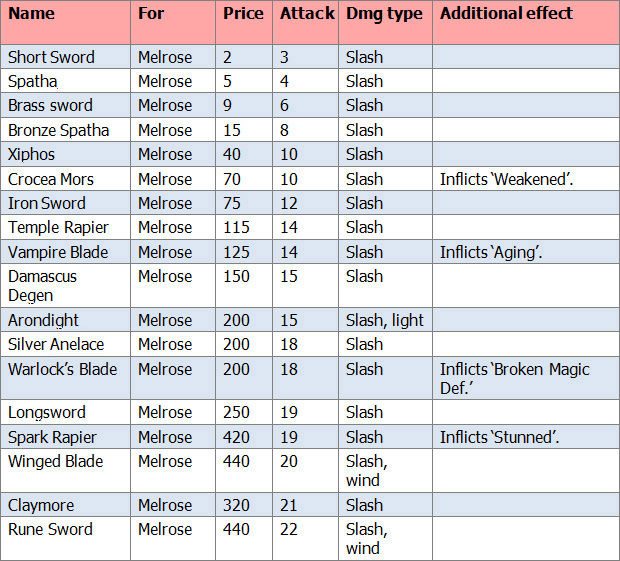
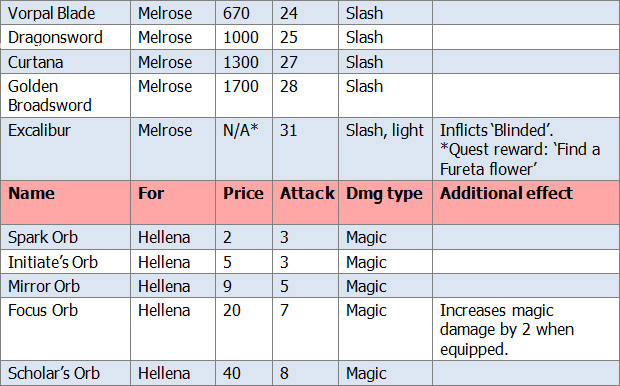
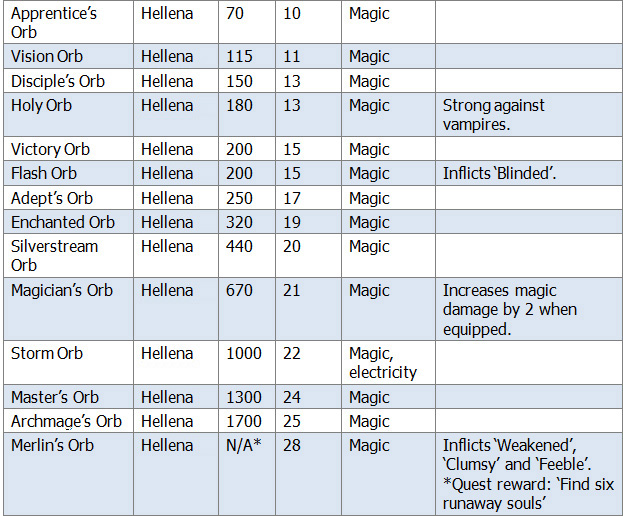
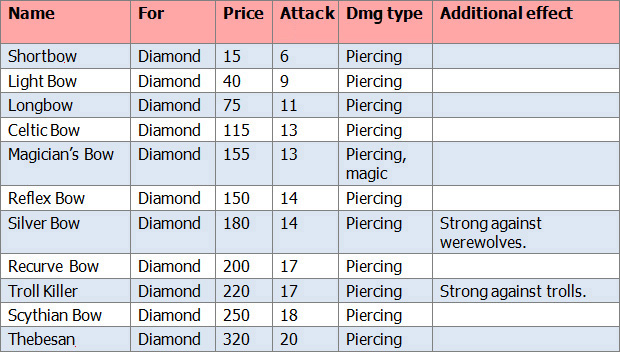
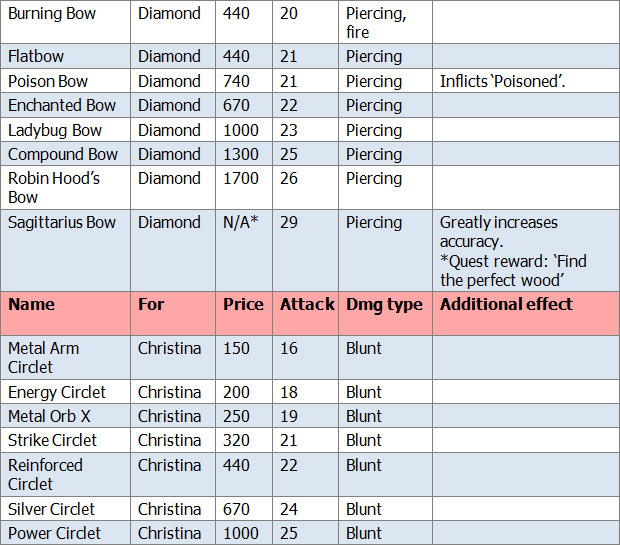
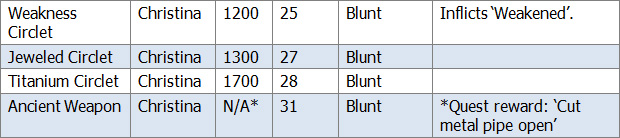
Relic Armor
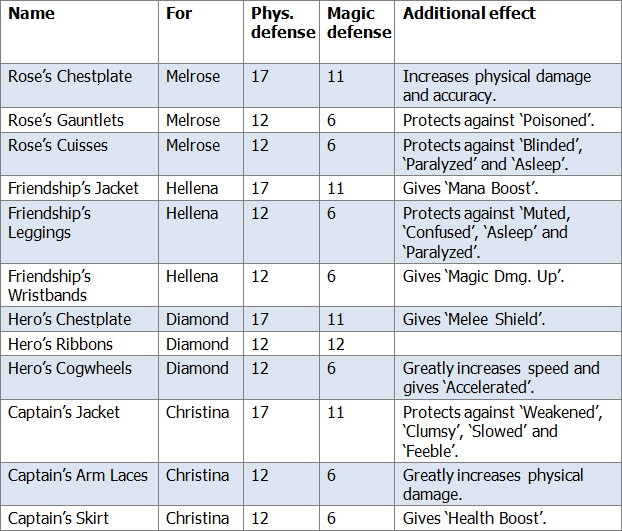
Accessories
Name: Effect when equipped Ring of the Rose: Protects against ‘Poisoned’. Purple Earring: Protects against ‘Poisoned’. Black Earring: Protects against ‘Blinded’. White Earring: Protects against ‘Asleep’. Blue Earring: Protects against ‘Muted’. Green Earring: Protects against ‘Paralyzed’. Yellow Earring: Protects against ‘Confused’. Red Earring: Protects against ‘Stunned’. Feather Necklace: Increases the chance of evading enemy physical attacks. Focus Necklace: Increases magic damage by 2 and slightly increases physical damage. Ruby Necklace: Protects against fire attacks. Emerald Necklace: Protects against wind attacks. Sapphire Necklace: Protects against water attacks. Petoskey Necklace: Protects against earth attacks. Crystal Necklace: Protects against wind and water attacks. Diamond Necklace: Protects against fire and earth attacks. Moss Agate Ring: Increases magic defense by 1. Chryscolla Ring: Increases magic defense by 2. Turquoise Ring: Increases magic defense by 3. Lace Agate Ring: Increases magic defense by 4 and increases magic damage by 1. Blue Topaz Ring: Increases magic defense by 5 and increases magic damage by 2. Sapphire Ring: Increases magic defense by 7 and increases magic damage by 4. Hematite Ring: Increases magic damage by 1. Sugilite Ring: Increases magic damage by 2. Obsidian Ring: Increases magic damage by 3. Amethyst Ring: Increases magic damage by 4 and increases magic defense by 1. Black Pearl Ring: Increases magic damage by 6 and increases magic defense by 2. Tanzite Ring: Increases magic damage by 9 and increases magic defense by 3. Sturdy Belt: Protects against ‘Stunned’. Love Ribbon: Gives ‘Speed Up’. Flame Earring: Protects against ‘Paralyzed’ and ‘Slowed’. Warrior’s Ribbon: Protects against ‘Stunned’, ‘Paralyzed’, ‘Blinded’, ‘Weakened’ and ‘Asleep’, but gives ‘Muted’. Moonblue Ring: Increases magic damage by 4 and protects against ‘Muted’ and ‘Blinded’. Yellow Necklace: Protects against electricity attacks. Wedding Ring: Increases magic defense by 3. Plate Armor Ring: Protects against slash and piercing attacks. Cursed Ring: Protects against darkness attacks, but gives ‘Weakened’. Winged Comb: Greatly increases speed and accuracy. Enchanted Mask: Increases magic damage by 5, but gives ‘Blinded’.Crafting
Almost every accessory in the game can only be gotten by crafting. Below is a list of all recipes in the game, including the 12 Relic Armor recipes that are found just before the final boss. Ingredients can be found and bought at various places, in particular Kairo. The Relic Orbs required to craft the most powerful armor in the game – Relic Armor – can be received from Juliet at Eley. For each Shark Tooth that you bring her (defeat the sharks at the Meylin Underwater Town for this item) she will trade you one Relic Orb. Tip! Craft Grape Wines instead of buying MP replenishing items. Grape Wine fully restores your MP, and also increases magic damage. Crafted item: Ingredients Earrings Purple Earring: Heat Orb, Cut Orb, Steel Pin, Silver Shell, Purple Rock, Black Earring: Heat Orb, Cut Orb, Steel Pin, Silver Shell, Black Rock, White Earring: Heat Orb, Cut Orb, Steel Pin, Silver Shell, White Rock, Blue Earring: Heat Orb, Cut Orb, Steel Pin, Silver Shell, Blue Rock, Green Earring: Heat Orb, Cut Orb, Steel Pin, Silver Shell, Green Rock, Yellow Earring: Heat Orb, Cut Orb, Steel Pin, Silver Shell, Yellow Rock, Red Earring: Heat Orb, Cut Orb, Steel Pin, Silver Shell, Red Rock, Necklaces Focus Necklace: Heat Orb, Steel Clip, Steel Thread, Blue Rock Ruby Necklace: Heat Orb, Steel Clip, Steel Thread, Ruby Emerald Necklace: Heat Orb, Steel Clip, Steel Thread, Emerald Sapphire Necklace: Heat Orb, Steel Clip, Steel Thread, Sapphire Petoskey Necklace: Heat Orb, Steel Clip, Steel Thread, Petoskey Crystal Necklace: Heat Orb, Steel Clip, Steel Thread, Crystal Diamond Necklace: Heat Orb, Steel Clip, Steel Thread, Diamond Rings Moss Agate Ring: Heat Orb, Cut Orb, Copper Ore, Moss Agate Chryscolla Ring: Heat Orb, Cut Orb, Metal Wire, Bronze Ore, Chryscolla Turquoise Ring: Heat Orb, Cut Orb, Metal Wire, Bronze Ore, Turquoise Lace Agate Ring: Heat Orb, Cut Orb, Metal Wire, Steel Ore, Lace Agate Blue Topaz Ring: Heat Orb, Cut Orb, Metal Wire, Steel Ore, Blue Topaz Sapphire Ring: Heat Orb, Cut Orb, Metal Wire, Gold Ore, Sapphire Hematite Ring: Heat Orb, Cut Orb, Copper Ore, Hematite Sugilite Ring: Heat Orb, Cut Orb, Metal Wire, Bronze Ore, Sugilite Obsidian Ring: Heat Orb, Cut Orb, Metal Wire, Bronze Ore, Obsidian Amethyst Ring: Heat Orb, Cut Orb, Metal Wire, Steel Ore, Amethyst Black Pearl Ring: Heat Orb, Cut Orb, Metal Wire, Steel Ore, Black Pearl Tanzite Ring: Heat Orb, Cut Orb, Metal Wire, Gold Ore, Tanzite Wines Strawberry Wine: Heat Orb, Sugar, Wine Yeast, Acid Blend, Strawberry Cherry Wine: Heat Orb, Sugar, Wine Yeast, Acid Blend, Cherry Grape Wine: Heat Orb, Sugar, Wine Yeast, Acid Blend, Grapes Bombs Laughing Bomb: Gunpowder, Hollow Ball, Cotton Thread, Vinegar, Laugh Dust Smart Bomb: Gunpowder, Hollow Ball, Cotton Thread, Vinegar, Smart Dust Sleep Bomb: Gunpowder, Hollow Ball, Cotton Thread, Vinegar, Sleep Dust Sulfur Bomb: Gunpowder, Hollow Ball, Cotton Thread, Vinegar, Sulfur Powder Food Chocolatemilk: Heat Orb, Fresh Water, Cocoa, Milk Healthy Salad: Cut Orb, Walnut, Sunflower Seeds, Pumpkin Cheeseburger: Heat Orb, Cheese, Ham, Slice of Bread Walnut Ice: Cold Orb, Vanilla, Walnut, Milk Cherry Cake: Heat Orb, Flour, Sugar, Cherry Strawberry Ice: Cold Orb, Vanilla, Strawberry, Milk Chocolatebar: Cold Orb, Fresh Water, Cocoa, Milk Mint Milkshake: Cold Orb, Sugar, Mint, Milk Espresso: Heat Orb, Fresh Water, Milk, Coffee Beans Relic Armor Rose’s Chestplate: Relic Orb, White Chestplate, Heat Orb, Metal Wire, Platina Ore, Ruby Rose’s Gauntlets: Relic Orb, White Gauntlets, Heat Orb, Metal Wire, Platina Ore, Steel Pin Rose’s Cuisses: Relic Orb, White Cuisses, Heat Orb, Metal Wire, Platina Ore, Steel Pin Friend’s Jacket: Relic Orb, Black Jacket, Heat Orb, Metal Wire, Golden Thread, Sapphire Friend’s Leggings: Relic Orb, Green Leggings, Cut Orb, Patch of Fabric, Golden Thread, Friend’s Wristbands: Relic Orb, Yellow Wristbands, Cut Orb, Steel Thread, Linen Thread, Hero’s Chestplate: Relic Orb, Red Chestplate, Heat Orb, Metal Wire, Gold Ore, Tanzite Hero’s Ribbons: Relic Orb, Red Ribbons, Cut Orb, Patch of Fabric, Golden Thread, Hero’s Cogwheels: Relic Orb, Red Cogwheels, Heat Orb, Platina Ore Captain’s Jacket: Relic Orb, Office Jacket, Heat Orb, Metal Wire, Golden Thread, Emerald Captain’s Arm Laces: Relic Orb, Office Arm Laces, Cut Orb, Steel Thread, Steel Thread, Steel Clip Captain’s Skirt: Relic Orb, Office Skirt, Cut Orb, Linen Thread, Golden Thread, Steel ClipMemory Teleportals
Memory Teleportals allow teleportation between them. Unlocking them usually costs 15 Memory Orbs, and using them costs 1 Recollection Orb. Recollection Orbs are randomly dropped by enemies that are strong compared to your current level. Fighting weaker enemies decreases the chances of receiving a Recollection Orb. Below is a list of all the locations of the Memory Teleportals. Along with the Memory Orb Vendors, they are transparent, so it may be difficult to spot them. Crystal Hills In the north-west of the southern area. Can only be accessed by taking the portal from the northern area. See the white cross on the map taken from the walkthrough: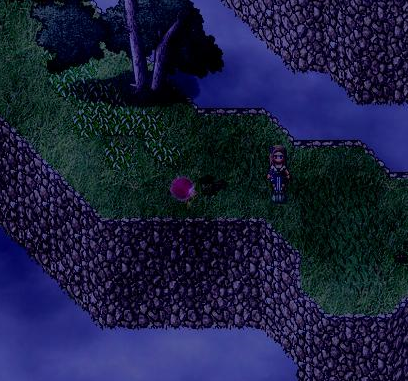 Heart Station
Next to Lady Anatta.
Butterfly Caves
The northern cave area, north-east in the tunnel complex that is connected to the southern cave area. See the maps in the main walkthrough.
Ladybug Village
South-east.
Valentown
North-west in the village, next to a heart-shaped gate on the road.
Mirrorcle Caves
At the exit to the Cursed Valley.
Hallowstone
At the entrance from the Cursed Forest.
Kairo
South-east, next to the stone market square.
Desert of Solitude
Second (western) area, south-west at a red colored ‘tent’.
Fureta Jungle
First (western) area, south-east, below some dirt patches.
Lekora
South-west, in front of the large village center.
Vestyrka
North-east, near the entrance to the village center.
Pirate Cove
Upon entrance from the Beaches of Freedom, take the first turn north-east. It’s at the end of that short tunnel, near a pond.
Heart Station
Next to Lady Anatta.
Butterfly Caves
The northern cave area, north-east in the tunnel complex that is connected to the southern cave area. See the maps in the main walkthrough.
Ladybug Village
South-east.
Valentown
North-west in the village, next to a heart-shaped gate on the road.
Mirrorcle Caves
At the exit to the Cursed Valley.
Hallowstone
At the entrance from the Cursed Forest.
Kairo
South-east, next to the stone market square.
Desert of Solitude
Second (western) area, south-west at a red colored ‘tent’.
Fureta Jungle
First (western) area, south-east, below some dirt patches.
Lekora
South-west, in front of the large village center.
Vestyrka
North-east, near the entrance to the village center.
Pirate Cove
Upon entrance from the Beaches of Freedom, take the first turn north-east. It’s at the end of that short tunnel, near a pond.
Start Journey+
After defeating Agraphobius and saving your game, ‘Start Journey’ at the title screen will change to ‘Start Journey+’. By replaying the game, a lot of extra’s will be unlocked. Below is a list of them all. • It is now possible to choose the class Summoner for Melrose at the beginning of the game. This will allow you to unlock and summon ALL dream creatures in the game. Check out the dream creatures section of this strategy guide for more information. • At the start of the game, you will receive all the recipes for Relic Armor. This will give you the information to craft these pieces of armor this time around. Though, as you are reading this guide, you could simply look the recipes up in here as well. • At the start of the game, you will receive all the broadcasting frequencies found in chests at the end of the game. Because some of them could only be found once there is no way back to Lady Anatta, you could not complete her quest the first playthrough. This time, however, it is possible. And much earlier, too. The frequencies you receive are: o #112.00 Ghastly Witches o #122.00 Lisetrix o #125.00 MachineGO o #132.00 PlotX o #135.00 Rose at Dawn o #137.00 Rose at Night o #144.00 Stagefright o #150.00 THE UNFORGIVABLE • There are two additional Skill Unlock Points that can be acquired. They look like Skill Upgrade points (orbs lying around on the map), but yellow. One is in the north-east of the Mountain Pass – north-east of the Green Dragon. The second is in the treasure room in the north-west of the Pirate Cove. It’s a little bit down and to the left from the pirate ship that ferries you to the Meylin Underwater Village.Rose Petal Points
• This time around you can find Rose Petal Points. They look like Skill Upgrade Points, but are pink. These points can be used in the skill tree to unlock Rose Petal Locks and access the most powerful skills in the game (including two dream creatures to summon). In total, five of these points can be found. The exact location of these Rose Petal Points are: o Crystal Hills: first/southern area, south-west corner (must go there by taking the south-western portal in the second/northern area)
o Butterfly Caves: See the maps of this area provided in the main walkthrough. Take the hill down at B1, go beyond the boulder puzzle and then down C3. Follow the tunnel south.
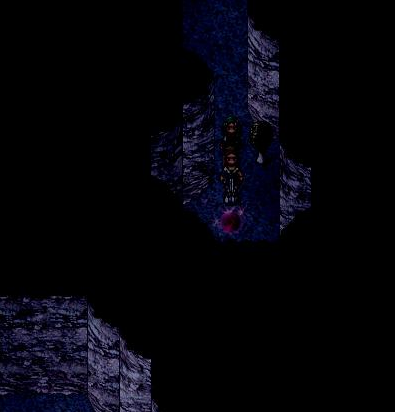 o Hills of the Crying Moon: North-west, up the hill, near the portal to the Moon.
 o Quicksand Caves: See the maps of this area provided in the main walkthrough. South-west from cave exit 4 (a little above cave exit 1).
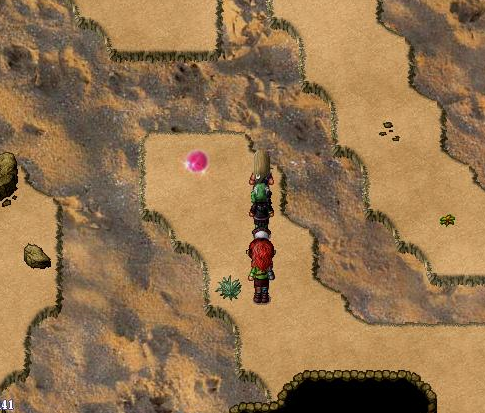 o Mountain Pass: South-west, all the way down from where the dragon roams.
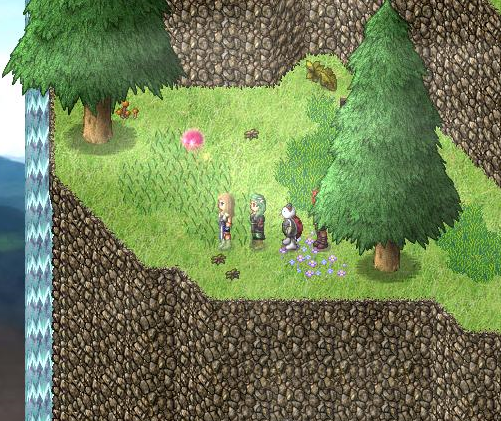
Created at: 2010-09-14