

Walkthrough Menu
General Tips
 • Hidden Object Scenes and mini-games are often randomized - your solution may vary.
• Hidden Object Scenes will be referred to as HOS in this walkthrough.
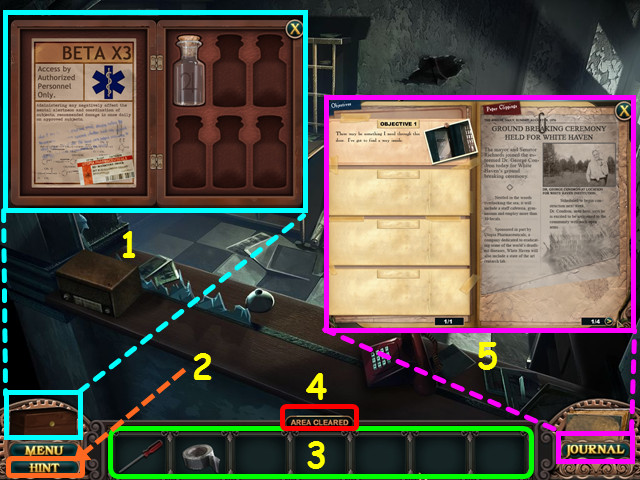
• The Antidote Case will hold the vials you collect throughout the game (1).
• Hints are unlimited, but you must wait for the hint meter to refill (2).
• Your inventory is in the bottom panel - click on an item to select it for use (3).
• The inventory panel auto-hides, move your mouse down to reveal the panel.
• ‘Area Cleared’ will show at the top of the inventory panel if there is nothing more to do in a location (4).
• The journal will collect the newspaper clippings and track your objectives (5).
• Hidden Object Scenes and mini-games are often randomized - your solution may vary.
• Hidden Object Scenes will be referred to as HOS in this walkthrough.
• The Antidote Case will hold the vials you collect throughout the game (1).
• Hints are unlimited, but you must wait for the hint meter to refill (2).
• Your inventory is in the bottom panel - click on an item to select it for use (3).
• The inventory panel auto-hides, move your mouse down to reveal the panel.
• ‘Area Cleared’ will show at the top of the inventory panel if there is nothing more to do in a location (4).
• The journal will collect the newspaper clippings and track your objectives (5).
Chapter 1
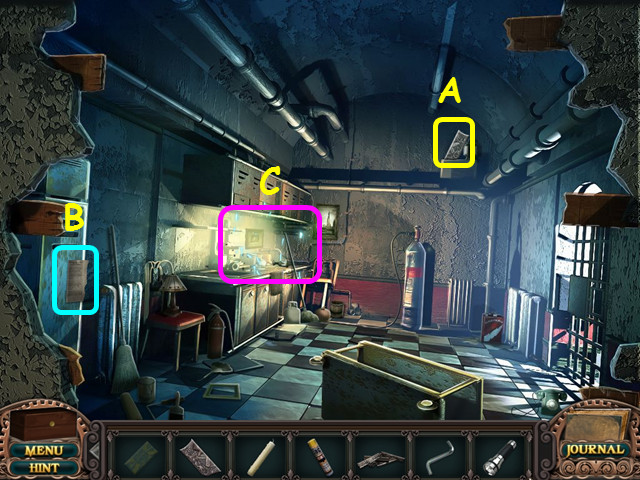
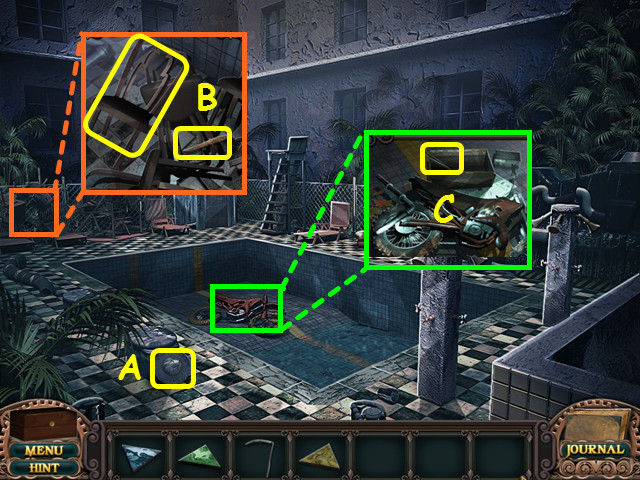
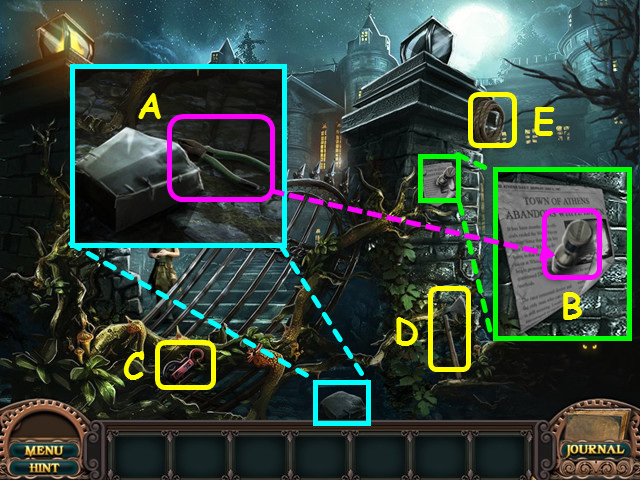 • Look at the stone; move it aside and take the PLIERS (A).
• Look at the clipping; use the PLIERS to take the SPIKE (B).
• Take the PULLEY (C), AXE (D), and ROPE (E).
• Look at the stone; move it aside and take the PLIERS (A).
• Look at the clipping; use the PLIERS to take the SPIKE (B).
• Take the PULLEY (C), AXE (D), and ROPE (E).
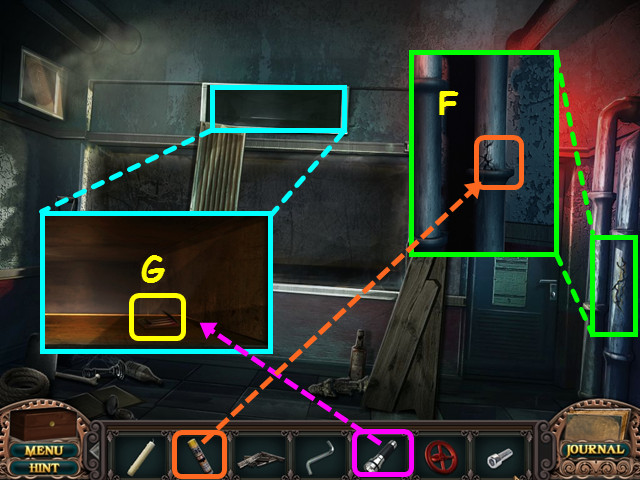
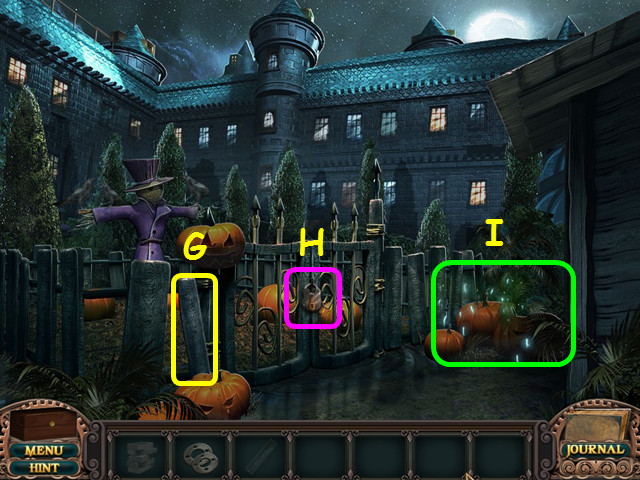
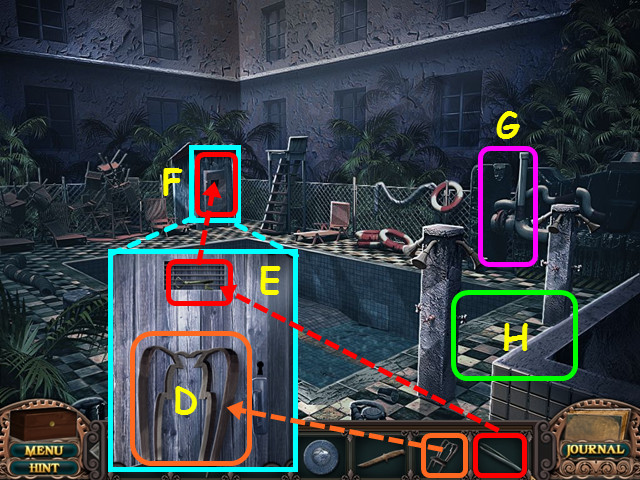
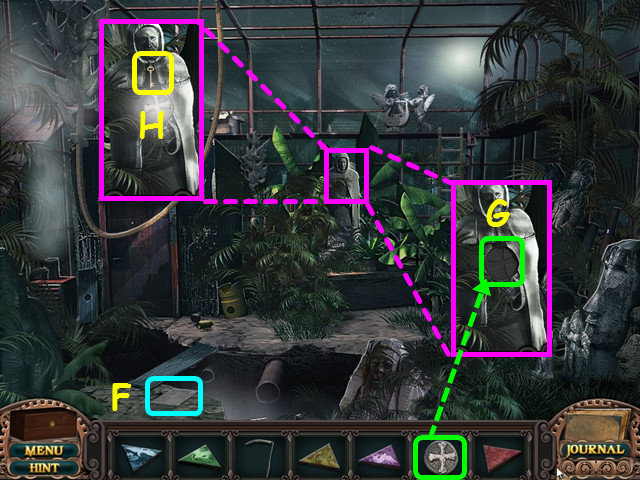
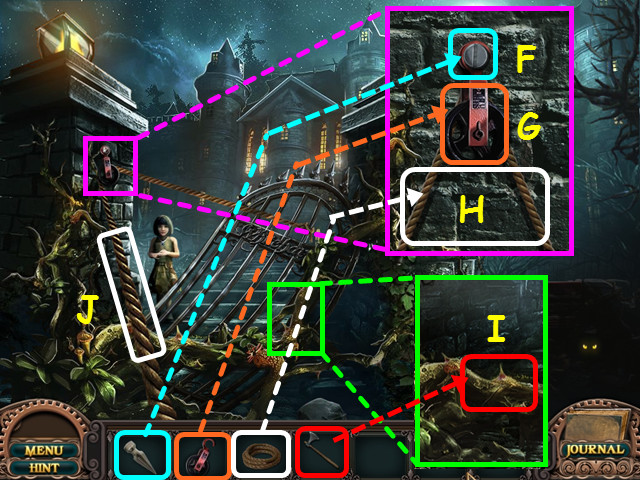 • Look at the left column and place the SPIKE into the hole (F).
• Hang the PULLEY (G) on the spike, then add the ROPE (H).
• Look at the vines on the gate and use the AXE to remove the vines (I).
• Pull on the rope (J), then walk forward.
• Look at the left column and place the SPIKE into the hole (F).
• Hang the PULLEY (G) on the spike, then add the ROPE (H).
• Look at the vines on the gate and use the AXE to remove the vines (I).
• Pull on the rope (J), then walk forward.
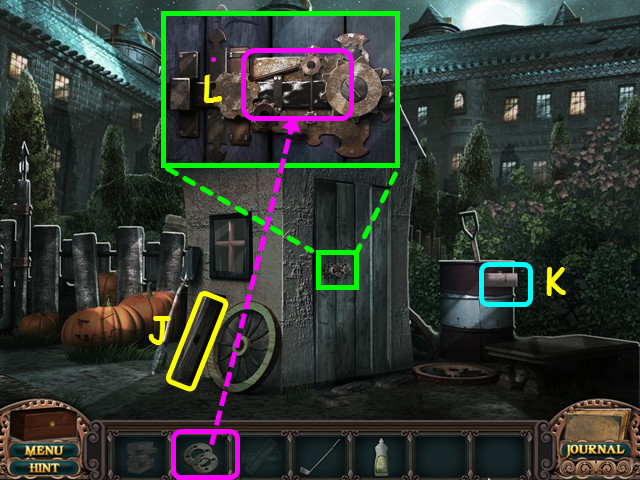
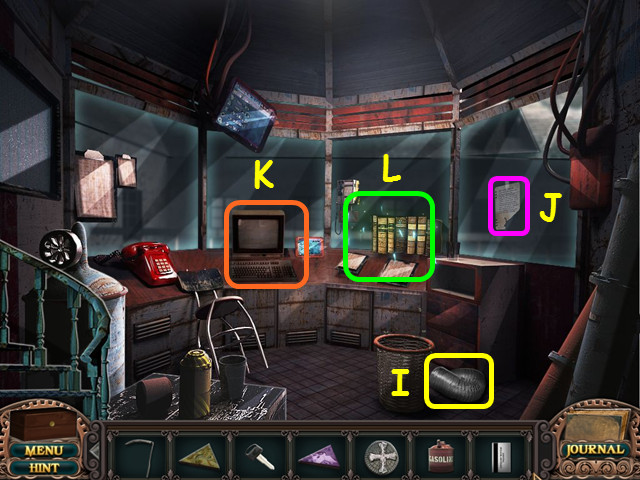
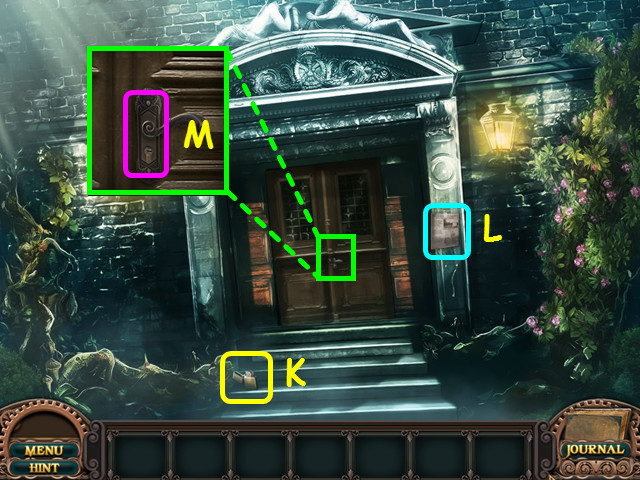 • Take the LIGHTER (K) and the news clipping (L).
• Look at the door and note the lock (M).
• Walk down to return to the gate.
• Take the LIGHTER (K) and the news clipping (L).
• Look at the door and note the lock (M).
• Walk down to return to the gate.
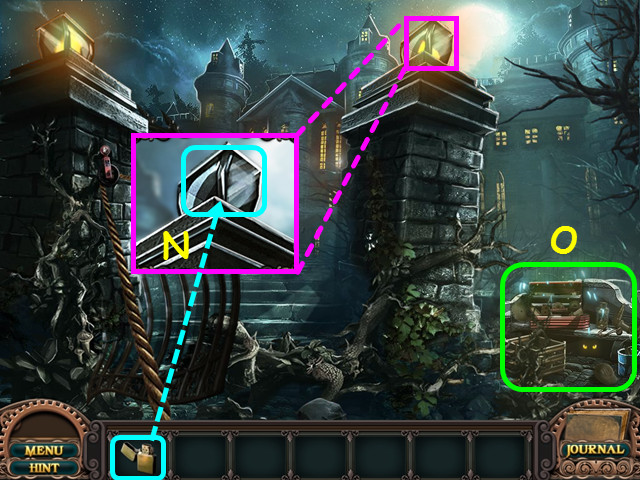 • Look at the top of the right column and use the LIGHTER on the lamp (N).
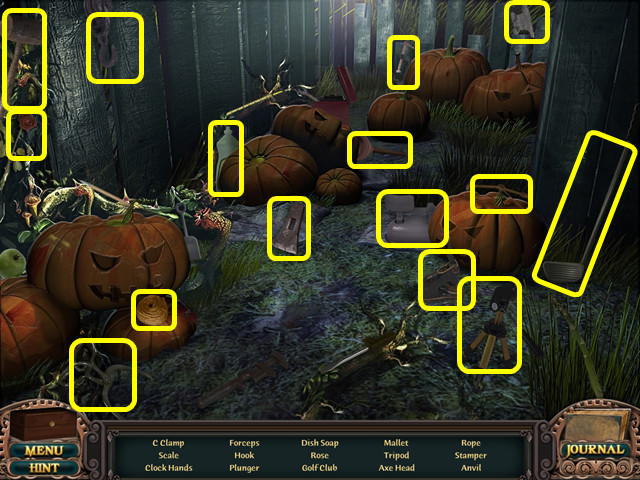
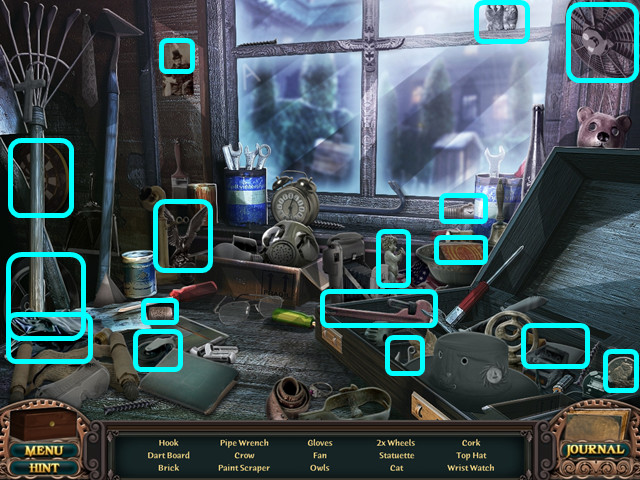
• Select the debris on the right for a HOS (O).
• Look at the top of the right column and use the LIGHTER on the lamp (N).
• Select the debris on the right for a HOS (O).
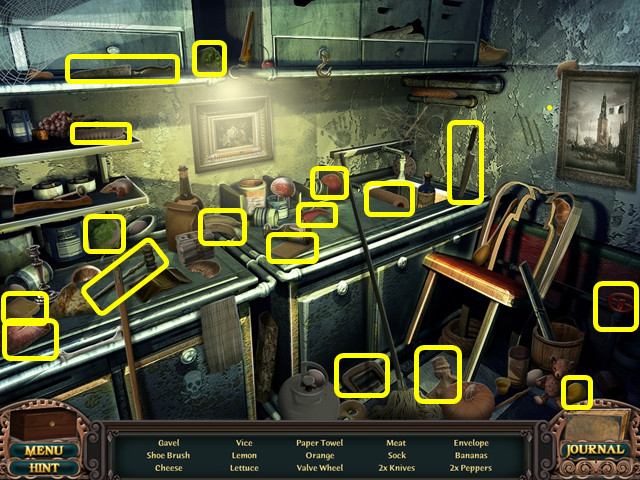
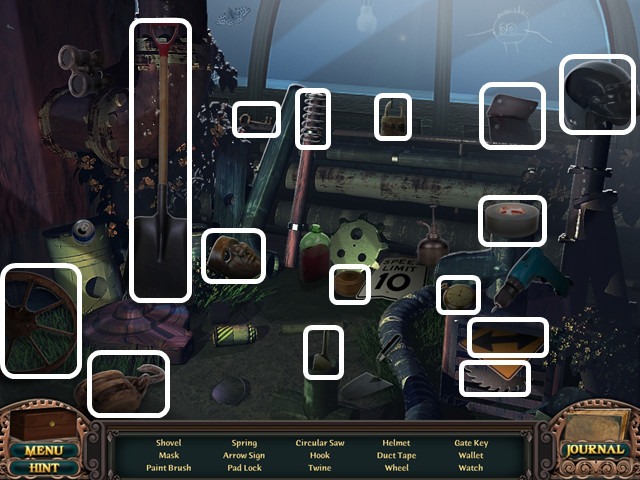
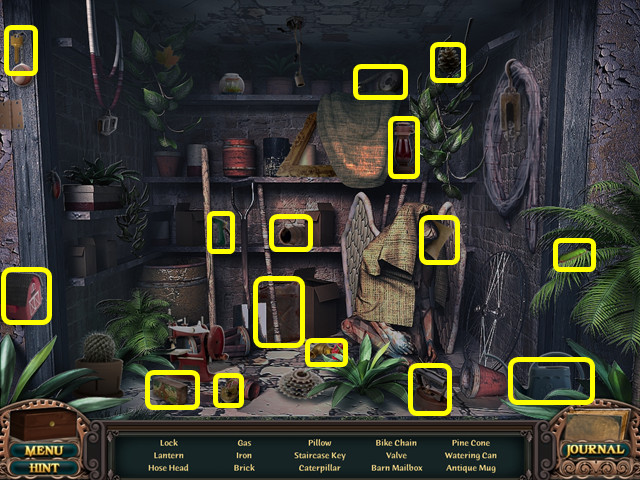
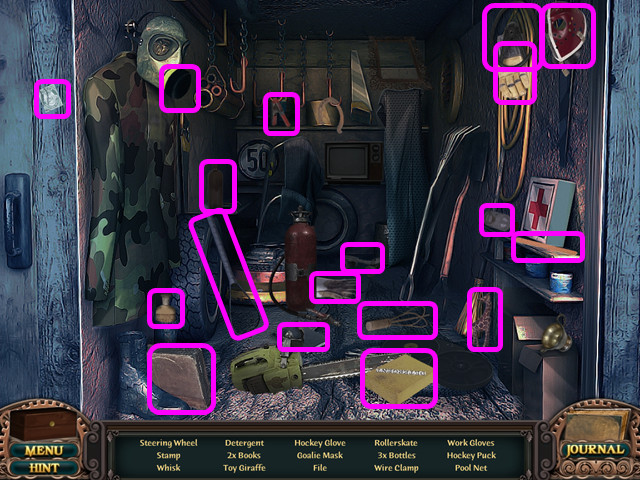
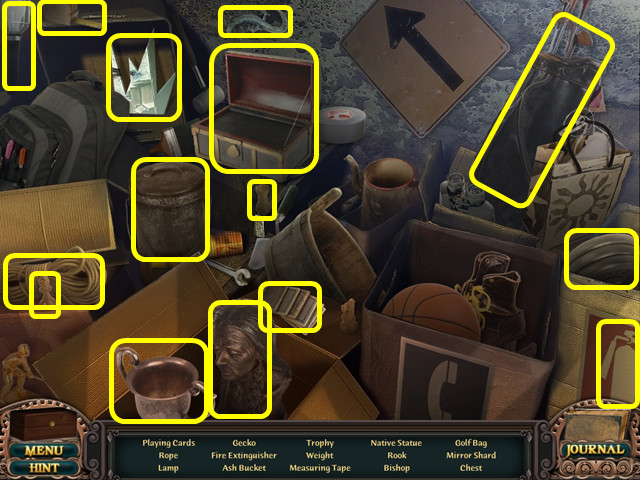
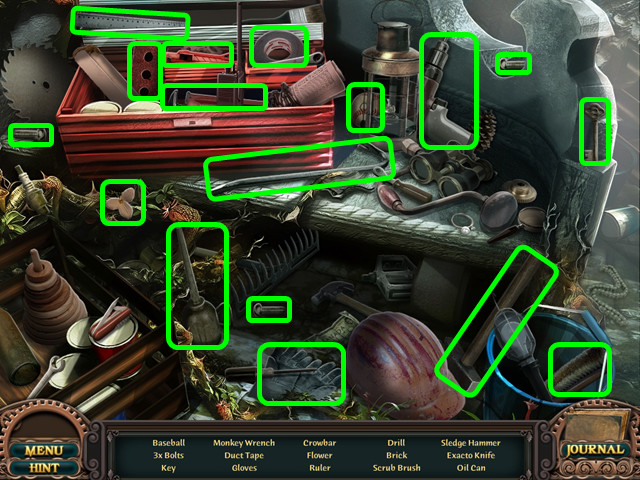 • Locate all the items on the list.
• You will earn the FRONT DOOR KEY.
• Walk forward, look at the front door and use the FRONT DOOR KEY in the lock.
• Walk forward to enter the lobby.
• Locate all the items on the list.
• You will earn the FRONT DOOR KEY.
• Walk forward, look at the front door and use the FRONT DOOR KEY in the lock.
• Walk forward to enter the lobby.
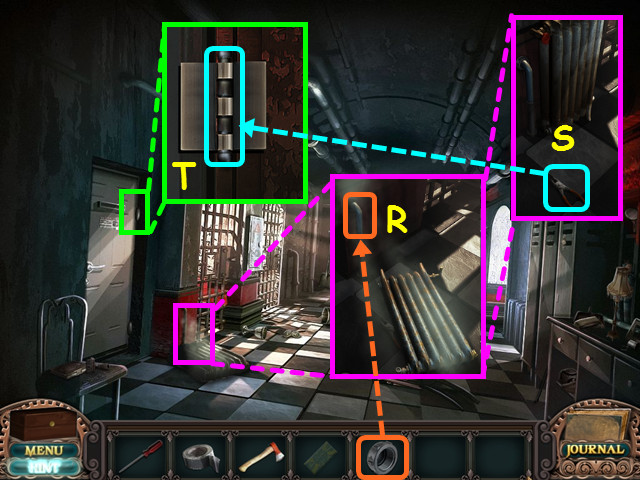
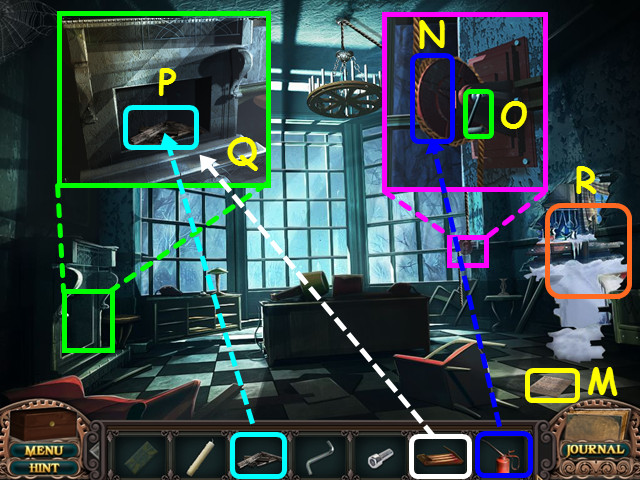
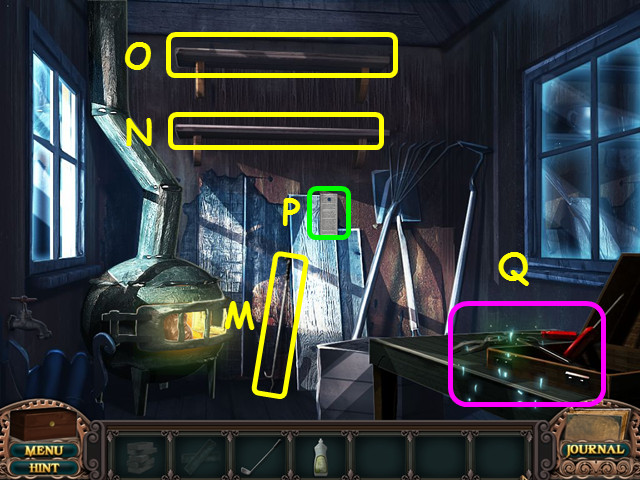
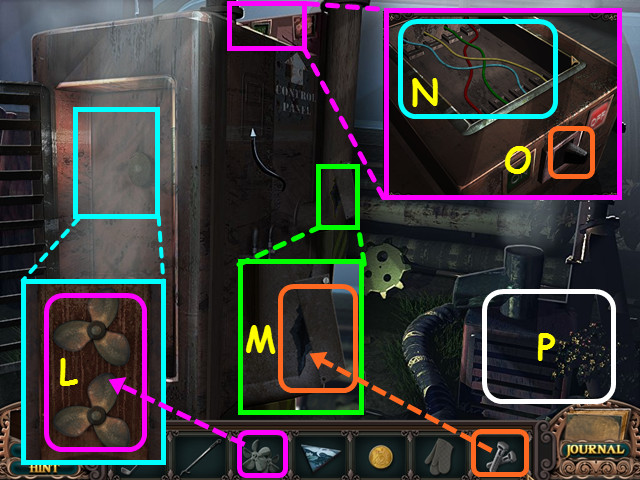
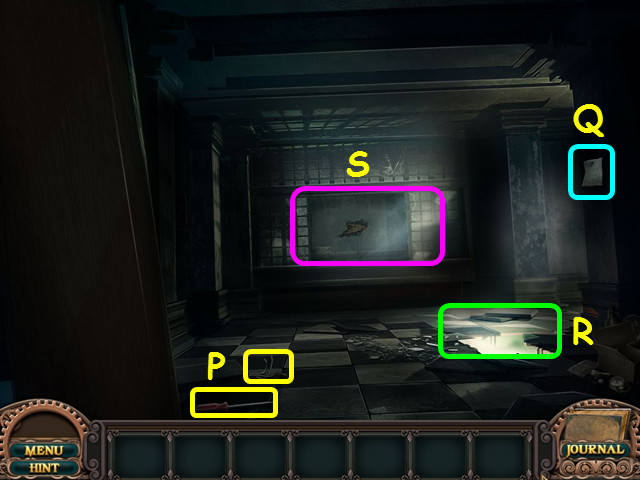 • Take the SCREWDRIVER and the WIRES (P).
• Take the clipping (Q).
• Note the hole in the floor (R).
• Walk forward to the office (S).
• Take the SCREWDRIVER and the WIRES (P).
• Take the clipping (Q).
• Note the hole in the floor (R).
• Walk forward to the office (S).
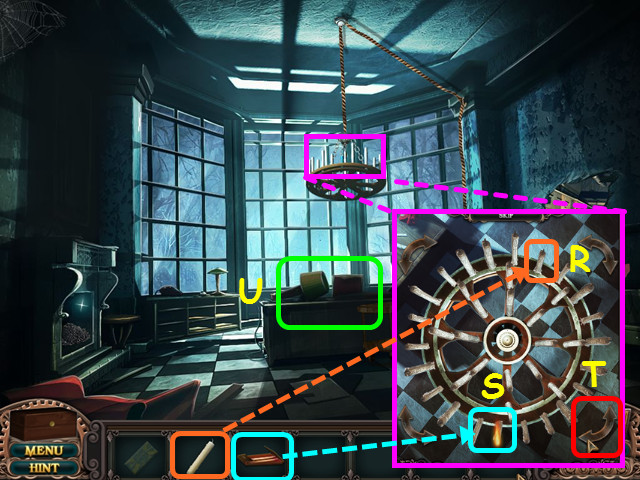
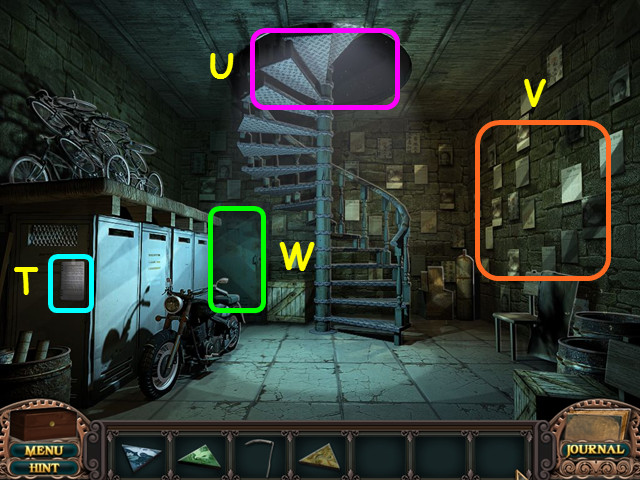
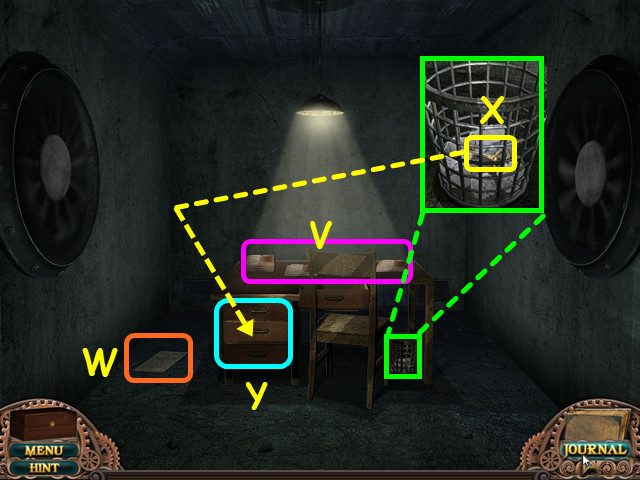
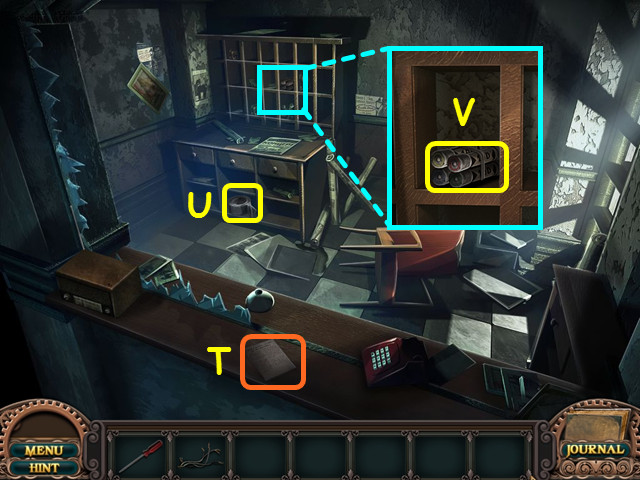 • Take the clipping (T) and the DUCT TAPE (U).
• Look in the cubbyholes and take the FUSES (V).
• Return to the lobby and look at the hole in the floor for a mini-game.
• Take the clipping (T) and the DUCT TAPE (U).
• Look in the cubbyholes and take the FUSES (V).
• Return to the lobby and look at the hole in the floor for a mini-game.
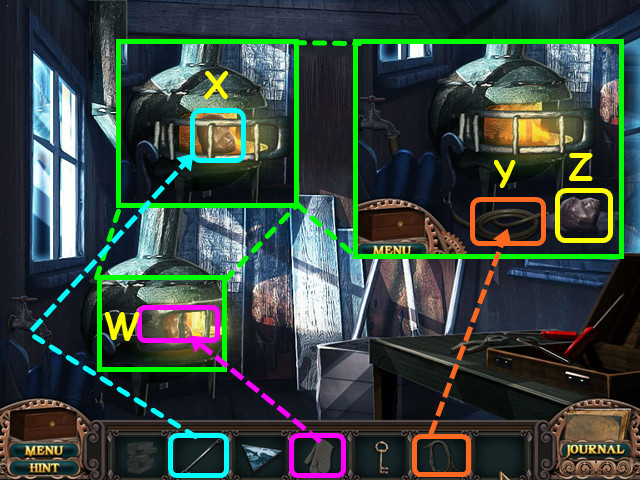
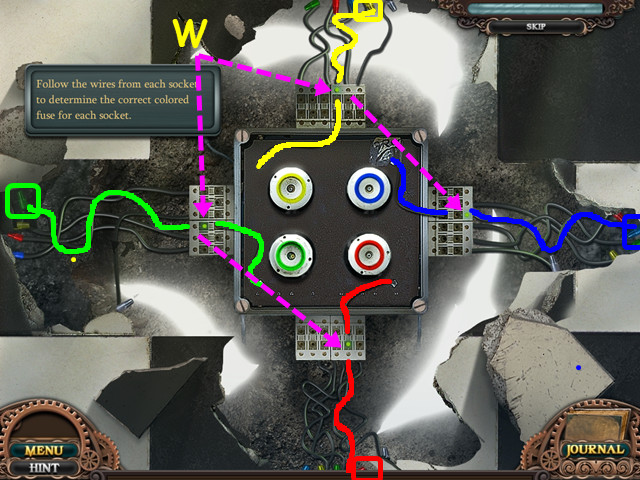 • Place the WIRES and the FUSES on the device to trigger the mini-game.
• Trace the wires with green lights (W) to determine the correct color fuse.
• Select 2 fuses to swap positions.
• Place the WIRES and the FUSES on the device to trigger the mini-game.
• Trace the wires with green lights (W) to determine the correct color fuse.
• Select 2 fuses to swap positions.
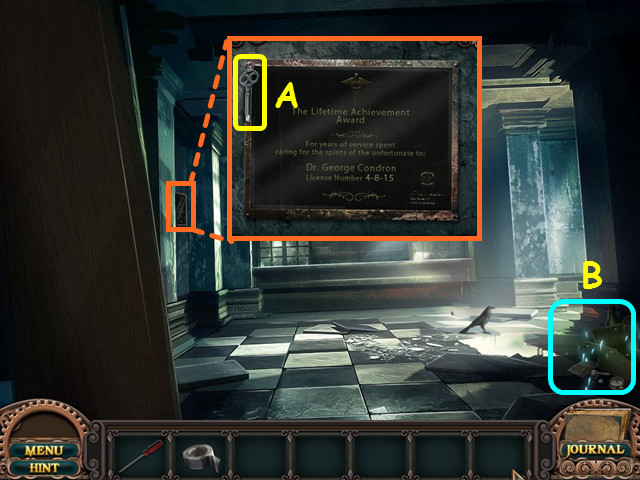 • Look at the plaque and take the DRAWER KEY (A).
• Select the debris on the right for a HOS (B).
• Look at the plaque and take the DRAWER KEY (A).
• Select the debris on the right for a HOS (B).
 • Locate all the items on the list.
• You will earn the SAW.
• Walk forward to the office.
• Locate all the items on the list.
• You will earn the SAW.
• Walk forward to the office.
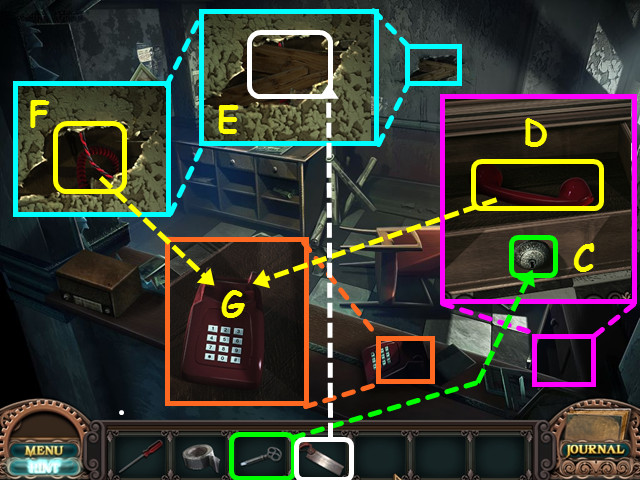 • Look at the cabinet and use the DRAWER KEY on the lock (C).
• Take the PHONE RECEIVER (D).
• Look at the hole in the wall and use the SAW to cut the boards (E).
• Take the PHONE CORD (F).
• Look at the phone. then place the PHONE CORD and PHONE RECEIVER on the phone (G).
• Look at the cabinet and use the DRAWER KEY on the lock (C).
• Take the PHONE RECEIVER (D).
• Look at the hole in the wall and use the SAW to cut the boards (E).
• Take the PHONE CORD (F).
• Look at the phone. then place the PHONE CORD and PHONE RECEIVER on the phone (G).
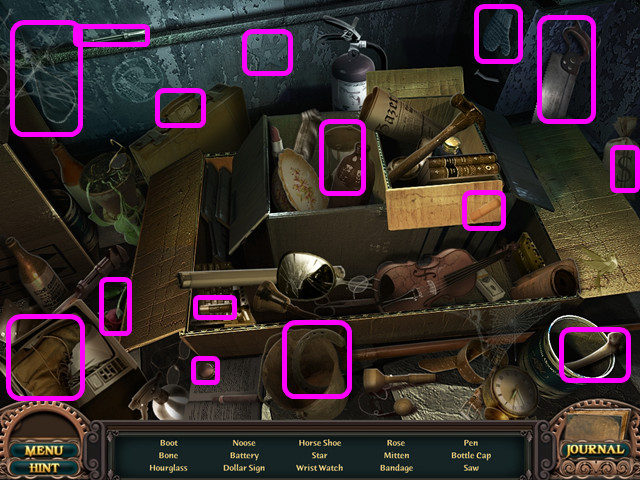
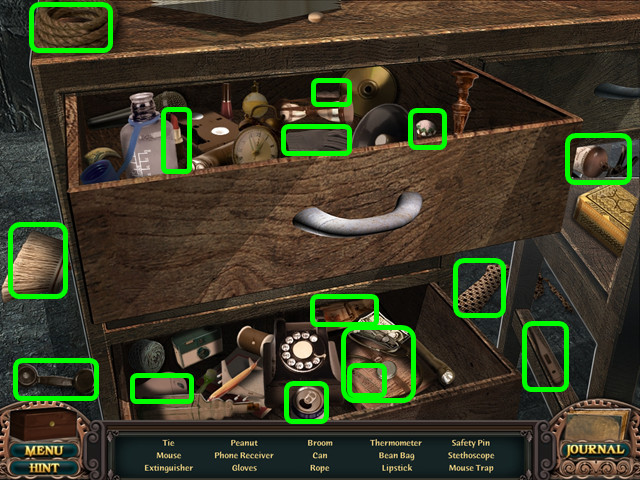
 • The phone HOS will open automatically.
• Locate all the items on the list.
• You will earn the ANTIDOTE CASE.
• The antidote case will go over the menu button and will hold the medicine vials you collect.
• Note - you are able to skip this HOS.
• The phone HOS will open automatically.
• Locate all the items on the list.
• You will earn the ANTIDOTE CASE.
• The antidote case will go over the menu button and will hold the medicine vials you collect.
• Note - you are able to skip this HOS.
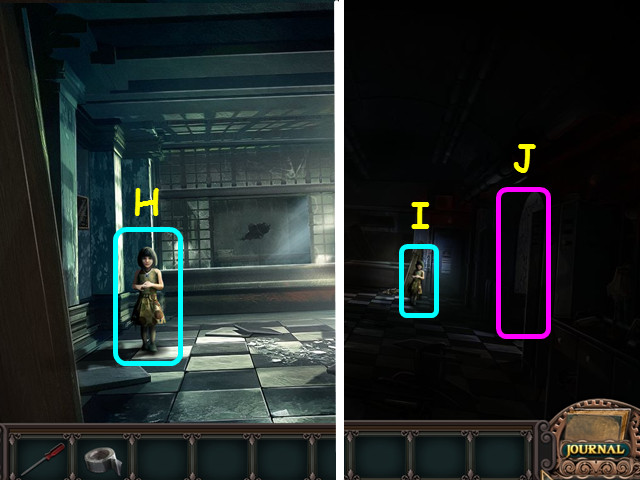 • Select the little girl, then follow her to the right (H).
• Select the girl again (I), then walk right to the stairs (J).
• Select the little girl, then follow her to the right (H).
• Select the girl again (I), then walk right to the stairs (J).
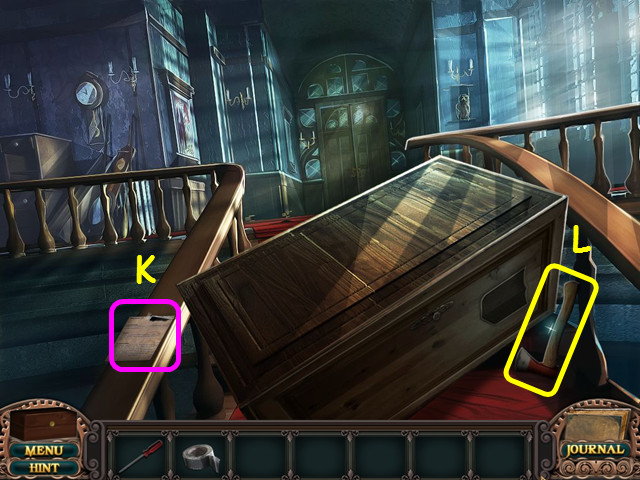 • Take the clipping (K), then take the AXE (L).
• Walk down to return to the hall, then walk forward to the hall end.
• Take the clipping (K), then take the AXE (L).
• Walk down to return to the hall, then walk forward to the hall end.
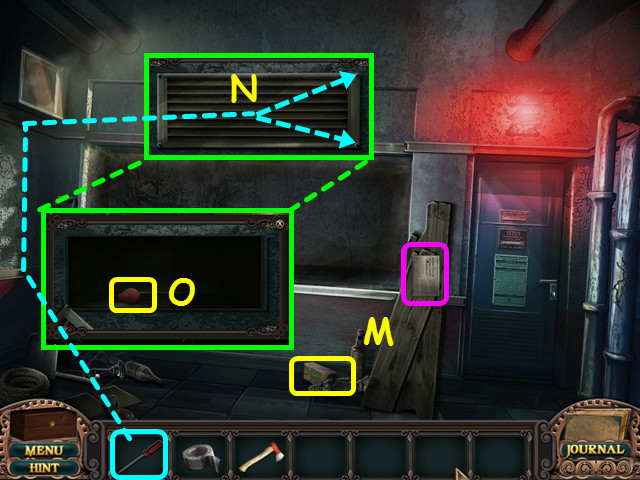 • Take the 1/8 BRICKS and the clipping (M).
• Look at the vent and use the SCREWDRIVER on the screws (N).
• Take the LIGHT BULB (O).
• Exit the close-up then walk down to the hall.
• Take the 1/8 BRICKS and the clipping (M).
• Look at the vent and use the SCREWDRIVER on the screws (N).
• Take the LIGHT BULB (O).
• Exit the close-up then walk down to the hall.
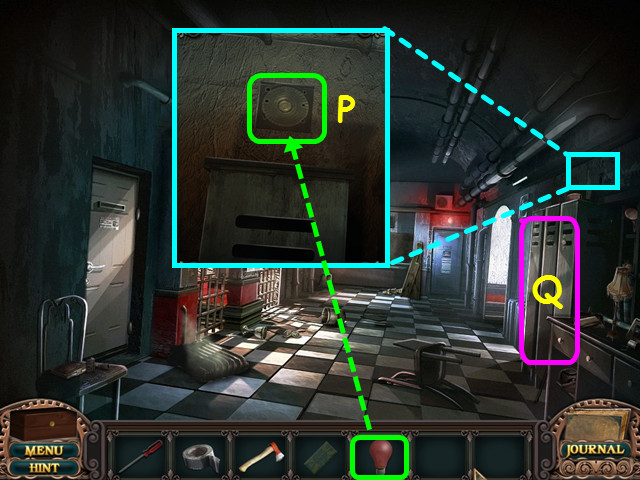 • Look over the lockers and place the LIGHT BULB into the socket (P).
• Select the lockers for a HOS (Q).
• Look over the lockers and place the LIGHT BULB into the socket (P).
• Select the lockers for a HOS (Q).
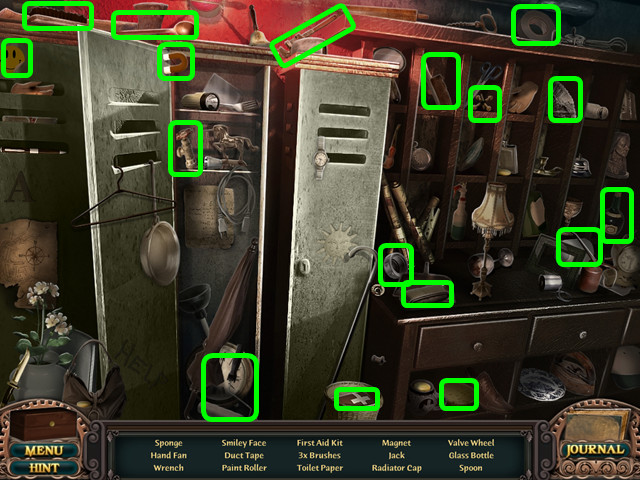 • Locate all the items on the list.
• You will earn the RADIATOR CAP.
• Locate all the items on the list.
• You will earn the RADIATOR CAP.
 • Look at the steam and place the RADIATOR CAP on the pipe (R).
• Move the radiator and take the PLIERS (S).
• Look at the door hinge and use the PLIERS to remove the pin (T).
• Walk left to the head office.
• Look at the steam and place the RADIATOR CAP on the pipe (R).
• Move the radiator and take the PLIERS (S).
• Look at the door hinge and use the PLIERS to remove the pin (T).
• Walk left to the head office.
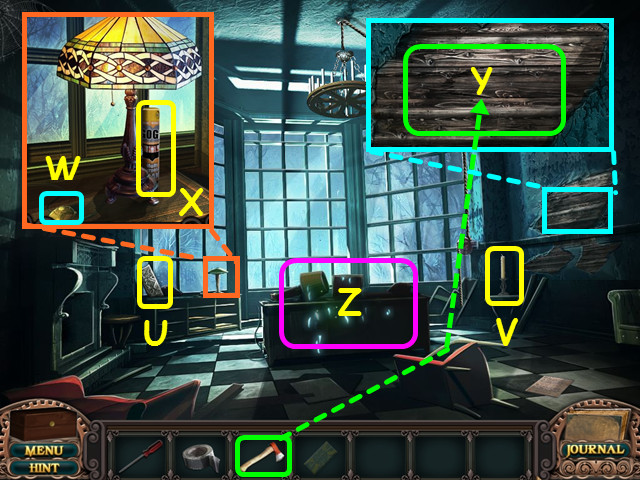 • Take the left CREST PIECE (U) and the CANDLE (V).
• Look at the lamp and press the button (W), then take the SPRAY FOAM (X).
• Look at the wall and use the AXE 3 times to get the WOOD (Y).
• Select the desk for a HOS (Z).
• Take the left CREST PIECE (U) and the CANDLE (V).
• Look at the lamp and press the button (W), then take the SPRAY FOAM (X).
• Look at the wall and use the AXE 3 times to get the WOOD (Y).
• Select the desk for a HOS (Z).
 • Locate all the items on the list.
• You will earn the ALLEN KEY and the FLASHLIGHT.
• Walk right through the hole in the wall to the maintenance room.
• Locate all the items on the list.
• You will earn the ALLEN KEY and the FLASHLIGHT.
• Walk right through the hole in the wall to the maintenance room.
 • Take the right CREST PIECE (A) and the clipping (B).
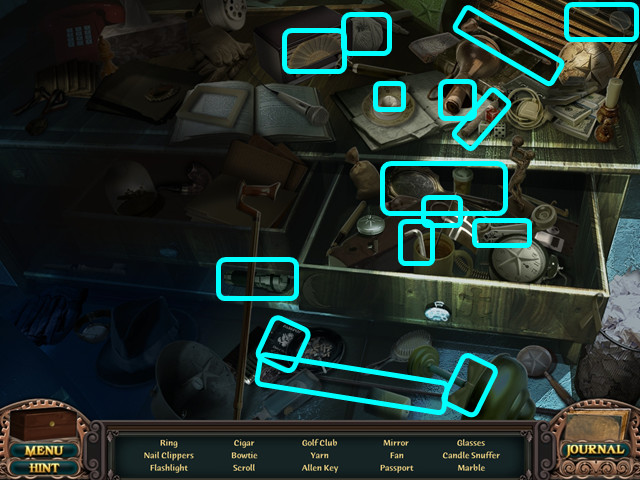
• Select the counter for a HOS (C).
• Take the right CREST PIECE (A) and the clipping (B).
• Select the counter for a HOS (C).
 • Locate all the items on the list.
• You will earn the VALVE.
• Walk down twice, then go right to the stairs.
• Locate all the items on the list.
• You will earn the VALVE.
• Walk down twice, then go right to the stairs.
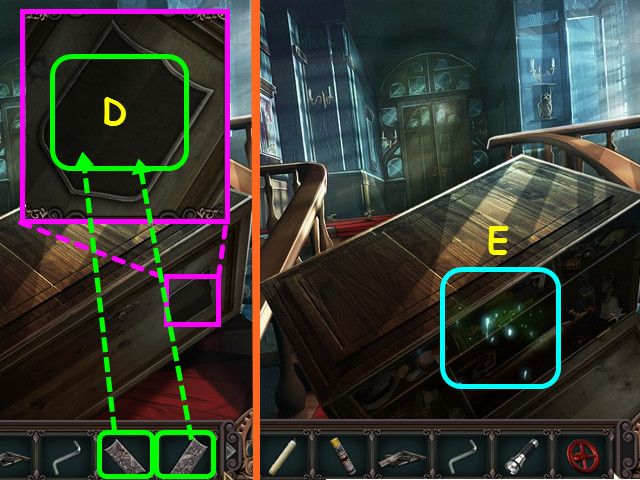 • Look at the front of the wardrobe and place the 2 CREST PIECES into the niche (D).
• Select the open wardrobe for an HOS (E).
• Look at the front of the wardrobe and place the 2 CREST PIECES into the niche (D).
• Select the open wardrobe for an HOS (E).
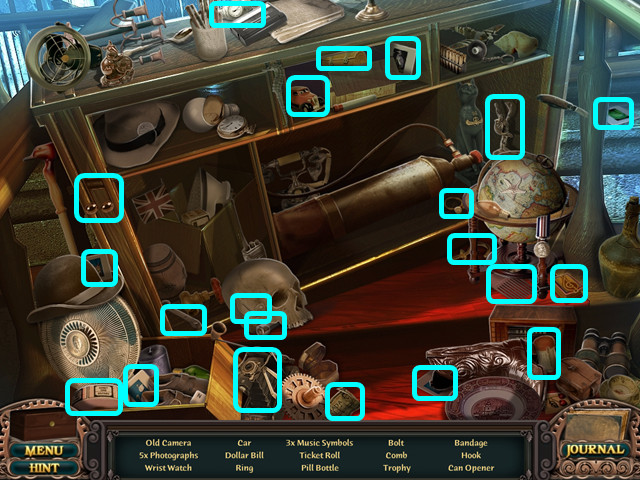 • Locate all the items on the list.
• You will earn the BOLT.
• Walk down, then go forward to the hall end.
• Locate all the items on the list.
• You will earn the BOLT.
• Walk down, then go forward to the hall end.
 • Look at the pipes on the right and use the SPRAY FOAM on the cracks (F).
• Exit the close-up that appears.
• Look in the vent, then use the FLASHLIGHT to light the area and take the MATCHBOOK (G).
• Walk down to the hall.
• Look at the pipes on the right and use the SPRAY FOAM on the cracks (F).
• Exit the close-up that appears.
• Look in the vent, then use the FLASHLIGHT to light the area and take the MATCHBOOK (G).
• Walk down to the hall.
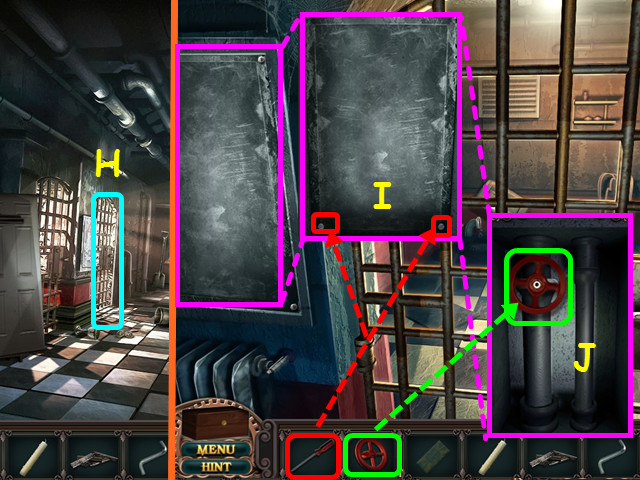 • Walk left to the holding cell (H).
• Look at the panel on the left and use the SCREWDRIVER to remove the screws (I).
• Place the VALVE on the left pipe (J).
• You will obtain the CLEANER.
• Exit the holding cell area, then walk forward to the end hall.
• Walk left to the holding cell (H).
• Look at the panel on the left and use the SCREWDRIVER to remove the screws (I).
• Place the VALVE on the left pipe (J).
• You will obtain the CLEANER.
• Exit the holding cell area, then walk forward to the end hall.
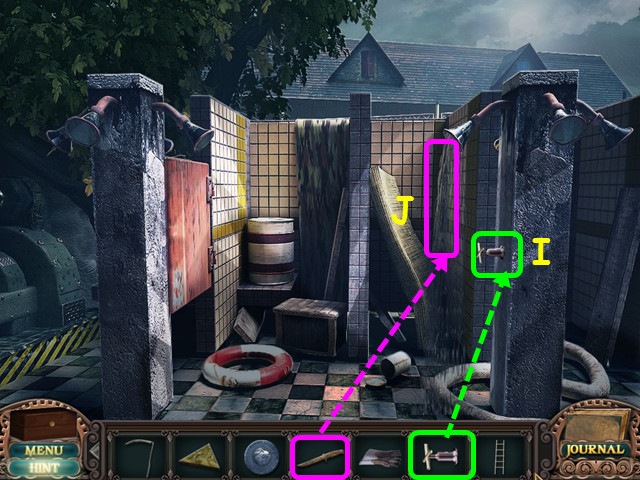
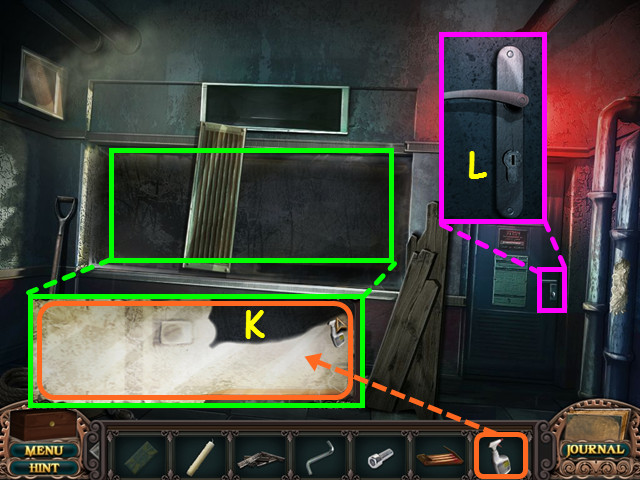 • Look at the window and use the CLEANER on the entire surface (K).
• Drag the cleaner across the entire window so it changes to white.
• Look at the door and note the lock (L).
• Walk down, then select the lockers for a HOS.
• Look at the window and use the CLEANER on the entire surface (K).
• Drag the cleaner across the entire window so it changes to white.
• Look at the door and note the lock (L).
• Walk down, then select the lockers for a HOS.
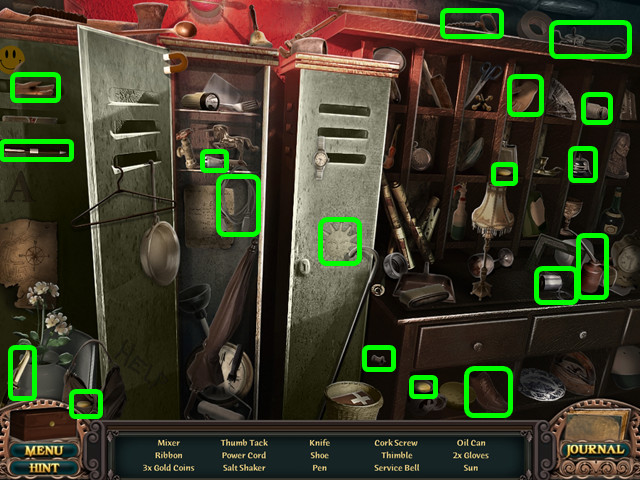 • Locate all the items on the list.
• You will earn the OIL CAN.
• Walk left to enter the head office.
• Locate all the items on the list.
• You will earn the OIL CAN.
• Walk left to enter the head office.
 • Take the clipping (M).
• Look at the crank and use the OIL CAN on the gear (N), then turn the handle (O).
• Look in the fireplace, place the WOOD inside (P), then use the MATCHBOOK to light the wood (Q).
• Exit the fireplace, then walk right to the snow kitchen (R).
• Take the clipping (M).
• Look at the crank and use the OIL CAN on the gear (N), then turn the handle (O).
• Look in the fireplace, place the WOOD inside (P), then use the MATCHBOOK to light the wood (Q).
• Exit the fireplace, then walk right to the snow kitchen (R).
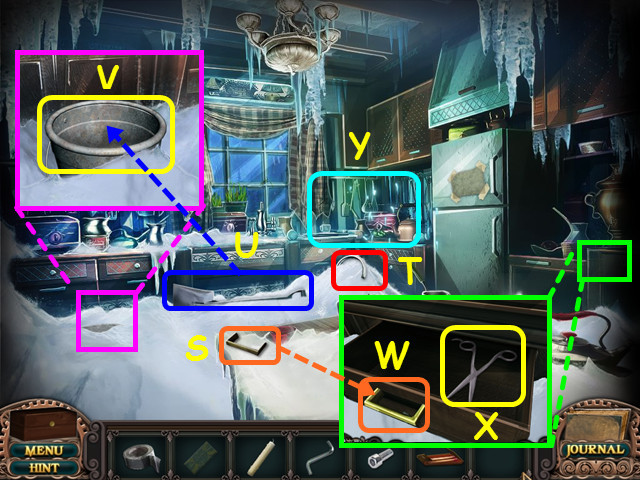 • Take the DRAWER HANDLE (S), FAUCET (T), and the SHOVEL (U).
• Look at the snow on the left and use the SHOVEL 3 times to dig out the BUCKET (V).
• Look at the drawer and place the DRAWER HANDLE on the front (W).
• Take the SCISSORS (X).
• Select the stove for a HOS (Y).
• Take the DRAWER HANDLE (S), FAUCET (T), and the SHOVEL (U).
• Look at the snow on the left and use the SHOVEL 3 times to dig out the BUCKET (V).
• Look at the drawer and place the DRAWER HANDLE on the front (W).
• Take the SCISSORS (X).
• Select the stove for a HOS (Y).
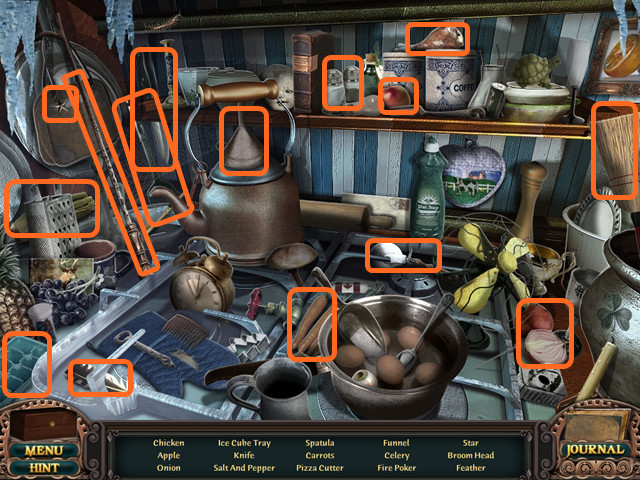 • Locate all the items on the list.
• You will earn the CHICKEN SOUP INGREDIENTS.
• Locate all the items on the list.
• You will earn the CHICKEN SOUP INGREDIENTS.
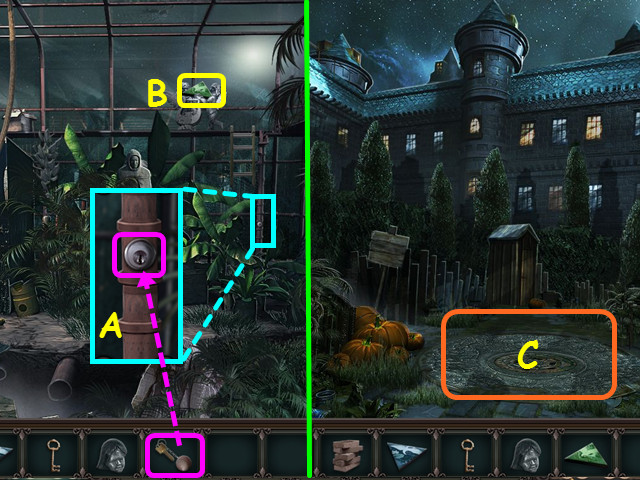
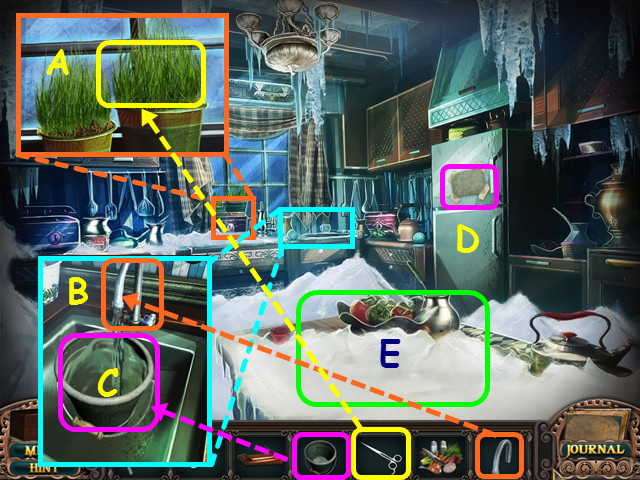 • Look at the herbs in the window and use the SCISSORS to get MOTHER'S HERBS (A).
• Look at the sink and place the FAUCET in the hole (B).
• Place the BUCKET in the sink; once it fills, take the BUCKET OF WATER (C).
• Take the clipping (D).
• Look at the island counter for a mini-game (E).
• Look at the herbs in the window and use the SCISSORS to get MOTHER'S HERBS (A).
• Look at the sink and place the FAUCET in the hole (B).
• Place the BUCKET in the sink; once it fills, take the BUCKET OF WATER (C).
• Take the clipping (D).
• Look at the island counter for a mini-game (E).
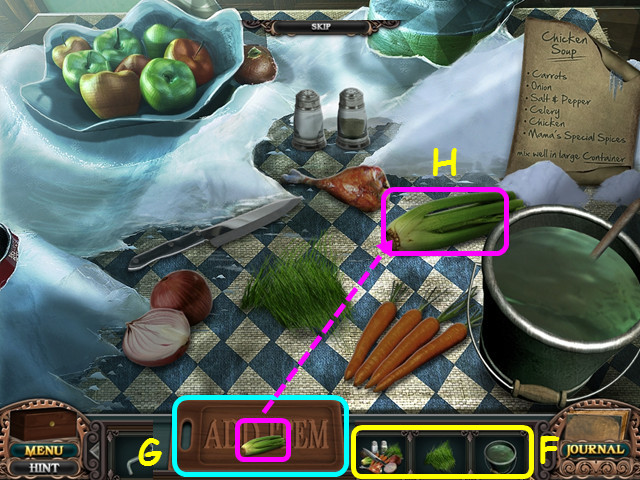 • Place the CHICKEN SOUP INGREDIENTS, MOTHER'S HERBS and the BUCKET OF WATER on the counter to trigger the mini-game (F).
• As an ingredient passes over the cutting board (G), select that ingredient on the counter (H).
• There are 4 sets of sequences to complete; if you make a mistake, that sequence will start over.
• The first set is: carrots-onion-celery-herbs-chicken.
• The second set is: salt and pepper-carrots-salt and pepper-salt and pepper-salt and pepper-carrots.
• The third set is: knife-celery-knife.
• The final set is: carrots-onions-celery-herbs-chicken-carrots-celery.
• You will find the maintenance room has returned to normal.
• Place the CHICKEN SOUP INGREDIENTS, MOTHER'S HERBS and the BUCKET OF WATER on the counter to trigger the mini-game (F).
• As an ingredient passes over the cutting board (G), select that ingredient on the counter (H).
• There are 4 sets of sequences to complete; if you make a mistake, that sequence will start over.
• The first set is: carrots-onion-celery-herbs-chicken.
• The second set is: salt and pepper-carrots-salt and pepper-salt and pepper-salt and pepper-carrots.
• The third set is: knife-celery-knife.
• The final set is: carrots-onions-celery-herbs-chicken-carrots-celery.
• You will find the maintenance room has returned to normal.
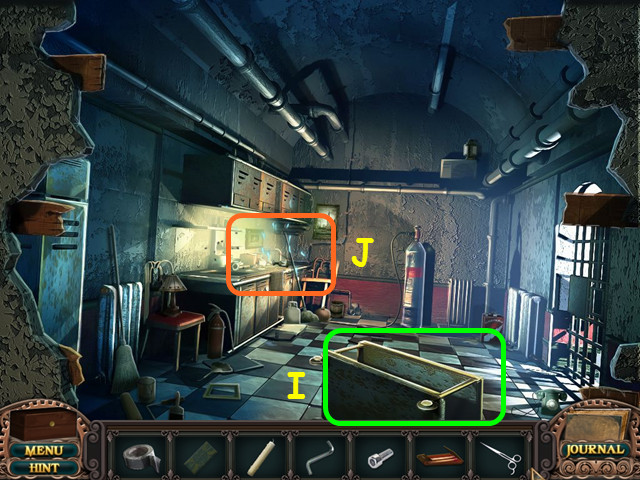 • Note the overturned cart (I).
• Select the counter for a HOS (J).
• Note the overturned cart (I).
• Select the counter for a HOS (J).
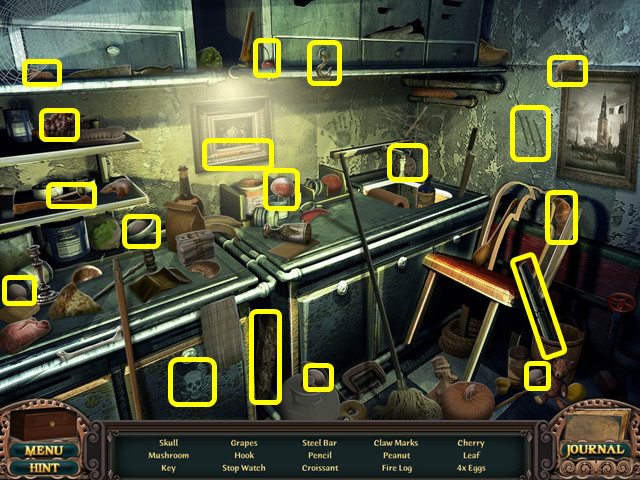 • Locate all the items on the list.
• You will earn the STEEL BAR.
• Look at the overturned cart.
• Locate all the items on the list.
• You will earn the STEEL BAR.
• Look at the overturned cart.
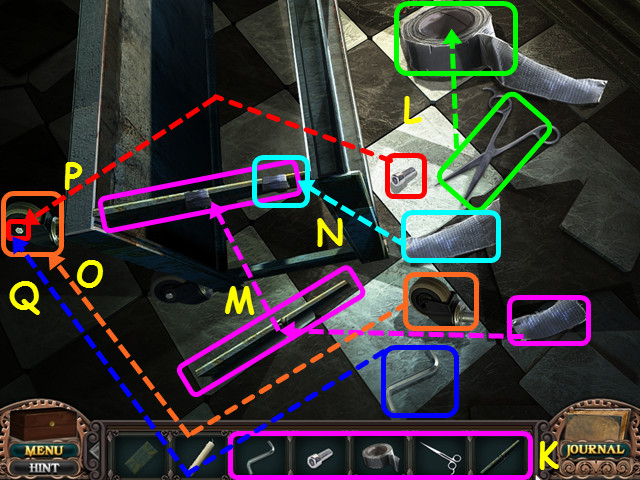 • Place the STEEL BAR, SCISSORS, DUCT TAPE, BOLT, and ALLEN KEY onto the same-shaped outlines (K).
• Use the scissors on the duct tape (L).
• Place a piece of tape on the steel bar (M), then place the bar on the cart.
• Use the other piece of tape near the top of the bar (N).
• Place the wheel at the bottom of the cart (O), then place the bolt in the wheel (P).
• Use the Allen key on the bolt (Q).
• Exit to the main office.
• Place the STEEL BAR, SCISSORS, DUCT TAPE, BOLT, and ALLEN KEY onto the same-shaped outlines (K).
• Use the scissors on the duct tape (L).
• Place a piece of tape on the steel bar (M), then place the bar on the cart.
• Use the other piece of tape near the top of the bar (N).
• Place the wheel at the bottom of the cart (O), then place the bolt in the wheel (P).
• Use the Allen key on the bolt (Q).
• Exit to the main office.
 • Look at the chandelier and place the CANDLE in the empty spot (R).
• Use the MATCHBOOK to light one of the candles (S).
• Press one of the arrows to spin the candles until they are all lit (T).
• Select the desk for a HOS (U).
• Look at the chandelier and place the CANDLE in the empty spot (R).
• Use the MATCHBOOK to light one of the candles (S).
• Press one of the arrows to spin the candles until they are all lit (T).
• Select the desk for a HOS (U).
 • Locate all the items on the list.
• You will earn the COMBINATION PAPER.
• Locate all the items on the list.
• You will earn the COMBINATION PAPER.
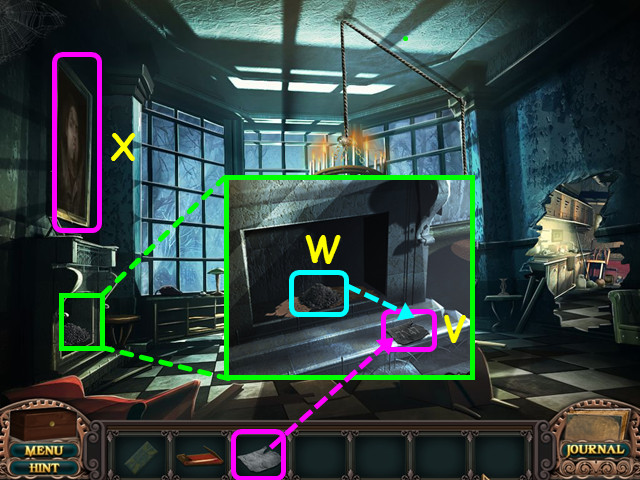 • Look at the fireplace and place the COMBINATION PAPER on the ledge (V).
• Take the ASHES from inside the fireplace and use them to make the paper legible (W).
• Take the COMBINATION PAPER.
• Look at the painting for a mini-game (X).
• Look at the fireplace and place the COMBINATION PAPER on the ledge (V).
• Take the ASHES from inside the fireplace and use them to make the paper legible (W).
• Take the COMBINATION PAPER.
• Look at the painting for a mini-game (X).
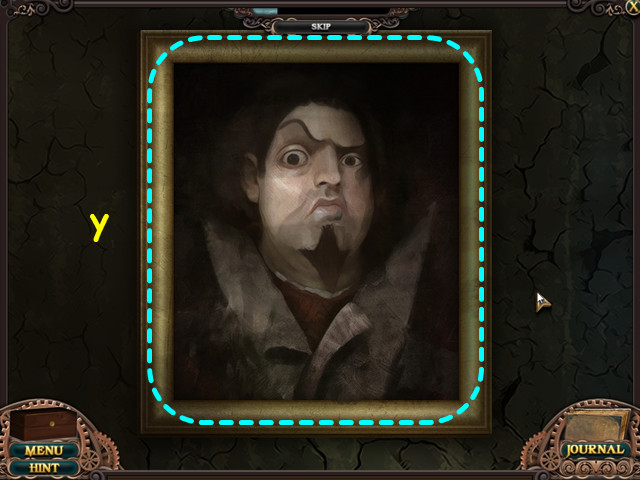 • Restore the painting by moving the strips.
• Select 2 strips to swap positions.
• The solution is pictured here (Y).
• Restore the painting by moving the strips.
• Select 2 strips to swap positions.
• The solution is pictured here (Y).
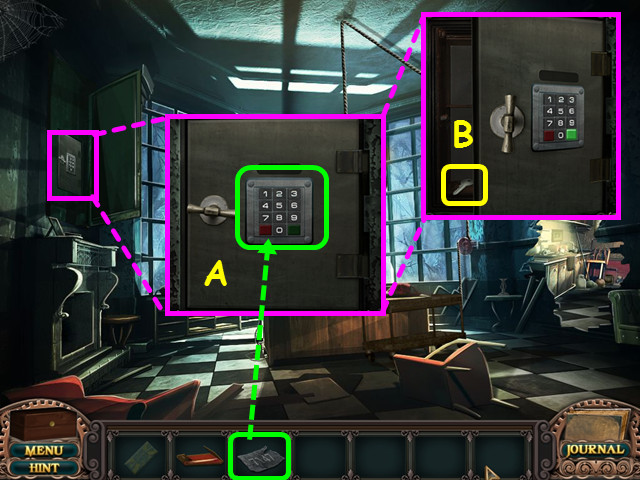 • Look at the safe behind the painting and use the COMBINATION PAPER on the keypad (A).
• Take the KEY from the open safe (B).
• Exit the office, then go the end hall.
• Look at the door, use the KEY on the lock then enter the interview room.
• Look at the safe behind the painting and use the COMBINATION PAPER on the keypad (A).
• Take the KEY from the open safe (B).
• Exit the office, then go the end hall.
• Look at the door, use the KEY on the lock then enter the interview room.
 • The chair HOS will open automatically.
• Locate all the items on the list.
• You will not earn an inventory item.
• Note - you are able to skip this HOS.
• The chair HOS will open automatically.
• Locate all the items on the list.
• You will not earn an inventory item.
• Note - you are able to skip this HOS.
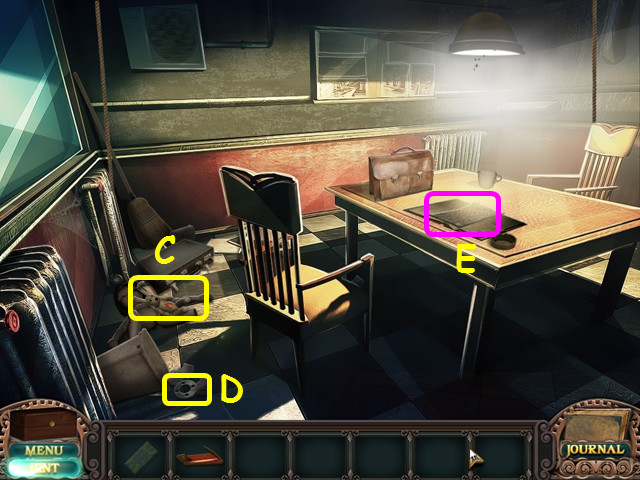 • Take the STUFFED BUNNY (C), the 1/3 GEARS (D), and the clipping (E).
• Exit and return to the maintenance room.
• Take the STUFFED BUNNY (C), the 1/3 GEARS (D), and the clipping (E).
• Exit and return to the maintenance room.
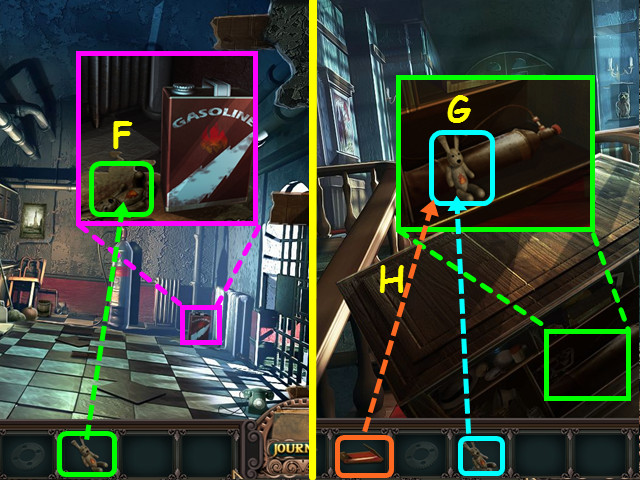 • Look at the gasoline container and place the STUFFED BUNNY in the spill (F).
• Take the GAS DRENCHED BUNNY.
• Return to the stairs.
• Look inside the cabinet and place the GAS DRENCHED BUNNY on the propane tank (G).
• Use the MATCHBOOK on the bunny (H).
• After the explosion, walk up the stairs.
• Look at the gasoline container and place the STUFFED BUNNY in the spill (F).
• Take the GAS DRENCHED BUNNY.
• Return to the stairs.
• Look inside the cabinet and place the GAS DRENCHED BUNNY on the propane tank (G).
• Use the MATCHBOOK on the bunny (H).
• After the explosion, walk up the stairs.
Chapter 2
 • Take the first TILE (A), ANTIDOTE VIAL (B), BUCKET (C), and clipping (D).
• The antidote vial will go into the antidote case.
• Note the vines blocking the path straight ahead (E).
• Walk left to the West Courtyard (F).
• Take the first TILE (A), ANTIDOTE VIAL (B), BUCKET (C), and clipping (D).
• The antidote vial will go into the antidote case.
• Note the vines blocking the path straight ahead (E).
• Walk left to the West Courtyard (F).
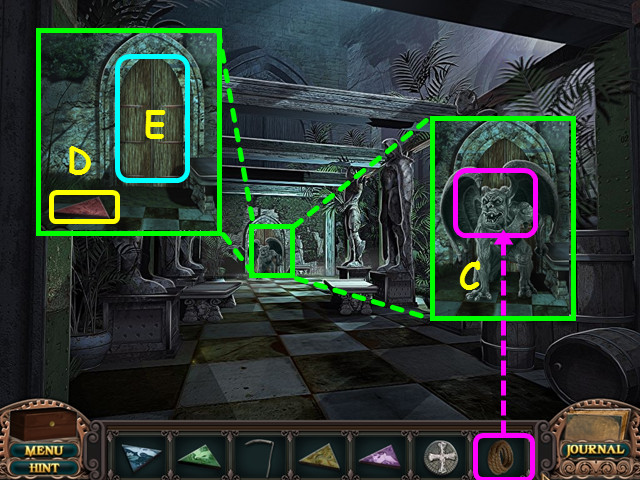
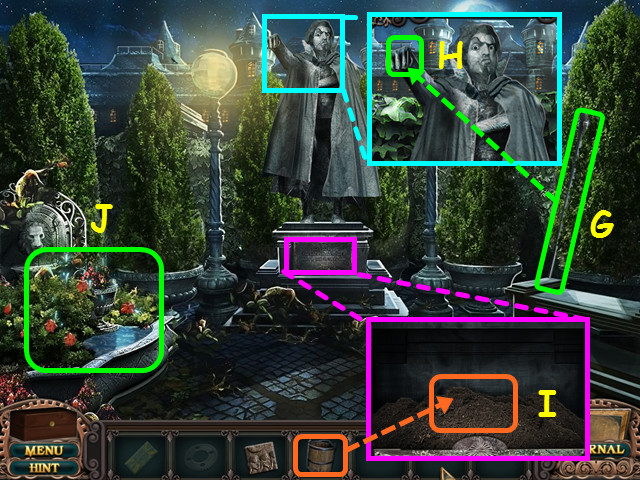 • Take the STONE CANE (G).
• Look at the statue and place the STONE CANE into the statue's hand (H).
• Look at the base of the statue and use the BUCKET to take the BUCKET OF COMPOST (I).
• Select the fountain for a HOS (J).
• Take the STONE CANE (G).
• Look at the statue and place the STONE CANE into the statue's hand (H).
• Look at the base of the statue and use the BUCKET to take the BUCKET OF COMPOST (I).
• Select the fountain for a HOS (J).
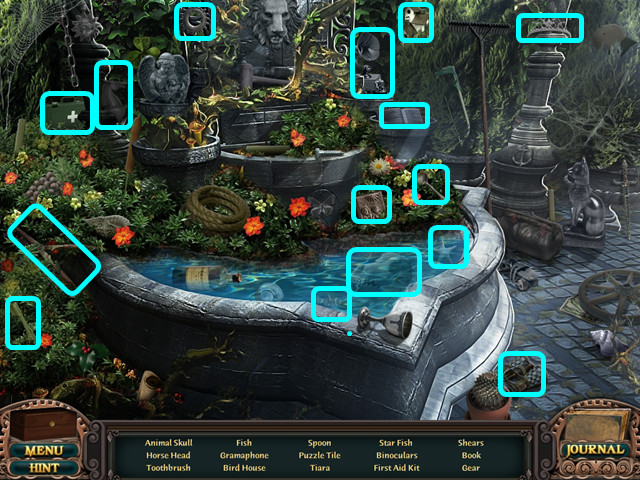 • Locate all the items on the list (blue).
• You will earn the second TILE.
• Walk down, then go right to the East Courtyard.
• Locate all the items on the list (blue).
• You will earn the second TILE.
• Walk down, then go right to the East Courtyard.
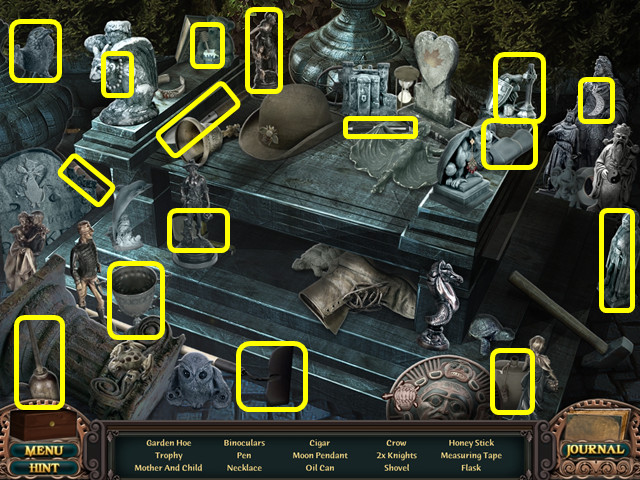 • Select the bench on the right for a HOS.
• Locate all the items on the list (yellow).
• You will earn the HOE.
• Select the bench on the right for a HOS.
• Locate all the items on the list (yellow).
• You will earn the HOE.
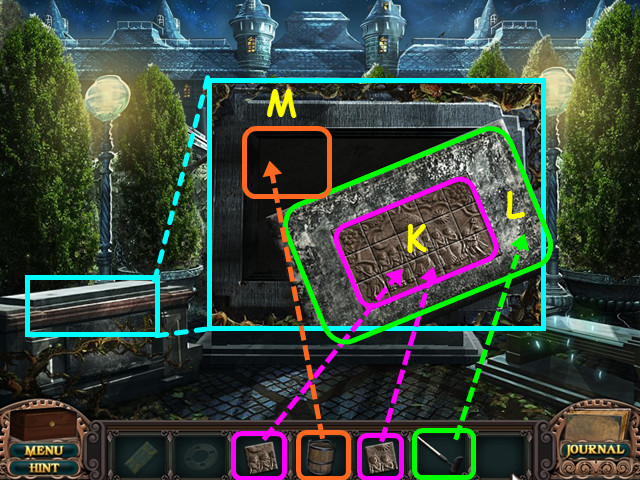 • Look at the stone box and place the 2 TILES on the lid (K).
• Use the HOE to pry open the lid (L).
• Pour the BUCKET OF COMPOST into the box (M).
• Exit the East Courtyard, then walk forward to the playground.
• Look at the stone box and place the 2 TILES on the lid (K).
• Use the HOE to pry open the lid (L).
• Pour the BUCKET OF COMPOST into the box (M).
• Exit the East Courtyard, then walk forward to the playground.
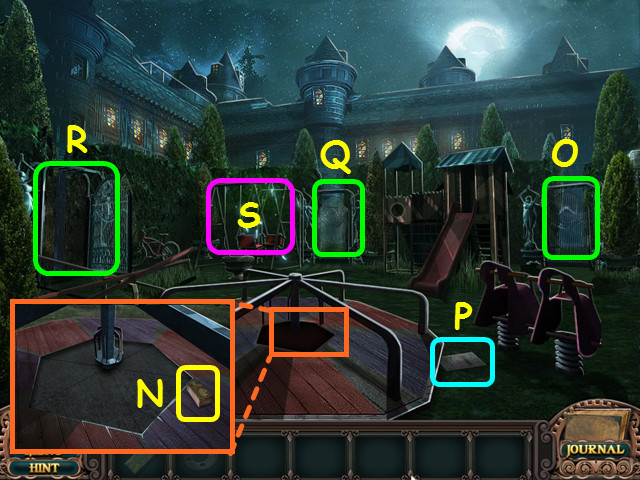 • Look at the carousel and take the 2/8 BRICKS (N).
• Note the right gate needs a key (O).
• Take the clipping (P).
• Note the center gate needs a mini-game piece (Q).
• Note the left gate to the garden entrance (R).
• Select the swings for a HOS (S).
• Look at the carousel and take the 2/8 BRICKS (N).
• Note the right gate needs a key (O).
• Take the clipping (P).
• Note the center gate needs a mini-game piece (Q).
• Note the left gate to the garden entrance (R).
• Select the swings for a HOS (S).
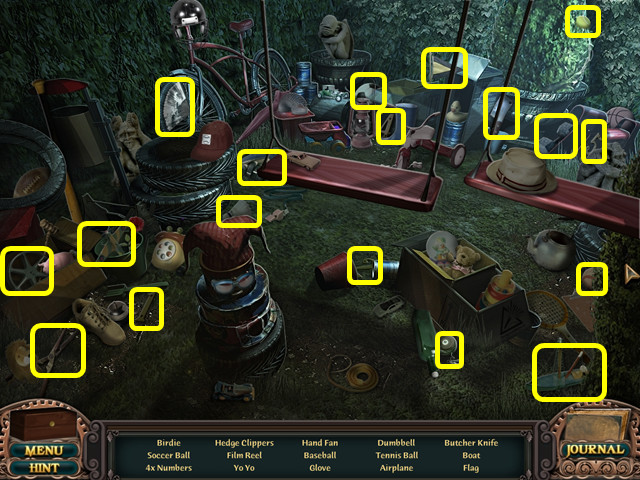 • Locate all the items on the list.
• You will earn the HEDGE CLIPPERS.
• Walk left to the garden entrance.
• Locate all the items on the list.
• You will earn the HEDGE CLIPPERS.
• Walk left to the garden entrance.
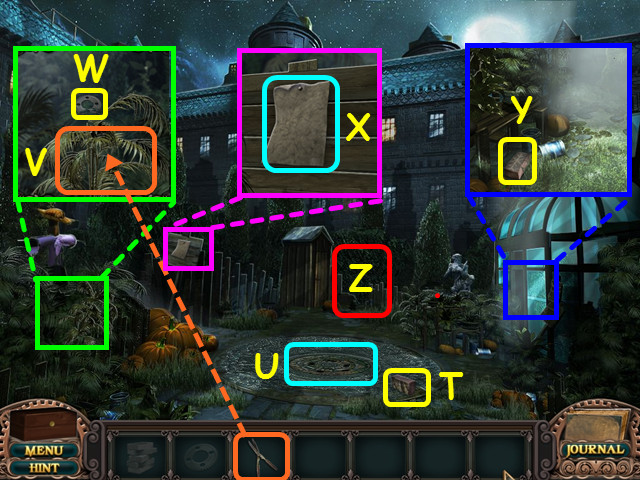 • Take the 3/8 BRICKS (T).
• Note the circle mosaic (U).
• Look at the palms, then use the HEDGE CLIPPERS (V) to find the 2/3 GEARS (W).
• Look at the sign and take the clipping (X).
• Look at the greenhouse and take the 4/8 BRICKS (Y).
• Walk forward to the terrace (Z).
• Take the 3/8 BRICKS (T).
• Note the circle mosaic (U).
• Look at the palms, then use the HEDGE CLIPPERS (V) to find the 2/3 GEARS (W).
• Look at the sign and take the clipping (X).
• Look at the greenhouse and take the 4/8 BRICKS (Y).
• Walk forward to the terrace (Z).
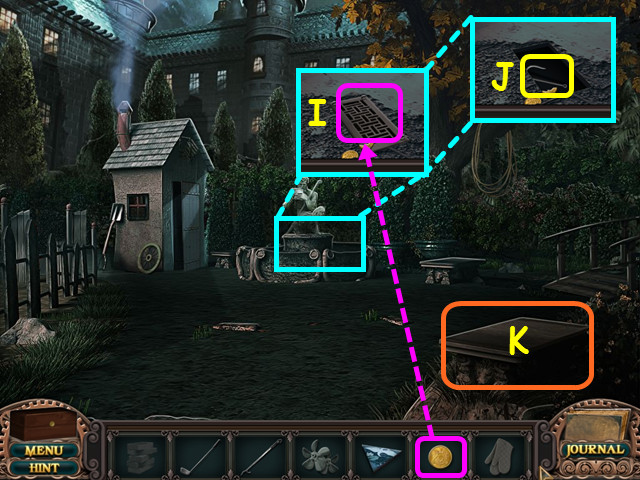
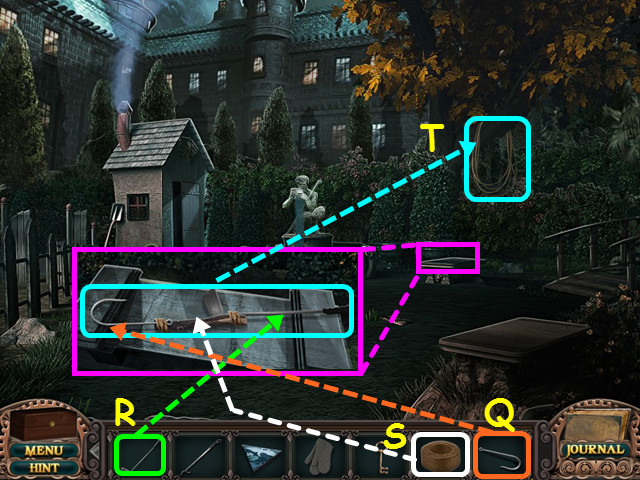
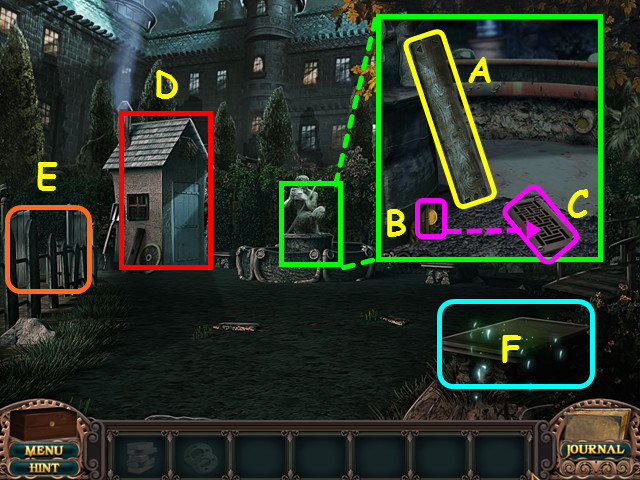 • Look in the fountain, then take the 1/5 PLANKS (A) and the COIN (B).
• Use the COIN on the GRATE (C).
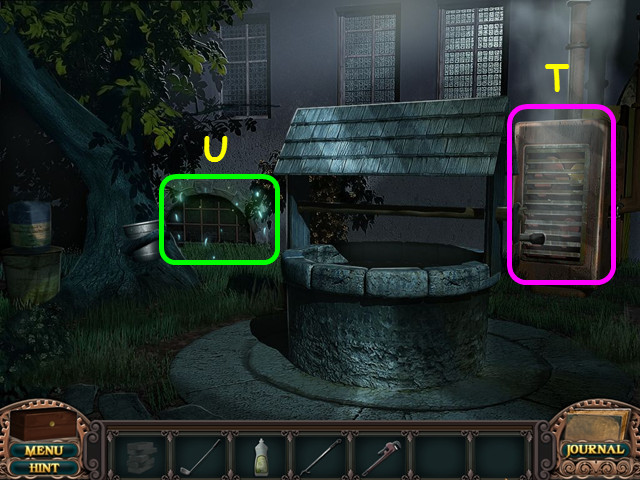
• Note the shed (D).
• Note the garden gate (E).
• Select the lower right bench for a HOS (F).
• Look in the fountain, then take the 1/5 PLANKS (A) and the COIN (B).
• Use the COIN on the GRATE (C).
• Note the shed (D).
• Note the garden gate (E).
• Select the lower right bench for a HOS (F).
 • Locate all the items on the list.
• You will earn the 5/8 BRICKS and the 3/3 GEARS.
• Walk left to the garden gate.
• Locate all the items on the list.
• You will earn the 5/8 BRICKS and the 3/3 GEARS.
• Walk left to the garden gate.
 • Take the 2/5 PLANK (G).
• Note the locked gate (H).
• Select the pumpkins for a HOS (I).
• Take the 2/5 PLANK (G).
• Note the locked gate (H).
• Select the pumpkins for a HOS (I).
 • Locate all the items on the list.
• You will earn the GOLF CLUB and the DISH SOAP.
• Walk down, then go forward to approach the shed.
• Locate all the items on the list.
• You will earn the GOLF CLUB and the DISH SOAP.
• Walk down, then go forward to approach the shed.
 • Take the 3/5 PLANKS (J) and the clipping (K).
• Look at the shed door and place the 3 GEARS on the lock (L).
• Enter the shed.
• Take the 3/5 PLANKS (J) and the clipping (K).
• Look at the shed door and place the 3 GEARS on the lock (L).
• Enter the shed.
 • Take the POKER (M), 4/5 PLANKS (N), 5/5 PLANKS (O), and the clipping (P).
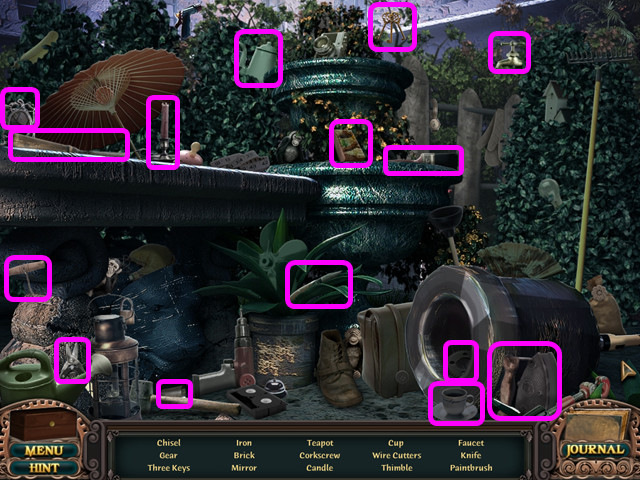
• Select the table for a HOS (Q).
• Take the POKER (M), 4/5 PLANKS (N), 5/5 PLANKS (O), and the clipping (P).
• Select the table for a HOS (Q).
 • Locate all the items on the list.
• You will earn the PIPE WRENCH and the 6/8 BRICKS.
• Walk down 3 times to the terrace, then walk right to the bridge.
• Locate all the items on the list.
• You will earn the PIPE WRENCH and the 6/8 BRICKS.
• Walk down 3 times to the terrace, then walk right to the bridge.
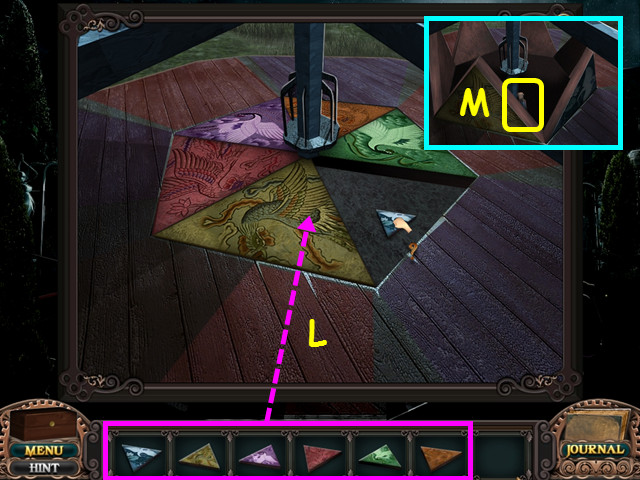
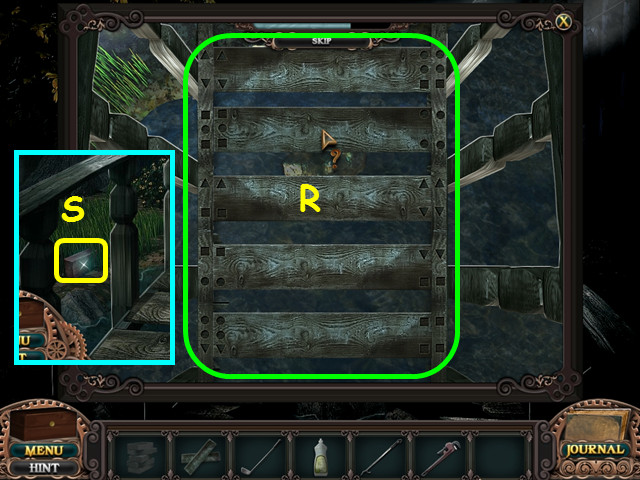 • Look down at the bridge for a mini-game.
• Place the 5 PLANKS on the bridge using the symbols on the ends as a guide (R).
• Take the 7/8 BRICKS (S).
• Walk forward across the bridge to the well.
• Look down at the bridge for a mini-game.
• Place the 5 PLANKS on the bridge using the symbols on the ends as a guide (R).
• Take the 7/8 BRICKS (S).
• Walk forward across the bridge to the well.
 • Note the water pump (T).
• Select the grate for a HOS (U).
• Note the water pump (T).
• Select the grate for a HOS (U).
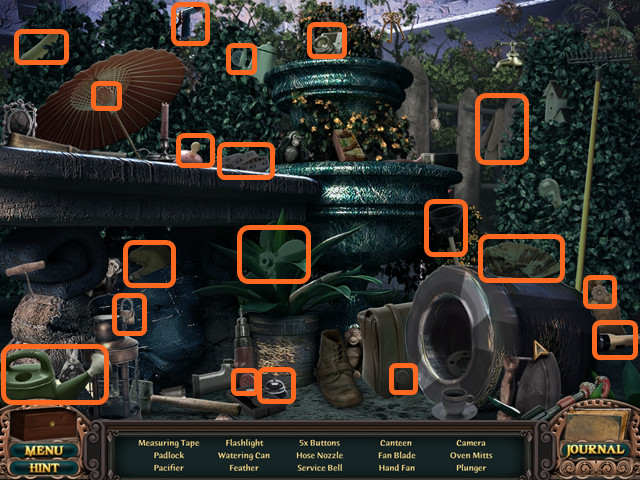
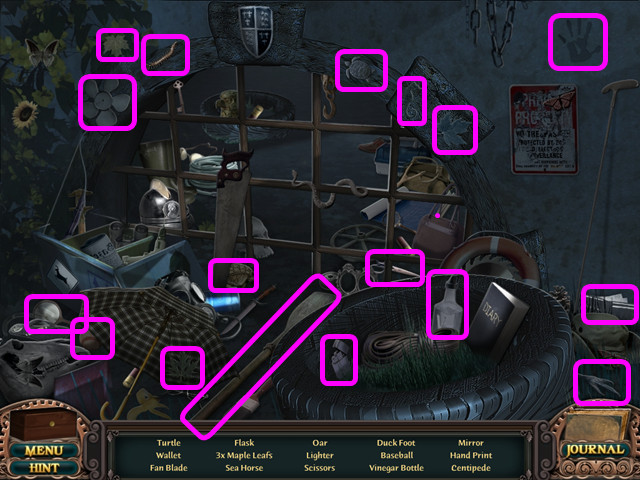 • Locate all the items on the list.
• You will earn the VINEGAR BOTTLE and the 1/2 FAN BLADES.
• Walk forward to the water pump.
• Locate all the items on the list.
• You will earn the VINEGAR BOTTLE and the 1/2 FAN BLADES.
• Walk forward to the water pump.
 • Look at the window, use the PIPE WRENCH to break the glass (V), then take the SALT (W).
• Return to the well area.
• Look at the window, use the PIPE WRENCH to break the glass (V), then take the SALT (W).
• Return to the well area.
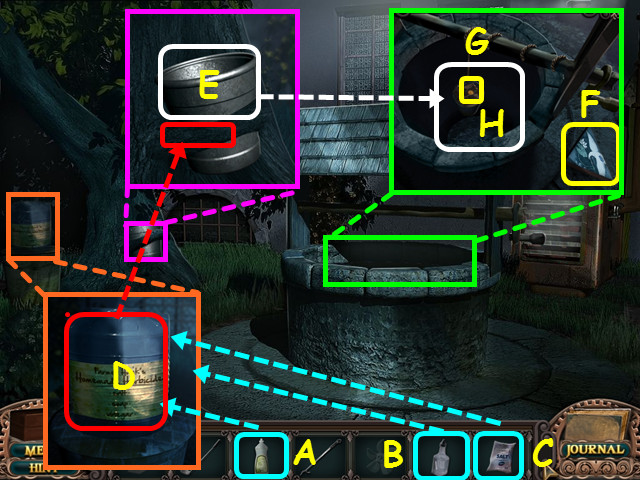 • Look at the jug, then add the DISH SOAP (A), VINEGAR BOTTLE (B), and the SALT (C).
• Take the HERBICIDE (D).
• Look at the tree and use the HERBICIDE to free the BUCKET (E).
• Look at the well and take the first CAROUSEL PIECE (F).
• Place the BUCKET on the rope (G); when it returns, take the COIN (H).
• Walk down twice to the terrace.
• Look at the jug, then add the DISH SOAP (A), VINEGAR BOTTLE (B), and the SALT (C).
• Take the HERBICIDE (D).
• Look at the tree and use the HERBICIDE to free the BUCKET (E).
• Look at the well and take the first CAROUSEL PIECE (F).
• Place the BUCKET on the rope (G); when it returns, take the COIN (H).
• Walk down twice to the terrace.
 • Look at the fountain and use the COIN on the grate (I).
• Take the HOOK (J).
• Select the right bench for a HOS (K).
• Look at the fountain and use the COIN on the grate (I).
• Take the HOOK (J).
• Select the right bench for a HOS (K).
 • Locate all the items on the list.
• You will earn the 2/2 FAN BLADES and the OVEN MITTS.
• Return to the shed and select the table for a HOS.
• Locate all the items on the list.
• You will earn the 2/2 FAN BLADES and the OVEN MITTS.
• Return to the shed and select the table for a HOS.
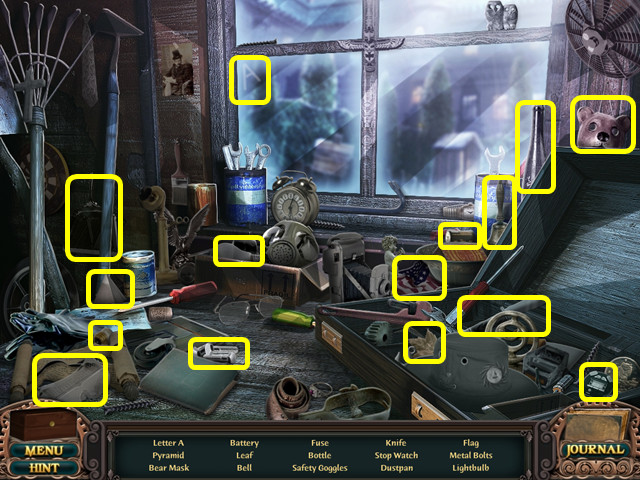 • Locate all the items on the list.
• You will earn the BOLTS.
• Return to the water pump.
• Locate all the items on the list.
• You will earn the BOLTS.
• Return to the water pump.
 • Look at the front of the machine and place the 2 FAN BLADES on the stems (L).
• Look at the pipes and use the BOLTS to repair the patch (M).
• Look at the controls and connect the colored pairs of wires (N).
• Click on two like-colored wires to connect them.
• Press the switch (O).
• Select the debris on the right for a HOS (P).
• Look at the front of the machine and place the 2 FAN BLADES on the stems (L).
• Look at the pipes and use the BOLTS to repair the patch (M).
• Look at the controls and connect the colored pairs of wires (N).
• Click on two like-colored wires to connect them.
• Press the switch (O).
• Select the debris on the right for a HOS (P).
 • Locate all the items on the list.
• You will earn the POOL GATE KEY and the TWINE.
• Walk down 3 times to the terrace.
• Locate all the items on the list.
• You will earn the POOL GATE KEY and the TWINE.
• Walk down 3 times to the terrace.
 • Look at the bench under the tree; place the HOOK on the left (Q) and the GOLF CLUB on the right (R).
• Use the TWINE to tie the pieces together (S).
• Take the LONG HOOK, then use it to collect the HOSE (T).
• Look at the bench under the tree; place the HOOK on the left (Q) and the GOLF CLUB on the right (R).
• Use the TWINE to tie the pieces together (S).
• Take the LONG HOOK, then use it to collect the HOSE (T).
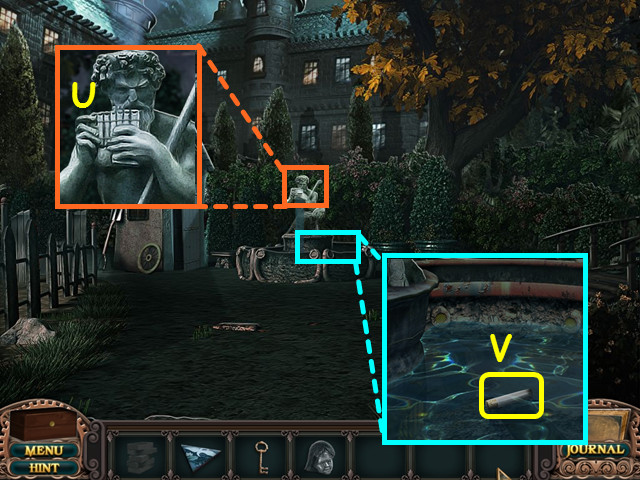 • Look at the the fountain statue (U).
• Look in the fountain and take the ANTIDOTE VIAL (V).
• Return to the shed.
• Look at the the fountain statue (U).
• Look in the fountain and take the ANTIDOTE VIAL (V).
• Return to the shed.
 • Use the OVEN MITTS to open the stove (W).
• Use the POKER to remove the head from the stove (X).
• Use the HOSE on the head to cool it down (Y).
• Take the STATUE HEAD (Z).
• Walk down 3 times, then enter the greenhouse on the right.
• Use the OVEN MITTS to open the stove (W).
• Use the POKER to remove the head from the stove (X).
• Use the HOSE on the head to cool it down (Y).
• Take the STATUE HEAD (Z).
• Walk down 3 times, then enter the greenhouse on the right.
 • Select the storage area on the left for a HOS.
• Locate all the items on the list.
• You will earn the LADDER KEY and the 8/8 BRICKS.
• Select the storage area on the left for a HOS.
• Locate all the items on the list.
• You will earn the LADDER KEY and the 8/8 BRICKS.
 • Look at the ladder and use the LADDER KEY on the lock (A).
• Take the second CAROUSEL PIECE (B).
• Exit the green house and look at the circle mosaic on the ground for a mini-game (C).
• Look at the ladder and use the LADDER KEY on the lock (A).
• Take the second CAROUSEL PIECE (B).
• Exit the green house and look at the circle mosaic on the ground for a mini-game (C).
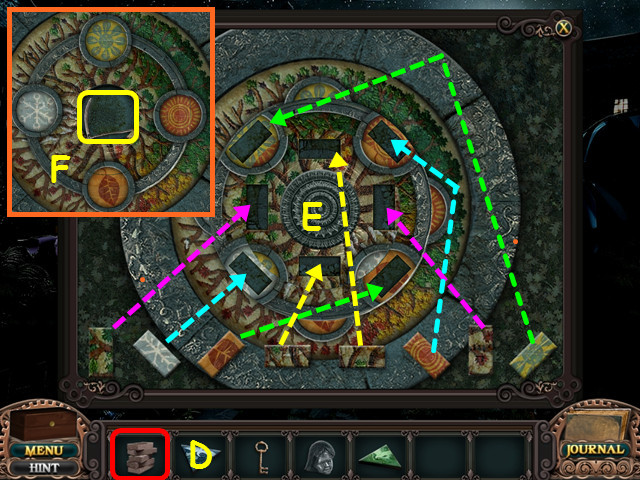 • Place the 8 BRICKS on the mosaic to trigger the mini-game (D).
• Place each brick in the coordinated hole based on the designs (E).
• Rotate the 2 inner rings to complete the circles and then take the SCYTHE from the center (F).
• Walk down twice, then go right to the East Courtyard.
• Place the 8 BRICKS on the mosaic to trigger the mini-game (D).
• Place each brick in the coordinated hole based on the designs (E).
• Rotate the 2 inner rings to complete the circles and then take the SCYTHE from the center (F).
• Walk down twice, then go right to the East Courtyard.
 • Look at the headless statue and place the STATUE HEAD on top (G).
• Take the third CAROUSEL PIECE (H).
• Return to the playground.
• Look at the right gate and use the POOL GATE KEY on the lock (I).
• Walk forward to the pool.
• Look at the headless statue and place the STATUE HEAD on top (G).
• Take the third CAROUSEL PIECE (H).
• Return to the playground.
• Look at the right gate and use the POOL GATE KEY on the lock (I).
• Walk forward to the pool.
Chapter 3
 • Take the EARTH PLATE (A).
• Look at the pile of chairs; take the CHAIR and the FILTHY OBJECT (B).
• Look at the motorcycle and take the TWEEZERS (C).
• Take the EARTH PLATE (A).
• Look at the pile of chairs; take the CHAIR and the FILTHY OBJECT (B).
• Look at the motorcycle and take the TWEEZERS (C).
 • Look at the shed and place the CHAIR in front of the door (D).
• Use the TWEEZERS on the grill to get the SHED KEY (E).
• Use the SHED KEY on the shed door (F).
• Note the path to the generator (G).
• Note the way to the changing rooms (H).
• Select the shed for a HOS.
• Look at the shed and place the CHAIR in front of the door (D).
• Use the TWEEZERS on the grill to get the SHED KEY (E).
• Use the SHED KEY on the shed door (F).
• Note the path to the generator (G).
• Note the way to the changing rooms (H).
• Select the shed for a HOS.
 • Locate all the items on the list.
• You will earn the WORK GLOVES.
• Walk right to the changing rooms.
• Locate all the items on the list.
• You will earn the WORK GLOVES.
• Walk right to the changing rooms.
 • Select the left stall for a HOS.
• Locate all the items on the list.
• You will earn the SHOWER HANDLE and the LADDER EXTENSION.
• Select the left stall for a HOS.
• Locate all the items on the list.
• You will earn the SHOWER HANDLE and the LADDER EXTENSION.
 • Place the SHOWER HANDLE under the shower head (I).
• Use the FILTHY OBJECT under the water to find the BROKEN KNIFE (J).
• Exit the changing rooms and walk to the playground.
• Place the SHOWER HANDLE under the shower head (I).
• Use the FILTHY OBJECT under the water to find the BROKEN KNIFE (J).
• Exit the changing rooms and walk to the playground.
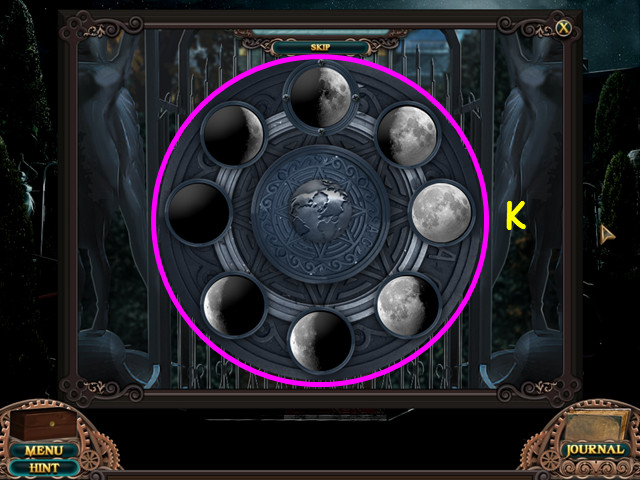 • Look at the center gate for a mini-game.
• Place the EARTH PLATE in the center of the device to trigger the mini-game.
• Set the moons to reflect a lunar cycle; select each moon to spin it to the proper position (K).
• Walk forward to the guard tower.
• Look at the center gate for a mini-game.
• Place the EARTH PLATE in the center of the device to trigger the mini-game.
• Set the moons to reflect a lunar cycle; select each moon to spin it to the proper position (K).
• Walk forward to the guard tower.
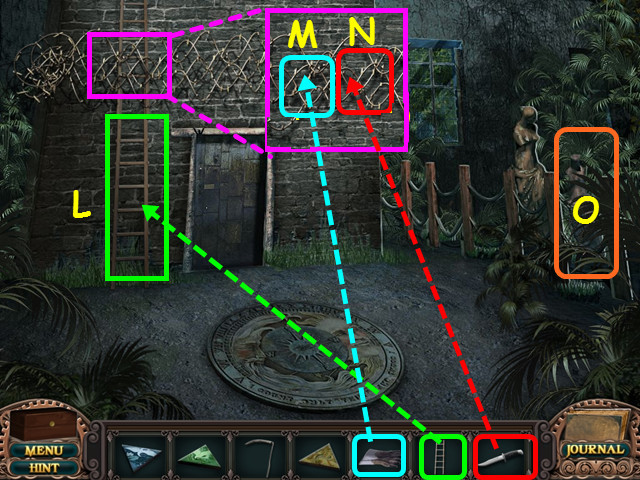 • Place the LADDER EXTENSION under the ladder (L).
• Look at the wires, then use the WORK GLOVES (M) and the BROKEN KNIFE (N) to break through.
• Note the path to the Trellis Hall (O).
• Climb the ladder to the guard tower top.
• Place the LADDER EXTENSION under the ladder (L).
• Look at the wires, then use the WORK GLOVES (M) and the BROKEN KNIFE (N) to break through.
• Note the path to the Trellis Hall (O).
• Climb the ladder to the guard tower top.
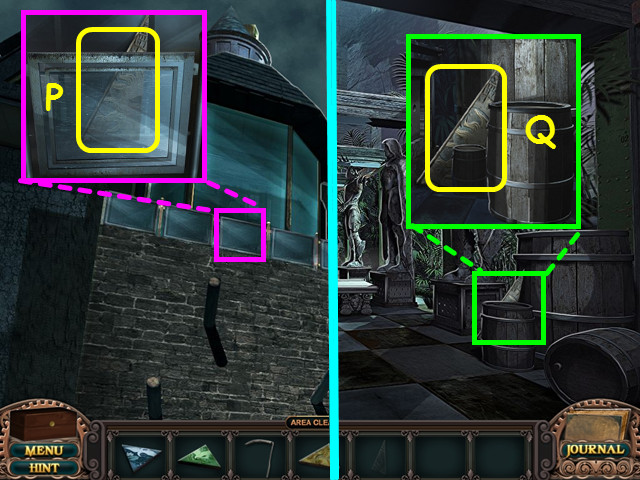 • Look at the glass partition and take the 1/2 SUNDIAL PIECE (P).
• Come down from the guard tower top, then go right to the trellis hall.
• Look behind the barrel and take the 2/2 SUNDIAL PIECE (Q).
• Exit the trellis hall.
• Look at the glass partition and take the 1/2 SUNDIAL PIECE (P).
• Come down from the guard tower top, then go right to the trellis hall.
• Look behind the barrel and take the 2/2 SUNDIAL PIECE (Q).
• Exit the trellis hall.
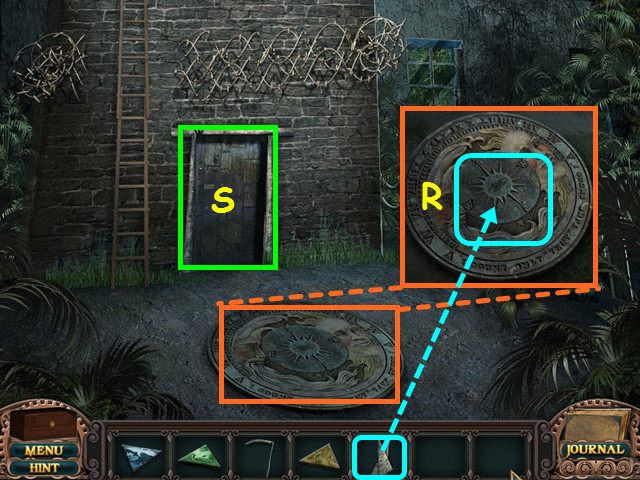 • Look at the sundial and place the 2 SUNDIAL PIECES onto the circle (R).
• Enter the guard tower first floor (S).
• Look at the sundial and place the 2 SUNDIAL PIECES onto the circle (R).
• Enter the guard tower first floor (S).
 • Take the clipping (T).
• Note the stairs to the second floor (U).
• Note the wall of mug shots (V).
• Enter the locker room (W).
• Take the clipping (T).
• Note the stairs to the second floor (U).
• Note the wall of mug shots (V).
• Enter the locker room (W).
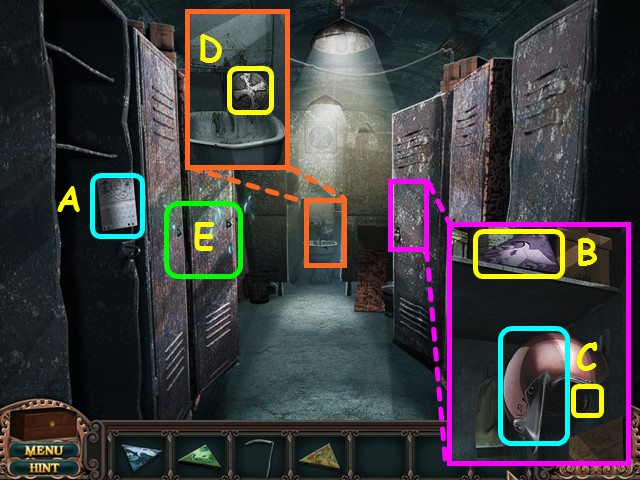 • Take the clipping (A).
• Look at the right locker, open the door and take the fourth CAROUSEL PIECE (B).
• Move the helmet and take the MOTORCYCLE KEY (C).
• Look at the toilet and take the CROSS PIECE (D).
• Select the left locker for a HOS (E).
• Take the clipping (A).
• Look at the right locker, open the door and take the fourth CAROUSEL PIECE (B).
• Move the helmet and take the MOTORCYCLE KEY (C).
• Look at the toilet and take the CROSS PIECE (D).
• Select the left locker for a HOS (E).
 • Locate all the items on the list.
• You will earn the GAS CAN.
• Exit the locker room and go up to the second floor.
• Locate all the items on the list.
• You will earn the GAS CAN.
• Exit the locker room and go up to the second floor.
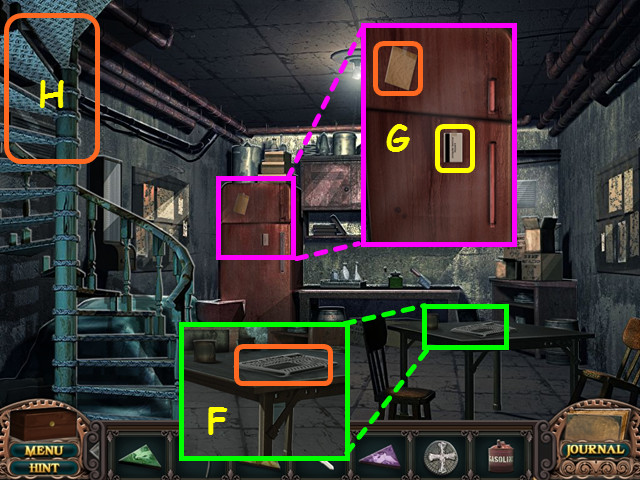 • Look at the table and take the clipping (F).
• Look at the refrigerator; take the clipping and the COMPUTER KEY CARD (G).
• Walk up the stairs to the third floor (H).
• Look at the table and take the clipping (F).
• Look at the refrigerator; take the clipping and the COMPUTER KEY CARD (G).
• Walk up the stairs to the third floor (H).
 • Take the FLEX DUCT (I) and the clipping (J).
• Note the computer (K).
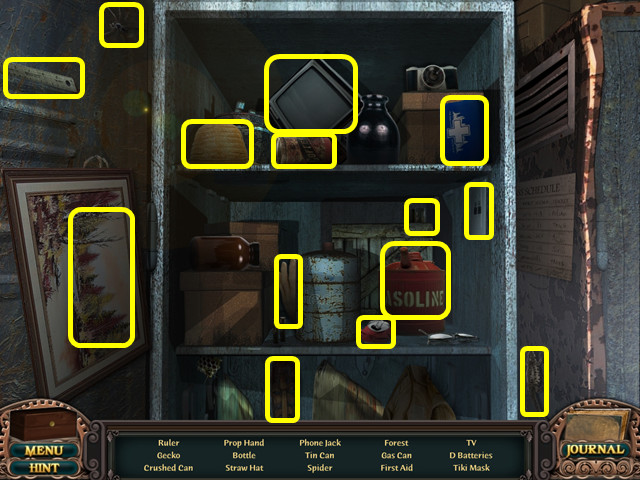
• Select the books for a HOS (L).
• Take the FLEX DUCT (I) and the clipping (J).
• Note the computer (K).
• Select the books for a HOS (L).
 • Locate all the items on the list.
• You will earn the BLACK LIGHT.
• Walk down 4 times, the take the right gate to the pool.
• Locate all the items on the list.
• You will earn the BLACK LIGHT.
• Walk down 4 times, the take the right gate to the pool.
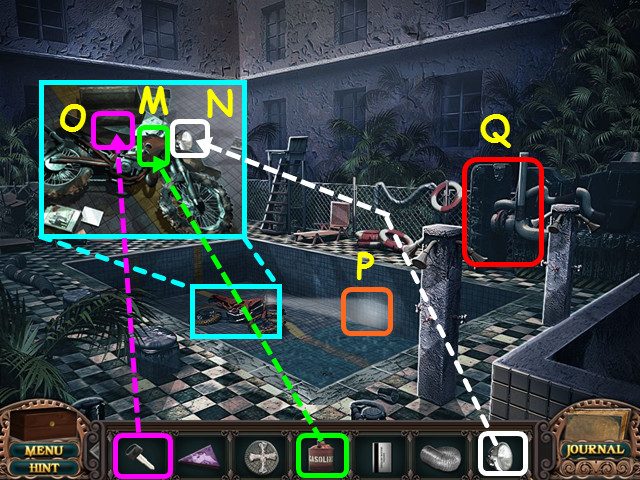 • Look at the motorcycle and use the GAS CAN on the tank (M).
• Place the BLACK LIGHT on the front (N), then use the MOTORCYCLE KEY to start the engine (O).
• Note the lighted grid area (P).
• Walk forward to the generator (Q).
• Look at the motorcycle and use the GAS CAN on the tank (M).
• Place the BLACK LIGHT on the front (N), then use the MOTORCYCLE KEY to start the engine (O).
• Note the lighted grid area (P).
• Walk forward to the generator (Q).
 • Look at the pipe and place the FLEX DUCT on the end (R).
• Return to the guard tower third floor.
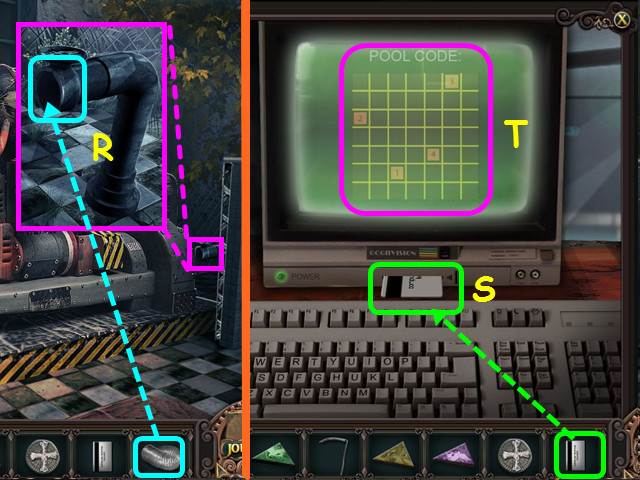
• Look at the computer and use the COMPUTER KEY CARD on the slot (S).
• You will earn the PATIENT NOTE.
• Note the screen for the pool code (T).
• Walk down to the first floor and look at the wall of mug shots.
• Look at the pipe and place the FLEX DUCT on the end (R).
• Return to the guard tower third floor.
• Look at the computer and use the COMPUTER KEY CARD on the slot (S).
• You will earn the PATIENT NOTE.
• Note the screen for the pool code (T).
• Walk down to the first floor and look at the wall of mug shots.
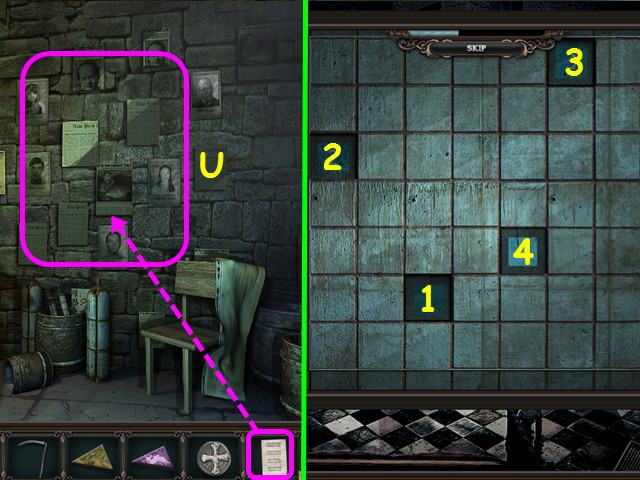 • Use the PATIENT NOTE on the wall to get the MUG SHOTS (U).
• Return to the pool and look at the lighted grid area.
• Press the squares in numerical order (1-4).
• Enter the secret chamber behind the tiles.
• Use the PATIENT NOTE on the wall to get the MUG SHOTS (U).
• Return to the pool and look at the lighted grid area.
• Press the squares in numerical order (1-4).
• Enter the secret chamber behind the tiles.
 • Note the top of the desk (V).
• Take the clipping (W).
• Look in the wastebasket and take the DESK KEY (X).
• Use the DESK KEY on the drawers (Y).
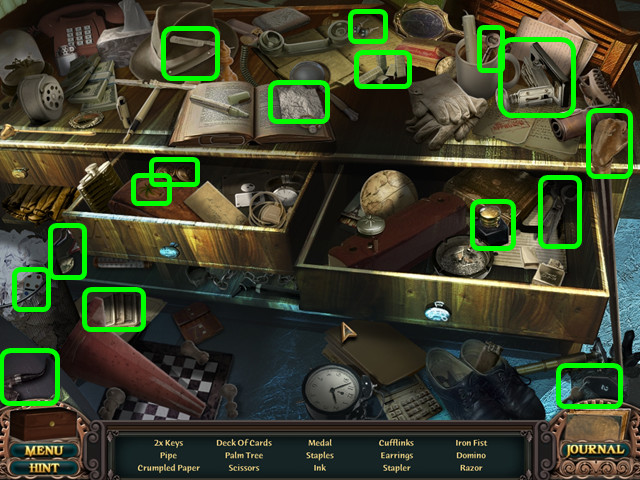
• Select the drawers for a HOS.
• Note the top of the desk (V).
• Take the clipping (W).
• Look in the wastebasket and take the DESK KEY (X).
• Use the DESK KEY on the drawers (Y).
• Select the drawers for a HOS.
 • Locate all the items on the list.
• You will earn the ROPE.
• Look at the top of the desk.
• Locate all the items on the list.
• You will earn the ROPE.
• Look at the top of the desk.
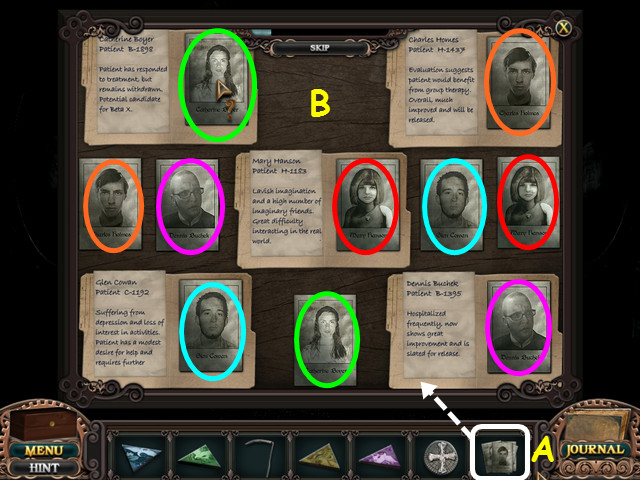 • Place the MUGSHOTS on the desk to trigger the mini-game (A).
• Drag the photos onto the files based on the silhouettes (B).
• After the cut-scene, you will earn another ANTIDOTE VIAL.
• Return to the trellis hall.
• Place the MUGSHOTS on the desk to trigger the mini-game (A).
• Drag the photos onto the files based on the silhouettes (B).
• After the cut-scene, you will earn another ANTIDOTE VIAL.
• Return to the trellis hall.
 • Look at the statue and tie the ROPE to it (C).
• Take the fifth CAROUSEL PIECE (D).
• Note the door to the solitary hall (E).
• Walk to the greenhouse.
• Look at the statue and tie the ROPE to it (C).
• Take the fifth CAROUSEL PIECE (D).
• Note the door to the solitary hall (E).
• Walk to the greenhouse.
 • Take the clipping (F).
• Look at the statue and place the CROSS PLATE into the circle (G).
• Take the GARDEN GATE KEY (H).
• Exit the greenhouse, go forward to the terrace, then go left to the garden gate.
• Take the clipping (F).
• Look at the statue and place the CROSS PLATE into the circle (G).
• Take the GARDEN GATE KEY (H).
• Exit the greenhouse, go forward to the terrace, then go left to the garden gate.
 • Look at the gate and use the GARDEN GATE KEY on the lock (I).
• Look at the scarecrow and use the SCYTHE to remove his head (J).
• Take the sixth CAROUSEL PIECE (K).
• Return to the playground and look at the carousel.
• Look at the gate and use the GARDEN GATE KEY on the lock (I).
• Look at the scarecrow and use the SCYTHE to remove his head (J).
• Take the sixth CAROUSEL PIECE (K).
• Return to the playground and look at the carousel.
 • Place the 6 CAROUSEL PIECES into the center (L).
• Take the ANTIDOTE VIAL (M).
• Return to the trellis hall.
• Place the 6 CAROUSEL PIECES into the center (L).
• Take the ANTIDOTE VIAL (M).
• Return to the trellis hall.
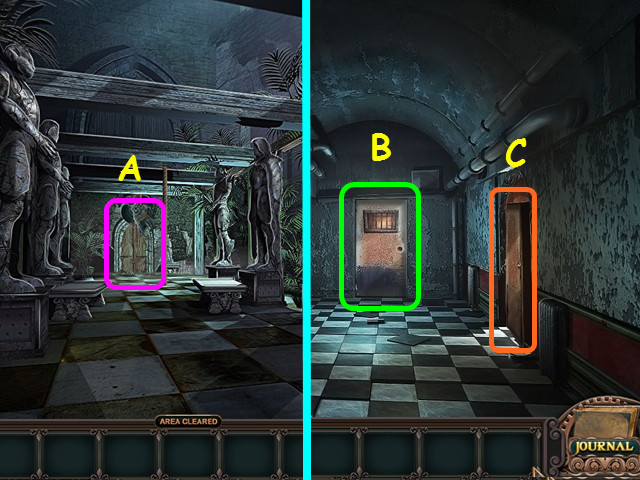 • Enter the solitary hall (A).
• Note the door at the end of the hall (B).
• Enter the door on the right to the mirror room (C).
• Enter the solitary hall (A).
• Note the door at the end of the hall (B).
• Enter the door on the right to the mirror room (C).
 • Select the debris on the right for a HOS.
• Locate all the items on the list.
• You will earn the SMALL MIRROR SHARD.
• Select the debris on the right for a HOS.
• Locate all the items on the list.
• You will earn the SMALL MIRROR SHARD.
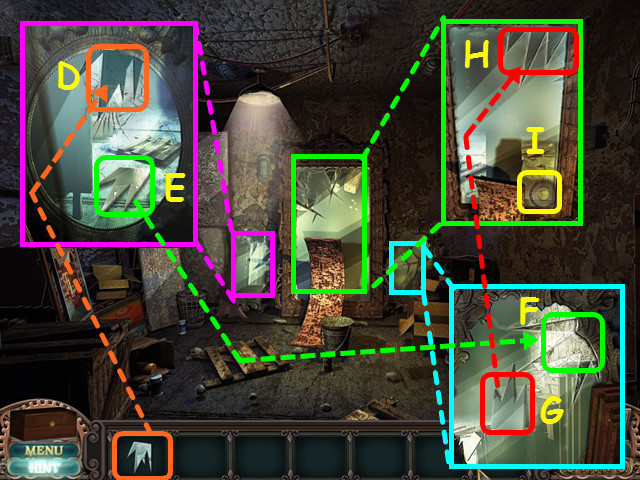 • Look at the small mirror on the left and place the SMALL MIRROR SHARD into the empty spot (D).
• Take the MEDIUM MIRROR SHARD (E).
• Look at the medium mirror on the right and place the MEDIUM MIRROR SHARD into the empty spot (F).
• Take the LARGE MIRROR SHARD (G).
• Look at the large mirror in the center and place the LARGE MIRROR SHARD into the empty spot (H).
• Take the DOOR CRANK (I).
• Exit the room.
• Look at the small mirror on the left and place the SMALL MIRROR SHARD into the empty spot (D).
• Take the MEDIUM MIRROR SHARD (E).
• Look at the medium mirror on the right and place the MEDIUM MIRROR SHARD into the empty spot (F).
• Take the LARGE MIRROR SHARD (G).
• Look at the large mirror in the center and place the LARGE MIRROR SHARD into the empty spot (H).
• Take the DOOR CRANK (I).
• Exit the room.
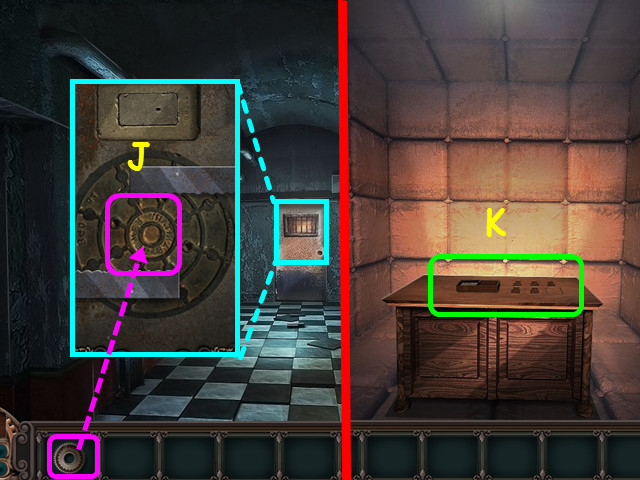 • Look at the door and place the DOOR CRANK on the device (J).
• Walk forward to enter the padded room.
• Look at the desk (K).
• Look at the door and place the DOOR CRANK on the device (J).
• Walk forward to enter the padded room.
• Look at the desk (K).
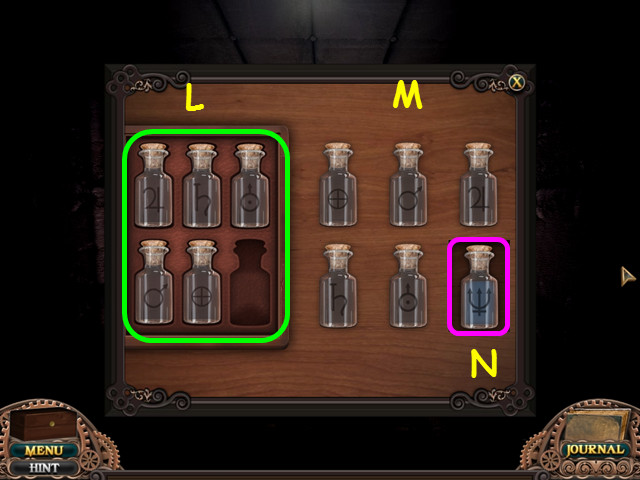 • Place the empty vials from the left (L) into the spots on the right with the matching symbols (M).
• Once the empty vials are placed, the final vial will appear.
• Take the final vial (N).
• Congratulations! You have completed White Haven Mysteries!
• Place the empty vials from the left (L) into the spots on the right with the matching symbols (M).
• Once the empty vials are placed, the final vial will appear.
• Take the final vial (N).
• Congratulations! You have completed White Haven Mysteries!Created at: 2012-02-17