

Walkthrough Menu
- General Tips
- Chapter 1: The Attic
- Chapter 2: Discovering the Graveyard
- Chapter 3: Discovering the Backyard
- Chapter 4: The Witches' Secret Room
General Tips
- You will not need to follow the exact path of this guide; however, some actions are required before you can complete another scene.
- Zoom into the sparkling areas to trigger a Hidden Object Scene. Throughout the guide, we will use the acronym 'HOS' for Hidden Object Scenes.
- Some items require an action to be performed before they are available in the HOS.
- Throughout the game you will need to talk to a character and move through the dialogue to continue game play. This walkthrough will not include these interactions.
- After you have collected all of the drawing pieces in a set, you will need to open the Journal (Z) to assemble the drawing and reveal an important clue. This walkthrough will not note when this is available.
Chapter 1: The Attic
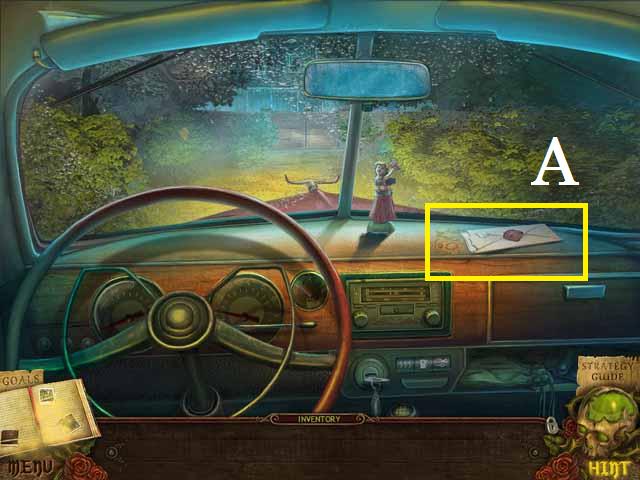
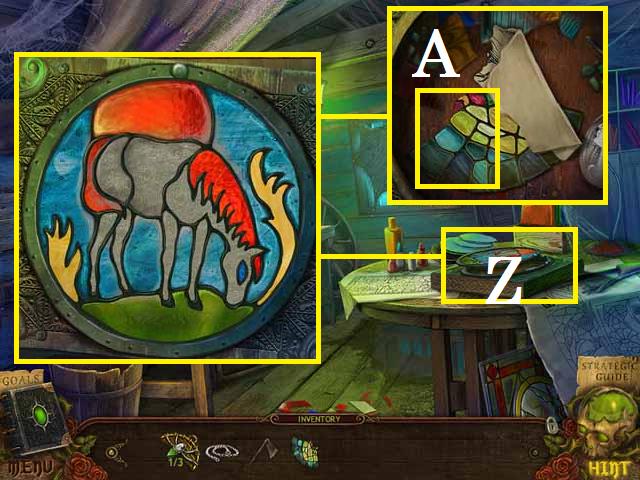
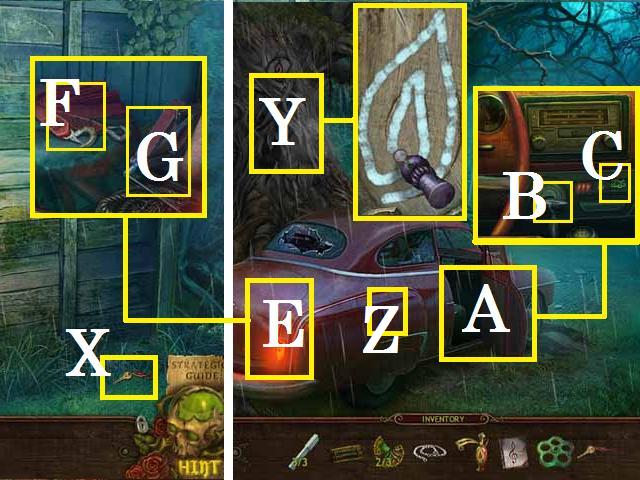
- Zoom into the envelope (A); collect all of the papers.
- Move forward.
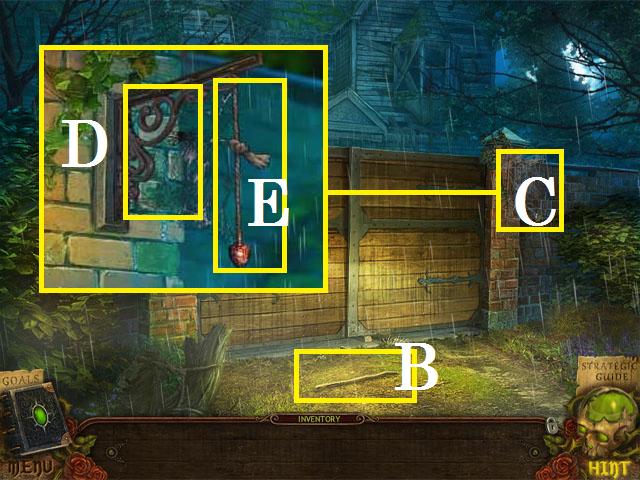
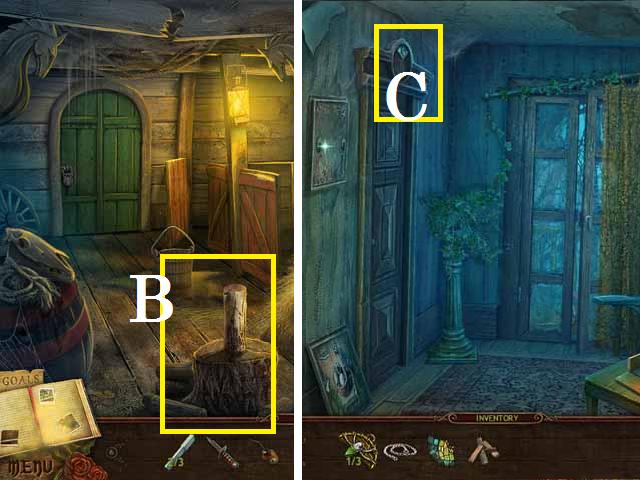
- Pick up the STICK (B).
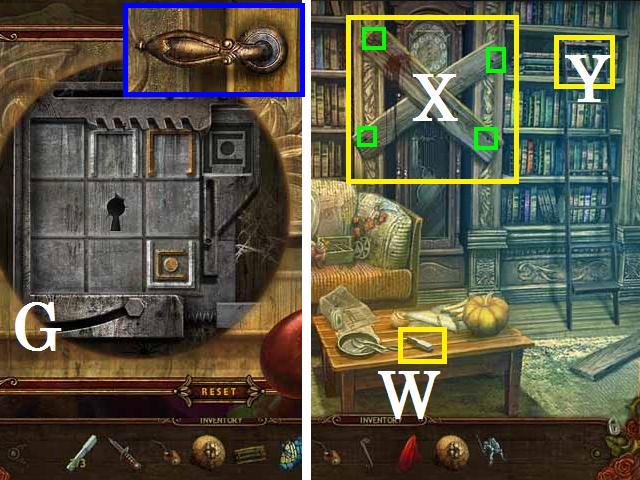
- Zoom into the gate release (C).
- Remove the cobwebs (D) with the STICK and pull the rope (E).
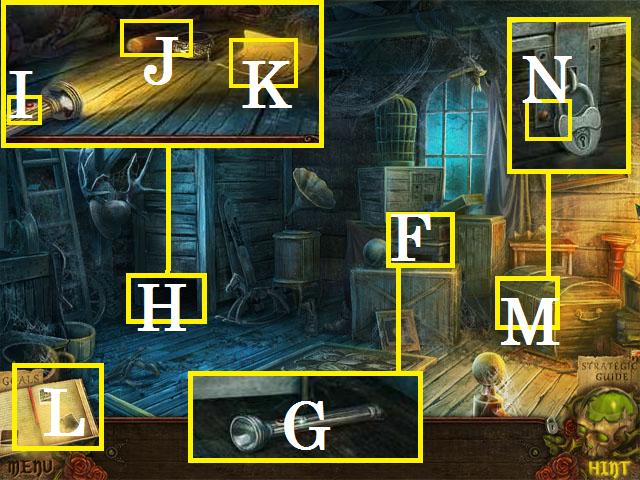
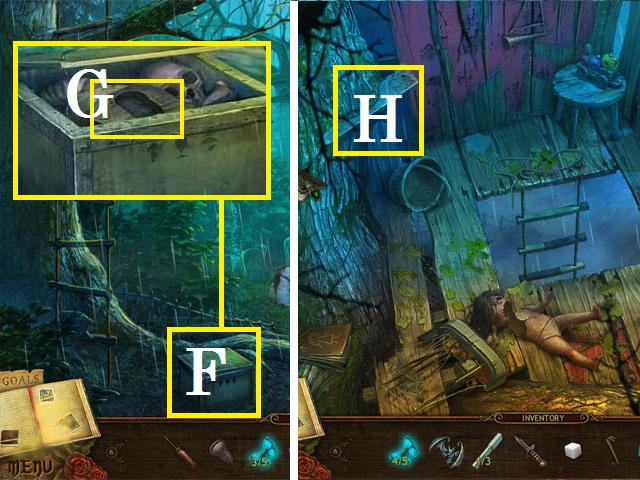
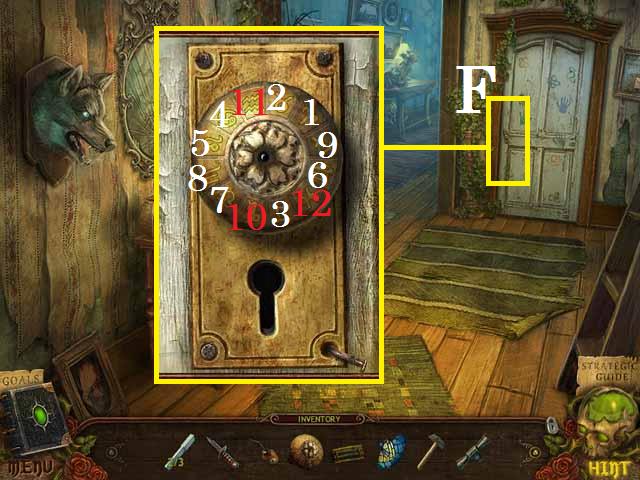
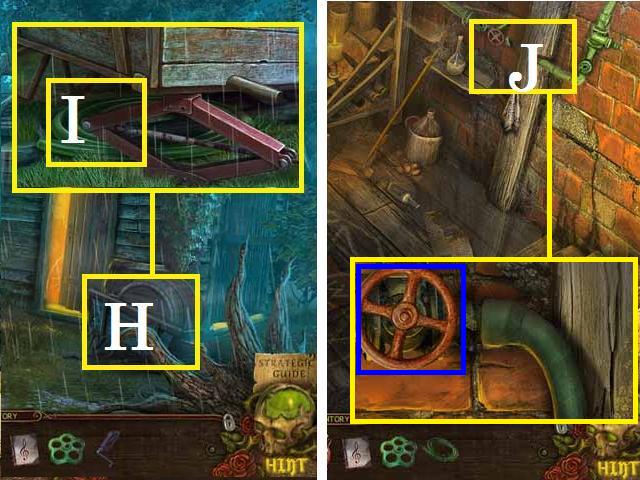
- Zoom into the table (F); pick up the FLASHLIGHT (G).
- Zoom into the dark space (H); place the FLASHLIGHT.
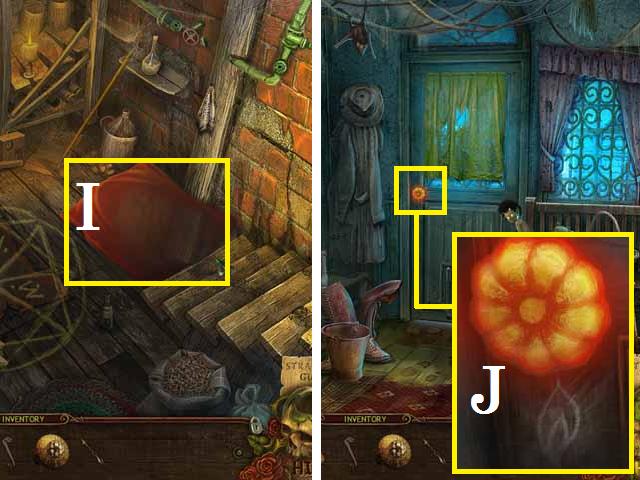
- Turn the FLASHLIGHT on (I).
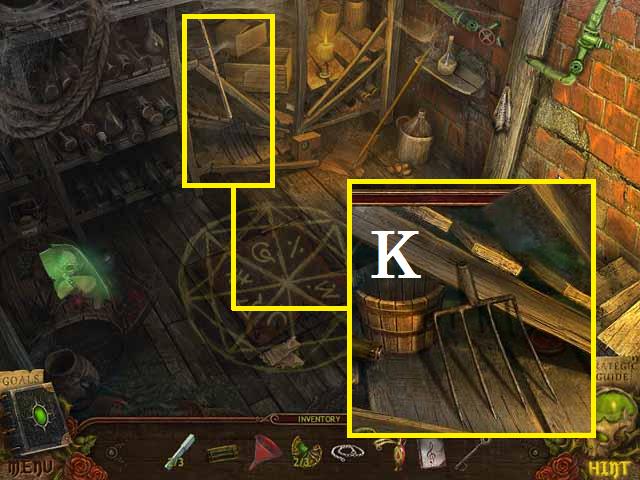
- Pick up the SCREWDRIVER (J) and piece of drawing (K).
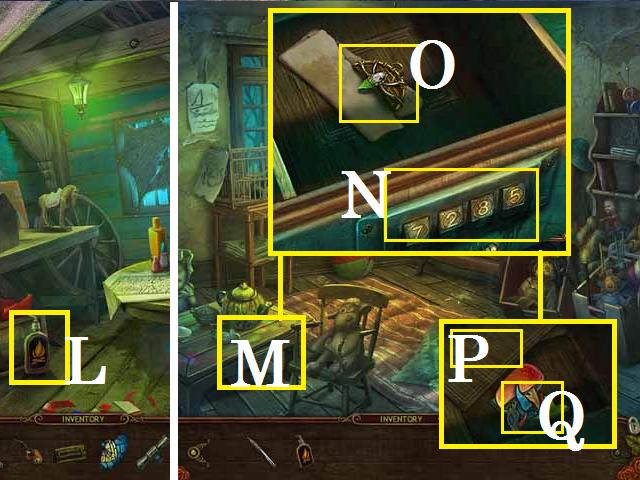
- Open the Journal (L) to receive the clue from the drawing piece.
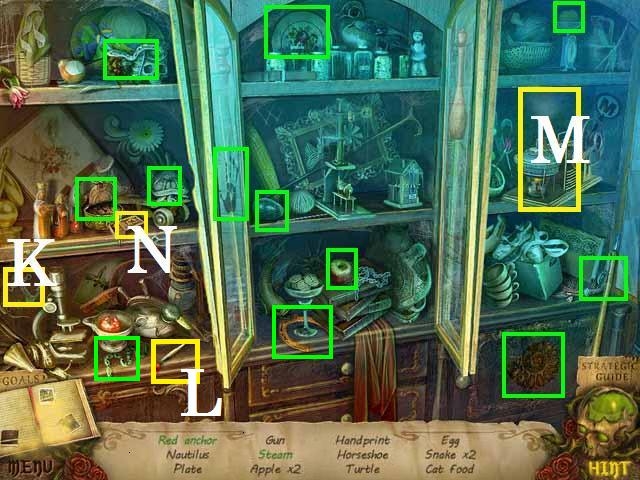
- Zoom into the chest (M).
- Remove the SCREW (N) with the SCREWDRIVER.
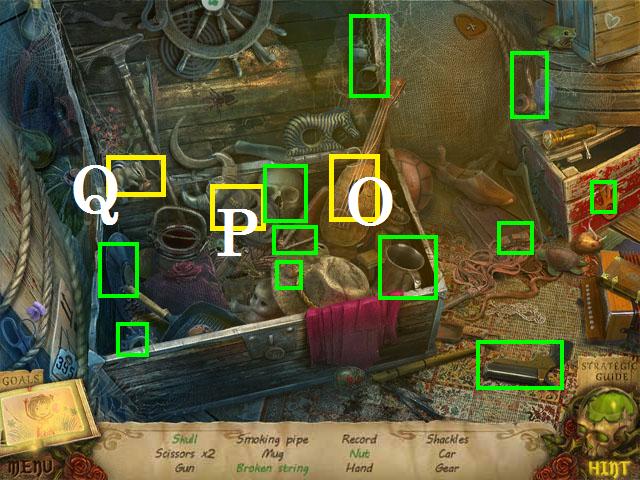
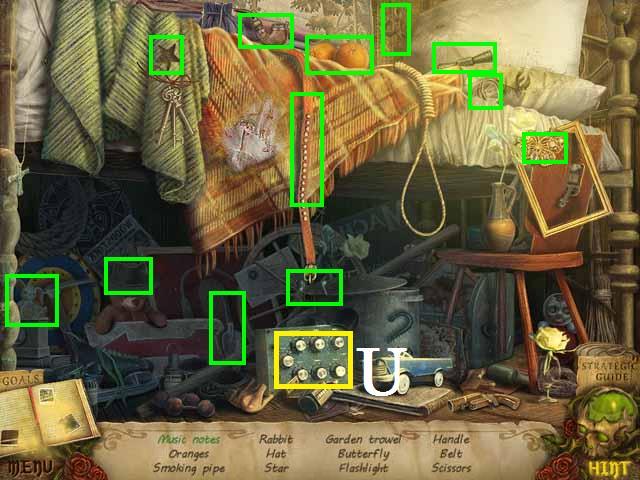
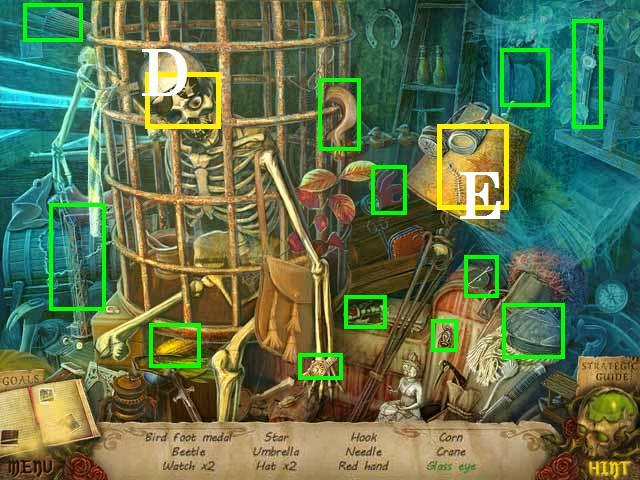
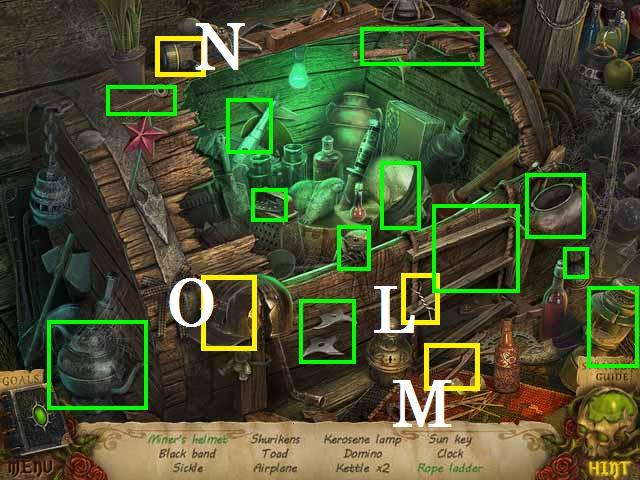
- Zoom into the sparkles to play a HOS.
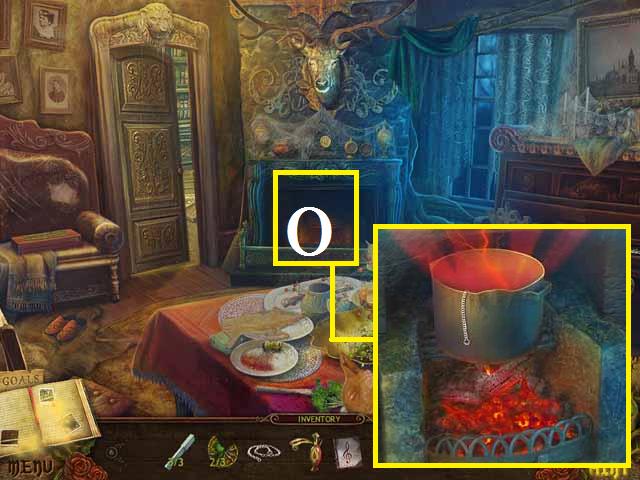
- Break the instrument's string (O).
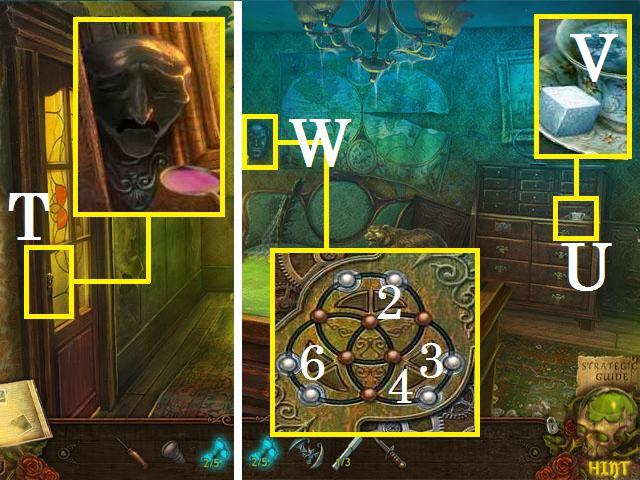
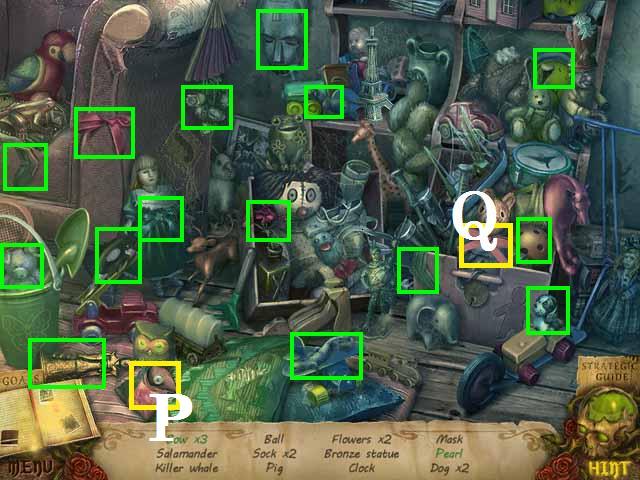
- Move the mask (P) to reveal the skull.
- Hit the squirrel (Q) to get the nut.
- Collect all of the items to receive the VINYL RECORD.
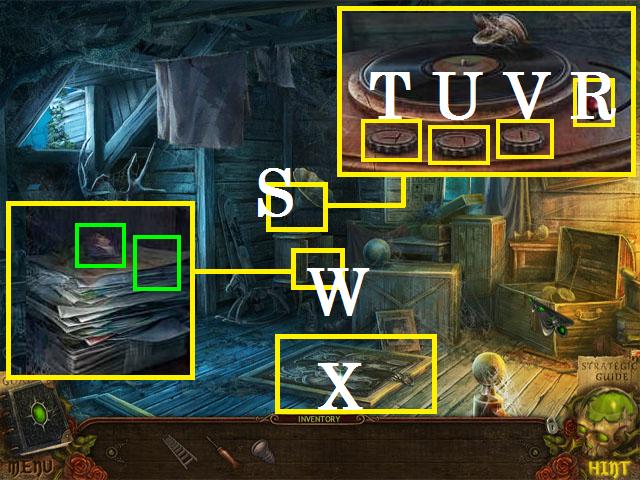
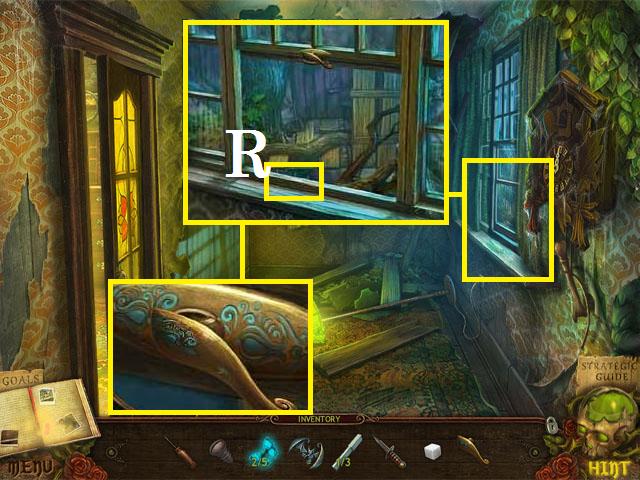
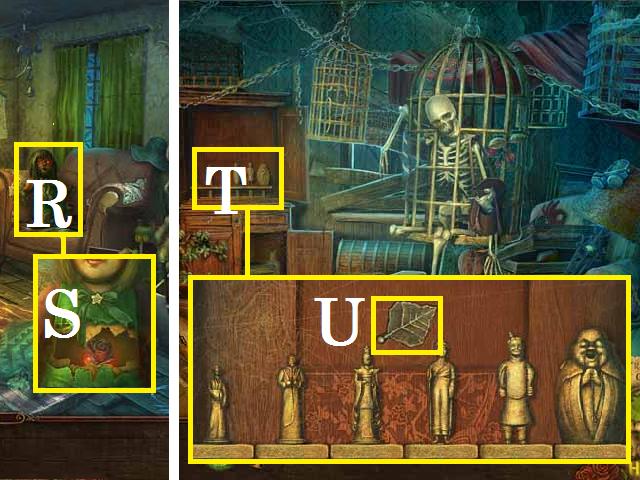
- Place the VINYL RECORD on the record player (S).
- Hit the buttons in the following sequence to set them as shown in the screenshot: (T) four times, (V) two times, and (U) six times.
- Flip the switch (R).
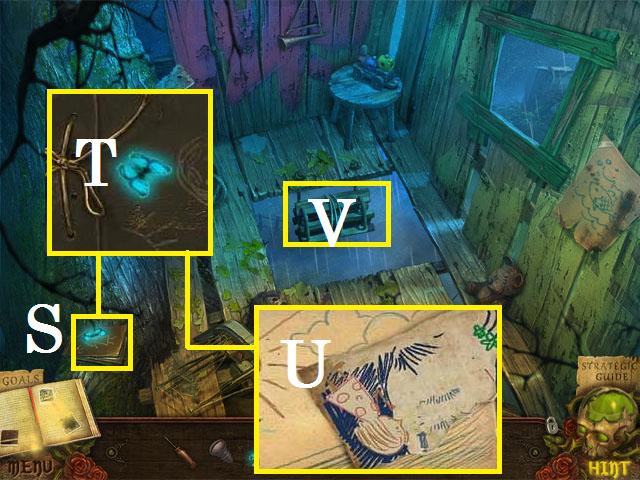
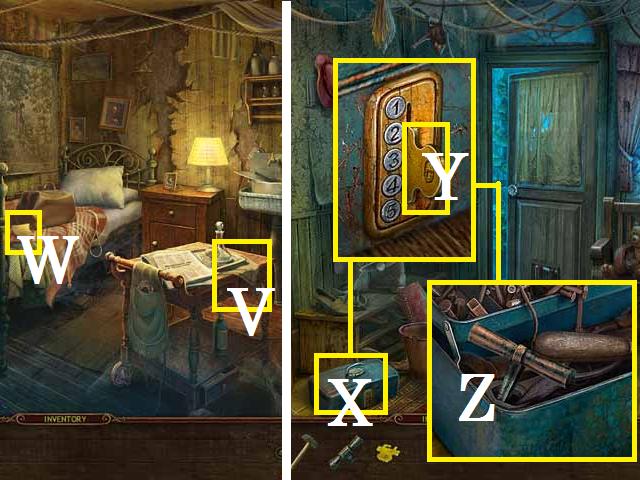
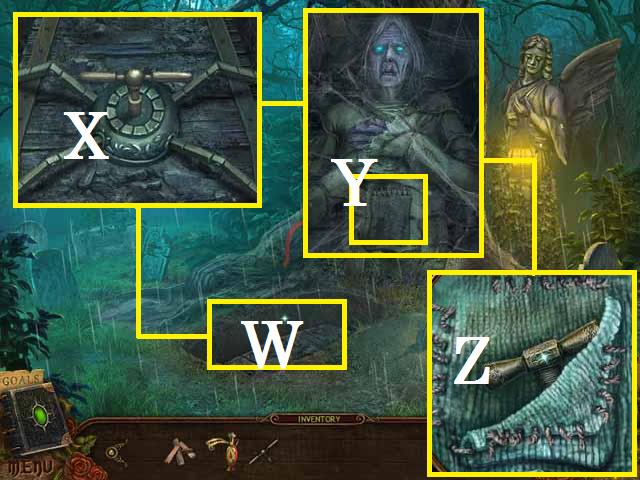
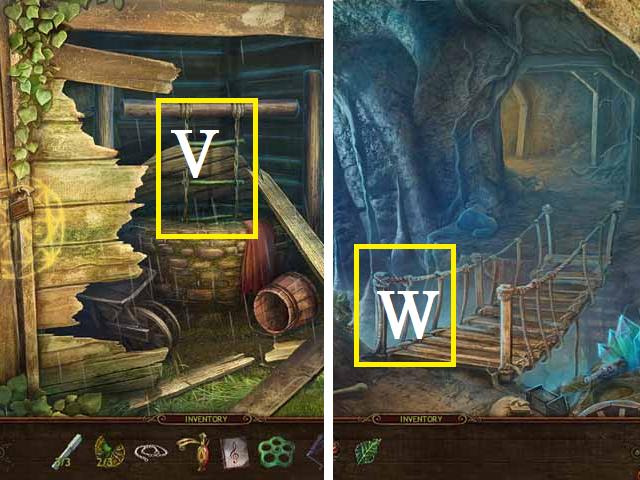
- Zoom into the base (W) of the record player.
- Pick up the paper (green) and the TILE (green).
- Zoom into the hatch (X).
- Drop the TILE over the lock plate, as seen in the screenshot.
- Push the spaces in the following order, to get the arrangement shown in the screenshot, (NOTE: Push the stationary spaces not the moveable tiles): 3, 2, 1, 6, 5, 4, 3, 2, and 4.
- Zoom into the painting (blue).
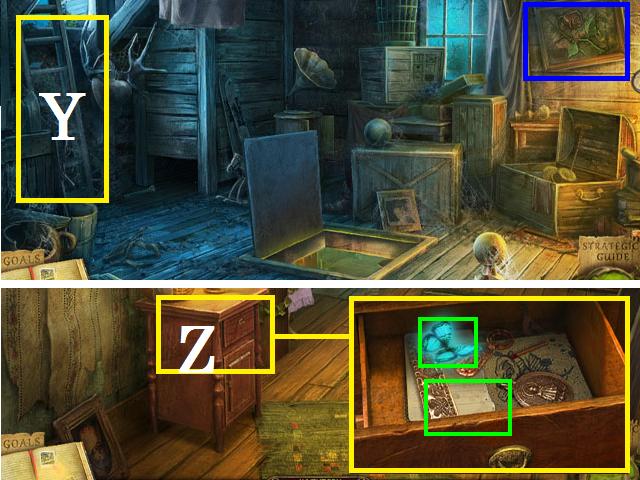
- Place the LADDER (Y) down the open hatch.
- Go down stairs to the attic landing.
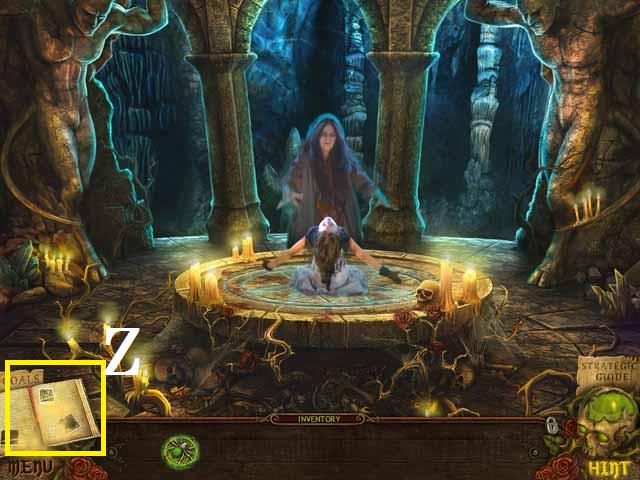
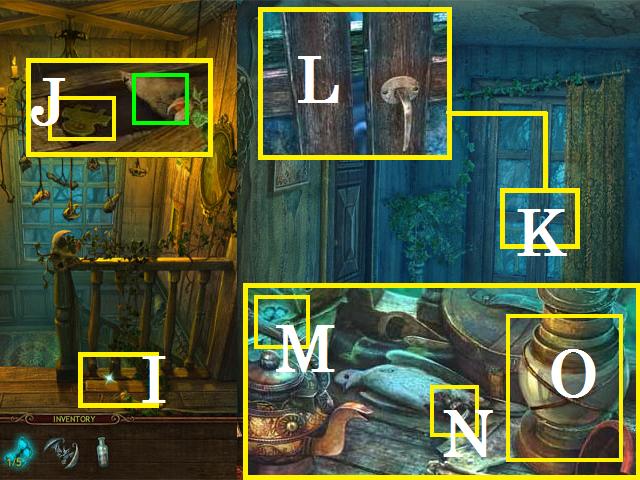
- Zoom into the stand (Z).
- Open the drawer and pick up the BUTTERFLY (green) and note (green).
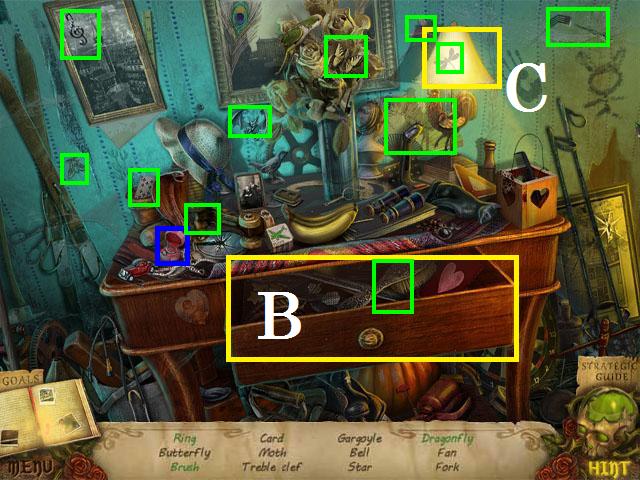
- Move forward down the hallway.
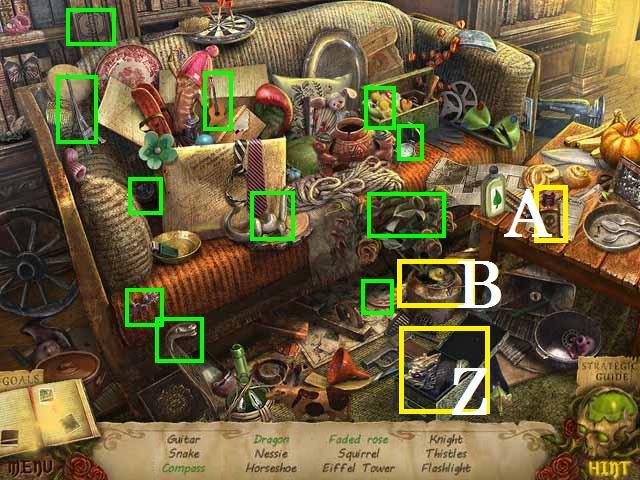
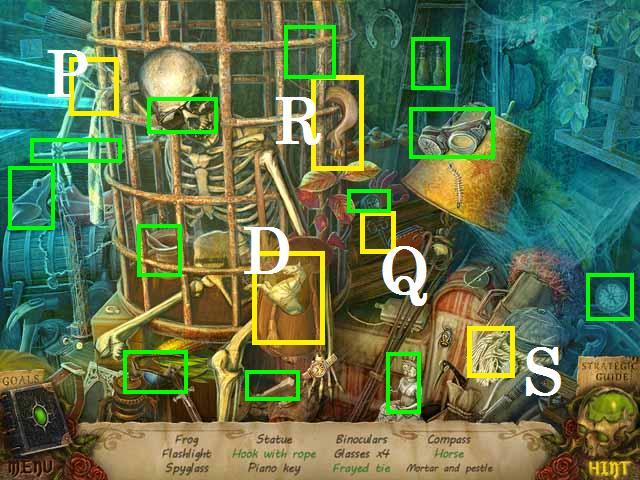
- Zoom into the sparkles to play a HOS.
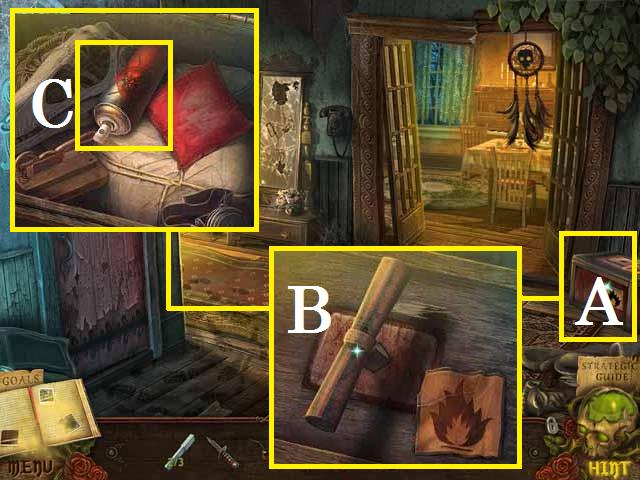
- Open the drawer (B) to reveal the brush.
- Open the box (blue) to reveal the ring.
- Turn on the lamp (C) to reveal the dragonfly.
- Receive the GARGOYLE.
- Pick up the drawing piece (D).
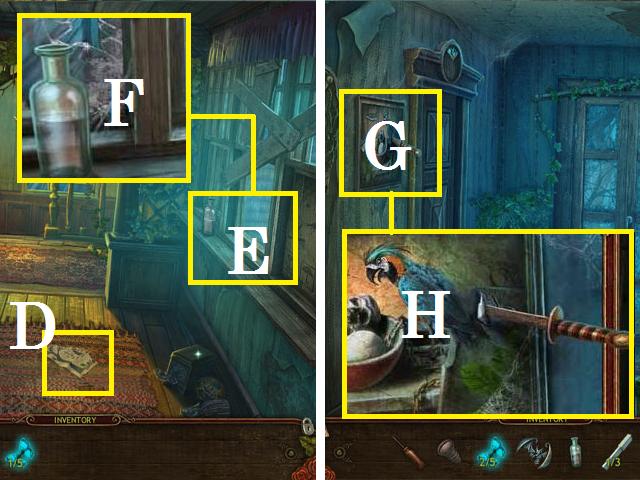
- Zoom into the window (E).
- Pick up the SALINE SOLUTION (F).
- Move forward to the top of the stairs.
- Take a right.
- Zoom into the painting (G).
- Remove the KNIFE (H).
- Move back one scene and take a left.
- Zoom into the window (I).
- Open the curtain and pick up the PIANO KEY (K).
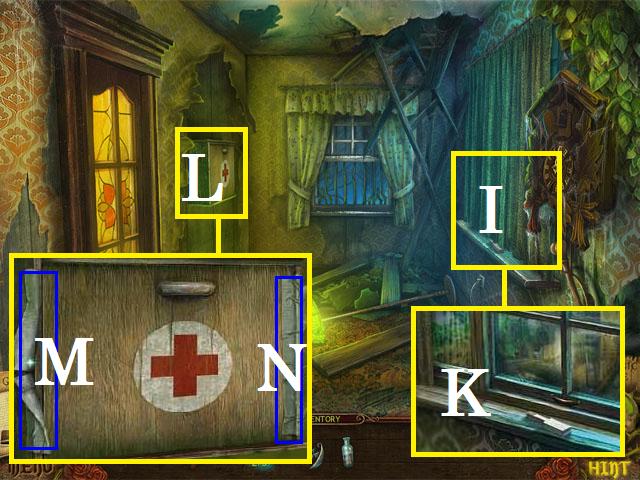
- Zoom into the first aid kit (L).
- Remove the tape (M) and cut the tape on the other side (N) with the KNIFE.
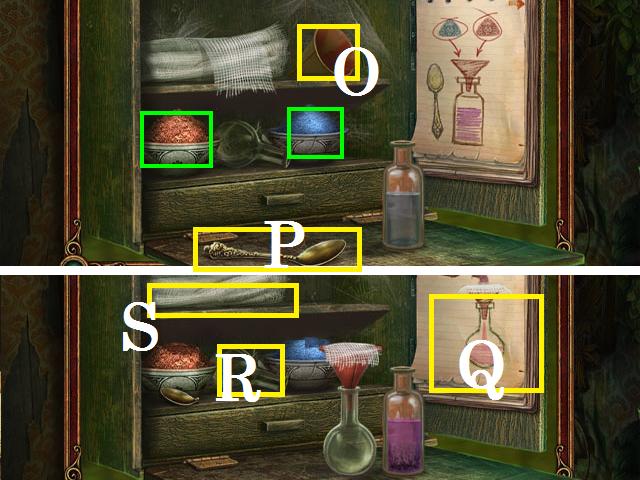
- Open the door and place the SALINE SOLUTION as shown in the screenshot.
- Place the funnel (O) in the SALINE SOLUTION.
- Spoon (P) both the blue (green) and orange (green) powders into the funnel.
- Flip the page (Q).
- Pick up the empty bottle (R).
- Place the funnel in the empty bottle with the cheese cloth (S) on top.
- Pour the SALINE SOLUTION bottle into the empty bottle.
- Remove the funnel and pick it up as the COLD REMEDY.
- Zoom into the door handle (T) and give it the COLD REMEDY.
- Enter the study.
- Zoom into the tea cup (U); pick up the SUGAR (V).
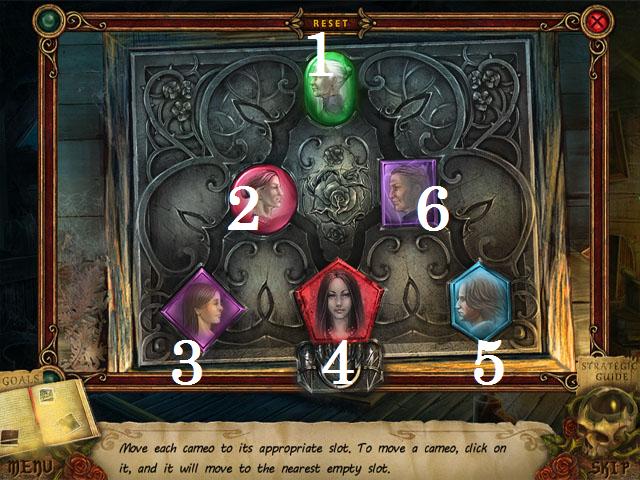
- Zoom into the mask (W).
- Push on the mask to open it.
- Hit the arrows in the following sequence to place the pearls as shown in the screenshot: 4, 6, 2, 6, 3, 6, and 4.
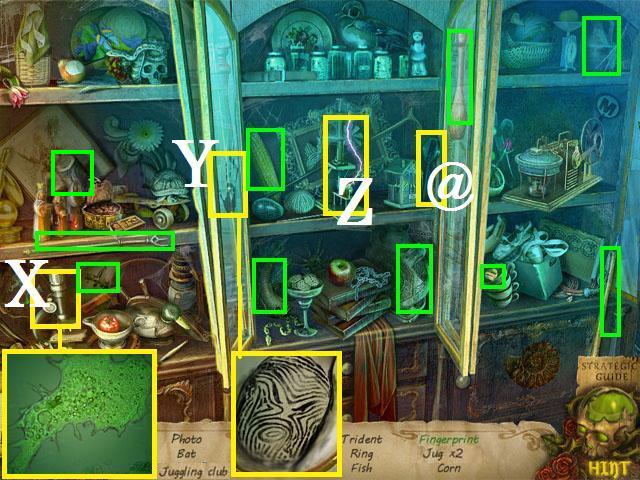
- Zoom into the sparkles to play a HOS.
- Zoom into the microscope (X) to reveal the amoeba.
- Place the magnifying glass (@) over the handprint (Y) to reveal the fingerprint.
- Hit the mechanism (Z) several times to reveal the lightning.
- Receive the SIGNET RING.
- Return to the top of the stairs. Move to the right.
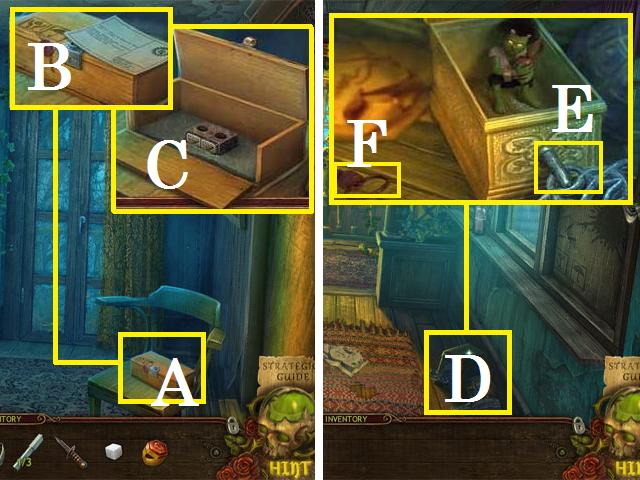
- Zoom into the box (A). Move the paper and zoom into the lock (B).
- Place the SIGNET RING in the lock. Remove all of the straw and pick up the MECHANISM PIECE (C).
- Back up one scene to the top of the stairs. Back up one more scene towards the attic.
- Zoom into the box (D) and turn the key (E).
- Give the SUGAR to the Imp.
- Pick up the SCREW LOCK KEY (F).
- Move forward.
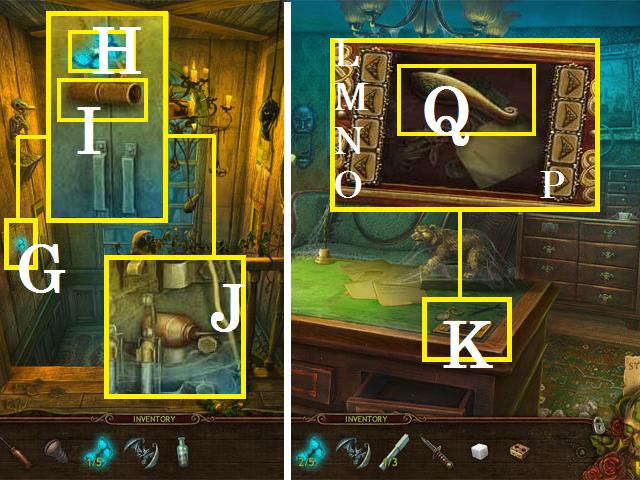
- Zoom into the panel (G). Pick up the BUTTERFLY (H).
- Place the SCREW LOCK KEY in the lock (I).
- Pick up the OIL CAN (J).
- Return to the study.
- Zoom into the corner of the desk (K). Move the paper and place the MECHANISM PIECE.
- Hit the buttons in the following sequence: (P), (L), (M) five times, (N) four times, and (O) four times.
- Pick up the WINDOW HANDLE (Q).
- Back up one scene.
- Zoom into the window.
- Place the WINDOW HANDLE (R) and open the window.
Chapter 2: Discovering the Graveyard
- Go through the window to the tree house.
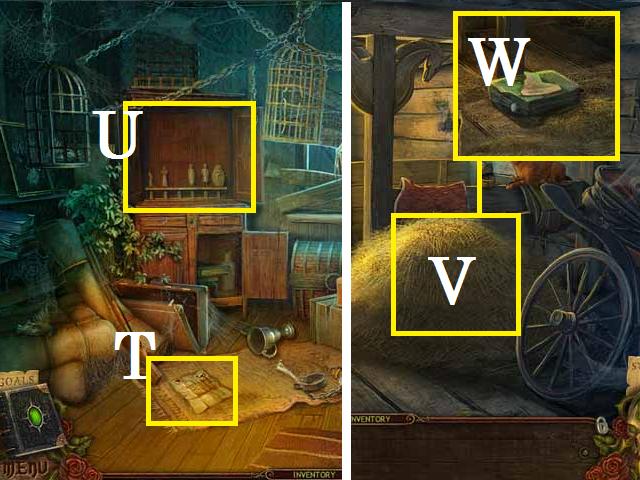
- Zoom into the album (S).
- Pick up the BUTTERFLY (T).
- Flip through the pages and pick up the drawing piece (U).
- Cut the rope on the ladder (V) with the KNIFE.
- Go down the rope ladder.
- Move forward into the graveyard.
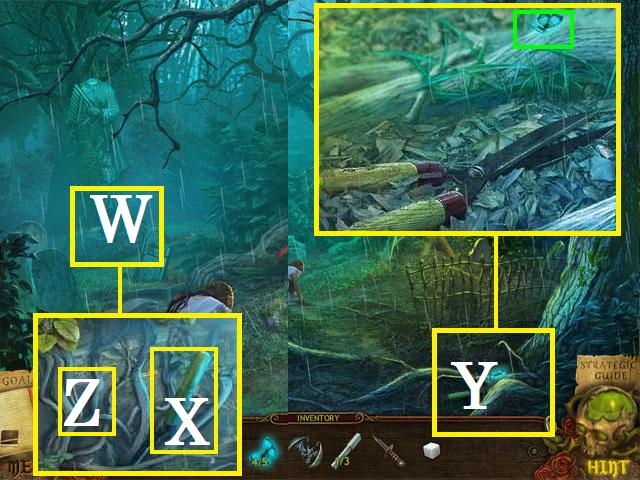
- Zoom into the statue (W).
- Pick up the SHEARS PART (X).
- Back up one scene.
- Zoom into the SHEARS (Y); place the SHEARS PART and the SCREW as shown in the screenshot.
- Tighten the SCREW with the SCREWDRIVER.
- Pick up the completed SHEARS.
- Pick up the BUTTERFLY (green).
- Move back to the graveyard.
- Cut the roots (Z) from the statue's base using the SHEARS.
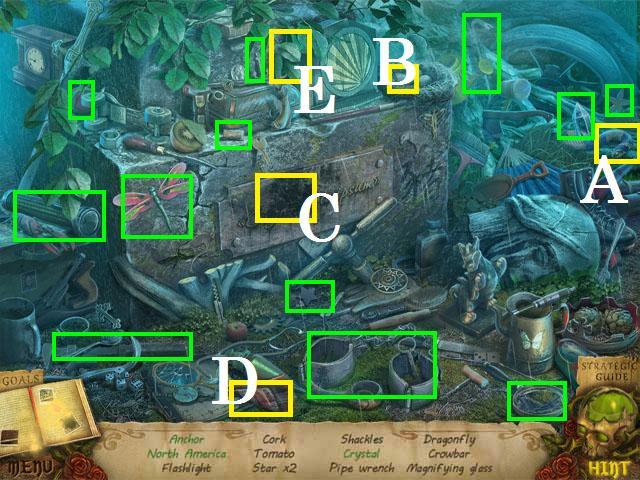
- Zoom into the sparkles to play a HOS.
- Feed the snake (A) an egg (B) to free the crystal.
- Clean the dirt off of North America (C) with the rag (D).
- Move the vine (E) to reveal the anchor.
- Receive the CROWBAR.
- Back up one scene.
- Open the crate (F) with the CROWBAR.
- Pick up the SAW HANDLE (G).
- Climb back up into the tree house.
- Place the SAW HANDLE on the SAW (H).
- Use the OIL CAN on the SAW and pick it up.
- Return to the top of the stairs.
- Pry open the board (I) with the CROWBAR.
- Pick up the LOCK PIECE (J) and the piece of drawing (green).
- Move to the right.
- Zoom into the door (K).
- Use the SAW on the board (L).
- Zoom into the open door.
- Pick up the last BUTTERFLY (M) and the paper (N).
- Unscrew the LANTERN top (O).
- Place the BUTTERFLIES in the LANTERN and replace the lid.
- Pick up the LANTERN.
- Back up one scene and go down the stairs.
- Place the LANTERN on the steps.
- Move forward to the downstairs hallway.
- Take a left down the hall to the back door.
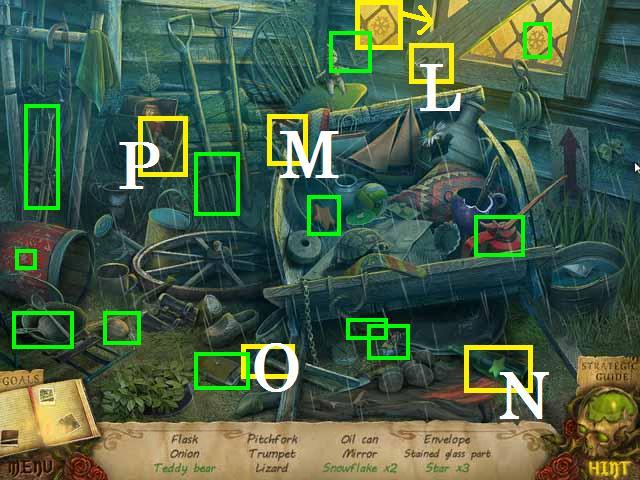
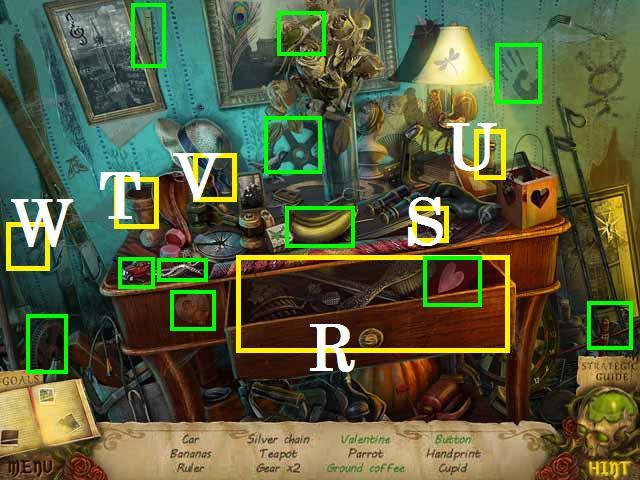
- Zoom into the sparkles to play a HOS.
- Place the three (blue) candles on the candelabra (P).
- Rub the lamp (Q) to reveal the genie's turban.
- Receive the DOOR KNOB.

- Cut open the bear (R) with the KNIFE.
- Pick up the SPOKE (S).
- Back up one scene and move forward into the dining room.
- Pick up the drawing piece (T) and the RAG (U).
- Zoom into the door (V).
- Place the SPOKE in the lock as shown in the screenshot.
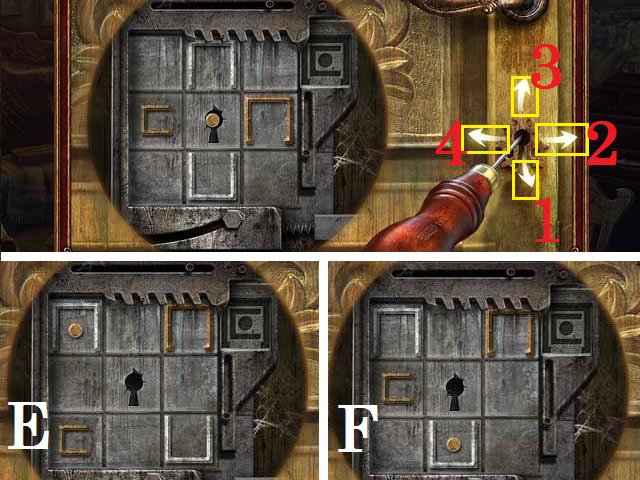
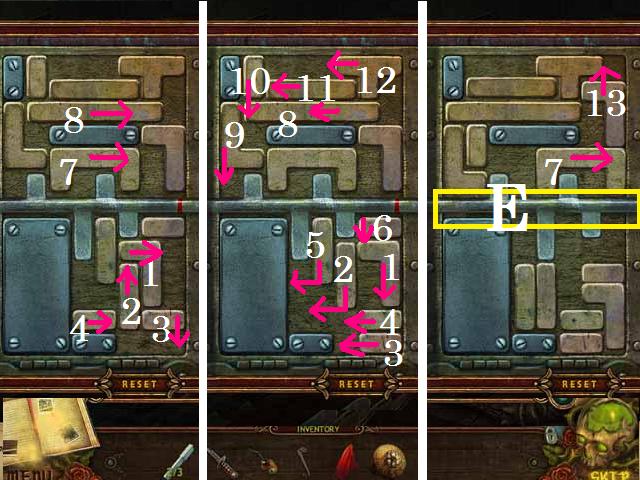
- Move the lock pieces to the arrangement shown in the screenshot (E) by pushing the arrows in the following sequence: down (1), right (2), up (3), up, down, left (4), left, down, right, up, up, and left.
- Use the following sequence to get from (E) to (F): down, right, down, left, up, right, right, down, and left.
- Use the following sequence to get to arrangement (G): up, left, up, right, down, down, and right.
- From position (G); move all the way up. Pull the door handle (blue).
- Enter the library.
- Pick up the PIANO KEY (W).
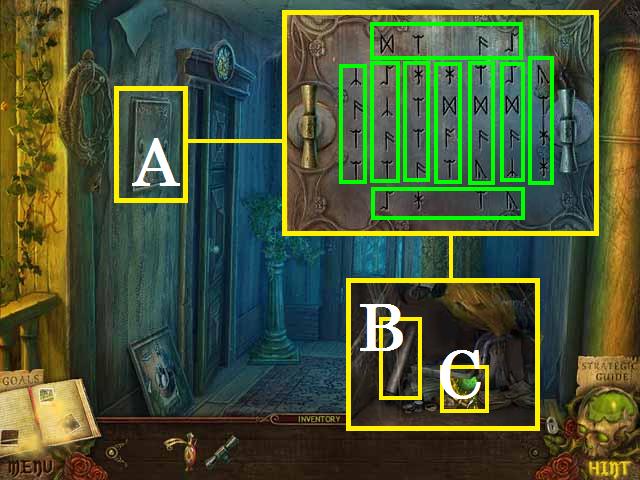
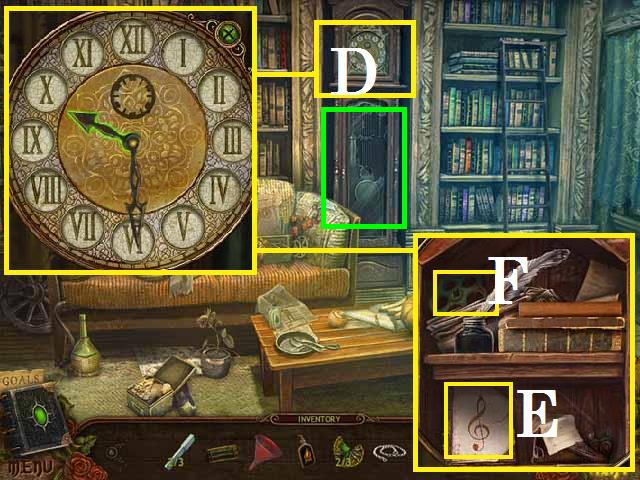
- Zoom into the clock (X). Remove all four nails (green) with the CROWBAR and collect them.
- Zoom into the book (Y). Flip through the pages and pick up the note. Flip through two more pages and pick up the piece of drawing.
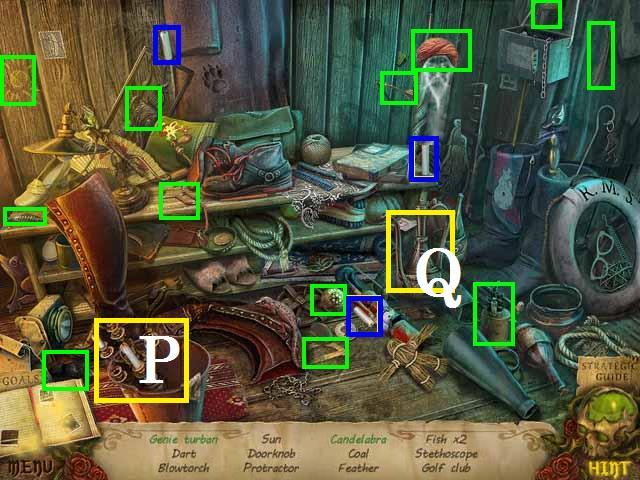
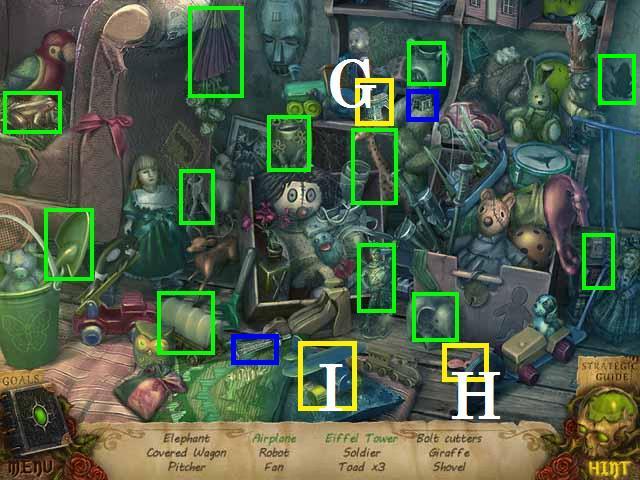
- Zoom into the sparkles to play a HOS.
- Open the box (Z) to reveal the dragon.
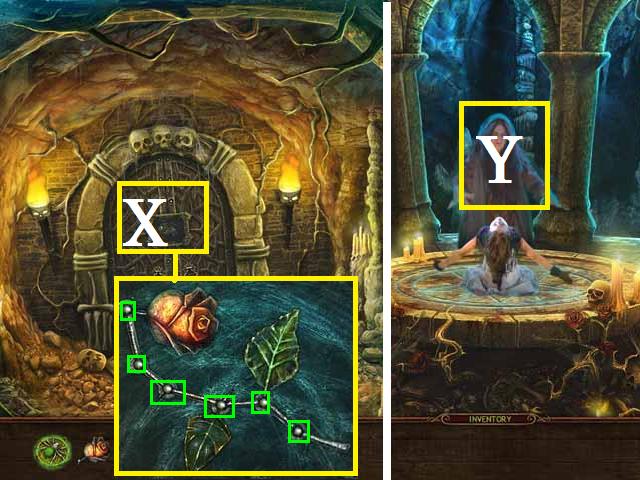
- Pour the poison (A) in the rose pot (B) to get the faded roses and reveal the compass.
- Receive the KNIGHT.

- Back up to the hallway.
- Zoom into the basement door (C).
- Place the GARGOYLE and the KNIGHT in the lock (D).
- Slide (1) to the right, (2) up, (3) down, (4) to the right.
- Slide (5) then (2) down and to the left.
- Slide (4) and (3) to the left. Slide (1) and (6) down.
- Slide (7) and (8) to the right. Slide the bar (E) to the right.
- Slide (9) and (10) down. Slide (8), (11), and (12) over to the left.
- Slide (13) up and (7) over to the right.
- Slide the bar (E) to the right.
- Enter the basement.
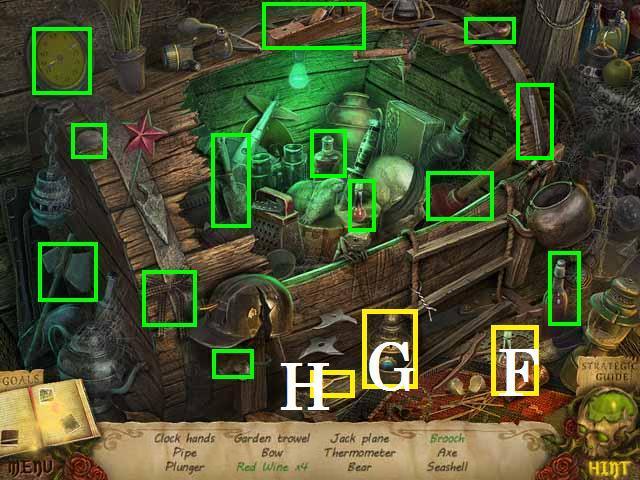
- Zoom into the sparkles to play a HOS.
- Open the case (F) to reveal the wine.
- Unlock the urn (G) with the KEY (H) to reveal the brooch.
- Receive the CLOCK ARROW.
- Place the RAG in the puddle (I) and pick it back up to receive the WET RAG.
- Return to the back door.
- Wipe off the chalk mark (J) from the door using the WET RAG.
- Turn the door handle.
Chapter 3: Discovering the Backyard
- Go out to the back porch.
- Pick up the ROPE LADDER (K).
- Take a left towards the barn. Move forward towards the barn.
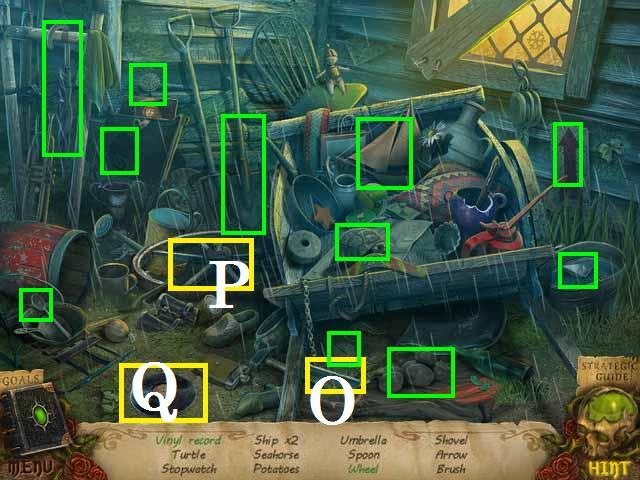
- Zoom into the sparkles to play a HOS.
- Remove the board (L) with the crowbar (M) to reveal the snowflake.
- Break the bottle (N) with the hammer (O) to get the star.
- Open the magazine case (P) to reveal the bear.
- Receive the STAINED-GLASS PART.
- Zoom into the cart (Q).
- Pick up the HAMMER (R).
- Back up one scene.
- Zoom into the window (S).
- Remove the pin (T) with the HAMMER.
- Climb through the window to the bricked up room.
- Zoom into the sparkles to play a HOS.
- Turn on the radio (U) to reveal the music notes.
- Receive the KNOB.
- Pick up the paper (V).
- Pick up the piece of drawing (W).
- Return to the back door.
- Zoom into the toolbox (X). Place the LOCK PIECE in the slot (Y).
- Hit the buttons in the following order: 3, 2, 1, 4, 5 and push the LOCK PIECE.
- Pick up the FORMED KEY (Z).
- Back up one scene.
- Zoom into the crate (A).
- Place the FORMED KEY in the crates lock (B) and turn the key.
- Pick up the SPRAY (C).
- Move to the library.
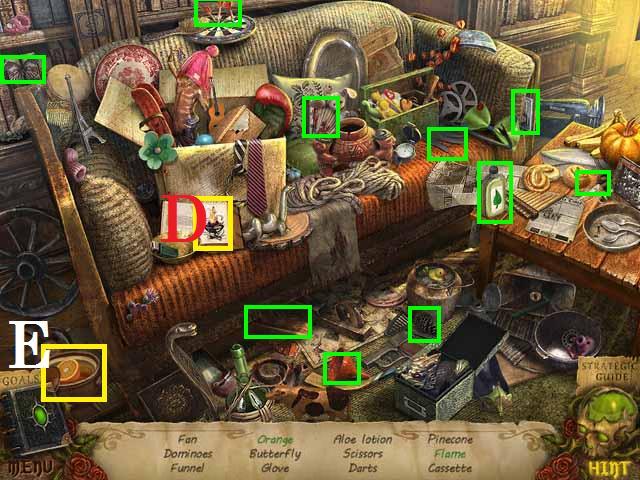
- Zoom into the sparkles to play a HOS.
- Tap the book (D) to reveal the flame.
- Open the pot (E) to reveal the orange.
- Receive the FUNNEL.
- Return to the upstairs landing just below the attic.
- Zoom into the door (F).
- HAMMER the NAILS in the lock and place the DOOR KNOB as shown in the screenshot.
- Hit the buttons sequentially: 1-12.
- Enter the bedroom.
- Zoom into the sparkles to play a HOS.
- Place the two tower pieces (blue) (small short one first) on the base (G).
- Place the propeller (H) on the plane (I) to complete it.
- Receive the NIPPERS.
- Return to the barn.
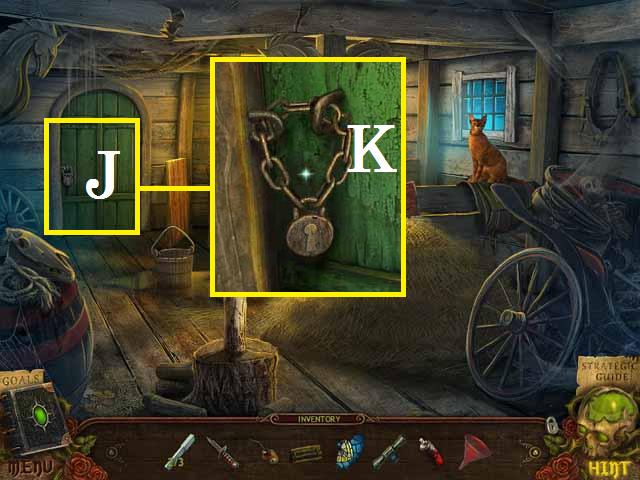
- Zoom into the door (J).
- Cut the chain (K) with the NIPPERS.
- Push the door open.
- Enter the workshop.
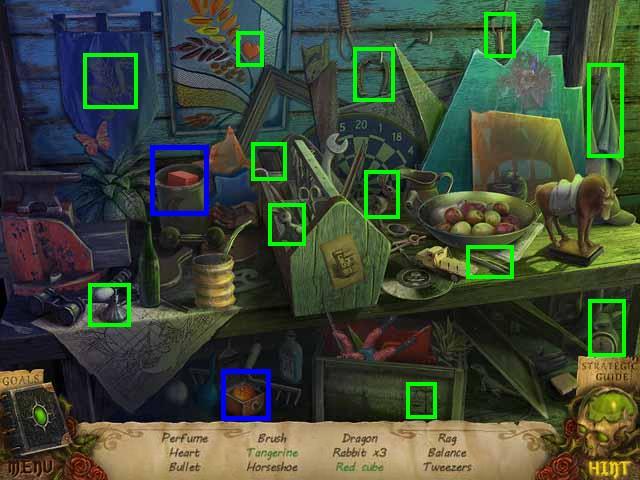
- Zoom into the sparkles to play a HOS.
- Open the two boxes (blue) to reveal the tangerine and the red cube.
- Receive the TWEEZERS.
- Pick up the IGNITION FLUID (L).
- Return to the upstairs bedroom.
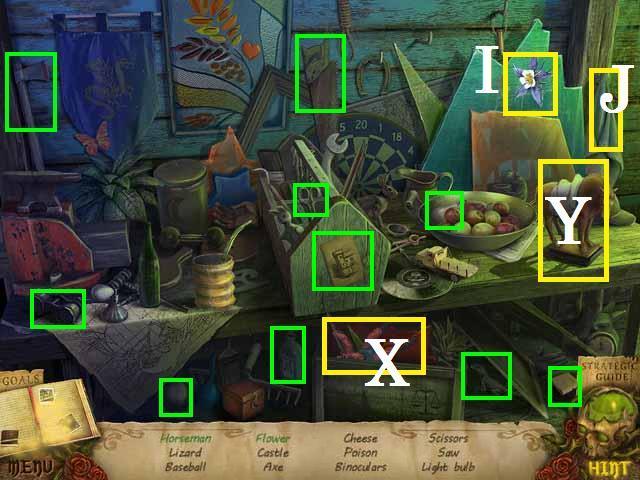
- Zoom into the drawer (M). Use the OIL CAN on the dials (N).
- Spin the dials to read 7285 and open the drawer.
- Pick up the AMULET FRAGMENT (O) and the piece of drawing.
- Open the hidden compartment (P) with the TWEEZERS. Pick up the PUZZLE PIECE (Q).
- Move back two scenes towards the downstairs.
- Zoom into the sparkles to play a HOS.
- Open the drawer (R) to reveal the valentine.
- Place the coffee (S) in the mortar (T) and grind with the pestle (U).
- Cut the button (V) off with the scissors (W).
- Receive the SILVER CHAIN.
- Return to the barn.
- Enter the workshop and zoom into the sparkles to play a HOS.
- Place the horseman (X) on the horse (Y).
- Clean dust (I) with the rag (J) to reveal the flower.
- Receive the AXE.
- Zoom into the box (Z).
- Place the PUZZLE PIECE.
- Assemble the picture as shown in the screen shot.
- Spin the picture to open the lid.
- Pick up the piece of drawing and the STAINED-GLASS PART (A).
- Move back one scene.
- Chop and collect the WOOD (B) with the AXE.
- Return to the hall at the top of the stairs.
- Take a right.
- Place the two STAINED-GLASS PARTS above the door (C).
- Enter the junk room.
- Zoom into the sparkles to play a HOS.
- Lift the sunglasses (D) to reveal the glass eye.
- The star is on the lampshade (E).
- Return to the study.
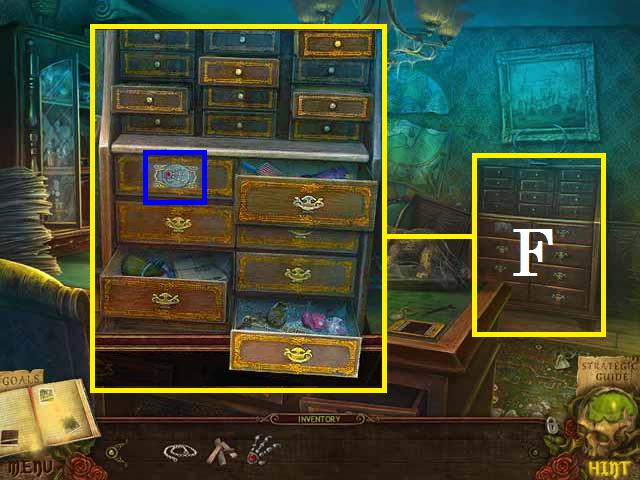
- Zoom into the chest of drawers (F).
- Place the BIRD'S PAW (blue) and spin it once.
- Open the drawers as shown in the screenshot.
Chapter 4: The Witches' Secret Room
- Go through the now open passage to the witches secret room.
- SPRAY the bugs (green).
- Move the chair (G).
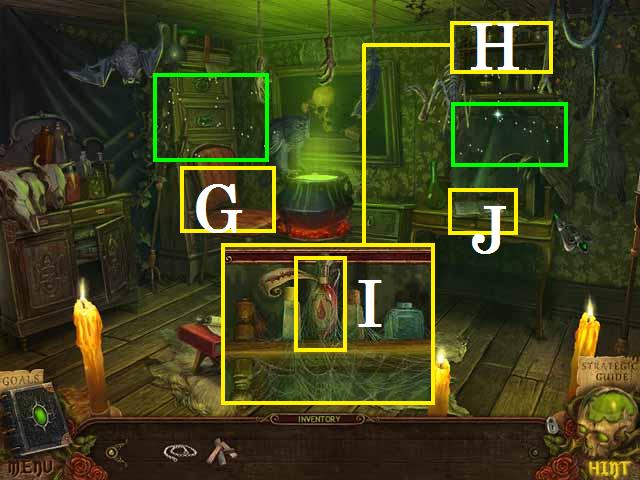
- Zoom into the shelf (H).
- Remove the cobwebs with your finger and pick up the BLOOD (I).
- Zoom into the book (J).
- Flip through the pages and pick up the piece of drawing.
- Exit back one scene.
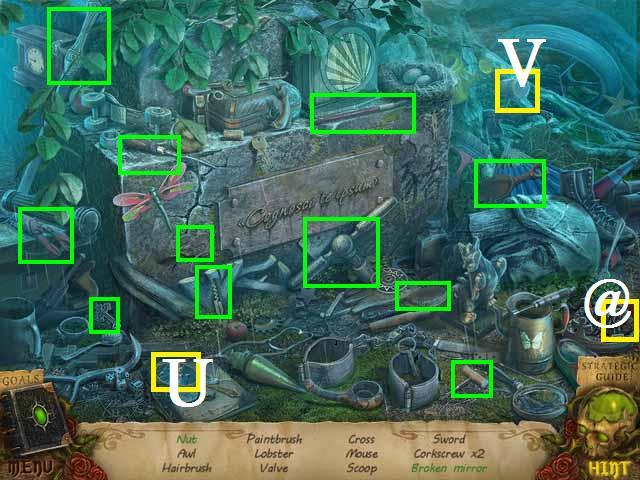
- Zoom into the sparkles to play a HOS.
- Paint the anchor (K) red with the paintbrush (L).
- Light the mechanism (M) with the matches (N).
- Receive the CAT FOOD.
- Move to the outside of the barn.
- Zoom into the sparkles to play a HOS.
- Place the spoke (O) on the wheel (P).
- Move the vines over the vinyl record (Q).
- Receive the SHOVEL.
- Enter the barn.
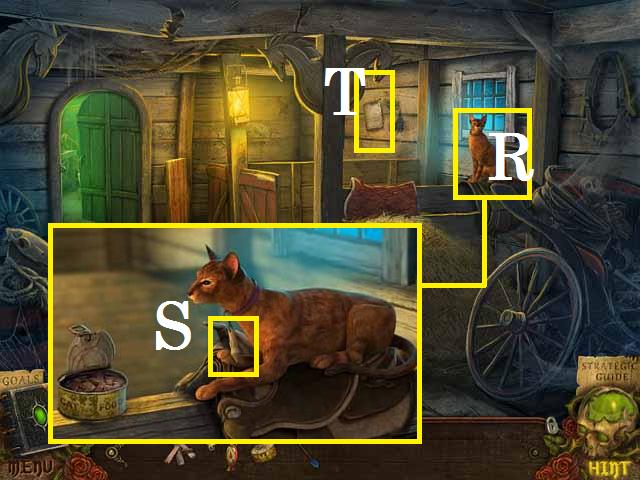
- Give the cat (R) the CAT FOOD.
- Pick up the CHALK (S).
- Pick up the paper (T).
- Return to the graveyard.
- Zoom into the sparkles to play a HOS.
- Smash the mirror (U) with the hammer (V).
- Open on the pinecone (@) to reveal the nut.
- Receive the GRAVE KEY.
- SHOVEL the grave (W).
- Unlock the casket (X) with the GRAVE KEY by turning is two times.
- Open the lid.
- Cut the pocket (Y) open with the KNIFE.
- Pick up the KNOB (Z).
- Return to the hallway outside of the junk room upstairs.
- Place both KNOBS on the safe (A), as shown in the screenshot, and spin them.
- Remove the runes in groups of four, one solution is shown circled in green in the screenshot.
- Pick up the CLOCK WEIGHT (B) and the AMULET FRAGMENT (C).
- Return to the library.
- Hang the CLOCK WEIGHT (green).
- Break the clocks face (D) with the HAMMER.
- Place the CLOCK ARROW and set the time to 10:30 as shown in the screenshot.
- Zoom back into the clock; pick up the SHEET MUSIC (E) and VALVE (F).

- Return to the back door.
- Zoom into the sparkles to play a HOS.
- Open the case (G) to reveal the tape.
- Tap the straw (H) several times to make the straw doll.
- Receive the MATCHES.
- Return to the dining room.
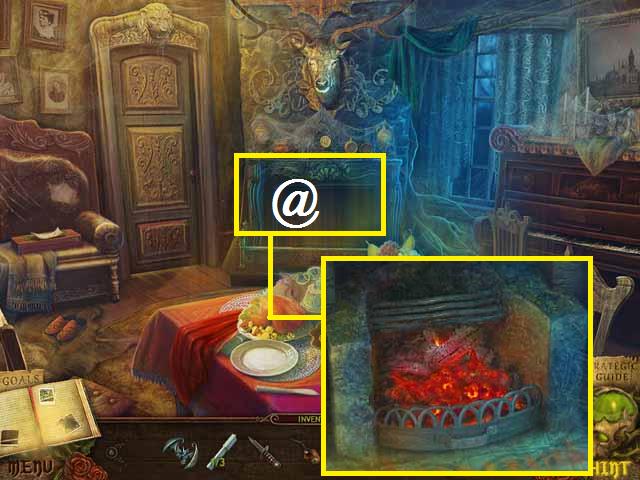
- Place the WOOD in the fire place (@) and douse with the IGNITION FLUID.
- Light the fire with the MATCHES.

- Go back to the bricked up room.
- Zoom into the sparkles to play a HOS.
- Place the two roses (blue) in the vase (I) to get the rose bouquet.
- Move the blanket (J) to reveal the medallion.
- Receive the PITCHFORK STICK.
- Return to the basement.
- Place the PITCHFORK STICK on the base (K) and pick up the PITCHFORK.
- Zoom into the sparkles to play a HOS.
- Remove the wire (L) with the forceps (M).
- Place the lamp (N) on the miners helmet (O).
- Receive the SUN KEY.
- Go back to the junk room upstairs.
- Zoom into the sparkles to play a HOS.
- Cut the tie (P) with the scissors (Q).
- Place the hook (R) on the rope (S).
- Open the bag (D) to reveal the horse.
- Receive the PIANO KEY.
- Pick up the piece of drawing (T).
- Open the hutch (U) with the SUN KEY.
- Return to the Barn.
- Remove all of the straw (V) with the PITCHFORK.
- Pick up the piece of drawing and GAS CAN (W).
- Return to the back porch. Take a right towards the well. Move forward one scene to the well shack.
- Pick up the CAR KEY (X).
- Move back one scene.
- Draw with the chalk on the tree (Y).
- Place the FUNNEL in the gas tank (Z) and fill with the GAS CAN.
- Remove the FUNNEL and close the door.
- Open the passenger side door (A) and zoom into the car.
- Place the CAR KEY in the ignition (B) and turn it.
- Push the trunk button (C).
- Move forward by pushing on the windshield.
- Exit the car.
- Zoom into the trunk (E); pick up the STRAP (F) and JACK (G).
- Move back to outside of the barn.
- Zoom into the cart (H) and JACK it up.
- Pick up the HOSE (I).
- Return to the basement.
- Fix the pipes (J) with the HOSE.
- Turn the valve (blue).

- Return to the bricked up room.
- Place the VALVE on the sink (K).
- Turn the VALVE and pick up the PAN WITH WATER.
- Return to the dining room.
- Place the PIANO KEYS on the piano (L).
- Place the SHEET MUSIC on the ledge (M).
- Hit the keys in the following sequence: 1, 2, 3, 4, 5, 2, and 3.
- Pick up the AMULET FRAGMENT (N).
- Place the PAN WITH WATER in the fire (O) and remove the lid.
- Pour the BLOOD in the pan.
- Place the SILVER CHAIN and the in the pan.
- Place the AMULET FRAGMENTS in the pan and receive the AMULET.
- Pick up the pan as the PAN WITH MAGIC WATER.
- Return to the upstairs bedroom.
- Zoom into the sparkles to play a HOS.
- Open the bag (P) to reveal the pearl.
- Tap the ribbon several times to form the bow (Q).
- Receive the STATUE.
- Clean the doll (R) with the PAN WITH MAGIC WATER.
- Pick up the METAL ROSE (S).
- Move to the junk room.
- Zoom back into the hutch (T) and place the STATUE.
- Rearrange the statues as shown in the screenshot.
- Pick up the ROSE LEAF (U).
- Return to the well.
- Open the lid and hang the ROPE LADDER above the well (V).
- Go down the well.
- Move forward.
- Fix the bridge (W) with the STRAP.
- Move forward again.
- Place the METAL ROSE and ROSE LEAF on the door (X).
- Push the knobs (green) to arrange the rose as shown in the screenshot.
- Enter the dungeon.
- Place the AMULET on the witch (Y).
- Congratulations, you have completed Witches' Legacy: The Charleston Curse
Created at: 2012-02-16