

Walkthrough Menu
- General Tips
- Chapter 1: The Centaur Forest
- Chapter 2: The Forest Fork
- Chapter 3: The Forest Patch
- Chapter 4: The Castle Entrance
- Chapter 5: The Golem Room
- Chapter 6: The Cure
- Chapter 7: The Stairs Room
General Tips
- This is the official guide for Awakening: The Redleaf Forest.
- This guide will not mention each time you have to zoom into a location; the screenshots will show each zoom scene.
- We will use the acronym HOP for Hidden-object puzzles. Interactive items will be color-coded.
- Use the map to travel to a location.
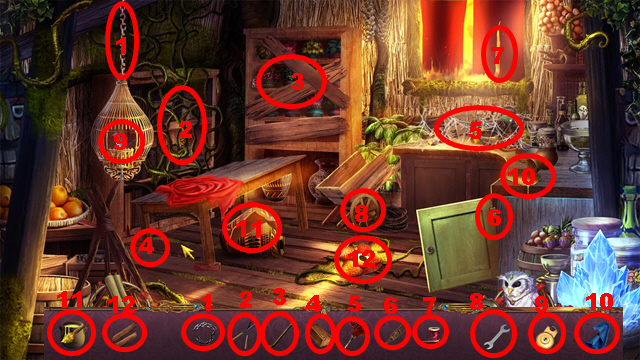
Chapter 1: The Centaur Forest
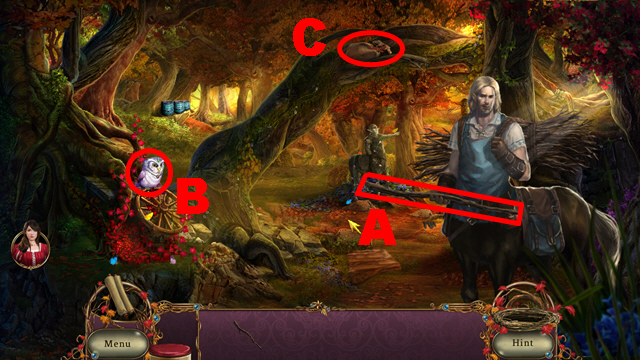
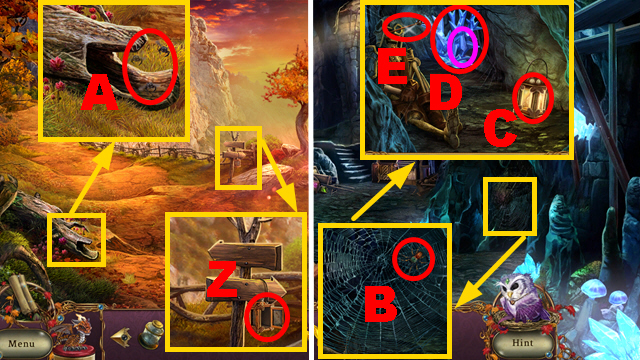
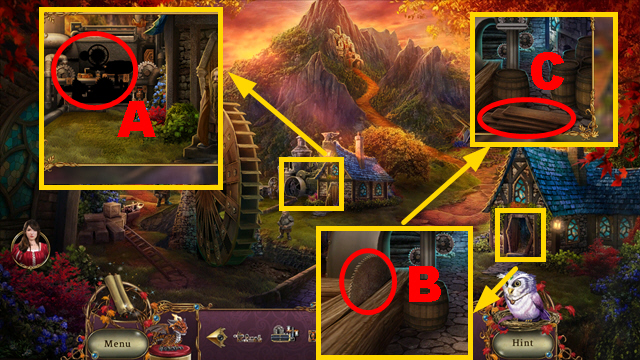
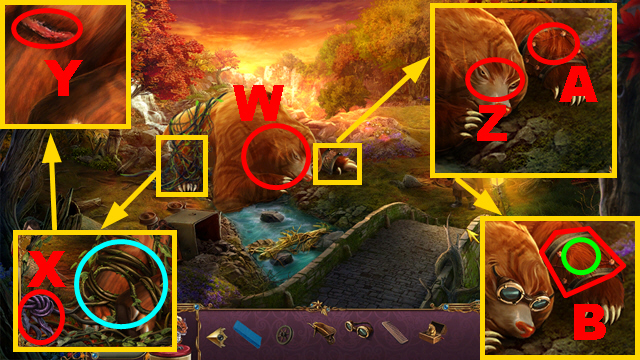
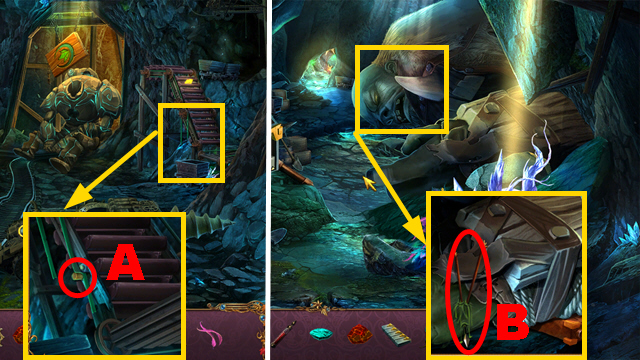
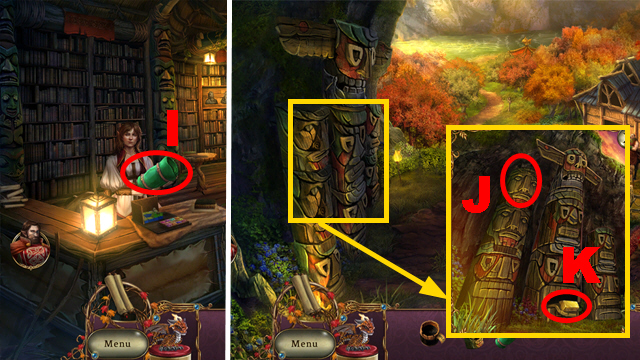
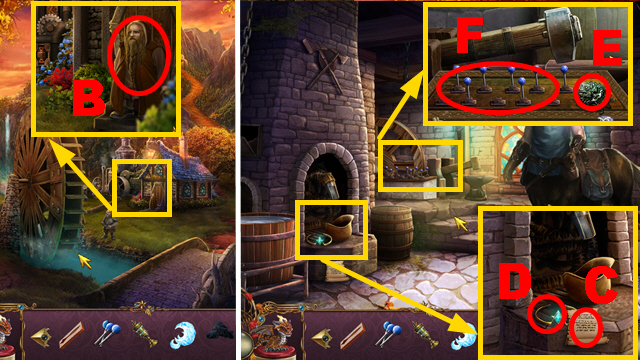
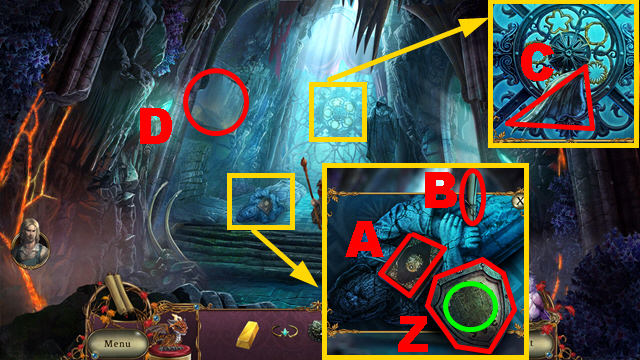
- Talk to the man; take the LONG STICK (A).
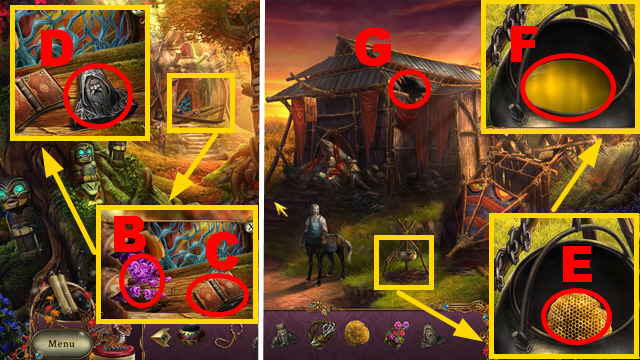
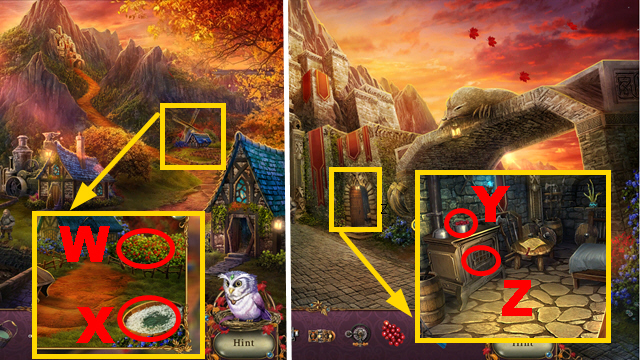
- Take the owl (B).
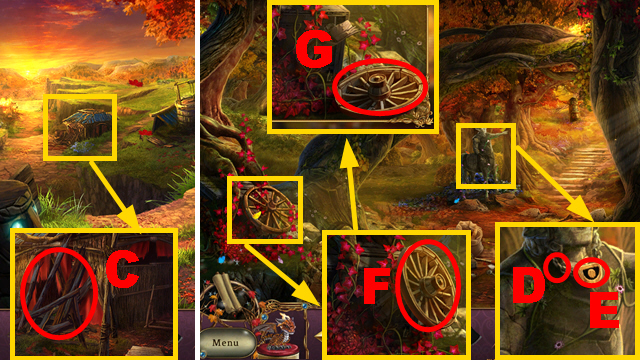
- Use the LONG STICK (C).
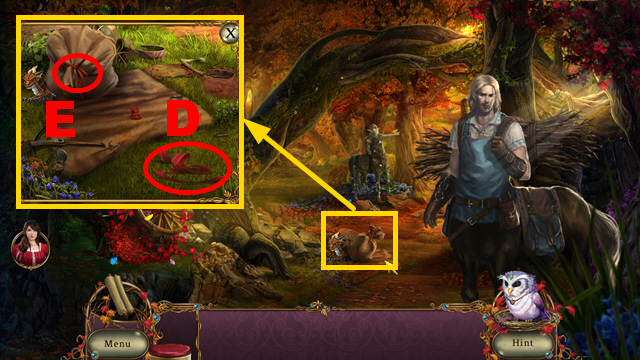
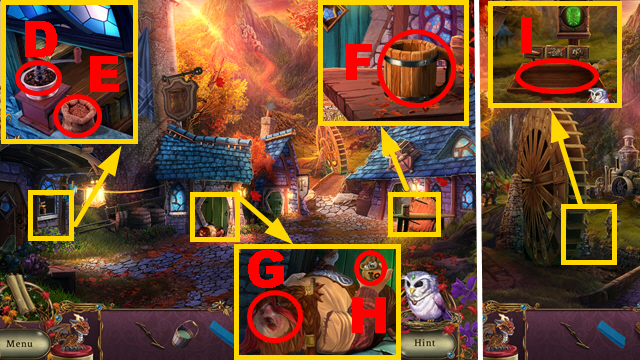
- Take the RIBBON (D).
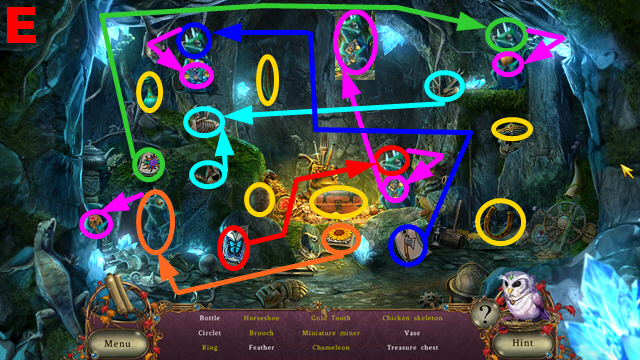
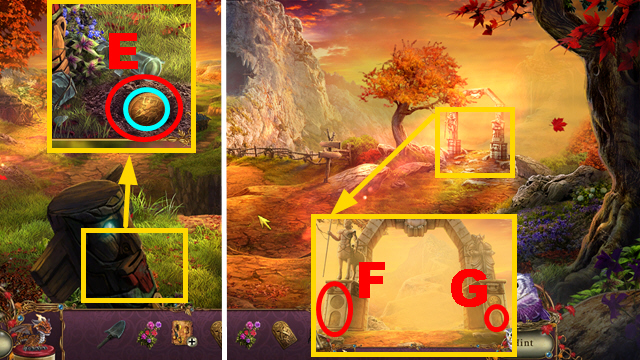
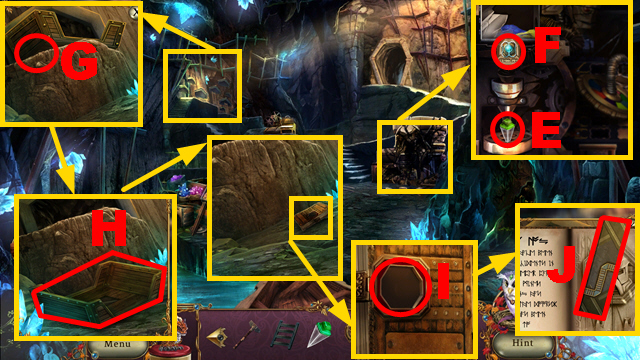
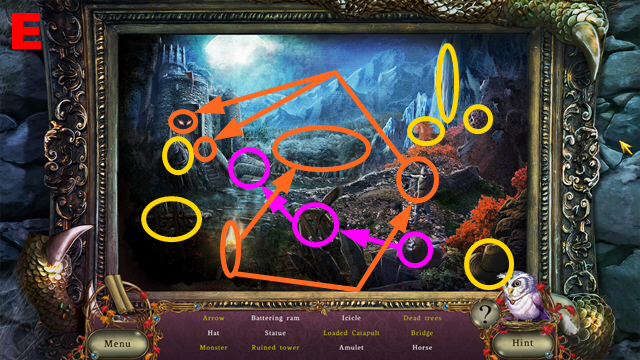
- Open the sack (E).
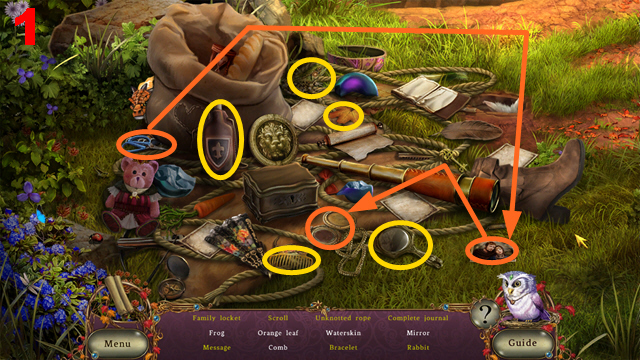
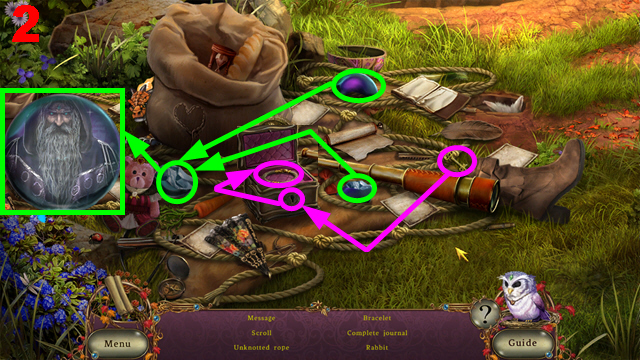
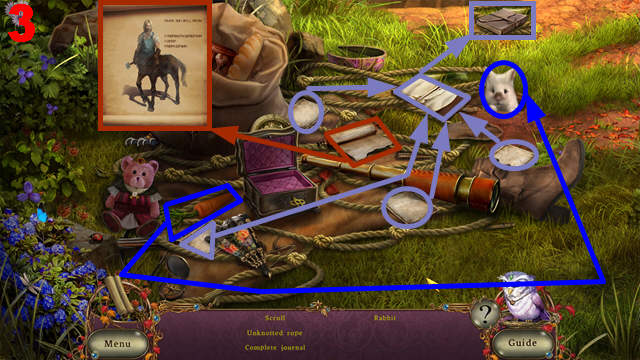
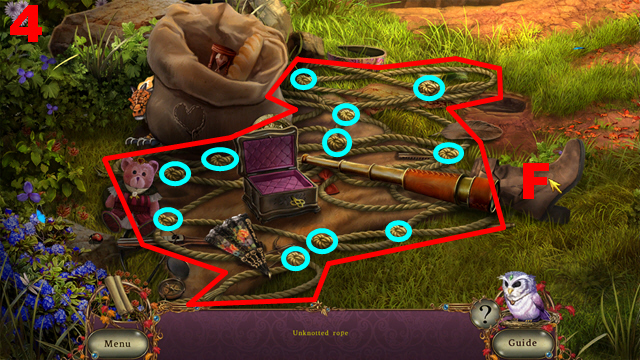
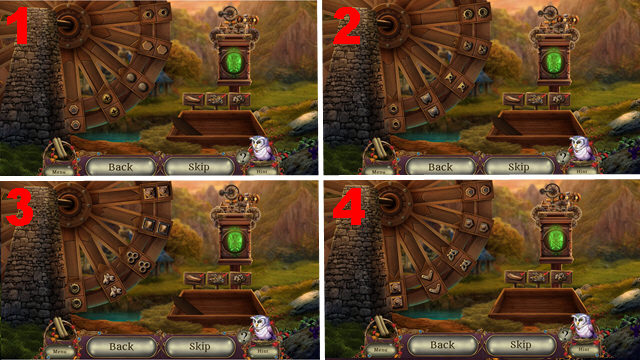
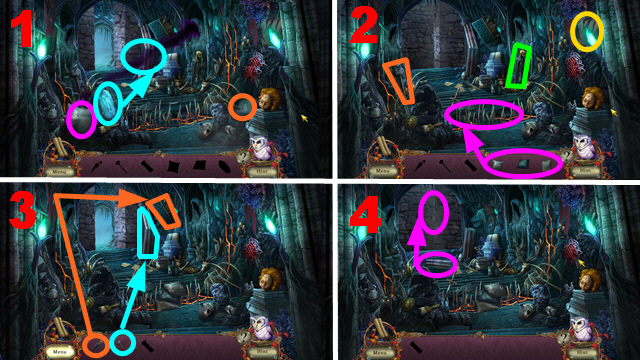
- Play the HOP.
- Solution: 1-4
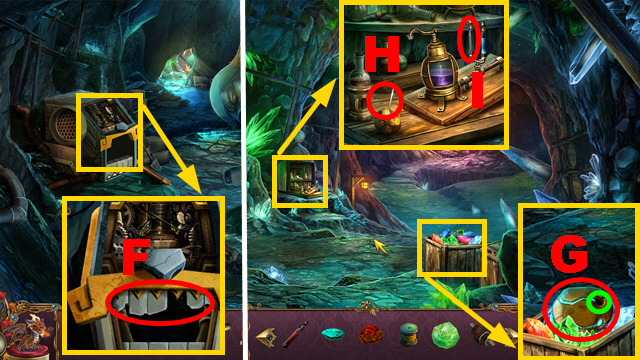
- You receive the ROPE (F).
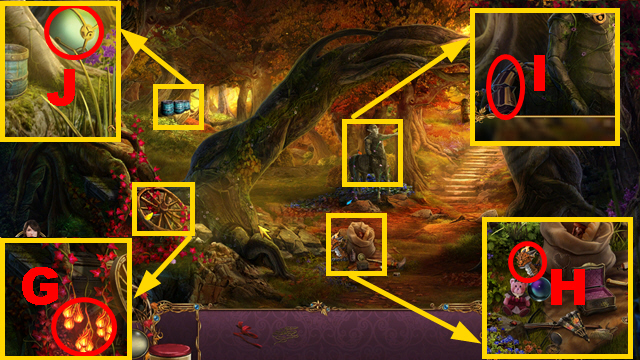
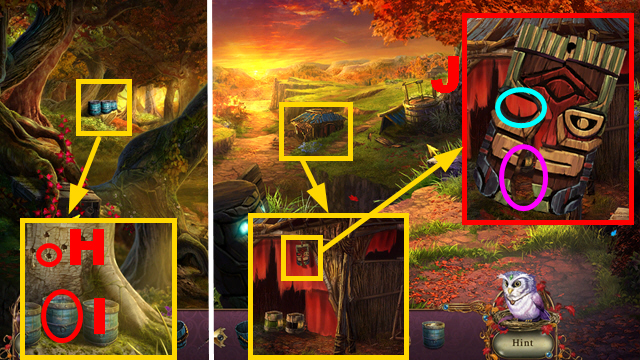
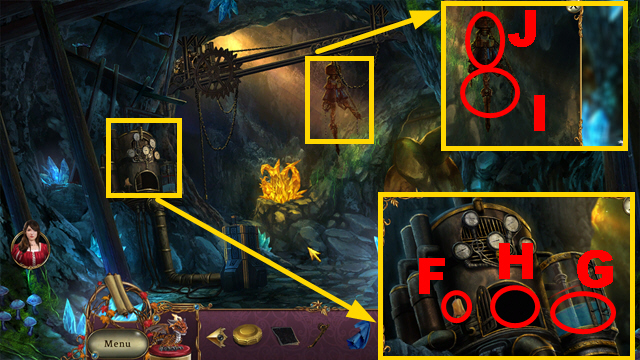
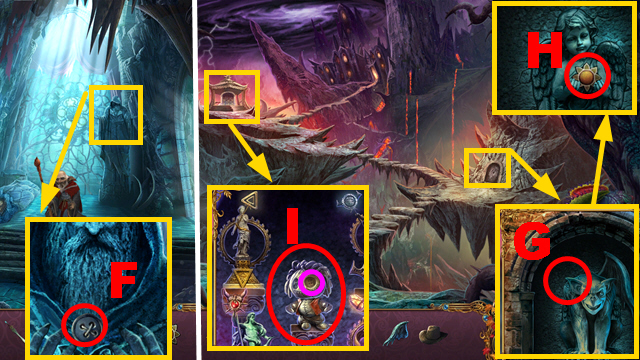
- Take the FIRE BERRIES (G).
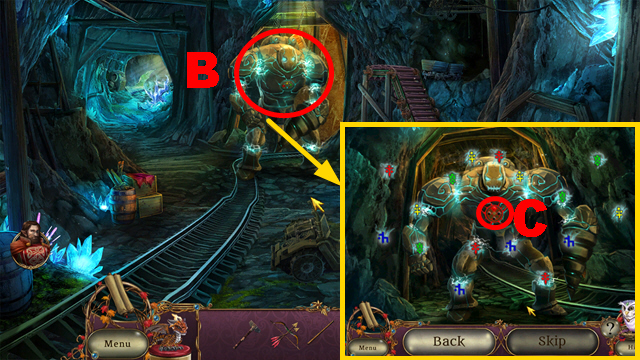
- Give the FIRE BERRIES to the dragon (H); take the dragon.
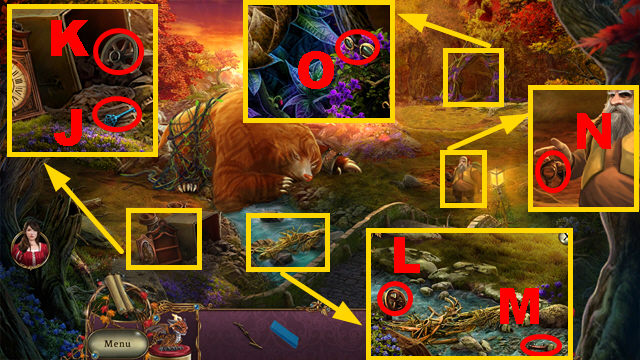
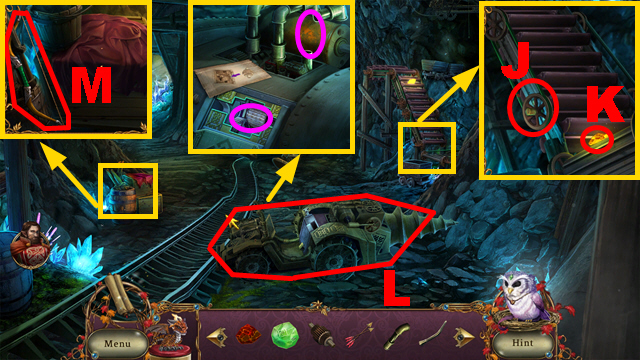
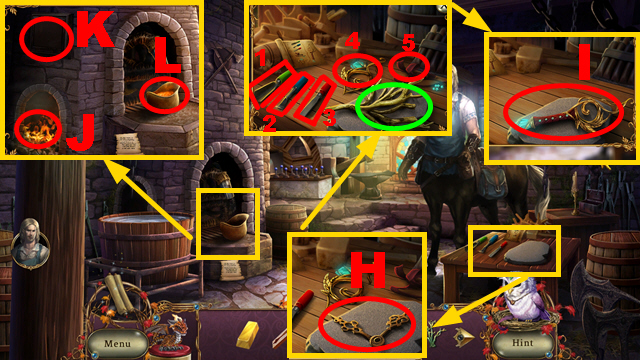
- Take 2 CLOCKWORK DRAGON PIECES (I) and (J).
- Turn right.
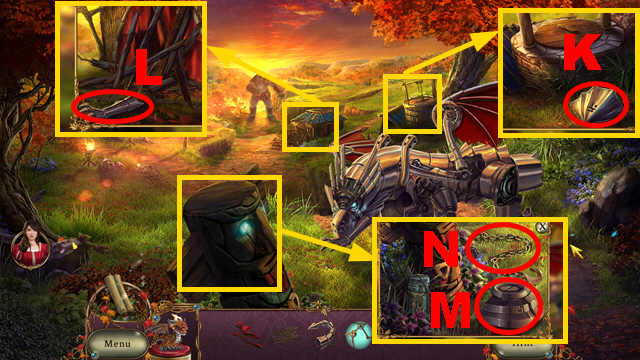
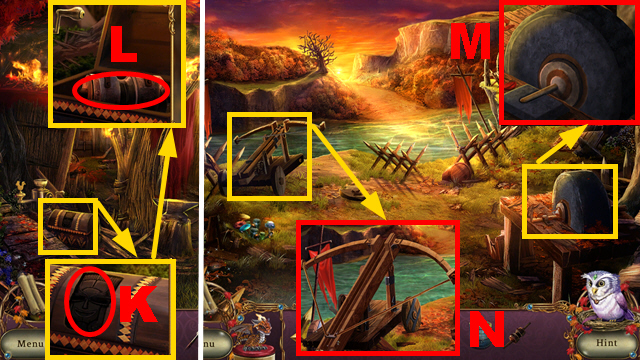
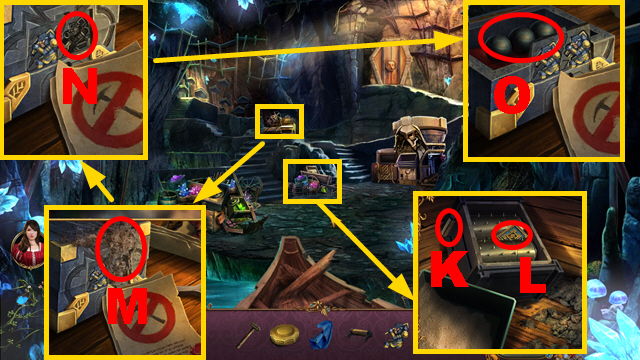
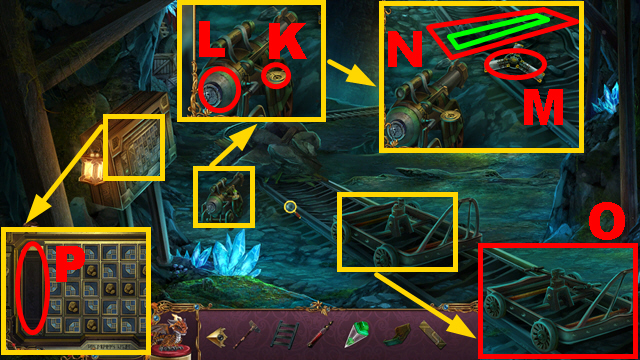
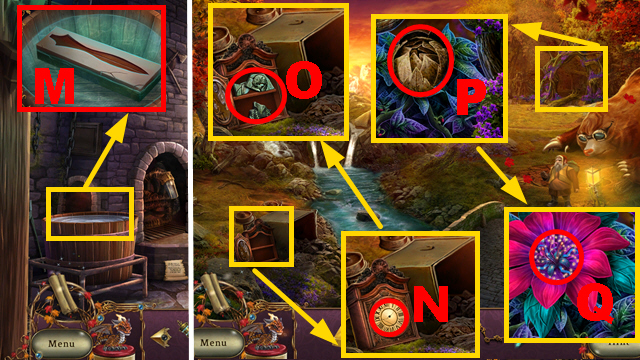
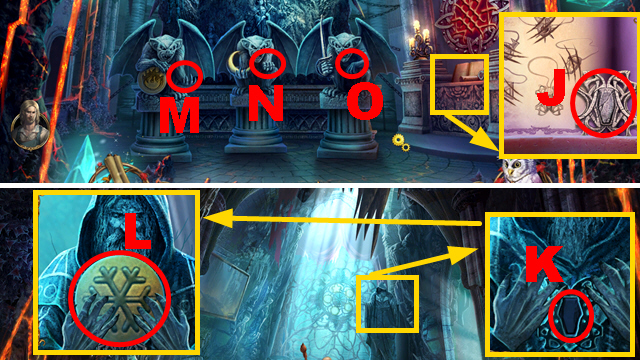
- Take 3 CLOCKWORK DRAGON PIECES (K), (L), and (M).
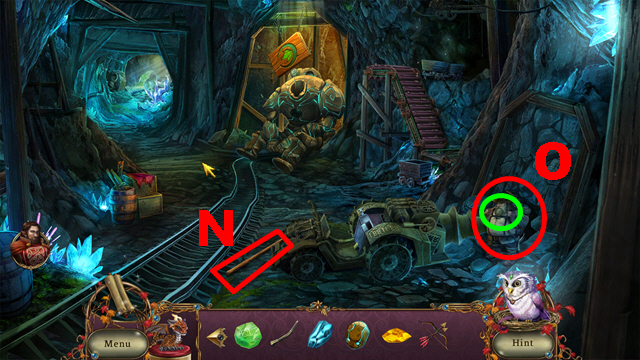
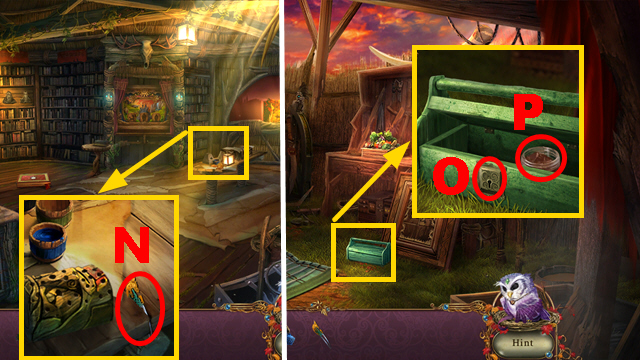
- Take the CHAINED HOOK (N).
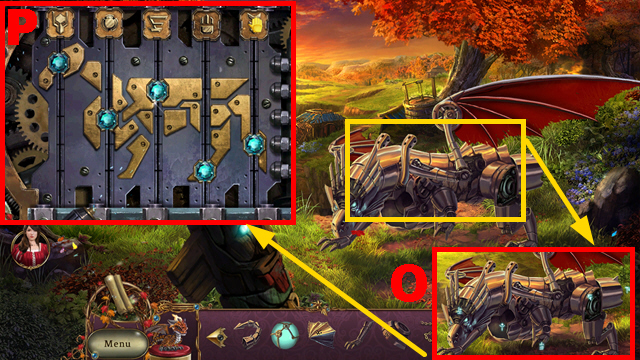
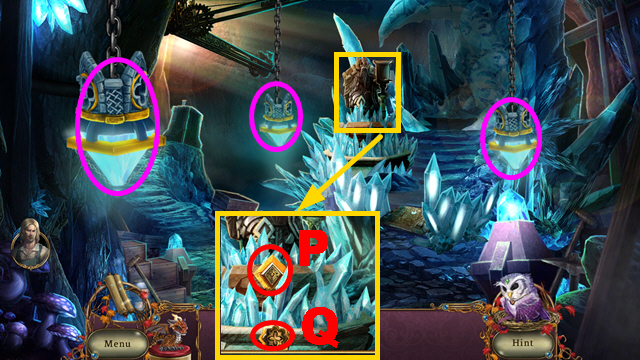
- Place 5 CLOCKWORK DRAGON PIECES (O).
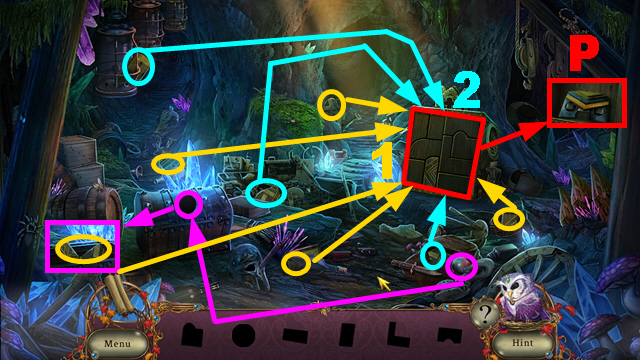
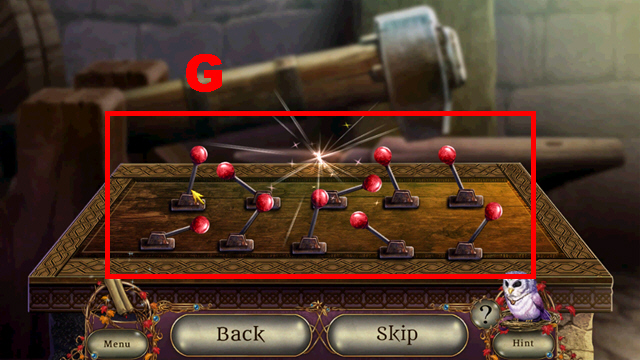
- Play the mini-game.
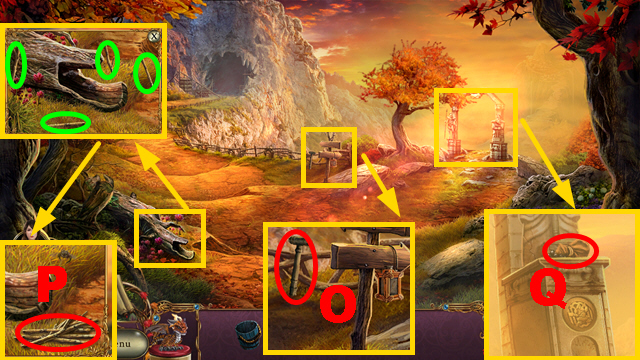
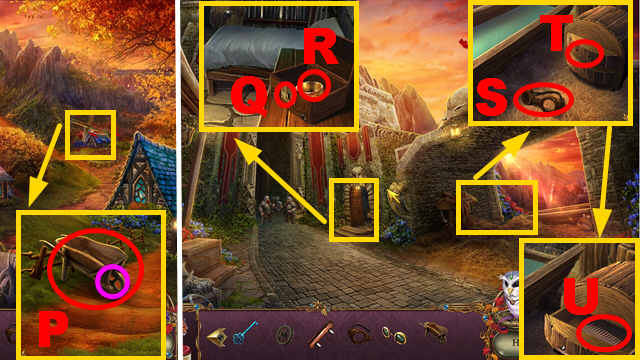
- Solution: (P).
- Move forward.
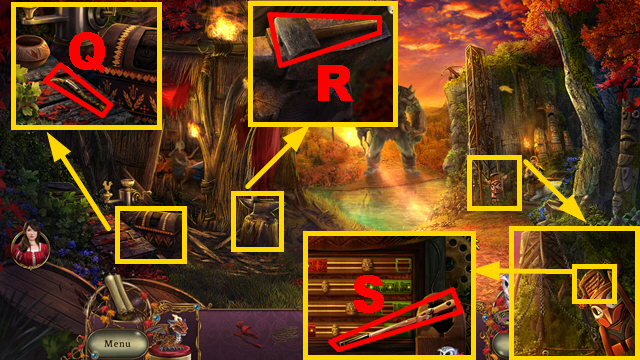
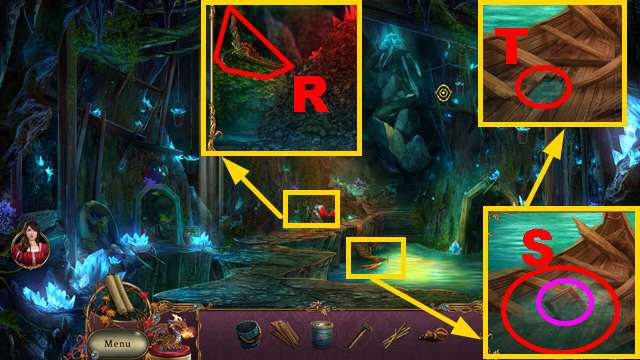
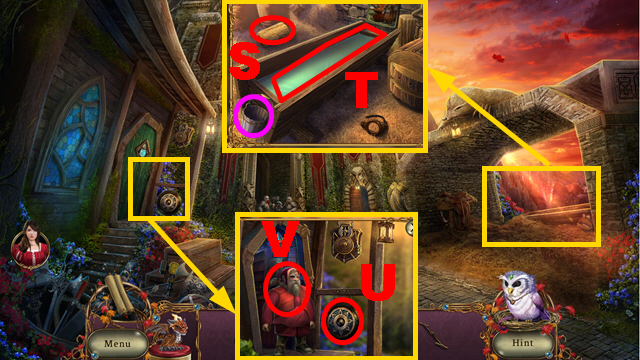
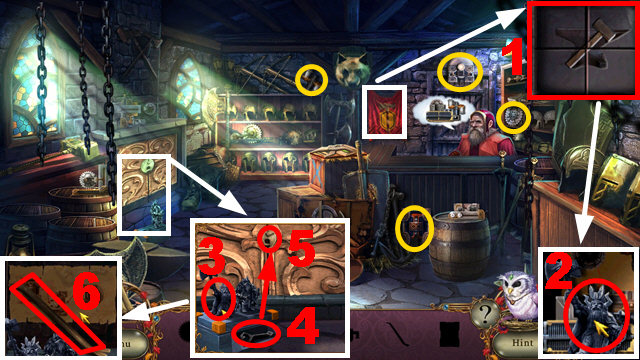
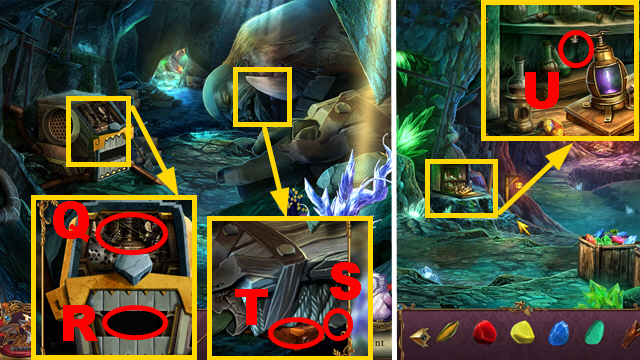
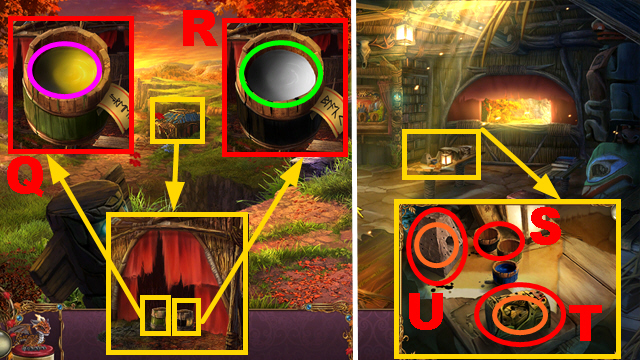
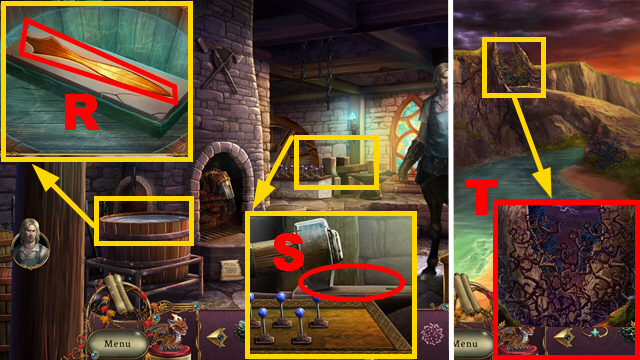
- Take the PAIL HANDLE (Q), HAMMER (R), and BOLT CUTTER HALF (S).
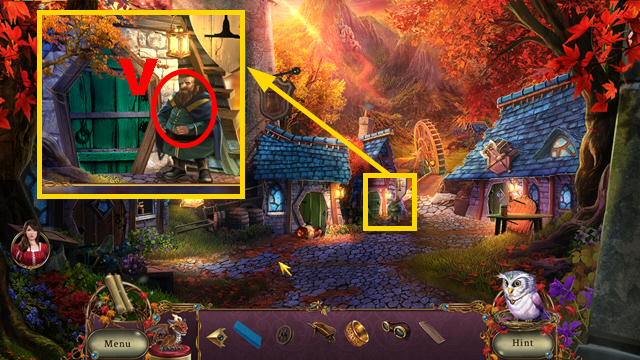
- Turn left.

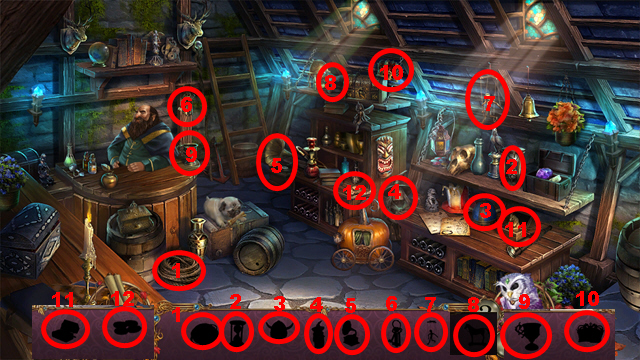
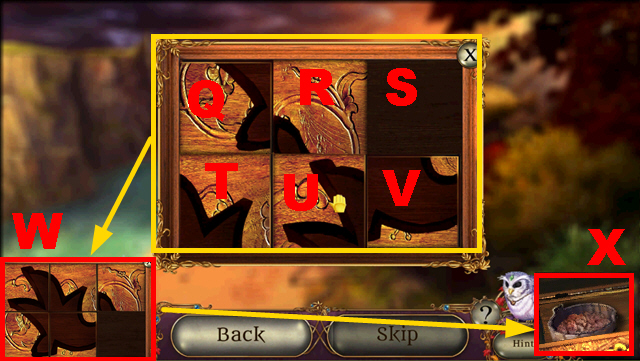
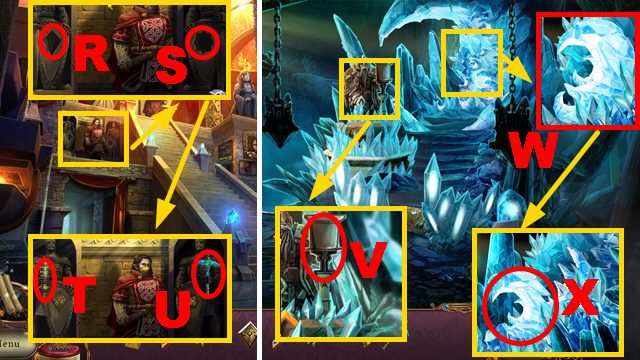
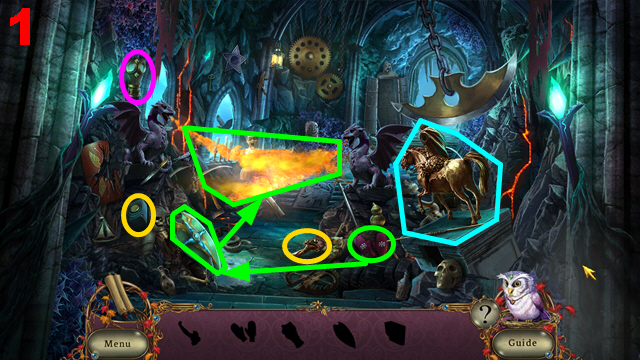
- Play the HOP.
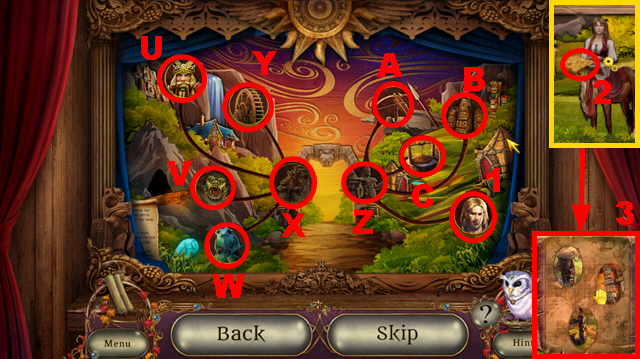
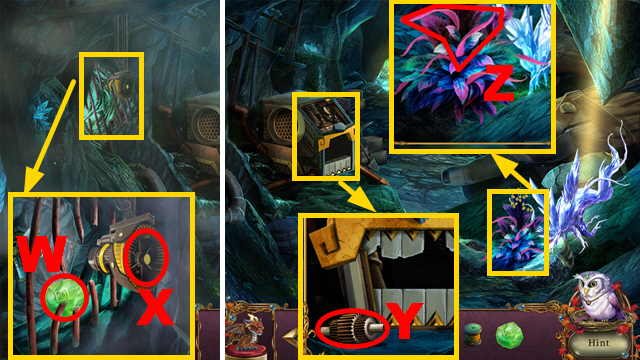
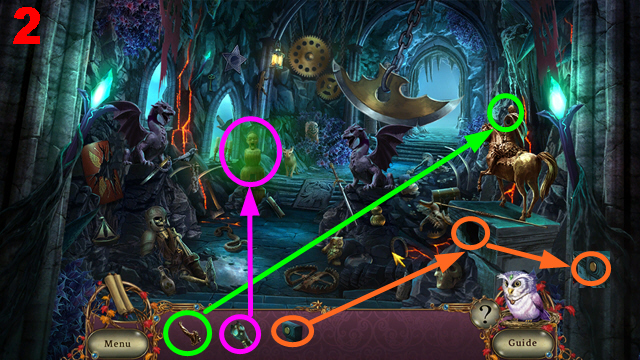
- Place the handle (T) on the oven (U).
- Use the tongs (orange) on the fire (V).
- Cut the rope (W) with the dagger (X); take the rope.
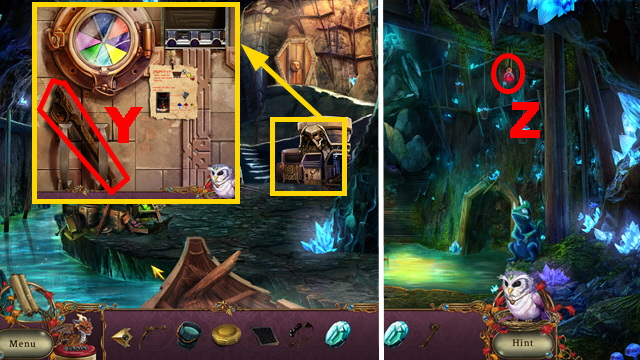
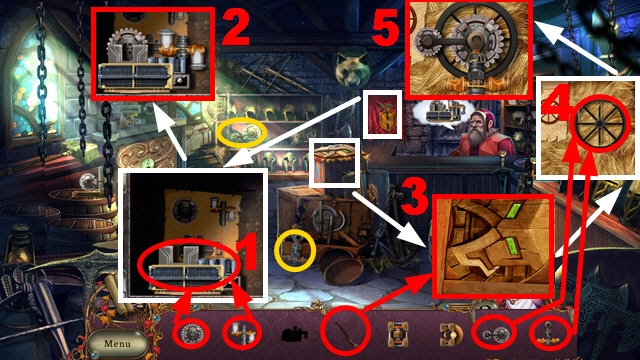
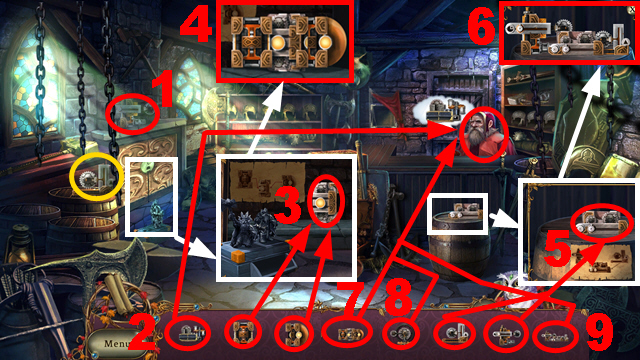
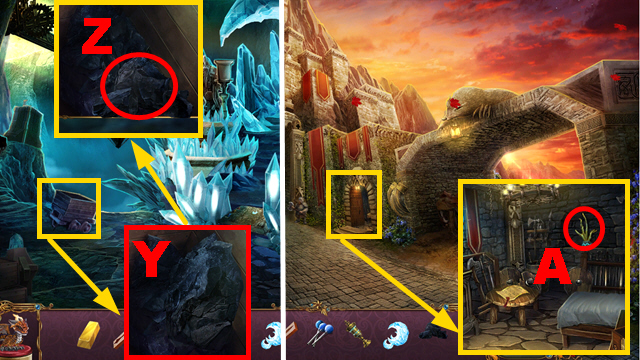
- Put the lock dial (Y) on the chest (Z).
- Place the chest plate (A) on the armor (B).
- Put the mace (C) on the stand (D).
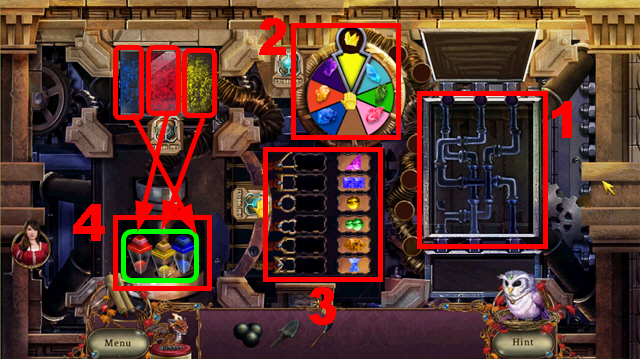
- Arrange the weapons correctly (green).
- Enter the correct code (purple).
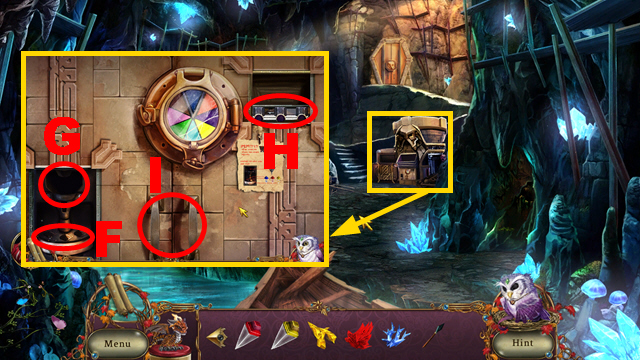
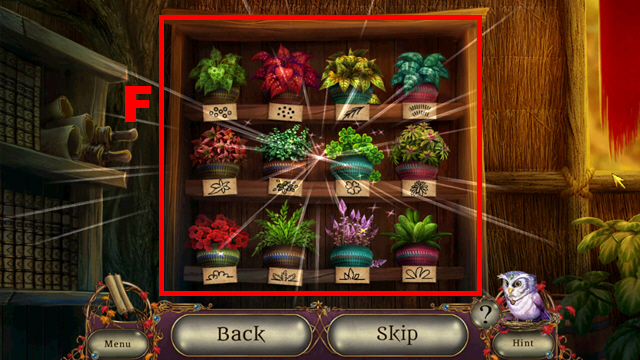
- Place the tile (E) on the panel (blue).
- Arrange the tiles correctly (F); take the wheel (G).
- Place the wheel and rope (H).
- Take the DAGGER (I).
- Walk down.
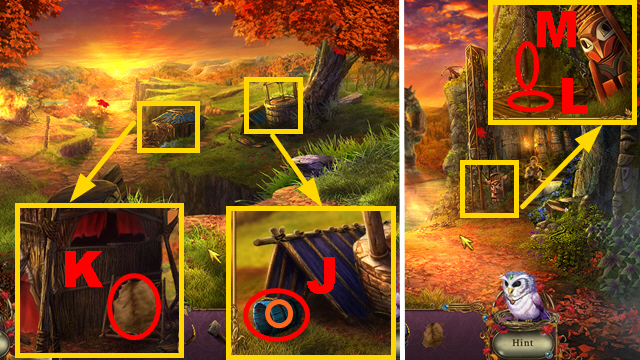
- Place the PAIL HANDLE (orange); take the PAIL (J).
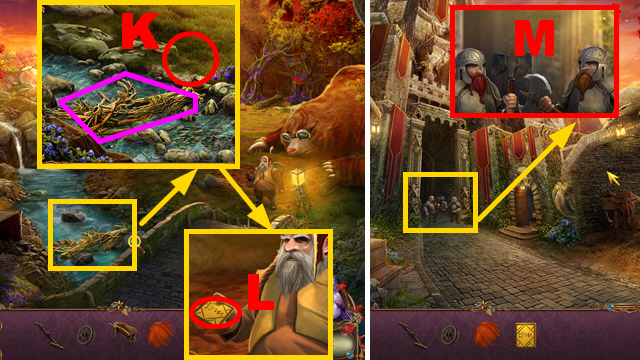
- Collect the LEATHER (K) with the DAGGER.
- Move forward.
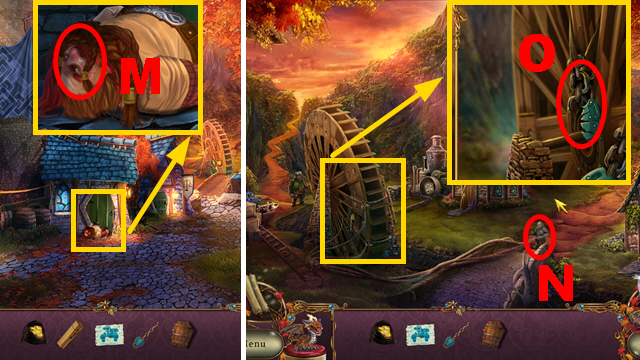
- Place the LEATHER (L) and CHAINED HOOK (M).
- Walk down.
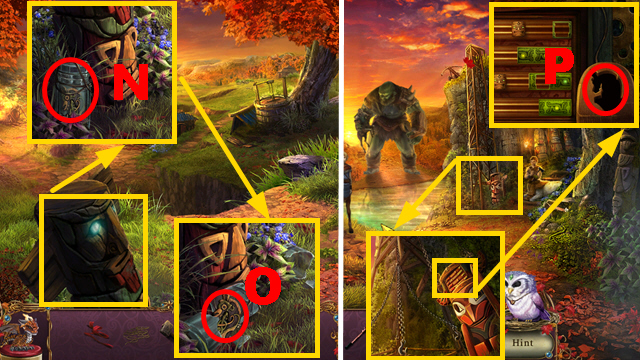
- Use the HAMMER (N); take the WOODEN HORSE (O).
- Move forward.
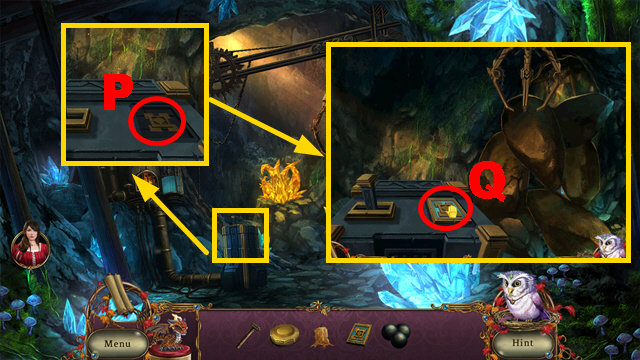
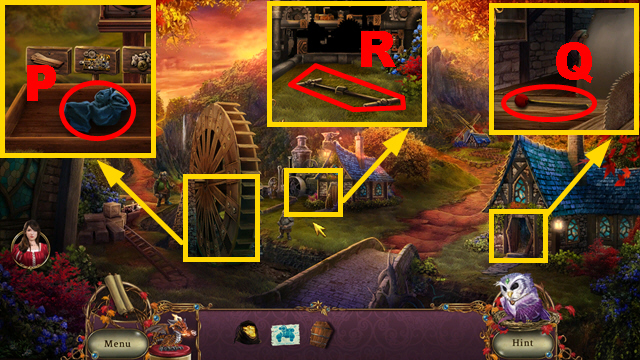
- Place the WOODEN HORSE (P).
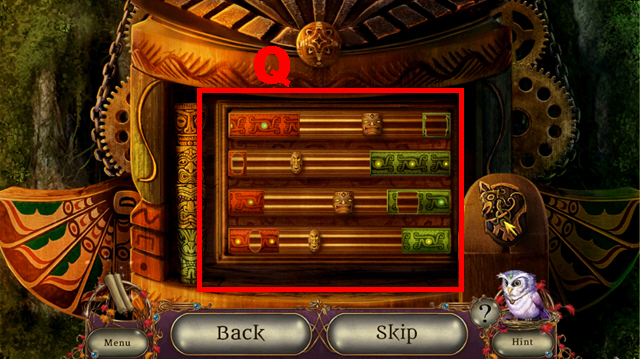
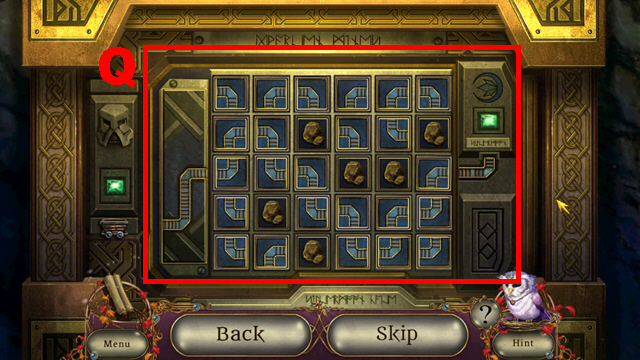
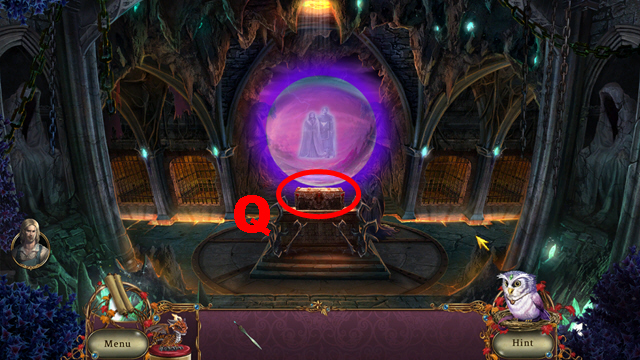
- Play the mini-game.
- Solution: (Q).
- Go upwards.
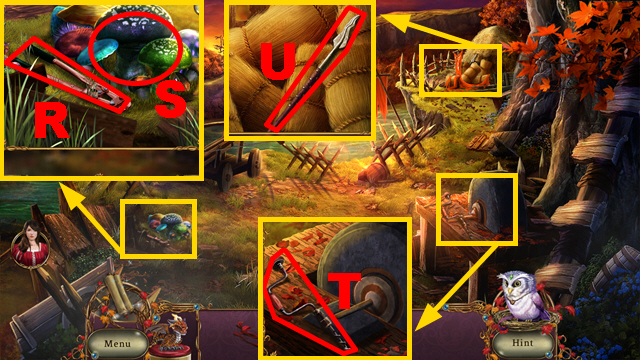
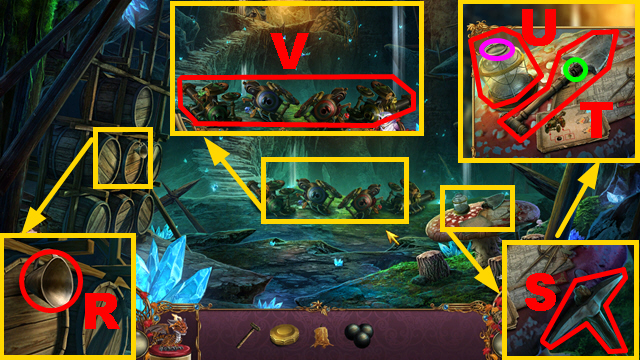
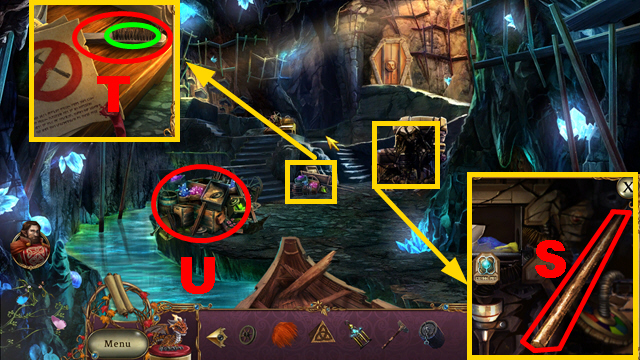
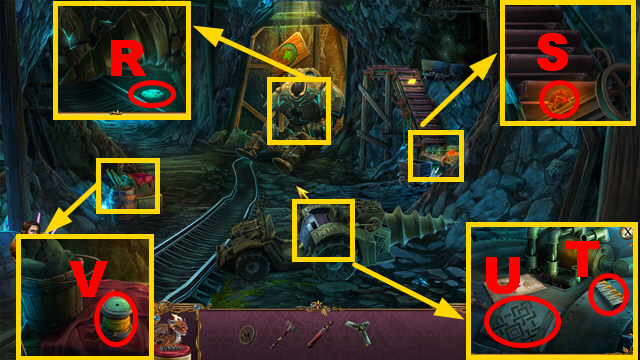
- Place the BOLT CUTTER HALF; take the BOLT CUTTER (R) and MEDICINAL MUSHROOMS (S).
- Take the HAND DRILL (T).
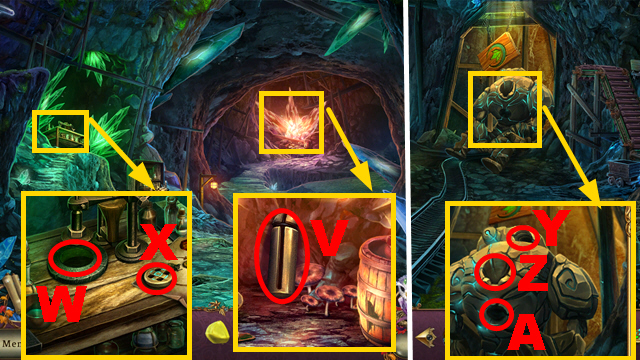
- Remove the hay; take the DENTED BALLISTA BOLT (U).
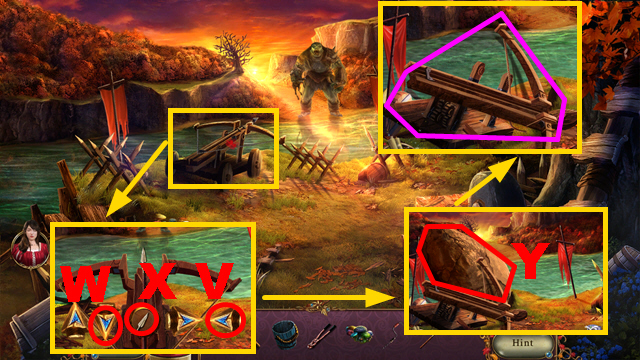
- Push buttons (V) and (W).
- Shoot the arrow (X).
- Use the DENTED BALLISTA BOLT (Y).
- Put up the ballista (purple).
- Walk down.
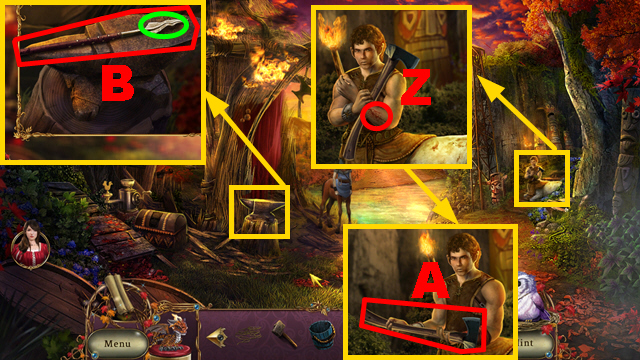
- Use the MEDICINAL MUSHROOMS and RIBBON (Z).
- Take the AXE (A).
- Place the DENTED BALLISTA BOLT (B).
- Use the dragon and HAMMER (green); take the DULL BALLISTA BOLT.
- Walk down.
- Use the AXE twice (C) to acquire the WOODEN BOARDS.
- Walk down.
- Use the BOLT CUTTER (D); take the WOODEN EYE (E).
- Use the AXE (F); take the WHEEL (G).
- Use the HAND DRILL (H); take the STICKY SAP (I).
- Move forward.
- Use the STICKY SAP (purple) and WOODEN EYE (blue); take the WOODEN MASK (J).
- Move forward.
- Place the WOODEN MASK (K); take the SPINNER (L).
- Turn right.
- Place the DULL BALLISTA BOLT (M) to acquire the SHARP BALLISTA BOLT.
- Place the SHARP BALLISTA BOLT, ROPE, WHEEL, and SPINNER (N).
Chapter 2: The Forest Fork
- Take the SHOVEL HANDLE (O).
- Assemble 4 sticks (green); take the FIREWOOD (P).
- Take the STONE BULLETS (Q).
- Move forward.
- Attempt to move forward.
- Take the CLAW PART (R) and SIFTER (purple).
- Use the PAIL to acquire the WATER (S); use the WOODEN BOARDS and STICKY SAP (T).
- Turn right.

- Use the SIFTER (U); take the LID (orange).
- Take the SANDPAPER (V).
- Place the STONE BULLETS (W) to acquire the SLINGSHOT.
- Take the SHINY GEM (X).
- Take the CLAW PART (Y).
- Walk down.
- Use the SLINGSHOT (Z).
- Turn left.

- Give the SHINY GEM to the animal (A).
- Take the RAG (B) and LEVER (C).
- Examine the cave (D).
- Play the HOP.
- You receive the MINIATURE MINER (E).
- Take the CANDLE (F); use the WATER (G).
- Use the FIREWOOD and dragon (H).
- Place 2 CLAW PARTS (I); use the SANDPAPER (J).
- Walk down, turn right.
- Place the LEVER (K); pull it.
- Take the BUTTON (L).
- Use the RAG (M); place the MINIATURE MINER (N).
- Open the box; take the CANNON BALLS (O).
- Walk down, turn left.
- Place the BUTTON (P).
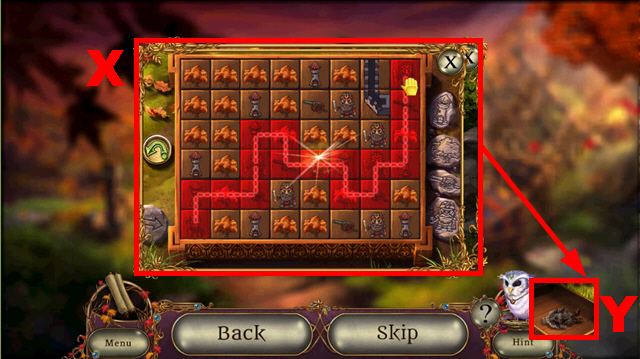
- Play the mini-game.
- To solve this puzzle, push the button (Q) when the claw is directly above the rocks.
- Move forward.
- Take the FUNNEL (R) and PICKAXE (S).
- Place the SHOVEL HANDLE (green); take the SHOVEL (T).
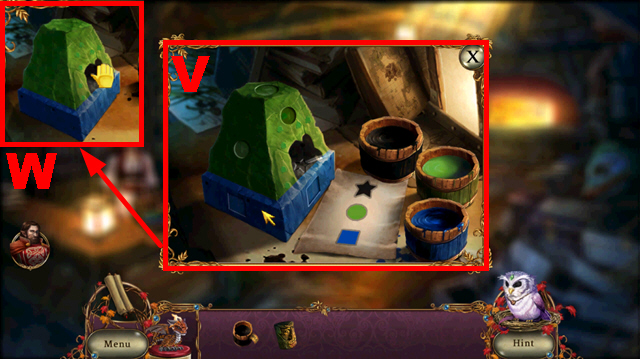
- Place the LID (purple); take the JAR (U).
- Erect the four cannons (V); you receive the BLUE VIAL, RED VIAL, and YELLOW VIAL.
- Walk down.
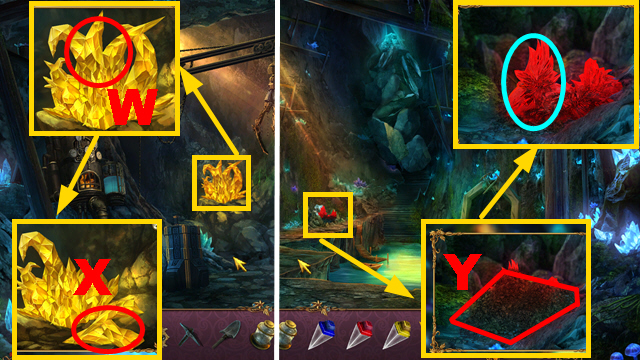
- Use the PICKAXE (W); take the YELLOW ORE (X).
- Walk down.
- Use the SHOVEL three times (Y).
- Use the PICKAXE; take the RED ORE (blue).
- Walk down.
- Open the lantern; use the CANDLE and dragon (Z).
- Take the LANTERN.
- Collect the FLIES with the JAR (A).
- Move forward, turn right.
- Use the FLIES (B); remove the cobweb.
- Place the LANTERN (C); use the PICKAXE (D).
- Take the BLUE ORE (purple) and ARROW (E).
- Place the RED VIAL, BLUE VIAL, and YELLOW VIAL (F).
- Use the FUNNEL (G).
- Place the RED ORE, YELLOW ORE, and BLUE ORE (H).
- Pull the handles (I).
- Play the mini-game.
- Solution: 1-4.
- Take the RED CRYSTAL DUST, YELLOW CRYSTAL DUST, and BLUE CRYSTAL DUST (green).
- Go to the Ogre's Lair.
- Place the CANNON BALLS (orange).
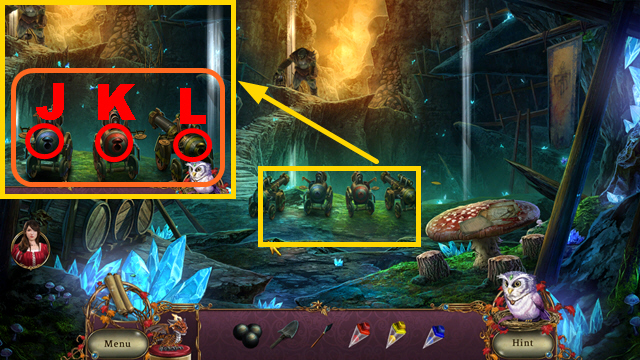
- Place the BLUE CRYSTAL DUST (J), RED CRYSTAL DUST (K), and YELLOW CRYSTAL DUST (L).
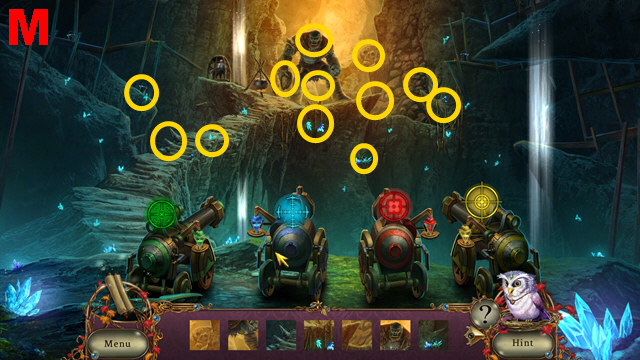
- Play the HOP.
- Find 12 spots (M).
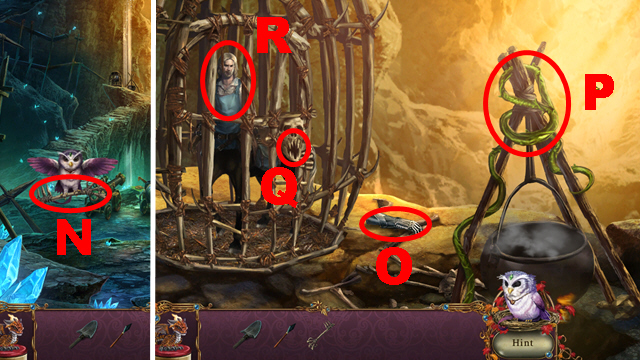
- Take the BONE KEY (N).
- Move forward.
- Take the GAUNTLETS (O) and VINES (P).
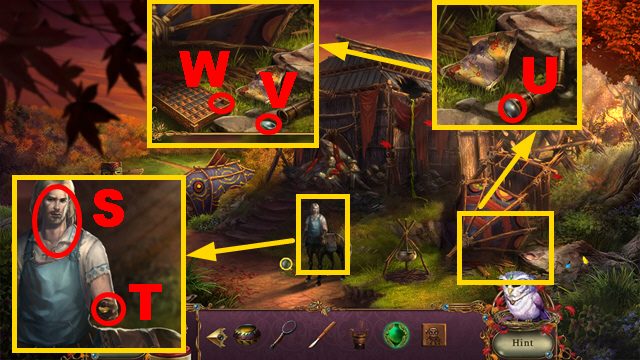
- Use the BONE KEY (Q); talk to the blacksmith (R).
- Walk down six times.
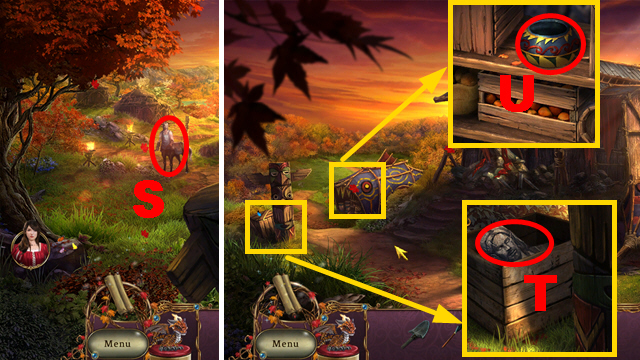
- Talk to the blacksmith (S).
- Turn left.
- Open the crate; take the BLACKSMITH BUST (T).
- Take the EMPTY WAX POT (U).

- Take the LARGE CLAW (V).
- Use the SHOVEL (W); take the PULLSTRING (purple).
- Take the DWARF BUST (X).
- Move forward.
Chapter 3: The Forest Patch
- Place the VINES and LARGE CLAW (Y) to acquire the GRAPPLING HOOK.
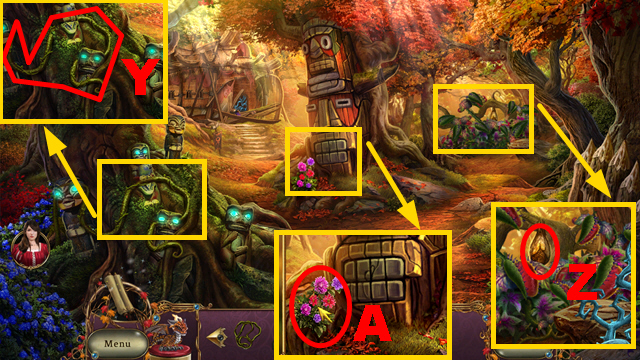
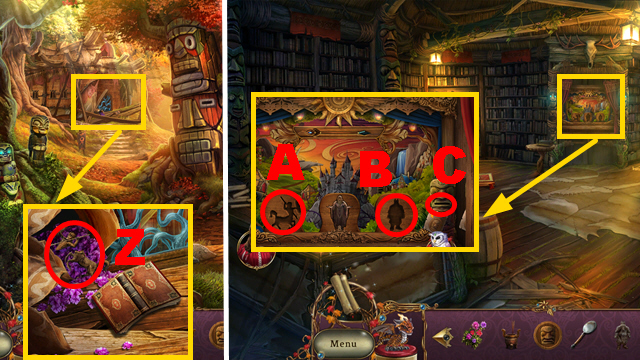
- Collect the HONEYCOMB with the GAUNTLETS (Z).
- Take the SCENTED FLOWERS (A).
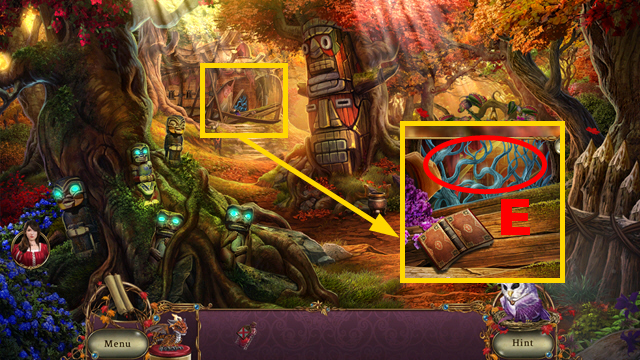
- Remove the flowers (B); read the book (C).
- Take the DREADMYRE BUST (D).
- Walk down.
- Use the HONEYCOMB and dragon (E).
- Place the EMPTY WAX POT (F) to acquire the BEES WAX.
- Throw the GRAPPLING HOOK (G).
- Enter the Library Interior.
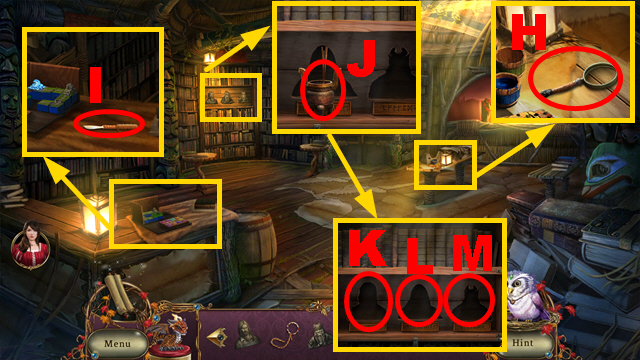
- Remove the leaves; take the LENSLESS MAGNIFIER (H).
- Take the CARVING SCALPEL (I).
- Take the INCENSE STICK (J); place the BLACKSMITH BUST (K), DREADMYRE BUST (L), and DWARF BUST (M).
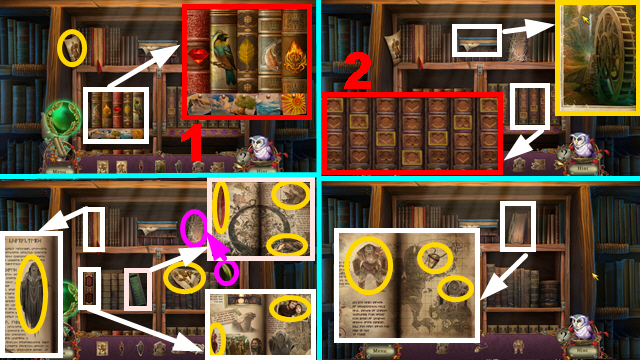
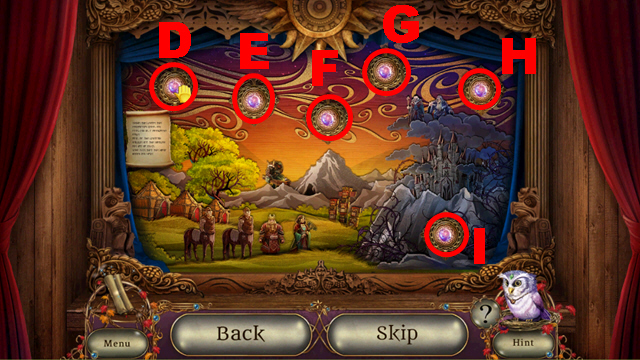
- Play the HOP.
- Solution: 1-2.
- You receive the KNOWLEDGE SPHERE.

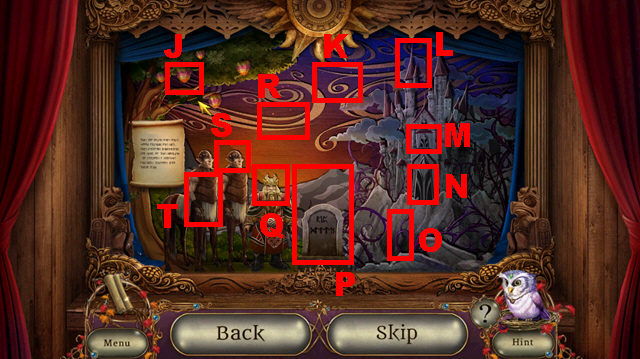
- Turn three pages; take the SHADOW FIGURINE (N).
- Take the WOODEN SQUARE (O).
- Place the PULLSTRING (P); pull it.
- Place the SHADOW FIGURINE (Q) and ARROW (R).
- Walk down.
- Give the KNOWLEDGE SPHERE to the blacksmith (S).
- Take the CENTAUR COIN (T).
- Use the CARVING SCALPEL (U); place the LENSLESS MAGNIFIER (V) to acquire the MAGNIFYING LENS.
- Place the WOODEN SQUARE (W).
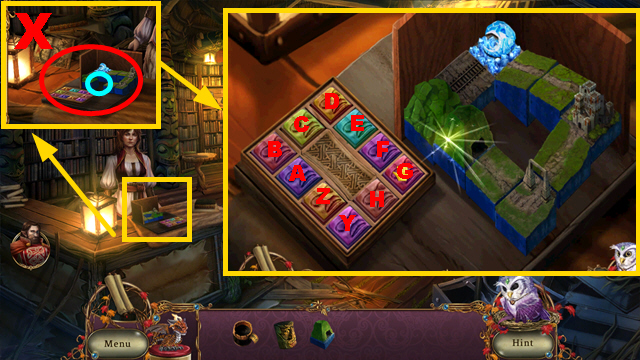
- Play the mini-game.
- Solution: (X).
- Take the DWARF FIGURINE (Y).
- Turn left.
- Use the BEES WAX (Z); take the CENTAUR FIGURINE.
- Walk down, turn right.
- Place the CENTAUR FIGURINE (A), DWARF FIGURINE (B), and CENTAUR COIN (C).
- Play the mini-game.
- Push the buttons D-T until the images are assembled correctly.
- The first two parts of this mini-game are randomized.
- Solution: V, W, U, Y, V, U, A, B, C, 1.
- Use the MAGNIFYING LENS (2); take the TREASURE MAP (3).
- Walk down.

- Use the SHOVEL (A); take the DWARF PLAQUE (purple).
- Turn left.
- Use the SHOVEL (B); place the INCENSE STICK (C).
- Light the incense with the dragon; take the DWARF CURRENCY (green) and CENTAUR PLAQUE (D).
- Walk down twice.
- Use the SHOVEL (E); take the CENTAUR EMBLEM (blue).
- Go to the Forest Fork.
- Place the CENTAUR EMBLEM and CENTAUR PLAQUE (F); place the DWARF PLAQUE (G).
- Turn right.

- Use the SCENTED FLOWERS (H); take the CLOTHESPIN (I).
- Take the WATERWHEEL BLUEPRINTS (J), FASTENER (K), and BROKEN DOOR (L).
- Use the CLOTHESPIN (M).
- Move forward.
- Talk to the dwarf (N).
- Use the FASTENER (O).
- Talk to the dwarf once more.
- Take the DIRTY NAPKIN (P), GONG MALLET (Q), and HANDCART HANDLE (R).
- Move forward.
Chapter 4: The Castle Entrance
- Take the SCRUB (S); put the bucket (purple) into the water (T) to acquire the BUCKET OF WATER.
- Use the GONG MALLET (U).
- Give the WATERWHEEL BLUEPRINTS and DWARF CURRENCY to the dwarf (V).
- Go through the door.
- Play the HOP.
- Solution: 1-6.
- Continue the HOP.
- Solution: 1-5.
- Continue the HOP.
- Solution: 2, 1, 3-9.
- You receive 4 WATERWHEEL-FORGE CONNECTOR PARTS.
- Walk down.
- Take the COFFEE BERRIES (W); put the DIRTY NAPKIN into the water (X) to acquire the BANDAGE.
- Move forward.
- Use the COFFEE BERRIES (Y) and dragon (Z); take the ROASTED BEANS.
- Walk down.
- Place 4 WATERWHEEL-FORGE CONNECTOR PARTS (A).
- Use the SCRUB and BROKEN DOOR (B); take the WOODEN BOARDS (C).
- Walk down.
- Place the ROASTED BEANS (D); take the GROUND COFFEE (E).
- Use the BUCKET OF WATER, GROUND COFFEE, and dragon (F); take the COFFEE MUG.
- Give the COFFEE MUG to the dwarf (G); take the BAG OF BOLTS (H).
- Move forward.
- Place the WOODEN BOARDS and BAG OF BOLTS (I).
- Play the mini-game.
- Solution: 1-4.
- Turn left.
- Take the STRONGBOX KEY (J), BELT WHEEL (K), CART WHEEL (L), and CABINET HANDLE (M).
- Take the GOGGLE HALF (N) and GOGGLE LENS (O).
- Walk down.
- Place the CART WHEEL (purple); take the WHEELBARROW (P).
- Move forward.
- Use the STRONGBOX KEY (Q); take the COLLECTOR'S BANGLE (R).
- Place the GOGGLE HALF and GOGGLE LENS (S); take the GOGGLES.
- Place the CABINET HANDLE (T); take the COMB (U).
- Walk down twice.
- Give the COLLECTOR'S BANGLE to the dwarf (V).
- Go through the door.
- Play the HOP.
- Solution: 1-12.
- You receive the MUSIC BOX.
- Move forward, turn left.
- Play the MUSIC BOX (W).
- Use the dragon (X); remove the vines (blue).
- Apply the BANDAGE (Y).
- Place the GOGGLES (Z); use the COMB (A).
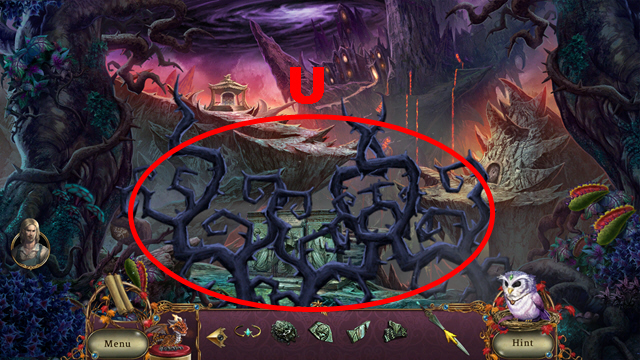
- Take the STIFF MOLE BRISTLES (green); examine the maze (B).
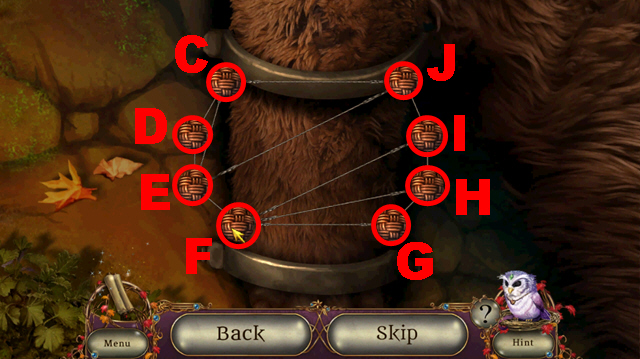
- Play the mini-game.
- Solution: E-F, G-C, E-I, E-H, D-H, G-I, D-H, E-I, E-C, E-D, D-J, G-E, F-J, F-I, F-G.
- Place the WHEELBARROW (K); put the debris (purple) into the wheelbarrow three times.
- Remove the wheelbarrow.
- Take the PALACE PASS (L).
- Walk down, move forward.
- Give the PALACE PASS to the dwarfs (M).
- Move forward.
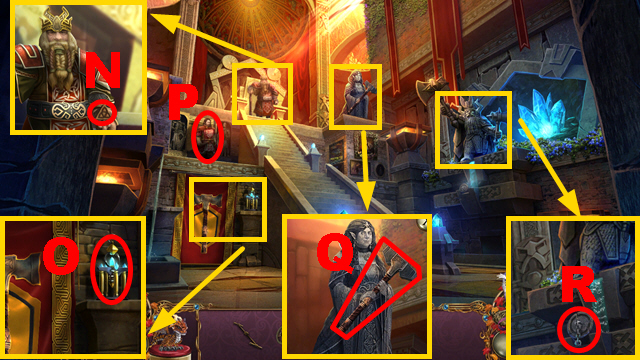
- Take the KEY TO THE MINES (N) and METAL DETECTOR (O).
- Talk to the man (P).
- Take the SLEDGEHAMMER (Q) and LARGE PLUG (R).
- Go to the Miner's Base.
- Take the AXLE (S).
- Place the STIFF MOLE BRISTLES (green); take the BRUSH (T).
- Use the METAL DETECTOR (U).
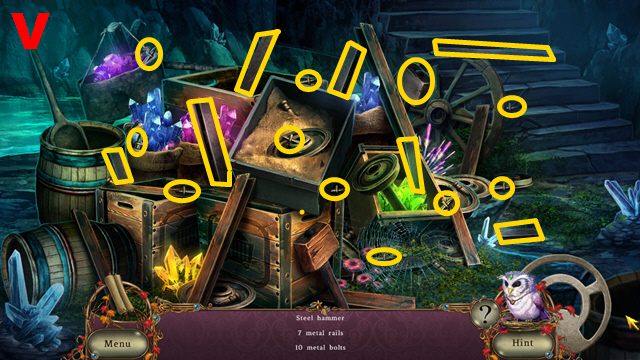
- Play the HOP.
- You receive the RAILS (V).
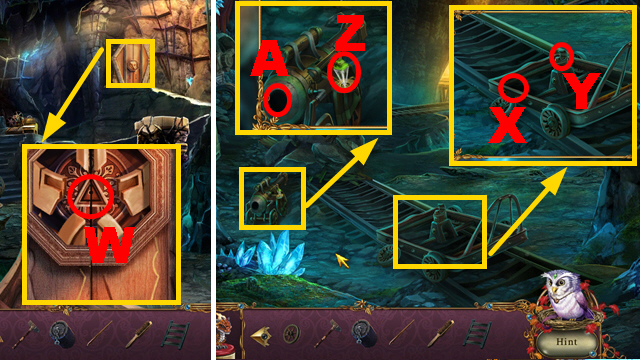
- Remove the lid; use the KEY TO THE MINES (W).
- Move forward.
- Place the AXLE (X) and HANDCART HANDLE (Y).
- Take the EMPTY VIAL (Z); place the LARGE PLUG (A).
- Use the BRUSH (B); take the LUBRICANT (purple) and DWARF BADGE (C).
- Take the RED SOLUTION (D).
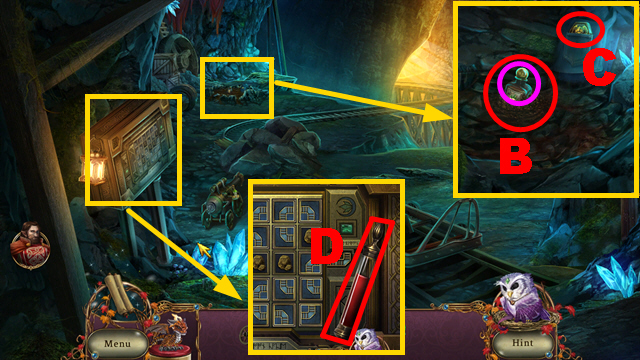
- Walk down.
- Place the EMPTY VIAL (E).
- Push the button (F); take the GREEN VIAL.
- Use the LUBRICANT (G); take the MINECART (H).
- Place the DWARF BADGE (I); open the book.
- Take the PANEL (J).
- Move forward.
- Place the GREEN VIAL (K); shoot the cannon (L).
- Take the PROPELLER (M); place the RAILS (N).
- Use the dragon and SLEDGEHAMMER (green).
- Place the MINECART (O) and PANEL (P).
- Play the mini-game.
- Solution: (Q).
- Move forward.
Chapter 5: The Golem Room
- Take the GOLEM EYE (R), ROUGH FIRESTONE (S), and TEETH (T).
- Remove the lid (U).
- Take the THREAD (V).
- Move forward.
- Take the ROUGH AIRSTONE (W).
- Place the PROPELLER (X); activate it.
- Take the DRILL PART (Y) and FEATHER (Z).
- Walk down.
- Place the BELT WHEEL (A).
- Move forward.
- Place the FEATHER (B) to acquire the ARROWS.
- Move forward.

- Take the DRILL PART (C), STRAW (D), and ROUGH WATERSTONE (E).
- Walk down.
- Place the TEETH (F).
- Move forward.
- Place the GOLEM EYE (green); take the GOLEM HEAD (G).
- Place the THREAD (H) to acquire the SEWING KIT.
- Place the RED SOLUTION (I).
- Walk down twice.
- Use the SEWING KIT (J); take the ROUGH EARTHSTONE (K).
- Place 2 DRILL PARTS (purple); activate the machine (L).
- Place the ARROWS (M) to acquire the BOW AND ARROW.
- Take the WOODEN ROD (N).
- Talk to the dwarf (green); you acquire the CORN.
- Examine the cave (O).
- Play the HOP.
- Take the CRUSHER PARTS (P).
- Move forward.
- Place the CRUSHER PARTS (Q).
- Insert the ROUGH AIRSTONE, ROUGH WATERSTONE, ROUGH FIRESTONE, and ROUGH EARTHSTONE (R).
- Take the SMOOTH AIRSTONE, SMOOTH WATERSTONE, SMOOTH FIRESTONE, and SMOOTH EARTHSTONE.
- Use the WOODEN ROD (S); place the STRAW (T) to acquire the EMPTY FUEL CONTAINER.
- Move forward.
- Place the EMPTY FUEL CONTAINER (U) to acquire the GOLEM FUEL.
- Use the GOLEM FUEL (V); take the TANK.
- Place the SMOOTH FIRESTONE, SMOOTH WATERSTONE, SMOOTH AIRSTONE, and SMOOTH EARTHSTONE (W).
- Take the GOLEM CORE (X).
- Walk down twice.
- Place the TANK (Y), GOLEM HEAD (Z), and GOLEM CORE (A).
- Use the BOW AND ARROW (B).
- Play the mini-game.
- To solve this puzzle, select the body parts that share the core's color (C) four times.
- Talk to the dwarf (D).
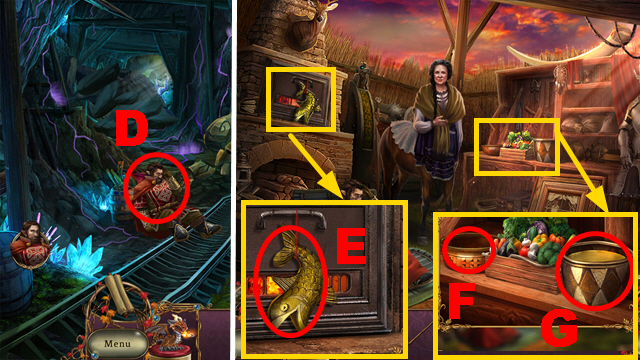
- Go to the Blacksmith's Hut.
- You acquire the RECIPE.
- Take the WOODEN FISH (E), SOUP BOWL (F), and CHICKEN STOCK (G).
- Walk down.
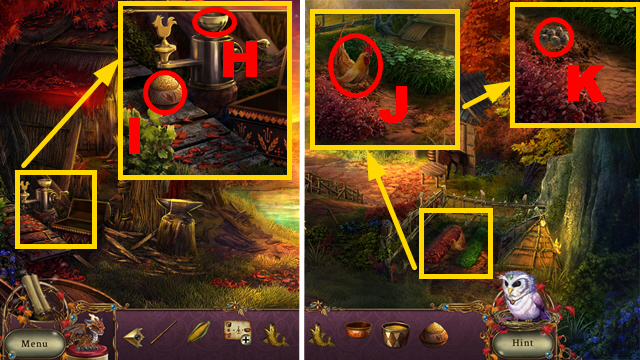
- Use the CORN (H); take the CHICKEN FEED (I).
- Go to the Cliffside.
- Use the CHICKEN FEED (J); take the EGG (K).
- Move forward.
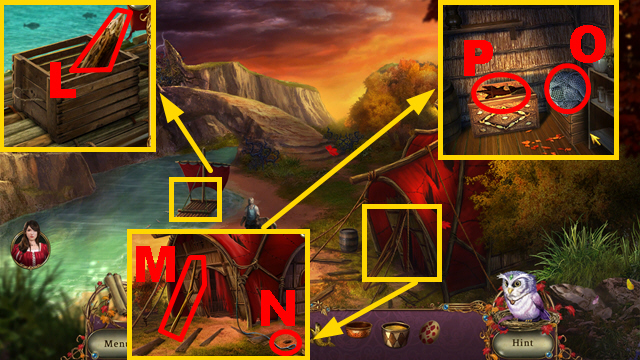
- Take the STAKE (L).
- Place the WOODEN ROD (M) and STAKE (N); hit the stake with the SLEDGEHAMMER.
- Take the FISHING NET (O).
- Examine the box (P).
- Play the mini-game.
- Solution: R-S, U-R, T-U, Q-T, R-Q, U-R, V-U.
- Place the WOODEN FISH (W); take the FISHING CHUM (X).
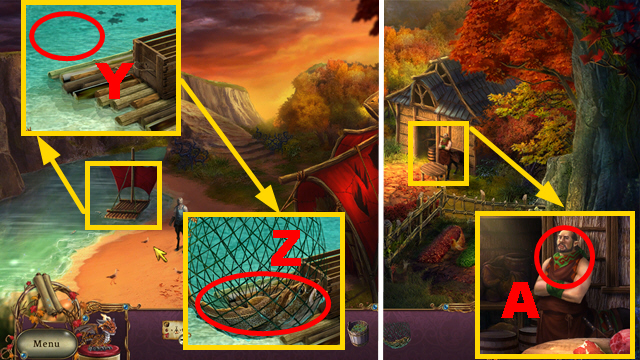
- Use the FISHING CHUM and FISHING NET (Y); take the FISH (Z).
- Walk down.
- Give the FISH to the man (A); you acquire the MEAT.
- Go to the Centaur Village Center.
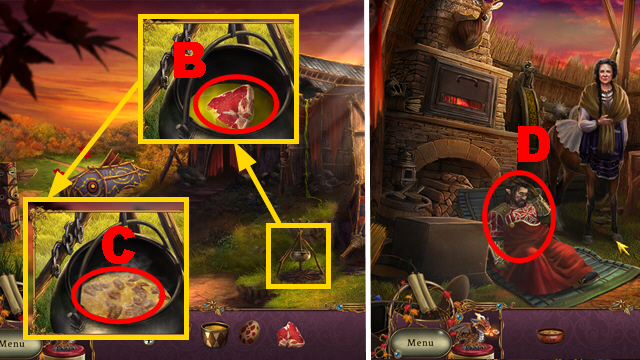
- Use the CHICKEN STOCK, EGG, MEAT, and dragon (B).
- Place the SOUP BOWL (C) to acquire the SOUP.
- Go to the Blacksmith's Hut.
- Give the SOUP to the dwarf (D); you acquire the LOCKWEED POTION.
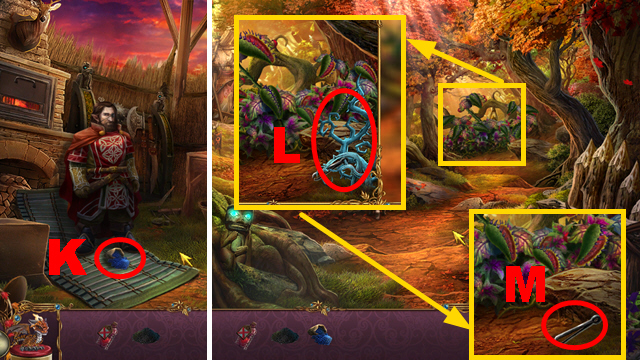
- Go to the Forest Patch.
- Use the LOCKWEED POTION (E).
- You acquire the BLACK POWDER.
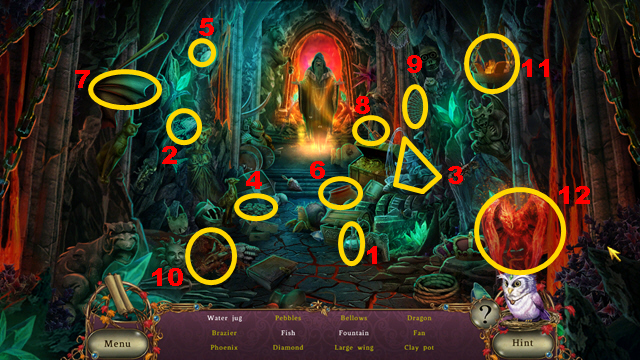
- Play the HOP.
- Solution: 1-12.
- Play the mini-game.
- Solution: (F).
- You receive the HERBS.
Chapter 6: The Cure

- Place the HERBS (G); pound them.
- Pour the herbs and potion (purple) into the bowl (green).
- Use the bowl and dragon (H); take the CURE (orange).
- Go to the Blacksmith's Hut.
- Use the CURE (I).
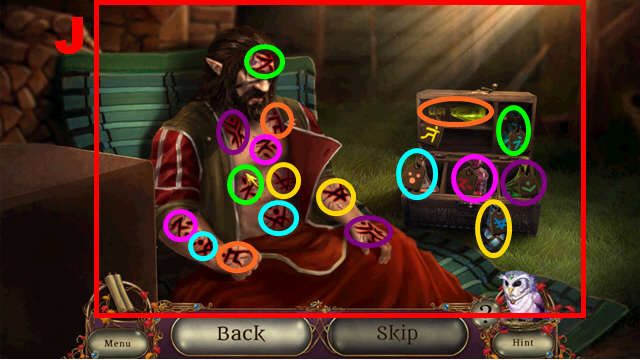
- Play the mini-game.
- To solve this puzzle (J), apply potions to wounds framed in the same color.
- Take the BLUE POWDER (K).
- Go to the Forest Patch.
- Use the LOCKWEED POTION (L); take the TWEEZERS (M).
- Go to the Library.
- Collect the PIN with the TWEEZERS (N).
- Go to the Blacksmith's Hut.
- Use the PIN (O); take the WOOD PUTTY (P).
- Go to the Centaur Village Entrance.
- Use the BLUE POWDER (purple); take the GREEN PAINT (Q).
- Use the BLACK POWDER (green); take the BLACK PAINT (R).
- Go to the Library.
- Place the BLACK PAINT and GREEN PAINT (S); use the WOOD PUTTY (orange).
- Take the TOTEM (T).
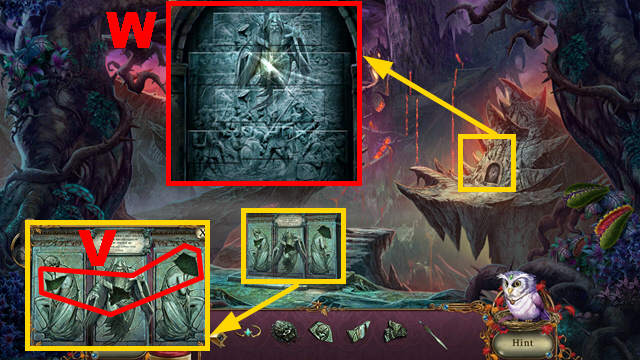
- Examine the structure (U).
- Play the mini-game.
- Solution: (V).
- Take the MODEL PART (W).
- Place the MODEL PART (blue); examine the model (X).
- Play the mini-game.
- Solution: Yx3, Zx2, Ax3, Bx3, Cx3, D, Ex2, F, Gx2, H.
- Take the CARGO TARP (I).
- Go to the Cliffside.
- Place the TOTEM (J); take the TRADER'S GOLD (K).
- Move forward.

- Give the CARGO TARP to the man (L).
- Go to the Dwarf Palace.
- Move forward.
- Take the SWORD MOLD (M) and CONTROL LEVERS (N).
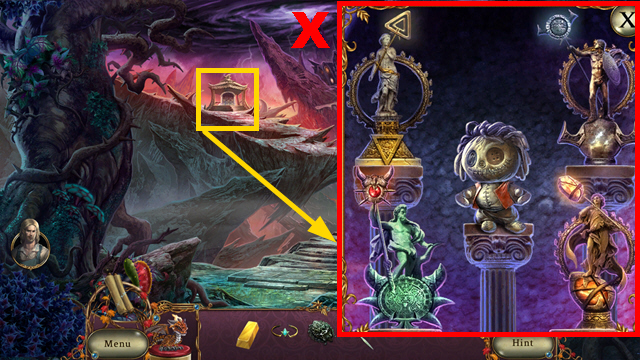
- Examine the panel (O).
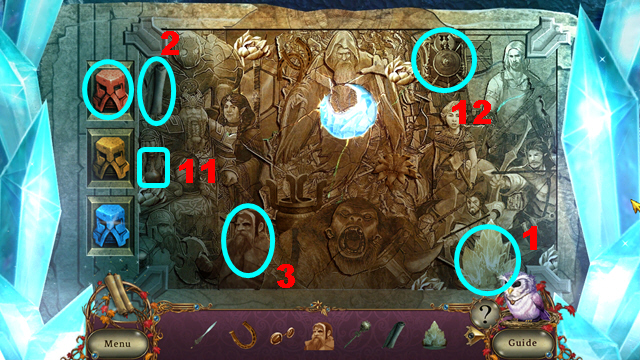
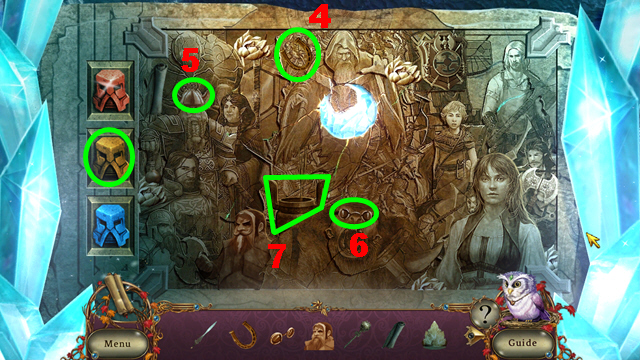
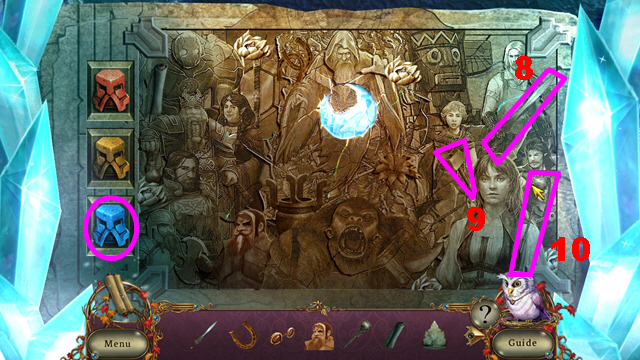
- Play the HOP.
- Solution: 1-12.
- Use the BLACK PAINT (purple).
- Take the DIAMOND MOTIF (P) and FLOWER MOTIF (Q).
- Walk down.
- Place the DIAMOND MOTIF (R) and FLOWER MOTIF (S).
- Take the CRYSTAL CHALICE (T) and CRYSTAL PICKAXE (U).
- Move forward.
- Place the CRYSTAL CHALICE (V); take the MOON WATER.
- Use the CRYSTAL PICKAXE (W); take the MOONSILVER ORE (X).
- Use the CRYSTAL PICKAXE (Y); take the COAL (Z).
- Walk down twice.
- Use the MOON WATER (A); take the PALEWOOD BRANCH.
- Walk down.
- Use the MOONSILVER ORE (B).
- Read the note (C); take the QUEEN'S CROWN (D).
- Take the SHIELD EMBLEM (E); place the CONTROL LEVERS (F).
- Play the mini-game.
- To solve this puzzle, activate the levers (G) in the correct sequence.
- This puzzle is randomized.
- Take the CLOCKHANDS (H); place the PALEWOOD BRANCH (green).
- Solution: 1-5.
- Take the PALEWOOD HILT (I).
- Use the COAL and dragon (J); place the MOONSILVER ORE (K).
- Take the SMELTED MOONSILVER (L).
- Place the SWORD MOLD (M); pour the SMELTED MOONSILVER into it.
- Go to the Mountain Spring.
- Place the CLOCKHANDS (N); take 3 COLORED STONES (O).
- Use the MOON WATER (P); take the FROST POLLEN (Q).
- Go to the Forge Room.
- Use the FROST POLLEN (R); take the MOONSILVER BLADE.
- Place the MOONSILVER BLADE and PALEWOOD HILT (S).
- You receive the BLADE OF COURAGE.
- Use the BLADE OF COURAGE (T).
Chapter 7: The Stairs Room
- Use the BLADE OF COURAGE three times (U).
- Place 3 COLORED STONES (V).
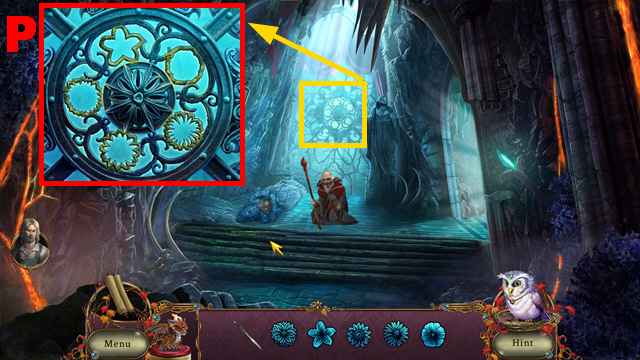
- Arrange the tiles correctly (W).
- Arrange the staff heads correctly (X).
- Move forward.
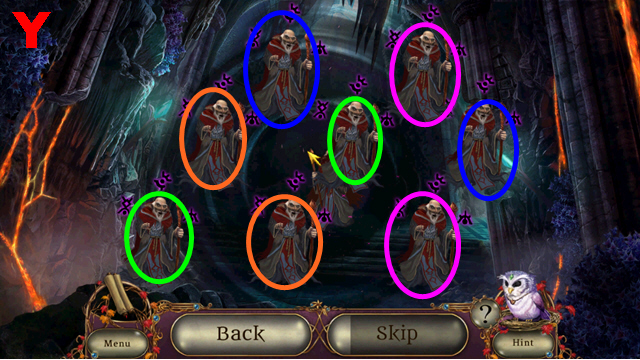
- Play the mini-game.
- Match 4 pairs framed in the same color to solve this puzzle (Y).
- This puzzle is randomized.
- Place the SHIELD EMBLEM (green); take the SHIELD (Z).
- Read the book (A); take the LOVE LETTERS (B).
- Take the GARGOYLE WING (C).
- Examine the painting (D).
- Play the HOP.
- You receive the FARMER'S HAT (E).
- Take the BUTTON (F).
- Walk down.
- Place the GARGOYLE WING (G); take the SUN MOTIF (H).
- Place the BUTTON (purple); take the DOLL (I).
- Move forward twice.
- Take the TESSERACT MODEL (J).
- Walk down.
- Place the TESSERACT MODEL (K); take the FROST MOTIF (L).
- Go right.
- Place the FROST MOTIF (M), SUN MOTIF (N), and SHIELD (O).
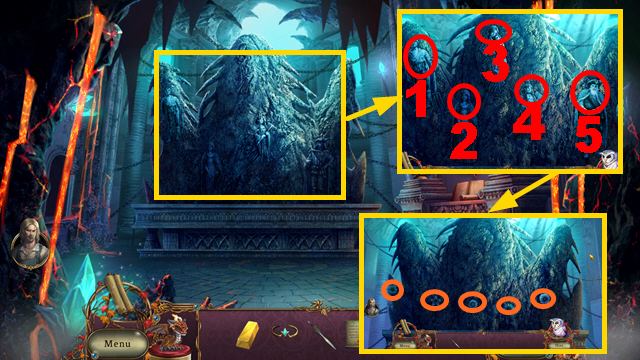
- Place the FARMER'S HAT (1), LOVE LETTERS (2), DOLL (3), QUEEN'S CROWN (4), and TRADER'S GOLD (5).
- Talk to the figurines.
- Take 5 PETRIFIED FLOWERS (orange).
- Walk down.
- Place 5 PETRIFIED FLOWERS (P).
- Move forward.
- Play the HOP.
- Solution: 1-2.
- Move forward.
- Play the HOP.
- Solution: 1-4.
- Play the HOP.
- Solution: 1-12.
- Use the BLADE OF COURAGE (Q).
- Play the mini-game.
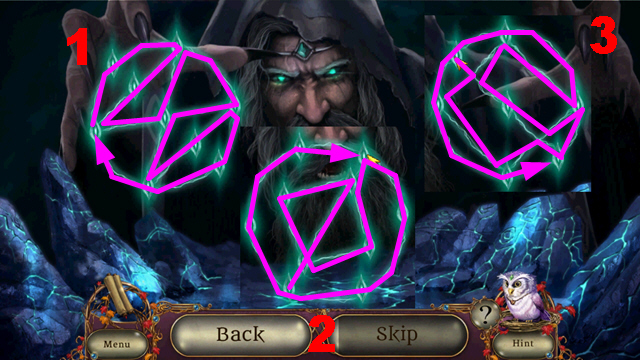
- Solution: 1-3.
- Congratulations, you have completed Awakening: The Red Leaf Forest.
Created at: 2014-06-29