
WALKTHROUGH MENU
- GENERAL TIPS
- CHAPTER 1: THE FOYER
- CHAPTER 2: THE WINDOW
- CHAPTER 3: THE THEATER
- CHAPTER 4: THE CATWALK
- CHAPTER 5: HALL OF GIANTS
- CHAPTER 6: FIRE AND ICE
- CHAPTER 7: THE BOOK
- CHAPTER 8: THE ROOFTOP
GENERAL TIPS
- The sketches in your inventory can be used within the paintings to unlock certain areas.
- Whenever you see a sparkly area click on it, since it is an area you need to interact with.
- When you see small glints appear in the scene, it means that you need to take a closer look at that area. There may be something hiding in that spot.
- You will collect several inventory items along the way. Some will be used right away and others will be used much later in the game.
- Inventory items go at the bottom of the screen; when the inventory gets full, use the arrows on each corner to scroll through all your items.
- Make sure you read the letters and notes in the pop-up windows; they will give you clues as to what you need to do next. Click on the characters in the game, they will give you valuable clues as well.
- From the Main Menu you can access the options for the game, change players, and look at credits and extras.
Navigation and Cursors
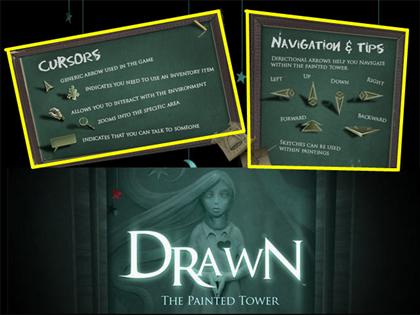
- Use the arrows in the scene to navigate the Painted Tower. In most scenes you can move in more than one direction, so experiment placing your cursor in different areas.
- The hand allows you to pick up an item in the scene. The items you pick up with the hand cursor will go into your inventory.
- A jigsaw piece indicates that you need to use an inventory item in that spot.
- When you see a magnifying glass appear it means that you will be able to get a closer view of a portion of the scene. Often times you can pick up valuable inventory items in these close-up views.
- If a speech bubble is present it means that you can talk to one of the characters. Click on that person and listen to what they have to say.
Hints
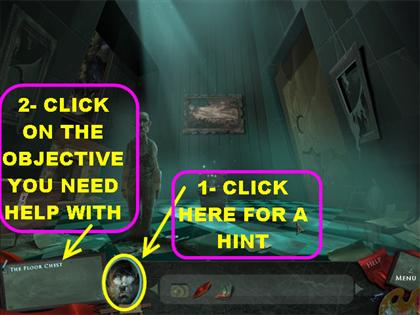
- Click on Franklin’s portrait in the lower left side and then on the objective you need help with. Franklin will give you hints as to what you need to do next.
- There are several tips for each objective, so if the first clue doesn’t help you click on Franklin again to receive the next clue.
- The hint feature will only work when Franklin’s portrait is full and not grayed out. Each time you use a hint you have to wait for it to recharge before you can use it again.
- The higher you are in the tower, the longer it will take for Franklin to give you a clue.
- Once Franklin has given you a clue on a specific objective you can look at it again by clicking on it.
CHAPTER 1: THE FOYER
The Tower Steps
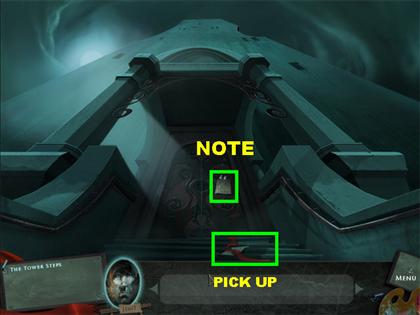
- Pick up the note on the door to read it. Exit out of that window by clicking on the outside of the box.
- Click on the paper with the red ribbon on the steps for a closer view.
Enter the Tower
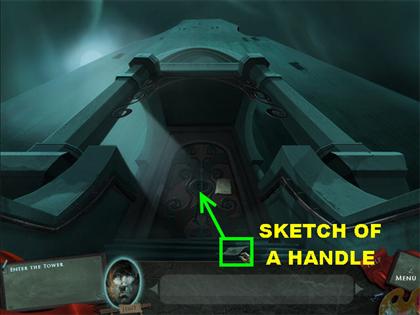
- Click on the Sketch of a Handle on the steps to add it to inventory.
- Place the Sketch of a Handle in the center of the door.
- Click on the door and it will open; go through the door.
The Stone Guardian
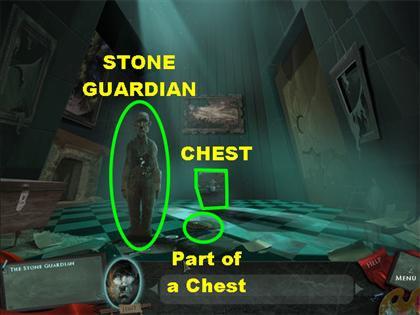
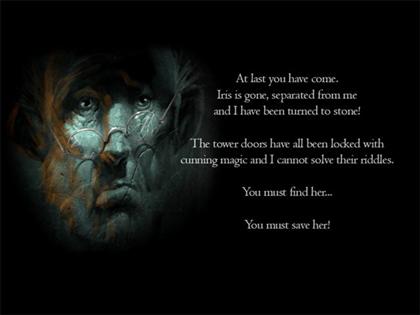
- Click on the Stone Guardian in the room. Listen to what he has to say.
- Take a look at your surroundings; there are many things to explore in this area.
The Floor Chest
- Pick up the Part of a Chest on the floor, next to the Guardian.
- Click on the sparkly Chest in the center of the room for a closer view.
- Place the “Part of a Chest” from inventory on top of the chest.
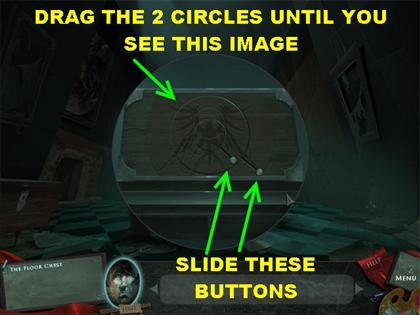
- Slide the 2 small silver buttons all the way down, and they will lock into place.
- Move the large circle into the center of the outline.
- Move the small circle into the center of the large circle, and it will lock into place.
- Rotate the circles until you form the image of a Phoenix.
- Once the parts are in the right place, the Phoenix will catch on fire.
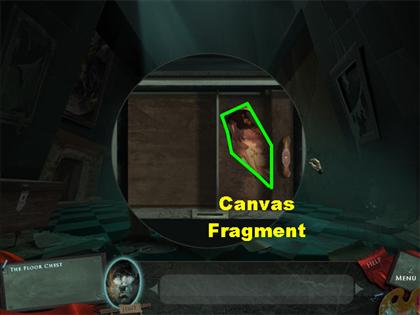
- Slide the cabinet to the right and pick up the Canvas Fragment.
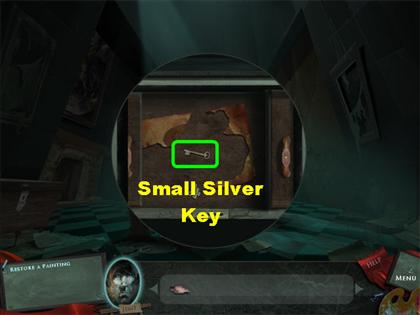
- Slide the cabinet all the way to the left and pick up the Small Silver Key.
Notes
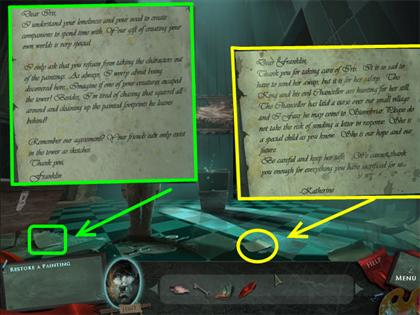
- Click on the sparkly page in the lower center of the floor and read what it says.
- Click on the other sparkly page on the left side of the floor to read it.
Rabbit and Pumpkins
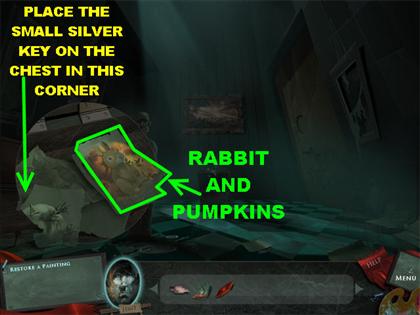
- Click on the chest on the left side of the room and pick up the Rabbit and Pumpkins sketch.
- Click on the sparkly area in the lower right side of the scene and a pop-up window will appear.
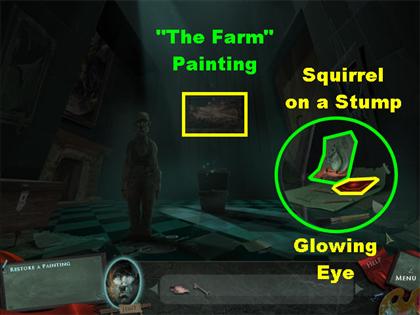
- Pick up the Glowing Eye and the Squirrel on a Stump. Close the window by clicking outside of the circle.
Restore a Painting
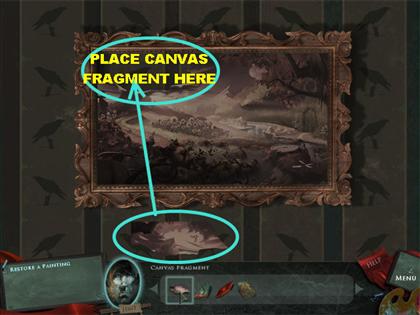
- Click the picture in the center of the back wall for a closer view.
- Place the Canvas Fragment on the upper left side of the painting and you will automatically be transported inside the painting.
Speak With a Scarecrow
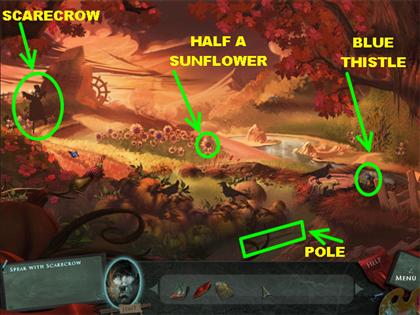
- Pick up the Blue Thistle on the upper right side of the scene.
- Grab the Sunflower Half in the field with the rest of the sunflowers. Your cursor will turn into a hand when you have the right item.
- Pick up the pole in the lower center of the scene.
- Click on the Scarecrow to get a closer view.
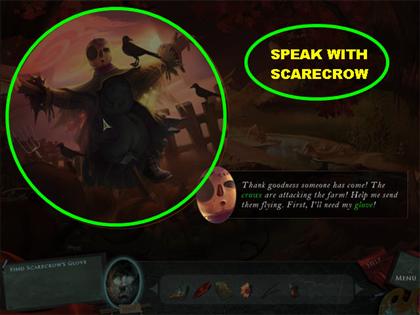
- Click on the scarecrow to speak to him.
- The scarecrow will ask you to find his glove for him.
- Exit out of there by clicking outside of the circle.
Find Scarecrow’s Glove
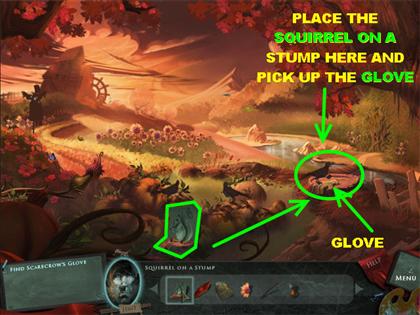
- Grab the sketch of the Squirrel on a Stump from your inventory and place it on the tree stump on the right side of the scene.
- The crow standing on the tree stump will move and a squirrel will appear.
- Grab the glove on the tree stump and return to the scarecrow.
- Put the glove on the scarecrow’s left arm.
- The Scarecrow will ask you to get his Hat so he places Clippers into your inventory which will be used to find his Hat.
Find Scarecrow’s Hat
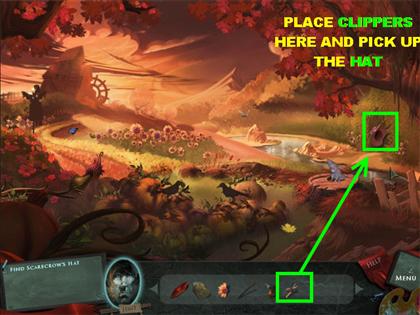
- Grab the Clippers from inventory and place them on the bushes on the right side of the field.
- The Hat appears underneath the bushes; click on it right away.
- Go back to the Scarecrow and place the Hat on his head.
- The Scarecrow will put the Knife in your inventory so you can use it to find his Eyes.
Find Scarecrow’s Eyes
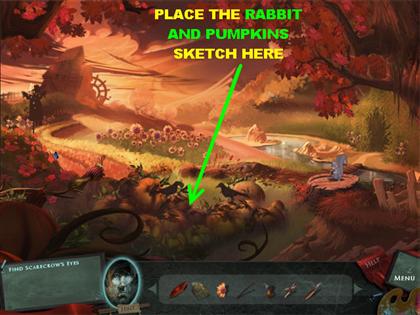
- Place the Rabbit and Pumpkins sketch on the pumpkin patch in the lower center of the scene for a closer view.
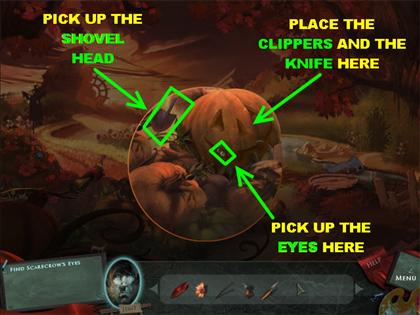
- Place the Clippers on the pumpkin covered with vines so you can take the vines off the pumpkin.
- Place the Carving Knife on that same pumpkin so you can obtain the Eyes. Click on the Eyes to add them to inventory.
- Before you leave the scene, pick up the Shovel Head in the upper left side of the close-up view.
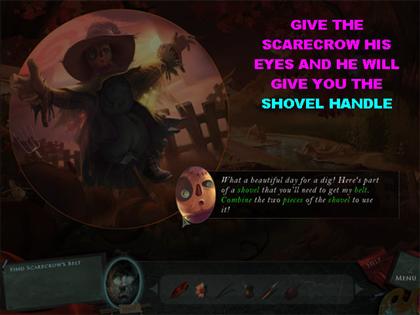
- Go back to the Scarecrow and put the Button Eyes on his face.
- The Scarecrow will ask you to find his Belt and give you the other part of the Shovel.
Find Scarecrow’s Belt
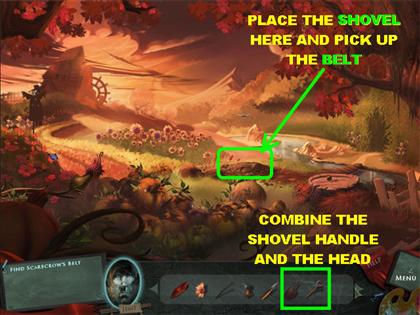
- From the inventory box, drag the Shovel Head onto the Shovel Handle and they will form a complete Shovel.
- Place the Shovel on the patch of dirt in the lower center of the scene. Grab the belt inside the hole.
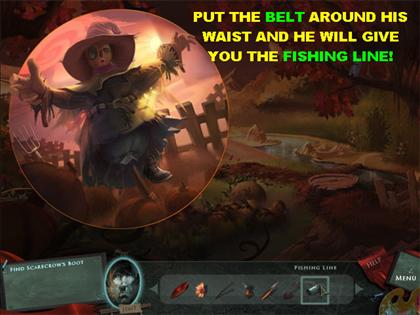
- Go back to the Scarecrow and place the Belt on his waist.
- The Scarecrow gives you a Fishing Line; use it to find his Boot.
Find Scarecrow’s Boot
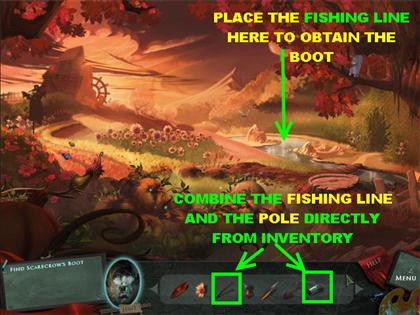
- From the inventory box combine the Fishing Line and the Pole by dragging one to the other. You will now have a Fishing Pole in your inventory.
- Place the Fishing Pole in the water and a boot will be placed in your inventory; go back to the scarecrow.
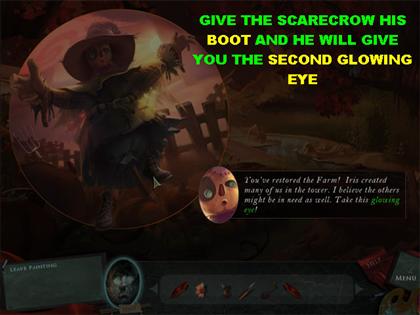
- Place the boot on the left foot of the scarecrow and he will give you the second red glowing eye that you need.
Leave Painting
- Your next task is to exit the scene; get out of the painting by placing your cursor in the lower center of the scene.
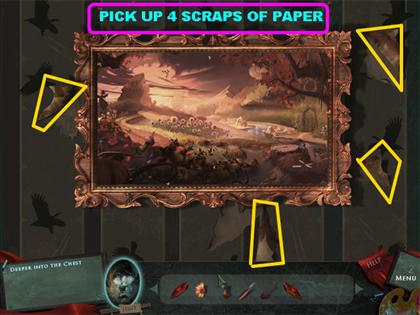
- Once you’re outside of the picture, pick up the 4 scraps of paper that appear on the side of the picture.
- Place your cursor at the bottom of the scene to exit.
Deeper into the Chest

- You are back in the Foyer.
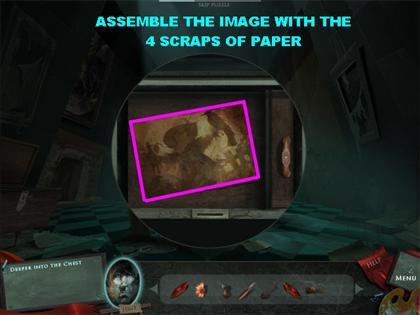
- Click on the Chest in the center of the room for a closer view.
- Place the 4 scraps of paper on the chest, just like you would for a jigsaw puzzle.
- When a piece is in the right spot, it will lock into place.
- Please look at the screenshot for the solution.
- Once the pieces have been correctly placed on the chest you will be asked to unscramble another picture.
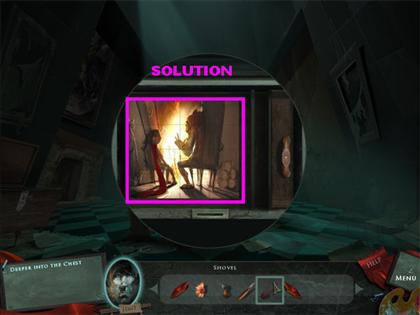
- Click on any 2 tiles, and they will swap places.
- The pieces will not lock into place until all the pieces are in the right place.
- Please look at the screenshot for the solution.
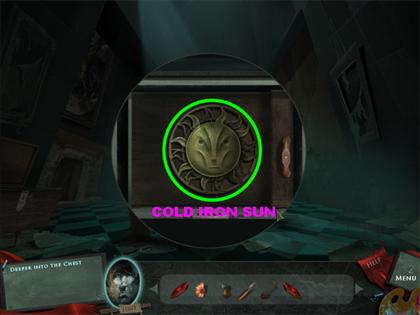
- Once this puzzle has been assembled correctly, the Cold Iron Sun appears. Click on it to pick it up.
The Sun and The Rain
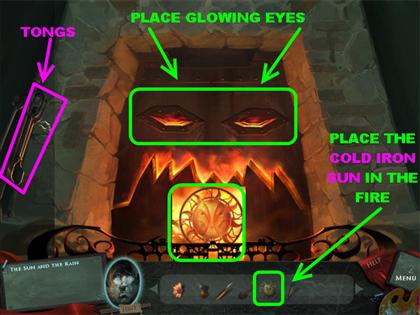
- Click on the fireplace for a closer view.
- Grab the Tongs on the left side of the scene.
- Place the Glowing Eyes on top of the fireplace; a fire will start burning in the fireplace.
- Place the Cold Iron Sun into the fireplace.
- Use the Tongs to get the Sun out of the fireplace; it will go back into inventory as a Radiant Sun.
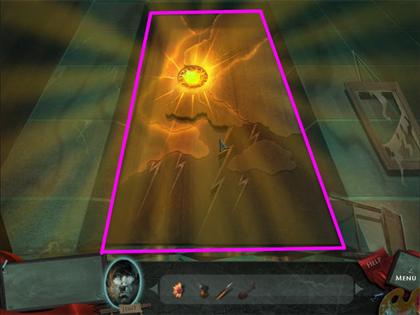
- Leave the fireplace by clicking at the bottom of the scene.
- Once you’re back in the main room, click on the Cloud Door on the right for a closer view.
- Place the Radiant Sun in the middle of the Cloud Door and it will open.
- Go upstairs by placing your cursor on top of the scene.
CHAPTER 2: THE WINDOW
Hammer, Note & Drawing
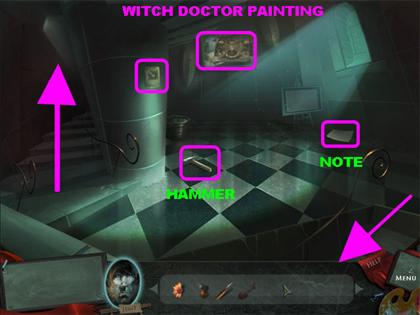
- Pick up the Hammer on the floor.
- Click on the note on the right to read what it says.
- Pay attention to the drawing of the arrow on the column. You will need that clue for another puzzle.
- Click the picture on the back wall for a closer view.
Restoration Project
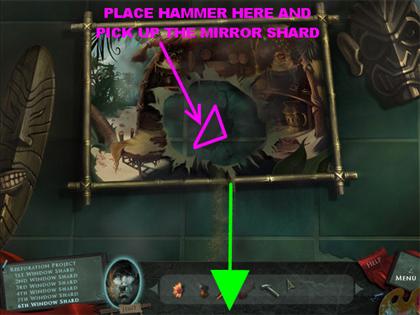
- Click on the painting of the Witch Doctor and it will explode.
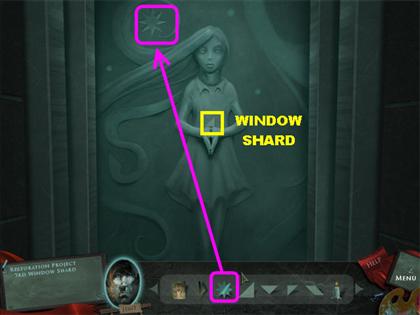
- Grab the hammer from inventory and place it on the hole in the wall; retrieve 1 Window Shard.
- Exit out of the painting by placing your cursor at the bottom of the scene.
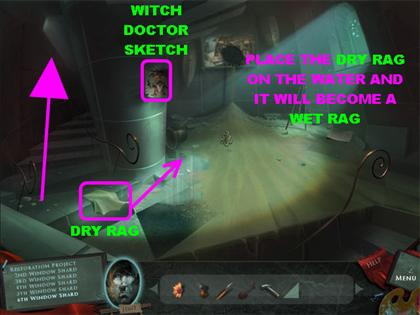
- When you return back to the scene you will see sand and water all over the floor.
- Pick up the Dry Rag on the steps.
- Grab the Dry Rag from inventory and place it on the puddle of water next to the sand. The Dry Rag will go back into inventory as a Wet Rag.
- Pick up the Witch Doctor sketch on the column.
- Underneath the Witch Doctor sketch you will find the drawing of an arrow; click on it for a closer view.
- Click on the steps to go upstairs.
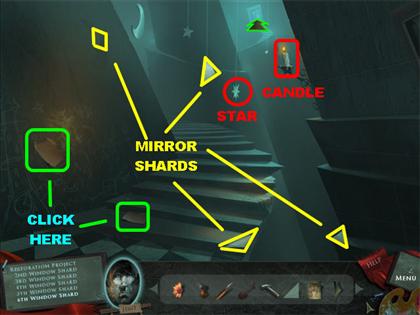
- Pick up the Stone Star hanging from the ceiling.
- Pick up the Flickering Candle in the upper right side of the scene.
- The Window Shards are highlighted in yellow.
- If you try to click on the moon symbol a star will fall to the ground; leave it there.
- Grab the 2 Window Shards in the upper left side of the scene.
- Pick up the other 2 Window Shards in the lower right side of the scene.
- Click on the left side of the wall for a closer view.
- Click on the note at the bottom of the steps for a closer view.
- Go up the steps of the castle and you will see a stone door with a relief carving of a little girl.
- Place the Stone Star from inventory in the upper left side of the scene and a heart-shaped hole will appear on her chest.
- Grab the Window Shard in Iris’ hand.
- Go back downstairs by placing your cursor at the bottom of the next 2 scenes.
The Window’s Pane
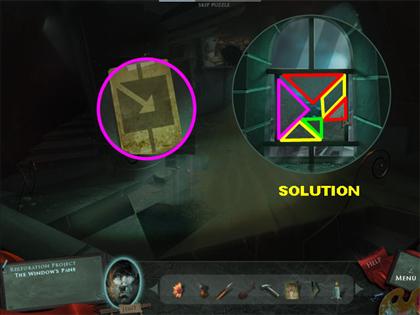
- Click on the window in the back of the scene to get a closer view.
- Your goal in this puzzle is to place the Window Shards back in the right spots.
- You can rotate the Window Shards by right-clicking on them.
- When a piece is in the right place it will turn dark gray.
- One piece has already been set in the lower right corner of the puzzle.
- Please look at the screenshot for the solution.
A Painted Treasure
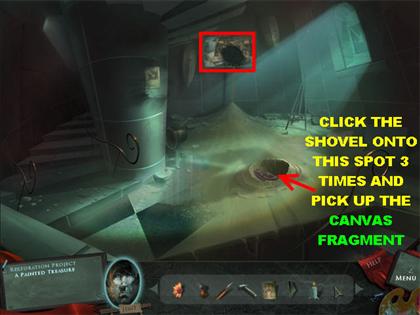
- After you complete the mirror puzzle you will see the shadow of an arrow pointing to a spot in the sand.
- Use your shovel 3 times in the spot to which the arrow is pointing to uncover the Canvas Fragment; pick it up.
- Click on the painting of the Witch Doctor.
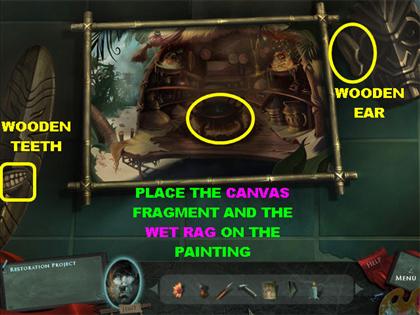
- Grab the Wooden Ear on the right mask.
- Grab the wooden teeth on the left mask.
- Place the Canvas Fragment on the hole in the middle of the painting and it will patch the painting.
- Place the Wet Rag from inventory on the painting to transport yourself into the picture.
The Doctor Is In?
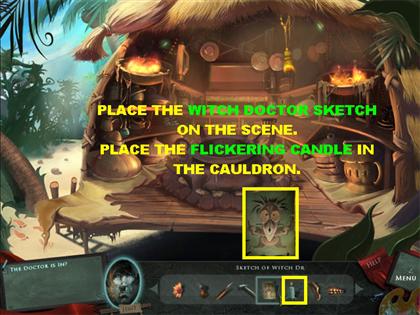
- As soon as you enter the painting, place the sketch of the Witch Doctor on any part of the scene and the Witch Doctor will come to life.
- Place the Flickering Candle on the cauldron to light the fire; the liquid will start bubbling.
- The Witch Doctor tells you that he needs a wand to go with his bubbling cauldron.
Three Pieces of a Wand

- Use the Hammer from inventory to break open all 4 vases on the floor.
- Pick up the Net piece in the left vase.
- The other Net piece is in the right vase.
- The first Shrunken Head is in the vase on the far left.
- The second Shrunken Head is in the vase on the far right.
- Once all the pieces have been collected, click on the sparkly spot on the right shelf for a closer view.
Trouble Ahead
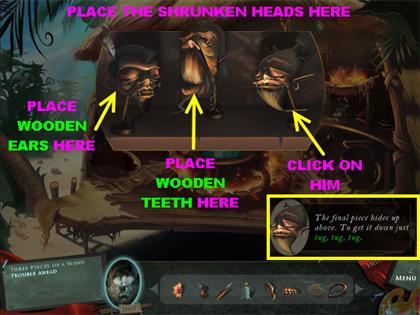
- Place both Shrunken Heads on the stands.
- Place the Wooden Ears on the Shrunken Head on the left, and a Magic Feather will go into inventory.
- Place the Wooden Teeth on the shrunken head in the middle, and Magic Beads will go into inventory.
- Click on the Shrunken Head on the right and it will tell you: “The final piece hides up above. To get it down just tug, tug, tug.”
- Exit out of that pop-up window.
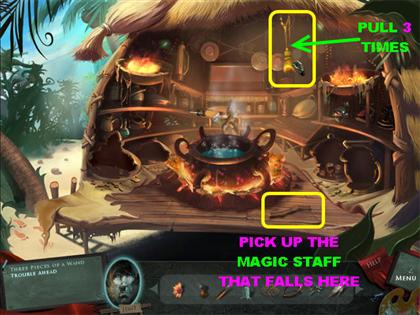
- Once you’re back in the scene with the Witch Doctor, click 3 times on the rope in the upper right side of the scene.
- A Magic Staff will fall to the ground; pick it up.
Three Pieces of a Wand

- Click on the Witch Doctor once you have all 3 parts of the wand; he will put Spell Circles in the air.
- Place the Magic Feather, the Magic Staff, and the Magic Beads in the Spell Circles to complete the wand.
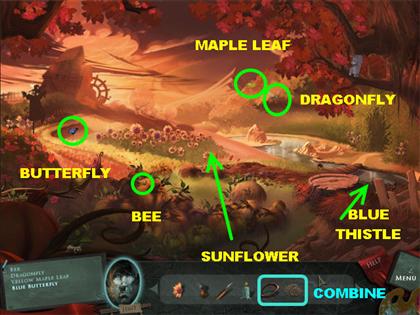
- He will now ask you to find the following items: Bee, Dragonfly, Sunflower, Thistle, Leaf, and Butterfly.
- Go back to the Foyer by placing your cursor at the bottom of the scene 4 times.
- Click on the Farm Painting on the back wall to revisit the scene with the Scarecrow.
- You may have picked up some of these items in the Farm Painting the last time you were here. If by chance you didn’t pick up some of the items, you can do so now.
- From the inventory box, combine the 2 Net pieces. You will use the Net to help you catch the Bee, the Butterfly, and the Dragonfly.
- You will see insects flying around; they will move a little bit but they will stay still long enough for you to pick them up.
- Grab the Blue Butterfly, and the Bee flying around the left side of the scene, with the Net.
- Grab the Dragonfly on the right side of the scene with the Net.
- Click on the Maple Leaf that floats down from the right side of the scene.
- Click on the Blue Thistle on the lower right side of the scene.
- Grab the Sunflower in the center of the scene.
- Go back to the Witch Doctor scene by placing your cursor in the following manner:DOWN 2 X RIGHT UP UP (RIGHT SIDE) UP
Recipe for Success
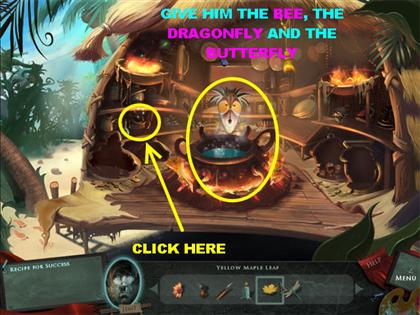
- Give the Witch Doctor the Butterfly, the Bee, and the Dragonfly. The Bee blows up, but the Doctor will put the Butterfly and the Dragonfly in the cauldron.
- Click on the sparkly spot on the left side for a closer view.
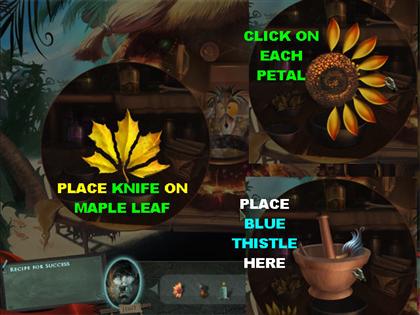
- Place the Sunflower on the scene and you will see it appear in the middle of the screen. Click on each petal until you eliminate all of them.
- Place the Blue Thistle in the mortar and pestle. Click on the mortar and pestle so it can grind the Thistle.
- Place the Yellow Maple Leaf on the screen, and it will appear as a whole piece. Grab the Knife so you can cut the Leaf in pieces. Click on the pieces to add them to the bowl.
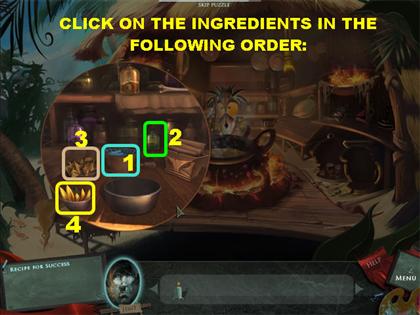
- In order to mix the correct potion you have to do it in a particular order. Click on the items in the following order:THISTLE GREEN JAR ON RIGHT MAPLE LEAF SUNFLOWERS
- The ingredients will go into inventory. Give the Prepared Ingredients to the Witch Doctor.
Have a Heart
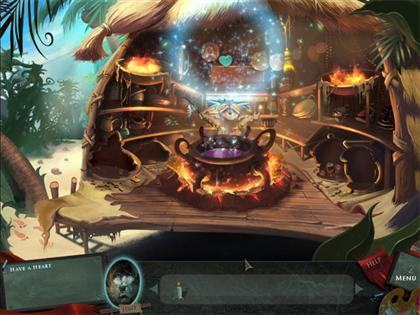
- After the Witch Doctor receives the Prepared Ingredients, he will give you a Stone Heart to help you reach the upper floors.
- Click on the Witch Doctor and he will tell you to remember that the Growth Potion will be ready soon.
- Exit the scene and head all the way up to the Tower. Place your cursor in the following manner to reach the Tower:DOWN 2 X UP (LEFT SIDE) UP (RIGHT SIDE)
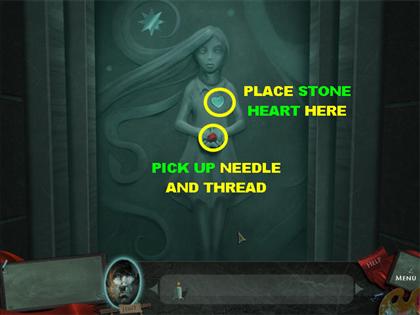
- Place the Stone Heart on Iris’ chest and a Needle and Thread will appear in her hand; grab it.
- The stone relief of Iris will magically part, revealing a bridge beyond.
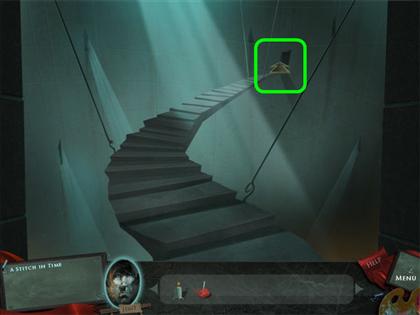
- Click on the door in the back of the scene and the walkway to the door will be destroyed by a huge bell that falls from above, leaving you no way to get through the other side.
- Head back downstairs to the Foyer by placing your cursor downwards 4 times.
A Stitch in Time
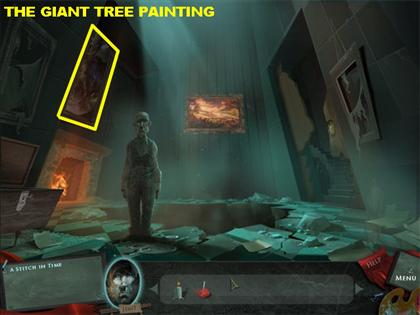
- Click on the Giant Tree painting on the upper left side of the room for a closer view.
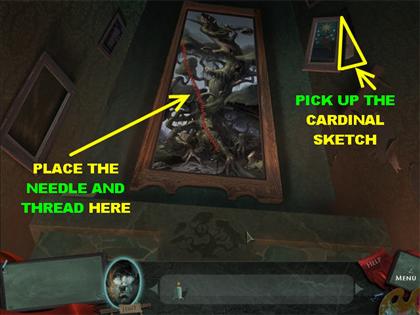
- Grab the Cardinal Sketch that is peeking out of the top right side of the scene.
- Place the Needle and Thread on the painting to stitch it up. You will be automatically transported into the painting.
The Root of The Problem
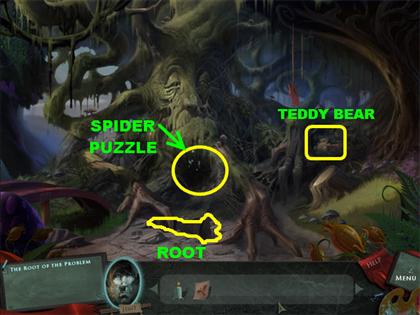
- Click on the tree; you will hear a noise, but no words will come out of the tree.
- Click on the root of the tree and it will tell you the tree has no access to moisture.
- Pick up the Teddy Bear on the right side of the scene.
- Click on the sparkly spot at the bottom of the tree for a closer view.
Spider Puzzle
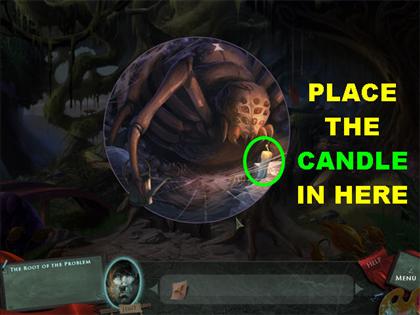
- Place the Candle in the pop-up window and you will encounter a large spider.
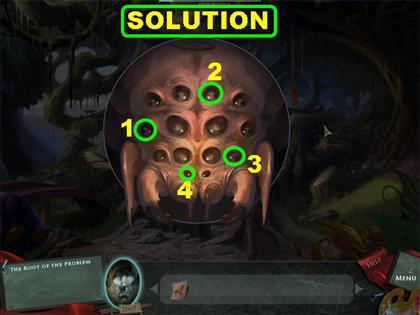
- Your goal is to click on the eyes of the spider until it disappears from the scene.
- Each spot that you touch lights up or darkens one of the eyes of the spider, as well as the adjacent eyes to it. Your goal is to shut all eyes in the puzzle.
- Please look at the screenshot and click on the eyes in the order shown.
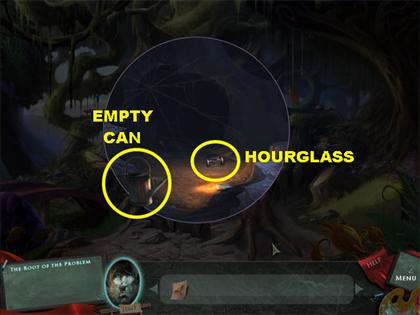
- After the spider disappears, pick up the Empty Can and the Hourglass.
One to Grow On
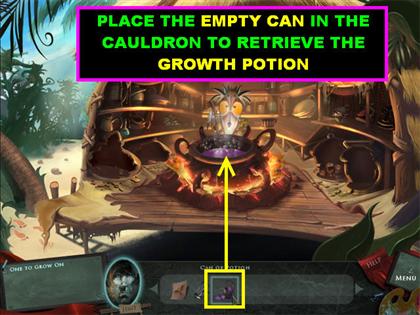
- Go back to the Witch Doctor painting and place the Empty Can in the cauldron so you can retrieve the Growth Potion.
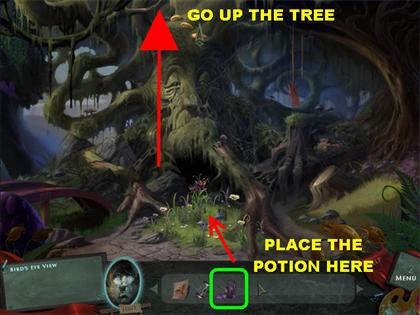
- Go back to the Giant Tree painting and place the Can of Potion on the roots of the tree. Mushroom steps form on the tree at the top of the screen.
- Click on the tree and it will tell you the forest needs a constant source of water.
- Place your cursor all the way to the top of the scene so you can climb the mushroom steps to the top of the tree.
Bird’s Eye View
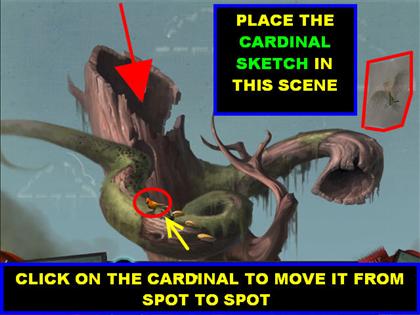
- Place the Cardinal Sketch on the top right side of the tree and the bird will come to life.
- Your goal is to move the bird around so you can get rid of all the bugs on the tree.
- Click on the bird a total of 4 times and all the bugs will disappear.
- Go inside the tree.
Cleaning The Treehouse
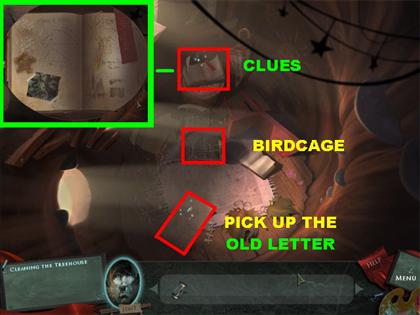
- Pick up the Metal Birdcage in the middle of the ground.
- Click on the sparkly page on the left side of the scene; read what it says. The letter will go back into inventory as an Old Letter.
- Click on the sparkly book on top of the scene and you will see a drawing with some clues.
- Move all the items off the rug. Once all items have been removed, click on the rug to reveal a puzzle.
Pentagon Puzzle
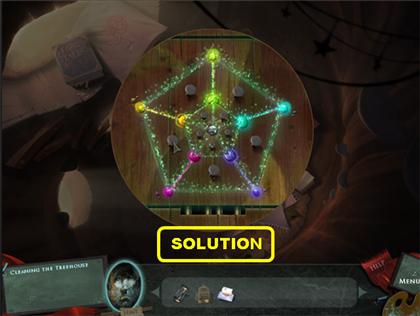
- Watch A Video Solution on the Big Fish Games Tips YouTube Channel!
- Your goal in this puzzle is to move all the symbols to their matching color and shape.
- Use the small silver buttons to move the items in the middle of the puzzle. Use the large silver buttons to move the pieces on the outside ring.
- When two pieces are in the right place, a light will connect both pieces.
- Light up all five sides to complete the game.
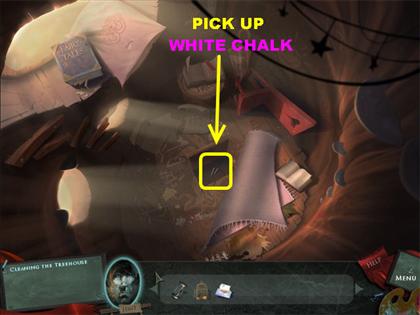
- After the puzzle has been completed, pick up the White Chalk inside the hidden compartment.
Chalk It up to The Rain
- Click on the upper part of the scene so you can go outside.
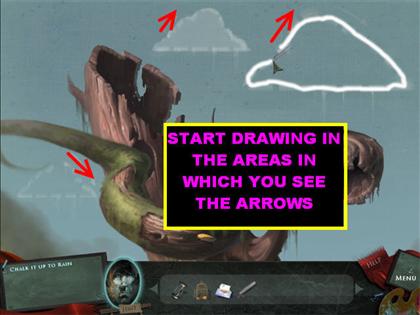
- Grab the White Chalk and drag it across the outline of the 3 clouds in the sky.
- You should start your outline in the area in which you see the arrow over the cloud.
- Make sure that you do not let go of your mouse until you connect all ends of the cloud.
- Once a cloud has been properly outlined, it will turn white.
- After all 3 clouds have been filled, it will begin to rain.
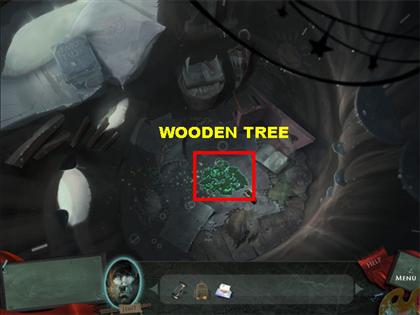
- Click inside the tree to pick up the Wooden Tree piece.

- Once you’re at the bottom of the tree, click on it and it will thank you for restoring the water source.
- Exit out of the scene by placing your cursor downwards.
Bridging The Gap
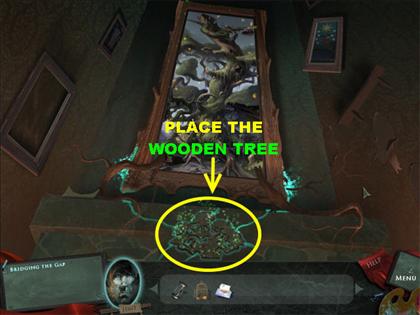
- Place the Wooden Tree at the bottom of the scene and the tree will grow out of the painting and into the Tower.
- You have to go back to the Broken Bridge at this time, follow these steps to get back there.
- From the outside of the painting, place your cursor to the right to go back in the Foyer.
- Place your cursor on the right to go through the door.
- Place your cursor on the broken door to go upstairs.
- Place your cursor on the steps to go up the steps.
- Put your cursor on the top right side to enter the Broken Bridge scene.
CHAPTER 3: THE THEATER
The Birth of A Phoenix
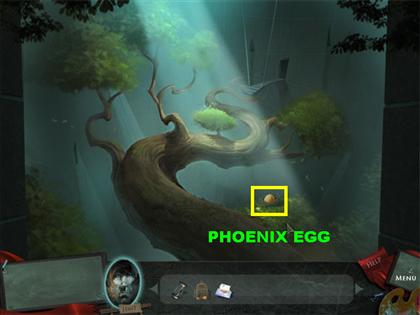
- Pick up the Phoenix Egg on the lower right side.
- Retrace your steps and go back down to the Foyer.
- Click on the fireplace.
- Place the Phoenix Egg inside the fireplace and the Phoenix will take flight.
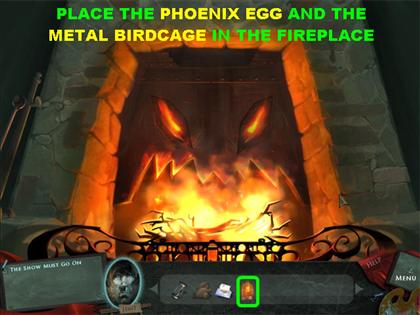
- Place the Metal Birdcage in the fireplace to contain the Phoenix.
The Show Must Go On
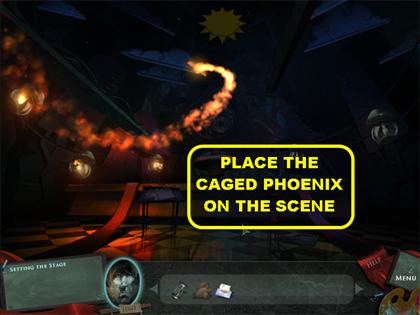
- Go back to the Broken Bridge and enter the door.
- As soon as you enter the door, place the Caged Phoenix anywhere in the scene; it will fly away and light up the small lanterns in the Theater.
Setting The Stage
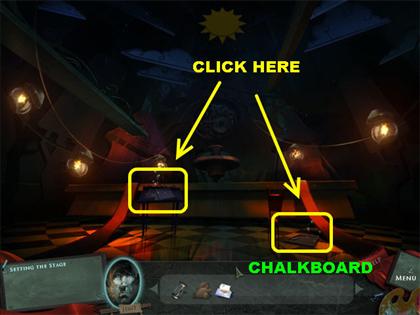
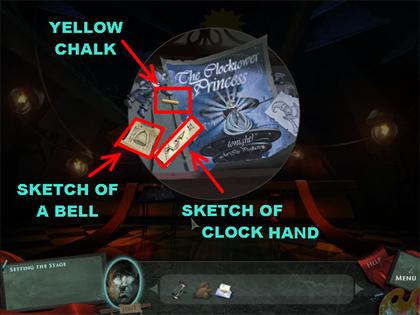
- Click on the sparkly spot in the lower left to pick up the Yellow Chalk, the Sketch of a Bell, and the Sketch of a Clock Hand.
- Click on the sparkly spot in the lower right to view a small chalkboard.
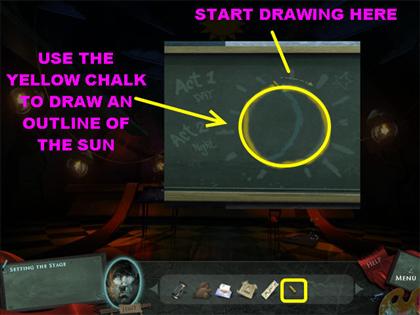
- Draw a circle around the outline of the sun with the Yellow Chalk to form the image of the sun.
- Start drawing from the arrow and work your way to the other end. Do not let go of your mouse until you connect both ends.
- Once it has been drawn correctly, the sun will appear brightly in the scene and you will be automatically transported to the next scene.
Time for Rehearsal
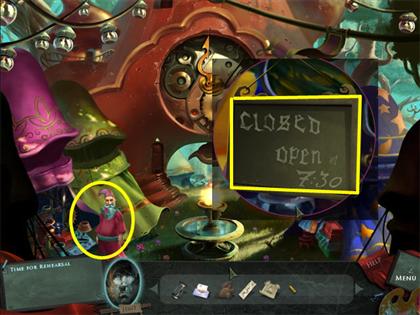
- Talk to the Merchant; he tells you that he would love to chat with you, but he doesn’t have the time.
- Click on the sparkly sign in the lower right and note that it opens at 7:30. Exit out of that window.

- Place the Sketch of a Clock Hand on the large clock.
- Change the clock’s time to 7:30 and another Merchant appears on the right side of the scene.
- Click on the right Merchant; he tells you that he cannot start his day until the clock is running.
- Go inside the small door on the right.
Cog in The Machine
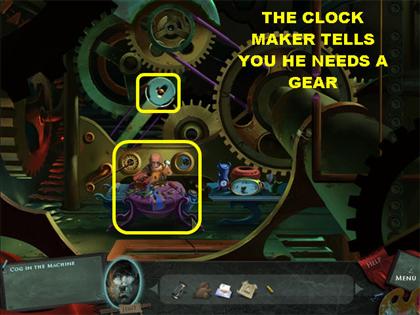
- Talk to the Clock Maker, he tells you the clock is missing a gear and that he needs it for the show that night.
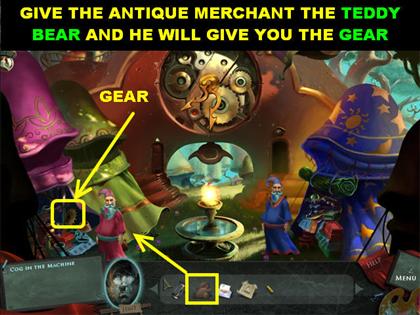
- Go back outside and talk to the Merchant on the left. He asks you if anything catches your eye. Click on the Gold Gear on his table.
- He says that in order for you to have it, he needs something old, tamed but wild, sentimental but forgotten.
- Hand him the Old Teddy Bear and he will give you the Gear. Click on the Gear to add it to inventory.
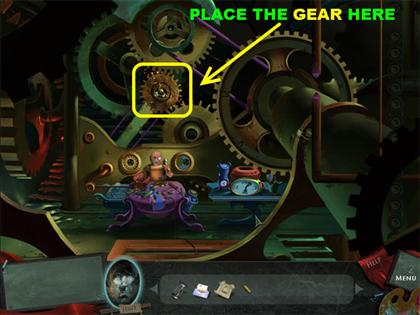
- Go back to the small door on the right and place the Gear in the upper left side of the scene.
- The Clock Maker tells you the Gear is rusted so he needs an Oil Can.
Oil Fix It
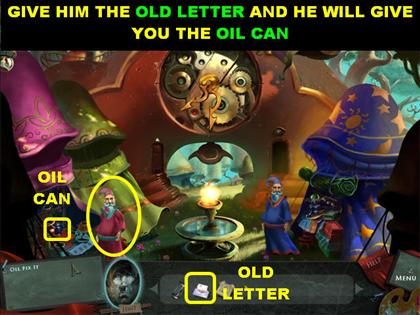
- Go back to the Merchant on the left and try to grab the Oil Can. He tells you that he needs something black and white and READ all over.
- Hand him the Old Letter and grab the Oil Can.
- Go back to the door on the right.
- Place the Oil Can on the gear.
- The clock works but now the Clock Maker wants some paints to complete the set.
A Show of Color
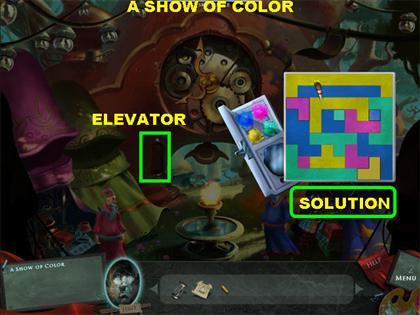
- Go back outside and talk to the Merchant on the right. He tells you that you have to prove your worth through a game.
- He tells you that the rules are that everything must be painted, but like colors can’t touch. The puzzle will automatically open once he is done talking.
- Dip the brush in the color you want to paint with; then click on the piece you want to color.
- If you make a mistake, just color over a spot or dip the brush in water to clean off the brush.
- You cannot change the colors that were previously on the board.
- Once you solve the puzzle he will give you the Magic Paints. He tells you that you can use those colors to ring the bell.
- Go to the elevator on the far left side of the scene to go to the top of the Tower.
Bats in The Belfry
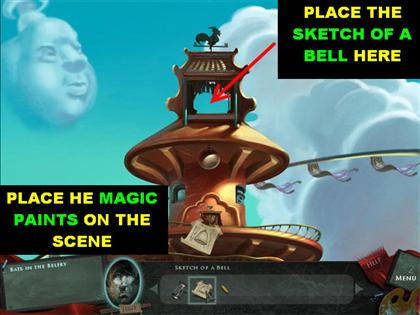
- Place the Magic Paints anywhere in the scene to bring the scene to life.
- Place the Sketch of a Bell in the bell tower and it will start ringing.
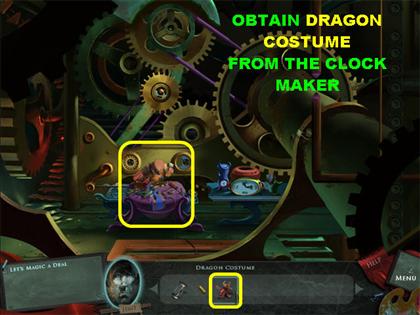
- Go back to the Clock Maker; click on him and he will give you a Dragon Costume. He tells you the costume is for the Magic Merchant.
Let’s Magic A Deal
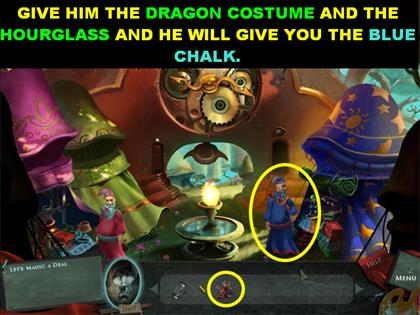
- Give the Dragon Costume to the Merchant on the right and he will tell you that he needs the Constellation from the night sky. He gives you a Blue Chalk.
- He asks you for an Hourglass; give it to him. He gives you back an Enchanted Hourglass which he says will slow down time.
A Star Is Born

- Go downstairs, click on the chalkboard, and use the Blue Chalk to draw the crescent moon.
- Make sure you draw the lines with the Blue Chalk on the right side of the chalkboard. This action will turn day into night.
- Go back upstairs and use the elevator.
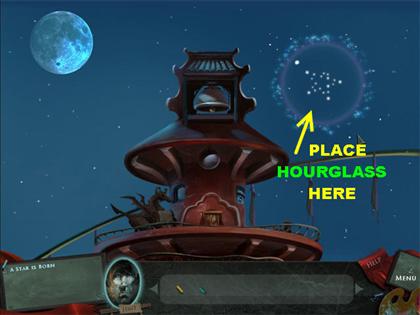
- Place the Enchanted Hourglass on the star in the upper right side.
- The Hourglass will slow down the shooting star; click on it when it slows down and the Constellation will be added to your inventory.
- Go downstairs and draw the sun again.
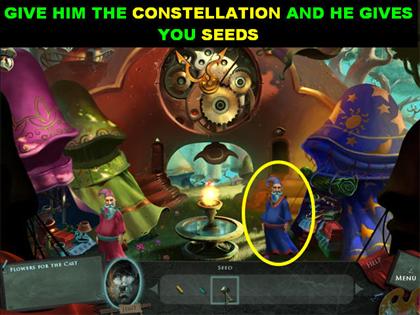
- Go back upstairs; give the Constellation to the Merchant on the right and he hands you a Seed. He says it only grows during the day and only blossoms at night.
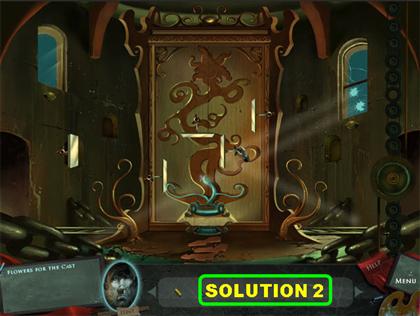
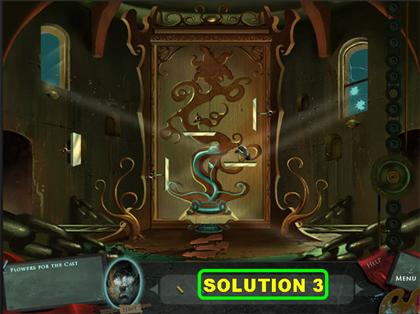
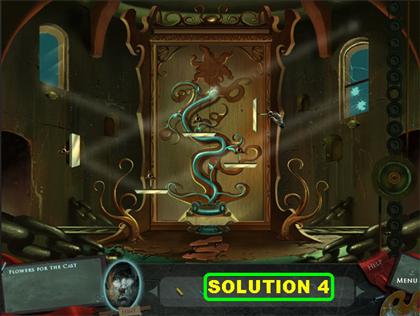
Flowers for The Cast
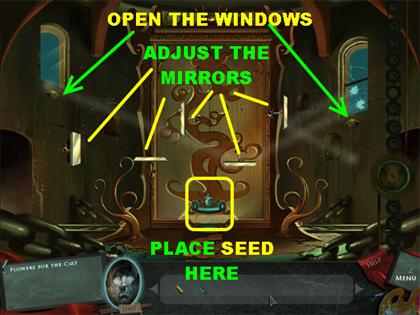
- Go through the door on the right; pass the Clock Maker and go up the steps on the left.
- Place the Seed on the planter in the lower center of the scene.
- Open the left and right windows by clicking on the buttons below each one. There are several mirrors in the scene which will reflect the light.
- Your goal is to move the mirrors around until the beam of light shines on the Seed and makes it grow.
- Each time the plant grows a bit you have to reposition the mirrors so you can shine the light on the plant in its new position.
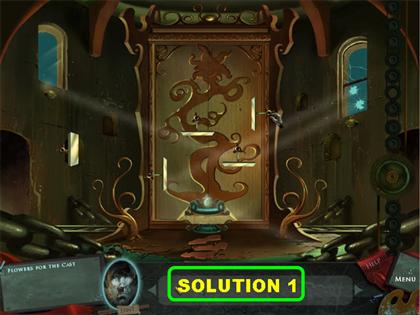
- Please look at the next set of screenshots for the solutions to each stage of the plant’s growth. All the mirrors do not have to be used for each stage of the plant to grow.
As Flowers Bloom
- Go all the way downstairs and turn it back to night.
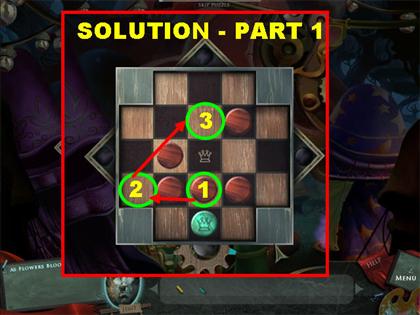
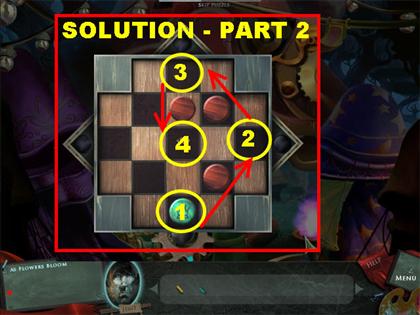
- Go back upstairs and click on the left Merchant. He asks you to play a game of chess with him.
- He tells you the goal is to leave no red disks while leaving the blue disk in the center.
- Click on a disk and all the spots you can jump to will light up. Pick a spot and one disk will be eliminated.
- Please look at the next screenshots for the solution.
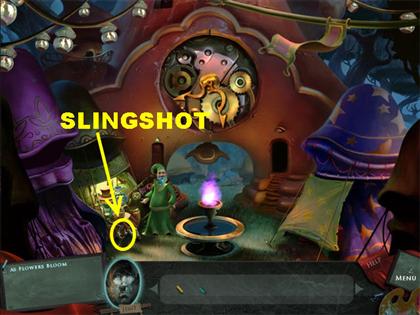
- Once you win the chess game, the Merchant tells you to take the Slingshot; click on the Slingshot on his table.
- Go to the Clock Tower by entering the door on the right. Pass the Clock Maker and go up the steps on the left.
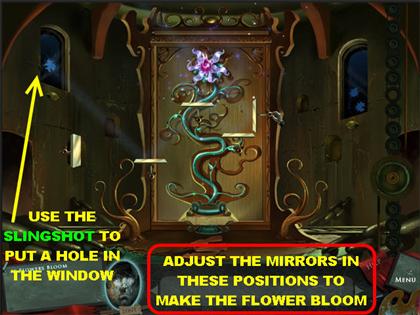
- Place the slingshot on the left window to put a hole through it.
- Position the mirrors like the image in the screenshot and the flower will bloom.
- You will be automatically transported to the next scene.
Ready for The Closeup
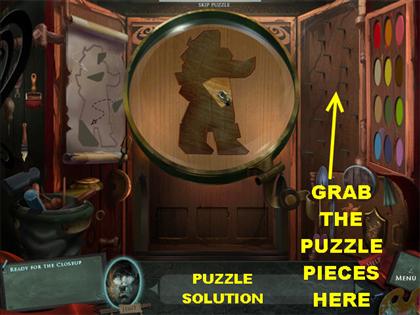
- Grab the puzzle pieces on the right and place them on the board.
- When a piece is in the right spot it will lock into place.
- Please look at the screenshot for the solution.
Breaking A Leg
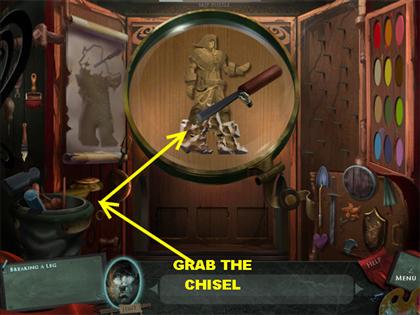
- Grab the chisel on the lower left and start chiseling at the wooden board.
- Take the big brush on the left and place it on the carving. It will automatically put primer on the wood with just one click.
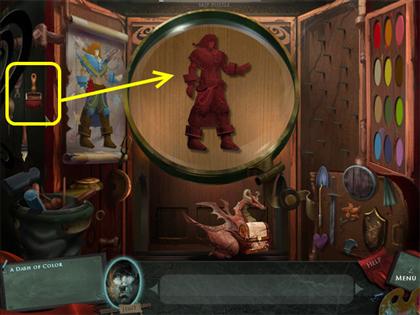
A Dash of Color
- Your goal is to paint the hero in the same colors as the sample on the left.
- Grab the small paintbrush on the left and add the neutral color to his hands and his face. You can also use the paint on the right to achieve this effect.
- Dip your paintbrush in any of the colors on the right to load color onto your paintbrush.
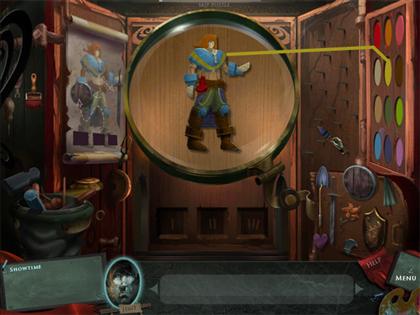
- Look at the screenshot for the right colors that you need to use.
- Once the puzzle is complete, three slots will open up at the bottom of the scene.
Showtime
- Your goal is to place the correct items in the slots.
- Look at the bottom of your screen; you will see a set of characters doing different activities. Your goal is to figure out how the elements that go into the slot fit in with the characters below.
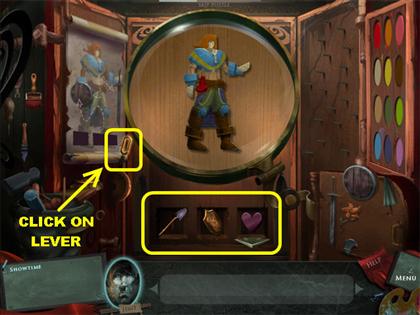
- Grab the items on the right side of the scene and place them into one of the slots.
- Press the lever on the left after you’ve made your selections to be able to see how the choice you made affected the outcome.
- Place these items in the slot from left to right and click on the lever:SHOVEL SHIELD HEART
CHAPTER 4: THE CATWALK
Behind The Scenes

- You will be automatically taken to the Theater, but the painting has been destroyed exposing a catwalk above. Click on the top right side to enter the next scene.
- Click on the door to enter a new location.
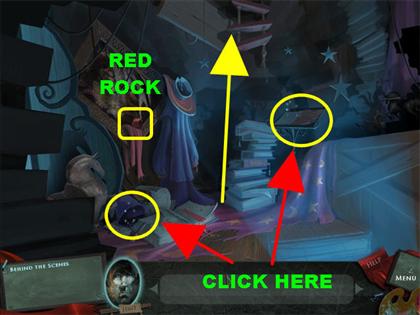
- Click on the sparkly spot in the lower left and grab the Chisel.
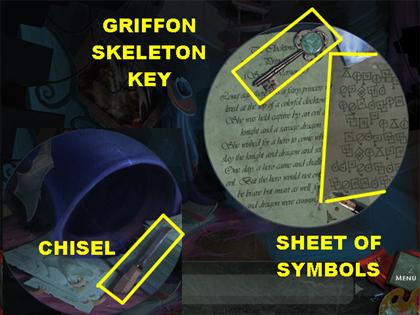
- Click on the sparkly spot on the right and pick up the Griffon Skeleton Key and the Sheet of Symbols.
- Pick up the Red Rock on the left side of the scene; it is on the red cloth.
- Place your cursor on top to enter a new scene. Click on the hole in the ceiling, and a puzzle will appear.
Stone Circles
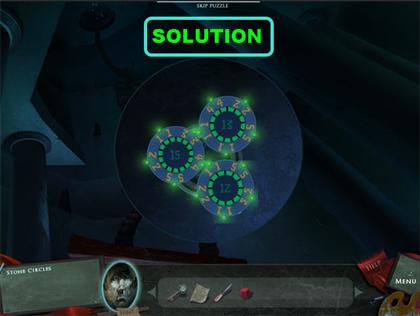
- Your goal is to arrange the numbers so the numbers next to each other add up to the total in the middle.
- Click on two numbers and they will swap places. When 2 correct numbers are placed next to each other, a green light will appear.
- Once all the numbers have been entered correctly you will be able to access the next scene.
- Solution for disc 15:1-3 3-4 4-5 5-2 2-1
- Solution for disc 13:2-5 5-1 1-1 1-4 4-2
- Solution for disc 12:2-1 1-5 5-3 3-1 1-2
- Click on the ceiling to enter the next location.
CHAPTER 5: HALL OF GIANTS
Chisel, Torch & Tile

- Click on the steps on the right and a boulder will drop to the ground.
- The large rock on top will crack. When you click on it, it says that glowing energy comes from inside.
- Place the Chisel on the stone, the energy is released and it hits the stone.
- Grab the Torch on the side of the large stone and place it in the lower left side of the scene.
- Click on the Tile that can be seen with the light from the torch.
- Click on the Torch again so it will go back into inventory. You can use the Torch more than once in the game.
- Click on the paper in the lower center to read it.
- Open the sparkly spot on the left side of the scene.
Yellow Chalk
- Click on the head of the giant rabbit on the right and pick up the Yellow Chalk on the scaffolding.
- Close that window out for now, you will return to it later.
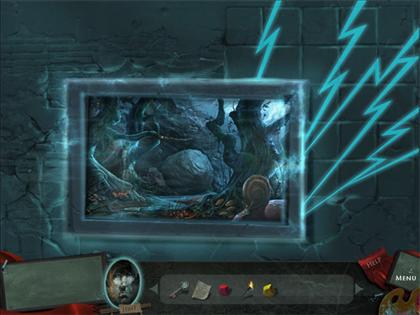
- Click on the painting at the bottom of the large rock.
A Powerful Idea
- Place the Tile from inventory on the empty spot.
- Turn the Tiles until you form the image shown on the screenshot.
- Once the puzzle is solved you will be automatically transported to the next scene.
Cave of Sorrow
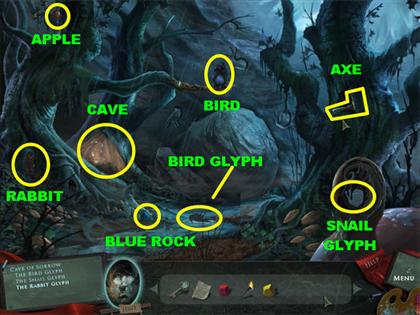
- Click on the Axe on the right tree and a bird will fly out of the tree and land on a branch on the left.
- Pick up the Axe after the bird has left that tree.
- Place the Axe on the branch in which the bird is located.
- The branch will break; the bird will fly away and drop the Bird Glyph. Pick up the Bird Glyph from the ground.
- Place the Axe on the shell in the lower right corner to open it and grab the Snail Glyph.
- Grab the apple in the upper left corner.
- Pick up the Blue Rock in the lower left side.
- Click on the sparkly cave on the left.
The Color Wheel
- Your goal is to fill the palette with the colors you need by mixing the right colors together.
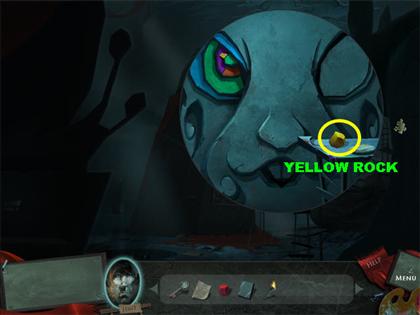
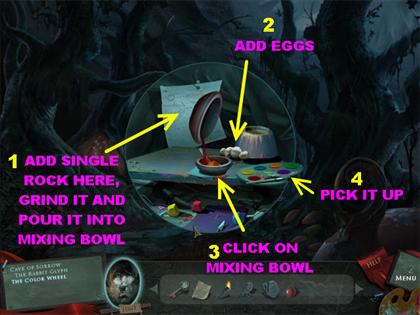
- Pick up the Yellow Rock and place it on the mortar and pestle to obtain a yellow powder.
- Click on the mortar and pestle and the yellow powder will pour into the mixing bowl.
- Click on the eggs and they will mix with the yellow powder to form yellow paint.
- Click on the mixing bowl to pour the yellow paint onto the palette.
- Repeat the same steps for the Red and Blue Rocks.
- Once you have the yellow, blue, and red paints in the palette, you have to start mixing colors together to obtain green, purple, and orange paint.
- You will follow the same steps as above; the only variation is that you have to mix 2 colors in the mixing bowl before you can add the eggs.
- To make orange paint, follow these steps:Grind the Yellow Rock and pour into mixing bowl. Grind the Red Rock and pour into mixing bowl. Add Eggs Pour into Palette.
- To make green paint, follow these steps:Grind the Yellow Rock and pour into mixing bowl. Grind the Blue Rock and pour into mixing bowl. Add Eggs Pour into Palette.
- To make purple paint, follow these steps:Grind the Blue Rock and pour into mixing bowl. Grind the Red Rock and pour into mixing bowl. Add Eggs Pour into Palette.
- Click on the palette to add it to inventory.
- Go back to the scene with the giant rabbit. Place your cursor down twice and you will return to the boulder scene.
See What Can’t Be Seen
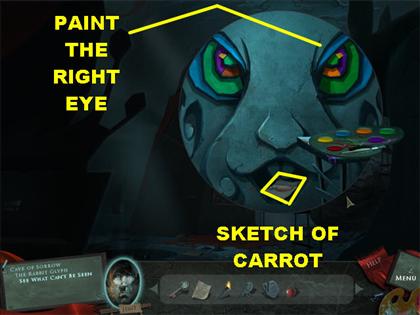
- Click on the giant rabbit for a closer view.
- Place the paint palette on the scaffolding and the eye on the right will open up.
- Pick up the paint brush and color the right eye as a mirror image of the left eye.
- Please look at the screenshot for the solution. Use all the colors except the red one.
- Pick up the Sketch of a Carrot that appears inside of the mouth of the rabbit.
The Rabbit Glyph
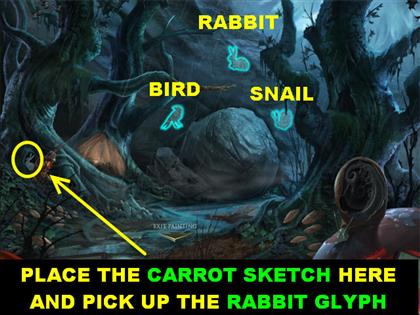
- Go back to the cave area.
- Place the Sketch of a Carrot on the rabbit in the lower left side of the scene. Click on the stone rabbit that appears once the rabbit moves out of the way.
- Place the Stone Bird, the Stone Rabbit, and Stone Snail in the section above the boulder and the boulder will move out of the way.
- Go inside the cave.
Once Upon A Time

- Place the torch on the left side of the scene.
- Place the Sheet of Symbols in the top left corner of the scene.
- Your goal is to arrange the symbols correctly using the sheet in the left corner.
- Click on 2 symbols to swap their places. When you arrange a group of symbols correctly an image will appear above the symbols.
- If the image is in the right spot, one of the symbols in the middle of the scene will light up. If it’s not correct, you will have to move it to another spot that holds the same number of symbols.
- Once all the symbols and images are in the right places you will be taken to a cut scene which will show you how the story of Iris unfolded.
- Look at the screenshot for the solution.
- Click on the Star in the upper right and grab the Torch from the left before you exit this scene.
Stone Weight
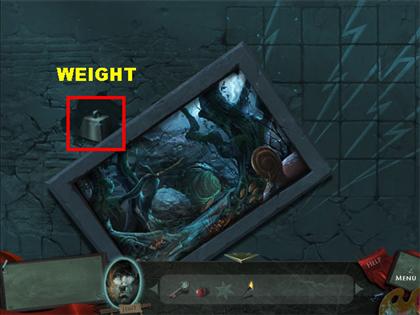
- Place your cursor downwards twice and exit the painting.
- Pick up the Stone Weight in the wall.
- Place your cursor downwards one more time.
- Go through the steps on the right.
CHAPTER 6: FIRE AND ICE
Weighting on Change
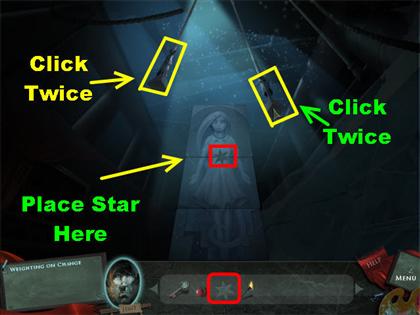
- Place the Stone Weight on the left rope hanging from the ceiling.
- Pull the left rope 2 times and you will see Iris’s face on the large stone. Pull the right rope 2 times to complete the image.
- Place the Stone Star in the middle.
A Warm Greeting
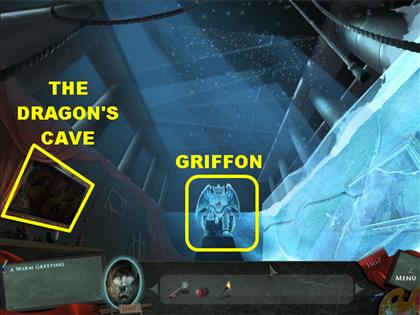
- It will begin snowing in that scene; you will notice that half the scene is covered in ice.
- Click on the left painting to enter a new scene.
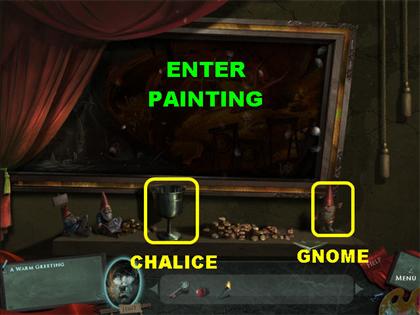
- Pick up the Gnome on the lower right.
- Pick up the Chalice in the lower center.
- Enter the painting.
Dragon’s Scales
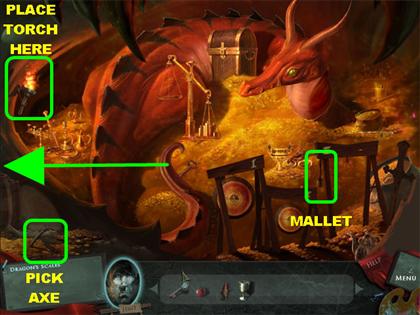
- Place the torch in the upper left side, so you can see inside the cave.
- The Dragon says you must prove your worth by equal weight.
- Grab the Pick Axe in the lower left.
- Grab the Mallet on the right; it is on the right gong stand.
- There is a key in the lower left, but you will not be able to access it now.
- Place your cursor on the left to enter the next scene.
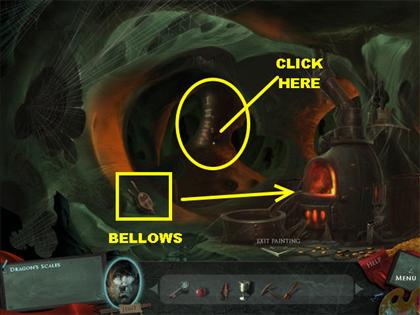
- Pick up the Bellows in the lower left side.
- Place the Bellows in the stove.
- Roman numerals appear on the back wall; the numbers are a clue needed for the game.
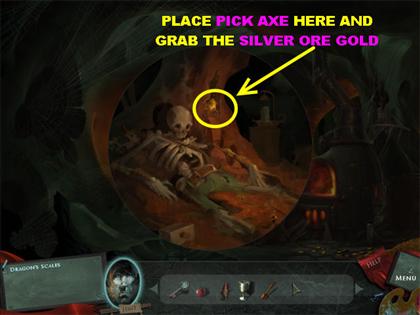
- Click in the back of the cave to open a new window; you will find a skeleton inside.
- Place the Pick Axe on the wall above the skeleton. Grab the Gold Ore inside the wall.
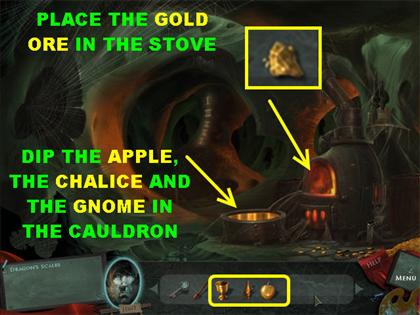
- Place the Gold Ore in the stove and the gold will melt into the cauldron.
- Place the Chalice, the Gnome, and the Apple into the cauldron. All 3 pieces will be returned to your inventory covered in gold.
- Place your cursor to the right.
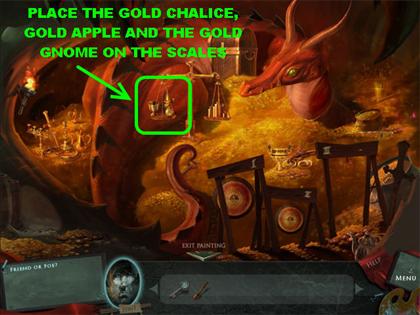
- Place the Gold Gnome, the Gold Apple, and the Gold Chalice on the left scale. This action will balance the scales.
- Once the scales are balanced, you will automatically be taken back outside where you will see the Dragon’s fire melt the ice on the left side of the room.
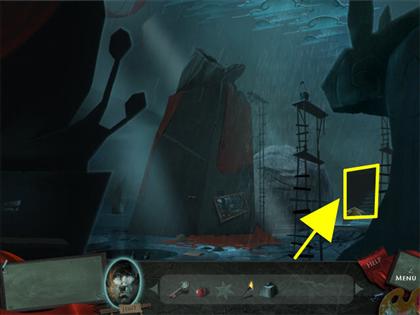
Friend or Foe?
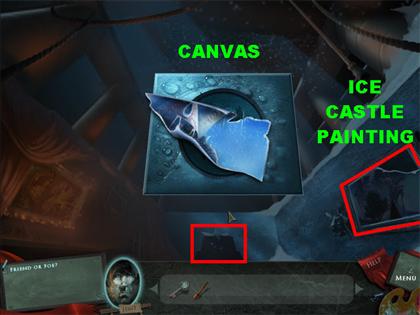
- Grab the Canvas on the pedestal in the back of the room.
- Click on the Ice Castle painting on the right.
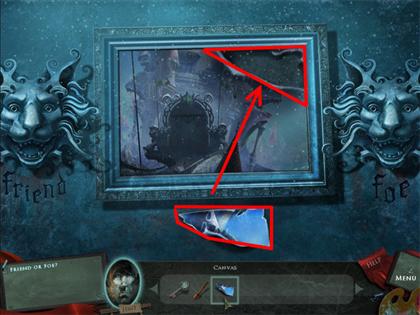
- Place the Canvas Fragment on the torn painting.
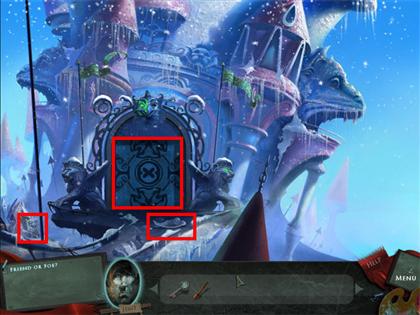
- When you first enter, the Guardian says you can enter the gate if you can prove if you’re a friend and not a foe.
- Notice the 2 lions inside the painting, their eye color will change depending on the image on the door. One lion has red eyes and the other one has green eyes. Green is your friend, red is a foe.
- With that in mind your goal is to turn the eyes of the lions on the inside and outside of the painting to show only green eyes. Once you can achieve this, it will also turn both the Guardian’s eyes green which will grant you access inside.
- Click on the tiles on the door to rotate them.
- Arrange the tiles just like the image on the screenshot and the eyes on the right lion will turn green. Notice the Guardian also has one green eye at this point.
- Pick up the Frozen Statue pieces in the lower left and right sides of the scene.
- Go outside of the painting.

- Click on the left lion for a closer view. Your goal is to turn both his eyes green by clicking on his whiskers in the correct manner.
- Solving friend in this section will light up the other eye of the Guardian.
- If you want to reset the puzzle, click on the lion’s nose.
- Each whisker you touch affects the movement of the teeth.
- Please look at the screenshot. The whiskers have been numbered 1 through 6. Click on each of the following whiskers a total of 3 times to solve the puzzle:3 6 1 4 2 6
- Go inside the painting and the Guardian will let you in.
An Uneasy Peace
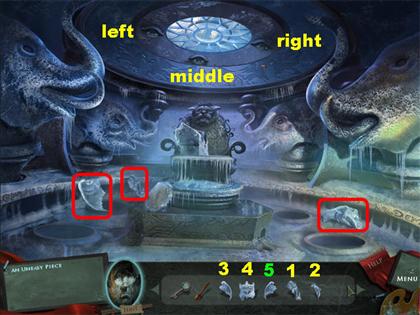
- Pick up the 3 Frozen Statue pieces highlighted in the screenshot.
- You have to place the Frozen Statue pieces on the statue, but you can only do so by placing the pieces in the correct order.
- Please look at the screenshot to see which pieces need to go first.
- Once the statue has been assembled you have to click on the eyes on the ceiling until you can let the light shine through.
- The eye on the left moves the crystal 7 spaces clockwise.
- The eye in the middle moves the crystal 3 spaces counter-clockwise.
- The eye on the right moves the crystal 5 spaces counter-clockwise.
- Click on the lights above the ceiling until the light shines on the stone statue.
- Click on the lights in the ceiling in the following order:MIDDLE EYE 2X RIGHT EYE 2X
- Once the statue has been defrosted it will tell you the dragon can be soothed by a tune written in fire.
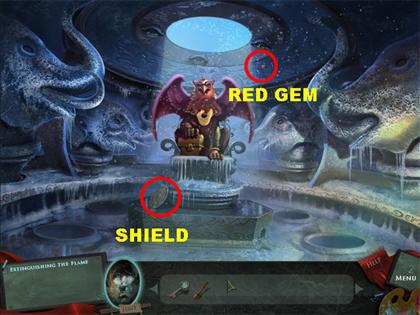
- Pick up the shield below the statue.
- Go back to the Dragon’s cave. Place your cursor in the following manner to return back to the cave:DOWN 3X LEFT UP LEFT
Extinguishing The Flame
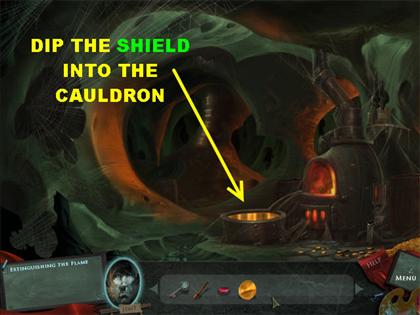
- Dip the Shield in the cauldron; it will return to your inventory as a Gold Shield.
- Place your cursor on the right side.
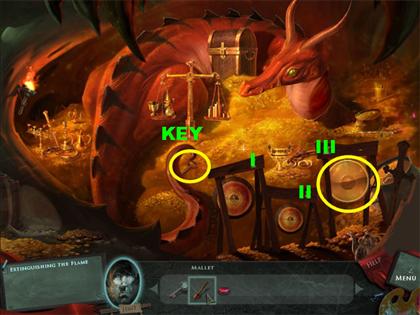
- Place the Gold Shield next to the other gongs.
- Notice each gong has a Roman numeral next to it. Your goal is to click on the gongs in the right order using the code that was in the other side of the cave.
- Use the mallet to hit the gongs in the following order:I III II II I
The Dragon’s Chest
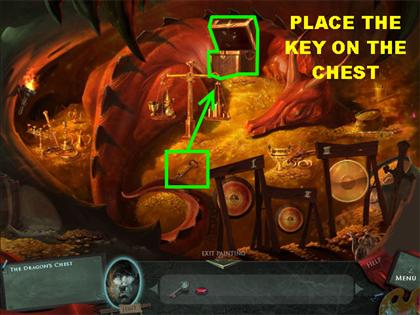
- Grab the Key that was under the Dragon’s tail and place it on the chest.
- Click on the chest once it opens to enter it.
Metal Rod Puzzle
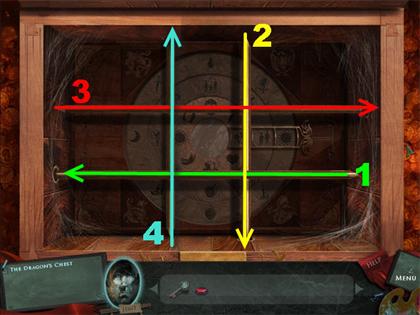
- Your goal is to move the metal rods out of the way, but they will only move in a certain direction.
- To move a rod, slide it left, right, up, or down.
- Please look at the screenshot and move the rods in the order shown by moving them in the direction of the arrows.
Chest Puzzle
- Click on a symbol in one of the 4 corners and they will light up. In the center of the puzzle you will have an image that belongs with that symbol.
- Your goal is to place the 3 symbols that best represent the image in the middle.
- Rotate the rings until they fall into one of the three slots on the right.
- Each time you make a successful match the symbols will disappear from the board.
- Please look at the next set of screenshots for the solutions.
Upper Right Symbol
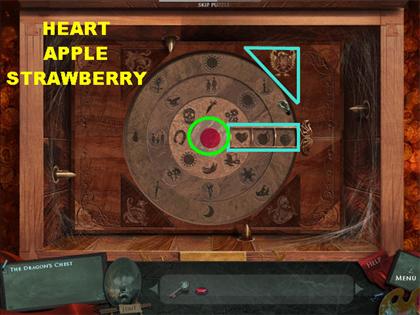
- The common thread is that you need only red items for this section.
- Place the heart, the apple, and the strawberry in the slots.
Lower Left Symbol
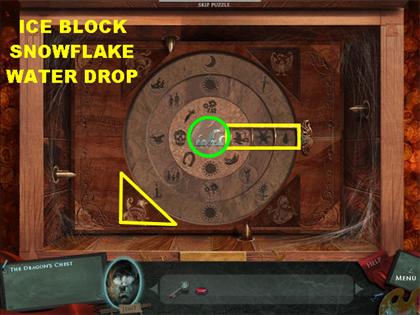
- The common thread is that all the items have to be made of water.
- Place the block of ice, the snowflake, and the water drop in the slots.
Upper Left Symbol
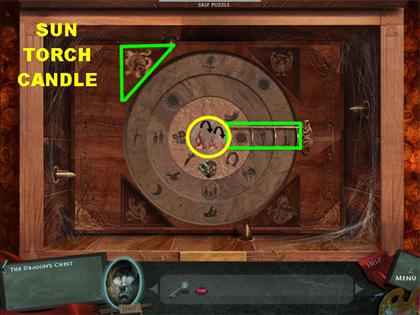
- The common thread is that you need items that are hot.
- Place the sun, the torch, and the candle in the slots.
Lower Right Symbol
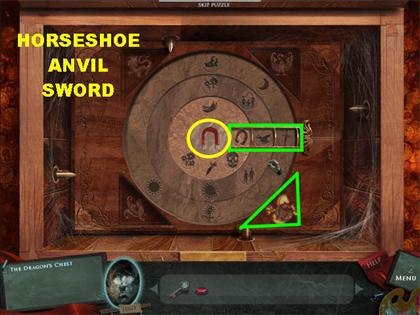
- The common thread is that you need items made of metal.
- Place the horseshoe, the anvil, and the sword in the slots.
Number Eight
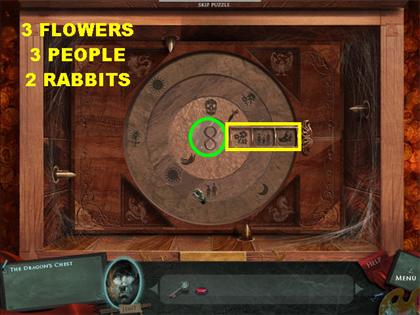
- Your goal in this section is to place 3 items into the slots that add up to the number eight.
- Place the 3 flowers, the 2 people, and the 2 rabbits into the slots.
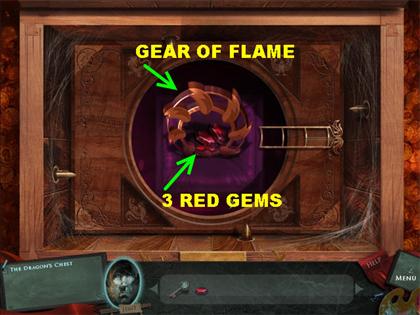
- Once the puzzle has been solved, pick up the 3 Red Gems and the Gear of Flame.
Warming Gaze
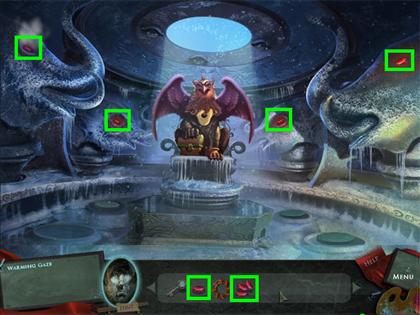
- Go back to the Ice Castle by placing your cursor in the following manner:DOWN 3 X RIGHT UP 2 X
- Place the 4 Red Gems in the eye sockets of the elephants.
The Griffon’s Game
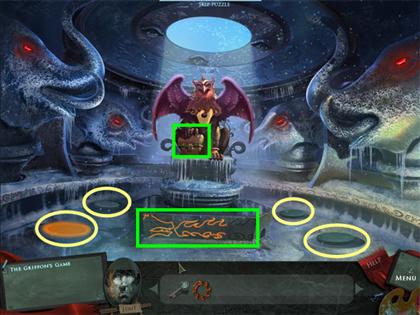
- Click on the Griffon and it says: “You’ve returned what has been stolen. The statues will show you how to return the warmth to my home.”
- Click on any of the pedestals to activate the game.
- Reproduce the light sequence shown on the floor.
- As soon as the sequence ends reproduce it by clicking the lights on the ground.
- If you reproduce it correctly the game will give you a new sequence. If you make a mistake you will be given a new tune to reproduce.
- Each time you make a correct tune, the base of the statue will light up with the symbol of the dragon breathing fire.
- You have to pass four rounds of this puzzle. The sequences are random.
Elemental Gears
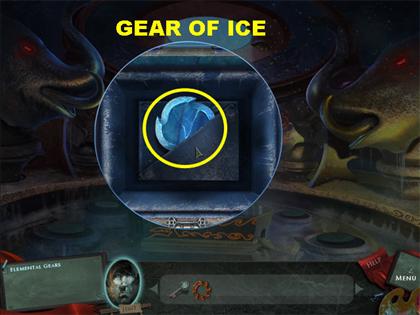
- Once you complete all sequences, click on the Griffon’s chest and pick up the Gear of Ice.
- Exit the scene by placing your cursor downwards 3 times.
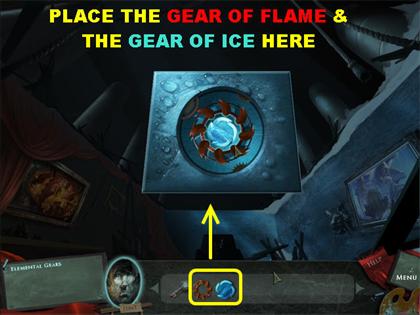
- Click on the sparkly spot in the back; place the Gear of Ice and the Gear of Flame into that spot.
- Go through the steps in the back.
CHAPTER 7: THE BOOK
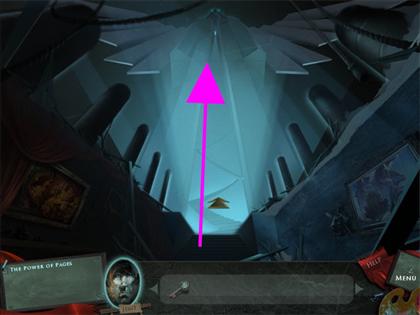
The Power of Pages
- Click on the book for a closer view.
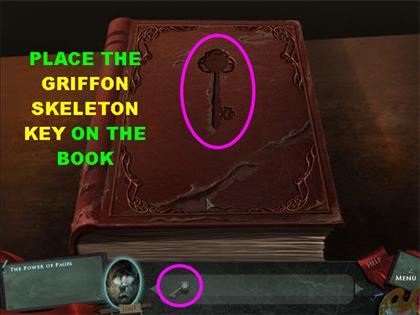
- Place the Griffon Skeleton Key on the book to open it.
- You will see sketches of scenes and characters you’ve encountered during your stay at the tower.
- You can turn the pages by clicking on the upper right and left corners of the pages.
- Your goal is to find the images that belong with those sketches.
- The following video will show you the exact path needed to find all the necessary pieces for the book.
- Please watch this video only if you’re having difficulty finding the pieces you need to complete this puzzle.
- Watch A Video Solution on the Big Fish Games Tips YouTube Channel!
Foyer
- Starting with the open book, click on the arrows in this order to reach the Foyer:DOWN 6 X MIDDLE, LEFT SIDE (CATWALK) DOWN 5 X
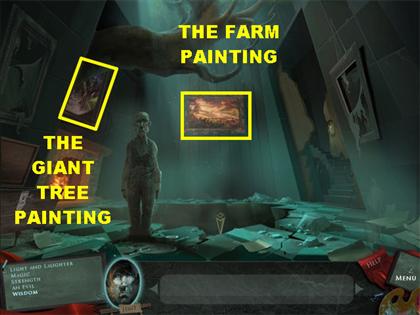
- You are now in the Foyer; there are 2 pictures you can access here. The Farm painting is on the back wall and the Giant Tree painting is on the left.
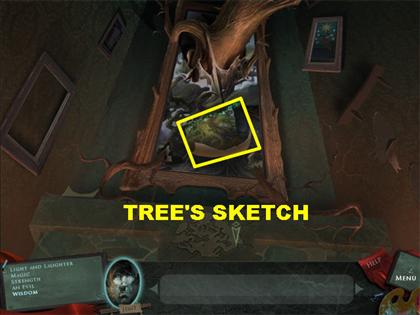
- Look at the Giant Tree painting and grab the Tree’s Sketch.
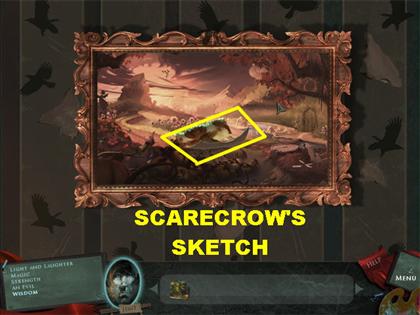
- Grab the Scarecrow’s Sketch that is on the outside of The Farm painting.
- From the Foyer, follow these steps to go to the next location:RIGHT UP
Doctor’s Sketch
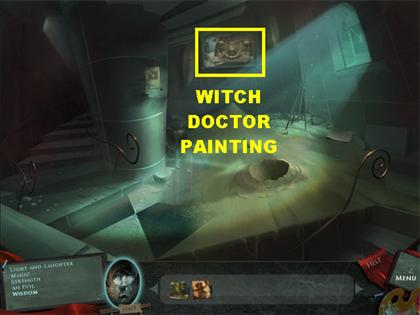
- Click on the Witch Doctor Painting on the back wall.
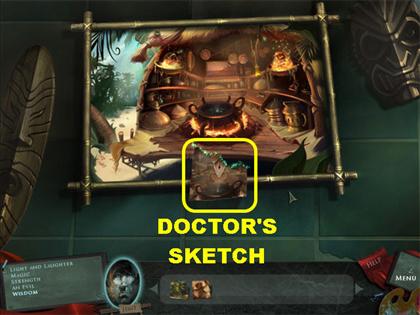
- Grab the Doctor’s Sketch.
- From the outside of the painting, follow these steps:DOWN UP (LEFT) UP (RIGHT) DOOR UP DOOR UP 2 X STEPS ON RIGHT UP
Dragon’s Sketch
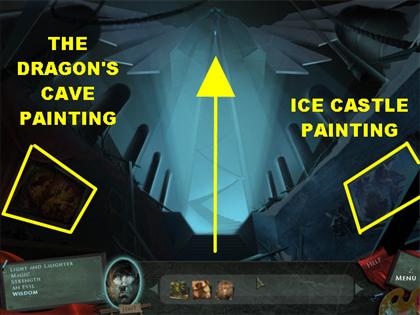
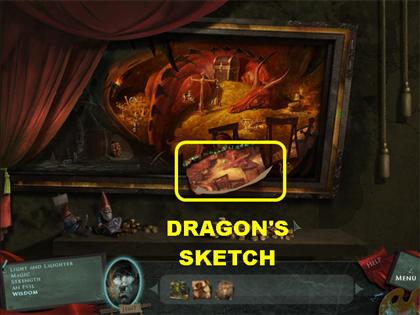
- If you click on the left, you will enter the Dragon’s Cave painting.
- Click on the right to enter the Ice Castle painting.
- Go to the left and pick up the Dragon’s Sketch.
Griffon’s Sketch
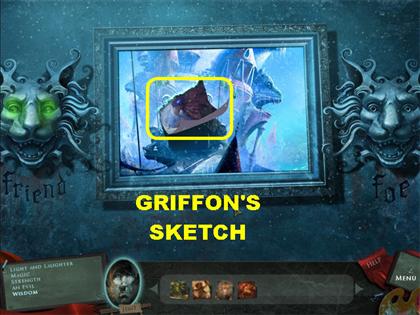
- From the outside of the Dragon’s painting place your cursor down and then to the right to enter the Ice Castle painting.
- Pick up the Griffon’s Sketch.
- From the painting go down and then up; click on the book.
- Arrange the sketches in the book.
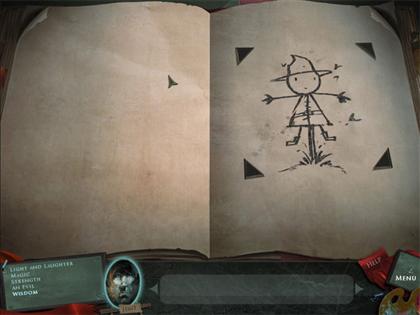
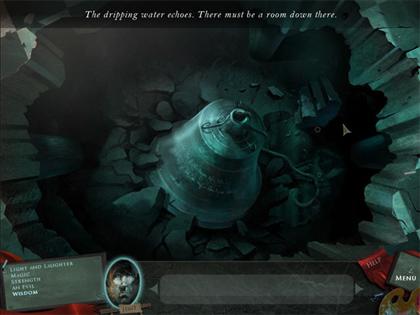
Light and Laughter
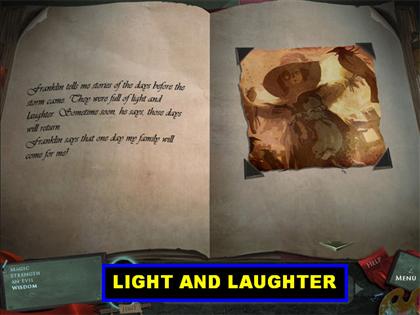
- Place the Scarecrow’s Sketch on the first page.
Magic
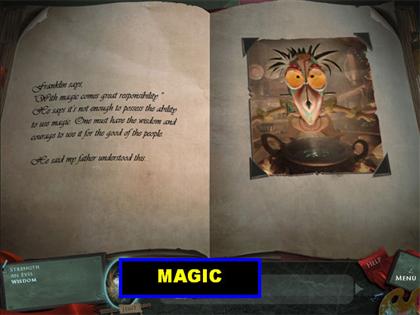
- Place the Doctor’s Sketch on the second page.
Strength
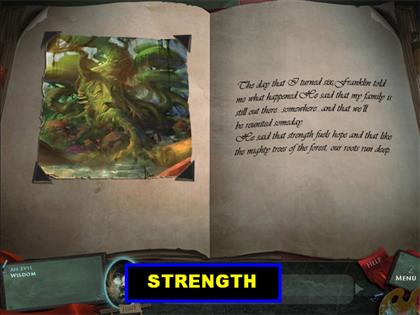
- Place the Trees’ Sketch on the third page.
An Evil
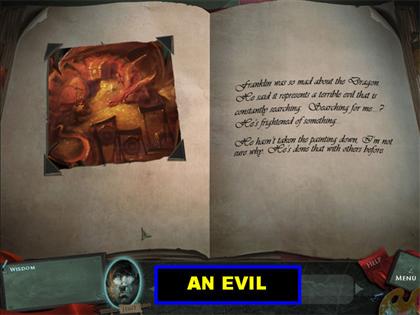
- Place the Dragon’s Sketch on the fourth page.
Wisdom
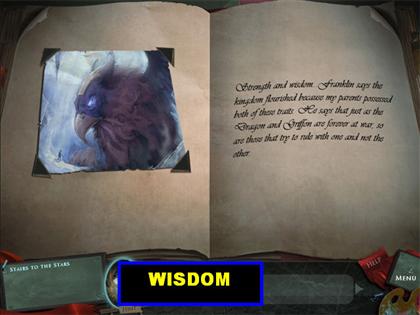
- Place the Griffon’s Sketch on the fifth page.
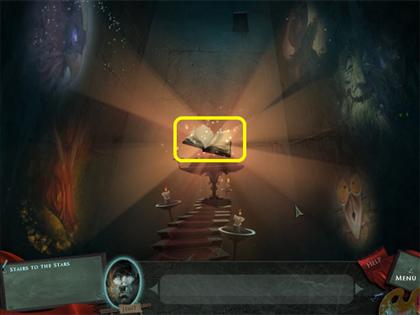
Stairs to The Stars
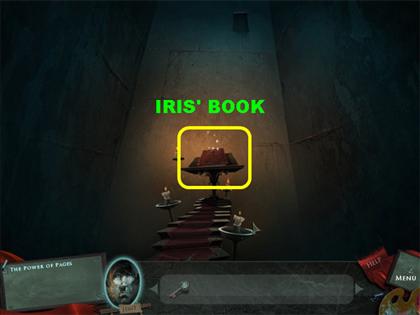
- Exit by placing your cursor on the bottom of the screen, images of all the characters automatically project from the book.
- Click on Iris’ Book and stairs will be drawn to the door above, go through the door.
CHAPTER 8: THE ROOFTOP
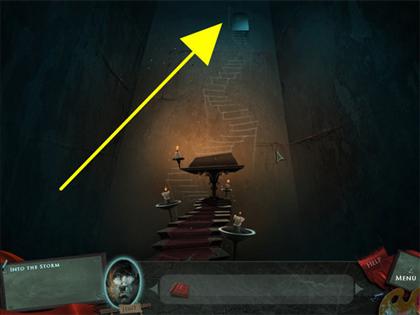
Into The Storm

- Give Iris back her book.
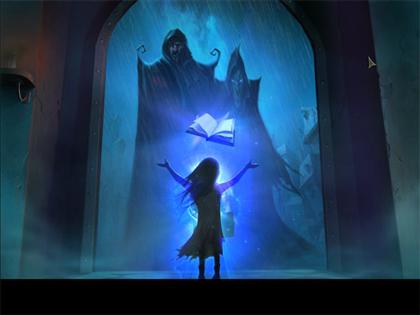
- Watch the ending scenes!
Created at: 2009-09-04