

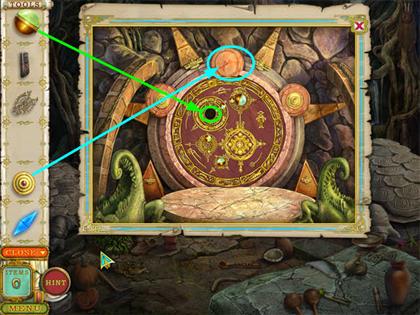
WALKTHROUGH MENU
- General Tips
- Chapter 1: Arrival
- Chapter 2: the Courtyard
- Chapter 3: the Campsite
- Chapter 4: Upper Cave Level
- Chapter 5: Lower Cave Level
- Chapter 6: the Dirigible
- Chapter 7: Upper Tree House
- Chapter 8: Lower Tree House
- Chapter 9: Research Vessel
- Chapter 10: Waterfall Path
- Chapter 11: Local Campsite
- Chapter 12: the Witch Doctor’s Hut
- Chapter 13: the Meeting Room
- Chapter 14: Strange Dinosaurs
- Chapter 15: Inside the Temple
- Chapter 16: T. Rex Hall
- Chapter 17: Stone Steps
- Chapter 18: the Tortoise Teleport
- Chapter 19: Teleport Landing
- Chapter 20: the Frigate
- Chapter 21: the Sea Monster’s Cave
- Chapter 22: the Balloon
- Chapter 23: the Cave-in
- Chapter 24: Michael
- Chapter 25: Uncle John
General Tips
- This is a Hidden Object Adventure Game with a variety of different mini-games.
- You collect items that you see in the Find List. Some of these items are Tools that can be used later in the game.
- The Find Lists are random, so different players will have different objects to Find. However, every player must find the same Tools in the scene.
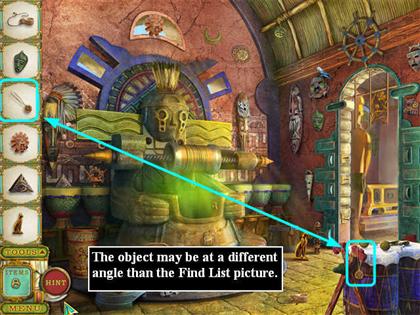
- The object in the scene is often differently oriented from the “snapshot” on the Find List. For example, a sword might be vertical in the picture on the Find List, but stuck into a tree at an angle in the actual scene. Or a snake might be curled up in the Find List picture, but stretched out on the steps in the scene.
- Objects sometimes appear to be a different color in the scene than they are in the Find List because of the lighting in the scene. For example, a green object may appear brown in the shadows of a scene.
- Some locations have more than one room. Sometimes you will need to find a Tool in the second room and bring it back to the first room to do something with it there.
- Areas may sparkle for one of three reasons: you need to use a Tool there, the area opens into a close-up scene, or there is an exit to another room there. You can tell which is which by the cursor. If the cursor is a hand, you need to use a Tool there. If the cursor is a magnifying glass, clicking will open a zoom scene. If the cursor is a gold spinning arrow, clicking will take you to another room.
- When you click where the cursor turns into the hand, you often get a hint about what Tool you need to use.
- “Jimmy” is a tool used to pry something open, like a crowbar.
- The game frequently says you need a “key” to proceed, but the key isn’t necessarily a regular metal key. Sometimes it’s a stone or ceramic object that was carved to fit a space on the lock.
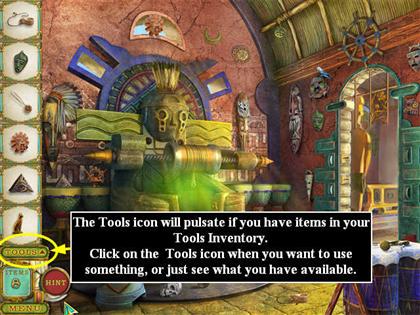
- All of the Tools will first appear on the Find List. Once they’re in your Tools Inventory, you can mouse over them to get a text label of what they are. This is the easiest way to find out just what kind of “key” you’re looking for.
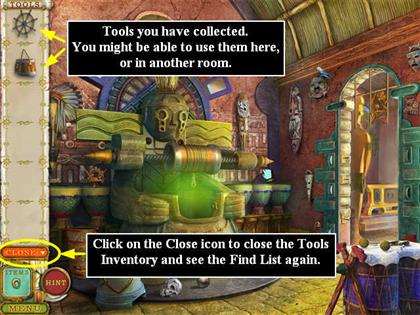
- When you want to view your Tools Inventory, click on the TOOLS button at the bottom of the Find List.
- To close it, and see the Find List again, click on the CLOSE button in the same place.
- There is no timer.
- The game saves automatically.
- When you make a wrong click, you will hear a short chirping noise.
- If you make too many wrong clicks in a row, the cursor will dance away for a few seconds.
- The game offers a fancy cursor. If you’d prefer to use your regular cursor, you can turn off the fancy cursor in the OPTIONS menu.
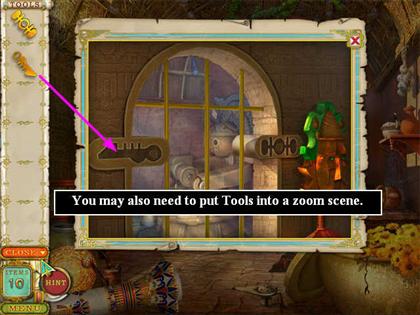
- In this game you may need to put something from your Tools Inventory into a close-up scene.
- There is a HINT button in the lower left corner.
- You get an unlimited number of hints, but you have to wait for the HINT button to recharge each time.
- There are no hints for the mini-games, but you can skip them once the SKIP meter recharges.
- If you want to review the instructions for a mini-game, click on the HELP button in the lower left.
- Many levels end with a gate or a door opening. You will usually have to click on the opening one more time to end the level.
Chapter 1: Arrival
- During the tutorial you will collect two objects, use a Tool to open the Sarcophagus, and then collect the first Gate Key.
- Now collect the remaining items on the Find List.
- The second Gate Key is inside the white pot on the right side of the scene.
- Click on the small green dinosaurs to get more information about them.
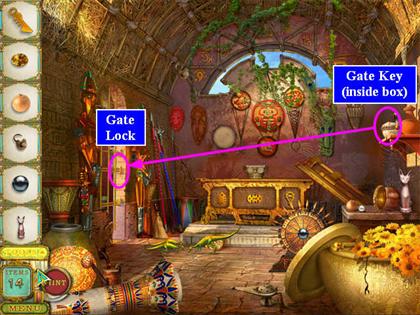
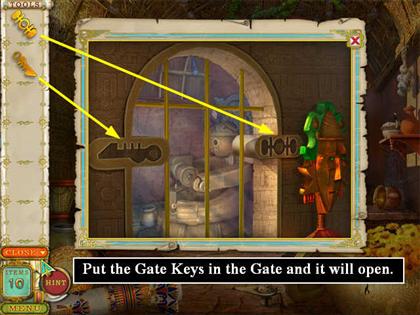
- When you have both Gate Keys, click on the Gate to zoom in. Use the Gate Keys to open the Gate.
- Enter the second room.
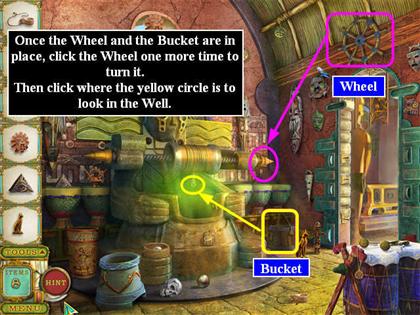
The Second Room
- Collect the objects on the Find List.
- Put the Bucket on the rope and the Wheel on the right end of the post.
- Click again to turn the Wheel.
- Click where the Bucket was to trigger a mini-game.
Drum Mini-Game
- This is a repeat-the-sequence game.
- You must repeat 3 sequences correctly. The sequences are random.
- Should you fail on the third sequence, you will have to start over again with the second.
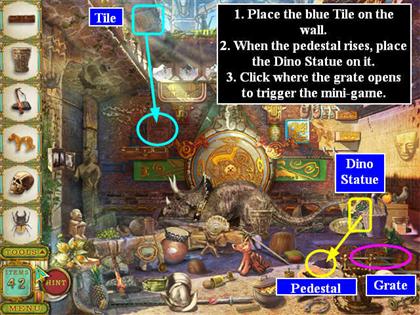
Chapter 2: The Courtyard
- Collect the items shown on the Find List.
- You will have 2 tools: a Dragon Statue and a blue Tile.
- Put the blue Tile on the wall.
- The small triangular pedestal will come up out of the floor on the right.
- Put the Dragon Statue on the pedestal.
- The grid covering the opening in the floor will move.
- Click on the floor opening to trigger a mini-game.
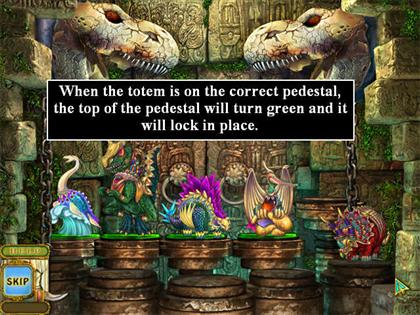
Five Pedestals Mini-Game
- You must position the 5 statues so that each sinks to the same height.
- When a statue is placed correctly, the top of its pedestal will turn green and lock into place.
Upper Garden
- Click where you get a gold spinning arrow in the upper right to go to the Upper Garden.
- Collect the items shown on the Find List.
- You will have 4 tools: Bananas, a Red Crystal, a Blue Crystal, and an Amulet.
- Put the Red Crystal in the bowl with the red line.
- Put the Blue Crystal in the bowl with the blue line.
- Zoom in on the altar.
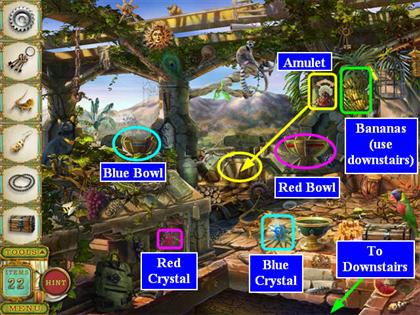
- Click each of the 4 tiles with a red jewel on it.
- Place the Amulet in the figure’s mouth.

- Now go back downstairs.
Lower Courtyard
- Now you have to get the dinosaur to move the gate.
- Place the Bananas as shown. The dinosaur will move forward and you will be able to go through the open gate.

Chapter 3: The Campsite
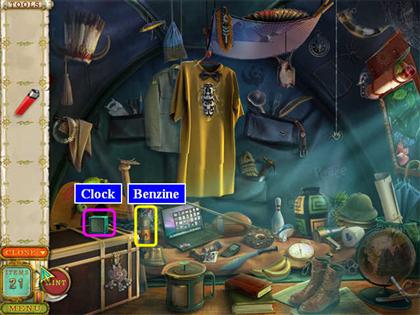
- Collect the items shown on the Find List. You will not be able to collect an item until it appears on the Find List.
- Zoom in on the Backpack to find the red Lighter.
- You will have 3 tools: a Flashlight, a Pot, and the red Lighter.
- Although it’s obvious that you want to use the red Lighter to start the fire, first you need to find some starter fluid.
- Hang the Pot over the fire.
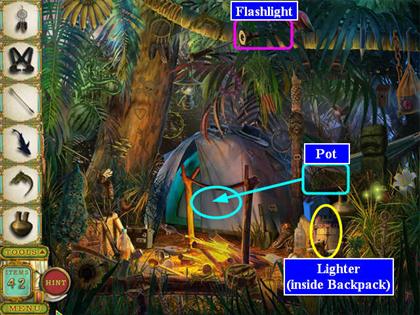
- Now you need to find a packet of Soup in the tent.
- Click on the tent to enter.
Inside The Tent
- It’s dark! You’ll need to use the Flashlight.
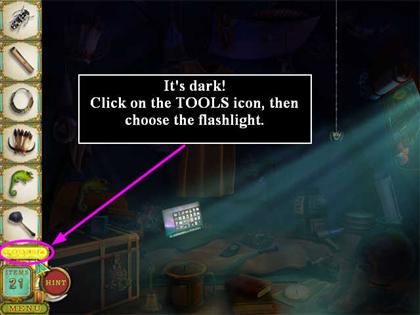
- Click on the tools tab and select the Flashlight. Once you have it, click once.
- This will immediately light up the whole scene. Click CLOSE to see the Find List.
- Collect the items shown on the Find List. You will not be able to collect an item until it appears on the Find List.
- The Key is sticking out of the boot.
- When you collect the turquoise Clock, you will trigger a mini-game.
Clock Battery Mini-Game
- For this mini-game you must use the batteries to create valid equations.
- When you right-click on a battery, you turn it upside down, and it becomes a negative number instead of a positive one.
- Drag the batteries to the slots. You can put them in either the top or bottom row.
- The light above the row changes from red to green when you have a valid equation. However, valid doesn’t necessarily mean it’s the one you want, since you may have used batteries you will need for the other equation.
- For example, 5 + 1 = 5 + 1 is a valid equation, and would turn the light green in the first row. But then you wouldn’t be able to make a valid equation in the second row.
- Our solution:Row 1: 9 + (-1) = 5 + 3 Row 2: 5 + (-1) = 3 + 1
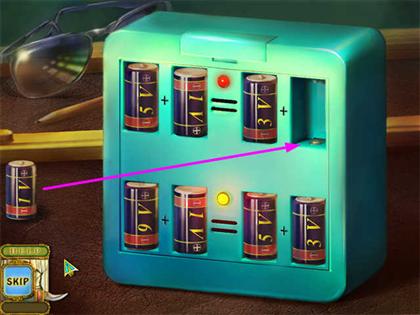
- Once you complete the mini-game, the trunk that the Clock was sitting on will open.
- Zoom in and collect the Soup.
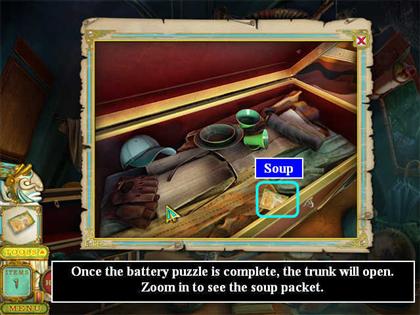
- Close the zoom scene; then click near the bottom of the screen to go back outside.
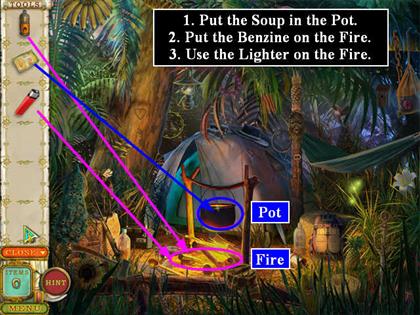
Outside at the Campsite
- You have three tools: the Soup, the bottle of Benzene, and the red Lighter.
- Put the Soup packet in the pot.
- Put the Benzene on the fire.
- Use the Lighter to light the fire.
Chapter 4: Upper Cave Level
- Collect the items shown on the Find List. You will not be able to collect an item until it appears on the Find List.
- You will have 4 tools: a Torch, a small Lever, a Dinosaur Statue, and a Flute.
- Place the Dinosaur Statue on the small pedestal on the right.
- Put the Torch in the Torchholder above the pedestal.
- Place the Lever in the slot next to the Grate.
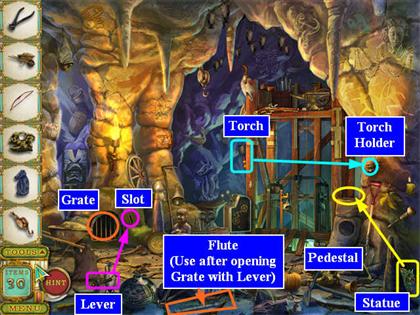
- Click on the Lever.
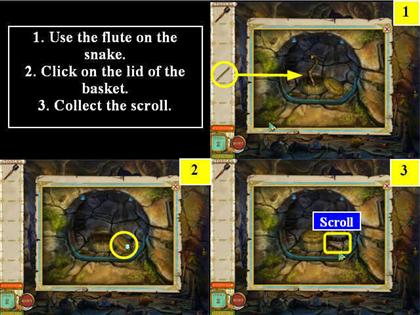
- The grate will open and you will see a zoom scene of a snake.
- Use the Flute on the snake. It will go to sleep in the basket.
- Put the cover on the basket. This will reveal a Scroll.
- Collect the Scroll.
- The Gear has been revealed below the Dinosaur Statue. Collect it.
- Place the Gear in the Gear Box on the left of the elevator.
- Place the Scroll you got from behind the snake basket in the Gear Box.
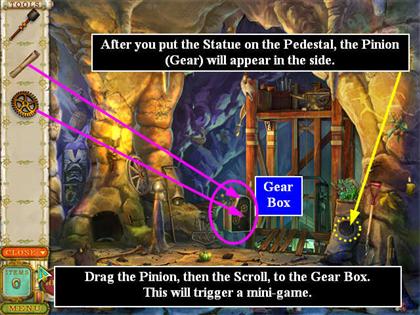
- This will trigger a mini-game.
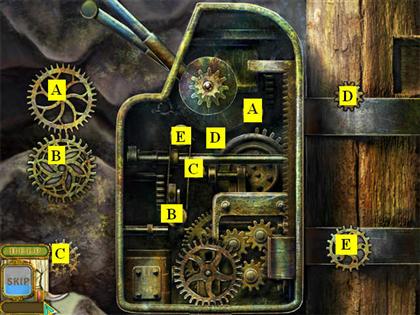
Gear Box Mini-Game
- Place the gears as shown in the screenshot.
- Note that the size of the center hole on the gear does not necessarily match the size of the post you will place it on.
- The gear will lock into place once it’s set correctly.
Chapter 5: Lower Cave Level
- When you take the elevator down, you will be on a ledge looking out of the lower level of the cave.
- Collect the items shown on the Find List. You will not be able to collect an item until it appears on the Find List.
- There is a bird drawing which is green on the Find List, but is reddish brown in the scene. It’s in the upper left.
- You will have 3 tools: a Knife, a Rope, and an Egg.
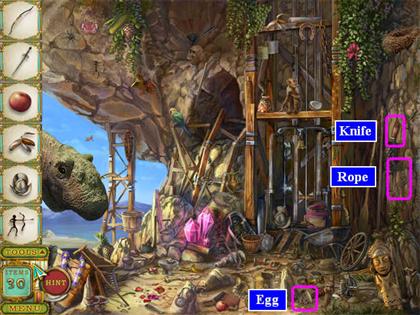
- Use the Knife to cut the red Flower in the upper right.
- The Flower will fall to the ground. Pick it up, and it will go into your Tools.
- Put the Egg into the nest in the upper right.
- Use the Rope on the small cave opening in the upper left. This will trigger a mini-game.

Jumping Birds Mini-Game
- You must swap the positions of the blue dinosaurs and the yellow dinosaurs.
- Dinosaurs may move forward one space, or jump over a dinosaur of the other color.
- There are many solutions:
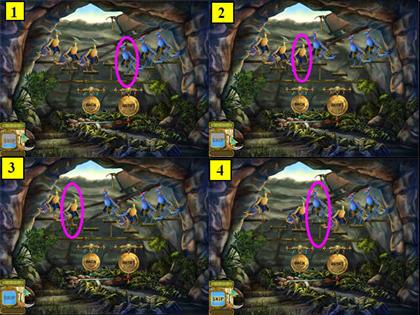
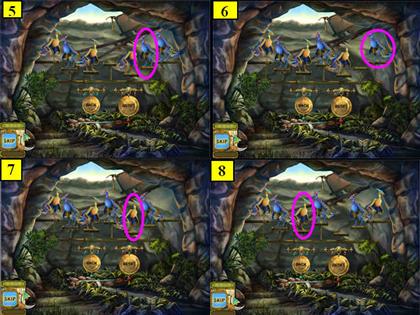
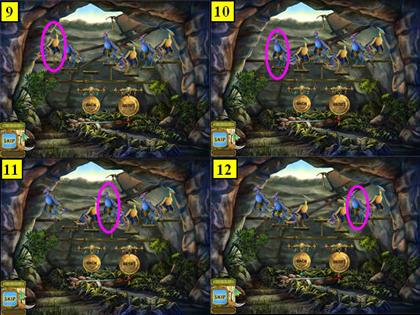
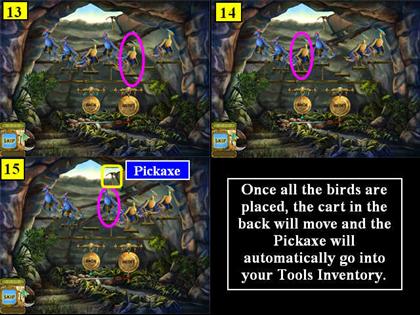
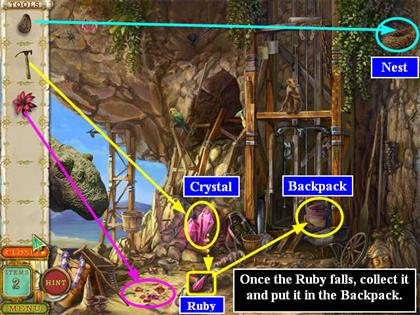
- Once the dinosaurs are in place, the Pickaxe stuck in the back of the scene will fall, and automatically go into your Tools Inventory.
- Use the Pickaxe on the large pink crystal, and you will break off a Ruby.
- Put the Ruby in the pink Backpack by the elevator.
- Put the Flower on the ground in front of the dinosaur. The dinosaur will move, and your character will be able to see where to go next.
Chapter 6: Dirigible
- During this scene, everything will shake when a dinosaur walks by outside. If that makes it difficult for you to see things, just wait until it passes.
- Collect the items shown on the Find List. You will not be able to collect an item until it appears on the Find List.
- The bundle of books is on the floor behind the bust of Nefertiti
- The black telescope is on the floor behind the large black scales.
- You will have 5 tools: Handle, Water Can (looks like a milk can), Oil Can, Fuel Can, and a Shutter.
- Use the Handle on the grate on the floor to open it.
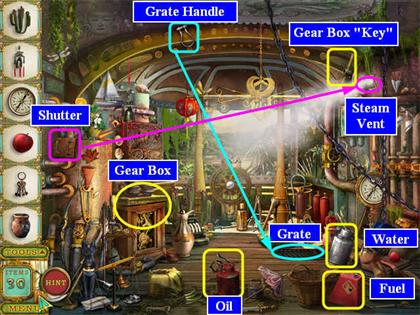
- Click on the open grate, and you will trigger a mini-game.
Steam Pipe Mini-game
- You must use all of the pipes. Here is the solution:

- After you complete the steam pipe mini-game, the steam will start to clear from the room. Now you just have to shut the vent at the top of the big pipe.
- Put the Shutter on it.
- Now you can see the Key just to the left of the big pipe. (It looks like a pickaxe.) Collect it.
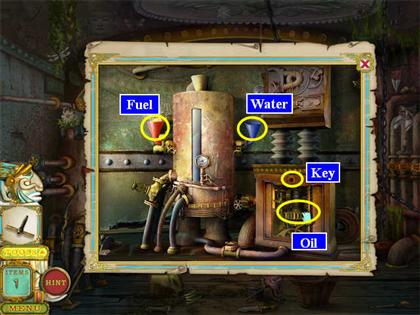
- Click on the gear box on the left to get a zoom scene.
- Put the fuel in the red funnel.
- Put the water in the blue funnel.
- Use the Oil Can on the gears on the right.
- Use the Key on the lock on the right.
Chapter 7: Upper Tree House
- Collect the items shown on the Find List. You will not be able to collect an item until it appears on the Find List.
- The Dino Statue is inside the small gold box above the gate on the left.
- You will have 5 tools: Dino Statue, Hook, Crowbar, a Pinion (Gear), and a “Key” (looks like a wooden dowel).
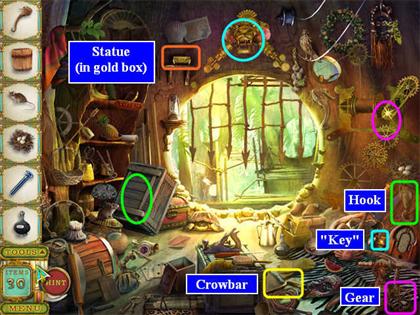
- Put the Dino Statue on the Totem shelf on the left.
- Use the Hook to raise the crate off the red chest.
- Use the Crowbar to open the red chest.
- Collect the Lighter from inside the Red Chest.
- Use the Lighter to light the lamp on the left side of the door.
- Use the Pinion to replace the Gear on the right of the gate.
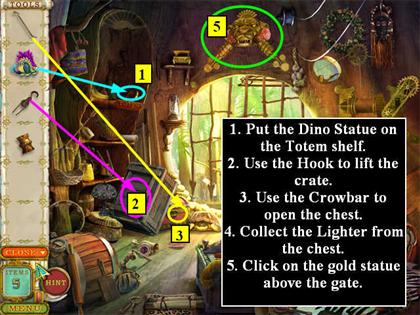
- Click on the gold statue above the gate.
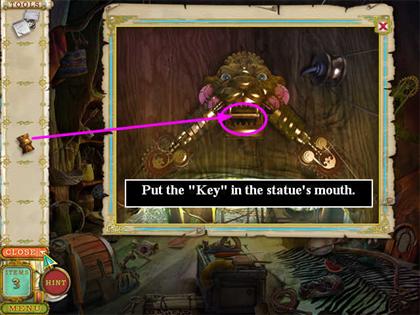
- Use the Key to block the statue’s mouth.
Chapter 8: Lower Tree House
- Collect the items shown on the Find List. You will not be able to collect an item until it appears on the Find List.
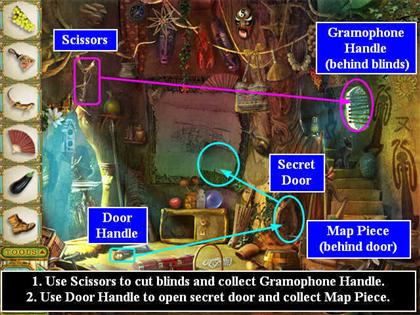
- You will have 2 tools: Door Handle and Scissors.
- Use the Door Handle to open the secret compartment.
- Collect the Map Piece.
- Put the missing Map Piece back on the wall and you will trigger a mini-game.
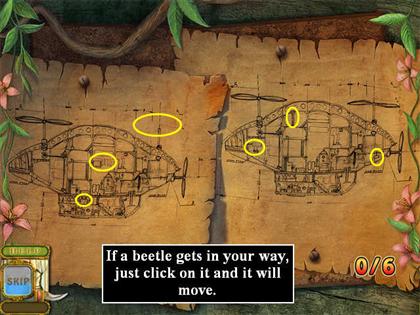
Dirigible Drawing Mini-game
- Find 6 differences between the two drawings.
- When a beetle gets in the way, just click on it and it will move.
- Solution:
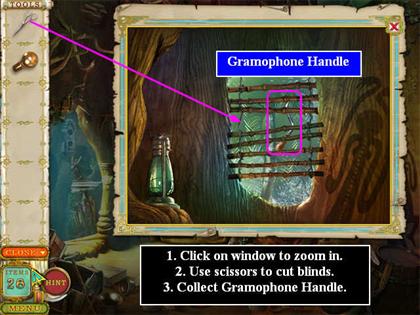
- Click on the window on the right of the scene to zoom in.
- Use the Scissors to cut the blinds.
- Collect the Gramophone Handle.
- Go upstairs by clicking where the cursor turns into a gold spinning arrow.
Tree House, Middle Room
- Collect the items on the Find List.
- You will collect a new tool, a Key.
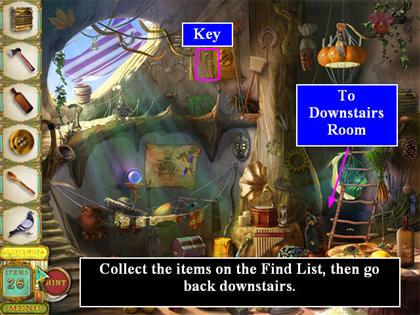
- Go back downstairs.
Tree House, Downstairs
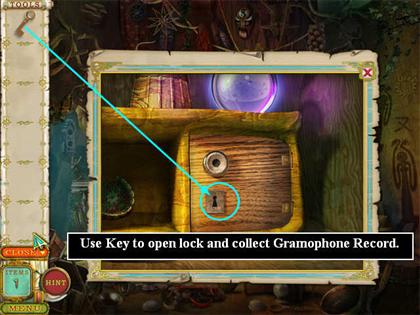
- Click on the locked cabinet below the dirigible drawing to zoom in.
- Use the Key to unlock the cabinet.
- Collect the Gramophone Record.
- Go back upstairs.
Tree House, Middle Room
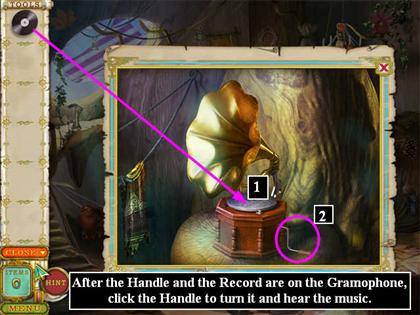
- Click on the gramophone to zoom in.
- Put the Handle in the tiny hole on the right side.
- Put the Gramophone Record on the gramophone.
- Click the Handle to turn it.
- You will hear music.
Chapter 9: Research Vessel
- Collect the items shown on the Find List. You will not be able to collect an item until it appears on the Find List.
- You will find the tools in those location one at a time.
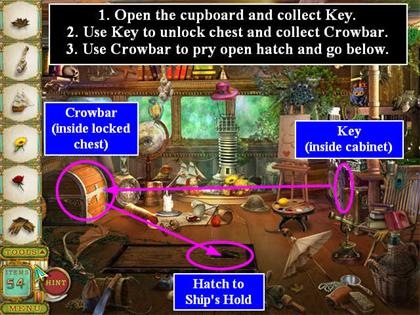
- Wait until the Key appears on the Find List; then, click on the cupboard door and it will open, showing you a zoom scene.
- Collect the Key.
- Use the Key to unlock the chest, showing you a zoom scene.
- Collect the Crowbar.
- Use the Crowbar to open the Hatch to the Ship’s Hold.
- Click where the cursor turns to a gold spinning arrow and go below.
Ship’s Hold
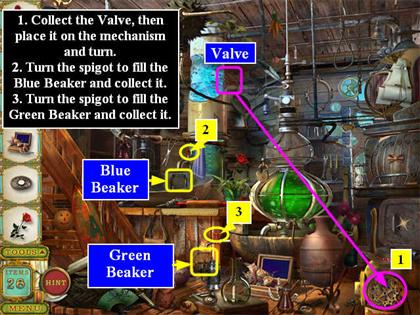
- Collect the Valve.
- Place the Valve on the mechanism in the lower right, and click to turn it.
- The furnace will open.
- Turn the spigot leading from the blue chemical to fill the Blue Beaker and collect it.
- Turn the spigot leading from the green chemical to fill the Green Beaker and collect it.
- Pour the Blue Beaker and the Green Beaker into the Yellow Flask.
- Collect the Yellow Flask.
- Pour it into the Furnace.

Chapter 10: The Waterfall Path
- Collect the items shown on the Find List. You will not be able to collect an item until it appears on the Find List.
- There are two regular items in yellow in the screenshot that are quite difficult to recognize at first. The pocket watch is upside down on the ground. The church is far in the distance.
- Collect the Lever and put it in the slot on the right side of the screen.
- Click on the Lever to reveal a bridge across the ravine.
- Collect the Blue Crystal and put it in the right statue.
- Collect the Red Crystal and put it in the left statue.
- The gold crown will drop down above the bridge. Put the Cyan Crystal in the gold crown.
- Collect the Sabre and use it to cut the vegetation on the left, revealing a totem.
- Collect the Capstone for the totem and put it on top.

Chapter 11: The Local Campsite
- Collect the items shown on the Find List. You will not be able to collect an item until it appears on the Find List.
- Collect the Pot and put it in on the fire. It will reveal the Dinosaur Key.
- Collect the Knife and use it to cut open the entrance to the tent.
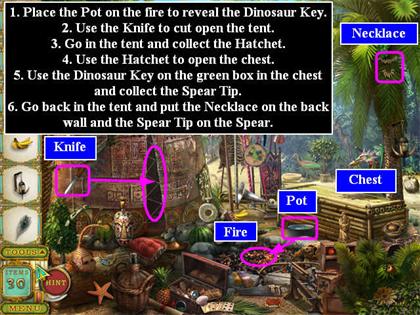
- Click on the tent to open a zoom scene.
Inside the Tent
- Click on the log in the lower left and it will roll aside, revealing the Stone Hammer. Collect it; then go back outside.
Outside the Tent
- Use the Stone Hammer to open the chest on the right. You will see a green box.
- Use the Dinosaur Key to open the green box, revealing the Spear Tip. Collect it.
- Collect the Tooth Necklace if you haven’t already.
- Click on the tent to open the zoom scene.
Inside the Tent
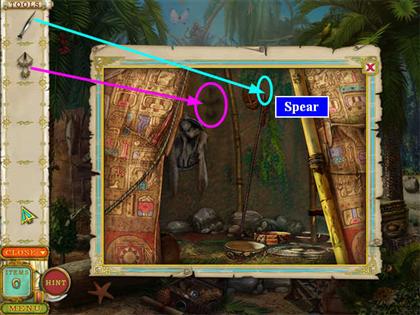
- Place the Tooth Necklace on the back wall of the tent.
- Place the Spear Tip on the Spear to the right of the necklace.
Chapter 12: The Witchdoctor’s Hut
- Collect the items shown on the Find List. You will not be able to collect an item until it appears on the Find List.
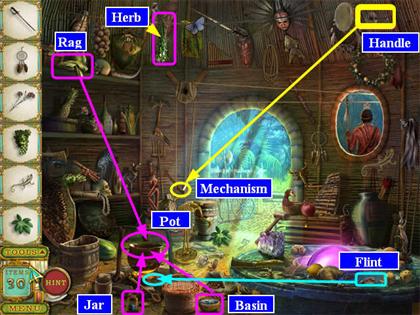
- Collect the Flint and use it to light the fire under the Pot on the left side of the screen.
- Click on the Herb, the Jar, and the Basin and add them to the Pot.
- Collect the Rag and put it in the Pot. It will automatically go up onto the rope of the Mechanism. You will not be able to add the Rag until you have added the other items to the Pot.
- Collect the Handle from the upper right and put it on the Mechanism.
- Click the Handle and the rag will be carried across to the window, where the fumes will knock out the guard.
Chapter 13: The Meeting Room
- Collect the items shown on the Find List. You will not be able to collect an item until it appears on the Find List.
- Collect the Key from the lower left.
- Use the Key to open the trunk on the right and collect the Lens.
- Click on the brown shield on the back wall and it will move, revealing the Skull Key.
- Collect the Skull Key and use it as a “jimmy” on the panel on the wall behind the right trunk, revealing the Hatchet.
- Collect the Hatchet and use it to break open the left trunk.
- Click the brown Bag of Coins from inside the left trunk.

- Put the Bag of Coins on the scale next to the left trunk and you will trigger the Scale and Coins mini-game.
Scale and Coins Mini-game
- Your objective is to have an equal weight of coins on each side of the scale.
- You do not have to use all the coins.
- Here was our solution:
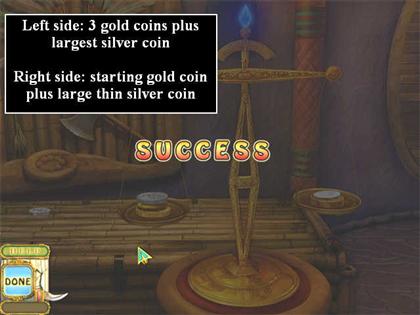
- When you have completed the mini-game, a beam of light will shoot out of the top of the scale.
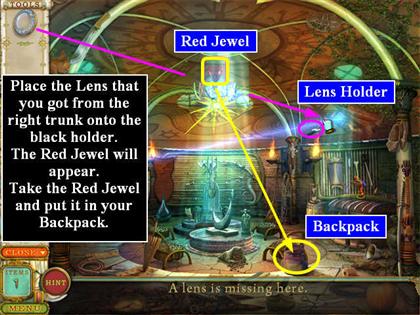
- Take the Lens and put it on the black holder near the ceiling on the right.
- The Red Jewel will appear in the center.
- Collect the Red Jewel and put it in the pink Backpack.
Chapter 14: Strange Dinosaurs
- Collect the items shown on the Find List. You will not be able to collect an item until it appears on the Find List.
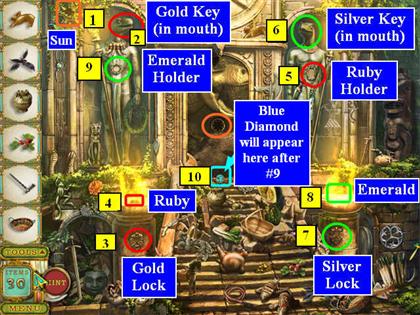
- Collect the Sun Medallion from the upper left.
- Put the Sun Medallion in the center door. This will cause the left dinosaur statue’s mouth to open.
- Collect the Gold Key from the left statue’s mouth.
- Use the Gold Key on the gold lock on the front of the left fire altar.
- Collect the Ruby from the fire altar on the left.
- Put the Ruby in the dinosaur statue on the right. Its mouth will open, revealing a Silver Key.
- Use this Key on the front of the fire altar on the right. The Emerald will appear in the fire.
- Collect the Emerald and put it in the dinosaur statue on the left. The blue Diamond will appear at the top of the stairs.
- Put the blue Diamond into the center of the door.
- The doors will open.
Chapter 15: Inside the Temple
- Collect the items shown on the Find List. You will not be able to collect an item until it appears on the Find List.
- You will have two tools: a Red Crystal and a Crowbar.
- Click on the small dinosaur statue on the right of the gate and a zoom scene will open.
- Place the Red Crystal in the dinosaur statue’s hands.
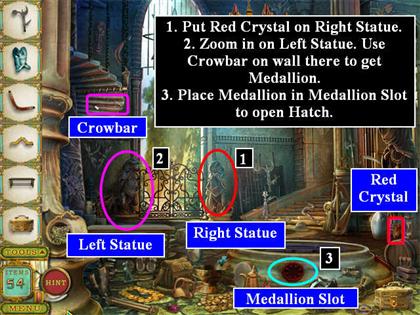
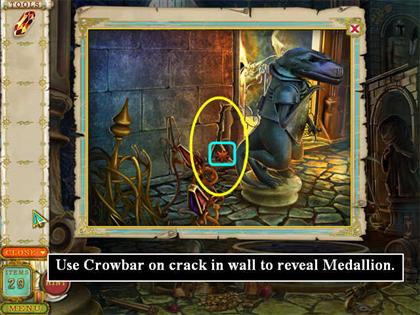
- Click on the small statue on the left. A zoom scene will open.
- Use the Crowbar on the crack in the wall and you will reveal the Medallion.
- Collect the Medallion and close the zoom scene.
- Use the medallion on the side of the Hatch. The message says you need a jimmy there, but you don’t—you just need the Medallion.
- Go down the hatch.
Temple, Lower Level
- Collect the items shown on the Find List. You will not be able to collect an item until it appears on the Find List.
- Zoom in on the dinosaur statue towards the back of the scene; then collect the Quiver.
- You will have 3 tools: a Green Crystal, a Lever, and the Quiver.
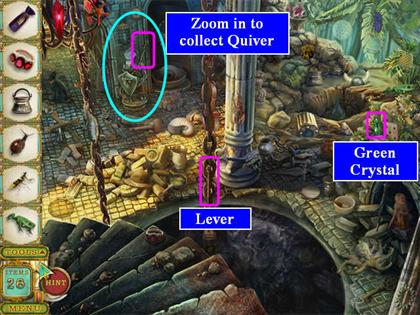
- Go back upstairs.
Inside the Temple, Upper Level
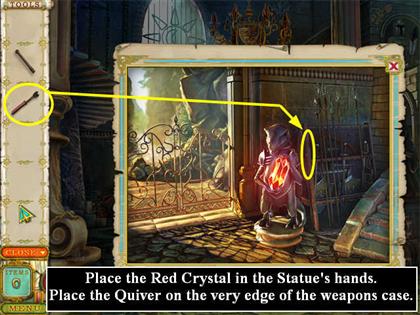
- Click on the statue on the right to open the zoom scene. Place the Red Crystal if you have not done so already.
- Put the Quiver on the left edge of the weapons case.
- Close the zoom scene.
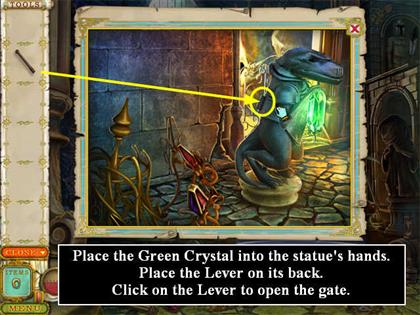
- Click on the statue on the left to open the zoom scene.
- Place the Green Crystal in the statue’s hands.
- Place the lever in the slot on the statue’s back.
- Click on the lever to open the gate. (The gate will not open unless you have already placed the Red Crystal on the other statue.)
Chapter 16: T. Rex Hall
- Collect the items shown on the Find List. You will not be able to collect an item until it appears on the Find List.
- You will have 5 tools: a Fuel Can, a Lighter, a Crystal, a Handle, and a Pinion.
- Put the Fuel in the Urn and use the Lighter on it.
- Place the Crystal in the empty slot as shown.
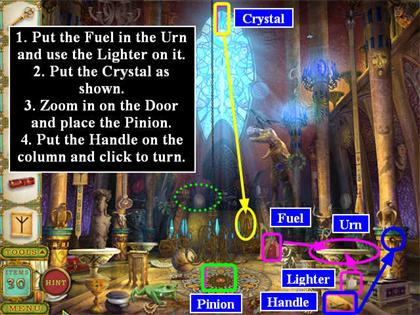
- Click on the Door to zoom in.
- Place the Pinion as shown.
- Near the bottom of the door, the message says you need a totem. Use the Door Fragment.
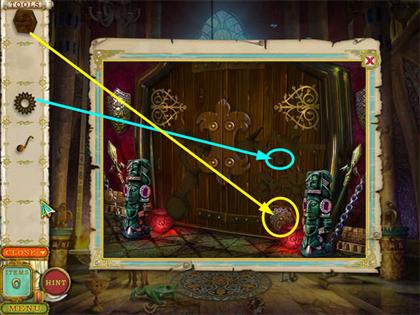
- Close the zoom scene.
- Put the handle on the column and click to turn it.
Chapter 17: Stone Steps
- Collect the items shown on the Find List. You will not be able to collect an item until it appears on the Find List.
- You will have 5 tools: a Bucket, a Handle, a Sphere, a Stone, and a Rune.
- Use the Bucket to put out the fire on the steps.
- Place the Stone on the Shelf at the top right. It will sink down.
- Place the Sphere in the Holder in the bottom right. This will turn off the force field.
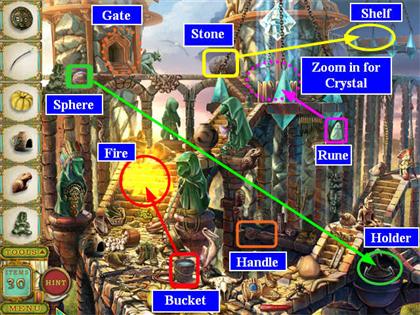
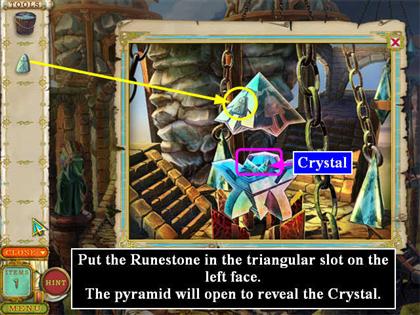
- Click on the large Crystal area to zoom in. You will see a large crystal pyramid.
- Put the Runestone in the slot on the left face. The Pyramid will open revealing a V-shaped blue Crystal.
- Collect the Crystal.
- Close the zoom scene.
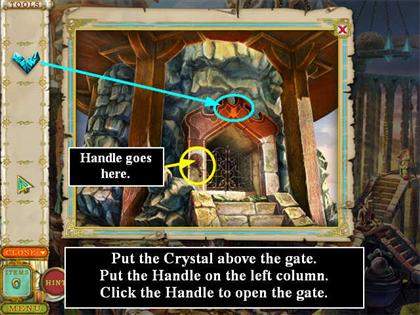
- Click on the Gate to zoom in.
- Put the Crystal above the Gate.
- Put the Handle on the left column.
- Click on the Handle to open the Gate.
Chapter 18: The Tortoise Teleport
- Your must repair the Teleport.
- Collect the items shown on the Find List. You will not be able to collect an item until it appears on the Find List.
- You will have six tools: a Lever, a Crystal, a Sphere, a Portal Part, a Pinion, and a Tortoise Shell piece.
- Put the Tortoise shell piece on the broken part of the shell.
- Place the Lever in the slot next to the tortoise.
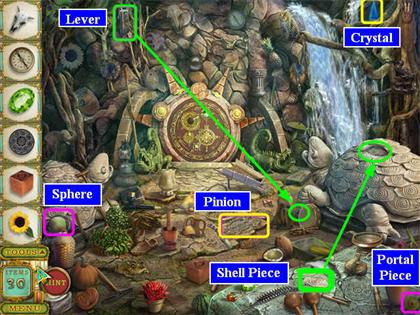
- Click the Lever and the Tortoise Shell will open. Click to zoom in.
- Place the Pinion and the Crystal as shown.
- Click on the Portal to zoom in.
- Replace the Sphere and the Portal Part as shown.
- Click one more times to trigger the mini-game if it doesn’t start automatically.
Light Beam Mini-game
- You must rotate each sphere, both big and small, so that a beam of light is connecting it to the Sun.
- Note that the different parts of each area rotate differently. The outermost ring rotates by itself, which is how you will usually position a small sphere.
- It’s easiest to position the central sphere in each group before rotating the smaller ones around to the right positions.
- The spheres in the lower left sometimes overlap—make sure they are separate with both beams of light showing.

- Once the puzzle is correct, the zoom scene will close by itself and you will be looking at a glowing portal. Click on it to go through.
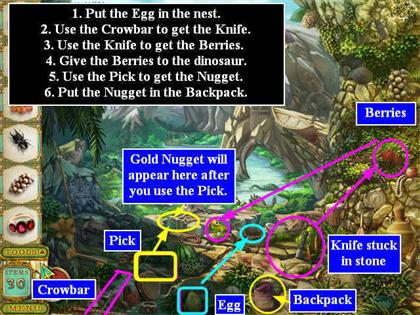
Chapter 19: The Teleport Landing
- Collect the items shown on the Find List. You will not be able to collect an item until it appears on the Find List.
- You will have 3 tools: a Crowbar, a Pick, and an Egg.
- Put the Egg back in the nest next to the small dinosaur.
- Use the Crowbar to pry up the stone where the Knife is stuck and collect the Knife.
- Use the Knife to cut the Berries and give them to the small Dinosaur.
- Find the area to the left of the small Dinosaur where the cursor turns into a hand, and use the Pick there. This will reveal the Gold Nugget.
- Collect the Gold Nugget.
- Put it in the pink Backpack.
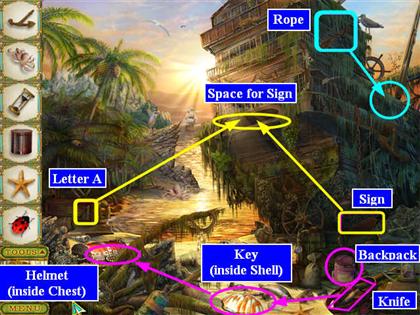
Chapter 20: The Frigate
- Collect the items shown on the Find List. You will not be able to collect an item until it appears on the Find List.
- You will have 4 tools: a Sign, a Letter “A,” a Rope with a Hook, and a Knife.
- Place the rope on the side of the Frigate where the cursor turns to a hand. The message says you will “embark the ship,” but you never do.
- Put the Sign on the Frigate as shown.
- Put the Letter on the Sign. This will trigger a mini-game.
Scrambled Name Mini-game
- The name is Catalina.
- Use the Knife to pry open the large orange Shell and collect the Key.
- Use the Key to open the Chest.
- Collect the Gold Helmet.
- Put it in the pink Backpack.
Chapter 21: The Sea Monster’s Cave
- Collect the items shown on the Find List. You will not be able to collect an item until it appears on the Find List.
- You will have 4 tools: a Key, a Lantern, some Boards, and a Crowbar.
- You will be allowed to use the Crowbar to open a box on the far side of the bridge even though you haven’t fixed the bridge yet. The box will open revealing the Rope. Collect it.
- Place the Rope and the Boards on the broken bridge.
- Place the Lantern on the stone on the far side of the bridge and it will scare the monster away.
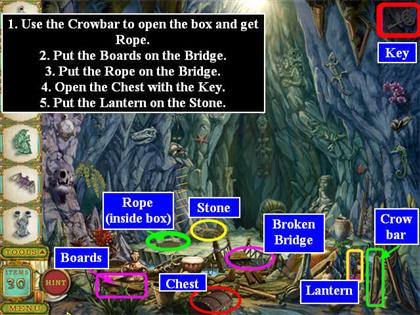
- Use the Key to open the Chest. There is a book inside. When you collect it, you will trigger a mini-game.
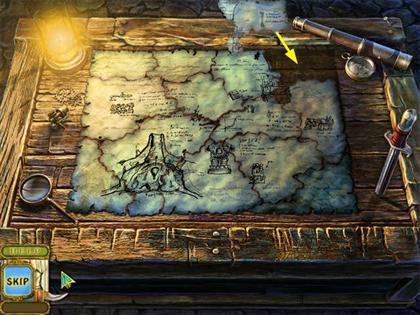
Map Jigsaw Mini-game
- The pieces will lock in place when set correctly.
- Pieces do not rotate.
- There is a faint image of the Map on the board underneath, so use that as a guide.
Chapter 22: The Balloon
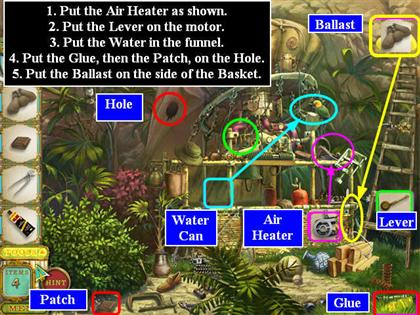
- Collect the items shown on the Find List. You will not be able to collect an item until it appears on the Find List.
- You will have 4 tools: an Air Heater, a Water Can, a Lever, Ballast, Glue, and a Patch.
- Put the Air Heater on the right side of the motor.
- Put the Water in the Funnel near the parrot.
- Put the Ballast on the side of the Basket.
- Put the Glue, then the Patch, on the hole in the Balloon.
Chapter 23: The Cave-In
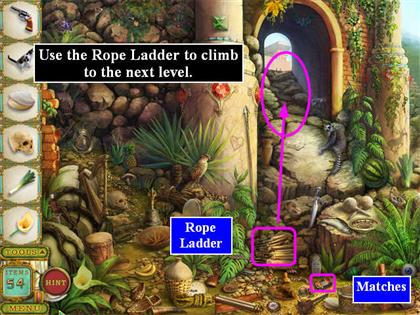
- Collect the items shown on the Find List. You will not be able to collect an item until it appears on the Find List.
- You will have two tools: a Rope Ladder and a box of Matches.
- Use the Rope Ladder to climb to the next level.
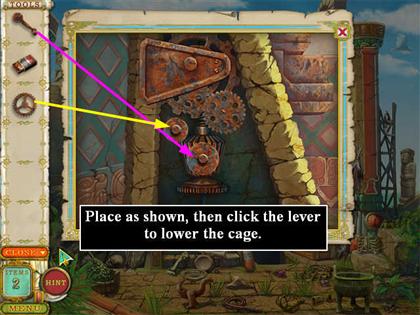
Above the Cave-in
- Collect the items shown on the Find List. You will not be able to collect an item until it appears on the Find List.
- You will have 2 tools: a Pinion and a Lever.
- Click to zoom in on the Gear Box on the left of the platform and place the items as shown.
- Click the Lever one more time to lower the cage.
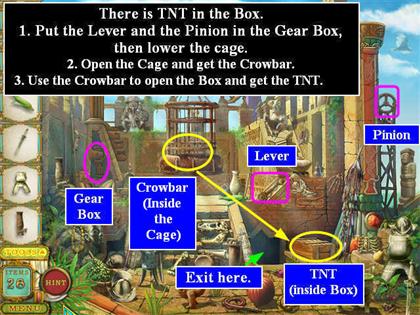
- Close the zoom scene.
- Click on the Cage to look inside. You can see a Crowbar.
- Click on the Cage door to open it.
- Collect the Crowbar and close the zoom scene.
- Click on the Box to zoom in.
- Use the Crowbar to open the Box and collect the TNT.
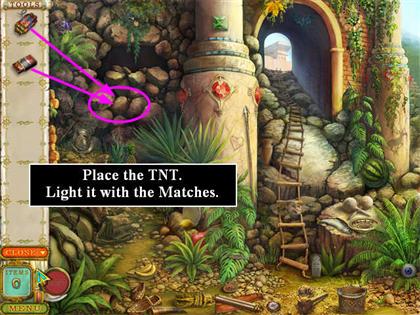
- Go back down to the Cave-in.
Cave-in
- Place the TNT on the rocks.
- Light the TNT with the Matches.
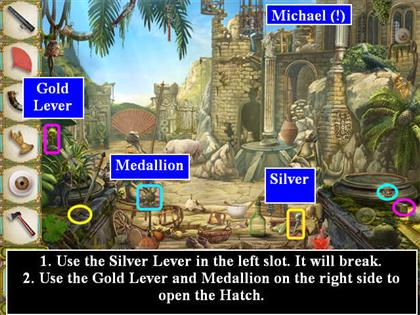
Chapter 24: Michael
- You can see Michael hanging in a cage. How can you get him down?
- Collect the items shown on the Find List. You will not be able to collect an item until it appears on the Find List.
- You will have 3 tools: a Silver Lever, a Gold Lever, and a Medallion.
- Use the Silver Lever on the left side. It will break.
- Use the Medallion and the Gold Lever on the right side to open the Hatch.
- Go down the Hatch.
Down the Hatch
- Collect the items shown on the Find List. You will not be able to collect an item until it appears on the Find List.
- You will have three tools: a Button, a Pinion, and a Lever.
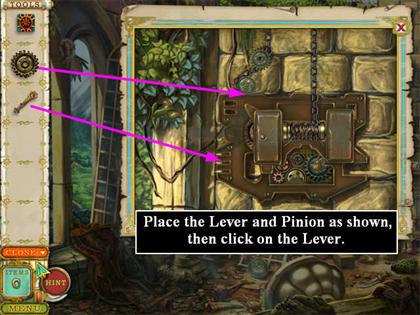
- Click on the Mechanism on the wall to zoom in.
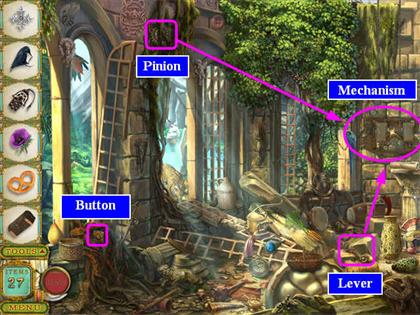
- Place the Lever and Pinion as shown.
- Click on the Lever one more time to lower the cage.
- The scene will automatically shift back to the courtyard.
The Courtyard
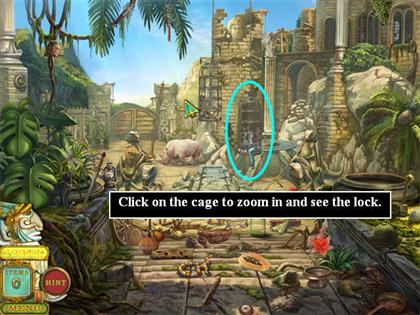
- Zoom in on the Cage to see the Lock.
- Put the Button in the Lock.
- Remember what the Button looks like.

- Now you must complete two mini-games in a row.
Lock Mini-game 1: Jumbled Tiles
- You must make a picture with the center tiles.
- This will look like the Button did when you first put it in the lock.
- You may swap any two tiles that are adjacent, but not diagonal.
- Try to anticipate where you will want tiles to end up, so you can “march” them in the correct order.
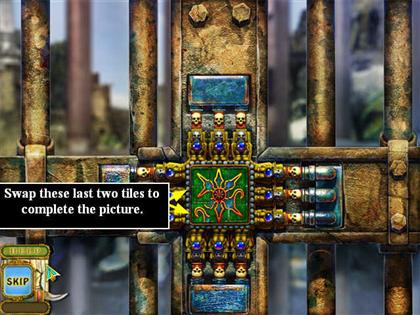
- Once you have the picture complete, the Button will lock in place.
Lock Mini-game 2: Guess the Combination
- Time to open the lock!
- There are 3 lights on each side of the Button.
- You must find the right combination for each side.
- The combination can be one, two, or three lights.
- Try any combination you want on one side; then click the center Button.
- When you are right, the locks on that side will open.
- Should you guess wrong, the lights will go off and you can try again.
- When you have all 4 sides open, the Cage will open.

Chapter 25: Uncle John
- Now you have to rescue Uncle John.
- Collect the items shown on the Find List. You will not be able to collect an item until it appears on the Find List.
- You will have 3 tools: Pot of Water, a Knife, and an Engine Part.
- Start by pouring the Water on the fire.
- Use the Knife to cut the ropes.
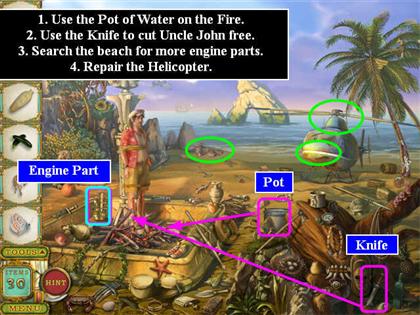
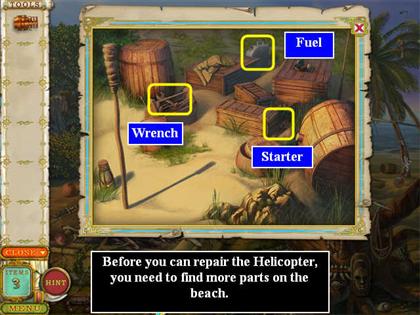
- Now you need to search for the other items you need to repair the helicopter. Zoom in on the crates and boxes by the ocean.
- Collect the Wrench, Fuel Can, and Starter.
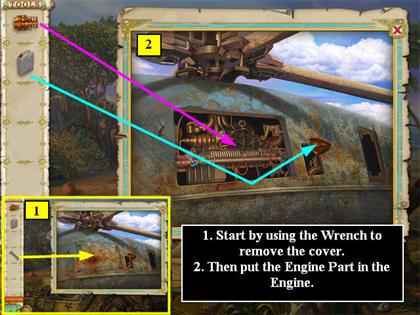
- Click on the top of the Helicopter (not the nose).
- Begin by using the Wrench to remove the Engine Cover.
- Put the Engine Part in the Engine.
- Put the Fuel in the Fuel Tank.
- Now click on the nose of the helicopter to get the inside view.
- Put the starter in place where the cursor turns to a hand.
- Click on the starter to start the engine.
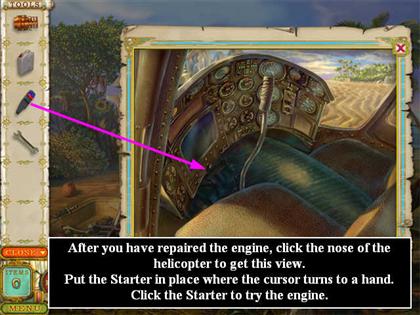
- Watch the ending.
Created at: 2010-02-04