

Walkthrough Menu
- General Tips
- Chapter 1: The Beach
- Chapter 2: Tavern
- Chapter 3: Gangway
- Chapter 4: The Galley
- Chapter 5: Library
- Chapter 6: Main Deck
General Tips
- This is the official guide for Sea of Lies: Leviathan Reef.
- This guide will not tell you when you have to zoom into a location; the screenshots will show each zoom scene.
- Hidden-object puzzles are referred to as HOPs. This guide will not show screenshots of the HOPs, however, it will mention when an HOP is available and the inventory item you'll collect from it.
- Use the Map to fast travel to a location.
Chapter 1: The Beach
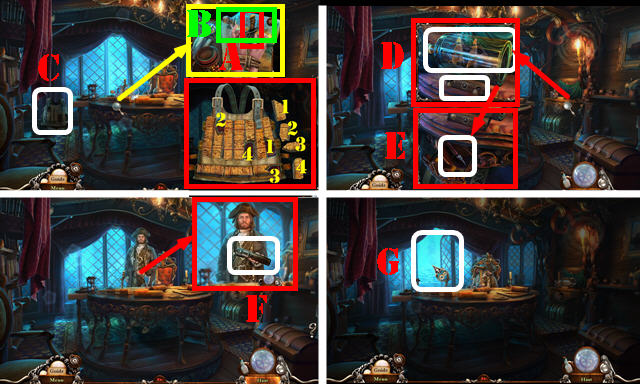
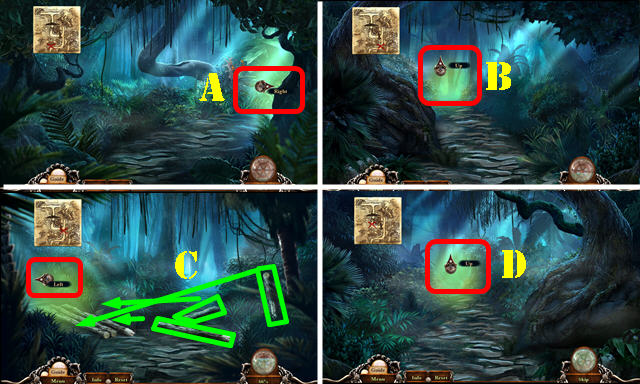
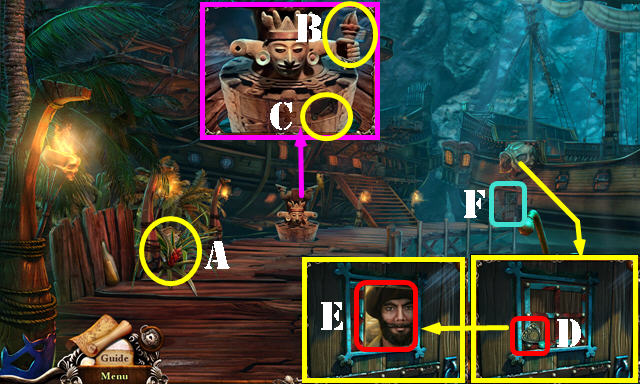
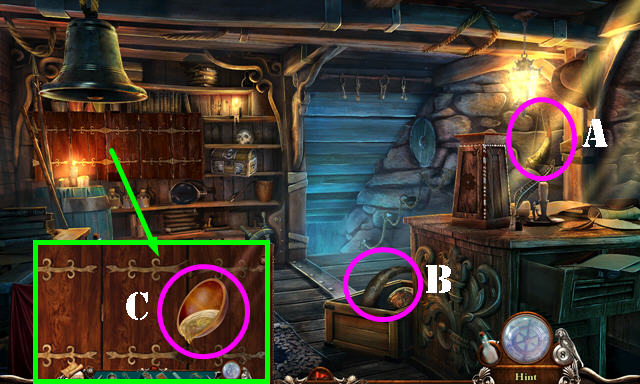
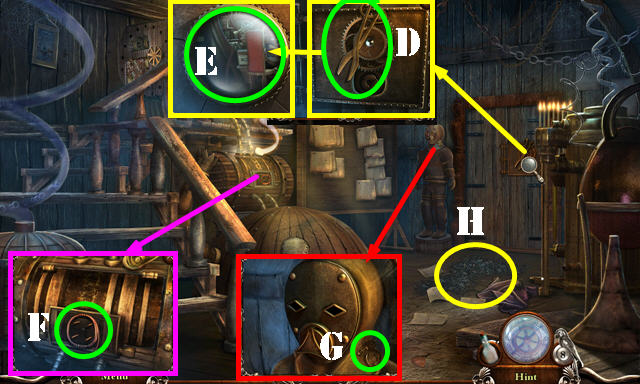
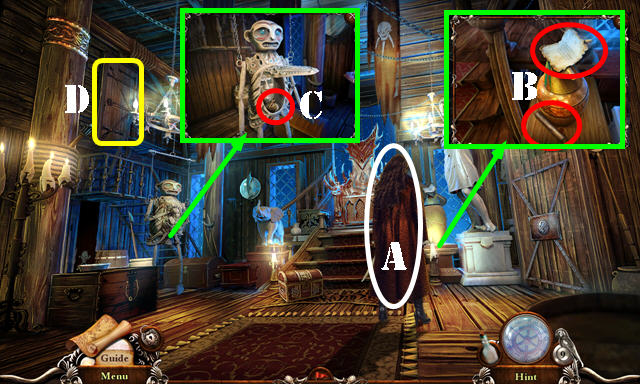
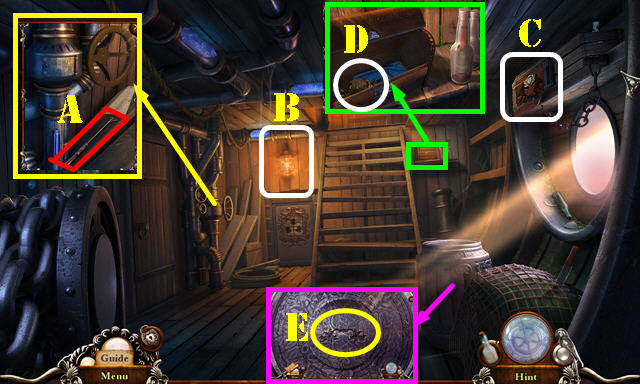
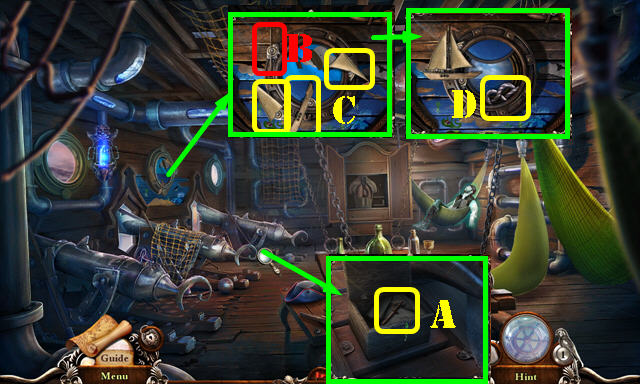
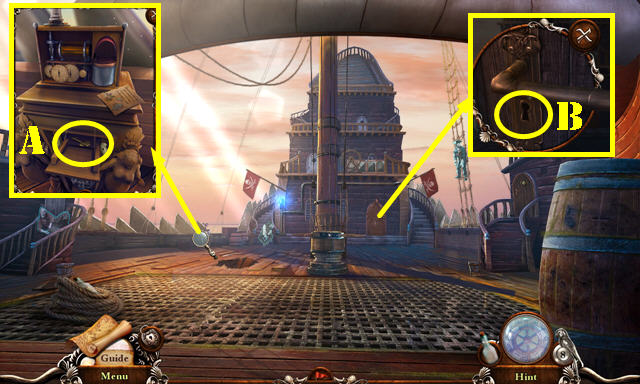
- Select the knife (A).
- Take the SHIP IN A BOTTLE (B) and INCOMPLETE CORK VEST (C).
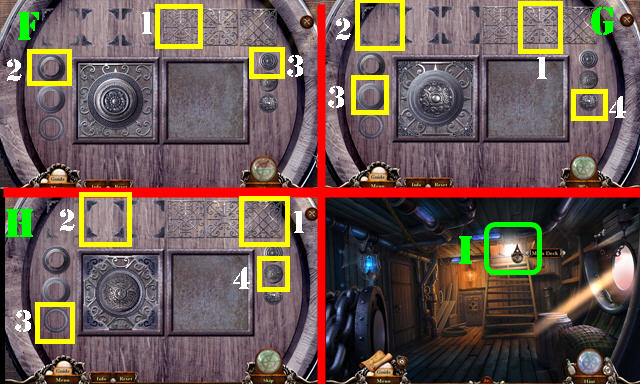
- Place the four corks in the INCOMPLETE CORK VEST; receive the CORK LIFE VEST (1-4).
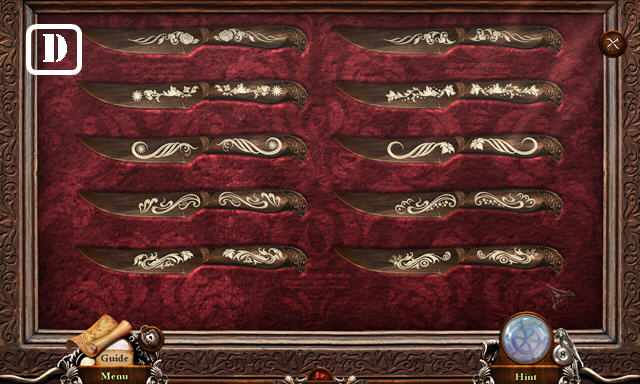
- Place the SHIP IN A BOTTLE and press the two buttons (D). Open the drawer; take the SEAM RIPPER (E).
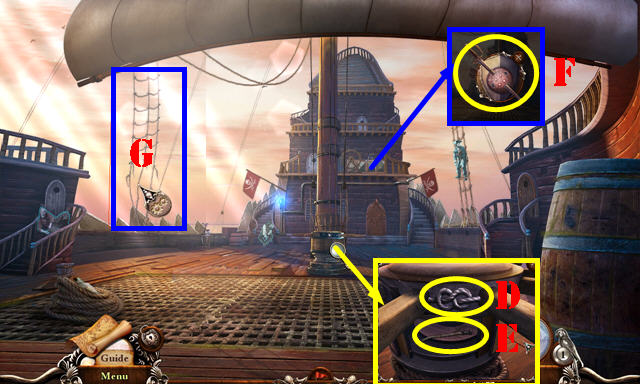
- Talk to Captain Bowen; take the LEATHER SCROLL CASE (F). Punch the captain twice and then slap him with the LEATHER SCROLL CASE.
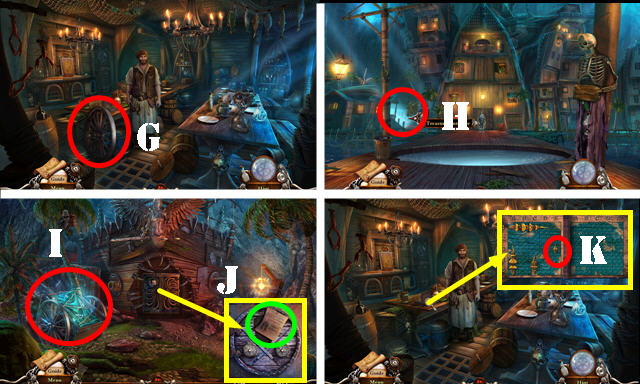
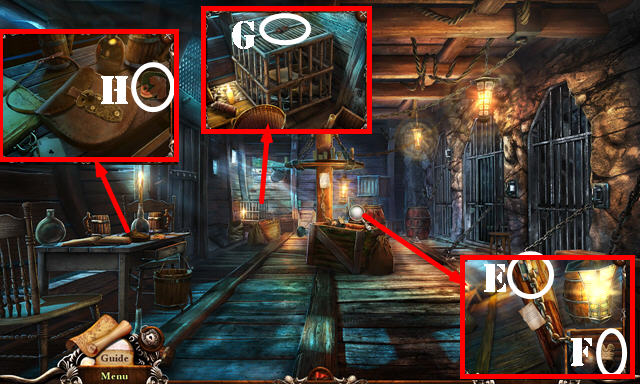
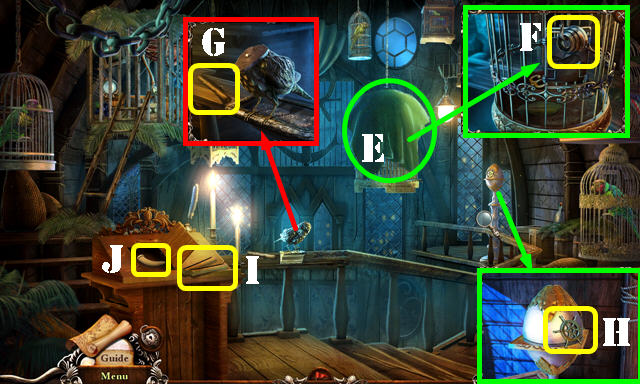
- Use the CORK LIFE VEST; go forward (G).
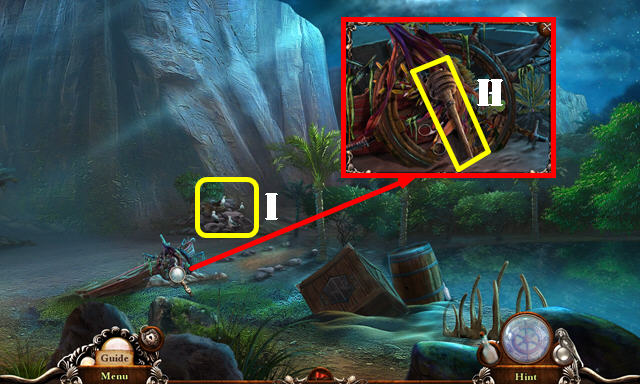
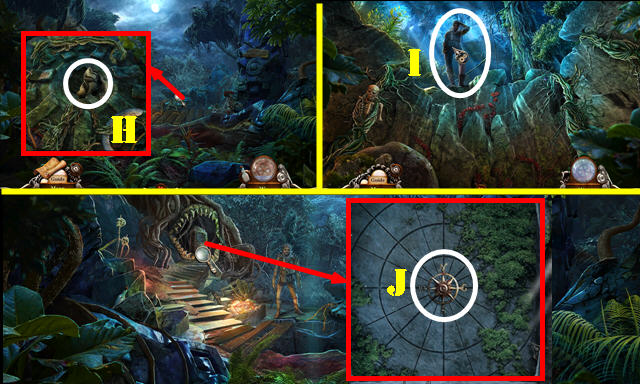
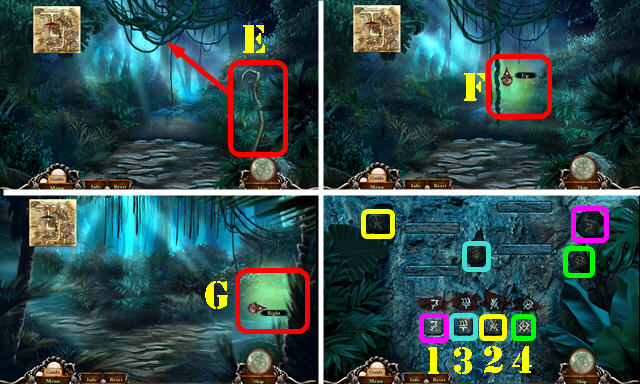
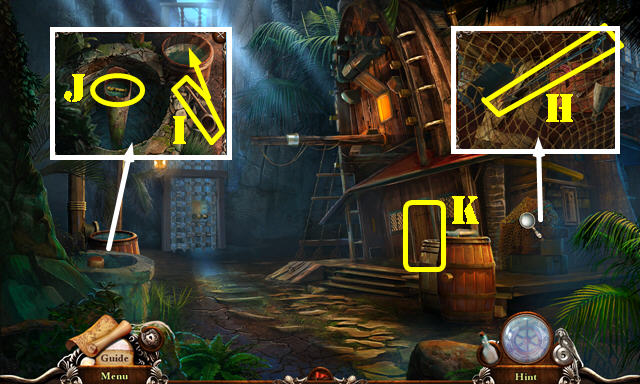
- Take the TORCH (H). Remove three branches.
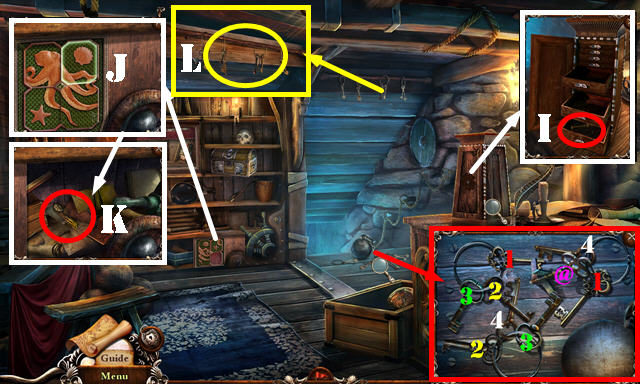
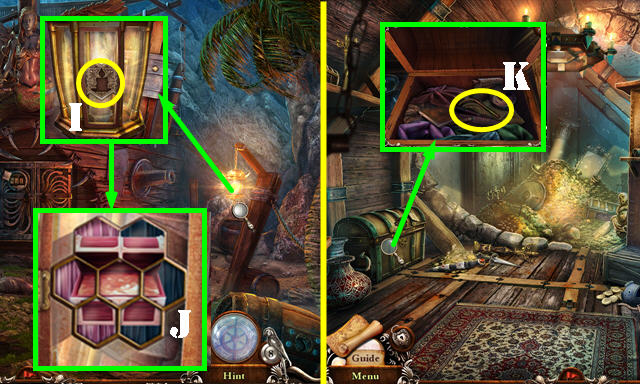
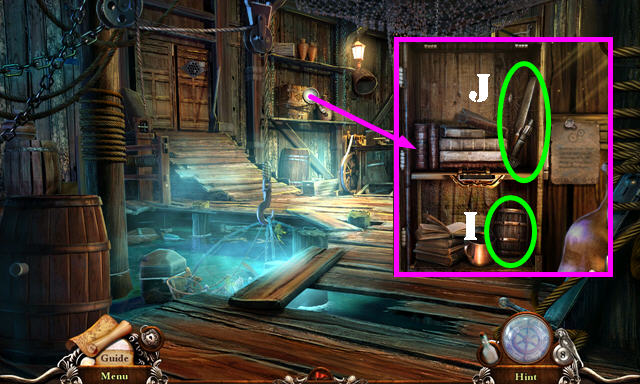
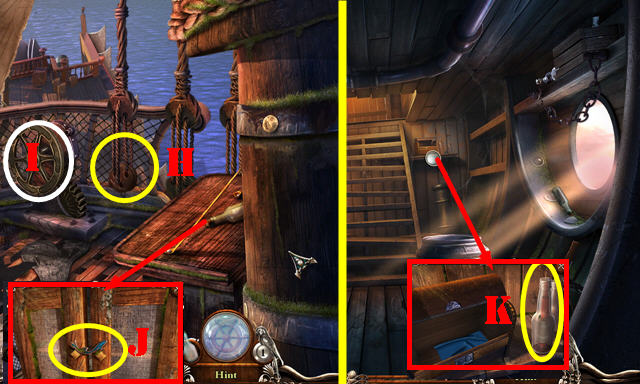
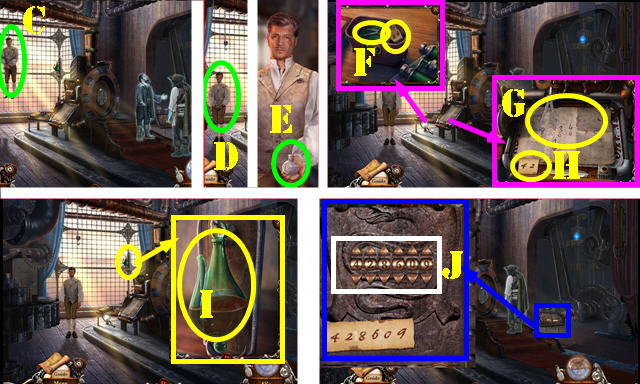
- Select the nest (I).
- Go left.
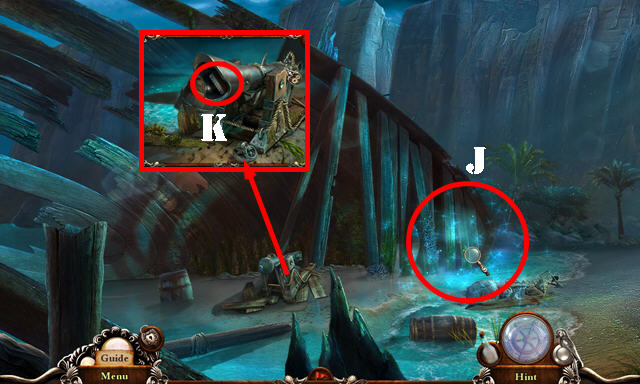
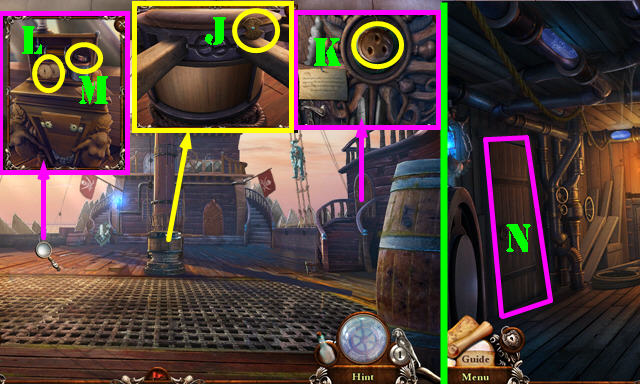
- Play the HOP (J) to get the PULLEY MECHANISM.
- Take the MILITARY INSIGNIA 1/2 from the PULLEY MECHANISM.
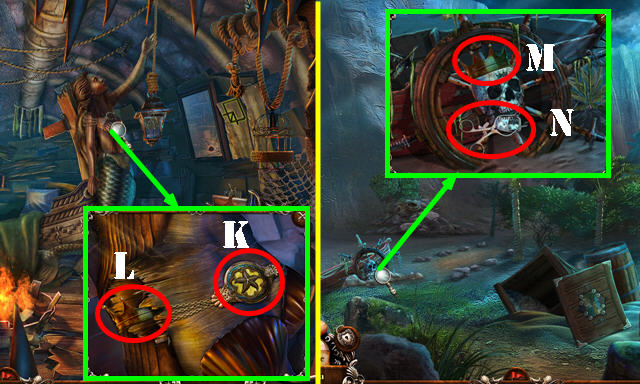
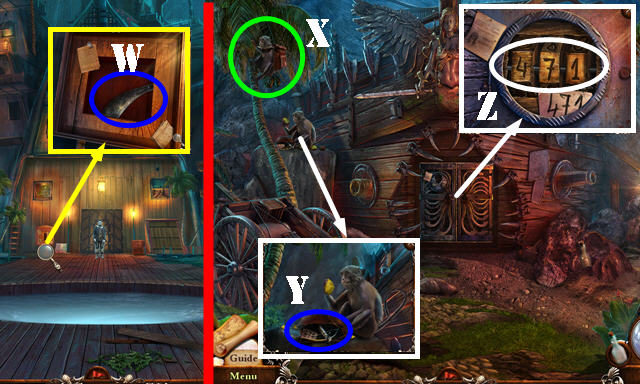
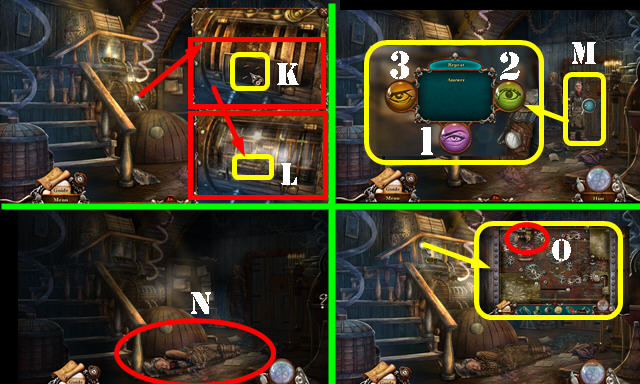
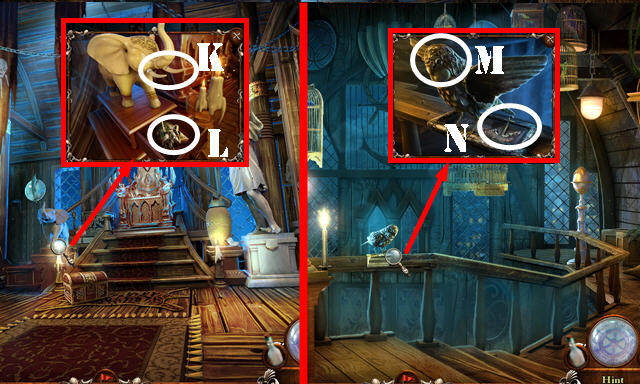
- Pull the plug; take the BRUSH (K).
- Go right and then forward.
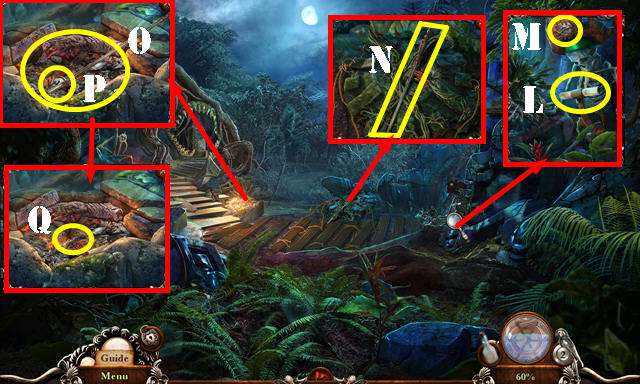
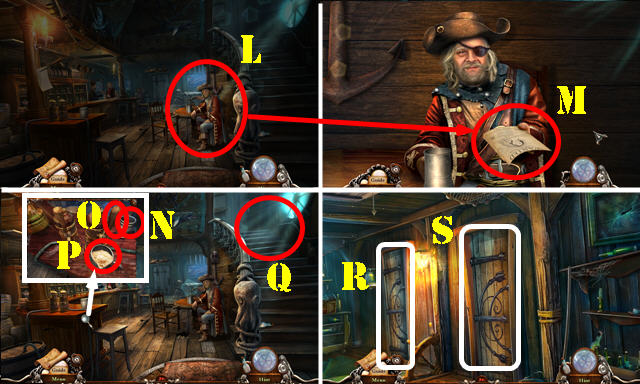
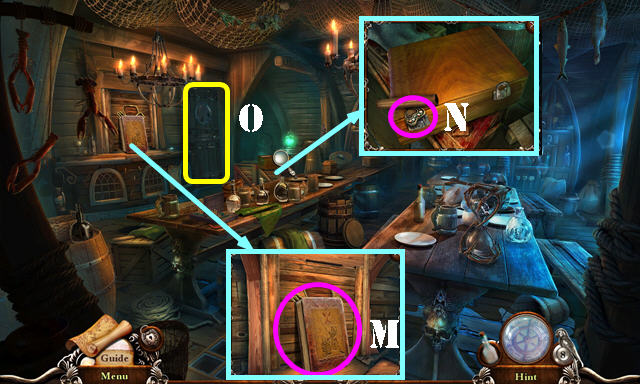
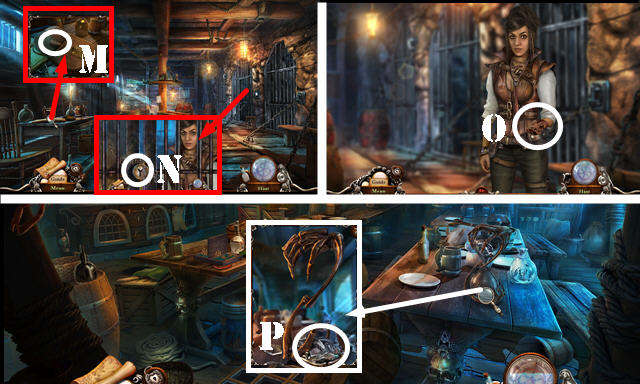
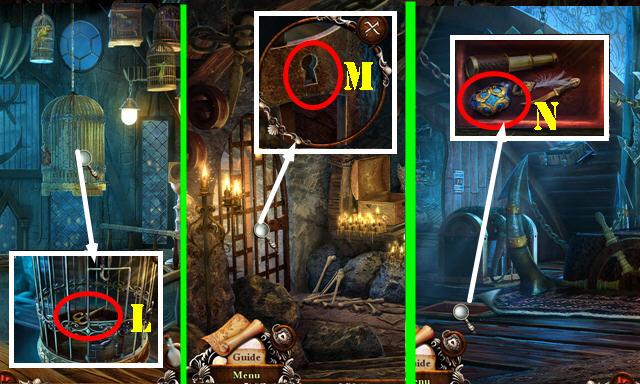
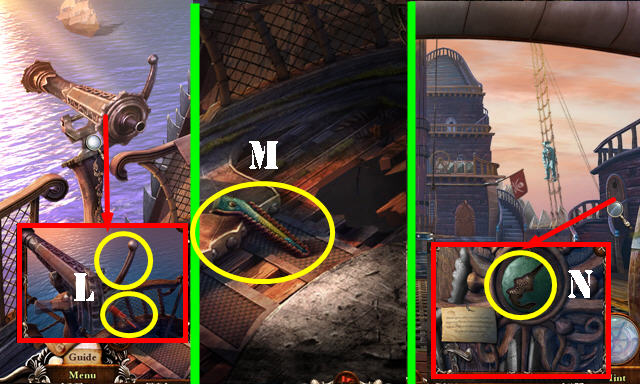
- Look at the scroll (L); use the SEAM RIPPER 3x; receive the MILITARY INSIGNIA 2/2 (M).
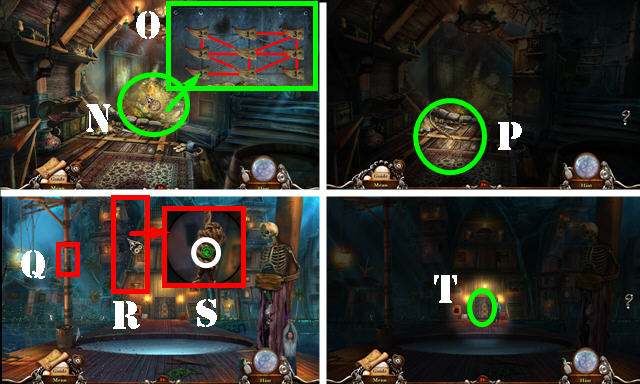
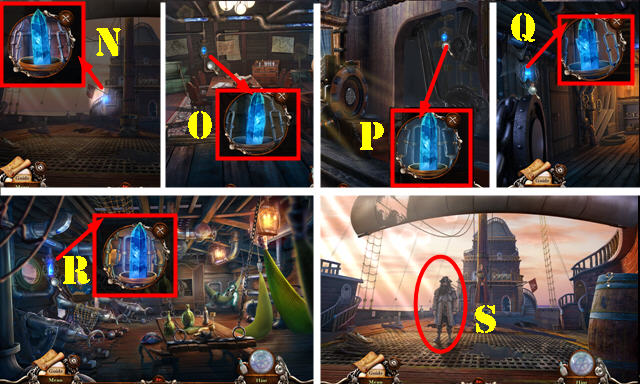
- Take the MUSKET ROD (N).
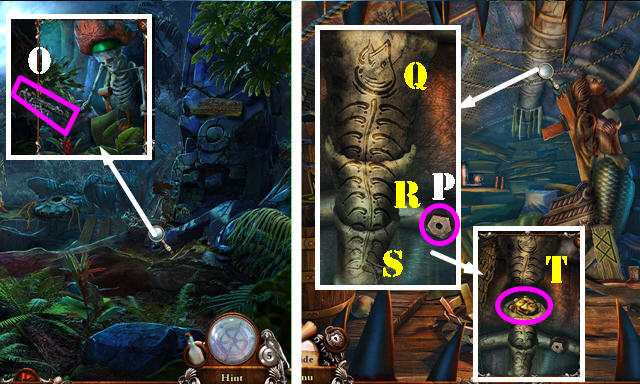
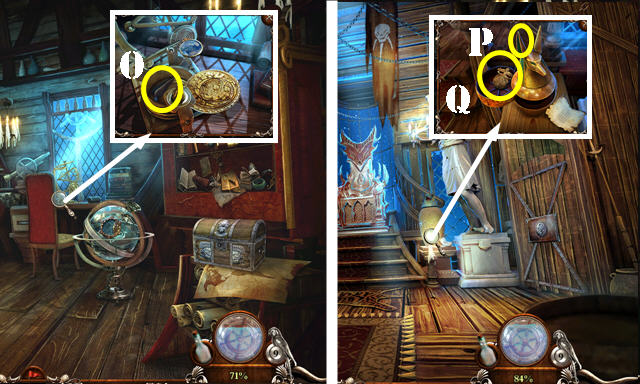
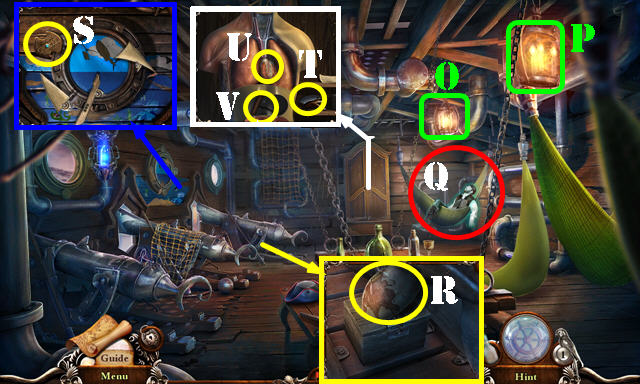
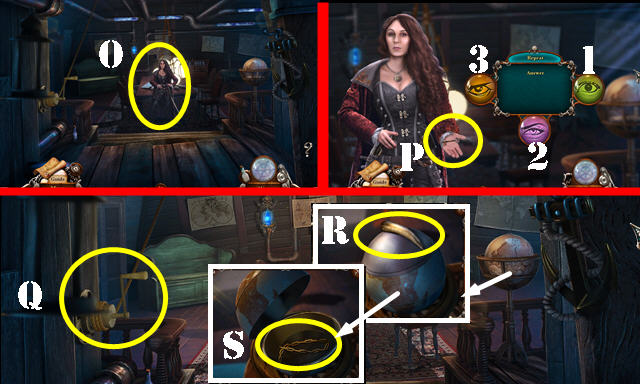
- Use the TORCH to receive the BURNING TORCH (O). Use the MUSKET ROD twice; take the EYE (P). Use the MUSKET ROD again; take the FISH (Q).
- Walk down.
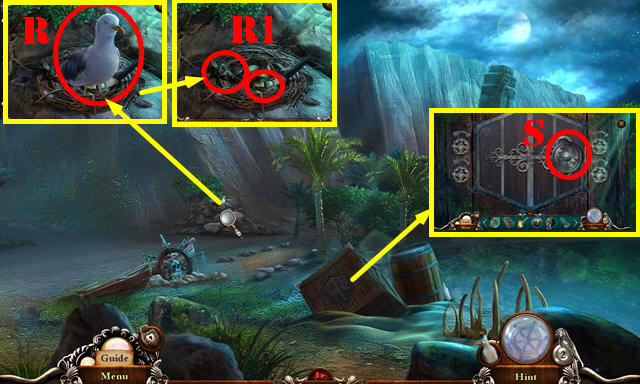
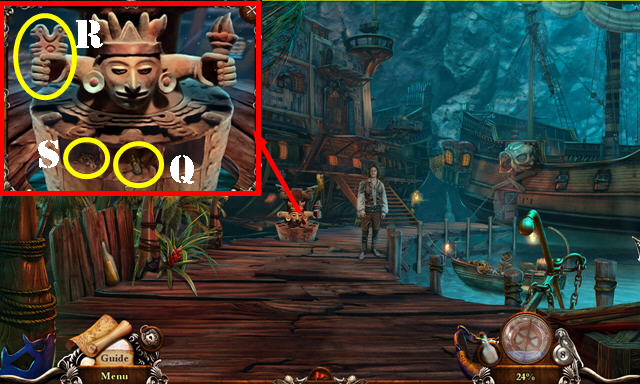
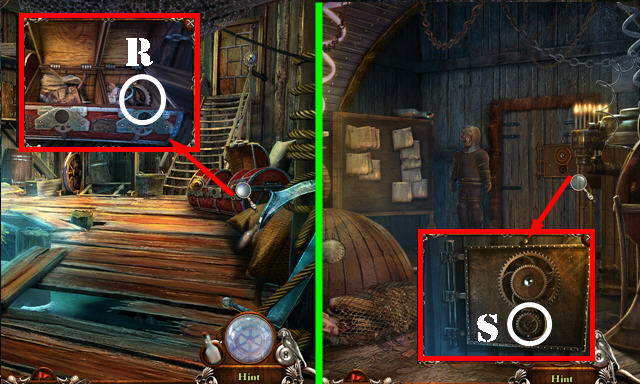
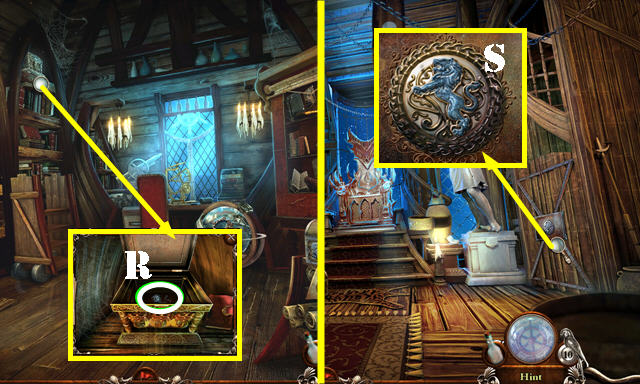
- Give the FISH (R); take the STARFISH MEDAL 1/2 and FIGURINE (R1).
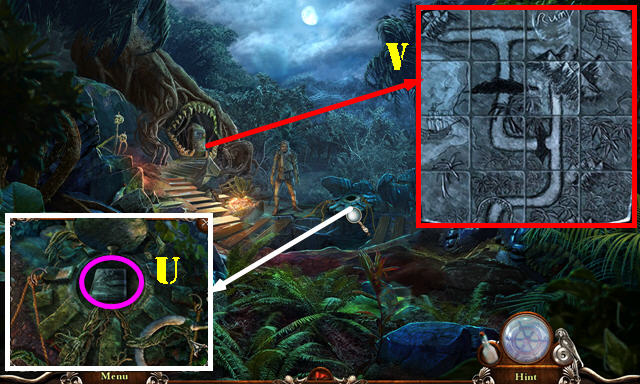
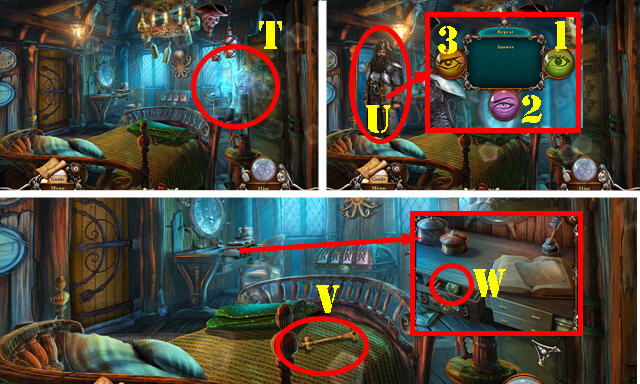
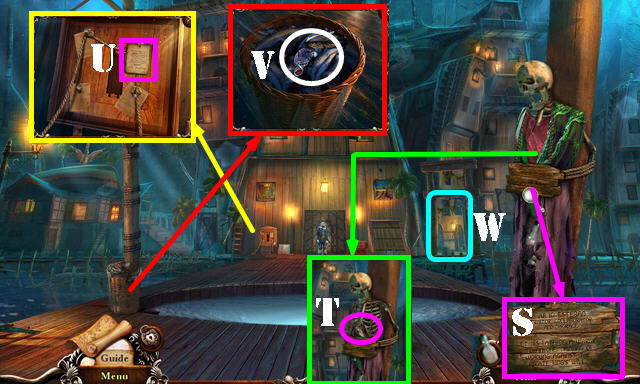
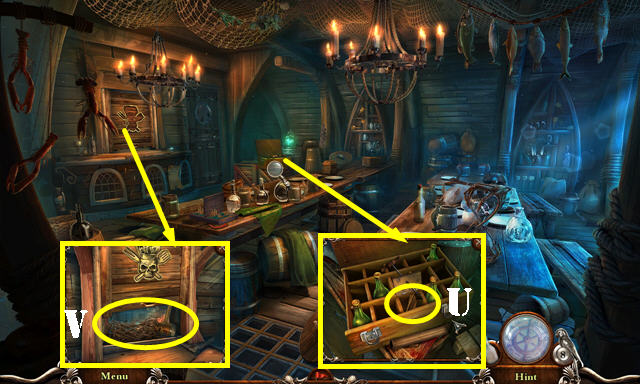
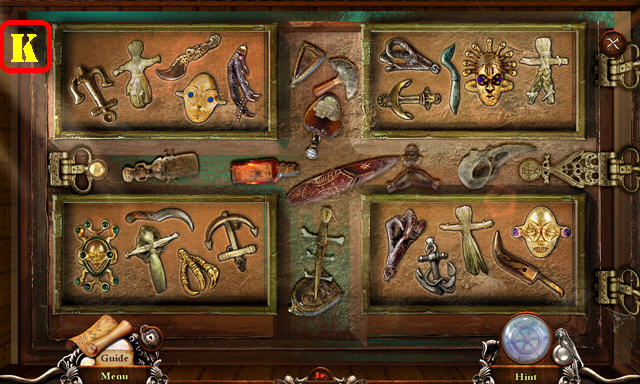
- Place the MILITARY INSIGNIA 2/2 for a puzzle (S).
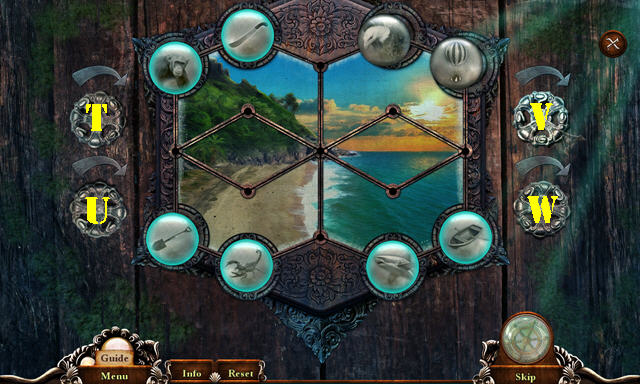
- Solution: Vx2-W-V-Wx2-V-W-V-W-V-Wx3-Tx4-U-T-U-V-Ux4-T-V-Tx5-Vx4.
- Take the PULLEY SCREW and CHAIN-SHOT.
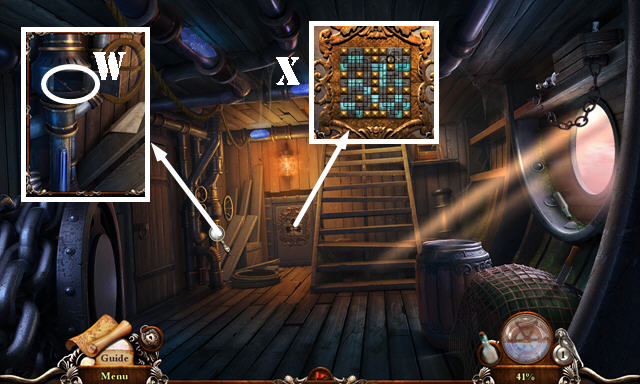
- Go left.
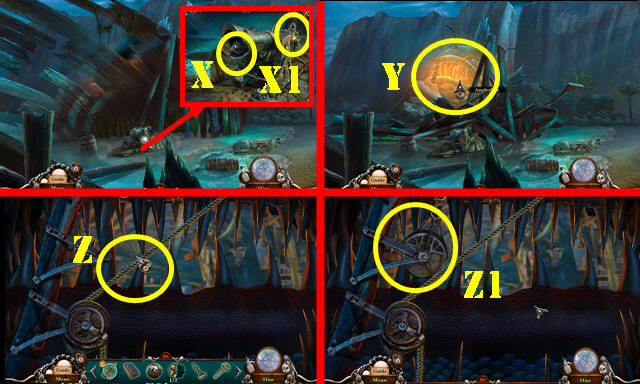
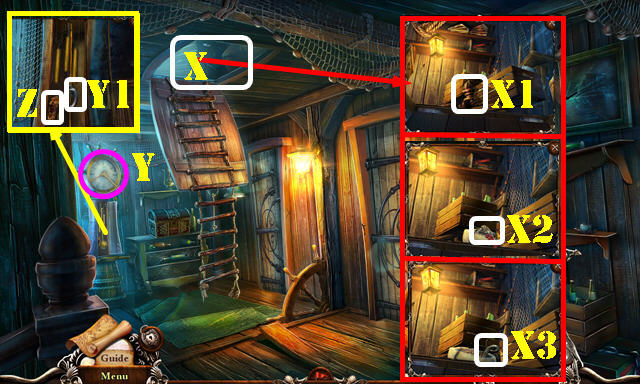
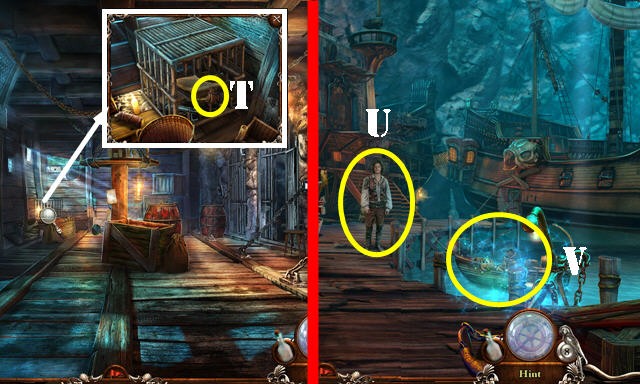
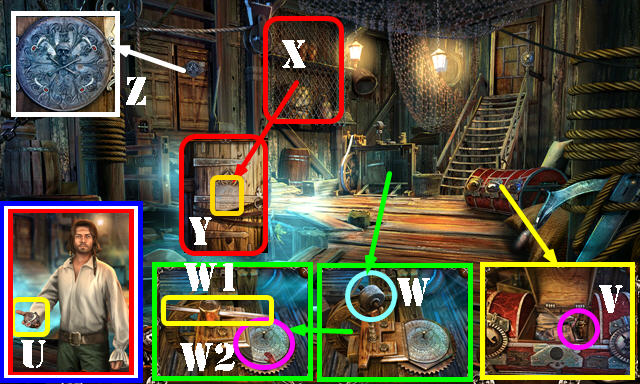
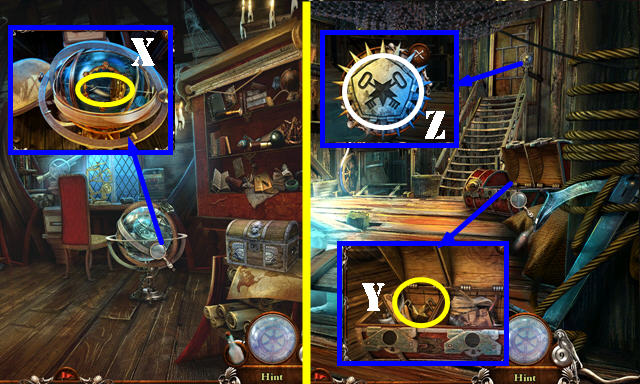
- Place the CHAIN-SHOT and pull it (X). Use the BURNING TORCH (X1).
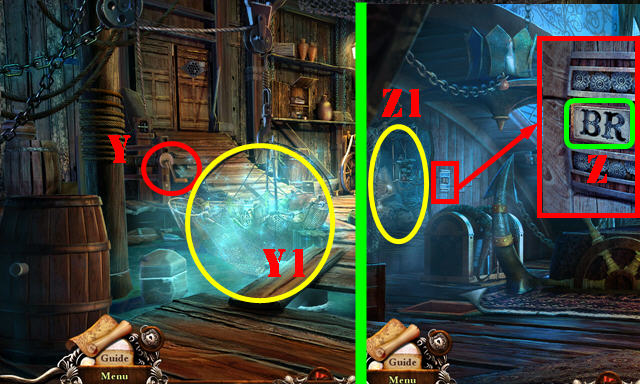
- Go to Anglerfish (Y).
- Place the PULLEY SCREW on the PULLEY MECHANISM; receive the PULLEY.
- Place the PULLEY (Z); select it 4x (Z1).
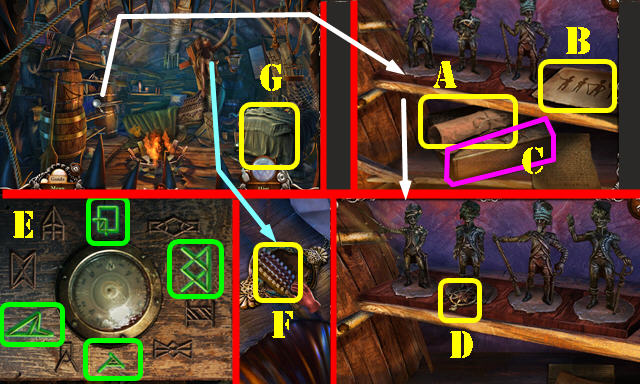
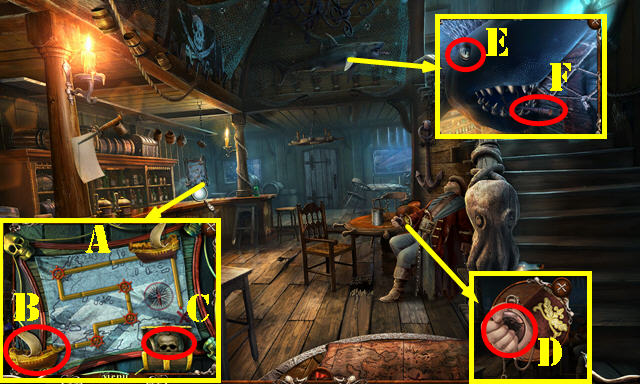
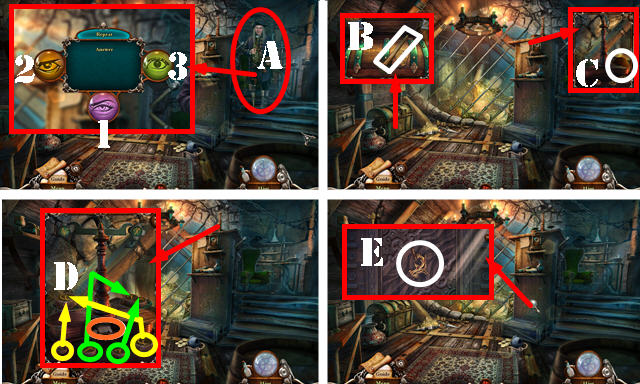
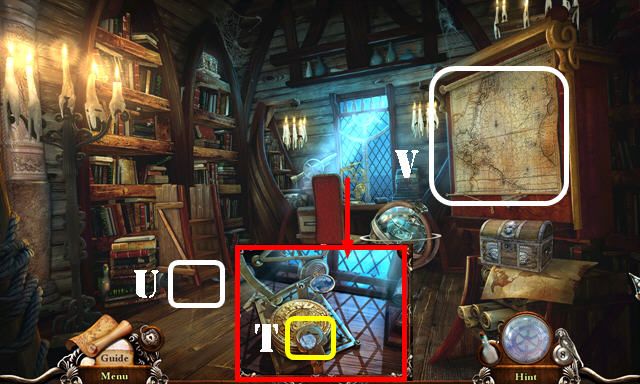
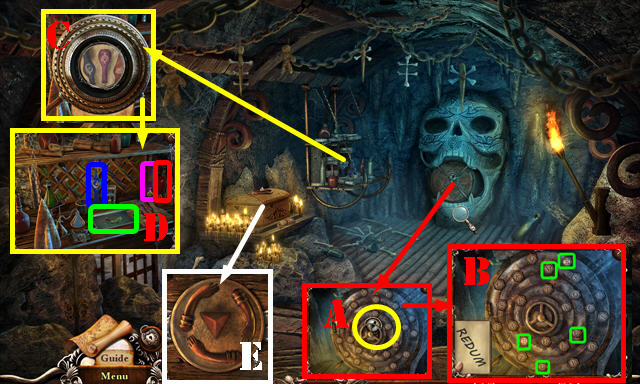
- Take the Map (A) and look at the note (B); take the COMPASS BOX (C).
- Place the FIGURINE; pose the figurines as shown; take the COMPASS ROSE (D).
- Use the BRUSH 4x on the COMPASS BOX; select the symbols shown (E); take the RELIEF PIECES 1/2.
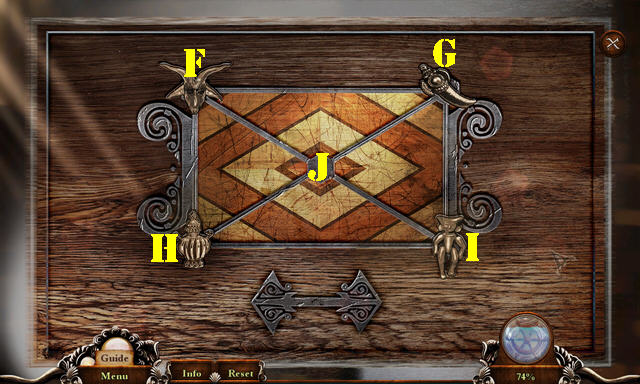
- Take the FISH SCALER (F).
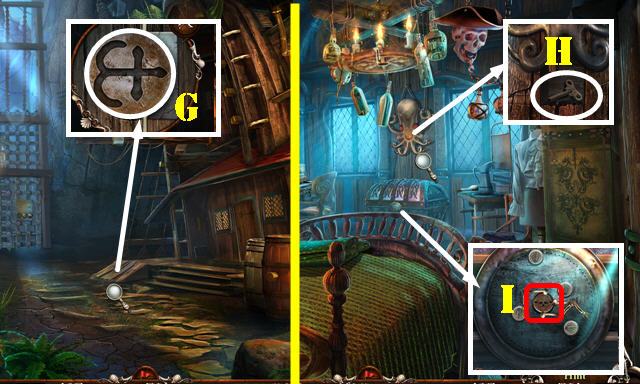
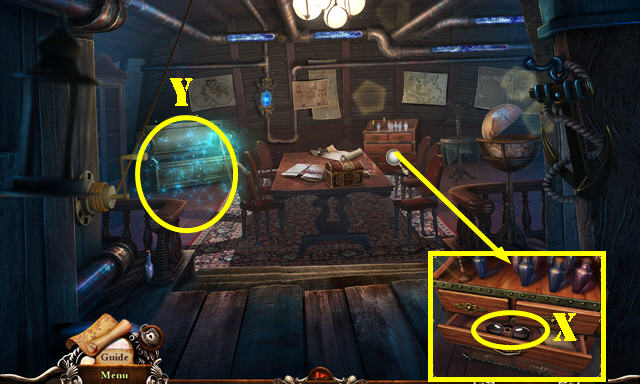
- Remove the cloth (G) and play the HOP to get the SICKLE.
- Return to the Ruins.
- Use the SICKLE 3x; take the STARFISH MEDAL 2/2 (H).
- Select the scene; show the LEATHER SCROLL CASE (I) and talk to the man.
- Place the COMPASS ROSE; look at the note (J).
- Return to Anglerfish.
- Place the STARFISH MEDAL 2/2; take the SEA PENDANT (K). Read the note; take the SKULL CROWN (L).
- Walk down and go right.
- Place the SKULL CROWN (M); take the MEDICAL RETRACTOR (N).
- Go forward.
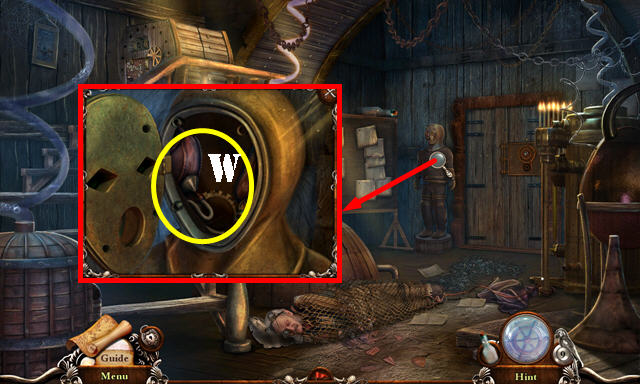
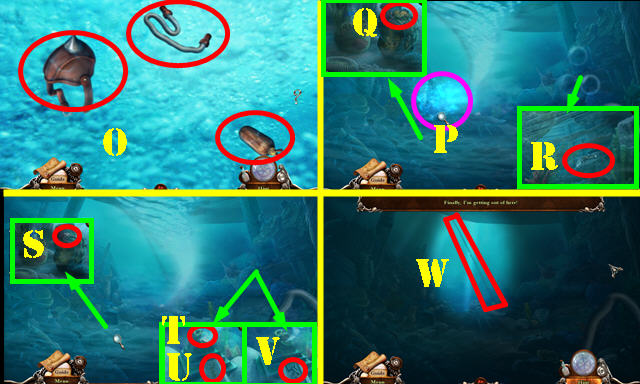
- Use the MEDICAL RETRACTOR; take the WRENCH (O).
- Return to Anglerfish.
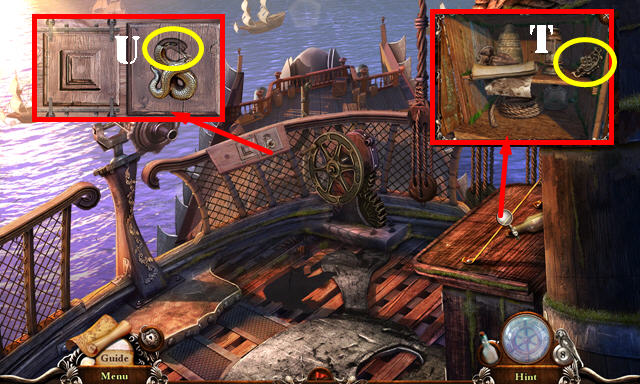
- Use the WRENCH (P); select Qx3-Rx1-Sx3; take the STONE DECORATION (T).
- Return to the Ruins.
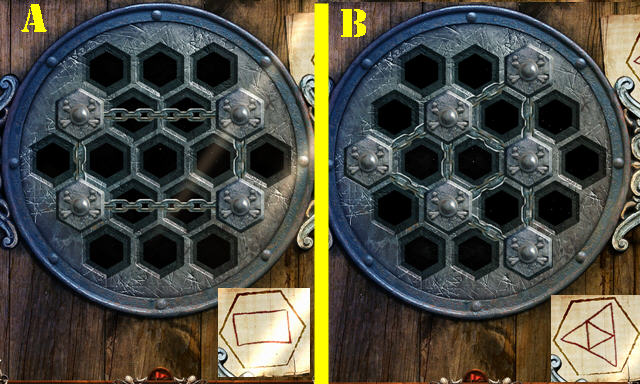
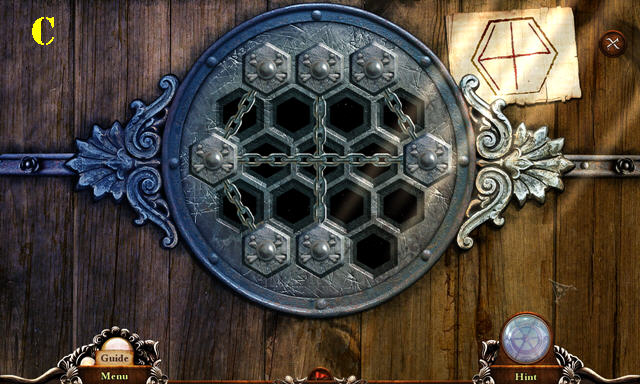
- Place the STONE DECORATION; take the RELIEF PIECES 2/2 (U).
- Place the RELIEF PIECES 2/2 for a puzzle. Solution (V).
Chapter 2: The Tavern
- Remove the leaves 3x.
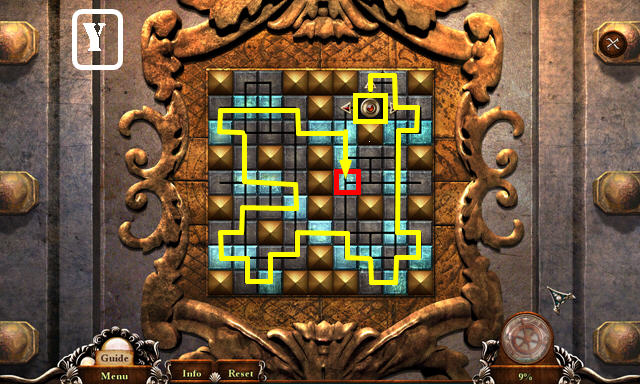
- Solution: Go right (A) and up (B). Place the three sticks, go left (C) and up (D). Use the hook (E) and select the vines twice. Go up (F) and right (G).
- Uncover and place all four tiles, then press each tile once (1-4).
- Select the scene.
- Talk to Captain Lars.
- Look at the note; use the SEAM RIPPER twice to get the NET PIECE; take the HARPOON (H).
- Use the ladle twice (I); take the SMALL SHIP CANNON (J).
- Enter the Tavern (K).
- Talk to the man (L). Show him the LEATHER SCROLL CASE and look at all the wanted posters (M).
- Select the cup (N) and lever (O). Select the cup (P).
- Go to the Second floor (Q). Touch the door (R). Go to the Guest room (S). Note: the game will make you enter the second door you touch.
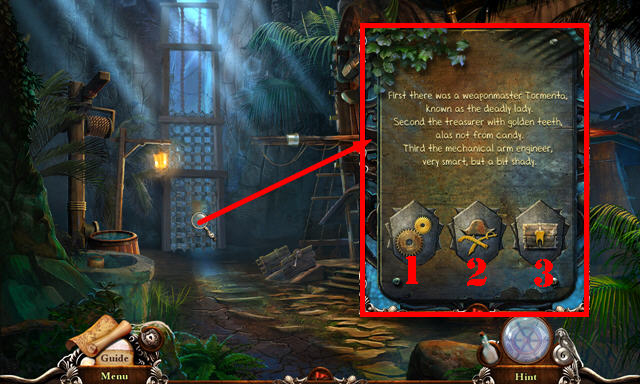
- Play the HOP to get the BROOCH (T).
- Talk to the captain (U). Answers: straightforward-sneaky-hostile (1-2-3).
- Move the pillow; take the LARGE CLOCK HAND (V).
- Look at the notebook. Place the SEA PENDANT; take the DOUBLOONS 1/3 (W).
- Go to the Second Floor.
- Use the HARPOON (X); take the RIGHT ARM (X1). Move the crate and sack; take the COAT OF ARMS (X2). Move the sack; take the TENTACLES 1/2 (X3).
- Place the LARGE CLOCK HAND (Y); move the chains 3x; take the TENTACLES 2/2 (Y1).
- Use the FISH SCALER; take the MAGNET (Z).
- Walk down.
- Arrange the pipes as shown (A). Place the SMALL SHIP CANNON (B); take the CHEST TOKEN (C).
- Take the PIRATE LOCKET (D).
- Place the EYE (E); take the STORAGE KEY (F).
- Go to the Tavern Entrance.
- Use the STORAGE KEY (G); play the HOP to get the RAVEN ORNAMENT.
- Place the RAVEN ORNAMENT on the PIRATE LOCKET; take the BRASS PLATE.
- Return to the Guest Room.
- Place the TENTACLES 2/2; take the TRIANGLE KEY (H).
- Use the TRIANGLE KEY on the PIRATE LOCKET and turn it; receive the GATE TOKEN.
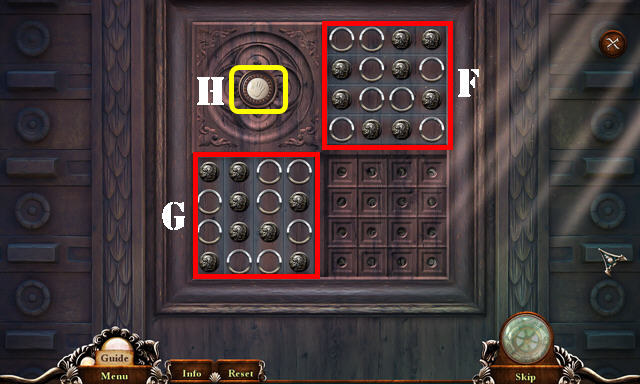
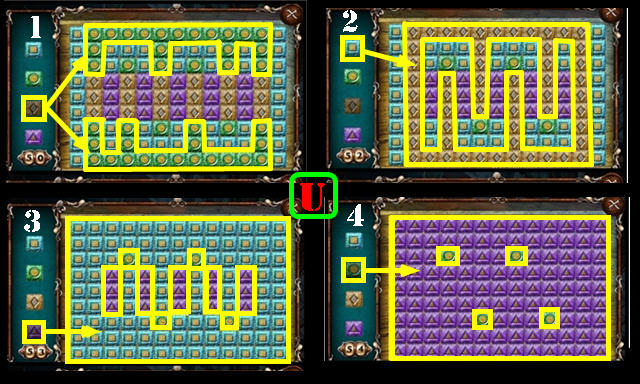
- Place the CHEST TOKEN for a puzzle (I).
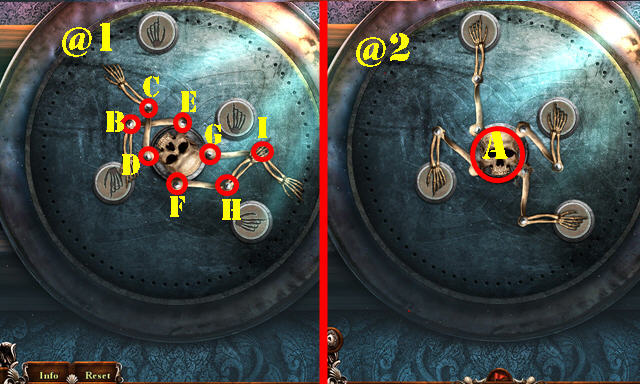
- Solution: Bx7-Ex4-Cx7-Dx7-Hx6-Fx4-Ix7-G-Ax5 (@1). Solved puzzle (@2).
- Look at the note; take the HAND-NET FRAME.
- Return to the Tavern Entrance.
- Place the GATE TOKEN; select the three tokens (2-3-1).
- Go forward.
Chapter 3: Gangway
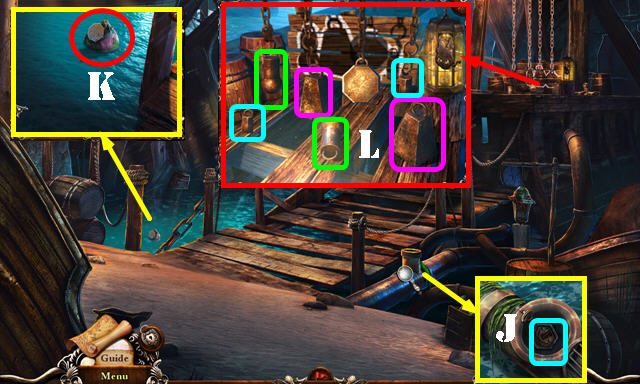
- Use the MAGNET and open the grate; take the MESS HALL TOKENS 1/2 and DOUBLOONS 2/3 (J).
- Place the NET PIECE on the HAND-NET FRAME; receive the FISHING NET.
- Use the FISHING NET (K); take the WEIGHT.
- Hang the WEIGHT; place the others and arrange as shown (L).
- Go up.
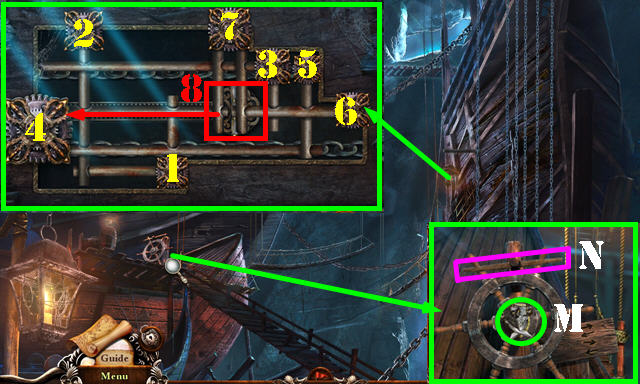
- Place the COAT OF ARMS (M). Remove the stick (N). Pull the wheel right-left-right-left.
- Place the BRASS PLATE for a puzzle. Solution (1-7). Slide the piece (8).
- Go up and left.

- Speak to the pirate (O). Take the DRAGON (P).
- Walk down twice.
- Place the DRAGON; take the DOUBLOONS 3/3 (Q).
- Go up twice and then left.
- Look at the note; place the DOUBLOONS 3/3 (R).
- Go forward.
- Look at the sign (S). Select the chest 4x; take the SEA CALF and MESS HALL TOKENS 2/2 (T).
- Look at the note (U). Untie all three knots; take the ROPE.
- Select the basket; use the BROOCH; take the INSIGNIA PIECE 1/4 (V).
- Go to the Brig Entrance (W).
- Select the leaves 2x; take the SHIELD (A).
- Place the RIGHT ARM (B); take the SCALE BEAM (C).
- Take the FLOWER 1/3 (D).
- Use the MESS-HALL TOKENS 2/2 (E).
- Go to the Mess Hall (F).
- Take the CART WHEEL (G).
- Return to the Square and go left (H).
- Place the CART WHEEL (I); play the HOP to get the BATTLESHIP TOKEN.
- Look at the note (J).
- Return to the Mess Hall.
- Place the BATTLESHIP TOKEN for a puzzle (K).

- Solution: A1-A2-A3-B4-C2-C4-E1-E2-E3-E4 (L).
- Take the COOKBOOK (M).
- Look at the note and take the FLOWER 2/3 (N). Open both latches.
- Go to the Galley (O).

- Take the GIMLET DRILL and GREASE POT (P).
- Take the KITCHEN JOLLY ROGER (Q) and select the latch (R).
- Use the ROPE (S). Pull the pulley (T).
- Walk down.
- Use the GIMLET DRILL; take the FRUIT PRESS HANDLE (U).
- Place the KITCHEN JOLLY ROGER; take the ROPE LADDER and MEAT POUNDER (V).
- Go to the Galley.
Chapter 4: The Galley

- Place the FRUIT PRESS HANDLE and press it; take the INSIGNIA PIECE 2/4 (W).
- Use the MEAT POUNDER; take the BELL SHAPE (X).
- Place the BELL SHAPE (Y); play the HOP to get the TUNING FORK.
- Use the ROPE LADDER and select it (Z).
- Take the GUNPOWDER HORN 1/6 (A) and GUNPOWDER HORN 2/6 (B).
- Use the GREASE POT for a puzzle (C).
- Solution (D).
- Look at the note; take the KNIFE.
- Go forward.
- Look at the note; use the KNIFE 4x and take the LEG IRON (E); take the LEFT ARM (F).
- Take the FLOWER 3/3 (G) and WOODEN TILE (H).
- Walk down.
- Place the FLOWER 3/3; select the drawers 3x; take the SAW FRAME (I).
- Place the WOODEN TILE; swap as shown (J). Look at the notebook and move the scroll; take the SAW HANDLE and BAG CLASP (K).
- Place the LEG IRON (L). Select the matching pairs (1-4). Take the CELL KEY (@).
- Go forward.
- Use the BAG CLASP; take the GUNPOWDER HORN 3/6 (M).
- Place the CELL KEY (N) and select 3x; take the STATUE PIECE (O).
- Walk down 3x.
- Use the TUNING FORK; take the INSIGNIA PIECE 3/4 and THUMB SCREW (P).
- Walk down.
- Place the STATUE PIECE; take the GOLD FIRESTARTER 1/2 and SAW BLADE (Q).
- Place the LEFT ARM (R); take the GOLD SHARK (S).
- Return to the Brig interior.
- Place the SAW BLADE, SAW HANDLE and THUMB SCREW on the SAW FRAME; receive the MEDICAL SAW.
- Use the MEDICAL SAW 2x; take the DOUBLOON POUCH and SCROLL EMBLEM (T).
- Return to the Brig Entrance.
- Give the DOUBLOON POUCH (U).
- Play the HOP (V) to get the PINEAPPLE.
- Walk down.
- Place the SCROLL EMBLEM; take the GUNPOWDER HORN 4/6 (W).
- Go to the Treasury Entrance.
- Throw the PINEAPPLE (X); take the INCOMPLETE CROSSBOW and TREASURY CODE (Y).
- Place the SHIELD and TREASURY CODE; change to 471 (Z) and go forward.
- Give the COOKBOOK and talk to the man (A). Answers: sneaky-hostile-straightforward (1-2-3).
- Look at the note; take the LEVER (B).
- Take the MACHINE ORNAMENT (C) and place the SCALE BEAM. Select both scales. Place the weights as shown (D). Take the CANDLE SHAPE (orange).
- Place the GOLD SHARK for a puzzle (E).
- Solution: place the tiles as shown (F-G) and press the button (H).
- Take the GUNPOWDER HORN 5/6.
- Walk down.
- Place the CANDLE SHAPE for a puzzle (I).
- Solution (J). Take the GLASS KEY.
- Go forward.
- Place the GLASS KEY; move two items; take the WHIP (K).
- Walk down.

- Use the WHIP (L); take the ARROW PLUS HORN (M).
- Select the ARROW PLUS HORN 4x; receive the GUNPOWDER HORN 6/6; take the ARROW.
- Go forward.
- Use the GUNPOWDER HORN 6/6; play the HOP (N) to get the GOLD FIRESTARTER 2/2. HOP puzzle solution (O).
- Use the GOLD FIRESTARTER 2/2 (P).
- Pull the lever (Q).
- Place the ARROW on the INCOMPLETE CROSSBOW; receive the CROSSBOW.
- Use the CROSSBOW (R) and hit the rope (S).
- Enter the Lower Deck (T).
- Take the INSIGNIA PIECE 4/4 (U).
- Place the SEA CALF; select 2x and take the FILIGREE ORNAMENTS 1/3 (V).
- Take the MISSING WHEEL (W). Place the LEVER and turn it (W1); take the INNER PLATE (W2).
- Take the NET (X). Look at the note (Y).
- Place the INSIGNIA PIECE 4/4 for a puzzle (Z).
- Solution one (A).
- Solution two (B).
- Solution three (C).
- Go through the door.
- Take the SNIPS (D) and look through the peephole (E).
- Take the THIN WIRE (F).
- Place the THIN WIRE (G).
- Take the FILIGREE ORNAMENTS 2/3 (H).
- Walk down.
- Use the SNIPS; move the cup; take the BARREL TOKEN (I).
- Place the MACHINE ORNAMENT; take the PINION and FILE (J).
- Go to the Research Room.
- Place the BARREL TOKEN (K); remove the pipe (L).
- Talk to the man (M). Answers: sneaky-straightforward-hostile (1-2-3).
- Use the NET (N).
- Place the PINION for a puzzle (O).
- Solution (P).
- Take the NARWHAL (Q).
- Walk down.
- Place the NARWHAL; move two items and take the CRANK WHEEL (R).
- Go to the Research Room.
- Place the CRANK WHEEL (S); go through the door.
Chapter 5: Library
- Take the KALEIDOSCOPIC LENS (T).
- Place the MISSING WHEEL (U).
- Select the map (V); play the HOP to receive the TRIANGLE WRENCH.
- Walk down.
- Use the TRIANGLE WRENCH and twist it 5x; take the BREATHING DEVICE and OUTER RING (W).
- Place the OUTER RING on the INNER PLATE; receive the SPHERE PLATE.
- Go to the Library.
- Spin the globe twice; place the SPHERE PLATE. Take the TUSK 1/2 and GRAMPUS SEA MONSTER (X).
- Go to the Lower Deck.
- Place the GRAMPUS SEA MONSTER. Move three items; take the STAR SYMBOL (Y).
- Place the STAR SYMBOL (Z); enter the Great Cabin.
- Talk to the lady (A).
- Look at the note; take the LADDER STEP 1/4 (B).
- Use the FILE 3x and open the compartment; take the LOCKING DEVICE (C).
- Go to the Parrot Room (D).
- Remove the cover (E); take the LENS HANDLE (F).
- Take the LADDER STEP 2/4 (G) and STEERING WHEEL (H).
- Look at the note (I); open the compartment and take the TUSK 2/2 (J).
- Walk down.
- Place the TUSK 2/2 (K); take the KNIGHT'S DECORATION 1/2 and PARROT HEAD (L).
- Return to the Parrot Room.
- Place the PARROT HEAD (M); take the ANCHOR (N).
- Return to the Library.
- Place the LOCKING DEVICE; take the WOODEN EAR (O).
- Return to the Great Cabin.
- Place the WOODEN EAR (P); take the FILIGREE ORNAMENTS 3/3 (Q).
- Return to the Library.
- Place the FILIGREE ORNAMENTS 3/3; select four items; look at the scroll and blueprints. Take the LION EMBLEM (R).
- Return to the Great Cabin.
- Place the LION EMBLEM; select the map (S) for a puzzle.
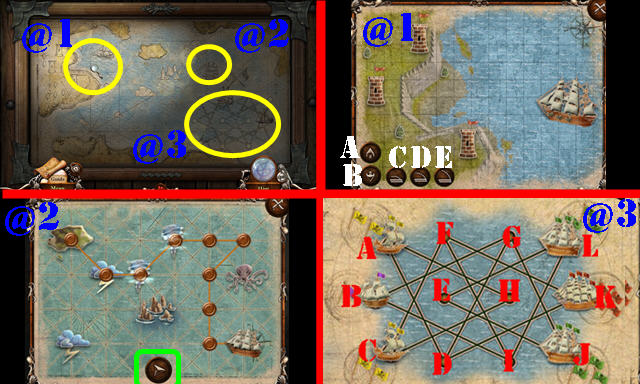
- Select (@1). Solution one: B-C-Ax2-E-Ax3-D.
- Select (@2). Solution two: select the areas shown and press the button (green).
- Select (@3). Solution three: (K-D)-(C-F)-(G-J)-(F-K)-(E-L)-(J-E)-(D-G)-(G-J)-(I-F)-(F-C)-(L-I)-(I-F)-(E-L).
- (L-I)-(C-H)-(H-A)-(A-D)-(F-C)-(C-H)-(H-A)-(I-F)-(F-C)-(B-I)-(I-L)-(D-G)-(G-B).
- Go through the right door.

- Take the SQUARED RING and LADDER STEP 3/4 (M).
- Take the LADDER STEP 4/4 (N).
- Place the STEERING WHEEL and ANCHOR (O). Take the GIMMEL RING 1/3 (P).
- Go to the Balcony (Q).
- Take the TRISKELION DISK and GOLDEN 8 (R).
- Walk down.
- Lift the rug; place the TRISKELION DISK for a puzzle (S).
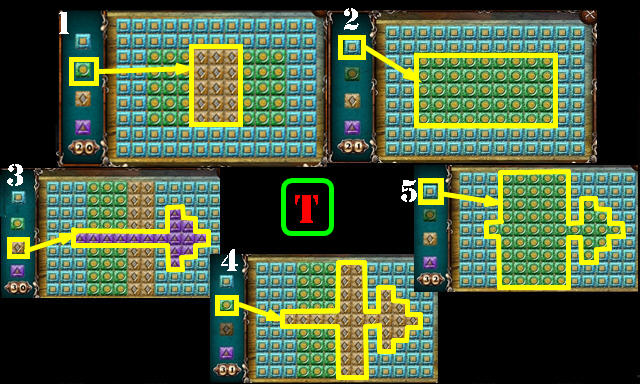
- Solution one: 1-5 (T).
- Solution two: 1-4 (U).
- Take the WINCH HANDLE.

- Place the GOLDEN 8; take the GIMMEL RING 2/3 (V).
- Return to the Parrot Room.
- Place the LADDER STEP 4/4 (W); play the HOP to get the ORNATE LETTER R.
- Place the SQUARED RING; take the INITIAL B (X).
- Walk down twice.
- Place the WINCH HANDLE (Y); turn it twice and play the HOP (Y1) to get the SEQUENCE OF LETTERS.
- Return to the Pirate King's Quarters.
- Place the INITIAL B and the ORNATE LETTER R (Z). Enter the Secret Chamber (Z1).
- Take the SEA SERPENT EYE (A).
- Place the SEQUENCE OF LETTERS; select 'REDUM' (B). Open the book and flip the pages twice. Take the GLUE.
- Place the KALEIDOSCOPIC LENS and GLUE on the LENS HANDLE; receive the DECIPHERING LENS .
- Use the DECIPHERING LENS and select 3x (C). Pour blue-purple-red into (D). Take the GIMMEL RING 3/3 (D).
- Place the GIMMEL RING 3/3 and select the three arms for a puzzle (E).
- Solution one: G-I-H-F-G-I-H-J.
- Solution two (K).
- Take the PARROT TILE.
- Return to the Parrot Room.
- Place the PARROT TILE; open the door and take the KEY (L).
- Return to the Secret Chamber.
- Use the KEY (M) and turn it; play the HOP to get the LOCKED BOX.
- Walk down.
- Place the LOCKED BOX and open it; take the CRYSTAL AMULET (N).
Chapter 6: Main Deck
- Select the three items and touch them (O). Select the scene.
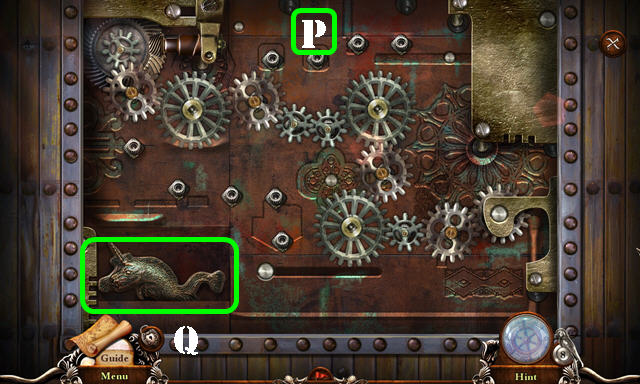
- Play the HOP (P) to get the IRON LEVER.
- Take the SEAHORSE TOKEN (Q).
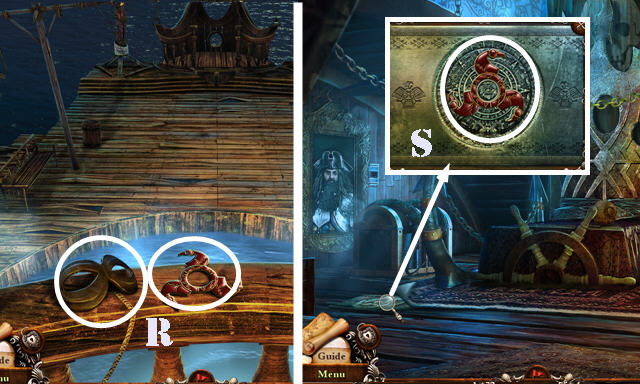
- Use the IRON LEVER; select the octopus 3x; take the SWIVEL GUN HANDLE and BROKEN SABRE (R).
- Use the BROKEN SABRE 2x; remove the moss; take the BARREL ORNAMENT and STONE CUTTLEFISH (S).
- Place the CRYSTAL AMULET (T) and STONE CUTTLEFISH (U); take the KNIGHT'S DECORATION 2/2 (V).
- Pull the chain 5x (W).
- Look at the note; take the LANTERN LIGHTER (A).
- Use the LANTERN LIGHTER (B); receive the LIT LANTERN LIGHTER.
- Take the KNIGHT'S BOX (C).
- Place the KNIGHT'S DECORATION 2/2 on the KNIGHT'S BOX; take the INCOMPLETE SAWSHARK and DIAL.
- Use the SEAHORSE TOKEN; take the COPPER COINS 1/3 and ROD OF ASCLEPIUS (D).
- Place the BARREL ORNAMENT for a puzzle (E).
- Solution one (F).
- Solution two (G).
- Solution three (H).
- Take the FAMILY LOCKET.
- Go to the Main Deck (I).
- Take the COPPER COINS 2/3 (J).
- Look at the note; take the DEADEYE RIG (K).
- Look at the note; place the NUMBER DIAL (L); take the BLOOD VIAL (M).
- Walk down and go to the Crew's Quarters (N).
- Use the LIT LANTERN LIGHTER (O-P).
- Select the man; use the FAMILY LOCKET (Q); play the HOP to get the BROTHER'S DIARY.
- Take the GLOBE PART (R) and COPPER COINS 3/3 (S).
- Place the ROD OF ASCLEPIUS; look at the note; take the SEA SERPENT HEAD (T).
- Use the BLOOD VIAL (U); take the DENTAL KEY (V).
- Walk down.
- Use the DENTAL KEY twice; take the MINIATURE MAST (W).
- Place the COPPER COINS 3/3 for a puzzle (X).
- Solution (Y).
- Take the ACID VIAL.
- Go to the Crew's Quarters.
- Use the ACID VIAL; open the box and take the SWORD KEY (A).
- Place the MINIATURE MAST (B); select the sailboat pieces (C); take the KNOT EMBLEM (D).
- Return to the Main Deck.
- Place the KNOT EMBLEM (D); take the SURGICAL TOOL (E).
- Use the SWORD KEY (F) and play the HOP to get the SHACKLES.
- Use the SHACKLES (G) and go left.
- Place the DEADEYE RIG (H) and select it twice. Select the wheel (I).
- Take the SAWSHARK TAIL (J).
- Return to the Hold.
- Use the SURGICAL TOOL; receive the FLARE (K).
- Return to the Top Deck.
- Place the SWIVEL GUN HANDLE and FLARE (L).
- Take the SHARK'S SAW (M).
- Walk down.
- Place the SAWSHARK TAIL and SHARK'S SAW on the INCOMPLETE SAWSHARK; receive the SAWSHARK EMBLEM.
- Place the SAWSHARK EMBLEM (N); go through the door.
- Select the lady and give her the BROTHER'S DIARY (O). Answers: straightforward-sneaky-hostile (1-2-3). Take the SHACKLES KEY (P).
- Select the handle twice (Q).
- Take the SEA SERPENT TOOTH (R).
- Place the GLOBE PART; spin it 3x; take the GOLD CHAIN (S).
- Place the SEA SERPENT EYE and SEA SERPENT TOOTH on the SEA SERPENT HEAD; receive the SEA SERPENT.
- Return to the Top Deck.
- Use the GOLD CHAIN; take the DRAWER HANDLE (T).
- Place the SEA SERPENT (U) for a puzzle.

- Solution one (V).
- Solution two (W).
- Take the LONG OARLOCK.
- Return to the Officers' Quarters.
- Place the DRAWER HANDLE; look at the note and take the SPYGLASS CLASP (X).
- Use the LONG OARLOCK (Y); play the HOP to get the SCREWDRIVER.
- Walk down.
- Use the SCREWDRIVER; take the NAVIGATION ROOM KEY (A).
- Use the NAVIGATION ROOM KEY (B); go through the door.
- Select the scene.
- Select the man (C); use the SHACKLES KEY (D). Take the CLEARING LIQUID (E).
- Use the SPYGLASS CLASP; take the COMPASS and ACTIVATOR CODE 1/3 (F).
- Use the COMPASS (G); take the ACTIVATOR CODE 2/3 (H).
- Use the CLEARING LIQUID to get the ACTIVATOR CODE 3/3 (I).
- Place the ACTIVATOR CODE 3/3; change the code to 428609 for a puzzle (J).
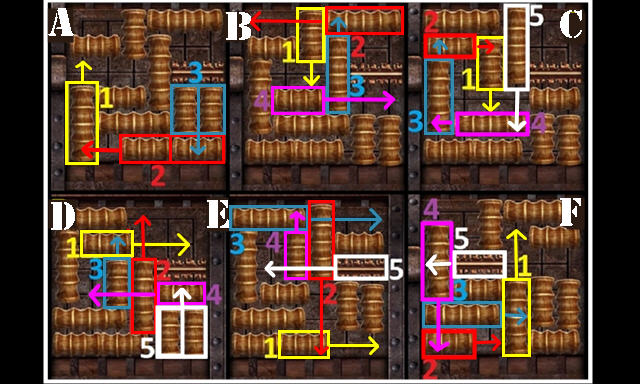

- Solution one (A-F).
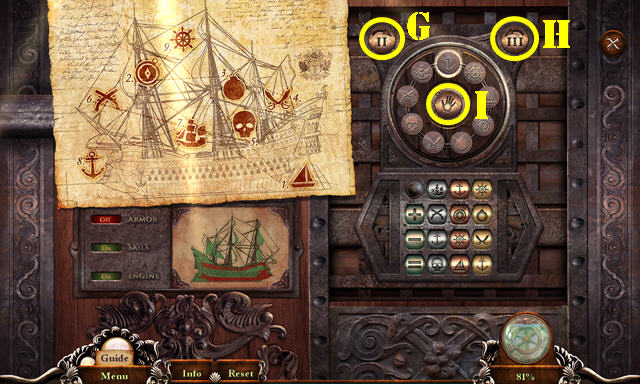
- Use the LEATHER SCROLL CASE. Solution two: Gx3-H-I-Gx2-I-G-I.
- Solution three: K-Jx2-K-J.
- Solution four: M-Lx4-M-Lx8-Mx2.
- Look at the note; take the CRYSTAL COLLECTOR.
- Select the scene. Use the CRYSTAL COLLECTOR; receive the ENERGY CRYSTALS 1/5 (N).
- Go to the Officers Quarters'. Use the CRYSTAL COLLECTOR; receive the ENERGY CRYSTALS 2/5 (O).
- Go to the Navigation Room. Use the CRYSTAL COLLECTOR; receive the ENERGY CRYSTALS 3/5 (P).
- Go to the Hold. Use the CRYSTAL COLLECTOR; receive the ENERGY CRYSTALS 4/5 (Q).
- Go to the Crew's Quarters. Use the CRYSTAL COLLECTOR; receive the ENERGY CRYSTALS 5/5 (R). The ENERGY CRYSTALS 5/5 automatically combine with the CRYSTAL COLLECTOR
- Go to the Main Deck. Select the scene and then the man for a puzzle (S).

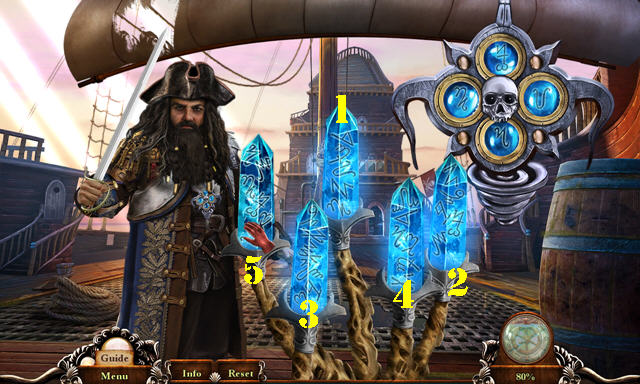
- Solution one: T-V-Ux2.
- Solution two: U-T-U-V-T.
- Solution three: V-T-U-V-U-T.
- Solution four (1-5).
- Congratulations, you've completed Sea of Lies: Leviathan Reef!
Created at: 2016-06-05