

Walkthrough Menu
- General Tips & Information
- Chapter One: Dorothy
- Chapter Two: The Scarecrow
- Chapter Three: The Tinman and the Lion
- Chapter Four: The First Tower and Beyond
- Chapter Five: To the Emerald City
- Chapter Six: Inside the Emerald City
- Chapter Seven: The Wicked Witch
- Chapter Eight: Glinda, the Good Witch
General Tips & Information
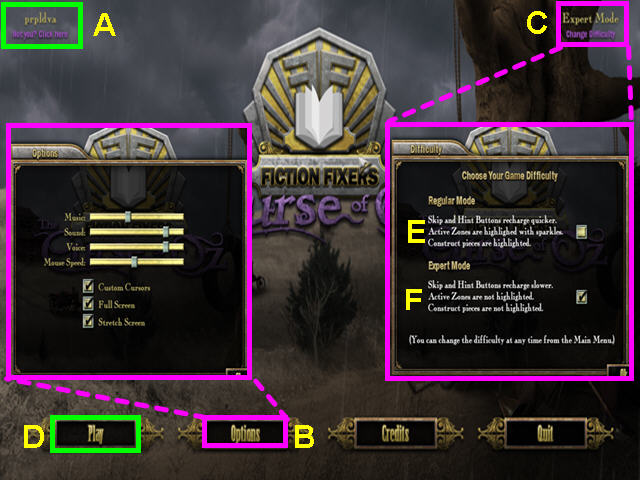
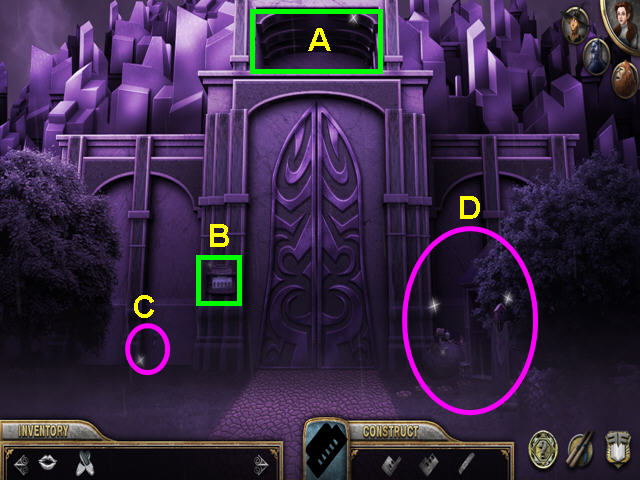
- Select 'Not You?' on the main screen to add or delete player profiles (A).
- You may play this game in full screen or windowed mode by changing the settings in the options menu (B).
- This game will also allow you to stretch the screen to fit your monitor.
- You may adjust the volume of sounds and music in the options menu.
- Select system cursor to discontinue use of the game cursor.
- The options menu is accessible from both the main screen and the in-game menu.
- Click on 'Change Difficulty' to switch between Regular and Expert mode (C).
- Select play to start your game (D).
- When you first start playing, you must choose between Regular and Expert difficulty levels.
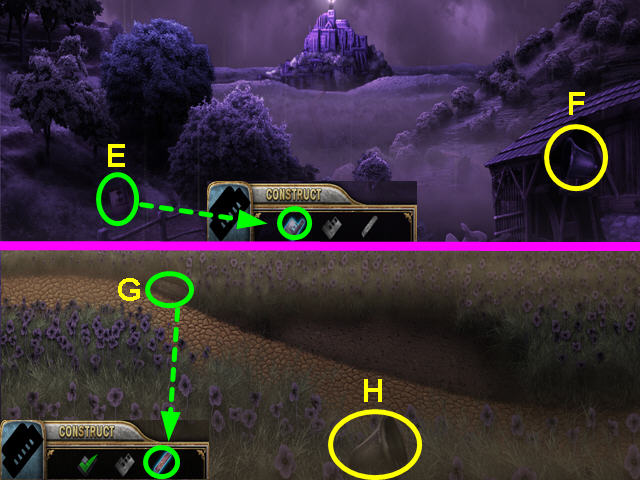
- Hints and skip meters will fill faster in the Regular Mode (E).
- Active areas will be indicated by sparkles and fragmented objects will glow if the piece in the current screen in the Regular Mode -they are nor available in the Expert mode..
- The Expert Mode will have slower filling hints and skips (F).
- You can change difficulty at any time.
- Once you start the game, you will have the a brief tutorial.
- Hidden object lists are random, your solutions may vary.

- Pieces of fragmented objects will glow when they are in the immediate screen if you are playing regular mode (G).
- Check marks will show which items have already been collected.
- Click on an item in a hidden objects list for the location.
- Area Complete will appear at the top of the screen when you have finished a location.
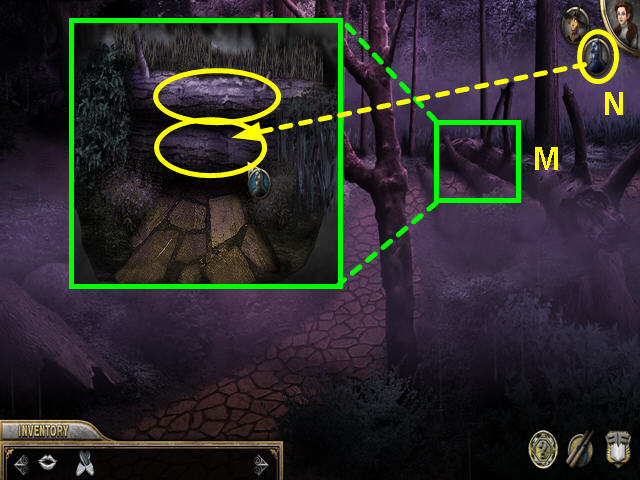
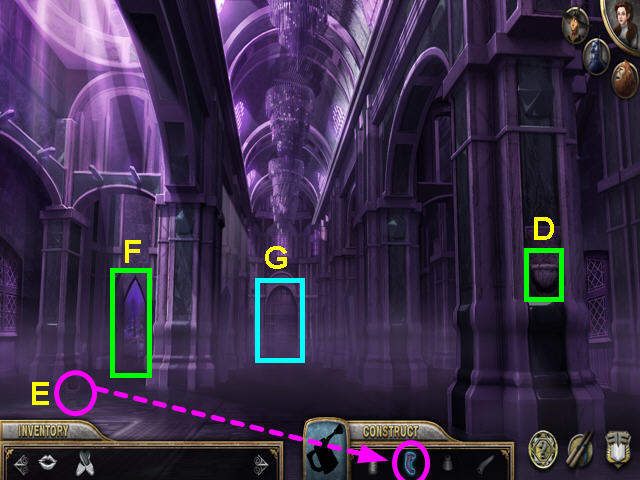
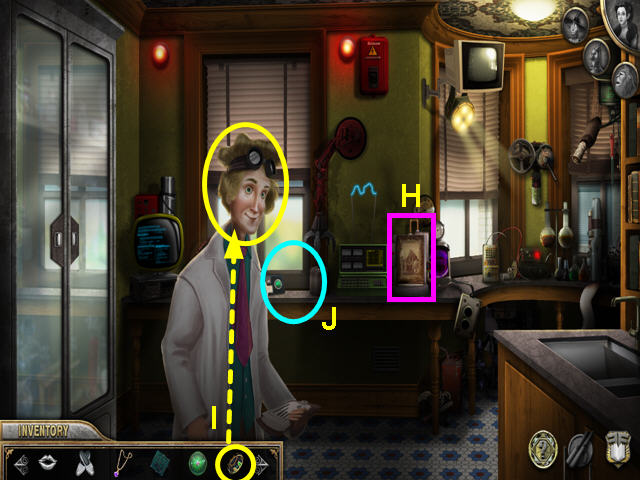
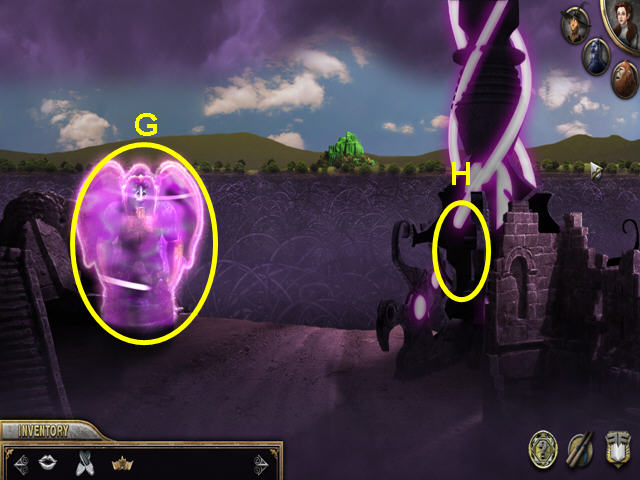
- Clicking on Dorothy will give you the current tasks (H).
- Clicking on the icons of the others allows you to use their powers.
- Hints are unlimited, but you must wait for the meter to fill (I).
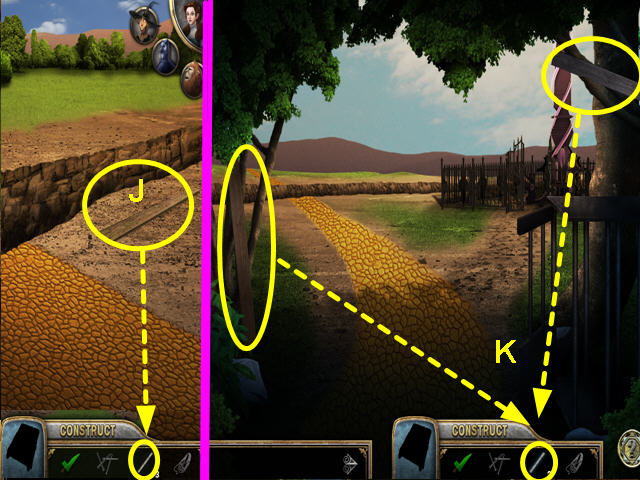
- Check the map for locations you have not finished if you get stuck (J).
- Click the menu button to return to the main menu (K).
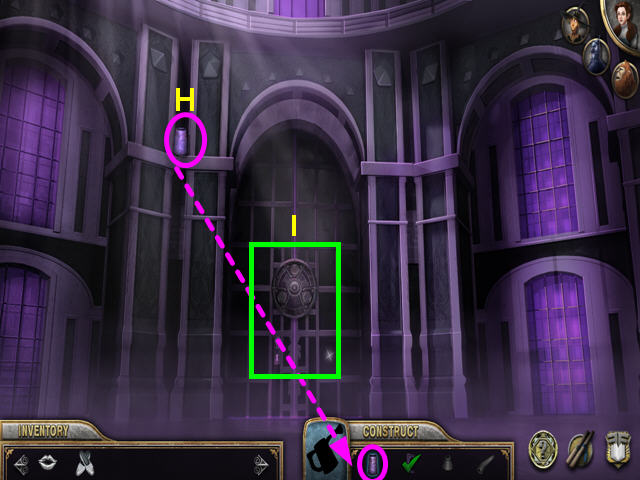
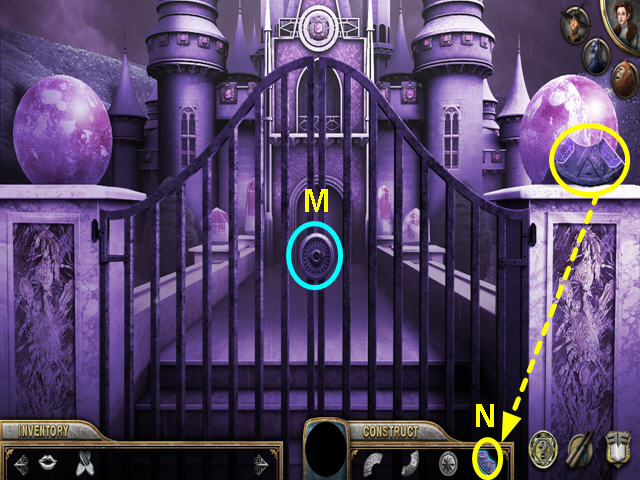
- Your inventory is at the lower left (L).
- Use the scroll buttons to see all your inventory.
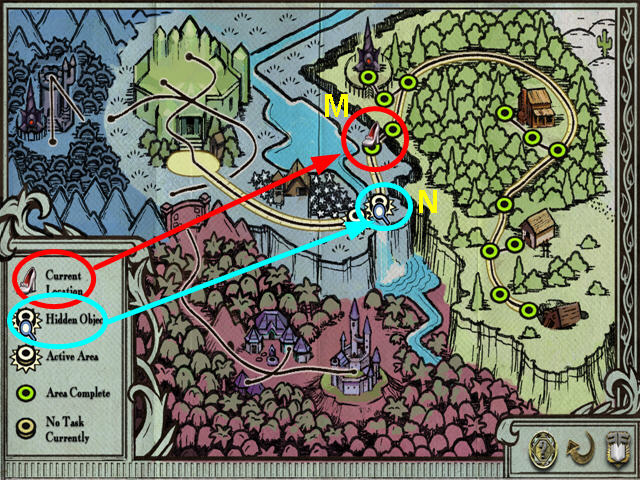
- Look at the map to show what needs to be done at teach location.
- The shoes show your current location (M).
- Hourglasses mean there are hidden object scenes to complete (N).
Chapter One: Dorothy
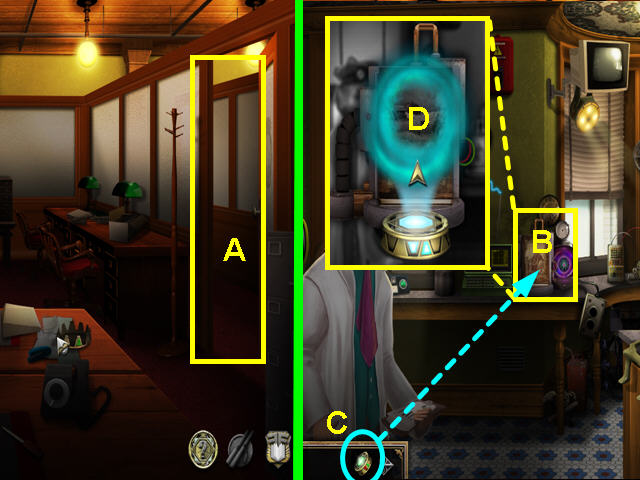
- After receiving your instructions from the Chief, click on the door to go to the lab (A).
- The FICTIONIZER will go into your inventory after Joel speaks with you.
- Look at the close-up of the book (B).
- Use the FICTIONIXER on the book (C).
- Enter the vortex that forms in front of the book (D).
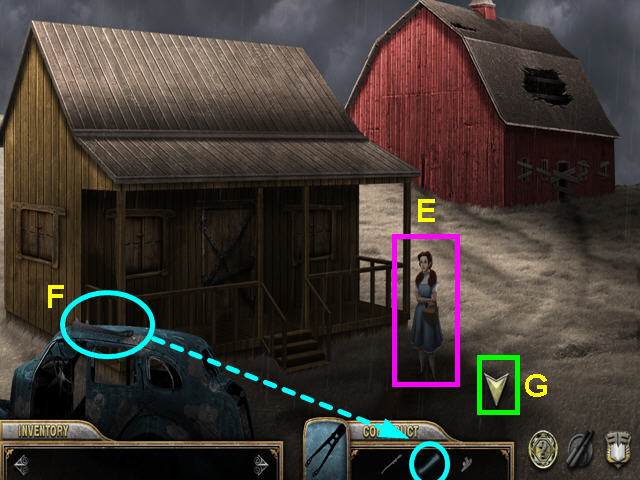
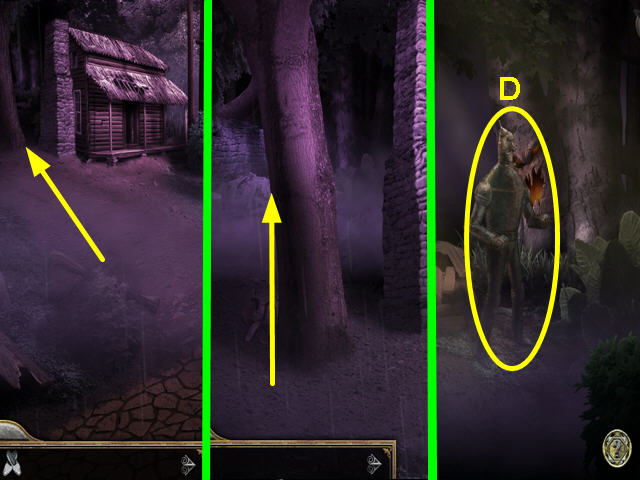
- You arrive in Kansas by the tire swing. Walk forward to the farm area.
- Talk to Dorothy about the coming storm and her missing dog, Toto (E).
- Take the piece of the bolt cutters (F).
- Walk down to return to the tire swing area (G).
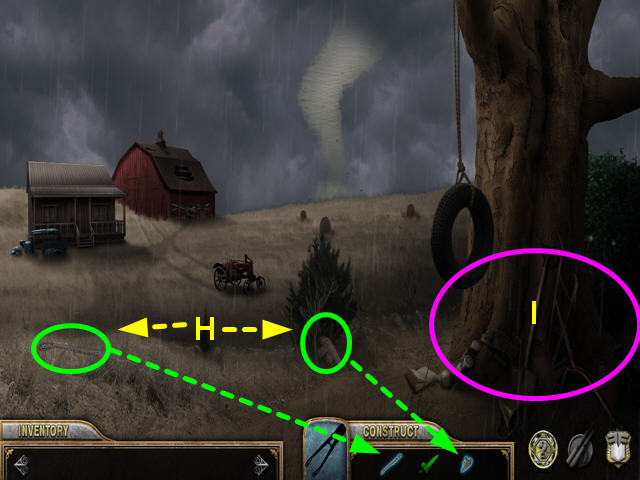
- Find the two remaining pieces of the BOLT CUTTERS and the tool will go into your inventory (H).
- Select the base of the tree for a hidden object area (I).
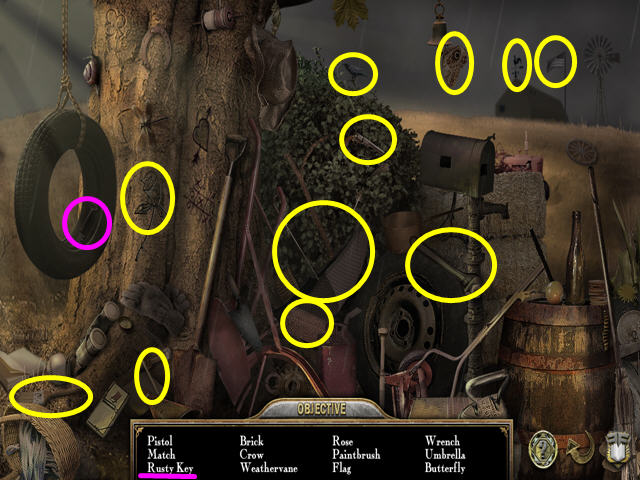
- Locate all the items on the list.
- The rusty key will go into your inventory as an OLD KEY.
- Walk up to the farm area.
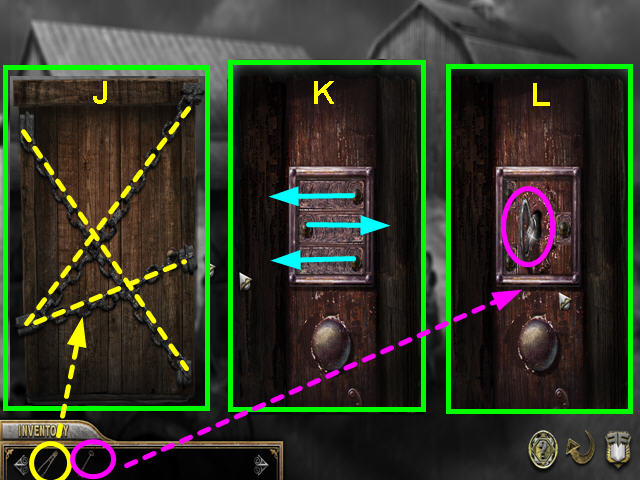
- Look at the close-up of the door on the house.
- Use the BOLT CUTTERS on each of the 3 chains (J).
- Look at the door again.
- Slide the three panels to reveal the lock (K).
- Use the OLD KEY on the lock (L).
- Click on the key to unlock the door.
- Enter the house.
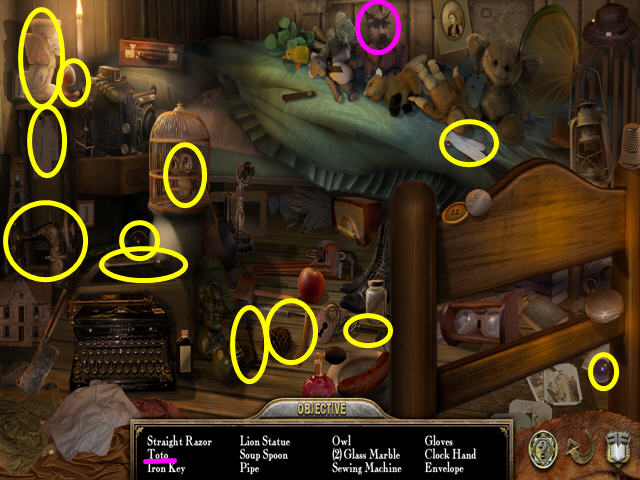
- Select the bed on the right for a hidden object area.
- Locate all the items on the list.
- TOTO will go into your inventory.
- Give TOTO to Dorothy.
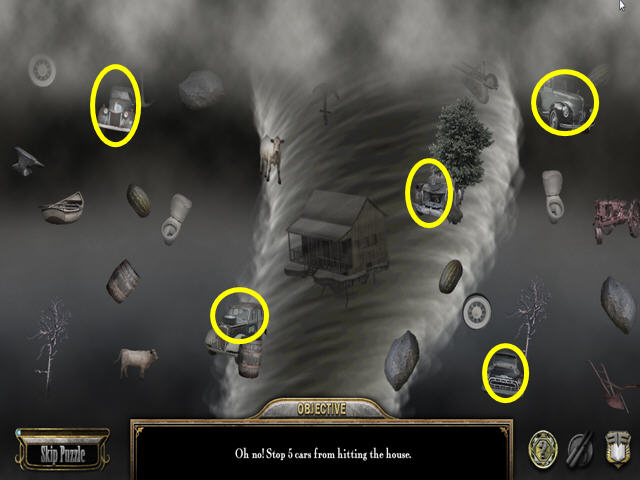
- Locate the 5 cars in the tornado.
- Clicking on anything except the requested item will through it at the house.
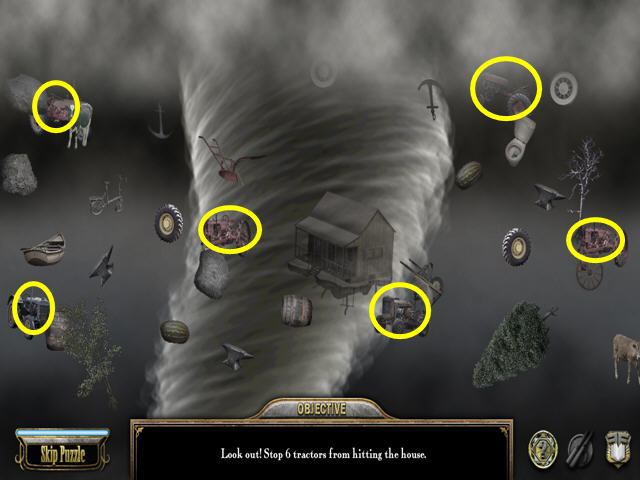
- Locate the 6 tractors in the tornado.
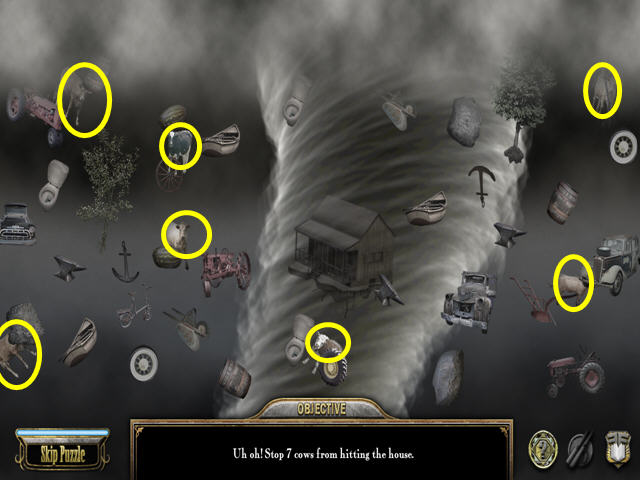
- Locate the 7 cows in the tornado.
- Walk forward, out of the house.
- After speaking with the Good Witch of the North, she will give you the GOOD WITCH'S KISS.
- Select the porch of the house for a hidden object scene.
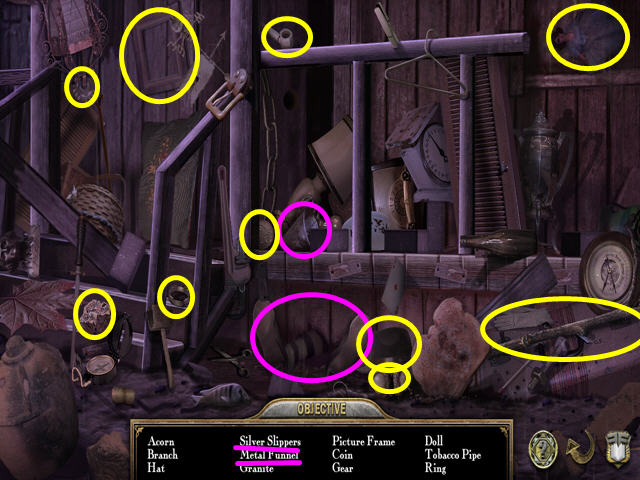
- Locate all the items on the list.
- The SILVER SLIPPERS and METAL FUNNEL will go automatically into your inventory.
- You can now click on Dorothy in the upper right corner to learn the current objective.
Chapter Two: The Scarecrow
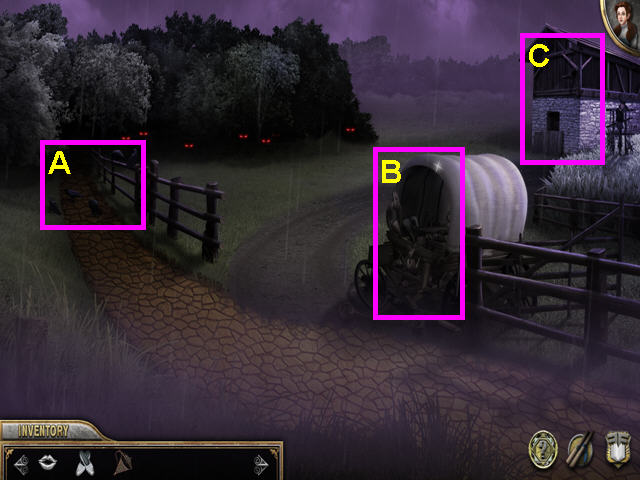
- Walk to the left, then walk forward.
- Note the crows blocking the left path (A).
- Note the building on the right (B).
- Select the wagon for a hidden object scene (C).
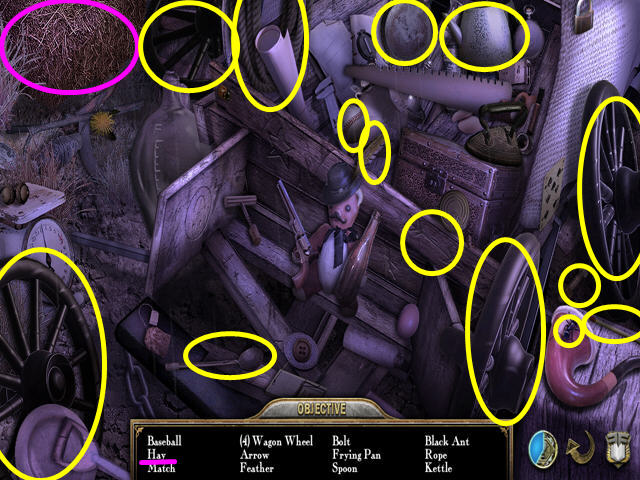
- Locate all the items on the list.
- The HAY BALE will go automatically into your inventory.
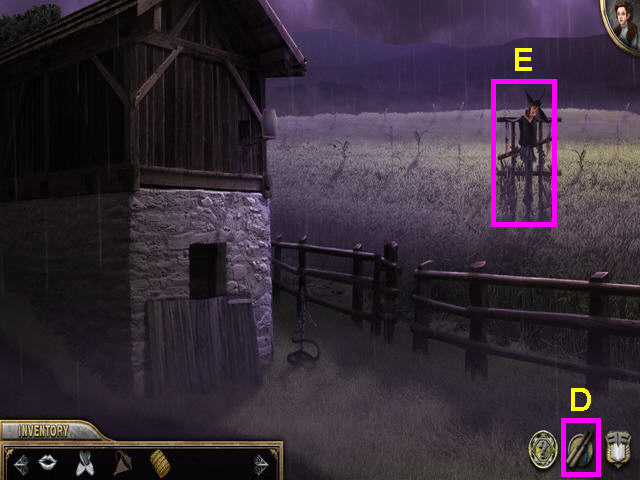
- Walk to the building on the right to see the Illiterati agent.
- You map will activate here-click on the scroll icon between the hint and menu buttons (D).
- Talk to the scarecrow on the right (E).
- Walk down 3 times to return to the fallen house.
- Select the porch of the house for a hidden object scene.
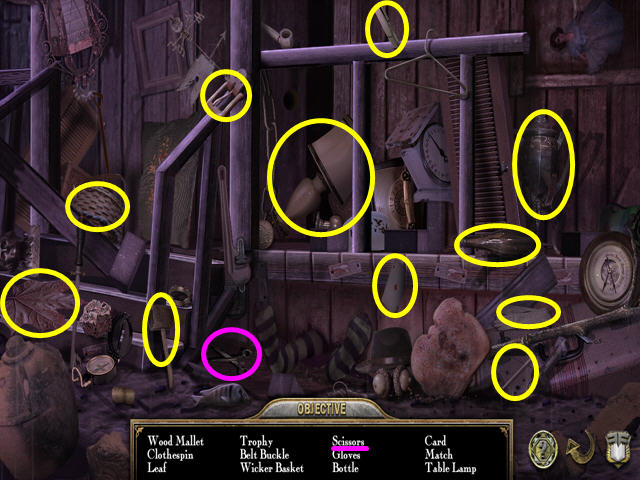
- Locate all the items on the list.
- The SCISSORS will go automatically into your inventory.
- Walk to the left.
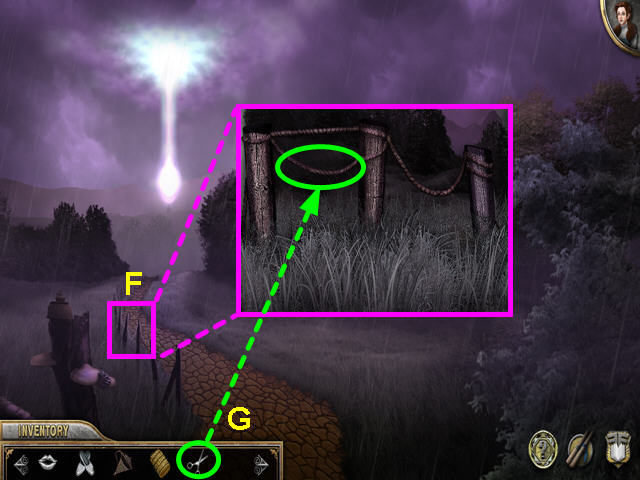
- Look at the close-up of the fence on the left (F).
- Use the SCISSORS to cut the twine railing (G).
- Walk up and then right to the building.
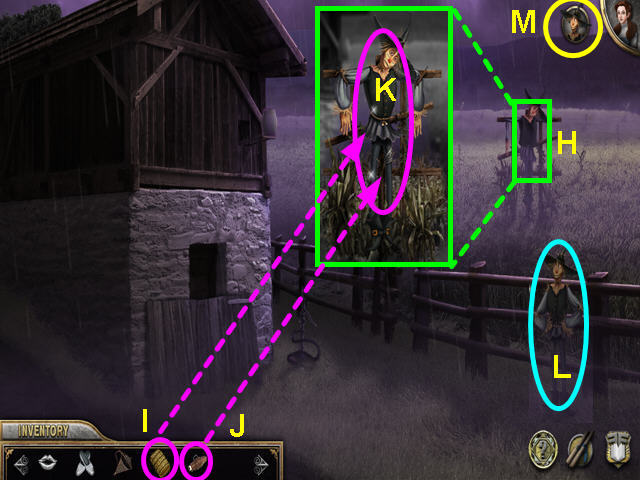
- Look at the close-up of the scarecrow (H).
- Use the BALE of HAY on the scarecrow (I)
- Use the TWINE on the scarecrow (J).
- Click on the Scarecrow to remove him from his stand. (K).
- Talk to the Scarecrow and he will join your team (L).
- You can now use the scarecrows powers (M).
- Walk down once to return to the yellow brick road.
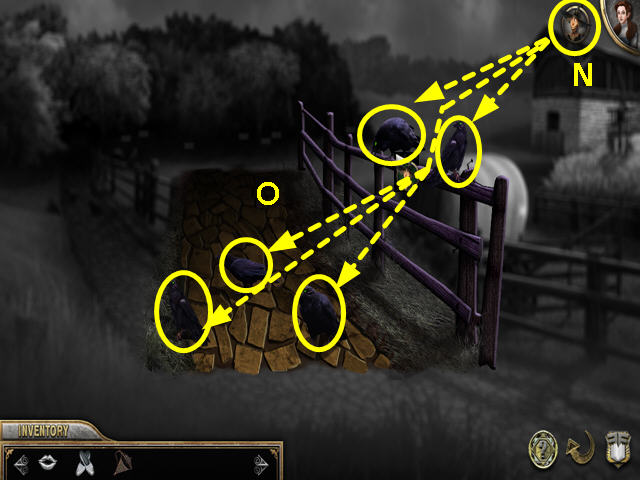
- Look at the close-up of the crows blocking the left path.
- Click on the Scarecrow's icon to use his abilities (N).
- Click on each of the crows to scare them away (O).
- Walk forward on the left path.
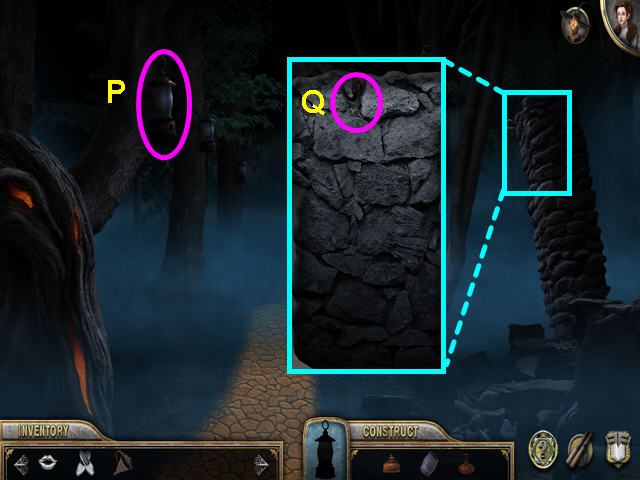
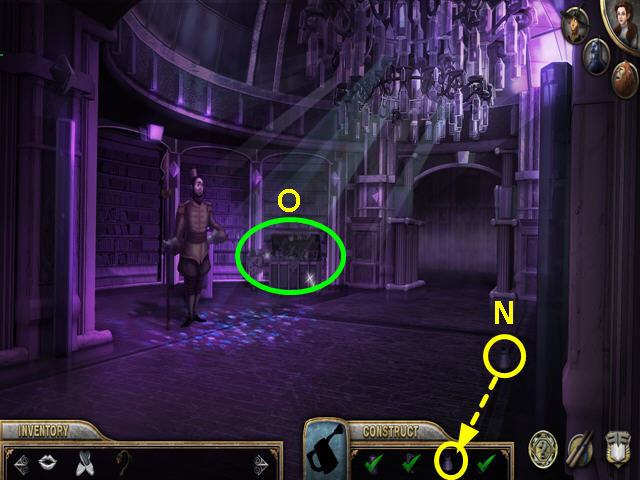
- Look at the lanterns hanging to activate a lantern to construct (P).
- Look at the stone pillar on the right to see it is missing a lantern (Q).
- Exit the close-up and walk down 3 times to return to the fallen house.
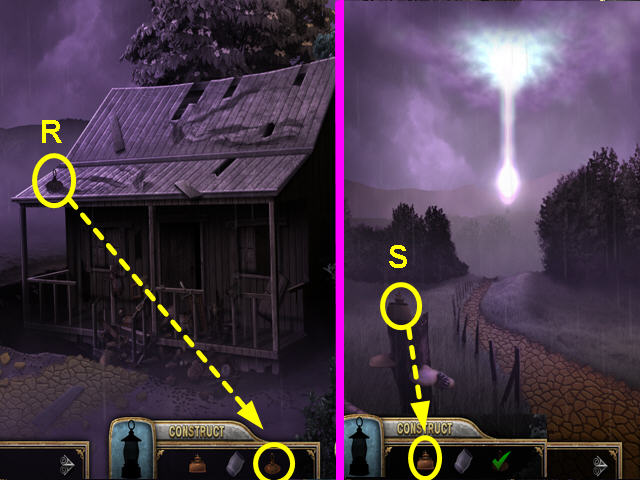
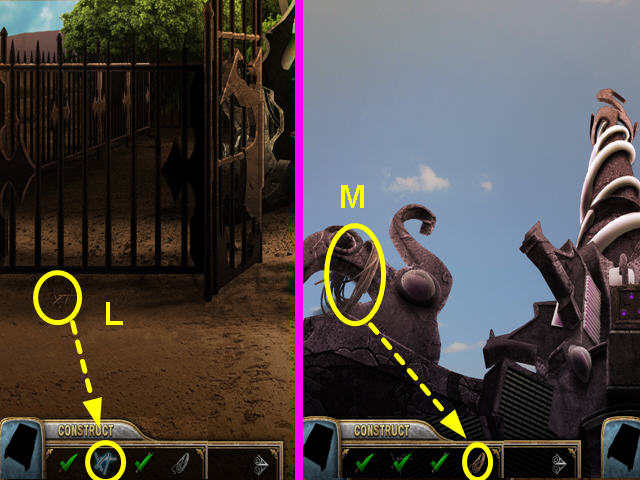
- Take the lantern piece from the roof of the house (R).
- Walk to the left.
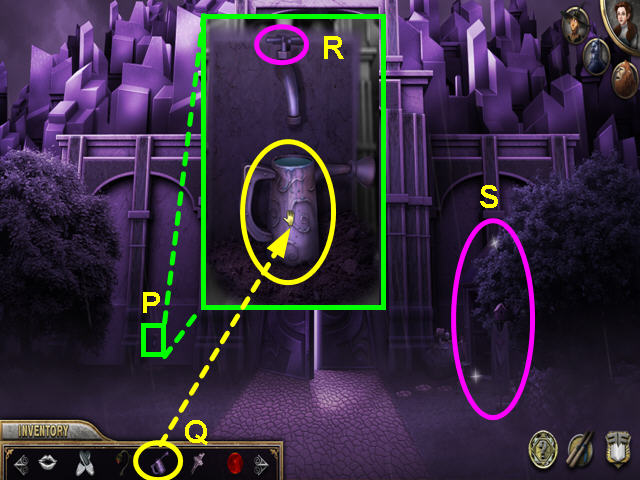
- Take the lantern piece from the post (S).
- Walk forward.
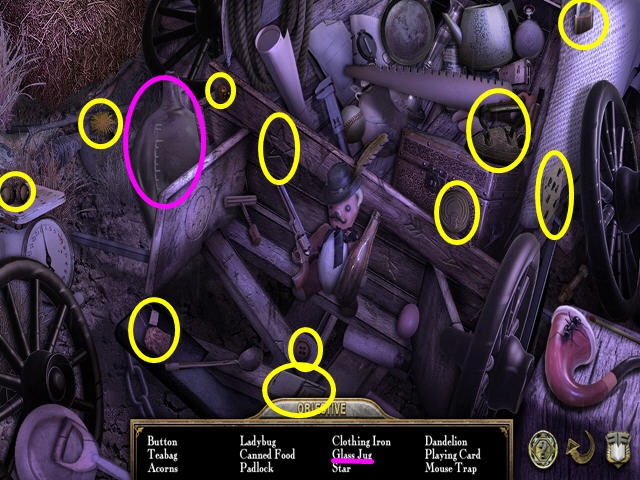
- Select the wagon for a hidden object scene.
- Locate all the items on the list.
- The glass jar will go automatically into your inventory as an EMPTY FUEL JUG.
- Walk to the building on the right.
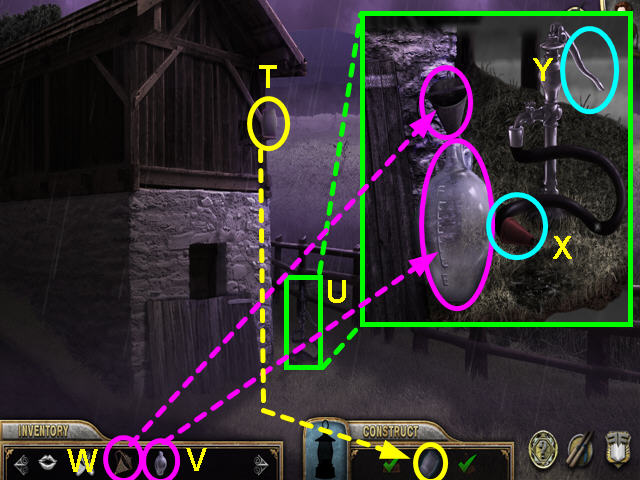
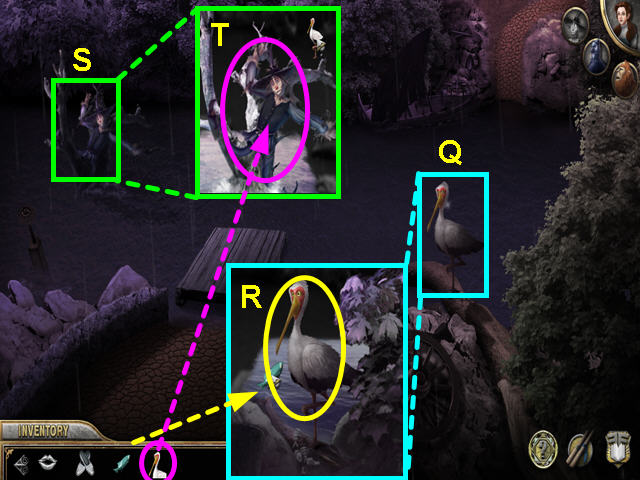
- Take the lantern piece from the top portion of the barn (T).
- The RUSTY LANTERN will go into your inventory.
- Look at the close-up of the pump (U).
- Place the EMPTY FUEL JUG near the pump (V).
- Use the METAL FUNNEL on the jug (W).
- Click on the end of the hose to place it in the funnel (X).
- Click on the pump handle 3 times to fill the jug with fuel (Y).
- Take the FULL FUEL JUG.
- Walk down to exit the barn area.
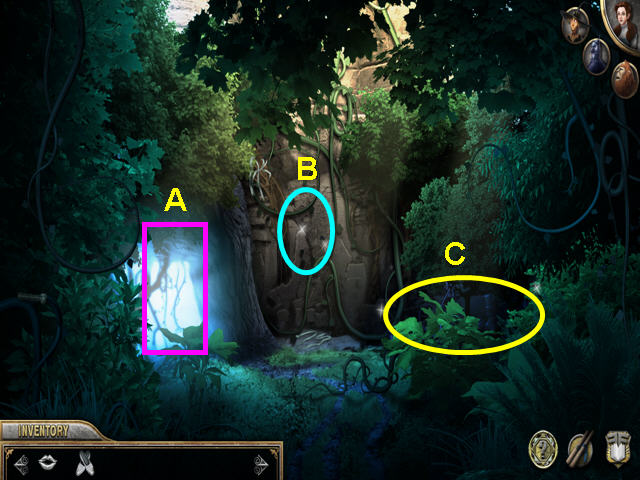
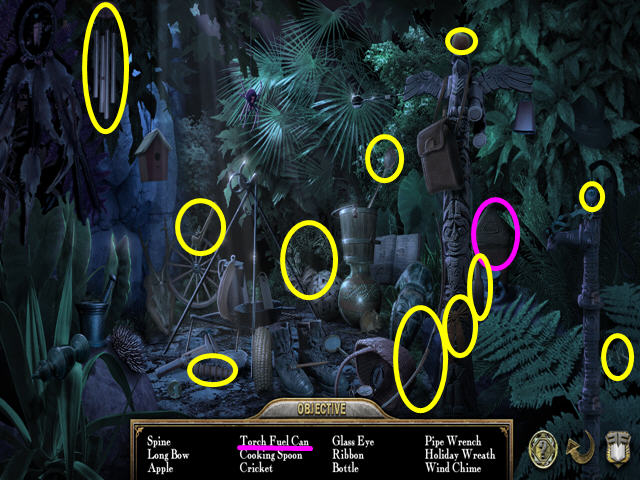
Chapter Three: The Tinman and the Lion
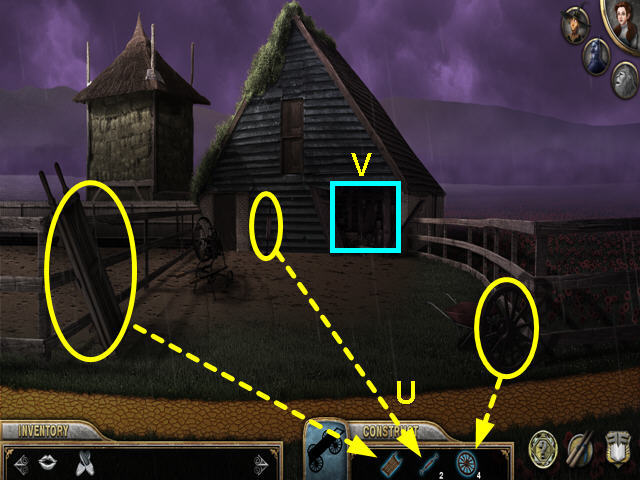
- Walk forward on the left path.
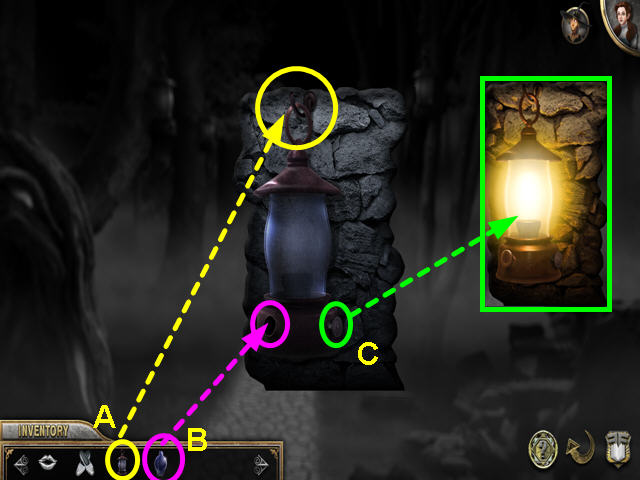
- Look at the close-up of the stone pillar on the right.
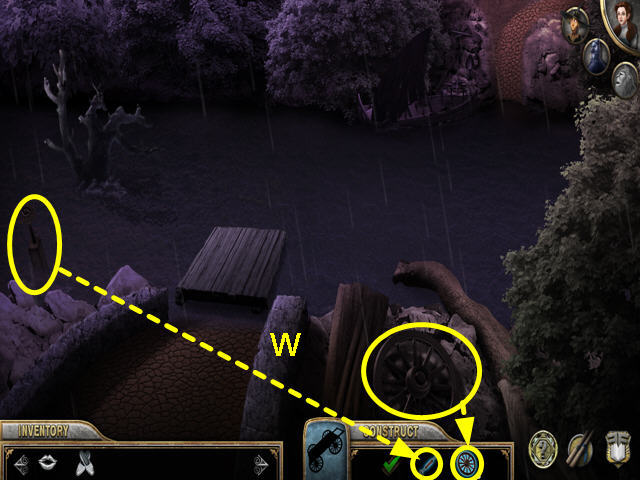
- Hang the RUSTY LANTERN on the hook (A).
- Use the FULL FUEL JUG on the lantern (B).
- Click on the button to light the lantern and the LIT LANTERN will go into your inventory (C).

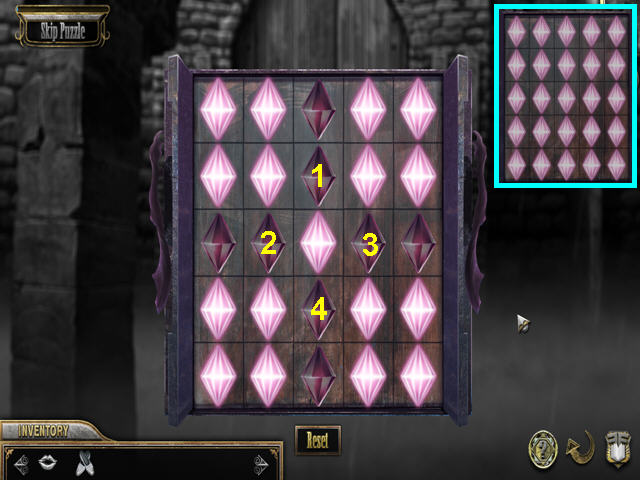
- Use the LIT LANTERN on the path ahead for a mini-game.
- The object is to light all the lanterns.
- Click on a lantern to turn it off or on.
- This will also effect the lanterns on either side.
- Numbering the lanterns from left to right, click on 5-4-2-3-6.
- Walk forward on the path.
- Take the left path twice to go behind the house and find the Tinman.
- Talk to the Tin-man to learn he need oil (D).
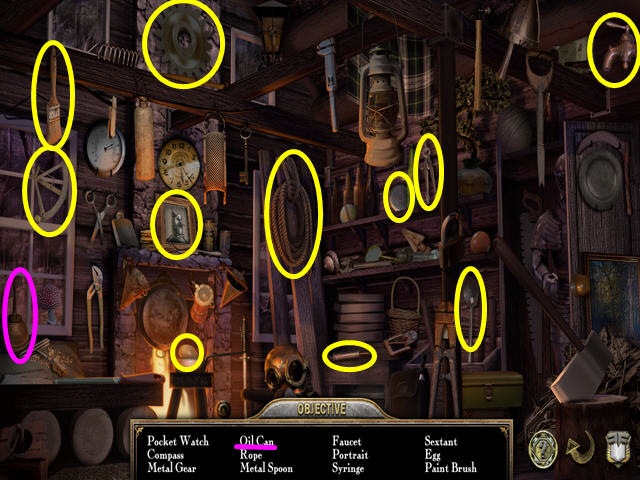
- Walk down once and select the door to the cabin for a hidden object area.
- Locate all the items on the list.
- The OIL CAN will go automatically into your inventory.
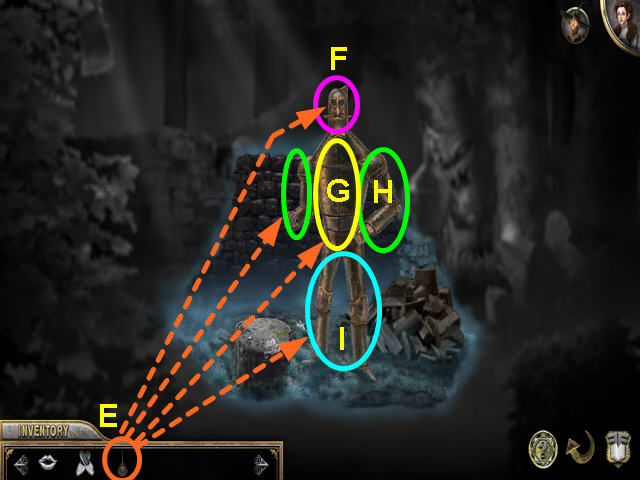
- Walk behind the cabin.
- Look at the close-up of the Tinman.
- Use the oil can (E) on his head (F), torso (G), arms (H), and legs (I).
- Talk to the Tinman to learn he needs his axe.
- Exit the close-up of the Tinman.
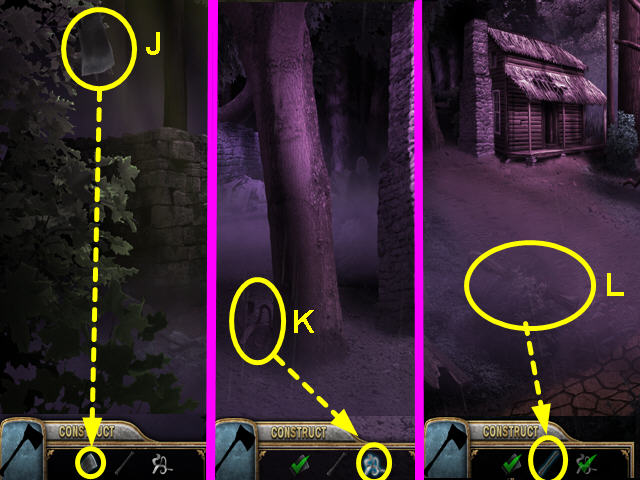
- Take the axe piece from the upper left foliage (J).
- Walk down and take the axe piece near the tree trunk (K).
- Walk down again and take the final piece of the axe (L).
- The VERY USED AXE will go into your inventory.
- Walk to the left twice and give the VERY USED AXE to the Tinman.
- Talk to the Tinman and he will join the group.
- Walk down twice to return to the front of the cabin.
- Look at the close-up of the logs blocking the path (M).
- Click on the Tinman's icon and use it 3 times each on the 3 logs (N).
- Walk forward on the right path.
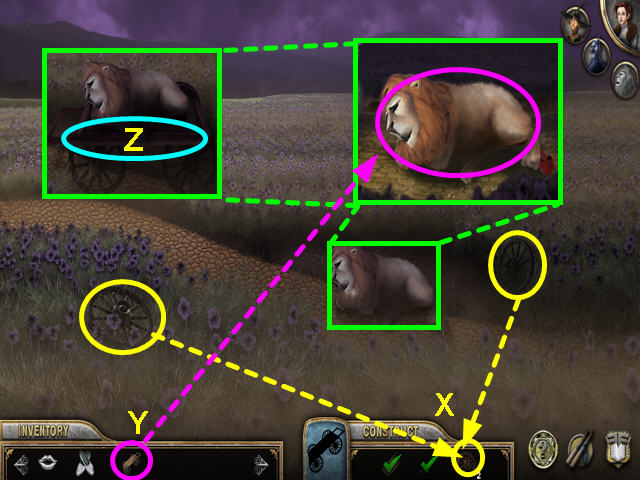
- Talk to the Lion in the cage on the right.
- Walk down and then take the left path to return to the cabin.
- Look at the cabin door for a hidden objects scene.
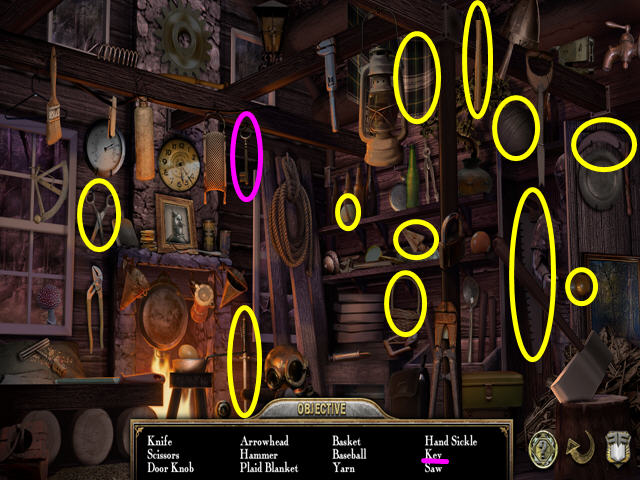
- Locate all the items on the list.
- The HEAVY IRON KEY will go into your inventory.
- Walk down, then take the path to the right.
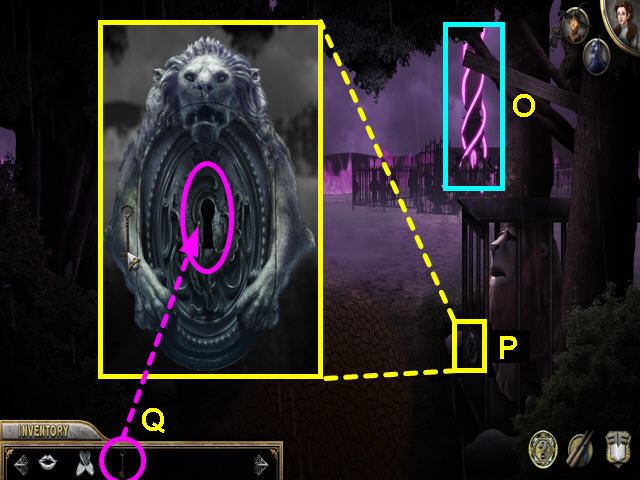
- Note the tower on the right (O).
- Look at the close-up of the lock on the cage (P).
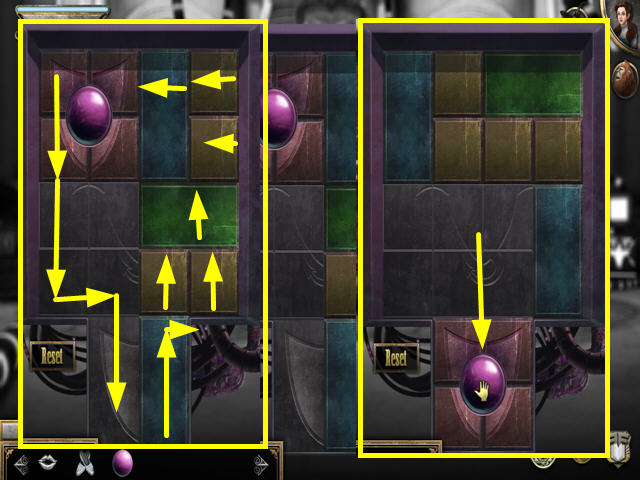
- Use the HEAVY IRON KEY on the lock to trigger a mini-game (Q).
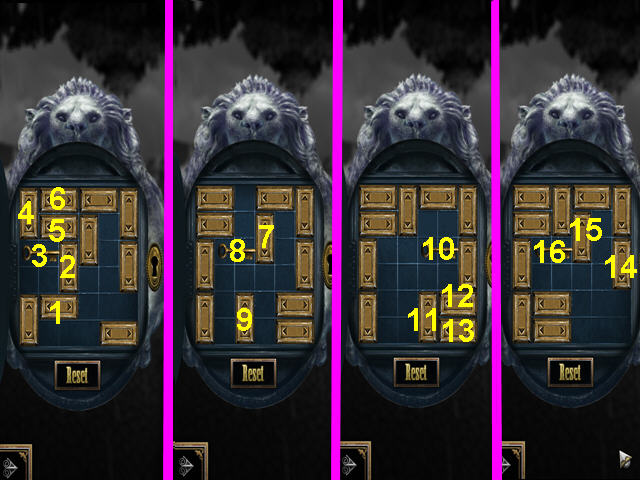
- The object is to slide the blocks do that the key can exit to the right.
- Slide the blocks and key in numerical order.
- Click on the end of the block that points in the direction you want it to move.
- The Lion will now join your group.
Chapter Four: The First Tower and Beyond
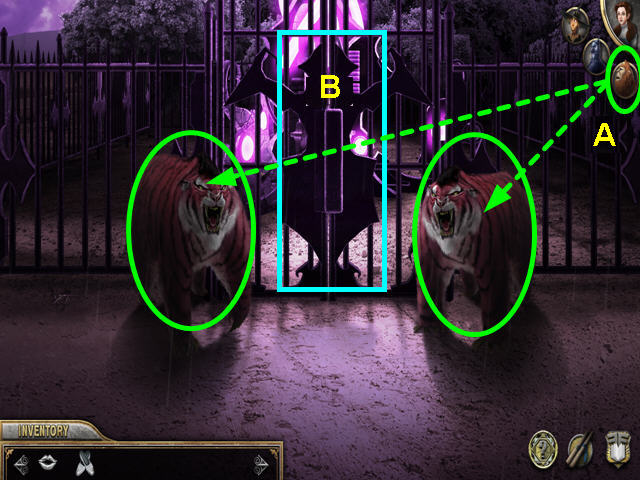
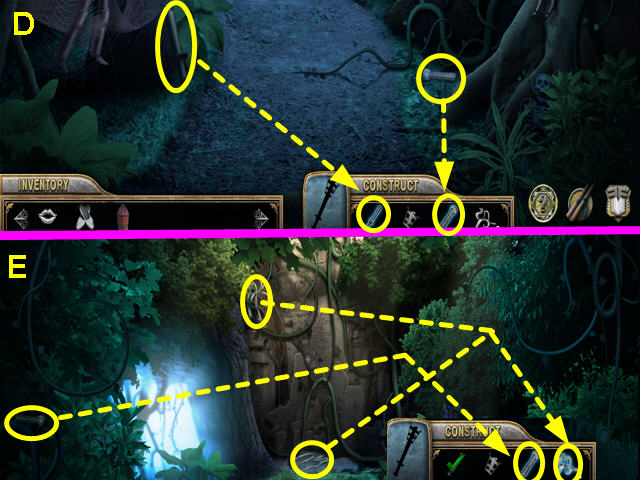
- Take the right path to the tower.
- Click on the Lion's icon and use it on the two tiger-beast Kalidahs (A).
- Click on the gate to open it and walk inside (B).
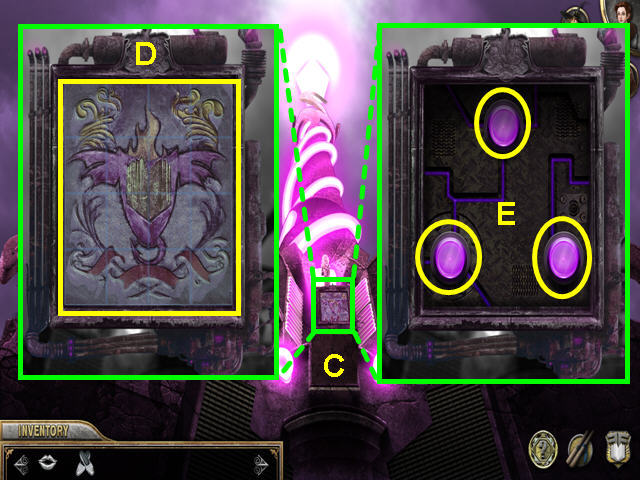
- Look at the power control (C).
- Rotate the tiles to restore the shield (D).
- Click on each tile to rotate it into position.
- Press the three buttons to turn off the tower (E).
- Walk down twice, then go forward on the left path.
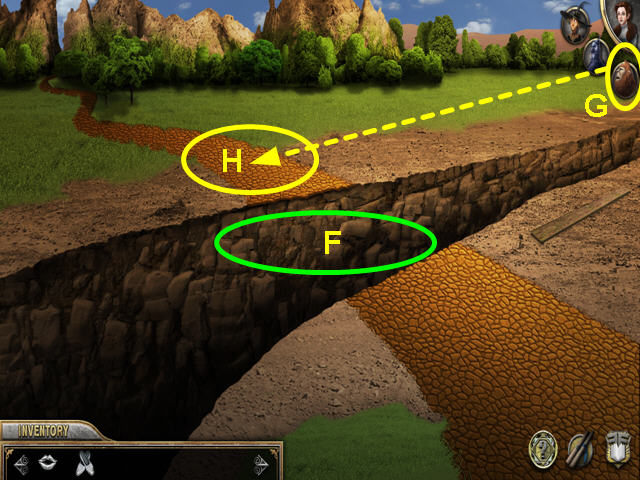
- Look at the ditch (F).
- Click on the Lion's icon (G), then click on the path on the other side of the ditch (H).
- Walk forward.
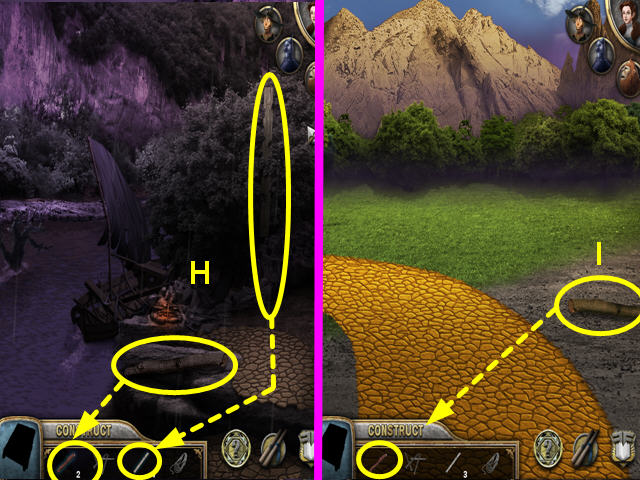
- The water is too wide for the Lion, so you must build a raft.
- Take the 2 raft pieces (H).
- Walk down and take the raft piece (I).
- Walk down and take the raft piece to the right of the path (J).
- Walk down again and take the two raft pieces (K).
- Walk to the right and take the raft part (L).
- Walk forward to the tower and take the final raft piece (M).
- The SHAKY RAFT will go into your inventory.
- Walk down twice, then go forward on the left path.
- Go forward twice to return to the river area.
- Use the SHAKY RAFT on the water.
- Click on the raft to cross the river.
- The Scarecrow has fallen off and needs help.
- Click on the raft again to return to the previous side of the river.
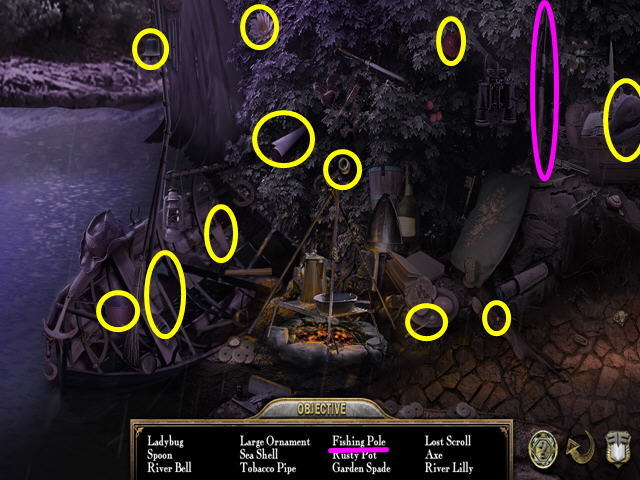
- Select the fishing boat for a hidden object scene.
- Locate all the items on the list.
- The FISHIING POLE will go automatically into your inventory.
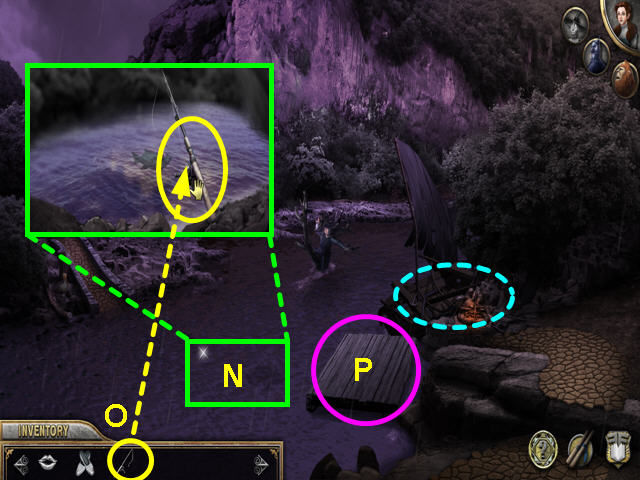
- Look at the close-up of the water (N).
- Use the FISHING POLE on the water (O).
- Click on the pole to catch the PLUMP FISH.
- Click on the raft to return to the other side (P).
- Look at the close-up of the stork (Q).
- Give the PLUMP FISH to the stork (R).
- Take the FRIENDLY STORK.
- Look at the close-up of the Scarecrow (S).
- Use the FRIENDLY STORK on the Scarecrow to return him to safety (T).
- Walk down to the field of poppies, where the Lion falls asleep.
- Walk to the left.
- Collect the 3 cart pieces (U).
- Note the barn in the rear (V).
- Walk to the right twice to return to the river.
- Take the 2 cart pieces (W).
- Walk down to return to the poppy field and the Lion.
- Take the two cart pieces (X).
- You can now have the OLD CART in your inventory.
- Look at the close-up of the Lion and use the OLD CART on him (Y).
- Click on the cart with the lion to push him to the next scene.
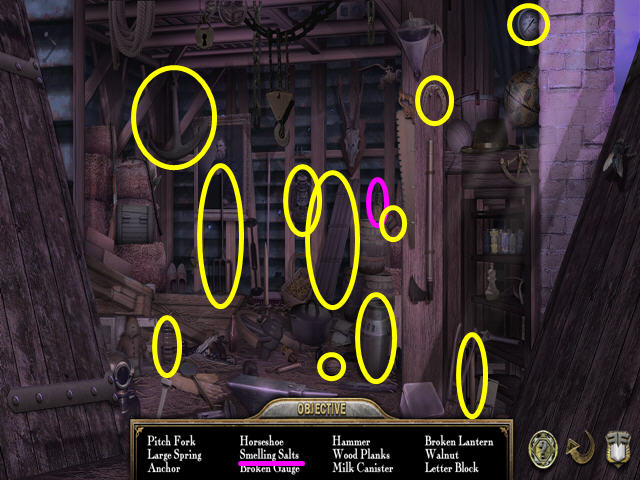
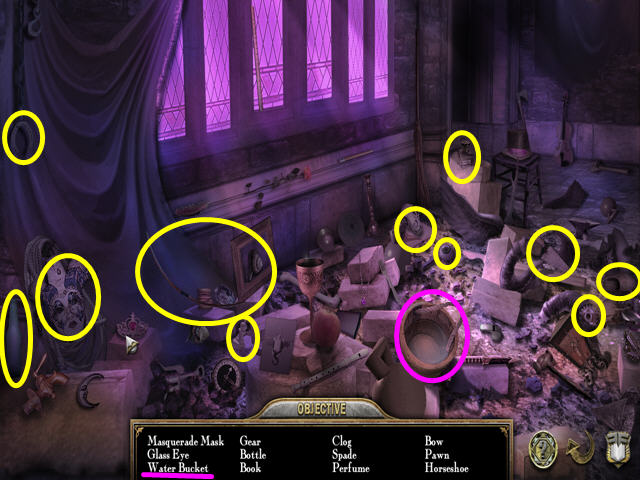
- Select the barn door for a hidden object scene.
- Locate all the items on the list.
- The BOTTLE of SMELLING SALTS will go into your inventory.
- Use the BOTTLE of SMELLING SLATS on the Lion.
- Walk to the left.
Chapter Five: To The Emerald City
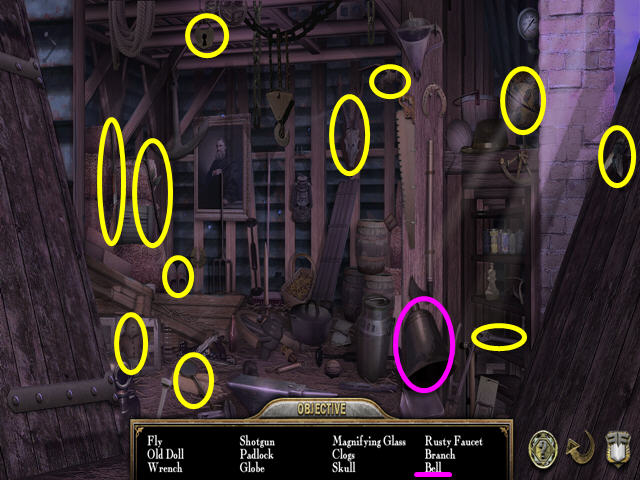
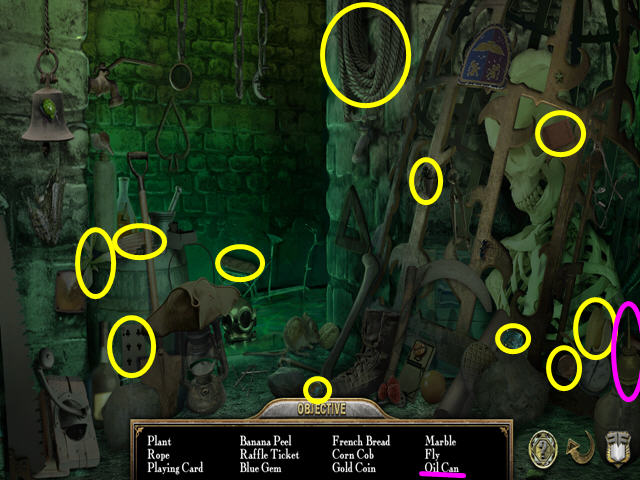
- Walk forward to the gates of the Emerald City.
- Look at the upper area to see that Victor has stolen the bells (A).
- Look at the doorbell to note something is missing (B).
- Note the water faucet on the left (C).
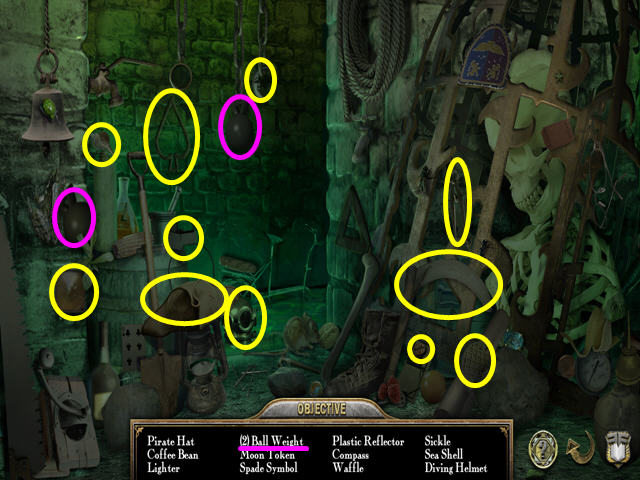
- Select the guardhouse area for a hidden object game (D).
- Locate all the items on the list.
- The EMERALD CITY BELL will go into your inventory.
- Walk down.
- Take the piece of the doorbell panel (E).
- Collect the EMERALD CITY BELL (F).
- Walk down, then go to the right.
- Take the piece of the doorbell panel (G).
- Collect the EMERALD CITY BELL (H).
- Walk to the left.

- Take the doorbell panel piece (I).
- Click on the DOORBELL PANEL to add it to your inventory.
- Collect the EMERALD CITY BELL (J).
- Select the barn door for a hidden object area (K).
- Locate all the items on the list.
- The EMERALD CITY BELL will go into your inventory.
- Walk to the left, then go up to return to the gates of the city.
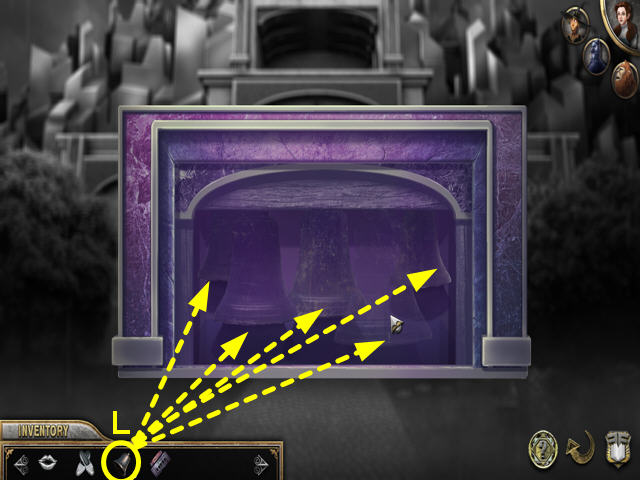
- Look at the close-up of the upper bell area.
- Use the 5 EMERALD CITY BELLS on the area (L).
- Note- Click 5 times.
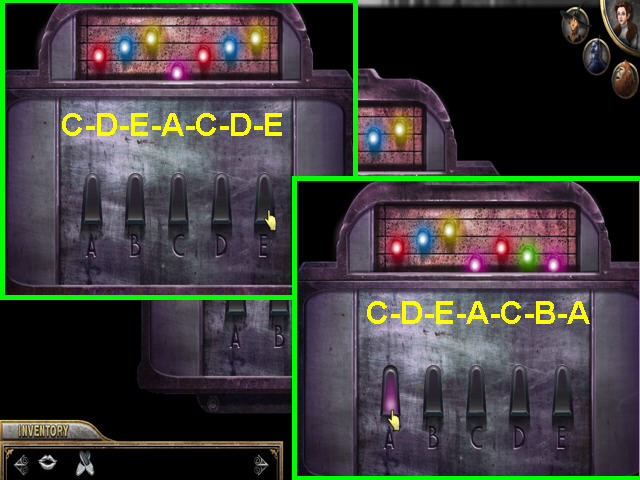
- Look at the close-up of the door bell and use the DOORBELL PANEL on it for a mini-game.
- The object is to play the notes in the correct order.
- The lights will shine when you are correct.
- There are 2 level to this mini-game.
- The first sequence is: C-D-E-A-C-D-E.
- The second sequence is: C-D-E-A-C-B-A.
- Walk forward to enter the city.
Chapter Six: Inside the Emerald City
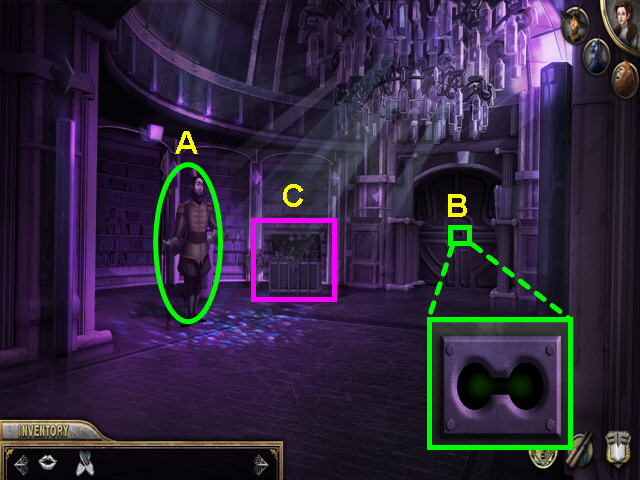
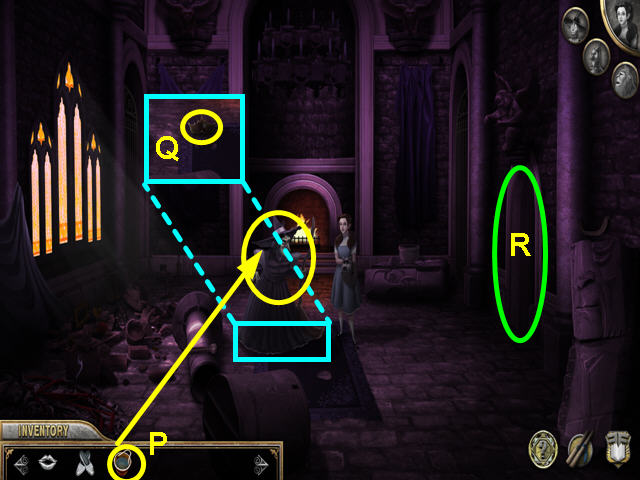
- Talk to the guard to learn you need a voucher to get special green glasses (A).
- Note the strange lock on the door (B).
- Select the chest for a hidden object area (C).
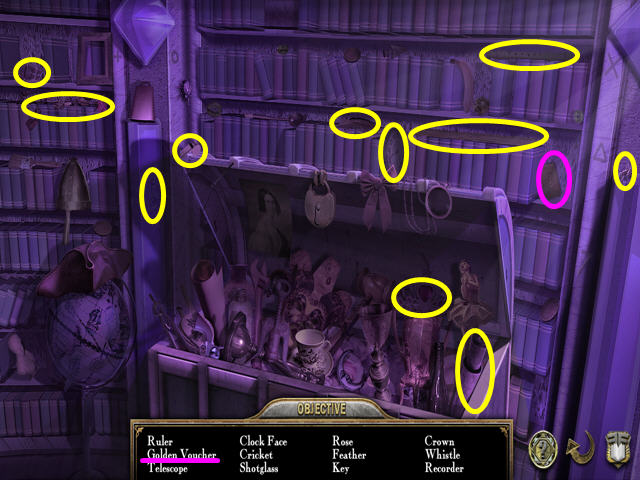
- Locate all the items in the list.
- The GOGGLE VOUCHER will go automatically into your inventory.
- Give the GOGGLE VOUCHER to the guard and you will get the GREEN GOGGLES in return.
- Look at the close-up of the lock.
- Use the GREEN GOGGLES on the lock.
- Walk forward through the doors.
- Note the planter on the right (D).
- Take the EMPTY PITCHER piece (E).
- Note the bedroom door (F).
- Walk forward towards the glass door (G).
- Take the EMPTY PITCHER piece (H).
- Note the lock on the glass doors (I).
- Walk down, then enter the bedroom on the left.

- Note the dried flower under glass (J).
- Take the EMPTY PITCHER piece (K).
- Note the wall fixture (L).
- Select the dresser area for a hidden object scene (M).
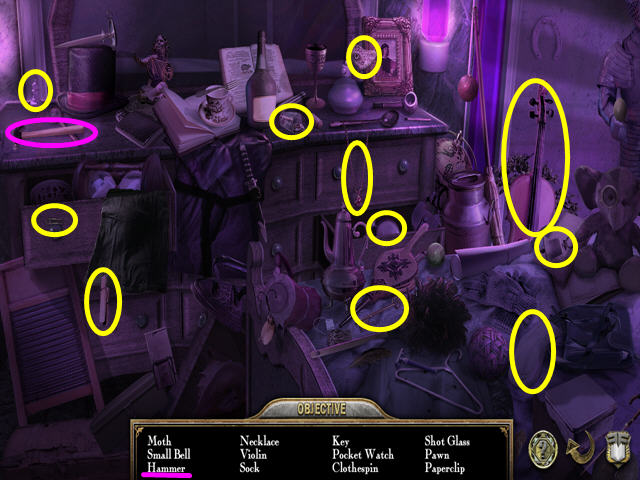
- Locate all the items on the list.
- The HAMMER will go automatically into your inventory.
- Look at the dried flower and use the hammer to break the glass.
- You will need to hit the glass several times.
- Take the DRIED RED FLOWER.
- Exit the bedroom and walk down to return to the guard area.
- Take the final EMPTY PITCHER piece (N).
- Select the chest for a hidden object area (O).

- Locate all the items on the list.
- The RED MARBLE and the PORCELAIN BALLERINA STATUE will go into your inventory.
- Walk down to return to the front gate.
- Look at the close-up of the water faucet (P).
- Place the EMPTY PITCHER under the faucet (Q).
- Click on the faucet handle to fill the pitcher with water (R).
- Take the PITCHER FULL of WATER.
- Look at the guard house area for a hidden object area (S).

- Locate all the items on the list.
- The DRIED GREEN FLOWER will go into your inventory.
- Enter the gates and walk forward.
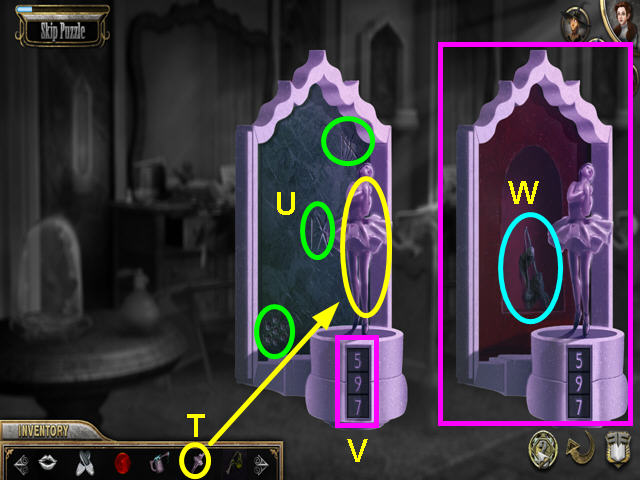
- Enter the bedroom and look at the wall fixture.
- Use the PORCELAIN BALLERINA STATUE on the wall fixture (T).
- Look at the back of the fixture for clues to the combination (U).
- Click on each of the numbers to set the combination (V).
- Take the DRIED BLUE FLOWER from the hidden compartment (W).
- Exit the bedroom.
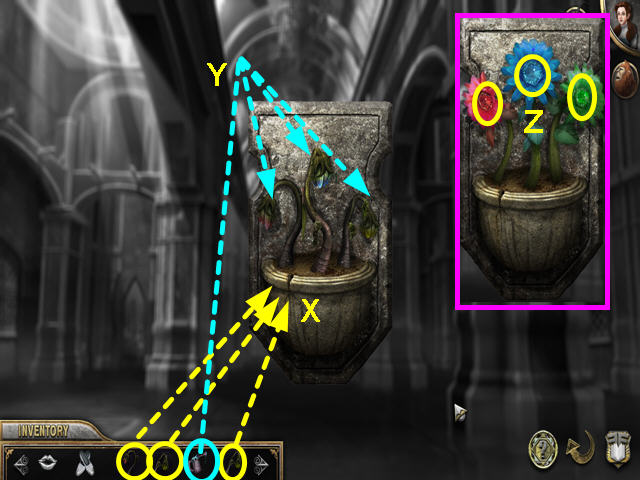
- Look at the planter on the right.
- Place the DRIED RED FLOWER, the DRIED BLUE FLOWER, and the DRIED GREEN FLOWER into the planter (X).
- Use the PITCHER FULL of WATER on each flower (Y).
- Click on the center of each flower to get the STRANGE RED GEM, STRANGE BLUE GEM, and the STRANGE GREEN GEM(Z).
- Walk forward to the glass doors and look at the lock.
- Place the 3 GEMS into the slots with the same color (A).
- The object is to align all the colors to match in each section.
- Rotate the part with the gems (1) to see the inner color (B).
- Rotate the outer ring so that the colors match (2).
- Rotate the inner ring so the colors match (3).
- Lastly, rotate the piece with the gem so that the gems are over their matching color (C).
- Walk forward to enter the throne room.
- Exit the throne room after Victor Vile speaks to you.
- Walk down and enter the bedroom.
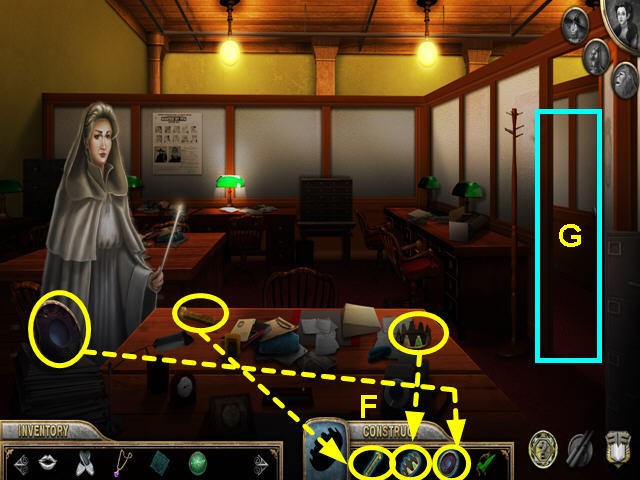
- Select the dresser for a hidden object scene.
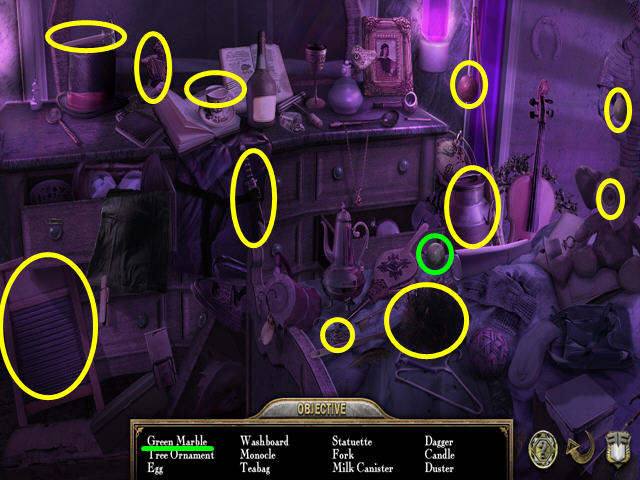
- Locate all the objects on the list.
- The GREEN MARBLE will go into your inventory.
- Exit the bedroom and return to the throne room.

- Look at the throne just under the floating head.
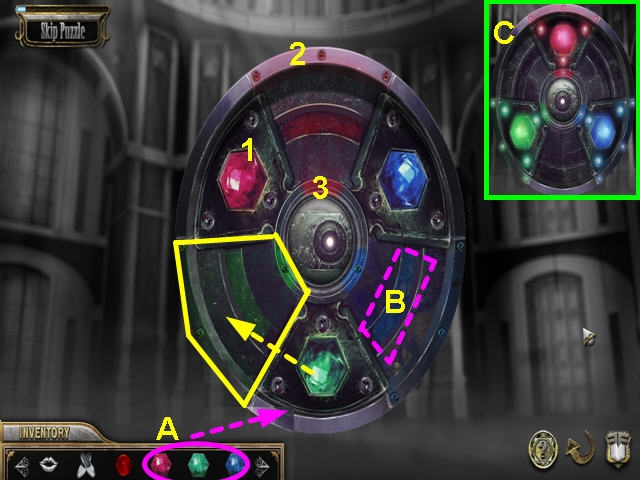
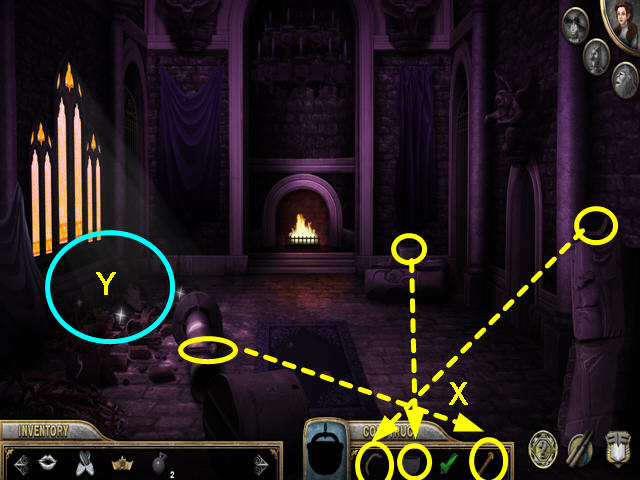
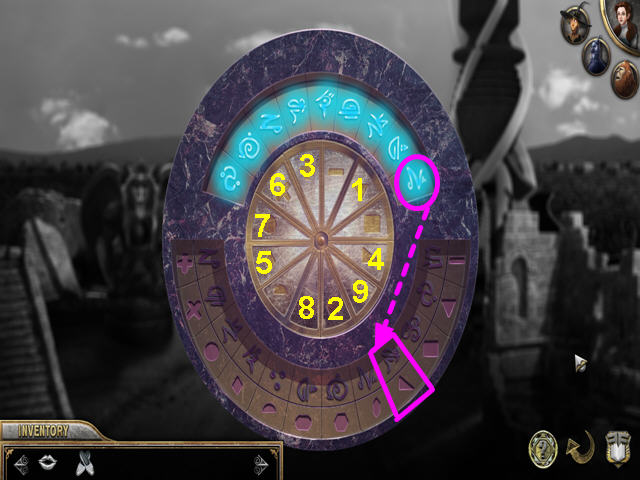
- Use the GREEN and RED MARBLES on the device for a mini-game.
- Numbering the buttons 1-5, make the following moves: 5x3, 4x5, 5x7, 4x1, 2x1, 5x3, 4x1, 1x5, 3x5, 5x3, 1x2, 5x2, 3x3, 5x4, 3x3, 2x3, 5x1, 3x1, 2x2, 5x4, 2x1, 5x3, 2x1, 5x4, and 1x7.
- Talk to the wizard.
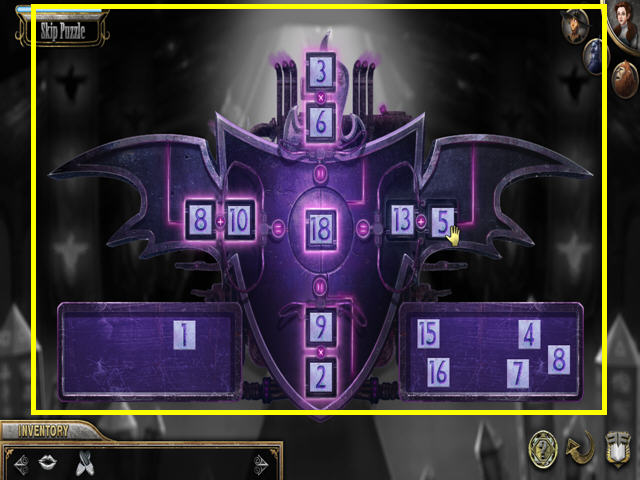
- Select the tower by the wizard for a mini-game.
- The object is to place the numbers from the bottom into the machine so that all 4 equations are true.
- Press the button that appears in the center to turn off the tower.
Chapter Seven: The Wicked Witch
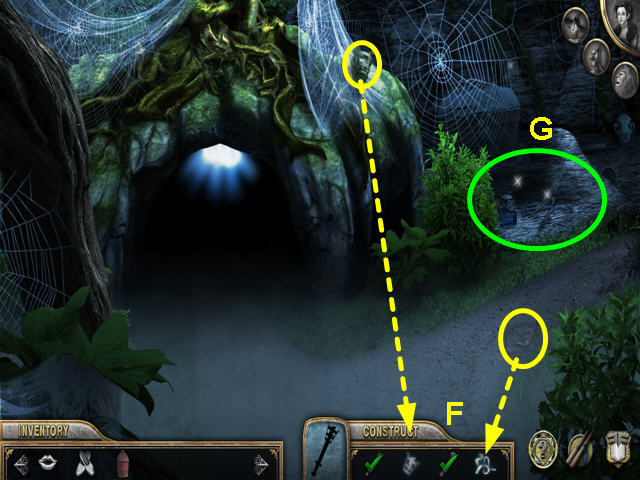
- Exit the throne room and walk down.
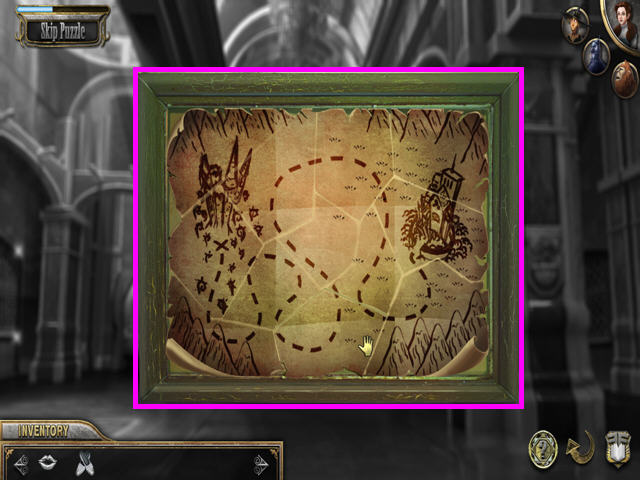
- Look at the left door (left of the bedroom) for a mini-game.
- The object is to restore the map in this jigsaw style mini-game.
- Click and drag each piece into position.
- Walk to the left.
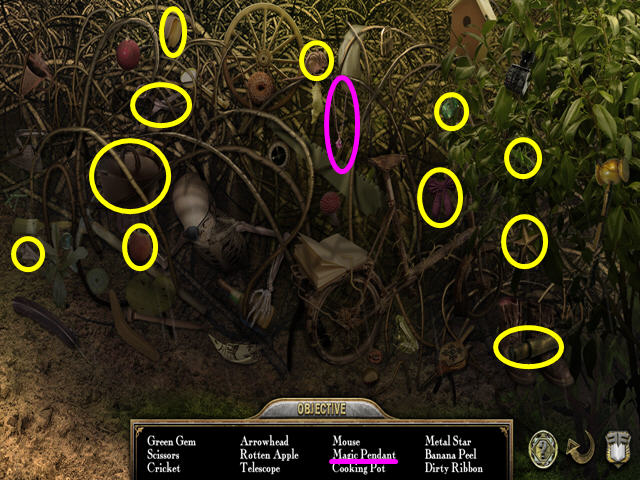
- Click on the right brambles for a hidden object scene.
- Collect all the items on the list.
- The GEM PENDANT will go into your inventory.
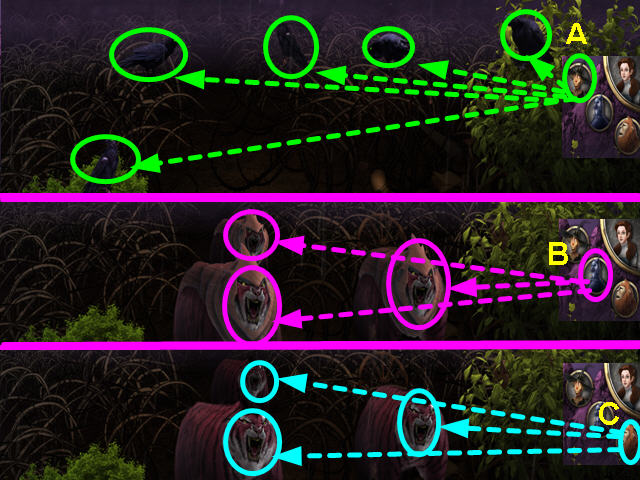
- The witch has sent her pets.
- Click on the Scarecrow's icon, then click on each of the crows (A).
- Next are the Kalidah with wooden armor.
- Select the Tinman's icon and click on the 3 Kalidahs (B).
- Then Click on the Lion's icon to finish the 3 Kalidahs (C).
- The flying monkeys attack and you at back at Fixer Headquarters.
- Once the Chief finished talking, walk to the right.
- Your fictionizer needs repair parts.
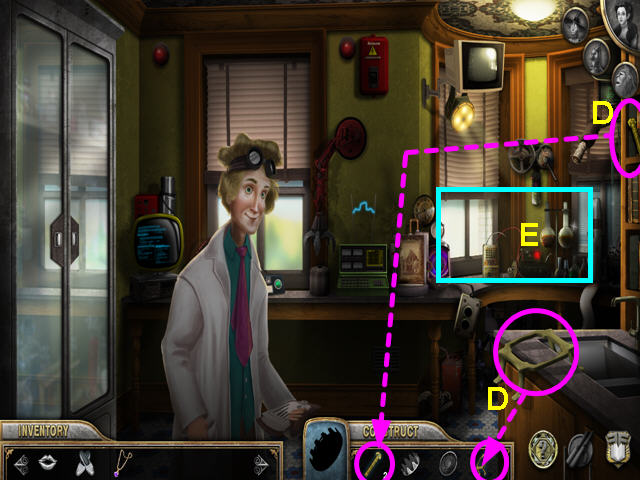
- Locate the 2 fictionizer casing parts (D).
- Select the right end of the table for a hidden object scene (E).

- Find all the items on the list.
- The FICTIONIZER CIRCUIT BOARD and FICTIONIZER POWER CELL will go into your inventory.
- Walk down to exit the lab.
- Collect the 3 fictionizer casing parts (F).
- The FICTIONIZER CASING will go into your inventory.
- Walk to the right to return to the lab (G).
- Note the Wizard of Oz book (H).
- Give the FICTIONIZER CASING to Joel (I).
- Select the work area to repair the fictionizer (J).
- Place the FICTIONIZER POWER CELL into the casing (K).
- Place the FICTIONIZER CIRCUIT BOARD over the power cell (L).
- Click on the circuit board for a mini-game (M).
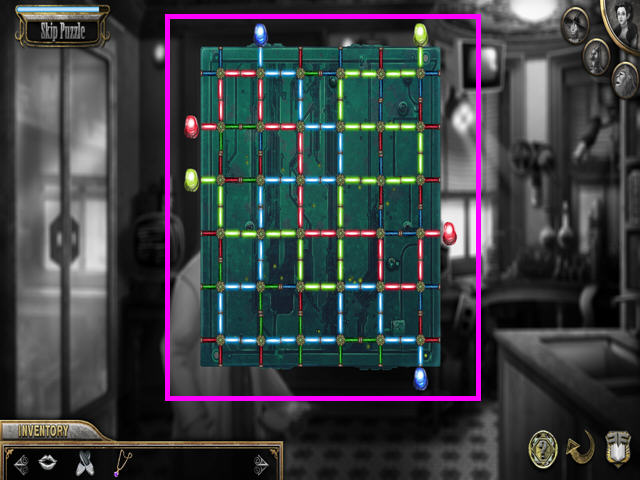
- The object is to connect the red, blue and green circuits.
- Click on tiles to rotate the position of the wires.
- A complete circuit will have lights at both ends.
- Now that the fictionizer is repaired, look at The Wizard of Oz book.
- Use the fictionizer on the book and enter the vortex.
- Look at the close-up of the lock (N).
- Use the GEM PENDANT on the lock to trigger a mini-game (O).
- The object is to light all the gems.
- Clicking on a gem will effect the adjacent gems.
- Click on the gems in numerical order.
- Once Victor, the Witch and Dorothy stop talking, select the area under the left window for a hidden object game.
- Collect all the items on the list.
- The BUCKET of WATER will go into your inventory.
- Use the BUCKET of WATER on the Witch (P).
- Take the GOLDEN CAP that remains where the Witch was standing (Q).
- Walk right, through the door (R).
- Note the Scarecrow, Tinman, and the Lion are all captive (S).
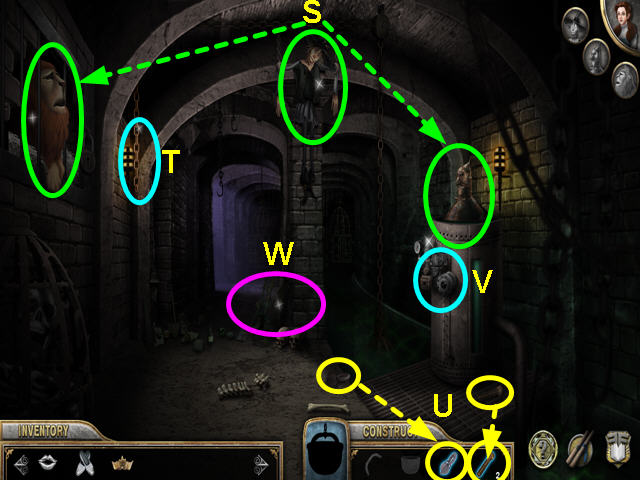
- Note the hanging chain (T).
- Take the 2 pieces of the IRON POT (U).
- Note the mini-game on the Tinman's tank (V).
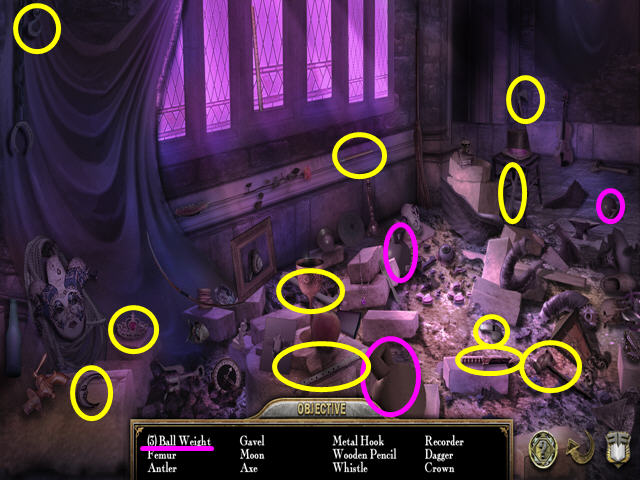
- Select the refuse at the base of the center column for a hidden object scene (W).
- Locate all the items on the list.
- The 2 IRON WEIGHTS are added to your inventory.
- Walk forward to exit the dungeon.
- Take the 3 pieces of the IRON POT (X).
- Select the area under the left window for a hidden object scene (Y).
- Collect all the items on the list.
- The 3 IRON WEIGHTS will go into your inventory.
- Walk right to return to the dungeon.
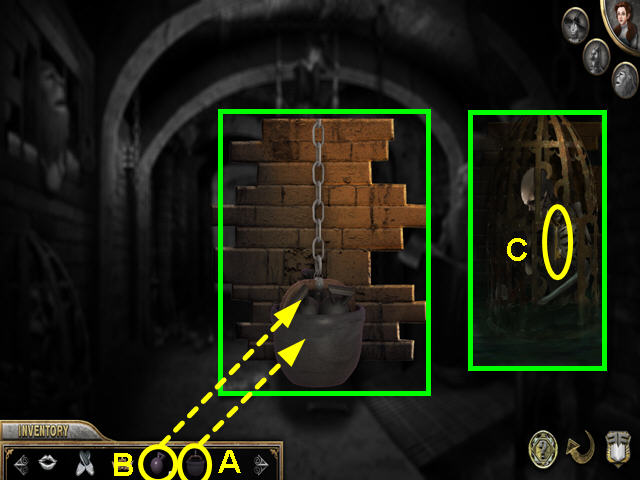
- Look at the close-up of the hanging chain on the left.
- Hang the IRON POT on the chain (A).
- Put the 5 IRON WEIGHTS in to the pot (B).
- Look at the cage that is pulled from the water to the right of the scarecrow.
- Take the PRISON KEY (C).
- Use the PRISON KEY on the Lion.
- Take the HAY BALE that was in the lion's cell.
- Select the refuse at the base of the center column for a hidden object scene.
- Locate all the items on the list.
- The OIL CAN is added to your inventory.

- Look at the mini-game on the Tinman's tank.
- The object is to turn the dials so that the needle goes into the green area, but not past it (D).
- Click on the bottom 2 dials along with the top dial (E).
- Use the OIL CAN on the Tinman.
- Click on the Tinman's icon and use it on the Scarecrow.
- Use the BALE of HAY on the Scarecrow.
- Walk forward and down to exit the castle.
- Note the monkey statue on the left (G).
- Look at the tower base for a mini-game (H).
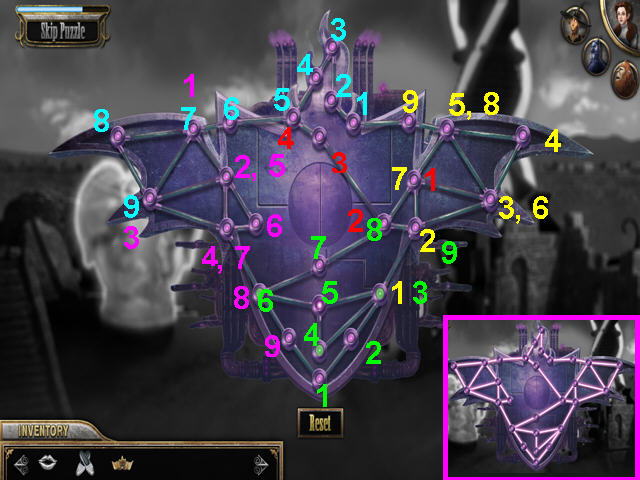
- The object is to light up all the lines without tracing your path.
- Press the buttons in this order: yellow 1-9, light blue 1-9, pink 1-9, green 1-9, and red 1-4.
- When the center opens, press the button to disable the tower.
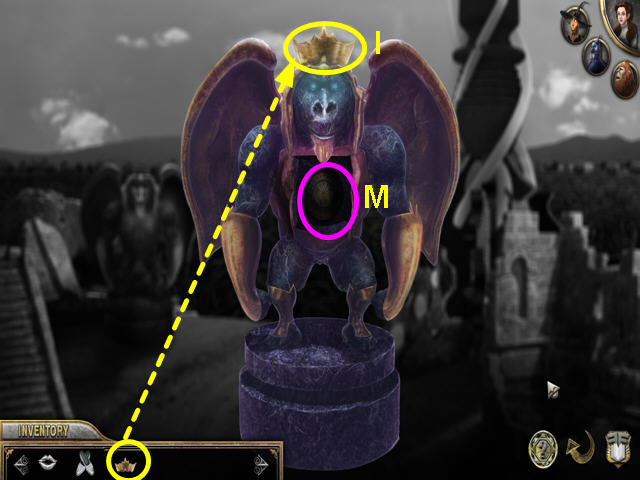
- Look at the monkey statue on the left.
- Place the GOLDEN CAP on the statue (I).
- When the center opens, click on the circle for a mini-game (M).
- The object is to light all the upper runes (N).
- Find the first rune on the lower half of the device.
- Push the symbol in the medal sections that corresponds to the rune.
- Push the symbols in numerical order.
- Click on the portal the Monkey King makes for you.
- Enter the Emerald City and walk forward 3 times to the throne room.
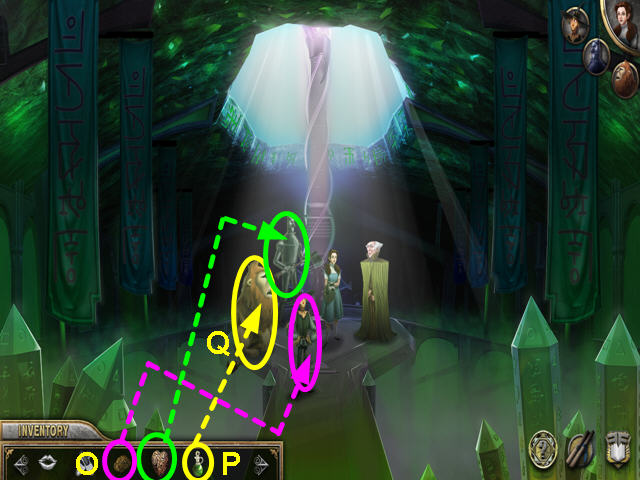
- After the Wizard speaks, he will give you three items.
- Give the CANVAS BRAIN to the Scarecrow (O).
- Give the Liquid courage to the Lion (P).
- Give the METAL HEART to the Tinman (Q).
- The Wizard is unable to help Dorothy- she must go to see Glinda.
Chapter Eight: Glinda, the Good Witch
- Walk down twice and walk to the left.
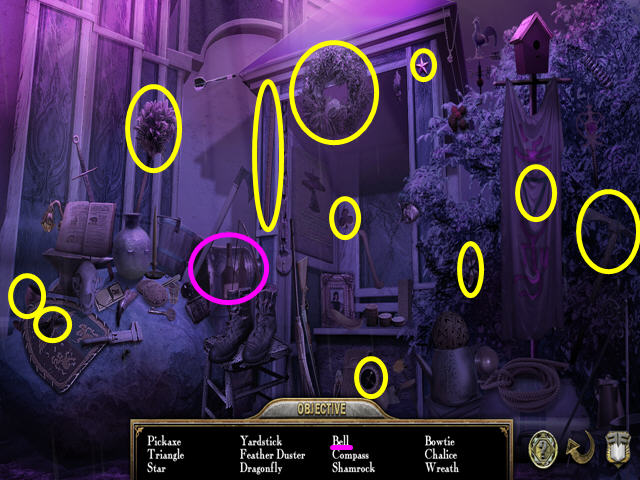
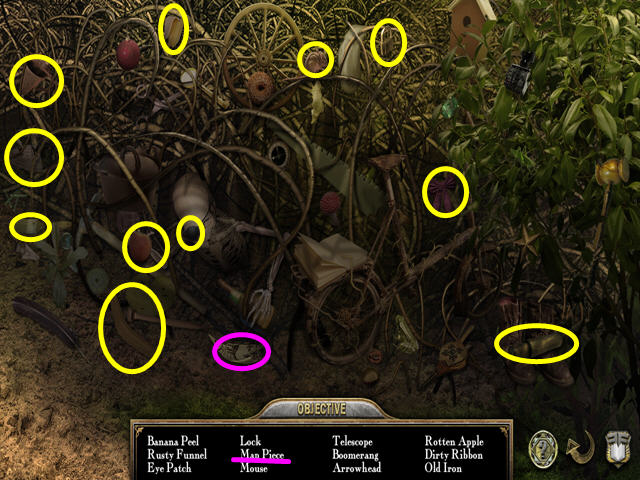
- Select the right bramble bush for a hidden object scene.
- Locate all the items on the list.
- You will earn a MAP PIECE.
- Walk down to return, then go right for a mini-game.
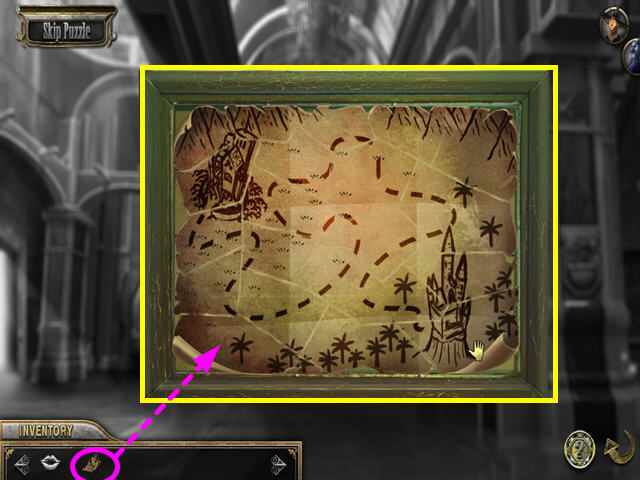
- Click and drag the puzzle pieces to restore the map.
- Walk left, then go forward.

- Click on the Tinman's icon then use it to chop the 2 trees to get the ladder pieces.
- Walk down.
- Click on the Tinman's icon then use it to chop the 2 trees to get the ladder pieces.
- You now have the LARGE LADDER in your inventory.
- Walk forward and use the LARGE LADDER on the high wall.
- Walk forward to climb the ladder and go over the wall.
- Note the path to the left (A).
- Note the torch holder (B).
- Select the area on the right for a hidden object area (C).
- Locate all the items on the list.
- The TORCH OIL will go to your inventory.
- Walk to the left.
- After the group is captured by vines, take the 2 UNLIT TORCH pieces (D).
- Walk down and take the 3 UNLIT TORCH pieces (E).
- Walk forward twice.
- Take the 2 UNLIT TORCH pieces (F).
- Select the area on the right for a hidden object scene (G).
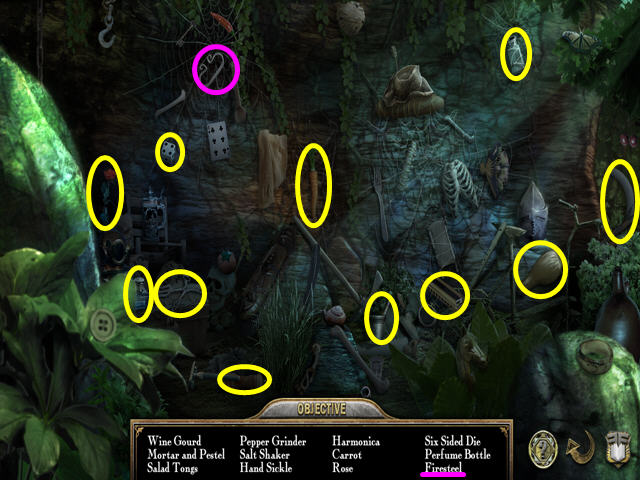
- Locate all the items on the list.
- The FIRESTEEL will go into your inventory.
- Walk down twice and look at the torch holder.
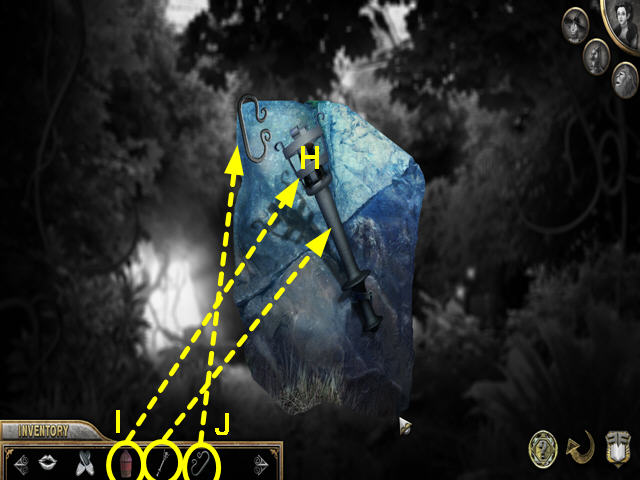
- Use the UNLIT TORCH on the holder (H).
- Use the TORCH OIL on the torch (I).
- Use the FIRESTEEL on the torch (J).
- Exit the close up and select the area on the right for a hidden objects area.
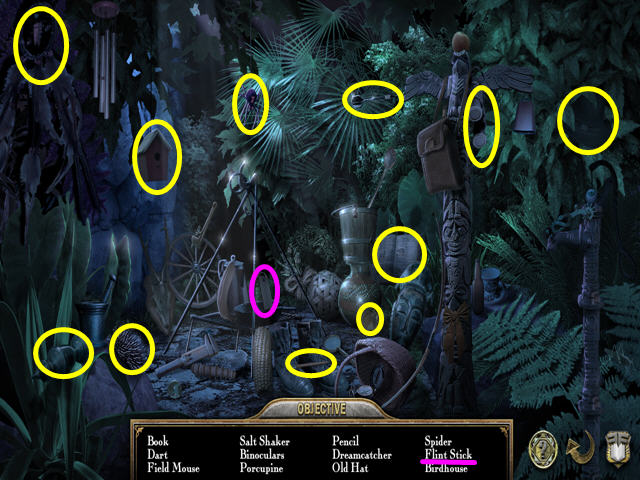
- Locate all the items on the list.
- The FLINT STICK will go to your inventory.
- Look at the torch and use the flint stick on the firesteel.
- The LIT TORCH will go automatically into your inventory.
- Walk to the right.
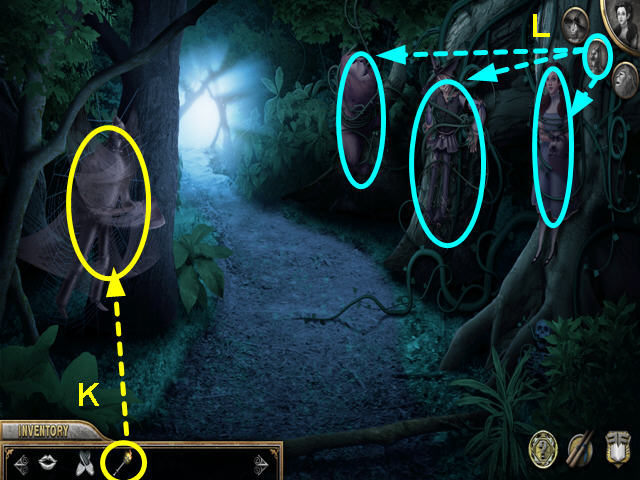
- Use the LIT TORCH on the Tinman to release him from the spider webs (K).
- Select the Tinman's icon and use it on the Lion, Dorothy, and Scarecrow (L).
- Walk forward.
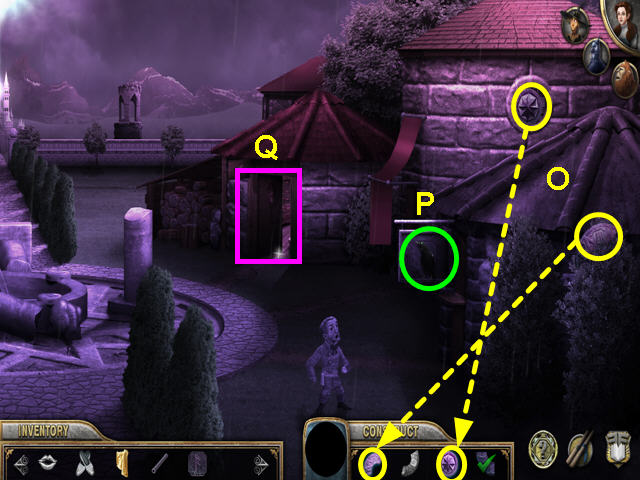
- Click on the lion's icon, then on the spider to get rid of it!
- Walk forward twice, to the gates of the castle..
- Note the unusual lock (M).
- Take the GATE PANEL piece (N).
- Walk down twice.
- Select the area on the right for a hidden object game.
- The WASH RAG will go into your inventory.
- Walk forward and select the sun dial for a hidden object scene.
- Locate all the items on the list.
- The STRANGE RUNE and the LEAD PIPE will go into your inventory.
- Walk to the right.
- Take the 2 GAE PANEL pieces (O).
- Note the crow on the sign (P).
- Select the open door for a hidden object scene (Q).
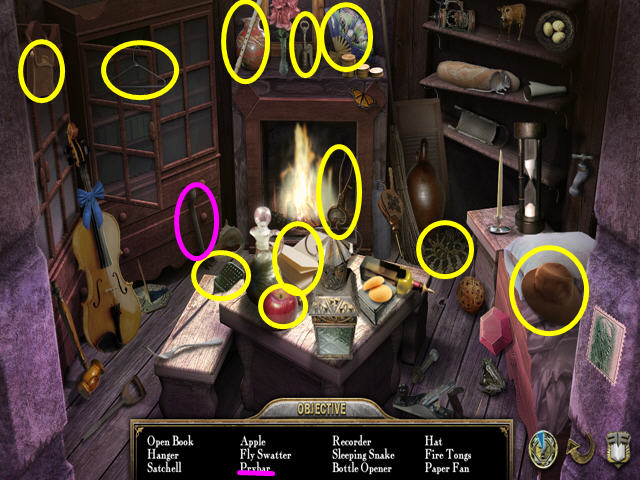
- Locate all the items on the list.
- The PRYBAR will go into your inventory.
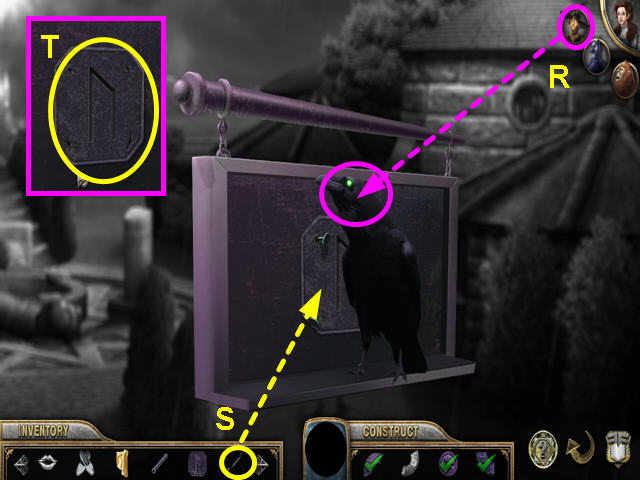
- Look at the crow on the sign.
- Click on the Scarecrow's Icon and use it on the crow (R).
- Use the PRYBAR to remove the nails (S).
- Take the RUNE (T).
- Walk to the left twice.
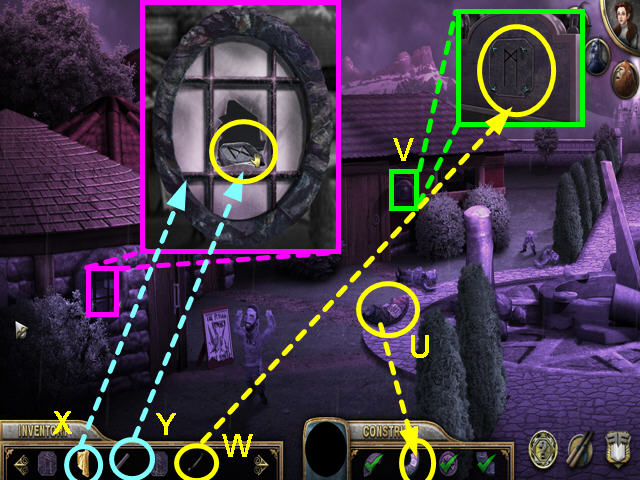
- Take the GATE PANEL piece (U).
- Look at the close-up of the sign (V).
- Use the PRYBAR to remove the nails and take the rune (W).
- Look at the window and use the WASH RAG to clean it (X).
- Use the LEAD PIPE to break the glass and take the Rune (Y).
- Walk to the right and look at the sundial- make note of the runes and numbers.
- Exit the close-up and walk forward.
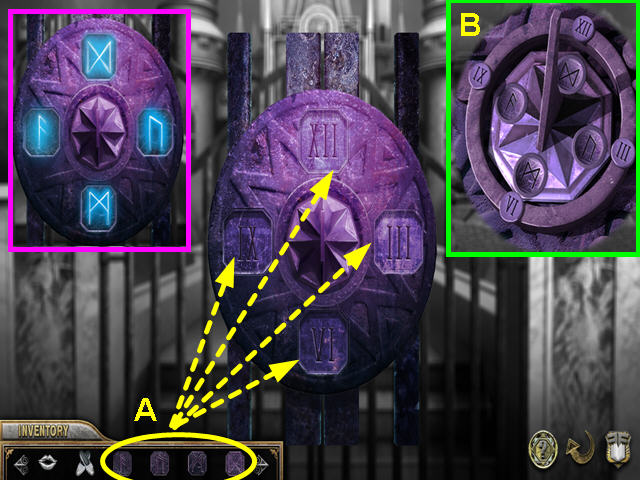
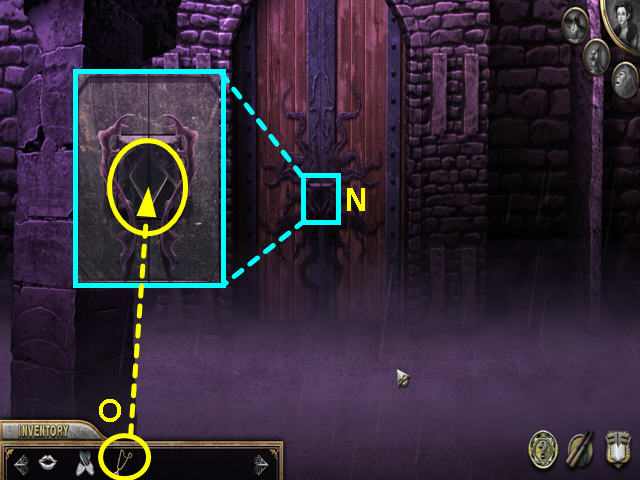
- Look at the gate and use the GATE PANEL on the lock.
- Place the 4 RUNES in the into the slots (A) based on the relationships noted at the sundial (B).
- Walk down and then to the right.
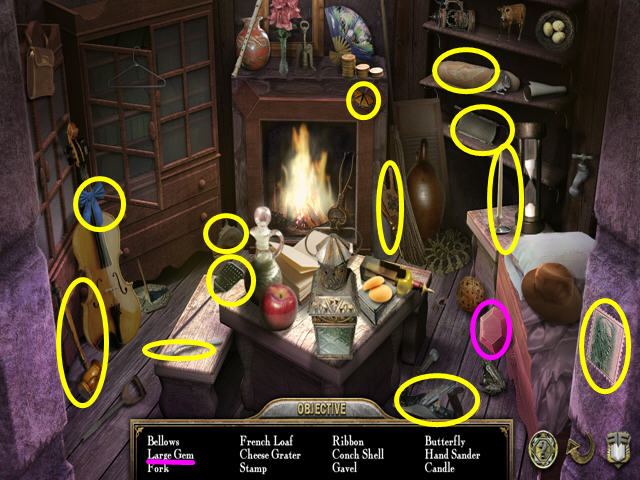
- Select the cabin door for a hidden object screen.
- Locate all the items on the list.
- The LARGE MAGICAL GEM will go to your inventory.
- Walk to the right and select the sun dial for a hidden object scene.
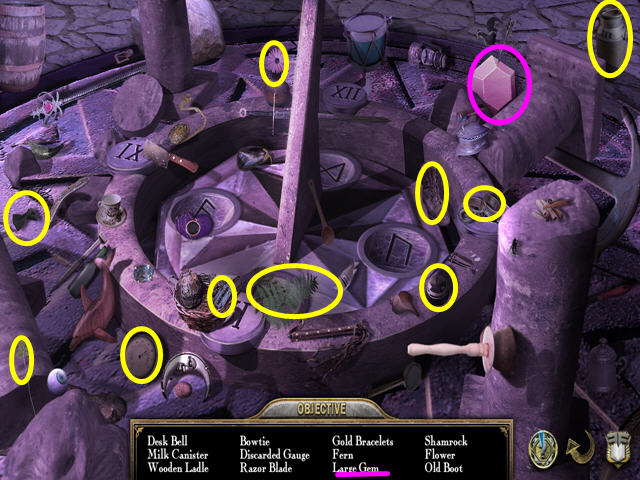
- Locate all the items on the list.
- The LARGE MAGICAL GEM will go to your inventory.
- Walk forward to the gate.
- Place the 2 LARGE MAGICAL GEMS into the the gem-shaped niches on the two columns.
- Click on the gate to open it and walk forward to enter the castle.

- Note the 4 machines around the room (C).
- Only the left machine is activated
- Select the left-most machine for a mini-game (D).
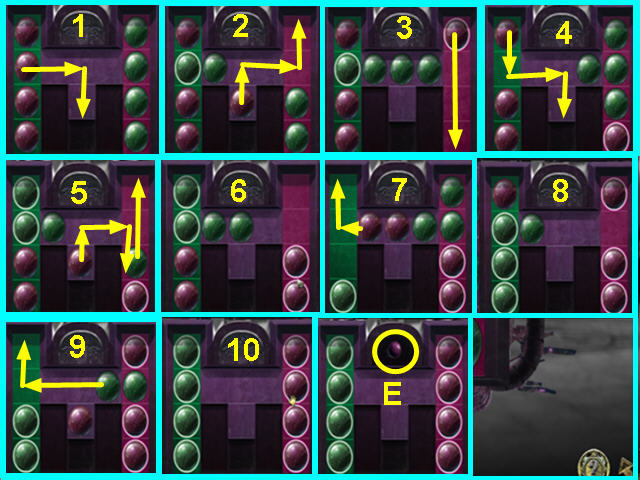
- The object is to swap the red and green balls.
- Click and drag a ball into position.
- Once the colors are swapped, a port will open.
- Take the pink ELECTRIC NODE (E).
- Select the machine on the far right.
- The object is to move the square with the ELECTRIC NODE out tho the bottom slot.
- Slide the blocks in the direction noted.
- Continue sliding the blocks until the red block is out.
- Once the red block is at the finish, it will open so you can take the ELECTRIC NODE.
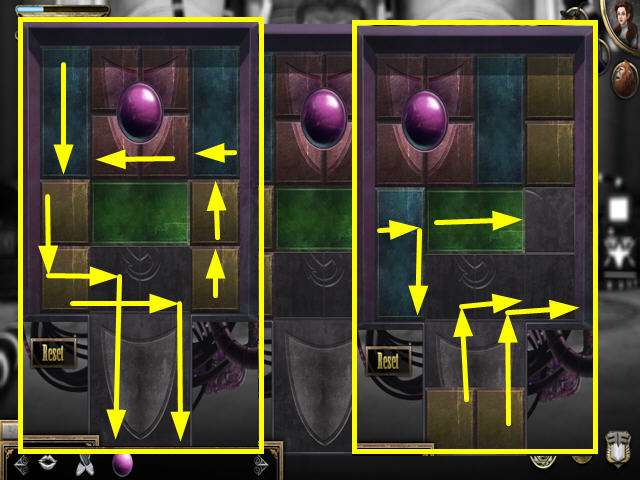
- Select the machine that is second from the right.
- The object of this mini-game is to move the marble to the hole.
- Slide the blocks to make a path for the marble.
- Once the marble gets to the hole, a compartment will open at the bottom.
- Take the ELECTRIC NODE.
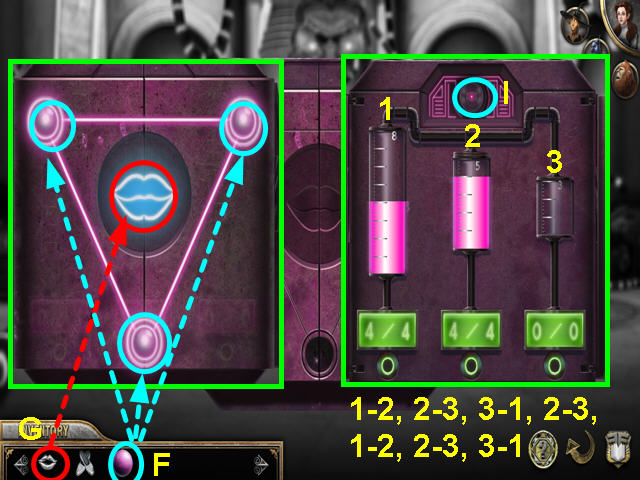
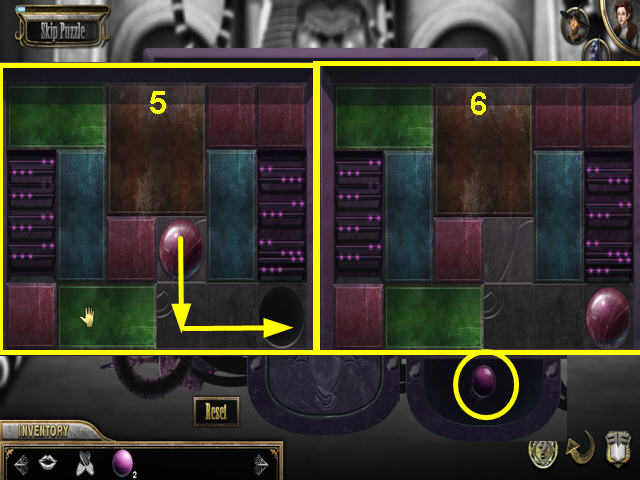
- Select the machine second from the left.
- Place the 3 ELECTRIC NODES in the 3 holes (F).
- Place the GOOD WITCH'S KISS in the center to open the box (G).
- The object is to get the amounts of liquid to 4 units each in the first two cylinders (H).
- Move the liquid from and to as follows: 1-2, 2-3, 3-1, 2-3, 1-2, 2-3, 3-1.
- When complete, press the button at the top (I).
- Show the SILVER SLIPPERS to Glinda the Good Witch.
- Click on the vortex to go home.
Created at: 2010-11-21