

Walkthrough Menu
- General Tips
- Chapter 1: Introduction - The Metro
- Chapter 2: The Boy in the Tree
- Chapter 3: The Girl in the Toy Store
- Chapter 4: The Boy in the Bedroom
- Chapter 5: The Girl in the Graveyard
- Chapter 6: The Boy in the Museum
- Chapter 7: Blackmore's Lair
General Tips
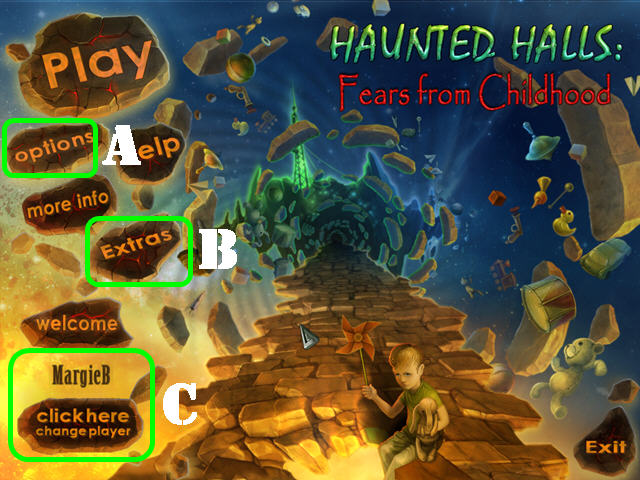
- The Options (A) Button allows you to adjust the screen size, music, cursor, and sound.
- The Extras (B) Button grants you access to the Bonus Content and Bonus Level after you complete the game. The walkthrough for the Bonus Level is located at the end of this Strategy Guide.
- The 'Click here – change player' button (C) can be used to manage your profiles in the game.
- This guide will refer to Hidden Object Scenes as 'HOS'.
- Items will stay in inventory until they are no longer needed.
- To access the built-in strategy guide during play, click on the words 'Strategy Guide' next to the Menu button in the lower left corner.
- Some puzzle solutions and HOS are random. Items written in orange in HOS require an action to be performed before the item(s) can be visible.
- The HINT button is accessible in both HOS and in quest scenes but you must wait for it to recharge in between uses.
- All mini-games can be skipped once the skip button has recharged. Most puzzles have a RESET button; use it if you want to follow the solutions shown in this guide.
Chapter 1: Introduction - The Metro
- Click on the little girl.
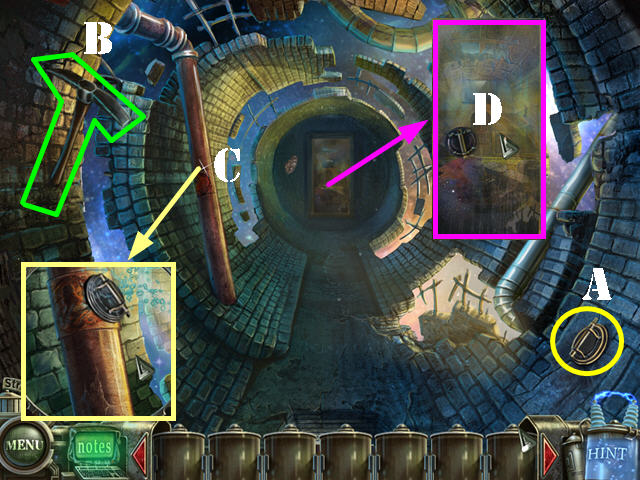
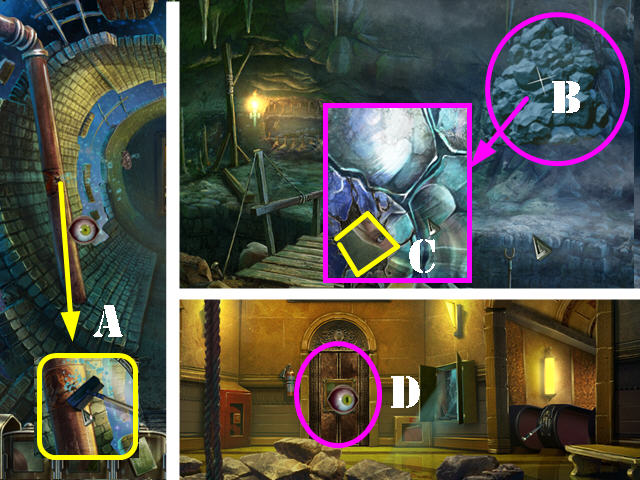
- Grab the SUCTION CUP (A) and the PICK (B).
- Examine the pipe (C); use the PICK on it for water to appear.
- Use the SUCTION CUP on the water flow to create the WET SUCTION CUP.
- Zoom into the back door; use the WET SUCTION CUP on the door (D).
- Open the door and go through it.
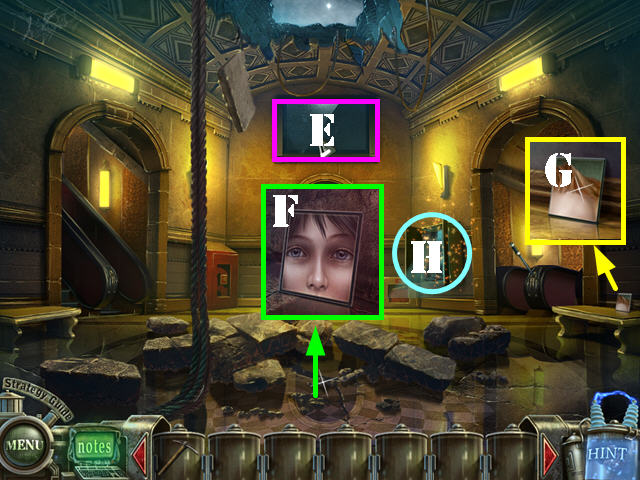
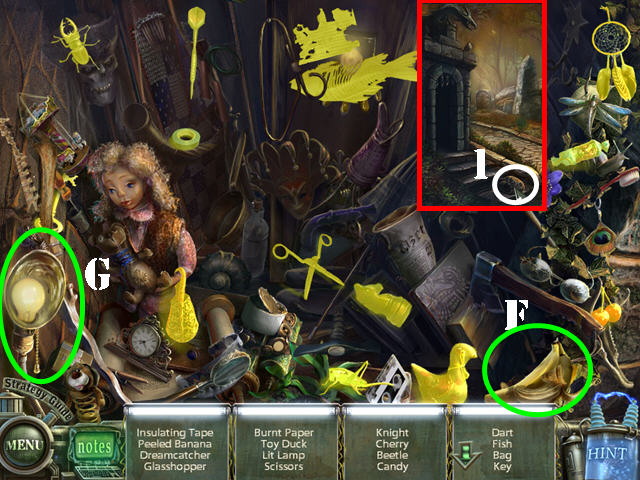
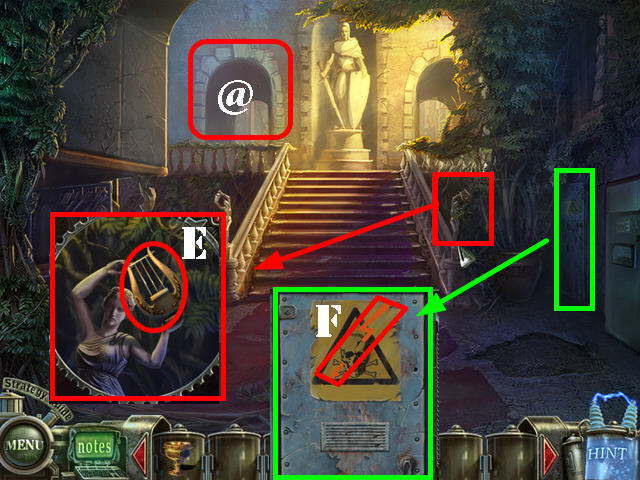
- Click on the TV to view a message from Blackmore (E).
- Examine the ground; take the TILE (F).
- Examine the table; take the second TILE (G).
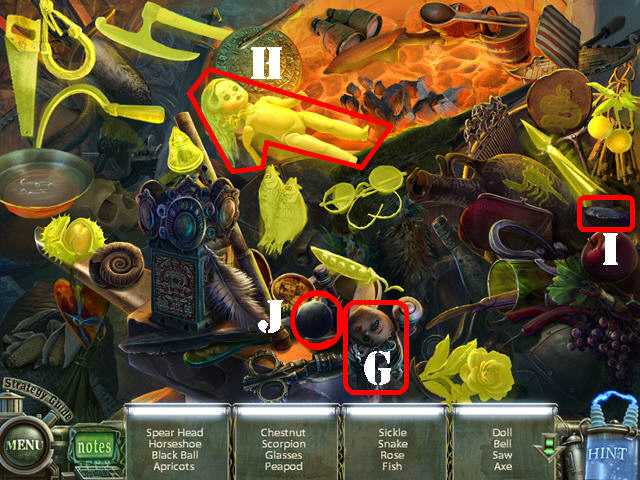
- Open the cabinet to activate a HOS; play it (H).
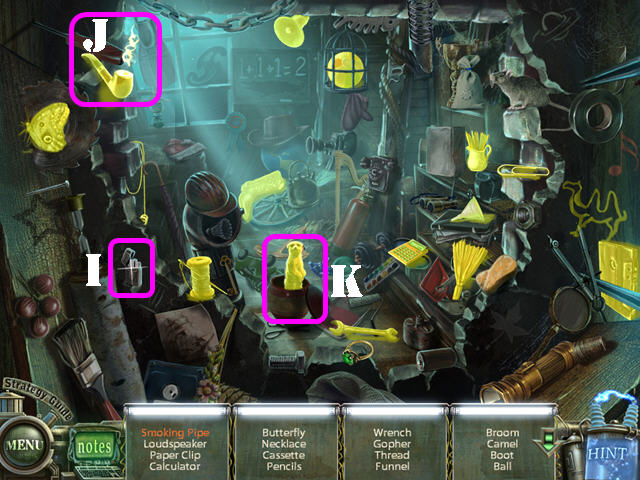
- Drag the lighter (I) to the pipe; take the SMOKING PIPE (J).
- Click on the pot; take the GOPHER (K).
- The WRENCH will be added to inventory.
- Examine the right escalator; pull the lever and go down.
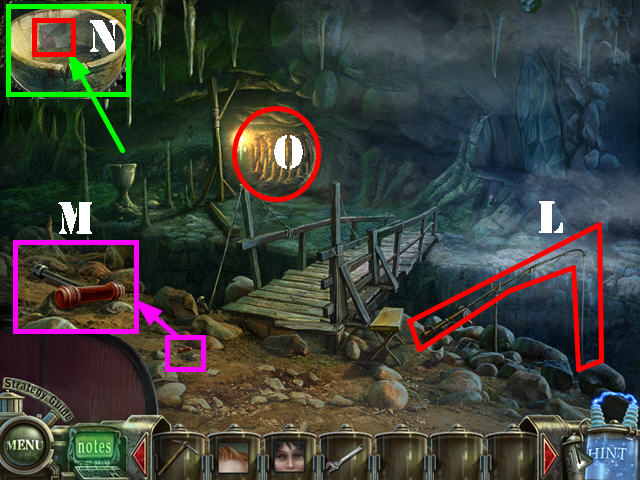
- Take the FISHING ROD (L).
- Examine the ground; take the LEVER (M).
- Zoom into the bowl; take the third TILE (N).
- Examine the cave on the left to activate a puzzle (O).
- Place the stalactites and stalagmites in the correct places.
- Right-click on a piece to rotate it or left-click it to place it.
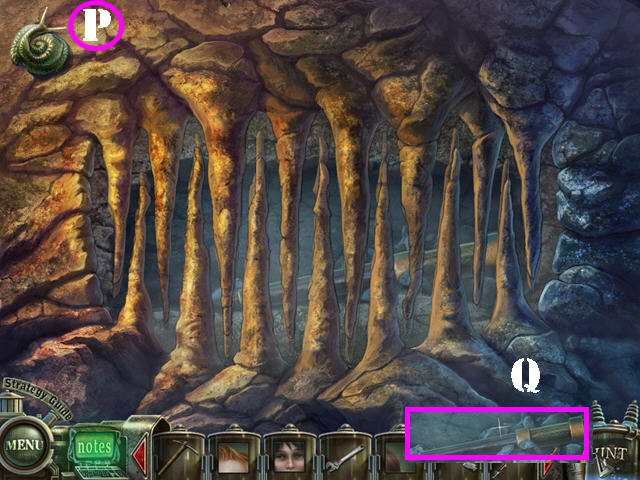
- Please look at the screenshot for the solution (P).
- Take the ESCALATOR LEVER (Q).
- Click down.
- Zoom into the left escalator; put the ESCALATOR LEVER on. Click on the lever and go up.
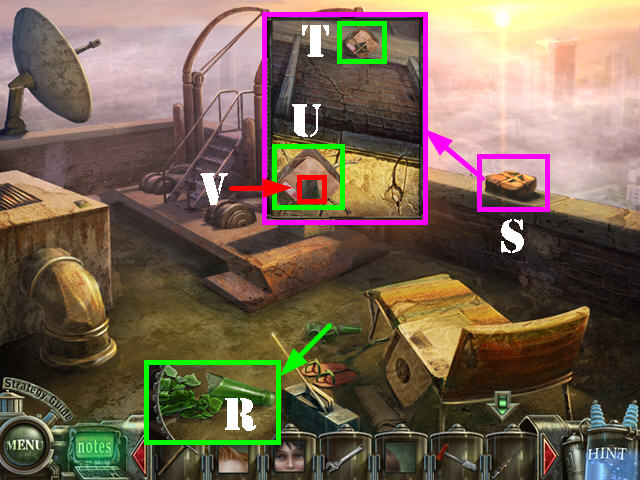
- Examine the ground; take the BROKEN BOTTLE (R).
- Click on the box on the right and the tentacles will remove the package from the ledge (S).
- Zoom into the right side of the wall; retrieve the package with the FISHING ROD (T).
- Cut the twine around the package with the BROKEN BOTTLE (U).
- Open the package; take the sixth TILE and the BOOK below it (V).
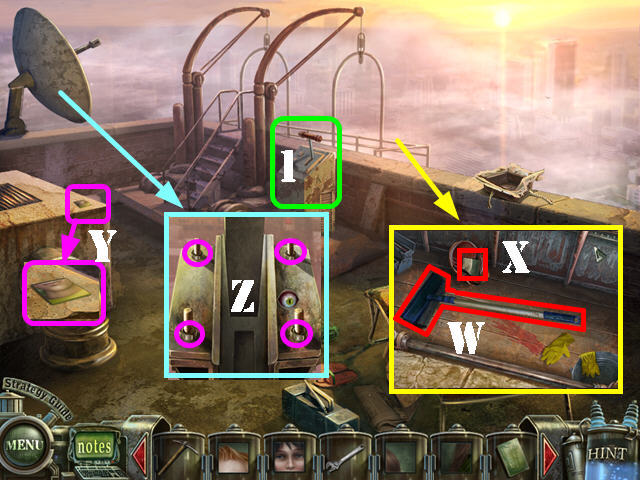
- Take a closer look at the device (1); put the LEVER in the slot. Click on the lever to raise the scaffolding.
- Zoom into the scaffolding; take the SQUEEGEE (W) and the fifth TILE (X).
- Examine the wall on left; take the fourth TILE (Y).
- Zoom into the antenna; use the WRENCH on the 4 nuts (Z) and take the ANTENNA.
- Click down twice.
- Zoom into the pipe; put the SQUEEGEE on the water to create the WET SQUEEGEE (A).
- Go forward and take the right escalator.
- Click on the right side of the wall and the tentacles will cause the rocks to fall.
- Use the PICK on the stones (B).
- Examine the mica; use the WET SQUEEGEE on the mica 3 times.
- Use the PICK in the lower left twice; take the seventh TILE (C).
- Click down.
- Zoom into the back door (D); put the 7 TILES on the door to activate the puzzle.
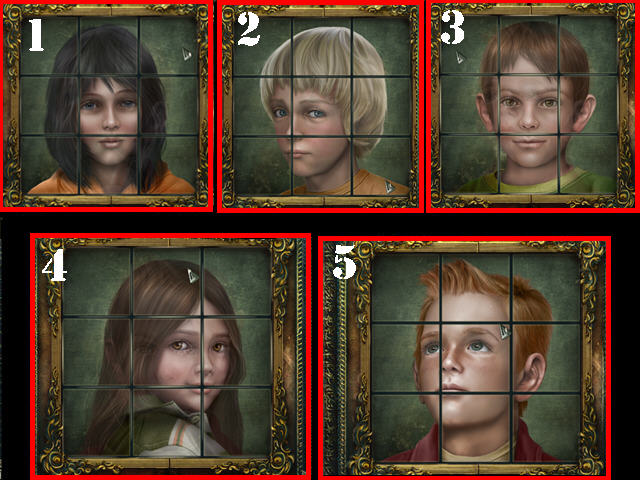
- Click on the tiles to change the images on them.
- Form the images of 5 different missing children.
- Please look at the screenshot for the solutions (1 through 5). The last picture will form automatically after you complete the fourth image.
- Go through the door.
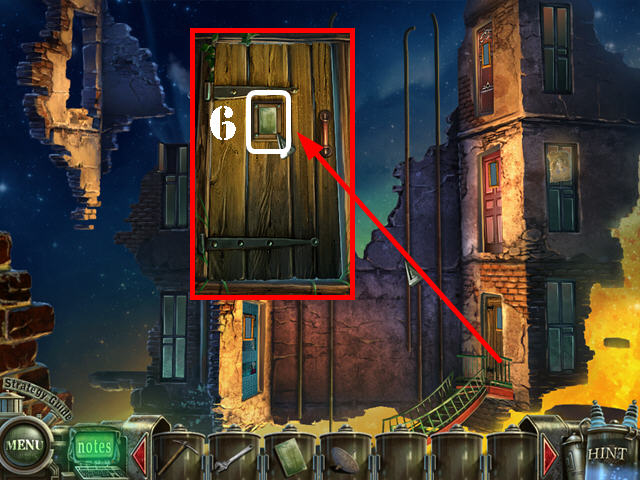
- Zoom into the door in the lower right; put the BOOK on the door (6).
- Open the door and go through it to reach the forest.
Chapter 2: The Boy in the Tree
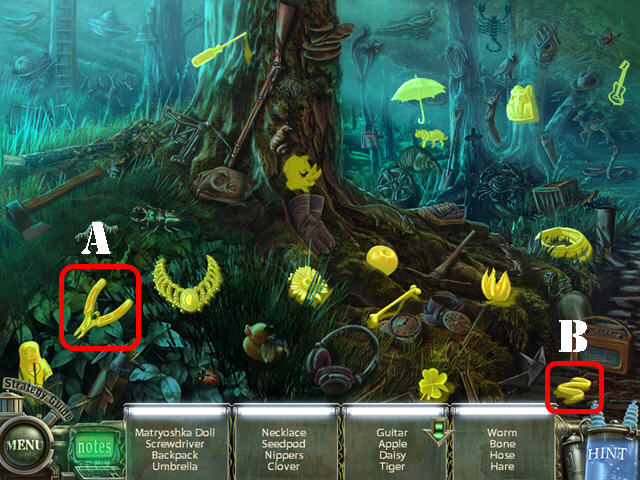
- Play the HOS.
- Move the leaves in the lower left; take the NIPPERS (A).
- Move the leaves in the lower right; take the WORM (B).
- The HOSE will be added to inventory.
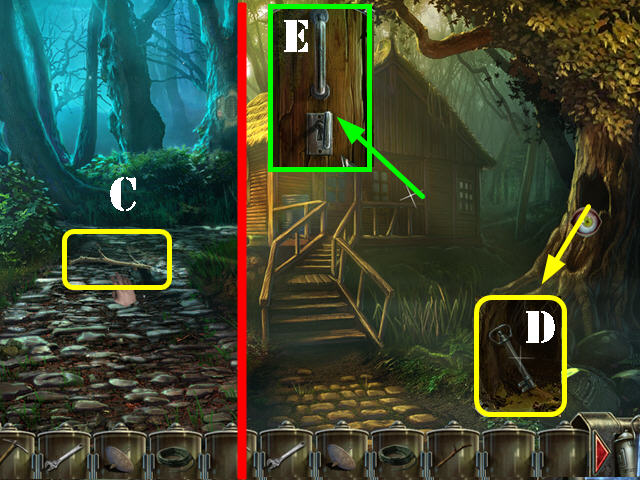
- Take the BRANCH on the road (C).
- Head left.
- Examine the tree hollow; take the KEY (D).
- Zoom into the door; put the KEY in the lock and go inside the hut (E).
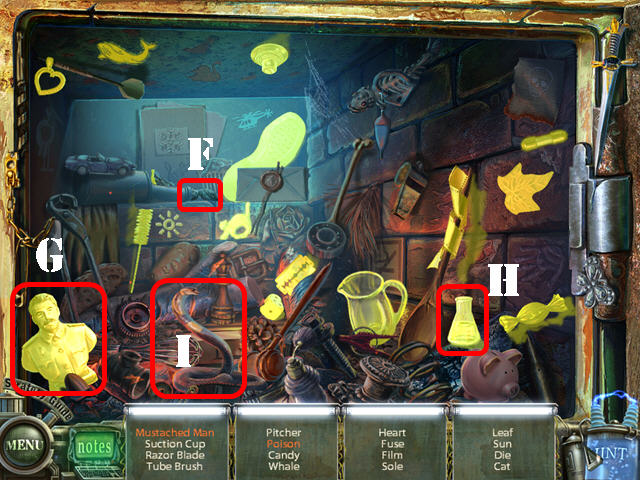
- Open the stove to trigger a HOS.
- Drag the mustache (F) to the bust; take the MUSTACHED MAN (G).
- Drag the flask (H) to the snake (I); take the POISON.
- The PITCHER will be added to inventory.
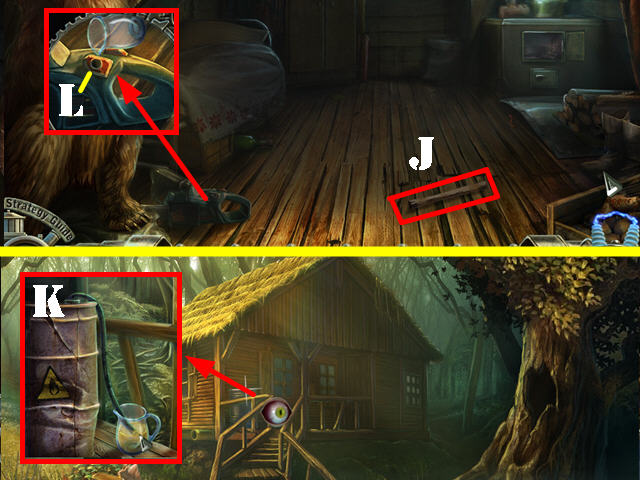
- Grab the CHAIR LEG (J).
- Click down.
- Zoom into the gasoline barrel; put the HOSE in the hole (K).
- Put the PITCHER at the end of the hose to obtain the FUEL.
- Go back into the cabin.
- Examine the chainsaw on the ground; remove the screw (L).
- Put the FUEL into the CHAINSAW to add the chainsaw to inventory.
- Click down twice and head right.

- Zoom into the mushrooms on the left side of the scene to activate a puzzle.
- Take the board on the right (1).
- Position the board so it always has 3 mushrooms in the holes (M); click on the board to highlight the selected mushrooms.
- You can right-click on the board to rotate it.
- Click on the sets of three mushrooms as marked on the screenshot to solve the puzzle.
- Take the last MUSHROOM (N).
- Use the CHAINSAW on the tree blocking the road.
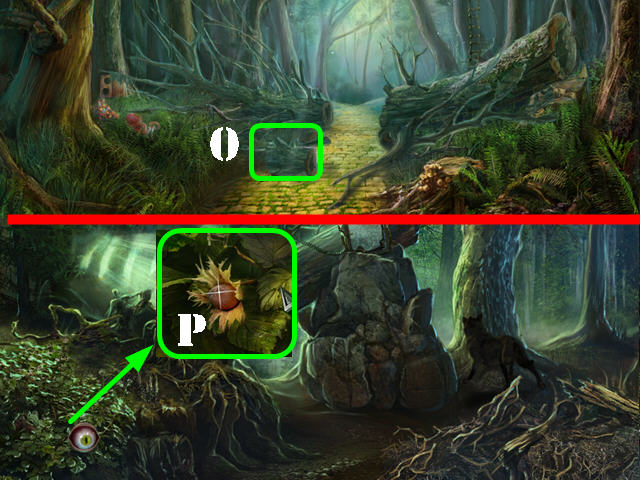
- Take the LOG (O) after you finish cutting the tree.
- Go forward.
- Zoom into the left bushes; push the leaves aside and take the HAZELNUT (P).
- Click down twice.

- Play the HOS.
- Move the log and take the MAGNIFIER (Q).
- Open the holster and take the HANDGUN (R).
- The MAGNIFIER will be added to inventory.
- Return to the cabin.
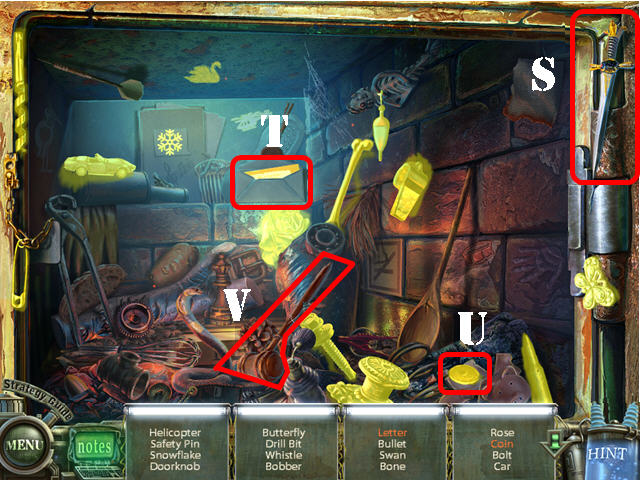
- Play the HOS.
- Use the dagger (S) on the envelope; take the LETTER (T).
- Break the piggy bank (U) with the gavel (V); take the COIN.
- The BONE will be added to inventory.
- Click down.
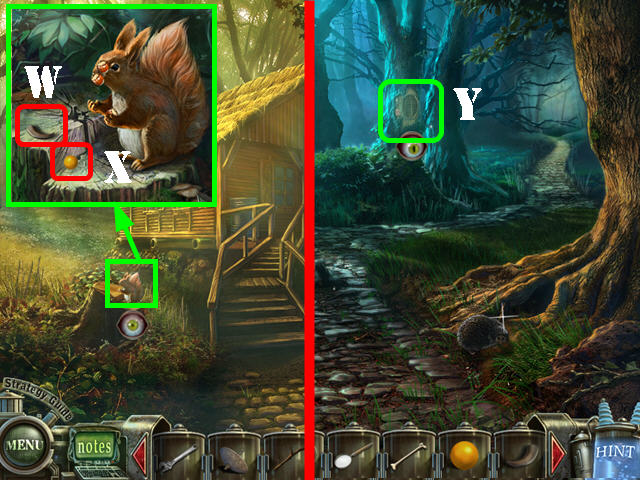
- Look at the squirrel; take the CLAW (W).
- Give the HAZELNUT to the juggling squirrel and take the MARBLE (X).
- Click down.
- Examine the tree hollow (Y) and put the MARBLE on the board to activate a puzzle.
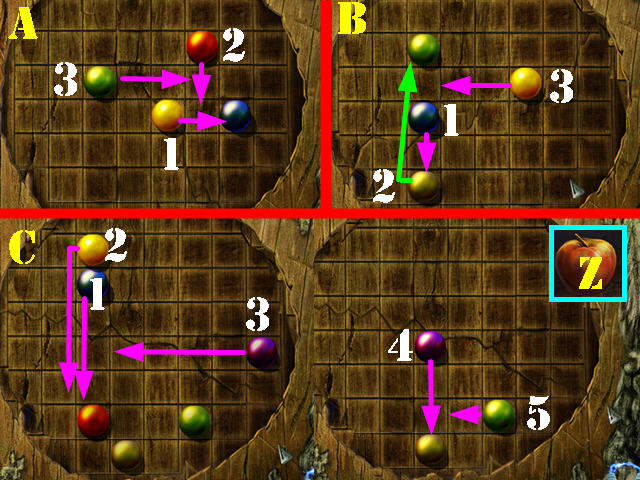
- Use the marbles to knock other marbles off the board. Only one marble should remain at the end of each round.
- Click on a marble for arrows to appear; click in the direction you want to head in. A marble will roll only if a viable move can be made.
- Please look at the screenshots for the solutions to all 3 rounds (A, B, and C).
- Take the APPLE (Z).
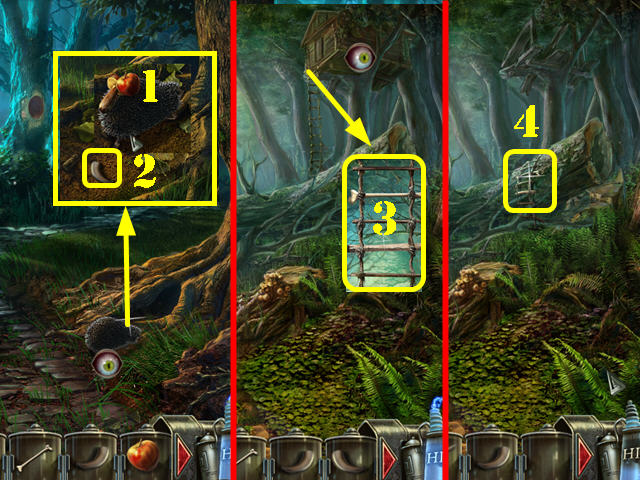
- Zoom into the porcupine; give him the MUSHROOM and the APPLE (1).
- Take the CLAW (2).
- Head right.
- Examine the tree house; put the CHAIR LEG, BRANCH, and the BONE on the broken ladder (3).
- Click on the tree house and take the fallen LADDER (4).
- Return to the cabin.
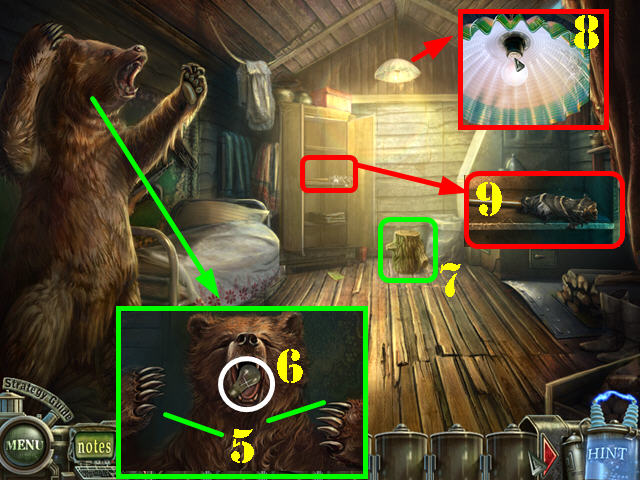
- Zoom into the bear; put the 2 CLAWS on the paws (5).
- Take the LIGHTBULB (6).
- Put the LOG on the ground (7).
- Zoom into the lamp and put the LIGHTBULB in it (8).
- Open the closet and take the TORCH (9).
- Click down.

- Zoom into the gasoline barrel (10).
- Dip the TORCH in the barrel to create the FUEL-SOAKED TORCH.
- Click down and head right.
- Zoom into the tree stump; put the MAGNIFIER on the stump (11).
- Click on the magnifier light and drag it around the edges of the flame drawing.
- Once the outline has been traced correctly, a fire will appear in the tree stump.
- Put the FUEL-SOAKED TORCH in the fire to create the BURNING TORCH (12).
- Go forward.
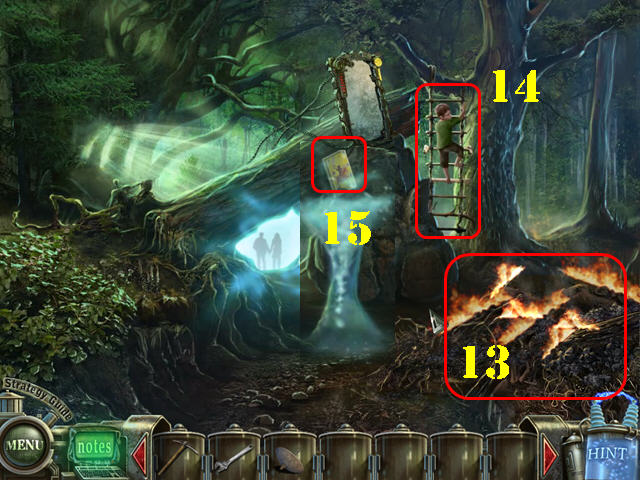
- Put the BURNING TORCH on the dry brush pile in the lower right to scare away the wolf. (13).
- Place the LADDER on the tree so the little boy can come down (14).
- Talk to the little boy.
- Take the BOOK (15).
- Click down 3 times.
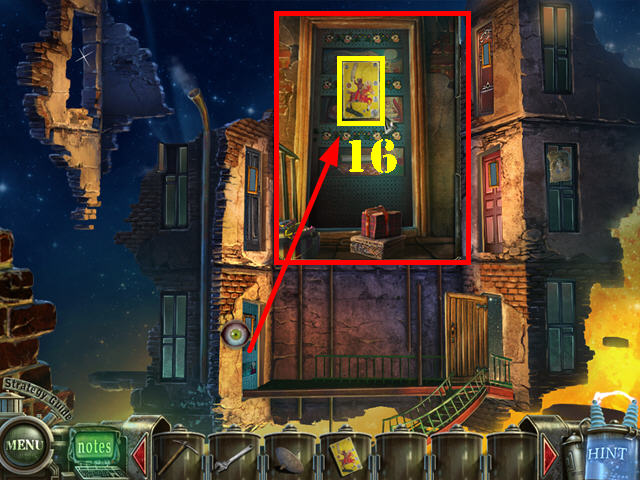
- Examine the lower left door.
- Put the BOOK on the door; open the door and go through it (16).
Chapter 3: The Girl in the Toy Store
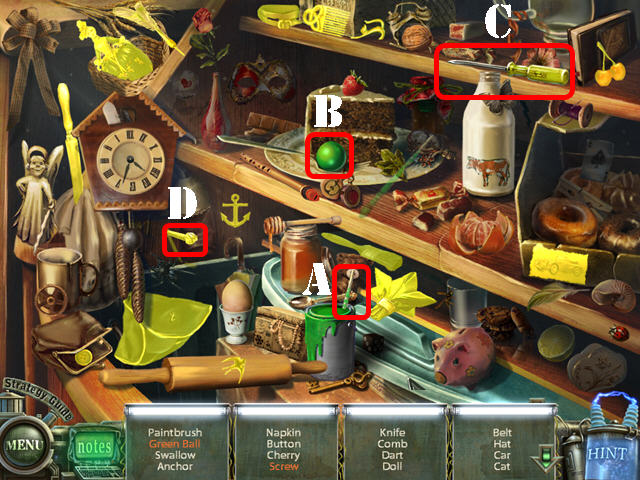
- Play the HOS.
- Drag the brush (A) to the ball; take the GREEN BALL (B).
- Use the screwdriver (C) on the screw; take the SCREW (D).
- The PIRATE HAT will be added to inventory.
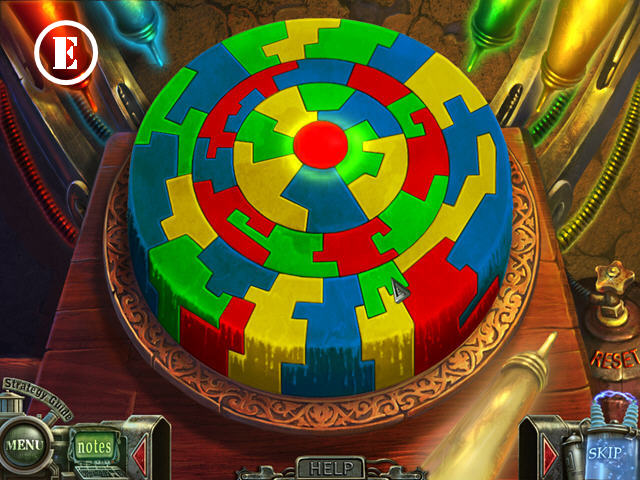
- Examine the cake on the back wall to activate a puzzle.
- Paint the cake sections so that no adjacent sections have the same colors.
- Click on a tube paint to attach it to your cursor; click on the section of your choice on the cake to apply the color.
- Please look at the screenshot for the solution (E).
- Take the CAKE.
- Zoom into the top of the cabinet; take the SABER (F).
- Go through the back door.
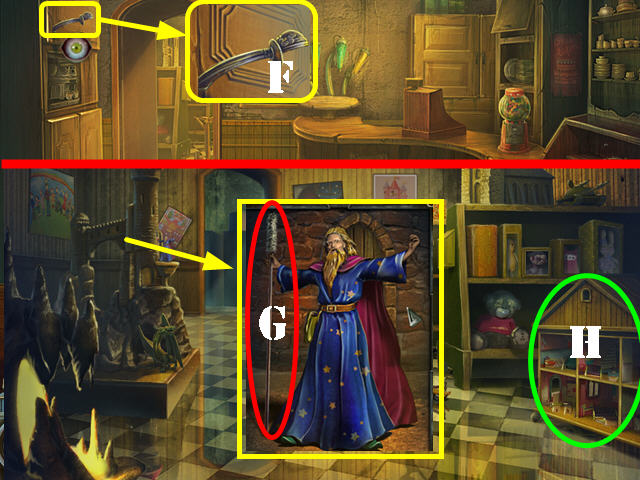
- Zoom into the castle; take a closer look at the wizard and take the RAMROD (G).
- Examine the dollhouse in the lower right to activate a puzzle (H).

- Move the people to the sections of the house they belong to. Pay attention to their clothing and items they are holding.
- Please look at the screenshot for the solution.
- Take the DOLL (I).
- Go through the back door.
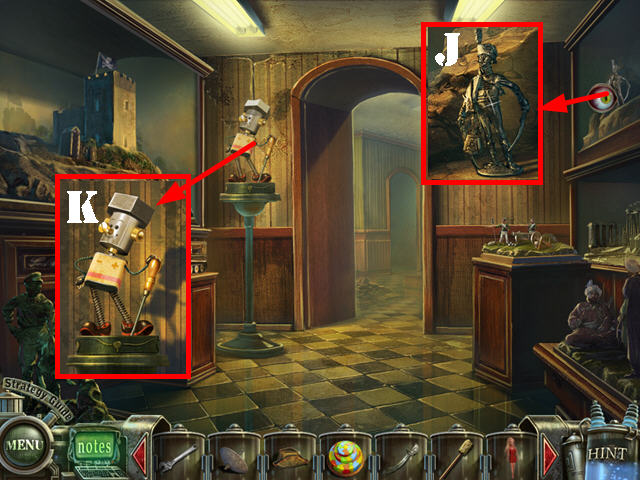
- Examine the shelf in the upper right; take the TIN SOLDIER (J).
- Zoom into the robot on the left; use the WRENCH on its head and take the NUT (K).
- Go through the back door.
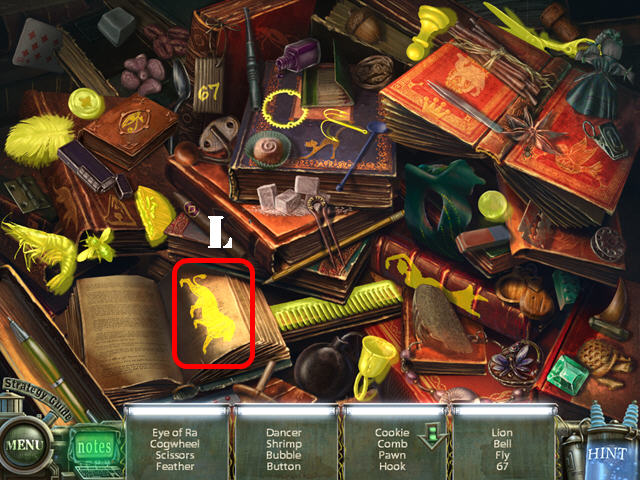
- Play the HOS.
- Flip the book page; take the LION (L).
- The SCISSORS will be added to inventory.
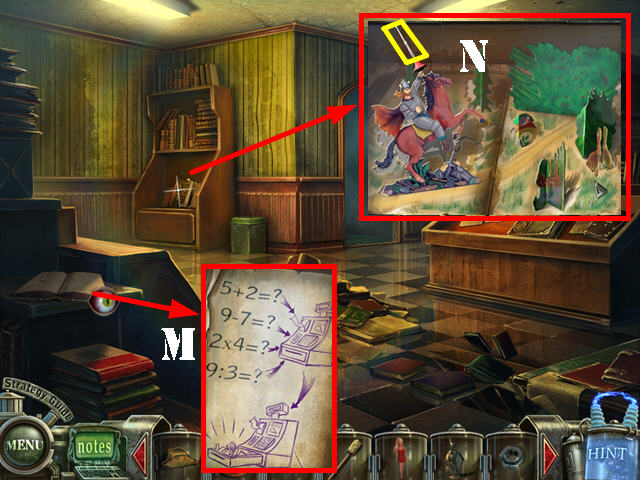
- Flip open the book on the left; zoom into it and note the cash register equations (M).
- Examine the bookcase; open the book and cut the METAL SEGMENT with the SCISSORS (N).
- Go through the back door.
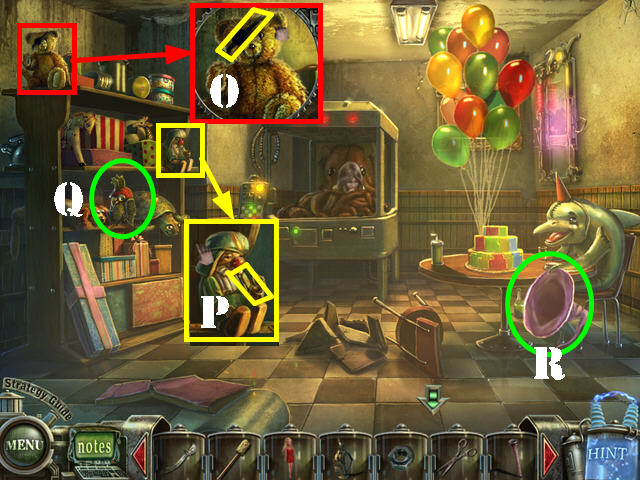
- Examine the teddy bear; take the EYE PATCH (O).
- Examine the doll; take the PIPE (P).
- Take the PARROT (Q).
- Give the CAKE to the dolphin and take the HAT (R).
- Click down twice.
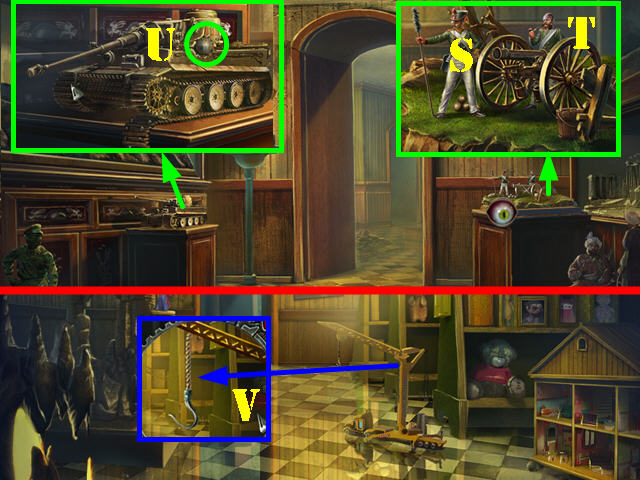
- Zoom into the soldiers on the right; give the RAMROD to the left soldier (S).
- Give the PIPE to the right soldier (T). The soldiers will fire on the tank on the left.
- Examine the tank and take the CANNONBALL (U).
- Click down.
- Examine the crane; cut the rope with the SCISSORS to obtain the HOOK (V).
- Click down.
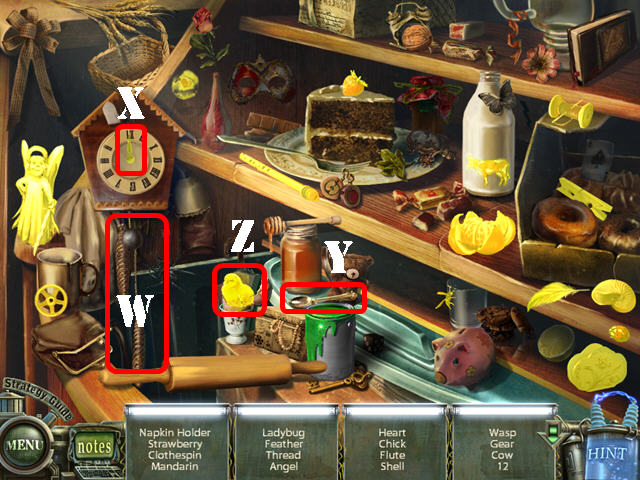
- Play the HOS.
- Click on the clock weights (W); take the 12 (X).
- Tap the spoon (Y) on the egg; take the CHICK (Z).
- The ANGEL will be added to inventory.
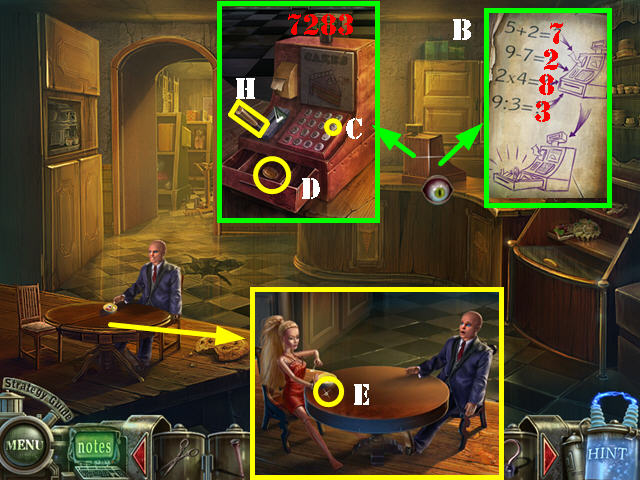
- Examine the cash register. In order to open the register you must decipher the code found in the library (B).
- 5 + 2 = 7, 9 - 7 = 2, 2 x 4 = 8, and 9 divided by 3 = 3. The code that needs to be entered to the cash register is 7283.
- If you enter the incorrect numbers, click on the letter 'C' to start over (C).
- Enter the code 7283 and then click on the handle (H) to open the register.
- Take the COIN (D).
- Zoom into the table; sit the DOLL in the empty chair.
- Zoom into the RING on the table and take it (E).
- Go through the back door.
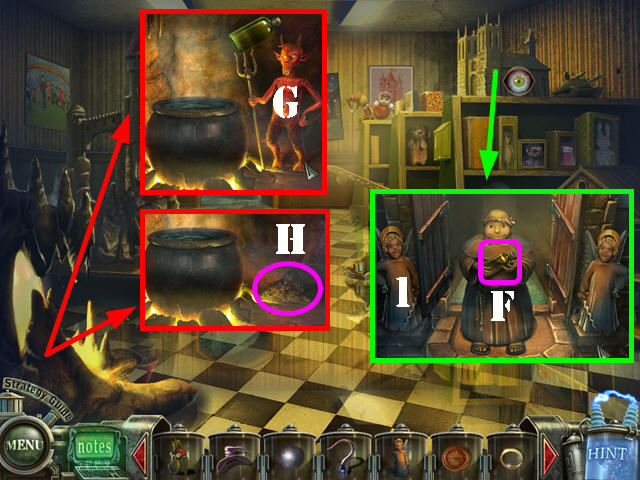
- Zoom into the castle in the upper right; put the ANGEL on the left (1) and take the HOLY WATER (F).
- Examine the lower left corner; put the HOLY WATER on the devil (G).
- Take the SULFUR (H).
- Return to the library.
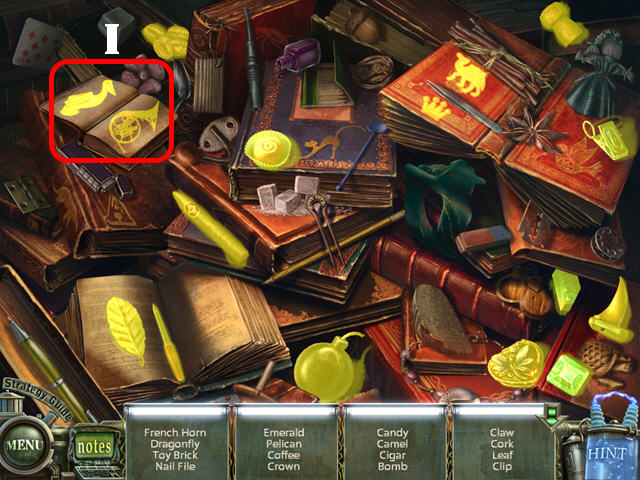
- Play the HOS.
- Open the book; take the PELICAN and the FRENCH HORN (I).
- The BOMB will be added to inventory.
- Click down.
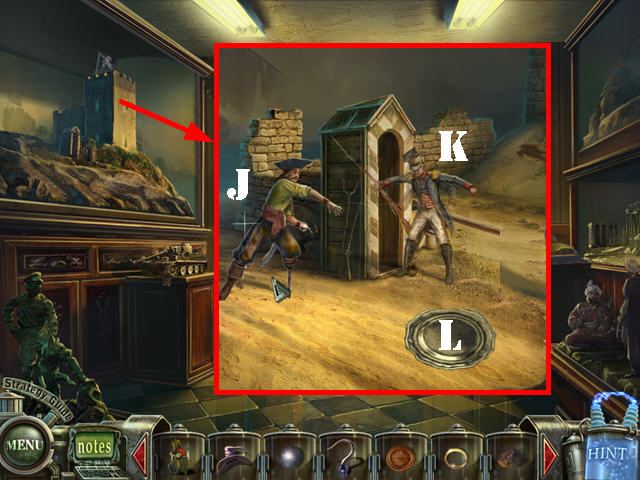
- Examine the castle; put the EYE PATCH, PARROT, SABER, METAL SEGMENT, PIRATE HAT, and HOOK on the pirate (J).
- Give the BOMB to the pirate once the soldier appears (K).
- Take the PLATE (L).
- Go through the back door.
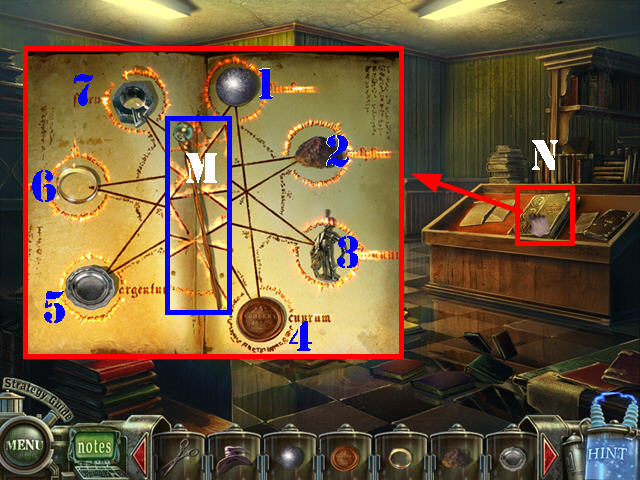
- Open the book on the right and zoom into it (N).
- Place the CANNONBALL (1), SULFUR (2), TINE SOLDIER (3), COIN (4), PLATE (5), RING (6), and NUT (7).
- Take the STAFF (M).
- Click down twice.
- Zoom into the left castle and then the wizard.
- Give the HAT and the STAFF to the wizard (O).
- Take the EMBLEM after the dragon disappears (P).
- Return to the party room.
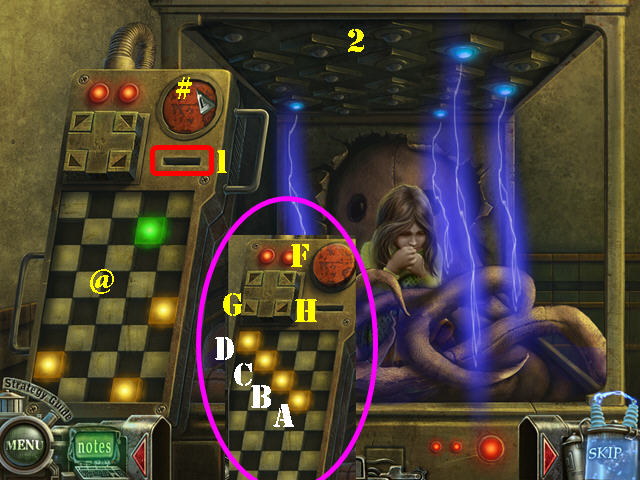
- Zoom into the machine; put the EMBLEM into the coin slot (1) and click on the red button (#) to activate a puzzle.
- Note the lights above the machine (2) and the ones on the outside of the machine (@).
- Use the arrows on the panel to move the lit squares to form the same pattern shown on the inside of the machine.
- Click on the lit square you wish to move and then click on the arrows to move it in the right direction.
- Click on the red button (#) to test your selection; lights that turn blue inside the machine are correct.
- To solve Square A click on the arrows in this order: G x 2, and H x 2.
- To solve Square B click on the arrows in this order: G x 2, H, and G.
- To solve Square C click on the arrows in this order: H x 3.
- To solve Square D click on the arrows in this order: H x 2, and F.
- Take the BROKEN MIRROR and the BOOK (I).
- Exit the toy store.
- Zoom into the middle door on the right (J).
- Put the BOOK on the door; open the door and go through it.
Chapter 4: The Boy in the Bedroom
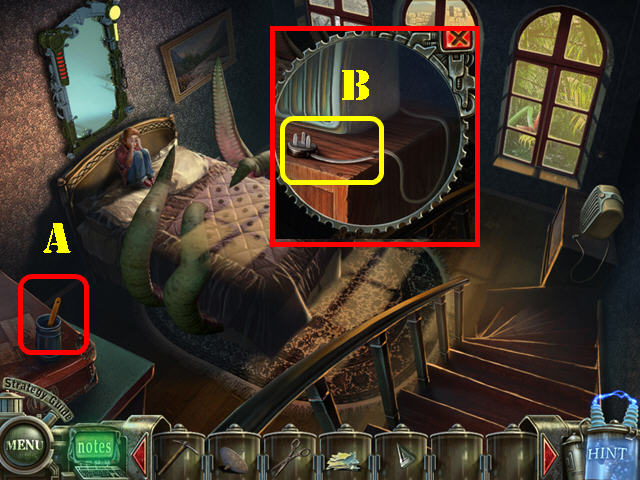
- Take the PAINT CAN (A).
- Examine the top of the cabinet; cut the cord with the SCISSORS.
- Take the ELECTRICAL CORD (B).
- Look under the bed.
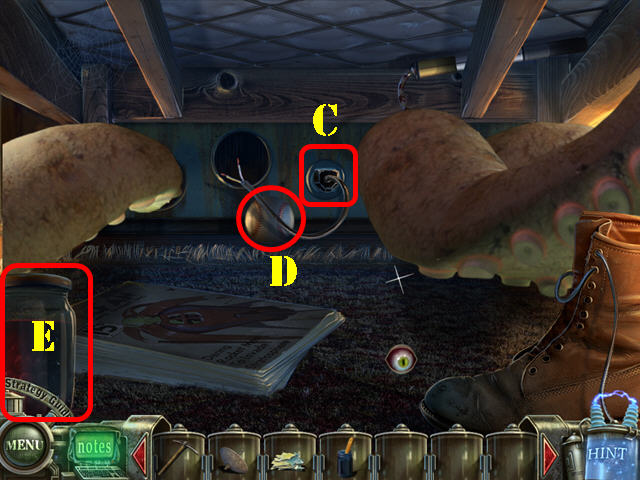
- Use the ELECTRICAL CORD in the outlet (C).
- Click on the BASEBALL (D) to clog up the left hole.
- Take the JAM JAR (E).
- Get out from under the bed and go through the center window.
- Play the HOS.
- Open the box; take the DOLL (F).
- Click on the sack (G); take the BIRD (H).
- The SHOVEL will be added to inventory.
- Click down and go through the left window.
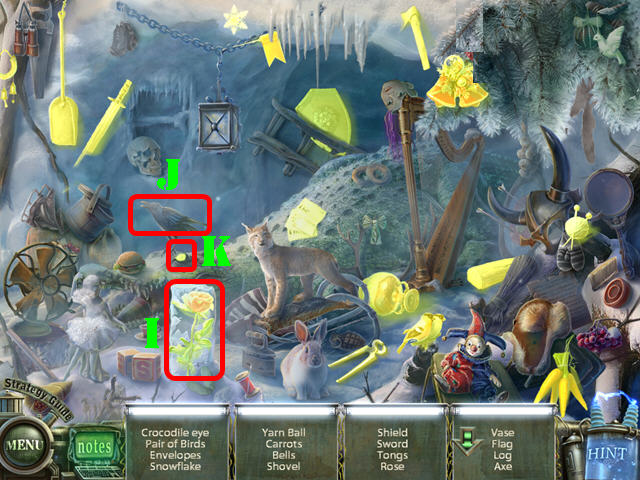
- Play the HOS.
- Click on the frozen flower; take the ROSE (I).
- Click on the bird (J); take the CROCODILE EYE (K).
- The TONGS will be added to inventory.
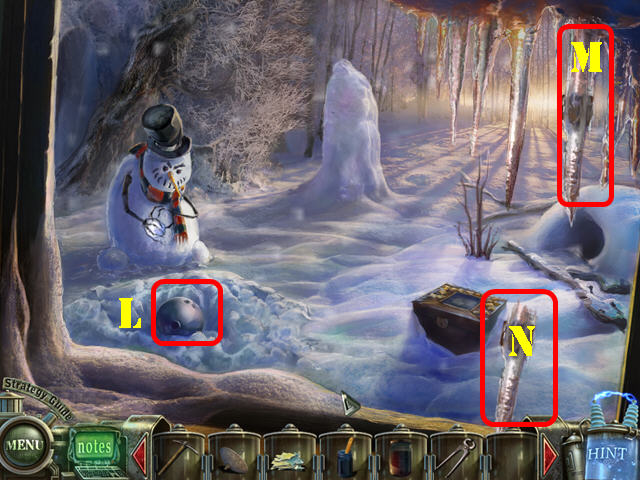
- Use the SHOVEL on the snow mound and take the BOWLING BALL (L).
- Use the PICK on the icicle in the upper right (M).
- Use the PICK on the fallen ice pick and take the PUZZLE PIECE (N).
- Click down and go through the last window.
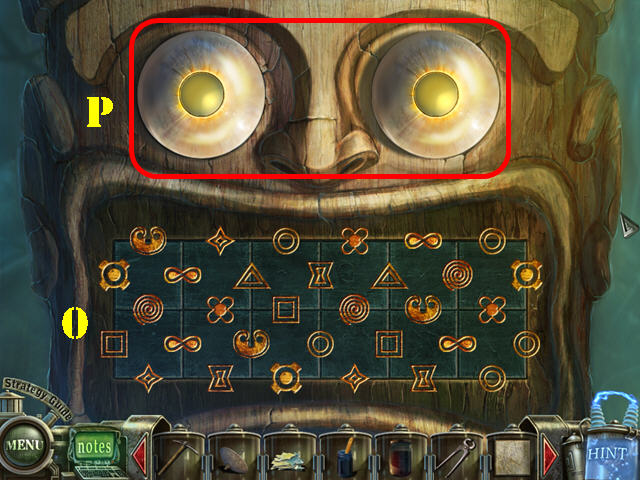
- Examine the idol to activate a puzzle.
- Swap teeth with each other until they are all in the correct spots.
- Right-click on a tooth to rotate it.
- Please look at the screenshot for the solution (O).
- Take the EYES (P).
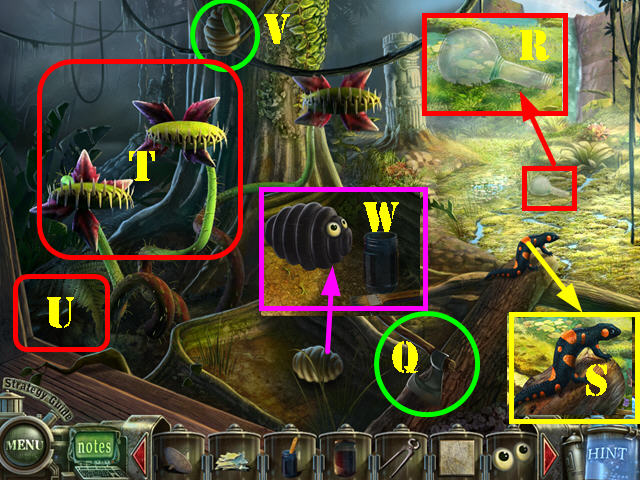
- Take the AXE (Q).
- Examine the ground; take the FLASK (R).
- Zoom into the SALAMANDER and take it (S).
- Give the AXE to the plants and one of them will eat it (T).
- Throw the JAM JAR in the lower left (U).
- Click on the beehive to drop it on the ground (V).
- Zoom into the fallen beehive; use the PAINT CAN on it and add the EYES (W).
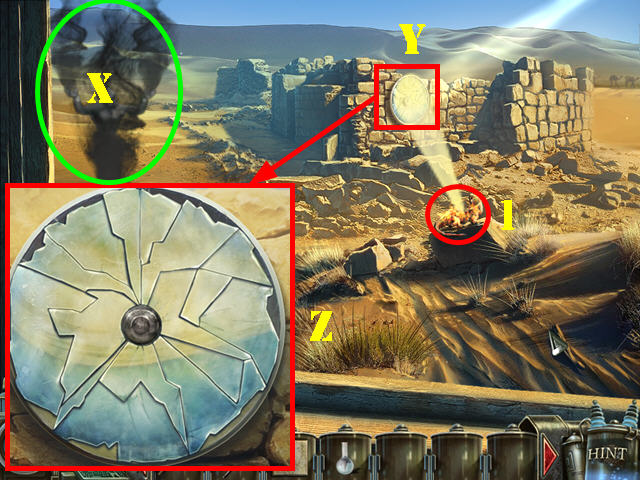
- Return to the desert scene.
- Put the FLASK over the tornado to obtain the BOTTLE TORNADO (X).
- Put the ANTENNA on the building and the BROKEN MIRROR next to the antenna (Y).
- Zoom into the antenna to activate a puzzle.
- Put the mirror shards into the correct spots. Right-click on a piece to rotate it.
- Please look at the screenshot for the solution (Z).
- Put the SALAMANDER on the rock (1).
- Take the FIERY LIZARD with the TONGS.
- Return to the wintery scene.
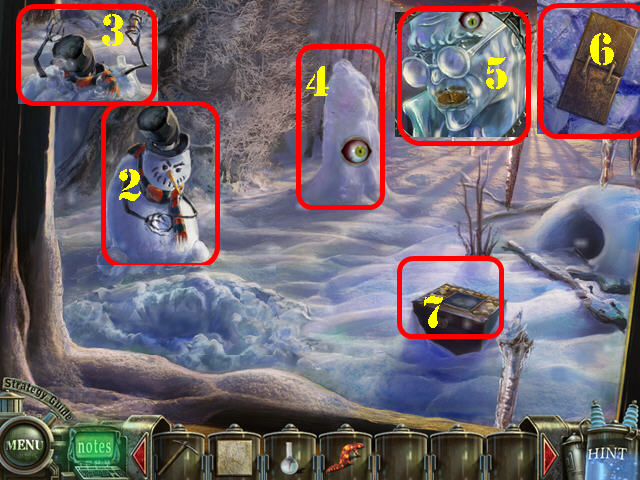
- Put the FIERY LIZARD on the snowman (2).
- Take the THREE GALLON HAT (3).
- Put the BOTTLE TORNADO on the large piece of ice (4).
- Zoom into Blackmore's ice statue and use the PICK on its mouth (5).
- Zoom into the broken ice; click on the ice 5 times and take the PUZZLE PIECE (6).
- Examine the box; put the 2 PUZZLE PIECES on it to activate a puzzle (7).
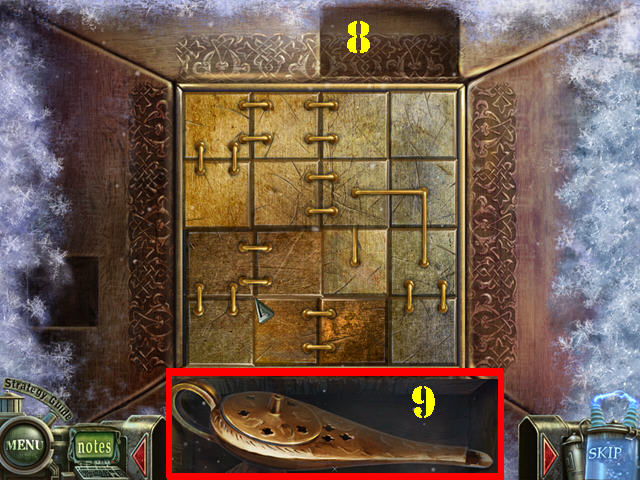
- Fit all the puzzle pieces in the box.
- Right-click on a piece to rotate it.
- Please look at the screenshot for the solution (8).
- Take the LAMP (9).
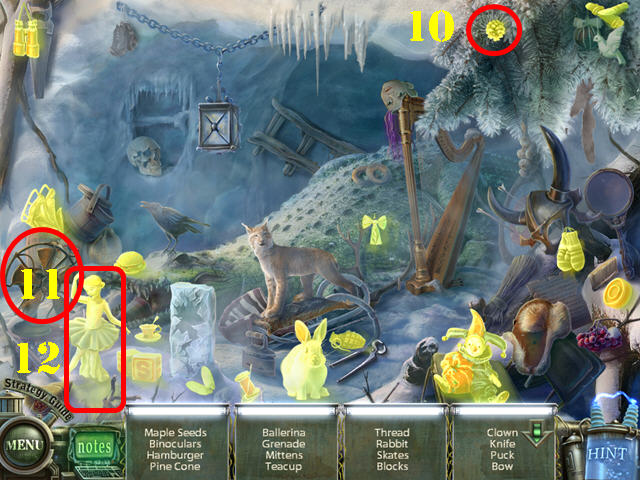
- Play the HOS.
- Click on the leaf; take the PINECONE (10).
- Click on the fan (11); take the BALLERINA (12).
- The WINGS will be added to inventory.
- Return to the desert scene.
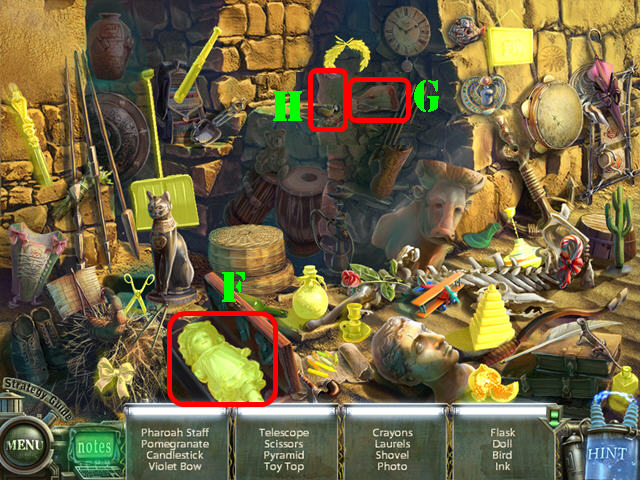
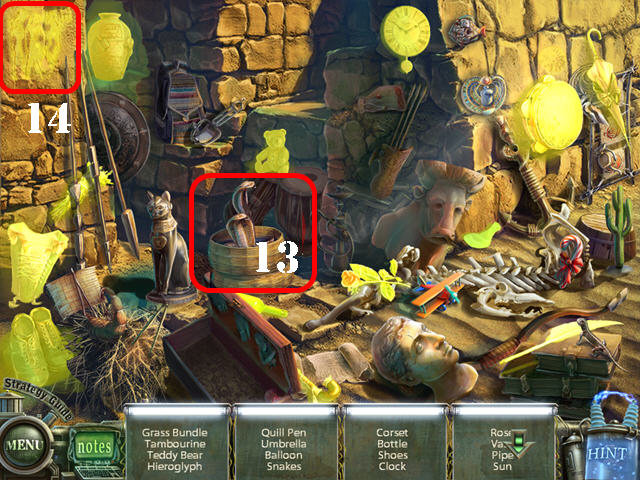
- Play the HOS.
- Open the basket; take the SNAKES (13).
- Click on the wall; take the HIEROGLYPH (14).
- The BALLOON will be added to inventory.
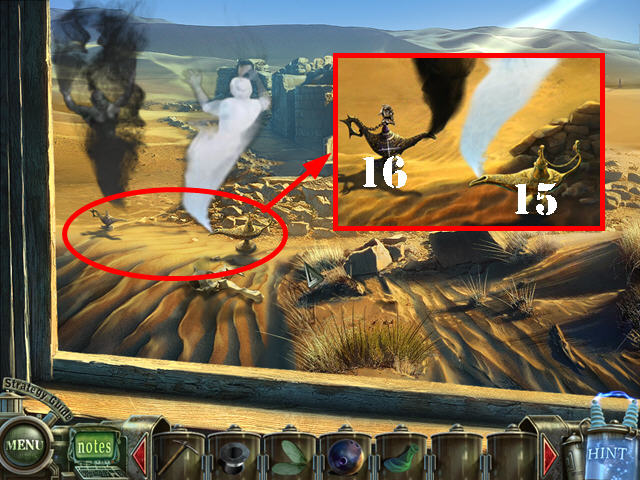
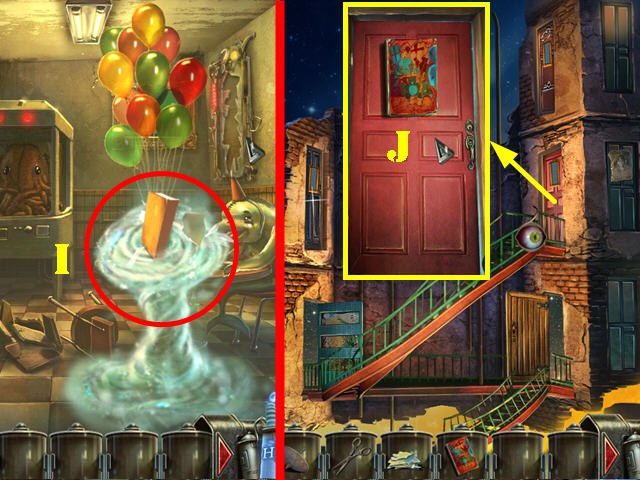
- Examine the genie lamp; put the LAMP next to it (15).
- Examine the genie lamp again; click on the left one (16).
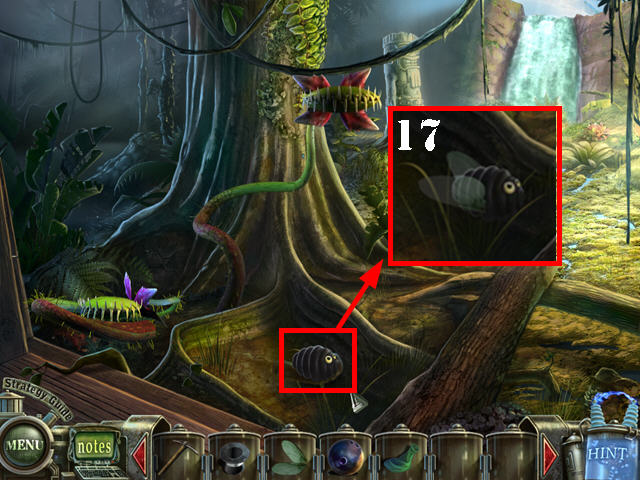
- Return to the tropical scene.
- Zoom into the hive and put the WINGS on it (17).
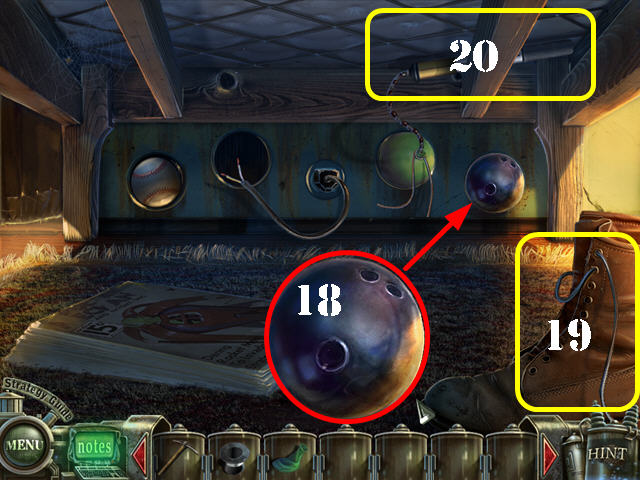
- Go back under the bed.
- Put the BOWLING BALL below the bed (18).
- Click on the bowling ball to clog up the last hole.
- Take the SHOELACE (19).
- Put the BALLOON on the bicycle pump (20).
- Tie the SHOELACE around the balloon.
- Click on the pump.
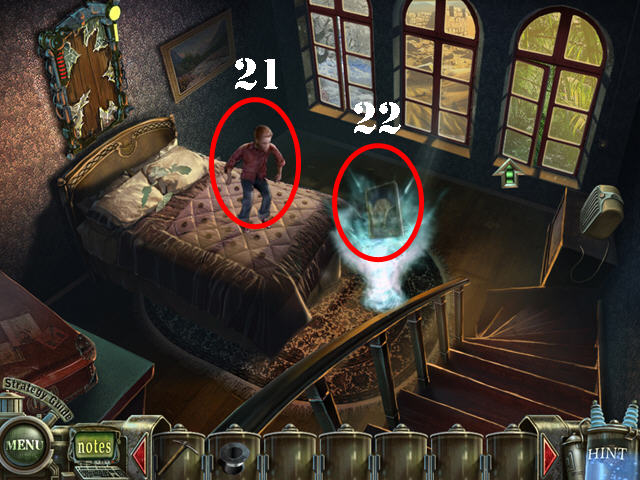
- Get out from under the bed.
- You saved the little boy! (21).
- Take the BOOK (22).
- Click down twice.
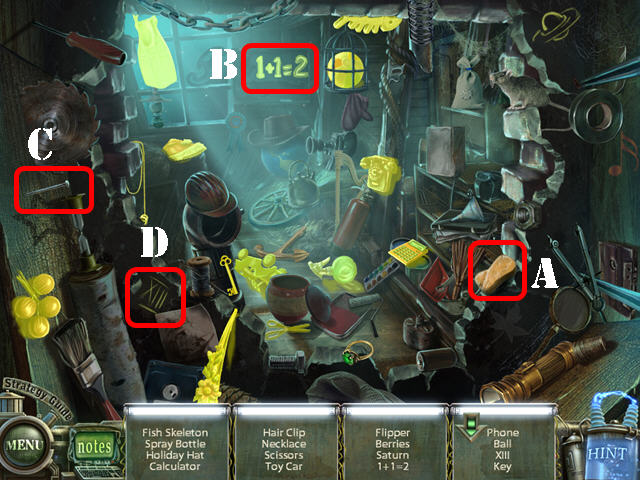
- Play the HOS in the metro lobby.
- Drag the sponge (A) to the chalkboard; take the 1 + 1 = 2 (B).
- Drag the nail (C) to the XII; take the XIII (D).
- The LAMP will be added to inventory.
- Click down.
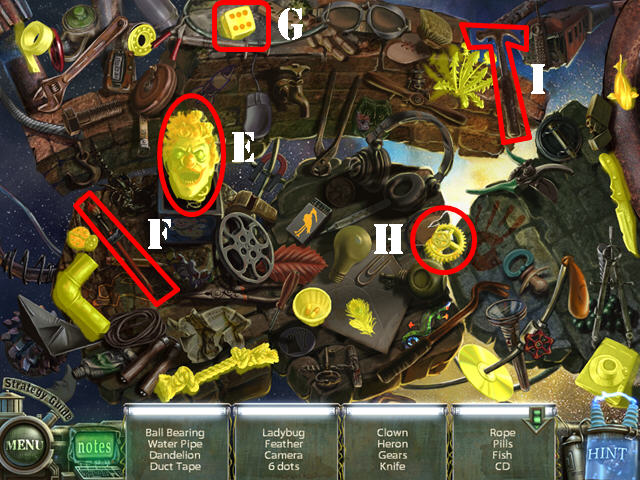
- Play the HOS.
- Click on the box; take the CLOWN (E).
- Drag the brush (F) to the die; take the 6 DOTS (G).
- Smash the clock (H) with the hammer (I); take the GEARS.
- The WATER PIPE will be added to inventory.
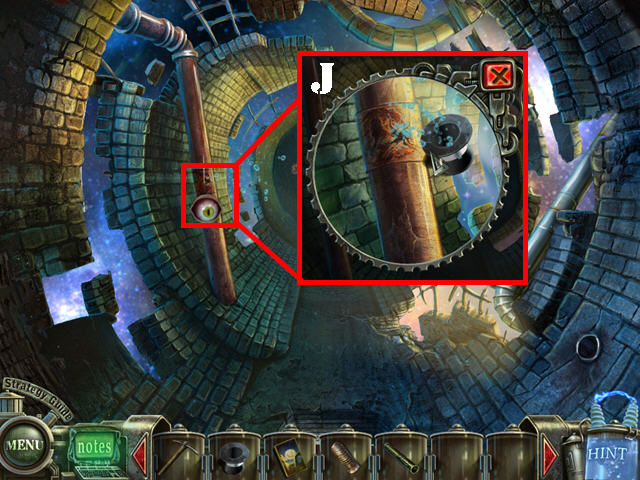
- Zoom into the leaky pipe; put the THREE GALLON HAT on it to obtain the HAT WITH WATER (J).
- Go forward twice.
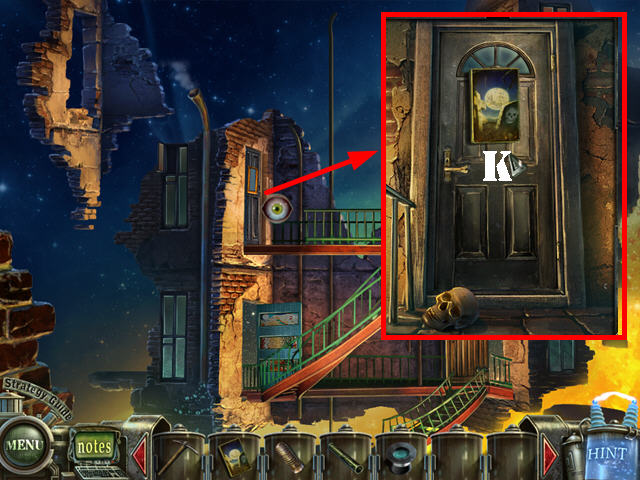
- Zoom into the middle left door (K).
- Put the BOOK on the door; open the door and go through it.
Chapter 5: The Girl in the Graveyard

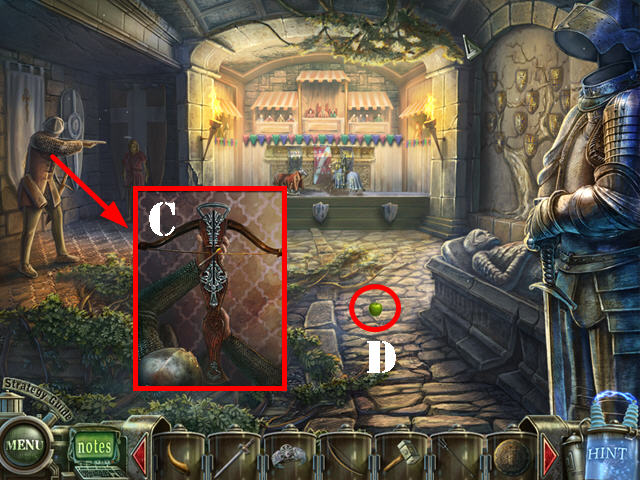
- Use the PICK on the stones on the left; take the STONE (A).
- Zoom into the top of the gate; click on the keys (B).
- Pick up the KEYS on the ground (C).
- Put the HAT WITH WATER on the right side of the ground (D).
- Zoom into the lock and put the KEYS in the lock (E).
- Click on the keys and go through the gate.
- Put the STONE on the left steps to open the gate and trigger a HOS (1).
- Click on the banana; take the PEELED BANANA (F).
- Click on the lamp; take the LIT LAMP (G).
- The INSULATING TAPE will be added to inventory.
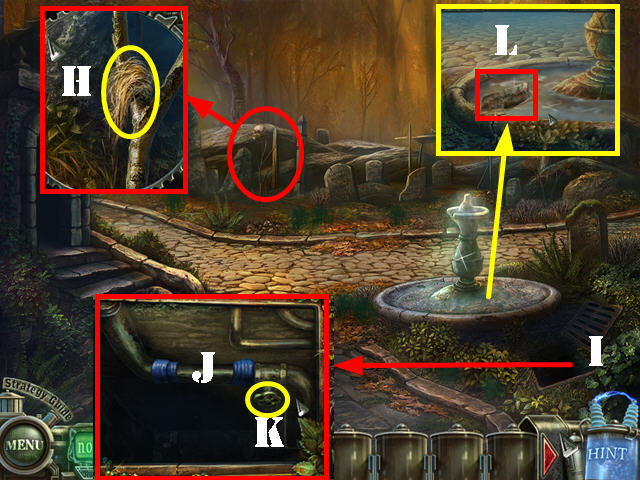
- Zoom into the stick; take the TOW (H).
- Remove the grate and zoom into it (I); put the WATER PIPE over the leak.
- Put the TOW and the INSULATING TAPE over the pipe (J).
- Click on the valve to activate the fountain (K).
- Zoom into the fountain; click on the paper boat and take the INSTRUCTIONS (L).
- Head left.
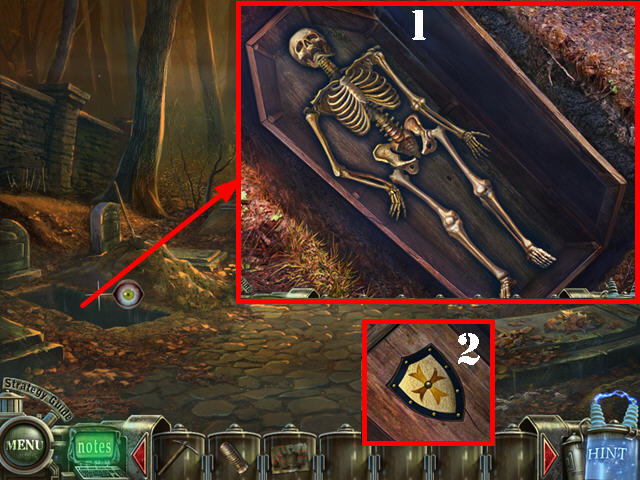
- Zoom into the open grave to activate a puzzle.
- Put together the skeleton by putting the pieces inside the coffin.
- Please look at the screenshot for the solution (1).
- Take the SHIELD (2).
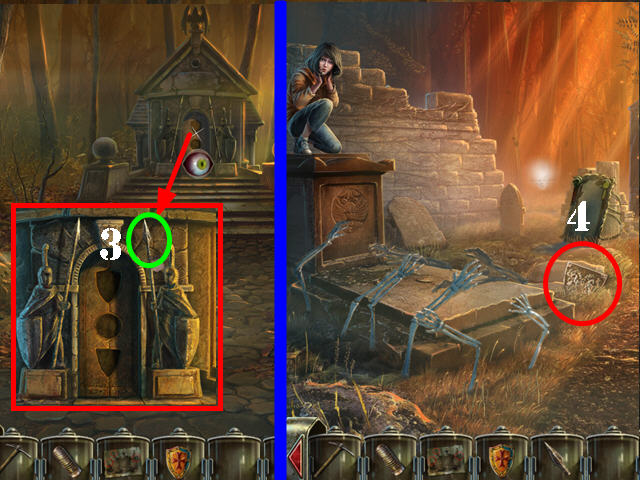
- Zoom into the statues; click on the SPEAR to add it to inventory (3).
- Click down and head right.
- Take the SHIELD on the ground (4).
- Play the HOS.
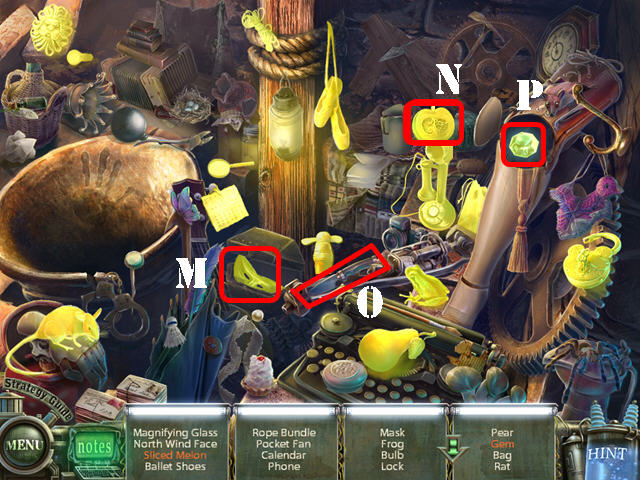
- Open the box; take the MASK (M).
- Cut the melon (N) with the knife (O); take the SLICED MELON.
- Click on the knee; take the GEM (P).
- The FAN will be added to inventory.
- Click down and head left.
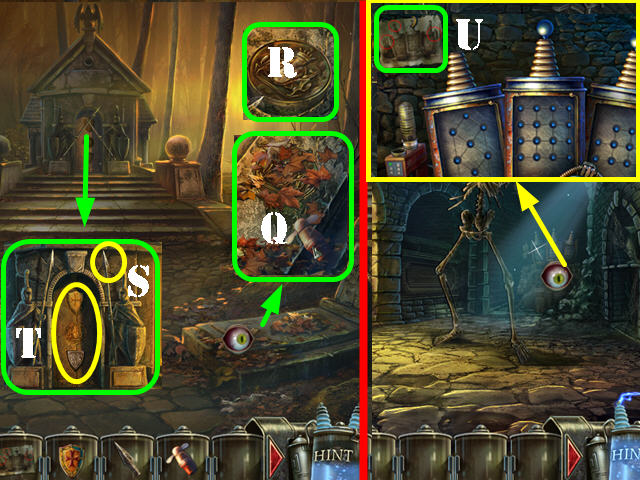
- Zoom into the right grave; put the FAN on it to blow away the leaves (Q).
- Use the SPEAR to pry off the SHIELD (R).
- Zoom into the mausoleum; put the SPEAR back on (S).
- Insert the 3 SHIELDS into the slots (T).
- Go forward.
- Zoom into the back wall; put the INSTRUCTIONS on the wall to activate the puzzle (U).
- Click down 3 times.
- Play the HOS.
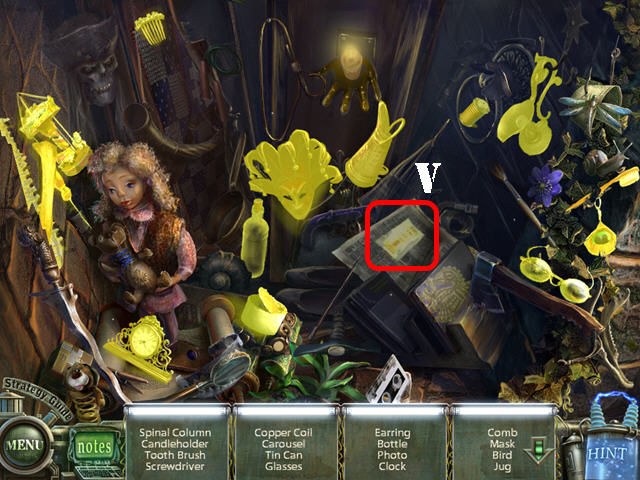
- Open the paper; take the PHOTO (V).
- The CONDUCTOR will be added to inventory.
- Head right.
- Play the HOS.
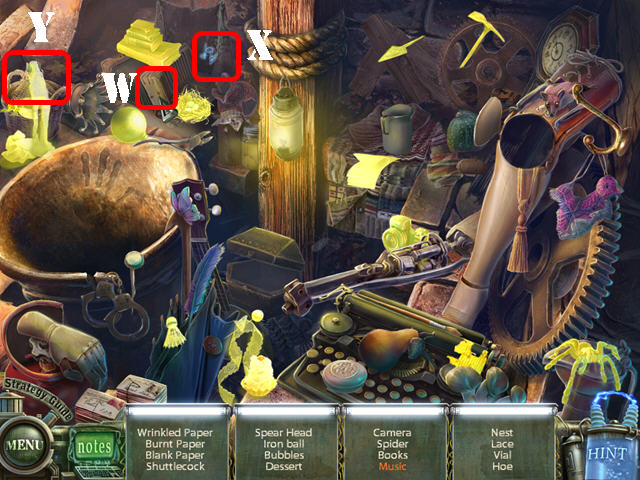
- Click on the accordion (W); take the MUSIC (X).
- Click on the bottle; take the BUBBLES (Y).
- The IRON BALL will be added to inventory.
- Return to the inside of the mausoleum.
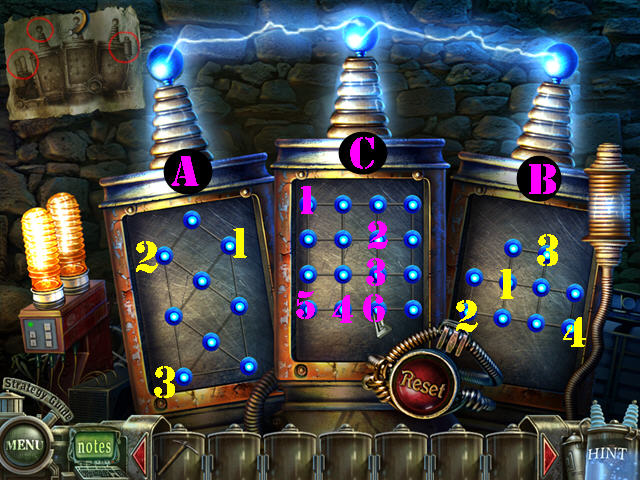
- Zoom into the puzzle on the back wall.
- Put the LAMP, IRON BALL, and CONDUCTOR on the mechanism to activate the puzzle.
- Click on the lights in the correct order until each section is lit up.
- Please look at the screenshot for the solutions (A, B, and C).
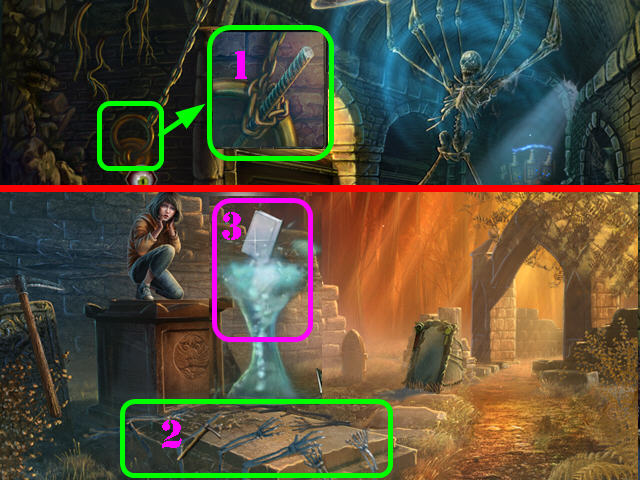
- Examine the lock; break it with the PICK to drop the chandelier on the skeleton (1).
- Click down twice and head right.
- Use the PICK on the skeleton hands on the grave 3 times (2).
- Take the BOOK (3).
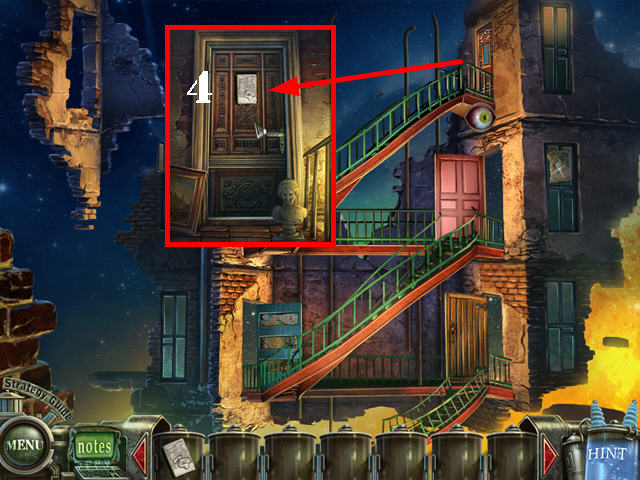
- Click down 3 times.
- Zoom into the top right door (4).
- Put the BOOK on the door; open the door and go through it.
Chapter 6: The Boy in the Museum
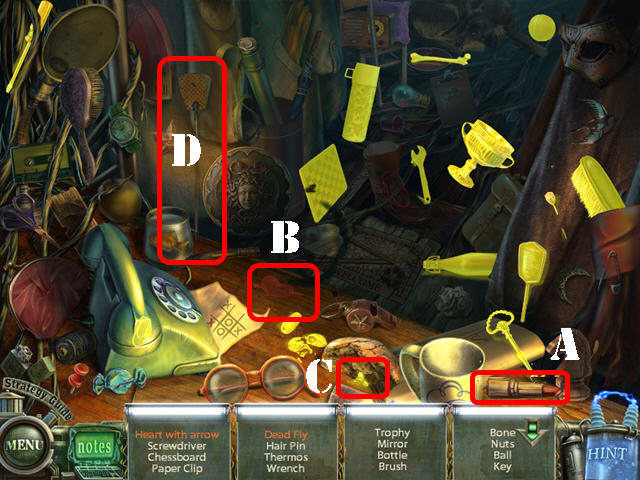
- Play the HOS.
- Put the lipstick (A) on the heart; take the HEART WITH ARROW (B).
- Hit the fly with the flyswatter (D); take the DEAD FLY (C).
- The CHALICE will be added to inventory.
- Examine the small statue; take the LIRA (E).
- Zoom into the door; take the LIGHTNING (F).
- Go through the left archway (@).
- Play the HOS.
- Put the head (G) on the body; take the DOLL (H).
- Drag the charcoal (I) to the ball; take the BLACK BALL (J).
- The SAW will be added to inventory.
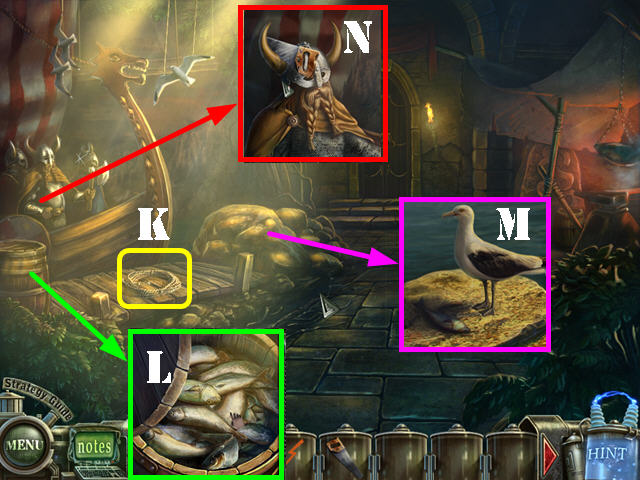
- Take the ROPE (K).
- Zoom into the barrel; open it and take the FISH (L).
- Zoom into the rock; put the FISH on it to attract the seagull.
- Zoom into the seagull and take the WINGS (M).
- Examine the Vikings; use the SAW on the helmet and take the HORN (N).
- Open the back door and go through it.
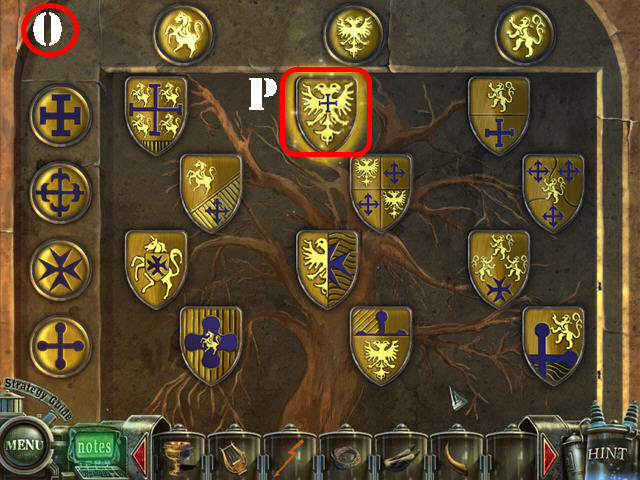
- Zoom into the shields on the right to activate a puzzle.
- Put the shields into the correct spots by placing them where the same symbols intersect.
- Please look at the screenshot for the solution (O).
- Take the glowing SHIELD after the puzzle has been solved (P).
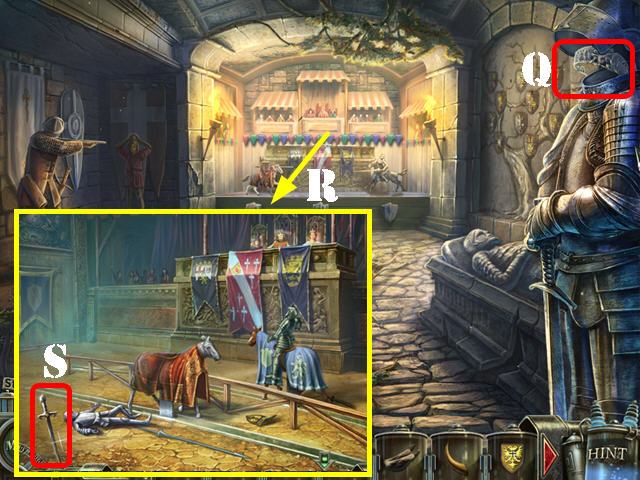
- Open the helmet and take the CROWN (Q).
- Zoom into the arena in the back (R).
- Place the SHIELD on the left knight.
- Take the SWORD (S).
- Click down twice and head into the right archway.
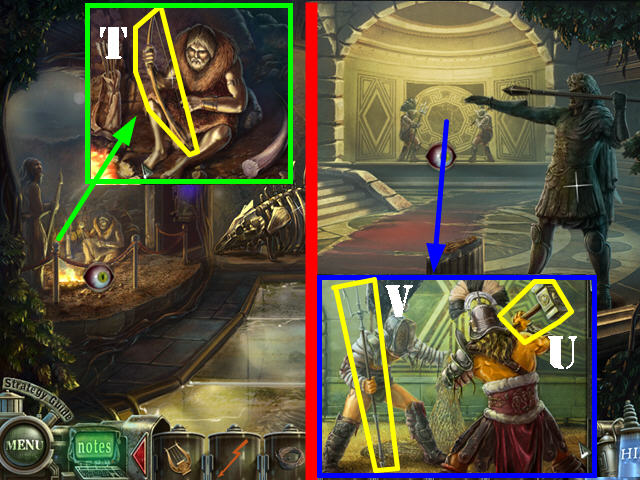
- Take a closer look at the caveman exhibit; take the BOW (T).
- Head right.
- Zoom into the statues in the back; take the HAMMER (U) and the TRIDENT (V).
- Click down twice.
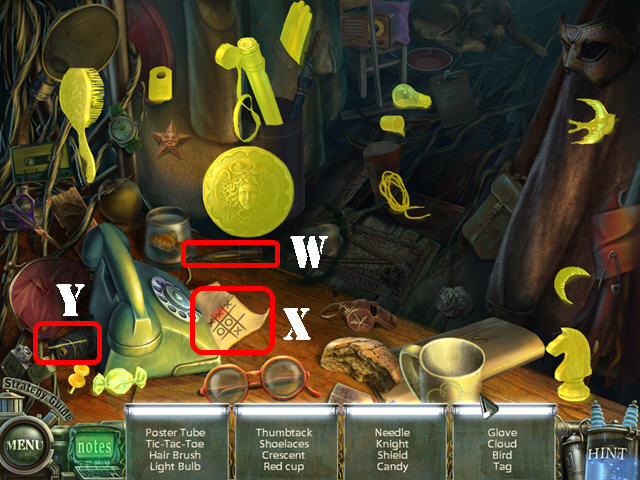
- Play the HOS.
- Put the pencil (W) on the paper; take the TIC-TAC-TOE (X).
- Click on the spool; take the NEEDLE (Y).
- The SHIELD will be added to inventory.
- Go through the left archway.
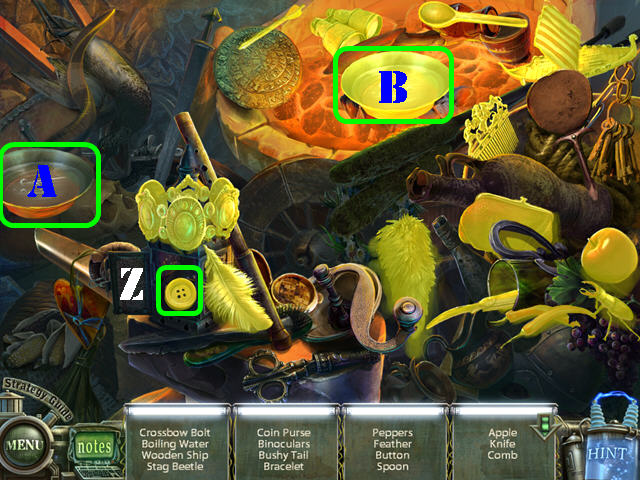
- Play the HOS.
- Open the box; take the BUTTON (Z).
- Drag the water bowl (A) to the coals; take the BOILING WATER (B).
- The BOLT will be added to inventory.
- Go through the back door.
- Zoom into the archer; place the BOLT on the crossbow (C).
- Take the APPLE on the ground (D).
- Click down twice; go through the right archway, and head right.
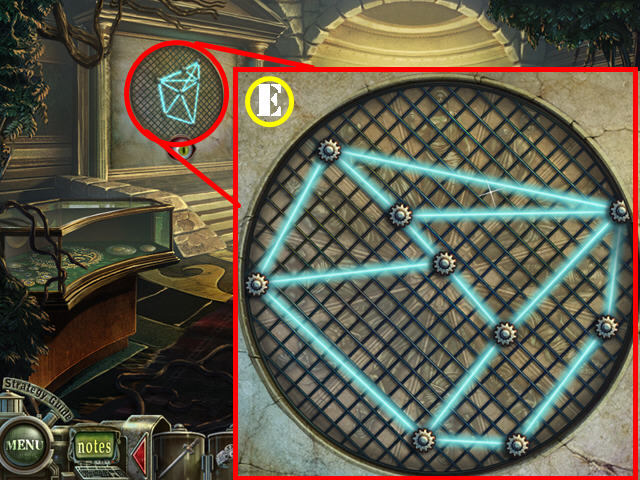
- Examine the left wall to activate a puzzle.
- Untangle the lasers by pulling apart the generators.
- Please look at the screenshot for the solution (E).
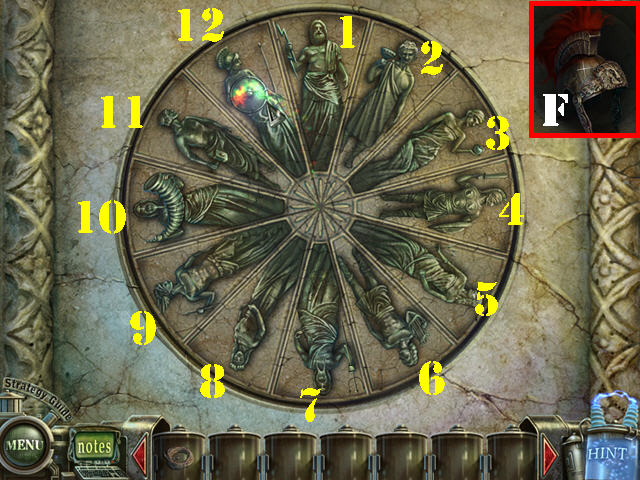
- A second puzzle appears after you untangle the lasers. This time you need to put the items next to the right people.
- Click on each person to read a brief description and then give them items that match their descriptions.
- Place the LIGHTNING (1), CHALICE (2), APPLE (3), SWORD (4), BOW (5), LIRA (6),TRIDENT (7), CROWN (8), WINGS (9), HORN (10), HAMMER (11) and the SHIELD (12) on the board.
- Take the HELMET (F).
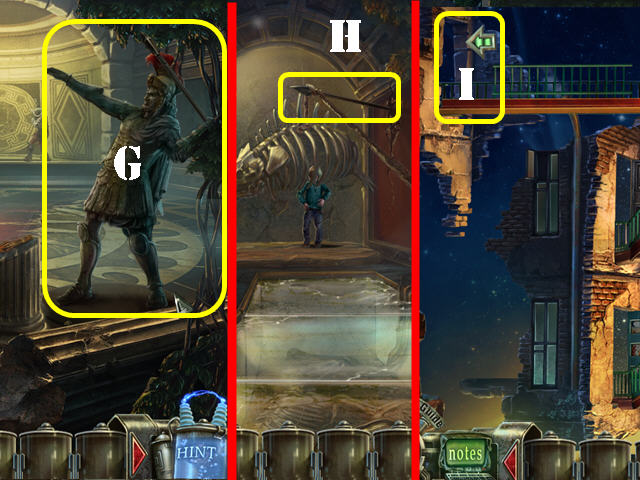
- Put the HELMET on the large statue (G).
- Click down.
- Put the ROPE on the spear to lift up the skeleton (H).
- Click down twice.
- Go through the door in the upper left (I).
Chapter 7: Blackmore's Lair
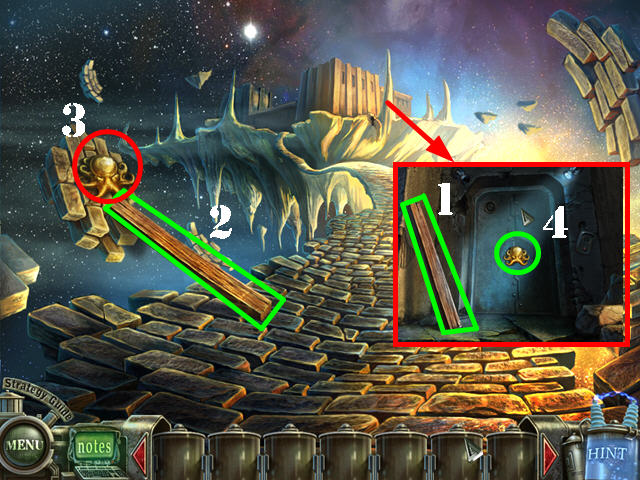
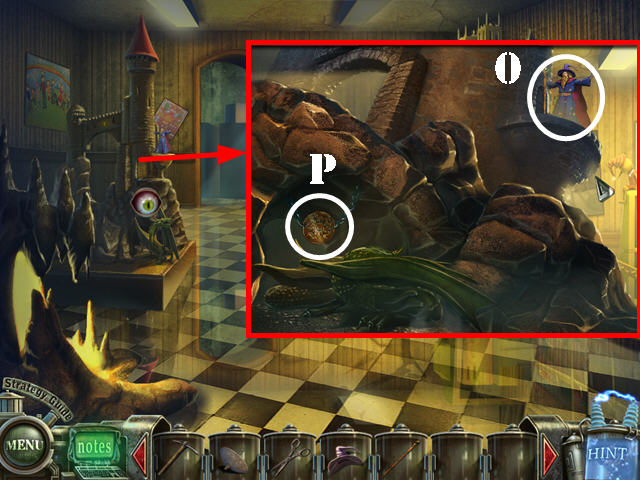
- Examine the large building; take the BOARD (1).
- Put the BOARD down by the octopus (2).
- Examine the OCTOPUS and take it (3).
- Zoom into the building again.
- Put the OCTOPUS on the door (4).
- Open the door and go through it.
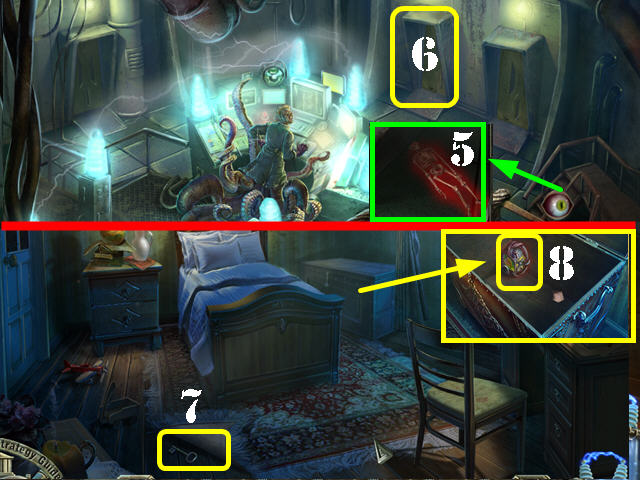
- Examine the bottom of the steps; take the SKELETON (5).
- Go through the center door (6).
- Lift the carpet and take the KEY (7).
- Examine the chest.
- Put the KEY in the lock; open the chest and take the MONSTERS (8).
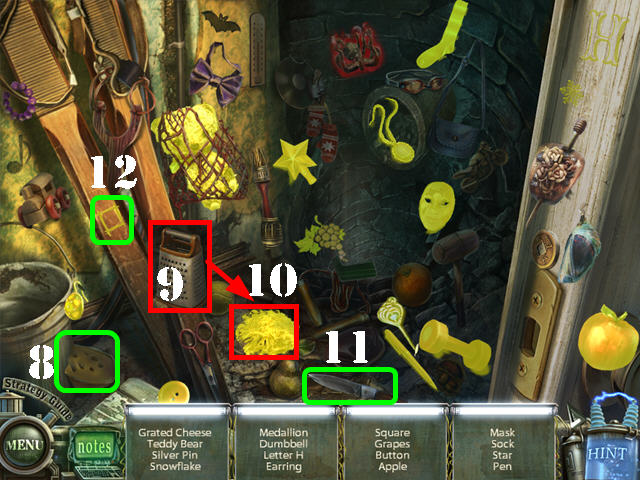
- Open the left door to trigger a HOS.
- Drag the cheese (8) to the grater (9); take the GRATED CHEESE (10).
- Put the knife (11) on the wood; take the SQUARE (12).
- The PIN will be added to inventory.
- Exit the room and go into the right door.
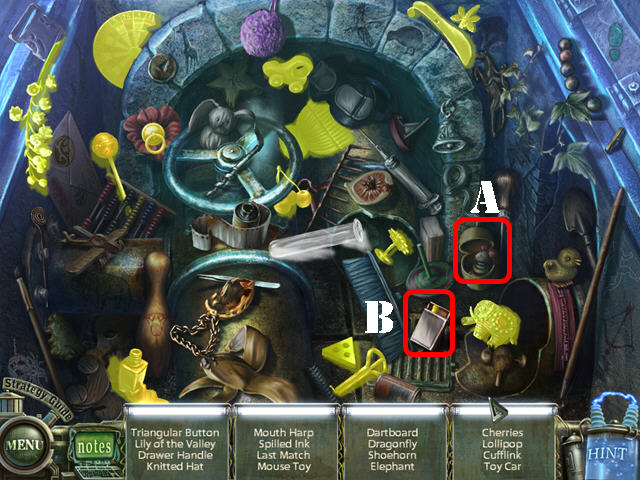
- Zoom into the grate; use the PIN on the lock to activate a HOS.
- Open the box; take the MOUSE TOY (A).
- Open the matchbox and take the LAST MATCH (B).
- The DRAWER HANDLE will be added to inventory.
- Return to the bedroom.
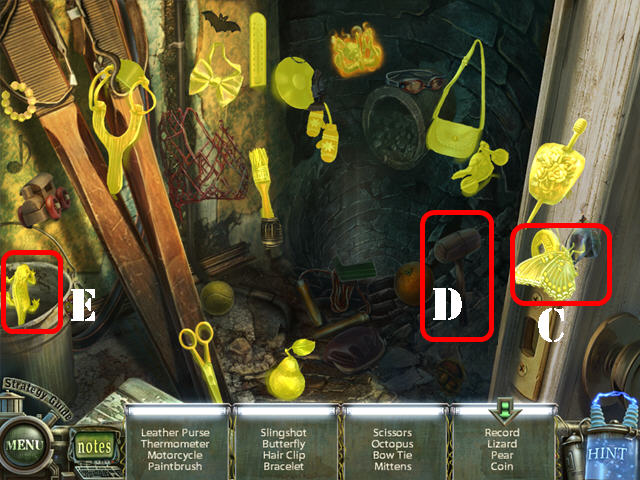
- Play the HOS.
- Click on the cocoon; take the BUTTERFLY (C).
- Use the hammer (D) on the bucket; take the LIZARD (E).
- The OCTOPUS will be added to inventory.
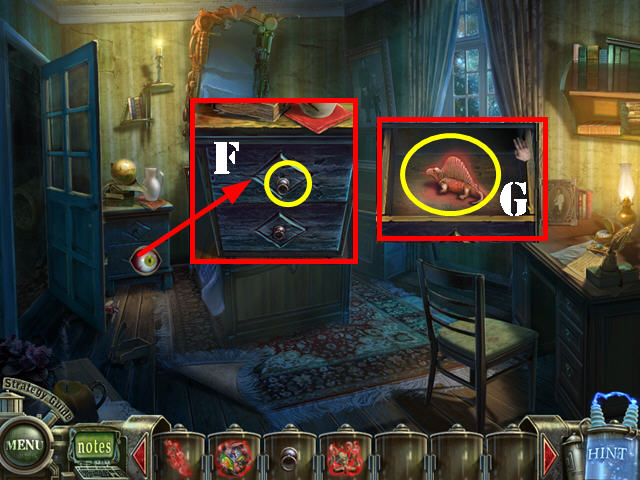
- Zoom into the drawer; put the DRAWER HANDLE on it (F).
- Open the drawer and take the DINOSAUR (G).
- Click down and head into the right door.
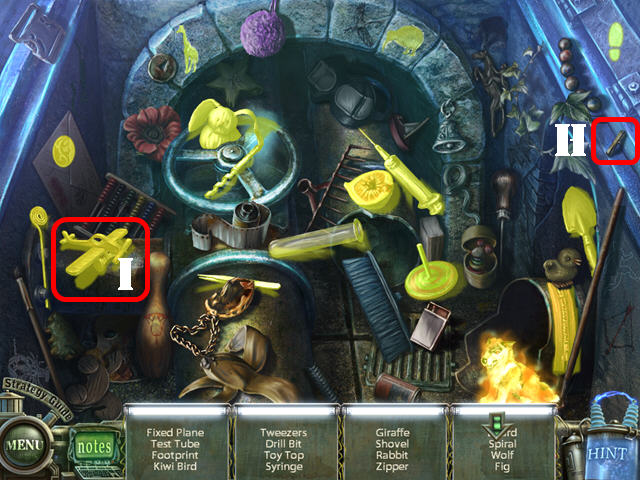
- Play the HOS.
- Put the propeller (H) on the plane to make it fly; take the FIXED PLANE (I).
- The WOLF will be added to inventory.

- From left to right, place the items in this order on the mirrors: WOLF (1), OCTOPUS (2), MONSTERS (3), SKELETON (4), and DINOSAUR (5).
- Take the TOY (J).

- Click down and go into the left door.
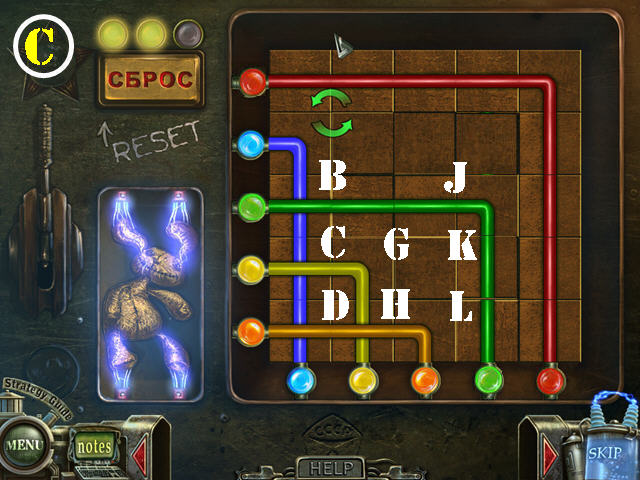
- Zoom into the device on the left; put the TOY in the lower left slot to activate a puzzle.
- Align the wires correctly.
- You have to solve 3 rounds of this puzzle.
- In the first round, you must swap the pieces into place as shown in the screenshot (A).
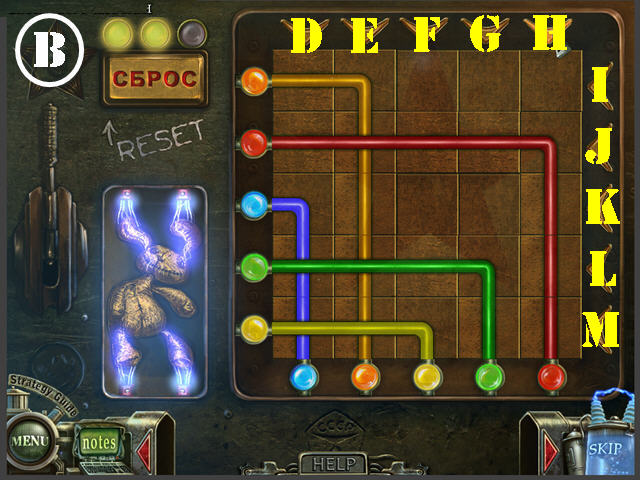
- In the second round (B), you must move the pieces with the arrows.
- To solve the second round, click on the arrows in this order: E, I x 2, H x 3, L x 2, F, M x 2, E, I, E x 4, H, M x 2, H x 4, M, H x 3, M x 6, H x 4, M, J x 3, H x 4, J x 2, H, I x 4, H x 4, and I.
- In the final puzzle you must rotate 4 pieces at a time.
- Place your cursor in between 4 tiles for arrows to appear and click to rotate.
- To solve the third puzzle (C), click in the center of the squares in this order: B x 3, C x 2, D x 3, H x 2, G, D x 3, L x 3, J x 2, K, and J x 2
- Tim will pull the lever and you will be taken back to the lab.
- Congratulations! You have completed Haunted Halls: Fears from Childhood!
Created at: 2011-11-11