

GAME WALKTHROUGH MENU
GENERAL TIPS
- You can use the CTRL key to switch between first and third person mode. This can be useful in several locations where an item you need to pick up is just off screen. Switch to first person to see what Holmes sees. Descriptions in the following guide may alternate between the first and third persons!
- In first person mode, once an item you can use – such as a door, note, or something to pick up – is near the center of the screen, an icon will appear over it.
- In first person mode, use W to move forward, A to move left, B to move right, and S to move back. Use the mouse to look around and the left mouse button when an icon appears.
- There are several icons in this game, and they will appear automatically when needed: footprints to move, a magnifying glass to examine something, and a hand to use or pick up an item. The basic pointer, Sherlock Holmes’ Pipe, will also move you to a location as a default. Once an icon is where you want it, just click the left mouse button to tell Holmes what to do.
- Many locations can be accessed by clicking the gold dots on the map screen. This can sometimes be much faster than walking!
- This game does not autosave. Make sure to save often by using ESC to get to the menu!
LONDON
Baker Street
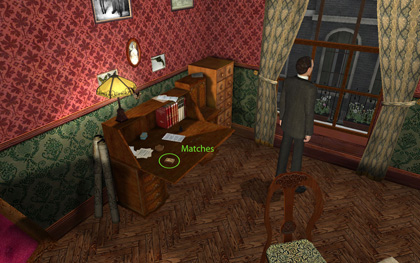
- When you get control of Holmes, turn to the desk on your left and pick up the box of matches.
- Leave Holmes’ apartment and go downstairs to the street.
- Talk to the paperboy.
- Read the Strand. You can switch pages by clicking the tabs on the top (previous) or bottom (next) of the book.
- Go in the opposite direction from the one the paperboy ran off in. Talk to the policeman to get directions to Barnes’ Bookstore, the owner of which was mentioned by Watson.
Barnes’ Bookstore
- Look for the books Barnes mentioned.
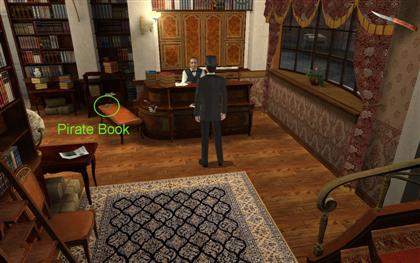
- The book on Pirates is on the seat to the left of the counter.
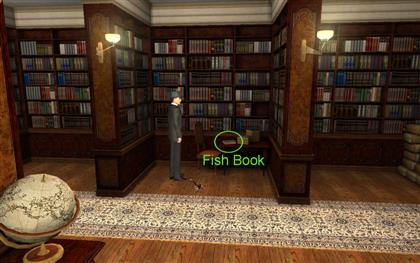
- The fish book (sea fauna) is on the table in the middle alcove.
- Head back to Baker Street.
Stenwick Residence
- As you near Baker St, Watson will direct your attention to a house across the way.
- Talk to him about the situation with Captain Stenwick and his servant.
- Once you are done talking to Watson, go up the steps and question Sgt. Rufles and Capt. Stenwick.
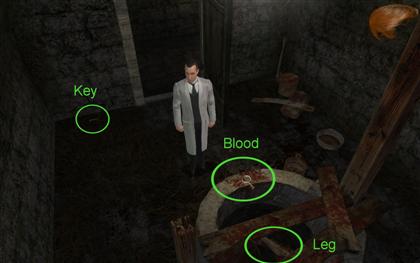
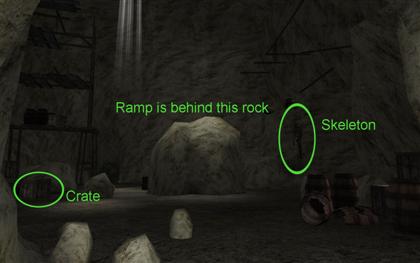
- Follow the path behind Sgt. Rufles’ around the back of the house to the shed that Baowpa lived in.
- Examine the door and the piece of cloth hanging from the doorway.
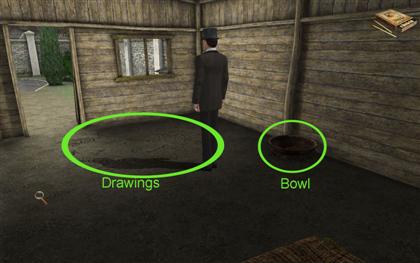
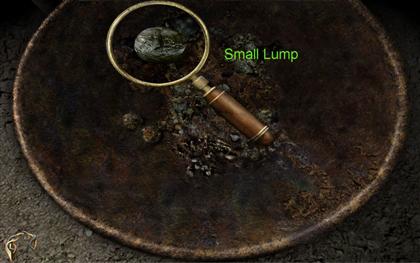
- Enter the shack and examine the drawings on the floor, then the bowl nearby. Use the magnifying glass near the upper left, in the closeup of the bowl, to pick up the small lump.
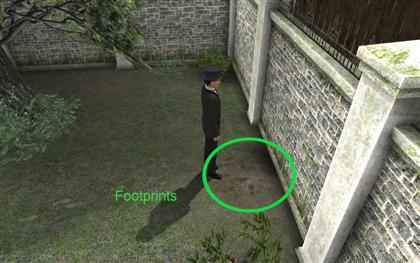
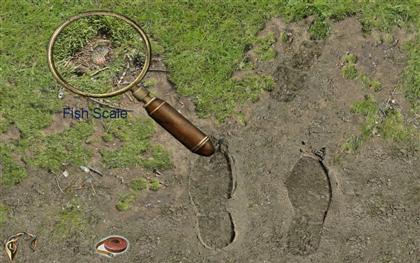
- Exit the shed and follow the footprints to the back wall. Examine the prints in the patch of dirt. Use the magnifying glass on the right footprint, then use it again towards the upper left of the screen to find some fish scales. Then use the measuring tape on the left footprint.
- Click on the ironwork on top of the wall above the footprints.
- You will have to circle around to the other side of the wall to take a closer look. To do this, go around the front of the house to the street and into the alley on the other side.
- You will notice more footprints on this side. Follow them.
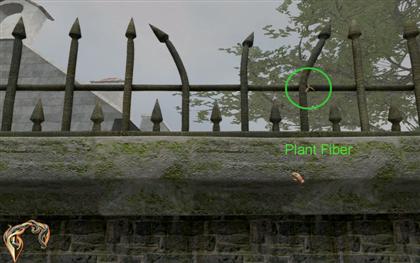
- Pick up the ladder on the ground near the gate and use it to reach the ironwork.
- Grab the plant fibers stuck on the right side of the ironwork.
- Return to the front of the house and speak to Stenwick.
Baker Street
- Click on the chair in front of the workbench to start analyzing the evidence you have found so far.
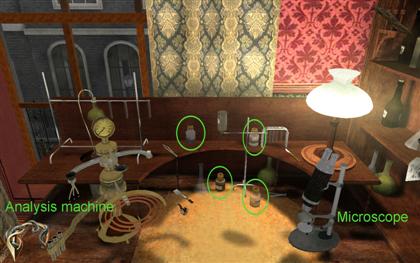
- Select the cloth in the Items Menu. Click on the microscope to look at the cloth more closely. Right–click to leave the closeup view and read Holmes’ findings.
- Do the same thing with the fish scales in your Items. Once on the microscope, you will notice you have tweezers and a scalpel in the lower left corner. Select the tweezers and click on the scales for Holmes’ findings.
- Repeat this process with the plant fibers. You will need to use the tweezers on the frayed area of the fibers.
- Select the piece of stained rope in the Items Menu and place it on the small dish in the middle of the analysis apparatus.
- Pick up the bottles of solvent, water, acid, and spirit of alcohol from the table.
- Select the solvent in your Items Menu and apply it to the plant fiber on the dish. The machine will do the rest.
- Select the small lump from Items and place it on the microscope. Use the scalpel to cut it in half. Use the tweezers to get the compound from ball.
- Select the compound from ball in the Items Menu and place it on the small dish.
- Select the acid from items and apply it to the dish. The compound will then dissolve.
- Select the matches from your inventory. Use them on the small candle on the right hand side of the analysis apparatus. Again, the machine will do the rest.
Baker Street (Watson)
- Control will then switch to Watson just outside Holmes’ front door.
- Cross the street and talk to the paperboy.
- Head for Barnes’ Bookstore.
Barnes’ Bookstore (Watson)
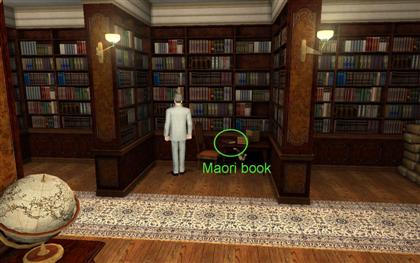
- Once you are done talking to Barnes, walk to the middle bookcase. The Maori book will be in the same place on the table as the book about fish was when Holmes visited.
- Read the text in your Documents Menu, then return to Baker Street.
Baker Street (Watson)
- Go upstairs and talk to Holmes.
- Type in any of these words: Dock, Wharf, or Thames.
- Open your map screen, where you have a new location. Go to Wharf no. 13.
Wharf no. 13
- You will be in control of Holmes again.
- Enter the pub.
The Cursed Mermaid
- Talk to the bartender.
- Exit the pub.
Wharf no. 13
- Turn to Holmes’ left and keep going in that direction. Stick to the right side; go past a bridge and down some stairs.
- Just past the bottom of the stairs is a building with an anchor painted on the side (Harper’s house). Knock on the front door of this building.
- You will see a stack of sacks just past the door. Pick up the rope sitting on top of them.
- Enter the small house across from Harper’s house.
Nepalese house
- Talk with the Nepalese woman.
- Take the silver Pelican medallion from the altar next to her.
- Exit the house.
Wharf no. 13
- Follow the docks towards the ship in the distance.
- Talk to the postman.
- You will receive the bottle of moonshine.
- Return to the Cursed Mermaid.
The Cursed Mermaid
- Talk to the bartender.
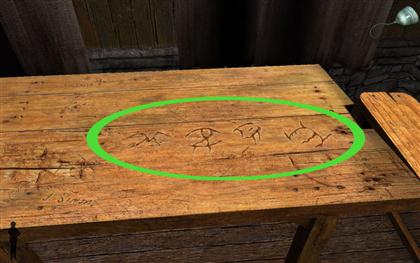
- Enter the curtain closest to the back wall opposite the bar.
- Switch to first person view (CTRL key) and examine the carvings on the table. The carvings will be entered into your "Documents" menu.
- Exit the pub.
Wharf no. 13
- Return to where you found the postman. Go down the alley just past him and up the stairs.
- Walk to the end of this street and down the alley with wooden planks covering a hole.
- Select the bottle of moonshine from your Items Menu and knock on the door at the end of the alley.
- Talk to the bootlegger. You will receive the parcel.
- Equip the Pelican Medallion and knock on the door again.
- Talk to the bootlegger again.
- Go back to the Cursed Mermaid.
The Cursed Mermaid
- Enter the pub.
- Go to your Items Menu and drag the knife to the parcel.
- You will receive the fake hand with scraper.
- Select the fake hand with scraper in your Items Menu and give it to the drunkard.
- Take the hook he left on the bar.
- Exit the pub and return to where you found the postman.
Wharf no. 13
- Continue following the road from the postman past the ship in drydock.
- Go right, down the street just past the ship, then right again at the first street.
- Try to open the green doors in the second building on the left side of the street. This is Warehouse 12; it will have a broken window above the door.
- In your Items Menu, combine the hook and the rope.
- Use the hook and rope on the broken window.
- Controlling Watson, walk around to the small window visible on the side of the building.
- Click on the window.
- Click and drag the hand cursor around the soot to clean the window; do this until you see a cut scene.
- Controlling Holmes again, open the green doors and enter the warehouse.
Warehouse 12
- Walk to the group of crates on the right.
- Pick up the iron bar in front of the first crate.
- Click the grey soot area on the floor where the footprints end.
- Take the Passport and the Hatpin.
- Select the iron bar in your Items Menu and use it to open the 2 crates parallel to the wall.
- Take the lantern from the second crate.
- Examine the blood on the crate on top of the stacks.
- Walk over to the large doors in the floor and examine the spot where the footprints disappear.
- Click on the large doors handles.
- Go to the giant cauldron hanging from the ceiling and stand on the other side of it, near the large basin.
- Click on the cauldron to push it under the faucet.
- Walk past the large basin and you will see a valve on the wall. Turn it.
- Return to the cauldron and push it until it is close to the platform made of planks.
- Climb to the top of the planks.
- Click the hanging rope and then click on the cauldron’s handle to tie the rope to it.
- Go to the other end of the hanging rope near the large doors.
- Click the end of the rope; then click the door handles to tie the rope to them.
- Walk back up the planks and use the knife on the old rope that the cauldron was tied to originally.
- Go through the newly opened doors and down the stairs.
Underground Temple
- Walk down the tunnel. The lantern will automatically be equipped for walking down the tunnel, but you will need to equip it before operating the pedestal.
- Click on the top of the pedestal in the center of the room.
- Move the symbol projected on the wall over the symbol drawn on the far left hand side of the wall until it matches the third symbol carved on the bar table.
- Examine the glyphs on either side of the door. Press them in the order that matches the ones carved on the bar table. – Left side, middle glyph – Right side, top glyph – Right side, bottom glyph – Left side, top glyph
- Enter the temple.
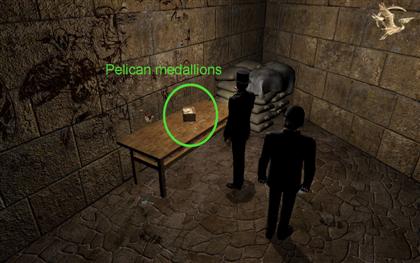
- Go left inside the door and examine the pelican medallions on the table.
- Go to the other side of the door and pick up some coal from the box on the floor.
- Walk down the center aisle of the temple.
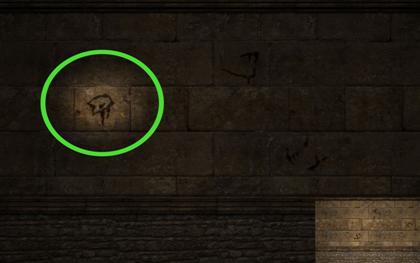
- Examine the black marks on the floor between the last 2 columns on the right.
- Examine the pile of clothes on the other side of the column.
- Go to the workbench behind the columns on the opposite side of the center aisle.
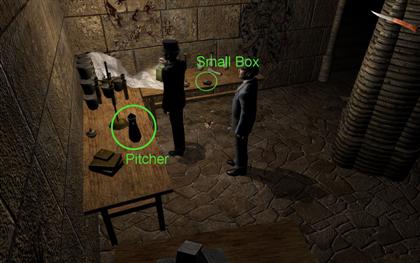
- Examine the pitcher.
- Examine the small box on the table and it will zoom in.
- Examine the white powder spilled near the glass beaker.
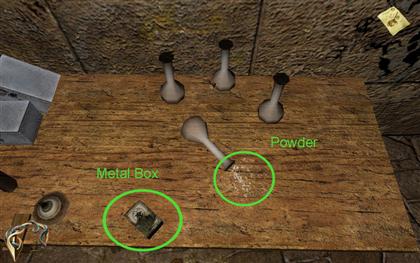
- Pick up the metal box with the flower.
- Return to the center aisle and walk up the steps to the altar.
- Examine the right hand, middle finger.
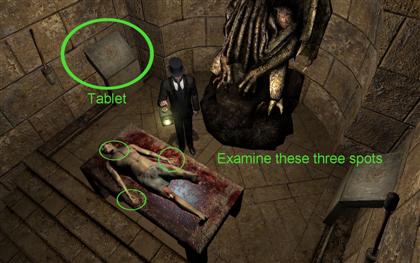
- Pick up the broken idol on the floor near the victim’s head.
- Examine the left hand, tip of the thumb.
- Examine the victim’s neck.
- Examine the tablets attached to the wall on either side of the large idol. They are both the same.
- Place the advertisement found in the pile of clothes on the tablet.
- Use the coal on the advertisement to make a rubbing of the tablets.
- Exit the temple.
Baker Street
- Walk to the workbench.
- Click the chair to begin analysis.
- In your Items Menu, drag the knife to the metal box with the flower to get the white powder.
- Select the white powder and put it on the microscope.
- Use the tweezers on the large chunks in the powder to get compounds from Maoris’s lump.
- Select the compounds and put them on the dish of the analysis machine.
- Use the matches on the small candle as you did before.
- When your map comes up after the dialogue. Select the Cursed Mermaid at the wharf.
The Cursed Mermaid
- Enter the pub.
- Talk to the bartender.
- Exit the pub.
Wharf no. 13
- Go to the customs shack, just past the Nepalese house on the left.
- Click the note on the small crate.
- Click the registry book on the large crate.
- Go to Warehouse 16. It will be a dot on your map between the Cursed Mermaid and the Smugglers.
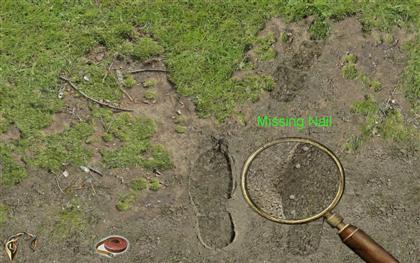
- Click the footprints in front of the door.
- Use the magnifying glass to find the shoe with the missing nail.
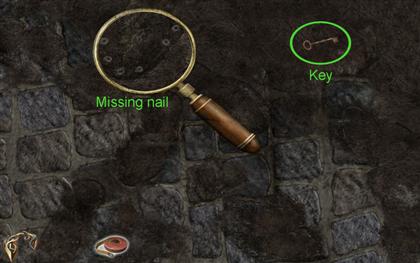
- Measure the footprints.
- Use the magnifying glass to pick up the key.
- Follow the footprints.
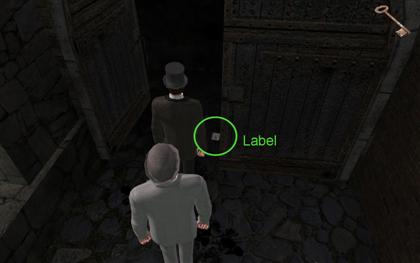
- Use the key you just found on the door where the footprints end.
- Pick up the label on the ground inside the door.
- Return to Baker Street.
Baker Street
- Read the letter from Mycroft and his translation of the rubbing.
- The symbols resemble the Swiss flag. Type Switzerland when prompted.
SWITZERLAND
Black Edelweiss Institute (Watson)
- Click the door to enter the institute.
- Walk inside.
- Talk to the receptionist.
Black Edelweiss Institute
- You will now be in control of Holmes. You must do the next part quickly if you want to avoid some adverse effects for a few minutes, but if you don’t it will not affect gameplay so don’t worry.
- Pick up the sedative and the syringe.
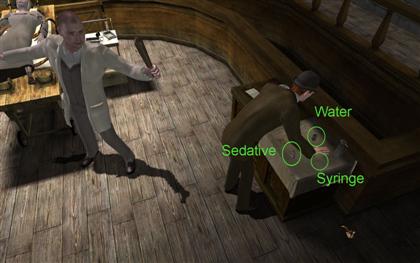
- Equip the syringe and use it on the glass of water.
Cell
- Pick up the spoon and meal tin near the other prisoner’s head.

- Click on the other prisoner.
- Walk over to the empty mattress.
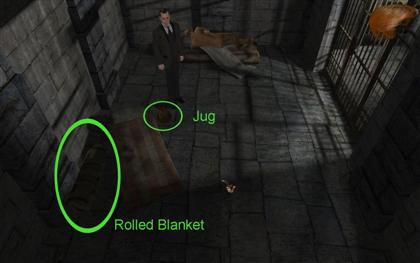
- Click on the rolled blanket and the jug. This will put them on the bed.
- Equip the hat and use it on the jug; then use the coat on the rolled blanket.
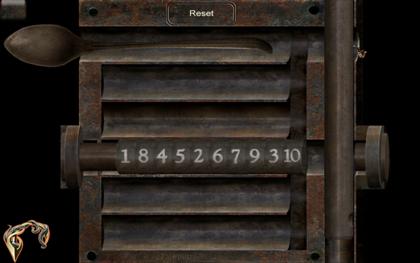
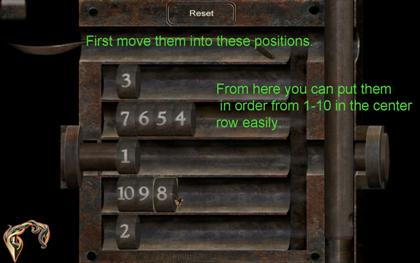
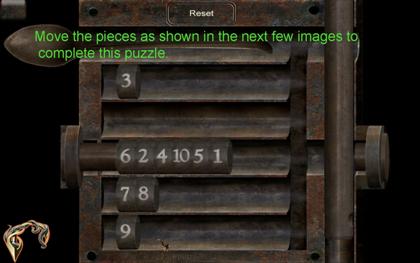
- Equip the spoon and click on the cell door’s lock.
- To open the lock you must put the numbered metal pieces in order from 1 through 10. One way to do this is illustrated in the following screenshots.
- Exit the cell.
Laboratory
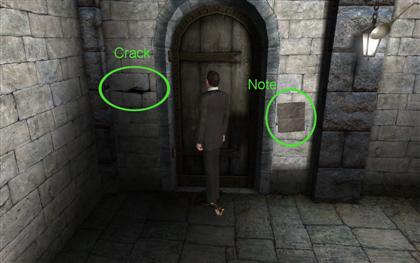
- Walk away from the locked wooden door and take the first left.
- Click on the note to the left of the first door.
- Enter the lab.
- Take the three syringes from the bottom of the first table.
- Pick up the doll on the table against the wall behind Holmes.
- Exit the lab and go left down the corridor.
- Walk to the end of the corridor.
- Click the note on the right side of the door.
- Click the large crack in the wall to the left of the door to get the key.
- Use the key on the door and enter the maintenance room.
- Pick up the iron bar on the floor.
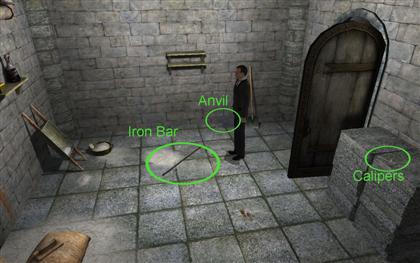
- Pick up the calipers from the stack of bricks.
- Pick up the Anvil that is next to the shovel.
- Equip the calipers and measure the pipes on the stack of crates in the far corner of the room.
- Pick up the 16mm pipe.
- In your Items Menu, drag the 15mm syringe to the sedative to fill it. Then drag the filled syringe to the pipe to get the blowpipe.
- Exit the maintenance room and walk back to Maurizio. Give him the iron bar.
- Go back to the lab.
- Equip the blowpipe and go to the table closest to the nurse.
- Click on the door to enter the room the nurse was in.
- Pick up the small box of crystals on the shelf.
- Click on the nurse.
- Click on the canisters near the nurse.
- Pick up the chlorine bottle on the shelf (you may have to hit CTRL and do this in first person mode).
- Click on the book to the left of the door.
- Click on the note left under the book.
- Exit the lab and head upstairs.
Examination Room
- Walk past the wardrobe and pick up the bunch of keys.
- Equip the spoon and use it to open the wardrobe.
- Take the lab coat.
- Exit the room by clicking the door to the right of the wardrobe.
Garden
- Walk down the corridor and enter the garden through the open archway on Holmes’ left.
- In the corner, to the left of where you came in, there is a fountain. Use the meal tin on the water.
- Go back through the Examination room and downstairs.
Cellblock
- Equip the keys and unlock the door next to the cell Holmes was originally locked in.
- Walk to the last door on the left and talk to Gerda.
- Talk to Gerda a second time.
- Go the other way down the corridor, past the maintenance room.
- Unlock the door at the end of the corridor.
- Go to the last corridor on the left and talk to Becker in the first cell.
- Drag the pink crystals from your Items Menu into the meal tin of water to get Becker’s Medicine.
- Give it to Becker.
- Return to Gerda’s cell and give her the doll. You will receive the key.
- Go back upstairs to the corridor by the garden.
Garden
- Go to the Second door on Holmes’ right.
- Use the key you got from Gerda to enter.
- Examine the loom.
- Take the note, spectacles, and the large bottle in holder from the desk.
- Take the pot holder hanging on the wall.
- Examine the book on the desk.
- Go past the bed, to the alcove on the other side, and examine the white shirt in the wardrobe to get the key to the aviary.
- Return to the birdcage in the garden.
- Equip the key and open the cage.
- Cross the garden and go to the kitchen, which is the door in the corner opposite the one you came from.
- Click on the kitchen door.
- Read the note on the wall next to the kitchen door.
- Return to the fountain and fill the blue bottle with water.
- Return to the lab.
- Go into the backroom where the sleeping guard is, and fill the meal tin with potash from the canisters near the guard’s head.
- Go to the table, near the main door to the lab, and use the meal tin of potash on the scale.
- Use the bottle of water on the scale.
- In your Items Menu, drag the chlorine to the bottle of water to combine them.
- Drag the meal tin of potash to the bottle of chlorine water to make a smoking device.
- Return to the kitchen door.
Kitchen
- Equip the smoking device and click on the kitchen door.
- Enter the kitchen.
- Walk to the table near the wall farthest from the door. Pick up the note and truss for roast beef.
- Return to Becker’s cell.
Cellblock
- Talk to Becker.
- Take the cart that is to the right of Becker’s cell.
- Walk left from Becker’s cell to the levers on the wall.
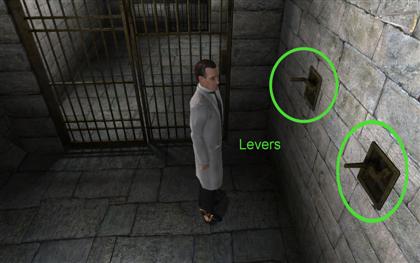
- Place the cart under the right lever.
- Use the pot holder on the right lever; then use the anvil on the pot holder.
- Use the truss for roast beef on the cart handle; it will automatically stretch past the first gate.
- Pull the left lever to open the first gate.
- Once you are inside the gate, pull the other end of the truss to open the second gate.
- Walk through the second gate and down the stairs.
Second Basement
- Walk down the hallway to the first cell.
- Talk to Wolff.
- Follow the signs to the right of Wolff’s cell to Dr. Gygax’s office.
- Click on the door to find out that it is locked.
- Go back to the nearest intersection and down the corridor to Holmes’ right.
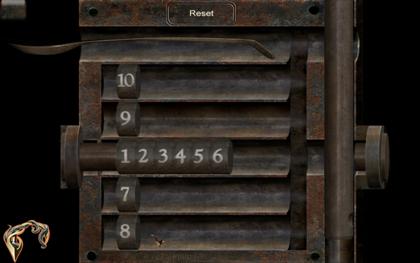
- Follow this corridor past Sigmund’s room and click on the last door.
- The puzzle lock is the same as the one on the cell Holmes started in. The spoon will automatically be equipped this time. One possible solution is shown here:
- Enter the cell and examine the blood on the side of the well.
- Examine the leg in the well.
- Pick up the key on the ground to the left of the door.
- Exit the cell and return to Dr. Gygax’s office.
- Equip the key you just found and enter the office.
- Pick up the poker to the left of the fireplace; then read the book on the table to the left of the door, and click the head on the table.
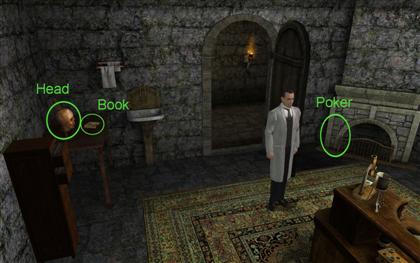
- Go to the file cabinet next to the table and read Wolff’s file.
- Walk to the other side of the office.
- Pick up the classroom key, telegram, and the note on the desk.
- Use the poker to open the top drawer on the right side of the desk. Read the handwritten letter inside; then click the drawer again for Holmes’ findings.
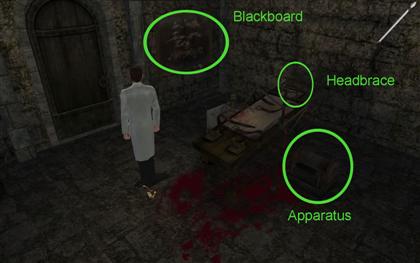
- Go through the door across from the desk to enter the experiment room.
- Examine the blackboard, the headbrace on the surgical bed, and the apparatus on the other side of the surgical bed.
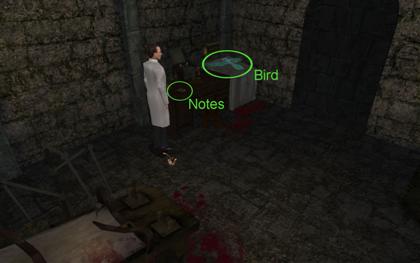
- Walk to the table in the corner of the room. Examine the bird and read Gygax’s notes.
- Return to the top of the stairs. Pull the lever on the wall to open the first gate; then walk back through to the cellblock area.
Cellblock
- Go back to Becker’s cell and speak with him.
- Walk to the other end of the hall past Becker’s cell and take a right.
- Equip the classroom key and open the first door on the right.
- In the classroom, go to the far corner and examine the stocks mounted to the wall.
- Go to the bookcase, to the left of the stocks, and pick up the false beard from the middle shelf.
- Read the paper on the desk next to the blackboard.
- Return to Dr. Gygax’s office.
Second Basement
- Go to the file cabinet and read the file marked ’?’.
- In your Items Menu, combine the false beard with the spectacles to get the Prof. Schwartz Disguise.
- Return to Wolff’s cell and talk to him; the disguise will be automatically equipped.
- Click on these torches to open the secret passage: – Torch just left of the door to Dr. Gygax’s office – Torch just across from Wolff’s cell – Torch just across from the Disposal Room
- Enter the secret area by the Disposal room.
- Type ’Light of Abyss’ when the keyboard comes up.
- Use the map to go back to Dr. Gygax’s office and go inside.
- Go to the far corner, left of the curtained wall. There are two cords hanging next to the curtain.
- Pull the left cord 3 times, then the right cord once.
- Enter the lift when the curtain opens and ride it to the cellblock floor.
Cellblock
- You will find yourself in the Laundry room. The dots on your map have been disabled for this next sequence, so you will have to physically walk Holmes around.
- Walk to the cell on Holmes’ right.
- Equip the spoon and unlock the cell door. There is no puzzle this time.
- Talk to the anonymous patient.
- Click the patient a second time, once Holmes is done talking.
- Follow the path the patient took up the stairs.
- Go around the bookshelves from the top of the stairs.
- Pick up the Amos disguise from the middle shelf.
Train
- Type ’New Orleans’ when the keyboard appears.
NEW ORLEANS
Port District
- From the dock, take the road to the right. Talk to the man in front of the first building on Holmes’ left, which is the bank.
- Equip the money and talk to him a second time.
- Open the gate across from the bank with a sign reading ’Quat des Cajuns’ next to it and enter.
- Open the door to the warehouse and go through it, coming out on the other side of the building.
- Cross the courtyard past the wagon and cut through another warehouse.
- Go under the Saloon sign and cross the plank walkway over the bayou. Follow this all the way to the end of the walkway.
- Talk to the man throwing a knife into a crate.
- Equip the money and talk to him a second time.
- Return to the Saloon (pub on your map).
Chase the Thief
- I found this part easier to do in first person mode.
- Follow the thief.
- Climb the steps to the sidewalk and close the gate to get past the tractor.
- Follow the thief onto the boat.
- Click on the upper part of the waterwheel on Holmes’ left, by the closed door, to climb to the upper walkway.
- Jump down to the ground at the end of the upper walkway.
- Go up the steps by the barking dog and follow that walkway until you see planks fall into the river.
- Click on the net hanging over the water to swing to the other side.
- Go past the sailor scrubbing the floor and out the door on the other side of the room on Holmes’ left.
- Follow the thief through the gates with Asian writing on them.
- Climb up the new ramp and jump to the ground on the other side. Go through the doorway to the street.
- On Holmes’ right, there is a lift with crates on it.
- Walk onto the lift and click the crates one at a time to push them off. Holmes will be lifted to the upper floor.
- Go through the room to Holmes’ left, taking a left around the wall when you see the sleeping man. Go out the open door.
- Watch where the thief goes.
- Jump to the ground and up the stairs to the balcony. Cross the walkway just like the thief did.
- Click the top of the ladder on the other side to climb up. Go in the door.
- Go through the door to Holmes’ left. Follow the path through the building; you can really only go one way at the intersections.
- When you see a door close in front of you, open it and go through it.
- Go to Holmes’ left and you will see the thief again, outside a window.
- Walk across the makeshift walkway in front of Holmes, and click the ladder at the end to climb down.
- Walk across the rooftop to the break in the railing and cross the bridge. Follow the thief when you see him again.
- Enter the building through the crack in the wall.
- Follow the hallway, ignoring the closed doors.
- Go through the open door at the end where a man is working. Cross the room. Go through the door.
- Click the ladder to climb to the hole in the ceiling.
- Turn around; the thief is behind Holmes. Run around the hole to where the thief is.
- Click on the bale of hay hanging from the pulley and ride it across the gap.
- On the other side of the gap, follow the ledge around to the left. Cross the walkway made of planks and rollers.
- Click the ladder against the wall on the other side of the walkway to climb up.
- Follow the walkway around and jump in the hole in the wall; climb down the crates.
- Go up the stairs to the left. Click on the large machine to push it into the rotating blades and block them. This makes a walkway along the back wall that you can go through.
- Go up the stairs on the other side of the blades and click the doorway to jump down the shaft in front of you.
- Pass the sleeping man and go through the door in the fence.
- Walk forward down the street until a cutscene occurs.
- Open your map and click on the dot for French District.
French District
- Walk down the street to the left of the iron gate in front of where Holmes starts out.
- Walk to the gate the woman was standing in front of. It will have some iron buffalo on it.
- Ring the bell by the gate.
Arneson House
- Equip the knife and click on the door Holmes is standing in front of to open it.
- Go through the door and walk towards the horse.
- Go to the table across from the horse and pick up the nails.
- Go through the gate doors behind the carriage on the other side.
- Walk around to the front of the house.
- Try the front door; it is locked.
- Go back around to the side of the house.
- Pick one of each kind of flower towards the back of the house, along the side walkway. The flowers are Peruvian Lily, Bluebell, and Lily.
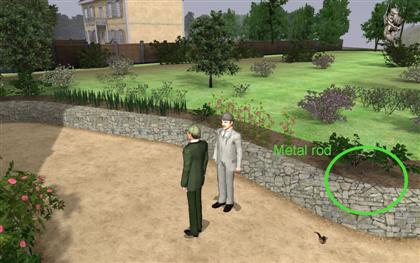
- Continue to the back of the house. Pick up a metal rod near the fountain.
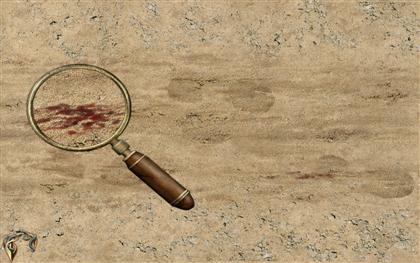
- Walk past the fountain to the back steps and examine the footprints on the ground.
- Use the magnifying glass on the blood.
- Follow the footprints and blood trail down the garden path, away from the house.
- You will be blocked by mosquitoes; return to the house.
- Enter the back door that the trail leads from.
- Go down the hall and enter the kitchen through the door just in front of the back door.
- Examine the ham on the table.
- Click on the basin in the sink.
Arneson house (Watson)
- Take the basin out back and use it on the water fountain to fill it.
- Take the water to the stable and place it on the floor in front of the horse.
- Pick up the hammer.
- Return to the kitchen.
Arneson House
- Leave the kitchen through the door you came in. Turn left and examine the footprints in front of the stairs.
- Click the magnifying glass on the footprint in the lower middle of the screen.
- Enter the room and examine the clothes on the bed, and the picture of Arneson, on the wall.
- Examine the footprints at the foot of the bed.
- Click on the foot of the bed to move it. Use the knife on the floor and pick up the ruby.
- Exit the room.
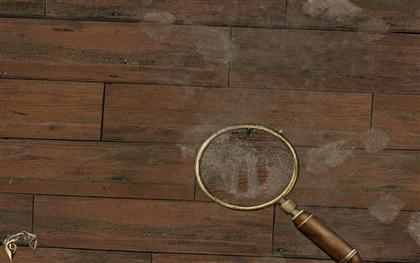
- Follow the footsteps down the hall and examine them, and then examine the blood on the floor. Try to open the door.
- Enter the open doors across from the blood.
- Examine the corpse’s hands, and use the magnifying glass on the dark fingernail.
- Take the bottle of champagne from the liquor cabinet to the left of the door.
- Examine the large picture of Arneson and the bear.
- Examine the burnt paper in the fireplace.
- Examine the candlestick on the floor near the broken dishes.
- Examine the ashtray on the table in the corner of the room.
- Examine the chair that has been knocked over.
- Examine the bright red spot on the wall near the floor in the doorway to the right of the fireplace.
- Follow the footprints to the door, and exit the room. Examine the blood on the floor just outside the door.
- Go upstairs, and enter the first room at the top.
- Examine the note on the table to Holmes’ right as he walks in the door.
- Go to the bookcase, and examine two books: "Fantastic Hunt" and "Fauna and Flora of Louisiana."
- Open the box on the table to the left of the bookshelf. Pick up the metal tube.
- Pick up the piece of paper to the right of the bed.
- Go out the door to the balcony, and pick up the lemon tree.
- Once every item has been picked up, and every piece of evidence has been examined, the safe will be revealed. If it isn’t, try following the footprints inside the house, and the drag marks outside the house in first person mode, keeping the view aimed downwards at the ground, and see if the magnifying glass icon appears. If it does, click it. The moment you examine the last piece of evidence, the safe will be revealed, and you will automatically be taken to it, regardless of where you are.
- The combination to the safe is hidden in the clock puzzle you picked up near the bed, which should be in your "Documents" screen.
- The inner numbers in the boxes are the amount of numbers that the outer number can be divided by. Example: 9 is only divisible by 1, 3, and 9, so the inner number is 3. The solution is below. – Top row on the safe: 1223 – Middle row: 2424 – Bottom row: 3426
- Once you are ready to put in the combination, click on the safe’s handle. Click on each number to change it. When you have put in all three rows, click the handle.
- Click on the key and the gun in the safe, although Holmes will not pick up the gun.
- Equip the key from the safe, and enter the trophy room, which is the locked door on the second floor.
- Once the screaming stops, head for the stable. You will not be able to get there by using your map screen this time.
- Try the stable door.
- Turn around, and pick up the large log by the woodpile.
- Equip the log, and click on the stable doors again.
- Once the scene ends, return to the trophy room.
- Walk past the alligator to the small table with a hole in the center.
- Equip the metal tube and use it on the hole.
- Examine the goat’s head on the wall.
- Go to the desk by the far window. Examine the picture on the right side of the desk, and pick up the horn on the left.
- Return to the goat’s head, and use the horn on it. Examine the picture.
- Go to the fresco on the wall, and click on the giant lizard’s eye.
- Go back to the center of the room until Holmes hears a click.
- Equip the lemon tree and place it on the pressure pad.
- Equip the metal rod, and return to the fresco. Use the rod on the lizard’s eye.
- Enter the new door.
- Examine the locked cabinet to the left as you enter, and then read the notes on the desk. Examine the woman’s picture.
- Walk down the stairs, and return to the stables, and then talk to Watson and Eulah.
- Return to the trophy room when the scene ends, and grab a lemon from the lemon tree.
- Return to the back yard, and give the lemon to Watson. You can now pass the mosquitoes.
- Examine the large smear of blood on the ground as you walk down the path.
- Walk to the end of the pier, and examine the rope on the left side.
- Return to the Port District.
- Walk down the dock where you first started. Take the branch on Holmes’ right to the Louisiana Nymph.
- Talk to the Madam by the door.
- Combine the 3 flowers in your "Items" menu to make a bouquet. Equip the bouquet and talk to the Madam again.
- Return to Champagne’s hut using your map screen.
- Equip the bottle of champagne, and talk to him.
- Go back to Arneson’s House.
Arneson’s House
- Type "Raccoon" when prompted.
- Enter the house. Go to the kitchen, and pick up a ham slice from the counter by the window.
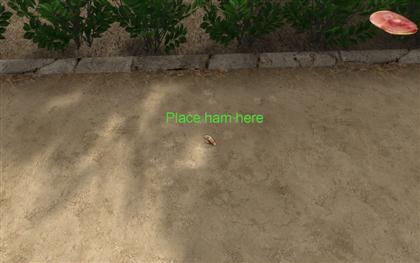
- Go back outside. Place the ham slice on the raccoon’s footprints.
- Return to the master bedroom, and then out to the balcony. Combine the nails with the planks you got from Champagne, and then combine the hammer with them to make a ladder.
- Equip the ladder, and click on the wall just above the bench.
- Click to climb the ladder.
- Click on the ring.
- Go back to the secret room. Equip the ring, and click on the cabinet to open it.
- Take the gun and the money.
- Walk into the upstairs hallway for a short cutscene.
- Go back to the balcony, and grab the ladder. Equip it, and turn around. Click on the railing across from the fountain to use the ladder.
Port District
- Go back to Champagne’s hut. Equip the money, and talk to him.
Swamp
- Go forward and to the left, past the blue ropes.

- Keep moving forward, hugging the left side. You will see more blue ropes, this means you are going the right way.
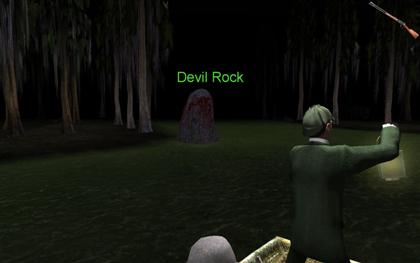
- Examine Devil’s Rock when you pass it.
- Just past the rock there are more blue ropes and the Jellyfish Tree. Head towards the tree for a cutscene.
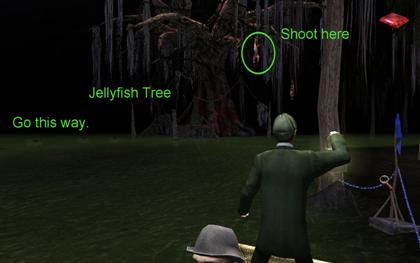
- Equip the Elephant Gun, and use it on the corpse hanging on the right side of the tree.
- Follow the river to the left of the tree until you see a small pier. Head for the pier. Wait there until the boat lands, and Holmes and Watson disembark.
Sacrifice Area
- Arneson is on the slab to Holmes’ left. Examine him.
- Examine the corpse hanging on the right of the main hut.
- Examine the sleeping huts behind the large tree.
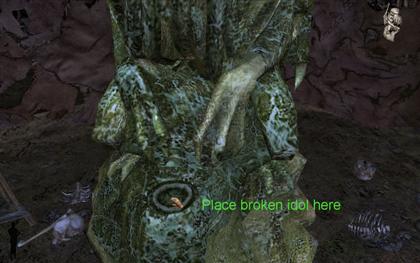
- Equip the broken idol, and examine the large idol in the main hut.
- Pick up the book.
- Return to Arneson, and click on him.
LONDON
Baker Street
- Read the letter from Mycroft.
- Davy’s cipher solution is as follows: the first nine numbers with a backslash at the end are an example of how the rest is decoded. 687954312 – See that numbers 1–9 are present. Look for spots where a number is repeated twice in a row – the first is the end of a set, and the second is the beginning of the next set. Find out which number is missing from the set.
- Type 56436 6134 when prompted.
- Go to Barnes’ Bookstore.
Barnes’ Bookstore
- Enter the bookstore.
- Equip the Kgwhman Kadwluh book, and speak to Barnes.
- Return to Baker Street.
Baker Street
- Speak with the newspaper boy.
- Read the Strand.
- Go to Wharf no. 13
Wharf no. 13
- Enter the pub, and talk to the bartender.
- Equip the key, and open the door to the right of the bar.
- Examine the papers on the table to find a photograph.
- Examine them again to get the chart.
- Click and hold the left mouse button to look around on the map. Use the numbers from Davy’s cipher as latitude and longitude – 5.6436 for vertical, 6.134 for horizontal. This location should be near a point on the west coast of Ardnamurcham. Once the crosshairs are on that spot, click it.
- Talk to the bartender again.
- Return to Barnes’ Bookstore.
Barnes’ Bookstore
- Enter and speak with Barnes.
SCOTLAND
Lighthouse – Outside
- Go up the steps, and examine the winged statues.
- Pick up the iron bar sitting at the base of the statue on the right.
- Try the door. It’s locked.
- Turn around, and head for the ruined building near the hills.
- Go inside, and pick up the rope on the floor. There is another worn rope to the right of the lighthouse near the shipwrecks, but you can only get one of them.
- Go to the three geysers on the left side of the lighthouse. Near the center of them, Holmes will speak.
- Look up the hill from the geysers to the rock shaped like a ram.
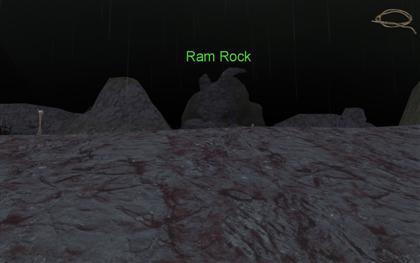
- Walk towards it until Holmes speaks.
- Equip the iron bar, and click on the greenish rock.
- Use the rope on the smaller rock to the left of the hole.
Pirate’s Cave
- Walk along the path. Stop to examine the skeleton, and pick up the knife near its hand.
- Continue past the skeleton.
- Use the knife on the stone slab on the wall where the path ends.
- Click the slab again and it will open.
- Walk forward down the tunnel until you see the pirate’s treasure room.
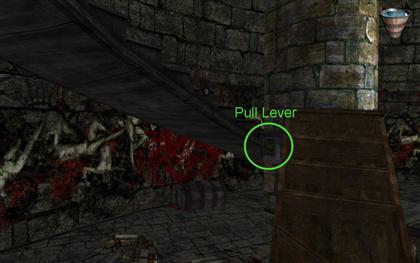
- Go to the hanging skeleton on the right, and click the flask on his chest. Once it falls, pick up the flask.
- Look over at the wall on Holmes’ right, and note the location where the rope holding the skeleton was tied to the wall.
- Walk down the tunnel past the skeleton. Examine the skeleton to the right when you enter the room. There is a metal flask to its right; pick it up.
- There is a large funnel under the still. Pick it up.
- Finally, pick up the rusted piece of gate leaning against the wall.
- Return to the main cave.
- Use the broken knife on the crate near the middle of the scaffolding, near the right. Pick up the sails.
- Walk around behind the large boulder, and examine the ramp made by planks. Walk up them and examine the barrel on the ledge above.
- Return to where the skeleton was hanging. Use the lantern on the hook at the end of the rope.
- Go to where the rope is tied to the wall, and click the panel.
- Go back up the plank ramp. Equip the rusted gate piece and use it on the wall at the top of the ledge.
- Climb the gate piece. Equip the empty flask and use it on the barrel.
- Lower the hook, and retrieve the lantern.
- Walk past the scaffolding to a tunnel with a pile of rocks. Climb over the rocks, and cross the bridge which breaks.
- Go forward and around the left of the boulder to climb up.
- Go forward until Holmes speaks.
- Look upwards (in first person mode), and click the opening.
- Equip the large funnel, and click the opening again.
- Go back, and then take the other tunnel, right before the hole where the bridge broke.
- Take the right tunnel at the next fork. Pick up a bone from the pile.
- In your "Items" menu, combine the rags with the bone. Combine that with the flask of rum, and then add matches to get a torch.
- Go back, and follow the tunnel left from the fork. There is a crevice you cannot cross.
- In "Items," combine the rags with the flask of powder to make a bomb.
- Use the bomb on a rock on the left wall by the impassable crevice.
- Cross to the other side, and examine the skeleton to pick up a leather belt.
- Walk to the end of this tunnel, and examine the machine to the left of the locked gate.
- Examine the ring puzzle. You have to turn the rings, and press the button on the upper left of the screen, after you are done turning each ring, until all four lights below the button are lighted. – Leave the center ring alone with the skull and crossbones right side up. – Turn the next ring out two times, and then press the button. – Turn the next ring from the center three times, and press the button. – Turn the outermost ring twice, and press the button. All four lights should be activated.
- Pick up the large rock from the ground in front of the machine. Use it on the padlock holding the lever on the right side of the puzzle rings.
- Use the leather belt on the wheel towards the bottom of the machine.
- Pull the lever. The gate opens.
- Take the leather belt off the machine.
- Go through the gate into a room with many holes in the ground.
- Drop a lighted torch down the hole in the far back, right from the door.
- Equip the leather belt and use it on the rock in the center of the room to climb down the hole.
- Combine rags, bone, and rum in your "Items" menu to make another torch. Light it with the matches.
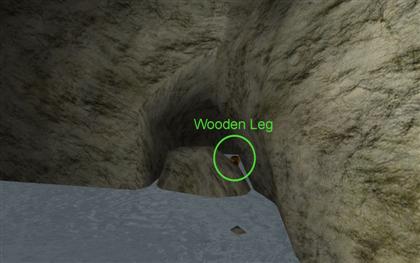
- Continue down the tunnel, and jump into the water at the end. Turn to the left, and pick up the wooden leg from the tunnel blocked by a rock.
- From where you found the leg, hug the left wall, and go down a tunnel on the left side.
- Walk to the large gate, and examine the marks on the floor in front of it. Stand on them.
- Equip the wooden leg and use it on the floor where there is a hole next to the footprint.
- Walk forward to the pirate throne, and take the sword the pirate is holding.
- Follow the tunnel opposite the throne.
- When you reach the underground river, look up and click on the hole in the ceiling.
Lighthouse – Outside (Watson)
- Turn around about 90 degrees, and head up the hill, hugging the cliff.
- You will see some wreckage after going a short distance. Pick up the log from the debris.
- Return to the large hole, and throw the log down.
Pirate’s Cave
- Cross the log bridge.
- Follow the tunnel until you see a ladder built into the rock. Click on it to climb up.
Lighthouse – Inside
- Walk to the barred door and open it to let Watson in.
- Go outside to the ruined cabin across from the lighthouse. Pick up the bucket on the left side in front of the cabin, and then fill it with water from the barrel around the right side.
- Return to the lighthouse.
- Equip the bucket of water and use it on the bowls from which green smoke is coming.
- Circle around to the left and see a lever on the wall by the stairs. Pull it.
- Finish putting out any buckets you could not reach before, and then go up the stairs.
- Stop at the landing halfway up, and look at the floor in the center of the room. Remember the image.
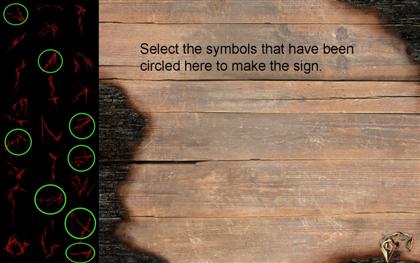
- At the top of the stairs, pick up the square piece of wood to the left and use it on the pool of blood on the right side, at the top of the stairs.
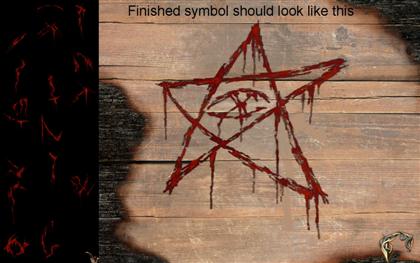
- You need to use the symbols on the left of the screen to draw the Elder Sign on the board. Click the symbols marked in the image below to do this. In the end, it should look like a pentagram with an eye in the center.
- Equip the board, and move toward the other stairs for a cutscene.
- Climb the next set of stairs.
- Use the metal bar in your inventory on the locked door.
- Climb the next set of stairs until you see a desk on the landing. Examine the book on the desk for a note.
- Climb the rest of the stairs, and try the locked door.
- Type "stomach" when prompted.
- Equip the key, and open the door at the top of the stairs.
- Continue through the door to the top for a cutscene.
- Pick up the empty bottle on the floor in front of the light.
- Use the empty bottle on the metal rung below the blue bottle to Holmes’ right. Click the wheel between the blue and empty bottles to turn them so the empty bottle is on top.
- Take the blue bottle.
- Use the blue bottle on the empty rung below the green bottle, and click the wheel to switch them so the blue bottle is on top.
- Sit back and enjoy the ending!
Created at: 2009-03-23