

Walkthrough
- Hidden Object Scenes and some mini-games are randomized - your solution may vary.
- Hidden Object Scenes will be referred to as HOS.
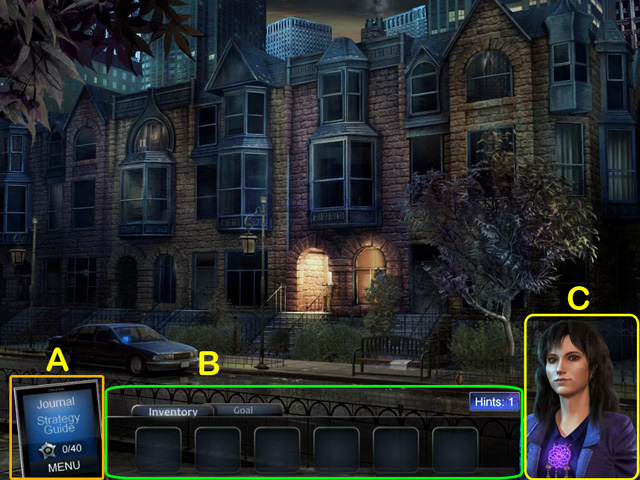
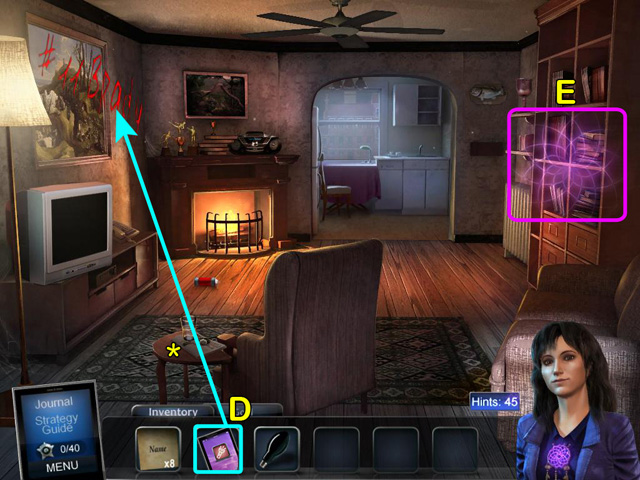
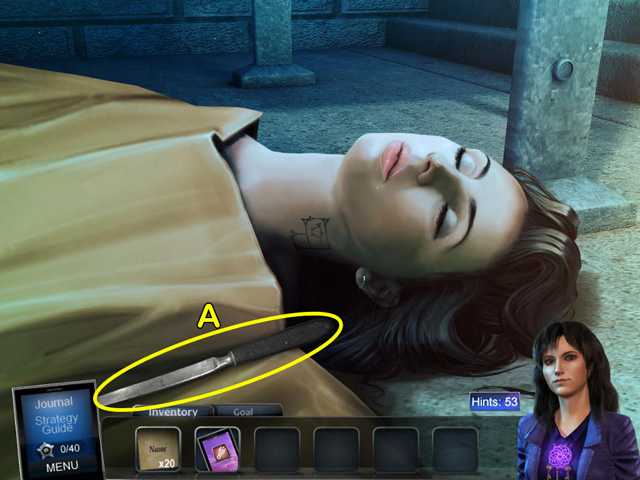
- The journal (A) will track your progress and note clues.
- Collect 40 Badges (A) to unlock Unlimited Hidden Object Mode.
- Tools that you collect will go into your Inventory (B).
- If you have more than six tools, move your cursor to the left or right along the inventory to scroll through them.
- Collect Dreamcatchers to use as hints. Left-click the Hints button (B) or Angelica (C) to use a hint.
- During HOS, left-click an item in the list and Angelica (C) will show you the shape. Left-click the Hints button or Angelica to see the location of the item in the scene.
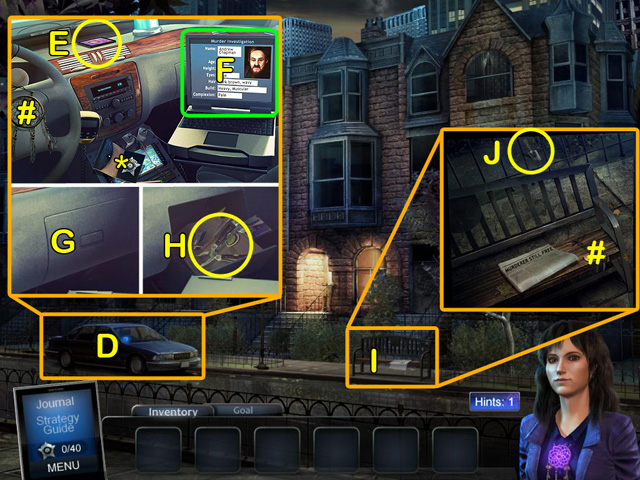
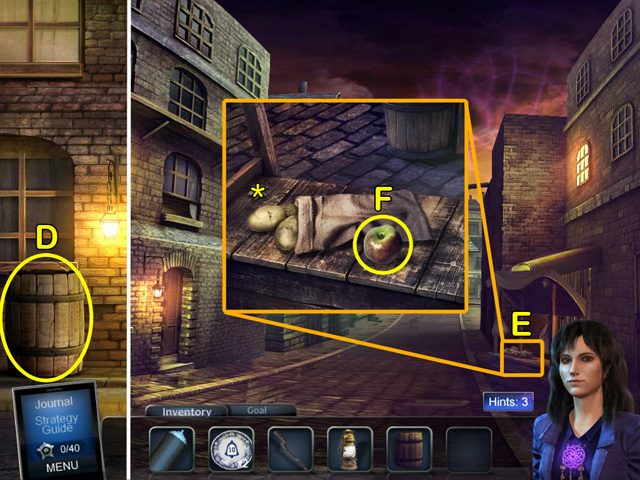
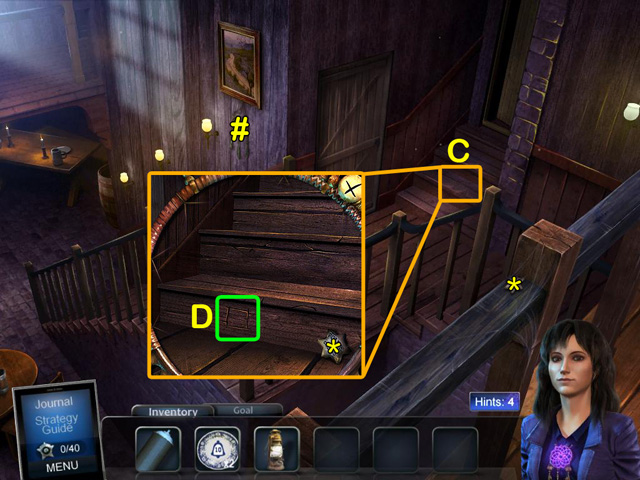
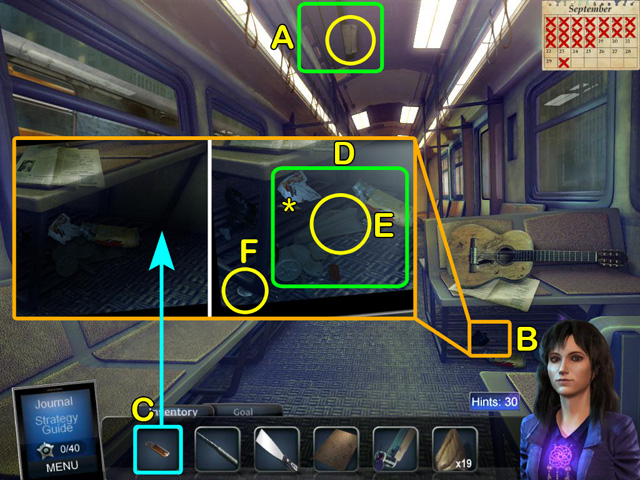
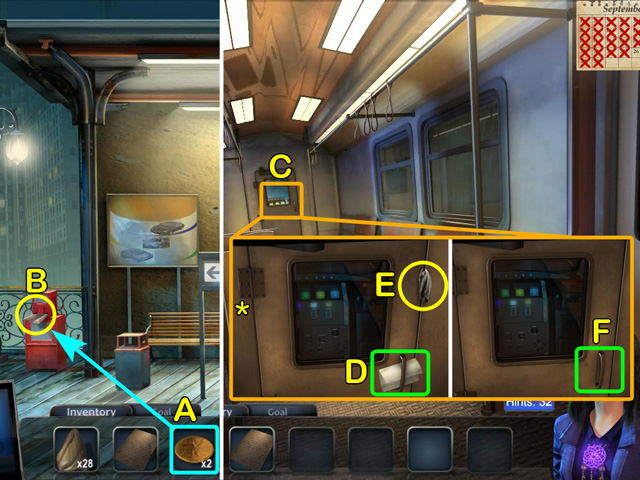
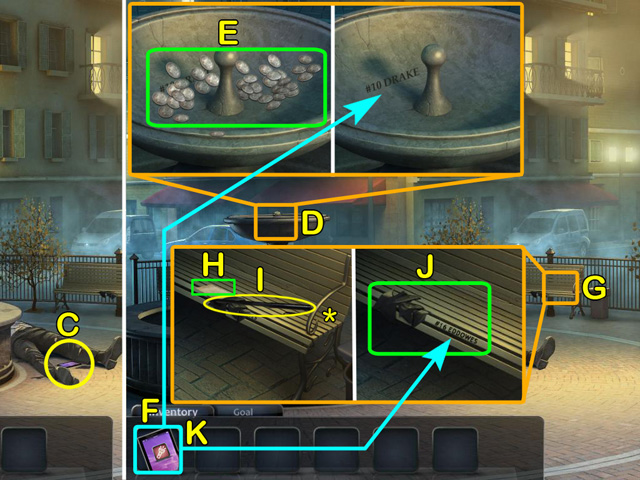
- Examine the car on the left (D).
- Take the 1/70 BADGE (*).
- Take the 1/52 DREAMCATCHER (#).
- Take the CELL PHONE (E).
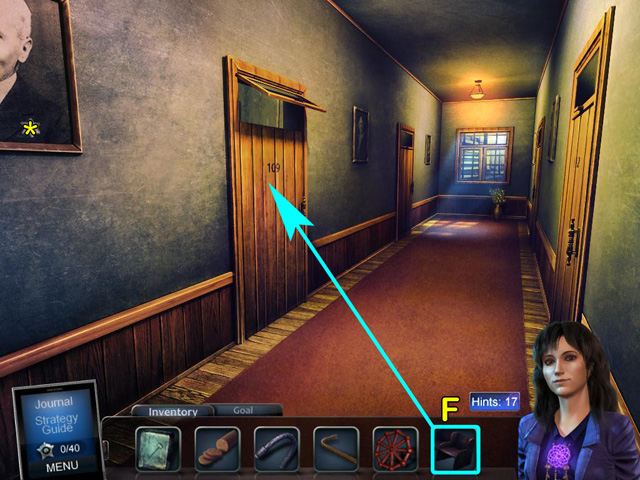
- Close the laptop (F).
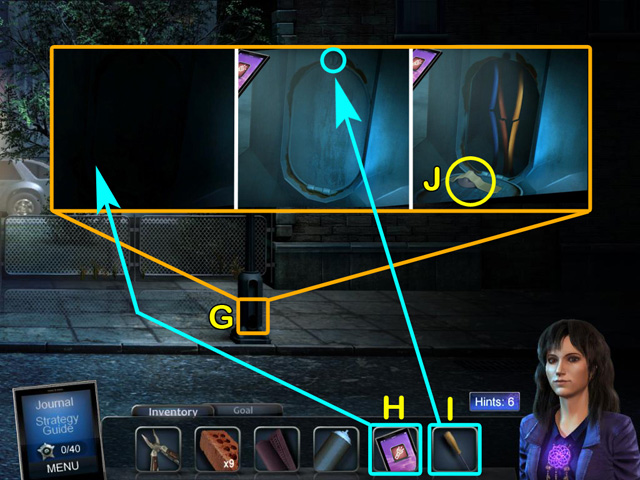
- Open the glove compartment (G).
- Take the MULTITOOL (H).
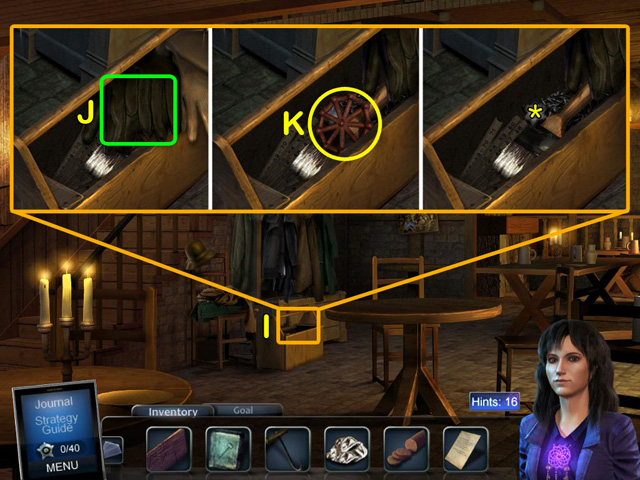
- Go to the bench on the right (I).
- Take the 2/52 DREAMCATCHER (#).
- Take the TROWEL (J).
- Go up to the entryway.
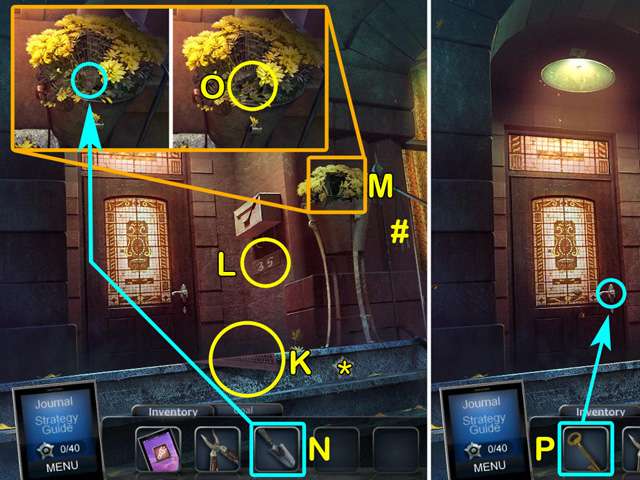
- Take the 2/70 BADGE (*).
- Take the 3/52 DREAMCATCHER (#).
- Take the RUBBER MAT (K).
- Take the 1/10 NUMBERED BRICK (L).
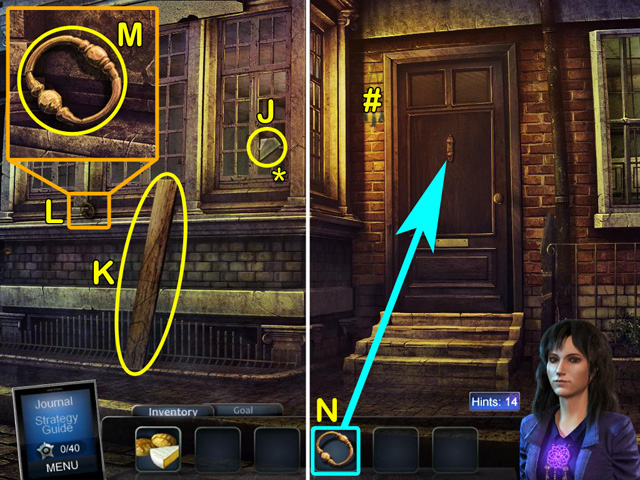
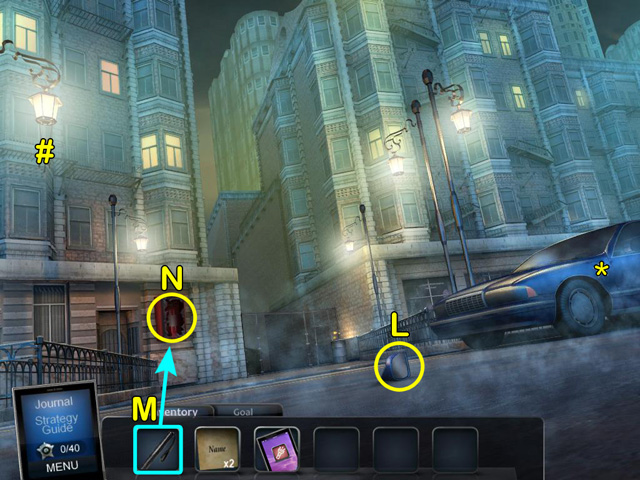
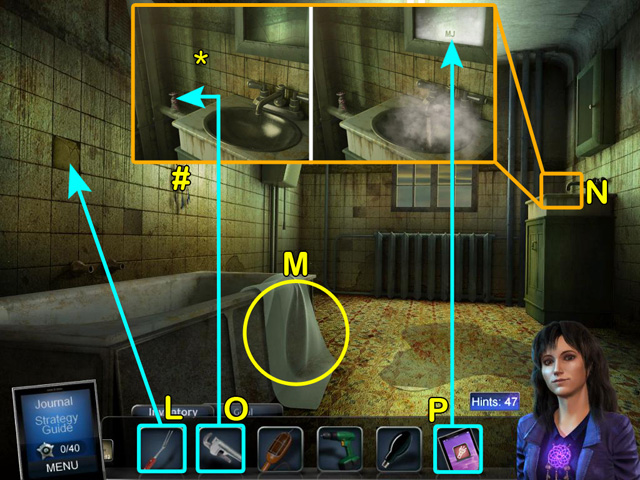
- Examine the potted plant (M).
- Use the TROWEL to dig up the HOUSE KEY (N).
- Take the HOUSE KEY (O).
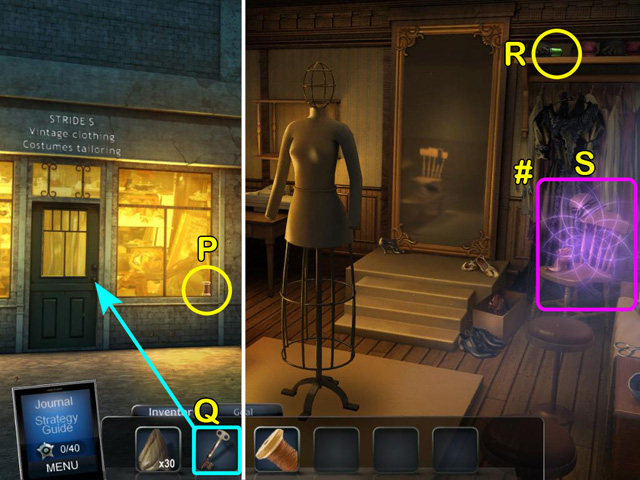
- Use the HOUSE KEY to unlock the door (P).
- Go into the house.
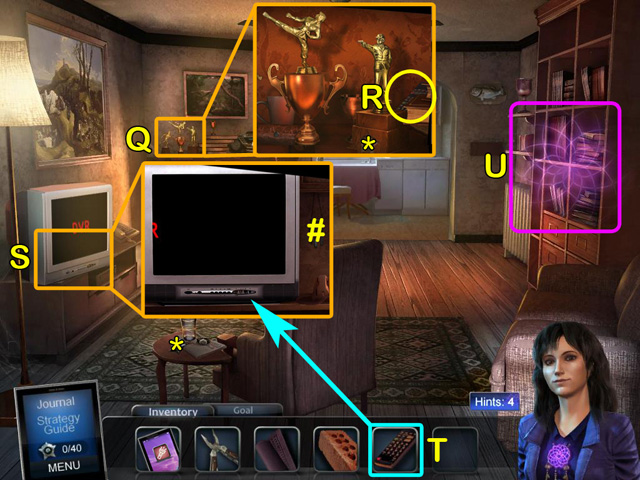
- Take the 3/70 BADGE (*).
- Examine the trophies on the mantle (Q).
- Take the 4/70 BADGE (*).
- Take the REMOTE CONTROL (R).
- Examine the TV (S).
- Take the 4/52 DREAMCATCHER (#).
- Use the REMOTE CONTROL to play the DVR (T).
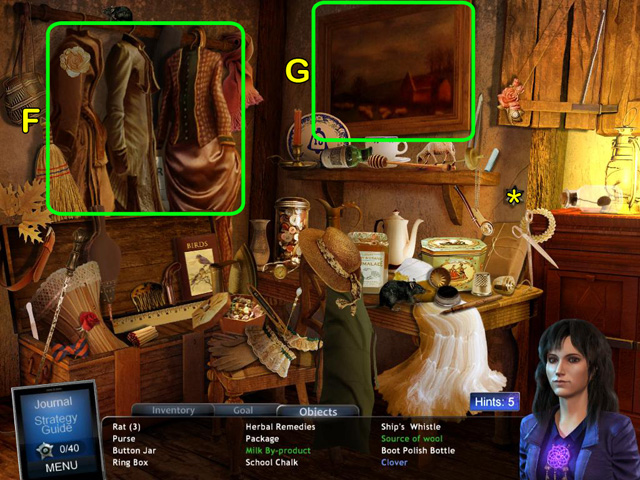
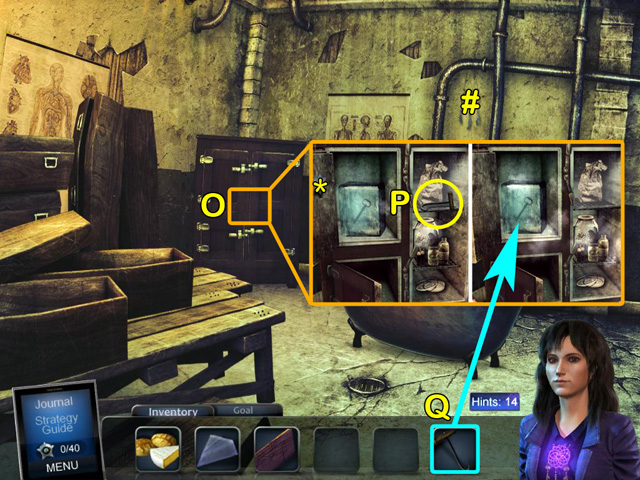
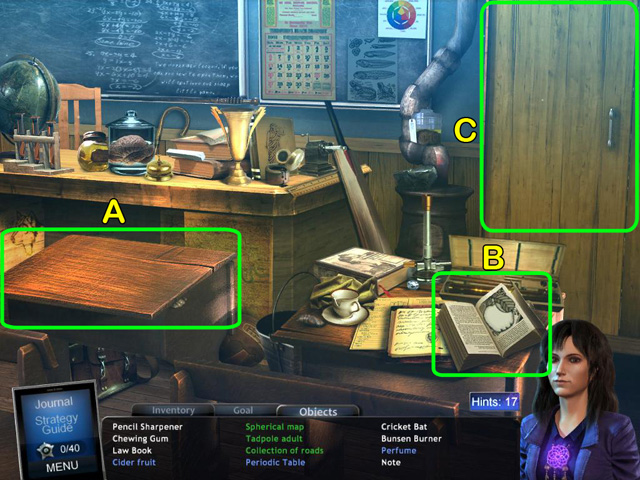
- Examine the shelves on the right to access a HOS (U).
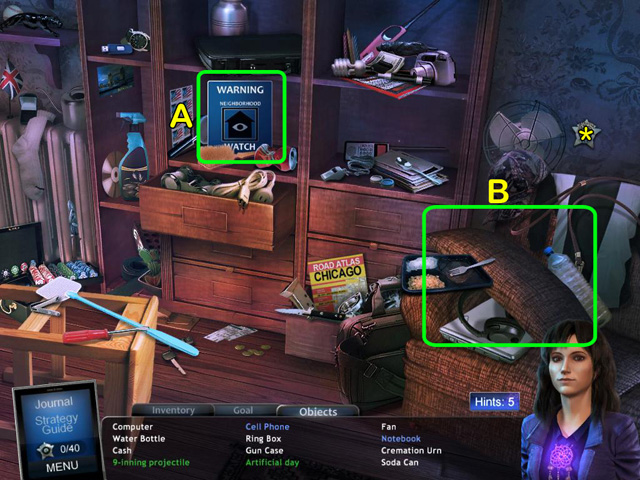
- Take the 5/70 BADGE (*).
- Find the items listed. Some items may be hidden within interactive areas (A, B).
- After completing the HOS you will have the 2/10 NUMBERED BRICK.
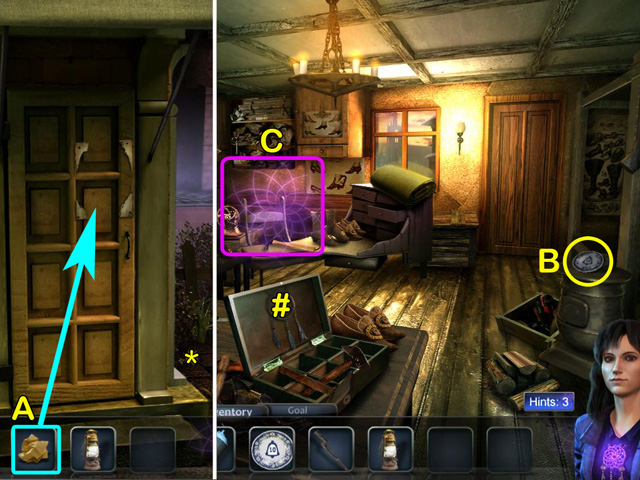
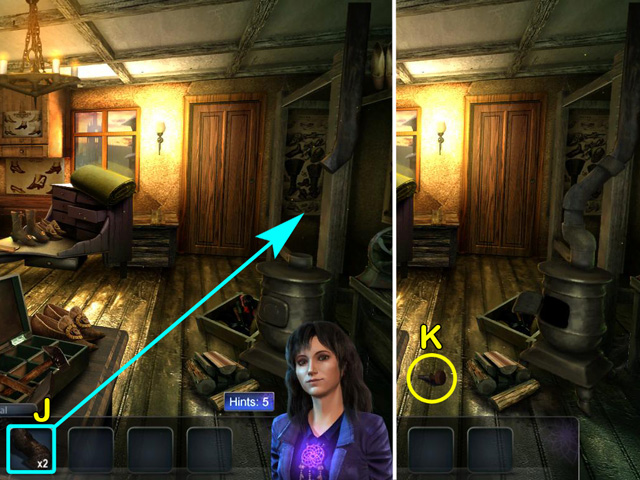
- Go into the kitchen.
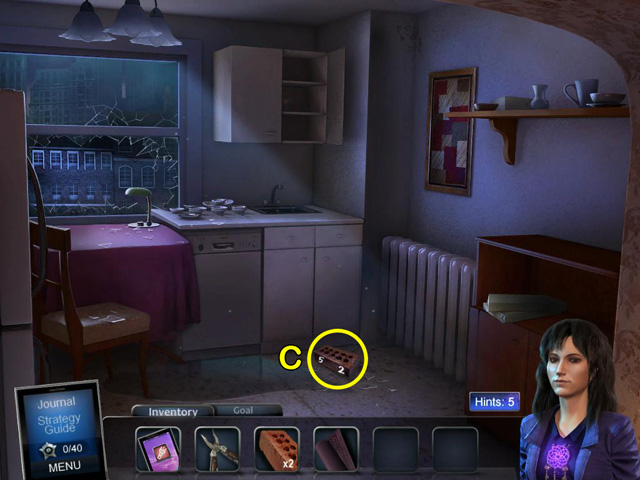
- Take the 3/10 NUMBERED BRICK (C).
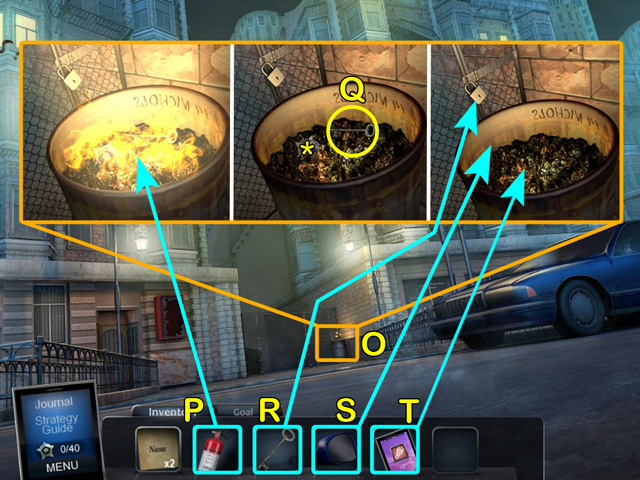
- Exit the house and go to the alley on the left.

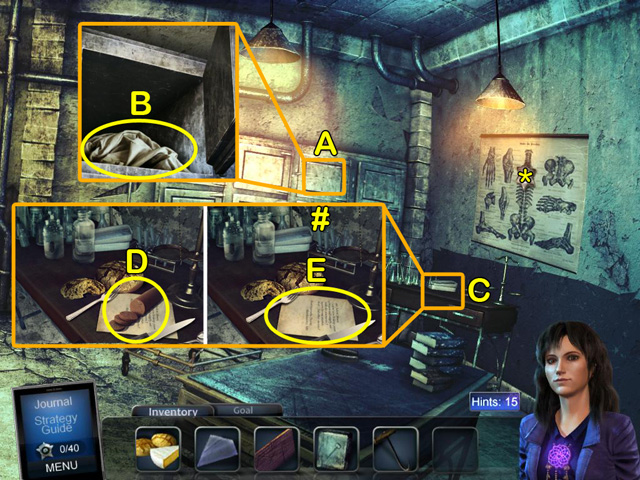
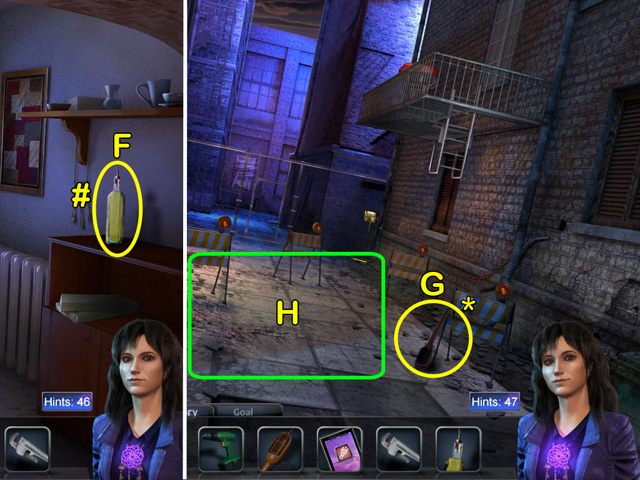
- Take the LADDER (D).
- Examine the trash can (E).
- Open the trash bag (F).
- Take the 6/70 BADGE (*).
- Take the SPRAY PAINT (G).
- Take the 4/10 NUMBERED BRICK (H).
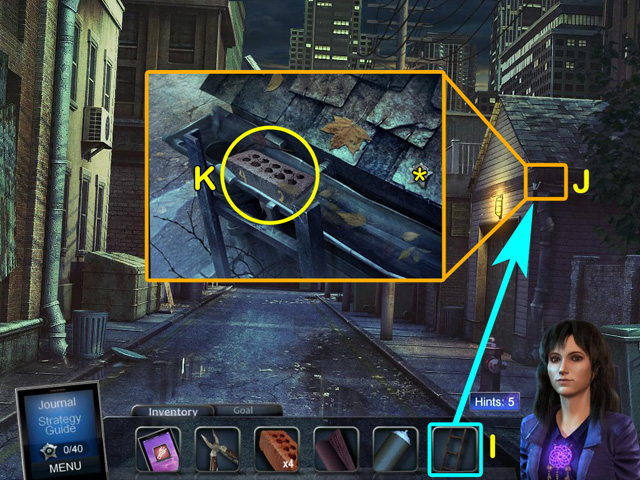
- Prop the ladder up against the wall on the right (I).
- Examine the eave trough (J).
- Take the 7/70 BADGE (*).
- Take the 5/10 NUMBERED BRICK (K).
- Go forward to the Chapman garage.
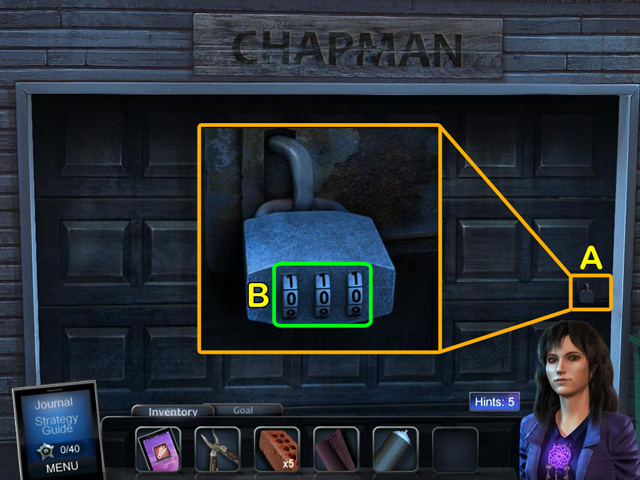
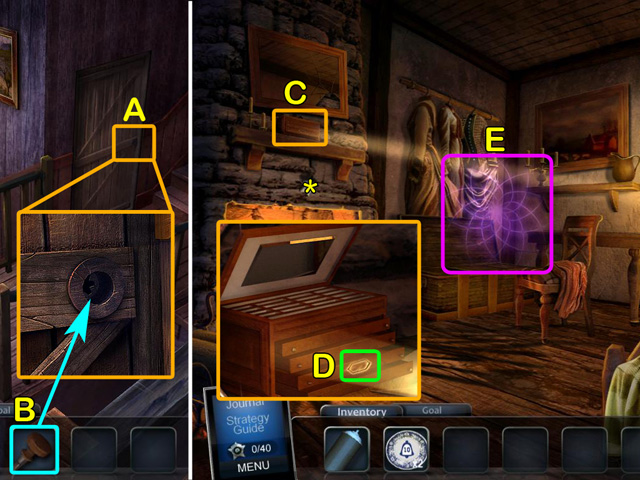
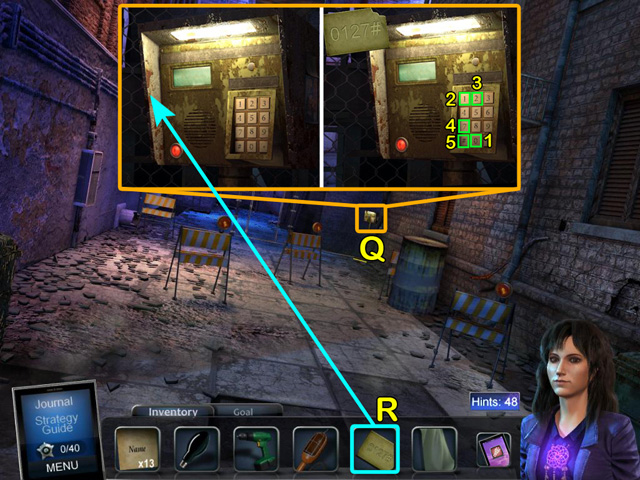
- Examine the lock on the door (A).
- Click each dial to change the number. Enter the code 1 - 8 - 7 (B).
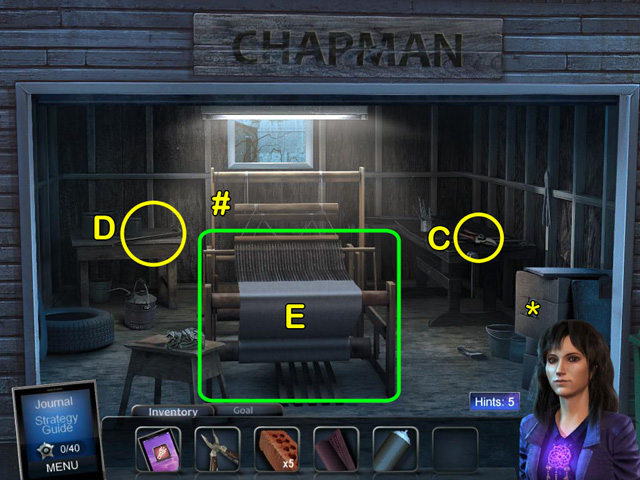
- Take the 5/52 DREAMCATCHER (#).
- Take the 8/70 BADGE (*).
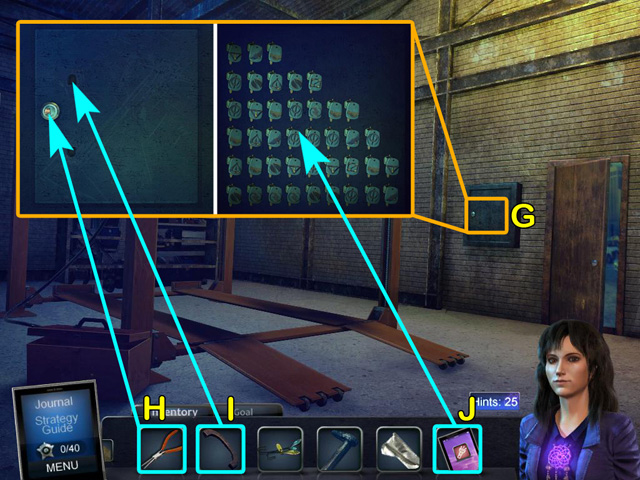
- Take the PRUNER (C).
- Take the CROWBAR (D).
- Examine the loom (E).
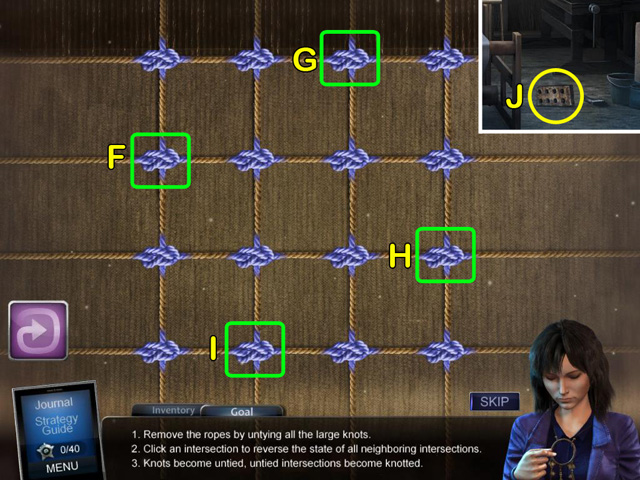
- Click the knots (F - I).
- Take the 6/10 NUMBERED BRICK (J).
- Back out to the alley.
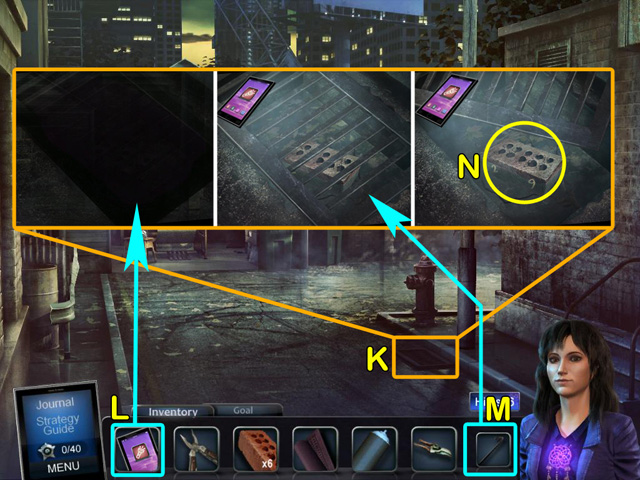
- Examine the drainage grate (K).
- Use the CELL PHONE to light the area (L).
- Use the CROW BAR to pry off the grate (M).
- Take the 7/10 NUMBERED BRICK (N).
- Go to the right of the garage.
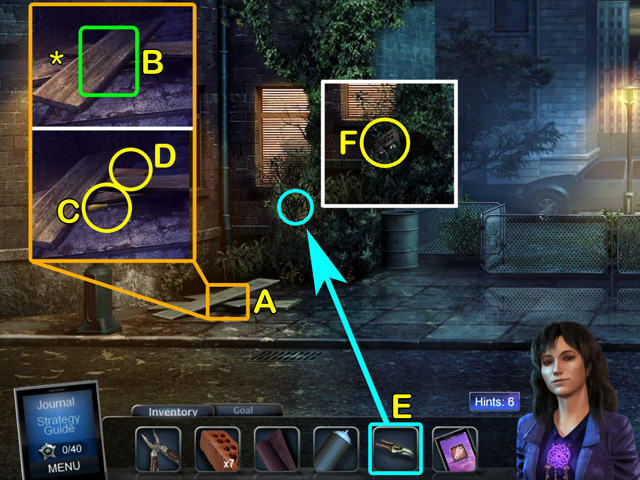
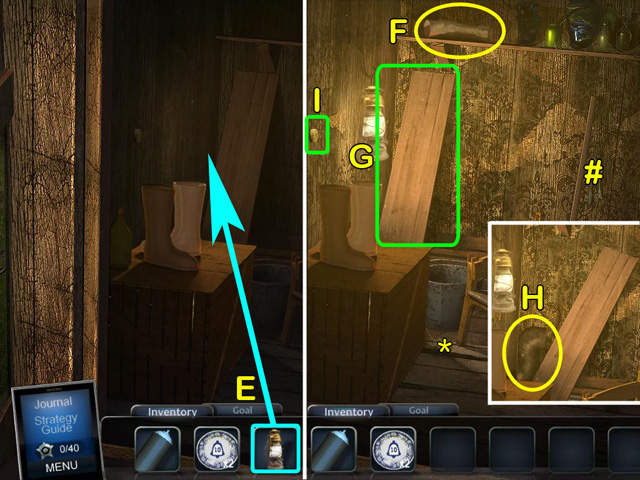
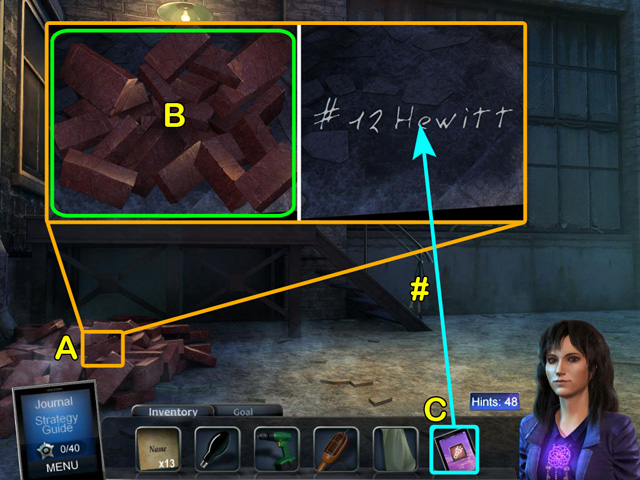
- Examine the pile of boards (A).
- Take the 9/70 BADGE (*).
- Push aside the top board (B).
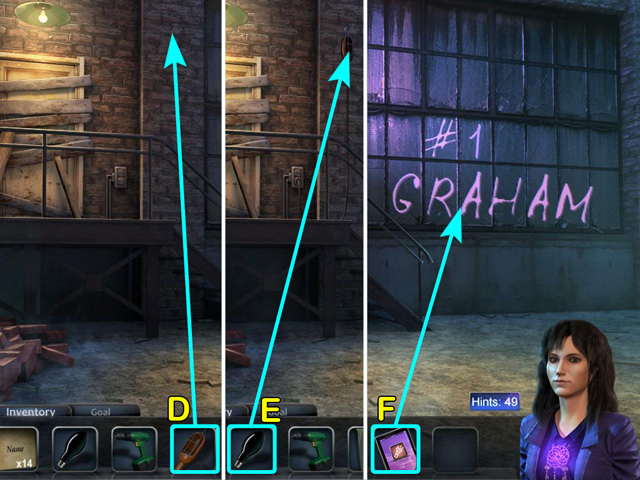
- Take the SCREWDRIVER (C) and the 8/10 NUMBERED BRICK (D).
- Use the PRUNER to cut the bushes (E).
- Take the 9/10 NUMBERED BRICK (F).
- Go to the right.
- Examine base of the light pole (G).
- Use the CELL PHONE to light the area (H).
- Use the SCREWDRIVER to remove the cover (I).
- Take the KNOB (J).
- Go back to the kitchen in Chapman's house.
- Put the RUBBER MAT over the water (K).
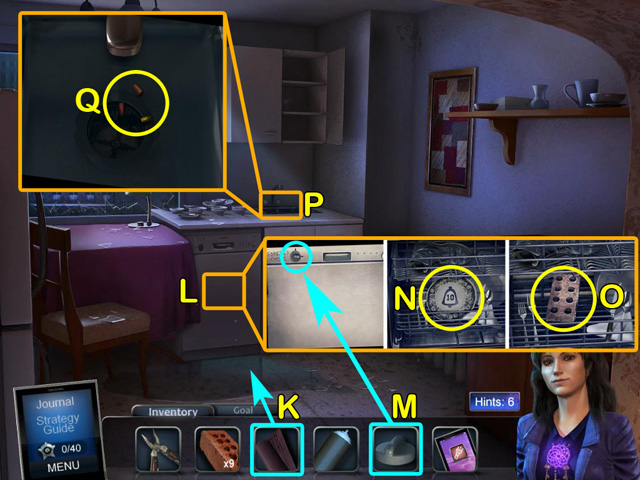
- Examine the dishwasher (L).
- Put the KNOB on the dishwasher (M).
- Take the 1/3 PLATE (N).
- Take the 10/10 NUMBERED BRICK (O).
- Examine the sink (P).
- Take the WIRE CAPS (Q).
- Go back to the light pole.
- Examine the base of the light pole and use the CELL PHONE to light the area.
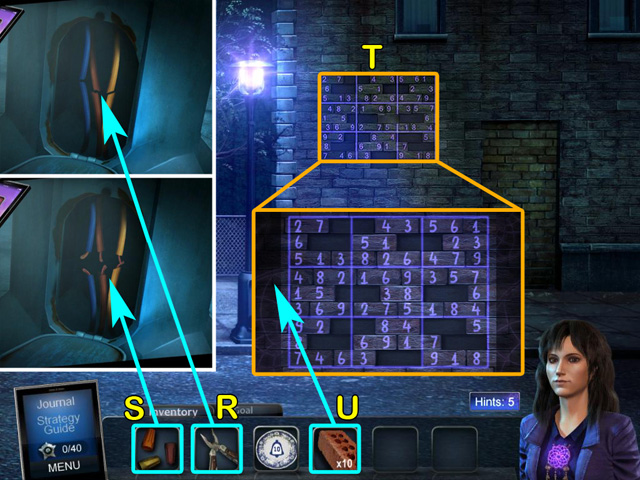
- Use the MULTITOOL to strip the wires (R).
- Put the WIRE CAPS onto the exposed wires (S).
- Examine the brick wall (T).
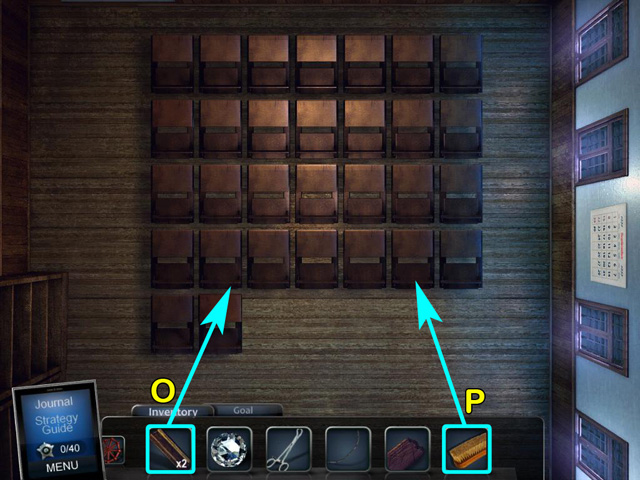
- Place the NUMBERED BRICKS onto the wall (U).
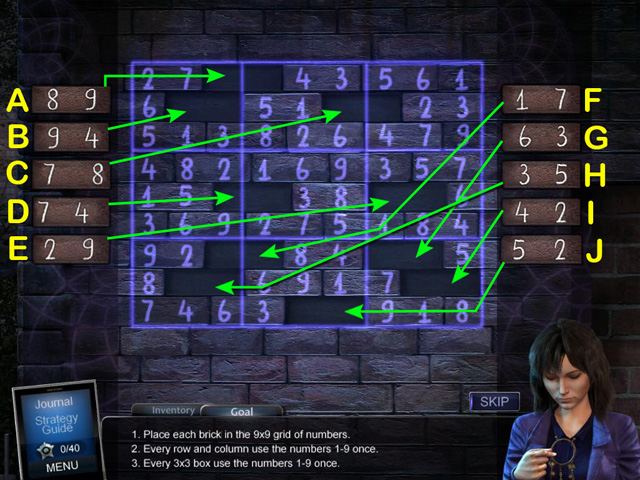
- Place the bricks into the correct spots (A - J).
- Examine the brick on the ground (K).
- Take the note (L).
- Take the 6/52 DREAMCATCHER (#).
- Take the BAYONET (M).
- Take the POSTER (N).
- Open the door (O).
- Step into the hallway.
- Take the 10/70 BADGE (*).
- Take the 7/52 DREAMCATCHER (#).
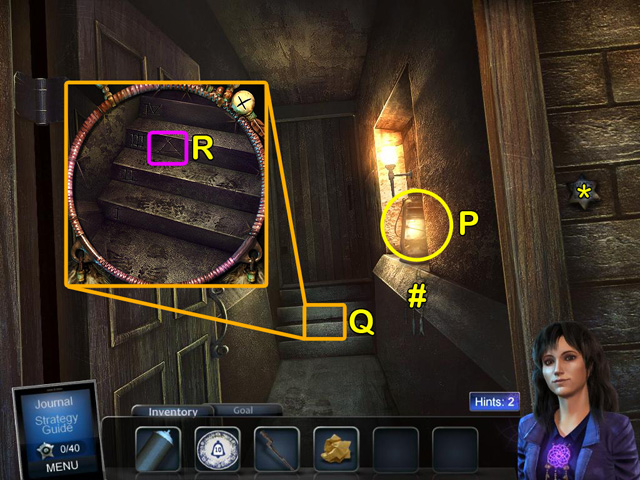
- Take the LANTERN (P).
- Examine the steps (Q).
- Make note of the symbol on the third step (R).
- Back out to the street and go to the left.
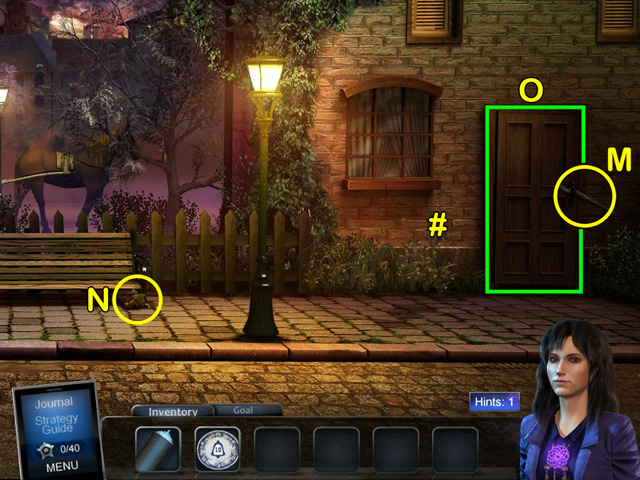
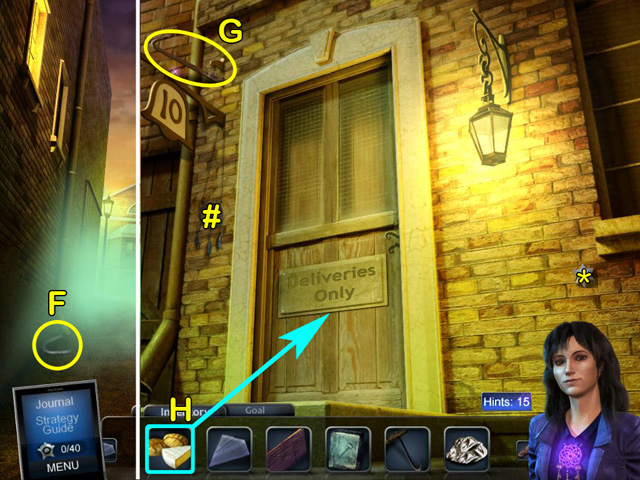
- Go up to John Pizer's doorstep.
- Take the 11/70 BADGE (*).
- Place the POSTER on the door (A).
- Go inside the shop.
- Take the 8/52 DREAMCATCHER (#).
- Take the 2/3 PLATE (B).
- Examine the bench to access a HOS (C).
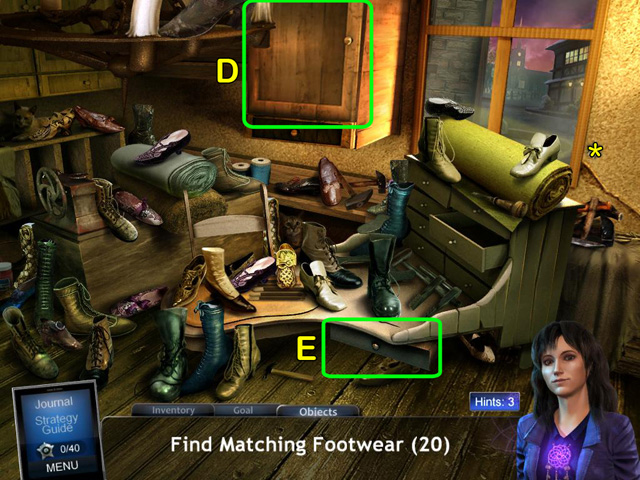
- Take the 12/70 BADGE (*).
- Match all shoes to create pairs. Some items may be hidden within interactive areas (C, D).
- After completing the HOS you will have the VICTIM'S BOOT.
- Back out to the crossroads.
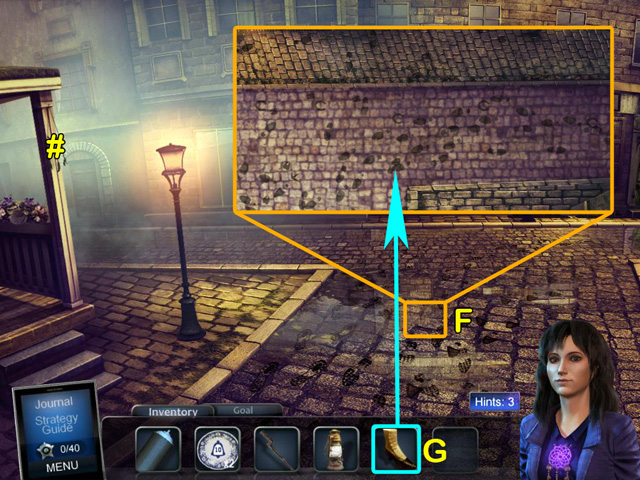
- Take the 9/52 DREAMCATCHER (#).
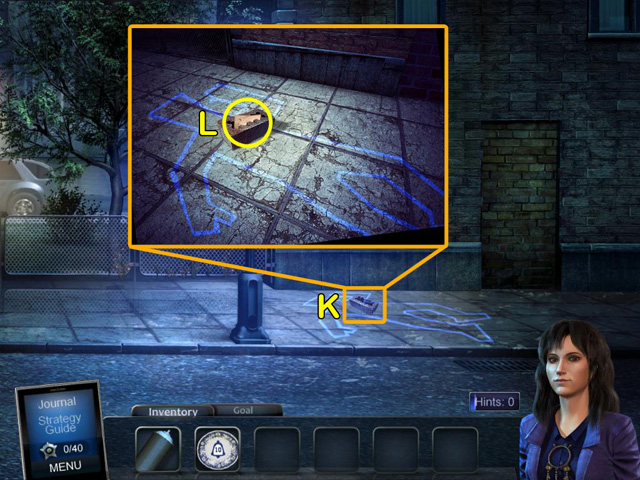
- Examine the footprints on the street (E).
- Place the VICTIM'S BOOT on the street (F).
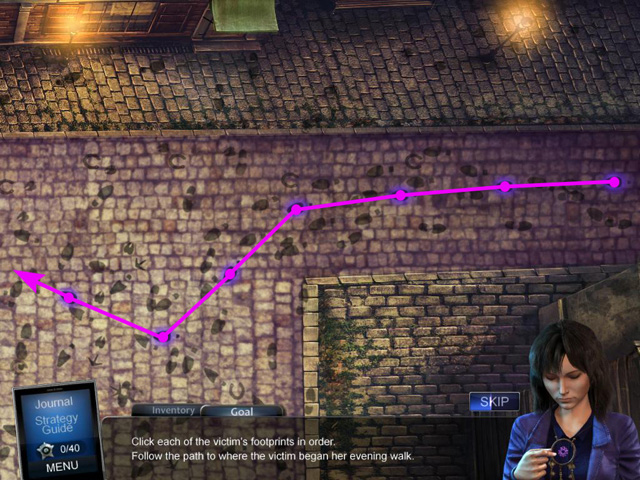
- Click the footprints in the correct sequence from left to right.
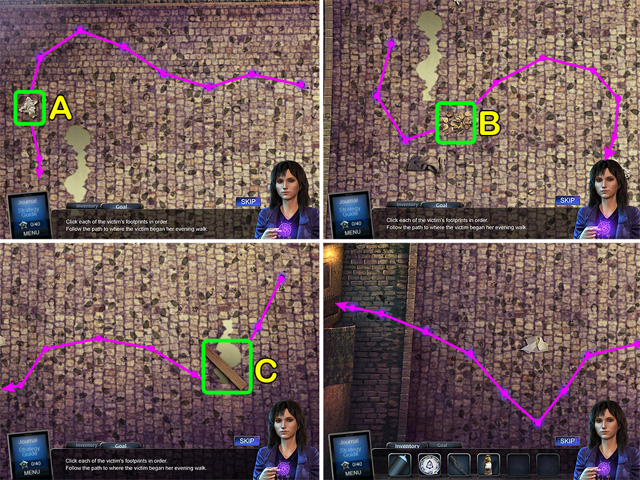
- Continue following the footprints.
- Move the paper to reveal a footprint (A).
- Push the leaves away to reveal a footprint (B).
- Move the board to reveal a footprint (C).
- Take the BARREL (D).
- Back out to the street and examine the food cart (E).
- Take the 13/70 BADGE (*).
- Take the APPLE (F).
- Go to the 10 Bells entrance.
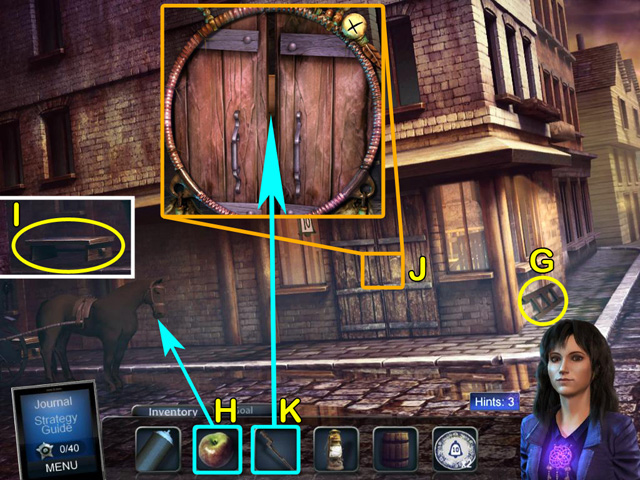
- Take the LADDER (G).
- Give the APPLE to the horse (H).
- Take the BENCH (I).
- Examine the door (J).
- Use the BAYONET to open the door (K).
- Go inside 10 Bells.
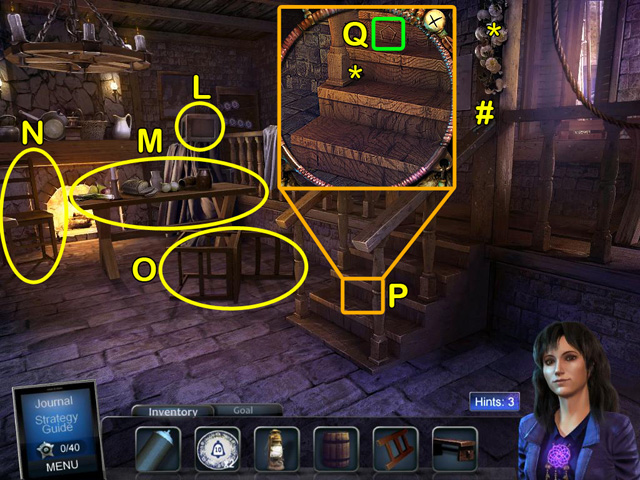
- Take the 10/52 DREAMCATCHER (#).
- Take the 14/70 BADGE (*).
- Take the CRATE, TABLE and CHAIRS (L - O).
- Examine the steps (P).
- Take the 15/70 BADGE (*).
- Make note of the symbol on the fourth step (Q).
- Go back outside to the open second floor window.
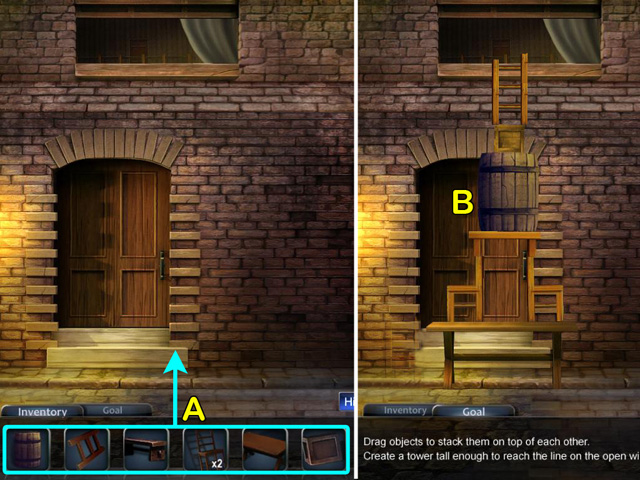
- Place the BARREL, LADDER, BENCH, CHAIRS, TABLE and CRATE on the ground (A).
- Stack the items high enough to reach the open window (B).
- Climb through the window.
- Take the 11/52 DREAMCATCHER (#).
- Take the 16/70 BADGE (*).
- Examine the steps (C).
- Take the 17/70 BADGE (*).
- Make note of the symbol on the first step (D).
- Go to the closet on the right.
- Use the LANTERN to light the closet (E).
- Take the 18/70 BADGE (*).
- Take the 12/52 DREAMCATCHER (#).
- Take the 1/2 PIPE PIECE (F).
- Move the board (G).
- Take the 2/2 PIPE PIECE (H).
- Take the note out of the wall (I).
- Go back to John Pizer's shop.
- Insert the PIPE PIECES into the stove (J).
- Take the KNOB (K).
- Go back to the landing above 10 Bells.
- Examine the door (A).
- Insert the KNOB (B).
- Go into the room.
- Take the 19/70 BADGE (*).
- Examine the jewelry box (C).
- Make note of the symbol on the second drawer (D).
- Examine the back corner of the room to access a HOS (E).
- Take the 20/70 BADGE (*).
- Find the items listed. Some items may be hidden within interactive areas (F, G).
- After completing the HOS you will have the 3/3 PLATE.
- Go back to the first floor of 10 Bells.

- Examine the shelves in the back (H).
- Put the three PLATES on the shelves (I).
- Take the Keepsake Key (J).
- Go back up to the second floor boarding room.
- Take the 13/52 DREAMCATCHER (#).
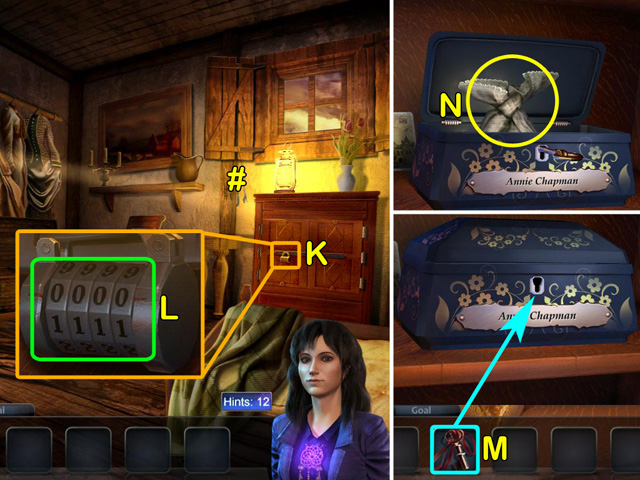
- Examine the lock on the cabinet to the right (K).
- Click the dials to change each number (L). Enter the code 4 - 6 - 3 - 5.
- Use the KEEPSAKE KEY to open the box (M).
- Take the BAG OF COINS (N).
- Go to the fence on the left.
- Examine the street on the left (A).
- Take the COINS (B).
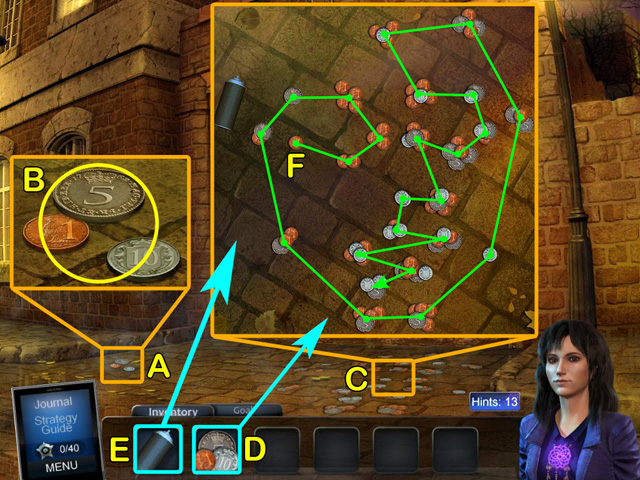
- Examine the coins scattered on the street (C).
- Place the COINS on the street (D).
- Place the SPRAY PAINT over the coins (E).
- Starting with the lowest value coin (F), left-click each pile of coins in ascending order.
- After completing the puzzle you will have the BAG OF COINS in your inventory.
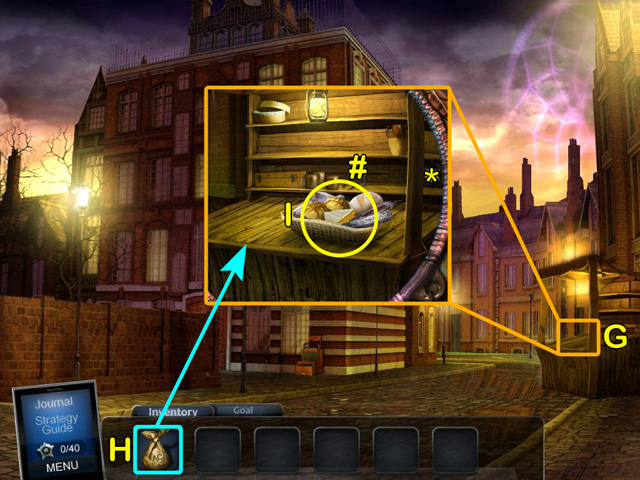
- Examine the food cart (G).
- Take the 21/70 BADGE (*).
- Take the 14/52 DREAMCATCHER (#).
- Place the BAG OF COINS on the stand (H).
- Take the HOMEMADE FOOD (I).
- Go forward on the street and then turn right to the mortuary entrance.
- Take the 22/70 BADGE (*).
- Take the 15/52 DREAMCATCHER (#).
- Take the GLASS PANE (J).
- Take the SCRATCHED PICKET (K).
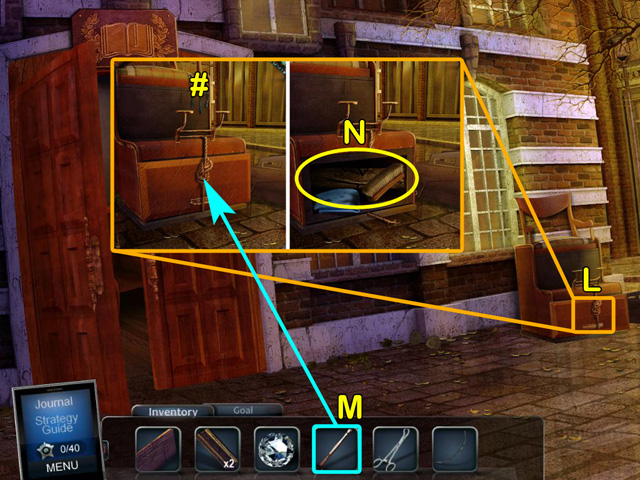
- Examine the window ledge (L) and take the KNOCKER (M).
- Put the KNOCKER on the door (N).
- Go into the mortuary.
- Take the 16/52 DREAMCATCHER (#).
- Open the icebox (O).
- Take the 23/70 BADGE (*).
- Take the ICE HOOK (P).
- Use the ICE HOOK to get the ICE (Q).
- Go to the right side of the mortuary.
- Take the 24/70 BADGE (*).
- Open the slab locker (A).
- Take the SHEET (B).
- Examine the table in the back (C).
- Take the 17/52 DREAMCATCHER (#).
- Take the MEAT (D).
- Take the DRUITT NOTE (E).
- Go to the alley between the school and 10 Bells.
- Take the FAUCET (F).
- Go up to the door on the right.
- Take the 25/70 BADGE (*).
- Take the 18/52 DREAMCATCHER (#).
- Take the SIGN SUPPORT (G).
- Put the HOMEMADE FOOD up to the door (H).
- Go into 10 Bells.
- Examine the toolbox (I).
- Move aside the gloves (J).
- Take the VALVE (K).
- Take the 26/70 BADGE (*).
- Go to the entrance of the school.
- Take the 27/70 BADGE (*).
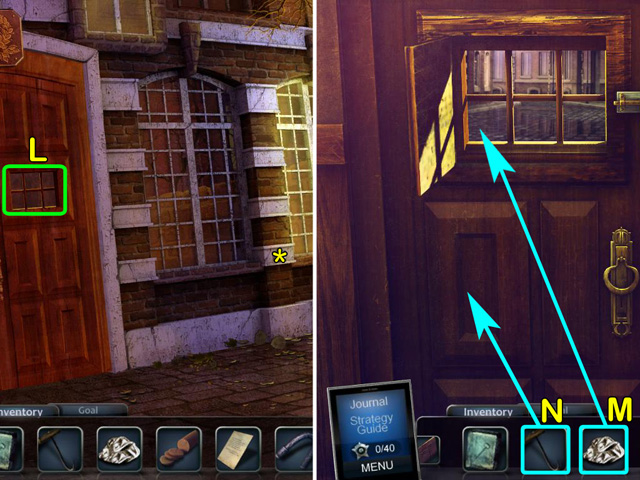
- Open the panel on the door and look through the window (L).
- Hang the sheet through the window (M).
- Attach the hook to the end of the sheet (N).
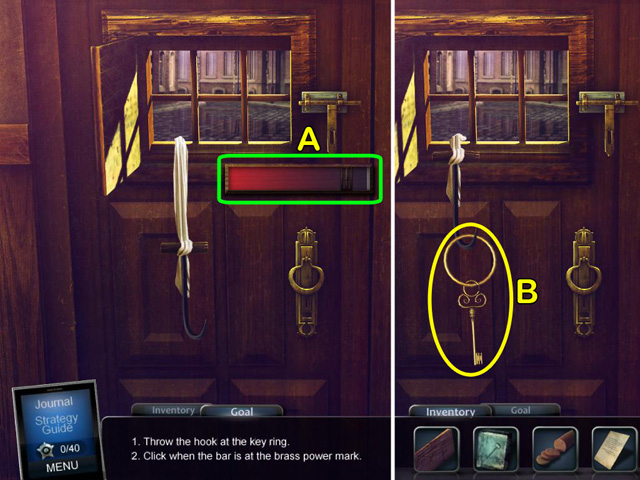
- When the red power meter fills up to the brass marker, left-click the screen to swing the hook over to the key on the right (A).
- Take the SCHOOL KEY (B).
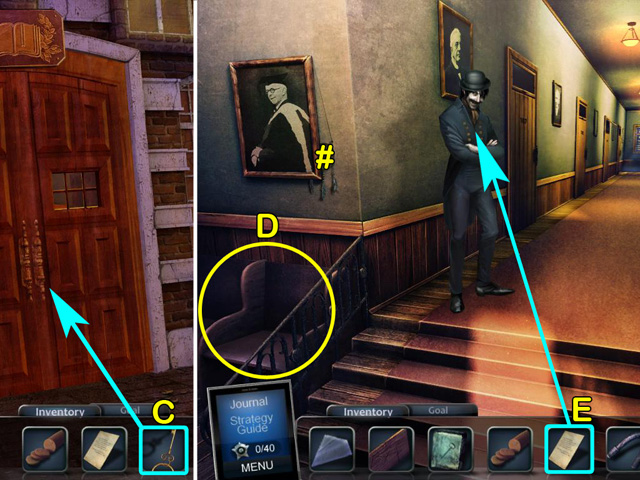
- Use the SCHOOL KEY to open the door (C).
- Go inside.
- Take the 19/52 DREAMCATCHER (#).
- Take the BENCH (D).
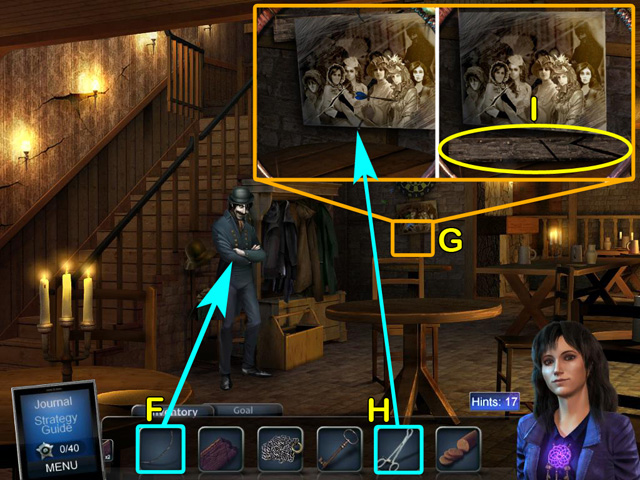
- Give the DRUITT NOTE to man in the hallway (E).
- Go down the hallway.
- Take the 28/70 BADGE (*).
- Lean the BENCH against the door (F).
- Climb into the classroom.
- Examine the floor by the coat rack (G).
- Take the 29/70 BADGE (*).
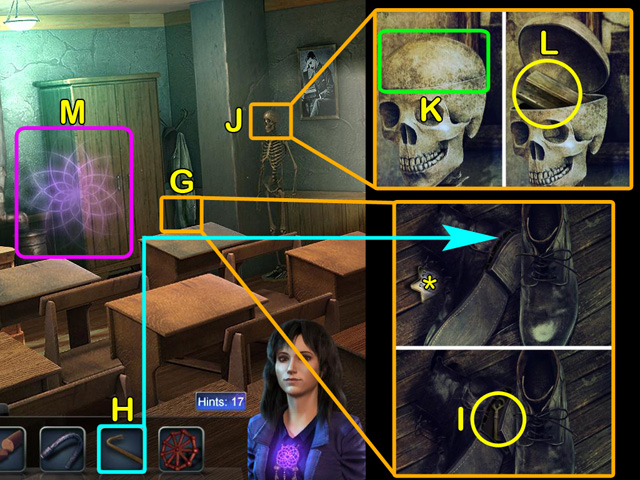
- Use the SIGN SUPPORT to pry off the sole of the shoe (H).
- Take the DISPLAY CASE KEY (I).
- Examine the skeleton (J).
- Open the top of the skull (K) and take the 1/2 ERASER (L).
- Examine the back part of the classroom to access a HOS (M).
- Find the items listed. Some items may be hidden within interactive areas (A, B, C).
- After completing the HOS you will have the DIAMOND.

- Take the 20/52 DREAMCATCHER (#).
- Take the SCALPEL (D).
- Examine the teacher's desk (E).
- Take the 30/70 BADGE (*).
- Take the 2/2 ERASER (F).
- Pick up the newspaper (G).
- Take the FORCEPS (H).
- Use the DISPLAY CASE KEY to unlock the display case (I).
- Open the heart model (J).
- Take the THREAD (K).
- Go outside to the school entrance.
- Examine the shoeshine chair (L).
- Take the 21/52 DREAMCATCHER (#).
- Use the SCALPEL to cut the rope (M).
- Take the BRUSH and the 1/2 PICKET HALF (N).
- Go back into the school and into the classroom on the right side of the hallway.
- Use the ERASERS to cover the desks in chalk dust (O).
- Use the BRUSH to reveal the arrows on the desks (P).

- Click the arrows in order (A - E).
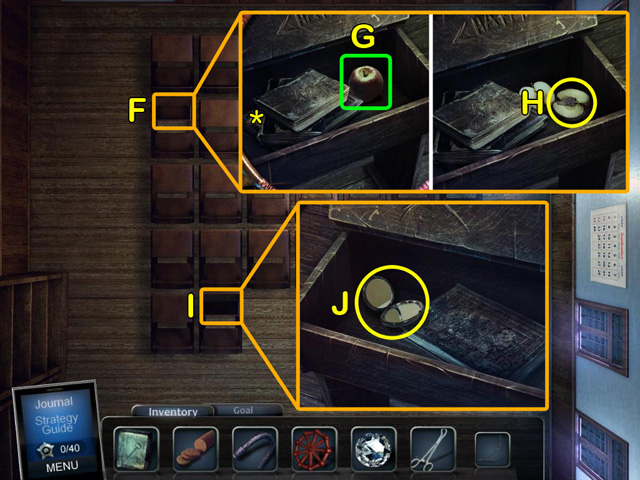
- Examine the desk near the front (F).
- Take the 31/70 BADGE (*).
- Split open the apple (G).
- Take the LOCKET CHAIN (H).
- Examine the desk in the back (I).
- Take the MIRROR (J).
- Go back to the mortuary.
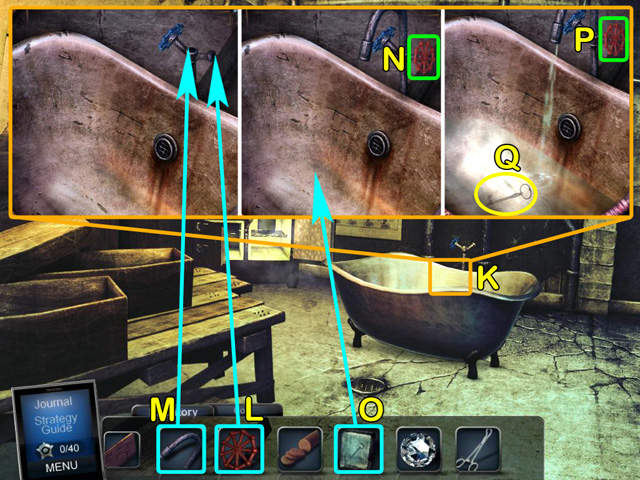
- Examine the tub (K).
- Install the VALVE and the FAUCET (L, M).
- Turn on the hot water (N).
- Put the ICE in the tub (O).
- Turn the hot water off (P) and take the ANNIE ROOM KEY (Q).
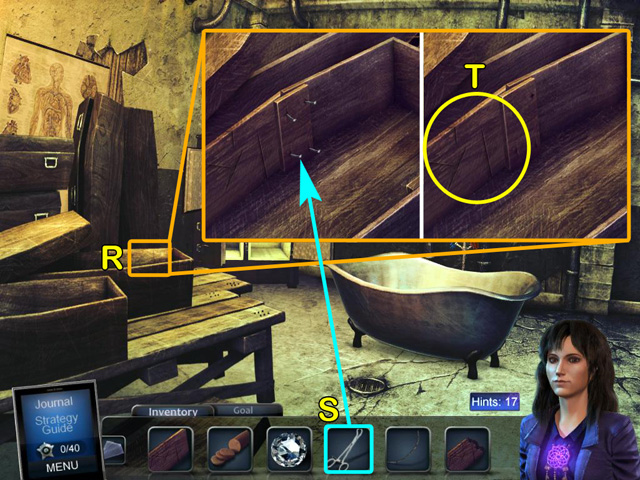
- Examine the coffin (R).
- Use the FORCEPS to pull out the nails (S).
- Take the 1/2 SCRATCHED PICKET (T).
- Go to the right side of the mortuary.
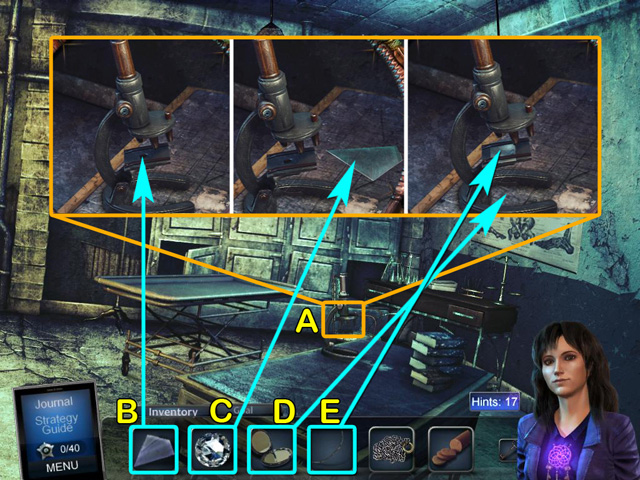
- Examine the microscope (A).
- Put the Glass Pane on the microscope stage (B).
- Use the DIAMOND to cut the glass (C).
- Put the MIRROR on the base of the microscope (D).
- Examine the THREAD under the microscope (E).
- Go back to 10 Bells.
- Place the THREAD on Robert Mann (F). You will then have the LOCKET in your inventory.
- Examine the picture in the back (G).
- Use the FORCEPS to pull the nails out of the picture (H).
- Take the 2/2 PICKET HALF (I).
- Go upstairs.
- Go to the closet on the right and take the 22/52 DREAMCATCHER (#).
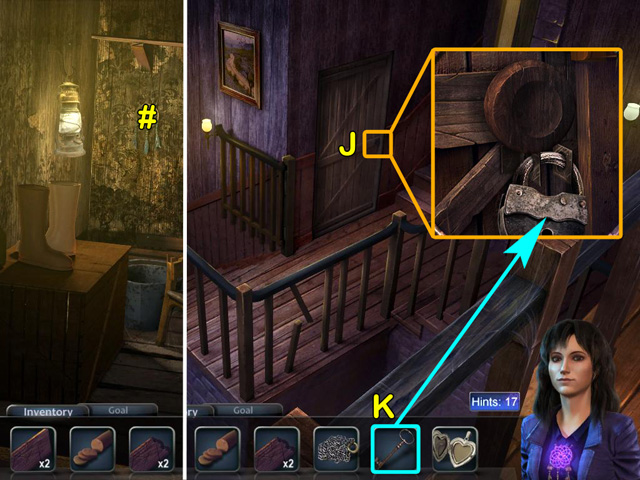
- Examine the door to Annie's room (J).
- Use the ANNIE ROOM KEY to unlock the door (K).
- Go into Annie's room.
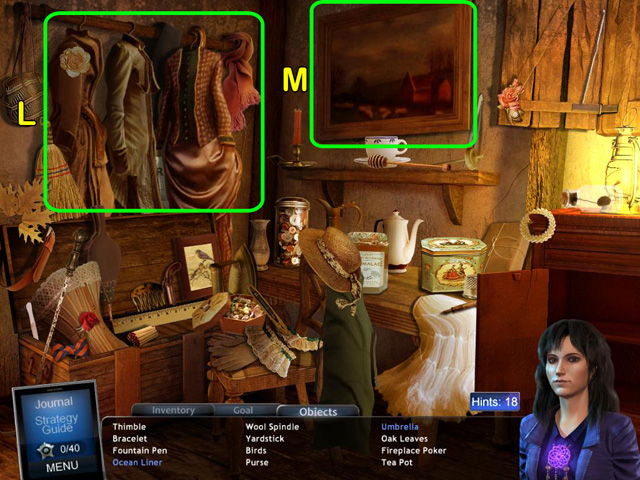
- Examine the back corner of the room to access a HOS.
- Find the items listed. Some items may be hidden within interactive areas (L, M).
- After completing the HOS you will have the LOCKET PORTRAIT.
- Go back to the ghost by the fence.
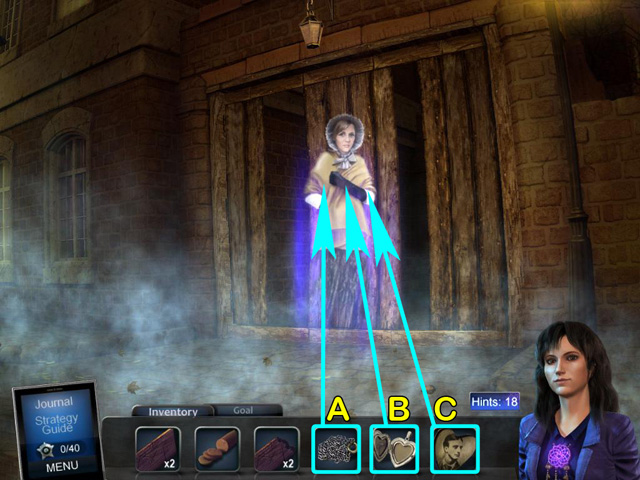
- Give the LOCKET CHAIN, LOCKET and LOCKET PORTRAIT to the ghost (A - C).
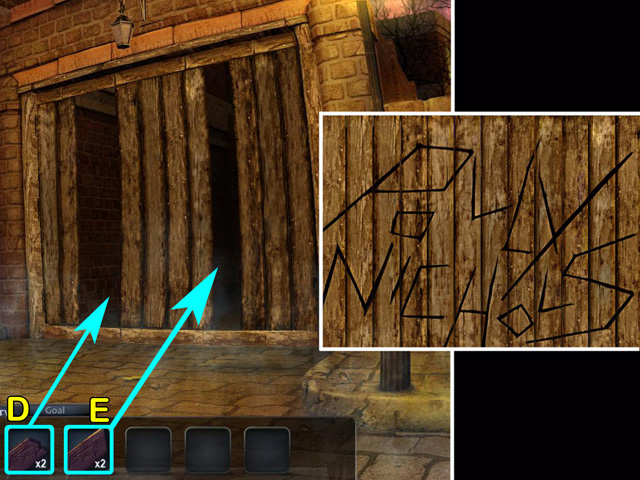
- Put the SCRATCHED PICKETS and PICKET HALVES into the fence (D, E).
- Left-click a picket to select. Move it to the desired spot and left-click again to release it. Rearrange the pickets to spell the name of the victim, Polly Nichols.
- Walk down the alley.
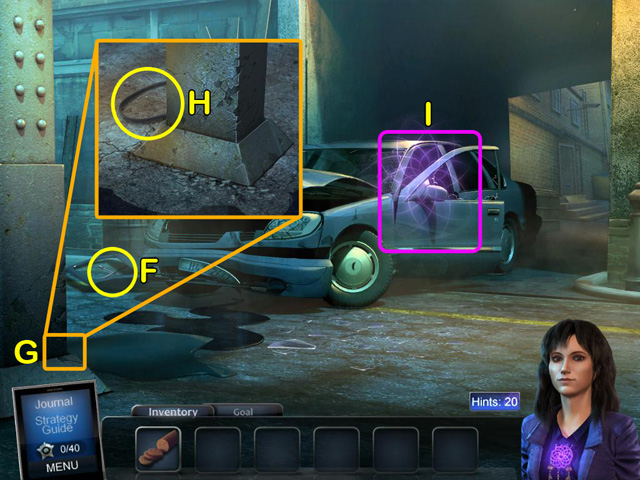
- Take the LUG WRENCH (F).
- Examine the girder (G).
- Take the FAN BELT (H).
- Examine the car to access a HOS (I).
- Take the 32/70 BADGE (*).
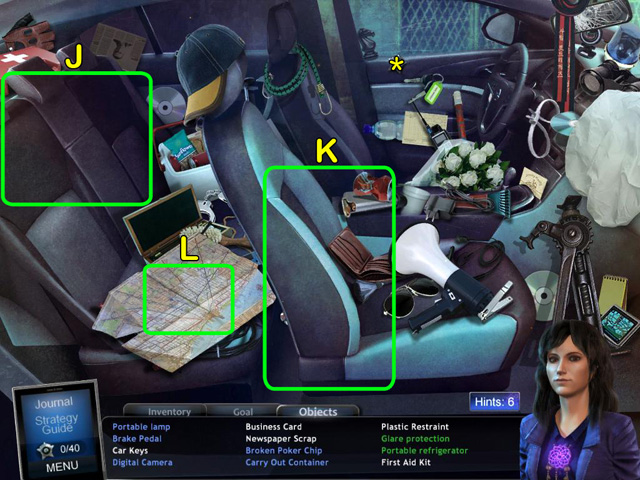
- Find the items listed. Some items may be hidden within interactive areas (J, K, L).
- After completing the HOS you will have the POLICE GUN.
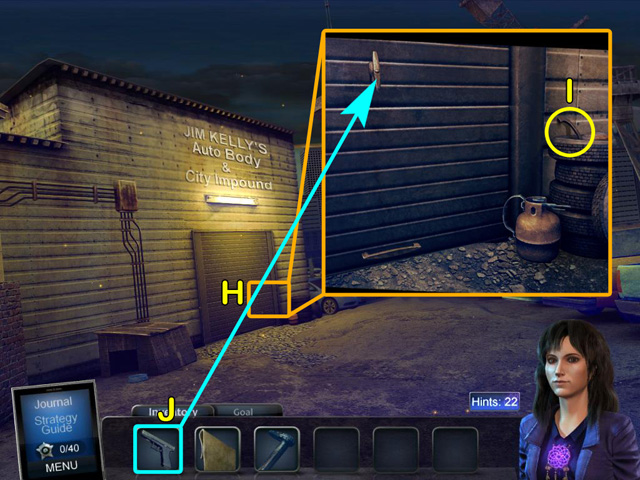
- Go forward to the impound gate.

- Take the RAG (A).
- Use the FAN BELT to pull the security camera down (B).
- Examine the gate (C).
- Use the LUG WRENCH to remove the bolts (D).
- Go into the impound lot.
- Take the 23/52 DREAMCATCHER (#).
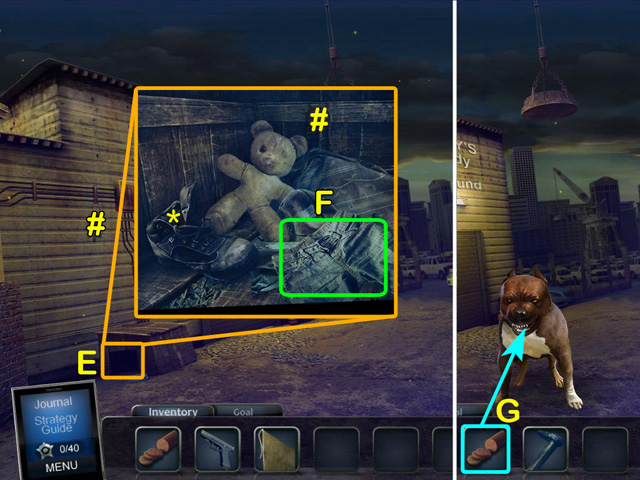
- Look inside the doghouse (E).
- Take the 24/52 DREAMCATCHER (#).
- Take the 33/70 BADGE (*).
- Move the pants and take the CONTROL LEVER (F).
- Give the MEAT to the dog (G).
- Examine the garage door (H).
- Take the HANDLE (I).
- Use the POLICE GUN to shoot the lock off the door (J).
- Go inside the garage.

- Take the 25/52 DREAMCATCHER (#).
- Go into the security room on the right.
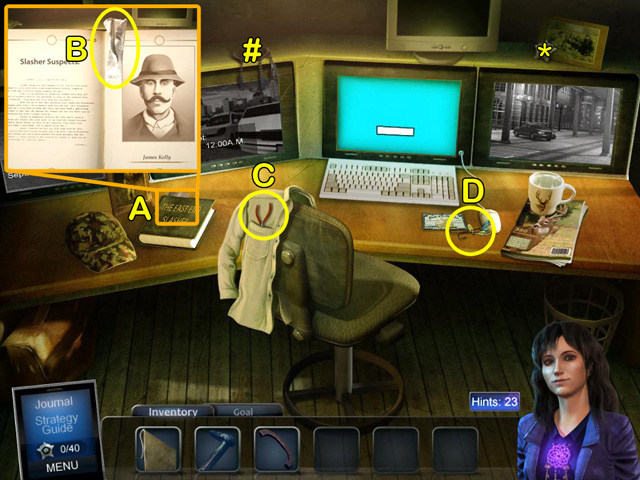
- Take the 26/52 DREAMCATCHER (#).
- Take the 34/70 BADGE (*).
- Open the book (A).
- Take the 1/2 FOIL WRAPPER (B).
- Take the NEEDLE NOSE PLIERS (C).
- Take the FISHING LURES (D).
- Back out to the street.
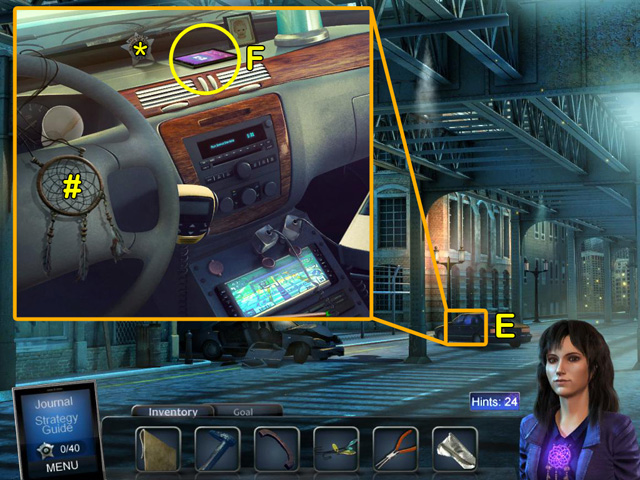
- Examine the car (E).
- Take the 27/52 DREAMCATCHER (#).
- Take the 35/70 BADGE (*).
- Take the CAMERA PHONE (F).
- Go back to the impound garage.
- Examine the safe (G).
- Use the NEEDLE NOSE PLIERS to pull out the key (H).
- Install the HANDLE (I).
- Use the CAMERA PHONE to take a picture of the keys (J).
- Go back out to the impound lot.
- Examine the crane (K).
- Take the PAINT BRUSH (L).
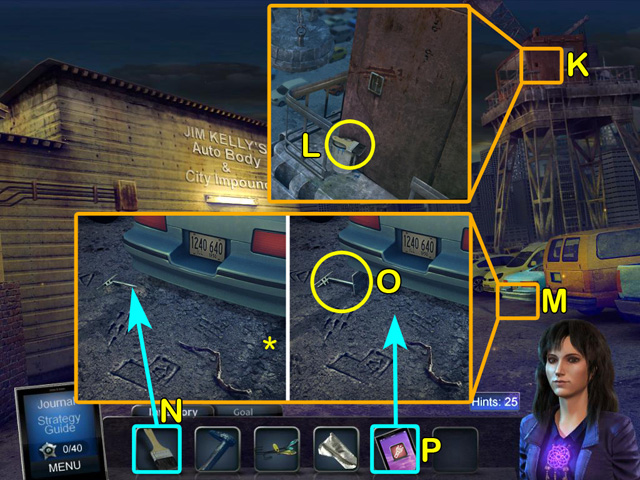
- Examine the ground by the car (M).
- Take the 36/70 BADGE (*).
- Use the PAINT BRUSH to clear away the dirt (N).
- Take the PEDAL (O).
- Use the CAMERA PHONE to take a picture of the symbols on the ground (P).
- Go back to the car crash site.
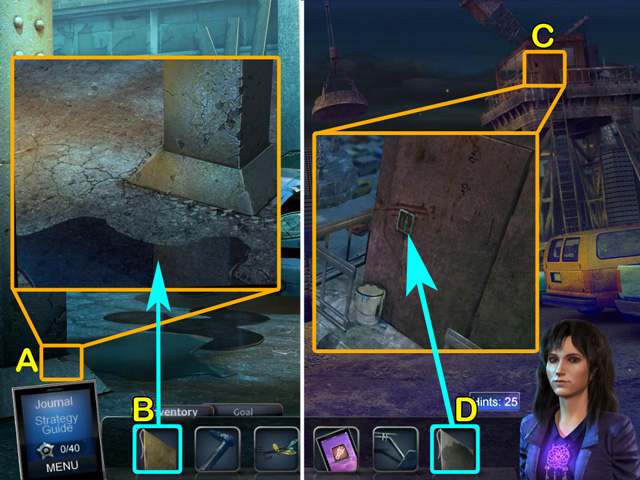
- Examine the base of the girder (A).
- Use the RAG to soak up some oil (B). Take the OILY RAG.
- Examine the crane door (C).
- Use the OILY RAG to open the door (D).
- Go inside the crane.
- Take the 28/52 DREAMCATCHER (#).
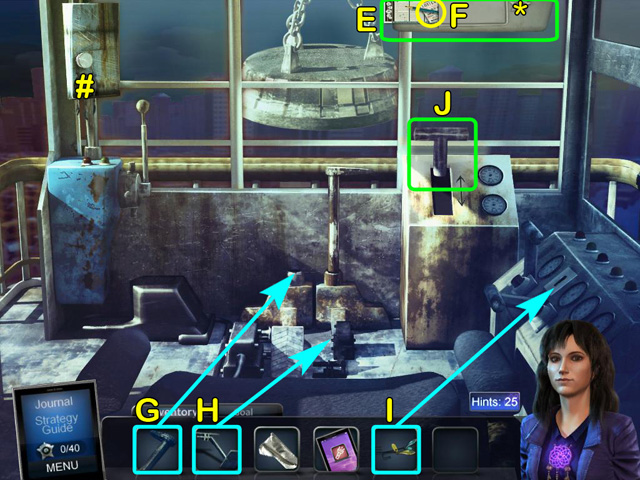
- Pull down the sun visor (E).
- Take the 37/70 BADGE (*).
- Take the LOTTERY TICKET (F).
- Install the CONTROL LEVER (G).
- Install the PEDAL (H).
- Put the FISHING LURES into the ignition (I).
- Pull the lever (J).
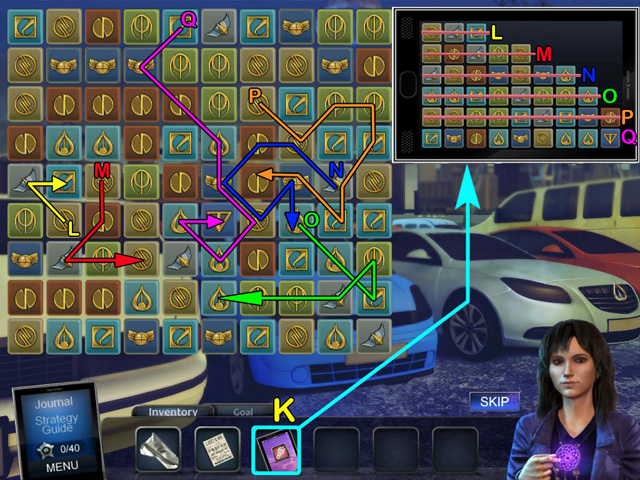
- Place the CAMERA PHONE next to the puzzle (K).
- Connect the symbols on the board according to the sequences shown in the picture on the right (L - Q).
- Go back to impound security room.
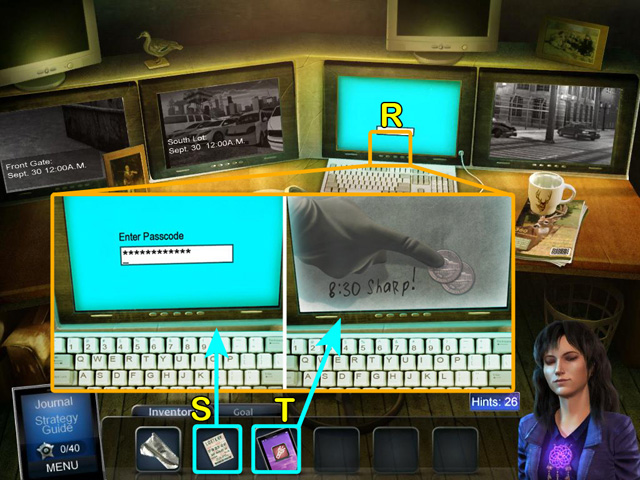
- Examine the computer (R).
- Enter the numbers from the LOTTERY TICKET as the password (S).
- Use the CAMERA PHONE to take a picture of the screen (T).
- Go back to the crash site and examine the car to access another HOS.
- .After completing the HOS you will have the NAIL CLIPPERS.
- Go back to the police car in the street.
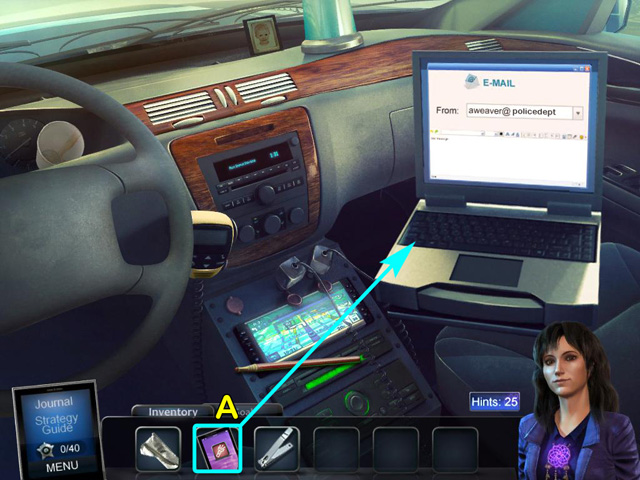
- Connect the CAMERA PHONE to the laptop (A).
- Go back to the impound garage.
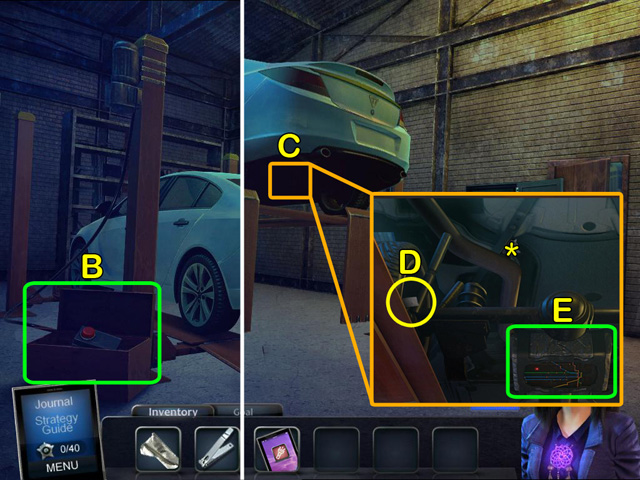
- Open the box and push the red button (B).
- Examine the undercarriage of the car (C).
- Take the 38/70 BADGE (*).
- Take the 2/2 FOIL WRAPPER (D).
- Examine the bomb (E).
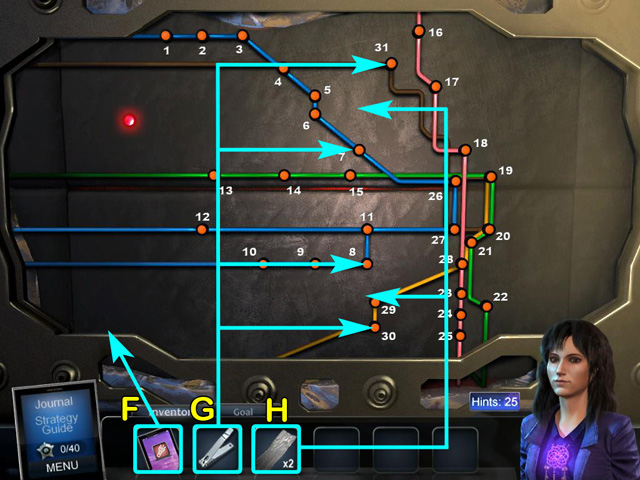
- Place the CAMERA PHONE next to the puzzle (F).
- Use the NAIL CLIPPERS to strip the wires at the areas marked 7, 31, 8 and 30 (G).
- Use the FOIL WRAPPERS to bridge the wires (H).
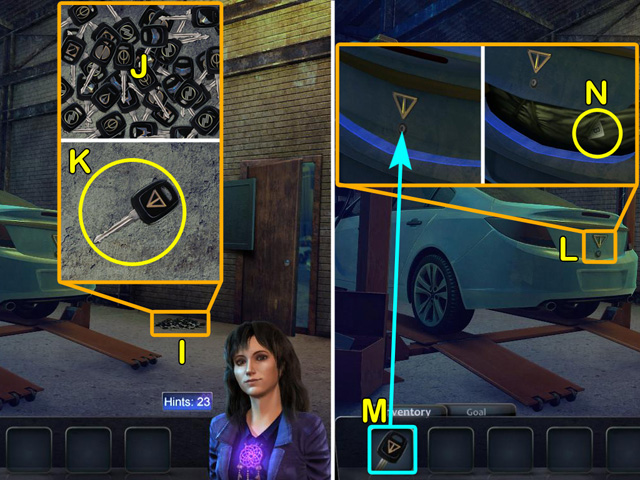
- Examine the pile of keys on the ground. (I).
- Left-click an exposed key to select it and then left-click another exposed key with a matching symbol to clear the pair. Remove all matching pairs (J).
- Take the CAR KEY (K).
- Examine the trunk of the car (L).
- Use the CAR KEY to open the trunk (M).
- Take the 1/2 TICKET PASS HALF (N).
- Go back out to the street.
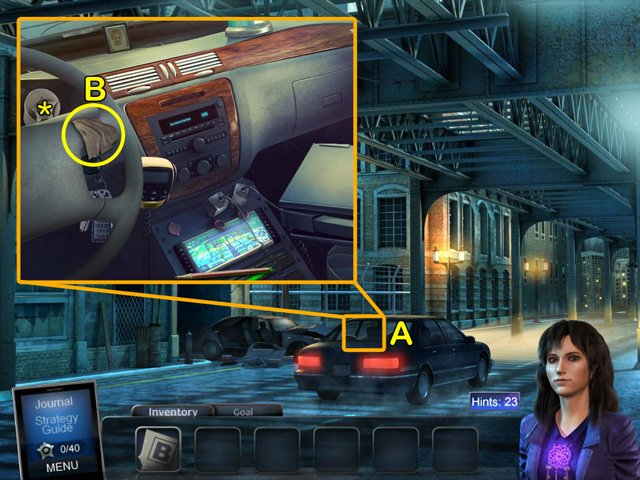
- Examine the car (A).
- Take the 39/70 BADGE (*).
- Take the 1/30 FABRIC PIECE (B).
- Go forward to the train station entrance.
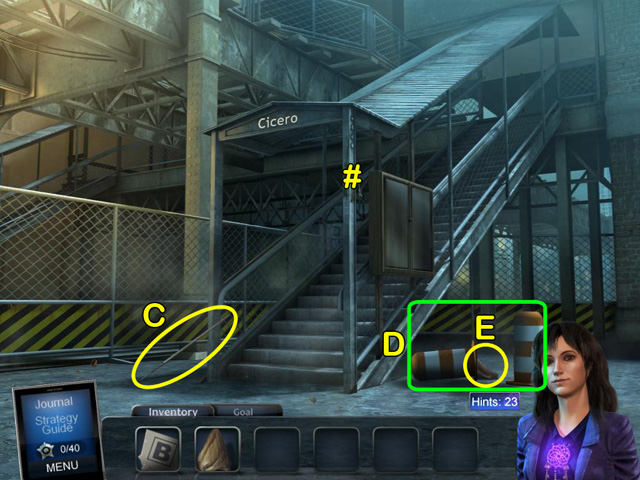
- Take the 29/52 DREAMCATCHER (#).
- Take the SPIKED ROD (C).
- Move the construction barricade (D).
- Take the 2/30 FABRIC PIECE (E).
- Go upstairs.
- Take the 30/52 DREAMCATCHER (#).
- Take the IRON PIPE (F).
- Take the 3/30 FABRIC PIECE (G).
- Go back downstairs.
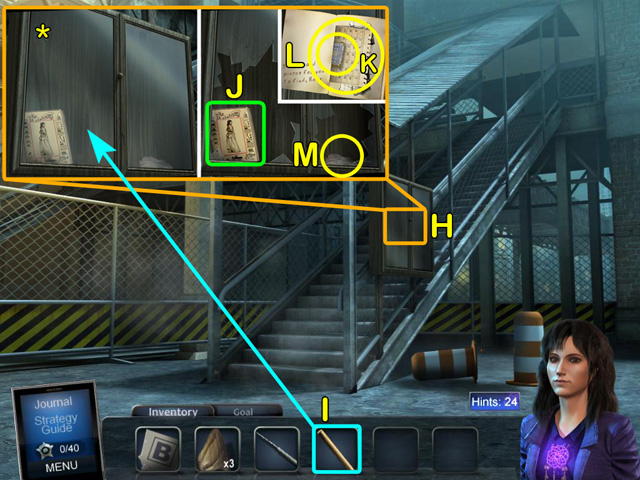
- Examine the display case (H).
- Use the IRON PIPE to smash the glass (I).
- Take the 40/70 BADGE (*).
- Open the magazine (J).
- Take the 2/2 TICKET PASS HALF (K).
- Take the calendar (L).
- Take the 4/30 FABRIC PIECE (M).
- Go back upstairs.
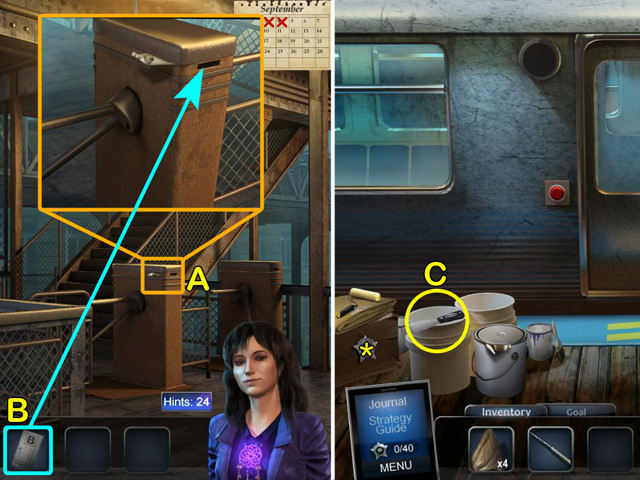
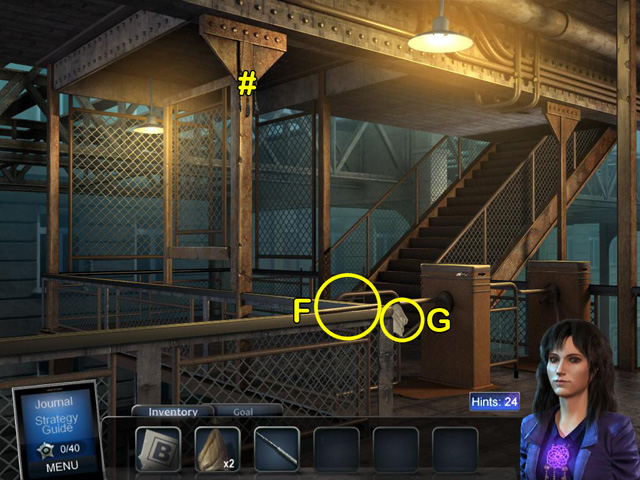
- Examine the turnstile (A).
- Insert the TICKET PASS into the turnstile (B).
- Go upstairs to the train platform.
- Take the 41/70 BADGE (*).
- Take the PUTTY KNIFE (C).
- Go downstairs.
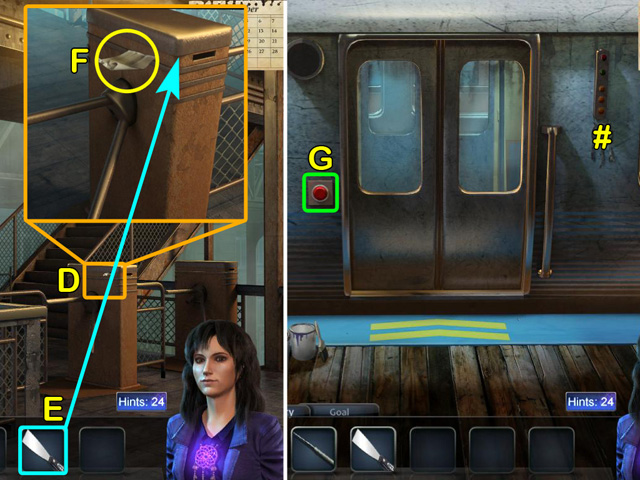
- Examine the turnstile (D).
- Use the PUTTY KNIFE to pry up the top of the turnstile (E).
- Take the 5/30 FABRIC PIECE (F).
- Go back up to the train platform.
- Take the 31/52 DREAMCATCHER (#).
- Press the red button to open the train doors (G).
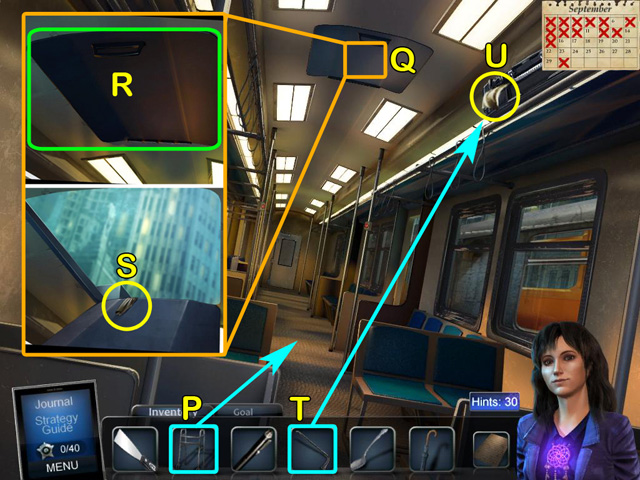
- Step onto the train.
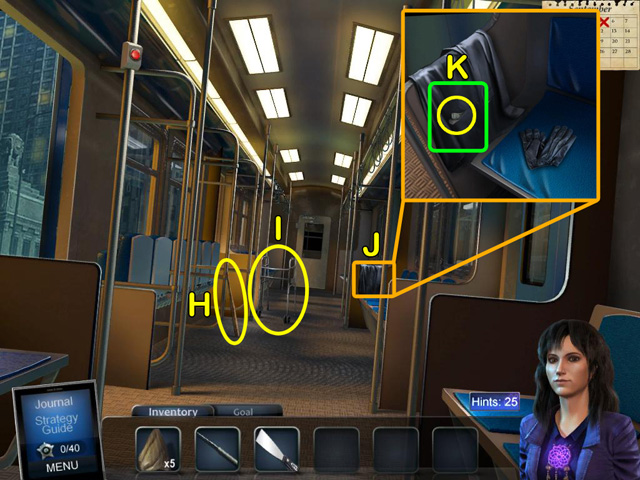
- Take the BASEBALL BAT (H).
- Take the WALKER (I).
- Examine the coat (J).
- Open the pocket and take the 6/30 FABRIC PIECE (K).
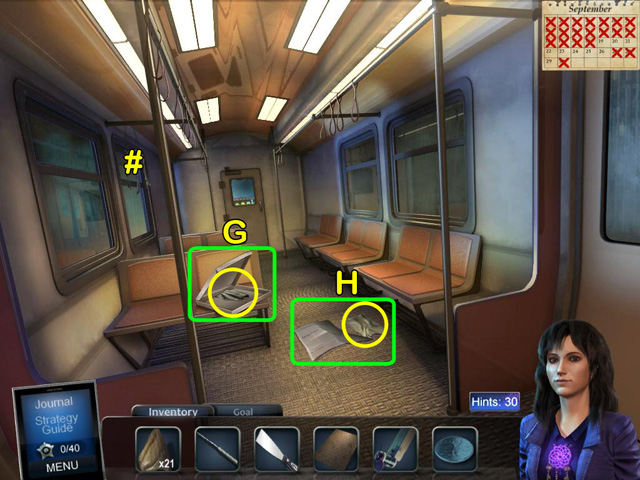
- Go to the back of the train car.

- Take the 32/52 DREAMCATCHER (#).
- Examine the seat on the left (L).
- Take the 42/70 BADGE (*).
- Take the 7/30 FABRIC PIECE (M).
- Take the SEAM RIPPER (N).
- Take the 8/30 FABRIC PIECE (O).
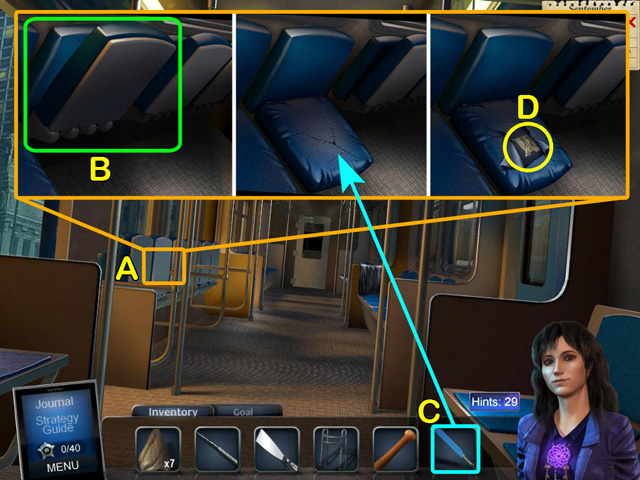
- Go forward and examine the seats on the left (A).
- Pull down the seat (B).
- Use the SEAM RIPPER to open the seat cushion (C).
- Take the 9/30 FABRIC PIECE (D).
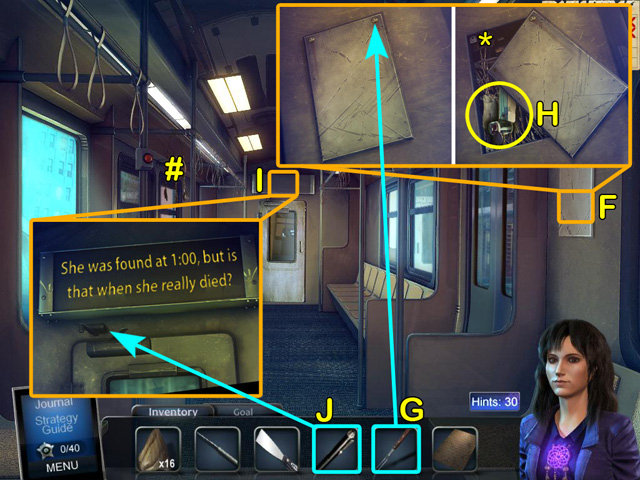
- Go forward to the next train car.
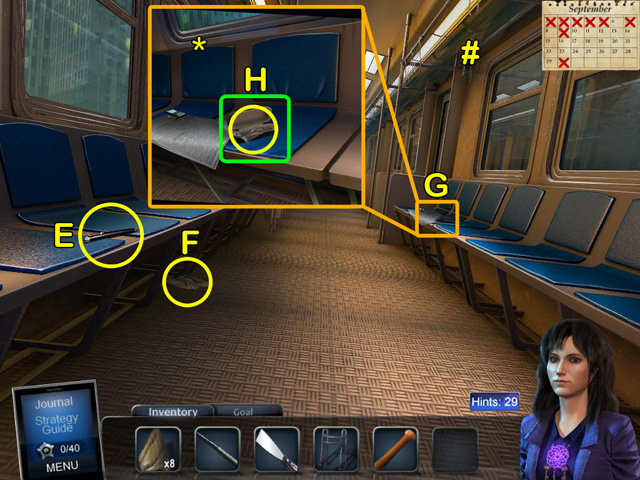
- Take the 33/52 DREAMCATCHER (#).
- Take the PEN (E).
- Take the 10/30 FABRIC PIECE (F).
- Examine the seat on the right (G).
- Take the 43/70 BADGE (*).
- Open the glasses case and take the 11/30 FABRIC PIECE and the EYEGLASS STEM (H).
- Go to the front of the train car.
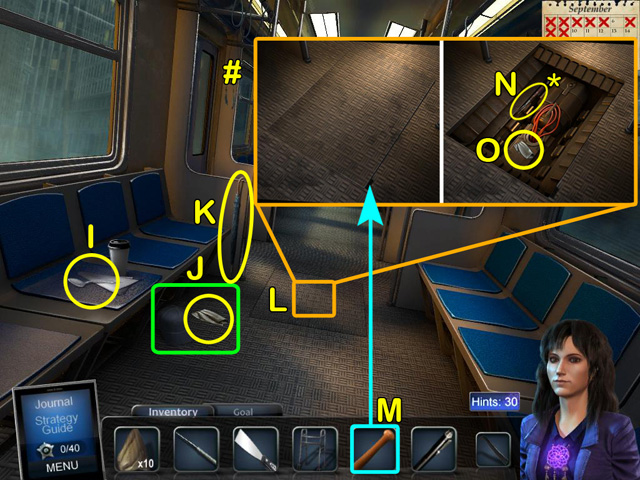
- Take the 34/52 DREAMCATCHER (#).
- Take the SPOON (I).
- Move the hat and take the 12/30 FABRIC PIECE (J).
- Take the UMBRELLA (K).
- Examine the floor (L).
- Use the BASEBALL BAT to open the hatch (M).
- Take the 44/70 BADGE (*).
- Take the SHRIMP FORK (N).
- Take the 13/30 FABRIC PIECE (O).
- Go to the back of the rear train car.
- Put the WALKER under the roof hatch (P).
- Examine the hatch (Q).
- Open the hatch (R).
- Take the 14/30 FABRIC PIECE (S).
- Use the EYEGLASS STEM to open the briefcase (T).
- Take the 15/30 FABRIC PIECE (U).
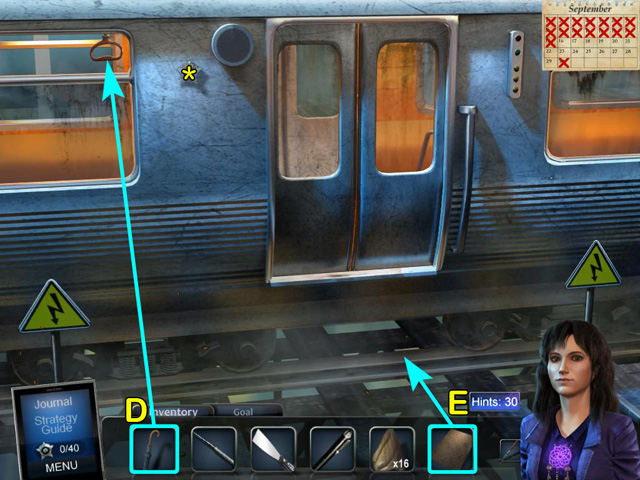
- Go back out onto the train platform.
- Use the spoon to pry the lid off the paint can (A).
- Take the 16/30 FABRIC PIECE (B).
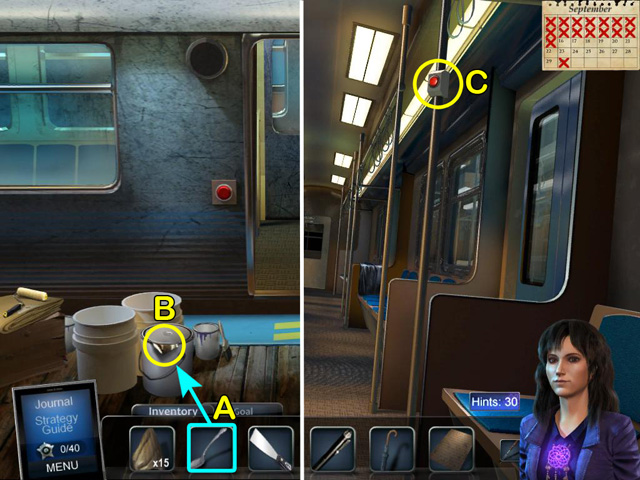
- Go back inside the train car.
- Press the red button on the right side to open the doors (C).
- Look through the doors on the right.
- Take the 45/70 BADGE (*).
- Use the UMBRELLA to pull down the handle (D).
- Lay the HATCH down between the train doors (E).
- Enter the next train car.
- Take the 35/52 DREAMCATCHER (#).
- Examine the cover on the right wall (F).
- Use the SHRIMP FORK to remove the cover (G).
- Take the 46/70 BADGE (*).
- Take the MINI-FAN and the 17/30 FABRIC PIECE (H).
- Examine the top of the door (I).
- Use the PEN to fix the door (J).
- Go to the back of train car.

- Take the 36/52 DREAMCATCHER (#).
- Examine the bicycle seat (K).
- Take the 47/70 BADGE (*).
- Move the seat and take the 18/30 FABRIC PIECE (L).
- Take the KEYCHAIN LIGHT (M).
- Take the 19/30 FABRIC PIECE (N).
- Go forward to the next train car.
- Pull aside the light fixture and take the 20/30 FABRIC PIECE (A).
- Look under the seat on the right (B).
- Use the KEYCHAIN LIGHT to light the area (C).
- Move away the trash (D).
- Take the 48/70 BADGE (*).
- Take the 21/30 FABRIC PIECE (E).
- Take the 1/2 COIN (F).
- Go to front of the train car.
- Take the 37/52 DREAMCATCHER (#).
- Open the pizza box and take the 22/30 FABRIC PIECE (G).
- Move the newspaper and take the 23/30 FABRIC PIECE (H).
- Go back to the rear train car.
- Press the red button on the right to open the doors (I).
- Step out onto the train platform.
- Move the trash can aside and take the 24/30 FABRIC PIECE (J).
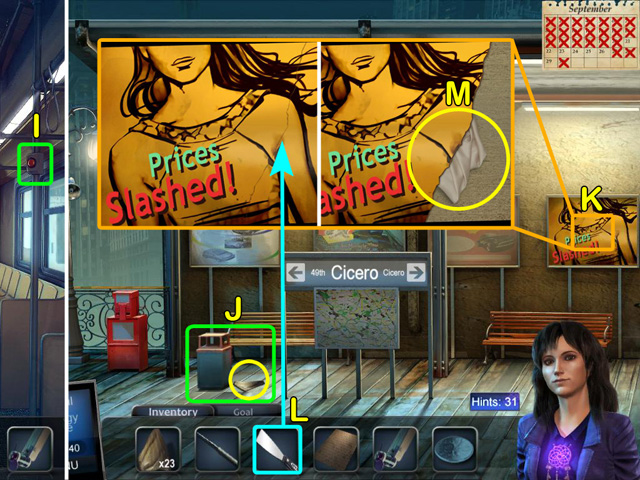
- Examine the poster on the right (K).
- Use the PUTTY KNIFE to cut off the right side of the poster (L).
- Take the 25/30 FABRIC PIECE (M).
- Go to the right side of the platform.
- Take the 38/52 DREAMCATCHER (#).
- Examine the guitar case (N).
- Take the 49/70 BADGE (*).
- Take the 2/2 COIN (O).
- Take the 26/30 FABRIC PIECE (P).
- Open mailbox and take the 27/30 FABRIC PIECE (Q).
- Examine the hole in the platform (R).
- Use the MINI-FAN to blow the fabric piece off the cables (S).
- Use the SPIKED ROD to take the 28/30 FABRIC PIECE (T).
- Go back to the left side of the platform.
- Put the COINS into the newspaper machine (A).
- Take the 29/30 FABRIC PIECE (B).
- Go back inside the train and head up to the control room at the front.
- Examine the door (C).
- Take the 50/70 BADGE (*).
- Read the note (D).
- Take the 30/30 FABRIC PIECE (E).
- Open the door and go inside the control room (F).
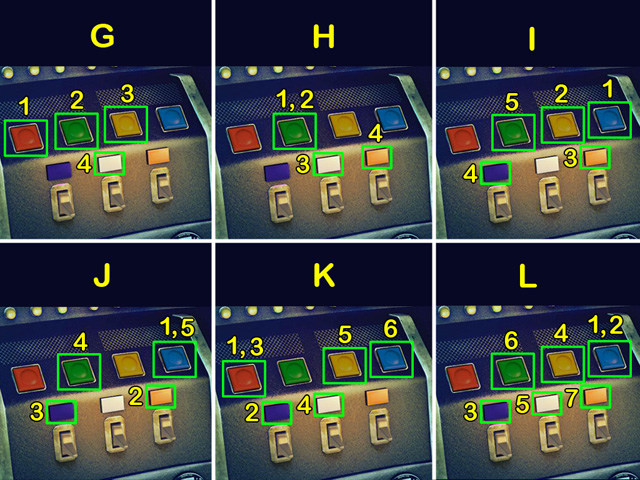
- Watch the pattern of flashing lights. Repeat each pattern by clicking on the correct sequence of buttons (G - L).
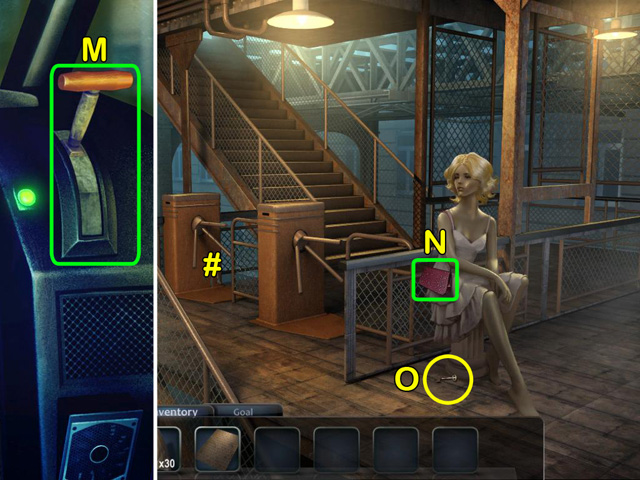
- Pull the lever (M).
- Exit the train and go downstairs.
- Take the 39/52 DREAMCATCHER (#).
- Open the purse (N).
- Take the KEY (O).
- Go downstairs to the street.
- Take the 1/6 EMBROIDERY SPOOL (P).
- Use the KEY to unlock the door (Q).
- Go into the clothing shop.
- Take the 40/52 DREAMCATCHER (#).
- Take the 2/6 EMBROIDERY SPOOL (R).
- Examine the back corner of the room (S).
- Take the 51/70 BADGE (*).
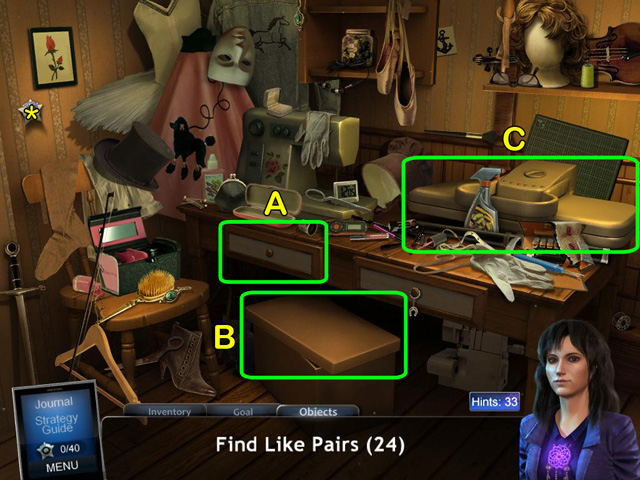
- Find like pairs. Some items may be hidden within interactive areas (A, B, C).
- After completing the HOS you will have the 3/6 EMBROIDERY SPOOL and the PIN CUSHION.
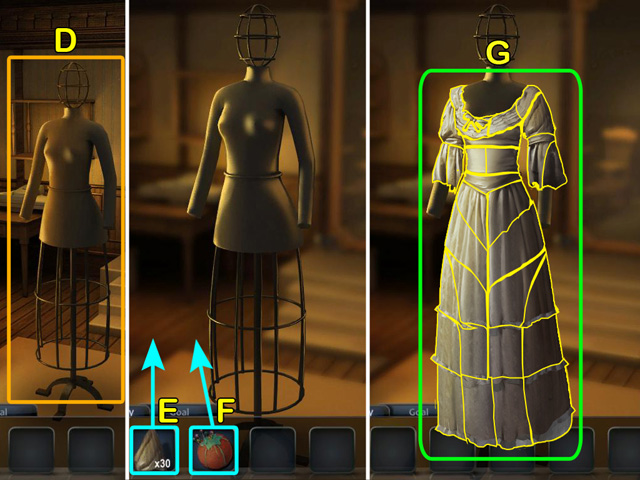
- Examine the dress form (D).
- Put the FABRIC PIECES around the dress form (E).
- Place the pins from the PIN CUSHION onto the FABRIC PIECES (F).
- Left-click each fabric piece and drag it over to the appropriate spot on the dress form. The pieces fit together like a jigsaw puzzle (G).
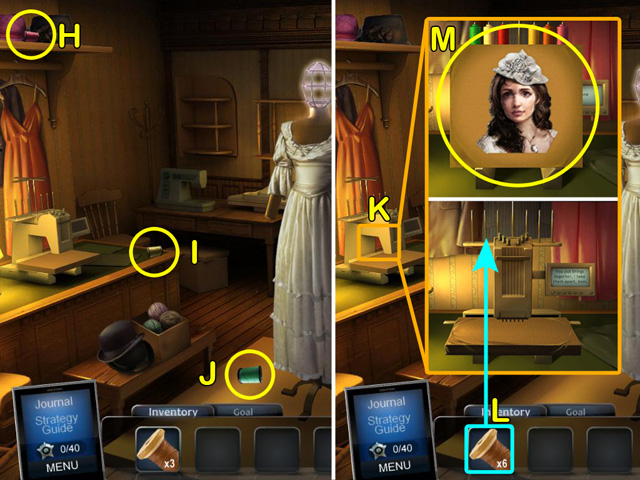
- Take the 4/6 EMBROIDERY SPOOL (H).
- Take the 5/6 EMBROIDERY SPOOL (I).
- Take 6/6 EMBROIDERY SPOOL (J).
- Examine the embroidery machine (K).
- Put the EMBROIDERY SPOOLS on the machine (L).
- Take the STRIDE PORTRAIT (M).
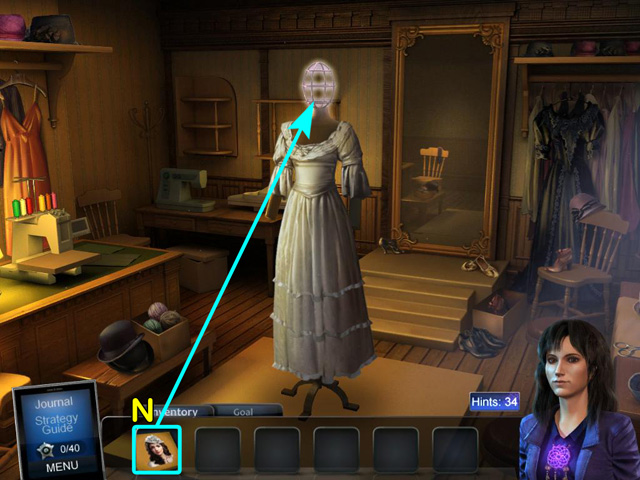
- Put the STRIDE PORTRAIT over the head of the dress form (N).

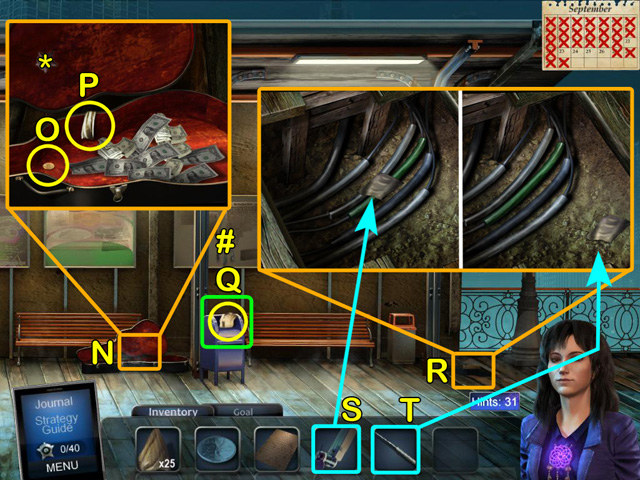
- Open the sack and take the COINS (A).
- Give the COINS to the carriage driver (B).
- Take the CAMERA PHONE (C).
- Examine the fountain (D).
- Move aside the coins (E).
- Use the CAMERA PHONE to take a picture of the 1/20 NAME (F).
- Examine the bench (G).
- Take the 52/70 BADGE (*).
- Read the note (H).
- Take the RETRACTABLE BATON (I).
- Move aside the clothing pieces (J).
- Use the CAMERA PHONE to take a picture of the 2/20 NAME (K).
- Go down the street to the left.
- Take the 53/70 BADGE (*).
- Take the 41/52 DREAMCATCHER (#).
- Take the MIRROR (L).
- Use the RETRACTABLE BATON to break the glass (M).
- Take the FIRE EXTINGUISHER (N).
- Examine the trash can by the fence (O).
- Use the FIRE EXTINGUISHER to put out the fire (P).
- Take the 54/70 BADGE (*).
- Take the KEY (Q).
- Use the KEY to unlock the gate (R).
- Use the MIRROR to get a reflected image of the name (S).
- Use the CAMERA PHONE to take a picture of the 3/20 NAME (T).
- Go through the gate.
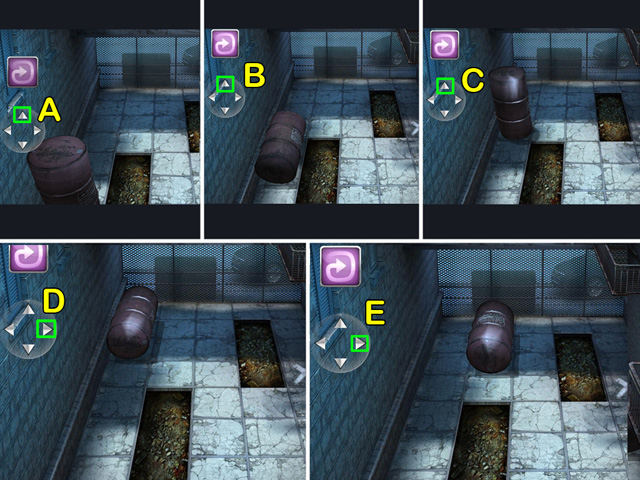
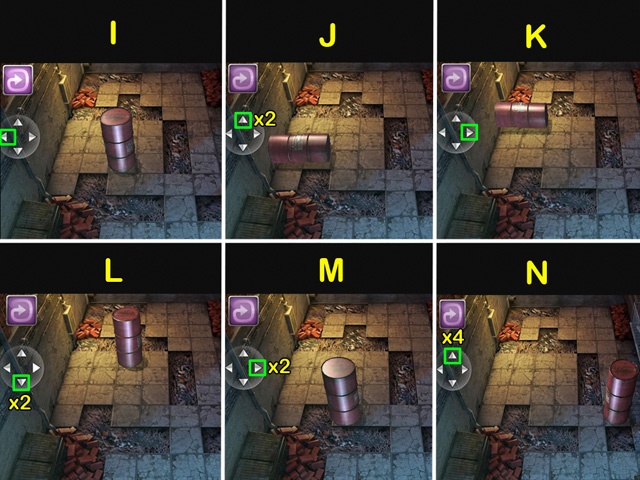
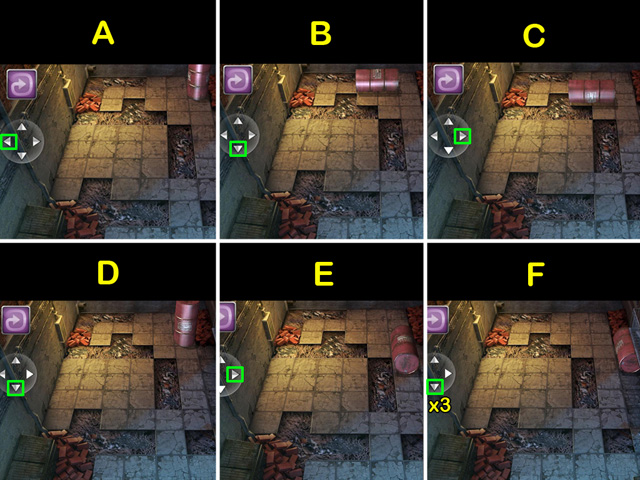
- Left-click the arrows to move the barrel onto the X by following the correct path (A - E).
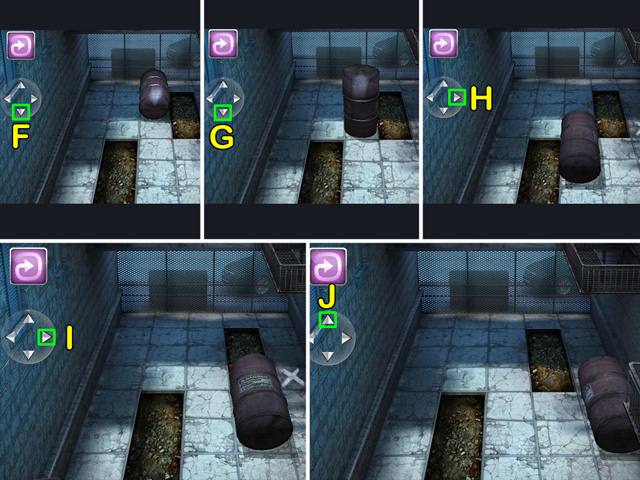
- Continue left-clicking the arrows to move the barrel in the correct path (F - J).
- Climb up to the fire escape.
- Take the 42/52 DREAMCATCHER (#).
- Pull the ladder up (K).
- Climb up to the next level.
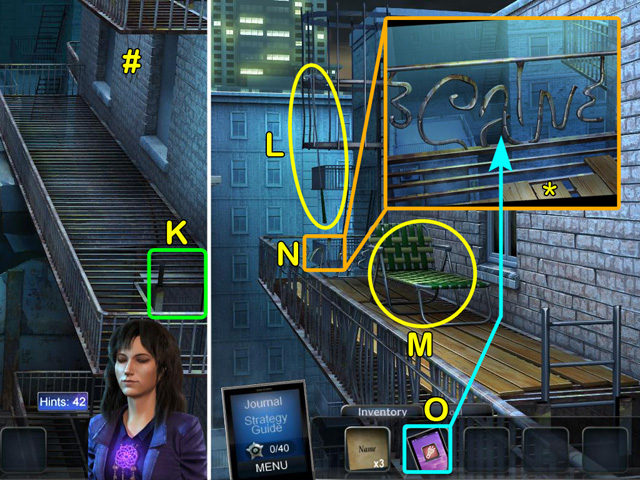
- Take the PUTTER (L).
- Take the LOUNGER (M).
- Examine the railing (N).
- Take the 55/70 BADGE (*).
- Use the CAMERA PHONE to take a picture of the 4/20 NAME (O).
- Climb up to the roof.
- Take the 56/70 BADGE (*).
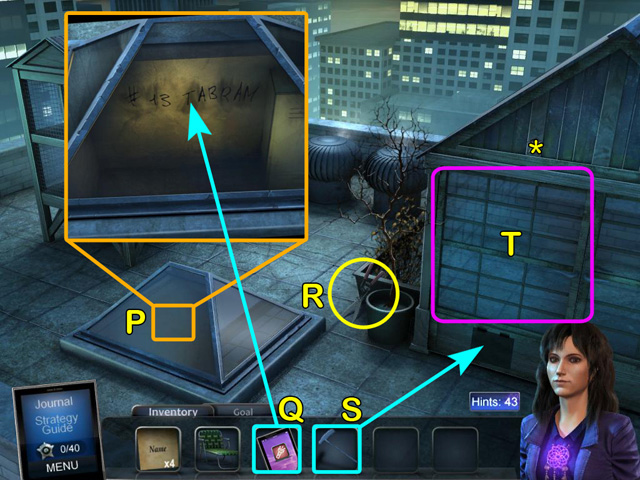
- Examine the skylight (P).
- Use the CAMERA PHONE to take a picture of the 5/20 NAME (Q).
- Take the GRASS CLIPPERS (R).
- Use the PUTTER to open the greenhouse door (S).
- Go inside the greenhouse to access a HOS (T).
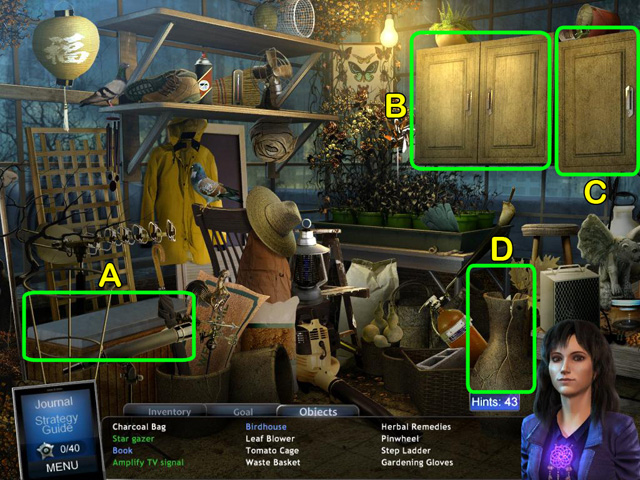
- Find all of the items listed. Some items may be hidden within interactive areas (A, B, C, D).
- After completing the HOS you will have the SCREEN DOOR.
- Exit the greenhouse.
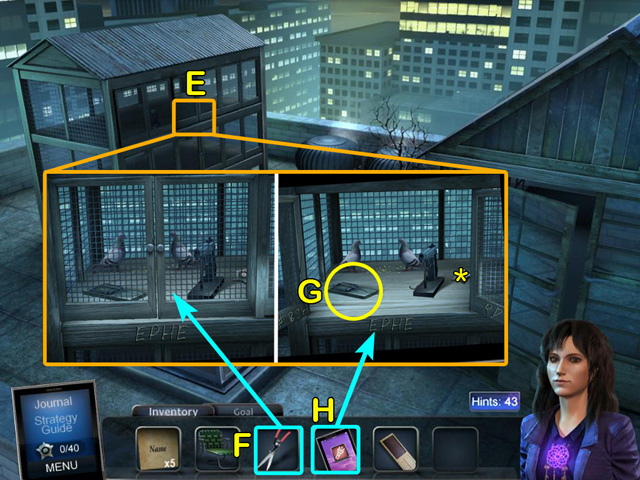
- Examine the pigeon coup (E).
- Use the GRASS CLIPPERS to cut the wire (F).
- Take the 57/70 BADGE (*).
- Take the RAT TRAP (G).
- Use the CAMERA PHONE to take a picture of the 6/20 NAME (H).
- Climb down to the first level of the fire escape.
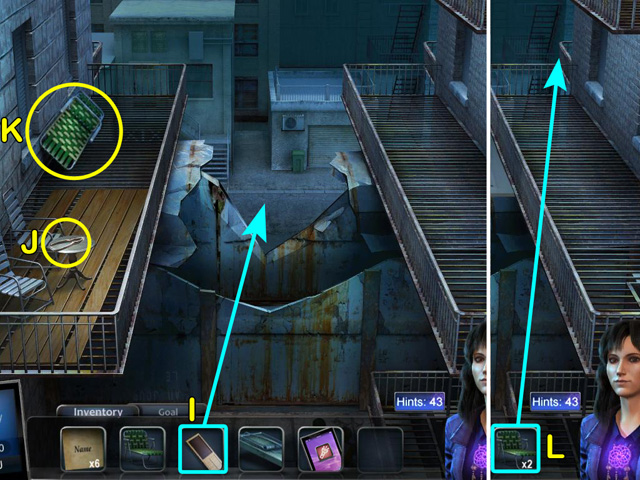
- Lay the screen door down between the balconies (I).
- Take the NUTCRACKER (J).
- Take the LOUNGER (K).
- Lay down a LOUNGER on the balcony rails to the right (L).
- Examine the corner of the balcony (M).
- Take the 58/70 BADGE (*).
- Use the NUTCRACKER to remove the HANDLE BARS from the bike (N).
- Lay down the other LOUNGER across the balcony rails on the left (O).
- Cross over to the next balcony.
- Use the RAT TRAP to bridge the wires together (A).
- Go back up to the roof and enter the greenhouse to access another HOS. After completing the HOS you will have the CAR KEY.
- Take the 59/70 BADGE (*).
- Look down over the balcony (B).
- Use the CAR KEY to turn off the alarm (C).
- Use the CAMERA PHONE to take a picture of the 7/20 NAME (D).
- Use the HANDLE BARS to slide down the cable (E).
- Take the 43/52 DREAMCATCHER (#).
- Take the 60/70 BADGE (*).
- Climb down to the street.
- Look under the stairs (F).
- Take the 61/70 BADGE (*).
- Use the CAMERA PHONE to take a picture of the 8/20 NAME (G).
- Go down to the corner by Chapman's garage.
- Take the 44/52 DREAMCATCHER (#).
- Go into Chapman's garage.
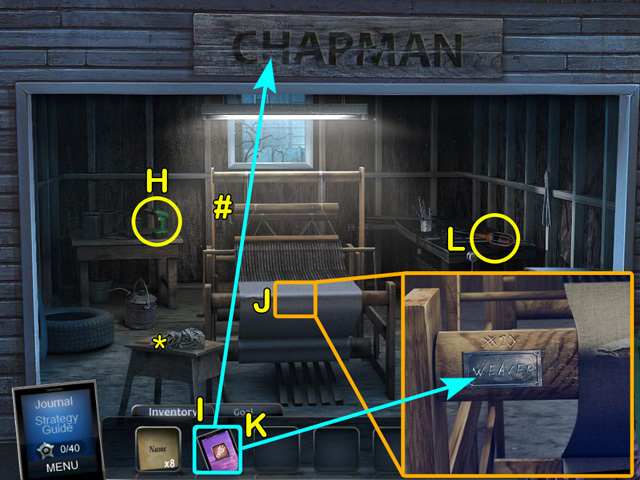
- Take the 62/70 BADGE (*).
- Take the 45\52 DREAMCATCHER (#).
- Take the CORDLESS DRILL (H).
- Use the CAMERA PHONE to take a picture of the 9/20 NAME (I).
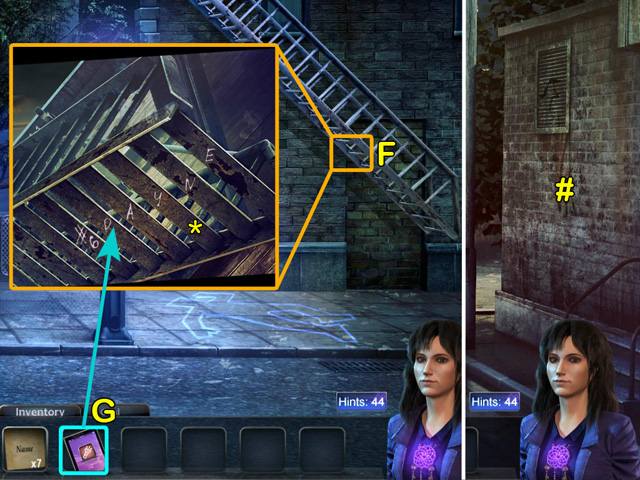
- Examine the loom (J).
- Take a picture of the 10/20 NAME (K).
- Take the LIGHT HOUSING (L).
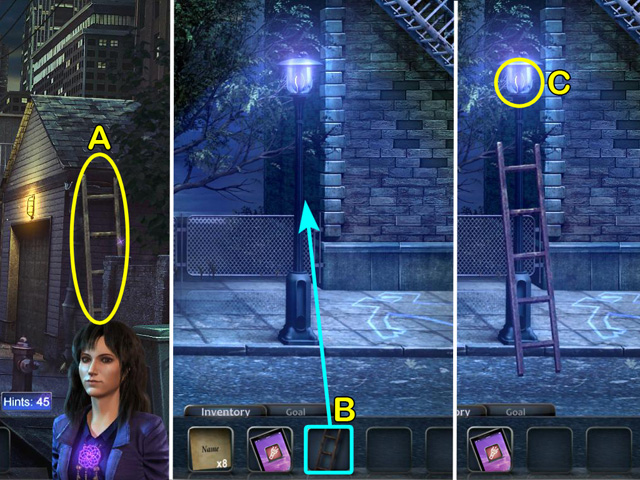
- Move further down the alley and take the LADDER (A).
- Lean the ladder against the light pole (B).
- Take the BLACK LIGHT (C).
- Go to Chapman's apartment.
- Take the 63/70 BADGE (*).
- Use the CAMERA PHONE to take a picture of the 11/20 NAME (D).
- Examine the book shelf on the right to access a HOS (E). After completing the HOS you will have the WRENCH.
- Go into the kitchen.
- Take the 46\52 DREAMCATCHER (#).
- Take the OLIVE OIL (F).
- Climb through the window and go left down the alley past Chapman's garage.
- Take the 64/70 BADGE (*).
- Take the GRILL BRUSH (G).
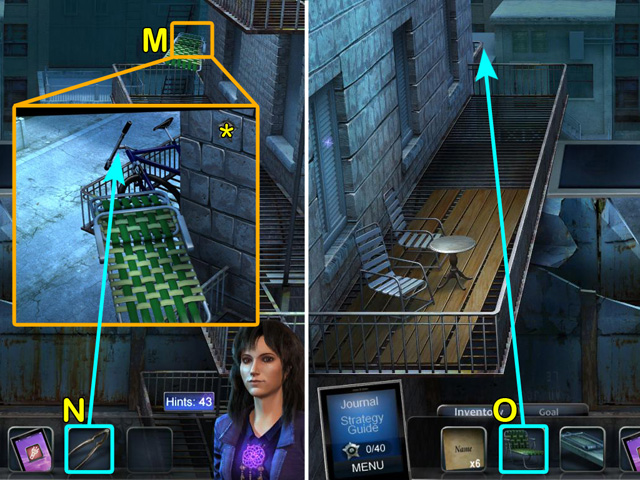
- Examine the ground (H).
- Left-click the arrows to move the barrel onto the X by following the correct path (I - N).
- Continue left-clicking the arrows to move the barrel in the correct path (A - F).
- Climb up to the balcony.

- Open the grill lid (G).
- Take the GRILL FORK (H).
- Use the GRILL BRUSH to clean the inside of the lid (I).
- Use the CAMERA PHONE to take a picture of the 12/20 NAME (J).
- Use the OLIVE OIL to open the window (K).
- Climb through the window.
- Take the 47\52 DREAMCATCHER (#).
- Use the GRILL FORK to pry out the tile and take the SECURITY CODE (L).
- Take the SHOWER CURTAIN (M).
- Examine the sink (N).
- Take the 65/70 BADGE (*).
- Use the WRENCH to turn the valve (O).
- Use the CAMERA PHONE to take a picture of the 13/20 NAME (P).
- Climb back down to the alley.
- Examine the keypad (Q).
- Place the SECURITY CODE next to the keypad (R).
- Press the numbers on the keypad to enter the code (1 - 5).
- Go through the gate.
- Take the 48/52 DREAMCATCHER (#).
- Examine the pile of bricks (A).
- Remove free bricks one by one until the pile is cleared (B).
- Use the CAMERA PHONE to take a picture of the 14/20 NAME (C).
- Hang up the LIGHT HOUSING (D).
- Put the BLACK LIGHT into the light housing (E).
- Use the CAMERA PHONE to take a picture of the 15/20 NAME (F).
- Go down the alley to the right.
- Close the dumpster lid to startle the cat (G).
- Examine the collar (H).
- Use the CAMERA PHONE to take a picture of the 16/20 NAME (I).
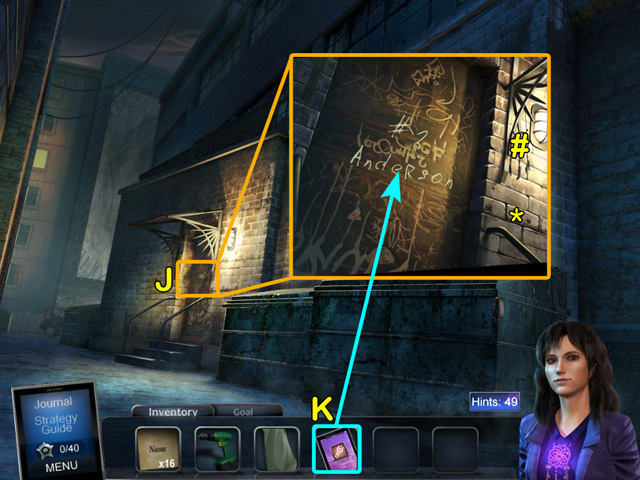
- Examine the door (J).
- Take the 49/52 DREAMCATCHER (#).
- Take the 66/70 BADGE (*).
- Use the CAMERA PHONE to take a picture of the 17/20 NAME (K).
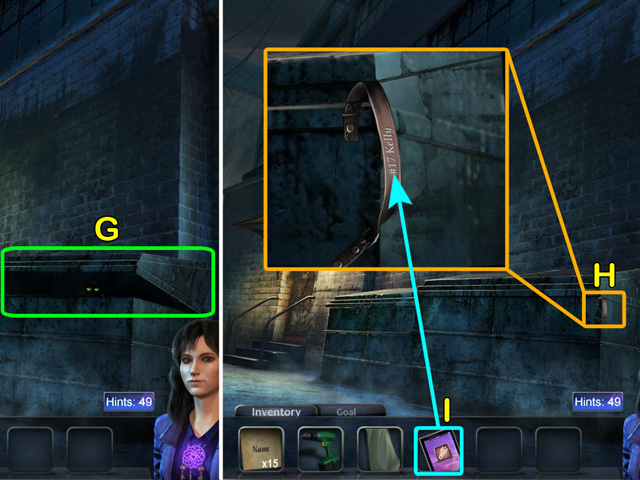
- Go down to the end of the alley and over to the truck on the left.
- Take the 50/52 DREAMCATDCHER (#).
- Use the CAMERA PHONE to take a picture of the 18/20 NAME (A).
- Take the CAR JACK (B).
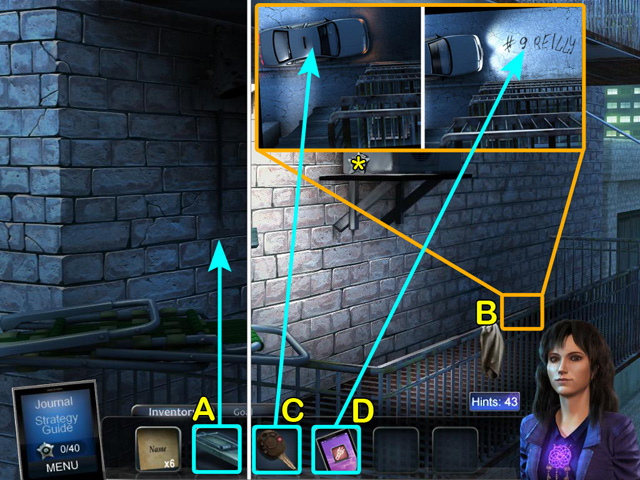
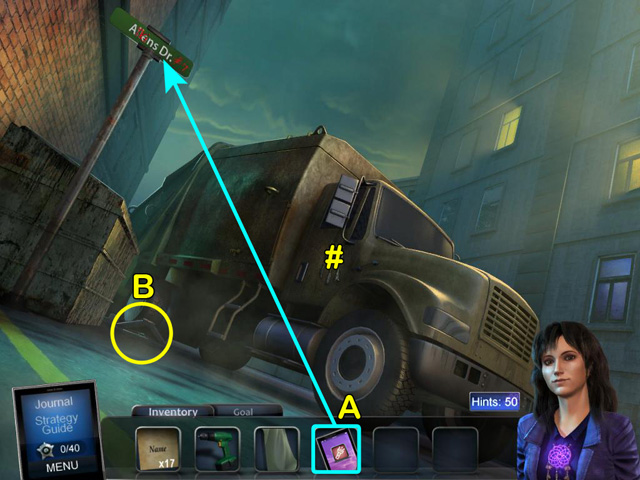
- Go back to the intersection.
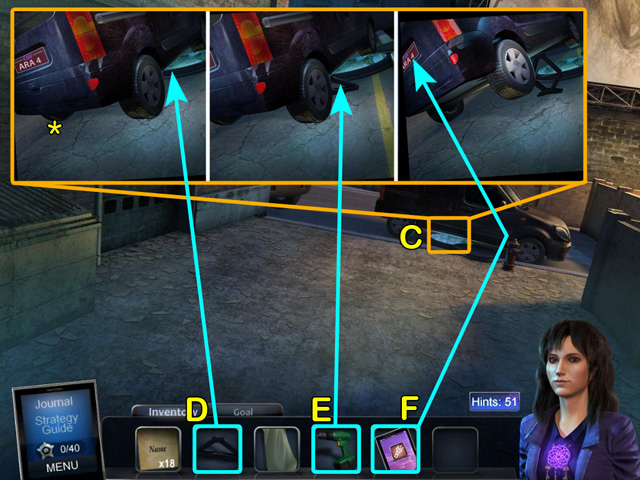
- Examine the vehicle (C).
- Take the 67/70 BADGE (*).
- Put the CAR JACK underneath the vehicle (D).
- Use the CORDLESS DRILL to lift the car jack (E).
- Take a picture of the 19/20 NAME (F).
- Go down into the sewer.
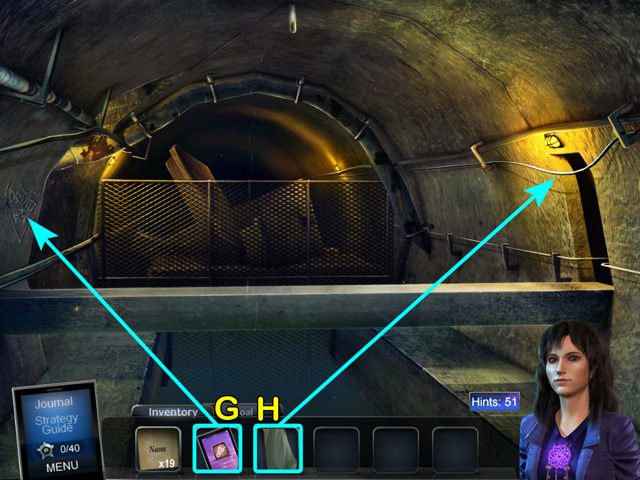
- Use the CAMERA PHONE to take a picture of the 20/20 NAME (G).
- Hang the SHOWER CURTAIN over the pipe (H).
- Go through the tunnel.
- Go forward to the end of the alley.
- Take the 1/2 DRESS PIECE (I).
- Go inside the lodge.
- Take the 51/52 DREAMCATCHER (#).
- Take the 68/70 BADGE (*).
- Take the 2/2 DRESS PIECE (J).
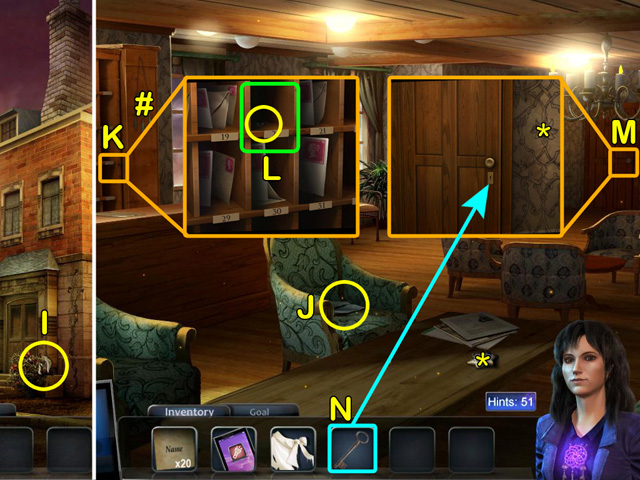
- Examine the mail slots on the left (K).
- Remove the envelope from slot #20 and take the KEY (L).
- Examine the door on the right (M).
- Take the 69/70 BADGE (*).
- Use the KEY to unlock the door (N).
- Go inside the room.
- Take the 52/52 DREAMCATCHER (#).
- Take the 70/70 BADGE (*).
- Examine the back of the room to access a HOS (A).

- Find the items listed. Some items may be hidden within interactive areas (B, C).
- After completing the HOS you will have MARY KELLY'S RING.
- Go back to Mary Kelly in the alley.
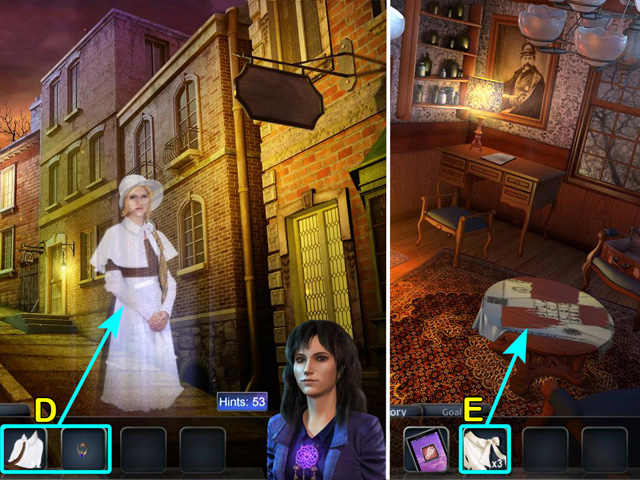
- Give the 2 DRESS PIECES and MARY KELLY'S RING to the ghost (D). You will receive 3 DRESS PIECES.
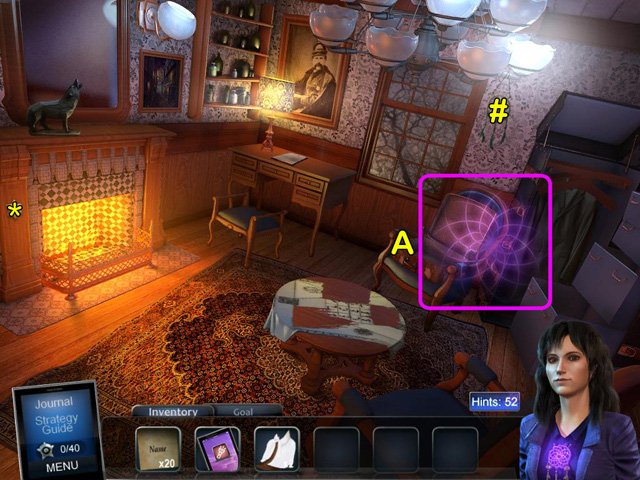
- Go back to the room in the lodge.
- Put the 3 DRESS PIECES into the quilt (E).
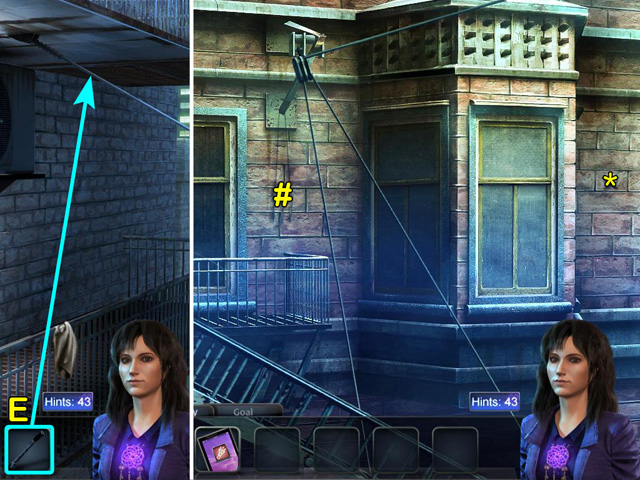
- Go to the scaffolding on the left.

- Left-click the rope on the left side and it will swing over to knock off the hook on the top right (F).
- As the rope swings back to the left, left-click it when it is at position G to knock off the hook on the left side. When the rope swings back to the right it will knock off the hook in the lower right corner.
- Go to the scaffolding on the right.
- Left-click the rope on the right side to knock off the hook in the top left corner (H).
- Left-click the rope on the left when it is at position I to knock off the hook in the middle of the left side. The rope will swing back to the right and knock off the last hook on that side.
- Left-click the rope when it is at position J to knock off the last hook.
- Take the MURDER WEAPON (A).
- Congratulations, you have completed Angelica Weaver: Catch Me When You Can!
Created at: 2012-10-05