

GAME WALKTHROUGH MENU
- General Tips
- Inventory Items
- Random Clicking
- S.O.S. Button / Hints
- Walkthrough Overview
- Chapter 1
- Chapter 2
- Chapter 3
- Chapter 4
- Chapter 5
- Chapter 6
- Chapter 7
- Chapter 8
- Chapter 9
- Chapter 10
- Chapter 11
- Chapter 12
- Chapter 13
- Chapter 14
- Chapter 15
- Chapter 16
- Chapter 17
- Chapter 18
- Chapter 19
- Chapter 20
- Chapter 21
- Chapter 22
- Chapter 23
- Chapter 24
- Chapter 25
- Chapter 26
- Chapter 27
- Chapter 28
- Chapter 29
- Chapter 30
- Chapter 31
- Chapter 32
- Chapter 33
- Chapter 34
- Chapter 35
- Chapter 36
- Chapter 37
- Chapter 38
- Chapter 39
- Chapter 40
GENERAL TIPS
- There are 2 modes you can choose to play in this game: Classic Mode and Light Mode.
- In Classic Mode you will be able to obtain a higher score but the timer will be enabled.
- In Light Mode you will be able to play without having to worry about a timer. Take your time and enjoy the game; however, you will not be able to obtain high scores like you would in Classic Mode. Beyond bragging rights, a higher score also allows you to buy items from the ’secret store’ in the game, a fun little extra that the game has.
- You can zoom into all areas of the scene by right–clicking your mouse anywhere on the scene. The magnifying glass will automatically show up in the area to which your cursor is pointing. If you want to get rid of the magnifying glass, you can right–click again.
- You can also click on the magnifying glass icon that is in the lower right side of the scene and it will enable the magnifying glass, either method will work. This tool will be very useful in helping you locate hard to see items.
- If you do not want to read the text that pops up in the middle of the screen, you can click the word "next" to get rid of it, but you don’t have to. You can also click anywhere on the scene and the text will disappear. I found it easier to click anywhere in the scene instead of clicking precisely on the word "next".
- You can look at any of the messages that have been shown on the screen by clicking on the message icon that is on the lower right side of the page. It can be useful to read these messages since some of them give you clues for upcoming puzzles.
- The money that you earn throughout the game will allow you to buy ’secrets’ from the store. Go to the main menu and click on the word "secrets" to access that location. This is a fun little section in which you can buy extra mini–games that do not appear in the game. You can also purchase sketches and other things.
- The game has lots of replay value since the objects move around each time you play. Even the key items in the game will not always be in the same location. Keep this in mind when following the walkthrough since there are so many random solutions.
- Once you’ve completed the game you can go back and replay any level you wish. Simply go back to the main menu and select "Choose Levels." It will let you play any of the levels in the game.
- You can replay a level before you’ve completed it. Click on the menu and select "Replay Level." The game will take you back to the beginning of the level you’re currently in. Keep in mind that when you replay a level the objects will not be in the same place. Once you’ve completed a level you will not be able to access it again until after you’ve finished the entire game.
- Once in a while you will be asked to complete a graphical task. This means that you will have to look for items in a scene by looking at a photograph. Graphical tasks are always in the upper right side of the screen.
- At the end of each chapter you will be asked to look for your next location on a map. The only way to know where you have to go is by reading the clue underneath the map.
INVENTORY ITEMS
- Every so often in the game you will have some items that will enter your inventory bar at the bottom of the screen. These items will go into the inventory automatically after you click on them.
- To use an inventory item you have to click on it to select it. When you click on it, that item will be raised, which means it is ready to be used. Once the item is selected, simply click on the item in the scene that you want to use it on.
- For example, if you have a wrench in your inventory and you want to take some bolts out of something, click on the wrench, and then place your cursor on the bolts. The bolts will come off.
- Once you’re completely done with an item from the inventory it will automatically disappear.
- You cannot click on items in the scene when your inventory item has been selected because the game thinks that you’re trying to use it in the spot that you’re clicking. Remember to click it back down if you want to click on other things in the scene.
RANDOM CLICKING
- You’re only allowed to click on 3 incorrect items in a row. Each time you click incorrectly you will see an "X" of a different color on the screen.
- A green "X" means that is the first time you’ve clicked incorrectly. You have 2 more times to do so before you’re penalized.
- A yellow "X" means that is the second time you’ve clicked incorrectly, you have one more time to do so.
- A red "X" means that you’ve clicked incorrectly 3 times in a row; you will be penalized at this point. Depending on the mode you’re playing, you will either lose points or have time taken from your clock.
- If you’re playing in Light Mode, you will have 100 points deducted from your total for mis–clicks. If you’re in Classic Mode, you will lose 20 seconds from your clock.
S.O.S. BUTTON / HINTS
- The red "S.O.S." button in the lower right side of the screen has 2 purposes: providing hints and skipping mini–games.
- Using it as a hint button will cost time from your clock or points from your total, depending on the mode in which you are playing.
- When you use it as a hint, several purple circles will glow around one of the objects on your list. The purple glow is pretty faint and can be hard to see at times. The good news is that the area will stay lit until you click on it. This gives you plenty of time to find it.
- If you’re playing in Classic Mode, you will have one minute deducted from your clock for each hint you use.
- The S.O.S. button can also be helpful when you’re trying to solve one of the mini games. You can use it to skip a puzzle you find too hard or a puzzle you just don’t feel like playing.
WALKTHROUGH
- The objects that you have to find during the game will not always be in the same location. There can be many locations for the same items.
- While the walkthrough cannot show you every possible combination, it can at least show you what the item looks like, and in some cases alternate locations for the items. This will make things easier to find.
CHAPTER 1: WELCOME
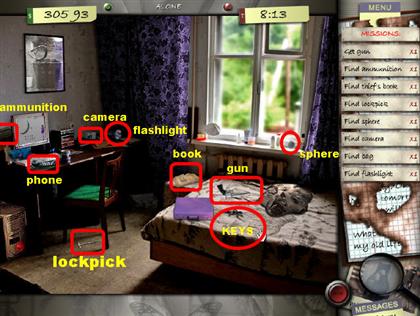
LEVEL 1 – FIND 13 KEYS
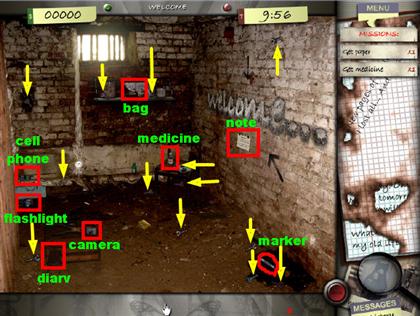
- Grab the note that is on the right side of the wall.
- Pick up the medicine bottle that has an "X" on it. It is on the floor against the back wall. It could also be on the back wall, on the shelf, or in the lower left side, on top of the crate.
- Grab the bag on the shelf, on the back wall. Pick up the other items that are on the list.
- The diary is on the lower left side of the ground.
- Find all 13 keys that are in the scene. The locations of the keys vary. If you want to get the same layout as the one in the walkthrough, keep clicking on "Restart Level" from the menu options.
- All the keys have yellow arrows pointing to them and the items from the list are highlighted in red.
CHAPTER 2: OLD HOUSE
LEVEL 2 – FIND 4 BATTERIES – 5 PIECES OF PAPER – 1 AUDIO TAPE
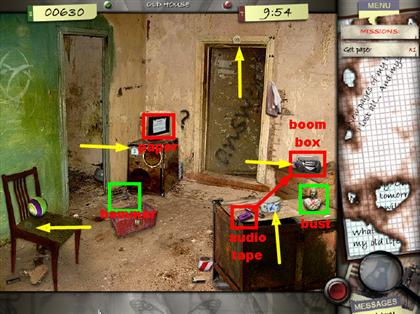
- Click on the paper that is on the monitor, left side of the page.
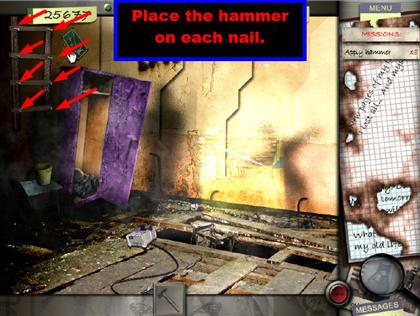
- The hammer is inside the door, on the left side. It could also be on the left side of the floor, in front of the speaker.
- The hammer will go into the inventory. All inventory items are at the bottom of the page. In order to use an inventory item, you must click on the item you want to use and that item will pop up. Once that item is up, click on the item in the scene with which you want to use it.
- Use the hammer on the white bust that is on the table, right side of the scene, and you will find a key inside of it.
- Click on the key and it will go into the inventory.
- Use the key on the lock that is on the red box, left side of the ground. You will find the 3 batteries inside. Click on all three batteries to take them off your list.
- The last battery is on the lower left side, under the chair. Now all 4 batteries will show up in your inventory.
- Place the batteries inside the boom box on the top right side of the scene.
- Grab the purple audiotape that is in the middle of the floor and it will go into your inventory. It could also be on the desk, on the right side.
- Place the audiotape inside the boom box that is in the top right side of the scene.
- You can look for the 5 numbers that are in the scene. These numbers will be on small colored pieces of paper throughout the scene. I’ve highlighted all the pieces with yellow arrows on the screenshot.
- Pick up the 5 pieces of paper in the scene. The locations may vary.
- The first piece of paper is on the large speaker that is on the floor, left side of the scene.
- The second piece of paper is on the bowl, on the desk, lower right side.
- On the back wall, there is another piece of paper above the door.
- On the left side, there is a piece of paper on the chair.
- On the right side, there's a purple piece of paper next to the boom box.
ENTER THE CODE
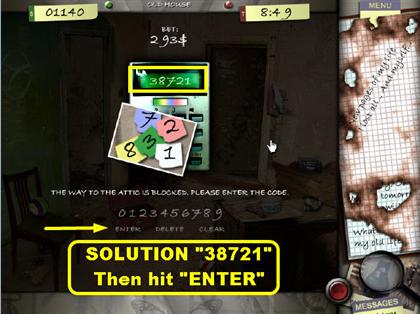
- You will have the numbers ’83217’ in front of you. You can use your own keyboard to enter the code or you can click on the numbers on the screen.
- You can skip this mini–game if you like, but it will cost you time or points, depending on which mode you are playing.
- If you look at the screen you will see a space for the numbers in the green area above the keypad. Underneath that, you will see some rainbow colors. Use those colors to help you determine the order of the numbers.
- The numbers should be entered in the following sequence: 3 8 7 2 1
CHAPTER 3: ATTIC
LEVEL 3 – COINS – PAYPHONE – LAPTOP
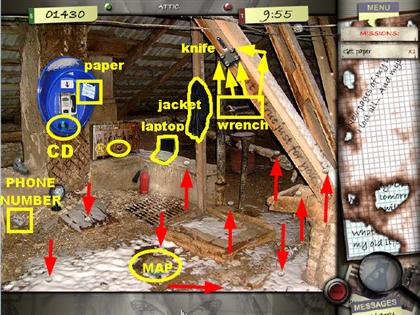
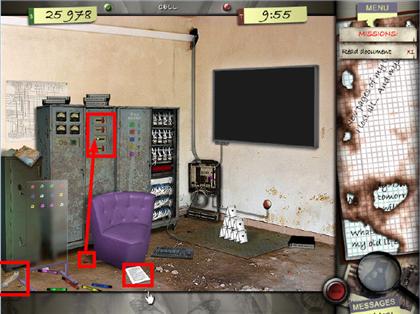
- The paper is on the telephone booth, left side of the scene.
- The CD is on the blue telephone booth, below the pay telephone.
- Click on the red button of the generator that is on the left side of the scene, and the laptop will power on. The red button will not work if you have an inventory item popping up.
- Place the CD in the laptop that is on the right side of the page.
- The phone number is written on a piece of paper in the middle of the floor. It could also be in the lower left corner of the scene.
- Grab the phone number from the inventory and place it on the payphone.
- Look for the coins in the scene; some of them may be hard to see, since they’re silver and blend in easily with the background. The locations in the screenshot may not work for everyone, since the locations of the coins are random. All the coins in this scene have a red arrow pointing to them.
- Once all the coins have been found, place them on the payphone.
- The wrench is on the ledge, on the right side of the payphone, behind the laptop. It could also be on the right side, underneath the wooden beams.
- Use the wrench on the 4 screws that are holding the knife attached to the wooden beam, right side. You have to click on all 4 screws in order to loosen them up.
- Grab the knife once all the screws have been loosened.
- The map is in the lower center of the scene.
- The black jacket is hanging above the right side of the laptop, on the wooden beam.
FIND THE NEXT LOCATION ON THE MAP
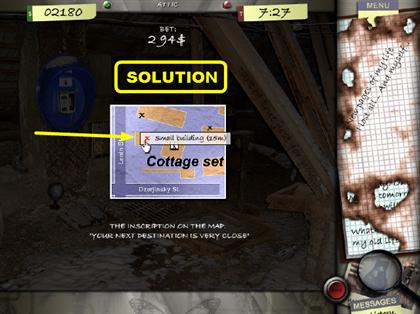
- Hover your mouse over a location and you will be able to read the name of that location. Left–click on an area to select it.
- In order to figure out the next location on the map, you should read the clue on the bottom of the map.
- The clue reads "Your next destination is very close." This means that you must look for the destination that is closest to you.
- Click on the location that says "small building, 15 m."
CHAPTER 4: FAST FOOD
LEVEL 4 – FIND AND PLACE THE BULB – TURN ON THE LIGHT
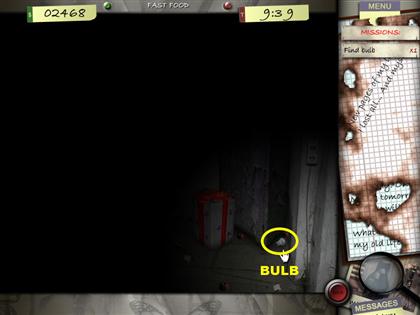
- When you first enter the scene, the only thing that will be available is a spotlight that will help you see things in the room.
- The game will ask you to find the light bulb in the scene. The bulb is in the lower right corner of the scene. It could also be in the middle of the floor, beneath the green box. Click on it and it will go into the inventory. Click on the bulb from the inventory to select it.
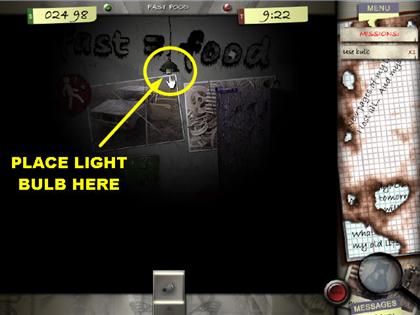
- Place the light bulb in the light fixture hanging in the middle of the ceiling.
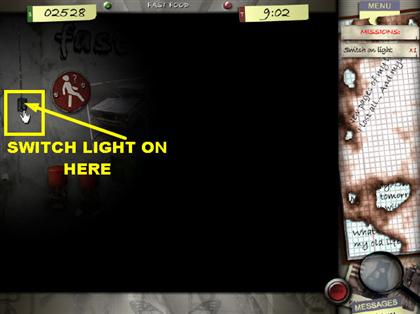
- Click on the light switch that is on the left side of the wall.
WRENCH – SCRAPS OF PAPER
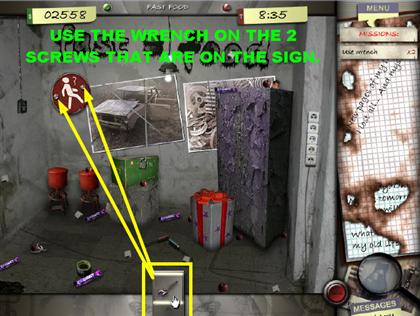
- When you first enter the scene, the wrench will already be in your inventory.
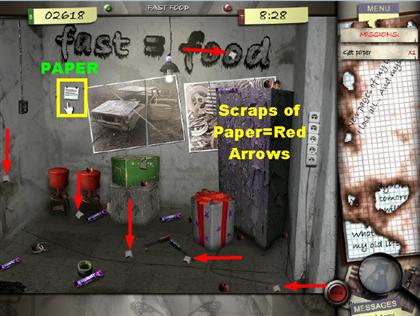
- Use the wrench that is in the inventory to unscrew the bolts that are on the red and white sign, on the left side of the wall. Underneath the sign you will find a piece of paper; get the paper.
- The 6 scraps of paper are highlighted in the screenshots with red arrows pointing to them.
ASSEMBLE THE PAPER
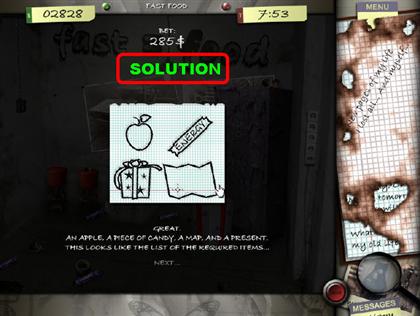
- When you assemble the paper, it should have at the top an apple and a candy bar. At the bottom it should have a present and a map.
FIND 9 APPLES AND 5 CANDIES – KNIFE – ROPE – KEY
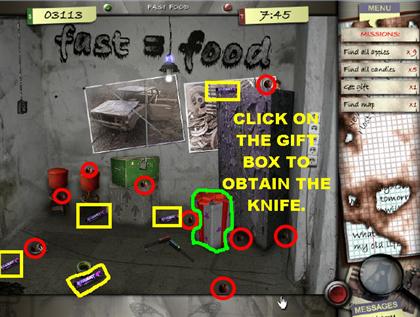
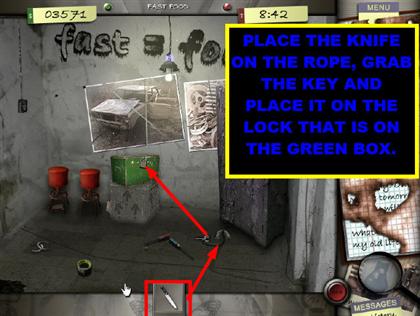
- Please look at the screenshot for the location of all the candy pieces and the apples. Since this solution is random, the apples and the candies may not be in the same location for everyone. In the screenshot provided, the apples are highlighted in red and the candies in yellow.
- Click on the gift that is on the right side of the floor and a knife will go into the inventory.
- Use the knife on the rope that is tied to the key; it is on the right side of the floor. Grab the key once it is loose.
- Place the key on the lock that is on the green box in the lower center of the scene and you will find the map inside. Grab the map.
FIND THE LOCATION ON THE MAP
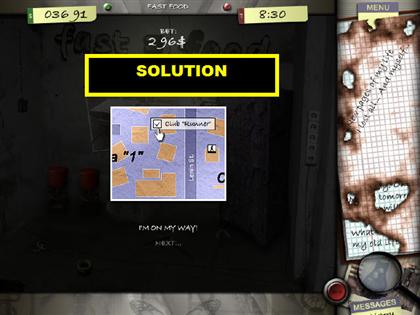
- The game will give you the following riddle: "The one who cuts through the path follows. Who makes it faster if not stumbles?"
- The answer is "Club Runner." Click on that spot on the map to continue with the game.
CHAPTER 5: MY LANE...
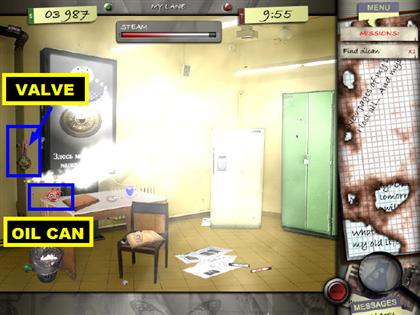
LEVEL 5 – VALVE
 VIDEO
VIDEO
- Click on the red oil can that is on the left side of the scene, on the desk. Use the oil can on the valve that is on the left side of the page. Click on the valve again and the steam will stop coming out of the pipes.
5 PAPERS
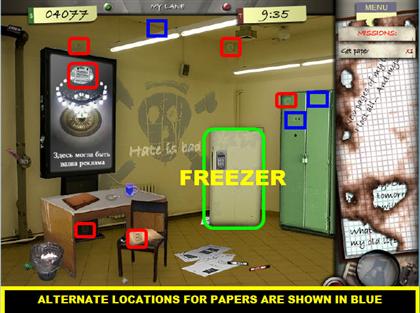
- Grab the paper that is on the poster on the left side of the wall.
- Look for the small pieces of paper that have a number scribbled on them. The pieces of paper are shown in red in the screenshot; however, some alternate locations have been placed in blue since the solutions are random.
OPEN FREEZER
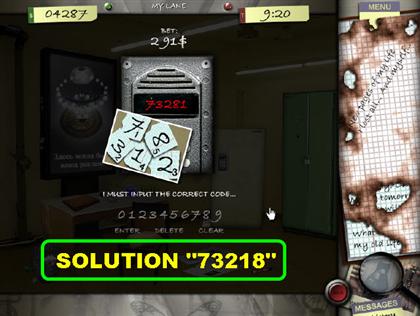
- Click on the freezer and a code will appear for you to enter. You will notice that all the pieces of paper have a tiny number at the bottom of them. Enter the code according to those numbers. The solution is "7 3 2 1 8."
TURN ON TV – FIND 3 PHOTO PIECES
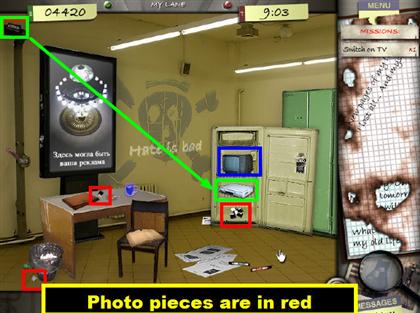
- Once the code is entered, the fridge will open and some items will be inside of it. Click on the TV to turn it on and a list of items for you to find will show up; look for those items.
- The video tape will be in the top left side of the scene.
- The blank check will be sticking out from the bottom of the freezer.
- Place the video tape from the inventory into the VCR that is inside the open freezer.
ASSEMBLE THE PHOTO
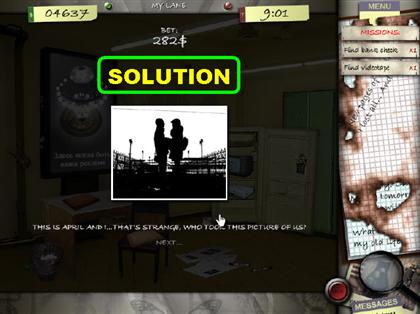
- You can look at the edges in parts of the pictures so it will be easier to assemble. The top part will be light and the bottom part will be dark. The people will be in the middle and the fence will be on either side of both of them.
LEVEL 6 – FIND 5 COOKIES (VHS – PART 1)
 VIDEO
VIDEO
- The coffee pot is on the left side of the scene, on the ledge, in front of the windows.
- Place the coffee pot on the tiny white mug that is on the desk, right side of the page, under the picture frame.
- The sugar cubes are on a small white saucer sitting on the left edge of the desk. There are 2 sugar cubes; you have to click on each one.
- Place the sugar cubes on the white mug as well. You only have to click on the sugar cubes once when placing them in the cup. Click on the cup of coffee in order to drink it.
- Find the 6 pieces of paper.
ASSEMBLE THE MESSAGE
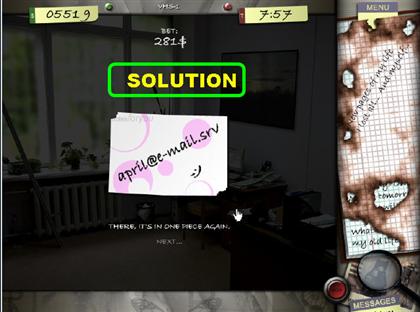
- Swap the pieces of paper around until you have them all in order.
- The message reads, "april@e–mail.srv" with a ":)" emote.
READ EMAIL – GET PHONE
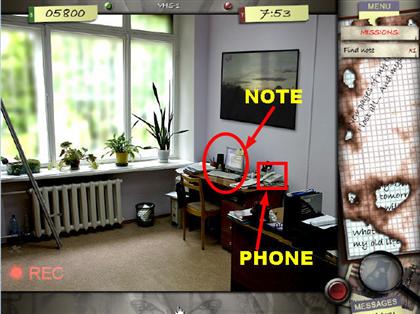
- The game asks you to find the note; it is on the computer monitor, on the desk.
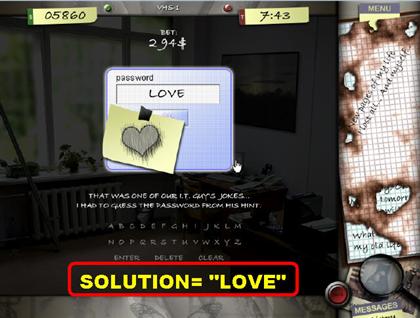
- Click on the computer monitor to check the email. You will see a heart drawn on the sticky note. That is your hint for the password.
- The password is "LOVE."
- Click on the telephone that is on the desk in order to answer the phone.
LEVEL 7 (VHS – PART 2)
 VIDEO
VIDEO
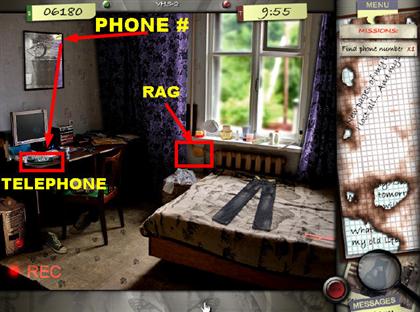
- The phone number is on a yellow piece of paper that is stuck on the top left side of the wall, on the picture frame.
- Place the telephone number on the green receiver, on the desk.
- Click on the telephone again so you can call April.
- Click on the computer display and it will turn on.
- Click on the PC again and a mini–game will appear.
ARRANGE THE PICTURE
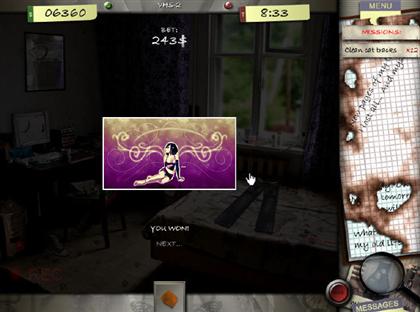
- The picture is of a woman lying down.
- Click the red blinking button that is on the PC tower, on the lower left side of the scene.
- Click the yellow rag on the heater, under the window, and it will go into the inventory.
- Click on the rag from the inventory and place it on the paw marks in the carpet. You have to click on them one by one in order to get rid of them.
CLEAN CAT TRACKS
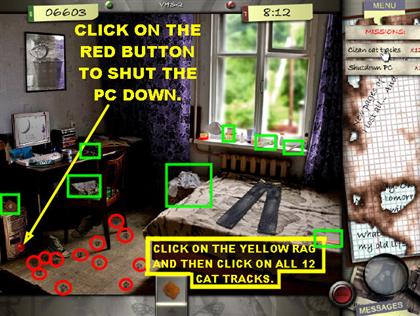
- To shut down the PC, click on the red button of the computer tower that is on the floor, lower left corner.
- Click on the yellow rag that is in the inventory and then click on all the cat tracks that are in the room. The cat tracks are in red.
- The toothbrush and the toothpaste should be on the window sill.
- The jeans are on the bed. The 2 sneakers are on the left side of the floor; click on both of them. The shirt is next to the bed, close to the window.
- The bag is on the chair. The cologne is on the window sill. The comb is on the bed. The wallet is on top of the PC tower. The keys are on the desk.
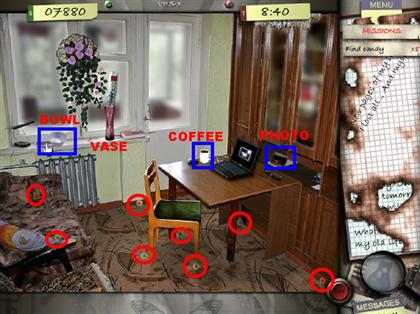
LEVEL 8 – FIND 3 BLACK BOOKS – FLOWER – VASE – LAPTOP (VHS – PART 3)
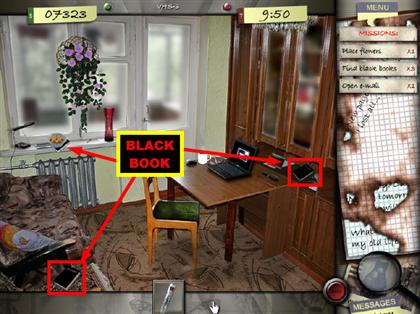
- You will have a single flower in your inventory when you start this level.
- Click on the black book that is under the bowl on the window sill, above the radiator. The bowl will fall to the ground. When the bowl falls, it scatters pieces of candy all over the carpet.
- The other black book is on the desk and the last one is on the lower left side, on the ground.
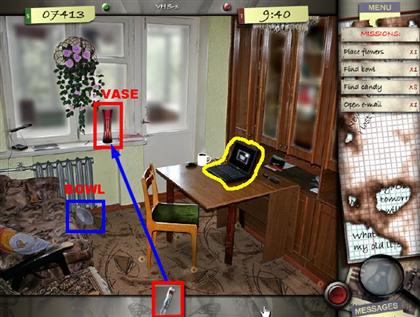
- Place the flower in the red vase that is by the window.
- Click on the monitor to open the email. Click on the monitor again to read the e–mail; click again to close the email.
MAKE THIS EMAIL NEW AGAIN
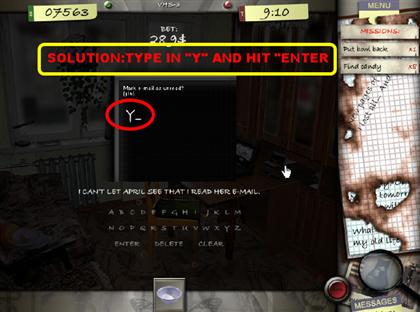
- Type the letter "Y" in response to the question "Make this email message as new again? (Y/N)."
CANDY BOWL
- Pick up the bowl that fell on the floor; it is in front of the radiator. Place the bowl on the left side of the window, where it was originally.
- The last piece of candy is on the carpet, underneath the chair.
- Place the candy in the bowl. Click on the candy bowl again so you can eat the candy.
- Click on the photo that is on the window sill, next to the red vase. Another location for the photo is on the right side, behind the desk.
- Click on the cup of coffee to drink it.
VHS: NO TAPE
- In this section all you have to do is read what it says on the page. Once you click on "next" it will take you to the next page.
CHAPTER 6: TRAINING
LEVEL 9 – PRINTER PAPER / NOTE
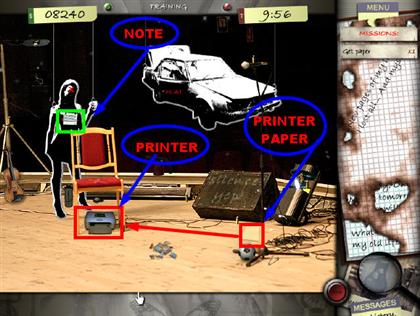
- The note is on the chest of the female silhouette, on the left side of the page.
- The printer paper is on the lower right side of the ground; it blends in with the ground. It can also be in the lower right corner, close to the "S.O.S." button.
- Place the printer paper on the printer that is under the chair. Click on the paper once it comes out of the printer.
- A knife will appear in your inventory.
ACCESS CARD – KNIFE
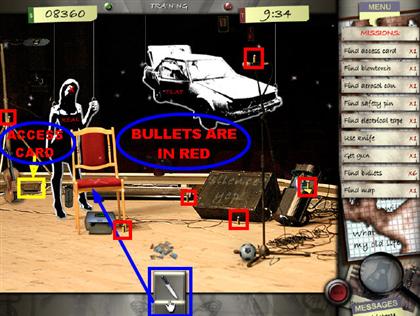

- Grab the access card that is behind the printer. It could also be on the lower left side, behind the violin.
- Use the knife on the seat cushion of the chair, a gun will appear. Click on the gun and it will disappear.
- Find the 6 bullets in the scene, they are highlighted in red. Any alternate bullet locations will be in blue. All other items on the list will be in green.
- Once you find all the bullets, the gun will appear in the inventory; click on the gun and then on the forehead of the female silhouette.
- Click on the shredded papers that are on the floor, next to the chair, and assemble the picture.
ASSEMBLE THE PICTURE OF THE MAP
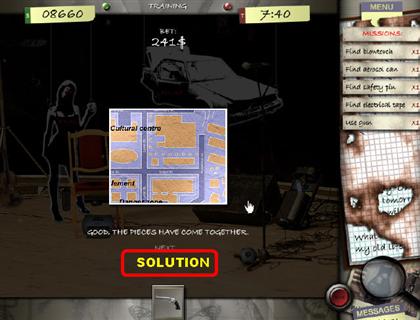
- Please look at the screenshot for the completed picture of the map.
MAP – FIND THE CORRECT LOCATION

- The clue under the map reads "Let your curiosity guide you." Click on the "unknown building" option to proceed to the next level.
CHAPTER 7: PRESSURE
LEVEL 10 – BALLOONS AND SAFETY PIN
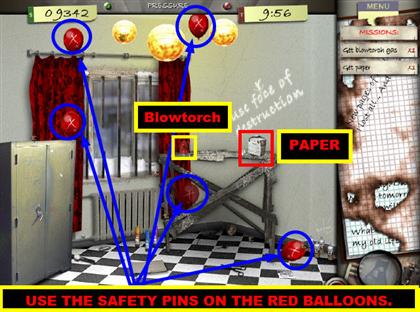
- The paper is on the right side, on top of the wooden table.
- A stickpin (safety pin) will appear in your inventory. Use the stickpin on all the red balloons that appear in the scene, and each balloon will be popped.
- The blowtorch is on the table; it blends in with the red curtains that are on the right. The blowtorch may also be on the right side of the table. Click on the blowtorch.
FIND 12 PUZZLE PIECES
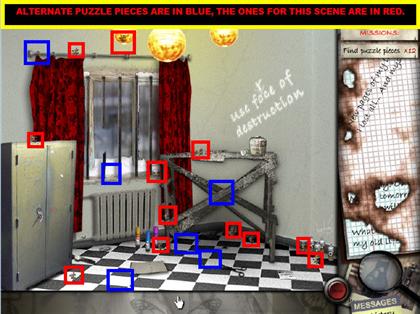
- Click on the 12 puzzle pieces that are shown in the scene. The puzzle pieces for this scene are highlighted in red.
- Alternate solutions have been highlighted in blue. All possible solutions may not be posted.
- As soon as you find the last puzzle piece, a puzzle will appear on the screen.
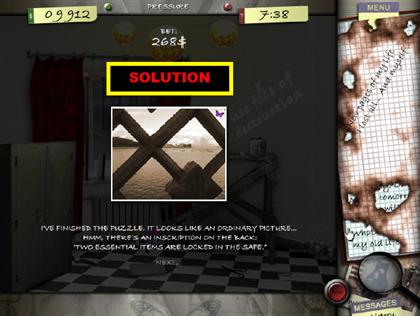
ASSEMBLE THE PUZZLE
AEROSOL AND TAPE
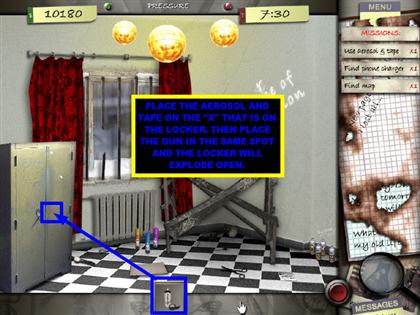
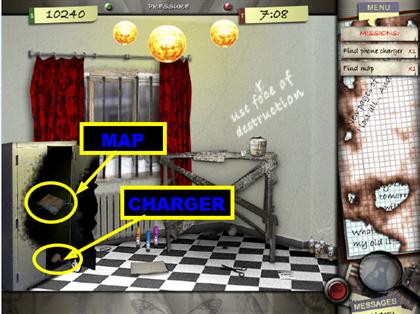
- Take the aerosol and the tape that is in the inventory and place it on the locker door, where the red "X" is marked, and the can will be attached to the locker.
- Take the gun from the inventory and place it on the locker where the can is, the locker will burst open. Once the smoke clears, click on the map and the charger inside the open locker.
FIND THE RIGHT SPOT ON THE MAP
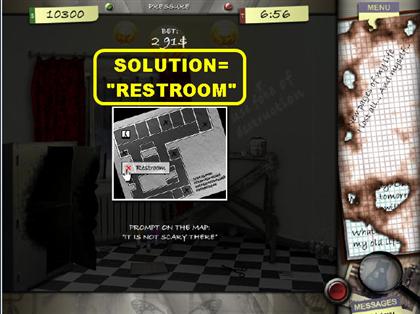
- The clue reads "It is not scary there."
- Click on the "restroom" location, since the clue indicates that it is not a scary location.
CHAPTER 8: HISTORY
LEVEL 11 – GET PHOTOS
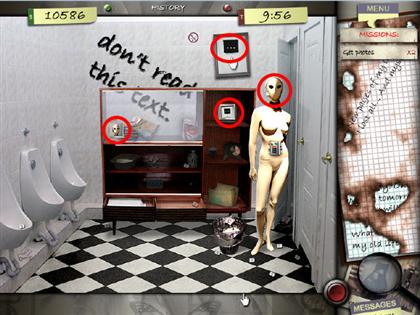
- Click on the 2 photos in the scene, one is on the left side of the case and the other is on the right side of the case.
- The 2 pictures will go on the top right side of the page as a graphical task. A graphical task works similar to a regular task. The only difference is that you must look for the item on the picture in the scene, instead of looking for a name on a list.
- The mask is on the face of the mannequin. Once you click on the photo and it disappears, the piece of paper will be underneath it.
- The other graphical task picture is on the top right side of the wall.
FIND 9 BUTTONS
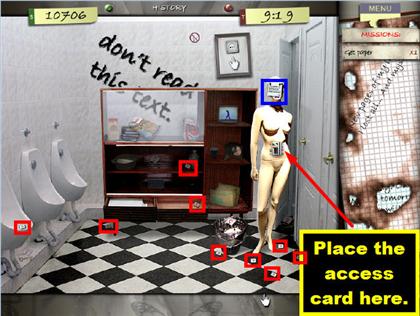
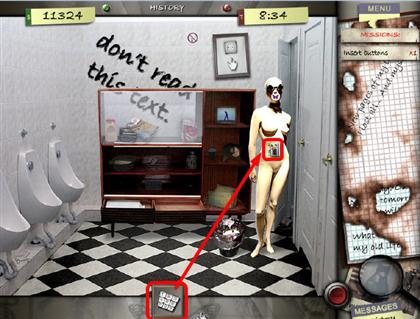
- Pick up the piece of paper that was underneath the mask on the mannequin.
- The access card will appear in the inventory.
- Place the access card on the chest of the mannequin. You will be asked to find the 9 buttons.
- The buttons in this instance are square. Please look at the screenshot for their locations; they are highlighted in red.
PUT THE BUTTONS IN ORDER
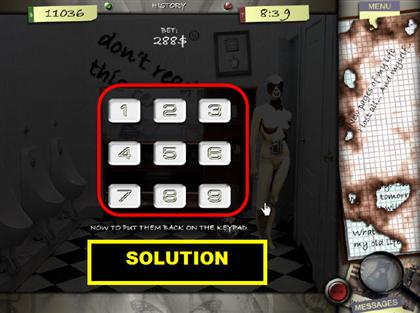
- Click on two buttons and they will swap places. You must place the buttons in numerical order: 1 2 3 4 5 6 7 8 9
ACCESS CODE
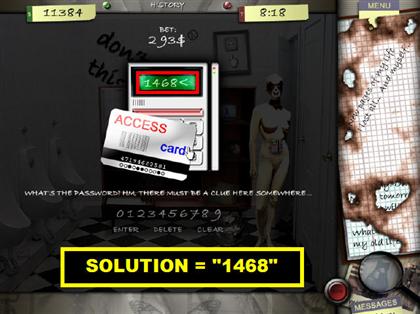
- Place the buttons on the key pad hanging from the mannequin’s neck. Click on the keypad again and it will ask you for an access code.
- Click on the numbers at the bottom of the access code that have a black circle underneath them: "1 4 6 8"
CHARGER – CELL PHONE – FIND 5 KEYS
- The charger and the cell phone will appear in your inventory.
- Place the charger in the plug on the top right side of the page. Now plug your phone into it. Click on the phone one more time to retrieve it.
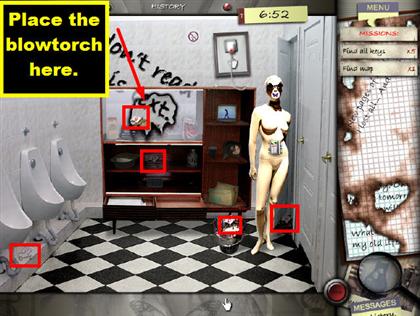
- The keys all have a tag attached to them; each tag has a letter on it. You can pick up the first 4 keys that are in the room. In order to pick up the last one, you must use the blowtorch.
- The blowtorch will appear in the inventory. Use the blowtorch on the back wall, where the word "text" is scribbled.
- Now click on the last key and the map that is in the spot where the explosion just took place.
MAP
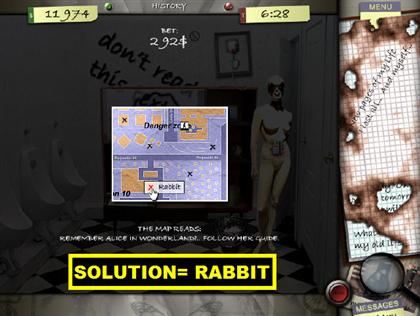
- The clue tells you to follow Alice in Wonderland; so click on the word "RABBIT."
CHAPTER 9: DATA
LEVEL 12 – BULB – SUITCASE AND KEYS
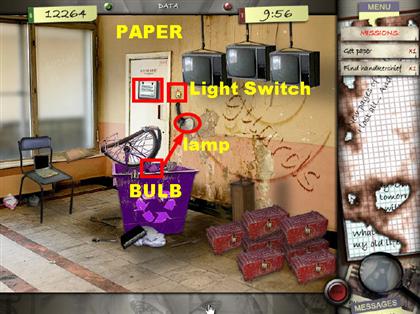
- Get the paper that is on the top left side, on the door.
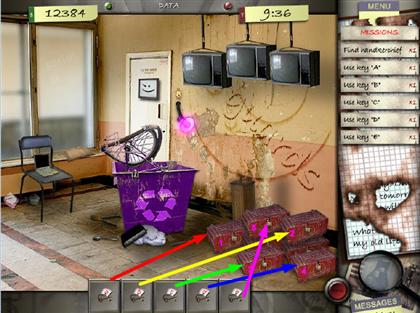
- Click on the light bulb that blends in with the purple recycle bin. Place the light bulb in the light fixture that is next to the door. Click on the light switch that is above the door, and the lights will turn on. 5 keys will appear in the inventory. Place key A on suitcase 1. Place key B on suitcase 2. Place key C on suitcase 3. Place key D on suitcase 4. Place key E on suitcase 5.
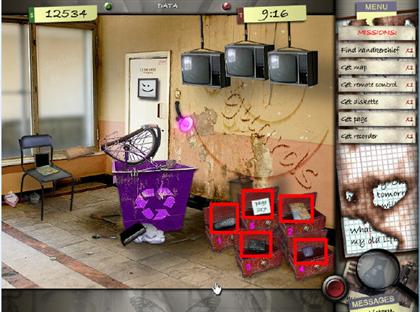
- Pick up all the items that are inside the suitcase.
DISKETTE – PASSWORD – PAGE 217
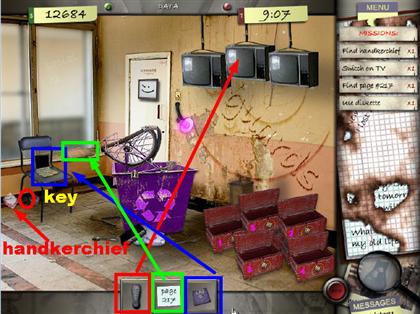
- The diskette, the remote control, and the page will all go into your inventory.
- Place the remote control on the TV.
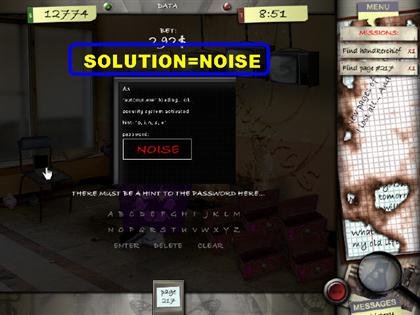
- Place the diskette on the laptop that is on the chair. Click on the laptop and you will be prompted to enter a password.
- Enter the word "NOISE" on the keyboard.
- Click on the handkerchief that is on the right side of the recycle bin, on the ground. The handkerchief can also be on the lower left side of the scene, behind the chair.
- The key is under the chair.
- Retrieve page 217 from the inventory and place it on the book on the ledge by the window.
PAGE
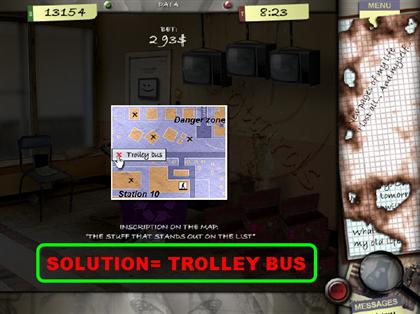
- The clue reads "The stuff that stands out on the page." The answer is "TROLLEY BUS."
CHAPTER 10: TRANSPORT
LEVEL 13 – RECORDER – PAPER
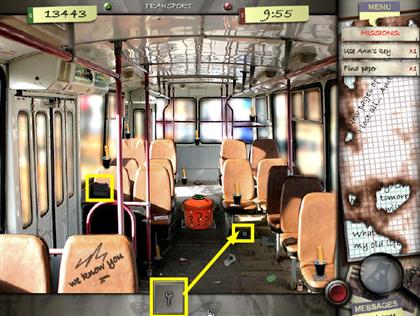
- There is a key in the inventory when you start this level.
- Get the paper that is on the seat, on the left side of the page.
- Use the key in the keyhole that is at the bottom of the seat, on the right side of the page. Click on the space that you just opened with the key, and you will retrieve a piece of paper.
- The recorder is on the lower right side, in front of the seat in which you placed the key.
FIX THE PIECE OF TAPE
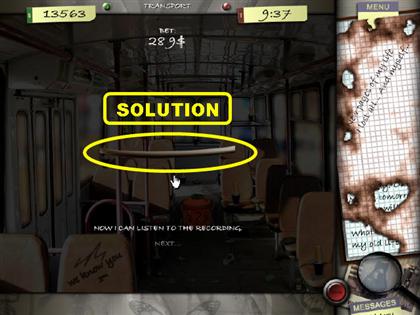
- Click on 2 pieces of tape and they swap places. Move them all around until you form one smooth piece.
FIND 8 MATCHES – 1 MATCHBOX – USE 8 MATCHES
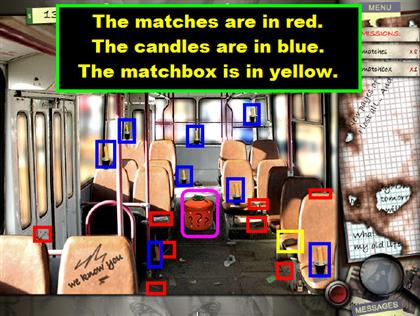
- The matches are highlighted in red in the screenshot, the matchbox in yellow, the candles in blue.
- Use the matches on all the candles in the trolley.
- Click on the orange saucepan (pot) that is in the middle of the floor.
FIND THE LOCATION ON THE MAP
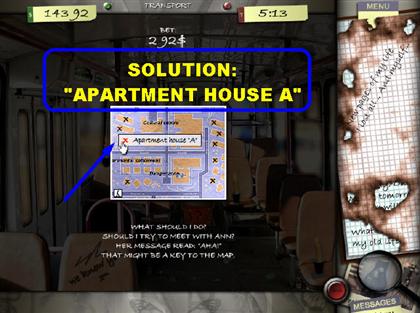
- The message reads "AHA," which is an acronym for "Apartment House." Choose that as your next location.
CHAPTER 11: SILENCE
LEVEL 14 – 4 PICTURES – CROWBAR AND WOODEN BOARDS
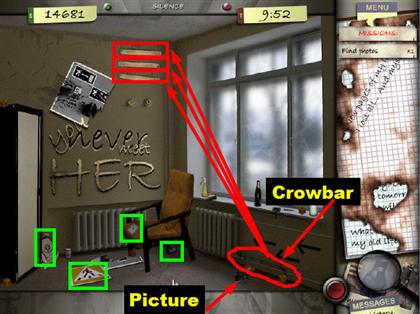
- Click on the photo that is on the right side of the floor and 4 pictures will go on the top right side of the page, under your mission tasks.
- Look for those 4 photos somewhere in the scene. tIn the screenshot those pictures are highlighted in green.
- Grab the crowbar that is on the lower right side, it is under the window sill, against the wall, next to the radiator.
- Grab the piece of paper that was underneath one of the photographs that you just picked up.
- Place the crowbar on the 3 wooden boards that are on the left side of the wall. You have to select the crowbar from the inventory and then click on all 3 boards in order to eliminate them.
BOOK – FIND 6 CUBES
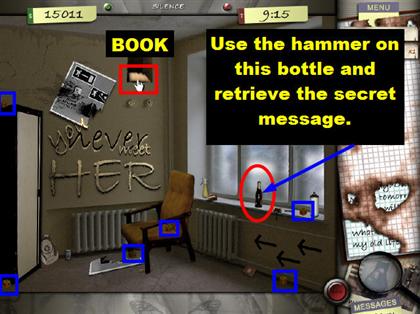
- Once all the boards have been removed, click on the open space and retrieve the book. A hammer will automatically go into inventory.
- Use the hammer on the bottle that is by the window sill, click on it again to retrieve the message that is inside.
- Find the 6 cubes that are in inventory. They are shown in blue in the screenshot but the location of the cubes will be random.
ARRANGE THE CUBES
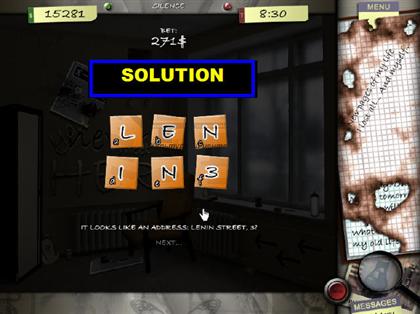
- The clue reads, "There are 3 buildings on Lenin Street, 3. Which one should I visit?"
- Arrange the cubes to read, "LENIN 3."
MAP
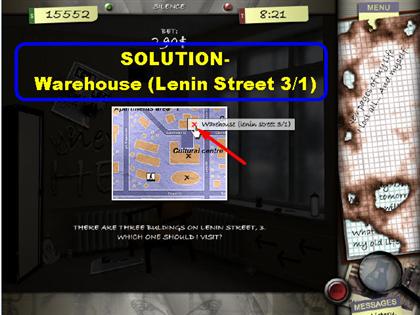
- Warehouse (Lenin Street 3/1) is the correct choice.
CHAPTER 12: TOO LATE
LEVEL 15 – PUT FIRE OUT – FIND 5 DYNAMITE STICKS
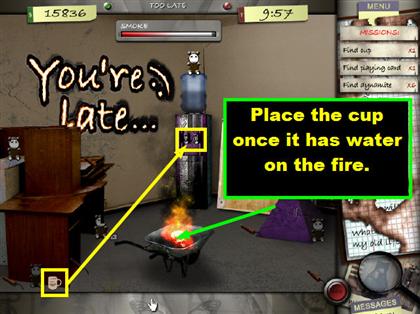
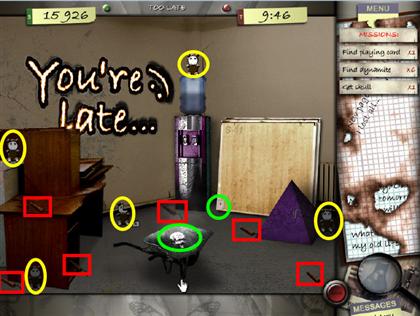
- Click on the cup that is on the lower left side and it will go into inventory. The cup could also be on top of the desk that is on the left side.
- Place the cup on the water cooler and it will fill with water. Just click on one of the water dispensers that are at the bottom. You can click on the hot or cold water, it doesn’t matter.
- Place the cup full of water on the fire and then grab the skull.
- Collect all 6 pieces of dynamite. Once you’ve found all these items, the lights will go out.
- Look for the 5 animals in the scene using only the spotlight provided. The animals are in yellow in the screenshot.
PUZZLE – RECREATE ONE OF THE ANIMALS
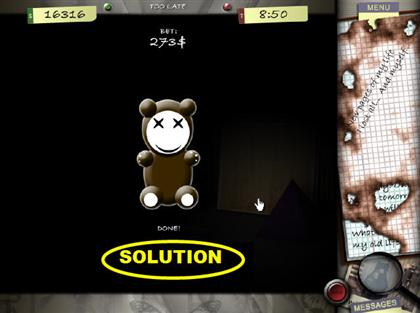
- Recreate the animal shown in the screenshot.
- A message comes on the screen that reads, "These awful toys can speak." 1ST TOY: "THE STUFF" 2ND TOY: "THAT GIVES" 3RD TOY: "LIFE" 4TH TOY: "KEEPS" 5TH TOY: "THE SECRET"
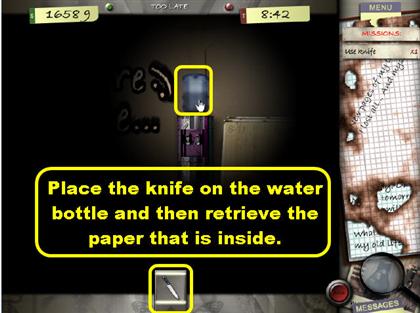
- Use the knife on the water bottle that is on the water cooler and water will start flowing through the room.
- Grab the paper that is inside the water bottle.
- A message will come on the screen that says: "I was right to believe in you number 7222222".
CHAPTER 13: NEXT STEP
LEVEL 16 – FLASH DRIVE – CARD
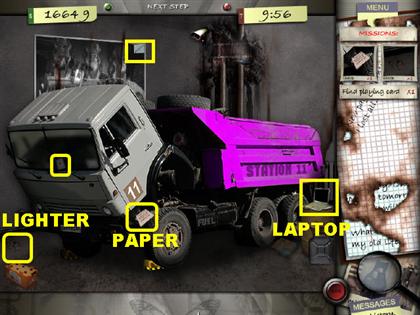
- Click on the paper that is on the wheel of the truck, lower left side. A flash drive will appear in the inventory.
- Click on the lighter that is on the lower left side.
- Click on the card that is on the windshield of the truck. The paper may move around different parts of the windshield so look for it somewhere on there.
- Click on the flash drive that is in the inventory and place it on the laptop.
- Click on the small piece of paper that is on the top right side of the large poster on the back wall and it will go into the inventory. The piece of paper could be on any part of the poster.
- Use that piece of paper that is in the inventory on the laptop and enter the password.
PASSWORD
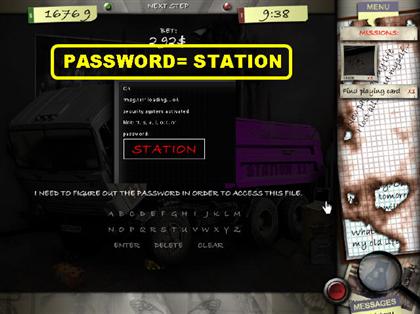
- Click on the password and then on the laptop; you will be prompted to input the password which is "STATION."
CROWBAR – BATTERY – GAS CAN
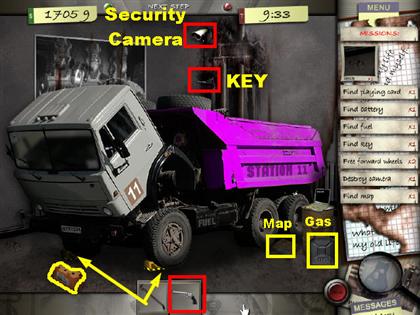
- A gun and a crowbar appear in the inventory box after you enter the password.
- The orange car battery is on the lower left side, in front of the truck.
- Grab the silver gas can that is on the lower right side and it will go into the inventory.
- Place the crowbars on the yellow wheel stoppers that are in front of the front tires of the truck.
- Place the gun from the inventory on the security camera that is on top of the page.
- Click on the map that is on the lower right side of the page.
- Place the gas can on the fuel tank of the truck. The fuel tank is marked on the lower side of the truck.
- Place the battery on the truck. I placed it on the side door and the game accepted it. The key will show up in the inventory.
- Place the key on the side of the door and the truck will start and the map will appear.
MAP
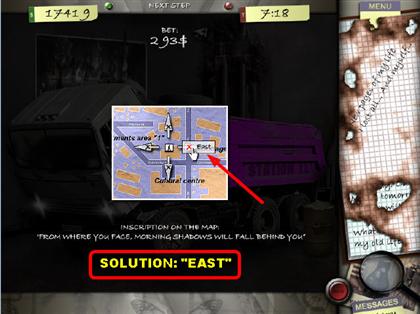
- Inscription on the map: "Morning Shadows Will Fall Behind You".
- Click on the "EAST" location on the map.
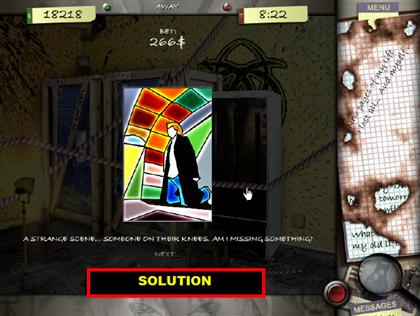
CHAPTER 14: AWAY
LEVEL 17 – TURN OFF FREEZE – CLEANSER – BRUSH
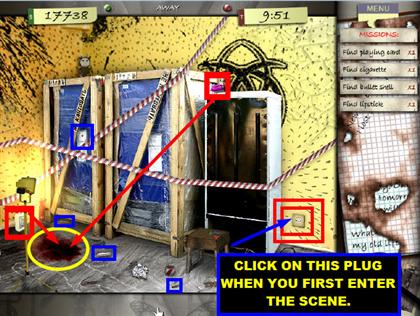
- Click on the plug that is on the lower right side of the scene and it will turn off the freezer.
- Pick up the lipstick, the playing card, the ketchup bottle, the bullet shell and the cigarette. These items are highlighted blue, but item placement in the scene is random.
- Click on the cleanser that is in the lower left side of the scene and it will go into the inventory.
- Pick up the purple brush that is on the top right side of the large wooden crate, right side.
- Place the cleaner on the blood stain that is on the left side of the floor and then click the brush on there as well.
- Click TWICE on the spot in which the blood was located. Grab the message that appears inside the floor.
FIND 5 GLASS PARTS AND ASSEMBLE THE PICTURE

- The pieces of glass are fragments of blue, green, and red. The screenshot shows the location of the pieces for this puzzle in red. Some alternate locations are shown in blue.
- Once all 5 pieces have been collected, a puzzle will pop up. Arrange the pictures so they look like the one in the screenshot.
- Once the glass is assembled, place it on the spot in which the blood was before you cleaned it up.
LOCATE THE RIGHT PLACE ON THE MAP
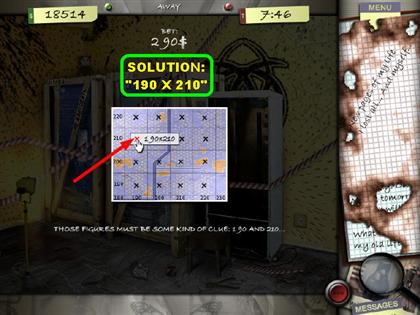
- The solution is "190 X 210."
CHAPTER 15: ARCHIVE
LEVEL 18 – FIND PAPER – FIND 12 FOLDERS
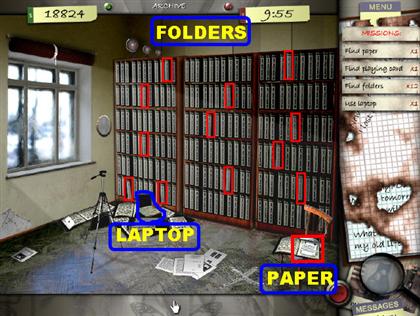
- The paper is on the seat of the chair that is on the lower right side.
- You have to click on the folders that are sticking out of the bookcase.
ARRANGE THE FOLDERS
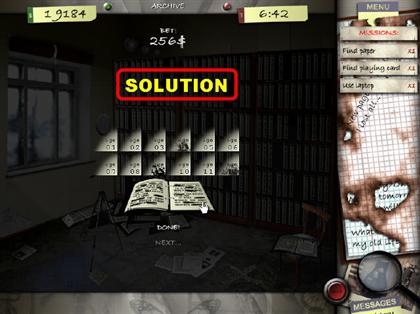
- Place the folders in numerical order. Some of the numbers are hard to see, but if you look closely you will be able to find what you need.
- The numbers will be arranged like this: 1 2 3 4 5 6 7 8 9 10 11 12
ENTER PASSWORD
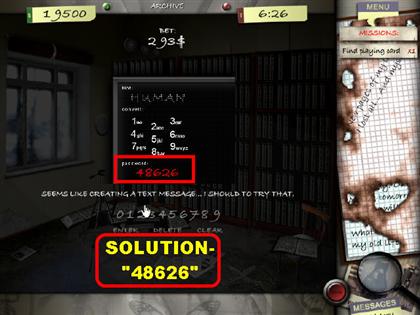
- Click on the laptop and enter the password.
- You have to click the letters on the keypad that spell out "Human."
- The answer is "4 8 6 2 6."
- Once the password has been entered, click on the laptop again and 2 pictures will appear in the graphic tasks.
KNIFE – CURTAINS – TRIPOD – MIRROR
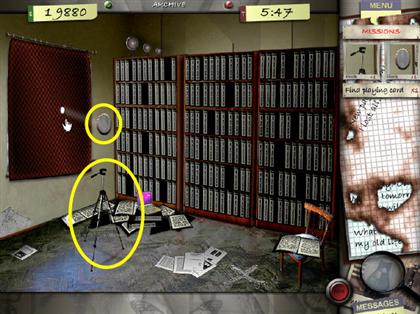
- Place the knife from the inventory on the string that is on the rolled up curtains; the curtains will then unfold. Click on the spot that is on the lower side of the curtains and a small ray of light will peek through.
- Click on the tripod that is on the floor. Click on the small mirror that is next to the curtains; they will both go into the inventory.
- Place the tripod on the "X" that is on the lower right side of the floor. Place the mirror on the tripod and it will deflect the light.
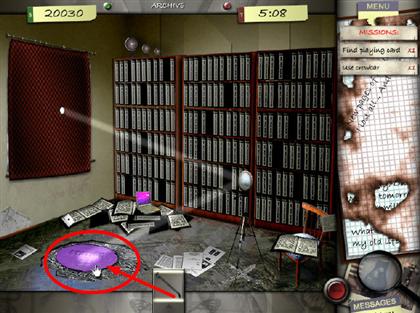
- Take the crowbar from the inventory and place it where the light is shining on the floor; a purple manhole cover will appear on the floor.
- Use the crowbar to remove the purple manhole from the ground.
- Click on the manhole to go to the next chapter.
CHAPTER 16: GATES S11
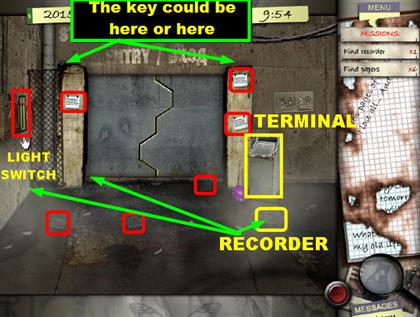
LEVEL 19 – RECORDER – 6 PAPERS – TERMINAL
- Watch Video on Big Fish Games YouTube Channel
- Click on the light switch that is on the left side of the page, next to the switch box and the lights will turn themselves on.
- Click on the 6 papers that are in the scene.
- Click on the recorder that is on the far left side of the room, in front of the doors. The recorder may also be located on the right side of the ground. The green arrows in the screenshot show you some alternative locations for the recorder.
- Click on the silver terminal that is on the right side of the page and a wrench will appear in the inventory; the lights will turn back off.
WRENCH – FUSES – TERMINAL – PASSWORD

- Place the wrench on the 4 screws that are holding the fuse box on the left side of the page. Click on the box again and the top will come off. Pull out the fuses that are inside the box.
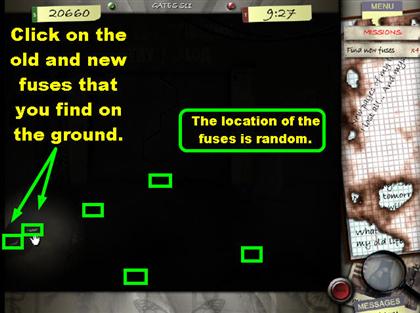
- Click on the 4 fuses that fell on the ground.
- Look for 4 new fuses in the scene. Place the new fuses in the fuse box. Click on the light switch to turn the lights back on.
- Click on the silver terminal on the right side of the page.
- Place the hammer on the terminal and it will turn on. Click on the terminal again and it will ask you for a new password.
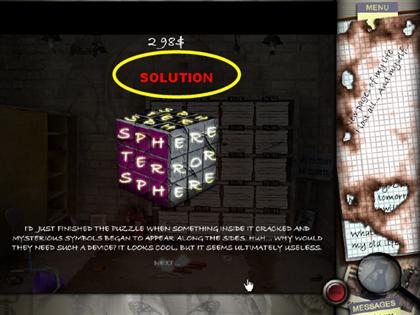
PASSWORD – MAP – HELMET
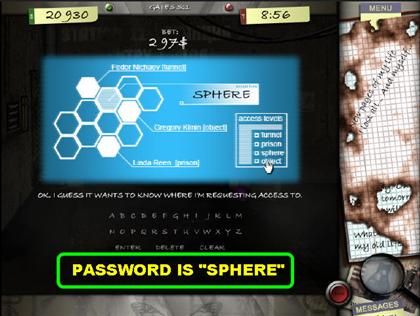
- The clue is, "I guess it wants to know where I’m requesting access to."
- The password is "SPHERE."
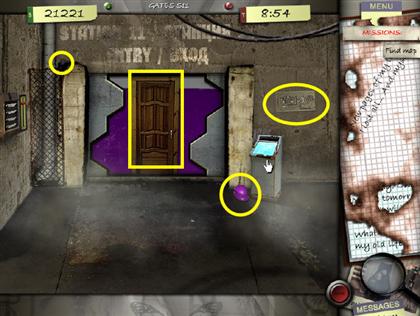
- Click on the map that is on the right side of the wall.
- Grab the key that is on top of the column that is on the back wall. The key may be on top of the left or right post.
- The key will go into the inventory. Place the key on the door.
MAP
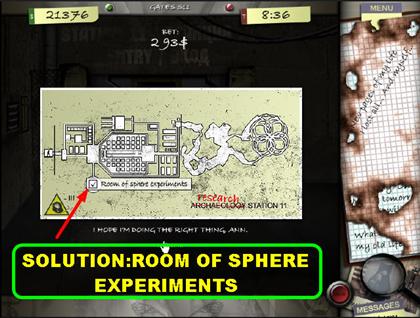
- The solution is, "Room of Sphere Experiments."
CHAPTER 17: SPHERE
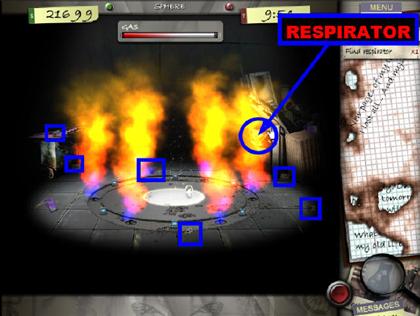
LEVEL 20 – FIND RESPIRATOR AND 6 ACCESS CARDS.
- Watch Video on Big Fish Games YouTube Channel
- Click on the hand that appears on the lower right side of the scene.
- Click on the respirator that is on the right side of the page where the flames are.
- Find all of the access cards that are in the scene, there are 6 total. The locations of the access cards are random but the screenshot will show you where 6 of them are.
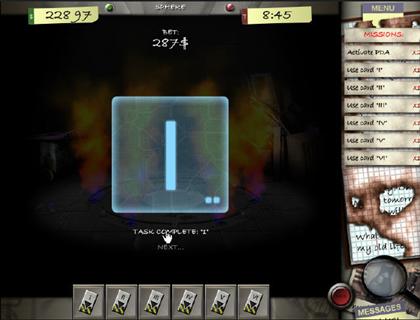
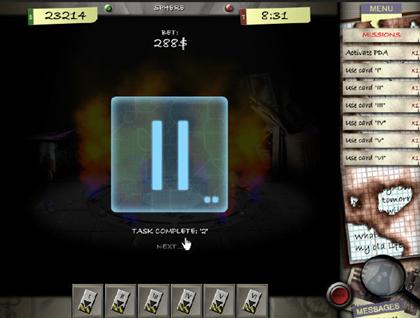
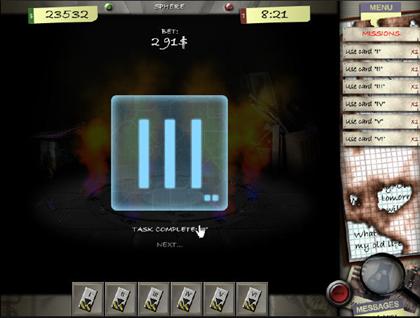
ASSEMBLE 6 PDAs
- Watch Video on Big Fish Games YouTube Channel
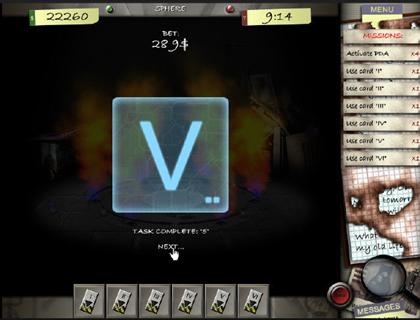
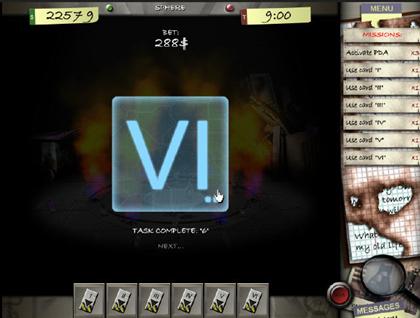
- Click on the PDAs that you see around the ring of fire and one by one they will open up another puzzle. Your goal is to click on the tiles so you can swap them around and form Roman numerals.
- Please look at the video and the screenshots in order to complete this challenge.
PDA I ASSEMBLY
PDA II ASSEMBLY
PDA III ASSEMBLY
PDA IV ASSEMBLY

PDA V ASSEMBLY
PDA VI ASSEMBLY
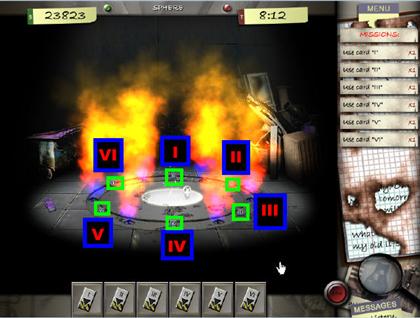
PLACE THE CARDS
- Watch Video on Big Fish Games YouTube Channel
- Once all the cards have been found and assembled, place them on the PDAs that are around the fire.
- As you place each card the flame will go away, little by little.
- Grab the 2 purple gloves that are on the lower and upper right side.
- Place the gloves on the handle that is on the manhole.
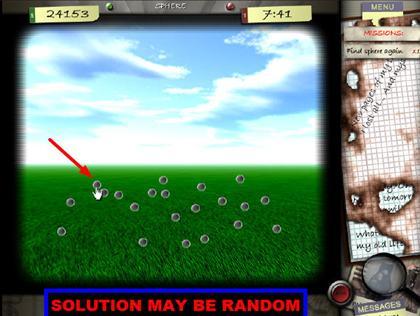
- Click anywhere on the grass.
- Click on the sphere that is on the grass and it will multiply into lots of spheres.
- The real one is on the lower left side.
CHAPTER 18: SHADOWS
LEVEL 21 – PLACE THE PICTURE BACK TOGETHER
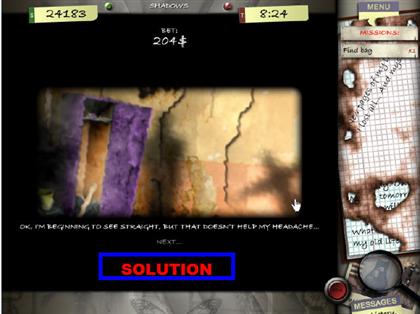
FIND 11 ITEMS FROM THE LIST
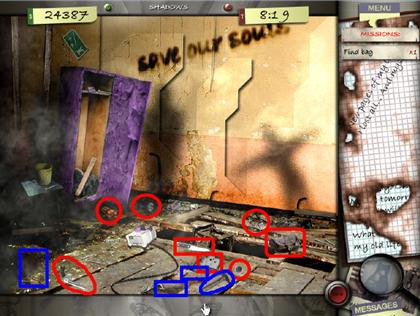
- Right after you click on the pocketbook the game asks you to find 11 items. A gun, a knife, dynamite, hammer, wrench, sphere, game cards, diary, marker, flashlight and a lighter.
- The placement of these items may be random.
FIND 3 SLIDES – 4 PLANKS – 8 NAILS – TURN PROJECTOR ON
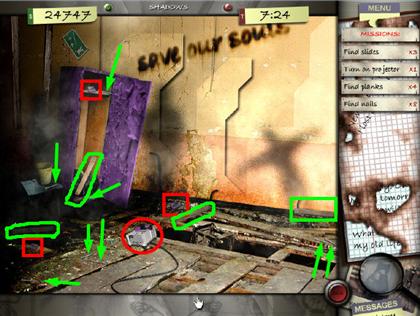
- Click on the projector that is on the floor and it will turn on.
- Find the slides; they are small purple slides that are scattered in the scene.
- The planks are highlighted green in the screenshots. The nails have green arrows pointing to them.
PLANKS – NAILS – HAMMER
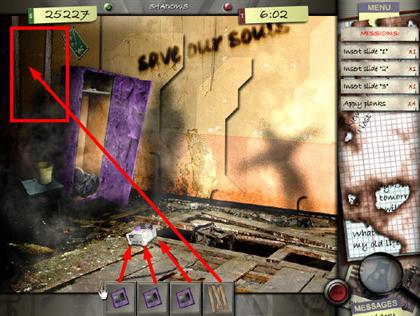
- Watch Video on Big Fish Games YouTube Channel
- Place all 3 slides in the projector that is in the center of the floor, and some pictures will appear on the wall.
- Set the planks on the two boards that are in the upper left side of the wall. You have to click the planks on 4 different areas so they can fall in the right place.
- To apply the nails, click on the nails that are in the inventory and then click on each corner of the planks.
- Grab the hammer from your inventory and place it over each nail. Click on your new ladder so you can go upstairs.
CHAPTER 19: CELL
LEVEL 22
- Click on the paper that is on the floor, in front of the purple chair, and 2 pictures will appear in your graphical task. The paper could also be on the purple chair.
- Click on the ’red switch cap’ on the left side of the floor, next to the purple chair. The cap will go into the inventory.
- Place the switch cap on the locker that has the red switches on it. The cap will go in the hole that is missing a cap. Once it’s in, click on the cap so you can set the switch to the same position as the others. Once that is done, the picture will fall off of your graphical task list.
- Click on the wires in the lower left side. It is the same item that is shown in your graphical task. A puzzle will appear wherein you must place the wires in the correct order.
WIRE PUZZLE
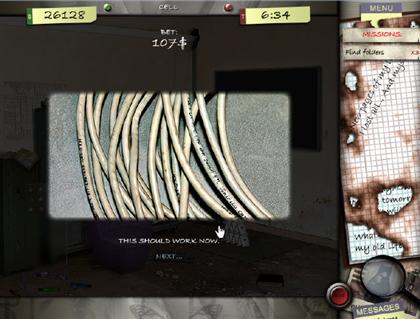
- Swap the pictures around until they look like the picture in the screenshot. The smaller, shorter pieces will go either on top or at the bottom.
WIRES – GRAPHICAL TASKS
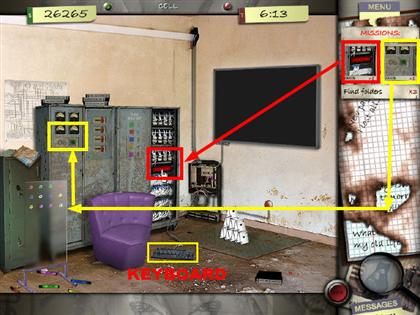
- Pick up the wire from the inventory and place it on the wires that are in the last locker; 2 more pictures will be added to your inventory.
- Click at the bottom of the first locker, in the section that looks like the picture in the mission task, and a puzzle will appear.
ENTER ANN’S NUMBER
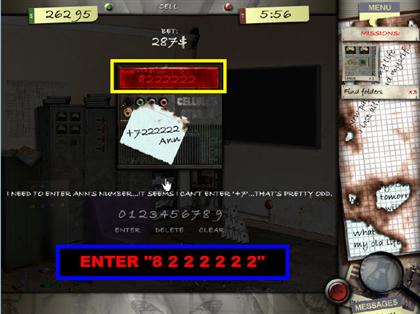
- Enter the code "8 2 2 2 2 2 2."
- Press "Enter."
KEYBOARD PUZZLE
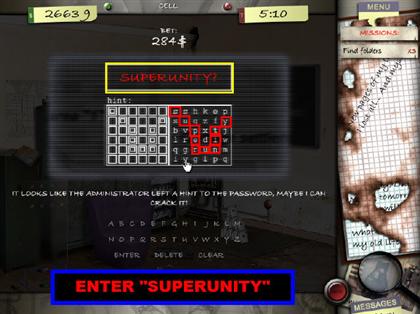
- Click on the keyboard on the floor, and a new puzzle will appear. Notice that the square on the left side has some blocks that have been highlighted. If you look at those same blocks on the right side, they spell out "SUPERUNITY."
- On the keyboard enter "SUPERUNITY" to solve the puzzle.
PLAYING CARDS – FOLDERS
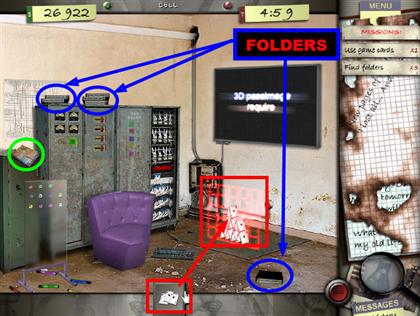
- Once you’ve solved the keyboard puzzle, some playing cards will enter your inventory. Place the cards from the inventory onto the stack of cards that are on the floor. Click on the keyboard. The cards will start floating around the room.
- Click on the 3 stacks of black folders in the room. There should be one on the floor and 2 on top of the lockers. This solution may be random.
- A marker appears in your inventory; place it on the clear board that is in the lower left side of the scene.
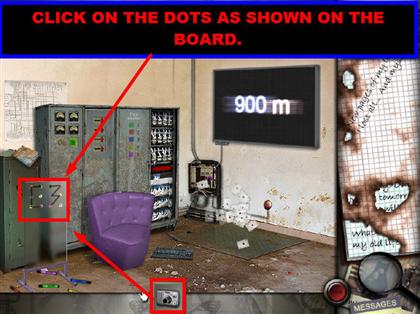
- Click the dots on the board until they form the design that you see on the screenshot. Start with the dots on the top and work your way down.
- Once you finish the left side, start at the top of the right side. Once that is complete, a camera will enter your inventory.
- Take the camera and place it on the clear board. Click the map that is on the top left side of the scene. A map will appear.
CHOOSE THE RIGHT LOCATION ON THE MAP
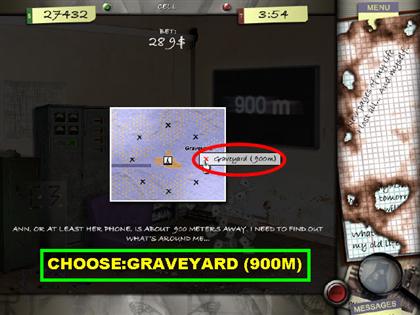
- The clue reads "Ann, or at least her phone, is about 900 meters away. I need to find out what’s around me..."
- Choose the location marked "Graveyard (900m)."
DYNAMITE
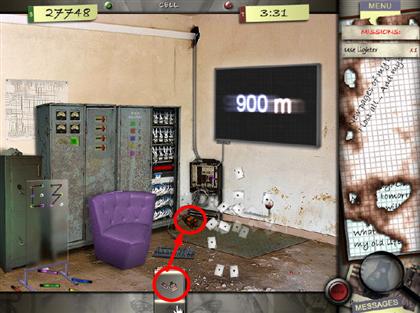
- Place the dynamite on the floor, at the end of the lockers. The lighter will go into the inventory. Place the lighter on the dynamite to blow the place up!
CHAPTER 20: NOT ALONE
LEVEL 23 – OIL CAN – TORCHES – LIGHTER – KEY – SHOVEL
- Watch Video on Big Fish Games YouTube Channel
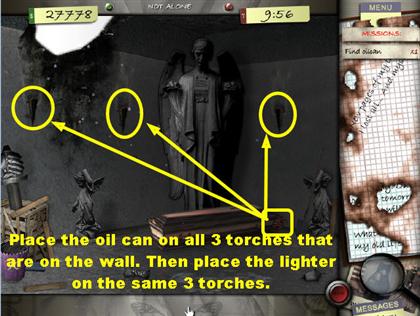
- Grab the red oil can from behind the casket; it is on the left side.
- Place the oil on all 3 torches that are on the wall. Place the lighter on all 3 torches as well.
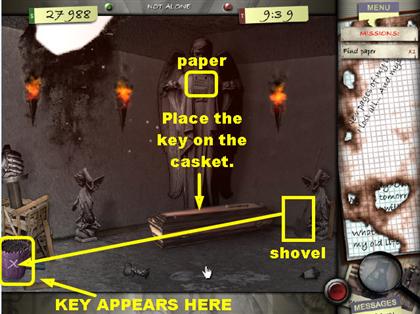
- Click on the chest of the statue to retrieve the paper.
- Click on the purple bucket that is in the lower left side of the scene; the game will ask you to look for a shovel.
- Grab the shovel that is in the lower right side of the screen, in front of the small statue.
- Place the shovel on the bucket and the key will fall into the dirt on the floor; grab the key.
- Place the key on the casket and a mini–game will appear.
ARRANGE THE PICTURES IN ORDER
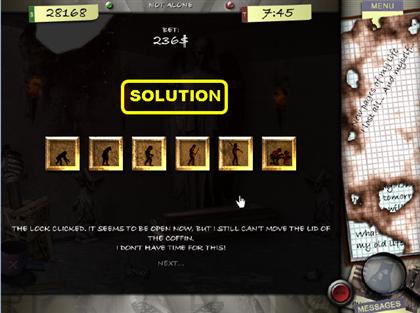
- Click on the pictures and they will swap positions. Place them in the order shown in the screenshot.
PERFORM CPR
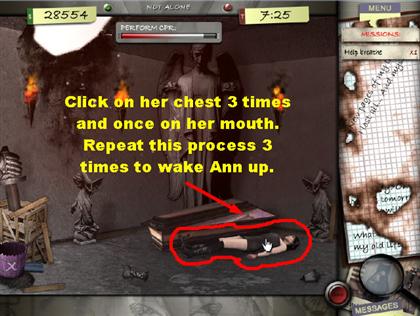
- Place the crowbar on the casket, and then click on Ann to get her out of the coffin.
- Click 3 times on her chest and once on her mouth. You have to repeat this step 3 times until Ann begins to breathe.
- Once Ann is breathing, click on her to wake her up. She will curl up in front of the casket.
FIND 5 PIECES OF FIREWOOD AND A BLANKET
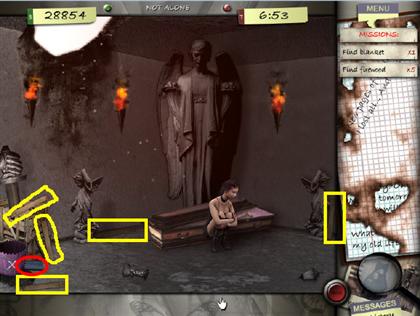
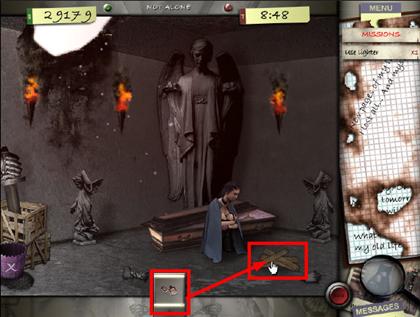
- Pick up the 5 pieces of firewood scattered around the scene. Pick up the blue blanket from the left side of the floor.
- Place the blanket on Ann and place the firewood in front of her.
- Place the oil can on the firewood. Use the lighter on the firewood and a fire will start.
FIND THE RIGHT LOCATION ON THE MAP
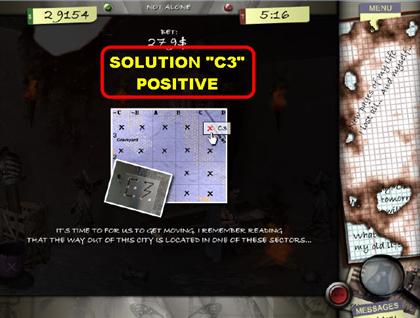
- Click in the sector marked "C3" in the upper right corner; make sure that you mark the positive C3 section and not the negative one.
CHAPTER 21: ALONE
LEVEL 24
- Click on the photo in the frame, on the wall above the desk.
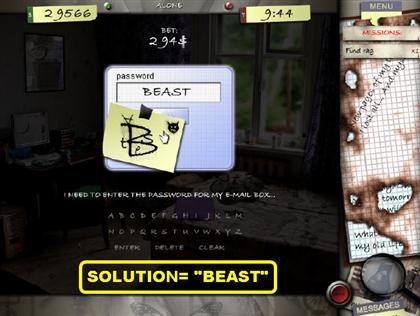
- Click on the computer to read a message and enter a password.
- The correct password is "BEAST."
- Once you’ve entered the password, click on the computer monitor once more so you can read the email.
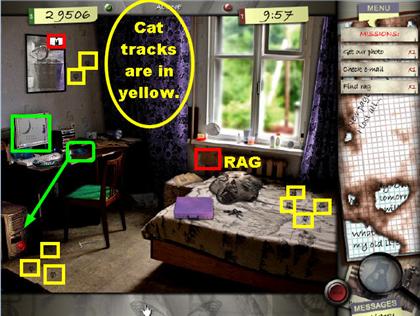
- The rag is on top of the computer tower, lower left corner. It could also be on the radiator, right side.
- Click on the 9 paws scattered around the scene; click on each of them with the cloth. There are some on the floor and some on the walls. The rest are on the bed, close to the curtains.
- Click on the blue CD on the right side of the desk. Place the CD on the computer tower. Then click on the monitor and a mini–game will appear.
EYE PUZZLE
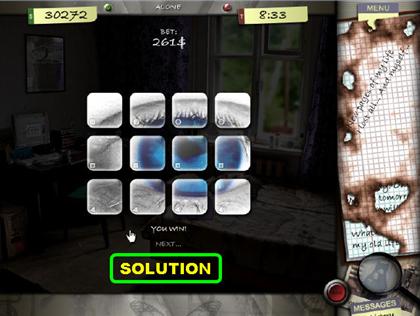
- If you look at the bottom of each square you will notice a shape, either a circle, a square, or a triangle. Arrange the rows by the shapes.
- Arrange all the circles in the top row.
- Arrange all the squares in the middle.
- Arrange all the triangles at the bottom.
- A picture of an eye will form.
GUN – AMMUNITION
- Pick up the phone.
- Click on the pillow on the bed, and then click on the gun that is underneath.
- Click on the book by the chair, and you will see a diagram of how to pick a lock.
- Grab the lockpick from the floor, under the chair and it will go into the inventory.
- Click on the sphere on the window sill. Throw the sphere out the window by clicking it onto the top right side of the window, on the part that is open.
- Find the camera on the desk.
- Click on the box of ammunition that is in the lower left corner of the scene, in front of the computer tower. The ammunition could also be behind the computer.
- Pick up the lockpick that is on the chair.
- Place the lockpick on the purple suitcase, on the bed. A puzzle will appear.
- Pick up the keys that are on the bed.
LOCK PUZZLE
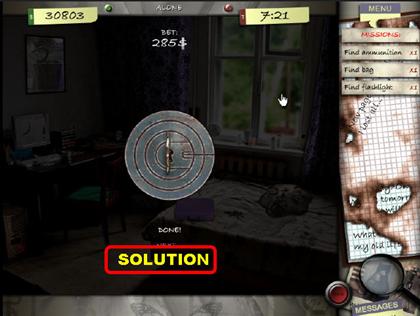
- Watch Video on Big Fish Games YouTube Channel
- Arrange the rings so the cuts in the lock line up on the right side.
- Position the smallest ring first.
- Position the largest ring next.
- Lastly, position the middle ring.
- Click on the permit inside the briefcase once it opens.
CHAPTER 22: NOWHERE
LEVEL 25 – ANN’S APARTMENT
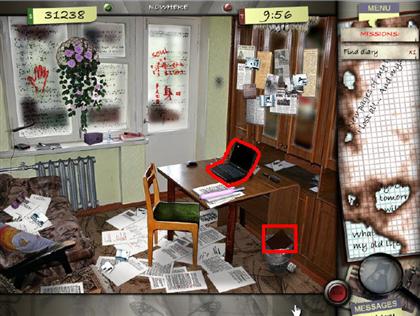
- Grab the diary from the trashcan on the lower right side of the screen.
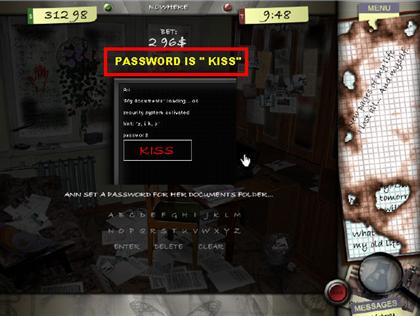
- Click on the laptop and it will prompt you for a password. To enter the right password, you must unscramble the letters "SIKS."
- The correct password is "KISS."
5 PICTURES – 6 TORN PIECES OF PAPER
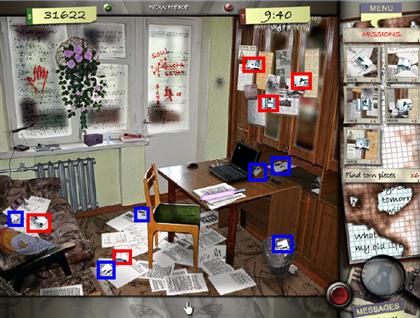
- Click on the laptop again so you can read the message. 5 pictures will appear in the graphical task section.
- Look for the 5 pictures in the scene. Solutions are random, so everyone may not have the same results. The pictures are highlighted red in the screenshot.
- Look for the 6 torn pieces in the scene. They appear red in the screenshot.
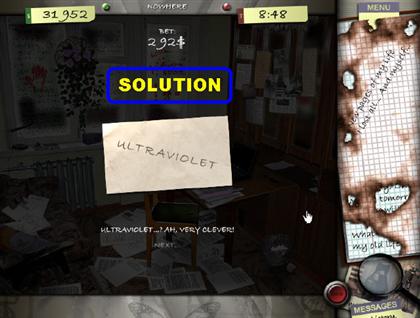
- Once all the torn pieces have been gathered, a puzzle will appear on the screen.
- Arrange the scraps of paper to form the word "ULTRAVIOLET."
- The paper will go into your inventory.
ULTRAVIOLET LIGHT – FLASH DRIVE
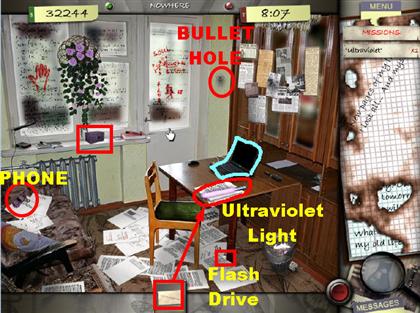
- Place the paper that reads "Ultraviolet" on the ultraviolet light on the desk, and it will reveal more parts of the message.
- Click on the UV light again and it will disappear from the desk.
- Click on the flash drive that is on the lower right side of the floor and it will go into the inventory.
- Place the flash drive on the laptop; then click on the laptop again and you will receive a lockpick in your inventory.
- Place the lockpick on the lock box on the window sill.
PICK THE LOCK
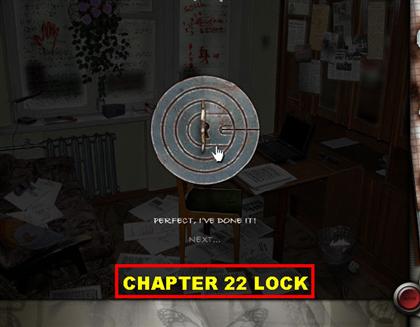
- Watch Video on Big Fish Games YouTube Channel
- From smallest to largest, the circles will be called 1 to 3.
- 1 is the smallest circle; it moves the largest circle counter–clockwise and the smallest circle clockwise at the same time.
- 2 is the middle circle; it moves itself and the smallest circle. When the small circle and the middle one meet, they will move as one piece until you click on something else.
- 3 is the largest circle; it moves itself and the middle circle in opposite directions.
- Click on the smallest circle first until the notch is facing the right side.
- Then click on the largest notch until all 3 notches are facing right. Grab the letter that appears inside the lockbox. The solution really depends on your game since all locks will not start in the same position for everyone.
- Answer the telephone that is on the lower left side, on the chair.
- Click on the bullet hole that is on the right side of the back wall.
CHAPTER 23: COLONEL
LEVEL 26 – CHECK RECEIPT
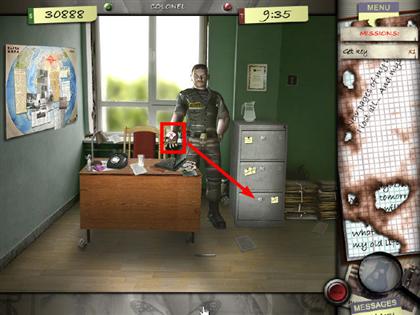
- Click on the Colonel and some money will appear in the inventory.
- Give the money to the Colonel. The Colonel is offended by this gesture.
- Click the gun in the inventory and then click on the Colonel.
- Grab the key from the Colonel’s hand.
- Place the key in the third drawer of the file cabinet. Grab the receipt that is inside the cabinet. The receipt number is "12702."
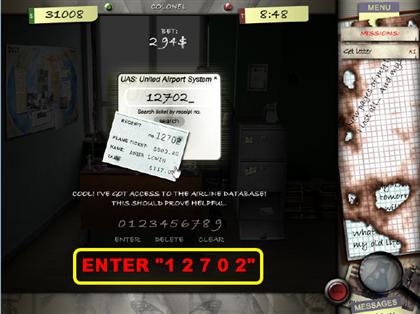
- Take the receipt from the inventory and place it on the laptop; you will get some more information.
- Enter the numbers "12702" in order to obtain the receipt number.
FIND 5 DOCUMENTS – LETTER – WATER
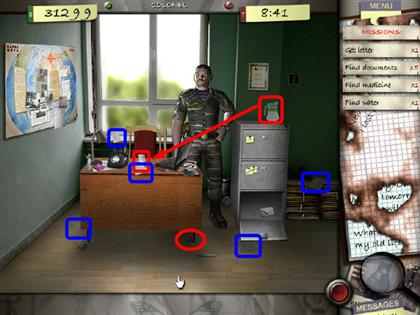
- Pick up the 4 documents scattered throughout the scene. They are marked blue in the screenshot. Once you’ve gathered them all, an image will appear on the screen.
- Pick up the letter that is inside of the open cabinet.
- Pick up the water jug that is on top of the file cabinet.
- Place the water jug on the glass on the desk, and the glass will fill with water.
- Click on the filled glass and it will go into your inventory.
- Pick up the medicine bottle from the lower right side of the desk. Give the medicine to the colonel. Then give him the full glass of water.
- Click on the phone; then click on the Colonel. Pick up the newspaper that is in the Colonel’s hand.
CHAPTER 24: DEJA VU
LEVEL 27
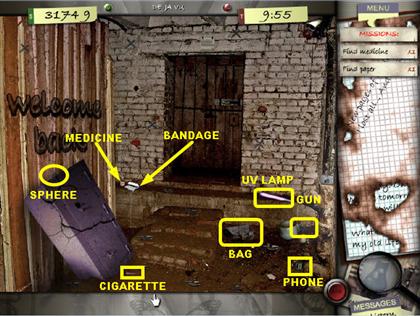
- Grab the medicine that is on the left side of the steps, to the left of the door, on the ground.
- Click on the paper that is above the door.
- Look for the items on the list. The screenshot shows you the location of the cigarette, medicine bottle, UV lamp, phone, bag, and gun.
FIND 8 MIRROR PARTS – ASSEMBLE THE MIRROR
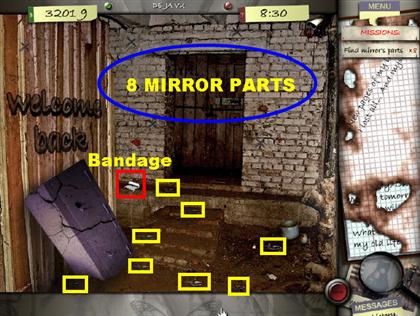
- As you’re picking up the pieces of glass, you will be asked to find some bandages. The white roll of bandages is on the left side of the scene.
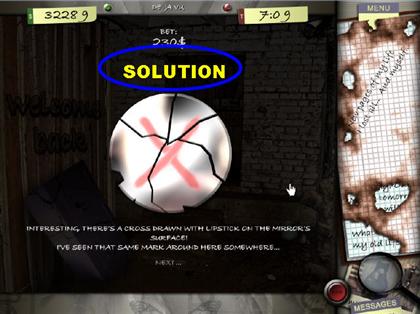
- Once you’ve collected all the mirror pieces, you will be asked to assemble them.
- Arrange the pieces in the shape of a sphere with a red "X’’ in the middle.
UV LIGHT – CAMERA
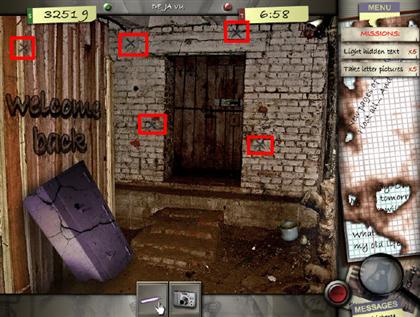
- Place the UV light on all the "Xs" in the scene; a purple letter will appear next to each one.
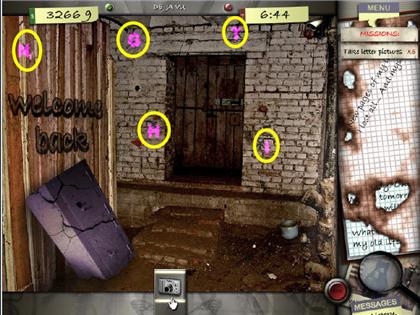
- Use the camera to take pictures of all the spots that have the purple letters. This will help you reveal the secret message.
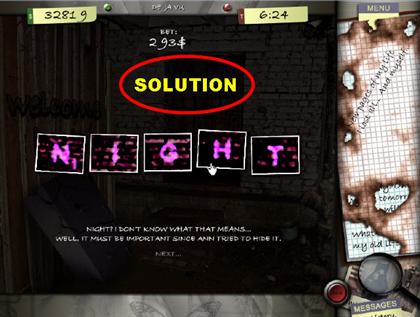
- Once all the pictures have been taken, a mini–game will appear. Swap the letters around to form the word "NIGHT."
- A gun will appear in your inventory. Place the gun on the security camera on the top right side of the scene.
- Click on the door latch to slide it, and then use the lockpick on the door.
LOCK
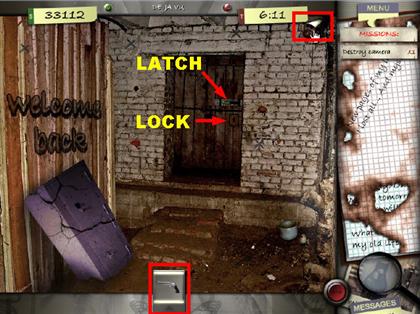
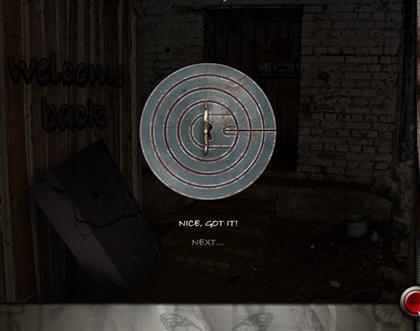
- Click on the lock and solve the puzzle. Once the lock is complete, click on the door to enter the next scene.
CHAPTER 25: SID NEY
LEVEL 28 – STRANGER
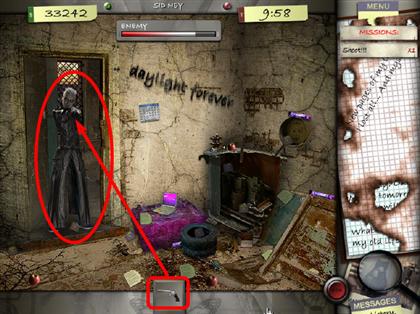
- Grab the gun and shoot at the man in the doorway. Click on that person so you can talk to them. A sphere will appear in the inventory.
- Give the man the sphere. Make sure that you put it in his hand; otherwise he will not take it.
CONNECT THE SPHERE
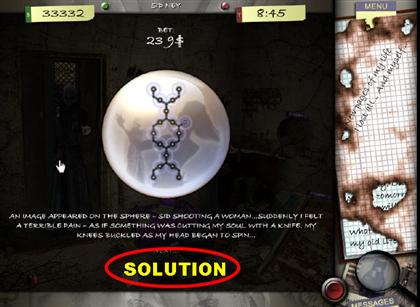
- This is like a pipe puzzle: you must connect all the pieces together. You will know that a piece has been connected correctly when it lights up.
- Click on the pieces in order to rotate them. Please look at the screenshot to see the solution.
FIND 2 PICTURES – 6 FOODS – 8 DISKETTES – 5 PAGES
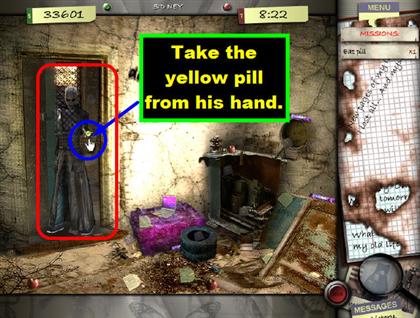
- The scene will be blurry at first; click on the man so you can talk to him. Click on the yellow pill that is in the man’s hand and 2 pictures will appear in your mission task. The scene will become clear again.
- Click on the calendar that is on the back wall.
- Click the screwdriver on the lower right side.
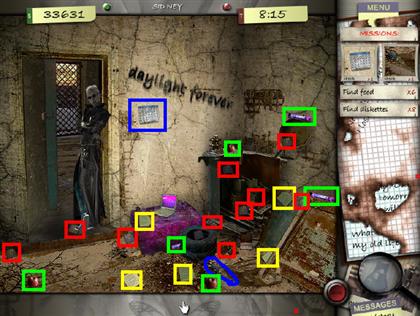
- Look for the food items in the scene, they consist of apples and rolled candy. The food is highlighted green.
- The diskettes are red and the pages are yellow. More than the 8 diskettes required to complete the scene have been highlighted. Alternate locations have been added as well.
- Place the diskettes in the laptop and arrange the pictures.
ARRANGE THE DISKETTES – ENTER THE PASSWORD
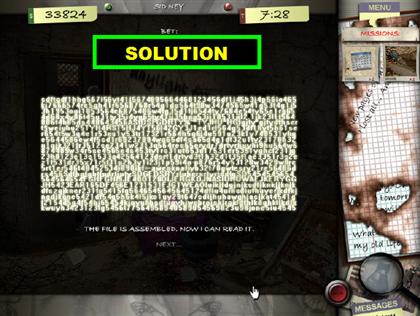
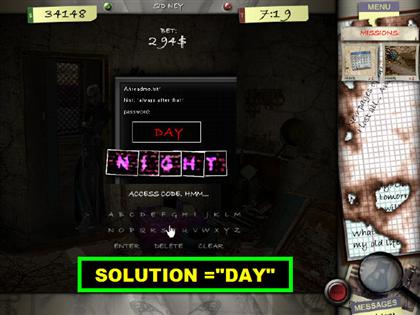
- Once you’ve solved the puzzle, click on the laptop and enter the password "DAY."
- Click on the man to talk to him and end the scene.
CHAPTER 26: WAY OUT
LEVEL 29
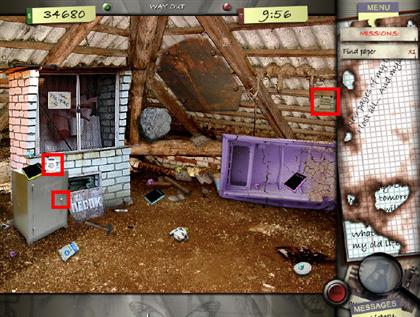
- Click on the paper that is on the top right side.
- Click on the cup of coffee that is on the left side of the scene, and you will see that the bottom of the cup reads "SAFE." A master key will appear in your inventory.
- Place the lockpick on the safe on the left side of the page. You will have to unlock the lock.
LOCK
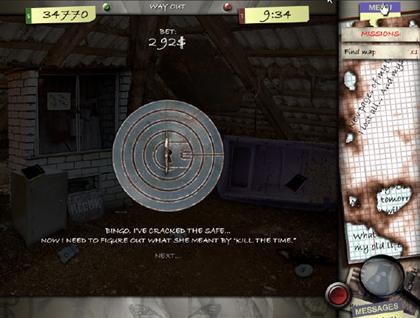
- Watch Video on Big Fish Games YouTube Channel
- This lock will be very simple to pick. The game will start with all the locks lined up, but they are not facing the right way.
- Simply click on the largest ring and all the rings will rotate. Place the markings on the lock so they are facing to the right. This solution may be random.
CLOCK – HAMMER – FIND 9 DICE
- Once the lock has been picked, the safe will open.
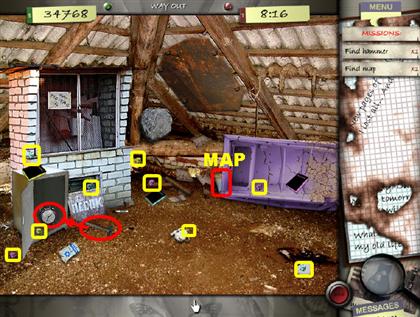
- Pick the hammer up from the ground near the safe and it will go into the inventory.
- Place the hammer on the clock inside the open safe, and the clock will be cracked open. Pick up the secret message that is inside the safe.
- The map is behind the purple cabinet.
- The dice are all highlighted yellow in the scene.
ARRANGE THE DICE
- Each time you find 3 dice of the same color, you will be asked to put them in order. Here is the solution for each set of dice:
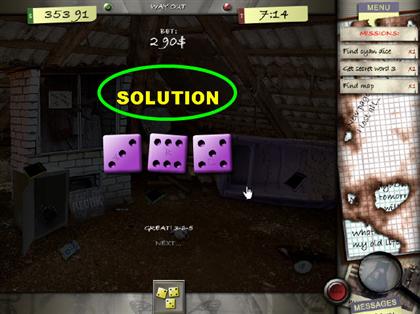
- The correct order is "365" for the magenta (purple) dice.
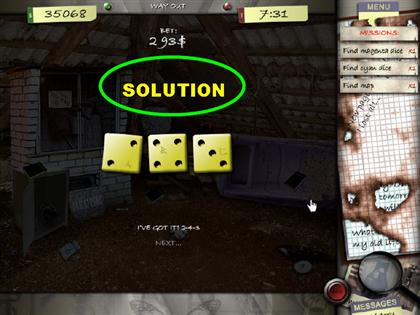
- The correct order for the yellow dice is "243."
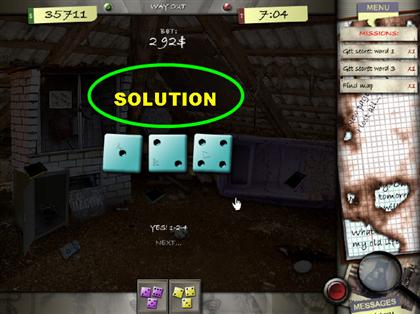
- The correct order for the cyan (blue) dice is "124."
GET 3 SECRET WORDS
- In order to get the secret messages, click on the dice in the inventory; then click on the book that has the same color as the dice.
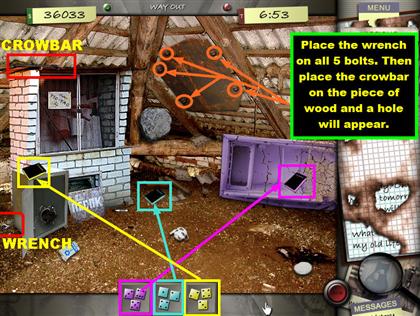
- Pick up the wrench and the crowbar.
- The crowbar is on the top left side of the brick structure.
- The wrench is on the lower left side, behind the safe.
- Place the wrench on the 5 bolts on the wall in the back of the scene, on the wooden board.
- Place the crowbar on the piece of wood, and a hole will appear. Click on the hole to exit the scene.
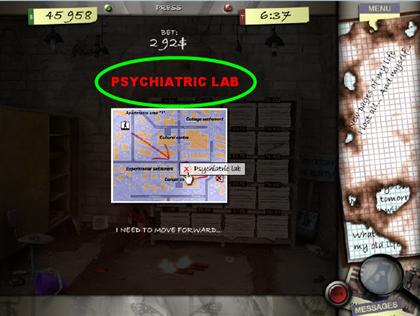
FIND THE RIGHT LOCATION ON THE MAP
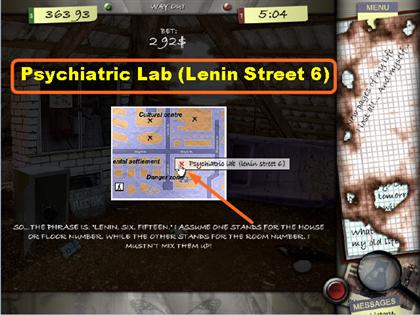
- Click on the choice that reads "Psychiatric lab (Lenin Street 6)."
CHAPTER 27: PSYCHO
LEVEL 30 – MEDICINE – PLANKS – CROWBAR
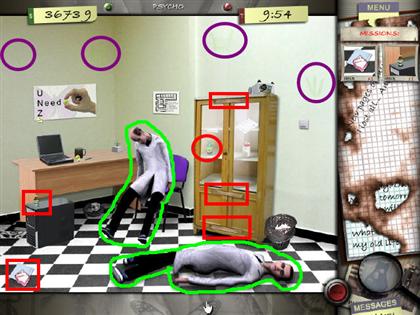
- Click on both scientists and 2 pictures will appear on your mission tasks.
- One of the pictures is in the lower left corner of the scene (handkerchief). A crowbar will appear in your inventory.
- The other picture (medicine) is on top of the computer tower.
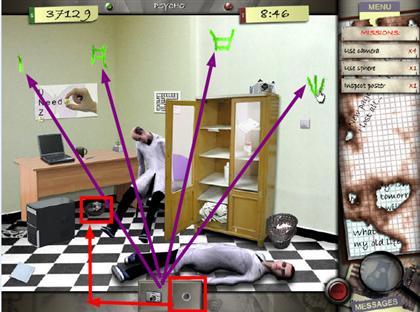
- Place the medicine on the scientist, on the floor, and a sphere will appear in the inventory.
- NOTE: In some levels you may have to place the medicine on the doctor that is on the chair. Experiment with both to see which one works for you.
- Place the crowbar on the 3 wooden planks on the tall cabinet.
- Click on the cabinet door and the left door will open up. Grab the reagent (green bottle) that is on the second shelf.
USE REAGENT 4 TIMES – USE CAMERA 4 TIMES
- Place the reagents on the 4 light green marks on the wall, and the marks will become more visible.
- Use the camera on all the green marks on the wall; it will take a picture of each one.
ARRANGE REAGENTS – CONNECT SPHERES
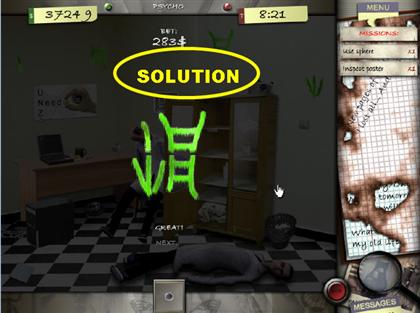
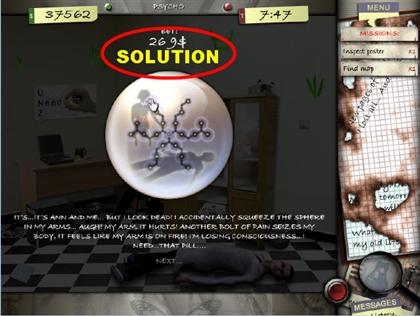
- The reagents should look like an arrow pointing downwards on the left, and like a ladder on the right side.
- Place the sphere on the cube under the desk and a puzzle will appear.
- Connect the dots according to the screenshot.
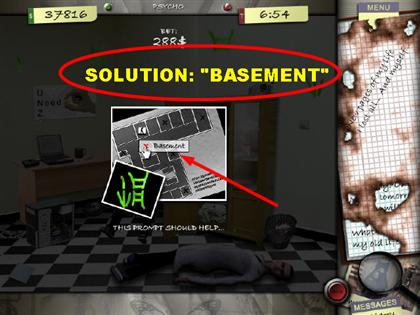
FIND PILL – INSPECT POSTER – FIND MAP
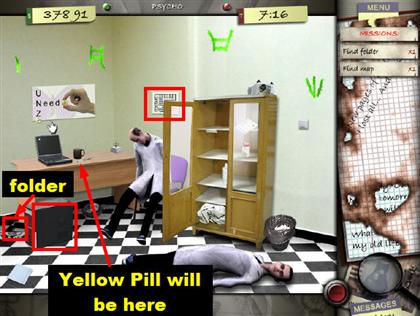
- When you return to the scene, it will be out of focus. Click on the poster that is on the left side of the wall.
- Click on the yellow pill in front of the cup, next to the laptop, and the scene will focus.
- Click on the folder in the lower left side, behind the desk, and a screwdriver will appear in your inventory.
- Use the screwdriver to remove the cover of the computer tower. Click the tower again to retrieve the disk.
- Place the disk onto the laptop. Click on the laptop and open the file.
- Grab the map that from the back wall, behind the tall cabinet. Click on the choice that reads "Basement."
CHAPTER 28: LIE
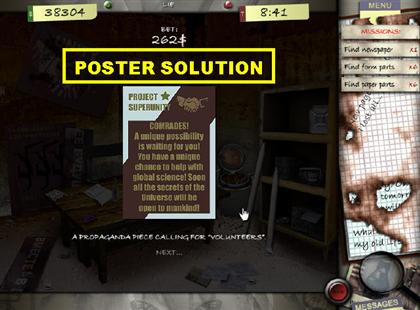
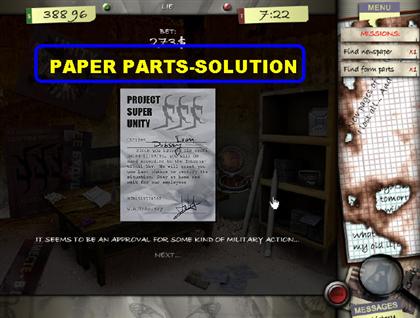
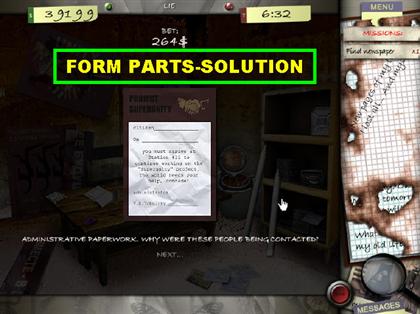
LEVEL 31 – FIND 6 FORM PARTS – 6 POSTER PARTS – 6 PAPER PARTS
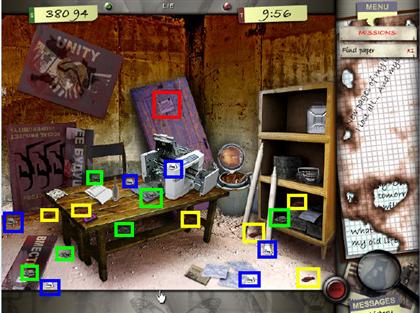
- Grab the paper on the purple locker.
- Find the newspaper on the floor.
- The poster parts have a mauve color to them. They’ve been highlighted yellow in the screenshot.
- The paper parts are white; they are highlighted blue in the screenshot.
- The form parts are gray; they are highlighted green in the screenshot.
- The newspaper is on the right side of the floor.
ASSEMBLE POSTER
ASSEMBLE PAPER
ASSEMBLE FORM
GAS CAN – TAPE – RAG – BOTTLE
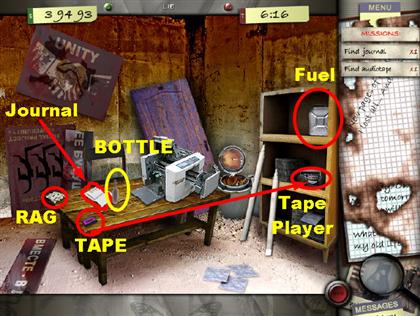
- Click the journal on the table.
- Pick up the purple audio tape from the table.
- Place the audio tape on the cassette player, on the shelf, right side.
- Grab the fuel can that is on the shelf, on the right side of the scene.
- Click on the rag that is on the left edge of the table. Sometimes the rag will be on the right side of the table.
- Place the fuel on the bottle that is on the table.
- Place the rag on the bottle that is on the table.
- Use the lighter on the bottle that is on the table.
- Click the lighted bottle, and it will go into the inventory.
- Throw the bottle anywhere on the scene.
LEVEL 32 – DRINK 5 CUPS OF COFFEE (NIGHTMARE: QUESTION 1)
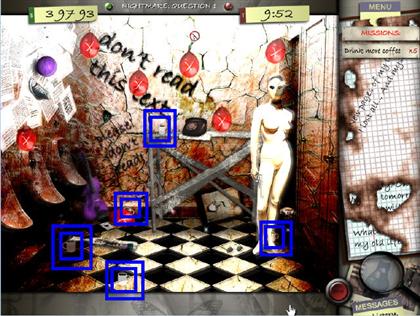
- The scene is blurry when you first walk in. Grab 5 cups of coffee scattered throughout the scene. Once you drink the coffee, the scene will become clear.
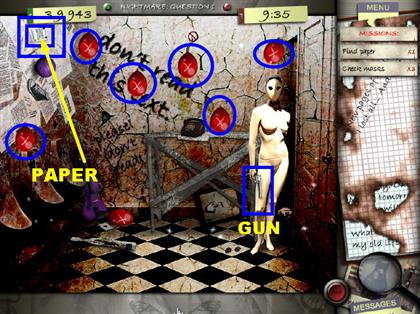
- Grab the paper that is in the top left side of the page.
- Click on the face of the mannequin 3 times to retrieve all the masks.
- Click on the mannequin’s face again, and the game will ask you to take the gun and find 5 game cards.
- Grab the gun from the mannequin’s hand, and shoot the gun at all the red balloons in the scene, except the one on the floor.
PICK UP THE CARDS AND PLACE THEM IN ORDER
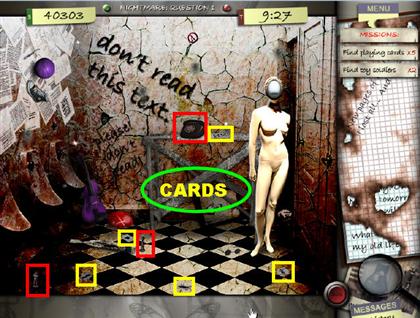
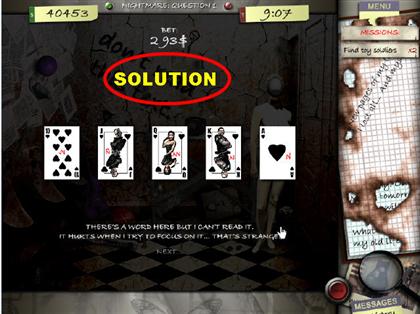
- Once all the balloons have been popped, pick up the game cards that fell on the ground.
- Place the cards in the following order: "10, J, Q, K, A."
- Click on the cards in the inventory; then click on the mannequin’s face.
- Click on the 2 silver, toy soldiers in the scene.
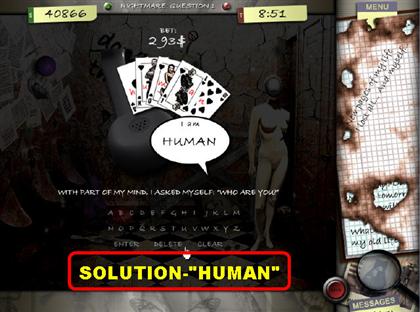
- Click on the telephone and solve the riddle.
- The answer is "HUMAN."
LEVEL 33 – MONEY – CASH REGISTER (NIGHTMARE: QUESTION 2)
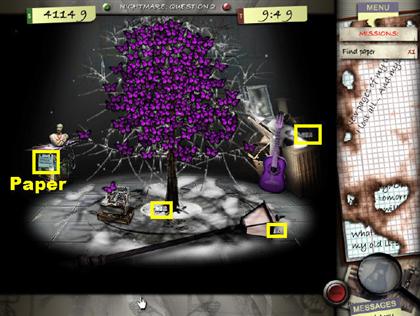
- The paper is on the side of the kiosk, left side of the page.
- Click the 3 paper currencies on the floor. The currency can be in other parts of the scene as well.
- Click on the cash register in the lower left side of the scene; the register will open.
- Place the money in the register; then click on the register again to close it. A gift will appear as soon as you close the register.
- Click on the gift and pick up the axe that appears inside.
- Place the axe on the bust, on top of the cart, left side of the page, and grab the puzzle piece that is inside.
GATHER 10 PUZZLE PIECES ASSEMBLE THE PUZZLE
- The puzzle pieces are highlighted yellow in the screenshot. The puzzle piece locations are random.
- When you finish picking up all the puzzle pieces, you will have to put the puzzle together.
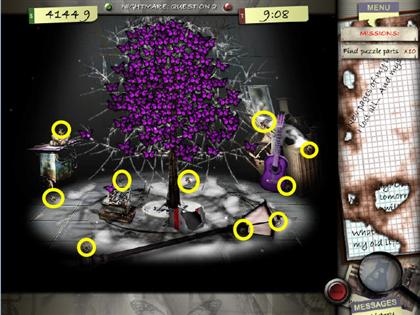
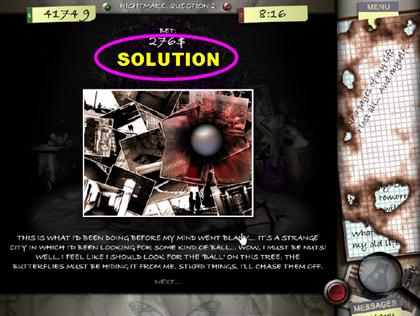
FIND SPHERE
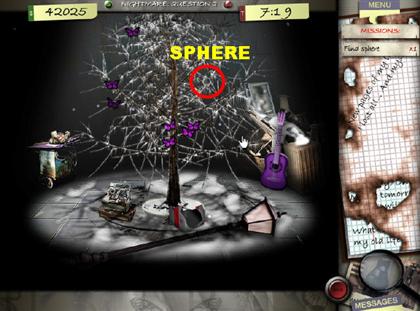
- To find the sphere you have to click on all the butterflies in the tree. The sphere will be underneath the butterflies, somewhere in the middle. The location of the sphere varies.
LEVEL 34 – FIND 9 COINS – LOCKPICK (NIGHTMARE: QUESTION 3)
- Watch Video on Big Fish Games YouTube Channel
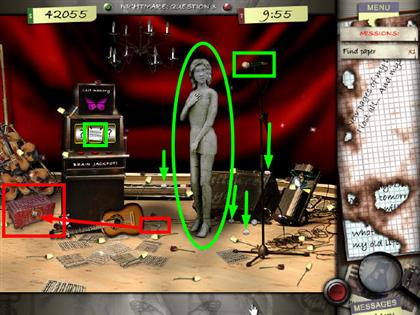
- Grab the paper from the middle of the slot machine.
- Click on the statue; then click on the microphone, so you can speak loudly to the mannequin.
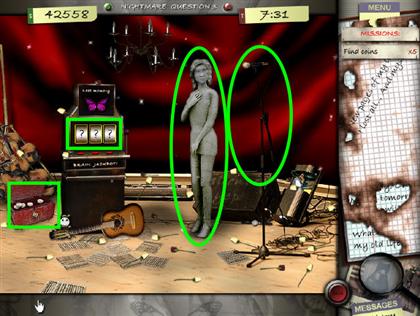
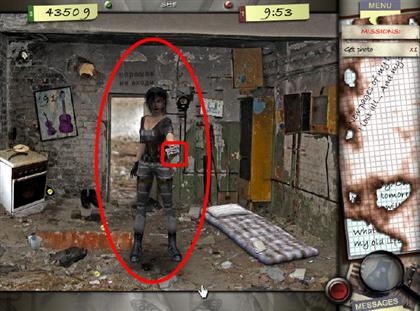
- You will only be able to find 4 of the 9 coins in the scene; the other 5 coins are in the red lock box on the floor.
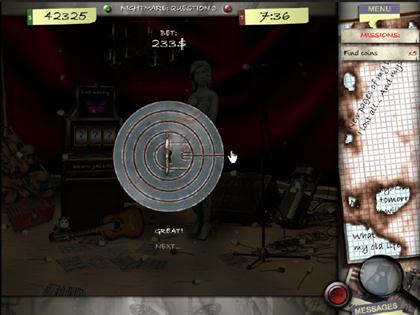
- Pick up the lockpick in the back of the scene. Place the lockpick on the red lock box and open the lock.
- Open the lock and retrieve the 5 coins within.
PASSWORD
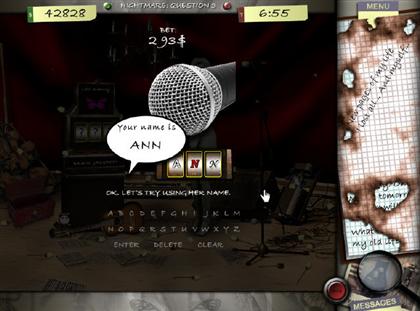
- Place the coins in the slot machine 3 times. The last time you enter the coins, the word "ANN" will pop up on the screen.
- Click on the microphone again; then enter the word "ANN" as the password.
- Click on Ann one last time.
FIND 9 ROSES OF LOVE
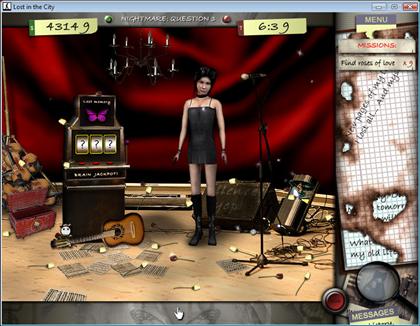
- You have to click on the red roses in the scene, not the white roses.
- Once you’ve collected all the red roses, hand them to Ann.
- Click on Ann again to talk to her.
CHAPTER 29: SHE
LEVEL 35 – GET PHOTO – SPHERE PUZZLE
- Click on the girl in the scene. Take the photo from her hand.
- Click on her again so you can talk to her. Grab the sphere from the inventory and place it on the cube in her hand.
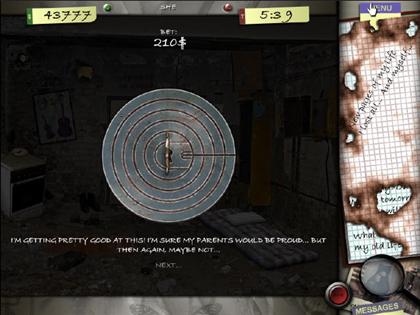
- Connect the links in the sphere, as shown in the screenshot, to complete the puzzle.
GET PILLS
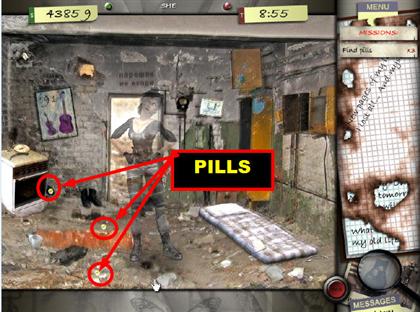
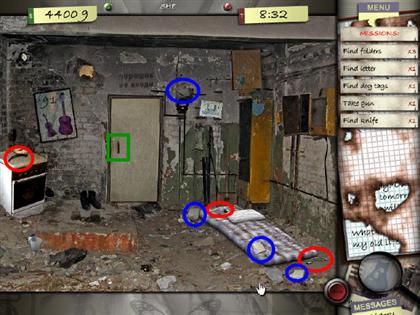
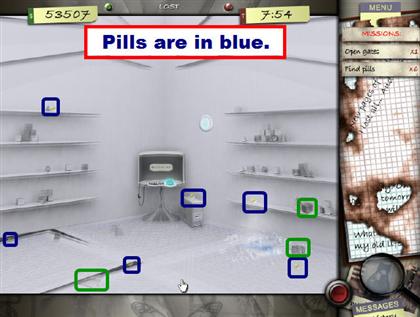
- Get the pills that are on the ground, they are yellow. The locations of the pills vary with each game.
- Click on the lady and find the items on the list. The lady will disappear from the page.
- Click on the pillow on the mattress and grab the gun that is underneath.
- Grab the knife that is in the far left side of the scene. Sometimes the knife is on top of the oven.
- The dog tags are in the lower right corner. They could also be next to the bed.
- Click on the 3 white folders in the scene.
- Pick up the letter that is above the door and the lockpick will enter your inventory.
- Place the lockpick on the door and the lock puzzle will appear.
OPEN THE LOCK
- Open the lock. Once you’re done you will find that the key is broken. Click on the door 5 times. A hole will form; go out the door once the hole is created.
CHAPTER 30: ANN
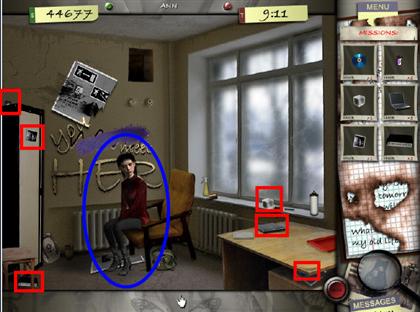
LEVEL 36 – TALK TO ANN AND PLACE HER BELONGINGS
- Watch Video on Big Fish Games YouTube Channel
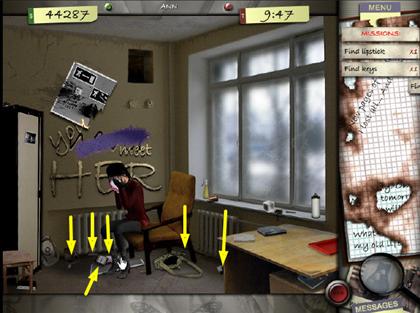
- Click on Ann; then give her the photo from the inventory. Pick up the handkerchief that falls on the floor. Give Ann the handkerchief and look for the items on the list.
- These next few items will go into your inventory as soon as you pick them up.
- The medallion is on the lower left side, on the floor in front of Ann.
- The lipstick is on the lower left side of the floor, in front of Ann.
- Click on the photo pinned under the desk.
- Grab the purse that is on the lower left side, in front of the cabinet.
- Click on the keys under the chair.
- The cigarettes are next to Ann’s feet.
- Place the keys, medallion, photo, purse and lipstick inside of Ann’s purse. The purse will close up and Ann will look at you.
- Click on Ann to talk to her.
FIND THE 6 PHOTOS IN THE MISSION TASK – MAP
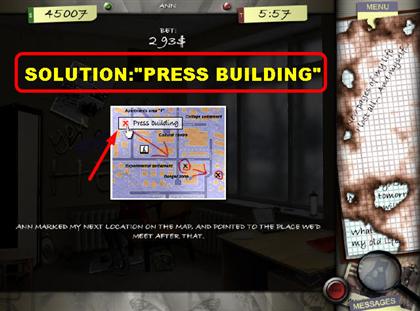
- Click the laptop on the table and it will open up. Take the CD from the inventory and insert it into the laptop. Click on the laptop again so you can read the file.
- Click on the cube by the window sill then hand the cube to Ann. Click on Ann again to talk to her. Grab the map that appears in Ann’s hand.
- On the map, choose the "Press Building" in the upper left corner.
CHAPTER 31: PRESS
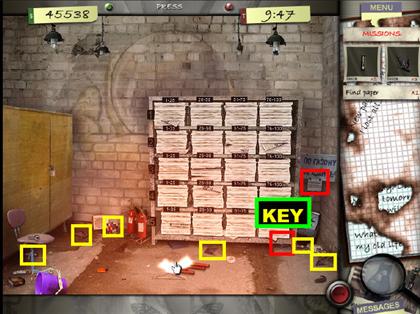
LEVEL 37 – 4 FLARES
- Watch Video on Big Fish Games YouTube Channel
- Find the 4 flares in the scene. Place them in the middle of the floor where you see 4 tiny holes.
- Click the paper in the top right side of the scene. The paper could also be in the lower right side of the scene.
- Click the colored cube that is on the right side of the base of the wall unit. The cube could also be on the left side of the floor.
- There are several keys in this scene. The one you need to find is under the right foot of the wall unit.
- The battery is under the chair. The other battery is under the right foot of the wall unit.
- Place the key on the tall cabinet on the left side of the page.
- Grab the book and the magnifying glass from inside the cabinet.
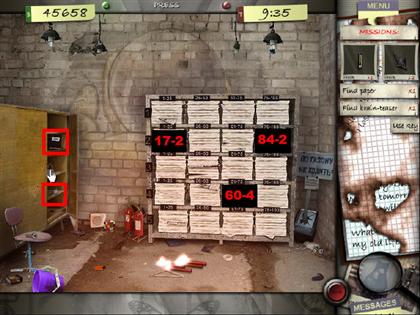
- The newspapers the game will ask you for will be random. However, finding the right newspapers is easy to do.
- For example, if they ask you for ’’newspaper 60–4" go to the 4th row and click on the bin marked "51–75.’’ The first number in the clue refers to the bins and the last number refers to the row.
- Look for the following newspapers: For 84–2, click on cubbyhole 76–100 in the second row, fourth column. For 17–2, click on cubbyhole 1–25 in the second row, first column. For 60–4, click on cubbyhole 51–75, fourth row, third column.
CUBE ASSEMBLY
MAP
CHAPTER 32: LAB
LEVEL 38 – UV LIGHTS

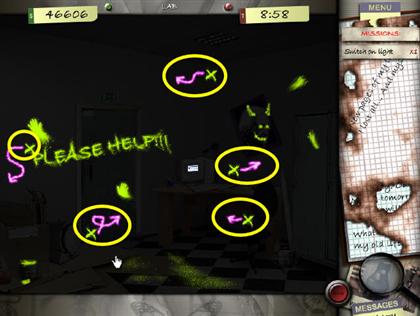
- Click the paper on the door and find the 4 items that show up in the mission task.
- Click the light switch on the left side of the wall.
- Use the UV lamp on any of the spots that have an "X."
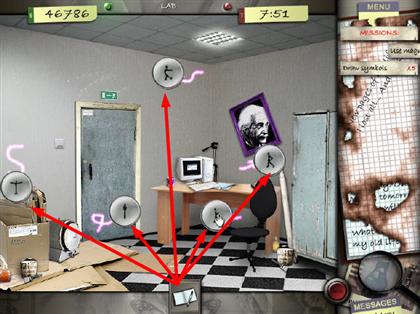
- Click the light switch again and use the magnifying glass on the spots you marked with the UV light. You have to click in the spot to which the arrow is pointing or it will not work.
- Place the notebook from the inventory on the drawings in the circles and each picture will be drawn.
ARRANGE THE SYMBOLS – ENTER PASSWORD
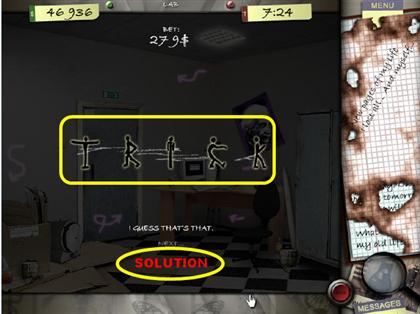
- Once you click on all the pictures you will notice that the figures look like letters; arrange them in the following order "TRICK."
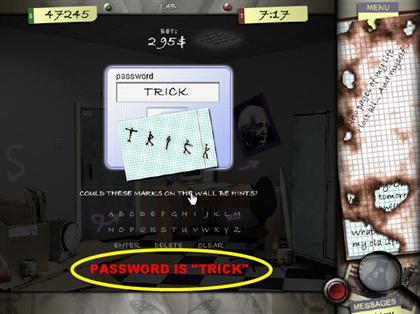
- Click on the computer and type in the word "TRICK." Click on the computer again so you can read the file.
- Click on the door.
MAP
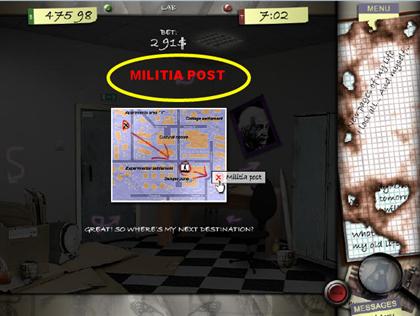
- Choose the "Militia Post" location as your next location on the map.
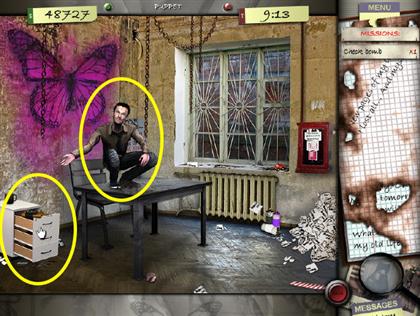
CHAPTER 33: PUPPET
LEVEL 39 – TALK TO THE NUT – 3 CRUMPLED PAPERS – GRAPHICAL TASKS
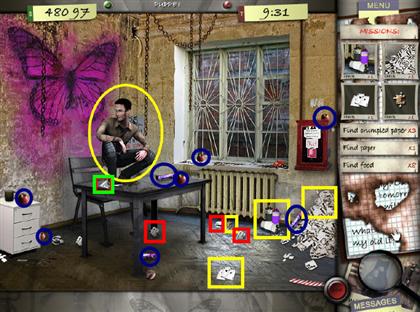
- The instructions ask you to check on the man and then tell you to interrogate the nut. Click on the man that on the table a total of 7 times to interrogate him.
- Click on the items in the pictures from the graphical task section.
- Look for the crumpled pieces of paper; they are highlighted red in the screenshot.
- The paper is on the desk, under the man’s foot; it is highlighted green.
- The 8 food items are highlighted blue; they consist of apples and wrapped candy.
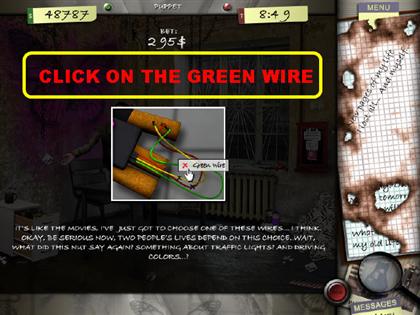
BOMB
- Once you’ve found all the items above, click on the man again.
- Check the drawers on the left side of the scene. You must click on each drawer one by one.
- Start with the bottom drawer; it will be empty.
- The drawer in the middle will contain a flash drive; click on it.
- The top drawer will contain a bomb. Click on the bomb to check it; then click on the knife that appears in the inventory.
- Place the knife on the bomb to cut the wire and you will get a closer view.
- Click on the green wire. You have to click in the spot on which you see the "X."
- Once the bomb is deactivated, click on the man to exit the scene.
CHAPTER 34: CYBER
LEVEL 40 – BROOM – DVD – CD
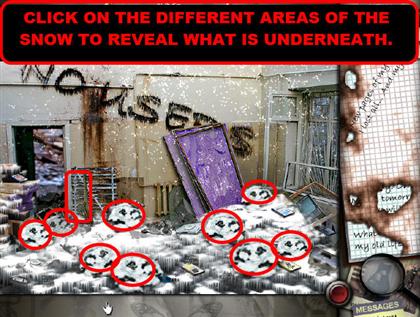

- Click on the broom on the left side of the scene; then click on the snow 9 times. Click the spots in which you see a small mound.
- Click on all the PCs until you find the one that works. The one that works is the one in the back of the scene, where you originally found the broom.
- A flash drive will go into your inventory. Place the flash drive on the working computer.
ENTER ACTIVATION NUMBER
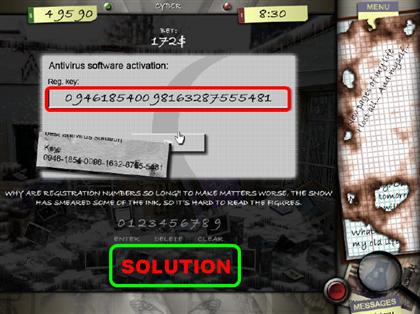
- A DVD will go into your inventory, place it in the PC.
- Look at the registration key in your inventory.
- ENTER THE FOLLOWING DIGITS: 094618540098163287555481
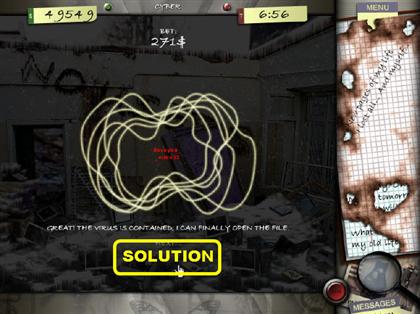
- Click on the computer to reboot it; click on it again and you'll be presented a puzzle. Rotate the pieces around until it looks like the picture on the screenshot.
- After you’ve completed the puzzle, click on the computer again; then click on the door to exit.
CHAPTER 35: FOLLOW
LEVEL 41 – GET THE SECURITY CAMERA
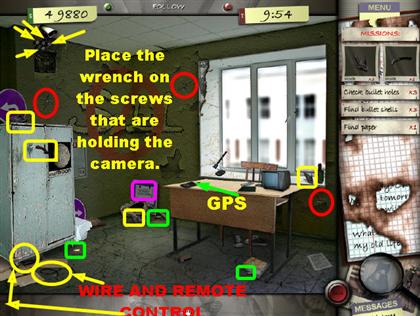
- Click on the items in the pictures from the mission task.
- Click the paper hidden on the left side of the back wall.
- The wrench will appear in your inventory. Place the wrench on all 4 screws that are holding the security camera in the top left corner. Place the wrench on each screw to take it off. Click on the camera to retrieve it.
- Pick up the wire that from the lower left side of the floor in front of the blue cabinet.
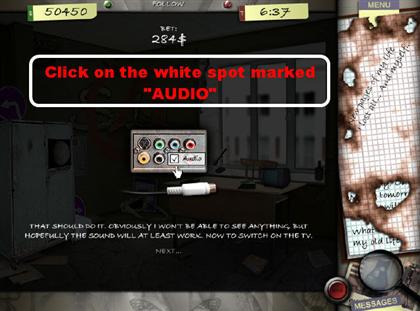
- The remote control is on the lower left corner, under the blue cabinet. Place the wire on the TV, on the desk.
- Connect the wire in the white spot that reads "AUDIO."
- Place the security camera next to the TV; then grab the remote and click it on the TV.
- Use the crowbar on the blue cabinet and the door will open. Grab the bugs that are at the bottom of the open cabinet.
- Pick up the GPS device from the desk and you will get a pop–up window.
TYPE IN THE CODE – MAP
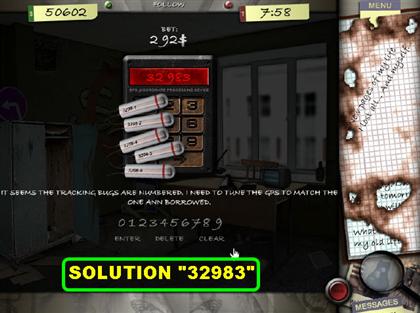
- Note that each bullet has a number on it. The numbers are in sequential order, but there’s one number missing from the middle.
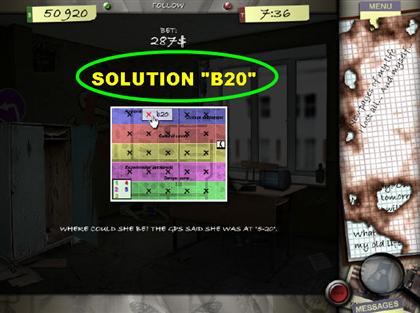
- Enter the numbers "3 2 9 8 3."
- Click the map that is on the lower right side of the screen. Enter "B20" in the top row as your choice.
CHAPTER 36: CHOICE
LEVEL 42 – CHOICES
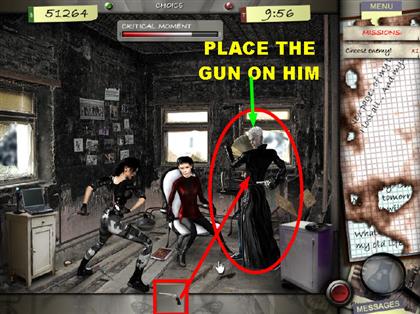
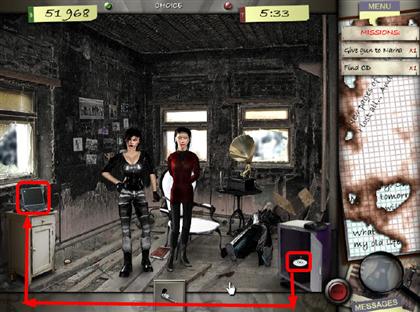
- Click on Narina and Sid, they are both dressed in black.
- Grab the gun from the inventory and place it on Sid, the man that is on the right side of the page. Sid will fall to the ground.
- Click on Narina, so you can talk to her.
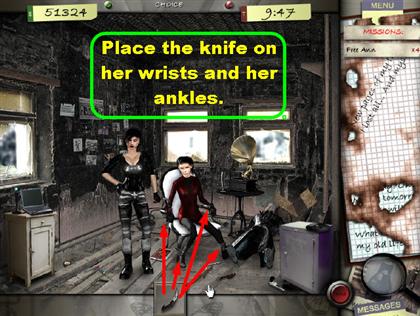
- Place the knife on Ann (The one sitting in the chair). In order to free her, the knife has to be placed around both hands and both feet.
- Click on Ann first and then on Narina.
- Click the paper that is on the top left side of the wall.
- Click on the laptop and you will see 3 mission tasks appear; find the lockpick.
- Click on Sid to search him. His gun landed in the lower right side of the scene; grab it.
- The lockpick is on the right side of the ground; use it on the safe.
OPEN THE LOCK
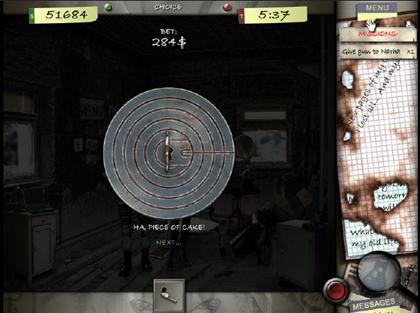
- Watch Video on Big Fish Games YouTube Channel
- Place the lockpick on the safe and unlock it. The solution in the video is random. You can click on the red S.O.S. button to skip this puzzle.
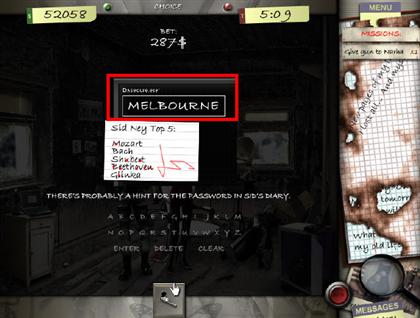
- Once the safe is open, click on the CD inside; place the CD on the laptop. When you click on the laptop again it tells you that you need to find a password.
- Click on Sid, the man that you shot, and you will retrieve a diary. Click on the laptop so you can read the file.
- Enter "MELBOURNE" as the password. Once you do that, a holographic image will show up on the screen.
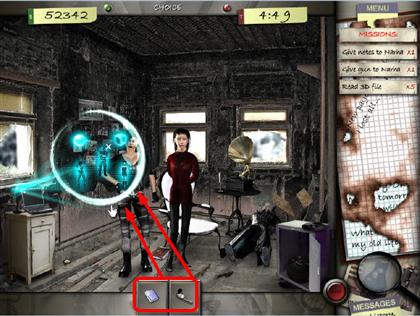
- Click on all the holographic images so you can read each file. Give the notepad from your inventory to Narina.
- Grab Sid’s gun from in front of the safe. Give the gun to Narina. Click on Narina and then on Ann.
CHAPTER 37: LOST
LEVEL 43 – TURN ON LIGHTS – FIND 5 CARTRIDGES – COMPUTER
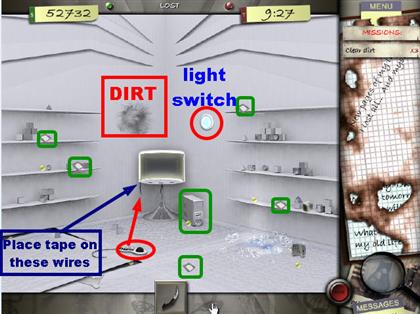
- Click the light switch that is on the right side of the wall; it is round and has a hand print on it.
- Click on the 3 membranes in the scene; they are clear. One is on the computer and the other 2 are covering the shelves on both sides of the scene.
- Place knife 3 times on the patch of dirt in the center of the wall, and a note will appear. Click on the note.
- Pick up the keyboard from the left side of the floor and then connect it to the computer.
- Place the scotch tape from the inventory on the loose wires hanging from the computer.
- Click on the blue, glowing button on the computer.
- The 5 cartridges are highlighted green in the screenshot.
- Place the cartridges on the computer tower on the floor.
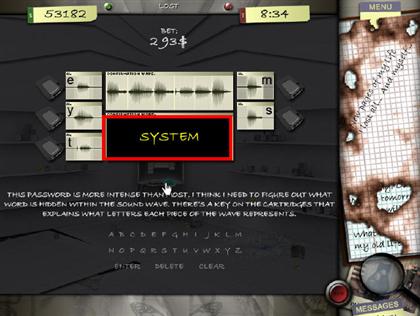
- Click on the computer and enter the following password "SYSTEM."
- Use the sphere on the glowing cube, on the lower right side shelf.
SPHERE PUZZLE – FIND YELLOW PILLS – MAP
- See the screenshot for the solution to the sphere puzzle.
- Open the gate by clicking on the computer monitor.
- Click on the pill box in the lower right corner of the scene.
- Click on the map in the lower left side of the scene, under the cover.
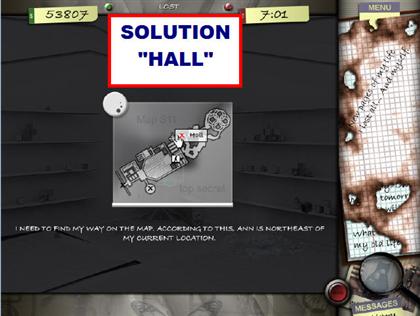
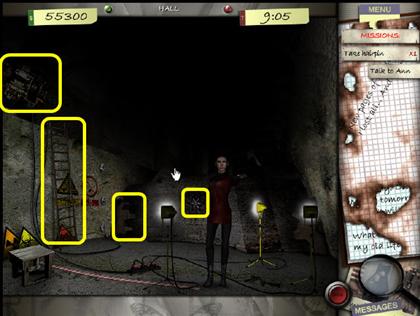
- On the map, click the top right corner where it reads "HALL."
CHAPTER 38: HALL
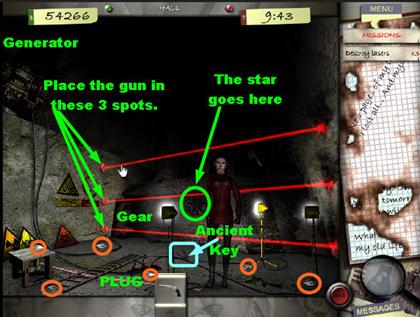
LEVEL 44 – TURN ON THE LIGHTS – DESTROY 3 LASERS – FIND 6 PIECES OF PAPER
- Watch Video on Big Fish Games YouTube Channel
- When you first enter the scene it will be dark. Look for the red plug in the lower left side of the scene. Click on the plug; it will connect to the surge protector.
- Click on the 3 yellow lights in the scene. The scene will illuminate once all three lights are on.
- Click on Ann so you can talk to her.
- Click on the gear that is in the far left side of the screen; a gun will appear in your inventory.
- Place the gun on the 3 beams of light; place it at the beginning of the beams that are on the left side of the wall.
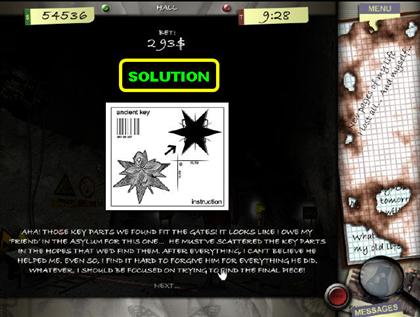
- The 6 torn pieces of paper are highlighted orange in the screenshot. When you pick up the last piece of paper, a puzzle will appear.
- Grab the ancient key from under the yellow spotlight in the middle of the scene. Sometimes the ancient key is next to the spotlight on the left; it varies from game to game.
ASSEMBLE THE PICTURE
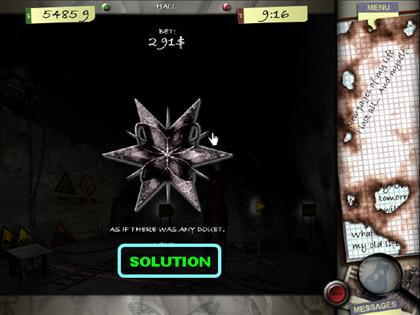
INSERT THE KEY INTO THE GEAR
- Insert the star (key) into the large gear on the far left side of the scene.
- The ladder is on the left side of the floor. Place the ladder on the left side of the wall.
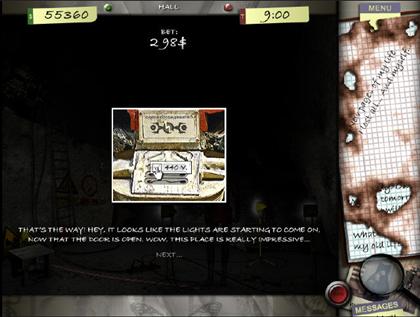
- Click the generator on the top left side of the screen.
- Click on Ann to talk to her. Grab the hairpin from Ann’s hand. Place the hairpin on the generator.
- Click on the first choice "440V."
- Click the gear that is in the back; then click on Ann. Place the crowbar on the star symbol, on the back wall.
- Click on Ann and then go out the back.
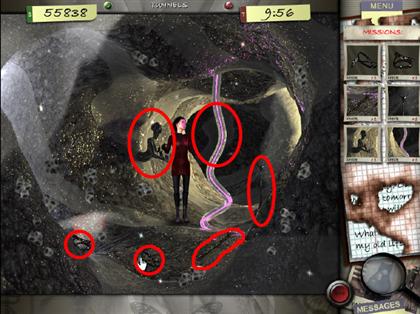
CHAPTER 39: TUNNELS
LEVEL 45 – FIND 6 GRAPHICAL TASKS – SPHERE
- Watch Video on Big Fish Games YouTube Channel
- Click on Anne and 6 pictures will appear in the graphical task section. The screenshot shows you where the 6 pictures are located in the scene.
- Give Ann the artifact from your inventory. Click on Ann again to take the artifact. Click on Ann to talk to her.
- Click on the webs that are in the lower left side of the scene. As you click on the webs, a red box will become visible.
- Use the lockpick on the red box; then open the lock. See the video for instructions on how to open the lock. Results are random, so it may not work for everyone.
- Grab the food from inside the red box. Give the food to Ann once it goes into your inventory.
- Click on all the cubes in the scene until you find the sphere that you’re looking for. The sphere could be anywhere. Most likely you will click on it automatically.
- Click on Ann; then place the original sphere on the sphere you just found.
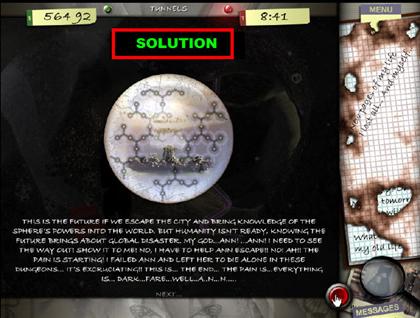
CHAPTER 40: GOODBYE
LEVEL 46 – SPHERE PUZZLE
- When you first enter the scene, click on the sphere in the water. Solve the sphere puzzle.
MEMORY MINI GAME
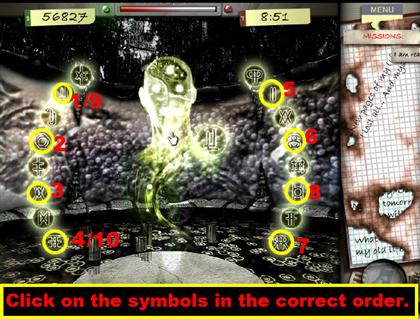
- Click on the ghost to see what he has to say. Click on him again to begin the memory mini–game.
- In this mini–game there are many symbols surrounding the ghost. The ghost will show you one symbol at a time.
- You must find the symbol he is showing you and click it before the red meter on top disappears.
- If you fail to make a selection in time, you will have to start over with the same sequence.
- The sequence seems to be the same each time. If you’re having trouble following it, look at the screenshot; it gives you the exact order in which you will be asked to enter the symbols.
THE FIRST SPHERE
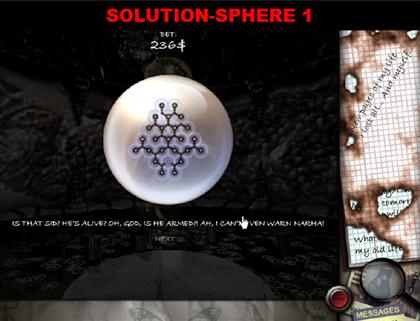
- Click on the sphere in the middle of the water and begin solving the puzzle. If you don’t want to solve this puzzle, you can click on the red S.O.S. button. You can also look at the screenshot for a solution.
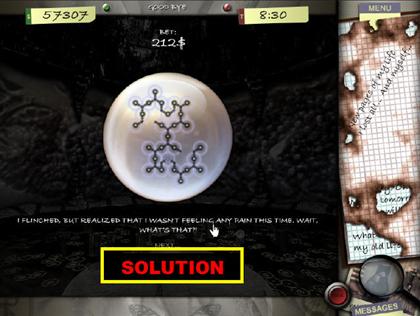
THE SECOND SPHERE
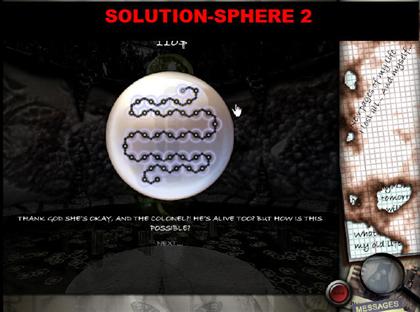
- Click on the sphere in the top right of the screen, behind the ghost, and begin solving the puzzle. You can skip this puzzle with the red S.O.S. button.
- You can also look at the screenshot for a solution.
THE THIRD SPHERE
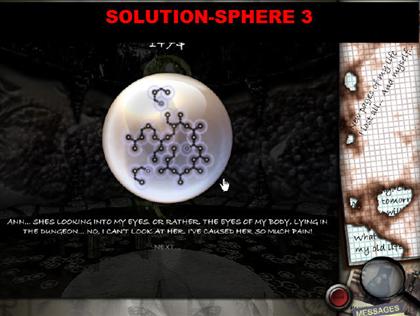
- Click the sphere on the top left side of the scene, behind the ghost, and begin solving the puzzle. You can skip this puzzle with the red S.O.S. button.
- You can also look at the screenshot for a solution.
CONGRATULATIONS! YOU COMPLETED LOST IN THE CITY!
Created at: 2009-03-14