Welcome to the
James Patterson’s Women’s Murder Club: A Darker Shade of
Grey
Walkthrough!
Whether you use this document as a reference when things get
difficult or as a roadmap to get you from beginning to end,
we’re pretty sure you’ll find what you’re looking for here.
Beginning with General Tips, this post quickly moves on to
complete breakdown of the Women’s Murder Club: A Darker Shade
of Grey game – complete with annotated screenshots! We hope
you find this information useful as you play your way through
the game. Use the menu below to quickly jump to whatever part
of the game you need help with. Remember to visit the
Big Fish Games Forums
if you find you need more help. Have fun! This walkthrough was
created by
Zach H.
GAME WALKTHROUGH MENU
-
General Tips
-
Investigation 1
-
Investigation 2
-
Investigation 3
-
Investigation 4
-
Investigation 5
-
Investigation 6
-
Investigation 7
-
Investigation 8
-
Investigation 9
-
Investigation 10
GENERAL TIPS
-
In this game you will play as three different women;
Lindsay, Cindy, and Claire. There will be times in each of
their separate investigations that you’ll revisit certain
scenes.
-
Your notebook is one of your best tools in your
investigations. It will describe what needs to be done in
each investigation, as well as outline any evidence and/or
items you need to collect.
-
For each investigation, you will be given 5 hints to help
you should you get stuck. Also, be aware that unused hints
will follow you from investigation to investigation.
- There is no timer in this game.
- The game spans 10 separate investigations.
-
Click on sparkly areas in each scene to investigate
further.
-
Inventory items will be stored in your notebook on the
left side of the screen.
-
View your Investigation Cards to get updated information
on Evidence, Victims, Information, and Suspects, as you
play.
INVESTIGATION 1
CRIME SCENE
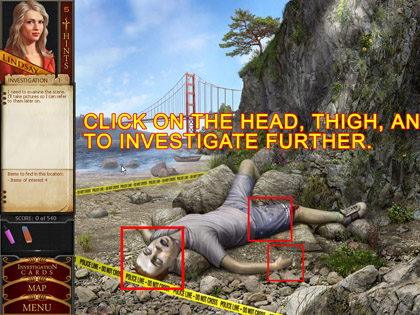
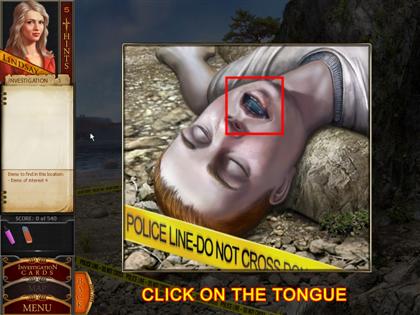
- Click on the boys head to examine his tongue.
-
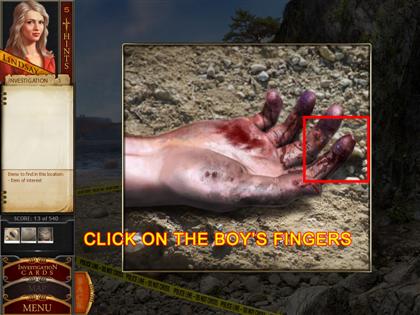
Click on the boy’s hand to investigate a discoloration.
-
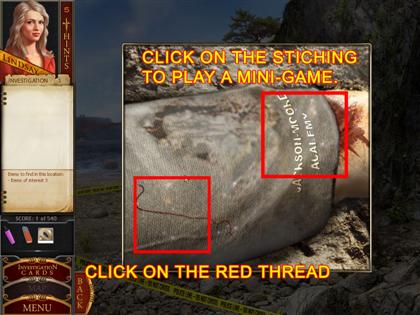
Click on the boy’s shorts. Take the red piece of fiber
found there. Click the letters on his shorts to play a
mini-game.
-
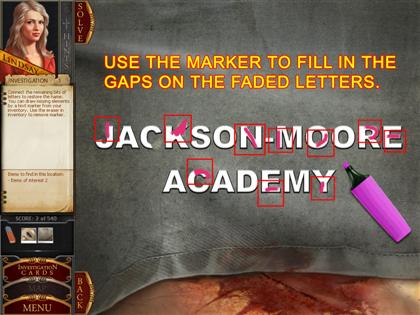
Using the marker and eraser found in your inventory,
recreate the damaged letters on his shorts to learn where
he came from before his death. They should read "JACKSON
MOORE ACADEMY."
COMMANDER’S OFFICE
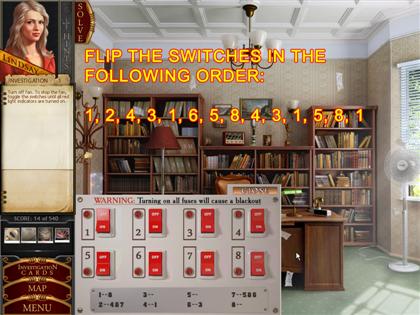
-
Click the fuse box on the left side of the screen to play
the fuse box mini-game.
-
You must switch all fuses on in order to disable the fan.
-
Use the following sequence to disable the fan: 1, 2, 4, 3,
1, 6, 5, 8, 4, 3, 1, 5, 1, 5, 8, 1
-
Once the fan is disabled, retrieve the scraps of paper
from the floor.
BARRACKS 4
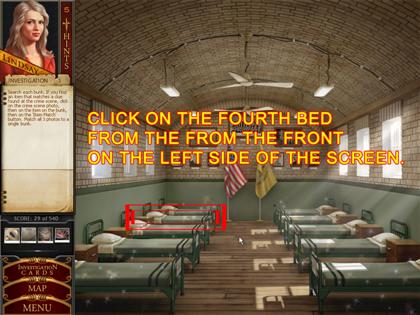
-
In the barracks, you need to find which bed’s personal
effects match the crime scene photos you took earlier.
-
To find a potential match, click on a bed, then an item on
the bed. Then click on a photo from the crime scene, and
click the Item Match button to confirm if you’re correct.
-
To complete the scene, click on the fourth bed back on the
left side of the screen labeled "Cadet Adams."
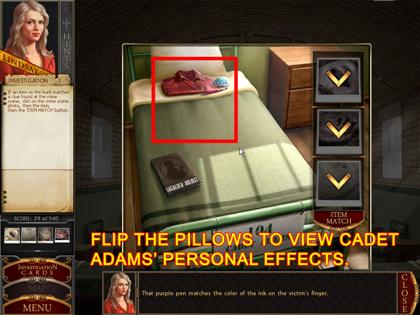
-
Click on his pillow to reveal some personal effects. Match
his candy to the photograph of his tongue, the pen to his
hand, and the shirt to the red fiber.
CRIME SCENE - REVISITED
-
Examine the body again by clicking on all the sparkling
areas.
-
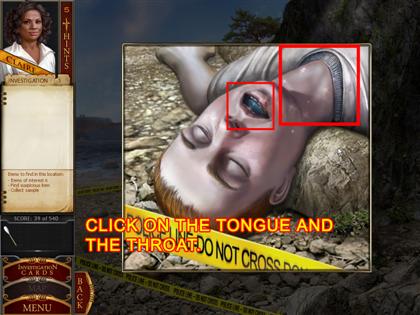
Click on the boy’s head, and examine his neck and mouth.
-
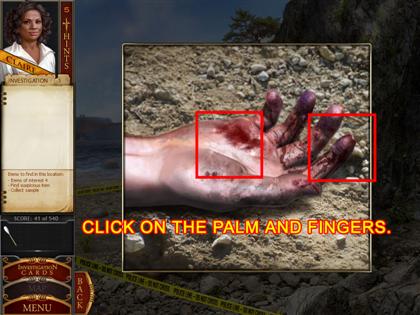
Click on the boy’s hand, and examine his fingers and palm.
-
Click on the boy’s left knee and also on the rock just
above his body.
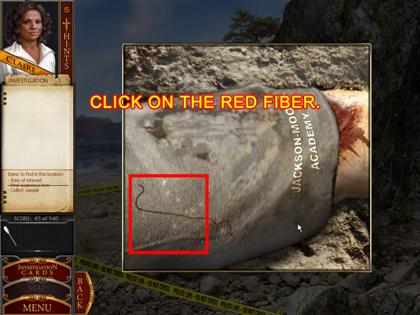
- Click on his shorts to examine the red fiber.
-
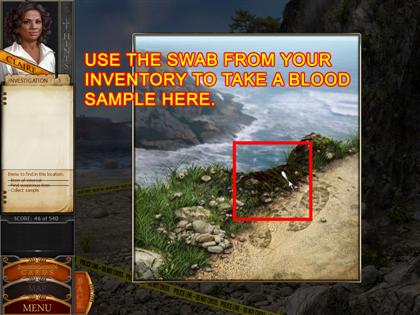
Click on the cliff above the boy. You’ll be taken to a
scene above. Using the swab in your inventory, take a
sample of the blood on the scene.
FORENSIC LAB

-
Click on the testing equipment at the back of the room on
the right.
-
Note the scrolling chemical bottles, analysis machine,
dropper, and blood sample on the desk.
-
Follow the analysis machine’s instructions. Start by
adding the blood sample to the machine.
-
The machine will ask for samples of the various chemicals
on the desk. When asked, retrieve the matching bottle, and
dispense the correct amount of drops from the bottle into
the analysis machine. The bottles asked for may be random.
-
Run the test a second time, again, following the
instructions of the analysis machine.
INVESTIGATION 2
PARADE GROUNDS
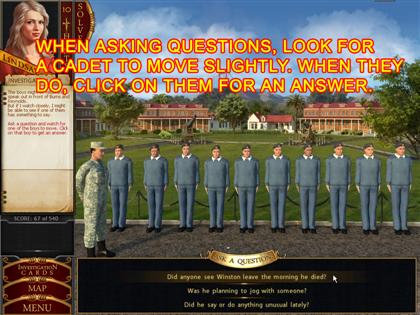
-
In this mini-game, you will be asking questions of the
other cadets at the school.
-
Each time you ask a question from the bottom, look for the
person who shifts or moves a bit, and then click on them.
-
Repeat this process until all questions have been asked
and answered.
FORT SCOTT SPORTS FIELD

-
When a ball appears in the middle of the screen, click the
arrow to sort the ball into its proper place.
-
Footballs go to the right, soccer balls to the top, and
basketballs to the left.
-
Sort the balls quickly, or they will disappear, and be
replaced with new ones.
-
Once a "bloody ball" appears, click the down area to take
it.
NATIONAL CEMETERY
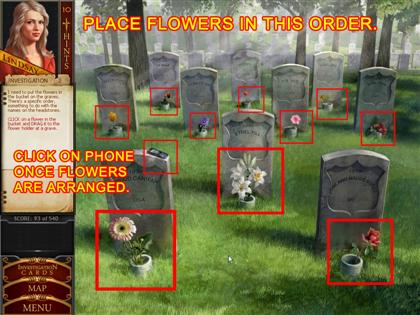
-
First, you must place each flower in front of its
corresponding gravestone.
-
Note that each name on the gravestones contains a hint for
the name of each flower, albeit jumbled up (i.e. Jose and
Maude Sores = Roses).
-
After arranging the flowers, a cell phone will be placed
on the front left gravestone. Pick it up, and examine the
on button and the label below the screen.
POLICE STATION
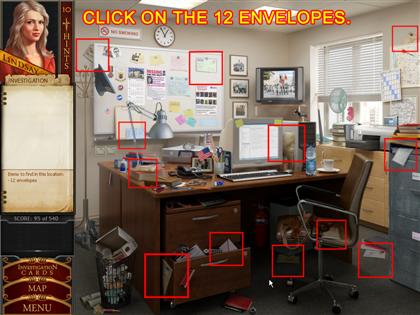
-
Find all the envelopes strewn across the police station.
INVESTIGATION 3
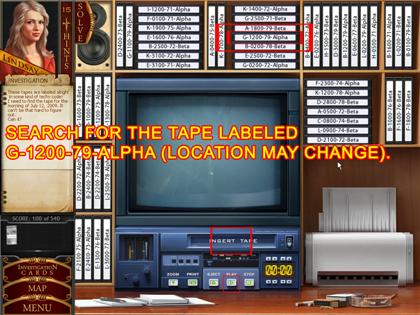
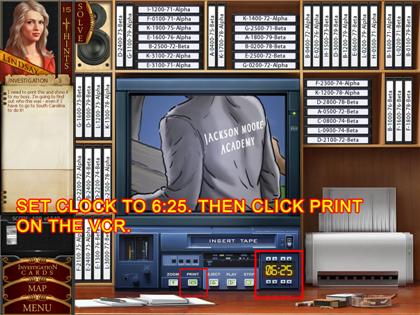
FARALLONES MARINE SANCTUARY
-
You need to find the tape labeled "July 12, 2009."
However, the tapes are not labeled by date.
-
Find the tape "G-1200-79-Alpha" on the shelf (location may
be random). G is the seventh letter in the alphabet, which
corresponds to July, the seventh month of the year, and
the 1200 matches with the 12th day of the month in
question.
-
Change the timestamp at the bottom right of the monitor to
read 6:25, and then press play.
-
After the initial viewing, press the zoom button to zoom
in on the sweater of the hooded runner. After that, press
the print button.
SHERIFF’S OFFICE
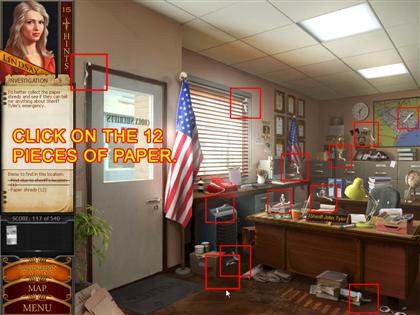
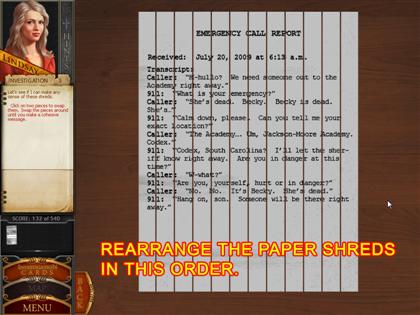
- Click on all the sparkly areas in the scene.
-
Find the 12 pieces of fax paper around the office. Once
found, click on the sparkly paper pile on the desk.
-
Next, arrange the 12 pieces of paper into their correct
order to read the fax.
CRIME SCENE – DECEASED GIRL

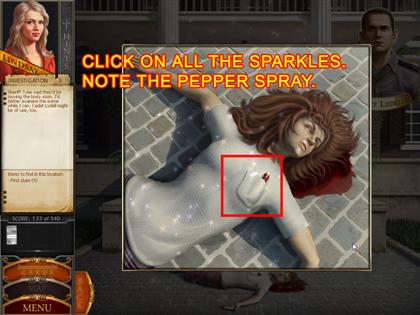
- Click on all the sparkly areas.
-
Click on the body, and examine the sparkly areas thereon.
Take note of the pepper spray.
-
Click on the balcony at the top of the screen to
investigate.
-
Click on Cadet Lydell when you’re ready to question him.
ATTIC
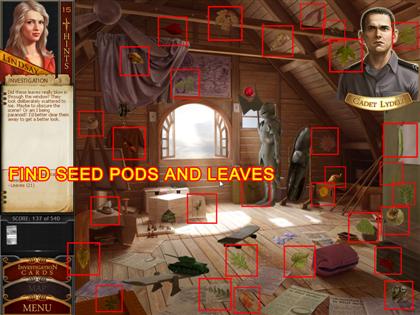
-
Find and click on all the seedpods (10) as well as the
leaves (21).
- After that, click on the purple spot on the floor.
- Speak with Lydell and try to distract him.
-
Place the bowling ball on the wooden plank with a toy tank
on it in the lower left hand corner of the screen. Once
Lydell is gone, use your sample kit from your inventory to
take a sample of the purple spot.
FORENSIC LAB
-
As before, follow the instructions of the analysis machine
to complete the scene (requirements may be random).
INVESTIGATION 4
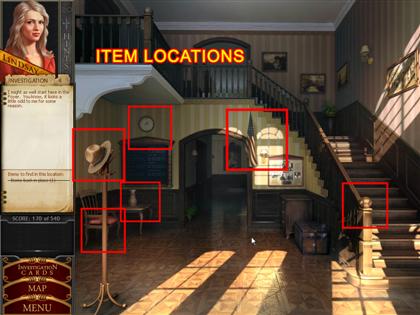
FOYER
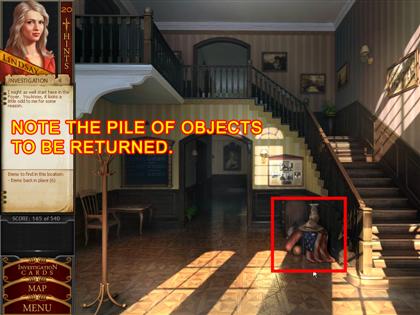
-
Locate the pile of objects to the left of the staircase.
-
Put each object from the pile into its proper place in the
scene.
-
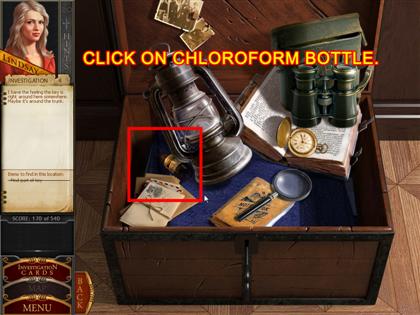
After that, inspect the sparkling trunk. Locate the 5
pieces of the key hidden on the trunk’s top.
-
Once the key is fixed, open the trunk and take the
chloroform.
ROOM 34
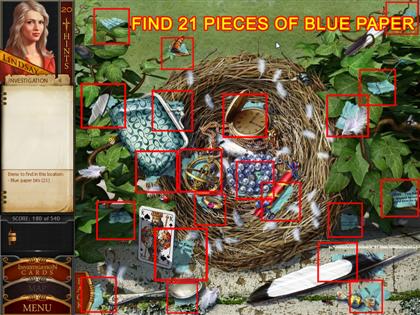
- Click on the bird’s nest in the window.
-
Once you’re viewing the nest, retrieve the 21 blue bits of
paper.
-
Once you have collected all the pieces, you’ll need to put
the pieces of the letter together. Click on a piece of
paper in your inventory to bring it into the screen, and
use the right mouse button to rotate pieces when
necessary.
LOCKER
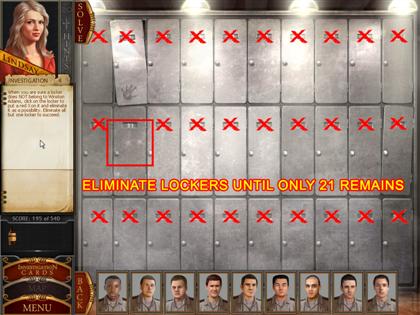
-
Once you’re in the locker room, click on the sparkling
lockers at the back. The boys will begin filing in.
-
Clicking on each boy will give you clues to which lockers
you can eliminate.
-
Click on lockers you know to be wrong to add a red ’X’ to
them, and to remove them from the list of possibilities.
-
You’ll have the puzzle once only locker 21 remains. Once
it’s sparkling, open it and examine its contents.
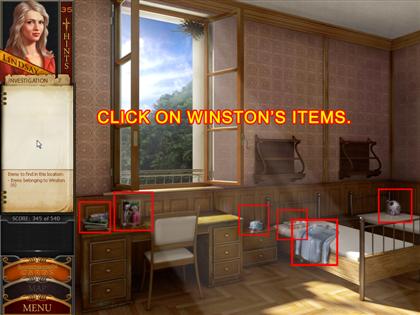
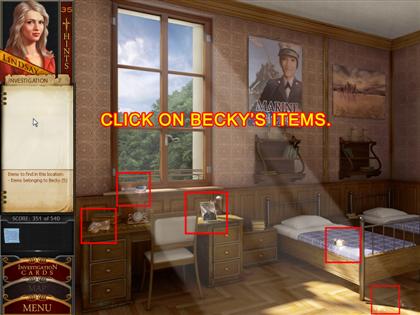
BECKY’S ROOM
- Click on all the sparkling areas in the scene.
-
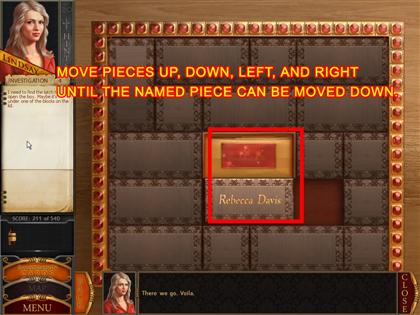
Clicking on the small box on the desk will begin a
mini-game.
-
The goal is to move the pieces around the piece with
Becky’s name on it so that it can be moved down one space.
-
The surrounding pieces can be moved left and right, up and
down. Becky’s name can only be moved down. Click and drag
a piece to move it.
-
Click on the red button when available, and examine the
box’s contents.
INVESTIGATION 5
CHARLESTON REPORTER
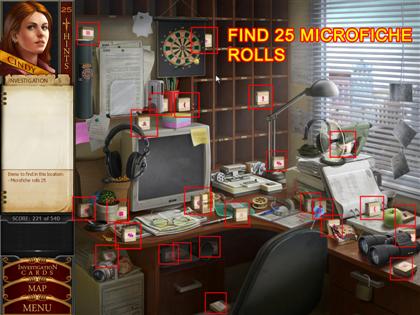
- Recover the 25 microfiche rolls in the scene.
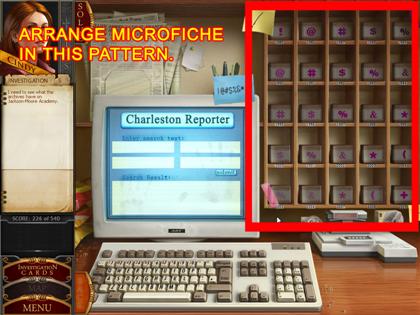
-
Arrange the microfiche on the shelf in the order seen in
the screenshot. Each row moves from left to right,
lightest to darkest.
-
Once completed, enter "Jackson-Moore Academy" into the
computer.
-
You will be asked to put the correct piece of microfiche
into the machine next to the computer. Take any pieces of
microfiche that are highlighted on the shelves, and put
them through the machine one at a time.
-
Once you’ve done that, you’ll be prompted to do a search
on General Hogenback. Search for him in the computer, and
load the appropriate microfiche as you did before.
BLUE BAYOU BAR

- Examine the sparkling game machine on the bar.
-
The goal of the game is to match 5 baby ducks with 5
farmers. There is one pair per board.
-
To find them, flip lily pads. You can remove lily pads
from the board by matching like pairs.
-
Be quick! There is a snake that gobbles up lily pads, and
you’ll have to start over if he eats the one with the baby
duck on it.
LOCKER
- Click on the sparkling piece of paper on the bench.
-
Click on the intercom by the door, press the button, and
learn you need new batteries.
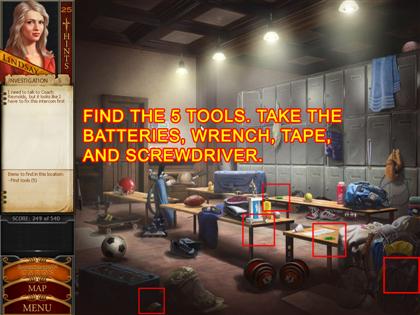
-
Locate the screwdriver, roll of tape, two green batteries,
and the wrench in the scene.
-
Click on the intercom to repair it. Use the screwdriver to
open the face plate. Set the batteries in place and tape
them down. Use the wrench to connect the loosened wire.
Then use the intercom to call Reynolds.
DAVIS’ HOME

- Find the 20 cards throughout the scene.
-
Read a note from Becky that has been slipped through the
mail slot.
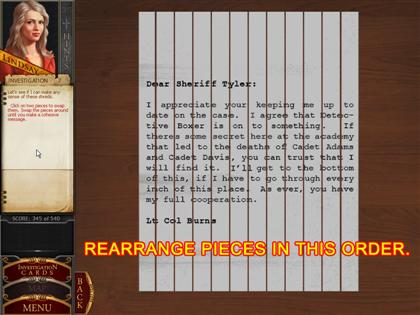
SHERIFF’S OFFICE

-
Click on the desk to lay out your case for the sheriff.
-
Place the evidence file in the top left corner, the letter
from Becky in the top right, the chloroform bottle in the
bottom left, the cell phone at bottom middle, and the
photograph in the bottom right corner.
INVESTIGATION 6
LAUNDRY ROOM
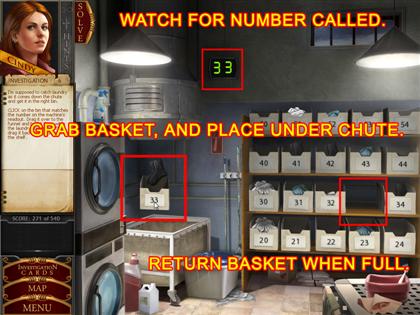
-
Using the machine on the left, collect cadets’ laundry in
the corresponding bins on the right.
-
Press the red lever, and note the number on the digital
readout. Grab the corresponding bin and hold it under the
shoot.
-
Once you collect the laundry, place it back on the shelf.
Continue catching the laundry until you are done.
DORM HALLWAY
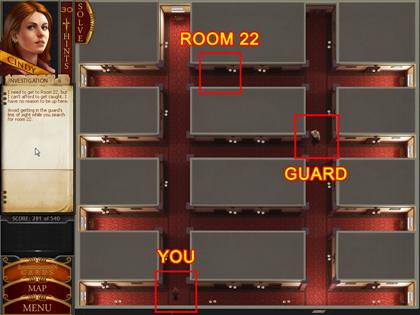
- Maneuver Cindy to room 22.
-
To move forward, click ahead of her; click right to go
right, left to go left, and behind her to go back.
-
Don’t let the guard see you, or you’ll have to start over.
-
Room numbers will light up as you pass by their doors. Use
them as guides.
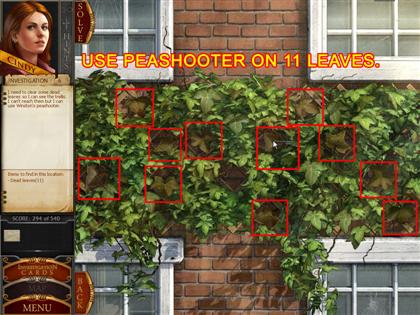
ROOM 22

- Investigate the sparkly areas of the room.
-
Open the window, and use the pea shooter to clear away 12
leaves.
-
Once cleared, climb the trellis from the bottom left to
bottom right, by clicking on the spaces you’ve cleared.
-
You can’t jump empty spaces; you have to make one
continuous path (see screenshot).
INVESTIGATION 7
CAFÉ

-
Pick up the coffee pot, and fill the 9 cups around the
room.
-
Hold down the left mouse button over a cup until it is
completely full.
-
Click on the glowing batter bowl as someone runs by the
front door and tosses something in.
-
Click on the whisk to stir the bowl, clicking on items as
they come to the surface (not the eggs). Once you’ve
finished, a piece of paper will float to the top.
FOYER
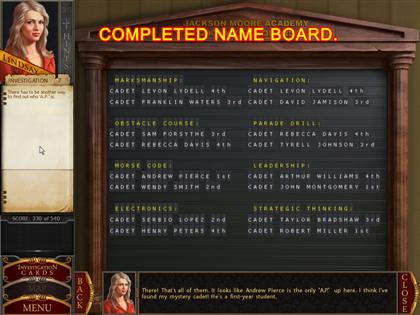
-
Start by clicking the board on the left side of the
screen.
-
Using the letters at the bottom of the screen, fill in the
blanks of the names on the board; pieces will lock in
place when correct.
-
When finished, click on the sparkling frame to the right
of the board.
SHERIFF’S OFFICE
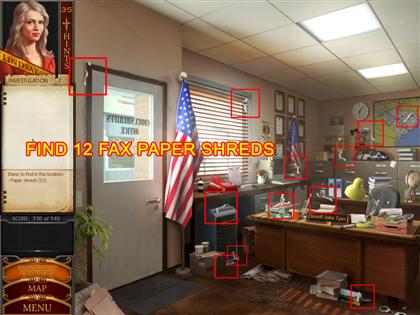
-
Find the shredded fax pieces (12) as you did previously,
and then reconstruct the letter.
ROOM 34
- Click on all sparkling items.
BECKY’S ROOM
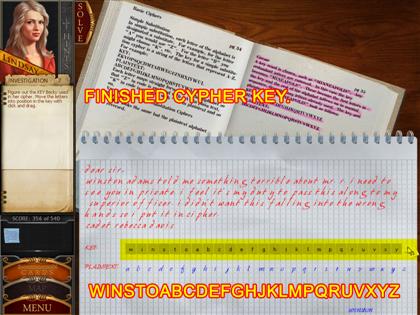
- Click on all sparkling items.
-
Decipher the note from Becky to Winston by experimenting
placing the letters from the bottom of the screen in place
on the line above. Once a letter is in the correct place,
it will lock. TIP: Read the highlighted text in the book
on how deciphers work.
- The key is as follows: winstoabcdefghjklmpqruvxyz
INVESTIGATION 8
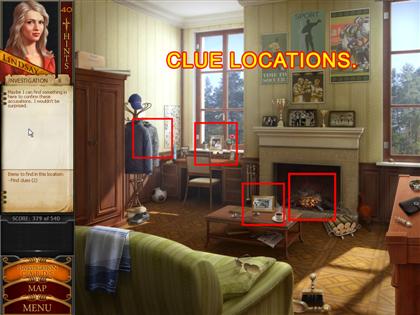
TEACHERS’ STAFF ROOM

- Click on the crumpled note by the trash can.
-
Click on the sparkling clipboard on the left side of the
screen.
-
Note the coffee stain removal instructions on the
whiteboard at the back of the room.
-
Take the baking soda and sugar cubes, and place them in
the sparkling bowl.
-
Take the coin from the chair, use it in the vending
machine, and pour the tonic water into the bowl.
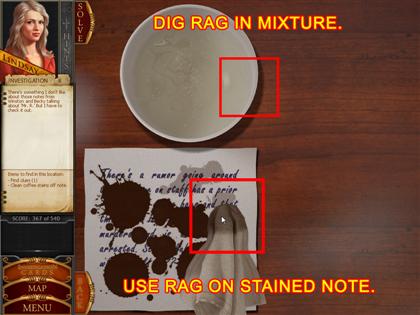
-
Dip the rag into the bowl, and proceed to click on the
note to remove the coffee stains.
-
Note that occasionally you’ll have to re-wet the rag if it
dries out.
MR. REYNOLD’S ROOM
- Click on the fireplace.
-
Click the photo on the coffee table to compare it with the
still frame from earlier.
- Click "No Match."
- Click the photograph on the desk.
- Click the hooded sweatshirt on the coat rack.
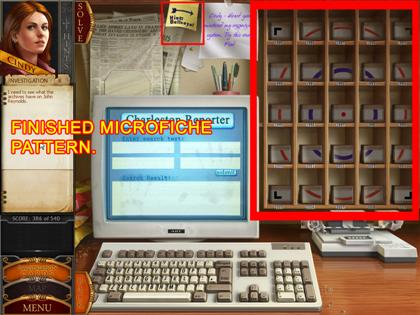
CHARLESTON REPORTER
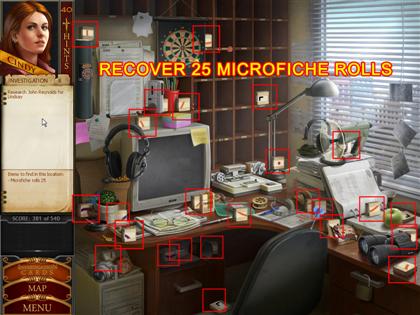
- Retrieve the 25 rolls of microfiche.
-
Click on the computer. Note the sticky note that says,
"Hint: Bullseye!"
-
Arrange the microfiche in the shelf so that it makes a
pattern: a red dot at the center with a purple circle
around it, and an orange circle around that.
-
Place the four black pieces in their respective corners.
- Pieces will lock into place when they are correct.
-
When prompted to search the computer, type in the
following words, one in each field: JOHN REYNOLDS, JACKSON
MOORE.
-
Load the highlighted microfiche into the player to read
it.
BLUE BAYOU BAR

-
Play the game machine on the bar again. Remember, if the
crocodile eats the baby duck, you’ll have to start over.
INVESTIGATION 9
LIEUTENANT COLONEL BURNS’ OFFICE
-
Place your evidence on the table before Lt. Col. Burns.
-
Place the hooded sweater in the bottom right corner, the
note to Becky in the bottom left, the newspaper clipping
in the top left, the encoded message in the top right, and
the magazine in the middle.
-
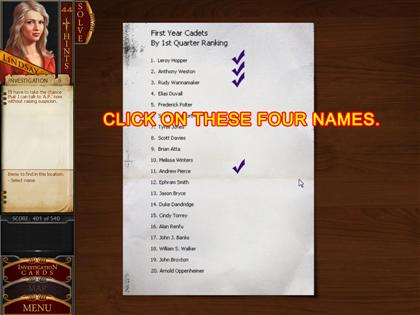
When presented with a list of names, click on the
following: Leroy Hopper, Anthony Weston, Rudy Wannamaker,
and Andrew Pierce.
BOOK STORE
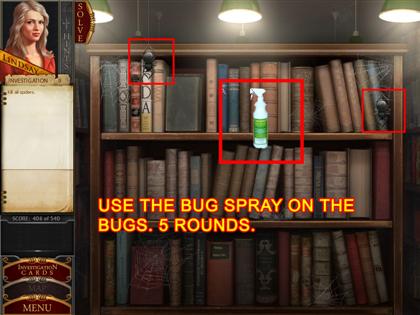
-
Pick up the bottle of bug spray, and use it on any bugs
you see on the bookshelf.
- Repeat this process for 5 rounds.
- When you finish, pick up the Morse code book.
CAFÉ
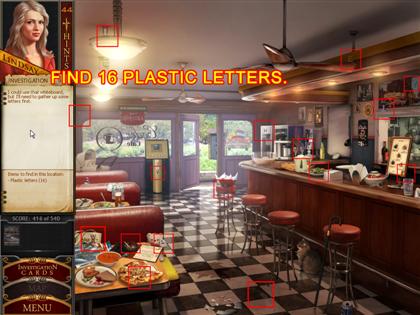
-
Find the 16 plastic letters scattered around the cafÉ.
-
When you’re finished click on the whiteboard behind the
counter.

-
Arrange the plastic letters on the board to read, "WHAT
DID BECKY SAY?"
- Click on two letters to swap them.
-
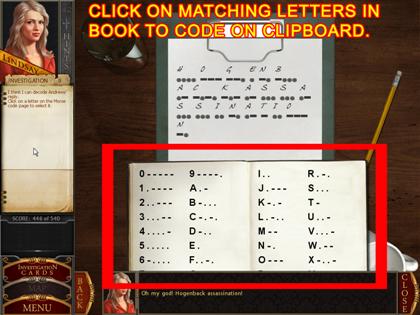
When the Morse code book opens, click on the letters in
the book to match the letters on the board and a Morse
code message.
INTERROGATION ROOM
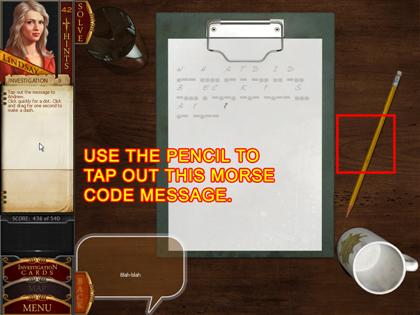
-
Clip on the clipboard to begin communicating to the
students in Morse code.
- Pick up the pencil.
-
Click your mouse cursor to sound a "dot," and drag a short
horizontal line with your mouse to make a "line."
-
If you make a mistake, you’ll have to restart the sequence
again.
-
Once you finish asking, "WHAT DID BECKY SAY," the student
will respond to you in Morse code. Use the book to
decipher his message. The message is, "HOGENBACK
ASSASSINATION."
INVESTIGATION 10
UTILITY
-
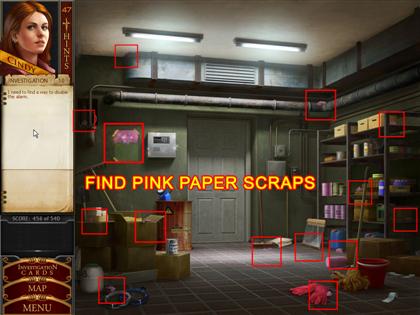
Click the ripped pink note on the wall left of the door.
- Find the 13 pink pieces of paper scattered around.
-
Investigate the alarm and learn you don’t know the
password.

-
Reconstruct the pink note with the pieces you’ve found.
-
Right-click on pieces to rotate them in place; pieces will
lock when placed correctly.
LAUNDRY MACHINE ROOM

- Click on the bulleting at the back of the room.
-
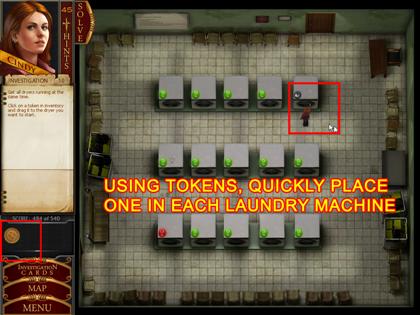
Collect 30 laundry tokens scattered around the room.
-
Quickly, use a token in each machine in order to get them
all running at once.
UTILITY ROOM
-
Click on the alarm at the back of the room to learn it’s
been disabled.
LT. COL. BURNS’ OFFICE
-
Click on the bag when it appears to add your items to the
inventory.
-
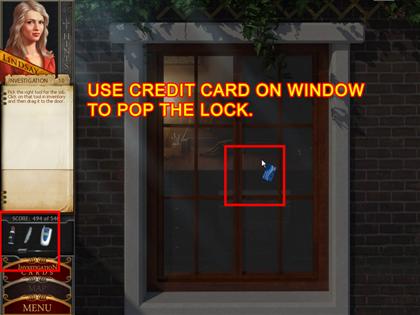
Use the credit card to open the window, giving you access
to the office.
-
Click on Burns’ desk to examine it. Note the hidden
compartment on the left side of the desk.

-
Note the decorative blocks just above the compartment.
Click the one with the dot in the middle to remove it.
-
Continue clicking to move each square one space to the
left, which will reveal a hole in the desk.
-
Take the small tool next to the plant on his desk and
place it in the hole to open the drawer. Examine its
contents.
DORM HALLWAY
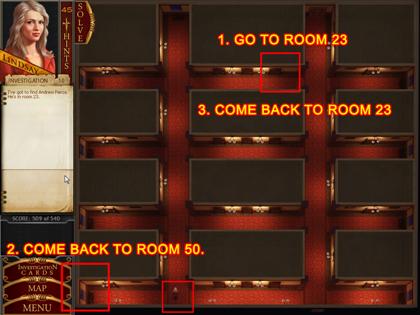
-
Maneuver Lindsay as you did before to get her to room 23
without being detected. Note that you need to avoid Lydell
as he’ll quickly move through the scene.
-
Once you get to room 23, you’ll need to backtrack to room
50. Keep track of the guard that appears.
-
Investigate Lydell’s trophy case and the computer in his
room to learn of his plans.
- Head back to room 23 to watch the ending unfold.
THE END! CONGRATULATIONS!