

Walkthrough Menu
- Chapter 1: Antique Shop
- Chapter 2: Antique Collector's Home
- Chapter 3: Deckard Street Crime Scene
- Chapter 4: Interrogation Room
- Chapter 5: Prison Archive
- Chapter 6: Auto Repair Shop
- Chapter 7: Underground Metro Station
Chapter 1: Antique Shop
- Talk with the police officer standing in front of the antique shop to get some information concerning the crime that had taken place.
- Enter the antique shop and interrogate the murder victim’s (Clifford Raven) assistant. Make sure that nothing valuable is missing from the shop – you will find a list of objects on the bottom of the screen.
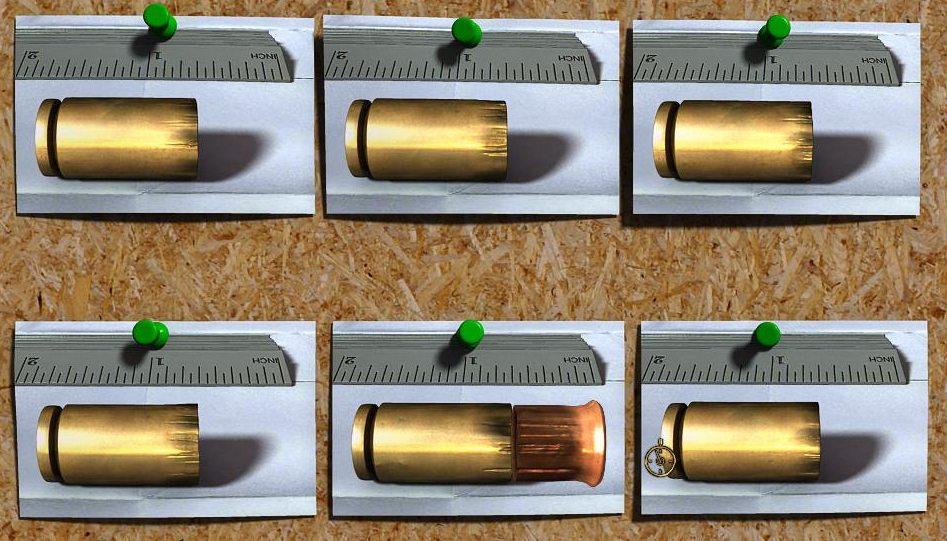
- Solve the hidden object puzzle (HO for short). Next, find the bullet shell. Compare the shell with others, and find the matching one. You will find the solution to the puzzle below:
- Talk with the assistant once more: she will tell you about the antique dealer’s newest purchase – a small chest containing some notes. The assistant will tell you that Clifford Raven probably locked the chest in his safe: check if that is the case.
- Go upstairs where Clifford Raven keeps his safe. The safe is locked. Ask the assistant for the combination: she will tell you that it is kept in the desk.
- Go to the desk and search for the combination (HO puzzle). The desk has a cabinet, but it is locked. The assistant will tell you to look for the key behind the screen.
- Go behind the screen. Search until you find the copper key (HO puzzle). Return to the desk and unlock the cabinet. Look inside and remove all the objects you don’t need (HO puzzle). You will find pieces of paper with the combination to the safe.
- Put the pieces of paper together to see what’s written on them.
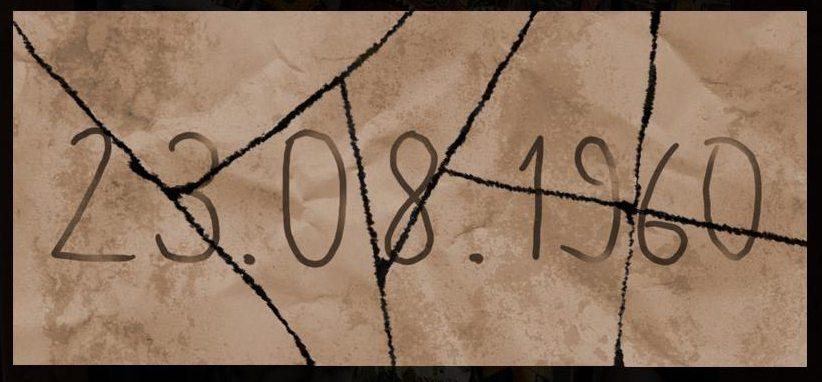
- Return to the safe and enter the correct combination on the dial: 2-3-0-8-1-9-6-0. Click on the handle to open the safe.
- The chest you are looking for is not inside, but you find an interesting document – a rough draft of a sales agreement for the chest containing information about the seller – an antique collector named Edgar Freeman.
- The assistant will give you more information concerning the transaction. You decide to meet with the antique collector.
Chapter 2: Antique Collector’s Home
- The antique collector owns a Victorian residence. You go inside.
- The Antique collector’s wife informs you that Edgar Freeman is dead. He died from a heart attack. The widow gives you permission to search her husband’s study. You go inside.
- The widow follows you in. Based on a photograph she gives you, you are able to see which items are missing from the study. Find twelve differences during a mini puzzle. There are more objects on the photo than in the study – find all of them.
- Ask the widow about the missing items. She will tell you that they’ve been probably moved to the writing table. Investigate the items on the table (HO). Initiate another conversation with the widow and ask her about the chest. She will give you more information concerning the chest and the notes that were kept inside. The notes lead to treasure hidden somewhere in New York City.
- Investigate the desk and search for sheets from Freeman’s day planner (HO). The sheets will contain information about a meeting with a man named Burke on the day of Freeman’s death. Look carefully around the room (HO) to confirm that someone had indeed met with the antique collector on the day he died. You come to the conclusion that the collector had indeed died from the heart attack – but the man named Burke had clearly had something to do with causing it.
- Talk with the widow once more and leave the study. A police officer is waiting for you in the hall – he tells you about a murder on Deckard Street.
Chapter 3: Deckard Street Crime Scene
- Talk with the police officer at the crime scene.
- Look for evidence with the help of a UV light bulb and luminol. Spray the luminol on the floor and replace the light bulb on the ceiling with the UV light. Secure the bloody shoeprints visible in the ultra florescent light (HO). One shoeprint belongs to the killer.
- Talk with the police officer once more. Search for evidence indicating the use of a firearm (HO). You will find a bullet shell. Compare it with those secured during previous crimes.
- The police officer will tell you the name of the victim – Paul Smith. You will also find out more about the victim.
Chapter 4: Interrogation Room
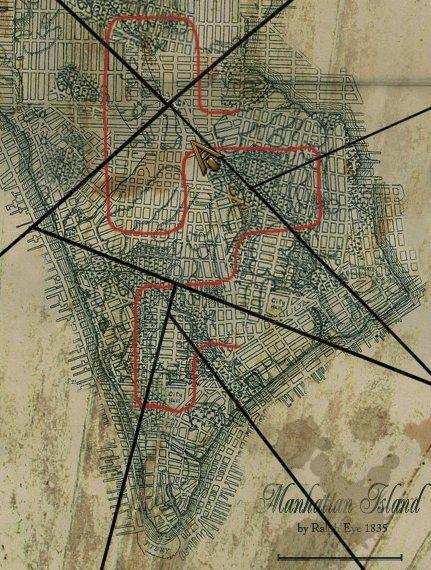
- Interrogate Paul Smith’s daughter. She will tell you about the robbery of the century and a map indicating where the robber’s loot is hidden.
Chapter 5: Prison Archive
- To find out more about the matter, you head to the prison archive. Go inside and talk with the police officer guarding the archive – he will tell you to speak with the filing clerk. The clerk complains about the mess that painters have made in the archive.
- Inspect the desk to find a key to the archive (HO puzzle). Unfortunately, the key is broken. Talk with the filing clerk. He will tell you look for a copy on the board on your right.
- Walk up to the board and find the copy. The right key is in the fifth row, the second one from the left. Take the copy and head to the hall where you met the police officer. Use the key to open the door to the archive.
- Go inside the archive. To get to the files, you have to clean up a bit (HO puzzle). You also find a soft paintbrush.
- Head to your right. You will have to find 20 file drawers. The drawers are covered with dust and you can’t see what’s written on them. Use the paintbrush to remove the dust.
- Go back to the filing clerk and ask him which drawer contains the files you are looking for. Return to the cabinet and open the drawer in the second column, third row. You will find information concerning the robber inside.
- Return to the filing clerk’s office. He will tell you where to find the remaining documents you are looking for.
- Go to the corridor and open the door to the storage room on your left. Clean up the mess and find a crowbar (HO). Use the crowbar to open a blue crate. Find documents concerning the robber’s escape from prison and the names of other people involved.
- The filing clerk will give you more information on the topic. The clerk will recall information about the robber and his escape from prison that are not in the official files. You decide to pay a visit to the people he mentions.
Chapter 6: Auto Repair Shop
- You decide to visit a retired prison guard first – a man named Whitecombe – in his auto repair shop. Talk with the mechanic. Whitecombe is not there, and you decide to wait for him.
- To look around the shop you have to dig through loads of junk (HO). You will find shoeprints on the floor inside. Secure the shoeprints and compare them with the ones you found on Deckard Street.
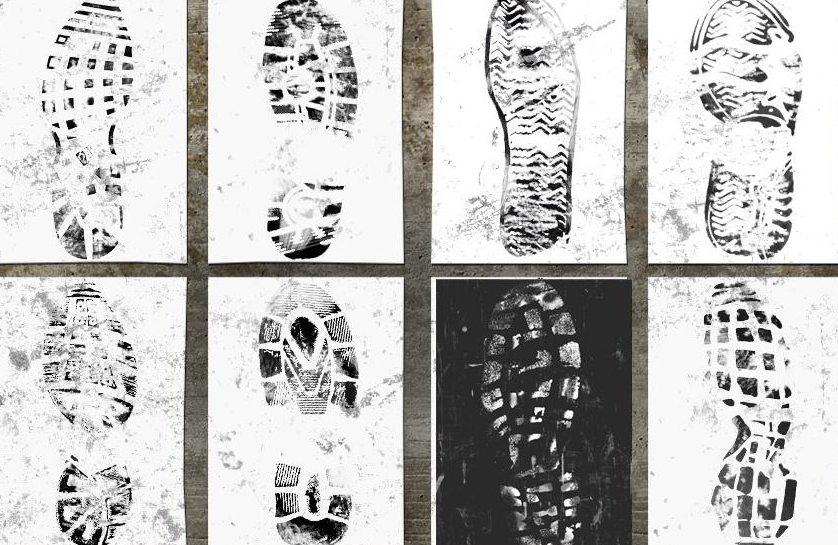
- Next, secure all the shoes in the workshop (HO puzzle). One of the shoes matches the shoeprints you found on Deckard Street.
- The mechanic will tell you that the shoes belong to the shop owner.
- Help the mechanic, who needs you to fetch him a tool. Enter the workshop and search for the tool on the table (HO puzzle). Give the socket wrench to the mechanic.
- Ask the mechanic where you can wait for his boss. He will tell you that there is a couch in the office, and that the key is on the table in the workshop, to your left. Go inside and find the key (HO puzzle).
- Use the key to open the door. Enter the office and look around (HO puzzle). Open the desk drawer. Inside, you will find the robber’s map fragments. Put them together so that they form a map.
- You finally guess what’s going on. Whitecombe has been murdering people to obtain map fragments. And you know where to look for him.
- Say goodbye to the mechanic. There’s no time to lose!
Chapter 7: Underground Metro Station
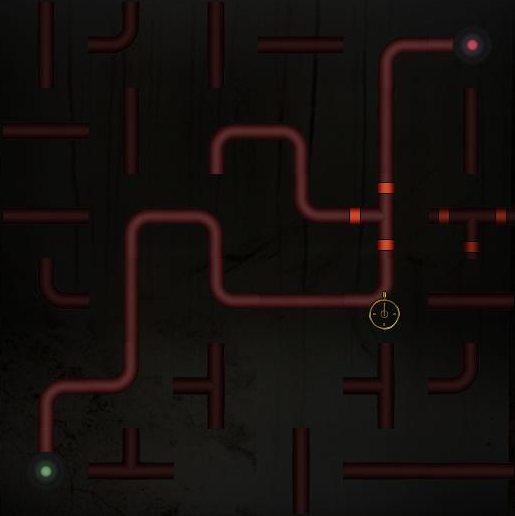
- You are standing in a dark basement. Open the electricity supply box and turn on the light.
- Turn the pipes with the cables to connect the green light with the red light.
- Once the light is on, you can see that there is lots of junk in the tunnel. Find a crowbar (HO puzzle). Use the crowbar to open the padlock.
- Enter an old underground tunnel. Walk straight ahead. Towards the edge of the metro platform you will find more items – search for the tire iron (HO puzzle). Use it to open the ventilation shaft.
- Investigate the narrow corridor (HO puzzle), and three other rooms (more HO puzzles). When you enter the last room, you will hear some noises. The murderer is close at hand. Enter the corridor to bring him to justice!
- Congratulations! You’ve completed the game!
Created at: 2011-04-05