

Walkthrough Menu
- General Tips
- Bloody Disappearances
- The Mysterious Person Behind the Order
- On the Trail of the Guilty Party
- A Broken Necklace
- The Crocodiles of Sobek
- The Euclid Enigma
- Escape
- The Cyclops
- Apollo’s Chariot
- Hydra
- Unwashed Hands
- The Astral Gate
General Tips
- This is an Adventure Game.
- This is a standard point and click adventure with 360 degree panning.
- To Play go straight through the doorway in front of you. You will have to choose an avatar and a sign of the zodiac the first time you play.
- The gameplay will change depending on your zodiac sign. There are good days and bad days. Check what kind of day it is for you often by right clicking and then clicking on your zodiac sign on the lower left.
- If you do an action and see a brief glittering of the screen that is a sign of a bad spell/day.
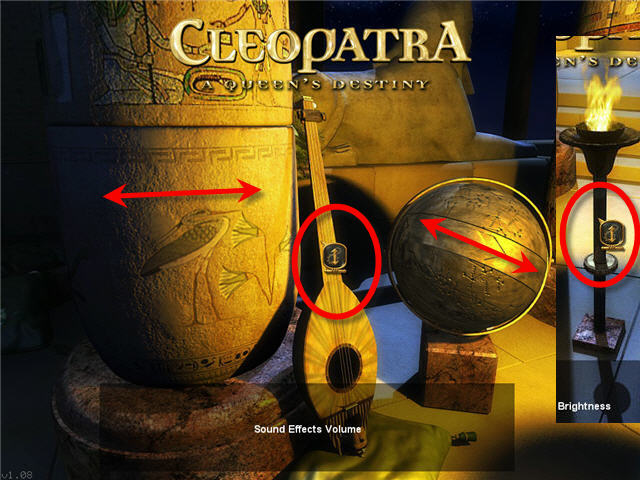
- Options are to the right in the sitting area. After choosing Options, you can click on the pillar to adjust various volume options (the pillar will turn) and then slide up and down the neck of the instrument to the right of the pillar to adjust high or low.
- While in Options, pan to the right and click on the globe to change panning speed. The brightness setting is in between the globe and the table on the base of the flame holder. The Subtitles and Object Info are on the scrolls on the table to the right next to the flame holder.
- Quit is through the doorway in the back of the room.
- To the right of the Quit stairway is the Credits and Gallery you can look through.
- The eye cursor means you can look closer and investigate an object and get more details. Clicking on them will update your notes and give you clues that you can use to solve puzzles on your own.
- The hand cursor means you can pick up/use something. Items that are picked up will go into your inventory.
- The gear icon means you can use an inventory item there.
- To combine items, click on the first item and then click on the one you want to combine it with.
- A pulsing cursor means you can walk in that direction.
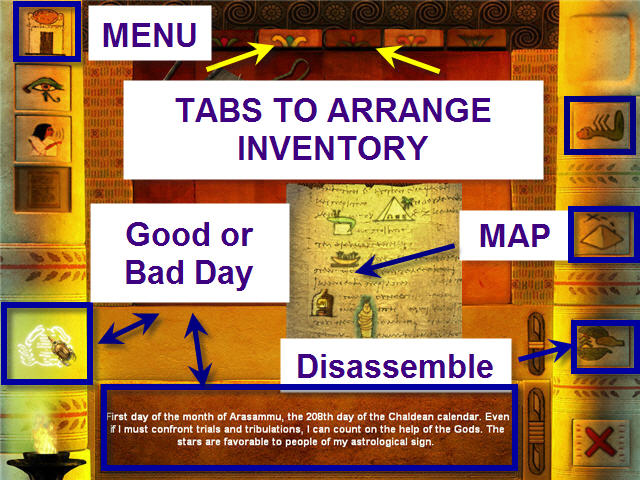
- Right-Click to bring up inventory, menu and more.
- You can save by right-clicking and clicking on the menu in the upper left. Click on the scroll next to flame to save. Pan to the right to Return to Session and Load the game by panning right again and clicking on scrolls in slots beneath the avatars.
Bloody Disappearances
- Click on the trail of blood to hear comments and walk towards the pyramid.
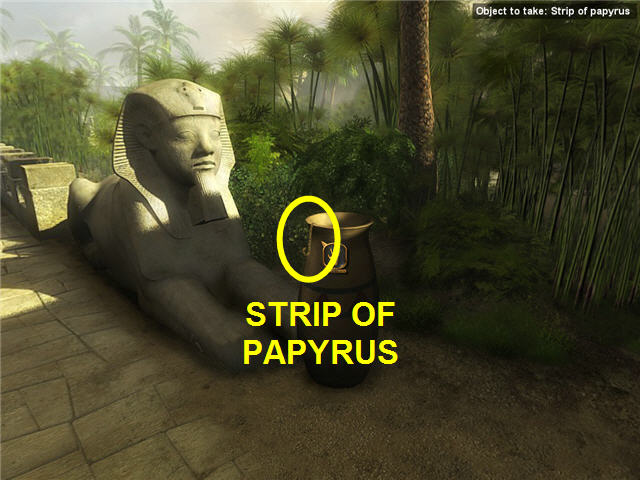
- Take the STRIP OF PAPYRUS on the vase to the right.

- Bad day only – Go forward one time and pan almost 180 degrees to the right. Take PAPYRUS STALK.
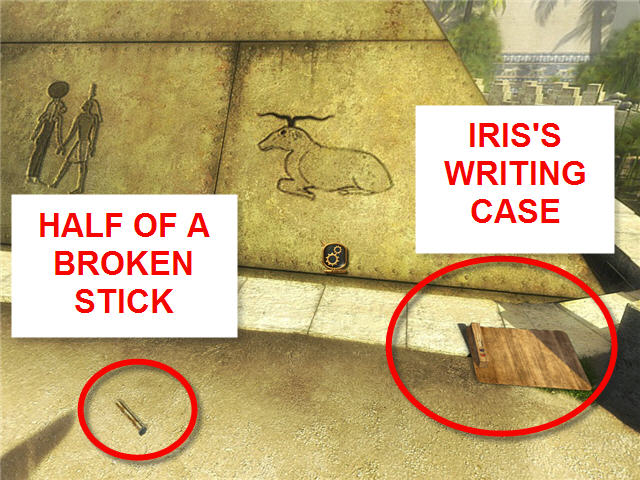
- Walk towards the pyramid and pick up IRIS’s WRITING CASE and HALF OF A BROKEN STICK on the ground in front of the etching of the Ram on the front right of the pyramid.
- Pan to the left and go forward one time.
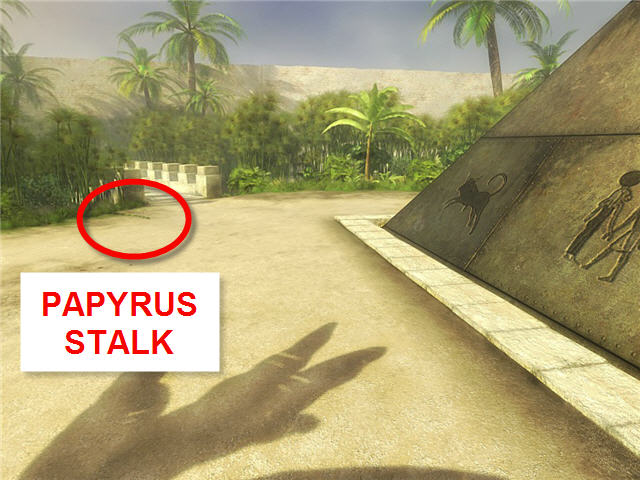
- Bad day only – Pan to the left and pick up the PAPYRUS STALK on the left side before the bridge.
- Pan to the right and go forward along the side of the pyramid. Automatically turn and face the Eros statue. Click on him to make note that he is missing his arrow.
- Pan slight right to head down path again and go straight to the Observatory building. Look on the ground to the left and pick up AKKAD’s HALF CROWN next to the trampled vegetation.
- Pan left again to other side of path and pick up PART OF A THEATRICAL MASK.
- Pan left and go forward two times across bridge towards Akkad’s mausoleum.
- Pan slightly to the right and go forward two times to next bridge. Pick up the HALF OF A BROKEN STICK on the ground to the right, just before the bridge.
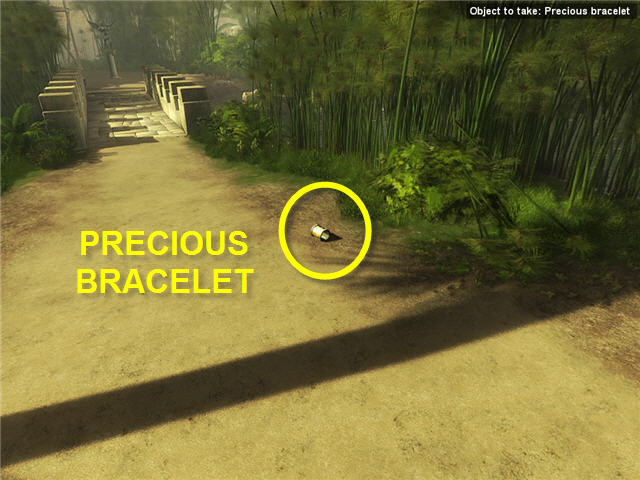
- Cross the bridge to get to the doorway with the hippopotamus fountains and turn around to face the next bridge. Pick up the PRECIOUS BRACELET on the right side of the path.
- Cross the bridge towards the scaffolding and look at the Eros statue.
- Turn around and look down and pick up the METAL HOOK and POT OF BITUMEN.
- Bad Day only – pick up the STRIP OF LEATHER on the bricks.
- Cross back over the bridge, pan left and cross the second bridge and go forward two more times. Stop before crossing the 3rd bridge.
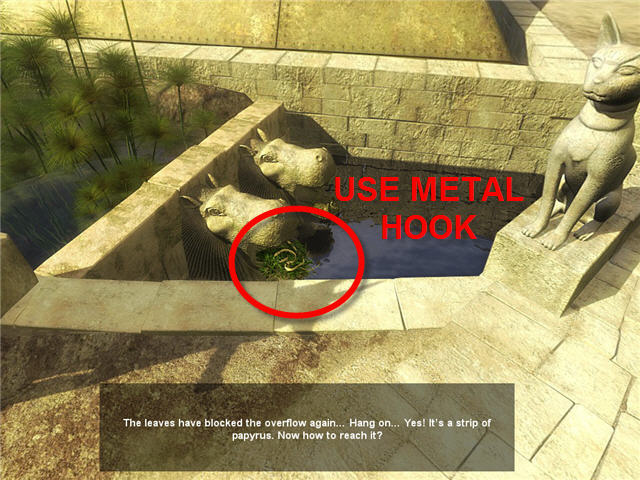
- Pan left towards the pyramid and look in the water. Note the reeds and the papyrus blocking the water flow coming out of the hippo’s mouth.
- Use the METAL HOOK on the reeds stuck in the hippos mouth and it will float downstream.
- Cross the bridge and pan to the right to see the reeds.
- Good Day only – Use the METAL HOOK to get the WATER DAMAGED PAPYRUS.
- Bad Day Only – Click on both of the PAPYRUS STALKS and the LEATHER STRAP in your inventory to make a POLE. Use the POLE on the reeds to get WATER DAMAGED PAPYRUS.
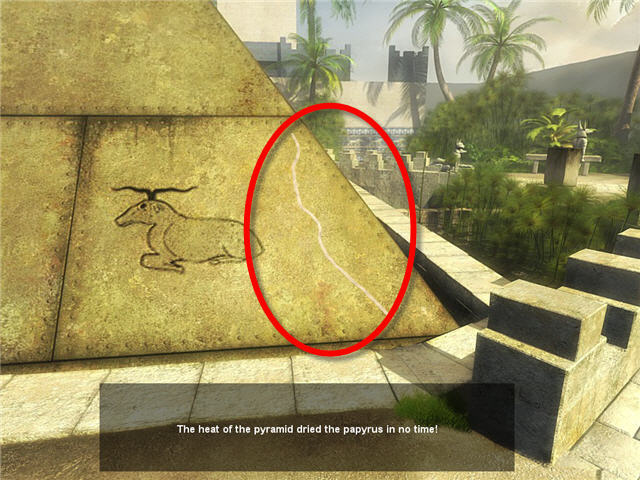
- Turn and go left 3 times to get to the front, sunny side of pyramid. Use WATER DAMAGED PAPYRUS on the pyramid to get DRIED PAPYRUS.
- Use the DRIED PAPYRUS on IRIS’s WRITING CASE to get LEGIBLE PAPYRUS.
- Combine the two HALF A BROKEN STICK’s with the POT OF BITUMEN to get a MENDED STICK.
- Use the MENDED STICK on the LEGIBLE PAPYRUS to get a message of what to do next.
The Mysterious Person Behind the Order
- Pan to the left and go towards the bridge straight ahead. Head across the bridge towards the globe.
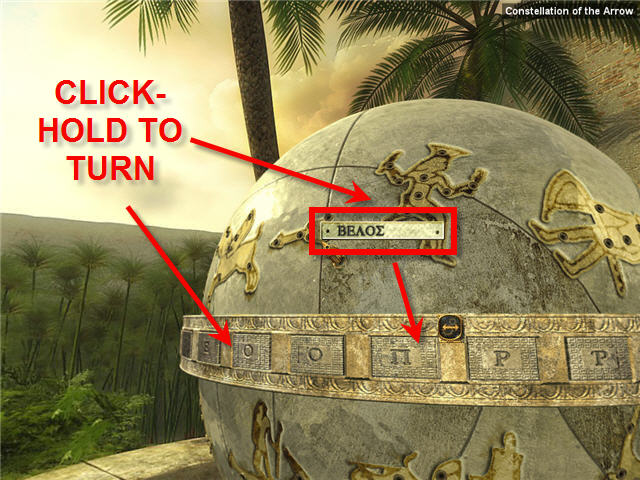
- Per Iris’s message, click-hold and turn the globe till you get to the arrow constellation. Click on the arrow to get the letters that you will need to enter.
- Click-hold and turn the letter ring and push in the corresponding letters to spell out the name for the arrow. The names of the buttons appear in the upper right of the screen when you hover your cursor over them.
- The correct order is; Beta, Epsilon, Lambda, Omicron and Sigma. When done correctly, the arrow constellation will fill in. None of these have apostrophe’s so be sure to check you are choosing the correct one.
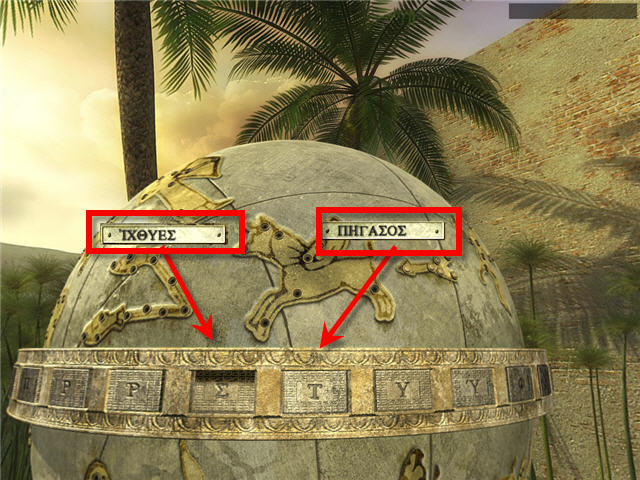
- You now need to name the two constellations that the arrow is pointing to. The arrow is pointing to Pegasus and Pisces.
- Click on the Pegasus and the Pisces on the globe to get the Greek name and spell them out like you did the arrow. You do not need to repeat any letters that have been previously used since those are already pushed in.
- The solutions are:
- Pegasus – Pi, Eta, Gamma, and Alpha. Be sure that none of these have apostrophes, since there are more than one with these names.
- Pisces – Iota (with the apostrophe), Khi, Theta and Upsilon.
- Watch the Eros statue in the cutscene and head over to where he was pointing. Go to the Eros statue by the scaffolding .
- Good Day only – Pick up the arrow by the pond.
- Bad Day only – Pick up the BROKEN ARROW. Place the BROKEN ARROW in the Disassembly area in your inventory to get ARROW TIP and ARROW FEATHERS.
- Combine the MENDED STICK, POT OF BITUMEN, ARROW TIP and the ARROW FEATHERS together to get ASSEMBLED ARROW.
- Go to the Eros with no arrow on the other side of the pyramid and click on the string on the bow and then place the ASSEMBLED ARROW on the ready to fire bow.
- Click on Eros to adjust the aim on the bow and click on the Sagittarius symbol on the side of the pyramid behind you to shoot. The middle setting is the correct one and opens a door to the observatory in front of you.
On the Trail of the Guilty Party
- Enter the secret passage to the observatory.
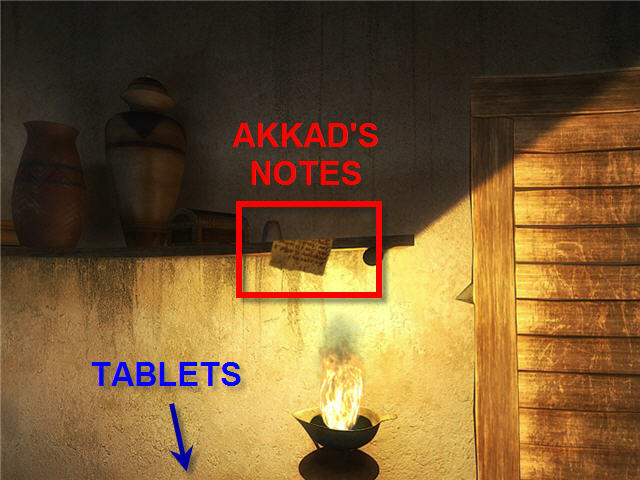
- Take AKKAD’s NOTES from the shelf and check the tablets immediately below.
- Walk forward into the room and click on the curtain to open.
- Look down to the left of the doorway and take the LIGHTER from the stool.
- Look to the right of the doorway and take the TABLET MOLD and the CLAY (4 times) that was underneath the mold.
- Grab the letter that is on the stone stoop to the right of the clay.
- Turn and walk towards the workbench and take the PAPYRUS WITH MONTHS from the chair.
- Take the SMALL PLIERS and the LETTER TO IRIS from the desk.
- Bad Day Only – take the SMALL BOARD and the SMALL TASSETTE. Combine the SMALL BOARD, SMALL PLIERS and SMALL TASSETTE to get a PILE OF TAGS. Place the PILE OF TAGS in the empty basket.
- Look at AKKAD’s calendar on the wall above the workbench.
- Take the NOTCHED ROD immediately to the right of the calendar on the shelf next to the flame.
- Exit the room and go left to head up the stairs.
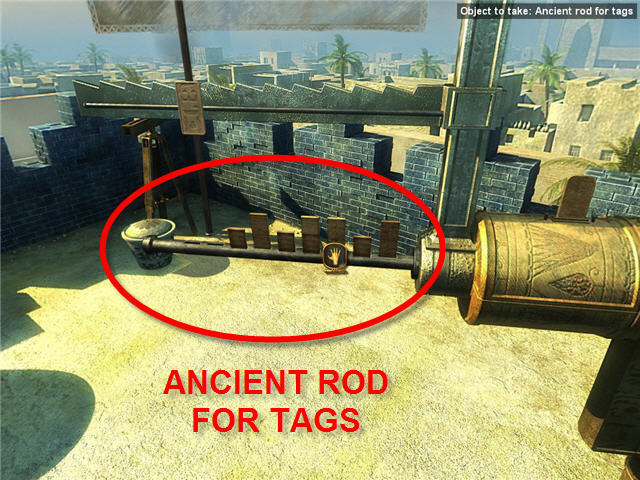
- Take the ANCIENT ROD FOR TAGS from the heliolab.
- Pan to the left and open the chest and take the PAPYRUS CONTAINING CODES.
- Go forward and take the CLEPSYDRA on the ground to the right next to the dioptre.
- Go back downstairs to the workbench.
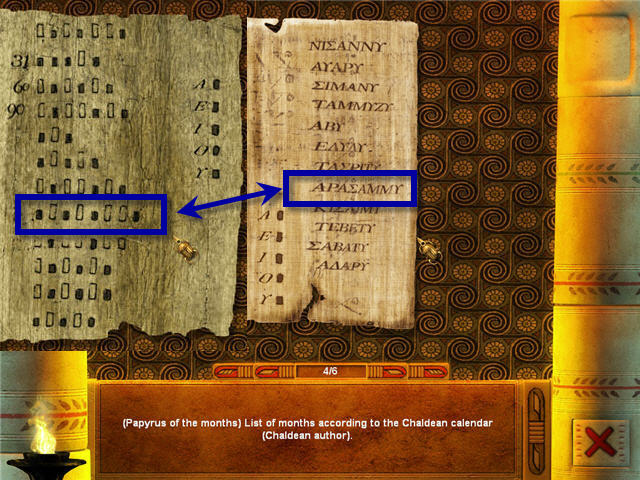
- Set the NOTCHED ROD on the groove on the workbench. We need to change the date to AKKAD’s Calendar above the Workbench (APAEAMMY).
- Place the tags from left to right in this order: Small, large, small, large, small, large, large, small to make a ROD WITH TAGS.
- Take ROD WITH TAGS upstairs and place in heliolab.
- Pan to the right to the other end of the heliolab and turn the rod at the end to tighten the spring.
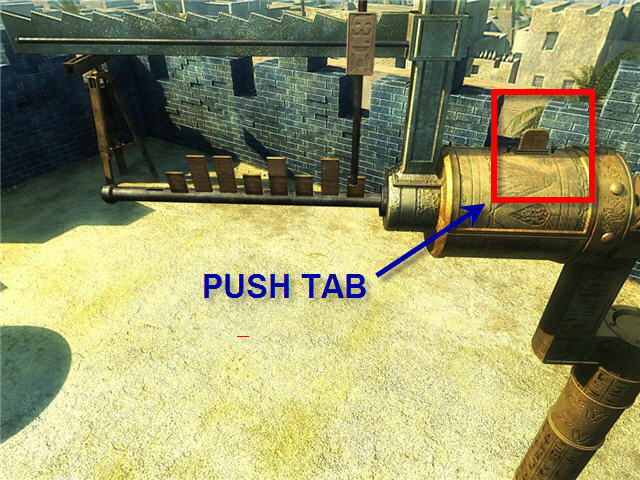
- Push the tab sticking up in the center of the heliolab and watch the message being sent and the cutscene. Meet Cleopatra.
A Broken Necklace
- Jump to Akkad’s workshop using your map.
- Turn right and walk straight to the left of the wine rack on the wall and open the cupboard to get the Story of Enuma Anu Enlil.
- Pan to the right of the cabinet and take the Letter from the Librarian from the wine rack.
- Go back to the Library where you started on your journey, it is located on the other side of the pyramid (there is a blood trail to the door). Go through the door.
- Take the CRUSHED NECKLACE from the ground in front of the crocodiles. Click on the crocodile and the bloody rags to hear comments.
- Good Day only – place CRUSHED NECKLACE in disassemble area to get the PAPYRUS and CRUSHED NECKLACE OPENED UP. Read the Note Written by Aniston.
- Bad Day only – Move forward one time to the right side of the pool and pick up the STONE. Use the STONE on the CRUSHED NECKLACE to get the PAPYRUS. Read the Note Written by Ariston.
- Continue on towards the debris by the building entrance. Click on the jade crocodile statue to summon a guardian. Talk to him completely.
The Crocodiles of Sobek
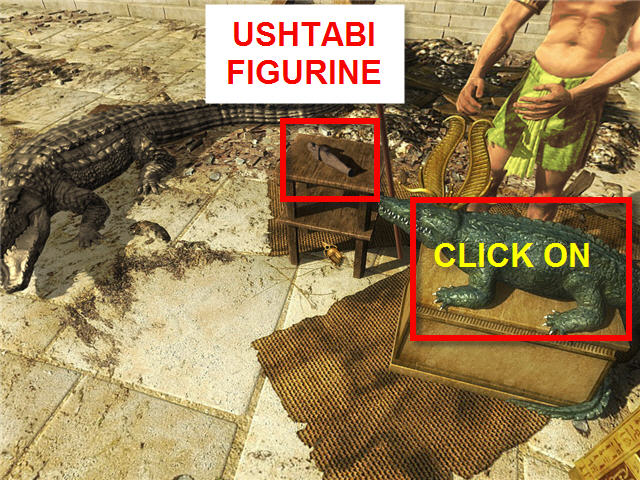
- Take the USHABTI FIGURINE from the table and head back to Akkad’s Workshop via the map.
- Combine one of the CLAY, TABLET MOLD and the USHABTI FIGURINE to get UNBAKED USHABTI HALF MOLD (FRONT) and repeat the CLAY, TABLET MOLD and USHABTI FIGURINE again to get UNBAKED USHABTI HALF MOLD (BACK).
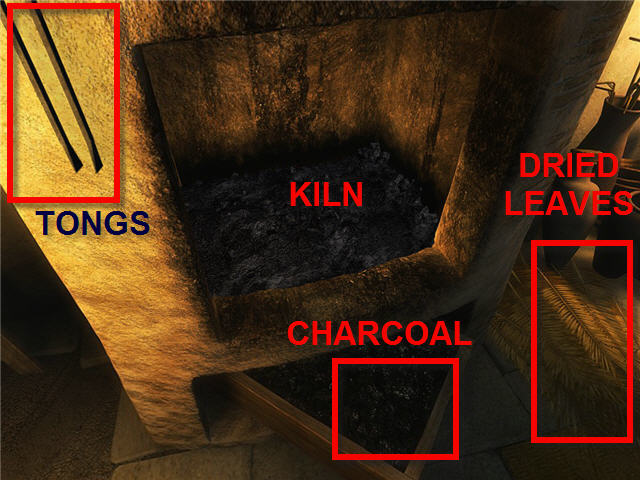
- Take some of the DRY LEAVES from the floor at the right of the kiln and place them inside the kiln.
- Use the LIGHTER on the DRY LEAVES in the kiln and add some CHARCOAL from the bin under the kiln quickly till Thomas says you have enough.
- Place UNBAKED USHABTI HALF MOLD (FRONT) in fire till Thomas says it is done. Use KILN TONGS hanging on the side of the kiln to remove the BAKED USHABTI HALF MOLD (FRONT).
- Repeat process of DRY LEAVES, LIGHTER and CHARCOAL for UNBAKED USHABTI HALF MOLD (BACK) to get BAKED USHABTI HALF MOLD (BACK). Do not remove till Thomas says it is done.
- Go across room to get more CLAY (Take 4 so you have some extra).
- Combine CLAY, BAKED USHABTI HALF MOLD (FRONT) and (BACK) to make UNBAKED USHTABI FIGURINE.
- Good Day Only – Make 2 figurines
- Bad Day Only – Make 3 figurines
- Combine the DRY LEAVES, LIGHTER and CHARCOAL and place UNBAKED USHABTI FIGURINES in the kiln.
- Make sure you have 2 CLAY in inventory and then use the map to go back to the Library and place the BAKED USHABTI FIGURINES on the table.
- Talk to the guardian and exhaust all conversation.
- Use the map to go to the Observatory Garden and pan right and head over to Akkad’s Mausoleum.
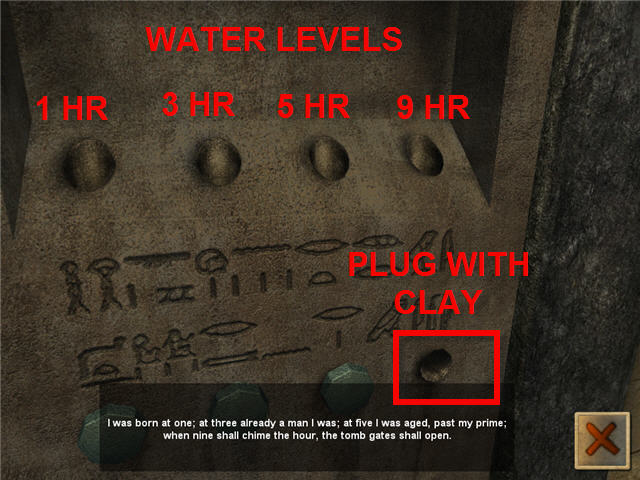
- Head up the stairs to the mausoleum and click on the door to see the door lock. Read the hieroglyphics on the door lock under the plugs.
- Pull out the left plug below the hieroglyphics and remark that it is a water lock.
- Place the CLEPSYDRA in inventory in the disassemble area to get LOWER HALF OF CLEPSYDRA.
- While still facing the door lock, turn right and go straight twice to the hippopotamus waterfalls. Use the LOWER HALF OF CLEPSYDRA on the waterfall till Thomas says he has enough (12 hours) and head back to the mausoleum.
- Plug the last hole with CLAY before pouring in the water.
- Following the message from the hieroglyphics, starting from left, pour 1 hour, 3 hours, 5 hours and 9 hours. Get water as needed.
- Bad Day only – the first plug is faulty and falls out. Use CLAY to replace the plug on first hole on door lock and then pour the 1 hour back in.
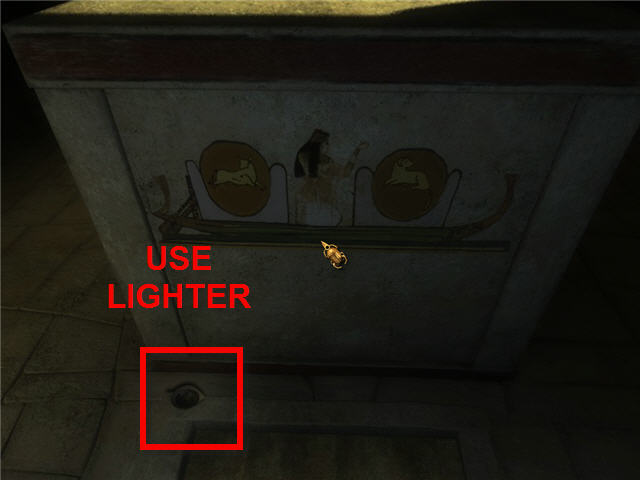
- Enter into the mausoleum and note the darkness.
- Look down at oil well in the floor filled and use LIGHTER on it.
- Head to the right and open each container to get STATUETTE OF ISIS, STATUETTE OF THOTH and STATUETTE OF ANUBIS.
- Click on the head of the container on the right on the floor and take the STATUETTE OF HORUS.
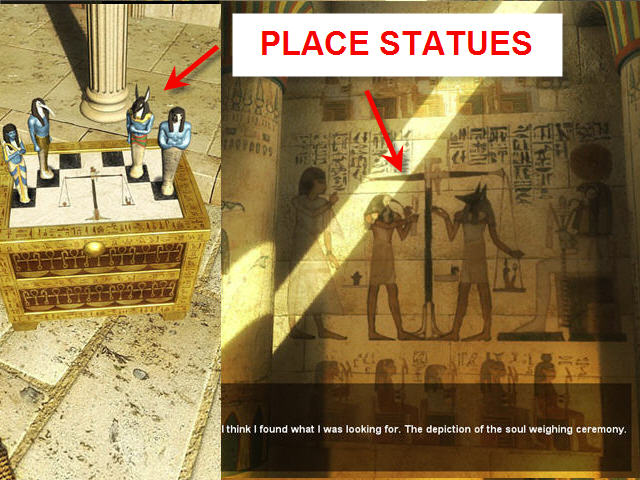
- Walk to the opposite side of the room and look at the fresco on the wall and see the diagram of the soul weighing ceremony. Note the position of the Gods; from the left, Isis, Thoth, Anubis and Horus.
- Go back to the library gardens via your map and place the statues on the scale box to the right in the same order they were on the fresco.
The Euclid Enigma
- You may now enter the library.
- Once inside look to the left and hear the comments on the eggs in the basket.
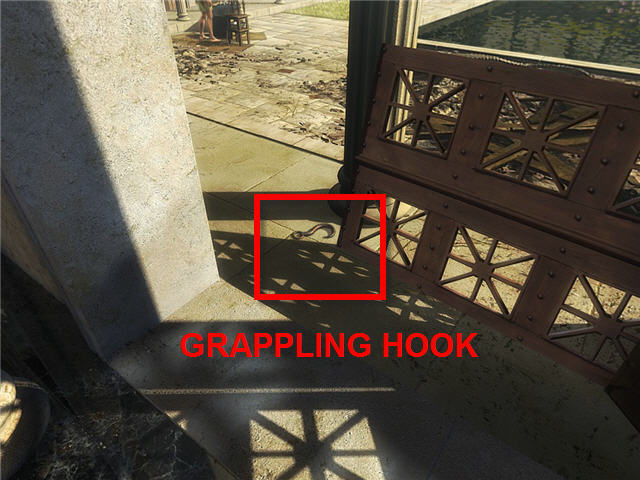
- Look down and pan to the left and pick up the GRAPPLING HOOK.
- Turn and face the eggs again and head to the left into the room and look at smoldering pile of wood. Pan slightly right and pick up DIGGING BAR on the floor next to the torch .
- Go to the rear of the room, look at painting and pan left and go forward 2 times. Take the ROPE next to crocodile. Combine ROPE and GRAPPLING HOOK.
- Pan to the center of the room and go forwards to the large crocodile in the center. Click on collar and hear comments.
- Pan to the right and speak with Kordax sitting on a chair. Exhaust all the conversation options. Turn to see the crocodile watching guard.
- Enter the room to the left of Kordax and see the room filled with rare plants.
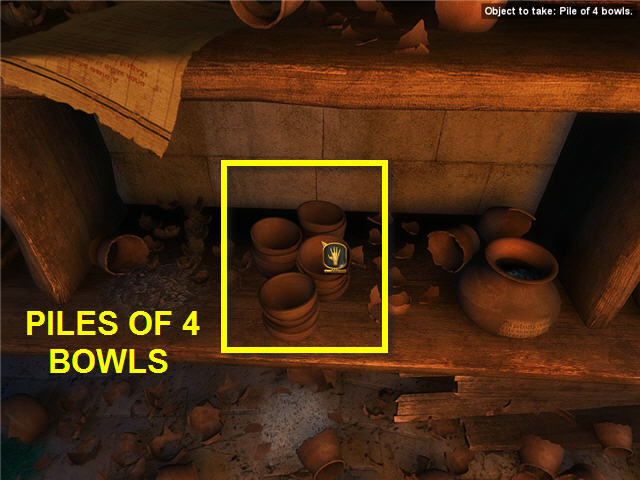
- Take the 4 PILES OF 4 BOWLS (4 each, 4 piles) on your right.
- Take the INVENTORY OF INGREDIENTS SCROLL from shelf above the bowls.

- Compare list of available ingredients with the papyrus from Anistion. (See Screenshot) Note that one of the needed ingredients, Amath leaves, are not available.
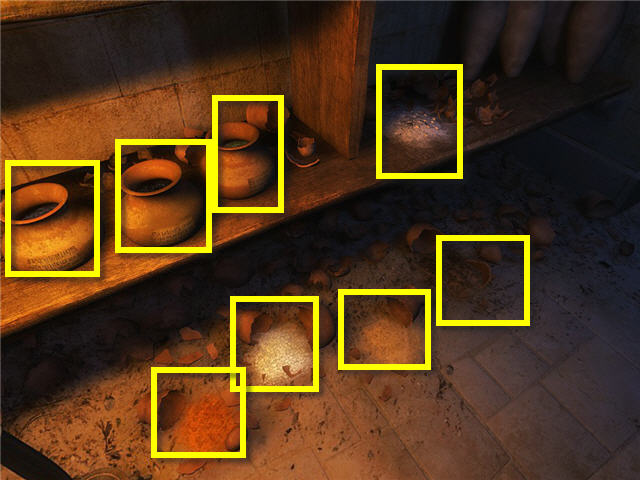
- Using the PILES OF 4 BOWLS, take a handful of each of the ingredients on the left side of room. There are 8 in all and you will use 2 of the PILES of 4 BOWLS on this side.
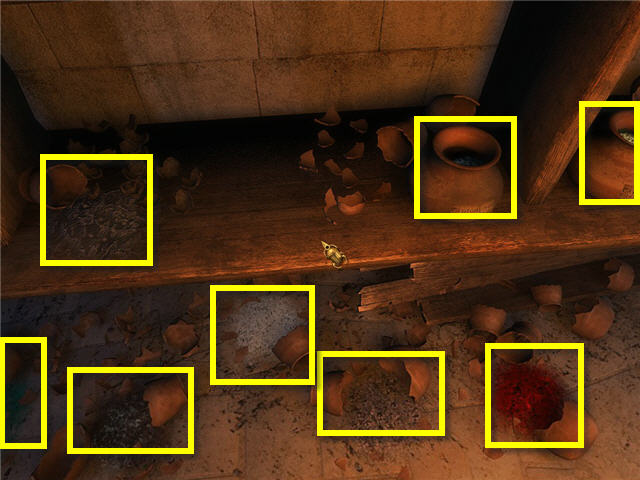
- Turn to the other side and once again, using the PILES OF 4 BOWLS, take a handful of each of the ingredients on the right side of room. There are 8 in all on this side and you will use 2 of the PILES OF 4 BOWLS.
- Bad Day Only – the Gray Nugget is moldy and you cannot pick it up. You will have 15 bowls full in all instead of 16.

- Step forward into the adjoining room and take the DIOMEDES REACTION SCROLL, ZOILOS REACTION SCROLL and PRUSIAS PROPERTIES on the left side of room.
- Good Day Only - Turn behind you and take the EMPTY DECANTER off the shelf.
- Bad Day Only – Turn behind you and take SMALL DECANTER off the shelf. Use SMALL DECANTER on the jug of overflow to the left of the ingredients table to get EMPTY DECANTER in inventory.
- Take any ingredient from inventory and click on any of the holes above the empty bowl and they will all automatically be placed in the slots.
- To prepare the solvent listed in Aristion’s note, take the big metal bowl in front of the ingredients and fill with running water from the basin to the right and place back in the center.
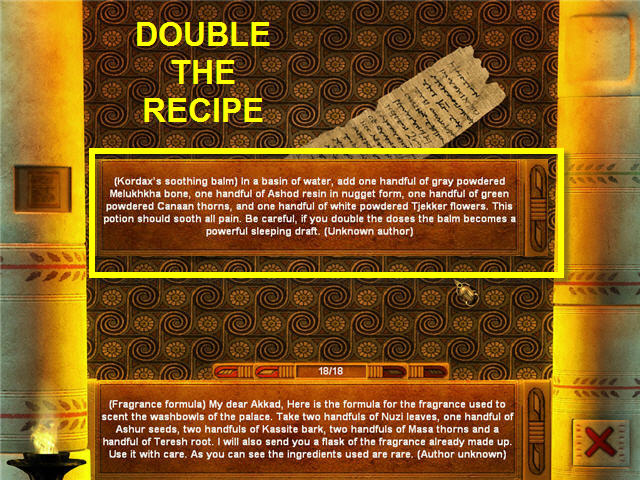
- Per Aristion’s note, add one handful of Lullubi flowers, two handfuls of Makkan Seeds, two handfuls of Uruku roots and one handful of Canaan Thorns (a substitute for Amath leaves as stated on the PRUSIAS SCROLL). If done correctly Thomas states the solvent is done.
- Use the EMPTY DECANTER on the solvent mixture in bowl to get SOLVENT.

- Head back out to the Library and go to the painting on the left side of the back wall. Look at the bottom of the pillar immediately to the right of the painting.
- Use the SOLVENT on the Column and click on it 2 times to clean off the paint and hear what Thomas has to say.
- Repeat the process of clicking on each column 1 - 2 times with the SOLVENT to remove the paint on the bottom of the remaining 3 center columns. Note the Roman numerals on the bottom of each column. The object is to turn the columns to be the first four prime numbers which are 2, 3, 5 and 7.
- Place the DIGGING BAR in the hole in the first column.
- Place the ROPE and GRAPPLING HOOK on the collar of Souchous, the crocodile in the middle of the room.
- Pick up the other end of the ROPE AND GRAPPLING HOOK and place on the back side of the DIGGING BAR closest to the wall.
- Go back to Souchous, the crocodile, and try and coax him to move , but the guardian tells you he only understands the stick.
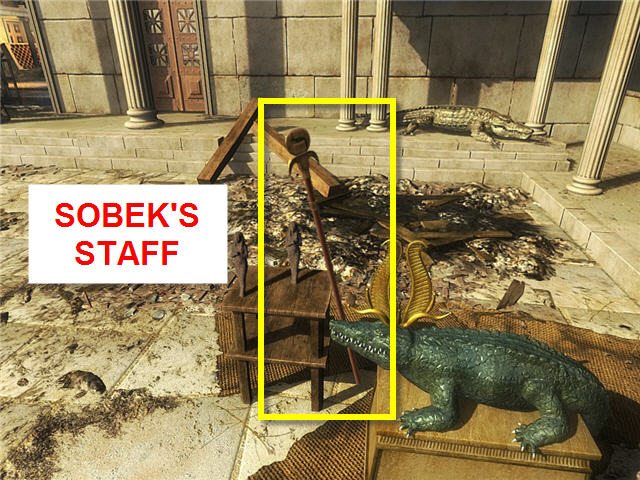
- Head out to the Library courtyard and get SOBEK’S STAFF.
- Use SOBEK’s STAFF on Souchous and he pulls the column one notch to get the first column correct with the triangle pointing to II.
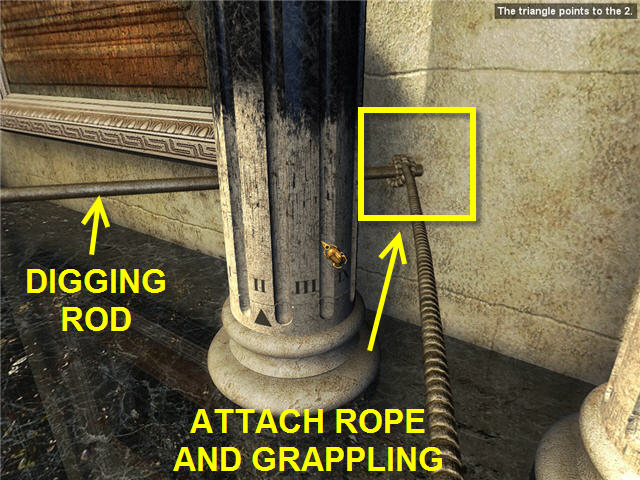
- Move the DIGGING BAR and ROPE AND GRAPPLING HOOK to the second from left column. Attach the ROPE AND GRAPPLING HOOK on the DIGGING BAR on the right side of the column and use SOBEK’s STAFF on the Souchous. The column should now be set with the triangle at III.
- Move the DIGGING BAR and ROPE AND GRAPPLING HOOK to the third from left column. Attach the ROPE AND GRAPPLING HOOK on the DIGGING BAR on the right/backside of the column and use SOBEK’s STAFF on Souchous 3 times. The column should now be set with the triangle at V.
- Move the DIGGING BAR and ROPE AND GRAPPLING HOOK to the last column on the right.
- Attach the ROPE AND GRAPPLING HOOK on the DIGGING BAR on the right side of the column and use SOBEK’s STAFF on Souchous 3 times. The column should now be set with the triangle at VII.
- The secret chamber opens up, enter it and take the clay TABLETS on the chair. The guardian takes SOBEK’s STAFF from you.
Escape
- Talk to Kordax and exhaust all conversation.
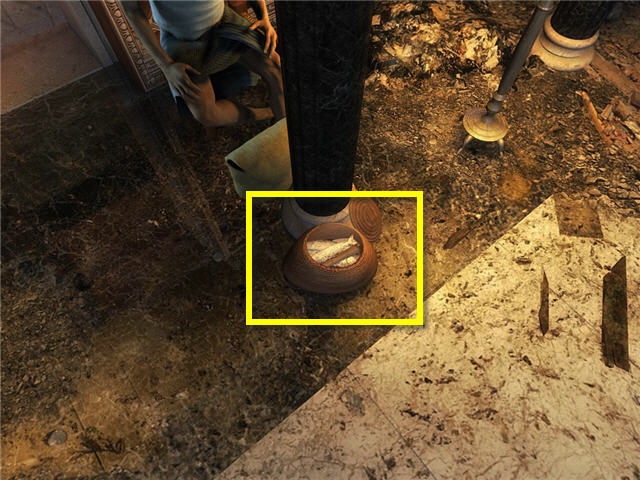
- Look down and take the FORMULA FOR THE MORPHEUS DRAFT (Kordax’s Soothing Balm) and the FILLETS OF DRIED FISH from the basket at your feet.
- Walk into the lab area and empty the bowl in front of the bowls of ingredients into the overflow jug on the left.
- Fill the empty bowl with water from the right and put back on ingredients table.
- The recipe calls for Ashod resin in Nugget form and White powdered Tjekker flowers. You have two white powder bowls and will need to read the Diomedes reaction in your documents to identify which is which.
- To test for TJEKKER FLOWERS, add 1 handful MITANNI GUM, 2 handfuls of ARSAWA POWDER and 1 handful of the WHITE POWDER in the bottom row, 4th from the left. After the reaction takes place the bowl is now labeled Tjekker flower.
- Empty the bowl in the jug on the left and get clean water from the water on the right.
- To test for ASHOD RESIN it depends on whether it is a good day or bad.
- Good day only – Add 1 handful MITANNI GUM, 2 handfuls ARSAWA POWDER, 2 handfuls of PITASSA GUM and one handful of GRAY NUGGETS POWDER (3rd from right on bottom row). It is now identified as ASHOD RESIN.
- Bad Day Only – Add 1 handful KERMA POWDER, 2 handfuls of ARSAWA POWDER. 2 handfuls of PITASSA GUM and 1 handful of GRAY POWDER from bottom right bowl. The bowl is now labeled as ATANIYA ROOTS.
- Empty the bowl to the left and fill with water on the right and place back on the table.
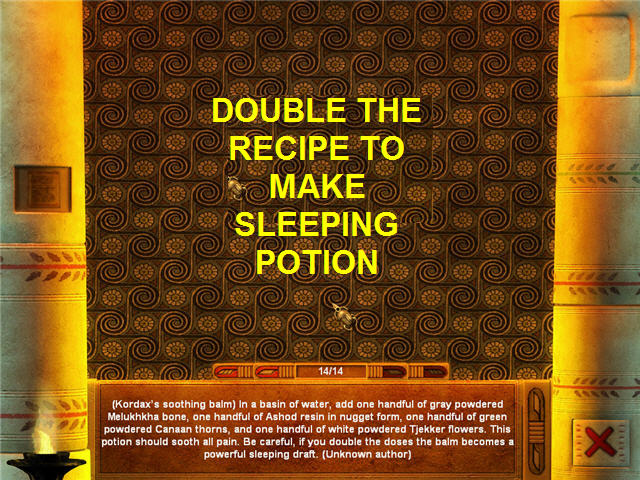
- Make the sleeping potion; Add 2 handfuls of MELUKHKHA BONE, 2 handfuls of CANAAN THORNS, 2 handfuls of TJEKKER FLOWERS. The rest depends on whether or not it’s a good or bad day.
- Good Day only – Add 2 handfuls ASHOD RESIN
- Bad Day Only - Add 2 handfuls ATANIYA ROOTS
- Take the FILLETS OF DRIED FISH and add to the bowl of the sleeping potion and get SOPORIFIC FISH.
- Leave the room and feed the SOPORIFIC FISH to the crocodile standing guard. Watch the cutscene.
The Cyclops
- Look at the horn to your left, you can use that to call for Kordax men when your mission is complete. Pan slightly to the left and see large pile of sand for later.
- Walk forward towards the lighthouse 2 times and see signal from Iris and her father. Walk to the lighthouse and look at the wall that is damaged.
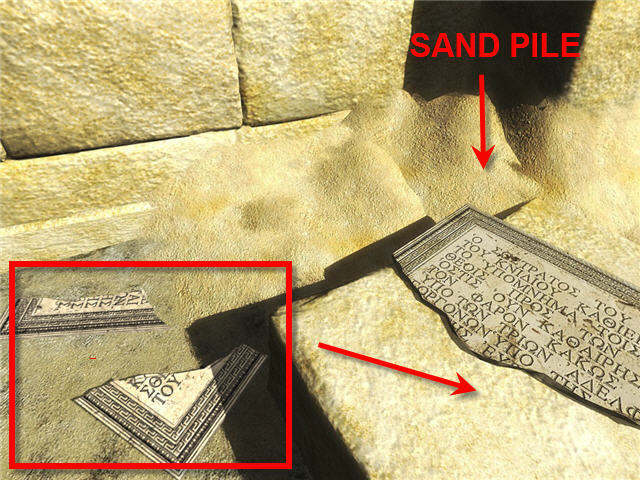
- Pick up Plaque pieces from the sand (3 for now) and place on the plaque on the stone.
- Look at the sand pile in the corner, you will need this later.
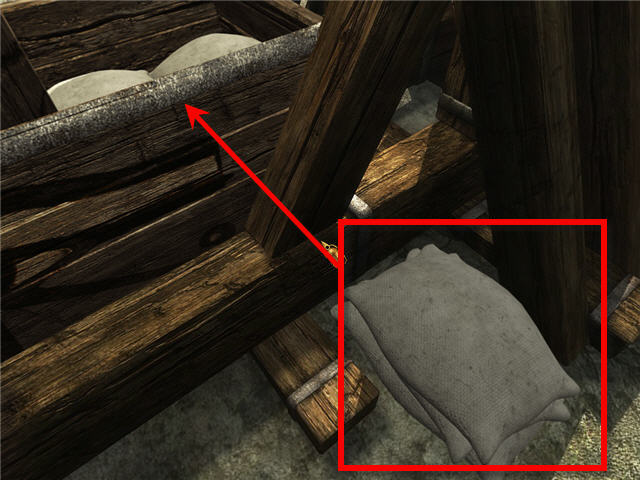
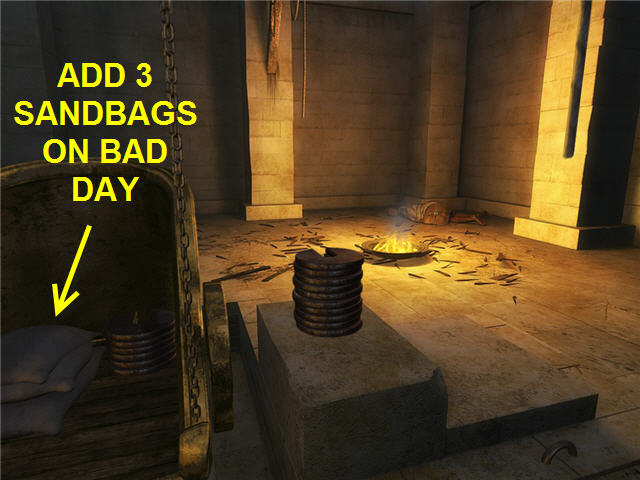
- Turn right and walk towards the catapult 2 x. Look down and slightly to the left and see 3 SANDBAGS. Place the SANDBAGS in the bin to your left. We need more sandbags to fill it up.
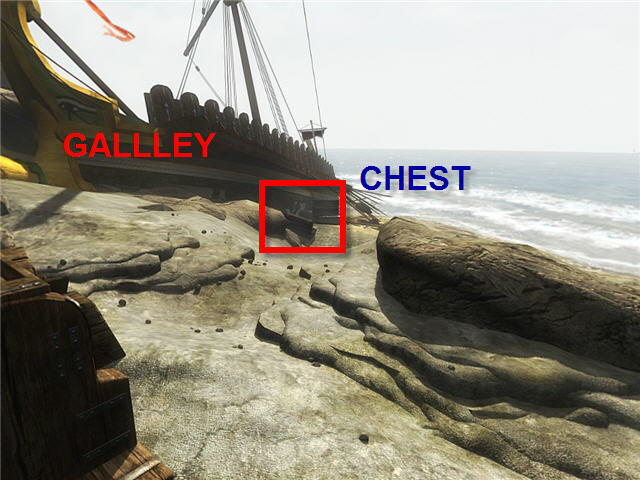
- Move forward one time and then head to the Galley to your left.
- Open the chest in front of you and take the NEEDLE AND REEL OF THREAD and the FRAYING INSTRUMENT.
- Use the FRAYING INSTRUMENT on the sails in the chest that are too heavy to carry to get a LARGE SECTION OF SAIL.
- In inventory, use the FRAYING INSTRUMENT on the LARGE SECTION OF SAIL to get 3 SMALL STRIP OF SAIL.
- In inventory, use the NEEDLE AND REEL OF THREAD on a SMALL STRIP OF SAILS. Combine the NEEDLE and the REEL OF THREAD with the remaining two SMALL STRIPS OF SAIL to get 3OPEN BAGS.
- Go to one of the piles of sand (Pier or lighthouse) and fill all 3 OPEN BAGS and get 3 SANDBAGS.
- Go back to the catapult and place the 3 SANDBAGS in the counterweight bin. Thomas should say it is full now.
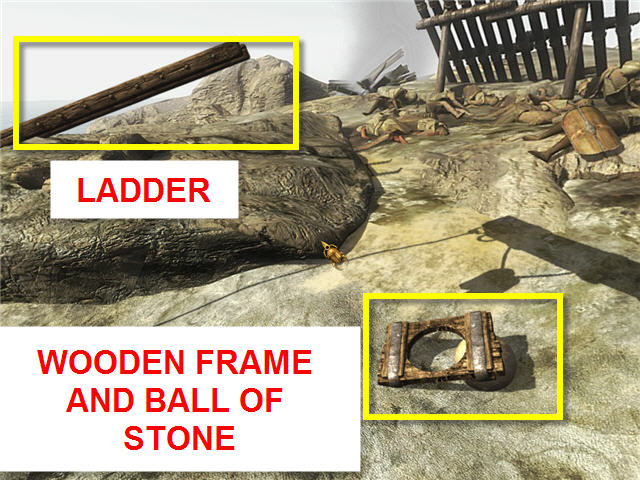
- Turn around and pick up the WOODEN FRAME and the BALL OF STONE. See the Ladder to your left and head in that direction.
- Turn right and pick up the LADDER and while holding it, turn and place it on catapult behind you.
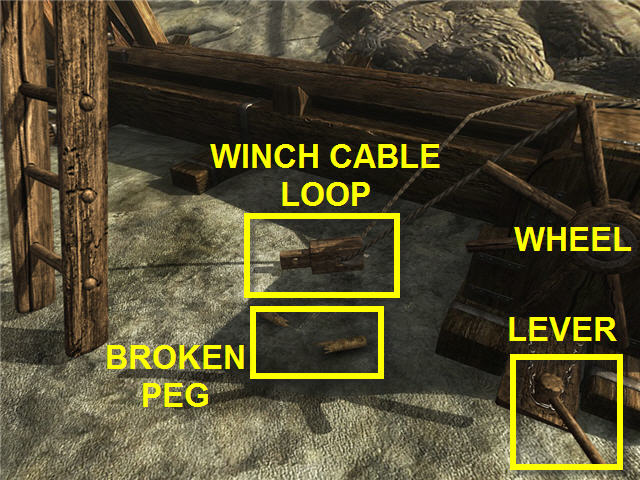
- Pick up the WINCH CABLE LOOP from the ground and climb up the LADDER and attach to winch.
- Step down off the LADDER and pick up the BROKEN PEG.
- Head to the galley and open the chest to the left to get the HAMMER and the CHISEL.
- Use the CHISEL on the beam in front of you to get A PIECE OF WOOD.
- Combine A PIECE OF WOOD, the BROKEN PEG, HAMMER and CHISEL to get a NEW PEG.

- Head back up the ladder and place the NEW PEG in the WINCH.
- Bad Day Only – The NEW PEG will break and you will have to go repeat the process of making a new one and attaching it.
- Take the LADDER and turn around to put the LADDER back on the rocks where you found it.
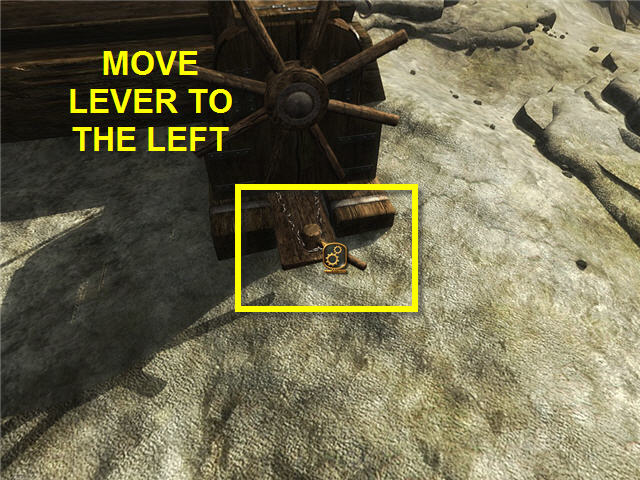
- Move the lever under the wheel to the left and then turn the wheel to lower the catapult arm.
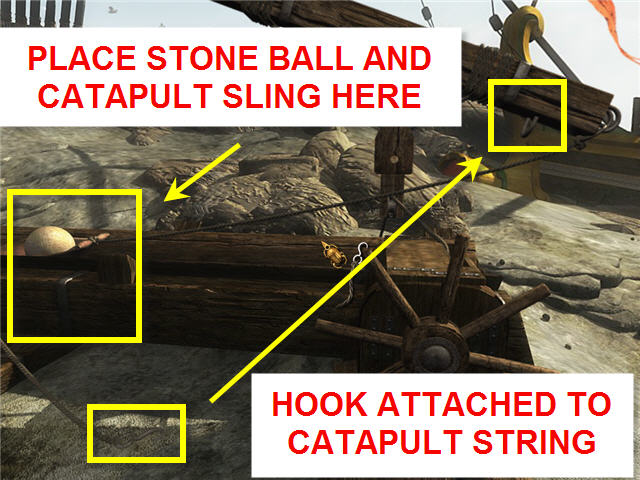
- Place the CATAPULT SLING in the front of the Cyclops and place it in the center of the lower catapult beam.
- Place the STONE BALL in the CATAPULT SLING and pick up the HOOK ATTACHED TO CATAPULT STRING from the ground and hook it on the hook U Bolt in the front on the underside of the catapult arm.
- Try and move the lever under the wheel to launch the catapult and see that it is stuck. Use the HAMMER on the NEW PEG and watch the Catapult launch.
- Go towards the lighthouse and try and get in. Look down and pick up STONE BALL.
- Go back to the catapult and pick up the WINCH CABLE LOOP. Use the HAMMER on the NEW PEG to fire the catapult again.
- Good Day Only – You can now pass through the opening.
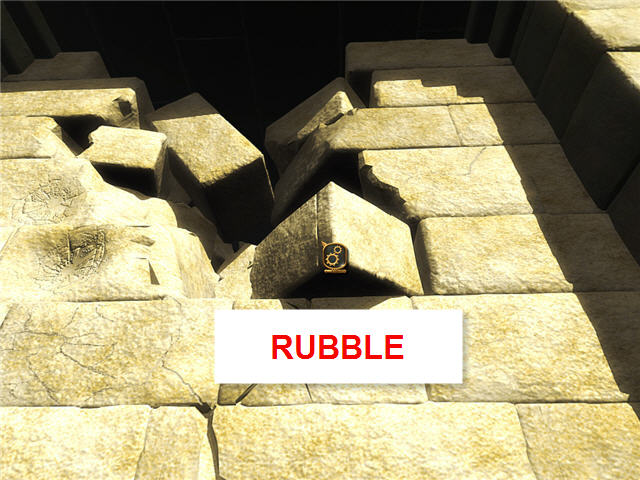
- Bad Day Only – You cannot pass through and your stone ball is shattered. Click on the wall to get RUBBLE. Use the HAMMER on the RUBBLE from the wall and combine the WOODEN FRAME, the CHISEL, the HAMMER and the RUBBLE to get STONE MISSILE. Pick up the winch and hit the NEW PEG with the HAMMER. Success!
Apollo’s Chariot
- Enter the lighthouse and turn far left and look down. Pick up the CHAINMAIL from the floor.
- Go forward into lighthouse and automatically turn to face door. Try the door and see it is locked. Turn and go to the plaque with rings on the opposite wall.
- Good Day Only – the wheels are ready to turn.
- Bad Day Only – The wheels are bent and you need to use the HAMMER on it 2 times to straighten it out.
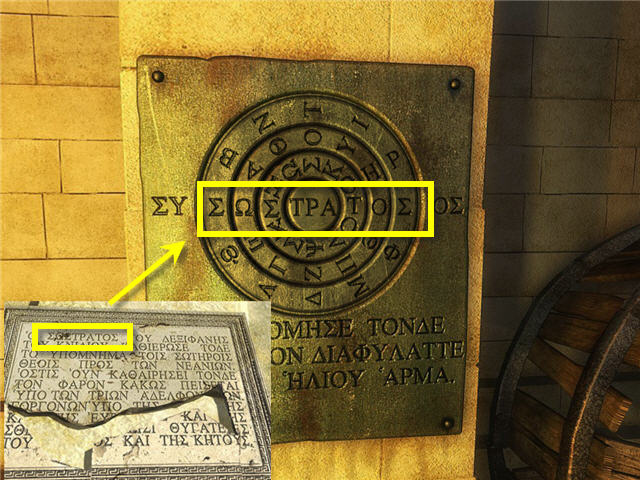
- Click on the writings below the rings. The missing name, Sostratos, can be found on the plaque you assembled outside the lighthouse. Click-Hold the rings to turn, the solution can be seen in screenshot.
- Push the center of the dials (TPA) when complete and take the LETTER FROM IRIS AND AKKAD’s KIDNAPPERS.
- Pull the lever next to the chains and see the chariot counterweights come down.
- Turn and go to the counterweight and remove all the weights by placing them on the pile with the others and the chariot will come down. Thomas states the chariot and the counterweight weigh about the same when there was one weight left on the counterweight.
- Good Day only – Add 11 weights to the chariot.
- Bad Day only – You have broken weights lying on the floor. You need to compensate for their loss. Go outside to the catapult and remove 3 of the SANDBAGS. Place 6 weights and the 3 SANDBAGS in the chariot.
- Grab the rope hanging where the counterweight was and it will automatically be brought down and tied.
- Add the remaining 10 weights to the counterbalance and untie it. Step into the chariot when it comes down.
- While standing in the chariot (facing the back) remove all the weights and place them to the right and place the 3 sandbags to the left. Up you go!
Hydra
- Head up the stairs and step into the middle of the room to hear from Iris. Look at the ropes she was talking about, they are coming out of the sides in the middle where you are standing.
- Try the winch and see that it is stuck. Click on the writing on the winch. Turn and look up at the prism and click on it to hear that it is too low.
- Leave the room and go down the stairs, open the door and go outside of the lighthouse. Read the plaque you assembled previously, on the stone, again.
- Combine the WOODEN FRAME, REEL OF THREAD and CHAINMAIL together to make a SIEVE.
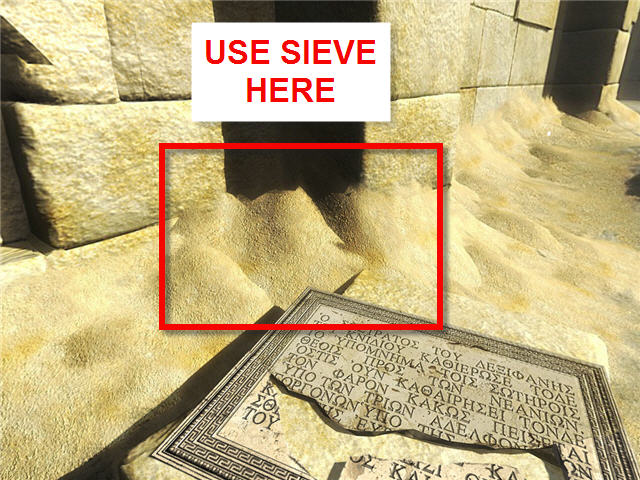
- Use the SIEVE on the sand behind the plaque. Repeat until you can’t collect anymore.
- Arrange the pieces on the plaque. If you previously filled sandbags from this corner you and you still need more pieces collect 3 SANDBAGS from the catapult and empty in the corner and use the SIEVE.
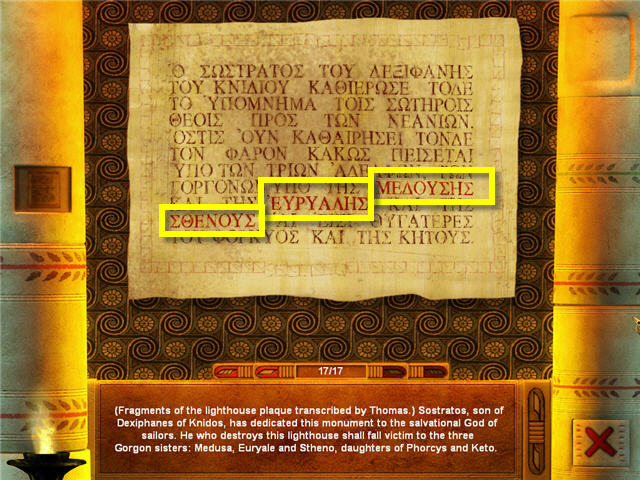
- Head upstairs and into the center of the room again. Look at the letters in the floor and spell the names. If a letter has already been pushed down for a previous name and you need it again, just skip it.
- The letters to be pushed (you can see the names in the upper right of the screen as you hover over the letters) are:Medusa: Mu, Epsilon, Delta, Omicron, Upsilon, Sigma, Eta Euryale: Epsilon (apostrophe), Rho, Alpha, Lambda Stheno: Theta, Nu
- Click on the winch and the prism is raised. Go into the center of the room and look up at the prism.
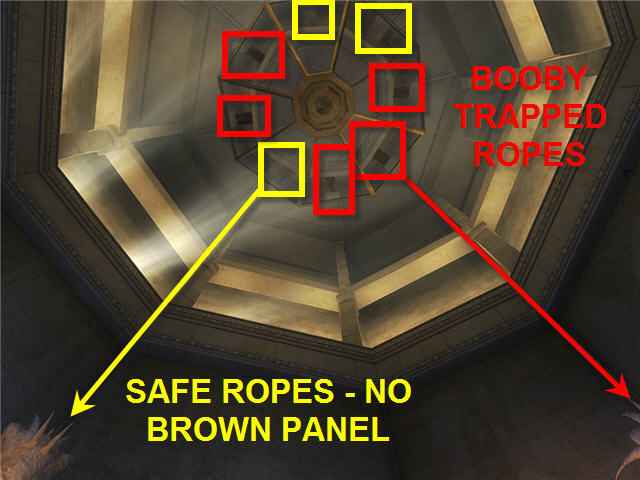
- Click on all the different panels on the prism and note that the ones with a brown rectangle in them are booby trapped.
- Follow the ropes on the 3 panels that are not booby trapped and pull them. You must click on the panels first that are not booby trapped or Thomas will not pull them.
- Iris comes down to Thomas and you will need to exhaust all conversations.
Unwashed Hands
- Speak to Iris completely two times. Your mission is to fix the heliotrope.
- Look at the heliotrope and see that the rod has vanished. Go down the stairs and talk to Kordax in the room to the left.
- Leave the room and turn right to stairs and pick up PART OF A MASK. Combine the two PARTS OF MASK together and see they are the same mask.
- Go upstairs and talk to IRIS about the MASK. Go back downstairs and talk to Kordax, exhaust all conversation.
- Go up the stairs and speak to Iris and exhaust all conversation, Go back to Kordax and ask him about his washbowl.
- Take the DIRTY WASHBOWL from Kordax and turn to the wall behind you and take the FRAGRANCE FORMULA from the table.
- Use your Map and head over to the library grounds.
- Take SOBEKS STAFF, leaning on the table and use on the crocodile blocking your way into the library.

- Enter the lab on the right inside the Library and prepare to make the fragranced poison. You must first identify the unmarked powders. The clues can be located in the scrolls in your documents.
- You must empty the water in the left bin and fill with fresh water on the right each time you test an ingredient. All measurements are a handful:1 Mitanni Gum + 1 Yellow Powder = Nuzi Leaf 1 Mitanni Gum + 2 Pitassa Gum + 1 Orange Powder = Ashur Seed 1 Kerma Powder + 1 Ochre Powder = Kassite Bark 1 Kerma Powder + 1 Arsawa Powder + 1 Green Powder = Masa Thorn 1 Kerma Powder + 1 Arsawa Powder + 1 Pitassa Gum + 1 Black Powder = Teresh Root 1 Mitanni Gum + 1 Kerma Powder + 2 Pitassa Gum + 1 Red Powder = Askelon Seeds 1 Kerma Powder + 2 Arsawa Powder + 1 Pitassa Gum + 1 White Powder = Ekron Leaf Good Day Only - 1 Kerma Powder + 2 Arsawa Powder + 2 Pitassa Gum + 1 Gray Powder = Ataniya Root
- You can now make the poison/sleeping potion; Add together 2 handfuls Melukhkha Bone, 2 handfuls of either Ashod Resin or Ataniya Root, 2 handfuls Canaan thorns and 2 handfuls of Tjekker flowers.
- Now add the fragrance to the bowl – Do not dump the water! Add 2 handfuls of Nuzi Leaf, 1 handful of Ashur Seed, 2 handfuls of Kassite Bark, 2 handfuls of Masa thorn and 1 handful of Teresh roots.
- Empty the DIRTY WASHBOWL from inventory into the overflow jug on the left of the ingredient table to get EMPTY WASHBOWL.
- Use the EMPTY WASHBOWL on the bowl with the Poisoned and fragrant concoction to get POISONED AND FRAGRANCED WASHBOWL.
- Head back to Akkad’s workshop via the map and go into the reception area across the hall.
- Place POISONED AND FRAGRANCED WASHBOWL on the table in front of Kordax.
- Good Day only – Kordax goes falls asleep.
- Bad Day Only – Kordax is immune:Take the POISONED AND FRAGRANCED WASHBOWL. Go upstairs to talk to Iris about the poison. Use map to go to the Hall of Honor Library and head into the lab. Empty the bowl in front of the ingredients into the left jug and fill with clean water on the right. Add 1 handful Melukhkha Bone and use the PRECIOUS BRACELET on the bowl. Empty the POISONED AND FRAGRANCED WASHBOWL and use on bowl with new poison to get POISONED WASHBOWL. Go back to Akkad’s Workshop and into reception area. Place POISONED WASHBOWL on table in front of Kordax and he will go to sleep.
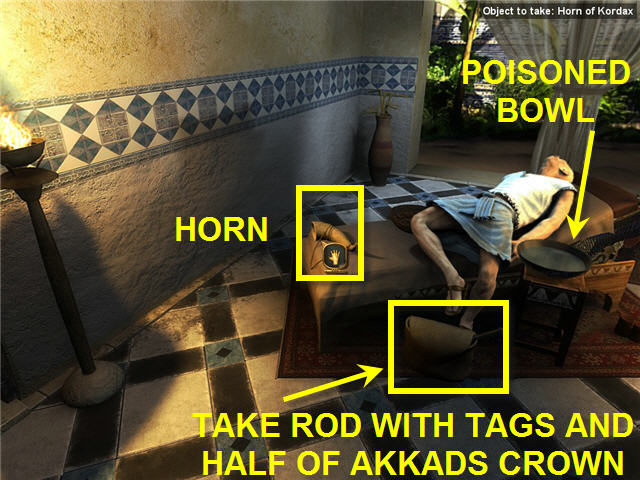
- Take ROD WITH TAGS and HALF OF THE CROWN OF AKKAD from Kordax’s bag.
- Take HORN on the chaise lounge and automatically blow it.
- Head upstairs and talk to Iris, Use your map to go Akkad’s mausoleum.
The Astral Gate
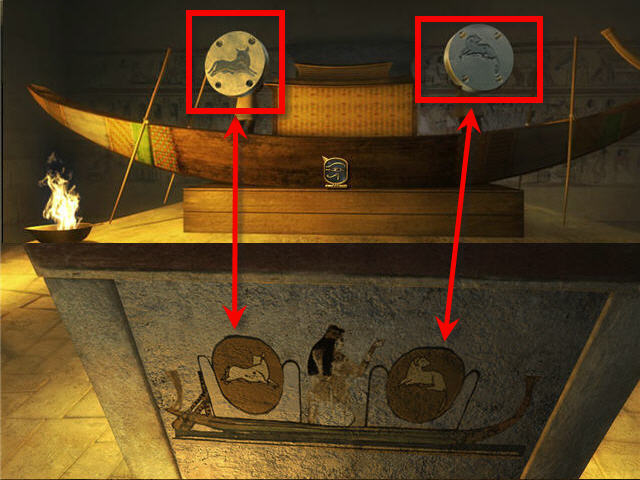
- Look at the fresco on the tomblike structure facing the doorway and then head to the opposite side of the tomb and look at the men on the boat with the hands out.
- Combine the 2 HALF OF THE CROWN OF AKKAD together to get AKKAD’s CROWN, ARIES MEDALLION and TAURUS MEDALLION.
- Use SMALL PLIERS on AKKAD’s CROWN to get the remaining 10 astrology medallions.
- Place the TAURUS MEDALLION on the character on the left and the ARIES MEDALLION on the right. Hear a noise like a stone sliding and go back to the front of the tomb.
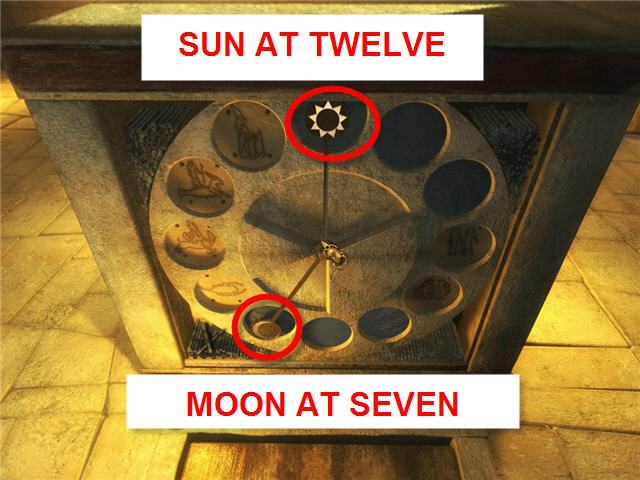
- Arrange the sun and moon on the dial to show only the astrology signs depicted on the sides of the tomb. To position them correctly, the moon should be on the 7 o’clock position and the sun on the 12 o’clock.
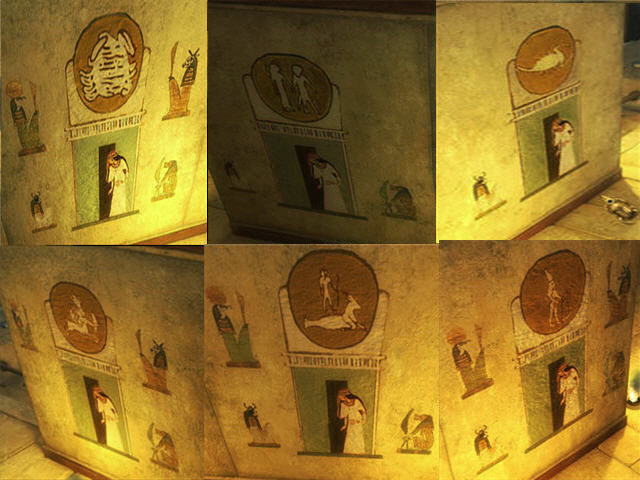
- Look at the position of the demons around Iris on each of the frescos.
- Place the MEDALLIONS on the matching astrology symbols
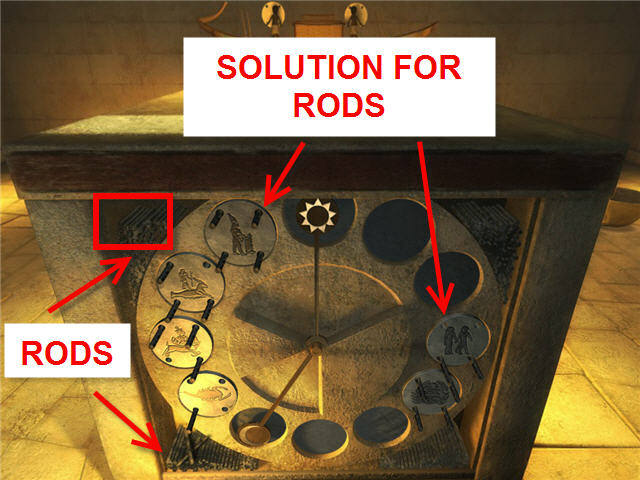
- Place the rods found in the corners of the dial on each MEDALLION to correspond with the position of the demons on the frescos on the left and right side of the structure. See the screenshot for proper placement. You will see the stairway to the secret observatory open if done correctly.
- Head to the backside of the structure and see the open stairwell.
- Use the LIGHTER on the oil well in floor on the left of the dark staircase opening and head down the stairs.
- Look to your right and Thomas states we have to fill the water chamber with water from the basins.
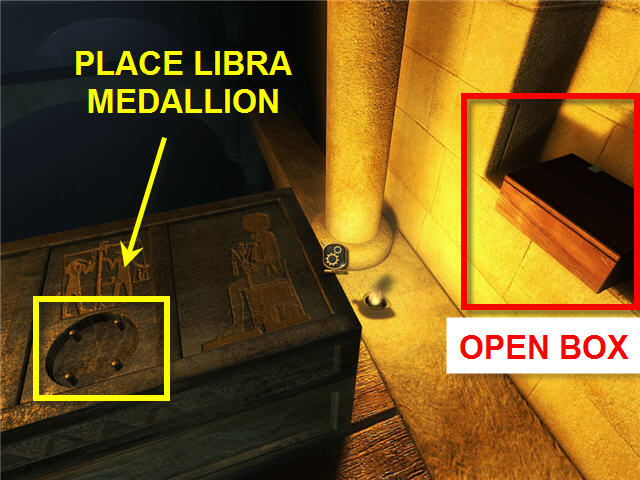
- Place the LIBRA MEDALLION on the chest to your right to get MOLDBOARD TUBE and LETTER FROM HERON OF ALEXANDRIA.
- Turn slight right and take AKKAD LAST WILL AND TESTAMENT from the small box in the niche in the wall.
- Turn left and go forward into the chamber 2 times and pick up the GANGWAY on the right .
- Climb up the stairs and click on all 3 instruments.
- Bad Day Only – take BEAM on the left side of platform.
- Turn and go back downstairs and talk to Iris.
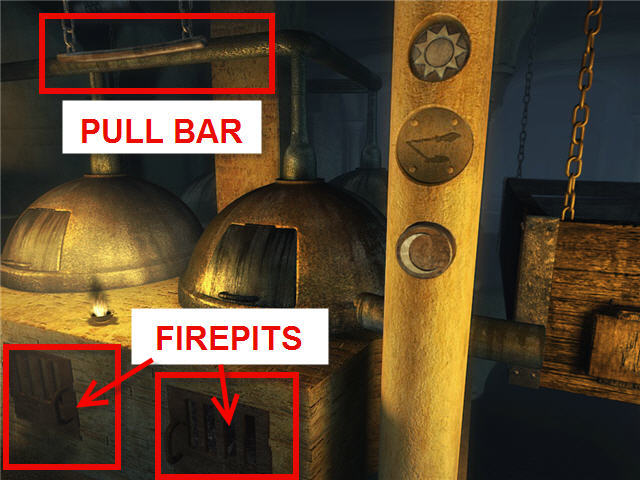
- Open the two fireboxes on the bottom of the Titan and use the LIGHTER on both.
- Pull the bar on chains over the Titan and then turn to the left to pull the bar over the heliolites.
- Leave the chamber and go outside. Head straight across the courtyard to the Horus and Anubis statues in front of the pyramid.
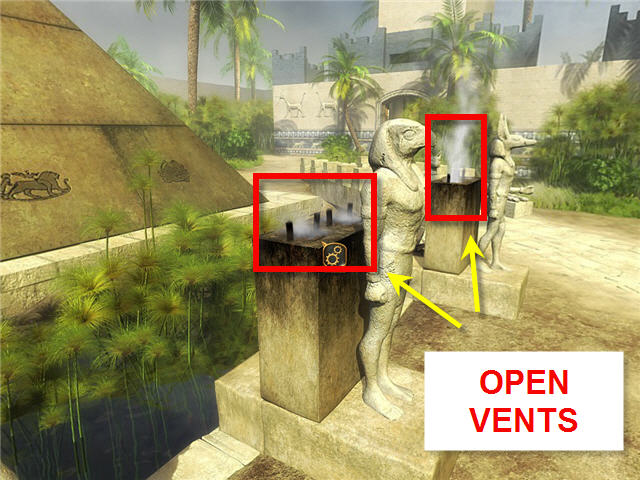
- Open the vents behind the Horus and Anubis statues.
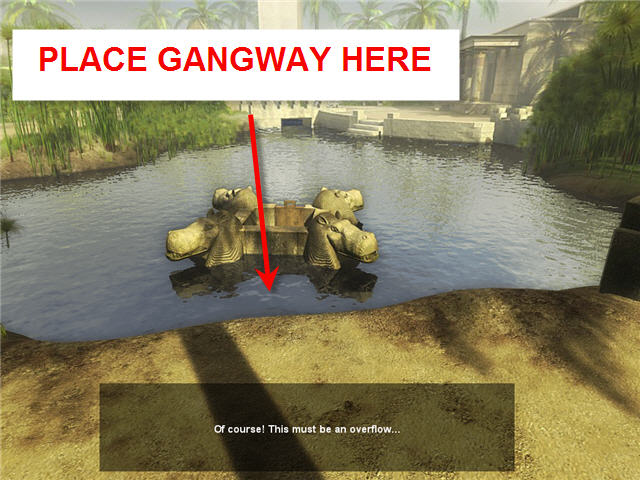
- Pan to the left and head over to the scaffolding area. Turn to face the hippos in the water.
- Place the GANGWAY on the water in front of the hippos and walk across it to head over to the overflow.
- Good Day Only – The drain is clear and you can just click on the panel holding back the water and the water will pour in the chamber.
- Bad Day Only – The drain has a cover over it. Use the BEAM on the cover 2 times and then click on the panel holding back the water and the water will flow into the chamber.
- Head back to the secret observatory under Akkad’s Mausoleum.
- There is a crocodile blocking your way.
- Good Day only – the crocodile moves out of your way.
- Bad Day only – Use STOBEK’s STAFF on the crocodile.
- Move forward towards the Titan.
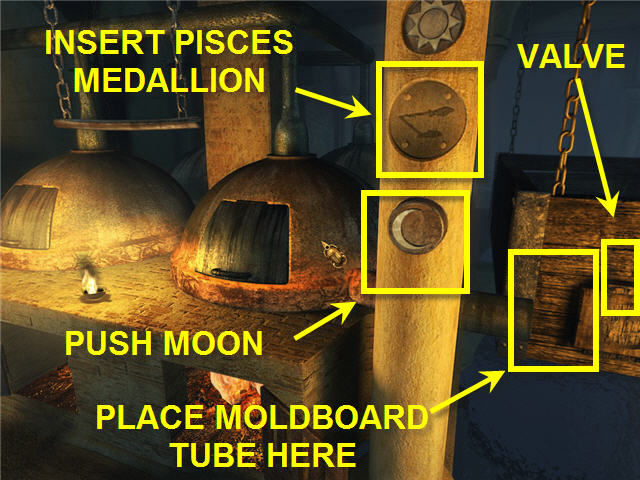
- Insert the PISCES MEDALLION in the Pisces slot on the column to the right of the fire pits.
- Push in the moon button on the column below the PISCES MEDALLION. Watch the cutscene.
- Insert the MOLDBOARD TUBE to the right of the moon button to link the water chamber to the machine.
- Click twice on the valve by the newly connected tube and the water will flow to the domes above the fire pits.
- Be sure to close the domes if you opened them so you can capture the steam.
- Open the fire pit doors and pan left and pick up the EMPTY SPADE leaning on the side of the heliolite bin.
- Using the EMPTY SPADE, shovel the heliolites into the fire pit till Thomas says it’s full for now. (5 scoops in each)
- Go forward towards the instrument platform and look at the chest on the left. Use LEO MEDALLION on the chest to open.
- Good Day Only – Get a WATER DISK, AIR DISK and FIRE DISK in the chest.
- Bad Day Only – There is nothing in the chest and you need to dig through the heliolites with your hands till you find a sack. In the sack is a WATER DISK, AIR DISK and FIRE DISK.
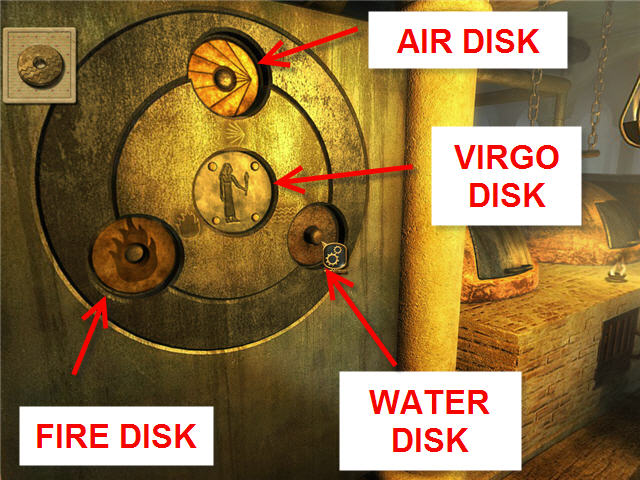
- Turn to the panel to the right of the chest and insert the VIRGO MEDALLION in the center.
- Insert the WATER DISK, AIR DISK and FIRE DISK in their matching slots around the VIRGO MEDALLION.
- Congratulations you have completed Cleopatra: A Queens Destiny.
Created at: 2010-06-18