
Walkthrough Menu
General Tips
- This game is a Hidden Object Puzzle Adventure.
- When you need a hint you can click on Dominic’s icon in the lower left corner. His bubble has to be full before he will grant you a hint.
- The Hint can be used in a Hidden Object Scene as well as in regular scenes.
- All mini-games and jigsaw puzzles can be skipped once the SKIP button is filled.
- Inventory items can be found in Hidden Object Scenes as well as in Regular Scenes. They will be stored in the tray at the bottom of the scene.
- Some inventory items can be used more than once and may remain in your inventory even if you no longer need them.
- When you click on 3 incorrect items in a Hidden Object Scene your cursor will disappear for a few seconds.
- Areas of interest will sparkle when you pass your mouse over them.
- Click on the Red “X” Button in the upper right to exit out of certain scenes.
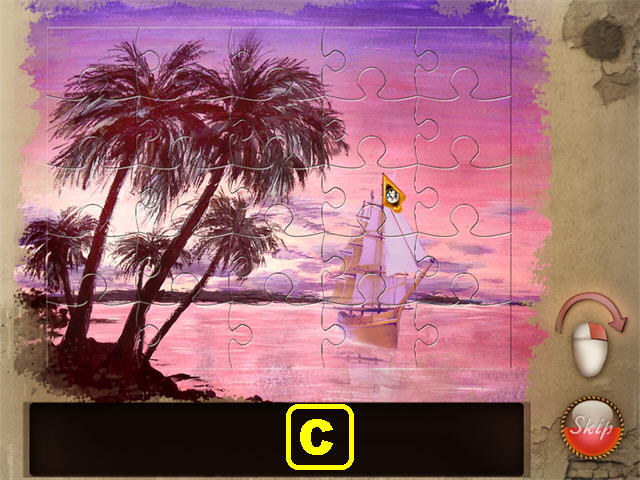
Chapter 1
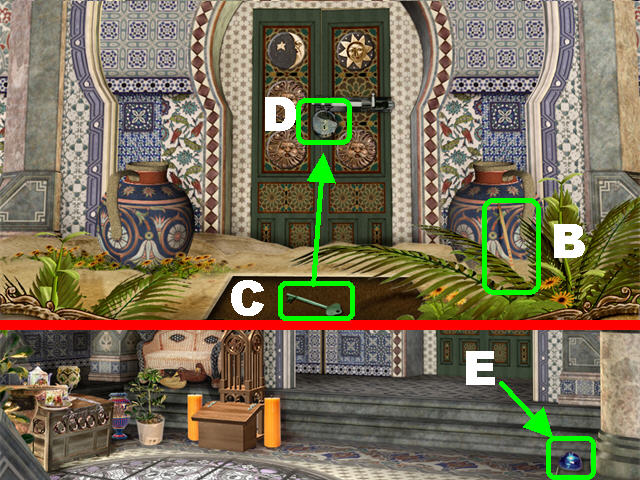
- Zoom into the window to play a Hidden Object Scene.
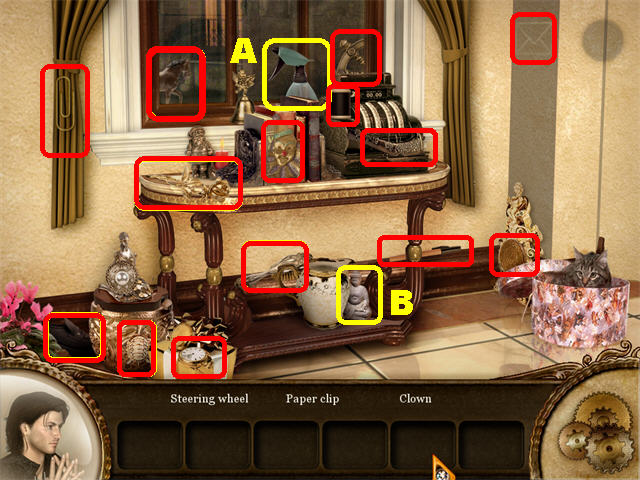
- The SPRAY BOTTLE (A) and the BUDDHA (B) will be added to inventory.
- Click on the red “X” in the upper right to exit this scene.
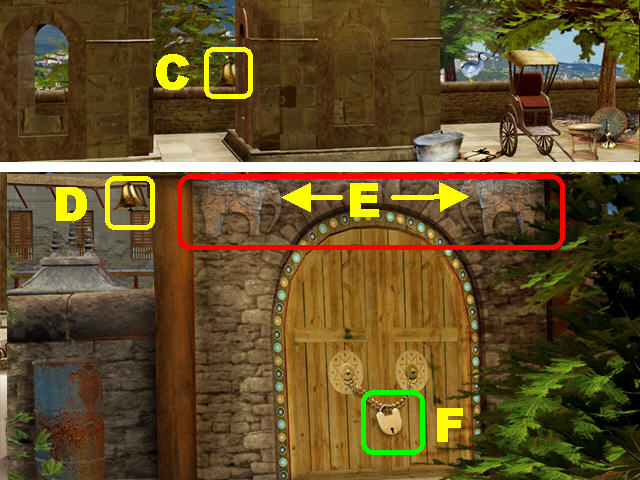
- Place the SPRAY BOTTLE on the flower vase (C) to fill it with water.
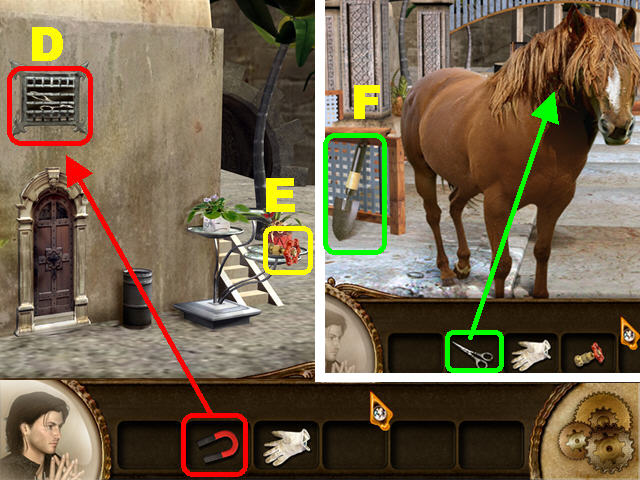
- Go left.
- Spray the glass door with the SPRAY BOTTLE to reveal a symbol (D) on the glass.
- Go right.
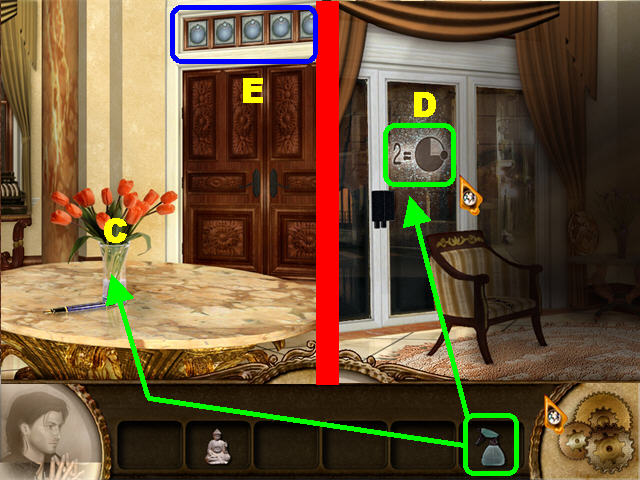
- Zoom into the symbols above the door (E) to trigger a puzzle.
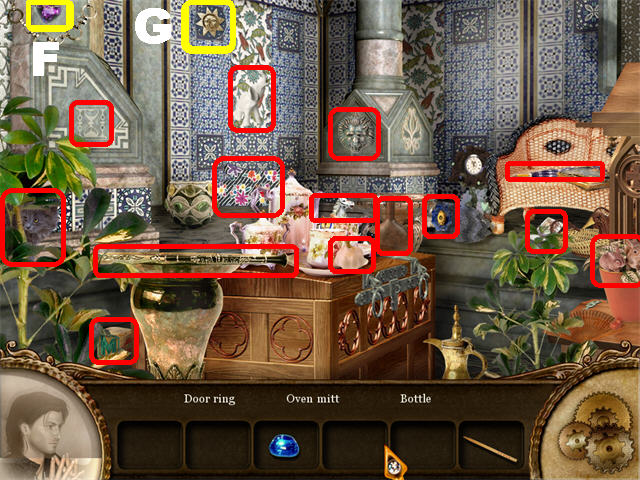
- Using the code on the glass door place the symbols in the correct order. The symbol on the door had a number 2 next to it; that symbol belongs in the second slot.
- The rest of the symbols should be placed according to the image in the second slot.
- Click on each symbol to change it.
- Please look at the screenshot for the solution (F).
- Go through the door.
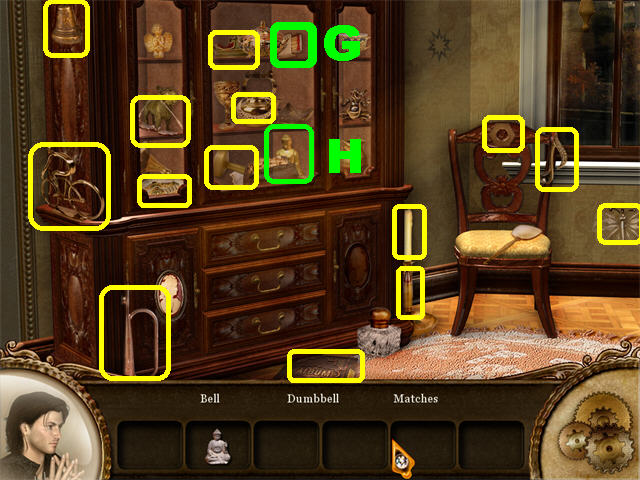
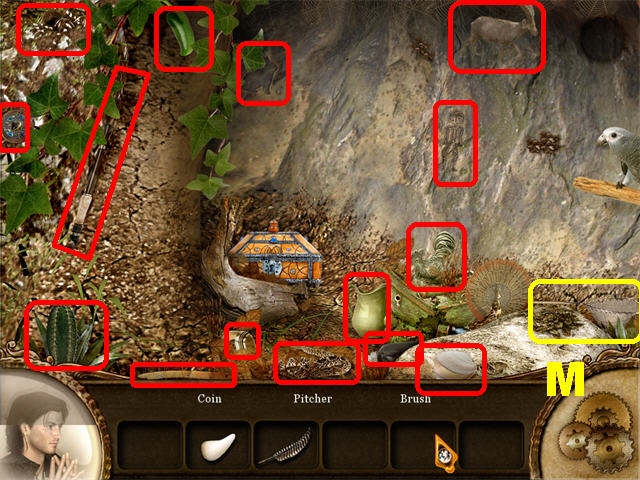
- Click on the cupboard to trigger a Hidden Object Scene.
- The MATCHES (G) and the BUDDHA (H) will be added to inventory.
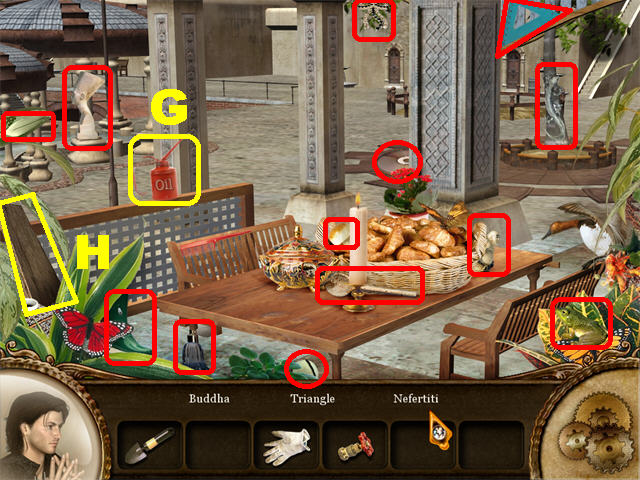
- Click on the “X” in the upper right and head left twice.
- Place the MATCHES in the fireplace.
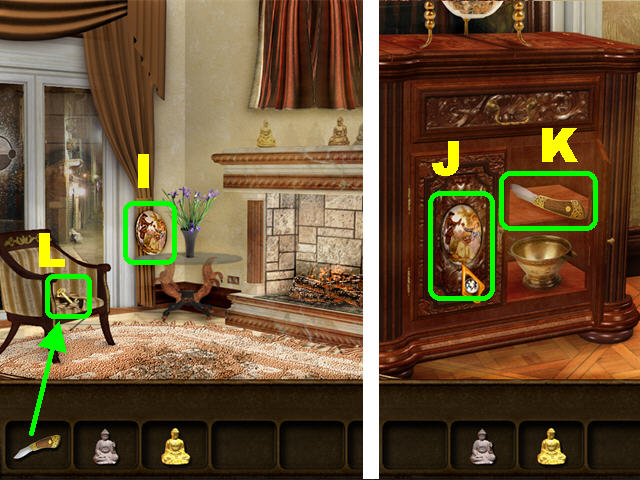
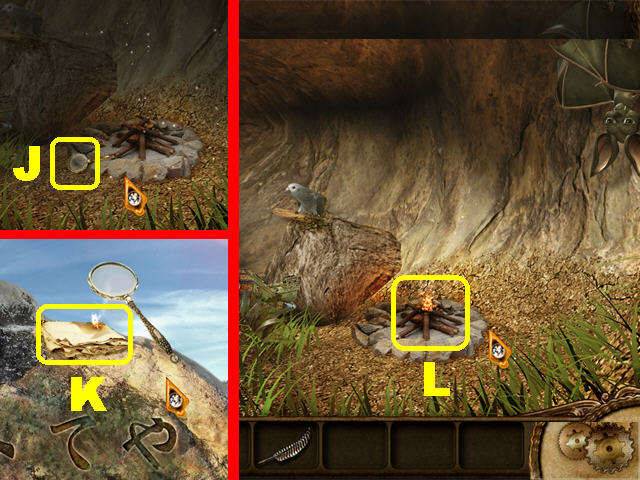
- Grab the PLAQUE (I) on the small table.
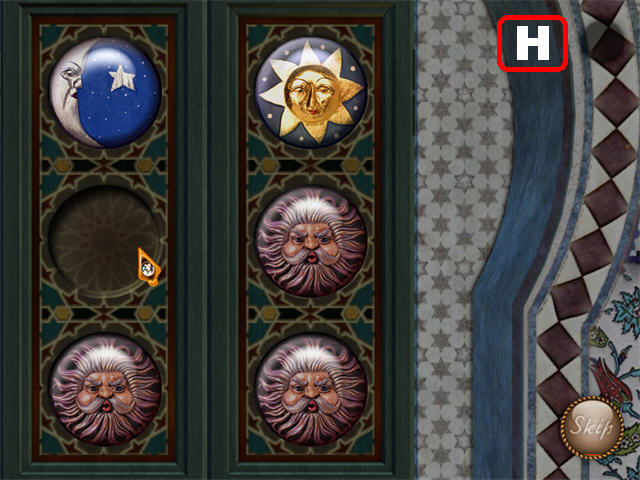
- Go right and through the door.
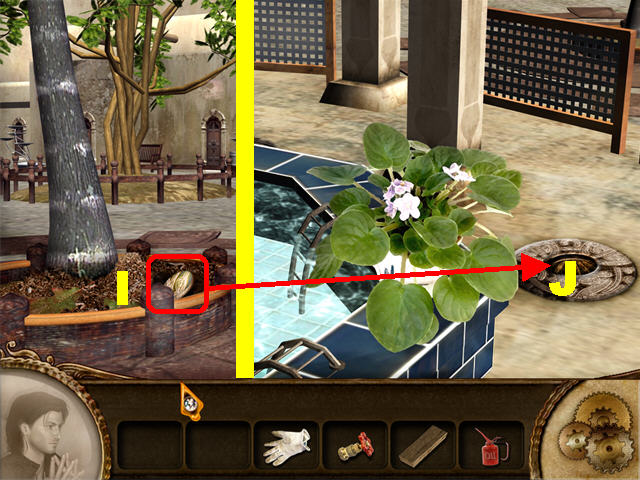
- Zoom into the cabinet on right.
- Put the PLAQUE in the empty slot (J); grab the KNIFE (K).
- Return to the fireplace room.
- Cut the chair with the KNIFE; take the KEY (L).
- Go right.
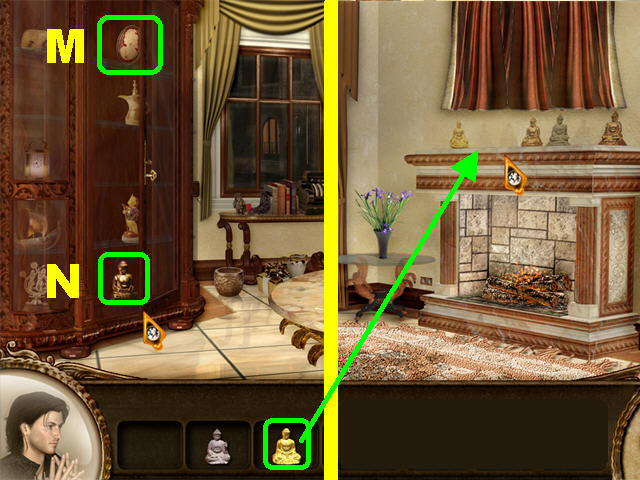
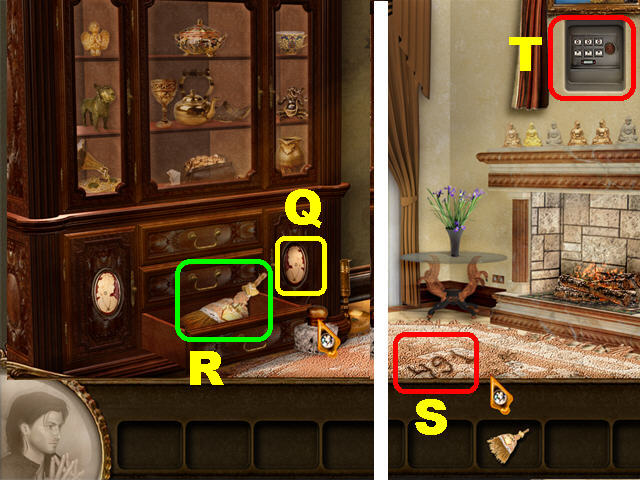
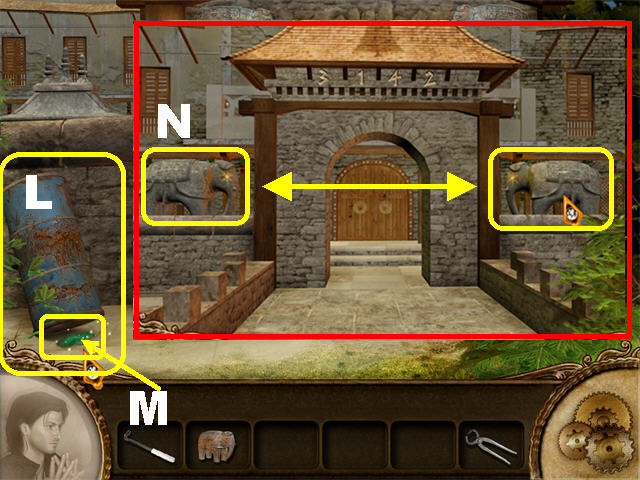
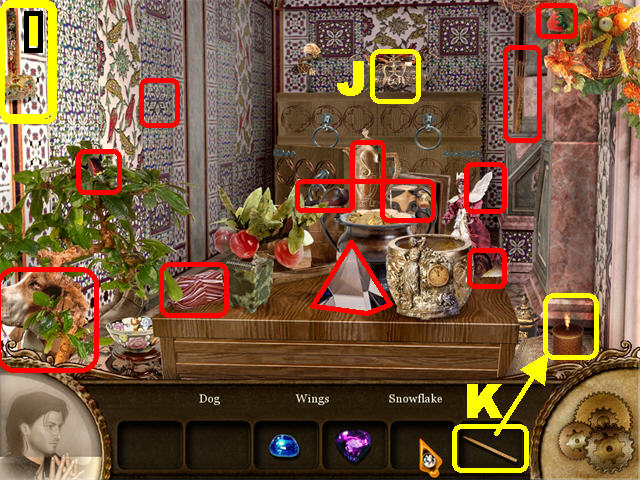
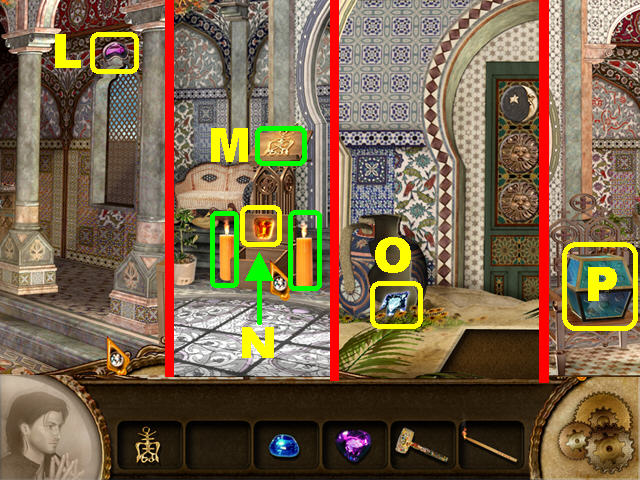
- Open the cabinet with the KEY; take the BUDDHA (M) and the CAMEO (N).
- Go left.
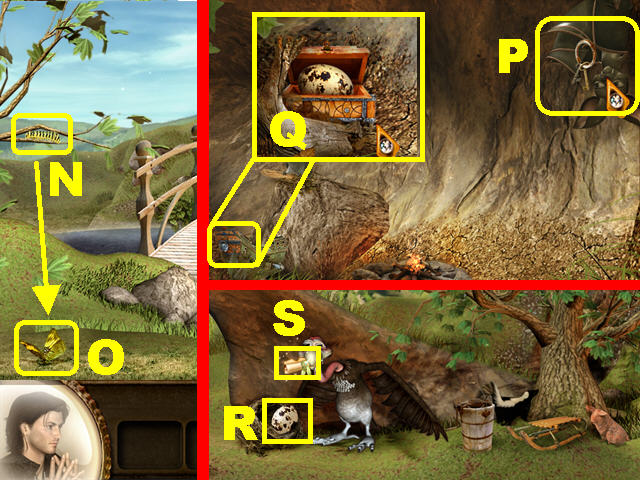
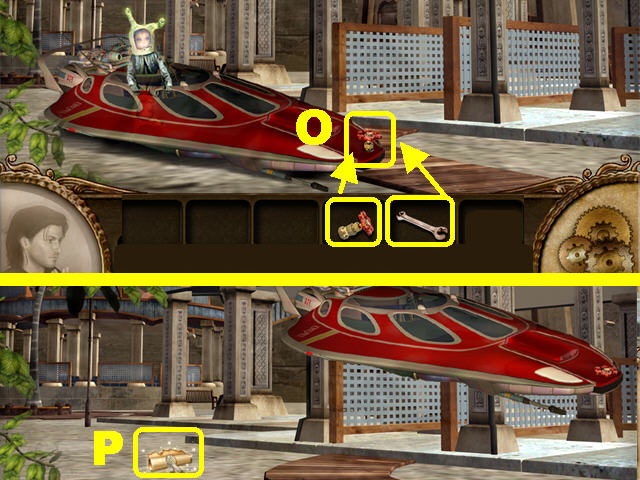
- Place a BUDDHA on the mantle above the fireplace to trigger a puzzle.

- Place the Buddhas in the correct order using the locked pieces as a guide.
- Click on any 2 Buddhas to swap their positions.
- One Buddha will not be used.
- Please look at the screenshot for the solution (O).
- A picture will appear above the fireplace after the puzzle has been solved.
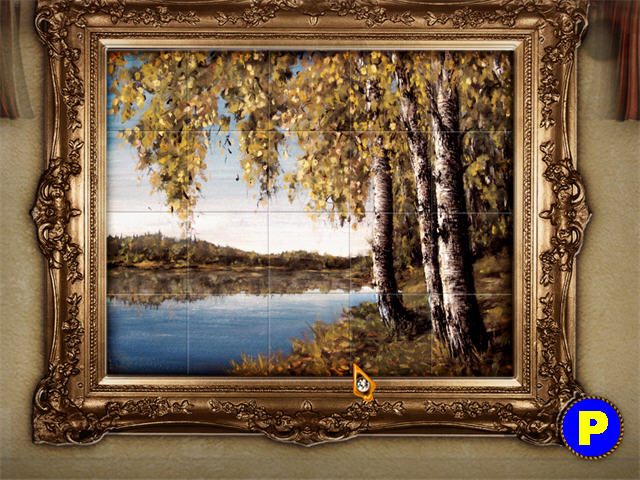
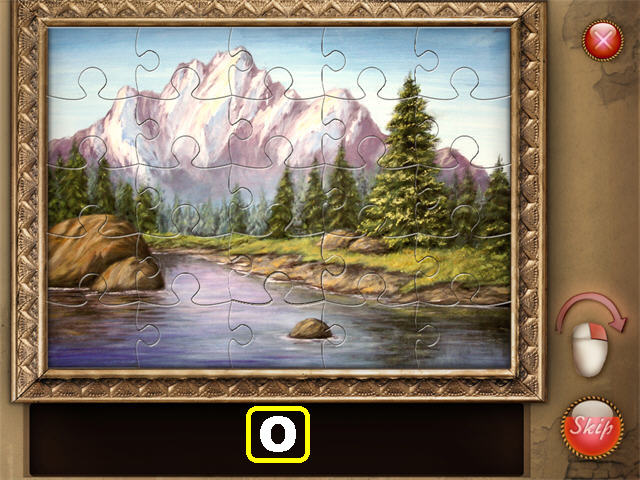
- Click on the picture to trigger a puzzle.
- Click on any 2 tiles to swap their positions.
- Please look at the screenshot for the solution (P).
- A Safe will appear behind the picture after the puzzle has been solved.
- Go right and through the door.
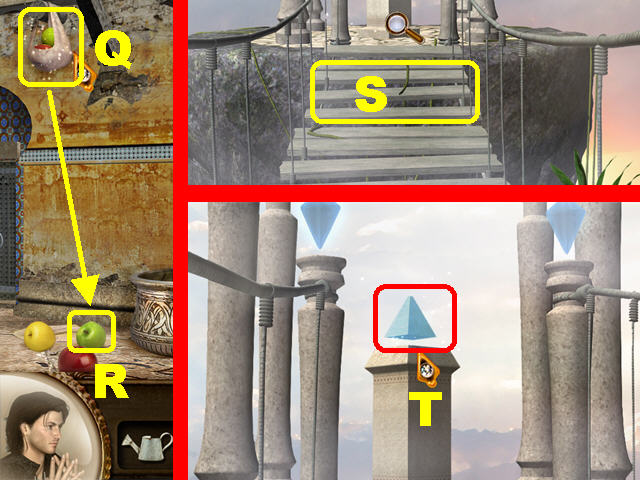
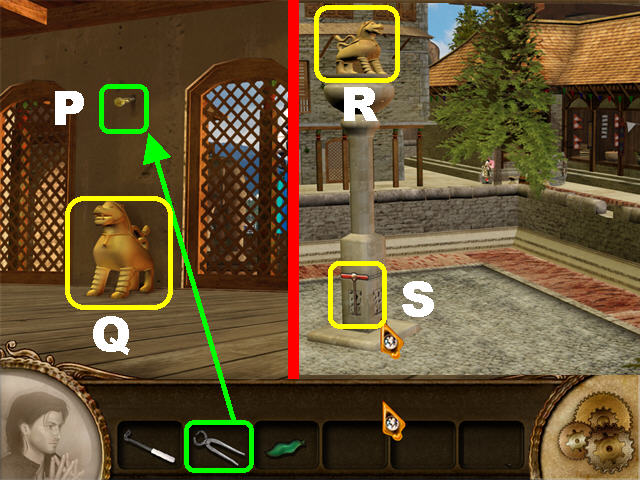
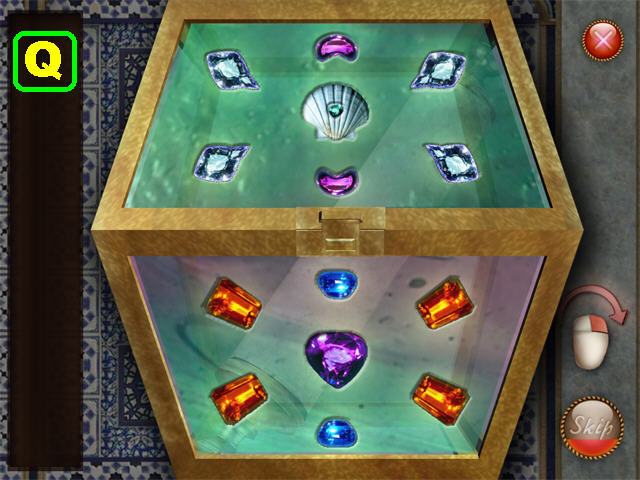
- Zoom into the cupboard.
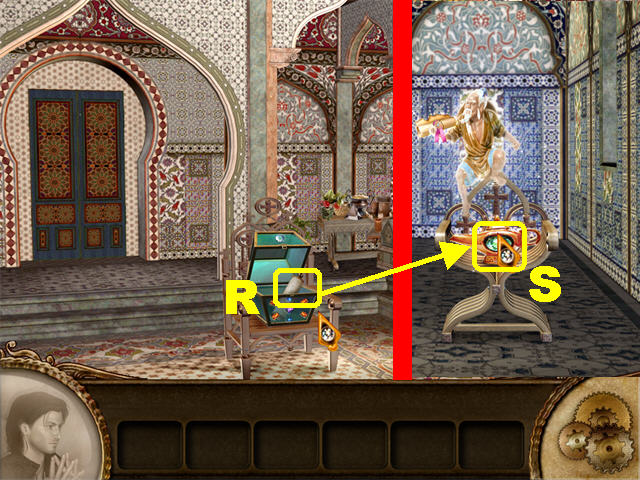
- Place the CAMEO in the empty slot (Q); take the WHISK BROOM (R) in the drawer.
- Return to the fireplace.
- Clean the carpet with the WHISH BROOM; note the numbers 491 on the carpet (S).
- Click on the safe above the fireplace to trigger a new puzzle (T).
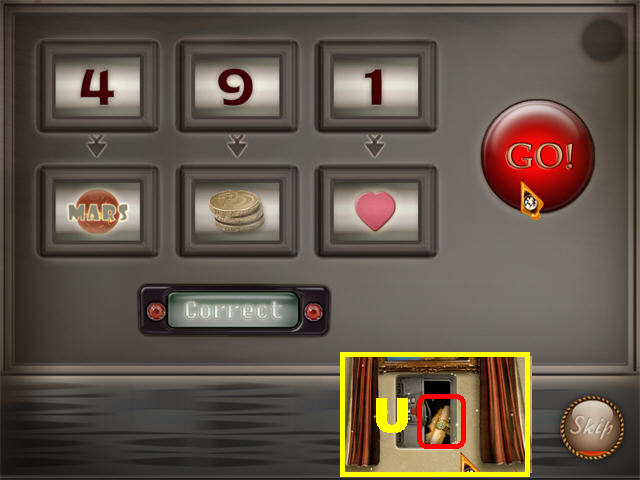
- Use the code “491” on the carpet to change the numbers on top from left to right to “491”.
- Now you have to find the items that have the same amount of items as the numbers above them.
- From left to right change the dials to: MARS, 3 CENT GOLD COINS STACK, and HEART.
- Click on the Red “Go” Button on right to enter your selections.
- Take the SCROLL (U) inside the safe to end this chapter.
Chapter 2
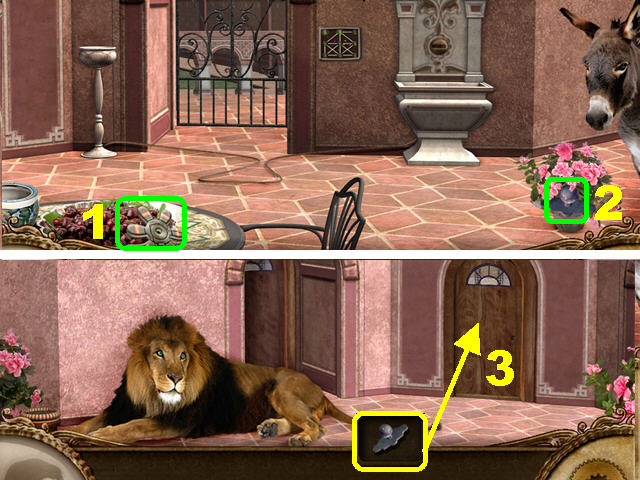
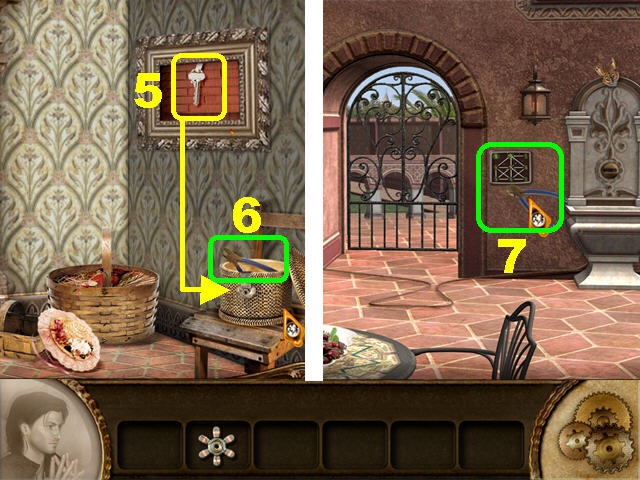
- Take the FAUCET HANDLE 1/3 (1) in lower left.
- Grab the DOORKNOB (2) inside the flower pot.
- Go left.
- Place the DOORKNOB on the door (3) to unlock it; go through door.
- Click on the right painting to trigger a puzzle.
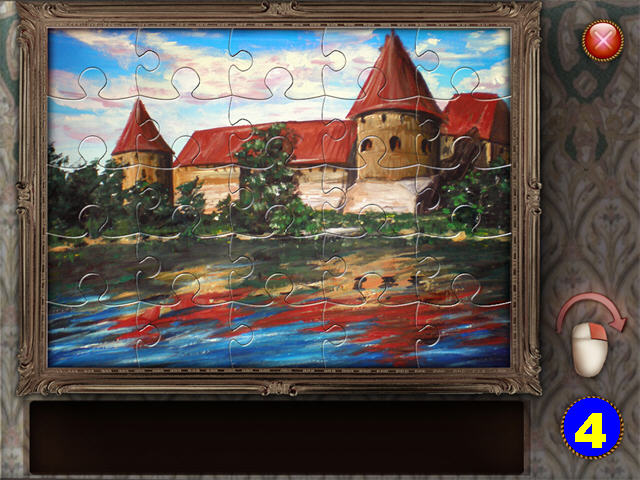
- Assemble the puzzle by placing the correct pieces of the painting in place.
- Pick up the puzzle piece and Right-click it to rotate it.
- Left-click on a piece to put it in place.
- Please look at the screenshot for the solution (4).
- Take the KEY (5) that appears after the puzzle has been solved.
- Open the basket on the chair with the KEY; take the WIRE CUTTERS (6).
- Exit and go right.
- Place the WIRE CUTTERS on the WIRES (7) next to door to trigger a puzzle.
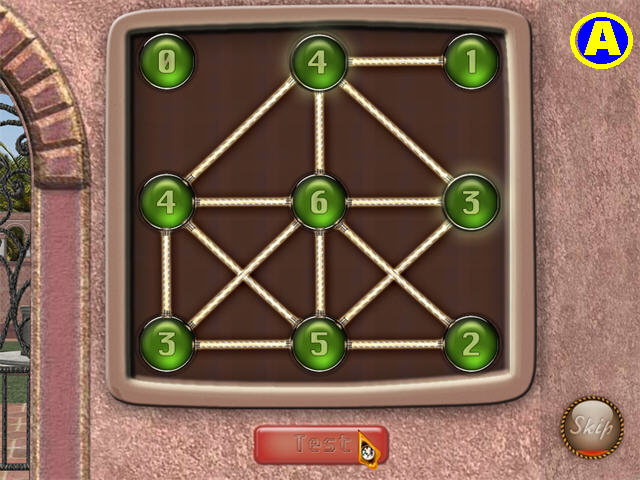
- The numbers on the board must coincide with the amount of wires connected to it.
- Click on 2 numbers to swap them.
- Click on “TEST” to enter your selection. If your answer is correct, all the numbers will light up. If it’s incorrect, try again.
- Please look at the screenshot for the solution (A).
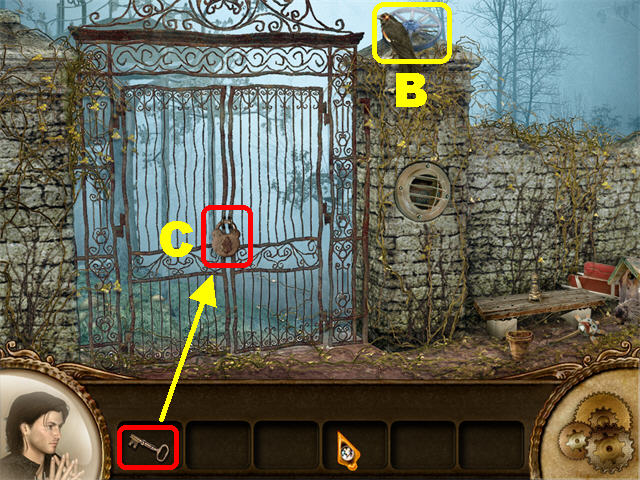
- Go through the gate after the puzzle has been solved.
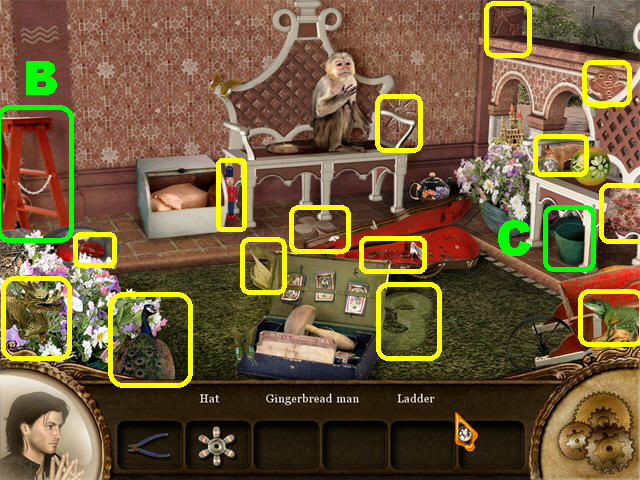
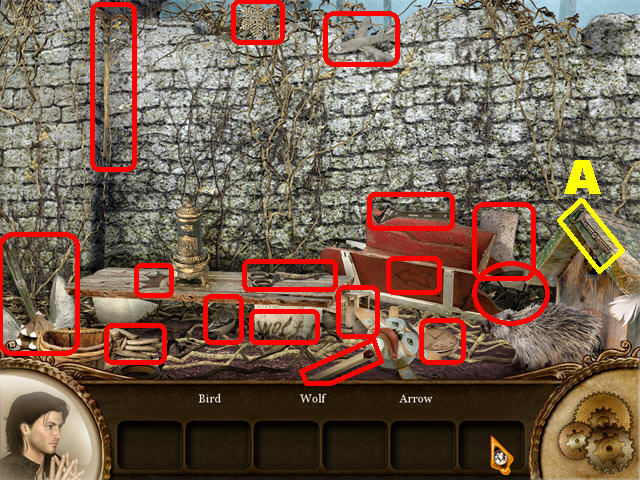
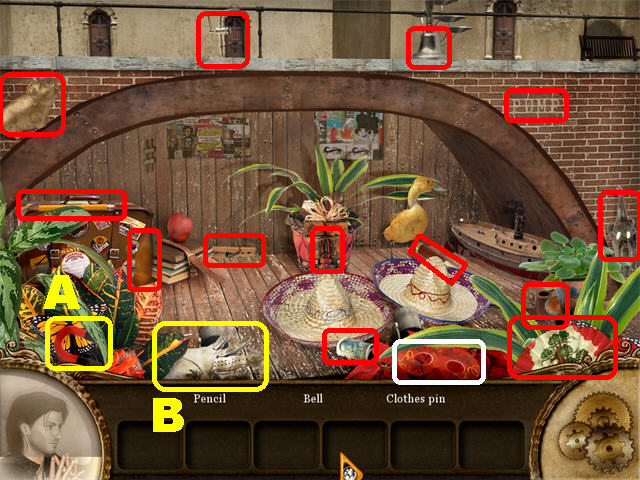
- Zoom into the benches in the back to trigger a Hidden Object Scene.
- The LADDER (B) and the BUCKET (C) will be added to inventory.
- Click on the red “X” in the upper right.

- Fill the BUCKET with water from the fountain (D).
- Pick up FAUCET HANDLE 2/3 (E) in the lower left (next to peacock).
- Go right and then left.
- Throw the BUCKET OF WATER on the lion to make it move out of the way.
- Place the LADDER below the window (F) and click on the window to trigger a Hidden Object Scene.
- The FAUCET HANDLE 3/3 (G) will be added to inventory.
- Exit through the window. Go right and through the iron door.
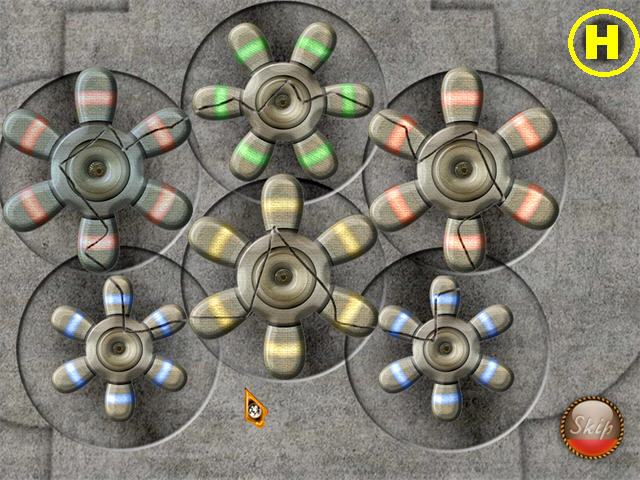
- Place the FAUCET HANDLES on the side of the fountain to trigger a puzzle.
- Click or drag the handles so the cracks on each handle line up with the cracks on the adjacent handles. Hold down the mouse to continuously rotate the handle.
- Please look at the screenshot for the solution (H).
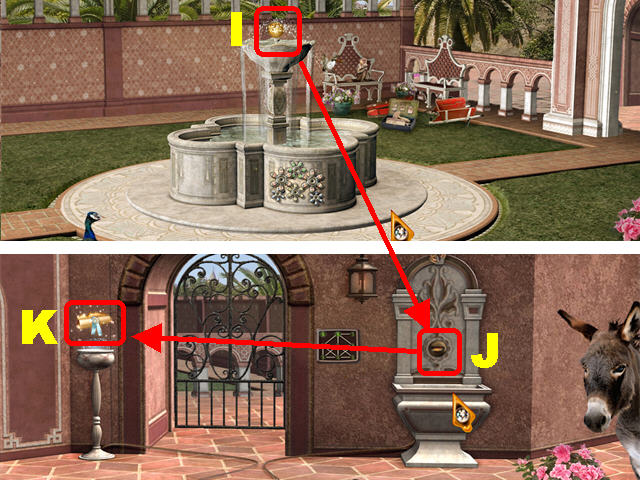
- Grab the COIN (I) that appears above the fountain after the puzzle has been solved.
- Go right.
- Place the COIN in the slot (J) of the small water fountain against the wall.
- Grab the SCROLL (K) that appears on left to end the chapter.
Chapter 3
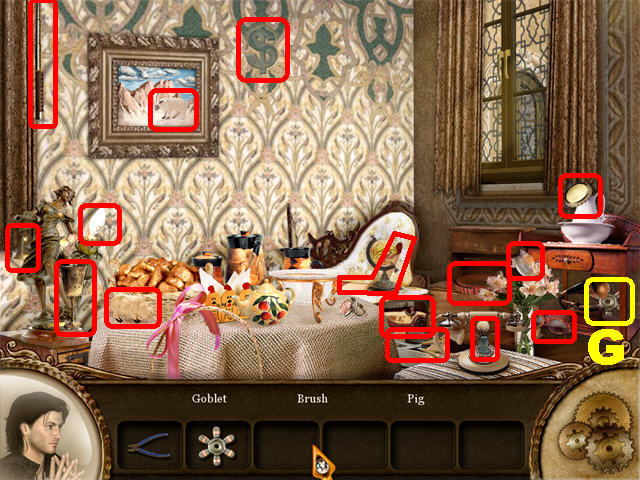
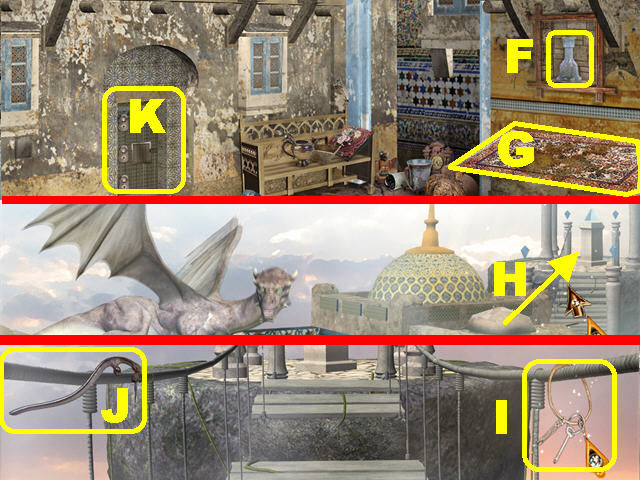
- Zoom into the bench to trigger a Hidden Object Scene.
- The KEY (A) will be added to inventory. Click on the “X” in the upper right.
- Click on the red “X” in the upper right.
- Grab the BLUE WHEEL (B) in the upper right.
- Open the lock (C) on the gate with the KEY.
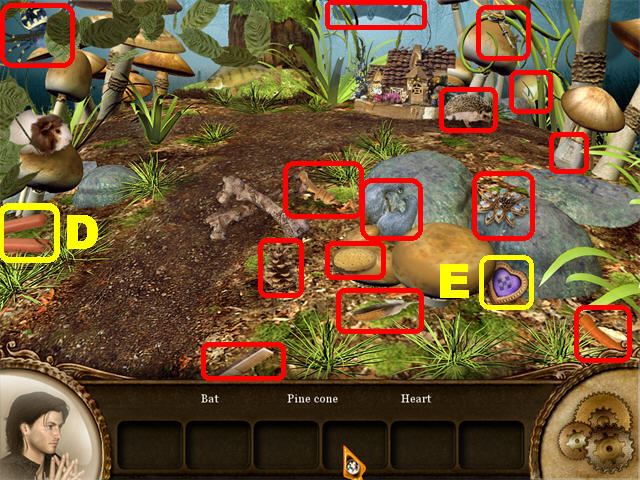
- Click on the area below the Treehouse to trigger a Hidden Object Scene.
- The SAUSAGES (D) and the HEART GEM (E) will be added to inventory.
- Click on the red “X” in the upper right.
- Give the SAUSAGES to the wolf (F).
- Take the LADDER (G) after the wolf receives the sausage.
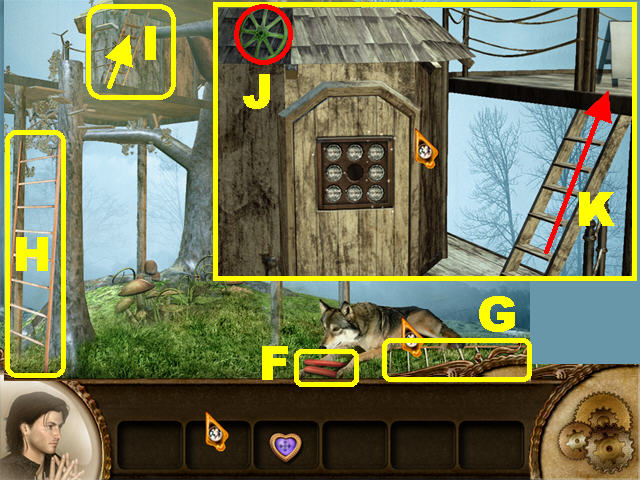
- Place the LADDER on the left as shown in the screenshot (H).
- Click on the small ladder (I) above the Treehouse to go up.
- Take the GREEN WHEEL (J).
- Click on the small ladder on right to go up (K).
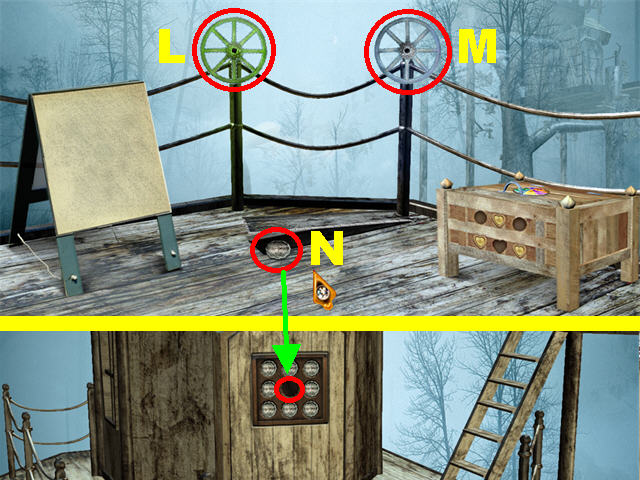
- Place the GREEN WHEEL (L) on the left post.
- Place the BLUE WHEEL (M) on the right post.
- Pick up the COIN (N) that appears below the boards.
- Click down.
- Place the COIN in the empty slot.
- Click on the puzzle to activate it.
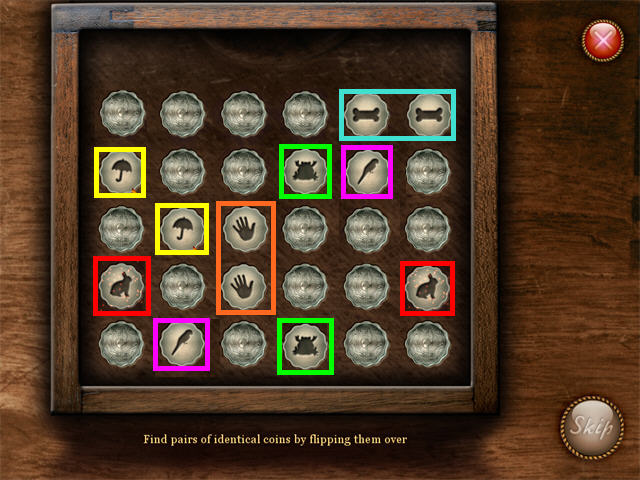
- Click on any 2 coins to flip them.
- Find matching pairs of symbols to eliminate them.
- The solution for this puzzle is random.
- Go through the door after the puzzle has been solved.
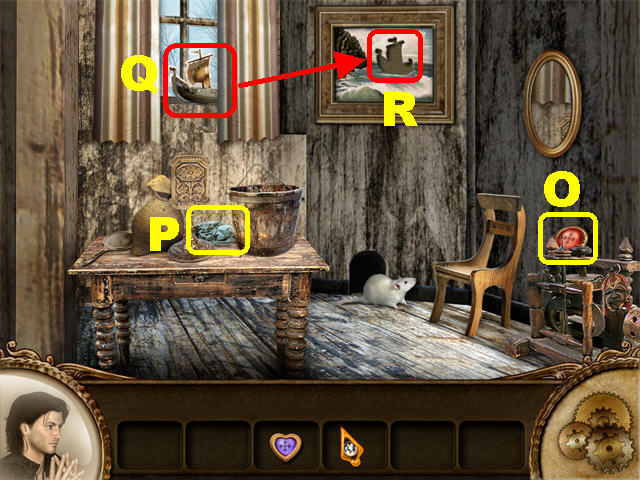
- Pick up the RED GEM (O) on right.
- Take the RAG (P) from the table.
- Open the curtains and take the SMALL SAILBOAT (Q).
- Place the SMALL SAILBOAT on the picture to trigger a puzzle (R).
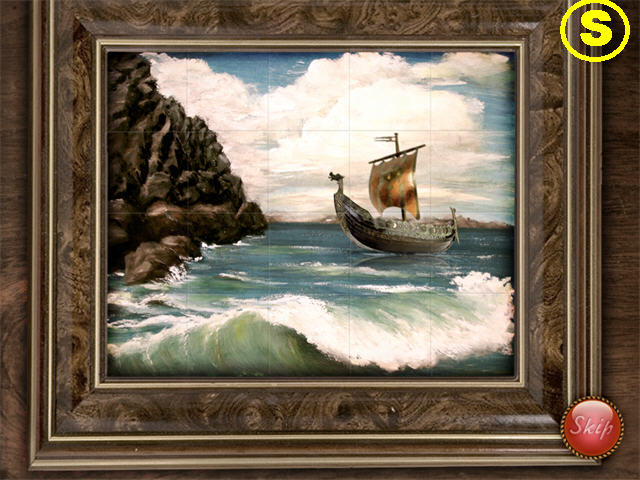
- Click on any 2 tiles to swap their positions.
- Please look at the screenshot for the solution (S).
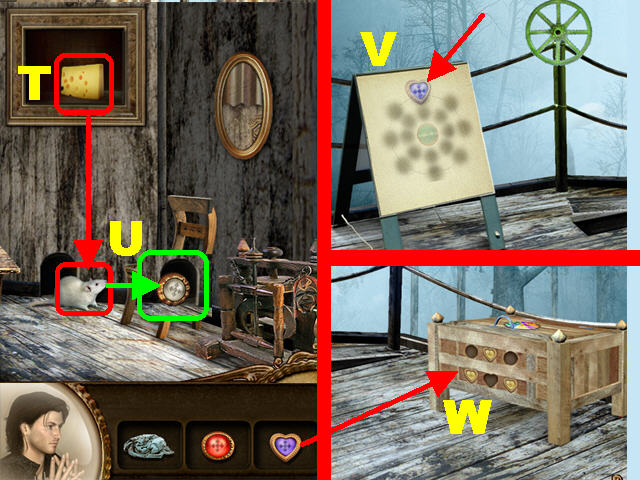
- Grab the CHEESE (T) that appears after the puzzle has been solved.
- Give the CHEESE to the mouse (U) and take the GEM in the mouse hole.
- Click down and go up the ladder.
- Wipe the canvas with the RAG (V).
- Note the drawing on the canvas has a blue heart on top.
- Place one of the GEMS (W) on the box to trigger a puzzle.
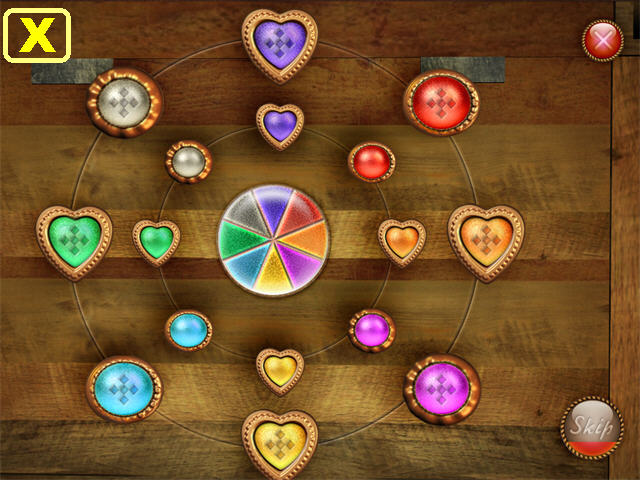
- Using the drawing on the canvas start by placing the blue heart on top.
- Move the center wheel so the blue piece is on top.
- Click on any 2 symbols to swap their positions.
- Move the rest of the symbols next to their matching colors on the wheel.
- The large symbols must be on the outside ring and the small symbols must be on the inside ring.
- Please look at the screenshot for the solution (X).
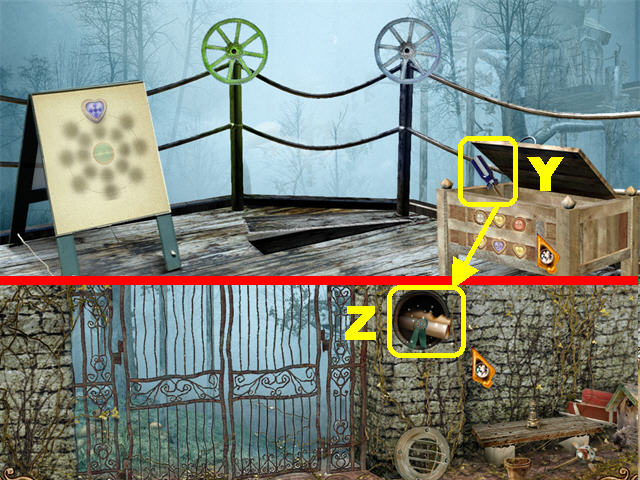
- Grab the SCREWDRIVER (Y) inside the box after the puzzle has been completed.
- Go all the way down and make a left.
- Place the SCREWDRIVER on the grate; take the SCROLL to end the chapter (Z).
Chapter 4
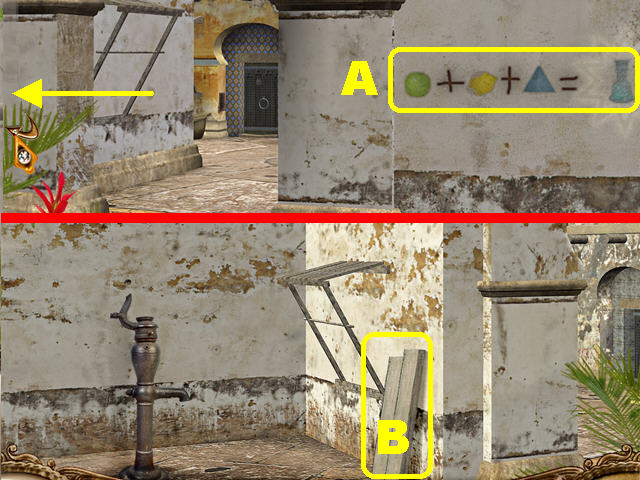
- Note the symbols (A) on the right side of the wall.
- Go left.
- Pick up the WOODEN PLANKS (B).
- Go right and head towards the door in the background.
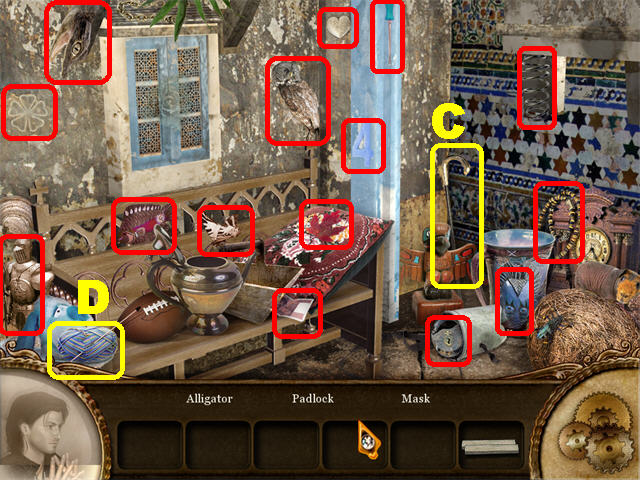
- Zoom into the bench to trigger a Hidden Object Scene.
- The CANE (C) and the YARN (D) will be added to inventory.
- Click on the “X” in the upper right.
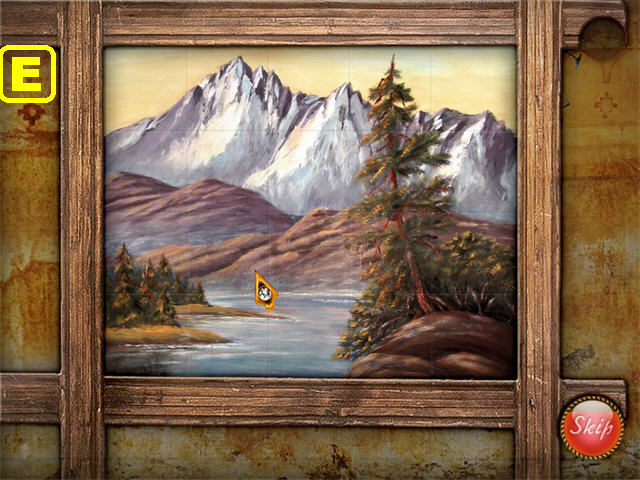
- Click on the picture on right to trigger a puzzle.
- Click on any 2 tiles to swap their positions.
- Please look at the screenshot for the solution (E).
- Take the BOTTLE (F) that appears after the puzzle has been solved.
- Repair the magic carpet (G) with the YARN.
- Click on the magic carpet to go up towards the dragon.
- Go toward the steps on right (H).
- Grab the KEYS (I) on right.
- Take the PUMP HANDLE (J) on left.
- Click down twice.
- Place the KEYS on the door to trigger a puzzle (K).
- Slide the KEY out of the box by moving the bars out of the way.
- Click on bars to slide them. The bars can only slide in the direction they are facing.
- You have to beat 3 stages of this game.
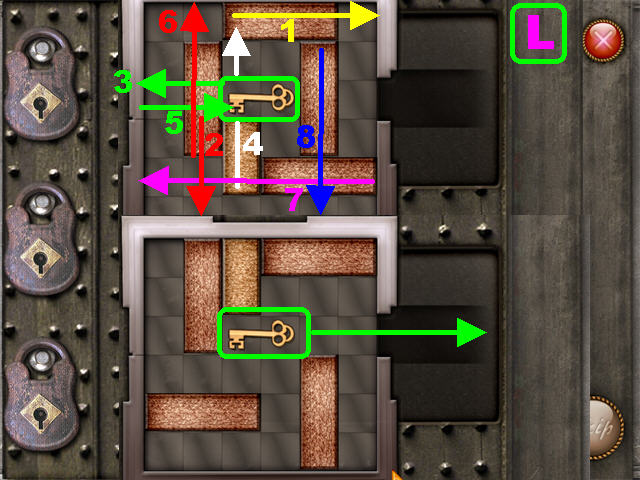
- Please look at screenshot (L) for the solution to the first puzzle.
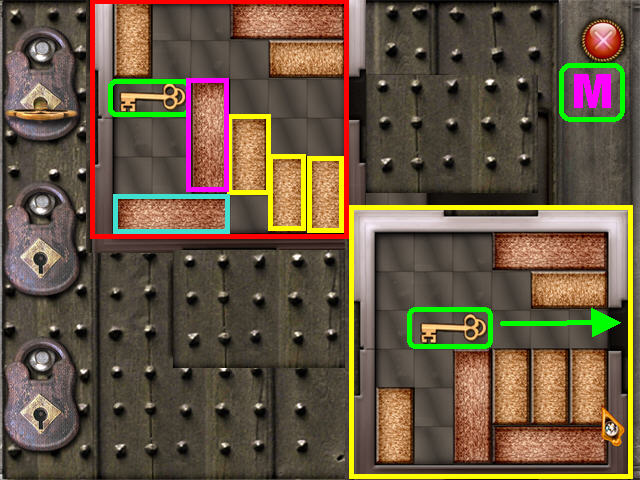
- Please look at screenshot (M) for the solution to the second puzzle.
- Move all the yellow pieces up.
- Slide the light blue piece all the way to the right.
- Slide the purple piece down.
- Move all the yellow pieces down.
- Slide the green key all the way out to the right.

- Please look at screenshot (N) for the solution to the third puzzle.
- Move the light blue piece up.
- Move the yellow pieces up.
- Slide the purple piece all the way to the right.
- Move the white piece down.
- Move the green piece to the right.
- Slide the red piece up.
- Move the yellow pieces down.
- Slide the green key all the way out to the right.
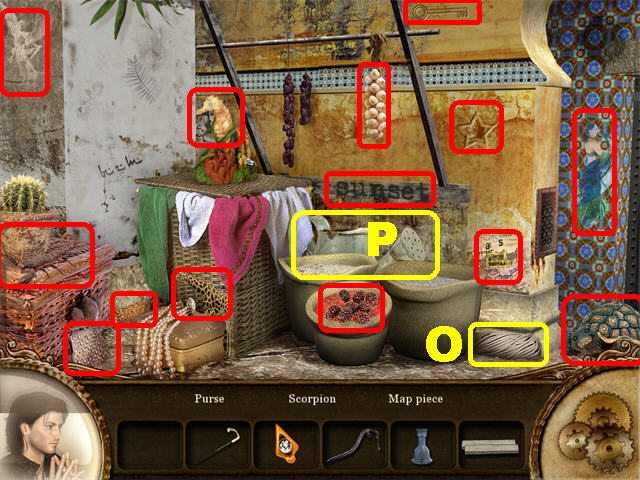
- Click on the basket on left to trigger a Hidden Object Scene.
- The ROPE (O) and the WATERING CAN (P) will be added to inventory.
- Click on the red “X” in the upper right.
- Knock the apples down with the CANE (Q).
- Pick up the GREEN APPLE from the ground (R).
- Leave this scene, take the magic carpet and return to the bridge.
- Place the ROPE on the broken bridge.
- Put the WOODEN PLANKS on the bridge (S).
- Go across the bridge.
- Take the PYRAMID (T).
- Take the magic carpet all the way back down. Click down and head left to access the water pump.
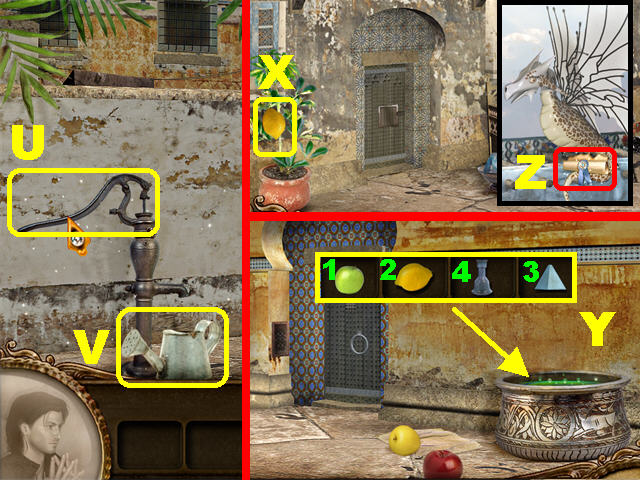
- Place the PUMP HANDLE on the water pump (U).
- Place the WATERING CAN below the water pump.
- Click on the pump handle to fill the watering can.
- Take the FULL WATERING CAN (V).
- Go right, and towards the door in the background.
- Place the FULL WATERING CAN on the potted plant on left to make the plant grow.
- Take the LEMON (X) from the plant.
- Go through the door.
- Place the GREEN APPLE, LEMON, PYRAMID, and BOTTLE in the pot on right to create the POTION (Y).
- Take the magic carpet back to the dragon.
- Give the POTION to the dragon and take the SCROLL (Z) to end the chapter.
Chapter 5
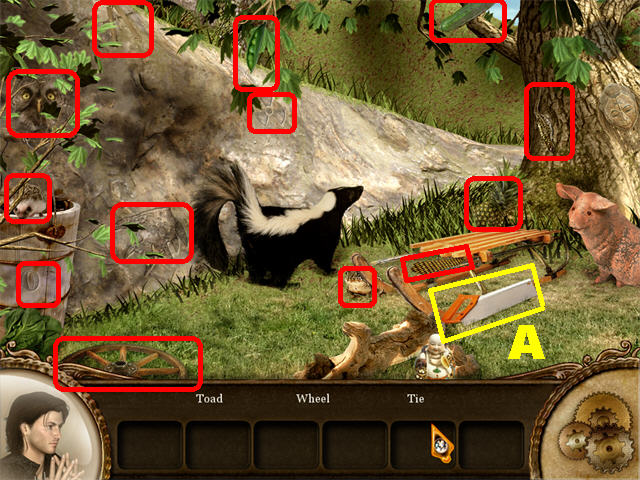
- Click on the tree to trigger a Hidden Object Scene.
- The SAW (A) will be added to inventory.
- Click on the red “X” in the upper right.
- Click on the bird and pick up the FEATHER (B) that falls on the ground.
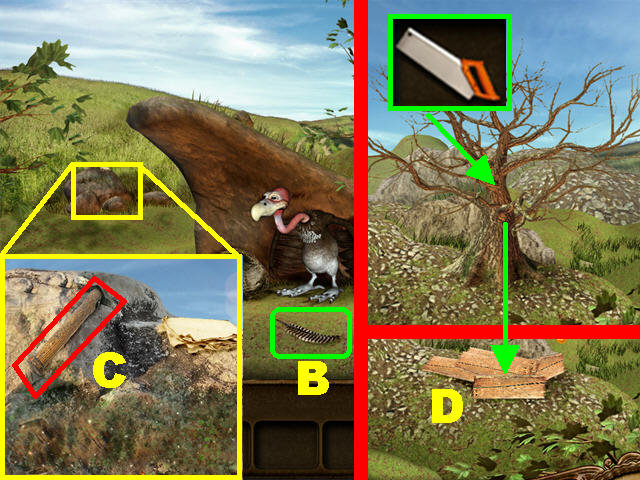
- Zoom into the rocks on left.
- Grab the PICKAXE (C).
- Go right.
- Cut the tree with the AXE and pick up the WOODEN BOARDS (D).
- Go left twice.
- Place the WOODEN BOARDS on the ground.
- Put the PICKAXE on the wooden boards to construct the bridge.
- Cross the bridge.
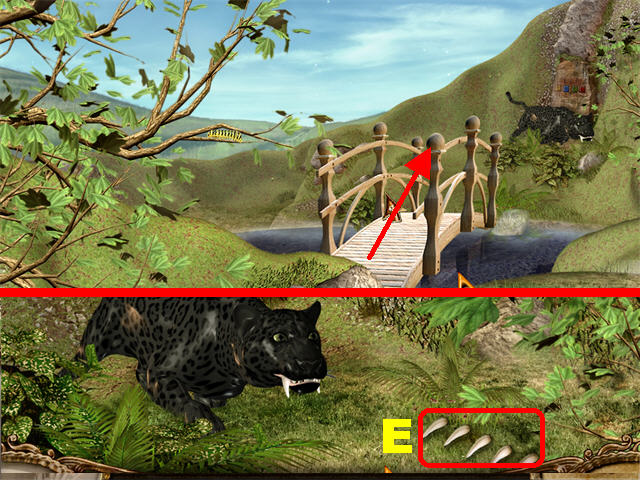
- Click on the FANGS (E) to trigger a mini-game.
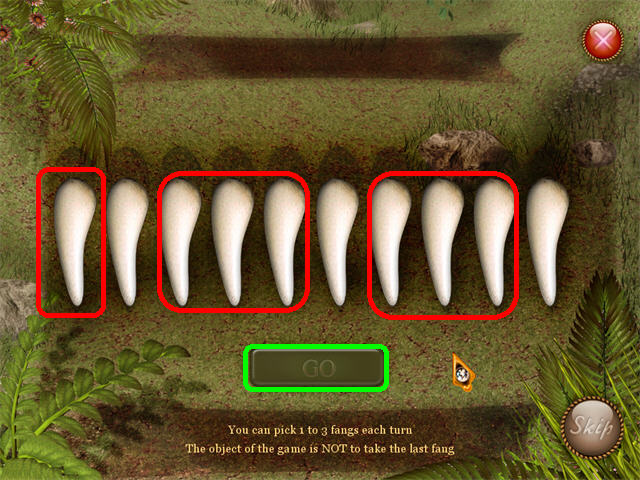
- Your goal is to click on 1 to 3 fangs to eliminate them in such a manner that you do not take the last fang.
- Each time you make a move, the computer will do the same.
- To solve the puzzle click on the fangs in the following order: First round choose 1 fang, second round choose 3 fangs, and last round choose 3 fangs.
- Click on the green “GO” button to enter your selection.
- Take the last FANG (F) on the ground.
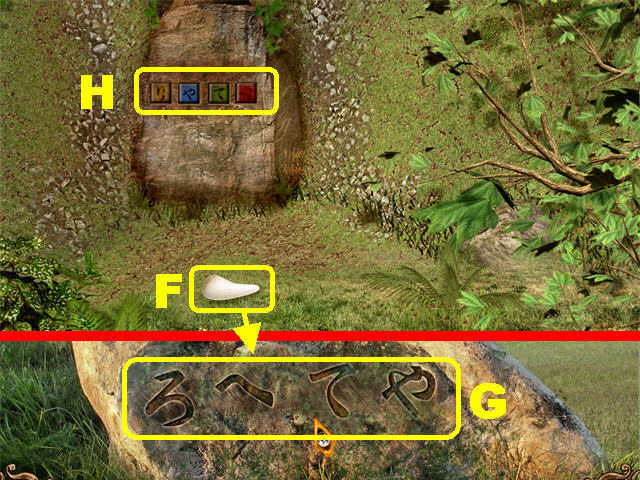
- Go right twice; zoom into the rocks on left.
- Place the FANGS on the side of the rock to reveal some symbols (G).
- Click on the “X” in the upper right, go left and cross the bridge.
- Zoom into the symbols in the back of the scene (H).
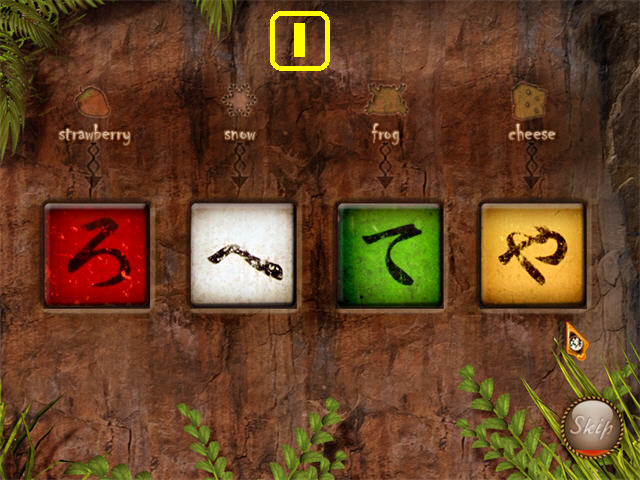
- Enter the symbols on the wall according to the symbols carved on the rock and the words written above each square.
- Please look at the screenshot for the solution (I).
- Go through the cave after the puzzle has been solved.
- Grab the MAGNIFYING GLASS (J) on the ground.
- Cross the bridge and go right.
- Zoom into the rocks on left; place the MAGNIFYING GLASS on the papers.
- Take the BURNING PAPERS (K).
- Return to the cave.
- Place the BURNING PAPERS on the sticks to start a fire (L).
- Click by the bird to activate a Hidden Object Scene.
- The BUTTERFLY NET (M) will be added to inventory.
- Cross the bridge.
- Place the FEATHER on the caterpillar (N) and a butterfly will fall to the ground.
- Grab the BUTTERFLY (O) with the BUTTERFLY NET.
- Return to the cave.
- Give the BUTTERFLY to the bat in the upper right; take the KEYS (P).
- Zoom into the area with the bird.
- Open the box with the KEY and take the EGG (Q).
- Cross the bridge and go right.
- Place the EGG in the nest (R); grab the SCROLL (S) the bird’s holding to end this chapter.
Chapter 6

- Head right.
- Click on the rickshaw to trigger a Hidden Object Scene.
- The PINCERS (A) and the KEY (B) will be added to inventory.
- Click on the red “X” in the upper right.
- Take BELL 1/4 on left (C).
- Go left.
- Take BELL 2/4 in upper left (D).
- Note the positions of the elephants above the door (E). You’ll need that solution for a puzzle.
- Open the lock with the KEY (F); go through the door.
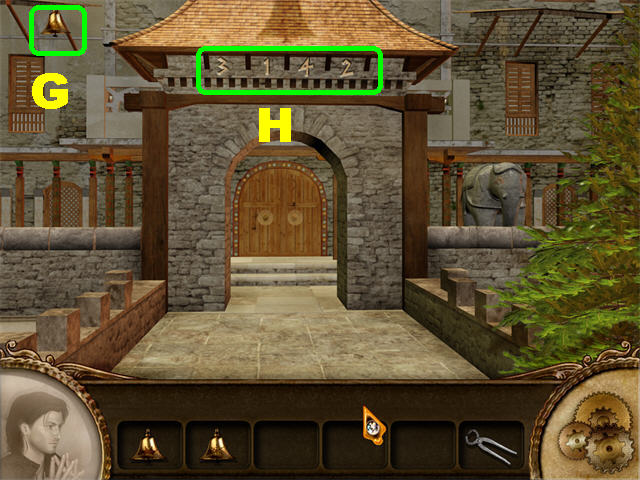
- Take BELL 3/4 (G) in the upper left.
- Note the numbers 3142 above the arch (H).
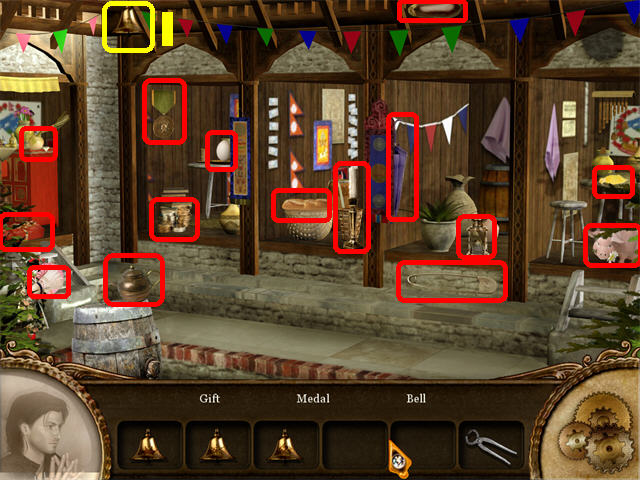
- Click on the right house to trigger a Hidden Object Scene.
- BELL 4/4 (I) will be added to inventory.
- Click on the red “X” in the upper right and head right.
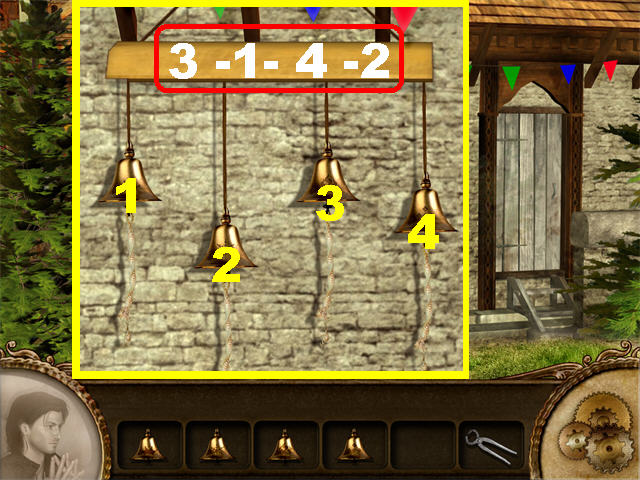
- Place the BELLS on the wall.
- Press on the bells in the order marked above the arch at the beginning of this chapter.
- To solve the puzzle click on the bells in this order:”3-1-4-2”.
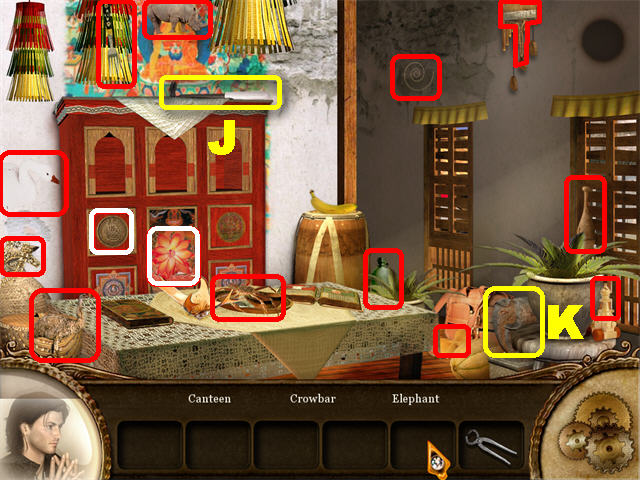
- Go through the door to trigger a Hidden Object Scene.
- The CROWBAR (J) and the ELEPHANT (K) will be added to inventory.
- Click on the “X” in the upper right, go left twice and click down.
- Move the drum (L) with the CROWBAR.
- Grab the DEFLATED BALLOON (M) below the drum.
- Go through the door.
- Place the ELEPHANT on the left (N).
- Click on each elephant until they face each other as they do outside the door.
- Go through the door after the elephants are in place.
- Click on the painting to trigger a puzzle.
- Pick up the puzzle piece and Right-click it to rotate it.
- Left-click on a piece to snap it in place.
- Please look at the screenshot for the solution (O).
- Remove the SCREW (P) with the PINCERS after the puzzle has been solved.
- Take the LION STATUE (Q) on the floor.
- Click down and head right.
- Place the LION STATUE above the post (R); take the AIR PUMP HANDLE (S).
- Go left and go through the door.
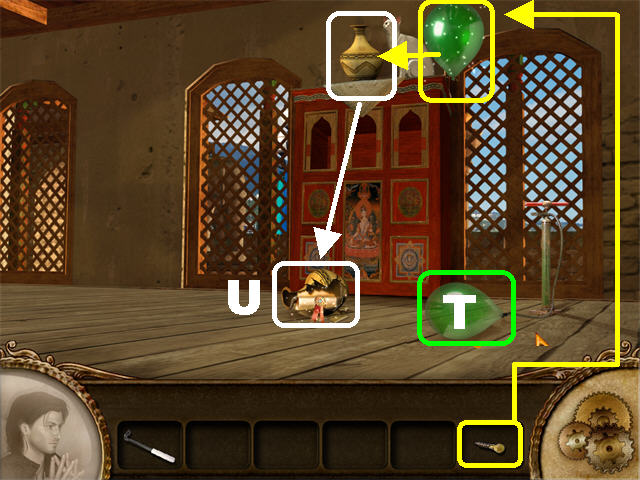
- Place the AIR PUMP HANDLE on the air pump.
- Place the DEFLATED BALLOON as shown in the screenshot (T).
- Click on the handle to inflate the balloon.
- Click on the balloon to make it rise next to the cat.
- Pop the balloon with the screw to make the vase fall to the ground.
- Take the SCROLL (U) from the broken case.
Chapter 7

- Click on the puzzle on the floor to activate it.
- Arrange the symbols according to their stages using the locked pieces as a guide. For example, the letters need to be placed in alphabetical order. The eyes need to be arranged by the order in which the eyes are opened.
- Click on 2 tiles to swap their locations.
- Please look at the screenshot for the solution (A).
- Take the CANDLE (B) leaning against the right vase.
- Take the KEY (C) on the ground after the puzzle has been solved.
- Open the lock (D) with the KEY; go through the door to access the palace.
- Take the BLUE GEM (E) in the lower right.
- Click on the furniture on left to trigger a Hidden Object Scene.
- The HEART GEM (F) and the SUN (G) will be added to inventory.
- Click on the red “X” in the upper right.
- Place the SUN on the door to trigger a puzzle.
- Your goal is to place the moon in the upper left slot and the sun in the upper right slot (according to the images behind them).
- Please look at the screenshot for the solution (H).
- Go through the door after the puzzle has been solved.
- Click on the right side to trigger a Hidden Object Scene.
- The MALLET (I) and the PENDANT (J) will be added to inventory.
- Light the UNLIT CANDLE in inventory with the candle in the lower right side of the scene (K).
- Click on the red “X” in the upper right.
- Take the PURPLE GEM (L) in the upper right.
- Go through door.
- Light the two candles on the ground with your LIT CANDLE.
- Place the PENDANT on the podium (M).
- Take the AMBER GEM (N) that appears in the open box.
- Go outside.
- Break the left vase with the MALLET; take the BLUE GEM (O).
- Go through the next 2 doors.
- Place the GEMS on the box (P) to trigger a puzzle.
- Put all the gems in the correct slots.
- Right-click a piece to rotate it. Left-click on a piece to snap it in place.
- Please look at the screenshot for the solution (Q).
- Grab the TUBE (R) inside the box after the puzzle has been solved.
- Go through door and make a right.
- Place the TUBE on the altar; take the SCROLL (S) to end the chapter.
Chapter 8
- Zoom into the lower left side of the scene to trigger a Hidden Object Scene.
- The MAGNET (A) and the GLOVE (B) will be added to inventory.
- Click on the red “X” in the upper right.
- Go forward.
- Take a closer look at the left building.
- Click on the painting to activate a puzzle.
- Assemble the puzzle by placing the correct pieces of the painting in place.
- Pick up the puzzle piece and Right-click it to rotate it.
- Left-click on a piece to put it in place.
- Please look at the screenshot for the solution (C).
- Click on the red “X” in the upper right.
- Use the MAGNET to retrieve the SCISSORS (D) from the grid.
- Pick up the VALVE (E) on the right.
- Click on the “X” in the upper right, click down and go right twice.
- Cut the horse’s hair with the SCISSORS to make the horse move out of the way.
- Take the SHOVEL (F) on left.
- Click on the left table to activate a Hidden Object Scene.
- The OIL CAN (G) and the WOOD PLANK (H) will be added to inventory.
- Click on the “X” in the upper right. Go left twice and then forward.
- Put the SHOVEL on the patch of dirt at the base of the tree; take the DISC (I).
- Go right; take a closer look at the right corner of the pool.
- Place the DISC (J) on the ground to trigger a puzzle.
- Click and hold the rings to rotate them until they form the image shown in the screenshot (K).

- Take the HORN (L) using the GLOVES.
- Click on the red “X” in the upper right.
- Place the WOOD PLANK on the side of the pool.
- Wake up the turtle with the HORN.
- Click the turtle to make it move and the WRENCH be automatically added to inventory.
- Go left, click down and head right.
- Place the OIL CAN (M) on the hood of the vehicle to lift it.
- Click inside the hood to trigger a puzzle.
- Your goal is to put the correct images in place according to the pictures in the top row.
- Click on any 2 tiles to swap their positions.
- The colors of the arrows indicate the color of the item in that row.
- Please look at the screenshot for the solution (N).
- Place the VALVE (O) in the front of the vehicle.
- Secure the VALVE with the WRENCH.
- Click on the SCROLL (P) that appears on the ground after the vehicle moves out of the way.
- Click on any 2 pieces of paper to swap their positions.
- Please look at the screenshot for the solution (Q).
- The End!
Created at: 2010-09-06