
Walkthrough Menu
- General Tips
- Chapter 1: The Cottage
- Chapter 2: The Garden
- Chapter 3: Bonus Chapter – The Cave
- Chapter 4: The Mountain
- Chapter 5: The Giant's Head
- Complete HOG list
- Achievements
General Tips
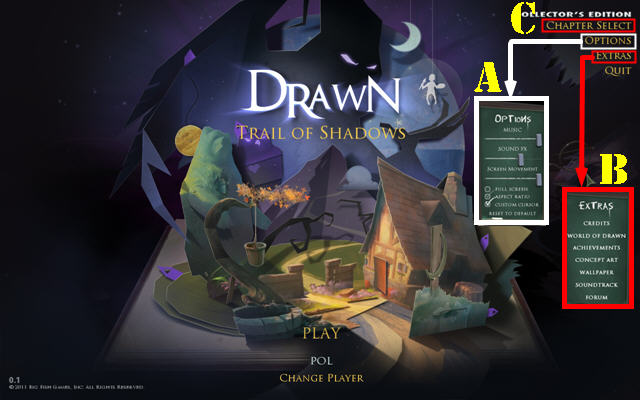
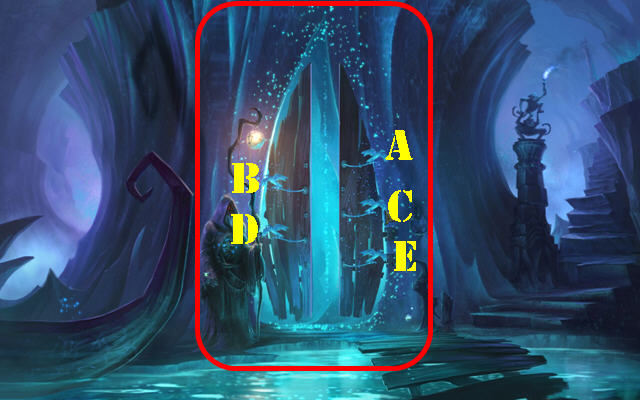
- Click on OPTIONS (A) in the main menu to adjust screen movement, music, sound, custom cursor, and screen size.
- Click on EXTRAS (B) to view the credits, achievements, wallpaper, soundtrack, concept art, and access the forum.
- The CHAPTER SELECT (C) option appears after you complete the game. You can replay any chapters you wish in order to collect missing HOGS or complete an Achievement.
- The best way to use this walkthrough is by clicking on the 'CTRL' and 'F' keys on your keyboard to simultaneously bring up a search box.
- Type the keyword into the search box at the bottom of your screen and click on 'NEXT' to find the section you need help with. Clicking 'NEXT' again will bring up all instances in which that keyword was mentioned in the guide.
- Read the letters and notes found throughout the game, they will give you information regarding gameplay and storyline.
- The sketches in your inventory can be used to unlock certain areas in the game.
- The hand cursor allows you to pick up inventory items.
- A magnifying glass icon allows you to zoom into certain areas or pick up inventory items.
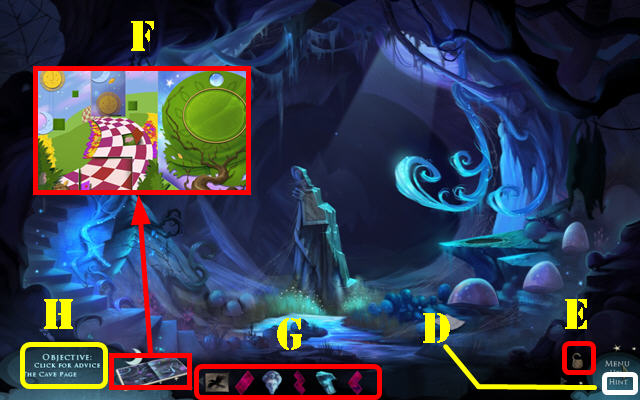
- Click on 'Hints' (D) in the lower right to access the Smart Guide. It knows where you are in the game and will lead you to the next step.
- Click on the lock icon (E) in the lower right to manage your inventory tray. When it is in the locked position your inventory tray will remain visible. If you decide to unlock it, the inventory tray will become visible once you mouse over it with your cursor.
- Some inventory items will be used right away and others will be used much later in the game. Place inventory items in parts of the scene in which a jigsaw piece appears.
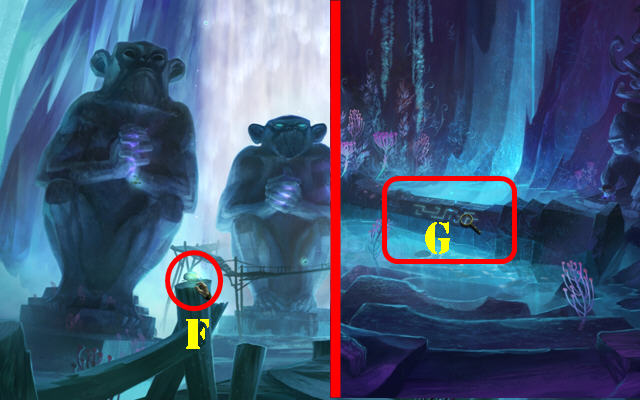
- Open the STORYBOOK (F) to access puzzles and find HOGS. There are 27 HOGS to find in the game; some are in the book and others are in the world. All HOGS are marked with the '@' symbol in the screenshots.
- Inventory items (G) are stored in the bottom tray. Use the arrows on either side of the inventory tray to scroll through all available items.
- Click on the Objective button (H) in the lower left side and then on the objective for a broader explanation.
Chapter 1: The Cottage
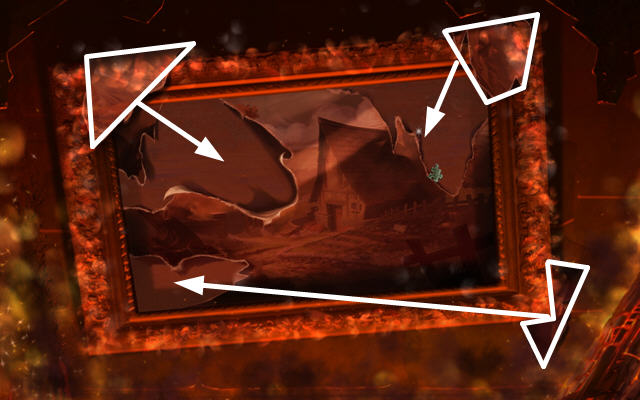
- Zoom into the painting.
- Click on the 3 SCRAPS OF CANVAS marked in white.
- Place the 3 SCRAPS OF CANVAS on the painting.
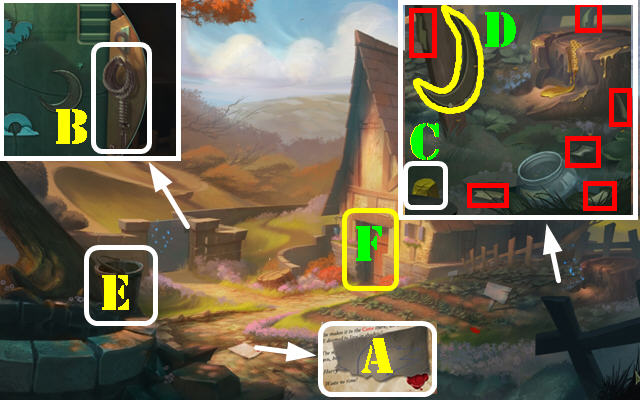
- Take the SCRAP OF PAPER (A).
- Zoom into the gate; take the ROPE (B).
- Examine the tree stump area on the right side of the house.
- Take the YELLOW STONE (C).
- Click on the 6 moon pieces marked in red to automatically add the pieces to the moon shape on left.
- Take the LITTLE MOON (D).
- Grab the WOODEN BUCKET and take the COTTAGE KEY underneath (E).
- Use the COTTAGE KEY on the door and enter the cottage (F).

- Examine the box; take the BLUE STONE (G).
- Zoom into the desk; take the CHARCOAL (H).
- Take the METAL POT (I).
- Zoom into the fireplace; take the IRON TONGS (J).
- Use the IRON TONGS to grab the GLOWING SUN (K).
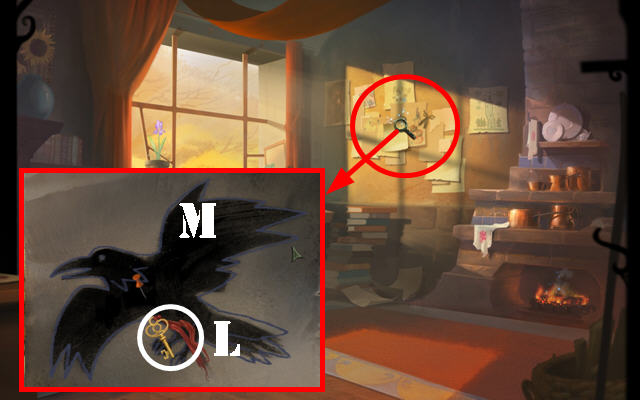
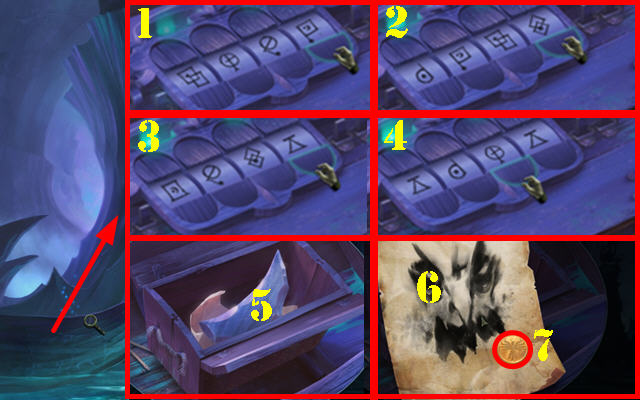
- Zoom into the papers on the wall.
- Click on the papers to scatter them around.
- Put the SCRAP OF PAPER on the board.
- Drag the scraps onto the pinned image to recreate the raven drawing.
- Use the CHARCOAL to draw in the wing.
- Take the STORYBOOK KEY (L) and the RAVEN SKETCH (M).
- Zoom into the desk again.
- Use the STORYBOOK KEY on the book's lock.
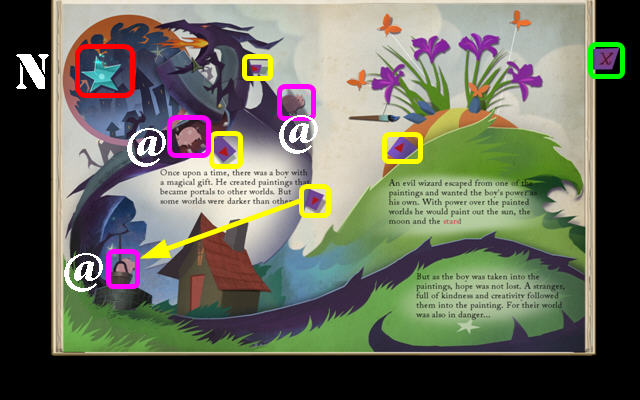
- Pull on the 4 tabs marked in yellow to reveal all parts of the pop-up book.
- Open the tab on the dragon's belly; take the 1/27 HOGS (@).
- Click on the dragon's wing and take HOG 2/27 (@).
- Lower and lift the bucket in the well by pulling on the center tab; take the 3/27 HOGS (@).
- Take the SMALL STAR (N).
- Click on the ‘x' (green) in the upper right to exit out of the book. The Storybook will be available in the lower left corner from now on.
- Exit the cottage.
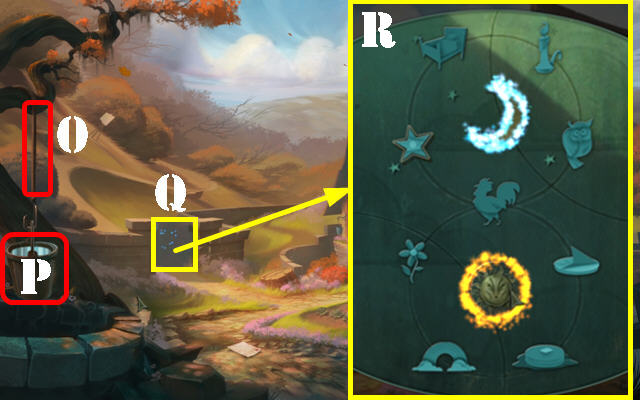
- Put the ROPE over the torn rope on the tree (O).
- Place the WOODEN BUCKET on the hook attached to the rope to lower the bucket into the well (P).
- Put the GLOWING SUN into the bucket of water to receive the LITTLE SUN.
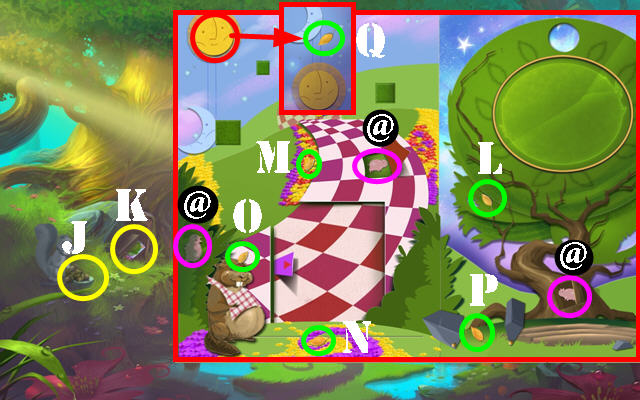
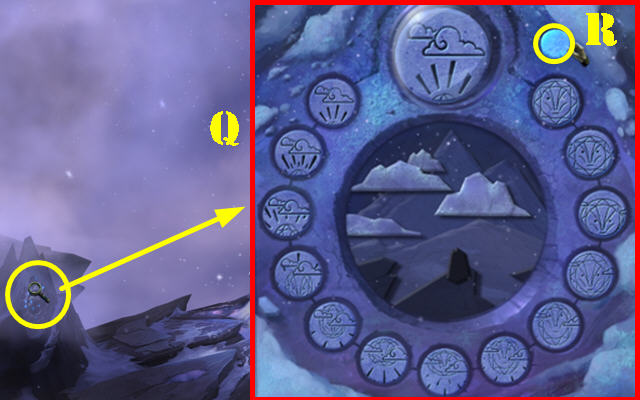
- Examine the gate (Q).
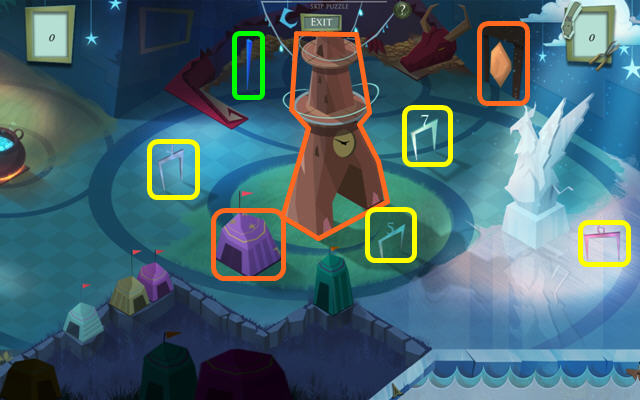
- Put the LITTLE MOON, SMALL STAR and the LITTLE SUN in their respective slots to activate a puzzle.
- Click on the MOON or the SUN in the center to rotate the symbols.
- On the top circle you should place all the items that have to do with nighttime (bed, candle, owl, and star).
- On the bottom circle, you should put all the items that have to do with daytime (flower, sundial, pancakes, and rainbow).
- Where both circles intersect, you should put the symbol that can belong to either day or night (rooster).
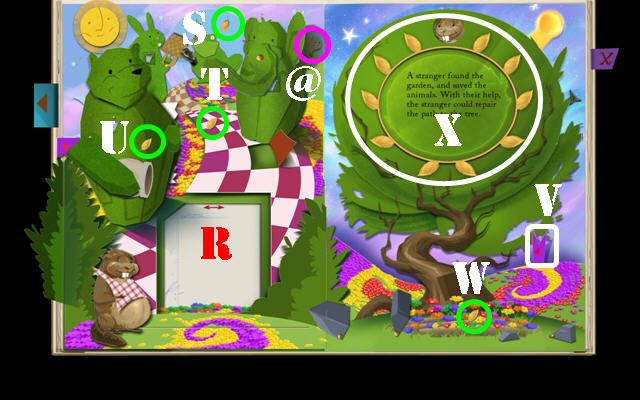
- Please look at the screenshot for the solution (R).
- Go through the gate.
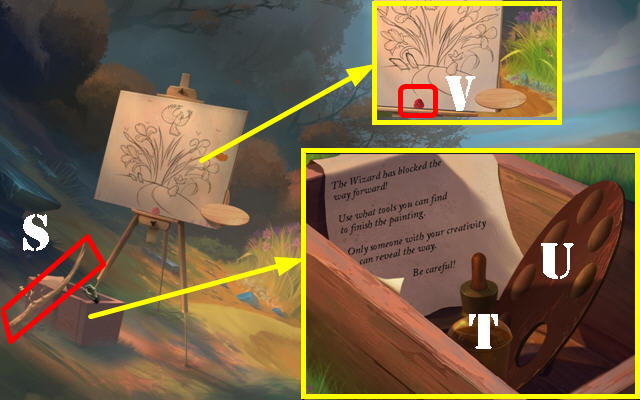
- Take the SHARP STICK next to the box (S).
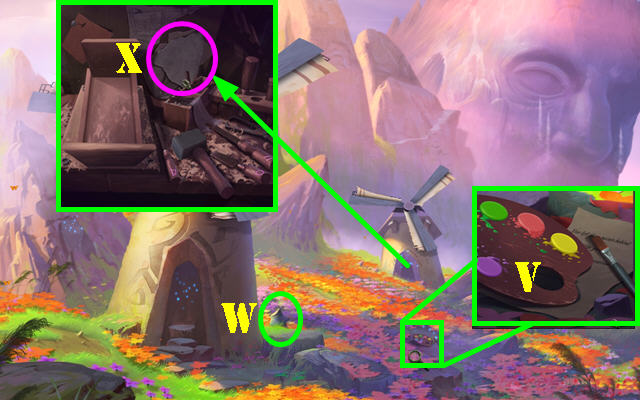
- Zoom into the box; take the LINSEED OIL (T) and the PALETTE (U).
- Examine the easel; take the RED STONE (V).
- Return to the outside of the cottage. Zoom into the tree stump on the right side of the house.
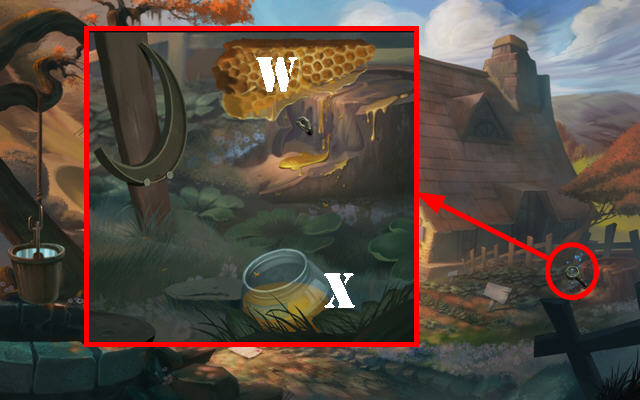
- Use the SHARP STICK on the hardened beeswax (W).
- Click on the hardened beeswax to put it above the jar.
- Move the honey left and right so the drops of honey fall into the jar.
- Take the JAR OF HUNNY as soon as it is full (X).
- Take the HARDENED BEESWAX.
- Go back inside the cottage.
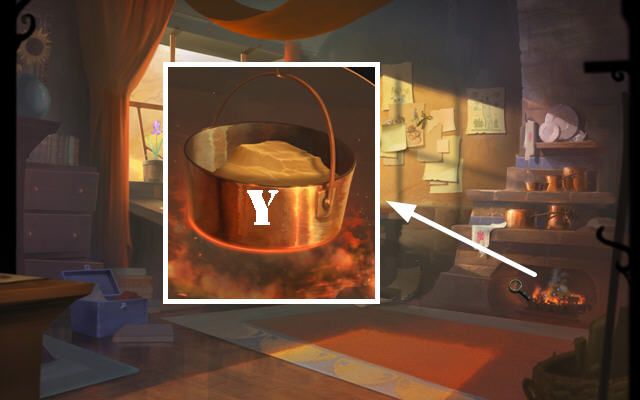
- Zoom into the fireplace.
- Put the METAL POT on the hook (Y).
- Put the HARDENED BEESWAX in the pot and take the SOFTENED BEESWAX.
- Zoom into the desk.
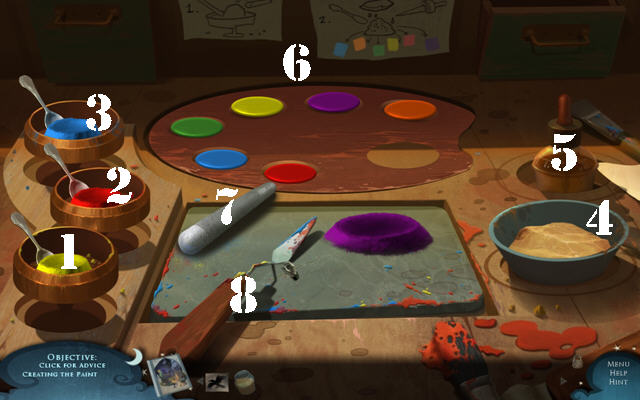
- Put the YELLOW STONE (1), RED STONE (2), and BLUE STONE (3) in the bowls.
- Put the SOFTENED BEESWAX into the bowl on the right (4).
- Put the LINSEED OIL on the right (5).
- Put the PALETTE in the back (6).
- Use the PESTLE (7) in each of the 3 paint bowls 3 times to pulverize the colored stones.
- Mix the colors so they can be automatically added to the palette.
- To create a color for the palette, click on a colored powder to add it to the tray. Then click on the LINSEED OIL followed by the SOFTENED BEESWAX.
- Use the PALETTE KNIFE (8) to smooth out the colors and automatically add them to the palette.
- Create the RED, BLUE, and YELLOW colors as described above to add those colors to the palette.
- To make your own colors, follow the same steps as above but add 2 different colors to the tray instead of 1.
- To make ORANGE, mix RED and YELLOW.
- To make PURPLE, mix RED and BLUE.
- To make GREEN, mix BLUE and YELLOW.
- The PALETTE OF PAINT will be added to inventory.
- Return to the hillside and zoom into the palette.
- Put the PALETTE OF PAINT on the side of the easel to activate the puzzle.
- Using the colors in the background as a clue, paint the canvas with the same colors.
- Dip the brush in the color of your choice to add it to the brush. Click the brush onto the part of the canvas you would like to paint.
- The road is yellow. The side of the road is orange. Paint the butterflies in orange.
- The grass is green. The Cardinal needs to be painted red. The 3 stones should be painted in blue. The flowers should be purple.
- Please look at the screenshot for the solution (Z).
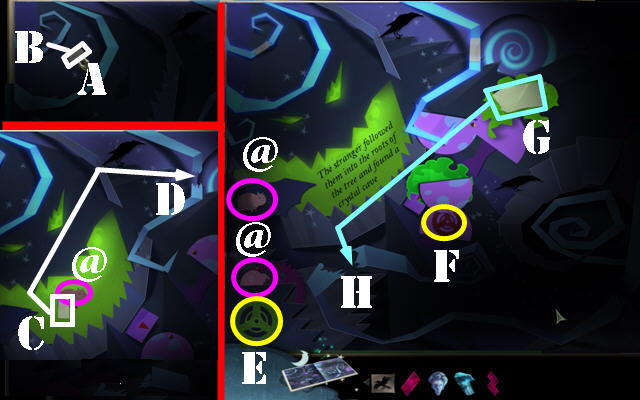
- Follow the Cardinal.
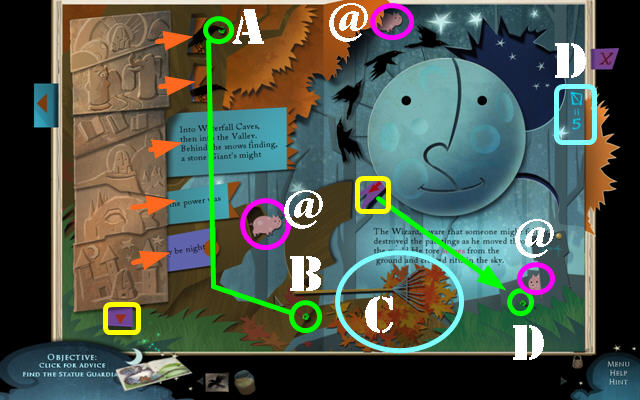
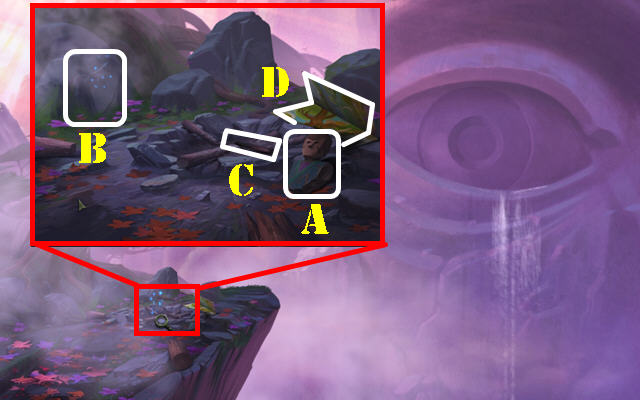
- Examine the stone on the ground; take the STORYBOOK PAGE.
- Pull on the 2 tabs marked in yellow. Note: Pulling the tab below the moon makes a green stone fall on the ground.
- Click on the top raven and it will drop the green stone (A).
- Take the GREEN STONE on the ground (B).
- Pull out the 5 tabs on the left side of the book (orange arrows).
- Use the RAKE on the leaves (C); take the GREEN GEM (D).
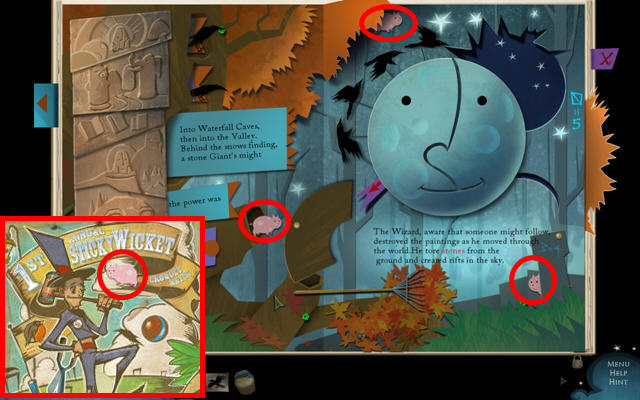
- Click on the 4/27 HOG (@) in the lower right.
- Click on the orange patch in the upper left; take HOG 5/27 (@).
- Move the cover on the left; take the 6/27 HOG (@).
- Click on the patch of grass on the right to reveal a formula (D).
- Exit the book.
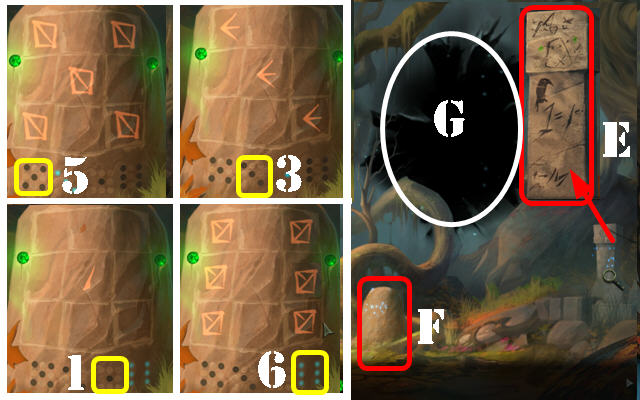
- Examine the column on the right; note the symbols and the green stones (E).
- Examine the stone; put the 2 GREEN STONES in the 2 holes to activate a puzzle (F).
- Recreate the patterns glowing at the bottom of the stone on the rock.
- The number of dots represents the type of symbols you need to recreate the pattern.
- Please look at the screenshot for the solutions (5, 3, 1, and 6).
- Take the FOREST FRAGMENT at the bottom of the stone.
- Put the FOREST FRAGMENT in the rip in the sky and go forward (G).
Chapter 2: The Garden
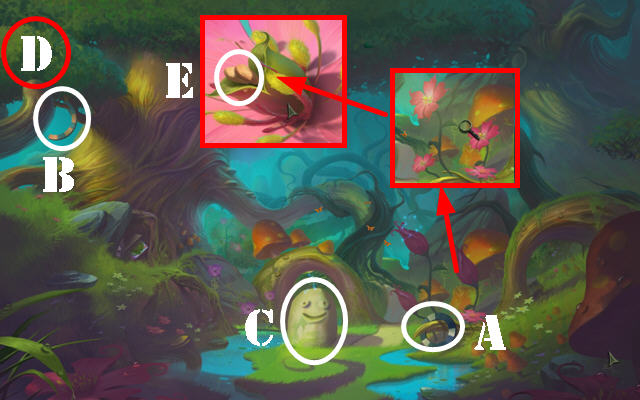
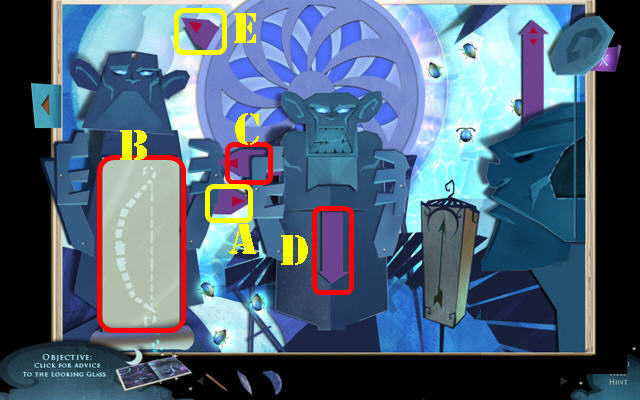
- Grab the WOODEN RING (A) and the RING PIECE (B).
- Zoom into the stone; note the carvings (C).
- Click on the branch in the upper left (D) to let the sunlight shine through to the scene.
- Open the flower and take the SEEDS (E).
- Go forward.
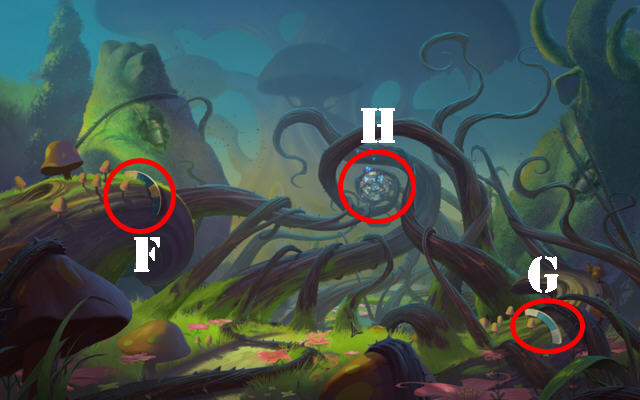
- Grab the 2 RING PIECES (F and G).
- Zoom into the strange device (H).

- Put the 3 WOODEN RINGS and the 3 RING PIECES on it to activate a puzzle.
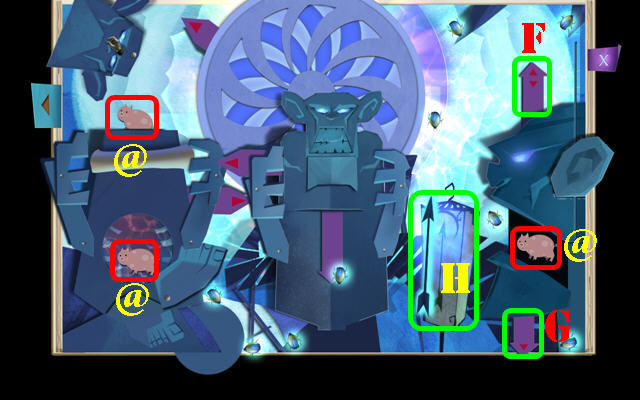
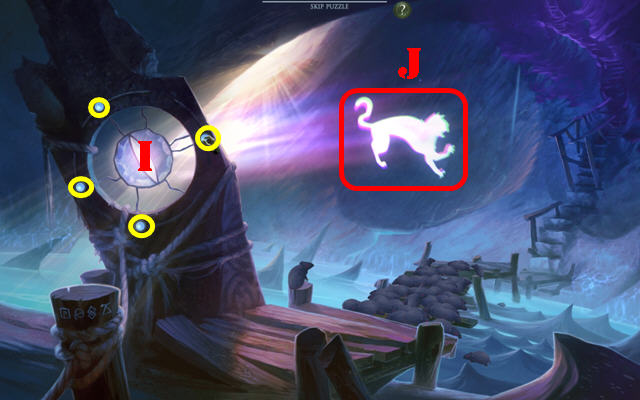
- Click on the center of the puzzle to release the energy onto the ring (I).
- Use the arrows to channel the energy from the center into each of the 3 eyes.
- Click on an energy source as it passes through a section with an arrow (or arrows) pointing upwards to transfer the energy to the next ring (J).
- Continue passing the energy through until you can pass it through all 3 of the eyes. Note: To earn the Achievement for this game you must light up all 19 tabs at once.
- Check out our video solution!
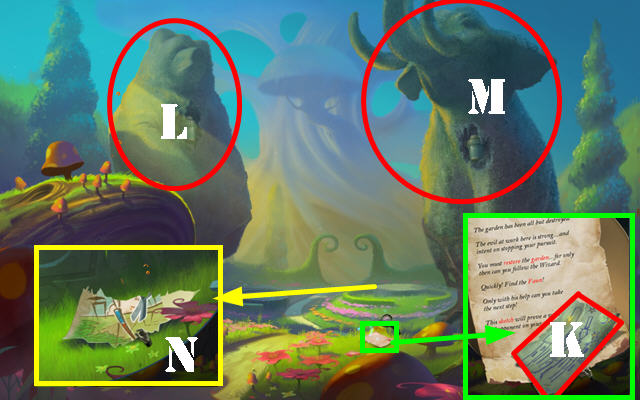
- Take the LAMPLIGHTER SKETCH (K).
- Click on the bear (L) and elephant (M) topiaries; they will ask for water for their roots.
- Zoom into the stone base on the right; take the CROQUET SCRAP (N).
- Go forward.
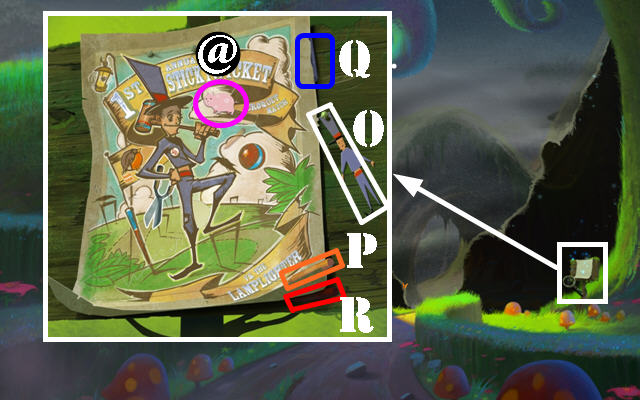
- Examine the sign.
- Pull out the lamplighter cutout on the side (O).
- Take the HOG 7/27 (@) on the sketch.
- Take the ORANGE CRAYON (P), BLUE CRAYON (Q), and RED CRAYON (R).
- Put the CROQUET SCRAP on the torn image.
- Use the crayons to color in the different parts of the lamplighter.
- The ORANGE CRAYON needs to go on his face, hands, and belly.
- Use the RED CRAYON on the band around the hat and belt.
- Once the lamplighter has been painted correctly, a mini-game will appear.
- You must beat the lamplighter in a game of croquet.
- Pull back the mallet to launch the ball; the further back you click on it, the more speed you will have.
- Hit the ball into the wickets.
- A red arrow shows when it is your turn to play and it also shows your next target.
- At the end of the round, whether you win or lose, you will earn the SHEARS.
- Check out our video solution for the Wicket Shot Achievement!
- To earn the 'Fairway Fever' Achievement you must hit 6 of the 7 targets marked in orange.
- To earn the 'Wicket Shot' Achievement you must go through the 7 wickets (marked in yellow) and hit the blue pole (green) in 10 turns or less. If you make a shot, it will be your turn again until you miss.
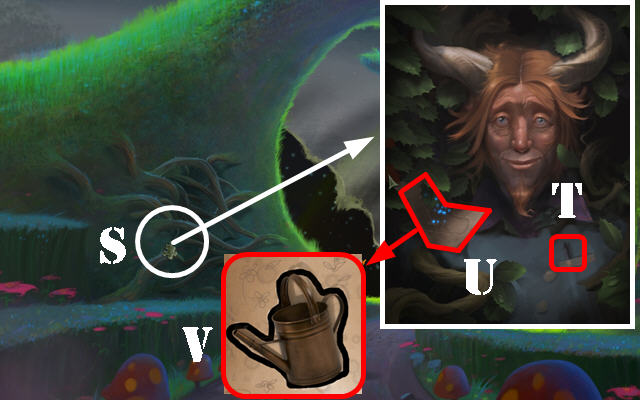
- Use the SHEARS on the roots on the left 3 times.
- Zoom into the roots (S); take the BLACK CRAYON from the fawn's shirt pocket (T).
- Click on the paper (U).
- Use the BLACK CRAYON to outline the edges of the drawing.
- Take the WATERING CAN (V).
- Click down twice.
- Use the WATERING CAN in the water pool to obtain the CAN OF WATER (W).
- Go forward.
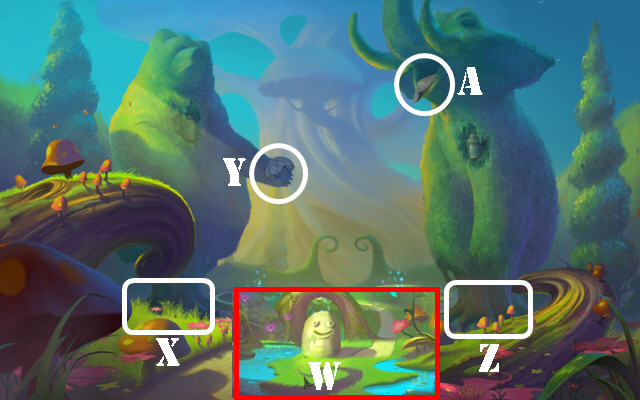
- Water the roots of the bear topiary (X) with the CAN OF WATER.
- Give the JAR OF HUNNY to the bear topiary; take the RABBIT MEDALLION from its hand (Y).
- Water the roots of the elephant topiary (Z) with the CAN OF WATER.
- Take the PAINTING SCRAP from the elephant's mouth (A).
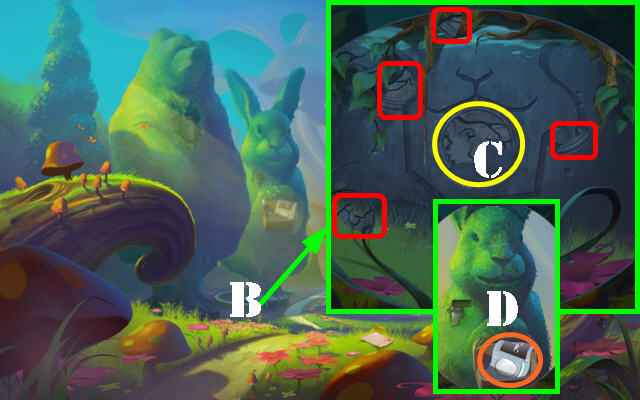
- Zoom into the stone base on the left (B); click on the 4 medallion pieces marked in red to add them to the slot.
- Put the RABBIT MEDALLION in the slot (C).
- Zoom into the rabbit's basket; it wants 3 eggs to put in it.
- Click on the STORYBOOK PAGE (D).
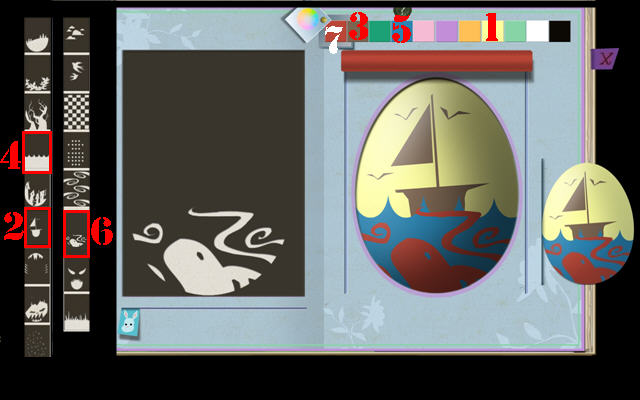
- You must recreate the designs of 3 eggs.
- Click on the color wheel on the right page to show all the colors.
- Choose a stencil on the left to add it to the left page.
- Use the bunny tab at the bottom of the left page to slide that image onto the right page.
- Click on the color you want to use on that image and then click on the roller to apply it.
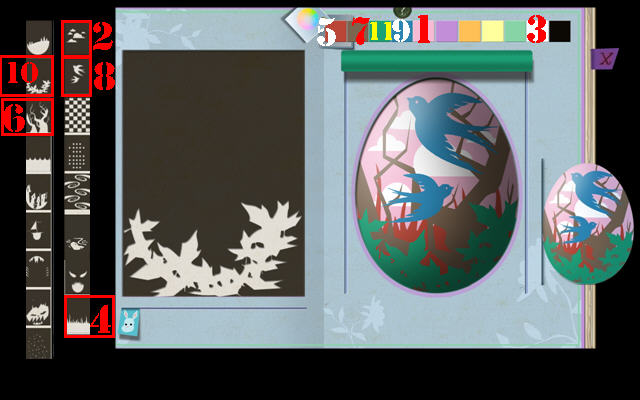
- Slide the bunny tab back to the left to move the image off the right page.
- Select another image on the left to repeat the same process until each egg has been completed.
- If you make a mistake just paint over the background with the base or background color.
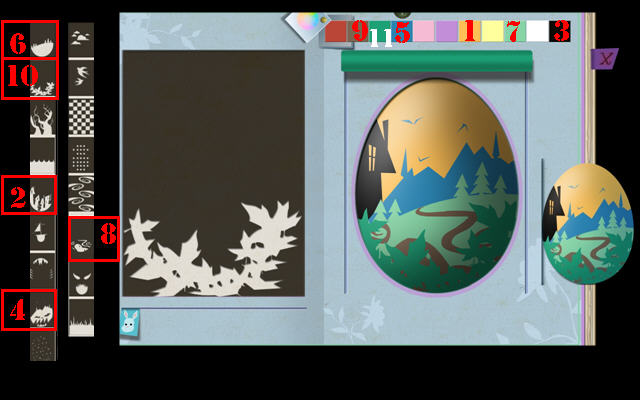
- The screenshots show you a step-by step solution for all 3 eggs.
- Check out our video solution!
- Zoom into the bunny topiary; put the 3 PAINTED EGGS into the basket (E).
- Take the FROG MEDALLION (F).
- Zoom into the stone base on the right (G).
- Put the FROG MEDALLION in the slot for the frog topiary to appear (H).
- Zoom into the frog topiary; take the ACORNS (I).
- Click down.
- Put the ACORNS on the rock in the lower left for the squirrel to appear (J).
- Take the STORYBOOK PAGE in the tree hole (K).
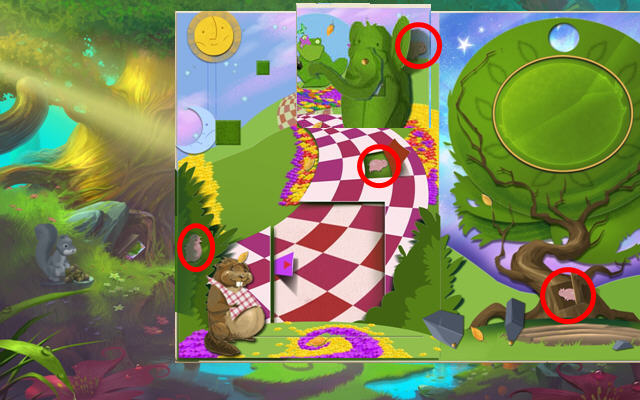
- Open the checkered tab on the path; take HOG 8/27 (@).
- Open the tab at the base of the tree; take HOG 9/27 (@).
- Click on the left bushes; take HOG 10/27 (@).
- Take the LEAF (L) on the tree.
- Take the LEAF next to the checkered path (M).
- Take the leaf on the ground (N).
- Move the beaver to the left; take the LEAF on his head (O).
- Move the stone on the right page; take the LEAF (P).
- Click on the sun; take the LEAF in the upper left (Q).
- Open the small door in the lower left (R).
- Slide the beaver to the right and then the left to create the frog topiary.
- Put the frog topiary on the green platform; click on it and take the LEAF (S).
- Slide the arrow in the door to the left to bring up another bush. Slide the beaver to the right and then the left to create the bunny topiary.
- Put the bunny on the green platform; swing the basket around and take the LEAF on the checkered path (T).
- Slide the arrow in the door to the left to bring up another bush. Slide the beaver to the right and then the left to create the bear topiary.
- Put the bear topiary on the green platform.
- Slide the arrow in the door to the left to bring up another bush. Slide the beaver to the right and then the left to create the elephant topiary.
- Place the elephant topiary on the green platform.
- Click on the elephant's ear; take HOG 11/27 (@).
- Swing the elephant's trunk so the water fills the pot the bear is holding; take the LEAF (U).
- Slide the tab below the tree to make a field of flowers appear (V).
- Swing the elephant's trunk so the water falls on the soil in front of the tree; take the LEAF (W).
- Take the GOLDEN CROWN (X).

- Exit out of the book and go forward.
- Zoom into the frog topiary and place the GOLDEN CROWN on its head (Y).
- Take the PAINTING SCRAP from the frog's hand (Z).
- Go forward.
- Place the 2 PAINTING SCRAPS on the torn canvas.
- Click on the fawn; it says you must restore the flowers at the base of the tree.
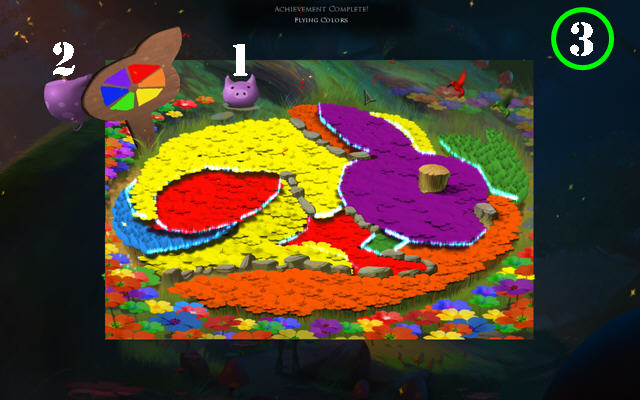
- Zoom into the ground; put the SEEDS and the CAN OF WATER on the ground to activate a puzzle.
- Click on a flower and then on a white section for a hummingbird to paint that section.
- Take the hog head (1) and put it on the pig body (2) to wipe the slate clean.
- Please look at the screenshot for the solution (3).

- Collect 4 FIREFLIES in the scene.
- Place your cursor on the screen; click on a firefly once the cursor turns into a hand (4).
- Put the 4 FIREFLIES into each of the 4 lanterns marked in white.
Chapter 3: Bonus Chapter – The Cave
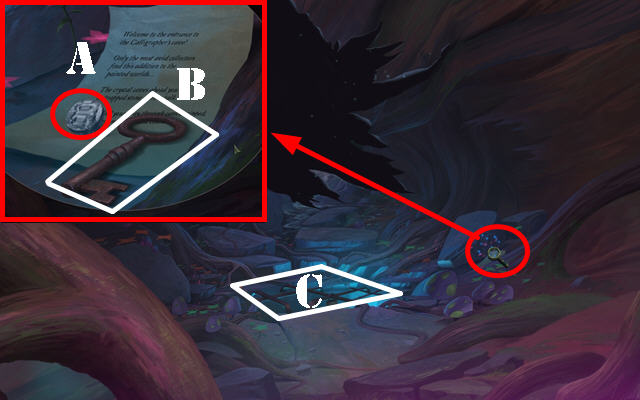
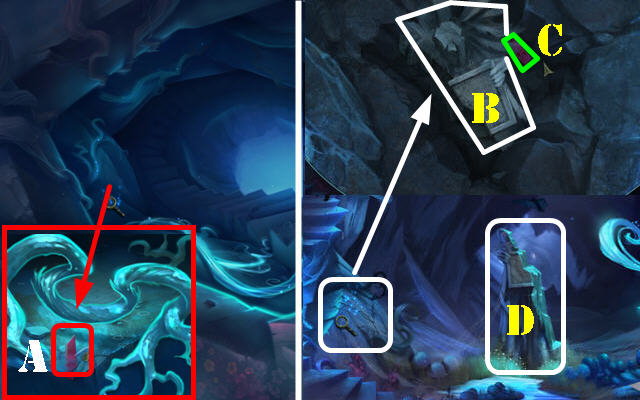
- Examine the rocks in the lower right; take the DIAMOND (A) and the IRON KEY (B).
- Use the IRON KEY on the iron grate (C).
- The Collector's Edition Area has been unlocked!
- Go down into the hole.
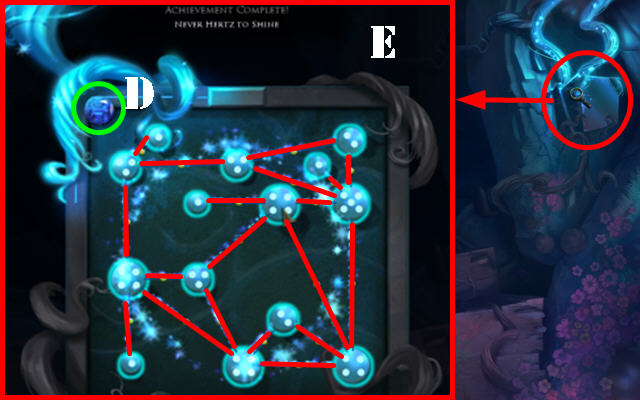
- Click on the puzzle in the upper right.
- Take the SAPPHIRE (D).
- Connect the dots between the mushrooms according to the dots on each one.
- To undo a line, click on the yellow dots in the center of each connection.
- Please look at the screenshot for the solution (E).
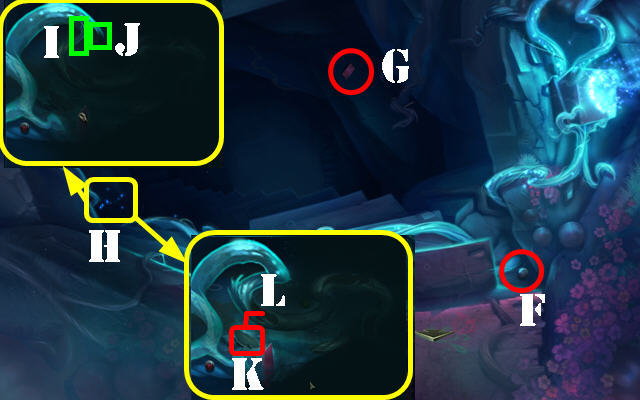
- Take the BLACK OPAL in the lower right (F).
- Take the GLASS SHARD (G) on the right.
- Zoom into the sparkles (H).
- Take the piece on top (I) and put it on the root to illuminate it a bit (J).
- Place the second piece (K) as shown in the screenshot (L).

- Put the third piece (3) in place (4).
- Place the last piece (M) as shown in the screenshot (N).
- Take the STONE HEAD (O).
- Take the EMERALD (P) and the RUBY (Q).
- Exit out of the zoom scene and go deeper into the cave.
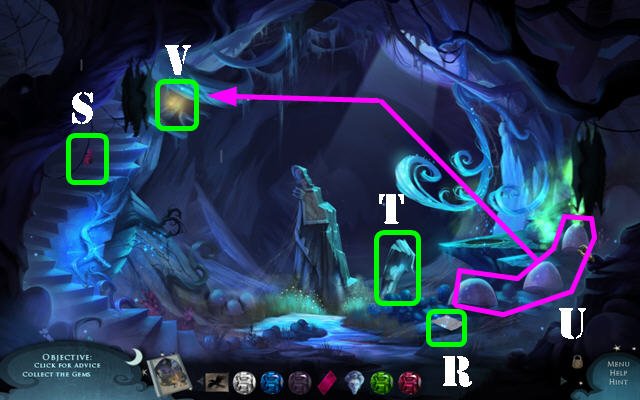
- Read the NOTE (R).
- Take the GLASS SHARD (S).
- Take the STONE LEG (T).
- Click on the 3 large mushrooms in the lower right 3 times to make some of the bats fly away (U).
- Take the YELLOW TOPAZ in the upper left (V).
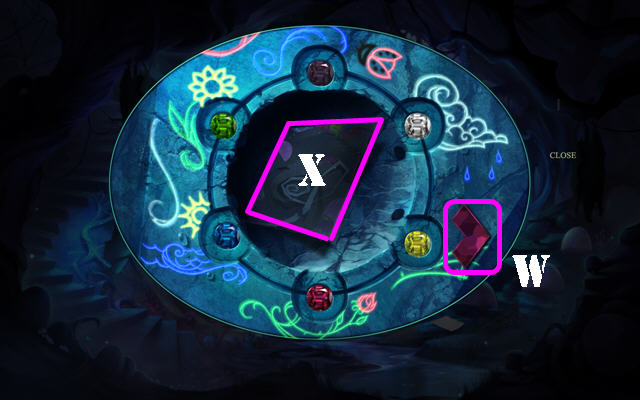
- Zoom into the grate in the lower left.
- Take the GLASS SHARD (W).
- Place the GEMS as shown in the screenshot to release the bars.
- Take the STORYBOOK PAGE (X).
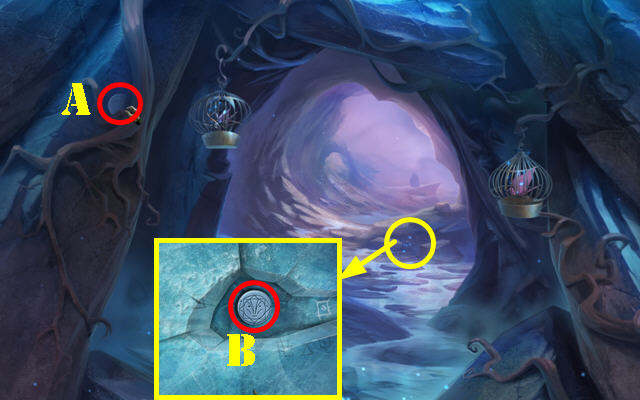
- Your goal here is to grab the tape pieces and place them on the torn spots one by one until the scene is completely illuminated.
- Take the tape piece (A) and place it on the tear (B).
- Pull the lower left tab and take HOG 12/27 (@).
- Take the tape piece (C) and place it on the tear in the upper center (D).
- Take HOG 13/27 (@) spinning in the lower left.
- Click on the black bat wing on the left edge of the page; take HOG 14/27 (@).
- Click on the blue tab in the lower left; take the green GEAR (E).
- Rotate the mushroom; take the red GEAR (F).
- Rotate the other mushroom; take the tape (G) and put it on the tear in the lower left (H).
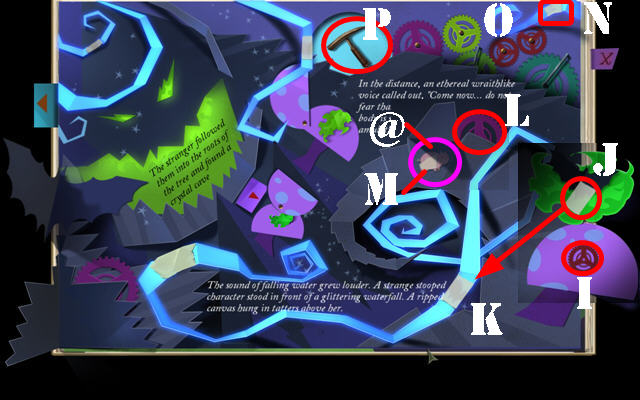
- Click on the purple mushroom in the lower right twice; take the red GEAR (I).
- Take the TAPE on the bat (J) and put it on the tear in the lower right (K).
- Grab the purple GEAR (L).
- Open the tab on the step; take HOG 15/27 (@).
- Put the TAPE (M) on the tear in the upper right (N).
- Arrange the gears in the upper right so they all spin (O).
- Take the PICKAXE (P).
- Exit the book.
- Go up the steps.
- Zoom into the repaired roots on the left; use the PICKAXE next to the shard.
- Take the GLASS SHARD (A).
- Go back down into the cave.
- Zoom into the stones on the left; use the PICKAXE on the stones 5 times.
- Take the STONE TORSO (B) and the GLASS SHARD (C).
- Put the STONE LEG, STONE TORSO, and the STONE HEAD on the broken statue (D).

- Zoom into the statue (E) and then zoom into the amulet around her neck (F).
- Put the 5 GLASS SHARDS into the frame.
- Click on a shard to rotate it.
- Please look at the screenshot for the solution (G).
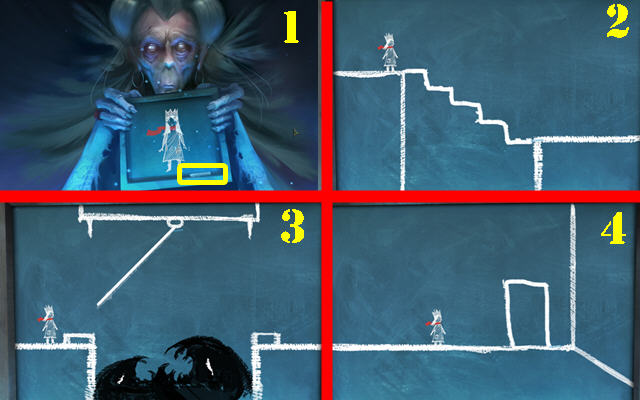
- Take the CHALK (1) and draw Iris' outline with it to activate a series of puzzles.
- In this section you have to guess what item Iris needs to get over certain obstacles. If make a mistake you can keep choosing until you get it right.
- It can be fun to choose the wrong items on purpose just so you can watch the animation.
- Mind Your Step - Click on the STEPS and draw them (2).
- The Inky Pitfall - Click on the ROPE and draw it (3).
- Cornered! - Draw the DOOR FRAME (4).
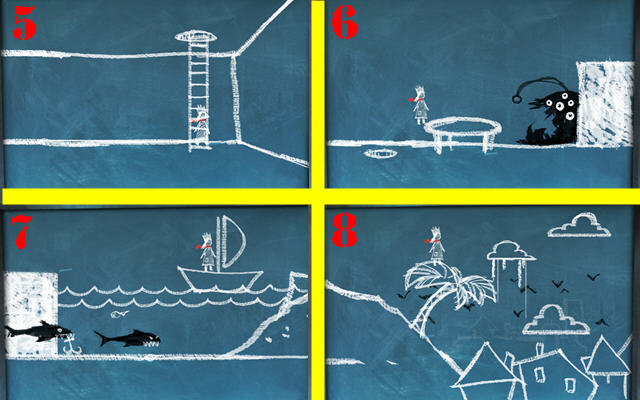
- Into the Sky – Draw the LADDER (5).
- Trapped! - Draw the TRAMPOLINE (6).
- An Ocean Away - Click on the BOAT and draw it (7).
- The Village Below – Draw the PALM TREE to get across (8).
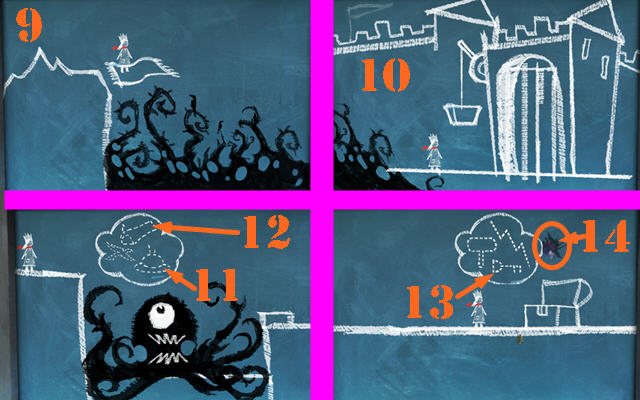
- Thorny Predicament – Draw the MAGIC CARPET to fly across (9).
- Locked! - Draw the weighted basket (10).
- Eye See You - Spoiler Alert! Click on the UFO (11) to earn an Achievement (First Contact). Click on the cannon and draw it to advance to the next step (12).
- The Prize – Choose the KEY and draw it (13).
- Take the PAINTING SCRAP (14).
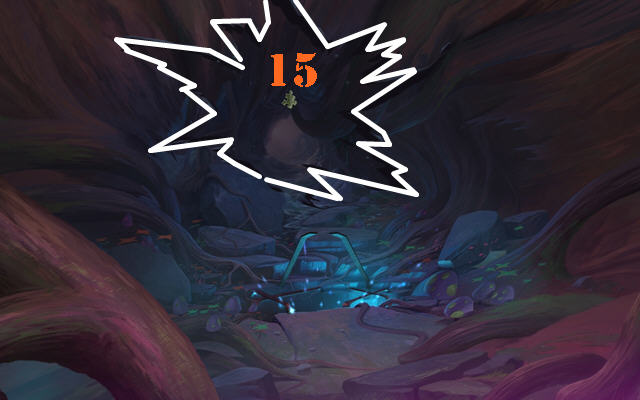
- Click down; go up the steps and click down again.
- Put the PAINTING SCRAP on the rip in the back of the cave (15).
- The Collector's Edition Addition has been completed!
Chapter 4: The Mountain
- Take the STONE DISK in the upper left (A).
- Examine the ground; take the STONE DISK (B).
- Go forward.
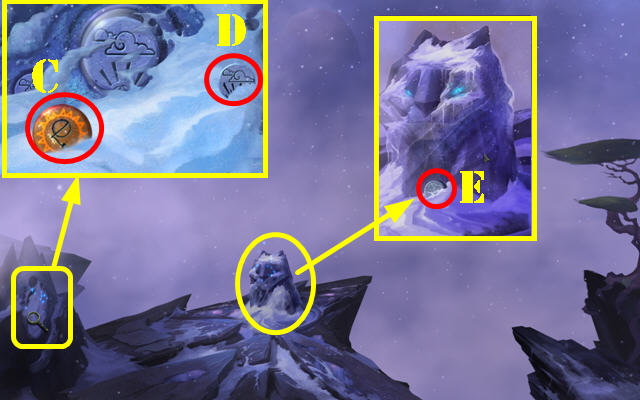
- Examine the left rock; take the SUNSTONE (C).
- Take the STONE DISK in the upper right (D).
- Click on the snow 5 times to reveal parts of a puzzle.
- Examine the frozen statue; take the STONE DISK (E).
- Click down.
- Examine the ground.
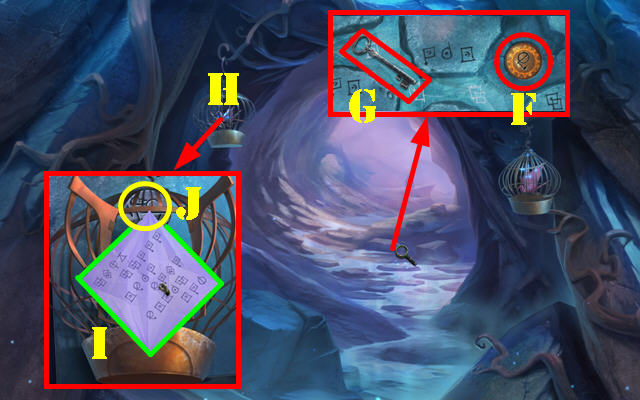
- Put the SUNSTONE in the recess (F) and take the CAGE KEY (G).
- Zoom into the left cage (H); use the CAGE KEY in the lock.
- Click on the origami bird until it is open up all the way; take the LEGEND (I).
- Take the STONE DISK in the cage (J).
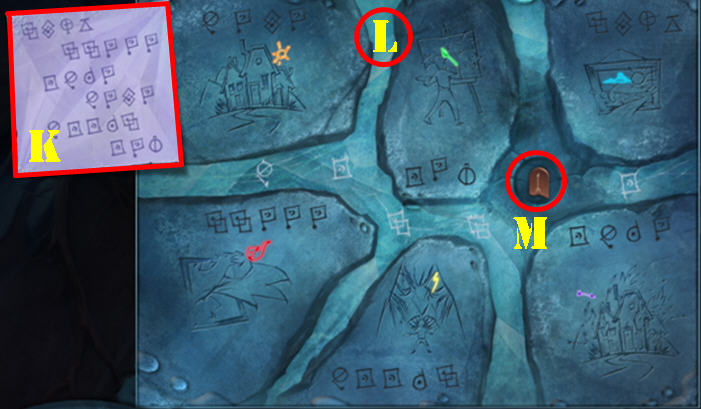
- Zoom into the ground again; put the LEGEND on the ground to activate a puzzle (K).
- Arrange the symbols according to the legend.
- A white lit symbol in between the stones means that a set of symbols has been placed correctly.
- Please look at the screenshot for the solution (L).
- Take the CERAMIC TAB (M).
- Exit the puzzle.
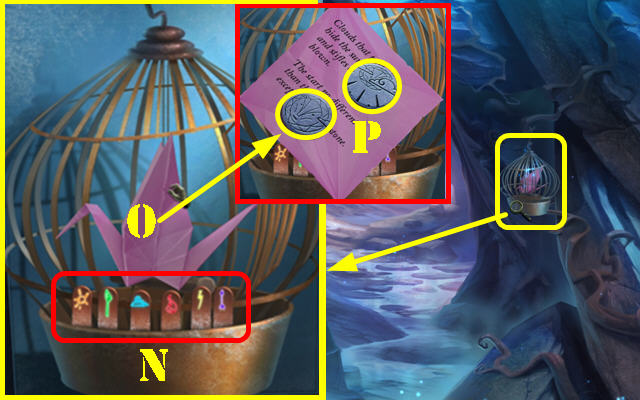
- Zoom into the right cage; put the CERAMIC TAB in the slot to activate a puzzle.
- Put the tabs in the correct order using the previous puzzle as a guide.
- The correct order is: Sun, Paintbrush, Clouds, Flame, Lightning, and Arrow (N).
- Click on the origami bird until it opens completely (O); take the 2 STONE DISKS (P).
- Go forward.
- Zoom into the left stone; put the 7 STONE DISKS in the empty slots to activate a puzzle.
- Arrange the disks so the clouds move away from the sun.
- Use the static pieces as a guide to solve the puzzle.
- Please look at the screenshot for the solution (Q).Click on the button in the upper right to check your settings (R).
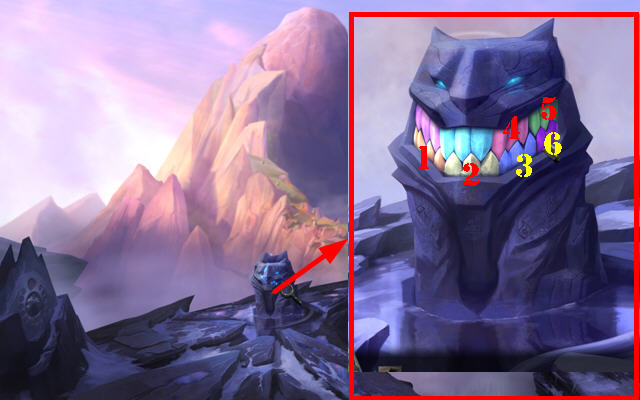
- Zoom into the statue; open its mouth.
- You must click on the cat's teeth in the correct order.
- Click on its teeth in this order to complete the puzzle: 1, 2, 3, 4, 5, and 6, as shown in the screenshot.
- Solving this puzzle gives you the' Scat Daddy' Achievement.
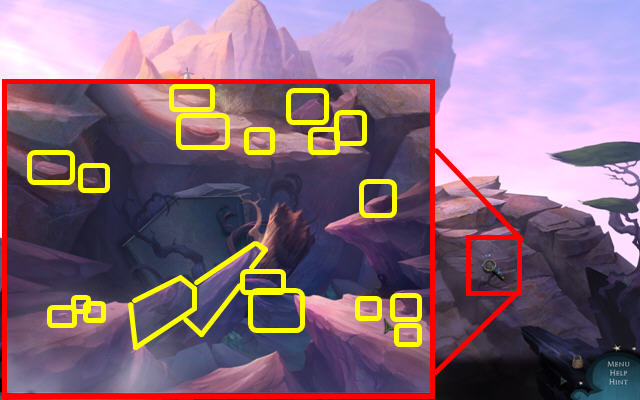
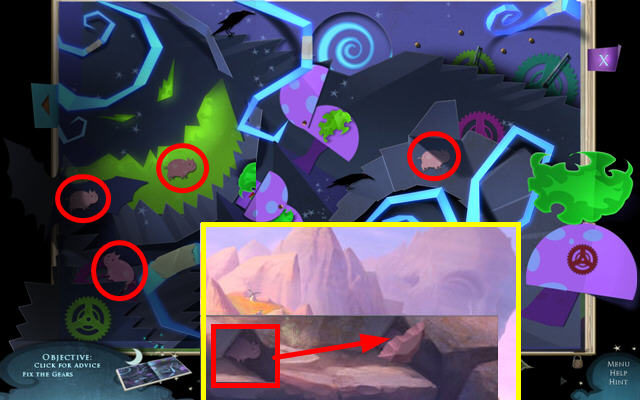
- Zoom into the right side of the mountain (S).
- Remove all the rocks marked in yellow. Some rocks cannot be removed until other pieces have been taken away first.
- Removing all the rocks gives you the 'Taken for Granite' Achievement.
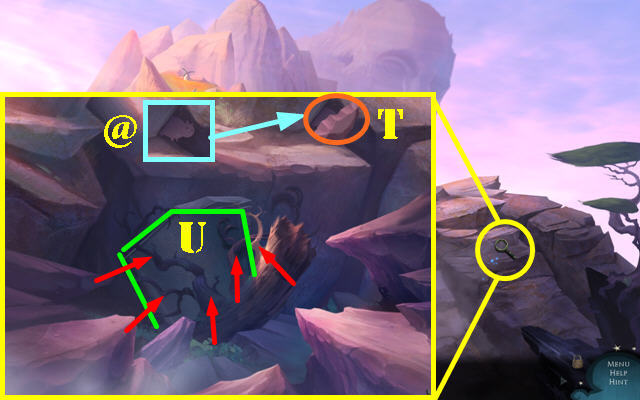
- Take the SHARP ROCK in the upper right after all the other rocks have been removed (T).
- Take HOG 16/27 behind the sharp rock (@).
- Use the SHARP ROCK to cut the 5 branches marked with red arrows.
- Take the SHIELD (U).
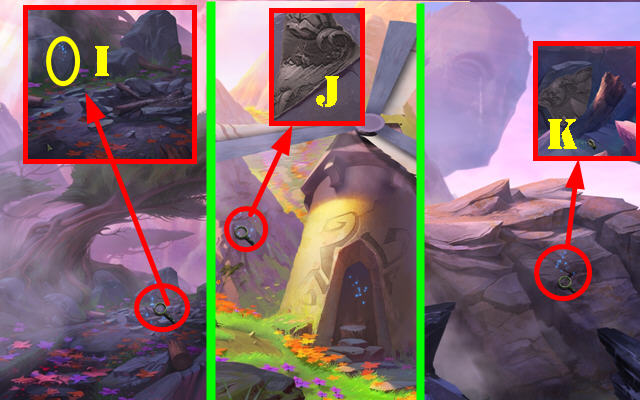
- Note the etching on the rock behind the shield.
- Go forward.
- Zoom into the PALETTE OF PAINT and take it (V).
- Take the BROKEN STATUE by the front windmill (W).
- Examine the back windmill.
- Take the 3 PAPERS (X).
- Go forward.
- Zoom into the campfire.
- Take the BROKEN STATUE (A).
- Note the etching on the left rock (B).
- Grab the CHARRED STICK (C).
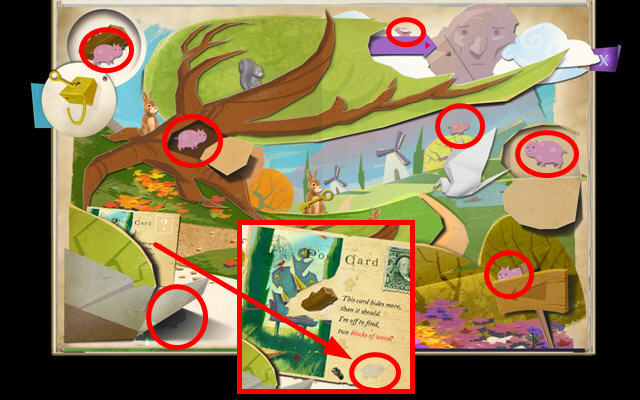
- Take the PAGE BOOK (D).
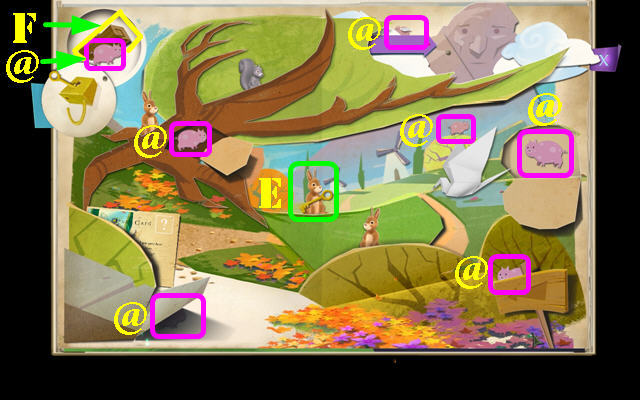
- Pull the tab in the upper right; click on the flying HOG 17/27 (@).
- Open the tree tab; take HOG 18/27 (@).
- Click on the tab in the lower left; take HOG 19/27 (@).
- Take HOG 20/27 (@) hiding behind the sign in the lower right corner.
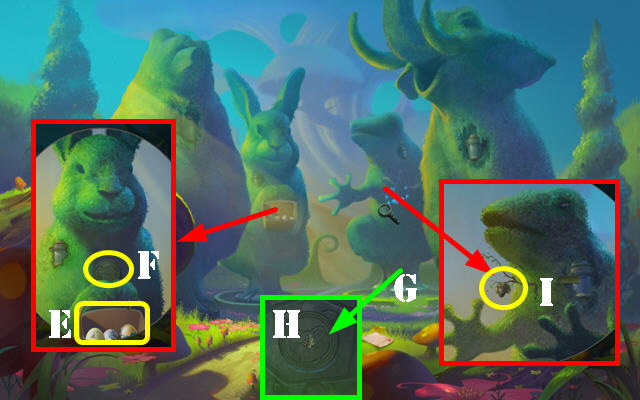
- Take the GOLD KEY from one of the bunny rabbits (E). Different rabbits could have the key at any given time; just take the key from any of them as they flip it in the air.
- Use the GOLD KEY on the lock in the upper left side. Slide the lock down; take HOG 21/27 (@) and the WOOD BLOCK (F).
- Take HOG 22/27 in the upper right (@).
- Open the tab on the right; take HOG 23/27 (@).
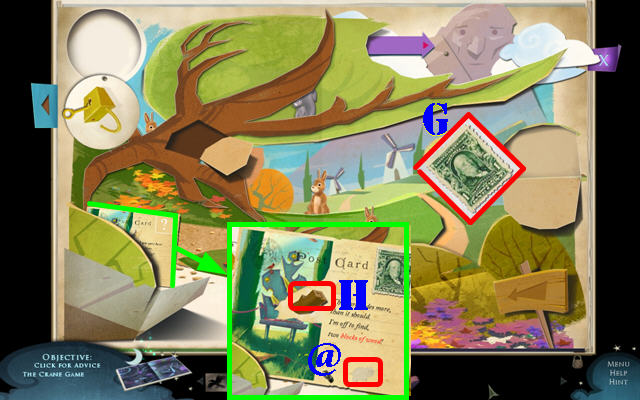
- Click on the origami bird until it opens completely; take the STAMP (G).
- Put the STAMP on the postcard; open the flap and take the WOOD BLOCK (H).
- Take HOG 24/27 on the postcard (@).
- Exit the book.
- Zoom into the rock on the left.
- Put the PAPER on the rock and then drag the CHARRED STICK back and forth over it to reveal an image. Take the RUBBING (I).
- Click down.
- Zoom into the left large rock.
- Put the PAPER on the rock and drag the CHARRED STICK back and forth over it to reveal an image. Take the RUBBING (J).
- Click down.
- Zoom into the right large rock.
- Put the PAPER on the rock and then drag the CHARRED STICK back and forth over it to reveal an image. Take the RUBBING (K).
- Go forward.
- Enter the windmill in the back.
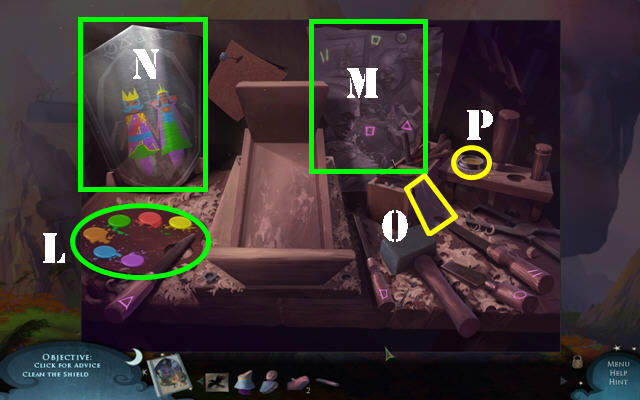
- Put the PALETTE OF PAINT on the lower left (L).
- Put the 3 RUBBINGS on the torn paper in the back (M).
- Put the SHIELD on the stand on the left (N).
- Take the CLOTH (O) on the right and dip it into the polish (P) to create the POLISHING CLOTH.
- Rub the SHIELD with the POLISHING CLOTH.
- Put a WOOD BLOCK in the vice on the workbench (Q).
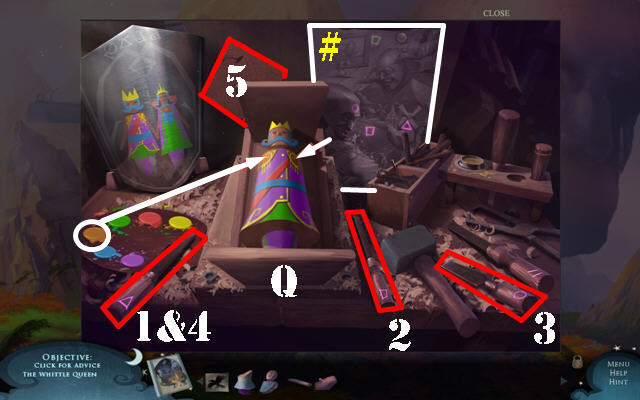
- Carve the statue using the tools on the workbench. Use the reconstructed drawing as a clue for the order in which to use the tools (#).
- Color the statue according to the image on the shield. Note the color of the shoulders (R).
- To carve the statue, use the items in the order shown in the screenshot (1-5).
- Take the WOODEN KING.
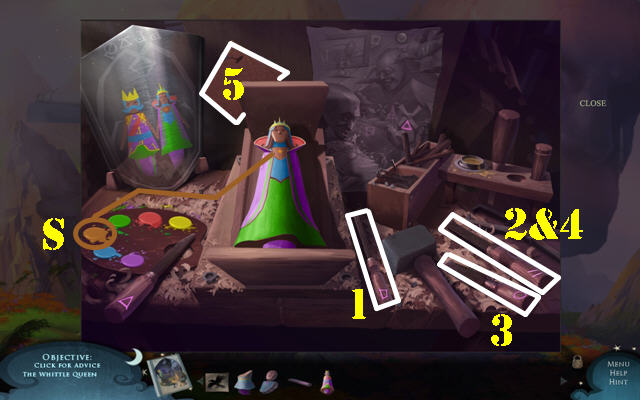
- Put the second WOOD BLOCK on the vice on the workbench.
- Color the statue according to the image on the shield. Note the color of the star on the queen's neck (S).
- Use the tools in the order shown in the screenshot to carve the queen (1-5).
- Take the WOODEN QUEEN.
- Exit this windmill and go into the front one.
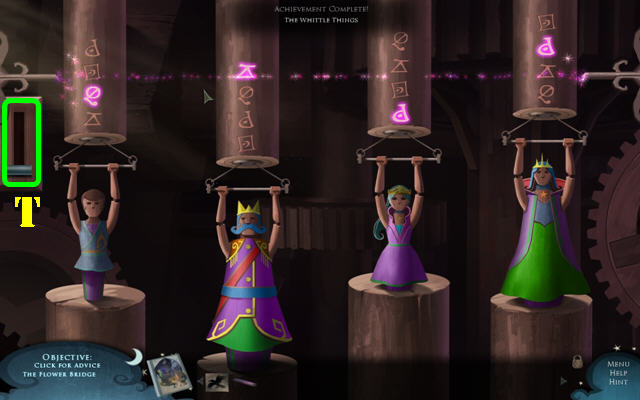
- Put the WOODEN KING and the WOODEN QUEEN on one of the stands.
- Put the 2 BROKEN STATUE PARTS on the hanging arms.
- Arrange the statues so that the 4 correct symbols found on the shield in the other windmill are lined up.
- Pull on the lever (T) to highlight the symbols.
- Go forward twice.
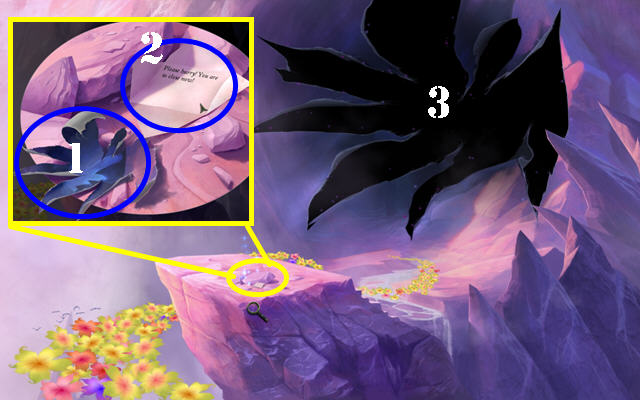
- Zoom into the rocks; take the CANVAS SCRAP (1) and the open the LETTER (2).
- Put the CANVAS SCRAP on the ripped canvas and go forward (3).
Chapter 5: The Giant's Head

- Go forward.
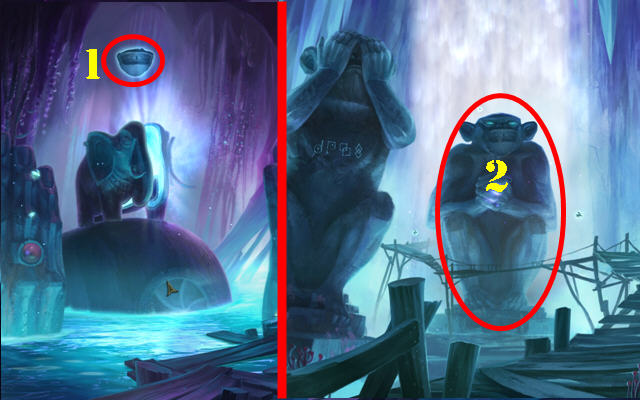
- Put the CHARRED STICK on the flame the monkey is holding to create the LIT TORCH (A).
- Look in the boat; take the PENCIL (B) and the HOOK (C) by the locked chest.
- Go up the steps.
- Take the DRY TWIGS (D).
- Take the VINE ROPE (E).
- Examine the monkey pool (F).
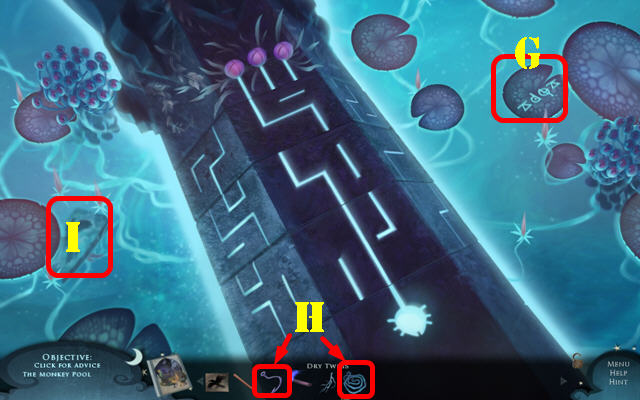
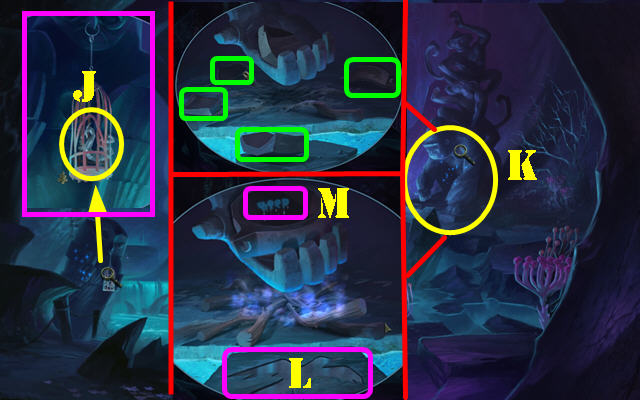
- Move the lily pad on the right; look at the symbols (G).
- In inventory combine the VINE ROPE and the HOOK to create the ROPE AND HOOK (H).
- Move the center left lily pad.
- Use the ROPE AND HOOK to catch the MOLD and the CAGE KEY at the bottom of the pool (I).
- Click down three times.
- Zoom into the cage; use the CAGE KEY on the lock and take the METAL DRAGON (J).
- Go forward and then go up the steps.
- Zoom into the right statue's hands; click on the 4 bowl pieces marked in green (K).
- Put the MOLD at the bottom.
- Place the DRY TWIGS below the hand.
- Use the LIT TORCH on the DRY TWIGS.
- Place the METAL DRAGON in the bowl.
- Tilt the bowl to let the liquid metal fall into the mold.
- Take the METAL RAVEN in the mold (L).
- Note the symbols in the hand (M).
- Click down.
- Put the RAVEN SKETCH and the METAL RAVEN on the door to activate a puzzle.
- Move the ravens until they all sparkle.
- To solve the puzzle, click on the birds in this order: E, A, B, D, A, B, and C. Note: You will receive the 'That was Murder' Achievement for completing this puzzle in 10 moves or less.
- Check out our video solution!
- Go through the door.
- Take the BEETLE in the lower left (F).
- Click down and go up the steps.
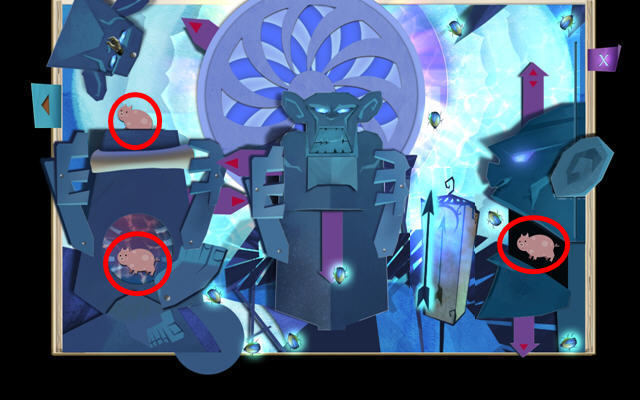
- Zoom into the monkey pool (G).
- Place the BEETLE on the glowing beetle sign to activate the puzzle.
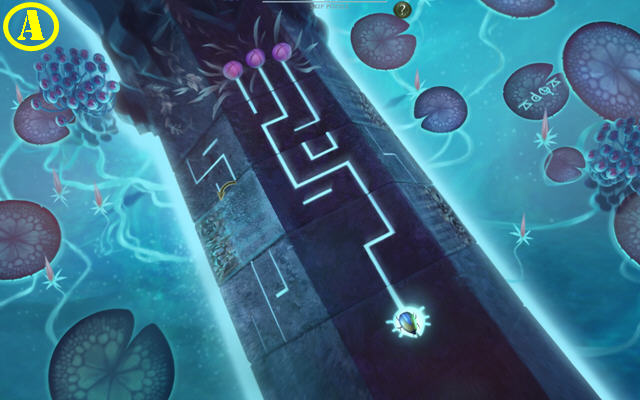
- Rotate each stone section so you can make a path for the beetle to all three flowers.
- Place your cursor on each side of the column's 3 moveable parts. Click on the column once the arrow appears to rotate it.
- Please look at the screenshot A for the 1st solution.
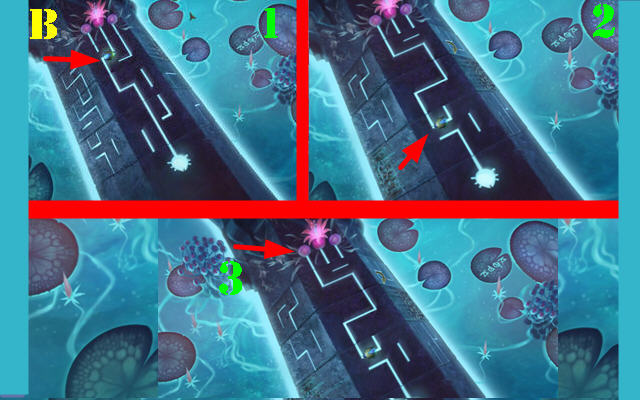
- Please look at the screenshot B for the 2nd solution.
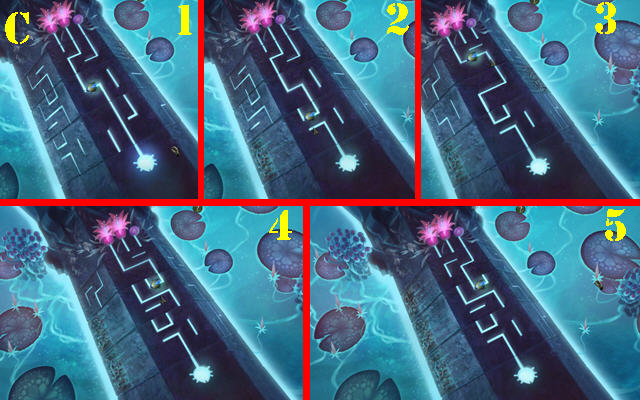
- Please look at the screenshot C for the 3rd solution.
- Check out our video solution!
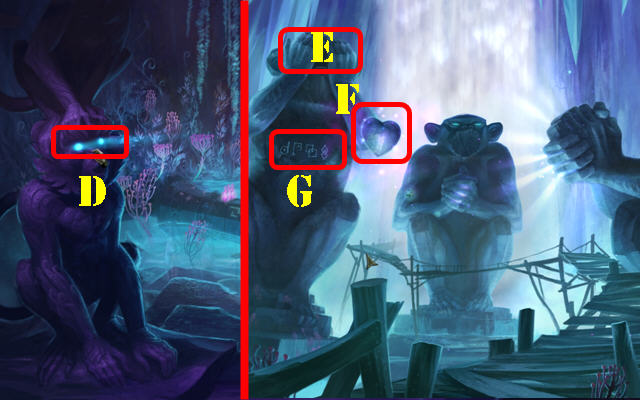
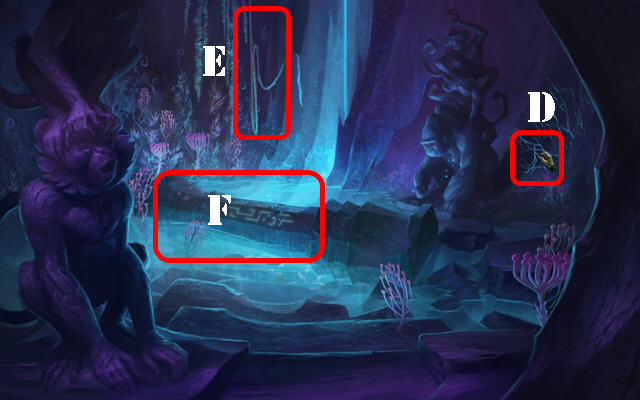
- Take the GLOWING EYES on the left statue (D).
- Return to the monkey hall.
- Put the GLOWING EYES on the left monkey (E).
- Take the STONE HEART (F).
- Note the symbols on the monkey's chest (G).
- Click down twice.
- Zoom into the owl; put the STONE HEART in the recess on his chest (H).
- Go up the newly formed steps.
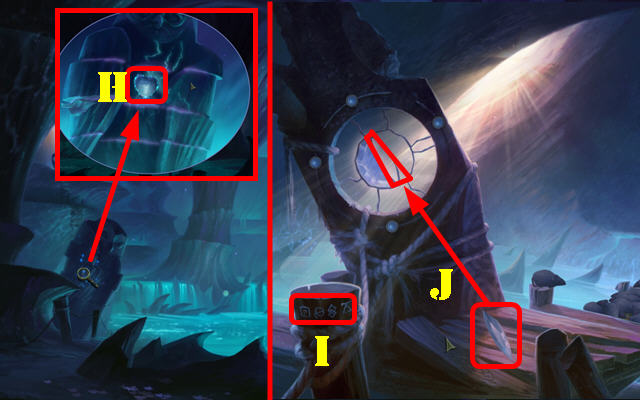
- Note the symbols on the left (I).
- Grab the GLASS SHARD and place it on the lens (J).
- Click down and go forward.
- Zoom into the boat; you need the correct set of symbols to unlock the 4 locks.
- The first set of symbols is in the monkey pool, below the lily pad on the right.
- The second set of symbols is on the hand of the monkey statue on the right (monkey pool area).
- The third set of symbols is in the monkey hall; on the first monkey's chest after he receives the glowing eyes.
- The fourth set of symbols is in the area with the big lens.
- Enter the four sets of symbols, in any order, to unlock all 4 locks (1-4).
- Take the GLASS SHARD (5).
- Zoom into the NOTE (6); take the GOLD COIN (7).
- Exit the boat.
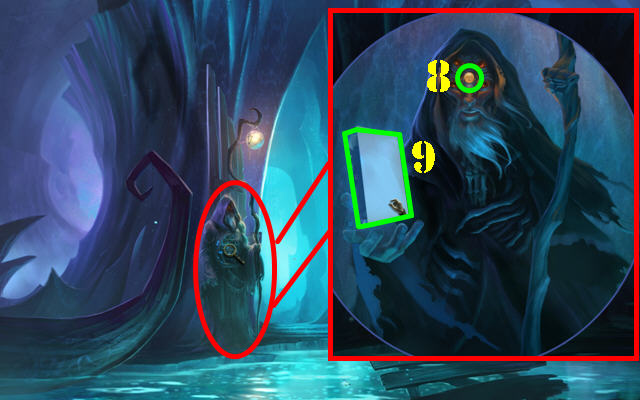
- Zoom into the wizard; talk to the wizard; put the GOLD COIN on his forehead (8).
- Take the STORYBOOK PAGE from his hand (9).
- Pull the left monkey's tab (A).
- Click on the scroll; use the PENCIL to draw in the outline and take the BOW (B).
- Pull the middle monkey's 2 tabs (C and D).
- Pull the wheel tab (E).
- Move the left monkey's foot; take HOG 25/27 (@).
- Move the left monkey's head; take HOG 26/27 (@).
- Pull the tab (F) on the last head until the ears fit in place for the bottom tab to appear.
- Pull the bottom tab (G); take HOG 27/27 (@).
- Take the 10 BEETLES scattered around the scene to fill up the arrow.
- Take the ARROW (H).
- Click down and go back up the left steps.
- Put the second GLASS SHARD on the lens (I) to activate a puzzle. Note: the first shard is on the steps.
- Move the tabs (yellow) around the lens so the images on the wall all look like one cat.
- Please look at the screenshot for the solution (J).
- Go up the steps on the right.
- Examine the right side of the water.
- Move the logs aside and take the 2 STONE EARS (K).
- Go back to monkey hall.
- Put the STONE EARS on each side of the right monkey's head (L).
- Take the GEMSTONE (M).
- Go back to the elephant room.
- Put the GEMSTONE in the recess of the left stone hand (N).
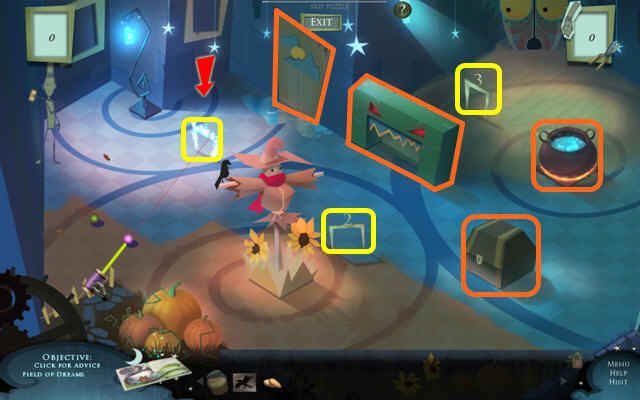
- Click in the center of the head (O) to access the head memory puzzle.
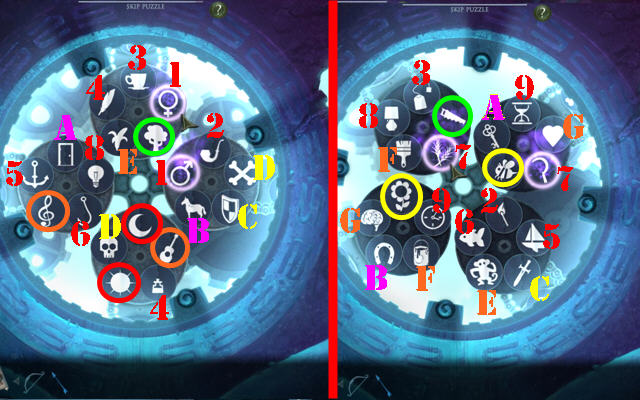
- Click on any 2 doors to view the symbols.
- Eliminate all the pairs that have something in common. For example: match cup and tea bag, banana and monkey, skull and crossbones, heart and brain etc.
- Each time a pair is found the remaining symbols will flash briefly.
- If the last pair are on the same wheel; you must rotate them and click on them once the wheel turns around.
- Please look at the screenshots for the possible matches. Pair up like numbers, letters or colors to solve the puzzle.
- Take the STONE MOUTH (1).
- Go back to monkey hall.
- Place the STONE MOUTH on the center monkey's mouth (2).
- Go forward.
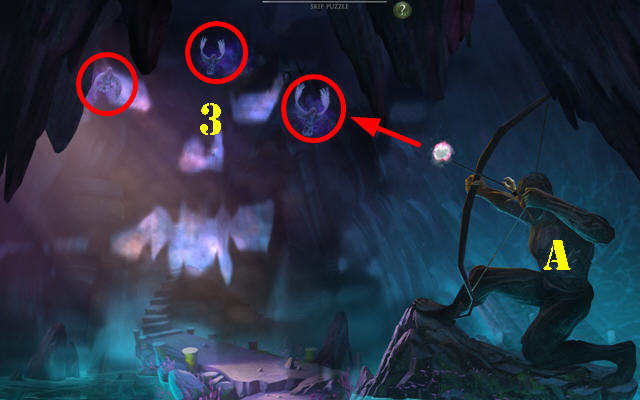
- Give the BOW and ARROW to the stone archer (A).
- Pull on the arrow and shoot at the 3 shadow birds (3). You must shoot at them several times to eliminate them.
- Check out our video solution!
- You will earn the 'Why the long face' achievement once you complete this mini-game.
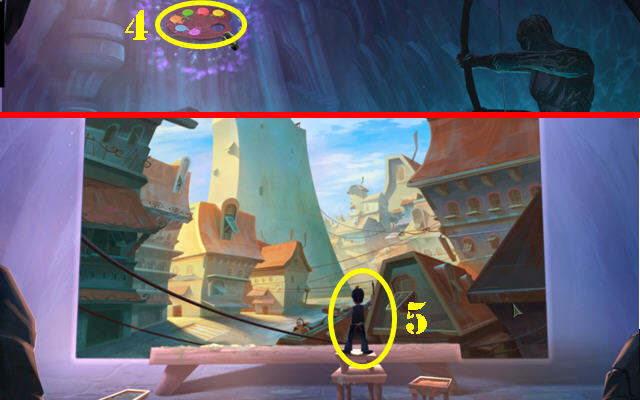
- Take the MAGIC PAINTS (4).
- Go forward.
- Give the MAGIC PAINTS to the little boy (5).
- Congratulations! You have completed Drawn: Trail of Shadows Collector's Edition!
Complete HOG List
- This section contains a complete list of all HOGS in the game by order of appearance.
- You can go to the Main Menu and click on 'Chapter Select' to replay the chapter of your choice without replaying the whole game. That gives you a chance to collect some of the HOGS you may have missed.
- Chapter 1, Storybook, Page 1 - In the dragon's belly.
- Chapter 1, Storybook, Page 1 - Behind the dragon's wing.
- Chapter 1, Storybook, Page 1 - Take the HOG in the bucket after you use the tab to lower and raise the bucket.
- Chapter 1, Storybook, Page 2 - Behind the 3 equals 4 Post.
- Chapter 1 - Storybook, Page 2 - Behind the tab just above the crow flying in a circle.
- Chapter 1 - Storybook, Page 2 - In the roots of the tree.
- Chapter 2 - On the lamplighter sketch (below the sticky wicket sign).
- Chapter 2, Storybook, page 4 – In the bushes, on the left side of the page.
- Chapter 2, Storybook, page 4 – Behind the elephant's ear.
- Chapter 2, Storybook, page 4 – Underneath the tab on the checkered path.
- Chapter 2, Storybook, page 4 –Under the heart in the tree trunk on the right page.
- Chapter 3, Storybook, page 5 – On the gear rotating on the bottom left side of the screen.
- Chapter 3, Storybook, page 5 – Behind the bat fold on the left page.
- Chapter 3, Storybook, page 5 – Underneath the steps tab on the right page.
- Chapter 3, Storybook, page 5 – Inside the mouth on the left page.
- Chapter 3, Rubble Close-up in the mountain (behind the SHARP ROCK in the upper right).
- Chapter 4, Storybook, Page 6 - Underneath the tab on the bottom left corner.
- Chapter 4, Storybook, Page 6 - Behind the post on the bottom right corner.
- Chapter 4, Storybook, Page 6 - On the bottom of the post card.
- Chapter 4, Storybook, Page 6 - Underneath the lock on the top left of the page.
- Chapter 4, Storybook, Page 6 - Under the tab of the tree, underneath the squirrel.
- Chapter 4, Storybook, Page 6 - Under the bush tab on the middle right edge of the page.
- Chapter 4, Storybook, Page 6 - To the right of the windmills.
- Chapter 4, Storybook, Page 6 - Flying in the clouds.
- Chapter 5, Storybook, Page 7 - Inside the mouth of the monkey on the right side of the page.
- Chapter 5, Storybook, Page 7 - Underneath the head of the left monkey.
- Chapter 5, Storybook, Page 7 - Underneath the belly of the left monkey after moving the feet.
Achievements!
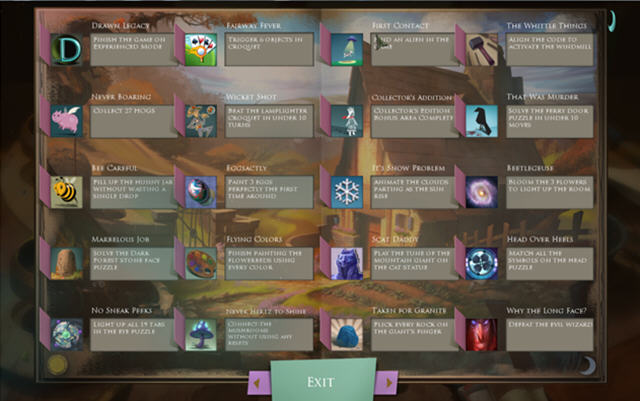
- This is a complete list of all the achievements and their requirements.
- You can go to the Main Menu and click on 'Chapter Select' to replay the chapter of your choice without replaying the whole game. That gives you a chance to collect some of the achievements you may have missed.
- Drawn Legacy – Finish the game in Experienced Mode.
- Never Boaring - Collect 27 HOGS.
- Bee Careful – Fill up the Hunny Jar without wasting a single drop.
- Marbelous Job – Solve the Dark Forest stone face puzzle.
- No Sneak Peeks – Light up all 19 tabs on the eye puzzle.
- Fairway Fever – Trigger 6 objects in Croquet.
- Wicket Shot – Beat the Lamplighter in under 10 turns.
- Eggsactly – Paint 3 eggs perfectly the first time around.
- Flying Colors – Finish Painting the flowers using every color.
- Never Hertz to Shine – Collect the mushrooms without using any resets.
- First Contact – Find an alien in the game.
- Collector's Addition – Collector's Edition Bonus Area complete.
- It's Snow Problem – Animate the clouds parting as the sun rises.
- Scat Daddy – Play the tune of the Mountain Giant on the cat statue.
- Taken for Granite – Flick every rock on the giant's finger.
- The Whittle Things – Align the code to activate the windmill.
- That was Murder – Solve the ferry door puzzle (Raven Door) in under 10 moves.
- Beetlegeuse – Bloom the 3 flowers to light up the room.
- Head over Heels – Match all the symbols on the head puzzle.
- Why the Long Face – Defeat the Evil Wizard.
Created at: 2011-10-20