

Walkthrough Menu
- General Tips
- Chapter 1: The Crash
- Chapter 2: The Guest Rooms
- Chapter 3: The Basement
- Chapter 4: The House
- Chapter 5: The Water Tower, Shelter, and Treehouse
- Chapter 6: The Attic and the Well
General Tips
- This is the official guide for Fright.
- This guide will not mention each time you have to zoom into a location; the screenshots will show each zoom scene.
- Hidden-object puzzles are referred to as HOPs. This guide will not show screenshots of the HOPs, however, it will mention when an HOP is available to play.
- This guide will give solutions for all puzzles which are not random. Please read the instructions in the game for each puzzle.
Chapter 1: The Crash
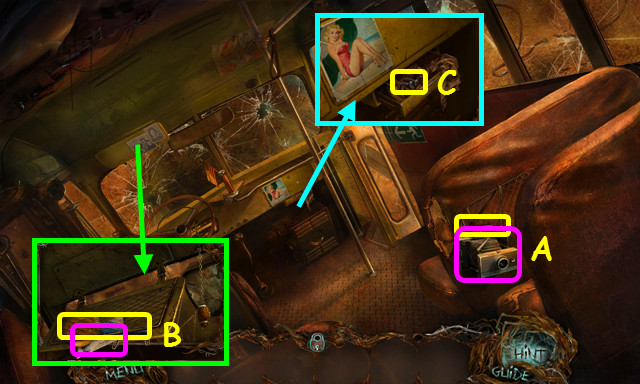
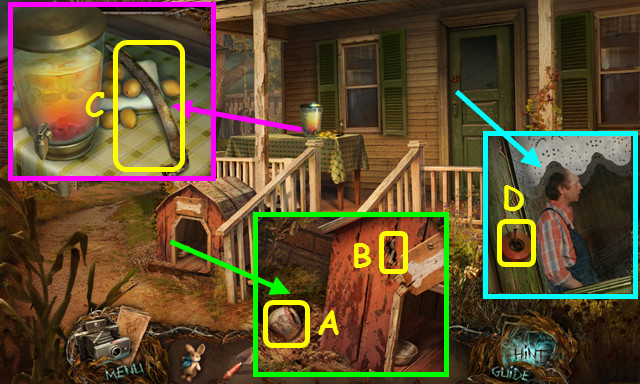
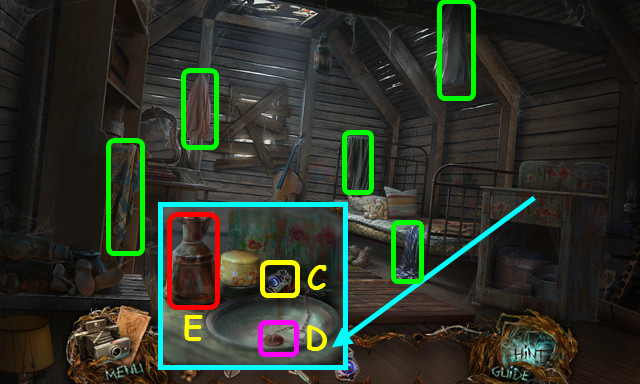
- Take the CAMERA and the SCREWDRIVER (A).
- Take the OILCAN and read the license (B).
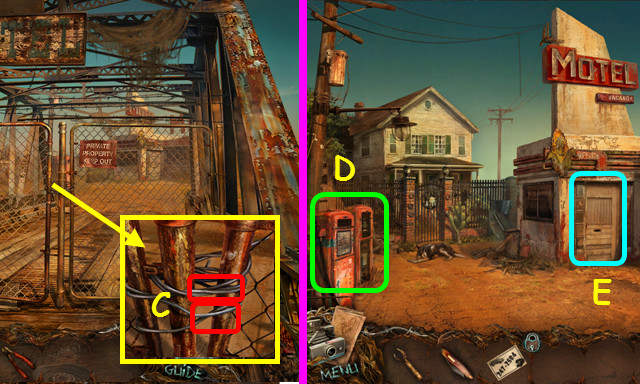
- Take the BOLTS (C).
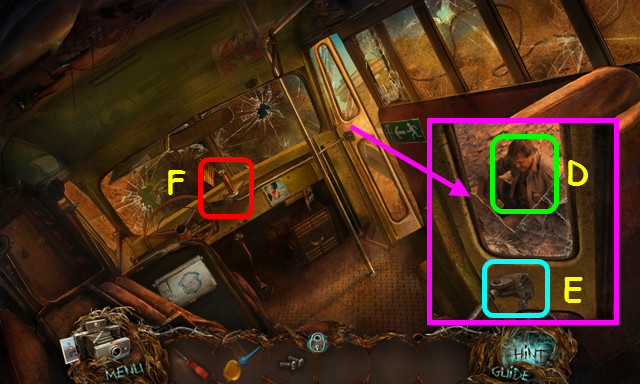
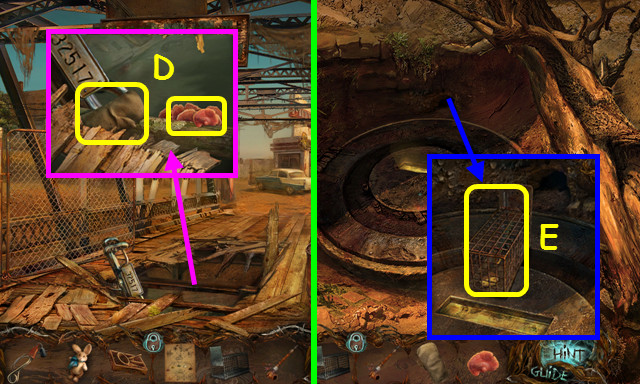
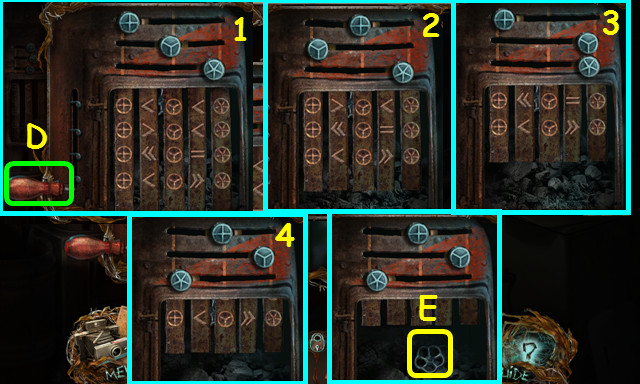
- Talk to the Bus Driver (D).
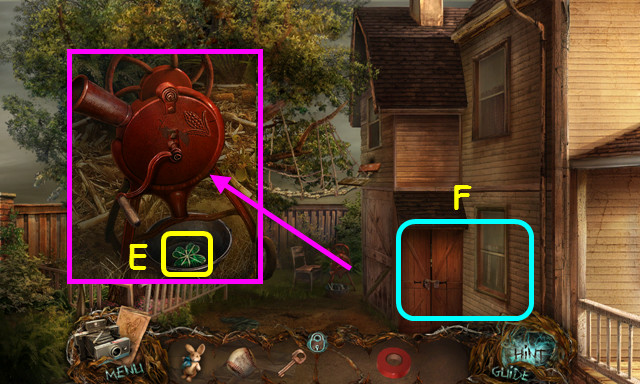
- Use the BOLTS and the SCREWDRIVER on the hinge (E).
- Pull the lever (F).
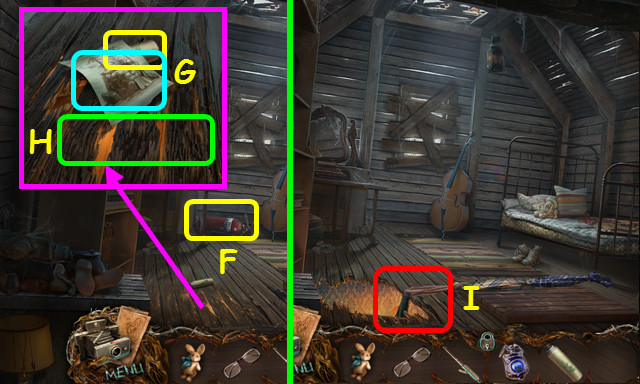
- Walk right.

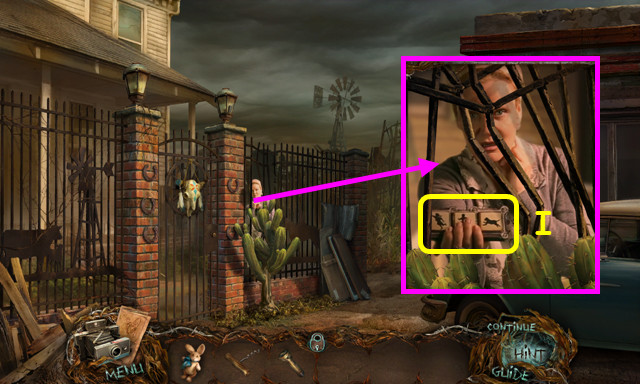
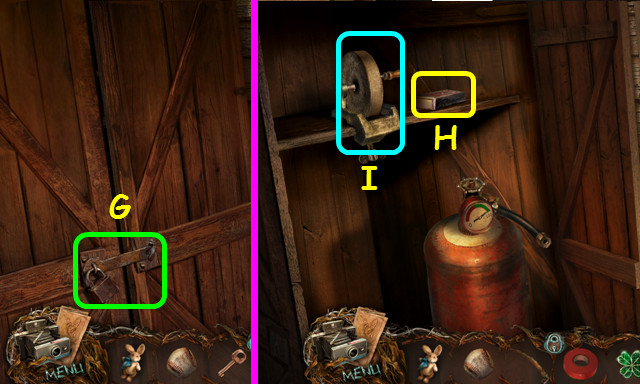
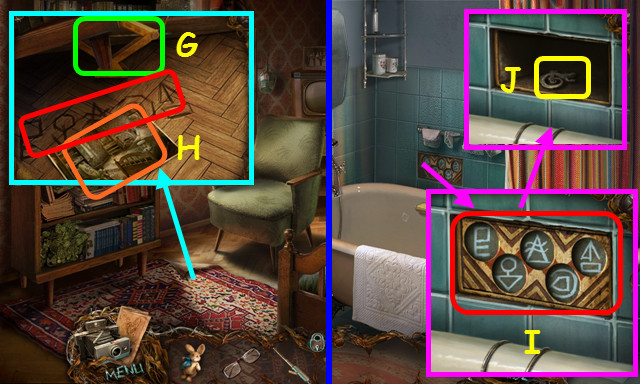
- Use the OILCAN on the lock (G).
- Select the color-coded sets of discs.
- Pull the lever (H).
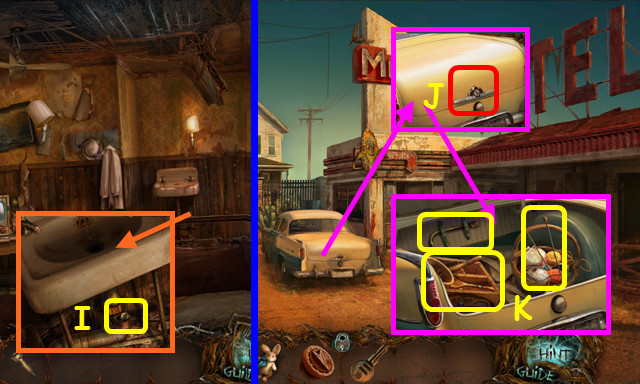
- Take the BUS KEYS (I).
- Walk left.
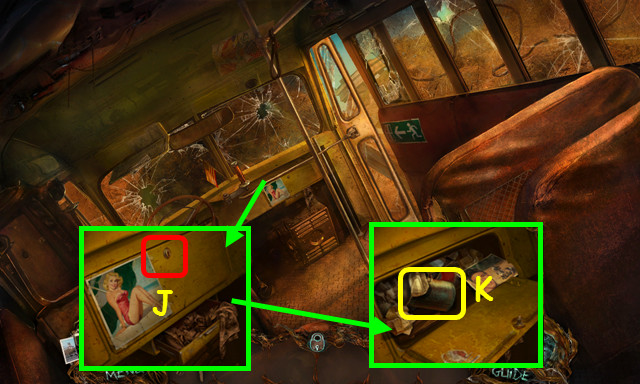
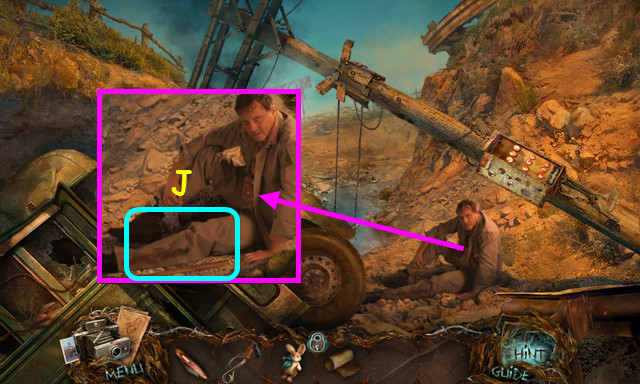
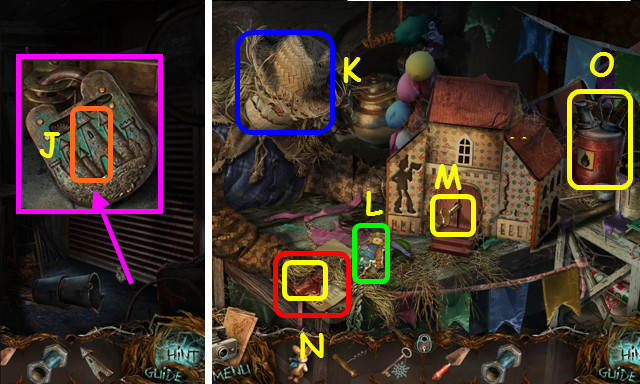
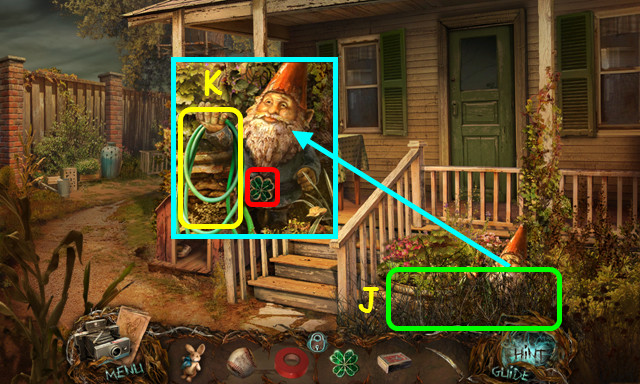
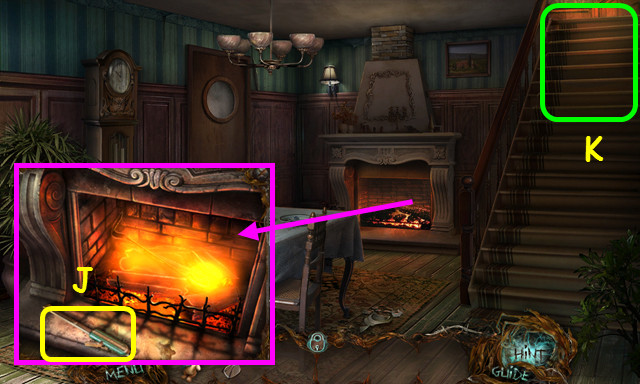
- Use the BUS KEYS on the lock (J).
- Take the TIN CAN (K).
- Walk right and forward to the Road Fork.
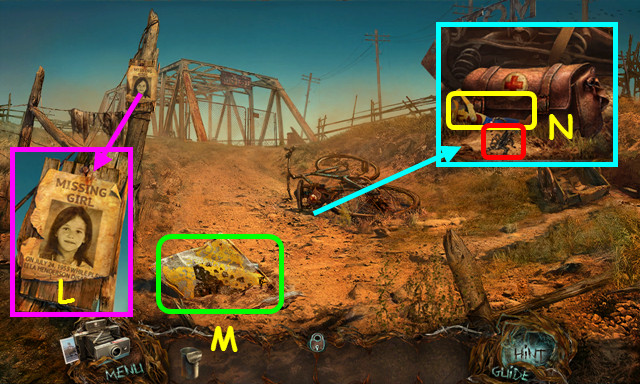
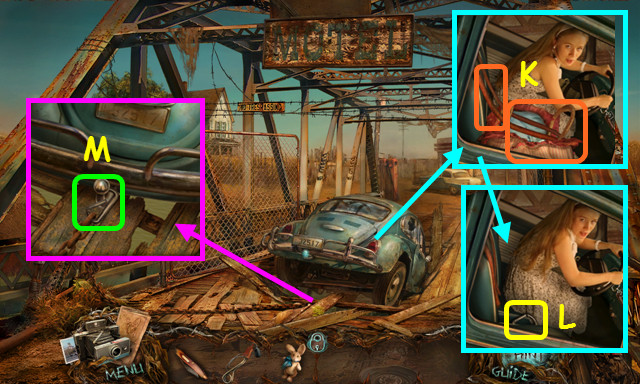
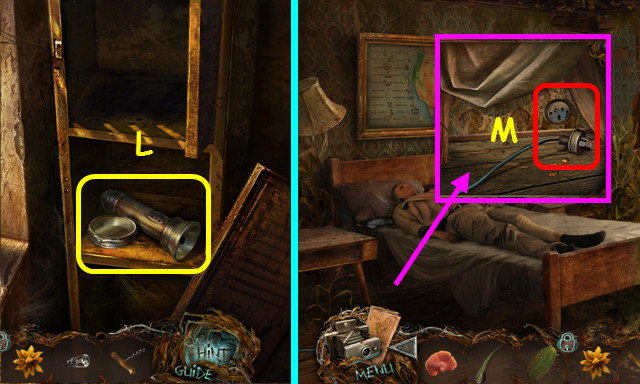
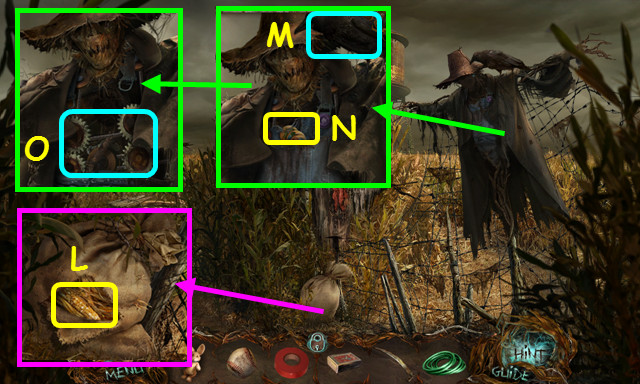
- Read the poster (L).
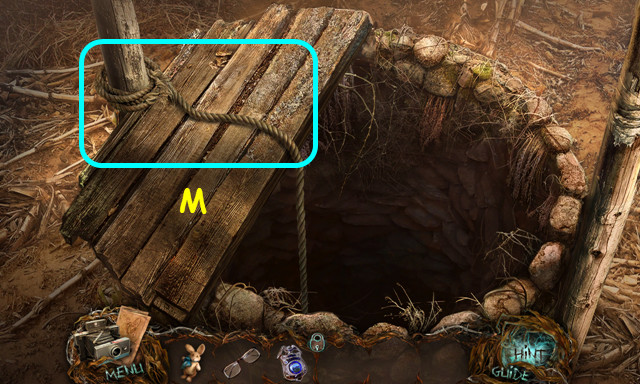
- Move the sign and note the farm mini-game (M).
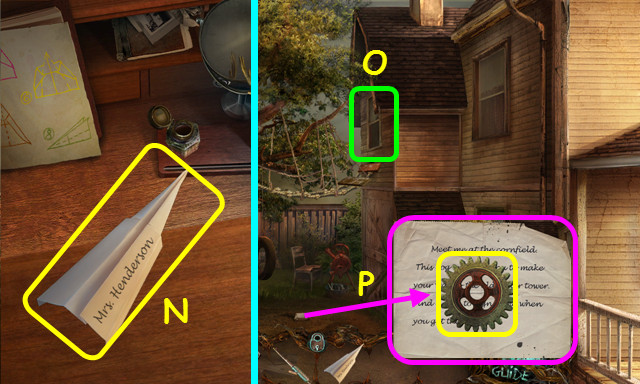
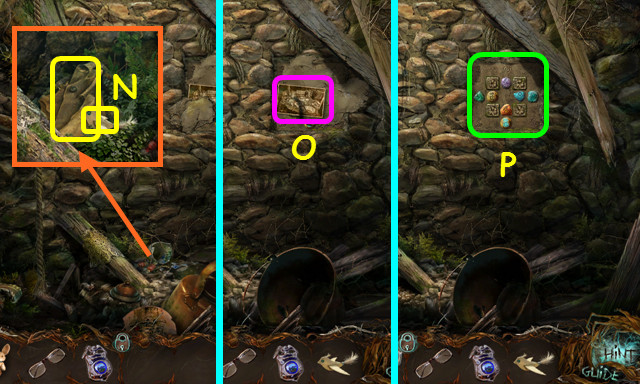
- Use the TIN CAN on the scorpion; take the COWBOY FIGURINE (N).
- Walk right to the Bunker Door.
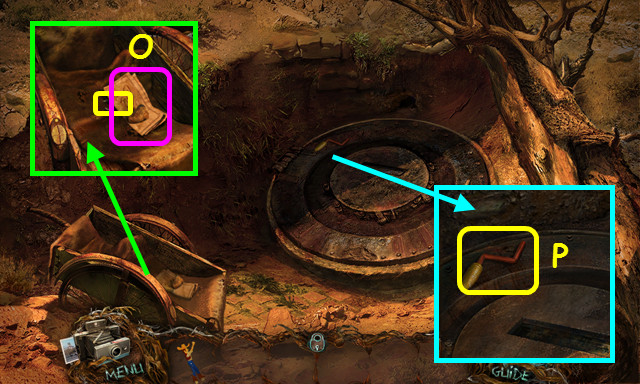
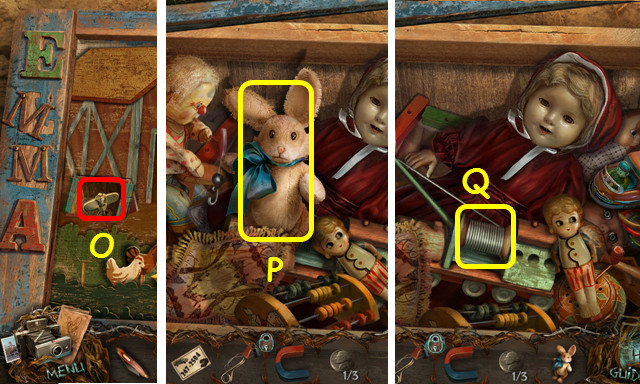
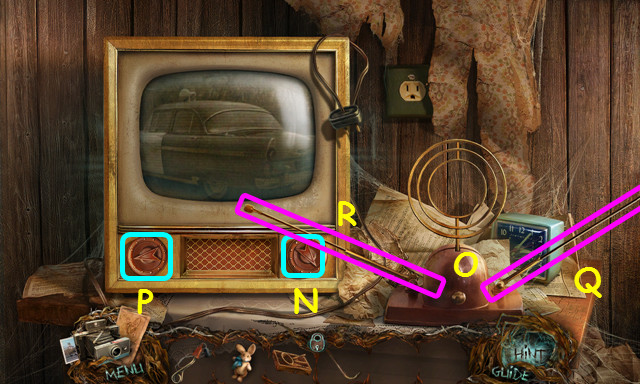
- Take the MAP and the CAN OPENER (O).
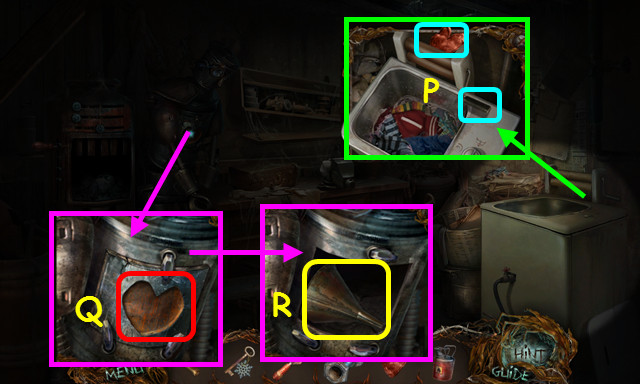
- Take the CORNCOB HANDLE (P).
- Walk down and forward to the Bridge.
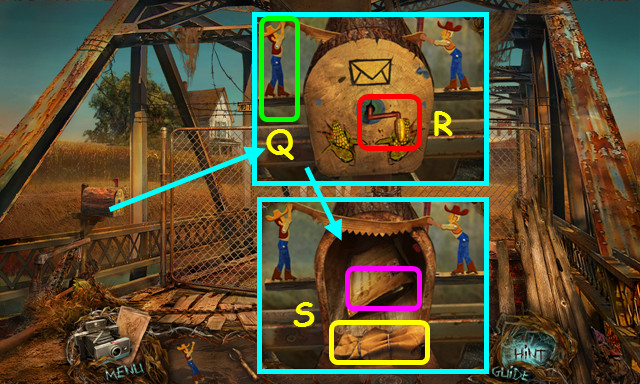
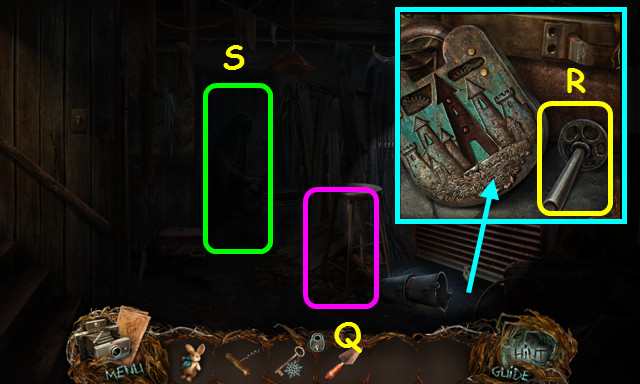
- Place the COWBOY FIGURINE on the mailbox (Q).
- Place the CORNCOB HANDLE on the door and turn it (R).
- Open the package; read the letter and take the KNIFE (S).
- Walk down.
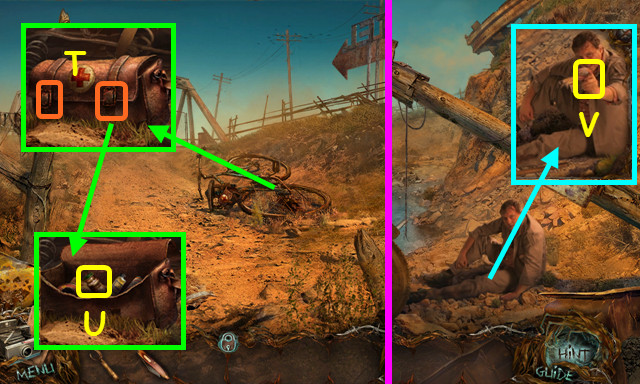
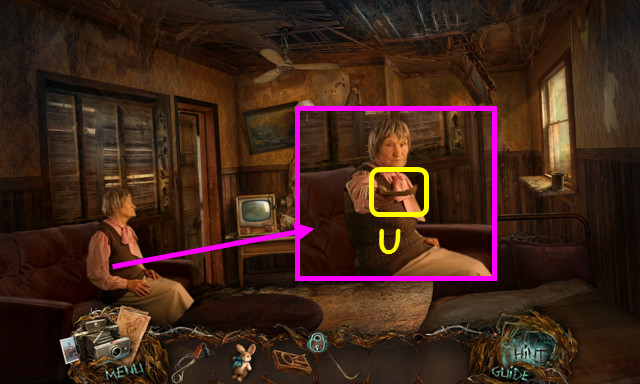
- Use the KNIFE on the 2 straps (T).
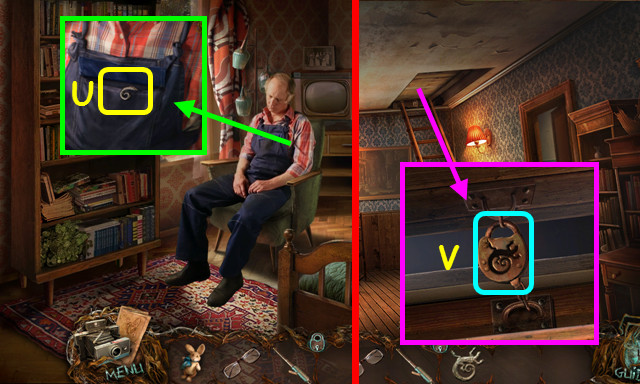
- Open the bag; take the PAIN-KILLERS (U).
- Walk down.
- Give the PAIN-KILLERS to the Bus Driver; take the BADGE (V).
- Walk left.
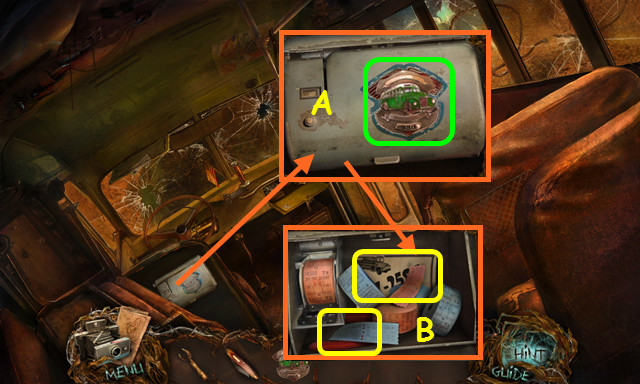
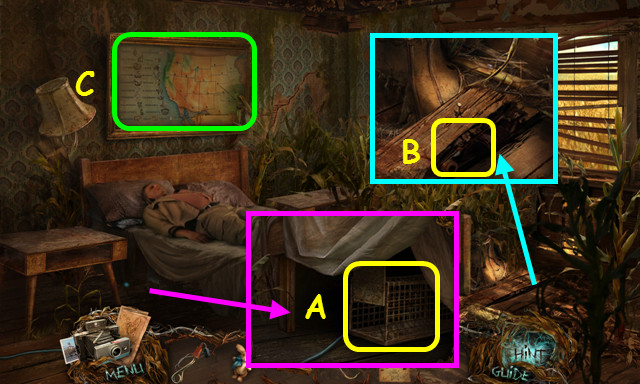
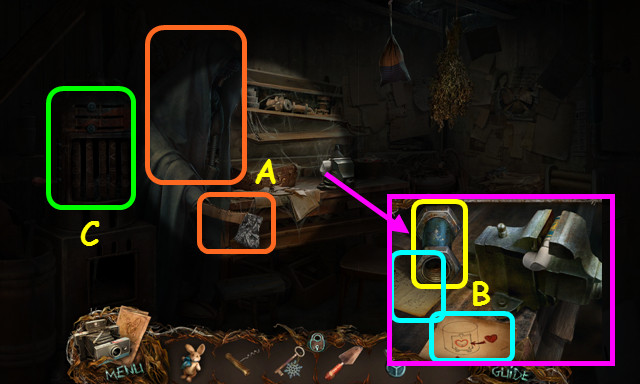
- Place the BADGE on the cover (A).
- Move the tickets; take the EMERGENCY NUMBER and the NIPPERS (B).
- Travel to the Bridge.
- Use the NIPPERS twice on the wires (C).
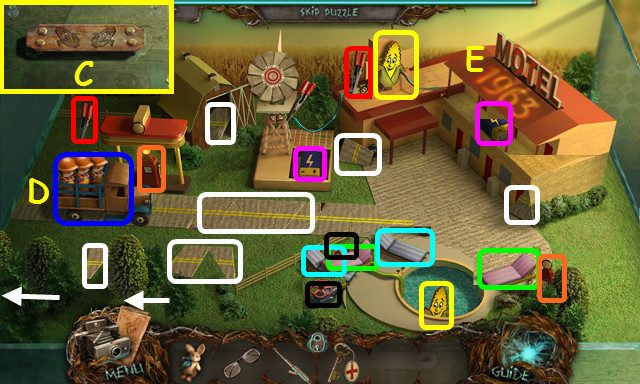
- Walk forward to the Motel Yard.
- Note the gas pump mini-game (D).
- Enter the Motel Office (E).
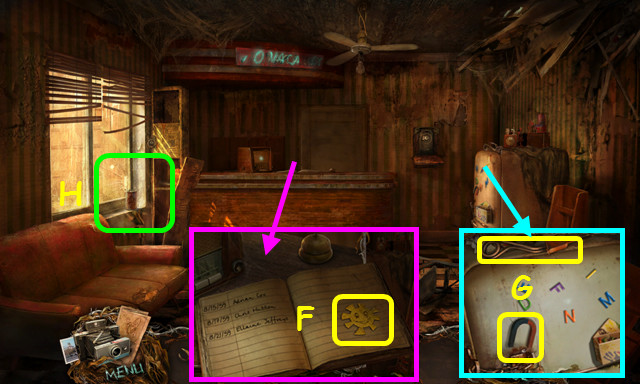
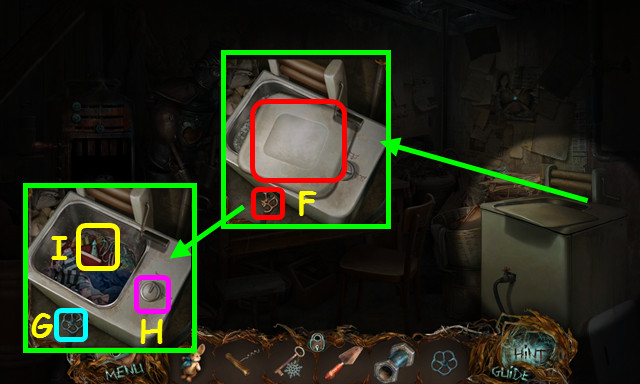
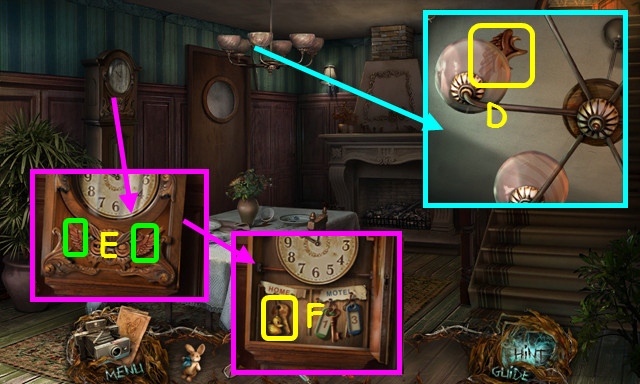
- Turn the page and take the SUN TOKEN (F).
- Take the HEATER and the MAGNET (G).
- Select the window area (H).
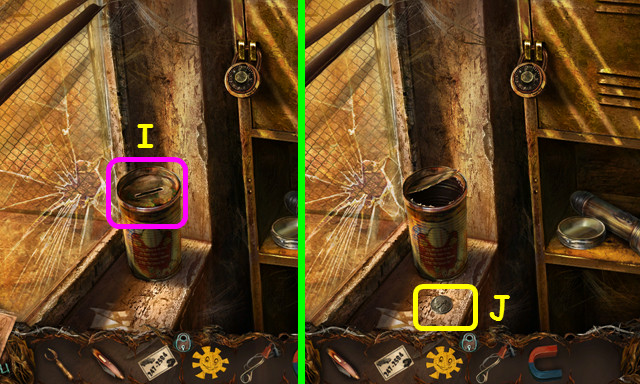
- Use the CAN OPENER on the can (I).
- Tip the can and take the 1/3 NICKEL (J).
- Return to the Road Fork and select the farm mini-game.
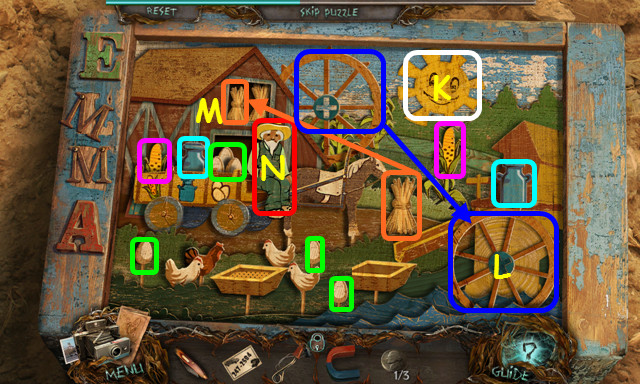
- Place the SUN TOKEN in the sky (K).
- Place the wheel in the water (L).
- Place the wheat in the barn (M).
- Place the corn, milk, and 3 eggs in the wagon (color-coded).
- Select the farmer (N).
- Open the cellar doors and turn the knob (O).
- Take the PLUSH BUNNY (P) and the HOOK ON A WIRE (Q).
- Travel to the Motel Yard and select the gas pump mini-game.
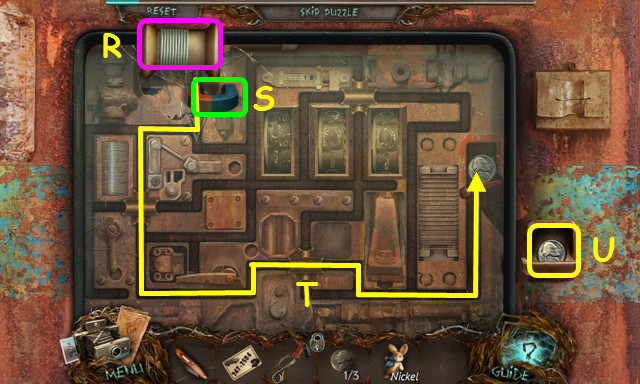
- Remove the twig and place the HOOK ON A WIRE in the hole (R).
- Place the MAGNET on the hook (S).
- Use the arrows to move the hook along the marked path (T).
- Take the 2/3 NICKEL (U).
- Enter the Motel Office.
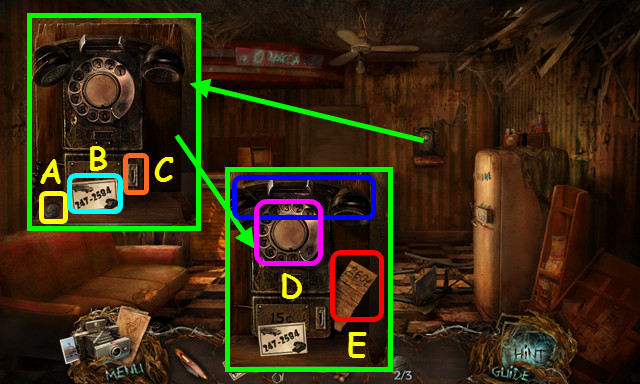
- Take the 3/3 NICKEL (A).
- Place the EMERGENCY NUMBER on the shelf (B).
- Place the 3 NICKELS in the slot (C).
- Remove the receiver and dial the emergency number (D).
- Touch the phone to hang up; answer it once it rings.
- Look at the combination 2601 (E).
- Go to the window area.
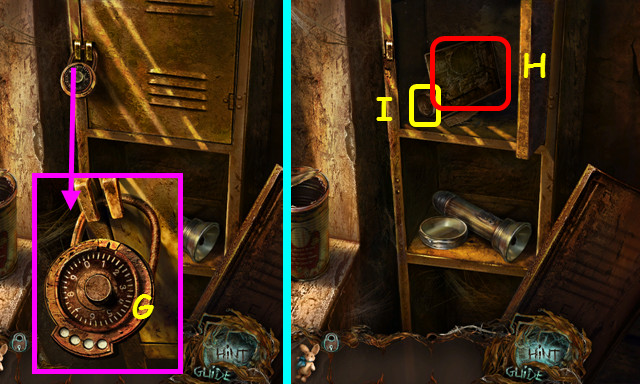
- Move the lock dial to 2-6-0-1 (G).
- Open the locker; take the photograph to play a HOP (H).
- Take the BANDAGE (I).
- Walk down and talk to the Motel Owner.
- Return to the Crash Site.
- Use the BANDAGE on the Bus Driver (J).
- Go to the Bridge.
- Use the KNIFE on the straps and take the baby (K).
- Take the CARABINER (L).
- Place the CARABINER on the chain, and then on the hitch (M).
- Walk forward.
Chapter 2: The Guest Rooms
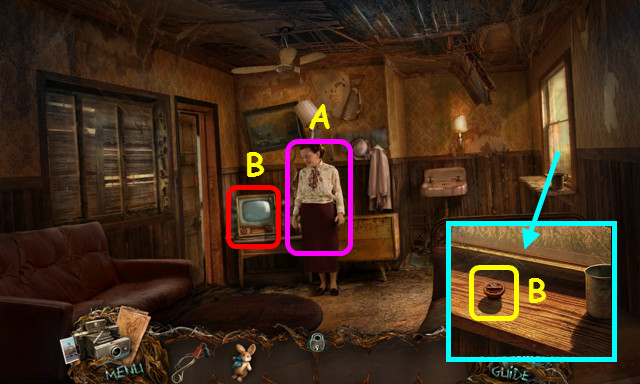
- Talk to Betty (A).
- Take the TV KNOB (B).
- Note the TV (C).
- Walk left.
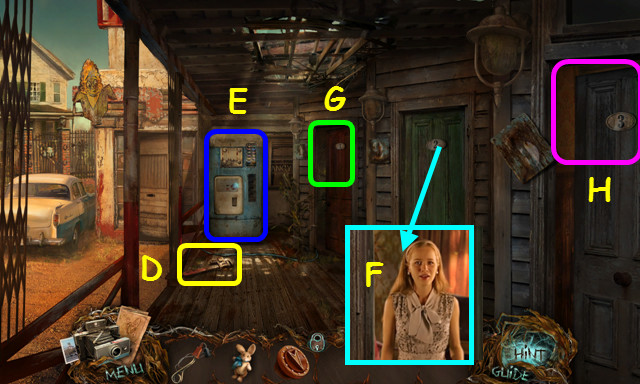
- Take the MONKEY WRENCH (D).
- Note the vending machine mini-game (E).
- Talk to Brenda in Room 2 (F).
- Note Room 1 (G).
- Enter Room 3 (H).
- Use the MONKEY WRENCH on the pipe; take the TRUNK KEY (I).
- Walk left twice.
- Use the TRUNK KEY on the lock (J).
- Take the POTION KIT, CROWBAR, and the KNITTING NEEDLES (K).
- Walk to Room 3 and select the TV.
- Place the right TV KNOB on the TV (N) and the KNITTING NEEDLES on the antenna (O).
- Turn the left knob 3 times (P).
- Turn the right knob once.
- Move the right antenna to the position shown (Q).
- Move the left antenna to the position shown to play a HOP (R).
- Exit the TV area.
- Talk to Betty and take the POTION RECIPE (U).
- Travel to Room 1.
- Take the TRAP (A).
- Use the CROWBAR on the board and take the TOBACCO PIPE (B).
- Note the map mini-game (C).
- Travel to the Bridge.
- Take the THICK GLOVE and the MUSHROOM (D).
- Walk down and right.
- Use the TRAP on the lizard; take the trap to earn the LIZARD TAIL (E).
- Go to the Motel Yard and walk forward to the House Gate.
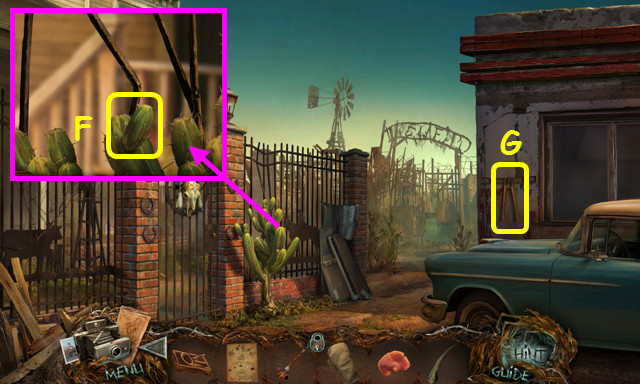
- Use the THICK GLOVE to take the CACTUS (F).
- Take the TONGS (G).
- Walk to the right.
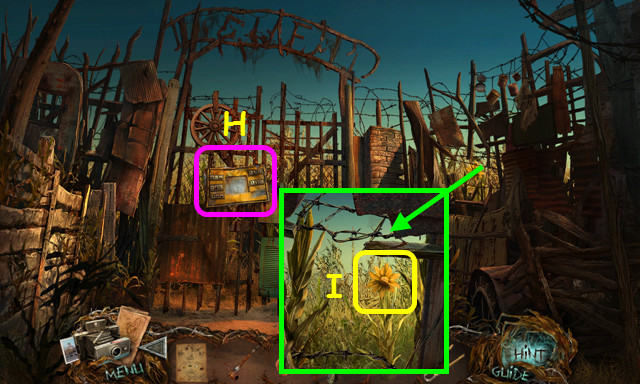
- Note the gate mini-game (H).
- Use the TONGS to take the FLOWER (I).
- Go to Room 3.
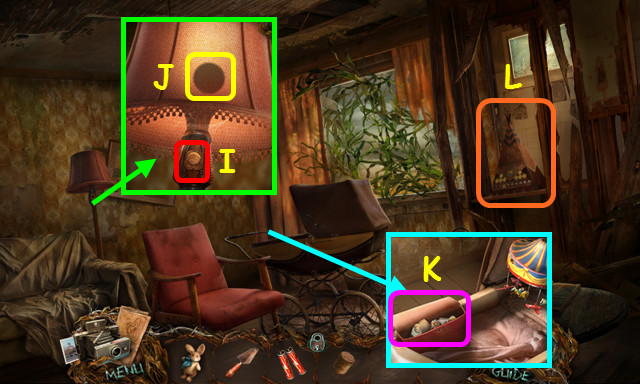
- Take the LIGHT BULB and the CORKSCREW (J).
- Note the window area (K).
- Go to the Motel office; select the window area.
- Place the LIGHT BULB in the opening to make the FLASHLIGHT (L).
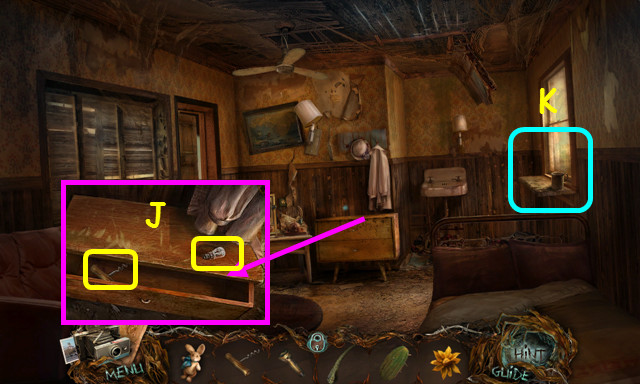
- Go to Room 1.
- Use the FLASHLIGHT under the bed; plug the cord into the wall socket (M).
- Walk down and select the vending machine mini-game.
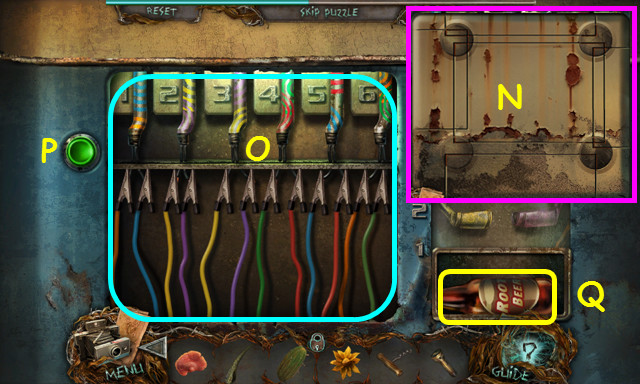
- Rotate the discs to complete the pattern on the cover (N).
- Place the wires as shown (O).
- Press the green button (P).
- Take the ROOT BEER (Q).
- Enter Room 3 and select the window area.
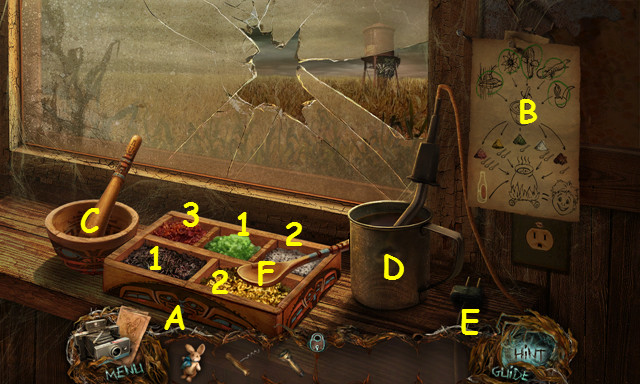
- Place the POTION KIT on the shelf (A).
- Place the POTION RECIPE on the wall (B).
- Place the LIZARD TAIL in the mortar and grind it up (C).
- Do the same for the FLOWER, CACTUS, MUSHROOM, and the TOBACCO PIPE.
- Place the ROOT BEER and then the HEATER in the cup (D).
- Plug in the heater (E).
- Use the spoon to put the correct number of scoops into the cup (F).
- Remove the heater and take the POTION.
- Go to Room 1.
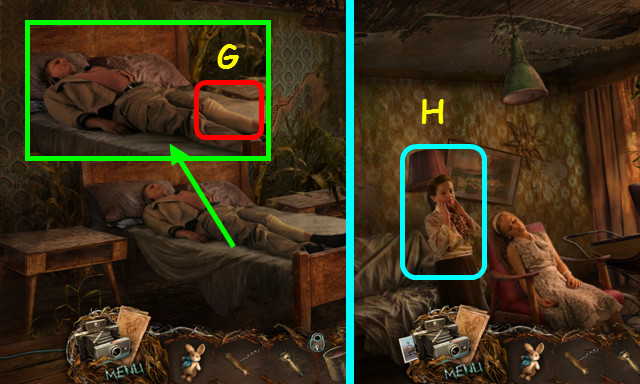
- Use the POTION on the Bus Driver (G).
- Go to Room 2.
- Talk to Betty (H).
- Go to the House Gate.
- Talk to the Motel Owner's Wife and take the BUTTON PANEL (I).
- Walk right and select the gate mini-game.
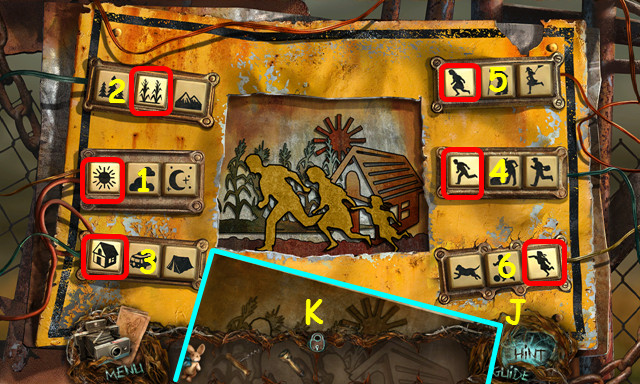
- Place the BUTTON PANEL on the lower right (J).
- Look at the diagram (K).
- Press the buttons to recreate the diagram (1-6).
- Walk forward to the Scarecrows.
- Take the FRIDGE KEY (L).
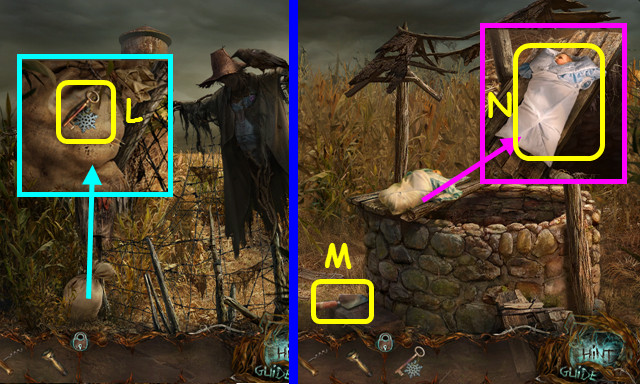
- Walk left to the Well.
- Take the SHOVEL (M).
- Take the baby (N).
- Travel to the Motel Office.
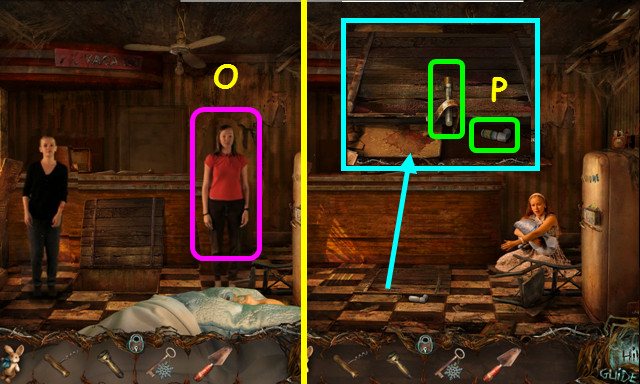
- Talk to Brenda (O).
- Try to take the inhaler; open the latch (P).
- Enter the trapdoor.
Chapter 3: The Basement
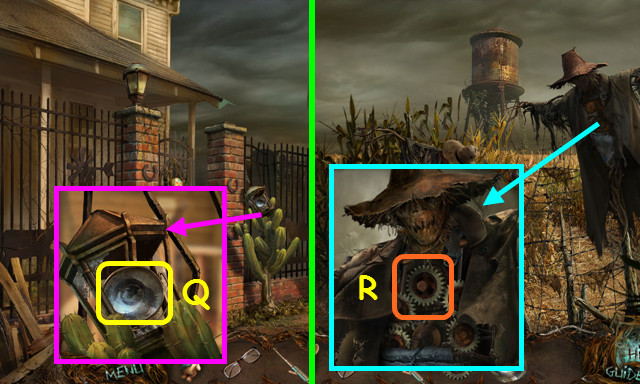
- Use the FLASHLIGHT on the scene (Q).
- Take the HANDLE (R).
- Walk forward (S).
- Remove the axe and cape (A).
- Read the 2 diagrams and take the ADAPTER (B).
- Select the furnace (C).
- Place the HANDLE on the furnace.
- Move the handles to each position and lift the lever (D) up one space (1-4).
- Take the VALVE (E).
- Remove the cover and the broken valve (F).
- Place the VALVE on the stem and turn it (G).
- Select the switch (H).
- Take the TOWER-SHAPED KEY (I).
- Walk down.
- Use the TOWER-SHAPED KEY in the lock (J).
- Open the door and walk right.
- Knock over the head (K) and take the SCARECROW FIGURINE (L).
- Take the RADIO KEY (M).
- Move the straw, take the BENT TIN HEART, and read the letter (N).
- Take the FUEL CANISTER (O).
- Walk down and go forward.
- Place the BENT TIN HEART in the rollers and turn the handle to receive the TIN HEART (P).
- Place the TIN HEART on the cover (Q).
- Take the FUNNEL (R).
- Walk down.
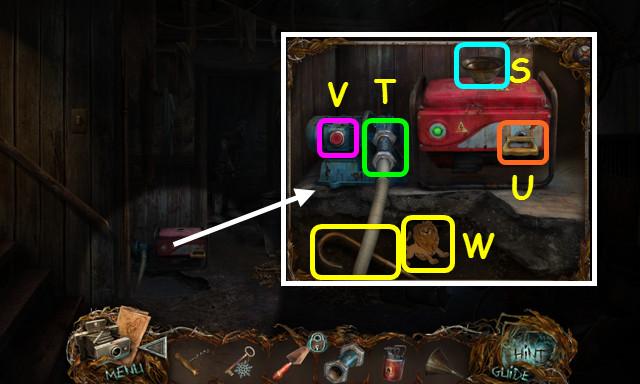
- Use the FUNNEL, and then the FUEL CANISTER on the generator (S).
- Use the ADAPTER on pump and attach the hose (T).
- Pull the start cord (U) and push the button (V).
- Take the BROKEN WALKING STICK and the LION FIGURINE (W).
- Walk forward.
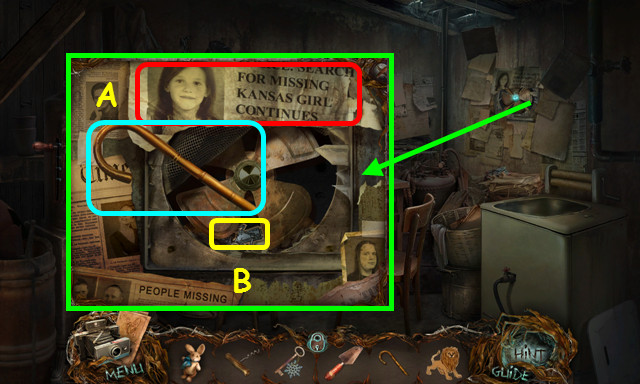
- Read the clipping and place the BROKEN WALKING STICK in the fan blades (A).
- Take the TIN MAN FIGURINE (B).
- Walk down and right.
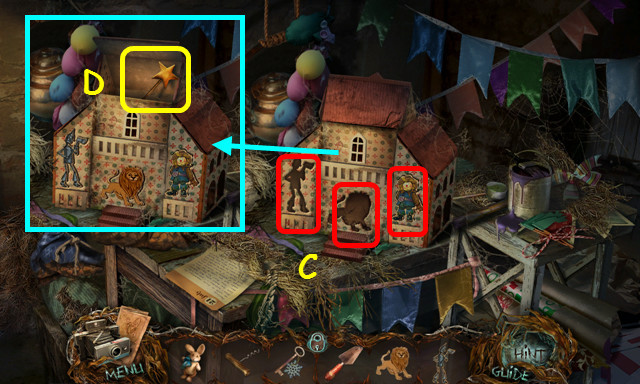
- Place the TIN MAN FIGURINE, the SCARECROW FIGURINE and the LION FIGURINE on the house (C).
- Take the METAL WAND (D).
- Walk down and forward.

- Place the METAL WAND in the hole and turn it to release the INHALER (E).
- Walk down.
- Give the INHALER to Brenda (F).
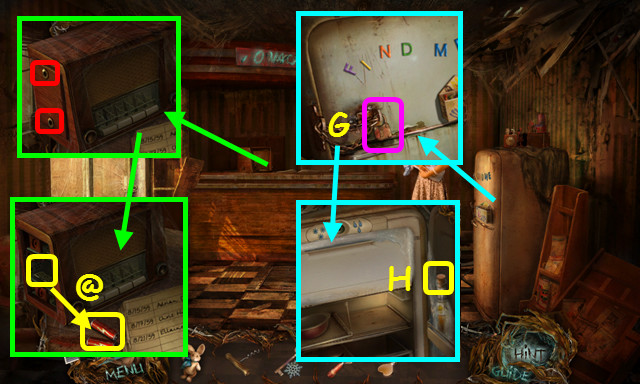
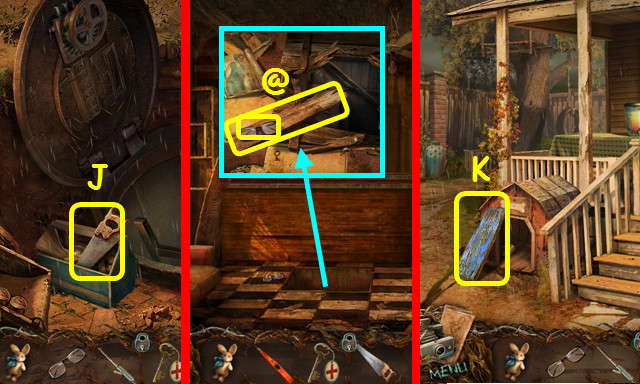
- Use the RADIO KEY twice on the panel (red).
- Take the BATTERIES (@).
- Use the FRIDGE KEY on the lock (G).
- Use the corkscrew to take the CORK (H).
- Walk down.
- After the cut-scene, go to Room 1.
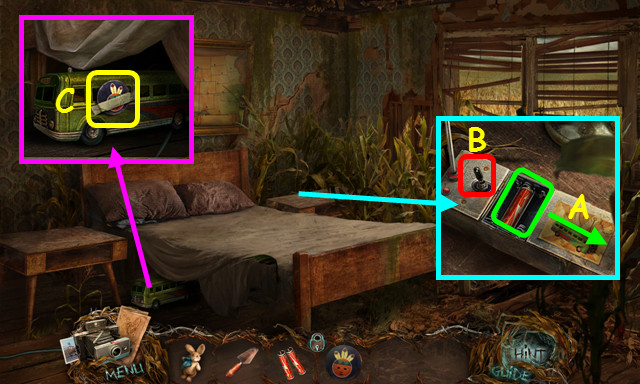
- Slide the lid, place the BATTERIES inside, and close the lid (A).
- Flip the switch (B).
- Take the 1st TOKEN (C).
- Go to Room 2.
- Place the CORK on the switch and push (I).
- Take the 2nd TOKEN (J).
- Open the purse and read the prescription (K).
- Select the mini-game (L).
- Move the tokens to the shown positions (M).
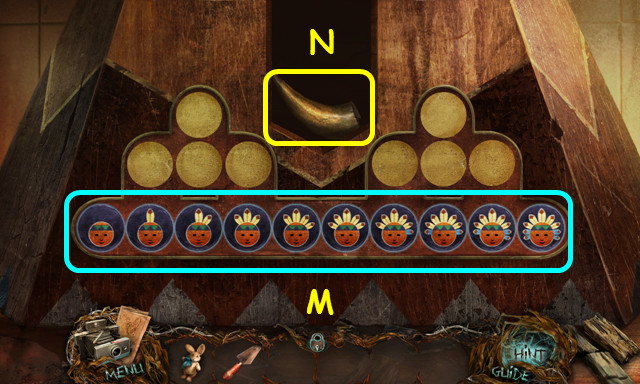
- Take the HORN (N).
- Walk to the House Gate.
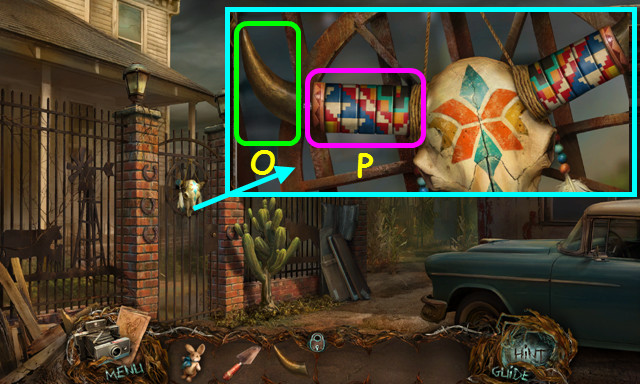
- Place the HORN on the skull (O).
- Turn the wheels to match the right horn (P).
- Walk left.
Chapter 4: The House
- Use the SHOVEL on the dirt to find the BASEBALL (A).
- Move the sign and take the SHED KEY (B).
- Take the DULL BLADE (C).
- Take the ADHESIVE TAPE (D).
- Walk left.
- Take the CLOVER (E).
- Select the window area (F).
- Use the SHED KEY on the lock (G).
- Take the MATCHES (H).
- Use the DULL BLADE on the sharpener to make the SHARP BLADE (I).
- Walk down twice.
- Use the SHARP BLADE on the weeds (J).
- Place the CLOVER and take the HOSE (K).
- Walk to the Scarecrows.
- Use the SHARP BLADE on the sack; take the CORNCOB (L).
- Use the BASEBALL on the crow (M).
- Take the STATE PINS (N).
- Open the overalls and note the gears (O).
- Return to Room 1; select the map mini-game.
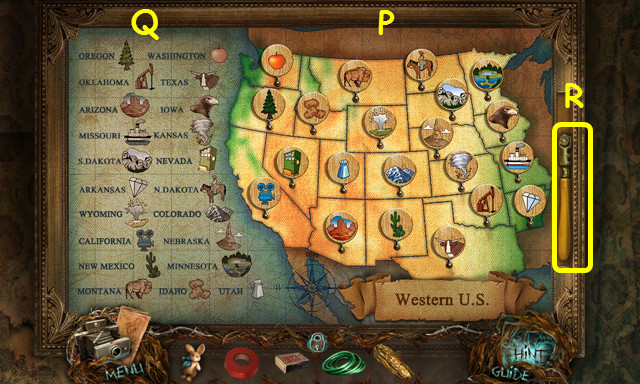
- Place the STATE PINS on the map.
- Move the pins (P) to match the list (Q).
- Take the GLASS CUTTER (R).
- Travel to the Backyard.

- Place the CORNCOB in the corn sheller and turn the crank (S).
- Take the CORN KERNELS (T).
- Use the GLASS CUTTER on the window; pull the latch and enter the house (U).
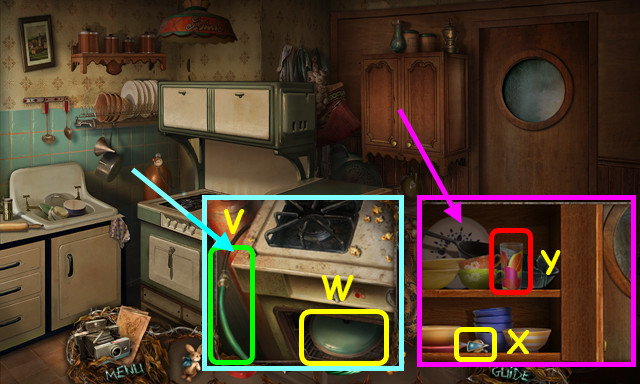
- Place the HOSE on the gas cylinder (V).
- Open the oven and take the PAN LID (W).
- Take the SWITCH (X).
- Touch the glass (Y).
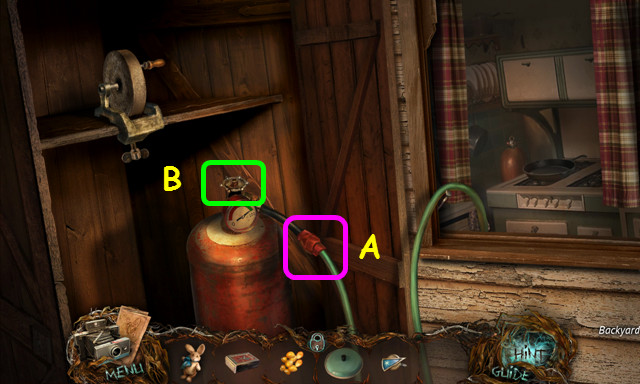
- Place the hose on the tube, and then use the ADHESIVE TAPE to secure it (A).
- Turn the valve (B).
- Go to the Motel Office.
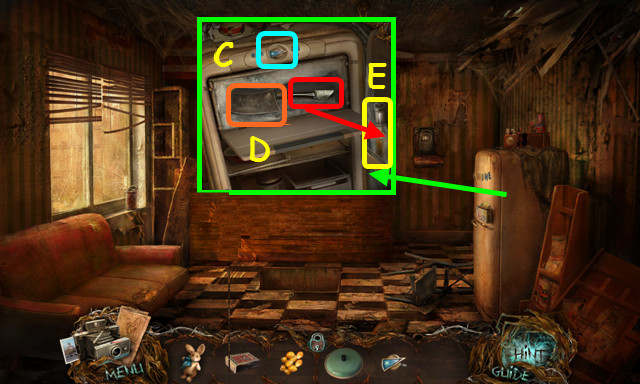
- Place the SWITCH and turn it once (C).
- Open the freezer and take the photo for a HOP (D).
- Use the ice chisel to take the OIL BOTTLE (E).
- Take the GLASSES and the 1st PLANK (F).
- Return to the Kitchen.
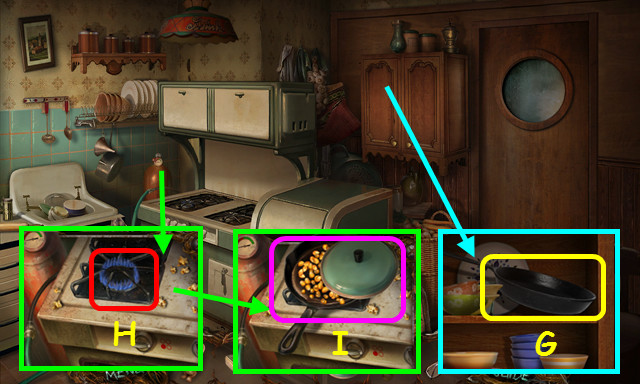
- Move the items and take the FRYING PAN (G).
- Use the MATCHES on the burner (H).
- Place the FRYING PAN on the burner; use the OIL BOTTLE, CORN KERNELS, and then the PAN LID on the pan (I).
- Walk down twice and enter the house.
- Take the LIGHTER (J).
- Walk up the stairs (K).
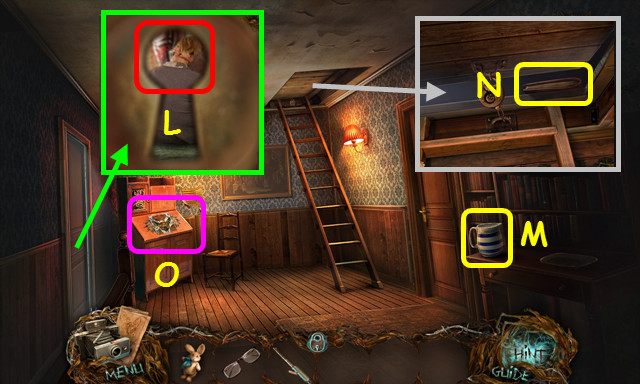
- Talk to the Motel Owner's Wife (L).
- Take the EMPTY JUG (M).
- Lift the trap door and take the ORIGAMI BOOK (N).
- Select the desk (O).
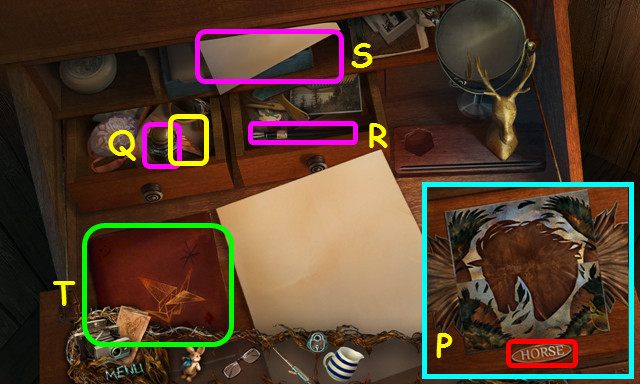
- Rotate the tiles to form a horse, and then press the 'HORSE' button (P).
- Open and sort through the left drawer until touching the inkwell; take the LEFT OWL WING (Q).
- Open and sort through the right drawer until touching the pen (R).
- Touch the paper (S).
- Place the ORIGAMI BOOK on the desk and open it (T).
- Walk to the Porch.
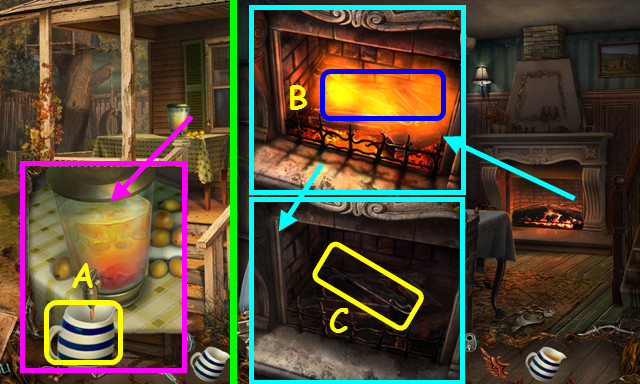
- Use the EMPTY JUG on the dispenser to get the JUG OF LEMONADE (A).
- Enter the house.
- Use the JUG OF LEMONADE on the flames (B).
- Take the POKER (C).
- Use the POKER on the chandelier; take the RIGHT OWL WING (D).
- Place the LEFT OWL WING and the RIGHT OWL WING on the clock (E).
- Take the BATHROOM KEY (F).
- Walk up the stairs.

- Use the BATHROOM KEY on the lock (G).
- Walk right.
- Open the curtain and the window (H).
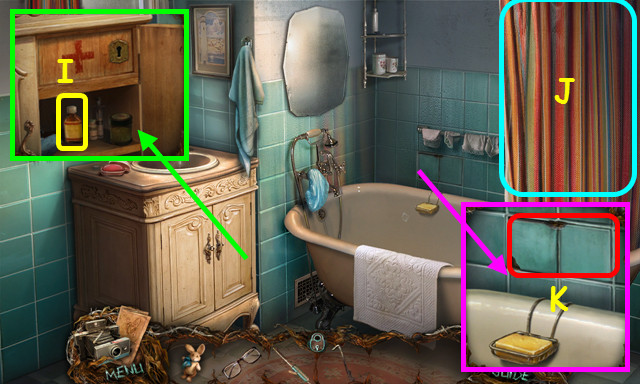
- Take the IODINE (I).
- Move the shower curtain (J).
- Use the POKER on the tiles twice (K).
- Walk down and select the desk.
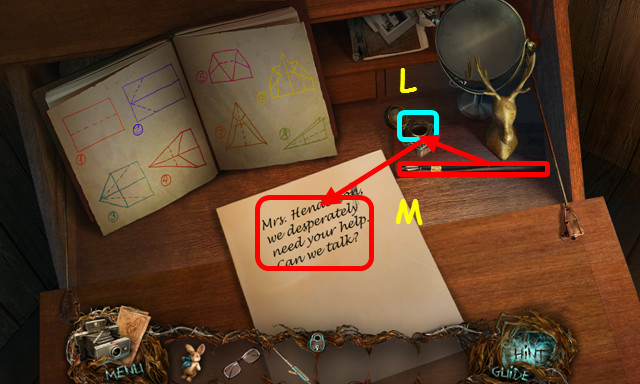
- Pour the IODINE in the inkwell (L).
- Take the pen; use it on the inkwell, and then the paper (M).
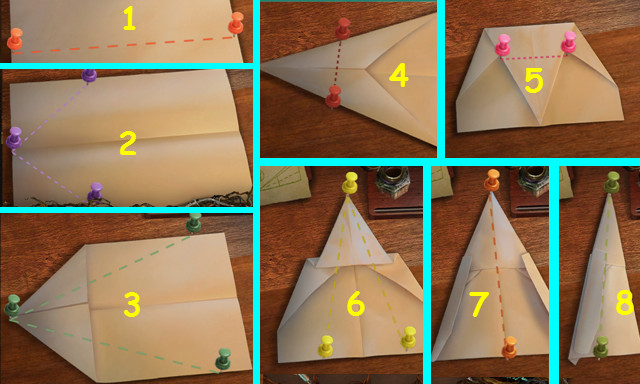
- Move the pins to match the drawing in the origami book (1-8).
- Lowering the menu bar allows more movement of the pins.
- Take the PAPER PLANE (N).
- Travel to the Backyard.
- Use the PAPER PLANE on the window (O).
- Take the GEAR and read the note (P).
- Walk down twice.
Chapter 5: The Water Tower, Shelter, and Treehouse
- Take the REFLECTOR (Q).
- Walk to the Scarecrows.
- Place the GEAR in the mechanism (R).
- Walk forward.
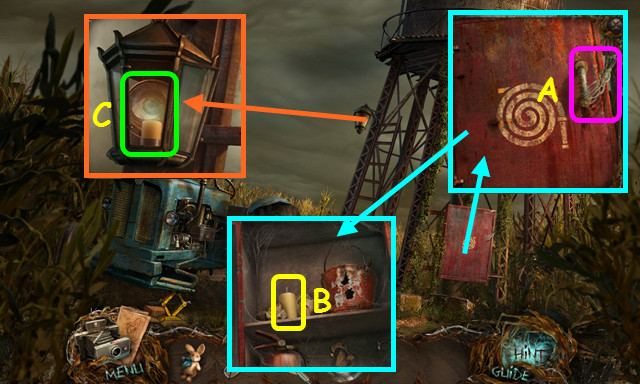
- Use the LIGHTER on the ties (A).
- Take the CANDLE (B).
- Open the light and remove the old candle; place the REFLECTOR and CANDLE inside, and then use the LIGHTER on the candle (C).
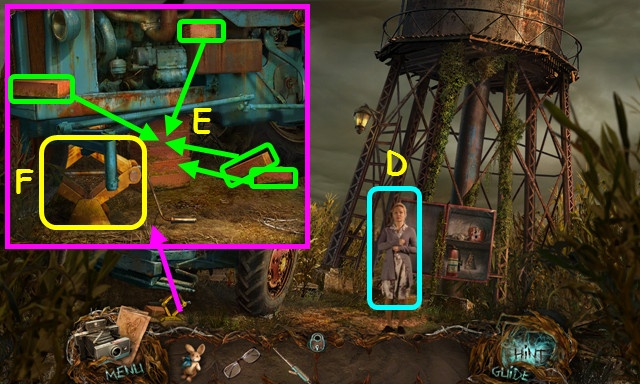
- Talk to Mrs. Henderson (D).
- Stack all the bricks (E).
- Take the JACK (F).
- Return to the Second Floor of the house, and then walk left.
- Place the JACK under the and turn the crank (G).
- Move the carpet, note the symbols, the bookcase nd select the photo for a HOP (H).
- Walk down and right.
- Change the symbols as shown (I).
- Take the LIZARD-SHAPED KEY (J).
- Walk down.
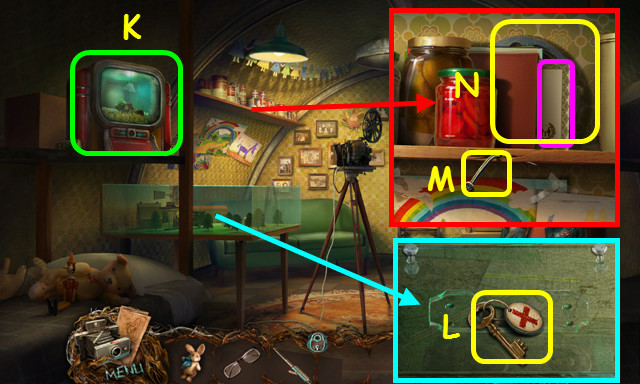
- Note the TV mini-game (K).
- Take the MEDS CABINET KEY and note the diorama beneath the glass (L).
- Take the NAIL (M).
- Move the jars, read the adoption certificate, and take the FILM (N).
- Take the SPRING BUTTON (O).
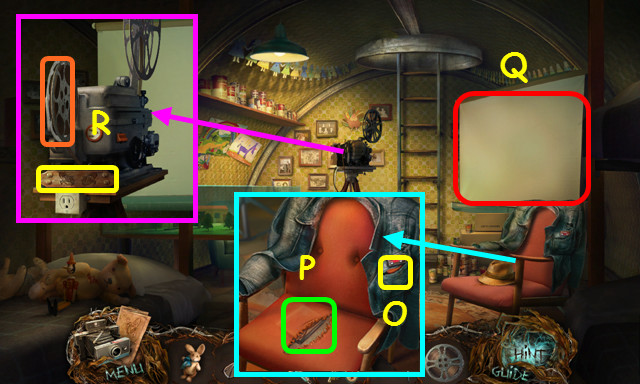
- Move the hat; use the NAIL on the seat and read the diary (P).
- Pull down the screen (Q).
- Place the FILM on the reel and take the CORN NAMEPLATE (R).
- Select the TV mini-game.
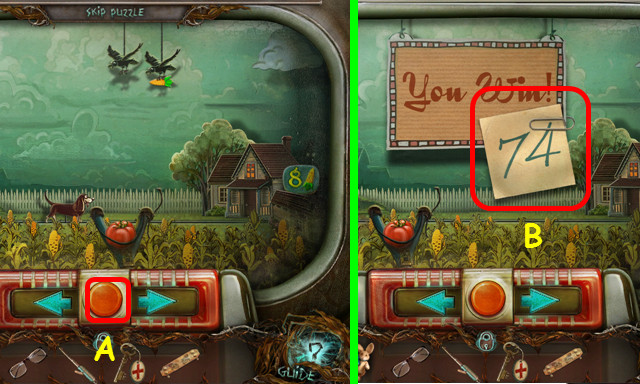
- Place the SPRING BUTTON in the center (A).
- Press the spring button to knock down the corn 8 times.
- Use the arrows to slide the slingshot left or right.
- Note the number 74 on the note (B).
- Select the diorama.
- Place the CORN NAMEPLATE in the holder (C).
- Replace the scenery items as shown (color-coded).
- Push the truck (D).
- Note the code 1963 on the roof (E).
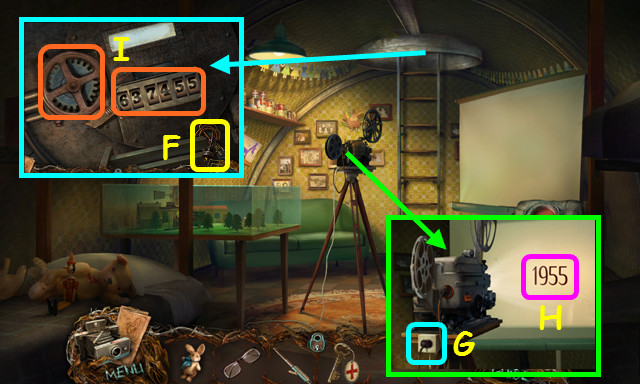
- Take the CABLE (F).
- Use the CABLE on the plug (G).
- Note the code 1955 on the screen (H).
- Enter 63-74-55 in the lock and turn the wheel (I).
- Take the SAW (J).
- Walk to the Motel Office.
- Take the 1st PLANK and the GLASSES (@).
- Return to the Front Porch.
- Take the 2nd PLANK (K).
- Walk to the Bathroom.
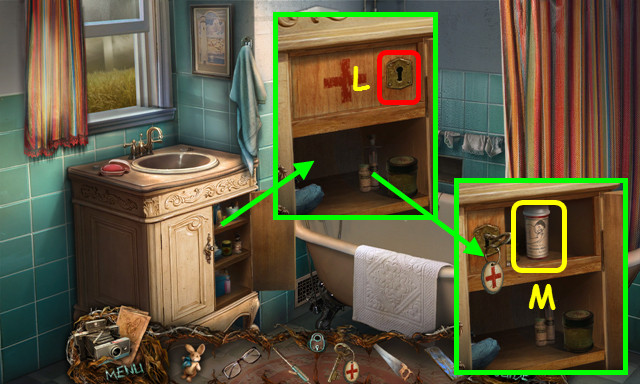
- Use the MEDS CABINET KEY on the lock (L).
- Take the SLEEPING PILLS (M).
- Return to the Backyard.

- Use the SAW on the fence (N).
- Place the ladder on the treehouse (O).
- Go up the ladder.
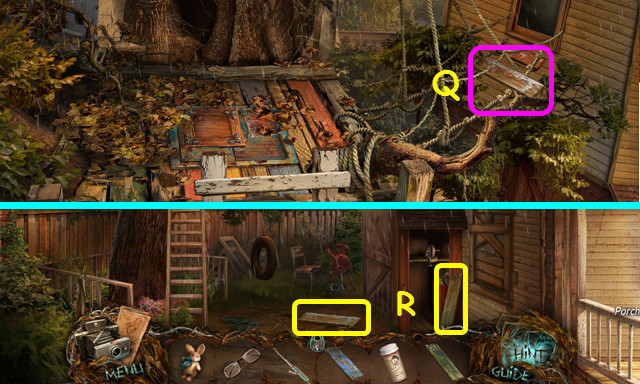
- Touch the plank (Q).
- Walk down.
- Take the 3rd and 4th PLANK (R).
- Return to the treehouse.
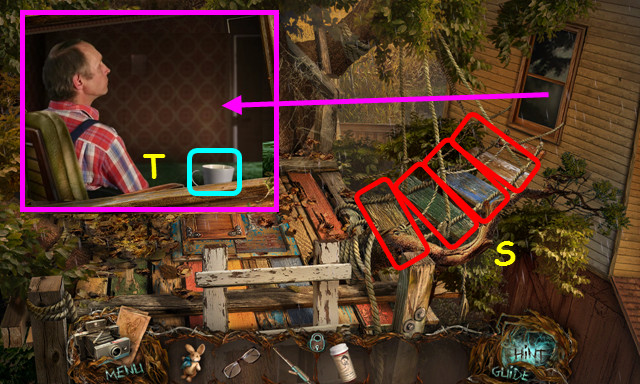
- Place the 4 PLANKS on the ropes (S).
- Use the SLEEPING PILLS on the cup (T).
- Return to the Second Floor and walk left.
- Talk to the Motel Owner and take the LIZARD-SHAPED KEY (U).
- Walk down.
- Use the LIZARD-SHAPED KEY in the lock (V).
- Climb up.
Chapter 6: The Attic and the Well
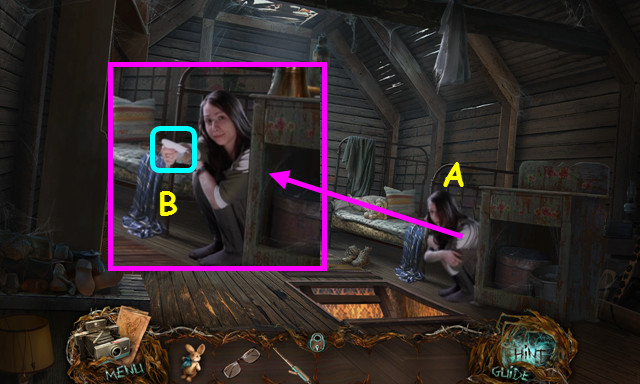
- Talk to Emma (A).
- Take the photo for a HOP (B).
- Move the items and take the POLICE BADGE (C).
- Place the plug in the sink (D).
- Pour the water (E).
- Collect the 5 RAGS to make the CLOTH ROPE (green).
- Take the EXTINGUISHER (F).
- Look at the drawing and take the AEROSOL (G).
- Use the EXTINGUISHER on the planks (H).
- Use the CLOTH ROPE on the hole, and then climb down (I).
- Return to the Scarecrows.

- Use the AEROSOL or the LIGHTER on the scarecrow (J).
- You need both items in your inventory.
- Take the ROPE (K).
- Walk left and look at the Well.
- Use the ROPE on the well (M).
- Climb down.
- Move the branch; take the BIRD MASCOT and the COAT (N).
- Remove the mud; take the photo for a HOP (O).
- Select the mini-game (P).
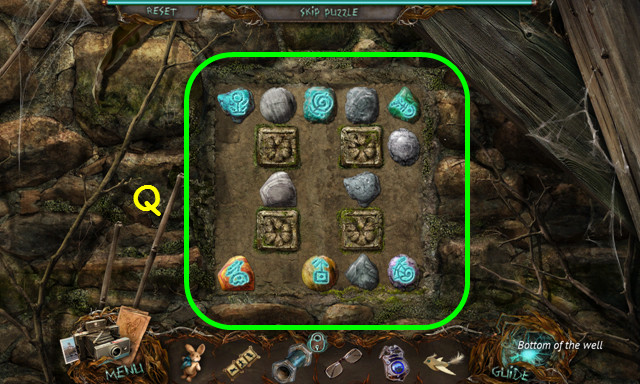
- Use the COAT to clean the area.
- Slide the symbols to the positions shown (Q).
- Walk forward.
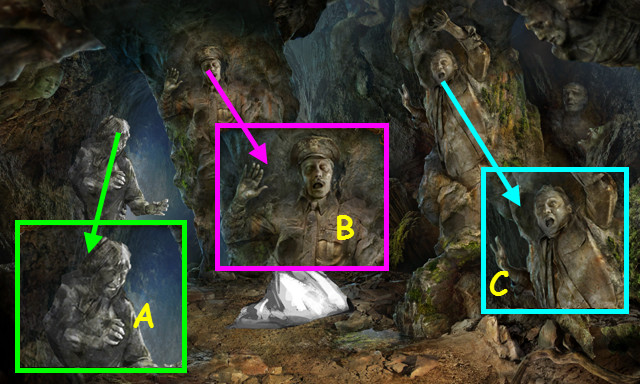
- Use the GLASSES on the left statue (A).
- Use the POLICE BADGE on the center statue (B).
- Use the BIRD MASCOT on the right statue (C).
- Congratulations, you've completed Fright.
Created at: 2014-07-27