

Walkthrough Menu
- General Tips
- Chapter 1: The Axiom
- Chapter 2: Cassandra
- Chapter 3: The Third Floor
- Chapter 4: A New Suspect
- Chapter 5: The Fire Escape
- Chapter 6: The Butcher
- Chapter 7: Into the Maze
General Tips
- This is the official guide for Haunted Hotel: The Axiom Butcher.
- This guide will not show when you have to zoom into a location; the screenshots will show each zoom scene.
- Hidden-object puzzles are referred to as HOPs. This guide will not show screenshots of the HOPs, however, it will mention when an HOP is available and the inventory item you'll collect from it.
- Use the Map to fast travel to a location.
Chapter 1: The Axiom
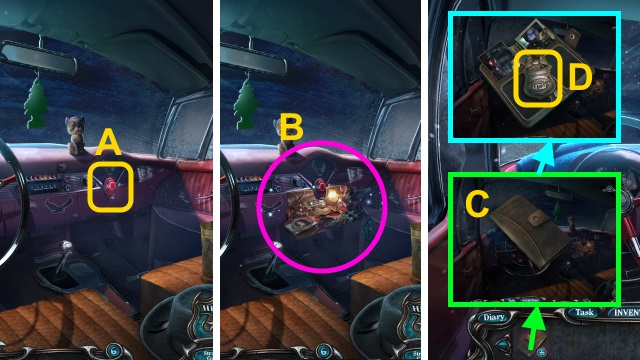
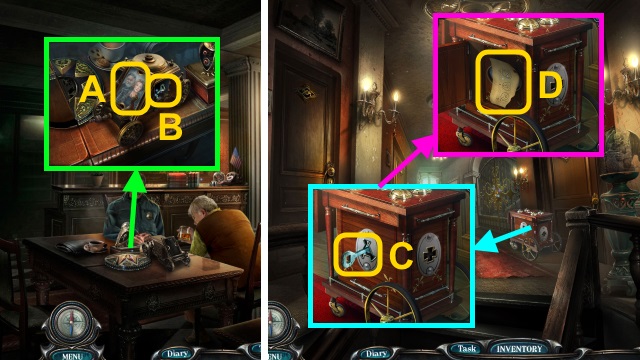
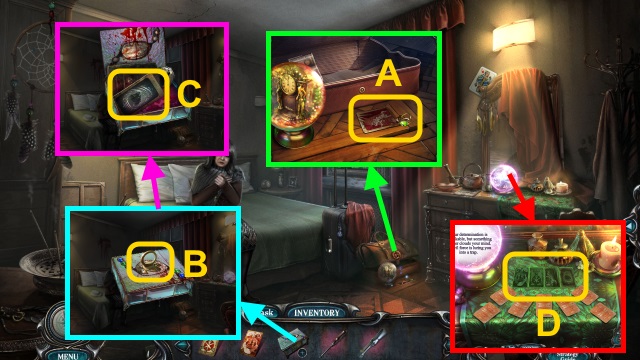
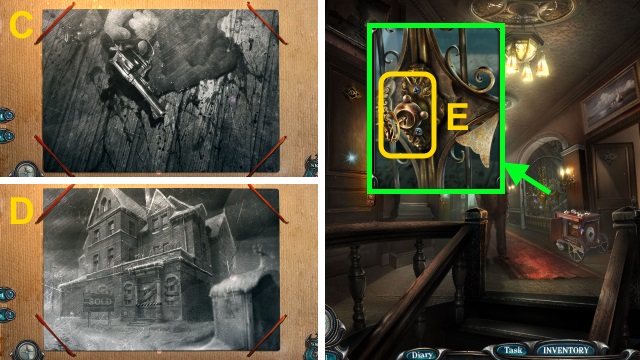
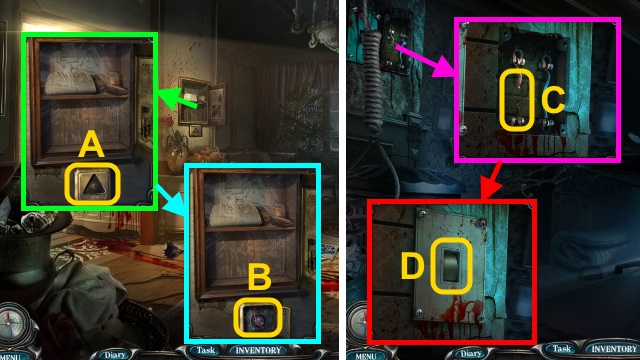
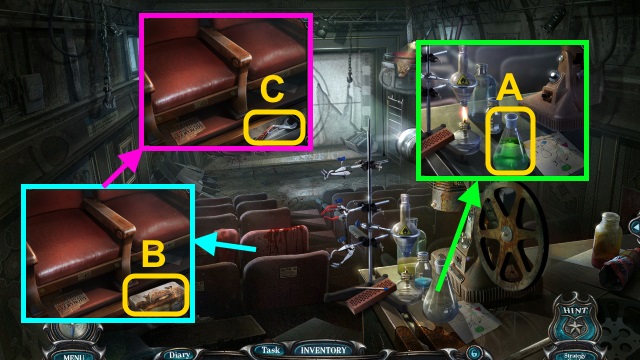
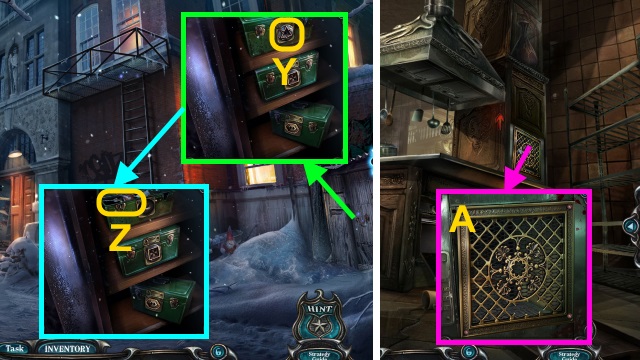
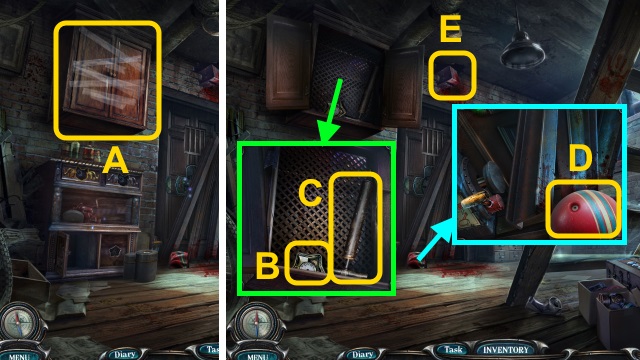
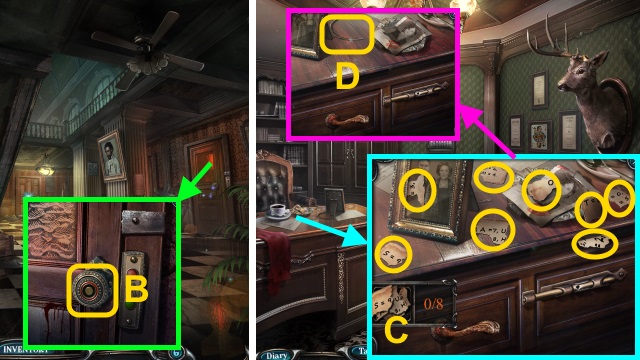
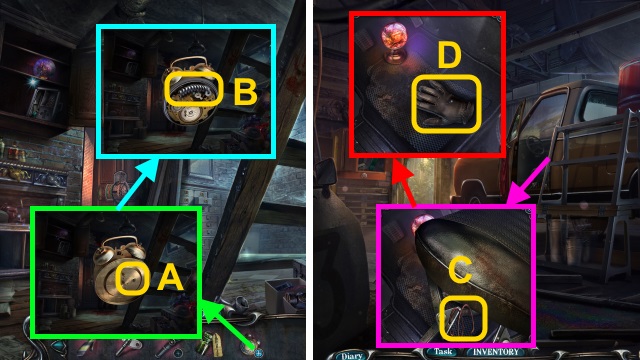
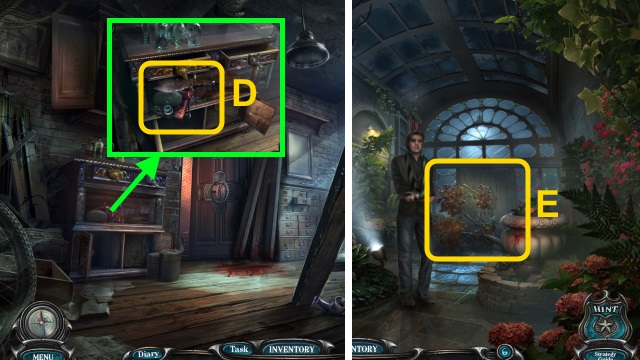
- Press the button (A).
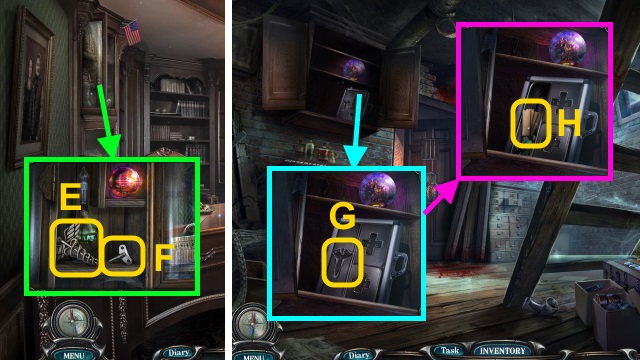
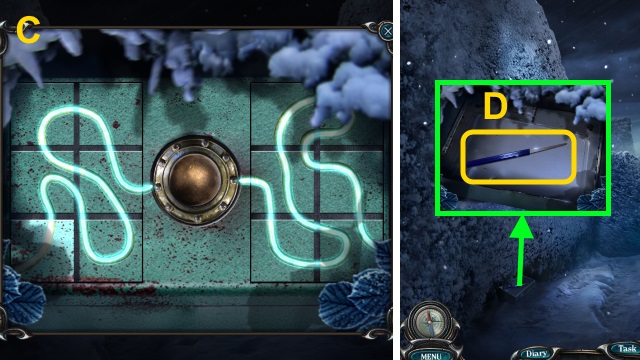
- Play the HOP; receive the WALLET (B).
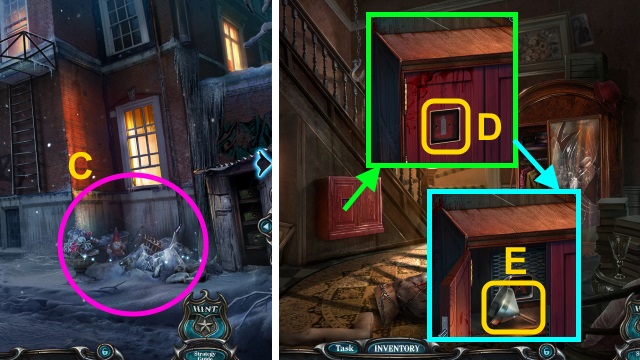
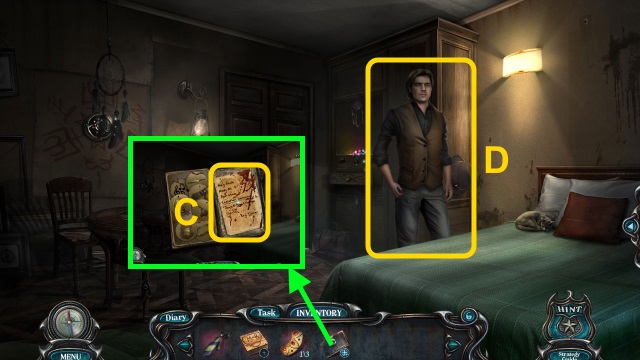
- Open the wallet (C); move the items.
- Take the DETECTIVE'S BADGE (D).
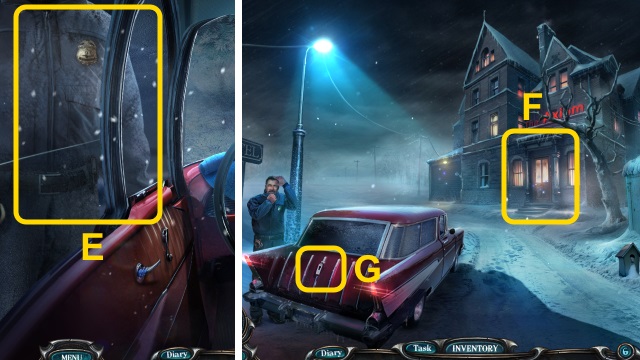
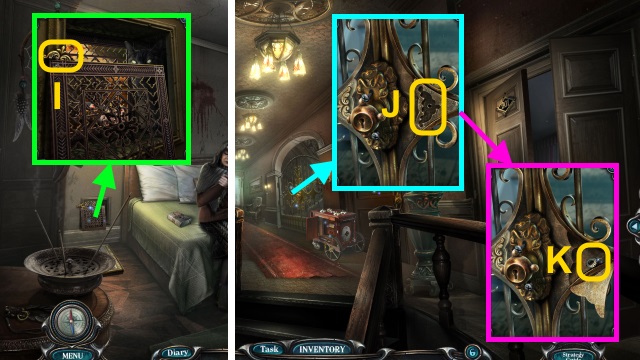
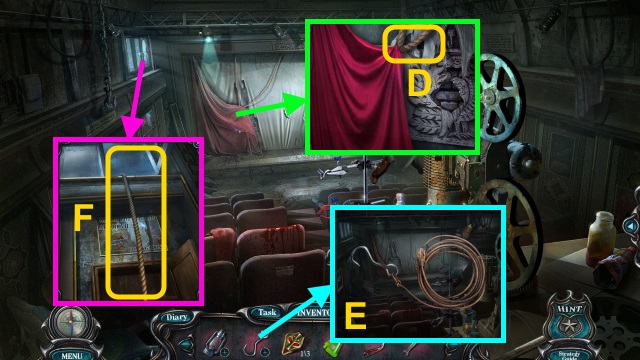
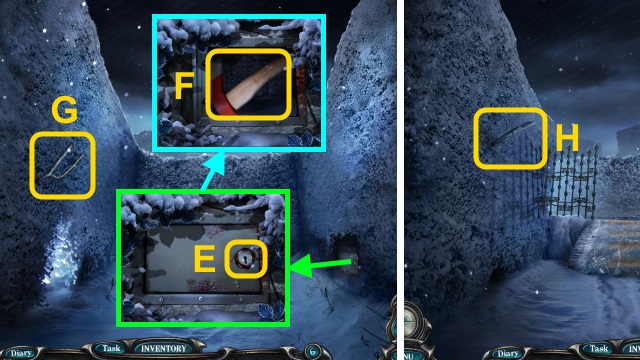
- Give the DETECTIVE'S BADGE (E).
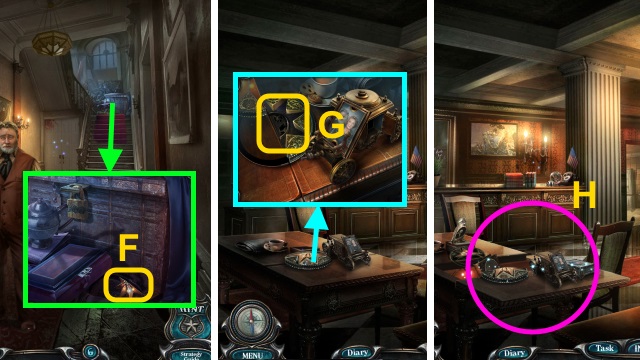
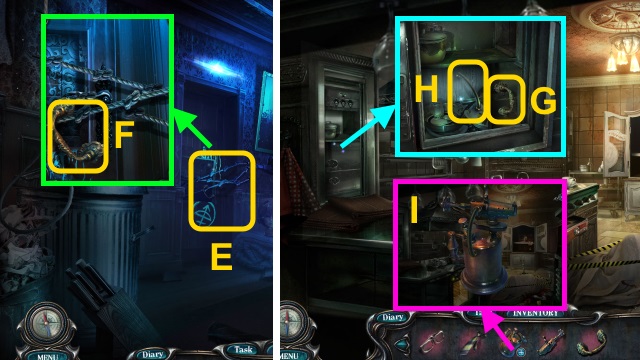
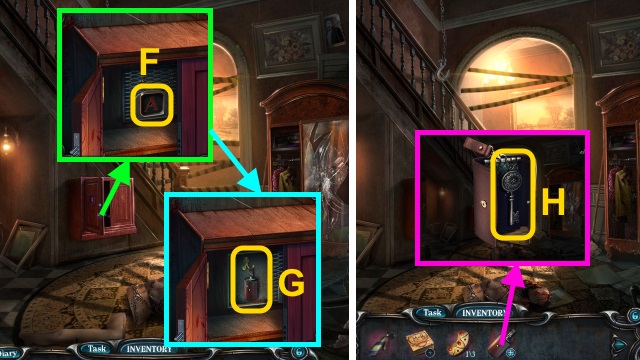
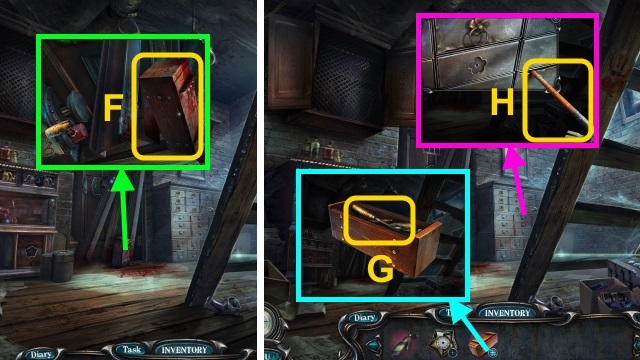
- Examine the door (F).
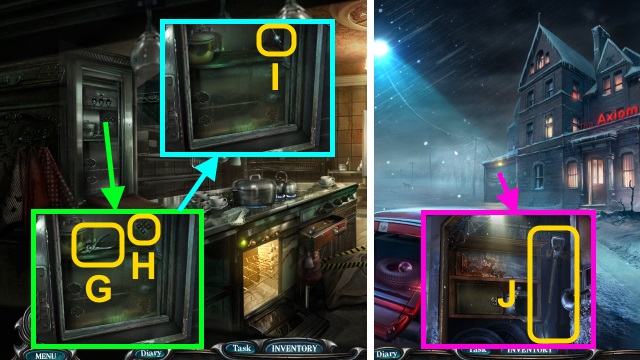
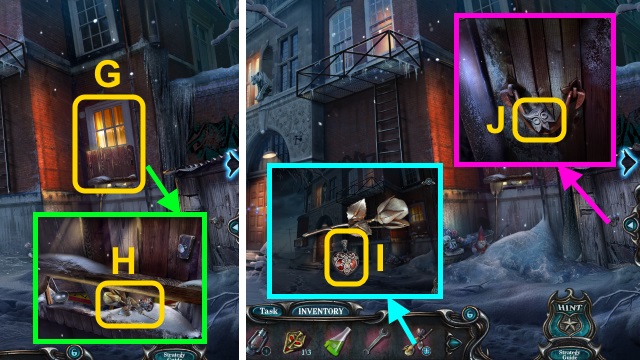
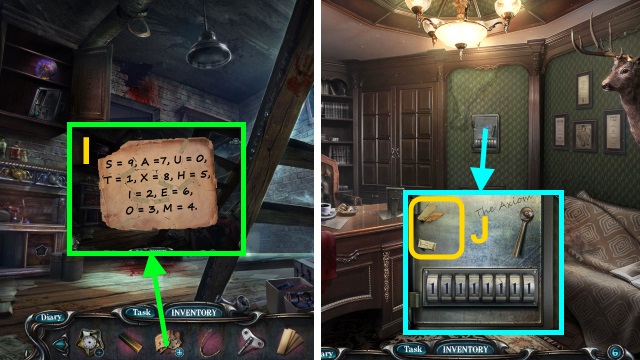
- Use the CAR KEY (G).
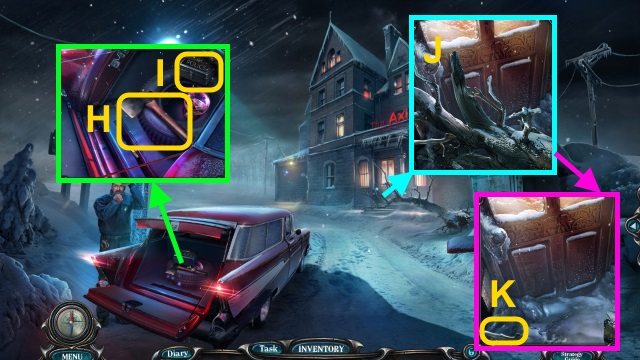
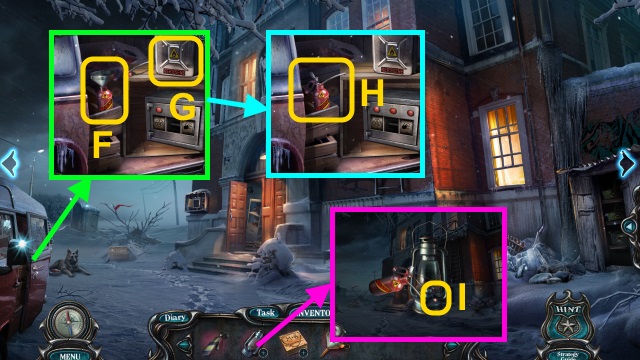
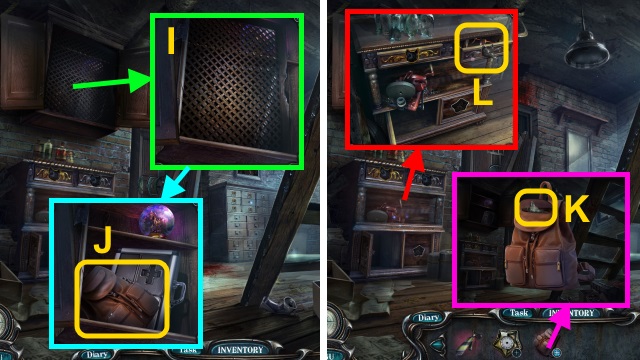
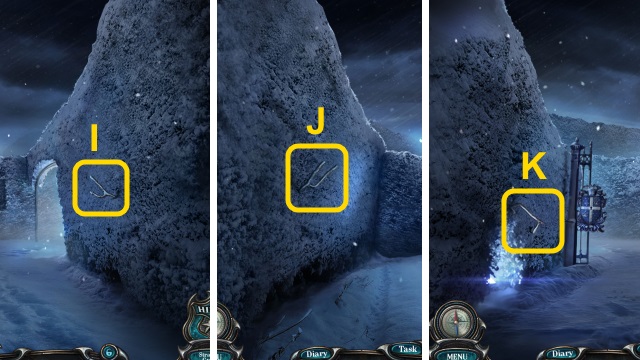
- Take the AXE (H) and DETECTIVE'S KIT (I).
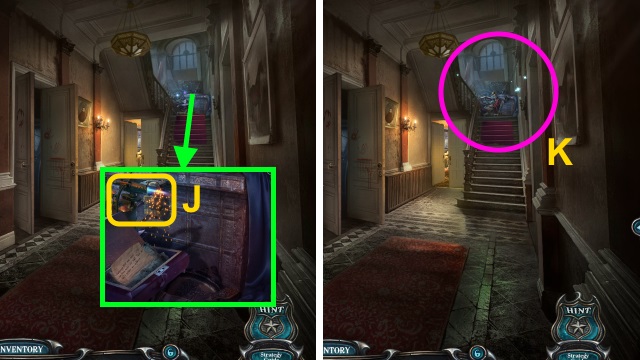
- Use the AXE 2x (J).
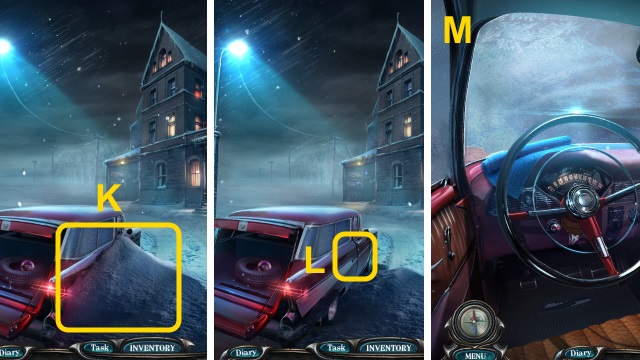
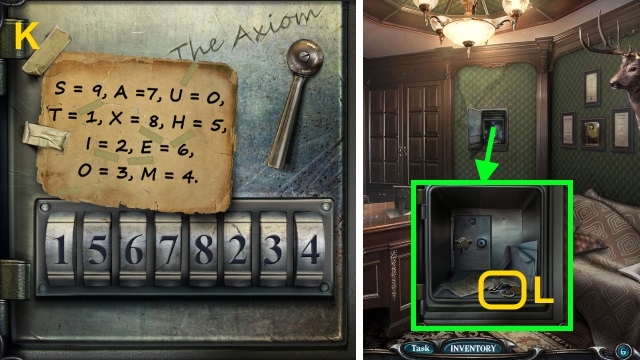
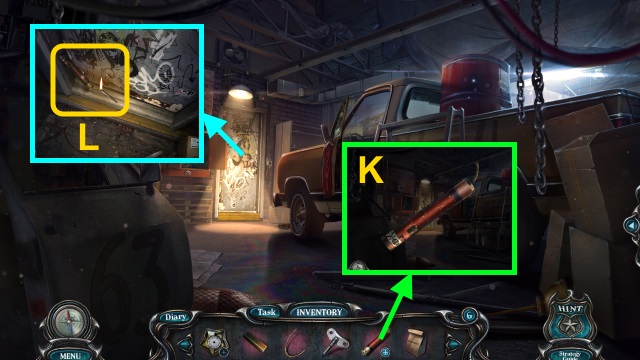
- Take the BRANCH (K).
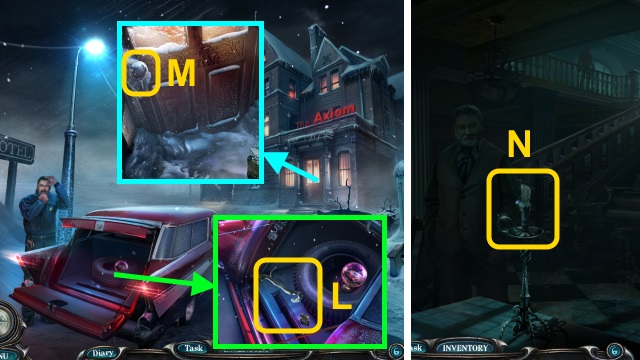
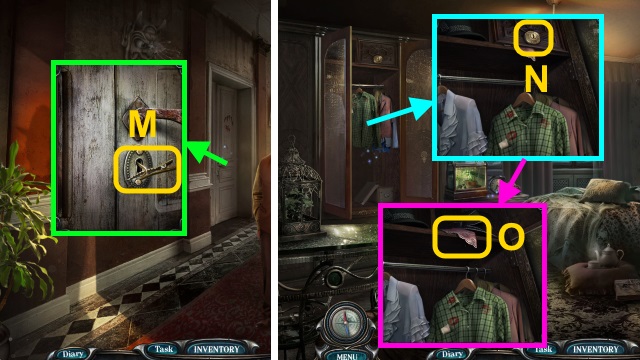
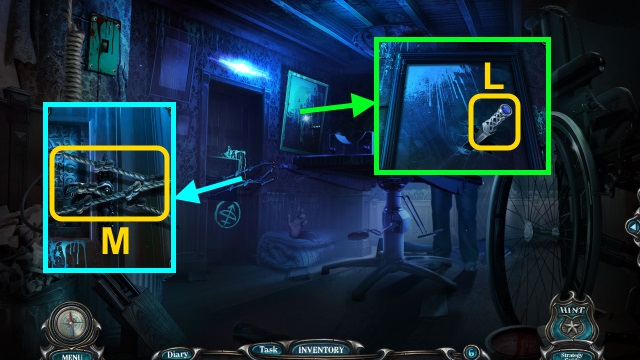
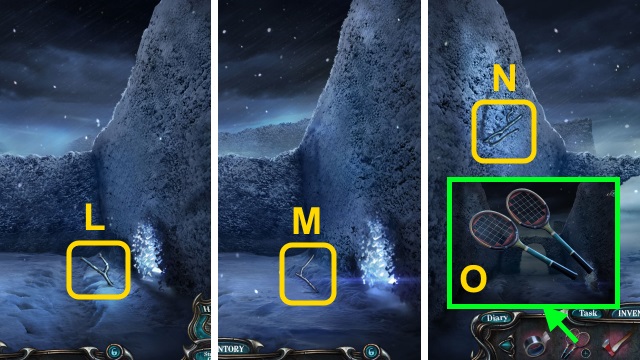
- Use the BRANCH; take the LIGHTER (L).
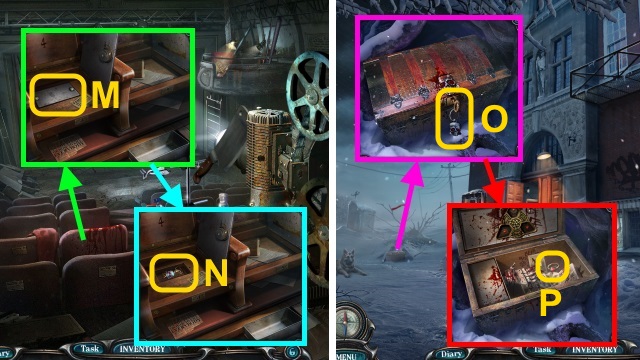
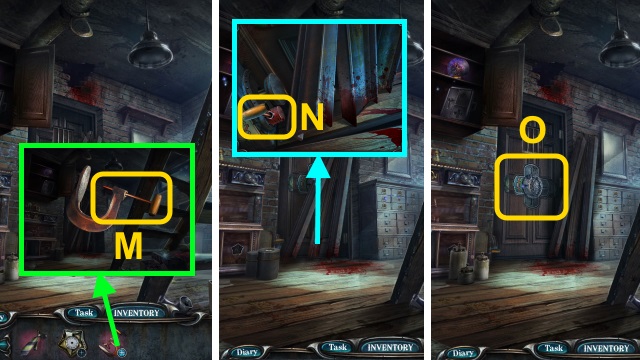
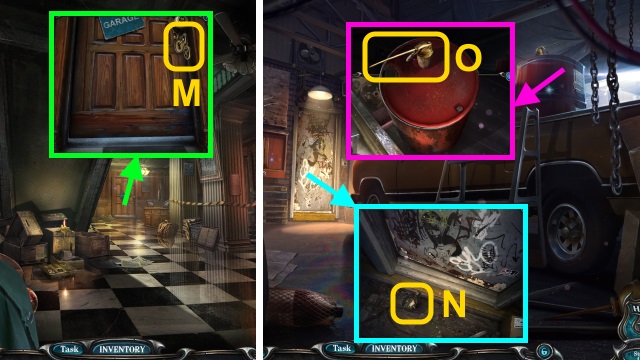
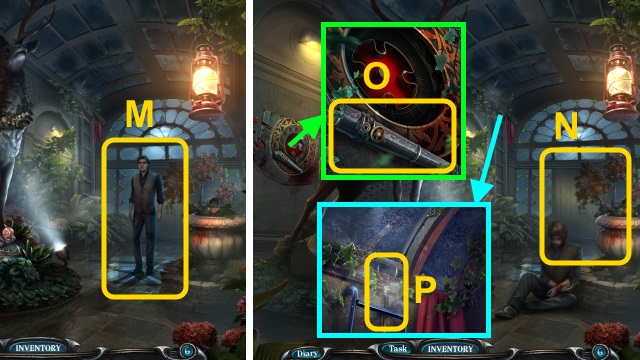
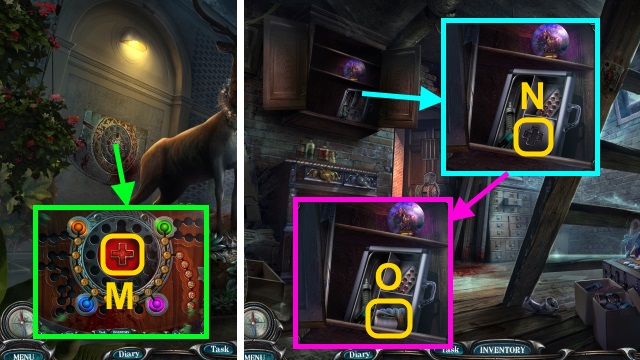
- Use the LIGHTER (M); open the door.
- Walk forward.
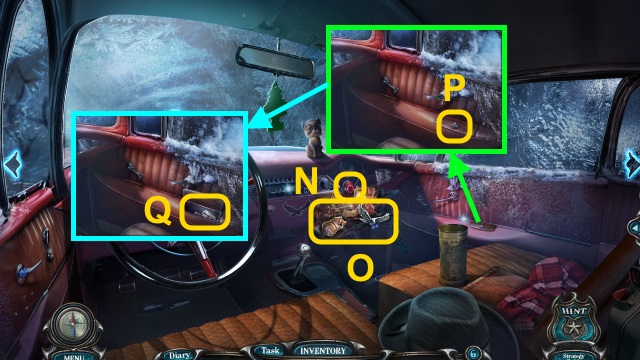
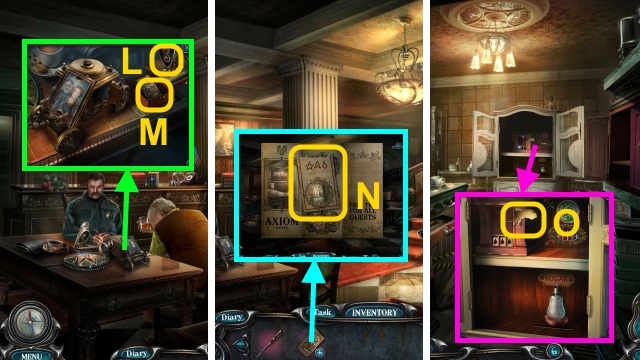
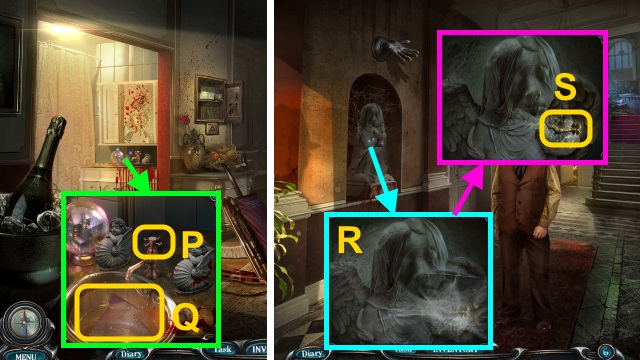
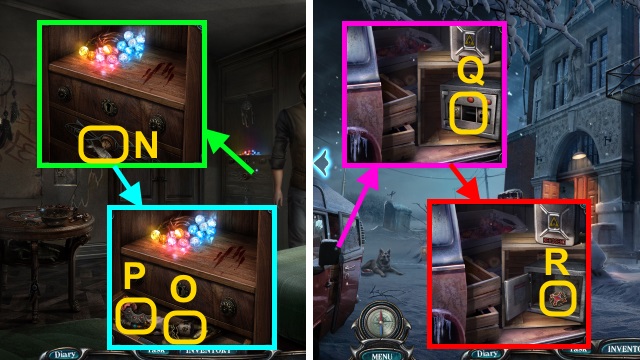
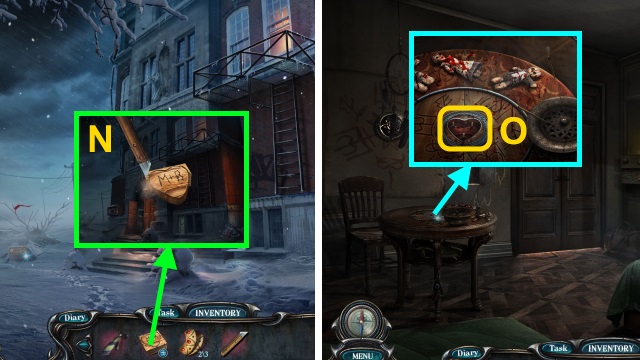
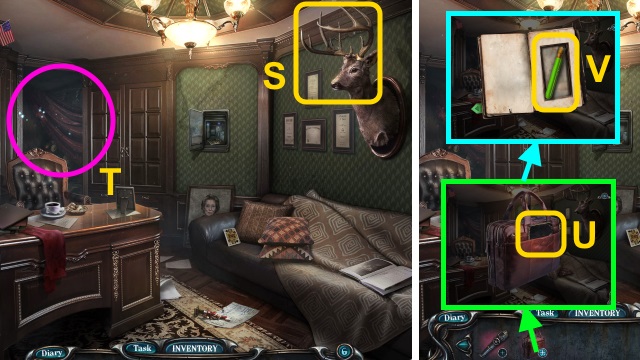
- Take the CANDLE (N).
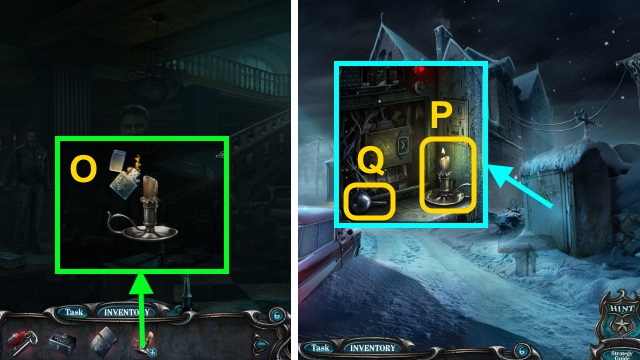
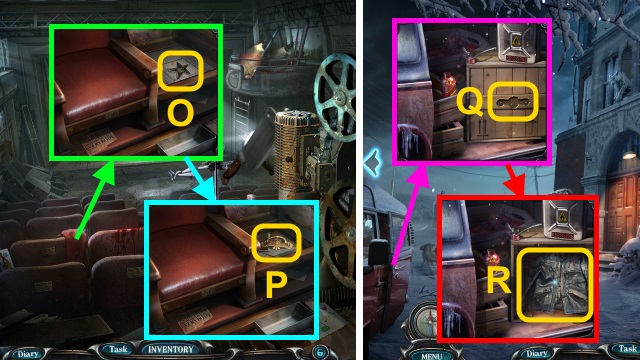
- Combine the CANDLE and LIGHTER (O); take the LIT CANDLE.
- Walk down.
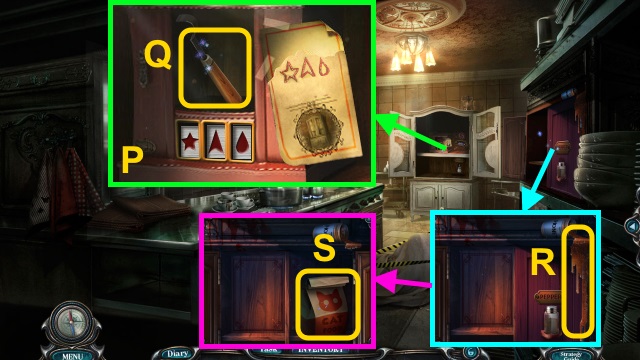
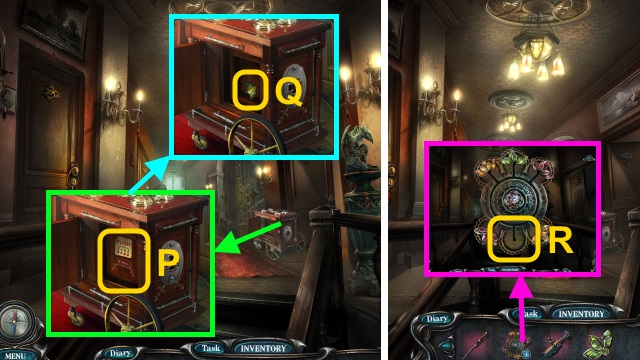
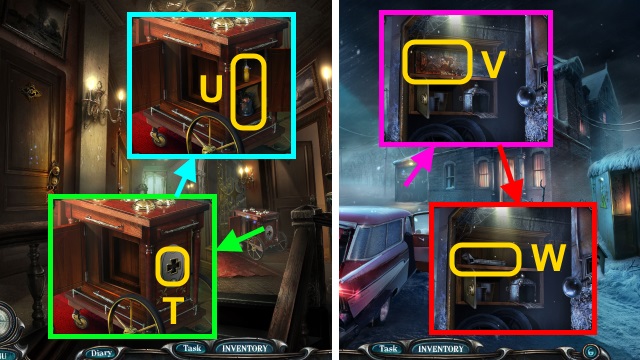
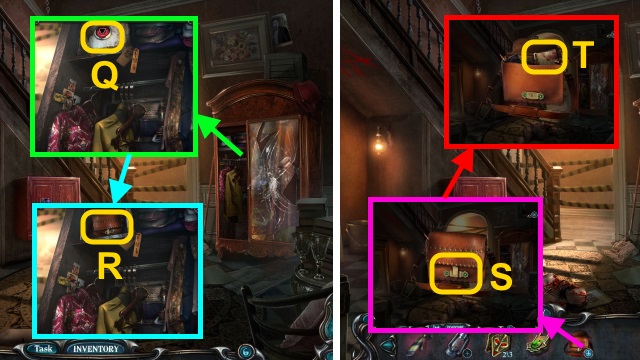
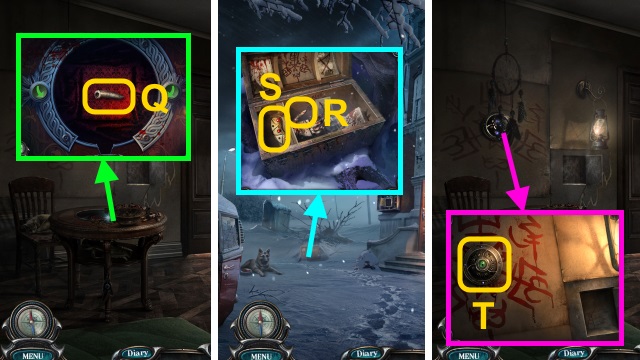
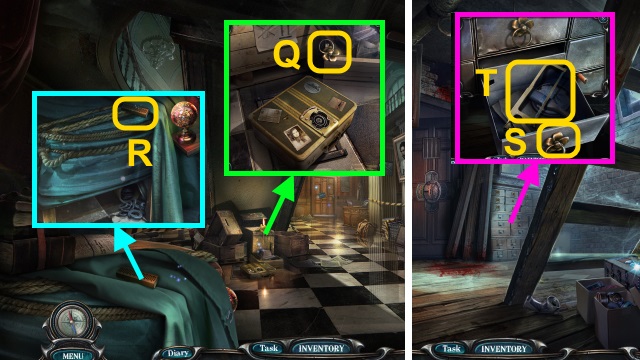
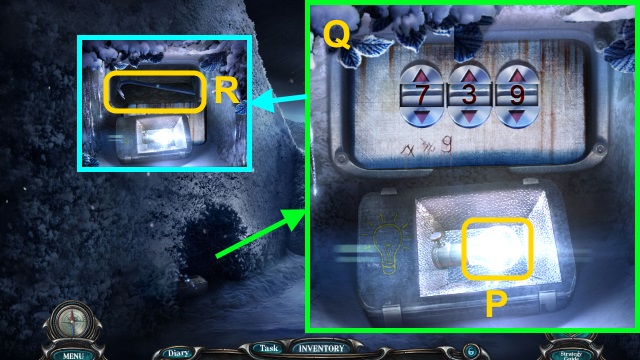
- Open the door; place the LIT CANDLE (P). Take the GARAGE LEVER (Q).
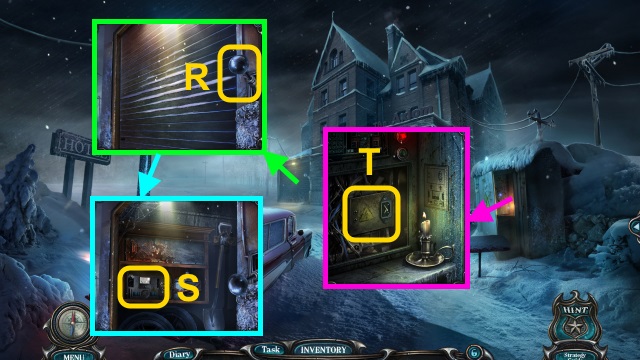
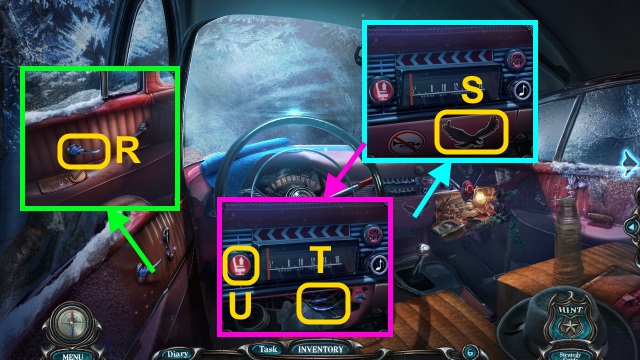
- Examine the lever. Place the GARAGE LEVER (R); pull it.
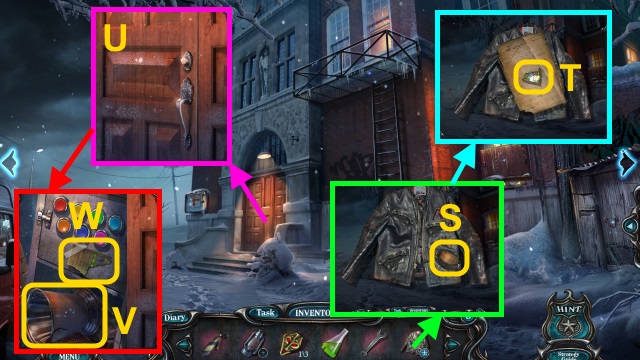
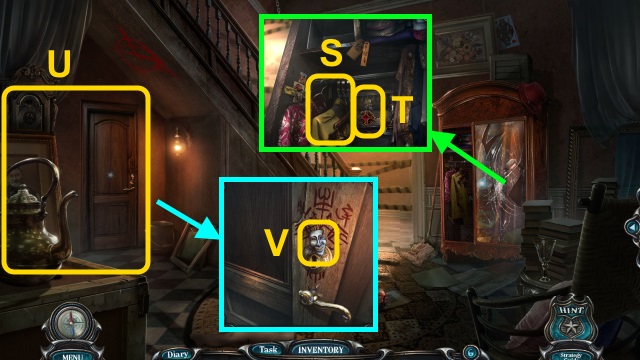
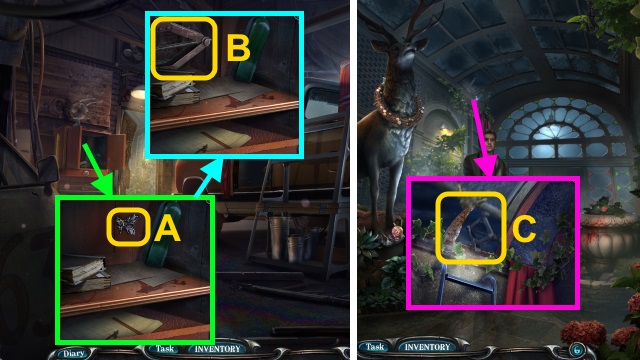
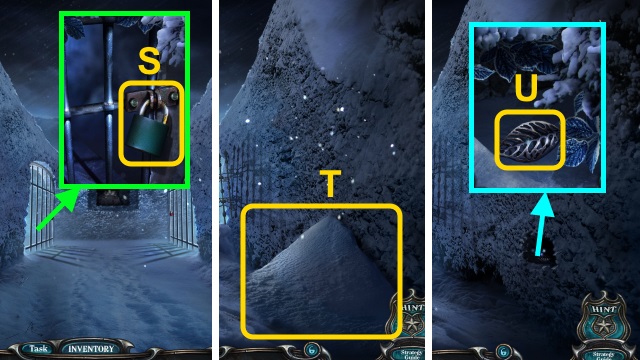
- Open the door; take the GENERATOR PART (S).
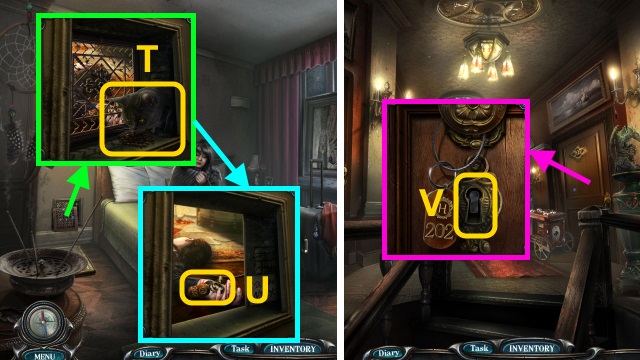
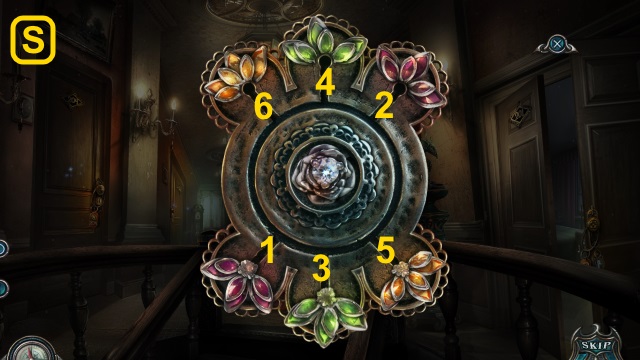
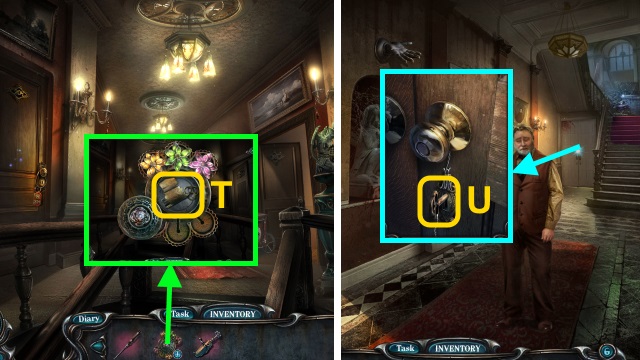
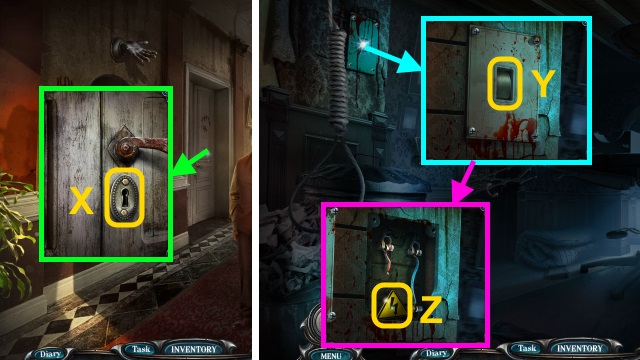
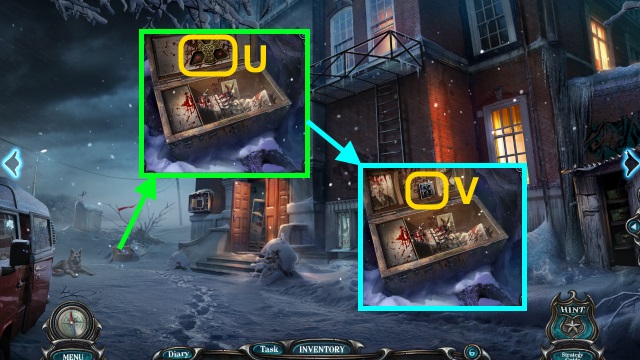
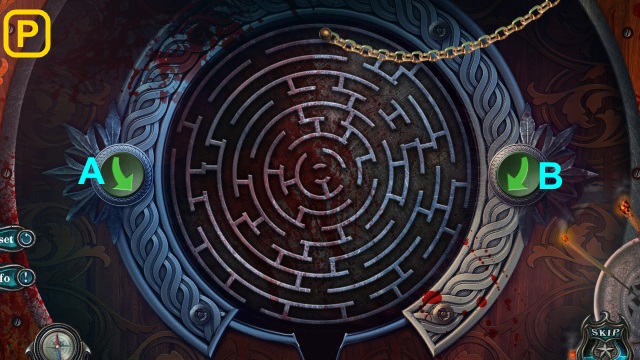
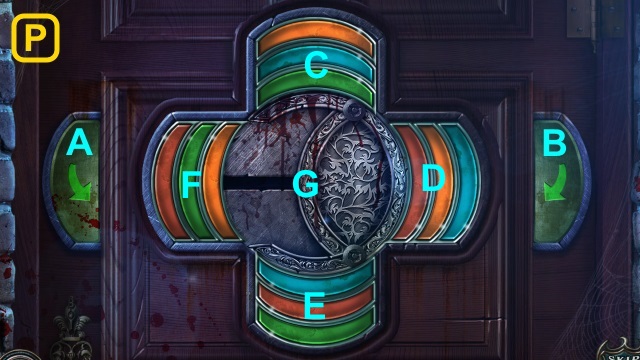
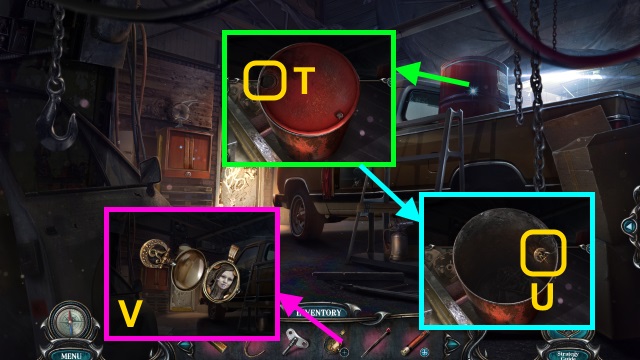
- Place the GENERATOR PART for a mini-game (T).
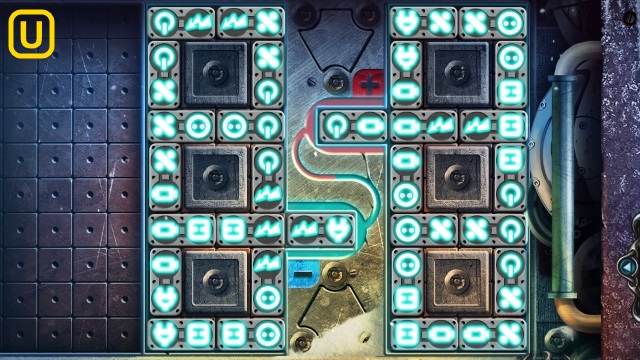
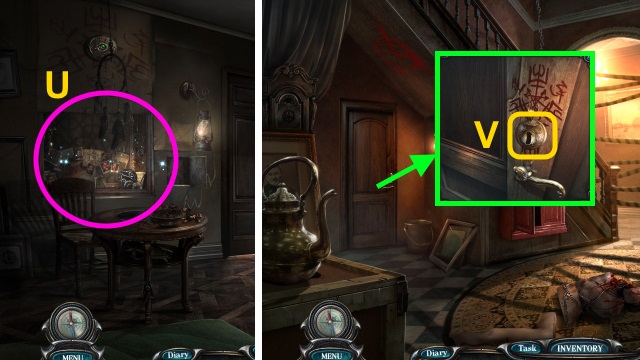
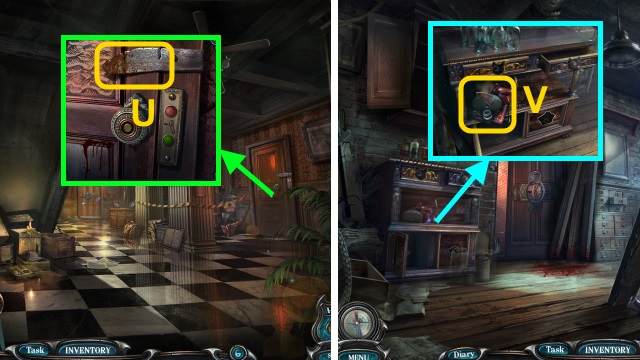
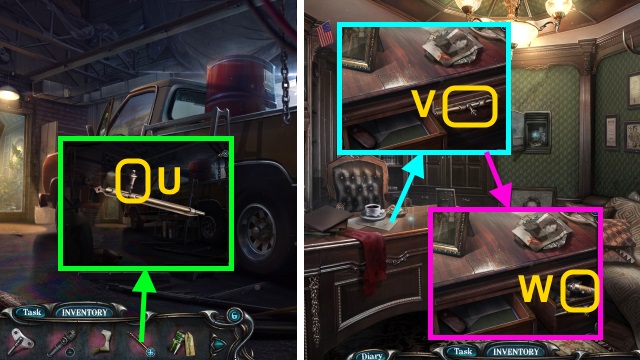
- Solution (U).
- Walk forward.
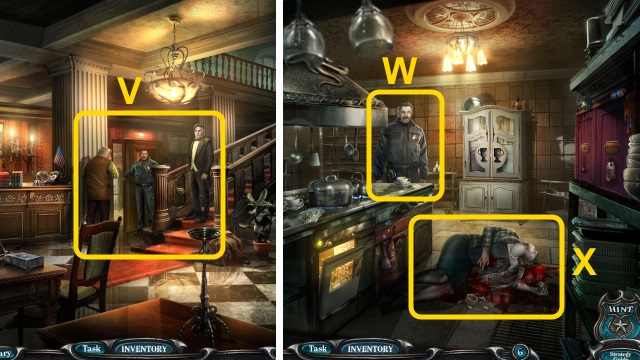
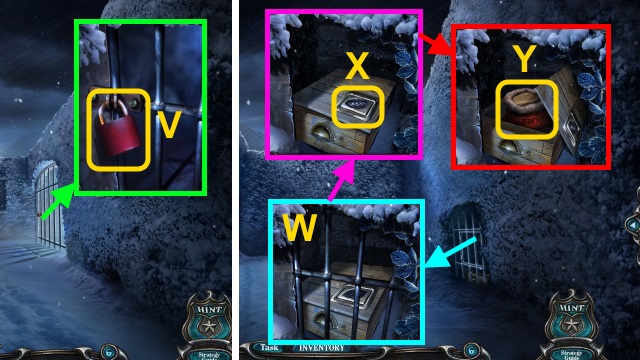
- Examine the door (V).
- Walk forward.
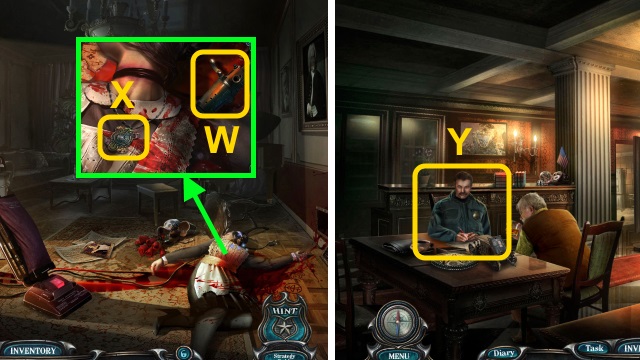
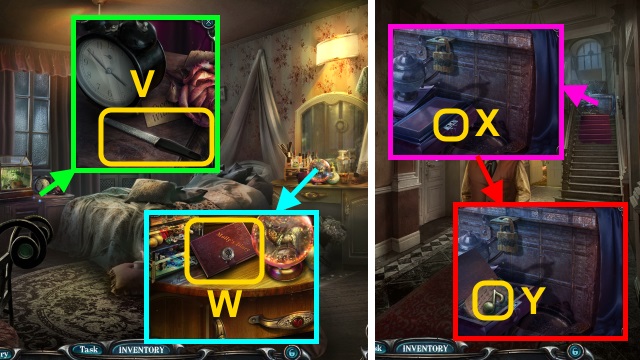
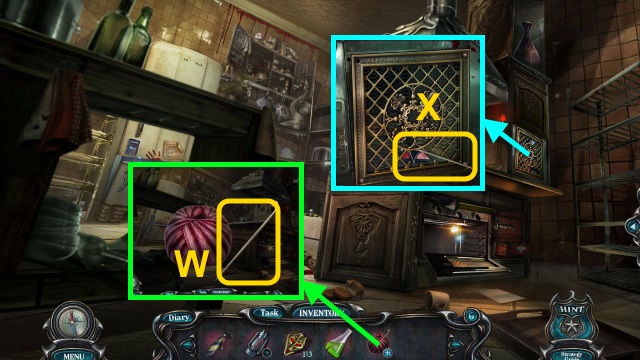
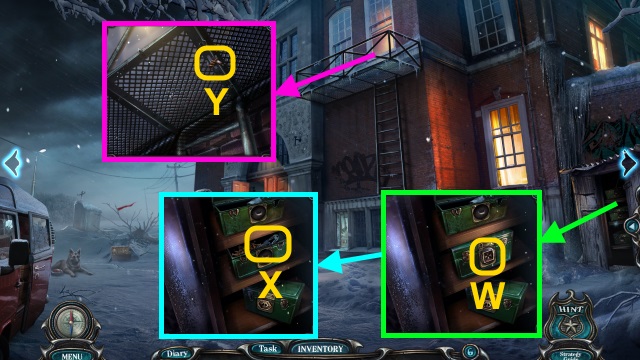
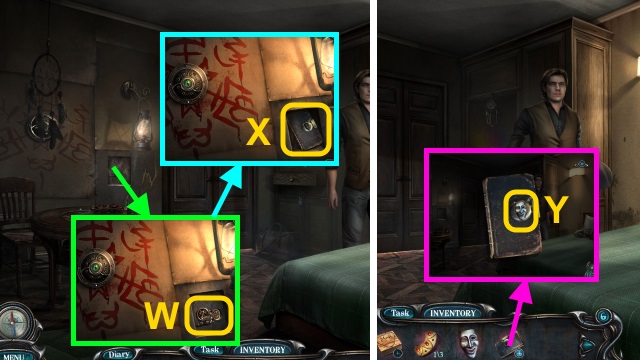
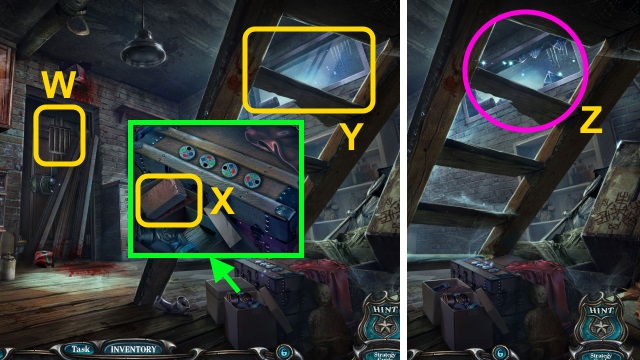
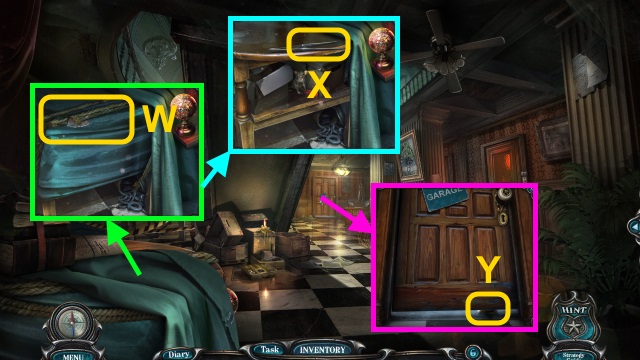
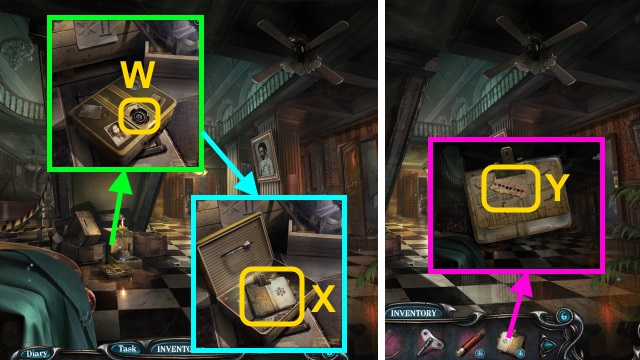
- Talk to Ray (W).
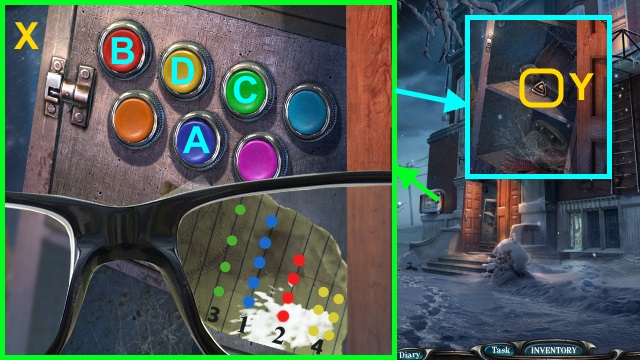
- Use the DETECTIVE'S KIT (X).
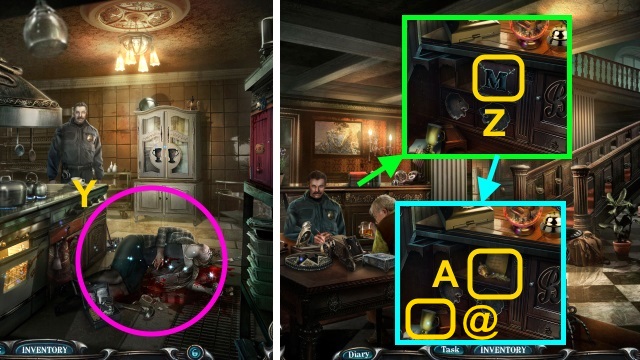
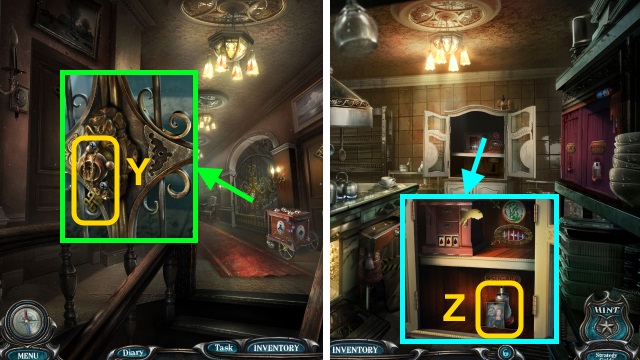
- Play the HOP; receive the 'M' MONOGRAM (Y).
- Walk down.
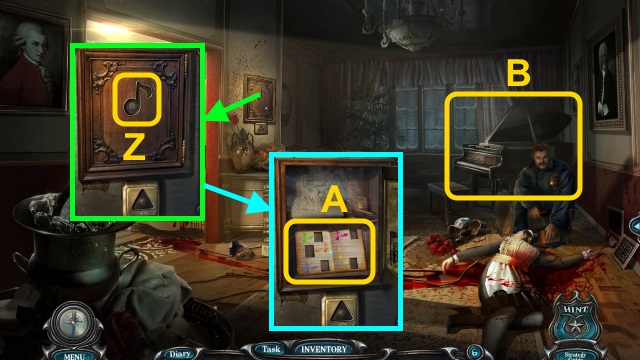
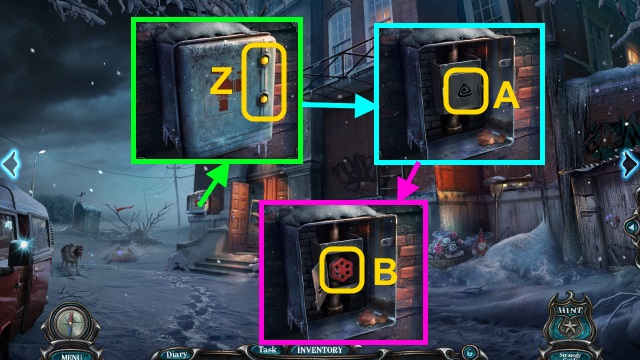
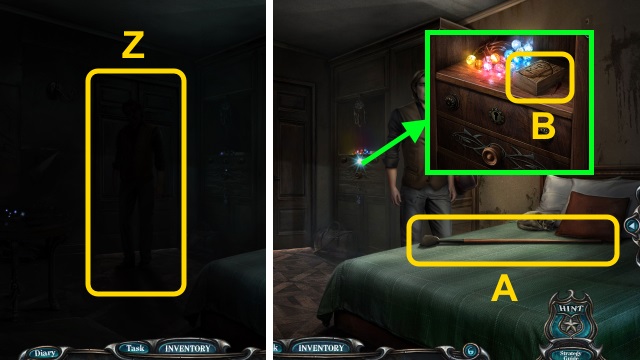
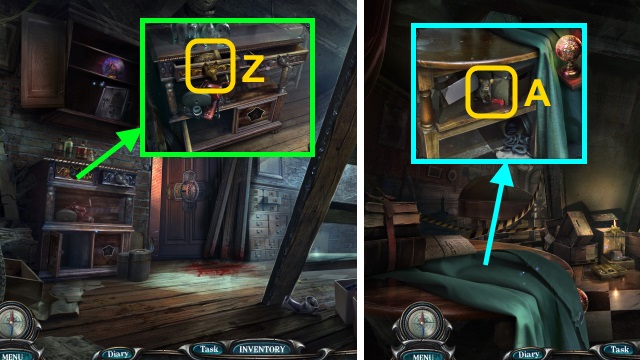
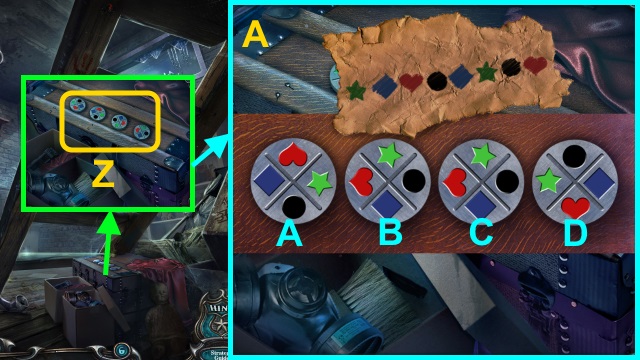
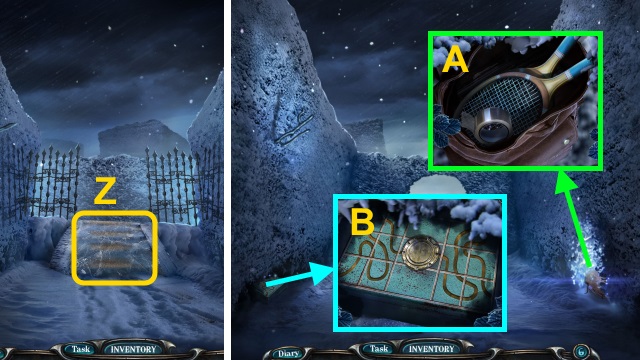
- Place the 'M' MONOGRAM; examine it (Z).
- Take the SQUARE HANDLE (A) and CUP (@).
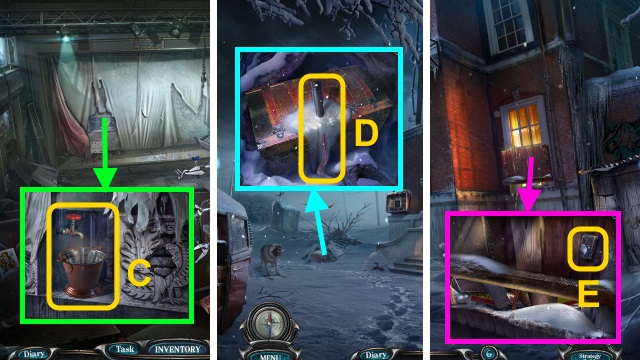
- Walk forward.

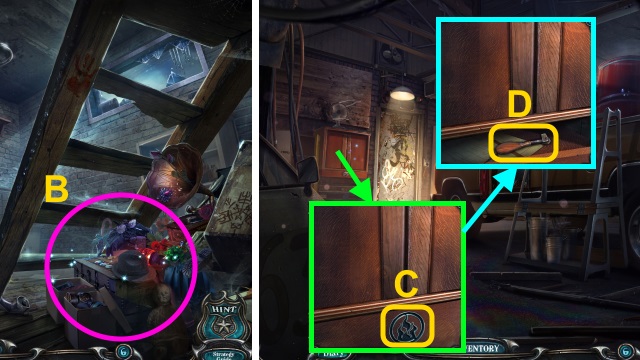
- Use the SQUARE HANDLE (B); take the LION (C).
- Take the LION (D).
- Walk down.
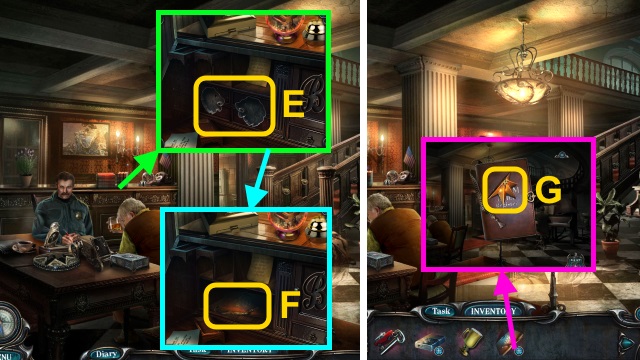
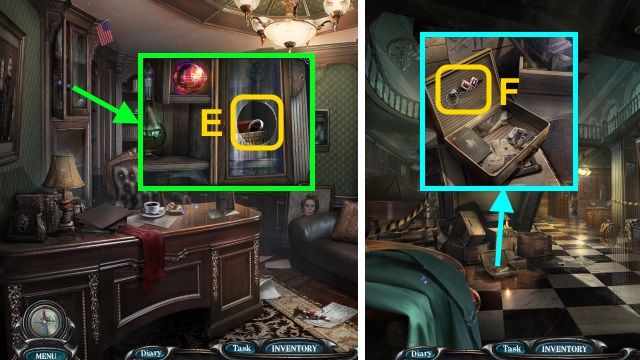
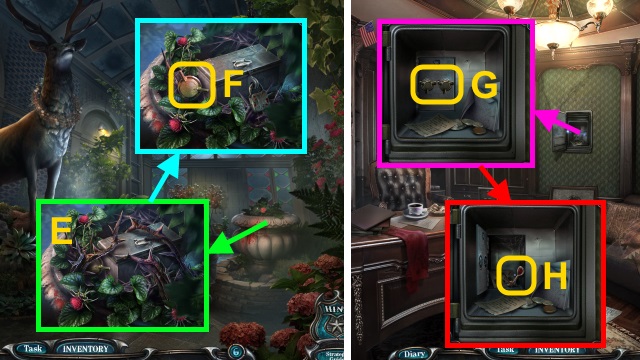
- Place the 2 LIONS (E).
- Move the papers; take the GUEST BOOK (F).
- Examine the GUEST BOOK; take the DECORATIVE PATTERN (G).
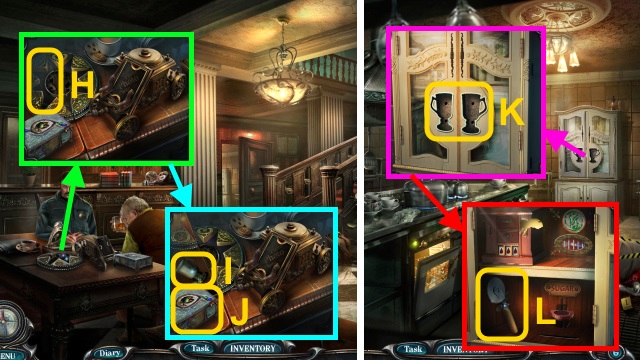
- Place the DECORATIVE PATTERN (H).
- Take the CUP (I) and CASSANDRA'S CHEST (J).
- Walk forward.
- Place the 2 CUPS (K).
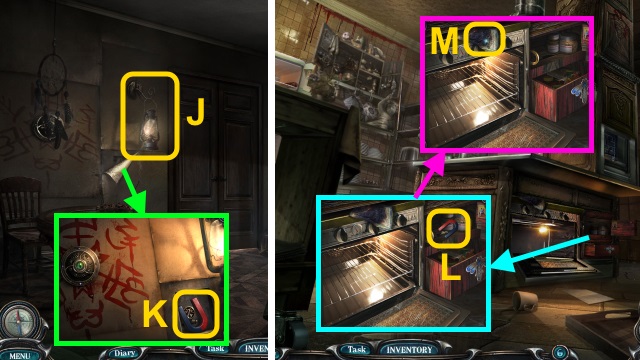
- Take the PIZZA CUTTER (L).
- Walk down twice.
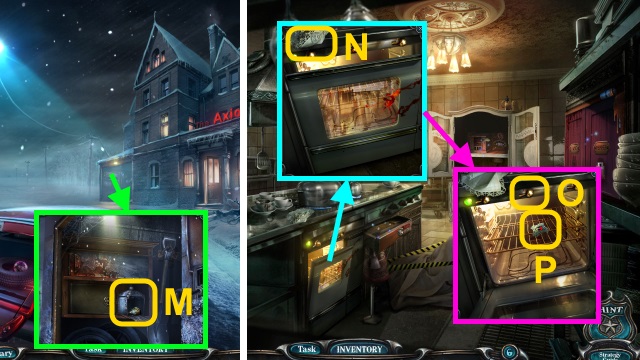
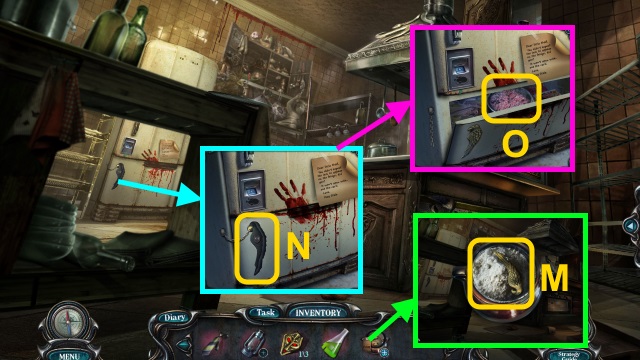
- Use the PIZZA CUTTER; take the OVEN KNOB (M).
- Walk forward twice.
- Examine the handkerchief (N).
- Place the OVEN KNOB (O); take MAY'S AMULET (P).
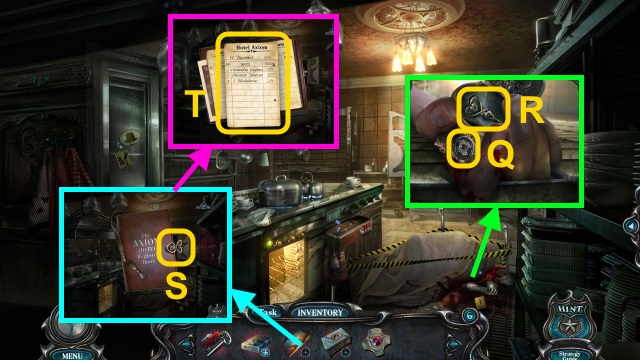
- Place MAY'S AMULET (Q); take the BOOK KEY (R).
- Combine the GUEST BOOK and BOOK KEY (S); read the book.
- Examine the list; take the GUEST LIST (T).
- Walk down.
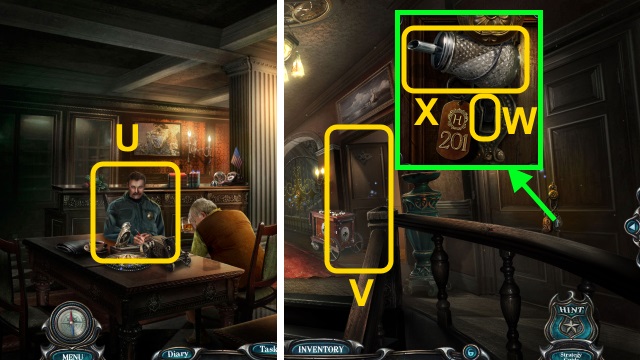
- Give the GUEST LIST (U).
- Walk right.
- Examine the door (V).
- Examine the keyhole (W); take the SUGAR (X).
- Take the POLYHEDRON (Y).
- Walk down, then forward.
- Place the SUGAR; take the STALES' PHOTO (Z).
- Walk down.
- Place the STALES' PHOTO (A); take the TRIANGLE KEY (B).
- Walk right.
- Use the TRIANGLE KEY (C).
- Take the PAPER CLUE (D).
- Walk down, then forward.

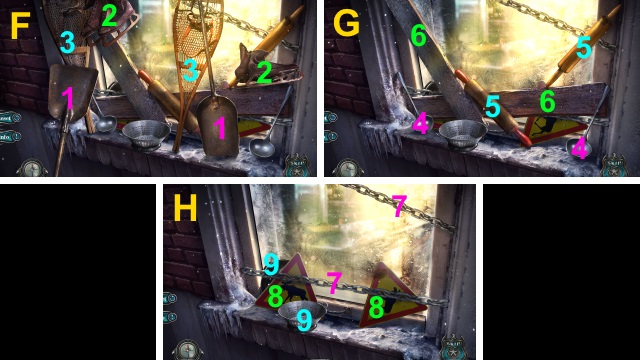
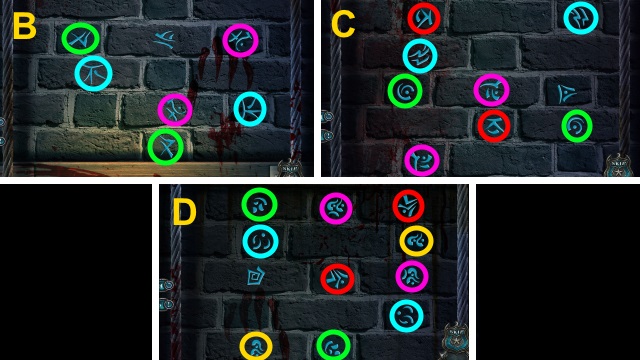
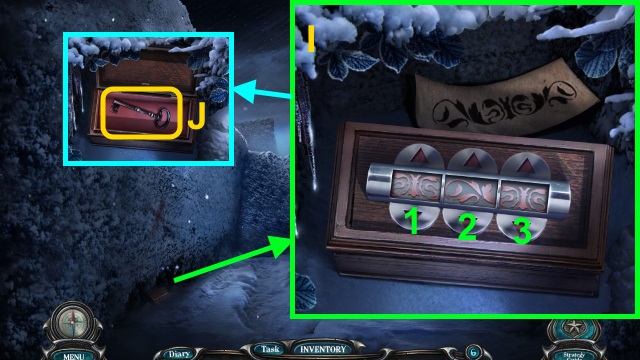
- Open the cover; place the PAPER CLUE for a mini-game (E).
- Solution (F): Ax2-B.
- Take the CUTTERS (G); place the POLYHEDREN (H).
- Take the SCREWDRIVER (I).
- Walk down twice.
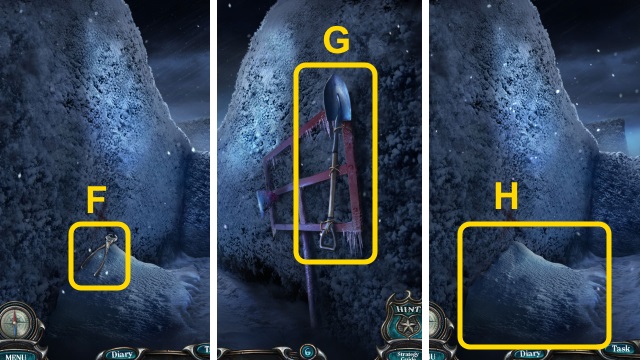
- Use the CUTTERS; take the SHOVEL (J).
- Use the SHOVEL (K).
- Use the CAR KEY (L).
- Walk left.
- Examine the scene (M).
- Press the button (N); take the CAR LOGO and DETECTIVE'S BADGE (O).
- Press the button (P); take the RAZOR BLADE (Q).
- Scroll left.
- Examine the handle; use the RAZOR BLADE (R).
- Receive the TAPE.
- Place the CAR LOGO (S); remove the cover.
- Use the TAPE (T); press the button (U).
- Scroll right.
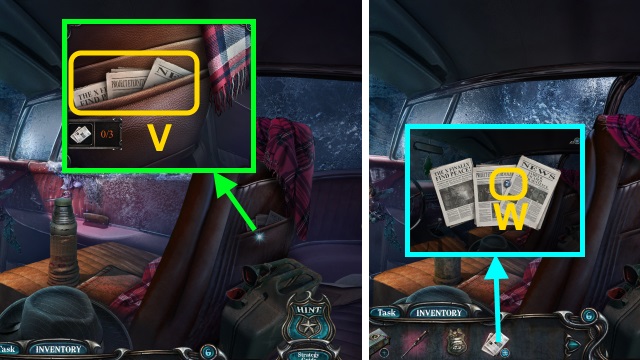
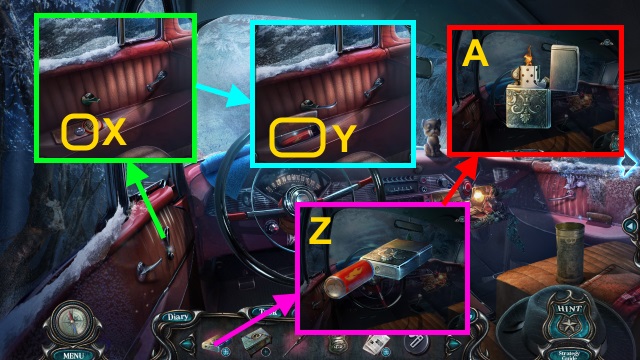
- Collect the NEWSPAPERS (V).
- Examine the NEWSPAPERS; take the CAR BUTTON (W).
- Scroll left.
- Place the CAR BUTTON; press it (X).
- Take the FUEL CYLINDER (Y).
- Examine the EMPTY LIGHTER; use the FUEL CYLINDER (Z).
- Light the lighter; take the LIGHTER (A).
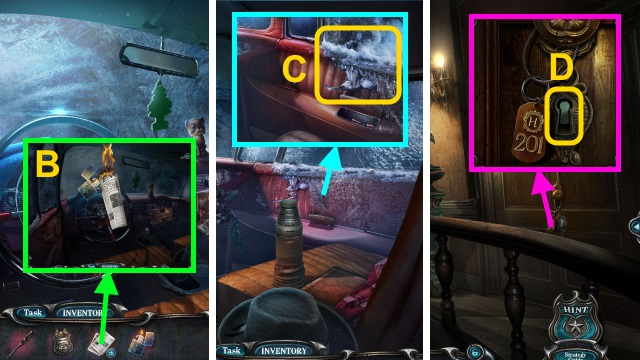
- Examine the NEWSPAPERS 2x; use the LIGHTER (B).
- Take the BURNING NEWSPAPERS.
- Scroll right.
- Use the BURNING NEWSPAPERS (C).
- Walk right, forward, then right.
- Use the DETECTIVE'S BADGE (D).
- Walk right.
Chapter 2: Cassandra
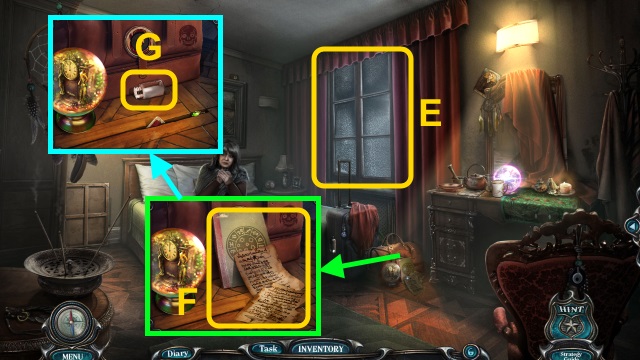
- Examine the window (E).
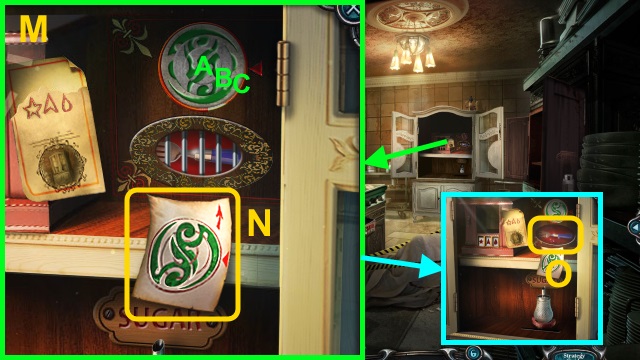
- Move the papers and book (F); take the SALT (G).
- Go to the Kitchen.
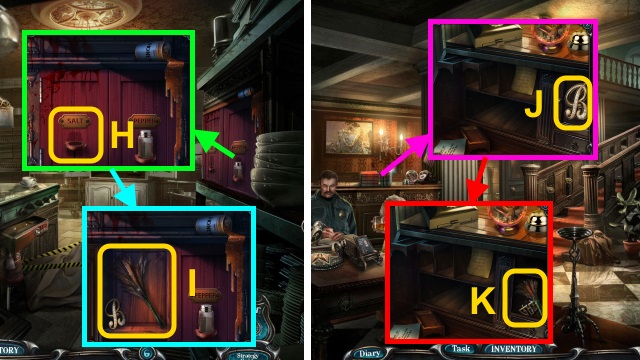
- Place the SALT (H).
- Take the 'B' MONOGRAM and HERBS (I).
- Walk down.
- Place the 'B' MONOGRAM (J); examine it.
- Take the SLIDER HANDLE and HERBS (K).
- Walk down.
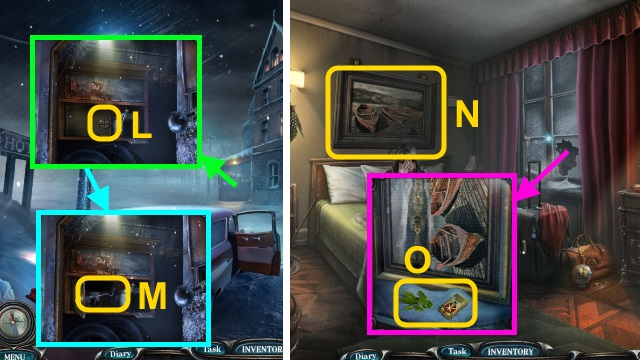
- Place the SLIDER HANDLE (L); open the door.
- Take the CROWBAR (M).
- Go to Cassandra's Room.
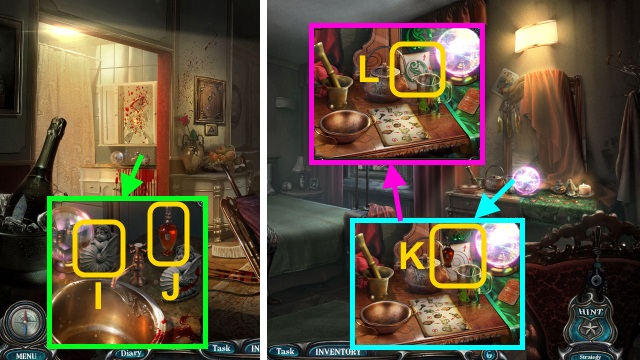
- Use the CROWBAR (N); take the PAINTING.
- Place the PAINTING. Move the snow; take the HERBS and TAROT CARD (O).
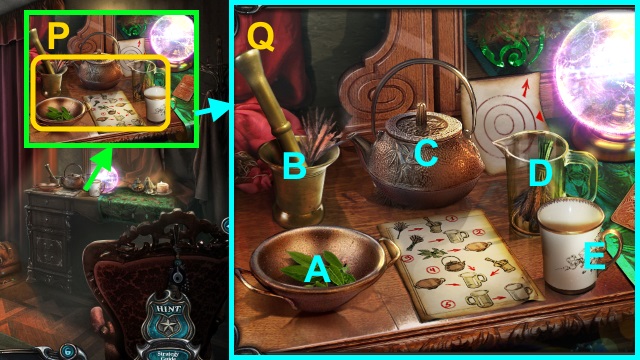
- Place the 3 HERBS for a mini-game (P).
- Solution (Q): (B)-(C-D)-(A-D)-(B-D)-(D-E).

- Take the HERBAL TEA (R).
- Give the HERBAL TEA (S); receive CASSANDRA'S BAG AMULET.
- Place CASSANDRA'S BAG AMULET for a mini-game (T).

- Solution (U): Ax3-Bx2.
- Take the TAROT CARD and AXIOM LOGO (V).
- Walk down.
- Place the AXIOM LOGO (W); examine it.
- Take the ALLEN WRENCH (X).
- Walk down, then forward.
- Use the ALLEN WRENCH (Y); take the TONGS (Z).
- Go to Cassandra's Room.
- Use the TONGS 2x; take the TAROT CARD and CASSANDRA'S RING (A).
- Combine CASSANDRA'S CHEST and CASSANDRA'S RING (B).
- Move the items; take the TAROT CARD (C).
- Place the 4 TAROT CARDS for a mini-game (D).
- Solution order is random: (E-H).
- Take the METAL DECORATION (I).
- Walk down.
- Place the METAL DECORATION (J).
- Take the GEAR (K).
- Walk down.
- Place the GEAR (L); take the BOOKLET (M).
- Open the BOOKLET; take the PAPER CLUE (N).
- Walk forward.
- Place the PAPER CLUE for a mini-game (O).
- Solution (P).
- Take the CHISEL (Q).
- Use the CHISEL (R).
- Take the CAT FOOD (S).
- Go to Cassandra's Room.
- Move the grate; pour the CAT FOOD (T).
- Move the grate; take the ROOM 202 KEY (U).
- Walk down.
- Use the ROOM 202 KEY (V).
- Enter Christian's Room.
- Take the GAS BURNER TUBE (W) and MOLLY'S LOCKET (X).
- Walk down twice.
- Talk to Ray for a mini-game (Y).
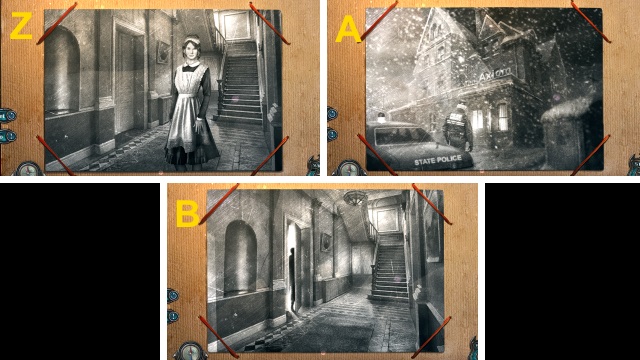
- Solution (Z-D).
- Receive the THIRD FLOOR KEY.
- Walk right.
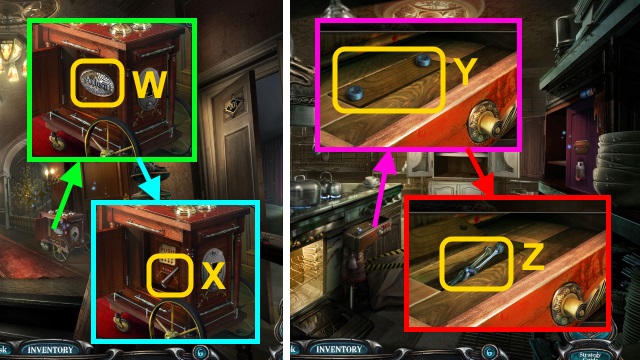
- Use the SCREWDRIVER; use the THIRD FLOOR KEY (E).
- Walk forward.
Chapter 3: The Third Floor
- Move the items; take the DECORATIVE PATTERN (F).
- Walk down twice.
- Place the DECORATIVE PATTERN (G).
- Play the HOP; receive the STATUETTE (H).
- Go to Christian's Room.
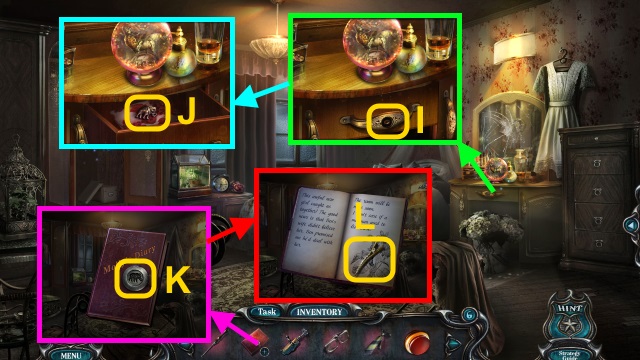
- Place the STATUETTE (I); take the PERFUME (J).
- Walk down, then right.
- Use the PERFUME; examine the paper (K).
- Take the CODE (L).
- Go to the Kitchen.
- Place the CODE for a mini-game (M).
- Solution (N): A-Bx2-C.
- Take the FORK (O).
- Walk down, then right.
- Use the FORK (P).
- Take MOLLY'S LOCKET PART (Q).
- Combine MOLLY'S LOCKET and MOLLY'S LOCKET PART for a mini-game (R).
- Solution (S).
- Read the note; take MOLLY'S KEY (T).
- Walk forward.
- Use MOLLY'S KEY (U).
- Walk forward.
- Take the NAIL FILE (V).
- Take MOLLY'S DIARY (W).
- Walk down.
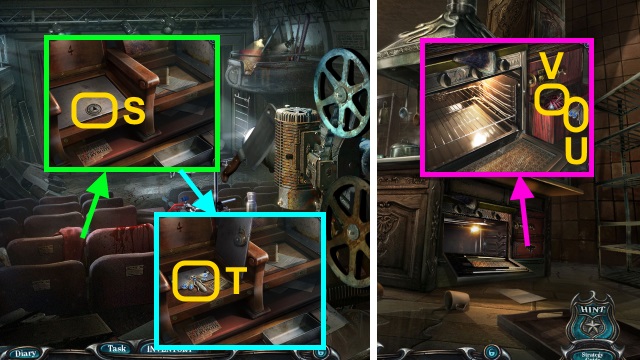
- Use the NAIL FILE (X); open the box.
- Take the MUSIC NOTE (Y).
- Go to Christian's Room.
- Place the MUSIC NOTE (Z).
- Take the SHEET MUSIC (A).
- Examine the piano (B).
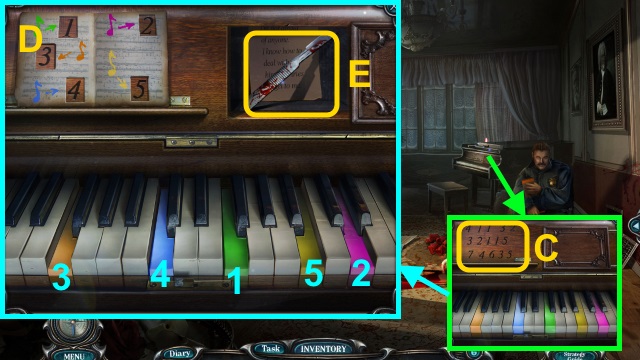
- Place the SHEET MUSIC for a mini-game (C).
- Solution (D).
- Take the SCALPEL (E).
- Go to Molly's Room.
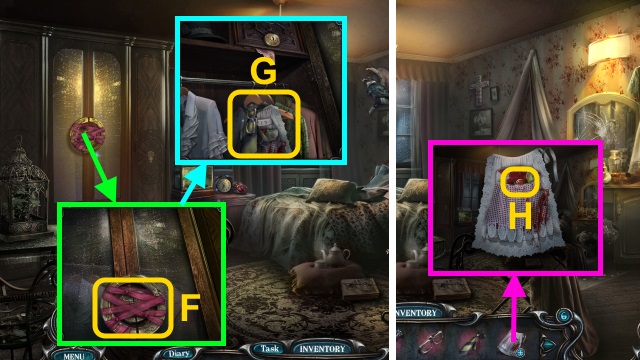
- Use the SCALPEL (F); open the closet.
- Move the clothes 3x; take the GLASSES, TIE, and MOLLY'S APRON (G).
- Examine MOLLY'S APRON; take the DRAWER BUTTON (H).
- Examine the drawer. Place the DRAWER BUTTON (I); press it.
- Take the ELEPHANT KEY (J).
- Combine MOLLY'S DIARY and the ELEPHANT KEY (K).
- Read the diary; take the HAIR CLIP (L).
- Walk down.
- Use the HAIR CLIP (M); take the BENT PAPERCLIP.
- Walk forward.
- Use the BENT PAPERCLIP (N); take the HANDKERCHIEF (O).
- Go to Christian's Room.
- Turn the handle (P).
- Place the HANDKERCHIEF; take the WET CLOTH (Q).
- Walk down, then forward.
- Use the WET CLOTH (R); take the CROSS KEY (S).
- Walk down.
- Use the CROSS KEY (T).
- Take the GAS BURNER and OIL BOTTLE (U).
- Walk down twice.
- Use the OIL BOTTLE (V).
- Take the ADJUSTABLE WRENCH (W).
- Go to the Third Floor.
- Use the ADJUSTABLE WRENCH (X).
- Walk left.
- Press the switch (Y); use the SCREWDRIVER.
- Take the METAL SIGN (Z).
- Go to Christian's Room.
- Place the METAL SIGN (A).
- Take the WIRE (B).
- Go to the Butcher's Room.
- Place the WIRE (C).
- Examine the switch 2x (D).
- Examine the door (E); take the HANDLE (F).
- Go to the Kitchen.
- Place the HANDLE (G); take the GAS BURNER TUBE (H).
- Combine the GAS BURNER and 2 GAS BURNER TUBES (I); take the GAS BURNER.
- Go to the Third Floor.
- Use the GAS BURNER (J).
- Play the HOP; receive the KNIFE HANDLE (K).
- Walk left.
- Place the KNIFE HANDLE; take the RITUAL KNIFE (L).
- Use the RITUAL KNIFE for a mini-game (M).
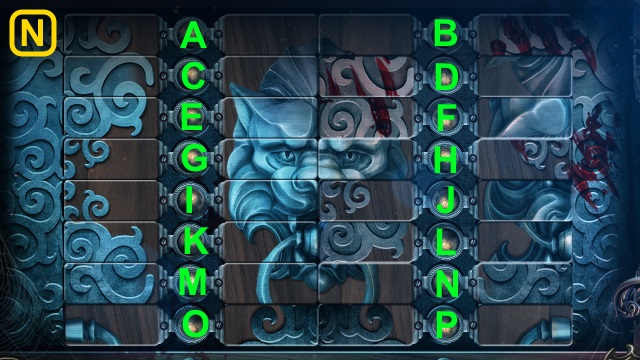
- Solution (N): F-J-G-I-K-O-J-N-P-O-K-M-P.
Chapter 4: A New Suspect
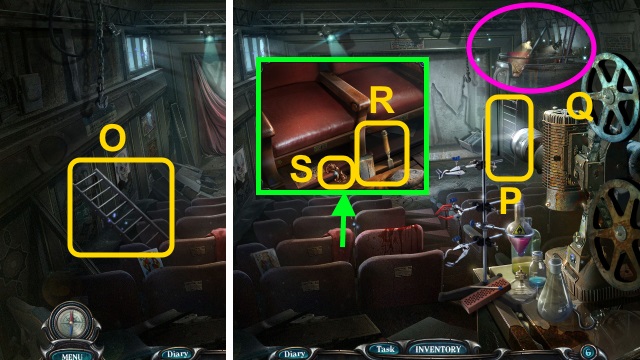
- Take the LADDER (O).
- Place the LADDER (P).
- Play the HOP; receive the WEDGE (Q).
- Use the WEDGE; receive the CHISEL (R).
- Take the WOODEN PATTERN (S).
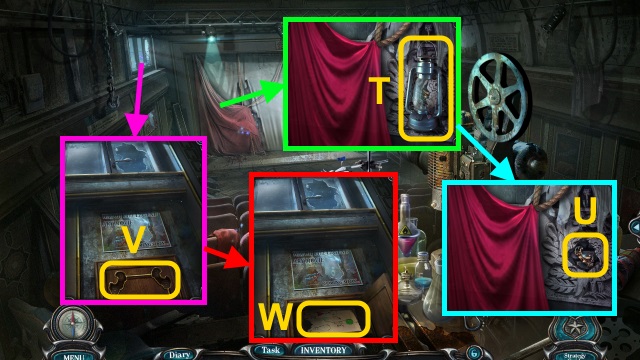
- Take the EMPTY LAMP (T).
- Use the CHISEL; take the WOODEN PATTERN (U).
- Place the 2 WOODEN PATTERNS (V).
- Take the RECIPE (W).
- Take the HOOK and SCARY SYMBOL (1/3) (X).
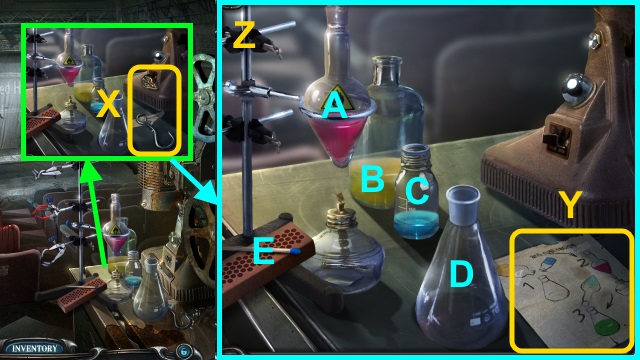
- Place the RECIPE for a mini-game (Y).
- Solution (Z): (C-D)-(B-D)-(E)-(A-D).
- Take the ANTI-RUST SOLUTION (A).
- Examine the box; use the ANTI-RUST SOLUTION (B).
- Open the box; take the RAZOR and WRENCH (C).
- Use the RAZOR (D); receive the ROPE.
- Combine the HOOK and ROPE; receive the GRAPPLING HOOK (E).
- Use the GRAPPLING HOOK 2x (F).
- Go left.
- Examine the window (G).
- Move the snow; take the JEWELED PIECE (H).
- Examine the JEWELED PIECE; take the DECORATION (I).
- Take the DECORATION (J).
- Go to the Old Cinema.

- Place the 2 DECORATIONS (K).
- Take the LOCKPICK (L).
- Go left.
- Use the LOCKPICK; open the door (M).
- Take the STAR AMULET (N).
- Go to the Old Cinema.
- Move the cushion; place the STAR AMULET (O).
- Take the CRATE HANDLE (P).
- Go left.
- Place the CRATE HANDLE (Q).
- Take the WORKER'S JACKET (R).
- Examine the WORKER'S JACKET; read the note (S).
- Take the CODE PART (T).
- Open the door (U).
- Move the items; take the BUCKET (V).
- Place the CODE PART and GLASSES for a mini-game (W).
- Solution (X): Ax5-Bx4-Cx4-Dx6.
- Take the COPPER TRIANGLE (Y).
- Use the WRENCH (Z); remove the cover.
- Place the COPPER TRIANGLE (A); open the door.
- Take the VALVE (B).
- Go to the Old Cinema.
- Place the VALVE and BUCKET; turn the valve. Take the HOT WATER (C).
- Go left.
- Pour the HOT WATER (D); take the CROWBAR.
- Use the CROWBAR for a mini-game (E).
- Solution (F-H).
- Go to the Kitchen.

- Examine the door (I).
- Take the LONG STICK (J).
- Use the LONG STICK (K).
- Play the HOP; receive the JAR (L).
- Open the JAR; examine the flour 2x. Take the BIRD AMULET (M).
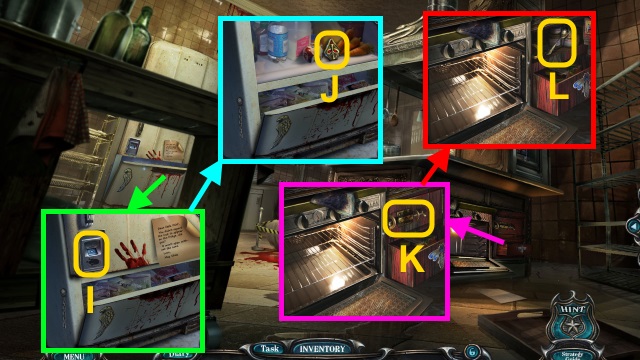
- Place the BIRD AMULET (N); open the fridge.
- Take the FROZEN FOOD (O).
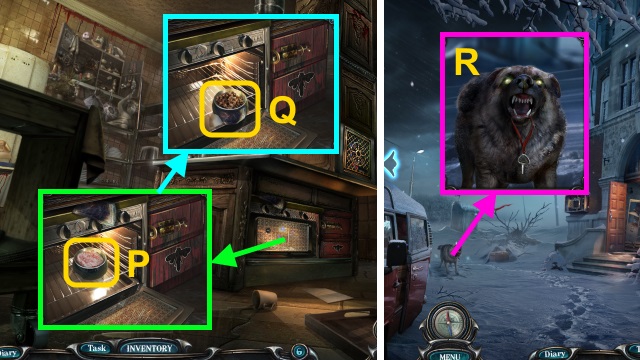
- Open the oven; place the FROZEN FOOD (P). Close the oven.
- Open the oven; use the cloth (Q). Take the DOG FOOD.
- Walk down.
- Give the DOG FOOD (R); receive the TRIANGLE PIECE.
- Go to the Old Cinema.
- Move the cushion; use the TRIANGLE PIECE (S).
- Take the DRAGONFLY (T).
- Go to the Kitchen.
- Place the DRAGONFLY (U); open the drawer.
- Take the YARN (V).
- Examine the YARN; take the NEEDLE (W).
- Use the NEEDLE; take the OLD AMULET (X).
- Walk down.
- Open the door; place the OLD AMULET (Y).
- Take the HAND DRILL (Z).
- Go to the Kitchen.
- Use the HAND DRILL for a mini-game (A).
- Solution (B-D).
Chapter 5: The Fire Escape

- Examine the doorway (E).
- Examine the closet (F).
- Open the closet; take the FRIDGE KEY (G).
- Take the BAG PART (H).
- Walk down.
- Use the FRIDGE KEY (I).
- Take the SCARY SYMBOL (2/3) (J).
- Use the ANTI-RUST SOLUTION (K); open the latch.
- Take the SPOON (L).
- Go to the Old Cinema.
- Use the SPOON (M).
- Take the SCARY KEY (N).
- Go left.
- Use the SCARY KEY (O).
- Move the photos; take CASSANDRA'S RING (P).
- Go to the Fire Escape.
- Use CASSANDRA'S RING (Q).
- Take the OLD BAG (R).
- Combine the OLD BAG and BAG PART (S); open the bag.
- Move the items; read the note (T). Take the SCARY SYMBOL (3/3).
- Walk down twice.
- Place the SCARY SYMBOL (3/3) (U).
- Take the OLD AMULET (V).
- Place the OLD AMULET (W).
- Take the BOLT CUTTERS (X).
- Use the BOLT CUTTERS (Y).
- Go to Cassandra's Room.
- Examine the figure (Z).
- Take the ICE BREAKER (A).
- Take the BLOCK OF WOOD (B).
- Walk down.
- Use the ICE BREAKER; play the HOP (C). Receive the FIRE SIGN.
- Go to the Fire Escape.
- Place the FIRE SIGN (D).
- Take the FUNNEL (E).
- Walk down twice.
- Place the FUNNEL (F); pour the kerosene (G).
- Examine the funnel; place the lid. Take the KEROSENE (H).
- Combine the EMPTY LAMP and KEROSENE; press the button (I). Take the OIL LAMP.
- Go to Cassandra's Room.
- Place the OIL LAMP (J).
- Move the paper; take the MAGNET (K).
- Go to the Kitchen.
- Use the MAGNET (L); take the HANDLE (M).
- Go to Cassandra's Room.
- Examine the drawer; place the HANDLE (N).
- Open the drawer; move the items. Take the CODE (O) and OMINOUS SIGN (1/3) (P).
- Walk down.
- Place the CODE (Q); take the CLOSET AMULET (R).
- Go to the Fire Escape.
- Move the clothes (S); place the CLOSET AMULET. Take CASSANDRA'S KEY (T).
- Move the picture; examine the door (U).
- Take the DIARY LOCK PART (V).
- Go to Cassandra's Room.
- Use CASSANDRA'S KEY (W); take CASSANDRA'S DIARY (X).
- Combine CASSANDRA'S DIARY and the DIARY LOCK PART for a mini-game (Y).

- Solution (Z-B).
- Turn the page; take the BLOODY LIST (C).
- Give the BLOODY LIST for a mini-game (D).
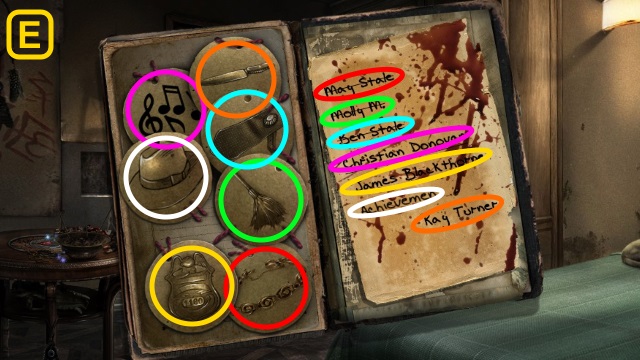
- Solution (E).
- Receive the TOKEN KEY.
- Go to the Fire Escape.
- Place the TOKEN KEY (F).
- Take the KEY KEEPER (G).
- Examine the KEY KEEPER 3x; take the TOKEN KEY (H).
- Go to Cassandra's Room.
- Use the TOKEN KEY (I). Open the drawer; move the items.
- Take the OMINOUS SIGN (2/3) (J) and OLD AMULET (K).
- Walk down.
- Place the OLD AMULET (L).
- Take the KNIFE (M).
- Use the KNIFE on the BLOCK OF WOOD 3x (N); take the WOODEN HEART.
- Go to Cassandra's Room.
- Place the WOODEN HEART for a mini-game (O).
- Solution (P): B-A-B-A-B-A-B-A-B-Ax2-B-A-B-Ax4.
- Take the FINGER (Q).
- Walk down.
- Place the FINGER (R); take the OMINOUS SIGN (3/3) (S).
- Go to Cassandra's Room.
- Place the OMINOUS SIGN (3/3) (T).
- Play the HOP; receive the SECRET KEY (U).
- Go to the Fire Escape.
- Use the SECRET KEY (V).
- Walk left.
Chapter 6: The Butcher
- Examine the door (W).
- Open the box; take the BRICK (X).
- Throw the BRICK (Y).
- Play the HOP; receive the KNIFE SHARD (Z).
- Use the KNIFE SHARD (A).
- Take the INCOMPLETE AMULET (B) and PUMP (C).
- Use the PUMP; take the BALL (D).
- Throw the BALL (E).
- Take the TOOLBOX (F).
- Open the TOOLBOX; take the FILE (G).
- Use the FILE; take the CROWBAR (H).
- Use the CROWBAR (I).
- Take the BACKPACK (J).
- Open the BACKPACK; take the ANIMAL AMULET (K).
- Place the ANIMAL AMULET; take the VISE (L).
- Examine the VISE 2x; take the IMPROVISED LEVER (M).
- Examine the lever. Place the IMPROVISED LEVER; pull it (N).
- Examine the door for a mini-game (O).
- Solution (P): Fx2-Bx2-D-Bx2-G-A-E-A-G-B-E-B-G-A-G.
- Bx2-C-Bx2-G-A-Dx2-A-G-B-G-A-Cx2-B-G-A-Gx2.
- Go forward.
- Take the HANDLE (Q).
- Take the MATCHES (R).
- Walk down.
- Place the HANDLE (S); take the HACKSAW (T).
- Walk forward.
- Use the HACKSAW (U); receive the IRON SHARD.
- Walk down.
- Use the IRON SHARD; receive the SHARP SHARD (V).
- Walk forward.
- Use the SHARP SHARD (W); move the cloth.
- Take the TWEEZERS (X).
- Use the TWEEZERS (Y); take the ANIMAL AMULET.
- Walk down.
- Place the ANIMAL AMULET; take the FOOD (Z).
- Walk forward.
- Give the FOOD; take BEN'S STUDY KEY (A).
- Use BEN'S STUDY KEY (B); open the door.
- Walk right.
- Collect the PIECES (C).
- Move the picture; take the FUSE (D).
- Open the door; take the CADUCEUS (E) and WINDING KEY (F).
- Walk down twice.
- Place the CADUCEUS (G).
- Take the ADHESIVE BANDAGES (H).
- Arrange the PIECES; use the ADHESIVE BANDAGES (I). Take BEN'S COMBINATION.
- Walk forward, then right.
- Place BEN'S COMBINATION for a mini-game (J).
- Solution (K).
- Take the GARAGE KEY (L).
- Walk down.
- Use the GARAGE KEY (M).
- Walk forward.
- Take RAY'S PENDANT (N).
- Take the OILCAN (O).
- Walk down, then right.

- Use the OILCAN (P); open the drawer.
- Take the PICKUP KEY (Q).
- Walk down, then forward.
- Take the ANTENNA; use the PICKUP KEY (R).
- Take the EMPTY STICK (S).
- Use the ANTENNA (T); take RAY'S LOCKET PART (U).
- Combine RAY'S PENDANT and RAY'S LOCKET PART. Take RAY'S WIFE (V).
- Walk down.
- Place RAY'S WIFE (W).
- Take the FOLDER (X).
- Read the FOLDER; take the COMBINATION (Y).
- Walk down.
- Place the COMBINATION for a mini-game (Z).
- Solution (A): C-A-Dx2-Bx2-Ax2.
- Play the HOP; receive the BADGE (B).
- Walk forward twice.
- Place the BADGE (C).
- Take the GLASS CUTTER (D).
- Walk down, then right.
- Use the GLASS CUTTER; take the RING (E).
- Walk down.
- Use the RING; take the RED CROSS (F).
- Walk down.

- Place the RED CROSS (G); take the SPREADER (H).
- Walk forward twice.
- Use the SPREADER (I).
- Take the GUNPOWDER (J).
- Open the EMPTY STICK; use the GUNPOWDER and FUSE (K). Receive the EXPLOSIVE.
- Use the EXPLOSIVE and MATCHES (L).
- Walk forward.
Chapter 7: Into the Maze
- Examine James (M).
- Examine the door (N).
- Take the LOCKED CYLINDER (O).
- Take the POLE (P).

- Use the POLE (Q); receive the LAMP.
- Take the AMULET HALF (R).
- Walk down.
- Place the LAMP (S).
- Take the BOLT LOCK and AMMONIUM CARBONATE (T).
- Examine the BOLT LOCK; take the BOLT KNOB (U).
- Walk down, then right.
- Place the BOLT KNOB (V); examine it.
- Take the GLUE (W).

- Examine the INCOMPLETE AMULET; use the GLUE and AMULET HALF (X). Take the CLOCK AMULET.
- Walk down twice.
- Use the CLOCK AMULET (Y).
- Take the ALARM CLOCK (Z).
- Turn the ALARM CLOCK; use the WINDING KEY (A).
- Take the SPRING (B).
- Walk forward twice.
- Remove the wire; place the SPRING (C).
- Take the GLOVE (D).
- Walk forward.
- Use the GLOVE (E); take the SAFE DIAL (F).
- Go to Ben's Study.
- Place the SAFE DIAL; turn the dials (G).
- Take the OLD KEY (H).
- Walk down.

- Move the case; use the OLD KEY (I).
- Take the MOSAIC PART (J).
- Walk forward twice.
- Place the MOSAIC PART for a mini-game (K).
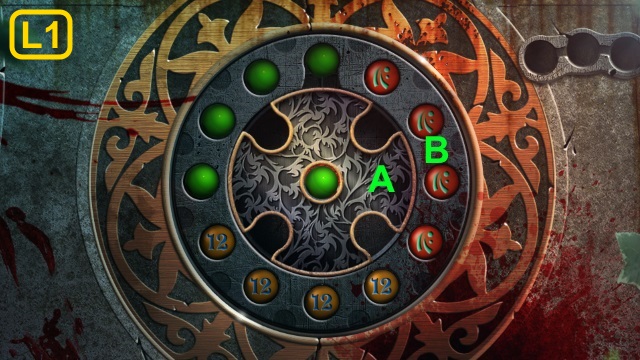
- Solution (L1): Ax3-Bx2-Ax4-Bx3-Ax4-Bx2-Ax2-Bx2-Ax4-Bx2-Ax2.
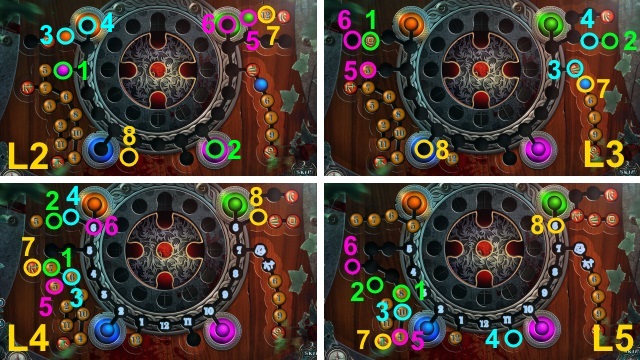
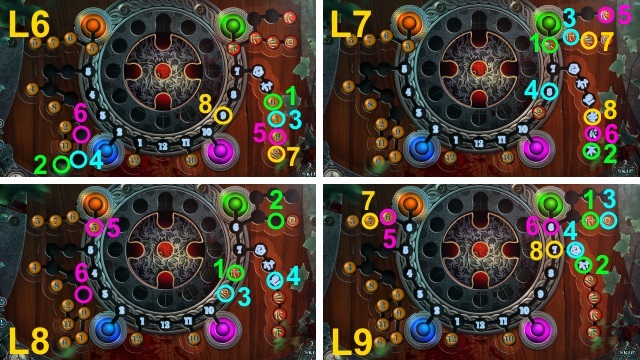
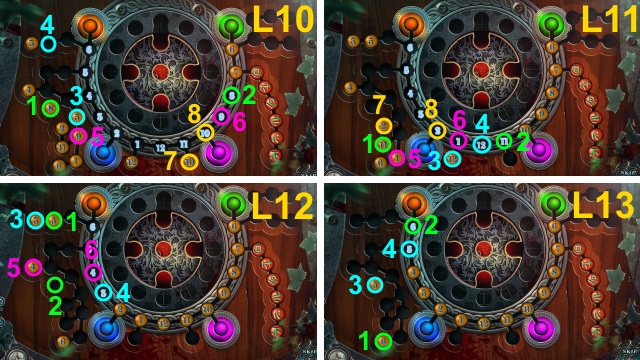
- Solution (L2-L13).
- Take the RED CROSS (M).
- Walk down three times.
- Place the RED CROSS (N).
- Take the BANDAGE (O).
- Walk forward three times.

- Use the AMMONIUM CARBONATE, BANDAGE, and TIE (P); receive the DEER EYE.
- Place the DEER EYE (Q).
- Take the ANTLER (R).
- Go to Ben's Study.
- Place the ANTLER (S).
- Play the HOP; receive RAY'S BAG (T).
- Examine RAY'S BAG; read the book (U).
- Take the ACID (V).
- Go to the Winter Garden.

- Pour the ACID (W); open the BOX.
- Take the CYLINDER PART (X).
- Combine the LOCKED CYLINDER and CYLINDER PART; examine the note (Y).
- Take RAY'S KEY (Z).
- Walk down.
- Use RAY'S KEY (A).
- Take the JACK (B).
- Walk forward.
- Use the JACK; take the RUSTY MACHETE (C).
- Walk down three times.
- Use the RUSTY MACHETE; receive the SHARP MACHETE (D).
- Walk forward three times.
- Use the SHARP MACHETE; open the door (E).
- Walk forward twice, then left.
- Take the CUTTERS (F).
- Walk down, then right.
- Use the CUTTERS (G); take the FIRE SPADE.
- Walk down, then left.
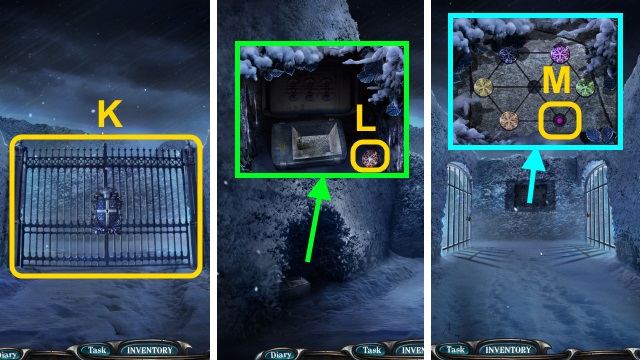
- Use the FIRE SPADE (H).
- Examine the hedge for a mini-game; solution (I).
- Take the KEY (J).
- Walk down, then right.
- Use the KEY (K).
- Walk right.
- Take the STONE PIECE (L).
- Walk down, then left.
- Place the STONE PIECE for a mini-game (M).
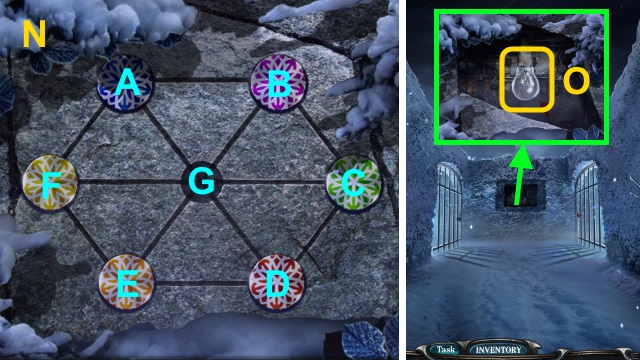
- Solution (N): A-B-C-G-A-F-E-G-D-E-F-G.
- Take the BULB (O).
- Walk down, then right.
- Place the BULB for a mini-game (P).
- Solution (Q).
- Take the CROWBAR (R).
- Walk down, then left.
- Use the CROWBAR (S).
- Walk left.
- Use the FIRE SPADE (T).
- Take the IRON LEAF (U).
- Walk down.
- Use the CROWBAR (V).
- Walk right.
- Use the CROWBAR (W).
- Place the IRON LEAF (X).
- Move the bags; take the SANDBAG (Y).
- Walk down, then left.
- Use the SANDBAG (Z).
- Walk left.
- Open the bag; take the RACKETS and ADHESIVE TAPE (A).
- Examine the box for a mini-game (B).
- Solution (C).
- Take the PROBE (D).
- Walk down, then right.
- Use the PROBE (E); take the FIRE AXE (F).
- Use the FIRE AXE (G); take the BRANCHES (1/8).
- Walk down.
- Use the FIRE AXE (H); take the BRANCHES (2/8).
- Walk down.
- Use the FIRE AXE (I); take the BRANCHES (3/8).
- Walk right.
- Use the FIRE AXE (J); take the BRANCHES (4/8).
- Walk down twice.
- Use the FIRE AXE (K); take the BRANCHES (5/8).
- Walk right.
- Use the FIRE AXE (L); take the BRANCHES (6/8).
- Walk down twice, then left.
- Use the FIRE AXE (M); take the BRANCHES (7/8).
- Walk down, right, then left 3x.
- Use the FIRE AXE (N); take the BRANCHES (8/8).
- Combine the RACKETS and BRANCHES (8/8) for a mini-game (O).
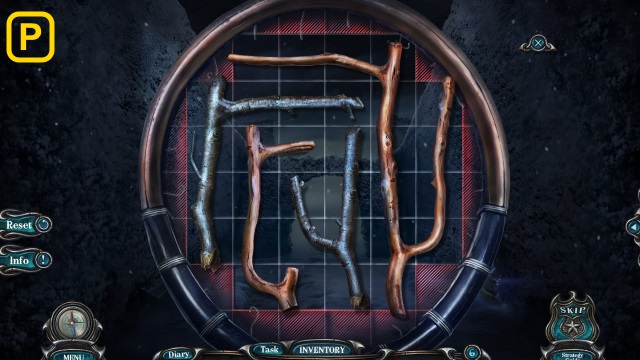
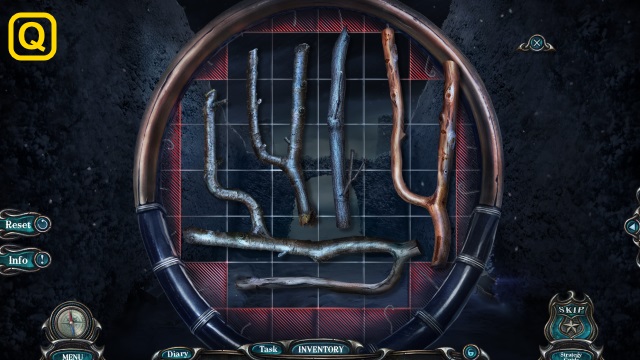
- Solution (P-Q).
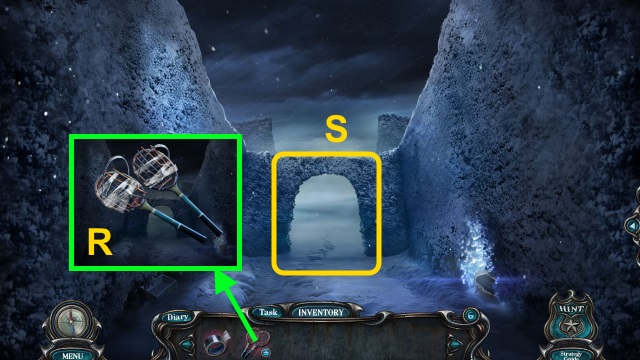
- Use the ADHESIVE TAPE (R); take the SNOWSHOES.
- Use the SNOWSHOES for a mini-game (S).
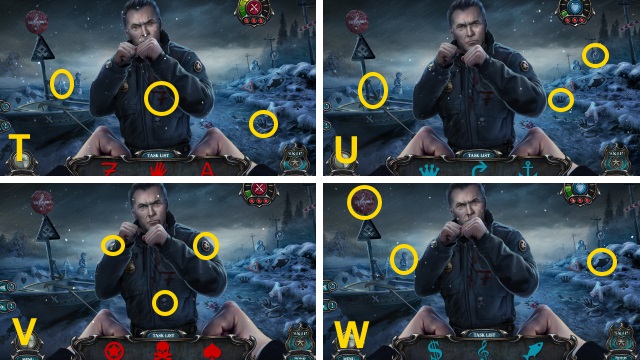
- Solution (T-W).
- Congratulations! You have completed Haunted Hotel: The Axiom Butcher.
Created at: 2016-05-29