

Walkthrough Menu
General Tips
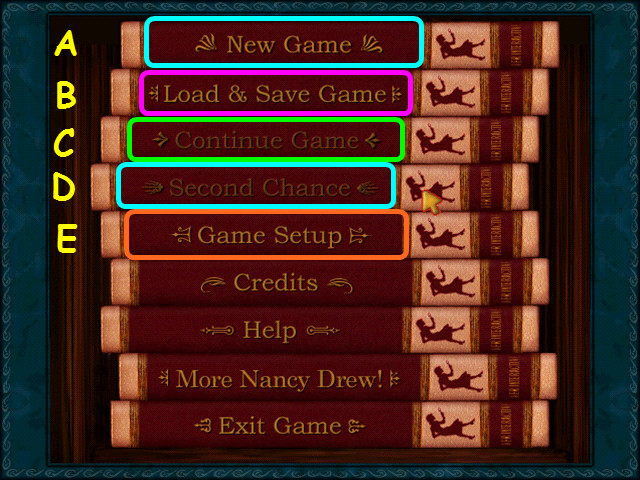 • From the main screen select New Game to create a new game
file (A). • Choose Load and Save Game to open or save game
profiles (B). • If you returned to this menu in error, select
Continue to return to your active game (C). • Use Second
Chance if you have made a fatal error in the game. It will
return to the point just before your mistake (D). • This is
great if you have forgotten to save your game recently. • Game
setup allows you to adjust volumes, brightness, and closed
captioning (E). • If the screen moves too much for you, turn
off the auto move feature here.
• From the main screen select New Game to create a new game
file (A). • Choose Load and Save Game to open or save game
profiles (B). • If you returned to this menu in error, select
Continue to return to your active game (C). • Use Second
Chance if you have made a fatal error in the game. It will
return to the point just before your mistake (D). • This is
great if you have forgotten to save your game recently. • Game
setup allows you to adjust volumes, brightness, and closed
captioning (E). • If the screen moves too much for you, turn
off the auto move feature here.
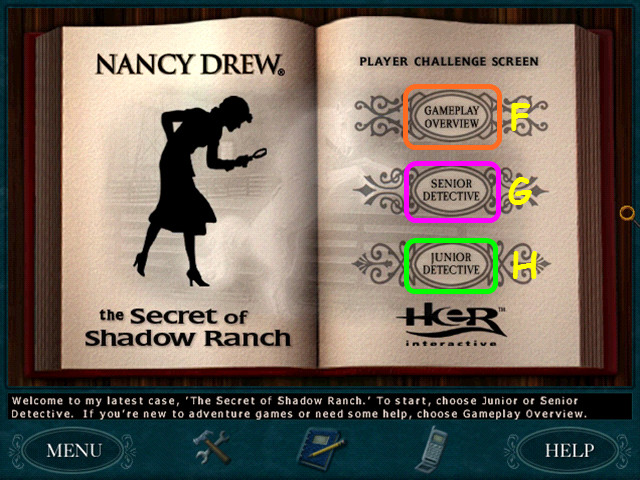 • After you select New Game, you will be taken to the Player
Challenge Screen. • If you are new to adventure games, or need
a refresher, select Gameplay Overview for a tutorial (F). •
You have the option of playing at the Junior Detective (G) or
Senior Detective (H) levels. • Senior Detective is more
difficult and it does not have a task list to follow.
• After you select New Game, you will be taken to the Player
Challenge Screen. • If you are new to adventure games, or need
a refresher, select Gameplay Overview for a tutorial (F). •
You have the option of playing at the Junior Detective (G) or
Senior Detective (H) levels. • Senior Detective is more
difficult and it does not have a task list to follow.
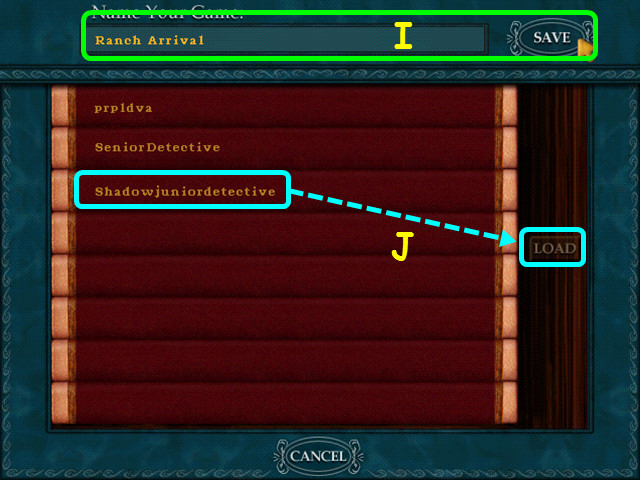 • You should save your game often. • You can give the file any
name you like, such as your name or where you are in the game
then press the Save button (I). • Select a file from the
'books' and press Load to open a previously saved game (J).
• You should save your game often. • You can give the file any
name you like, such as your name or where you are in the game
then press the Save button (I). • Select a file from the
'books' and press Load to open a previously saved game (J).
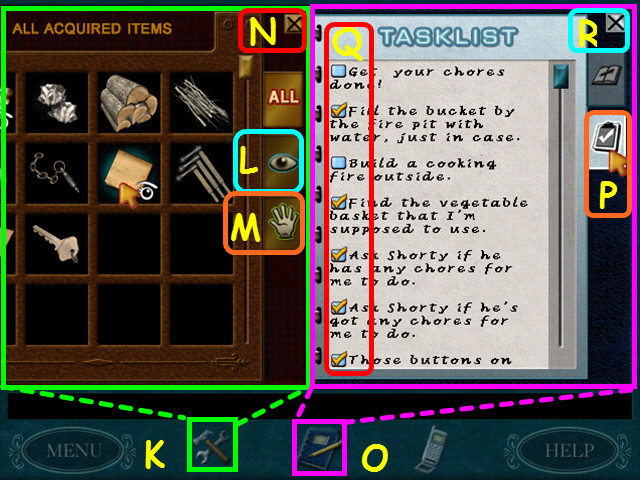 • Select the tools icon to open your inventory (K). • Some
items your can look inside your inventory; you can sort by
pressing the Eye button (L). • Items you can use can be sorted
by pressing the Hand Icon (M). • Press the X button to close
inventory (N). • If you use an item that you are not finished
with, you must open inventory and return it. • Select the
notebook to view your journal and task list (O). • Press the
Check mark to switch to the task list (P). • You can check off
tasks that you have accomplished (Q). • The task list is not
available in Senior detective mode. • Press the X button to
close the journal (R).
• Select the tools icon to open your inventory (K). • Some
items your can look inside your inventory; you can sort by
pressing the Eye button (L). • Items you can use can be sorted
by pressing the Hand Icon (M). • Press the X button to close
inventory (N). • If you use an item that you are not finished
with, you must open inventory and return it. • Select the
notebook to view your journal and task list (O). • Press the
Check mark to switch to the task list (P). • You can check off
tasks that you have accomplished (Q). • The task list is not
available in Senior detective mode. • Press the X button to
close the journal (R).
Chapter 1: Day One
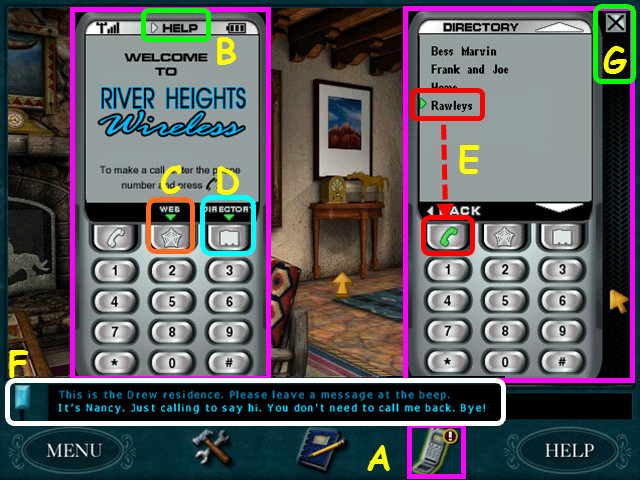 • Select the cell phone icon at the bottom of the screen (A).
• Should you need instructions on using the phone, press the
Help button (B). • To access your e-mail or the internet,
press the Web button (C). • Press the Directory button (D). •
Select the Rawleys from the list, then press the green
receiver button (E). • You will need to participate in the
conversation; use the button on the left to scroll down if
necessary to choose your responses (F). • You can now search
the web and learn about several topics, such as rattlesnakes
and scorpions. • Next, call Bess Marvin and speak to her
completely. • At the end of the conversation, you will have
the option to ask for a hint to steer you in the right
direction, if necessary. • Select the 'X' in the upper right
corner to close the phone (G).
• Select the cell phone icon at the bottom of the screen (A).
• Should you need instructions on using the phone, press the
Help button (B). • To access your e-mail or the internet,
press the Web button (C). • Press the Directory button (D). •
Select the Rawleys from the list, then press the green
receiver button (E). • You will need to participate in the
conversation; use the button on the left to scroll down if
necessary to choose your responses (F). • You can now search
the web and learn about several topics, such as rattlesnakes
and scorpions. • Next, call Bess Marvin and speak to her
completely. • At the end of the conversation, you will have
the option to ask for a hint to steer you in the right
direction, if necessary. • Select the 'X' in the upper right
corner to close the phone (G).
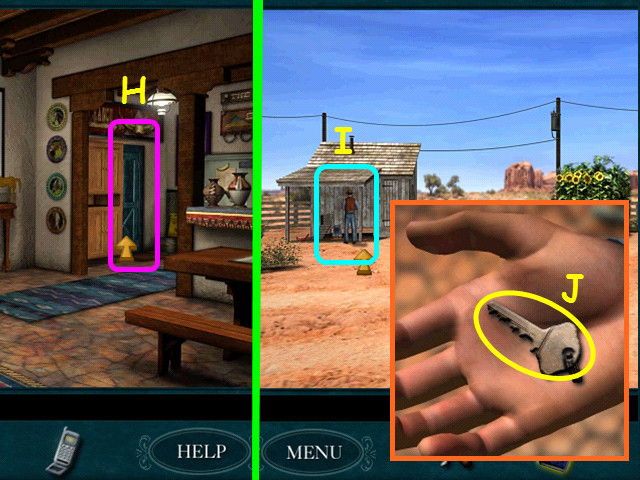 • Walk forward to the kitchen and exit through the blue door
on the left (H). • Walk forward several times and talk to Dan
at the chicken coop (I). • After discussing the desk, he will
give you the DESK KEY (J). • Turn around and return to the
house via the blue door.
• Walk forward to the kitchen and exit through the blue door
on the left (H). • Walk forward several times and talk to Dan
at the chicken coop (I). • After discussing the desk, he will
give you the DESK KEY (J). • Turn around and return to the
house via the blue door.
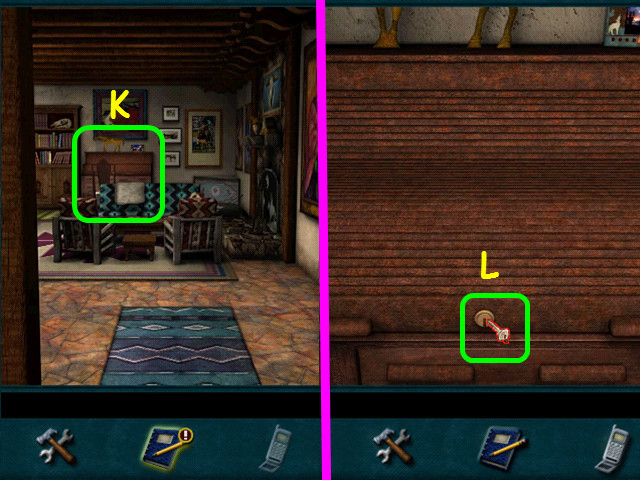 • Turn right, then walk forward to the roll-top desk (K). •
Use the DESK KEY to unlock the desk (L).
• Turn right, then walk forward to the roll-top desk (K). •
Use the DESK KEY to unlock the desk (L).
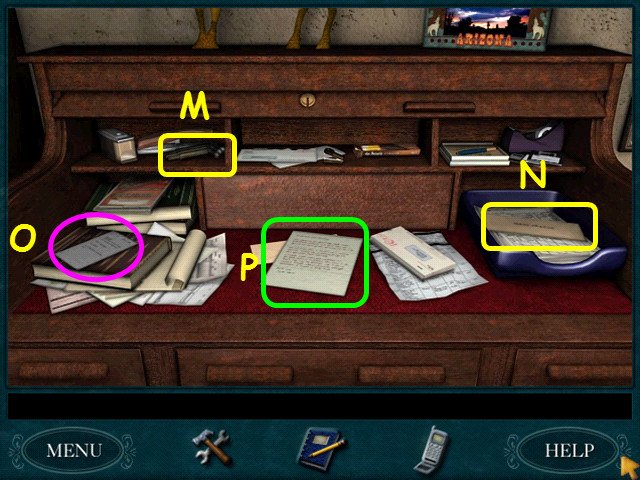 • Take the 3 HAND LEVERS (M) and the LETTER TO MARY YAZZEE
(N). • Note the bill of sale to Mary Yazzee (O). • Read the
letter from disgruntled, former employee Jane Nash (P). • Make
sure you arrow down to read the entire letter. • Exit the desk
then look at the bookcase just to the left.
• Take the 3 HAND LEVERS (M) and the LETTER TO MARY YAZZEE
(N). • Note the bill of sale to Mary Yazzee (O). • Read the
letter from disgruntled, former employee Jane Nash (P). • Make
sure you arrow down to read the entire letter. • Exit the desk
then look at the bookcase just to the left.
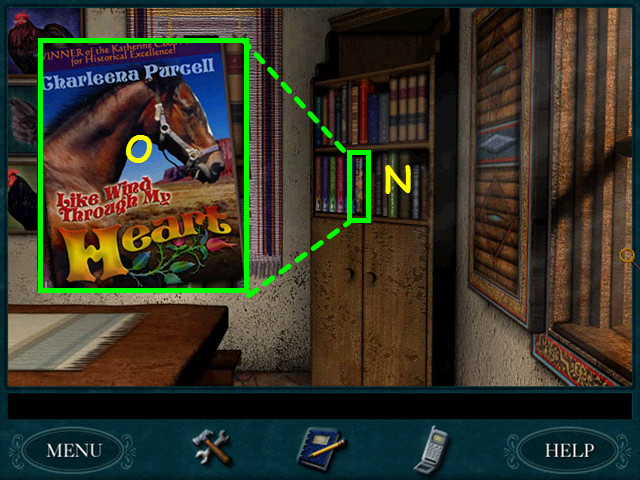
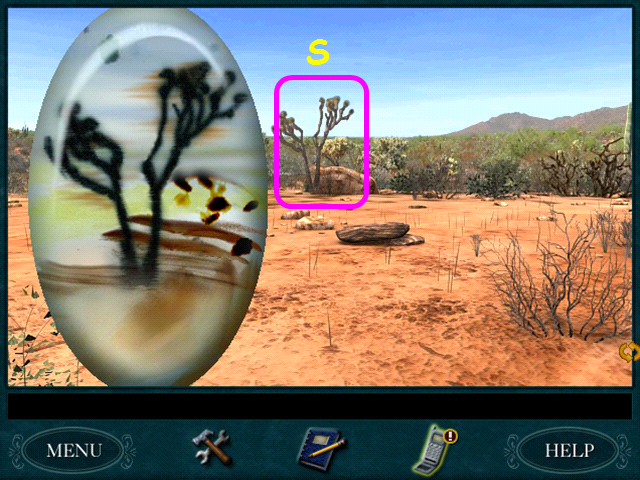
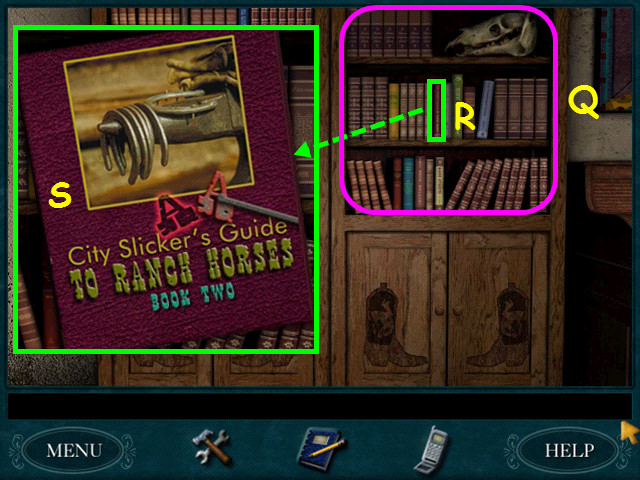 • Zoom into the right side of the bookcase (Q). • Select the
red book on the middle shelf (R). • Open and read the book
thoroughly to learn about horses (S). • Turn around, go left,
then forward to the fireplace.
• Zoom into the right side of the bookcase (Q). • Select the
red book on the middle shelf (R). • Open and read the book
thoroughly to learn about horses (S). • Turn around, go left,
then forward to the fireplace.
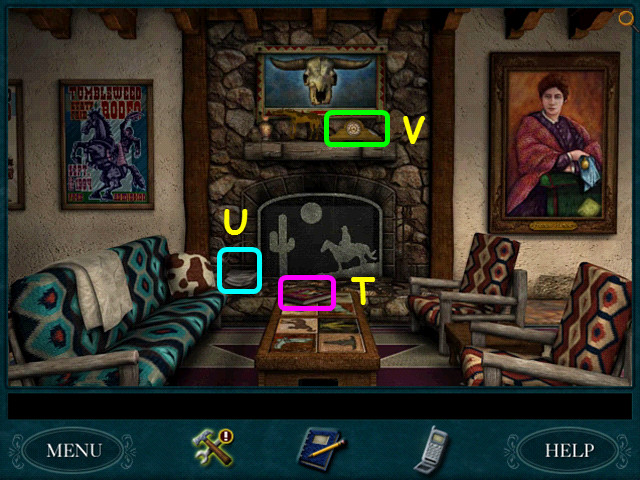 • Zoom in and read the other book on horses (T). • Zoom in and
read the newspaper (U). • Zoom in and note the mantle clock
(V). • Back out of the fireplace area and walk to the
triangular chest to the right of the roll-top desk.
• Zoom in and read the other book on horses (T). • Zoom in and
read the newspaper (U). • Zoom in and note the mantle clock
(V). • Back out of the fireplace area and walk to the
triangular chest to the right of the roll-top desk.
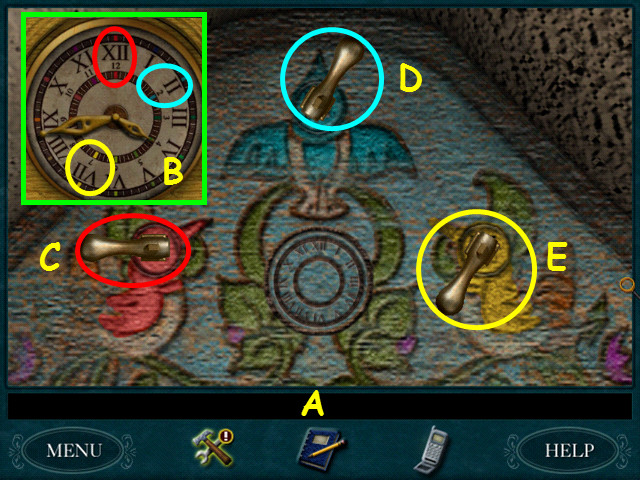 • Zoom into the top area and place the 3 HAND LEVERS on the
holes (A). • Per the colors on the clock (B), turn the red
bird's handle to the 12 o'clock position (C), the light blue
bird's lever to the 2 o'clock position (D), and the yellow
bird's lever to the 7 o'clock position (E).
• Zoom into the top area and place the 3 HAND LEVERS on the
holes (A). • Per the colors on the clock (B), turn the red
bird's handle to the 12 o'clock position (C), the light blue
bird's lever to the 2 o'clock position (D), and the yellow
bird's lever to the 7 o'clock position (E).
 • Look at and read the journal (F). • Take and open the
envelope (G). • Look at and take the map (H). • Read the
letter (I). • Select the watch for a mini-game (J).
• Look at and read the journal (F). • Take and open the
envelope (G). • Look at and take the map (H). • Read the
letter (I). • Select the watch for a mini-game (J).
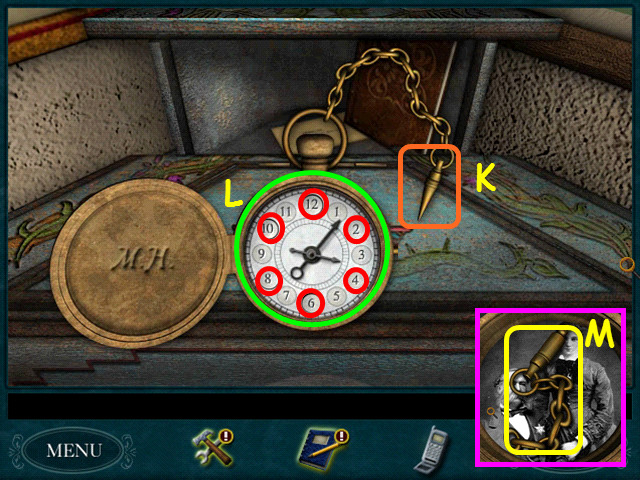 • Select the key to open the watch (K). • Zoom into the face
of the watch (L). • You need to find the sequence of even
numbers to press so they all stay down. • Press the even
numbers until one stays down. • Press another number; if they
both pop up, press the first number again plus another until
they both stay down. • Continues this process until all are
pressed in. • This mini-game is randomized, your solution may
vary. • Returning the watch to the cabinet will rest the
combination. • Our solution was: 4-10-2-12-6-8. • Take the
WATCH KEY from inside the watch (M). • Walk to the opposite
corner of the living room to the small bookcase.
• Select the key to open the watch (K). • Zoom into the face
of the watch (L). • You need to find the sequence of even
numbers to press so they all stay down. • Press the even
numbers until one stays down. • Press another number; if they
both pop up, press the first number again plus another until
they both stay down. • Continues this process until all are
pressed in. • This mini-game is randomized, your solution may
vary. • Returning the watch to the cabinet will rest the
combination. • Our solution was: 4-10-2-12-6-8. • Take the
WATCH KEY from inside the watch (M). • Walk to the opposite
corner of the living room to the small bookcase.
 • Zoom into the bookcase and select the 6th book form the left
(N). • Open the book to see the inscription inside (O). • Back
out twice, then turn to the left. • Walk forward to the
portrait.
• Zoom into the bookcase and select the 6th book form the left
(N). • Open the book to see the inscription inside (O). • Back
out twice, then turn to the left. • Walk forward to the
portrait.
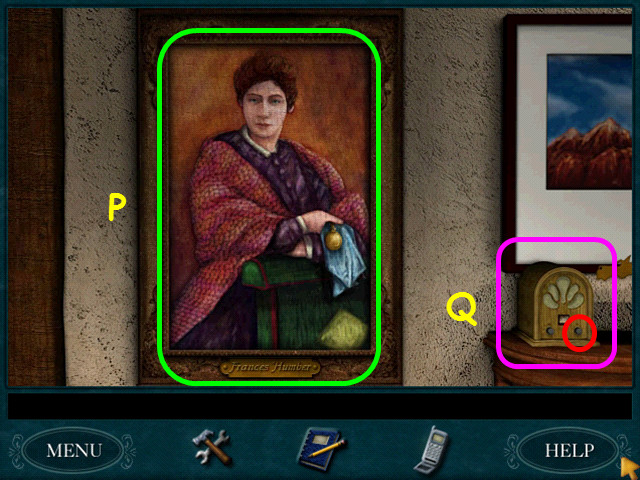 • Look at the portrait of Frances Humber (P). • Zoom into the
radio and select the knob to listen to the weather report (Q).
• You can exit the close-up once the auction news starts. •
Walk to the kitchen and exit through the blue door.
• Look at the portrait of Frances Humber (P). • Zoom into the
radio and select the knob to listen to the weather report (Q).
• You can exit the close-up once the auction news starts. •
Walk to the kitchen and exit through the blue door.
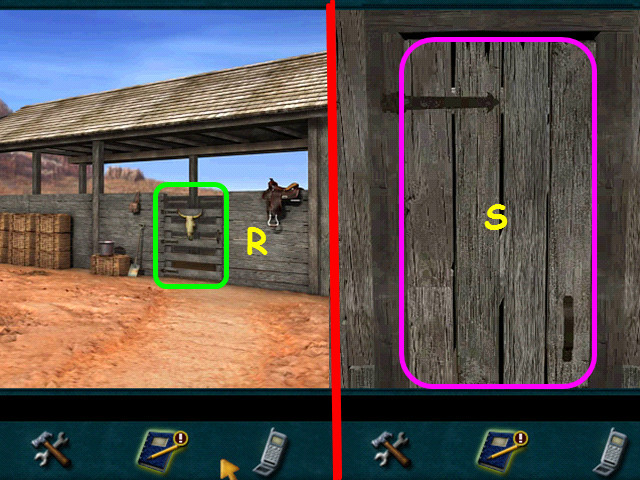 • Walk to the stable on the right (R). • Go up to the gate
with the steer skull and enter. • Turn right and enter the
wooden door (S).
• Walk to the stable on the right (R). • Go up to the gate
with the steer skull and enter. • Turn right and enter the
wooden door (S).
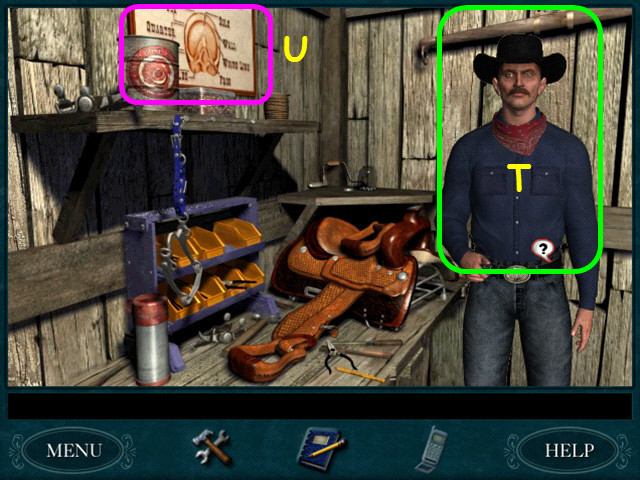 • Turn left and talk to Tex completely (T). • Look at the
poster over the work bench (U). • Turn around and look at the
poster on the opposite wall. • Return to the house thorough
the blue door; walk forward into the kitchen.
• Turn left and talk to Tex completely (T). • Look at the
poster over the work bench (U). • Turn around and look at the
poster on the opposite wall. • Return to the house thorough
the blue door; walk forward into the kitchen.
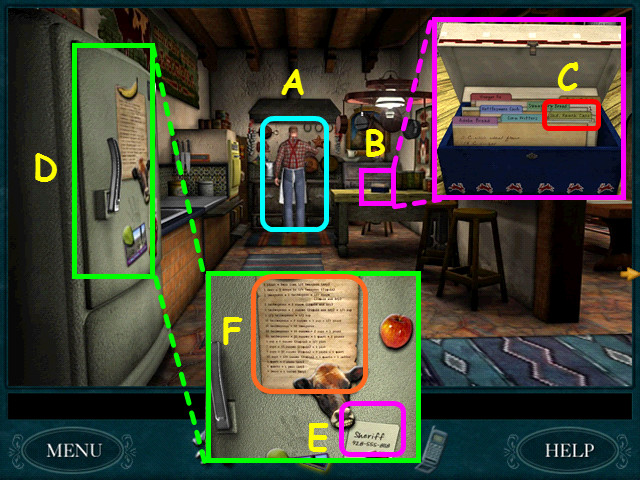 • Talk to Shorty thoroughly (A). • Zoom into the recipe box
(B) on the right and read the recipe card for Shadow Ranch
Cake (C). • Zoom into the refrigerator door (D); read the
Sheriff’s number (E) and the list of measurement conversions
(F). • Turn and exit trough the blue door.
• Talk to Shorty thoroughly (A). • Zoom into the recipe box
(B) on the right and read the recipe card for Shadow Ranch
Cake (C). • Zoom into the refrigerator door (D); read the
Sheriff’s number (E) and the list of measurement conversions
(F). • Turn and exit trough the blue door.
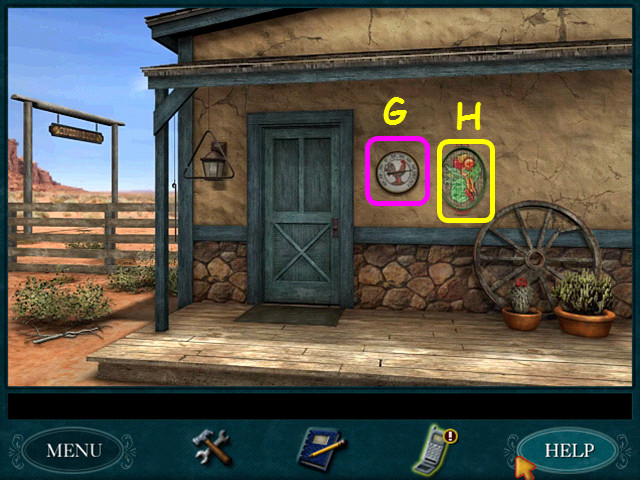 • Walk forward off the porch, then turn around. • Look at the
thermometer (G). • Take the VEGETABLE BASKET (H). • Turn
around and walk forward to the sunflowers.
• Walk forward off the porch, then turn around. • Look at the
thermometer (G). • Take the VEGETABLE BASKET (H). • Turn
around and walk forward to the sunflowers.
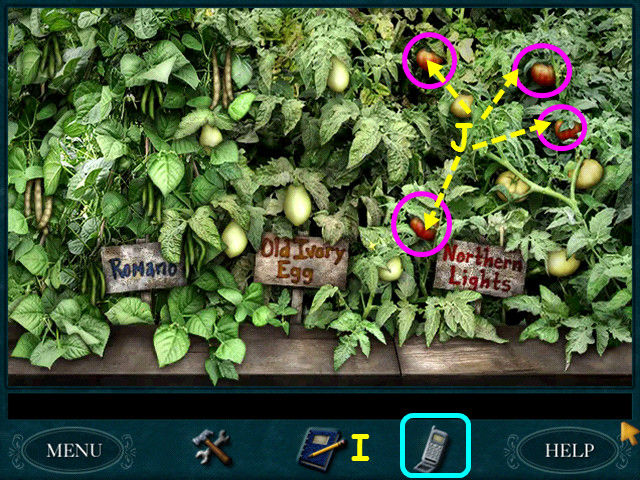 • Look at your phone and go to the web to learn how vegetables
look when ready to pick (I). • Look at the left garden and
pick the 4 ripe Northern Lights Tomatoes (J). • Turn around
and look at the right garden.
• Look at your phone and go to the web to learn how vegetables
look when ready to pick (I). • Look at the left garden and
pick the 4 ripe Northern Lights Tomatoes (J). • Turn around
and look at the right garden.
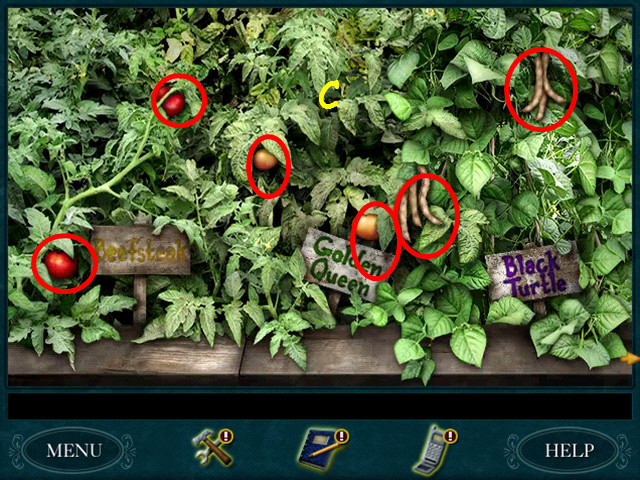
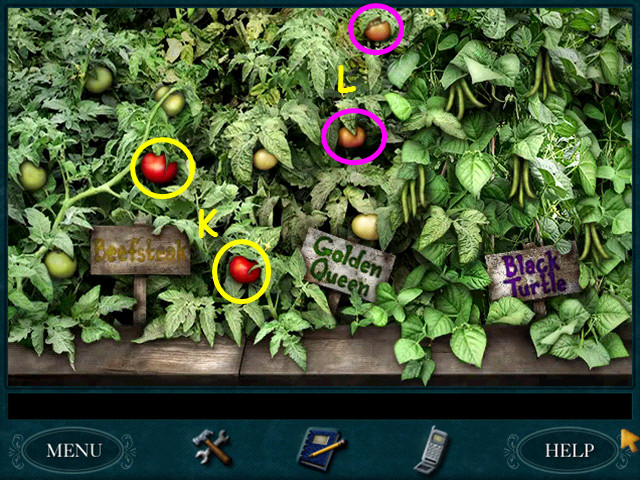 • Pick the 2 red Beefsteak tomatoes (K). • Pick the 2 darker
Golden Queen tomatoes (L). • Make sure you do not pick
unripened vegetable, or you will be sent home. • Return to the
kitchen and talk to Shorty.
• Pick the 2 red Beefsteak tomatoes (K). • Pick the 2 darker
Golden Queen tomatoes (L). • Make sure you do not pick
unripened vegetable, or you will be sent home. • Return to the
kitchen and talk to Shorty.
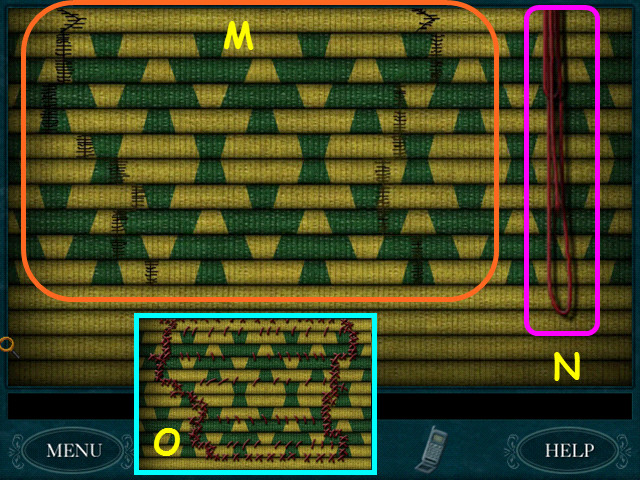 • Pick up the egg basket, then look at it in your inventory. •
Zoom in on the broken part for a mini-game. • Right-click to
rotate pieces in place; left-click to take or place. • Pieces
will lock in place when correct. • Shown here is the Senior
Detective mini-game (M). • Select the red thread (N) 3 times
to sew the pieces together (O).
• Pick up the egg basket, then look at it in your inventory. •
Zoom in on the broken part for a mini-game. • Right-click to
rotate pieces in place; left-click to take or place. • Pieces
will lock in place when correct. • Shown here is the Senior
Detective mini-game (M). • Select the red thread (N) 3 times
to sew the pieces together (O).
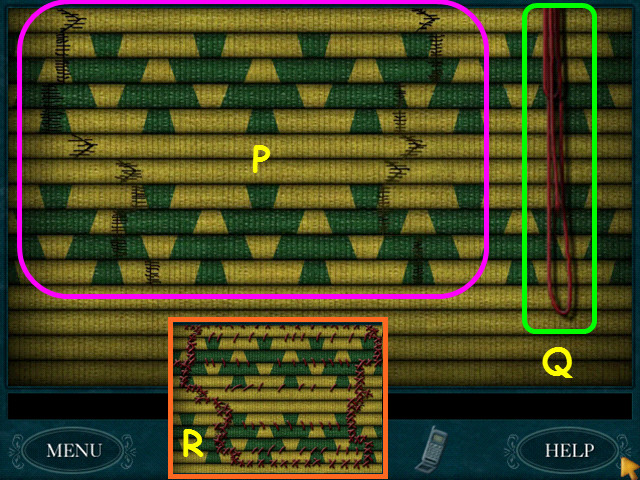 • Shown here is the Junior Detective mini-game (P). • Select
the red thread (Q) 3 times to sew the pieces together (R). •
Exit the basket and your inventory. • Return and talk to Dave
by the chicken coop, then enter the coop using the door on the
right.
• Shown here is the Junior Detective mini-game (P). • Select
the red thread (Q) 3 times to sew the pieces together (R). •
Exit the basket and your inventory. • Return and talk to Dave
by the chicken coop, then enter the coop using the door on the
right.
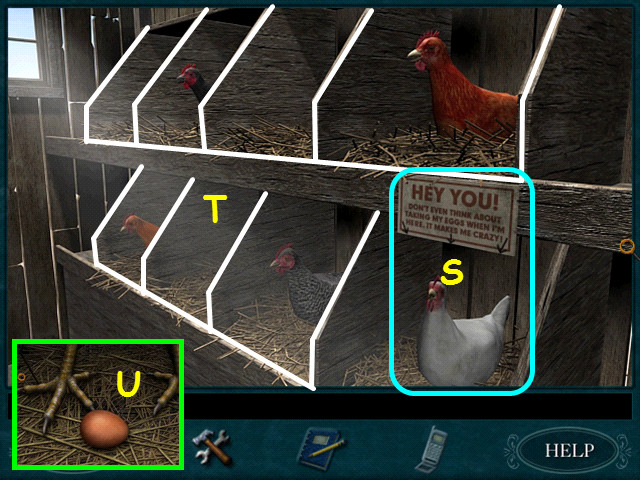 • Note the sign and the white chicken; do not look for eggs in
her nest when she is present (S). • Look in the other 7 nests
(T) and take the eggs (U). • Walk to the kitchen, then
immediately return to the coop. • With the white chicken gone,
check her nest and the others until you have 6 eggs. • Exit
the chicken coop and turn around.
• Note the sign and the white chicken; do not look for eggs in
her nest when she is present (S). • Look in the other 7 nests
(T) and take the eggs (U). • Walk to the kitchen, then
immediately return to the coop. • With the white chicken gone,
check her nest and the others until you have 6 eggs. • Exit
the chicken coop and turn around.
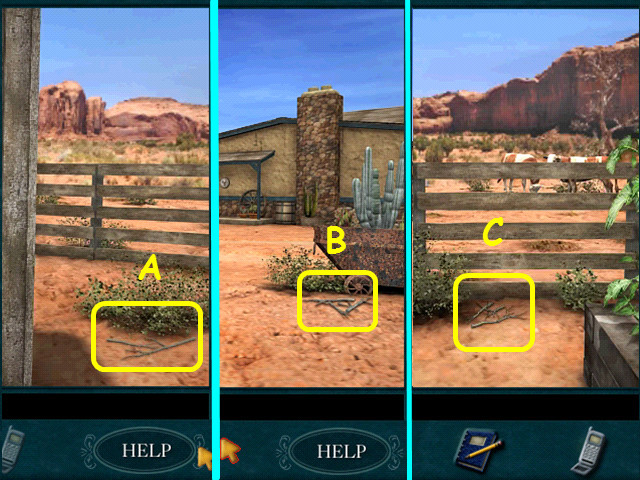 • Turn around and take the 1/5 KINDLING (A). • Turn around
again and take the 2/5 KINDLING by the mine cart (B). • Walk
down the center of the vegetable garden and take the 3/5
KINDLING (C). • Return to the kitchen and talk to Shorty. Give
him the eggs and he will give you a CANTEEN OF WATER. • Walk
to the fireplace in the living room and take 2 pieces of
NEWSPAPER. • Walk to the kitchen and exit through the blue
door.
• Turn around and take the 1/5 KINDLING (A). • Turn around
again and take the 2/5 KINDLING by the mine cart (B). • Walk
down the center of the vegetable garden and take the 3/5
KINDLING (C). • Return to the kitchen and talk to Shorty. Give
him the eggs and he will give you a CANTEEN OF WATER. • Walk
to the fireplace in the living room and take 2 pieces of
NEWSPAPER. • Walk to the kitchen and exit through the blue
door.
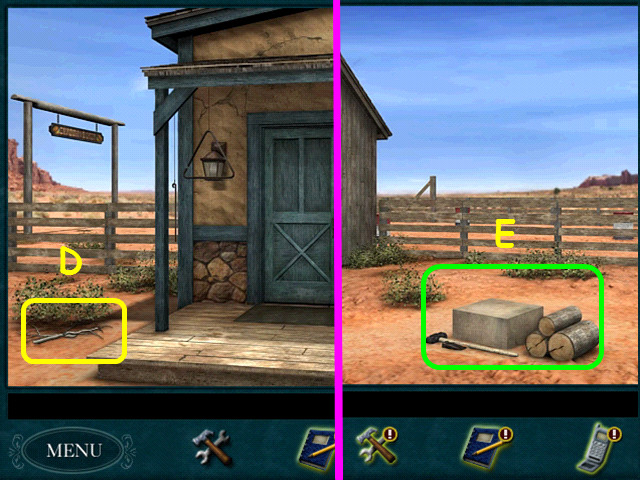 • Walk forward, then turn around. • Take the 4/5 KINDLING to
the left of the blue door (D). • Turn to the left and look at
the chopping block (E).
• Walk forward, then turn around. • Take the 4/5 KINDLING to
the left of the blue door (D). • Turn to the left and look at
the chopping block (E).
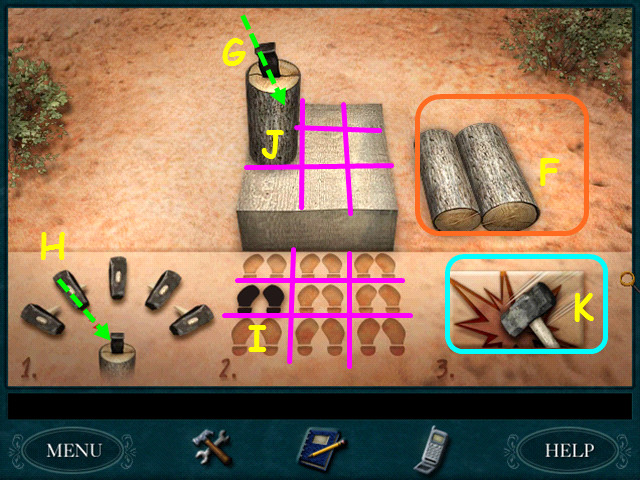 • Select a log form the pile on the right (F) and it will go
automatically on the block. • Select the wedge from below the
axe to trigger the mini-game. • Look at the angle of the wedge
(G) and select the hammer head to match (H). • Move your feet
to a position (I) that matches where the log is placed (J). •
Select the hammer to swing (K). • Repeat this process with the
other 2 logs, than take the SPLIT LOGS. • Turn around and walk
forward to the fire pit.
• Select a log form the pile on the right (F) and it will go
automatically on the block. • Select the wedge from below the
axe to trigger the mini-game. • Look at the angle of the wedge
(G) and select the hammer head to match (H). • Move your feet
to a position (I) that matches where the log is placed (J). •
Select the hammer to swing (K). • Repeat this process with the
other 2 logs, than take the SPLIT LOGS. • Turn around and walk
forward to the fire pit.
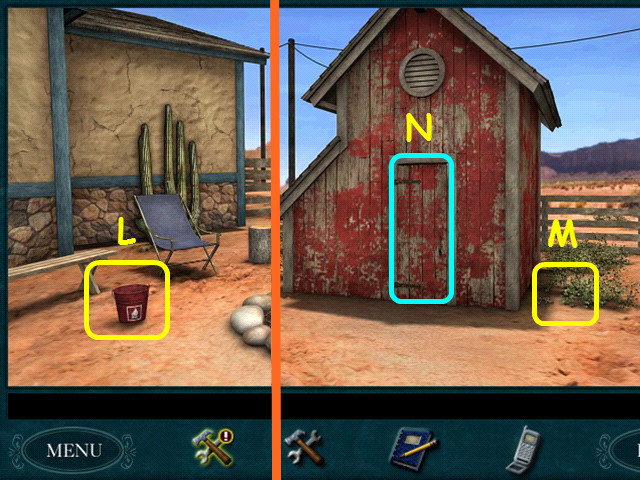 • Take the EMPTY FIRE BUCKET (L). • Turn around, walk forward,
then turn to the left until you see the shed. • Walk forward
to the shed and take the 5/5 twigs (M). • Open the door and
enter the shed (N). • Walk to the sink, place the EMPTY FIRE
BUCKET inside and turn on the faucet. • Take the FIRE BUCKET
and return to the fire pit.
• Take the EMPTY FIRE BUCKET (L). • Turn around, walk forward,
then turn to the left until you see the shed. • Walk forward
to the shed and take the 5/5 twigs (M). • Open the door and
enter the shed (N). • Walk to the sink, place the EMPTY FIRE
BUCKET inside and turn on the faucet. • Take the FIRE BUCKET
and return to the fire pit.
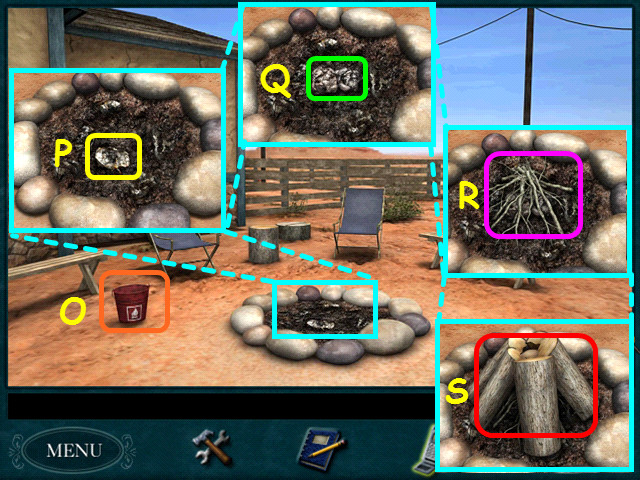 • Place the FIRE BUCKET on the ground where you originally
found it (O). • Look in the fire pit and take the CRUMPLED
NOTE (P). • Place the NEWSPAPER in the fire pit (Q). • Place
the KINDLING over the newspaper (R). • Place the SPLIT LOGS on
the kindling (S). • Return to the stable and enter the tack
room.
• Place the FIRE BUCKET on the ground where you originally
found it (O). • Look in the fire pit and take the CRUMPLED
NOTE (P). • Place the NEWSPAPER in the fire pit (Q). • Place
the KINDLING over the newspaper (R). • Place the SPLIT LOGS on
the kindling (S). • Return to the stable and enter the tack
room.
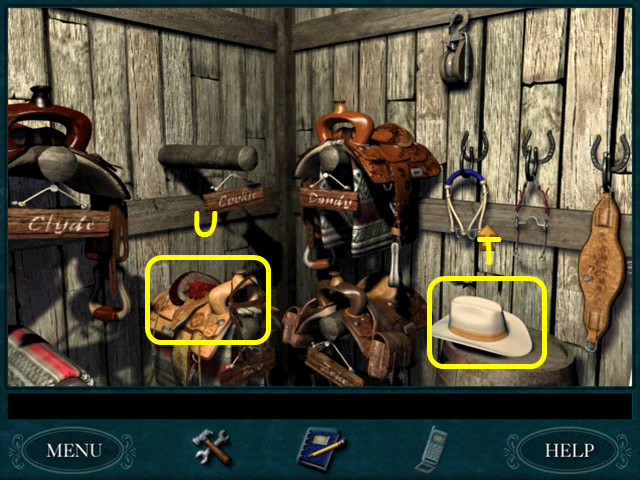 • Turn around so you are facing the opposite corner of where
Tex stands. • Zoom in and take the HAT (T). • Zoom in and take
the SADDLE AND GLOVES that are over Bob's name (U). • Turn
around and talk to Tex and ask if you can now ride. • Exit the
tack room and walk forward twice to the horses. • Turn left to
look at Bob the horse.
• Turn around so you are facing the opposite corner of where
Tex stands. • Zoom in and take the HAT (T). • Zoom in and take
the SADDLE AND GLOVES that are over Bob's name (U). • Turn
around and talk to Tex and ask if you can now ride. • Exit the
tack room and walk forward twice to the horses. • Turn left to
look at Bob the horse.
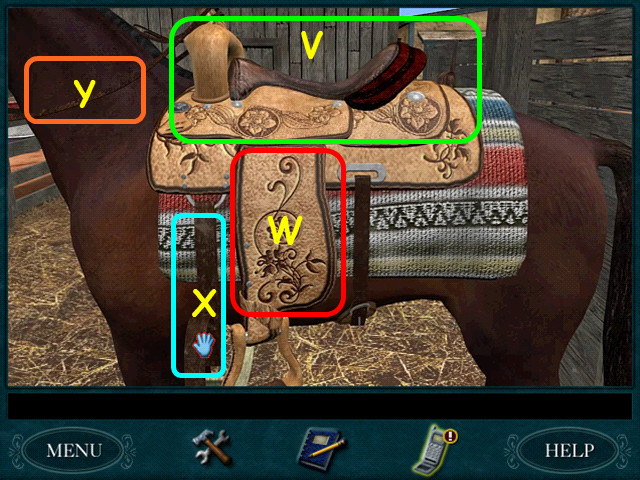 • Move until you are at the side of the horse. • Place the
SADDLE on Bob (V). • Lift the stirrup (W), pull the cinch 3
times (X), then lower the stirrup. • Grab the reins (Y). •
Once you are in the corral, select the saddle to mount the
horse. • Tex has some questions for you. • Q: Where are the
horse's hocks? A: On its back legs. • Q: Where is the horse's
frog? A: On the bottom of the hoof. • Q: How tall is 15 hands?
A: Five feet. • Q: What is a Paso Fino? A: A gaited horse. •
Q: How do you know if a horse is colicking? A: It keeps lying
down and then standing up. • Q: What is the difference between
a bay and a chestnut? A: A bay has black points. • Q: What
tribe bred the first Appaloosas? A: The Nez Perce. • Q: What
part of the horse is most likely to be hurt when it founders?
A: Feet. • Q: What part of the saddle should be checked before
you go out on the trail? A: The cinch. • Q: What is a mule? A:
The offspring of a female horse and male donkey. • You can
take a break and come back later to the questions if you like.
• Once you have answered all 10 questions, go forward and open
the gate. • Walk out the gate, then select Mary's Gifts on the
map.
• Move until you are at the side of the horse. • Place the
SADDLE on Bob (V). • Lift the stirrup (W), pull the cinch 3
times (X), then lower the stirrup. • Grab the reins (Y). •
Once you are in the corral, select the saddle to mount the
horse. • Tex has some questions for you. • Q: Where are the
horse's hocks? A: On its back legs. • Q: Where is the horse's
frog? A: On the bottom of the hoof. • Q: How tall is 15 hands?
A: Five feet. • Q: What is a Paso Fino? A: A gaited horse. •
Q: How do you know if a horse is colicking? A: It keeps lying
down and then standing up. • Q: What is the difference between
a bay and a chestnut? A: A bay has black points. • Q: What
tribe bred the first Appaloosas? A: The Nez Perce. • Q: What
part of the horse is most likely to be hurt when it founders?
A: Feet. • Q: What part of the saddle should be checked before
you go out on the trail? A: The cinch. • Q: What is a mule? A:
The offspring of a female horse and male donkey. • You can
take a break and come back later to the questions if you like.
• Once you have answered all 10 questions, go forward and open
the gate. • Walk out the gate, then select Mary's Gifts on the
map.
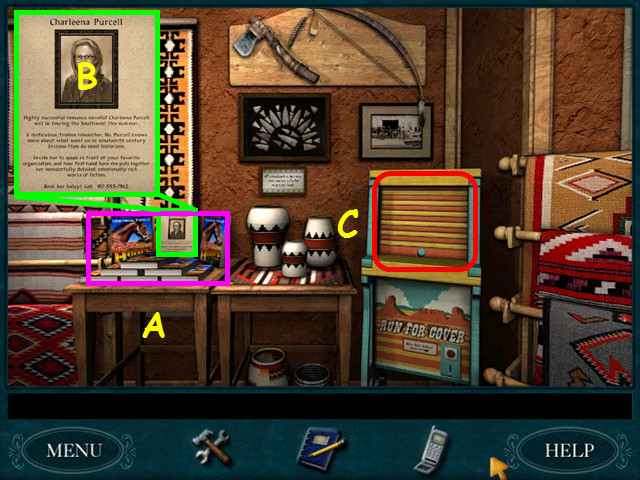 • Enter the gift shop and find Mary behind the counter; talk
to her thoroughly. • Turn to the right and look at Charleena
Purcell's book display (A). • Make sure to read the display
card to get her phone number (B). • Select the top section of
the Run for Cover game (C).
• Enter the gift shop and find Mary behind the counter; talk
to her thoroughly. • Turn to the right and look at Charleena
Purcell's book display (A). • Make sure to read the display
card to get her phone number (B). • Select the top section of
the Run for Cover game (C).
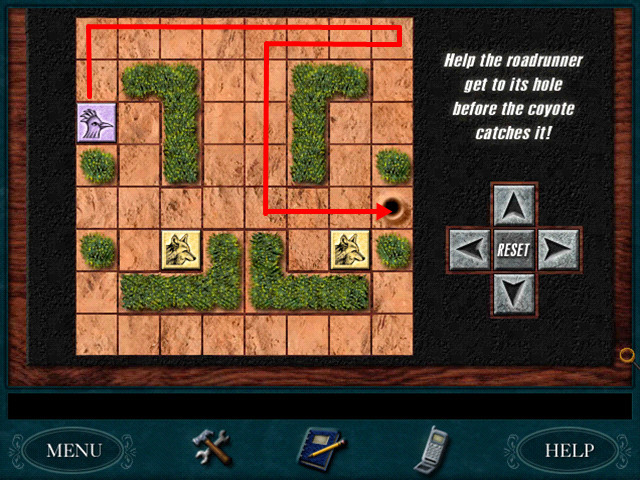
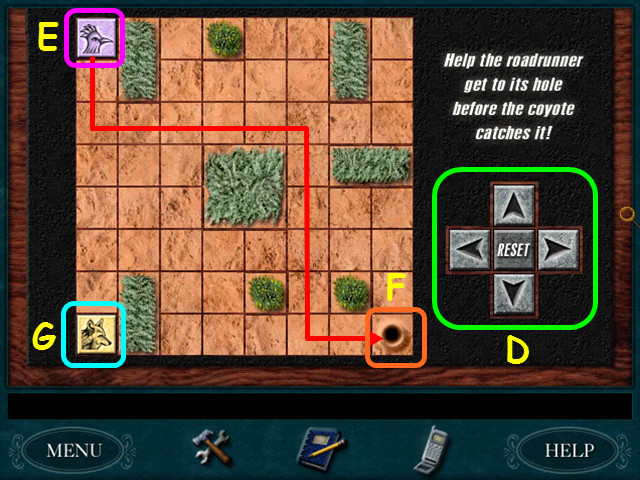 • Use the arrows (D) to move the roadrunner (E) to the hole
(F), while avoiding the coyotes (G). • This screenshot is for
Junior Detective Level 1. • Move the roadrunner: D x 1, R x 5,
D x 5, and R x 5.
• Use the arrows (D) to move the roadrunner (E) to the hole
(F), while avoiding the coyotes (G). • This screenshot is for
Junior Detective Level 1. • Move the roadrunner: D x 1, R x 5,
D x 5, and R x 5.
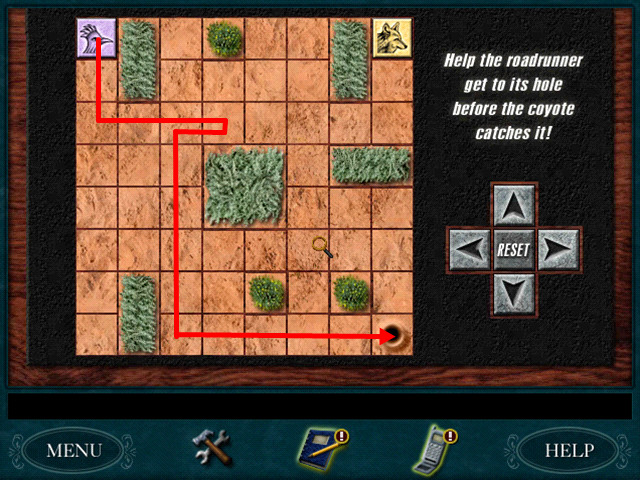
 • This screenshot is for Junior Detective Level 2. • Move the
roadrunner: D x 3, R x 1, U x 1, R x 1, D x 5, and R x 5.
• This screenshot is for Junior Detective Level 2. • Move the
roadrunner: D x 3, R x 1, U x 1, R x 1, D x 5, and R x 5.
 • This screenshot is for Junior Detective Level 3 and Senior
Detective Level 2. • Move the roadrunner: U x 2, R x 7, L x 3,
D x 4, and R x 3.
• This screenshot is for Junior Detective Level 3 and Senior
Detective Level 2. • Move the roadrunner: U x 2, R x 7, L x 3,
D x 4, and R x 3.
 • This screenshot is for Senior Detective Level 1. • Move the
roadrunner: D x 2, R x 3, L x 1, D x 5, and R x 5.
• This screenshot is for Senior Detective Level 1. • Move the
roadrunner: D x 2, R x 3, L x 1, D x 5, and R x 5.
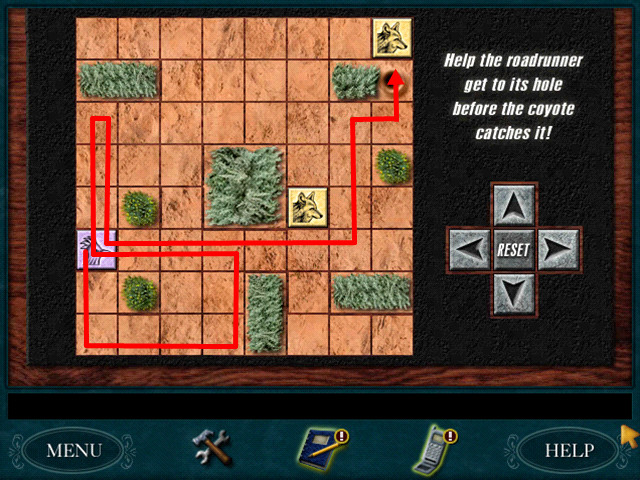 • This screenshot is for Senior Detective Level 3. • Move the
roadrunner: D x 2, R x 3, U x 2, L x 3, U x 3, D x 3, R x 6, U
x 3, R x 1, and U x 1. • Take the TOKEN from the coin slot.
You can play several times if you like. • Turn around to the
rest of the shop.
• This screenshot is for Senior Detective Level 3. • Move the
roadrunner: D x 2, R x 3, U x 2, L x 3, U x 3, D x 3, R x 6, U
x 3, R x 1, and U x 1. • Take the TOKEN from the coin slot.
You can play several times if you like. • Turn around to the
rest of the shop.
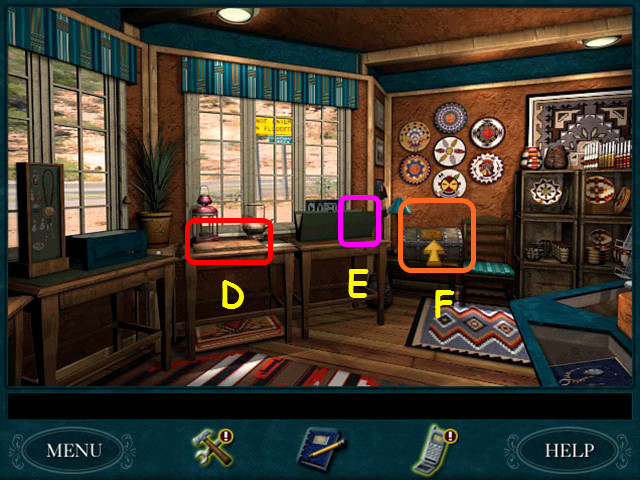 • Make note of the tuning fork set (D). • Flip through the
prints to learn about petroglyphs (E). • Zoom into the trunk
(F).
• Make note of the tuning fork set (D). • Flip through the
prints to learn about petroglyphs (E). • Zoom into the trunk
(F).
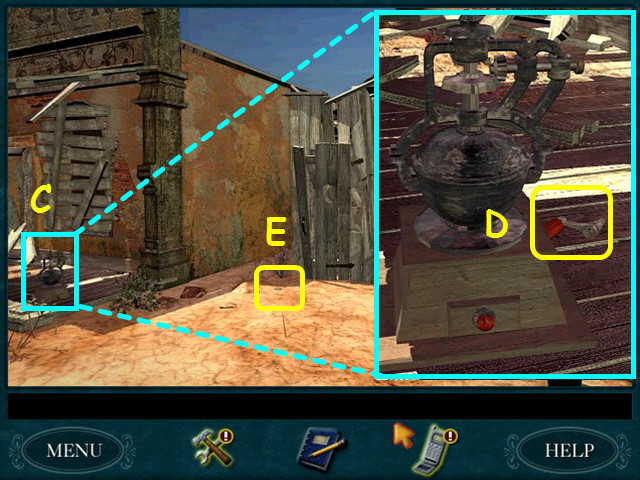
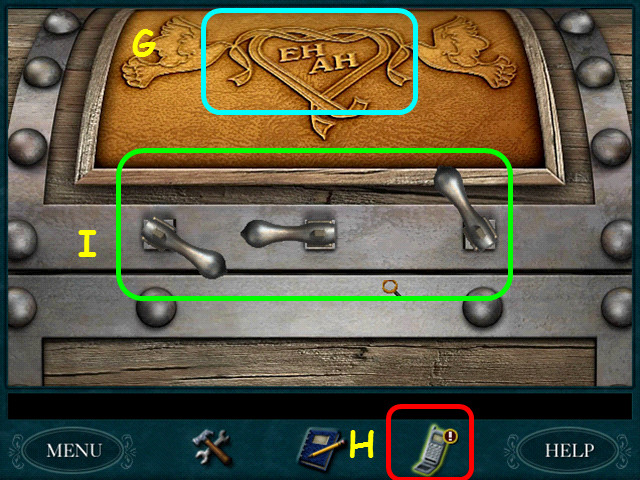 • Look closely at the trunk and the insignia (G). • Place the
3 hand levers into the holes. • Use your cell phone to call
Charleena Purcell (H). • You learn that the Humber's wedding
date is April, 9th, 1811 (4-9-11). • From left to right, turn
the levers to 4 o'clock, 9 o'clock, and 11 o'clock (I). • Take
the pocket watch from the trunk. • Back out so the POCKET
WATCH goes to your inventory.
• Look closely at the trunk and the insignia (G). • Place the
3 hand levers into the holes. • Use your cell phone to call
Charleena Purcell (H). • You learn that the Humber's wedding
date is April, 9th, 1811 (4-9-11). • From left to right, turn
the levers to 4 o'clock, 9 o'clock, and 11 o'clock (I). • Take
the pocket watch from the trunk. • Back out so the POCKET
WATCH goes to your inventory.
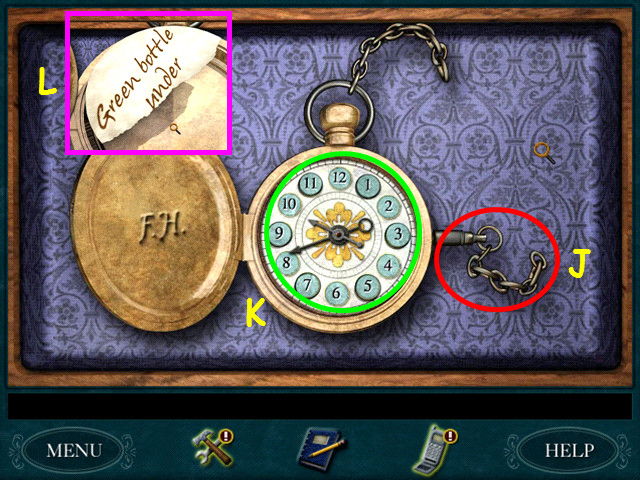 • Look at the POCKET WATCH in your inventory. • Use the WATCH
KEY to open the watch (J). • Zoom into the watch face (K). •
You need to find the sequence of odd numbers to press so they
all stay down. • Press the odd numbers until one stays down. •
Press another number; if they both pop up, press the first
number again plus another until they both stay down. •
Continues this process until all are pressed in. • This
mini-game is randomized, your solution may vary. • Returning
the watch to inventory will rest the combination. • Our
solution was: 5-9-1-11-3-7. • Turn over the torn photo to see
the message on the back (L). • Exit the shop and get on Bob
the horse. • Select Shadow Ranch on the map. • Look at Bob the
horse and remove his saddle by lifting the stirrup, loosening
the cinch, lowering the stirrup and taking the saddle. •
Return to the tack room and return the saddle to its stand.
• Look at the POCKET WATCH in your inventory. • Use the WATCH
KEY to open the watch (J). • Zoom into the watch face (K). •
You need to find the sequence of odd numbers to press so they
all stay down. • Press the odd numbers until one stays down. •
Press another number; if they both pop up, press the first
number again plus another until they both stay down. •
Continues this process until all are pressed in. • This
mini-game is randomized, your solution may vary. • Returning
the watch to inventory will rest the combination. • Our
solution was: 5-9-1-11-3-7. • Turn over the torn photo to see
the message on the back (L). • Exit the shop and get on Bob
the horse. • Select Shadow Ranch on the map. • Look at Bob the
horse and remove his saddle by lifting the stirrup, loosening
the cinch, lowering the stirrup and taking the saddle. •
Return to the tack room and return the saddle to its stand.
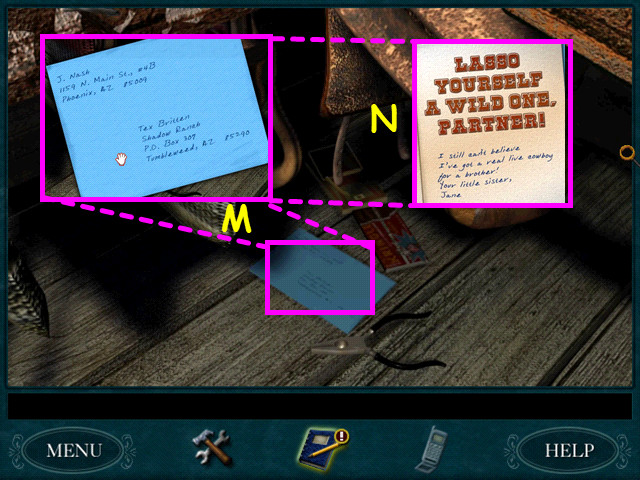 • Look at the blue envelope that falls to the floor (M). •
Note the card is from Jane Nash to her brother, Tex (N). •
Turn around and talk to Tex about his sister. • Turn and exit
the tack room to bring on the evening. • After the campfire,
you witness the phantom horse!
• Look at the blue envelope that falls to the floor (M). •
Note the card is from Jane Nash to her brother, Tex (N). •
Turn around and talk to Tex about his sister. • Turn and exit
the tack room to bring on the evening. • After the campfire,
you witness the phantom horse!
Chapter 2: Day Two
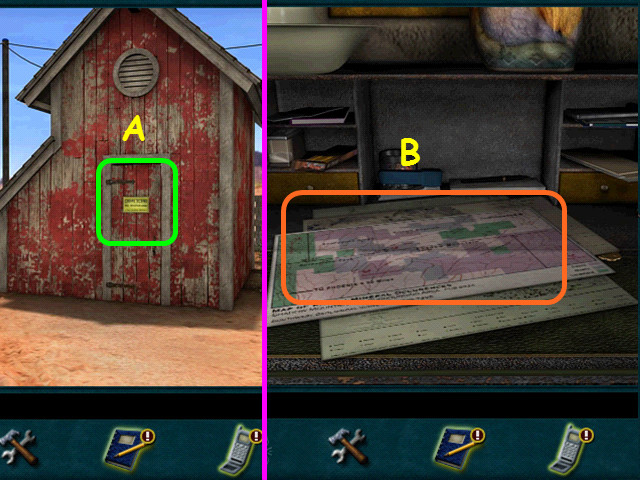 • Begin the day with a call from the Rawleys. • Leave the
house and walk to the pump house. • Read the sign on the front
door, then call the sheriff (A). • Return to the kitchen and
zoom in on the desk to the right of the stove. • Look at the
survey map (B). • After Shorty catches you snooping, turn and
talk to him thoroughly to get your chores. • Exit the building
and turn around to take the VEGETABLE BASKET off the wall. •
This is a good time to make some calls; you should call SW Geo
Survey, Charleena Purcel, and Bess. • Turn around and head to
the gardens to pick veggies.
• Begin the day with a call from the Rawleys. • Leave the
house and walk to the pump house. • Read the sign on the front
door, then call the sheriff (A). • Return to the kitchen and
zoom in on the desk to the right of the stove. • Look at the
survey map (B). • After Shorty catches you snooping, turn and
talk to him thoroughly to get your chores. • Exit the building
and turn around to take the VEGETABLE BASKET off the wall. •
This is a good time to make some calls; you should call SW Geo
Survey, Charleena Purcel, and Bess. • Turn around and head to
the gardens to pick veggies.
 • Look at the left garden and pick 5 ripe Romano beans (C) and
2 Old Ivory Egg tomatoes (D). • Remember to refer to the
internet article on harvesting vegetables to see how the ripe
ones appear.
• Look at the left garden and pick 5 ripe Romano beans (C) and
2 Old Ivory Egg tomatoes (D). • Remember to refer to the
internet article on harvesting vegetables to see how the ripe
ones appear.
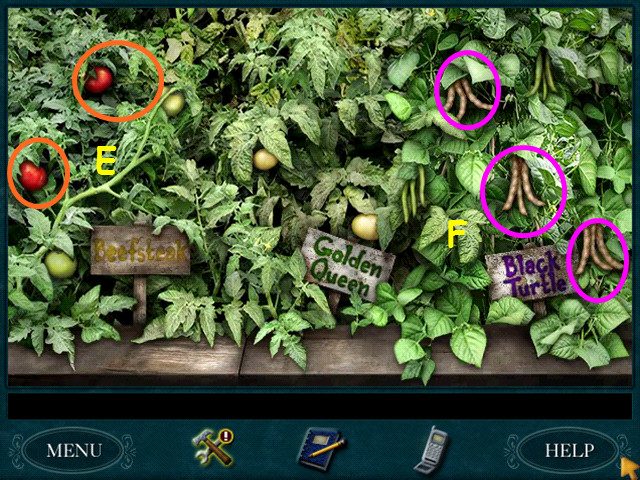 • Turn around and look at the right garden. • Pick the 2 red
Beefsteak tomatoes (E) and the 3 brownish Black Turtle beans
(F). • Return and give the vegetables to Shorty. • Next, run
out to the chicken coop and collect 6 eggs. • Remember to
avoid the white chicken. • Return and talk to Shorty. • Make
sure to get a canteen from him. • Turn to the right, look on
the table and get the Shadow Ranch Cake recipe from the box. •
Look in your inventory and read the recipe carefully. Refer
back to the measurements list on the refrigerator if
necessary. • Turn around and look at the counter to get
started.
• Turn around and look at the right garden. • Pick the 2 red
Beefsteak tomatoes (E) and the 3 brownish Black Turtle beans
(F). • Return and give the vegetables to Shorty. • Next, run
out to the chicken coop and collect 6 eggs. • Remember to
avoid the white chicken. • Return and talk to Shorty. • Make
sure to get a canteen from him. • Turn to the right, look on
the table and get the Shadow Ranch Cake recipe from the box. •
Look in your inventory and read the recipe carefully. Refer
back to the measurements list on the refrigerator if
necessary. • Turn around and look at the counter to get
started.
 • Select the butter (G) and place 2 sticks into the mixing
bowl (H). • Next add 2 eggs (I). • The recipe calls for 1 and
2/3 cup milk (J) but you have a 1/3 cup measure so you must
add the milk 5 times. • Add 2 pints of flour (K). • Select the
Baking powder and add 3 teaspoons (L). • For the sugar (M),
you will need to add the 1/3 cup to the bowl 7 times. •
Lastly, add 3 teaspoons of vanilla (N). • Back up from the
counter and choose 'Bake' when it pops up. • If you backed
away in error, select 'Add more ingredients' to return to the
counter. • If you have made a mistake, back away from the
counter and select 'Throw away' to start over. • Select the
large round pan in the center to pour the batter.
• Select the butter (G) and place 2 sticks into the mixing
bowl (H). • Next add 2 eggs (I). • The recipe calls for 1 and
2/3 cup milk (J) but you have a 1/3 cup measure so you must
add the milk 5 times. • Add 2 pints of flour (K). • Select the
Baking powder and add 3 teaspoons (L). • For the sugar (M),
you will need to add the 1/3 cup to the bowl 7 times. •
Lastly, add 3 teaspoons of vanilla (N). • Back up from the
counter and choose 'Bake' when it pops up. • If you backed
away in error, select 'Add more ingredients' to return to the
counter. • If you have made a mistake, back away from the
counter and select 'Throw away' to start over. • Select the
large round pan in the center to pour the batter.
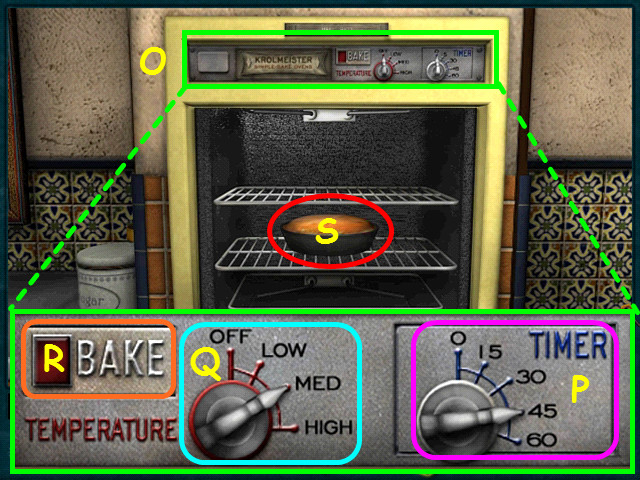 • Once you are at the oven, zoom into the controls (O). • Turn
the timer to 45 (P). • Set the temperature to MED (Q). • Press
the Bake button (R). • Take the baked cake from the oven (S).
• Back at the counter, try some of the cake to make sure it
tastes OK. • Select the bowl of icing on the left for a
mini-game.
• Once you are at the oven, zoom into the controls (O). • Turn
the timer to 45 (P). • Set the temperature to MED (Q). • Press
the Bake button (R). • Take the baked cake from the oven (S).
• Back at the counter, try some of the cake to make sure it
tastes OK. • Select the bowl of icing on the left for a
mini-game.
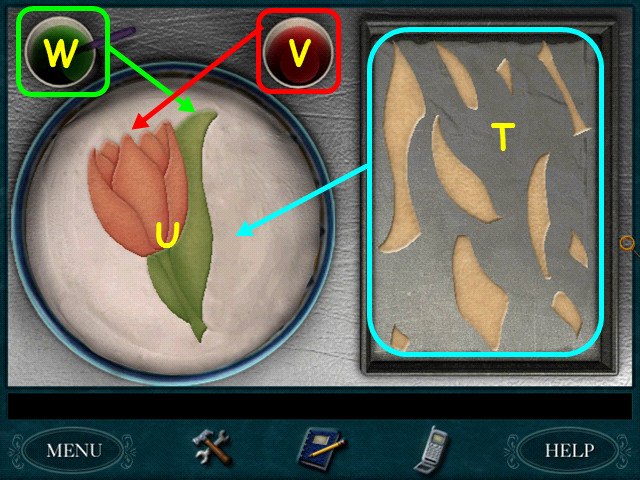 • Take the pieces of marzipan (T) from the right and fit them
into the indentation on the left (U). • Left-click to take or
place a piece; right-click to rotate a piece. • Pieces will
lock into place when properly placed. • Use the red food
coloring on the blossom (V), and use the green food coloring
on the leaf and stem (W). • Back away from the cake then exit
through the blue door. • Walk to the tack room and talk to Tex
to learn you must feed the chickens and horses before you can
go riding.
• Take the pieces of marzipan (T) from the right and fit them
into the indentation on the left (U). • Left-click to take or
place a piece; right-click to rotate a piece. • Pieces will
lock into place when properly placed. • Use the red food
coloring on the blossom (V), and use the green food coloring
on the leaf and stem (W). • Back away from the cake then exit
through the blue door. • Walk to the tack room and talk to Tex
to learn you must feed the chickens and horses before you can
go riding.
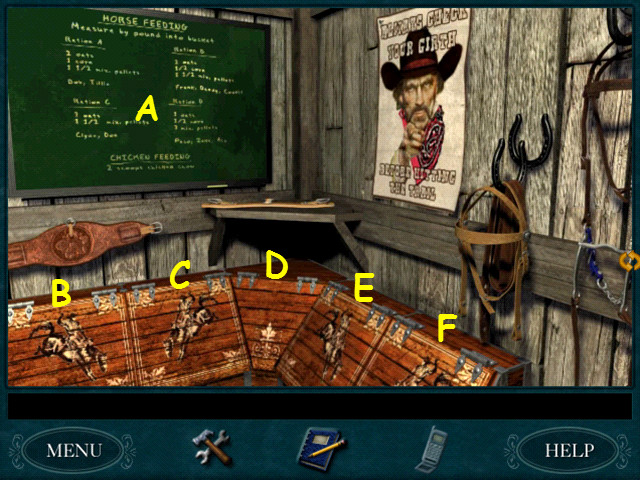 • Turn around and look at the feeding instructions (A). • From
left to right the contents of the bins are: oats (B), pellets
(C), corn (D), cattle supplement (E), and chicken chow (F).
• Turn around and look at the feeding instructions (A). • From
left to right the contents of the bins are: oats (B), pellets
(C), corn (D), cattle supplement (E), and chicken chow (F).
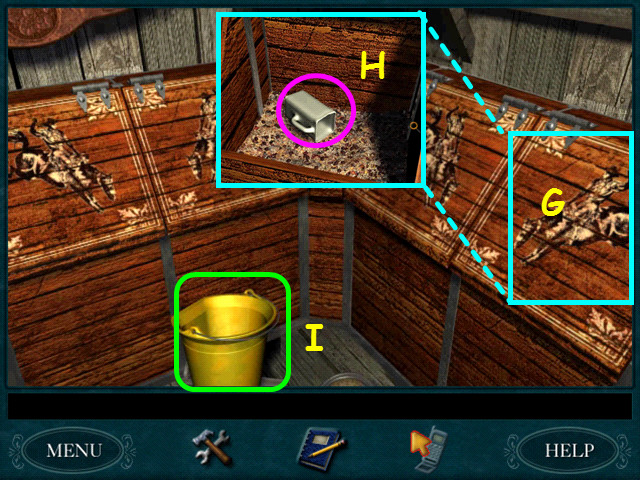 • Zoom into the bins. • Open the far right bin with the
chicken chow (G) and select the scoop (H). • You will
automatically place the feed into the bucket on the scale (I).
• Return to the bin and take another scoop. • Back out of the
close-up and choose to keep the BUCKET OF CHICKEN CHOW. • Walk
to the chicken coop.
• Zoom into the bins. • Open the far right bin with the
chicken chow (G) and select the scoop (H). • You will
automatically place the feed into the bucket on the scale (I).
• Return to the bin and take another scoop. • Back out of the
close-up and choose to keep the BUCKET OF CHICKEN CHOW. • Walk
to the chicken coop.
 • Zoom into the hopper on the chicken coop (J). • Open the
hopper lid and pour in the BUCKET OF CHICKEN CHOW (K). • Close
the hopper and return to the bins.
• Zoom into the hopper on the chicken coop (J). • Open the
hopper lid and pour in the BUCKET OF CHICKEN CHOW (K). • Close
the hopper and return to the bins.
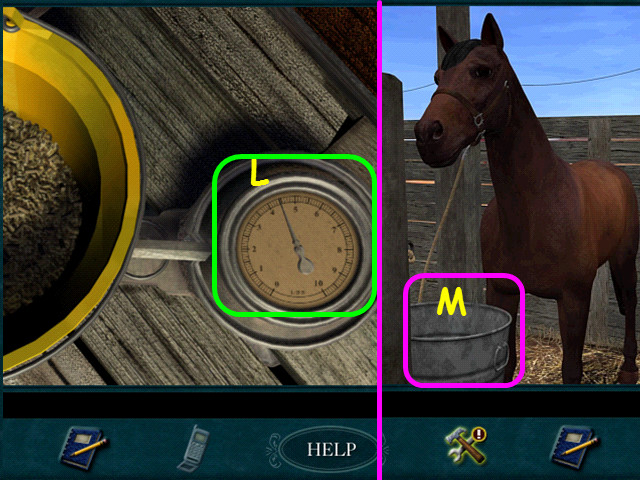 • You now need to feed the horses. • Looking at the board, Bob
needs 2 pounds of oats, 1 pound corn, and 1 ½ pound of mixed
pellets. • Watch the scale as you add food; 2 scoops of oats
is 2 pounds, 2 scoops of corn is 1 pound, and one scoop of
mixed pellets is 1 ½ pounds. • The scale should now read 4 ½
pounds (L). • Take the BUCKET OF RATION A out to Bob and use
it on his feed bag (M). • Return to the bins and place the
bucket on the scale. • You must do the same for Clyde and Ace.
• Clyde will need 3 scoops of oats and I scoop of mixed
pellets. • Ace will need 1 scoop of oats, 1 scoop of corn, and
2 scoops of mixed pellets. • Now that you have finished your
chores, walk to the pump house and go inside.
• You now need to feed the horses. • Looking at the board, Bob
needs 2 pounds of oats, 1 pound corn, and 1 ½ pound of mixed
pellets. • Watch the scale as you add food; 2 scoops of oats
is 2 pounds, 2 scoops of corn is 1 pound, and one scoop of
mixed pellets is 1 ½ pounds. • The scale should now read 4 ½
pounds (L). • Take the BUCKET OF RATION A out to Bob and use
it on his feed bag (M). • Return to the bins and place the
bucket on the scale. • You must do the same for Clyde and Ace.
• Clyde will need 3 scoops of oats and I scoop of mixed
pellets. • Ace will need 1 scoop of oats, 1 scoop of corn, and
2 scoops of mixed pellets. • Now that you have finished your
chores, walk to the pump house and go inside.
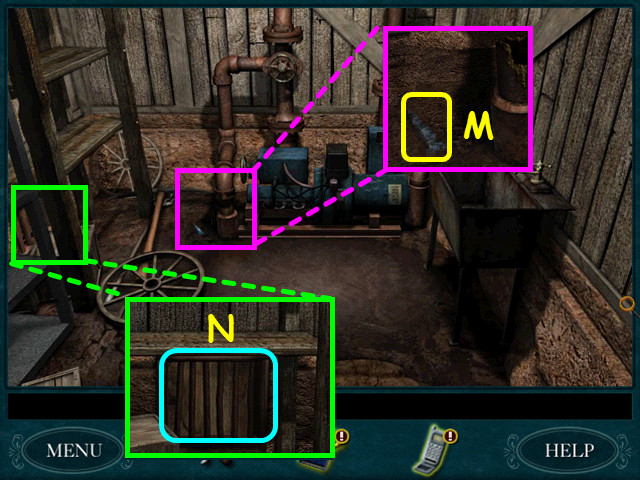 • Look at the close-up of the broken pipe and take the 1/10
ARROWHEAD (M). • Turn to the left and open the grate (N). •
Walk forward to the door, open it and go inside. • Talk to
Dave until he leaves. He will show you the other half of the
message from the watch.
• Look at the close-up of the broken pipe and take the 1/10
ARROWHEAD (M). • Turn to the left and open the grate (N). •
Walk forward to the door, open it and go inside. • Talk to
Dave until he leaves. He will show you the other half of the
message from the watch.
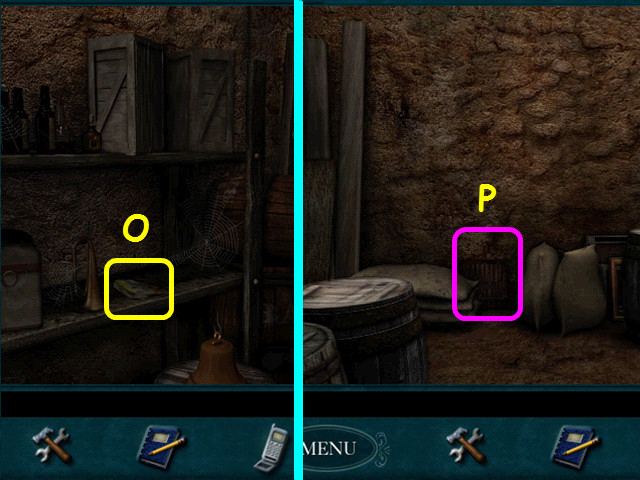 • Turn to the left and take the BEADED PURSE (O). • Turn left
again and walk forward to the grate (P) and exit the room. •
Turn around and zoom into the stairs; open the top stair for a
mini-game.
• Turn to the left and take the BEADED PURSE (O). • Turn left
again and walk forward to the grate (P) and exit the room. •
Turn around and zoom into the stairs; open the top stair for a
mini-game.
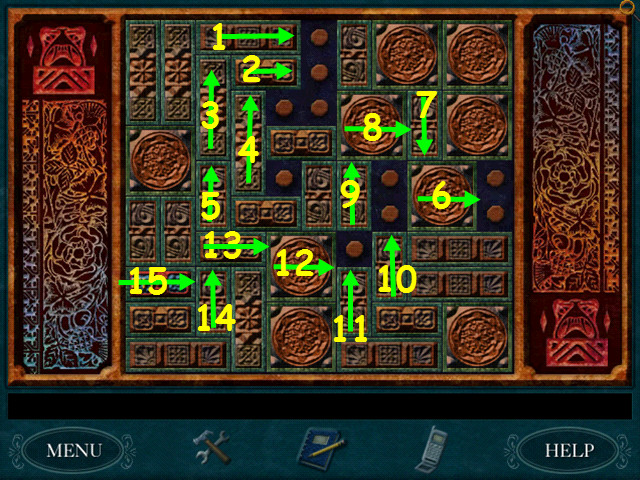 • You must slide the pieces to enable the piece with the
initials 'F.H.' to move one space to the right. • Slide the
pieces in numerical order (1-15) • This show the solution for
the Senior Detective mini-game.
• You must slide the pieces to enable the piece with the
initials 'F.H.' to move one space to the right. • Slide the
pieces in numerical order (1-15) • This show the solution for
the Senior Detective mini-game.
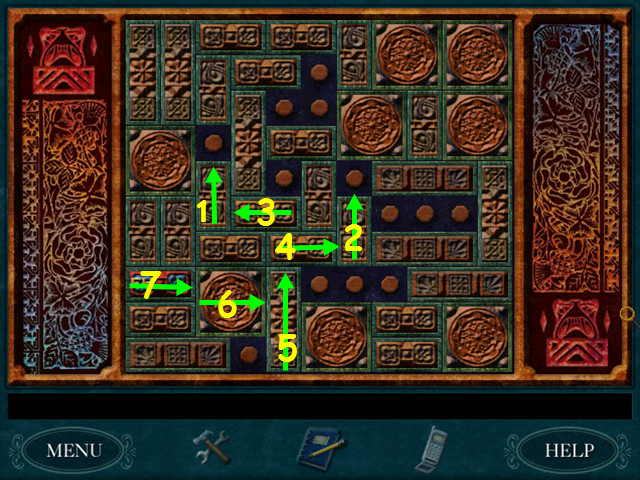 • Slide the pieces in numerical order (1-7) • This show the
solution for the Junior Detective mini-game. • Open the green
bottle and read Dirk's letters. • Return to the chicken coop
and talk to Dave about fixing the coop and Frances' letter. •
Walk to the tack room and ask Tex if you can ride. • Turn
around and take SADDLE and GLOVES. • Exit the tack room and
look at the barrel riding poster on the right. • Walk to Bob
and saddle him; don't forget the cinch. • Grab the reins to
walk to the corral, then saddle up.
• Slide the pieces in numerical order (1-7) • This show the
solution for the Junior Detective mini-game. • Open the green
bottle and read Dirk's letters. • Return to the chicken coop
and talk to Dave about fixing the coop and Frances' letter. •
Walk to the tack room and ask Tex if you can ride. • Turn
around and take SADDLE and GLOVES. • Exit the tack room and
look at the barrel riding poster on the right. • Walk to Bob
and saddle him; don't forget the cinch. • Grab the reins to
walk to the corral, then saddle up.
 • You need a barrel run that is less than 10 seconds. • Select
the first barrel to begin your run (Q). • As you near a
barrel, click on it with your mouse to make a tight turn. •
Make sure it is not to early or you will hit the barrel. •
After you finish with the barrels, take the lariat to begin
that test (R).
• You need a barrel run that is less than 10 seconds. • Select
the first barrel to begin your run (Q). • As you near a
barrel, click on it with your mouse to make a tight turn. •
Make sure it is not to early or you will hit the barrel. •
After you finish with the barrels, take the lariat to begin
that test (R).
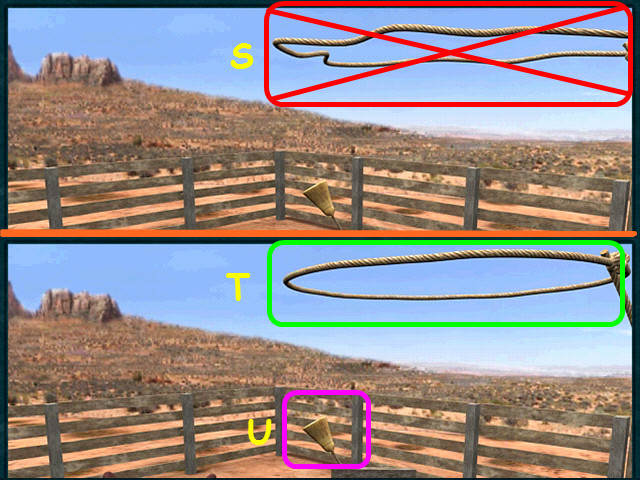 • Do Not use the lariat when the rope is wavy (S). • Once the
rope has a perfect circle (T), select the broom (U) to rope
it. • You will need to score 4 out of 5 times. • Once you
succeed, you are returned to the tack room. • Tex will give
you your lariat. • Ask if you can ride again, then get the
saddle and take Bob out the fence. • Select Dry Creek on the
map.
• Do Not use the lariat when the rope is wavy (S). • Once the
rope has a perfect circle (T), select the broom (U) to rope
it. • You will need to score 4 out of 5 times. • Once you
succeed, you are returned to the tack room. • Tex will give
you your lariat. • Ask if you can ride again, then get the
saddle and take Bob out the fence. • Select Dry Creek on the
map.
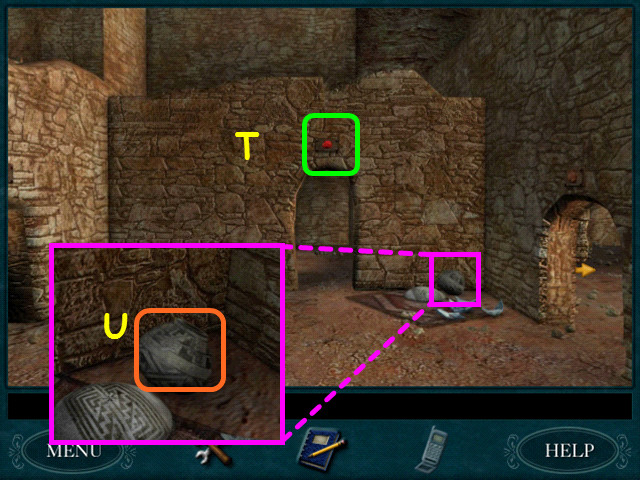
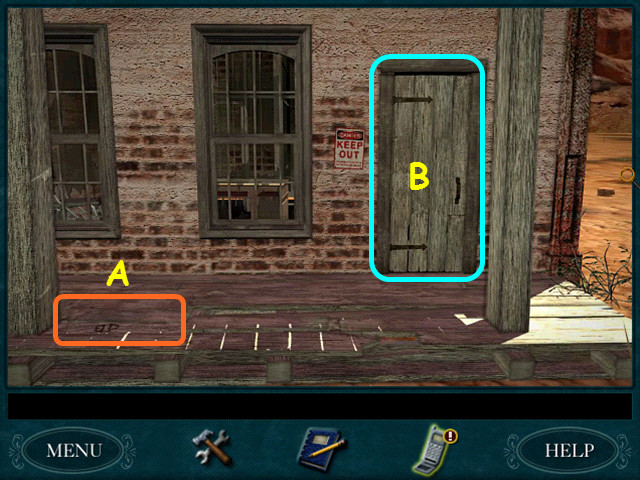 • Walk forward twice, turn right and walk forward to the
Sheriff's Office. • Look at the plank on the porch (A). •
Enter the building (B). • Inspect the cells and learn they are
locked. • Exit the building and go across the street to the
General Store. • You cannot enter the front door, so walk to
the right of the building.
• Walk forward twice, turn right and walk forward to the
Sheriff's Office. • Look at the plank on the porch (A). •
Enter the building (B). • Inspect the cells and learn they are
locked. • Exit the building and go across the street to the
General Store. • You cannot enter the front door, so walk to
the right of the building.
 • Look on the porch and zoom into the machine (C). • Take the
HANDLE (D). • Take the 2/10 ARROWHEAD near the outhouse (E). •
Note if there are scorpions or snakes near, walk away and come
back when they are gone before trying to pick up something. •
Turn around from the out house and walk straight across to the
barrel. • Note the brand on the barrel and pick up the 3/10
ARROWHEAD. • Turn around from the barrel and walk across the
road to the hitching post to see another brand. • The building
to the right of the hitching post is Cappy's. • Note the
combination lock and the Sheriff's notice on the door. • Turn
around and walk to the center of the road then turn to the
left to see one more brand on a hitching post. • Return to Bob
and travel to Mary's.
• Look on the porch and zoom into the machine (C). • Take the
HANDLE (D). • Take the 2/10 ARROWHEAD near the outhouse (E). •
Note if there are scorpions or snakes near, walk away and come
back when they are gone before trying to pick up something. •
Turn around from the out house and walk straight across to the
barrel. • Note the brand on the barrel and pick up the 3/10
ARROWHEAD. • Turn around from the barrel and walk across the
road to the hitching post to see another brand. • The building
to the right of the hitching post is Cappy's. • Note the
combination lock and the Sheriff's notice on the door. • Turn
around and walk to the center of the road then turn to the
left to see one more brand on a hitching post. • Return to Bob
and travel to Mary's.
 • Before you go inside, call the Sheriff and Bess. • Enter the
shop and look at the arrowhead collection (F). • Note the new
addition to the petrified wood collection (G). • Talk to Mary
until she won't talk anymore. • Hop on Bob and head to Cougar
bend.
• Before you go inside, call the Sheriff and Bess. • Enter the
shop and look at the arrowhead collection (F). • Note the new
addition to the petrified wood collection (G). • Talk to Mary
until she won't talk anymore. • Hop on Bob and head to Cougar
bend.
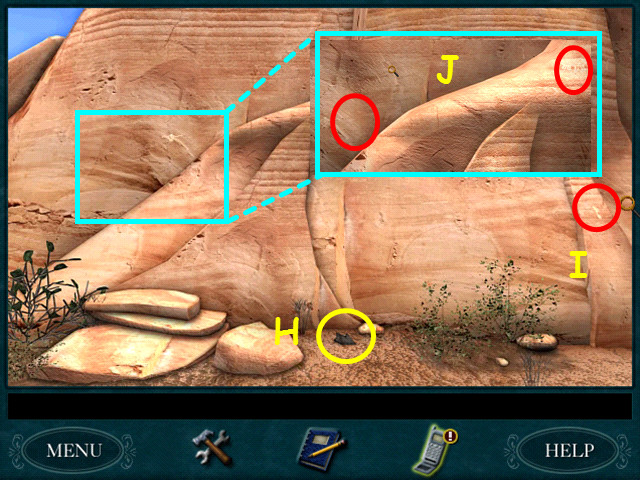 • Walk forward twice and zoom in on the left rocks. • Take the
4/10 ARROWHEAD (H). • Select the glyph on the right rock (I).
• You will go to the map in your inventory. • Take the glyph
from the right an place it on the map where you found it. •
Zoom in on the rocks and look at the 2 glyphs (J). • They are
difficult to see, left-click when your cursor glows red.
• Walk forward twice and zoom in on the left rocks. • Take the
4/10 ARROWHEAD (H). • Select the glyph on the right rock (I).
• You will go to the map in your inventory. • Take the glyph
from the right an place it on the map where you found it. •
Zoom in on the rocks and look at the 2 glyphs (J). • They are
difficult to see, left-click when your cursor glows red.
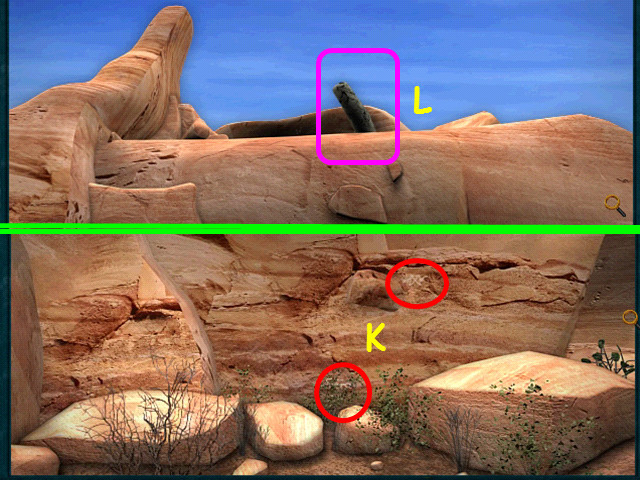 • Walk to the right and find 2 more glyphs (K). • Look up and
use the LARIAT on the log (L).
• Walk to the right and find 2 more glyphs (K). • Look up and
use the LARIAT on the log (L).
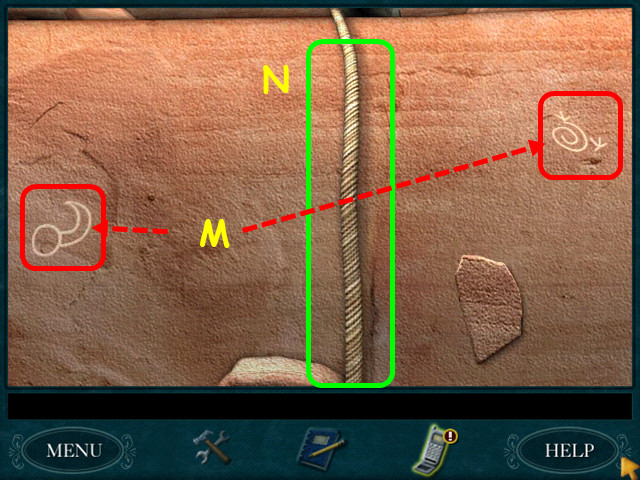 • Look down and grab the rope to start climbing. • When you
see the two glyphs, you will not be able to access the map,
but Nancy will make note of them (M). • Grab the rope to climb
up (N).
• Look down and grab the rope to start climbing. • When you
see the two glyphs, you will not be able to access the map,
but Nancy will make note of them (M). • Grab the rope to climb
up (N).
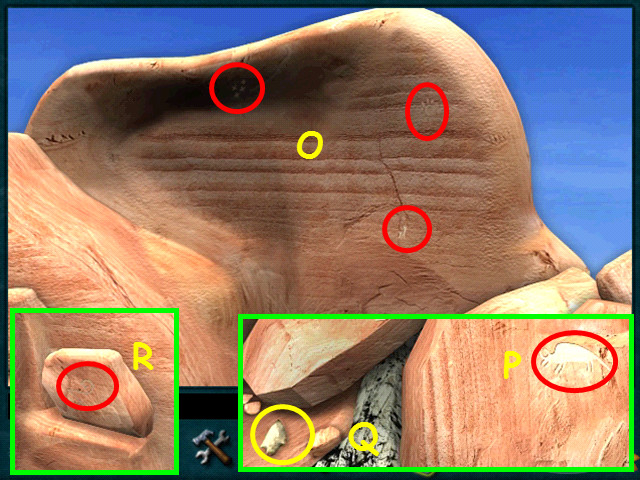 • Note the three glyphs on the rock ahead (O). • Turn to the
right and find a glyph (P) and 5/10 ARROWHEAD (Q). • Turn
around and find another glyph (R). • Turn left and climb down
the ladder. • Walk to the left of where you first found
glyphs.
• Note the three glyphs on the rock ahead (O). • Turn to the
right and find a glyph (P) and 5/10 ARROWHEAD (Q). • Turn
around and find another glyph (R). • Turn left and climb down
the ladder. • Walk to the left of where you first found
glyphs.
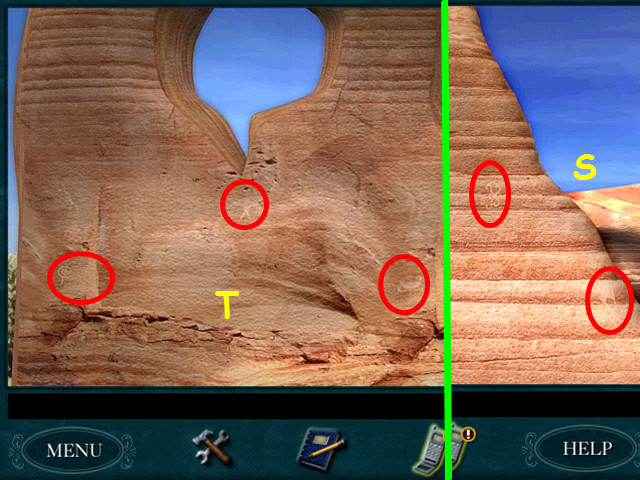 • Take the 6/10 ARROWHEAD on the ground just before you can
start climbing the rocks. • Walk up the stones 4 times and
find the 2 glyphs (S). • Turn to the left and find the
remaining 3 glyphs (T).
• Take the 6/10 ARROWHEAD on the ground just before you can
start climbing the rocks. • Walk up the stones 4 times and
find the 2 glyphs (S). • Turn to the left and find the
remaining 3 glyphs (T).
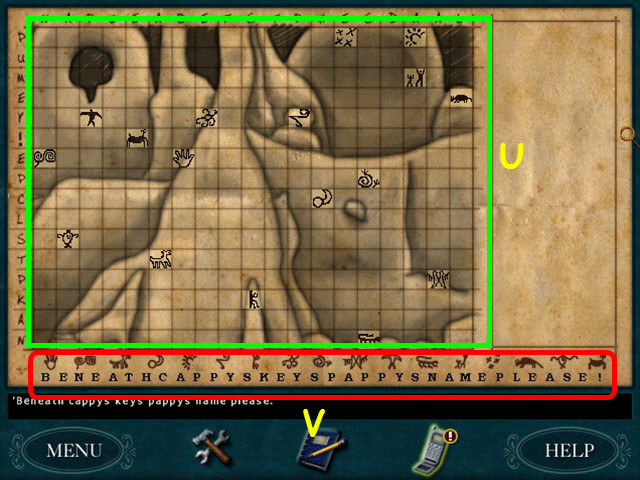 • All the glyphs should be in place now (U). • The message at
the bottom (V) reads, “Beneath Cappy's keys, pappy's name
please!”
• All the glyphs should be in place now (U). • The message at
the bottom (V) reads, “Beneath Cappy's keys, pappy's name
please!”
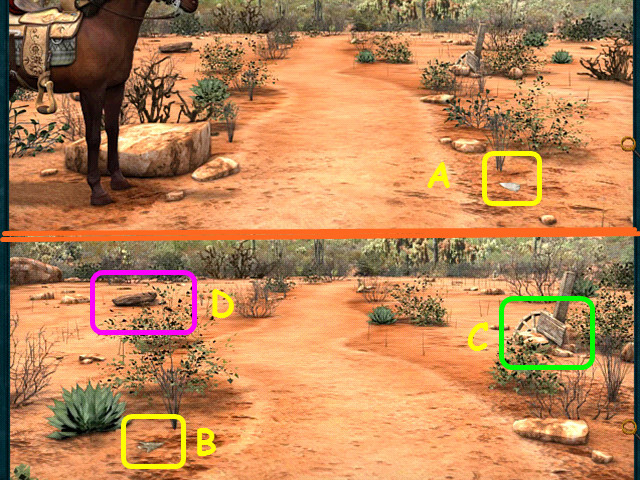 • Jump on Bob and go to the trail stop. • Take the 7/10
ARROWHEAD (A). • Walk forward and take the 8/10 ARROWHEAD (B).
• Note Charlie's grave (C). • Opposite the grave is Zebra Rock
(D), but don't move it! • There is a rattlesnake hiding
underneath.
• Jump on Bob and go to the trail stop. • Take the 7/10
ARROWHEAD (A). • Walk forward and take the 8/10 ARROWHEAD (B).
• Note Charlie's grave (C). • Opposite the grave is Zebra Rock
(D), but don't move it! • There is a rattlesnake hiding
underneath.
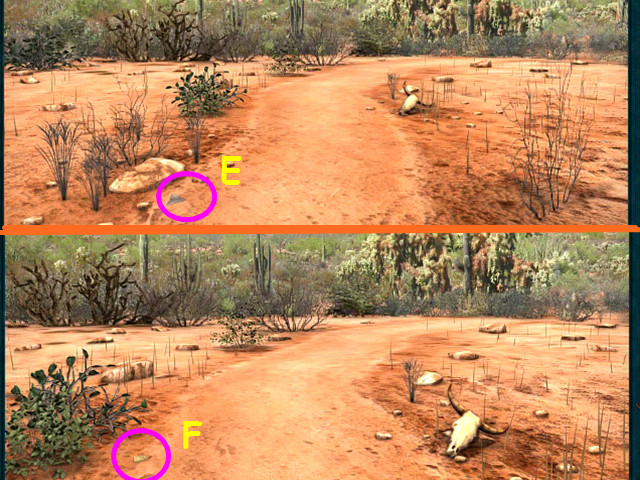 • Return to the path and walk forward. • Take the 9/10
ARROWHEAD (E). • Walk forward again and take the 10/10
ARROWHEAD (F). • Return to Bob, then head to Mary's. • Call
Charleena and talk to her thoroughly. • Do an internet search
and read about brands and branding. • Leave Mary's and head to
Dry Creek.
• Return to the path and walk forward. • Take the 9/10
ARROWHEAD (E). • Walk forward again and take the 10/10
ARROWHEAD (F). • Return to Bob, then head to Mary's. • Call
Charleena and talk to her thoroughly. • Do an internet search
and read about brands and branding. • Leave Mary's and head to
Dry Creek.
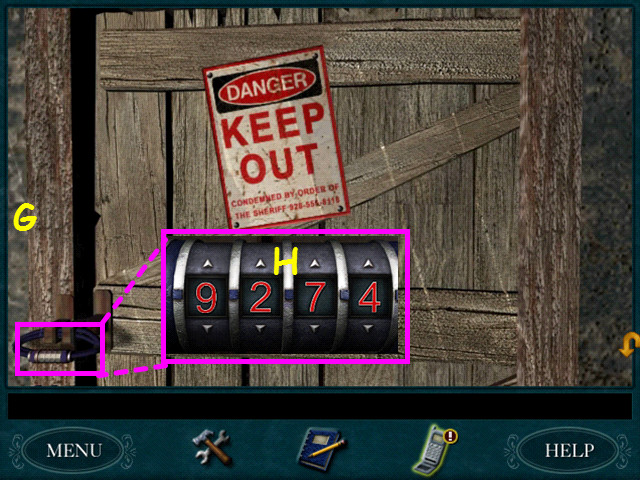 • Walk to Cappy's and look at the combination lock (G). •
Enter the code the Sheriff gave you, 9-2-7-4 (H). • Open the
doors, enter Cappy's and turn to the left.
• Walk to Cappy's and look at the combination lock (G). •
Enter the code the Sheriff gave you, 9-2-7-4 (H). • Open the
doors, enter Cappy's and turn to the left.
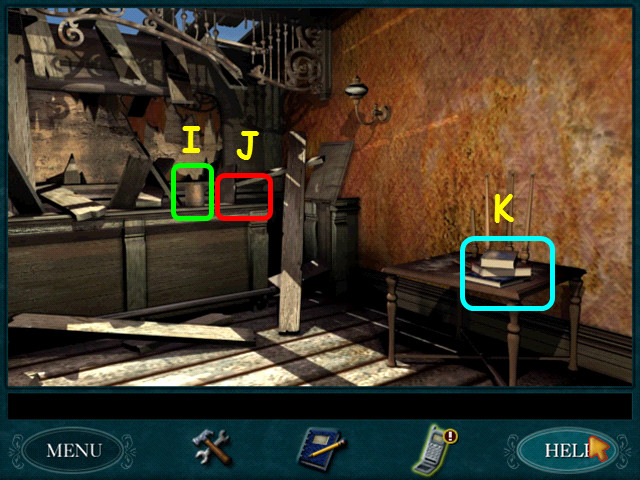 • Zoom in and look at the can of crackers (I). • Look at the
counter to see an indentation (J). • Look at the table and see
the electrician's manual (K).
• Zoom in and look at the can of crackers (I). • Look at the
counter to see an indentation (J). • Look at the table and see
the electrician's manual (K).
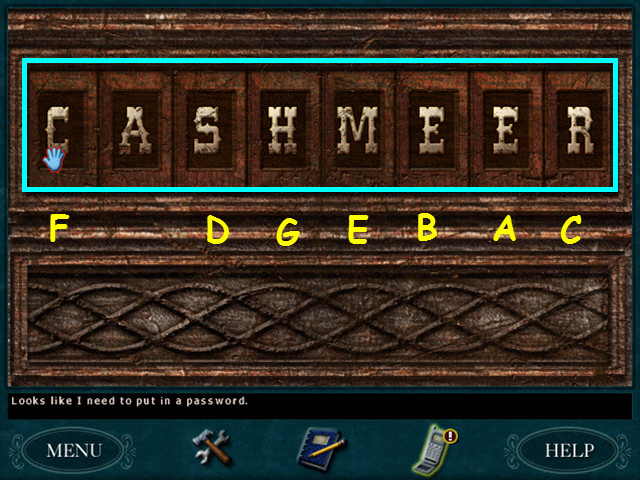 • Turn around, go forward and look at the bottom of the piano.
• Save your game- there is no reset on this mini-game. • Turn
the dials so it reads Cashmeer. • Most dials effect others. •
Assuming you have not moved any dials. A x 3, B x 1, C x 1, D
x 3, E x 5, F x 3, and G x 3. • Read the note within. • Turn
to the left and look at the arcade game. • Use the token you
earned earlier.
• Turn around, go forward and look at the bottom of the piano.
• Save your game- there is no reset on this mini-game. • Turn
the dials so it reads Cashmeer. • Most dials effect others. •
Assuming you have not moved any dials. A x 3, B x 1, C x 1, D
x 3, E x 5, F x 3, and G x 3. • Read the note within. • Turn
to the left and look at the arcade game. • Use the token you
earned earlier.
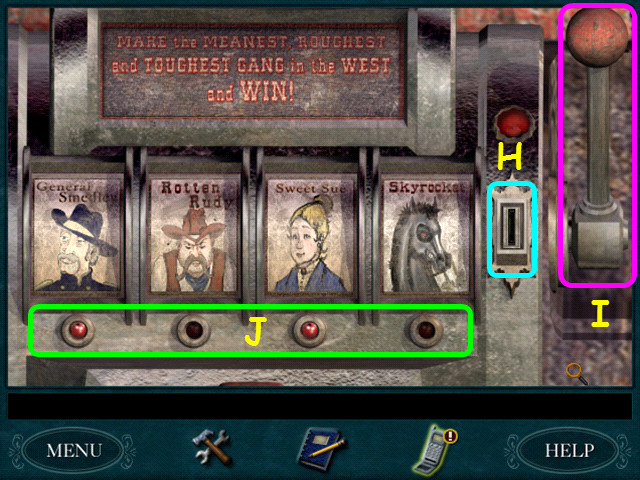 • Drop the TOKEN in the coin slot (H). • Pull the lever (I). •
You need to make a hand of 4 Bad Guys. • Press the buttons (J)
under the bad guys you want to keep, then pull the lever
again. • Getting 4 bad guys will earn you 2 TOKENS. • If you
don't win the game, you can go back to Mary's and play the
roadrunner game again to earn more tokens. • Exit Cappy's and
walk to the Sheriff's. • Look under the branded board on the
porch and take the STRANGE BOX. • Hop on Bob and head back to
Mary's. • Call Charleena again to ask about the crackers, then
enter the shop. • Look at the tuning forks again, then talk to
Mary. • She'll give you the tuning forks for 10 ARROWHEADS and
gives you a box for them. • If you have all 10 she will decide
she only needs 9 and give 1 back to you. • Take the TUNING
FORKS and return to Cappy's.
• Drop the TOKEN in the coin slot (H). • Pull the lever (I). •
You need to make a hand of 4 Bad Guys. • Press the buttons (J)
under the bad guys you want to keep, then pull the lever
again. • Getting 4 bad guys will earn you 2 TOKENS. • If you
don't win the game, you can go back to Mary's and play the
roadrunner game again to earn more tokens. • Exit Cappy's and
walk to the Sheriff's. • Look under the branded board on the
porch and take the STRANGE BOX. • Hop on Bob and head back to
Mary's. • Call Charleena again to ask about the crackers, then
enter the shop. • Look at the tuning forks again, then talk to
Mary. • She'll give you the tuning forks for 10 ARROWHEADS and
gives you a box for them. • If you have all 10 she will decide
she only needs 9 and give 1 back to you. • Take the TUNING
FORKS and return to Cappy's.
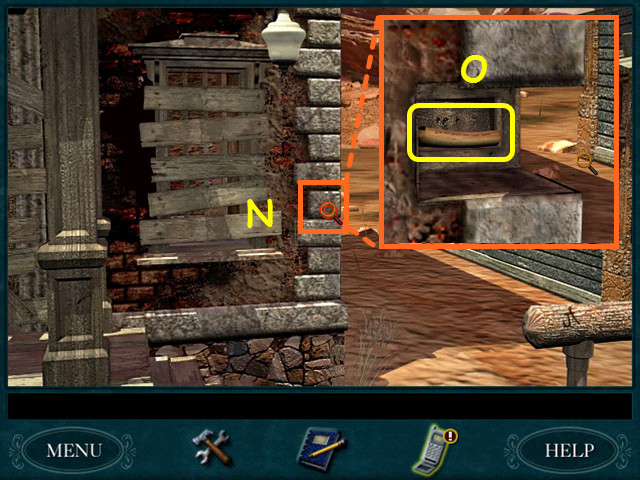
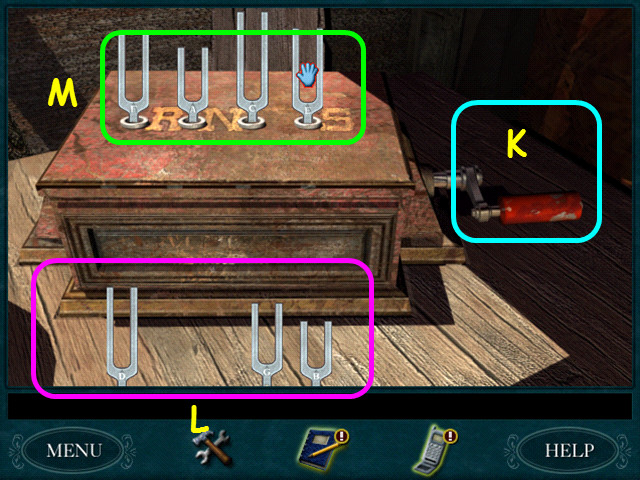 • Place the STRANGE BOX on the the bar in the indentation next
to the crackers. • Place the HANDLE on the side of the box
(K). • Use the TUNING FORKS on the top of the box and they
will line up at the bottom of the screen (L). • Each tuning
fork has a letter engraved for the notes on a scale. • Place
the tuning forks in the holes so that Frances is spelled out
using the forks and the letters on top (M). • You will hear
glass breaking; back up and look at the lamp on the wall to
the right. • Take the note and read it. • Jump on Bob and ride
back to the ranch. • Return Bob's saddle to the stand and exit
the stables.
• Place the STRANGE BOX on the the bar in the indentation next
to the crackers. • Place the HANDLE on the side of the box
(K). • Use the TUNING FORKS on the top of the box and they
will line up at the bottom of the screen (L). • Each tuning
fork has a letter engraved for the notes on a scale. • Place
the tuning forks in the holes so that Frances is spelled out
using the forks and the letters on top (M). • You will hear
glass breaking; back up and look at the lamp on the wall to
the right. • Take the note and read it. • Jump on Bob and ride
back to the ranch. • Return Bob's saddle to the stand and exit
the stables.
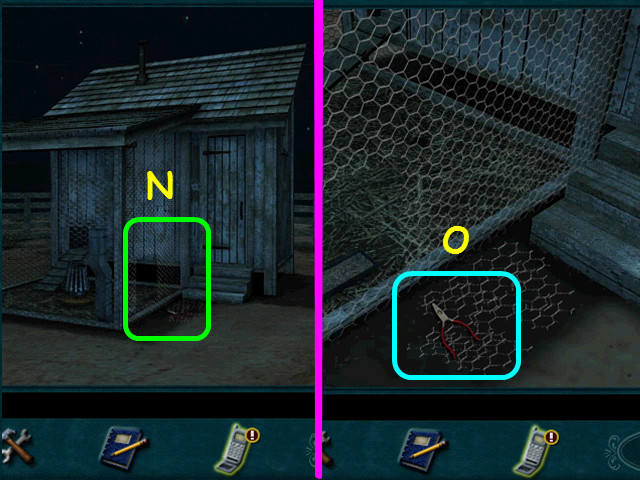 • Now that it is evening, walk over to the chicken coop and
look at the hole in the chicken wire (N). • Try to pick up the
pliers to learn you need gloves (O). • Return to the tack room
and take the gloves from Bob's saddle and return to the coop.
• Take the pliers to trigger a mini-game. • Place the wire
pieces from the right onto the fence on the left. • Pieces
will lock into place when correct.
• Now that it is evening, walk over to the chicken coop and
look at the hole in the chicken wire (N). • Try to pick up the
pliers to learn you need gloves (O). • Return to the tack room
and take the gloves from Bob's saddle and return to the coop.
• Take the pliers to trigger a mini-game. • Place the wire
pieces from the right onto the fence on the left. • Pieces
will lock into place when correct.
Chapter 3 : Day Three
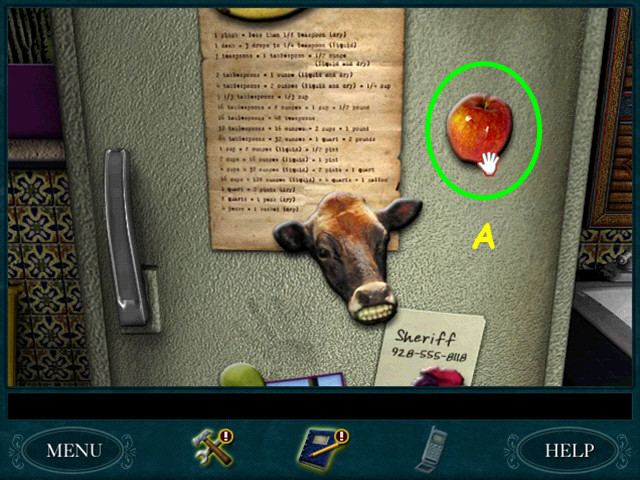 • After a call from Bess and George, do a web search and read
the articles on knitting and Harrison's yellow roses. • Look
closely at Frances Humber's portrait to learn her shawl was
made of the Daisy stitch. • Walk to the kitchen and look at
the refrigerator. • Take the APPLE MAGNET. • Turn and talk to
Shorty to get your chores for the day. • Walk outside and you
will see a HORSESHOE; take it for your investigation. • Turn
around and get the vegetable basket then walk to the gardens.
• After a call from Bess and George, do a web search and read
the articles on knitting and Harrison's yellow roses. • Look
closely at Frances Humber's portrait to learn her shawl was
made of the Daisy stitch. • Walk to the kitchen and look at
the refrigerator. • Take the APPLE MAGNET. • Turn and talk to
Shorty to get your chores for the day. • Walk outside and you
will see a HORSESHOE; take it for your investigation. • Turn
around and get the vegetable basket then walk to the gardens.
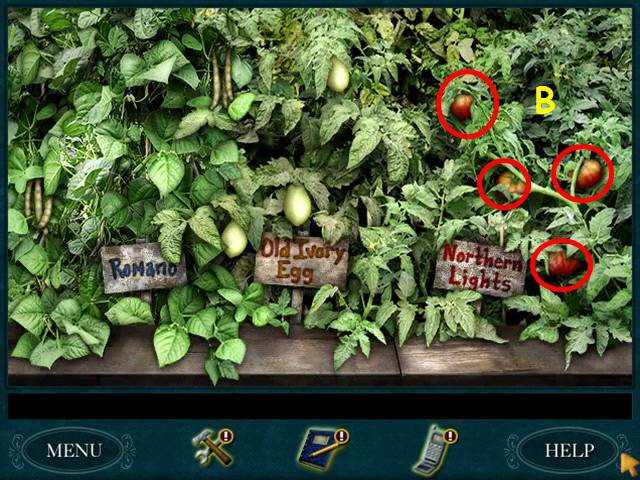 • Look at the left garden. • The only things ripe enough are
the 4 Northern Lights Tomatoes (B).
• Look at the left garden. • The only things ripe enough are
the 4 Northern Lights Tomatoes (B).
 • Look at the right garden; it looks like all the veggies are
ripe. • Take the 2 beefsteak tomatoes, 2 Golden Queen
tomatoes, and the 2 Black Turtle beans (C). • Return to the
kitchen and give Shorty the vegetables, then head to the
chicken coop. • Talk to Dave, then collect the eggs. • The
white hen is back, so you must run to the kitchen and back to
collect the 6th egg from her nest. • Give the eggs to Shorty
and don’t forget to ask for your canteen. • Walk to the tack
room and talk to Tex.
• Look at the right garden; it looks like all the veggies are
ripe. • Take the 2 beefsteak tomatoes, 2 Golden Queen
tomatoes, and the 2 Black Turtle beans (C). • Return to the
kitchen and give Shorty the vegetables, then head to the
chicken coop. • Talk to Dave, then collect the eggs. • The
white hen is back, so you must run to the kitchen and back to
collect the 6th egg from her nest. • Give the eggs to Shorty
and don’t forget to ask for your canteen. • Walk to the tack
room and talk to Tex.
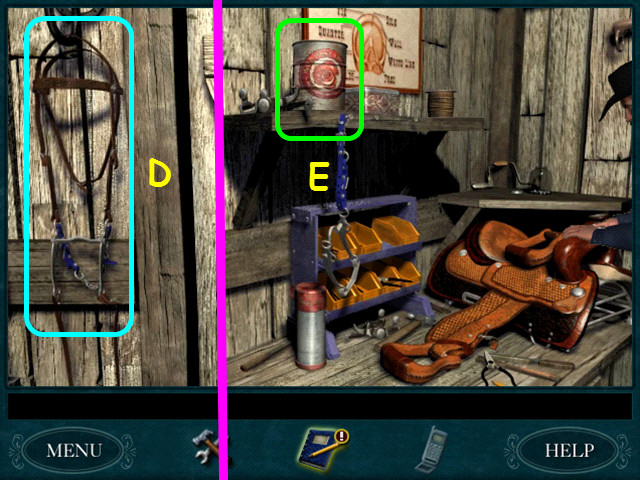 • Take a quick look at the bridle next to the door (D). • Look
inside the coffee can on the shelf over Tex's worktable (E).
• Take a quick look at the bridle next to the door (D). • Look
inside the coffee can on the shelf over Tex's worktable (E).
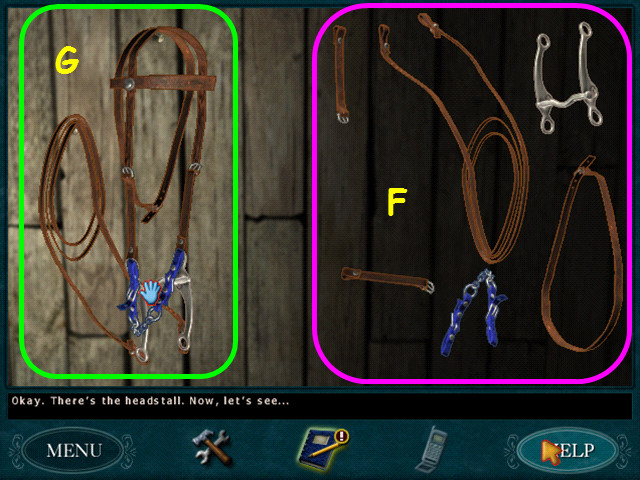 • Piece together the bridle for Tex. • Take the pieces from
the right (F) and fit them on the left (G). • Left-click to
take or place a piece; right-click to rotate a piece. • Take
the BRIDLE, then talk to Tex. • Saddle up Bob and return to
Dry Creek. • Walk down to Cappy's and go inside.
• Piece together the bridle for Tex. • Take the pieces from
the right (F) and fit them on the left (G). • Left-click to
take or place a piece; right-click to rotate a piece. • Take
the BRIDLE, then talk to Tex. • Saddle up Bob and return to
Dry Creek. • Walk down to Cappy's and go inside.
 • Look at the table that originally held the electrician's
manual (H). • Walk to the corner where the sleeping bag was
and zoom into the box in the corner. • Reach for the key (I).
• Look at the table that originally held the electrician's
manual (H). • Walk to the corner where the sleeping bag was
and zoom into the box in the corner. • Reach for the key (I).
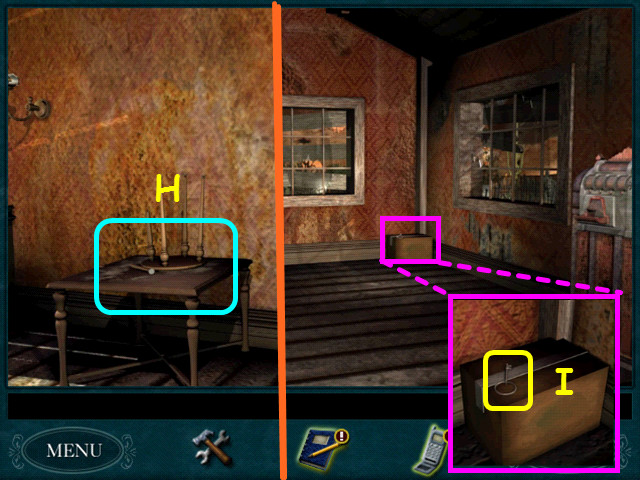
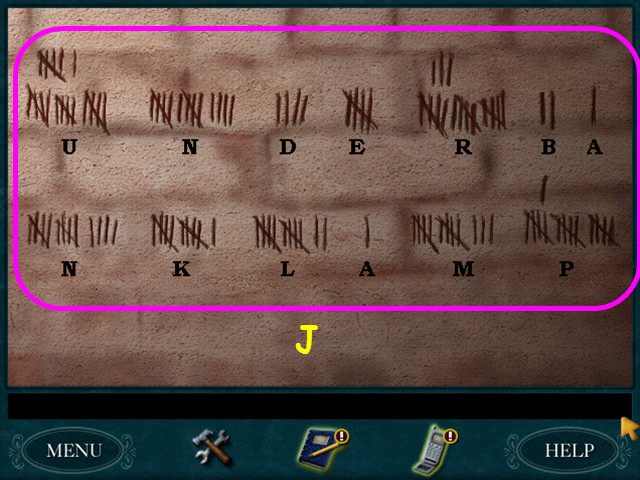 • After waking up in the jail cell, look at the hash marks on
the wall to the right of the sink. • Count the number of hash
marks and enter the corresponding letter from the alphabet. •
For instance, A = 1, B = 2, and so on. • Type a letter, then
press enter to move to the next set of hash marks. • It will
read, “Under bank lamp” when correct (J). • Turn around, look
down and take 2 BRICKS. • Turn right and look out through the
bars. • Use your LARIAT to pull the chair to a standing
position. • Use the BRICKS on the key for a mini-game.
• After waking up in the jail cell, look at the hash marks on
the wall to the right of the sink. • Count the number of hash
marks and enter the corresponding letter from the alphabet. •
For instance, A = 1, B = 2, and so on. • Type a letter, then
press enter to move to the next set of hash marks. • It will
read, “Under bank lamp” when correct (J). • Turn around, look
down and take 2 BRICKS. • Turn right and look out through the
bars. • Use your LARIAT to pull the chair to a standing
position. • Use the BRICKS on the key for a mini-game.
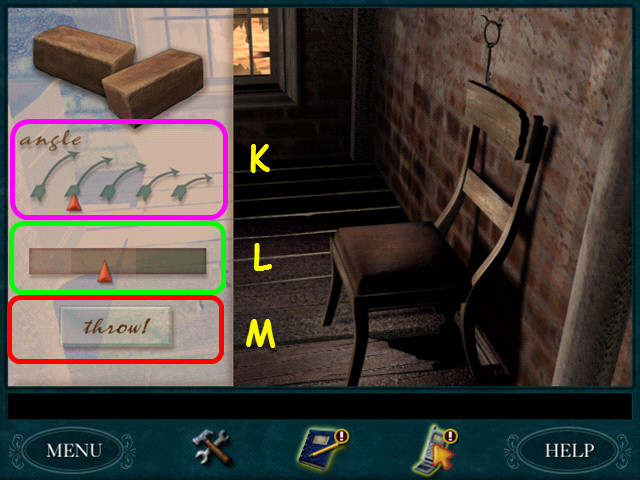 • You need to throw the bricks using the right strength and
intensity. • Select the 2nd longest angle (K), and the medium
intensity (L). • Press the THROW BUTTON (M). • Use the LARIAT
to pull the chair to you and take the KEY. • Use the KEY on
the cell door; walk out and turn to the left. • Pick up the
DECODER KEY from the floor. • Exit the sheriff's and walk to
the 2 story bank building.
• You need to throw the bricks using the right strength and
intensity. • Select the 2nd longest angle (K), and the medium
intensity (L). • Press the THROW BUTTON (M). • Use the LARIAT
to pull the chair to you and take the KEY. • Use the KEY on
the cell door; walk out and turn to the left. • Pick up the
DECODER KEY from the floor. • Exit the sheriff's and walk to
the 2 story bank building.
 • Zoom in on and remove the brick below the lamp (N). • Read
the note (O). • Jump on Bob and go to Mary's. • Use your phone
to check your email. • One message gives directions on how to
repair the missing beads on the purse. • The other message is
from Charleena for you to look up Kelleher. • Do a web search
and read about the Kelleher company. • Enter the shop and talk
to Mary. • Turn around and open the box on the table for a
mini-game.
• Zoom in on and remove the brick below the lamp (N). • Read
the note (O). • Jump on Bob and go to Mary's. • Use your phone
to check your email. • One message gives directions on how to
repair the missing beads on the purse. • The other message is
from Charleena for you to look up Kelleher. • Do a web search
and read about the Kelleher company. • Enter the shop and talk
to Mary. • Turn around and open the box on the table for a
mini-game.
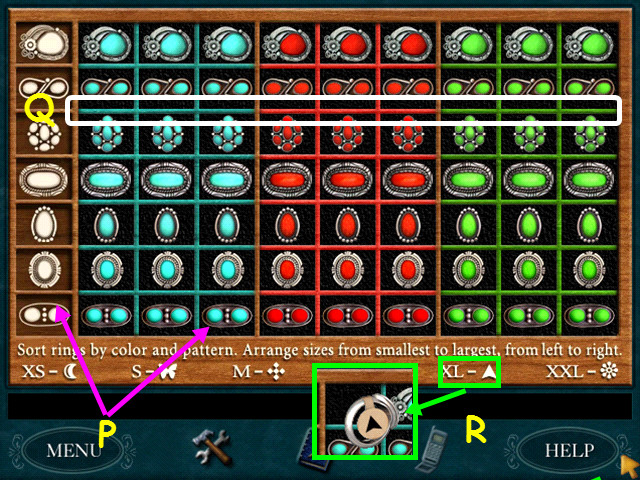 • First, sort the rings according to color and shape (P). •
Select 2 rings to swap position. • Note the colored dividers
(Q). • Next, look at each ring to see the size tag (R). • Move
the rings so that the sizes are from left to right, the
smallest to the largest with that ring type's section. • Nancy
will tell you when you have the layout correct. • See the
screenshot for the color and shape layout. • The sizes in the
first row are: XS-M-XL-S-S-M-S-XL-SL. • The sizes in the
second row are: XS-XL-XXL-M-L-XL-M-M-M. • The sizes in the
third row are: XS-S-XXL-M-XL-XL-XS-L-XL. • The sizes in the
fourth row are: L-XL-XXL-M-XL-XXL-XS-L-L. • The sizes in the
fifth row are: S-M-XL-S-L-XL-L-XL-XL. • The sizes in the sixth
row are S-S-M-XS-L-XL-L-XL-XXL. • The sizes in the seventh row
are: S-XL-XXL-M-XXL-XXL-XS-XS-XS. • Turn around and talk to
Mary; she will give you the beads. • Look at the BEADED PURSE
in your inventory. • Select the area missing the beads for a
mini-game.
• First, sort the rings according to color and shape (P). •
Select 2 rings to swap position. • Note the colored dividers
(Q). • Next, look at each ring to see the size tag (R). • Move
the rings so that the sizes are from left to right, the
smallest to the largest with that ring type's section. • Nancy
will tell you when you have the layout correct. • See the
screenshot for the color and shape layout. • The sizes in the
first row are: XS-M-XL-S-S-M-S-XL-SL. • The sizes in the
second row are: XS-XL-XXL-M-L-XL-M-M-M. • The sizes in the
third row are: XS-S-XXL-M-XL-XL-XS-L-XL. • The sizes in the
fourth row are: L-XL-XXL-M-XL-XXL-XS-L-L. • The sizes in the
fifth row are: S-M-XL-S-L-XL-L-XL-XL. • The sizes in the sixth
row are S-S-M-XS-L-XL-L-XL-XXL. • The sizes in the seventh row
are: S-XL-XXL-M-XXL-XXL-XS-XS-XS. • Turn around and talk to
Mary; she will give you the beads. • Look at the BEADED PURSE
in your inventory. • Select the area missing the beads for a
mini-game.
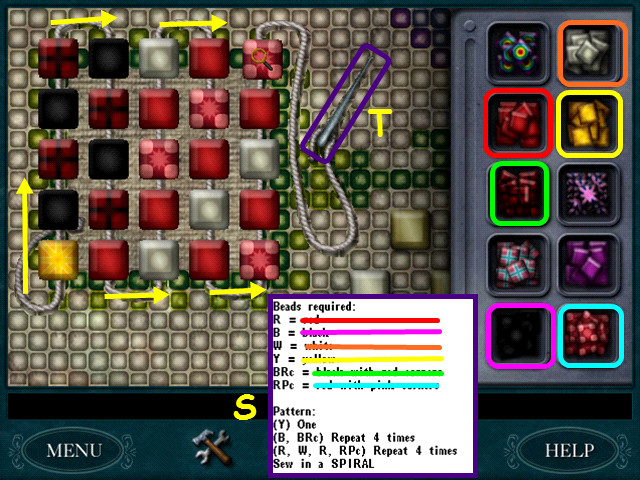 • Refer to the pattern in your email (S). • Select a bead from
the right and place it on the needle (T). • Continue placing
beads per the pattern. • Travel back to the ranch and talk to
Dave to borrow his AUNT ELLIE'S RING. • Return to Dry Creek
and the arcade game at Cappy's.
• Refer to the pattern in your email (S). • Select a bead from
the right and place it on the needle (T). • Continue placing
beads per the pattern. • Travel back to the ranch and talk to
Dave to borrow his AUNT ELLIE'S RING. • Return to Dry Creek
and the arcade game at Cappy's.
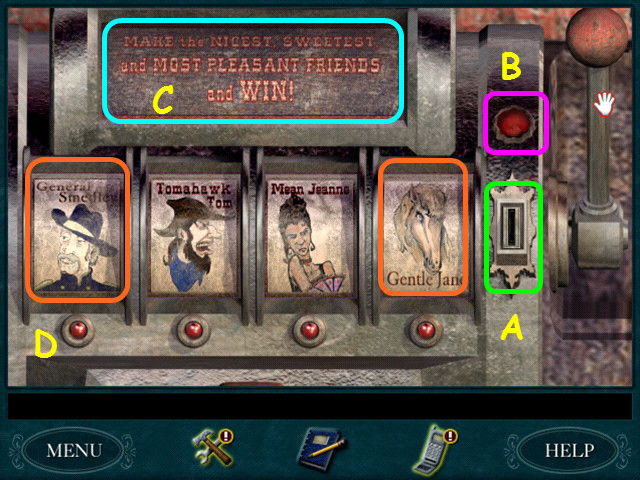 • Place a TOKEN in the slot (A), the use AUNT ELLIE'S RING on
the niche (B) to change the game to a 'nice' version (C). •
Pull the lever to spin, then press the buttons under the nice
ones (D) and spin again. • If you need extra tokens, play the
roadrunner game at Mary's. • Once you have a set of 4 nice
friends, take the KEY. • Travel back to Trail Stop.
• Place a TOKEN in the slot (A), the use AUNT ELLIE'S RING on
the niche (B) to change the game to a 'nice' version (C). •
Pull the lever to spin, then press the buttons under the nice
ones (D) and spin again. • If you need extra tokens, play the
roadrunner game at Mary's. • Once you have a set of 4 nice
friends, take the KEY. • Travel back to Trail Stop.
 • Walk forward twice, turn left then zoom into Zebra rock. •
Move the rock (E) and open the trap door (F). • Look inside
for a mini-game (G).
• Walk forward twice, turn left then zoom into Zebra rock. •
Move the rock (E) and open the trap door (F). • Look inside
for a mini-game (G).
 • Using the APPLE MAGNET, move the element symbols from the 4
corners to their matching element in the center. • The pink
and purple circle is Manganese, so move the symbol Mn from the
lower right corner to the pink and purple circle (H). • The
gray circle is silicon; it will want the Si symbol from the
upper left (I). • The blue-green circle is copper; move the Cu
symbol from the lower left (J). • Move the Fe symbol from the
upper right corner to the orange circle in the center (K). •
Underneath is another mini-game.
• Using the APPLE MAGNET, move the element symbols from the 4
corners to their matching element in the center. • The pink
and purple circle is Manganese, so move the symbol Mn from the
lower right corner to the pink and purple circle (H). • The
gray circle is silicon; it will want the Si symbol from the
upper left (I). • The blue-green circle is copper; move the Cu
symbol from the lower left (J). • Move the Fe symbol from the
upper right corner to the orange circle in the center (K). •
Underneath is another mini-game.
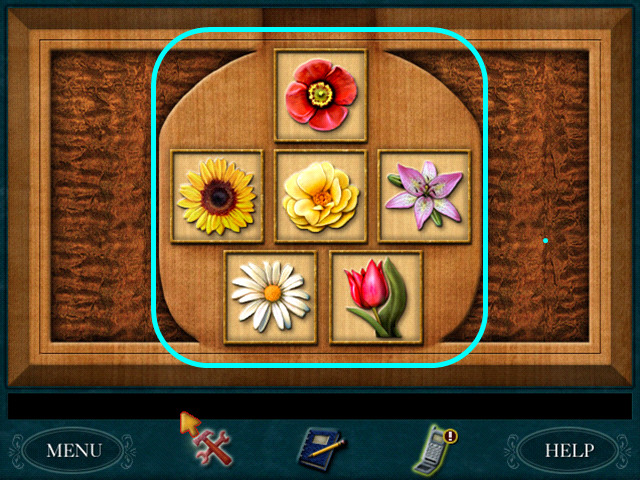 • Now all the flowers clues make sense. • Not all the flowers
are in all the spots. • You need a poppy, sunflower, daisy,
lily, tulip, and Harrison yellow rose. • Put the favorite
flower, the Harrison yellow rose in the center. • See the
screenshot for the solution.
• Now all the flowers clues make sense. • Not all the flowers
are in all the spots. • You need a poppy, sunflower, daisy,
lily, tulip, and Harrison yellow rose. • Put the favorite
flower, the Harrison yellow rose in the center. • See the
screenshot for the solution.
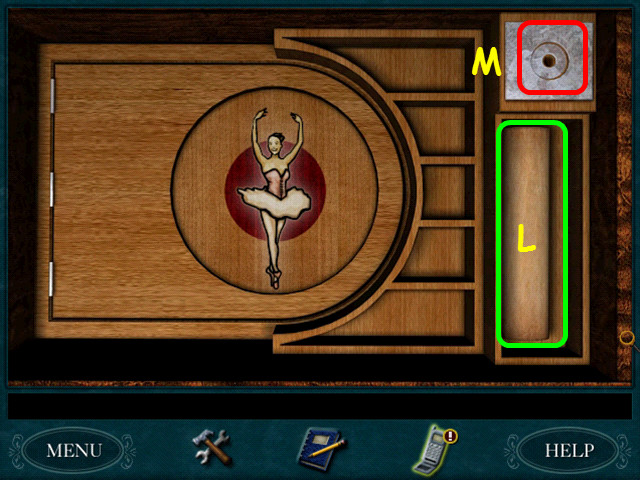 • Read the note (L). • Use the KEY from the arcade game in the
hole to wind up the ballerina (M). • Read the note under the
ballerina panel.
• Read the note (L). • Use the KEY from the arcade game in the
hole to wind up the ballerina (M). • Read the note under the
ballerina panel.
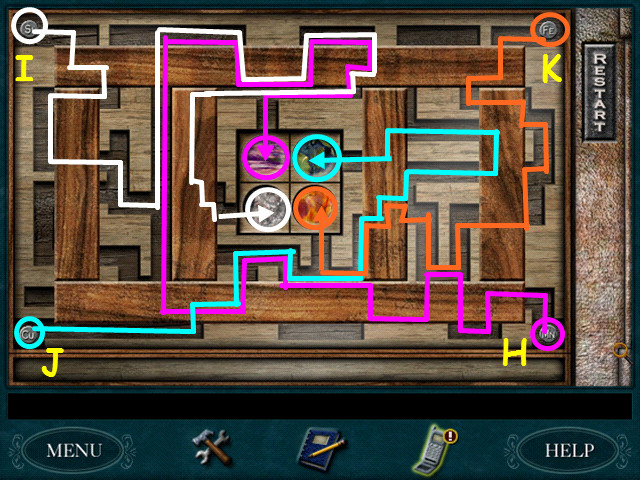
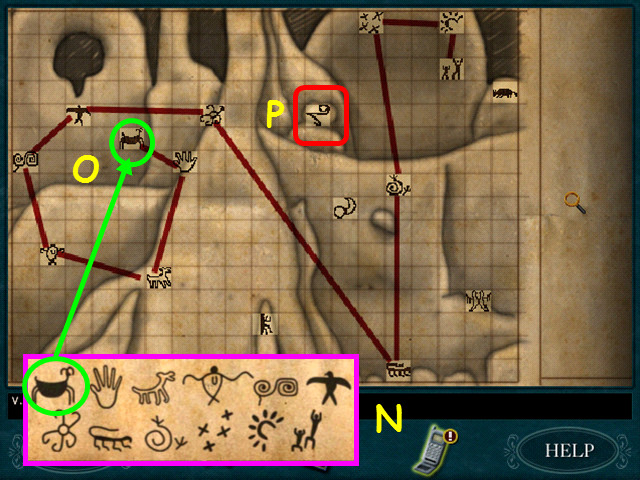 • Look at the pteroglyph map and draw lines between the
symbols as listed on the note (N). • Click on the first symbol
(O), then the others in sequence. • The lines form a symbol. •
Note where the symbol is on the map (P). • Return to Cougar
Bend. • Walk to the right side and use your LARIAT to reach
the top. • Turn to the left.
• Look at the pteroglyph map and draw lines between the
symbols as listed on the note (N). • Click on the first symbol
(O), then the others in sequence. • The lines form a symbol. •
Note where the symbol is on the map (P). • Return to Cougar
Bend. • Walk to the right side and use your LARIAT to reach
the top. • Turn to the left.
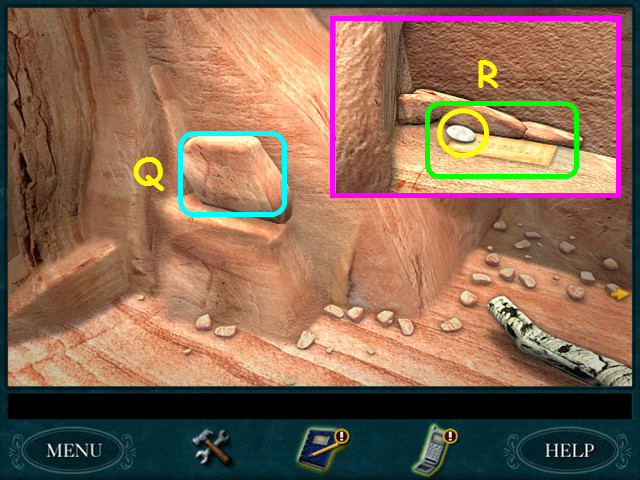 • Move the rock with the 'V' symbol aside (Q). • Read the note
and take the ROCK (R). • Take Bob and return to Mary's. • Talk
to Mary and she will polish the rock for you. • Take the
PICTURE AGATE when she is done. • Exit the shop and receive a
call from Bess and George. • Return to Trail Stop and walk to
Charlie's grave.
• Move the rock with the 'V' symbol aside (Q). • Read the note
and take the ROCK (R). • Take Bob and return to Mary's. • Talk
to Mary and she will polish the rock for you. • Take the
PICTURE AGATE when she is done. • Exit the shop and receive a
call from Bess and George. • Return to Trail Stop and walk to
Charlie's grave.
 • Look at Charlie's grave and the PICTURE AGATE will come up.
• Turn around until your view is similar to the agate. • Walk
forward to the tree (S). • Nancy will grab Bob and head to
that location. • Walk forward as far as you can, then turn to
the right. • Climb up the rocks 3 times, then use the LARIAT
on the branch to get to the top. • Walk forward until you see
a message on the wall. • Use your DECODER KEY to decipher the
path. • Your path is: brown-lime (KEY) (Also, look in the
orange room for a KEY)-yellow-red
(KEY)-blue-orange-lime-yellow-brown-blue-lime-orange-blue-brown
(KEY)-lime-orange-red-blue-yellow-lime-blue (KEY near the red
door)-lime-brown-yellow. • Turn right to start the maze. •
Follow the colored rocks using the path (T). • Look in every
pot for keys (U). • Make sure to turn around and check the
entire room.
• Look at Charlie's grave and the PICTURE AGATE will come up.
• Turn around until your view is similar to the agate. • Walk
forward to the tree (S). • Nancy will grab Bob and head to
that location. • Walk forward as far as you can, then turn to
the right. • Climb up the rocks 3 times, then use the LARIAT
on the branch to get to the top. • Walk forward until you see
a message on the wall. • Use your DECODER KEY to decipher the
path. • Your path is: brown-lime (KEY) (Also, look in the
orange room for a KEY)-yellow-red
(KEY)-blue-orange-lime-yellow-brown-blue-lime-orange-blue-brown
(KEY)-lime-orange-red-blue-yellow-lime-blue (KEY near the red
door)-lime-brown-yellow. • Turn right to start the maze. •
Follow the colored rocks using the path (T). • Look in every
pot for keys (U). • Make sure to turn around and check the
entire room.
 • When you reach the final yellow door, open the panel. • The
5 KEYS will appear. • Place the KEYS in the same-shaped holes
(V). • Push the handle (W). • Enter the room and turn to the
right to find a chest full of golden hearts. • Leave the
treasure and exit the room to discover you have been followed.
• Run to the left and go down the ladder. • Run to the next
room.
• Turn around and take the LIME STONE. • Turn to the right and
take the RED STONE. • Place the LIME STONE where the red was.
• Turn left and place the RED STONE where the green was
originally. • Exit the close-up and you will automatically
hide and watch the bad guy get it (X)! • CONGRATULATIONS! You
have completed Nancy Drew: The Secret of Shadow Ranch!
• When you reach the final yellow door, open the panel. • The
5 KEYS will appear. • Place the KEYS in the same-shaped holes
(V). • Push the handle (W). • Enter the room and turn to the
right to find a chest full of golden hearts. • Leave the
treasure and exit the room to discover you have been followed.
• Run to the left and go down the ladder. • Run to the next
room.
• Turn around and take the LIME STONE. • Turn to the right and
take the RED STONE. • Place the LIME STONE where the red was.
• Turn left and place the RED STONE where the green was
originally. • Exit the close-up and you will automatically
hide and watch the bad guy get it (X)! • CONGRATULATIONS! You
have completed Nancy Drew: The Secret of Shadow Ranch!
Created at: 2012-03-18