

Walkthrough Menu
- Chapter 1: An Unexpected Guest
- Chapter 2: Boats Away
- Chapter 3: Beneath the Town
- Chapter 4: The Labyrinth
- Chapter 5: The Shipwreck Cemetery
- Chapter 6: The Lighthouse
- Chapter 7: Find Calliope
- Chapter 8: Get Kraken!
General Tips
- This is the official guide for Nightmares from the Deep: The Siren's Call.
- Hidden-object puzzles are referred to as HOPs in this guide. Items listed in yellow are hidden, or they require additional actions to locate. Interactive items in HOPs are color-coded.
- Sometimes a HOP or step will not become available until a journal entry has been added. Please refer to the guide to see if you have missed any of these steps. HOPs may be random; our lists may vary from yours.
- There are three difficulty levels: Casual, Advanced, and Expert. The difficulty level may be changed at any time.
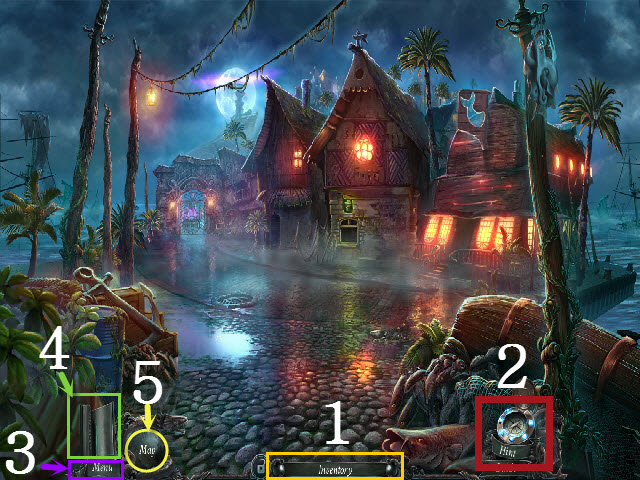
- The Inventory items are stored here (1).
- The Hint button will offer hints and allow you to skip puzzles, but will take some time to recharge (2).
- Selecting the Menu button will bring up the Options, Help, and allow you to exit the game (3).
- The Diary will show your current tasks and clues (4).
- Early on you will be given an in-game map. This may be used to fast travel from location to location (5).
Chapter 1: An Unexpected Guest
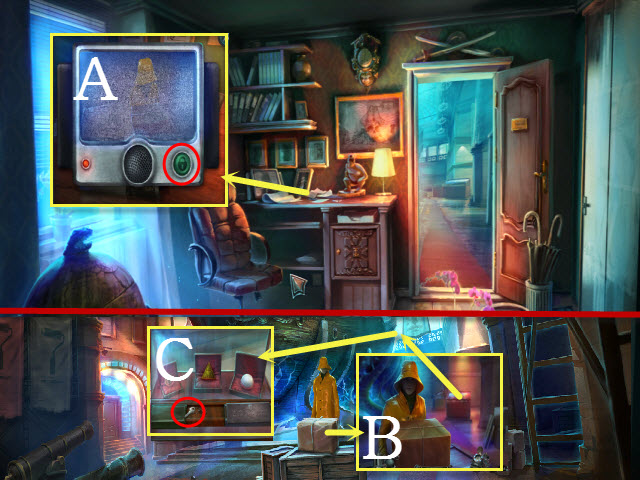
- Examine the desk and select the screen; press the green button (A).
- Walk forward to the Hall.
- Talk to the Fisherman; examine the display case (B).
- Take the OFFICE KEY (C).
- Walk down to your Office.
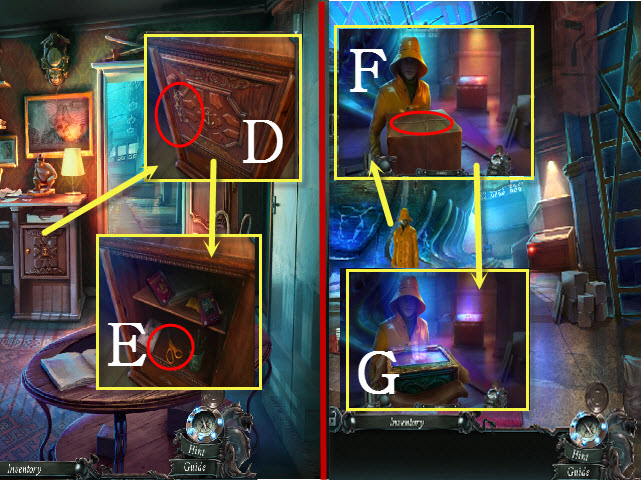
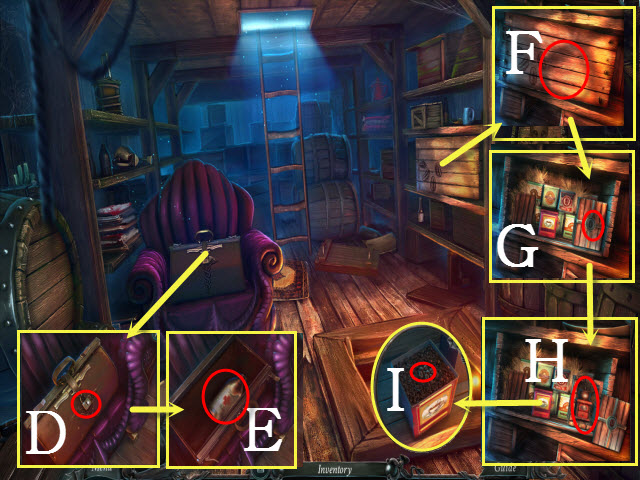
- Examine the cupboard door; place the OFFICE KEY in the lock and turn it (D).
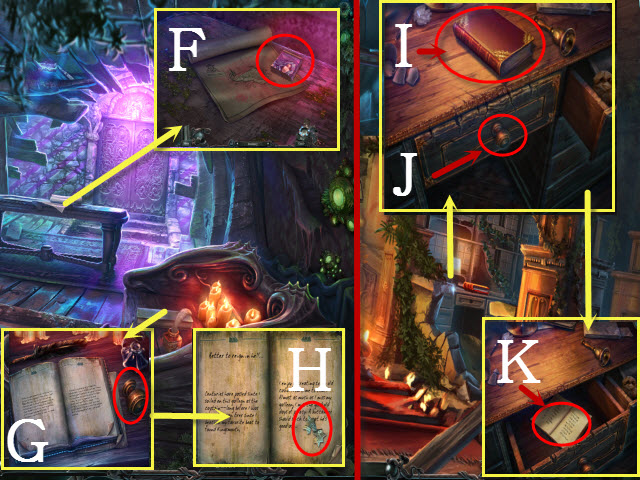
- Examine the book; take the SCISSORS (E).
- Walk forward to the Hall.
- Examine the Fisherman; use the SCISSORS on the rope (F).
- Select the rope and open the package (G).
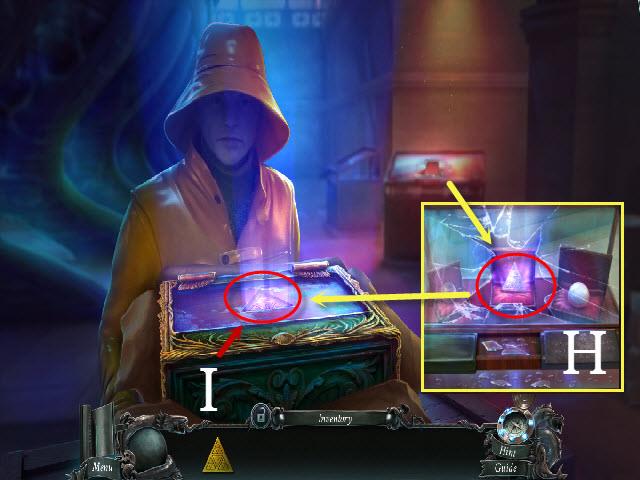
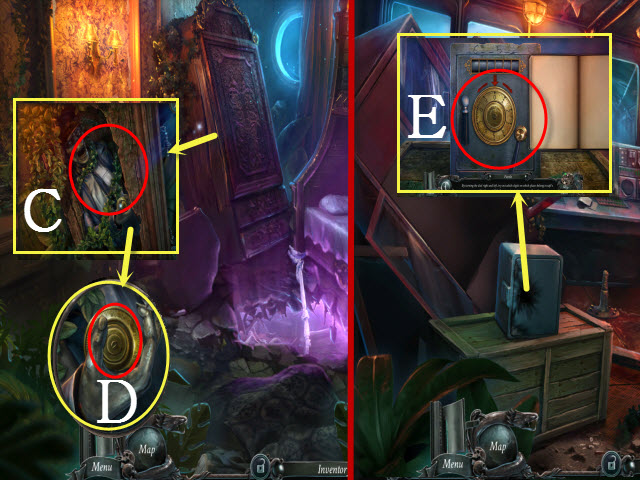
- Examine the display case; take the TRIANGULAR PENDANT (H).
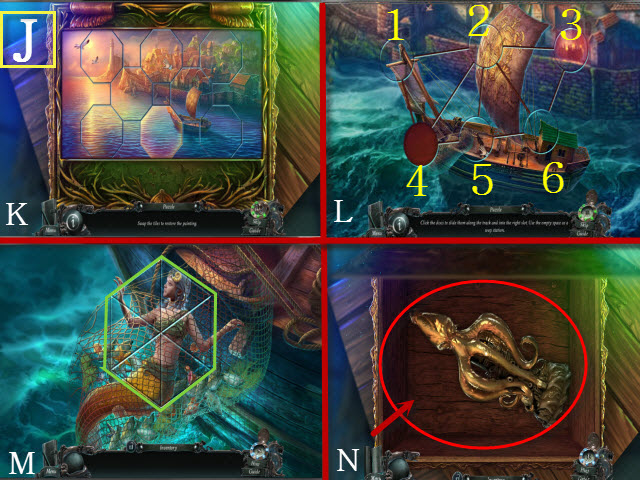
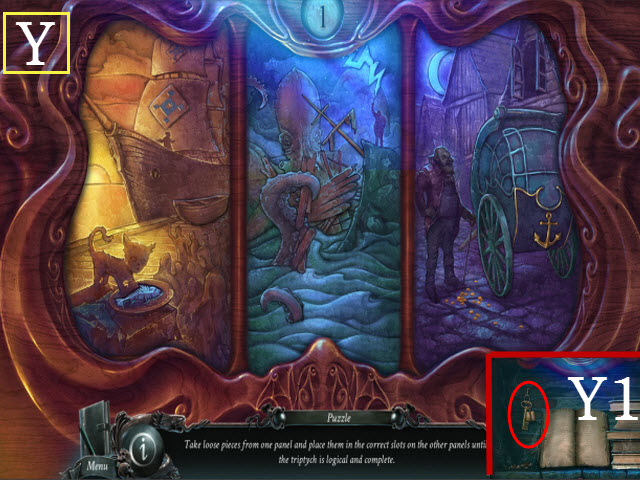
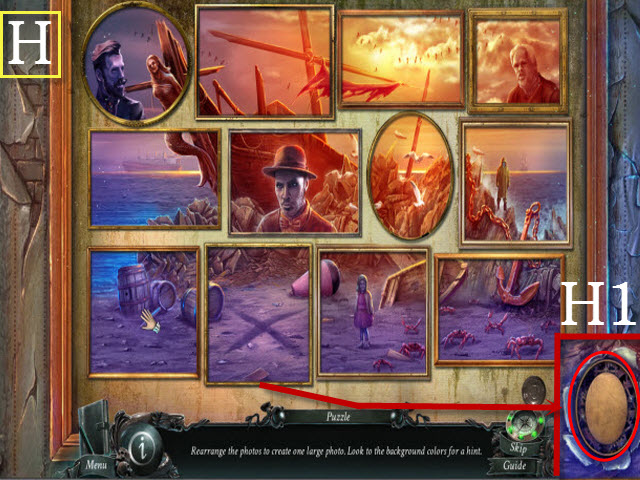
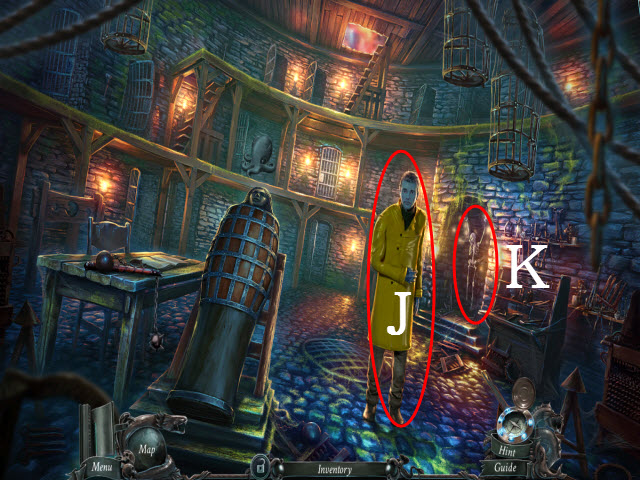
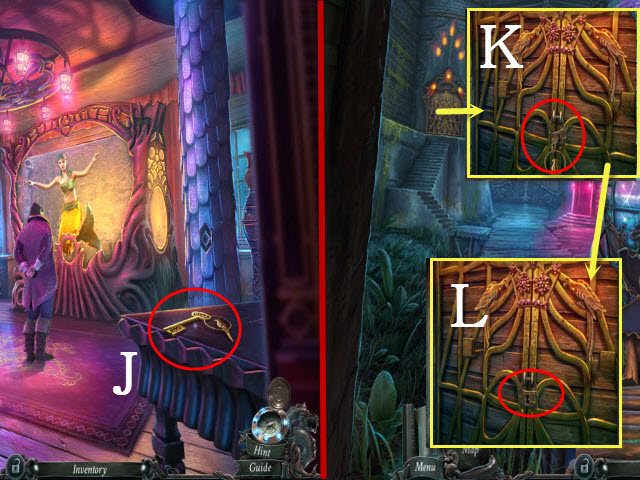
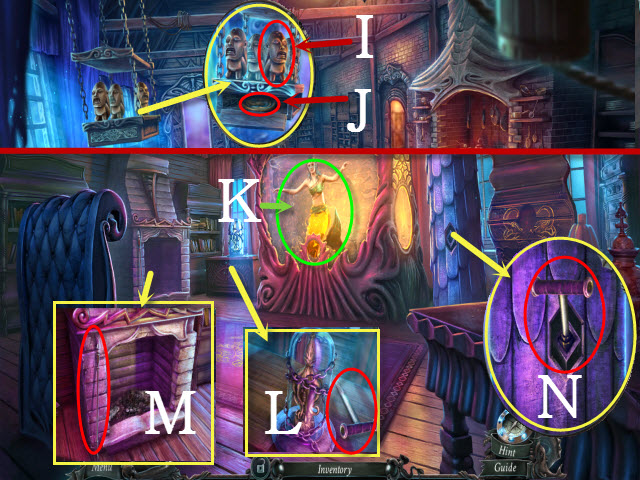
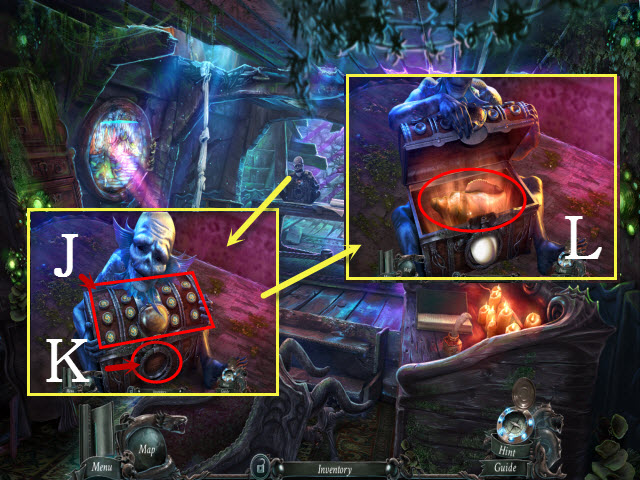
- Place the TRIANGULAR PENDANT in the engraving to activate a puzzle (I).
- Please see the screenshot for the solutions (J).
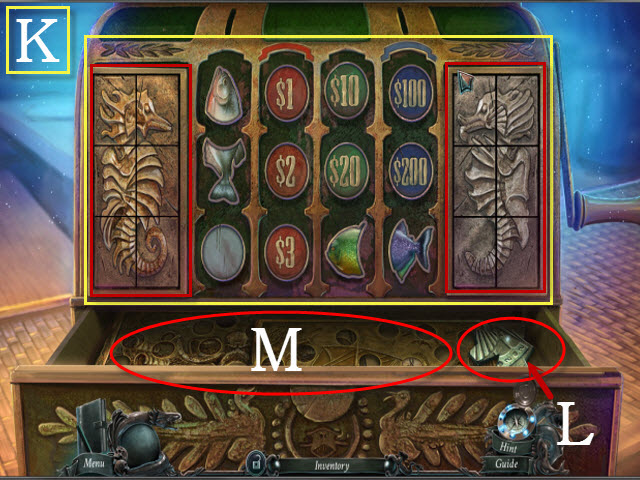
- Phase 1: Arrange the tiles so they create a complete picture (K).
- Phase 2: Slide the tiles to recreate the image; solution: 4, 5, 2, 1, 4, 5, 2, 4, 5, 2, 3, 6, 5, and 4 (L).
- Phase 3: Swap adjacent titles to create a complete picture (M).
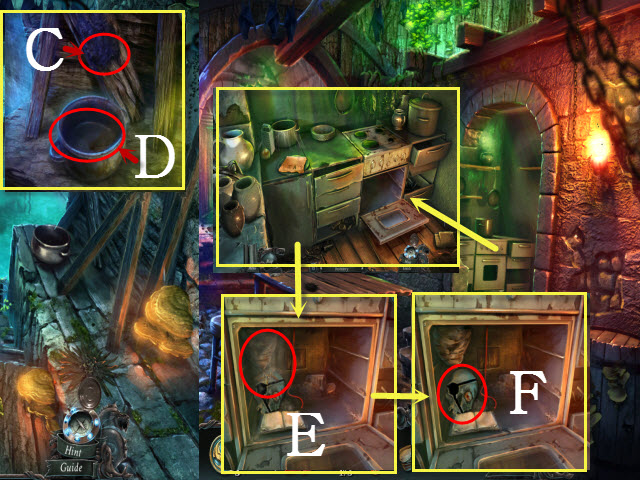
- Select the handle; take the idol (N).
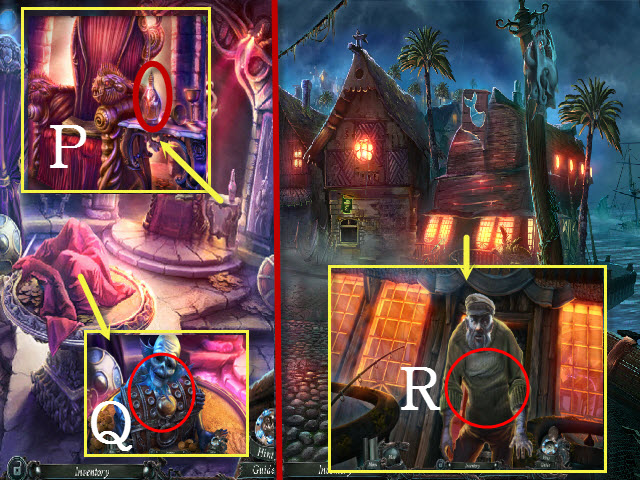
- Talk to the Fisherman (O).
- Take the OAR (P).
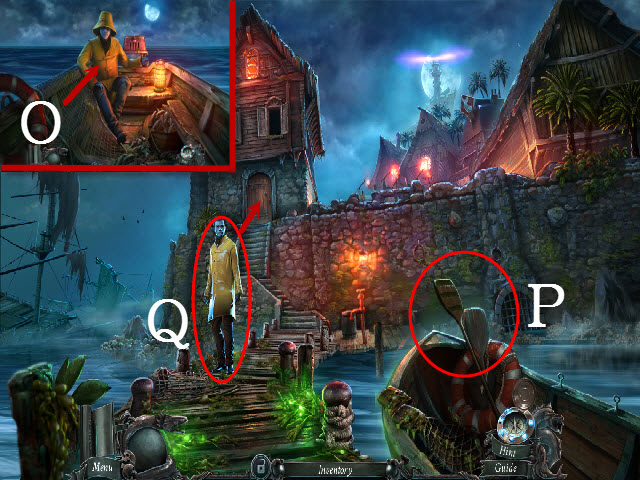
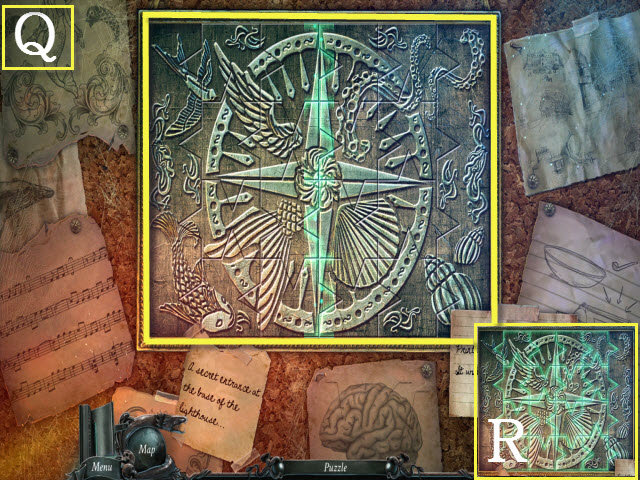
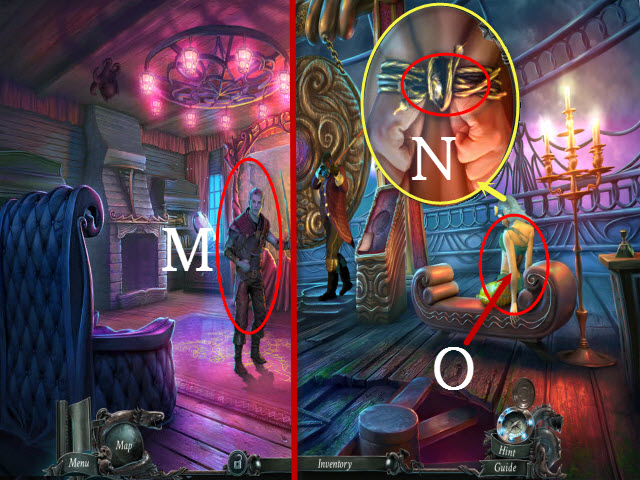
- Select the Fisherman; walk forward to the Corridor (Q).
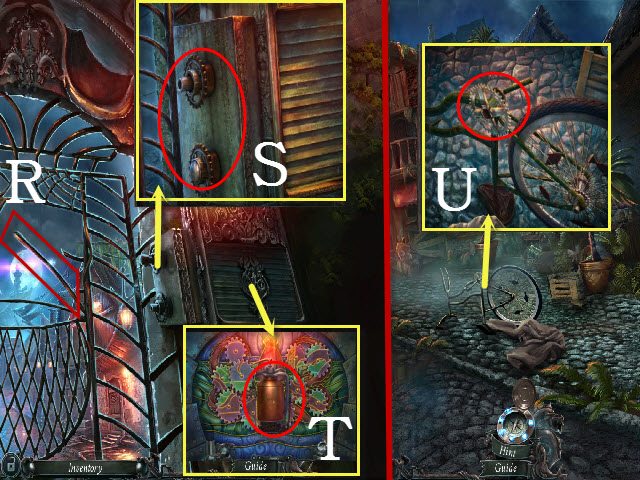
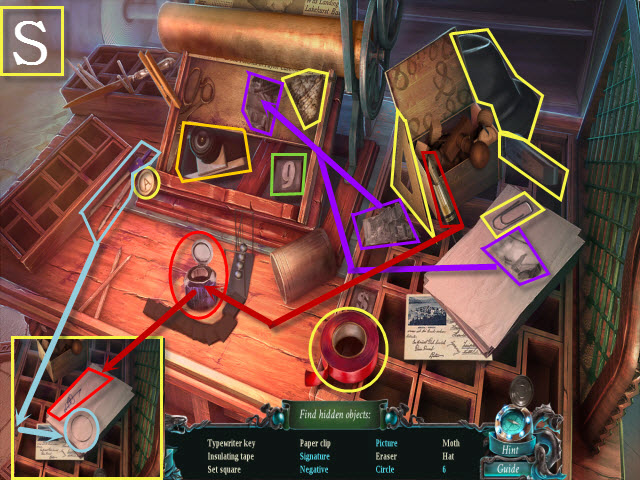
- Talk to the Fisherman and move the dresser twice (R).
- Examine the second dresser; place the OAR underneath it and select the OAR (S).
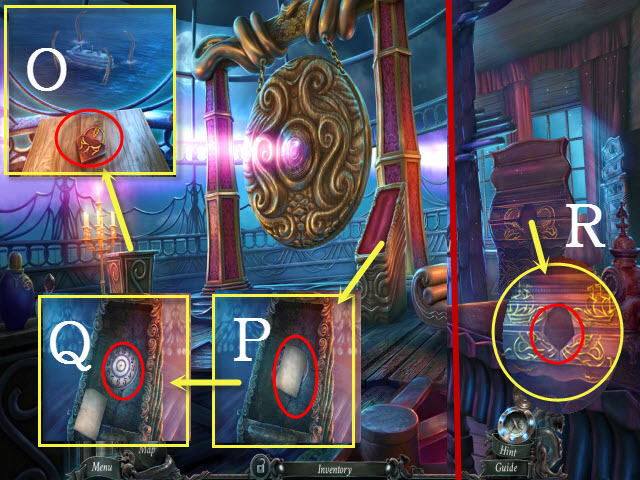
- Walk upstairs to the Bedroom (T).

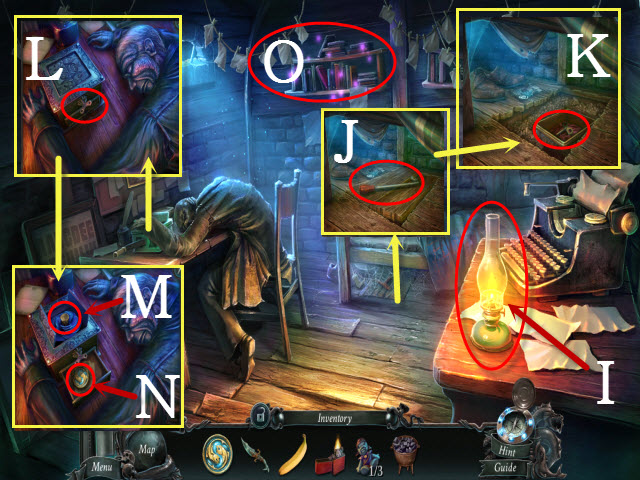
- Examine the cupboard and open it; use the OAR to get the HOSE (U).
- Examine the coat; take the VALVE (V).
- Walk down.
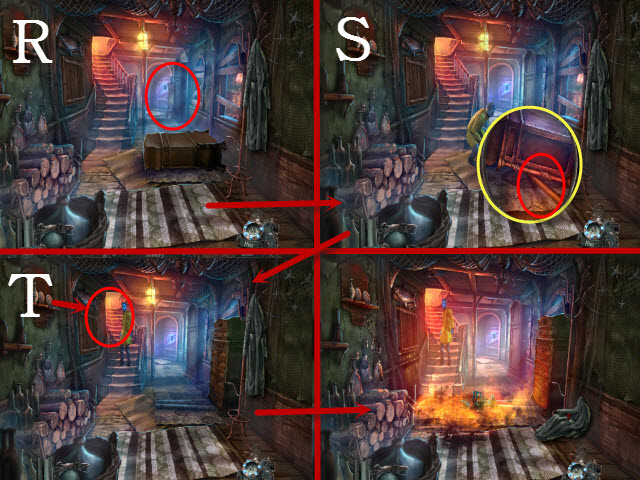
- Examine the pump; place the HOSE and the VALVE on the pump (W).
- Turn the valve.
- Walk forward.
- Select the hose; drag it around the flames to extinguish the fire (X).
- Walk upstairs to the Bedroom.
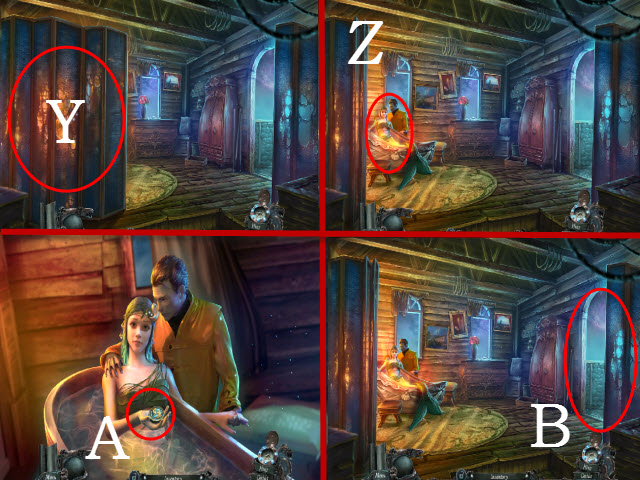
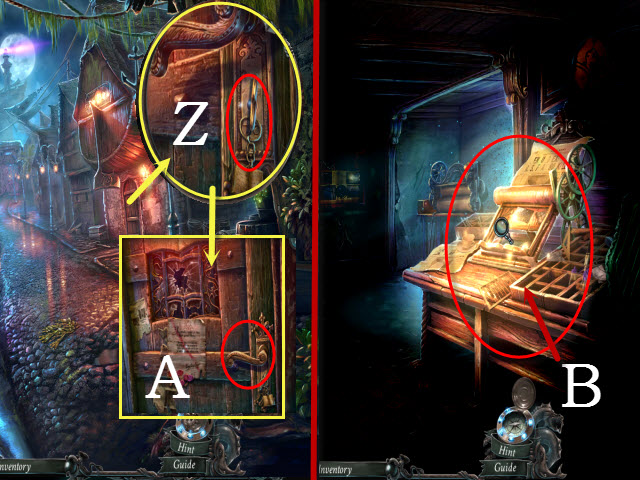
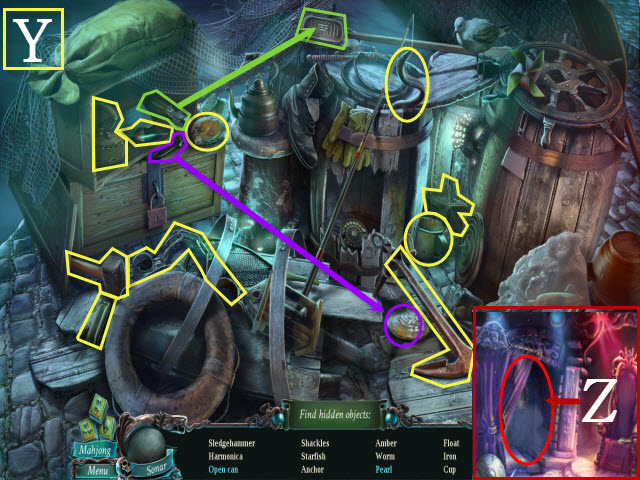
- Move the curtain (Y).
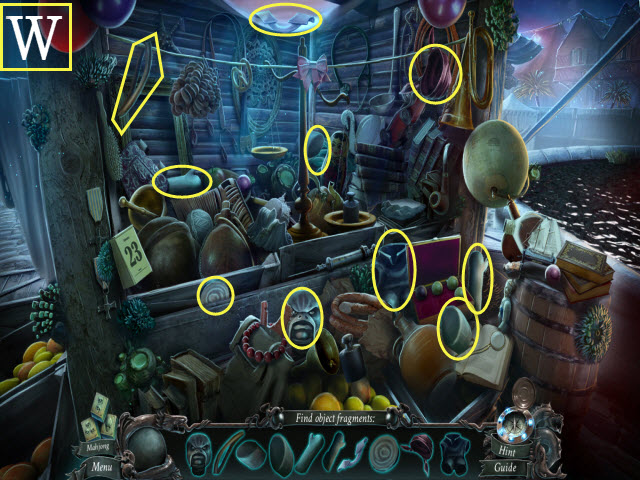
- Talk to Calliope (Z).
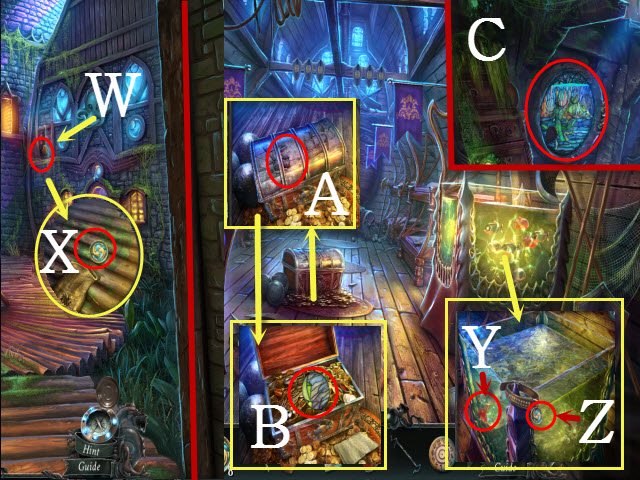
- Take the 1/12 GOLDEN FISH (A).
- Examine the balcony (B).
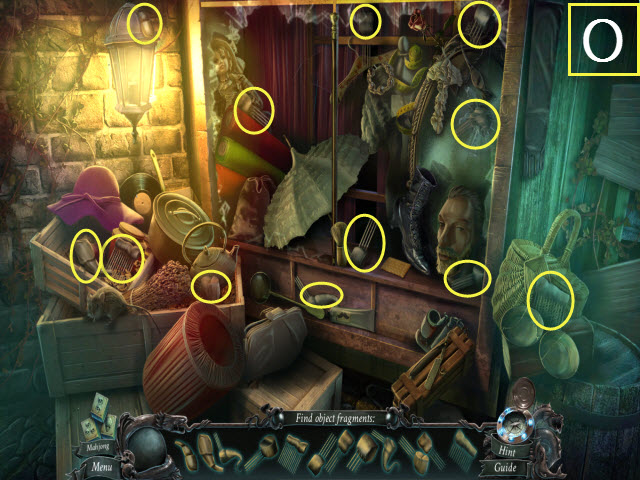
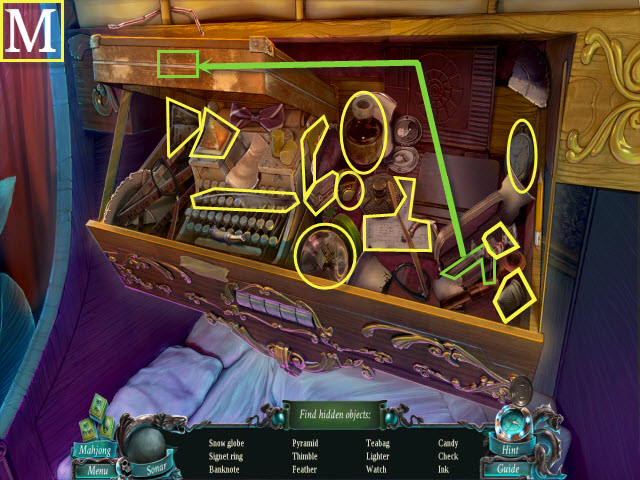
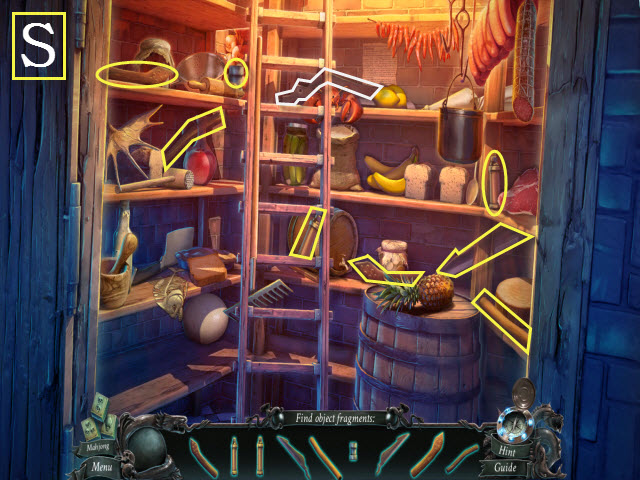
- Examine the Fisherman; select the antiques to activate a HOP.
Chapter 2: Boats Away
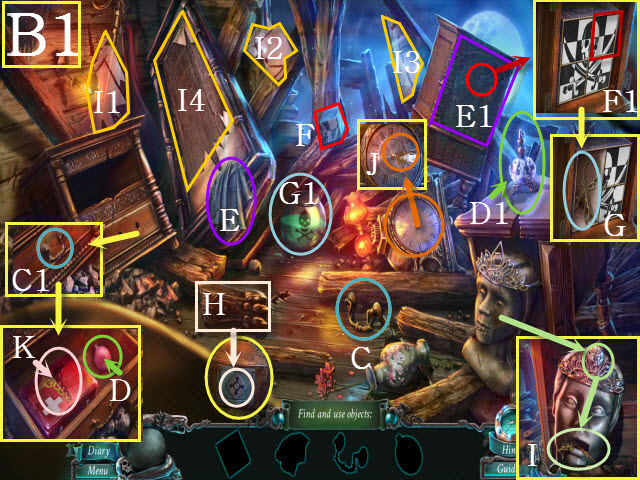
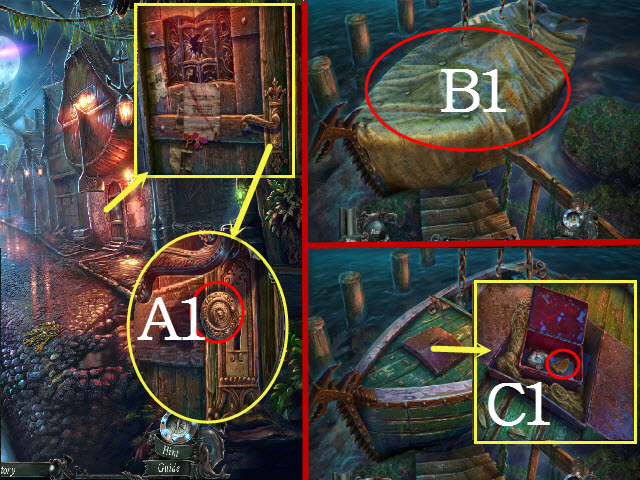
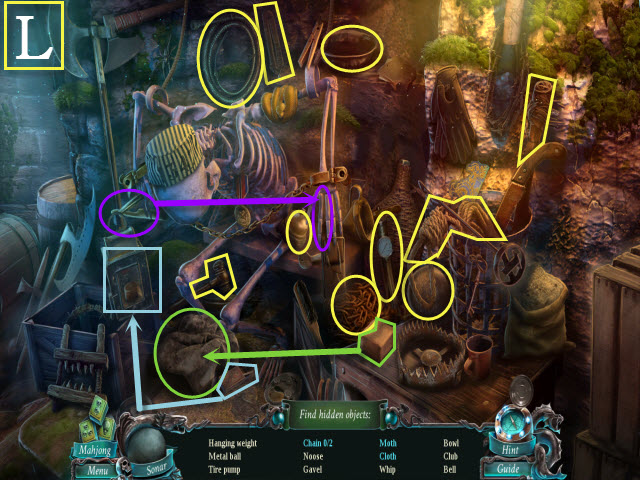
- Find the listed items (B1).
- Take the drawer handle (C); place it on the drawer and open it (C1).
- Take the pump (D) and place it on the perfume bottle; select the bottle (D1).
- Take the cloth (E); use it on the cupboard and open it (E1).
- Take the checkerboard piece (F); place it on the checkerboard and swap the tiles to create a whole image (F1).
- Take the tongs (G); use the tongs to get the cross (G1).
- Move the wood; place the cross in the recess and take the tiara's jewel (H).
- Place the tiara's jewel on the crown and take the clock hands (I).
- Place the glass shards (I1-I3) on the mirror (I4).
- Place the clock hands on the clock and set the time to 4:15; take the caduceus (J).
- Place the caduceus in the engraving to get the SMELLING SALTS (K).
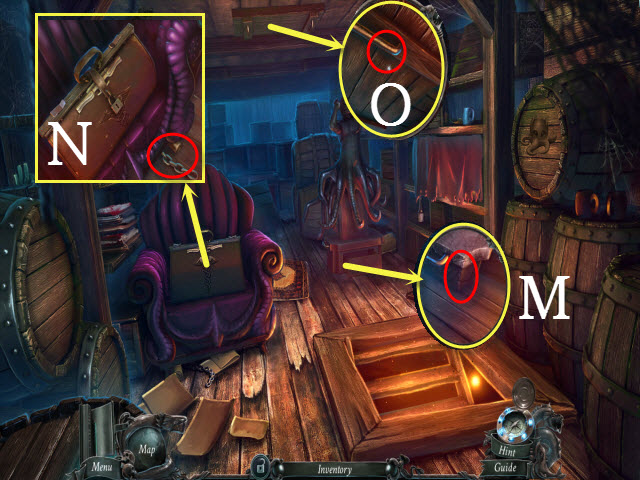
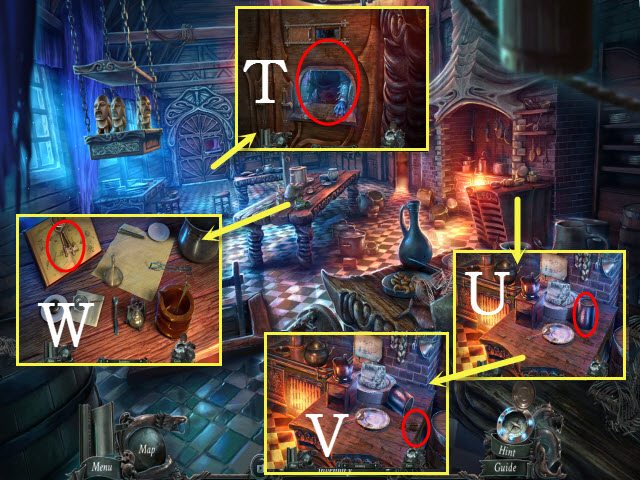
- Examine the Fisherman; use the SMELLING SALTS on him and take the Map (L).
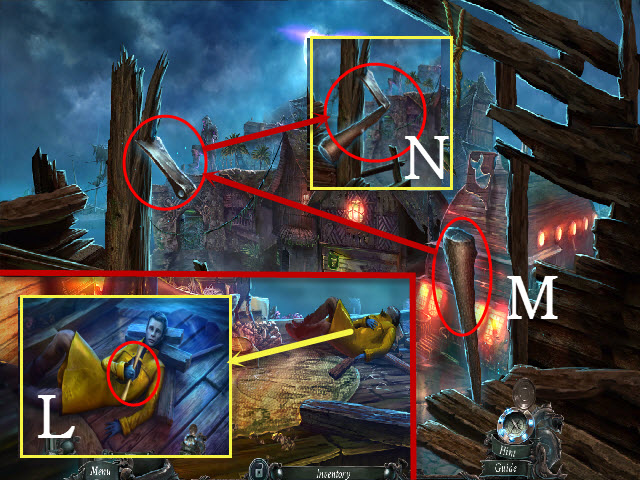
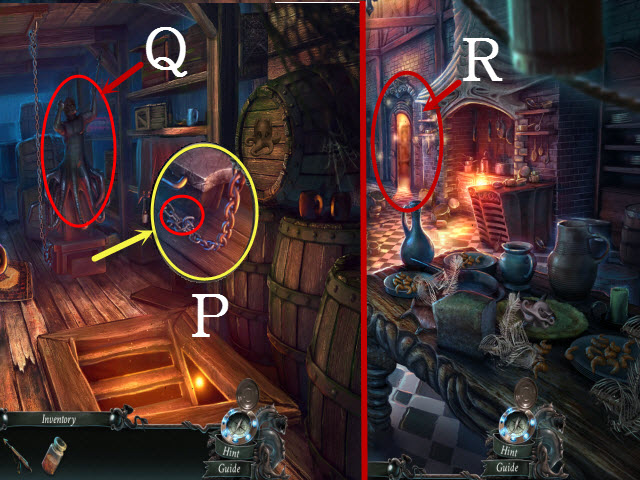
- Examine the balcony; place the handle with the blade (M); take the HATCHET (N).
- Walk downstairs.
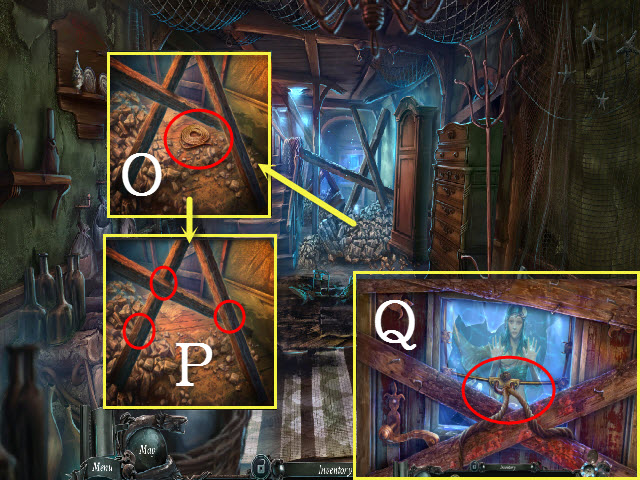
- Examine the rubble; move the rubble and take the ROPE (O).
- Examine the beams and use the HATCHET on them (P).
- Walk forward to the Front Door.
- Place the rope on the boards; select the rope (Q).

- Examine the window; select the buttons: Bx2, Cx2, Ex1, and Fx2 (1).
- Open the window; take the BANDAGES (2).
- Walk forward to the Archway.
- Examine the bike; move the blanket.
- Select the bolt; take the PEDAL (3) and the CHAIN (4).
- Examine the gate.
- Take the ROD (R).
- Examine the gear; place the PEDAL and CHAIN on it (S).
- Select the pedal.
- Examine the mechanism and take the OILCAN (T).
- Walk down.
- Examine the bike; use the OILCAN on the gear and take the GEAR (U).
- Walk down to the Square.
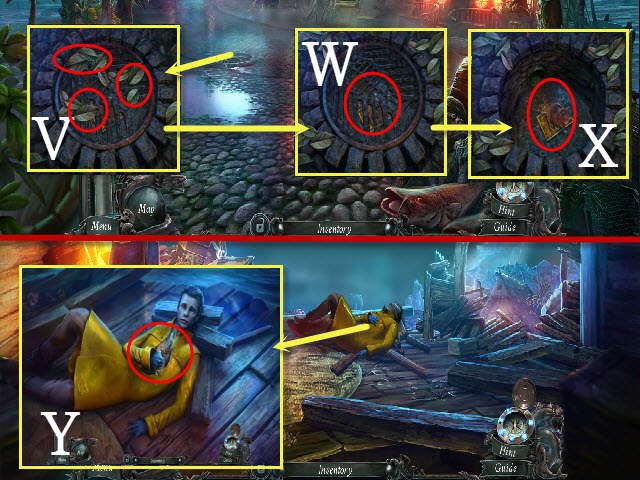
- Examine the manhole cover; move the three leaves (V).
- Use the ROD on the manhole cover (W).
- Select the mouse and take the 1/2 MECHANISM PLATE (X).
- Return to the Bedroom.
- Select the Fisherman; give him the BANDAGES and take the DAGGER (Y).
- Return to the Square.
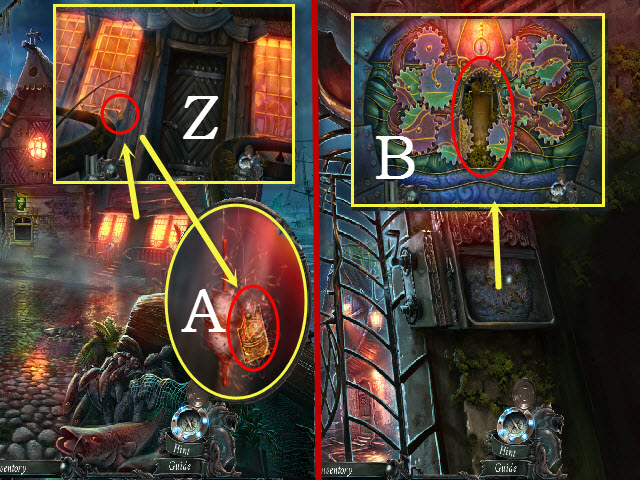
- Examine the Tavern and select the fishing lure; use the DAGGER on it (Z) and take the 2/2 MECHANISM PLATE (A).
- Return to the Archway and look at the gate.
- Examine the mechanism and press the button; place the 2/2 MECHANISM PLATE and the GEAR on it to activate a puzzle (B).
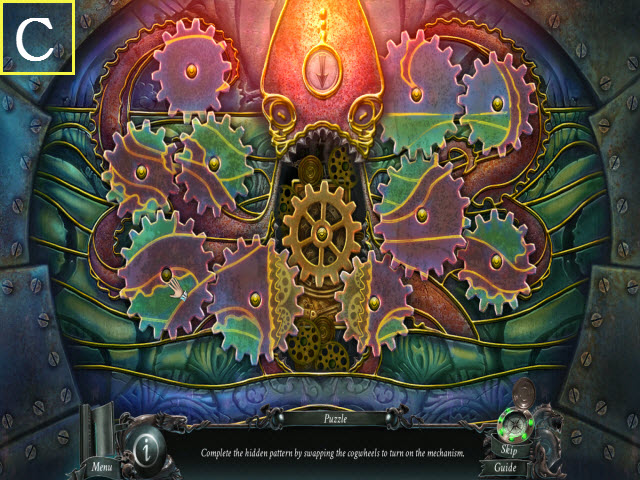
- To solve the puzzle, arrange the cogs so that they complete a whole image.
- Please see the screenshot for the solution (C).
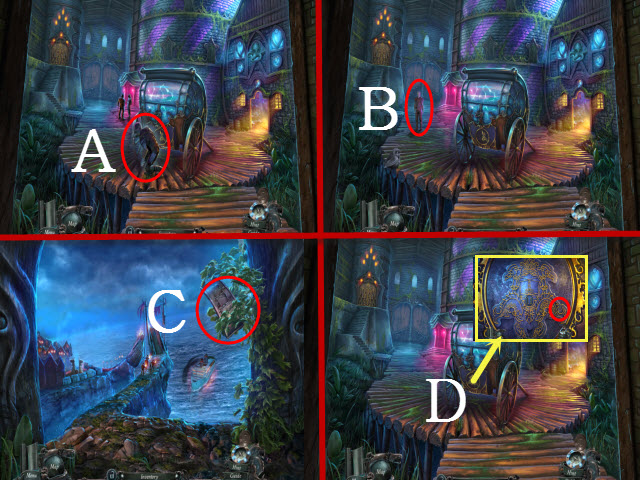
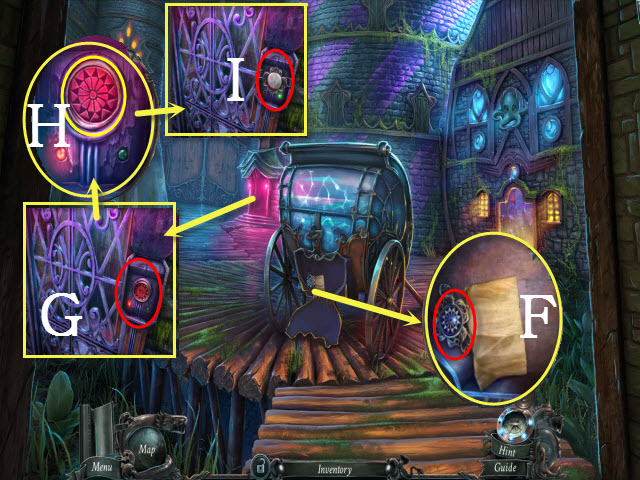
- Enter the Promenade; select the carriage.
- Examine the door; look at the handle and select the knob to get the COIN (A1).
- Walk forward to the Gate; walk left to the Dilapidated Harbor.
- Select the sheet three times and move the bar (B1).
- Examine the doors and open them.
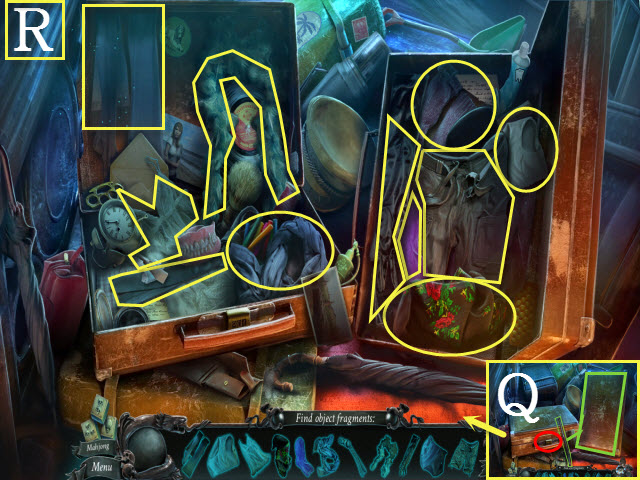
- Move the net and open the suitcase; move the fishbone and take the CIRCLE HALF (C1).
- Return to the Archway; examine the stall to activate a HOP.
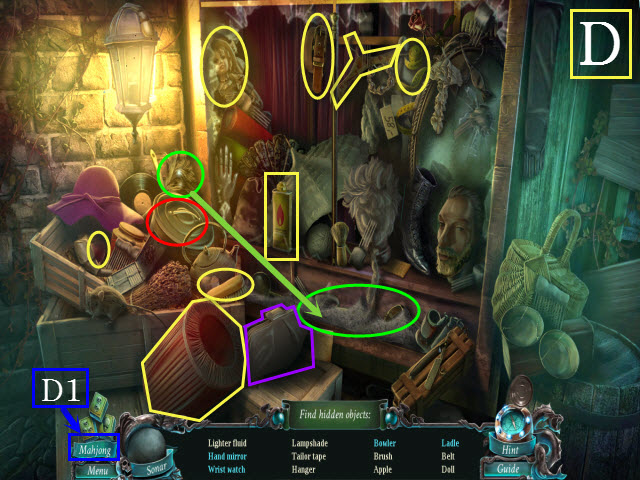
- Play the HOP to receive the LIGHTER FUEL (D). Alternatively, you may choose to play a game of Mahjong instead (D1).
- Return to the Gate.
- Examine the vending machine; place the COIN in the slot (E).
- Open the grate; use the LIGHTER FUEL on the lighter to receive the LIGHTER (F).
- Examine the toolbox; look at the note (G).
- Open the toolbox; move the tool and take the WRENCH (H).
- Return to the Bedroom.
- Examine the floor; look at the note and pick up the REBEL SYMBOL (I).
- Examine the box and place the CIRCLE HALF on the engraving; open the box (J).
- Take the GUNPOWDER (K).
- Return to the Promenade; walk left to the Statue.
- Examine the base and select the wall; use the DAGGER three times on it (L).
- Place the GUNPOWDER on the wall (M).
- Use the LIGHTER on the gunpowder (N).
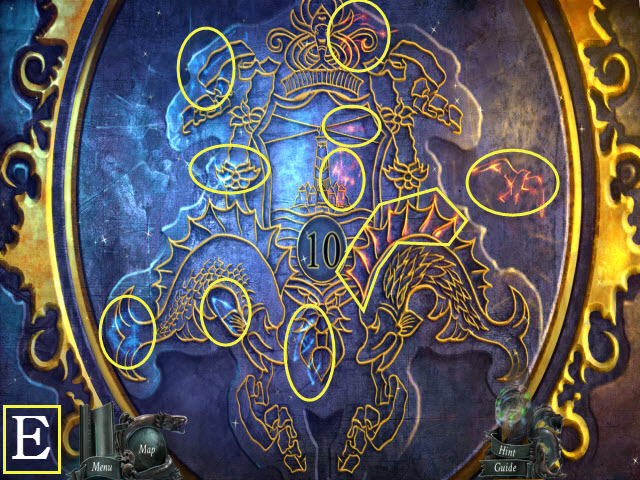
- Examine the wall to activate a puzzle.
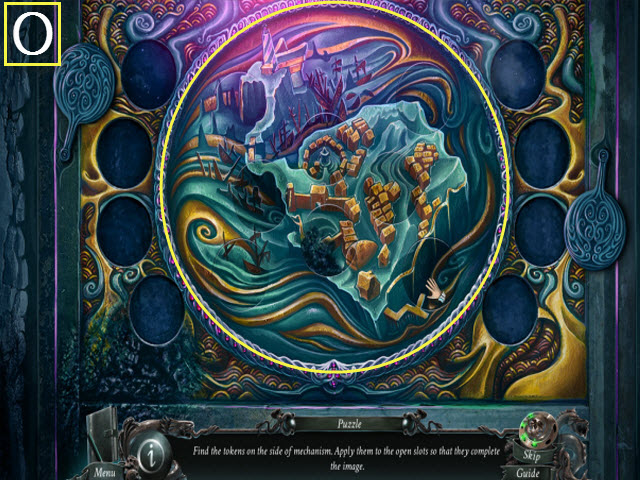
- To solve the puzzle, place the tokens in the correct slots to complete the image.
- Please see the screenshot for the solution (O).
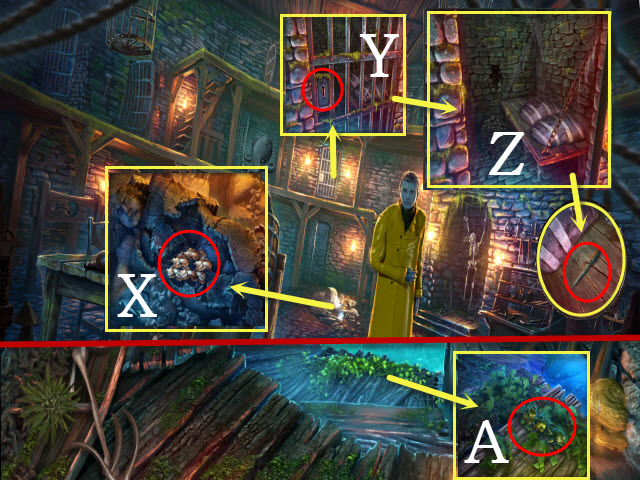
- Enter the Secret Chamber.
- Examine the throne; take the BOTTLE OF RUM (P).
- Move the sheet and examine the chest; talk to the goblin (Q).
- Return to the Square.
- Examine the tavern and select the door; give the sailor the BOTTLE OF RUM (R).
- Enter the Tavern; examine the bar to activate a HOP.
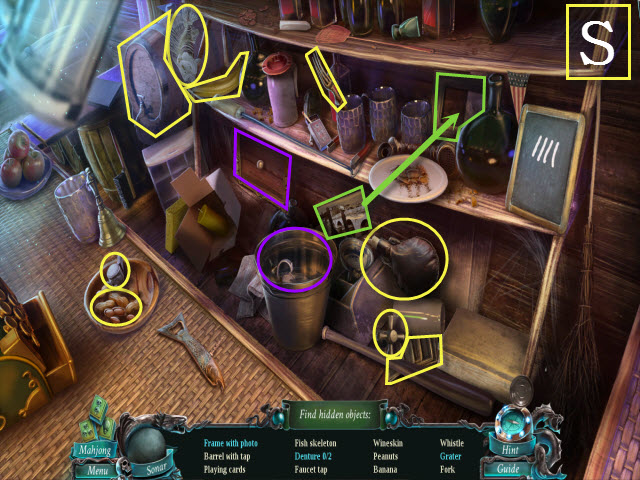
- Play the HOP to receive the BANANA (S).
- Talk to the sailor and you will receive the PHOTO (T).
- Examine the mugs; move them (U).
- Move the statuette and take the 2/12 GOLDEN FISH (V).
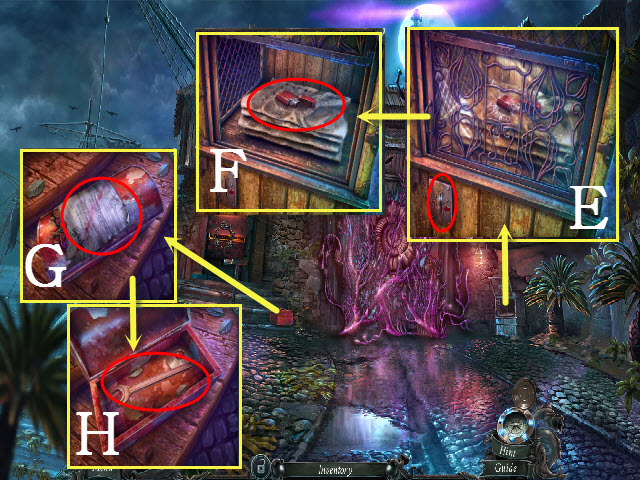
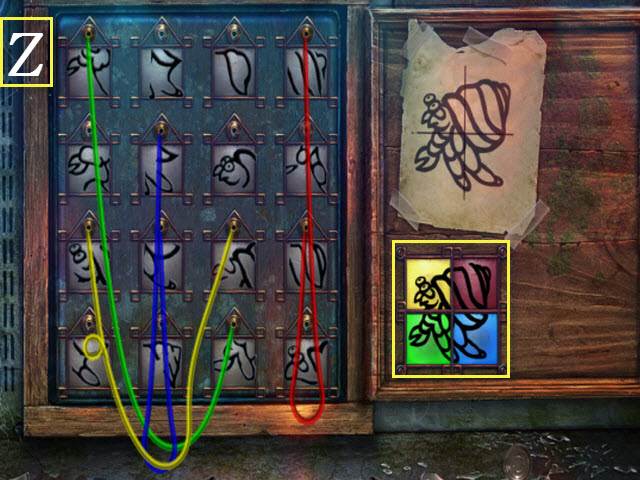
- Examine the mirror to activate a puzzle (W).
- To solve the puzzle, place the pieces in the correct slots to complete the image.
- Please see the screenshot for the solution (Y).
- Take the NEWSPAPER KEY (Y1).
- Return to the Promenade.
- Examine the door and select the lock; use the NEWSPAPER KEY on it (Z).
- Turn the key and select the handle; enter the Newspaper Office (A).
- Use the LIGHTER on the scene and select the desk to activate a HOP (B).
- Play the HOP to receive the LIGHT BULB (C).
- Select the light and move the bulb; place the LIGHT BULB in the slot (D).
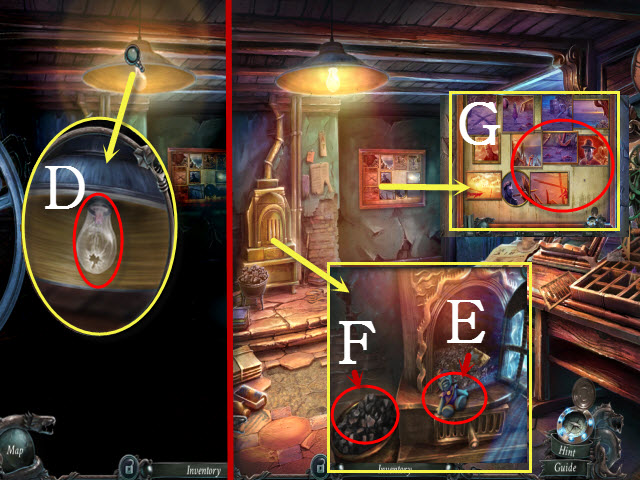
- Examine the furnace and open the door; move the soot and select the toy to receive the 1/3 TOY SOLDIER (E).
- Take the COAL (F).
- Examine the board; place the PHOTO on it to activate a puzzle (G).
- To solve the puzzle, arrange the photographs to form a cohesive image.
- Please see the screenshot for the solution (H).
- Place the REBEL SYMBOL in the slot (H1).
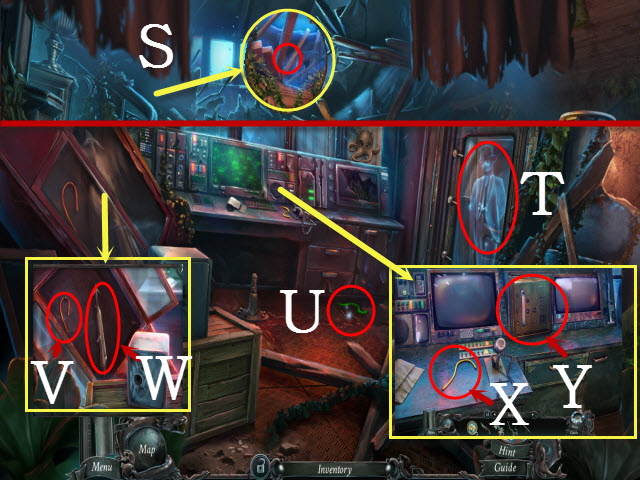
- Walk downstairs to the Hideout.
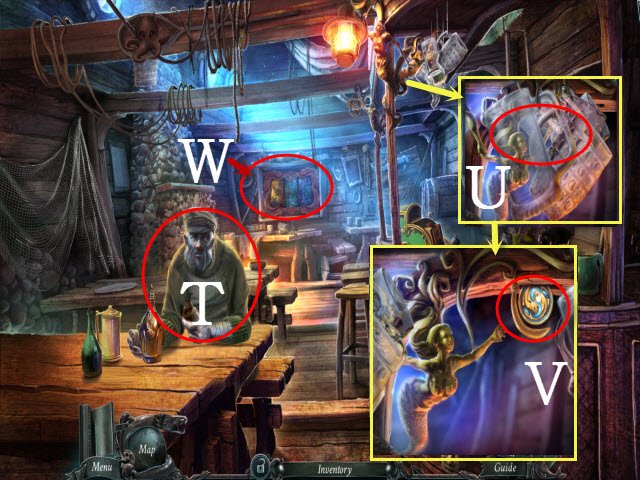
- Use the LIGHTER on the lantern (I).
- Move the sheet and look under the bed; move the two cobwebs and take the CRANE LEVER (J).
- Move the two floorboards and the dirt; open the tin and take the WIND-UP KEY (K).
- Examine the corpse and move the arm; place the WIND-UP KEY in the box slot and turn it (L).
- Take the SIGNET RING (M) and the 3/12 GOLDEN FISH (N).
- Examine the shelf to activate a HOP (O).
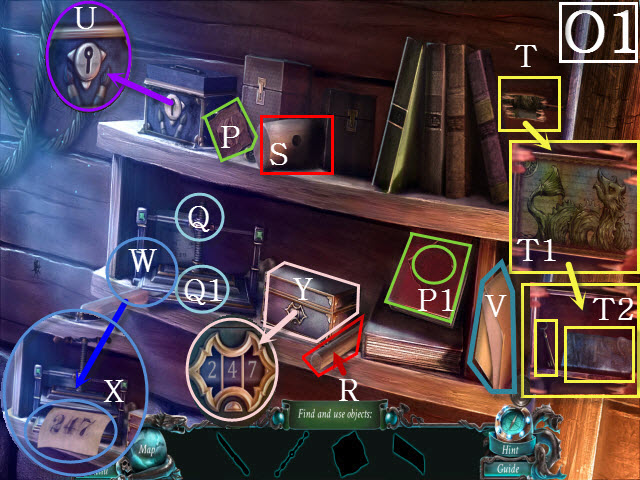
- Find the listed items (O1).
- Place the book symbol (P) on the book and take the handle (P1).
- Place the handle on the letterpress; select the handle and take the knife (Q).
- Use the knife on the hammer handle and take it (R); on the hammer head to receive the hammer (S).
- Move the books and use the hammer on the crack (T); solve mini-game (T1) to get the fonts and the paint box key (T2).
- Use the paint box key on the lock to get the printing ink (U).
- Take the blank paper (V).
- Place the fonts, the printing ink, and the blank paper on the letterpress (W); select the letterpress and look at the code (X).
- Enter 247 to get the BOLTS (Y).
- Return to the Secret Chamber.
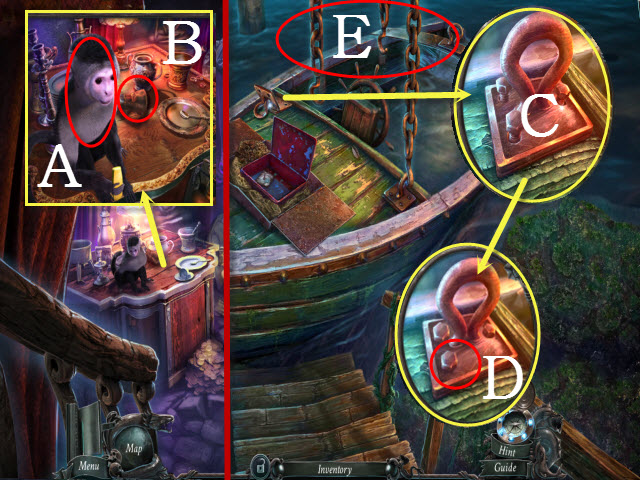
- Examine the monkey; give him the BANANA (A).
- Take the FIREPROOF GLOVE (B).
- Return to the Dilapidated Harbor.
- Examine the ring; move it and place the BOLTS on it (C).
- Use the WRENCH on the three bolts (D).
- Select the three chains (E).
- Walk down; examine the controls to activate a puzzle.
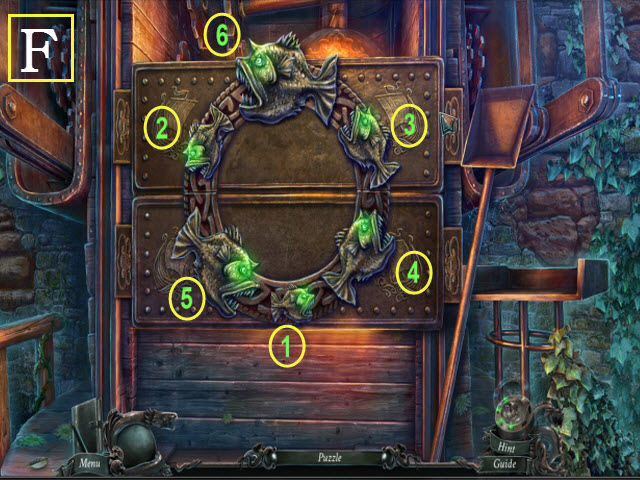
- To solve the puzzle, choose the fish in the proper sequence: 1-6 (F).
- Examine the controls; place the CRANE LEVER in the slot (G).
- Place the COAL on the shelf (H).
- Use the FIREPROOF GLOVE on the furnace (I).
- Use the shovel with the coal (J).
- Pull the left lever (K).
- Pull the right lever (L).
- Walk forward to the Street.
Chapter 3: Beneath the Town
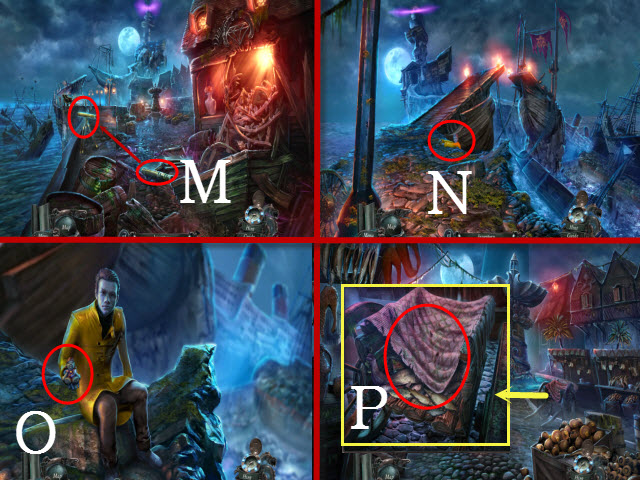
- Select the lens; examine the telescope (M).
- Examine the cliff; select the Fisherman (N).
- Talk to the Fisherman; take the 2/3 TOY SOLDIER (O).
- Walk down and then walk forward to the Fountain.
- Examine the cart; take the THICK CLOTH (P).
- Walk down.
- Place the THICK CLOTH on the boards; enter the Pawn Shop (Q).
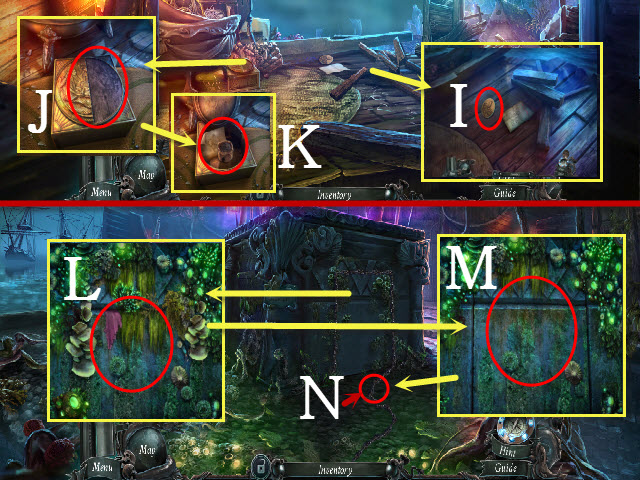
- Examine the table; move the glass and the photo.
- Take the 1/3 PRINTING MATRIX PIECES (R).
- Examine the cubbies; take the TONGS (S).
- Examine the desk and look at the drawer; place the SIGNET RING in the slot (T) and select the handle.
- Take the STEEL WHEEL (U).
- Return to the Fountain.
- Examine the switch; place the STEEL WHEEL on it and turn the wheel to activate a HOP (V).
- Play the HOP.
- You will receive the 3/3 TOY SOLDIER (W).
- Talk to the Fisherman (X).
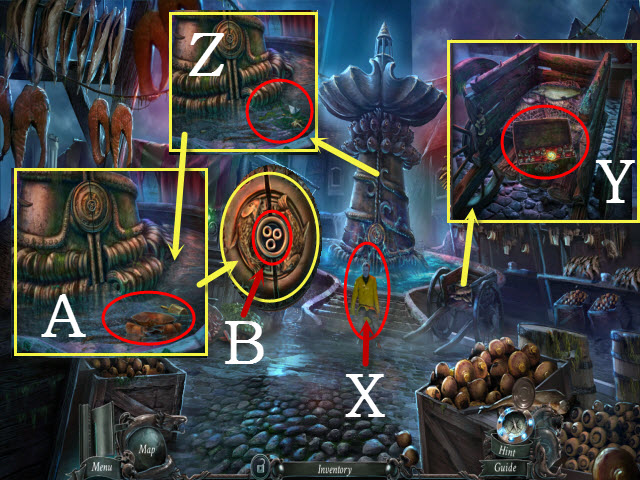
- Examine the cart and move the three fish; use the DAGGER on the chest to get the 4/12 GOLDEN FISH (Y).
- Examine the fountain; move the moss and select the key (Z).
- Use the TONGS to get the KEY (A).
- Examine the lock; place the KEY in it and turn it (B).
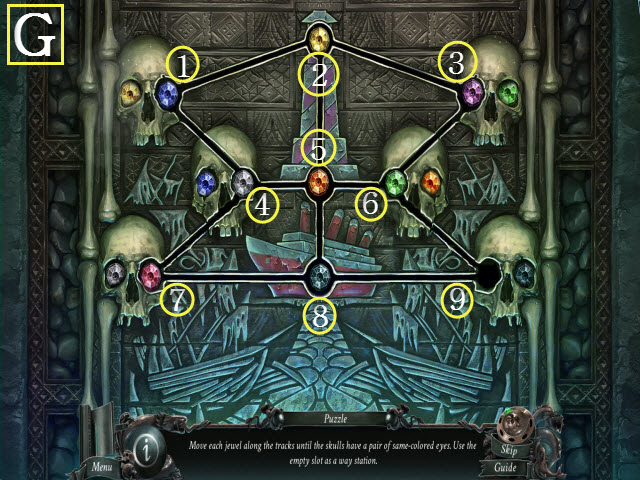
- Examine the steam vents to activate a puzzle.
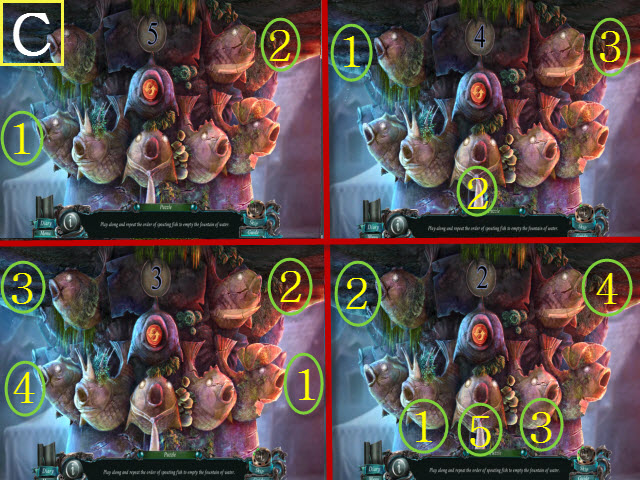
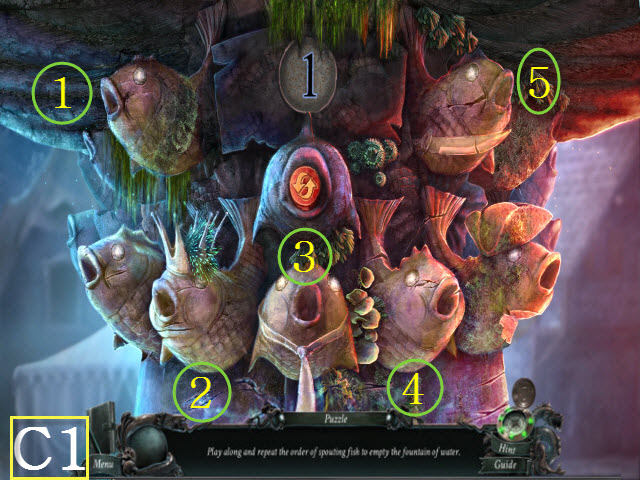
- To solve the puzzle, select the fish and play a game of Simon Says; there are five phases.
- Please see the screenshots for the solutions (C and C1).
- Return to the Pawn Shop.
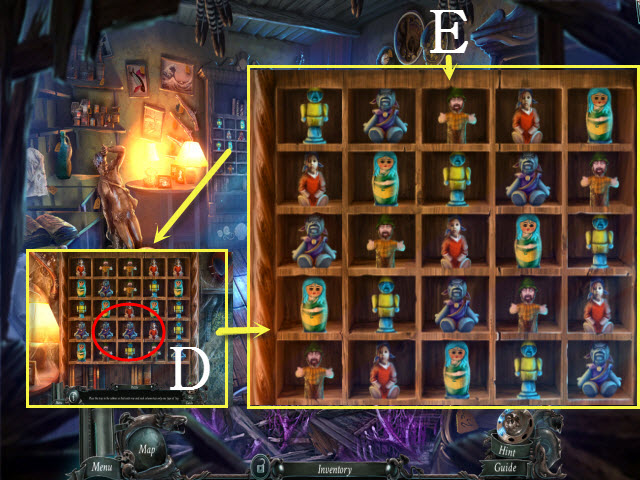
- Examine the cubbies; place the 3/3 TOY SOLDIER on the shelf to activate a puzzle (D).
- To solve the puzzle, arrange the toys so that each row has only one type of toy per row vertically or horizontally.
- Please see the screenshot for the solution (E).
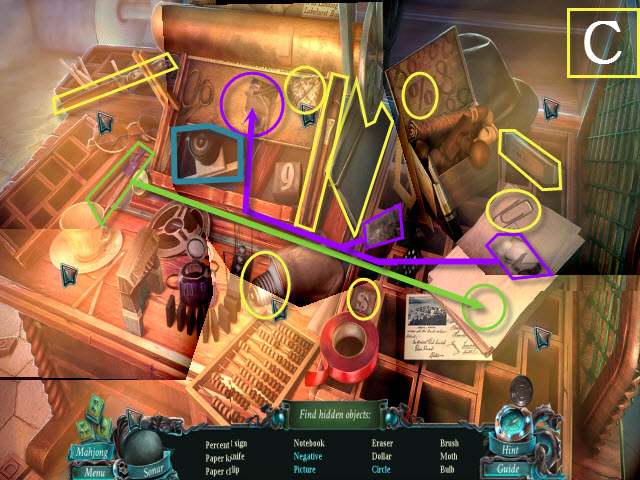
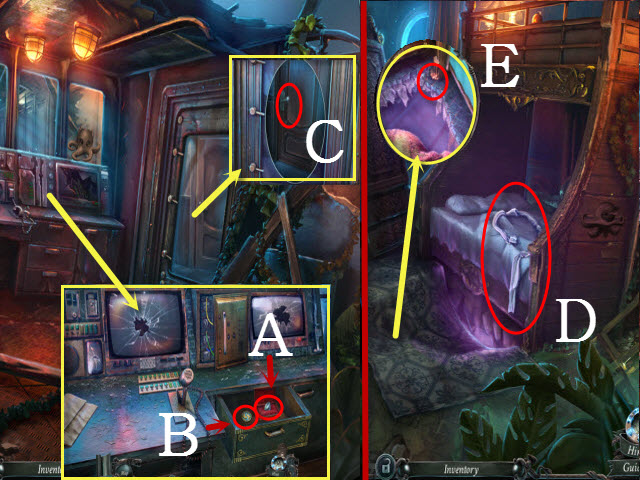
- Examine the doorway to activate a HOP.
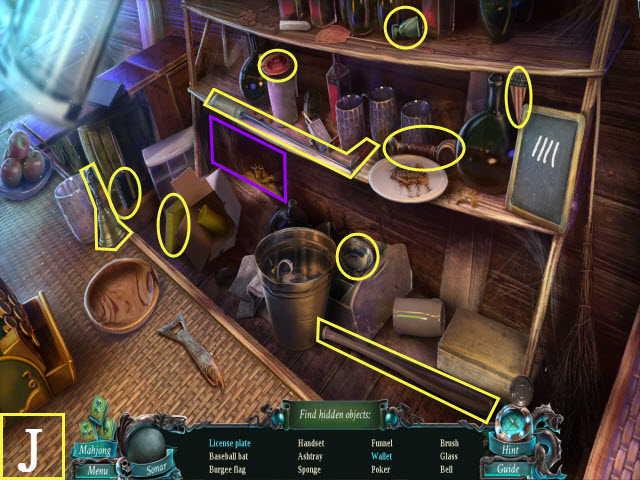
- Find the listed items (E1).
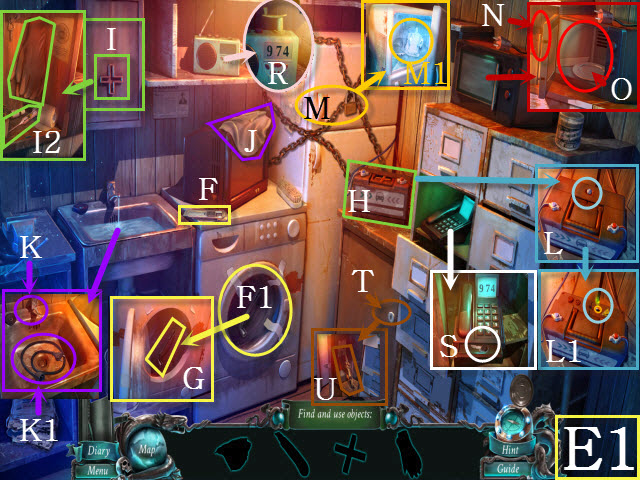
- Take the cutter (F); use the cutter on the tape (F1) and open the door to take the wrench (G).
- Take the red cross (H); place it in the slot (I) and take the rubber gloves and the syringe (I2).
- Take the rag (J); turn off the faucet (K) and use the rag to get the extension cord (K1).
- Use the wrench on the bolt (L); open the lid and use the syringe on the hole to get the syringe with acid (L1).
- Use the syringe with acid on the lock (M); use the rubber gloves on the ice and take the ice block (M1).
- Place the extension cord in the outlet (N) and open the microwave; place the ice block in it and close the door to get the crank (O).
- Place the crank on the radio and turn it to get the 974 clue (R); dial 974 on the phone and take the key (S).
- Use the key on the cabinet (T) lock to get the BLOWTORCH (U).
- Return to the Fountain.

- Examine the hatch; move the moss and use the BLOWTORCH on the hatch to open it (V).
- Enter the Underground.
- Look at the stove; move the pot lid and examine the pot.
- Select all of the items in the pot; touch the satchel to receive the CASH REGISTER BUTTONS (W).
- Examine the books and move the cobwebs and the old paper; take the BLUNDERBUSS LOCK (X).
- Examine the table; select the map (Y).
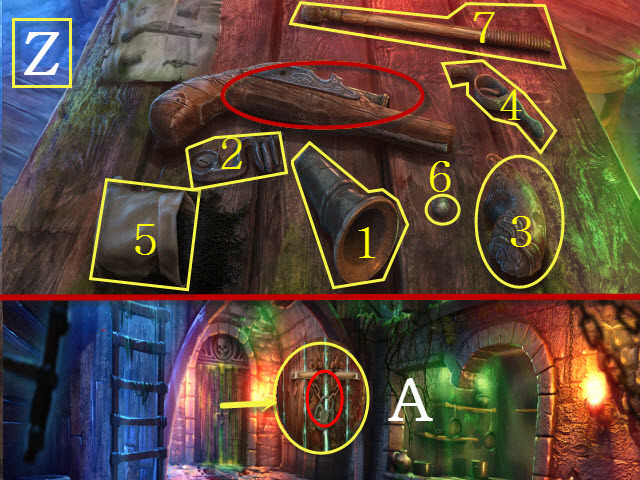
- Examine the table; place the BLUNDERBUSS LOCK on it.
- Assemble the blunderbuss; place each object in this order: 1-7 (Z).
- Take the BLUNDERBUSS PISTOL.
- Examine the door; use the BLUNDERBUSS PISTOL on the padlock (A).
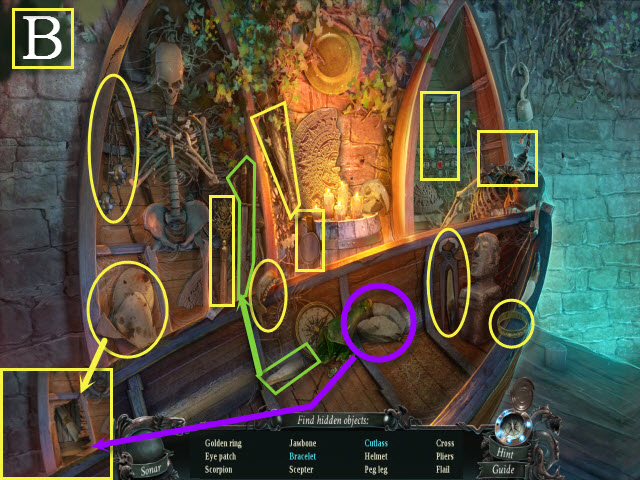
- Enter the Catacombs; examine the boat to activate a HOP.
- Play the HOP to receive the BELLOWS (B).
Chapter 4: The Labyrinth
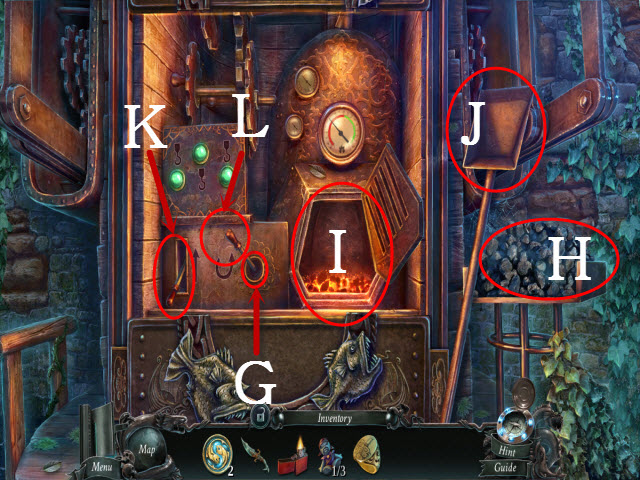
- Examine the pot and use the DAGGER on the tar (C); take the POT OF HARD TAR (D).
- Walk down.
- Examine the oven; open it and select the hornet nest.
- Use the BELLOWS on the hornets (E).
- Take the ONE-EYED SKULL (F).
- Return to the Catacombs.
- Examine the door; place the ONE-EYED SKULL on it to activate a puzzle.
- To solve the puzzle, slide the gems into the corresponding colored slots.
- Please see the screenshot for the solution: 8, 7, 4, 1, 2, 3, 6, and 5 (G).
- Enter the Labyrinth.
- Move the two planks to receive the GAS CYLINDER (H).
- Return to the Tavern.
- Examine the bar to activate a HOP (I).
- Play the HOP to receive the BASEBALL BAT (J).
- Examine the register; place the CASH REGISTER BUTTONS on it to activate a puzzle.
- To solve the puzzle, arrange like buttons vertically so that the images on the left and right are correct.
- Please see the screenshot for the solution (K).
- Take the 2/3 PRINTING MATRIX PIECES (L) and the DECODER PLATES (M).
- Return to the Archway; examine the stall to activate a HOP.
- Play the HOP to receive the COMB (O).
- Return to the Street.
- Examine the mannequin; use the COMB on the mannequin's hair to get the HAIR BRISTLE (P).
- Return to the Underground and examine the oven.
- Place the GAS CYLINDER in the oven; select the cylinder (Q) and turn the oven dial (R).
- Use the LIGHTER on the burner and place the POT OF HARD TAR on it; use the BASEBALL BAT on the pot (S).
- Place the HAIR BRISTLE with the baseball bat and then use the LIGHTER on it to receive the TORCH (T).
- Return to the Labyrinth.
- Use the TORCH on the scene (U).
- Walk forward.
- Return to the Pawn Shop.
- Examine the desk; look at the map (V).
- Place the decoder plates on the map to activate a puzzle (W).
- To solve the puzzle, choose matching pairs until only three symbols remain (X).
- Take the STRANGE CODE (Y).
- Return to the Labyrinth.
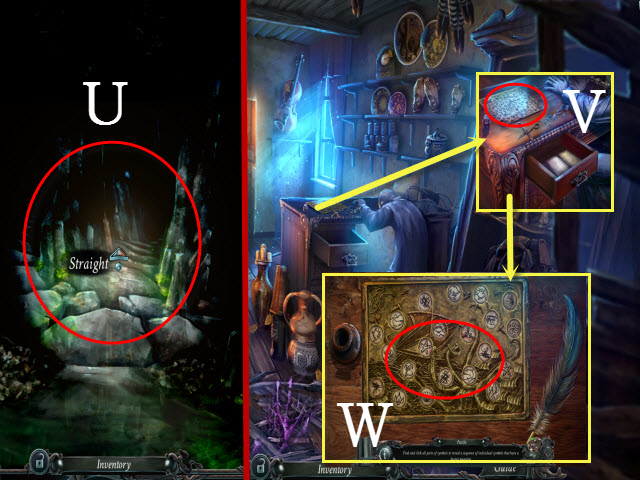
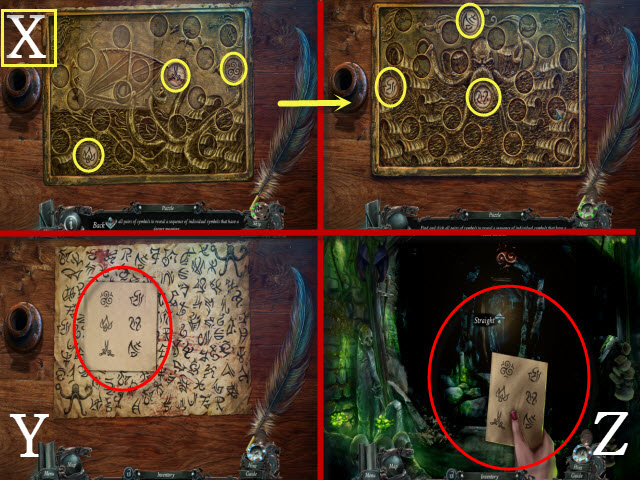
- Use the STRANGE CODE on the scene and follow the symbols to navigate the tunnels (Z).
- Order: straight, right, straight, left, right, and straight.
Chapter 5: The Shipwreck Cemetery
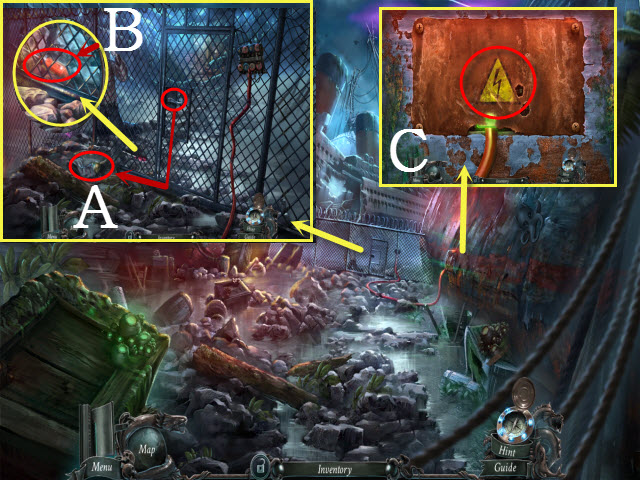
- Examine the gate; select the handle to get the HOOK (A).
- Examine the fence; use the HOOK to get the SCREWDRIVER (B).
- Examine the circuit breaker; use the SCREWDRIVER on the screws to activate a puzzle (C).
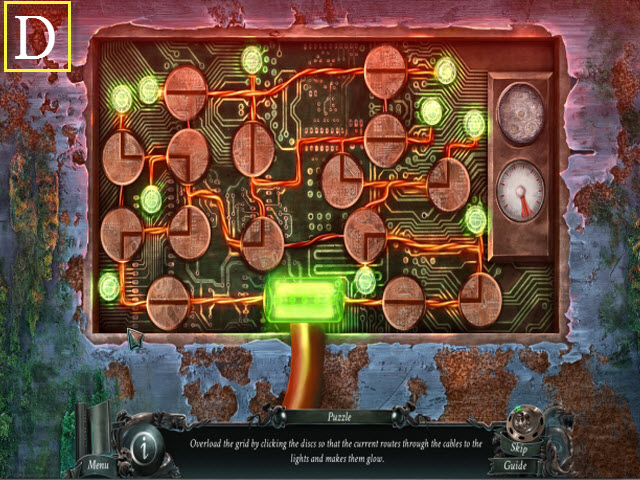
- To solve the puzzle, turn the knobs so that all the green lights are lit.
- Please see the screenshot for the solution (D).
- Examine the gate; open the door and enter the Foyer.
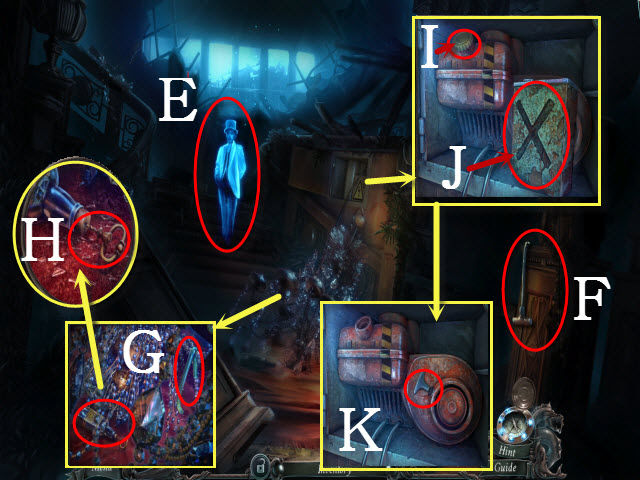
- Talk to the ghost (E).
- Take the STARTER CORD (F).
- Examine the floor and take the TUBE (G); look at the bottle and take the CORKSCREW (H).
- Examine the panel; remove the nozzle (I) and take the EMPTY FUEL CAN (J).
- Remove the old starter cord (K).
- Walk down.

- Examine the tank; use the CORKSCREW on the cork (L).
- Place the TUBE and the EMPTY FUEL CAN next to the tank; pick up the FULL FUEL CAN (M).
- Walk forward.
- Examine the generator and use the FULL FUEL CAN on the nozzle (N); place STARTER CORD in the slot and then pull it three times (O).
- Examine the beams (P); select the stairs to activate a HOP.
- Select the suitcase handle; use the crowbar to open the suitcase (Q).
- Play the HOP to receive the IMPROVISED ROPE (R).
- Examine the boards; use the IMPROVISED ROPE on them (S).
- Walk up to the Bridge.
- Talk to the ghost (T).
- Pick up the 1/3 CABLES (U).
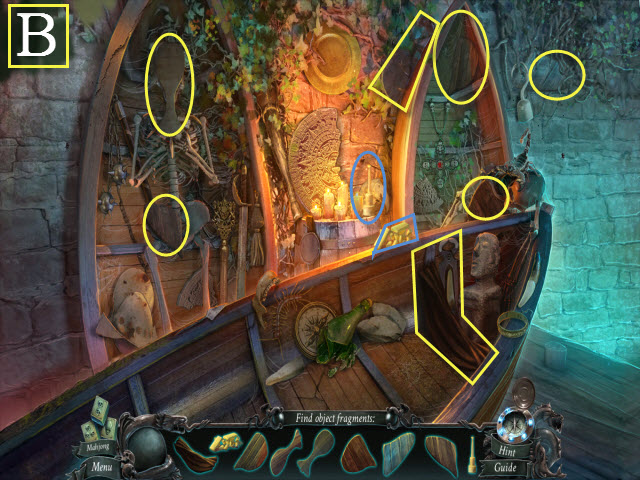
- Examine the display case and open the doors; take the 2/3 CABLES (V) and the HARPOON GUN (W).
- Examine the console and take the 3/3 CABLES (X).
- Open the console panel and look inside it; place the 3/3 CABLES to activate a puzzle (Y).
- To solve the puzzle, place the wires in various slots to complete the image.
- This puzzle is random; please see the screenshot for one possible solution (Z).
- Open the jewelry box; take the DIAMOND (A) and the 5/12 GOLDEN FISH (B).
- Examine the door and use the DIAMOND on the glass; move the glass and then turn the handle (C).
- Enter the Passenger Cabin.
- Talk to the ghost.
- Move the sheet; take the SHEET ROPE (D).
- Move the rug and examine the hole; hang the SHEET ROPE from the beam (E).
- Enter the Captain's Cabin.
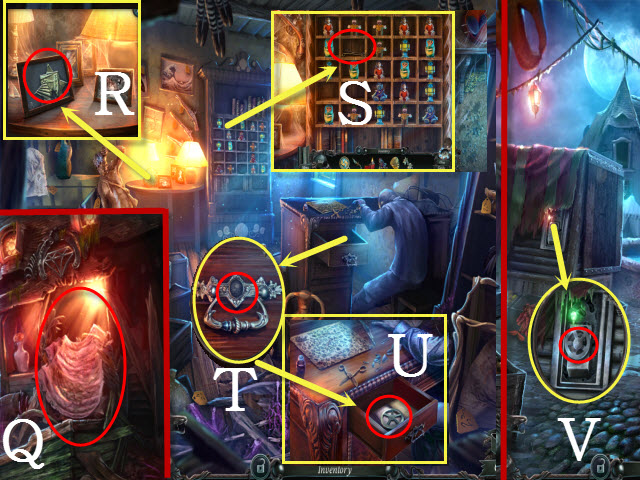
- Examine the table; take the STONE PICTURE (F).
- Examine the desk; take the KNOB (G).
- Open the book; examine it and take the 3/3 PRINTING MATRIX PIECES (H).
- Return to the Foyer.
- Examine the desk; take the RED BOOK (I) and place the KNOB in the slot (J).
- Turn the knob and look at the book (K).
- Return to the Passenger Cabin; examine the bed to activate a puzzle.

- To solve the puzzle, arrange the tiles so the mathematical equations are true.
- Please see the screenshot for the solution (L).
- Examine the compartment to activate a HOP.
- Use the lockpick on the suitcase (green).
- Play the HOP to receive the PRINTING INK (M).
- Return to the Underground.
- Examine the bookshelf; place the RED BOOK on it to activate a puzzle.
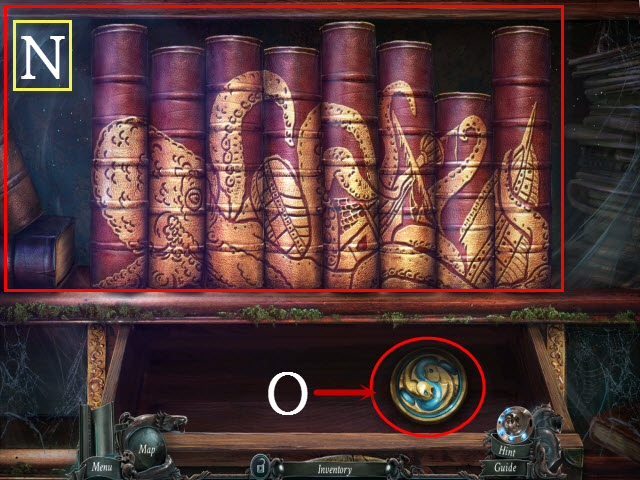
- To solve the puzzle, arrange the books to form a complete image.
- Please see the screenshot for the solution (N).
- Take the GOLDEN FISH 6/12 (O).
- Return to the Fountain; examine the stall to activate a HOP.
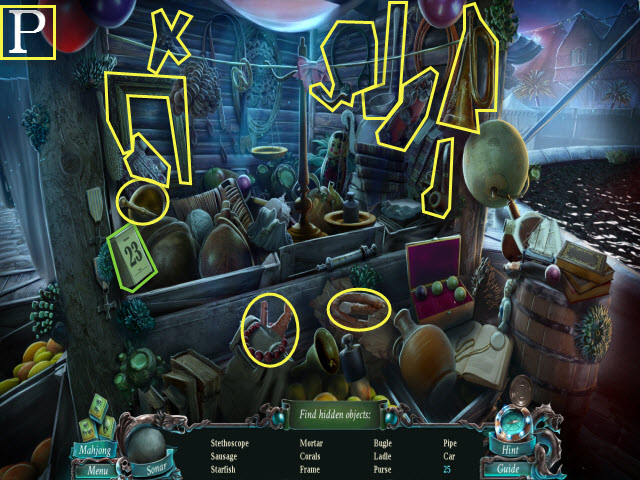
- Play the HOP to receive the STETHOSCOPE (P).
- Return to the Hideout.
- Examine the bulletin board; move the notes and place the 3/3 PRINTING MATRIX PIECES on it to activate a puzzle.
- To solve the puzzle, arrange the pieces to form a complete image.
- Please see the screenshot for the solution (Q).
- Take the MATRIX (R).
- Walk down; examine the table to activate a HOP.
- Play the HOP.
- You will receive the INSULATING TAPE (S).

- Examine the press; use the PRINTING INK (T) on the nozzle and place the MATRIX (U) and the INSULATING TAPE on it (V).
- Turn the valve (W) and take the RING'S PATTERN (X).
- Return to the Statue.
- Examine the junk to activate a HOP.
- Play the HOP to receive the SLEDGEHAMMER (Y).
- Enter the Secret Chamber.
- Move the statue; examine the painting and place the STONE PICTURE on it to activate a puzzle (Z).
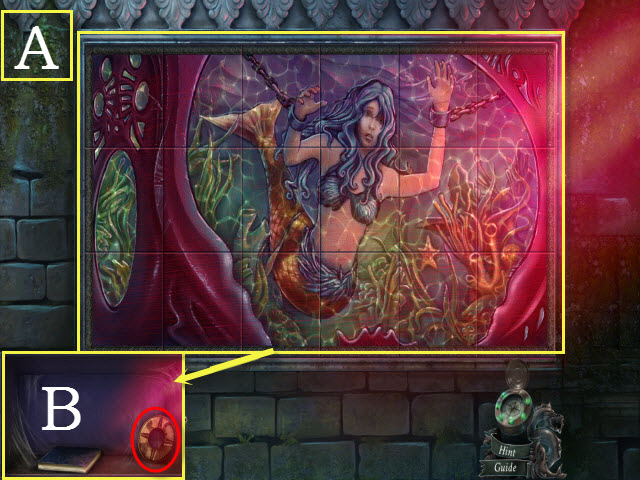
- To solve the puzzle, swap the tiles to form a complete image.
- Please see the screenshot for the solution (A).
- Take the STONE RING (B).
- Return to the Passenger Cabin.
- Examine the armoire; use the SLEDGEHAMMER on the crack three times (C).
- Examine the hand; move it twice and take the SAFE DIAL (D).
- Walk down to the Bridge.
- Examine the safe; place the STETHOSCOPE and the SAFE DIAL on it to activate a puzzle (E).
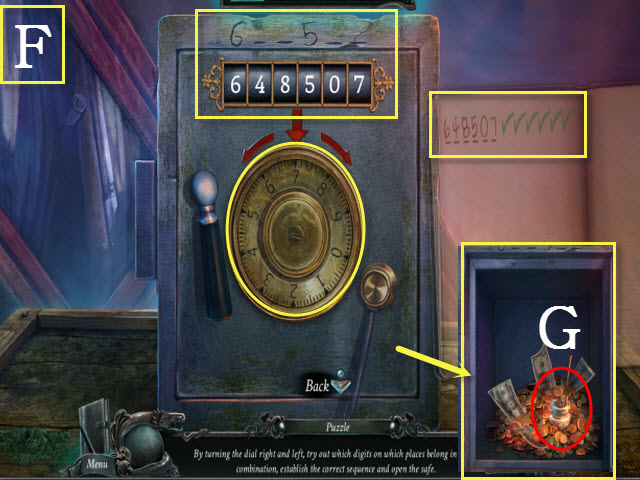
- To solve the puzzle, try various numbers until you discover the combination.
- Please see the screenshot for the solution (F).
- Take the STICKY RESIN (G).
- Return to the Captain's Cabin.
- Talk to the Fisherman.
- Examine the door; place the STONE RING and the RING'S PATTERN on it to activate a puzzle.
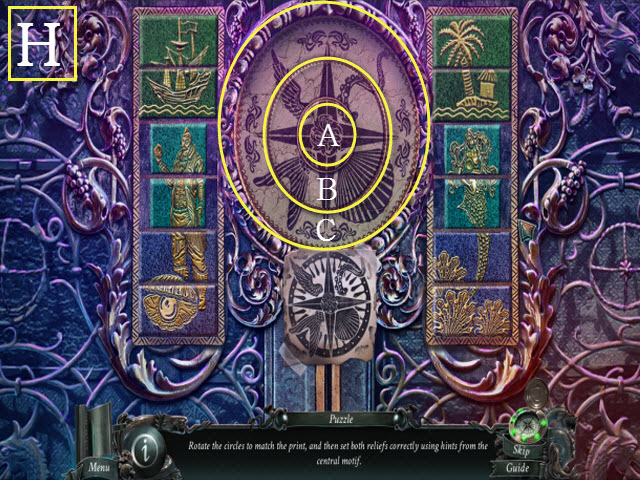
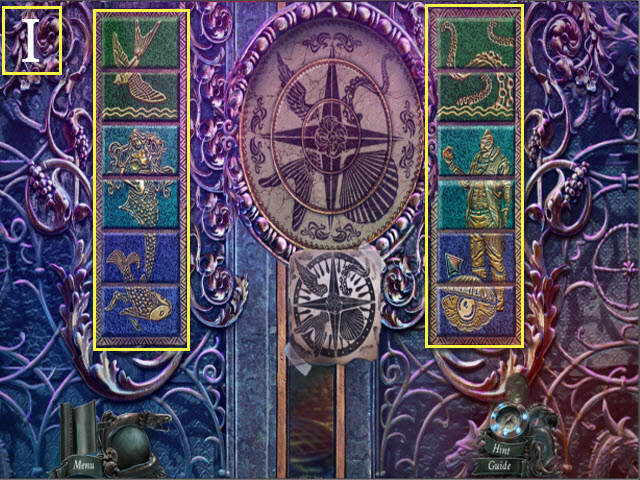
- Phase 1: Align B, C, and then A to match the image on the bottom (H).
- Phase 2: Flip the tiles to complete the images; please see screenshot for the solution (I).
- Enter the Prison.
Chapter 6: The Lighthouse
- Talk to the Fisherman (J).
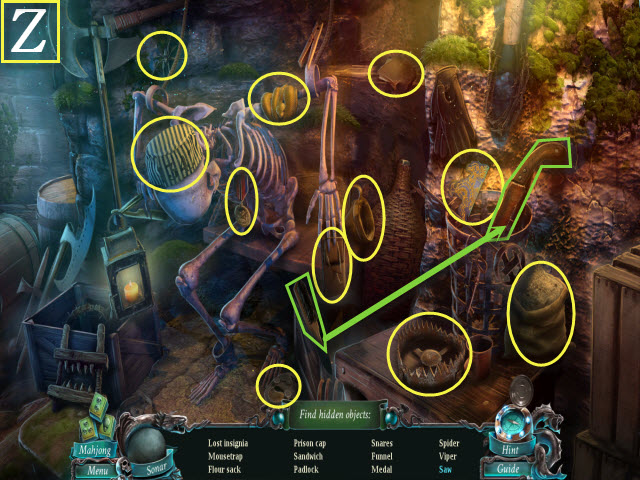
- Examine the skeleton to activate a HOP (K).
- Play the HOP to receive the CHAIN (L).
- Walk upstairs to the Storeroom.
- Move the sheet; examine the statue and place the CHAIN on the leg (M).
- Move the sheet; examine the chair and pick up the OLD CHAIN (N).
- Examine the trapdoor; place the OLD CHAIN on it (O).
- Examine the statue and select the chain (P); move the statue twice (Q).
- Walk upstairs to the kitchen; open the pantry door and examine it to activate a HOP (R).
- Play the HOP to receive the GARDEN SHEARS (S).
- Examine the door; open the hatch and talk to the Guardian (T).
- Examine the table; use the DAGGER (U) on the can and take the COFFEE SYMBOL (V).
- Examine the workbench; take the KEYS (W).
- Return to Prison.
- Examine the rubble; move the stones to get the 1/3, 2/3, and 3/3 GOLDEN FLAKES (X).
- Examine the cell and use the KEYS on the lock (Y).
- Examine the cot and move the mattress; take the ICE PICK (Z).
- Return to the Catacombs.
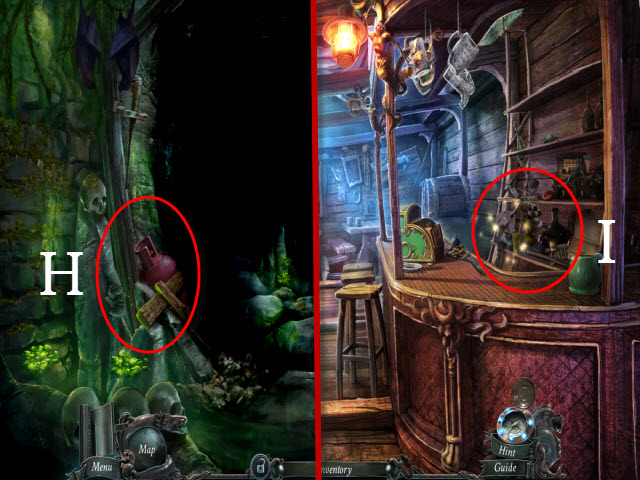
- Examine the vines; use the GARDEN SHEARS to get the FLOWER STALK (A).
- Examine the boat to activate a HOP.
- Play the HOP to receive the PLIERS (B).
- Return to the Passenger Cabin.
- Examine the bed to activate a HOP.

- Play the HOP to receive the CHINA CUP (C).
- Return to the Storeroom.
- Examine the chair; use the KEYS on the lock and select the two latches to open it (D).
- Take the HYDROGEN PEROXIDE (E).
- Move the cloth; examine the crate and use the PLIERS on the nails (F).
- Open the crate and place the COFFEE SYMBOL in the slot (G).
- Open the box and take the COFFEE GRINDER (H).
- Examine the tin; use the DAGGER on the lid to get the COFFEE BEANS (I).
- Return to the Kitchen.
- Examine the workbench; place the HYDROGEN PEROXIDE, the FLOWER STALKS, and the 3/3 GOLDEN FLAKES on it to activate a puzzle.
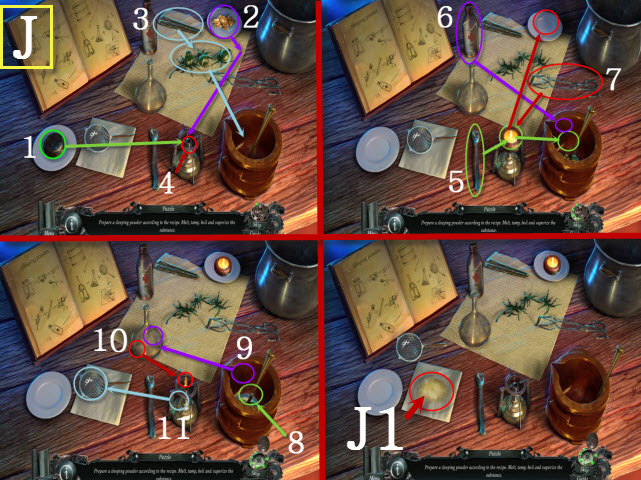
- Please see the screenshot for the correct order 1-11 (J).
- Take the SLEEPING POWDER (J1).
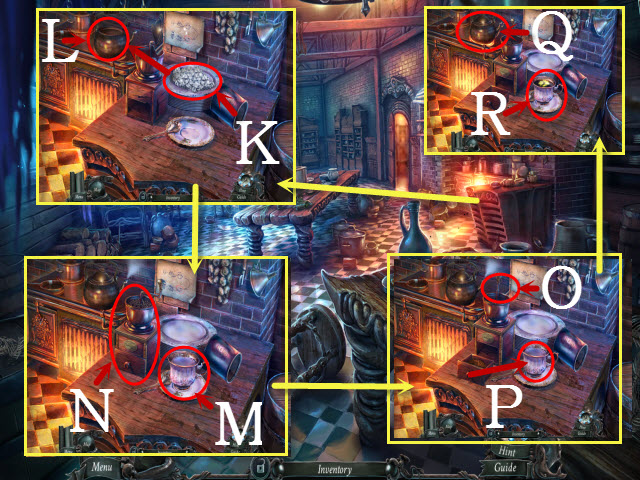
- Examine the table; use the ICE PICK on the ice (K).
- Open the kettle; place the ice in it (L).
- Place the CHINA CUP on the plate (M); place the COFFEE GRINDER and the COFFEE BEANS on the mechanism (N).
- Select the crank (O); place the ground coffee in the china cup (P).
- Select the kettle (Q).
- Place the SLEEPING POWDER in the china cup and take the SPIKED COFFEE (R).

- Examine the door; give the guard the SPIKED COFFEE (S).
- Select the door handle to enter the Yard (T) and walk right to the Quarters.
Chapter 7: Find Calliope
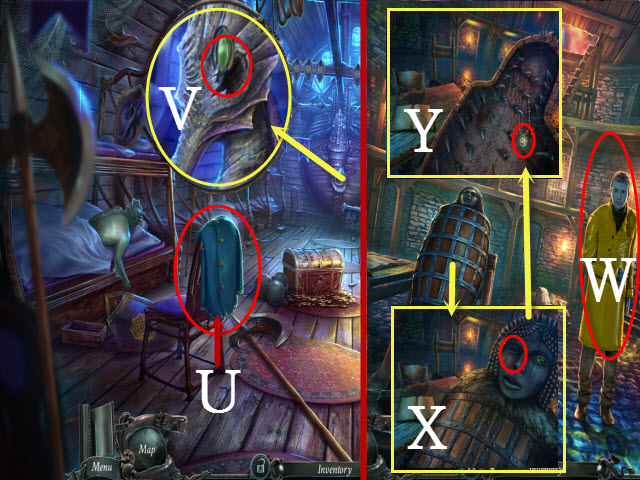
- Take the UNIFORM (U).
- Examine the seahorse; use the DAGGER on its eye to get the GREEN EYE (V).
- Return to the Prison.
- Give the UNIFORM to the Fisherman (W).
- Examine the sarcophagus; place the GREEN EYE in the socket (X).
- Take the 7/12 GOLDEN FISH (Y).
- Examine the skeleton to activate a HOP.
- Play the HOP to receive the GOLD INSIGNIA (Z).
- Return to the Yard.
- Select the Fisherman (A).
- Talk to the Fisherman (B).
- Walk forward to the Embankment.
- Take the CHEST PANEL (C).
- Walk down.
- Examine the carriage and place the GOLD INSIGNIA on it; select the morphing dolphin to activate a puzzle (D).
- To solve the puzzle, find the ten morphing figures within the picture.
- Please see the screenshot for the morphing locations (E).
- Examine the trunk; take the RING (F).
- Examine the door; open the panel and examine it (G).
- Place the RING on the mechanism (H) and select the button (I).
- Enter the elevator.
- Take the TREASURY KEY (J).
- Walk down.
- Examine the door and move the bar; place the TREASURY KEY in the keyhole (K).
- Move the lock and open the door (L).
- Examine the Treasury to activate a HOP.
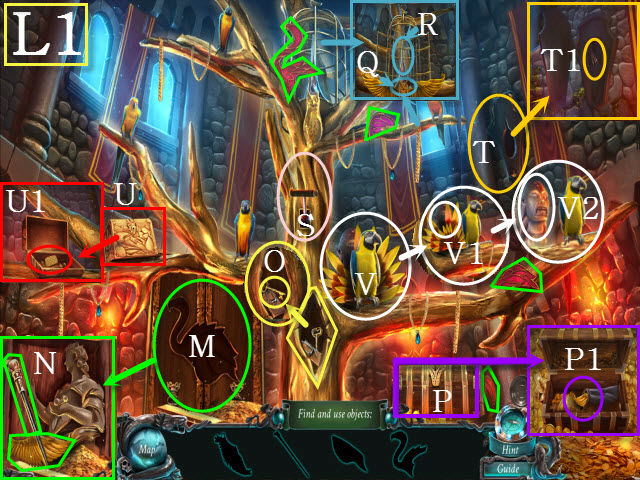
- Find the listed items (L1).
- Place the four flamingo parts (green) on the flamingo (M); open the door and take the cane and the wing (N).
- Use the cane on the mousetrap to get the key (O).
- Use the key on the chest (P); open the bag and take the wing (P1).
- Place the wings on the owl (Q); select the owl and take the trophy (R).
- Pull the lever (S).
- Place the trophy on the wall mount and select it (T); take the lock picks (T1).
- Use the lock picks on the keyhole (U) and take the cracker (U1).
- Give the cracker to the parrot (V); take the feather and place it with the plumage (V1) to get the BRASS IDOL (V2).
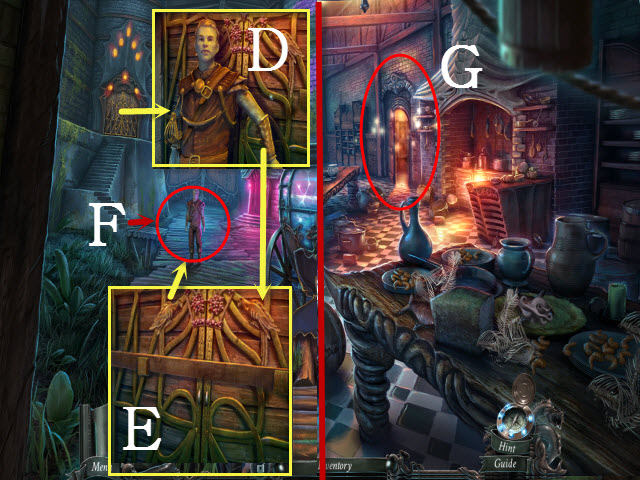
- Talk to the Fisherman (D).
- Select the door (E).
- Talk to the Fisherman (F).
- Return to the Kitchen.
- Examine the pantry to activate a HOP (G).
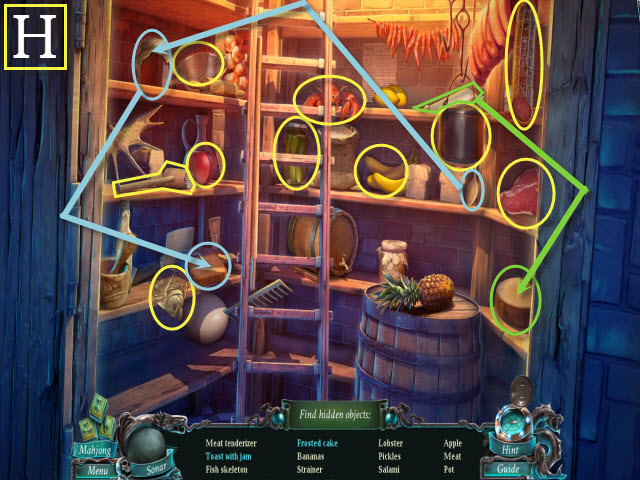
- Play the HOP to receive the MEAT (H).
- Examine the idols; place the BRASS IDOL with them (I).
- Take the 8/12 GOLDEN FISH (J).
- Return to the Apartment.
- Talk to Calliope (K).
- Examine the table; take the LEVER (L).
- Examine the fireplace; take the FIRE POKER (M).
- Examine the pillar; place the LEVER on the slot and pull it (N).
- Walk upstairs to the Gong.
Chapter 8: Get Kraken!
 #
#
- Examine the altar; take the WOODEN SEAL (O).
- Examine the stand; move the cover and look at the note (P).
- Take the CLOCK FACE (Q).
- Walk down.
- Examine the dresser; place the WOODEN SEAL in the slot (R) to activate a HOP.
- Play the HOP to receive the GONG PIECES (S).
- Walk upstairs.
- Examine the gong; place the GONG PIECES on it to activate a puzzle.
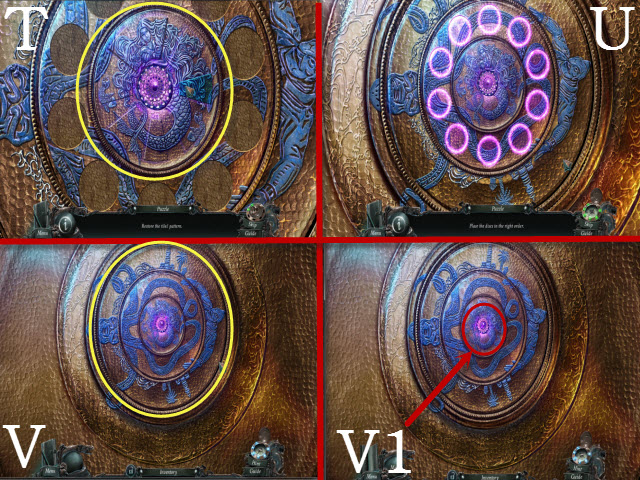
- Phase 1: Arrange the pieces to create a whole image (T).
- Phase 2: Swap the tiles to form a whole image (U).
- Phase 3: Align the dials to create a whole image (V).
- Take the CHEST SEAL (V1).
- Return to the Yard.
- Examine the satchel; use the HARPOON GUN on it (W).
- Examine the satchel; open it to get the 9/12 GOLDEN FISH (X).
- Walk right to the Quarters.
- Examine the fish tank; place the MEAT (Y) in it and use the FIRE POKER to get the 10/12 GOLDEN FISH (Z).
- Examine the chest; place the CHEST PANEL on it (A).
- Open the chest and look at the note; use the STICKY RESIN on the glass shards to get the STAINED-GLASS DISK (B).
- Return to the Captain's Cabin.
- Examine the stained-glass window; place the STAINED-GLASS DISK in the slot to activate a puzzle (C).
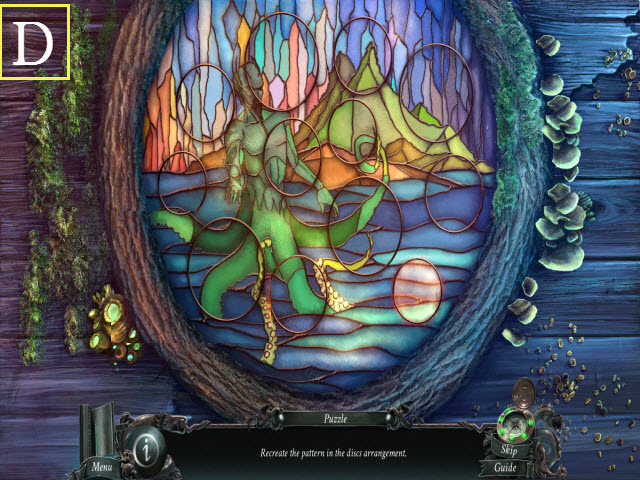
- Rotate the puzzle pieces to create a whole image.
- Please see the screenshot for the solution (D).

- Examine the floorboards and use the DAGGER on them; open the tin and take the 11/12 GOLDEN FISH (E).
- Return to the Foyer; examine the suitcases to activate a HOP (F).
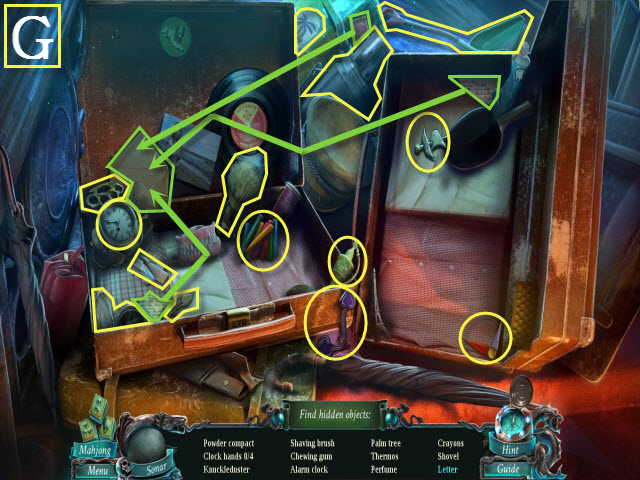
- Play the HOP to receive the CLOCK HANDS (G).
- Examine the clock; place the CLOCK FACE and then the CLOCK HANDS on it to begin a puzzle.
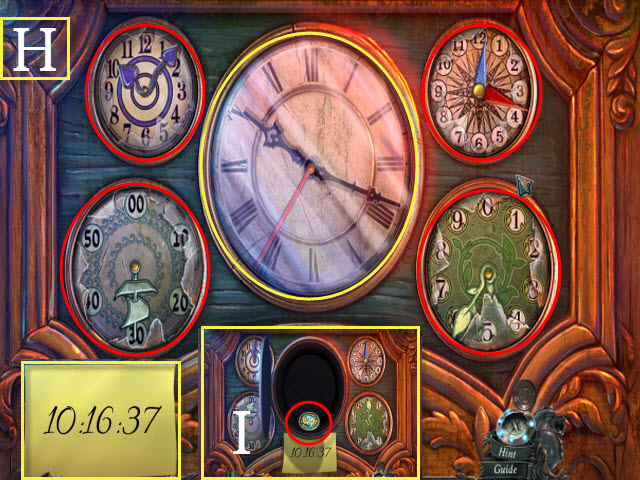
- To solve the puzzle, align the hands so they match the note.
- Please see the screenshot for the solution (H).
- Take the 12/12 GOLDEN FISH (I).
- Return to the Captain's Cabin.
- Examine the chest and place the 12/12 GOLDEN FISH in the slots (J); place the CHEST SEAL in the slot (K).
- Take the CONCH (L).
- Return to the Yard; take the elevator to the Apartment.
- Talk to the Fisherman (M).
- Walk upstairs.
- Examine Calliope; use the DAGGER on the rope three times (N).
- Give the CONCH to Calliope (O).
- Congratulations! You have completed Nightmares from the Deep: The Siren's Call!
Created at: 2013-08-16