

Walkthrough Menu
- General Tips
- Chapter 1: Rebel
- Chapter 2: Sherwood Forest
- Chapter 3: Town Center Notice Board
- Chapter 4: Back Alley Gate (Baker’s Quest)
- Chapter 5: The Fields
- Chapter 6: Open the Bell Tower (Priest’s Quest)
- Chapter 7: The Bishop’s Treasure
- Chapter 8: Time Out for Gold
- Chapter 9: Start the Market Quest
- Chapter 10: To the Docks
- Chapter 11: The Ship
- Chapter 12: Build a House (Marley Quest)
- Chapter 13: Sawmill
- Chapter 14: Start Robin’s Quest
- Chapter 15: The Jail
- Chapter 16: The Castle
- Location of all Pardon Pieces
- How to Acquire the Special Abilities
General Tips
- This is a Hidden Object Adventure game. In addition to the items on the Find List, you must find Key Items that go into your Inventory Tray so they can be used later.
- There is no timer.
- Use the MENU tab in the lower left to return to the Main Menu.
- The game autosaves automatically.
- Most locations have a main scene and 1 or more additional zoom scenes. The zoom scenes will sparkle and your cursor will change to a twirling magnifying glass in that area. When you click on the sparkles the zoom scene will open. Many areas do not sparkle until you have completed other tasks, so be alert to new sparkles during a chapter.
- You can travel to unlocked scenes in any order you like, and revisit scenes as much as you like. If you have done everything you can in a location, there will be an AREA CLEAR sign at the top of the screen. You may still need to travel through that area to get to another location.
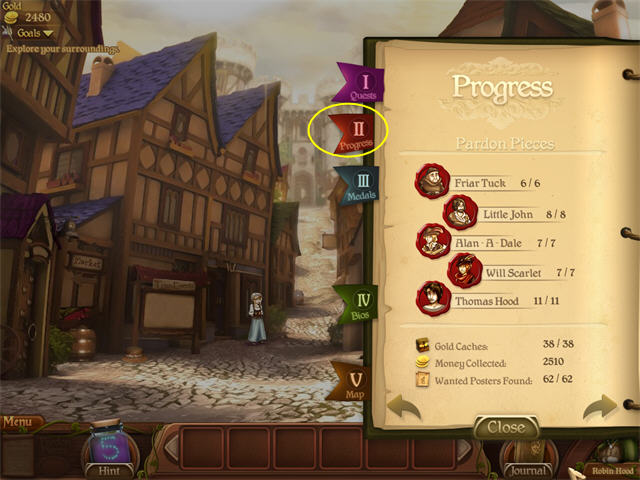
- Because different players will do things in different order, there’s no fixed length to the game. If you want to get a sense of how far along you are, check the Journal to see how many PARDON PIECES you have collected. You will need to collect all 62 to complete the game, so if you’ve collected 25 so far you know you have a lot of gameplay left.
General Tips for the Inventory Tasks
- This game has many adventure elements where you must complete tasks important to the story, like opening a locked chest. Inventory tasks cannot be skipped.
- You will get hints about inventory tasks from the comments that Robin makes in the lower right.
- The spoken dialogue sometimes has more information than the written text. You can turn the dialogue value down if you don’t want these extra clues by using OPTIONS from the Main Menu.
- Key Items are needed to complete the inventory tasks. Key Items may appear on the Find List in the zoom scenes, be stand alone items in the main scene, or be given to you automatically when you complete other tasks. For example, opening a treasure chest may add several Key Items to your inventory tray.
- Key Items are not identified ahead of time, so check your inventory at the end of each Hidden Object Scene and Quest to see if any new items have been added.
- Key items may be used in the scene where they are found or later in the game.
- If you collect more than one of the same kind of item, for example 2 SILVER NUGGETS, they will go into the same tray in your inventory.
- If you pick up an item from your Inventory Tray and then decide you don’t want to use it, click on any empty space in the tray to put it back.
- If there is a spot in the scene where you can use a Key Item, the cursor will change to gears.
- The Inventory Tray is always open in the main scenes. Use the arrows on the left and right to scroll through your inventory.
- To use a Key Item, click on it in the Inventory Tray, move the cursor to where you want to use it, then click again.
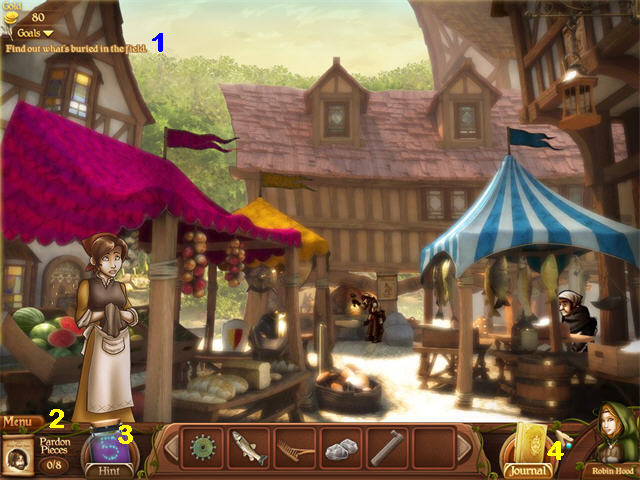
- The task list (1) in the upper left of the screen will remind you what your current objectives are.
- The lower left counter (2) shows you how many PARDON PIECES you have collected for the current Merry Man.
- The Hint Jar (3) shows you how many HINTS you have available. You can use HINTS during main scenes to help with inventory tasks.
- For more detail on the current Quest or to check your progress, open the Journal (4) in the lower right. Some secret codes will also be recorded in the Journal.
General Tips for the Hidden Object Scenes
- All objects are generally the right color and size.
- You may only be able to see part of an object.
- Click on the HINT in the lower left if you need a hint in a Hidden Object Scene. This will shoot purple smoke towards one of the items from the Find List.
- The number on the HINT jar shows you how many hints you have available.
- If you need more hints, capture more FIREFLIES. 3 FIREFLIES = 1 hint.
- The Find List will be different for different players, but the Key Items will always be the same.
- When you have done everything you can in a zoom scene, it will close automatically.
- If you want to leave a zoom scene on your own, click on the X in the upper right corner to return to the main scene. You will need to do this if you want to go get more Hints before completing the scene.
General Tips for the Bonus Items
- There are four kinds of Bonus Items in the game: Pardon Pieces, Gold Coins, Wanted Posters, and Fireflies.
- Quite often the bonus items are hidden behind or inside something else. For example, you might have to move books on a shelf to find gold coins behind them.
- If you don’t use the walkthrough, move your cursor carefully across the scene, looking for places where it turns into a hand or gears. These will often be optional activities that reveal bonus items.
- You can see how many bonus items you’ve collected by checking the Journal in the lower right.
- FIREFLIES look like round blue-white dots that move around the main scenes. Click on one to capture it.
- Once you’ve have done all of the required tasks and collected all the bonus items in a scene, the words “Area Clear” will appear at the top of the screen in that location.
- If you’ve done all the required tasks, you can use a HINT to reveal a bonus item like a WANTED POSTER.
General Tips for Special Abilities
- During the game, Robin will learn several Special Abilities, starting with being able to shoot a bow accurately.
- You will also add more team members, each of whom has a special ability.
- When the cursor turns into a hand holding a star, click there to open the medallion showing the available Special Abilities.
- Choose the Special Ability you want to use, then click. You will be returned to the scene with that Special Ability activated.
- You may find a place in the scene where you need a Special Ability that you don’t have yet. In that case you will have to come back when you have acquired that Special Ability, usually by adding the team member who has it.
General Tips for When you get Stuck
- If a scene says AREA CLEAR at the top, there is nothing else to do in that location. It’s only open so that you can travel through it to get to other areas.
- If a scene does not say AREA CLEAR, but you can’t figure out what you’re supposed to do there, there are several possibilities.
- Look for sparkles first. These reveal zoom scenes with puzzles or Hidden Object Scenes.
- If there are no sparkles, look for places where the cursor changes.
- You can use a HINT to find optional items, like GOLD COINS.
- If you click on the HINT jar and nothing happens, but there’s no Area Clear sign at the top of the screen, that means that you need something from another location before you can complete a task in this one. That might be a Key Item, or something purchased in the Market, or another team member.
Chapter 1: Rebel
- The Prologue told you that Robin (a woman) and her husband were trying to steal a tax cart from the Sheriff, and have been locked in different parts of the Castle. Robin’s goal is to escape and then rescue her husband. You start out in Robin’s Jail Cell.
- WANTED POSTERS are marked in red.
- PARDON PIECES are marked in purple.
- GOLD COIN CACHES are marked in green.
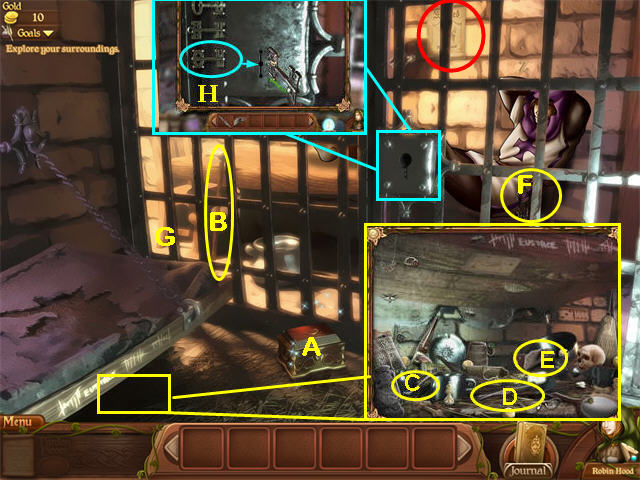
- Open the Chest (A) and then click on it a second time to collect the JAR and the LOCKET.
- The JAR will become the HINT JAR in the lower left of the screen. The LOCKET will be the Skip icon for the puzzles.
- Complete the Hidden Object Scene under the Bed and collect the BONE (C), DINNER KNIFE (D) and CLOTH (E).
- Use the BONE to collect the CANE (B).
- Use the CANE to collect the guard’s KEYS (F).
- Use the KEYS on the Gate. This will trigger a zoom scene with a mini-game.
- Take the KEYS from your inventory and try them on the lock in the zoom scene. They will separate into three separate Keys.
- There are three Keys on the left in the zoom scene. The trick is that you can use either end of them in the lock. Select the bottom Key (H) and rotate it so that you are inserting the end with three round posts into the lock. The lock will open and you will return to the main scene.
- Once the gate is open, collect the WANTED POSTER (red).
- Exit (G) to the Castle Hallway.
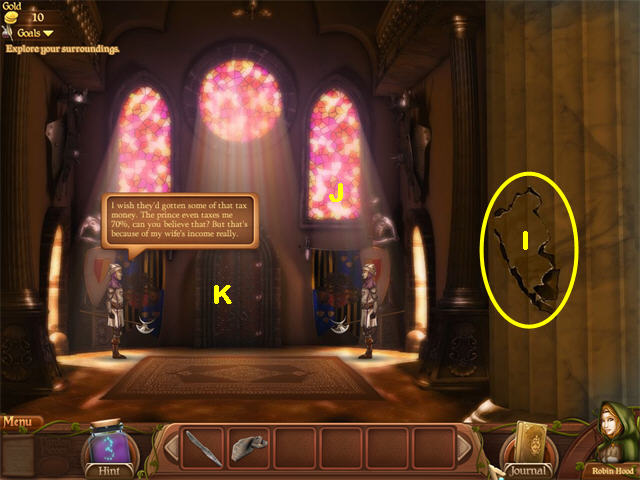
- Two guards are talking. Their conversation is just for fun, you don’t have to listen to all of it.
- Use the KNIFE on the crack in the wall on the right (I). A piece of the wall will come off and go into your inventory as the ROCK.
- Use the ROCK on the right Window (J) and it will break. The guards will run outside.
- Start to go through the door (K) and Friar Tuck will appear to help you. He will give you a very important piece of adv ice—you need to keep the townspeople on your side. This means that you should always help townspeople who ask for help.
Chapter 2: Sherwood Forest
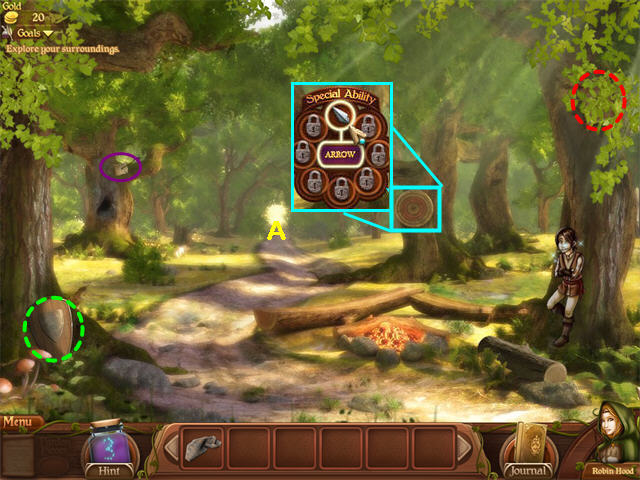
- Click on the Boy. He will offer to teach you archery. Accept.
- Click on the Target on the tree. This will open the medallion of Special Abilities. Select the Arrow.
- Center the bull’s-eye cursor on the Target. Hit the Target to complete your lesson.
- Exit on the path (A) and go to the Gypsy Caravan.
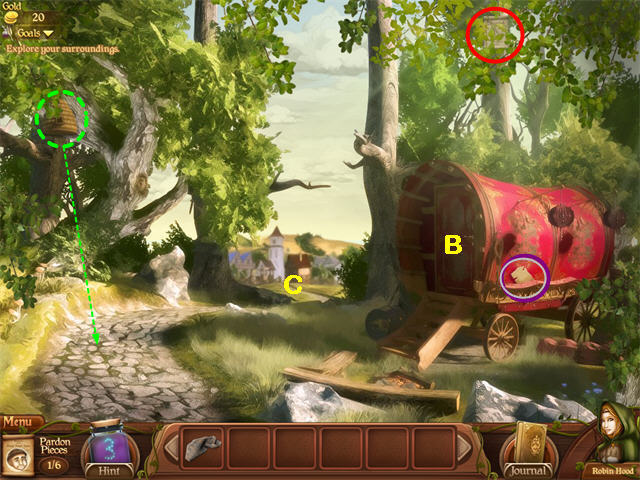
- Fire an Arrow at the Beehive. It will fall down, revealing GOLD COINS.
- Enter the Gypsy Caravan (B).
- This will trigger a conversation with the Gypsy. She will explain that you need to collect FIREFLIES to get extra hints.
- Exit the zoom scene.
- Exit to the Town Center (C).
Chapter 3: Town Center Notice Board
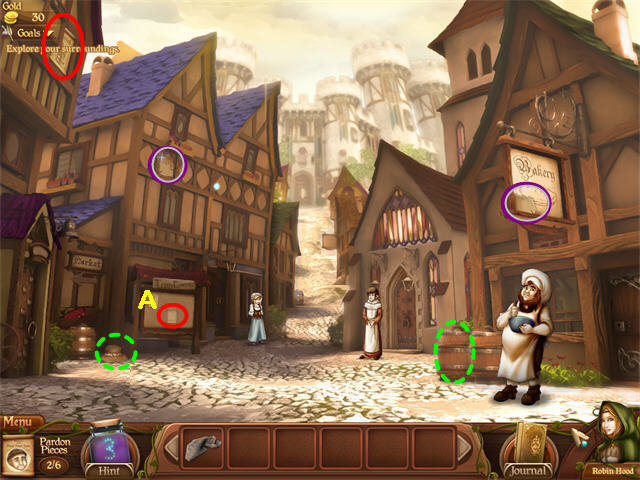
- When you first arrive at the Town Center, you will notice several alternate pathways, the Baker standing outside his shop on the right, and the Notice Board on the left.
- Collect the GOLD COINS from the Barrel on the right.
- There are many possible exits from this scene, but for now stay in the Town Center.
- The Notice Board (A) has optional activities. It’s a good way to earn gold.
- Zoom in on the Notice Board and collect the WANTED POSTER.
- At various points in the game you will see an announcement of an Archery Contest on the board.
- Click on the announcement of the Archery contest so you can read more about it.
- Whenever there is a new announcement of an Archery Contest, you will be able to play the game to earn gold.
- 10 targets will display, one after another. Use your bow to shoot arrows at them.
- Most targets are regular bull’s eye targets, but there are also some wooden animals that may show up: rabbits in the field, ducks and fish on the river, and birds in the air.
- If you hear the man say “Shoot!” but then nothing seems to happen, search the scene carefully for one of the small wooden animal targets. These are easy to overlook.
- At the end of the game, you will get your score, and can decide whether to accept it or try again.
- You can enter each regular Contest only once, and then it will be stamped “Completed.” There are 6 of the regular Contests.
- The Contests become progressively harder. All of them are optional—they’re just a way of earning more gold.
- There is also a never-ending Challenge Round contest. You can enter this one as many times as you like, but you have to pay an entry fee each time.
Chapter 4: Back Alley Gate (Baker’s Quest)
- Begin by talking to the Baker who is standing on the right side of the Town Center. He will explain to you that an evil lord has been overcharging the town for grain. He will ask for your help. You should agree to help him.
- You will start the Quest by going back and forth between two locations, the Bakery and the Back Alley. Different activities will be available at different times, so stay alert for sparkles.
- Go into the Bakery through the door to the right of the Baker.
- Look out the window (F)--there are two guards there.
- Exit to the Back Alley (A).
- You will hear the guards talking about how they used to steal pies off the baker’s window.
- Try talking to the Guards. They will tell you the exits are blocked until Robin Hood is found.
- A new Task has been added to the upper left corner: get past the guards. Remember they liked to steal pies from the Baker’s window?
- Return to the Bakery (G).
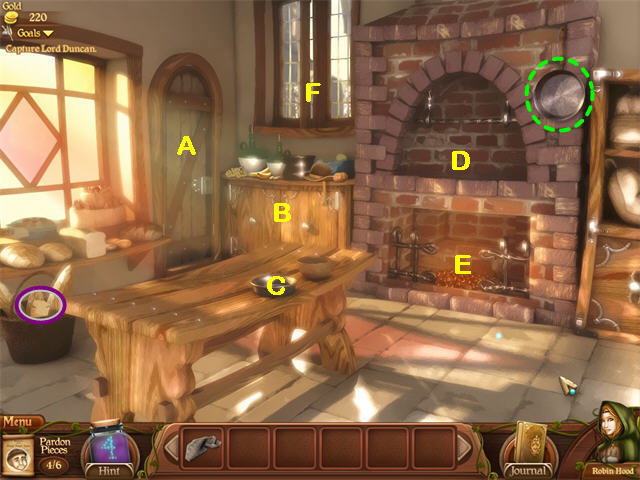
- A Hidden Object Scene is now available in the Cabinet beneath the window (B).
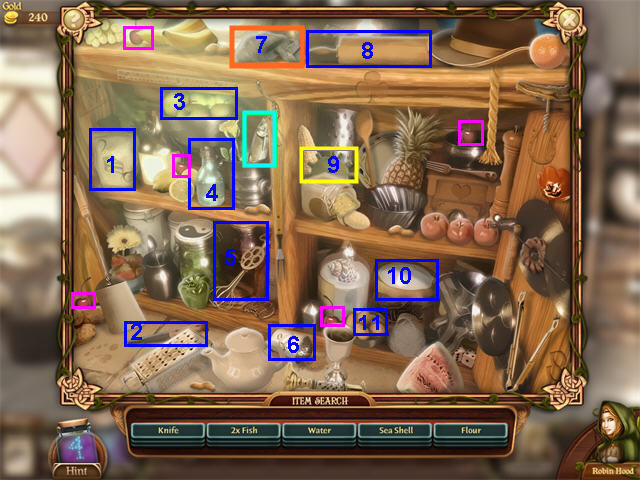
- Collect the items from the Find List, including the GEAR (9), CLOTH (7), and the pie ingredients: SUGAR (1), KNIFE (2), APPLES (3) WATER (4), EGG BEATER (5) CINNAMON SHAKER (6), ROLLING PIN (8), FLOUR (10) AND EGGS (11).
- The INGREDIENTS will all automatically combine into one inventory slot. The CLOTH will go into the same slot as the CLOTH you collected in the Jail Cell, so now there are two CLOTHS in that slot.
- The FISH is marked in cyan.
- The Cherries are marked in pink.
- Put the INGREDIENTS into the silver Pie Pan (C) on the table. This will trigger a mini-game.
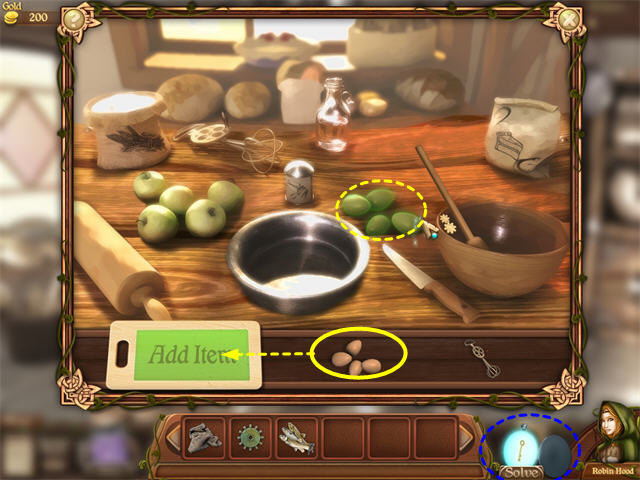
- Should the INGREDIENTS stick on your cursor, click once to get rid of them.
- The order of the ingredients follows a pie recipe in 3 stages. First you will make the bottom crust, then you will cut the apples, then you will make the top crust.
- If you make a mistake in any of the 3 stages, you will start over at the beginning of that stage.
- Once you have completed all the ingredients, you will receive the RAW PIE in your inventory.
- If you prefer, you can skip the game by clicking on the SOLVE Locket in the lower right once it opens to show the Key.
- Put the RAW PIE in the upper part of the brick Oven (D).
- Now you need wood. Exit to the Back Alley.
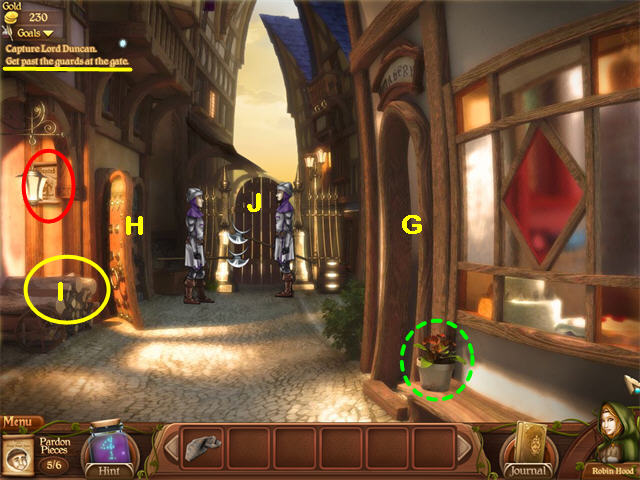
- You see the WOOD (I), but you don’t want to just steal it. Go in the Door (H) just past the wood and talk to the man there. He will offer you some wood if you can scare away some crows. Agree.
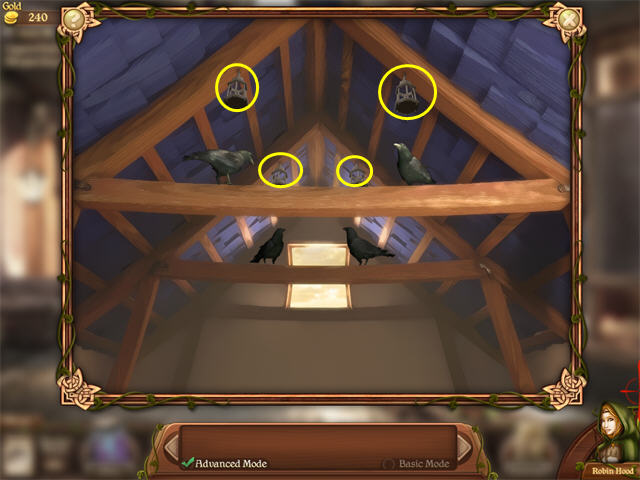
- The woodcutter mini-game will open up. Shoot the 4 Lanterns with arrows, and the Crows will be scared away.
- The woodsmith will tell you you can take some wood. Collect the WOOD and return to the Bakery.
- Put the WOOD in the lower Fireplace (E).
- Remove the BAKED PIE and put it in the Window (F).
- Exit to the Back Alley. The guards will smell the Pie and go over to the Window, leaving the gate unguarded.
- Go through the Gate (J) to the Fields.
Chapter 5: the Fields (Baker’s Quest)
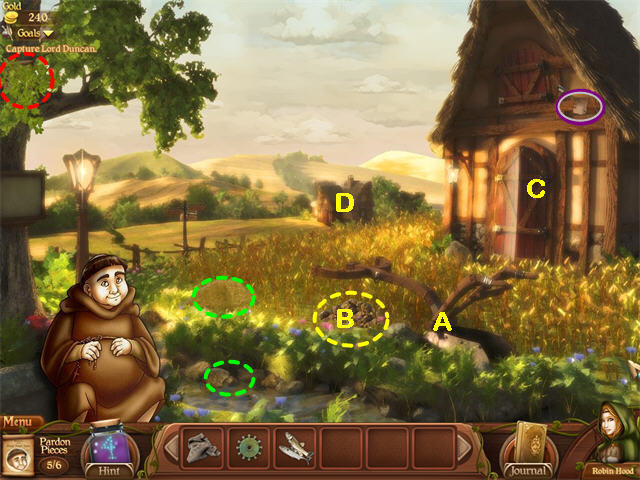
- Collect the LAST PARDON piece for Friar Tuck if you’ve been following the walkthrough. If not, come back after you’ve collected the first 5 pieces. See the list at the end of the walkthrough if you need help finding them.
- Talk to Friar Tuck. You will not be able to give him his pardon until after you’ve talked to him.
- Once you have all 6 of his PARDON PIECES, they will go into your inventory tray. Give him his pardon. He will join your band, adding the power of persuasion.
- Try the Dirt Heap (B) in the Field and the Plow (A). You’ll be able to dig up something there later. A new Task has been added in the upper left: “Find out what’s buried in the field.”
- Enter the Barn (C).
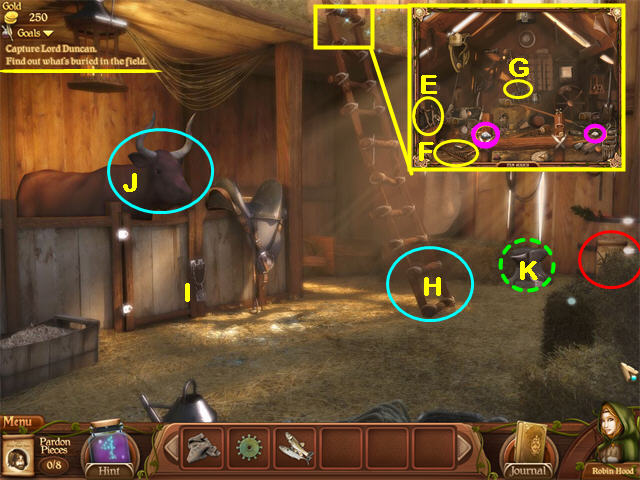
- Zoom in on the top of the Ladder to activate the Hayloft zoom scene. If you get the message “I should see what’s at the top of the ladder,” you didn’t click high enough. Position the cursor where it turns into a magnifying glass, then click there.
- Collect the items from the Find List, including the two SILVER NUGGETS (pink), the KEY (G), the RAKE (F), and the HARNESS (E).
- The HARNESS is made of wood and is on the left side of the scene.
- After you complete the Hayloft Zoom Scene, you will be able to collect the LADDER (H) by clicking at the bottom of it.
- Use the KEY to unlock the Bull’s Pen (I).
- Put the HARNESS on the BULL (J) and collect the BULL.
- Exit to the Fields, then to Duncan’s House (D) at the back of the Fields.
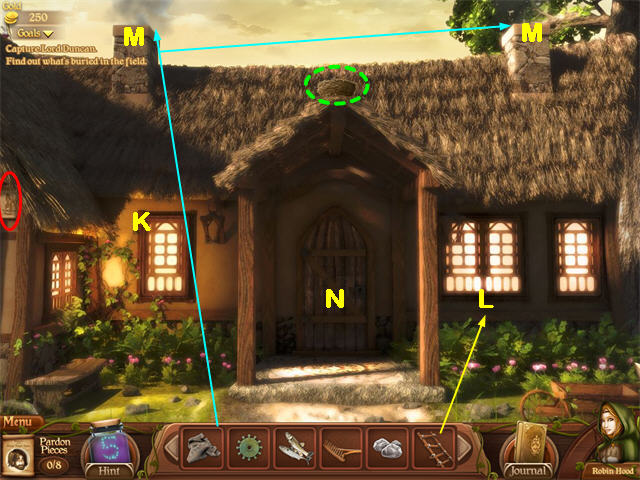
- Duncan is the Lord who has been stealing from the Baker. Look through the Window (K) on the left and you will see him.
- Put the LADDER against the right Window (L).
- Shoot an arrow at the Nest at the top of the scene to collect GOLD COINS.
- Put a CLOTH in each Chimney (M). You will have to place the LADDER before you can get to the Chimneys. If you don’t have the LADDER yet, go to the Barn.
- Lord Duncan will come running out. Click anywhere in the door area (N). You don’t have to click exactly on him.
- Lord Duncan will give you a SILVER ROD that is part of the lock to his Treasure Chest. He tells you the Blacksmith in the Market will be able to make another rod for you.
- Exit to the Fields.
- Attach the OX to the Plow (A) and it will dig up the field, revealing the Treasure Chest. You still need to make the third bar to unlock it, though, so return to the Town Center and click on the Market sign on the left side to go there.
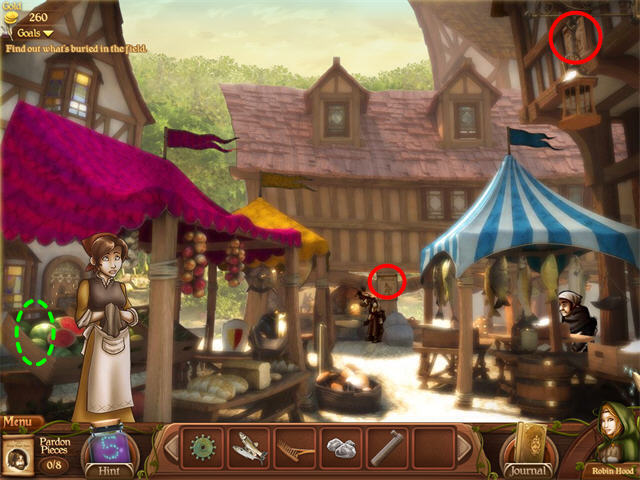
- Zoom in on the Blacksmith.
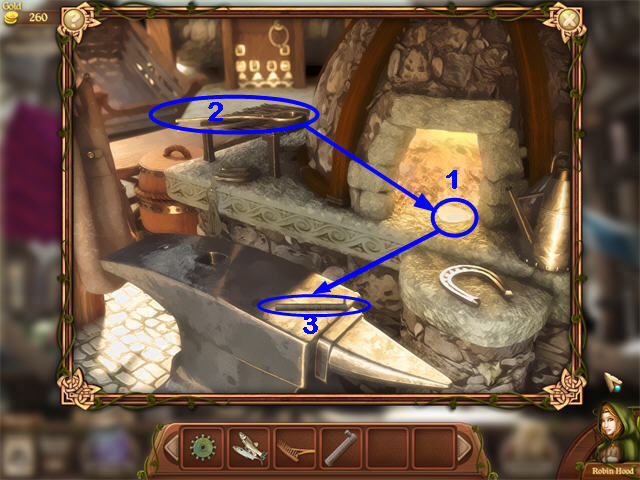
- Once you have 2 SILVER NUGGETS from the Hayloft you can make the 2nd Silver Rod you need for Lord Duncan’s Treasure Chest.
- Put the SILVER NUGGETS into the fire (2).
- Use the TONGS (1) to take the silver out of the file and put it on the Anvil (3).
- The Blacksmith will make the SILVER ROD (3). Collect it.
- Go back to the Fields by going to the Town Center, then the Bakery, the Back Alley, and out to the Fields.
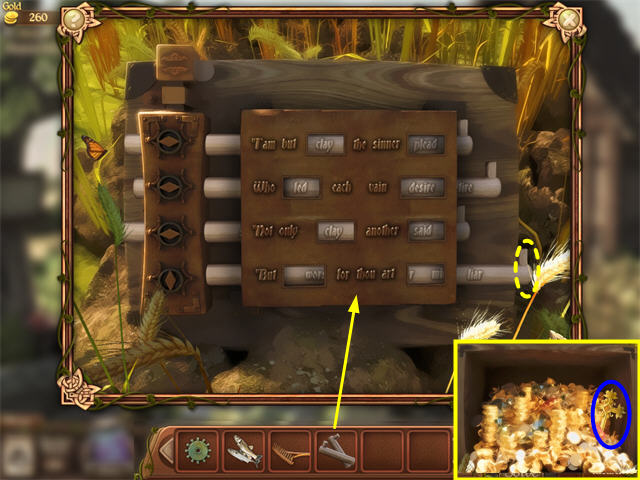
- Zoom in on the Treasure Chest and place the SILVER RODS on it. If you cannot see the TREASURE CHEST in the field, you need to go into the Barn and get the OX so you can use the Plow to dig it up.
- You must have two SILVER RODS in your inventory to open the TREASURE CHEST. Lord Duncan gave you one at Duncan’s House. You made the other in the Marketplace after you found 2 SILVER NUGGETS in the Hayloft.
- Now you have to slide each rod by clicking on its far right end. You are trying to line up the words to make a rhyme:I am but CLAY the sinner PLEAD Who FED each vain DESIRE. Not only CLAY another SAID But WORSE for thou art MIRE.
- The Treasure Chest will open. Click on the CROSS on the right.
- You will automatically receive the BAKER’S TREASURE and the CROSS.
- Exit to the Back Alley, the Bakery, and Town Center.
- Give the BAKER’S TREASURE to the Baker, completing the Baker’s Quest.
Chapter 6: Open the Bell Tower (Priest’s Quest)
- Now that you have Friar Tuck with you, talk to the Priest in front of the Church. Use the Persuasion Special Ability on him and he will let you in.
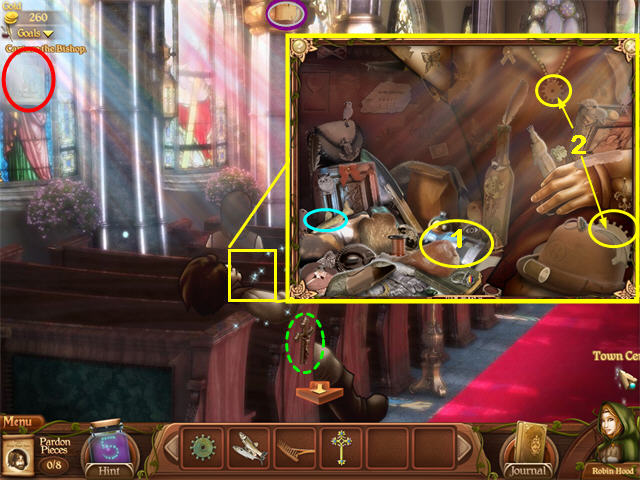
- Zoom in on the man sleeping in the Church Aisle to open a Hidden Object Scene. Complete it and collect a FLASK (1) and two GEARS (2).
- The FISH is marked in cyan.
- The Heart is a pink pillow in the lower left.
- Go down the aisle to the Church Front.
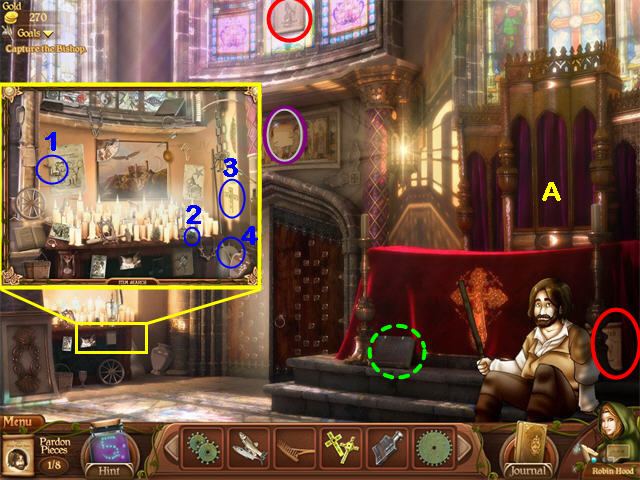
- Zoom in on the Hidden Object Scene on the left wall of the Church Front.
- Collect the items on the Find List including the VISHNU ARM (1), BLACK ORE (2), CROSS (3), and GEAR (4).
- Pull aside the Curtain (A) above where Little John is sitting to reveal a puzzle.
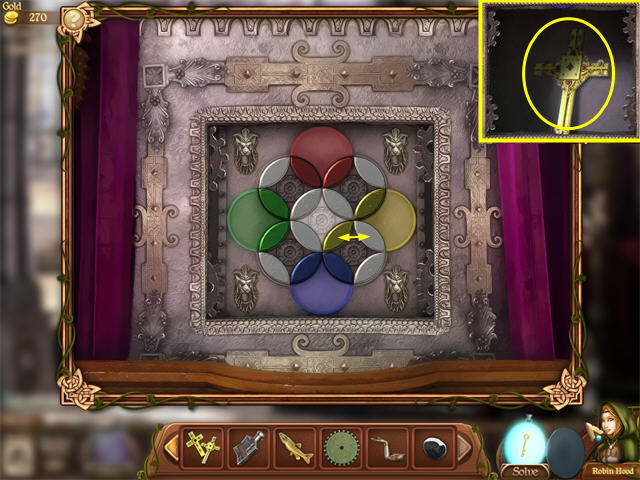
- Rotate the disks so that the color pieces are on the circles of the same color as shown in the screenshot.
- The yellow pieces look olive.
- When all the pieces are set correctly, the panel will open revealing a CROSS. Collect it.
- When you have collected everything, you will probably want to go through the Door to the Church Staircase. However, first you need to go back to the Market and see the Fish Vendor, as you need a Knife that he has.
- Exit all the way to the Town Center, then click on the Market sign on the left to go there.
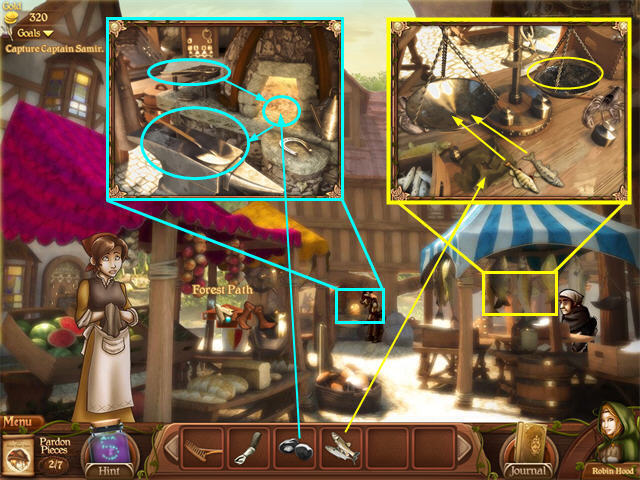
- The Fish Vendor is in the righthand stall. Zoom in.
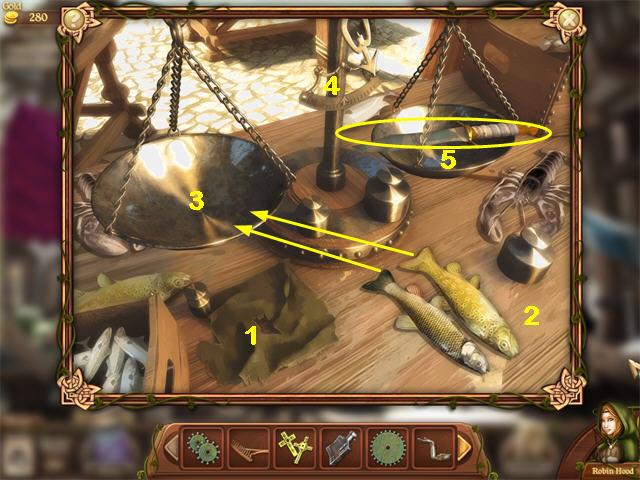
- Put the FISH you have collected so far (from the Bakery and from the Church Aisle) on the Rag (1) on the left.
- The Fish will be automatically laid out on the Counter (2).
- Now anytime you want to trade you have to put your Fish in the left scale (3) until they equal the weight of the object on the right scale.
- You can tell the weight is correct when the arrow on the scale (4) is pointing straight down.
- The first object is a KNIFE. (5)
- Put both FISH on the scale, then collect the KNIFE.
- Go back to the Church Staircase.
- Move the Tapestry (B) on the left, revealing a stone sticking out.
- Use the KNIFE that you got from the Fish Vendor in the Market and remove the stone. This will reveal Flaming Arrows. Take them, and you will have the Burning Arrow Special Ability. You will also find the 4th CROSS you need to open the Church Basement Door.
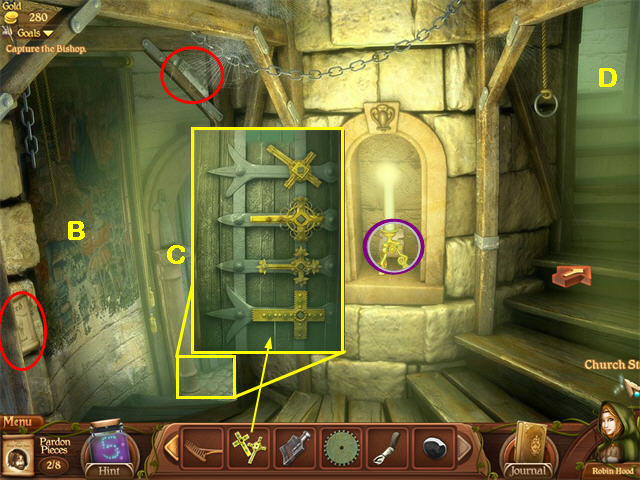
- Zoom in on the Door (C) you can see down the stairs to trigger a puzzle.
- You need four CROSSES in order to unlock the door. There was one in Lord Duncan’s Treasure Chest in the Baker’s Quest, one in the Church Front Altar Puzzle, one in the Church Front Hidden Object Scene, and one behind the Tapestry in the Church Staircase.
- Place the 4 CROSSES.
- Click on each CROSS once. The door will unlock, and you will have access to the Church Basement.
- Shoot an Arrow at the Lantern on the ceiling. It will fall down, revealing GOLD COINS.
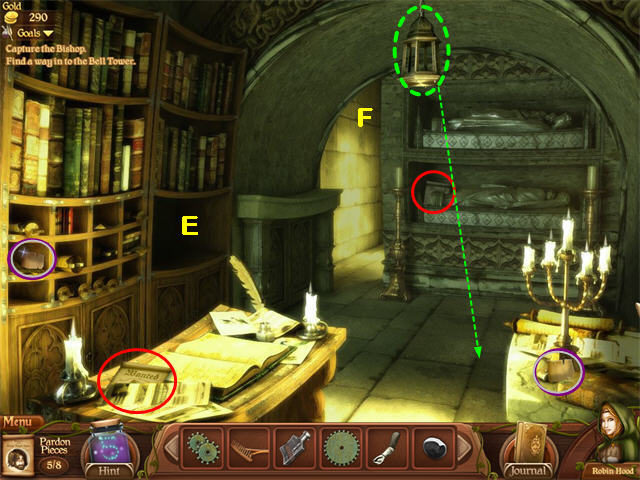
- Zoom in on the Bookcase (E) on the left. You need a BOOK to enter the secret room, but you don’t have it yet so you’ll have to come back later.
- Go through the Archway (F) to the Church Basement Altar.
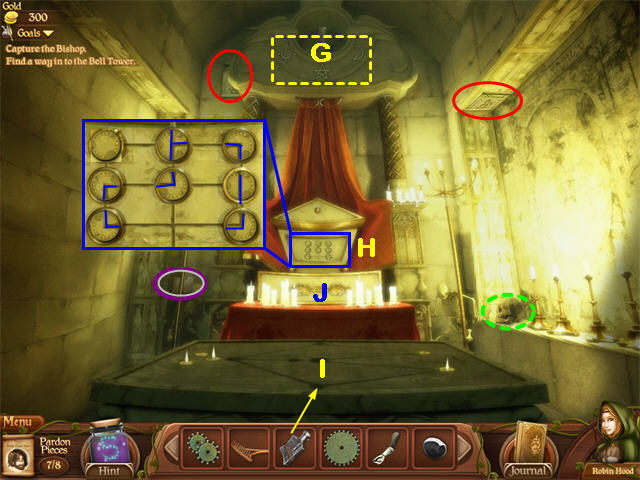
- Notice the Symbols (G) at the very top of the Altar. You don’t have to do anything—just look at them. They will be copied to your Journal.
- Zoom in on a puzzle (H) on the back of the Altar.
- The pieces cannot be rotated.
- Use the pieces to create a connected pipe with no dead ends.
- The piece with no pipes can be used on the upper left. See the screenshot for our solution.
- A line of Oil will descend from the ceiling, making a pool of Oil (I) on the Altar.
- Take the EMPTY FLASK that you got from the Church Aisle Hidden Object scene and place it on the Altar. It will fill with oil and return to your inventory tray as a FLASK WITH OIL.
- Zoom in on the gold Casket (J) at the back to open a Hidden Object Scene.
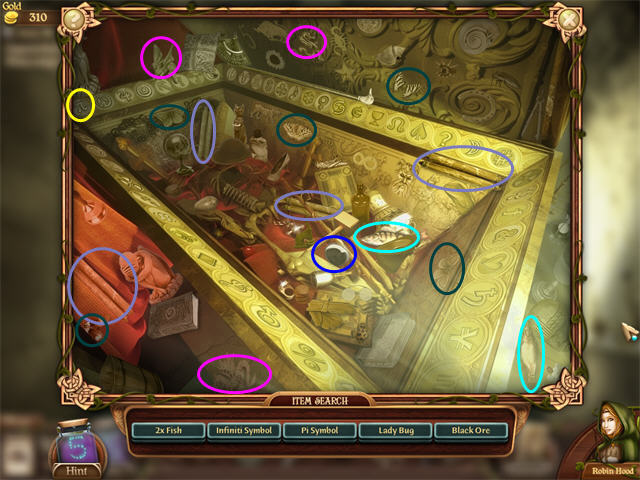
- Collect the items on the Find List, including the BLACK ORE and two FISH.
- The Pi Symbol is marked in yellow.
- The Infinity Symbol looks like a number 8 lying on its side.
- The FISH are marked in cyan. One of the FISH is on the right outside of the box.
- The Dragons are marked in pink.
- The Scrolls are marked in blue-gray.
- The Butterflies are marked in dark green.
- The Church Basement Altar is now clear.
- Go from the Church Basement Altar to the Church Basement to the Church Stairway and up to the Bell Tower Hatch.
- Collect the PARDON PIECES. You should now have all of Little John’s Pardon Pieces. Go back to the Church Front and give him his pardon. He will join your gang, adding the Special Ability of Strength.
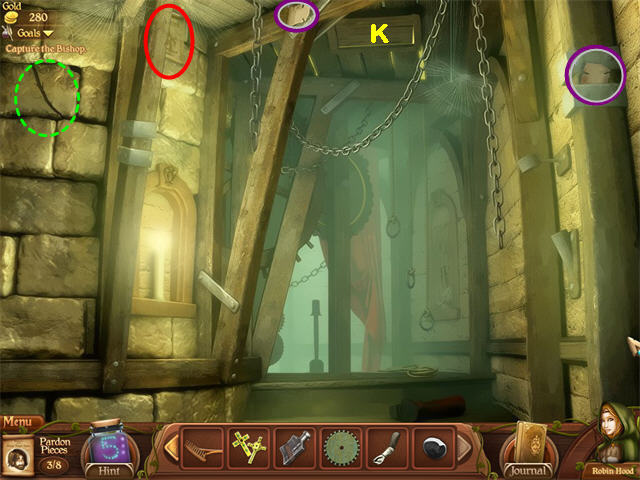
- Return to the Bell Tower Hatch.
- Use the FLASK WITH OIL on the Trap Door (K) in the ceiling. You got the Oil in the Church Basement Altar.
- Now you can use a Flaming Arrow on the Trapdoor. If you don’t have the Flaming Arrows yet, they’re in the Church Staircase behind the Tapestry.
- This will clear the area.
- Click on the open trapdoor (K) to enter the Bell Tower room.
Chapter 7: The Bishop’s Treasure (Priest’s Quest)
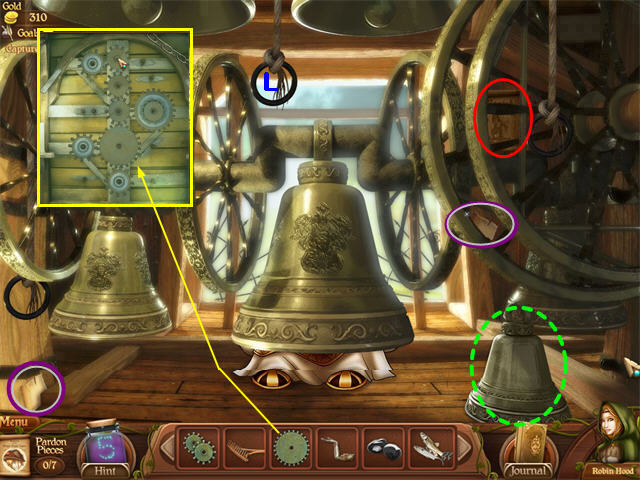
- Once you have Little John with you, use the Strength Special Ability to lift the Bell on the right and collect GOLD COINS.
- Pull the Bell Rings. One is broken.
- Click on the right where the sparkles are to zoom in on a puzzle.
- Use the GEARS from your inventory. See the screenshot for our solution. The LARGE GEAR is near the bottom, and the 3 SMALL GEARS are in a vertical line above it.
- Ring the Bells (L). The Bishop will come out of hiding. Talk to him, and he will give you the BOOK for the Church Basement. Go there.
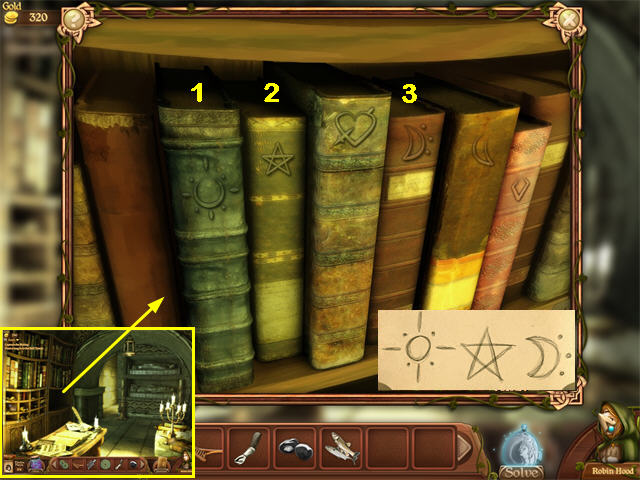
- Zoom in on the left Bookcase.
- Put the missing BOOK in place.
- Remember the Symbols at the top of the Church Basement Altar? They are also in your Journal. Click on the Books that have the matching symbols: Sun, Star, Left-Facing Moon.
- The Bookshelf will open revealing the TREASURE. Click to collect it.
- Go back out to the Town Center.
- Give the TREASURE to the Priest.
- This ends the Priest’s Quest.
Chapter 8: Time Out for Gold
- Once you have the Burning Arrow and Strength Power, you can go back to some previous scenes and pick up extra gold pieces.
- All of these activities are optional, but the locations will not say AREA CLEAR until you’ve done them.
- In the Field behind the Bakery use Burning Arrow on the Pile of Hay and collect GOLD COINS.
- In the Barn, use Strength on the Anvil and collect GOLD COINS.
- If you’re low on Hints, you can stop by the Gypsy Caravan and buy some Fireflies, otherwise continue to the Market for the next Quest.
Chapter 9: Start the Market Quest
- Now that you have Little John with you, talk to the Farmwife at the left stall in the Market in the Market. She will tell you about a problem at the Docks. Agree to help her.
- Before you go, stop at the Fish Vendor. You have two new Fish to sell from the Hidden Object Scene at the Church Basement Altar.
- Trade the two FISH for the NET.
- Now visit the Blacksmith.
- Put the BLACK ORE in the Fire. You got the BLACK ORE from the Church Front Hidden Object Scene and the Church Basement Altar Hidden Object Scene.
- Once it melts, take it out with the Tongs and put it on the Anvil.
- Collect the SHOVEL.
- Now take the exit to the Path to the Docks that goes left behind the Farmwife’s stall.
Chapter 10: To the Docks
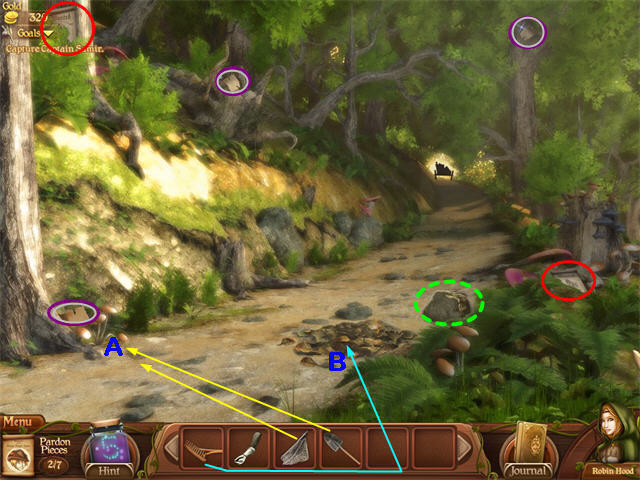
- Use the SHOVEL that the Blacksmith made for you to dig a hole near the Mushrooms (A).
- Use the NET that you bought from the Fish Vendor to cover the hole you just made.
- Use the RAKE that you got from the Hayloft in the Barn to rake the Pile of Leaves (B) over the NET.
- The Cart Puller will come up the path and fall into the hole.
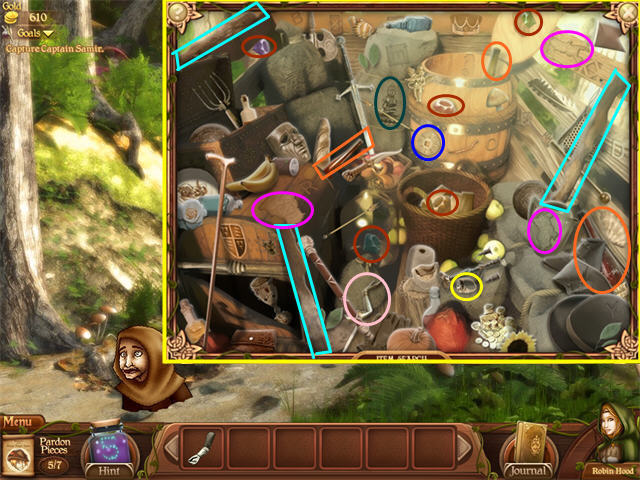
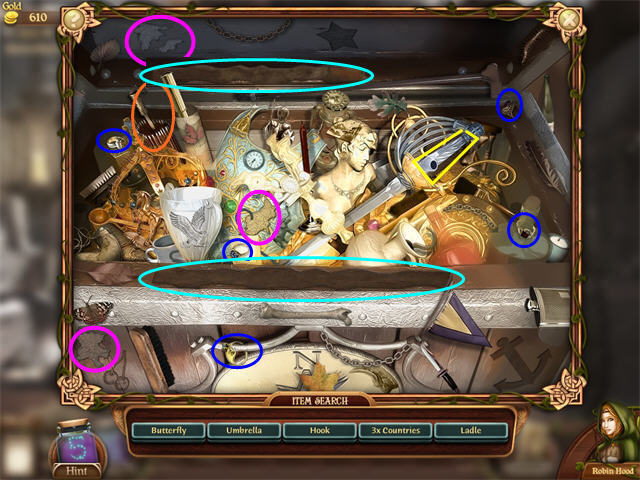
- Zoom in on the side of the Cart to see a Hidden Object Scene.
- Collect the items on the FIND LIST, including 3 Countries (pink), 3 PLANKS (cyan) and the ALPHABET DIAL (blue).
- There are many bottles in the scene, but the only ones that count as Wine Bottles have long necks. We have marked them in orange.
- The Ring is marked in yellow.
- The “Sleeping Statue”(dark green) is seated with its eyes closed.
- The ARM OF VISHNU is marked in light pink.
- The “Rubies” (brown) are Gemstones. They can be any color.
- Exit to the Docks.
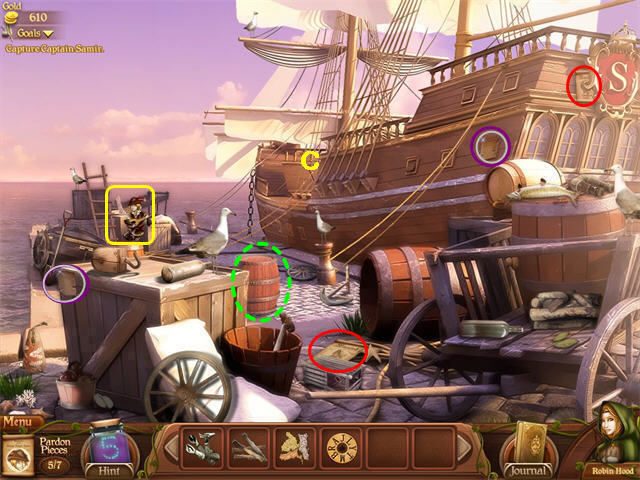
- After you collect the two PARDON PIECES shown, you should have all of Alan A Dale’s Pardon. If you don’t have all of them, go back and collect them before proceeding.
- Talk to Alan-a-Dale. Remember you have to talk to him before you can give him his pardon.
- Give him the PARDON PIECES and he will join your band, adding Music to your special Abilities.
- Use Strength on the Barrel in the center to reveal GOLD COINS.
- If you only have 5 PARDON PIECES for Alan a Dale, you probably missed the two in the Church Bell Tower. Go back to the Church, climb the stairs, and click on the trap door in the ceiling to climb through.
- Continue on to the Ship Deck (C).
Chapter 11: The Ship
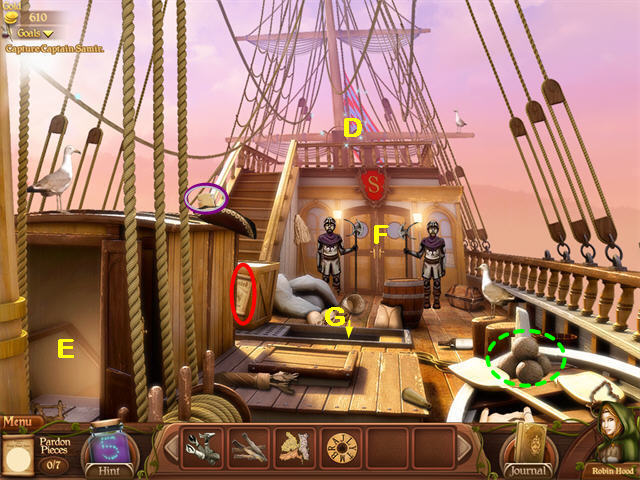
- Before you can do anything else, you have to lull the Guards to sleep with your Music Special Ability. If Alan A Dale has not joined your party yet, go back to the Docks and get him.
- Use Strength to move the Cannonballs on the right and reveal GOLD COINS.
- Zoom in on the Hidden Object Scene (D) above the Guards.
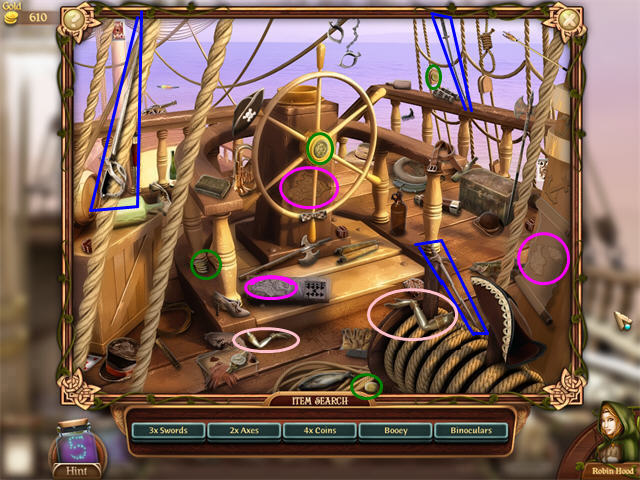
- Collect the items on the Find List, including 3 COUNTRIES (pink) and 2 ARMS OF VISHNU (light pink).
- We have marked the 3 Swords in blue.
- We have marked the Coins in dark green.
- One of the Boots is floating in the water to the right of the ship.
- You should now be back on the main view of the Ship Deck.
- Exit to the Ship’s Galley (E) on the left side of the Ship Deck.
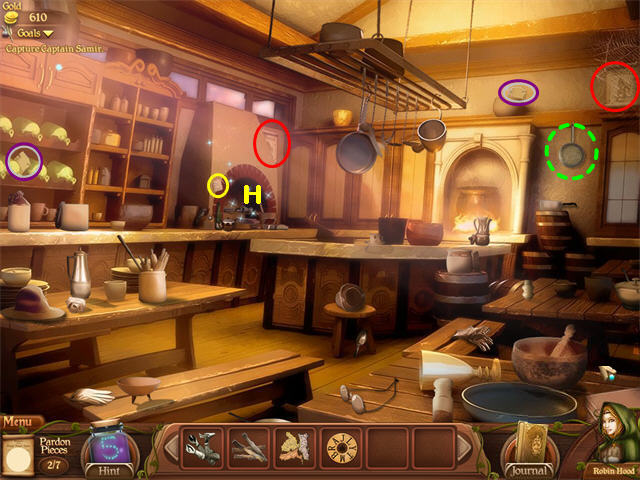
- There is a Dinner Order stuck next to the Oven (H). It has the initials JIB on it, and will go into your Journal.
- Zoom in on the Hidden Object Scene in the Oven.
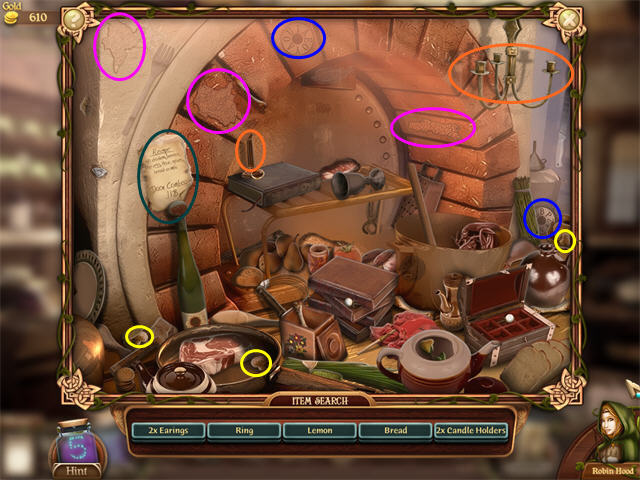
- The “Masher” is a Pastry Blender.
- The Candlesticks are marked in orange.
- The “Garlic Cloves” (yellow) are Mushrooms.
- Collect the items on the Find List, including 3 COUNTRIES (pink) and 2 ALPHABET DIALS (blue).
- Exit to the Ship’s Deck.
- Zoom in on the Door to the Captain’s Quarters (F).
- Put the 3 ALPHABET DIALS onto the lock. Each Dial will only go on one spot.
- You got one of the DIALS from the Cart on the Path to the Docks and two of the DIALS from the Hidden Object Scene in the Ship’s Galley.
- Turn the DIALS so they say J I B as shown. Note that the red arrow for the B is at the bottom of the dial, so the letter appears upside down.
- Open the Door Handle.
- Go into the Captain’s Quarters.
- Use Strength to collect the GOLD COINS from under the Floorboard on the right.
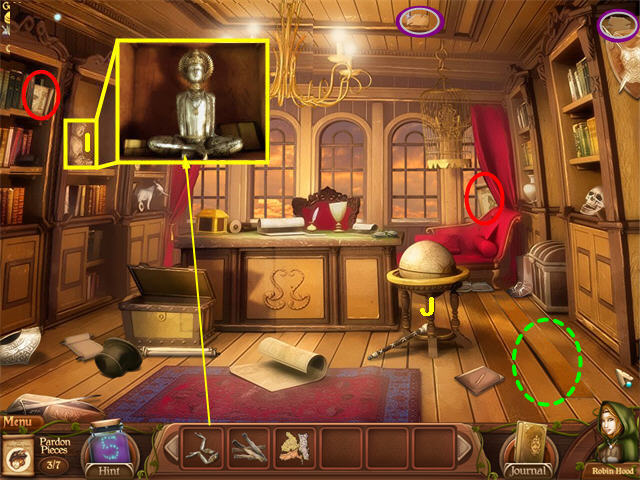
- Zoom in on the Statuette (I) on the right shelf.
- Put the ARMS OF VISHNU on the Statuette. You will have to click once for each arm.
- Click each arm one more time to move it into position.
- The Bookcase will swing open, revealing the Captain. Talk to him.
- He will give you the COMPASS.
- You can zoom in on the Globe (J) on the right, but you don’t have all the country pieces yet, so you’ll finish that one later.
- Exit to the Ship’s Deck.
- Go down into the Cargo Hold (G) through the opening in the center of the Ship’s Deck.
- Collect two PARDON PIECES for Will Scarlett . If you have been following the walkthrough, these are the last two pieces you need. If not, go get the first 5 pieces and then return.
- Talk to Will Scarlett, then give him his PARDON PIECES. He will join your band, giving you the Special Ability Sneak.
- Use the Fire Arrow to burn the Map on the far wall, revealing GOLD COINS.
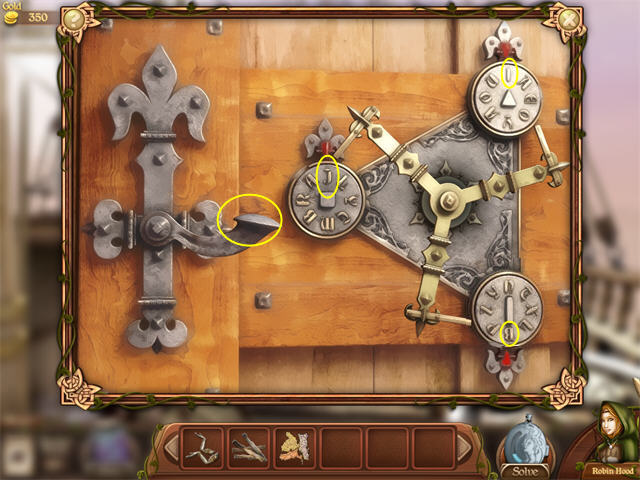
- Zoom in on the Chest (K) on the left. It is missing some lock pieces.
- Put the COMPASS that you got from the Captain’s Quarters into the Lock.
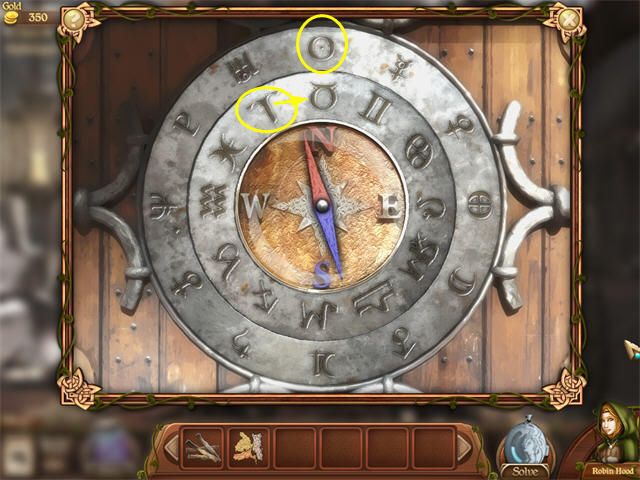
- You must set the inner ring so that the symbol that looks like a T is at the top and the outer ring so that the symbol that looks like an O with a dot in it is at the top.
- The lock will open.
- Zoom in on the Chest.
- Collect the items on the Find List, including 3 COUNTRIES (pink).
- The Pipe is marked in yellow.
- The five Rings are marked in blue.
- The “Umbrella” is a parasol marked in orange.
- The PLANKS are marked in cyan.
- The only Bottle that counts is a wine bottle on the far right.
- Go back upstairs and return to the Captain’s Quarters.
- Now you should have all the COUNTRIES for the Globe puzzle. You got them from the Cart on the Path to the Docks, the Hidden Object scene on the Ship’s Deck, the Hidden Object Scene in the Ship’s Galley, and the Hidden Object Scene in the Cargo Hold.
- Zoom in on the Globe.
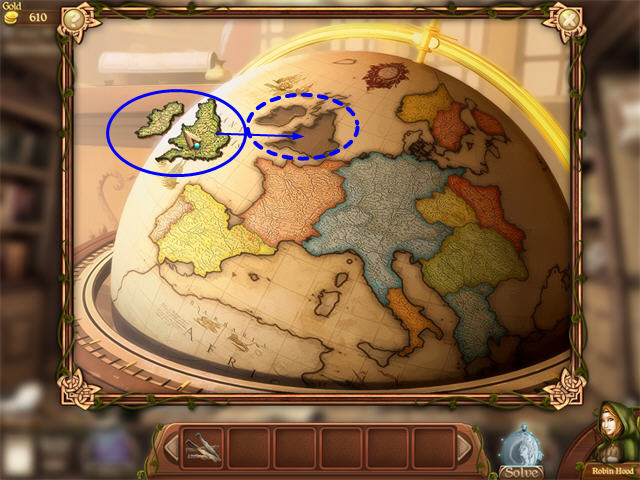
- Take the COUNTRIES from your inventory and click once on the map. They will scatter around the edges.
- Put each one in place, then click to stick it. They will orient themselves.
- Once all the COUNTRIES are placed, the Globe will open, and you can collect the TREASURE from inside it.
- Exit to the Ship’s Deck.
- Return to the Market by going to the Docks, the Path, and the Market.
- Give the VENDOR TREASURE to the Farmwife.
- This completes the Market Quest.
Chapter 12: Build a House (Marley Quest)
- Talk to Mrs. Marley who is standing on the left side of the Town Center. As long as you have Will Scarlett with you, you will be able to enter the Marley House behind her. If you missed Will Scarlett at the end of the Market Quest, he was sitting in the Ship’s Cargo Hold, so you’ll need to go back there and get him.
- Talk to Mr. Marley, who is sitting on the ground. He needs wood to finish his home. You have some PLANKS, but not enough. You need 8 total.
- Zoom in on the Hidden Object Scene on the right (A).
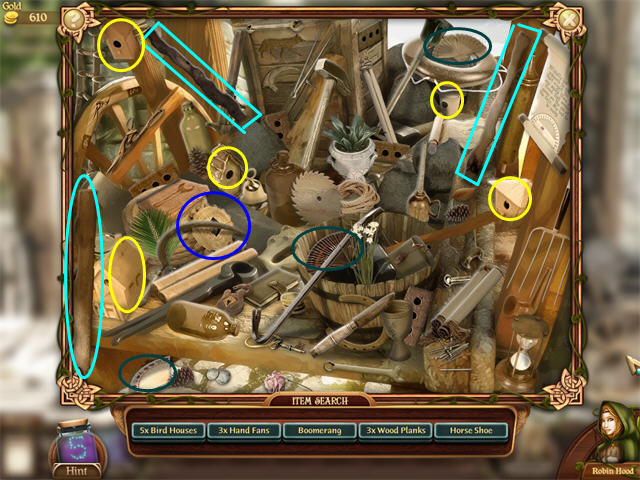
- Collect the items on the FIND LIST, including the GEAR (blue) and the 3 PLANKS (cyan).
- The Birdhouses are marked in yellow.
- The Hand Fans are marked in dark green.
- The Pipe is a tan smoking pipe on the lower right.
- Now you have enough PLANKS to finish the house.
- Zoom in on the House (B).
- Put the PLANKS next to the puzzle and it will spread out.
- This is a jigsaw puzzle.
- Once the House is completed, Mr. Marley will unlock the Gate.
- Go through the Gate (C) to the Sawmill Road.
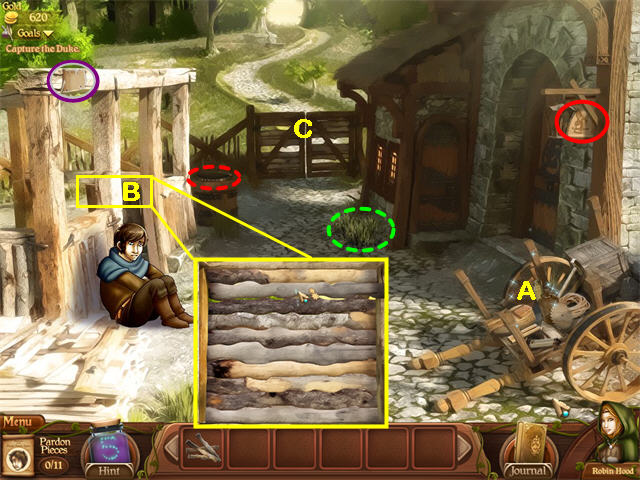
Chapter 13: Saw Mill
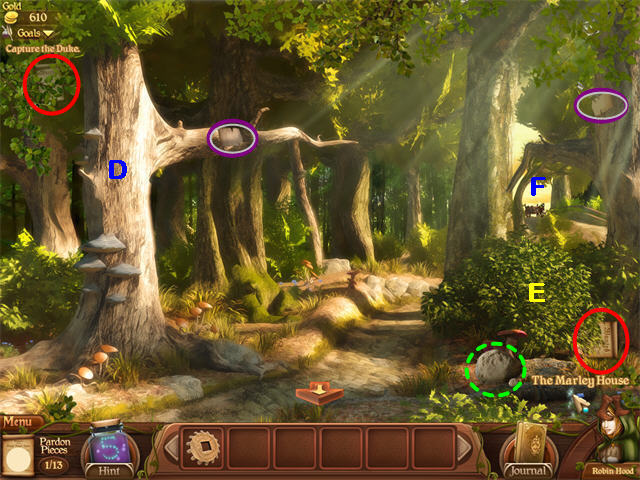
- Use Strength on the big rock on the right side of the path to reveal GOLD COINS.
- There is a Cart in the distance. You need to set a trap for it.
- Use the Special Ability Strength on the left tree (D) and Little John will climb up onto the Branch.
- Use the Special Ability Sneak on the right Bush (E), and Will Scarlett will go there and hide.
- When the Cart pulls up, Little John will distract the man. Use Sneak on the side of the cart, and Will Scarlett will take a PIKE out of the Cart.
- This will unlock the path to the Sawmill. After the man leaves, exit at the far end (F) where you first saw the Cart.
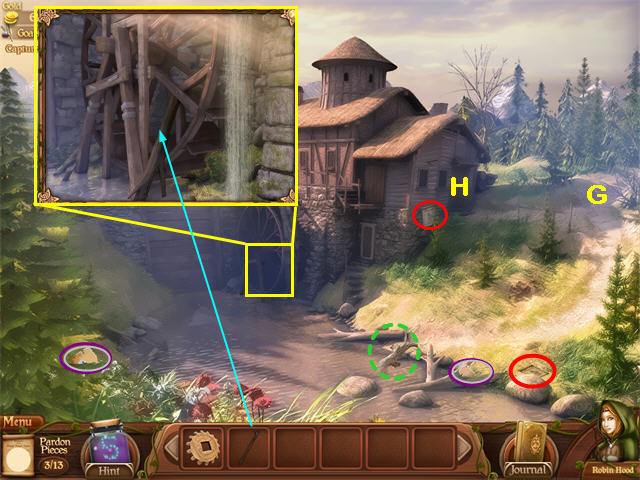
- Use Strength to move the Log in the river and reveal GOLD COINS.
- Zoom in on the Water Wheel.
- Put the PIKE into the Water Wheel.
- This unlocks the Saw Mill Floor (H). First, though, go up the Logging Road (G).
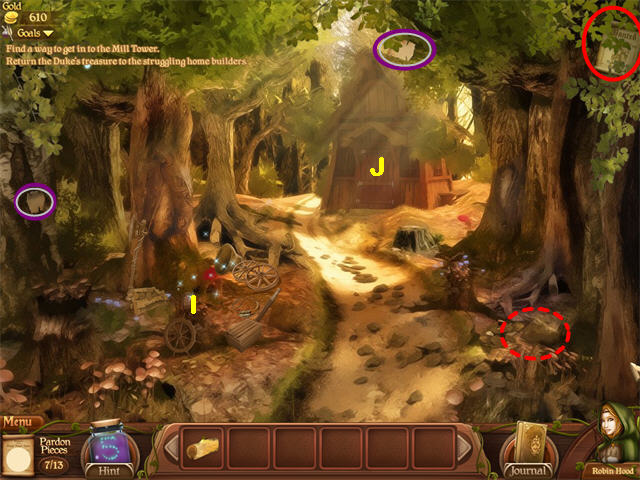
- Zoom in on the Hidden Object Scene on the left.
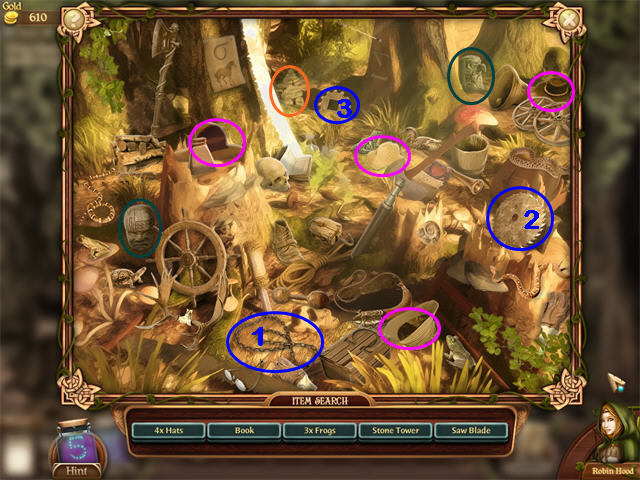
- Collect the items on the Find List, including the CHAIN (1), DULL SAW BLADE (2), and GEAR (3).
- The Hats are marked in pink.
- The Stone Heads are marked in dark green.
- The Stone Tower is a small pile of stones near the back of the scene.
- Continue to the Logging Shed.
- Zoom in on the Chest.
- Collect the items on the Find list, including the CHAIN (1) and the GEAR (2).
- The Bucket of Water is a picture on the front of the Chest.
- You will automatically receive the CRANK when you are finished.
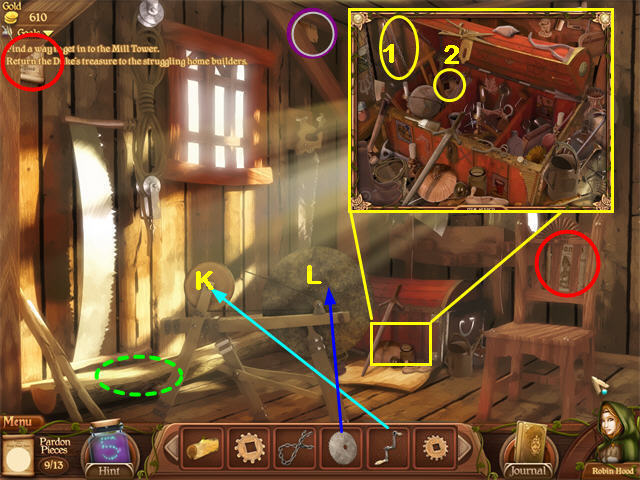
- Back in the main view, zoom in on the Grinder.
- Put the CRANK on the left side (K) of the Grinder. Click the CRANK once to start the wheel. You will return to the Main View.
- Put the Saw Blade on the right side (L) of the Grinder, and it will return to your inventory tray as a Sharp Blade. You originally got the SAW BLADE from the Hidden Object Scene on the Logging Road just outside the Logging Shed.
- Go back outside to the Logging Road, back to the Sawmill, and then into the Saw Mill Floor (H).
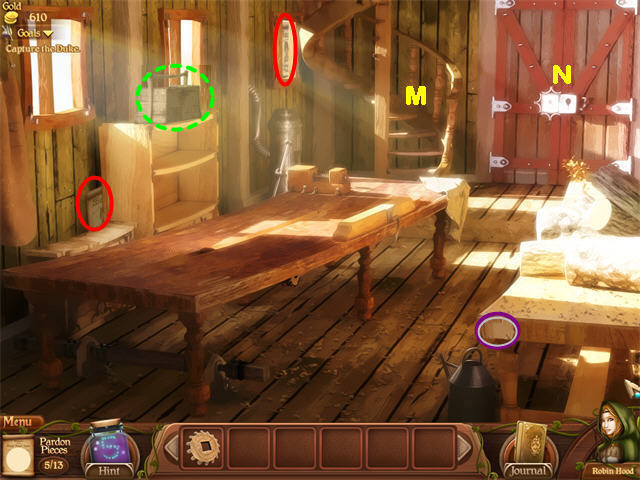
- You need to find a way to get Upstairs (M).
- Zoom in on the locked Door (N) at the back.
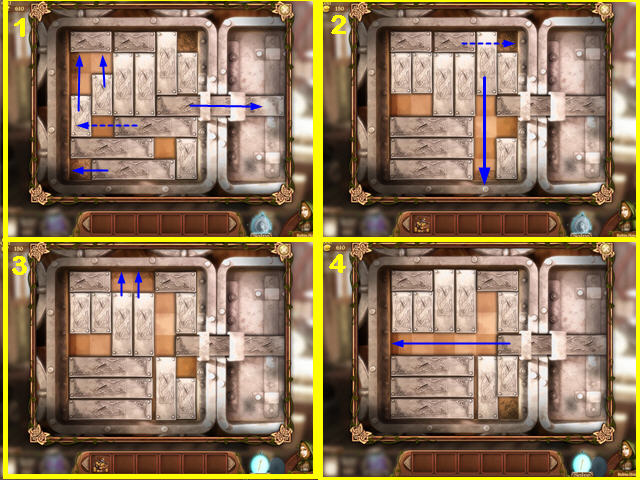
- This is a Slider Puzzle.
- See the screenshot for the solution.
- Go through the Door to the Logging Lake.
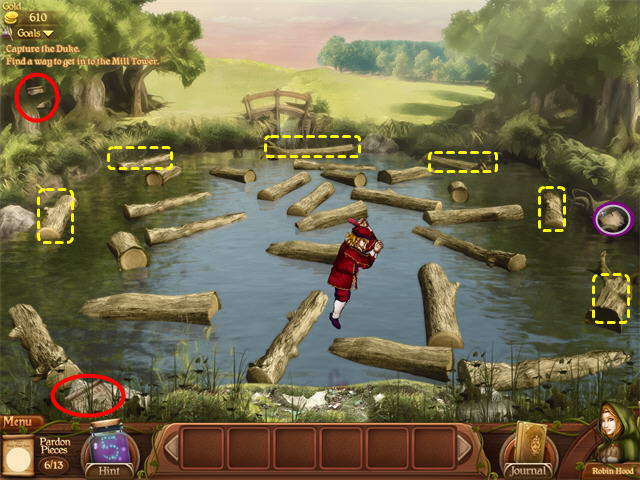
- The Man jumping around on the Logs is the evil Duke.
- Use the Flaming Arrow special ability to burn Logs in a circle around him and he will come to shore.
- Talk to him. He will surrender and give you a LOG.
- Return to the Saw Mill Floor.
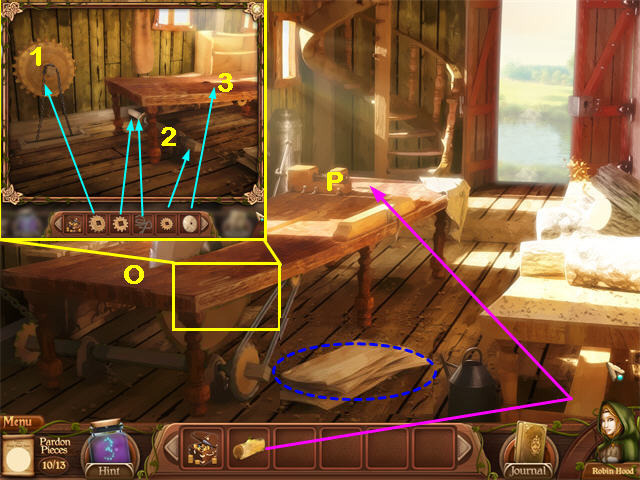
- Zoom in on the left end of the Log Cutter Table (O) on the left.
- You need to have a large GEAR, 2 small GEARS and 2 CHAINS in your inventory to do this puzzle. You got the items in the Hidden Object Scene on the Logging Road and the Hidden Object Scene inside the Logging Shed. If you don’t have them yet, you’ll have to go get them and return.
- Put the 3 GEARS and the 2 CHAINS in place as shown. The large GEAR goes on the big wheel, and the two small GEARS go under the Table, along with the CHAINS.
- Put the BLADE in the middle of the Log Cutter Table.
- You will return to the main view. If the Blade is not spinning, go outside and come in again.
- Now you need to cut a LOG into planks to rebuild the Stairs. If you don’t have a LOG in your inventory yet, you need to go out through the back doors of this room to the Logging Lake to get one.
- Once the Blade is spinning, put the LOG on the Holder (P) on the Log Cutter Table.
- The PLANKS will now be on the Floor. Collect all 5.
- Zoom in on the Steps at the Back of the room.
- Put the PLANKS on the Steps and go up into the Saw Mill Tower.
- Use the Flaming Arrow on the Painting on the back wall to reveal GOLD COINS.
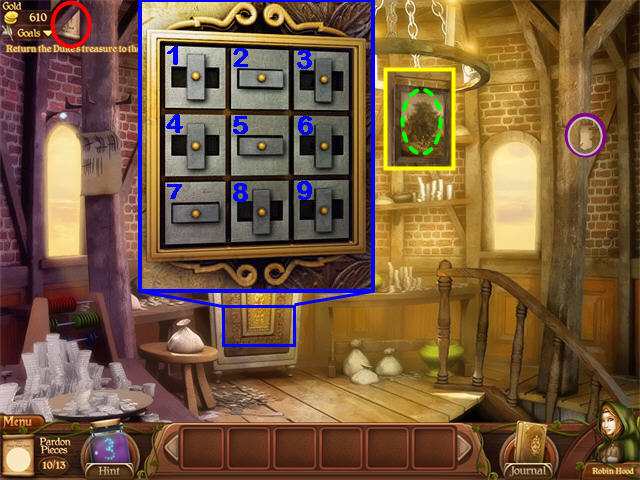
- Zoom in on the Safe to trigger a puzzle.
- There are many possible solutions. Here is one.6, 8, 4, 9, 1, 5, 1, 7, 8, 6, 3
- Note that if at any time you manage to get all the boxes set to vertical, you can turn them all horizontal with this sequence:5, 1, 6, 9, 3
- Collect the TREASURE.
- After you collect the PARDON PIECE in this scene, you should have all 11 of the PARDON PIECES needed for Thomas Hood. If not, you’ll need to go back through the various scenes around the Saw Mill to collect them before returning to Town Center.
- Exit to the Saw Mill, Saw Mill Road, Marley House, then Town Center.
- Return to the Town Center and give the WIFE TREASURE to Mrs. Marley.
- This ends the Marley Quest.
Chapter 14: Start Robin’s Quest
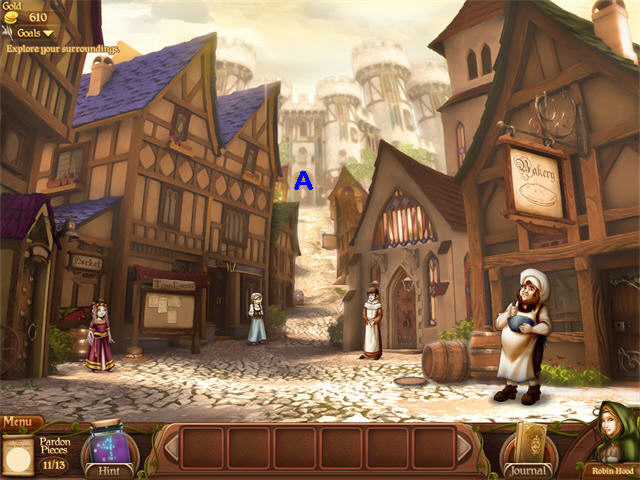
- Back at Town Center, a new character is on the scene, a little girl. Talk to her.
- She is Maid Marian. She will join your band, adding the Special Ability Charm.
- It’s time for Robin to rescue her husband!
- Exit to the Castle Drawbridge (A).
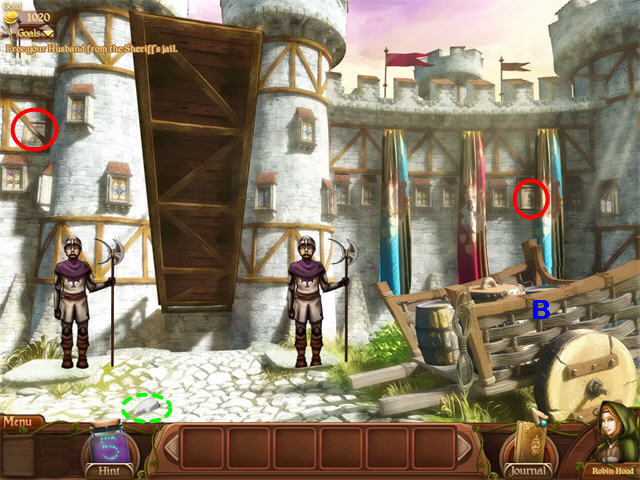
- Start by using Charm on the Guards. They will lower the Drawbridge.
- Now use Flaming Arrows on the Cart (B). You may need to click towards the center of the Cart to make it work.
- The Cart will catch on fire, and the Guards will run away.
- Enter the Castle through the Drawbridge.
Chapter 15: The Jail
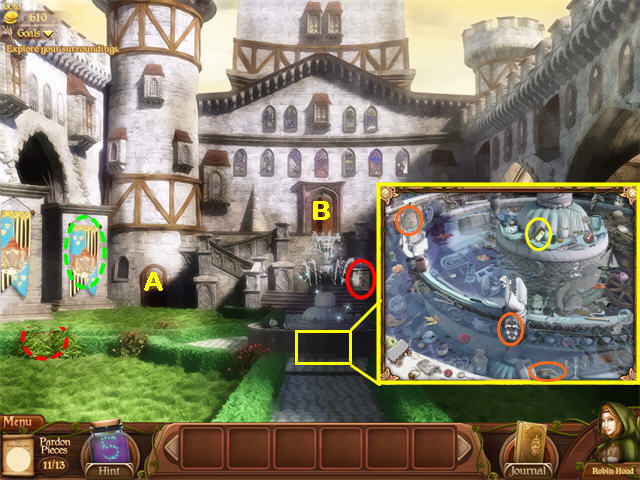
- Use the Flaming Arrow on the Banner on the left side of the Courtyard to reveal GOLD COINS.
- Zoom in on the Fountain.
- Collect the items on the Find List, including the GOLDEN DISC.
- The “Parrot” is a Toucan.
- The “Carriage” is a small Covered Wagon in the lower left.
- The “3 Faces” are the Buddha, the Harlequin Mask and the Gold Mask. They are marked in orange.
- The Saw is in the lower right.
- Exit into the Castle Jail (A).

- Now you have to deal with the Guard. This is a three-step process.
- First, use Music to make the Guard fall asleep.
- Now use Sneak and Will Scarlett will tie up the Guard.
- Finally, use Strength and Little John will scare the Guard into telling you which is the right key.
- Zoom in on the tray of Keys (C).
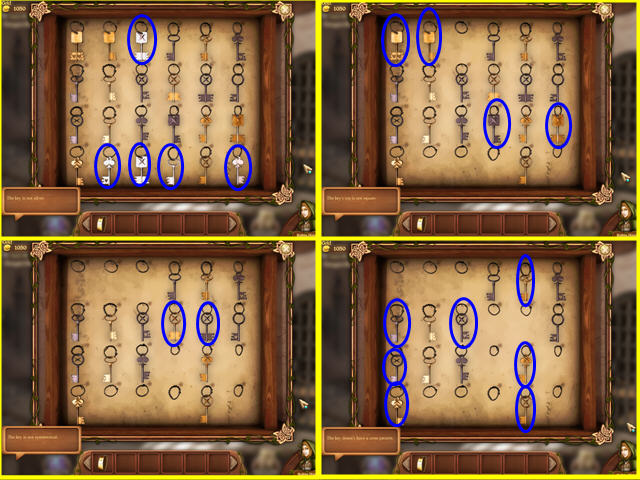
- The Guard is going to give you a series of clues. Each time he tells you what the KEY is not, you can remove any KEYS that match that description by clicking on them.
- There are 3 key colors: Gold, Silver, and Iron (dark gray).
- A “Cross Pattern” is an X anywhere on the Key.
- First clue: Not Silver.
- Second Clue: Not square.
- Third Clue: Not symmetrical.
- Fourth Clue: Doesn’t have a Cross pattern.
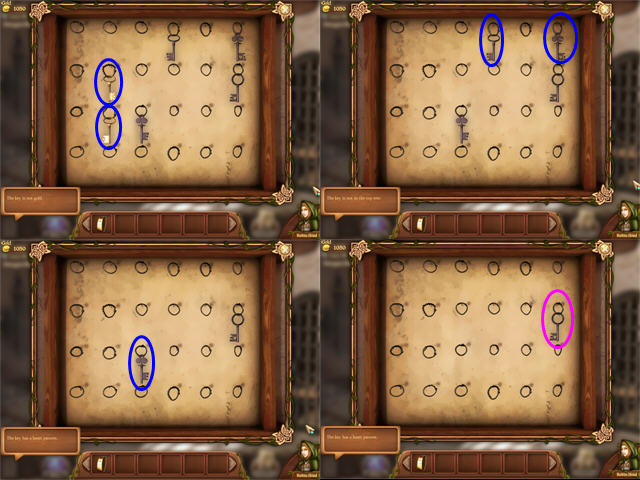
- Fifth Clue: Not Gold.
- Sixth Clue: Not in the Top Row.
- Seventh Clue: Has a Heart pattern. Note that the heart is tiny, on the part of the KEY that goes into the lock.
- When only one Key is left, collect it and you will return to the main view.
- Use the KEY on the Jail Door and it will open.
- Watch the cut scene. At the end, you will receive a GOLDEN DISK.
- Exit to the Courtyard, then go into the Castle Entrance (B).
16: The Castle
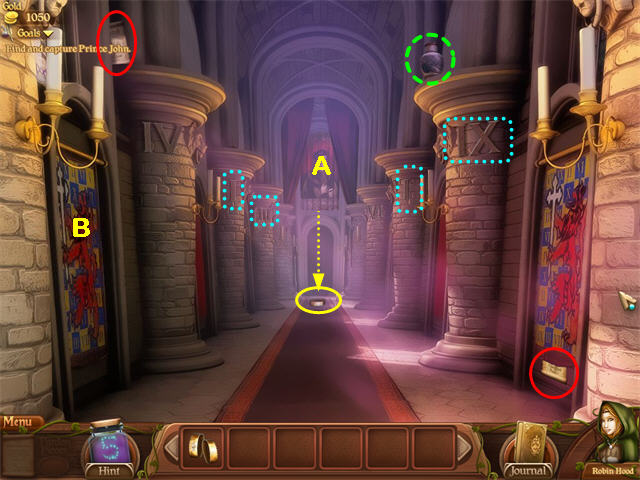
- Use a FIRE ARROW on the Tapestry (A) at the far end. A GOLDEN DISC will fall down. Collect it.
- Use a regular Arrow on the Vase on the top right and it will fall down to reveal GOLD COINS.
- Zoom in on the Tapestry on the left wall (B). It will reveal a Find the Differences puzzle.

- Ween you click on the numbers that are different, they will arrange themselves into math formulas, so that the end result is the numbers: III, I, I, IX.
- Click on the Columns that have these numbers at the top and the door at the far end will open.
- Exit to the Throne Room.
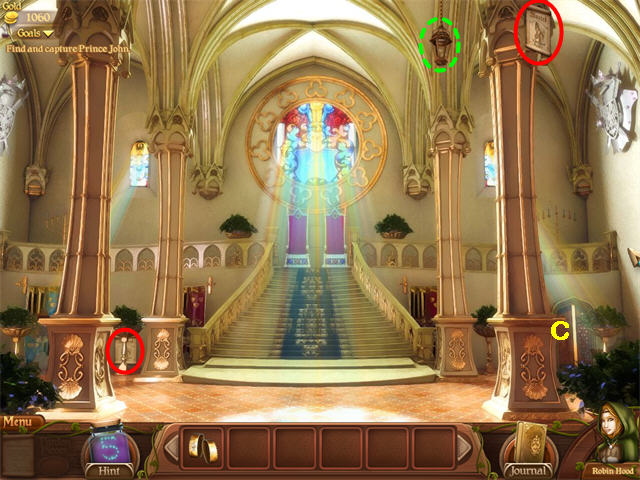
- Shoot a regular Arrow at the Lantern high on the right and it will fall down, revealing GOLD COINS.
- Prince John will run into a secret room behind the Thrones. When you zoom in there, you discover you need a KEY and a Combination to unlock the door.
- Exit to the Castle Hall (C) through the door on the lower right.

- Use Charm on the Guard and he will open the door to the King’s Bedroom.
- Use Strength on the Clamshell Planter and it will fall down, revealing GOLD COINS.
- Use a Flaming Arrow on the left Candle and it will melt, revealing GOLD COINS.
- Exit to the King’s Bedroom.
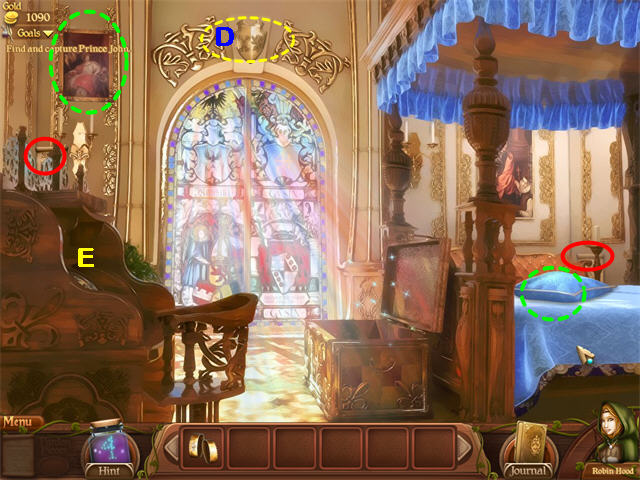
- Use a Flaming Arrow to burn the painting in the upper left and reveal GOLD COIN.
- Examine the King’s Crest (D). It is a Key and a Lion.
- Zoom in on the Chest at the foot of the bed.

- The Daisy (blue) is a small icon on the front of the chest.
- The 5 Horns are marked in yellow.
- The Pencil (orange) looks like a Candle.
- Collect the GOLD DISK (pink) and the two Keys (cyan).
- Time to open the King’s Desk. You should have four GOLD DISKS in your inventory: 1 from the Chest in the King’s Bedroom, 1 from burning the Tapestry in the Entrance Hall, 1 from the Fountain in the Courtyard, and 1 from the Jail. If you don’t have all 4, go get them and then return.
- You also need to have looked at the King’s Crest (D).
- Zoom in on the King’s Desk (E).
- Put the 4 GOLD DISKS onto the puzzle.
- Now turn each GOLD DISK so that you make a copy of the King’s Crest (Key, Lion) on each side.
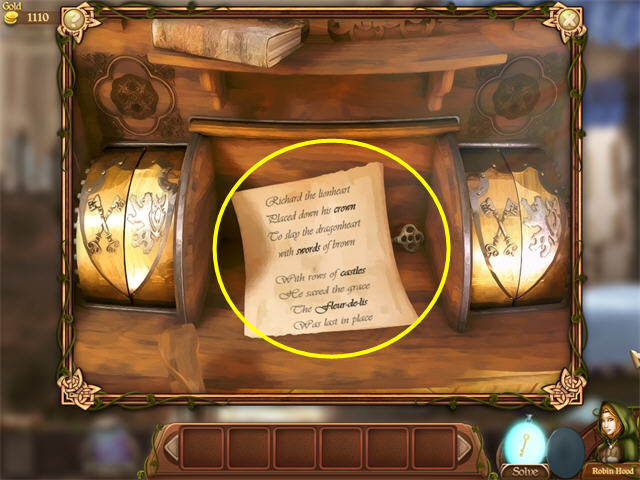
- The Desk will open, revealing a Letter and a KEY. Collect them.
- The Rhyme from the Letter will be copied to your Journal. The key words are Crown, Swords, Castle, and Fleur-de-Lis.
- Exit to the Castle Hall, then the Throne Room.
- You should now be ready to open the Secret Room. You need to have the THRONE ROOM KEY that you got in the King’s Bedroom.
- Zoom in on the thrones.
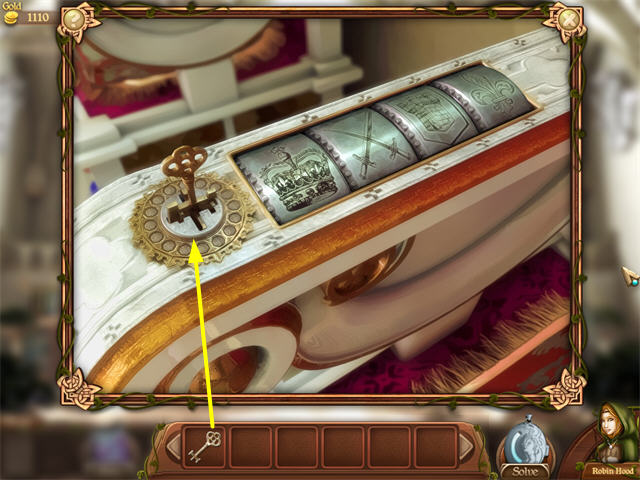
- Set the four picture dials to match the keywords: Crown, Swords, Castle, and Fleur de Lis.
- Put the THRONE ROOM KEY in the lock and click it one more time to turn it after the 4 pictures are set correctly.
- Exit to the Treasure Cave (Secret Room).
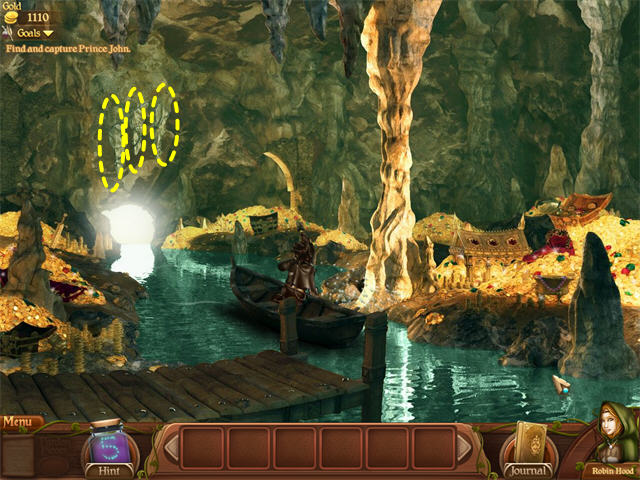
- Prince John will get in a boat and start paddling away. However, about half-way up he will keep paddling but stay in one place, so you have as much time as you need to solve the scene.
- There are 3 Stalactites hanging from the cave ceiling. Shoot each one with an Arrow and it will fall down. When all 3 have fallen, the exit will be blocked and you will win the game.
- Watch the Cut Scene.
- Even though the game has ended, you can go back in under the same profile and continue to do the optional activities. Click on the Journal to check your progress and make sure you got all the WANTED POSTERS and all the GOLD COINS.
- You can also continue to play Archery Contests from the Town Center.
- If you are missing two of the Gold Caches, they’re probably the two from the Baker’s Quest that required Special Abilities you didn’t have yet—a Pile of Hay to be burned in the Fields and the Anvil to be lifted in the Barn.
- When you have completed all of the optional activities except the never-ending Archery Contests, all of the locations will say ALL CLEAR except the Town Center and the Market.
- If you would like to replay with different Find Lists, start a new Profile.
Location of all Pardon Pieces
- Friar Tuck (6):
- Little John (8) :Church Aisle (1) Church Front (1) Church Staircase (1) Bell Tower Hatch (2) Church Basement (2) Church Basement Altar (1)
- Alan A Dale (7) :Church Bell Tower (2) Path to the Docks (3) The Docks (2)
- Will Scarlett (7) :Ship’s Deck (1) Captain’s Quarters (2) Ship’s Galley (2) Cargo Hold (2)
- Thomas Hood (11) :Marley House (1) Sawmill Road (2) Sawmill (2) Logging Road (2) Logging Shed (1) Saw Mill Floor (1) Logging Lake (1) Saw Mill Tower (1)
How to Acquire the Special Abilities
- Arrow. Talk to Johnny Goodshot in Sherwood Forest and he will teach you to shoot a bow. Hit the Target in Sherwood Forest, and you will get the Arrow Special Ability.
- Persuasion. Add Friar Tuck from the Fields to your band.
- Flaming Arrows/Burning Things. Get the FISH from the Hidden Object Scene in the Bakery and the Church Aisle, then buy the KNIFE from the Fish Seller in the Market. Use it on the Hidden Stone in the Church Staircase and collect the FLAMING ARROWS.
- Bow Staff/Strength. Add Little John from the Church Front to your team.
- Music. Add Alan-a-Dale from the Docks to your team. This can lull some guards to sleep.
- Sneak. Add Will Scarlett from the Ship’s Cargo Hold to your band.
- Charm. Add Maid Marion from the Town Center to your band.
Created at: 2010-08-18