

WALKTHROUGH MENU
GENERAL TIPS
- "Samantha Swift and the Golden Touch" has 7 stages. Each stage has several interactive hidden object scenes to solve and some mini-games in between all levels.
- This game does not have a timer; you can take your time and solve the puzzles at your leisure.
- You will not be able to access another room until you’re completely done with the room you’re currently in. Make sure that all the puzzles have been solved in order to exit a room.
- When you see a green magnifying glass appear on the scene, it means that you need to investigate that area at some point before you leave the scene. Those areas contain puzzles that need solving.
- You will not always be able to investigate a scene with a magnifying glass right away. At times you may have to wait until you perform other actions before you can access them.
- The walkthrough will show you the location of all the lightning bolts in the scene. The locations may be random, so they may not be in the same place for everyone.
- If you decide to replay the game, you will be asked to find a new set of items. Some of the items in blue may not be in the same place for everyone.
- Several of the items you pick up will need to be stored in the tool area that is in the lower right side of the scene. You will use these items in the same room you’re in or in another room. The tools will help you unlock the items that are listed in blue.
SCANNER / HINTS
- You will find the scanner in the very first scene that you encounter. The scanner will help you look at the shape of any item on your list. Just click on any item on the list, and it will appear on the scanner on the lower left side of the page. Looking at the shape of an item will make it easier for you to locate the item in the scene.
- You can use the scanner to help you find blue items and secret items. Click on the blue item from the list and then hover your mouse around the scene. Even though you will not be able to see the blue item itself, you will be able to see the hotspot that will help you unlock the item.
- You can use the scanner as many times as you like. Once the item is in the scanner, move your cursor around the scene. The redder the item is in the scanner, the closer you are to finding it. When the item is yellow it means that you are getting closer. If the item is white it means that you are far away, move in a different direction or area.
- If you click randomly in the scene you will disable the scanner temporarily. When the scanner is disabled it will turn completely black and it will not help you locate any items in the scene.
- You will be able to use the scanner again once you see the green light shining through it.
HINTS / LIGHTNING BOLTS
- Find the lightning bolts in the scene, and you will be able to collect bonus hints. Most scenes only have one lightning bolt, with the exception of the first scene.
- The hint will show you the exact location of an item in your scanner. Click on an item on your list, and then click on the hint; a lightning bolt will show you the exact location of that particular item you clicked on. The item will also remain circled until you click on it.
- The hints will carry over with you from scene to scene. You can hang on to your hints for as long as you need them. Use them only when you absolutely need to.
BLUE ITEMS / SPECIAL ITEMS
- Blue items are the items that are hidden within each scene. In order to uncover them, you have to use a tool from the tool section, also referred to as inventory items in the walkthrough.
- You will know where a blue item is located when you see your cursor turn blue with two gears moving underneath it.
- Special items are items which will not show up on your original list. They will always show up at the end of a scene. The scanner can help you find the secret items; just use it like you would to help you find any other item in the scene.
PDA
- The PDA will help you get special information that you will need for the game. It gives you information about the museum, the contacts, and the travel log. You can customize the settings in your PDA.
- Customizing the settings is just for your own enjoyment and has no effect on the outcome of the game.
STAGE 1 – MENDING A BROKEN HEART
FIRST LOCATION
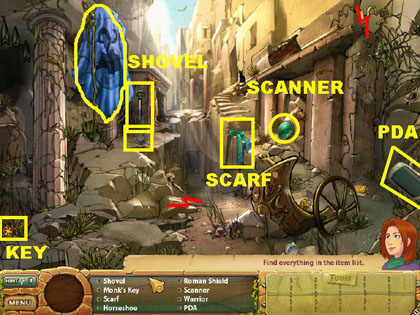
- Scanner – Pick up the green scanner that is on the right side of the scene.
- Shovel – It is on the left side of the scene.
- PDA – Pick up the PDA that is on the lower right edge of the scene.
- Scarf – The green scarf is on the right side of the scene.
- Horseshoe – It is on the left side of the scene, underneath the shovel.
- Monk’s Key – It is on the lower left side of the scene.
- Parachute – The blue parachute is hanging on the top left side of the scene.
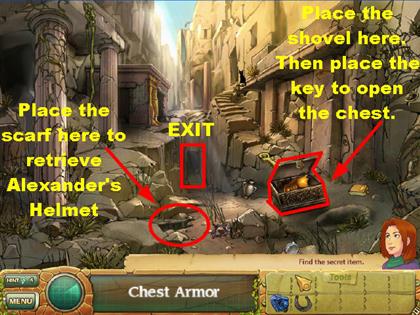
- Alexander’s Helmet – Place the scarf in the hole that is on the lower left side of the scene. The scarf will pull up the helmet. Click on the helmet once it lands on the ground.
- Chest Armor – Place the shovel in the lower right side to dig up the chest armor. Once it comes out, use the Monk’s key on the chest in order to open it up. Once the chest is open, click on the armor and it will go into the museum. A door in the back of the room will open up, go through it.
SECOND ROOM
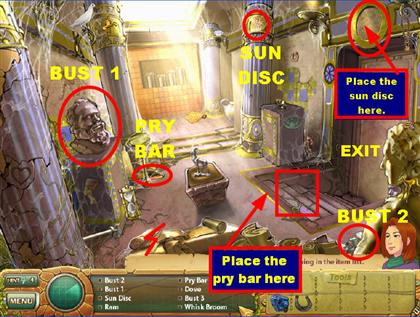
- Bust 1 – It is on the left side of the scene.
- Bust 2 – It is on the lower right corner of the scene. It is hiding close to the large statue.
- Sun Disc – It is on the top of the blue pillar on the right side of the scene.
- Pry Bar – The pry bar is on the far left side of the ground.
- Whisk Broom – It is on the lower left side of the scene.
- Dove – It is on the top left side of the scene. When you click on the dove it flies to the right side of the scene, and it lands on the head of the large statue. The dove will drop a ring on the head of the statue; you will pick the ring up later. Click on the dove again and it will be taken off your list.
- Chest – Place the horseshoe from your tool section onto the horseshoe that is on the right side of the wall. The chest will come out of the wall.
- Crank – Place the pry bar on the steps in the lower right side of the scene. The crank will automatically come out of the steps. Click on it once it lands on top of the steps.
- Open the door – Place the sun disc on top of the door on the right side of the scene. Once the door is open, go through it.
MAP ROOM
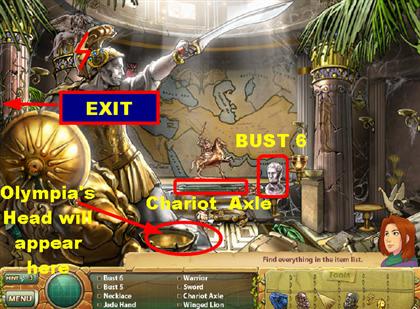
- Bust 6 – It is on the lower right side of the scene.
- Chariot Axle – It is located on the lower center of the scene, below the map.
- Mask – Place the whisk broom on the steps, below the map on the wall. Click on the golden mask once it appears, it looks like a gold tablet. It will land in the lower center of the scene.
- Once you’re done here, you will be taken back to the previous room.
- Exit through the top left side of the scene.
SECOND ROOM – PART 2
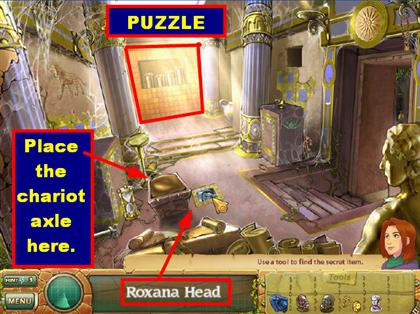
- Roxana Head – Place the chariot axle on the structure that is in the middle of the floor. The axle will move it out of the way. Click on the head once it is visible on the floor.
- Click on the puzzle that is in the back of the room to solve it.
BUST PUZZLE

- The objective of this game is to place all the busts in the right order. It doesn’t matter which bust you place first as long as they are in the right spot.
- Please look at the screenshot for the correct order.
- Once the puzzle is correct, the door will open in the back wall, exit through it.
BALL ROOM
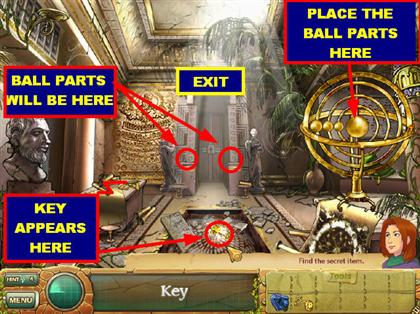
- Ball Part 1 – It is in the back of the scene, next to the statue on the left.
- Ball Part 2 – It is in the back of the scene, next to the statue on the right.
- Key – Place the two ball parts in the center of the golden art piece on the right side of the scene. Once the balls start spinning, the door in the back will open up.
- The center of the floor will open up, and a key will appear at the bottom. Grab the key and place it on the door that is in the back.
- Exit through the door.
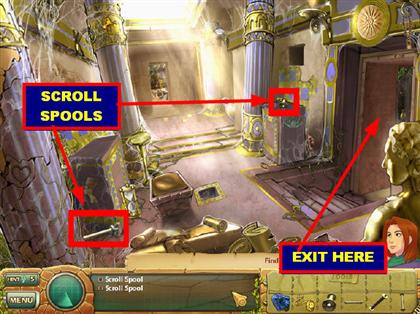
GARDEN
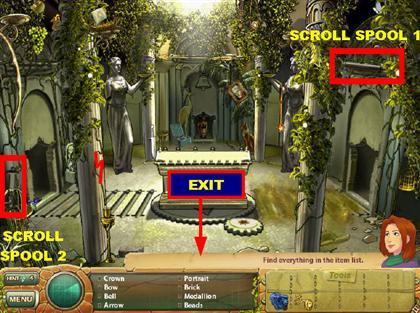
- Scroll Spool 1 – It is located on the lower left side of the page.
- Scroll Spool 2 – It is on the top right side of the scene.
- At this point you will have to look in other rooms in order to open the sarcophagus.
- Exit through the hole in the ground.
BALL ROOM
- Scroll Spool 1 – It is in the lower right corner of the scene.
- Scroll Spool 2 – It is located in the lower left corner of the room.
- Once you pick up both scrolls, exit through the door that is in the left side of the room.
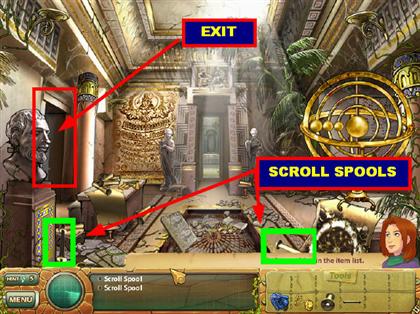
SECOND ROOM – PART 3
- Scroll Spool 1 – It is located on the right side of the scene, on a pedestal that is close to the steps.
- Scroll Spool 2 – It is in the lower left corner of the room.
- Exit through the door on the right.
MAP ROOM – PART 2
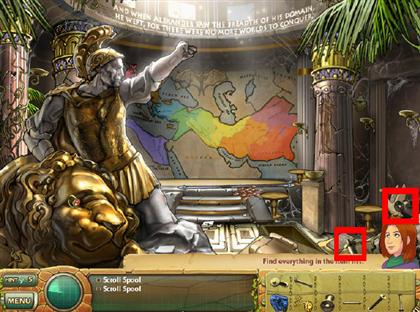
- Scroll Spool 1 – It is on the lower right corner of the scene, above Samantha’s head.
- Scroll Spool 2 – It is on the lower right corner, in front of Samantha’s face.
- Exit through the top left side of the scene.
- Once you exit that room, exit through the door in the back of the next room and you will be back in the garden.
OPEN THE SARCOPHAGUS

- Place all the scroll spools on the left side of the floor. You will see some indentations on the floor that look like the shapes of the spools. Once all the pieces are in place, the sarcophagus will roll out of the garden into the door on the left.
- A secret opening will be revealed on the right side of the page, and part of the ground will open up as well.
- Side Carving 1 – It is on the right side of the wall. Once you pick it up, the sarcophagus will roll back into the center. In order to roll the sarcophagus back out, click on the scroll spools that you originally placed on the left side of the floor. Those scroll pieces will go right back into the inventory.
- Swift Symbol – Grab the scrolls from the inventory and place them on the floor again, but this time you need to place it on the RIGHT side of the floor. The sarcophagus will roll out of the way once more. This time the left side of the wall will open up. Grab the swift symbol that appears on the floor.
- Side Carving 2 – Grab the side carving that is on the left side of the wall. The sarcophagus will roll back to the center.
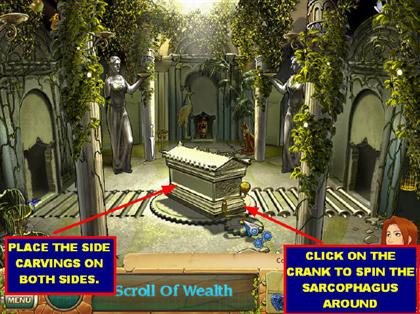
- Scroll of Wealth.
- Place the side carving from the inventory on the side of the sarcophagus.
- Place the crank on the wheel that is in front of the sarcophagus.
- Click on the crank until the sarcophagus is turned on the other side. Place the other side carving on that side of the sarcophagus.
- Once that is done correctly, some chains will fall from the ceiling and open the sarcophagus. Grab the scroll that is inside.
- Exit through the far right side of the scene.
LIGHT THE ROOM
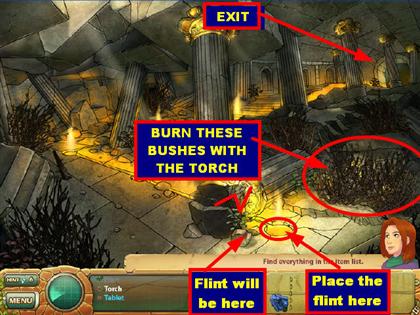
- Click on the flint piece on the lower right side of the scene.
- Place the flint on the hole in the ground that is on the lower right side of the scene. It will spark a fire that will light the rest of the room.
- Torch – Pick up the torch that is on the lower left side.
- Light the torch by placing it over the fire.
- Tablet – Place the lit torch on the bushes in the lower right side of the scene. Click on the tablet once all the bushes have disappeared.
- Exit on the top right side of the scene.
TURN ON THE LIGHTS IN THE LIBRARY
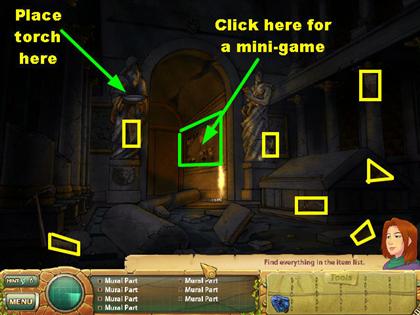
- When you first enter the room, use the blowtorch from the inventory on the bowl of the statue that is on the left side of the scene. If you have a hard time finding where to place the torch, move it around the scene until you see several blue sparkles appear on the screen.
- Once the light comes on, start looking for the seven mural parts.
- Please look at the screenshot for the location of all the mural pieces.
- Click on the mural that is in the inside of the arch and a mini-game will appear.
RECONSTRUCT THE MURAL
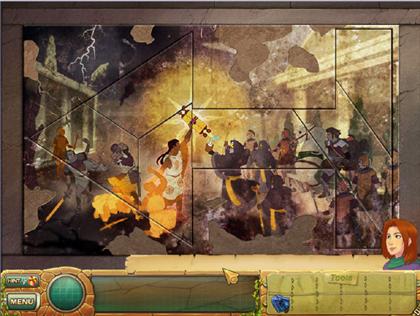
- In this puzzle you have to reconstruct the mural by placing the pieces from the inventory box onto the mural itself.
- The pieces will remain small until you actually click them onto the board. Grab any piece at the bottom and click it onto the scene. Once the piece is larger, you will be able to move it around by holding down your mouse over the GREEN ARROW and moving it in the direction you choose.
- Once a piece is where you need it to be, click it onto the area. If it’s in the right place, it will lock in automatically.
- Once a piece is on the board it cannot be placed back into the inventory. If it’s in your way, just move it to another area on the board until you are ready to use it.
- Once the mural has been placed, read the story if you wish, then exit through the door in the back.
DOCK
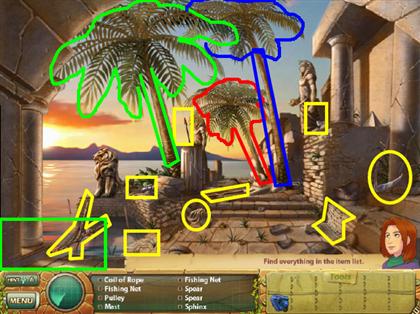
- Coil of Rope – It is on the lower left side of the ground.
- Fishing Net 1 – It is on the lower right side of the scene.
- Fishing Net 2 – It is on the lower left side of the ground.
- Pulley – The pulley is on the lower left side, behind the lion statue.
- Mast – The mast is on the lower left corner.
- Spear 1 – The first spear is on top of the steps.
- Spear 2 – It is in the center of the scene.
- Scythe – The scythe is on the lower right side of the scene.
- Axe – The axe is next to the statue on the top right side of the scene.
- Place the axe at the base of the palm tree on the right side, in front of the statue. The axe will chop the tree down, and a log will go into your inventory.
- Place the axe on the tree that is in the MIDDLE, and another log will go into your inventory.
- Place the axe on the largest palm tree, and a bracelet will fall to the ground. You will also have another log added to your inventory.
- Make sure that you pick up the bracelet as well.
- Once all the pieces have been placed and the palm trees have been cut, click on the lower left corner of the scene and start building the boat.
BUILD THE BOAT
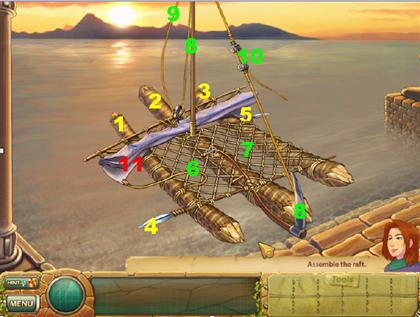
- The raft has to be built in a certain order; otherwise, you will not be able to complete it. If you pick up a piece that you cannot use, just place it back in the inventory section and pick up a different piece.
- Place the three logs on the water first. Once they are in the right place, click on it and it will lock into place. You will know you’re in the right spot when you see blue sparkles appear.
- Place BOTH spears on the logs.
- Place BOTH nets on top of the logs and spears.
- You will need to place the mast on top of the logs next.
- The scythe needs to be placed next.
- Place the coil of rope on the mast.
- The pulley goes on next.
- The parachute will go on last.
- Once the raft is back together, Samantha will ask you to go back to the library to find more raft parts.
- From the dock, exit through the lower right side of the scene.
LIBRARY – PART 2
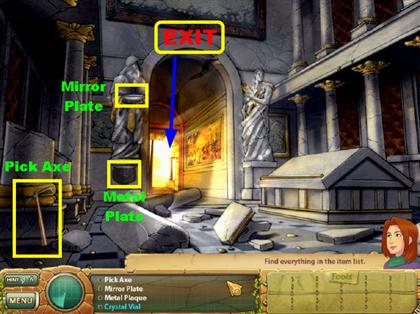
- Pick Axe – The pick axe is on the lower left side of the scene.
- Mirror Plate – The statue on the left is holding the mirror plate.
- Metal Plaque – The metal plaque is underneath the statue on the left.
- Crystal Vial – Use the pick axe on the cylinder that is on the ground, close to the statue on the left side. Pick up the vial that appears inside of it.
- Exit through the back of the library.
DOCK – PART 2
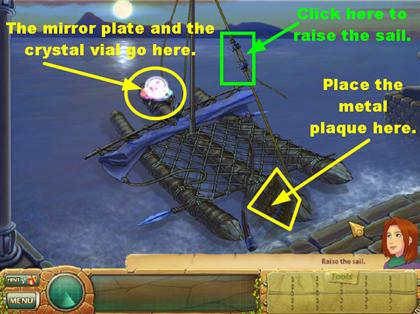
- The map is on the top right side of the scene, on top of the pillar. The map will help you navigate the boat to its destination.
- Click on the raft in the lower right corner in order to finish building the raft.
- The mirror plate goes on top of the log in the middle.
- The metal plaque goes on the opposite end of the middle log.
- Place the crystal vial on top of the mirror plate that you placed originally.
- To raise the sail, just click on the pulley.
ROSETTA DOCK
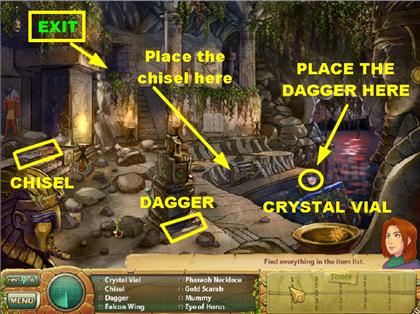
- Crystal Vial – Click on the crystal vial that is on the boat in the lower right side of the scene.
- Chisel – The chisel is on the steps, on the left side of the page.
- Dagger – It is on the lower center of the ground.
- Papyrus Boat – Place the dagger on the lower right side of the scene. Click on the papyrus boat that appears.
- Heart Piece – Place the chisel on the area to the left of the small steps on the right. The heart piece will be located behind the rock that the chisel moved. Exit through the top left side of the scene.
SHRINE
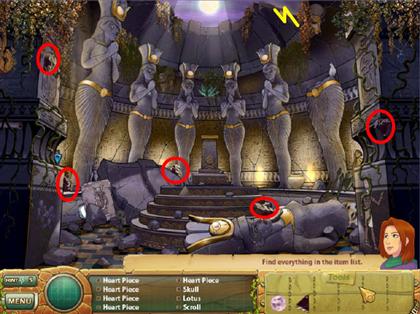
- Please look at the screenshot for the location of all the heart pieces. They will be highlighted in red.
- Once all the items have been collected, click on the pedestal that is in the back of the room and a puzzle will appear.
HEART PUZZLE
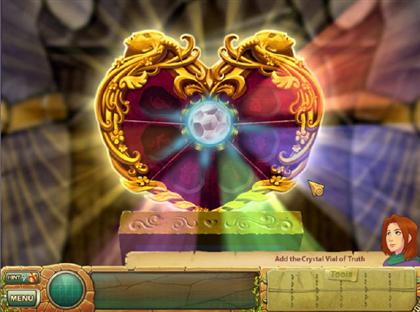
- Your goal is to recreate the heart by placing the puzzle pieces in the right place. Unlike the previous puzzle, you do not have to rotate these pieces around to make them fit.
- Once you’ve reconstructed the heart, place the crystal vial in the middle.
STAGE 2 – FINDING BEAUTY
PHRYGIAN VALLEY, TURKEY
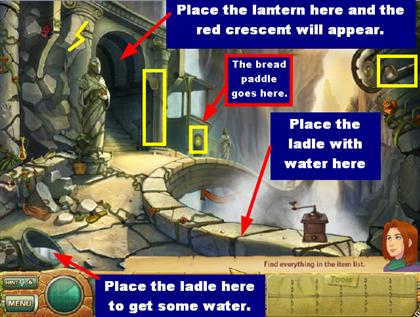
- Bread Paddle – It is on the pillar located on the right side of the arch.
- Lantern – It is in the center of the scene, next to the small statue.
- Dipper – The dipper is on the top right side of the scene.
- Red Crescent – Place the lantern on the inside of the arch, and you will be able to see the red crescent; click on it to pick it up.
- Golden Fern – Place the ladle in the water that is in the lower left corner. The ladle will be filled with water.
- Use the ladle filled with water on the stone area that is in the lower right side of the scene. Click on the golden fern once it appears.
- Golden Bread – Place the bread paddle in the brick oven that is close to the entrance. Click on the bread once it comes out. Exit on the top right side of the page.
MIDAS’ EXHIBIT
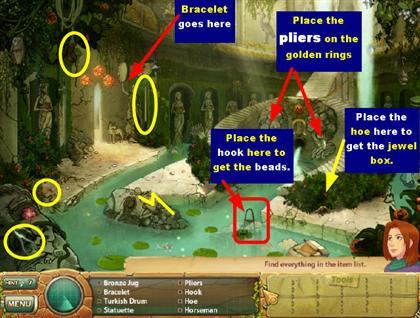
- Bracelet – The bracelet is on the lower left side of the scene.
- Pliers – They are in the lower left corner of the scene.
- Hook – It is on the top left side of the scene.
- Hoe – It is on the left side of the scene, close to the statues.
- Jewel Box – Place the hoe on the shrubbery that is on the lower right side of the scene.
- Golden Goblet – Place the bracelet on the statue that is on the right of the entrance, and the golden goblet will come out of the water.
- Beads – Place the hook on the right side of the water, where you see the hook coming out of the water. The beads will come out. Once the beads are revealed, pick them up from the piece of stone.
- Key – Place the pliers on the golden rings that are attached to the lions in the water fountain on the right. The key will fall in front of the fountain; pick it up.
- To exit, place the key in the door that is in the top right side of the scene.
KING MIDAS’ TOMB
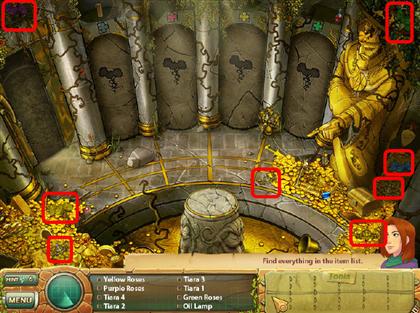
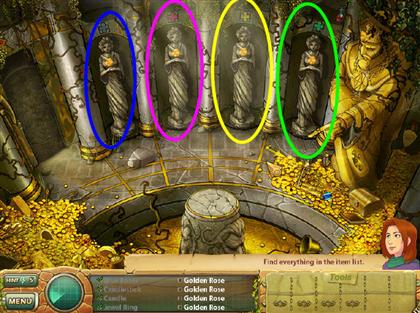
- The yellow roses are in the lower left side.
- The green roses are on the top right side of the scene.
- The purple roses are in the top left side of the scene.
- The blue roses are in the lower right side of the scene.
- Tiara 1 is in the lower left side of the scene.
- Tiara 2 is located in the lower right side, close to the area in which the gold coins begin.
- Tiara 3 is in the lower right side.
- Tiara 4 is on the lower right side of the scene.
- To find the blue items in the scene, place the roses from the inventory on the pillars that are in the back of the scene. You will know which color goes where when you look at the crosses that are above each section.
- Golden Rose 1 – Place the blue roses in the first section in the back of the scene.
- Golden Rose 2 – Place the purple roses on the second section in the back of the scene.
- Golden Rose 3 – Place the yellow roses on the third section in the back of the scene.
- Golden Rose 4 – Place the green roses on the fourth section in the back of the scene.
- Once all the statues are revealed holding the golden roses, click on them to collect them.
- Place Tiara 1 on the first statue.
- Place Tiara 2 on the second statue.
- Place Tiara 3 on the third statue.
- Place Tiara 4 on the fourth statue.
- The tiaras can really go on any statue. As soon as everything is in place, a hole will appear on the ground; exit through there.
TURKISH BATH HOUSE
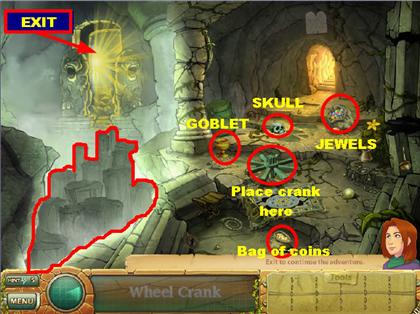
- The bag of coins is in the right side of the scene.
- The goblet is on the top right side of the scene.
- The jade ball is on the right side of the scene.
- Skull – Place the jade ball on the round hole that is on the right side of the ground.
- Gold Plate – Place the goblet in the hole in the ground that is close to the pillar in the center of the scene.
- Jewels – The bag of coins goes in the hole in the ground in the lower right side of the scene. The jewels will appear on the left side of the scene.
- Gold Fork – Place the jewels on the hole that is on the top right side of the ground and the golden fork will appear in the lower right side of the scene.
- Wheel Crank – Place the skull on the ground, close to the green barrel. The crank will appear on the top left side of the pillar in the center of the room.
- Place the wheel crank on the golden wheel that is in the center of the ground. The crank will start turning. The door on the left side of the room will open.
GORDIAN KNOT PUZZLE 1

- In order to untie the knots you must click on them in a certain order. Each knot you click has an effect on the other knots in the bunch.
- I will label the knots from 1 through 4 starting from the top and going left to right. Press the knots in the following order:Press knot # 2 Press knot # 4 Press knot # 3 Press knot # 1
GORDIAN KNOT PUZZLE 2
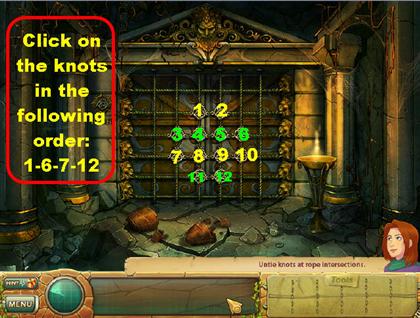
- In order to untie the knots you must click on them in a certain order. Each knot you click has an effect on the other knots in the bunch.
- I will label the knots from 1 through 4 starting from the top and going left to right.
- Solution: Press the knots in the following order:Press knot # 1 Press knot # 6 Press knot # 7 Press knot # 12
GORDIAN KNOT PUZZLE 3
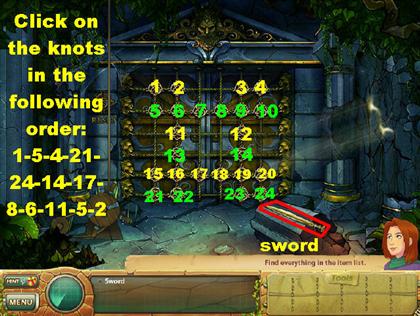
- The sword is in the lower right side of the scene.
- In order to untie the knots you must click on them in a certain order. Each knot you click has an effect on the other knots in the bunch.
- I will label the knots from 1 through 4 starting from the top and going left to right. Press the knots in the following order:Press knot # 1 Press knot # 5 Press knot # 4 Press knot # 21 Press knot # 24 Press knot # 14 Press knot # 17 Press knot # 8 Press knot # 6 Press knot # 11 Press knot # 5 Press knot # 2
- Once you’ve untied the last knot, exit through the back of the scene.
INSIDE THE CAVE
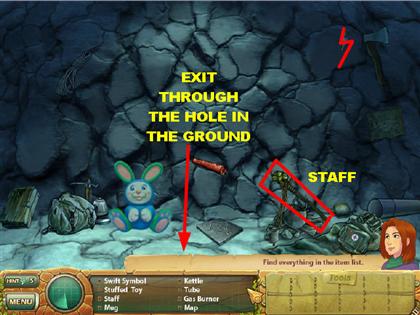
- The staff is in the lower right side of the scene.
- Once all the items have been found, a hole in the ground will open up, exit through there.
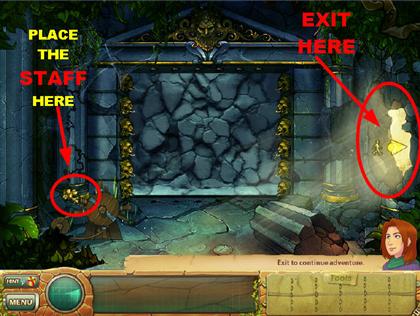
- Once you go back to the original area, place the staff on the turning wheel on the lower right side of the scene. A log will go through the wall and open up an exit; go through the hole to get to the next scene.
THRONE ROOM
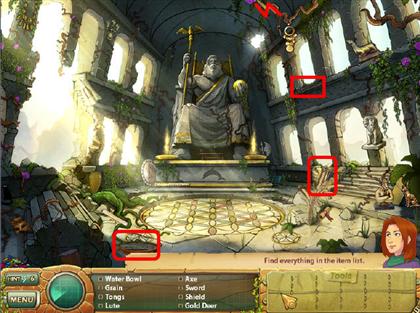
- The water bowl is in the lower left side of the scene.
- The grain is in the lower right side, next to the steps.
- The tongs are in the top right side of the scene.
- Dove – Place the grain in the center of the floor and the doves will gravitate to the center and will start eating the grain. Click on the white dove that is in the center of the scene.
- Amethyst – Place the tongs on the flame that is on the left side of the statue. The amethyst will automatically be taken off your list.
- Emerald – Place the water bowl on the flame that is on the right side of the statue. Once the flame goes out, click on the emerald that appears.
- Vial of Beauty – Click on the floor and a puzzle will appear.
TURN THE KNOBS
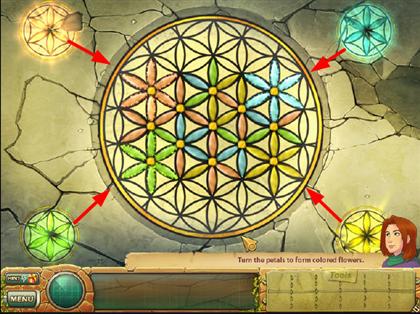
- Click on the petals so you can turn them. The goal of the game is to form petals that match the colors of the petals that are on each corner of the scene. Once you’ve successfully formed the right combination, the flower you matched will light up in its corner.
- Light up all four colors to win the game.
- Click on the Vial of Beauty once it lands on the floor.
STAGE 3 – FULFILLING THE BASICS: SUSTENANCE
TIGRAY, ETHIOPIA
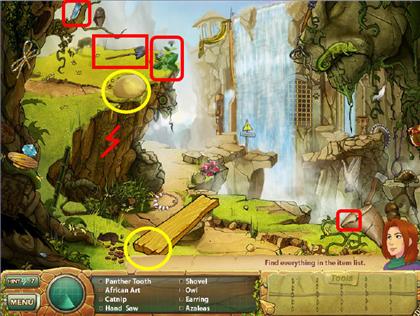
- The panther tooth is in the lower right side of the scene.
- The catnip is in the top right side of the scene.
- The saw is in the top right side.
- The shovel is on the top left side of the scene.
- Panther Stamp – Place the catnip over the panther statue that is on the top right side of the scene. The panther stamp will fall to the ground once the panther opens its mouth. Pick up the stamp to move on.
- Your next step is to fix the path so you can get over to the other side.
- Grab the panther tooth and place it at the end of the wooden board at the bottom of the scene.
- Place the shovel on the large rock on the top left side of the scene. The shovel will move the rock and fall on the wooden board. The panther tooth will fall on the edge of the cliff.
- Place the panther stamp on the paw print that is next to the waterfall on the right. The gate will open; exit through the gate.
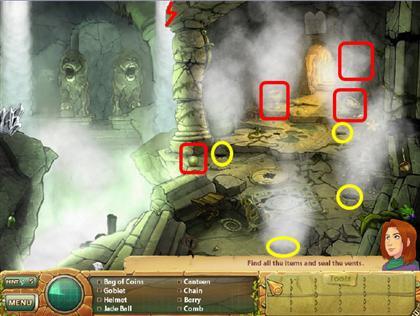
ENTRANCE
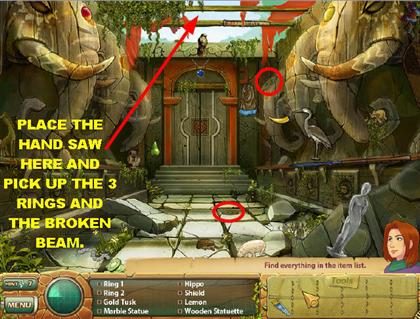
- Rings 1 and 2 – Please look at the screenshot for the location of all the rings, they are circled in red.
- Ring 3, 4, 5, and the Broken Beam – Place the hand saw on the wooden pieces that are on top of the scene. Once the wood falls to the ground, you will see some rings appear on the floor. Pick up all three rings and the broken beam.
- Ring 6 – Place the broken beam on the large rock that is on the lower left side of the scene. The beam will move the rock out of the way. Pick up the ring that was underneath the rock.
OPEN THE SECRET DOOR
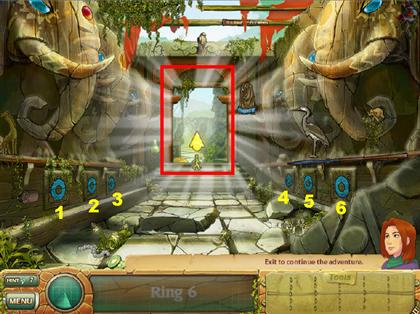
- Place all 6 rings in the areas that are underneath the elephants on each side of the scene.
- Once the rings are in place, you must click on them in a certain order. I will label the rings 1 through 6 from left to right.
- Click on them in the following order:Ring # 1 Ring # 5 Ring # 4 Ring # 3 Ring # 2 Ring # 6
- Once that is done, click on the door in the back to exit.
PALACE
- The knife is on top of the chest in the lower left side of the scene.
- Eagle Board – Place the knife on the vines that are on the top right side of the scene. Click on the eagle board as soon as it is revealed.
- Sheba’s Scroll – In order to get the scroll you have to click on the puzzle that is behind the eagle board.
SLIDER PUZZLE
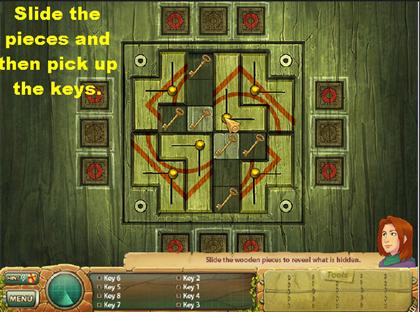
- The first part of the puzzle consists of moving the pieces around until the keys are revealed. Just click on the keys as they become available. Once all the keys have been picked up, you have to place the keys in the right place.
SLIDER PUZZLE – PART 2

- This second part of the puzzle consists of sliding the pieces around until all the red keyhole pieces are showing.
- Place the keys in the keyhole. As you place each key, you will notice that the blocks with red circles around them will open up.
- Once all the keys have been placed, the scroll will appear inside.
- Exit through the lower left side of the scene.
JERUSALEM, ISRAEL
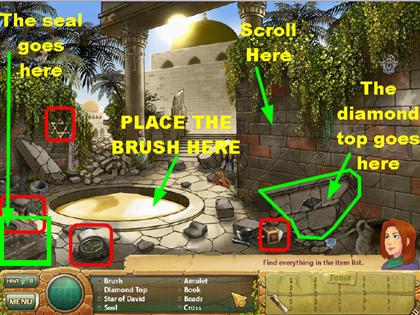
- The brush is on the lower left side of the scene.
- The diamond top is on the lower right side of the scene.
- The Star of David is in the left edge of the scene.
- Click on the scale that is on the lower left side of the scene.
- Horn – The diamond top goes on the rock piece that is in the lower right side. Once the piece is broken, pick up the horn that is inside.
- Camel – Place the brush on the sand that is on the ground. Click on the camel once it is revealed.
- Menorah – Place the seal on top of the structure that is in the lower left side. Click on the Menorah once it surfaces.
- Once the Menorah has been found, place the scroll on the brick wall on the right. A puzzle will appear on your screen.
SCROLL PUZZLE
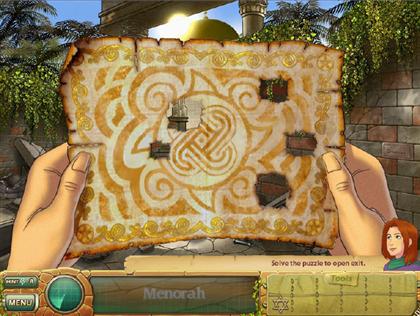
- Click on the holes in the scroll in the following order, from left to right, the holes are numbered 1 through 5: 3, 4, 5, 1, 2
- Once you’ve completed the puzzle, a secret passage will open up, exit through the passage.
SECRET PASSAGE
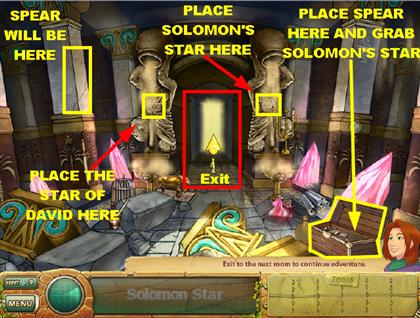
- Spear – It is on the column on the left side of the scene.
- Solomon Star – Place the spear on the chest that is in the lower right side. Once the chest is open, grab Solomon’s Star.
- Grab the Star of David and place it on the statue on the left.
- Place Solomon’s Star on the statue on the right. The door behind the statues will open up, exit through them.
SECRET PASSAGE – SECOND LOCATION
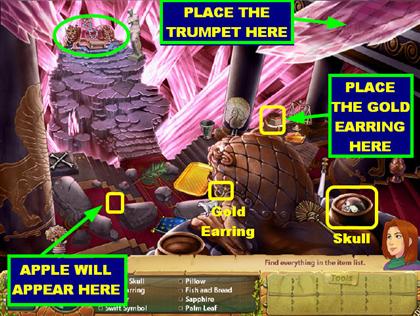
- The crystal skull is in the pot that is in the lower right side of the scene.
- The gold earring is located in the lower center of the scene.
- Trumpet and Crystal Bowl – Place the crystal skull on the bones that are on the left edge of the scene. Grab the crystal bowl and the trumpet that appears once the skull has moved. The trumpet will automatically go into your inventory.
- Crystal Ball – Place the gold earring on the container that is on the right side of the page, between the columns. Grab the crystal ball once the container opens.
- Golden Apple – Place the trumpet in the upper left side of the scene. Once the trumpet stops playing, the golden apple will fall on the steps on the left side.
- Vial of Sustenance – Click on the treasures that are in the upper left side, and a puzzle will appear.
LEAD & GOLD PUZZLE
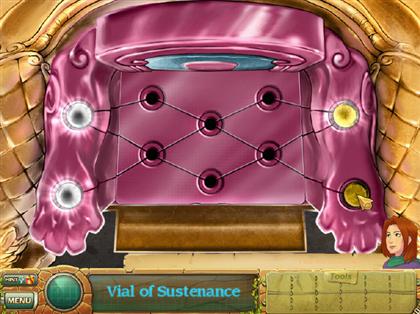
- Your goal here is to switch the places of the lead and gold pieces so they are in the opposite side of the field.
- Click on the piece that you want to move, and the spaces that you are able to move the piece to will light up. Click on one of the empty lit spaces and the lead or gold piece will move in that spot.
- Once the puzzle is complete, click on the golden grapes of sustenance.
CASABLANCA, MOROCCO
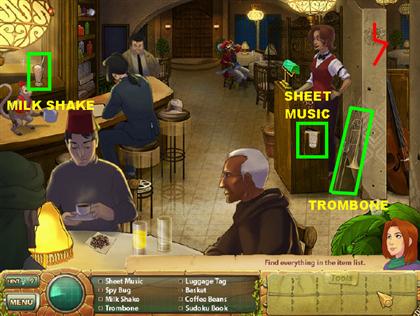
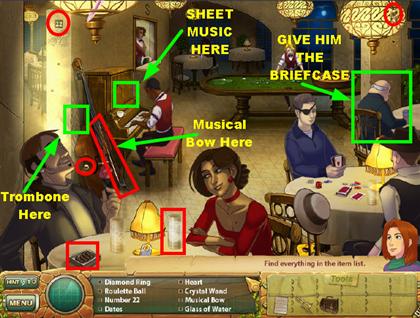
- The trombone is on the lower right side, leaning on the wall.
- The milk shake is on the top left side of the scene, behind the bar.
- Click on the sheet music that is on the podium on the right.
- In this section you need to find out what each person at the bar needs. Click on them after all the regular items have been found, and they will tell you their needs.
- Briefcase – The man in the blue suit tells you that he wants something tasty; give him the milk shake. The briefcase will appear on the floor next to him; click on it. Another room opens up on the right side, enter that room.
GAMBLING ROOM
- The diamond ring is on the lamp in the top right side of the scene.
- The glass of water is on the table on the lower left side. It is the glass that is in front of the lady.
- Pick up the dates that are in the lower left side, on the table.
- The roulette ball is on the lower left side; it is on the base.
- The number 22 is on the top left side of the wall.
- The musical bow is leaning against the bass that is next to the piano.
- Hotel Key – Place the musical bow on the bass, and the hotel keys will fall to the floor. Pick them up once they fall on the ground.
- Place the roulette ball on the roulette wheel.
- Gold Wasps – There is an older man that is sitting with his back to the crowd. Give the older man the briefcase, and he will give you some solid gold cufflinks. Click on the gold cufflinks once they appear on his table.
- Swift Symbol – Place the sheet music on the piano, and the piano player will give you the Swift Symbol. Click on the Swift Symbol once it appears on top of his piano.
- Pendant – Place the trombone on the side of the violin and it will scratch the back of it. Grab the pendant once it falls on the floor.
- Go back to the other room for now.
BAR
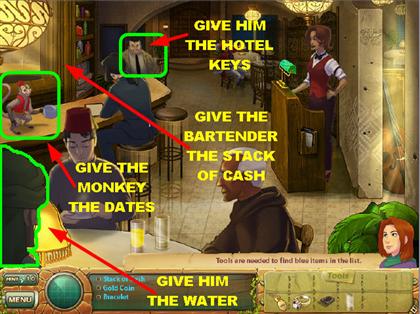
- Gold Coin – Give the man in the lower left corner the glass of water, and he will you a gold coin. Pick up the gold coin once it appears on the table.
- Bracelet – Give the monkey the dates, and he will give you the bracelet. Pick up the bracelet once it appears on the bar.
- Stack of Cash – Give the man in the beige jacket the hotel keys, and he will give you a stack of cash. Pick it up from the counter in front of him.
- Old Document – Give the stack of cash to the bartender, and he will hand you the old document. Pick it up once it appears on the bar.
- Click on the scene and read the conversation between Samantha and the bartender. Go back to the game room; you are done in this room.
GAME ROOM – PART 2
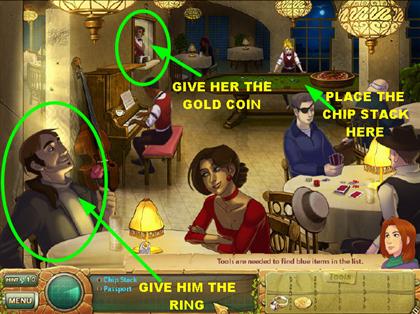
- Chip Stack – Give the gold coin to the lady in the cashier’s office, and she will give you a stack of chips. Click on the stack of chips in front of her.
- Passport – Place the stack of chips on the roulette table and you will get the passport.
- Plane Ticket – Give the engagement ring to the man on the left, and he will put some plane tickets on the table. Take the plane tickets.
BAR – PART 3
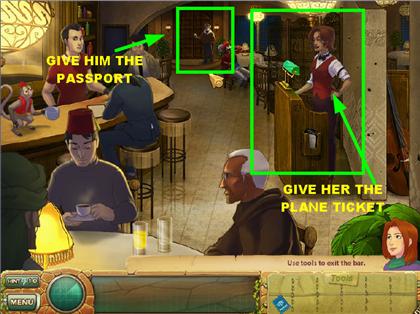
- Go back to the other room and give the plane ticket to the lady at the podium. A man will appear in the back of the room. Hand him your passport and exit through the door.
STAGE 4 – BUILDING STABILITY
GENERAL STORE
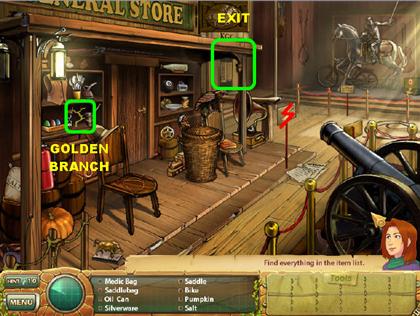
- Golden Branch – Find all the items on the list first, and then you will be asked to find the golden branch. Go through the swinging doors on the right side of the scene.
SALOON
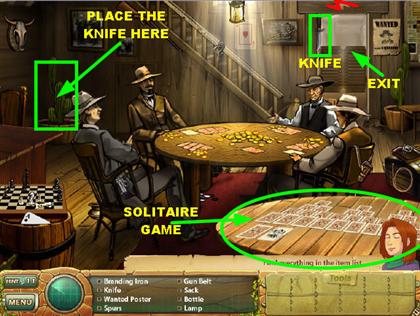
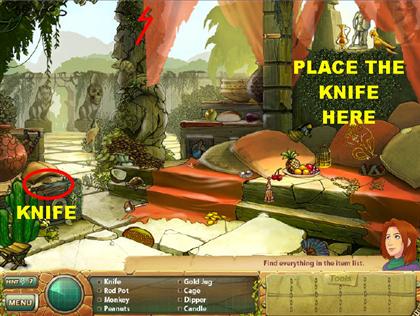
- The knife is on the top right side of the scene.
- Click on both tables, and you will open up a puzzle. Once you’ve found all the items on the list, you will be asked for the Golden Branch.
- Golden Branch – Place the knife on the cactus that is in the far left side of the scene. Click on the golden branch once it appears over the cactus.
SOLITAIRE GAME
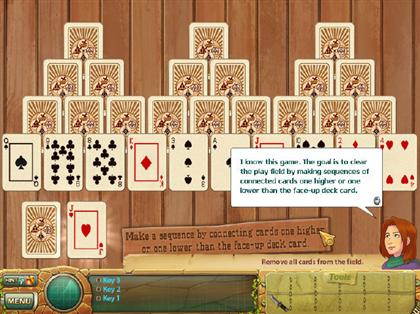
- Keys 1, 2, and 3 – In order to get the 3 keys, you have to win a hand of solitaire.
- Click on the table that is in the lower right side and you will play a game of solitaire. In this solitaire game all you have to do is click on the card that is higher OR lower than the card face up on the deck.
- Each time you eliminate a card from the top of the deck, a key will be revealed. Find all three keys to win the match.
- For example, if the card that is face up is a "J," you can use a "10" or a "Q." Then keep placing numbers that are one up or one lower.
- For example, you can do: 10, J, Q, K, A, K Q, K, A, 2.
- The jokers are wild, meaning that you can place any card that you desire on it. When you get the joker, choose the card that will allow you to play the largest number of cards.
START THE GENERATOR
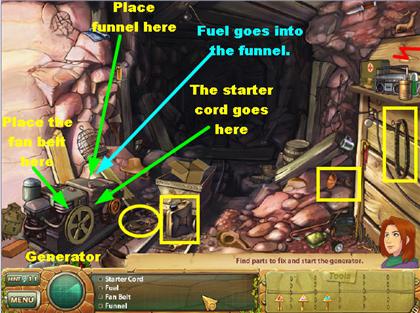
- The funnel is in the lower right side.
- The fan belt is on the right edge of the scene.
- Pick up the starter cord that is in the lower left side of the ground.
- Now you need to fix the generator, you have to do the steps in the right order or it will not work. The generator is located in the lower right side of the scene.
- Place the funnel on top of the generator.
- The fan belt goes on the large wheel that is on the generator.
- Place the fuel can on top of the funnel.
- Place the starter cord on the side of the generator.
- Once the generator has started the lights will come on. Look for the items on the list.
MINE
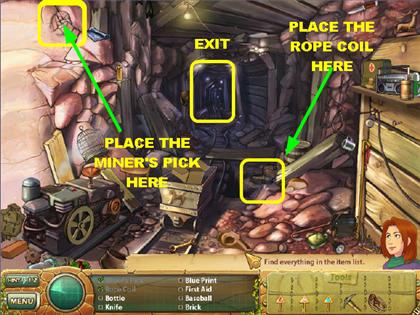
- The miner’s pick is in the far left side of the scene.
- The rope coil is in the far right side of the wall.
- Fossil – Place the miner’s pick in the upper left side of the wall. Pick up the fossil that appears in the wall.
- Golden Branch – Place the rope coil in the lower right side. Pick up the golden branch as soon as it comes up. The door in the back will open up, exit through there.
CAVE
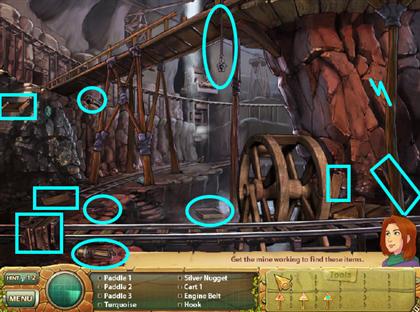
- Paddle 1 is in the top left side.
- Paddle 2 is on the lower right side, behind the wheel.
- Paddle 3 is in the lower left side, on the tracks.
- Cart 1 is in the lower left side of the scene.
- Cart 2 is in the upper left side, under the walkway.
- The engine belt is in the lower left side of the ground.
- The hook is on the top right side of the scene.
- The mining lamp is in the lower left corner of the scene.
- The sifter is in the lower center of the scene, in the water.
- The miner’s pick is in the lower right side.
CAVE – PART 2
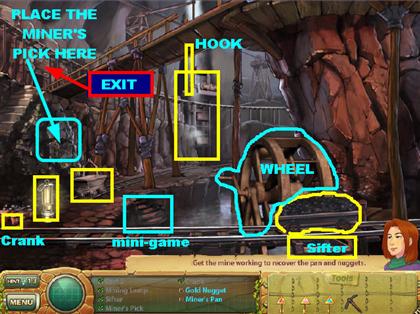
- NOTE – If your inventory gets too full, you will have to look for some of the blue items in order to make room in your inventory box for extra items. Before you can look for the items in blue, you will have to place some of the items in inventory around the scene.
- Place the sifter in the lower right side of the scene, under the wheel.
- Place Paddle 1, 2, and 3 on the wheel that is in the lower right side of the scene.
- Place the engine belt and cart #2 on the machine that is spinning in the middle of the scene.
- Place the hook on the upper left side of the scene, over the bridge.
- Place cart #2 on the lower left side of the scene, on the tracks.
- Crank – Place the mining lamp in the lower left side of the scene. Pick up the crank that appears on the ground. The crank will go into inventory.
- Place the crank on the large wheel that is in the lower right side of the scene.
- Gold Nugget – Place the miner’s pick in the lower left side of the scene. Once it is done breaking off some coal from the walls, click on the cart. The cart will go up and come out through the tracks on the lower right side of the scene.
- Click on the wheel and it will start spinning. Once the wheel stops, pick up the gold nugget.
- Miner’s Pan – Click on the cart again and the cart will roll away and go through the tracks upstairs. Place the miner’s pick in the lower left side of the scene. Once the miner’s pick stops moving, click on the cart again. Once the coal cart returns to the lower right side of the scene, click on the wheel and it will start spinning again. Pick up the gold miner’s pan that appears under the cart.
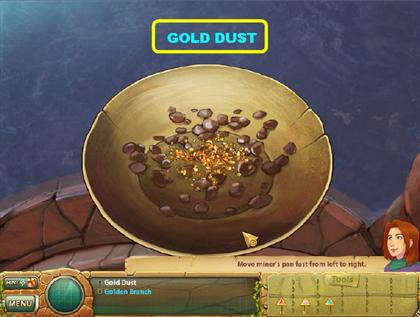
GOLD DUST & THE GOLDEN BRANCH
 Secret Item:
- Gold Dust – on the steps by the water and you will be taken to a different scene. Place the miner’s pan anywhere in the scene. Once the pan is in the middle of the scene, hold it down with your mouse and it will move from left to right.
- Click on the gold dust once it appears at the bottom of the scene.
- Golden Branch – Repeat the steps above to obtain the golden branch.
- Exit in the top left side of the scene.
BLACK KETTLE HIDEOUT
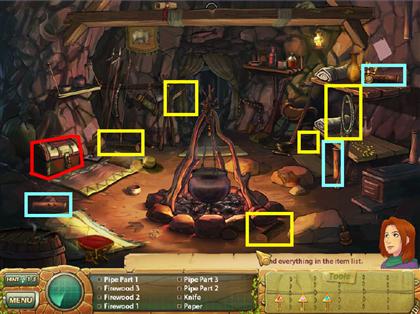
- Pipe Part 1 is located in the lower left side of the scene.
- Pipe Part 2 is in the top left side of the scene.
- Pipe Part 3 is in the lower right side, under the table.
- Firewood 1 is in the lower right side, under the table.
- Fire wood 2 is on the lower right side in the scene.
- Firewood 3 is on the far left side of the scene.
- The knife is on the left side of the back wall.
- The rope is in the top right side of the scene.
BLUE ITEMS FOR THE BLACK KETTLE HIDEOUT
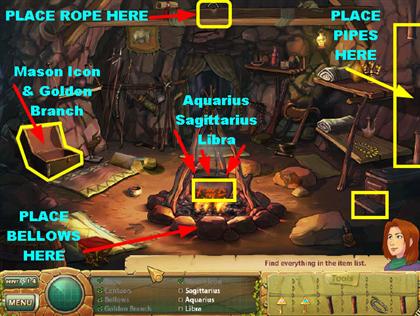
- Place Firewood 1, 2, and 3 under the kettle that is in the middle of the room.
- Bellows – Place the knife in the area that is behind the treasure chest, and the bellows will appear; click on it.
- Golden Branch and Mason Icon – Place key 2 (the pink key) on the treasure chest that is in the lower left side of the scene. Click on the golden branch, and the Mason Icon that is inside.
- Sagittarius, Aquarius and Libra – Place the bellows under the kettle, and the fire will start. Once the fire has started, the Sagittarius, Aquarius, and Libra symbols will appear on the side of the kettle.
- Treasure – In the upper right corner of the scene, place the pipes in the following order: Place pipe part 1 first. Place pipe part 2 second. Place pipe part 3 last.
- Pick up the gold treasures that fall on the ground in the lower right side of the scene.
- Place the rope on the wooden beam that is on top of the scene.
- Once the rope is in place, click on the shorter end of the rope and it will lift the kettle; exit through the hole under the kettle.
WILDERNESS
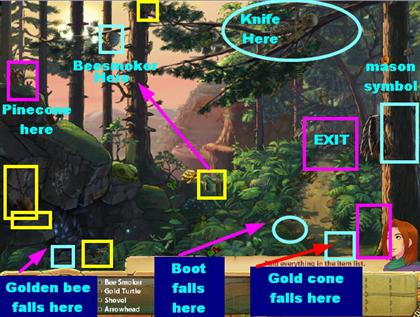
- The Indian axe is in the lower left side of the scene.
- The shovel is in the lower left side of the scene.
- The bee smoker is in the lower center of the scene.
- Pick up the pinecone that is in the top center of the scene.
- The knife is in the lower left side of the scene.
- Golden Cone – Place the pinecone in the upper left side of the scene, on top of the hill. A squirrel will run up the tree on the right side and drop the cone in the lower right side of the scene.
- Gold Bee – Place the bee smoker on the beehive that is hanging from the top of the scene. The golden bee will fall at the bottom left corner of the scene; pick it up.
- Payne’s Boot and Mason Symbol – Place the knife on the branch where the skeleton is, in the upper right corner. Once the branch falls to the ground, grab the boot that lands in the lower right side of the scene, close to the path.
- Click on the Mason symbol that is carved on the side of the tree on the right.
- Golden Branch – Place the shovel in the lower right corner of the scene, close to the bushes by the tree. A box will appear on the ground, use Key 1 (purple key) on the box to unlock it. Grab the golden branch that appears inside.
- Exit by the bridge on the right side.
ENTER THE FORT
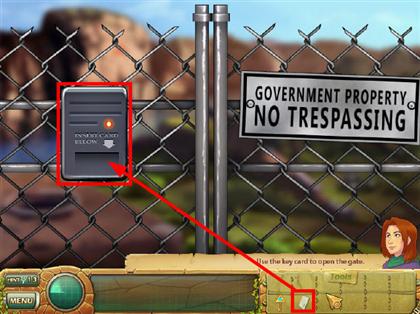
- When you enter the scene, click on it several times. You will be taken to a cut scene; a card tool will go into your inventory.
- Place the card tool into the electronic panel and the gate will open.
FORT

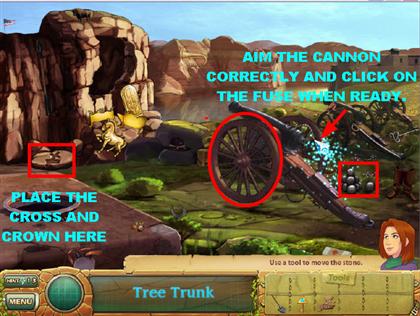
- The cross and crown is in the lower left side of the scene.
- The lanyard fuse is on the lower left side.
- The ramrod is on the side of the largest cannon.
- The cannonball is on the right side of the field.
- The shovel is on the top right side of the scene.
- The spare wheel is in the top right side of the scene.
ASSEMBLE THE CANNON
 Secret Item:
- Tree Trunk – Assemble the cannon in the following manner:
- Place the spare wheel on the side of the large cannon.
- Place the cannonball on the side of the cannon.
- The lanyard fuse goes in the back of the cannon.
- The ramrod goes on the barrel of the cannon.
- Click on the cannon so you can position it correctly. You want the cannon to hit the target that is on the rock in the path of the cannon.
- Once the cannon is in place, click on the fuse and the cannon will shoot. If you miss the target you can try again.
- Make sure that each time you fire the cannon you grab a cannonball from the pile of cannonballs that are next to the cannon. You also have to place the ramrod inside of the barrel again. Aim and then shoot. Once you place the other cannonball, and place the ramrod in the barrel, aim and shoot again.
- Place the cross and crown on the rock that has the matching symbol on it. Once the rock moves away, place the shovel in the corner where the rock was.
- Place Key 3 in the treasure chest that appears in the box.
ASSEMBLE THE TREE – THE VIAL OF STABILITY
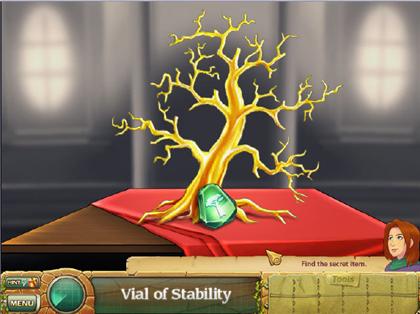
- In this puzzle, all you have to do is grab the pieces at the bottom of the page and place them on the tree. You do not have to rotate the pieces. Once they are in the right place, they will lock into place automatically.
STAGE 5 – THE RACE FOR ZOE’S LOVE
NASSAU, CARIBBEAN
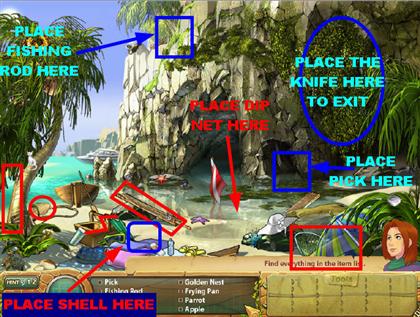
- The pick is in the lower left side; it is against the palm tree.
- The fishing rod is on the lower center of the scene; it is leaning against the large rock.
- The shell is on the lower left side, under the palm tree.
- Knife – Place the shell in the lower center of the sand, close to the picnic basket.
- Midas Gold Spoon – Place the fishing rod in the upper right side of the scene, close to where the captain’s hat is. The golden spoon will fall on the ground close to the picnic basket; pick it up.
- Pendant – Place the pick in the lower right side of the water. Grab the pendant once it comes out of the water; it will land on the sand, in the spot that was behind it.
- Message in a Bottle – Place the dip net on the right side of the water, close to the flag.
- To Exit – Place the knife on the vines that are in the upper right side of the scene. Exit through the opening as soon as it is available.
DOCK
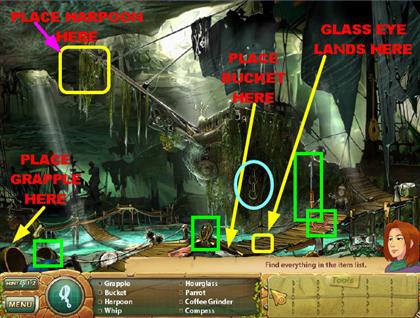
- Grab the grapple that is in the lower center of the scene.
- The bucket is in the lower left corner of the scene.
- The harpoon is in the lower right side of the scene.
- Pick up the whip that is in the lower right side.
- Anchor – Place the grapple in the lower left corner of the scene, just behind the barrel. Grab the anchor once it comes out of the water. The anchor will go into your inventory.
- Tooth Necklace – Place the harpoon in the top left side of the scene. Grab the pendant once it falls on the lower left corner of the scene.
- Medallion – Place the whip in the upper left side of the ship. Pick up the medallion once it falls on the ground. It will fall in the lower center of the scene.
- Glass Eye – Place the bucket in the lower center of the scene; grab the glass eye that lands on the walkway.
- Golden Links – Place the anchor on the right side of the scene, on the side of the boat where the chain is. Grab the golden links that appear.
- Exit through the door in the back.
SHIP’S DECK
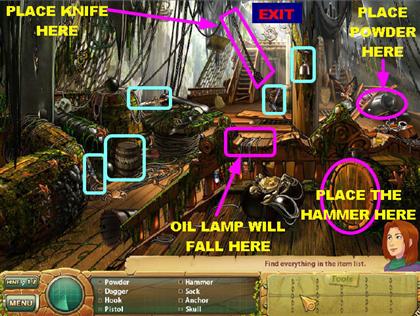
- The powder is in the barrel in the lower left side of the scene.
- Grab the dagger that is on the top left side of the scene, it is sticking out of the side of the large barrel.
- The hook is on the top right side of the scene.
- The hammer is in the top right side of the scene.
- The pistol is in the lower left side of the scene.
- Earring – Place the hammer on the large barrel that is on the lower right side of the scene. The ring will be inside the barrel once it is opened.
- Oil Lamp – Place the knife on the rope in the center of the ceiling. Once the rope has been cut, grab the oil lamp that falls on the banister.
- Jewel Ring – Place the hook in the barrel of the cannon that is on the right side of the scene.
- Pirate’s Chest – Place the powder on top of the large covered chest that is in the lower left side of the scene. Place the pistol on the barrel and click on the chest once it is available.
SHIP’S OFFICE
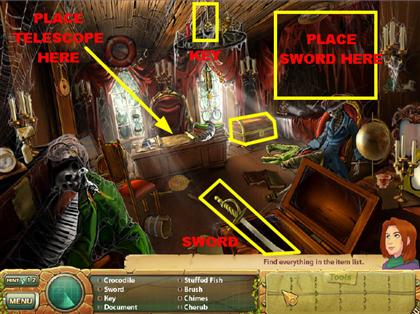
- The key is hanging from the chandelier in the middle.
- The sword is sticking out of the chest in the lower right side of the scene.
- Pirate Shirt – Place the sword on the torn curtains that are in the upper right side of the scene. Grab the white pirate’s shirt that appears behind the curtains.
- Telescope – Place the key on the chest that is in the far right side of the scene.
- Place the telescope in the center of the desk. Go through the exit that opens in front of the chest.
TREASURE ROOM
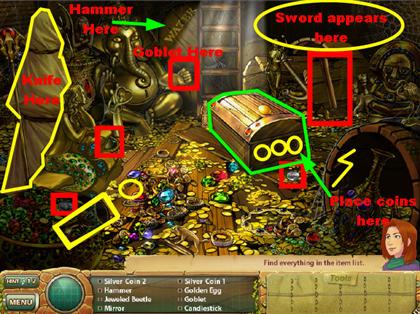
- Silver Coin 1 – It is in the large bowl in the lower left side of the scene.
- Silver Coin 2 – The large silver coin is in the lower right side of the scene, in front of the treasure chest.
- The hammer is on the top right side of the scene; it is leaning against an open barrel.
- The mirror is on the right side of the page, in front of the golden mermaid.
- The goblet is in the lower left side of the scene.
- Pirate Sword – Place the mirror in front of the chest, close to the steps, and the mirror will shine a light on the sword against the wall.
- Silver Coin 3 – Place the goblet in the hand of the golden elephant that is on the top left side of the scene. Place the hammer on the water barrel that is next to the elephant, and water will fill the goblet. Grab the silver coin that falls on the left side of the ground, in front of the mermaid.
- Diamond – Place the 3 silver coins on the side of the large treasure chest that is on the right side of the scene. You have to place the coins in the right spot; otherwise, the game will not accept it. From left to right, place coins 1 through 3.
- When the treasure chest opens, grab the diamond inside the chest.
- Midas’ Daughter Zoe – Place the knife on the statue that is covered with a sheet on the left side of the scene. Click on the statue once it is revealed.
STAGE 6 – MUSIC IN THE AIR
ST. PETERSBURG, RUSSIA
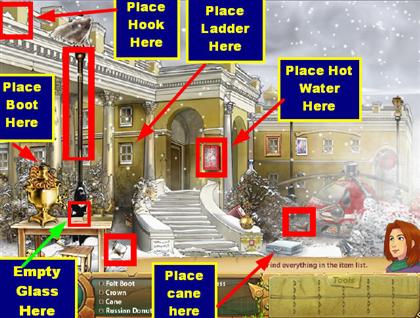
- Pick up the felt boot that is on the lower right side of the scene; it is next to the steps.
- The cane is on the lamp post, on the left side of the scene.
- Pick up the empty glass that is on the lower left side of the scene; it is almost buried under the snow.
- Hot Water – Place the empty glass on the table that is in the lower left side of the scene. Place the felt boot on top of the gold coffee pot that is on the table. Click on the glass once it is filled with hot water.
- Hook – Place the hot water on the red glass case that is close to the entrance of the building. Pick up the hook that is inside the case once it opens.
- Ladder – Place the hook on the top left side of the scene. Click on the hammer once it falls down to the lower left side of the scene.
- Painting – Place the cane on the white briefcase that is in the lower right side of the scene. Once the briefcase opens, click on the painting that is inside. The painting will go into your inventory.
- Enter the building – Place the ladder under the window on the left, the one that is closest to the door. The window should be lit. Once the ladder is in place, the window will open, enter through the window.
PIANO ROOM
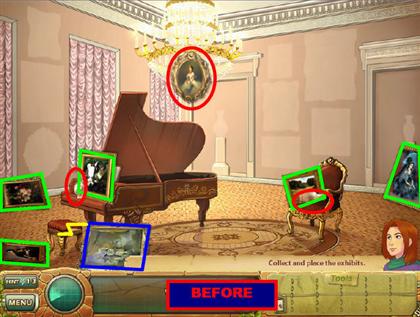
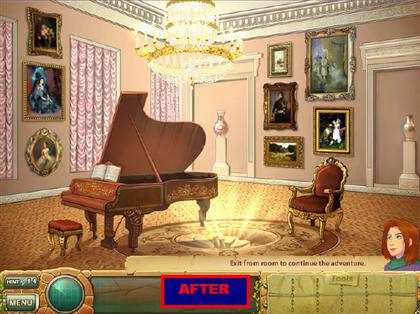
- In this scene you need to collect the paintings that are scattered in the room. Once you’ve collected them all, you must hang them in their rightful place.
- Make sure that you also collect both vases as well, since you will need to place them against the wall.
- Please look at the screenshot for the location of all the paintings and vases.
- Grab a painting from the inventory and place it on the wall. You will not be able to place a painting in the wrong place. A painting will only stay on the wall once it is in the right place.
- Once everything is in the right place, a hole in the floor will open up.
SECRET OFFICE OF NICHOLAS II
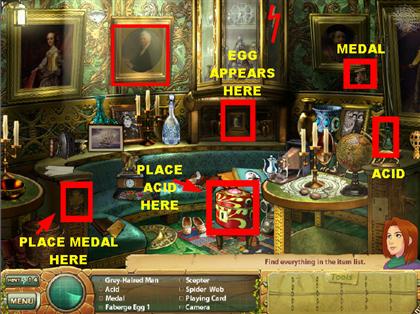
- The acid is in a green bottle that is in the top right side of the scene.
- Pick up the medal that is on the top right side of the wall, it is at the bottom of the picture.
- Faberge Egg 2 – Place the bottle of acid on the small red box that is in the lower right side of the scene. Once the box opens, click on the Faberge egg that is inside.
- Faberge Egg 3 – Place the medal in the lower right side of the scene. It goes on the matching carving at the end of the booth. Pick up the Faberge egg that appears in the middle of the fireplace.
LOCK PUZZLE
 Secret Item:
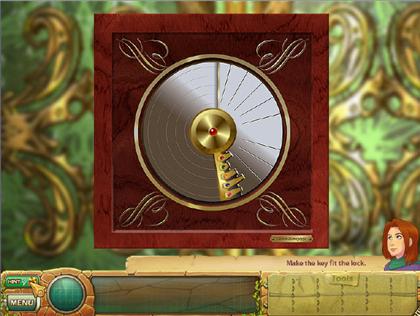
- Gold Canary Eggs – Click on the red clock that is on the back of the wall, and a puzzle will appear.
- Your goal in this puzzle is to make the key fit the lock. Click on the center button, and the key will move towards the lock. If the key does not fit, move the pieces of the key until you have the right configuration.
- Click on two of the key pieces, and they will swap places. Keep moving them around until they are in the right spots.
- If the key is in the starting position (upwards), place the colors in the following manner, from top to bottom: Pink, Blue, Orange, Green, Red
- Once the lock has been solved, grab the canary eggs that appear behind the clock.
A VILLAGE IN CAVAN COUNTY, IRELAND

- Pick up the cleaning rag that is on the top right side of the scene.
- Grab the can opener that is in the lower right side, on the potted plant.
- Pick up the matches that are in the lower left side of the scene, on the wall, above the plant.
- Milk, Flour, Honey, Eggs, and Cheese – Place the cleaning rag on the window that is on the right side of the scene. Once the window is clean, click on the five items that show up in the window.
- Sardine – Place the can opener on the blue can that appeared on the window you just cleaned. The can will open and one sardine will go into your inventory.
- Key – Give the cat the sardine. When the cat moves, grab the key that was underneath the cat. The key will go into the inventory.
- Map – Place the matches on the lantern that is on the top left side of the scene, and that area will light up. Grab the map that is above the bulletin board.
- Money – Place the key in the red mailbox on the right side of the page. Grab the gold coins that fall in the middle of the path.
- To exit – In order to exit the village, place the gold coins in the tip box that is next to the man on the left. He will start playing his violin; once he stops, go to the back of the village to exit the scene.
COUNTRYSIDE
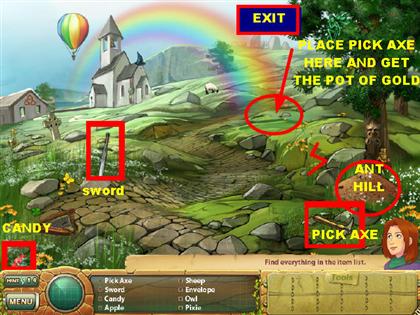
- The pick axe is on the lower right side of the scene.
- The sword is in the lower left side of the field.
- Pick up the candy that is in the lower left corner in the scene.
- Gold Ant – Place the candy on the ant hill. Click on the golden ant once the ants bring it out to the hill.
- Dragon – Place the sword on the large rock that is in the lower left side of the scene. Click on the dragon that is etched on the rock once the rock has turned over.
- Pot of Gold – Place the pick axe at the end of the rainbow. Pick up the pot of gold that appears on the ground. Exit on the top right side of the scene.
HENGE OF CROM CRUACH
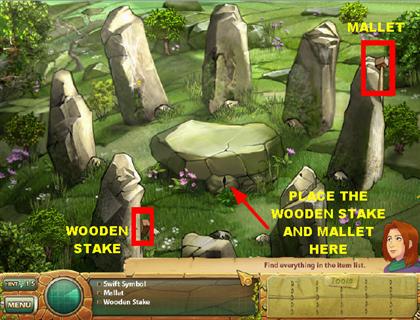
- The wooden stake is on the lower left side of the scene.
- The mallet is on the top right side of the scene.
- Place the wooden stake on the side of the large rock. Then place the hammer in the same spot.
- Exit in the location that opens up under the rock.
REMOVE THE WOODEN BOARDS
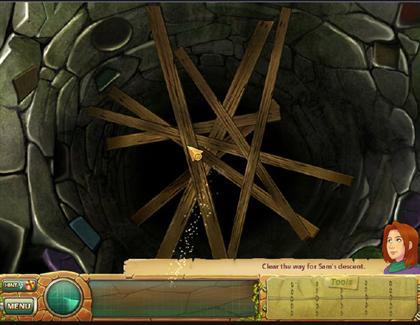
- In this mini-game all you have to do is click on the wooden board that is on top in order to eliminate it. Once all the boards have been eliminated, you will be able to move on to the next section.
REMOVE THE TILES
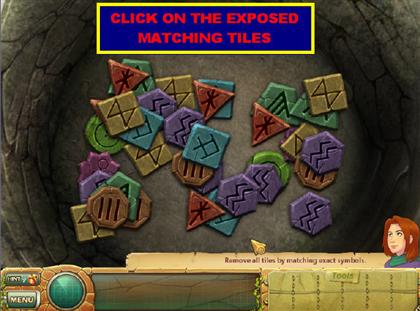
- This game has the same basic rules as a Mahjong game. Click on two exposed tiles that match in order to eliminate them from the board.
- If you run out of moves, you will have to start the round over again. Pay close attention to making matches that unblock as many tiles as possible.
CLICK ON THE STONES IN THE RIGHT SEQUENCE
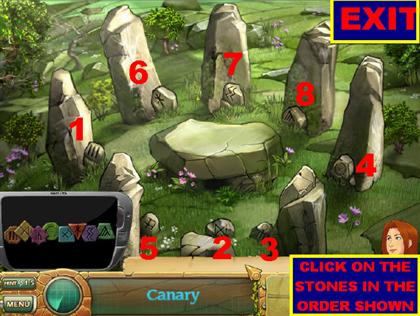
- Look at the tiles in the lower left side. Your goal is to click on the stones in the same order as shown in the runes. Please look at the screenshot for the correct order.
- Canary – Once all the stones have been clicked in the right order, the golden canary will appear inside.
- Exit through the top right side.
THE VILLAGE AT NGHT
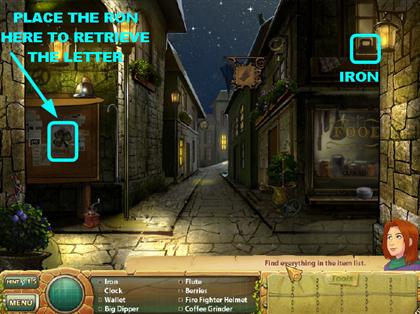
- Pick up the iron that is in the top right side of the scene.
- Letter – Place the iron on the shamrock that is on the bulletin board, on the left side.
STAGE 7 – FINDING LOYALTY
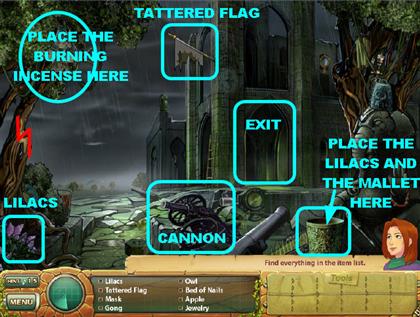
AHMADNAGAR, INDIA
- In this scene some items may not be completely visible until lightning strikes the scene.
- Pick up the lilacs in the lower left corner.
- Grab the tattered flag that is in the top center of the scene.
- Mallet – Place the tattered flag on the cannon in the lower center of the ground. Pick up the mallet that falls on the lower left side of the ground. The mallet will go into the inventory.
- Incense – Place the lilacs in the pot that is on the lower right side of the scene. Place the mallet on the pot after you’ve placed the flowers. The incense stick will go into the inventory.
- Goddess – Place the incense over the burning flag; the incense will light up. Place the burning incense on the bats in the top left side of the scene. Click on the golden goddess statue that appears once the bats are gone.
- Exit through the door of the castle.
CASTLE
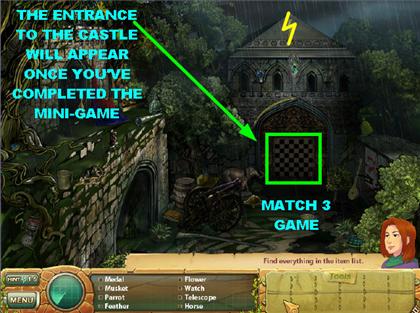
- Look for all the items on the list, and then click on the chess board that is in the back of the scene; you will open up a mini-game.
MATCH 3 GAME
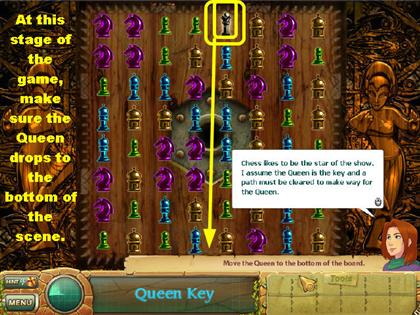
- Click on a piece and switch places with another one that will make a match of three or more. Each time you make a match, it will clear the background in the board. Clear the entire background to get to the next phase of the game.
- Once the board is clear, the Queen piece will appear on top. You must clear the pieces underneath her so the Queen falls all the way to the bottom of the board.
- The Queen itself cannot be moved, so you have to clear any pieces that are underneath.
- You cannot continue making matches while other matches are clearing on the board.
- Queen Key – Once you’ve completed the puzzle in its entirety, the Queen key will go into your inventory. Use the key on the lock, and the door to the castle will open up.
GEBER’S LAB
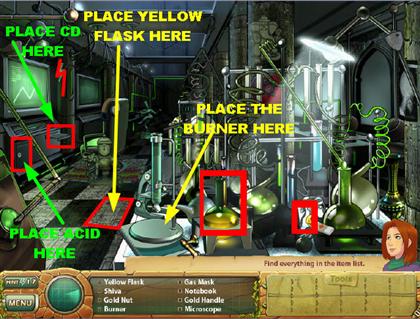
- The burner is in the lower right side of the scene, close to the large green flask.
- The yellow flask is in the lower center of the scene.
- Gold Dates – Place the yellow flask on the left side of the floor, and once the bottle breaks, pick up the gold dates that appear.
- Acid – Place the burner under the test tube that is in the lower left side of the scene. Once the test tube has been heated, click on the flask in order to get the acid. The acid will go into your inventory.
- CD – Place the acid on the locked cabinet that is in the lower left side of the scene, under the large monitor. Once the cabinet opens, grab the CD that is inside. The CD will go in the inventory.
- Golden Horse – Place the CD in the slot on the lower right side of the monitor. Click on the golden horse once it comes down from the ceiling.
BANGKOK, THAILAND
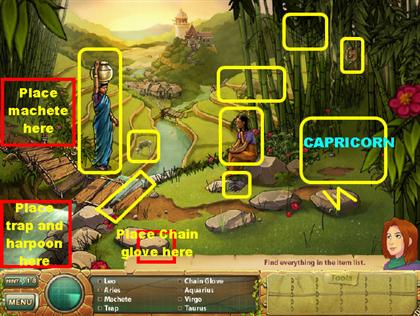
- For Leo, click on the lion that is on the top right side of the scene, it is hiding in between the bamboo.
- Aries – Click on the ram that is on the left side of the river.
- The machete is in the lower left side of the scene; it is at the end of the steps.
- The trap is in the top right side of the scene; it is amongst the tress.
- Pick up the chain glove that is in the lower center of the scene. It is close to the woman that is sitting down.
- For Aquarius, click on the lady on the left that is holding the water jug over her head.
- For Virgo, click on the lady that is sitting down on the rock.
- For Taurus, click on the bull that is hiding behind the bamboo on the right.
- For Capricorn, click on the goat that is on the right side of the page.
- Cancer – Place the trap in the water that is in the lower left side of the scene. Once the trap comes back up from the water, a crab will come out; click on the crab.
- Scorpio – Place the chain glove on the small rock that is in the lower left side of the scene. The glove will grab the scorpion and place it in your inventory.
- Harpoon – Place the machete on the bamboo that is on the left side of the scene. Pick up the harpoon that falls on the ground. The harpoon will go into the inventory.
- Pisces – Place the harpoon in the water that is in the lower left side of the scene and click on the fish once it lands on the grass.
- Exit on the top right side of the scene.
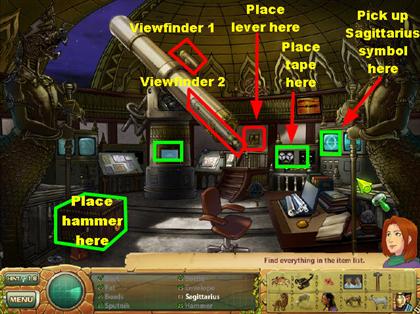
OBSERVATORY
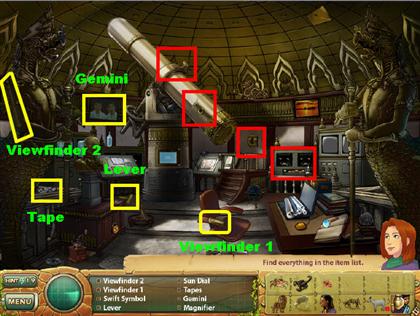
- When you first enter this scene, you will be asked to find some items that will go into your inventory. Your inventory will be almost full by the time you enter the scene; if it gets full, you will not be able to pick up anymore items until you’ve placed some items first. If this happens, just read the instructions posted about what to do next.
- Viewfinder 1 – It is on the arm of the red chair that is in the scene.
- Viewfinder 2 – It is on the arm of the large statue on the left side of the scene.
- The lever is at the base of the large telescope.
- Place Viewfinder 1 on top of the telescope.
- Place Viewfinder 2 on the side of the telescope.
- Place the lever in the slot that is behind the end of the telescope.
- Click on the lever, and the dome will open up.
- The tapes are in the lower left side of the scene.
- For Gemini, click on the picture of the twins that is in the top left side of the scene.
- The hammer is in the top left side of the scene.
OBSERVATORY – PART 2
 Blue Items:
- Sagittarius – Place the tape on the machine on the far right side of the scene. For Sagittarius, click on the bow and arrow that appear on the monitor.
- Libra – Place the hammer on the locked cabinet that is on the lower left side of the ground. Once the cabinet is open, click on the scales that are inside.
CONSTELLATIONS PUZZLE
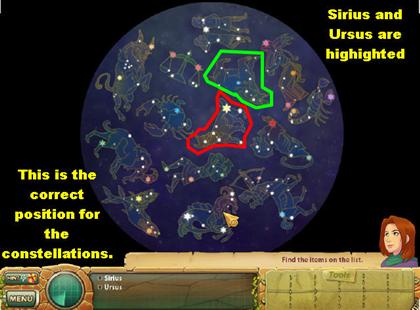
- Once you’ve collected all the Zodiac signs, click on the telescope and a puzzle will appear. Your goal is to put all the constellations in place.
- In order to place the constellations, you must look at the colored stars that appear on each Zodiac sign. They all have different colors and sizes. Try to look for matches by looking at the colors in the center of the scene.
- Once you find what you think is a match, place the constellation in place and use the arrows to center the piece.
- Using the arrows to rotate the pieces can be tricky; try to hold the arrows from the top, instead of just by the arrows themselves.
- Sirius and Ursus – Once the constellations are all in place, you have to find Sirius and Ursus and click on them. Once you click on them, they will be added to your inventory. Please look at the screenshot for the location of both items.
MATCH CANIS STARS TO THE KEYBOARD
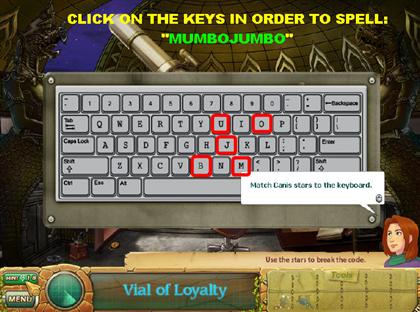
- Once you’ve completed the constellations puzzle, click on the computer monitor that has a green outline around it.
- A keyboard will appear on the scene, and you will have to type in the following word: MUMBOJUMBO
MUMBO JUMBO JIGSAW PUZZLE
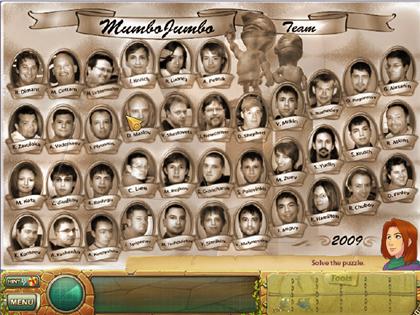
- This is a pretty easy jigsaw puzzle to solve. Just drag the pieces into place, and they will lock in. Please look at the screenshot for the solution.
MATCH CANIS TO THE KEYBOARD – PART 2
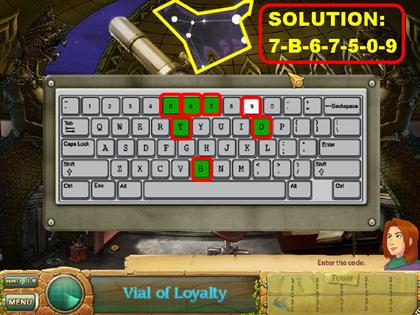
- Vial of Loyalty – Once you’ve completed the jigsaw puzzle, you will be presented with the keyboard again. Grab the Sirius symbol from the inventory and place it on the top of the scene. Some numbers on the keyboard will light up. You have to click on the buttons in a particular order. When the number is correct, it will turn green. The solution is: 7-B-6-7-5-O-9
- Pick up the Vial of Loyalty once it comes out of computer area.
MATCH CANIS STAR TO THE KEYBOARD – PART 3
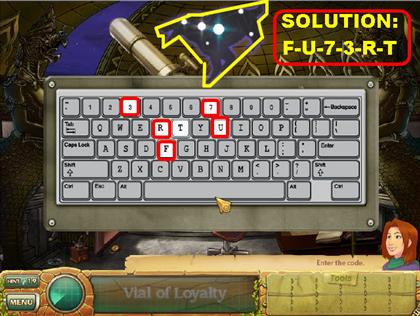
- Place the Ursus symbol from the inventory on the keyboard, and it will position itself above the keyboard. Some letters will light up on the keyboard again.
- Follow the same steps as above; click on the keys in the correct order. Once a key has been hit correctly, it will light up. The solution is: F-U-7-3-R-T
- Go through the exit on the right side of the page.
GEBER’S LAB
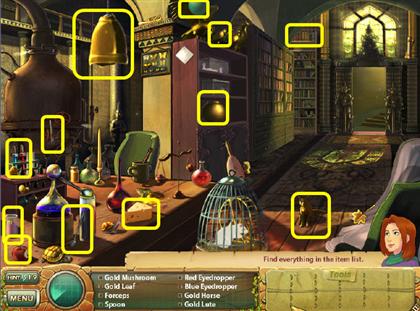
- The forceps are on the left side of the scene, they are in front of the large brown furnace.
- The spoon is located on the table in the lower left side of the scene.
- The red and blue eyedroppers are on the lower left side of the scene.
- Red Powder – Place the spoon in the small tube that is in the lower left side of the scene.
- Gold Apple – Place the red eyedropper on the red apple that is in the lower left side of the scene. Click on the apple once it turns gold.
- Gold Bug – Place the forceps in the small tube that is in the lower left side of the scene.
- Feather – Place the blue eyedropper on the gold bird that is on top of the bookcase. Once the bird flies away, grab the feather that falls on the floor next to the cat.
- Gold Fish – Place the blue eyedropper on the gold fish bowl that is in the bookcase. The eyedropper will restore the fish bowl to its original state. Click on the goldfish that is floating around in the bowl, and it will be taken off your list.
- Gold Cheese – Place the red eyedropper on the cheese wedge that is on the table. Click on the cheese once it has turned gold.
- Vial of Truth – Place the red eyedropper on the top of the bookcase that is in the back of the scene. The books will turn gold and fall down. At that point, you will be taken to a cut scene. Once you return back to the lab, place the blue eyedropper on the gold lamp that is on the top left side of the ceiling. The owls in the cage will fly away.
- Place the red eyedropper on the blue balloon that is in the top center of the scene.
- Place the blue eyedropper on the cat that is on the floor. The cat will jump on the cage where the mouse is, and the mouse will jump on the lady.
- The lady will turn into gold; grab the vial of truth that is in her hand.
Created at: 2009-04-29