

Walkthrough Menu
- General Tips
- Chapter 1: The Baron
- Chapter 2: Board the Ship
- Chapter 3: The Island
- Chapter 4: Skull Cave
- Chapter 5: The Fire Hall
General Tips
- This is the official guide for Sea of Lies: Mutiny of the Heart.
- This guide will not mention each time you have to zoom into a location; the screenshots will show each zoom scene.
- Please look at the puzzle instructions in the game by selecting the question mark in the upper right. This guide will provide instructions only when the ones in the game are not enough. However, full solutions will be given for any puzzle which is not random.
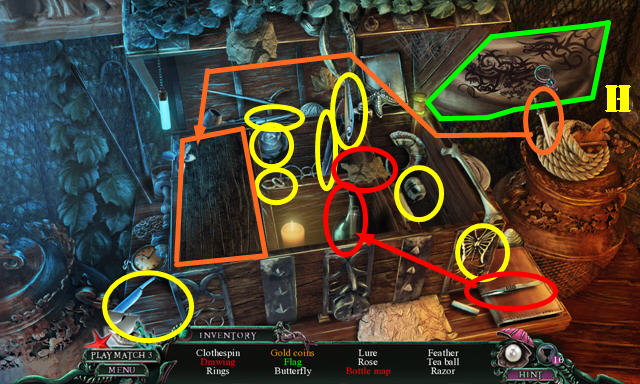
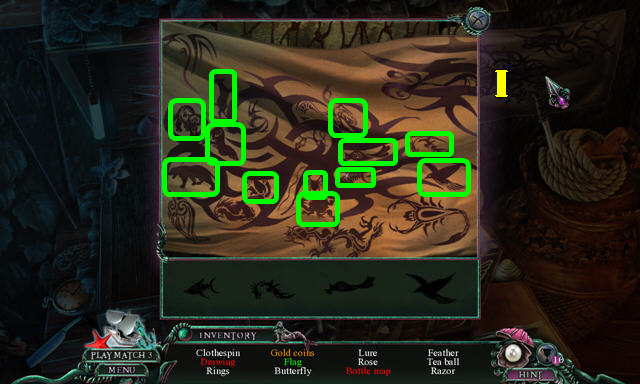
- We will use the acronym HOP for Hidden-object puzzles. Interactive items will be color-coded. Red listed items are marked in red, orange ones in orange, and white ones are marked in yellow. Items listed in green are marked in green; you have to zoom into the areas marked in green to find all the items in silhouette.
- The HOP lists and the interactive items are random; our lists may vary from yours.
- You can opt to play a Match 3 game instead of a HOP.
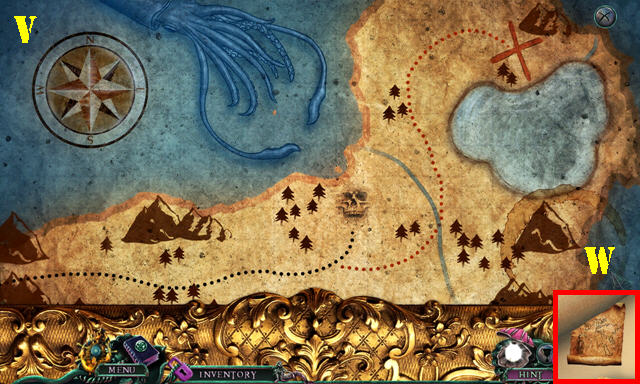
- Use the map to fast travel to a location.
Chapter 1: The Baron
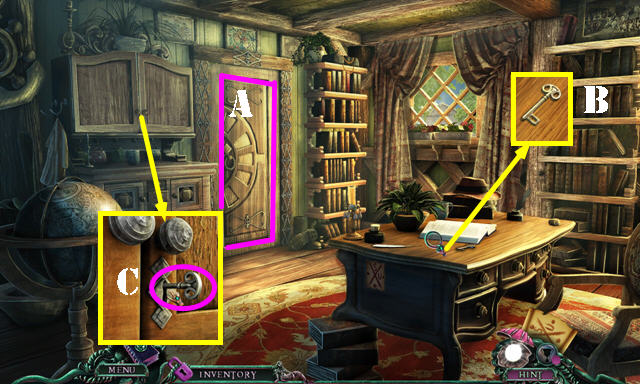
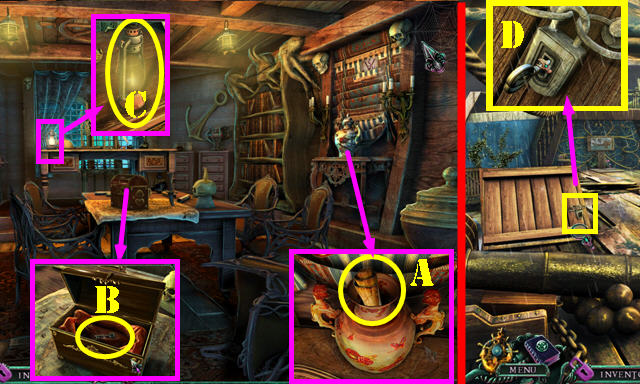
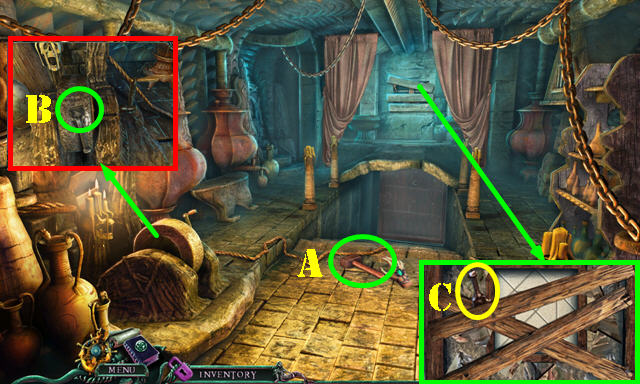
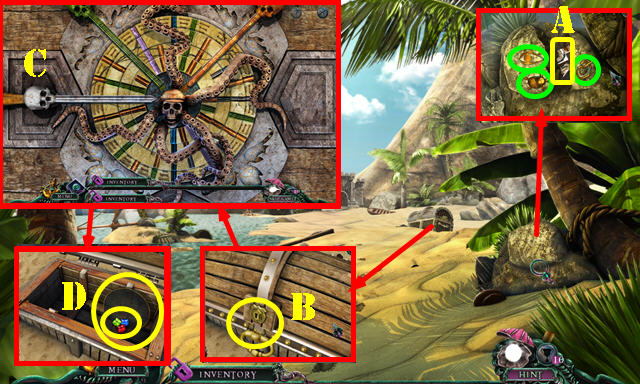
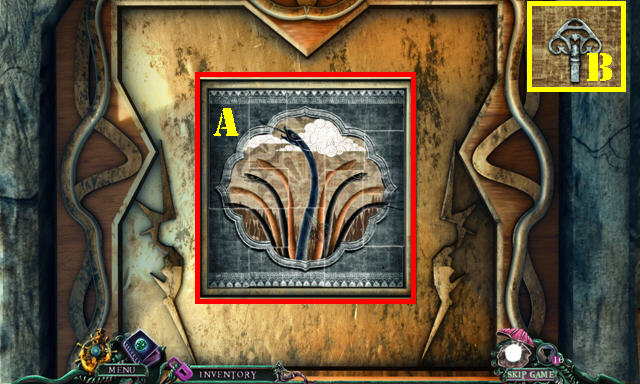
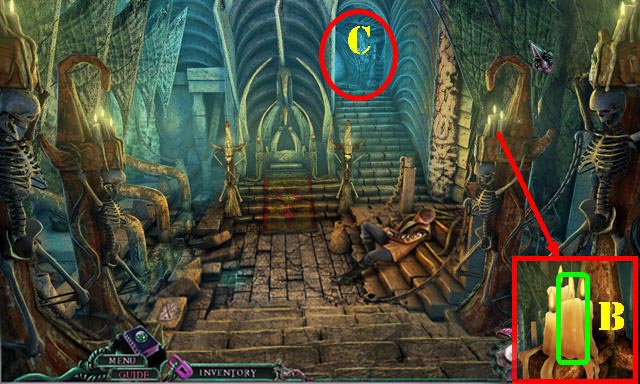
- Open the door (A) and talk to the boy to receive the NECKLACE.
- Take the CUPBOARD KEY (B).
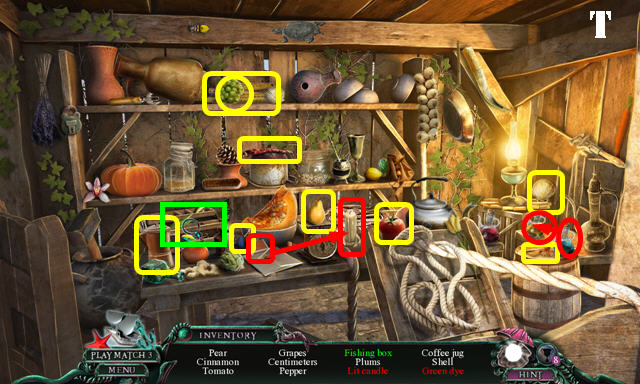
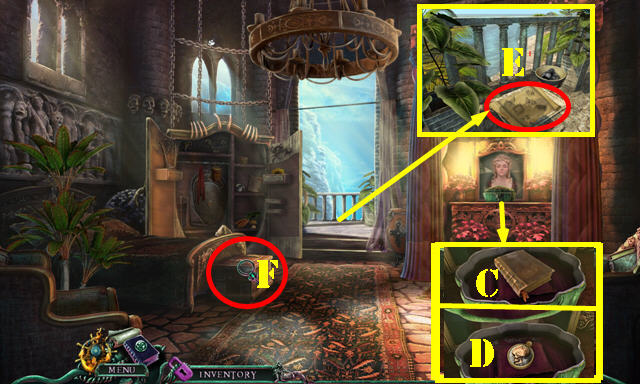
- Use the CUPBOARD KEY in the lock and turn it to activate a HOP (C).
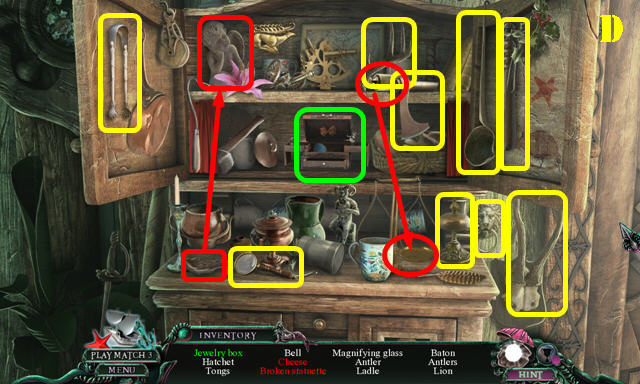
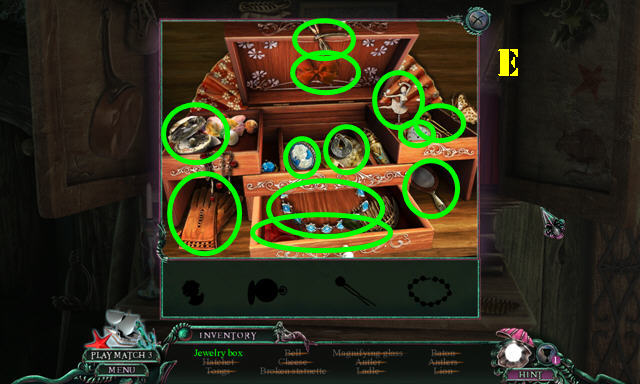
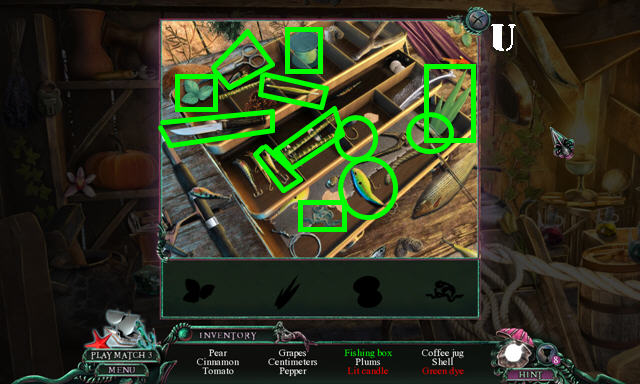
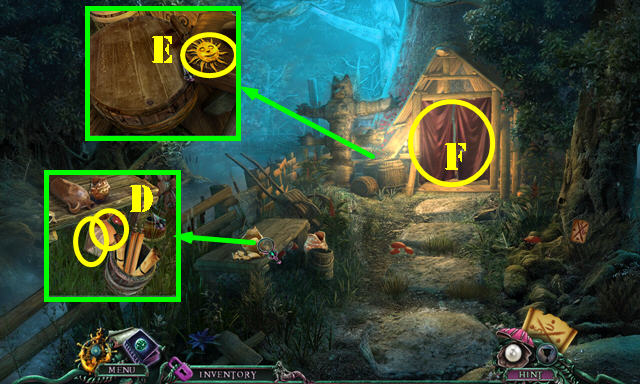
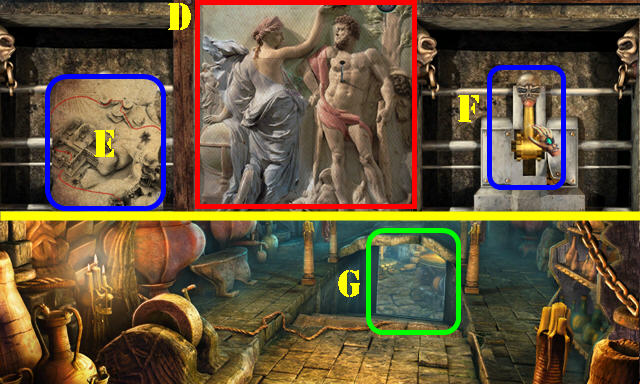
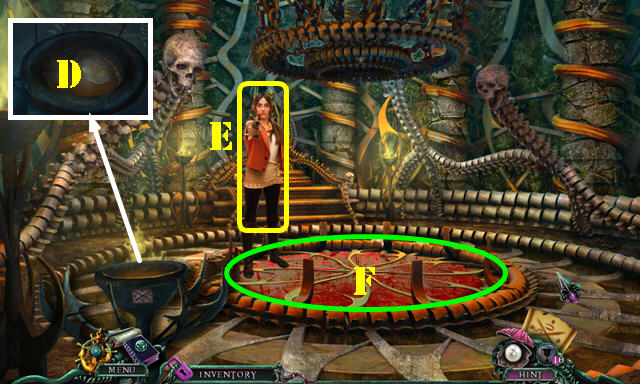
- Play the HOP (D and E).
- You receive a MAGNIFYING GLASS.
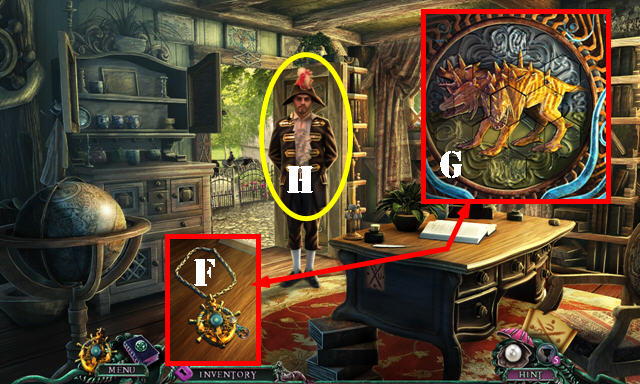
- Put the NECKLACE on the table and then use the MAGNIFYING GLASS on it to activate a puzzle (F).
- Swap the pieces to form the right image (G).
- Open the door and talk to Jonathan (H).
- Go through the door.
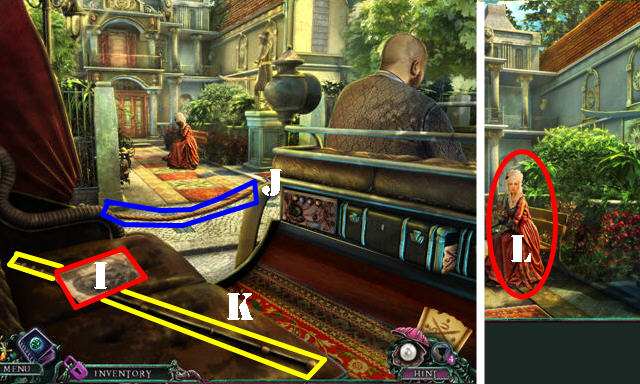
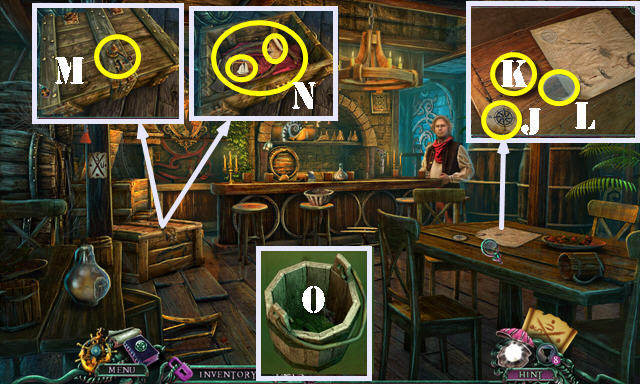
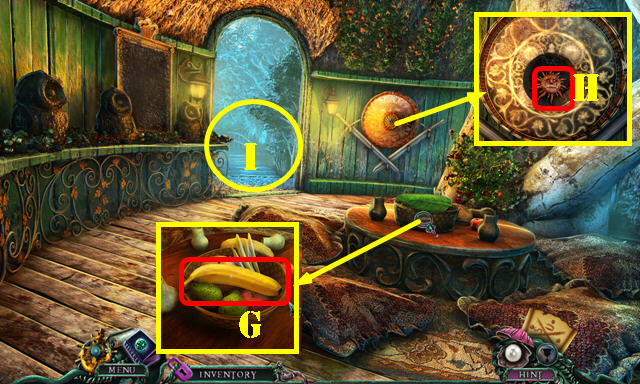
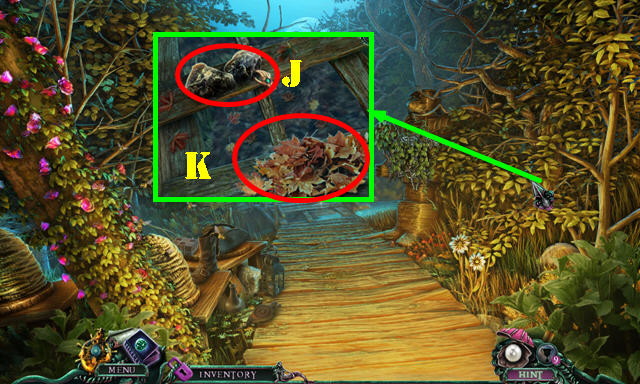
- Take the map (I), CORD (J), and CANE SHAFT (K).
- Go forward.
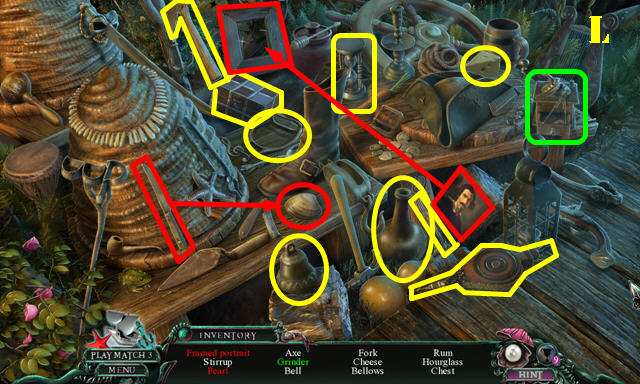
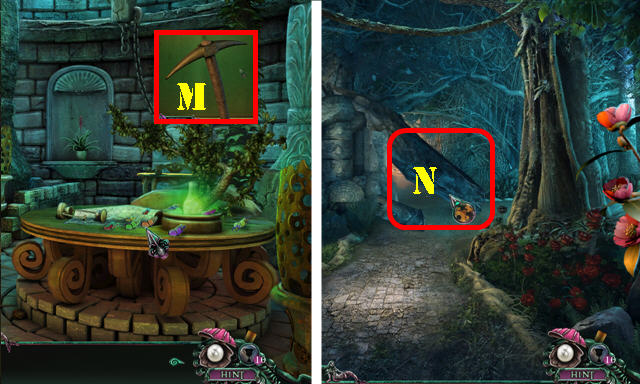
- Talk to the Baroness (L) to receive the MAP PIECE 1/6.
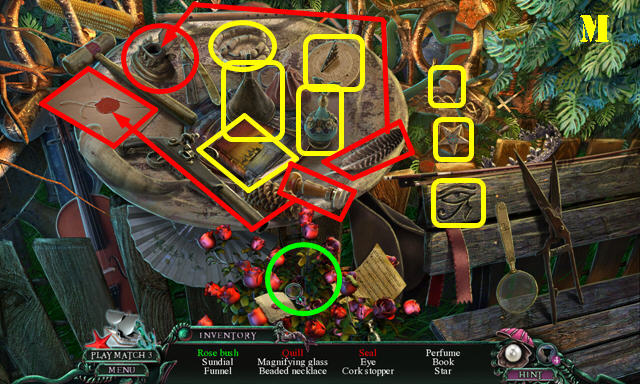
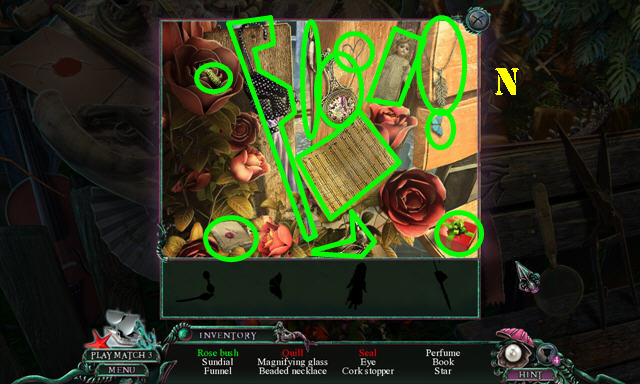
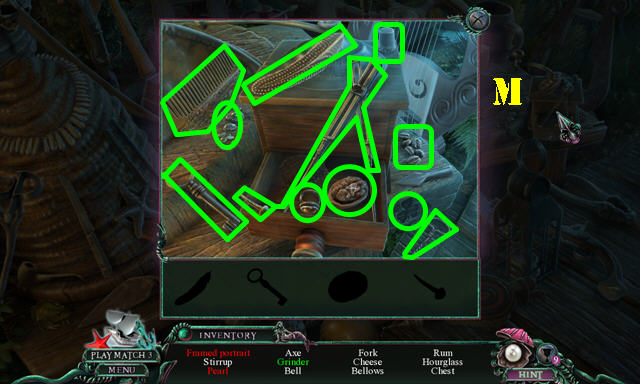
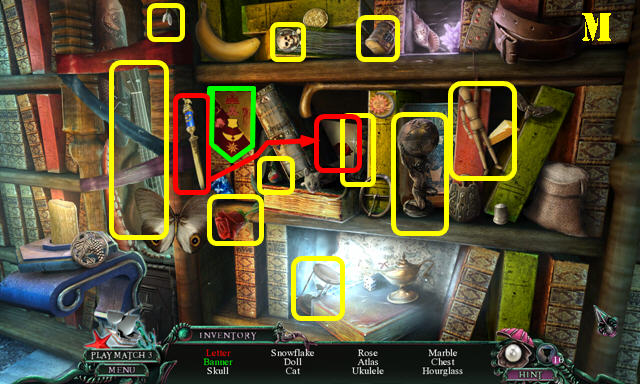
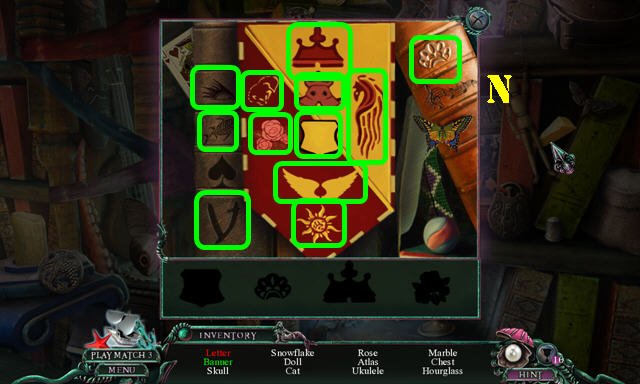
- Play the HOP (M and N).
- You receive the BOOK.
- Go through the door to the Palace Hallway, then go through the next door to enter the Baron's Quarters.
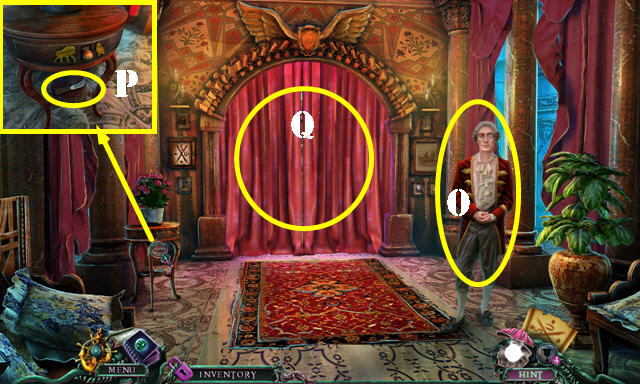
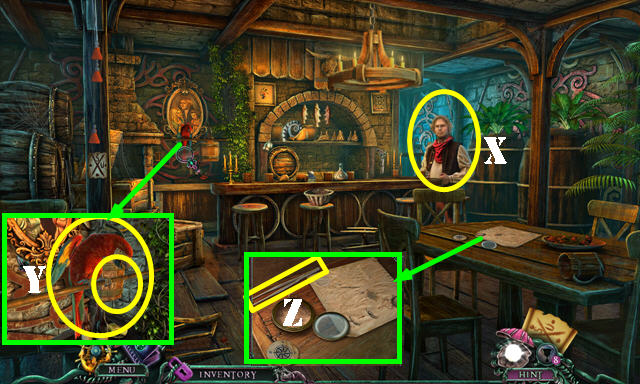
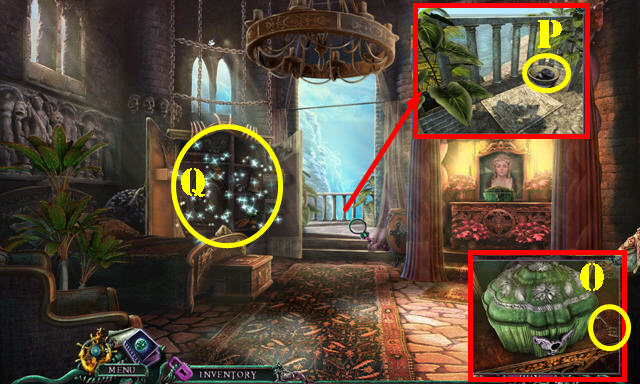
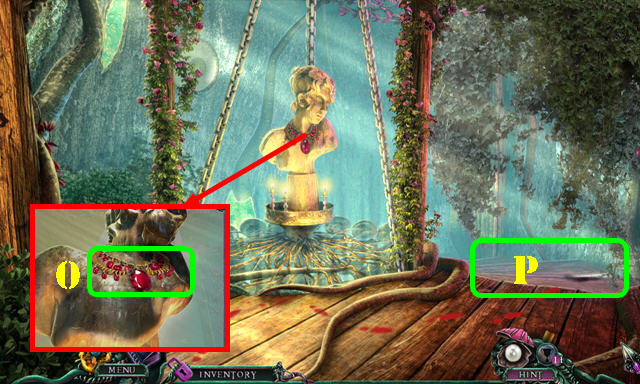
- Talk to the Baron to receive the JEWEL 1/3 (O).
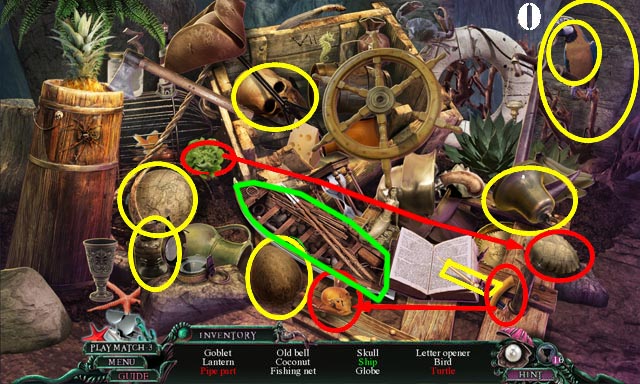
- Take the POCKETKNIFE (P).
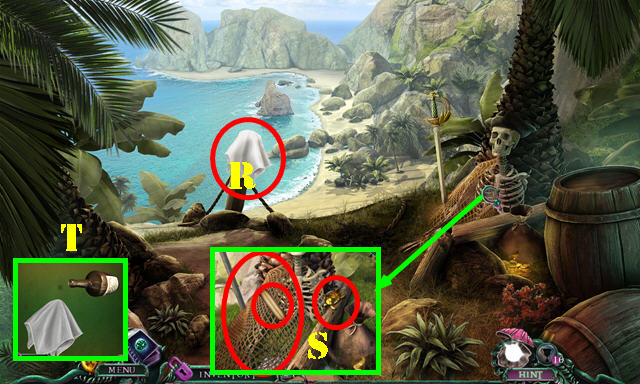
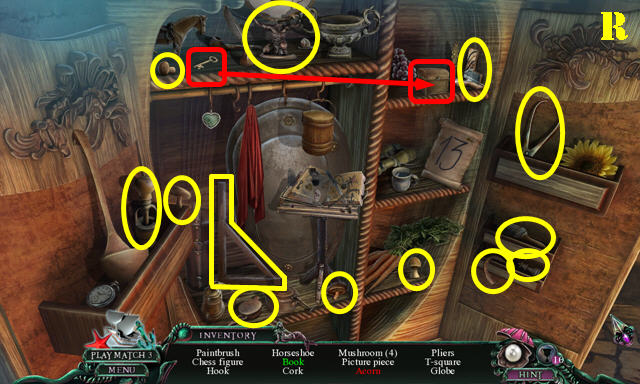
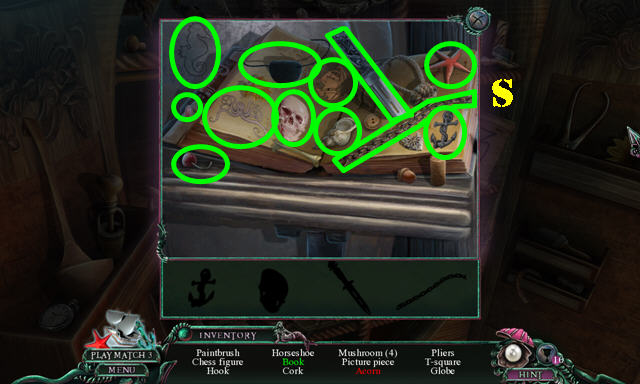
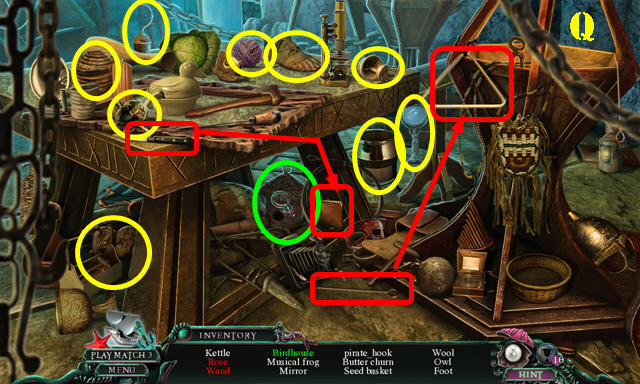
- Use the CORD on the curtains to activate a HOP (Q).
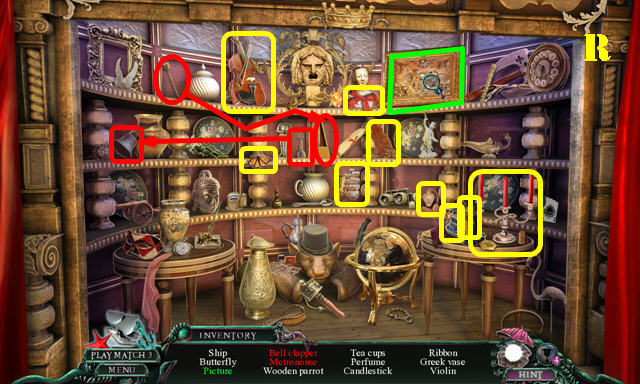
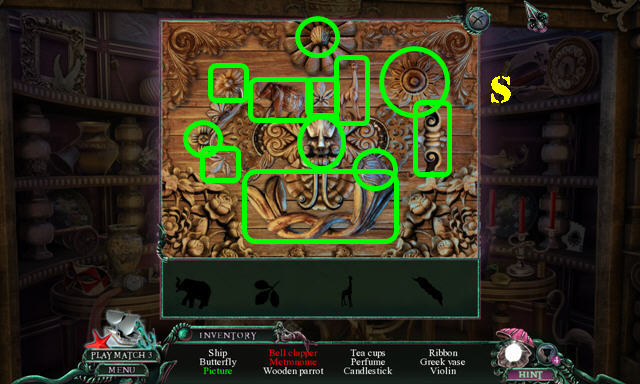
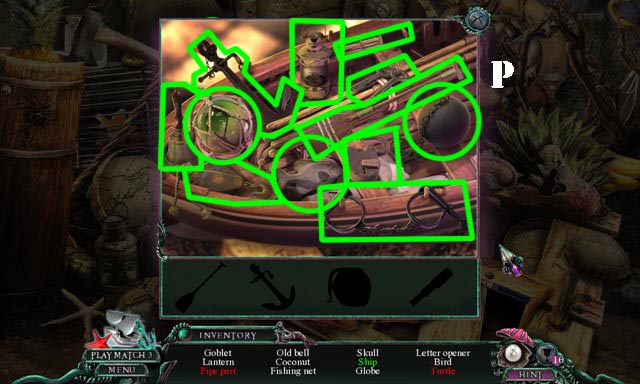
- Play the HOP (R and S).
- You receive the WOODEN PARROT.
- Walk down.
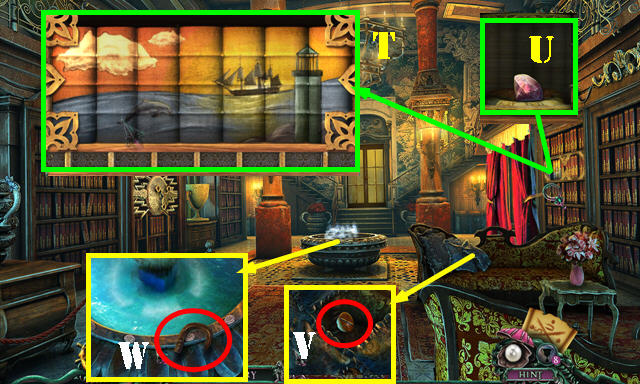
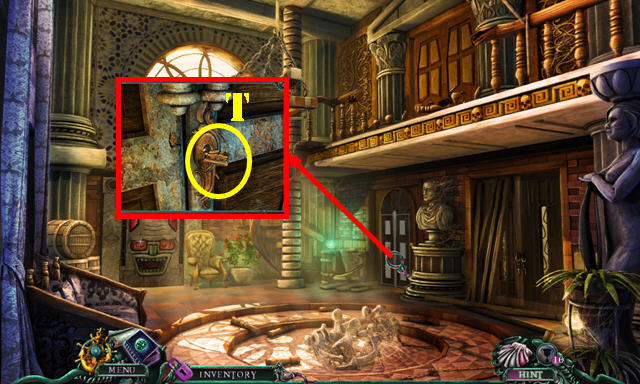
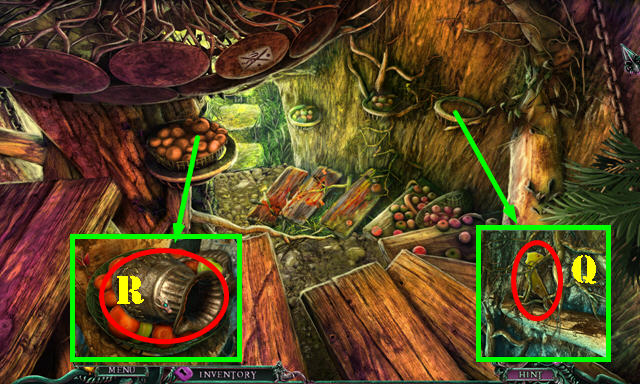
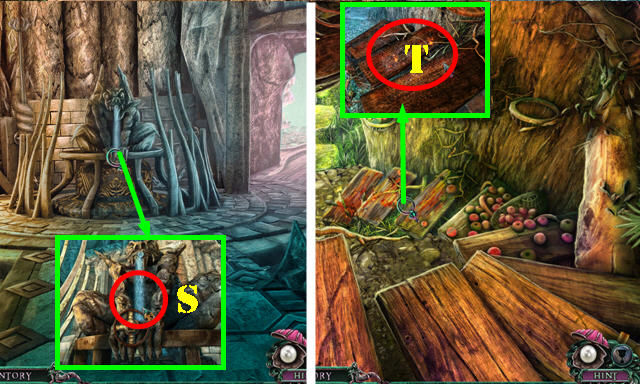
- Place the BOOK on the shelf. Swap the books to form this image (T).
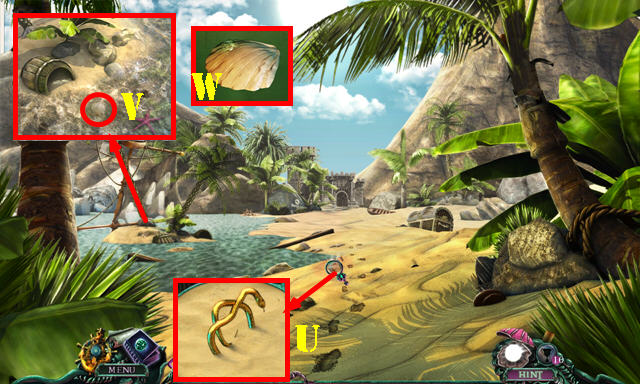
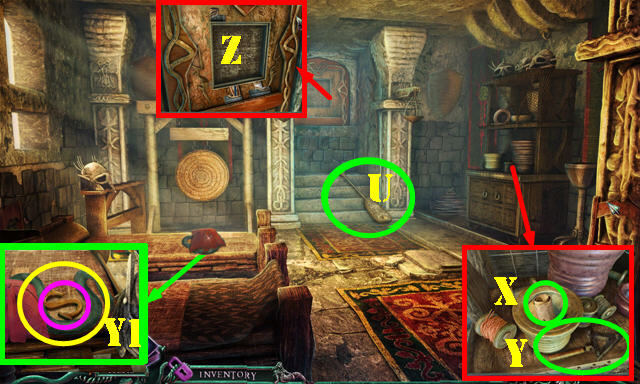
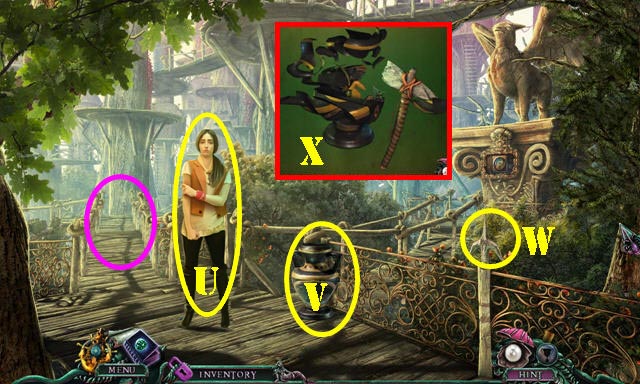
- Take the JEWEL 2/3 (U).
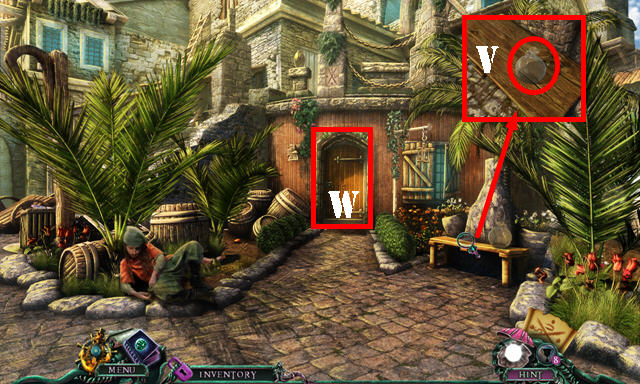
- Move the pillows and take the GLOVE COMPARTMENT PIECE 1/2 (V).
- Take the CANE HANDLE (W).
- Walk down.
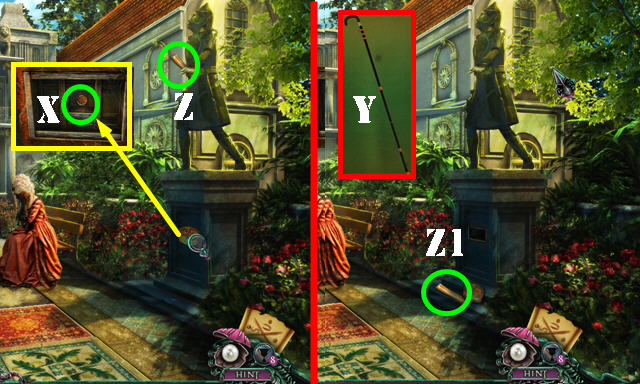
- Remove the cover with the POCKETKNIFE; take the GLOVE COMPARTMENT PIECE 2/2 (X).
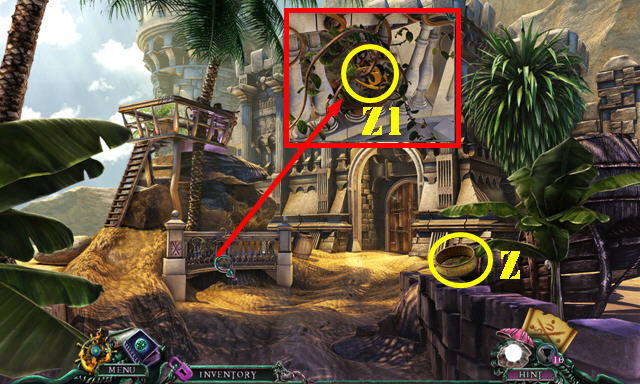
- Grab the CANE HANDLE in inventory; add the CANE SHAFT to it to create the CANE (Y).
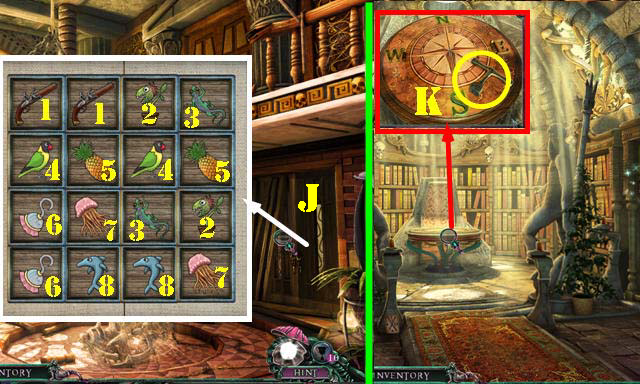
- Use the CANE to get the code (Z). Take the code (Z1).
- Walk down.
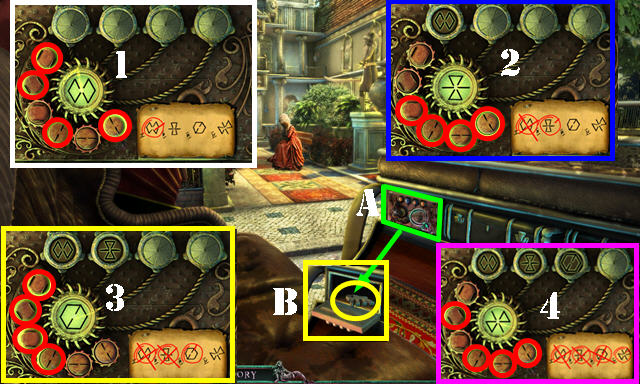
- Place the 2 GLOVE COMPARTMENT PIECES in the slots to activate a puzzle (A).
- Select the right buttons to form the image shown on the clue.
- Solutions (1-4).
- Take the WOODEN MONKEY (B).
- Return to the Baron's Quarters.
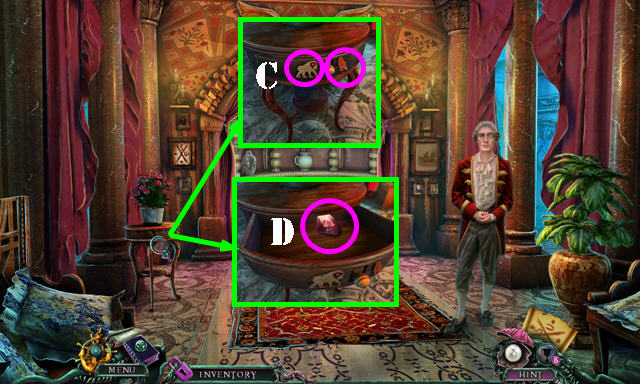
- Place the WOODEN PARROT and the WOODEN MONKEY in the slots (C).
- Open the drawer; take the JEWEL 3/3 (D).
- Walk down.
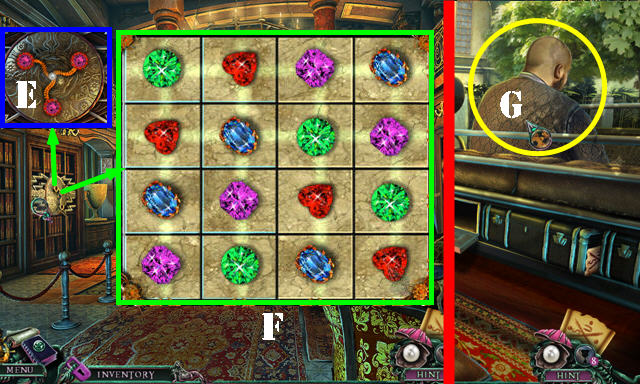
- Place the 3 JEWELS in the slots to activate a puzzle (E).
- Swap the pieces to form this combination (F).
- Touch the signet ring on the screen to receive the BAG OF COINS and the ADDRESS PARCHMENT.
- Return to the Carriage.
- Give the ADDRESS PARCHMENT to the driver (G).
Chapter 2: Board the Ship
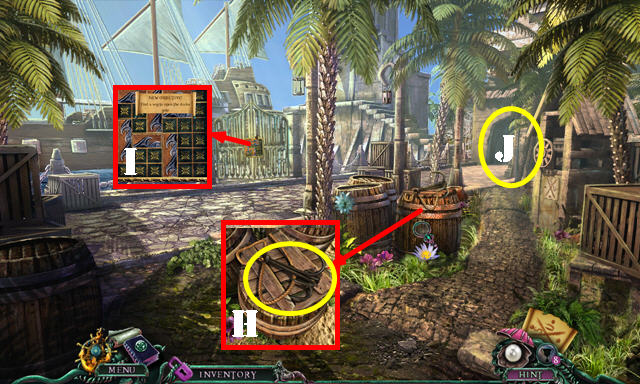
- Take the GRAPPLING HOOK (H).
- Look at the gate (I).
- Go to the Tower Base (J).
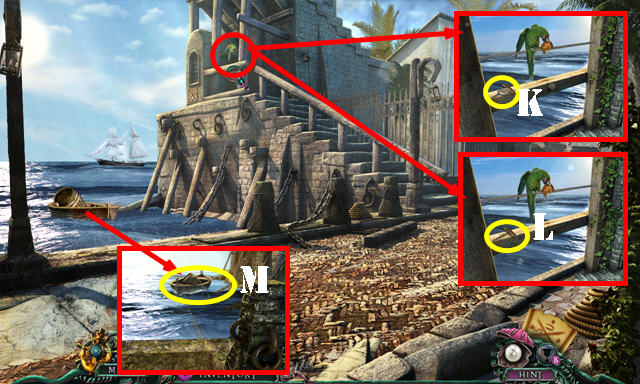
- Take the Amulet Piece for a cut scene (K), then take the CORKSCREW (L).
- Use the GRAPPLING HOOK on the boat and pull it to activate a HOP (M).
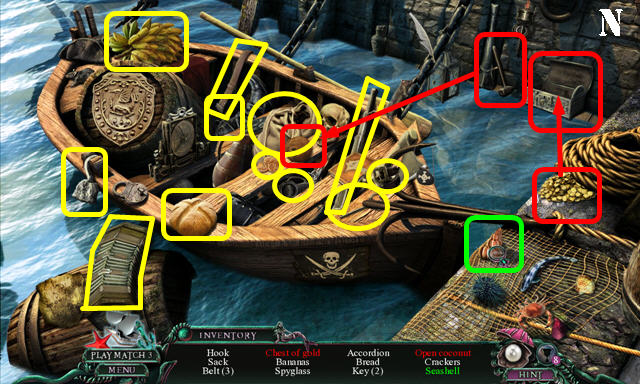
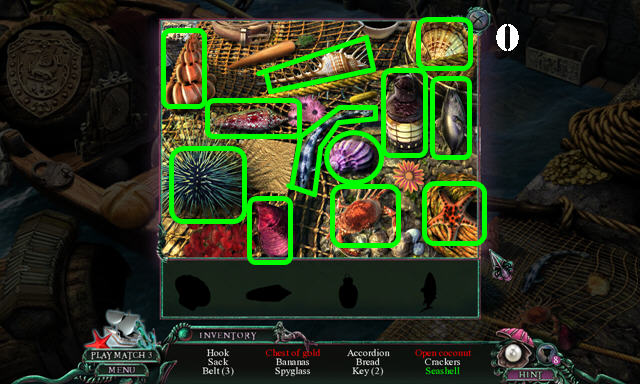
- Play the HOP (N and O).
- You receive the CRACKERS.
- Go to the Town center.
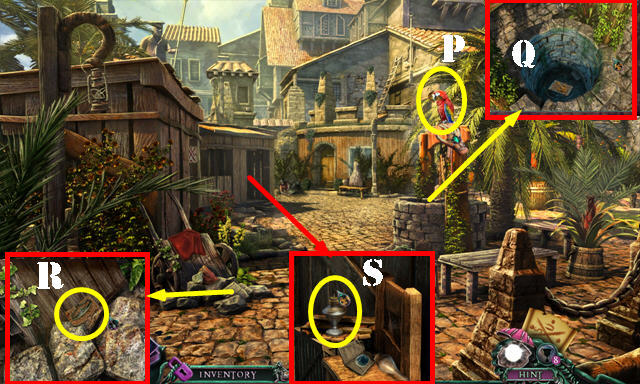
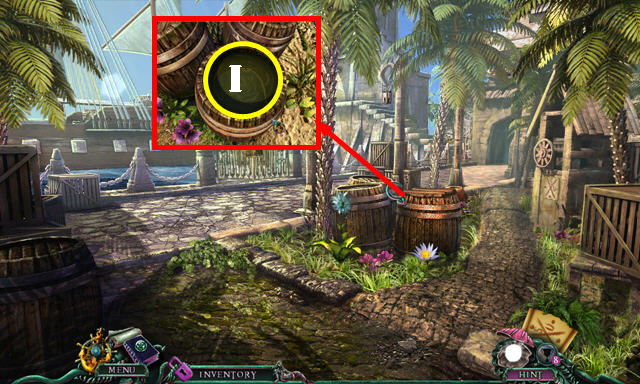
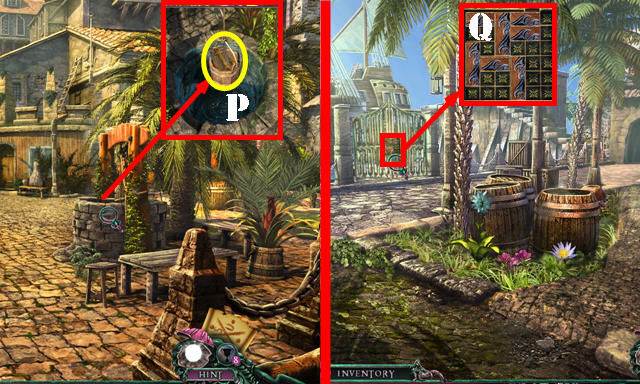
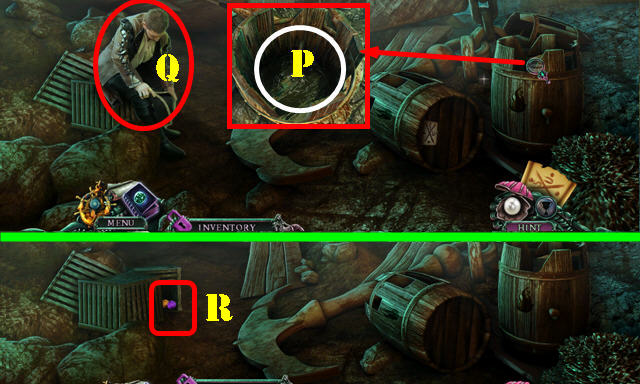
- Touch the parrot (P) and then zoom into the well (Q).
- Remove the stones; take the FLINT STRIKER and the MAP PIECE 2/6 (R).
- Remove the cover; use the FLINT STRIKER on the lamp to activate a HOP (S).
- Play the HOP (T and U).
- You receive the COFFEE.
- Go forward to the Town Tavern Front.
- Take the CARAFE (V).
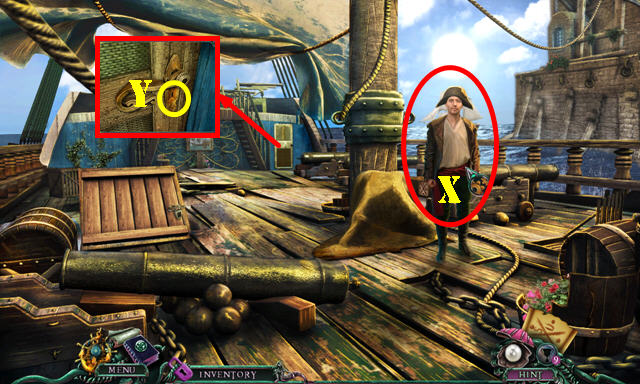
- Enter the Town Tavern (W).
- Talk to the Innkeeper and give him the BAG OF COINS (X). You receive the SMALL BAG OF COINS.
- Give the Innkeeper the SMALL BAG OF COINS. You receive the SMALLER BAG OF COINS.
- Give the CRACKERS to the parrot to receive the PARROT and then take the BUCKET (Y).
- Take the TWEEZERS (Z).
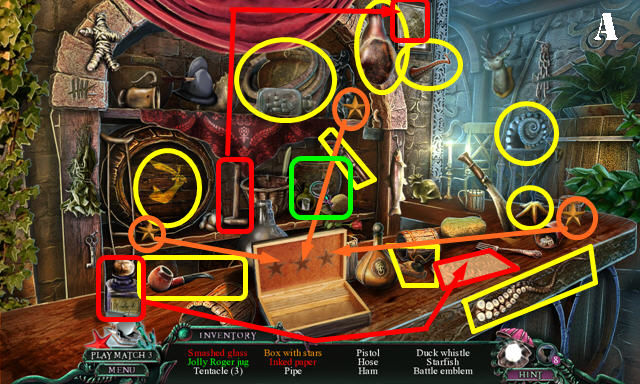
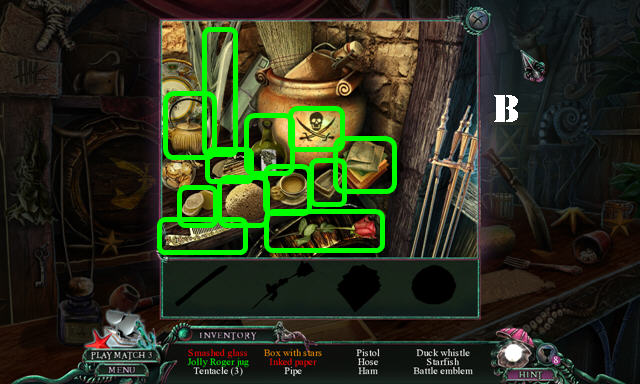
- Play the HOP (A and B).
- You receive the DUCK WHISTLE.
- Walk down.
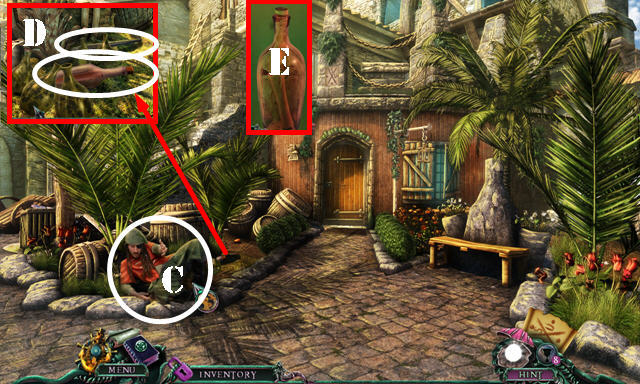
- Use the DUCK WHISTLE on Willy (C); give him the COFFEE, and then the SMALLER BAG OF COINS.
- Take the CROWBAR and the CORKED BOTTLE (D).
- Use the CORKSCREW on the CORKED BOTTLE in inventory, then use the TWEEZERS to get the MAP PIECE 3/6 (E).
- Walk down.
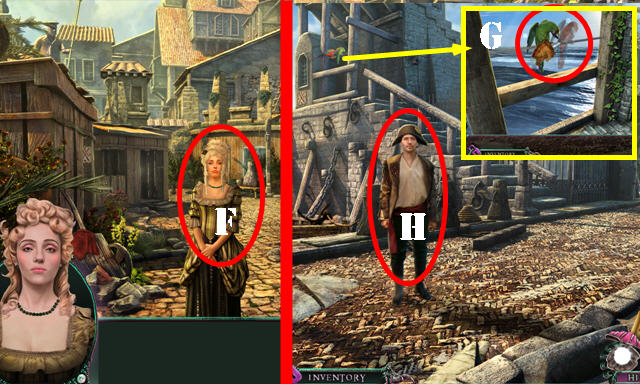
- Talk to the Baroness to receive the SEXTANT (F).
- Walk down.
- Place the PARROT next to the other one to receive the MAP PIECE 4/6 (G).
- Talk to the Navigator to receive the COMPASS NEEDLE (H).
- Walk down.
- Remove the lid with the CROWBAR. Use the CARAFE to get the OLIVE OIL (I).
- Return to the Town Tavern.
- Touch the compass piece (J); place the COMPASS NEEDLE in it (K) and then touch the lens (L).
- Take the COMPASS.
- Use the OLIVE OIL on the handle (M) and then turn it.
- Take the MAP PIECE 5/6, SCHOONER, and ROPE (N).
- Use the ROPE on the BUCKET in inventory to get the BUCKET WITH ROPE (O).
- Return to the Town Center.
- Place the BUCKET WITH ROPE in the well. Take the ANCHOR (P).
- Return to Town South.
- Place the SCHOONER on the gate to activate a puzzle (Q).
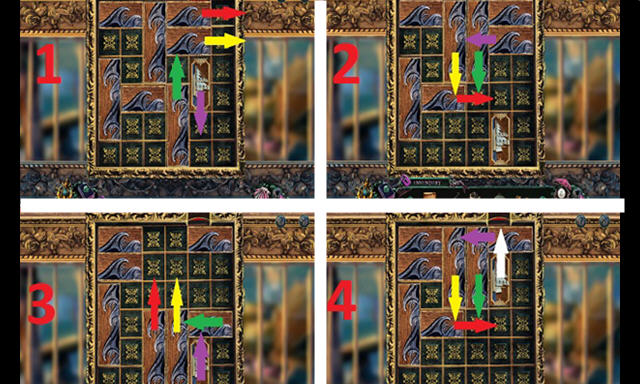
- Move the blocks in the direction of the arrows in this order: Red, Yellow, Green, Purple and White (1-4).
- Go to the Town Docks.

- Talk to Willy (R).
- Take the GLOVES and SHIP'S WHEEL (S).
- Go forward.
- Place the SHIP'S WHEEL (T) and the ANCHOR (U) on the ship to activate a puzzle.
- Drag the pieces up and down to form this image (V).
- Take the MAP PIECE 6/6 (W).
- Give the 6 MAP PIECES, COMPASS, and SEXTANT to the Navigator to receive the MAP and the CABIN KEY (X).
- Use the CABIN KEY on the lock and enter the Ship Cabin (Y).
- Remove the lid and place the MAP here (A).
- Talk to Willy.
- Open the chest with the CROWBAR. Take the HULL KEY (B).
- Take the OIL LAMP (C).
- Walk down.
- Use the HULL KEY in the lock and turn the key (D). Place the OIL LAMP in the hole and go down.
Chapter 3: The Island
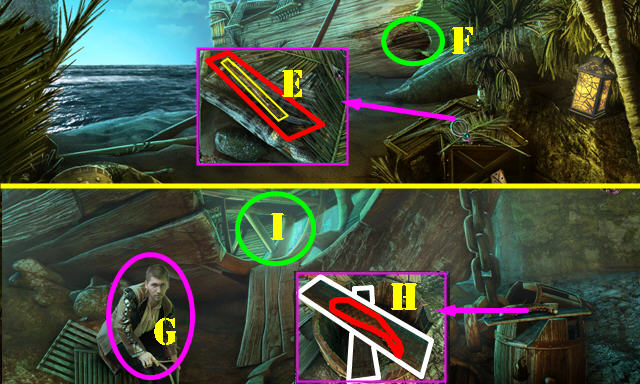
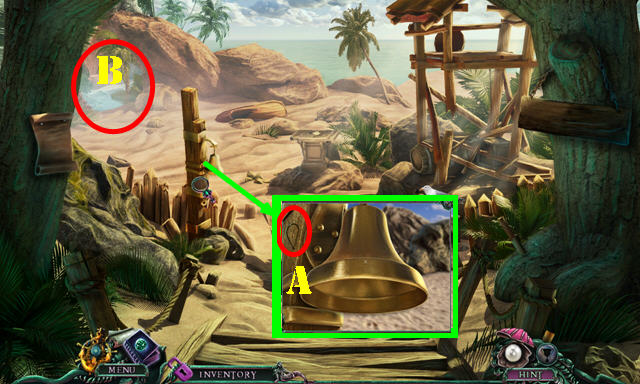
- Remove the leaves; take the STICK and the CUTLASS (E).
- Go into the Shipwreck Hole (F).
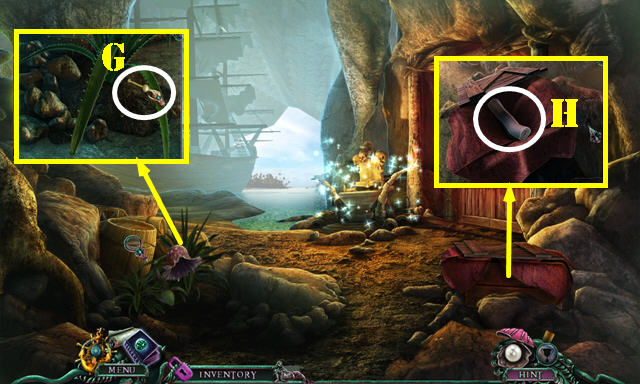
- Talk to the Navigator (G).
- Take the WATER SKIN (H). Remove the boards (white).
- Go forward to the Shipwreck Cells (I).
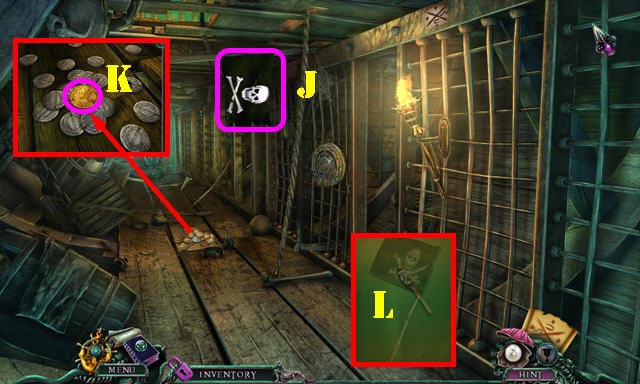
- Take the JOLLY ROGER FLAG (J).
- Remove the coins and take the GOLD COIN (K).
- Take the STICK from inventory and wrap the JOLLY ROGER FLAG on it to create the WRAPPED STICK (L).
- Go forward to Black Island Beach.
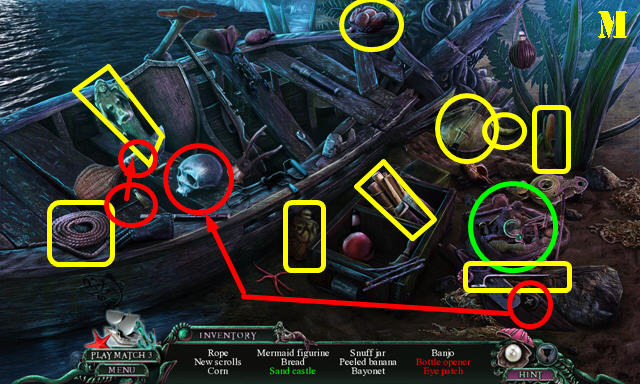
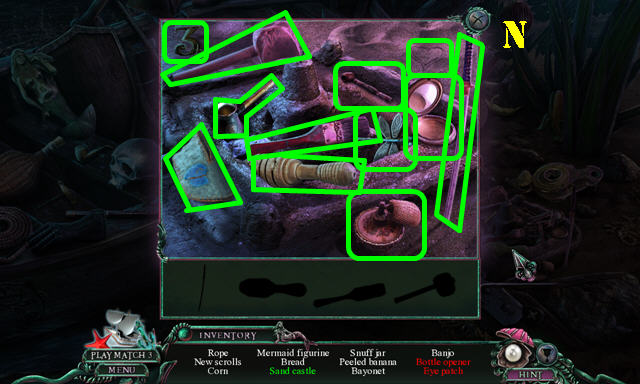
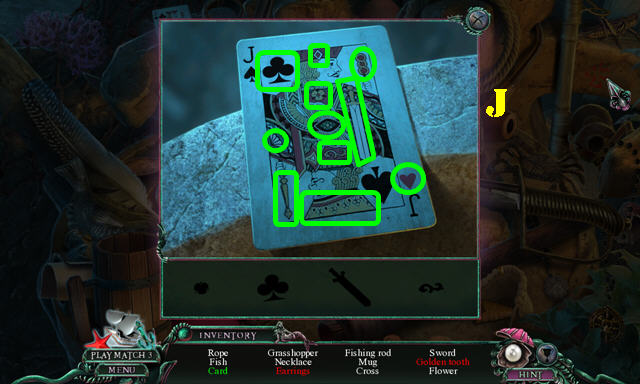
- Play the HOP (M and N).
- You receive the APPLE-SHAPED KEY.
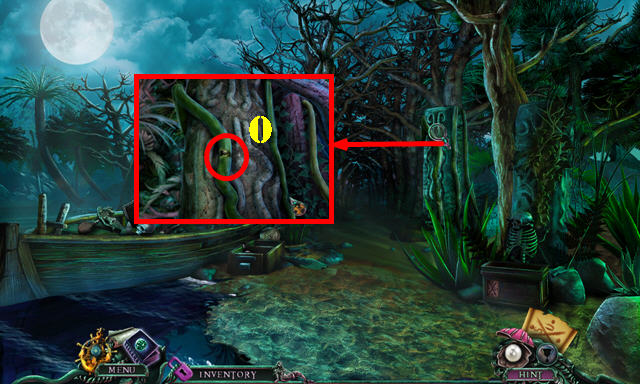
- Cut the vines with the CUTLASS. Place the WATER SKIN on the water to get the FULL WATER SKIN (O).
- Return to the Shipwreck Hole.
- Dip the WRAPPED STICK in the oil (P) to get the UNLIT TORCH.
- Give the FULL WATER SKIN to the Navigator (Q).
- Take the CELL PUZZLE PIECE (R).
- Go forward.
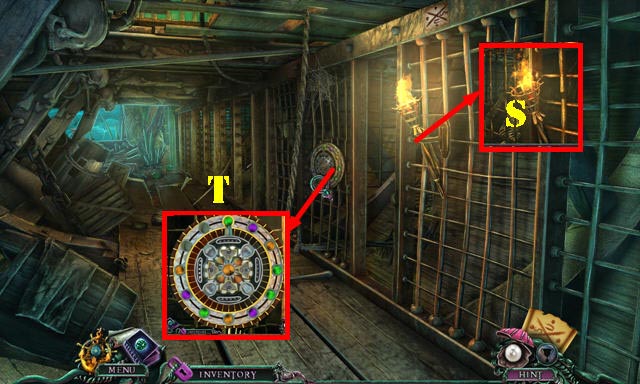
- Place the UNLIT TORCH on the fire to get the LIT TORCH (S).
- Place the CELL PUZZLE PIECE on the puzzle to activate it (T).
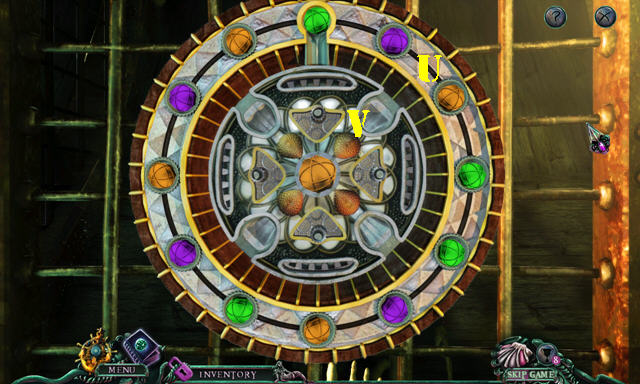
- Select the inner and outer rings to rotate each section. Place 4 balls of the same color in the center at the same time. Repeat this process for all the colors.
- Solution 1: U, V, Ux2, Vx2, Ux3, Vx2, Ux4, Vx2.
- Solution 2: Ux4, Vx2, Ux2, Vx2, Ux3, Vx2.
- Solution 3: Ux2, Vx2, Ux3, Vx2, Ux5, Vx2.
- Take the SCRAPER.
- Go forward.
- Use the LIT TORCH on the torch (A).
- Go forward to Black Island Jungle.
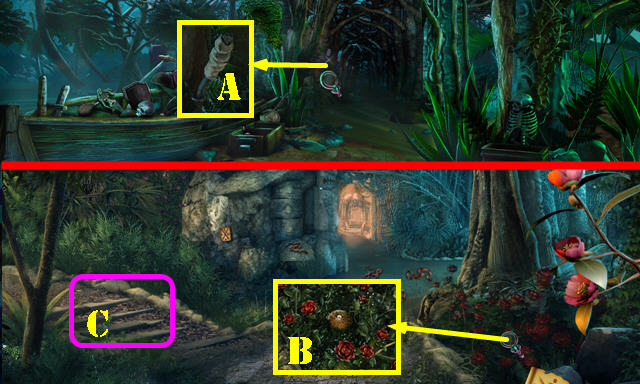
- Push aside the thorns twice with the GLOVES. Take the COAT OF ARMS (B).
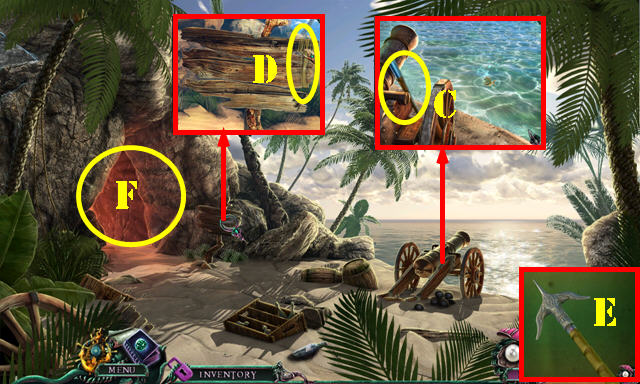
- Go left to the Cottage Entrance (C).
- Take the letter and JUG (D).
- Remove the leaf and take the SMILING SUN (E).
- Open the curtains. Enter the Cottage (F).
- Remove the leaf; take the BANANA (G).
- Place the COAT OF ARMS on the shield; take the CRYING SUN (H).
- Go to the Bridge (I).
- Take the FLINT ROCKS (J).
- Use the LIT TORCH on the leaves to activate a HOP (K).
- Play the HOP (L and M).
- You receive the TORN PICTURE PIECES.
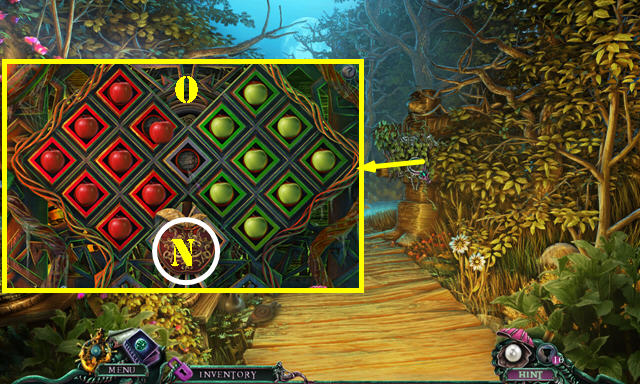
- Use the APPLE-SHAPED KEY in the lock to activate a puzzle (N).
- Move the red apples to the left and the green ones to the right (O). An apple can only jump over another apple into an empty space.
- Take the GUNPOWDER HORN.
- Walk down.
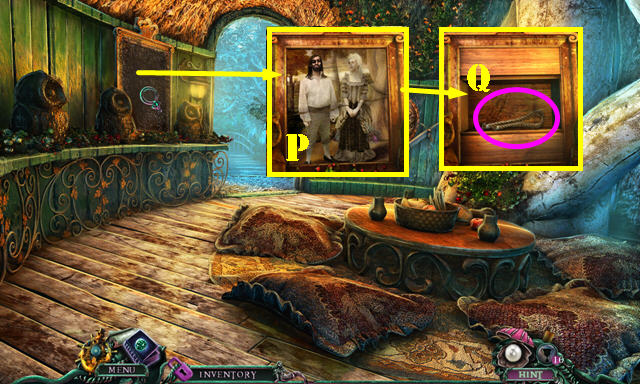
- Remove the dirt with the SCRAPER. Place the TORN PICTURE PIECES in the frame (P).
- Take the WICK (Q).
- Walk down.
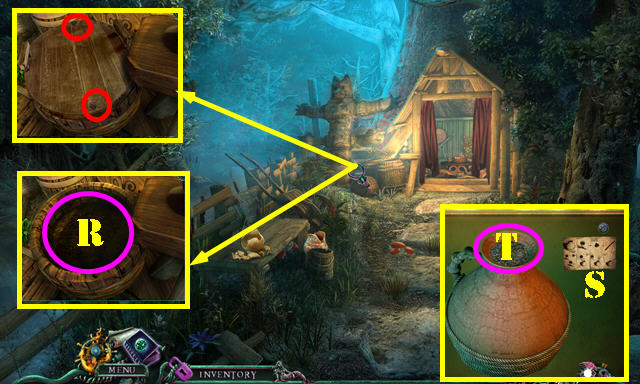
- Use the GOLD COIN on the screws (red); use the GUNPOWDER HORN in the barrel to get the GUNPOWDER (R).
- Open the JUG in inventory; the clue will be removed (S).
- Place the GUNPOWDER and WICK in the jug to get the IMPROVISED BOMB (T).
- Walk down.
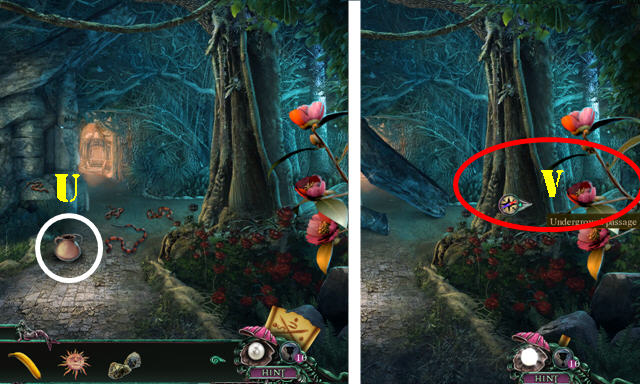
- Put down the IMPROVISED BOMB; light the wick with the FLINT ROCKS (U).
- Head right to the Underground Passage (V).
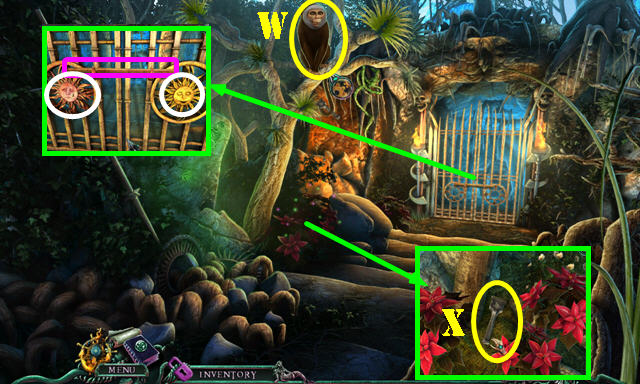
- Give the BANANA to the monkey (W). Move the flowers aside and take the DULL CHISEL (X).
- Place the SMILING SUN and CRYING SUN in the slots (white).
- Take the PICKAXE HANDLE (purple).
- Go through the gate to the Distillery.
- Take the HAMMER (A).
- Place the DULL CHISEL on the grindstone to get the SHARP CHISEL (B).
- Place the SHARP CHISEL on the boards, then use the HAMMER on the chisel (C) to activate a puzzle.
- Assemble the jigsaw pieces in the right spots. Pieces will rotate into whatever space you place them in.
- Solution (D).
- Take the MAP 1/2 (E).
- Pull the handle (F).
- Go down to the Good Works (G).
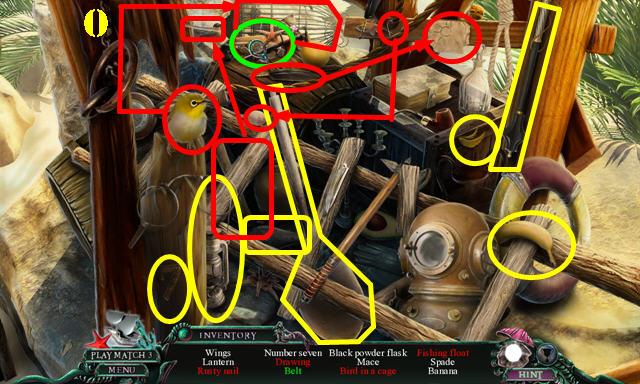
- Open the chest on the left to activate a HOP.
- Play the HOP (H and I).
- You receive the MAP 2/2.
- Give the 2 MAP pieces to the Navigator.
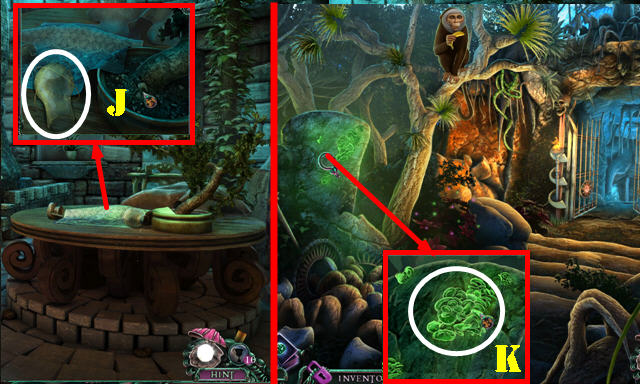
- Take the LAMP CHIMNEY (J).
- Return to the Underground Passage.
- Use the LAMP CHIMNEY on the fungus to get the GLOWING FUNGUS (K).
- Return to the Good Works.
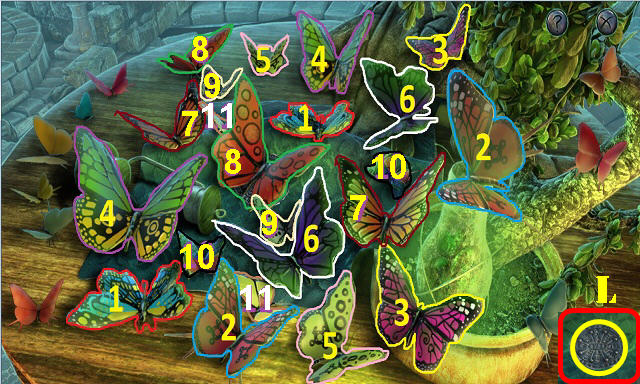
- Zoom into the table and place the GLOWING FUNGUS in the dirt to activate a puzzle.
- Select matching pairs of butterflies (1-11).
- Take the Amulet Piece (L). Remove the cloth and take the PICKAXE HEAD.
- Select the PICKAXE HEAD in inventory and place the PICKAXE HANDLE on it to create the PICKAXE (M).
- Return to the Black Island Jungle.
- Use the PICKAXE on the boulders (N). Go forward to the Skull Cave Entrance.
Chapter 4: Skull Cave
- Play the HOP (O and P).
- You receive the RAZOR BLADE.
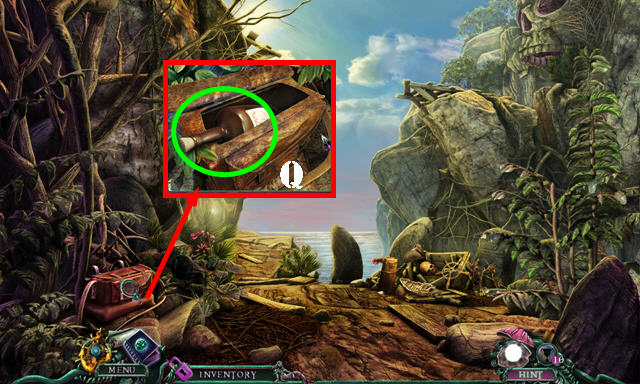
- Open the bag and take the RUM (Q).
- Go forward to the Cliff.
- Take the CLOTH (R).
- Pick up the TURTLE SHAPE, LANDING NET, and the note (S).
- Open the CLOTH in inventory; use the RUM on it to get the ALCOHOL-SOAKED RAG (T).
- Go forward to the Beach.
- Take the SNAKE SHAPE (U).
- Use the LANDING NET to get the SHELL (V).
- Open the SHELL in inventory and use the RAZOR BLADE on it to get the PUZZLE PIECE (W).
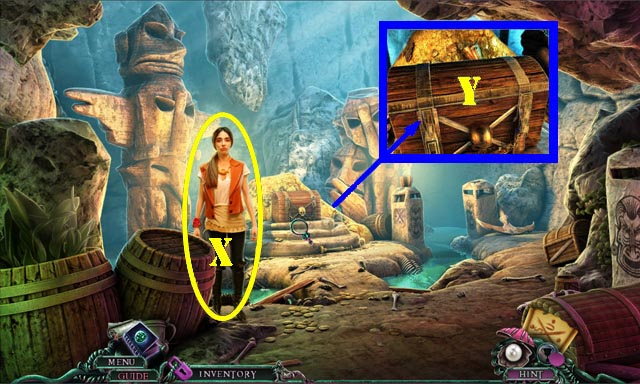
- Go forward to the Front of the House.
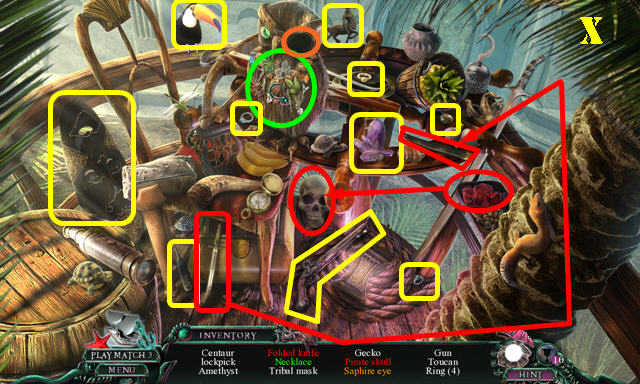
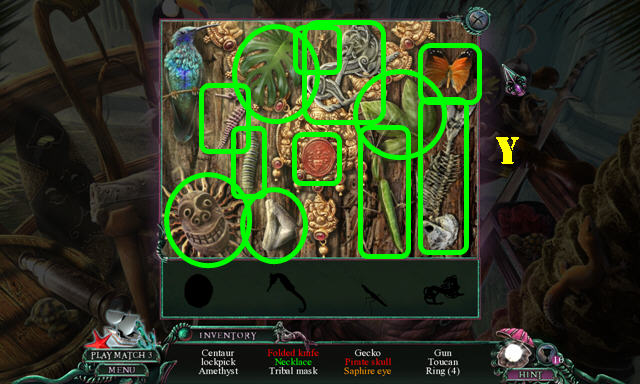
- Play the HOP (X and Y).
- You receive the LOCKPICK.
- Take the WOODEN RIM (Z).
- Use the RAZOR BLADE to get the EYE SHAPE (Z1).
- Walk down.
- Place the SNAKE SHAPE, EYE SHAPE, and the TURTLE SHAPE in the slots (green). Take the PICTURE PIECE 1/3 (A).
- Use the LOCKPICK on the lock to activate a puzzle (B).
- Slide each of the 4 rings into place as shown here (C). Start from the outer ring and work your way in.
- Take the SHINY GEMS and the ROUND WIRE from inside the chest (D).
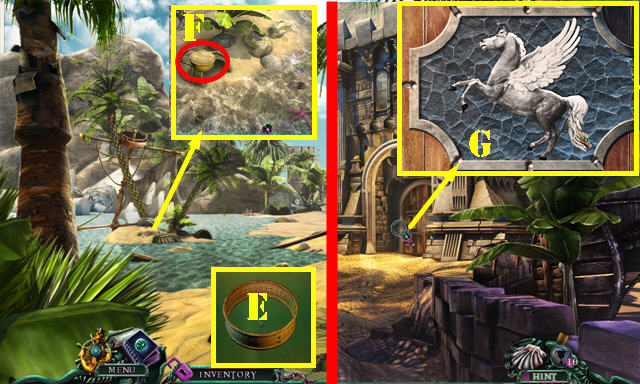
- Select the WOODEN RIM in inventory; place the ROUND WIRE in it to get the SIEVE (E).
- Use the SIEVE in the sand; take the PEGASUS WING (F).
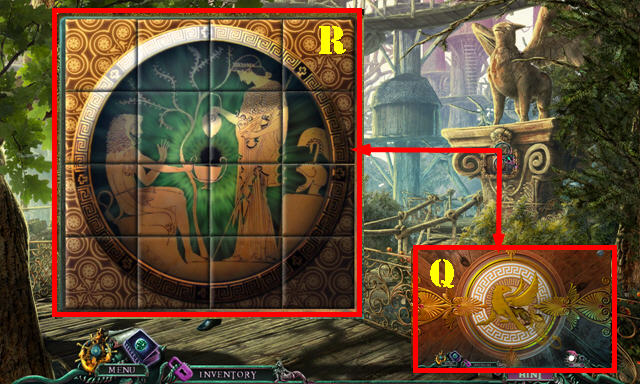
- Go forward.
- Place the PEGASUS WING on the door to activate a puzzle. Arrange the picture as shown (G).
- Enter the Pirates' Lair Hallway.
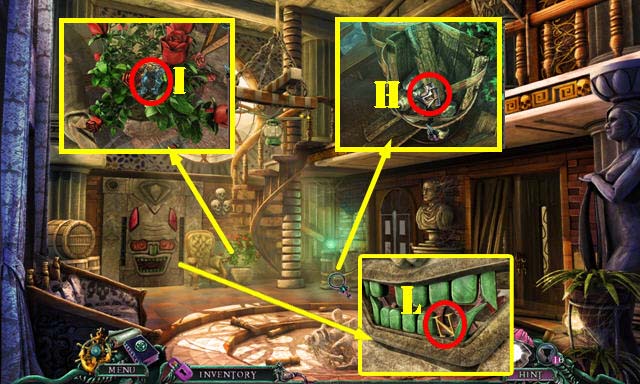
- Take the PICTURE PIECE 2/3 (H).
- Move the flowers and take the SKULL 1/3 (I).
- Place the PUZZLE PIECE on the door to activate a puzzle (J).
- Find the matching pairs (1-8). The solution is random.
- Enter the Library.
- Talk to the man.
- Take the GEAR KEY (K) and the LETTER N (L).
- Play the HOP (M and N).
- You receive the SKULL 2/3.
- Walk down and go to the Captain's Quarters in the upper level.
- Take the RIGHT DOOR KEY (O) and the LUMP OF COAL (P).
- Open the armoire door to activate a HOP (Q).
- Play the HOP (R and S).
- You receive the PICTURE PIECE 3/3.
- Walk down.
- Use the ALCOHOL-SOAKED RAG on the keyhole. Use the RIGHT DOOR KEY in the lock (T).
- Enter the Guards' Room.
- Take the PADDLES 1/2 (U).
- Remove the lid and take the PAPER SCROLL (X). Take the LEVER (Y).
- Move the pillow; take the LETTER S and the SCARF (Y1).
- Put the 3 PICTURE PIECES on the door to activate a puzzle (Z).
- Recreate the picture (A).
- Take the WINDING KEY (B).
- Return to the Captain's Quarters.
- Use the WINDING KEY in the lock. Open the book (C) and take the SKULL 3/3 (D).
- Use the PAPER SCROLL on the floor; use the LUMP OF COAL on the paper and take the note (E).
- Zoom into the chest (F).
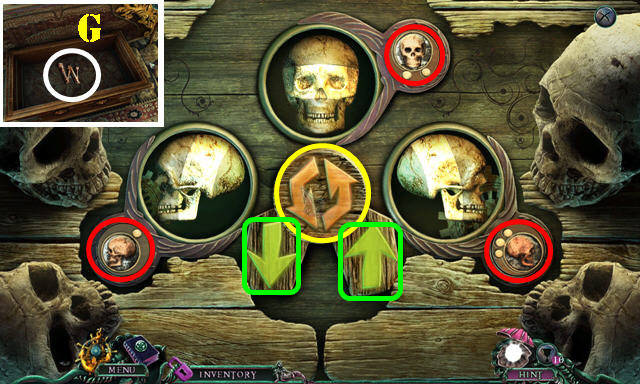
- Put down the 3 SKULLS and then place them in the slots (red).
- Use the green arrows to highlight the top, middle, or bottom section of each skull. Use the center arrows (yellow) to rotate the highlighted part of the skull.
- Solution: Yellow left arrow twice, right green arrow once, left yellow arrow twice, right green arrow once, and left yellow arrow once.
- Take the LETTER W (G).
- Return to the Library.
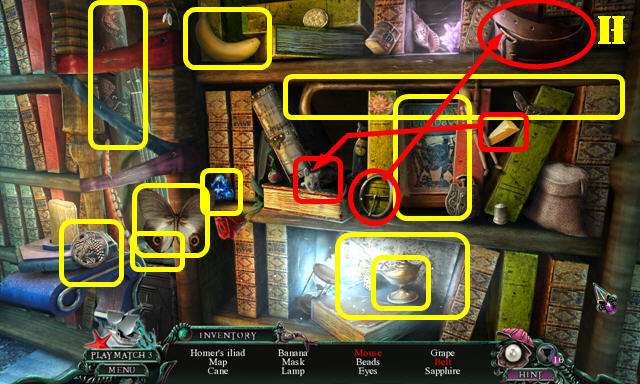
- Play the HOP (H).
- You receive the ILIAD BOOK.
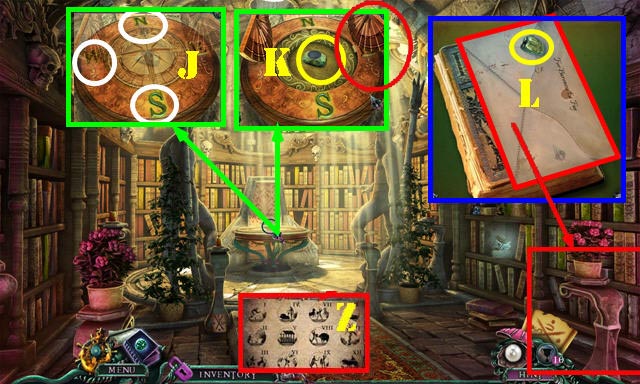
- Place the LETTER N, LETTER S, and LETTER W on the globe (J).
- Take the AMULET PIECE (K) and then the TEETH 1/2 below it.
- Open the ILIAD BOOK in inventory; take the TEETH 2/2 and OLIVIER'S LETTER (L).
- Walk down.
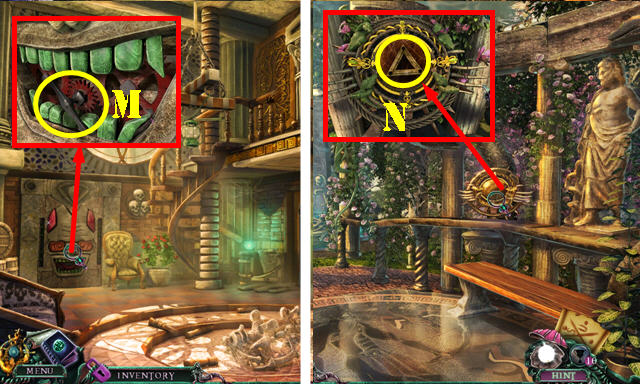
- Place the 2 TEETH in the mouth. Use the GEAR KEY in the lock and go through the door (M).
- Talk to the man (Hector) to receive the PADDLES 2/2.
- Place the LEVER in the slot to activate a puzzle (N).
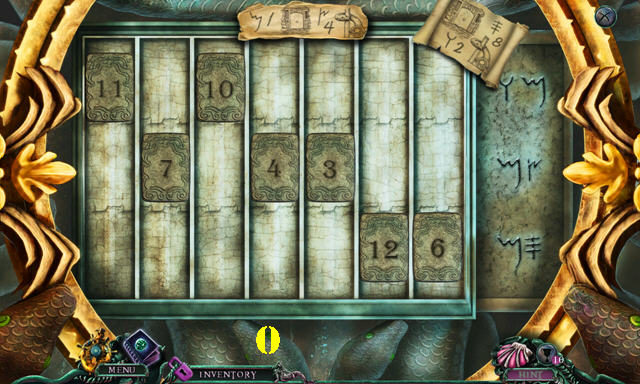
- Slide the rocks so their sum equals the number on the right.
- Solution (O).
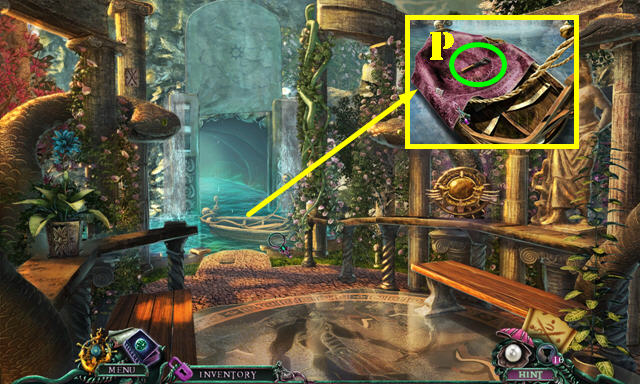
- Take the WRENCH (P) and remove the cover. Place the 2 PADDLES in the boat.
- Take the boat to the Fire Hall.
Chapter 5: The Fire Hall

- Talk to the Navigator.
- Play the HOP (Q and R).
- You receive the PIRATE HOOK.
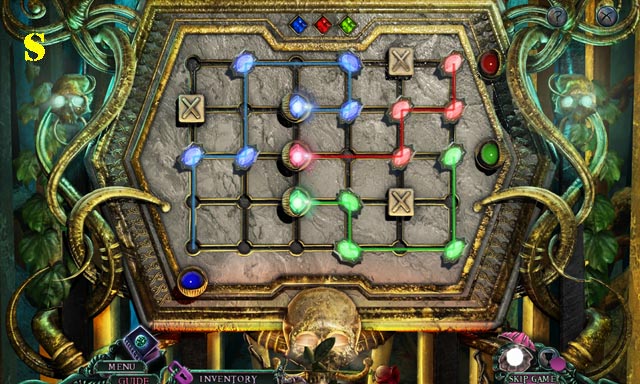
- Place the SHINY GEMS on the door to activate a puzzle.
- Select a mirror and then select an empty spot to move it there.
- Arrange the mirrors as shown here (S).
- Go through the door to reach the Underground Corridor.

- Use the SCARF twice on the valve (T).
- Use the WRENCH on both bolts to get the LONG BAR (U).
- Open the PIRATE HOOK in inventory and use the LONG BAR on it to create the LONG HOOK (V).
- Use the LONG HOOK on the shield (W); take the SHIELD (X) and the ORNAMENT KEY below it.
- Place the ORNAMENT KEY on the door (Y). Go through the door to Necropolis Hall.
- Talk to the Navigator to receive the LABORS MAP (A).
- Take the CANDLE (B).
- Go to the Black Captain's Lair (C).
- Use the CANDLE in the oil (D).
- Talk to the Baroness. Use the SHIELD on the Baroness (E).
- Go to the Gargoyle Foyer (F).
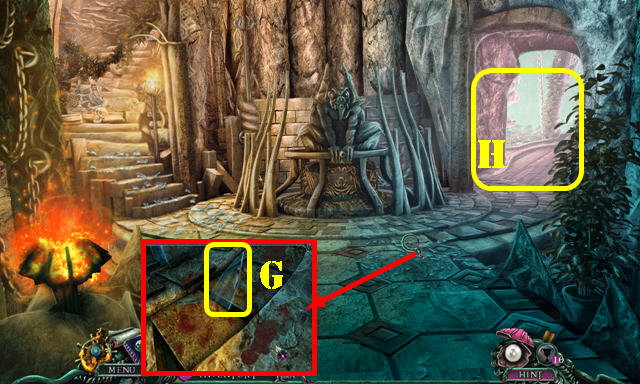
- Take the GLASS SHARD (G).
- Go to the Statue Room (H).
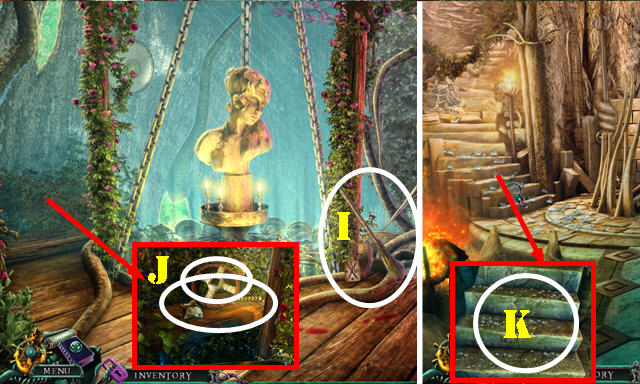
- Take the BROOM (I).
- Use the GLASS SHARD on the bushes twice; take the GARGOYLE FOUNTAIN TAP and the TOMAHAWK (J).
- Walk down.
- Use the BROOM on the broken glass (K) to activate a HOP.
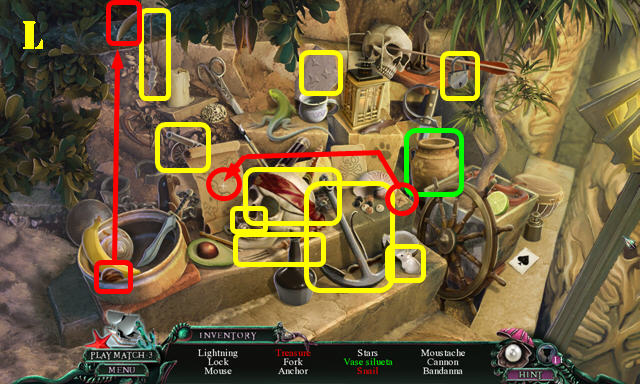

- Play the HOP (L and L1).
- You receive the FORK.
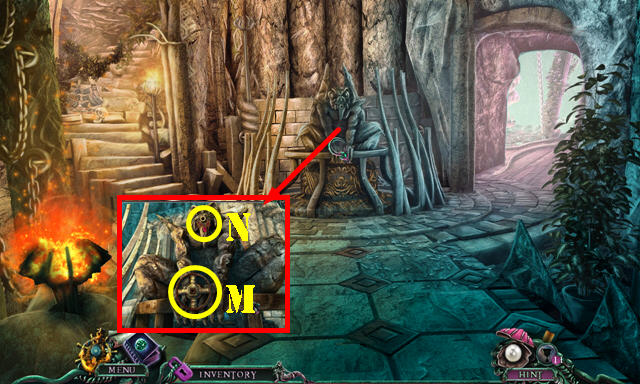
- Place the GARGOYLE FOUNTAIN TAP in the slot (M).
- Use the FORK to get the FOUNTAIN NECKLACE (N).
- Go to the Statue Room.
- Place the FOUNTAIN NECKLACE on the statue (O).
- Go to the Staircase Passage (P).
- Move the branches and take the EAGLE HEAD (Q).
- Remove the apples and take the EWER (R).
- Return to the Gargoyle Foyer.
- Use the EWER on the water to get the EWER WITH WATER (S).
- Return to the Staircase Passage.
- Use the EWER WITH WATER on the burning steps (T).
- Go to the Treetops Square.
- Talk to the Baroness (U).
- Take the GREEK AMPHORA (V) and the SPEARHEAD (W).
- Open the GREEK AMPHORA and use the TOMAHAWK on it to get the LION'S TAIL (X).
- Go to the Village Exit (purple).
- Take the FISHHOOK (A).
- Go to the Cave Entrance (B).
- Take the LONG STICK (C).
- Take the FISHING LINE (D).
- Open the SPEARHEAD in inventory and place the LONG STICK on it to get the SPEAR (E).
- Go to the Underground Beach (F).
- Take the CLAPPER (G).
- Remove the top and take the CLOTH (H).

- Play the HOP (I and J).
- You receive the FISHING POLE STICK.
- Walk down.
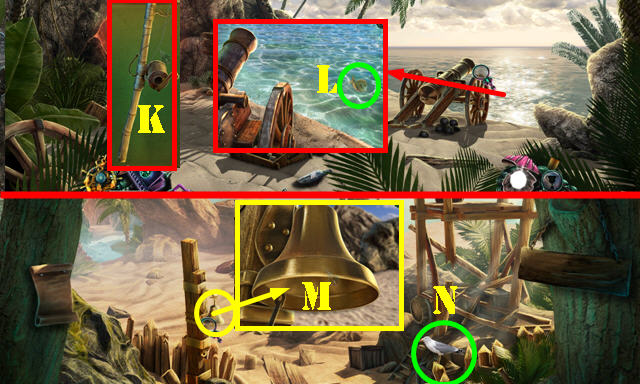
- Open the FISHING POLE STICK in inventory; put the FISHING LINE and the FISHHOOK on it to get the FISHING POLE (K).
- Use the FISHING POLE to get the FISH (L).
- Walk down.
- Put the BELL CLAPPER in the bell to get the CRAB (M).
- Give the FISH to the seagull (N) to activate a HOP.

- Play the HOP (O and P).
- You receive the WINGS.
- Walk down.
- Place the EAGLE HEAD, LION'S TAIL, and WINGS in the slots to activate a puzzle (Q).
- Swap the pieces by dragging one piece over the other and then rotate them into the right positions (R).
- Take the HERCULES FIGURINE.
- Go to the Village Exit.

- Place the HERCULES FIGURINE on the pedestal (S); take the CAVE DOOR PIECE 1/2 (T).
- Return to the Underground Beach.
- Use the CRAB on the aloe vera; use the CLOTH to get the ALOE VERA BANDAGE (U).
- Return to the Treetops Square.

- Use the ALOE VERA BANDAGE on the Baroness and then give her OLIVIER'S LETTER (V).
- Return to the Underground Beach.
- You receive the CAVE DOOR PIECE 2/2 from the Baroness.
- Use the 2 CAVE DOOR PIECES on the door (W).
- Enter the Cave.
- Talk to the Baroness (X).
- Open the chest with the SPEAR to activate a puzzle (Y).
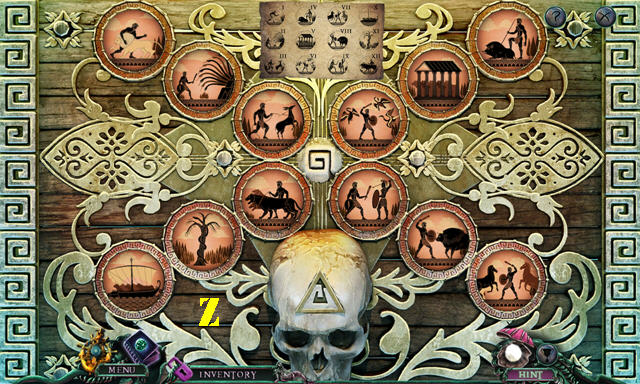
- Place the LABORS MAP on the puzzle to activate it.
- Grab a token and look at the number behind it, then place the right token in that slot according to the labors map.
- Put the images in the right order by swapping them with each other.
- Solution (Z).
- Congratulations, you have completed Sea of Lies: Mutiny of the Heart.
Created at: 2013-09-29