

Walkthrough Menu
- General Tips
- Chapter 1 – Arrival at Kangale Estate
- Chapter 2 – The Library
- Chapter 3 – The Stables
- Chapter 4 – The Park
- Chapter 5 – The Lake
- Chapter 6 – The Manor
- Chapter 7 – The Loft
General Tips
- Select Options to adjust the Music and Sound Effects. You may also adjust Full Screen, Widescreen, and Custom Cursor.
- Throughout the guide, we will use the acronym 'HOS' for Hidden Object Scenes. The items listed in yellow in the find lists require extra steps to locate.
- Puzzles may be skipped. Select the '?' in the lower left to get the instructions for the puzzles.
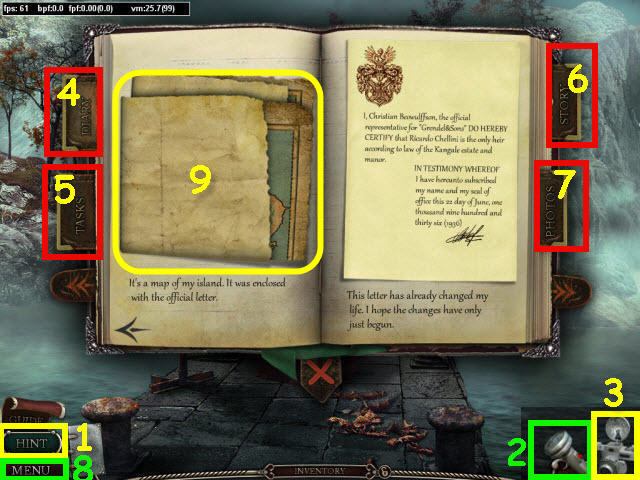
- Select the Hint button (1) in the lower left to get a hint in either the HOS or regular gameplay.
- You will acquire a flashlight (2) during the game that will be added to the toolbar in the lower right. Use the flashlight in the dark areas.
- You will acquire a camera (3) during the game that will allow you to capture screenshots of your choice; the photos are added to your diary under the photos tab.
- When the camera flashes it means that you can take a picture in that area which will offer clues or story updates. These photos will be added into the diary tab.
- The journal in the lower left allows you to track the clues in the diary (4), check the tasks (5) you need to complete, read the notes you collected to complete the story (6) and view the photos (7) that you took with the camera.
- Items that have a box around them in Inventory will require you to interact with that item.
- Select Menu (8) to exit or access options. There is a Map (9) on the 3rd page of the diary.
- This game is not linear and you may do things in a different order as the guide. If you cannot do an action when stated in the guide, please check the previous entries to see if you missed something.
Chapter 1 – Arrival at Kangale Estate
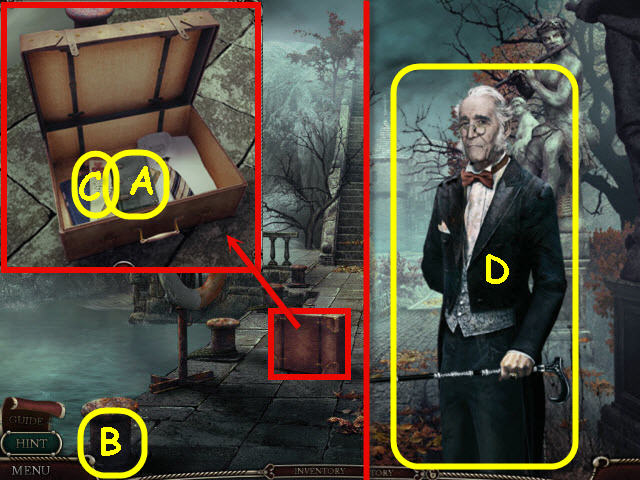
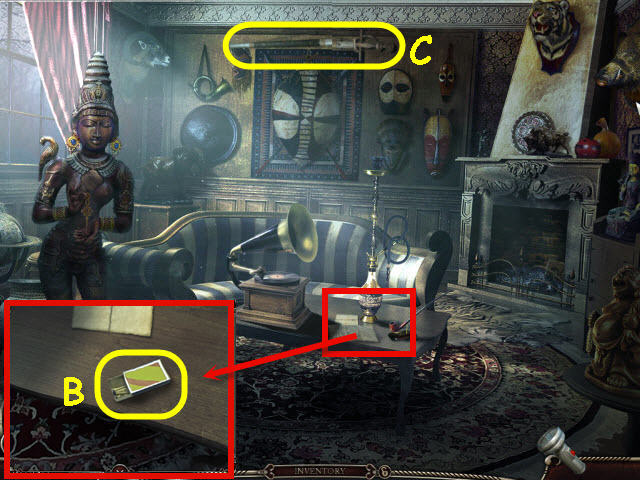
- Open and examine the suitcase; take the diary (A) and map which will be added to your menu bar on the bottom (B).
- Take the PAPERS (C).
- Go forward up the stairs.
- Give the PAPERS to the butler (D).
- Select the Butler to get a conversation tree; exhaust all conversation.
- Go forward and left.
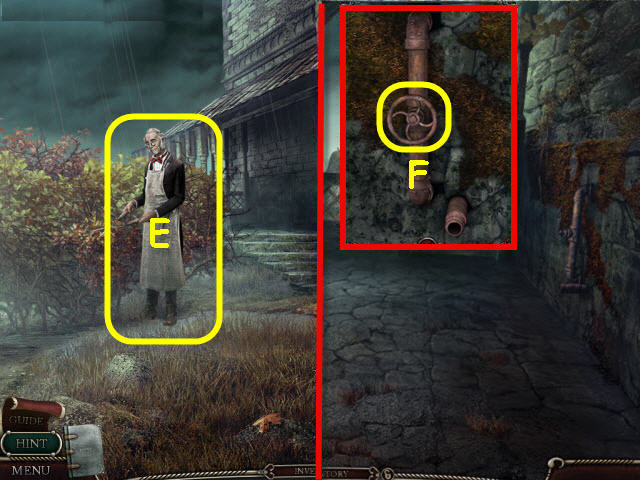
- Speak to the gardener (E).
- Go straight up the stairs.
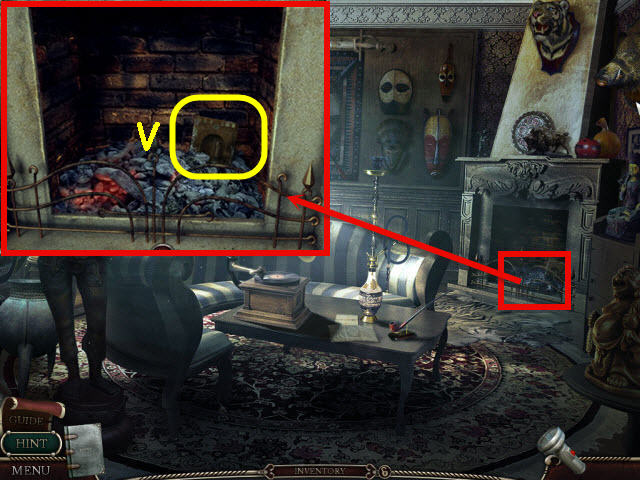
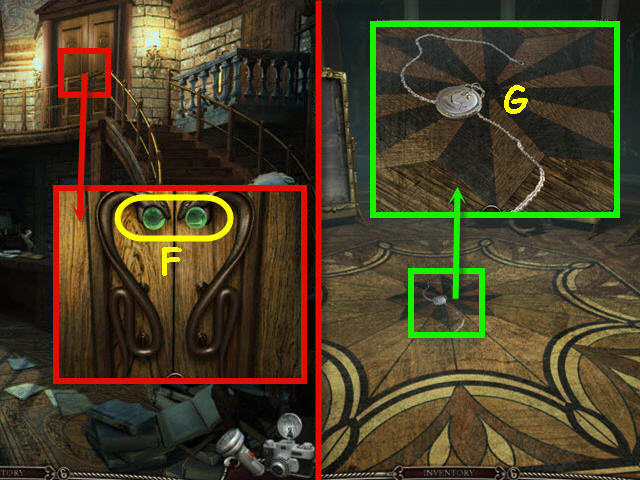
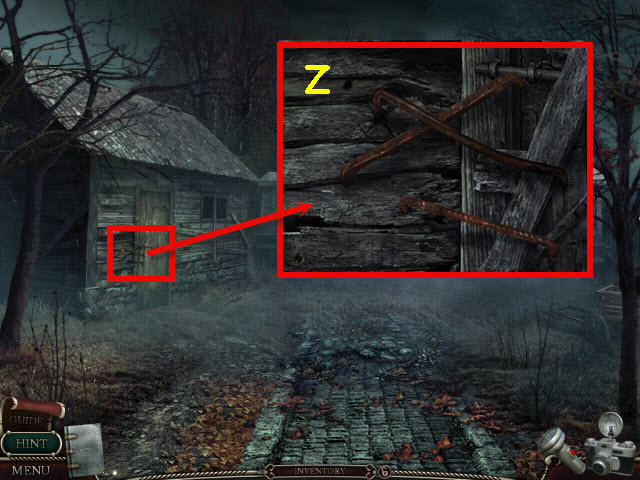
- Examine the pipes; take the VALVE (F).
- Back out twice.
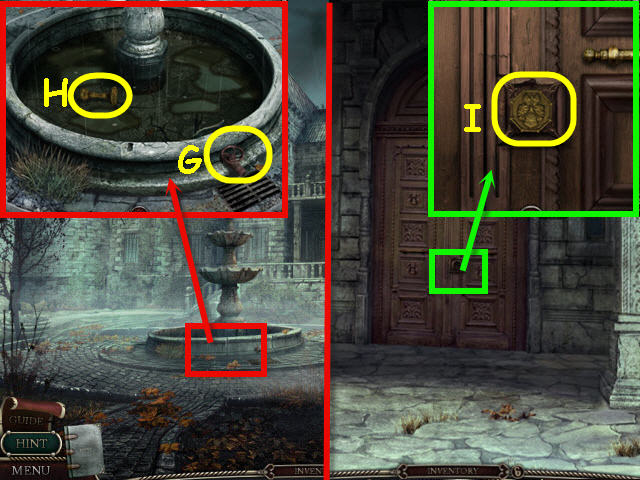
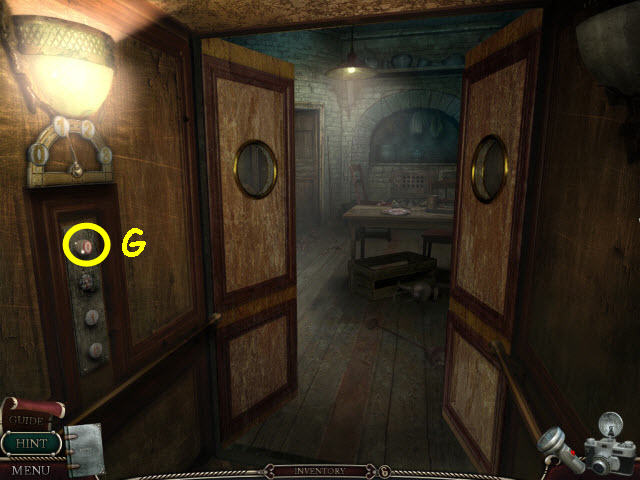
- Examine the fountain; place the VALVE on the tap (G).
- Turn the VALVE; take the MANOR KEY (H).
- Go forward.
- Examine and place the MANOR KEY on the door (I); turn to open.
- Enter the manor.
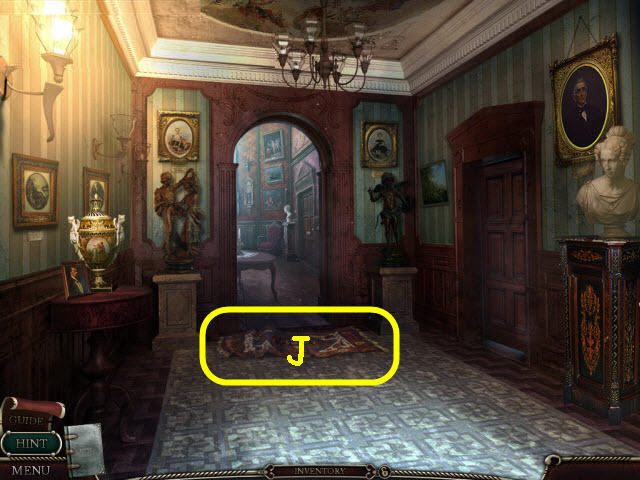
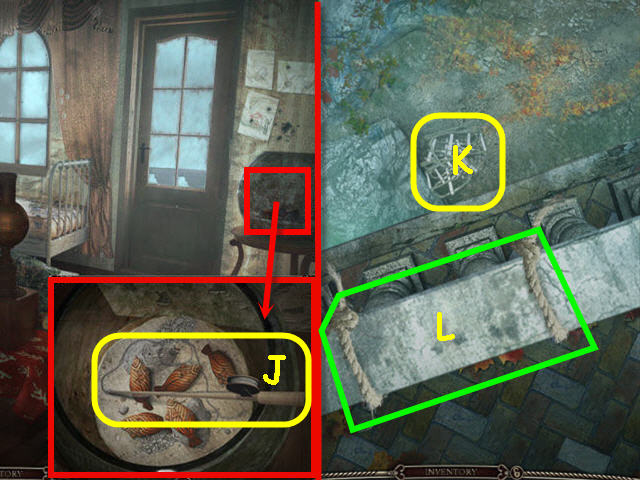
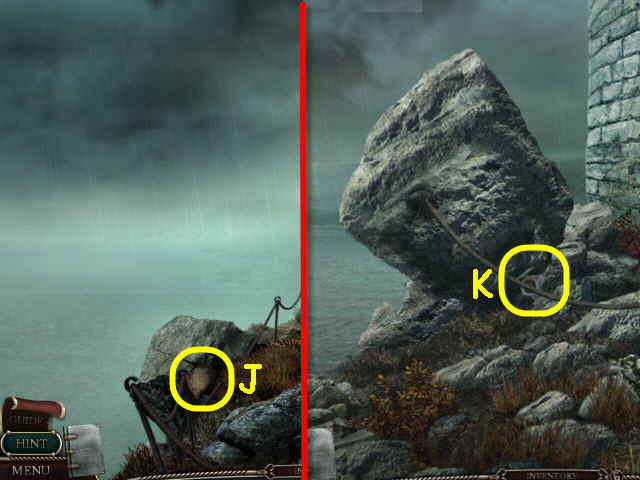
- Take the CARPET (J).
- Go forward.
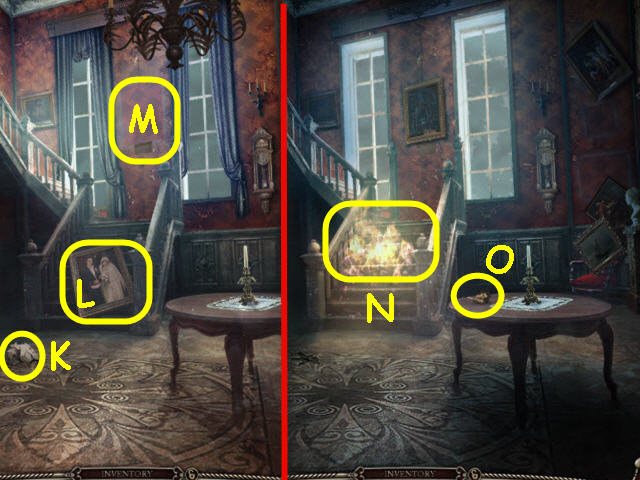
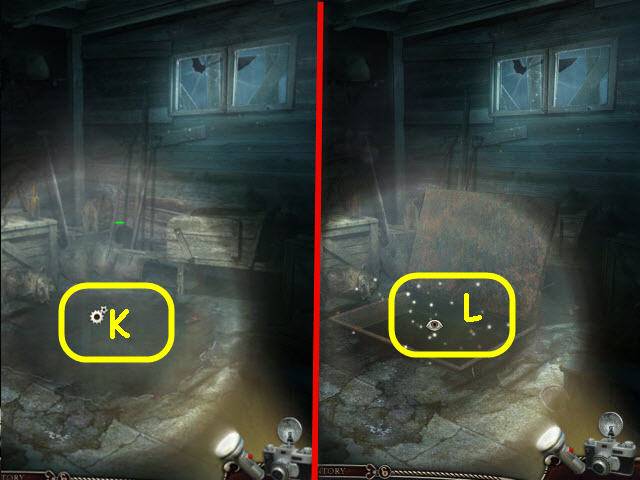
- Examine the crumpled paper (K).
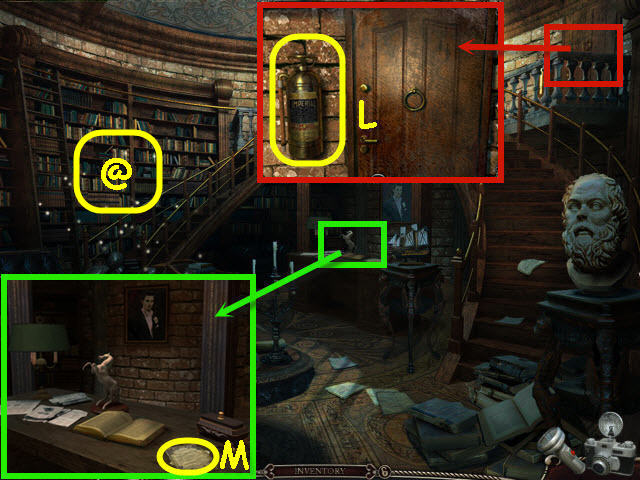
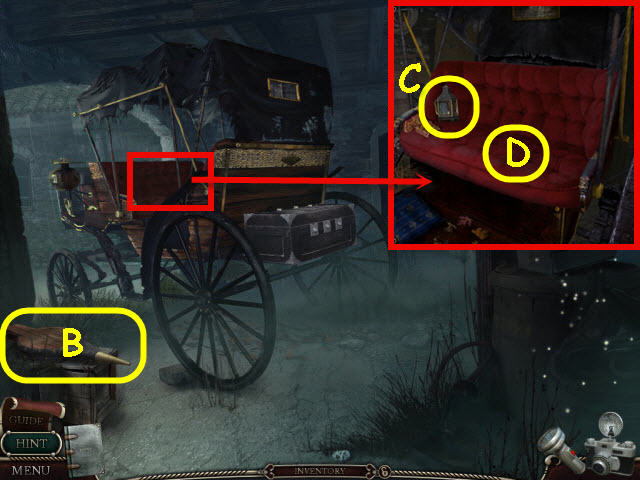
- Hang the portrait (L) on the wall (M).
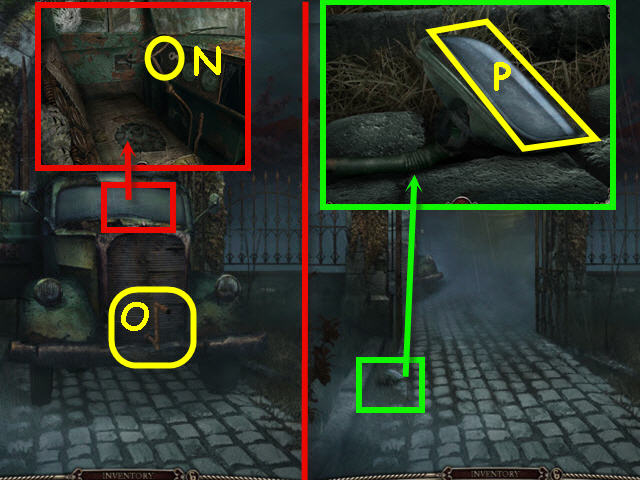
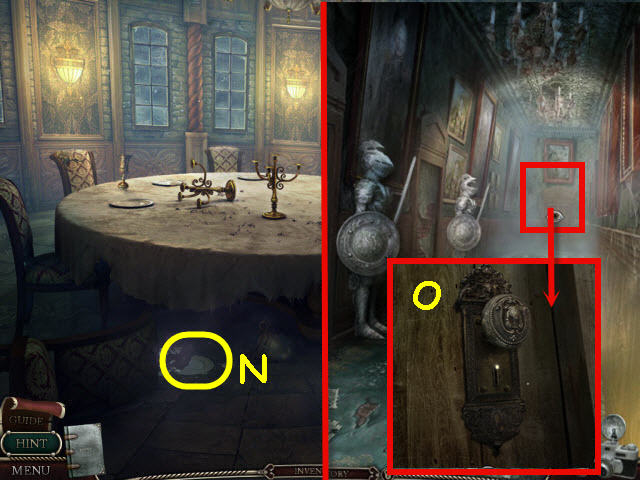
- Place the CARPET on the flames (N).
- Take the TORN PORTRAIT (O).
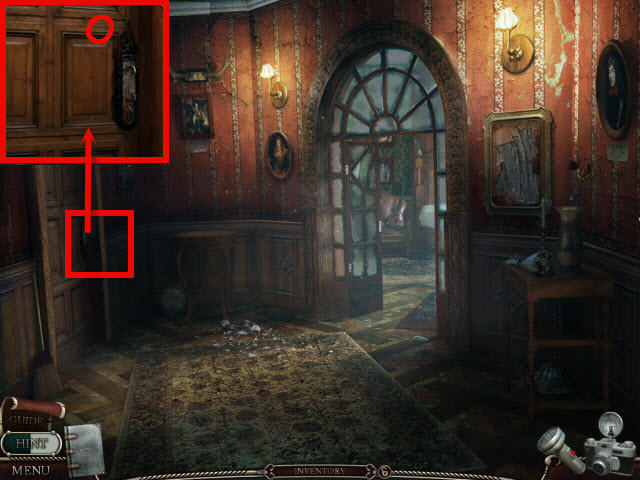
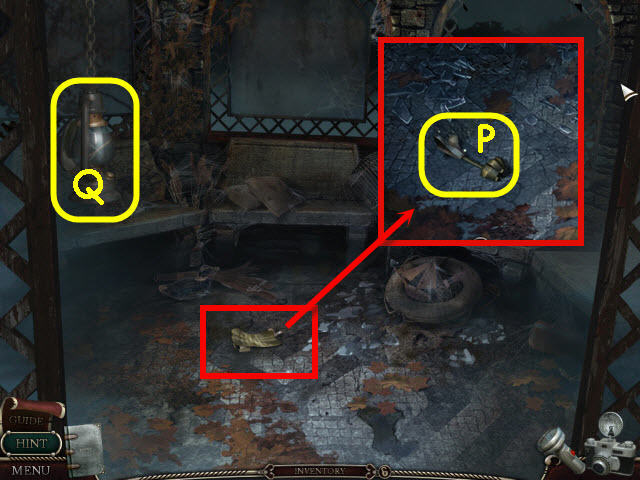
- Go up the stairs.
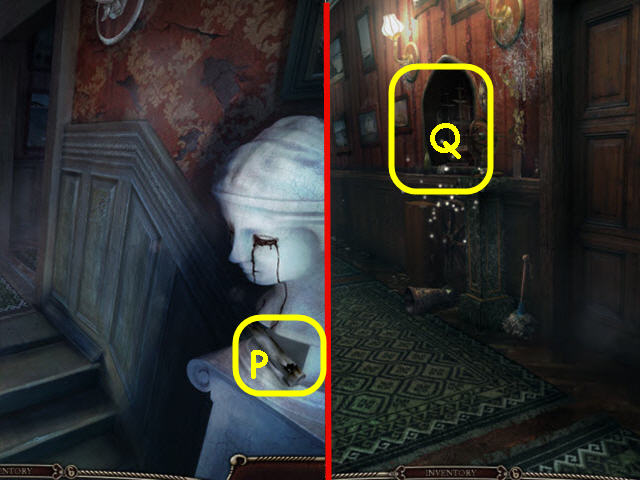
- Take the note (P).
- Go through the door on the right.
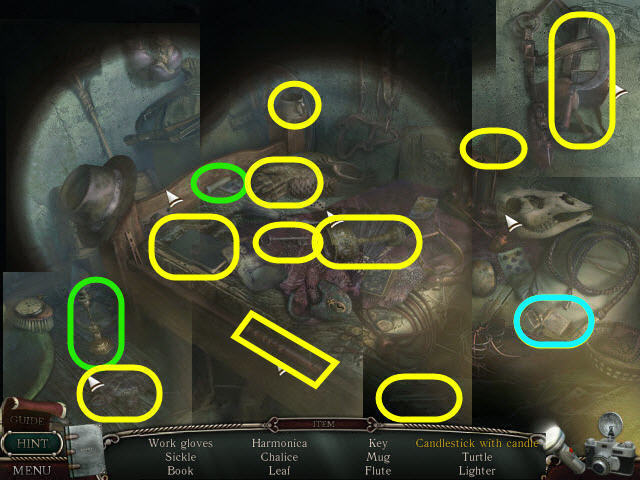
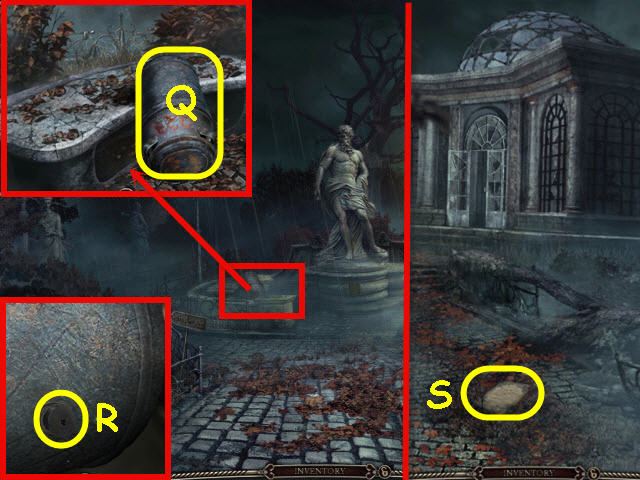
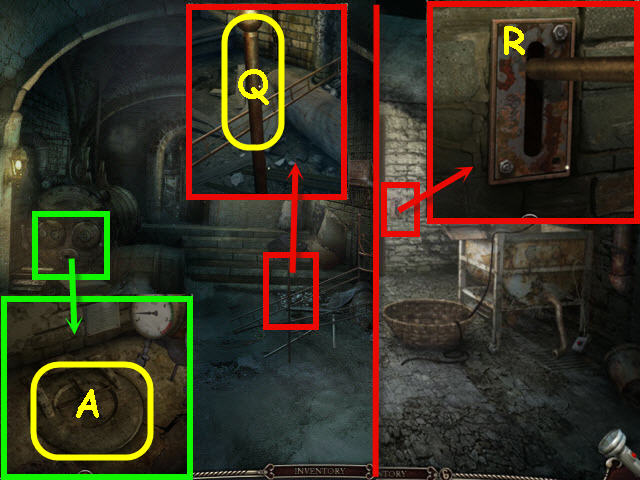
- Examine the alcove (Q) to access a HOS.
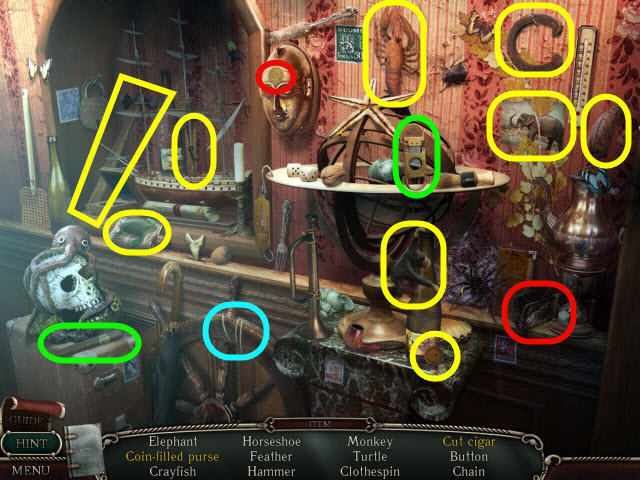
- Find the items listed.
- Marked in green: use the guillotine cutter on the cigar to get a cut cigar.
- Marked in red: place the coin in the purse to get a coin-filled purse.
- You will earn a NECKLACE CHAIN.
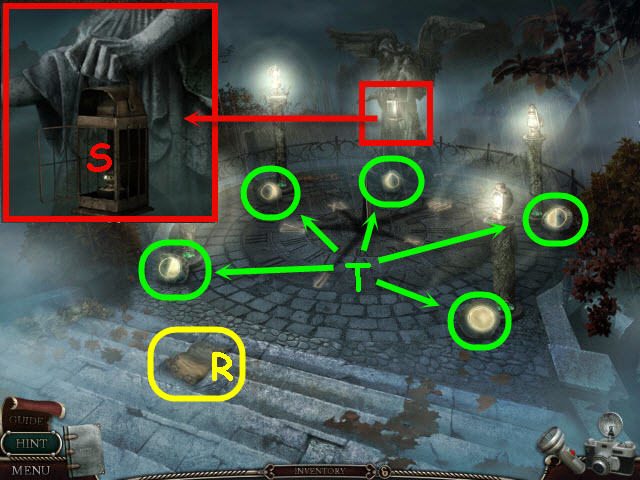
- Go straight down the hall.
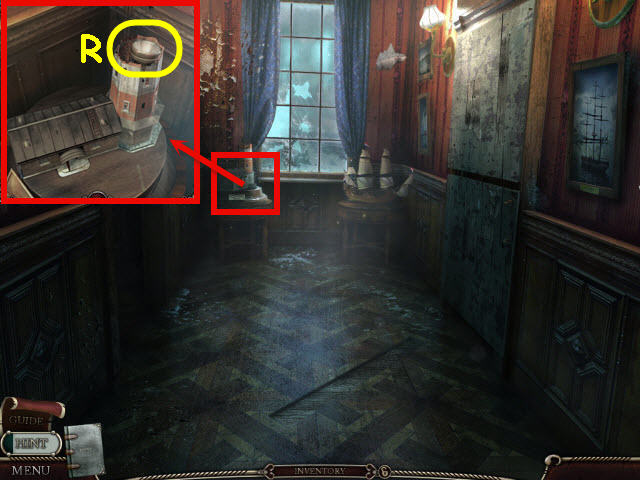
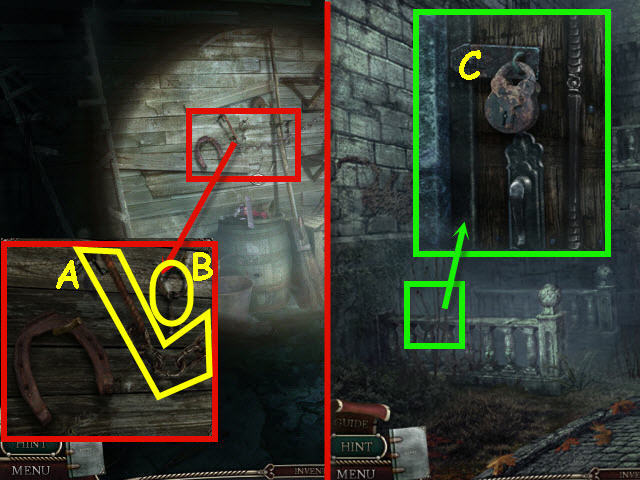
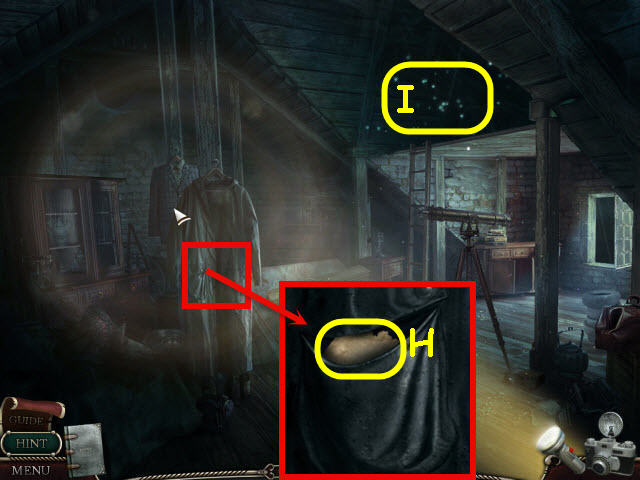
- Examine the lighthouse; take the DISCHARGED FLASHLIGHT (R).
- Go into the room on the left.

- Knock over the vase (S).
- Examine and move the vase pieces; take the CLOAK ROOM KEY (T).
- Back out five times.
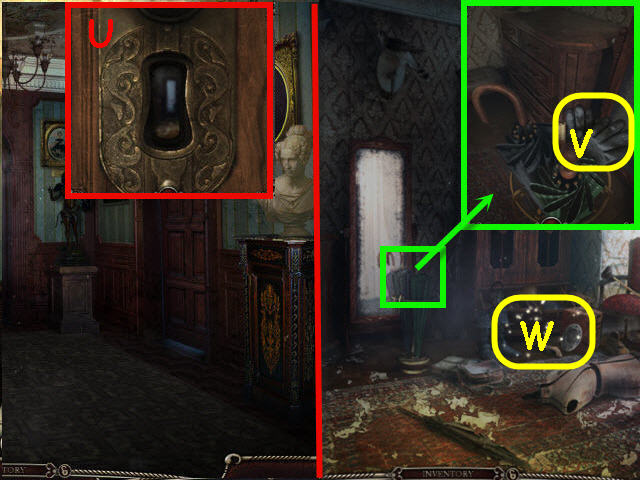
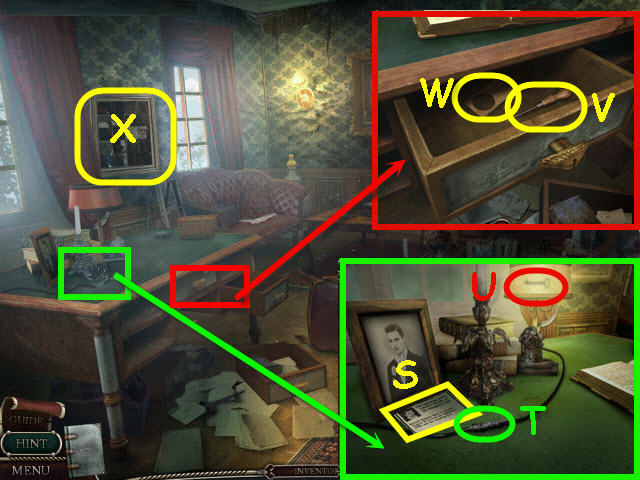
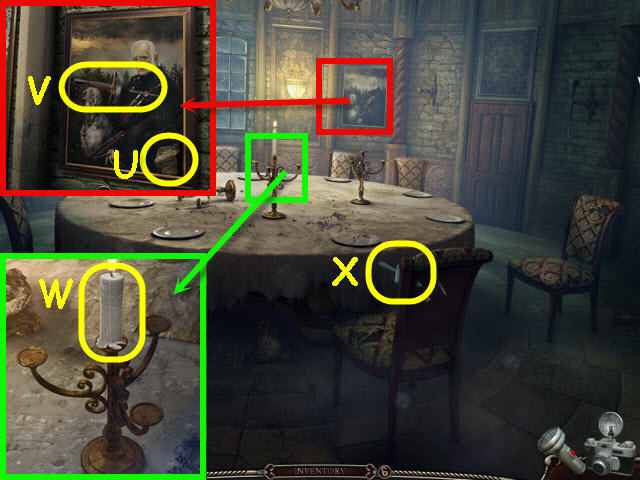
- Examine the door on the right; use the CLOAK ROOM KEY on the lock (U).
- Enter the newly-opened room on the right.
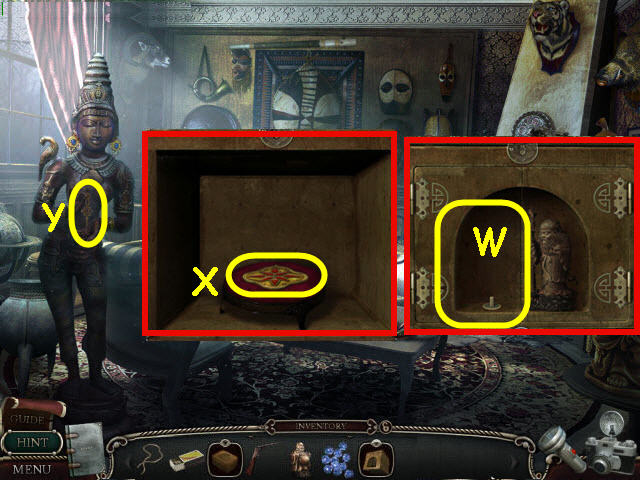
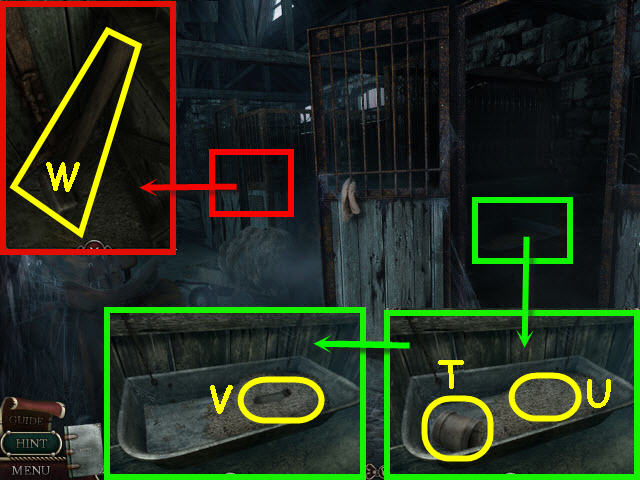
- Examine the umbrella stand; take the GLOVES (V).
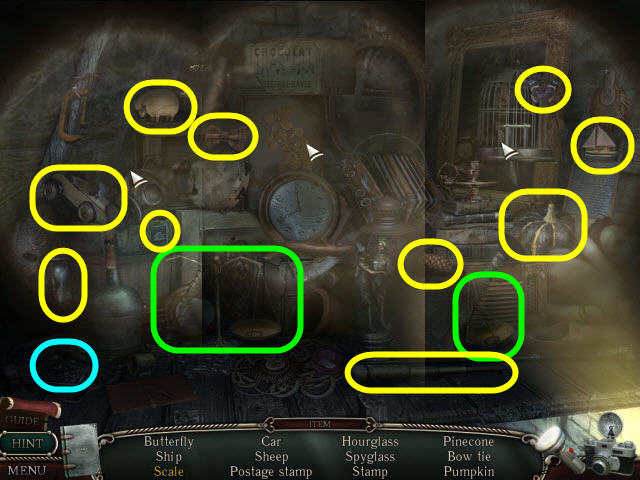
- Examine the opened drawer (W) to access a HOS.
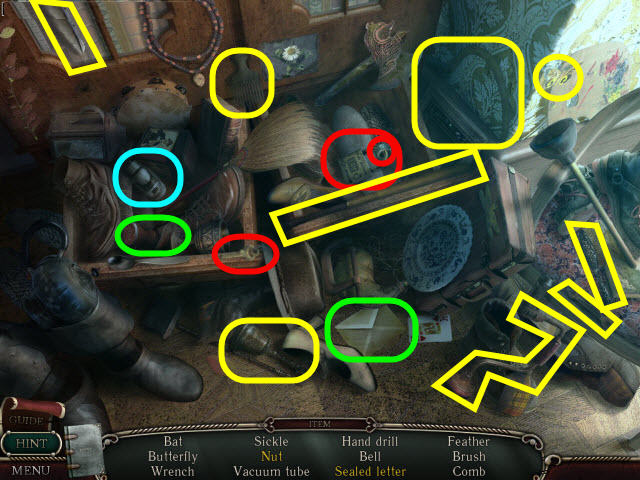
- Find the items listed.
- Marked in green: use the seal on the letter to get a sealed letter.
- Marked in red: use the key on the padlock to get a nut.
- You will earn a VACUUM TUBE.
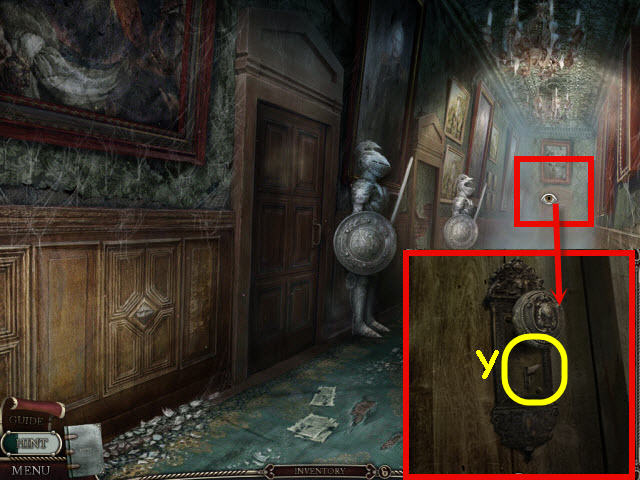
- Back out; go straight and up the stairs; open the door in the back left of the hall and enter.
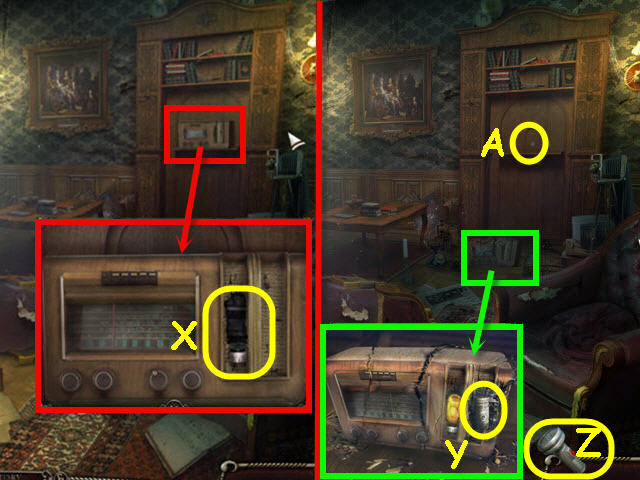
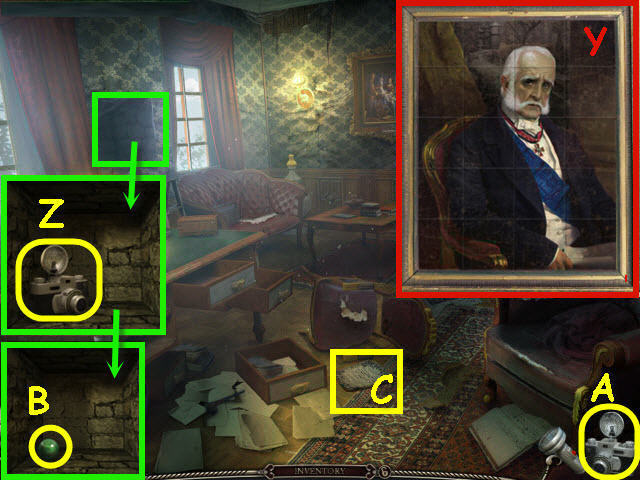
- Examine and place the VACUUM TUBE on the radio (X).
- Examine the fallen radio; take the BATTERY (Y).
- Automatically combine the BATTERY and the DISCHARGED FLASHLIGHT to get a flashlight added to your toolbar (Z).
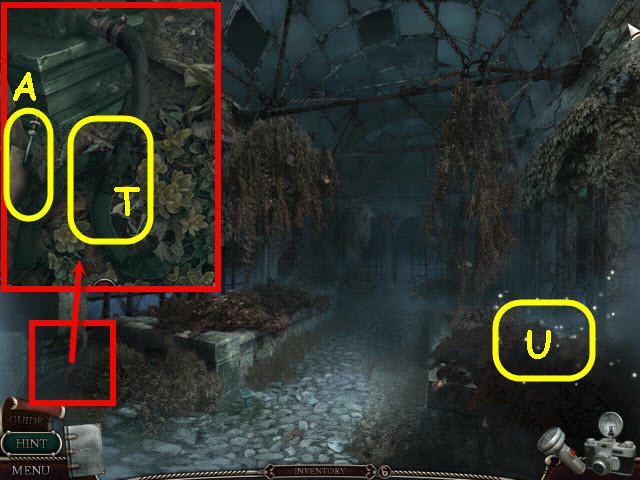
- Examine the shelf; push the button (A).
- Go through the newly-opened passage.
- Examine the table; take the note and the MATCHBOX (B).
- Take the BROKEN SABER (C).
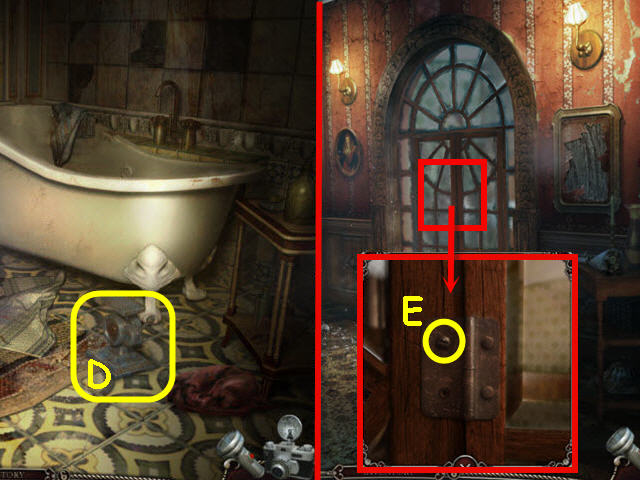
- Back out twice and go right; open the door on the right and enter.

- Turn on the flashlight (D).
- Examine and use the MATCHBOX on the lamp (E).
- Turn off the flashlight.
- Examine and pull the chain (F) on the bathtub to access a HOS.
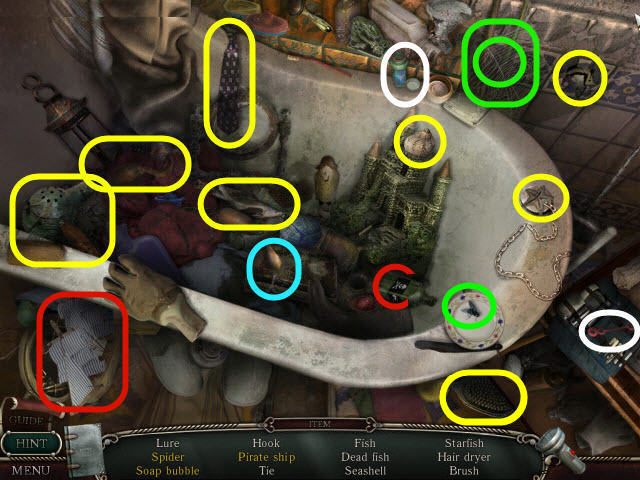
- Find the items listed.
- Marked in green: place the fly on the web to get the spider.
- Marked in red: place the Jolly Roger on the ship to get a pirate ship.
- Marked in white: place the bubble dipstick in the bubble bottle to get a soap bubble.
- You will earn a LURE.
- Back out and go forward down the hall.
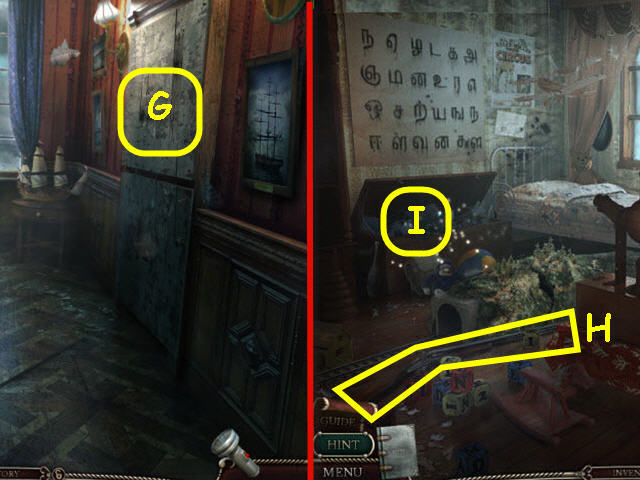
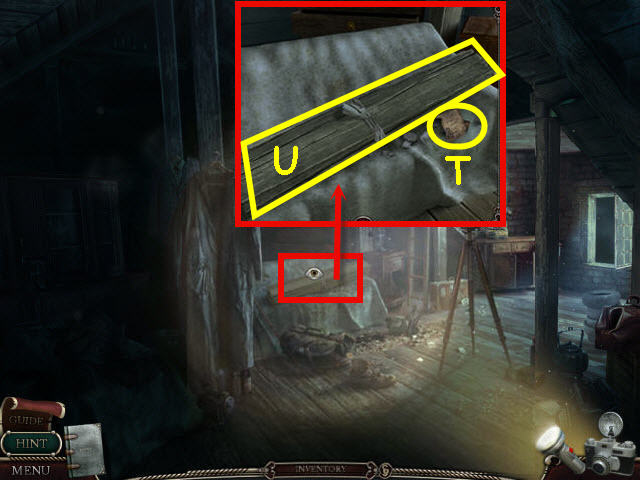
- Use the BROKEN SABER on the plywood (G) three times.
- Open the door and enter the room on the right.
- Take the HUNTING RIFLE (H).
- Examine the toy chest (I) to access a HOS.
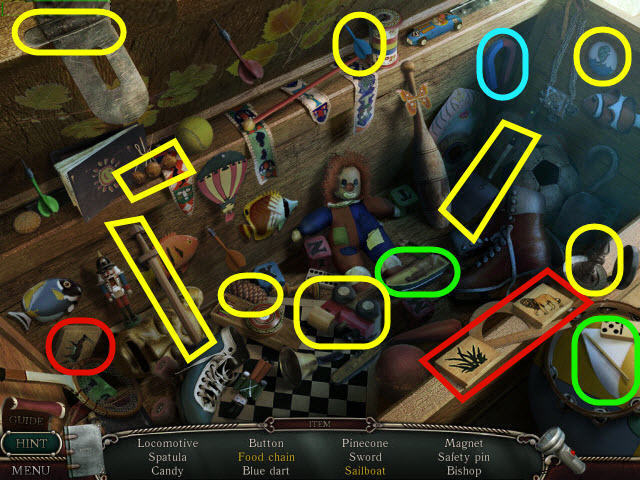
- Find the items listed.
- Marked in green: place the sail on the boat to get a sailboat.
- Marked in red: place the animal tile in between the tiles to get a food chain.
- You will earn a MAGNET.
- Examine the fishbowl; take the INCOMPLETE FISHING ROD (J).
- You will automatically combine the INCOMPLETE FISHING ROD with the LURE and get a FISHING ROD.
- Open the door and go out on the balcony.
- Use the FISHING ROD to get the ROPE LADDER (K).
- Place the ROPE LADDER on the railing (L) and go down.
- Go forward.
- Hook the bar on the ground into the grating (M).
- Take the BATHTUB LEG (N).
- Back out; go up the ladder; back out twice and go into the room on the left.
- Examine and use the BATHTUB LEG on the mirror; take the PANEL PIECE (O).
- Note: You may also use the BROKEN SABER, FIRE EXTINGUISHER, HUNTING RIFLE (loaded or not), JACK, or MAGNET to break the mirror.
- Back out four times.
- Examine and use the MAGNET on the broken floorboards; get the HAIRPIN (P).
- Back out twice to get a cutscene.
- Go into the room on the right.
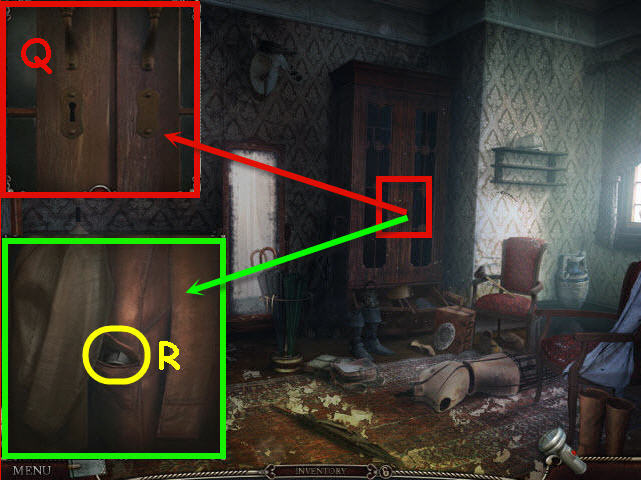
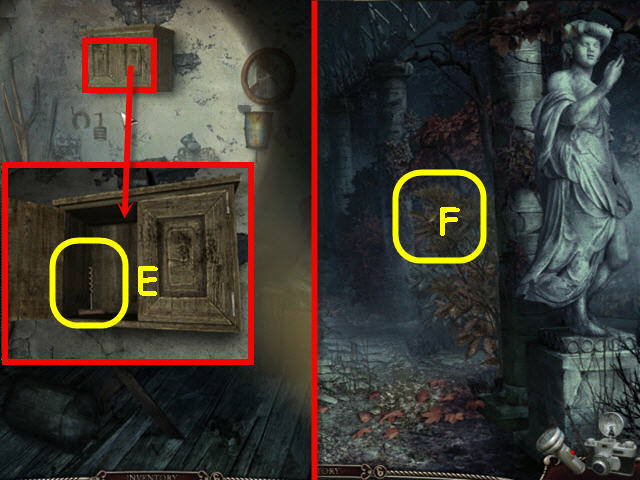
- Examine and use the HAIRPIN on the wardrobe lock (Q).
- Examine the opened wardrobe; take the ELECTRICAL TAPE (R).
- Back out; go forward and up the stairs; go straight into the door on the left in the back.
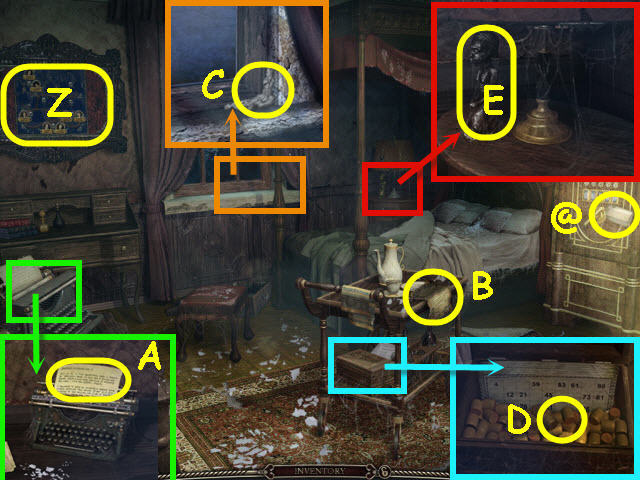
- Examine the desk; take the note (S); use the ELECTRICAL TAPE on the wire (T).
- Take the KEY (U).
- Examine and use the KEY on the drawer; take the SCREWDRIVER (V) and FRAME (W).
- Examine and place the PANEL PIECE in the frame (X).
- Arrange the panel pieces to complete the picture (Y).
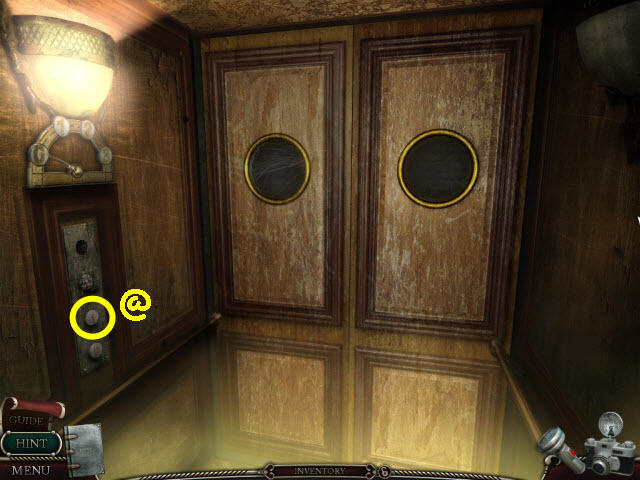
- Examine the wall safe; take the camera (Z) which will be added to your toolbar (A).
- You may now take pictures anytime by pressing on the camera. These pictures will be added to your diary under photos.
- Examine the wall safe; take the MARBLE (B).
- Take the note (C).
- Back out; go right twice through the doorways to the bathroom.
- Place the BATHTUB LEG on the bathtub; take the JACK (D).
- Back out; go forward and through the left doorway.
- Examine and use the SCREWDRIVER on the door hinge; get a SCREW (E).
- Go straight through the newly-opened door.
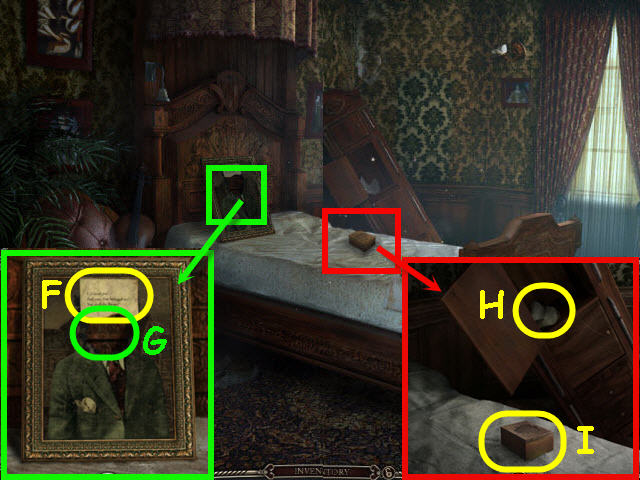
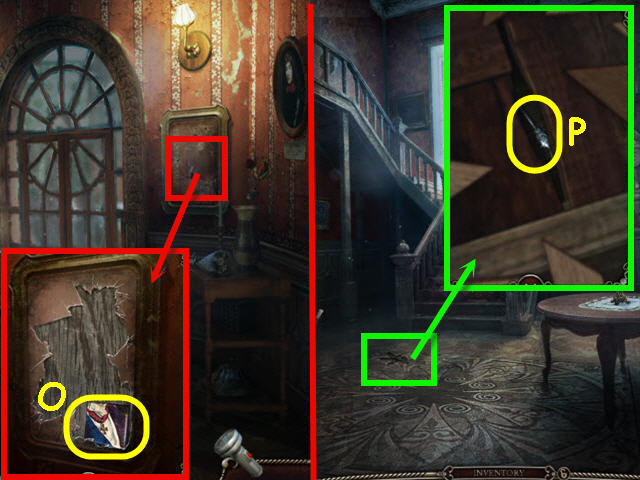
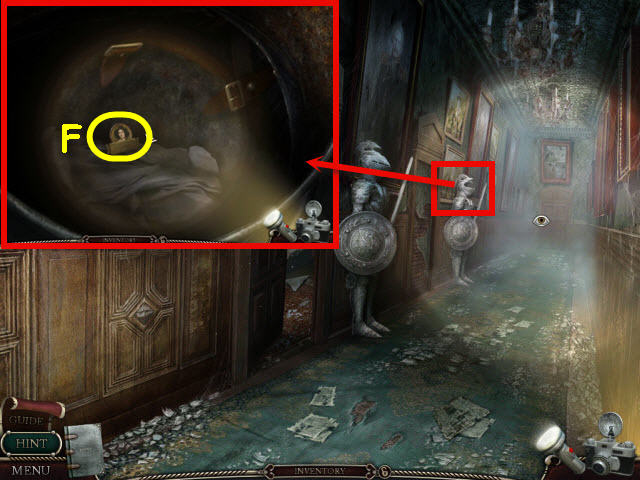
- Examine the portrait; take the note (F); place the TORN PORTRAIT on the portrait (G).
- Examine the bed; take the note (H) and PUZZLE BOX (I).
- Back out twice and go right; go out the door and down the ladder.
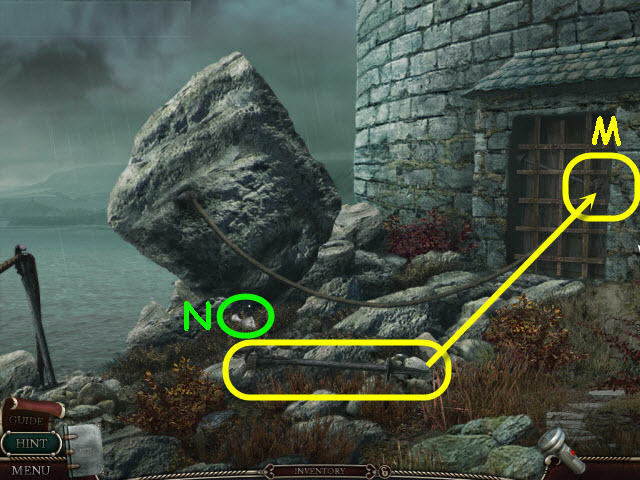
- Take the note (J).
- Go forward.
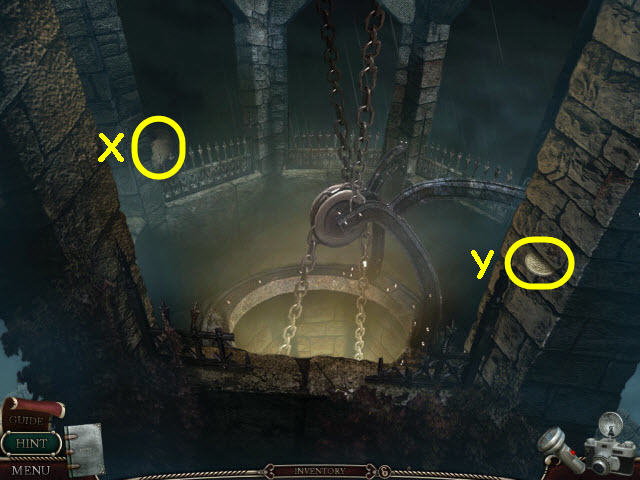
- Use the JACK on the boulder; press on the JACK (K) to move the boulder.
- Open the door on the right and enter.
Chapter 2 – The Library
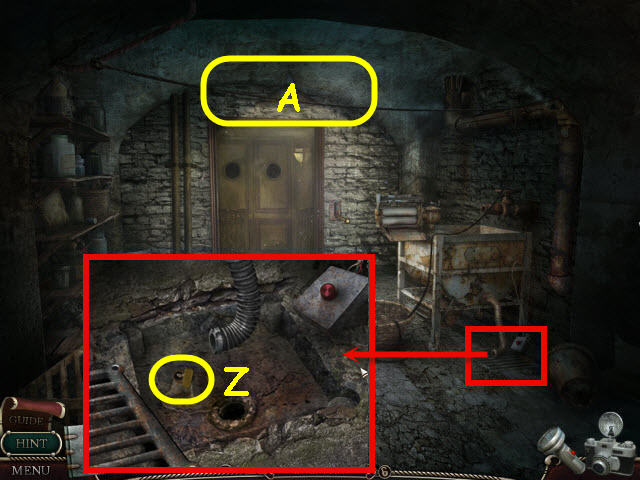
- Examine the door; take the FIRE EXTINGUISHER (L).
- Examine the desk; take the note (M); take the STENCIL directly under the note.
- You will automatically combine the FRAME and the STENCIL to get a SLIDE.
- Examine the bookcase (@) to access a HOS.
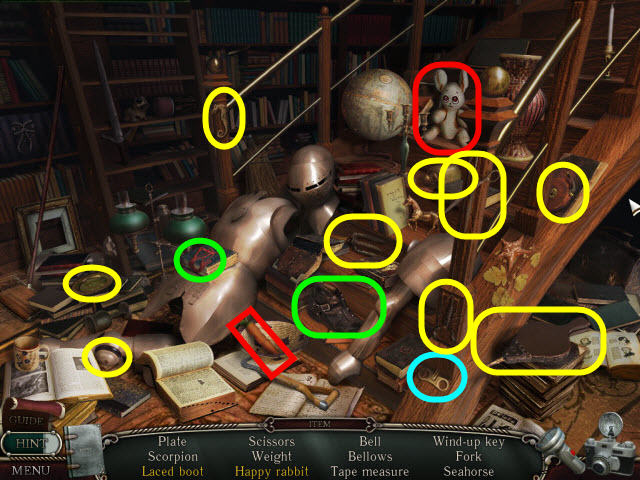
- Find the items listed.
- Marked in green: place the laces on the boot to get a laced boot.
- Marked in red: give the carrot to the rabbit to get a happy rabbit.
- You will earn a WIND-UP KEY.
- Back out twice; go up the ladder and back out.
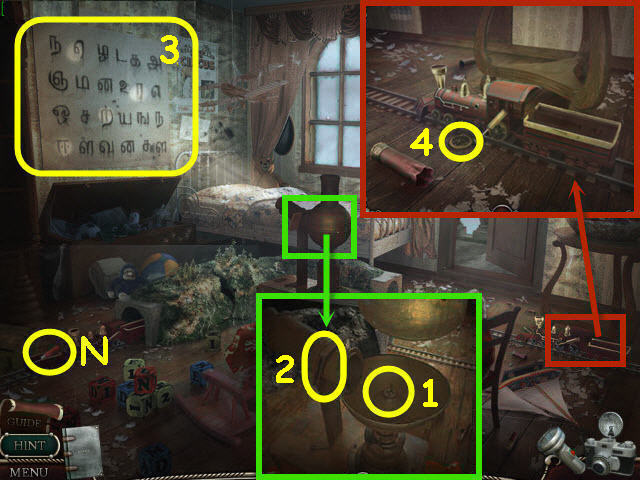
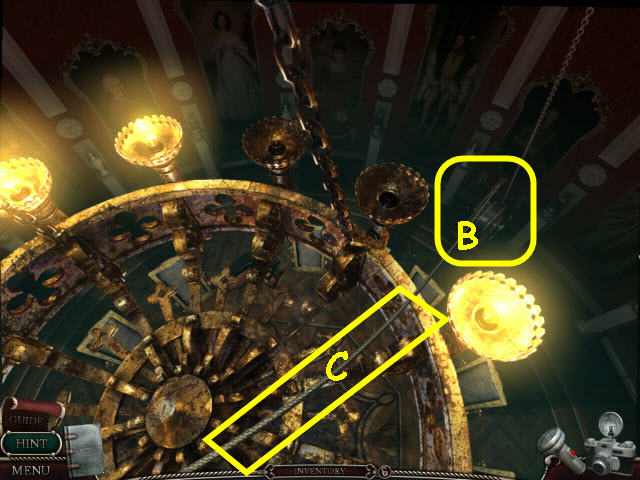
- Examine the projector; open the lid and use the MATCHBOX on the wick (1).
- Place the SLIDE in the projector (2); note the highlighted symbols (3).
- Examine the train; use the SCREW on the wheel (4).
- Place the SCREW and wheel on the train; use the SCREWDRIVER on the SCREW.
- Place the WIND-UP KEY in the hole above the wheel in the train; take the CARTRIDGE (N) after the train goes around.
- You will automatically combine the HUNTING RIFLE and the CARTRIDGE to get a LOADED RIFLE.
- Back out and go left.
- Examine and use the LOADED RIFLE on the door lock (O); get a HUNTING RIFLE.
- Enter the newly-opened door on the left.
- Turn on the flashlight.
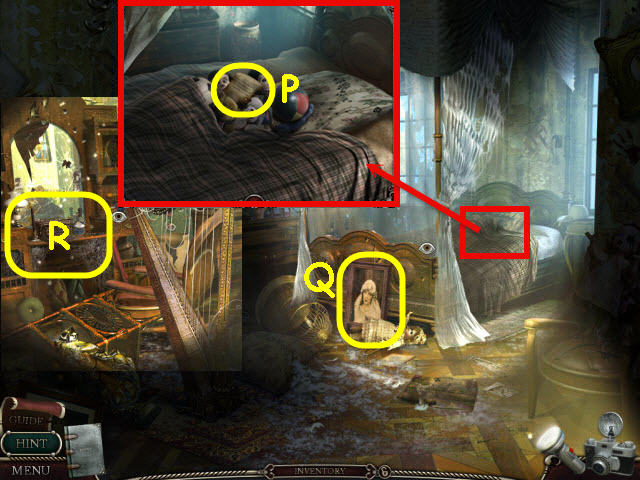
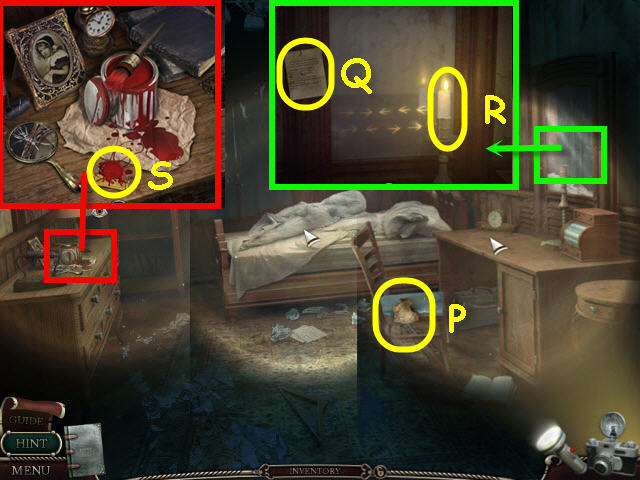
- Examine the bed; move the blanket; take the note (P) and the FIGURINE that was underneath it.
- Examine the portrait (Q).
- Examine the dressing table (R) to access a HOS.
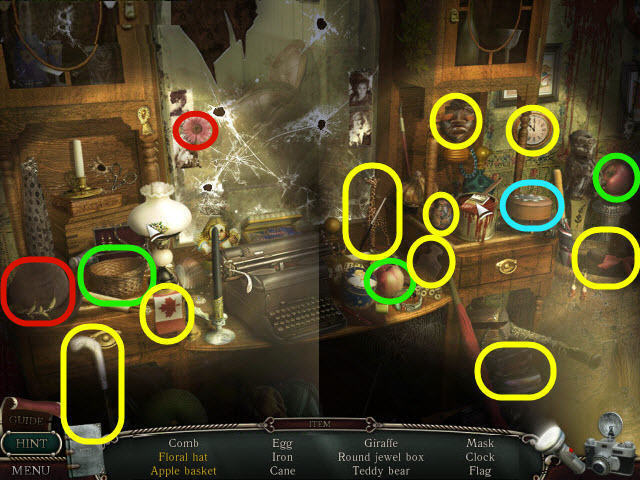
- Find the items listed.
- Marked in green: place the 2 apples in the basket to get an apple basket.
- Marked in red: place the flower on the hat to get a floral hat.
- You will earn a JEWEL BOX.
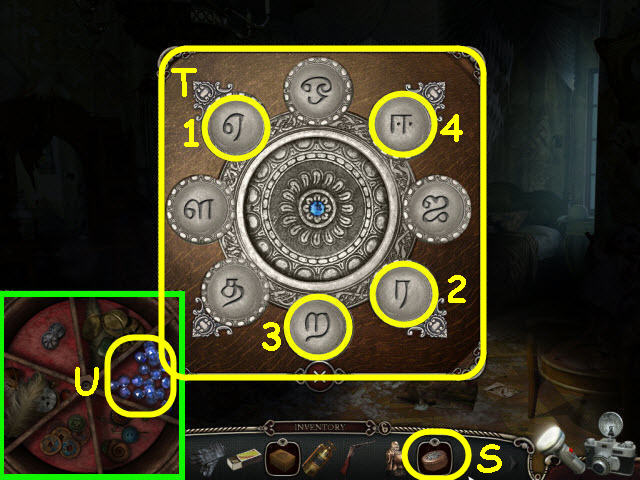
- Examine the JEWEL BOX (S) in Inventory.
- Use the code from the child's room wall to open. See screenshot (T) for symbols to press.
- Take the BEADS (U).
- Back out four times; go straight into the room on the left in the back and straight again through the back right doorway.
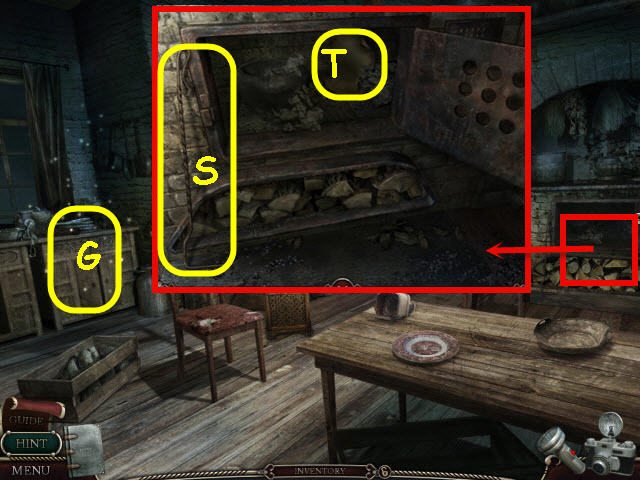
- Examine the fireplace; attempt to take the box.
- Use the FIRE EXTINGUISHER on the fire; use the GLOVES to get the ORIENTAL BOX (V).
- Examine the ORIENTAL BOX in Inventory; place the FIGURINE on the stand (W).
- Take the AMULET (X).
- You will automatically combine the AMULET with the NECKLACE CHAIN to get a NECKLACE.
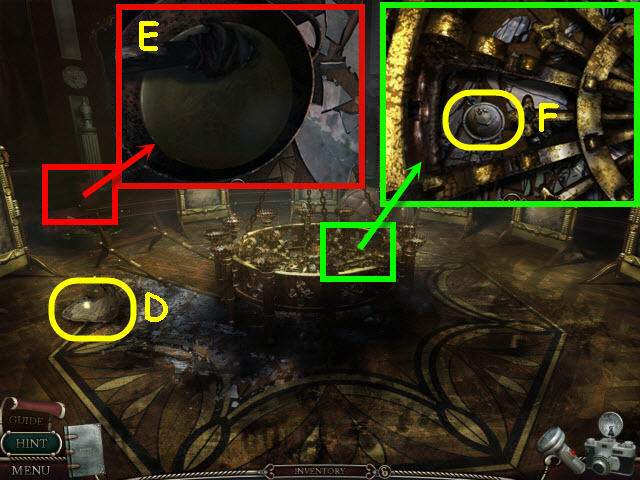
- Place the NECKLACE on the statue; take the HOUR HAND (Y).
- Back out three times.
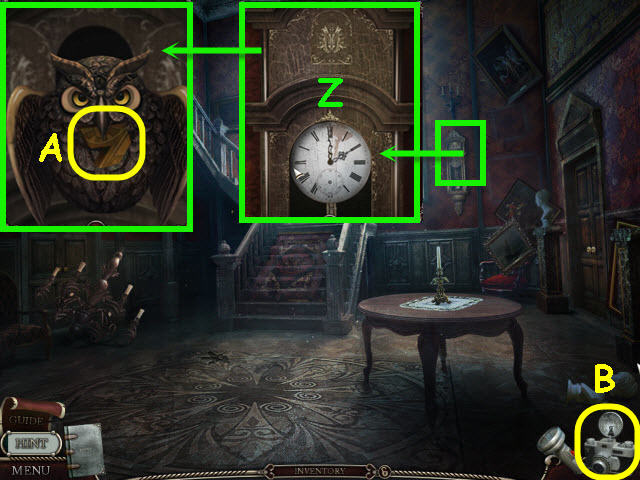
- Examine and place the HOUR HAND on the clock (Z).
- Use the camera (B) to get a picture of the solution.
- Solution: Set the clock hands to 12:10.
- Take the PUZZLE PART (A).
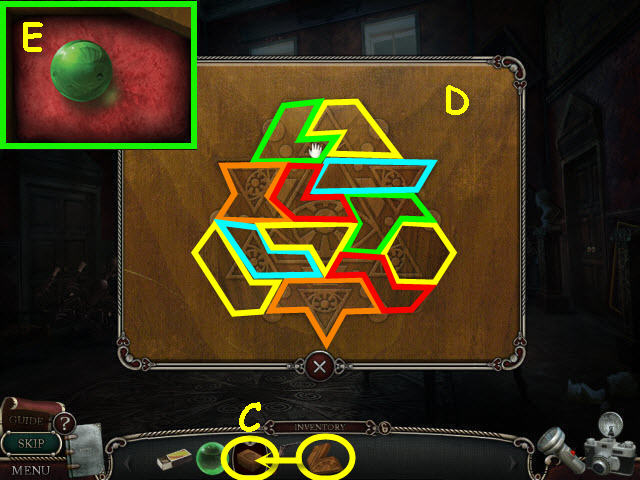
- Examine the PUZZLE BOX (C); place the PUZZLE PART in inventory on the box.
- Arrange the pieces to complete the puzzle. See screenshot (D) for solution.
- Take the note and the 2nd MARBLE (E) that was underneath.
- Go up the stairs; go right, straight, right, out the door, down the ladder, straight and right into the library.
- Examine the door; place the 2 MARBLES in the snake's mouths (F).
- Enter through the newly-opened door.
- Examine the center; pick up the necklace (G).
- Speak to the butler.
Chapter 3 – The Stables
- Go left of the fountain.
- Examine the fire; take the BASIN (H).
- Back out three times.
- Use the BASIN on the water (I); get a BASIN WITH WATER. You may get water from either side of the pier.
- Go forward twice and left.
- Examine and use the BASIN WITH WATER on the fire.
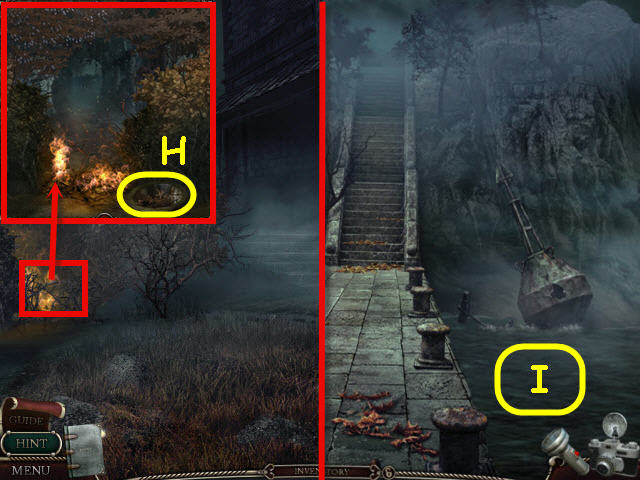
- Move the branches; go straight through the bushes.
- Use the camera.
- Go straight.

- Take the SHAFT (J).
- Go straight.
- Examine the truck; take the note (K) and the BOLT CUTTERS (L).
- Back out and go right.
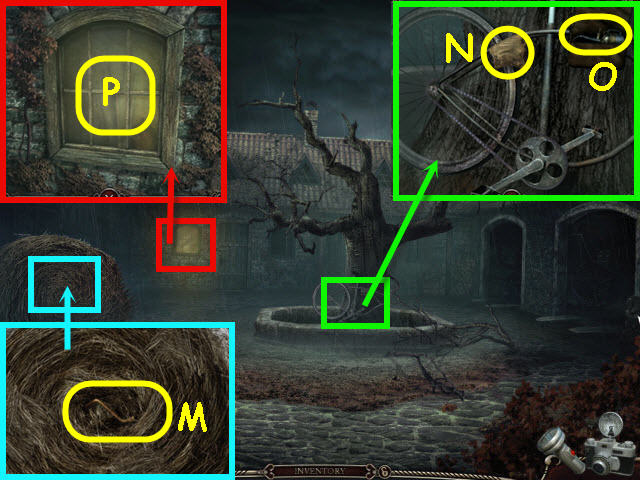
- Examine and move the hay three times; take the CRANK STARTER (M).
- Examine the bicycle; take the note (N); open the pouch and take the OIL CAN (O).
- Examine and use the SHAFT on the window (P) three times.
- You may also use the CRANK STARTER, BOLT CUTTERS, or TONGS to break the window.
- Go through the window.
- Turn on the flashlight.
- Examine the basin; take the DULL BLADE (Q).
- Examine and use the BOLT CUTTERS on the pole; get a FISHING LINE (R).
- You may also use the BLADE (not the DULL BLADE) or SHEARS to get the FISHING LINE.
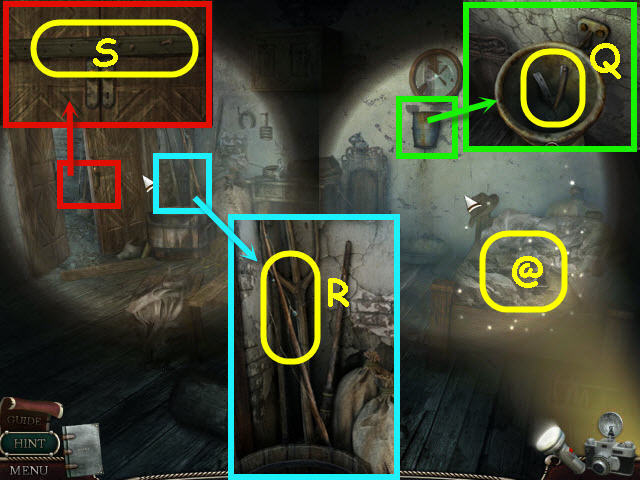
- Examine the door; use the BOLT CUTTERS to get the NAILS (S); open the door.
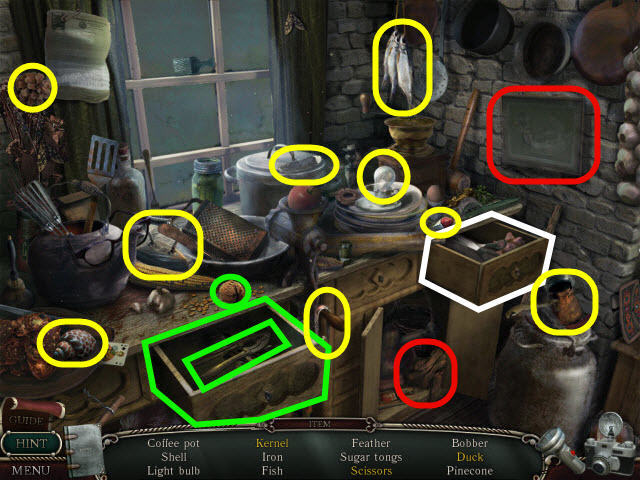
- Examine the bed (@) to access a HOS.
- Find the items listed.
- Marked in green: place the candle in the candlestick to get a candlestick with candle.
- You will earn a LIGHTER.
- Go left through the door.
- Examine the feeding tray; use the can (T) on the oats (U) to get a CAN OF OATS.
- Take the CORKED BOTTLE (V).
- Examine the stall; take the HAMMER (W).
- Back out twice; go right.
- Examine the barrel on the right to access a HOS.
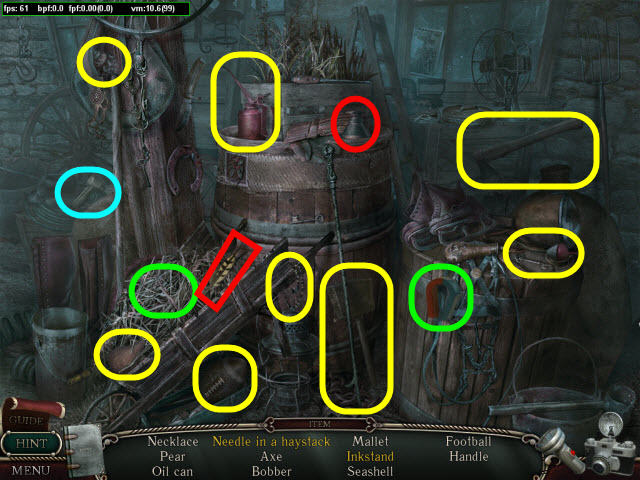
- Find the items listed.
- Marked in green: use the magnet on the hay to get a needle in a haystack.
- Marked in red: place the quill in the inkpot to get an inkstand.
- You will earn a HANDLE.
- Go straight through the door.
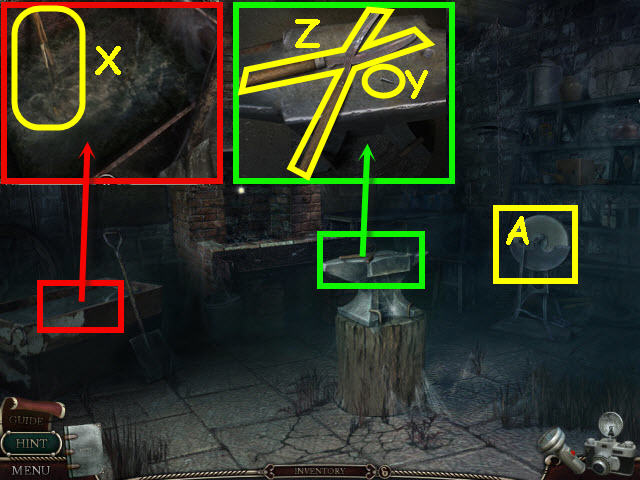
- Examine the trough; take the TONGS (X).
- Examine the anvil; place the pin (Y) on the shears.
- Use the HAMMER on the pin; take the SHEARS (Z).
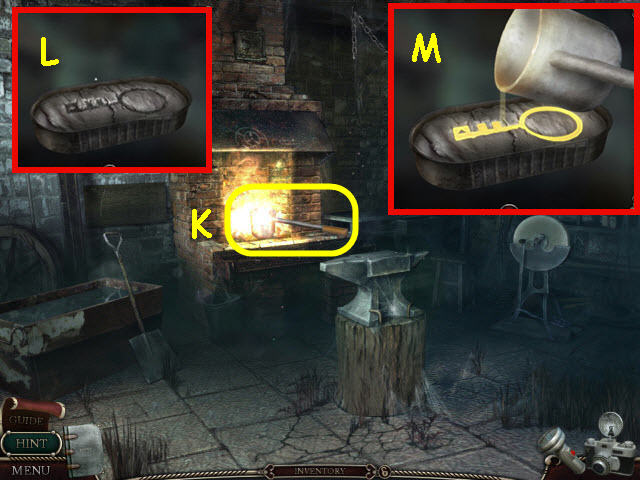
- Examine and use the DULL BLADE on the grinder (A); get a BLADE.
- Back out.
- Take the BELLOWS (B).
- Examine the carriage; take the LANTERN (C).
- Use the BLADE on the seat; get a LEATHER (D).
- Back out; go straight through the window.
- Use the flashlight.
- Examine and place the HANDLE on the cabinet; turn the handle; take the CORKSCREW (E).
- You will automatically use the CORKSCREW on the CORKED BOTTLE to get a BOTTLE and a CORK.
- Back out three times.
- Examine and use the SHEARS four times on the bushes (F).
- Go straight through the bushes.
- Examine and take the NOTE (G).
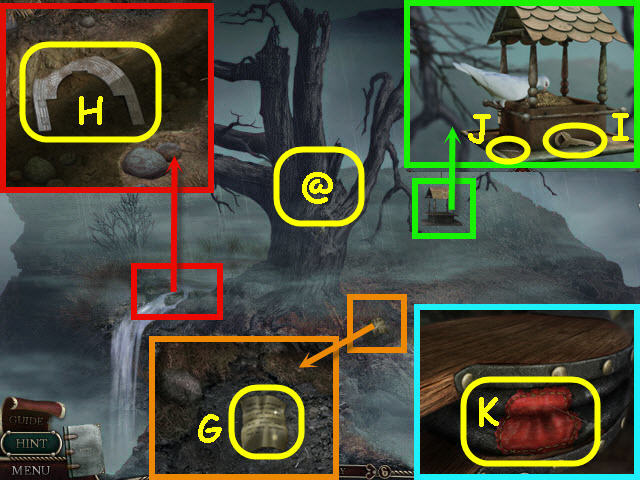
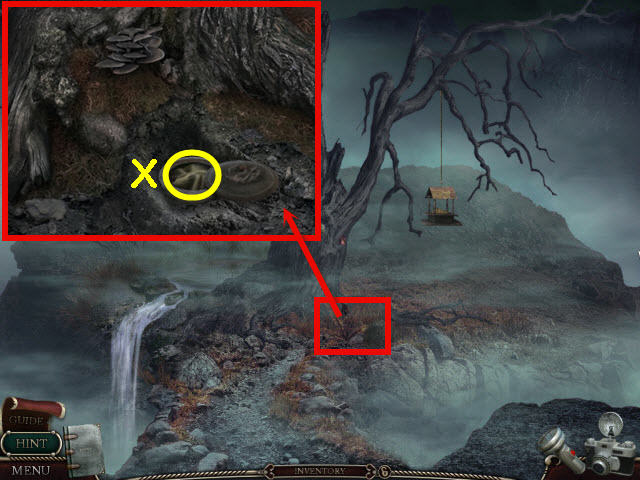
- Examine the stream; take the STRANGE PLATE (H).
- Examine and use the CAN OF OATS on the bird feeder; place the NOTE on the tube tied to the pigeon's leg; take the IGNITION KEY (I) and NEEDLE (J).
- You will automatically combine the NEEDLE and the FISHING LINE to get a NEEDLE AND THREAD.
- Examine the BELLOWS in inventory; use the LEATHER and NEEDLE AND THREAD on the patched hole (K).
- Examine the tree (@) and use the camera.
- Back out; go forward and right twice.
- Examine and place the STRANGE PLATE on the chest (L).
- Take the BROKEN CROSSBOW (M).
- Back out twice; go straight to the truck.
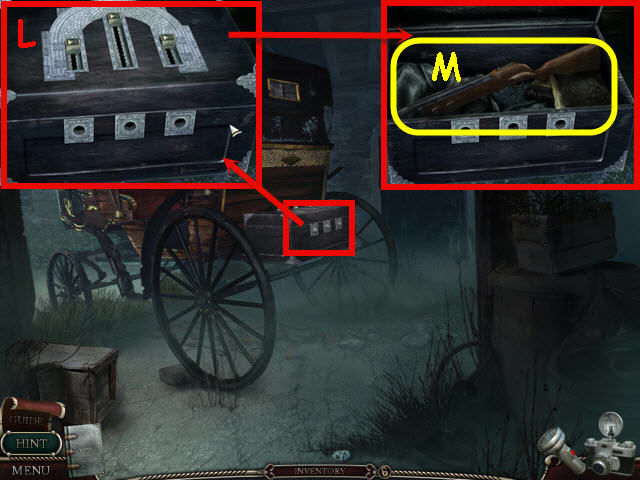
- Examine the truck cab; place the IGNITION KEY in the ignition (N); turn the key.
- Place the CRANK STARTER on the truck; rotate the CRANK STARTER (O) until the truck starts by holding the left mouse button down and turning in a circle.
- Examine and take the MIRROR (P).
- Go straight.
Chapter 4 – The Park
- Examine the bench; take the HOLE-RIDDELED BARREL (Q).
- Examine the HOLE-RIDDELED BARREL in Inventory; place the CORK in the hole (R) to get a BARREL.
- Go left.
- Take the note (S).
- Go straight.
- Examine and use the BLADE to get the HOSE (T); take the SCOOP (A).
- Examine the ferns (U) to access a HOS.
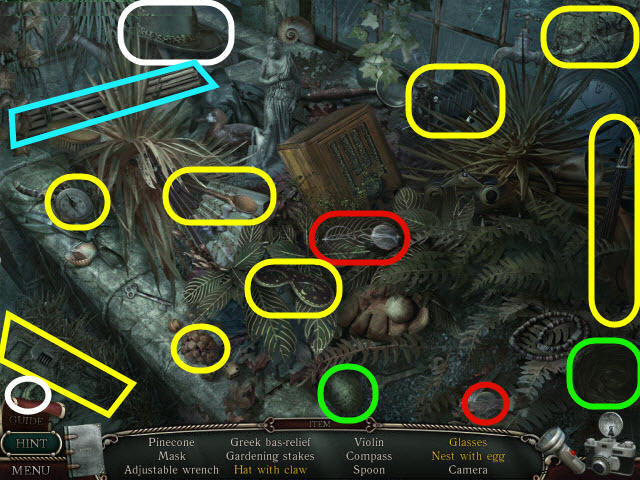
- Find the items listed.
- Marked in green: place the egg in the nest to get a nest with egg.
- Marked in red: place the lens in the frame to get glasses.
- Marked in white: place the claw on the hat to get a clawed hat.
- You will earn GARDENING STAKES.
- You will automatically combine the GARDENING STAKES with the NAILS to get BOLTS.
- Back out twice and go right of the fountain.

- Examine the pail; take the COAL (V).
- Go up the path to the right.
- Examine the burning leaves; take the IRON (W).
- Back out five times; go right.
- Examine and use the SCOOP on the ground; open the lid; read the note (X) and then take the KEY HALF.
- Back out; go forward and right twice; go straight.
- Place the COAL in the furnace (Y); use the LIGHTER and BELLOWS on the COAL.
- Place the IRON in the fire; use the TONGS to remove the hot iron and place it on the anvil (Z).
- Use the HAMMER on the hot metal three times.
- Use the TONGS on the hot metal; dunk the hot metal in the water trough (A) to get a CROSSBOW.
- You will automatically combine the BOW, BROKEN CROSSBOW and BOLTS to get a CROSSBOW.
- Back out three times; go straight down the path twice; go right twice.
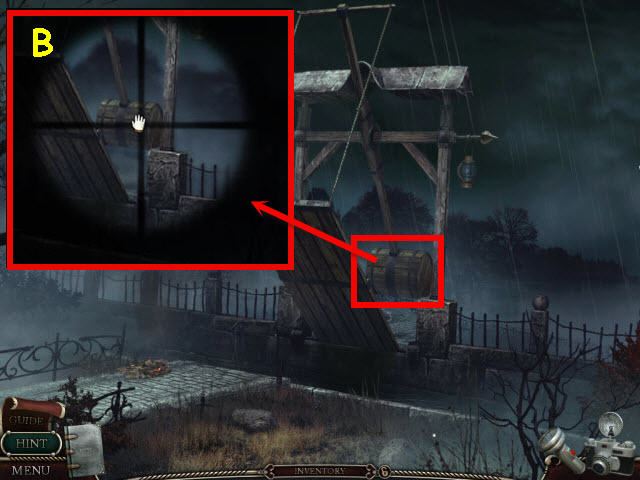
- Use the CROSSBOW on the barrel to trigger a puzzle.
- Fire at the barrel when the crosshairs are on the barrel (B).
- You will need to get a few good hits to lower the gate.
- Go forward.
Chapter 5 – The Lake
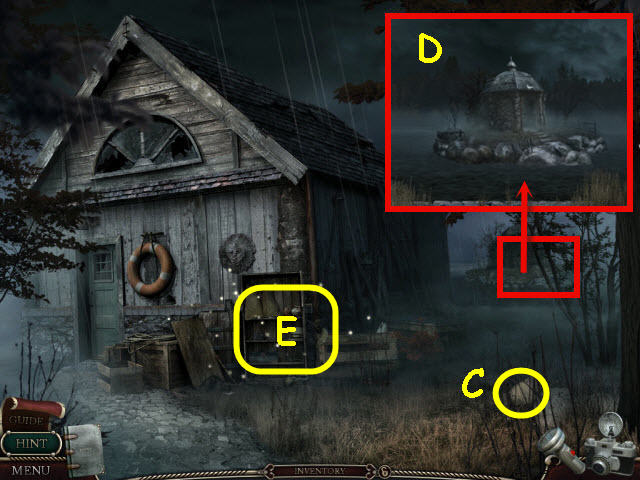
- Read the note (C).
- Examine the gazebo (D).
- Examine the shelves (E) to access a HOS.
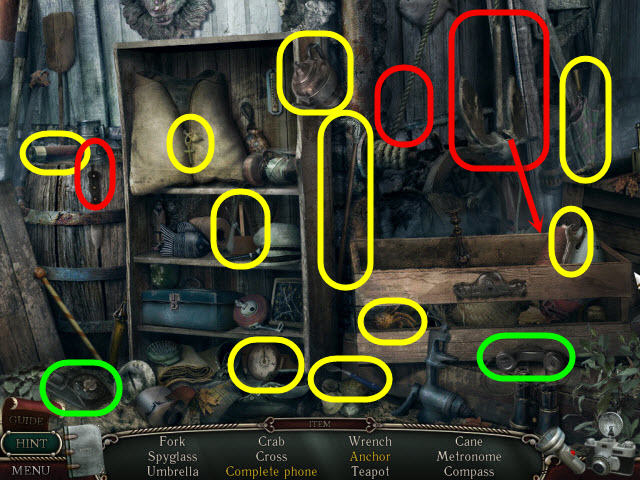
- Find the items listed.
- Marked in green: place the handset on the phone base to get a complete phone.
- Marked in red: use the knife on the rope to get an anchor.
- You will earn a WRENCH.
- Open the door and enter the boathouse.
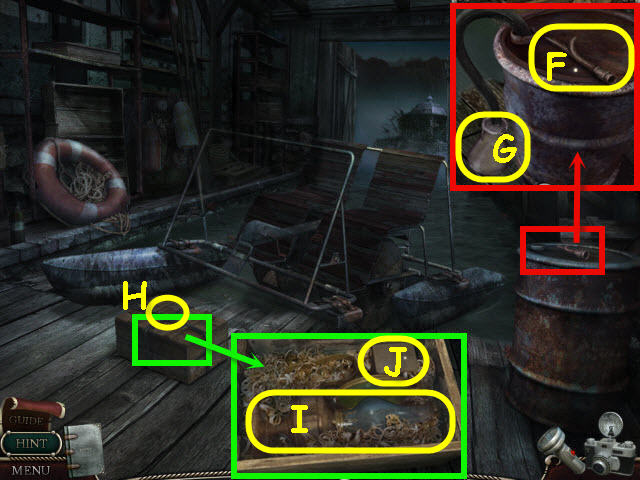
- Examine the drum; take the HOOK (F).
- You will automatically combine the SHAFT and HOOK to get a BOATHOOK.
- Place the HOSE and BOTTLE on the drum; get a BOTTLE WITH KEROSENE (G).
- Examine and use the BOLT CUTTERS on the wired box; get a WIRE (H).
- Take the 2nd LANTERN (I); open the box (J) and take the WICK.
- Back out twice.
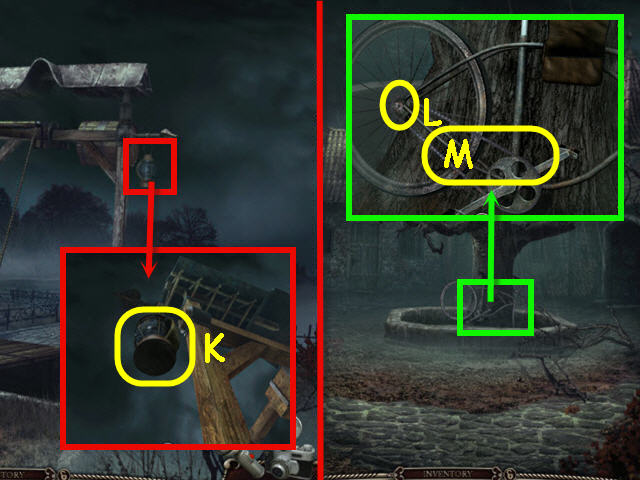
- Examine and use the BOATHOOK on the lantern; get a 3rd LANTERN (K).
- Back out four times; go right.
- Examine the bike; use the WRENCH on the bolt (L); get the CHAIN (M).
- Back out; go forward twice; go right twice. Go forward and into the boathouse.
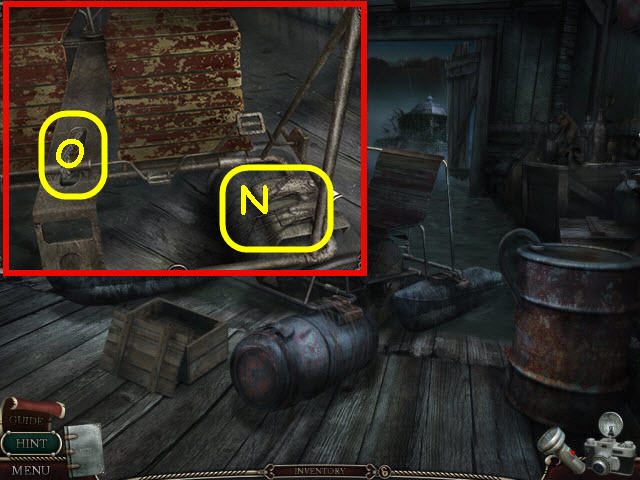
- Examine and place the BARREL on the paddle boat; place the WIRE on the BARREL (N).
- Use the OIL CAN and CHAIN on the gear (O).
- Go straight and enter the gazebo.
- Examine the note; take the note and the 2nd KEY HALF (P).
- You will automatically combine the 2 KEY HALVES to get a KEY.
- Take the 4th LANTERN (Q).
- Back out six times; go left, go straight twice through the greenhouse.
- Use the camera.
- Take the note (R).
- Examine and place the MIRROR on the lantern; use the BOTTLE WITH KEROSENE, WICK, and LIGHTER on the lantern (S).
- Place the LANTERN on each of the four pedestals; note the phases of the moon (T).
- Back out three times.
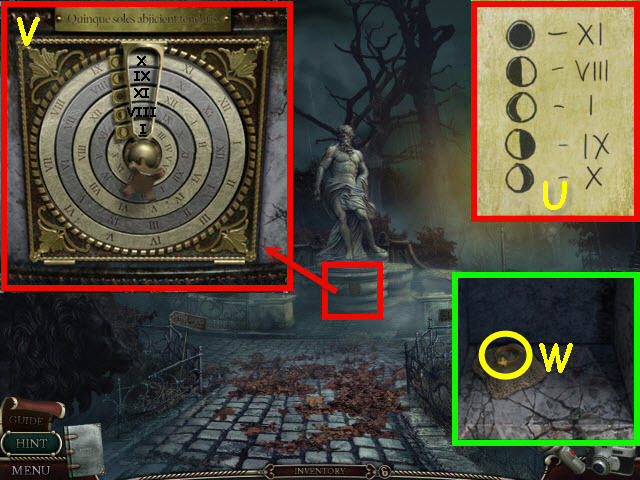
- Examine the statue pedestal; place the KEY in the center.
- Turn the dials to match the code in your diary (U).
- See screenshot (V) for solution.
- Take the note and RICHARD'S RING (W).
- Back out.
Chapter 6 – The Manor
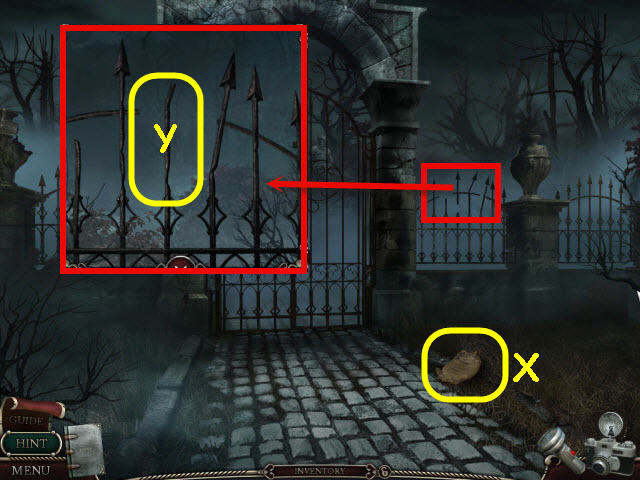
- Take the note (X).
- Examine the fencing; bend the rod back and forth multiple times until you get a STEEL ROD (Y).
- Back out four times; go right twice.
- Examine the door; use the STEEL ROD three times on the bars (Z).
- Enter the shed.
- Turn on the flashlight.
- Examine the wall; use the STEEL ROD on the hook; get a CHAIN WITH HOOK (A).
- Take the BASEMENT KEY (B).
- Back out twice; go left to the basement door.
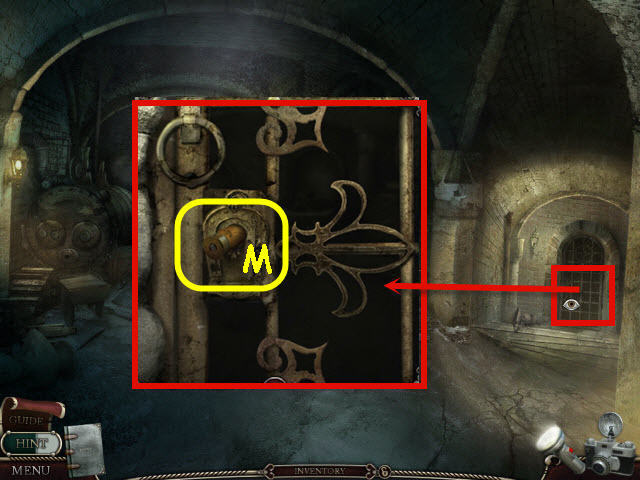
- Examine and use the BASEMENT KEY on the door lock (C).
- Go forward.

- Turn on the flashlight.
- Examine the right iron door; take the WIRE (D).
- Open and go straight through the door (E).
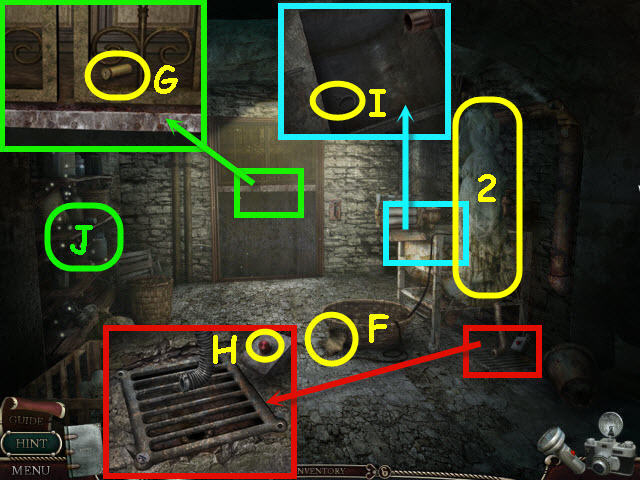
- Take the note (F).
- Examine the elevator; use the WIRE to get the CARTRIDGE (G).
- Take the WEDDING GOWN (2).
- Examine the grate; press the button (H).
- Examine the wringer washer; take the KEY PART (I).
- Examine the shelves (J) to access a HOS.
- Find the items listed.
- Marked in green: place the coffee beans into the grinder to get ground coffee.
- You will earn a SAW.
- Back out three times; go right down the path and left into the shed.
- Turn on the flashlight.
- Examine and use the WEDDING GOWN on the oil (K); get an OILY RAG.
- Open the hatch (L) and examine to access a HOS.
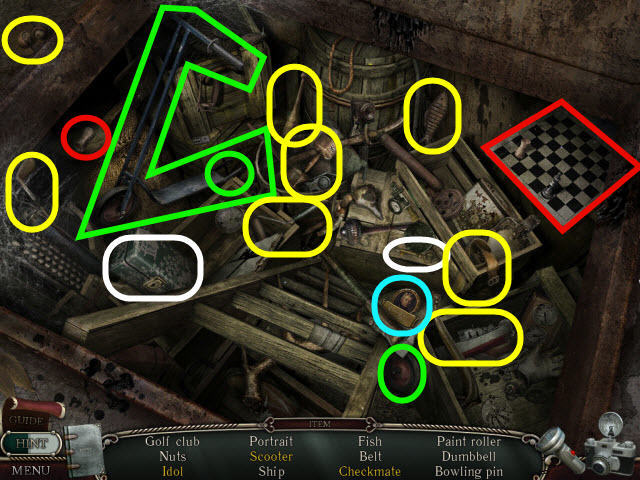
- Find the items listed.
- Marked in green: place the wheel on the scooter to get the scooter.
- Marked in red: place the rook on the chessboard to get a checkmate.
- Marked in white: use the key on the chest to get an idol.
- You will earn a PORTRAIT.
- Back out twice; go left and straight into the basement.
- Turn on the flashlight.
- Examine the right door; place the CARTRIDGE in the lock (M).
- Use the OILY RAG and LIGHTER on the CARTRIDGE.
- Go through the newly-opened door.
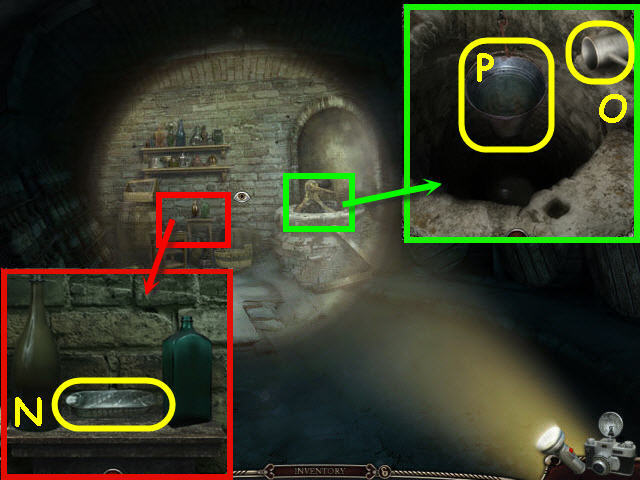
- Examine the table; move the bottles; take the TIN (N).
- Examine the well; take the CRUCIBLE (O).
- Use the CHAIN WITH HOOK on the well; get a BUCKET OF WATER (P).
- Back out.
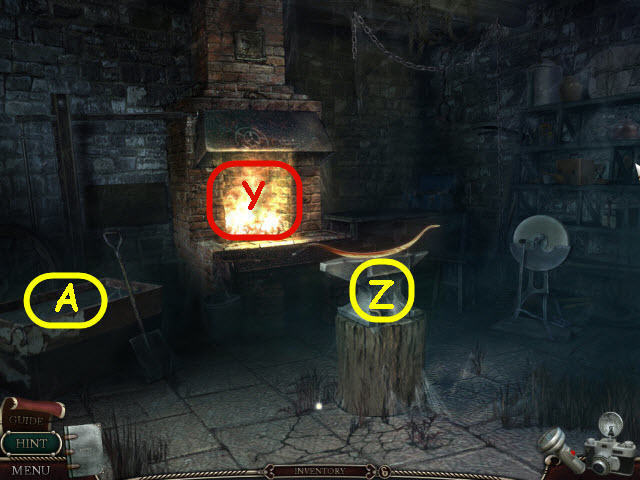
- Examine the bed frame; use the SAW on the post; get the PIPE (Q).
- Examine the boiler; open the hatch (A); use the BUCKET OF WATER in the hole; close the hatch.
- Go forward.
- Examine and place the PIPE in the lever; pull the LEVER (R).
- Go forward into the elevator.
- Press the 1st floor button (@).
- Go forward.
- Examine and open the burner; take the POKER (S) and the note (T).
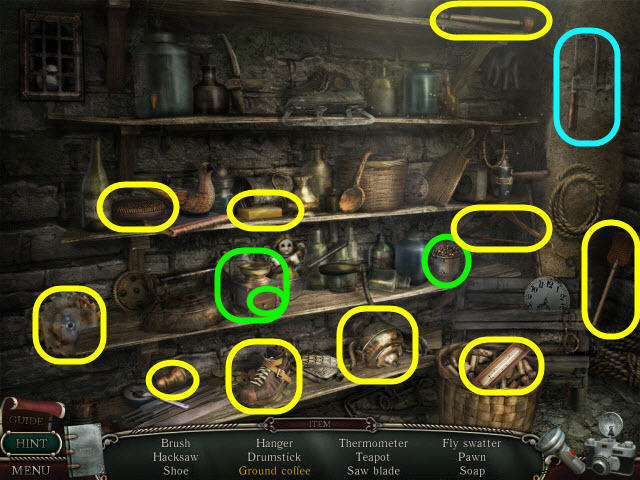
- Examine the cabinet (G) to access a HOS.
- Find the items listed.
- Marked in green: open the drawer, use the nut cracker on the nut to get a kernel.
- Marked in red: use the rag on the picture to get a duck.
- Marked in white: open the drawer to get the scissors.
- You will earn SUGAR TONGS.
- Open the door and go straight.
- Examine the portrait; take the note (U) and RAPIER (V).
- Examine the candelabrum; take the CANDLE (W).
- Take the CAKE KNIFE (X).
- Open and go straight through the door.
- Turn on the flashlight.
- Examine the door at the end of the hall; use the SUGAR TONGS on the broken key to get the 2nd KEY PART (Y).
- Open and enter through the door on the left.
- Take the KANGALE FAMILY TREE (Z). Examine the safe; read the note (@).
- Examine the typewriter; take the note (A).
- Take the note (B).
- Examine the window; use the CAKE KNIFE to get PUTTY (C).
- You will automatically combine the RAPIER and PUTTY to get a RAPIER WITH PUTTY.
- Examine and open the box; take the LOTTO KEG (D).
- Examine the nightstand; take the STATUETTE (E).
- You will automatically combine the STATUETTE and CRUCIBLE to get a METAL STATUE.
- Back out.
- Turn on the flashlight.
- Examine the armor; use the RAPIER WITH PUTTY to get the 2nd PORTRAIT (F).
- Back out three times.
- Place the LOTTO KEG in the top hole of the elevator panel; push the top button (G).
- Go forward.
Chapter 7 – The Loft
- Turn on the flashlight.
- Examine the overcoat; take the note (H).
- Examine the loft (I) to access a HOS.
- Find the items listed.
- Marked in green: place the tray on the scale to get the scale.
- You will earn a TIN OPENER.
- You will automatically use the TIN OPENER on the TIN to get a TIN.
- Back out; push the button to the ground floor.
- Back out five times; go forward.

- Take the note (@).
- Back out; go left twice and go right.
- Examine the stream; use the TIN on the clay (J)
- Back out; go forward go right twice and straight into the smithy.
- Place the METAL STATUE in the furnace; take the HOT METAL (K).
- Open the TIN in Inventory; press the 2 KEY PARTS into the clay (L).
- Place the HOT METAL in the mold; get a KEY (M).
- Back out six times; go right, down and straight three times into the elevator.
- Select the first floor elevator button; go forward twice.
- Pick up the BROKEN CHINA (N).
- Go straight through the door.
- Turn on the flashlight.
- Examine and use the KEY on the door (O).
- Go straight through the newly-opened door.
- Take the note (P).
- Examine the mirror; take the note (Q).
- Place the CANDLE in the holder; use the LIGHTER on the CANDLE (R).
- Use the camera while in close-up.
- Examine the dresser; take the 3rd PORTRAIT (S).
- Back out to the elevator; press the 3rd floor button; go forward.
- Examine the wood; take the note (T).
- Examine the wood; use the BROKEN CHINA on the rope; take the PLANK (U).
- Exit out the window; attempt to go forward.
- Place the PLANK on the gap (V).
- Go forward.
- Use the POKER on the rung (W).
- Go up.
- Take the note (X) and COIN (Y).
- Back out twice; go right and back out to the elevator.
- Press the ground floor button.
- Back out.
- Examine the grate; use the COIN on the two screws; take the 4th PORTRAIT (Z).
- Use the BROKEN CHINA on the rope to get TWINE (A).
- Automatically combine the CROSSBOW with the TWINE to get a CROSSBOW WITH TWINE.
- Go forward.
- Press the 3rd floor elevator button.
- Go forward and out the window; go forward, up and forward.
- Use the CROSSBOW WITH TWINE on the lever (B).
- Pull the rope (C).
- Take the note (D).
- Examine the gas can; place the PORTRAIT covered with red paint in the bowl (E); get a PORTRAIT.
- Examine the chandelier; take the GOLDEN MEDALLION (F).
- Examine the KANGALE FAMILY TREE in inventory and place the 4 PORTRAITS on the sides to trigger a puzzle.

- Examine the clues in the note (G) and place the portraits in the correct location to complete the family tree.
- See screenshot (H) for solution.
- Go forward; back out twice, go right and back out into the elevator.
- Press the 1st floor button.
- Go forward through the doors three times; go into the room on the left.
- Examine the safe; read the note (I).
- Enter the numbers in the safe based on the clues from the note and the dates from the family tree.
- Rotate the dials to the correct number and turn the handle when complete.
- The solution is random.
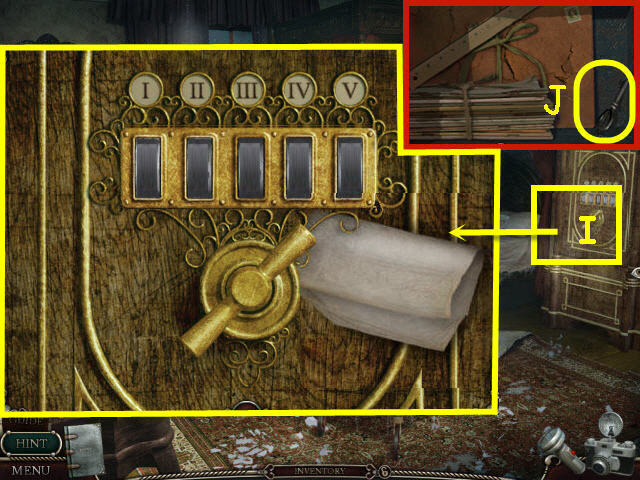
- Take the GOLDEN KEY (J).
- Examine the GOLDEN MEDALLION in Inventory.
- Use the directions from the mirror.
- Solution: Turn the dial to the blue arrows: Right 2x, Left 3x, Right, Left, and Right 2x.
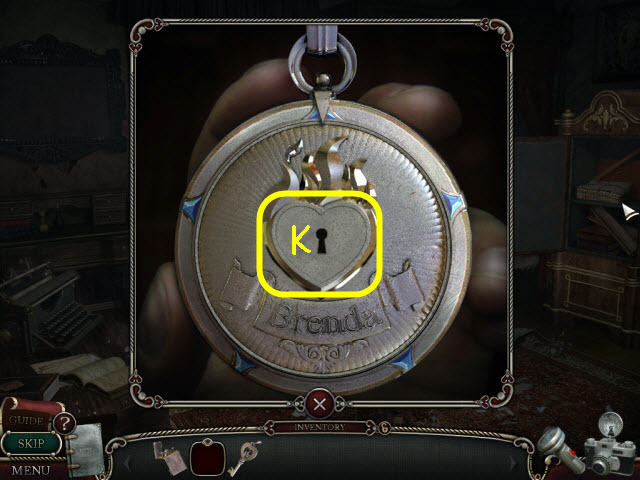
- Place the GOLDEN KEY on the lock (K); take BRENDA'S RING.
- Back out to the elevator.
- Press the ground floor elevator button.
- Back out five times; go left twice and right.
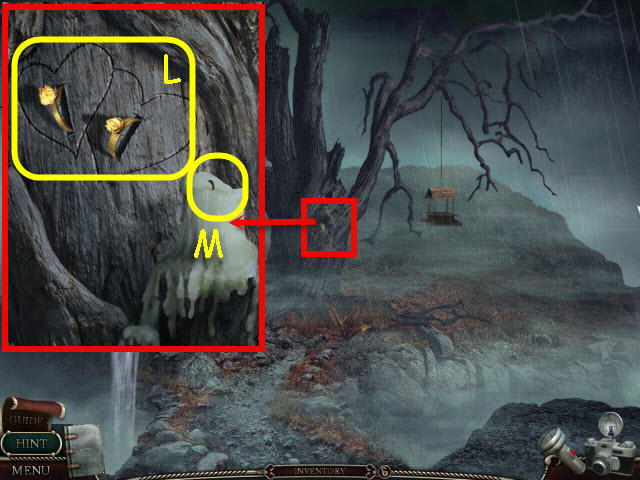
- Examine the tree; place RICHARD'S RING and BRENDA'S RING in the hearts (L).
- Use the LIGHTER on the candle (M).
- Congratulations! You have successfully completed Shiver: Poltergeist Standard Edition.
Created at: 2012-04-27