

Walkthrough Menu
- General Tips
- Chapter 1: Town Square
- Chapter 2: Cathedral
- Chapter 3: High Street
- Chapter 4: Town House
- Chapter 5: Cave
General Tips
- This is the official guide for Shrouded Tales: The Spellbound Land.
- This guide will not mention each time you have to zoom into a location; the screenshots will show each zoom scene.
- Hidden-object puzzles are referred to as HOPs. This guide will not show screenshots of the HOPs, however, it will mention when an HOP is available and the inventory item you'll collect from it.
- This guide will give step-by-step solutions for all puzzles which are not random. Please read the instructions in the game for each puzzle.
Chapter 1: Town Square
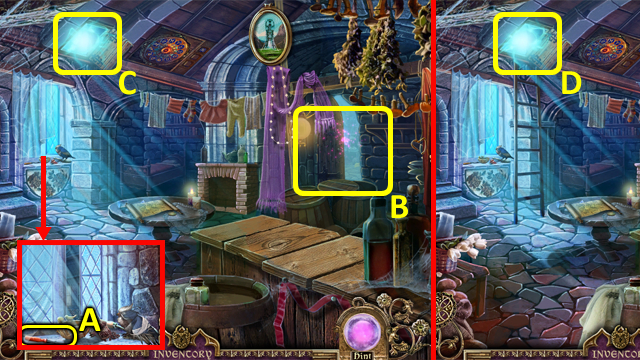
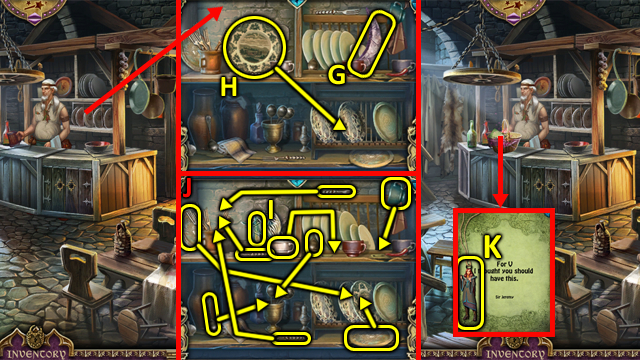
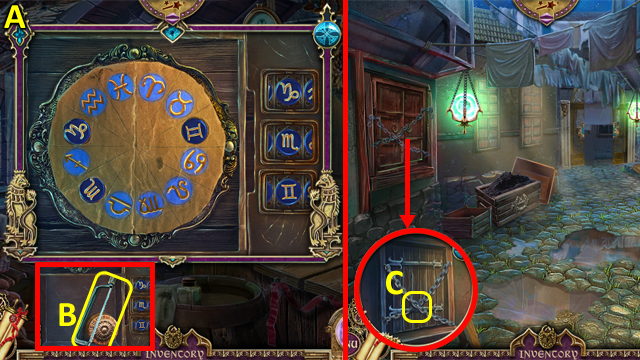
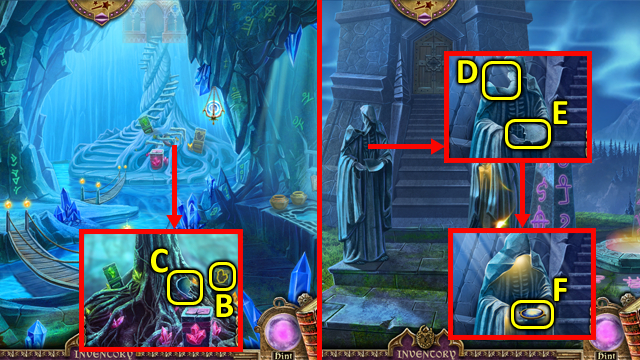
- Grab the CHISEL (A).
- Open the curtain, and play the HOP (B); receive a LADDER.
- Place the LADDER (C); enter the BALCONY (D).

- Read the note (E); take the SPELL BOOK (F).
- Select the SPELL BOOK (G) for spell information.
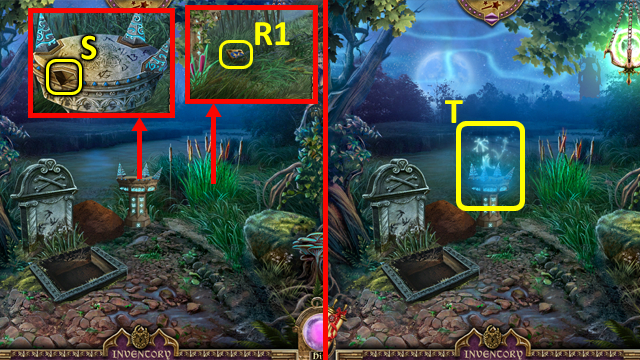
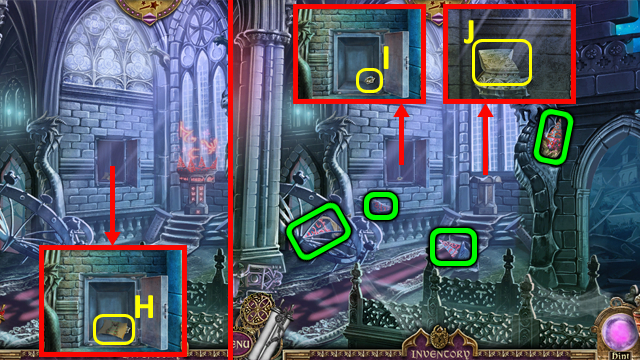
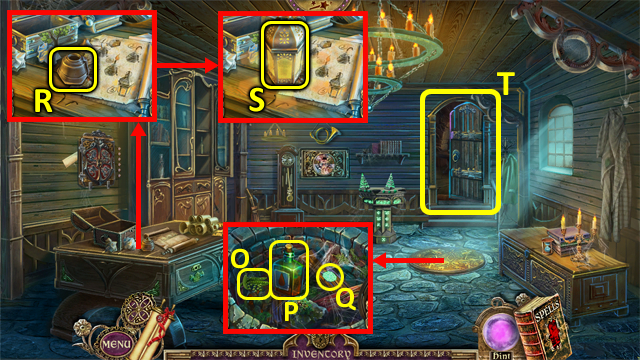
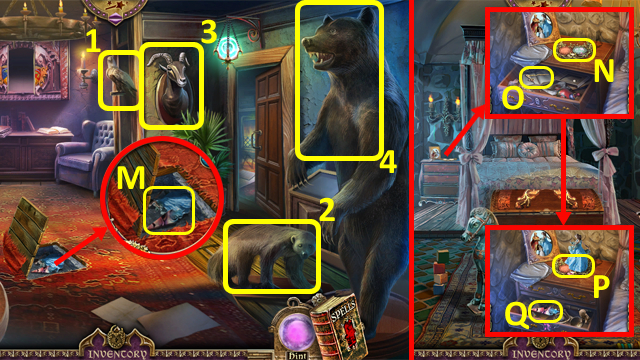
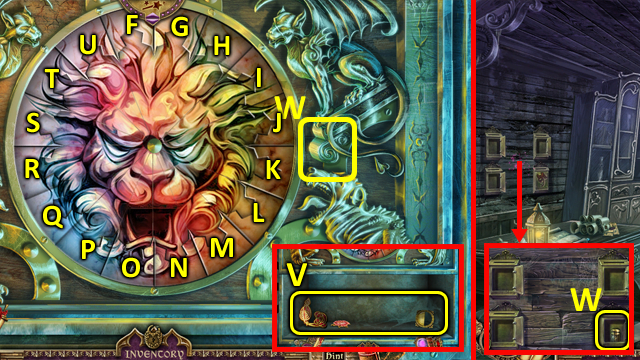
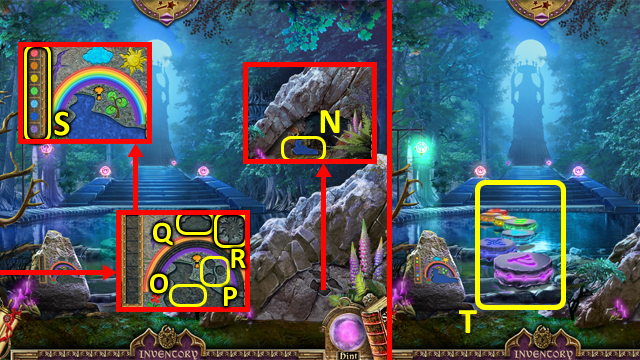
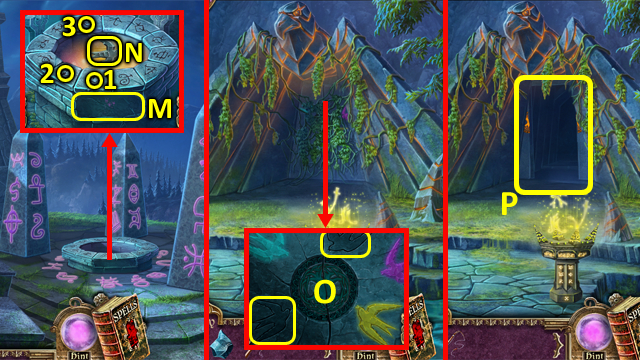
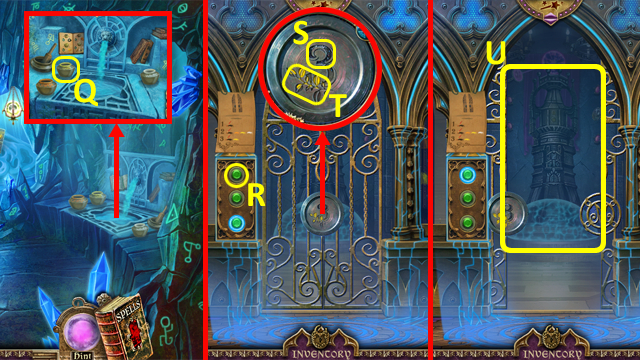
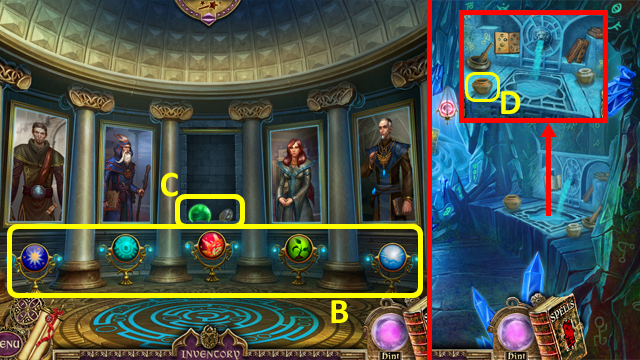
- Grab the BLUE RUNE 1/9 (H) and KEY (I).
- Walk down.

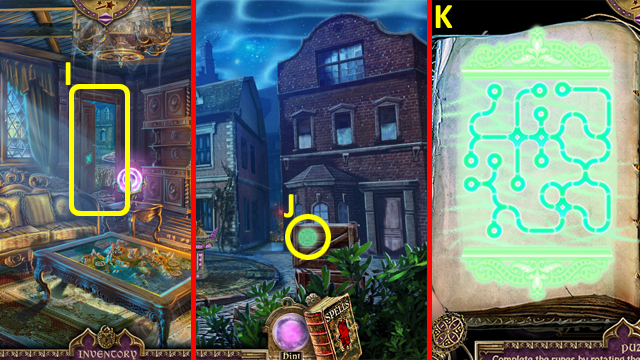
- Grab the MAP (J); select it to move around locations (K).
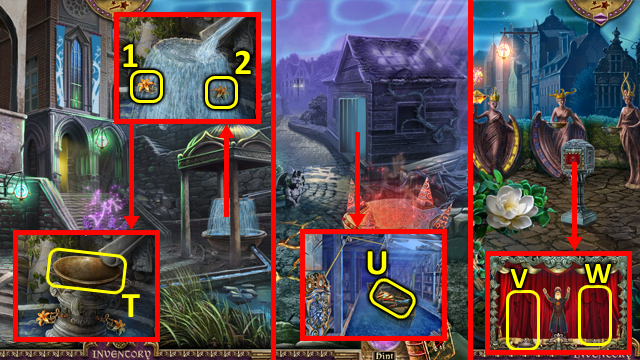
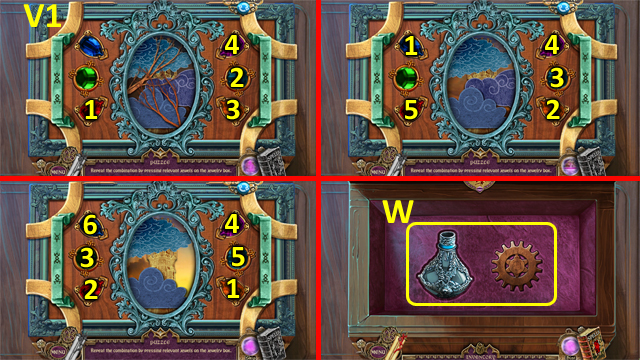
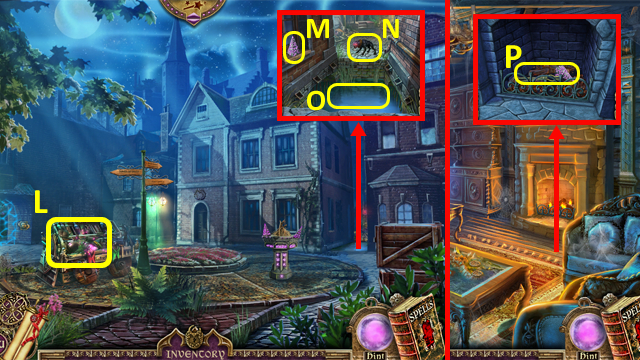
- Take the COIN (L). Complete the cup (1-2); grab the BLUE RUNE 2/9 (M).
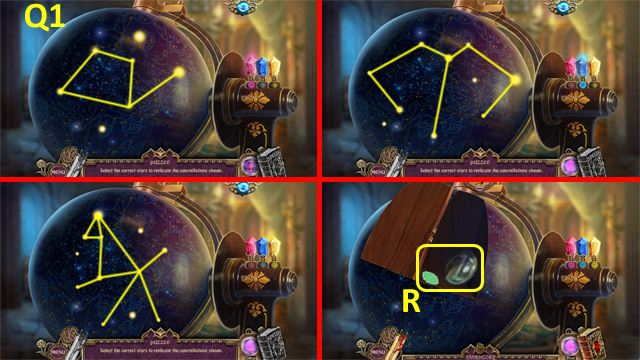
- Select the Spell Book to trigger a puzzle.
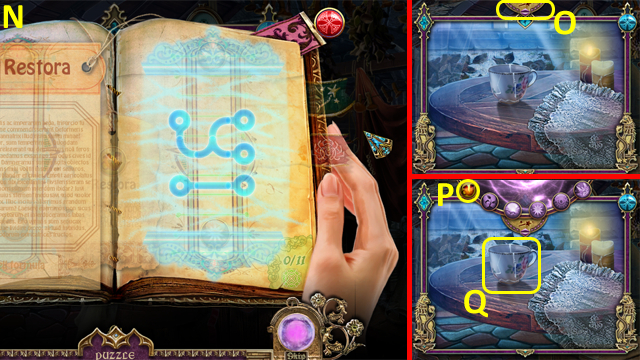
- Solution (N).
- Select your Spells (O). Use the RESTORA spell (P) with the CUP (Q); take it.
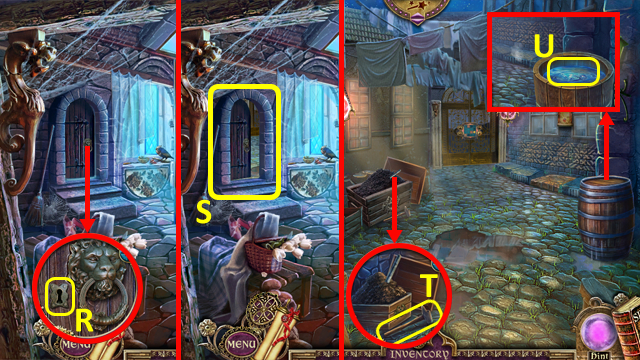
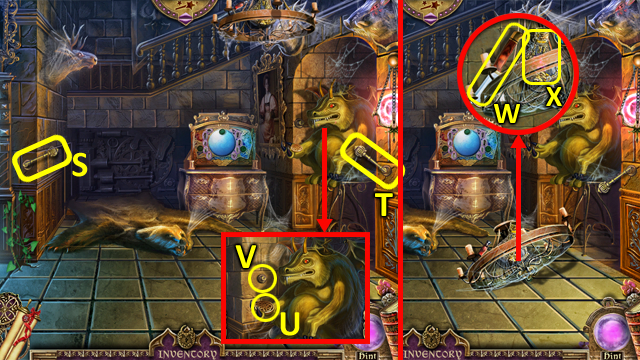
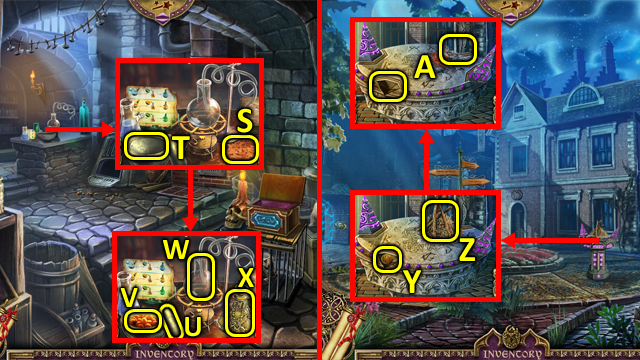
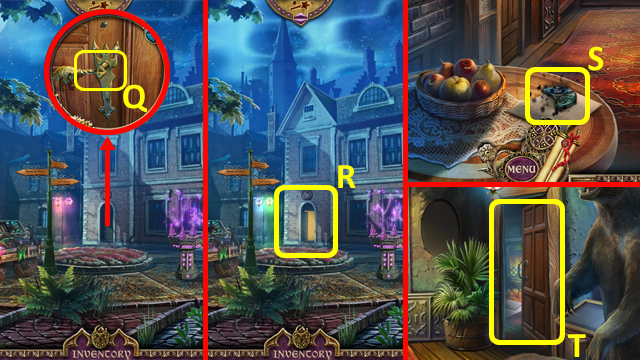
- Use the KEY (R); enter the Back Alley (S).
- Grab the HAMMER (T).
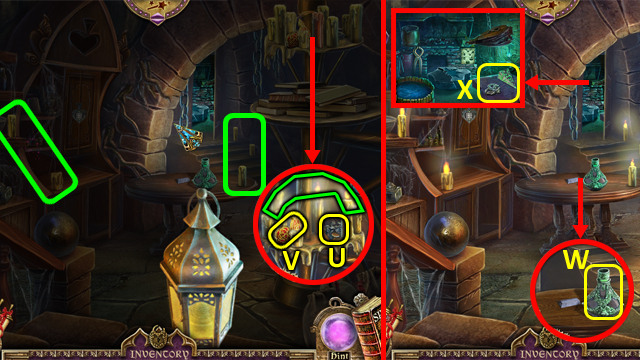
- Use the HAMMER then CHISEL on the barrel. Use the CUP (U); receive a CUP OF WATER.
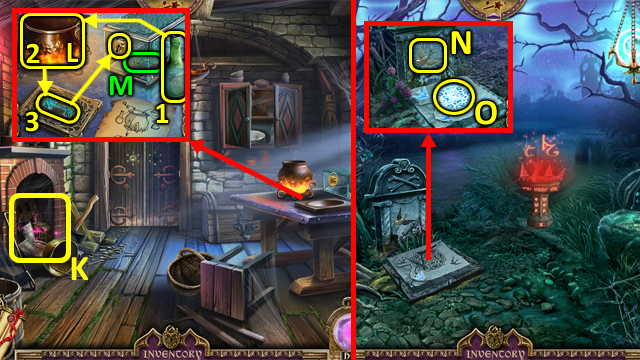
- Walk down.
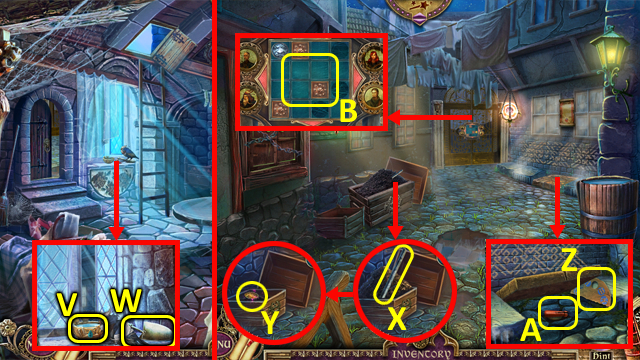
- Use the CUP OF WATER (V); grab the SMALL SHOVEL (W).
- Enter the Back Alley.
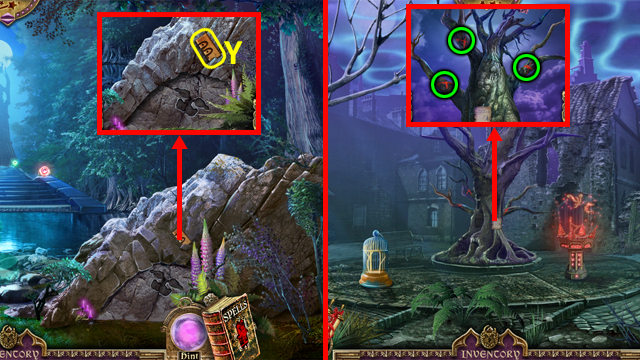
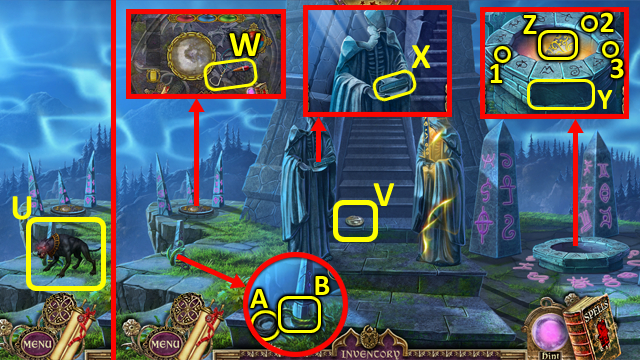
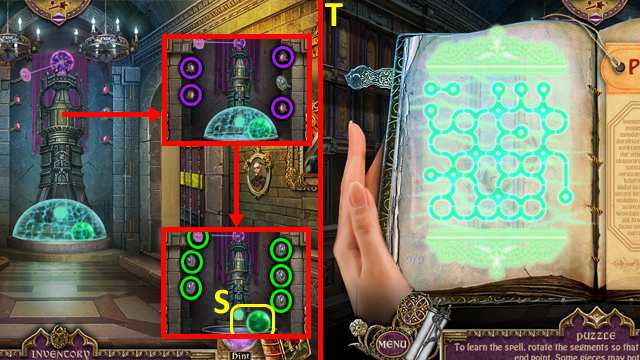
- Use the SMALL SHOVEL with the dirt; take the LEVER (X).
- Use the SMALL SHOVEL again; take the COIN (Y).
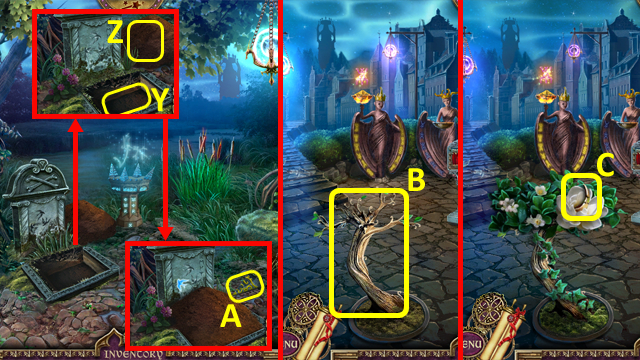
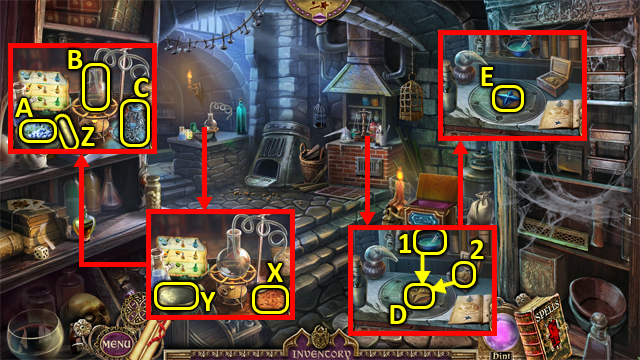
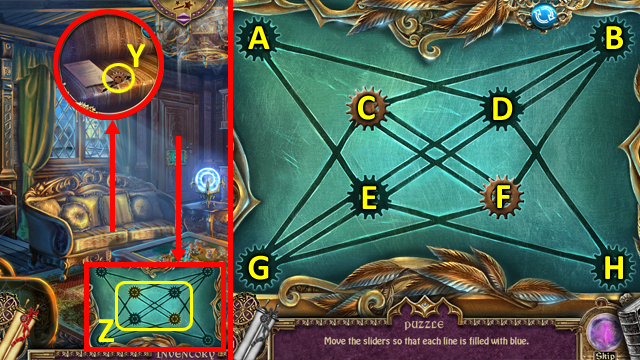
- Lift the cover with the LEVER; grab the STENCIL HALF (Z), and HANDLE and COIN (A).
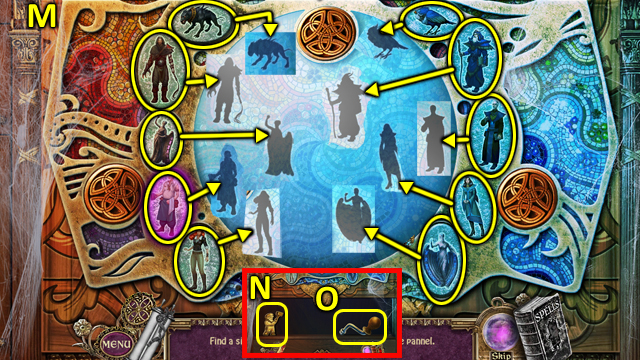
- Place the three COINS to trigger a puzzle (B).
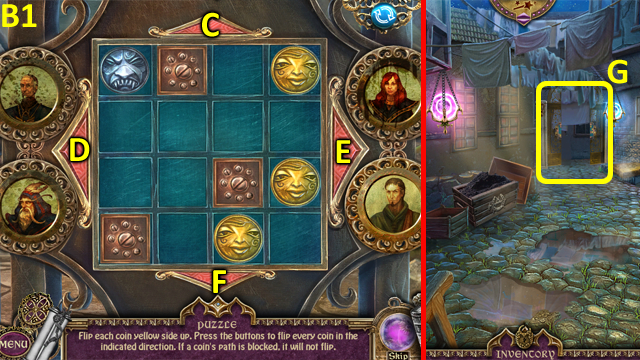
- Solution: Fx2-D-Cx2-Ex2-F-D.
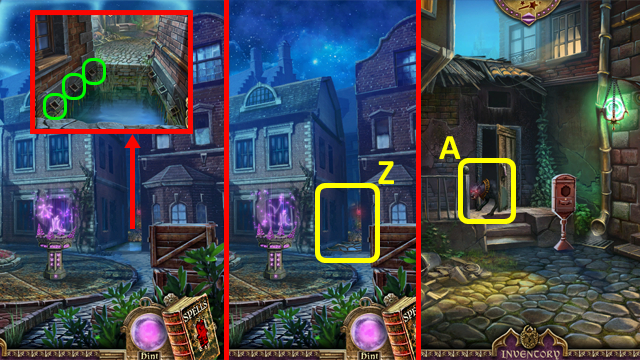
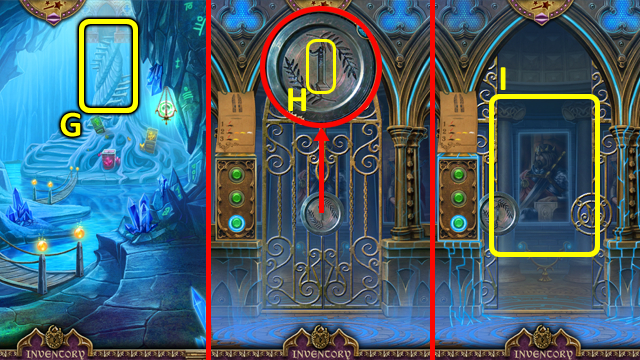
- Enter the Embankment (G).
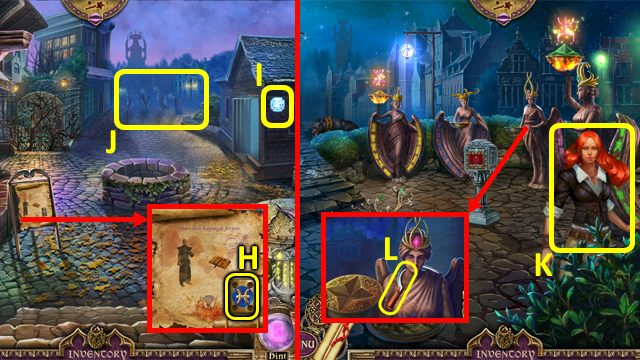
- Untie the string; take the HOROSCOPE TILE (H) and BLUE RUNE 3/9 (I).
- Enter the Baron's Square (J).
- Talk to the woman (K); receive a LANTERN POLE.
- Attach the HANDLE to the sickle (L) then use the RESTORA spell; take the SICKLE.
- Walk down.
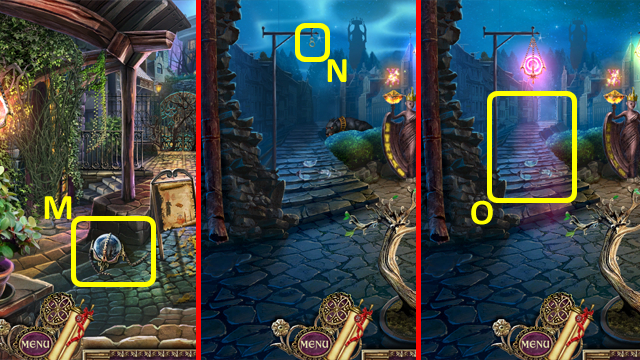
- Use the LANTERN POLE with the lantern (M); receive a LANTERN ON POLE.
- Enter the Baron's Square.
- Use the LANTERN ON POLE (N).
- Enter the Forest (O).
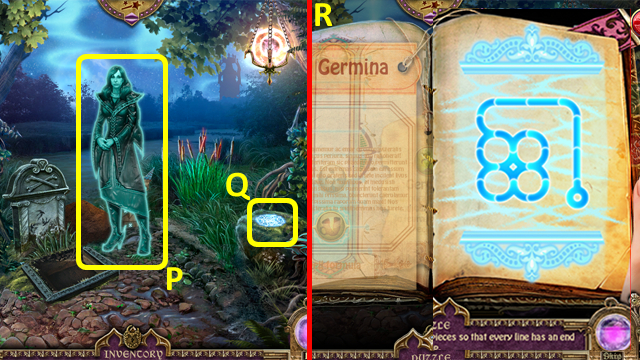
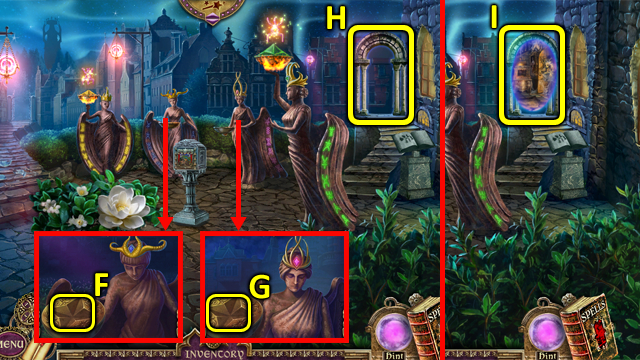
- Talk to your Mother (P); receive a BLUE ALTAR STONE.
- Grab the BLUE RUNE 4/9 (Q).
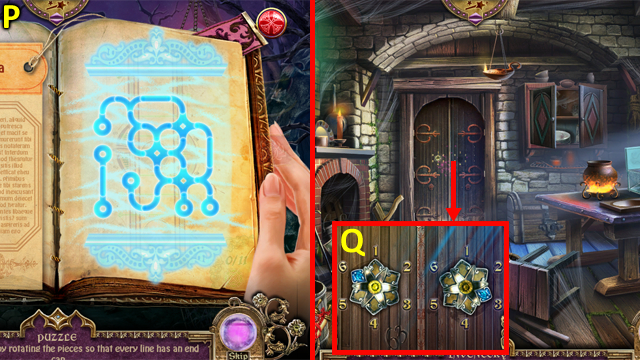
- Select the Spell Book to trigger a puzzle.
- Solution (R); receive the GERMINA spell.
- Cut the grass with the SICKLE; grab the HOROSCOPE TILE (R1).
- Place the BLUE ALTAR STONE (S).
- Enter the Forest Shadow Realm (T).
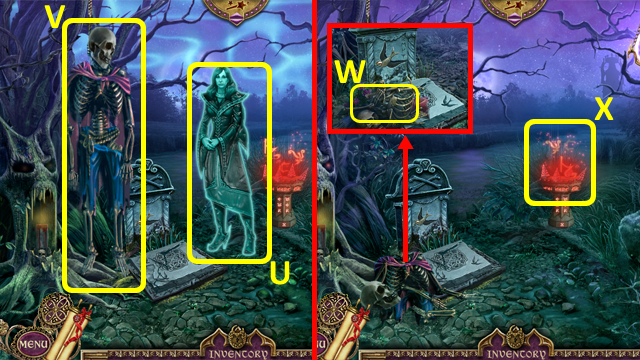
- Talk to your Mother (U).
- Cut down the skeleton with the SICKLE (V).
- Grab the REMAINS (W).
- Exit the Forest Shadow Realm (X).
- Place the REMAINS (Y), then use the SMALL SHOVEL three times (Z); grab the YELLOW ALTAR STONE 1/2 (A).
- Walk down.
- Use the GERMINA spell (B); grab the STONE HORN 1/4 (C).
- Walk down.
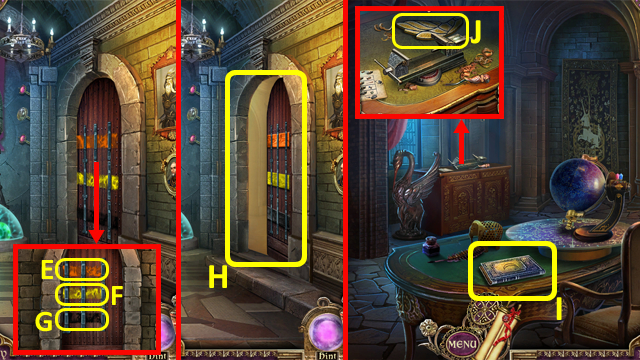
- Use the GERMINA spell (D); open the door and enter the Inn (E).
- Play the HOP (F); receive a YELLOW ALTAR STONE 2/2.
- Grab the STONE HORN 2/4 (G).
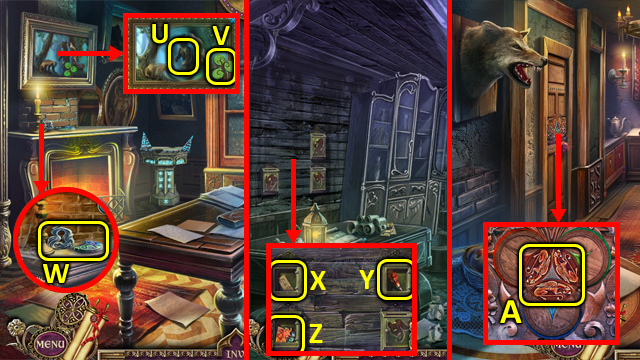
- Use the RESTORA spell, then move the plate (H); take the ANGEL SYMBOL 1/2 (I), then re-arrange the items (J).
- Grab the BARONESS FIGURE (K).
- Walk down.
- Grab the STONE HORN 3/4 (L).
- Repair the altar with the RESTORA spell; place the YELLOW ALTAR STONES (M).
- Enter the Embankment Shadow Realm.
- Talk to the man (N).
- Use the GERMINA spell (O); take the BLUE RUNE 5/9 (P) and STONE HORN 4/4 (Q).
- Place the STONE HORNS (green).
- Exit the Embankment Shadow Realm.
- Grab the WOODEN GEAR (R) and ANGEL SYMBOL 2/2 (R1).
- Return to the Embankment Shadow Realm.
- Place the WOODEN GEAR (S).
- Exit the Embankment Shadow Realm.
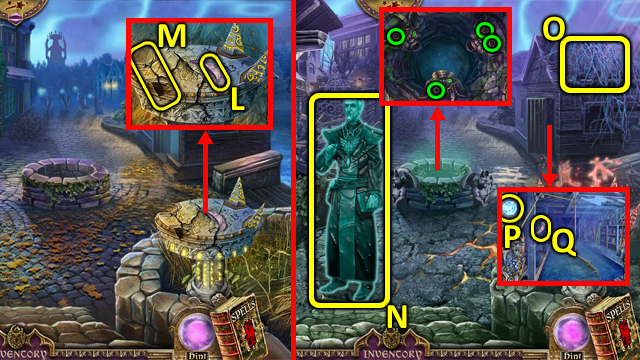
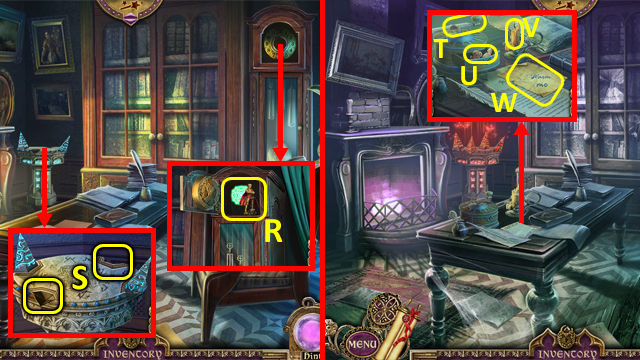
- Turn the handle (U); grab the STENCIL HALF (V).
- Return to your Home.
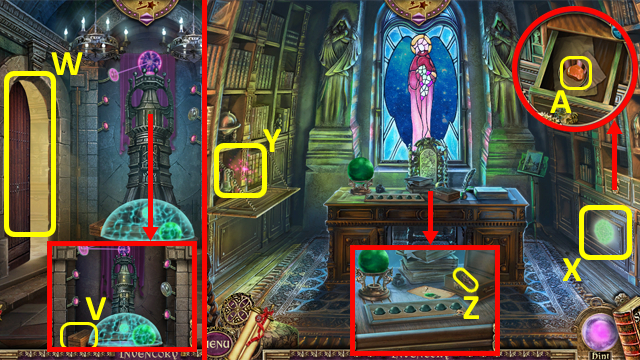
- Play the HOP (W); receive a PURPLE ALTAR STONE 1/2.
- Use the GERMINA spell (W1); grab the BLUE RUNE 6/9 (W2).
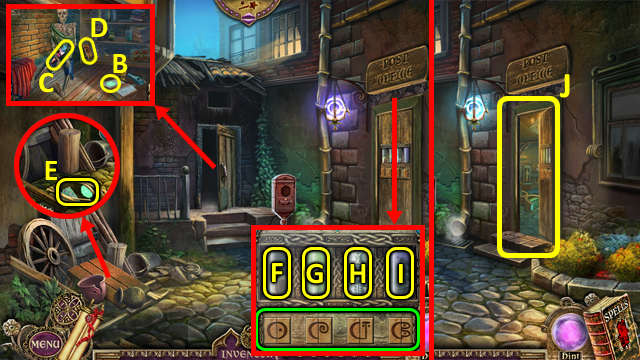
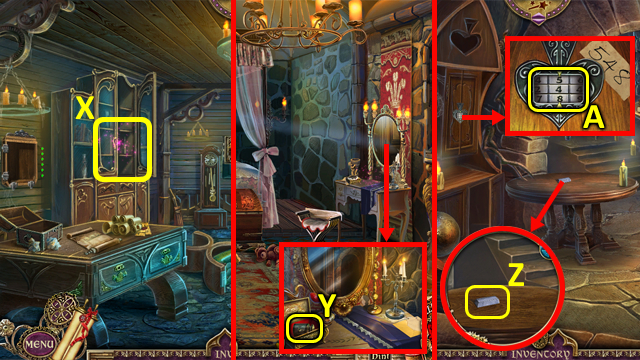
- Move the ladder (X).
- Place the STENCIL HALVES (Y) and HOROSCOPE TILES (Z).
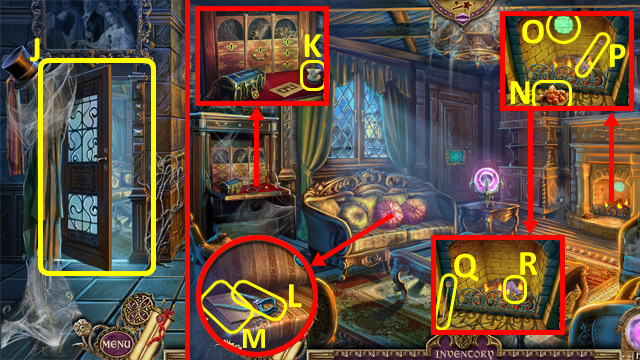
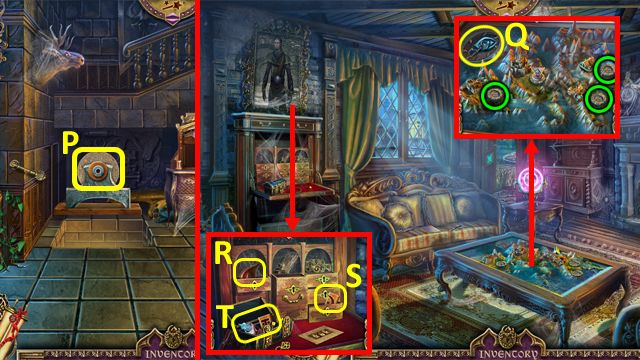
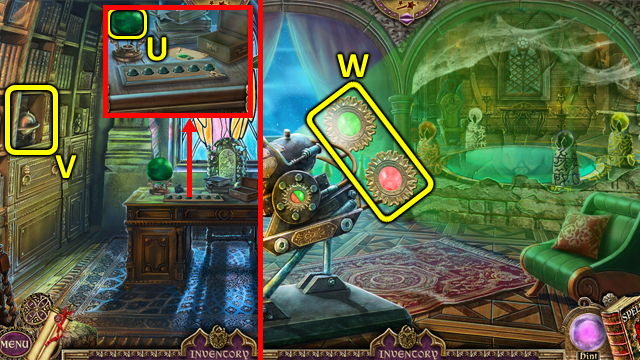
- Select the correct tiles (A); grab the BRASS KNOB 1/2 and HACKSAW (B).
- Enter the Back Alley.
- Use the HACKSAW (C); open the window.

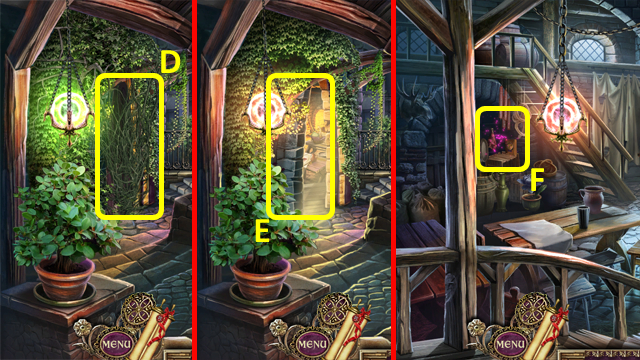
- Enter the Alchemist's House (D).
- Play the HOP (E); receive some ROPE.
- Grab the RULER (F).
- Open the cupboard with the RULER; take the BLUE RUNE 7/9 (G) and BRASS KNOB 2/2 (H).
- Return to the Inn.
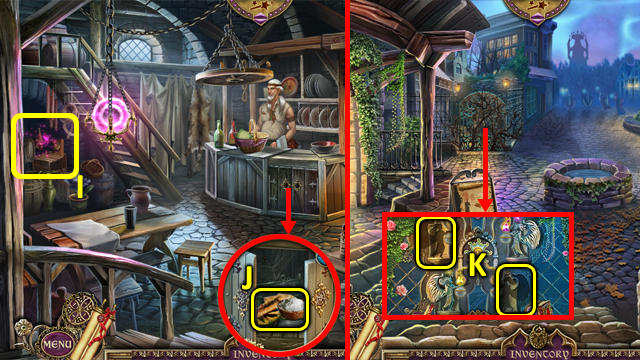
- Play the HOP (I); receive a GEM.
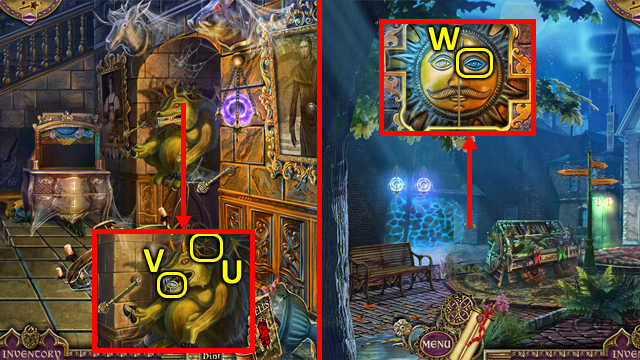
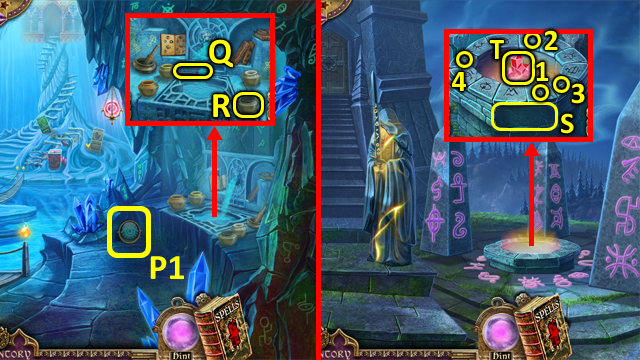
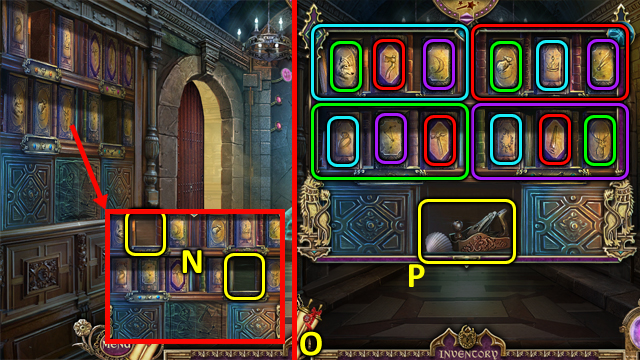
- Attach the BRASS KNOBS to the cupboard; grab the FABRIC WITH SYMBOL 1/2 and BAKING SODA (J).
- Walk down.
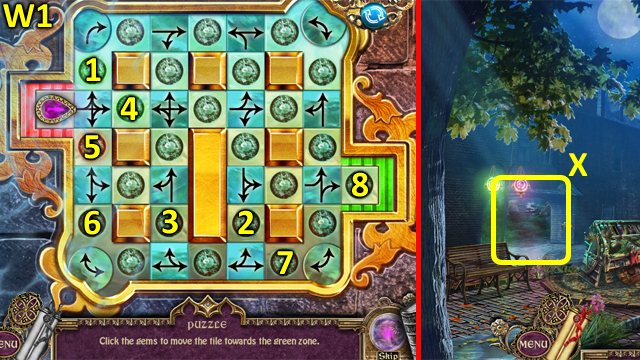
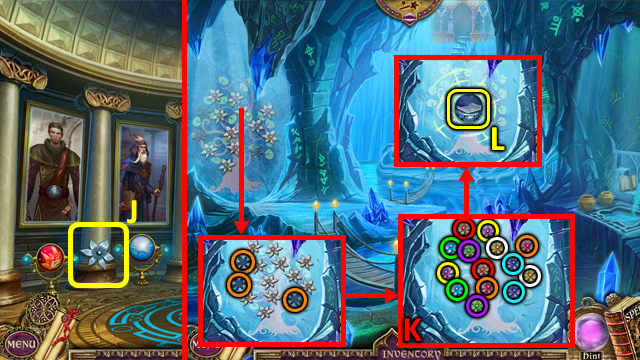
- Use the GERMINA spell on the overgrowth; place the ANGEL SYMBOLS to trigger a puzzle (K).
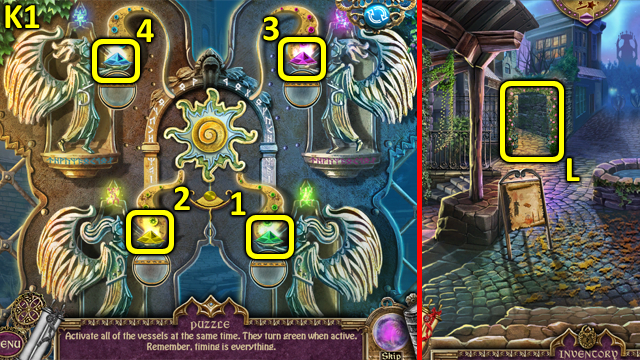
- Solution (K1).
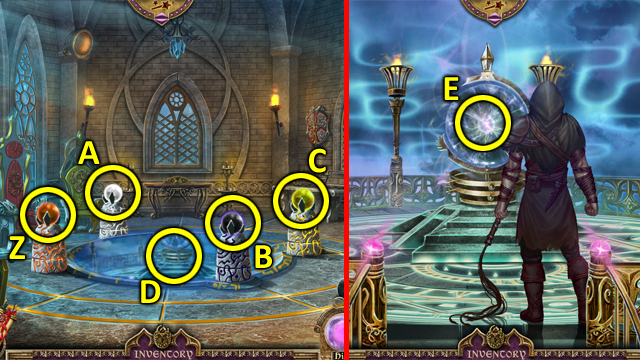
- Enter the Cathedral (L).
Chapter 2: Cathedral
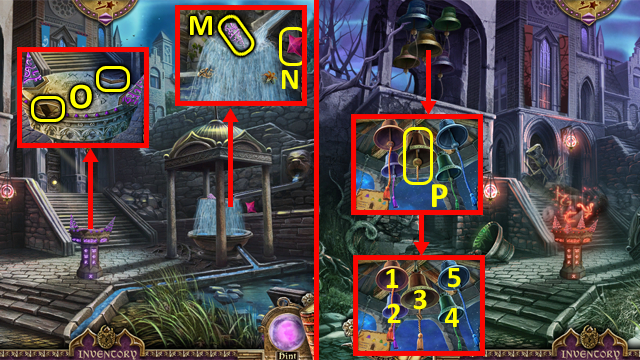
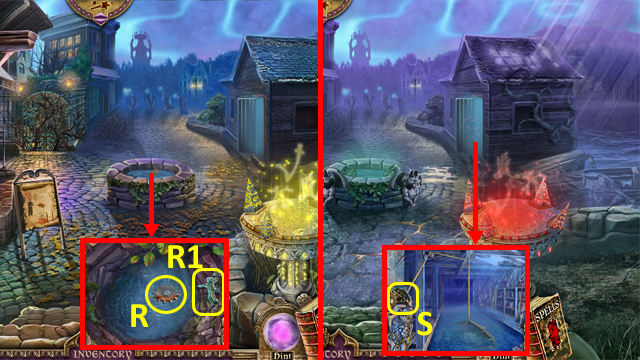
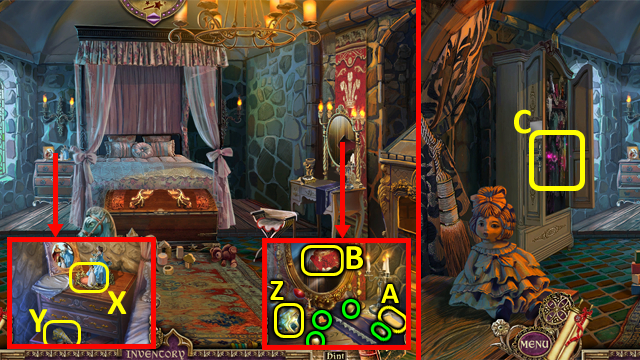
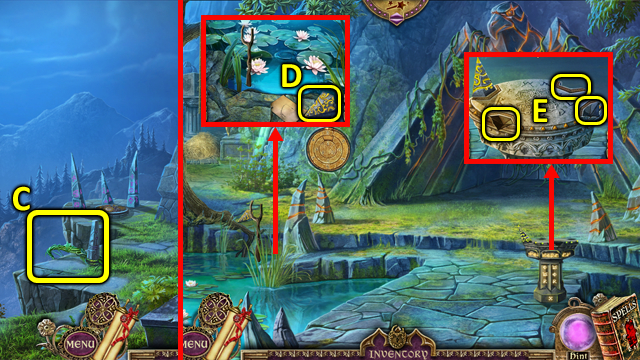
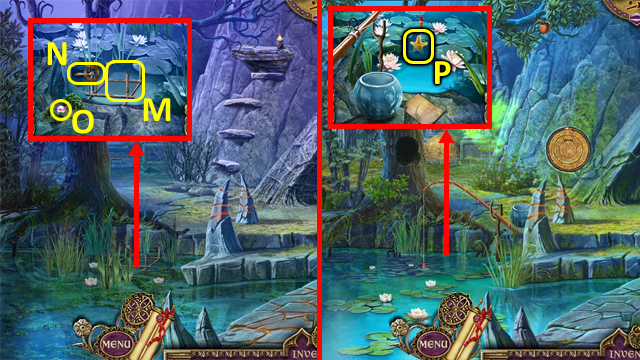
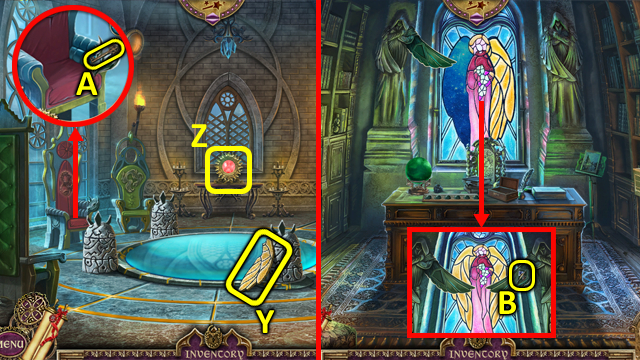
- Grab the PURPLE ALTAR STONE 2/2 (M) and PINK CRYSTAL (N).
- Place the PURPLE ALTAR STONES (O); enter the Cathedral Shadow Realm.
- Use the RESTORA spell on the bell, then add the ROPE (P); ring the bells (1-5).
- Exit the Cathedral Shadow Realm.
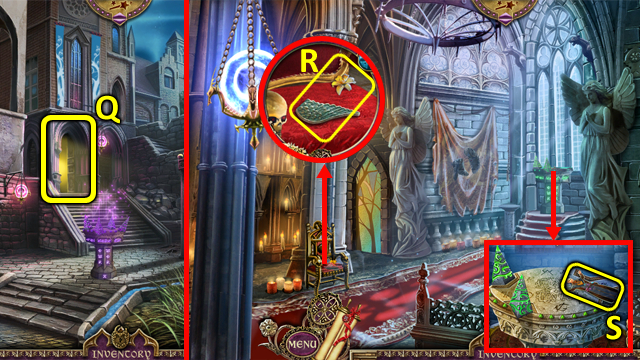
- Enter the Cathedral Interior (Q).
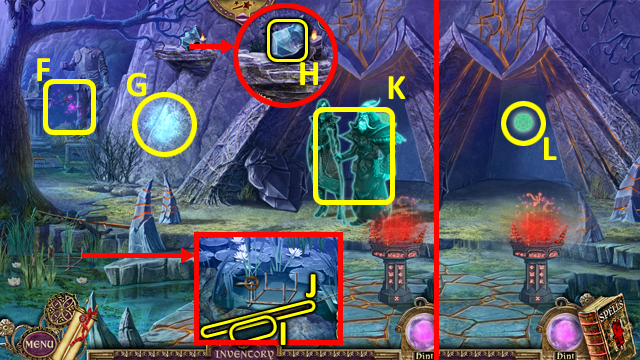
- Grab the STONE WING 1/2 and FLOWER HANDLE (R), and ALEXANDER FIGURE (S).
- Walk down.
- Attach the FLOWER HANDLE (1); press the handles (1-2).
- Use the RESTORA spell with the BOWL (T); take it.
- Return to the Embankment Shadow Realm.
- Use the BOWL with the boat twice; grab the FABRIC WITH SYMBOL 2/2 and PRUNERS (U).
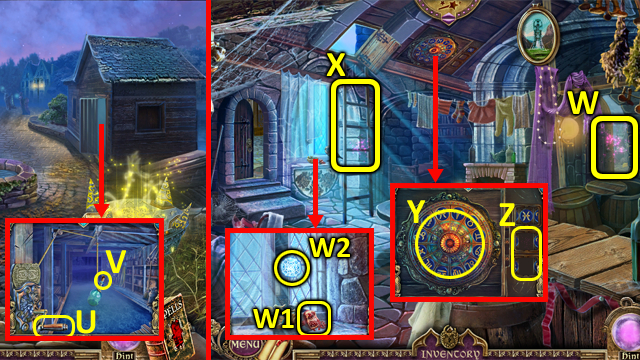
- Return to the Baron's Square.
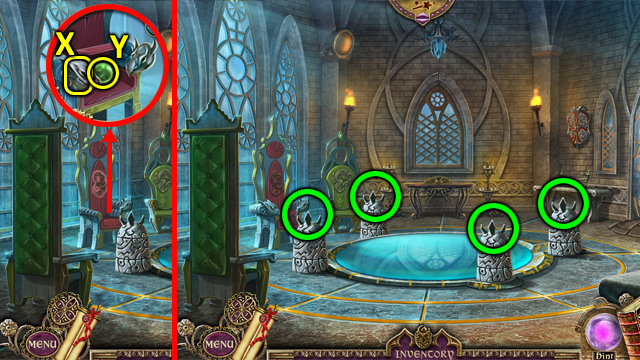
- Place the BARONESS FIGURE (V) and ALEXANDER FIGURE (W) to trigger a puzzle.
- Solution (W1).
- Grab the GREEN ALTAR STONE 1/2 (X).
- Return to the Cathedral Shadow Realm.
- Grab the BLUE RUNE 8/9 (Y) and SAND (Z); use the GERMINA spell (A).
- Use the PRUNERS (B); take the GREEN ALTAR STONE 2/2 (C).
- Return to the Cathedral Interior.
- Place the FABRICS WITH SYMBOLS (D); pull the chord (E).
- Select the buttons (1-4); read the note (F).
- Place the GREEN ALTAR STONES (G).
- Enter the Cathedral Interior Shadow Realm.
Chapter 3: High Street
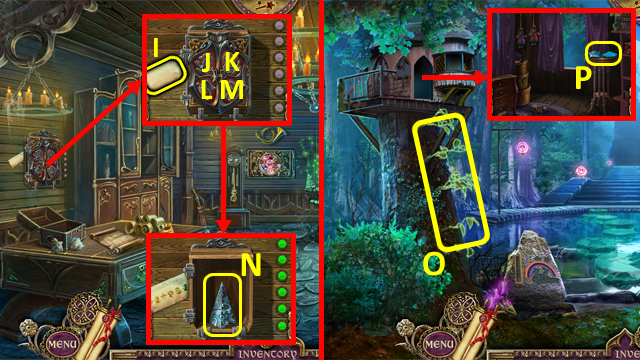
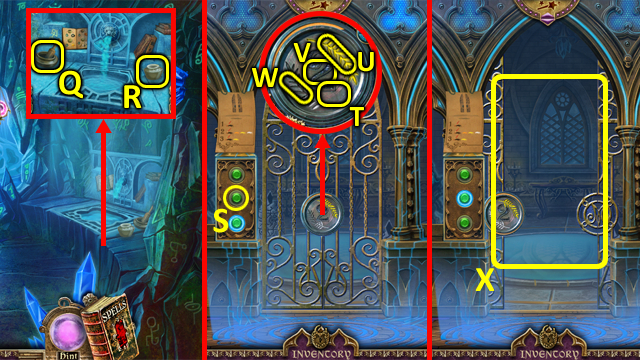
- Take the spell book page (H), then ROTATING HANDLE (I).
- Grab the ALTAR PIECES (green) and add them to the altar (J); repair it with the RESTORA spell.
- Return to the Alchemist's House.
- Play the HOP (K); receive some CHALK.
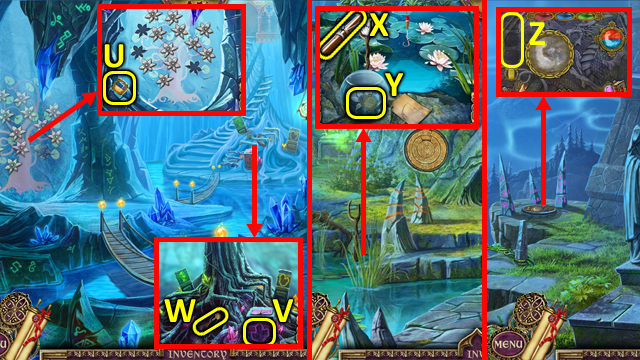
- Add the BAKING SODA, SAND, and CHALK (L), then unlock the box (1-3); take the STONE WING 2/2 (M).
- Return to the Forest Shadow Realm.
- Place the STONE WINGS (N); use the RESTORA spell on the platform then grab the BLUE RUNE 9/9 (O).
- Select the Spell Book to trigger a puzzle.
- Solution (P); receive the DISPERSA spell.
- Return to the Alchemist's House.
- Place the ROTATING HANDLE in the door; rotate as shown (Q).
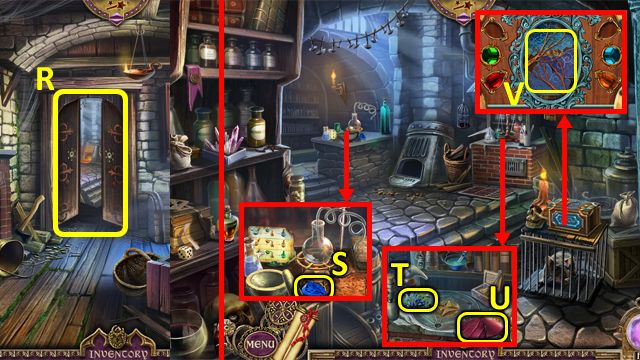
- Enter the Lab (R).
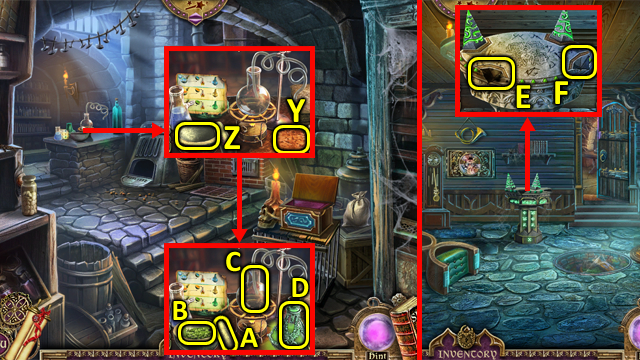
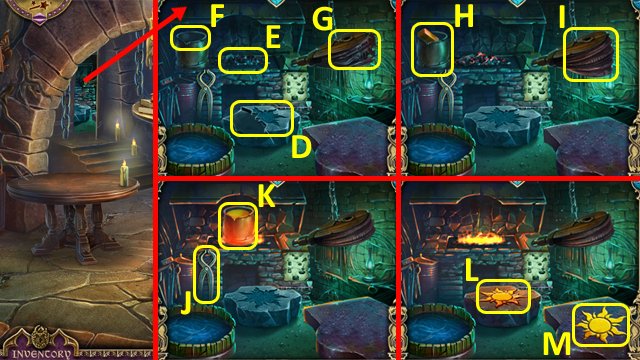
- Grab the GEM (S), DARKBERRY (T) and RAG (U).
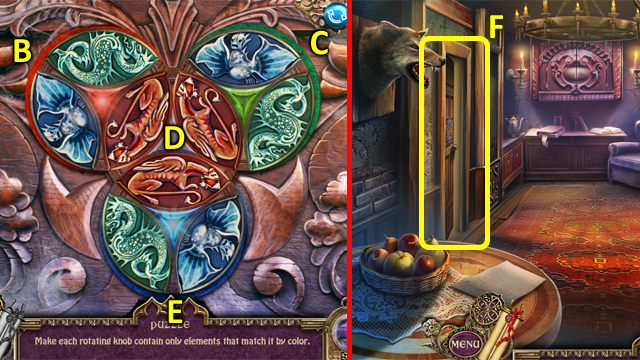
- Place the GEMS to trigger a puzzle (V).
- Solution (V1).
- Grab the ALCHEMIC VESSEL and COGWHEEL (W).
- Place the ALCHEMIC VESSEL (X) and DARKBERRY (Y); use the DISPERSA spell on the darkberries.
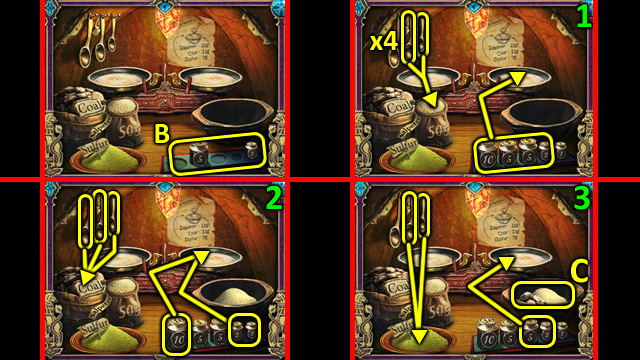
- Use the pestle (Z) to crush the darkberries (A), then pour the juice into the flask (B); take the CRYSTAL OIL (C).
- Pour the CRYSTAL OIL (D), then add the ingredients (1-2); take the BLUE CRYSTAL (E).
- Return to the Barons' Square.
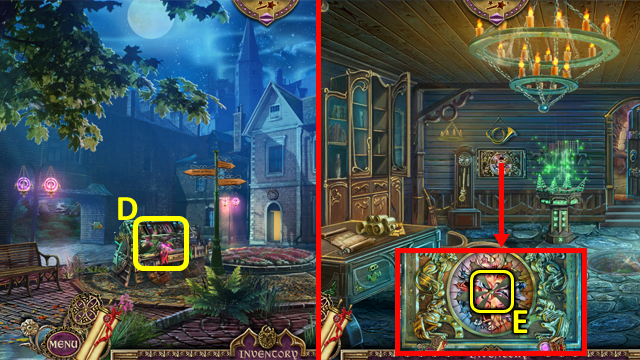
- Place the BLUE CRYSTAL (F) and PINK CRYSTAL (G); select the archway (H).
- Go through the portal (I) into the Common Hall.
- Enter the Living Room (J); grab the STONE FIGURINE 1/3 (K).
- Move the cushions, then use the RESTORA spell with the TONGS (L); take them then read the letter (M).
- Grab the GOLDBERRY (N) and GREEN RUNE 1/11 (O) then use the TONGS with the lever (P). Take the LEVER (Q); use the TONGS (R).
- Walk down.
- Use the GERMINA spell on the lever (S); pull it.
- Use the DISPERSA spell on the lever (T); pull it.
- Take the CIRCULAR PLATE 1/3 (U). Attach the LEVER (V); pull it.
- Grab the KNIFE (W) and ALCHEMIC VESSEL (X).
- Enter the Living Room.
- Cut the thread with the KNIFE; grab the COGWHEEL 2/2 (Y).
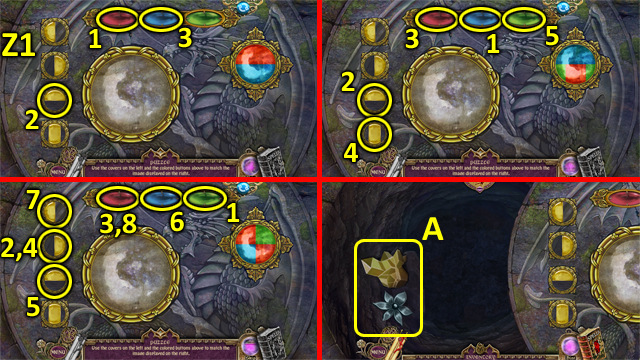
- Place the COGWHEELS to trigger a puzzle (Z).
- Solution: C-B, F-G, B-D, D-B, B-F, F-C, C-F, G-E, E-D, D-A, A-E, E-H, H-D, D-E, E-G, G-C.
- Enter the High Street (I).
- Grab the GREEN RUNE 2/11 (J).
- Select the Spell Book to trigger a puzzle.
- Solution (K); receive the COMBUSTA spell.
- Play the HOP (L); receive a BUCKET.
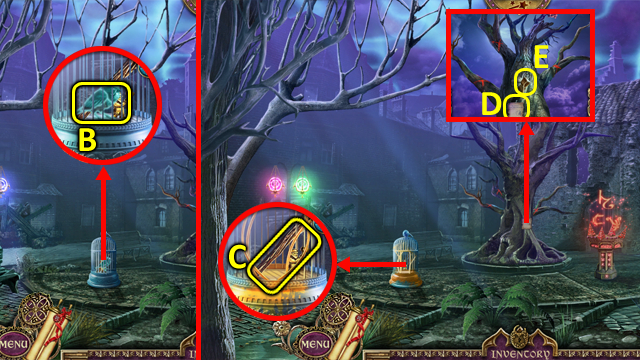
- Grab the PURPLE ALTAR STONE 1/2 (M); use the DISPERSA spell on the dog (N).
- Place the BUCKET and the RAG in the water (O); receive BUCKET WITH WATER and WET RAG.
- Walk down.
- Pour the BUCKET WITH WATER on the fire; take the TONGS and PURPLE ALTAR STONE 2/2 (P).
- Return to the Lab.
- Place the ALCHEMIC VESSEL (S) and GOLDBERRY (T); use the COMBUSTA spell on the goldberries.
- Use the pestle (U) to crush the goldberries (V) then pour the juice into the flask (W); take the ELIXIR OF PHILOSOPHERS (X).
- Return to the High Street.
- Grab the CIRCULAR PLATE 2/3 (Y); use the COMBUSTA spell (Z).
- Place the PURPLE ALTAR STONES (A).
- Enter the High Street Shadow Realm.
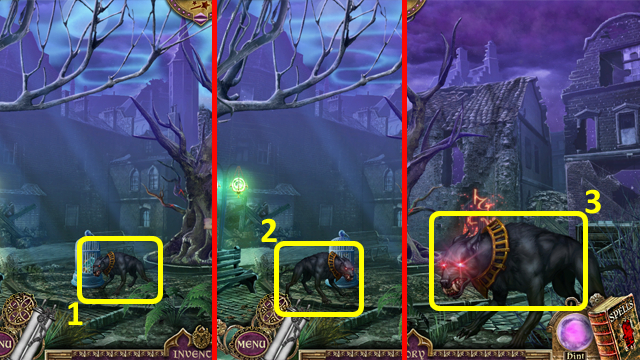
- Use the DISPERSA spell on the dogs (1-3).
- Use the ELIXIR OF PHILOSOPHERS on the bars (B); bend them twice.
- Grab the AXE HANDLE and GOLDEN DWARF 1/2 (C).
- Read the note (D) then insert the AXE HANDLE (E); take the BLUNT AXE.
- Return to the Common Hall.
- Grab the STONE FIGURINE 2/3 (F); use the TONGS on the nails (green).
- Move the rug; take the CIRCULAR PLATE 3/3 (G) then use the WET RAG (H).
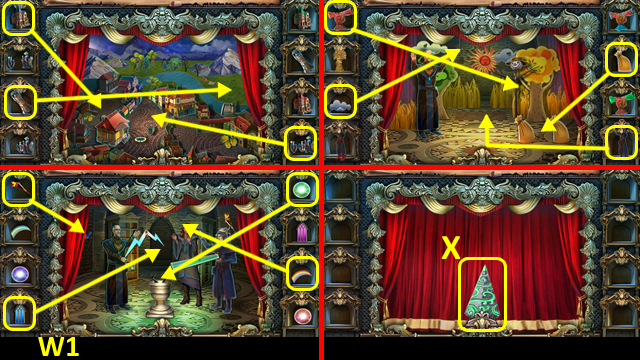
- Cycle the tiles to make a complete picture (I).
- Use the COMBUSTA spell with the candle (J); grab the STONE FIGURINE 3/3 (K) then pull the lever (L).
- Place the CIRCULAR PLATES (orange) to trigger a puzzle.
- Solution (M).
- Grab the GOLDEN DWARF 2/2 (N) and ROTATING HANDLE (O).
- Attach the ROTATING HANDLE to the wheel (P) then sharpen the BLUNT AXE; receive SHARP AXE.
- Enter the Living Room.
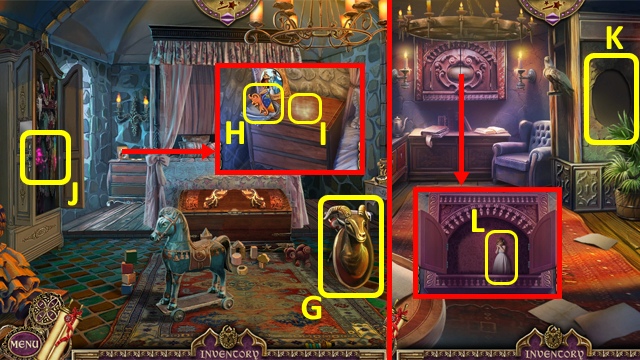
- Place the STONE FIGURINES (green); grab the DRAWER KEY and BRONZE EYE (Q).
- Open the drawers with the DRAWER KEY; take the STUFFED EAR (R) and SYMBOL (S).
- Place the GOLDEN DWARVES in the box; use the DISPERSA spell, then grab the PAINTING PART 1/5 and SYMBOL (T).
- Walk down.
- Place the STUFFED EAR (U); grab the GOLDEN EYE (V).
- Return to the High Street.
- Place the BRONZE EYE and GOLDEN EYE into the face; pour the ELIXIR OF PHILOSOPHERS to trigger a puzzle (W).
- Solution (W1).
- Enter The River (X).
- Grab the SYMBOL (Y).
- Return to the High Street Shadow Realm.
- Use the SHARP AXE (green); take the three SOLID BRANCHES.
- Exit the High Street Shadow Realm.
- Place the SOLD BRANCHES (green).
- Enter the Street (Z).
- Use the DISPERSA spell on the dog (A).
- Open the book, and take the GREEN RUNE 3/11 (B); grab the PAINTING PART 2/5 (C) and SYMBOL (D).
- Move the three items, then use the ELIXIR OF PHILOSOPHERS on the bars; bend them and take the GREEN ALTAR STONE 1/2 and GREEN RUNE 4/11 (E).
- Use the COMBUSTA spell (F), GERMINA spell (G), RESTORA spell (H), and DISPERSA spell (I); place the SYMBOLS and arrange as shown (green).
- Enter the Post Office (J).
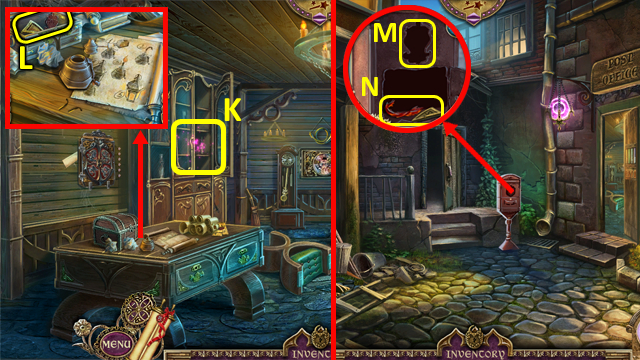
- Play the HOP (K); receive a LAMP CAP.
- Open the box; grab the STASH PART 1/2 and POST BOX SIGN (L).
- Walk down.
- Place the POST BOX SIGN (M); take the WICK and STASH PART 2/2 (N).
- Enter the Post Office.
- Place the STASH PARTS into the cover, then use the COMBUSTA spell on the cobwebs; grab the MAGIC BEANS (O), OIL (P), and GREEN RUNE 5/11 (Q).
- Add the OIL and WICK (R); light the wick with the COMBUSTA spell, add the LAMP CAP, then take the LAMP (S).
- Enter the Basement (T).
- Use the LAMP with the scene.
- Use the COMBUSTA spell (green).
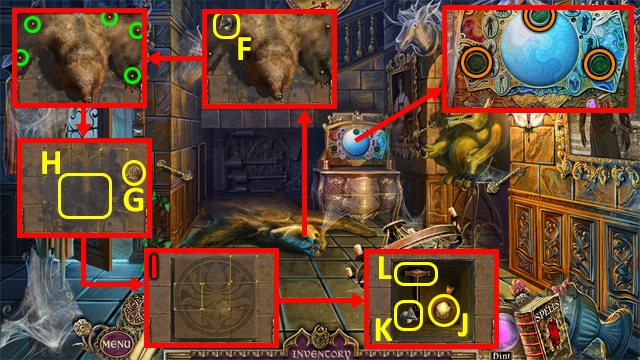
- Move the candle; grab the LION FIGURINE (U).
- Take the SYMBOL (V), ALCHEMIC VESSEL (W), and DRAGON FIGURINE and GREEN ALTAR STONE 2/2 (X).
- Return to the Lab.
- Place the ALCHEMIC VESSEL (Y) and MAGIC BEANS (Z); use the GERMINA spell on the beans.
- Use the pestle (A) to crush the beans (B) then pour the juice into the flask (C); take the ELIXIR OF GROWTH (D).
- Return to the Post Office.
- Use the DISPERSA spell (E); place the GREEN ALTAR STONES (E-F).
- Enter the Post Office Shadow Realm.
Chapter 4: Town House

- Grab the GREEN RUNE 6/11 (G).
- Select the Spell Book to trigger a puzzle.
- Solution (H); receive the DISCLOSA spell.
- Exit the Post Office Shadow Realm.
- Select the note (I); use the DISCLOSA spell.
- Press the buttons: M-J-L-M-K-J.
- Grab the BLUE ALTAR STONE 1/2 (N).
- Return to the River.
- Use the GERMINA spell (O).
- Open the curtains; use the ELIXIR OF GROWTH, then take the MOLD PART and CLOUD TILE (P).
- Walk down.
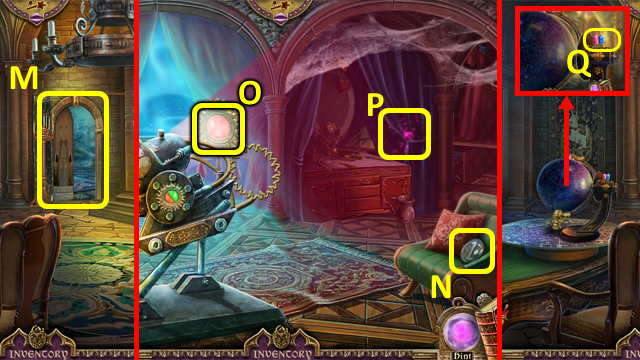
- Use the DISCLOSA spell with the door handle; open the door (Q).
- Enter the Entry (R).
- Use the DISPERSA spell (S); take the INSIGNIA 1/3.
- Enter the Office (T).
- Use the DISCLOSA spell (U); grab the TREE TILE (V).
- Take the CHIMERA FIGURINE and INSIGNIA 2/3 (W).
- Return to the Post Office Shadow Realm.
- Use the DISCLOSA spell; place the DRAGON FIGURINE then take the CODE (X).
- Place the LION FIGURINE; grab the PAINTING PART 3/5 (Y).
- Place the CHIMERA FIGURINE; take the COAT OF ARMS PART and INSIGNIA 3/3 (Z).
- Return to the Entry.
- Place the INSIGNIA to trigger a puzzle (A).
- Solution: B-D-Cx2-D-E-B-Dx2.
- Enter the Bedroom (F).
- Grab the RAM HEAD (G) and COAT OF ARMS PART (H); use the DISCLOSA spell (I).
- Open the wardrobe and play the HOP (J); receive BLUE ALTAR STONE 2/2.
- Walk down.
- Place the RAM HEAD (K).
- Use the DISCLOSA spell, then place the COAT OF ARMS PARTS in the cupboard door; take the CHILD STATUETTE (L).
- Select the animals (1-4); grab the PAINTING PART 4/5 and MOTHER STATUETTE (M).
- Enter the Bedroom.
- Place the MOTHER STATUETTE (N); take the CLOCK ARROW (O).
- Place the CHILD STATUETTE (P); grab the PAINTING PART 5/5 (Q).
- Return to the Office.
- Place the CLOCK ARROW on the clock; grab the GREEN RUNE 7/11 and FATHER STATUETTE (R).
- Place the BLUE ALTAR STONES (S); enter the Office Shadow Realm.
- Turn the handle (T); take the MIRROR SHARD (U).
- Use the COMBUSTA spell on the candle (V), then add the note (W); receive a RECIPE.
- Return to the Bedroom.
- Place the FATHER STATUETTE (X); grab the YELLOW ALTAR STONE 1/2 (Y).
- Use the DISCLOSA spell (Z); open the envelope and read the letter (A).
- Place the mirror pieces (green) in the mirror (B); add the MIRROR SHARD, then use the RESTORA spell.
- Play the HOP (C); receive a WEIGHT.
- Return to the High Street.
- Play the HOP (D); receive a BIRD FIGURINE.
- Return to the Post Office.
- Place the PAINTING PARTS to trigger a puzzle (E).
- Solution: S-N, Q-P, Q-J, R-T, S-K, T-M, U-F, F-G, G-K, H-I, I-L, K-M, L-M.
- Grab the SYMBOL 2/2, FLOWER EMBLEM, and GOLDEN KNOB 1/3 (V).
- Enter the Post Office Shadow Realm.
- Place the BIRD FIGURINE; take the WEIGHT (W).
- Exit the Post Office Shadow Realm.
- Play the HOP (X); receive THREAD AND NEEDLE.
- Return to the Bedroom.
- Place the FLOWER EMBLEM on the box, then use the ELIXIR OF GROWTH; grab the WEIGHT (Y).
- Return to the Basement.
- Use the ELIXIR OF PHILOSOPHERS then the ELIXIR OF GROWTH; take the GOLD INGOT (Z).
- Set the combination as shown (A).
- Place the WEIGHTS (B).
- Follow the recipe (1-3).
- Take the GUNPOWDER (C).
- Place the MOLD PART, then use the RESTORA spell (D).
- Place the GUNPOWDER, then use the COMBUSTA spell (E).
- Place the GOLD INGOT (F).
- Use the THREAD AND NEEDLE (G).
- Select the pot (H); use the bellows (I).
- Use the tongs (J) with the pot (K) then the sun (L); take the SUN TILE (M).
- Return to the River.
- Place the SYMBOLS in the slots; take the RIVER TILE (N).
- Place the RIVER TILE (O), TREE TILE (P), CLOUD TILE (Q), and SUN TILE (R); arrange the tiles as shown (S).
- Walk forward to the Stairs (T).
Chapter 5: Cave
- Use the DISPERSA spell (U).
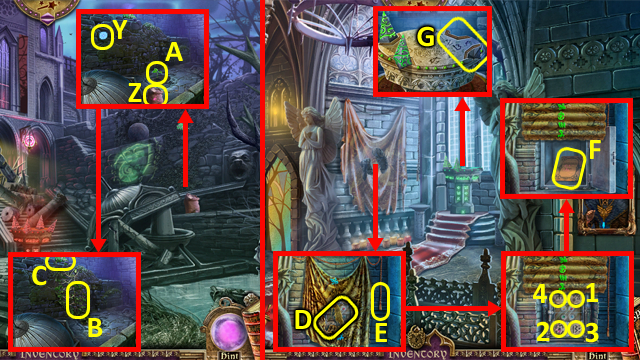
- Grab the MIRROR 1/4 (V), FISHING LINE (W), and PLATE WITH SYMBOLS (X).
- Place the PLATE WITH SYMBOLS (Y), then press the buttons (1-3); take the YELLOW ALTAR STONE 2/3 (Z).
- Grab the DOG FUR (A); use the GERMINA spell (B).
- Walk down to the Secret Passage (C).
- Grab the YELLOW ALTAR STONE 3/3 (D).
- Place the YELLOW ALTAR STONES (E).
- Enter the Secret Passage Shadow Realm.
- Play the HOP (F); receive a STONE BIRD 1/2.
- Use the DISCLOSA spell (G); grab the STATUE FRAGMENT (H).
- Take the PLATE WITH SYMBOLS (I), then add the FISHING LINE to the FISHING ROD (J); take it.
- Talk to the people (K); grab the GREEN RUNE 8/11 (L).
- Return to the Stairs.
- Place the PLATE WITH SYMBOLS (M), then press the button (1-3); grab the STONE BIRD 2/2 (N).
- Return to the Secret Passage.
- Use the GERMINA spell on the overgrowth; place the STONE BIRDS (O).
- Enter the Cave (P).
- Grab the RESTORA SHIELD (P1).
- Grab the PLATE WITH SYMBOLS (Q); select the pot, add the DOG FUR, then take the ENCHANTED PAINT (R).
- Return to the Stairs.
- Place the PLATE WITH SYMBOLS (S), then press the button (1-4); grab the CRYSTAL (T).
- Return to the Cave.
- Take the GOLDEN KNOB 2/3 (U).
- Place the CRYSTAL (V); grab the GLASS CUTTER (W).
- Walk down.
- Place the FISHING ROD (X); select it when it moves. Use the DISCLOSA spell, then the GLASS CUTTER; remove the lid, and take the GOLDEN KNOB 3/3 and FLOWER 1/3 (Y).
- Return to the Stairs.
- Place the GOLDEN KNOBS to trigger a puzzle (Z).
- Solution (Z1).
- Grab the FLOWER 2/3 and CRYSTAL (A).
- Return to the Cave.
- Place the CRYSTAL (B); grab the STATUE FRAGMENT (C).
- Place the STATUE FRAGMENTS, then use the RESTORA spell (D-E); use the DISCLOSA spell and take the SPARK SHIELD (F).
- Return to the Cave.
- Enter the Elevator (G).
- Use the black ENCHANTED PAINT (H).
- Enter the Hall of Fame (I).
- Grab the FLOWER 3/3 (J).
- Return to the Cave.
- Place the FLOWERS (orange); select pairs of flowers (K), then take the SIEVE (L).
- Return to the Secret Passage Shadow Realm.
- Place the SIEVE (M), then turn the handle (N); open the sea plant and take the PEARL (O).
- Exit the Secret Passage Shadow Realm.
- Attach the PEARL to the fishing rod; select the fishing rod when it moves, then grab the GOLDEN STARFISH (P).
- Enter the Cave.
- Select the pot, then add the GOLDEN STARFISH; take the ENCHANTED PAINT (T).
- Return to the Elevator.
- Press the button (R).
- Use the black ENCHANTED PAINT (S) and gold ENCHANTED PAINT (S).
- Enter the Third Floor (U).
Chapter 6: Tower
- Take the WOODEN BLOCK (V).
- Enter the Cabinet (W).
- Grab the GREEN RUNE 9/11 (X).
- Play the HOP (Y); receive a GERMINA SHIELD.
- Open the box; take the WOODEN KEY (Z).
- Open the drawer; grab the ORANGE WAX (A).
- Return to the Hall of Fame.
- Place the RESTORA SHIELD, SPARK SHIELD, and GERMINA SHIELD, then arrange as shown (B); grab the POWER ORB 1/4 and MIRROR 2/4 (C).
- Return to the Cave.
- Select the pot, then add the ORANGE WAX; take the ENCHANTED PAINT (D).
- Return to the Third Floor.
- Apply the orange ENCHANTED PAINT (E), gold ENCHANTED PAINT (F), and black ENCHANTED PAINT (G); slide back the blocks.
- Enter the BARONESS' CHAMBER (H).
- Grab the BOOK 1/2 (I) and LARGE GLASS WING (J).
- Return to the Cabinet.

- Place the LARGE GLASS WING in the window; take the RUNIC TILE (K).
- Return to the Secret Passage.
- Place the RUNIC TILE in the slot; arrange the dials as shown (L).
- Play the HOP (M); receive BOOK 2/2.
- Return to the Third Floor.
- Place the BOOKS (N).
- Arrange the books as shown (O).
- Grab the WHITE SHELL and WOOD TRIMMER (P).
- Return to the Cave.
- Place the WHITE SHELL in the mortar (Q), then pour it into the pot (R); select it then take the ENCHANTED PAINT.
- Return to the Elevator.
- Press the button (S).
- Use the orange ENCHANTED PAINT (T), gold ENCHANTED PAINT (U), black ENCHANTED PAINT (V), and white ENCHANTED PAINT (W).
- Enter the Hall of Council (X).
- Grab the LARGE GLASS WING (Y), RED LENS (Z), and WOODEN KEY 2/2 (A).
- Return to the Cabinet.
- Place the LARGE GLASS WING into the window; take the BLOWTORCH (B).
- Return to the Baroness' Chamber.

- Place the WOODEN BLOCK, then use the WOOD TRIMMER (C); rotate the block (D) and use the wood trimmer (E).
- Use the tool (F) with the block (G); rotate the block and repeat.
- Use the BLOWTORCH with the sculpture (H); rotate the sculpture and use the blowtorch (I) with the sculpture.
- Use the white ENCHANTED PAINT with the sculpture (J); rotate the sculpture and repeat.
- Grab the CHAIR DECORATION (K).
- Move the curtain; place the WOODEN KEYS (L).
- Enter the Astrology Chamber (M).
- Grab the MIRROR 3/4 (N).
- Place the RED LENS (O).
- Play the HOP (P); receive a CRYSTAL GEM.
- Walk down.
- Place the CRYSTAL GEM to trigger a puzzle (Q).
- Solution (Q1).
- Grab the GREEN RUNE 10/11 and MIRROR 4/4 (R).
- Walk down.
- Place the MIRRORS (purple), then select the mirrors (green); grab the GREEN RUNE 11/11 and POWER ORB 2/4 (S).
- Select the Spell Book to trigger a puzzle.
- Solution (T); receive the PERFORATA spell.
- Enter the Cabinet.
- Use the PERFORATA spell on the POWER ORB 3/4 (U); take it.
- Play the HOP (V); receive a GREEN LENS.
- Return to the Astrology Chamber.
- Place the GREEN LENS, then select the lens (W).
- Return to the Hall of Council.
- Place the CHAIR DECORATION (X); grab the POWER ORB 4/4 (Y).
- Place the POWER ORBS (green).
- Use the orange ENCHANTED PAINT (Z), white ENCHANTED PAINT (A), black ENCHANTED PAINT (B), and gold ENCHANTED PAINT (C).
- Enter the Tower Top (D).
- Use the PERFORATA spell to trigger a puzzle (E).
- Solution (E1).
- Congratulations, you have completed Shrouded Tales: The Spellbound Land.
Created at: 2014-10-12