

Walkthrough Menu
- General Tips
- Chapter 1: The Train Station and Police Station
- Chapter 2: Town Hall and the Lighthouse
- Chapter 3: The Boutique and the Park
- Chapter 4: The Gardner's House, Gold Mine, and Photo Studio
- Chapter 5: The Mansion
General Tips
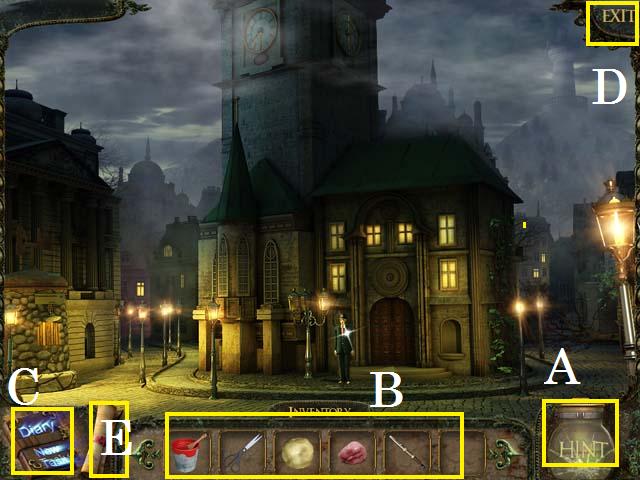 • This is the official guide for 1 Moment of Time:
Silentville. • You will not need to follow the exact path of
this guide; however, some actions are required before you can
complete another scene. • If you get stuck in your game play,
you can use the Hint Button (A). • Your inventory bar (B) will
hold items needed in other scenes until you use them. • Zoom
into any sparkling scene to trigger a Hidden Object Scene. In
this guide we will use the acronym ‘HOS' for Hidden Object
Scenes. • For extra help use the journal (C). • Click on the
Exit (D) button to exit, pause, or resume the game. You can
also adjust your options (sound, music, and screen size). •
Once you find the Map (E) you can use it to travel between
locations that you have opened.
• This is the official guide for 1 Moment of Time:
Silentville. • You will not need to follow the exact path of
this guide; however, some actions are required before you can
complete another scene. • If you get stuck in your game play,
you can use the Hint Button (A). • Your inventory bar (B) will
hold items needed in other scenes until you use them. • Zoom
into any sparkling scene to trigger a Hidden Object Scene. In
this guide we will use the acronym ‘HOS' for Hidden Object
Scenes. • For extra help use the journal (C). • Click on the
Exit (D) button to exit, pause, or resume the game. You can
also adjust your options (sound, music, and screen size). •
Once you find the Map (E) you can use it to travel between
locations that you have opened.
Chapter 1: The Train Station and Police Station
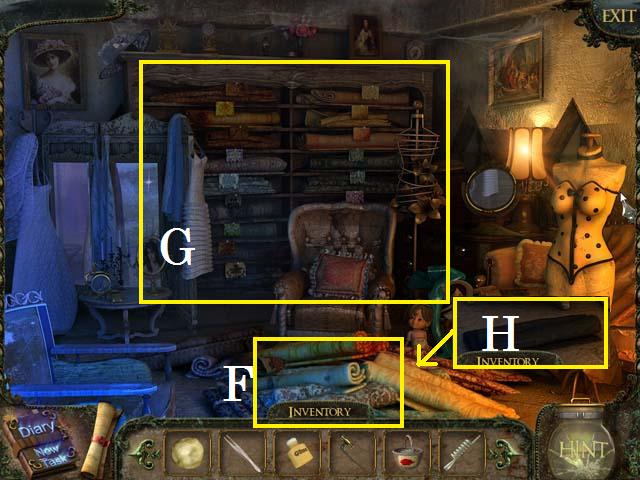
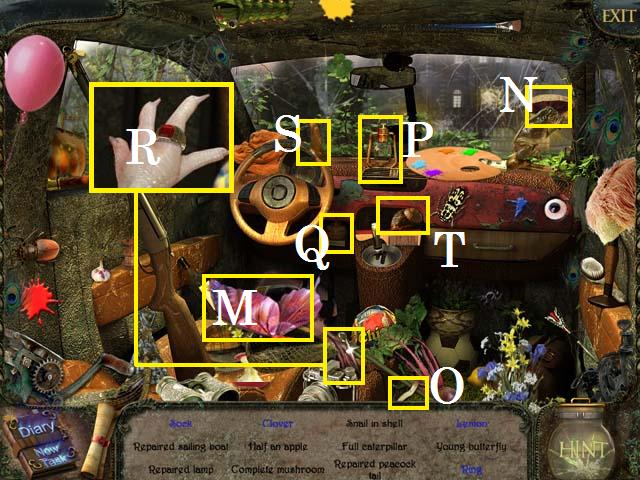
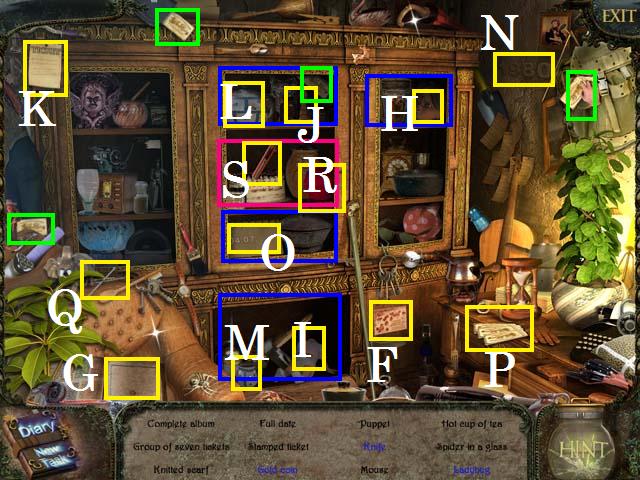 • Leave the Platform, enter the Train Station, and then enter
the Ticket Office. • Zoom into the sparkles to play a HOS. •
Place the stamps (F) in the book (G) for the completed album.
• Open the doors (blue); then drag the doll head (H) to the
doll body (I) for the puppet. • Drag the stamp (J) to the
ticket (K) for the stamped ticket. • Pour the tea (L) into the
cup (M) for the hot cup of tea. • Drag the year 1980 (N) to
the calendar (O) for the full date. • Place the four (green)
tickets with the others (P) for the group of seven tickets. •
Open the door (pink); drag the needles (Q) to the yarn (R) for
the knitted scarf. • Pick up the knife (S).
• Leave the Platform, enter the Train Station, and then enter
the Ticket Office. • Zoom into the sparkles to play a HOS. •
Place the stamps (F) in the book (G) for the completed album.
• Open the doors (blue); then drag the doll head (H) to the
doll body (I) for the puppet. • Drag the stamp (J) to the
ticket (K) for the stamped ticket. • Pour the tea (L) into the
cup (M) for the hot cup of tea. • Drag the year 1980 (N) to
the calendar (O) for the full date. • Place the four (green)
tickets with the others (P) for the group of seven tickets. •
Open the door (pink); drag the needles (Q) to the yarn (R) for
the knitted scarf. • Pick up the knife (S).
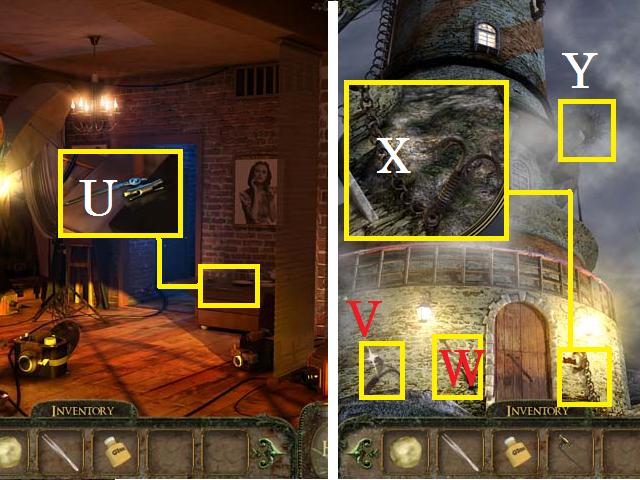
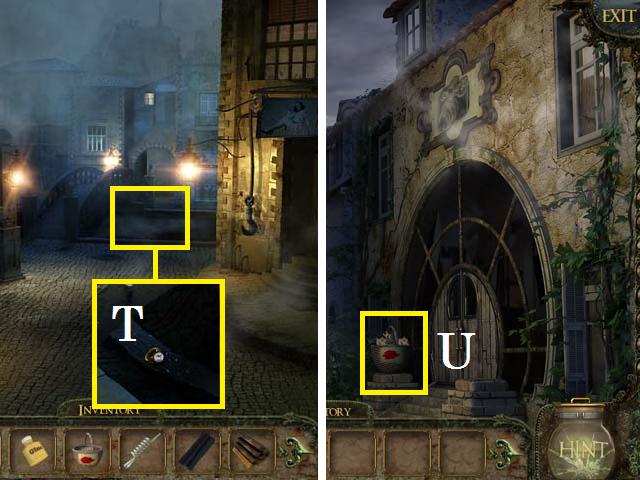
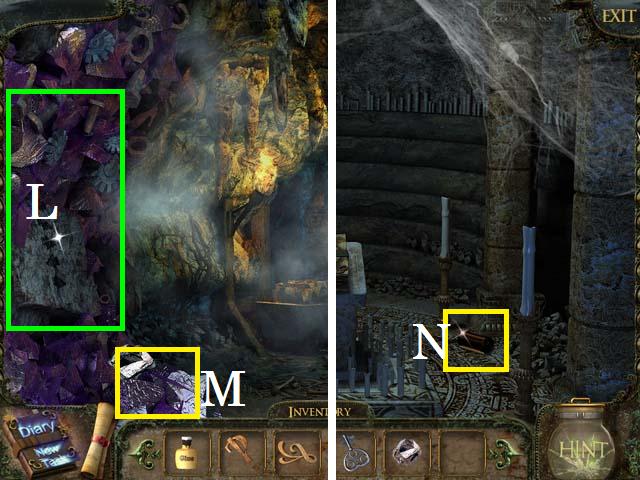
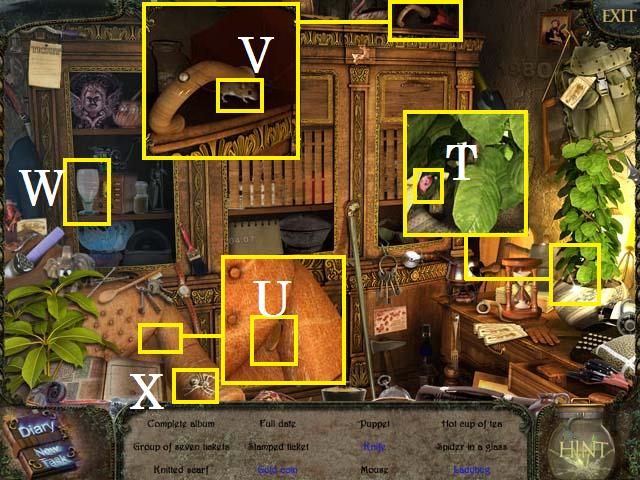 • Zoom into the plant; pick up the ladybug (T). • Zoom into
the armchair; pick up the gold coin (U). • Zoom into the
umbrella; open the umbrella and then pick up the mouse (V). •
Place the glass (W) over the spider (X) for the spider in a
glass. • Receive the KNIFE.
• Zoom into the plant; pick up the ladybug (T). • Zoom into
the armchair; pick up the gold coin (U). • Zoom into the
umbrella; open the umbrella and then pick up the mouse (V). •
Place the glass (W) over the spider (X) for the spider in a
glass. • Receive the KNIFE.
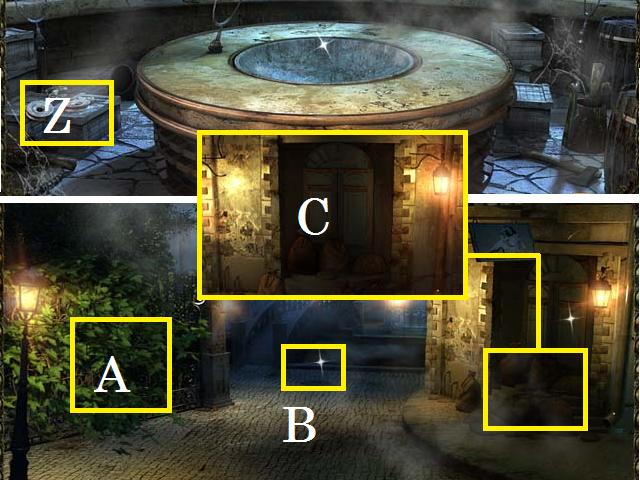
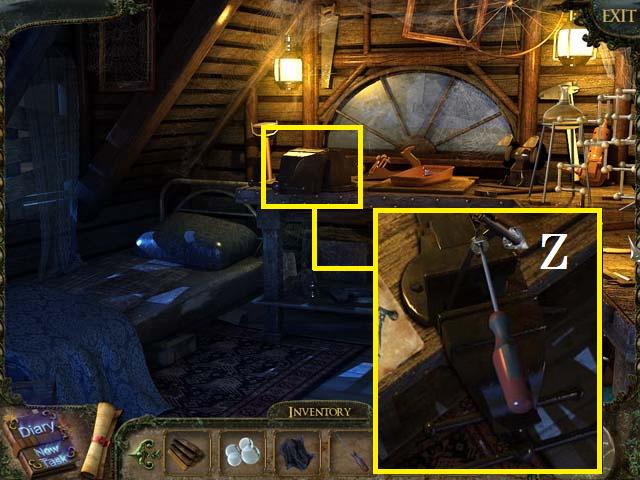
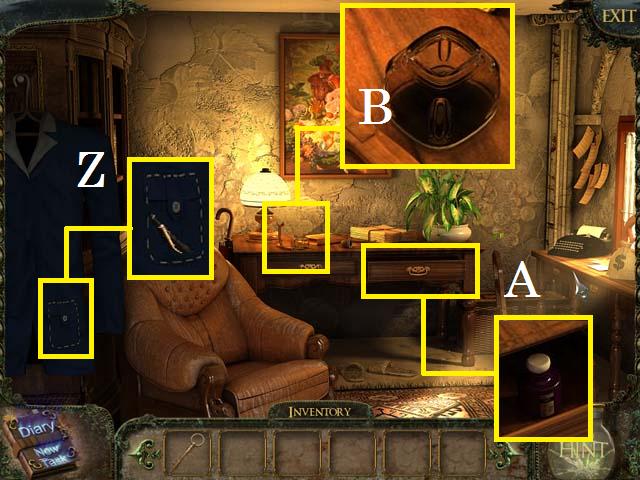 • Zoom into the coat; open the pocket with the KNIFE and then
pick up the STORAGE KEY (Z). • Zoom into the drawer; pick up
the INK (A). • Zoom into the desk; pour the INK into the well
(B). • Exit the Ticket Office and speak with the man.
• Zoom into the coat; open the pocket with the KNIFE and then
pick up the STORAGE KEY (Z). • Zoom into the drawer; pick up
the INK (A). • Zoom into the desk; pour the INK into the well
(B). • Exit the Ticket Office and speak with the man.
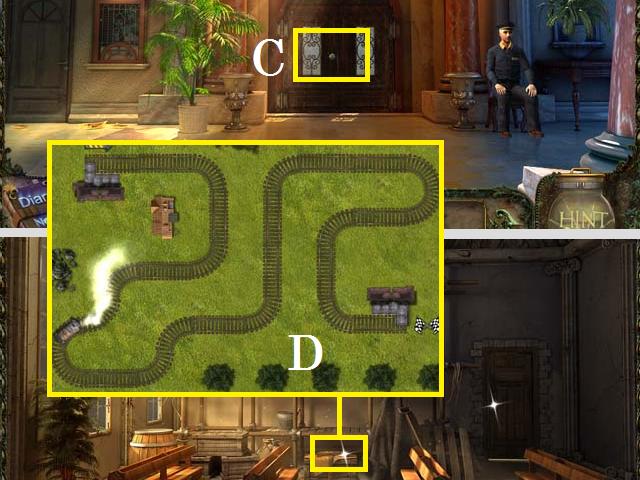 • Zoom into the door (C); try to turn the knob. • Take a right
to the Waiting Room. • Zoom into the box and then the train
set; arrange the track as shown in the screenshot (D).
• Zoom into the door (C); try to turn the knob. • Take a right
to the Waiting Room. • Zoom into the box and then the train
set; arrange the track as shown in the screenshot (D).
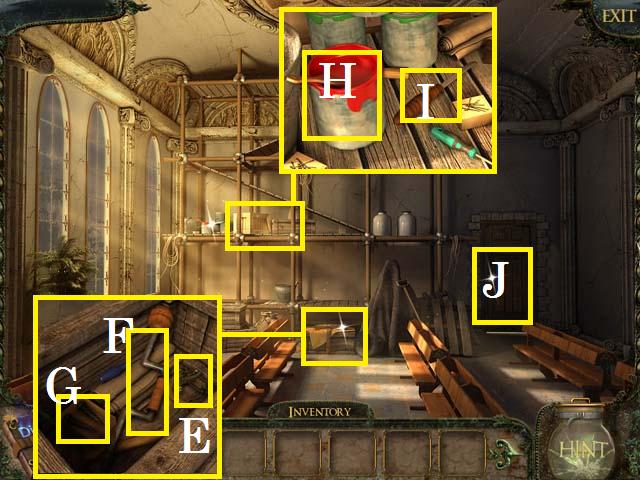 • Collect the map and zoom back into the box; pick up the DOOR
HANDLE (E) and the WIMBLE (F). Open the little box; pick up
the SCREWS (G). • Zoom into the shelf; pick up the PAINT (H)
and CHISLE (I). • Unlock the door (J) with the STORAGE KEY.
• Collect the map and zoom back into the box; pick up the DOOR
HANDLE (E) and the WIMBLE (F). Open the little box; pick up
the SCREWS (G). • Zoom into the shelf; pick up the PAINT (H)
and CHISLE (I). • Unlock the door (J) with the STORAGE KEY.
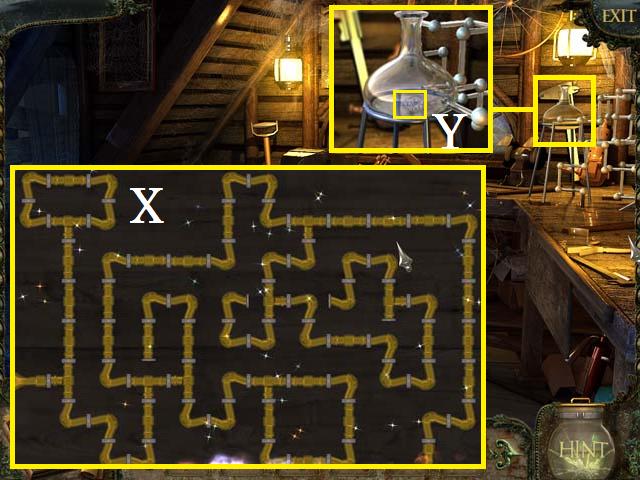
 • Zoom into the sparkles to play a HOS. • Pick up the Arthur
(K). • Open the burlap bag by pulling the string (@), followed
by the bricks (L) and then zoom into the open space. Pick up
the cockroach (M). Note: after you remove the burlap bag,
grains will pour on the floor and the rat will appear. • Use
the yellow liquid (N) on the cabinet's hinge (O). • Zoom into
the oven; place the coin (P) in the slot (Q) and then flip the
first switch (R). • Pick up the key (S). The key will land on
the floor (T). Use this key to unlock the cabinet (U). First,
zoom into the lock and place the key. Next, pick up the
anti-rust acid (V) and the cabinet will open. • Use the hammer
(W) to pull out the nail (X) and pick it up.
• Zoom into the sparkles to play a HOS. • Pick up the Arthur
(K). • Open the burlap bag by pulling the string (@), followed
by the bricks (L) and then zoom into the open space. Pick up
the cockroach (M). Note: after you remove the burlap bag,
grains will pour on the floor and the rat will appear. • Use
the yellow liquid (N) on the cabinet's hinge (O). • Zoom into
the oven; place the coin (P) in the slot (Q) and then flip the
first switch (R). • Pick up the key (S). The key will land on
the floor (T). Use this key to unlock the cabinet (U). First,
zoom into the lock and place the key. Next, pick up the
anti-rust acid (V) and the cabinet will open. • Use the hammer
(W) to pull out the nail (X) and pick it up.
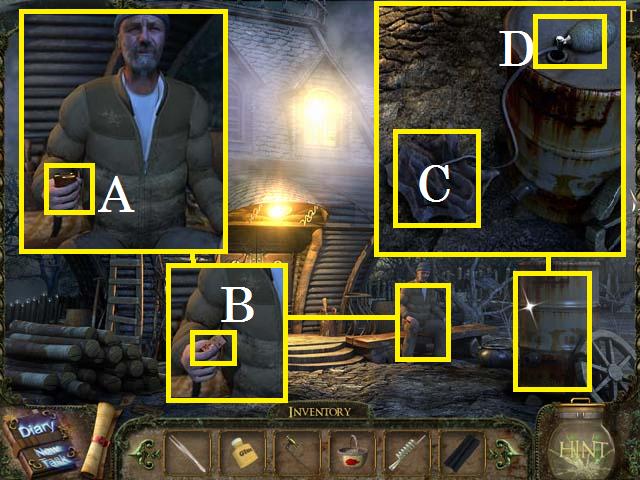
 • Open the other side of the cabinet; drag the broom bottom
(Y) to the handle (Z) for the repaired broom. • Pour the
bucket (A) into the mixture (B) to make the concrete mixture.
• Zoom back into the oven and then place the coin back into
the slot. Flip the second switch (C) and then pick up a cup of
coffee (D). • Zoom back into the oven and then place the coin
back into the slot. Flip the third switch (E). Pick up the rat
(F) then zoom into the oven and place it with the cat eyes for
the cat and rat (G).
• Open the other side of the cabinet; drag the broom bottom
(Y) to the handle (Z) for the repaired broom. • Pour the
bucket (A) into the mixture (B) to make the concrete mixture.
• Zoom back into the oven and then place the coin back into
the slot. Flip the second switch (C) and then pick up a cup of
coffee (D). • Zoom back into the oven and then place the coin
back into the slot. Flip the third switch (E). Pick up the rat
(F) then zoom into the oven and place it with the cat eyes for
the cat and rat (G).
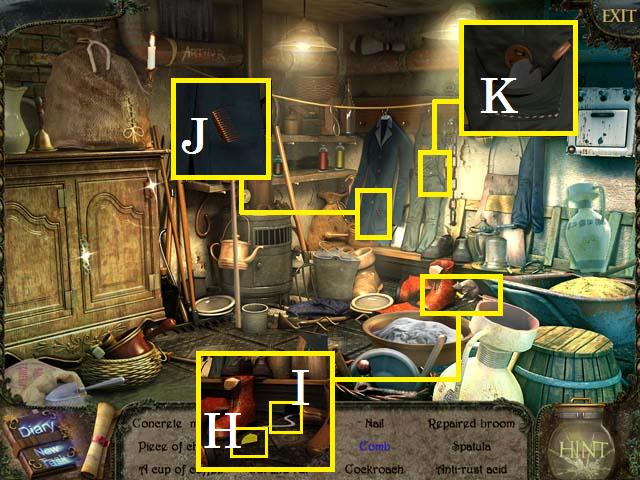 • Zoom into the mouse hole; pick up the piece of cheese (H)
and lace (I). • Zoom into the coat; pick up the comb (J). •
Zoom into the overalls; open the pocket and then pick up the
spatula (K). • Receive the ANTI-RUST SOLUTION. • Exit the
waiting room.
• Zoom into the mouse hole; pick up the piece of cheese (H)
and lace (I). • Zoom into the coat; pick up the comb (J). •
Zoom into the overalls; open the pocket and then pick up the
spatula (K). • Receive the ANTI-RUST SOLUTION. • Exit the
waiting room.
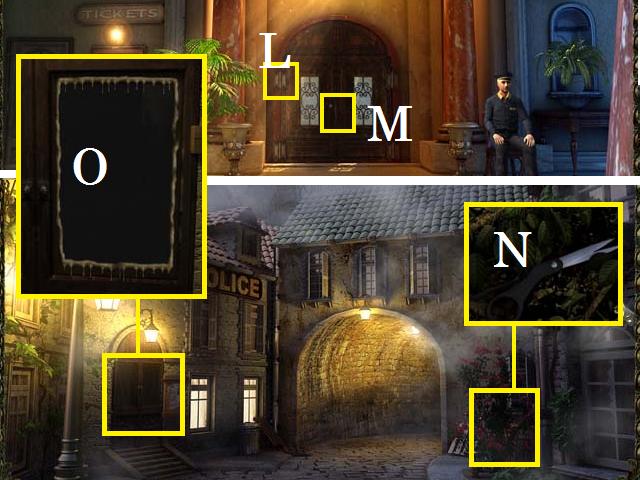 • Place the DOOR HANDLE, followed by the SCREWS on the door
(M), and secure with the WIMBLE. • Pour the ANTI-RUST SOLUTION
on the door's hinge (L). • Exit the Train Station to the
Police Station Exterior. • Zoom into the bushes; pick up the
SCISSORS (N). • Zoom into the Police Station door; remove the
PUTTY (O) with the CHISLE. • Return to the Waiting Room in the
Train Station.
• Place the DOOR HANDLE, followed by the SCREWS on the door
(M), and secure with the WIMBLE. • Pour the ANTI-RUST SOLUTION
on the door's hinge (L). • Exit the Train Station to the
Police Station Exterior. • Zoom into the bushes; pick up the
SCISSORS (N). • Zoom into the Police Station door; remove the
PUTTY (O) with the CHISLE. • Return to the Waiting Room in the
Train Station.
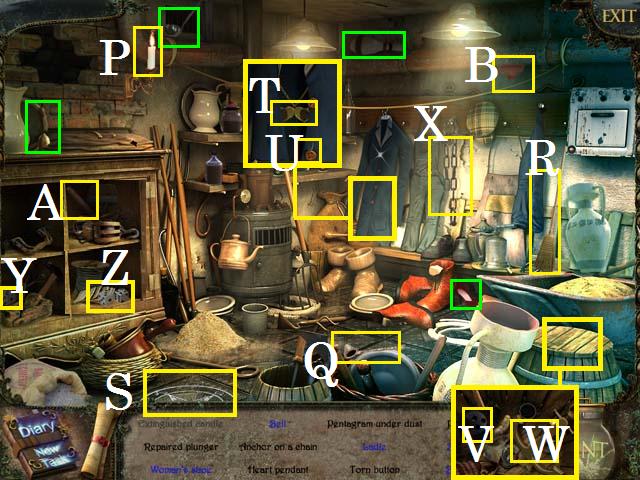 • Zoom into the sparkles to play a HOS. • Pick up the bowling
pin, woman's shoe, ladle, and the bell all marked in green. •
Snuff the candle (P) with the snuffer (Q) for the extinguished
candle. • Use the broom (R) on the dust to reveal the
pentagram under dust (S). • Zoom into the coat; open the coat
and then pick up the heart pendant (T) and the torn button
(U). • Zoom into the cask; pick up the bowling ball (V), and
then drag the anchor (W) to the chain (X) to complete the
anchor on a chain. • Open up both doors to the cabinet; drag
the die (Y) to the other one (Z) to create the pair of dice. •
Drag the handle (A) to the plunger (B) to make the repaired
plunger. • Receive the PLUNGER. • Return to the Police
Station.
• Zoom into the sparkles to play a HOS. • Pick up the bowling
pin, woman's shoe, ladle, and the bell all marked in green. •
Snuff the candle (P) with the snuffer (Q) for the extinguished
candle. • Use the broom (R) on the dust to reveal the
pentagram under dust (S). • Zoom into the coat; open the coat
and then pick up the heart pendant (T) and the torn button
(U). • Zoom into the cask; pick up the bowling ball (V), and
then drag the anchor (W) to the chain (X) to complete the
anchor on a chain. • Open up both doors to the cabinet; drag
the die (Y) to the other one (Z) to create the pair of dice. •
Drag the handle (A) to the plunger (B) to make the repaired
plunger. • Receive the PLUNGER. • Return to the Police
Station.
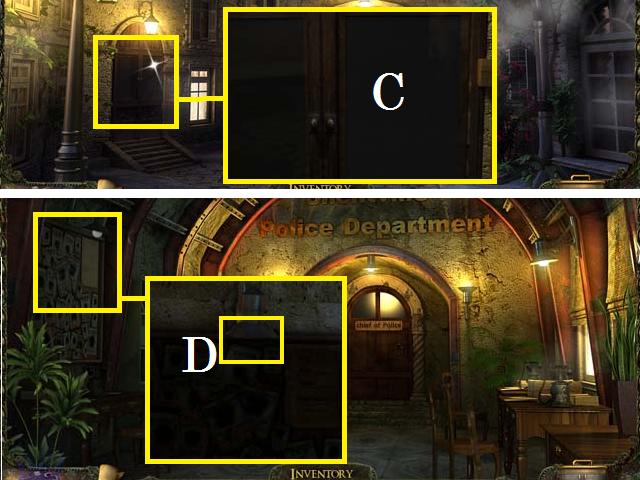 • Zoom into the door; remove the glass (C) with the PLUNGER
and enter the Police Station. • Zoom into the board; remove
the light bulb (D). • Enter the Police Chief's Office.
• Zoom into the door; remove the glass (C) with the PLUNGER
and enter the Police Station. • Zoom into the board; remove
the light bulb (D). • Enter the Police Chief's Office.
 • Zoom into the sparkles to trigger a HOS. • Open all of the
drawers and doors (green). • Place the glove (E) with its mate
(F) for the pair of gloves. • Unlock handcuffs (G) with the
key (H). • Place the feather (I) in the hat (J) for the hat
with a feather. • Drag the cigarette (K) over the candle (L)
and pick up the lit cigarette (M). • Place the three stacks of
money (pink) in the sack of dollars (N).
• Zoom into the sparkles to trigger a HOS. • Open all of the
drawers and doors (green). • Place the glove (E) with its mate
(F) for the pair of gloves. • Unlock handcuffs (G) with the
key (H). • Place the feather (I) in the hat (J) for the hat
with a feather. • Drag the cigarette (K) over the candle (L)
and pick up the lit cigarette (M). • Place the three stacks of
money (pink) in the sack of dollars (N).
 • Place the receiver (O) on its base (P) for the phone on
stand. • Place the aspirin (Q) in the beaker (R), followed by
the solution (S), for the aspirin solution. • Open the case
(T) and place the three cigars (blue) inside for the cigar
case with 4 cigars. • Place the tip (U) to complete pen (V). •
Close the door and remove the boot (W); pick up the boot
print. • Zoom into the drawer; fold the paper (X) until it is
folded into the completed origami. • Complete the football
player with a ball (Y) with the ball (Z). • Receive the EMPTY
PEN.
• Place the receiver (O) on its base (P) for the phone on
stand. • Place the aspirin (Q) in the beaker (R), followed by
the solution (S), for the aspirin solution. • Open the case
(T) and place the three cigars (blue) inside for the cigar
case with 4 cigars. • Place the tip (U) to complete pen (V). •
Close the door and remove the boot (W); pick up the boot
print. • Zoom into the drawer; fold the paper (X) until it is
folded into the completed origami. • Complete the football
player with a ball (Y) with the ball (Z). • Receive the EMPTY
PEN.
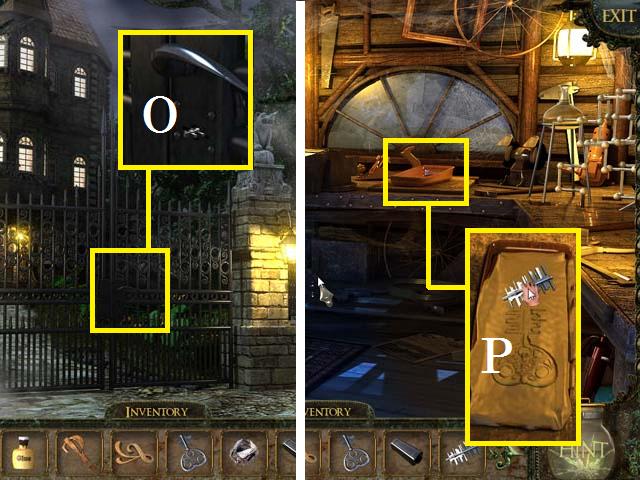
 • Zoom into the bottom of the desk; pick up the CHEWING GUM
(A). • Zoom into the lamp; remove the LIGHT BULB (B). • Exit
the Office. • Zoom into the board; replace the LIGHT BULB (C).
• Remove the PASS FORM (D) with the SCISSORS. • Return to the
Ticket Office in the Train Station.
• Zoom into the bottom of the desk; pick up the CHEWING GUM
(A). • Zoom into the lamp; remove the LIGHT BULB (B). • Exit
the Office. • Zoom into the board; replace the LIGHT BULB (C).
• Remove the PASS FORM (D) with the SCISSORS. • Return to the
Ticket Office in the Train Station.
 • Zoom into the desk; place the PEN in the ink (E) to receive
the PEN WITH INK. • Return to the Police Station and enter the
Police Chief's Office. • Zoom into the certificate; hang the
PASS FORM over it using the CHEWING GUM. Drag the PEN over the
signature (F) and pick up the PASS. • Exit the Police Station
and move forward to the Town Hall Exterior.
• Zoom into the desk; place the PEN in the ink (E) to receive
the PEN WITH INK. • Return to the Police Station and enter the
Police Chief's Office. • Zoom into the certificate; hang the
PASS FORM over it using the CHEWING GUM. Drag the PEN over the
signature (F) and pick up the PASS. • Exit the Police Station
and move forward to the Town Hall Exterior.
Chapter 2: Town Hall and the Lighthouse
 • Give the PASS to the man (G) and enter the Town Hall. •
Climb the stairs to the Study. • Zoom into the handbag; place
the cap (H) on the DETERGENT (I) and pick it up. • Place the
powder brush (J) in the MAKEUP KIT (K) and pick it up. • Open
the case; pick up the STICKER (L). • Enter the Mayor's Office.
• Give the PASS to the man (G) and enter the Town Hall. •
Climb the stairs to the Study. • Zoom into the handbag; place
the cap (H) on the DETERGENT (I) and pick it up. • Place the
powder brush (J) in the MAKEUP KIT (K) and pick it up. • Open
the case; pick up the STICKER (L). • Enter the Mayor's Office.
 • Speak with the Mayor. • Zoom into the Mayor and tap his
glass (M) so that he drinks it. • Zoom into the empty glass;
use the MAKEUP KIT followed by the STICKER on the glass and
pick up the FINGERPRINT. • Return to the staircase.
• Speak with the Mayor. • Zoom into the Mayor and tap his
glass (M) so that he drinks it. • Zoom into the empty glass;
use the MAKEUP KIT followed by the STICKER on the glass and
pick up the FINGERPRINT. • Return to the staircase.
 • Zoom into the door; use the FINGERPRINT on the lock (N) and
enter the Archive. • Pick up the DOCUMENTS (O).
• Zoom into the door; use the FINGERPRINT on the lock (N) and
enter the Archive. • Pick up the DOCUMENTS (O).
 • Zoom into the sparkles to play a HOS. • Drag the blades (P)
over to complete windmill (Q). • Drag the moon (R) to the sky
(S) for the moon in the sky. • Pick up the key (T) and then
zoom into the cage. Open the cage with the key. Coax the snake
out. After the snake has left the cage pick up the sea shell
(U). • Place the pencil (V) in the sharpener (W) for the
sharpened pencil. • Place the lance (X) in the knight's hands
(Y) for the knight with a lance. • Place the cork (Z) in the
bottle (A) to cork the bottle. • Place the record (B) on the
player (C) to play the record. • Place the eye (D) in the
skull (E) to complete the skull with two eyes. • Place the
three piano keys (green) on the keyboard (F) to complete piano
keyboard.
• Zoom into the sparkles to play a HOS. • Drag the blades (P)
over to complete windmill (Q). • Drag the moon (R) to the sky
(S) for the moon in the sky. • Pick up the key (T) and then
zoom into the cage. Open the cage with the key. Coax the snake
out. After the snake has left the cage pick up the sea shell
(U). • Place the pencil (V) in the sharpener (W) for the
sharpened pencil. • Place the lance (X) in the knight's hands
(Y) for the knight with a lance. • Place the cork (Z) in the
bottle (A) to cork the bottle. • Place the record (B) on the
player (C) to play the record. • Place the eye (D) in the
skull (E) to complete the skull with two eyes. • Place the
three piano keys (green) on the keyboard (F) to complete piano
keyboard.
 • Zoom into the crocodile; pick up the crocodile tooth (G). •
Open the globe and zoom in; pick up the pinchers (H). • Place
the five hearts (blue) on the chest (I). Zoom into the open
chest and pick up the golden heart (J). • Receive the
TWEEZERS. • Return to the Mayor's Office and give him the
DOCUMENTS. • Return to the Police Station.
• Zoom into the crocodile; pick up the crocodile tooth (G). •
Open the globe and zoom in; pick up the pinchers (H). • Place
the five hearts (blue) on the chest (I). Zoom into the open
chest and pick up the golden heart (J). • Receive the
TWEEZERS. • Return to the Mayor's Office and give him the
DOCUMENTS. • Return to the Police Station.
 • Zoom into the safe; use the DETERGENT on all of the dirty
buttons and then press the buttons (1-4). • Zoom into the
sparkles to play a HOS.
• Zoom into the safe; use the DETERGENT on all of the dirty
buttons and then press the buttons (1-4). • Zoom into the
sparkles to play a HOS.
 • Use the ice pick (K) to get crushed ice (L). • Chop the
salami (M) with the knife (N), and then place it on the pizza
(O) to get the pizza with salami. • Open the toilet to find
the swimming duck (P). • Place the cigarette stub (Q) in a zip
lock baggie (R). • Slice the film strip (S) with the scissors
(T). • Groom the dog (U) with the brush (V) to get the dog's
fur. • Place the two lenses (green) in the sunglasses (W).
• Use the ice pick (K) to get crushed ice (L). • Chop the
salami (M) with the knife (N), and then place it on the pizza
(O) to get the pizza with salami. • Open the toilet to find
the swimming duck (P). • Place the cigarette stub (Q) in a zip
lock baggie (R). • Slice the film strip (S) with the scissors
(T). • Groom the dog (U) with the brush (V) to get the dog's
fur. • Place the two lenses (green) in the sunglasses (W).
 • Use the clippers (X) on the chicken foot (Y) and then pick
up the chicken toenail (@). • Place the watch (Z) on the wrist
(A) to get the wristwatch being worn. • Use the toothbrush (B)
to clean tooth (C). • Unlock the safe (green) with the key (D)
and then pick up the handsaw (E) and boomerang (F). • Receive
the HANDSAW. • Return to the Town Hall.
• Use the clippers (X) on the chicken foot (Y) and then pick
up the chicken toenail (@). • Place the watch (Z) on the wrist
(A) to get the wristwatch being worn. • Use the toothbrush (B)
to clean tooth (C). • Unlock the safe (green) with the key (D)
and then pick up the handsaw (E) and boomerang (F). • Receive
the HANDSAW. • Return to the Town Hall.
 • Take the path to the right and use the HANDSAW on the tree
(G). • Take the path to the Photo Studios exterior and zoom
into the basket (H). • Return to the Police Station.
• Take the path to the right and use the HANDSAW on the tree
(G). • Take the path to the Photo Studios exterior and zoom
into the basket (H). • Return to the Police Station.
 • Zoom into the sparkles to play a HOS. • Pick up the pacifier
(I) and the rubber belt (J). • Open the safe and bust the
piggy bank (K) open with the hammer (L) to get the spare
change. • Plug the cord (M) into the outlet (N) to get the lit
Christmas tree (O). • Place the hook (P) on the string (Q) and
then dip it in the fishbowl (R) to get the fish. • Place the
four keys (green) on the key ring (S) to create the set of 5
rings. • Zoom back into the box; collect the chips (blue) to
create a bunch of poker chips.
• Zoom into the sparkles to play a HOS. • Pick up the pacifier
(I) and the rubber belt (J). • Open the safe and bust the
piggy bank (K) open with the hammer (L) to get the spare
change. • Plug the cord (M) into the outlet (N) to get the lit
Christmas tree (O). • Place the hook (P) on the string (Q) and
then dip it in the fishbowl (R) to get the fish. • Place the
four keys (green) on the key ring (S) to create the set of 5
rings. • Zoom back into the box; collect the chips (blue) to
create a bunch of poker chips.
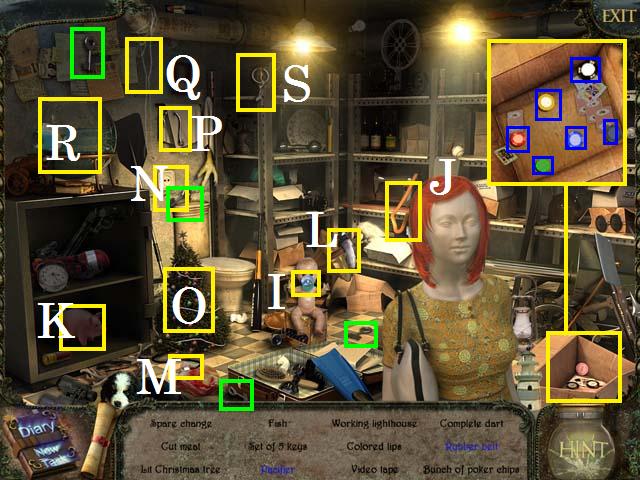
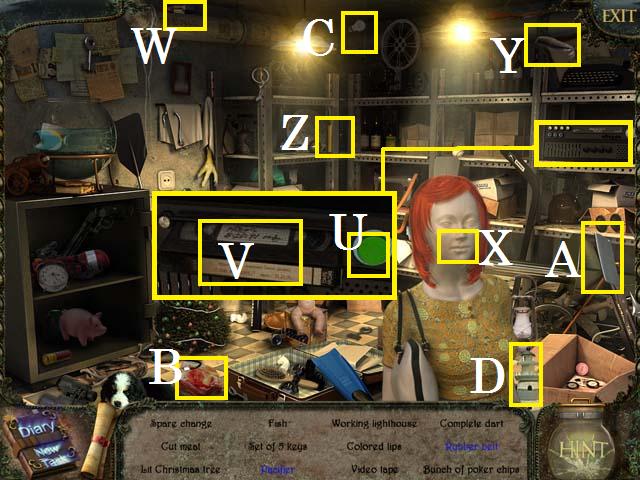 • Zoom into the VCR; press the button (U) to remove the video
tape (V). • Drag the lipstick (W) over the mannequin's mouth
(X) for the colored lips. • Place the feather (Y) to complete
dart (Z). • Use the knife (A) to cut meat (B). • Place the
light bulb (C) in the lighthouse (D) for the working
lighthouse. • Receive the DRIVING BELT. • Enter the Police
Chief's Office.
• Zoom into the VCR; press the button (U) to remove the video
tape (V). • Drag the lipstick (W) over the mannequin's mouth
(X) for the colored lips. • Place the feather (Y) to complete
dart (Z). • Use the knife (A) to cut meat (B). • Place the
light bulb (C) in the lighthouse (D) for the working
lighthouse. • Receive the DRIVING BELT. • Enter the Police
Chief's Office.
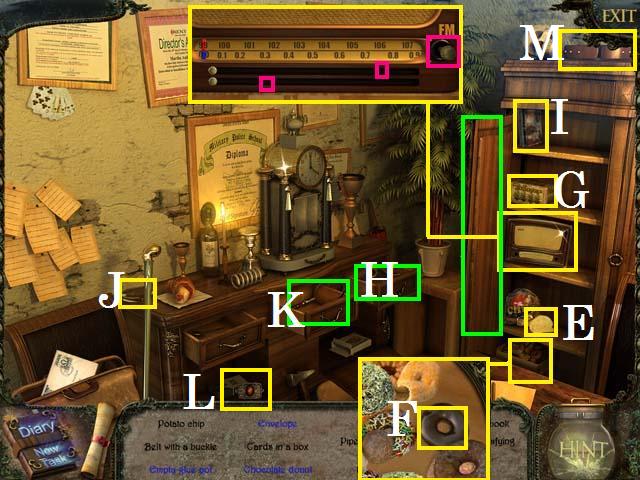 • Zoom into the sparkles to play a HOS. • Open the door
(green); pop the chip bag open and pick up the potato chip
(E). • Zoom into the box; move the donuts around until you
reveal the chocolate donut (F). • Open the drawer (green);
place the tobacco (G) in the pipe (H) for the pipe stuffed
with tobacco. • Zoom into the radio; set it to 106.3 fm by
pressing where marked pink in the screenshot. • Open the book
(I) and remove a page from a book. • Open the drawer (green);
place the lens (J) to complete magnifying glass (K).
• Zoom into the sparkles to play a HOS. • Open the door
(green); pop the chip bag open and pick up the potato chip
(E). • Zoom into the box; move the donuts around until you
reveal the chocolate donut (F). • Open the drawer (green);
place the tobacco (G) in the pipe (H) for the pipe stuffed
with tobacco. • Zoom into the radio; set it to 106.3 fm by
pressing where marked pink in the screenshot. • Open the book
(I) and remove a page from a book. • Open the drawer (green);
place the lens (J) to complete magnifying glass (K).
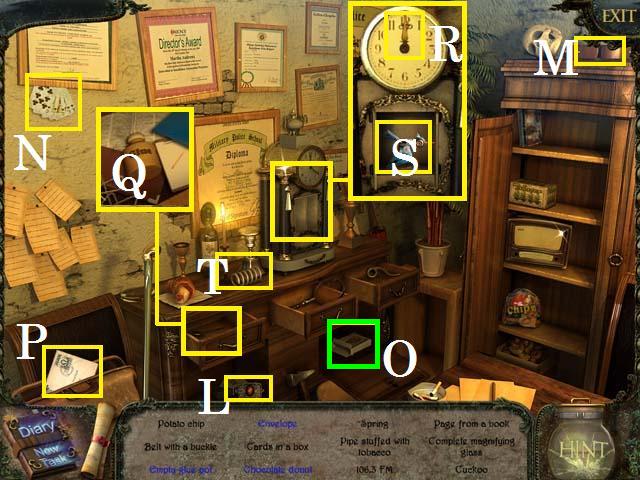 • Place the buckle (L) on the belt (M) to complete the belt
with buckle. • Open the door (green); place the cards (N) in a
box (O). • Open the bag and pick up the envelope (P). • Zoom
into the drawer and pick up the empty glue pot (Q). • Zoom
into the clock; set the time to 12 (R) and then pick up the
cuckoo (S). • After you set the clock the spring will fly off
you can then pick it up from where it lands (T). • Receive the
EMPTY GLUE BOTTLE. • Return to the Town Hall, take the gate to
the right and enter the Photo Studio.
• Place the buckle (L) on the belt (M) to complete the belt
with buckle. • Open the door (green); place the cards (N) in a
box (O). • Open the bag and pick up the envelope (P). • Zoom
into the drawer and pick up the empty glue pot (Q). • Zoom
into the clock; set the time to 12 (R) and then pick up the
cuckoo (S). • After you set the clock the spring will fly off
you can then pick it up from where it lands (T). • Receive the
EMPTY GLUE BOTTLE. • Return to the Town Hall, take the gate to
the right and enter the Photo Studio.
 • Zoom into the desk; pick up the COMPASS (U). • Exit the
Studio, move forward, and then take a right to the outside of
the Lighthouse. • Pick up the ANCHOR (V) and HAND DRILL (W). •
Zoom into the chain; place the ANCHOR (X) and then throw the
chain over the NEST (Y). Collect the NEST. • Enter the
Lighthouse and move upstairs.
• Zoom into the desk; pick up the COMPASS (U). • Exit the
Studio, move forward, and then take a right to the outside of
the Lighthouse. • Pick up the ANCHOR (V) and HAND DRILL (W). •
Zoom into the chain; place the ANCHOR (X) and then throw the
chain over the NEST (Y). Collect the NEST. • Enter the
Lighthouse and move upstairs.
 • Pick up the ROPES AND PULLEYS (Z). • From the exterior of
Town Hall, take a left to the exterior of the Boutique. •
Attempt to take the path to the Park (A). • Zoom into the
water (B) to locate the RING. • Zoom into the door; place the
ROPES AND PULLEYS (C).
• Pick up the ROPES AND PULLEYS (Z). • From the exterior of
Town Hall, take a left to the exterior of the Boutique. •
Attempt to take the path to the Park (A). • Zoom into the
water (B) to locate the RING. • Zoom into the door; place the
ROPES AND PULLEYS (C).
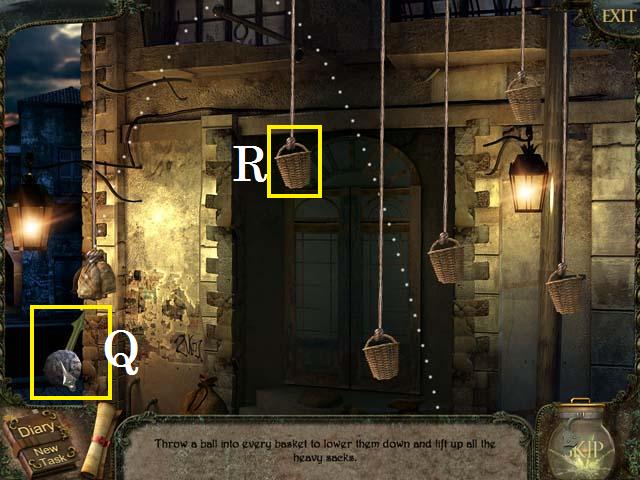 • The trick is to point the arrow and then click and hold the
ball (Q) until the arrow grows. When you fell it is ready
release the ball. • Adjust your aim and force until you have
sunk a ball in each basket (R).
• The trick is to point the arrow and then click and hold the
ball (Q) until the arrow grows. When you fell it is ready
release the ball. • Adjust your aim and force until you have
sunk a ball in each basket (R).
Chapter 3: The Boutique and the Park
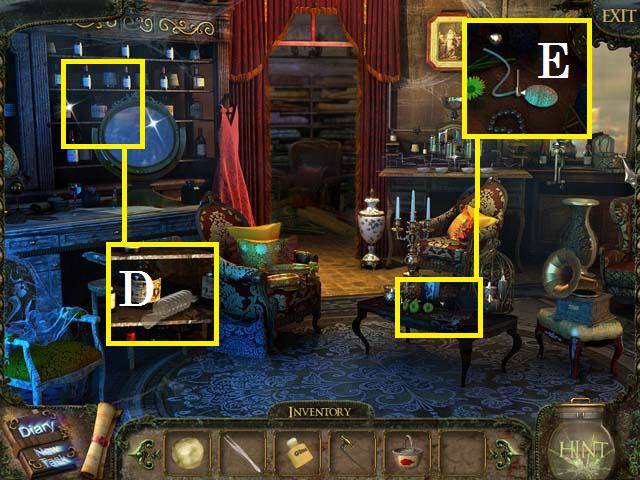 • Enter the Boutique. • Zoom into the shelf; pick up the GLASS
TUBE (D). • Zoom into the coffee table; pick up the SPRAYER
(E). • Enter the Back Room.
• Enter the Boutique. • Zoom into the shelf; pick up the GLASS
TUBE (D). • Zoom into the coffee table; pick up the SPRAYER
(E). • Enter the Back Room.
 • Place the cloth rolls (F) on the shelf (G) as shown in the
screenshot. • Pick up the THICK BLACK FABRIC (H). • Move back
towards the Lighthouse stopping at the Big Tree.
• Place the cloth rolls (F) on the shelf (G) as shown in the
screenshot. • Pick up the THICK BLACK FABRIC (H). • Move back
towards the Lighthouse stopping at the Big Tree.
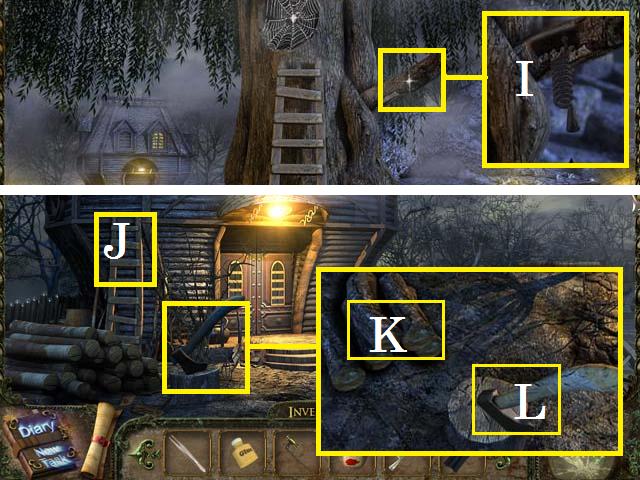 • Zoom into the branch; use the HAND DRILL on the branch and
place the GLASS TUBE in the hole (I). Collect the GLUE with
the EMPTY GLUE BOTTLE. • Take the path to the left towards the
Light Keepers House. • Pick up the LADDER (J). • Zoom into the
axe; place all of the wood (K) on the stump and use the axe
(L) to chop it up. Pick up the twenty pieces until you are
awarded the FIREWOOD. • Speak with the man. • Enter the House.
• Zoom into the branch; use the HAND DRILL on the branch and
place the GLASS TUBE in the hole (I). Collect the GLUE with
the EMPTY GLUE BOTTLE. • Take the path to the left towards the
Light Keepers House. • Pick up the LADDER (J). • Zoom into the
axe; place all of the wood (K) on the stump and use the axe
(L) to chop it up. Pick up the twenty pieces until you are
awarded the FIREWOOD. • Speak with the man. • Enter the House.
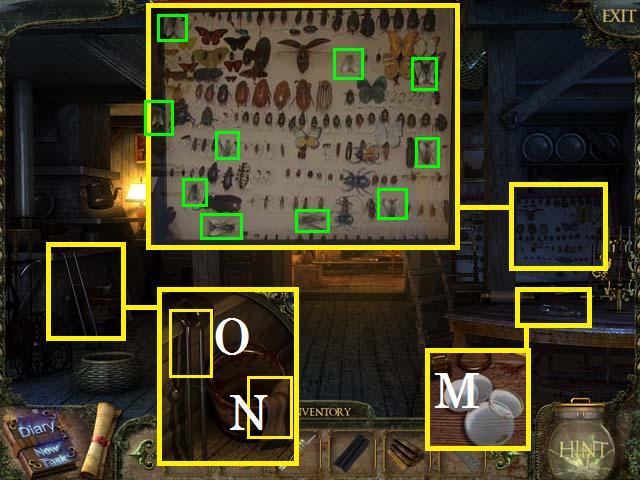 • Zoom into the table; pick up the LENSES (M). • Zoom into the
bug collection; pick up all the flies (green) to receive the
FLY. • Zoom into the stove; pick up the DRY RAG (N) and the
PAIR OF TONGS (O). • Enter the Back Room.
• Zoom into the table; pick up the LENSES (M). • Zoom into the
bug collection; pick up all the flies (green) to receive the
FLY. • Zoom into the stove; pick up the DRY RAG (N) and the
PAIR OF TONGS (O). • Enter the Back Room.
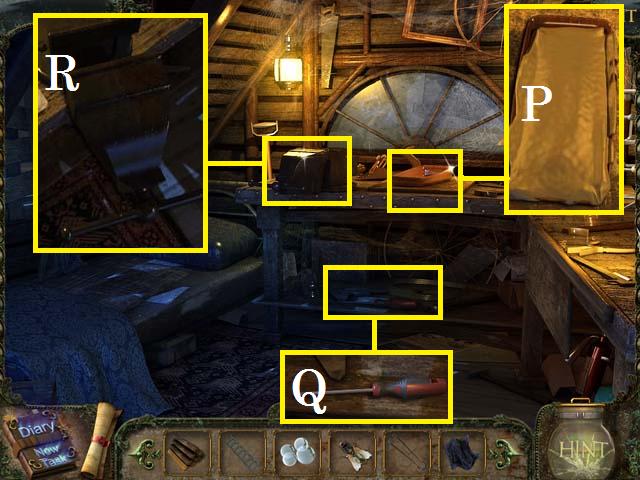 • Zoom into the desk; place the PUTTY in the mold (P). • Zoom
into the lower shelf; pick up the SCREWDRIVER (Q). • Zoom into
the clamp; place the COMPASS in the clamp (R). • Return to the
Exterior of the Boutique.
• Zoom into the desk; place the PUTTY in the mold (P). • Zoom
into the lower shelf; pick up the SCREWDRIVER (Q). • Zoom into
the clamp; place the COMPASS in the clamp (R). • Return to the
Exterior of the Boutique.
 • Zoom into the water; use the PAIR OF TONGS to pick up the
RING (T). • Return to the Exterior of the Photo Studio. •
Replace the BASKET (U) with the nest. • Return Light Keepers
House stopping at the Big Tree.
• Zoom into the water; use the PAIR OF TONGS to pick up the
RING (T). • Return to the Exterior of the Photo Studio. •
Replace the BASKET (U) with the nest. • Return Light Keepers
House stopping at the Big Tree.
 • Lean the LADDER on the tree (V) and zoom into the spider
web. • Feed the FLY to the spider and pick up the SCREW
(green) and the PIPE'S MOUTHPIECE (green). • Return to the
Light Keepers House and enter the back room. • Zoom into the
vial; place the RING inside (W) and zoom in.
• Lean the LADDER on the tree (V) and zoom into the spider
web. • Feed the FLY to the spider and pick up the SCREW
(green) and the PIPE'S MOUTHPIECE (green). • Return to the
Light Keepers House and enter the back room. • Zoom into the
vial; place the RING inside (W) and zoom in.
 • Spin the tubes as shown in the screenshot (X). • Now remove
the DIAMOND (Y) with the TWEEZERS.
• Spin the tubes as shown in the screenshot (X). • Now remove
the DIAMOND (Y) with the TWEEZERS.
 • Zoom back into the clamp and place the DIAMOND in the
COMPASS (Z) and secure with the SCREW and SCREWDRIVER. Pick up
the completed GLASS CUTTER. • Exit the House.
• Zoom back into the clamp and place the DIAMOND in the
COMPASS (Z) and secure with the SCREW and SCREWDRIVER. Pick up
the completed GLASS CUTTER. • Exit the House.
 • Zoom into the man; place the PIPE'S MOUTHPIECE (A) and pick
up the MATCHES (B). • Zoom into the barrel; Place the DRY RAG
(C) and the SPRAYER (D). Squeeze the SPRAYER and pick up the
KEROSENE SOAKED RAG. • Return to the Boutique and move inside.
• Zoom into the man; place the PIPE'S MOUTHPIECE (A) and pick
up the MATCHES (B). • Zoom into the barrel; Place the DRY RAG
(C) and the SPRAYER (D). Squeeze the SPRAYER and pick up the
KEROSENE SOAKED RAG. • Return to the Boutique and move inside.
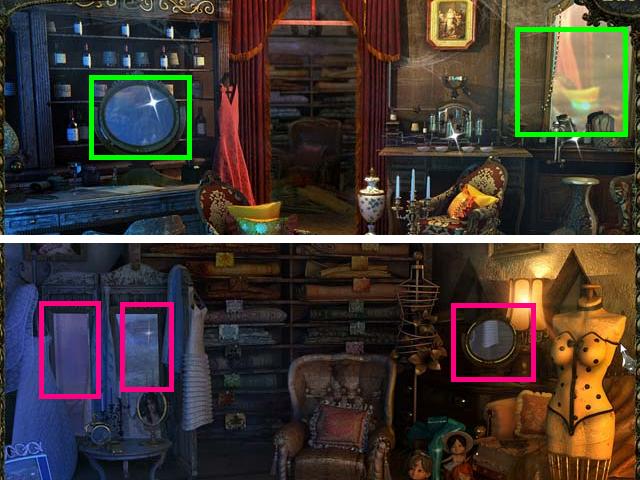 • Zoom into the mirrors (green) and remove the GLASS with the
GLASS CUTTER. • Enter the back room. • Zoom into the mirrors
(pink) and remove the GLASS with the GLASS CUTTER. • Return to
the upstairs of the Lighthouse.
• Zoom into the mirrors (green) and remove the GLASS with the
GLASS CUTTER. • Enter the back room. • Zoom into the mirrors
(pink) and remove the GLASS with the GLASS CUTTER. • Return to
the upstairs of the Lighthouse.
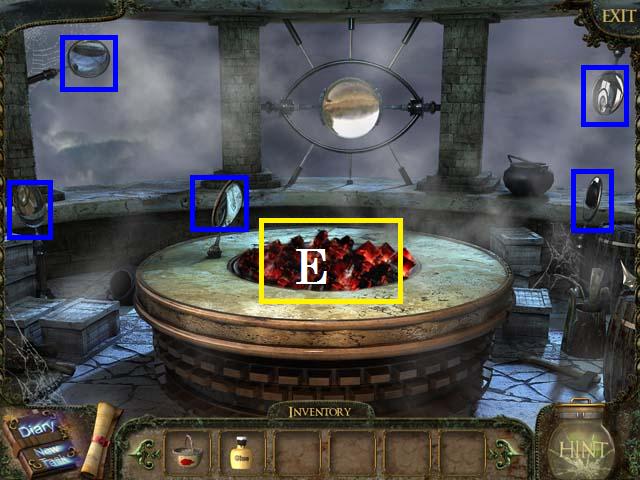 • Zoom into the fire pit (E); place the FIREWOOD, KEROSENE
SOAKED RAG, and light with the MATCHES. • Place all of the
MIRRORS (blue). The Path to the Park is now open. • Return to
the Exterior of the Boutique and enter the Park.
• Zoom into the fire pit (E); place the FIREWOOD, KEROSENE
SOAKED RAG, and light with the MATCHES. • Place all of the
MIRRORS (blue). The Path to the Park is now open. • Return to
the Exterior of the Boutique and enter the Park.
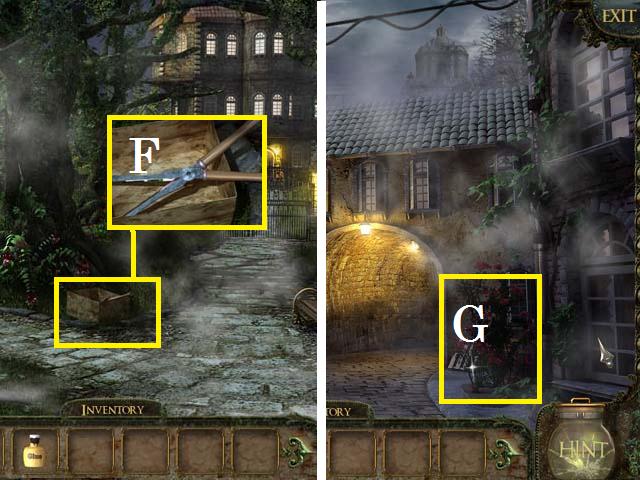 • Zoom into the box; pick up the GARDEN PRUNER (F). • Return
to the Police Station Exterior. • Zoom into the bush (G); use
the GARDEN PRUNER to receive the ROSE'S THORN. • Return to the
Park and take the path to the left to VW bug.
• Zoom into the box; pick up the GARDEN PRUNER (F). • Return
to the Police Station Exterior. • Zoom into the bush (G); use
the GARDEN PRUNER to receive the ROSE'S THORN. • Return to the
Park and take the path to the left to VW bug.
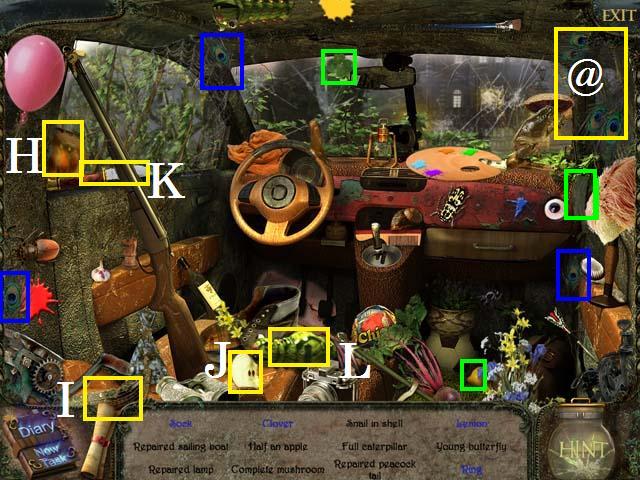 • Zoom into the sparkles to play a HOS. • Pick up the clover,
lemon, and sock, all marked in green. • Place the sail (H) on
the boat (I) for the repaired sailing boat. • Place the three
(blue) feathers in the repaired peacock tail (@). • Slice the
apple (J) with the knife (K) for the half an apple. • After
slicing the apple collect the full caterpillar (L).
• Zoom into the sparkles to play a HOS. • Pick up the clover,
lemon, and sock, all marked in green. • Place the sail (H) on
the boat (I) for the repaired sailing boat. • Place the three
(blue) feathers in the repaired peacock tail (@). • Slice the
apple (J) with the knife (K) for the half an apple. • After
slicing the apple collect the full caterpillar (L).
 • The caterpillar will cocoon and become the young butterfly
(M). • Place the mushroom cap (N) on its stem (O) to complete
mushroom. • Place the lamp (P) on the base (Q) for the
repaired lamp. • Zoom into the chicken foot; pick up the ring
(R). • Place the snail (S) in a shell (T). • Receive the EMPTY
LAMP. • Return to the Light Keepers House.
• The caterpillar will cocoon and become the young butterfly
(M). • Place the mushroom cap (N) on its stem (O) to complete
mushroom. • Place the lamp (P) on the base (Q) for the
repaired lamp. • Zoom into the chicken foot; pick up the ring
(R). • Place the snail (S) in a shell (T). • Receive the EMPTY
LAMP. • Return to the Light Keepers House.
 • Zoom into the barrel; place the EMPTY LAMP (U) and squeeze
the SPRAYER. Pick up the FULL LAMP. • Return to the Lighthouse
and move upstairs. • Zoom into the coals; place the FULL LAMP
(V) and dip the ROSE'S THORN into the hot coals. Pick up the
LIGHTED LAMP. • Return to the Park and take the path to the VW
bug. Move forward to the Gardner's House.
• Zoom into the barrel; place the EMPTY LAMP (U) and squeeze
the SPRAYER. Pick up the FULL LAMP. • Return to the Lighthouse
and move upstairs. • Zoom into the coals; place the FULL LAMP
(V) and dip the ROSE'S THORN into the hot coals. Pick up the
LIGHTED LAMP. • Return to the Park and take the path to the VW
bug. Move forward to the Gardner's House.
Chapter 4: The Gardner's House, Gold Mine, and Photo Studio
 • Speak with the man. • Pick up the SHOVEL (W), and the
BUTTERFLY NET (X). • Zoom into the bench (Y); remove all of
the vegetables and pick up the BASKET. • Back up to the VW
bug. • Zoom into the puddle; use the SHOVEL next to the puddle
(Z) to release the water and then pick up the MYSTERIOUS
SYMBOL (A). • Move forward and take the path to the left.
• Speak with the man. • Pick up the SHOVEL (W), and the
BUTTERFLY NET (X). • Zoom into the bench (Y); remove all of
the vegetables and pick up the BASKET. • Back up to the VW
bug. • Zoom into the puddle; use the SHOVEL next to the puddle
(Z) to release the water and then pick up the MYSTERIOUS
SYMBOL (A). • Move forward and take the path to the left.
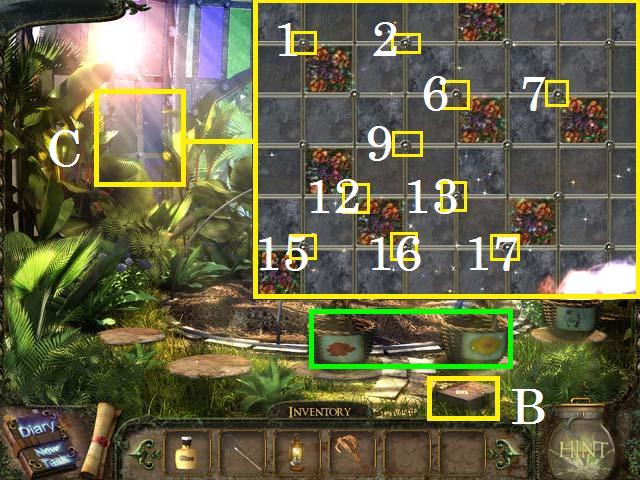 • Zoom into the book (B) and read the pages. • Go ahead and
place the two BASKETS (green). • Zoom into the glass window
(C). The beginning positions of the clear windows are random,
however the flower positions are fixed. I used the following
sequence to solve the puzzle: 1, 1, 2, 2, 2, 6, and 6, 4, 7,
7, and 7, 15, 15, 13, 15, 15, and 15, 9, 9, 9, 13, 13, and 17.
Finish with 16. • Exit back one scene and take a right.
• Zoom into the book (B) and read the pages. • Go ahead and
place the two BASKETS (green). • Zoom into the glass window
(C). The beginning positions of the clear windows are random,
however the flower positions are fixed. I used the following
sequence to solve the puzzle: 1, 1, 2, 2, 2, 6, and 6, 4, 7,
7, and 7, 15, 15, 13, 15, 15, and 15, 9, 9, 9, 13, 13, and 17.
Finish with 16. • Exit back one scene and take a right.
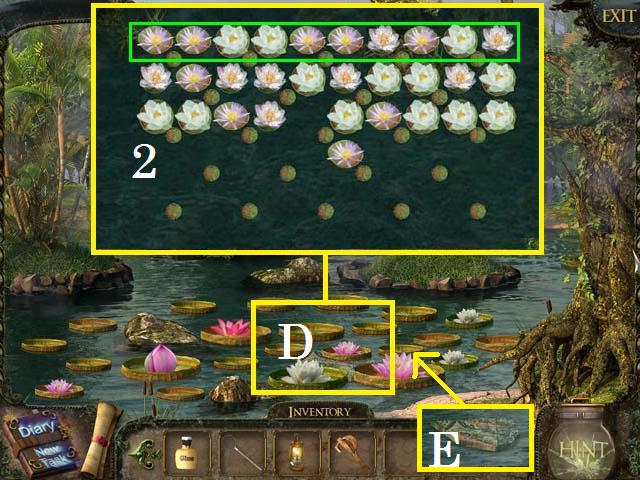 • Zoom into the Lillie pads (D). • The beginning positions of
the lilies are random so is the solution. Fill in the top row
first (green). Continue in this manor until all the lilies are
in the top three rows (2). • Use the BUTTERFLY NET to fish out
the MOSAIC PIECE (E). • Return to the Lighthouse.
• Zoom into the Lillie pads (D). • The beginning positions of
the lilies are random so is the solution. Fill in the top row
first (green). Continue in this manor until all the lilies are
in the top three rows (2). • Use the BUTTERFLY NET to fish out
the MOSAIC PIECE (E). • Return to the Lighthouse.
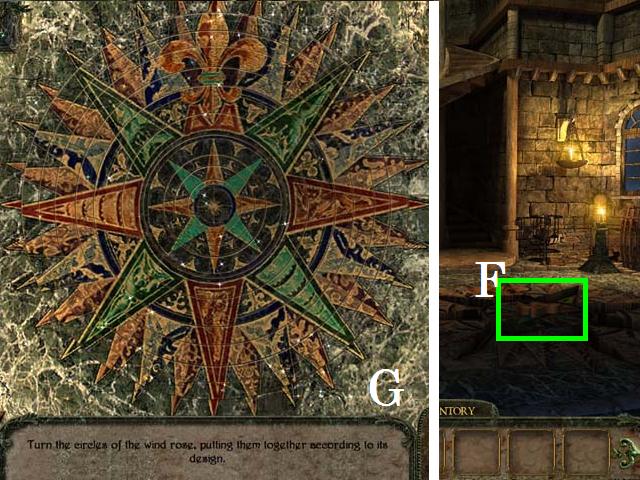 • Inside the first level, lay the MOSAIC PIECE in the ground
(F). • Set the rings as shown in the screenshot (G). • Pick up
the MYSTERIOUS SYMBOL (green). • Return to the Park. Take the
path to the right toward the Mansion Gate.
• Inside the first level, lay the MOSAIC PIECE in the ground
(F). • Set the rings as shown in the screenshot (G). • Pick up
the MYSTERIOUS SYMBOL (green). • Return to the Park. Take the
path to the right toward the Mansion Gate.
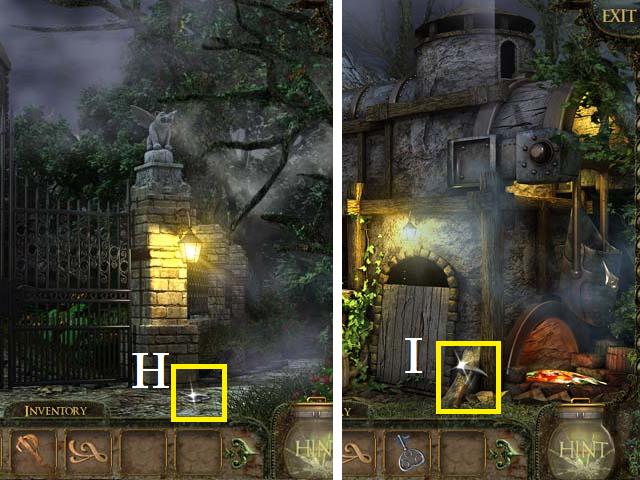 • Pick up the PIECE OF KEY (H). • Continue down the path to
the Gold Mine. • Pick up the ROCK HAMMER (I).
• Pick up the PIECE OF KEY (H). • Continue down the path to
the Gold Mine. • Pick up the ROCK HAMMER (I).
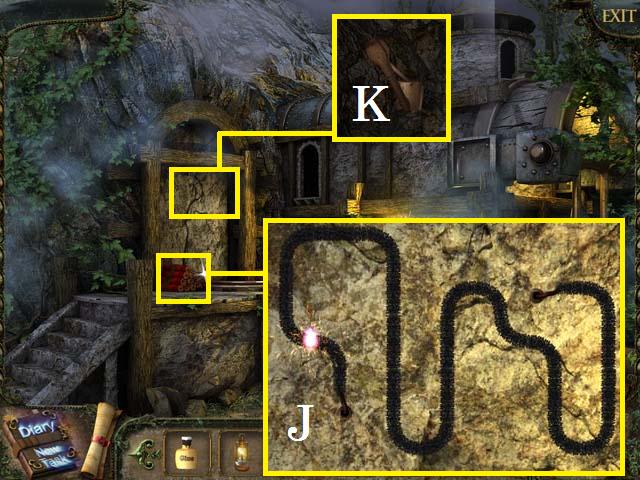 • Zoom into the dynamite; set the path as shown in the
screenshot (J). • Zoom into the Mine Entrance and hang the
LIGHTED LAMP (K). • Enter the GOLD MINE.
• Zoom into the dynamite; set the path as shown in the
screenshot (J). • Zoom into the Mine Entrance and hang the
LIGHTED LAMP (K). • Enter the GOLD MINE.
 • Use the ROCK HAMMER on the side of the wall (green). • Zoom
into the directions (L). • Pick up the MAGNETIC OAR (M). •
Move forward into the mine shaft; take a left, then move
forward. Take a right and then move forward. Take a right
again. You should now be in the Alter room. • Pick up the FILM
CARTRIDGE (N). • Exit back to the Mansion gate.
• Use the ROCK HAMMER on the side of the wall (green). • Zoom
into the directions (L). • Pick up the MAGNETIC OAR (M). •
Move forward into the mine shaft; take a left, then move
forward. Take a right and then move forward. Take a right
again. You should now be in the Alter room. • Pick up the FILM
CARTRIDGE (N). • Exit back to the Mansion gate.
 • Zoom into the gate; remove the PIECE OF KEY (O) with the
MAGNETIC OAR. • Return to the Light Keepers House and enter
the back room. • Zoom into the mold; both PIECES OF KEY in the
mold (P) and pick up the KEY IMPRINT. • Return to the Photo
Studio and enter the Dark Room.
• Zoom into the gate; remove the PIECE OF KEY (O) with the
MAGNETIC OAR. • Return to the Light Keepers House and enter
the back room. • Zoom into the mold; both PIECES OF KEY in the
mold (P) and pick up the KEY IMPRINT. • Return to the Photo
Studio and enter the Dark Room.
 • PAINT the bulb (Q) red. • Hang the THICK BLACK FABRIC (R). •
Pick up the PHOTO PAPER (S) and place it in the enlarger (T).
• Place the LENSES (U) and FILM CARTRIDGE (V). • Flip the
switch (W).
• PAINT the bulb (Q) red. • Hang the THICK BLACK FABRIC (R). •
Pick up the PHOTO PAPER (S) and place it in the enlarger (T).
• Place the LENSES (U) and FILM CARTRIDGE (V). • Flip the
switch (W).
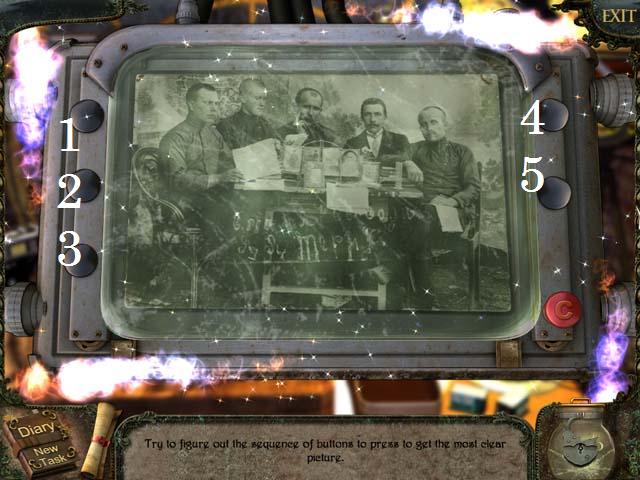 • Press the buttons in the following order: 3, 1, 4, 2, and 5.
• Receive the UNDEVELOPED PHOTO PAPER.
• Press the buttons in the following order: 3, 1, 4, 2, and 5.
• Receive the UNDEVELOPED PHOTO PAPER.
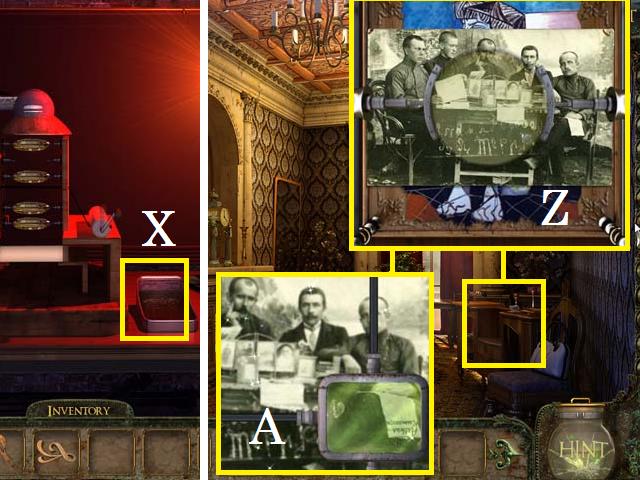 • Place the UNDEVELOPED PHOTO PAPER in the tray (X) and pick
up the PHOTO. • Return to the Town Hall. • Enter Study. • Zoom
into the sparkles; place the PHOTO in the middle (Z) and zoom
in again. • Use the arrows to read the name, shown in the
screenshot (A). • Move to the Archive.
• Place the UNDEVELOPED PHOTO PAPER in the tray (X) and pick
up the PHOTO. • Return to the Town Hall. • Enter Study. • Zoom
into the sparkles; place the PHOTO in the middle (Z) and zoom
in again. • Use the arrows to read the name, shown in the
screenshot (A). • Move to the Archive.
 • Zoom into the shelf; place the folders in the corresponding
spaces as shown in the screenshot (B). • Pick up the last file
(C). Open it and pick up the BLANK KEY (D). • Exit the Town
Hall.
• Zoom into the shelf; place the folders in the corresponding
spaces as shown in the screenshot (B). • Pick up the last file
(C). Open it and pick up the BLANK KEY (D). • Exit the Town
Hall.
 • Zoom into the key machine; place the DRIVING BELT (E) the
KEY IMPRINT (F), the BLANK KEY (G) and then spin the handle
(H). • To unscramble the key, begin by moving the inner most
piece (green) to the outside. Continue this way until you have
the arrangement shown in the screenshot (I) to receive the
MANSION KEY. • Return to the Park and head to the Mansion
gate. Unlock the gate with the MANSION KEY and enter the Yard.
• Zoom into the key machine; place the DRIVING BELT (E) the
KEY IMPRINT (F), the BLANK KEY (G) and then spin the handle
(H). • To unscramble the key, begin by moving the inner most
piece (green) to the outside. Continue this way until you have
the arrangement shown in the screenshot (I) to receive the
MANSION KEY. • Return to the Park and head to the Mansion
gate. Unlock the gate with the MANSION KEY and enter the Yard.
Chapter 5: The Mansion
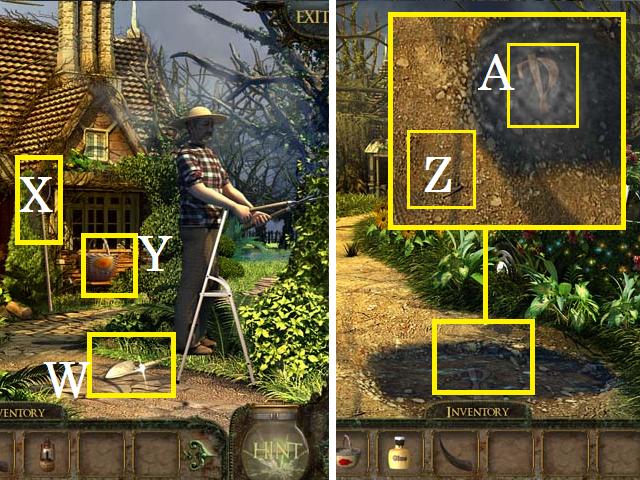
 • Zoom into the plant; open the flower and pick up the SEEDS
(J) once it is available. • Pick up the EMPTY WATERING CAN (K)
and the FERTILIZER (L). • Enter the Mansion. • Zoom into the
BASKET (M) and remove all of the thread. Pick up the BASKET. •
Climb the stairs.
• Zoom into the plant; open the flower and pick up the SEEDS
(J) once it is available. • Pick up the EMPTY WATERING CAN (K)
and the FERTILIZER (L). • Enter the Mansion. • Zoom into the
BASKET (M) and remove all of the thread. Pick up the BASKET. •
Climb the stairs.
 • Speak with the man. • Zoom into the table and then the box;
unscramble the map as shown in the screenshot (N). • Pick up
the KEY (O). • Zoom into the globe and unlock it with the KEY;
open the instructions and pick up the KITCHEN KEY (P). Look at
the instructions. • Enter the Bathroom.
• Speak with the man. • Zoom into the table and then the box;
unscramble the map as shown in the screenshot (N). • Pick up
the KEY (O). • Zoom into the globe and unlock it with the KEY;
open the instructions and pick up the KITCHEN KEY (P). Look at
the instructions. • Enter the Bathroom.
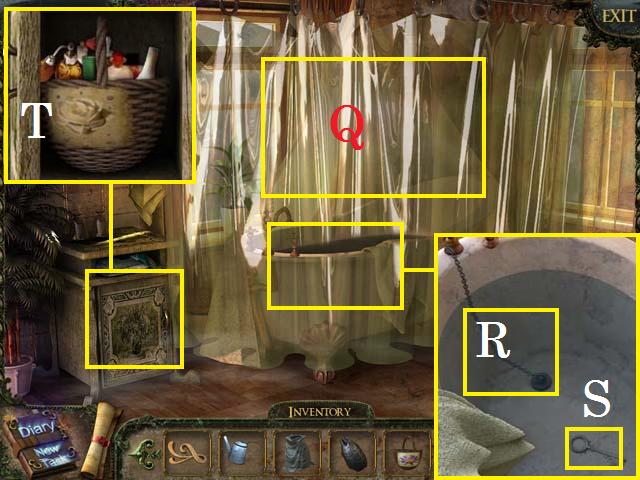 • Pick up the PLASTIC SHOWER CURTAIN (Q). • Zoom into the
bathtub, pull the drain (R) and pick up the KEY (S). • Zoom
into the cabinet and unlock it with the KEY; remove all of the
items from the BASKET (T) and pick it up. • Return to the
Gardner's House and take the path to the right.
• Pick up the PLASTIC SHOWER CURTAIN (Q). • Zoom into the
bathtub, pull the drain (R) and pick up the KEY (S). • Zoom
into the cabinet and unlock it with the KEY; remove all of the
items from the BASKET (T) and pick it up. • Return to the
Gardner's House and take the path to the right.
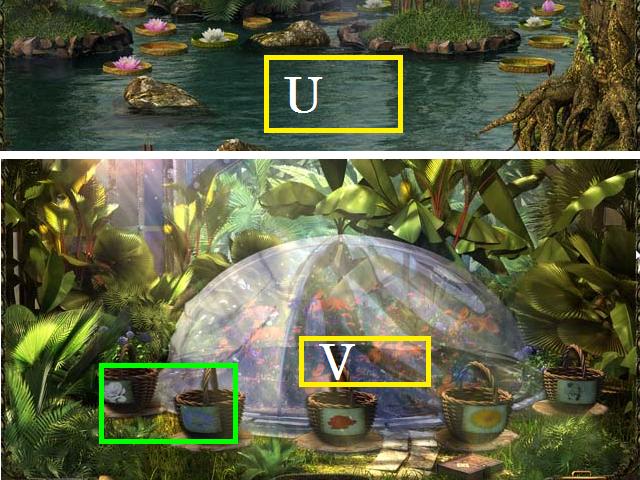 • Fill the EMPTY WATERING CAN in the water (U). • Exit back
one scene and take a left. • Place the BASKETS (green). • Zoom
into the soil (V); place the SEEDS, followed by the
FERTILIZER, and water with the FULL WATERING CAN. • Cover them
with the PLASTIC CURTAIN ant then zoom into the completed
garden.
• Fill the EMPTY WATERING CAN in the water (U). • Exit back
one scene and take a left. • Place the BASKETS (green). • Zoom
into the soil (V); place the SEEDS, followed by the
FERTILIZER, and water with the FULL WATERING CAN. • Cover them
with the PLASTIC CURTAIN ant then zoom into the completed
garden.
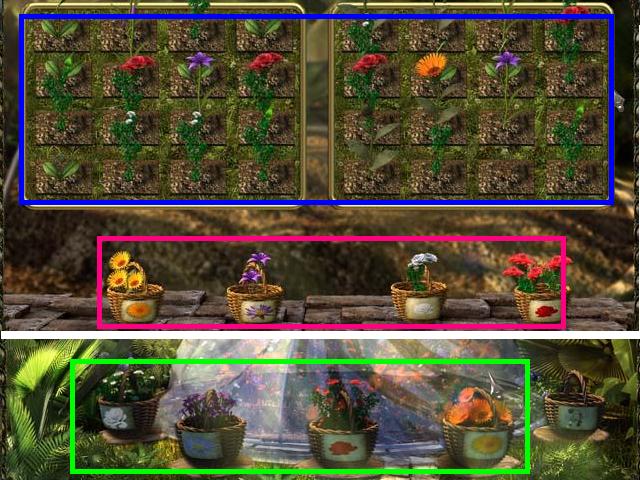 • Once the flowers (blue) are full place them in the baskets,
as shown in the screenshot (pink). • After you have picked all
of the flowers, collect all four of the BASKETS OF FLOWERS
(green). • Return to the Boutique.
• Once the flowers (blue) are full place them in the baskets,
as shown in the screenshot (pink). • After you have picked all
of the flowers, collect all four of the BASKETS OF FLOWERS
(green). • Return to the Boutique.
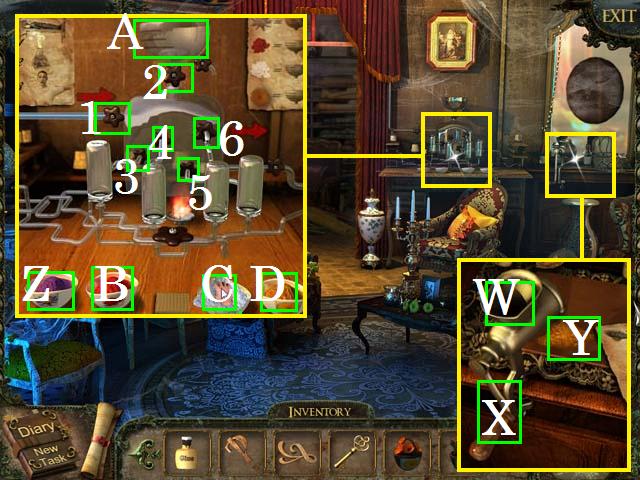 • Zoom into the grinder; pour one of the BASKET OF FLOWERS in
the grinder (W), pull the handle (X) and pick up the FLOWER'S
FLOUR (Y). Repeat for all of the BASKET OF FLOWERS, • Zoom
into the beakers; place the FLOWER'S FLOUR in the
corresponding bowls as shown in the screenshot. • Pour the
purple flour (Z) three times into the funnel (A). Turn the (1)
valve, then the (2) valve, followed by the (6) valve. • Pour
the red flour (B) once into the funnel. Turn the (1) valve,
then the (2) valve, followed by the (3) valve. • Pour the
white flour (C) four times into the funnel. Turn the (1)
valve, then the (2) valve, followed by the (4) valve. • Pour
the orange flour (D) two times into the funnel. Turn the (1)
valve, then the (2) valve, followed by the (5) valve. • Return
to the Park and head to the VW bug.
• Zoom into the grinder; pour one of the BASKET OF FLOWERS in
the grinder (W), pull the handle (X) and pick up the FLOWER'S
FLOUR (Y). Repeat for all of the BASKET OF FLOWERS, • Zoom
into the beakers; place the FLOWER'S FLOUR in the
corresponding bowls as shown in the screenshot. • Pour the
purple flour (Z) three times into the funnel (A). Turn the (1)
valve, then the (2) valve, followed by the (6) valve. • Pour
the red flour (B) once into the funnel. Turn the (1) valve,
then the (2) valve, followed by the (3) valve. • Pour the
white flour (C) four times into the funnel. Turn the (1)
valve, then the (2) valve, followed by the (4) valve. • Pour
the orange flour (D) two times into the funnel. Turn the (1)
valve, then the (2) valve, followed by the (5) valve. • Return
to the Park and head to the VW bug.
 • Zoom into the sparkles to play a HOS. • Open the glove box
(green). • Pick up the horse, iron, and beets all marked in
blue. • Collect the three blobs of paint (pink) with the paint
brush (E) and transfer them to the palette full of paint (F).
• Clean flask (G) with the rag (H). • Place the flowers (I) in
the boot (J) to get the repaired flowerbed. • Place the 8 (K)
on the numbered billiard ball (L).
• Zoom into the sparkles to play a HOS. • Open the glove box
(green). • Pick up the horse, iron, and beets all marked in
blue. • Collect the three blobs of paint (pink) with the paint
brush (E) and transfer them to the palette full of paint (F).
• Clean flask (G) with the rag (H). • Place the flowers (I) in
the boot (J) to get the repaired flowerbed. • Place the 8 (K)
on the numbered billiard ball (L).
 • Place the spider (M) in the web (N) to get the repaired
spider web. • After the web is complete, pick up the house fly
(O). • Zoom into the pot; remove all of the plants to reveal
the cactus (P). • Place the lens (Q) in the repaired
binoculars (R). • Bust the balloon (S) with the dart (T) and
pick up the balloon fragments (U). • Receive the EMPTY FLASK.
• Return to the Boutique.
• Place the spider (M) in the web (N) to get the repaired
spider web. • After the web is complete, pick up the house fly
(O). • Zoom into the pot; remove all of the plants to reveal
the cactus (P). • Place the lens (Q) in the repaired
binoculars (R). • Bust the balloon (S) with the dart (T) and
pick up the balloon fragments (U). • Receive the EMPTY FLASK.
• Return to the Boutique.
 • Zoom into the beakers; place the EMPTY FLASK (V). • Turn the
(7) valve. • Arrange the pipes as shown in the screenshot (W).
• Pick up the FLASK OF ESSENCE.
• Zoom into the beakers; place the EMPTY FLASK (V). • Turn the
(7) valve. • Arrange the pipes as shown in the screenshot (W).
• Pick up the FLASK OF ESSENCE.
 • Return to the Mansion and go inside. • Unlock the door (X)
with the KITCHEN KEY.
• Return to the Mansion and go inside. • Unlock the door (X)
with the KITCHEN KEY.
 • Zoom into the sparkles to play a HOS. • Open the four
cupboards (pink). • Place the tip (Y) on the completed bellows
(Z). • Place the three pieces of laundry (blue) in the basket
(A). • Stab the sausage on a fork (B) with the fork (C). •
Place the beans (D) in the grinder (E) then in the coffee
machine (F) and pick up a hot cup of coffee (G). • Place the
pole (H) with its match (I) to make the ski poles. • Place the
three tulips (orange) to complete the vase with 5 tulips (J).
• Place Africa (K) in the right place (L). • Place the bow (M)
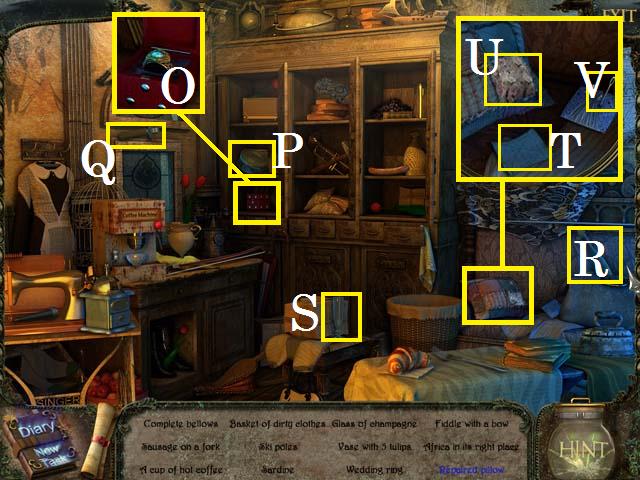
with the fiddle with a bow (N).
• Zoom into the sparkles to play a HOS. • Open the four
cupboards (pink). • Place the tip (Y) on the completed bellows
(Z). • Place the three pieces of laundry (blue) in the basket
(A). • Stab the sausage on a fork (B) with the fork (C). •
Place the beans (D) in the grinder (E) then in the coffee
machine (F) and pick up a hot cup of coffee (G). • Place the
pole (H) with its match (I) to make the ski poles. • Place the
three tulips (orange) to complete the vase with 5 tulips (J).
• Place Africa (K) in the right place (L). • Place the bow (M)
with the fiddle with a bow (N).
 • Zoom into the shelf; open the box and pick up the wedding
ring (O). • Open the can (P) with the can opener (Q) to get
the sardine. • Pour the champagne (R) in the glass of
champagne (S). • Zoom into the pillow; place the patch (T) on
the pillow (U) and sew with the needle (V) for the repaired
pillow. • Receive the BELLOWS.
• Zoom into the shelf; open the box and pick up the wedding
ring (O). • Open the can (P) with the can opener (Q) to get
the sardine. • Pour the champagne (R) in the glass of
champagne (S). • Zoom into the pillow; place the patch (T) on
the pillow (U) and sew with the needle (V) for the repaired
pillow. • Receive the BELLOWS.
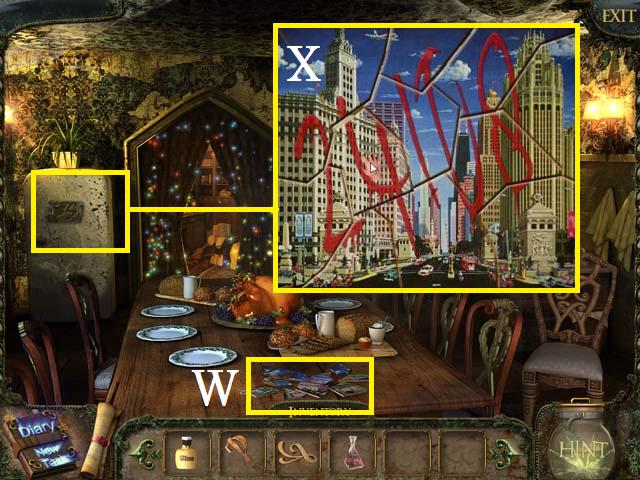 • Pick up the MAGNETIC PIECES (W). • Zoom into the fridge;
place the MAGNETIC PIECES and arrange them to reveal the safe
code (X).
• Pick up the MAGNETIC PIECES (W). • Zoom into the fridge;
place the MAGNETIC PIECES and arrange them to reveal the safe
code (X).
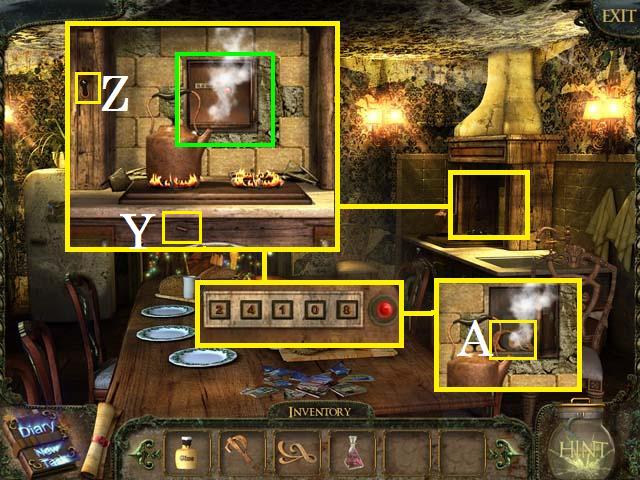 • Zoom into the stove; turn the knob (Y) and close the flue
(Z). With the steam in full effect remove the bricks (green).
Open the flue to reveal the safe. • Zoom into the safe and
punch the code 24108 then pick up the MYSTERIOUS SYMBOL (A). •
Exit the kitchen and climb the stairs.
• Zoom into the stove; turn the knob (Y) and close the flue
(Z). With the steam in full effect remove the bricks (green).
Open the flue to reveal the safe. • Zoom into the safe and
punch the code 24108 then pick up the MYSTERIOUS SYMBOL (A). •
Exit the kitchen and climb the stairs.
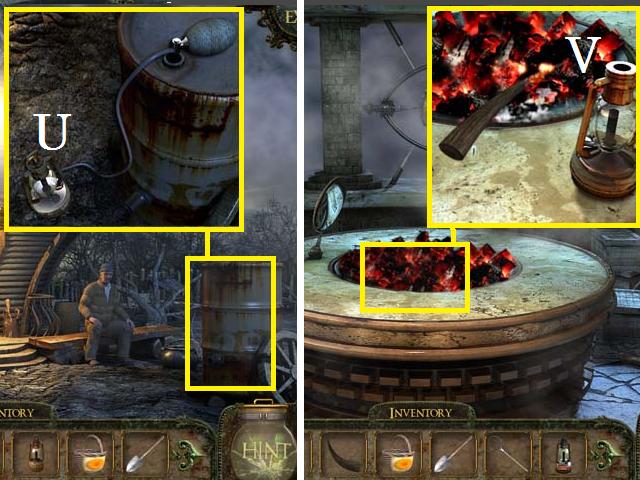
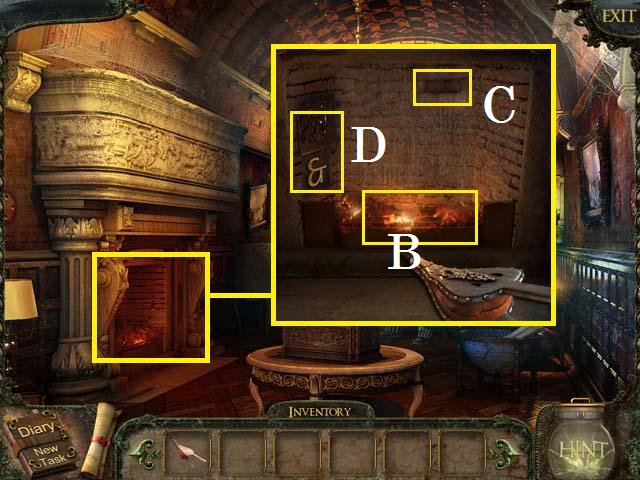 • Zoom into the fireplace; use the BELLOWS on the fire (B) and
press the brick (C). Pick up the MYSTERIOUS SYMBOL (D). •
Return to the Train Station Platform.
• Zoom into the fireplace; use the BELLOWS on the fire (B) and
press the brick (C). Pick up the MYSTERIOUS SYMBOL (D). •
Return to the Train Station Platform.
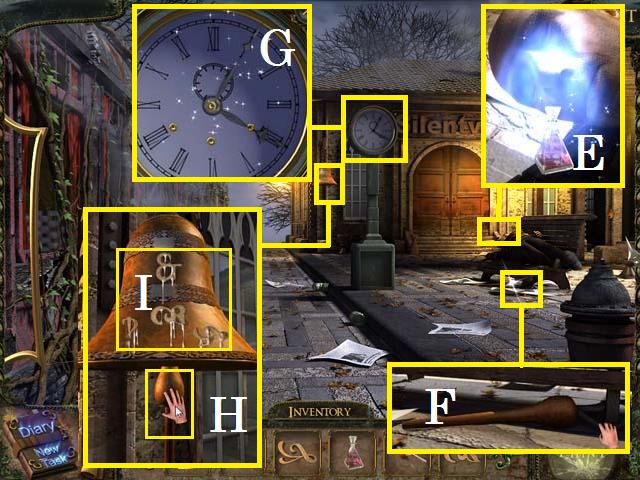 • Zoom into the man's head; place the FLASK OF ESSENCE under
his nose (E). • Zoom into the bench and pick up the CLAPPER
(F). • Zoom into the clock; set it to 4:05 (G) • Zoom into the
bell; place the clapper (H) and then pour the GLUE on the
bell. Place the MYSTERIOUS SYMBOLS (I), then ring the bell
with the CLAPPER until you are transported to the Alter. •
Open the book (J). • Congratulations! You have made
reparations for the greedy old man's actions and completed 1
Moment of Time: Silentville!
• Zoom into the man's head; place the FLASK OF ESSENCE under
his nose (E). • Zoom into the bench and pick up the CLAPPER
(F). • Zoom into the clock; set it to 4:05 (G) • Zoom into the
bell; place the clapper (H) and then pour the GLUE on the
bell. Place the MYSTERIOUS SYMBOLS (I), then ring the bell
with the CLAPPER until you are transported to the Alter. •
Open the book (J). • Congratulations! You have made
reparations for the greedy old man's actions and completed 1
Moment of Time: Silentville!
Created at: 2012-06-16