
WALKTHROUGH MENU
- General Tips
- At Sea
- Map Mini-game
- Fish Island
- Slider Puzzle Mini-game
- Ruhh Island
- Follow the Sequence Mini-game
- Jabbah Island
- Unmatched Jewels Mini-game
- Volcano
- Lava Pipes Mini-game
- Iceberg
- Find the Differences Mini-game
- Stone Ship
- Picture Jumble Mini-game
- Floating Castle
- The Octopus
GENERAL TIPS
- This is a Hidden Object Game with a variety of different mini-games.
- The main character’s name is Sindbad, not Sinbad.
- The Hidden Object scenes are of several different types. You may get a Find List with the name of the objects, pictures of the objects where you have to find the pieces of them, plain silhouettes, or riddles.
- Some Hidden Object scenes are location searches rather than object searches. You must identify what part of the scene matches a small thumbnail picture on the Find List. When you click in that spot, you will be awarded an object, even though you never see that object in the scene itself.
- There is no timer.
- The game autosaves automatically.
- Whenever you leave in the middle of a Hidden Object scene, you will come back to that exact point when you return, a nice feature.
- The game offers a fancy cursor. If you’d prefer to use your regular cursor, you can turn off the fancy cursor on the OPTIONS menu.
- Whenever you are dragging something into a scene, click when you have the tip of the cursor positioned where you want the object to go. Don’t worry about the image of the object itself, which may be an inch or more away from the end of the cursor. (This tip will make sense once you start playing the game. If you’re trying to put something into the scene but it just won’t “stick” when you click it, you’re probably trying to position the object itself, rather than paying attention to the tip of the cursor.)
- There is a Magic Amulet in the lower right corner. When you click on it, one of the items in the scene (or one of the locations for a location search) will be marked with a colored ring.
- You get an unlimited number of hints, but you have to wait for the Amulet to recharge each time.
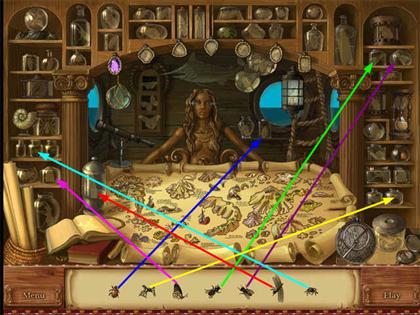
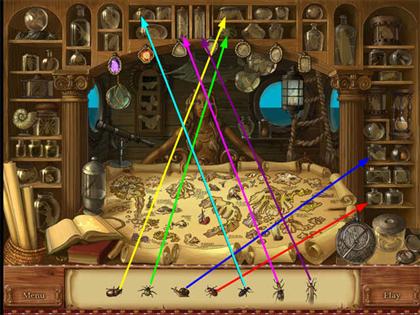
- There are bonus insects in most of the scenes. When you collect the insects and place them in the holding jars on the Bridge, you power up the Amulet so that it will recharge faster. The more insects you collect, the less time you have to wait between hints.
- Different scenes have different numbers of optional insects. If you don’t find the insect the first time you visit the location, it will still be there if you come back. You will visit most locations 2 or 3 times.
- The game also provides free sparkle hints in some scenes.
- There are no hints for the mini-games, but you can skip them at any time.
- Some of the bonus insects are awarded for successful completion of the mini-games, so if you skip the mini-games, you can’t collect as many insects. There is no other penalty for skipping a mini-game.
- You may return to the Bridge anytime you see the BRIDGE button in the upper left. If the Map is active, you won’t be able to drag insects across it, but you can click on an insect, then drag it around the edge of the screen and put it in its jar. Then just click on the PLAY button in the lower right of the Bridge scene to return to the location you just left.
- Note that the game does not allow you to return to the Bridge after the credits, so you will not be able to place your final set of insects in jars unless you go to the Bridge before you complete all the actions at the end of the game.
- Fun Tip: when you’re on the Ship’s Bridge, watch Chalida’s face closely.
AT SEA: the Sunken Ship (SPOILERS BEGIN HERE)
- For the first task, you just have to search the area around the Sunken Ship to find the objects shown in the picture tiles.
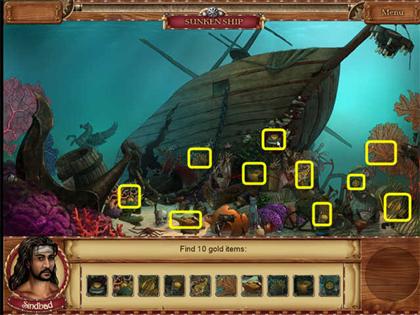
- Now find all the parts of the three objects shown.

The Bridge
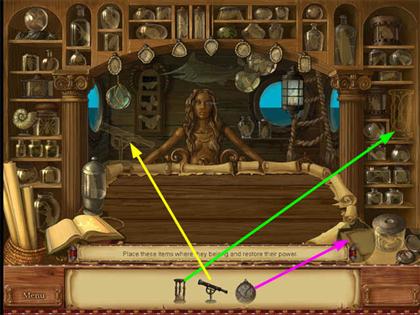
- You will be rescued by Chalida and taken to the Bridge. Place the 3 objects you just collected into the scene as shown. The place for the amulet is in the lower right.
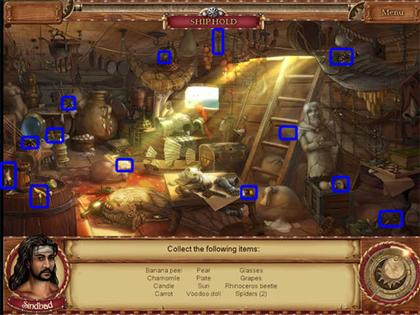
The Shiphold
- Collect the objects named on the Find List.
The Bridge
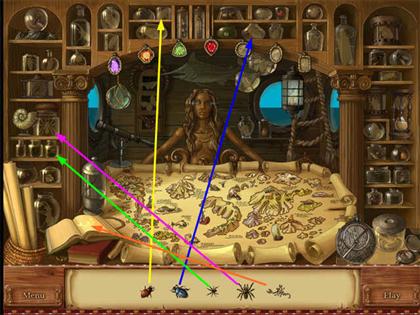
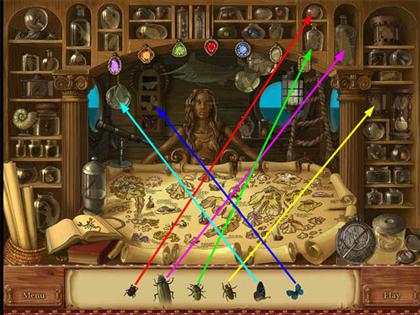
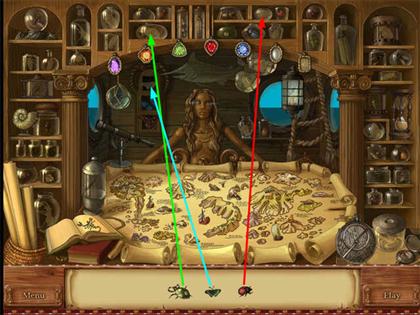
- Now place the insects into the jars with a matching silhouette. Chalida will explain that every insect you collect “increases the Amulet’s power.” In practical terms, that means the Amulet will recharge more quickly.
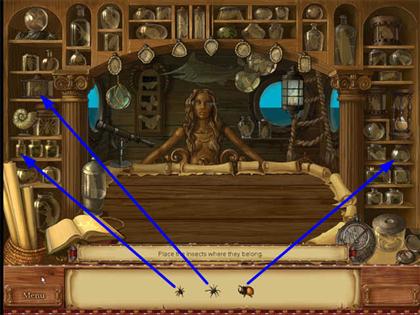
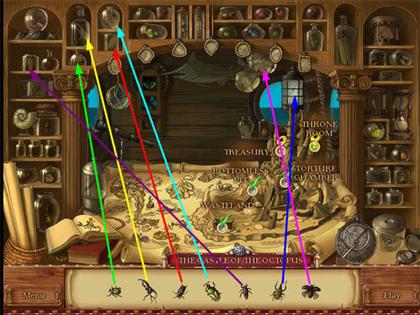
- From now on, the insects will not be part of the regular Find List. Just click on any insect you see in any scene. One snail will also count as an insect.
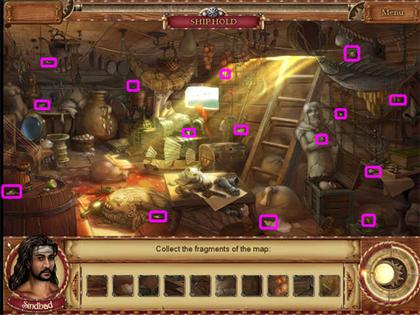
The Shiphold
- Collect the tiny fragments of the Map that are visible in the scene. The picture tiles in the Find List show you where to look, but you can also see the pieces if you just look at the main scene.
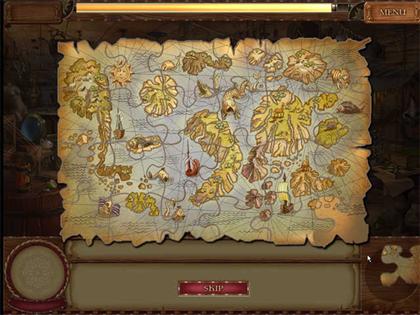
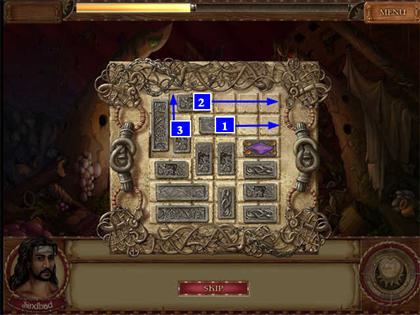
Map Mini-game
- This is a jigsaw puzzle. The pieces do not rotate.
- The screenshot shows the finished map.
FISH ISLAND: the Peninsula
- The first scene on the Peninsula is a standard Hidden Object scene. Collect the items on the Find List.
- The “message” is a scroll in a bottle.
- There are also 3 optional insects in the scene (marked in orange).

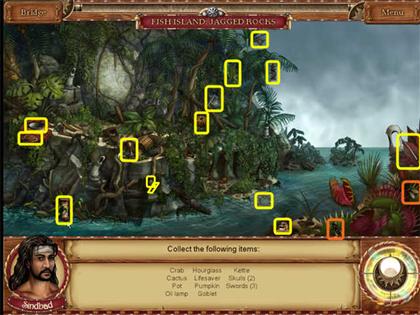
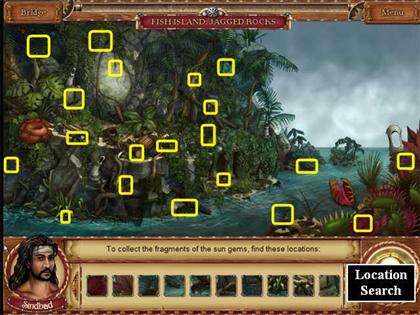
Jagged Rocks
- Collect the items named on the Find List.
- The “Life Saver” is a life preserver ring.
- One of the skulls is part of a pirate flag.
- One of the swords is part of the same pirate flag, in place of the usual crossbone on that side.
- Optional insects are marked in orange.
- The next task is a location search. You are collecting jewel fragments, but you will not see them in the scene. Instead, you have to click on the locations that exactly match the picture tiles in the Find List.
- Each time you click on the location that exactly matches one of the picture titles, you will be awarded a jewel fragment.
Fish Island Peninsula
- Return to the Peninsula.
- This is a location search. You are collecting jewel fragments, but you will not see them in the scene. Instead, you have to click on the locations that exactly match the picture tiles in the Find List.
- Each time you click on the location that exactly matches one of the picture titles, you will be awarded a jewel fragment.
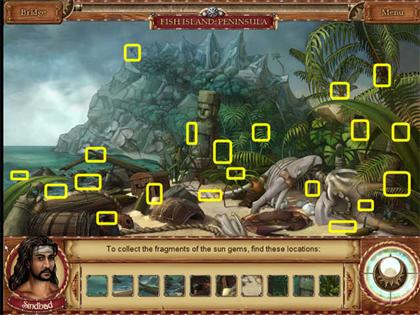
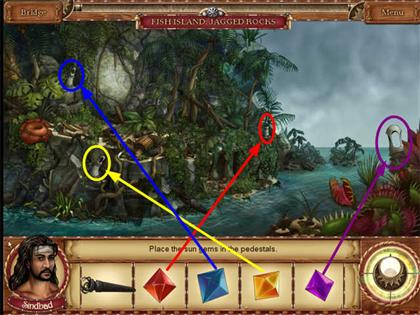
- Now you have the pieces for all four Sun Gems. You need to place each one into the matching “pedestal” in the picture.
- When you click on each pedestal, it will glow with a faint light that is the color of the gem you should use there.
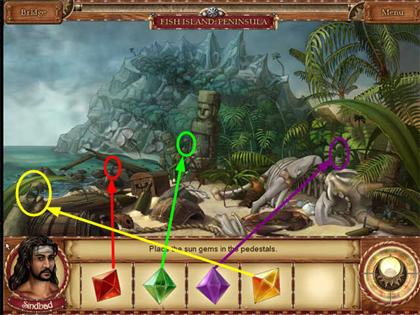
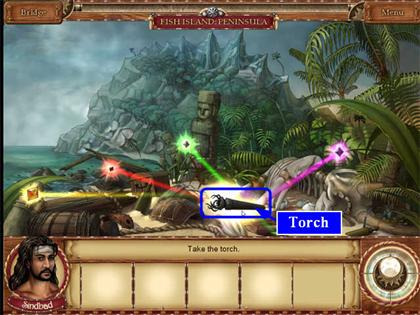
- Once the Sun Gems are placed correctly, the Torch will appear. Collect it.
Jagged Rocks
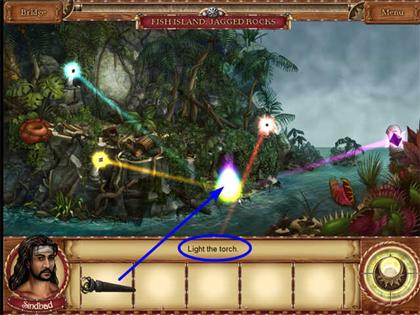
- Now put the next four Sun Gems into the pedestals in this location.
- Once the Sun Gems are placed correctly, a rainbow flame will appear in the center of the scene.
- Take the Torch from your inventory and touch it to the flame. (Click when the tip of the cursor is in the correct spot, not the Torch itself.)
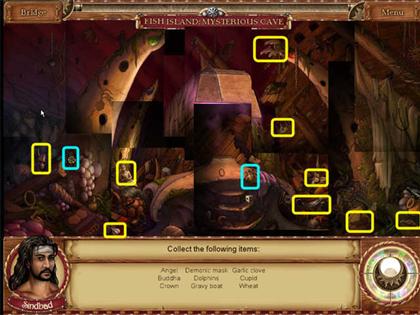
Mysterious Cave
- Now you are ready to enter the Mysterious Cave. Your cursor will automatically act as a torch to light a small part of the screen.
- We’ve used a composite screenshot to show the entire scene at once. You will only see one small part at a time.
- Collect the items named on the Find List.
- The chest in the center of the scene is moving up and down, and sometimes blocks access to the Crown which is just to its right.
- The Cupid is just a silhouette in the lower right.
- The optional insects are marked in cyan (neon blue).
- Now it is time for your first riddle task. You must first solve the riddle on the Find List, then collect the object that matches the solution.
- Riddle: “It gives light and warmth, but you can’t look at it.” The Sun.
- Riddle: “It wears a thousand layers, none of which can be removed without tears.” An onion.
- Riddle: “It lives in water, but it is not a fish. It has eight appendages, but it is not a spider.” And, surprise—it’s not an octopus, either! It’s a lobster.
- Riddle: “It begins orange, oak, and ostrich.” The letter O.
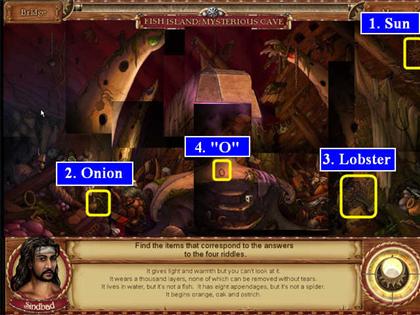
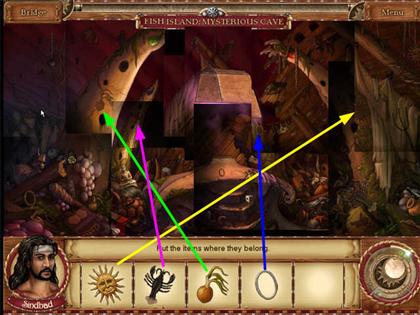
- Now that you’ve collected them, you have to put them back into the scene. There are indentations that match the general shape of each object.
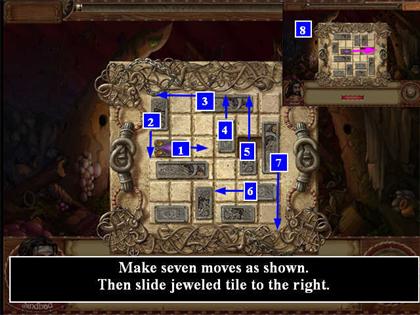
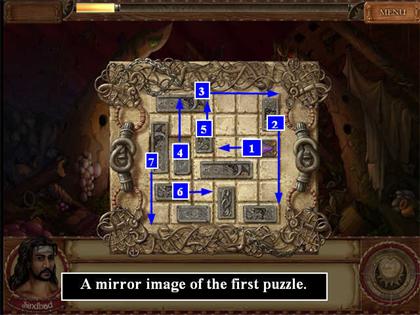
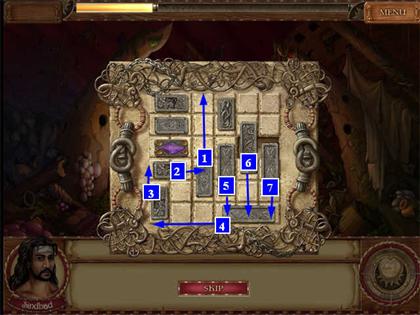
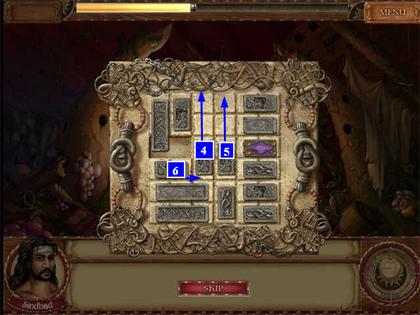
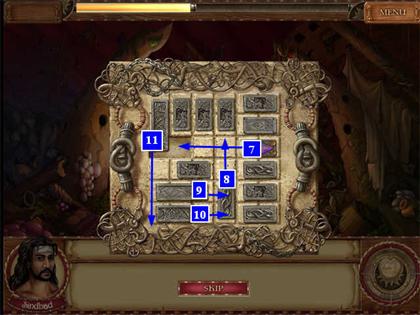
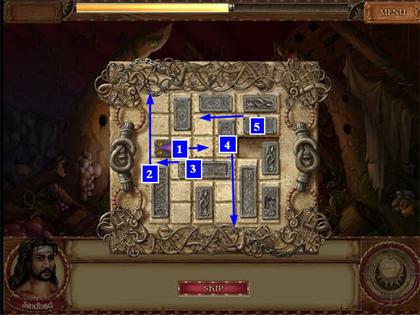
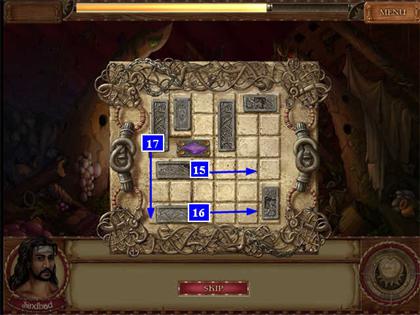
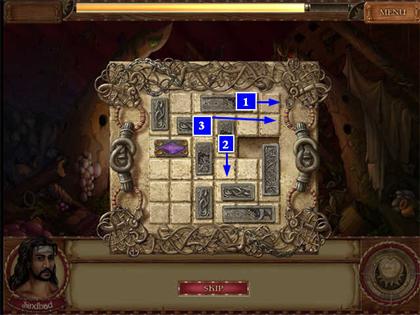
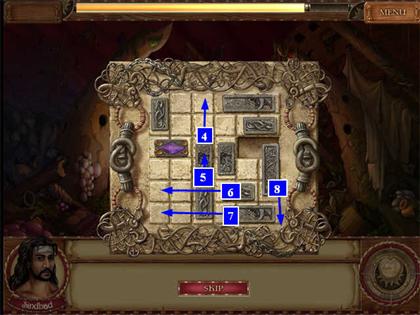
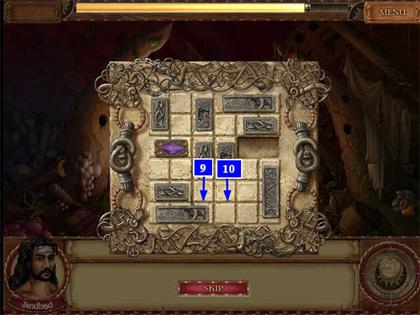
Slider Puzzle Mini-game
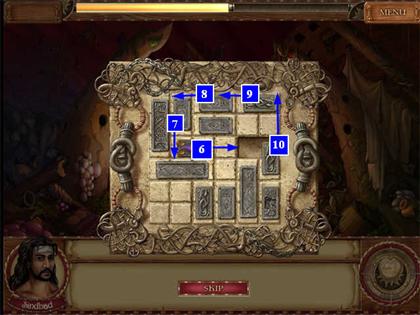
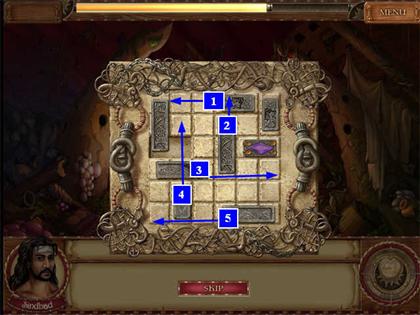
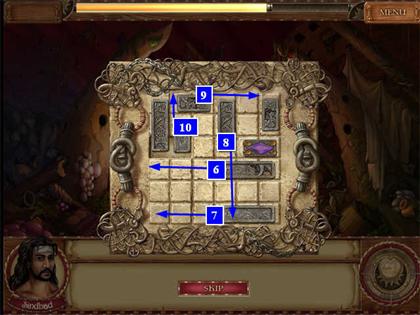
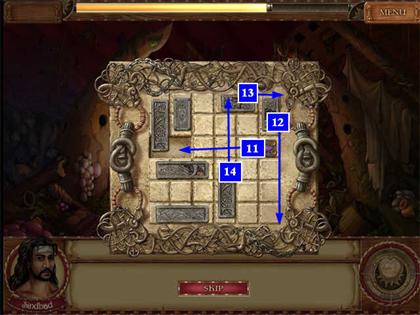
- Now you must solve 7 slider puzzles. We have marked the initial steps on the screenshots. The last step in each case is to slide the tile with a jewel on it into the indentation.
- There may be more than one solution to some of the puzzles.
- Sometimes you will only be able to move the jeweled tile part way towards its destination in the first phase, and then you will have to move other tiles for awhile to clear the rest of the path.
- Slider 1 has 7 initial steps.
- Slider 2 has 7 initial steps.
- Slider 3 has 7 initial steps.
- Slider 4 has 11 initial steps.
- Slider 5 has 10 initial steps.
- Slider 6 has 17 initial steps.
- Slider 7 has 10 initial steps.
The Bridge
- Back on the Bridge, it’s time to put the insects you’ve collected so far into jars.
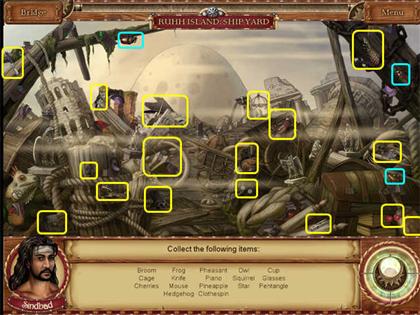
RUHH ISLAND: the Shipyard
- Begin with a standard Hidden Object scene and collect the items named on the Find List.
- Optional insects are marked in cyan.
The Peak
- This is a standard Hidden Object scene. Collect the items named on the Find List.
- The clue “13” is the Roman numeral XIII.
- Optional insects are marked in cyan.
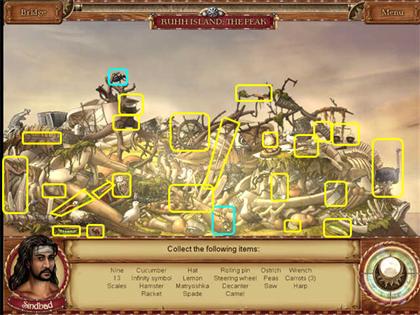
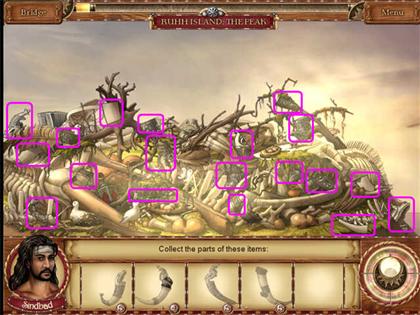
- Now collect the pieces of the items shown.
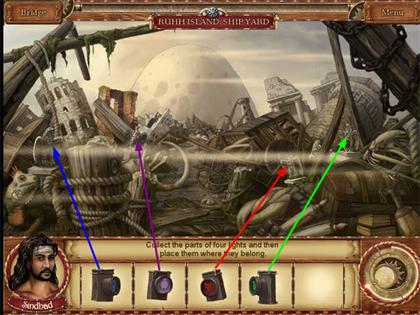
The Shipyard
- Back at the Shipyard, collect the pieces of the four lights.
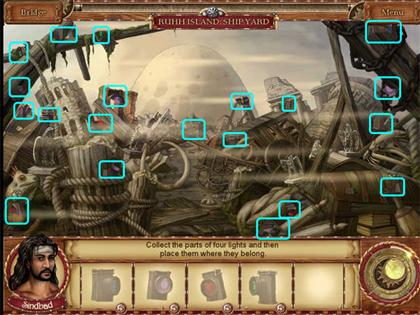
- There are four eagle statues in the scene. Each wears a medallion with a geometric shape. You must match the shape on each light to the eagle with the same shape.
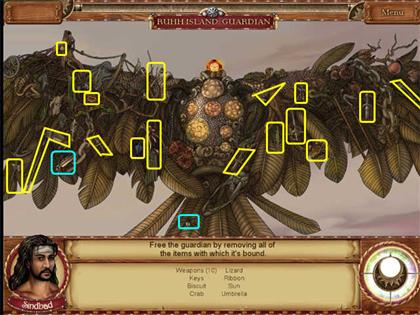
Guardian
- The Guardian is a giant bird similar to the Roc of Sinbad’s legend. Begin by collecting the named items on the Find List.
- Optional insects are marked in cyan.
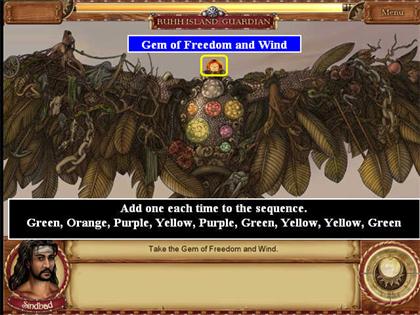
Follow the Sequence Mini-game
- The lights on the chest of the Ruhh will light. You must repeat each sequence.
- The game will begin with one light, and add one more each time.
- The sequences are random, so you may get a different one than we got. However, if you write down the new note each time it should be pretty simple. Each step is the same as the one before plus one new note at the end.
- Our solution: Green, Orange, Purple, Yellow, Purple, Green, Yellow, Yellow, Green.
- When the mini-game ends, collect the jewel from the bird’s head.
The Bridge
- Put the insects you’ve collected into the appropriate jars.
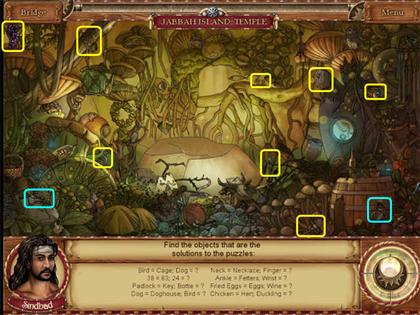
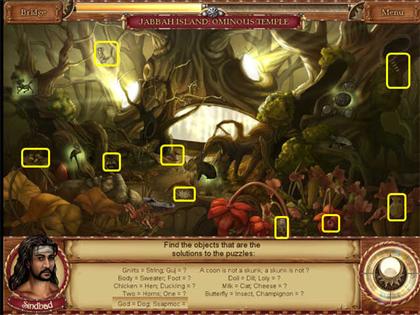
JABBAH ISLAND: Mysterious Moors
- Collect the fragments that match the pictures on the Find List.
- Optional insects are marked in cyan.

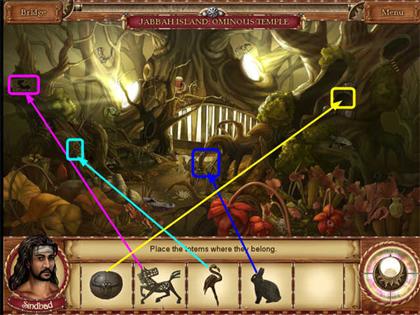
Ominous Temple
- Collect the fragments that match the pictures on the Find List.
- Optional insects are marked in cyan.
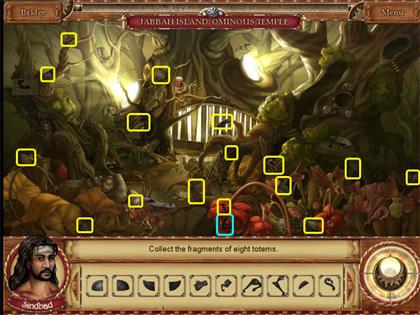
- Now place four totems back into the scene. Some match to indentations, others to wire frames.
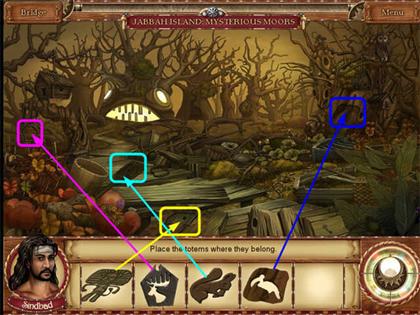
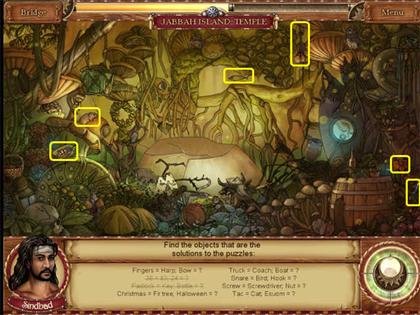
Mysterious Moors
- Place four more totems into the scene. Some match to indentations, others to wire frames.
Temple
- This is another riddle list. Find the object that matches the solution.
- Riddle: “Bird = cage; Dog = “ Collar. (The cage is a restraint, not a home.)
- Riddle: “38 = 83; 24 =” 42.
- Riddle: “Padlock = Key; Bottle = “ Corkscrew.
- Riddle: “Dog = Doghouse; Bird = “ Birdhouse.
- Riddle: “Neck = Necklace; Finger = “ Ring.
- Riddle: “Ankle = Fetters; Wrist =” Handcuffs.
- Riddle: “Fried Eggs = Eggs; Wine =” Grapes.
- Riddle: “Chicken = Hen; Duckling =” Duck.
- More riddles.
- Riddle: “Fingers = Harp; Bow =” Violin.
- Riddle: “Christmas = Fir Tree; Halloween =” Pumpkin.
- Riddle: “Truck = Coach; Boat =” Ship. (This is a ship in a bottle.)
- Riddle: “Snare = Bird; Hook =” Fish.
- Riddle: “Screw = Screwdriver; Nut =” Wrench.
- Riddle: “Tac = Cat; Esuom = “ Mouse.
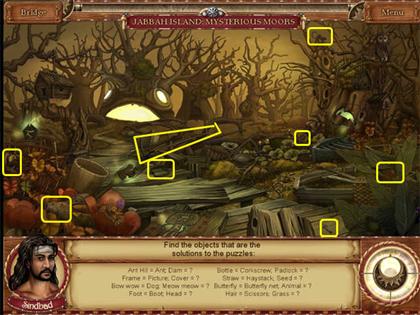
Mysterious Moors
- Riddle: “Ant hill = Ant; Dam =” Beaver.
- Riddle: “Frame = Picture; Cover =” Book.
- Riddle: “Bow wow = Dog; Meow meow =” Cat.
- Riddle: “Foot = Boot; Head =” Hat.
- Riddle: “Bottle = Corkscrew; Padlock =” Key.
- Riddle: “Straw = Haystack; Seed =” Sunflower.
- Riddle: “Butterfly = Butterfly net; Animal =” Steel trap. It’s near the center scene, like a bear trap.
- Riddle: “Hair = Scissors; Grass = “ Scythe.
- Riddle: “Drive in = Screw; Hammer in =” Nail.
- Riddle: “Beat = Drum; Blow =” Flute.
- Riddle: “With a stick = Candy; Without a stick =” This is still purple candy. In the lower left.
- Riddle: “Aim = Claim; Over =” Clover.
- Riddle: “Raven = Bird; Anaconda = “ Snake.
- Riddle: “Boil = Pot; Fry =” Pan.

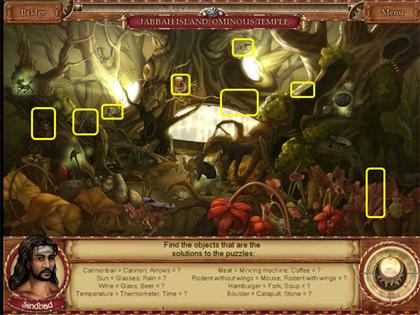
Ominous Temple
- Riddle: “Cannonball = Cannon; Arrows =” Bow.
- Riddle: “Sun = Glasses; Rain =” Umbrella.
- Riddle: “Wine = Glass; Beer =” Stein.
- Riddle: “Temperature = Thermometer; Time =” Watch.
- Riddle: “Meat = Mincing Machine; Coffee =” Grinder.
- Riddle: “Rodent without wings = Mouse; Rodent with wings =” Bat.
- Riddle: “Hamburger = Fork; Soup =” Spoon.
- Riddle: “Boulder = Catapult; Stone =” Slingshot.
- Riddle: “Gnirts = String; Guj = “ Jug.
- Riddle: “Body = Sweater; Foot = “ Sock.
- Riddle: “Chicken = Hen; Duckling =” Duck.
- Riddle: “Two = Horns; One =” Horn.
- Riddle: “God = Dog; ssapmoC = “Compass.
- Riddle: “A raccoon is not a skunk; a skunk is not a “ Raccoon.
- Riddle: “Doll = Dill; Loly =” Lily. This is a water lily.
- Riddle: “Milk = Cat; Cheese =” Mouse.
- Riddle: “Butterfly = Insect; Champignon =” Mushroom.
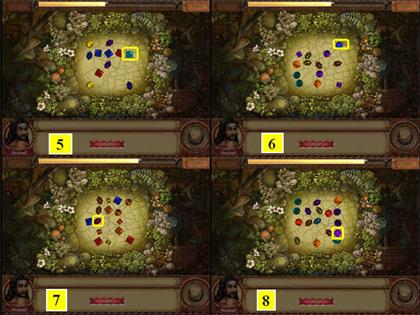
Unmatched Jewels Mini-game
- Find the jewel which doesn’t have a match.

The Bridge
- Place the insects in the matching jars.
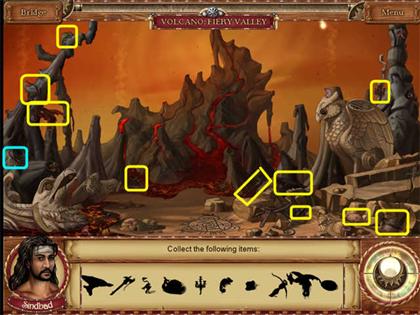
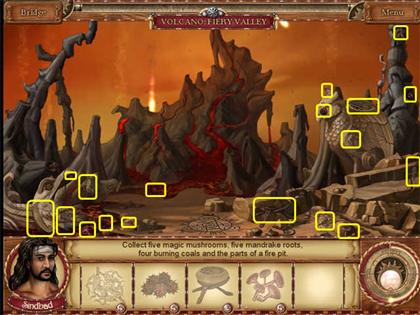
VOLCANO: Fiery Valley
- Collect the items that match the silhouettes on the Find List.
- Optional insects are marked in cyan.
- The little things with faces are Mandrake Roots, not insects.
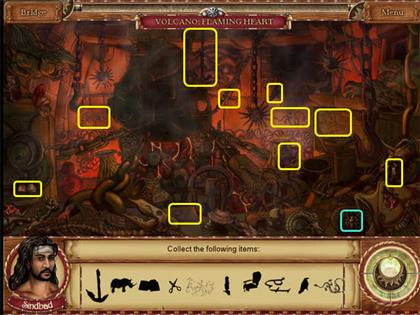
Flaming Heart
- Collect the items that match the silhouettes on the Find List.
- The very faint item is a drawing on the right wall.
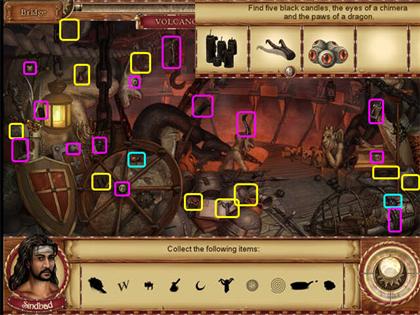
Bottomless Pit
- First collect the items shown as silhouettes on the Find List. They are marked in yellow on the screen shot.
- Then collect the items marked in pink. “Paws of a dragon” should probably be “Claws of a dragon.”
- Optional insects are marked in cyan.
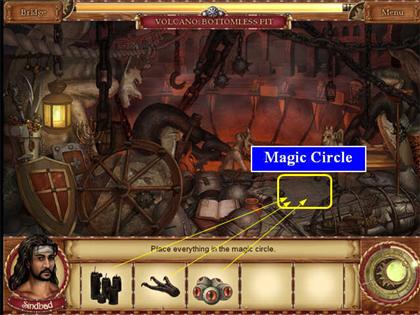
- Now you must place the objects into the Magic Circle on the floor.
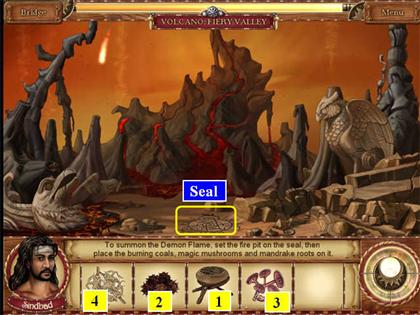
Fiery Valley
- Collect the parts of the objects shown.
- Now you must place the items in the exact order specified: Fire Pit, Burning Coals, Magic Mushrooms and then Mandrake Roots.
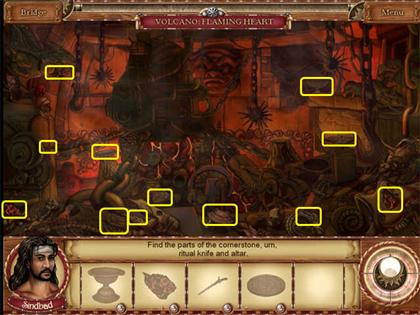
Flaming Heart
- Collect the parts of the items shown.
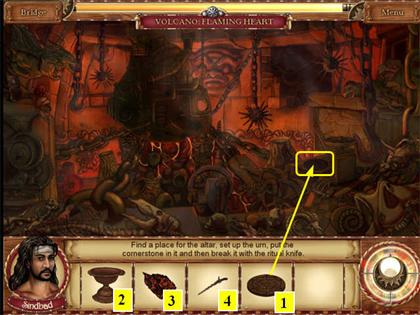
- Place the Altar (flat stone) on the indentation center right.
- Put the Urn on the Altar.
- Put the red Cornerstone into the Urn and use the Knife to crush it.
- Click when the tip of the cursor is at the right point, don’t worry about where the inventory object is.
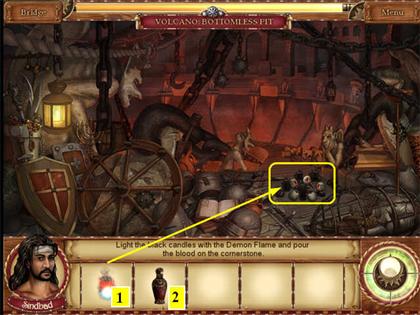
Bottomless Pit
- First use the flame, then the jar.
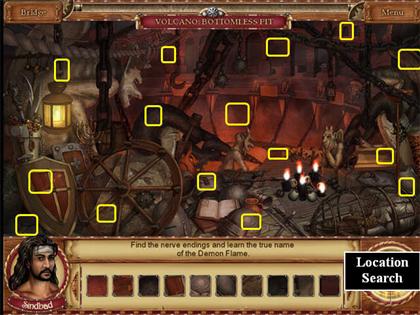
- This is a location search. You are searching for “nerve endings,” but you will not see them in the scene. Instead, you have to click on the locations that exactly match the picture tiles in the Find List.
- Each time you click on the location that exactly matches one of the picture titles, a magic symbol will appear at that spot.
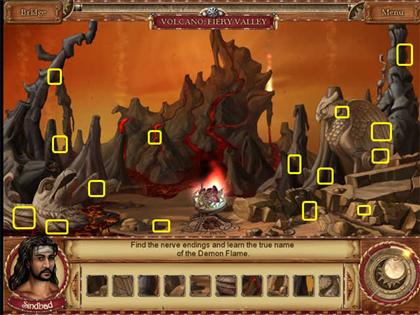
Fiery Valley
- This is a location search. You are searching for “nerve endings,” but you will not see them in the scene. Instead, you have to click on the locations that exactly match the picture tiles in the Find List.
- Each time you click on the location that exactly matches one of the picture titles, a magic symbol will appear at that spot.
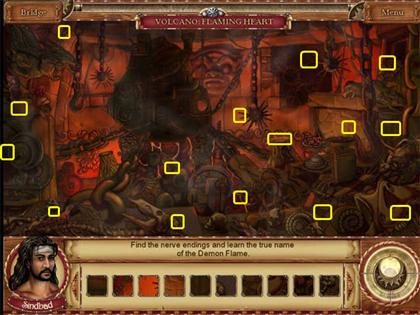
Flaming Heart
- This is a location search. You are searching for “nerve endings,” but you will not see them in the scene. Instead, you have to click on the locations that exactly match the picture tiles in the Find List.
- Each time you click on the location that exactly matches one of the picture titles, a magic symbol will appear at that spot.
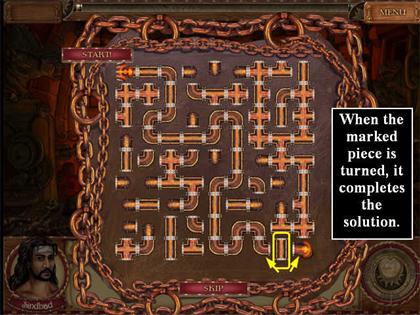
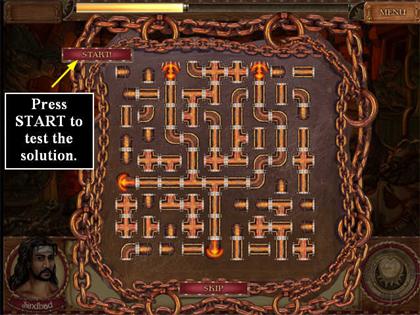
Lava Pipes Mini-game
- Now you must complete a series of increasingly-complex pipes puzzles.
- Any element which is glowing must be connected to the route you will build.
- Although end caps are available, you are not allowed to use them unless there is no other choice.
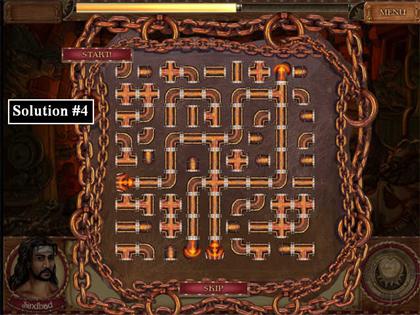
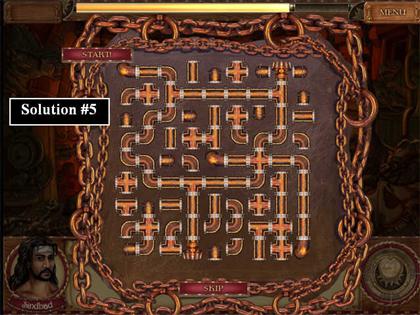
- There may be more than one solution to some of the puzzles.
- When you have your pipes connected, click on the START button in the upper left to release the lava.
- When you have the right answer, you will be given a new puzzle (usually with one more glowing element).
- When you have the wrong answer (usually because you have everything connected but you used an end cap), the level will just restart. So it’s a good idea to keep count of the number of glowing elements at the beginning of the puzzle so you can tell whether you passed or are redoing the same level again.
- Two glowing elements solution:
- Three glowing elements solution:

- Four glowing elements solution:
- Next solution (also has four glowing elements):
- Five glowing elements solution:
The Bridge
- Place the insects you have captured in the corresponding jars.
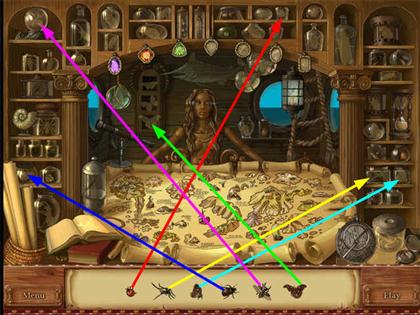
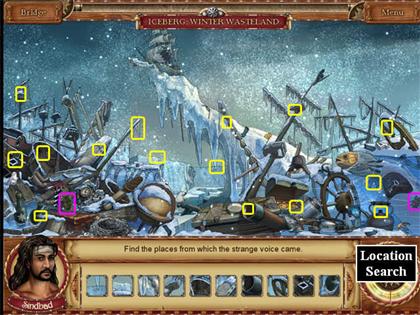
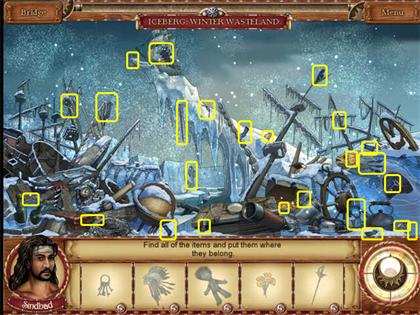
ICEBERG: Winter Wasteland
- You start with a location search. This time, you are just collecting information as you search for the source of the mysterious voice. So you just have to click on the locations that exactly match the picture tiles in the Find List.
- Optional insects are marked in pink.
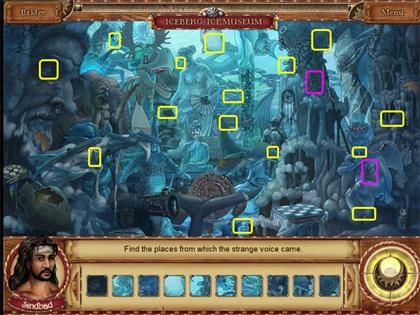
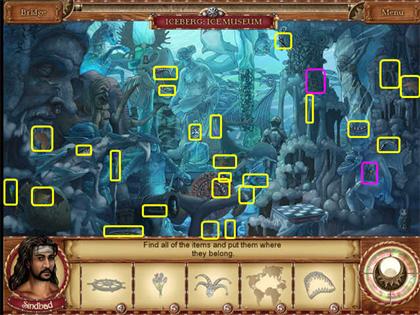
Ice Museum
- Continue searching for the source of the mysterious voice. Click on the locations that exactly match the picture tiles in the Find List.
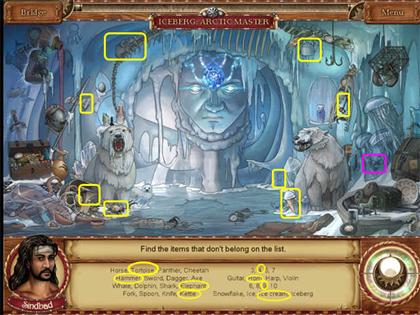
Arctic Master
- Begin with a new kind of riddle. First decide which of the items in each list doesn’t belong. Then collect that item from the scene.
- Horse, Tortoise, Panther, Cheetah. Tortoise.
- Hammer, Sword, Dagger, Axe. Hammer.
- Whale, Dolphin, Shark, Elephant. You could argue Shark, since the others are mammals, but the answer is Elephant.
- Fork, Spoon, Knife, Kettle. Kettle.
- 3, 4, 5, 7. 4 is the only even number.
- Guitar, Horn, Harp, Violin. Horn is the only one that isn’t a stringed instrument.
- 6, 8, 9, 10. 9 is the only odd number.
- Snowflake, ice, ice cream, iceberg. Ice Cream, since it’s the only one that doesn’t occur in nature.
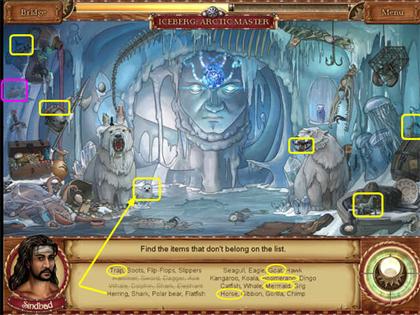
- Trap, Boots, Flip-flops, Slippers. Trap.
- Herring, Shark, Polar Bear, Flatfish. Although the list says Polar Bear, the item you have to collect is a Seal. Probably they realized there were two polar bears in the picture, then forgot to change the word list.
- Seagull, Eagle, Goat, Hawk. Goat, because the others fly.
- Kangaroo, Koala, Boomerang, Dingo. Boomerang is the only one that isn’t an animal.
- Catfish, Whale, Mermaid, Grig. Mermaid, because it’s mythical.
- Horse, Gibbon, Gorilla, Chimp. Horse, because the others are primates.
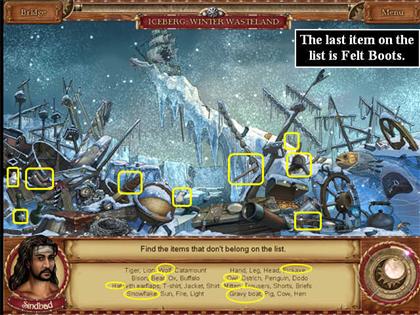
Winter Wasteland
- Tiger, Lion, Wolf, Catamount. Wolf, because the other three are feline.
- Bison, Bear, Ox, Buffalo. Bear, because the others are bovine.
- Hat, T-shirt, Jacket, Shirt. Hat.
- Snowflake, Sun, Fire, l.ight. Snowflake.
- Hand, Leg, Head, Pickaxe. Pickaxe.
- Owl, Ostrich, Penguin, Dodo. The Owl is the only one that can fly.
- Mitten, Trousers, Shorts, Briefs. Mitten.
- Gravy Boat, Pig, Cow, Hen. Gravy Boat (note that the picture looks more like an oil lamp).
Ice Museum
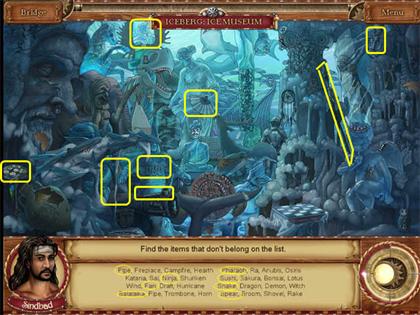
- Pipe, Fireplace, Campfire, Hearth. Pipe.
- Katana, Sai, Ninja, Shuriken. Ninja—the other three are types of weapons.
- Wind, Fan, Draft, Hurricane. Fan.
- Balalaika, Pipe, Trombone, Horn. Balalaika—it’s a stringed instrument.
- Pharaoh, Ra, Anubis, Osiris. The last 3 are high gods.
- Sushi, Sakura, Bonsai, Lotus. Sushi. The other three are plants.
- Snake, Dragon, Demon, Witch. Snake—the other three are mythical.
- Spear, Broom, Shovel, Rake. Spear.
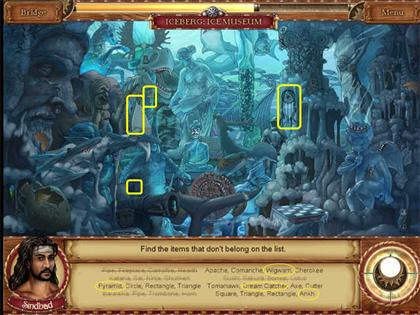
- Pyramid, Circle, Rectangle, Triangle. Pyramid. The others are two-dimensional.
- Apache, Comanche, Wigwam, Cherokee. Wigwam.
- Tomahawk, Dreamcatcher, Axe, Cutter. Dreamcatcher.
- Square, Triangle, Rectangle, Ankh. Ankh.
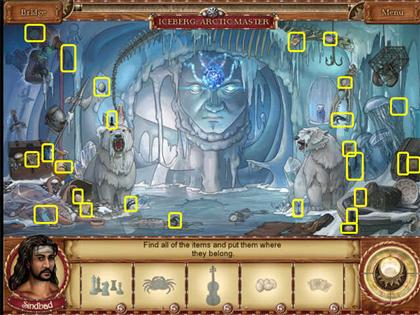
Arctic Master
- Begin by collecting the parts of all the items shown.
- The violin is blue.
Winter Wasteland
- Collect the parts of all the items shown.
Ice Museum
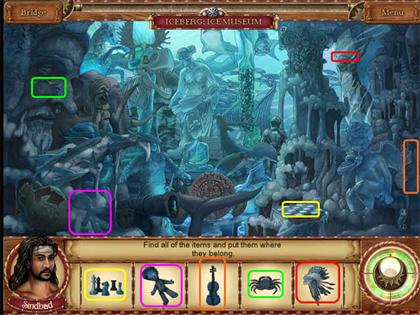
- Collect the parts of all the items shown.
- Now start putting the completed items into the scene.
- The headdress goes on the warrior’s head.
- The chess pieces go on the chessboard.
- The other items match indentations that are approximately the same shape.
- Click when the tip of the cursor touches the place where you want to put the item, don’t worry about the image of the item itself.
Winter Wasteland
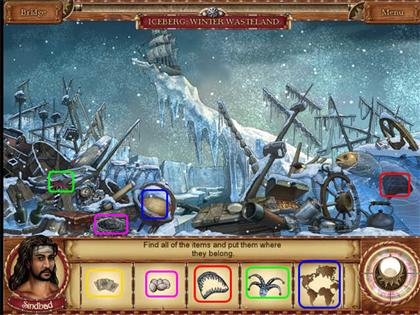
- Put the completed items into the scene.
- The cards go on the table with the other cards.
- The jester doll head goes on the jester collar.
- The shark’s teeth go in the shark’s mouth.
- The continents go on the globe.
- The eggs go in the nest.
- Click when the tip of the cursor touches the place where you want to put the item, don’t worry about the image of the item itself.
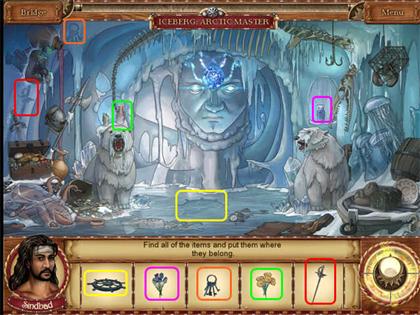
Arctic Master
- Put the completed items into the scene.
- The blue flowers go in the blue vase on the right.
- The yellow flowers go in the pink vase on the left.
- The other items match indentations that are approximately the same shape.
- Click when the tip of the cursor touches the place where you want to put the item, don’t worry about the image of the item itself.
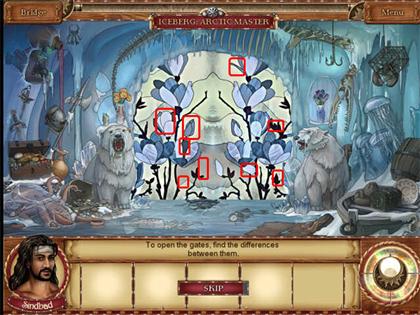
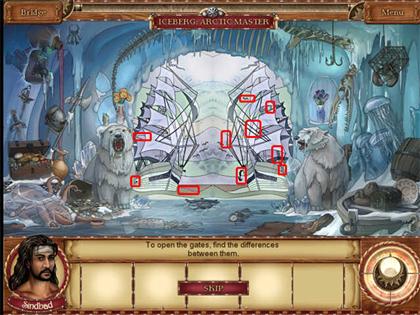
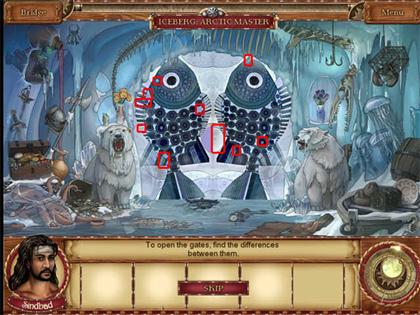
Find the Differences Mini-game
- Compare the left side and ride side of the door. Click on any differences.
- Differences caused by ice around the doorframe don’t count.
The Bridge
- Place the insects you’ve collected into the corresponding jars.
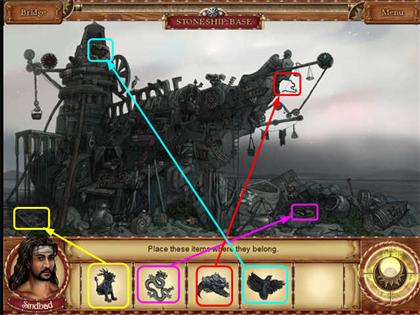
STONE SHIP: Base
- Collect the pieces of the items shown.
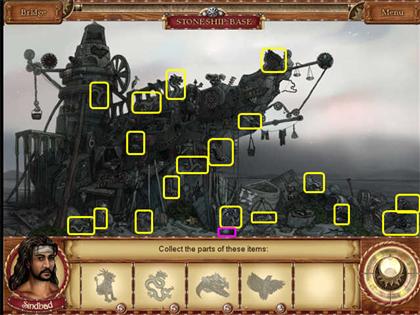
- Place the completed items back into the same. Some go into indentations of the same general shape, others go into wire frames.
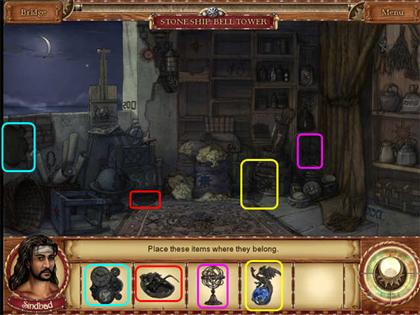
Bell Tower
- Collect the pieces of the items shown.
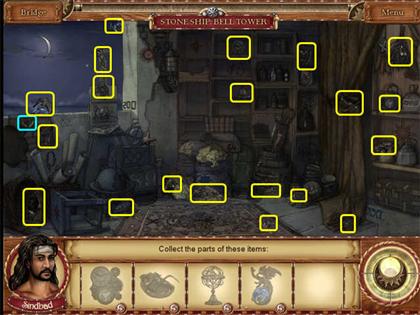
- Place the completed items back into the scene.
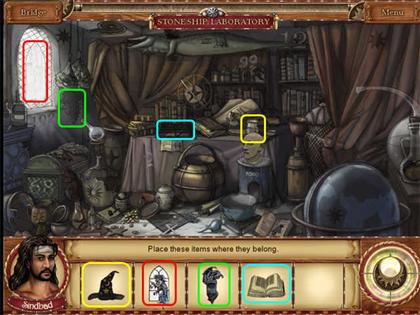
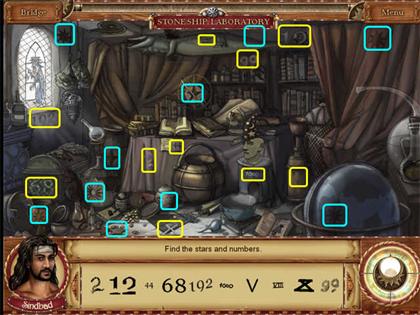
Laboratory
- Collect the pieces of the items shown.
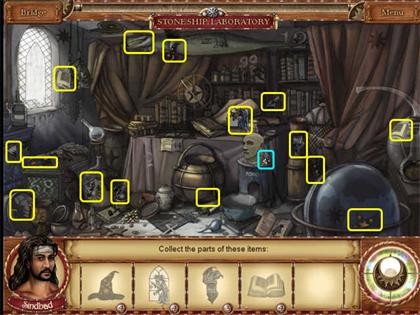
- Place the completed items back into the scene.
- The hat goes on the bust.
- The book goes on the bookstand.
- The stained glass goes in the window.
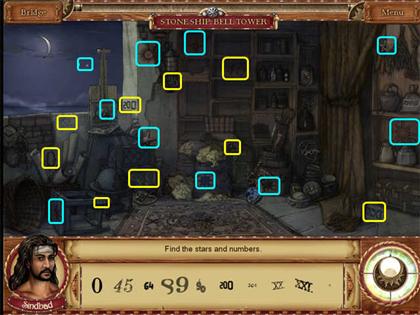
- Find the stars and numbers. Stars also include suns.
Bell Tower
- Find the stars and numbers. Stars also include suns.
- The last star is the real one you can see in the sky.
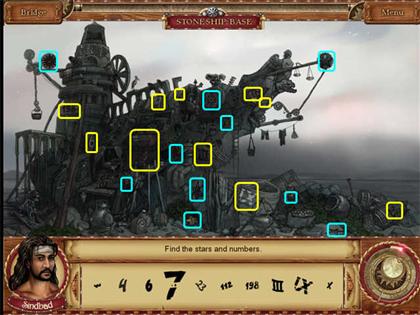
Base
- Find the stars and numbers. Stars also include suns.
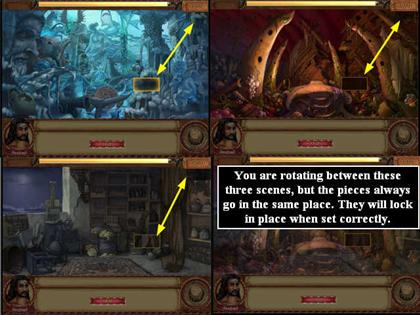
Picture Jumble Mini-game
- This is a typical jumbled picture mini-game. You can swap any two tiles. When a tile is placed in the correct position, it locks into place and you can’t move it any more.
- But there is a twist. The scene continually rotates between the three locations of the Stone Ship: the Base, the Bell Tower and the Laboratory. This can be disorienting.
- You can still solve the puzzle by looking at the picture. You’ll find that some areas of the puzzle are easier to work in one location than another. If you start working on a tile and the location shifts, you can just wait and it will eventually shift back again.
- Alternatively you can take advantage of the fact that a piece locks into place once it’s positioned correctly and just use trial and error. Start with any piece and work your way across each row of the picture until it locks into place. Then take another piece and do the same thing until the puzzle is complete.
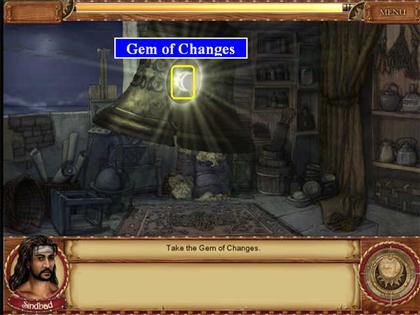
- When you finish, take the Gem of Changes from the Bell.
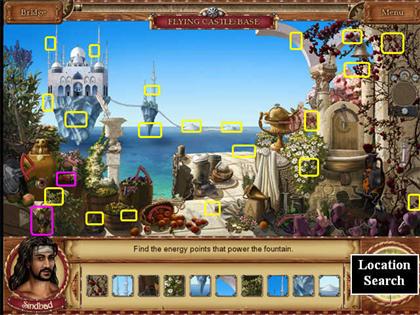
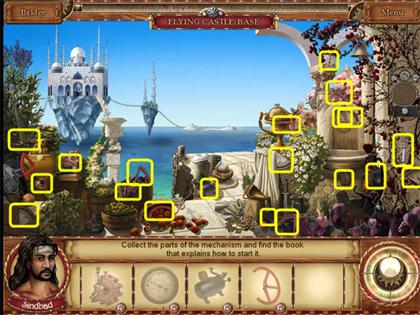
FLYING CASTLE: Base
- Click on the locations that exactly match the picture tiles in the Find List.
- Optional insects are marked in pink.
The Fountain of Eternity
- Click on the locations that exactly match the picture tiles in the Find List.
- Optional insects are marked in pink.
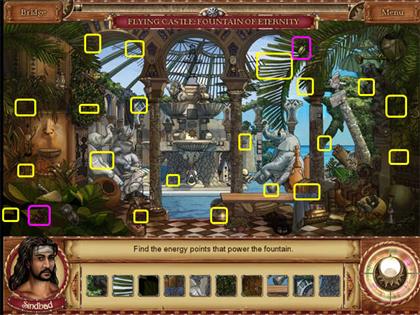
- Now we used the BRIDGE button in the upper left to return to the Bridge and place the insects in the corresponding jars. You can do this now or later. If you do it, use the PLAY button to return to the regular gameplay.
The Bridge
The Library
- Click on the locations that exactly match the picture tiles in the Find List.
- Optional insects are marked in pink.
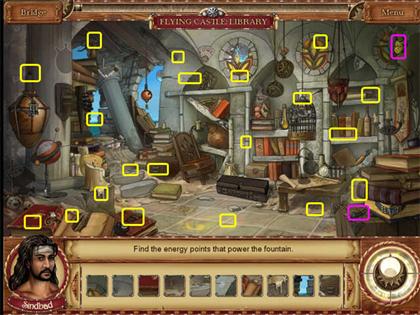
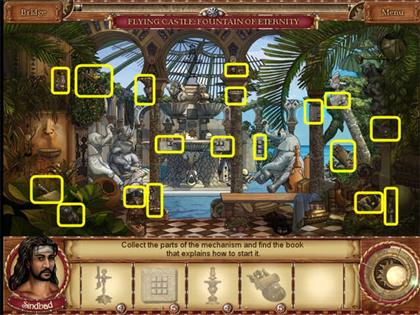
- Collect the parts of the items shown.
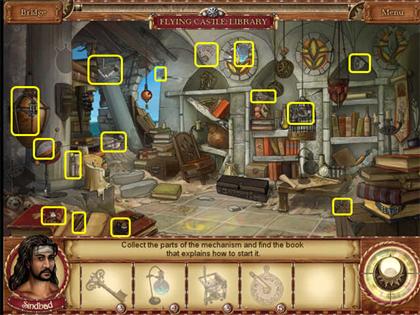
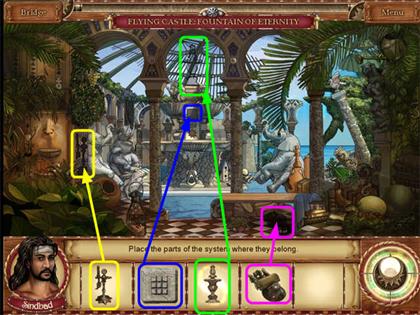
- Place the collected items back into the scene where they belong.
- Use the Key on the lock on the chest and you will reveal the book you need. You don’t have to collect it, though, Chalida will take it for herself.
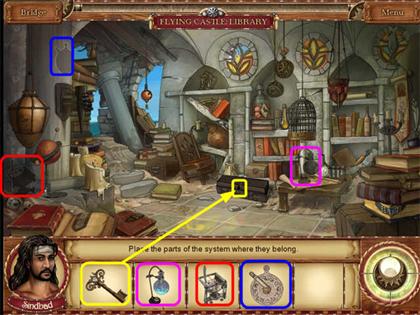
Base
- Collect the parts of the items shown.
- You can’t collect the red piece of the wheel that’s on the left. You can only collect the pinker pieces.
- Place the collected items back into the scene where they belong.
- The parts of the wheel you collected now match up with the piece in the scene on the left.

The Bridge
- Place the insects you’ve collected into the corresponding jars.
The Fountain of Eternity
- Collect the parts of the items shown.
- Place the collected items back into the scene where they belong.
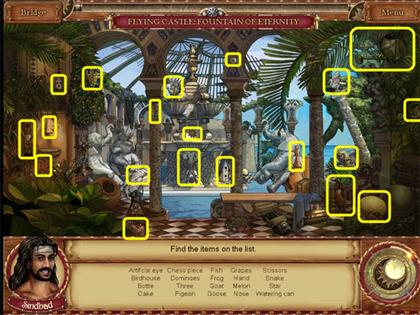
- Collect the items named on the Find List.
- The “Nose” is part of a carving on the left wall.
Base
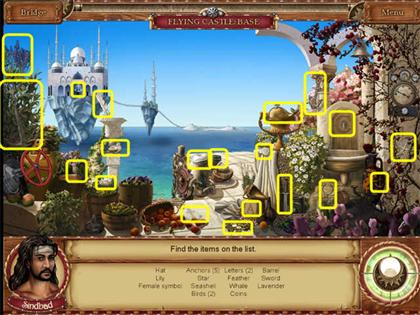
- Collect the items named on the Find List.
- The only Barrel that counts is the one closest to the water in the center of the scene.
- The Whale is a gold statue on the right.
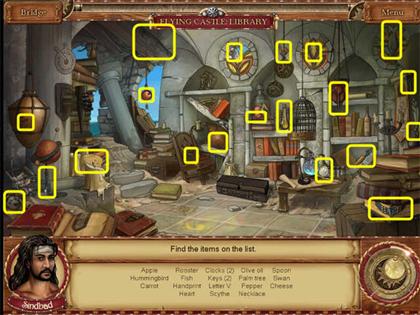
Library
- Collect the items named on the Find List.
- The Handprint is quite hard to see. It’s a smudge on the large wineskin on the left shelf.
- The Heart is a cut-out in the chair by the wineskin.
Matching Pairs Mini-game
- Now you must complete several rounds of a standard pairs-matching card game. Each pair you match will be taken off the board. You win the round when all the pairs are removed.
The Bridge
- Place the Insects in the corresponding jars.
- Use the PLAY button to return to regular gameplay.
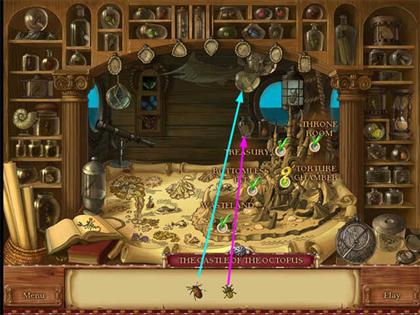
THE OCTOPUS: the Bottomless Pit
- Begin by collecting the pieces of the two items shown.
- You can’t get any HINTS until you have the Amulet again, although you may get some free sparkle hints.
- You can only use the existing light until you have the Torch again.
- This location is very dark, and even after you get the Torch your cursor will only illuminate a small section at a time. We have used composite screenshots so we can show everything at once.
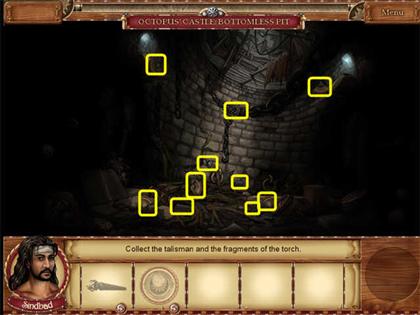
- Now you must click on the spots in the scene that match the picture tiles exactly.
- Although the instructions say you are pushing “hidden buttons,” you will never actually see the buttons. You just need to click on the right places.
- Remember that our screenshot is a composite—you will only see one small portion at a time.
- Optional insects are marked in cyan.

Wasteland
- Collect the items named on the Find List.
- The Unpeeled Chestnut is the spiky green round object in the lower left.
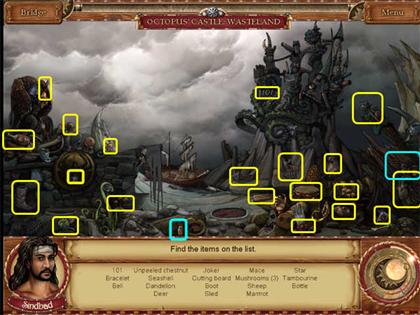
- Collect the pieces of the items shown.
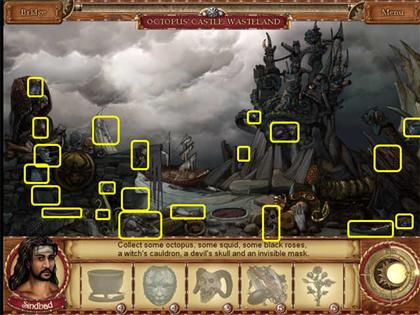
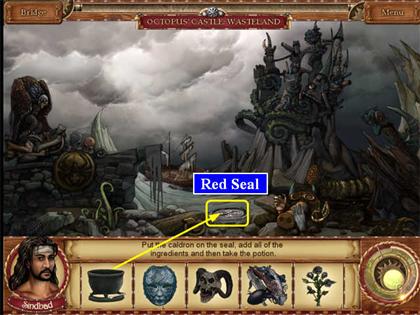
- Now that you have all the items, place the Cauldron on the Red Seal, then place the other items in the Cauldron.
- Click when the tip of the cursor is in the correct place, don’t worry about the exact position of the object.
Torture Chamber
- Collect the pieces of the items shown. The game calls them “keys,” but they look like large masks.
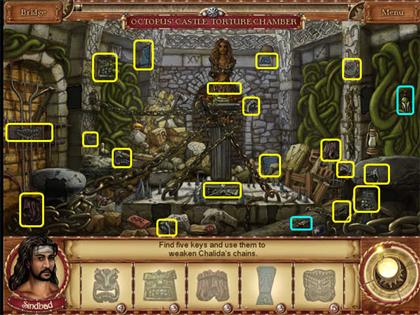
- Now that you have the items, place them back into the scene as shown.

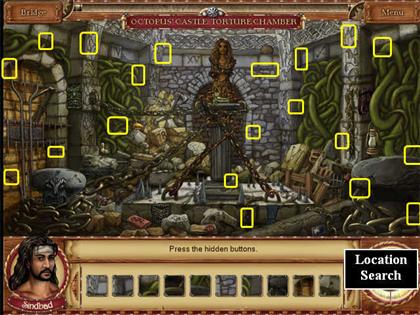
- The next task is a location search. You must click on the places that match the picture tiles exactly. Notice what happens to the chains as you do so.
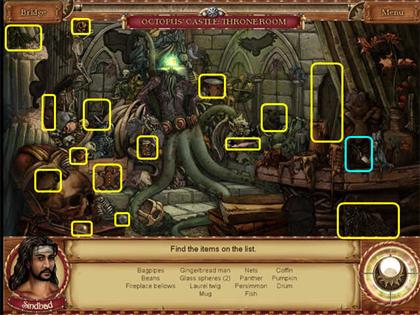
Throne Room
- Collect the items named on the Find List.
- Optional insects are marked in cyan.
Bridge
- Since you won’t be able to revisit the Bridge after the end of the game, it’s a good idea to use the BRIDGE button to go to the bridge and put away the insects that you have collected.
- When you are done, click on PLAY in the lower right to go back to the Throne Room.
Throne Room
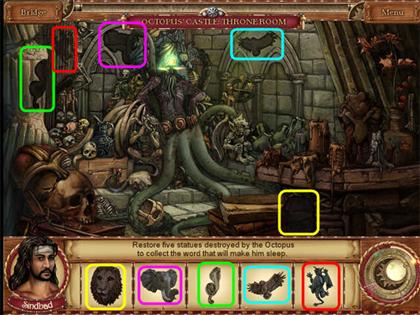
- Collect the pieces of the items shown.
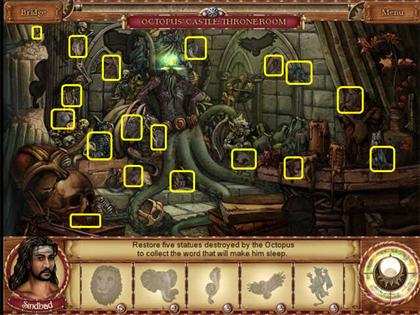
- Now that you have the items, place them back into the scene as shown.
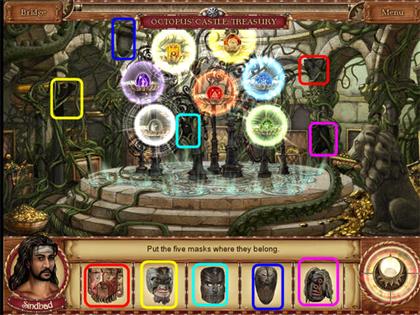
Treasury
- Collect the pieces of the items shown.
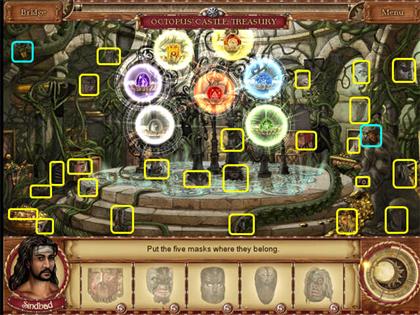
- Now that you have the items, place them back into the scene as shown. Note that one of the Masks goes in a partially-obstructed spot behind the jewels (see screenshot).
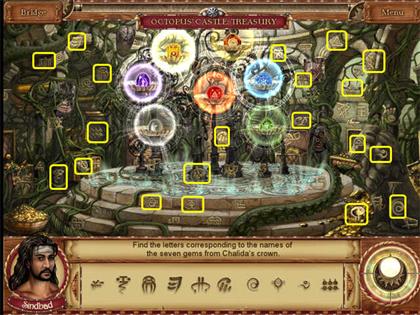
- Click on the symbols that match the Find List.
Torture Chamber
- Last chance to visit the Bridge and see your insect collection!
- Take the Crown and place it on Chalida’s head.
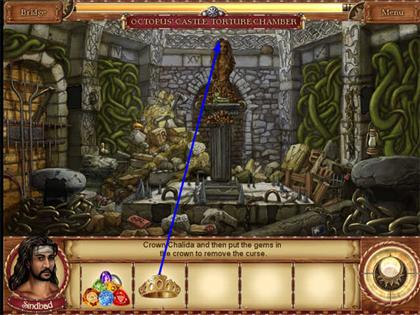
- Put the jewels in the Crown.
- Watch the Credits.
- Because Chalida is human now, you will not be able to return to the ship.
Created at: 2010-01-27