

Walkthrough Menu
- General Tips
- Chapter 1: The Dungeon
- Chapter 2: The Great Hall
- Chapter 3: The Village
- Chapter 4: The Underground
General Tips
- Hidden Object Scenes and mini-games are often randomized - your solution may vary.
- Hidden objects listed in yellow are hidden or require you to change the item to what you are trying to locate.
- Hidden Object Scenes will be referred to as HOS in this walkthrough.
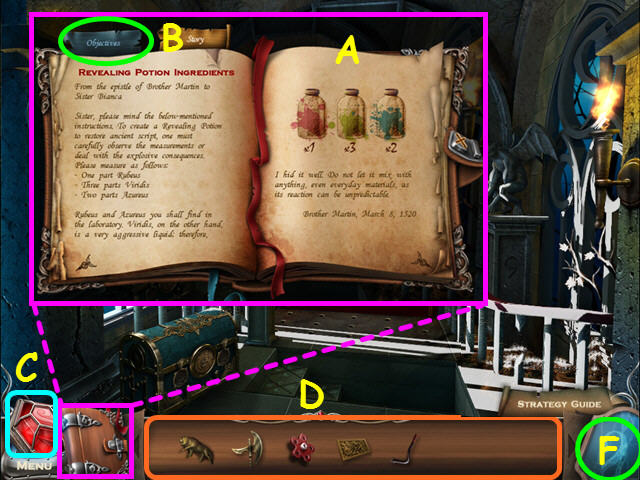
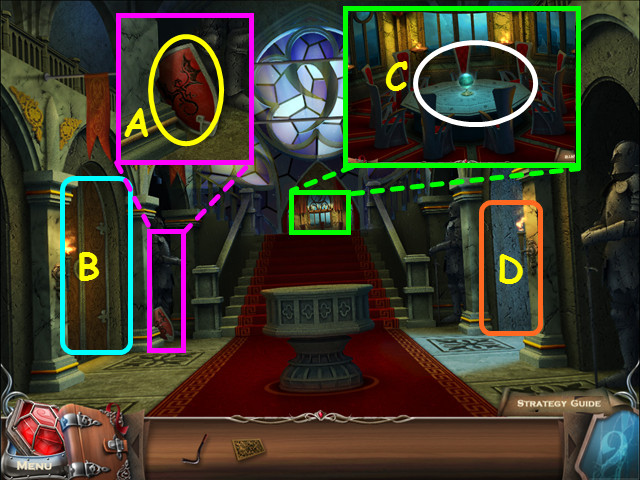
- Inside the journal you will find the clues and information you have found (A).
- Click on the Objectives tab to view your current tasks (B).
- The amulet will glow when there are hidden runes to find; click on the amulet and move it over a scene to locate the runes (C).
- Your inventory is in the bottom panel - click on an item to select it for use (D).
- Hints are unlimited, but you must wait for the hint meter to recharge (F).
Chapter 1: The Dungeon
- You will have the option of some interactive help.
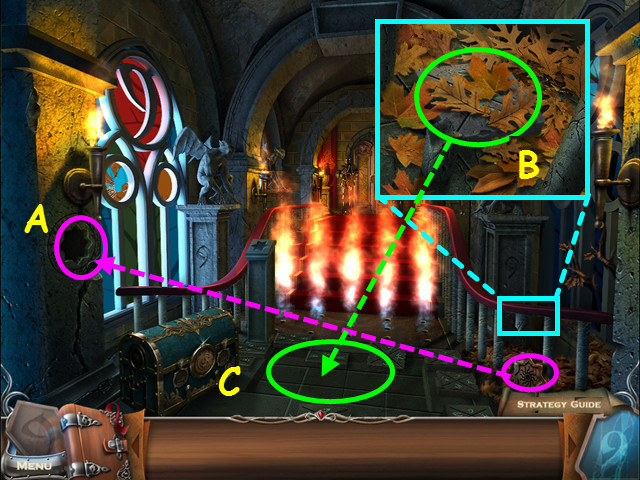
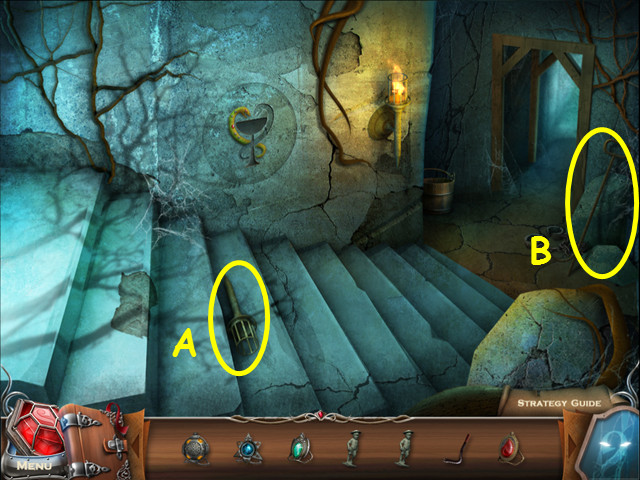
- Take the STONE STAR from the right and place it in the niche on the left (A).
- Zoom into the right, remove the leaves and take the TILE (B).
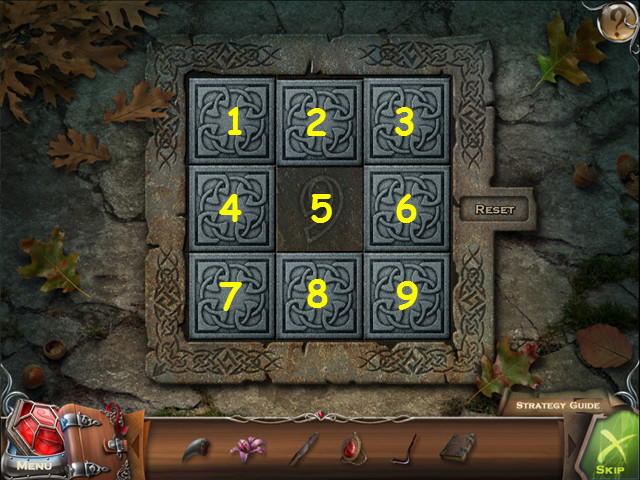
- Place the TILE into the floor grid for a mini-game (C).
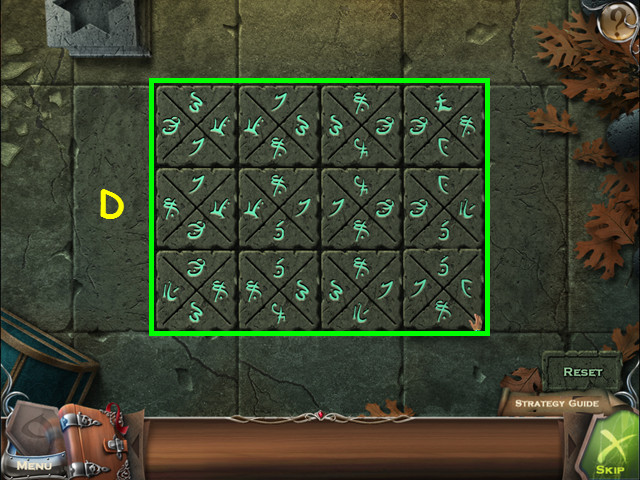
- Place the tiles into the grid so the same symbols are touching on the edges.
- This mini-game is randomized - your solution may vary.
- Our solution is shown here (D).
- Walk down the stairs that appear.
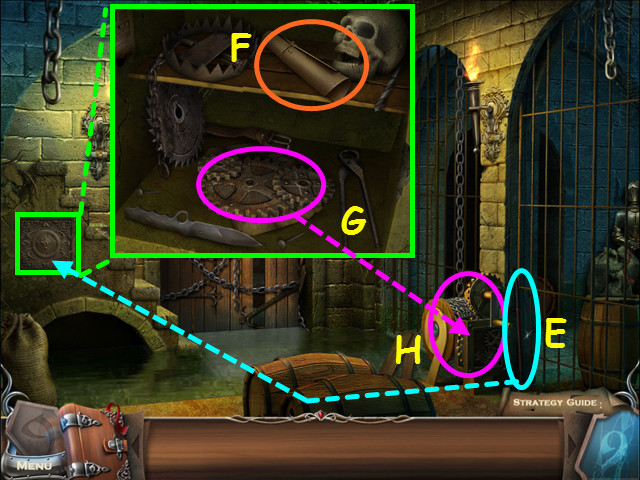
- Take the CROWBAR and use it to open the compartment (E).
- Look inside the compartment and read the scroll on the top shelf (F).
- Move items on the bottom shelf and take the GEARS (G).
- Use the GEARS on the hoist for a mini-game (H).
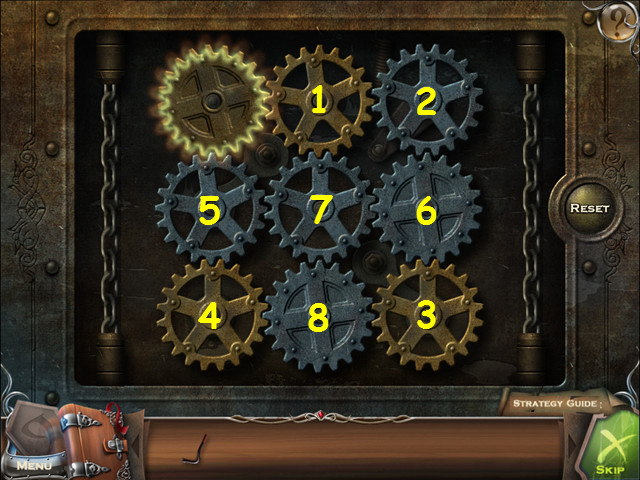
- Get all the gears turning by clicking on them in a specific order.
- Click on the gears in numerical order (1-8).
- Walk to the right.
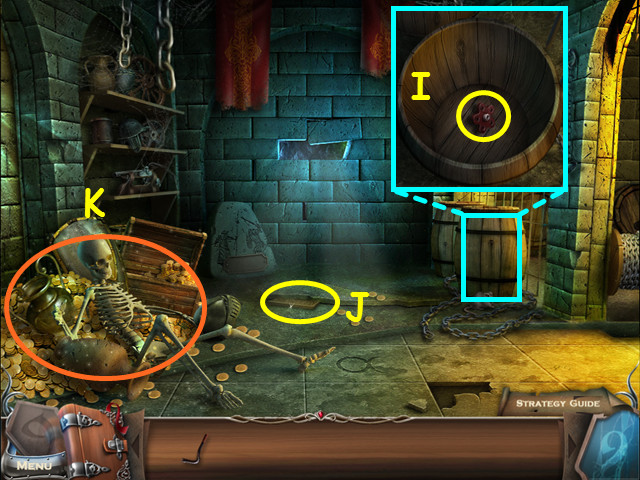
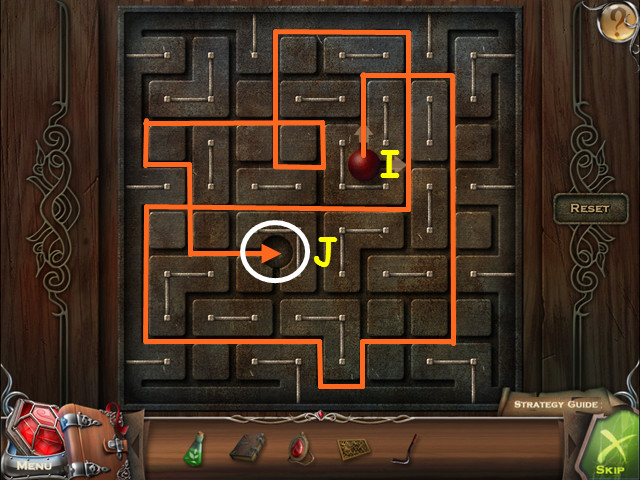
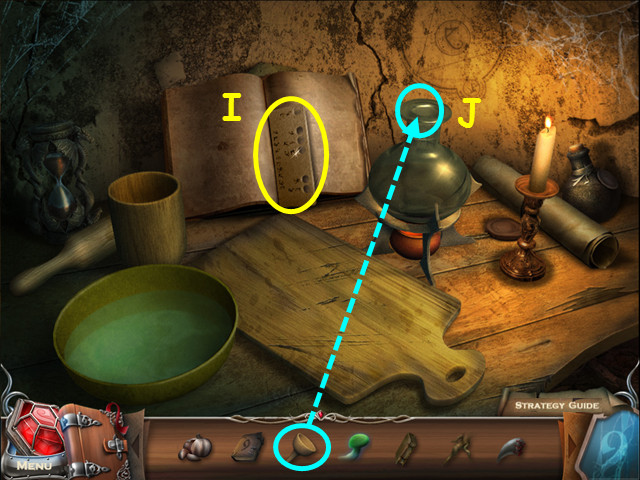
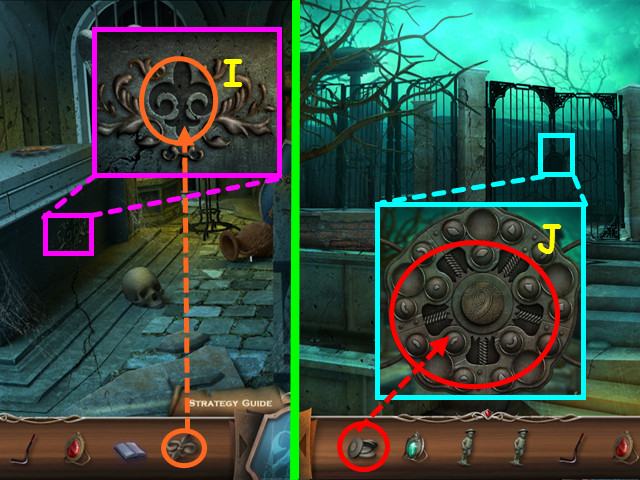
- Look in the barrel and take the VALVE (I).
- Take the 1st STAR FRAME (J).
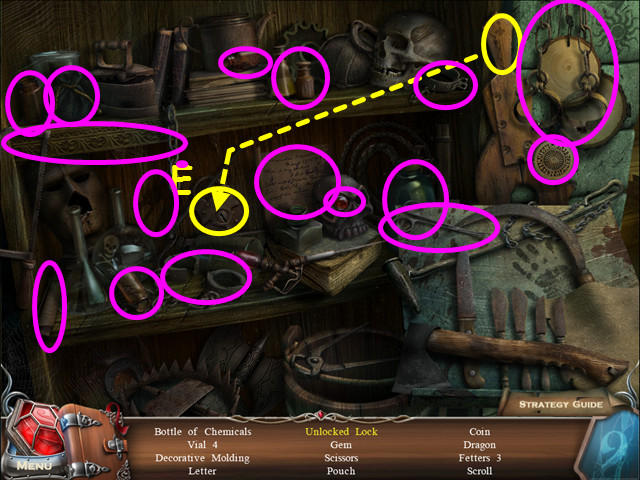
- Select the skeleton for a HOS (K).

- Locate all the items on the list.
- Use the matches on the lamp to make the burning lamp (L).
- You will earn the GOLDEN STAR.
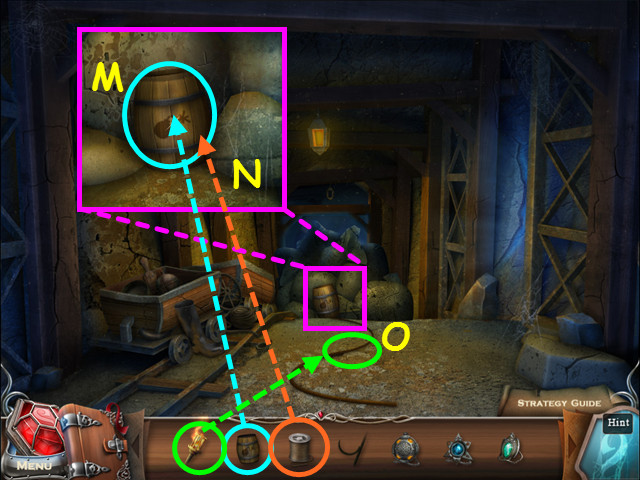
- Walk to the right, then go down.
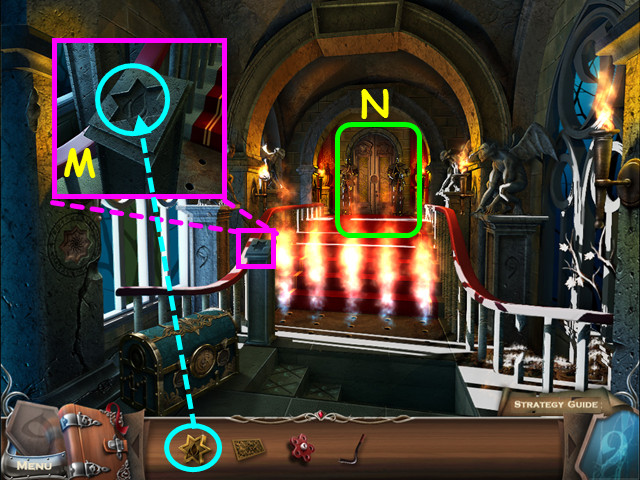
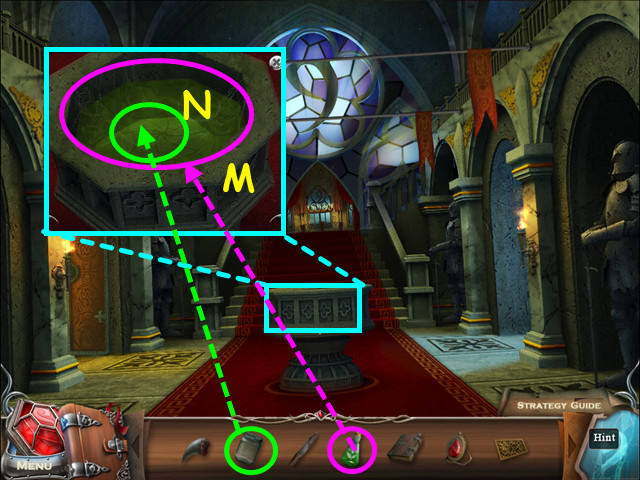
- Look at the pedestal and place the GOLDEN STAR into the niche (M).
- Walk forward to the double doors (N).
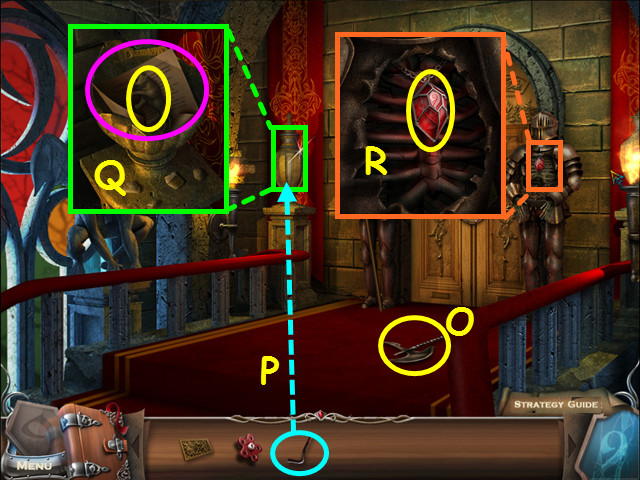
- Take the BATTLE AXE (O).
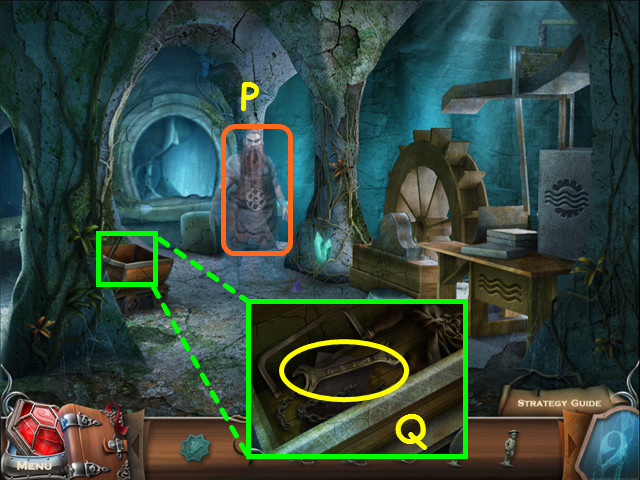
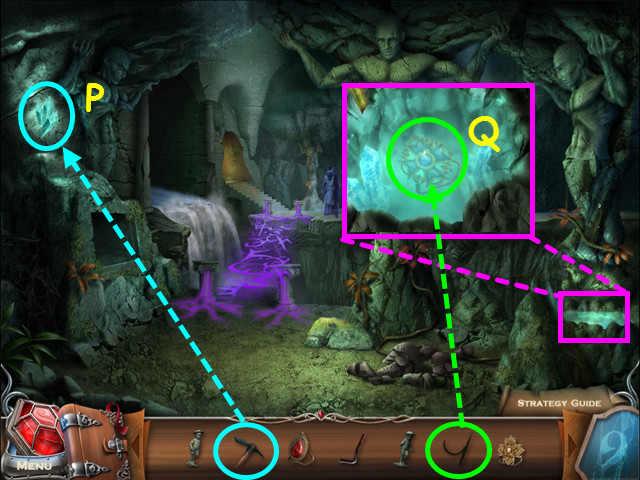
- Use the CROWBAR on the urn (P).
- Look inside the broken urn; take the LION STATUETTE and read the scroll (Q).
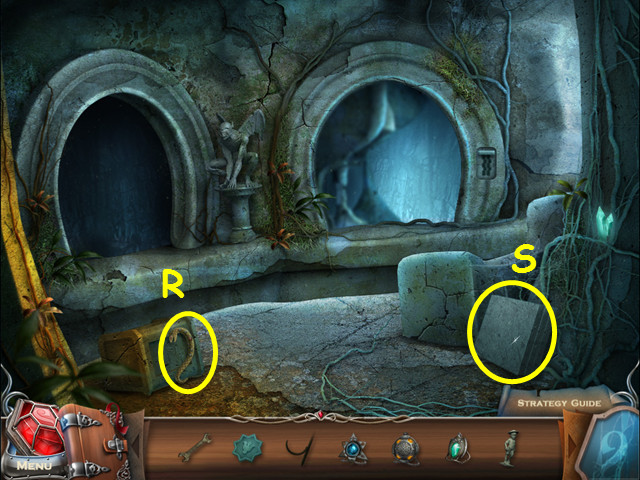
- Look at the right knight and take the amulet (R).

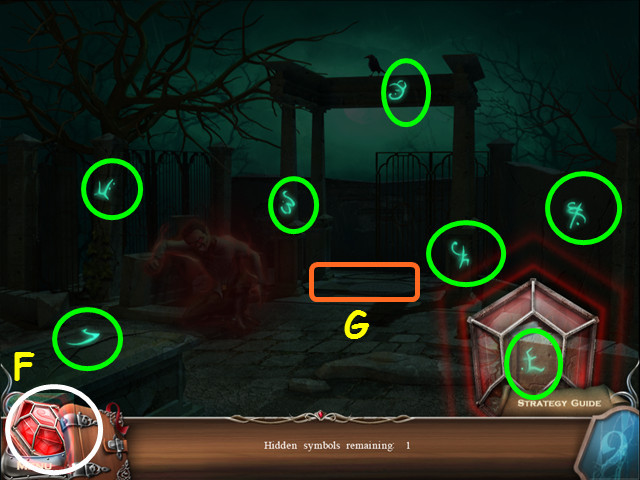
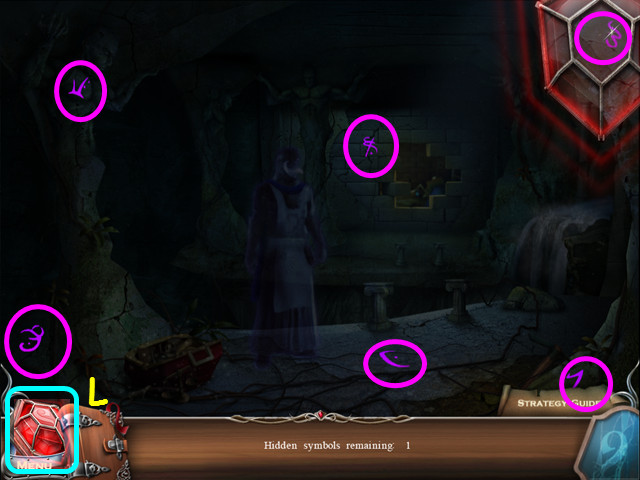
- When the red amulet in the lower left glows red, it means there are runes to find in the scene.
- Click on the amulet to take it from the corner, then move it around to find the hidden runes (S).
- Click when you are over a rune to make it visible.
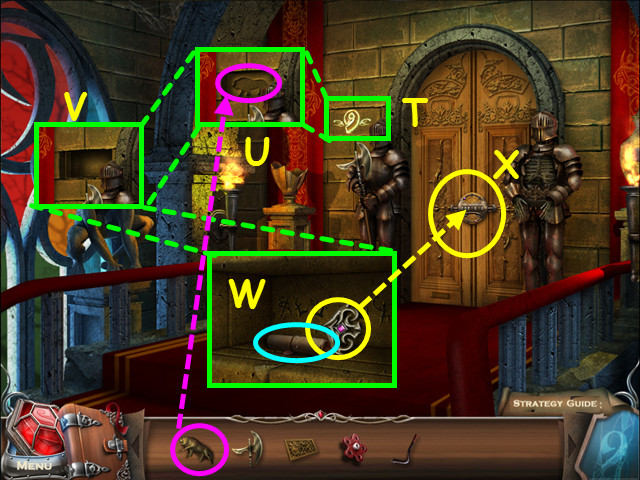
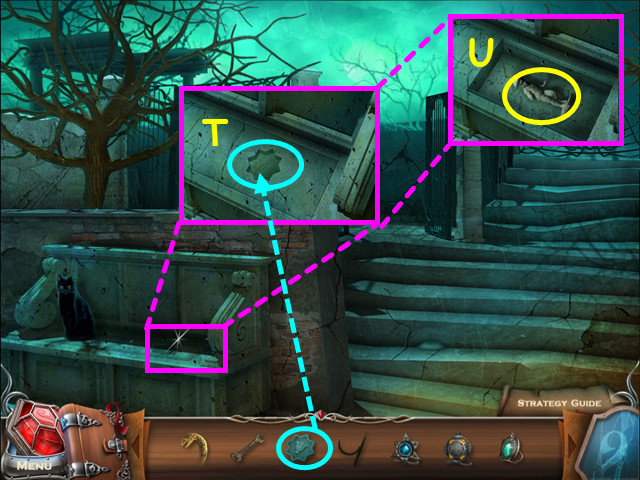
- Press the brick with the '9' symbol (T).
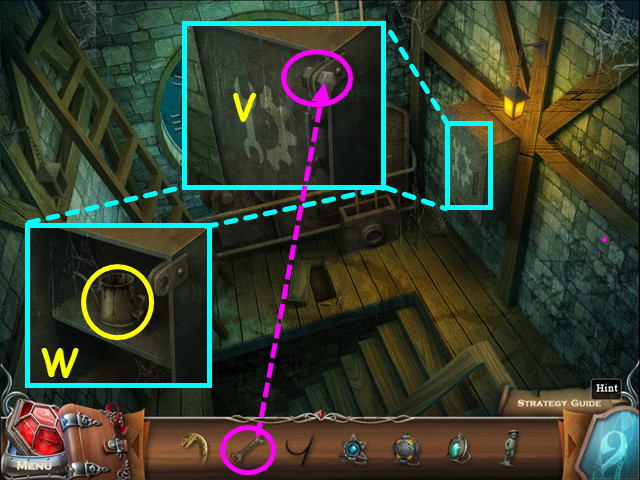
- Place the LION STATUETTE into the niche (U).
- Look inside the opening (V), take the GOLDEN ARROW and read the scroll on the potion (W).
- Look at the lock on the door; use the GOLDEN ARROW on the lock for a mini-game (X).
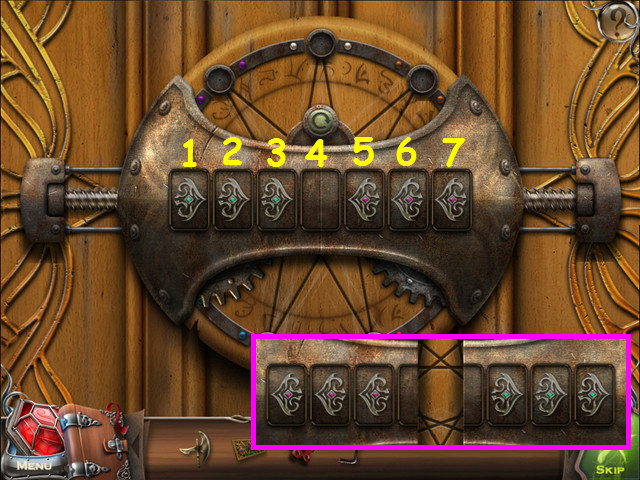
- Swap the positions on the blue and violet arrows.
- Arrows can only move in the direction they point to an empty spot next to them or jump another arrow to a spot.
- Click on the arrows in the numbered positions in this order: 3-5-6-4-2-1-3-5-7-6-4-2-3-5-4.
- Exit the close-up and walk down twice.
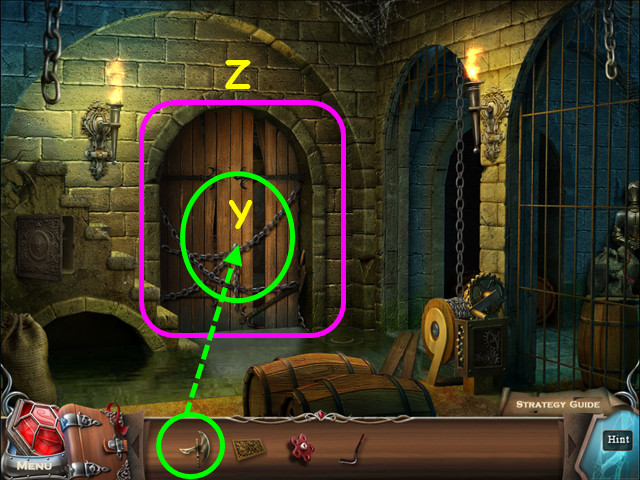
- Use the BATTLE AXE to break down the wooden doors (Y).
- Walk forward into the laboratory (Z).
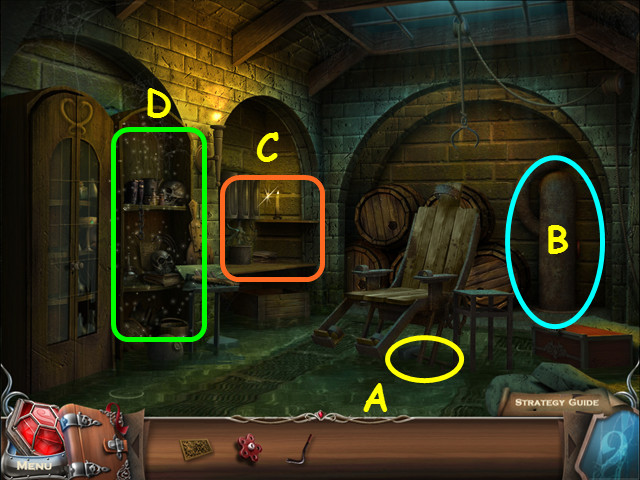
- Take the SLEDGEHAMMER (A).
- Note the water control mechanism (B).
- Note the desk (C).
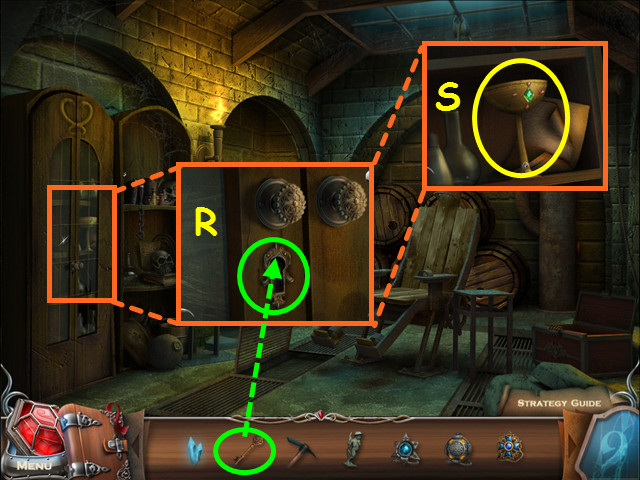
- Select the shelves for a HOS (D).
- Locate all the items on the list.
- Use the key on the lock to get the unlocked lock (E).
- You will earn the BOTTLE of AZUREUS.
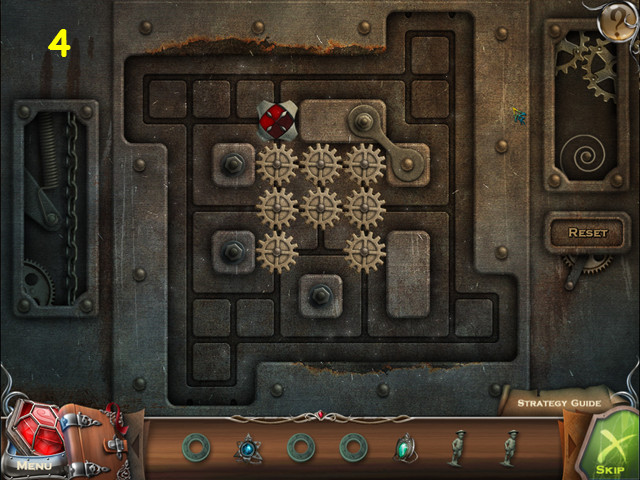
- Look at the water control mechanism for a mini-game.
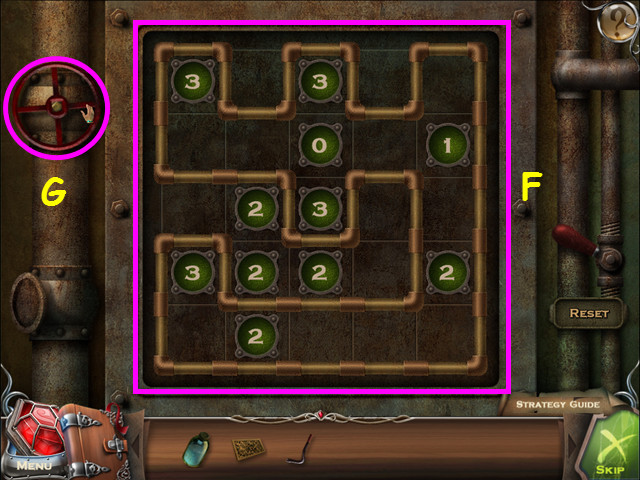
- Place pipes on the grid based on the numbers so there is a continuous pipe (F).
- Each number indicates how many pipes are on that number's border.
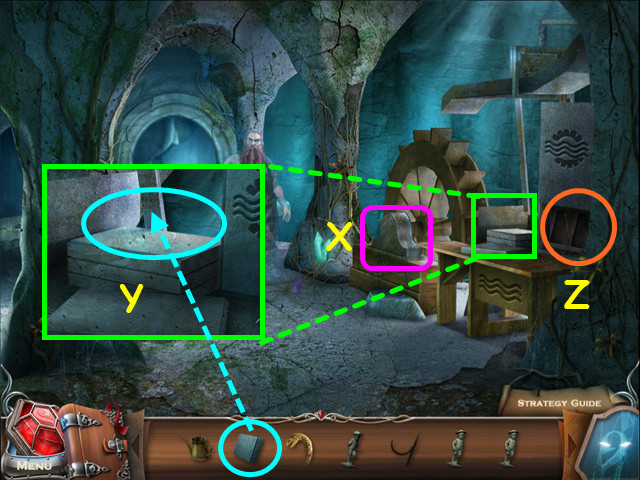
- Turn the valve to drain the water in the lower level (G).
- Look at the desk.
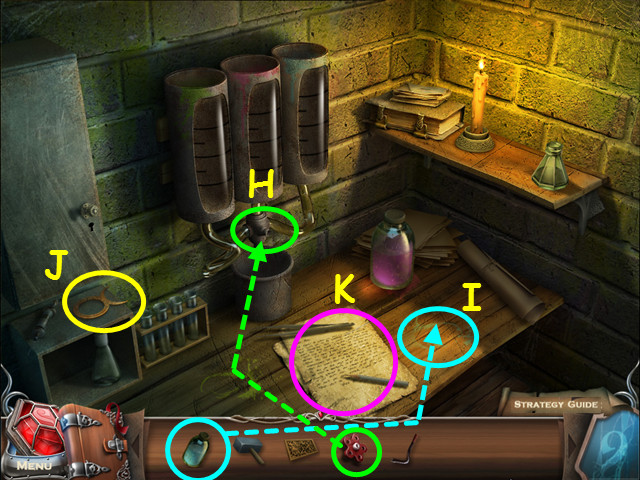
- Place the VALVE on the mixer (H).
- Place the BOTTLE of AZUREUS on the blue stain (I).
- Take the ANCIENT SYMBOL (J).
- Take and read the scroll on the revealing potion (K).
- Exit the close-up and walk down.
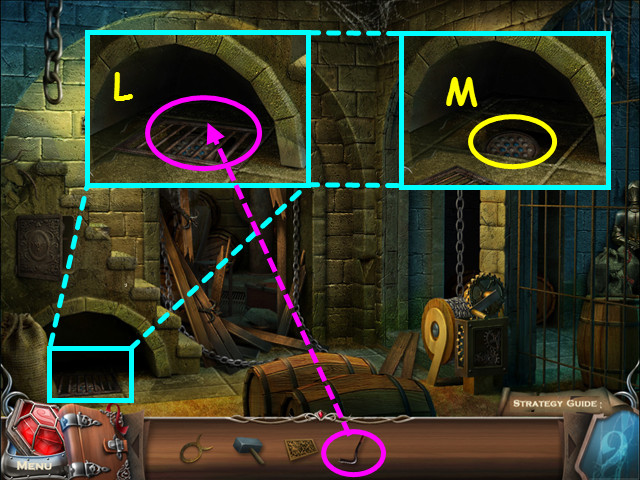
- Look in the alcove and use the CROWBAR to open the grate (L).
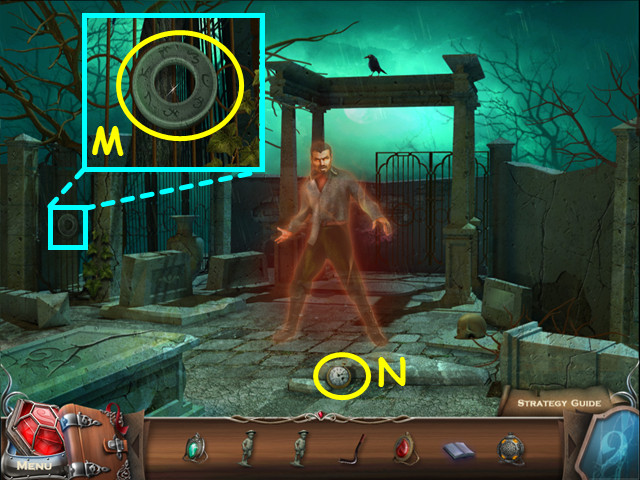
- Take the 1st TOKEN (M).
- Walk to the right.
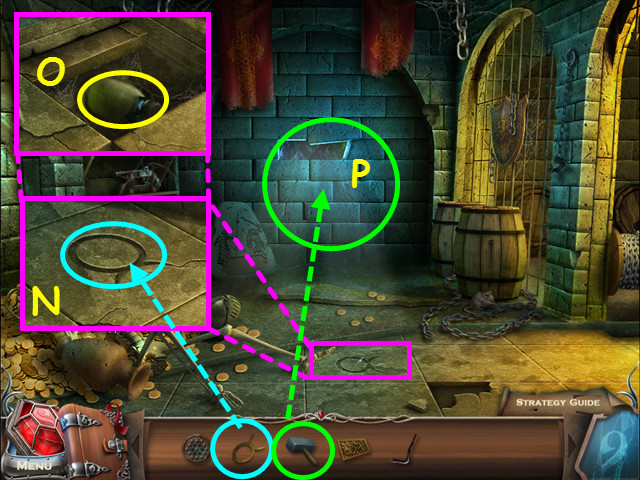
- Look at the tile and place the ANCIENT SYMBOL into the indentation (N).
- Take the BOTTLE of VIRIDIS (O).
- Use the SLEDGEHAMMER on the back wall (P).
- Walk forward through the hole in the wall.
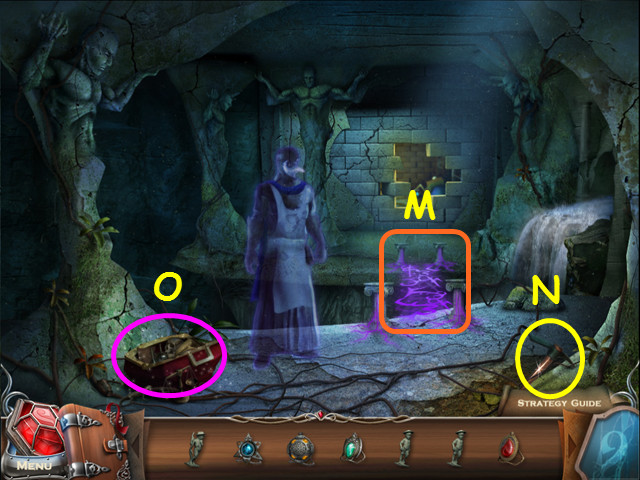
- Watch the cut-scene then return to the laboratory desk.
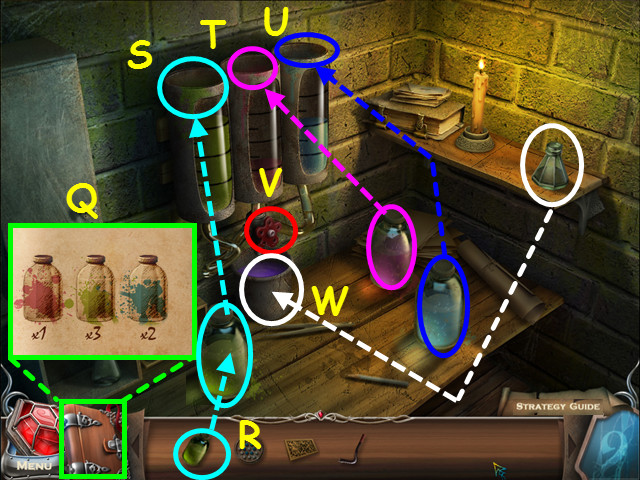
- Refer to your journal for the potion recipe (Q).
- Place the BOTTLE of VIRIDIS on the green stain (R).
- Use the green bottle on the left tube 3 times (S).
- Use the red bottle on the center tube once (T).
- Use the blue bottle on the right tube twice (U).
- Click on the valve to mix the potion (V).
- Take the small bottle from the shelf and use it on the container to get the REVEALING POTION (W).
- Exit the close-up of the desk, walk down, then go to the right.
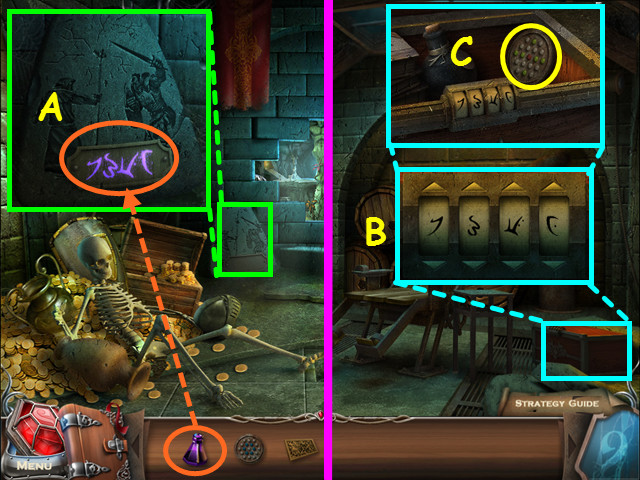
- Look at the tablet and use the REVEALING POTION on the plaque (A).
- Note the symbols that appear.
- Walk to the right, then go forward.
- Look at the chest and enter the symbols using the arrow keys (B).
- Look inside the chest and take the 2nd TOKEN (C).
- Walk down twice.
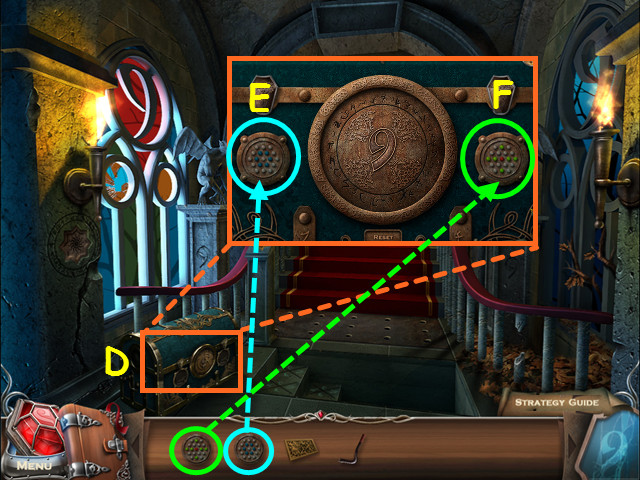
- Look at the chest (D).
- Place the TOKEN with the blue gems on the left (E), while the TOKEN with the red and green gems go on the right (F).
- This will trigger a mini-game.
- This mini-game has 2 parts.
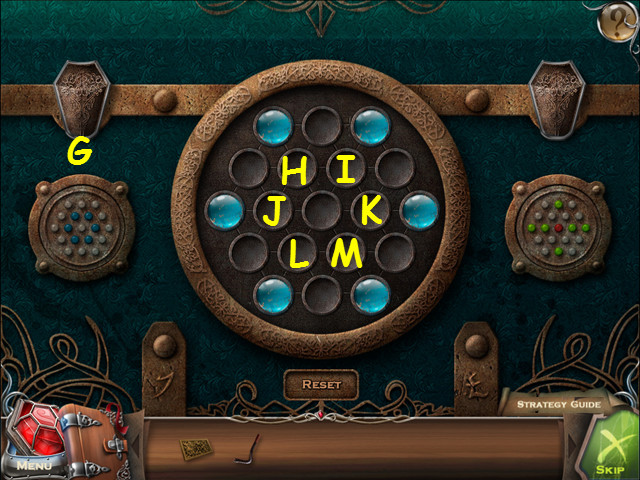
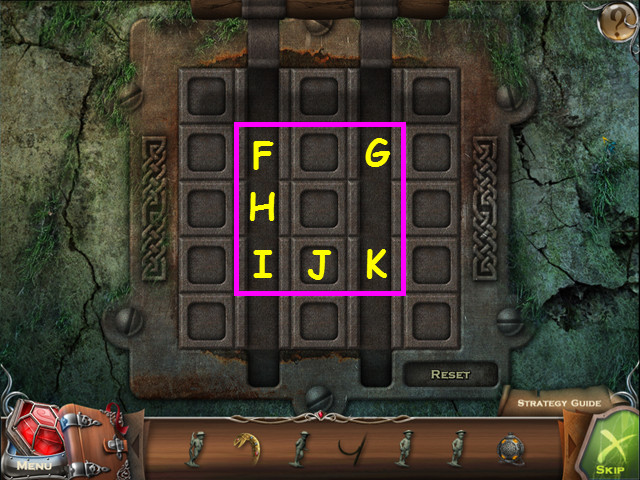
- For the first part, move the gems in the center to match the pattern shown on the left (G).
- Click in the center of 7 circles to rotate them clockwise.
- Click on the following: Lx2, Mx4, Jx4, Kx2, Hx2, Ix2, and Hx2.
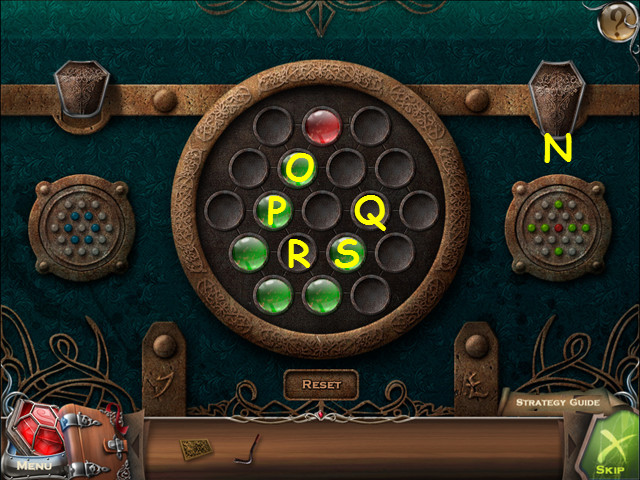
- For the second part, move the gems in the center to match the pattern shown on the right (N).
- Click in the center of 7 circles to rotate them clockwise.
- Click on the following: Sx3, Px2, Qx2, Px2, Rx1, Px1, Qx2, Px1, Rx4, Px5, and Ox2.
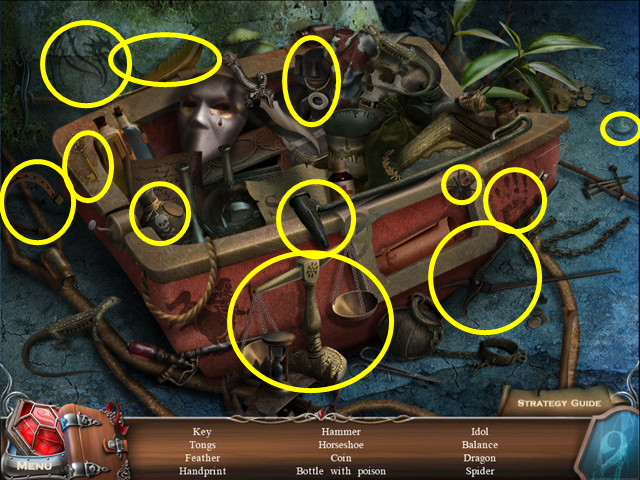
- Look inside the chest for a HOS.

- Locate all the items on the list.
- Look inside the pot to find the GEMS (T).
- Use the paintbrush on the red paint (U) then on the flower to make the red flower (V).
- You will earn the GEMS.
- Walk forward; look at the lock on the doors and use the GEMS to trigger a mini-game.
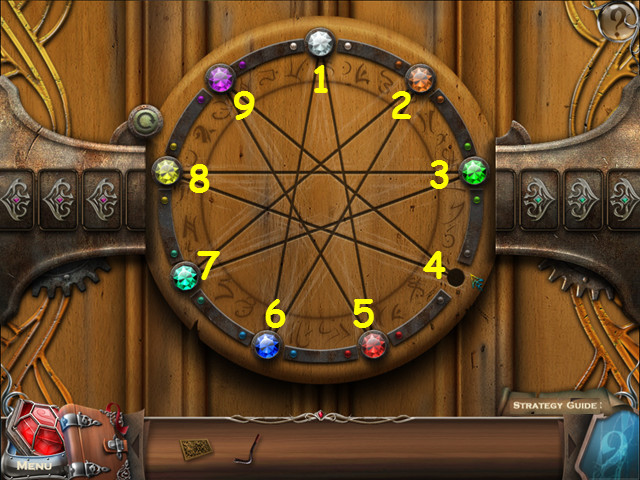
- Slide the gems to the point on the star with the same color.
- Click on the points in this order: 8-3-7-2-6-1-5-9-4-8-3-7-2-6-1-5-9-4-8-3-7-2-6-1-5-9-4-8-3-7-2-6-1-5-9-4.
- Walk forward.
Chapter 2: The Great Hall
- Look at the knight on the left and take the SHIELD (A).
- Note the locked door on the left (B).
- Walk forward to the great hall and look at the table (C).
- Exit the close-up and walk down again.
- Exit to the garden on the right (D).
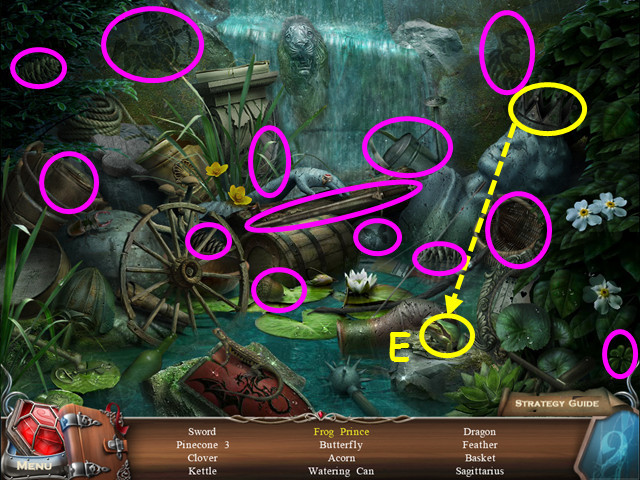
- Select the broken statue on the right for a HOS.
- Locate all the items on the list.
- Place the crown on the frog to make the frog prince (E).
- You will earn the KNIGHT'S SWORD.
- Walk down 4 times, go to the right then forward.
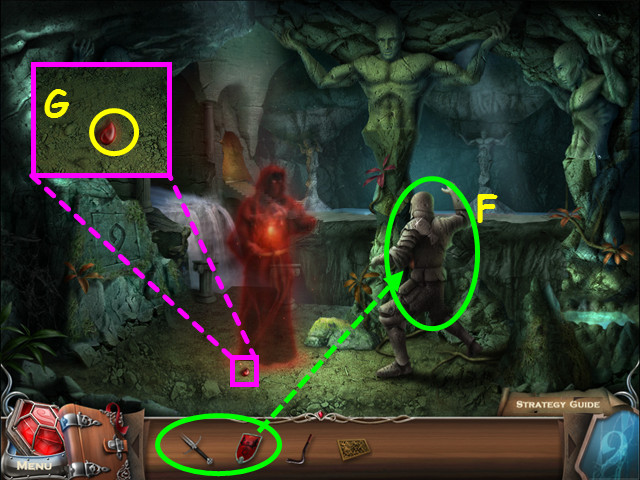
- Give the SHIELD and the KNIGHT'S SWORD to the knight (F).
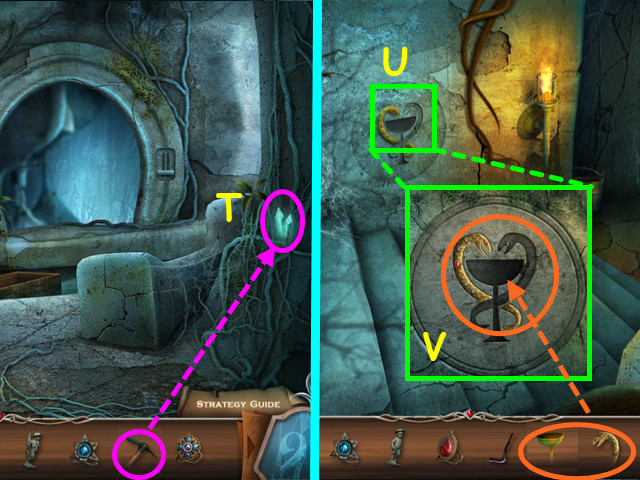
- Look at the ground and take the TEAR of BLOODSHED (G).
- Return to the garden.
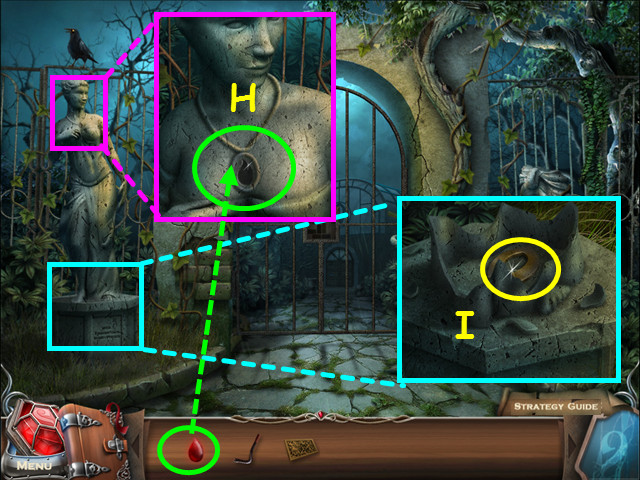
- Look at the statue on the left and place the TEAR of BLOODSHED into the pendant (H).
- Lady Anna will give you the TEAR of BLOODSHED MEDALLION.
- Look at the base of the now broken left statue and take the NINE TOKEN (I).
- Return to the underground area and go through the hole in the wall.

- Place the NINE TOKEN into the '9' space on the rock (J).
- Look in the compartment, read the scroll and take the STEEL FRAME (K).
- Return to the upper level, go through the doors and look at the locked door on the left.

- Place the STEEL FRAME on the lock for a mini-game.
- Press the tiles so that all tiles are down.
- Pressing a tile will affect the surrounding tiles.
- There are 4 levels to this mini-game (L-O).
- Click on the tiles in numerical order.
- Walk left, then go forward to the library.
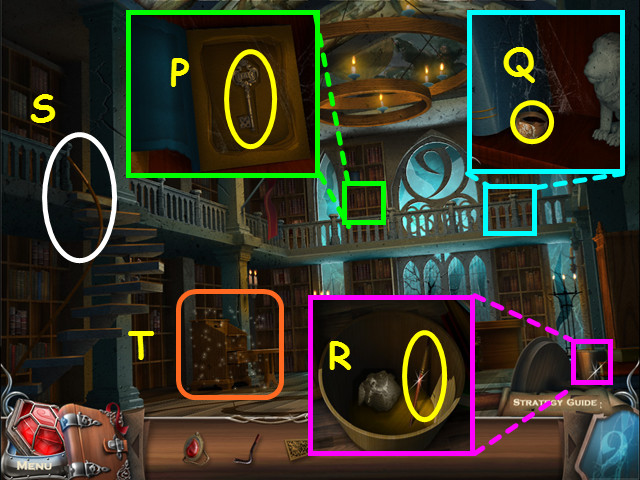
- Look at the upper left bookcase, open the book and take the KEY (P).
- Look at the upper right bookcase and take the PAINTER'S SIGNET RING (Q).
- Look in the wastebasket and take the BRUSH (R).
- Note the stairs going to the upper level (S).
- Select the desk for a HOS (T).
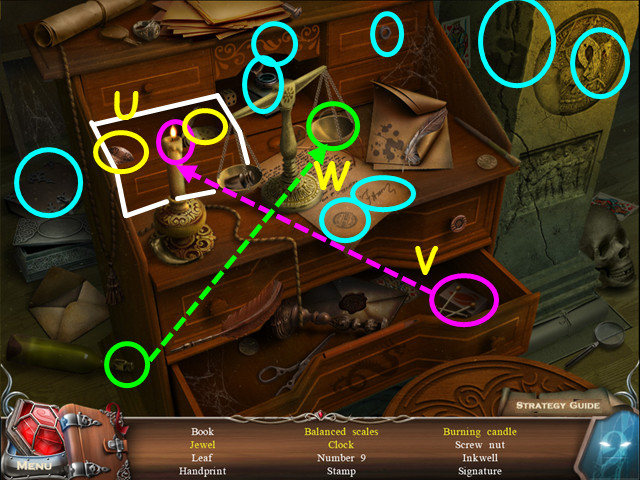
- Locate all the items on the list.
- Open the drawer to find the jewel and the clock (U).
- Use the matches on the candle to make the burning candle (V).
- Take the cork from the bottle to make the balanced scales (W).
- You will earn the 1st BOOK.
- Walk up the stairs.
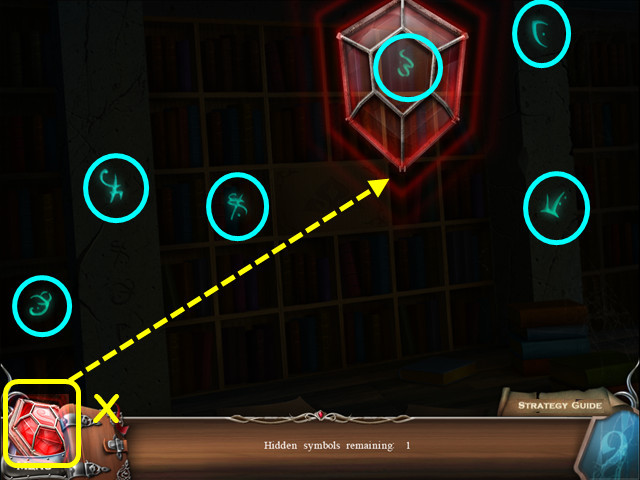
- Select the red amulet in the lower left corner (X).
- Locate the 6 runes.
- Return to the laboratory desk.
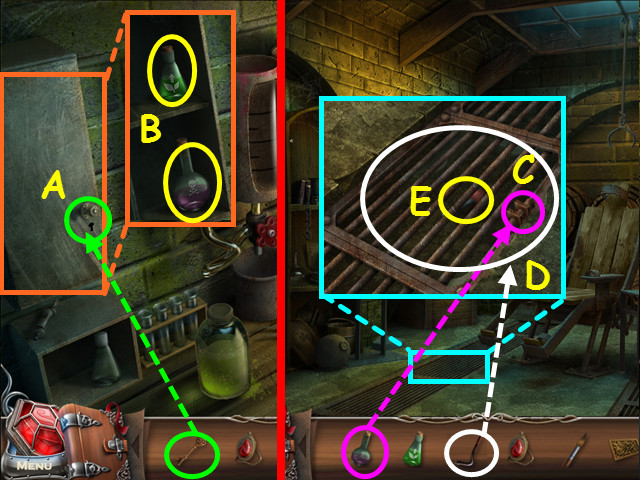
- Use the KEY to open the metal box (A).
- Take the REVITALIZING CONCENTRATE and the ACID (B).
- Exit the desk.
- Look at the floor grate and use the ACID on the latch (C).
- Use the CROWBAR to open the grate (D) then take the LEVER (E).
- Return to the upper level, go through the doors then enter door on the left.
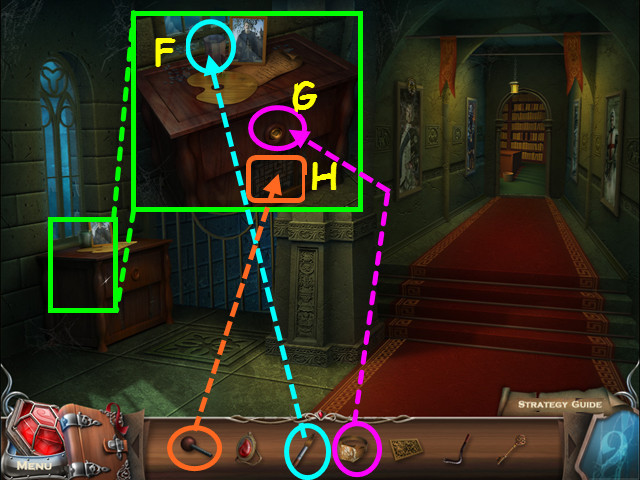
- Look at the chest and place the BRUSH into the glass (F).
- Use the PAINTER'S SIGNET RING on the drawer (G).
- Use the LEVER on the bottom area for a mini-game (H).
- Move the lever (I) to the hole (J) by sliding it along the tracks.
- Click on one of the arrows around the lever to move it in that direction.
- The lever will move until stopped by a wall.
- Move the lever in the indicated path.
- Take the METAL TILE from inside the drawer.
- Exit to the garden.
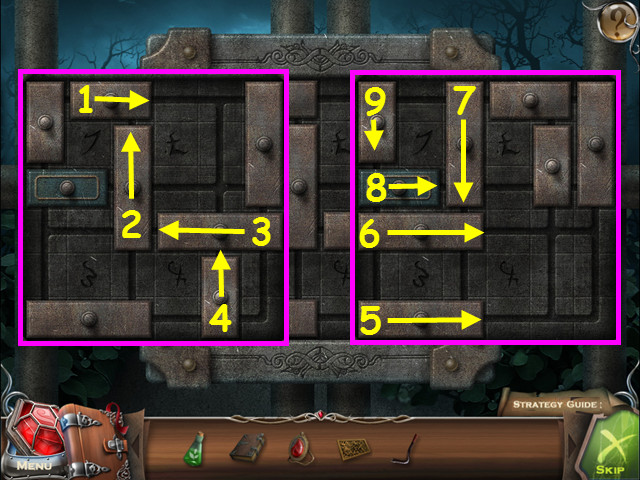
- Look at the lock on the gate and use the METAL TILE to trigger a mini-game.
- Slide the bricks so the blue brick can exit on the right.
- Move the bricks as far as possible in the direction indicated except for step 9 (1-8).
- Move the brick in step 9, 1 space down only (9).
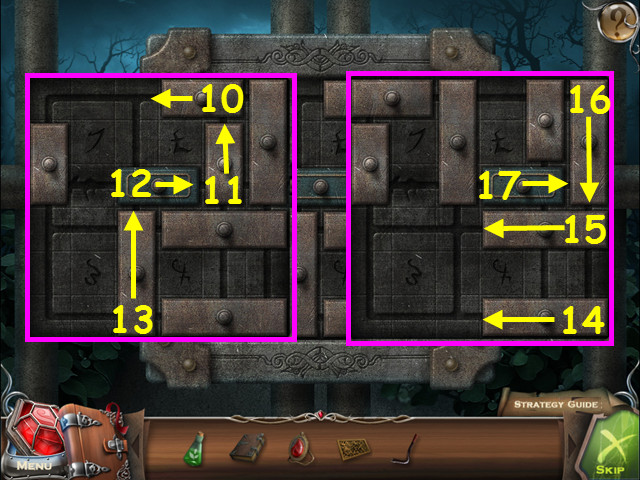
- Slide the bricks so the blue brick can exit on the right.
- Steps 10-17 are shown here.
- Walk forward through the gate.
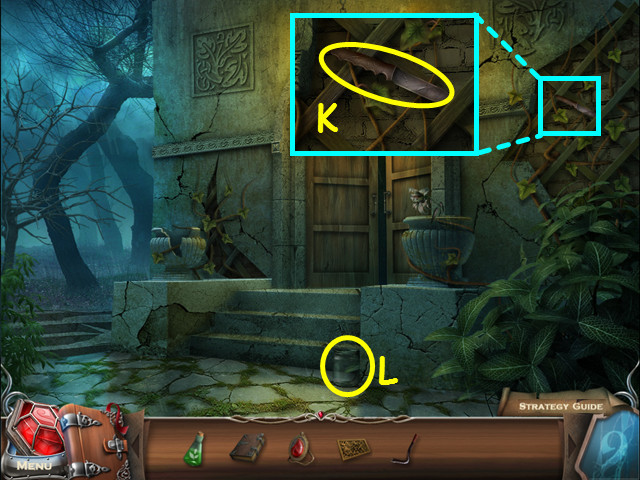
- Look at the trellis and take the knife (K).
- Take the GLASS JAR (L).
- Walk down twice.
- Look at the font and pour the REVITALIZING CONCENTRATE into the basin (M).
- Use the GLASS JAR on the green liquid to get the GROWTH CHEMICAL (N).
- Walk to the right then go forward.
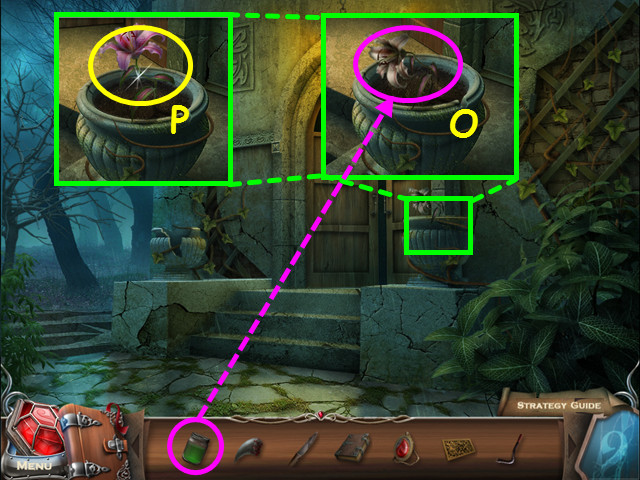
- Look at the urn and use the GROWTH CHEMICAL on the plant (O).
- Take the FLOWER (P).
- Enter the building.
- Select the red amulet in the lower left corner (Q).
- Locate the 6 runes.
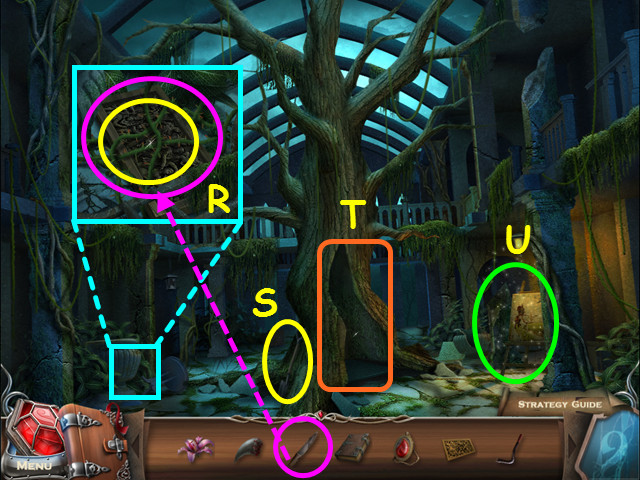
- Look at the urn; use the KNIFE to cut the vines and take the 2nd STAR FRAME (R).
- Take the SPADE (S).
- Note the tree entrance (T).
- Select the painting for a HOS (U).
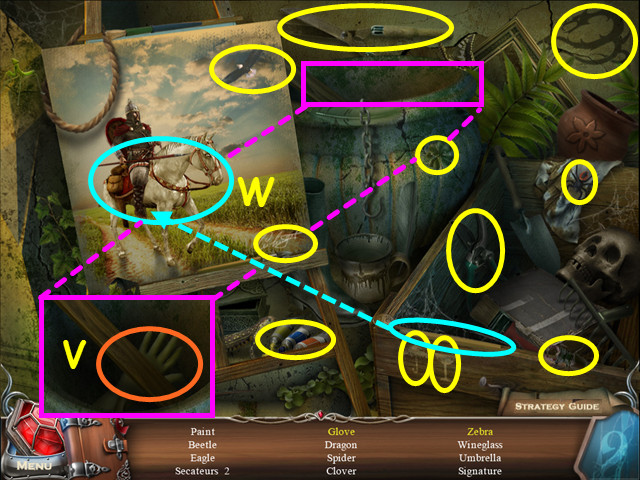
- Locate all the items on the list.
- Look inside the urn for the glove (V).
- Use the pencil on the horse to make the zebra (W).
- You will earn the PAINT SET.
- Exit the building and walk to the left.
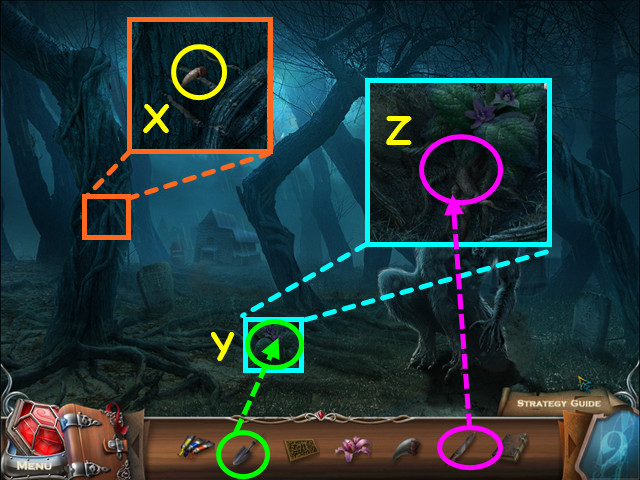
- Look at the tree and take the WEREWOLF CLAW (X).
- Use the SPADE to dig up the ground (Y).
- Look at the close-up and use the KNIFE to take the MANDRAGORA ROOT (Z).
- Walk down 3 times, then go to the left.
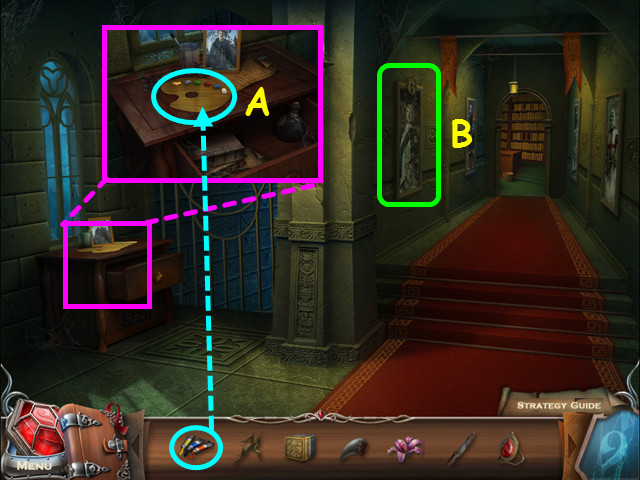
- Look at the chest and use the PAINT SET on the palette; take the PAINTER'S PALETTE (A).
- Look at the painting of Sir Henry (B).
- After the cut-scene, use the PAINTER'S PALETTE on the painting for a mini-game.
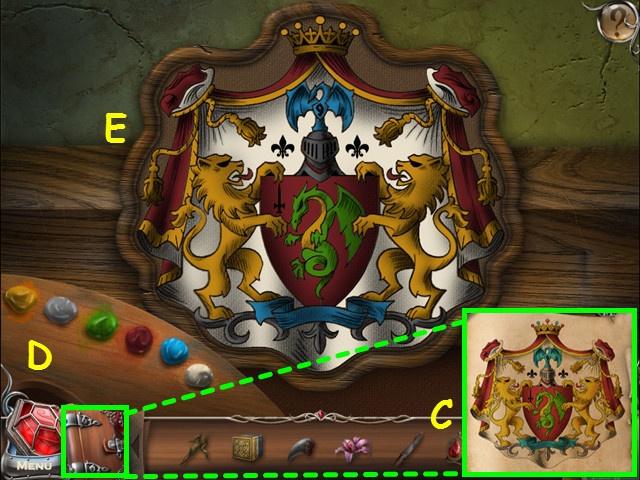
- Paint the coat of arms with the correct colors.
- Refer to your journal for the coat of arms (C).
- Use the brush on a color (D), then paint on the coat of arms (E).
- You will receive the COAT of ARMS.
- Look behind the painting and take the 2nd BOOK.
- Return to the library.
- Look at the large table in front of the window for a mini-game.
- Place the 2 STAR FRAMES into the empty spots to trigger the mini-game.
- You must push down all the plates; pushing one plate will affect other plates.
- Press the panels in numerical order (1-3).
- Take the BI-COLOR CUBE (F).
- Travel to the tree entrance.
- Use the BI-COLOR CUBE on the grid for a mini-game.
- Roll the cubes so the gray side faces up.
- Click on a cube to roll it to the adjacent empty spot.
- Click on the cubes in the following locations: 8-7-4-5-6-3-2-1-4-5-2-3-6-5-2-1-4-5-2-3-6-9-8-5-4-7-8-5-4-1-2-5-6-3-2-5.
- Enter the tree.
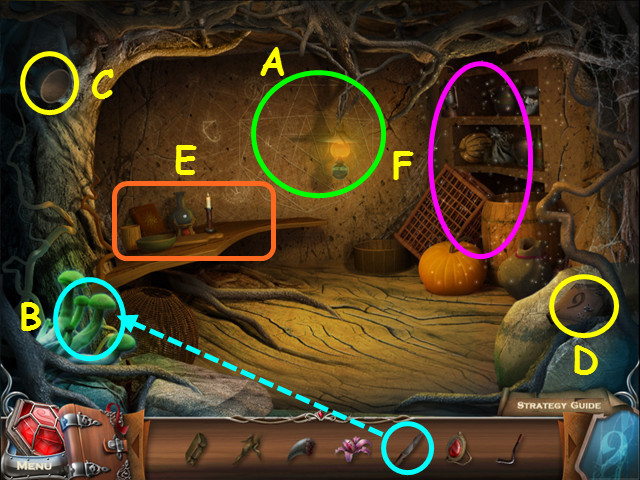
- Note the diagram on the back wall (A).
- Use the KNIFE to take a MUSHROOM (B).
- Take the FUNNEL (C).
- Take the 3rd BOOK (D).
- Note the desk (E).
- Select the bookcase for a HOS (F).
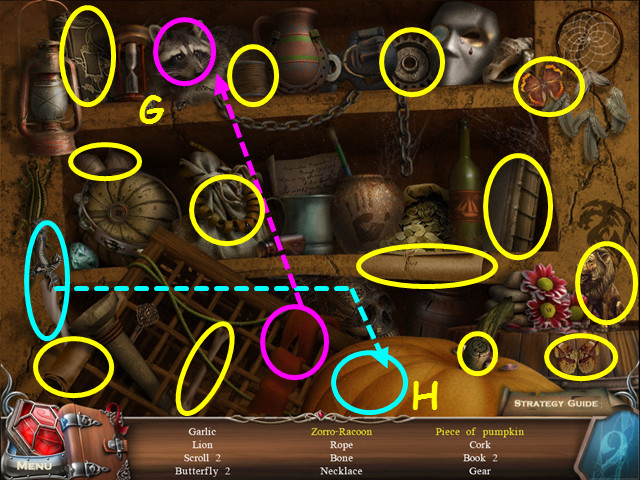
- Locate all the items on the list.
- Use the mask on the raccoon to make the Zorro-raccoon (G).
- Use the knife on the pumpkin for the piece of pumpkin (H).
- You will earn the GARLIC.
- Look at the desk.
- Open the book and take the PATTERN PLATE (I).
- Place the FUNNEL in the flask (J).
- Return to the library and go up the stairs.
- Click on the light blue symbol in the center of the bookcase to reveal some hidden books.
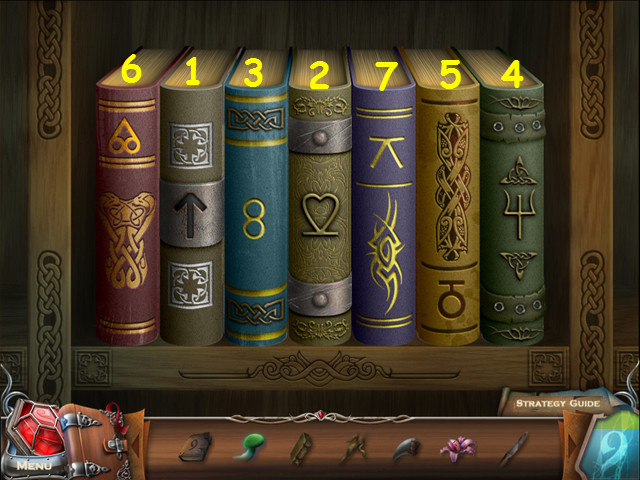
- Look at the close-up and place the 3 BOOKS on the shelf for a mini-game.
- Each book has a symbol on the spine that is made of a number and its reflection.
- Click on the books in numerical order (1-7).
- Walk forward into the hidden room.

- Take the PATTERN with MAGIC LINES (K).
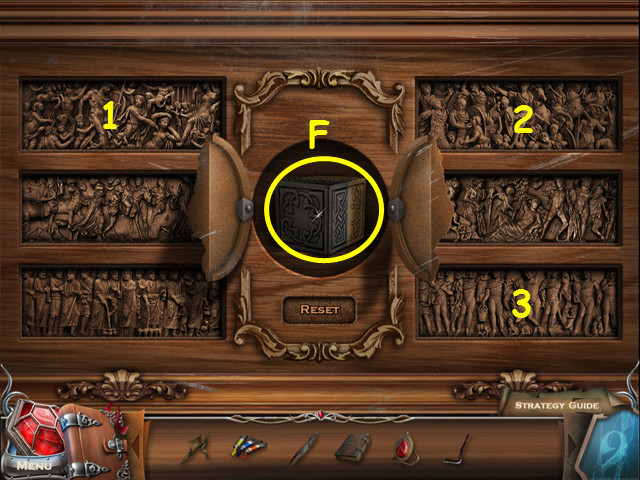
- Look at the box and use the PATTERN PLATE on it for a mini-game (L).
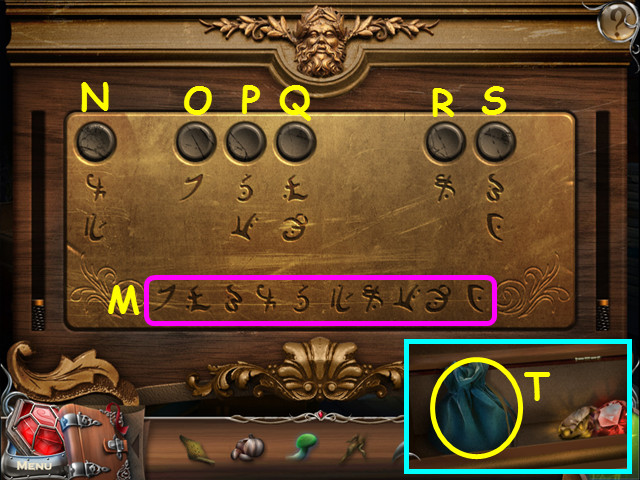
- The symbols shown at the base of the plate is the order to push the buttons (M).
- Push the buttons in in this order: O-Q-S-N-P-N-R-P-Q-S.
- Look inside the box and take the REVEALING POWDER (T).
- Return to the room inside the tree.
- Look at the drawing on the wall and place the PATTERN with MAGIC LINES on it (U).
- Take the MAGIC STAR PATTERN (V).
- Look at the desk.
- Use the REVEALING POWDER on the book (W).
- Select the book for a mini-game (X).
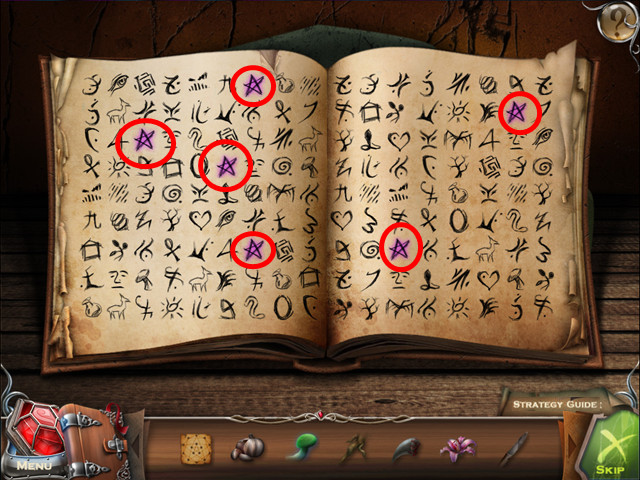
- Find all the instances of each symbol.
- Select all of one symbol by clicking on each instance.
- Repeat this process until all the symbols are removed from the book.
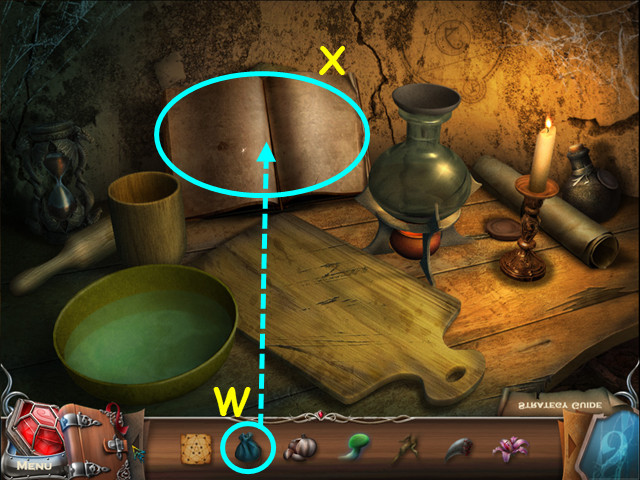
- Read the instructions for the recipe then exit the close-up of the book.
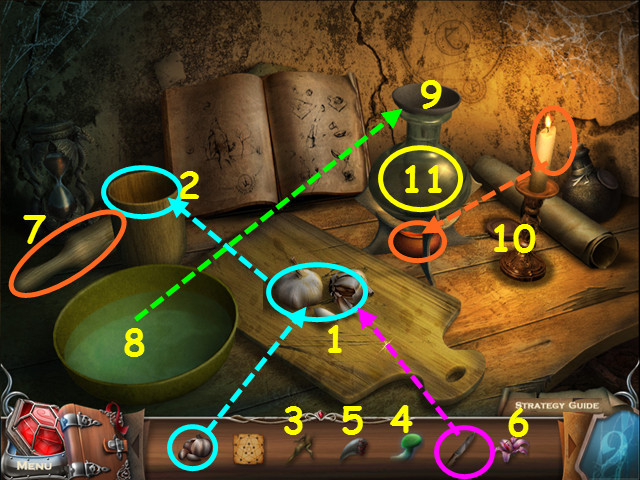
- Place the GARLIC on the cutting board, the use the KNIFE to chop it up (1).
- Place the chopped garlic into the cup (2).
- Chop the MANDRAGORA ROOT and place it into the cup (3).
- Chop the MUSHROOM and place it into the cup (4).
- Place the WEREWOLF CLAW (5) and the FLOWER into the cup (6).
- Use the mortar to grind everything in the cup (7).
- Pour the cup into the bowl (8).
- Pour the bowl into the flask (9).
- Use the candle to light under the flask (10).
- Take the ANTI-WEREWOLF POTION (11).
- Return to the upper level of the library and enter the hidden room.
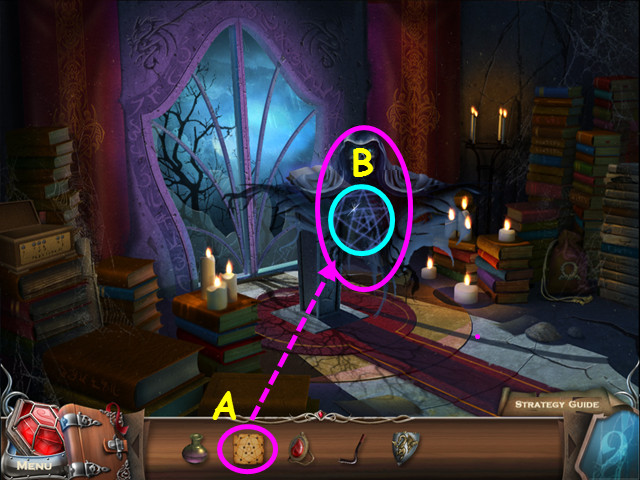
- Use the MAGIC STAR PATTERN on the demon (A).
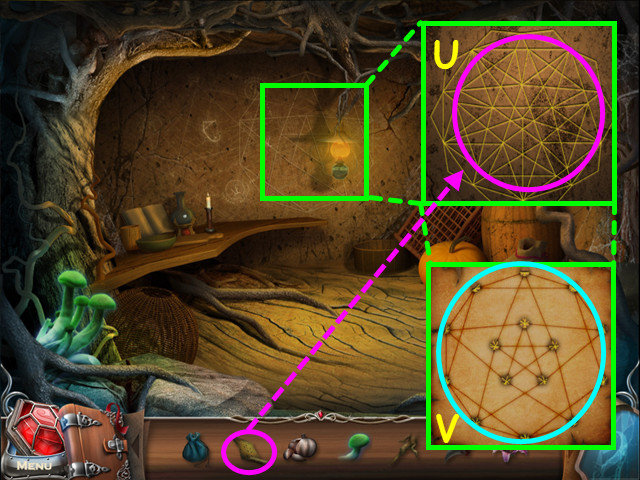
- Click on the star on the demon for a mini-game (B).
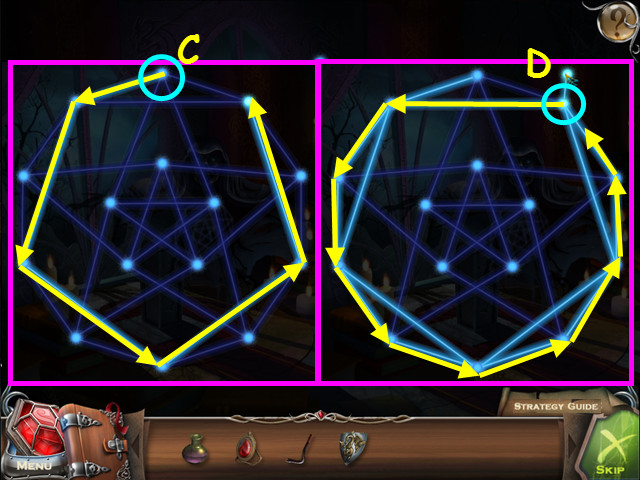
- Starting from any point on the star, draw a continuous line crossing every point once.
- Our solution starts at the top of figure, then follow the arrows around (C).
- Continue from point (D).
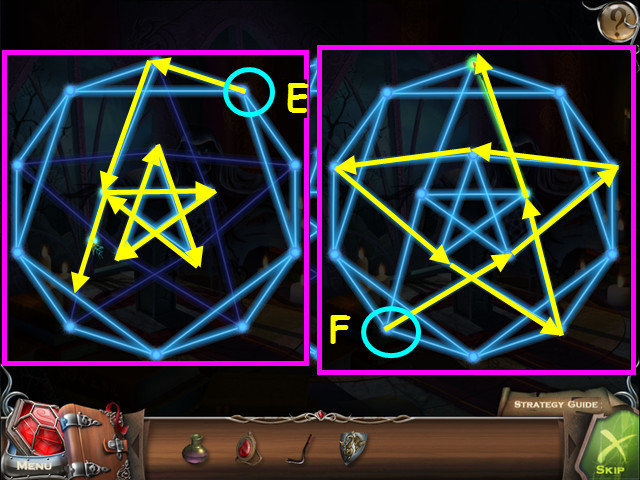
- Continuing our star mini-game, follow the arrows from point (E).
- The final steps in the solution start at point (F).

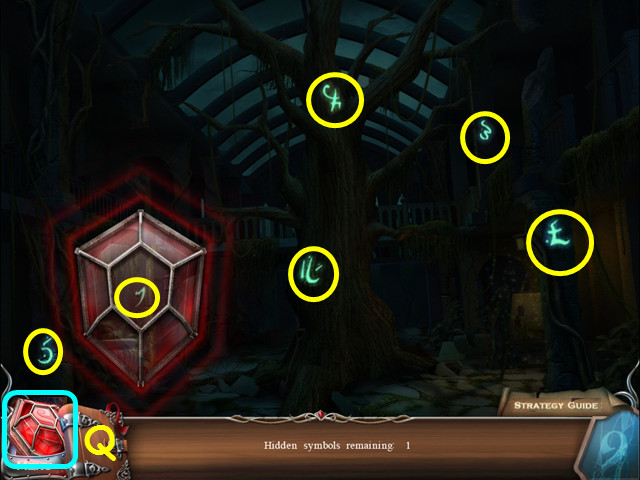
- Select the red amulet in the lower left corner (G).
- Locate the 3 runes.
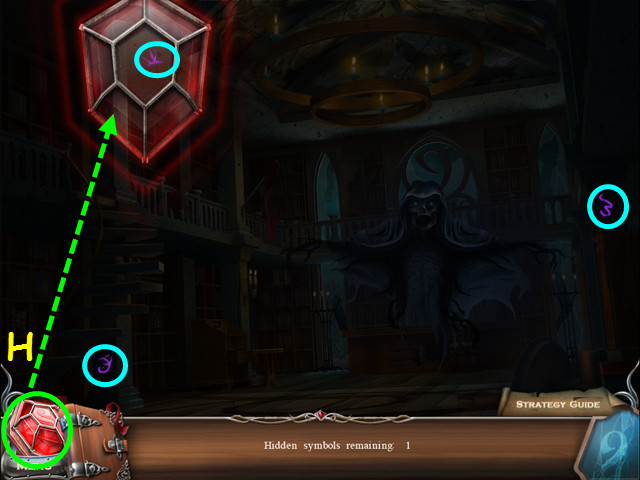
- You need to try the amulet again.
- Select the red amulet in the lower left corner (H).
- Locate the 3 runes.
- Note the hole in the floor.
- Climb the stairs, enter the secret room and take the ENCRYPTED BOOK of SECRETS that was behind the demon.
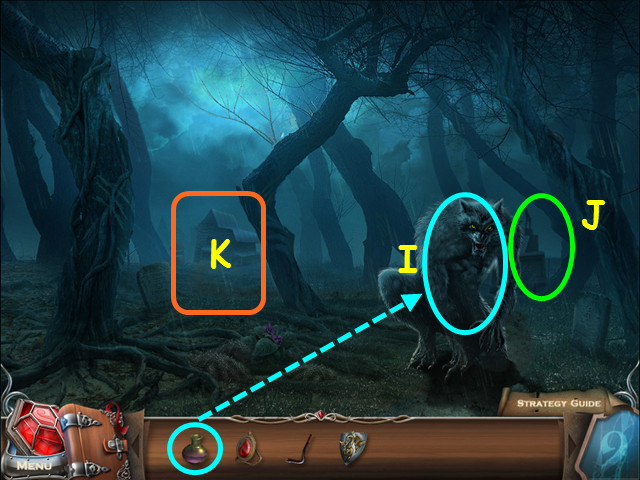
- Return to the scene with the werewolf.
- Use the ANTI-WEREWOLF POTION on the werewolf (I).
- Alistan will give you the WEREWOLF MEDALLION.
- Note the grave on the right (J).
- Walk forward (K).
Chapter 3: The Village
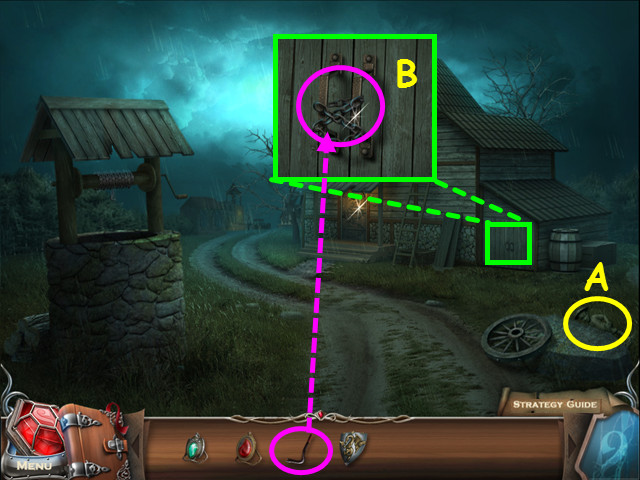
- Take the 1st STATUETTE (A).
- Look at the blacksmith's shed and use the CROWBAR to remove the chains (B).
- Enter the blacksmith's shed.
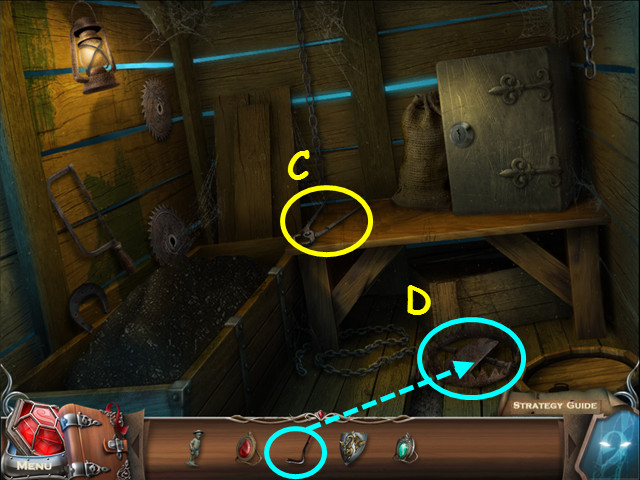
- Take the TONGS (C).
- Use the CROWBAR to spring the trap (D).
- Exit the shed, walk forward to the village then enter the arch on the left.
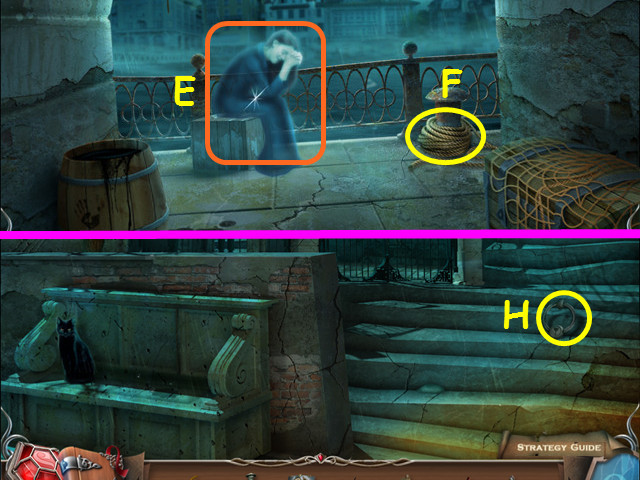
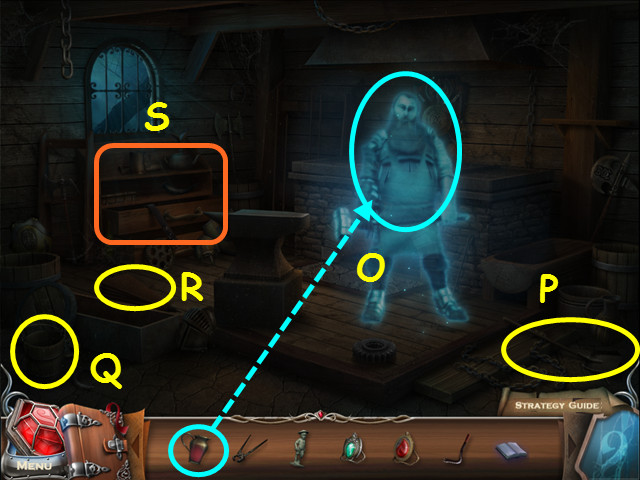
- Talk to the ghost Bianca (E).
- Take the ROPE (F).
- Walk down then go forward between the buildings.
- Take the WINEGLASS RING (H).
- Return to the library and look at the hole in the floor.
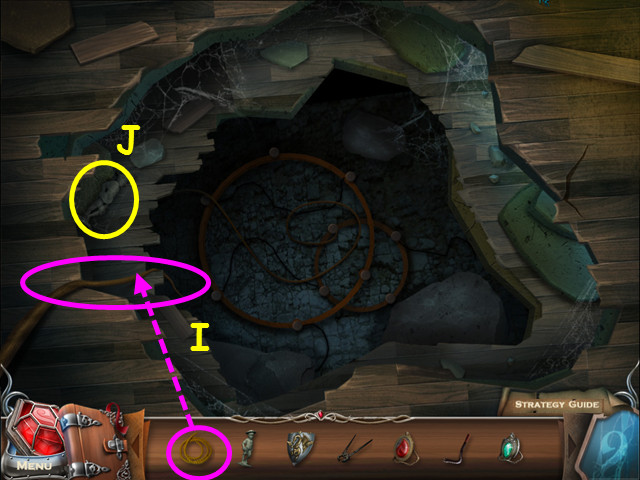
- Use the ROPE on the hole (I).
- Take the 2nd STATUETTE (J).
- Climb down the rope.
- Take the DISFIGURED LILY (K).
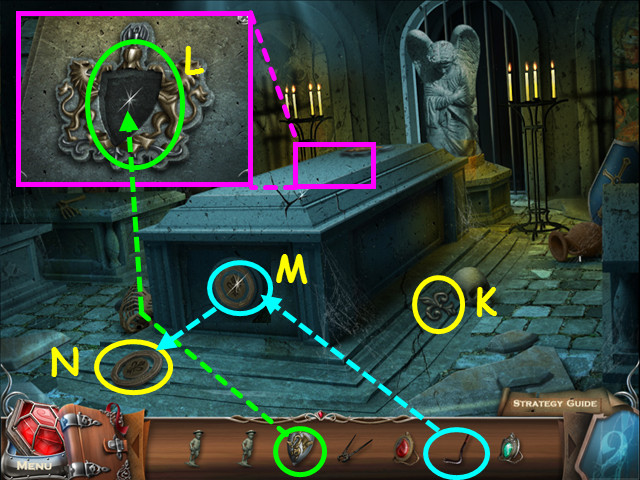
- Look at the top of the sarcophagus and place the COAT of ARMS into the niche (L).
- Use the CROWBAR on the disk that appears (M).
- Take the DISC that falls to the floor (N).
- Return to the blacksmith's.
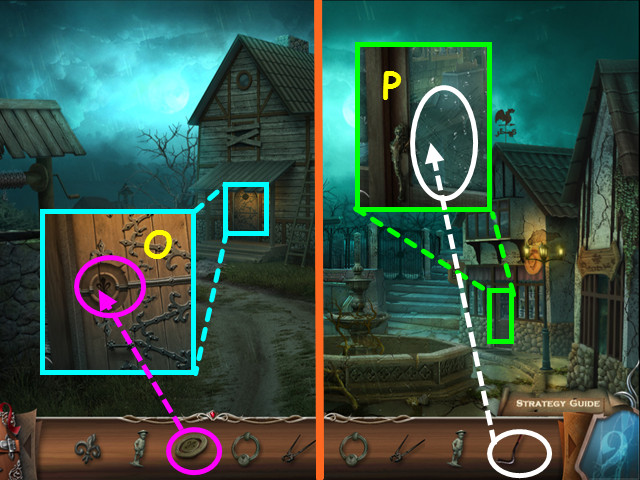
- Look at the door and use the DISC on the lock (O).
- Enter the building, talk to the blacksmith and he will give you the EMPTY WINE JUG.
- Walk forward to the village.
- Look at the tavern window and use the CROWBAR to break the glass (P).
- Enter the tavern.

- Look in the barrel and take the PRESSURE GAUGE (Q).
- Take the EMPTY JAR (R).
- Take the GLASS TUBE (S).
- Note the locked cabinet (T).
- Look at the trapdoor and place the WINEGLASS RING on the latch (U).
- Climb down to the cellar.
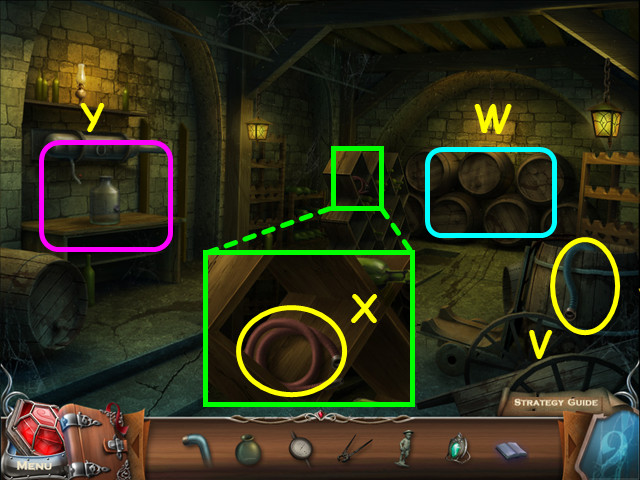
- Take the BLUE TUBE (V).
- Note the barrels (W).
- Look at the wine rack and take the RED TUBE (X).
- Look at the table on the left (Y).
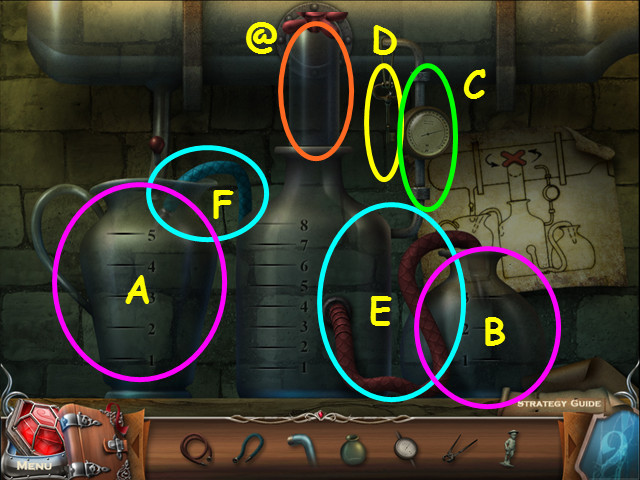
- Place the GLASS TUBE into the top of the center jar (@).
- Place the EMPTY WINE JUG on the left (A).
- Place the EMPTY JAR on the right (B).
- Place the PRESSURE GAUGE into the tubes over the jar (C).
- Take the KEY (D).
- Place the RED TUBE into the jar (E).
- Place the BLUE TUBE into the jug (F).
- Return upstairs to the tavern.
- Use the KEY on the locked cabinet then select the cabinet for a HOS.
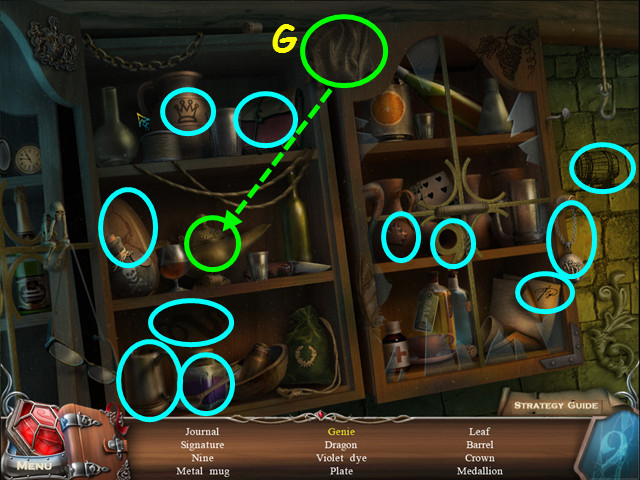
- Locate all the items on the list.
- Use the cloth on the lamp to find the genie (G).
- You will earn the WINEMAKER'S JOURNAL.
- Return to the cellar and look at the barrels in the back.
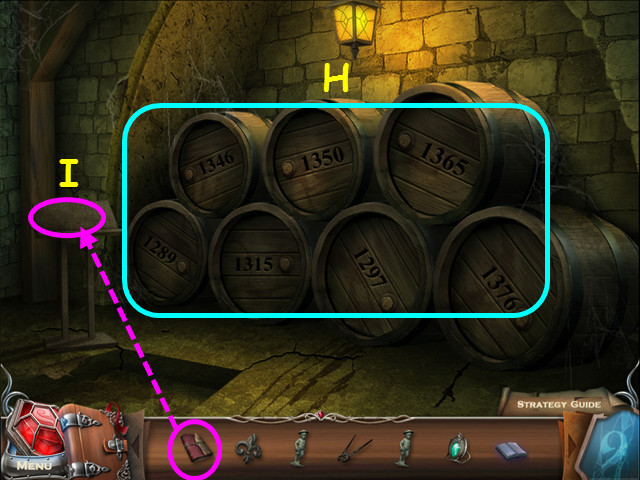
- Note the dates on the barrels (H).
- Place the WINEMAKER'S JOURNAL on the book stand (I).
- Look at the journal for a mini-game.
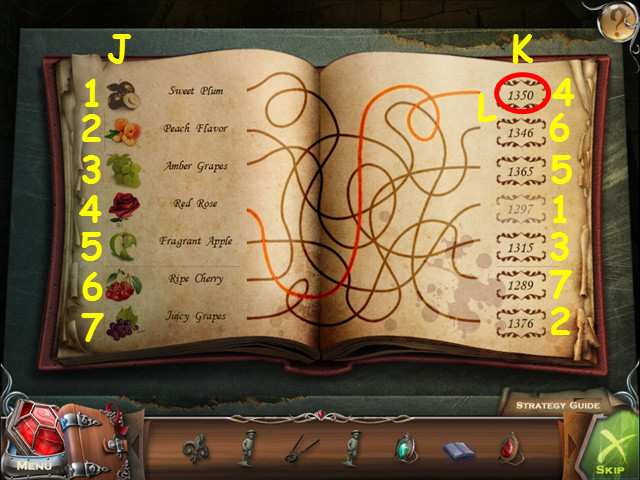
- Click on a flavor on the left (J), then follow the line to the date on the right (K).
- Click on the date after each flavor to determine the barrel you need (1-7).
- The Red Rose is 1350 (L).
- Exit the journal and click twice on the barrel labeled 1350.
- Look at the table on the left.
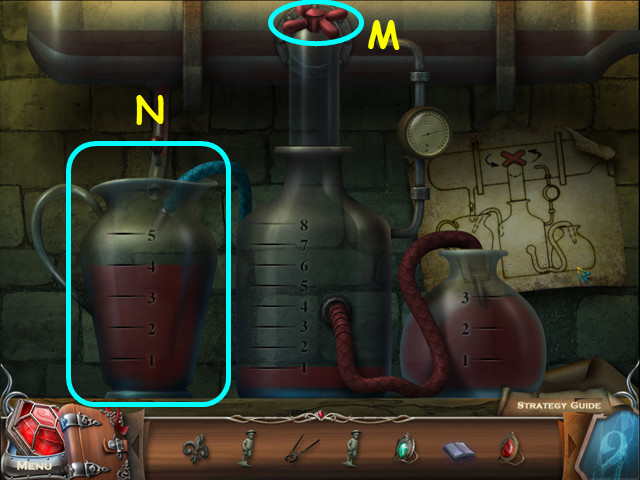
- You need 4 liters of wine in the jug on the left.
- Click on the valve (M) to fill the center jar.
- Click on a jar you want to pour, then click on the jar you want to pour it into.
- Click on the center jar, then the left.
- Click the left jar, then the right.
- Click on the right jar, then the center.
- Click the left jar, then the right.
- Click on the center jar, then the left.
- Click the left jar, then the right.
- Take the FULL WINE JUG from the left (N).
- Return to the blacksmith's.
- Give the FULL WINE JUG to the blacksmith (O).
- Take the SHOVEL (P).
- Take the EMPTY BUCKET (Q).
- Take the BELLOWS (R).
- Select the drawers for a HOS (S).
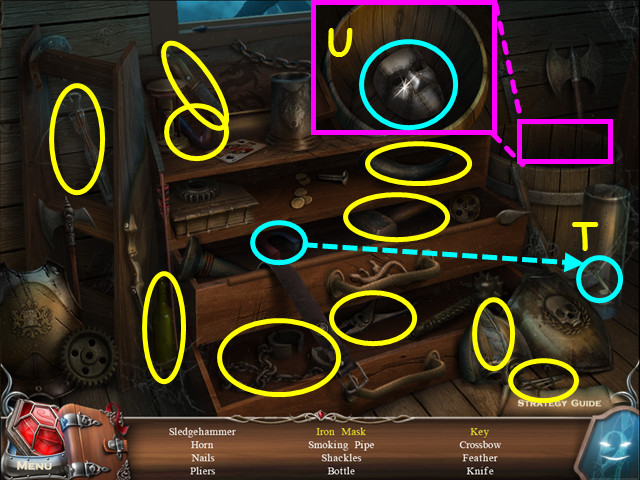
- Locate all the items on the list.
- Use the magnet to get the key (T).
- Look in the barrel to find the iron mask (U).
- You will earn the SLEDGEHAMMER.
- Exit the blacksmith's.
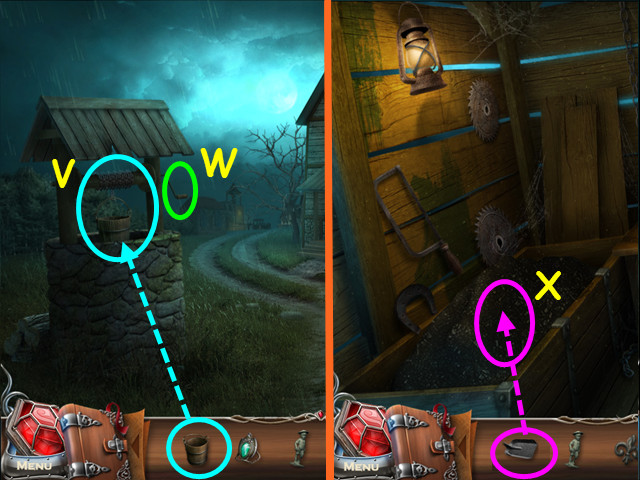
- Use the EMPTY BUCKET on the well (V).
- Click on the crank to lower the bucket (W).
- Take the BUCKET of WATER once it returns.
- Enter the shed.
- Use the SHOVEL on the coal bin to get the SHOVELED COAL (X).
- Return to the blacksmith's.
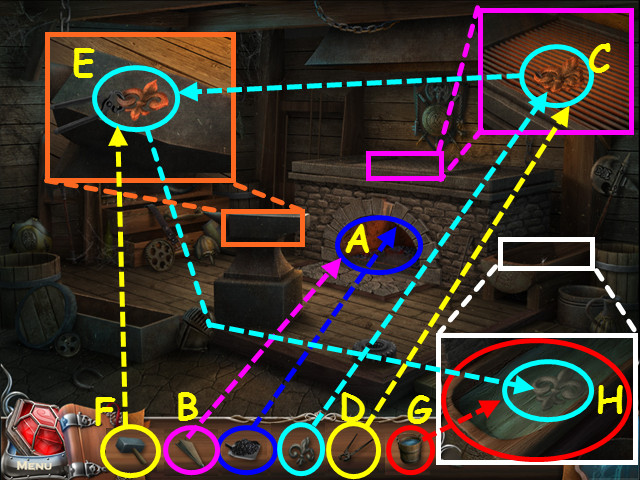
- Placed the SHOVELED COAL into the fireplace (A).
- Use the BELLOWS on the fireplace (B).
- Look at the grill and place the DISFIGURED LILY on top (C).
- Use the TONGS on the lily to get the HOT METAL LILY (D).
- Look at the anvil and place the HOT METAL LILY on top (E).
- Use the SLEDGEHAMMER on it, then take the HOT METAL LILY (F).
- Look at the water trough and pour the BUCKET OF WATER into it (G).
- Place the HOT METAL LILY into the water then take the GOOD METAL FIGURE from the trough (H).
- The blacksmith will appear and give you the BLACKSMITH'S MEDALLION.
- Return to the library and go down the hole in the floor.
- Look at the side of the sarcophagus and place the GOOD METAL FIGURE into the indentation (I).
- Sir Charles will give you the TOKENS of LOGIC.
- Return to where you saw the cat.
- Look at the gate and use the TOKENS of LOGIC on the lock for a mini-game (J).

- Place the tokens in the lock so the symbols on the 3 smaller tokens (K) equal the symbol on the larger token (L).
- Walk forward through the gates to the cemetery.
- Look at the fence and take the 1st STONE RING (M).
- Take MARTIN'S POCKET-WATCH (N).
- Walk down twice then go left into the archway.
- Give MARTIN'S POCKET-WATCH to Bianca (O).
- She will give you BIANCA'S MEDALLION.
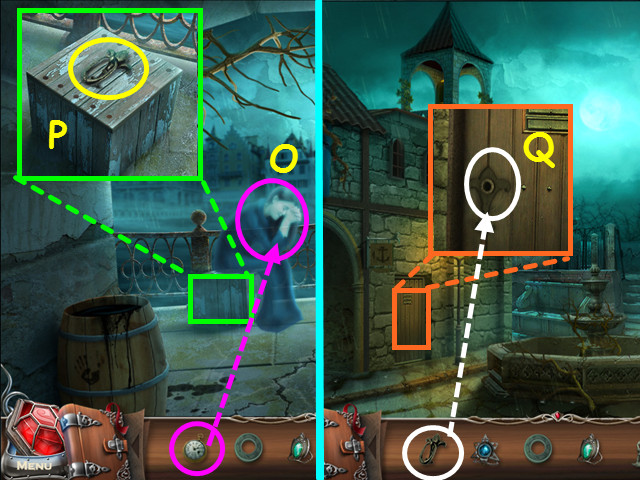
- Look at the crate and take the HANDLE (P).
- Walk down, look at the tower door and use the HANDLE on the door (Q).
- Enter the tower.
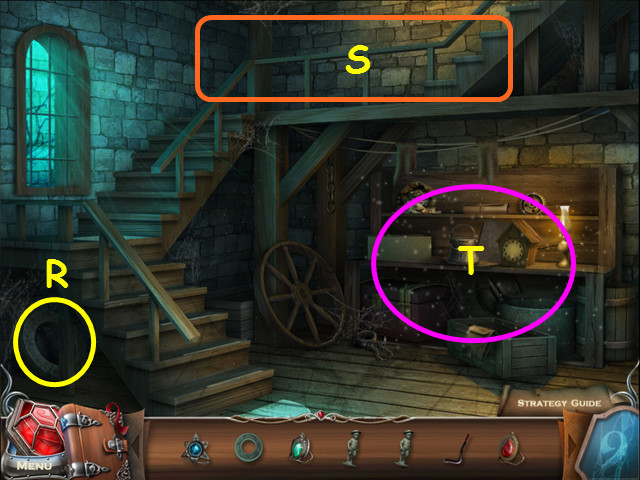
- Take the 2nd STONE RING (R).
- Note the stairs going up (S).
- Select the shelves for a HOS (T).
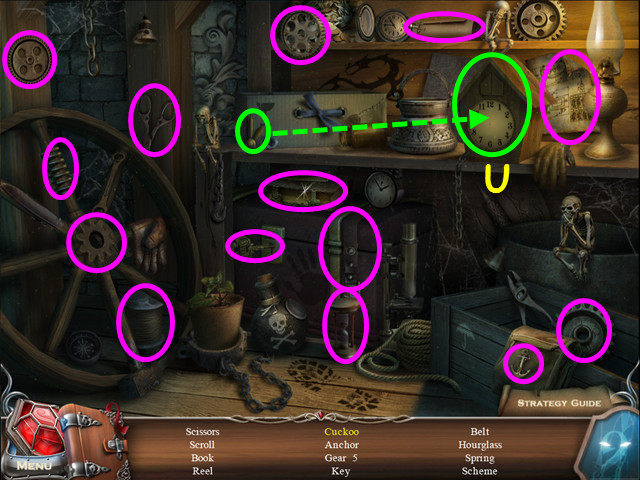
- Locate all the items on the list.
- Place the clock hands on the clock to find the cuckoo (U).
- You will earn the SCISSORS.
- Return to the archway.
- Look at the chest and use the SCISSORS on the ropes (V).
- Take the CLOCK SPRING (W).
- Return to the tower and go up the stairs, then climb the ladder to the bell tower.
- Take the 3rd STONE RING (X).
- Take the PLATE of BELL TILES (Y).
- Walk down 5 times to where you saw the werewolf and look at the tomb on the right.
- Use the PLATE of BELL TILES on the grid for a mini-game (Z).
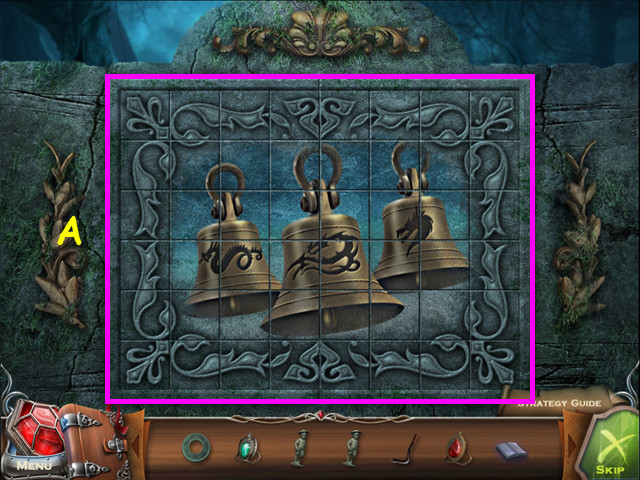
- Restore the mosaic by rotating the tiles (A).
- Click on each tile to rotate it in place.
- Take the BELL CLAPPER from inside the mosaic.
- Return to the bell tower.
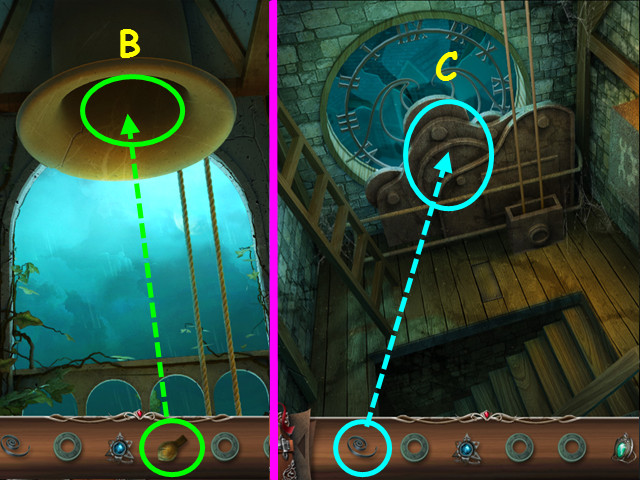
- Place the BELL CLAPPER inside the bell (B).
- Click on the bell to learn it must be in sync with the clock.
- Climb down one level.
- Use the CLOCK SPRING on the clock mechanism for a mini-game (C).
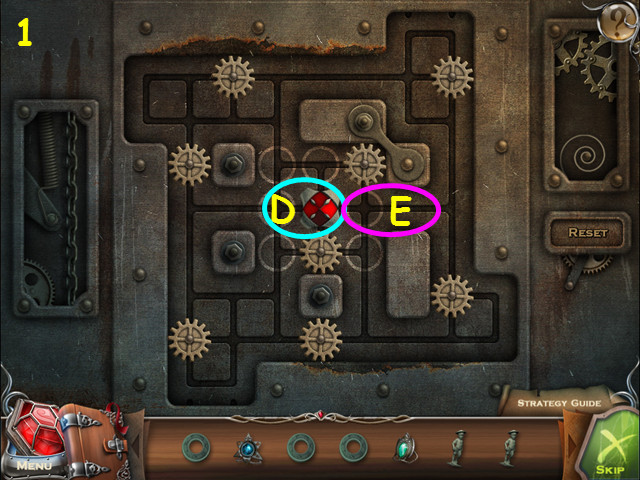
- Use the red shield (D) to push the gears to the white circles in the center (E).
- Click on the path ahead of the shield in the direction you want to move.
- You can also click on the lighted edge of the red shield.
- Left, Right, Up, and Down are abbreviated as L, R, U, and D.
- Make the following moves to get in the position shown in the screenshot (1): D1, L4, D2, R1, D2, L1, U1, D2, L2, U2, R3, D1, R1, U1, R2, U2, L1, U1, L3, D2, R1, D2, L1, D1, L2, U2, R2, U1, R1, and D1.
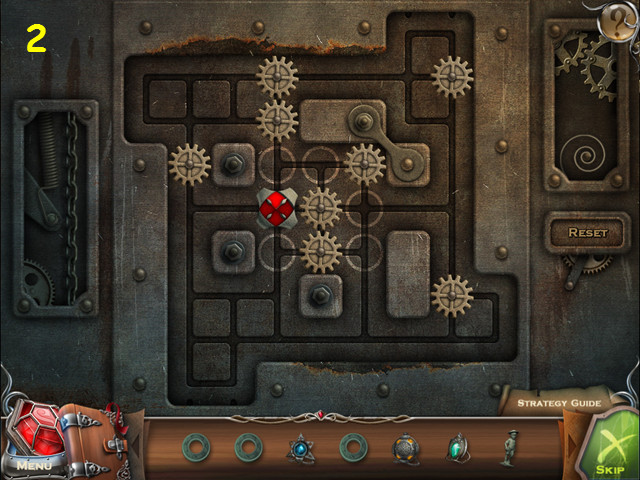
- Left, Right, Up, and Down are abbreviated as L, R, U, and D.
- Make the following moves to get in the position shown in the screenshot (2): L1, U2, L2, U1, R1, D1, R1, D2, L2, U1, D1, R2, U2, L1, U1, L2, D1, R2, L1, D4, R1, D2, L1, U4, R4, D3, L2, U1, L2, D2, R1, U1, L1, U1, R1, D1, R1, U2, D1, L2, U2, R2.
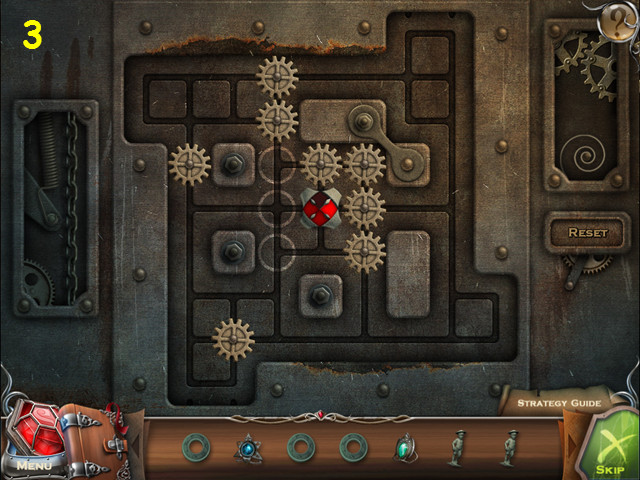
- Left, Right, Up, and Down are abbreviated as L, R, U, and D.
- Make the following moves to get in the position shown in the screenshot (3): D3, R2, U3, R2, D2, R1, D1, L5, U2, R1, U1, R3, U2, L1, U2, R1, D6, R1, D1, L4, R3, U3, L6, D4, R1, U1, L1, U1, R1, L1, U2, R6, D3, L4, U2, D1, L2, U2, R3.
- Left, Right, Up, and Down are abbreviated as L, R, U, and D.
- Make the following moves to get the solution shown (4): L3, D4, R1, U1, L1, U1, R1, D1, R1, U2, D1, L2, U2, R2, D3, R4, U6, L4, D2, U1, L2, U1, R5, U1, R1, D6, R1, D1, L5, U1, L2, D2, R1, U1, L1, U1, R1, D1, R1, U1, L2, U3, D4, R6, U6, L7, D1, R2, U1, R1, D1.
- Return to the cemetery.
- Select the red amulet in the lower left corner (F).
- Locate the 7 runes.
- You will receive MARTIN'S MEDALLION.
- Look at the ground by the pillars for a mini-game (G).
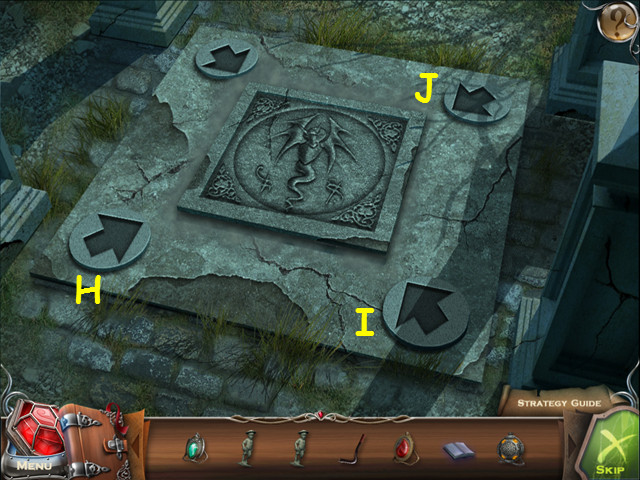
- Rotate the arrows so they all point to the center.
- Click on an arrow to rotate it; doing so may affect other arrows.
- Click on the following arrows, H x 3, I x 2, and J x 3.
- Look at the pillar that rises and place the 3 STONE RINGS into the circle for a mini-game.

- Rotate the rings to put the correct symbols in alignment.
- Alternate black and white as well as the number of sides, but have a similar quality like a dot in the center (K).
- Enter the passageway.
Chapter 4: The Underground
- Take the UNLIT TORCH (A).
- Take the GAFF (B).
- Walk forward.
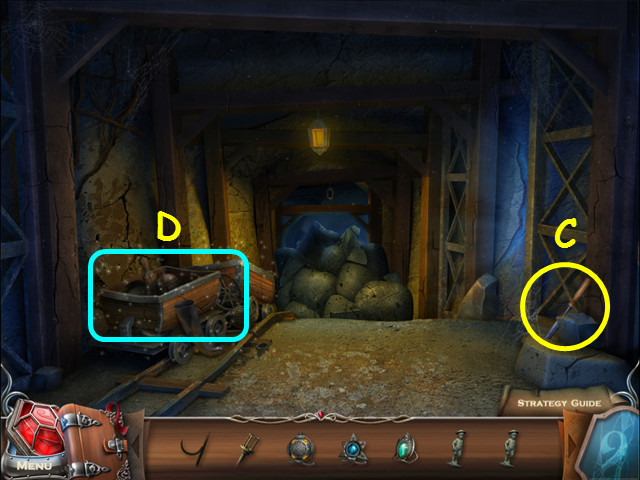
- Take the CHISEL (C).
- Select the mine car for a HOS (D).
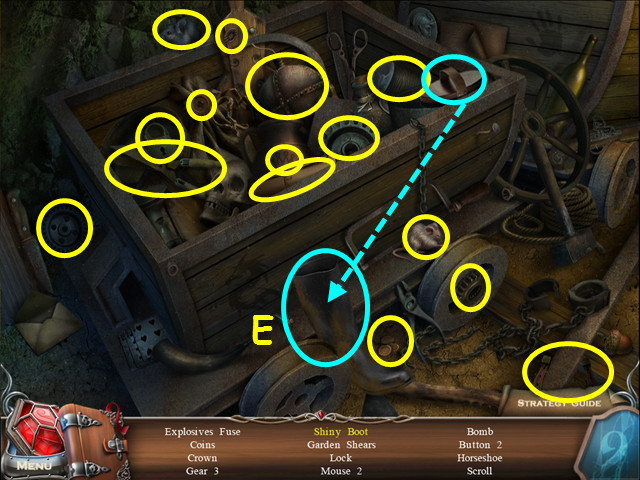
- Locate all the items on the list.
- Use the shoe-brush on the boot to make the shiny boot (E).
- You will earn the FUSE.
- Walk down 4 times and enter the archway.
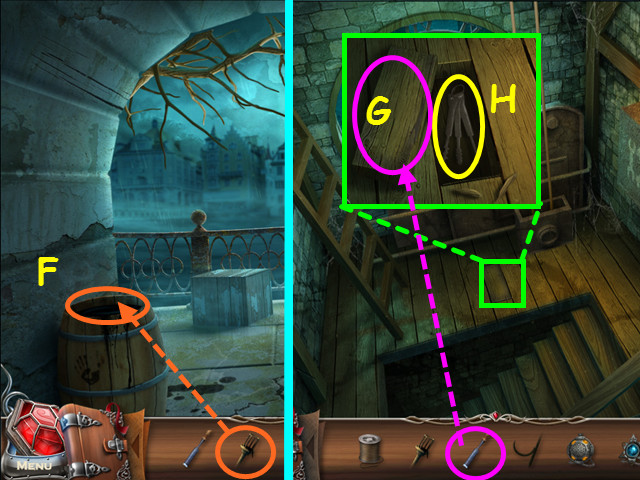
- Use the UNLIT TORCH on the barrel to get the TORCH WITH RESIN (F).
- Walk down, then go to the second level of the bell tower.
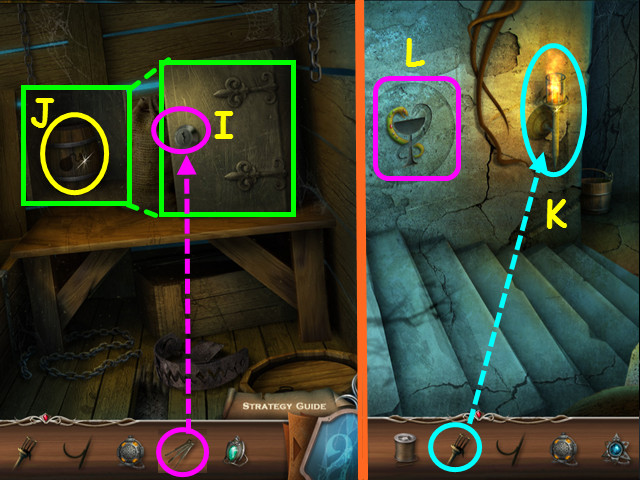
- Look at the floor and use the CHISEL on the board (G).
- Take the LOCKPICKS from the hole (H).
- Return to the blacksmith's shed.
- Use the LOCKPICKS on the safe (I).
- Take the BARREL of GUNPOWDER (J).
- Return to the cemetery and enter the underground.
- Use the TORCH with RESIN on the wall torch to get the LIT TORCH (K).
- Note the Staff of Asclepius (L).
- Walk forward.
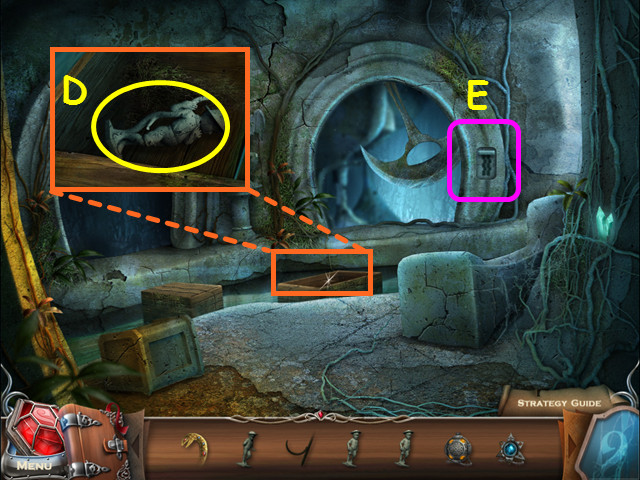
- Look at the rubble and place the BARREL of GUNPOWDER on the ground (M).
- Use the FUSE on the barrel (N).
- Use the LIT TORCH on the fuse (O).
- Walk forward.
- After talking to Hederik (P), you will receive HEDERIK'S SEAL.
- Look in the mine car and take the WRENCH (Q).
- Walk forward.
- Take the GOLDEN SNAKE (R).
- Take the STONE TILES (S).
- Walk down 5 times.
- Look at the bench and place HEDERIK'S SEAL in the niche (T).
- Take the 3rd STATUETTE (U).
- Return to the second level of the church tower.
- Look at the lock box and use the WRENCH on the bolt (V).
- Take the OILCAN (W).
- Return to the scene with Hederik.
- Note the waterwheel axle (X).
- Look at the platform to the right of the water wheel and place the STONE TILES atop the others (Y).
- Select the panel that opened for a mini-game (Z).
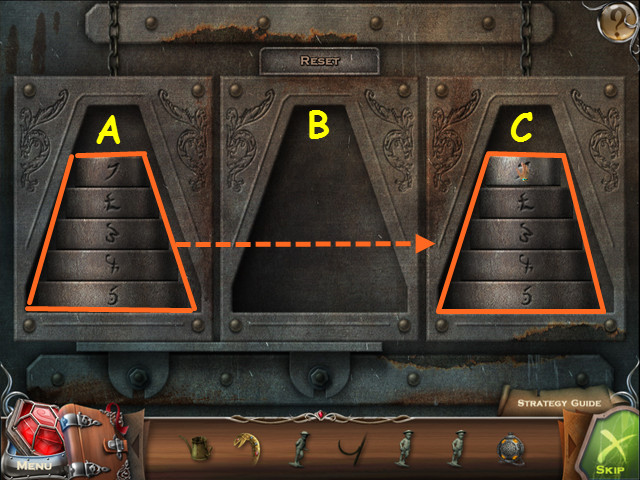
- Move the weights from the left to the right platform.
- Move one weight at a time; weights cannot be placed on a smaller weight.
- Drag the weight you wish to move to another platform.
- Labeling the 3 platforms A, B, and C, move the top weight in the stack in the order below.
- A to C, A to B, C to B, A to C, B to A, B to C, A to C, A to B, C to B, C to A, B to A, C to B, A to C, A to B, C to B, A to C, B to A, B to C, A to C, B to A, C to B, C to A, B to A, B to C, A to C, A to B, C to B, A to C, B to A, B to C, A to C.
- Look at the water wheel and use the OILCAN on the gears.
- Walk forward.
- Look in the crate and take the 4th STATUETTE (D).
- Look at the control for a mini-game (E).
- Rotate the tiles to create 2 vertical pathways so the lever can go down.
- Clicking on 1 of the inner 9 tiles will cause the surrounding tiles to rotate around it.
- Click on the following locations: H x 3, G x 4, F, I, J, K, G, K, G, F, I x 3, F x 3, G x 2, K x 7, I, Gx6, and Fx2.
- Walk through the right archway.
- Select the red amulet in the lower left corner (L).
- Locate the 6 runes.
- Note the newly formed bridge (M).
- Take the PICKAXE (N).
- Select the chest for a HOS (O).
- Locate all the items on the list.
- You will earn the CABINET KEY.
- Walk forward across the bridge.
- Use the PICKAXE to get the 1st GLOWING CRYSTAL (P).
- Look in the pool; use the GAFF to retrieve CHARLES' MEDALLION (Q).
- Walk down, right, then go forward.
- Look at the cabinet and use the CABINET KEY on the lock (R).
- Look inside the cabinet and take the GOLDEN GOBLET (S).
- Walk down, right, go forward twice, then down once more.
- Use the PICKAXE to get the 2nd GLOWING CRYSTAL (T).
- Walk down 3 times.
- Look at the Staff of Asclepius on the wall (U).
- Place the GOLDEN SNAKE and the GOLDEN GOBLET in the indentations for a mini-game (V).
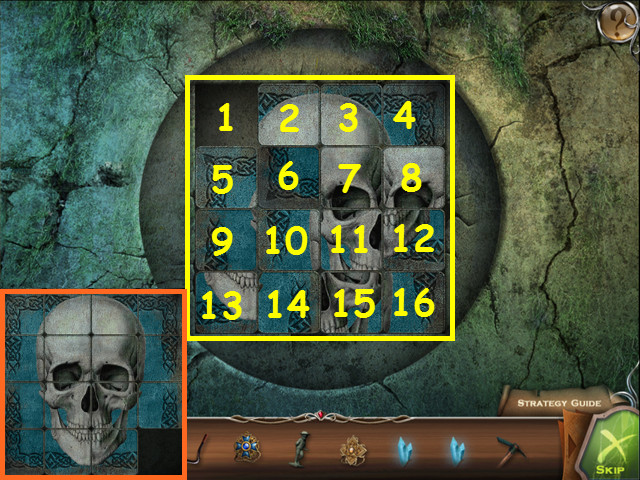
- Restore the mosaic by sliding the tiles into position.
- Click on a tile to slide it into the adjacent empty spot.
- This mini-game is randomized- your solution may vary.
- Click on the tiles in this order:
- 5-9-10-6-7-11-15-14-13-9-5-1-2-3-4-8-12-11-15.
- 16-12-8-7-11-15-16-12-8-4-3-2-1-5-9-13-14-15-16-12.
- 8-7-6-5-9-1-14-13-9-5-6-10-11-12-16.
- 15-14-13-9-5-1-2-3-4-8-7-6-10-11-12-8-7-6-10-11.
- 12-8-4-3-2-1-5-9-13-14-15-16-12-8-7-11-1.
- 9-13-14-15-16-12-8-4-3-2-1-5-6-10-11-15-14-13-9.
- 5-1-2-3-4-8-12-11-9-5-6-10-9-5-6-10-11-12.
- Take the SKULL from the compartment that opens.
- Exit the close-up then walk down 3 times to the village center and look at the fountain.
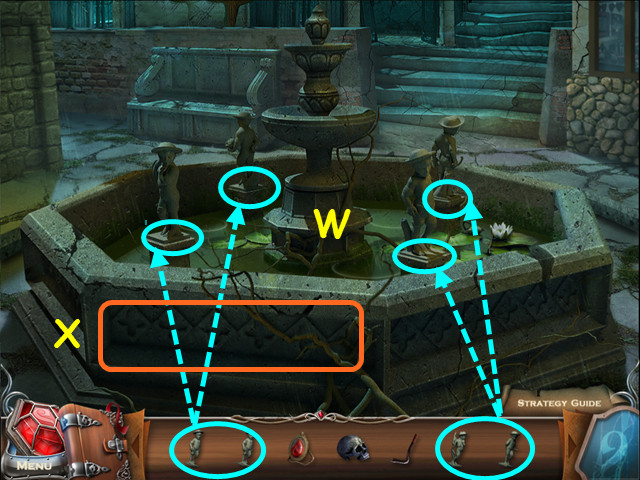
- Place the 4 STATUETTES on the 4 pedestals in the fountain (W).
- Look at the front panel of the fountain for a mini-game (X).

- Solve the equations at the bottom (A) and turn the upper dials to the correct symbol (B).
- The first equation tells us what symbol equals 3, so turn the 3rd dial to that symbol (C).
- The third equation has a symbol subtracted from another to equal 3. Since we already have the symbol for 3, these two symbols must be 4 and 1 so change the 1st and 4th dial to these symbols (D).
- Process of elimination gives us the second symbol (E).
- Click on the fountain to collect the SYMBOL of LIFE.
- Return to the scene with Hederik.
- Give the SYMBOL of LIFE to Hederik (F).
- You will receive HEDERIK'S MEDALLION.
- Use the PICKAXE to take the 3rd GLOWING CRYSTAL (G).
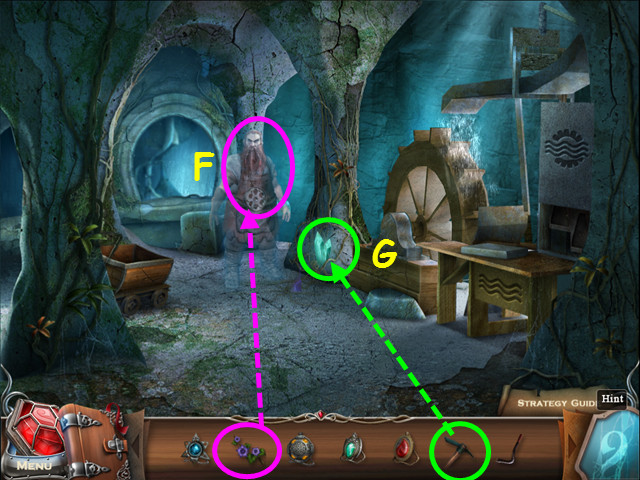
- Walk forward then enter the left opening.
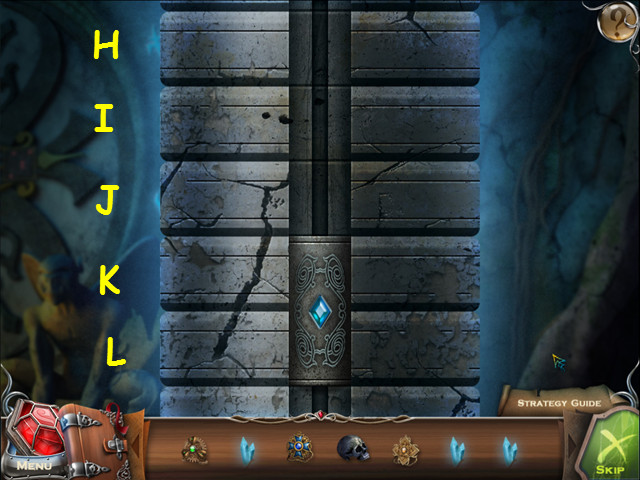
- Look at the pillar in the center of the room for a mini-game.
- Rotate the stone rings to create a path down the center.
- Click on the rings to turn them; clicking on a ring will affect other rings.
- Click on the following rings: H x 2, J x 1, K x 2, I x 2, H x 2, and L x 1.
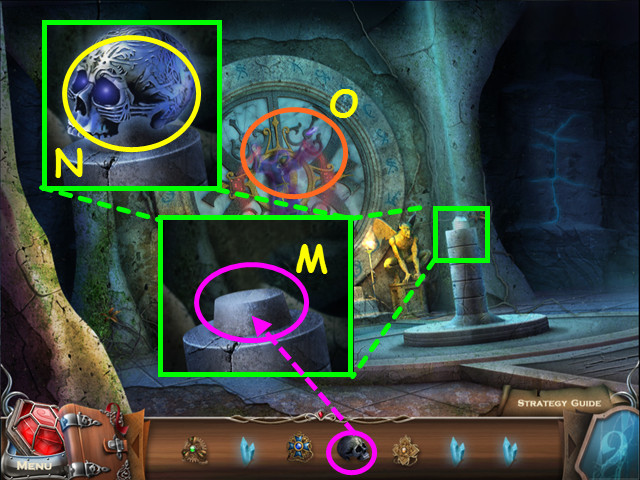
- Look at the column and place the SKULL on top (M).
- Once the purple energy goes into the skull, look at the column again and take the SYMBOL of DEATH (N).
- Walk forward to Arckivius (O).
- Place the 3 GLOWING CRYSTALS in to the 3 holes (P).
- Note the right square (Q).
- Select the left square for a mini-game (R).
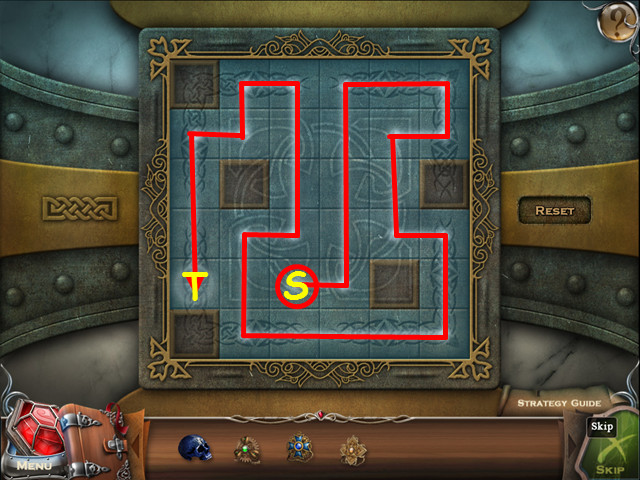
- Fill in all the rows with light.
- Click on a square then go in any direction; light will stop only when it meets an obstruction.
- Click on the starting square (S) and follow the path to the end (T).
- Select the right box for another mini-game.

- Fill in all the rows with light.
- Click on a square then go in any direction; light will stop only when it meets an obstruction.
- Click on the starting square (U) and follow the path to the end (V).
- You will receive ARCKIVIUS' MEDALLION.
- Walk down and go through the right arch.
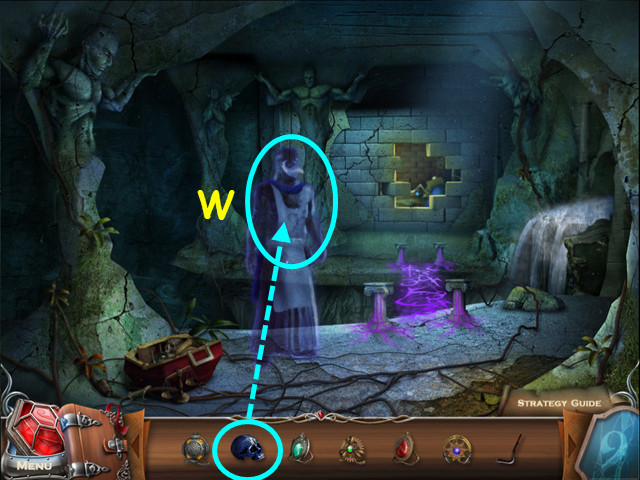
- Give the SYMBOL of DEATH to Lorenzo (W).
- You will receive LORENZO'S MEDALLION.
- Walk down 12 times then go forward to the great hall and look at the table.
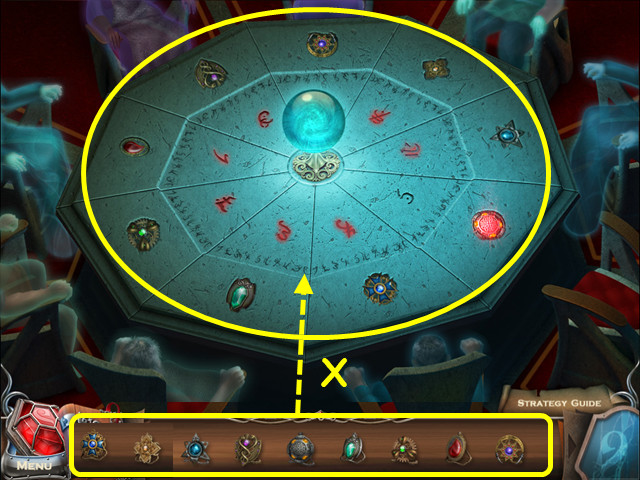
- Place each of the 9 MEDALLIONS into the table indentations (X).
- You will hear from each guardian as you place them.
- Return to the table after the cut-scene and place the next MEDALLION.
- Walk down the stairs under the table.
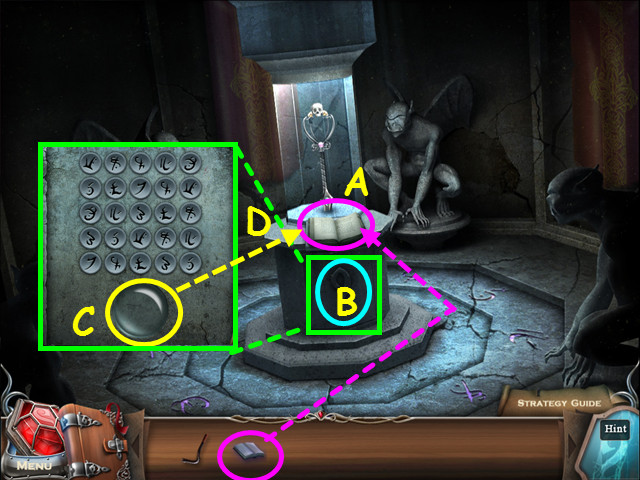
- Place the ENCRYPTED BOOK of SECRETS on the pedestal (A).
- Click on the '9' panel to open it (B).
- Look inside the panel and take the MAGIC GLASS (C).
- Use the MAGIC GLASS on the book (D).
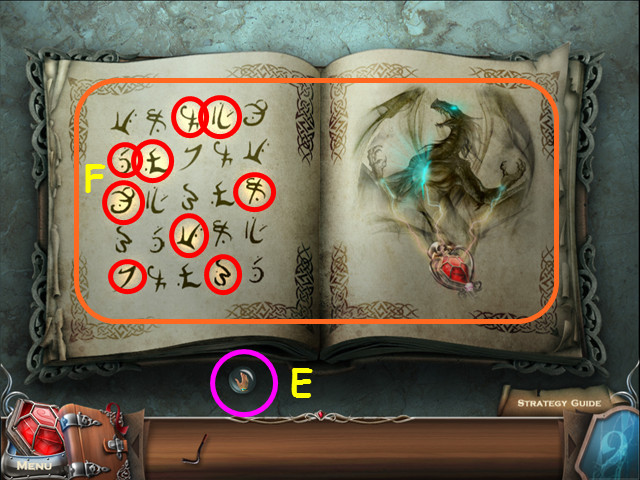
- Move the magic glass back and forth to reveal the text and picture (E).
- Move the glass until it is taken away from you.
- Note the highlighted symbols on the left (F).
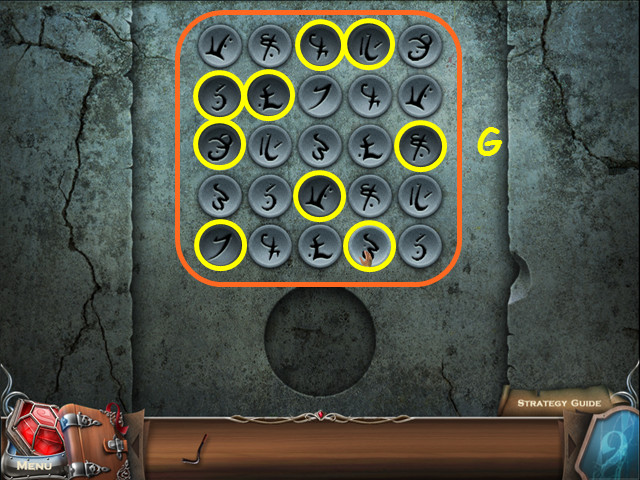
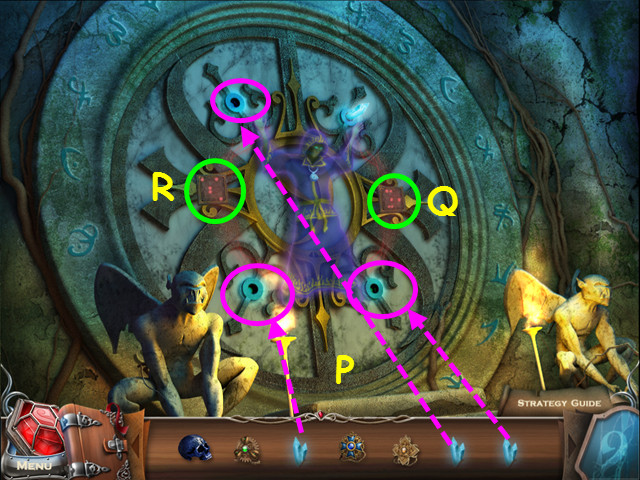
- Look inside the panel and press the symbols that were highlighted in the book (G).
- The glass will break around the artifact.
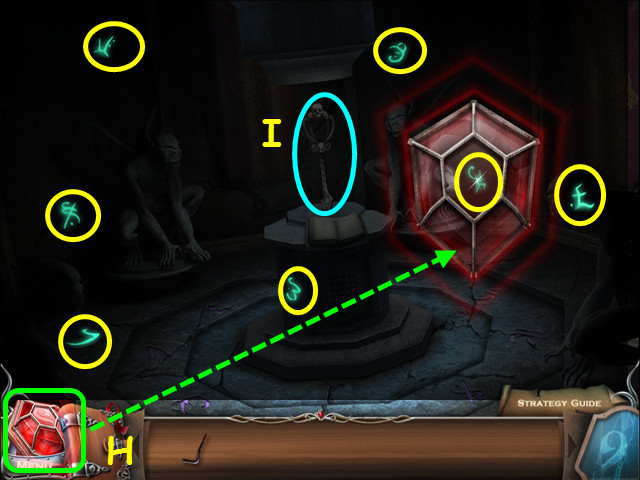
- Select the red amulet in the lower left corner (H).
- Locate the 7 runes.
- Take the DARK SIDE ARTIFACT (I).
- Return to the round door in which you placed the 3 glowing crystals.

- Use the DARK SIDE ARTIFACT on the dragon (J).
- You cursor will look like the artifact (K).
- Click on the flying skulls to destroy them (L).
- One you destroy a wave of flying skulls, one of the crystals will start zapping the dragon (M).
- There are 3 waves of flying skulls to destroy.
- Note – the dragon sometimes can be defeated by clicking on the 3 crystals.
- Congratulations! You have completed 9: The Dark Side.
Created at: 2012-01-17