

Walkthrough Menu
- General Tips
- Chapter 1: Enter the Asylum
- Chapter 2: Fix the Elevator
- Chapter 3: Enter the Small House
- Chapter 4: Seven Doors
- Chapter 5: Diffuse the Bomb
General Tips

- From the main menu you can play the game, adjust options like volume, screen size, custom cursor and difficulty. You can also start a new profile and view some extras.
- There are 3 types of cursors in the game: the arrow cursor that lets you move to a new place (1), the magnifying glass lets you inspect an area or talk to a character (2), and the hand cursor is used to pick up or interact with an object (3).
- In the Hidden Object Scenes some of the object names will be written in blue. This means that some of the objects must be combined before they can be collected.
- Clues that you find during your travels will be put in your journal (4). Reference your journal to solve puzzles.
- The hint button regenerates slowly and can help you find an object or skip a puzzle. If there is nothing to do in your area, the hint will not be used.
- During the cut scenes you can skip them by clicking in the bottom right corner of the screen.
- There are several Morphing Objects to find in the game, they are marked with a star symbol in the screenshots.
Chapter 1: Enter the Asylum
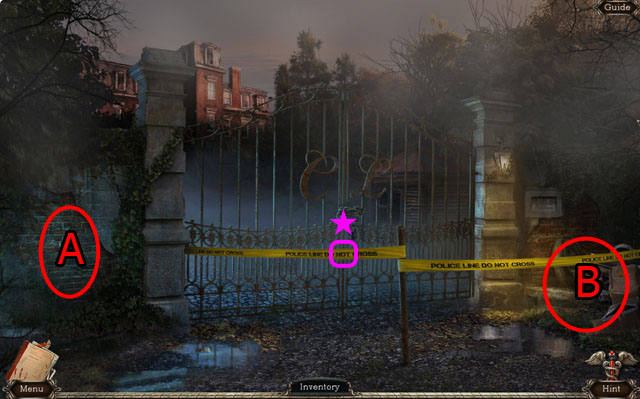
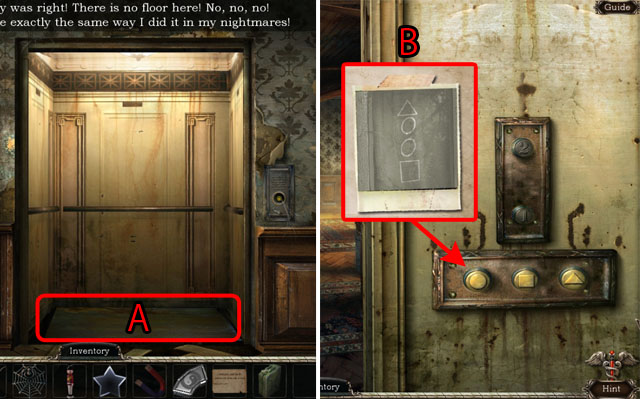
- Inspect the bricks to the left (A).
- Enter the Hidden Object Scene on the right (B).
- The Morphing Object is marked with a star.
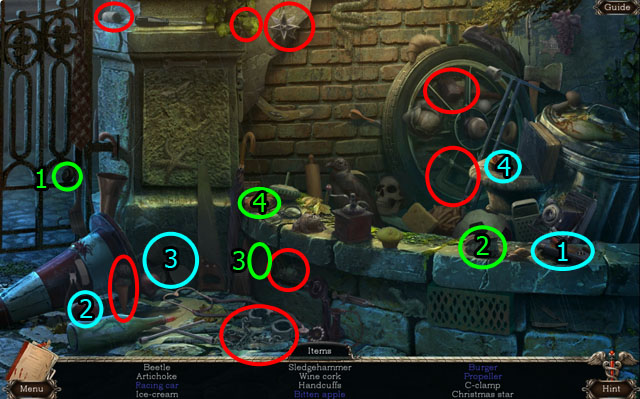
- Find all of the hidden objects.
- Use the wheel on the car (1) to collect it.
- Use the teeth on the apple (2).
- Use the fin on the propeller (3).
- Use the bun on the burger (4).
- You will receive the SLEDGEHAMMER.
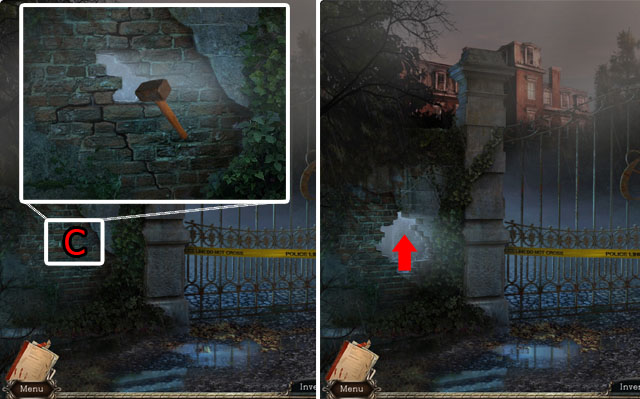
- Use the SLEDGEHAMMER on the wall (C).
- Go through the wall.
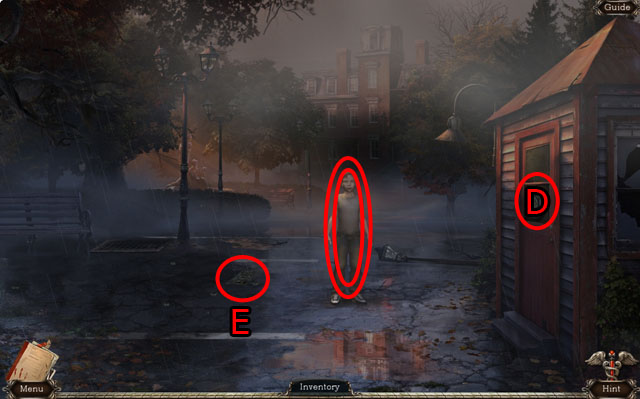
- Talk to the boy in the middle of the scene.
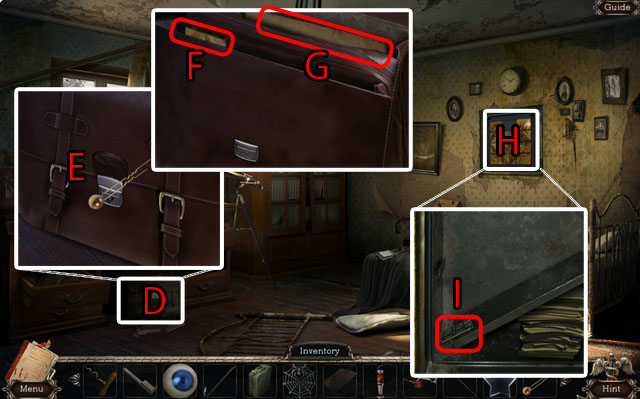
- Inspect the door (D) and the license plate (E).
- Go forward.
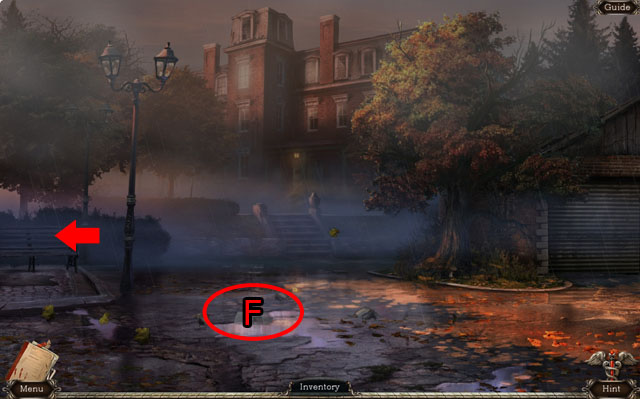
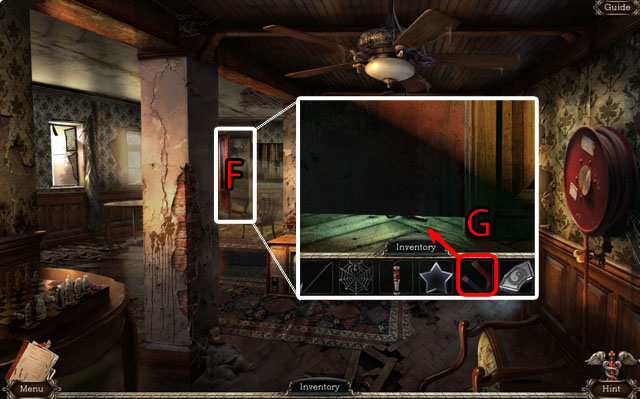
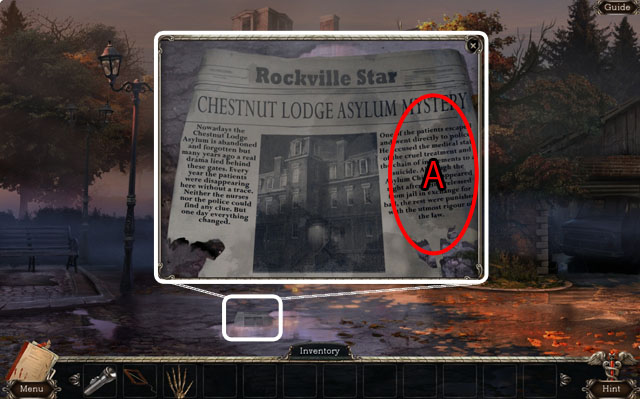
- Inspect the newspaper (F).
- Move to the left and enter the Hidden Object Scene.
- Collect all of the Hidden Objects.
- Use the fly swatter on the fly (1).
- Use the globe on the base (2).
- Use the iron on the paper (3).
- You will receive an EMPTY GLASS.
- Collect the Morphing Object (star).
- Go back and then travel towards the asylum.
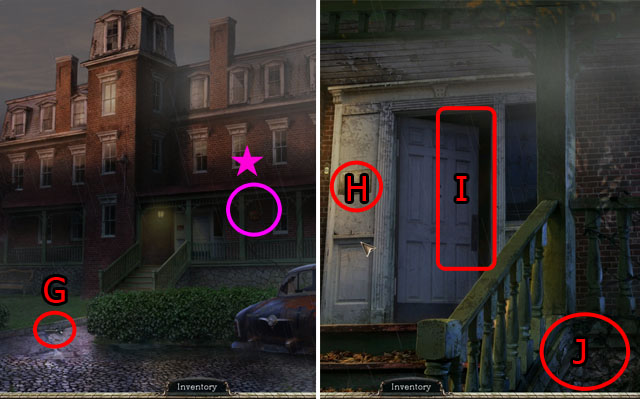
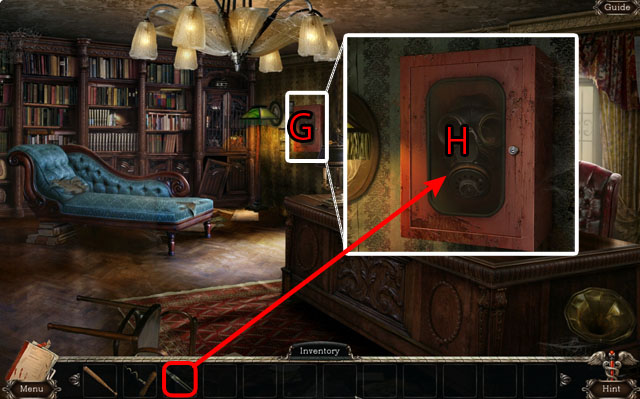
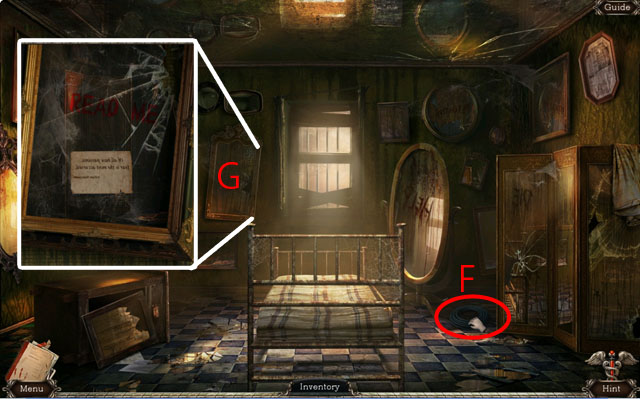
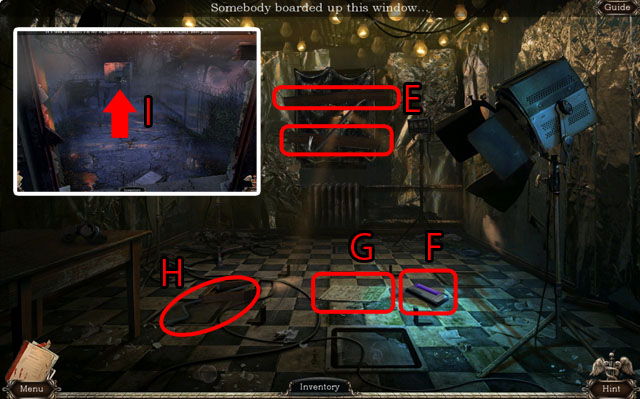
- Inspect the flashlight (G) and collect the Morphing Object (star).
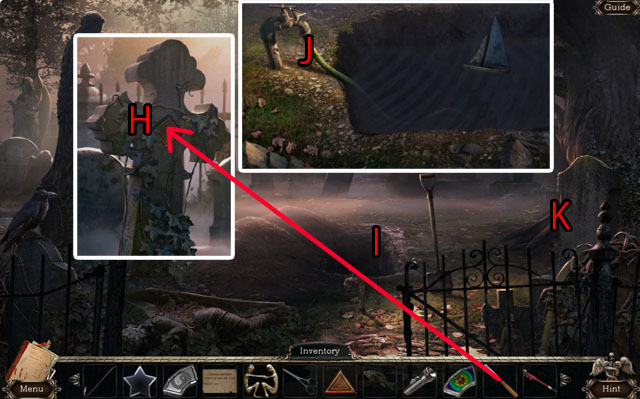
- Move forward to the entryway. Inspect the message to the left of the door (H).
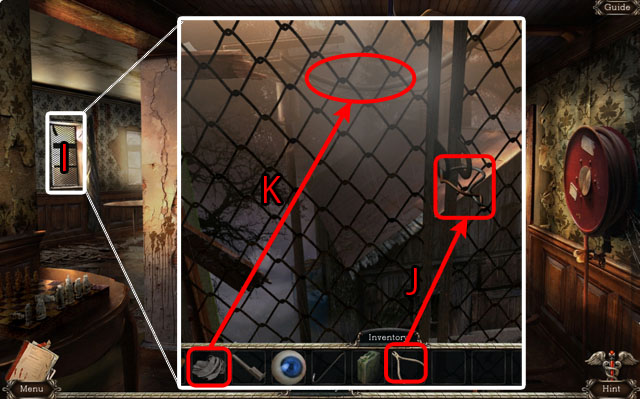
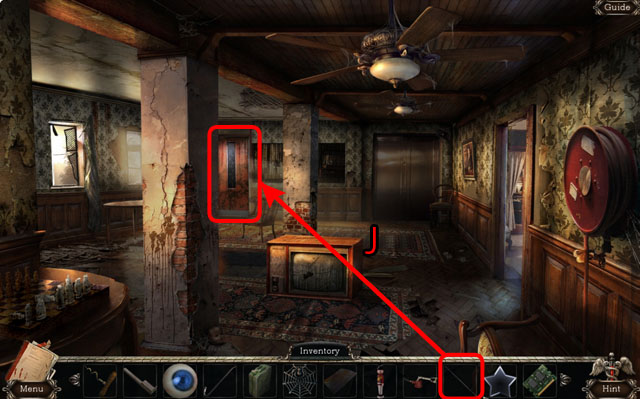
- Try to enter the asylum (I) and then enter the Hidden Object Scene (J).
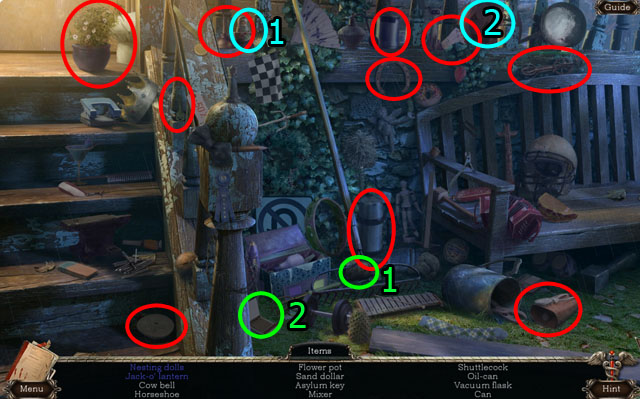
- Find the Hidden Objects.
- Use the top nesting doll on the base (1).
- Light the jack-o-lantern with the match (2).
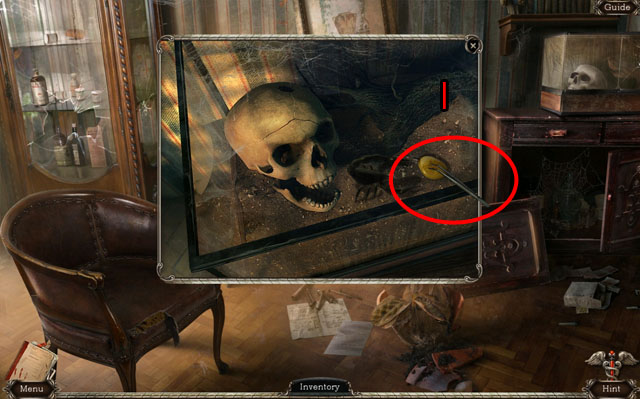
- You will receive the ASYLUM KEY.
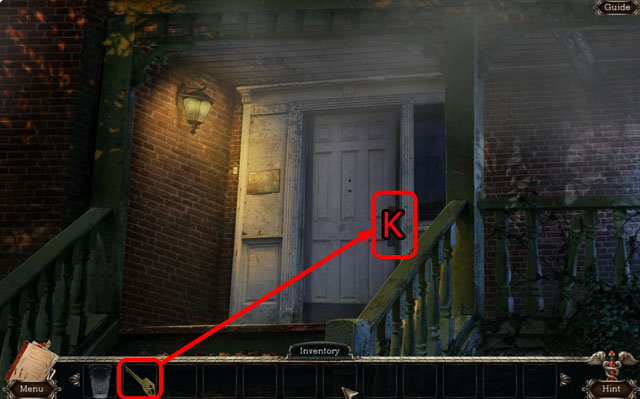
- Use the ASYLUM KEY on the door (K).
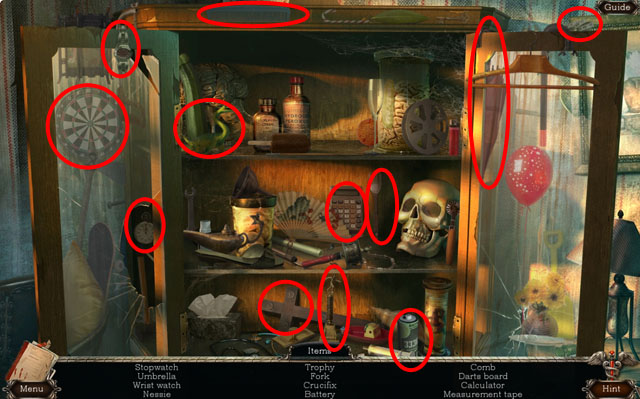
Chapter 2: Fix the Elevator
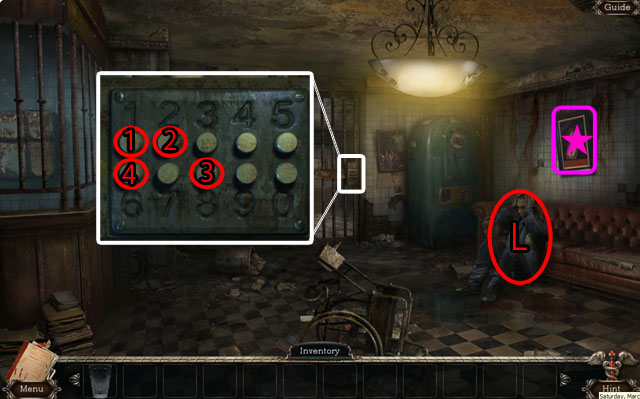
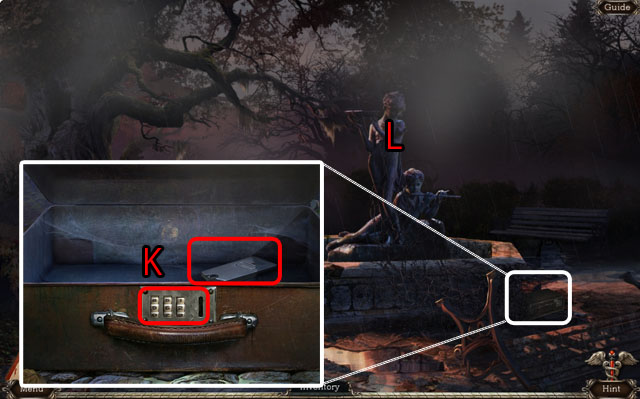
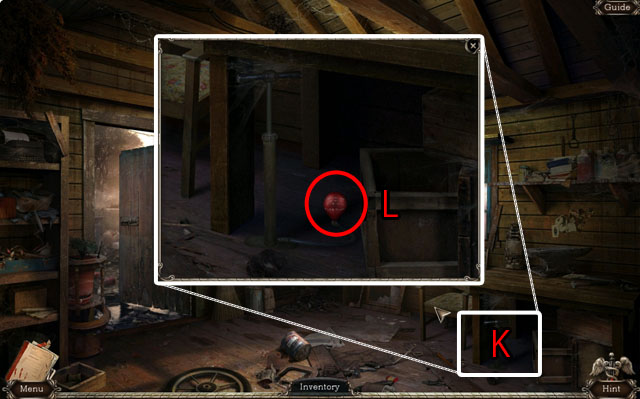
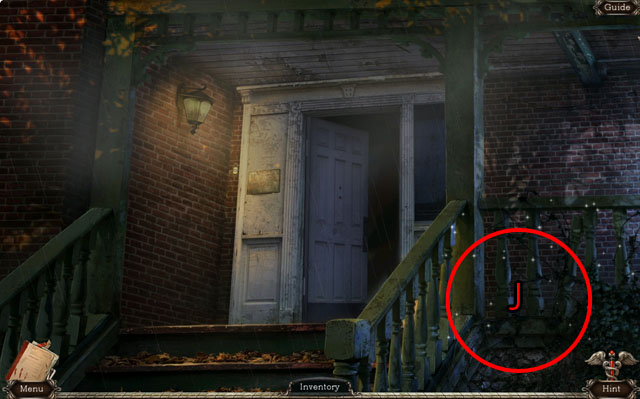
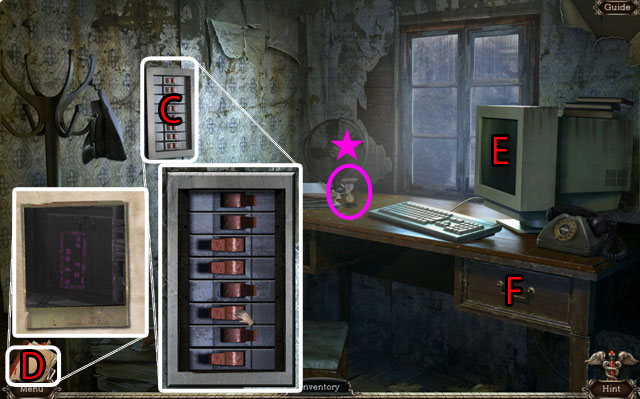
- Talk to the police officer (L).
- Inspect the lock on the barred door and input the 4 numbers: 1,2, 6, and 8 (marked 1-4 on screenshot).
- Find the Morphing Object (star) and go into the next room.
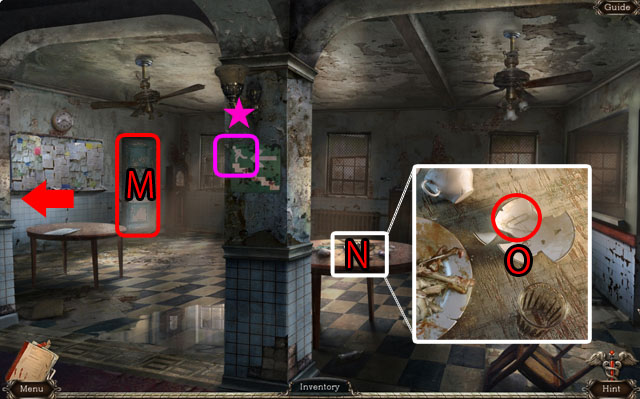
- Find the Morphing Object (star).
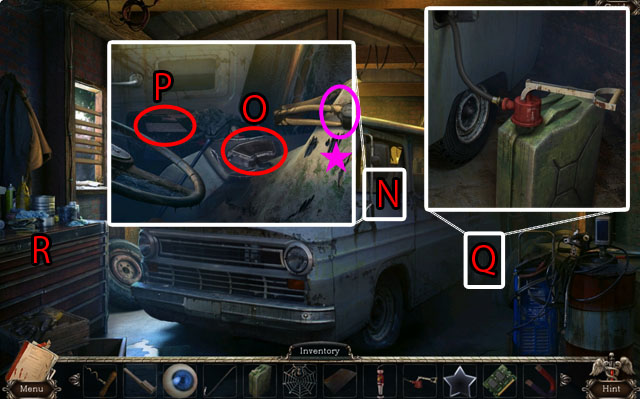
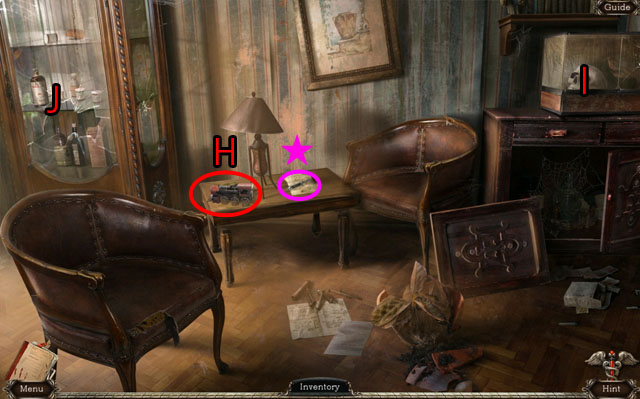
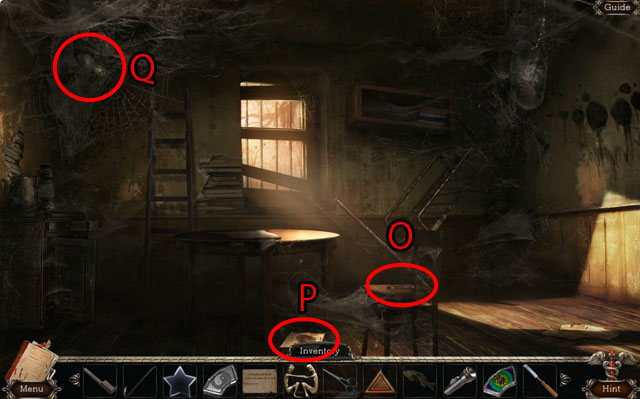
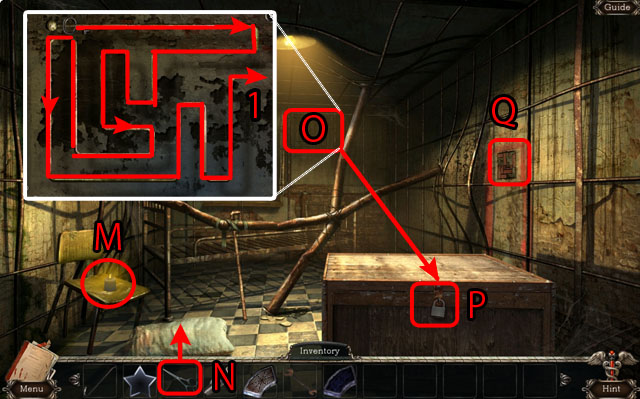
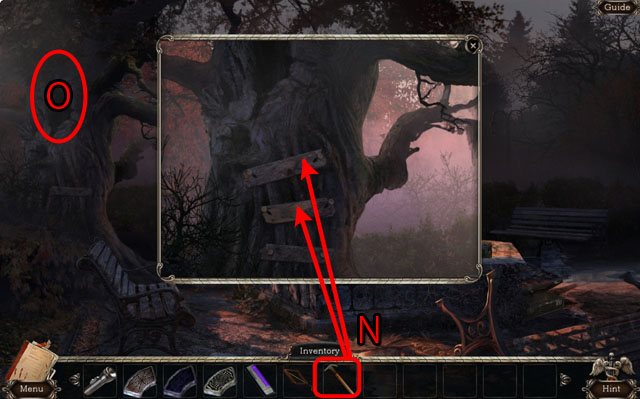
- Inspect the table (N) and take the PAPERCLIP (O).
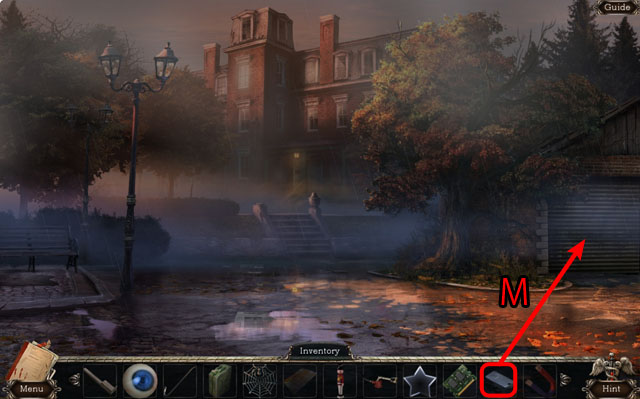
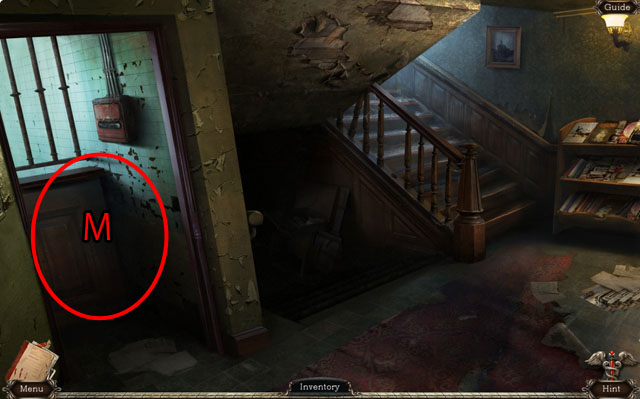
- Inspect the door (M), which is rusted shut, and go towards the left.
- Find the Morphing Object (star).
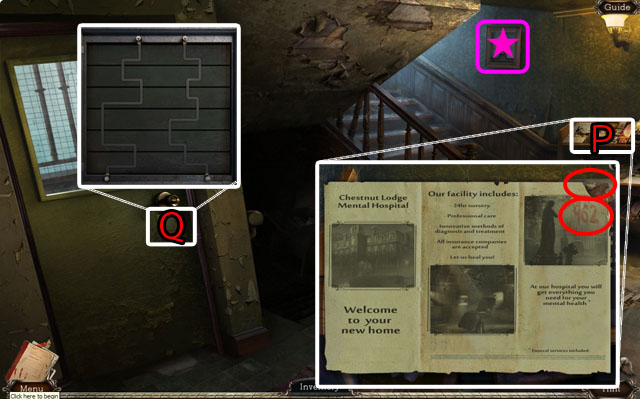
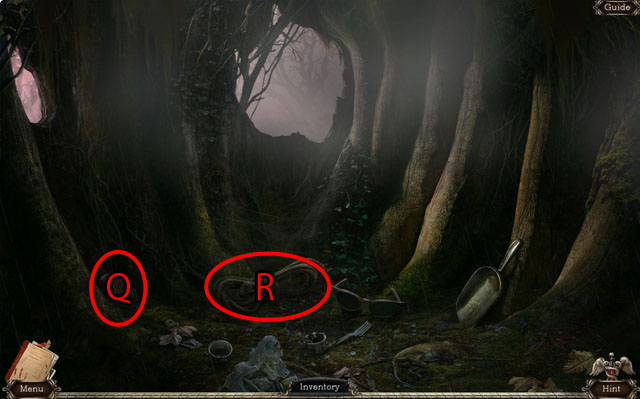
- Inspect the lock (Q) and rearrange the pieces to connect the top pins to the bottom pin.
- Pick up one strip and use it on another strip to switch their places.
- See the screenshot for the solution (Q).
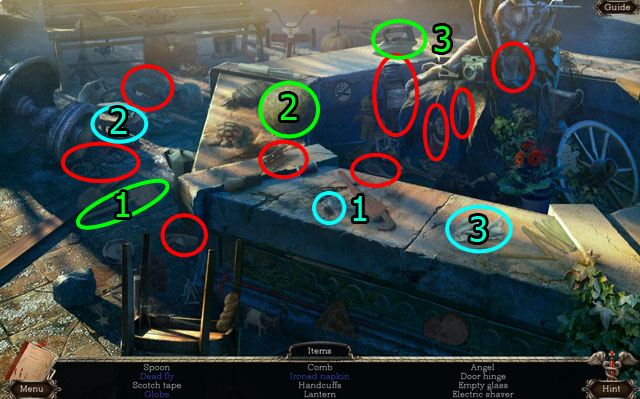
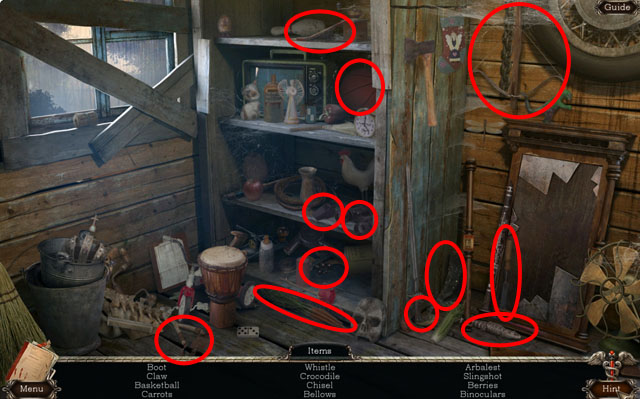
- Inspect the papers on the right (P) and take the MOTH.
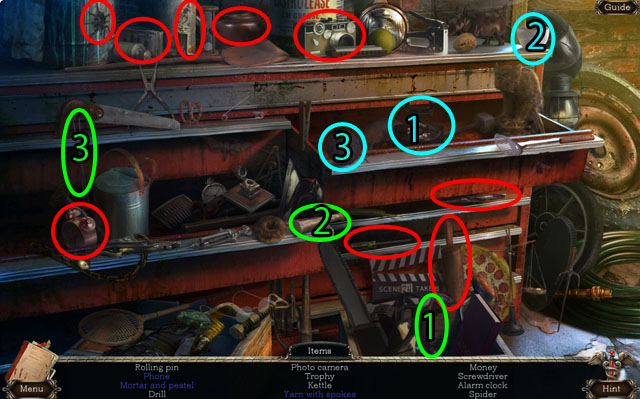
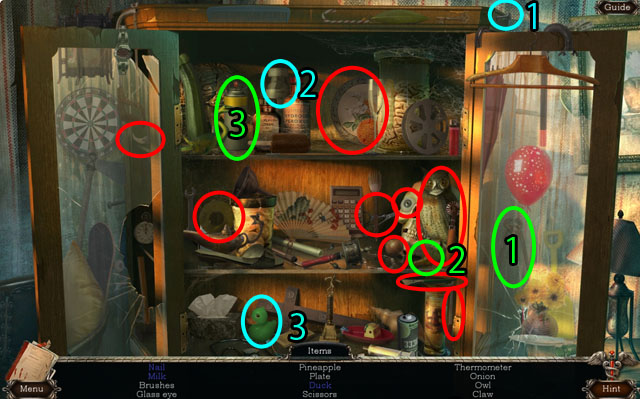
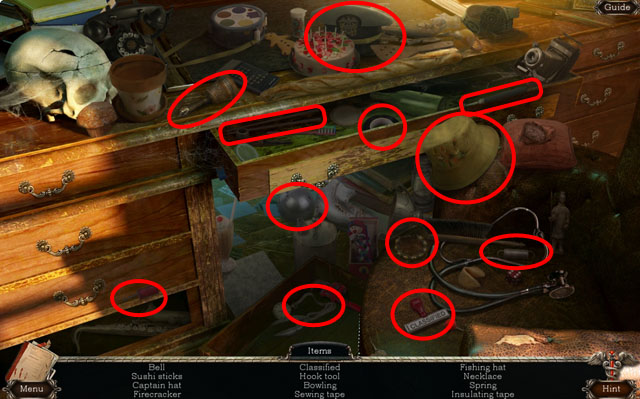
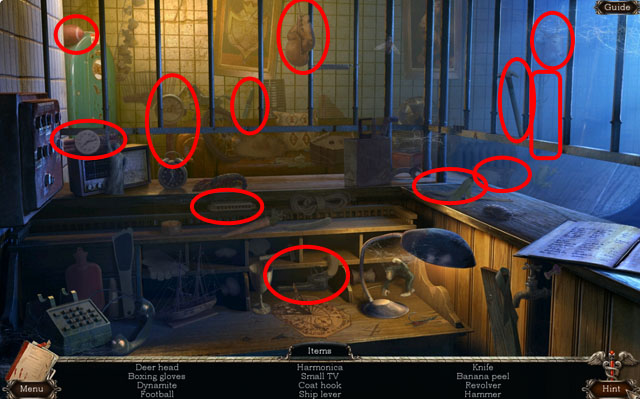
- Enter the Hidden Object Scene (Q).
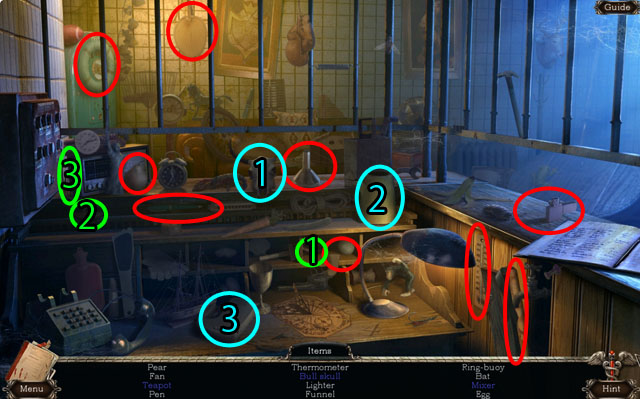
- Find all of the Hidden Objects.
- Use the horn on the skull (1).
- Use the cover on the teapot (2).
- Use the egg beater on the mixer (3).
- You will receive the BASEBALL BAT.
- Go up the stairs.
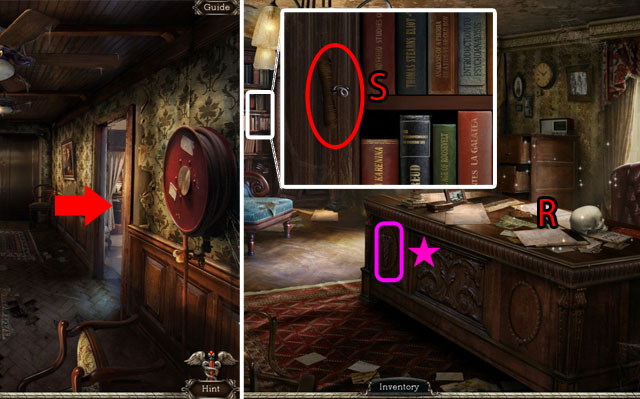
- Move through the door at the right.
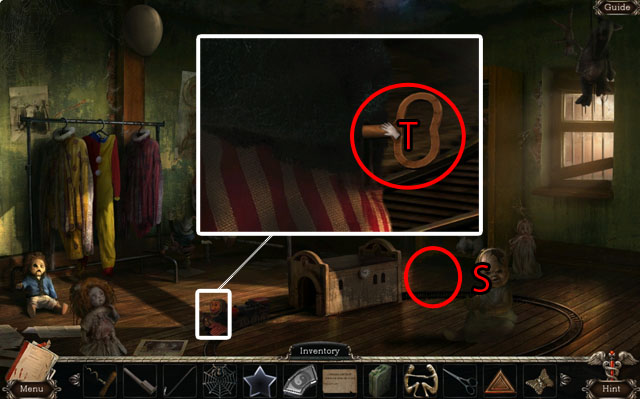
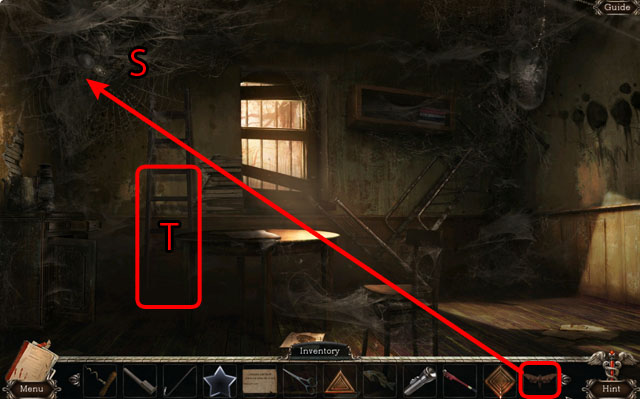
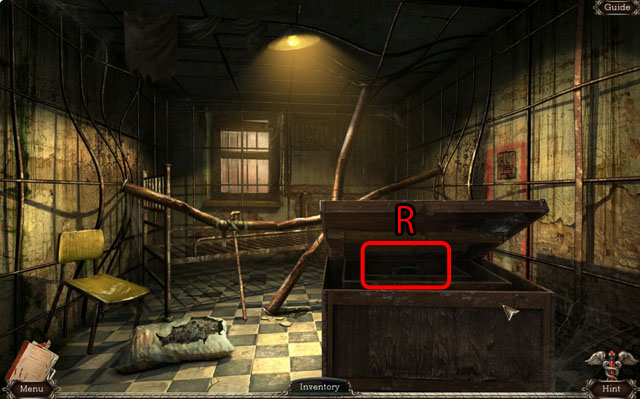
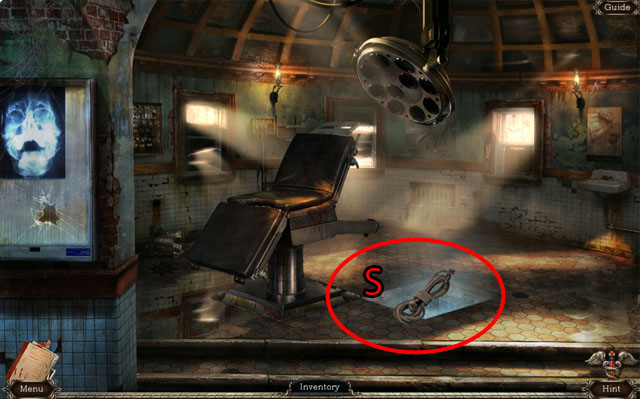
- Zoom in on the bookcase and take the CORKSCREW (S).
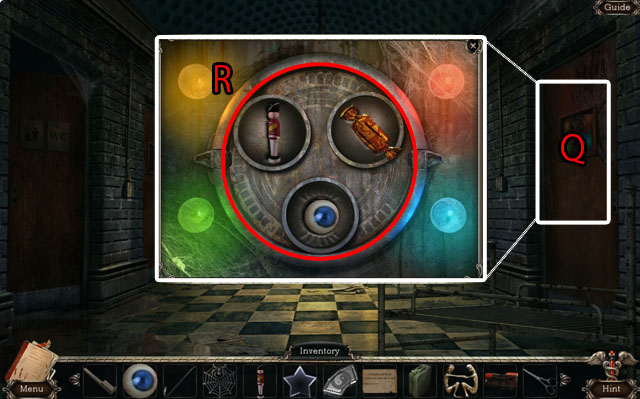
- Find the Morphing Object (star) and zoom into the desk Hidden Object Scene (R).
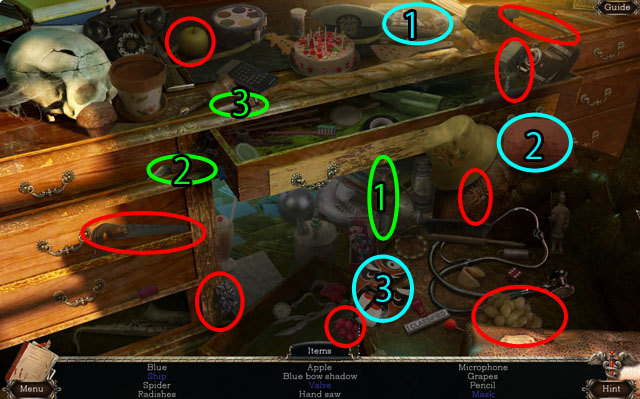
- Find all of the Hidden Objects.
- Use the hammer on the ship in the bottle (1).
- Use the knife on the pillow to find the valve (2).
- Use the glue on the mask (3).
- You will receive the VALVE.
- Go back two times and then go down the stairs.
- Find the Morphing Object (star).
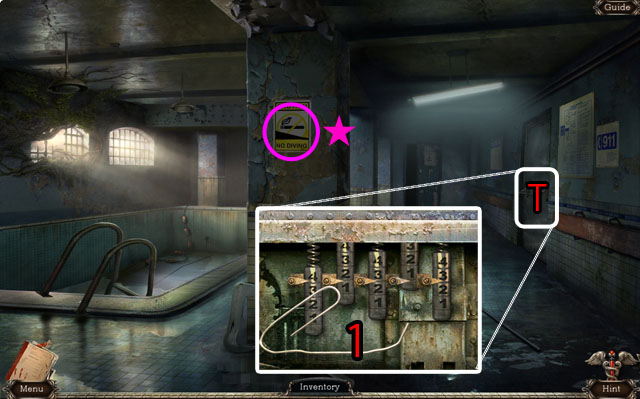
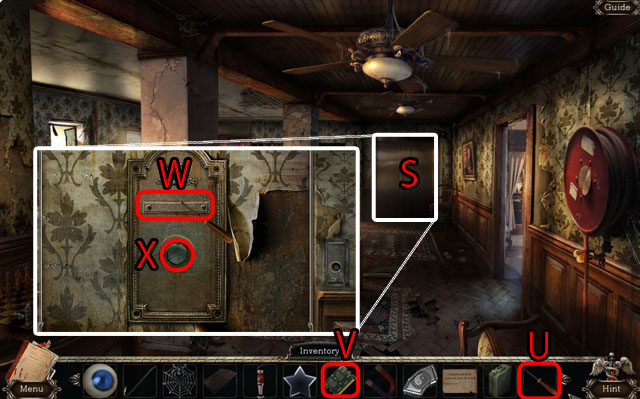
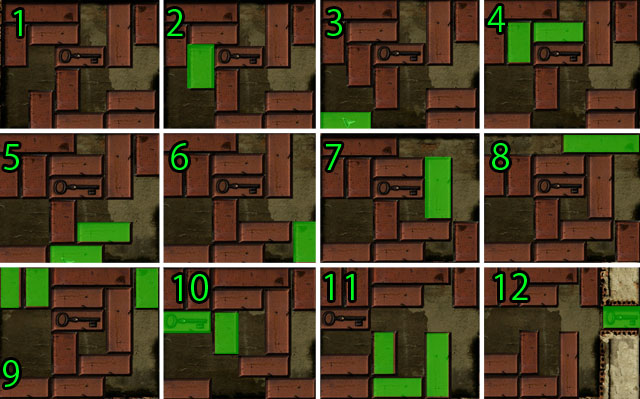
- Inspect the door and use the PAPER CLIP to open it (T).
- Use the paper clip to push in each pin. If the pin is in the wrong position, all of the pins will reset; if the pin is in the correct position you can move on to the next pin.
- Push down the pins one at a time to the correct position until all of the pins are set.
- From left to right, push in the pins to these positions: 4,2,3,1 and 3 (1).
- Find the Morphing Object (star).
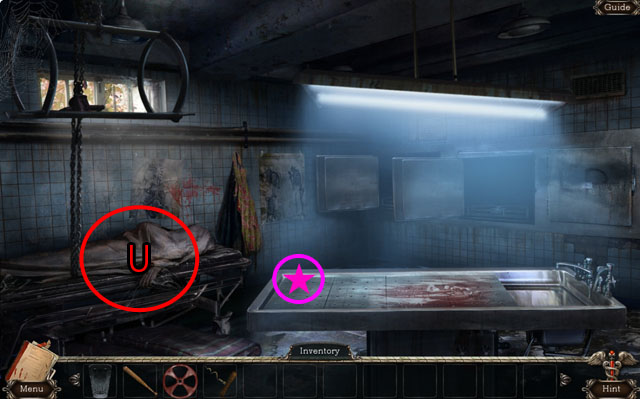
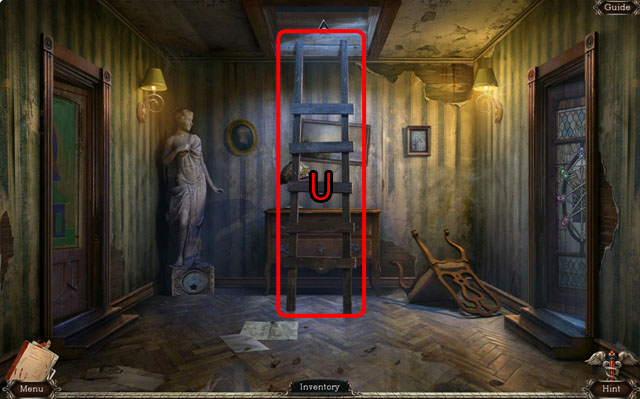
- Enter the Hidden Object Scene (U).
- Use the rib on the ribcage (1).
- Use the lighter on the pipe (2).
- You will receive the SCAPEL.
- Exit the house and go to the right.
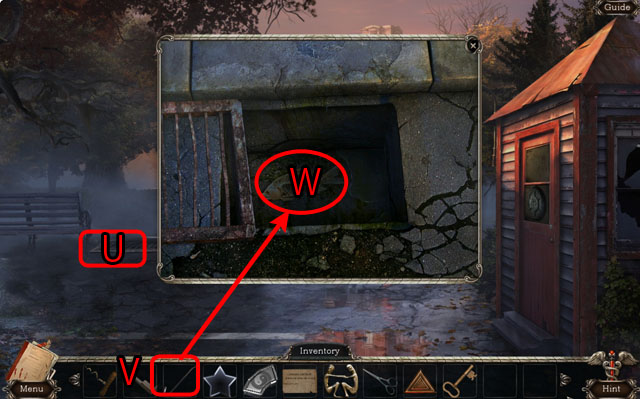
- Inspect the doghouse (V) and the door (W).
- Go to the left.
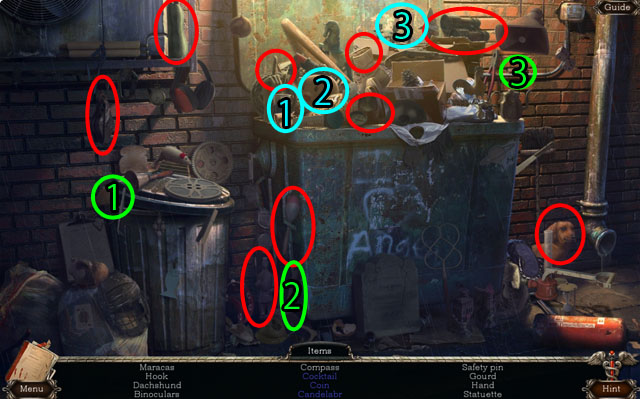
- Enter the Hidden Object Scene.
- Use the umbrella on the drink (1).
- Use the hammer on the piggy bank (2).
- Use the candle on the candelabra (3).
- You will receive a DIME.
- Return to the house. Inspect the vending machine.
- Use the DIME on the slot (A) and place the EMPTY GLASS in it (B).
- Press the button (C) and take the GLASS OF WATER.
- Inspect the policeman and give the GLASS OF WATER to him.
- You will receive a LAMP CHAIN.
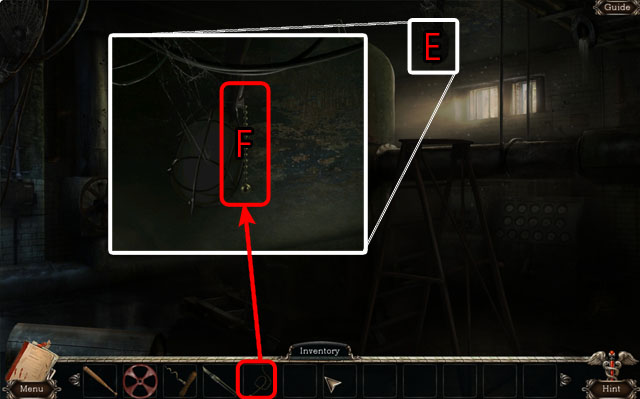
- Return below the stairs to the pool and go through the door in the back.
- Inspect the light at the top of the scene (E) and use the LAMP CHAIN (F).
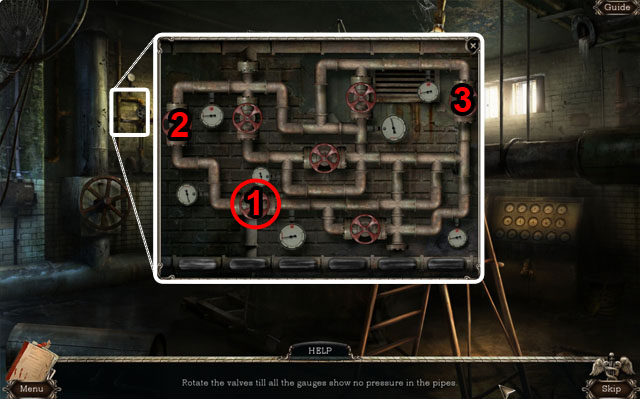
- Use the VALVE on the empty spot (1) and then turn it to relieve the pressure in the nearby dial.
- Then turn the two other valves in this order: 2 and then 3 to finish the puzzle.
- The complete solution has all of the pressure equalized and not in the red zone.
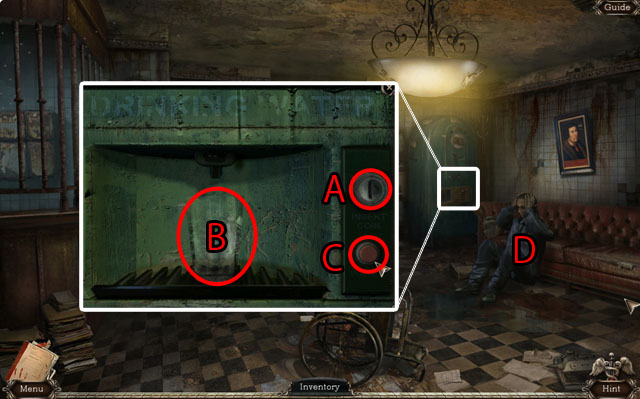
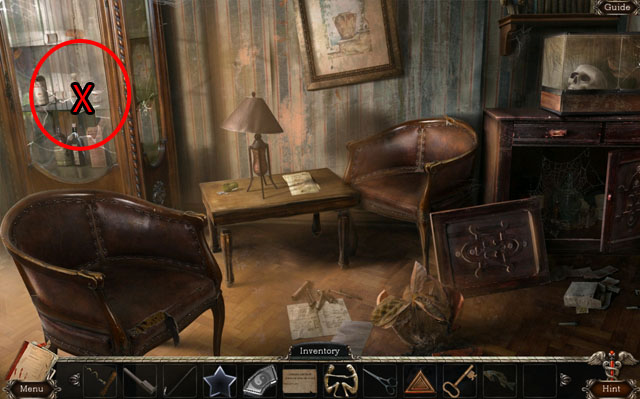
- Go back upstairs and enter the door on the right, into the study.
- Use the SCALPEL to open up the door (G) and get the GAS MASK (H).
- Go back three scenes.
- Look through the window on the right (I).
- Use the BASEBALL BAT to break the glass (J).
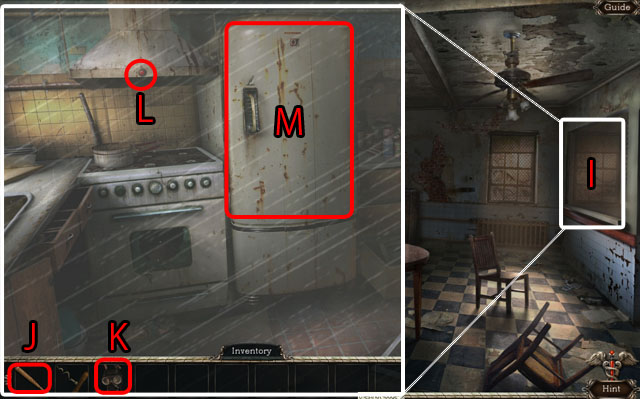
- Use the GAS MASK on the scene (L).
- Press the button (L) and then open the refrigerator (M).
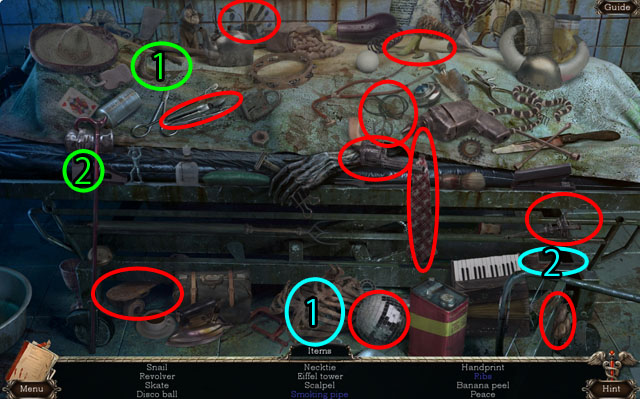
- Enter the Hidden Object Scene.
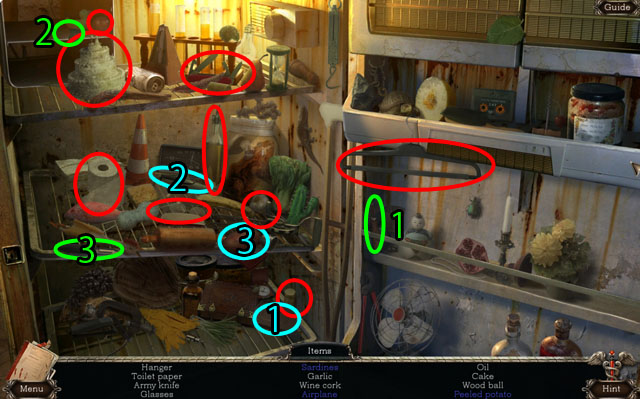
- Use the can opener on the can (1).
- Use the wing on the plane (2).
- Use the peeler on the potato (3).
- You will receive some OIL.
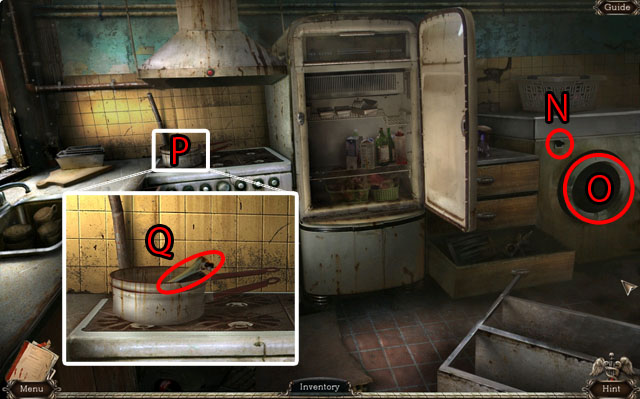
- Zoom in on the washing machine and press the button (N).
- Open the door and take the TOWEL (O).
- Zoom in on the pot (P) and take the BONE (Q).
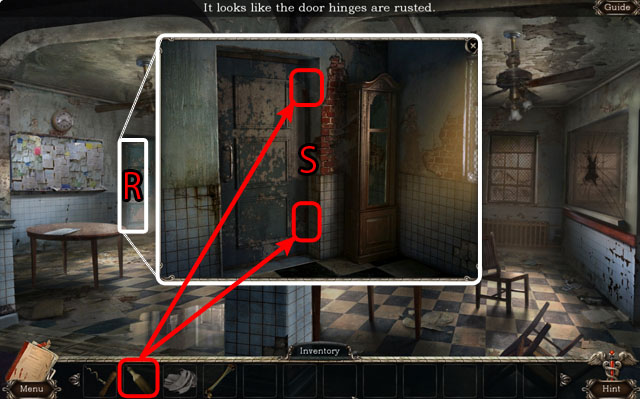
- Exit the room and zoom in on the door (R).
- Use the OIL on the hinges (S).
- Open and go through the door.
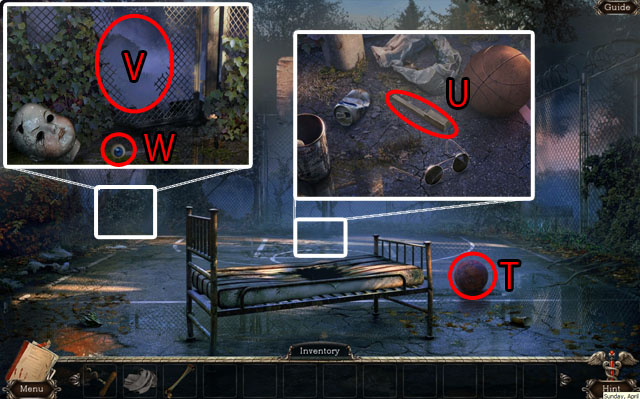
- Pick up the basketball and use it on the hoop (T).
- Inspect the items that fall down and take the PIANO KEY (U).
- Zoom in on the bushes to the left. Remove the leaves to find the hole (V).
- Shake the mask until the EYE falls out and collect it (W).
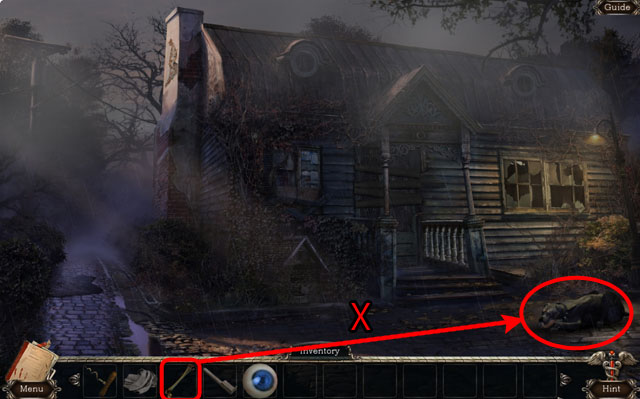
- Return to the small house to the right of the asylum.
- Give the BONE to the dog (X).
- Move to the right.
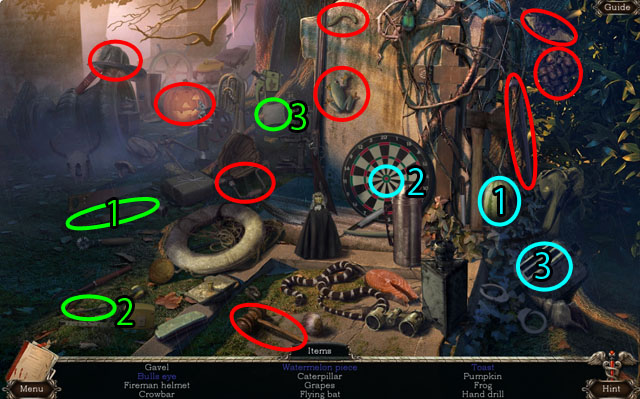
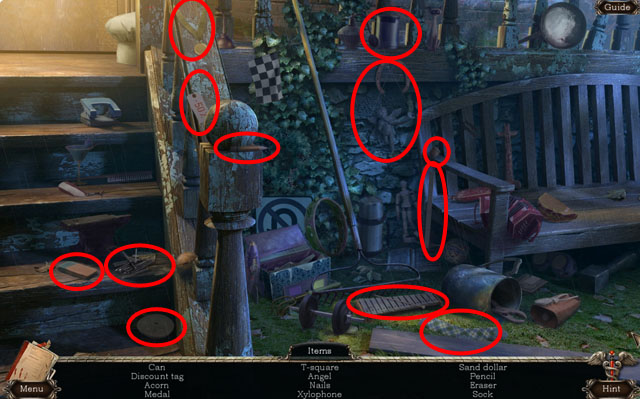
- Enter the Hidden Object Scene.
- Use the machete on the watermelon (1).
- Use the dart on the dartboard to get the bulls eye (2).
- Use the bread in the toaster (3).
- You will receive a CROWBAR.
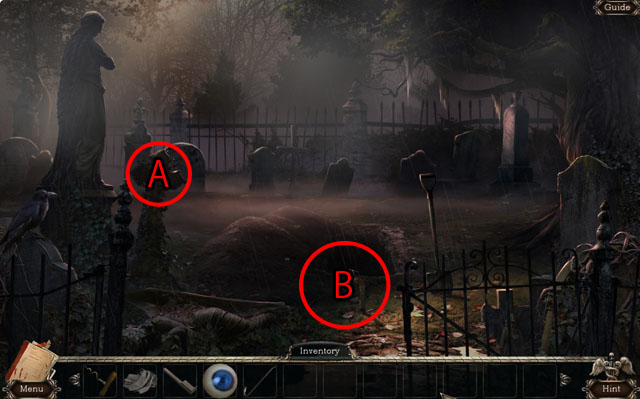
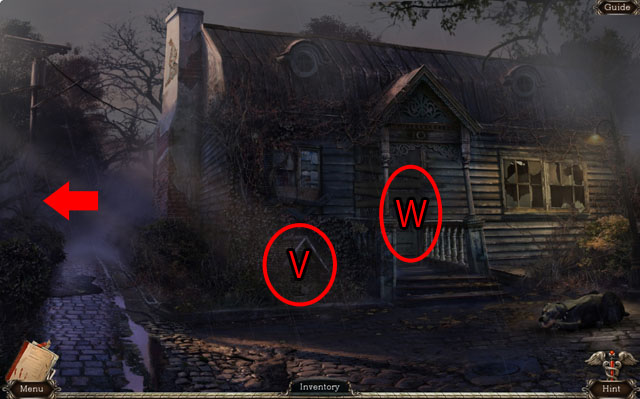
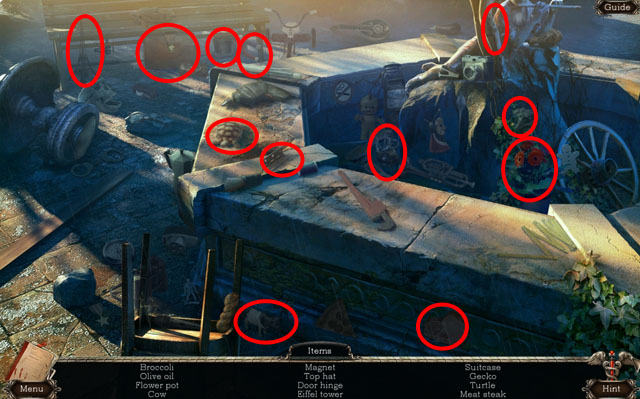
- Inspect the tombstone (A) and the grave (B).
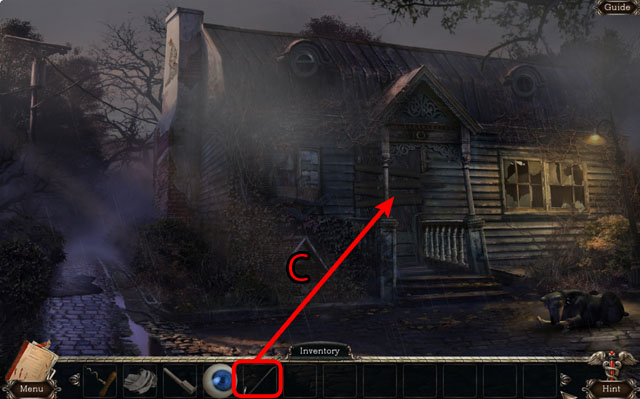
- Return to the small house and use the CROWBAR to take the boards off of the door (C).
- Go back to the outside of the asylum.

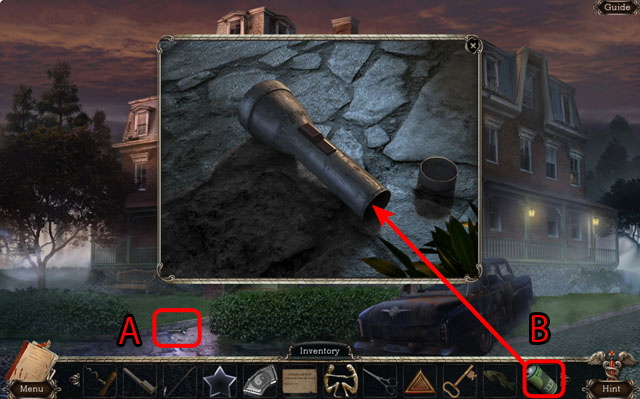
- Zoom in on the trunk of the car.
- Use the CROWBAR to open the trunk (D).
- Take the EMPTY CONTAINER (E) and read the note (F).
- Go back to the entry way.
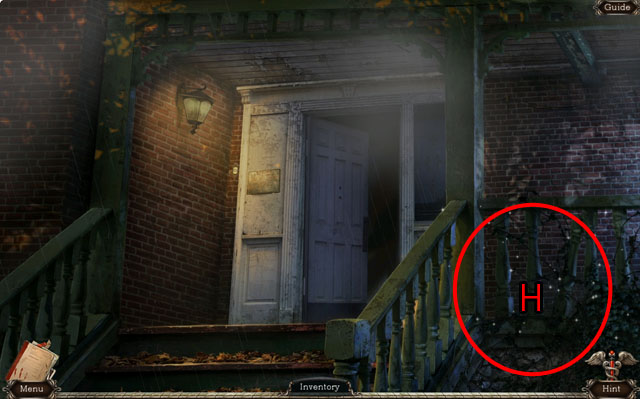
- Enter the Hidden Object Scene (H).
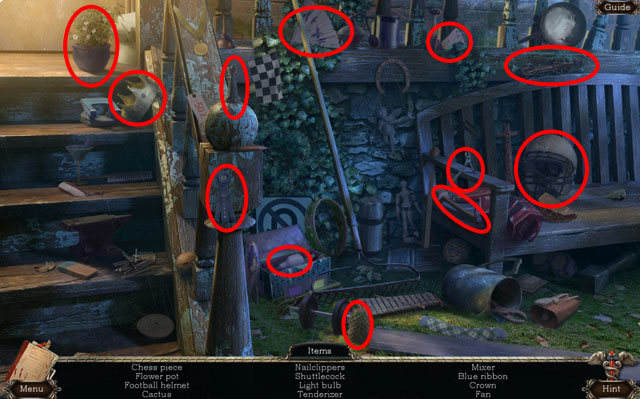
- Find the Hidden Objects and get the NAILCLIPPERS.
- Return to the inside of the asylum and then go up the stairs.
- Zoom in on the window (I) and use the NAILCLIPPERS (J) to open it.
- After that use the TOWEL on the rope to go to the next area (K).
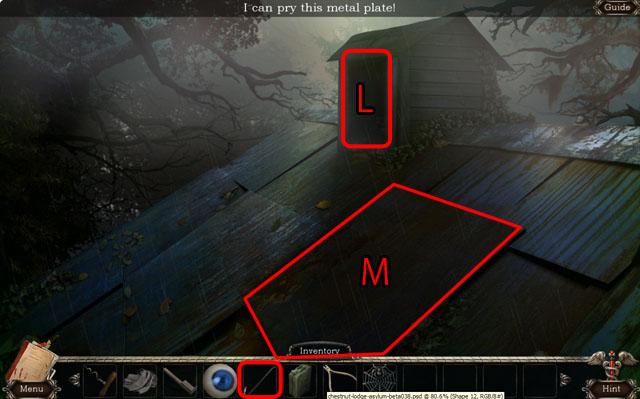
- Inspect the top of the roof (L).
- Use the CROWBAR on the wood and collect the SPIDERWEB.
- Use the CROWBAR on the roof (M) and you will receive a METAL PLATE.
- Talk to the young boy (N).
- Inspect the working air pump (P), there is also an exit to the left now that goes to the alleyway.
- Enter the Hidden Object Scene (O).
- Use the knife on the avocado (1).
- Use the paper on the calendar (2).
- Use the parrot on the cage (3).
- You will receive the DOOR HANDLE.
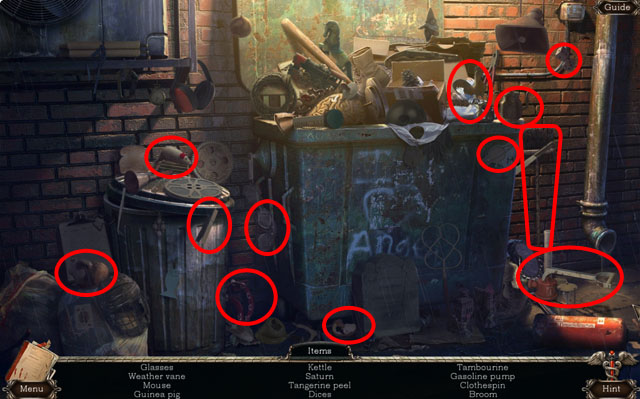
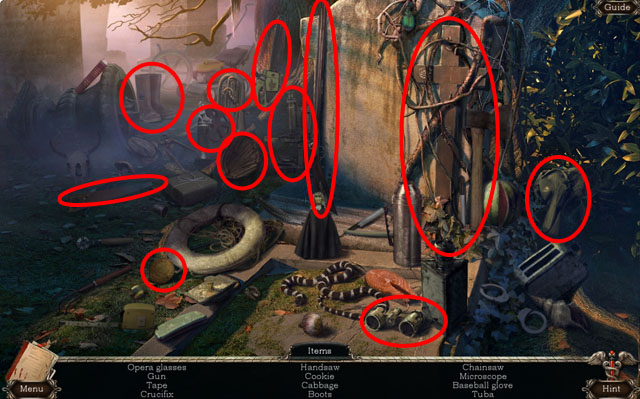
- Enter the Hidden Object Scene in the dumpster.
- Find all of the Hidden Objects and then you will receive the GAS PUMP.
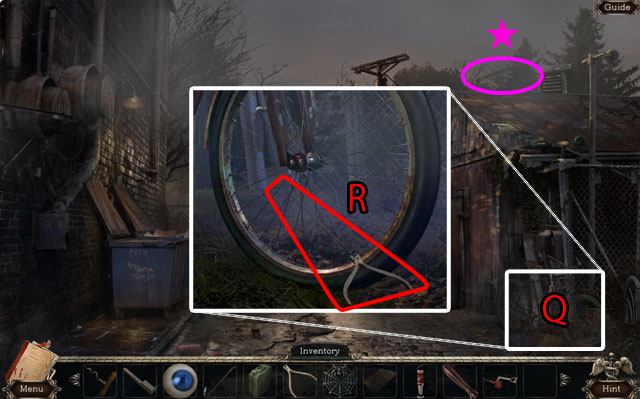
- Find the Morphing Object (star).
- Zoom in on the bicycle (Q) and use the NAILCLIPPERS to get the SPOKE (R).
- Go back one scene to the small house.
Chapter 3: Enter the Small House
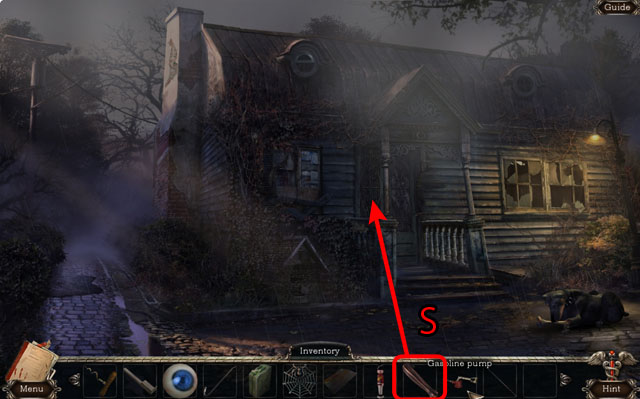
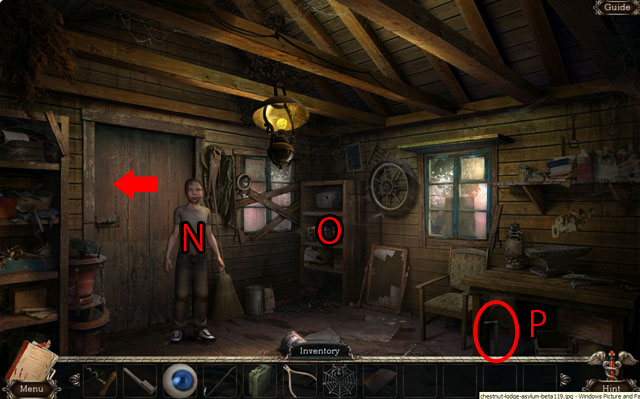
- Use the DOOR HANDLE on the door (S) then enter the house.
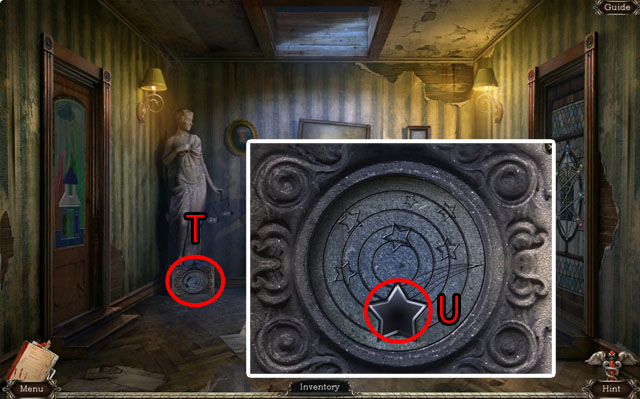
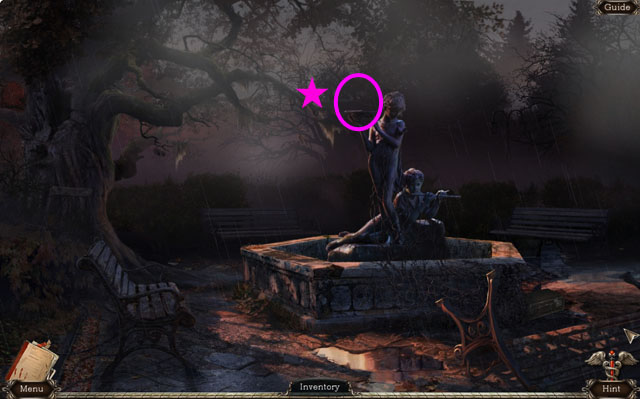
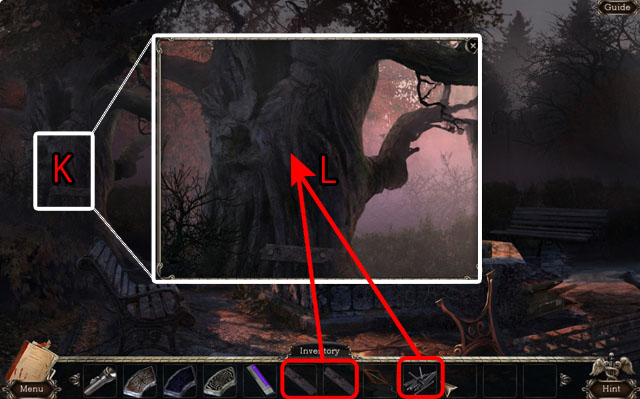
- Zoom in on the base of the statue (T).
- Drag the rings to expose the large star at the bottom of the puzzle (U).
- Start from the middle and work your way to the outside until it matches the screenshot.
- Take the STAR.
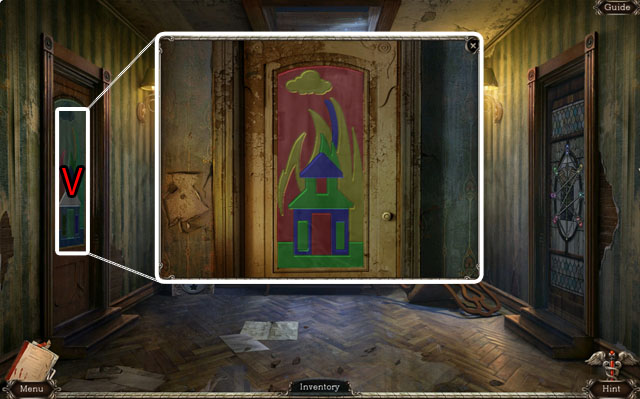
- Zoom in on the door to the left (V).
- Swap the colors in the pictures until none of the pieces touch another piece of the same color.
- See the screenshot for the final solution.
- Go through the door.

- Find the Morphing Object (star).
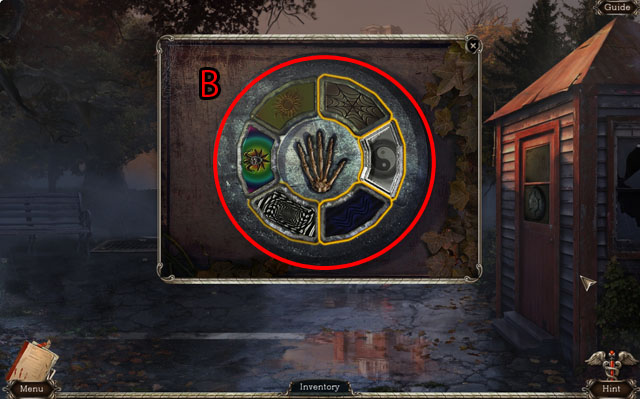
- Look through the telescope (W) and find the symbols off to the left.
- Inspect the painting on the wall and solve the slider puzzle (Y).
- Press any of the pieces to move it into the empty spot.
- See the screenshot for the solution; there will be an empty spot at the end.
- Inspect the bag on the floor (X).
- Exit the room.
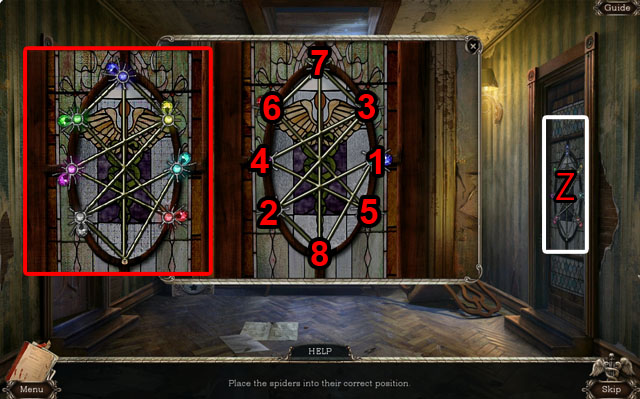
- Inspect the door on the right (Z).
- Press a bug that is connected to an empty spot to move it to that spot.
- Move the bugs to so the jewels on the back match the jewel on the head.
- Press the bugs in the correct order (1-8) to arrange them like in the screenshot.
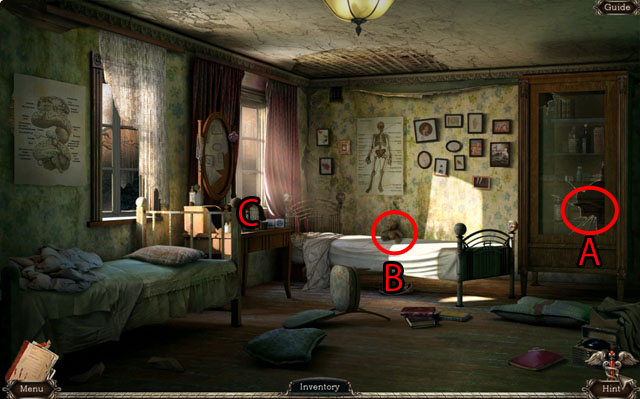
- Inspect the puzzle behind the broken glass (A).
- Inspect the bear on the bed (B).
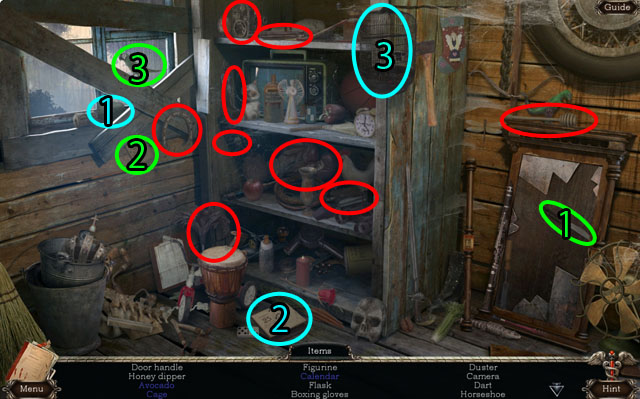
- Enter the Hidden Object Scene (C).
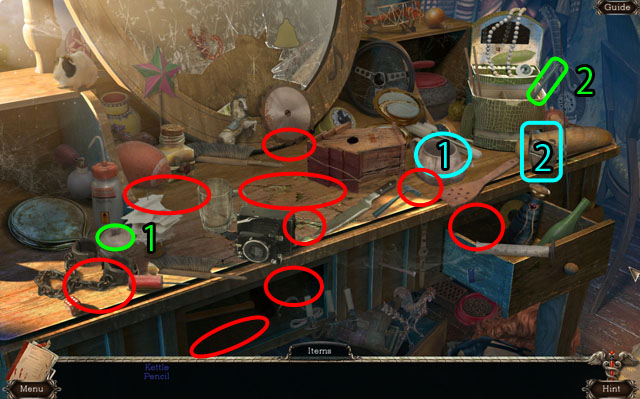
- Use the lid on the teapot (1) and the pencil in the pencil sharpener (2).
- You will receive a HAIRPIN.
- Exit the room and go across the hall.
- Zoom in on the briefcase (D) and use the HAIRPIN to open it (E).
- Take the TILE (F) and read the note (G).
- Zoom in on the tile puzzle (H) and use the TILE on the empty spot; collect the CHIP from behind the puzzle (I).
- Exit the small building and go outside. Enter the asylum and go upstairs.
- Zoom in on the door and use the SPOKE to push the key out of the hole (J).
- Exit the asylum and return to the fountain, to the left.
- Open the briefcase (K) with the password 962 and take the REMOTE CONTROL.
- Enter the Hidden Object Scene (L).
- Find all of the Hidden Objects and receive the MAGNET.
- Go back one scene.
- Use the REMOTE CONTROL on the garage door (M).
- Open the door to the van (N) and zoom in on the van.
- Find the Morphing Object (star).
- Take the LOCK PART (O) and MIRRORED NOTE (P).
- Zoom in on the back of the van (Q).
- Use the EMPTY CONTAINER on the ground and then open the gas cover.
- Use the GAS PUMP and pump it to fill the container.
- Take the CONTAINER OF GAS.
- Enter the Hidden Object Scene (R).
- Use the receiver on the base (1).
- Use the mortar on the pestle (2).
- Use the needles on the yarn (3).
- You will receive a SCREWDRIVER.
- Return to the upstairs of the asylum.
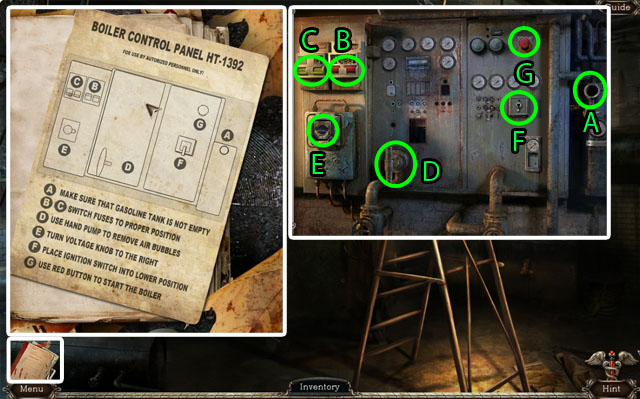
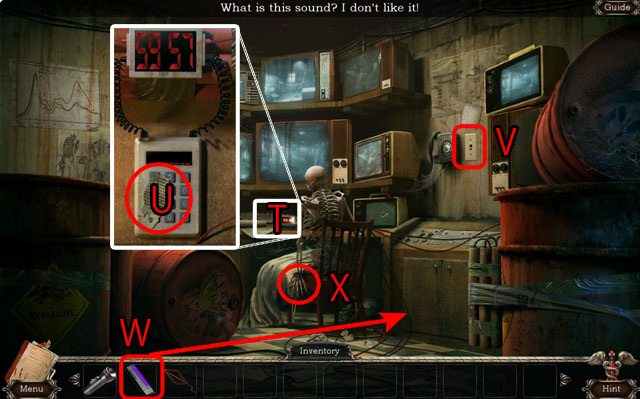
- Zoom in on the elevator and zoom in on the control panel (S).
- Use the SCREWDRIVER (U) on the panel (W) and take it off.
- Use the CHIP on the panel (V) and press the button once it lights up (X).
- Use the METAL PLATE on the elevator and press the button again (A).
- Press the shaped buttons in the order that was seen in the telescope (B).
Chapter 4: Seven Doors
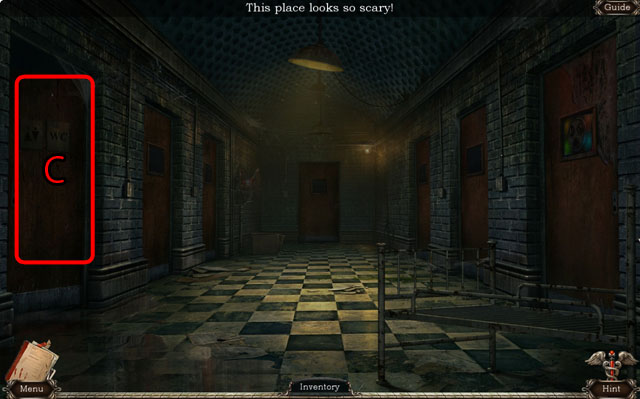
- Enter the first door on the left (C).
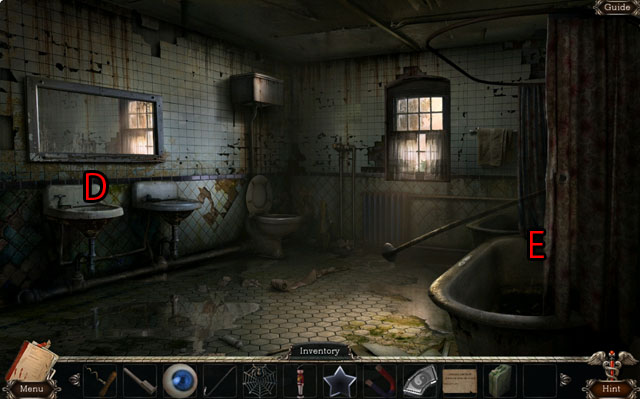
- Inspect the sink (D).
- Move the curtain (E) and enter the Hidden Object Scene.
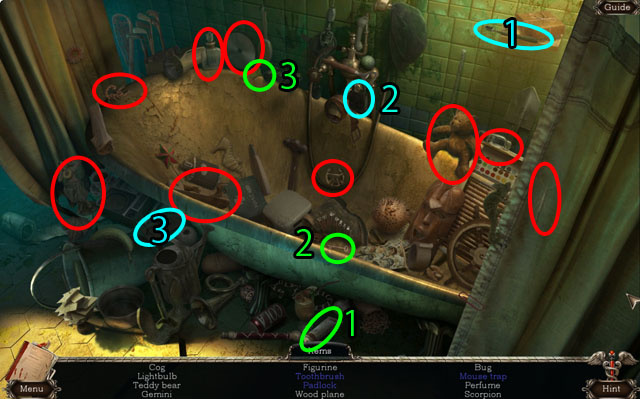
- Use the toothpaste on the brush (1).
- Use the key on the lock (2) and the cheese on the mousetrap (3).
- You will receive a GEMINI statue.
- Return to the elevator and press button 1.
- Zoom in on the door (F) and use the MAGNET to get the key (G).
- Use the KEY on the door and enter it.
- Find the Morphing Object (star).
- Inspect the skull case to the right (I), you do not have the right tool to collect the piece of amber yet.
- Take the LOCOMOTIVE toy (H) and enter the Hidden Object Scene (J).
- Use the pliers on the nail (1).
- Use the nipple on the bottle (2) and the spray paint on the duck (3).
- You will receive the SCISSORS.

- Return downstairs and go to the right of the morgue.
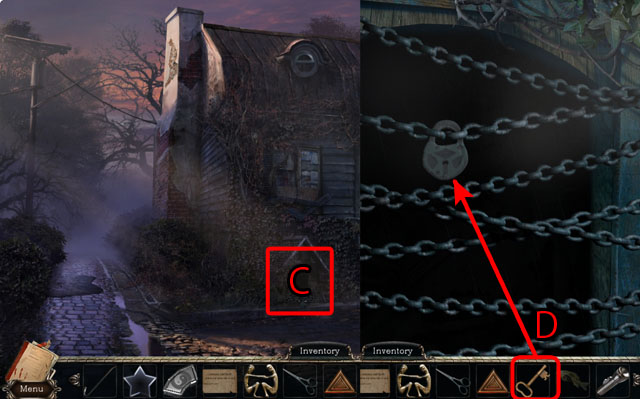
- Use the MAGNET to open the door (K).
- Arrange the skulls in order from heaviest to lightest, left to right.
- Put the skulls on the scale to figure out which is lighter.
- See the screenshot for the final solution (L).
- After solving the puzzle take the TRIANGLE symbol (M).
- Return to the small house and go to the left once inside.
- Find the Morphing Object (star).
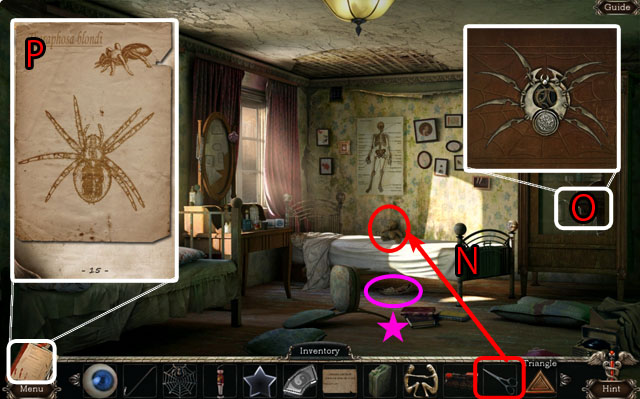
- Use the SCISSORS on the bear to get the CANDY (N).
- Adjust the legs on the spider (O) to match the paper scene previously (P).
- Take the BUTTERFLY.
- Return to the asylum and go up to the second floor on the elevator.
- Inspect the first door on the right (Q).
- Use the CANDY, EYE and SOLDIER on the correct holes in the door (R).
- Enter to the door to the next room.
- Use the LOCOMOTIVE on the track (S).
- Inspect the toy and take the TOY KEY (T).
- Exit the asylum again and go back to where the license plate was on the ground.
- Zoom in on the grate (U).
- Use the CROWBAR to pry off the grate (V) and take the FISH (W).
- Return to the inside of the asylum and go upstairs. Enter the room on the left.
- Play the Hidden Object Scene (X).
- Find all of the Hidden Objects and receive a BATTERY.
- Exit the asylum and zoom in on the flashlight (A).
- Use the BATTERY on the (B) flashlight and replace the cap to pick it up.
- Go to the right.
- Inspect the doghouse (C) and use the TOY KEY on the lock (D).
- Use the FLASHLIGHT to inspect the interior.
- Pick up the MATCHBOOK (E), inspect the dog tag (F), take the TWEEZERS (G) and take the BALLOON (H).
- Return to the previous room inside the asylum.
- Zoom in on the skull, and use the TWEEZERS to take the AMBER (I).

- Exit the asylum and go to right. Go through the alley and enter the shed.
- Enter the Hidden Object Scene (J).
- Find all of the hidden objects and receive the CHISEL.
- Zoom in on the tire pump (K).
- Use the BALLOON on the pump and pump it once (L).
- Take the BALLOON and go back to the second floor of the asylum.
- Zoom in on the last door on the right (M).
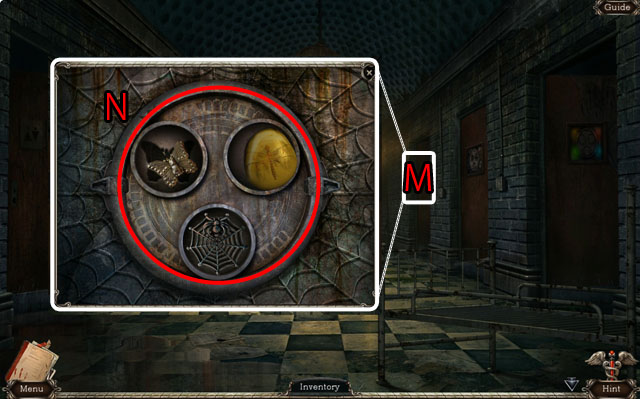
- Use the BUTTERFLY, AMBER, and SPIDERWEB on the door (N) and go through it.
- Take the GLASS CUTTER from the top of the stool (O).
- Inspect the drawing (P) and the spider (Q).
- Go outside to the cemetery.
- Use the MOTH (S) on the spider and take the LADDER (T).
- Use the LADDER to get into the attic (U).
- Use the GLASS CUTTER on the mirror (V) to get the GLASS KEY.
- Take the boiler instructions.
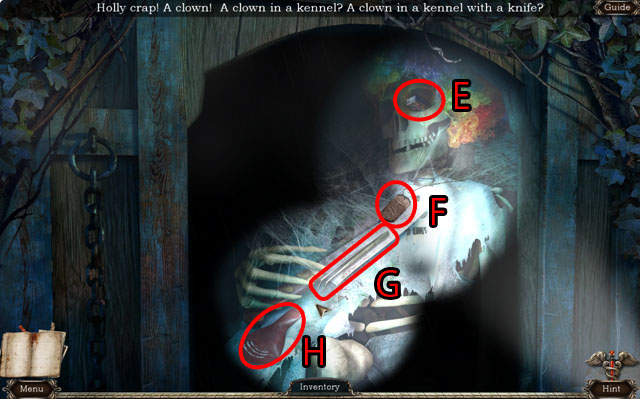
- Inspect the skeleton (W) and take the LOCK PART (X).
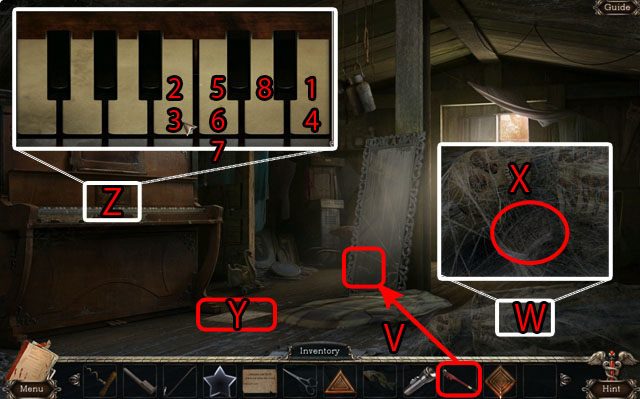
- Zoom in on the keyboard and use the KEY on the blank space (Z).
- A series of notes will play on the piano. Play the notes in the same order.
- The first time will be 5 notes, and then each time after that will add one more note will be added up to a maximum of 8.
- See the screenshot for the correct order (1-8).
- Return to the inside of the asylum and go downstairs. Enter the generator room in the back.
- Zoom in on the generator and follow the instructions in your journal.
- Open the gas tank and use the GAS CONTAINER with it (A).
- Flick the red levers up (B) and the green levers down (C).
- Pull the metal lever once (D) and flick the switch until the darker part is toward the right (E).
- Finally flick the switch to the down position (F) and press the red button (G).
- Return to the second floor and go to the first door on the left.
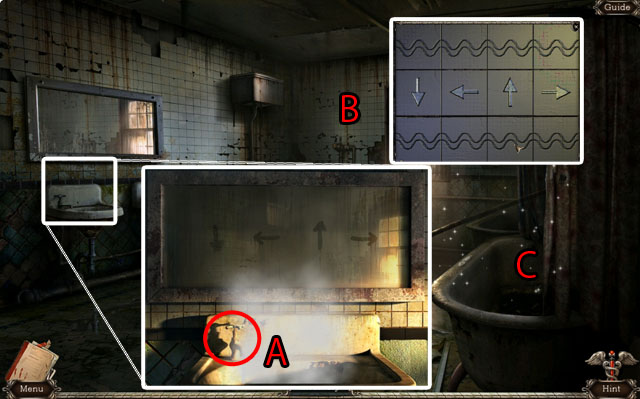
- Zoom in on the sink and turn on the hot water (A) to find a puzzle key.
- Rearrange the puzzle pieces (B) to create the solution in the screenshot.
- Pressing on a tile will rotate it and all of the tiles connected to it; pressing it again will rotate it back in the other direction.
- Take the YIN YANG from behind the puzzle.
- Enter the Hidden Object Scene (C).
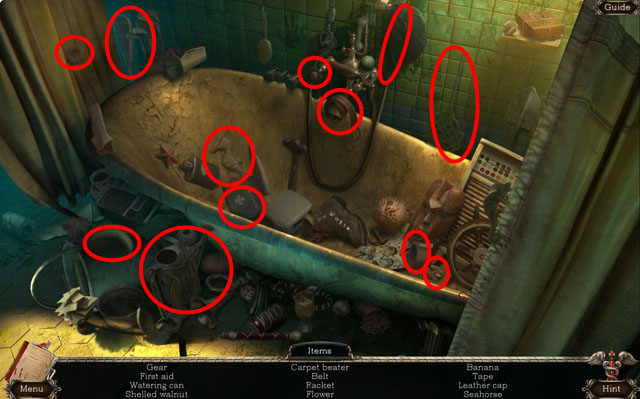
- Find all of the objects and receive the SEAHORSE.
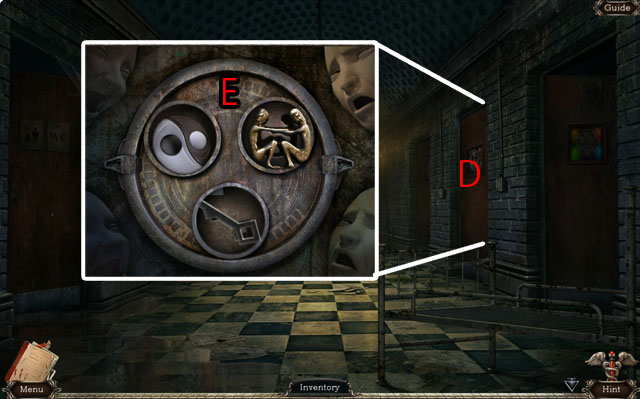
- Exit the room and inspect the 2nd door on the right (D).
- Use the GEMINI, YIN-YANG and the GLASS KEY on the door to open it (E) and go through it.
- Take the HOSE (F).
- Inspect the mirror and use the BACKWARDS NOTE on it to read it (G).
- Leave the asylum and return to the graveyard.
- Use the CHISEL to get the DIAMOND from the gravestone (H).
- Zoom in on the grave (I) and use the HOSE (J) on the faucet.
- Turn the faucet and take the BOAT.
- Enter the Hidden Object Scene (K).
- Collect the Hidden Objects and receive the HANDSAW.
- Return to the 2nd floor and look at the 2nd door on the left (D).
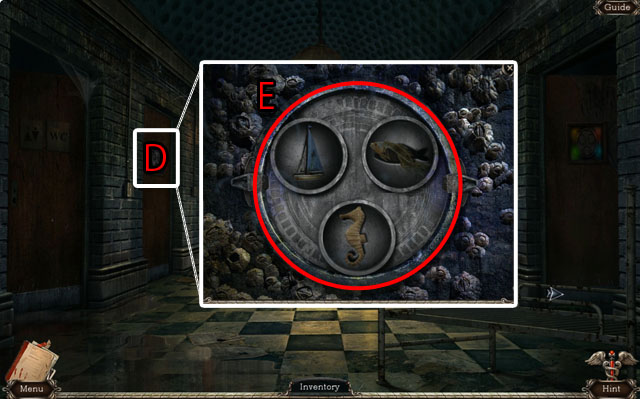
- Place the BOAT, FISH and SEAHORSE in the door holes (E).
- Go through the door.
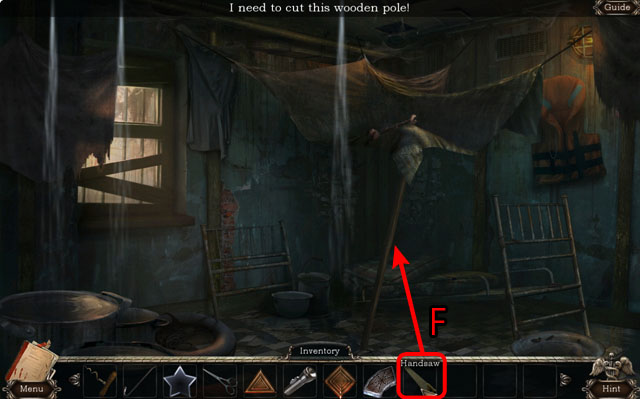
- Use the HANDSAW on the pole (F) and take the WRENCH.
- Return to the 1st floor and go downstairs into the basement.
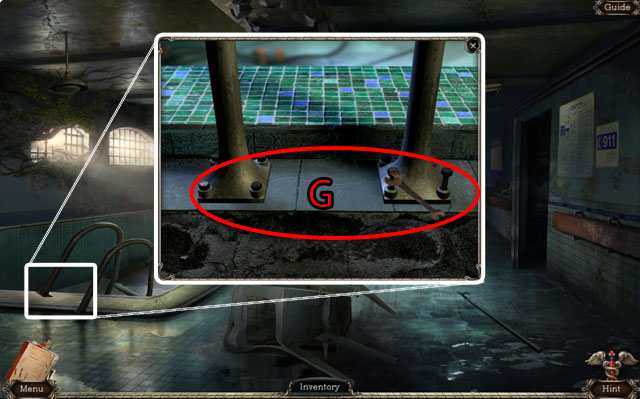
- Zoom in on the pool and use the WRENCH to put on the bolts (G).
- Pick up the bolts and place them in the holes first, then use the WRENCH.
- Go down into the pool.
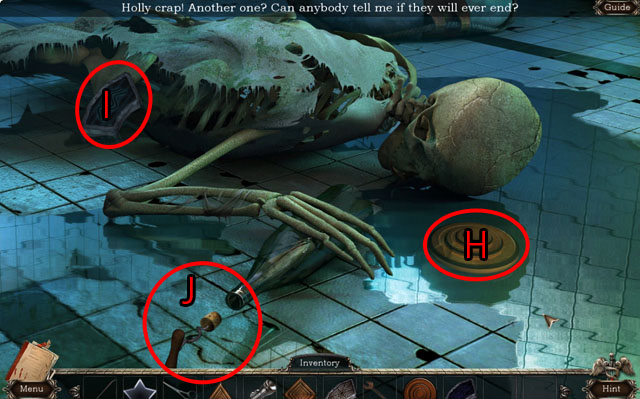
- Take the CIRCLE (H) and the LOCK PIECE (I).
- Use the CORKSCREW to uncork the bottle and read the note (J).
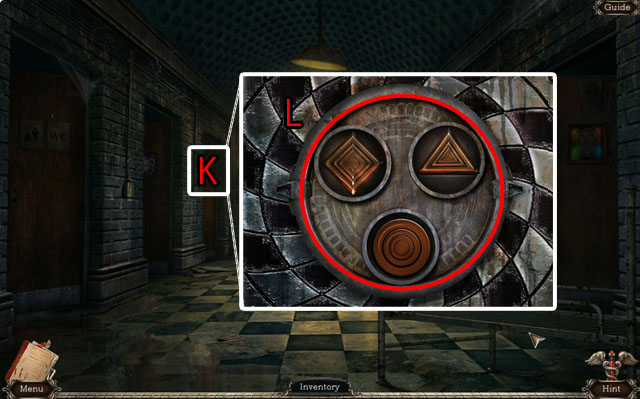
- Return to the 2nd floor and open the last door on the left (K).
- Use the CIRCLE, TRIANGLE, and DIAMOND on the holes (L). Enter the door.
- Use the SCISSORS on the pillow (N) and take the KEY.
- Take the CANDLE (M).
- Inspect the ring on the wall (O).
- In this mini-game you need to move the ring from the top left to the bottom right following the path (1).
- Pick up the key and follow the path with your mouse until the end. If you go too far away from the line and the ring touches the edge you will have to start over.
- Use the two SKELETON KEYS on the locked chests (P).
- Zoom in on the puzzle to the right (Q).
- Move the pieces in order to get the key out of the space to the right side.
- Follow the steps in the screenshot (1-12) by moving the highlighted tiles.
- Take the SKELETON KEY.
- Unlock the last chest and take the LOCK PART (R).
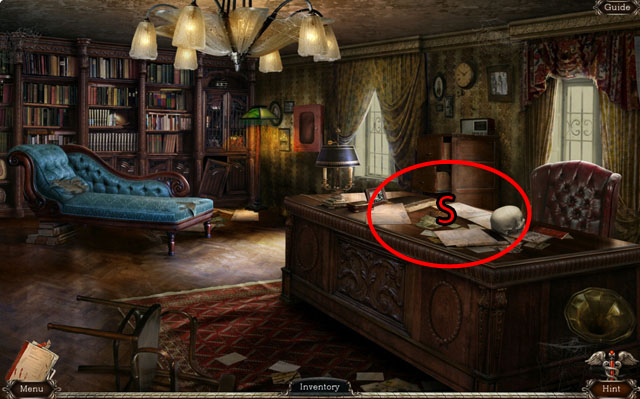
- Return to the 1st floor upstairs and enter the desk Hidden Object Scene (S).
- Find all of the Hidden Objects and receive the INSULATING TAPE.
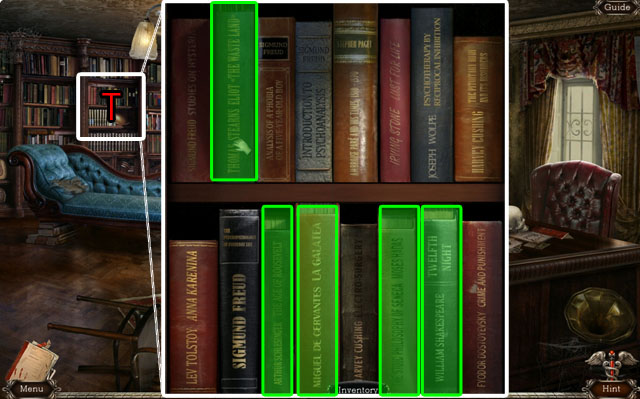
- Zoom into bookcase and pull on all of the books that you have found throughout the game (T).
- Go through the opened case.
- Inspect the sun shape on the floor (U).
- Use the CANDLE on the sun shape and take the SUN that is formed.
- Zoom in on the base of the chair (W). Use the WRENCH to move the chair (X).
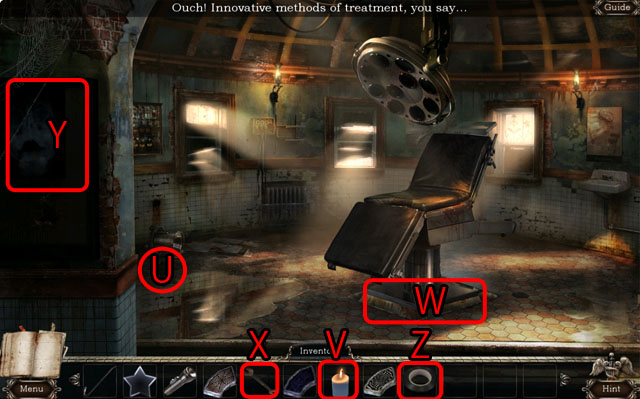
- Zoom into the X-ray on the left (Y) and use the INSULATING TAPE to fix the wires (Z).
- Inspect the number in the X-ray.
- Exit the room and go back once more.
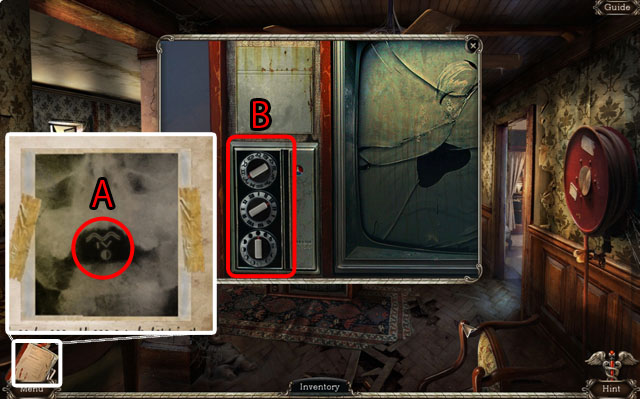
- Zoom in on the TV (B) and put in the code from the X-ray (A).
- Press the 3 dials to line them up and take the LAMP once finished.

- Return to the 2nd floor and zoom in on the door in the back (C).
- Use the CROWBAR on the boards on the window (E).
- Take the 2 BOARDS from the ground.
- Take the UV LAMP (F), read the map (G) and take the LEVEL (H).
- Look through the window and then go forward (I).
Chapter 5: Diffuse the Bomb
- Exit the asylum and enter the Hidden Object Scene (J).
- Find all of the objects and receive the NAILS.
- Move to the fountain outside and zoom in on the tree (K).
- Use the BOARDS and then the NAILS to make a ladder (L).
- Enter the asylum and go to the stairs. Enter the Hidden Object Scene there (M).
- Find all of the Hidden Objects to receive the HAMMER.
- Return to the tree (O) and use the HAMMER to hit in the nails (N).
- Enter the tree.
- Take the ROPE (R) and the LOCK PART (Q).
- Return to the secret room and use the ROPE to go through the hatch on the floor (S).
- Zoom in on the bomb (T) and take the NEWSPAPER (U).
- Turn off the lights (V) and use the BLACK LIGHT to find the domino piece clue (W).
- Remove the skeleton’s HAND and pick it up off the floor (X).
- Return to the outside of the asylum and use the NEWSPAPER PIECE with the newspaper on the ground (A).
- Go back one scene.
- Use all of the LOCK PIECES and the SKELETON HAND on the lock (B).
- Find the Morphing Object (star).
- Zoom in on the fuse box (C) and set it up to match the domino found with the black light (D).
- Take the PATTERN from the drawer (F).
- Zoom in on the computer (E).

- Enter the badge number password: 8497 (G).

- Use the PATTERN on the screen (H).
- Get the correct pattern to diffuse the bomb (I).
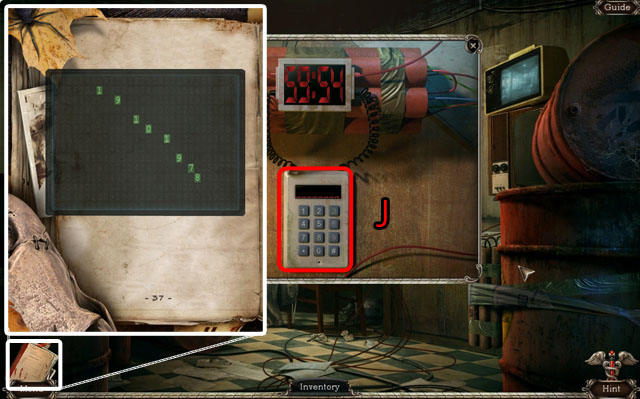
- Return to the bomb room and input the pattern (J).
- Back away as fast as you can until you are outside the asylum.
- Congratulations, you have completed Abandoned: Chestnut Lodge!
Created at: 2012-04-28