

Walkthrough Menu
- General Tips
- Chapter One
- Chapter Two
- Chapter Three
- Chapter Four
- Chapter Five
- Chapter Six
- Chapter Seven
- Chapter Eight
- Chapter Nine
- Chapter Ten
- Chapter Eleven
General Tips

- There are 3 modes in this game: TIMED, CAREFREE, and FIND ALL. TIMED mode sets a time limit for each chapter, and CAREFREE lets you play at your own leisure. FIND ALL mode is unlocked after you complete the main story.
- You can choose between TIMED and CAREFREE mode at any time during the main story in the options menu. If you run out of time you will have to start from the beginning of the chapter again.
- Items displayed in a highlighted text are KEY ITEMS. These items must be found in a descending order (relevant to their positions on the item list).
- You will receive 3 HINTS at the beginning of each chapter (if you have less than 3 HINTS saved up). You will gain an extra HINT for every 3 items found in rapid succession. HINTS will replenish over time if you have less than 3 available.
- Random clicking has a different consequence in each game mode. In TIMED mode you will lose 30 seconds instantly. In CAREFREE mode your mouse will spiral out of control. And in FIND ALL mode you will Lose 1 hint.
- The MAP button allows you to exit a scene and return to the World map.
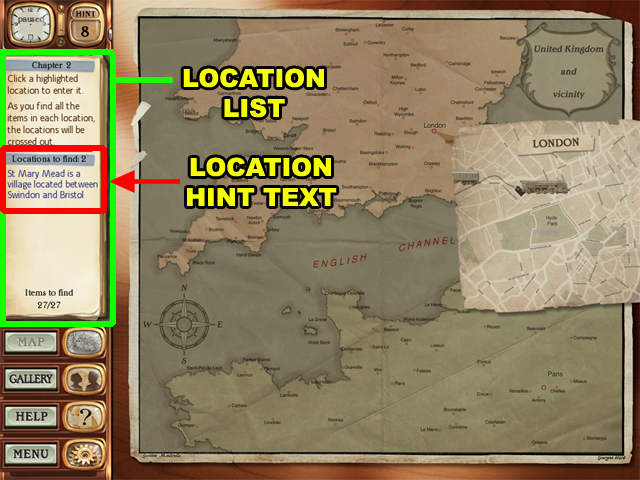
- Sometimes you will have to find new locations on the World map. Use the highlighted hint texts to guide you to each location. You can also use your HINTS to find new locations.
- After discovering a location it will remain visible until the game is complete. You can only enter the locations listed on the location list.
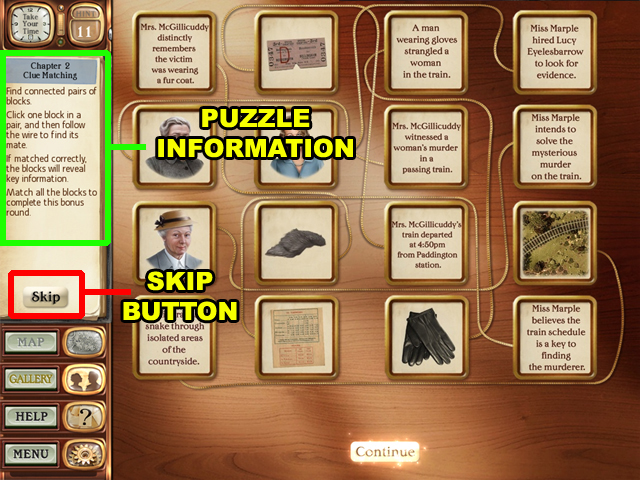
- Bonus puzzles can be skipped at anytime by clicking on the skip button in the left panel. However, you will receive an extra HINT if you complete it.
- HINTS will not work in these scenes but there is information about the puzzle in the left panel.
Chapter One
Train Carriage
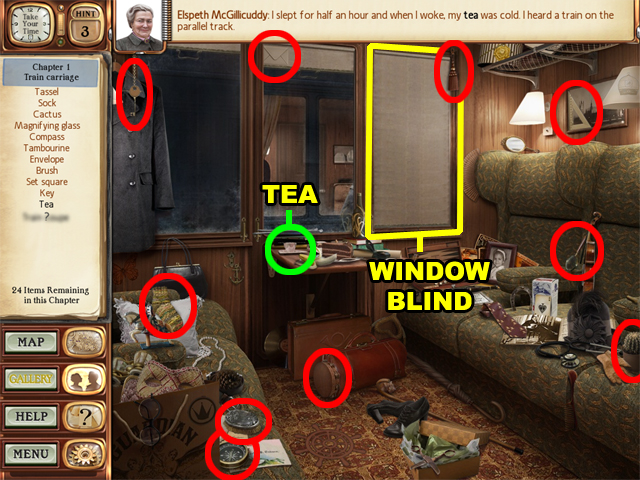
- Enter the Train Carriage location (highlighted on the World map) to arrive at this scene.
- Collect the normal items before collecting the KEY ITEMS. Not everyone will receive the same normal items.
- Collect the TEA to reveal the blurred KEY ITEM on the list.
- Collect the WINDOW BLIND afterwards to complete this scene.
World Map
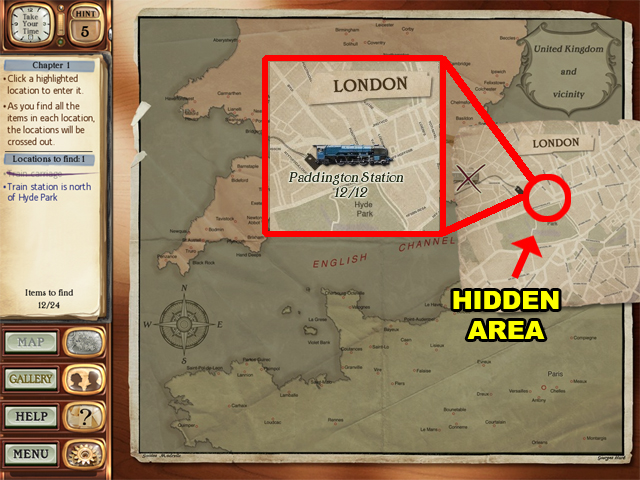
- This time you will have to find the next location manually.
- Locate the Paddington Station above Hyde Park and then enter it.
Paddington Station
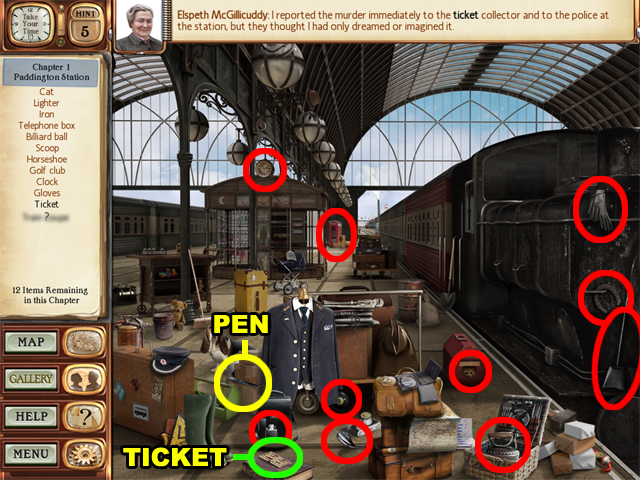
- From now on you will not have to collect the normal items before the KEY ITEMS.
- Collect the TICKET near the lower left corner to reveal the PEN item.
- Collect the PEN beside the suit to complete this scene.
Rummage
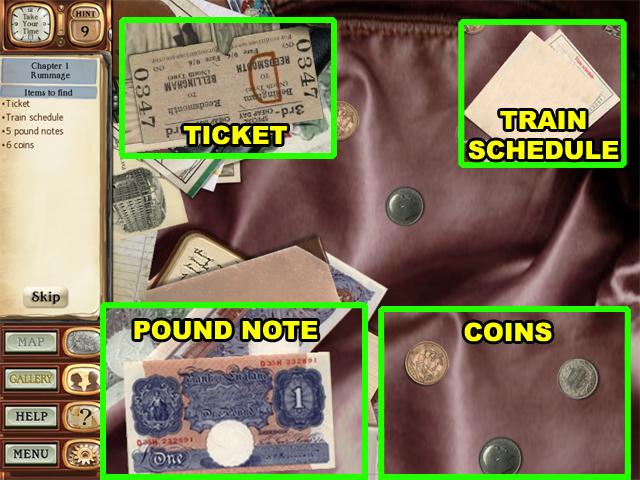
- Drag the items around until you find the 4 varieties of the listed items. Hold the left mouse-button to drag an item.
- This screenshot displays each of the 4 kinds of items. Collect these items to complete this chapter.
Chapter Two
World Map
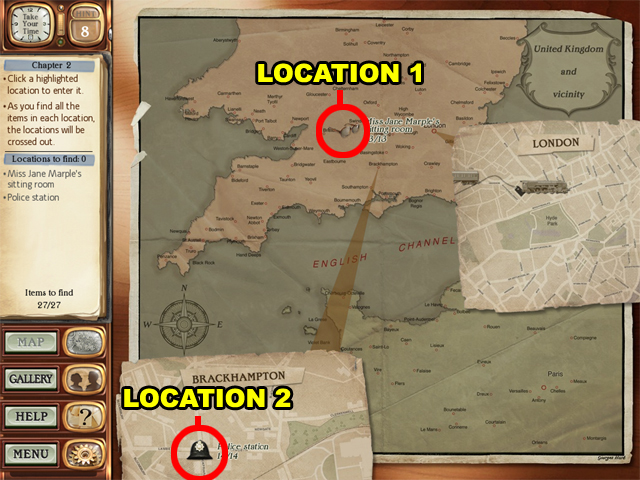
- Locate the 1st location above the center of the World map. Afterwards, a smaller map will appear at the bottom of this screen.
- Locate the 2nd location on the Brackhampton map.
- Enter Miss Jane Marple’s Sitting Room first.
Miss Jane Marple’s Sitting Room
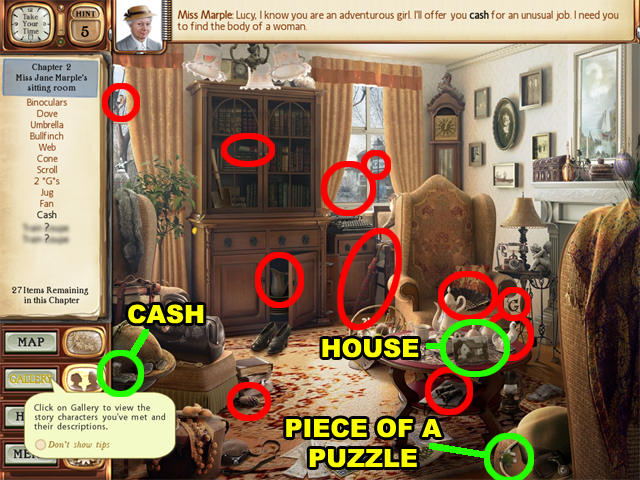
- Collect the normal items first.
- Collect the CASH item in the lower left corner.
- Collect the HOUSE item on the table afterwards.
- Collect the PIECE OF A PUZZLE item near the lower right corner to complete this chapter.
- Enter the Police Station afterwards.
Police Station
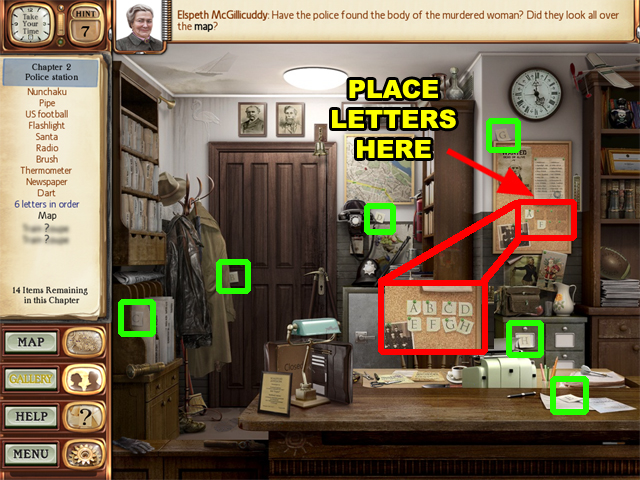
- Drag and drop the 6 LETTERS into their proper silhouettes on the poster board. The LETTERS are highlighted in green.
- The letters should be placed into the silhouettes in alphabetical order (“A” through “H”). Afterwards the 6 LETTERS IN ORDER will be crossed off of the list.

- Collect the MAP on the wall.
- Collect the TRAIN above the where the MAP was.
- Collect the “CLOSED” FILE on the left side of the desk to complete this scene.
Clue Matching
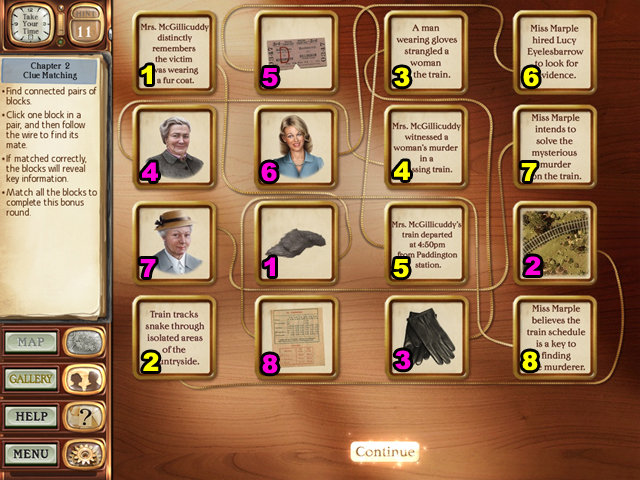
- Pair the cards which are linked by a common wire.
- The cards in this screenshot have been numbered to match their corresponding cards. Pair the cards with matching numbers to locate the correct pairs.
- Although the contents of the blocks are random, the wire connections are always the same.
- Complete this puzzle to complete this chapter.
Chapter Three
World Map
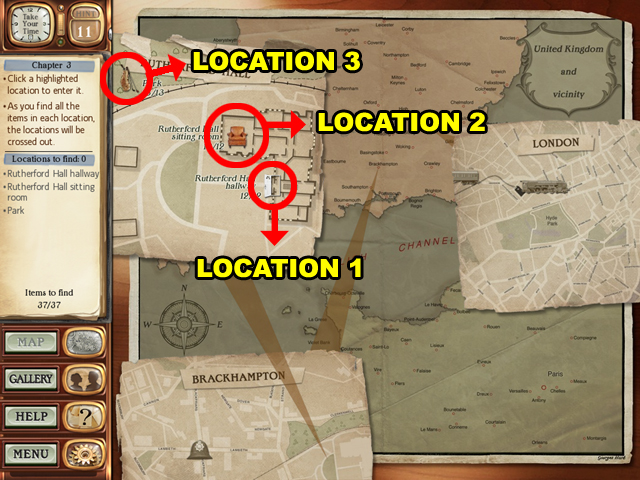
- Locate the 3 locations hidden on the Rutherford Hall map.
- Enter the Rutherford Hall Hallway afterwards.
Rutherford Hall Hallway
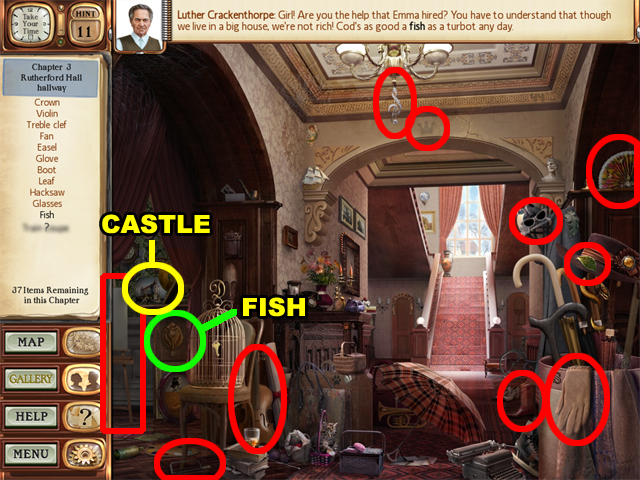
- Collect the FISH item above the lower left corner.
- Collect the CASTLE item above the lower left corner as well.
- Enter the Rutherford Hall Sitting Room after completing this scene.
Rutherford Hall Sitting Room
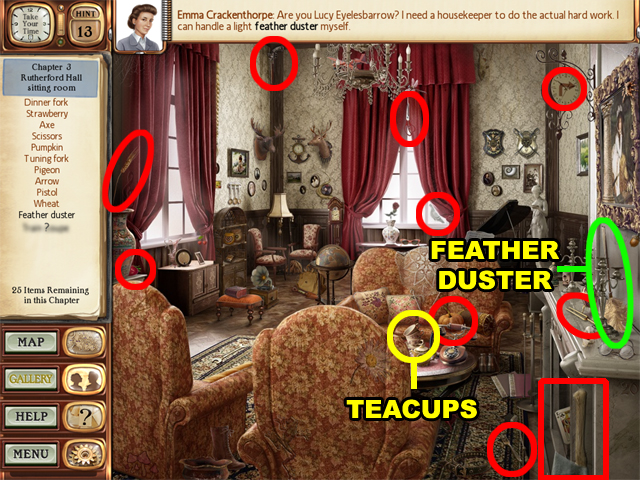
- Collect the FEATHER DUSTER above the fireplace.
- Collect the TEACUPS on the table afterwards.
- Visit the Park location next.
Park
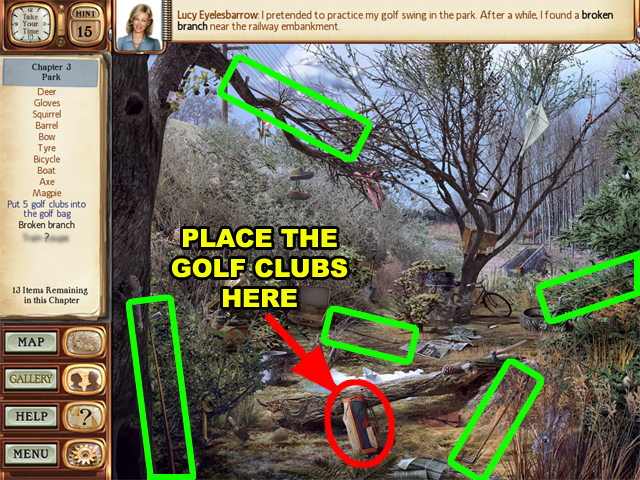
- Drag and drop the 5 GOLF CLUBS into the GOLF BAG. The GOLF CLUBS are highlighted in green.
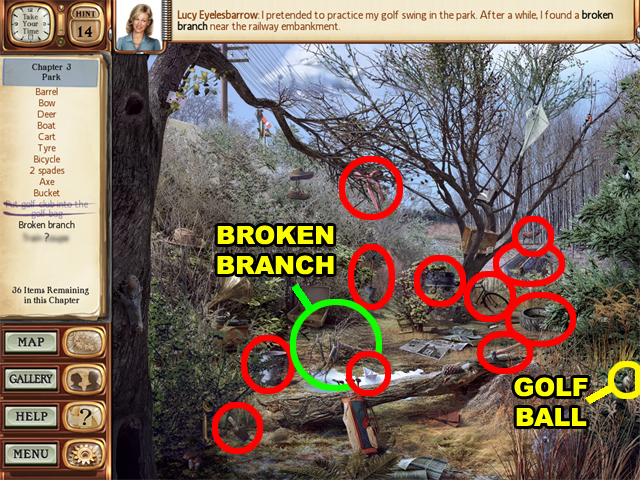
- Collect the BROKEN BRANCH near the center of this scene.
- Collect the GOLF BALL above the lower right corner to complete this scene.
Rummage

- Rummage through everything until the hidden items are found.
- Complete this puzzle to conclude this chapter.
Chapter Four
World Map
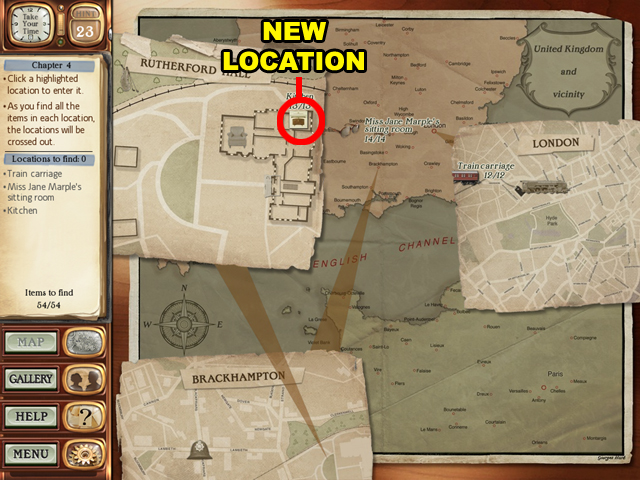
- Find the new location on the Rutherford Hall map.
- Visit the Train Carriage location first.
Train Carriage
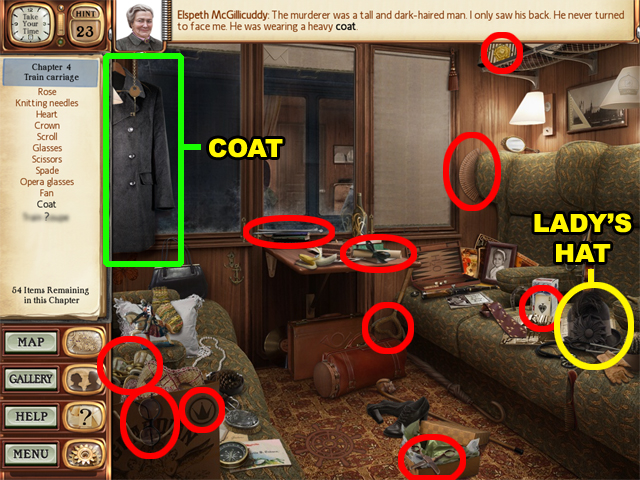
- Collect the COAT in the upper left corner.
- Collect the LADY’S HAT above the lower right corner afterwards.
- Enter Miss Jane Marple’s Sitting Room after finding all of the items.
Miss Jane Marple’s Sitting Room
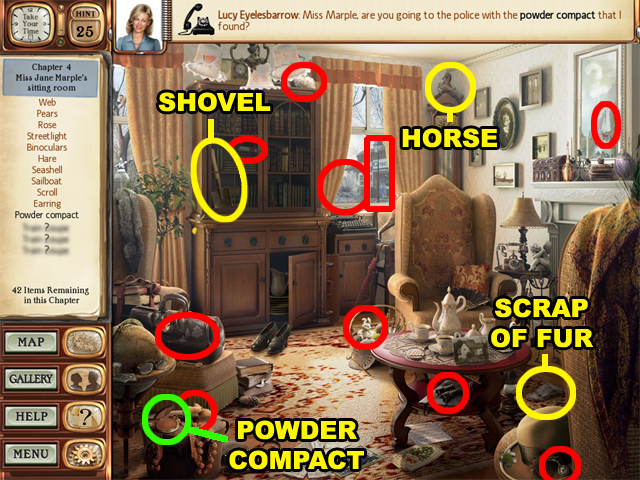
- Collect the POWDER COMPACT in the lower left corner.
- Collect the SCRAP OF FUR above the lower right corner.
- Collect the SHOVEL in the bookcase.
- Collect the HORSE above the chair in the center of this room.
- Visit the Kitchen location after completing this scene.
Kitchen
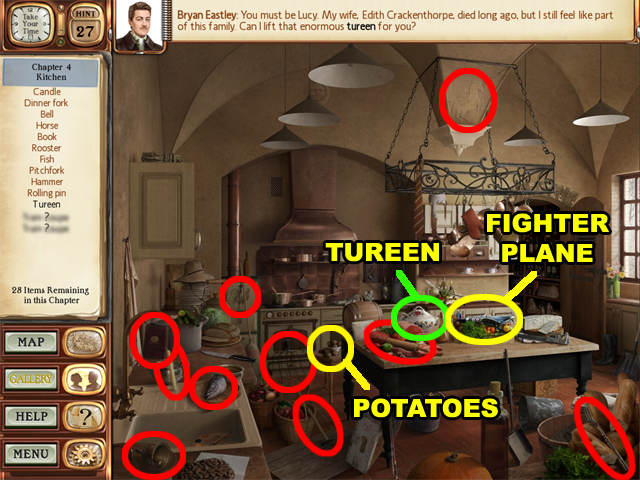
- Collect the TUREEN on the table.
- Collect the POTATOES to the left of the table.
- Collect the FIGHTER PLANE on the table.
- After completing this scene you will be taken to the map screen.
World Map
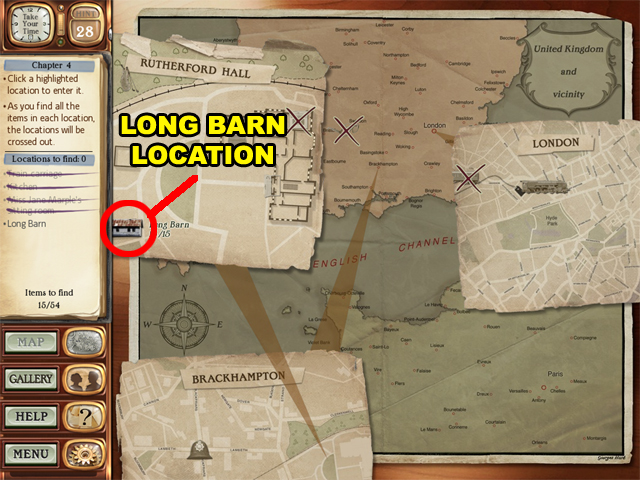
- Locate the Long Barn location on the Rutherford Hall map and enter it.
Long Barn
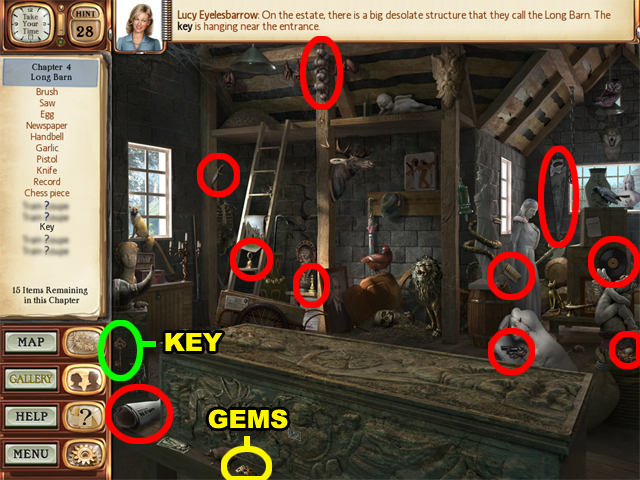
- Collect the KEY above the lower left corner.
- Collect the GEMS to the right of the lower left corner.
- Be sure to collect all of the normal items before trying to move on.
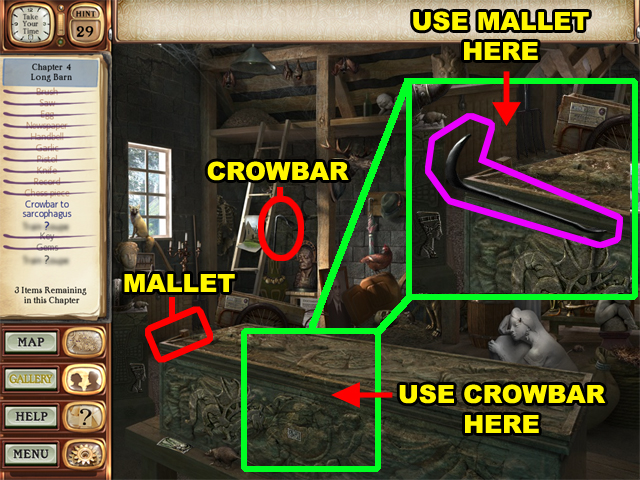
- Use the CROWBAR on the SARCOPHAGUS below the center of this scene.
- Use the MALLET on the CROWBAR to open the SARCOPHAGUS.

- Collect the COAT in the sarcophagus.
Clue Matching
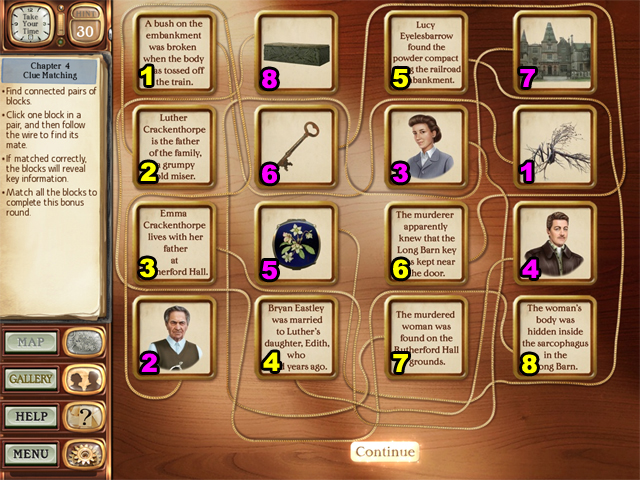
- Pair the blocks with matching numbers to complete this chapter.
Chapter Five
World Map
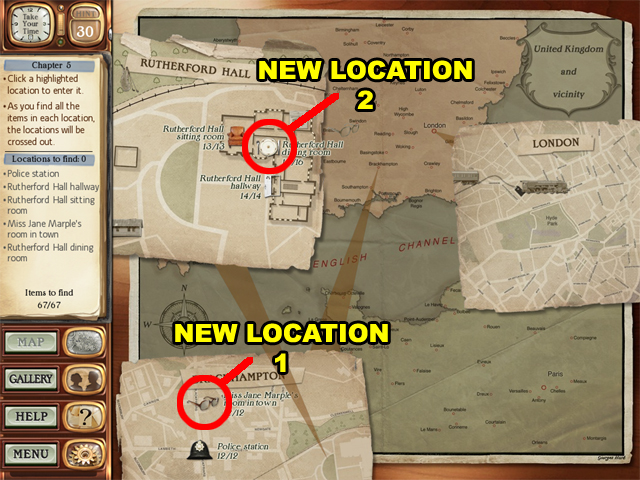
- Find the new locations on the Brackhampton and Rutherford Hall maps.
- Enter the Police Station location first.
Police Station
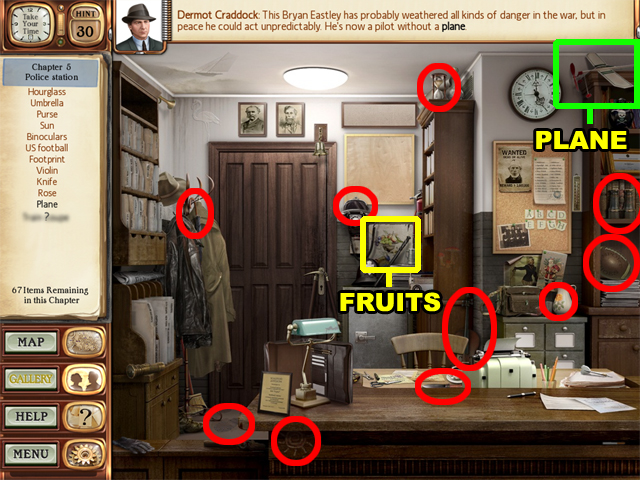
- Collect the PLANE in the upper right corner.
- Collect the FRUITS in the center of this scene afterwards.
- Enter the Rutherford Hall Hallway after this scene is complete.
Rutherford Hall Hallway
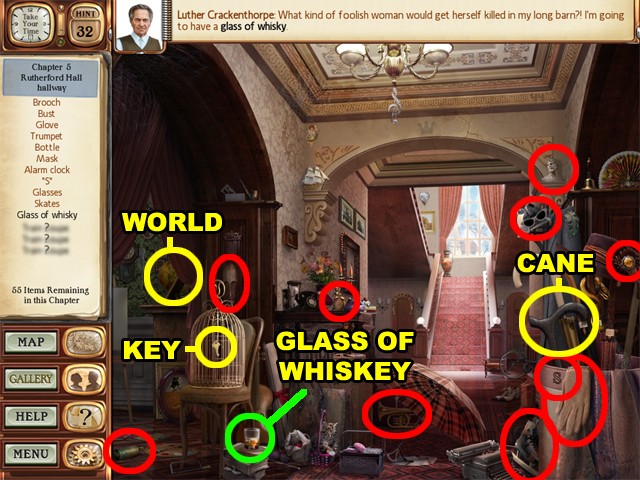
- Collect the GLASS OF WHISKEY near the lower left corner.
- Collect the CANE above the lower right corner next.
- Collect the WORLD above the lower left corner.
- Collect the KEY on the birdcage near the lower left corner.
- Visit the Rutherford Hall Sitting Room after completion.
Rutherford Hall Sitting Room

- Collect the FAMILY PORTRAIT above the piano.
- Collect the MUSHROOMS in the lower left corner afterwards.
- Collect the POISON on the fireplace.
- Enter Miss Jane Marple’s Room in Town afterwards.
Miss Jane Marple’s Room In Town

- Collect the BRACELET on the white cat at the bottom of this scene.
- Collect the DANCER on the fireplace afterwards.
- Go to Rutherford Hall Dining Room after this scene is complete.
Rutherford Hall Dining Room
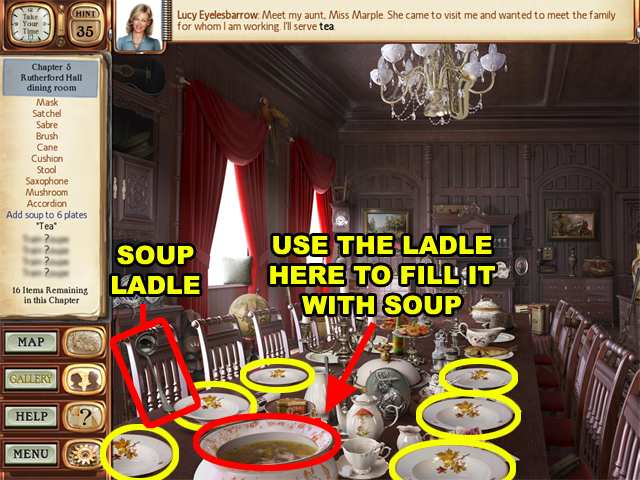
- Use the SOUP LADLE to take soup out of the soup container. Both of these items are located near the lower left corner.
- Then use the filled SOUP LADLE to pour soup into an empty plate. The empty plates are highlighted in yellow.
- Repeat this process until all 6 plates are filled with soup.
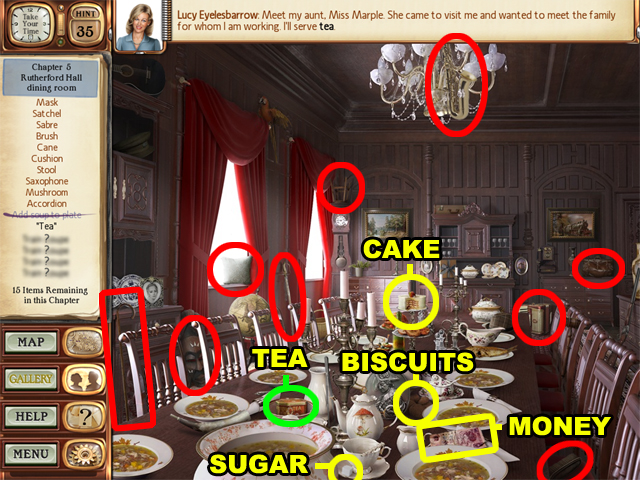
- Collect the TEA above the soup container.
- Collect the CAKE in the center of this scene.
- Collect the BISCUITS below the center of this scene.
- Collect the SUGAR at the bottom of this scene.
- Collect the MONEY in the lower right corner.
Find The Poison
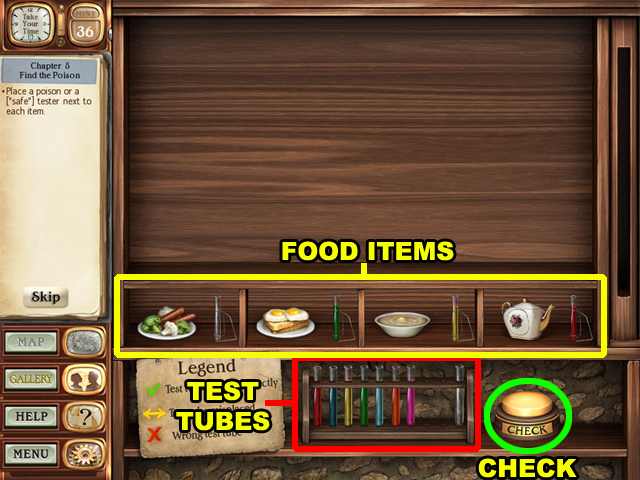
- Place the test tubes beside their correct food to complete this puzzle.
- After a tube has been placed beside each food item, click on the “check” button to see if you guessed correctly.
- Afterwards a sign will appear by each of the food items with a special indication.
- A checkmark means that you guessed correctly. A two-way arrow means that the tube belongs to different food item. And an “X” means that the test tube does not belong to any of the food items.
- The solution for this puzzle is always random.
Chapter Six
World Map
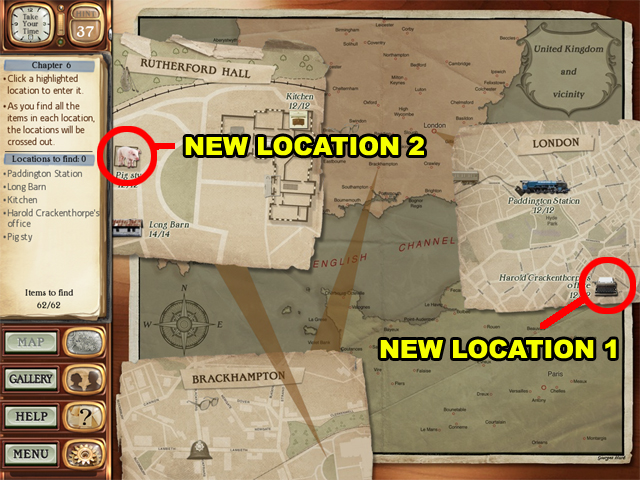
- Find the new locations on the London and Rutherford Hall maps.
- Visit the Paddington Station first.
Paddington Station
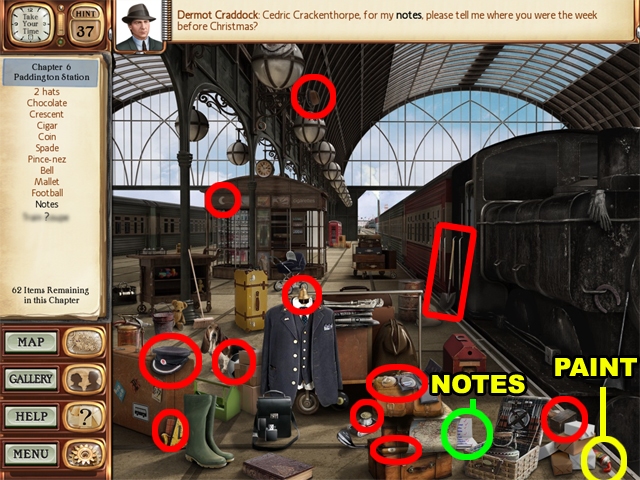
- Collect the NOTES to the left of the lower right corner.
- Collect the PAINT in the lower right corner.
- Visit the Long Barn location next.
Long Barn
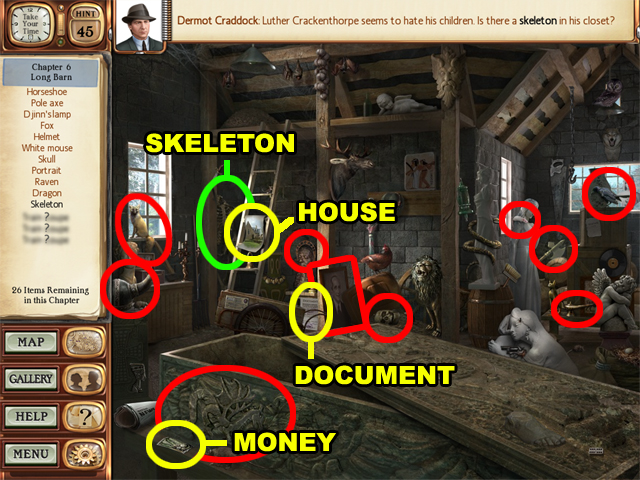
- Collect the SKELETON beside the ladder.
- Collect the MONEY in the lower left corner.
- Collect the HOUSE on the ladder.
- Collect the DOCUMENT to the left of the center of this scene.
- Go to the Pig Sty location afterwards.
Pig Sty
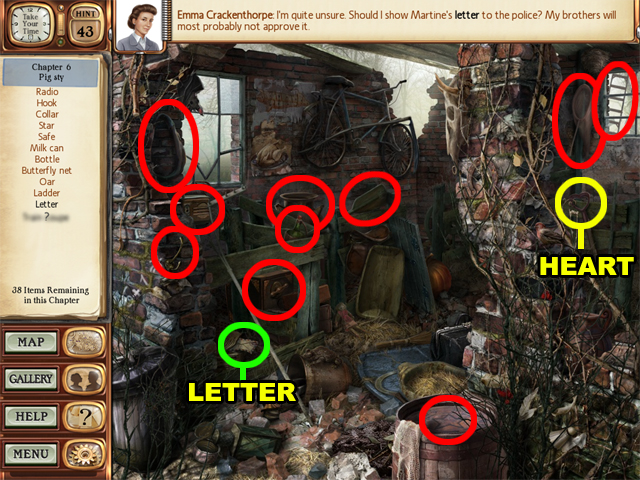
- Collect the LETTER near the lower left corner.
- Collect the HEART below the upper right corner.
- Head to Harold Crakenthorpe’s Office afterwards.
Harold Crackenthorpe’s Office
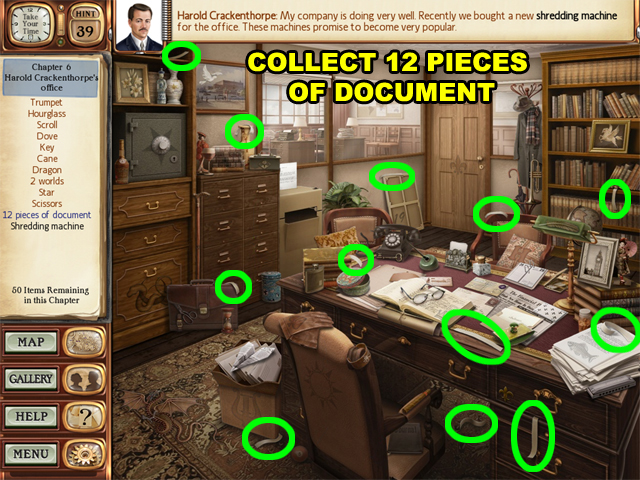
- Collect the 12 PIECES OF DOCUMENT highlighted in green.
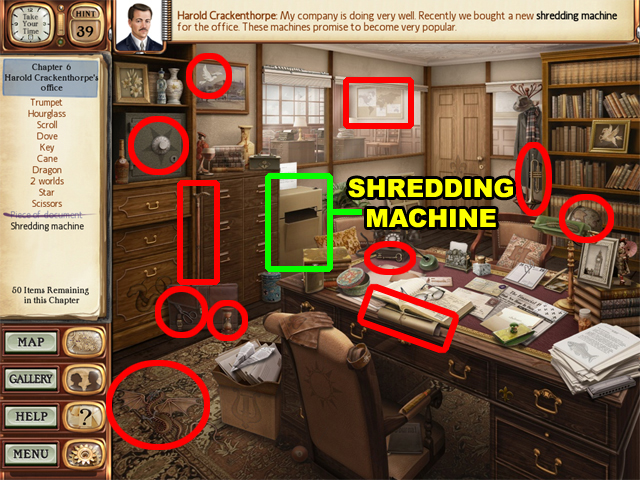
- Collect the SHREDDING MACHINE beside the filing cabinet.
- Enter the Kitchen location afterwards.
Kitchen
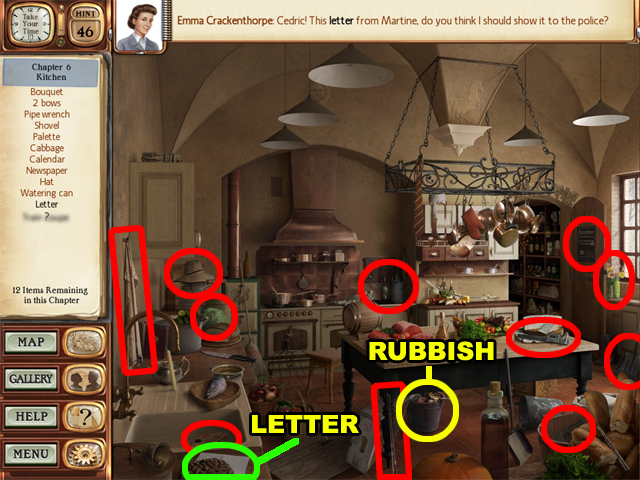
- Collect the LETTER in the lower left corner.
- Collect the RUBBISH under the table.
Shredded Paper
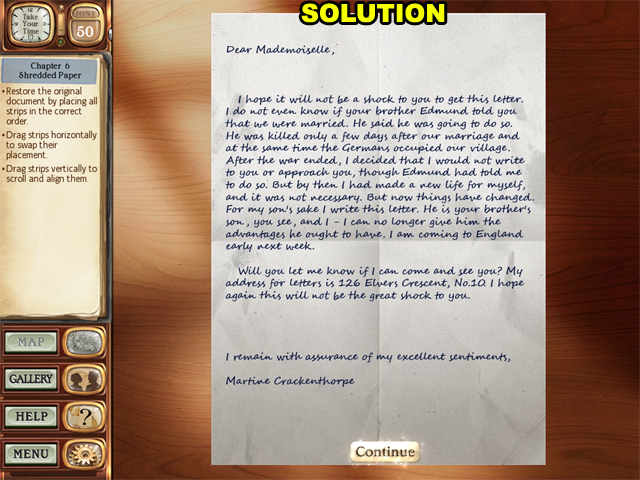
- Align the strips of paper (both vertically and horizontally) until the document is complete.
- Drag the strips upwards and downwards to adjust them vertically or left and right to adjust them horizontally.
- When a strip is in its correct position it will darken and lock into place.
- The first few lines of the letter are as follows:Dear Mademoiselle, I hope it will not be a shock to you to get this letter. I do not even know if your brother Edmund told you that we were married. He said he was going to do so.
- It is best to align the strips from left to right. Beginning with the word “Dear” is the best option.
Chapter Seven
World Map
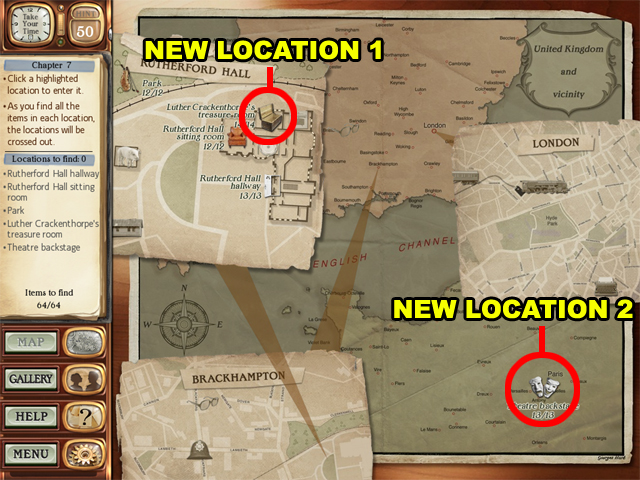
- Find the new locations on the World and Rutherford Hall maps. The location on the World map is located in the lower right corner.
- Enter the Rutherford Hall Hallway first.
Rutherford Hall Hallway
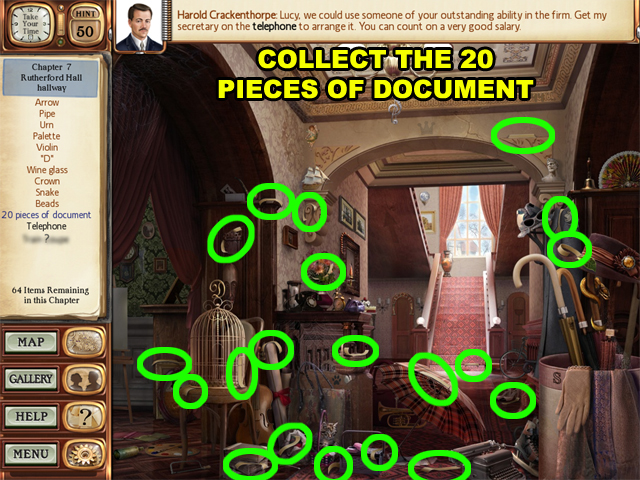
- Collect the 20 PIECES OF DOCUMENT highlighted in green.

- Collect the TELEPHONE on the table near the center of this scene.
- Collect the TYPEWRITER near the lower right corner.
- Afterwards, go to the Rutherford Hall Sitting Room.
Rutherford Hall Sitting Room
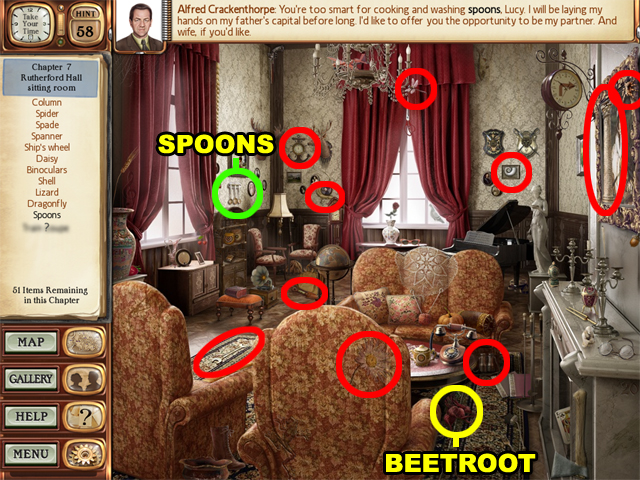
- Collect the SPOONS on the wall beside the left window in the room.
- Collect the BEETROOT under the coffee table.
- Visit the Park location next.
Park
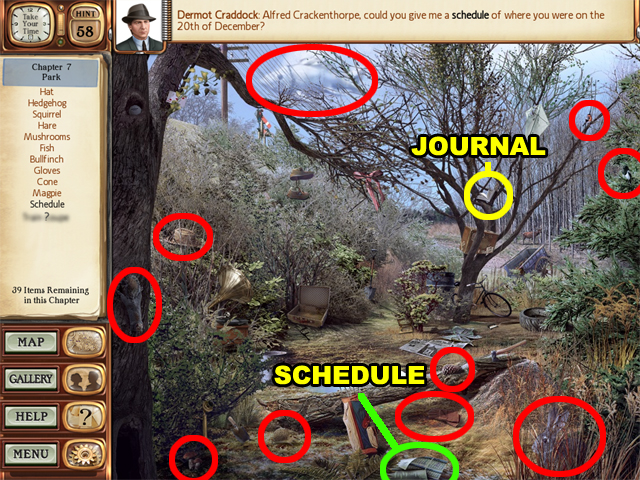
- Collect the SCHEDULE at the bottom of this scene.
- Collect the JOURNAL in the tree near the center of this scene.
- Visit Luther Crackenthorpe’s Treasure Room next.
Luther Crackenthorpe’s Treasure Room
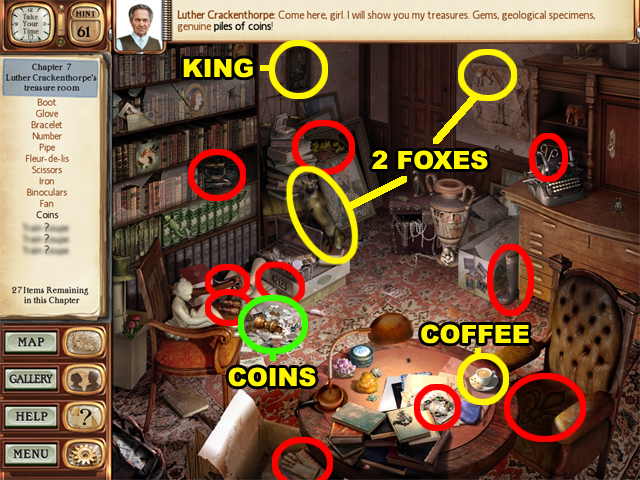
- Collect the COINS to the left of the table.
- Collect the KING to the right of the bookcase.
- Collect the 2 FOXES next. One is above the center, and the other is to the left the center of this room.
- Collect the COFFEE on the table.
- Enter the Theatre Backstage afterwards.
Theatre Backstage
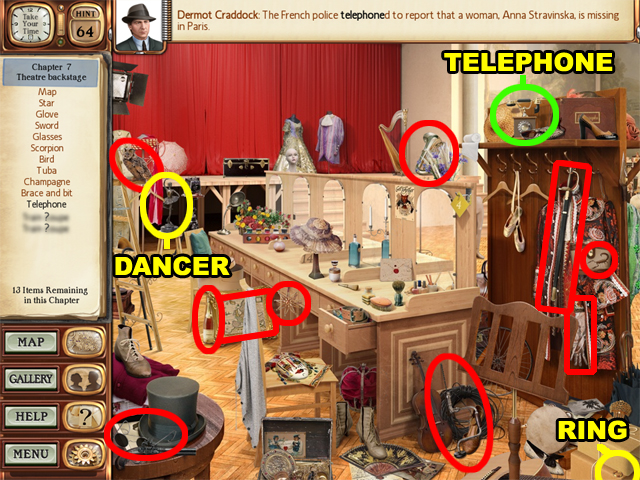
- Collect the TELEPHONE near the upper right corner.
- Collect the DANCER below the upper left corner.
- Collect the RING in the lower right corner.
Shredded Paper
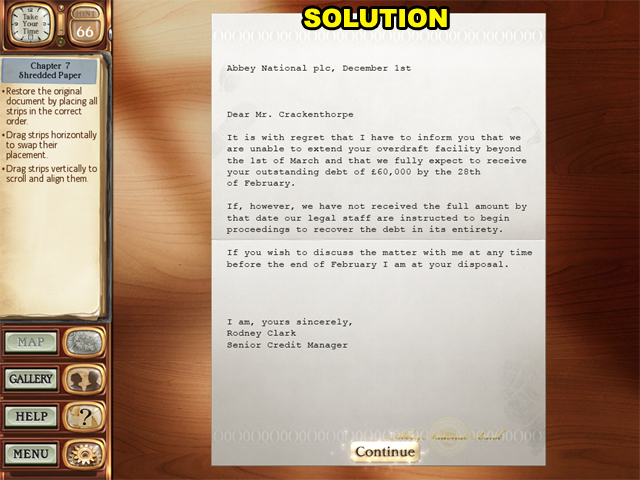
- Align the strips of the document correctly to complete this puzzle.
- The first few lines are as follows:Abbey National plc, December 1stDear Mr. CrackenthorpeIt is with regret that I have to inform you that we are unable to extend your overdraft facility beyond the 1st of March and that we fully expect to receive your outstanding debt of $60,000 by the 28th of February.
- It is best to align the strips from left to right starting with the word “Abbey”.
Chapter Eight
Paddington Station
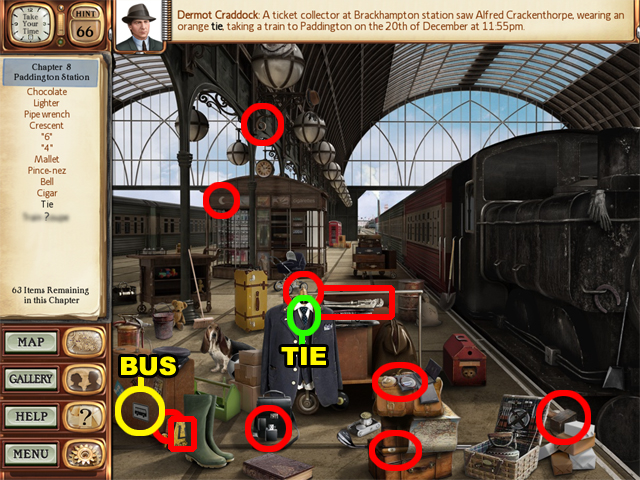
- This time there are no hidden locations, so enter Paddington Station first.
- Collect the TIE on the suit in the center of this scene.
- Collect the BUS in the lower left corner.
- Go to Harold Crackenthorpe’s Office next.
Harold Crackenthorpe’s Office
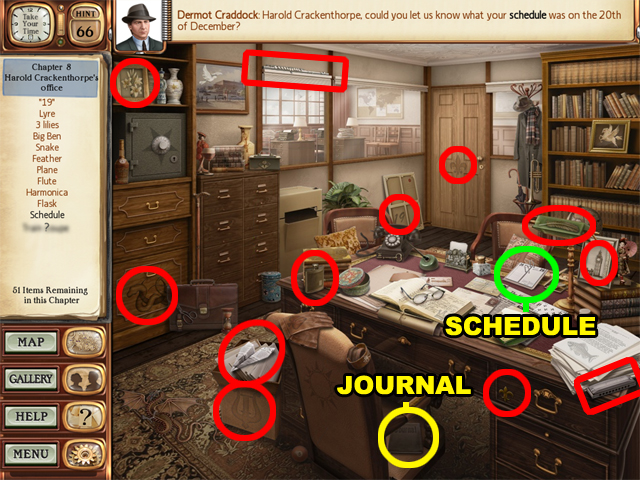
- Collect the SCHEDULE on the desk.
- Collect the JOURNAL on the chair below the desk.
- Visit the Pig Sty location afterwards.
Pig Sty
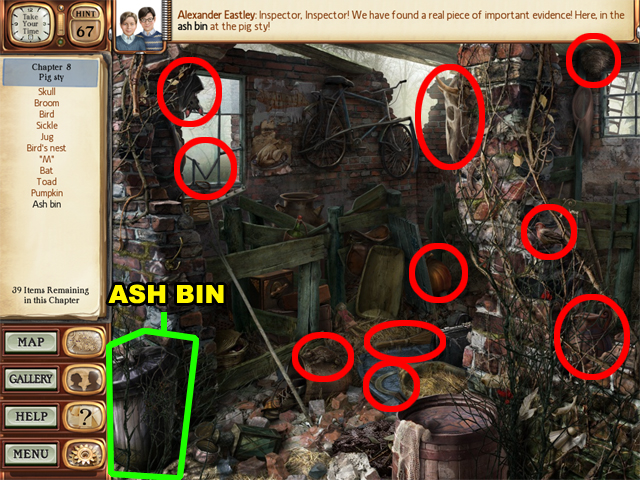
- Collect the ASH BIN in the lower left corner.
- Enter the Kitchen location next.
Kitchen
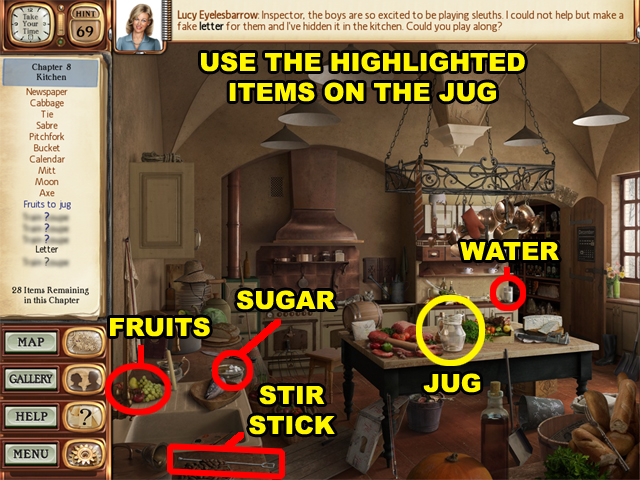
- Place the FRUITS, SUGAR, and WATER into the JUG on the table.
- The FRUITS are located above the lower left corner.
- The SUGAR is located near the lower left corner.
- The WATER is beside the door to the right of this scene.
- Afterwards, use the STIR STICK to stir the cocktail in the JUG. The STIR STICK is located in the lower left corner.
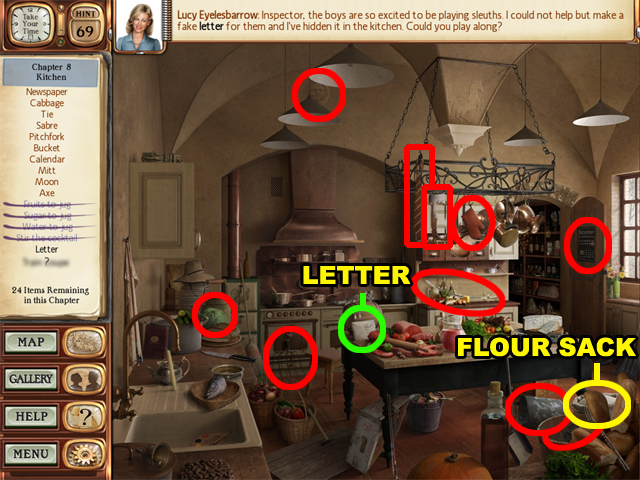
- Collect the LETTER on the table.
- Collect the FLOUR SACK above the lower right corner.
- Go to the Rutherford Hall Dining Room afterwards.
Rutherford Hall Dining Room
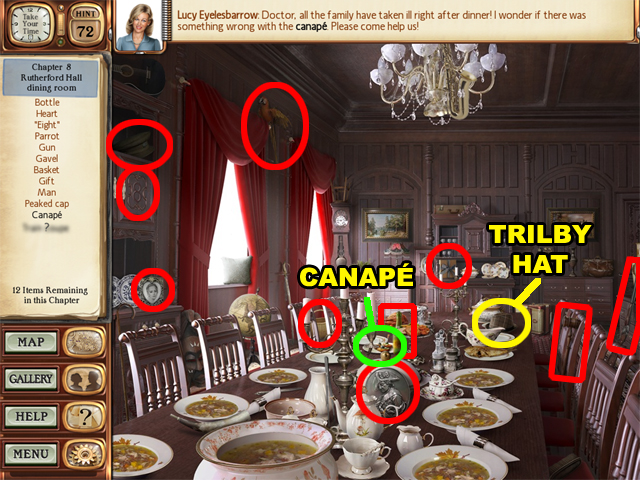
- Collect the CANAPÉ in the center of the table.
- Collect the TRILBY HAT on the table.
Rummage
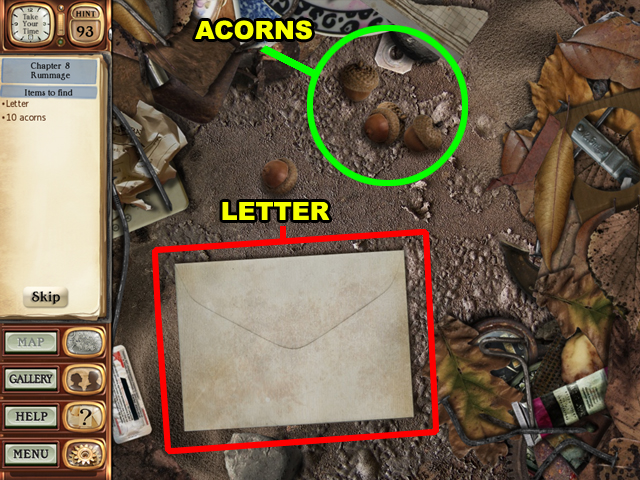
- Collect the LETTER, and 10 ACORNS to advance to the next chapter.
Chapter Nine
World Map

- Locate the new location on the Rutherford Hall map.
- Enter Miss Jane Marple’s Room in Town first.
Miss Jane Marple’s Room In Town
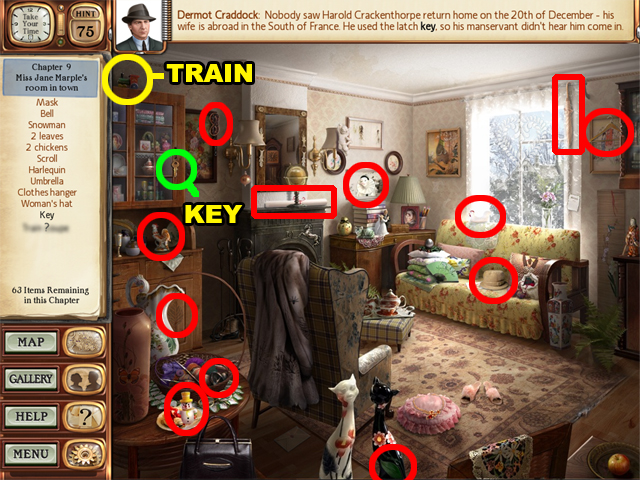
- Collect the KEY on the cupboard door.
- Collect the TRAIN in the upper left corner.
- Visit the Long Barn location next.
Long Barn
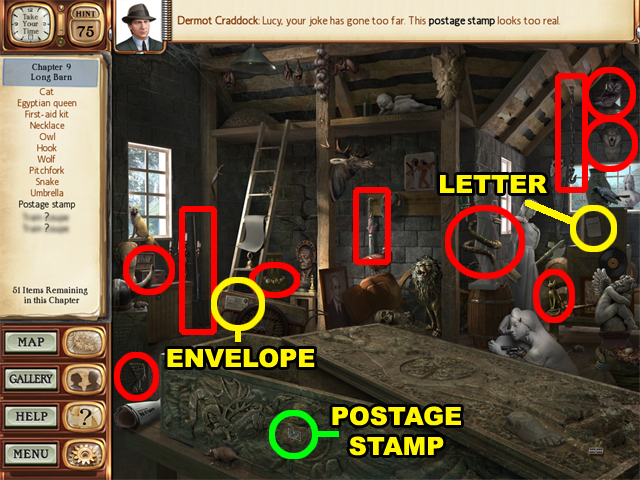
- Collect the POSTAGE STAMP on the sarcophagus.
- Collect the LETTER on the crate below the upper right corner.
- Collect the ENVELOPE below the ladder.
- Go to Luther Crackenthorpe’s Treasure Room afterwards.
Luther Crackenthorpe’s Treasure Room
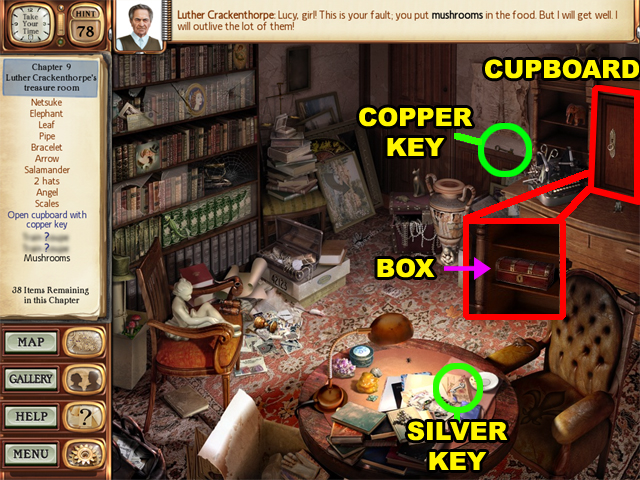
- Use the BRONZE KEY to open the CUPBOARD and reveal the box inside.
- Use the SILVER KEY to open the BOX in the CUPBOARD.
- Collect the GOLD SOVEREIGNS in the BOX.
- The BRONZE KEY is beside the room door, and the SILVER KEY is on the table.
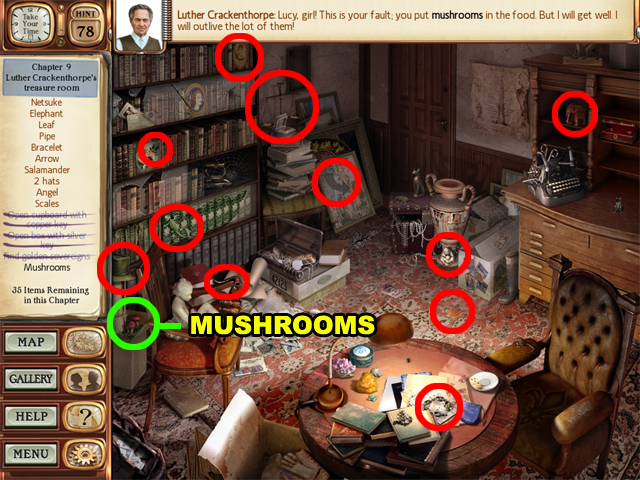
- Collect the MUSHROOMS above the lower left corner.
- Enter the Theatre Backstage location next.
Theatre Backstage
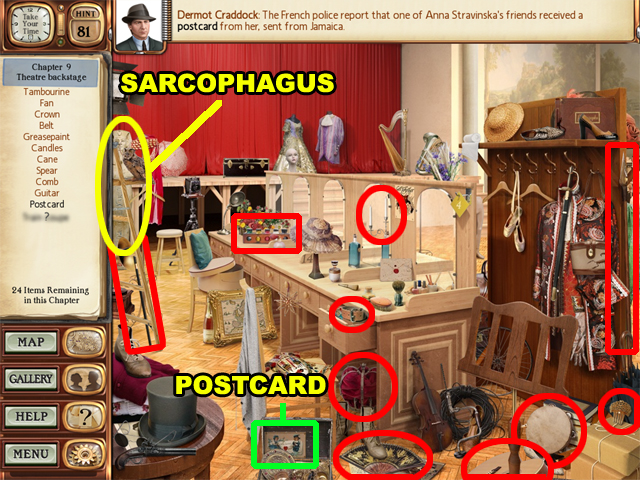
- Collect the POSTCARD to the right of the lower left corner.
- Collect the SARCOPHAGUS below the upper left corner.
- Go to Alfred Crackenthorpe’s Bedroom.
Alfred Crackenthorpe’s Bedroom
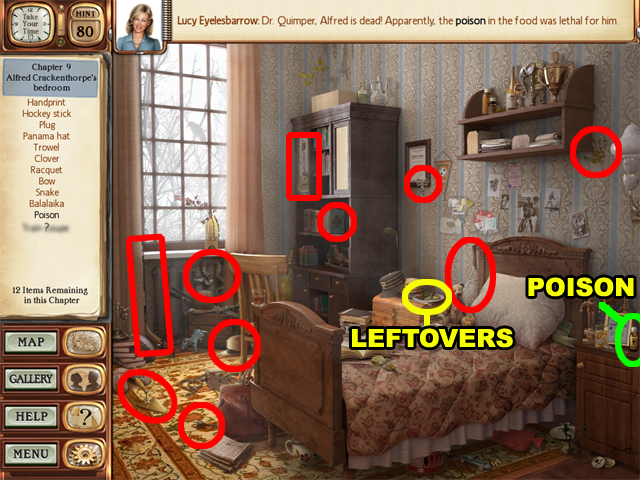
- Collect the POISON on the nightstand.
- Collect the LEFTOVERS on the chest beside the bed.
- Afterwards complete the “Find the Poison” puzzle to complete this chapter.
Chapter Ten
Train Carriage
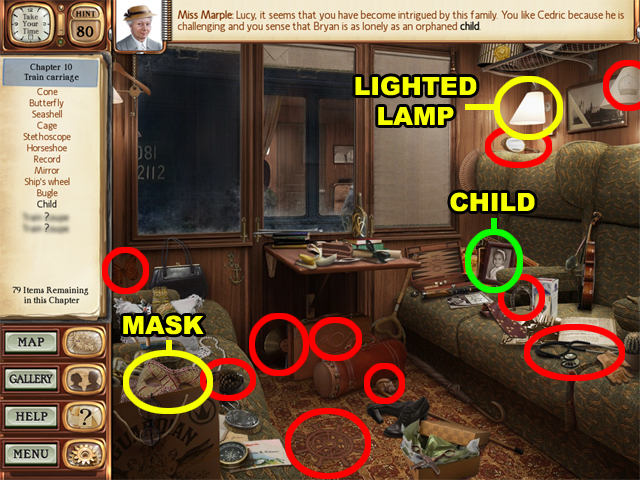
- There are no hidden locations to find on the World map, so enter the Train Carriage scene first.
- Collect the CHILD to the right of the center of this scene.
- Collect the LIGHTED LAMP near the upper right corner.
- Collect the MASK above the lower left corner.
- Go to Harold Crackenthorpe’s Office.
Harold Crackenthorpe’s Office
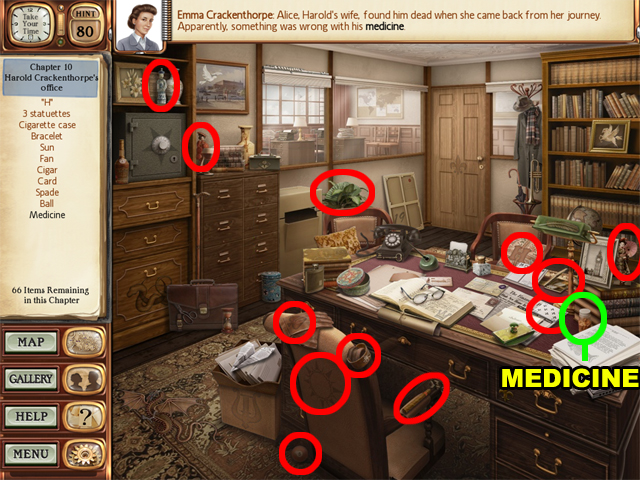
- Collect the MEDICINE on the desk above the lower right corner.
- Visit the Police Station next.
Police Station

- Collect the MUSHROOMS on the bookcase near the center of this scene.
- Collect the POISON in the upper right corner.
- Go to the Pig Sty location afterwards.
Pig Sty
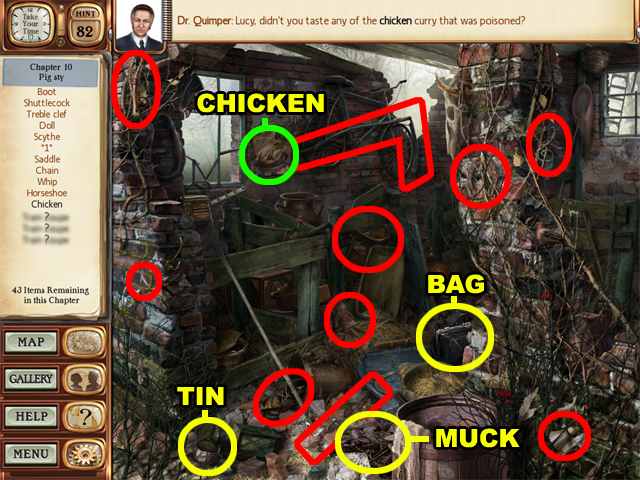
- Collect the CHICKEN by the window to the left of the room.
- Collect the TIN in the lower left corner.
- Collect the BAG below the center of this scene.
- Collect the MUCK beside the barrel at the bottom of this scene.
- Go to Rutherford Hall Sitting Room next.
Rutherford Hall Sitting Room
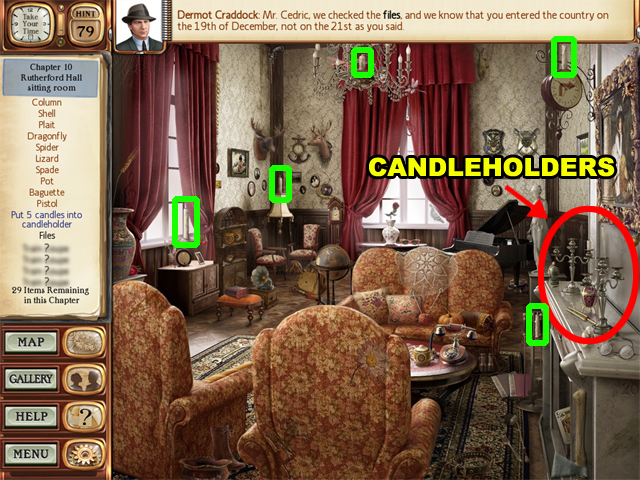
- Place the 5 CANDLES into the 2 CANDLEHOLDERS on the fireplace. The CANDLES are highlighted in green.

- Collect the FILES beside the fireplace.
- Collect the PLANE on the chandelier at the top of this scene.
- Collect the “20” above the lower right corner.
- Collect the FILM below the piano.
- Collect the FROG on the back of the chair.
- Head to the Park location next.
Park

- Collect the HOUSE near the center of this scene.
- Collect the BOOTS hanging on the branch of the left tree.
- Collect the THREE in the upper left corner.
- Afterwards is another “Find the Poison” puzzle. Complete it to conclude this chapter.
Chapter Eleven
Miss Jane Maple’s Room In Town
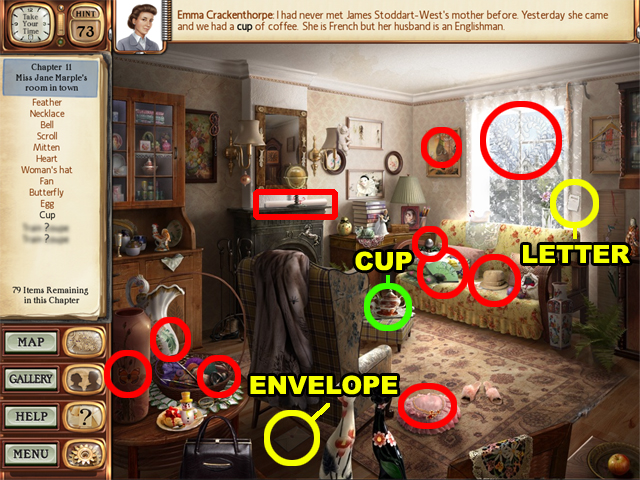
- There are no hidden locations yet, so enter Miss Jane Marple’s Room in Town first.
- Collect CUP in the center of the room.
- Collect the ENVELOPE below the chair.
- Collect the LETTER beside the window.
- Go to the Rutherford Hall Hallway next.
Rutherford Hall Hallway
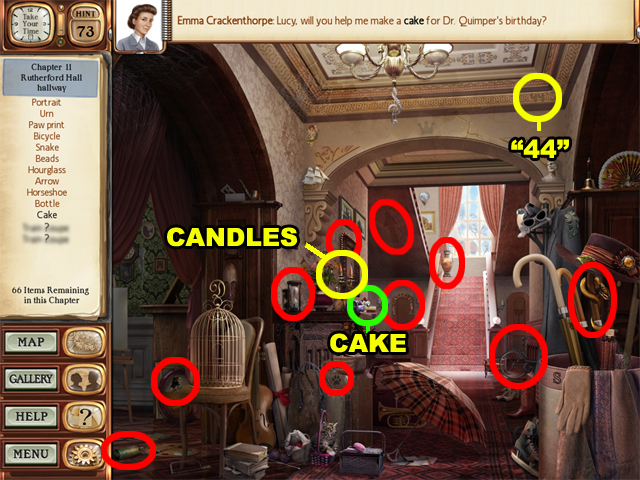
- Collect the CAKE near the center of this scene.
- Collect the CANDLES near the center of this scene.
- Collect the “44” by the upper right corner.
- Head to Alfred Crackenthorpe’s Bedroom afterwards.
Alfred Crackenthorpe’s Bedroom
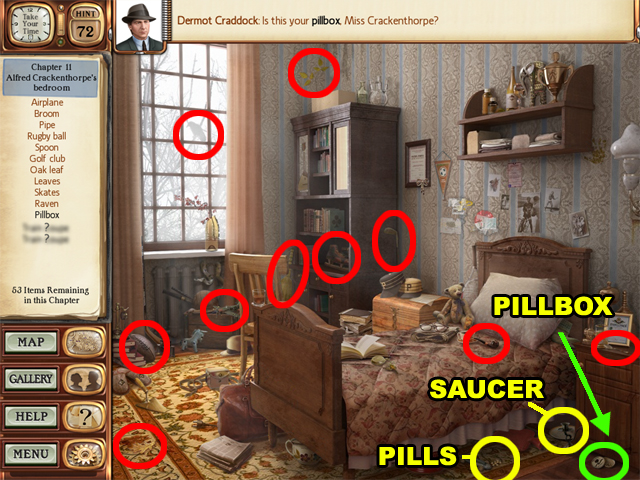
- Collect the PILLBOX in the lower right corner.
- Collect the SAUCER in the lower right corner.
- Collect the PILLS under the bed afterwards.
- Visit the Theatre Backstage location.
Theatre Backstage
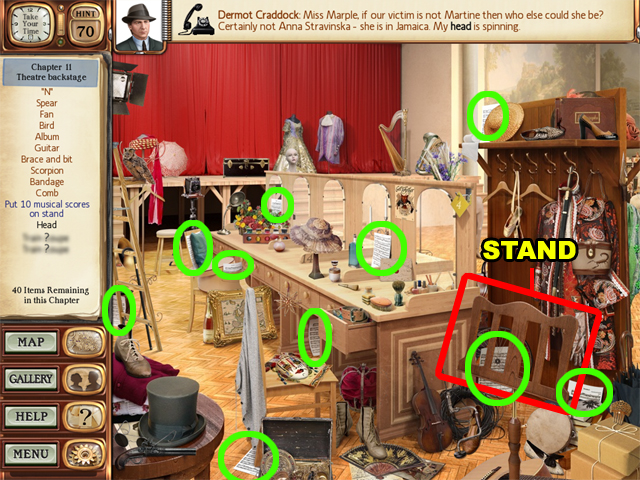
- Place the 10 MUSICAL SCORES (highlighted in green) onto the STAND.
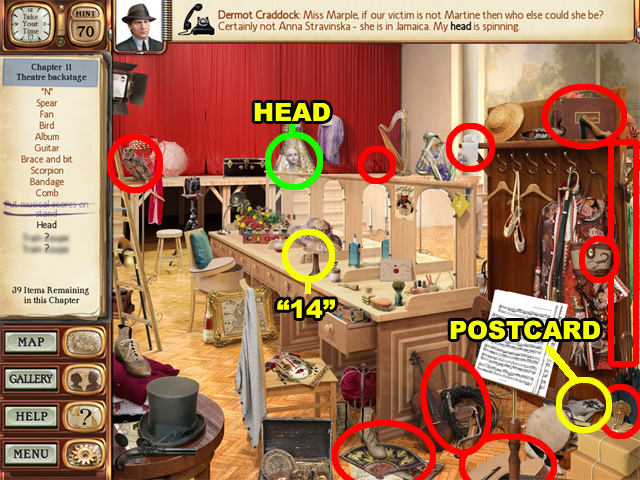
- Collect the HEAD by the stage curtain.
- Collect the POSTCARD above the lower right corner.
- Collect the “14” to the left of the center of this scene.
- Go to Miss Jane Marple’s Sitting Room next.
Miss Jane Marple’s Sitting Room
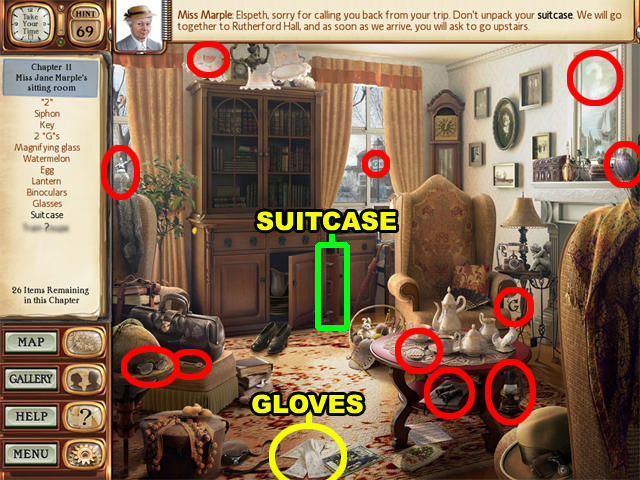
- Collect the SUITCASE below the window in the center of this scene.
- Collect the GLOVES at the bottom of this scene.
Clue Matching

- Pair the blocks that are labeled with matching numbers.
- Afterwards the Rutherford Hall Dining Room will become active again; enter it.
Rutherford Hall Dining Room
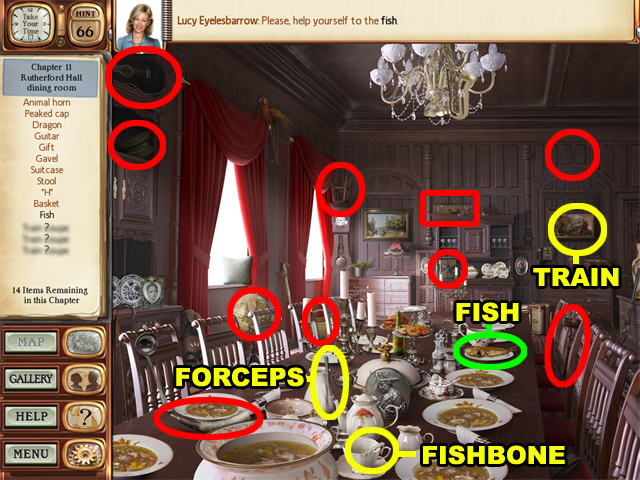
- Collect the FISH on the table.
- Collect the FISHBONE in the cup on the table.
- Collect the FORCEPS near the soup container.
- And lastly, collect the TRAIN below the upper right corner.
- Enjoy finding out whodunit!
Created at: 2010-06-17