

Walkthrough Menu
- General Tips
- Chapter 1- Yumanco
- Chapter 2 - Natsumi
- Chapter 3 - Samuel Murray
- Chapter 4 - Neferes
- Chapter 5 - The Monk
- Chapter 6 - Nathan
General Tips
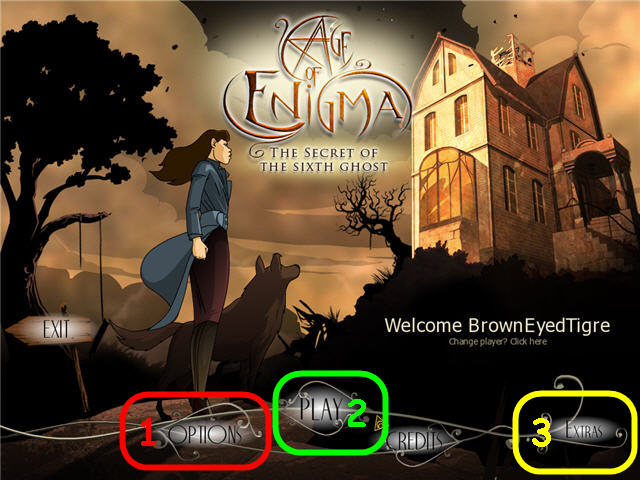
- Click on Options (1) to adjust the Music and SFX Volume, Full Screen, Windowed Mode and System Cursor.
- After you click Play (2), you may choose your difficulty level.
- Casual Mode has less dialog and active zones are highlighted, Adventure mode has more dialog, you are free to roam and no highlights.
- Click on Extras (3) to play the 25 mini-games from the game. You will unlock them as you complete them.
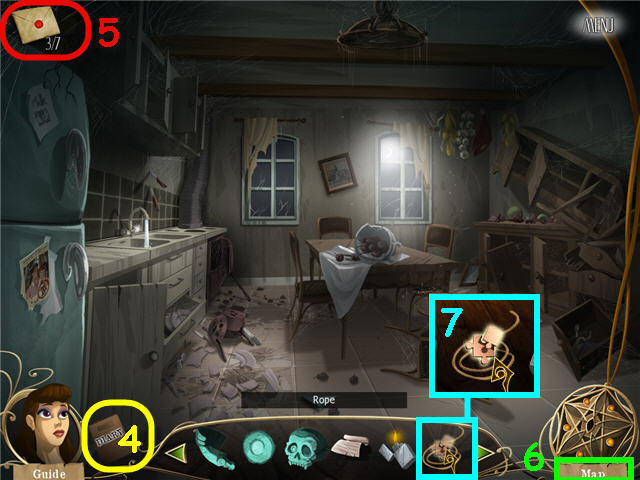
- Click on the Diary (4) to get story updates and access the guide. The Diary will open when there is a new update.
- Collect the 7 hidden envelopes (5) to get diary updates.
- Click on the Map (6) in the lower right to see where you are and what areas are left to explore.
- A hand cursor means you can pick up an item.
- A magnifying glass cursor means you can look closer at an area.
- A gear cursor signifies you can interact with the item.
- You can combine inventory items if a puzzle piece (7) appears over the item when you place your cursor over it.
- A puzzle piece cursor signifies you need to use an inventory item there.
- Puzzles may be skipped. When skipping a puzzle you will have the option of using a Joker (you get two for each puzzle) to make the puzzle easier or you can skip the puzzle.
- Click on menu to exit the game.
Chapter 1- Yumanco
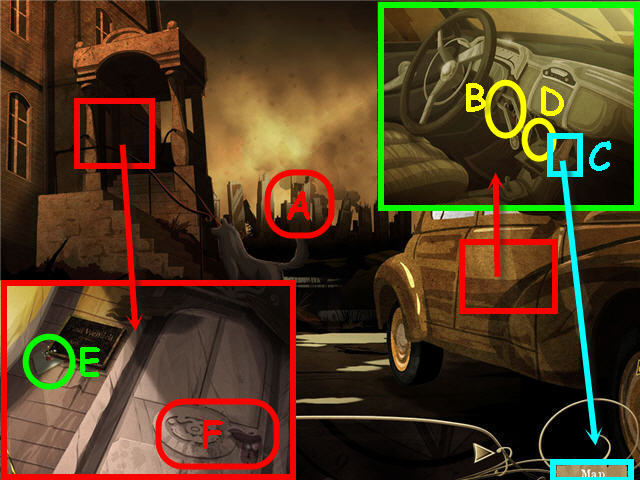
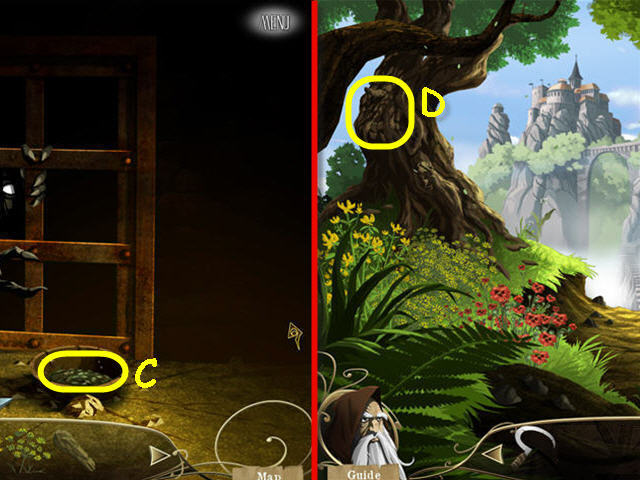
- Examine the skyline (A) to get a diary update.
- Click on the car door; remove the CAR KEYS (B) from the ignition.
- Use the CAR KEYS on the glove box; take the MAP (C) it will go to the lower right map area) and the KEY (D).
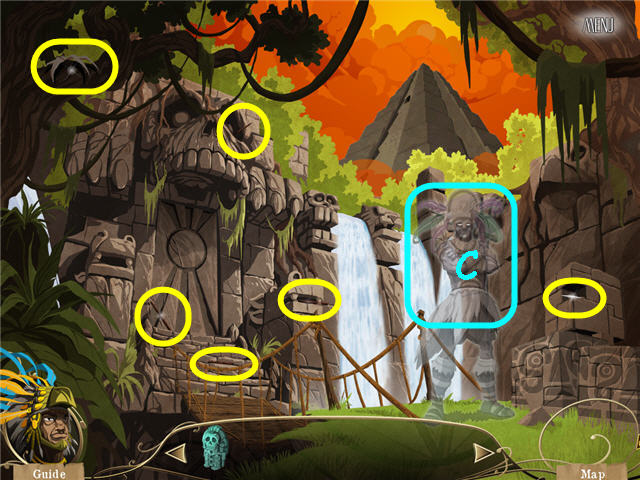
- Walk to the entrance; take the ENVELOPE 1 of 7 (E).
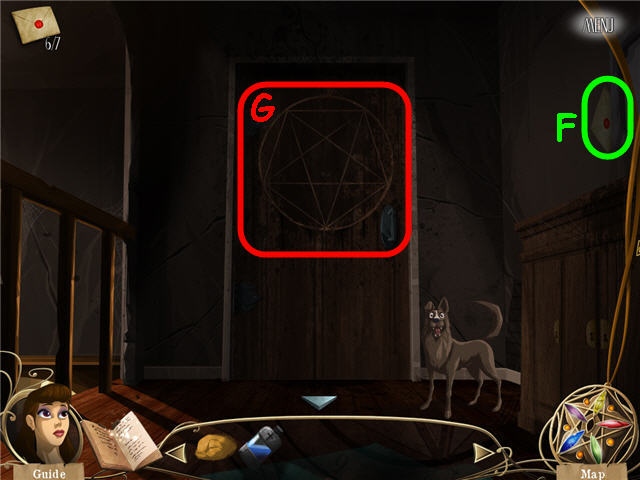
- Use the KEY on the lock (F) and enter.
- Pick up the PIECES OF LIGHT SWITCH (F) to get a REPAIRED SWITCH.
- Use the REPAIRED SWITCH on the junction box (G); click on the switch.
- Head left into the living room.
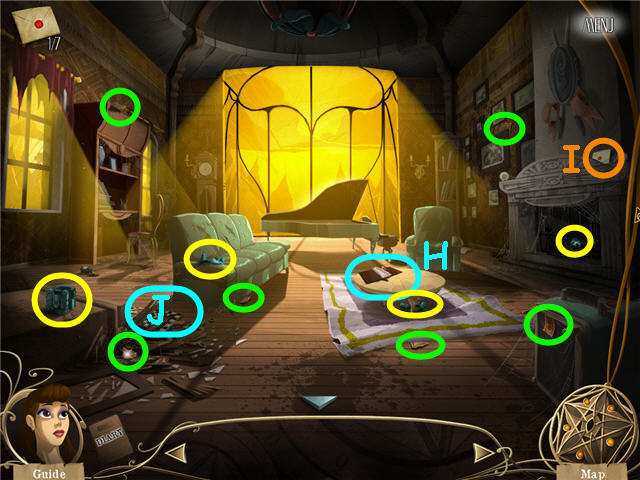
- Pick up the PIECE OF SATUETTE (in yellow).
- Pick up the 6 TORN PAGES (in green) to get a BOOK.
- Examine the torn book (H) and place the BOOK in the binder. Note the directions and items needed for the statue.
- Take the ENVELOPE 2 OF 7 (I).
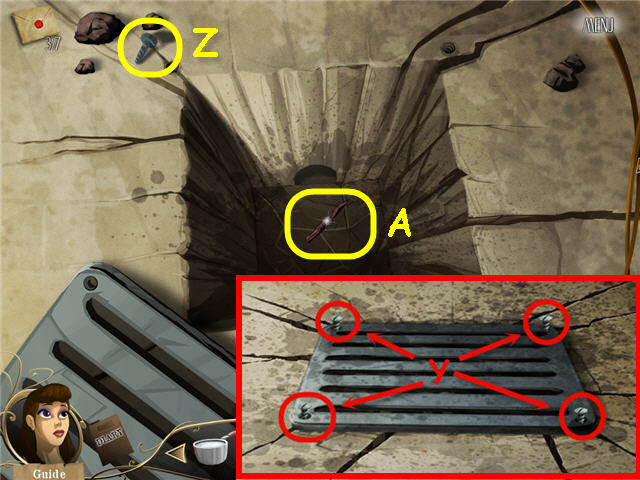
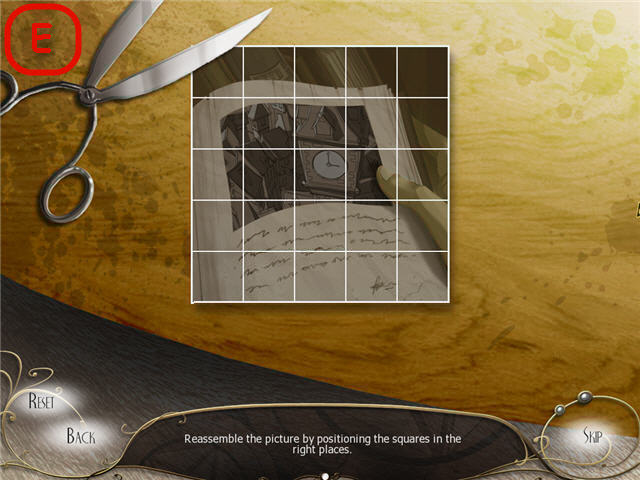
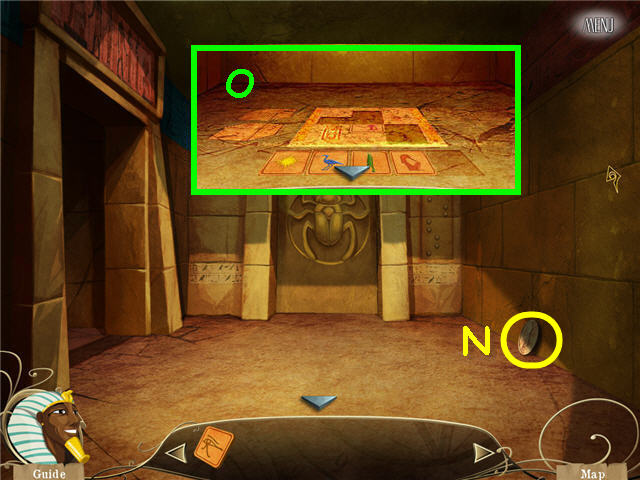
- Examine the rubble (J); click on the box to trigger a puzzle.
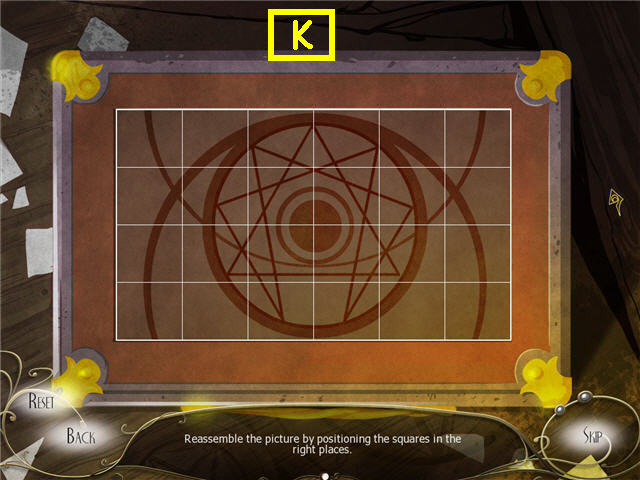
- Arrange the pieces to complete the symbol by swapping any two squares. See screenshot (K) for solution.
- Take the KAPANGYA EYE from the opened box.
- Exit the room and walk straight to the corridor.
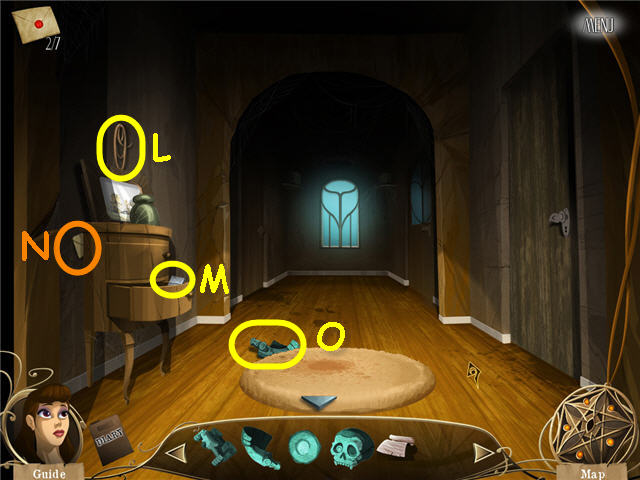
- Remove the painting on the left; take the ROPE (L).
- Open the bottom drawer; take the EMPTY LIGHTER (M).
- Take the ENVELOPE 3 of 7 (N).
- Take the PIECE OF STATUETTE (O).
- Head into the closet on the left.
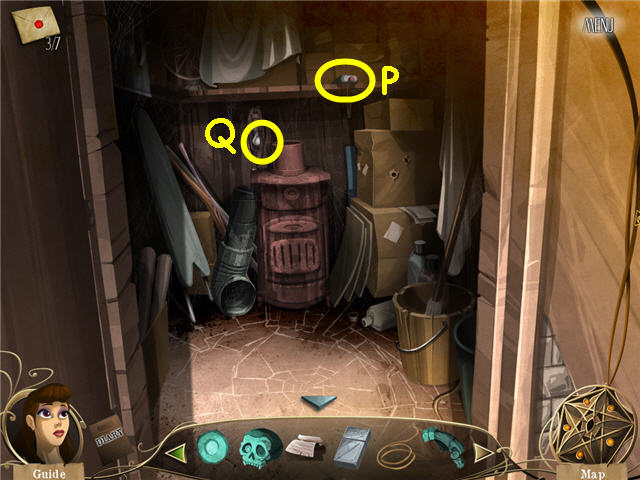
- Take the LIGHTER FLUID (P) and the LIGHT BULB (Q).
- In inventory, combine the LIGHTER FLUID with the EMPTY LIGHTER to get a RELOADED LIGHTER.
- Exit the room and head right across the hall into the kitchen.
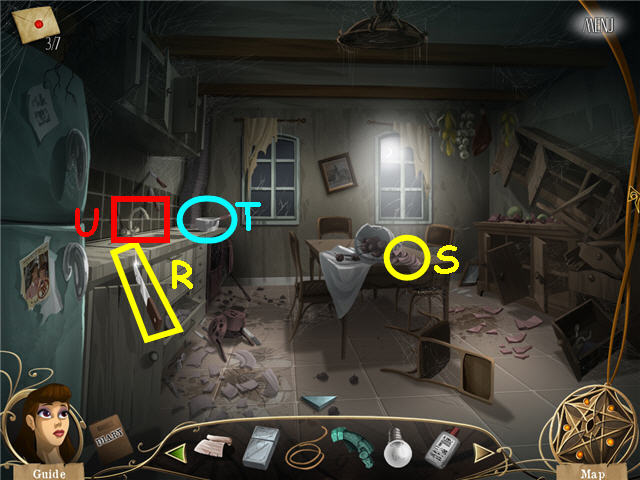
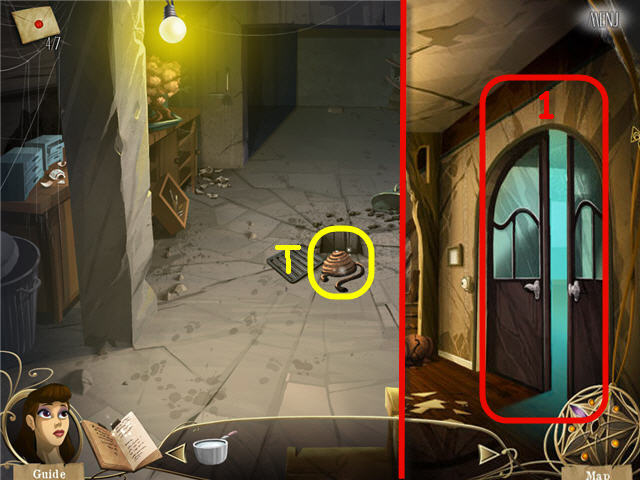
- Take the KNIFE (R), RAG (S) and the EMPTY SAUCEPAN (T).
- Turn on the faucet (U) and use the EMPTY SAUCEPAN on the water to get a SAUCEPAN FULL OF WATER.
- Exit the room and head back to the main hall.
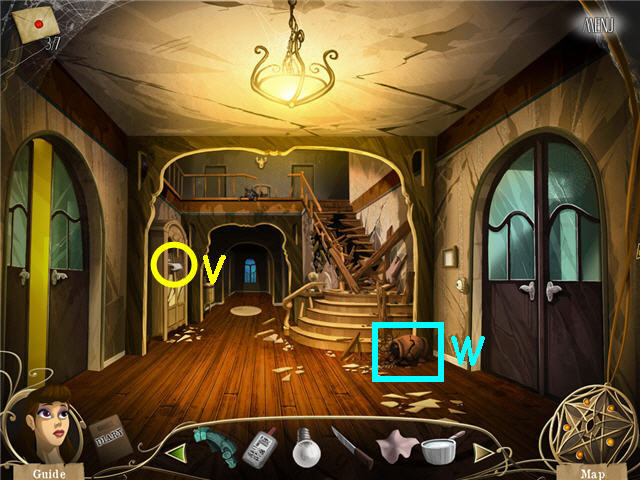
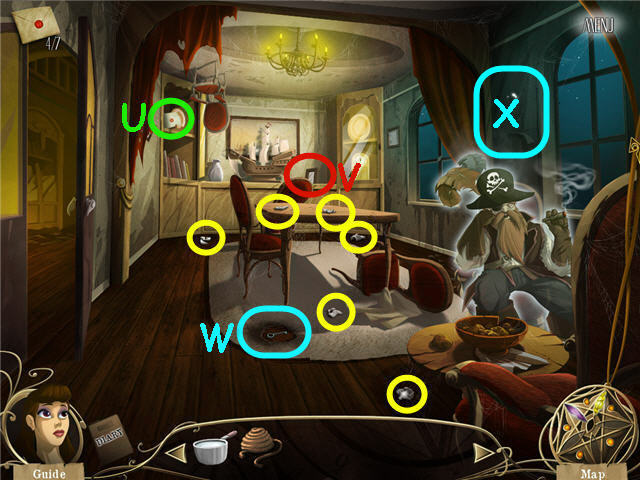
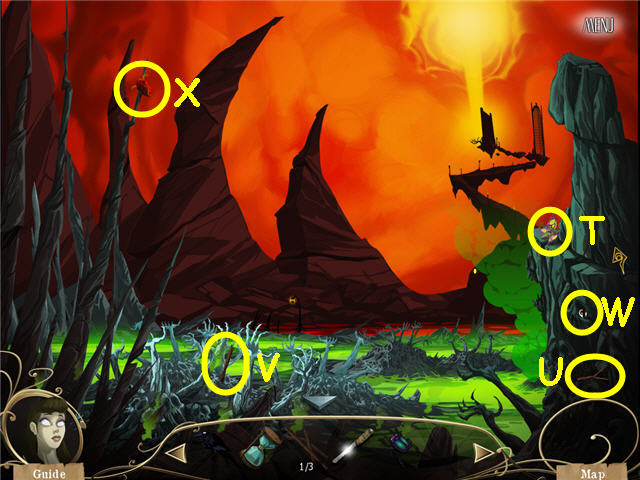
- Take the SCORE (V).
- Use the KNIFE on the vase (W) to automatically get TWIGS.
- In inventory, combine the ROPE and TWIGS to get TINDER WOOD.
- Head into the living room.
- Examine the piano; place the SCORE on the stand to trigger a puzzle.
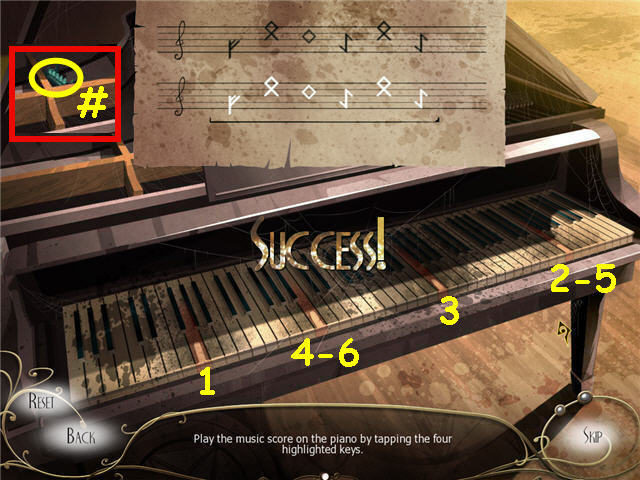
- Duplicate the notes on the music sheet by pressing the correct highlighted keys.
- Solution: Press the highlighted keys from left to right; 1-4-3-2-4-2.
- Take the PIECE OF STATUETTE (#) from the top of the piano.
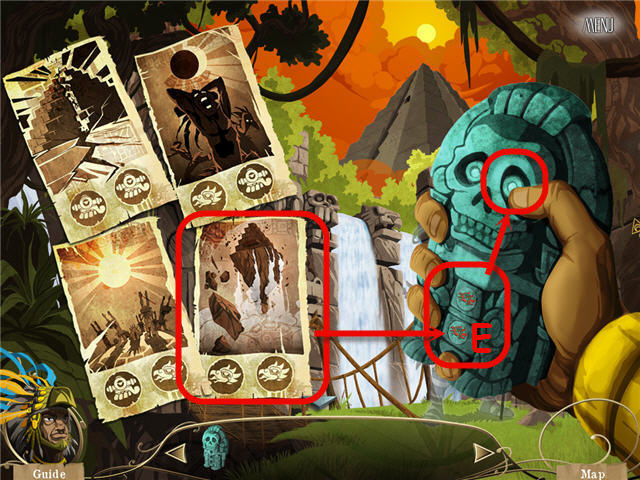
- Back out and examine the book on the table.
- Assemble the statuette by placing the pieces according to the instructions in the book. See screenshot for order of assembly.
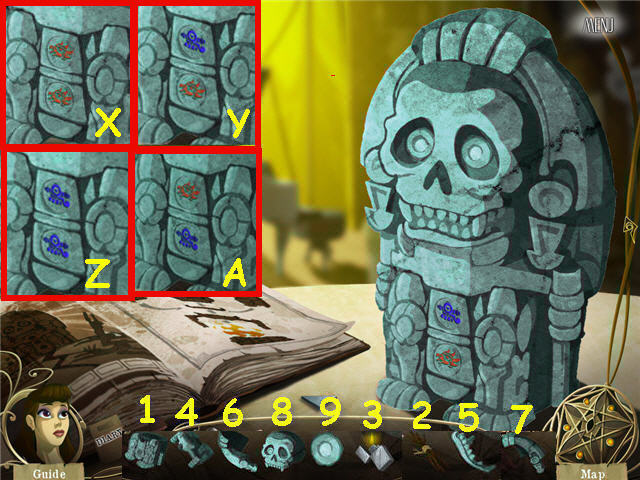
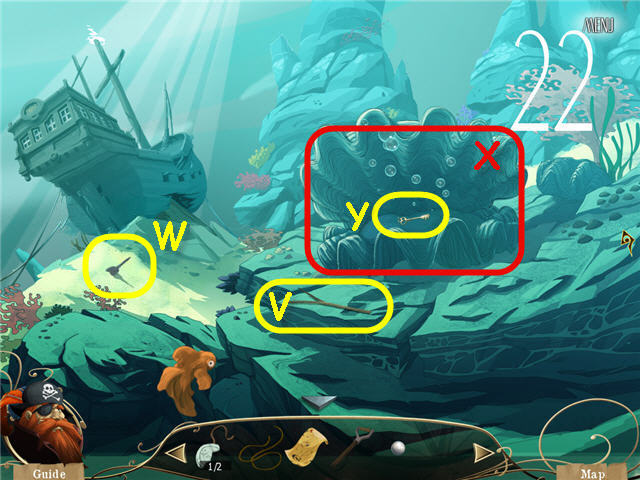
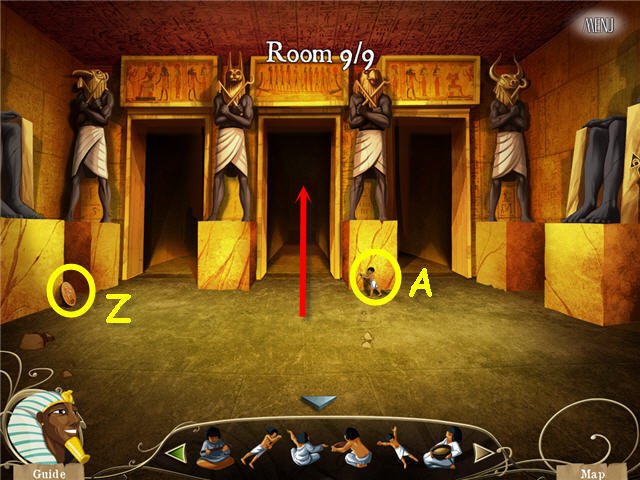
- Activate the Kapangya by following the Incan Warrior’s instructions and clicking on the correct stones in the statues midsection and then pressing its right eye to enter.
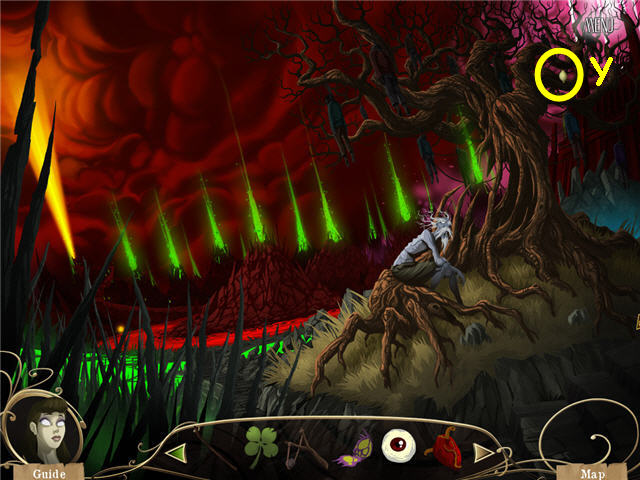
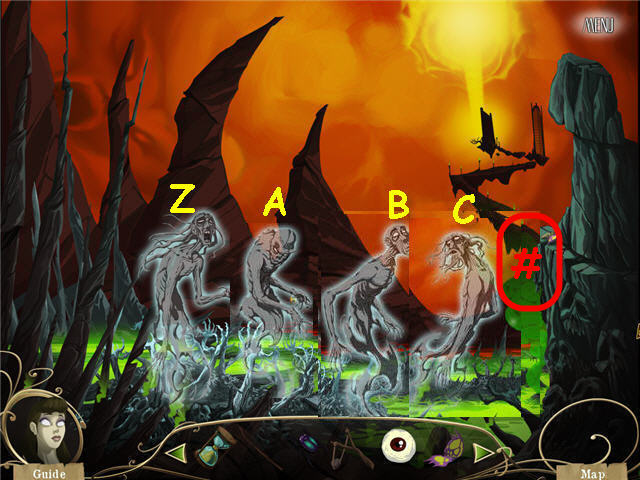
- Solution to activate the Kapangya: Elevation (X), Illumination (Y), Quake (Z), Eclipse (A).
- Automatically get the KAPANGYA added to your inventory after all 4 activations.
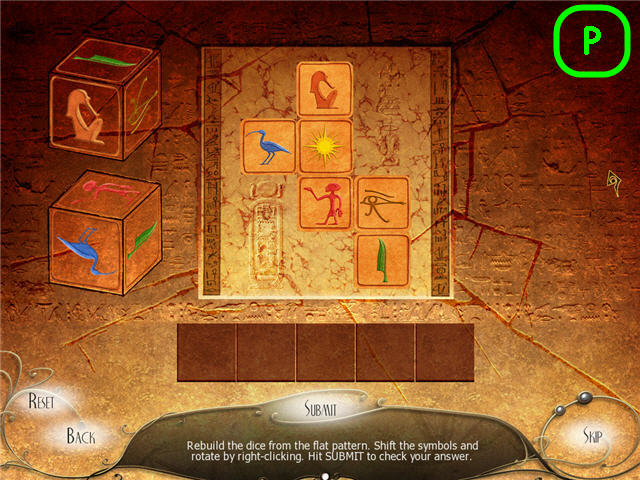
- Click on the stack of cubes to the right of Yumanco to activate a puzzle.

- Calculate the total number of cubes that are in the stack (B).
- Solution: 39.
- Take the 6 INCOMPLETE SPEAR pieces (in yellow) to get the REPAIRED SPEAR.
- Give the REPAIRED SPEAR to Yumanco (C).
- Use the KAPANGYA on the door (D).
- Enter the elevate power code (E) on the KAPANGYA to open the door, click the eye when set.
- Enter into the temple.
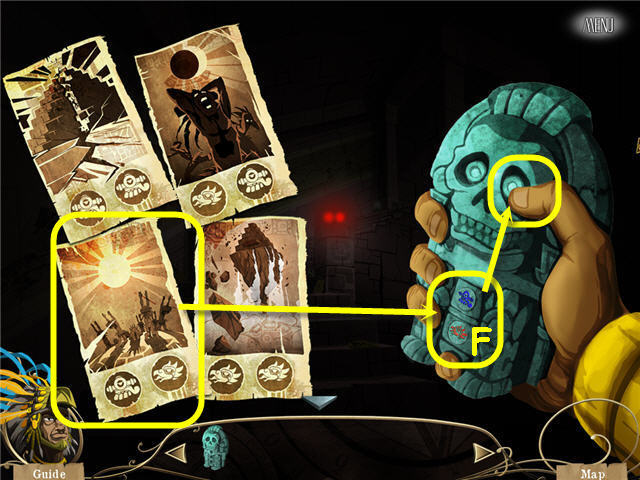
- Use the KAPANGYA anywhere in the room.
- Enter the illumination power code (F) on the KAPANGYA to light up the room, click the eye when set.
- Pick up the INCOMPLETE PIECES OF FRESCO (in yellow) to get a COMPLETE PIECES OF FRESCO.
- Pick up the INCOMPLETE PIECES OF FRESCO (in red) to get a COMPLETE PIECES OF FRESCO.
- Place the yellowish COMPLETE PIECES OF FRESCO on the side wall fresco (1) to trigger a puzzle.
- Choose the correct two pieces to complete the fresco and click submit.
- See screenshot (G) for my solution; the pieces are random so your pieces can differ from mine.
- Take the 1ST GREAT SORROW medallion from the wall when complete.
- Place the COMPLETE PIECES OF FRESCO on the back wall fresco to trigger a puzzle.
- Choose the correct two pieces to complete the fresco and click submit.
- See screenshot (H) for my solution; the pieces are random so your pieces may differ from mine.
- Take the 2nd GREAT SORROW medallion from the wall when complete.
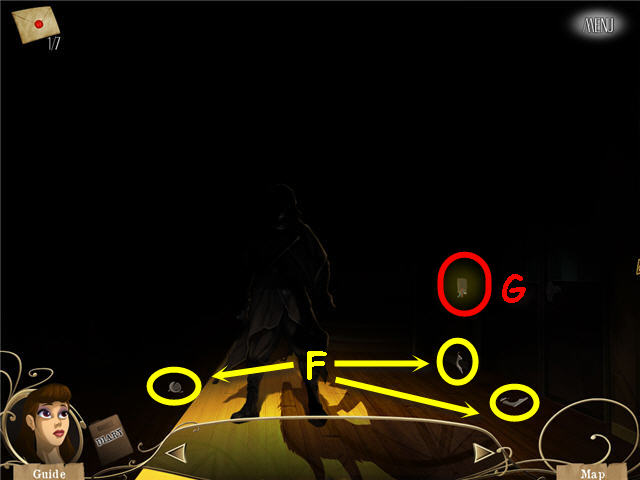
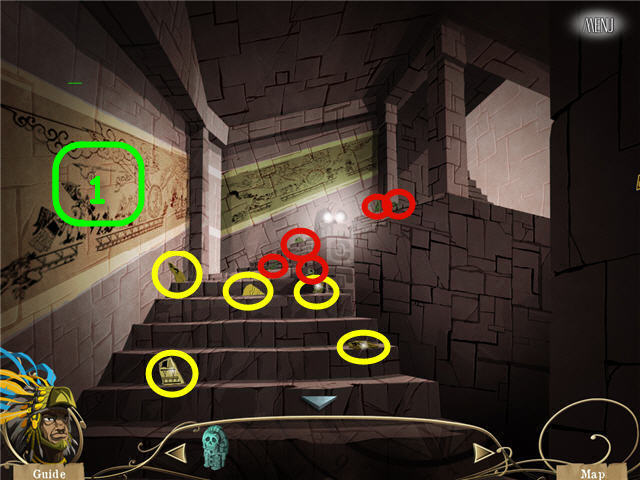
- Walk up the stairs.
- Use the KAPANGYA on the ceiling; enter the quake power code (I) on the KAPANGYA to cover the gap in the floor, click the eye when set.
- Pick up the pink CARTRIDGE (J) and the blue CARTRIDGE (K).
- Place the pink CARTRIDGE in the slot under the pink fresco to trigger a puzzle.
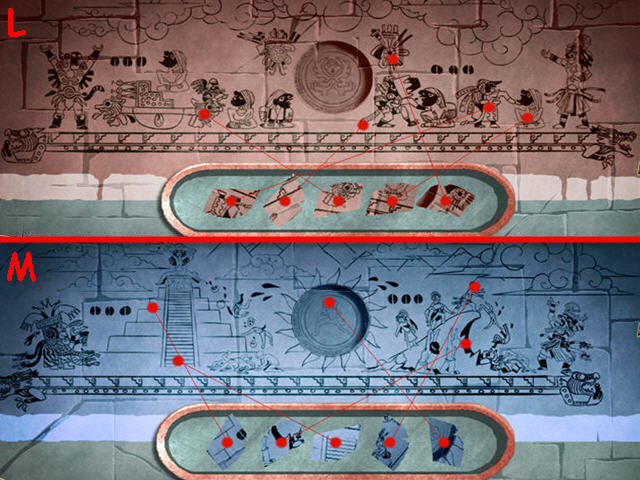
- Complete the fresco by clicking on a piece and then clicking on the area it is located on the fresco. After finding the location of all 5, click submit. See screenshot (L) for solution.
- The pieces are random and your solution may differ from mine.
- Take the 3rd GREAT SORROW.
- Place the blue CARTRIDGE in the slot under the blue fresco to trigger a puzzle.
- Complete the fresco by clicking on a piece and then clicking on the area it is located on the fresco. See screenshot (M) for solution.
- Take the 4th GREAT SORROW.
- Head up the stairs to the tip of the pyramid.
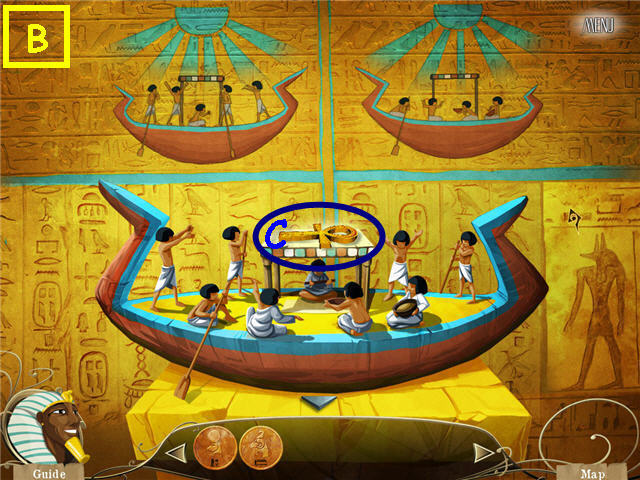
- Use KAPANGYA on the altar; choose eclipse power (N).
- Examine the altar.
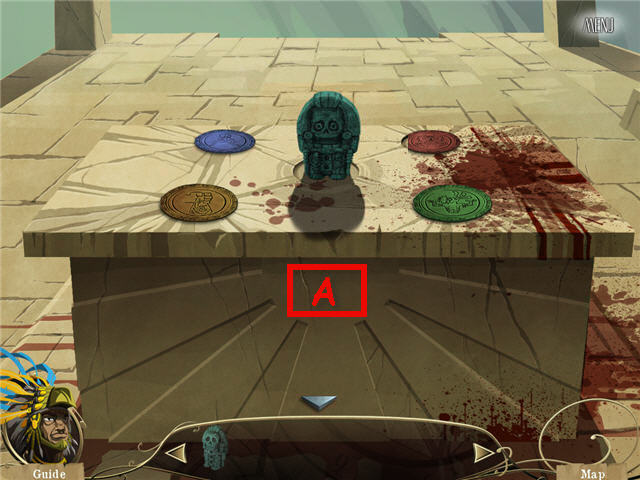
- Place the 1st, 2nd, 3rd and 4th GREAT SORROW on the altar counter-clockwise starting at the bottom left.
- Place the KAPANGYA in the center. See screenshot (A) for solution.
Chapter 2 - Natsumi
- Take the BASEMENT KEY (O).
- Exit the room.
- Step forward and examine the basement door.
- Use the BASEMENT KEY on the hole and walk down the stairs.
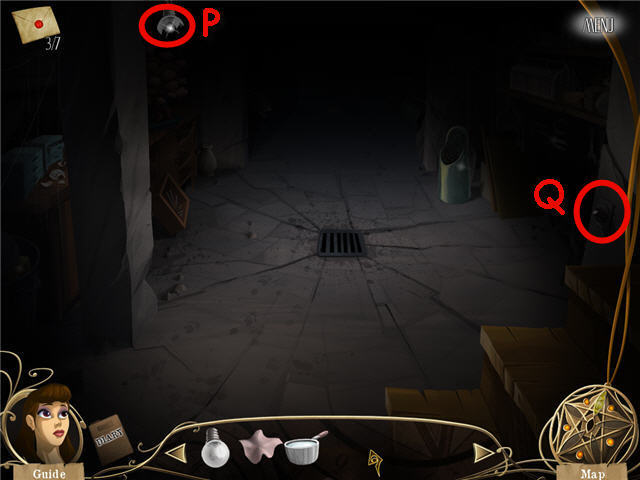
- Use the RAG on the broken bulb (P).
- Place the LIGHT BULB in the socket.
- Flip the switch (Q).
- Take the ENVELOPE 4 OF 7 (R).
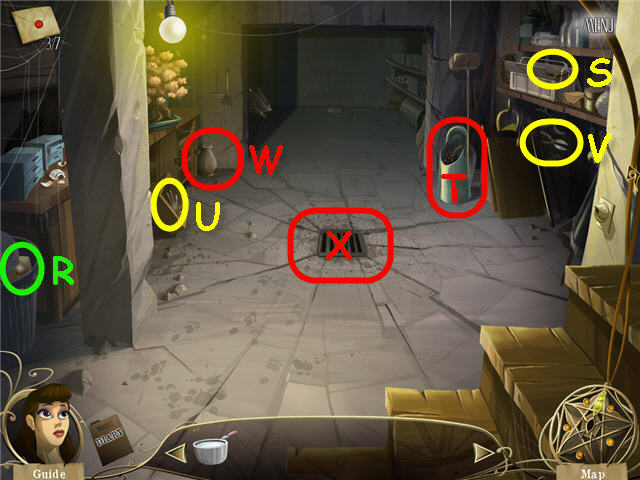
- Open the toolbox and take the HAMMER (S).
- Knock over the vase (T).
- Take the SCREWDRIVER (U) and the BROKEN PRUNING SHEARS (V).
- Use the HAMMER to break the vase (W) and take the PAPER.
- Examine and use the SCREWDRIVER on the grate (X) to trigger a puzzle.
- Unscrew the 4 screws (Y).
- Right-click to loosen, left-click to tighten. Turning one screw may turn another.
- Solution: Right click on the screws in the following order until they are fully unscrewed; lower right, lower left, upper right, upper left, lower left, upper right, lower right, lower left, lower right.
- Take the BOLT (Z) and CHARCOAL (A).
- In Inventory, combine the BOLT and the BROKEN PRUNING SHEARS to get PRUNING SHEARS.
- Click on Natsumi (B).
- Give Natsumi the PAPER and CHARCOAL.
- Take the SKETCH (C).
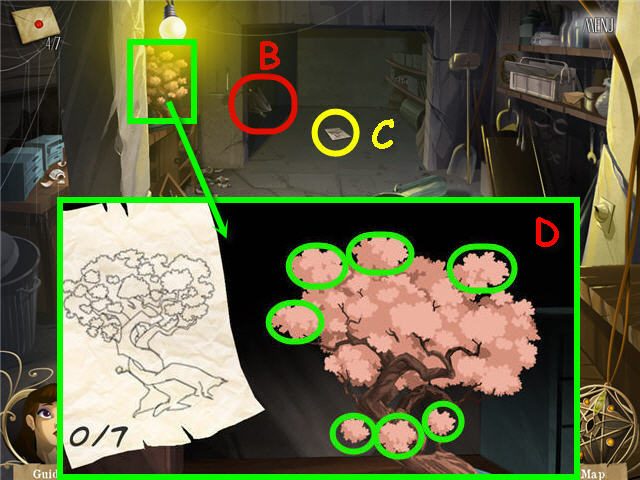
- Use the PRUNING SHEARS on the bonsai to trigger a puzzle.
- Trim the bonsai to look like the sketch.
- Click on the seven areas to be trimmed. See screenshot for solution (D).
- Walk to the Zen garden.
- Click on the center stone to trigger a puzzle.
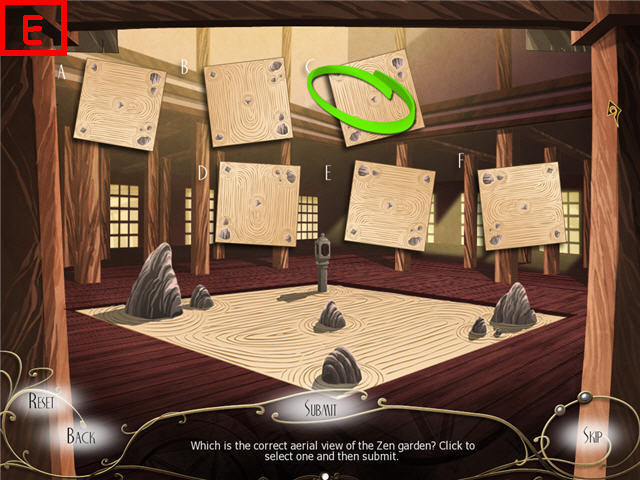
- Click on the correct aerial view of the Zen garden and click submit. See screenshot for solution (E).
- Click on the center windows across the Zen garden twice to enter the bridal suite.
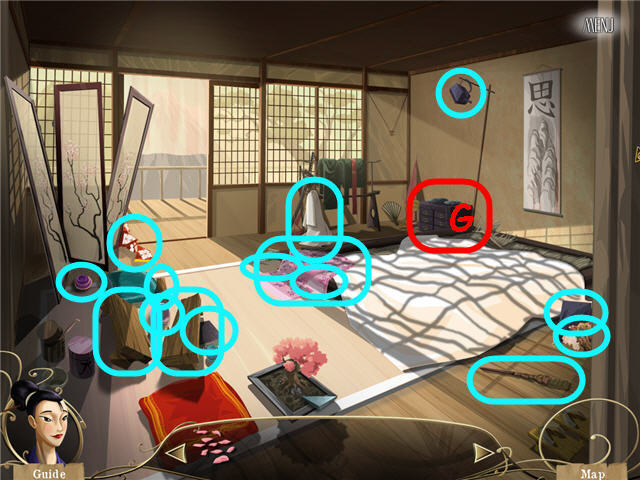
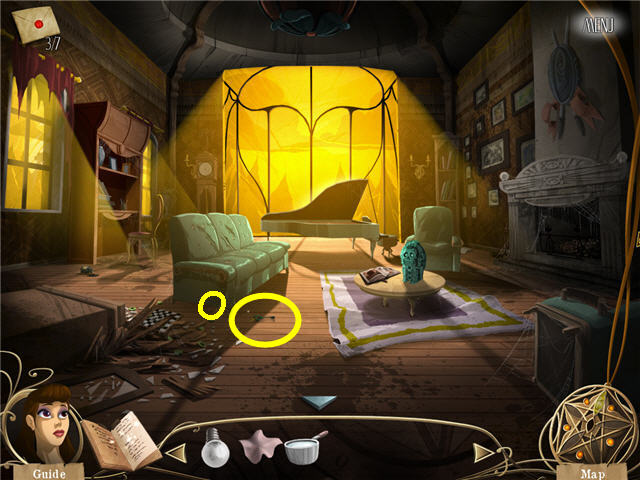
- Tidy up the room by picking up all the items marked in cyan in the screenshot.
- Get the PART OF KIMONO (3 of them), TEAPOT, TABLE, BOWL (2 of them), TEAPOT STAND, INCOMPLETE INCENSE HOLDER, INCENSE STICK, EXTINGUISHED TORCH, MEAL and EMPTY BENTO.
- Click on the room divider to straighten.
- In inventory, combine the INCENSE STICK and the INCOMPLETE INCENSE HOLDER to get an INCENSE HOLDER.
- In inventory, combine the MEAL and the EMPTY BENTO to get the FULL BENTO.
- Examine the nightstand (G) to trigger a puzzle.
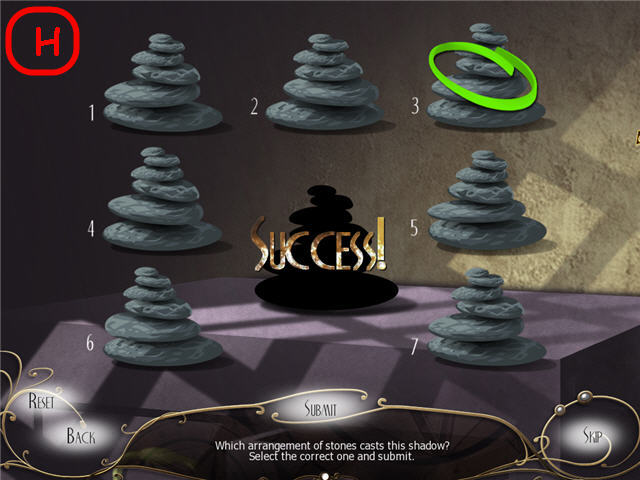
- Choose the stone arrangement that casts the shadow in the center. See screenshot for solution (H).
- Back out to the Zen garden.
- Use the EXTINGUISHED TORCH on the burning lantern to get a BURNING TORCH.
- Back out to the exterior.
- Light the lanterns with the BURNING TORCH in the correct order.
- Solution: Light the far right, lower left and the one by the bench.
- Take the PETALS (I).
- Click on the bench (J) to trigger a puzzle.
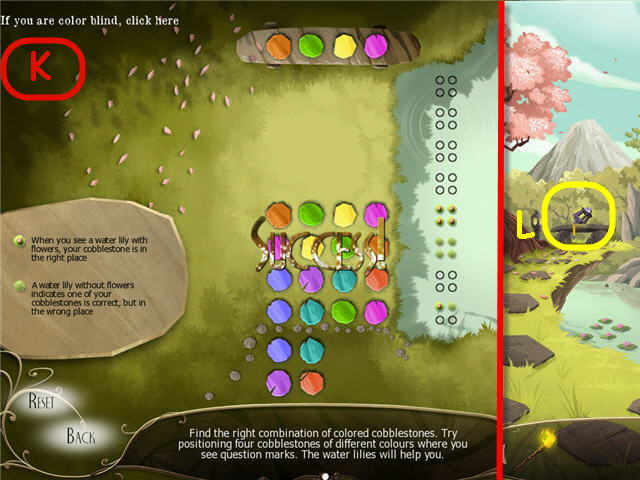
- Find the correct combination of cobblestones by placing them on the question marks.
- Use the guide on the right to see which ones are in the correct spot.
- The solution is random. See screenshot (K) for my solution.
- Take the OIL LAMP (L).
- Head to the Zen garden and enter into the middle windowed doors to the bridal suite.
- Place the items back in the room in the proper places.
- Click on the bed anytime to see the proper placement of items.
- Place the TABLE (M) then place the TEAPOT STAND, TEAPOT, both BOWLS and FULL BENTO on the TABLE.
- Place the INCENSE HOLDER next to the table (N) and use the BURNING TORCH to light it.
- Hang the white, pink and then the red PART of KIMONO on the room divider (O).
- Place the OIL LAMP over the bed (P) and light it with the BURNING TORCH.
- Hang the BURNING TORCH on the wall (Q).
- Place the PETALS on the bed (R).
- Click on the curtains (S).
Chapter 3 – Samuel Murray
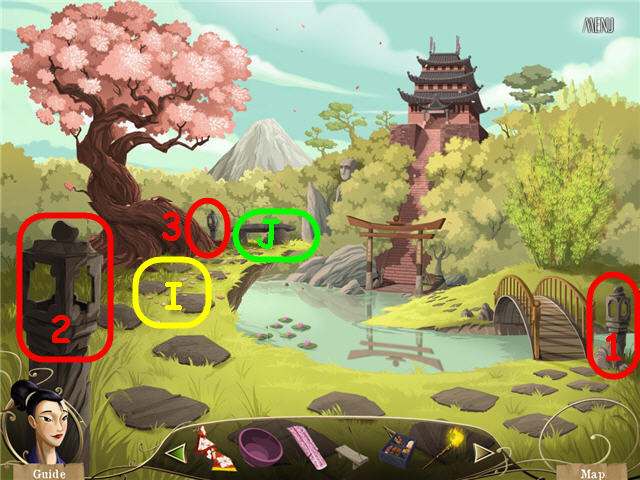
- Take the ROPE (T).
- Exit the basement and back to the main hall.
- Enter into the dining room (1) on the right.
- Take the ENVELOPE 5 OF 7 (U).
- Pick up the 6 PIECES OF VASE (in yellow) to get a VASE.
- Take the PICTURE FRAME (V).
- Place the VASE where the picture frame was.
- Use the SAUCEPAN FULL OF WATER on the fire and take the DISPLAY CABINET KEY (W).
- Place the PICTURE FRAME on the wall (X).
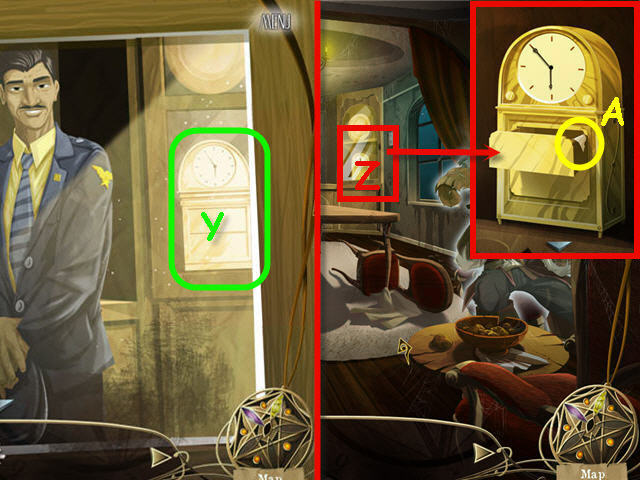
- Click on the blacked out clock face (Y) and note the time; 5:55.
- Use the DISPLAY CABINET KEY on the cabinet (Z).
- Examine the opened cabinet.
- Set the clock to 5:55 by using the click knobs to the left and right of the face.
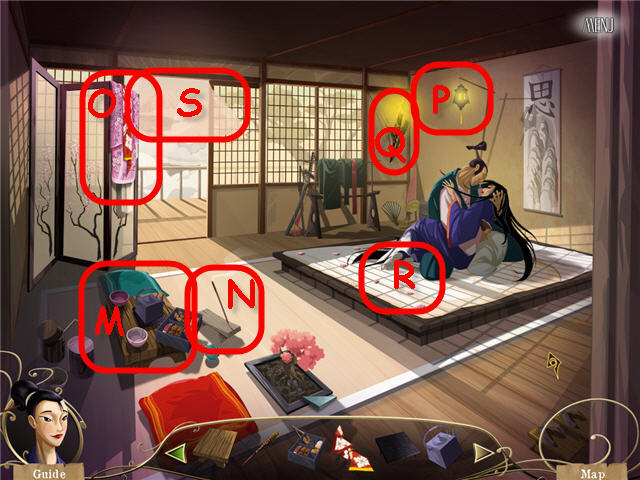
- Take the TORN PAGE (A) and back out.
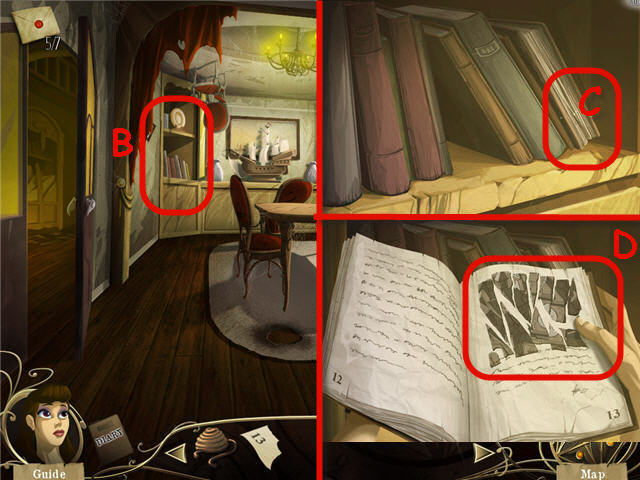
- Examine the bookshelf on the left (B).
- Place the TORN PAGE on the right book (C).
- Click on the picture to trigger a puzzle (D).
- Arrange the photo pieces to complete the picture.
- Click on any two pieces to swap them. See screenshot for solution (E).
- Note the time on the clock in the photo; 3:00.
- Back out and examine the clock in the cabinet.
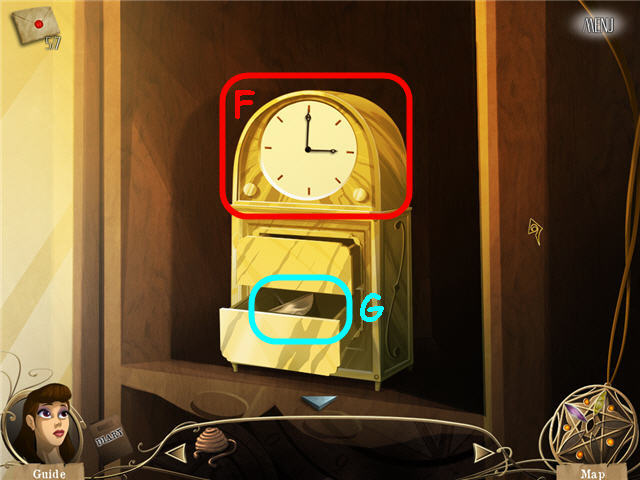
- Set the clock to the time from the photo in the book.
- Solution: 3 o’clock (F).
- Take the BOAT MAST (G).
- Back out and examine the model ship.
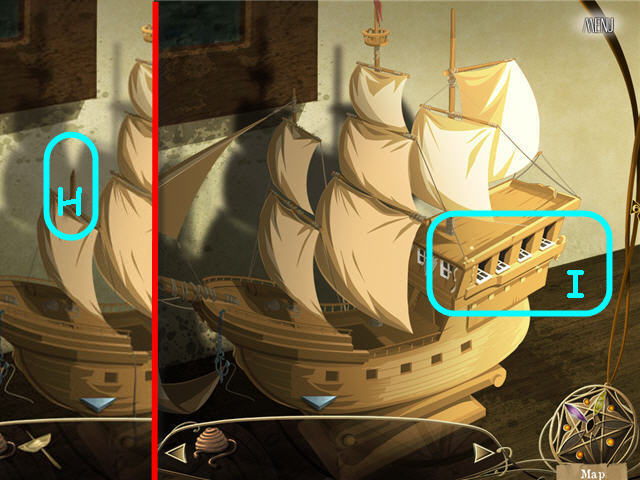
- Place the BOAT MAST on the ship (H).
- Examine the ships windows (I) to trigger a puzzle.
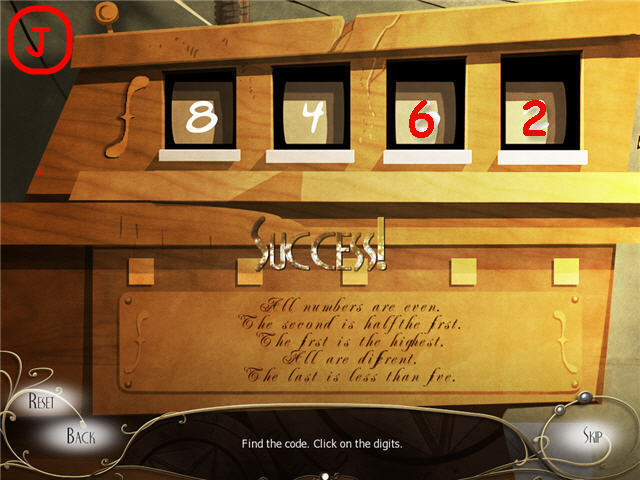
- Find the correct code by deciphering the verse underneath.
- Solution: 8-4-6-2. See screenshot for solution (J).
- Take the TREASURE.
- Back out and give the TREASURE to Samuel.
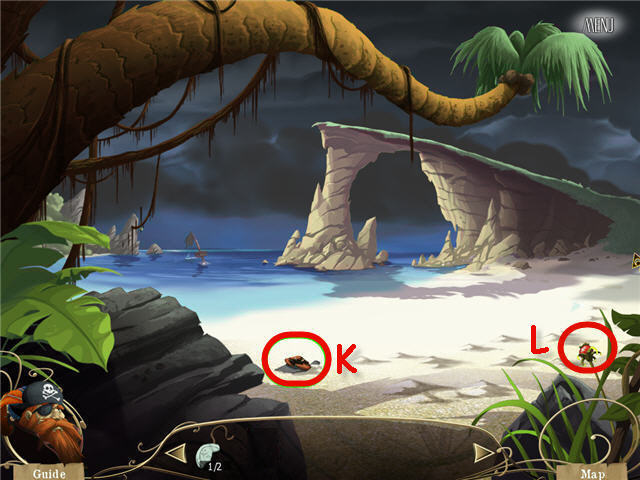
- Catch the CRAB (K) as he runs across the rock.
- Take the BERRY (L).
- Head right to the creek.
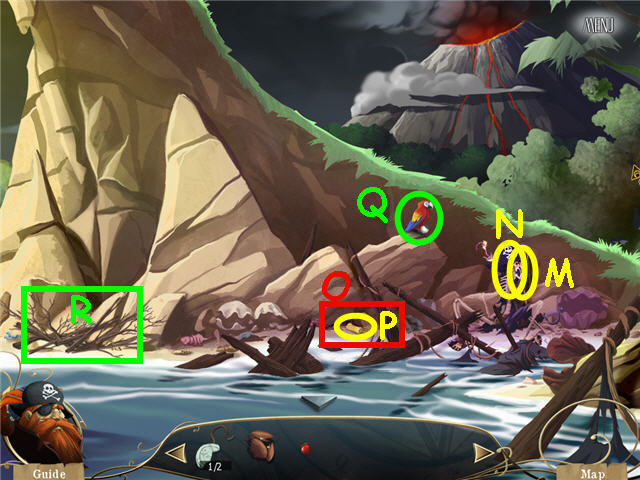
- Take the STRAP (M) and the HOLLOW REED (N).
- In Inventory, combine the BERRY and the HOLLOW REED to get a BLOWPIPE.
- Place the CRAB in the hole (O) and take the TREASURE MAP (P).
- Click on the parrot (Q) to shoo him away.
- Examine the pile of branches (R) twice to trigger a puzzle.
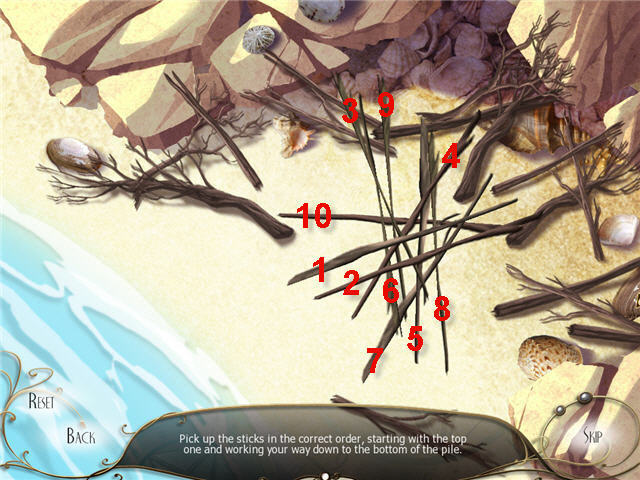
- Remove the sticks by taking the top one off till you reach the bottom.
- The layout of the sticks is random. See screenshot for my solution.
- Take the SHOVEL HANDLE when complete.
- Back out to the beach.
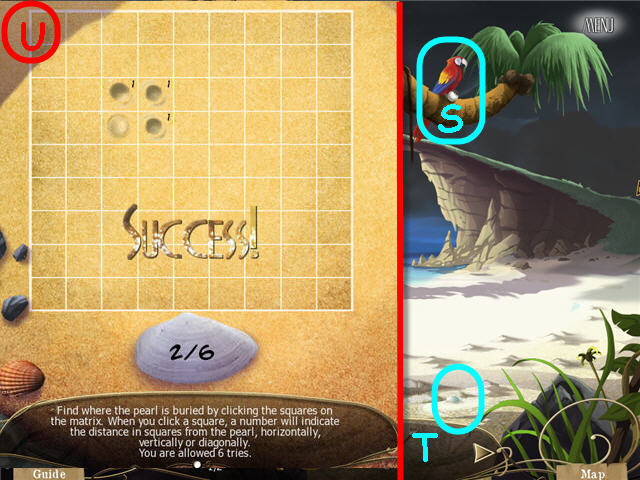
- Use the BLOWPIPE on the parrot (S).
- Click on the dropped pearl (T) to trigger a puzzle.
- Find the buried pearl by clicking on a square.
- The number on the square indicates how many squares away the pearl is located. You get 6 tries and then it will reset. See screenshot (U) for my solution.
- Automatically get the PEARL when complete.
- Head out to the seafloor.
- Take the STICK (V) and the SHOVEL HEAD (W).
- Use the STICK to prop up the shell (X) when it opens.
- Place the PEARL on the key (Y) and automatically get the KEY.
- If you run out of air before you are finished, you will return to the beach and can try again.
- Return to the beach when complete.
- In Inventory, combine the SHOVEL HEAD and the SHOVEL HANDLE to get a SHOVEL.
- Place the TREASURE MAP on the beach to trigger a puzzle.
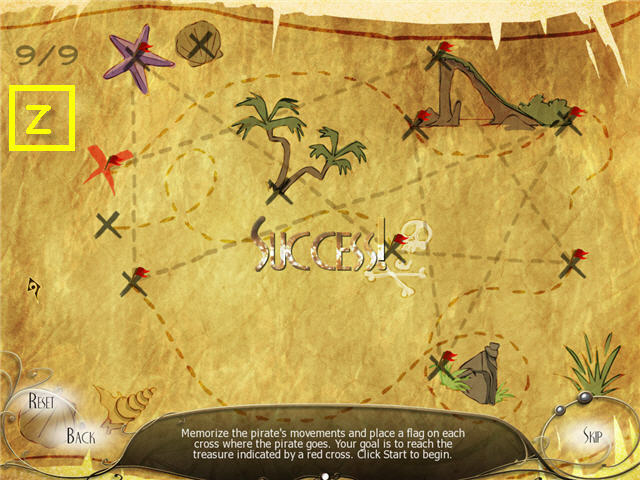
- Watch the pirate and duplicate his movements.
- See screenshot (Z) for my solution, the movements are random.
- Use the SHOVEL on the X in the sand and get a BROKEN SHOVEL.
- In inventory, combine the BROKEN SHOVEL and STRAP to get a STRENGTHENED SHOVEL.
- Use the STRENGTHENED SHOVEL on the X in the sand.
- Use the KEY on the chest.
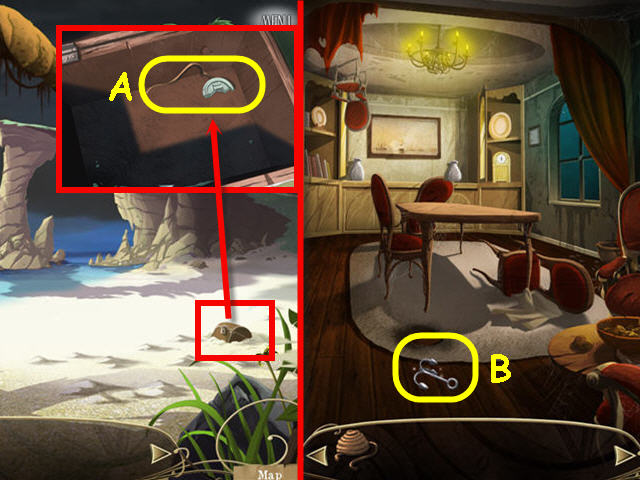
- Examine the chest; take the HALF LOCKET (A).
- Take the HOOK (B).
- In inventory, combine the HOOK and ROPE to get a GRAPPLE.
- Exit to the hall.
Chapter 4 – Neferes
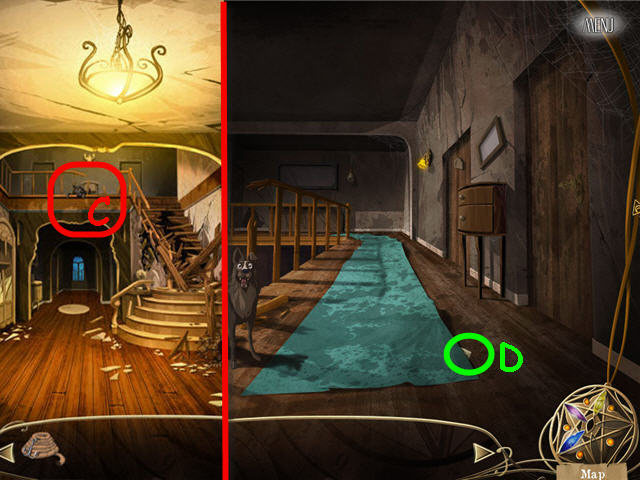
- Use the GRAPPLE on the balcony (C); climb up.
- Take the ENVELOPE 6 OF 7 (D).
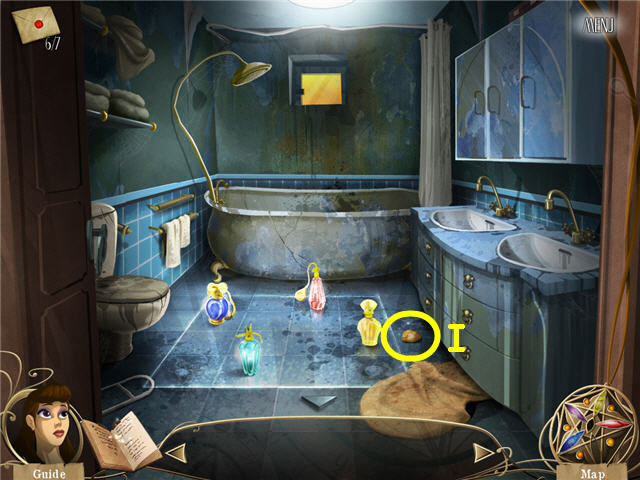
- Head right into the bathroom.
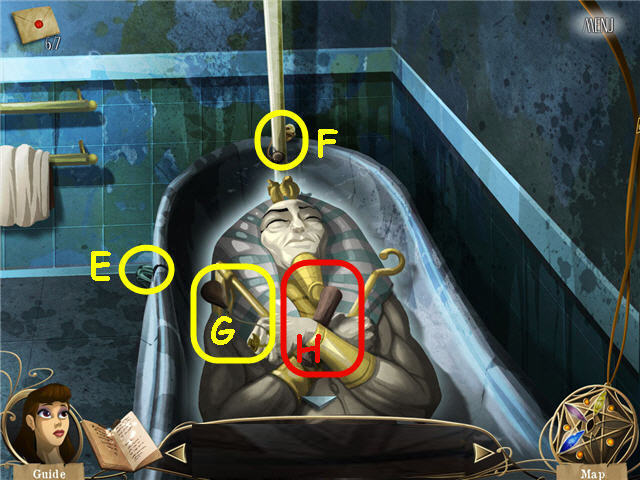
- Open the shower curtain and examine the bathtub.
- Take the INCOMPLETE GREEN BOTTLE (E), INCOMPLETE BLUE BOTTLE (F) and INCOMPLETE RED BOTTLE (G).
- Examine the scroll in the pharaoh’s hand.
- Exit out of the tub.
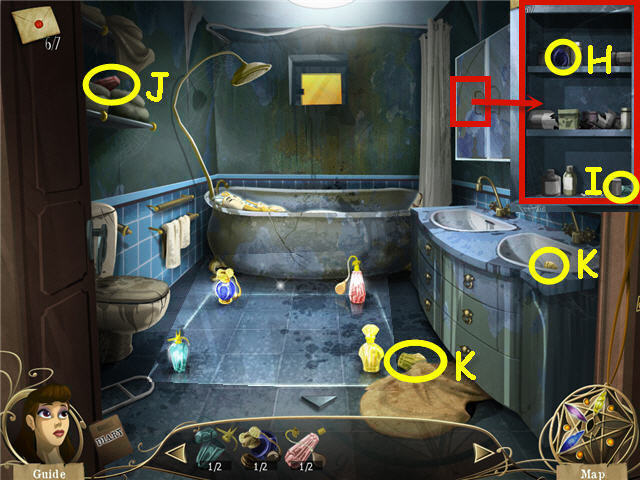
- Examine the cabinets; open the left cabinet door.
- Take the INCOMPLETE BLUE BOTTLE (H) to get a BLUE BOTTLE.
- Take the INCOMPLETE GREEN BOTTLE (I) to get a GREEN BOTTLE.
- Back out of the close-up.
- Take the INCOMPLETE RED BOTTLE (J) to get a RED BOTTLE.
- Take the 2 INCOMPLETE YELLOW BOTTLES (K) to get a YELLOW BOTTLE.
- Place the bottles on the floor in the order of the parchment in the pharaoh’s hand.
- Clockwise from the upper left; BLUE BOTTLE, RED BOTTLE, YELLOW BOTTLE and GREEN BOTTLE. See screenshot for layout.
- Click on the floor to trigger a puzzle.
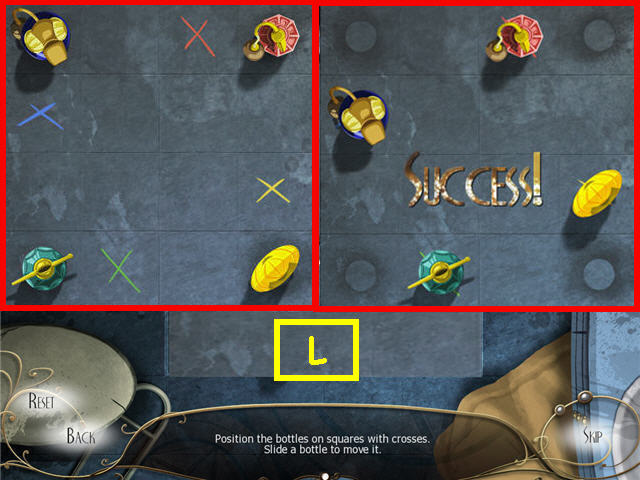
- Move the bottles to their matching colored cross by sliding the bottles. See screenshot for solution (L).
- Solution: Move the perfume bottles in the following order; Yellow – Up, Left, Down and Right; Green – Right; Blue – Down; Red – Left; Green – Left; Blue – Up; Red – Right; Green – Up; Red – Left; Green – Down.
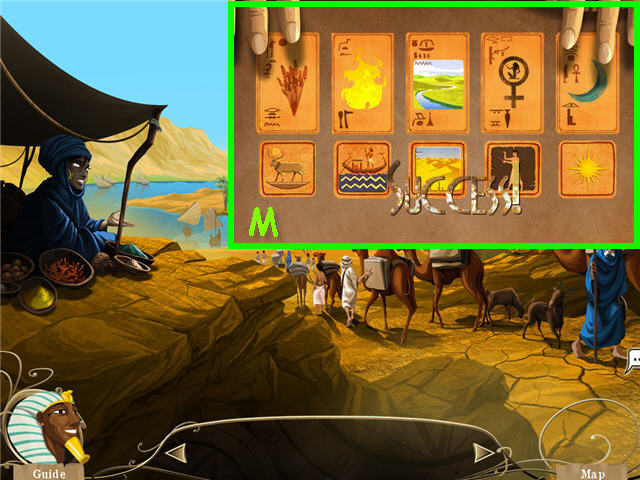
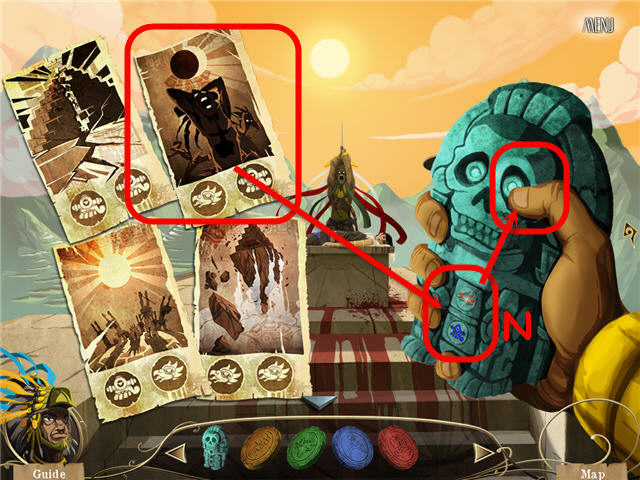
- Speak to the merchant and examine her area.
- Click on the area in front of her to trigger a puzzle.
- Match the bottom pictures with the cards. The clue is to explain life’s secrets.
- Solution: Life’s secret is conflict, so the pictures should depict opposites. See screenshot for solution (M).
- Get the MAZE KEY when complete.
- Head to the pyramid entrance.
- Take the HATHOR medallion (N).
- Enter the key room on the left.
- Examine the floor (O).
- Place the MAZE KEY on the bottom empty tile space to trigger a puzzle.
- Place the tiles underneath the grid to the correct spot on the grid to reconstruct the sides of the cubes on the left.
- See screenshot for solution (P).
- Click on the pedestal in the center of the room when complete.
- The code map (Q) for the maze is located on the right side of the entrance. The position of the dots is the key to which doorway you enter.
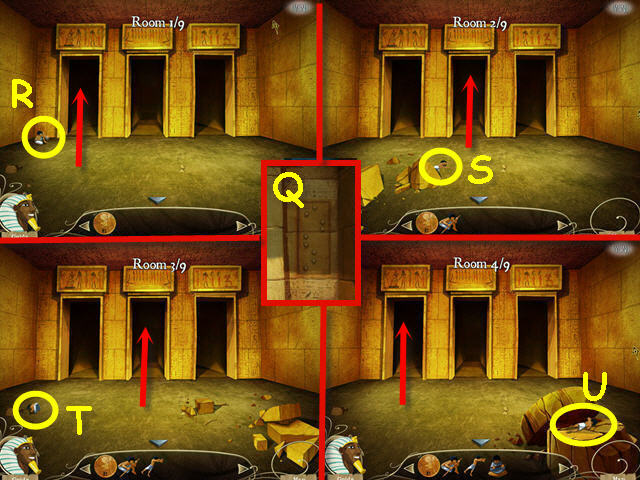
- Enter the maze.
- Take the FIGURINE (R); head into the left doorway.
- Take the FIGURINE (S); head into the middle doorway.
- Take the FIGURINE (T); head into the middle doorway.
- Take the FIGURINE (U); head into the left doorway. See next screenshot for next moves.
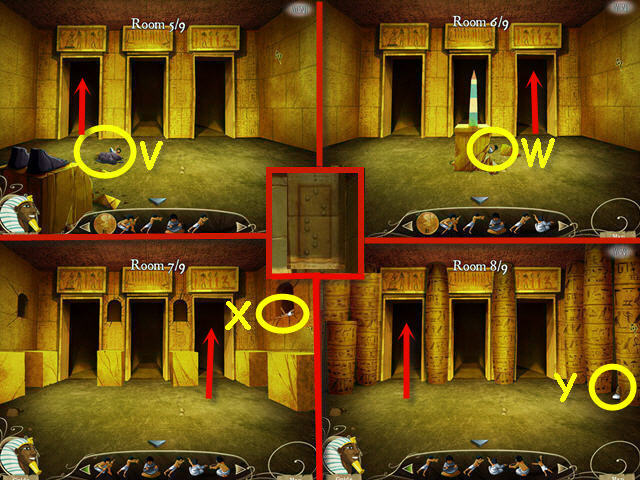
- Take the FIGURINE (V); head into the left doorway.
- Take the FIGURINE (W); head into the right doorway.
- Take the FIGURINE (X); head into the right doorway.
- Take the FIGURINE (Y); head into the left doorway. See next screenshot for next move.
- Take the AMON medallion (Z).
- Take the FIGURINE (A); head into the middle doorway.
- Examine the boat in the left corner of the room.
- Place the FIGURINES in the boat as depicted on the drawings above the boat.
- See screenshot (B) for placement.
- Take the ankh KEY (C).
- Back out of the close-up.
- Examine the ankh impression on the left doorway; place the KEY in the ankh indentation.
- Head left into the tomb.
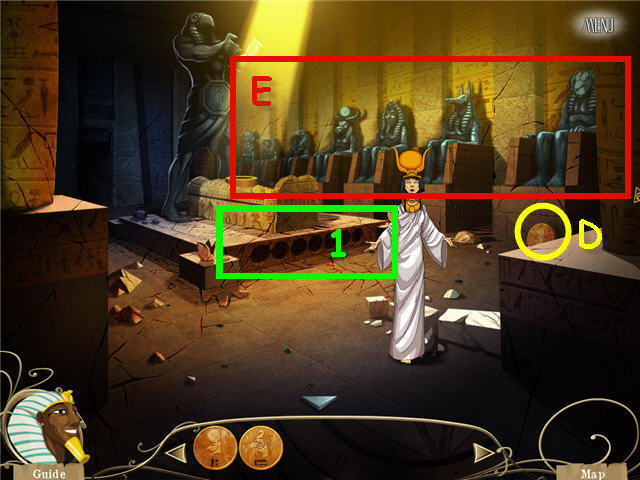
- Take the ISIS (D) medallion.
- Click on each statue (E) to note the order of the gods.
- Examine the base of the sarcophagus (1).
- Arrange the medallions, using the three in inventory also, in the order of the statues along the right wall of the room.
- Solution: From left, ISIS, Thot, Horus, HATHOR, Osiris, Anubis and AMON. See screenshot (F) for solution.
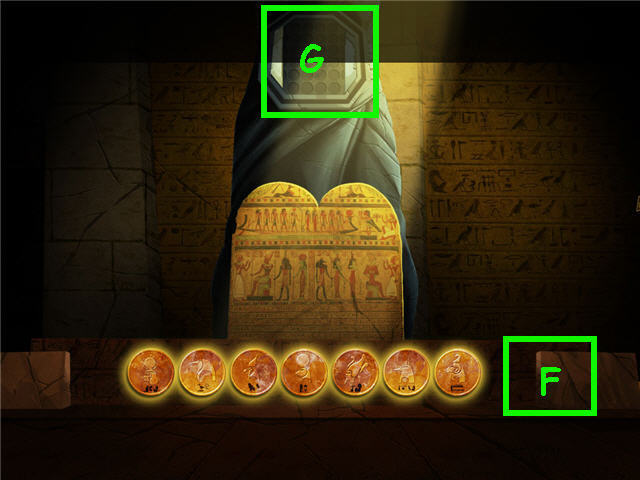
- Examine the mechanism panel (G) on the top of the statue to trigger a puzzle.
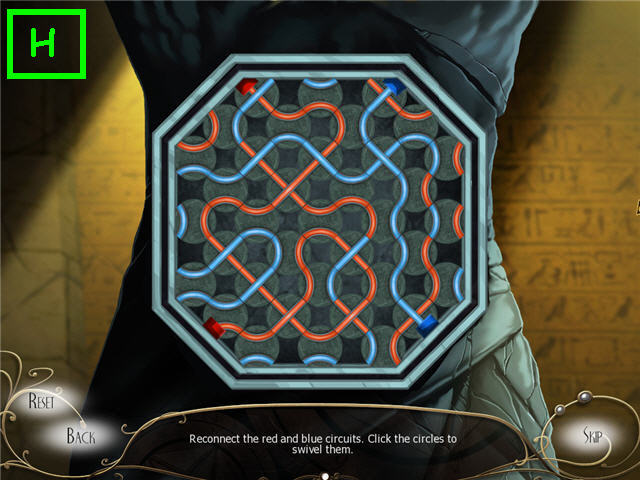
- Connect the red and the blue circuits with a continuous flow by rotating the circles.
- See screenshot (H) for solution.
- Take the OCHRE CHALK (I).
- Back out of the room.
Chapter 5 – The Monk
- Enter the bedroom.
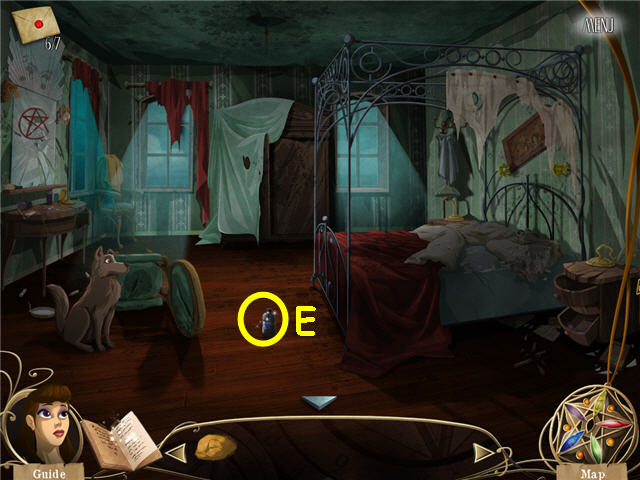
- Examine the nightstand (J) and click on the drawer.
- Speak to the monk.
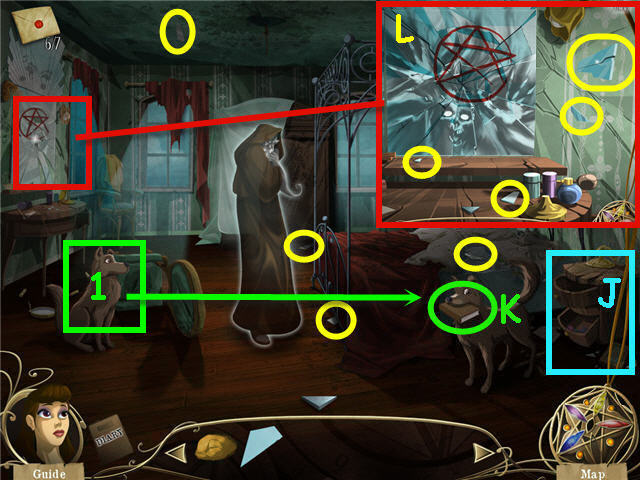
- Click on Isaac, the dog (1) and take the BIBLE (K).
- Give the BIBLE to the monk and get a MIRROR FRAGMENT.
- Click on the bedspread to move it.
- Collect the 4 MIRROR FRAGMENTS circled in yellow.
- Examine the mirror and take the remaining 4 MIRROR FRAGMENTS circled in yellow (L).
- Place the 9 MIRROR FRAGMENTS on the matching shaped slots on the mirror.
- Click on the mirror when complete to trigger a puzzle.
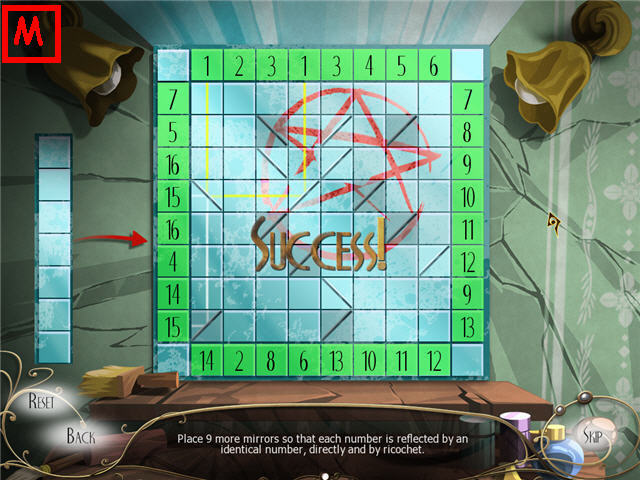
- Place the mirrors on the left on the grid so that each number is reflected by an identical number.
- See screenshot (M) for solution.
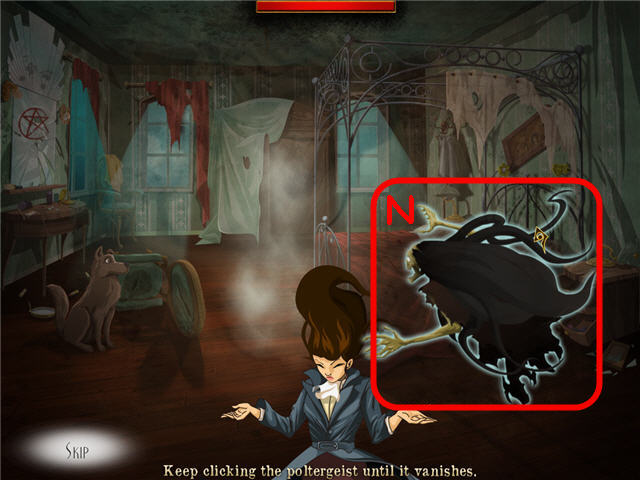
- Click on the poltergeist (N) till he disappears.
- The poltergeists health meter is located on the top of the screen.
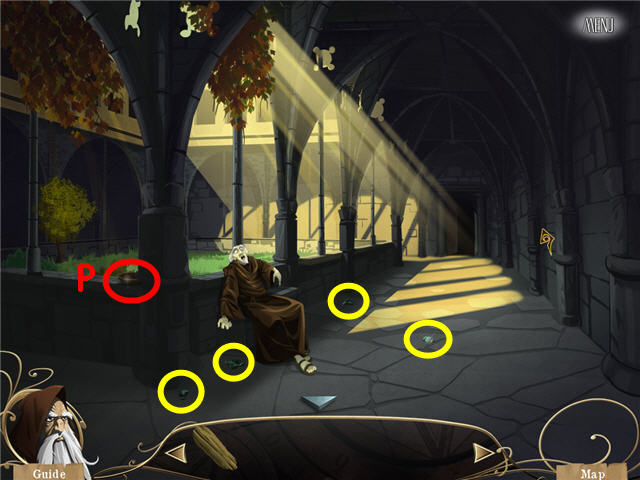
- Head forward to the cloister and speak to the abbot.
- Take the PLATE (P).
- Pick up the bottle fragments (in yellow) and get an EMPTY BOTTLE.
- Head forward to the jail.
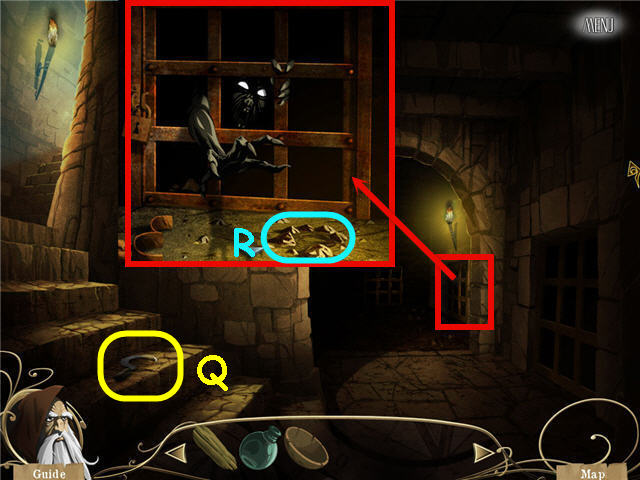
- Take the SICKLE (Q).
- Examine the jail cell and speak to the prisoner.
- Place the PLATE on the ground (R).
- Head back to the countryside to get a plant that looks like a snake head.
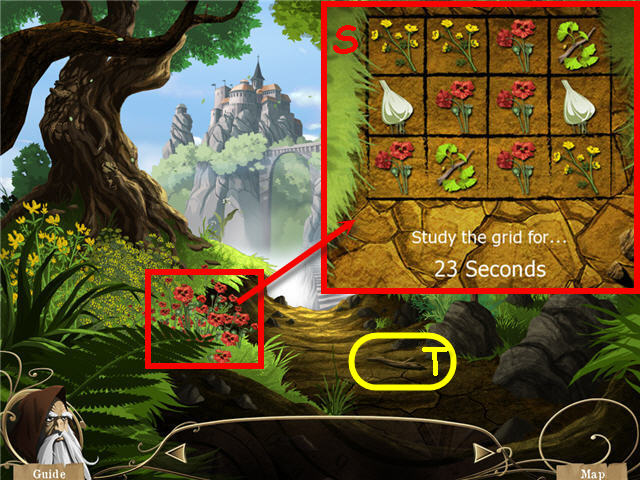
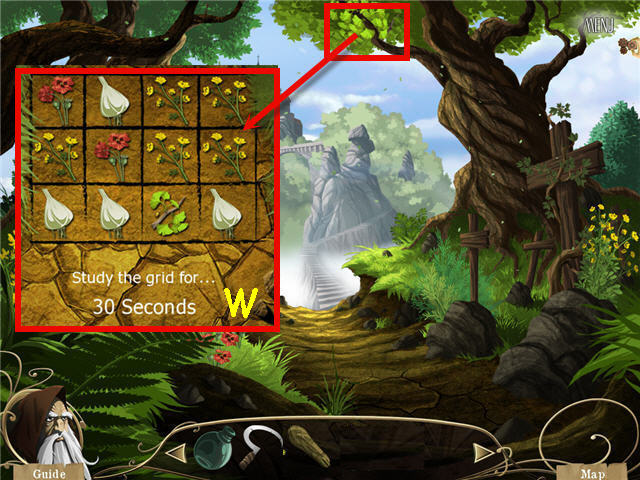
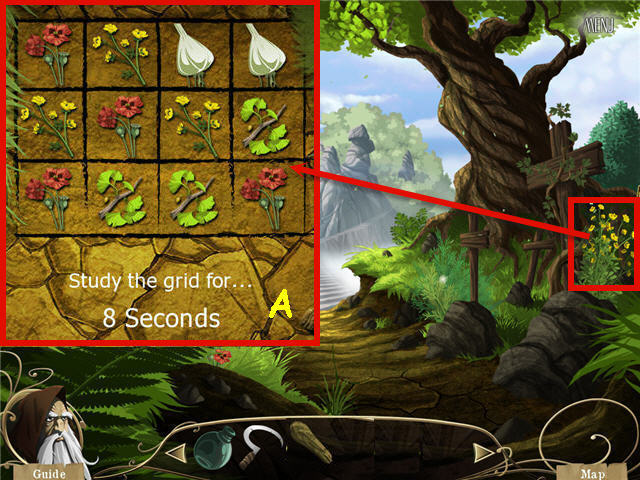
- Use the SICKLE on the red flower to trigger a puzzle.
- Study the grid (S) and then click on the squares that match the question asked. The placements are random.
- Take the PIECE OF WOOD (T).
- Use the SICKLE on the PIECE OF WOOD to get a PESTLE.
- Head to the jail and give the prisoner the RED FLOWER.
- Place the RED FLOWER in the plate.
- Use the PESTLE on the plate to trigger a puzzle.
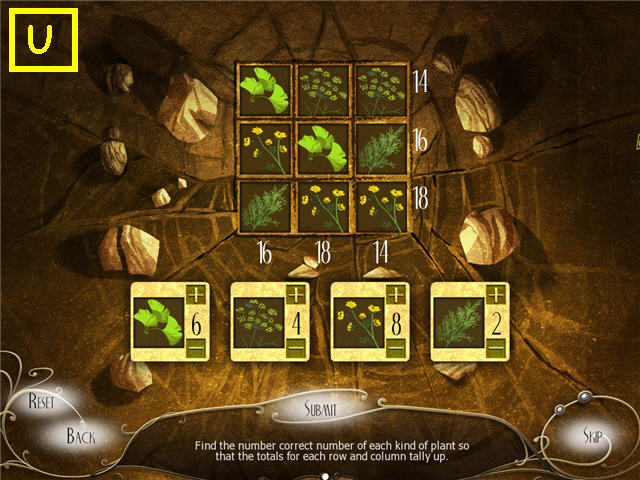
- Find the value of each plant so that they add up to the numbers on the right and bottom.
- Enter the value in the tiles below the grid and click submit.
- See screenshot (U) for my solution, the puzzle is random.
- Head back to the countryside to get a plant that looks like a fan.
- Use the SICKLE on the fan shaped plant to trigger a puzzle.
- Study the random grid (W) and answer the question.
- Get the BRANCH when complete.
- Head to the jail and hand the BRANCH to the prisoner.
- Place the BRANCH in the plate.
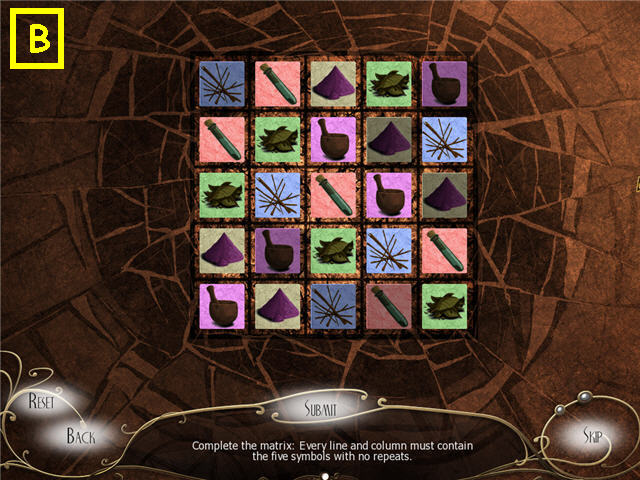
- Use the PESTLE on the plate to trigger a puzzle.
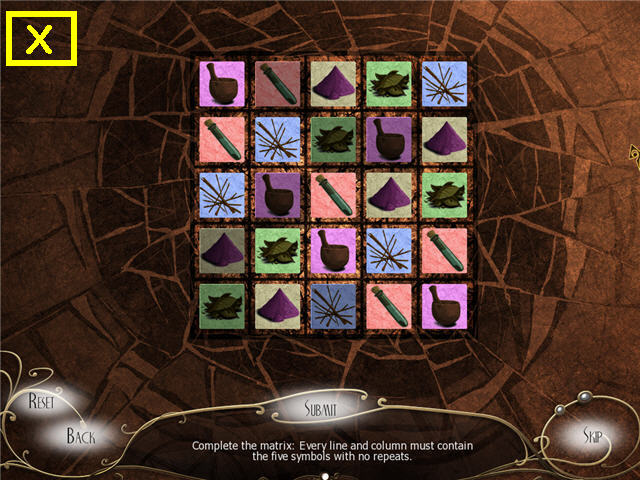
- Place the symbols on the grid so that there are no duplicates in any column or row.
- The original layout is random; see screenshot (X) for my solution.
- Head back to the countryside to get a foul smelling white plant. .
- Use the SICKLE on the white flower to trigger a puzzle.
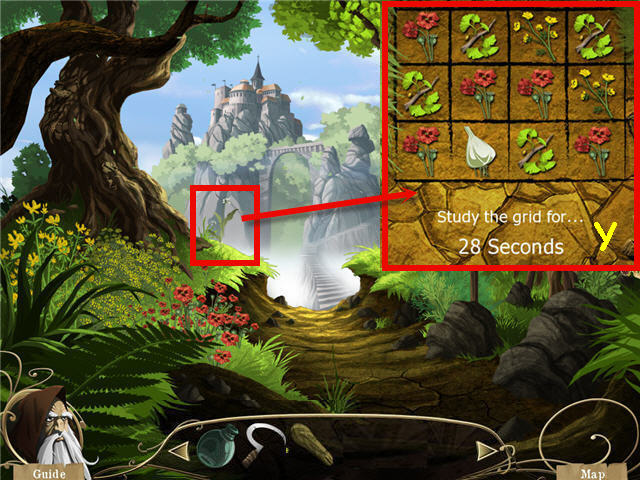
- Study the random grid (Y) and answer the question.
- Get the STRONG SMELLING PLANT when complete.
- Head to the jail and hand the STRONG SMELLING PLANT to the prisoner.
- Place the STRONG SMELLING PLANT in the plate.
- Use the PESTLE on the plate to trigger a puzzle.

- Find the value of each plant so that they add up to the numbers on the right and bottom.
- Enter the value in the tiles below the grid and click submit.
- See screenshot (Z) for my solution, the puzzle is random.
- Head back to the countryside.
- Use the SICKLE on the yellow flower by the crosses to trigger a puzzle.
- Study the random grid (A) and answer the question.
- Get the YELLOW FLOWER when complete.
- Head to the jail and hand the YELLOW FLOWER to the prisoner.
- Place the YELLOW FLOWER in the plate.
- Use the PESTLE on the plate to trigger a puzzle.
- Place the symbols on the grid so that there are no duplicates in any column or row.
- The original layout is random; see screenshot (B) for my solution.
- Take the PREPARATION (C).
- Give the PREPARATION to the prisoner.
- Give the EMPTY BOTTLE to the prisoner.
- Head to the countryside to get a cork.
- Use the SICKLE on the tree (D) to get a CORK.
- In Inventory, use the SICKLE on the CORK to get a CAP.
- Head back to the jail.
- Give the prisoner the CAP and get the BOTTLE CONTAINING CURE.
- Head back to the monk.
- Give the BOTTLE CONTAINING CURE to the abbott.
- Take the FLASK OF HOLY WATER (E).
- Exit the room and walk to the attic door.
Chapter 6 – Nathan
- Take the ENVELOPE 7 OF 7 (F).
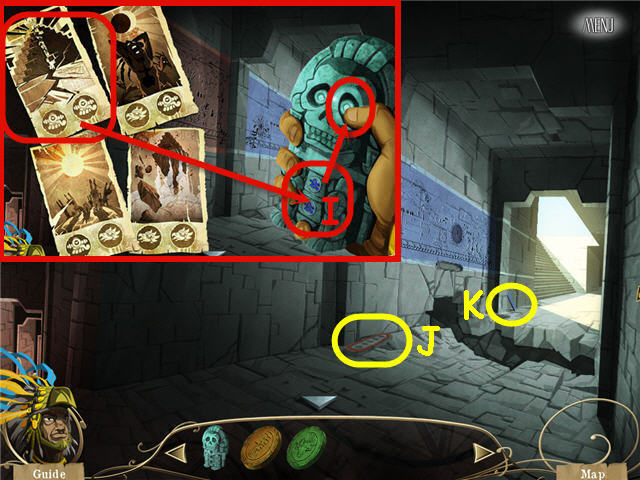
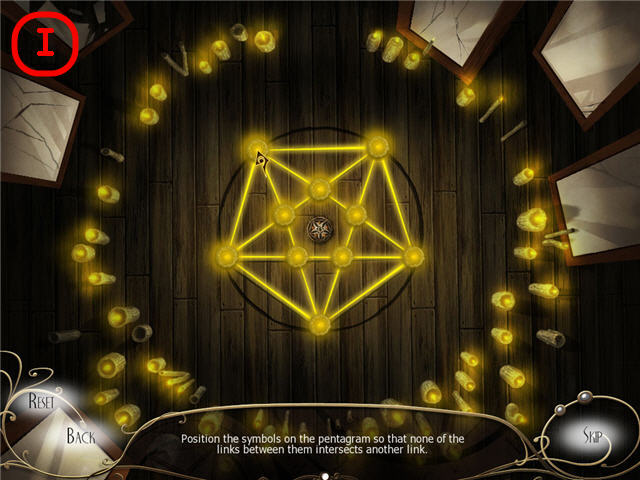
- Use the OCHRE CHALK on the pentagram (G) to trigger a puzzle.

- Enter the correct number of triangles found in the symbol.
- Note that one of the lines in the pentagram is not complete.
- Solution: 30. See screenshot (H) for solution.
- Use the FLASK OF HOLY WATER on the symbol.
- Walk to the attic and automatically get the SOUL PENDENT.
- Examine the ritual ring.
- Place the SOUL PENDANT in the center to trigger a puzzle.
- Detangle the lines so that none of them cross and they reconstruct the pentagram symbol. See screenshot (I) for solution.
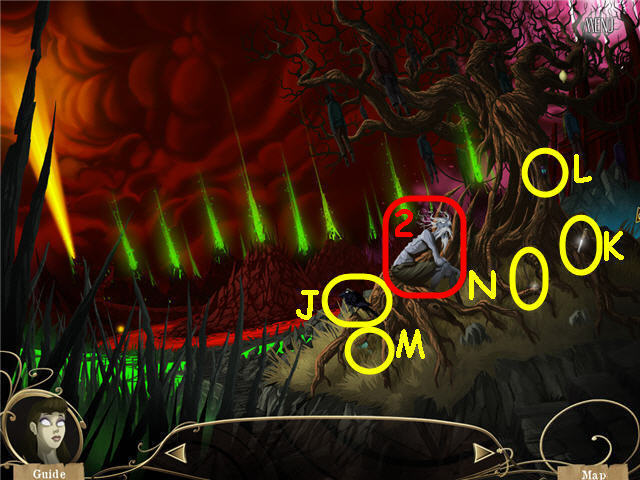
- Speak with Seth (2).
- Take the INJURED CROW (J), KNIFE (K). BEETLE (L), EMPTY HOURGLASS (M) and INCOMPLETE WALKING STICK 1 of 3 (N).
- Head straight twice to the river.
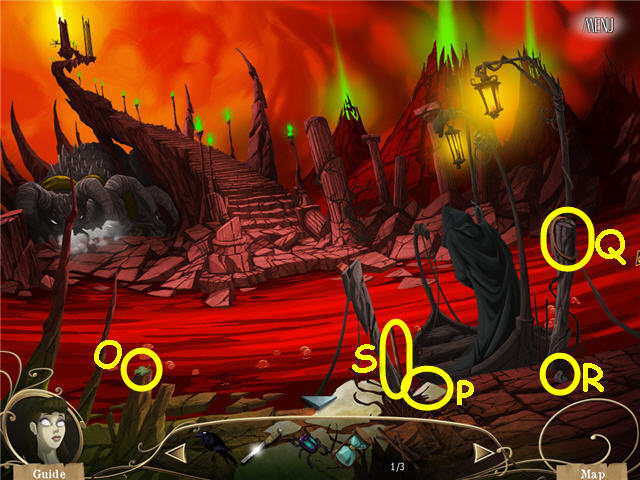
- Take the FOUR LEAF CLOVER (O), SAND (P), STRING (Q), STONE (R), and INCOMPLETE WALKING STICK 2 OF 2 (S) .
- In Inventory, combine the SAND and the EMPTY HOURGLASS to get an HOURGLASS.
- Back out to soul valley.
- Take the BUTTERFLY WING (T), STICK (U), and the INCOMPLETE WALKING STICK 3 of 3 (V) to get a WALKING STICK.
- Use the KNIFE on the cliff to get an EYEBALL (W).
- Take the HEART (X).
- In inventory, combine the STICK, STRING and STONE to get an ARMED SLINGSHOT.
- Back out to the tree of the hanged.
- Used the ARMED SLINGSHOT on the lemon (Y) and take the fallen LEMON from the ground.
- Head to soul valley.
- Click on the hands on the bottom to raise a soul (Z) and give the soul a HEART, a FOUR LEAF CLOVER and a BEETLE.
- Click on the hands to raise a soul (A) and give him an EYEBALL, INJURED CROW and an HOURGLASS.
- Click on the hands to raise a soul (B) and give the soul a BUTTERFLY WING and the WALKING STICK.
- Use the LEMON on the foul smoke (#) to get a ROTTEN LEMON.
- Give the ROTTEN LEMON to the soul.
- Click on the hands to raise a soul (C).
- Head back to the tree of the hanged and speak to Seth.
- Automatically get a GOLD COIN.
- Head forward twice to the River Styx.
- Give the GOLD COIN to the boat man (D).
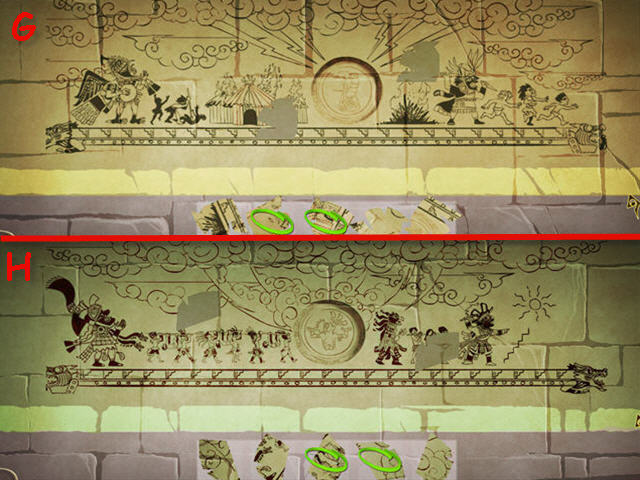
- Click on the wall on the top of the stairs to trigger a puzzle.
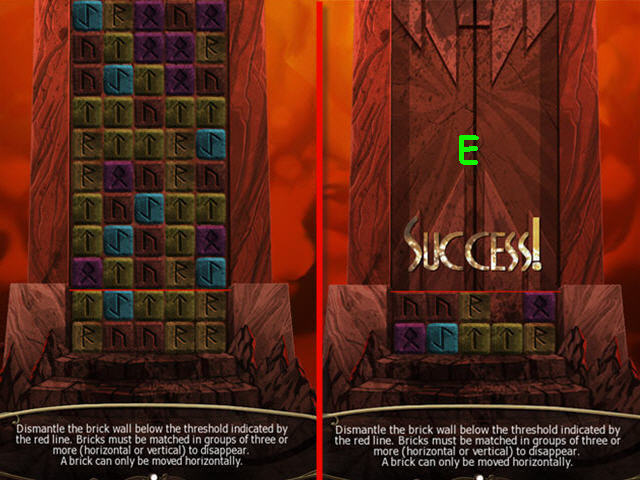
- Click and drag a block to make sets of three blocks to remove them.
- All bricks must be removed to below the red line to complete the puzzle (E).
- You may only move a brick horizontally but you can move a brick more than one space over and you can drop them into an empty space to fall to a lower column.
- Congratulations! You have successfully completed Age of Enigma: The Secret of the Sixth Ghost.
Created at: 2011-08-24