

Walkthrough Menu
- General Tips
- Chapter 1: The Magician's House
- Chapter 2: Outside
- Chapter 3: The Cave
- Chapter 4: The Cottage
- Chapter 5: The Castle
- Chapter 6: The Ship
- Chapter 7: The Town
- Chapter 8: The Ship - 2nd visit
- Chapter 9: The Cave - 2nd visit
- Chapter 10: Outside - 2nd visit
- Chapter 11: The Magician's House
General Tips
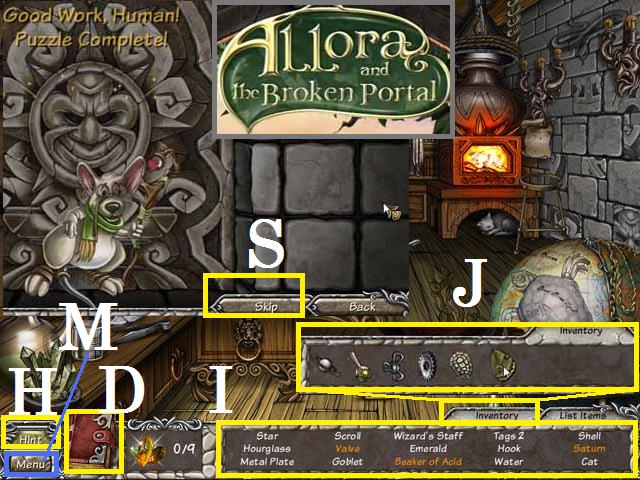
- When the cursor changes to an eyeball you will need another item to use with it.
- Some items will be needed to obtain the CRYSTALS and RUNES.
- When you enter a room an item list (I) will be populated. Any item in yellow will be needed later and will automatically be added to your inventory (J) once it is picked up.
- You can switch between your item list and inventory list at any time.
- You do not need to wait until you are done with a scene or item list to use an inventory item and or change scenes.
- Click on the Menu (M) button in the lower right corner to exit, pause or resume the game. You can also adjust your options (sound, music, and screen size).
- The Hint Button (H) will show you where a hidden object is, or reveal the next step.
- You can use the Journal (D) to see current tasks and info.
- When playing a mini-game you can use the skip button (S) once it is full.
- All the ITEMS are marked in green in the screenshots for this walkthrough.
- Each time you play a Hidden Object Scene the items in the inventory list may change. The screenshots in this walkthrough show the items as listed during our play.
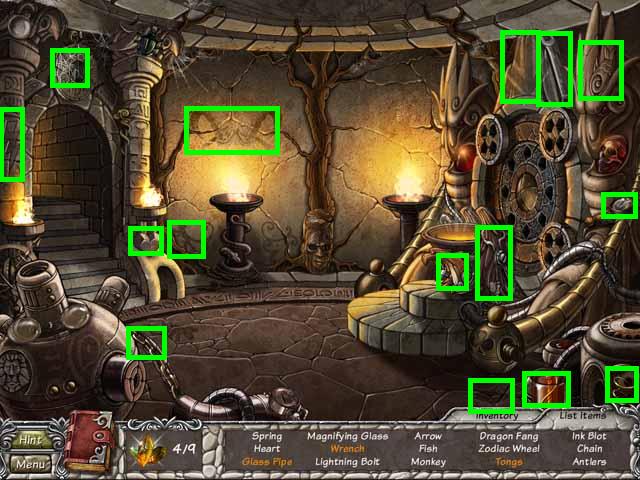
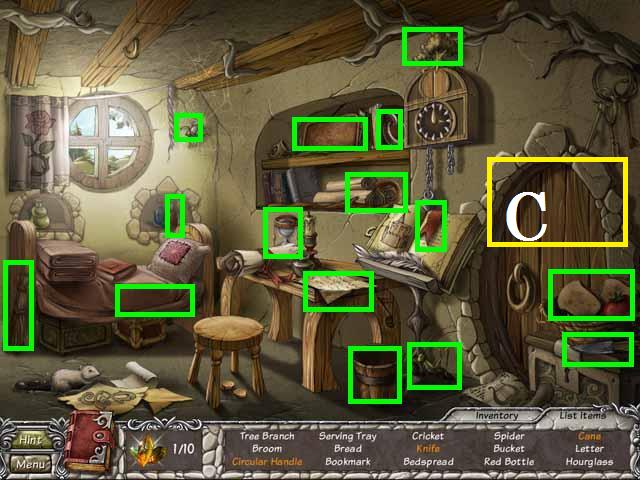
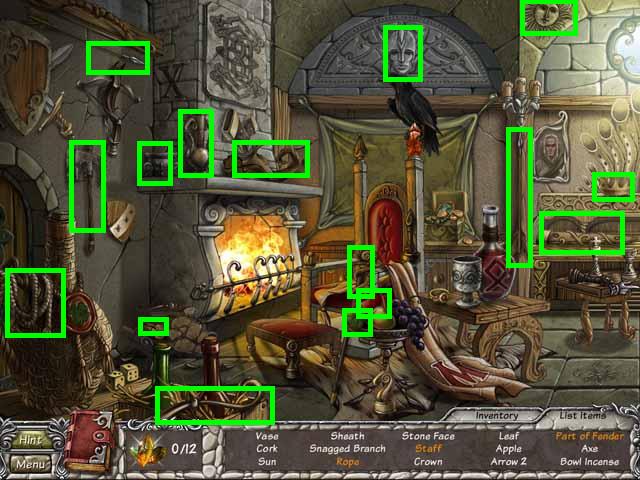
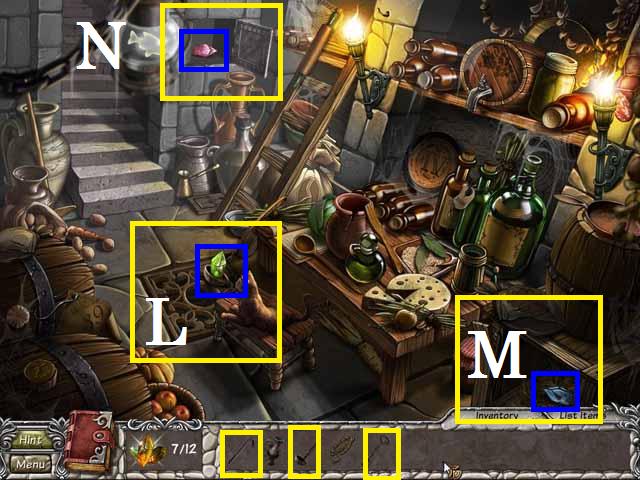
Chapter 1: The Magician's House
- Pick up all of the items in the list. They are all marked in green in this walkthrough.
- The VALVE, BEAKER of ACID, and SATURN will be added to your inventory list.
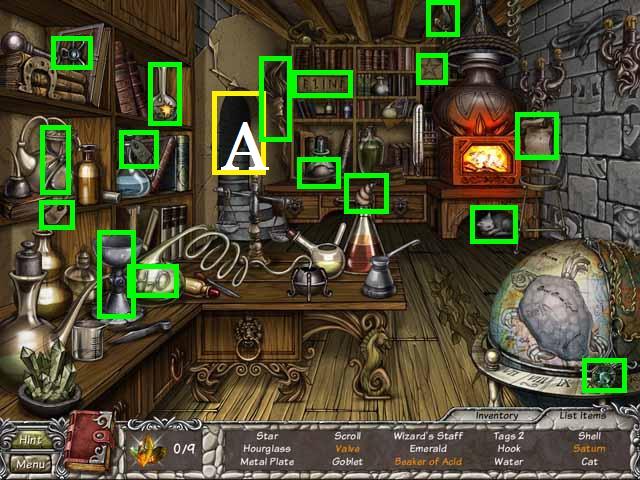
- Go upstairs (A).
- Pick the entire list of items (green).
- The BUTTERFLY'S WING, GEAR, and TORTOISE SHELL will be added to your inventory.
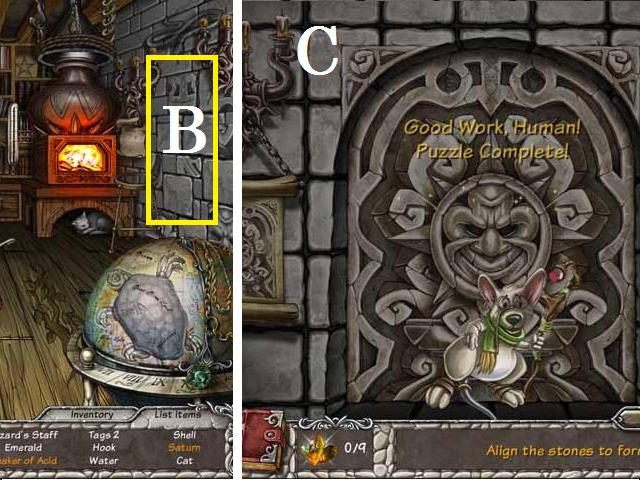
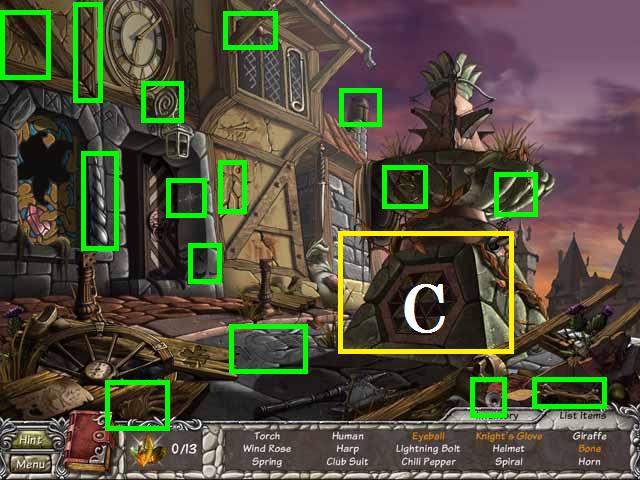
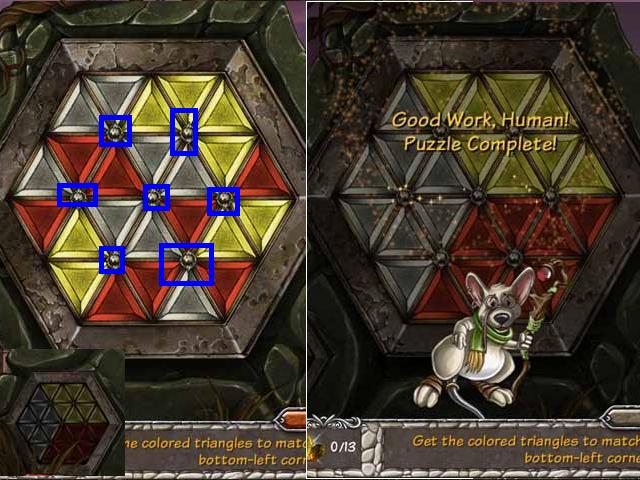
- Go back down stairs and click on the left wall (B).
- Solve the puzzle by rotating each tile until you have the image (C) as shown in the screenshot.
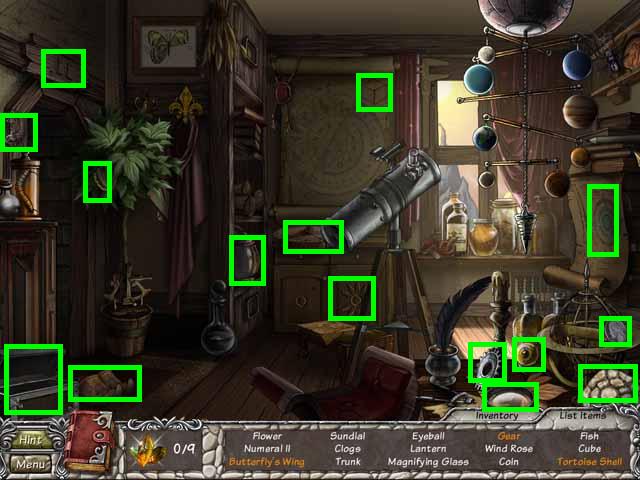
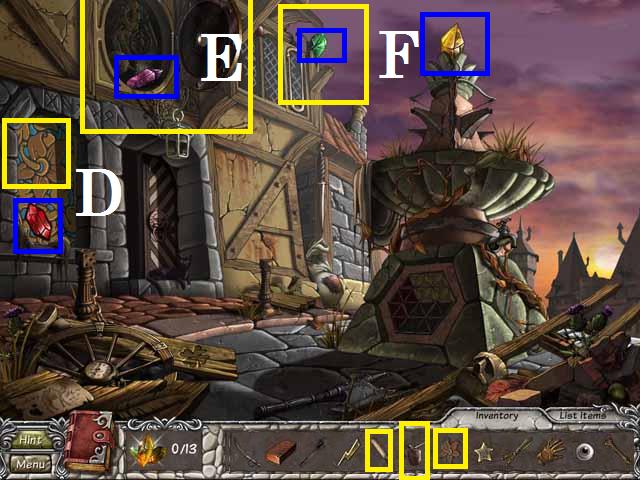
- Enter the room through the doorway (D).
- Pick the entire list of items (green).
- The GLASS PIPE, WRENCH, and TONGS will be added to your inventory.
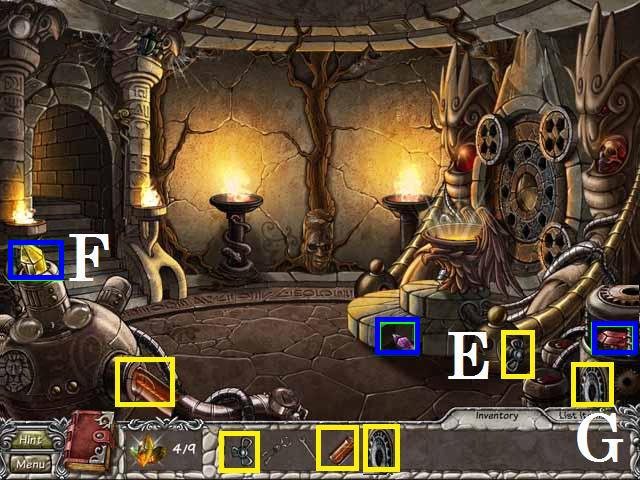
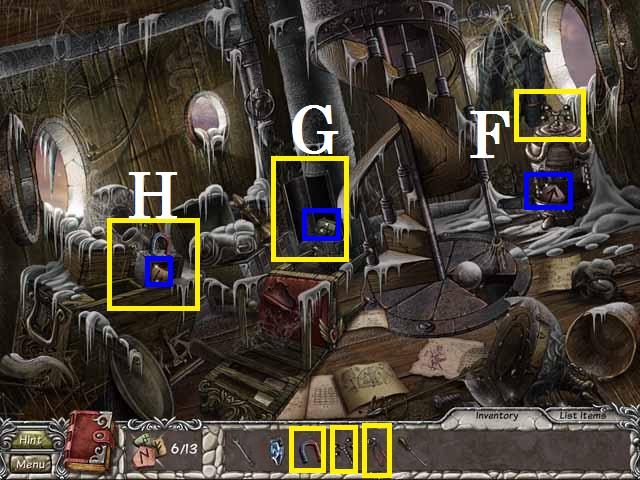
- Place the GEAR on the machine (E).
- Place the GLASS PIPE on the metal ball (F).
- Place the VALVE on the machine (G) as seen in the screenshot.
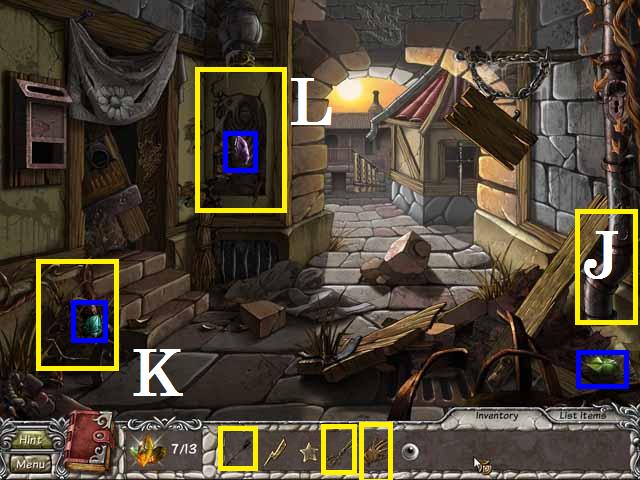
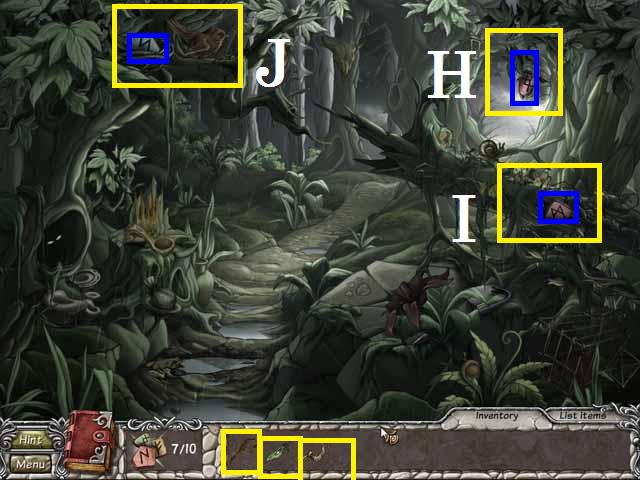
- Pick up the three CRYSTALS all marked in blue in the screenshot.
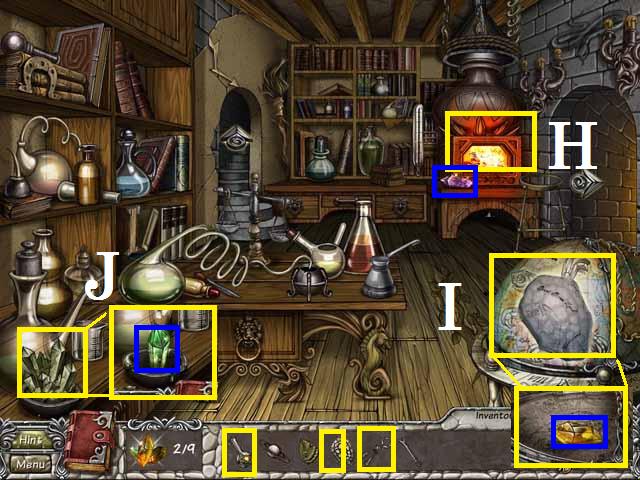
- Go back one room and use the TONGS on the furnace (H).
- Place the TORTOISE SHELL on the tortoise (I) and pour the BEAKER of ACID on the crystal cluster (J).
- Pick up the three CRYSTALS all marked in blue in the screenshot.
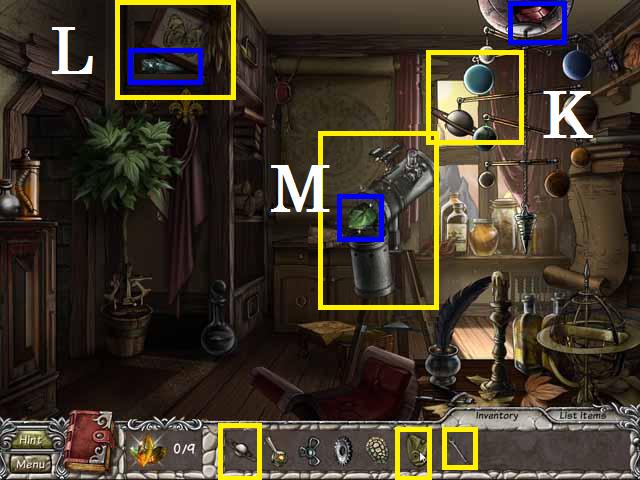
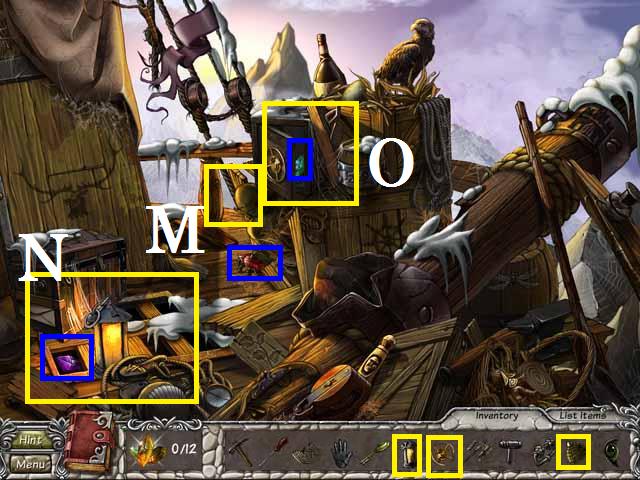
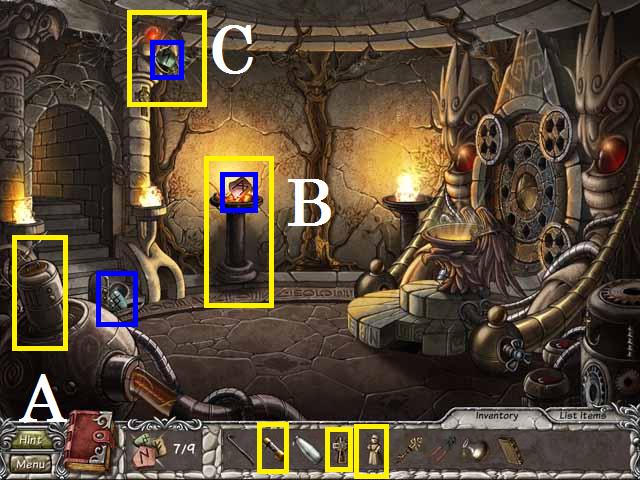
- Go back upstairs and place the SATURN on the planet mobile (K), the BUTTERFLY”S WING on the butterfly (L), and the WRENCH on the telescope (M).
- Pick up the three CRYSTALS all marked in blue in the screenshot.
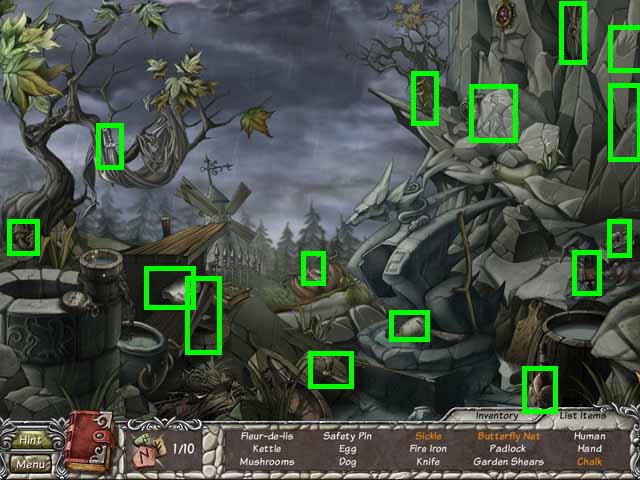
Chapter 2: Outside
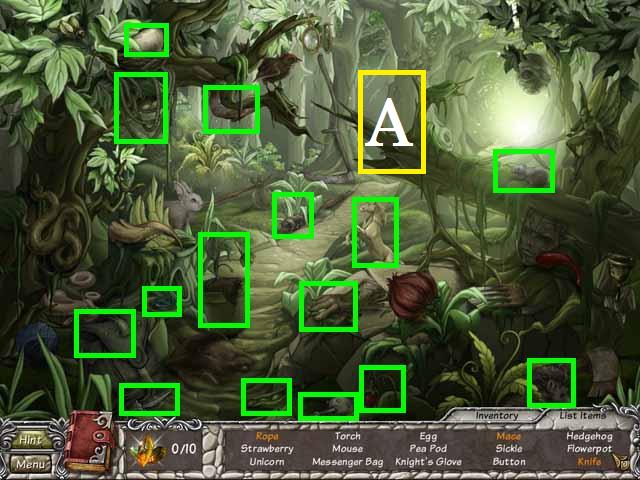
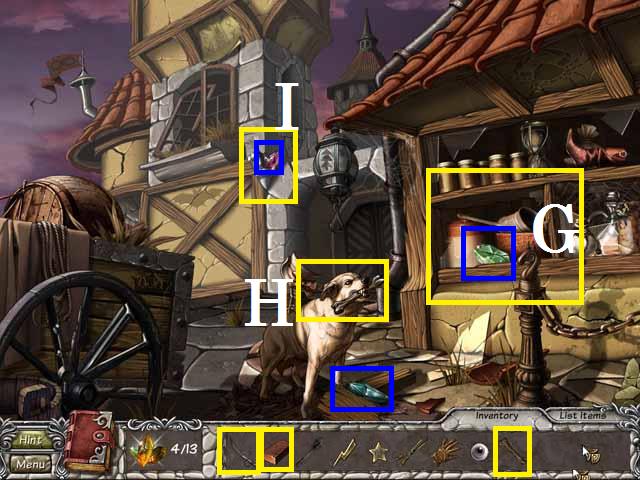
- Pick the entire list of items (green).
- Move down the path (A) to the park.
- Pick the entire list of items (green).
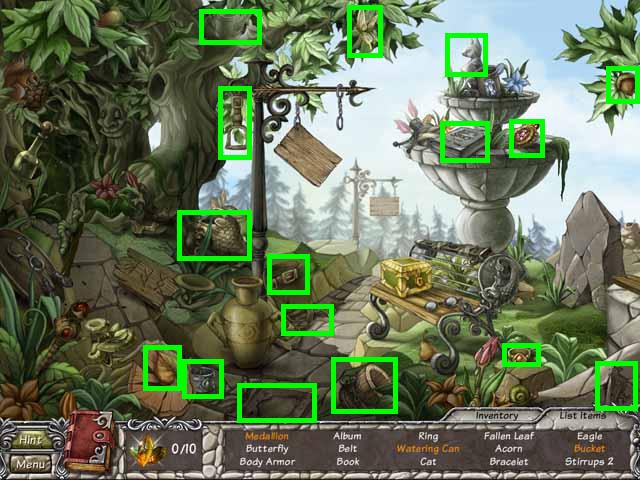
- Exit the park to the left to the mountains.
- Pick the entire list of items (green).
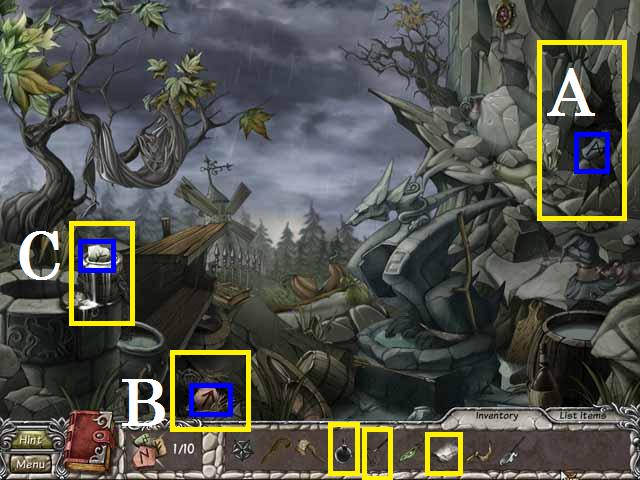
- Zoom into the broken statue (B).
- Pick up the broken pieces piled around the statue and place them on the matching outlines as seen in the screenshot (C).
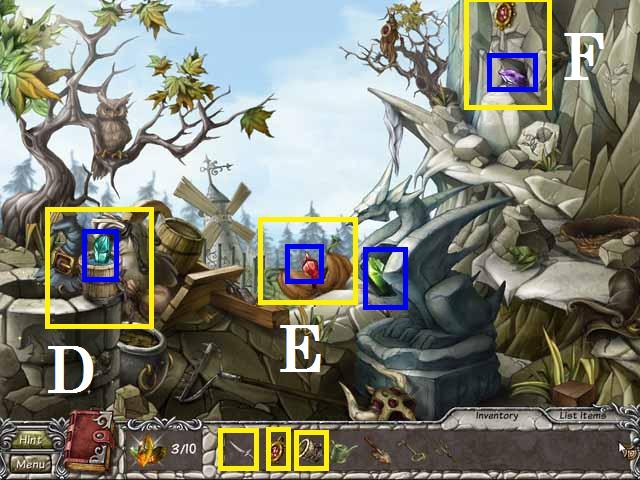
- Place the on the BUCKETT in the well (D) and carve the pumpkin (E) with the KNIFE.
- Place the MEDALLION on the cliff (F).
- Pick up the four CRYSTALS all marked in blue in the screenshot.
- In the park move the rock (G) with the ROPE, open the box (H) with the KEY and break the jar (I) with the MACE.
- Pick up the three CRYSTALS all marked in blue in the screenshot.
- Return to the path and move the snake (J) with the PITCHFORK.
- Dig the dirt (K) with the SHOVEL and water the plant (L) with the WATERING CAN.
- Pick up the three CRYSTALS all marked in blue in the screenshot.
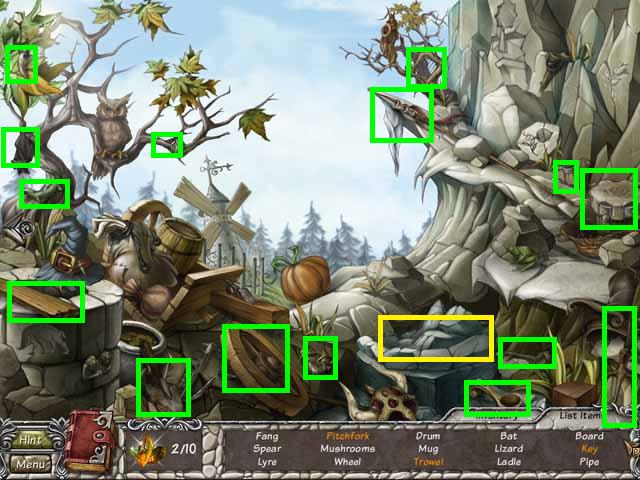
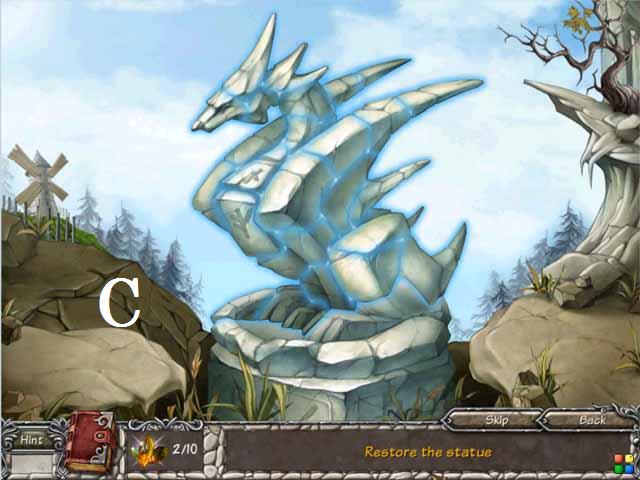
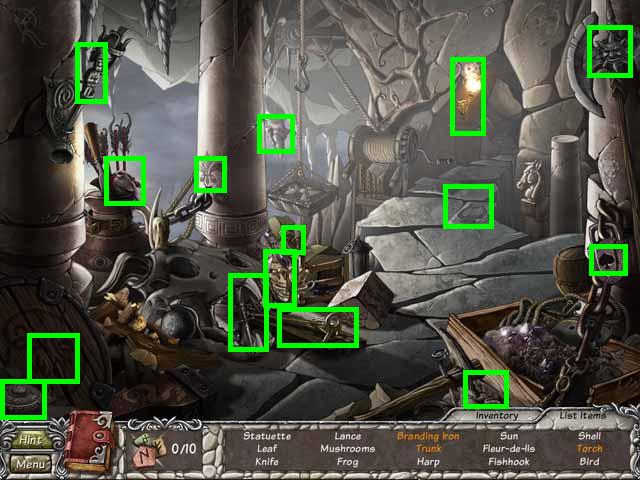
Chapter 3: The Cave
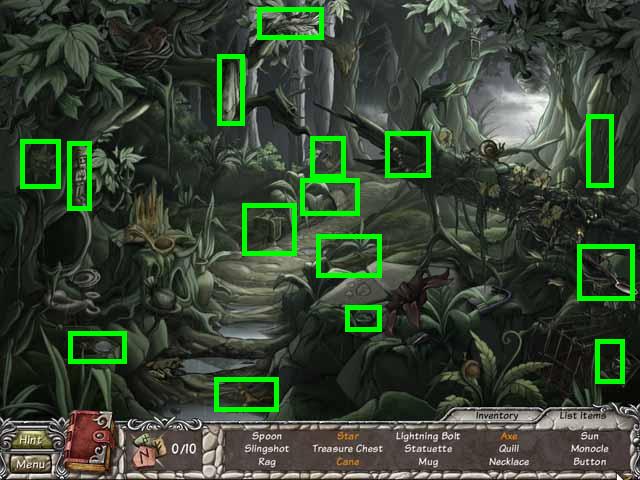
- Pick the entire list of items (green).
- Enter the path through the tunnel (A).
- Pick the entire list of items (green).
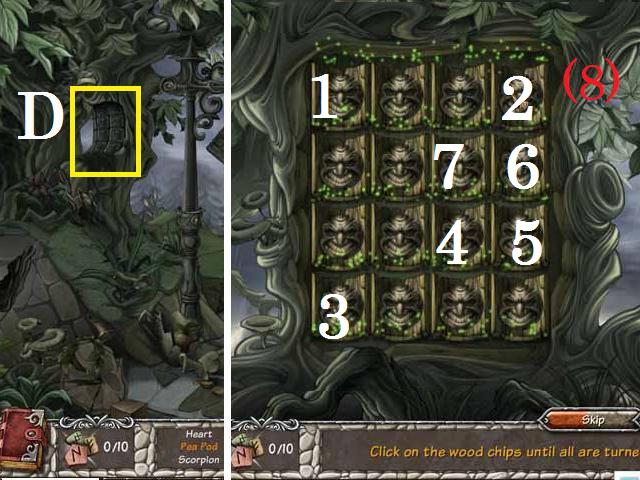
- Click on the tomb door (B).
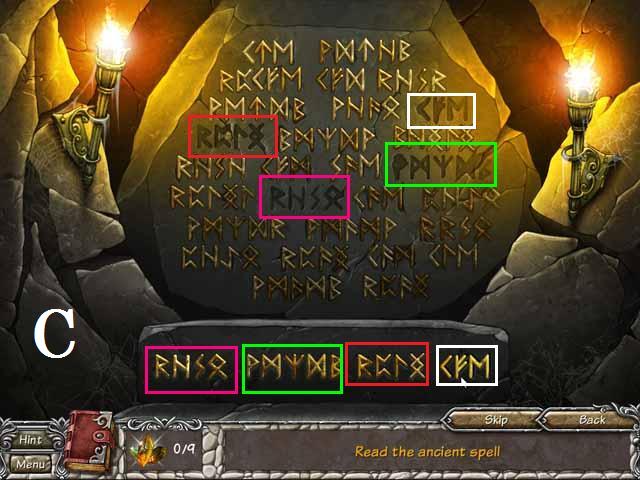
- Solve the puzzle by dropping the correct configuration of letters over the outlines as seen in the screen shot (C).
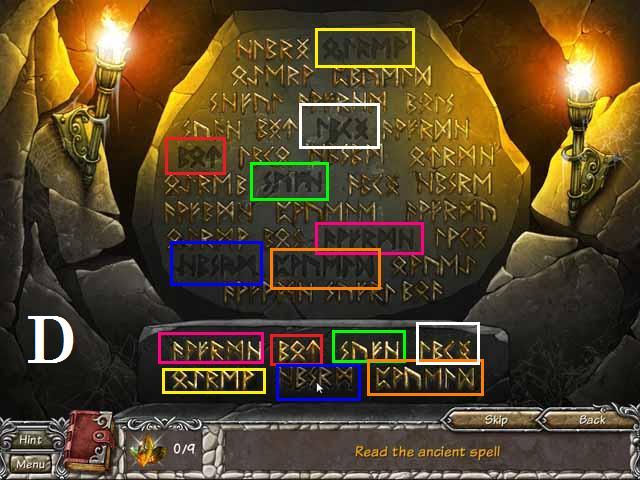
- Repeat this again (D).
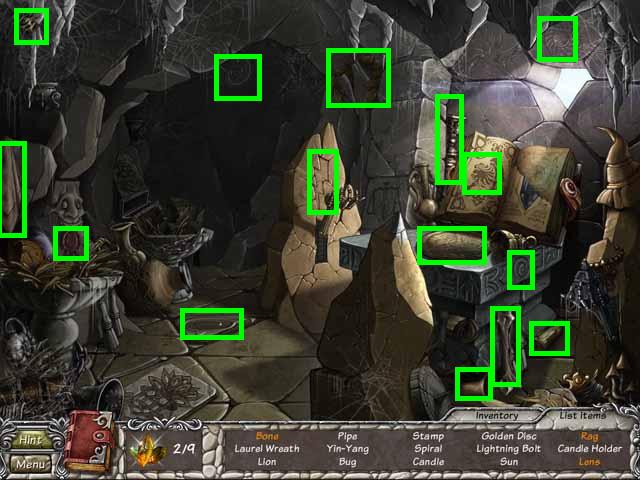
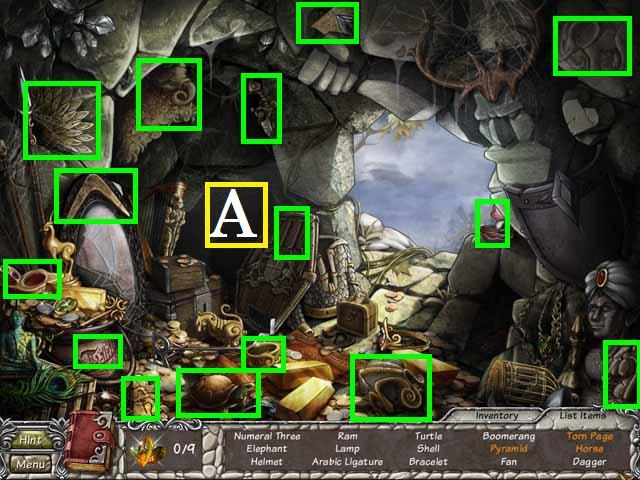
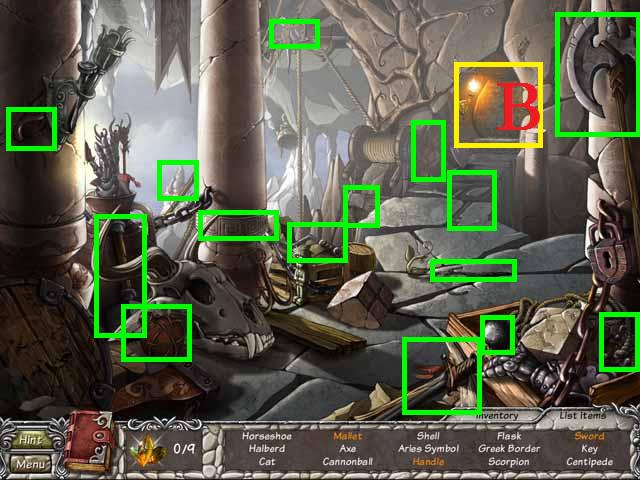
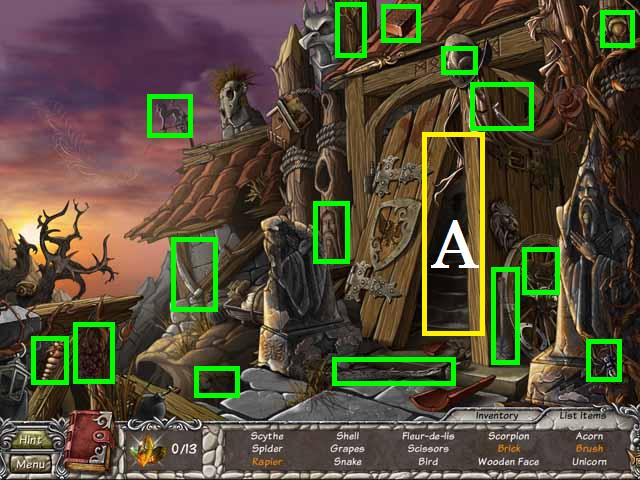
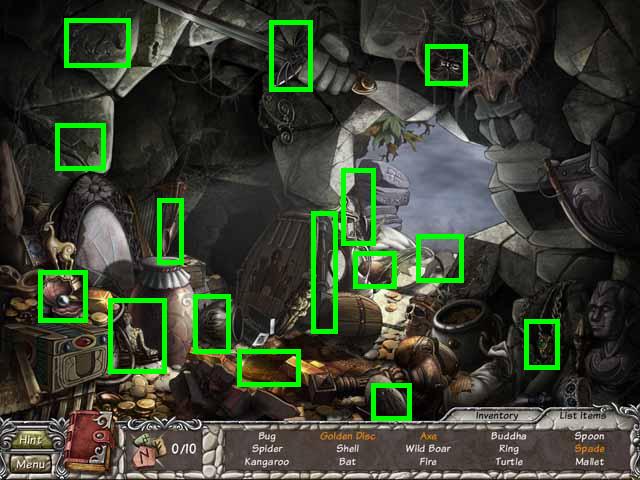
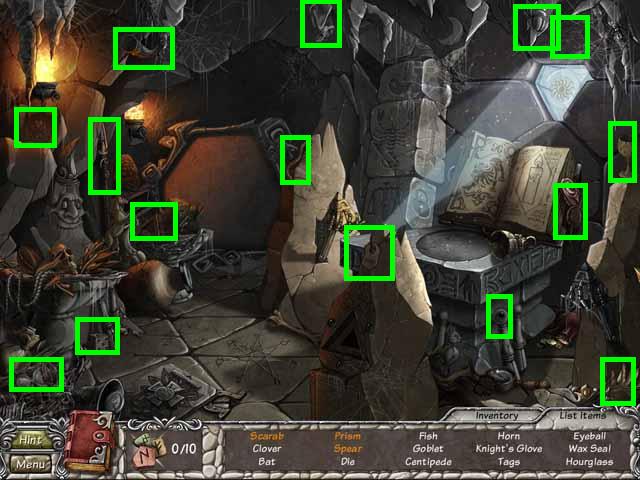
- Enter the tomb and pick the entire list of items (green).
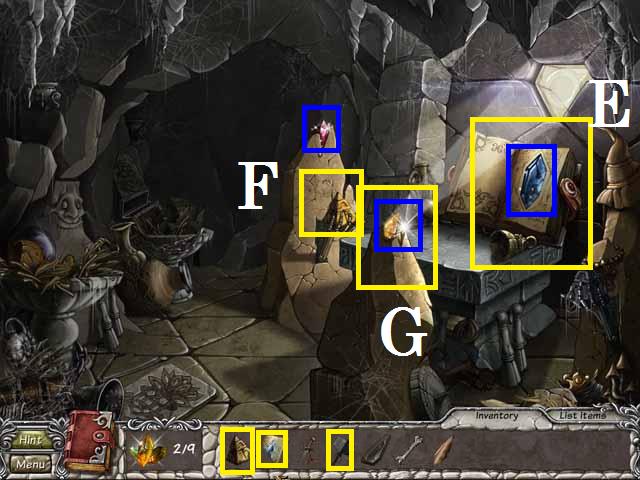
- Place the on the TORN PAGE on the book (E), and the PYRAMID on the skeleton arm (F).
- Place the LENS on the window (G) and pick up the three CRYSTALS (blue).
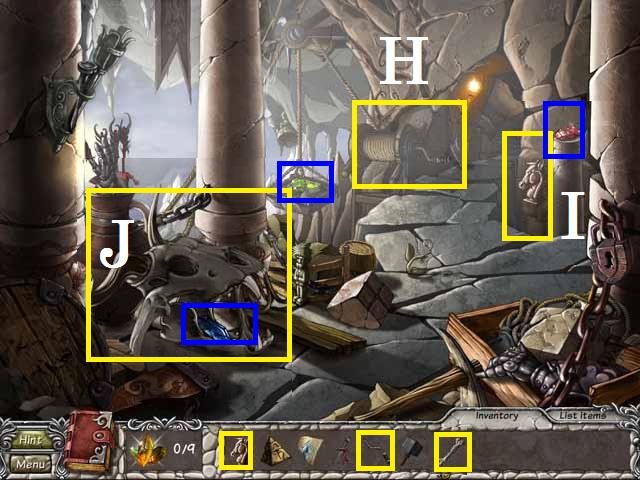
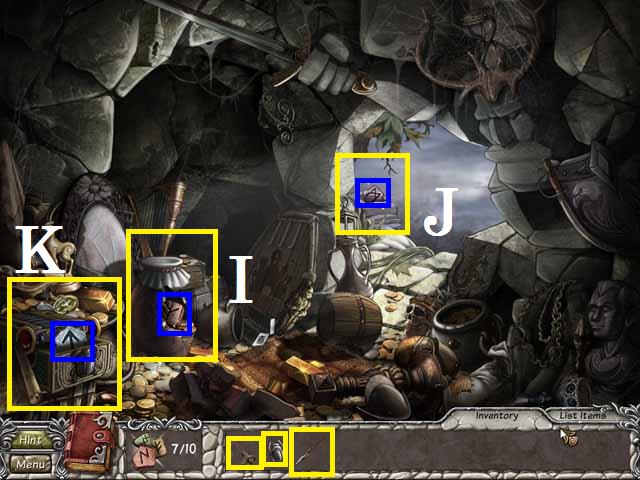
- Exit the tomb and place the HANDLE on the crank (H), and the HORSE on the pillar (I).
- Place the BONE on the skull (J) and pick up the three CRYSTALS (blue).
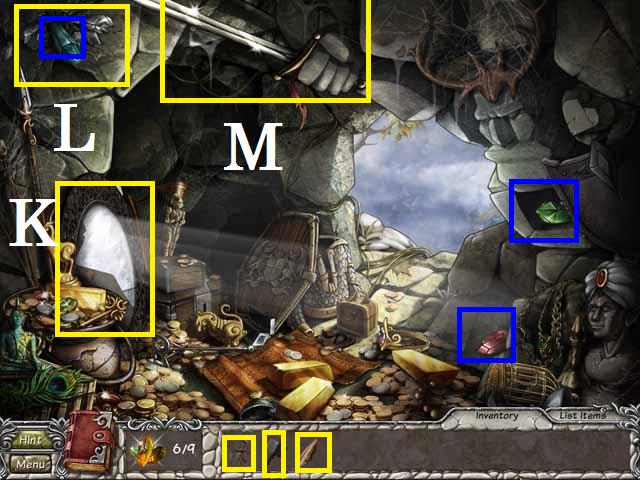
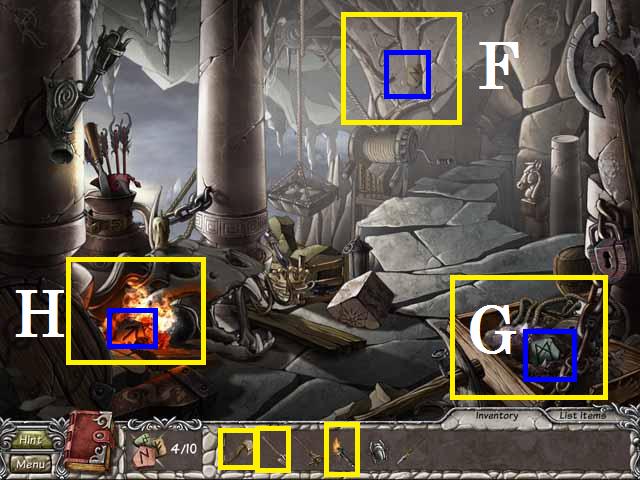
- In the cave clean the mirror (K) with the RAG and the break the crystal cluster (L) with the MALLOT.
- Place the SWORD in the stone hand (M) and pick up the three CRYSTALS (blue).
Chapter 4: The Cottage
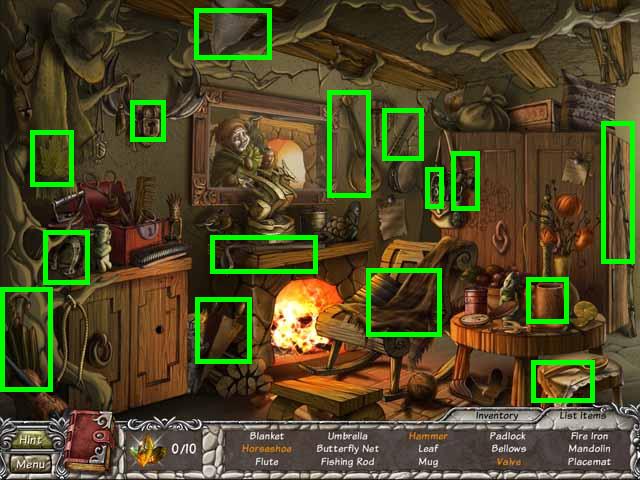
- Pick the entire list of items (green).
- Enter the bedroom to the right and pick the entire list of items (green).
- Enter the kitchen through the door (C).
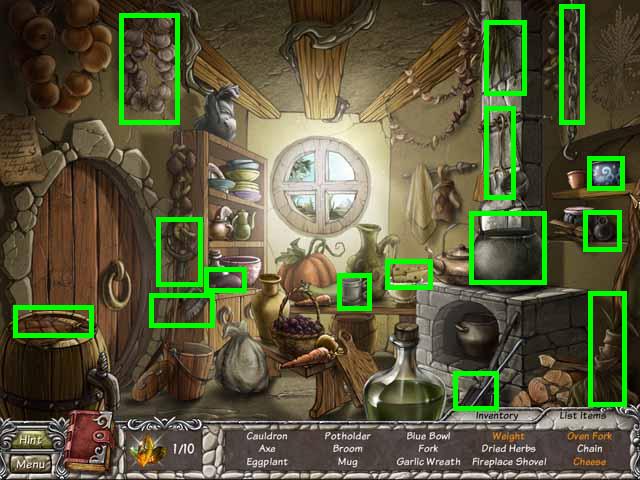
- Pick the entire list of items (green).
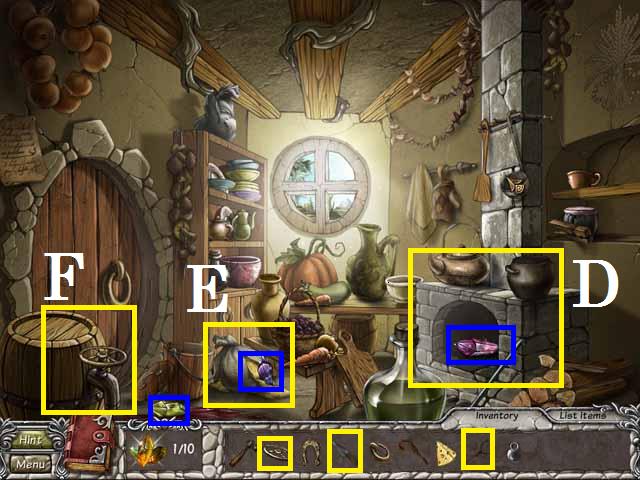
- Move the pot (D) with the OVEN FORK and cut open the grain bag (E) with the KNIFE.
- Place the VALVE on the wine cask (F) and pick up the three CRYSTALS (blue).
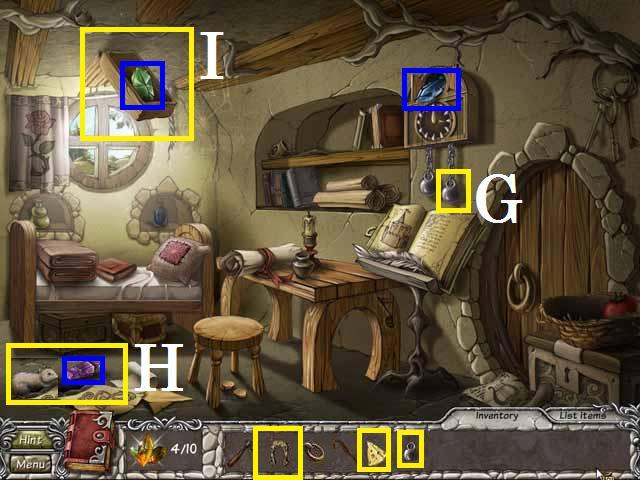
- In the bedroom, place the WEIGHT on the clock (G) and the CHEESE in front of the mouse (H).
- Place the HORSESHOE on the ceiling beam (I).
- Pick up the three CRYSTALS (blue).
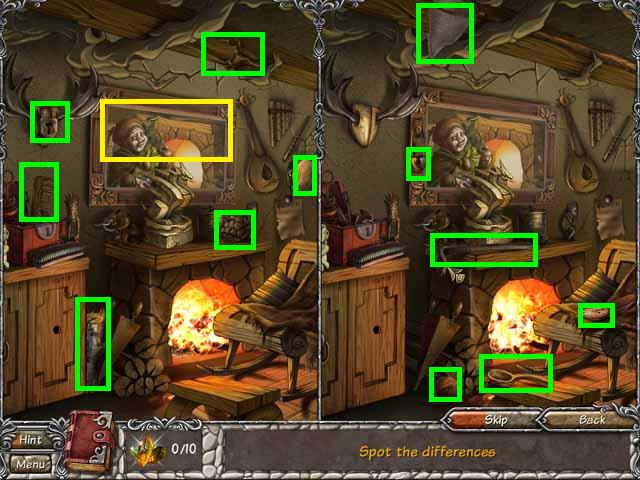
- In the living room, zoom into the painting (A).
- Find all of the differences in each side as seen in the screenshot.
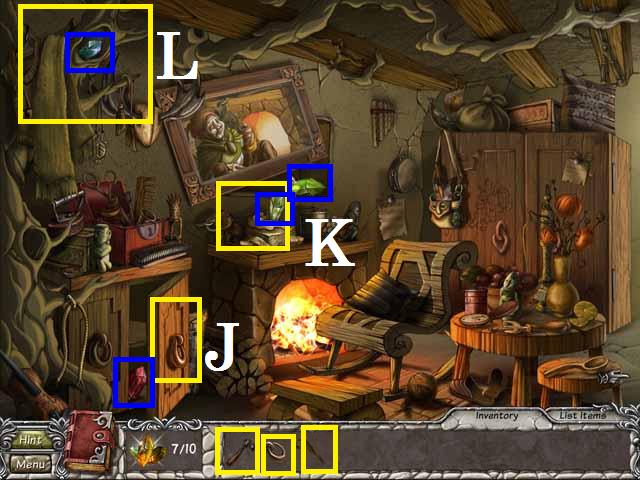
- Open the cabinet (J) with the HANDLE and smash the statue (K) with the HAMMER.
- Drop the CAIN over the hat (L) and pick up the four CRYSTALS (blue).
Chapter 5: The Castle
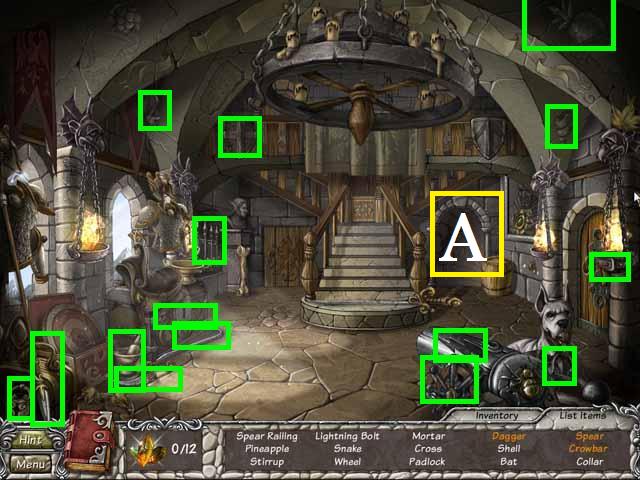
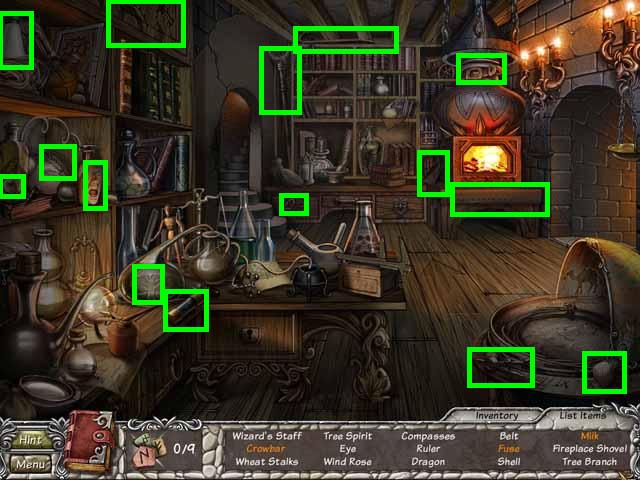
- Pick the entire list of items (green).
- Go to the cellar through the stairway (A).
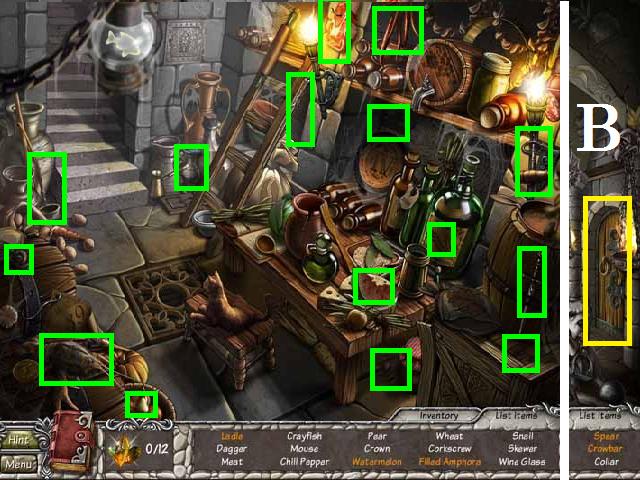
- Pick the entire list of items (green).
- Go back upstairs and enter the main room through the door (B).
- Pick the entire list of items (green).
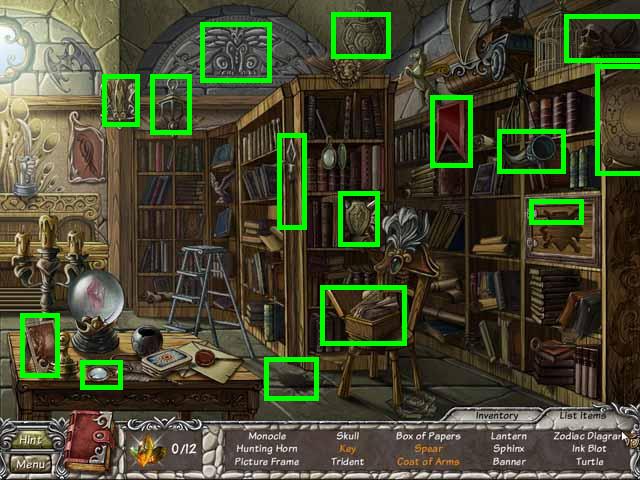
- Go to the study to the right and pick the entire list of items (green).

- Place the COAT of ARMS on the shelve panel (C), and break the magic ball (D) with the STAFF.
- Move the stone (E) with the SPEAR and pick up the three CRYSTALS (blue).
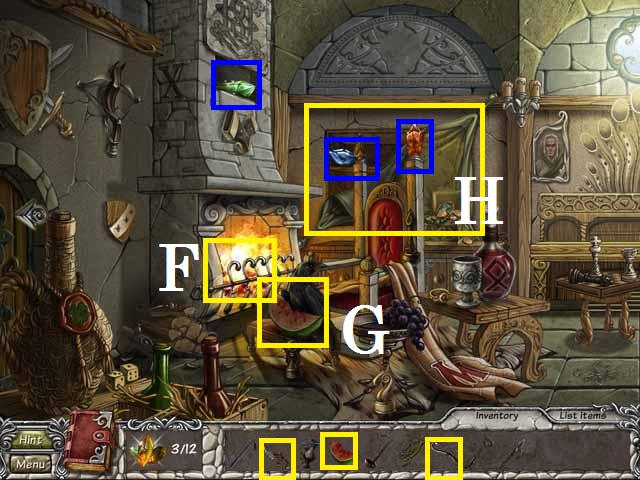
- In the main room place the PART of FENDER on the fireplace (F) and the WATERMELON on the footstool (G).
- Cut the curtain (H) with the DAGGER and pick up the three CRYSTALS (blue).
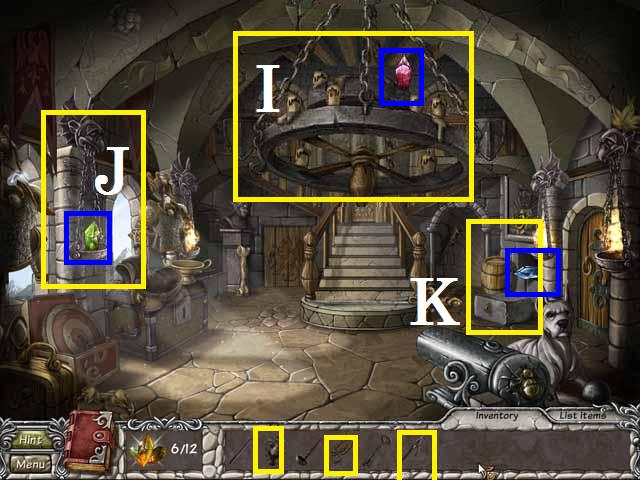
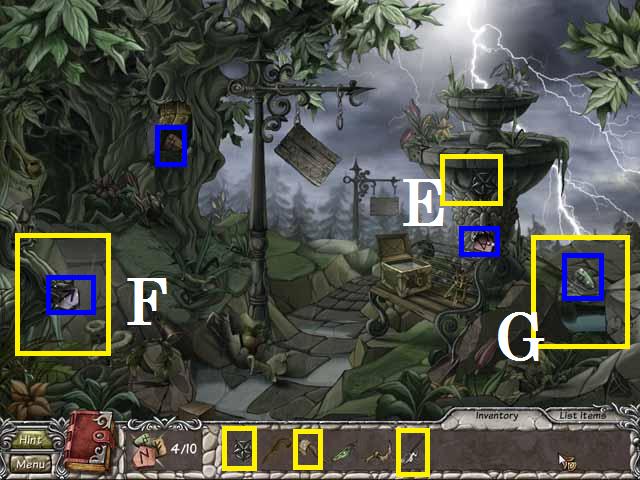
- In the entryway, pull the chandelier (I) down with the hooked SPEAR.
- Pour the FILLED AMPHORA over the fire (J) and use the rope on the wall (K).
- Pick up the three CRYSTALS (blue).
- In the cellar use the LADLE on the floor grate (L) and the CROWBAR on the crate (M).
- Unlock the wall panel (N) with the KEY and pick up the three CRYSTALS (blue).
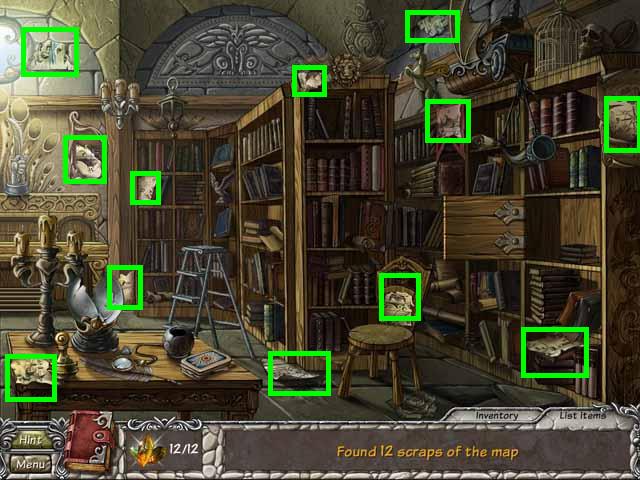
- Pick up the twelve MAP PIECES marked in green in the screenshot.
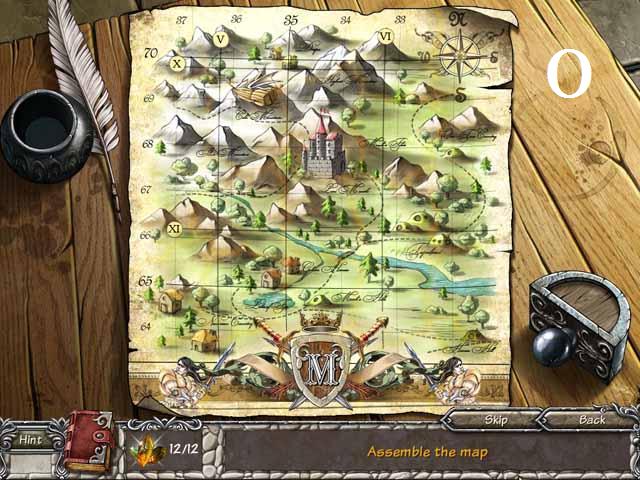
- Assemble the map as shown in the screenshot (O).
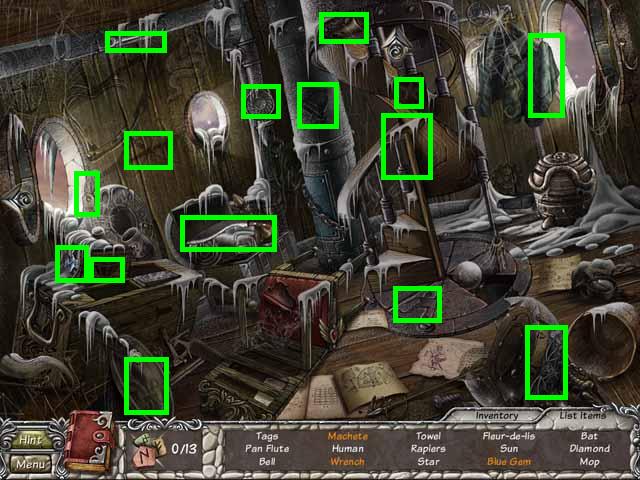
Chapter 6: The Ship
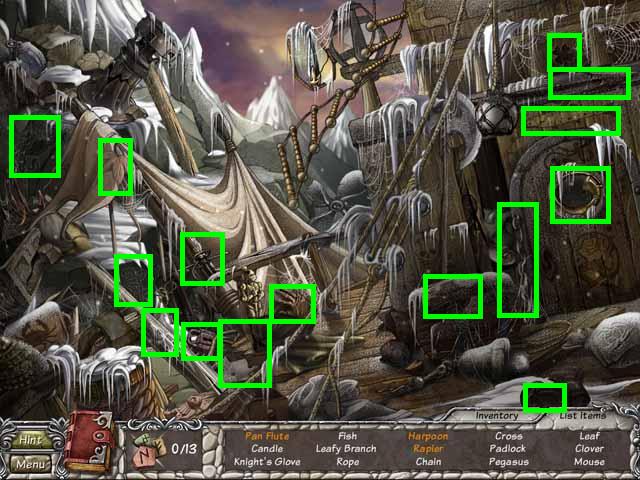
- Pick the entire list of items (green).
- Move to the front of the boat at right screen.
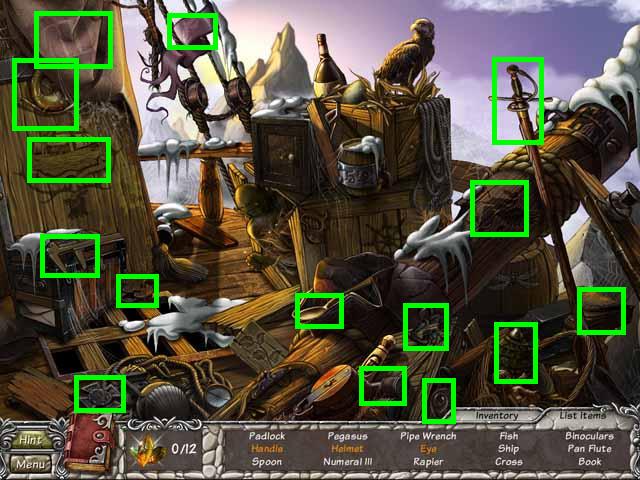
- Pick the entire list of items (green).
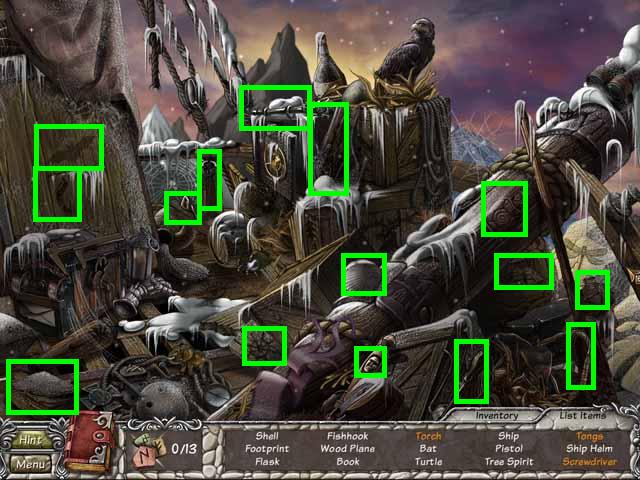
- Go back one screen and enter the cabin (A).
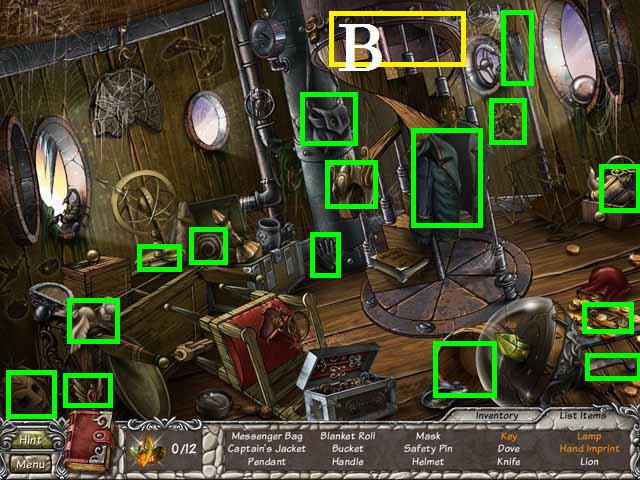
- Pick the entire list of items (green).
- Try to go up the stairs (B).
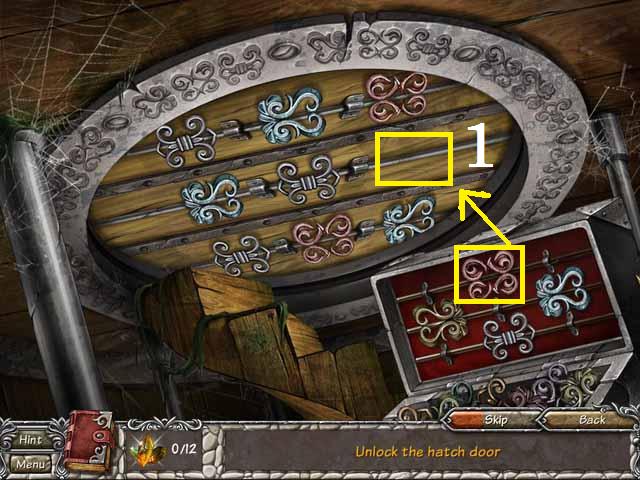
- Solve the puzzle by placing the correct decals in the open spaces as shown in the screenshot (1).
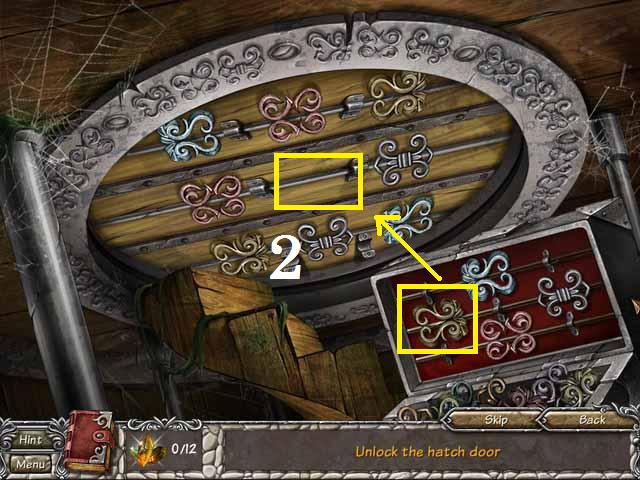
- Repeat the above step (2).
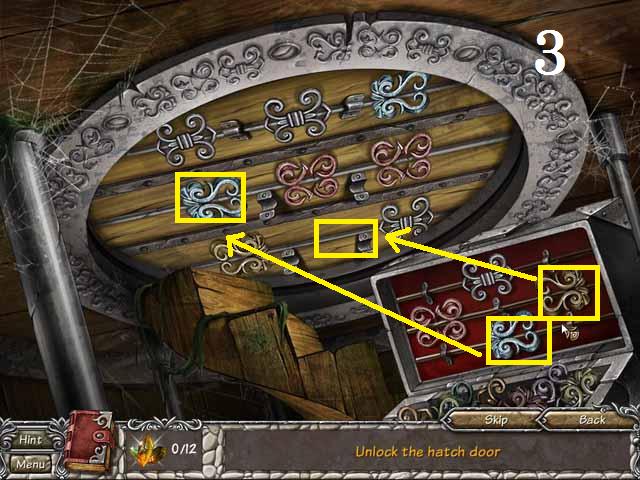
- Repeat the above step (3).
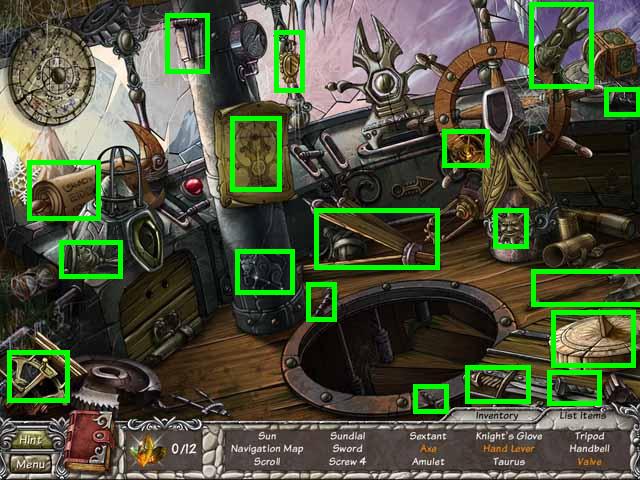
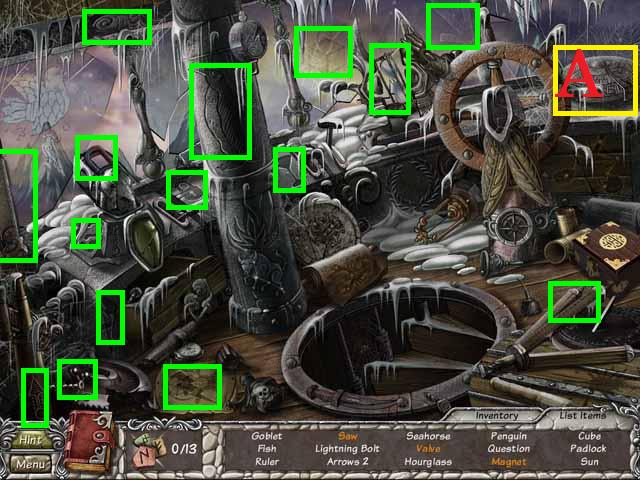
- Go upstairs and pick the entire list of items (green).
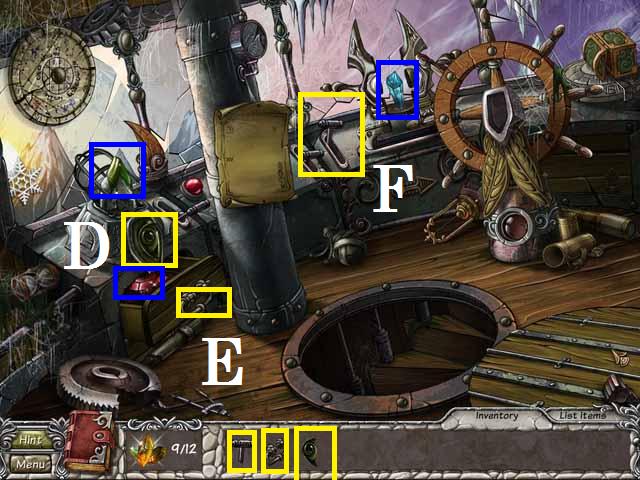
- Place the EYEBALL in the machine (D) and the HANDLE on the board (E) under it.
- Place the LEVER on the dash (F) and pick up the three CRYSTALS (blue).
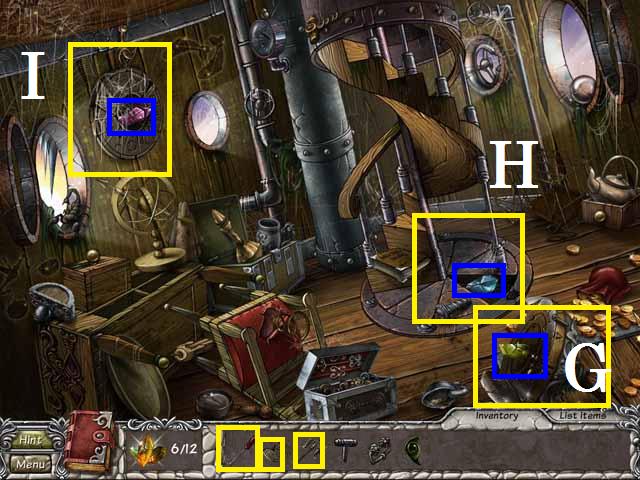
- Go back downstairs and break the glass (G) with the AXE.
- Remove the screw (H) with the SCREWDRIVER and fix the medallion (I) with the CIRCLE FRAGMENT.
- Pick up the three CRYSTALS (blue).

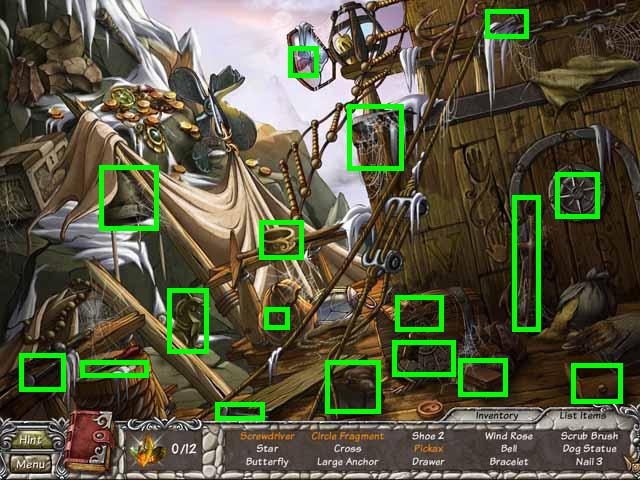
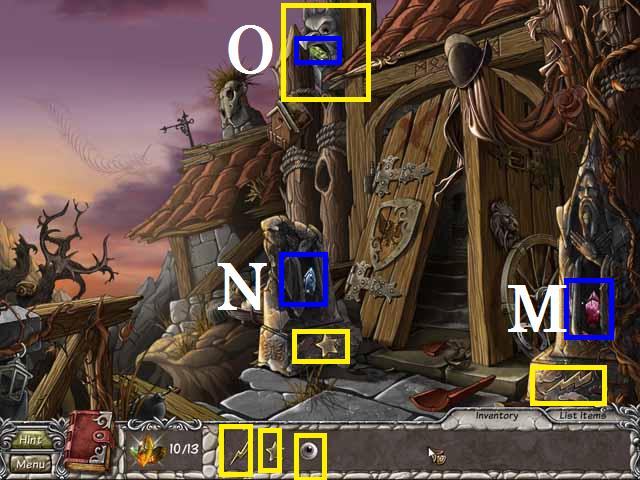
- Outside place the HAND on the panel (J) and smash the rocks (K) with the PICKAXE.
- Open the box (L) with the KEY and pick up the three CRYSTALS (blue).
- Move to the front of the boat and place the HELMET on the statue (M).
- Place the LAMP over the grate (N) and open the safe (O) with the VALVE.
- Pick the entire list of items (green).
Chapter 7: The Town
- Pick the entire list of items (green) and go through the doorway (A) into the alley.
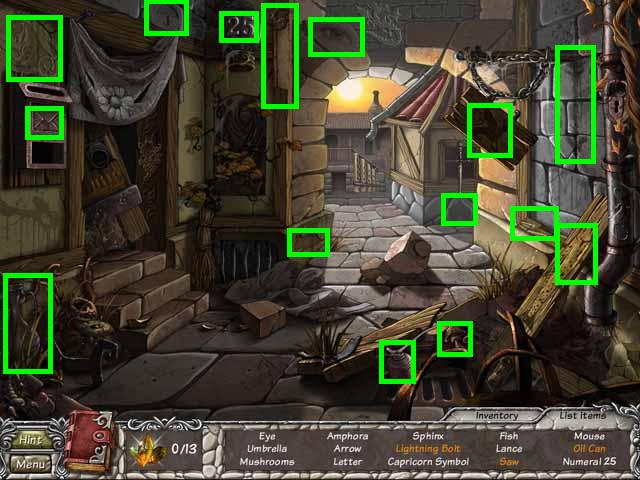
- Pick the entire list of items (green) and move on down the alley to the storefront.
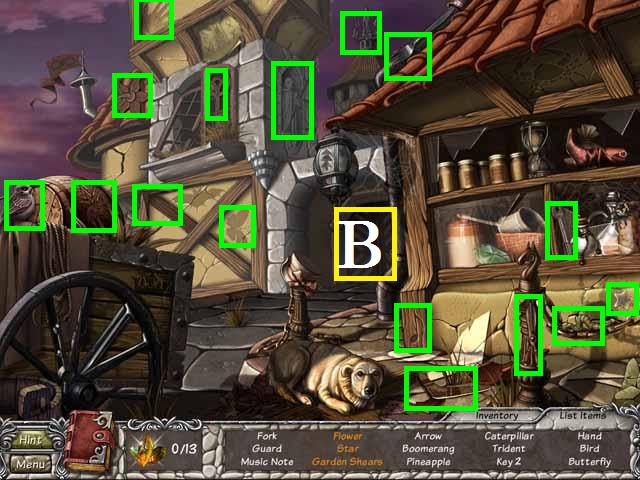
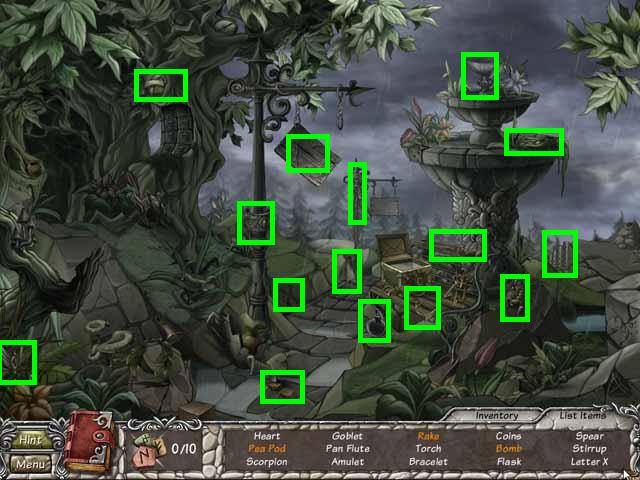
- Pick the entire list of items (green) go through the tunnel (B) to get to the fountain.
- Pick the entire list of items (green).
- Zoom into the fountain (C).
- Solve the puzzle by clicking on the silver balls marked in blue in the screenshot to move the pie pieces around until you have the final image shown in the screenshot. Every time you play through the beginning pattern will change.
- One way to solve the puzzle is to set one color first, for instance move all of the red into place then the yellows and finish with the grey pie pieces. As you put the yellows in place the reds will move out of place but always put them back without moving the pie piece you just moved.
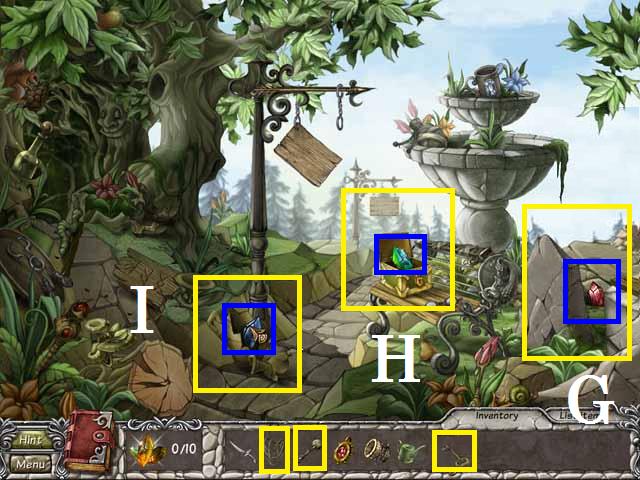
- Place the FLOWER in the window (D) and OIL the clock (E).
- SAW the wooden beam (F) and pick up the four CRYSTALS (blue).
- Return to the store front and break its window (G) with the BRICK.
- Give the dog (H) the BONE and chop the hive (I) with the RAPIER.
- Pick up the three CRYSTALS (blue).
- Return to the ally and BRUSH out the gutter (J).
- Use the KNIGHTS GLOVE on the dirt (K) and cut the tree (L) with the GARDEN SHEARS.
- Pick up the three CRYSTALS (blue) and return to the first scene.
- Place the LIGHTING BOLT on the right statues base (M) and the star on the left's base (N).
- Put the EYEBALL in the gargoyle (O) and pick up the three CRYSTALS (blue).
- You have found all of the CRYSTALS and now will need to revisit some of the scenes to pick up the RUNES now all marked in blue in the following screenshot.
Chapter 8: The Ship - 2nd visit
- Pick the entire list of items (green) and move to the front of the boat.
- Pick the entire list of items (green).
- Go inside then pick the entire list of items (green) and go upstairs.
- Pick the entire list of items (green).
- Zoom into the large dial on the dash (A).
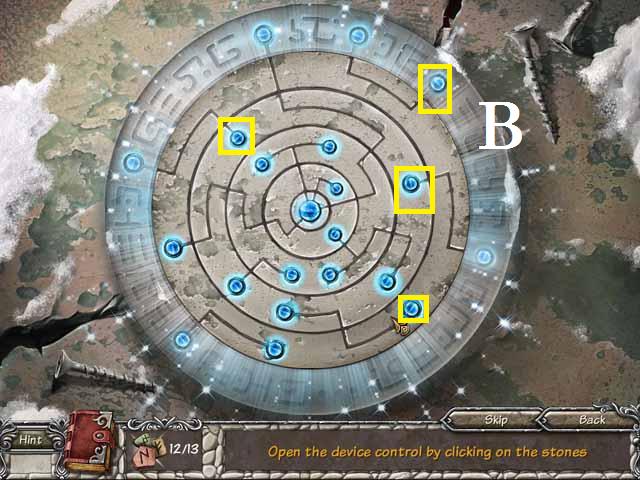
- Solve the puzzle by moving the dials by clicking on the blue buttons (B) until you have the same orientation as shown in the screenshot.
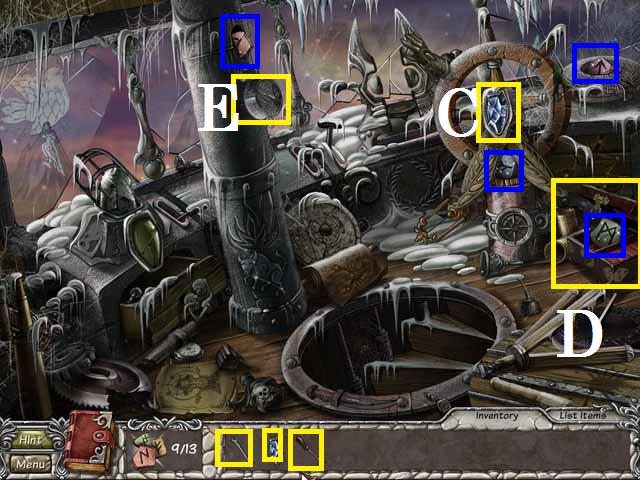
- Place the JEWEL on the steering wheel (C) and open the box (D) with the SCREWDRIVER.
- Move the gage (E) with the WRENCH and pick up the four RUNES (blue).
- Back downstairs place the VALVE on the cask (F) and cut the chain (G) with the BOLT CUTTER.
- Open the drawer (H) with the MAGNET.
- Pick up the three RUNES (blue) and go back outside.
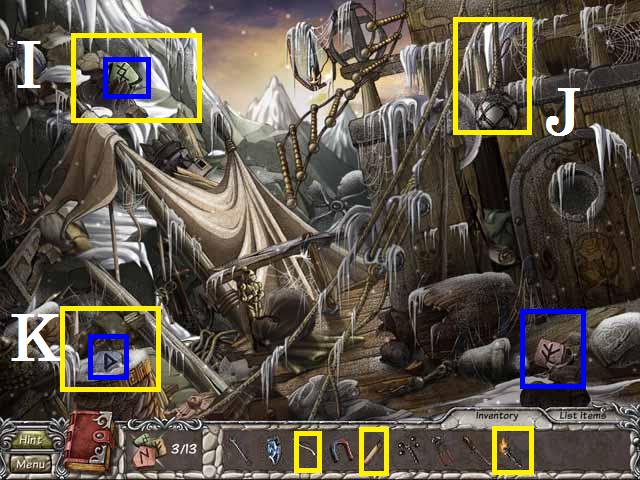
- SAW the beam (I), cut down the lamp (J) with the MACHETE and melt the ice (K) with the TORCH.
- Pick up the three RUNES (blue) and move towards the front of the ship.
- Open the box (L) with the SPEAR and place the FLUTE on the bird (M).
- Cut the sail (N) with the RAPIER and pick up the three RUNES (blue).
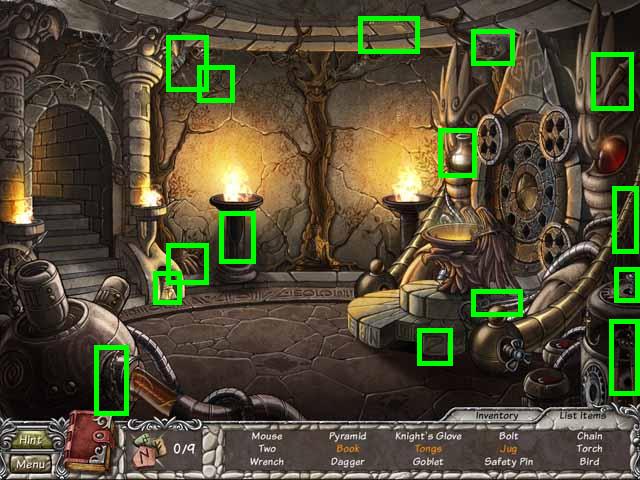
Chapter 9: The Cave - 2nd visit
- Pick the entire list of items (green) and enter the path through the tunnel.
- Pick the entire list of items (green) and go into the tomb.
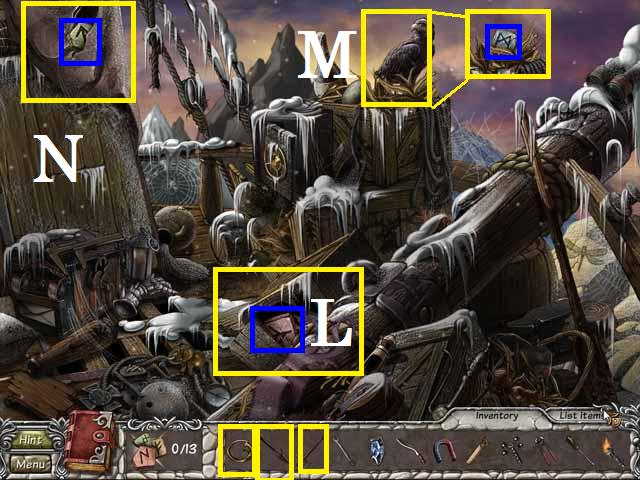
- Pick the entire list of items (green) and zoom into the mirror (A).
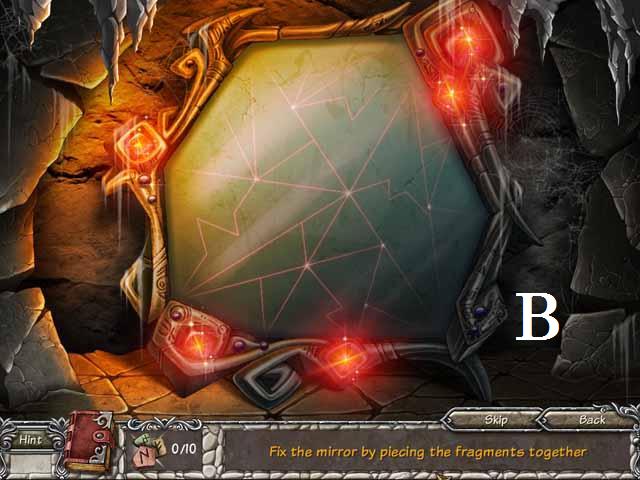
- Fix the mirror by placing the matching shards in the outline (B).
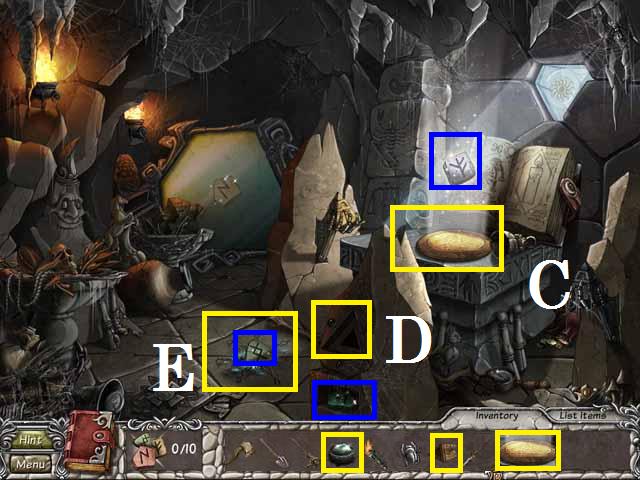
- Place the PRISM in the stone (C) and the GOLD PLATE on the alter (D).
- Place the TRUNK on the floor (E) and pick up the four RUNES (blue).
- Leave the tomb and enter the path.
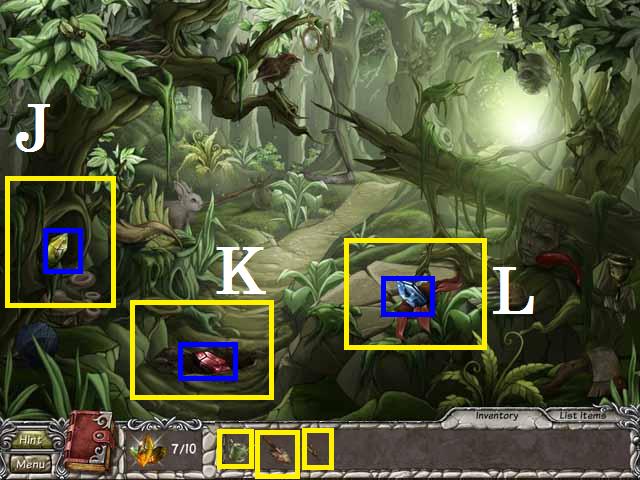
- Cut the tree (F) with the AXE and SHOVEL the crystals (G).
- Burn the wood (H) with the TORCH and pick up the three RUNES (blue).
- Return to the cave and break the jar (I) with the BRANDING IRON.
- Move the rocks (J) with the SPEAR and place the SCARAB on the box (K).
- Pick up the three RUNES (blue).
Chapter 10: Outside - 2nd visit
- Pick the entire list of items (green) and move down the path to the fountain.
- Pick the entire list of items (green) and exit right screen to the mountain.
- Pick the entire list of items (green).
- Blow up the mountain side (A) with the BOMB.
- RAKE the grass (B) and place the CHALK in the bucket (C).
- Pick up the three RUNES (blue) and head back to the fountain.
- Click on the tree (D).
- Solve the puzzle by clicking on the tiles, 1-7 as marked in the screenshot, in the following order: 1, 2, 3, 4, 5, 6, 7, 2.
- Place the STAR on the fountain (E) and cut the branch (F) with the AXE.
- Put the NET in the water (G) and pick up the four RUNES (blue).
- Back on the path; knock the hive (H) down with the CAIN.
- Cut the vines (I) with the SICKLE and feed the bird (J) the PEAPOD.
- Pick up the three RUNES (blue).
Chapter 11: The Magician's House
- Pick the entire list of items (green) and go upstairs.
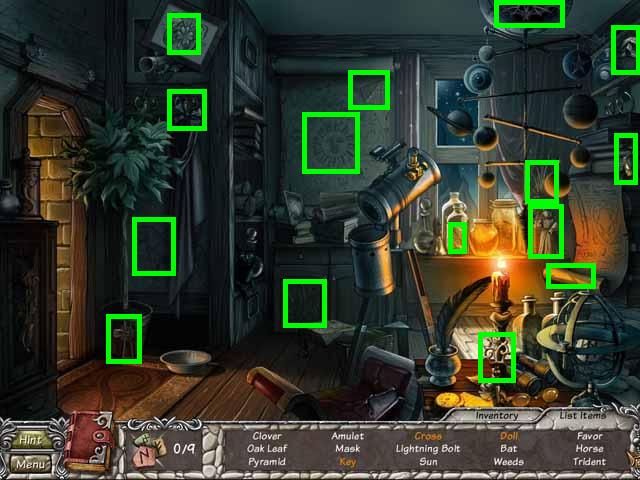
- Pick the entire list of items (green) then return downstairs.
- Go into the room to the right and pick the entire list of items (green).
- Place the FUSE in the device (A), the DOLL in the fire (B), and the CROSS on the pillar (C).
- Pick up the three RUNES (blue) and go back one room.
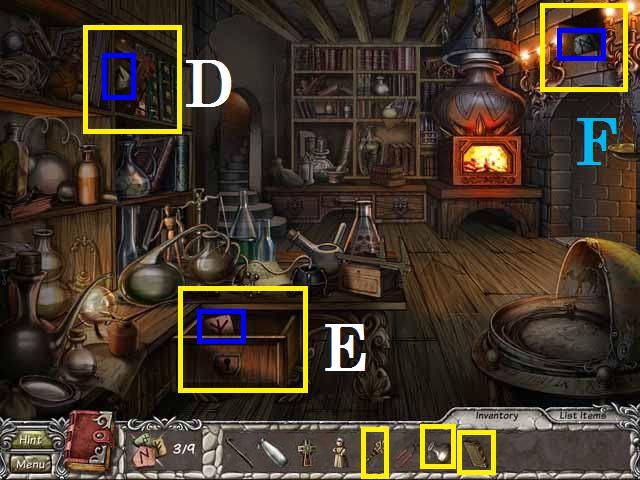
- Place the BOOK on the shelve (D) and open the desk drawer (E) with the KEY.
- Pour the JUG into the hanging saucer (F) and pick up the three RUNES (blue).

- Go upstairs and pour the MILK into the bowl (G).
- Remove the board (H) over the door with the CROWBAR and cut open the globe (I) with the TONGS (or bolt cutters).
- Pick up the three RUNES (blue).
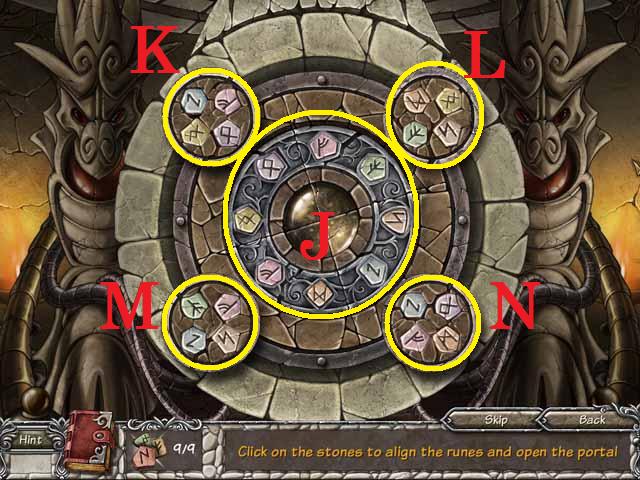
- Fix the portal by clicking the center circle (J) six times.
- Then each of the small circles (K-N) 3times until you have the configuration shown in the screenshot.
- Congratulations you have successfully fixed the portal!
Created at: 2011-04-29