

Walkthrough Menu
- General Tips
- Chapter 1: Cave
- Chapter 2: Monument
- Chapter 3: Cliff Base
- Chapter 4: Temple
- Chapter 5: Granary
- Chapter 6: Shelter
General Tips
- This is the official guide for Amaranthine Voyage: The Burning!
- This guide won't tell you when to zoom into a location; the screenshots show each zoom scene.
- Hidden-object puzzles are referred to as HOPs. Only the locations of the HOPs will be shown.
- Use the Map to fast travel to a location.
Chapter 1: Cave
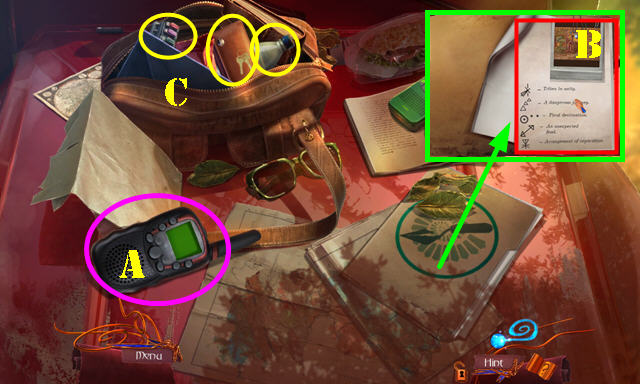
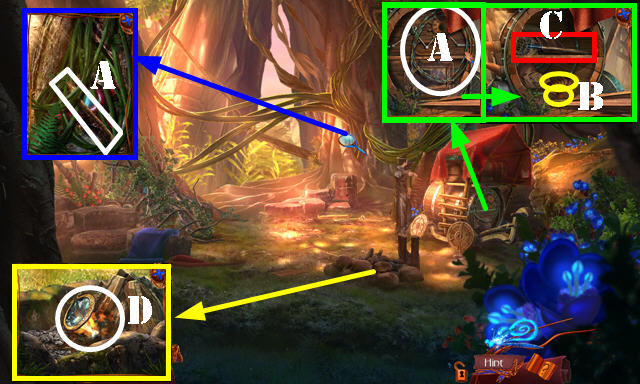
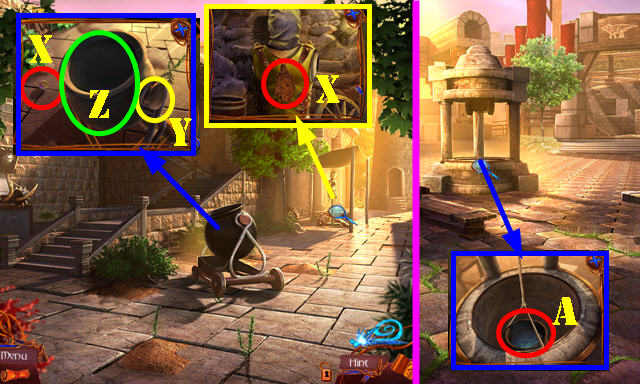
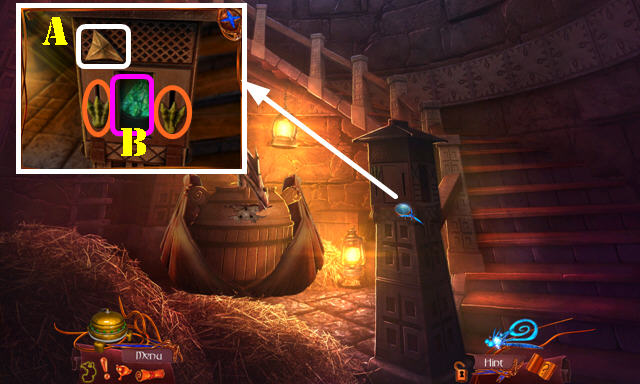
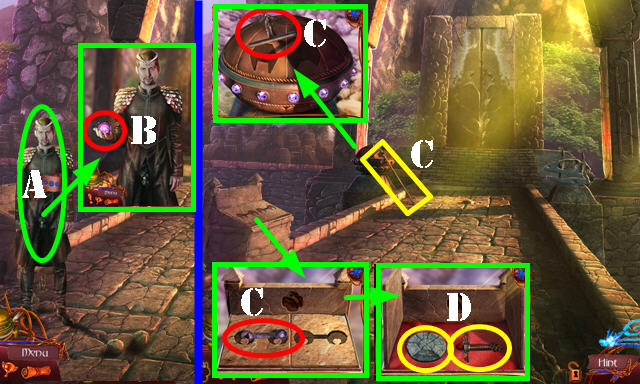
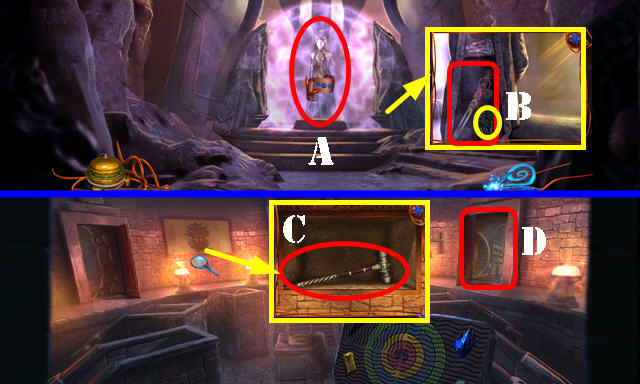
- Select walkie-talkie (A).
- Open folder; select 2x; take DECRYPTION NOTE (B).
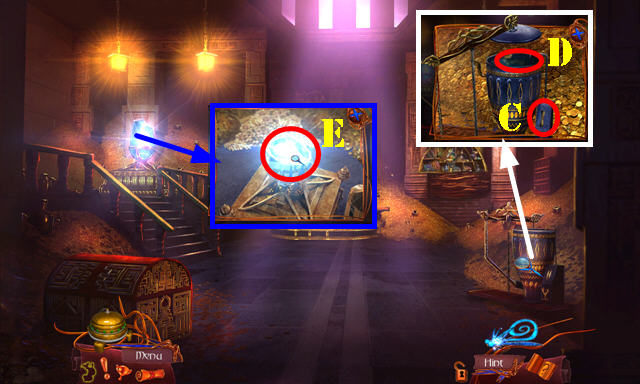
- Open bag; look at note; take CAR KEYS, EMPTY BOTTLE, and SPARE FUSES (C).
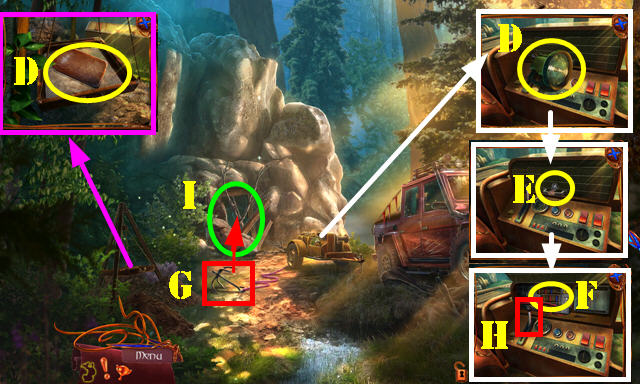
- Take SPECIMEN SCOOP and FLASHLIGHT (D).
- Select both screws on CAR KEYS; move keys; receive KEY.
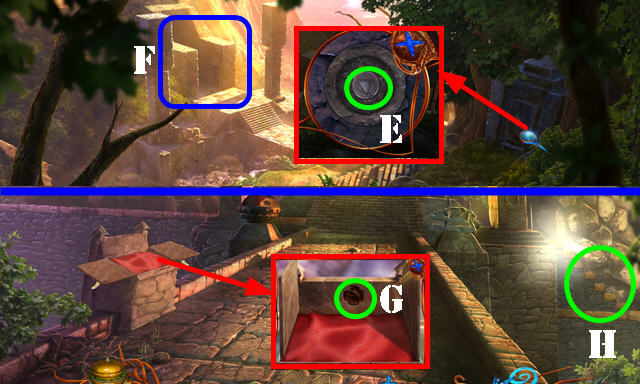
- Use KEY (E); select; receive BROKEN KEY.
- Place SPARE FUSES (F).
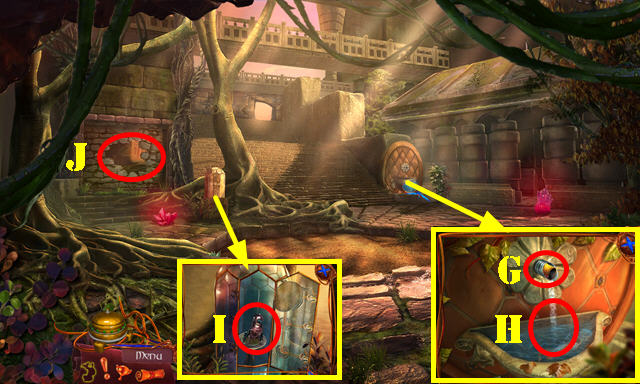
- Select grappling hook and attach it (G).
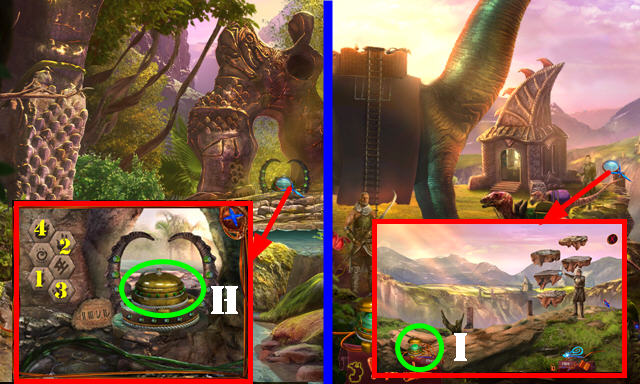
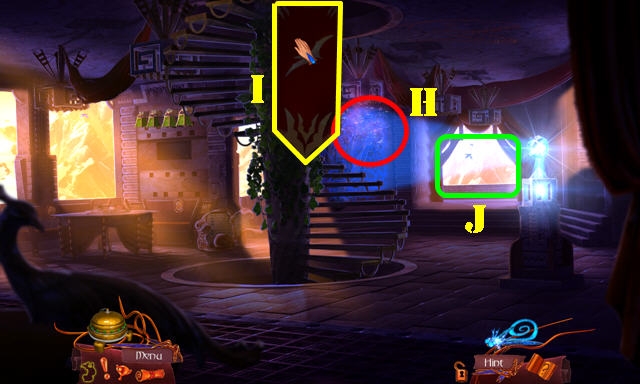
- Pull stick shift (H).
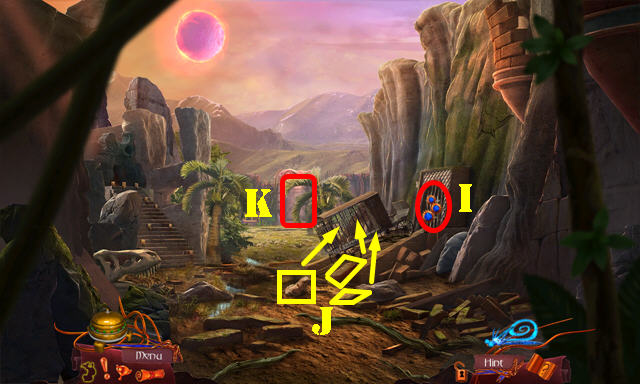
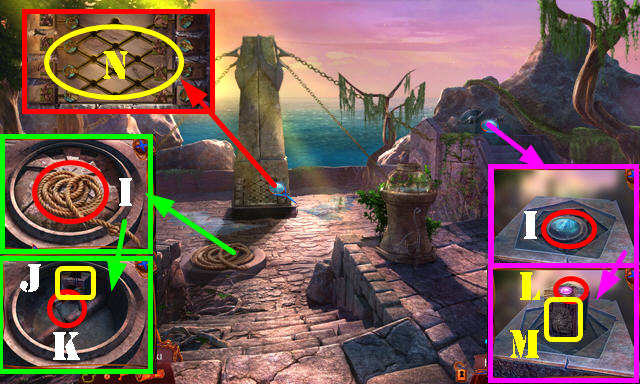
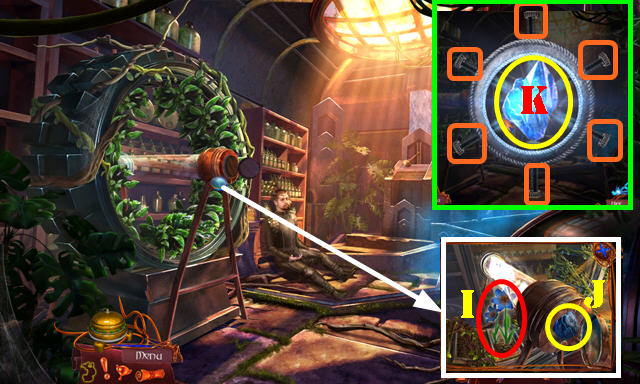
- Go (I).
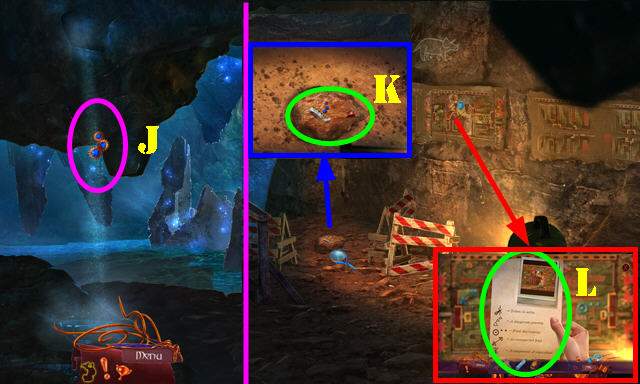
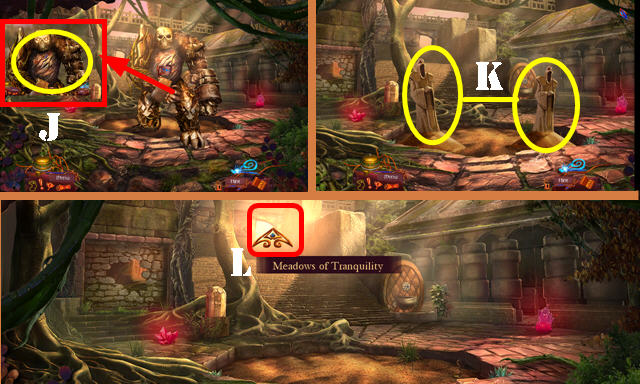
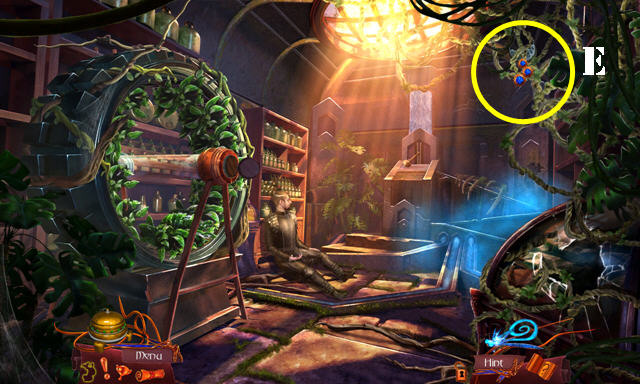
- Use EMPTY BOTTLE (J); receive WATER BOTTLE.
- Go right.
- Use FLASHLIGHT on scene.
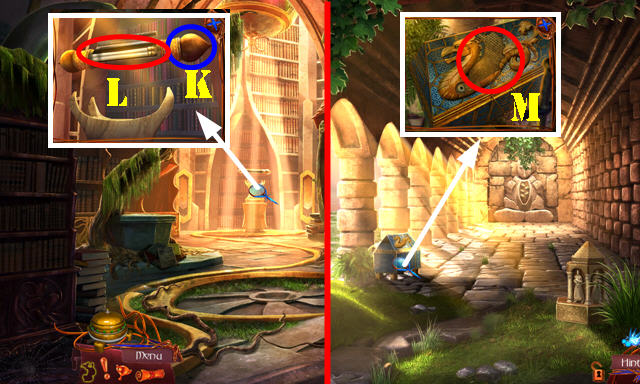
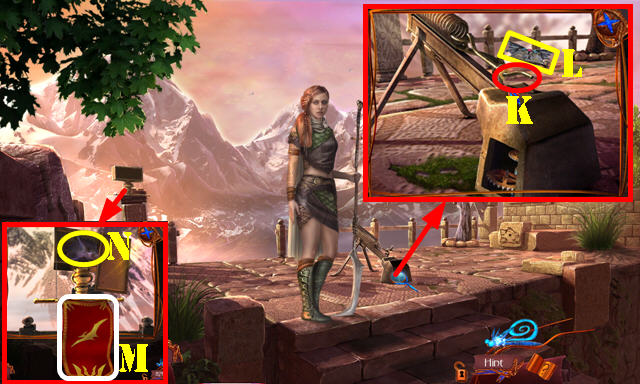
- Select barricade; use SPECIMEN SCOOP (K); receive SOIL SAMPLE.
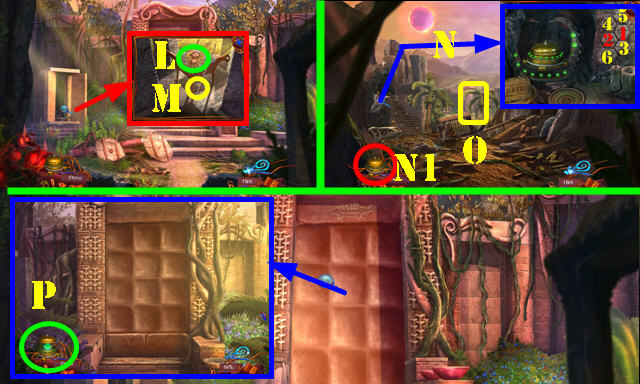
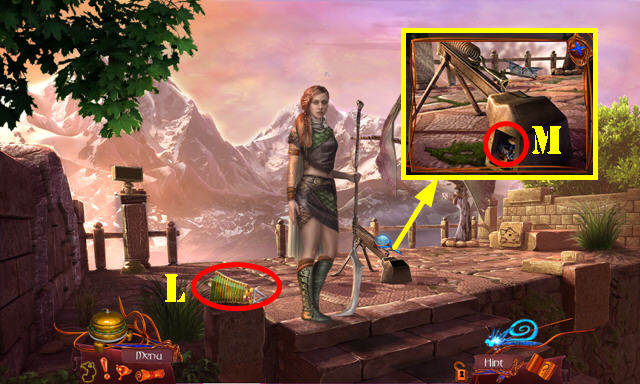
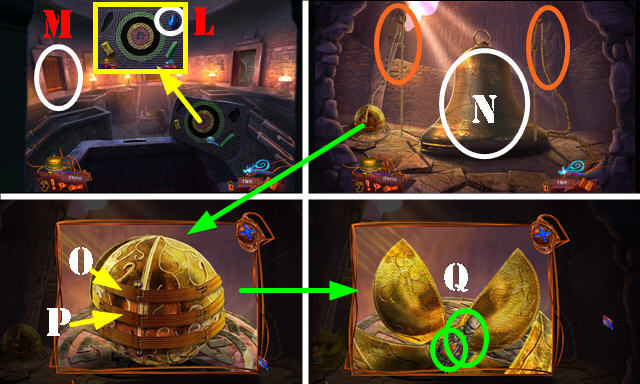
- Place DECRYPTION NOTE (L).

- Solution (1-5).
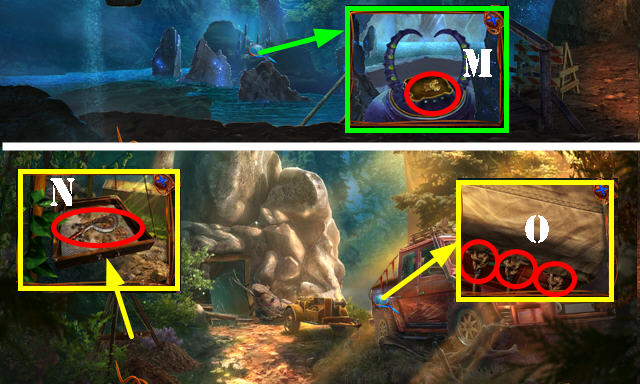
- Take STRANGE EMBLEM (M).
- Walk down.
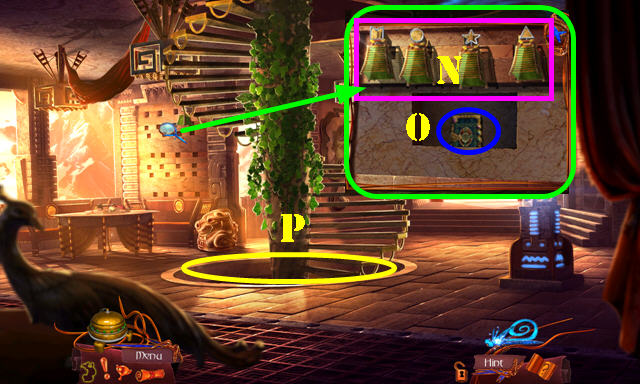
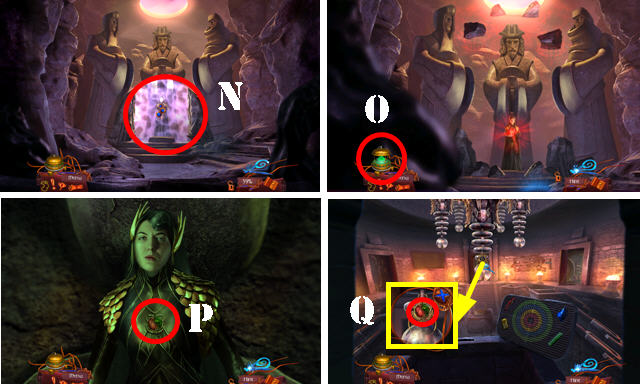
- Place SOIL SAMPLE; select. Use WATER BOTTLE; take MATRIARCH FIGURINE and SICKLE (N).
- Use SICKLE 3x (O). Play HOP; receive EQUIPMENT CASE.
- Go to Cave; turn right.
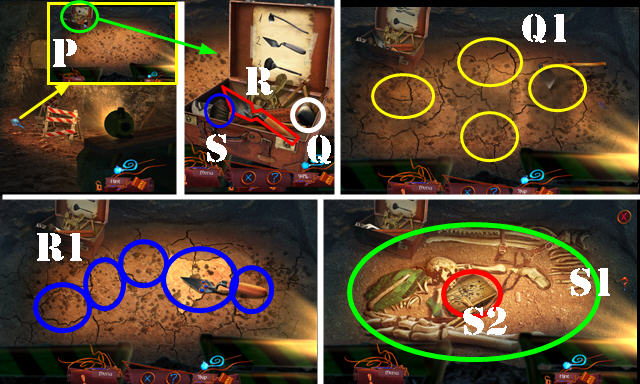
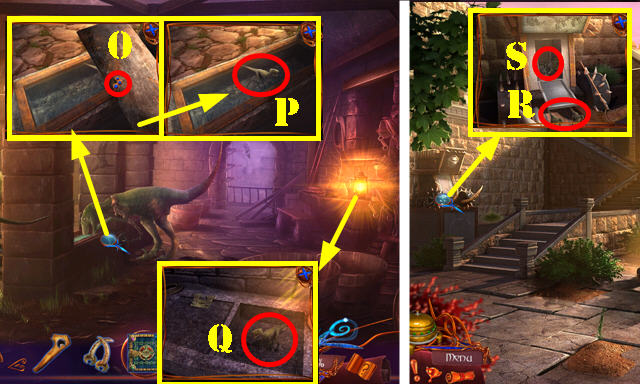
- Place EQUIPMENT CASE and open it (P).
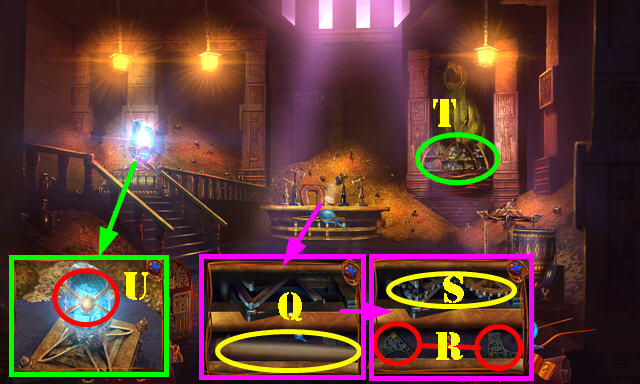
- Use hoe (Q) 4x (Q1).
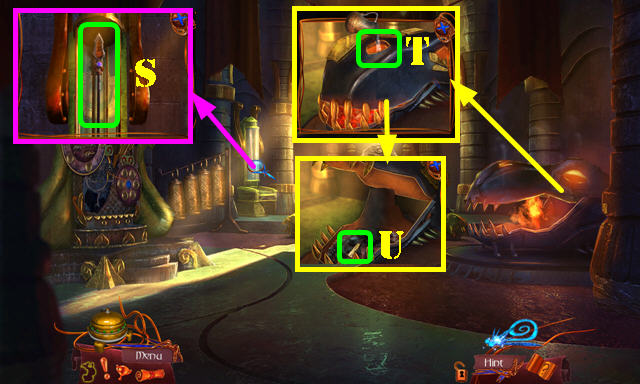
- Use trowel (R) 5x (R1).
- Drag brush (S) all over soil (S1); take WOODEN BOX (S2).
- STRANGE EMBLEM on WOODEN BOX. Look at note; take UNKNOWN ARTIFACT.
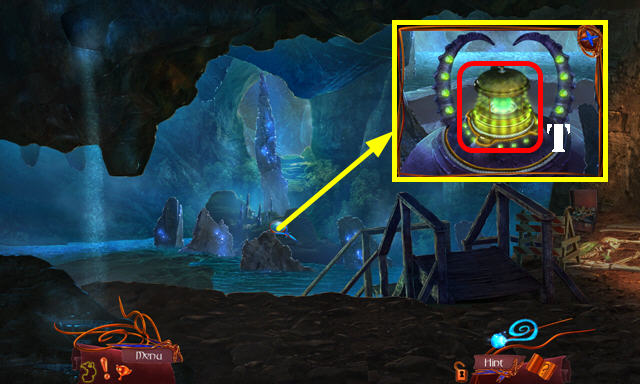
- Go left.
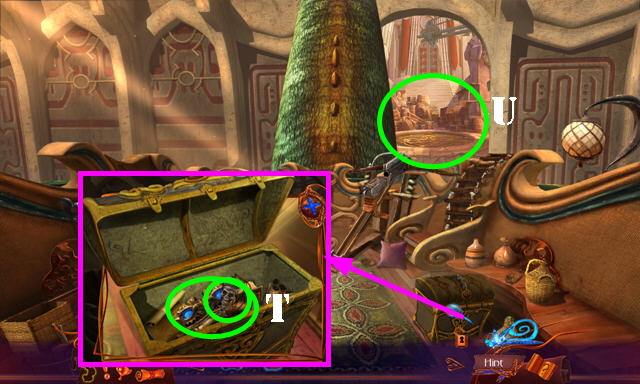
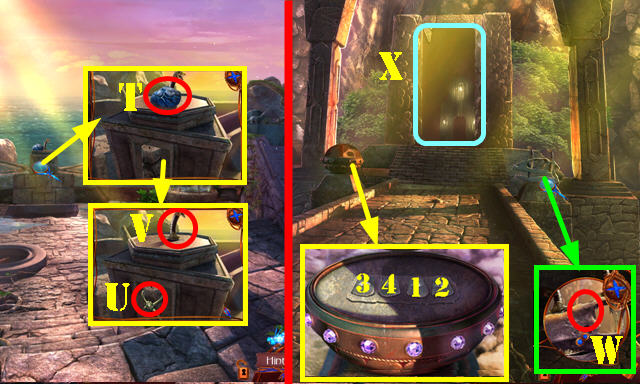
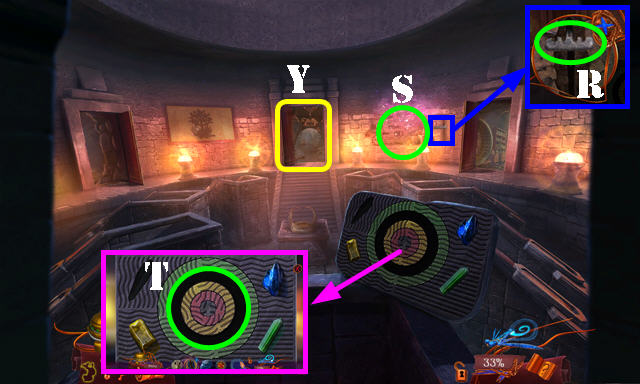
- Place UNKNOWN ARTIFACT (T).
- Select firefly (T).
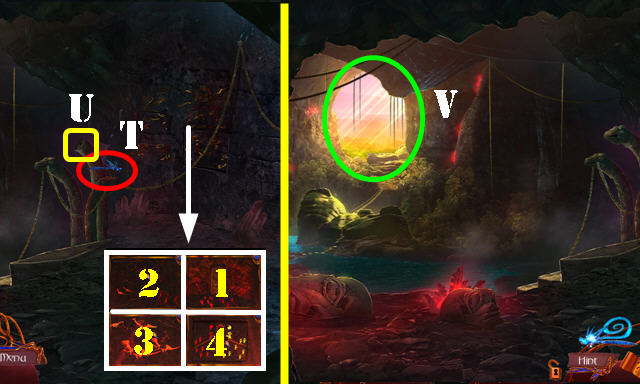
- Select 1-4; take TORCH, Map, and STATUE HEAD.
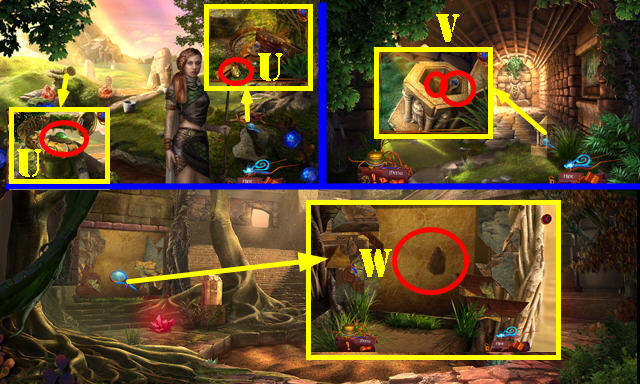
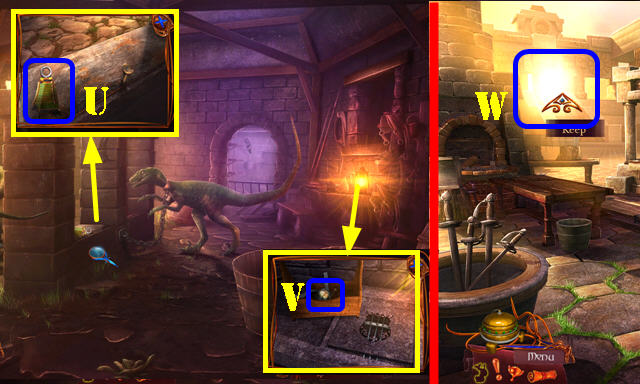
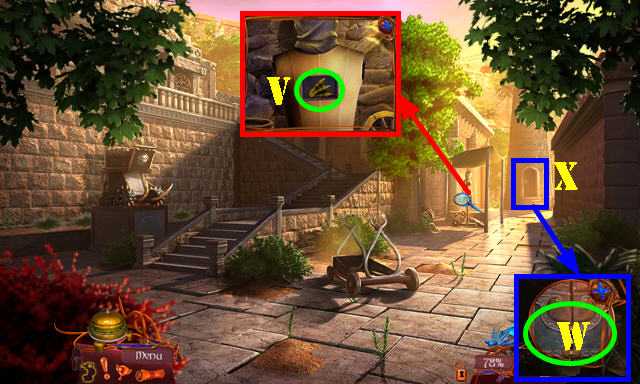
- Place STATUE HEAD (U).
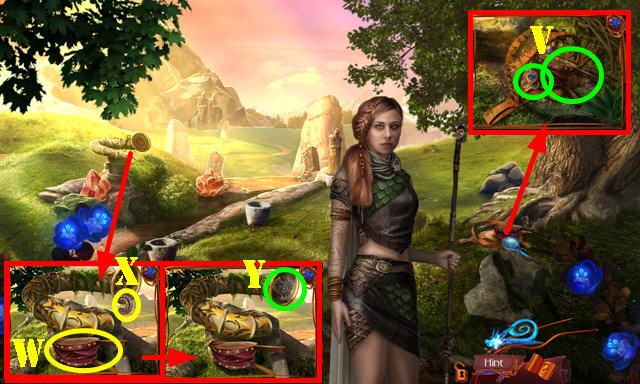
- Go (V).
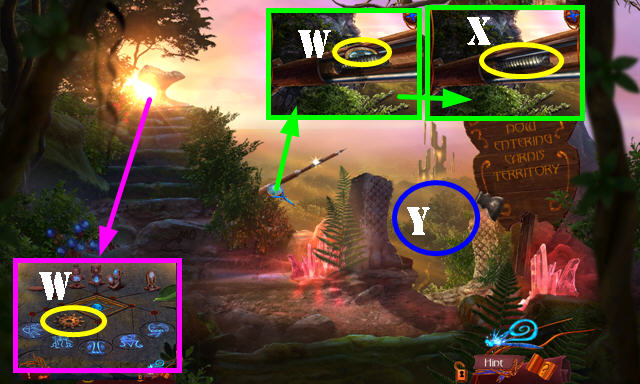
- Receive KINETIC BEACON.
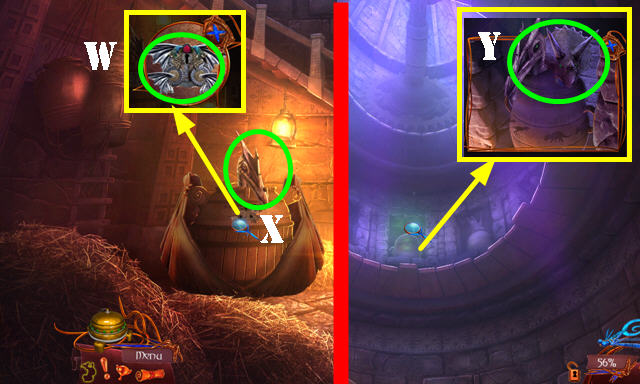
- Take CRYSTAL LENS and WOODEN GEAR (W).
- Use BROKEN KEY (X); receive SPRING.
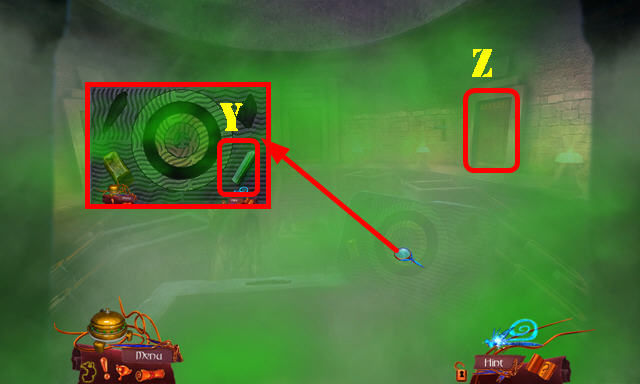
- Go (Y).
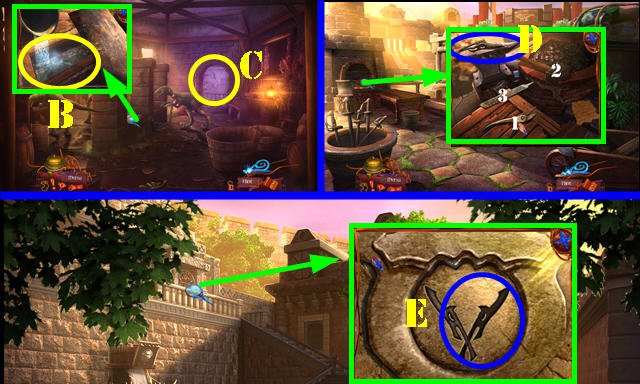
- Remove vines on scene 3x.
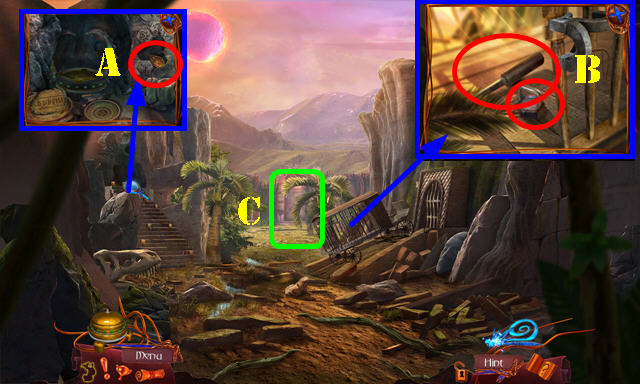
- Take AXE HANDLE and STRONG CORD (A).
- Open compartment; place SPRING. Look at note; take INSIGNIA LOCK and SPOON (B).
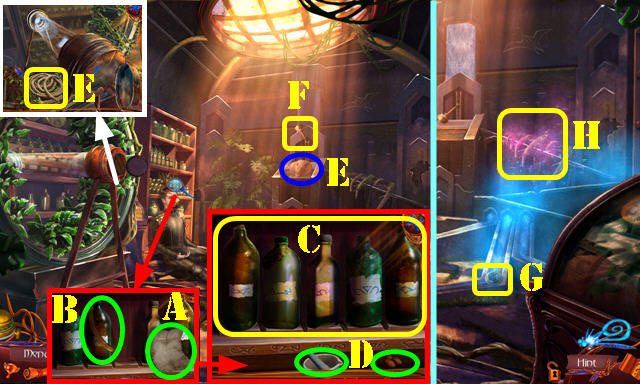
- Place WOODEN GEAR; take FISHING NET (C).
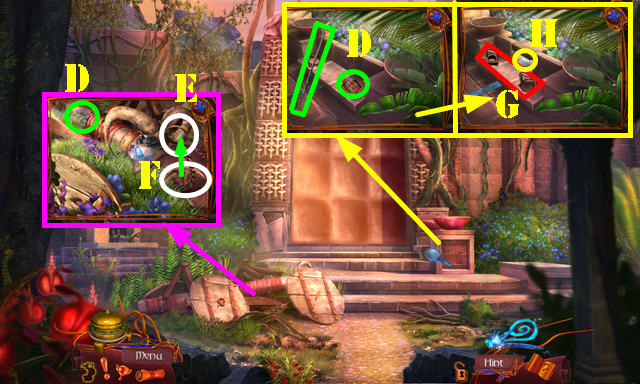
- Use CRYSTAL LENS and TORCH (D); receive LIT TORCH.
- Walk down.
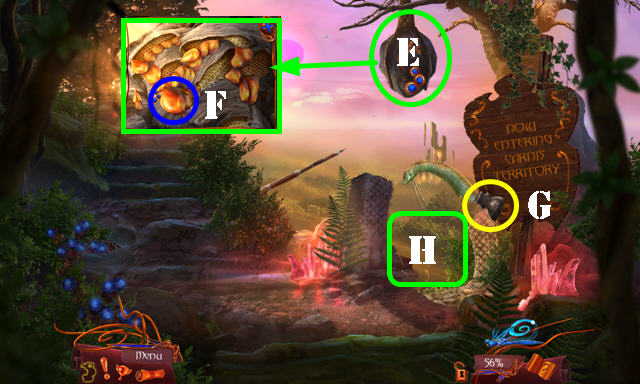
- Use LIT TORCH (E).
- Use SPOON (F); receive HONEY.
- Use AXE HANDLE (G); receive AXE.
- Go (H).

- Use AXE (I). Play HOP; receive WEED KILLER.
- Use WEED KILLER (J); go (K).
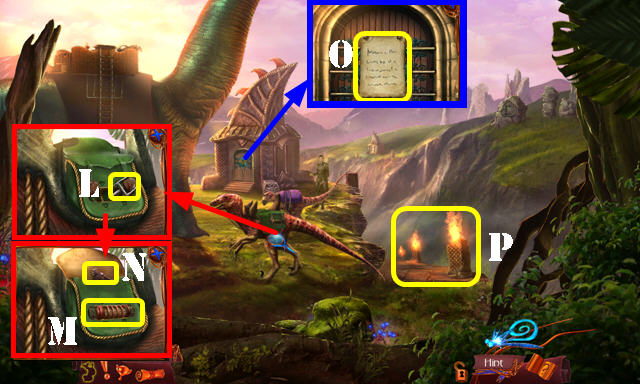
- Take METAL FRAME (L).
- Place INSIGNIA LOCK (M); look at note and take CHIEFTAIN FIGURINE (N).
- Look at note (O).
- Go (P).
Chapter 2: Monument
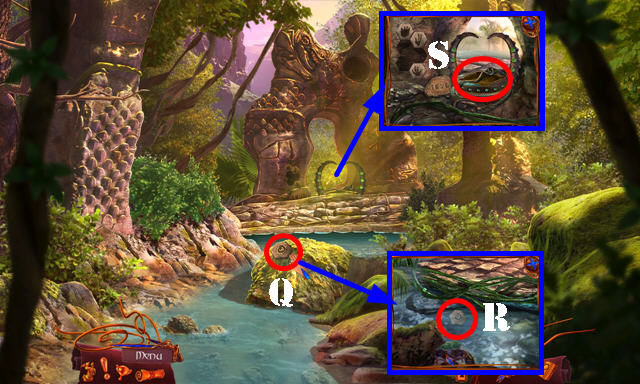
- Select tile (Q); use FISHING NET (R); receive SHRINE TILES 1/3.
- Take HOOK (S).
- Go to Overlook.
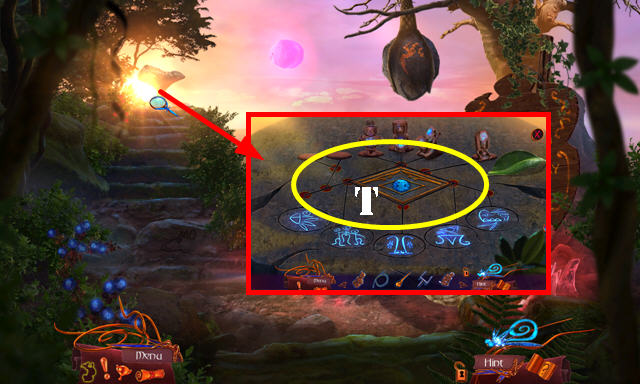
- Place MATRIARCH FIGURINE and CHIEFTAIN FIGURINE (T).
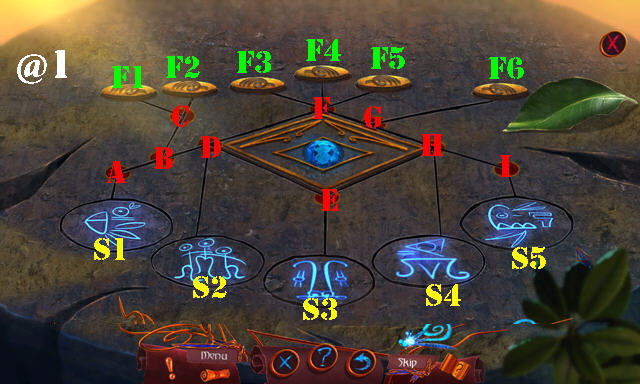
- Solution (@1): (A-S1)-(G-S4)-(I-G)-(S4-S5)-(E-I)-(D-S3)-(F-S4)-(G-S2).
- (I-F1)-(S2-F3)-(S4-F5)-(S3-F4)-(S1-F2)-(S5-F6).
- Take ANCIENT RUNE.
- Go to Monument.
- Place ANCIENT RUNE (X); take SHRINE TILES 2/3 and BROKEN PTERODACTYL (Y).
- HONEY on BROKEN PTERODACTYL; receive PTERODACTYL.
- Walk down.
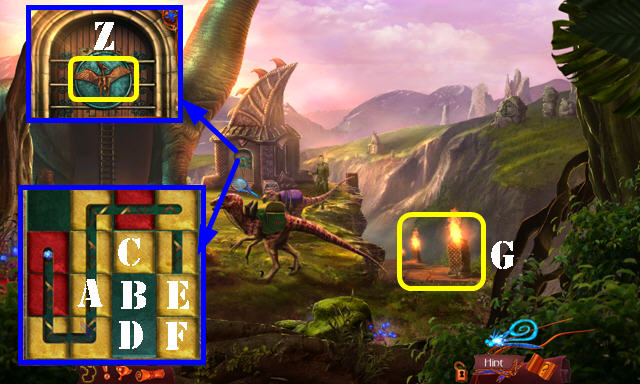
- Place PTERODACTYL (Z). Play HOP; receive SHRINE TILES 3/3.
- HOP puzzle solution: (F-D)-(E-F)-(B-E)-(A-C)-(D-A).
- Go (G).
- Place KINETIC BEACON (H).
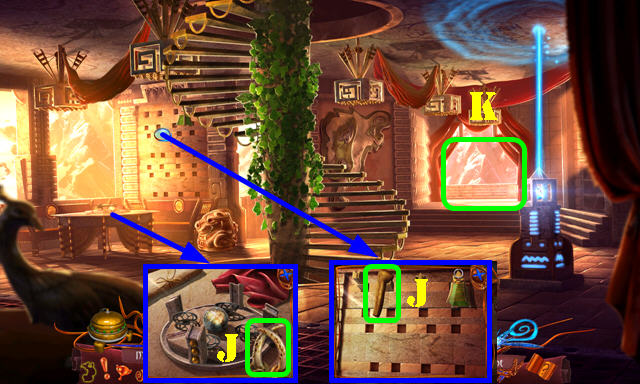
- Place SHRINE TILES 3/3; select 1-4.
- Walk down.
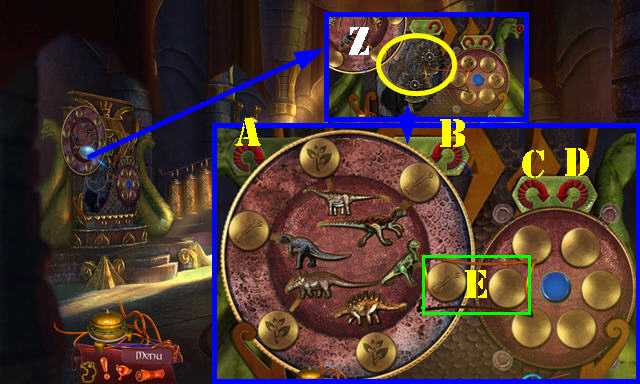
- Select Kinetic Beacon (I).
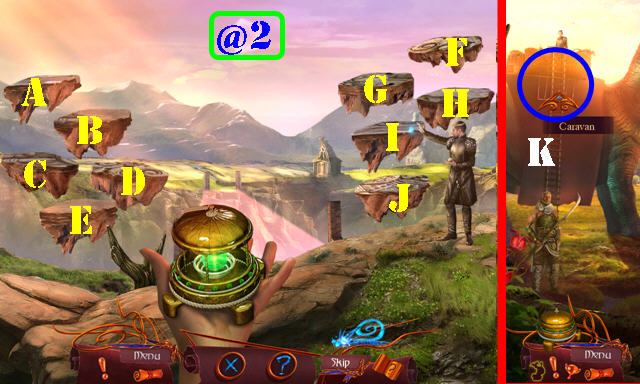
- Solution (@2): (B-I)-(B)-(Ix3).
- (E-F)-(Ex2)-(Fx3).
- (D-J)-(Dx3)-(Jx2).
- (A-G)-(Ax3)-(G).
- (A-F)-(Ax3)-(Fx3).
- (C-J)-(Cx2)-(Jx2).
- Go (K).
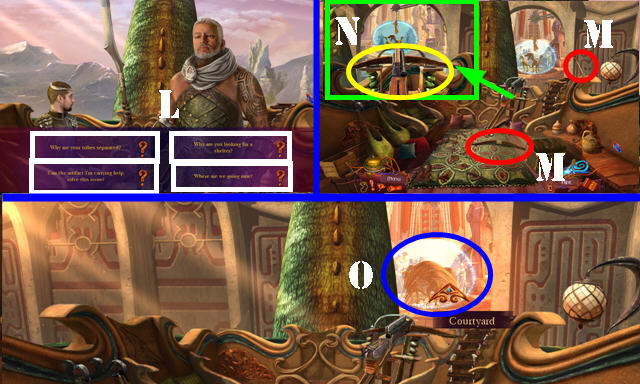
- Select each question (L).
- Take CROSSBOW LATHE and ARROW (M).
- Place CROSSBOW LATHE, METAL FRAME, STRONG CORD, and ARROW (N).
- Go (O).
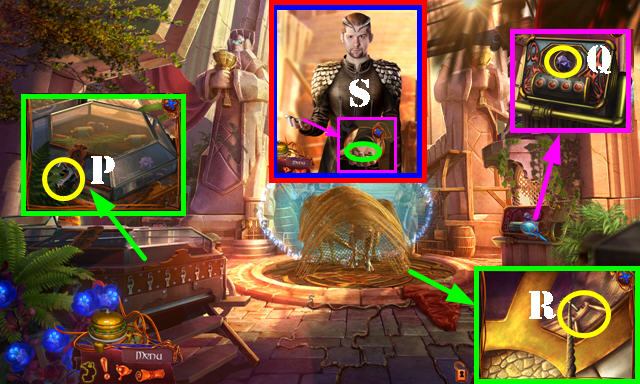
- Take STAR WEIGHT (P).
- Remove crystal (Q).
- Use HOOK (R).
- Take CHEST KEY (S).
- Walk down.
- Use CHEST KEY; take SKELETON KEY and TRADER'S AMULET (T).
- Go (U).
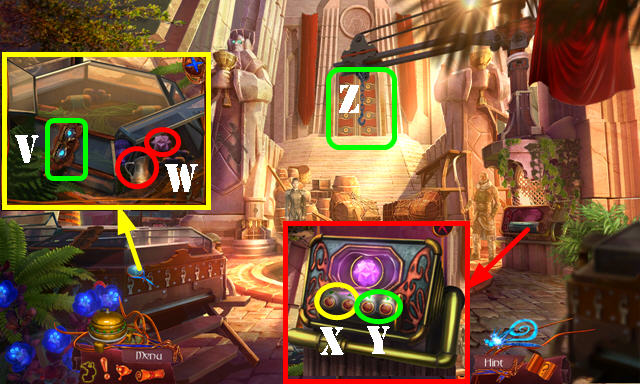
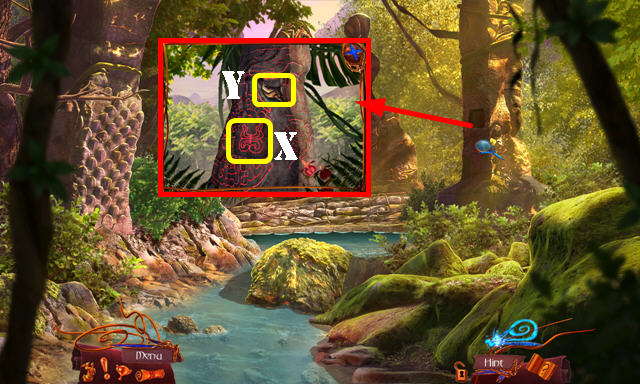
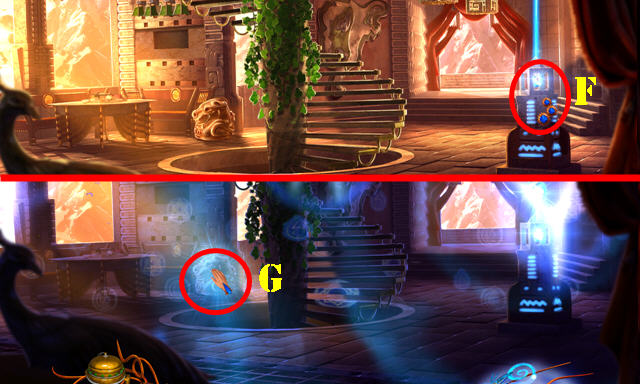
- Place TRADER'S AMULET (V); take EMPTY JUG and ENERGY CRYSTAL (W).
- Place ENERGY CRYSTAL; select Yx3-X.
- Try to go and then go (Z).
Chapter 3: Cliff Base
- Take FRAME PARTS 1/4 (A).
- Use SKELETON KEY; take CHISEL and HEXAGON WEIGHT (B).
- Go (C).
- Take SHRINE TILES 1/3, FRAME PARTS 2/4 and IRON BAR (D).
- Use CHISEL (E) and rock (F); take CHAIN.
- Place HEXAGON WEIGHT and STAR WEIGHT (G). Take SHRINE TILES 2/3 (H).
- Walk down.
- Use CHAIN (I).
- Place three rocks (J). Play HOP; receive FOUNDER'S SIGIL.
- Go (K).
- Place FOUNDER'S SIGIL (L) and use IRON BAR; take SHRINE TILES 3/3 (M).
- Walk down.
- Place SHRINE TILES 3/3; select Kinetic Beacon (N). Press 1-6.
- Go to Entrance Gate (O).
- Use Kinetic Beacon (P).
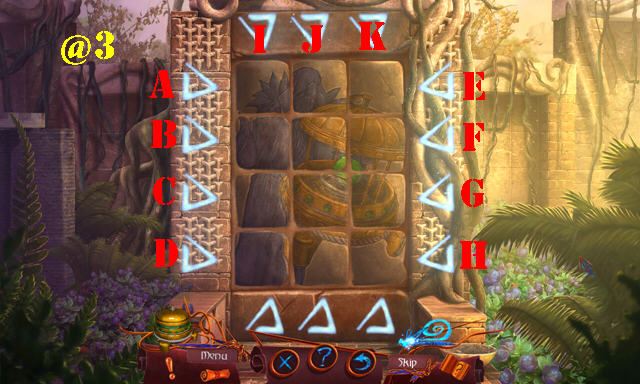
- Solution (@3): Ax2-J-K-B-Gx2.
- Go forward.
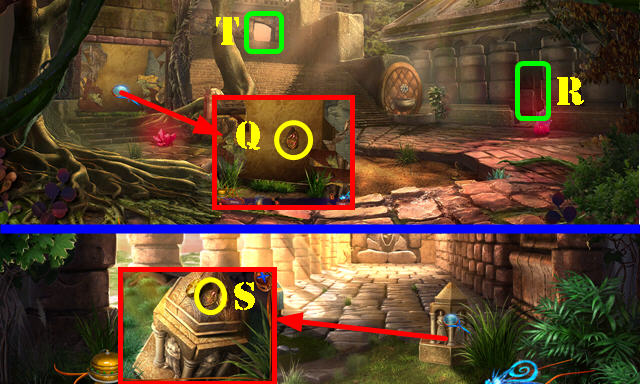
- Take FRAME PARTS 3/4 (Q).
- Go (R).
- Take FRAME PARTS 4/4 (S).
- Walk down and go (T).
- Take TOPAZ and DINO EGG TRINKET (U).
- Go to Hallway.
- Place TOPAZ; take JEWELED CONTROL 1/3 and MURAL PIECE (V).
- Walk down.
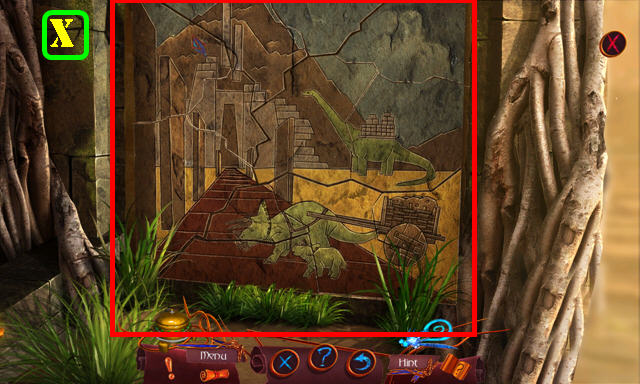
- Place MURAL PIECE (W).
- Solution (X).
- Walk down.
- Take ANCIENT TWEEZERS (Y).
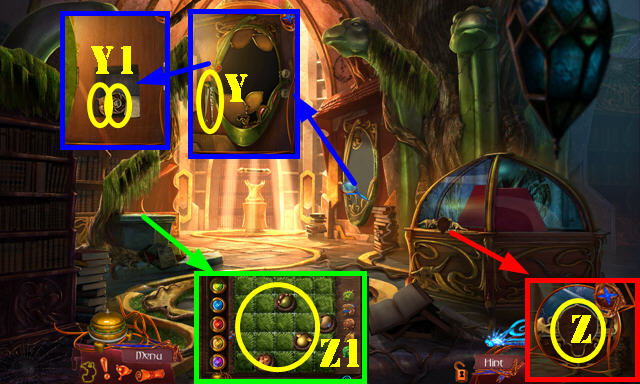
- Place FRAME PARTS 4/4; look at note; take PANEL DIAL and MESSAGE PIECE (Y1).
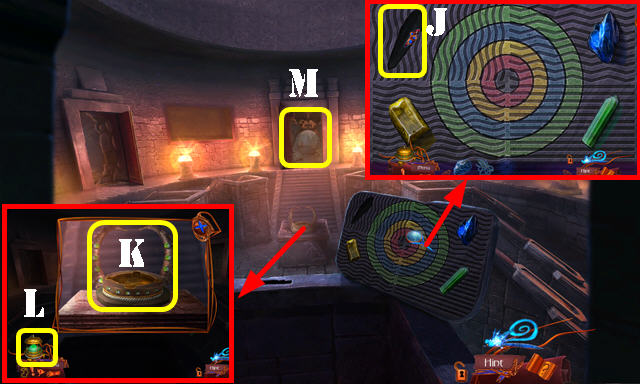
- Place PANEL DIAL (Z). Play HOP; receive REPTILE PROD.
- Place DINO EGG TRINKET (Z1).

- Solution: E-Bx2-Cx3-A-Ex4-Cx5-Ax3-Ex2-Dx5-E.
- Take CLOCK DIAL.
- Walk down.
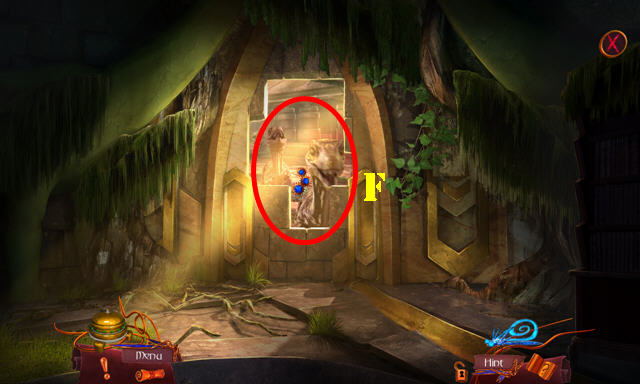
- Use REPTILE PROD (F).
- Go forward.
- Use ANCIENT TWEEZERS; receive SCROLL END (G).
- Use EMPTY JUG (H); receive WATER JUG.
- Place MESSAGE PIECE and select 3 latches; take MECHANICAL BIRD (I).
- Take CHRONICLER'S KEY from MECHANICAL BIRD. Place CLOCK DIAL on MECHANICAL BIRD; take DRAGON WING.
- Go (J).
- Place SCROLL END (K); take SUMMONING INSTRUCTIONS (L).
- Go to Hallway.
- Place DRAGON WING (M). Play HOP: receive ETERNAL HOURGLASS.
- Walk down.
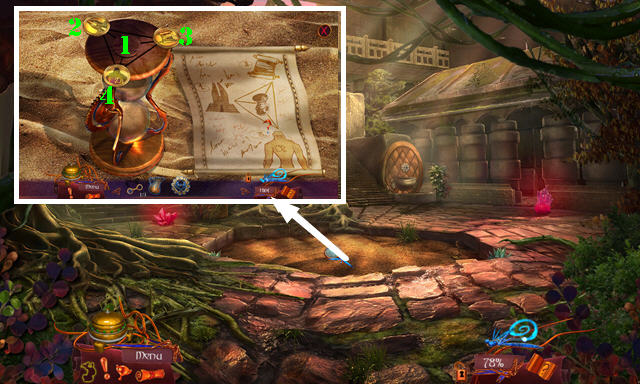
- Place SUMMONING INSTRUCTIONS and ETERNAL HOURGLASS. Select 1-4.
- Receive ANCIENT HERBICIDE.
- Go to Hallway.
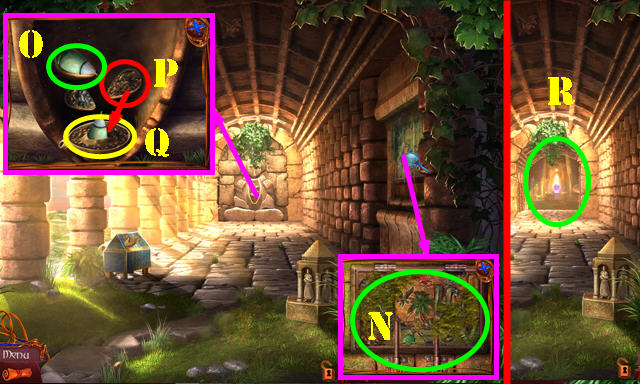
- Use ANCIENT HERBICIDE (N). Play HOP; receive FLINT.
- Select (O) and place (P). Use FLINT (Q).
- Go (R).
Chapter 4: Temple
- Place CHRONICLER'S KEY; take FERAL SPIKE (S).
- Use WATER JUG (T); take BELLOWS MOUTH (U).
- Go to Meadows of Tranquility.
- Use FERAL SPIKE; take JEWELED CONTROL 2/3 and BELLOWS BASE (V).
- BELLOWS MOUTH on BELLOWS BASE; receive BELLOWS.
- Place BELLOWS and select (W); take JEWELED CONTROL 3/3 (X).
- Select bellows again (W); take STRANGE COG (Y).
- Go to Temple.
- Place STRANGE COG (Z).
- Solution: E-B-D-E-B-A-D-E-Ax2-D-E-Bx2-D-E-A-D-E-B.
- Take LOCK PICK.
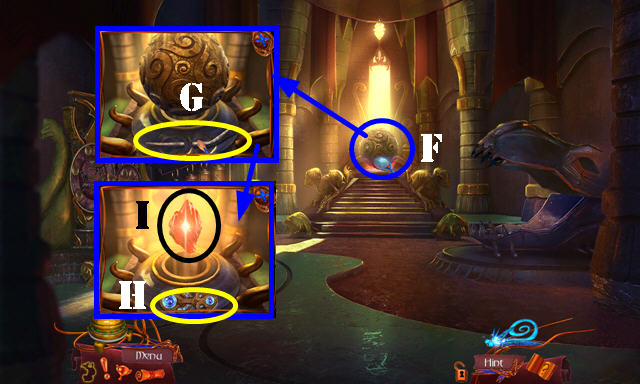
- Select sphere (F); take WORN LEVER (G).
- Place JEWELED CONTROL 3/3 (H). Take MEMORY CRYSTAL (I).
- Walk down twice.
- Give MEMORY CRYSTAL (J); receive HERITAGE CRYSTAL.
- Take IDOLS 1/2 and IDOLS 2/2 (K).
- Go to Meadows of Tranquility (L).
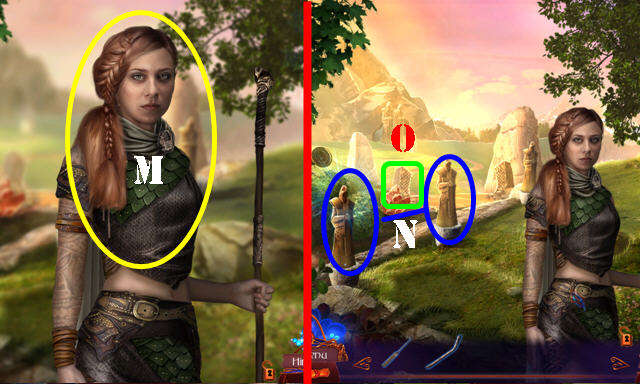
- Give HERITAGE CRYSTAL (M).
- Place IDOLS 2/2 (N).
- Go to Carnis Square (O).
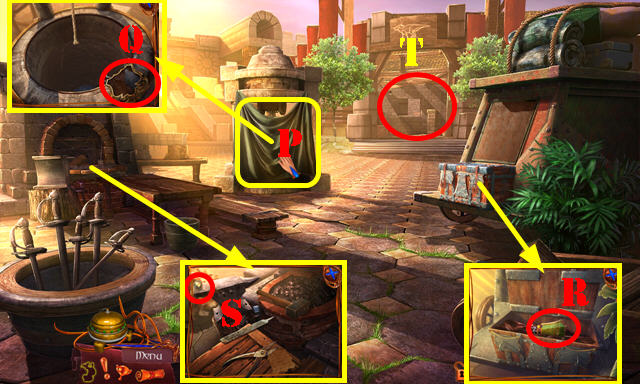
- Remove cloth (P); take BROKEN EMBLEM (Q).
- Use LOCK PICK; take MEMORIAL LANTERNS 1/3 (R).
- Take MARBLES 1/4 (S).
- Go (T).
- Take MEMORIAL LANTERNS 2/3 (U).
- Take MARBLES 2/4 (V) and move box.
- Walk down and go (W).
- Take WOODEN RAIDER and MARBLES 3/4 (X).
- Use WORN LEVER (Y); take CAULDRON (Z).
- Walk down.
- Place CAULDRON (A); receive CAULDRON WITH WATER.
- Go to Stables.
- Select cover; use CAULDRON WITH WATER (B).
- Play HOP (C); receive BENT POLEARM.
- Walk down.
- Look at note. Place BENT POLEARM (D); select 1-3; take POLEARM SYMBOL.
- Go to Keep.
- Place POLEARM SYMBOL (E).
- Solution (F-G-H).
- Go to Chieftain's Hall (I).
- Take ANTLER WRENCH and CROSSED TUSKS (J).
- Go to Terrace (K).
- Take MEMORIAL LANTERNS 3/3 (L).
- Open compartment; take COGS (M).
- Walk down.
- Place MEMORIAL LANTERNS 3/3; solution (N).
- Take CHIEFTAIN'S DIARY (O).
- Go to Treasury (P).
- Look at note (Q).
- Select both pieces (R); receive LOCK PLATE.
- Place COGS (S). Play HOP (T); receive THROWING STAR.
- Take BONE SYMBOL (U).
- Go to Keep.
- Use THROWING STAR; take DINO PAW (V).
- Place LOCK PLATE (W).
- Go (X).
Chapter 5: Granary
- Take TRIANGLE TOKEN (A).
- Place DINO PAW; select each paw (orange); take SHARP CRYSTAL (B).
- Go to Treasury.
- Insert TRIANGLE TOKEN (C); take COIL HANDLE (D).
- Use SHARP CRYSTAL and select; look at note and take MAP CRYSTAL (E).
- Walk down.
- Use MAP CRYSTAL (F).
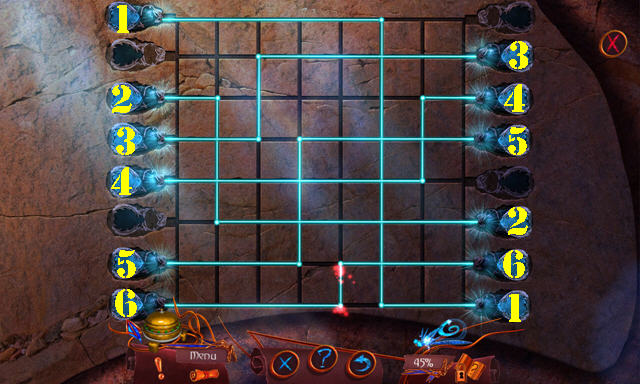
- Select twice for a puzzle (G).
- Solution (1-6).
- Play HOP (H); receive METAL RAIDER.
- Take CARNIS BANNER (I).
- WOODEN RAIDER and METAL RAIDER on BROKEN EMBLEM; take RAIDER EMBLEM.
- Go (J).
- Place COIL HANDLE (K) and select; take INCOMPLETE KEY (L).
- Place CARNIS BANNER (M).
- Remove cover; take HERBIVORE HEAD (N).
- Go to Stables.
- Use ANTLER WRENCH (O). Remove cover; take RAPTOR TRINKETS 1/2 (P).
- Place RAIDER EMBLEM; take RAPTOR TRINKETS 2/2 (Q).
- Go to Keep.
- Place RAPTOR TRINKETS 2/2 (R); take BOOK WINDER and WINGS (S).
- BOOK WINDER on CHIEFTAIN'S DIARY.
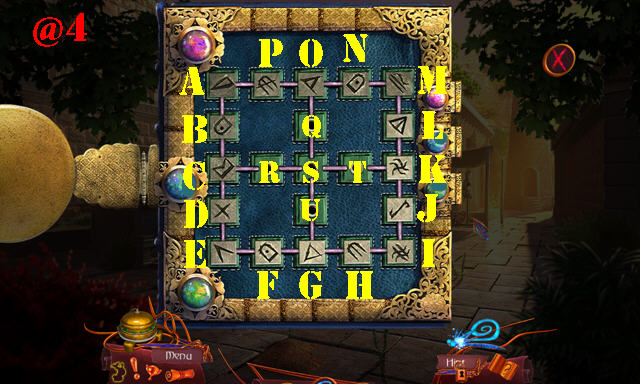
- Solution (@4): (G-R)-(K-G)-(R-U)-(O-T)-(P-O)-(A-P)-(B-A)-(C-B)-(D-S)-(B-R).
- (A-D)-(P-C)-(O-B)-(S-A)-(N-P)-(T-N)-(J-O)-(I-Q)-(L-S)-(M-T)-(H-L)-(T-J)-(G-I)-(U-H).
- (F-G)-(E-F)-(S-U)-(R-K)-(C-T)-(D-R)-(B-E)-(R-D)-(N-M)-(Q-B)-(O-C)-(T-N)-(P-O)-(A-P)-(B-A)-(C-B)-(U-C).
- Select book 3x; take MARBLES 4/4.
- Go to Chieftain's Hall.
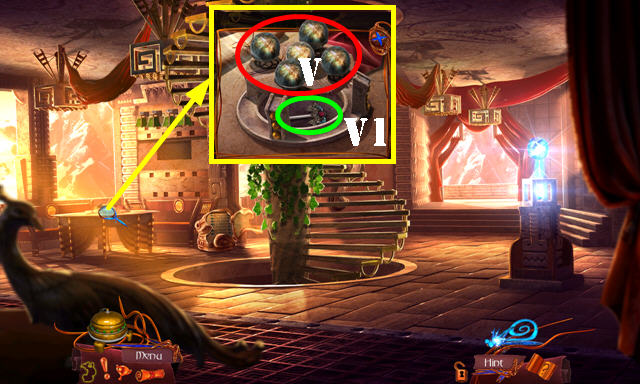
- Place MARBLES 4/4 (V); take WINDER (V1).
- WINGS on INCOMPLETE KEY; select both wings. Insert WINDER and select 4x; receive WINGS KEY.
- Go to Granary.
- Place WINGS KEY (W); take CARNIVORE HEAD (X).
- Go up.
- Place HERBIVORE HEAD and CARNIVORE HEAD (Y). Play HOP; receive STABLES STORAGE KEY.
- Go to Stables.

- Use STABLES STORAGE KEY; take HARNESS (Z).
- Go to Terrace.
- Place HARNESS (Z1).
- Go (Z2).
Chapter 6: Shelter
- Talk (A). Take BORDAN'S AMULET (B).
- Take LONG HOOK, HATCH LEVER, and PYRAMID CRANK (C).
- Place CROSSED TUSKS; take FOCUSED STONES 1/2 and SWORD HANDLE (D).
- Walk down.
- Use PYRAMID CRANK and select (E). Play HOP; receive MOON AND STAR.
- Go (F).
- Place MOON and STAR (G).
- Go (H).
- Take CRYSTAL PENDANT and ROPE PIECES 1/2 (I).
- Use HATCH LEVER; take MINIATURE PILLAR (J) and pull lever (K).
- Place MINIATURE PILLAR AND BORDAN'S AMULET (L). Take FOCUS STONES 2/2 (M).
- Play puzzle (N).

- Solution (@5): (C-Q)-(A-J)-(J-M)-(M-N)-(N-C)-(G-O)-(O-M)-(M-L)-(H-R)-(R-G).
- (G-O)-(Q-S)-(S-R)-(R-H)-(C-Q)-(Q-S)-(S-R)-(B-N)-(N-C)-(D-Q)-(Q-S)-(C-Q)-(O-M)-(M-J).
- (J-A)-(L-K)-(K-J)-(J-B)-(F-L)-(L-K)-(K-J)-(E-L)-(L-K)-(R-P)-(P-O)-(O-G)-(S-R)-(Q-P)-(P-O)-(O-F).
- (J-M)-(M-N)-(N-C)-(C-Q)-(Q-D)-(K-J)-(J-M)-(M-N)-(N-C)-(R-P)-(P-O)-(F-L)-(L-E)-(O-F).
- Take SEED BOTTLE and GREEN CRYSTAL.
- Take GLOW STONE (T).
- Use BONE SYMBOL (U); take CEREMONIAL DAGGER (V).
- Walk down.
- Use CEREMONIAL DAGGER (W).
- Place FOCUS STONES 2/2; select 1-4.
- Go (X).
- Place GREEN CRYSTAL (Y).
- Go (Z).
- Look at note (A); take GOLD SLIDER (B).
- Place SEED BOTTLE; solution (C).
- Take EXTINCT SEEDS and MORTAR AND PESTLE (D).
- Take RAPTOR SKULL and ROPE PIECES 2/2 (E).
- Use LONG HOOK (F).
- Take SUNDIAL BASE (G).
- Play HOP (H); receive BROKEN PLATE PIECE.
- Plant EXTINCT SEEDS (I); place GLOW STONE (J).
- Take SAVIOR PLANT (I) and GLOW STONE (J).
- SAVIOR PLANT in MORTAR AND PESTLE; take CURE.
- CURE gets used automatically.
- BROKEN PLATE PIECE on CRYSTAL PENDANT; remove cover and select all screws (orange). Take BLUE CRYSTAL (K).
- Walk down.
- Place BLUE CRYSTAL (L).
- Go (M).
- Use ROPE PIECES 2/2 on bell (N); select both pieces (orange).
- Place GOLD SLIDER; select O-Px2.
- Take SPIKED CLAW and SUN RING (Q).
- Walk down.
- Use SPIKED CLAW (R).
- Play HOP (S); receive PANEL KEY.
- Place PANEL KEY (T).
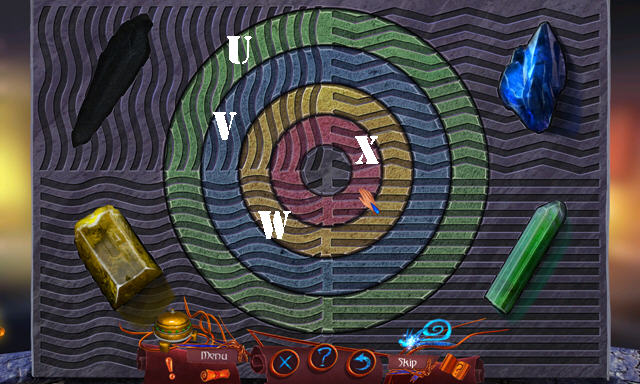
- Solution: rotate in order (U-W-V-X).
- Go (Y).
- Talk (A).
- Place RAPTOR SKULL; take SWORD BLADE and RHONIAN CREST (B).
- SWORD BLADE on SWORD HANDLE; take ADAMANTINE BLADE.
- Walk down.
- Place RHONIAN CREST; take BELL HAMMER (C).
- Go (D).
- Use ADAMANTINE BLADE (E); receive TANGLED VINE.
- Take MOON RING and STRANGLE VINE from TANGLED VINE.
- Go to Bell Tower.
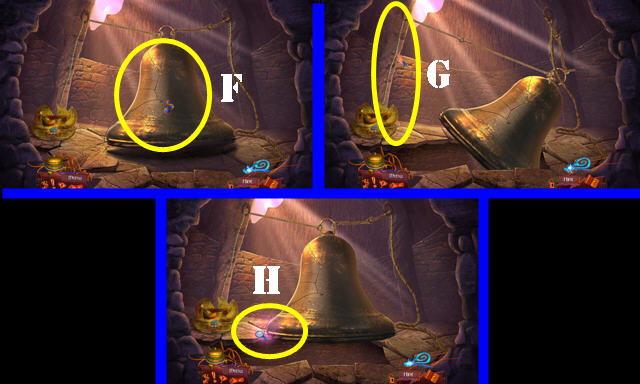
- Use BELL HAMMER (F); pull rope (G).
- Play HOP (H); receive OUTER RING.
- Go to Memorial Room.

- MOON RING, OUTER RING, and SUN RING on SUNDIAL BASE; take SUNDIAL.
- Place SUNDIAL; take RED CRYSTAL (I).
- Walk down.
- Place RED CRYSTAL (J).
- Look at charging base (K). Select Kinetic Beacon (L).
- Go (M).
- Use STRANGLE VINE and GLOW STONE (N).
- Select Kinetic Beacon (O).
- Take HERBANI AMULET (P).
- Walk down.
- Place HERBANI AMULET (Q).
- Congratulations, you've completed Amaranthine Voyage: The Burning Sky!
Created at: 2017-08-13