

Walkthrough Menu
- General Tips
- Chapter 1: Campsite
- Chapter 2: Clockwork Temple
- Chapter 3: The Forest
- Chapter 4: New York Street
- Chapter 5: Museum
- Chapter 6: Sewers
General Tips
- This is the official guide for Amaranthine Voyage: The Obsidian Book.
- This guide will not show when you have to zoom into a location; the screenshots will show each zoom scene.
- Hidden-object puzzles are referred to as HOPs. This guide will not show screenshots of the HOPs, however, it will mention when an HOP is available and the inventory item you'll collect from it.
- Use the Map to fast travel to a location.
Chapter 1: Campsite
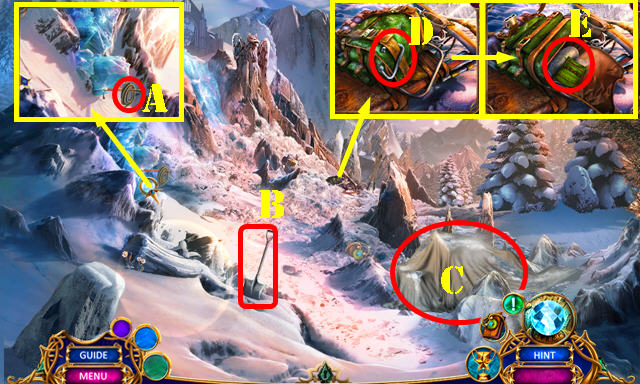
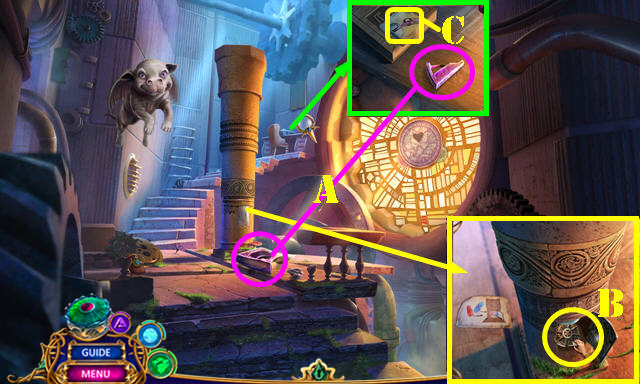
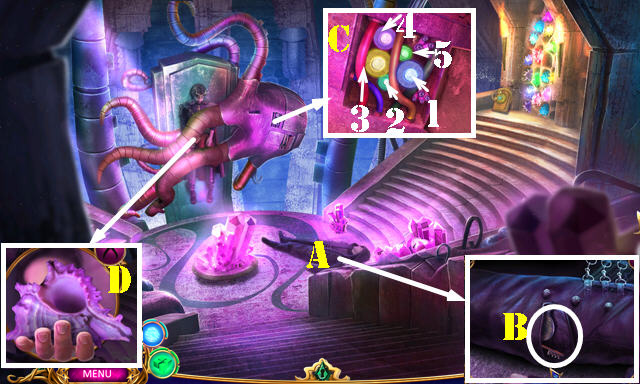
- Open the letter.
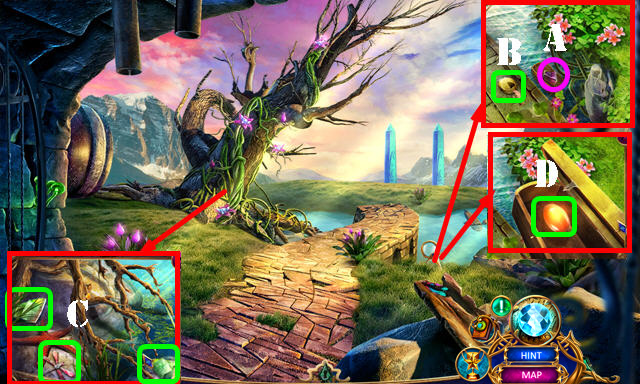
- Take the ROPE (A) and SHOVEL (B).
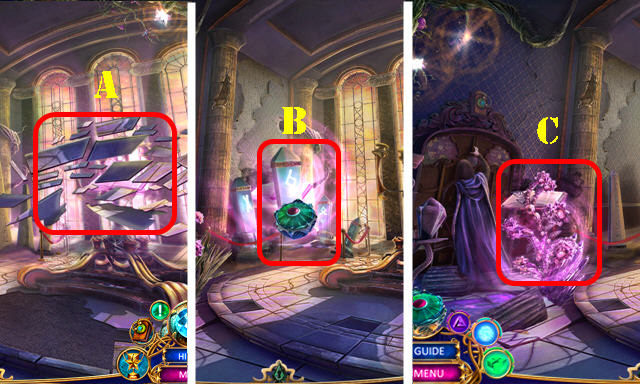
- Remove the sheet for a HOP (C); play it to get the TORCH.
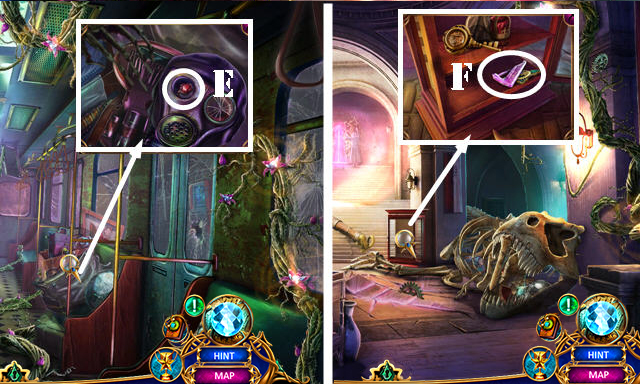
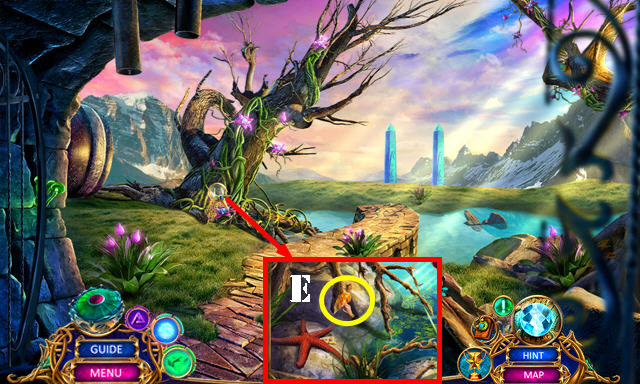
- Use the SHOVEL; take the CARABINERS 1/2 (D). Open the backpack; take the ZIPPERED BAG, BLANKET, and MATCHES (E).

- Open the ZIPPERED BAG; take the Map and CARABINERS 2/2 (inventory).
- Use the MATCHES on the TORCH; take the FLAMING TORCH (inventory).
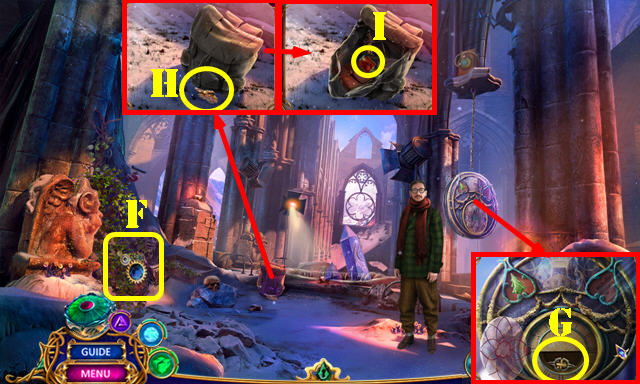
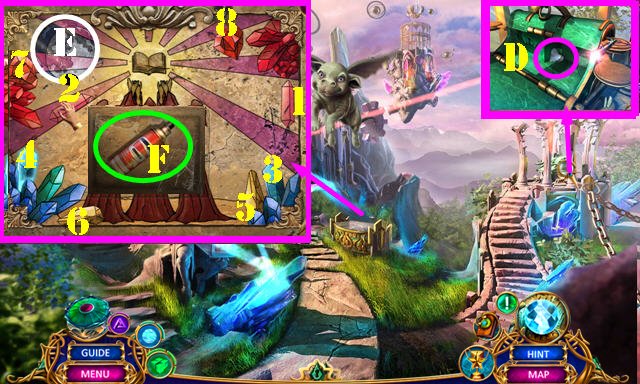
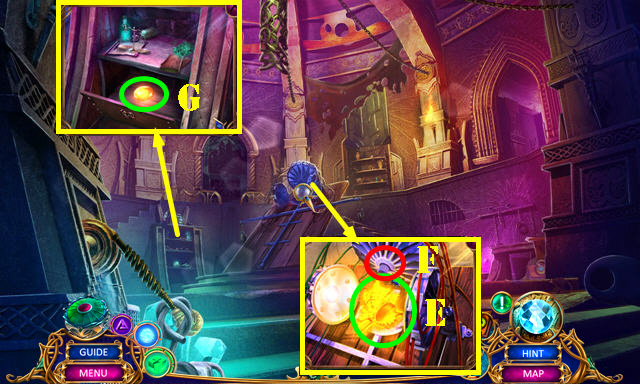
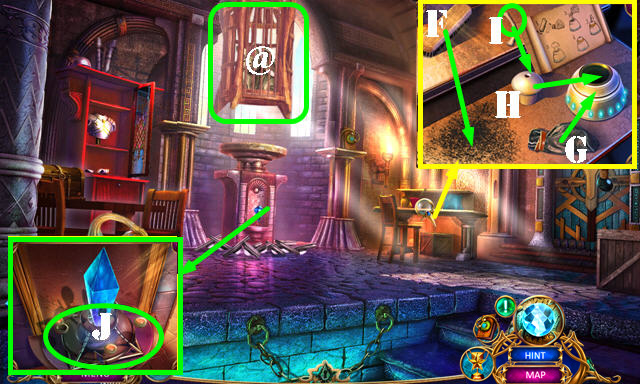
- Use the FLAMING TORCH; take the PICKAXE (F).
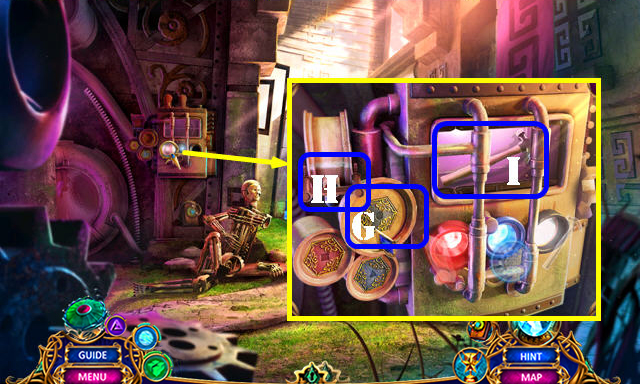
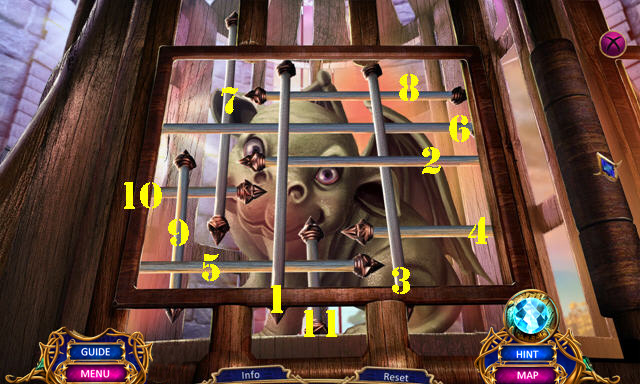
- Use the PICKAXE (G) for a puzzle.
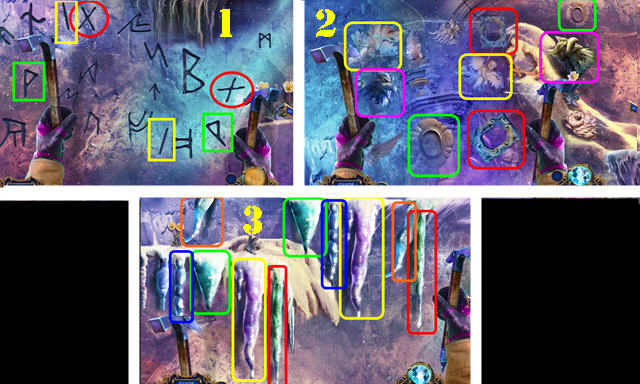
- Solution (1). Pan left.
- Solution (2). Pan right.
- Solution (3). Pan right and then go up.
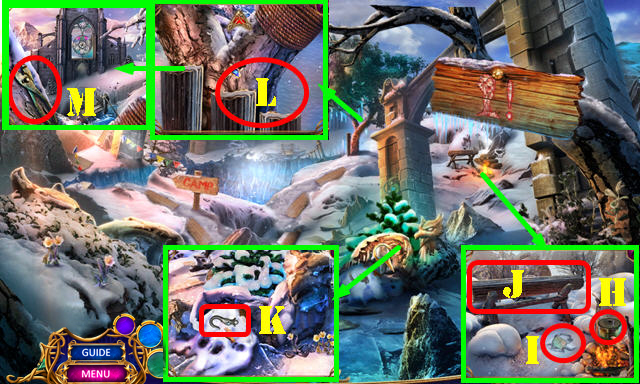
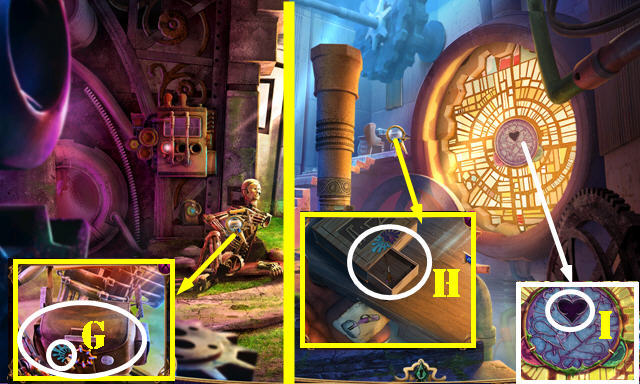
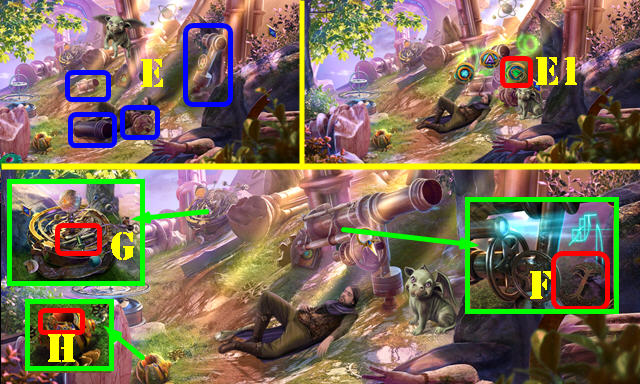
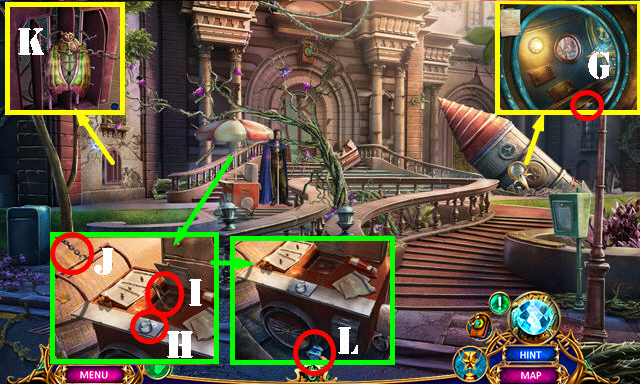
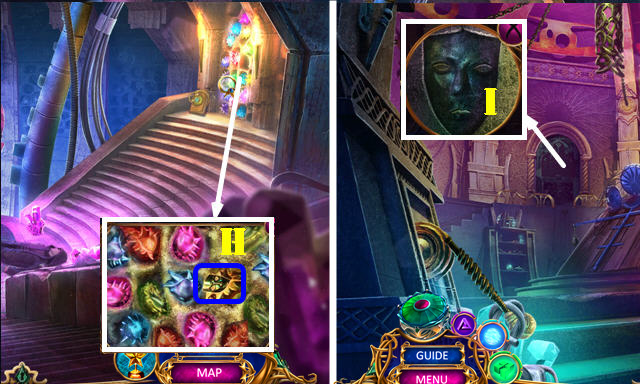
- Take the HOT POT (H); read the note; take the CHAIN SAW PART (I).
- Place the 2 CARABINERS on the CHAIN SAW PART to get the IMPROVISED SAW (inventory).
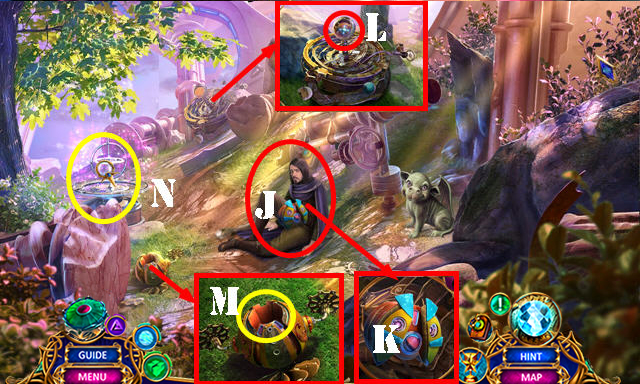
- Use the IMPROVISED SAW (J); take the STUMPS.
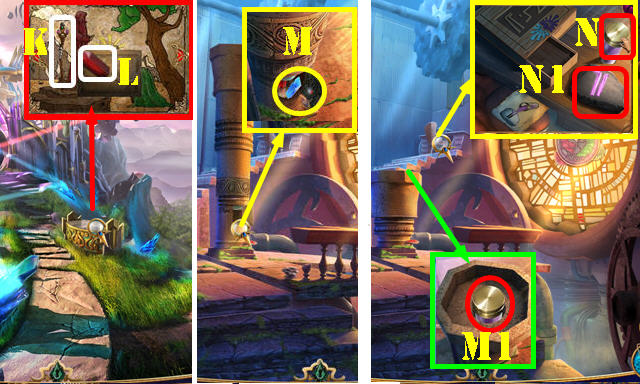
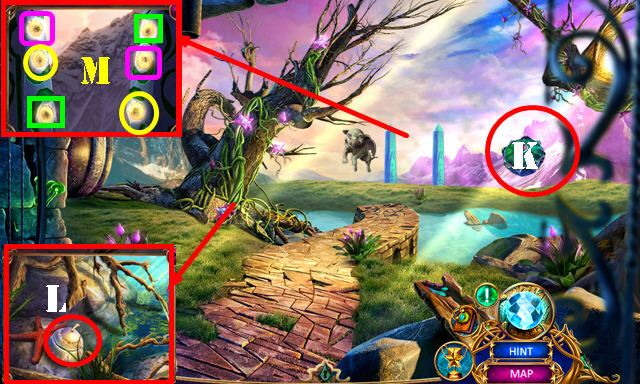
- Take the METAL HOOK (K).
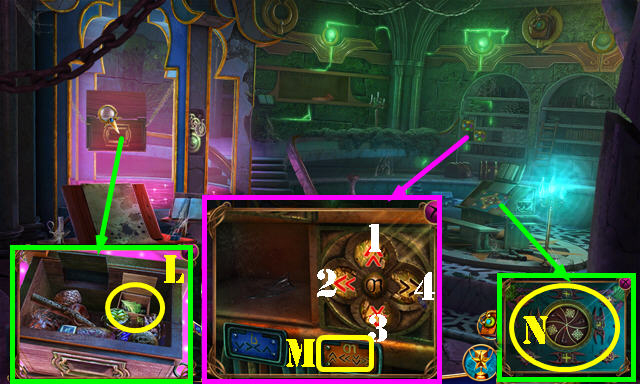
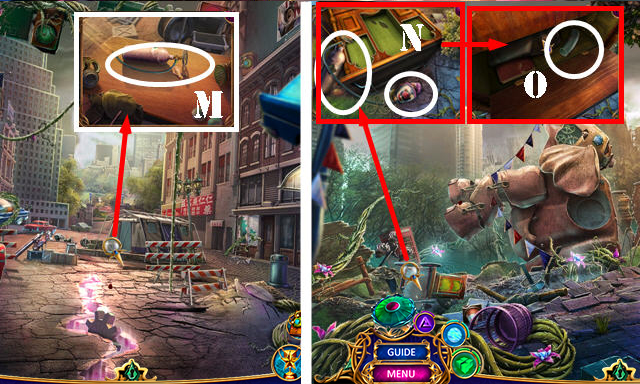
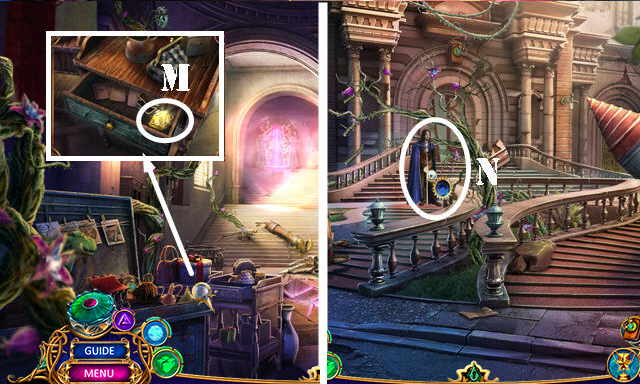
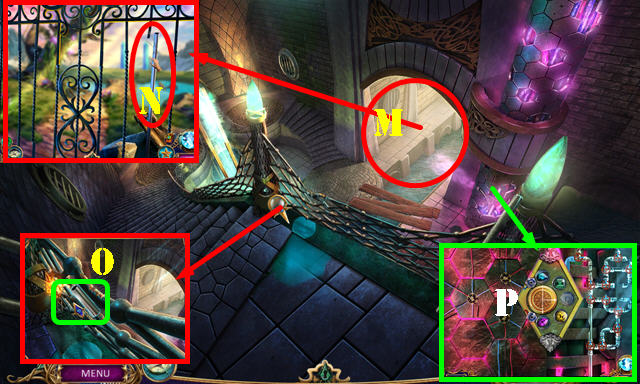
- Use the STUMPS (L); go up and take the PLIERS (M).

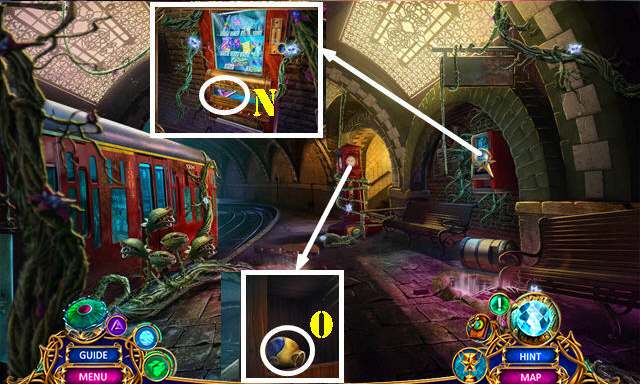
- Take the GREEN CRYSTALS 1/4 and 2/4 (N).
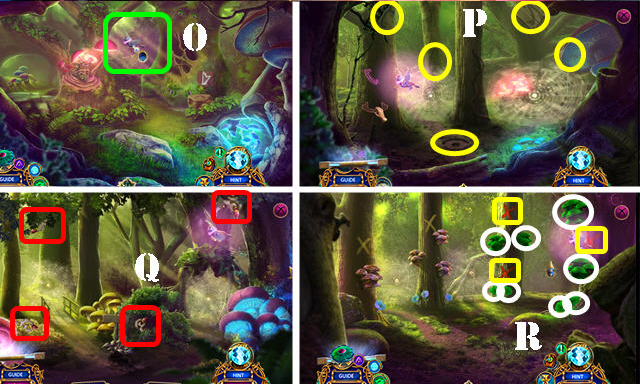
- Use the HOT POT; take the CCPP SIGN (O).
- Use the PLIERS to get the WOODEN SIGN (P).
- Place the WOODEN SIGN (Q); go to the Campsite.
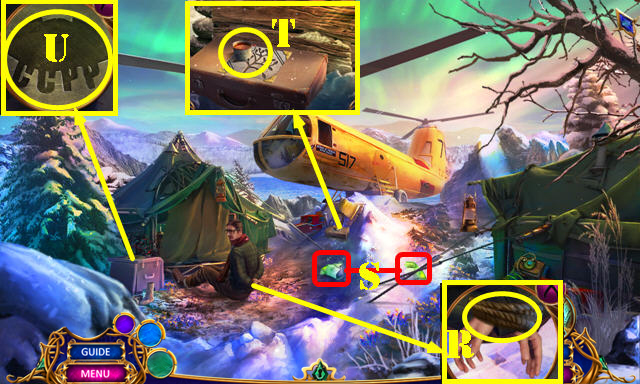
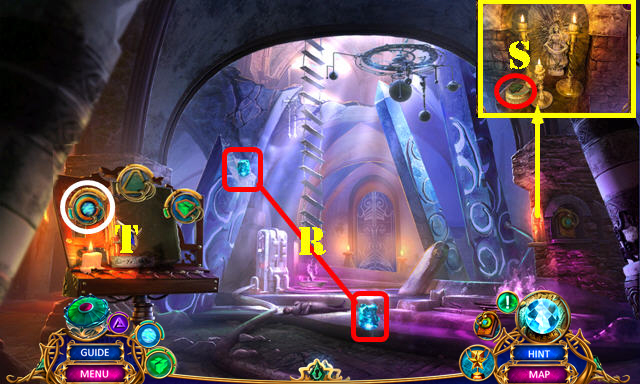
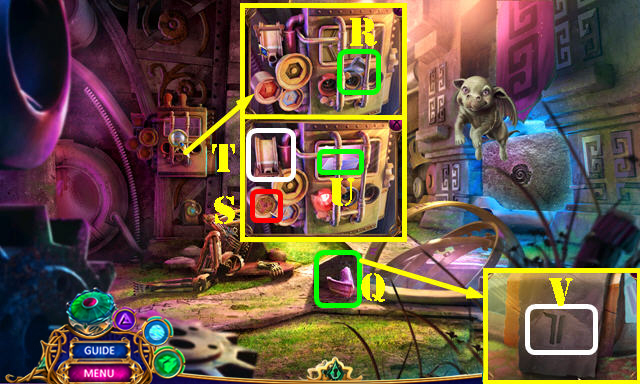
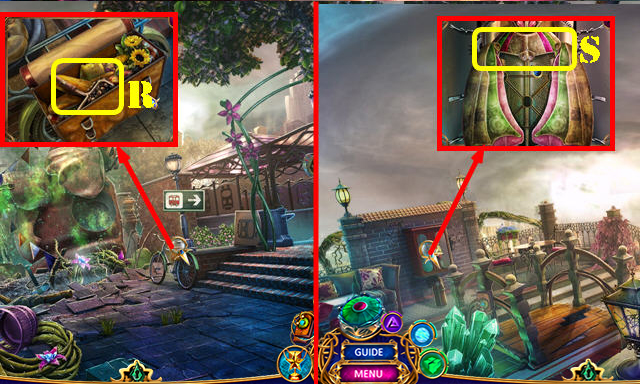
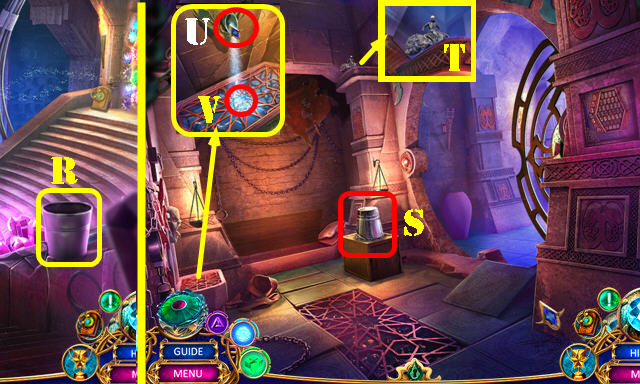
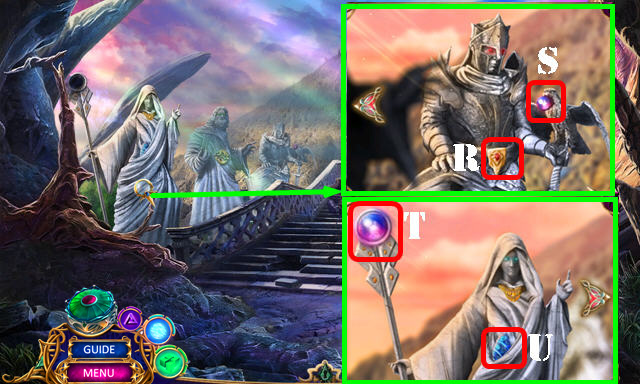
- Untie the rope (R). Give him the BLANKET.
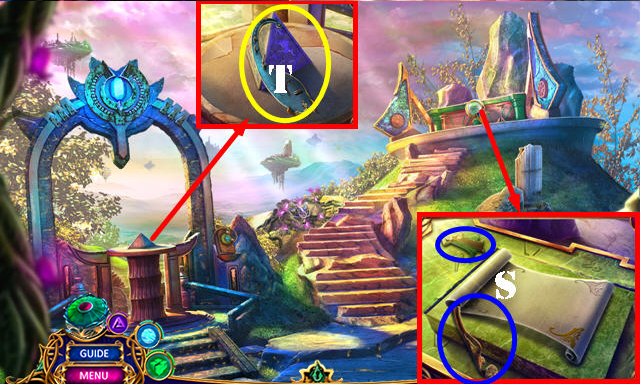
- Take the GREEN CRYSTALS 3/4 and 4/4 (S).
- Take the COLD TEA (T).
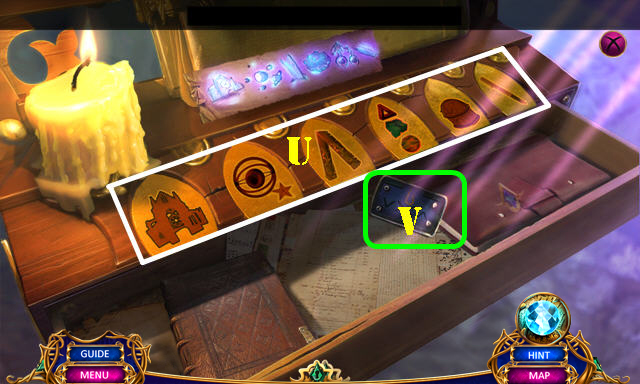
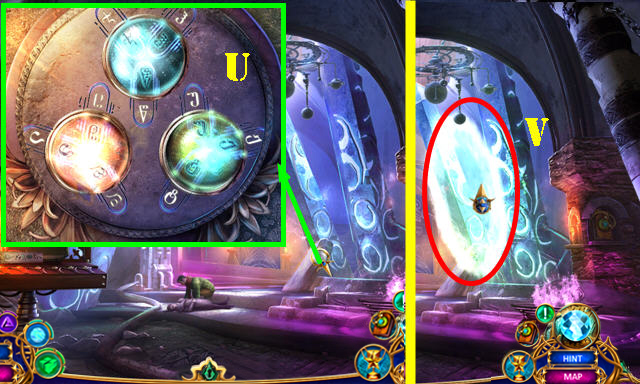
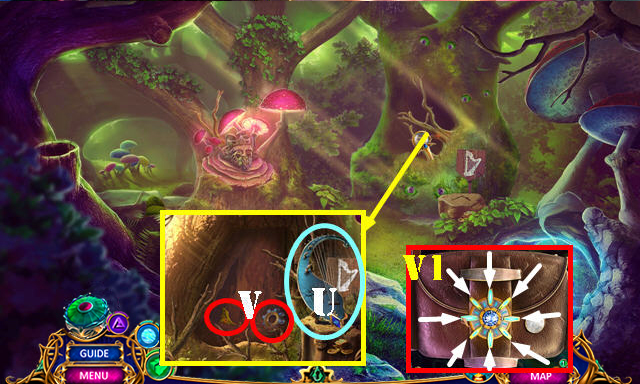
- Place the CCPP SIGN for a HOP (U); play it to get the ICE PICK.
- Walk down.
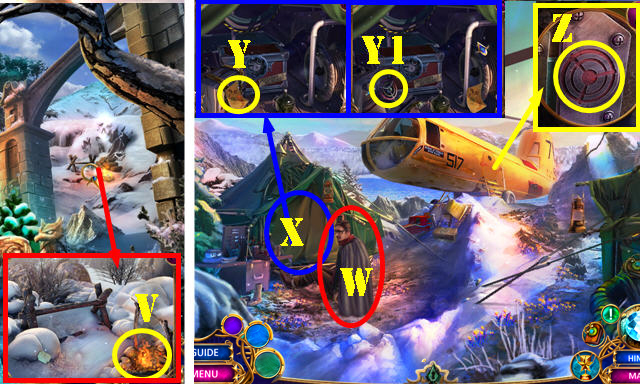
- Place the COLD TEA to get the HOT TEA (V).
- Return to the Campsite.
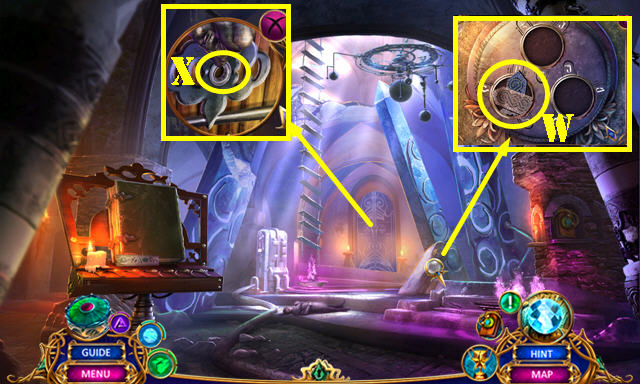
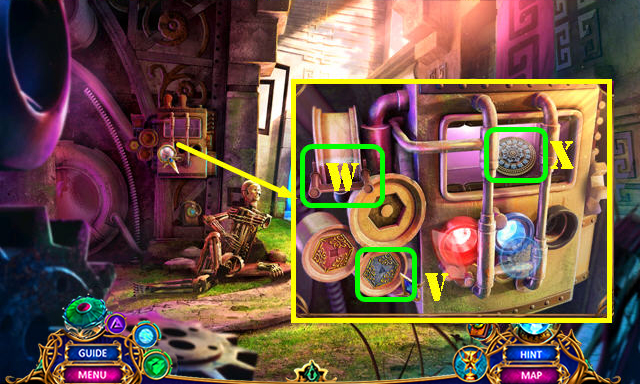
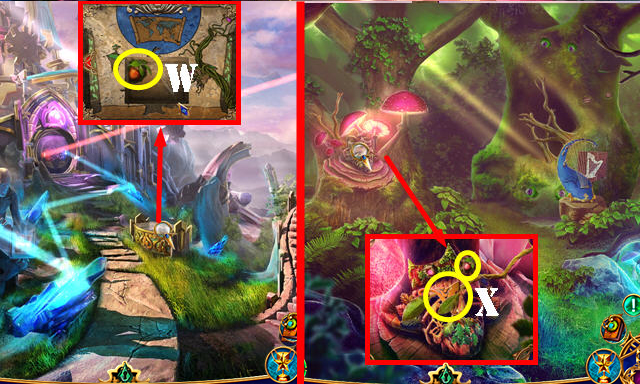
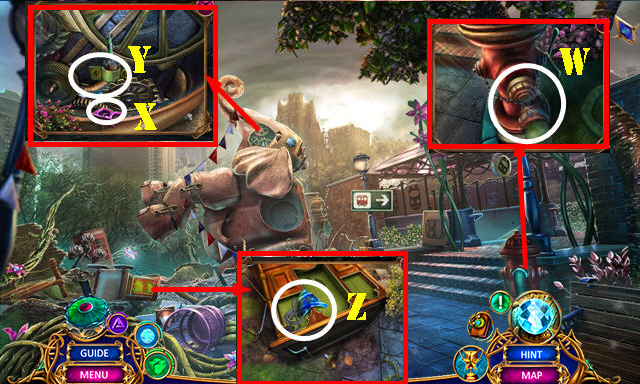
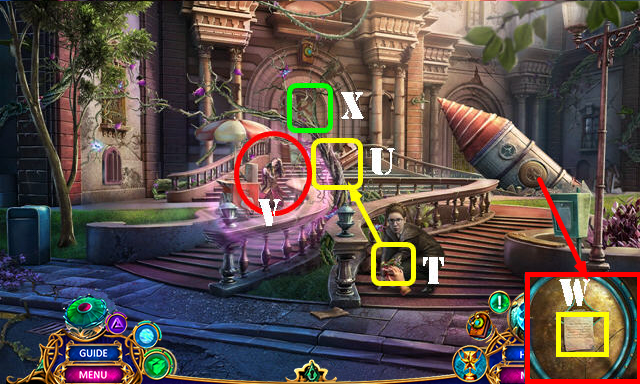
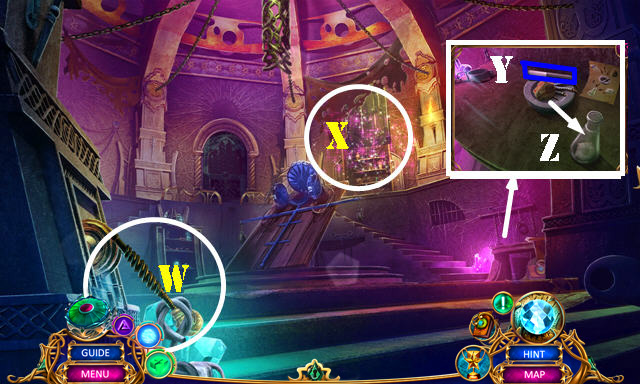
- Give the HOT TEA (W).
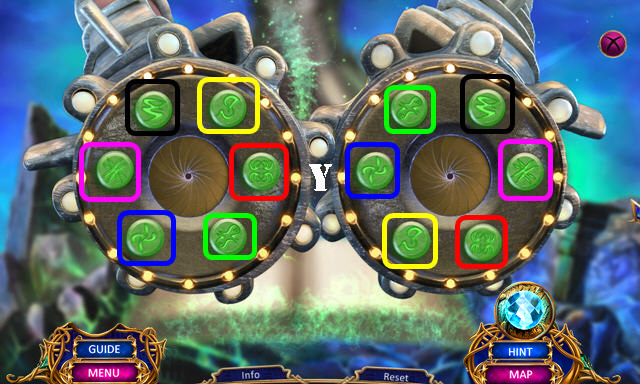
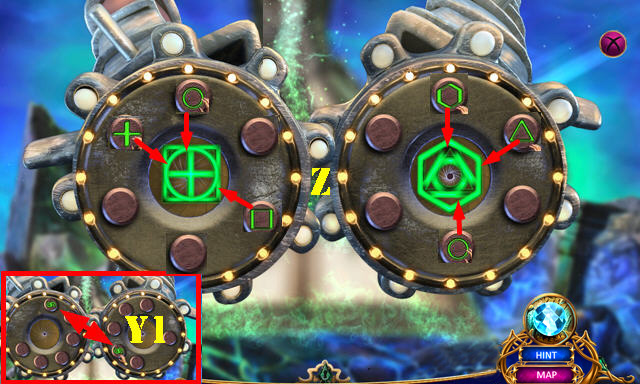
- Open the curtain (X); look at the note (Y); open the bag; take the PROPELLER KEY and SIGNAL DECODER (Y1).
- Use the PROPELLER KEY (Z); turn it and go inside.
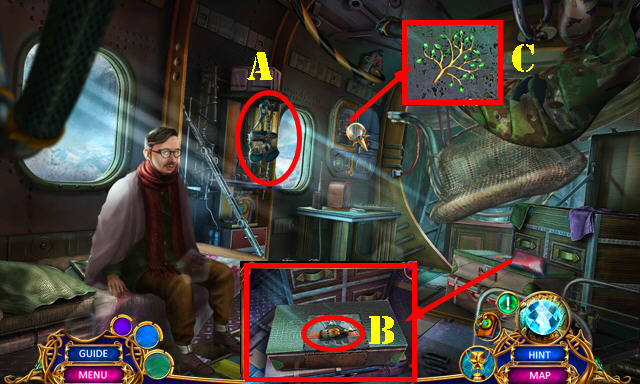
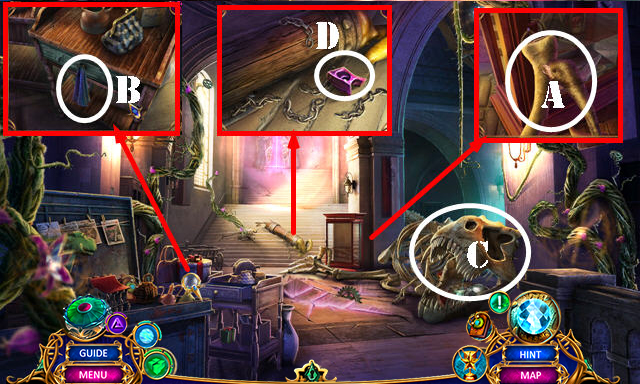
- Take the PARACHUTE HARNESS (A).
- Move the pillow; take the OIL (B).
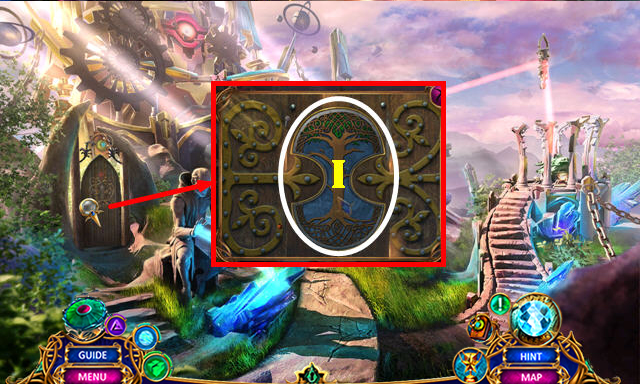
- Take the JEWELED TREE (C).
- Walk down.
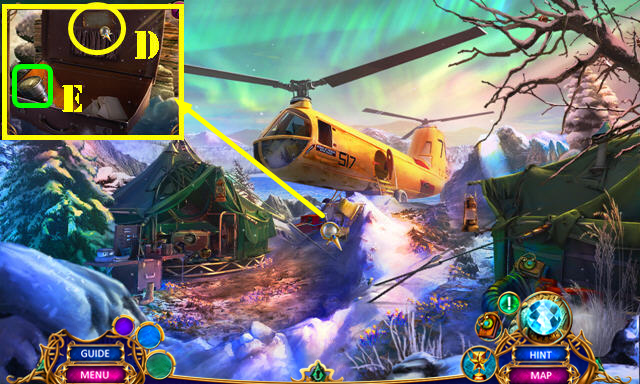
- Place the JEWELED TREE; read the note and take the HEX KEY (D).
- Use the ICE PICK; take the SHATTERED BEAR CHARM (E).
- Return to the Helicopter.
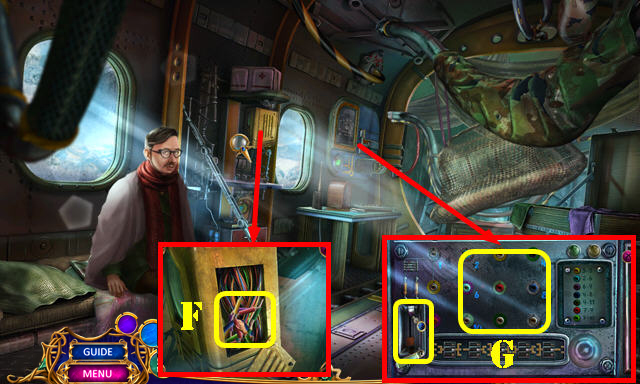
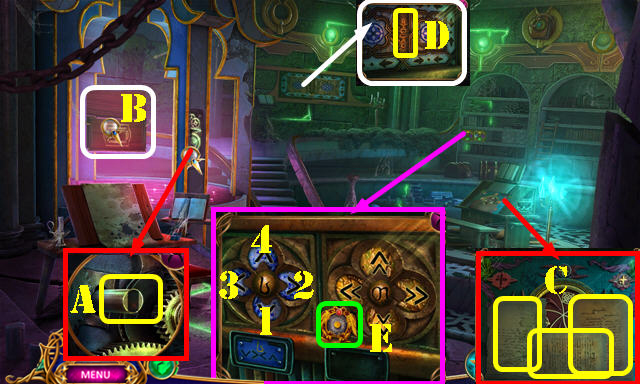
- Use the HEX KEY; take the WIRES (F).
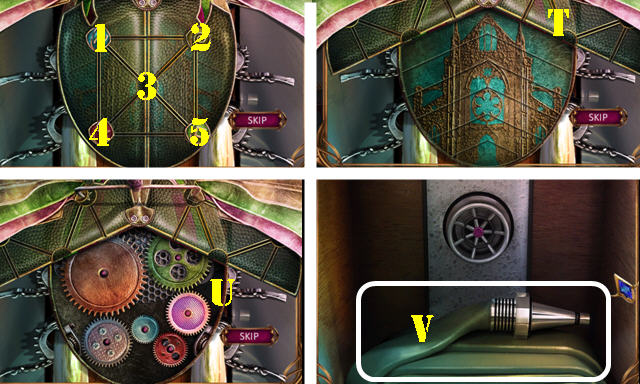
- Place the SIGNAL DECODER and WIRES for a puzzle (G).
- Solution (H).
- You receive the BULB and the WHITE DRYAD.
- Walk down.
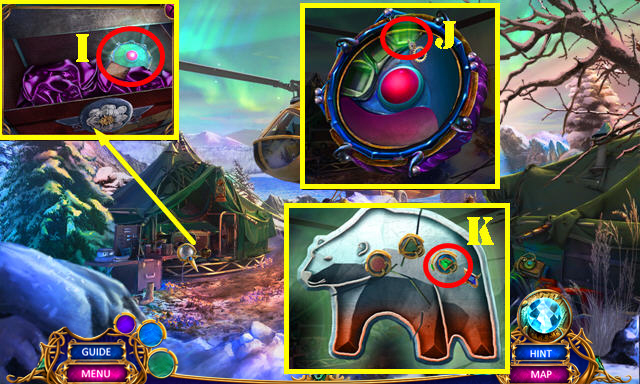
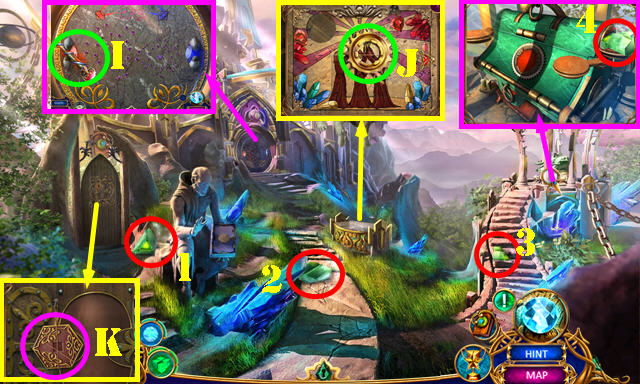
- Place the WHITE DRYAD; read the note and take the Harmonium Collector (I).
- Touch the Harmonium Collector to add it the useable items in the UI; select the Harmonium Collector to open it up again; place the 4 GREEN CRYSTALS into the glowing slot (J).
- Select the SHATTERED BEAR CHARM (inventory); place the pieces back together; Select the pieced-together bear to open the Harmonium Collector ui; use Mend (K). Get the POLAR BEAR.
- Go to the Helicopter.
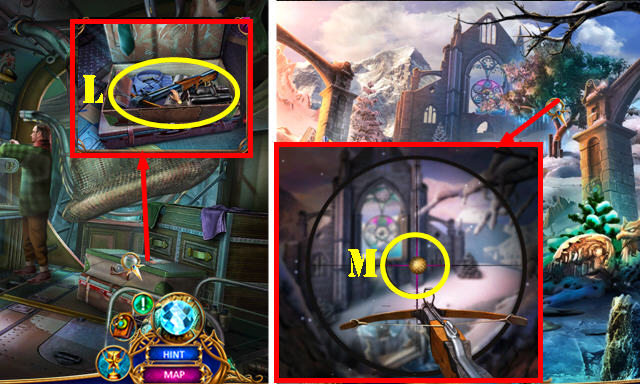
- Place the POLAR BEAR; look at the book and take the CROSSBOW (L).
- Use the ROPE on the CROSSBOW; take the CROSSBOW WITH ROPE (inventory).
- Return to the Crevasse.
- Use the CROSSBOW WITH ROPE (M). Pull back the rope to make it taut to trigger the mini-game. Select the ball once it's in the middle. Repeat 2x.
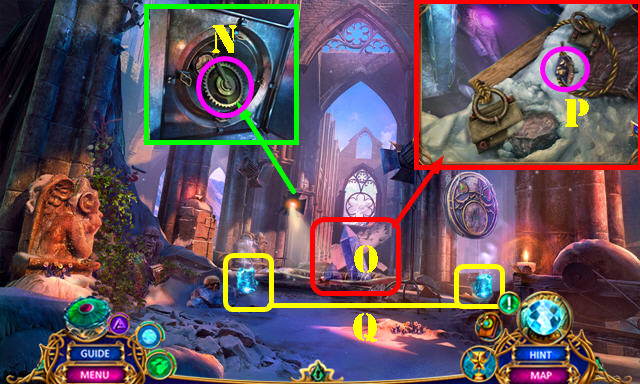
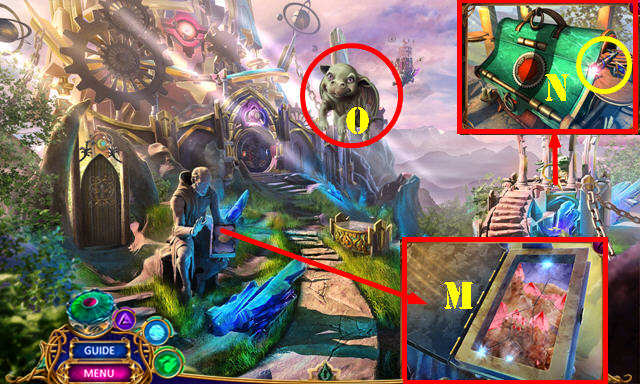
- Use the OIL; take the HANDLE (N); place the BULB.
- Look (O).
- Take the METAL ORNAMENT; place the METAL HOOK and select it (P).
- Take the BLUE CRYSTALS 1/4 and 2/4 (Q).
- Go to the Undercroft (O).
- Take the BLUE CRYSTALS 3/4 and 4/4 (R).
- Place the 4 BLUE CRYSTALS in the Harmonium Collector to gain the Cleanse Power.
- Use the Cleanse Harmonium Collector. Take the GLASS CLOUD (S).
- Use the Cleanse Harmonium Collector (T) for a puzzle.
- Solution (U).
- Take the BLUE CODED PLATE (V).
- Take the BROKEN TILE (W).
- Place the METAL ORNAMENT (X); go forward.
- Place the HANDLE (A) for a HOP; play it (B) to get the OBSIDIAN MAP 1/3.
- Remove the three notes (C).
- Select both pieces of the BROKEN TILE; use the Mend Harmonium Collector to get the TILE (inventory).
- Place the TILE (D); select the note and take the TRAVEL HEMISPHERES 1/3.
- Take the FRAME (E). Place the BLUE CODED PLATE. Select 1-2-3-4; take the SICKLE.
- Return to the Monastery Ruins.
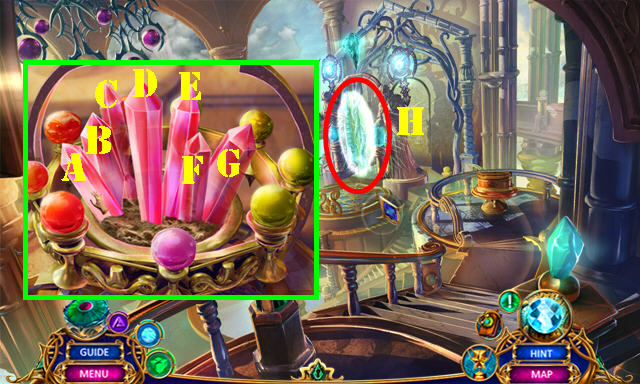
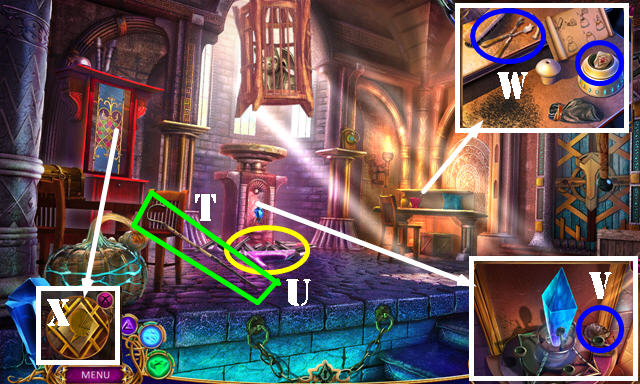
- Use the SICKLE for a HOP (F); play it to get the ENGRAVING TOOL.
- Place the GLASS CLOUD; select the area and take the CRYSTAL KNOB (G).
- Take the STATUE PART (H). Open the sack and move items; take the FIRE EXTINGUISHER (I).
- Go to the Undercroft.

- Place the STATUE PART (J); take the YELLOW CODED PLATE (K).
- Go forward.
- Use the ENGRAVING TOOL; take the GLASS TREE (L).
- Place the YELLOW CODED PLATE (M); select 1-2-3-4; take the PETROLEUM BOTTLE.
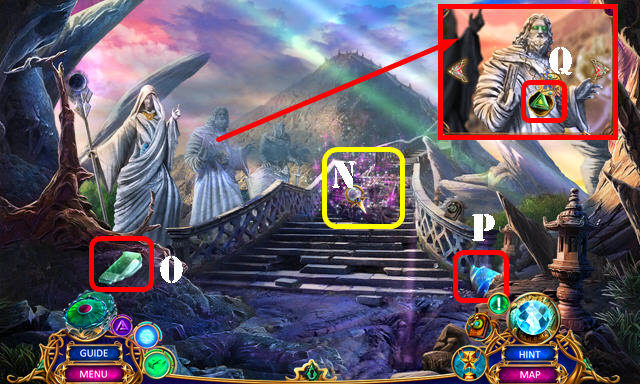
- Place the CRYSTAL KNOB for a puzzle (N).
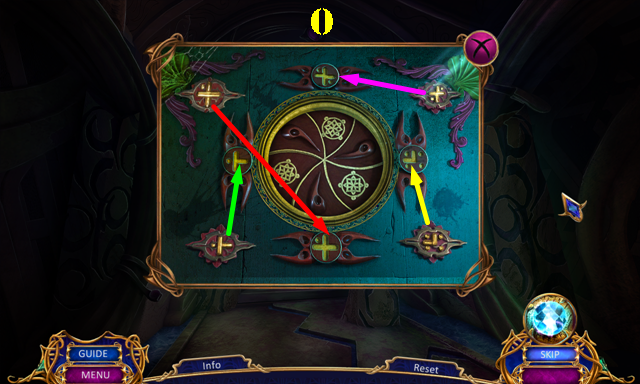
- Solution (O); take the TRAVEL HEMISPHERES 2/3.
- Walk down.
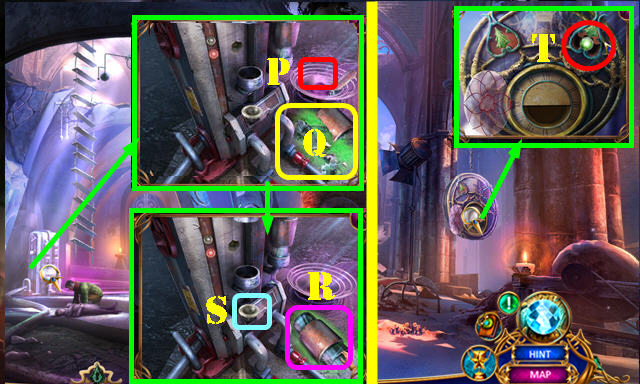
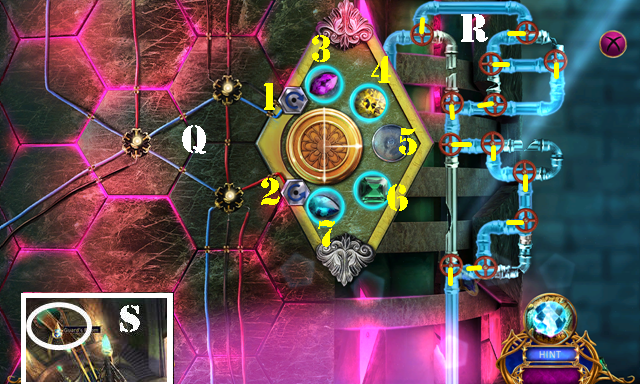
- Use the FIRE EXTINGUISHER (P); select this area 4x (Q); use the Mend Harmonium Collector. Select the pipe (R) and use the PETROLEUM BOTTLE (S).
- Return to the Monastery Ruins.
- Place the GLASS TREE; take the TRAVEL HEMISPHERES 3/3 (T).
- Go to the Undercroft.
- Place the 3 TRAVEL HEMISPHERES; swap as shown and rotate all three (U).
- Go through the portal (V).
Chapter 2: Clockwork Temple
- Play the HOP to get BASIL'S WHISTLE.
- HOP puzzle solution: (C-G-B)-(E-D-A-C)-(G-A-E-B-D).
- Go to the Courtyard (H).
- Take the 4 GREEN CRYSTALS (1-2-3-4).
- Take the CONTROL HANDLE (I).
- Pan left; take the STONE CREST PIECE (J).
- Take the RED HEXAGON (K).
- Place the STONE CREST PIECE on the FRAME; take the STONE CREST (inventory).
- Place the STONE CREST; select all pieces (M).
- Place the CONTROL HANDLE (N).
- Use BASIL'S WHISTLE (O).
- Place the 4 GREEN CRYSTALS in the Harmonium Collector.

- Select each crystal twice (P).
- Enter the Clockwork Temple.
- Take the VIOLET CRYSTAL 1/4 (Q) and VIAL (R).
- Place the RED HEXAGON (S); pull the lever (T); take the BLUE CRYSTAL (U).
- Take the DEPLETED RUNE (V).
- Go forward.
- Take the VIOLET CRYSTALS 2/4 and 3/4 (A).
- Look at the note; open the compartment and take the TEMPLE EMBLEM (B).
- Look at the note; take the MOON EMBLEM (C).
- Walk down twice.
- Place the TEMPLE EMBLEM; take the STAINED GLASS HEART (D).
- Place the MOON EMBLEM and rotate (E). Soluton (1-8).
- Take the RUST REMOVER (F).
- Go to the Clockwork Temple.
- Use the RUST REMOVER; take the INSIGNIA PIECE and SATCHEL (G).
- Go forward.
- Place the INSIGNIA PIECE; take the STAFF EMBLEM (H).
- Place the STAINED GLASS HEART for a puzzle (I).

- Solution (J).
- Walk down twice.
- Pan right. Place the STAFF EMBLEM (K) for a HOP. Take the RED CRYSTAL (L).
- Return to the Temple Tower.
- Place the BLUE CRYSTAL and the RED CRYSTAL; close the door. Remove the top and take the PURPLE RUNE POWDER (M1).
- Put down the DEPLETED RUNE and the PURPLE RUNE POWDER. Open the lid (N); take the ENERGIZED RUNE (N1).
- Walk down.
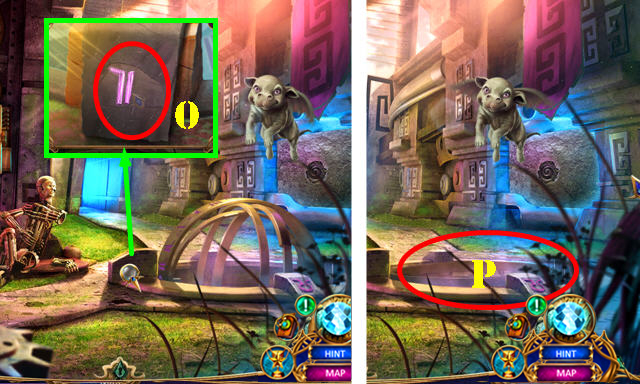
- Place the ENERGIZED RUNE (O).
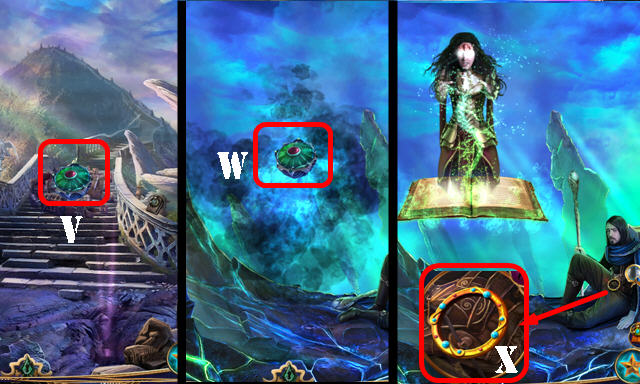
- Go to the Vault (P).
- Select the scene.
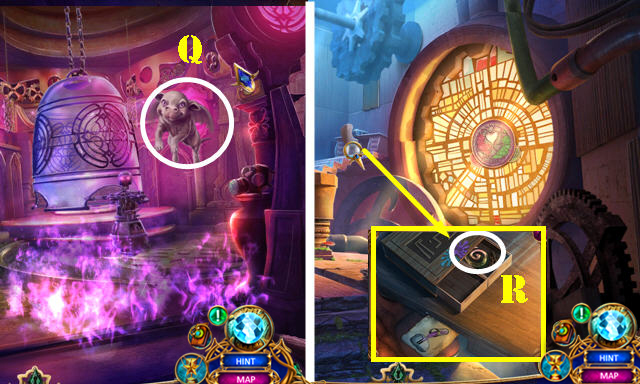
- Use BASIL'S WHISTLE (Q) to get the INSIGNIA PIECE.
- Return to the Temple Tower.
- Place the INSIGNIA PIECE; take the RELIEF PART (R).
- Walk down.
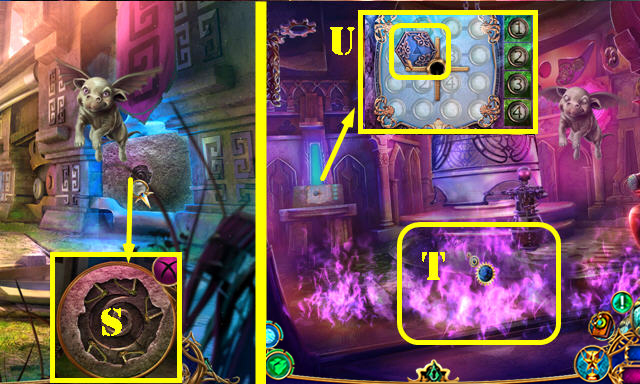
- Place the RELIEF PART for a HOP (S); play it to get the FROST ORB.
- Return to the Vault.
- Use the FROST ORB 3x (T).
- Take the BLUE HEXAGON (U).
- Walk down.
- Place the BLUE HEXAGON (V); pull the lever (W); take the ORNATE BUTTON (X).
- Return to the Vault.
- Place the ORNATE BUTTON; take the TREE AMULET (Y) and press the gears.
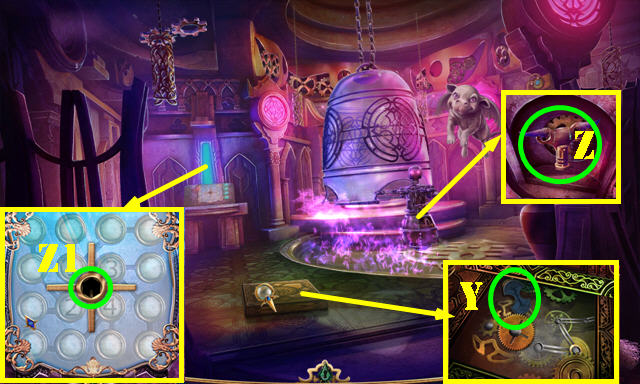
- Remove the cover; select the pieces. Use the Mend Harmonium Collector and take the CLOCKWORK KEY (Z).
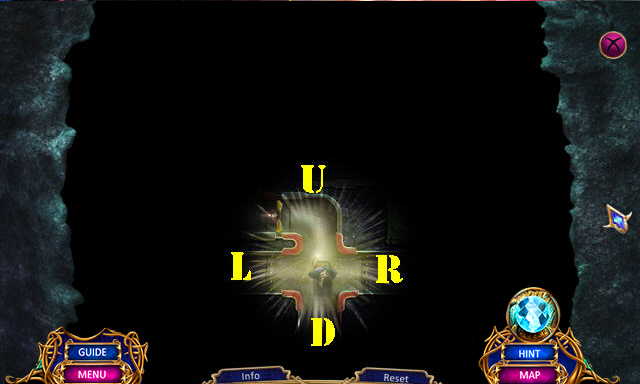
- Use the CLOCKWORK KEY for a puzzle (Z1).
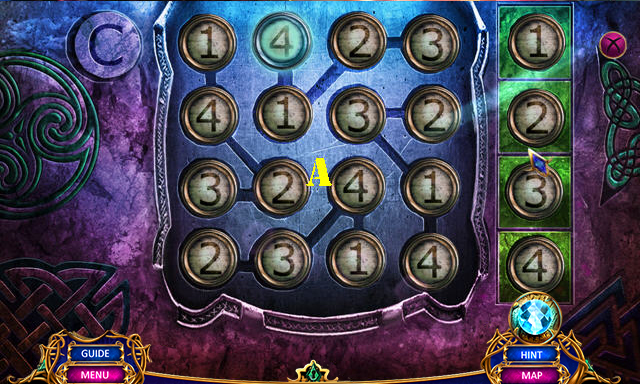
- Solution (A).
- Read the note; take the OBSIDIAN MAP 2/3 and CROWN EMBLEM (B).
- Walk down twice.
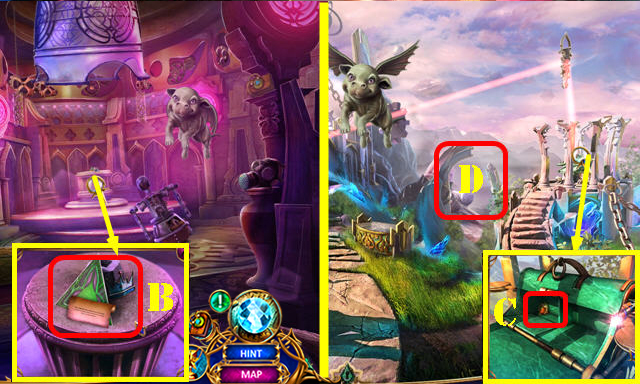
- Place the CROWN EMBLEM; take the ACORN (C).
- Go to the Crash Site (D).
- Select the 4 parts (E). Talk to Basil. Use the Mend Harmonium Collector (E1).
- Take the TREE AMULET 2/2 (F).
- Take the DRILL KEY and METAL STRING (G).
- Take the WIND-UP KEY (H).
- Walk down.
- Place the 2 TREE AMULETS (I).
- Go through the door.
Chapter 3: The Forest
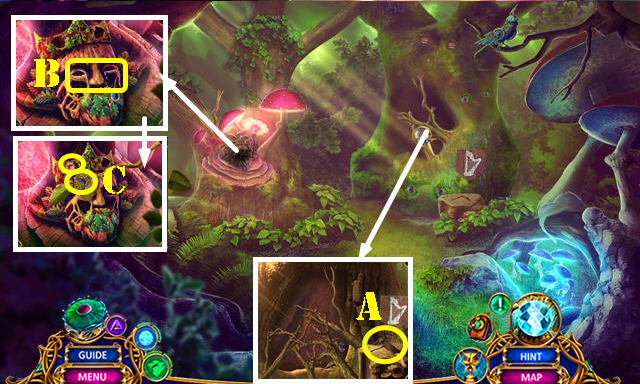
- Take the TRY SQUARE (A).
- Use the Cleanse Harmonium Collector. Use the VIAL to get the TEARS OF THE FOREST (B).
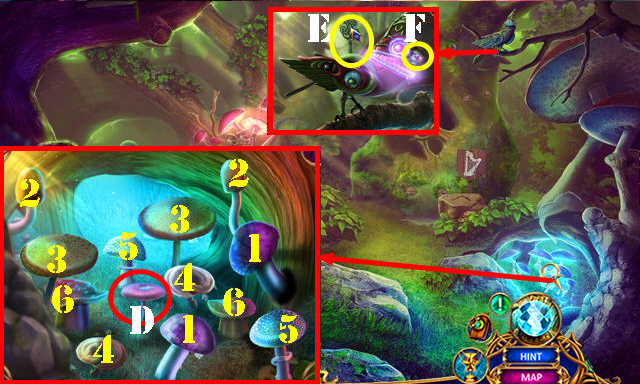
- Place the ACORN; take the BLACK HEXAGON (C).
- Select matching mushrooms (1-6). Take the SOCIAL MUSHROOM (D).
- Use the WIND-UP KEY 3x (E); take the CHARGED CRYSTALS 1/2 (F).
- Return to the Clockwork Temple.
- Place the BLACK HEXAGON (G); pull the lever (H); take the HAMMER (I).
- Return to the Crash Site.
- Give the SOCIAL MUSHROOM and TEARS OF THE FOREST (J). Take the BROKEN POWER CORE (K).
- Use the HAMMER; take the CHARGED CRYSTALS 2/2 (L).
- Place the 2 CHARGED CRYSTALS in the BROKEN POWER CORE; take the POWER CORE (inventory).
- Place the POWER CORE (M) for a HOP (N): play it to get the FOREST MAP.
- Return to the Forest Entrance.
- Place the FOREST MAP (O); select the scene.
- Select the symbols (P). Go forward.
- Select the symbols (Q). Go forward.
- Select the symbols (R). Go forward.
- Take the GARRICK FIGURINE and CLOCKWORK SCEPTER HANDLE (S).
- Take the BROKEN HARP (T).
- Place the METAL STRING on the BROKEN HARP; take the HARP (inventory).
- Walk down.
- Place the HARP (U); take the OFFERINGS 1/3 and COG-SHAPED KEY (V).
- Use the COG-SHAPED KEY on the SATCHEL. Rotate until lit, then select each piece twice (V1). Take the OFFERINGS 2/3 (inventory).
- Walk down.
- Pan right; place the GARRICK FIGURINE; touch it and take the ACORN (W).
- Go to the Forest Entrance.
- Place the ACORN; take the OFFERINGS 3/3 (X).
- Go to the Resting Place.
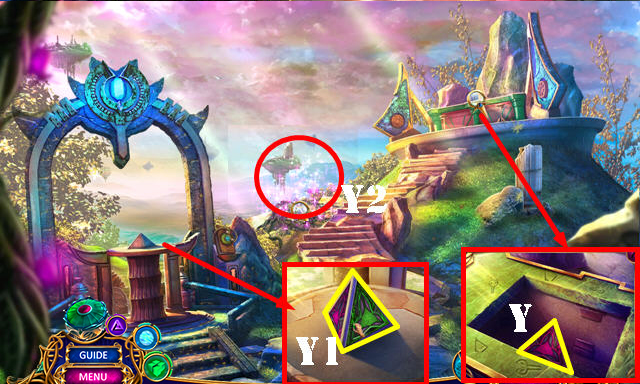
- Place the 3 OFFERINGS; remove the lid and take the OBSIDIAN MAP 3/3 (Y).
- Place the 3 OBSIDIAN MAP pieces (Y1); touch the hologram for a HOP (Y2); play it to get the TELESCOPE INSTRUCTIONS.
- Return to the Crash Site.
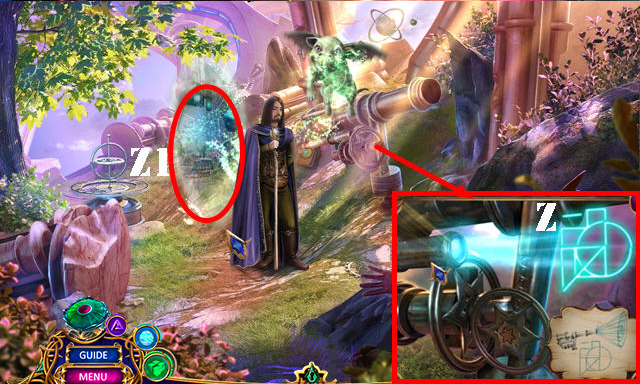
- Place the TELESCOPE INSTRUCTIONS for a puzzle. Solution (Z).
- Use the Portal (Z1).
Chapter 4: New York Street
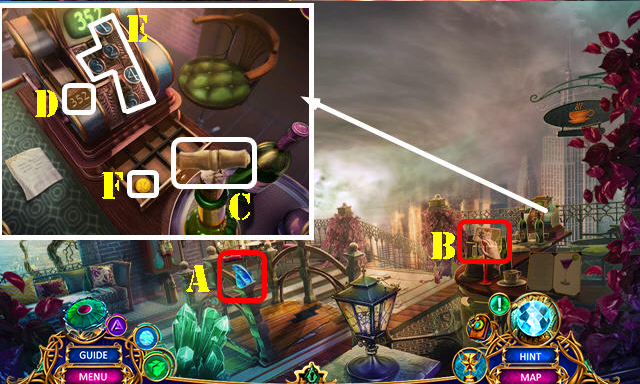
- Take the BLUE CRYSTAL 1/4 (A).
- Use the Cleanse Harmonium Collector; take the WAITER'S ID (B).
- Take the CORKSCREW (C).
- Read the note; place the WAITER'S ID (D). Enter 352 (E) and take the TEN CENTS (F).
- Go forward.
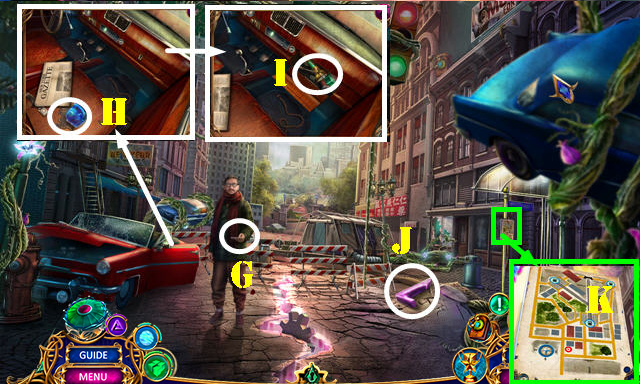
- Talk to Julian; take the PARANORMAL ACTIVITY MAP (G).
- Look at the paper; take the BLUE CRYSTAL 2/4 and TRAIN SYMBOL (H).
- Use the CORKSCREW; take the FLASHLIGHT and TAPE (I).
- Take the VIOLET CRYSTAL 4/4 (J).
- Open the FLASHLIGHT; take the BATTERY (inventory).
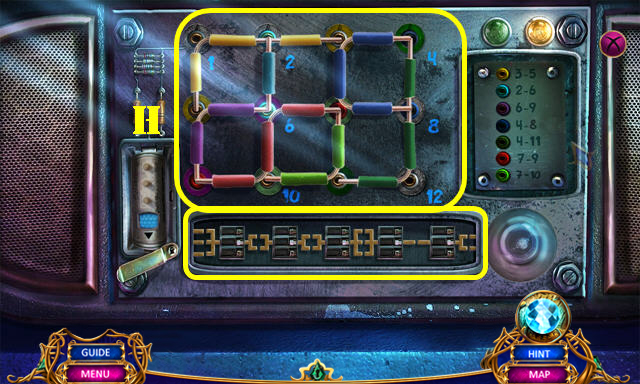
- Place the PARANORMAL ACTIVITY MAP for a puzzle (K).
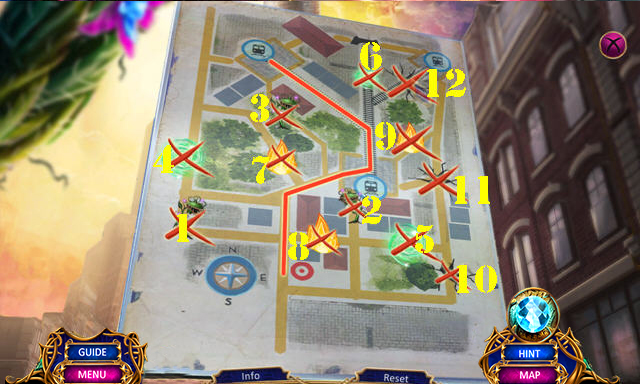
- Solution (1-12).
- You receive the SAFE CITY ROUTE.
- Place the 4 VIOLET CRYSTALS in the Harmonium Collector.
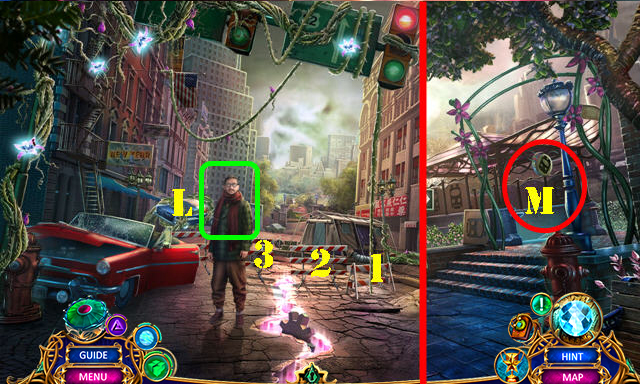
- Give the SAFE CITY ROUTE (L).
- Move the three barricades (1-3); go forward and then go to the Subway Station (M).
- Use the Phase Harmonium Collector; take the VIOLET CRYSTAL 1/4 (N).
- Use the TRY SQUARE; take the CLOCKWORK SCEPTER MECHANISM (O).
- Walk down 3x.

- Use the Phase Harmonium Collector; take the PLANT POISON (P).
- Go forward.
- Use the PLANT POISON for a HOP (Q); play it to get the COMPASS CUTTER.
- Go forward.
- Use the COMPASS CUTTER; open the bag; take the TWO-TINED FORK (R).
- Walk down twice.
- Place the TWO-TINED FORK for a puzzle (S).
- Solution one (2-5-3-1-4-5-3).
- Solution two (T).
- Solution three (U).
- You receive the SCARAB. Open the door; take the FIRE HOSE (V).
- Go forward twice.
- Place the FIRE HOSE (W) and use it to extinguish the fire.
- Take the VIOLET CRYSTAL 2/4 (X). Use the DRILL KEY; take the SHARP TUSK (Y).
- Take the BLUE CRYSTAL 3/4 and TREBLE CLEF EMBLEM (Z).
- Go to the Subway Station.
- Place the TREBLE CLEF EMBLEM; take the VIOLET CRYSTAL 3/4 (A). Move the three papers; take the TWENTY-FIVE CENTS.
- Insert the TWENTY-FIVE CENTS and TEN CENTS (B) to get the CLOCKWORK SCEPTER ORB.
- Use the SHARP TUSK (C) for a puzzle.
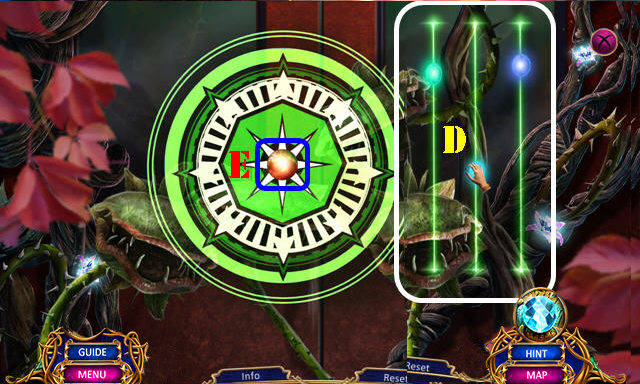
- Solution (D). Select the ball or balls when they're in the middle (E). Repeat 4x.
- Enter the Subway Car.
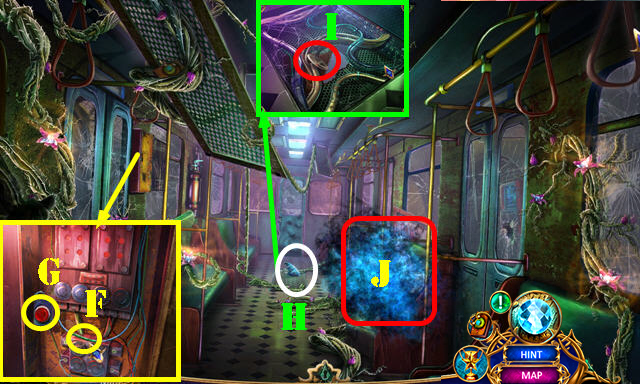
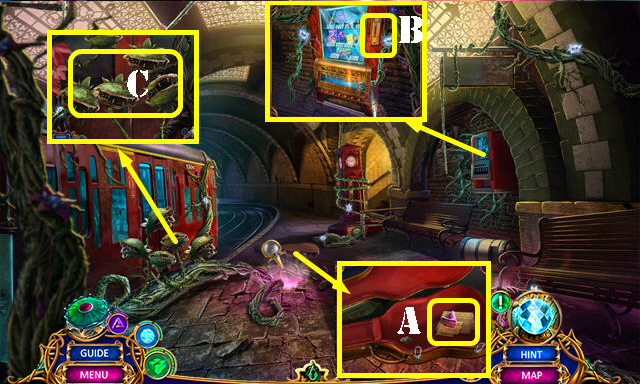
- Slide the latch; use the TAPE (F) and push the button (G).
- Take the BLUE CRYSTAL 4/4 (H).
- Move the vines; place the TRAIN SYMBOL; take the VALVE (I).
- Place the 4 BLUE CRYSTALS in the Harmonium Collector.
- Use the Cleanse Harmonium Collector twice for a HOP (J); play it to get the GIANT CLOWN BALLOON.
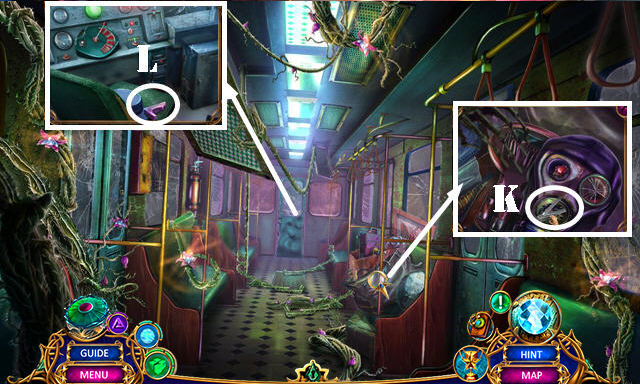
- Take the NAIL CLIPPER (K).
- Remove the glass; take the VIOLET CRYSTAL 4/4 (L).
- Place the 4 VIOLET CRYSTALS in the Harmonium Collector.
- Go to New York Street.
- Place the VALVE; take the HELIUM TANK (M).
- Go forward.
- Place the GIANT CLOWN BALLOON and then the HELIUM TANK (N). Twist the valve; take the RUBBER TUBE (O).
- Return to the Subway Car.
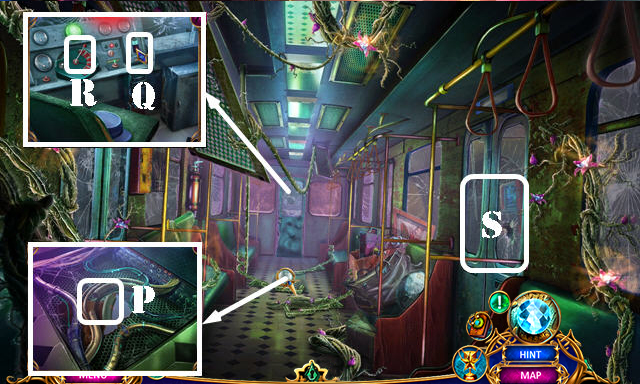
- Place the RUBBER TUBE (P).
- Place the BATTERY (Q). Flip the lever (R).
- Exit (S).
Chapter 5: Museum
- Take the GROWTH CONTROLLER (T) and use it here (U). Use the Phase Harmonium Collector (V).
- Read the note (W).
- Enter (X).
- Talk to the Duke.
- Take the BONE (A) and CLOTH (B).
- Place the BONE for a HOP (C); play it to get the GRABBER.
- Take the VIOLET CRYSTAL 1/4 (D). Select all the chain pieces. Use the Mend Harmonium Collector; take the CHAIN.
- Return to the Subway Car.
- Use the GRABBER to get the CABINET RING (E).
- Return to the Museum Hall.
- Place the CABINET RING; take the VIOLET CRYSTAL 2/4 and CLOCKWORK SCEPTER CROWN (F).
- Walk down.
- Place the CLOCKWORK SCEPTER MECHANISM, CLOCKWORK SCEPTER ORB, and CLOCKWORK HANDLE CROWN on the CLOCKWORK SCEPTER HANDLE to get the CLOCKWORK SCEPTER (inventory).
- Place the CLOCKWORK SCEPTER; Move the chair and look at the note; take the CONTROL KNOB (G).
- Place the CONTROL KNOB (H); take the TONGS (I).
- Place the CHAIN (J).
- Place the SCARAB (K).
- Take the BLUE CRYSTAL 1/4; select the wedge (L).
- Return to the Museum Hall.
- Use the TONGS; take the ILLUMINATION STONE (M).
- Walk down.
- Give the ILLUMINATION STONE for a puzzle (N).
- Solution: Rx2-U-L-R-D-Lx4-Ux3-Dx3-Rx2-U-L-U-D-R-D-Rx2-Ux2-Lx2-U-L-U-D-R-D-R-U-L-U.
- Select the scene.
- Use the Mend Harmonium Collector first and the Cleanse Harmonium Collector next (A).
- Use the Phase Harmonium Collector first and the Cleanse Harmonium Collector next (B).
- Use the Phase Harmonium Collector (C) for a puzzle.
- Solution 1 (D).
- Solution 2 (E).
- Solution 3 (F).

- Take the CANDLE (G).
- Remove the sheet and pillows; take the SOLDIER PIECES 1/2 (H).
- Take the POTION INSTRUCTIONS (I).
- Use the NAIL CLIPPER (orange). Place the CANDLE for a HOP (J); play it to get the CAPTAIN'S MEDAL.
- Take the GLASS BOTTLE (K). Place the CLOTH (K1).
- Place the CAPTAIN'S MEDAL (L) and press it for a puzzle.
- Solution (L).
- Open the two latches (M); go forward.
- Take the METAL SCALER and BROKEN VISE (N).
- Take the HOSE (O).
- Move the items; take the LIZARD'S CLAW and OCTOPUS (P).
- Go (Q).
- Take the METAL BUCKET (R).
- Walk down twice.
- Place the METAL BUCKET (S); take the SOLDIER FIGURINE (T).
- Use the METAL SCALER (U); take the SOLDIER PIECES 2/2 (V).
- Place the 2 SOLDIER PIECES on the SOLDIER FIGURINE; take the BRASS FIGURINE; open the chestplate and take the JASPER STONE (inventory).
- Place the BRASS FIGURINE on the HOSE; take the TIED WEIGHT (inventory).
- Go forward.
- Place the TIED WEIGHT (W) for a HOP (X): play it to get the MOON FLOWER.
- Put down the POTION INSTRUCTIONS, GLASS BOTTLE, LIZARD'S CLAW, MOON FLOWER, and JASPER STONE. Use the pestle (Y) on the mortar and place the ingredients into the bottle; take the SLEEPING POTION (Z).
- Go to Reflection Hall.
- Use the SLEEPING POTION (A). Take the CHEST KEY and HELMET EMBLEM (B).
- Place the OCTOPUS; select each gear (1-5)(C).
- Take the UNCHARGED SHELL (D).
- Walk down.
- Place the UNCHARGED SHELL (E); turn the button (F); take the MEMORY SHELL.
- Use the CHEST KEY; take the LEVITATING CARNELIANS 1/3 (G).
- Return to Reflection Hall.
- Place the MEMORY SHELL. Select the image; take the METAL FACE (H).
- Walk down.
- Place the METAL FACE (I); go through the door.
Chapter 6: Sewers

- Select the three boards (orange).
- Take the BLUE CRYSTAL 2/4 and METAL BAR (K).
- Place the METAL BAR on the BROKEN VISE; take the VISE (inventory).
- Use the VISE; take the LEVITATING CARNELIANS 2/3 (L).
- Go (M). Take the LONG PIPE (N).
- Walk down.
- Place the LONG PIPE to get the PIPE (O).
- Place the PIPE for a puzzle (P).
- Solution one (Q).
- Solution two: 7-3-2-4-7-1-1-6-3-2-2-4-7-3-1-5.
- Solution three (R).
- Go to the Guard's Room (S).
- Take the SHEPHERD'S CROOK (T), VIOLET CRYSTAL 3/4 (U) and FLINT AND STEEL (V).
- Take the BUCKLE and SERRATED TONGS (W).
- Place the HELMET EMBLEM for a HOP (X); play it to get the CRYSTAL BOWL.
- Walk down.

- Place the CRYSTAL BOWL; take the ACID (Y).
- Go (Z).
- Use the ACID (Z1).
- Take the VIOLET CRYSTAL 4/4 (A) and COIN 1/2 (B).
- Take the GREEN CRYSTALS 1/4 and 2/4 and DRAGONFLIES 1/2 (C).
- Use the SHEPHERD'S CROOK (A); select all the lights and take the LEVITATING CARNELIANS 3/3 (D).
- Use the SERRATED TONGS; take the TREE RESIN (E).
- Place the 4 VIOLET CRYSTALS in the Harmonium Collector.
- Return to the Guard's Room.
- Use the brush (F). Place sack (G) and cover (H). Place the TREE RESIN on the cover. Place wick (I). Take the BOMB.
- Place the 3 LEVITATING CARNELIANS 3/3 (J).
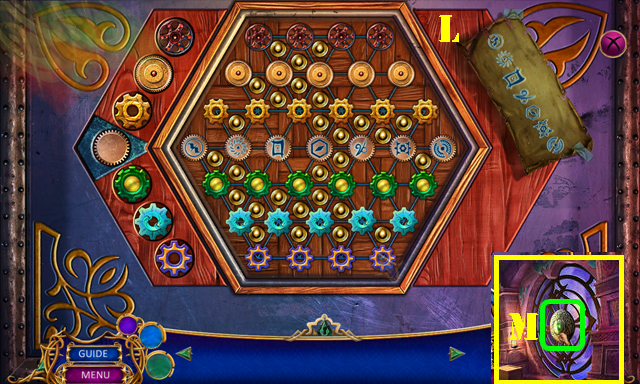
- Play the puzzle (@).
- Solution (1-11).
- Basil gives you the COIN 2/2.
- Return to the City Exit.
- Use the Phase Harmonium Collector (K).
- Place the BOMB (L); use the FLINT AND STEEL on it.
- Place the 2 COINS. Select matching pairs (M).
- Go forward.
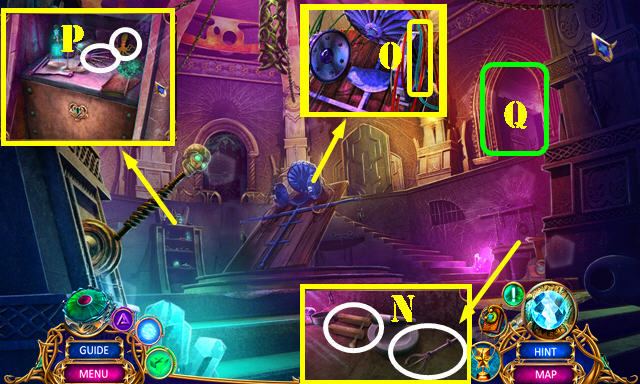
- Play the HOP (N) to receive the DRAGONFLIES 2/2.
- Take the GREEN CRYSTAL 3/4 (O) and BLUE CRYSTAL 3/4 (P).
- Use the Cleanse Harmonium Collector. Place the 2 DRAGONFLIES; take the GREEN CRYSTAL 4/4 (Q).
- Place the 4 GREEN CRYSTALS in the Harmonium Collector.
- Pan right; place the BUCKLE (R); take the MAGE'S ORB (S).
- Pan left twice. Use the Cleanse Harmonium Collector. Place the MAGE'S ORB (T); take the BLUE CRYSTAL 4/4 (U).
- Place the 4 BLUE CRYSTALS in the Harmonium Collector. Use the Mend Harmonium Collector (V).
- Go forward.
- Use the Cleanse Harmonium Collector 3x on the scene (W).
- Take the RING OF ELORIA (X) and place it on the Harmonium Collector for a puzzle.
- Solution one: match pairs (Y).
- Solution two: match pairs. The board rotates after each selection (Y1).
- Solution three: Drag pieces to the right spots (Z).
- Congratulations, you've completed Amaranthine Voyage: The Obsidian Book!
Created at: 2015-05-25