
Walkthrough Menu
- General Tips
- Chapter 1: Old World Ruins
- Chapter 2: Frozen Gardens
- Chapter 3: City Courtyard
- Chapter 4: Hideout Reach
- Chapter 5: Magecrafter Temple
- Chapter 6: Underground Complex
General Tips
- This is the official guide for Amaranthine Voyage: Winter Neverending.
- This guide will not tell you when you have to zoom into a location; the screenshots will show each zoom scene.
- Hidden-object puzzles are referred to as HOPs. This guide will not show screenshots of the HOPs, however, it will mention when an HOP is available and the inventory item you'll collect from it.
- Use the Map to fast travel to a location.
Chapter 1: Old World Ruins
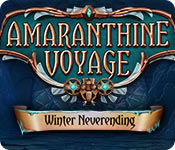
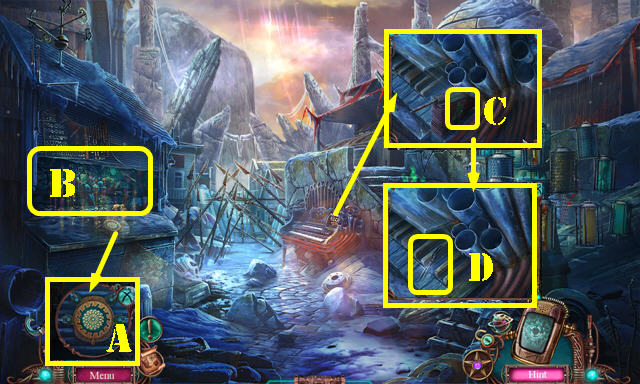
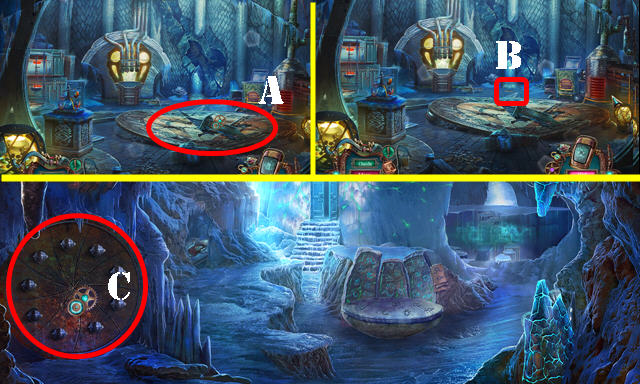
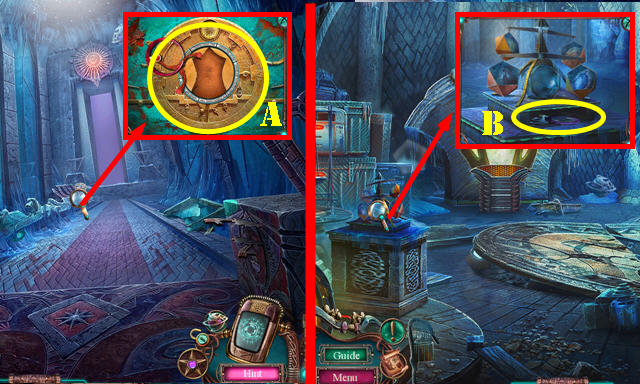
- Open the bag; select the two items (A). Pull the zipper; select the two items (B).
- Take the CONTAINER BADGE (C) and select it.
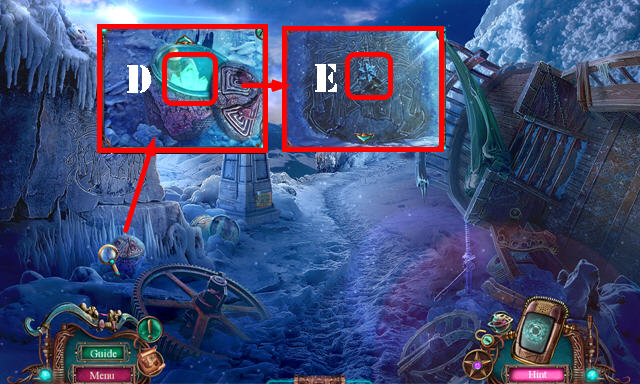
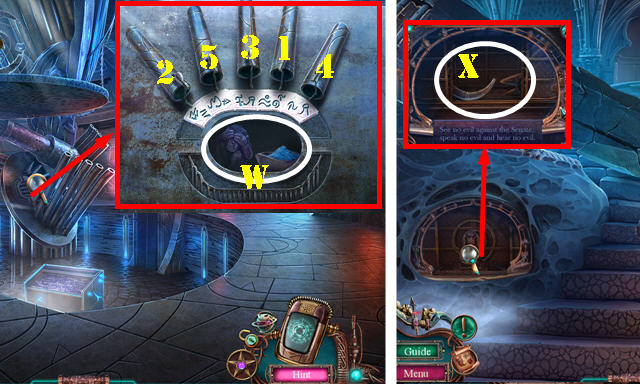
- Place the CONTAINER BADGE (D); play the HOP (E) to receive the LIGHT REFRACTOR.
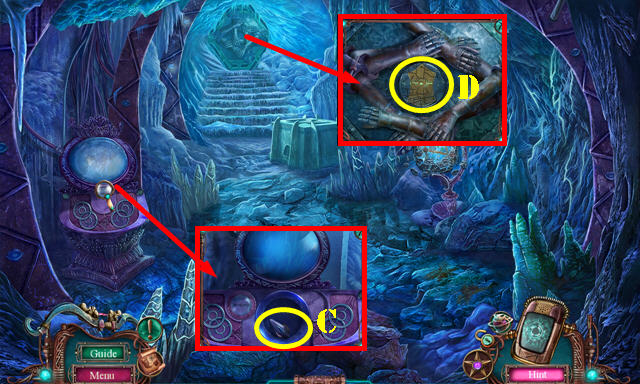
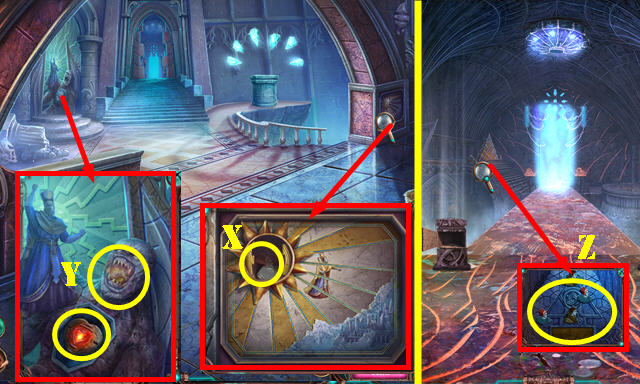
- Select the scene 3x.
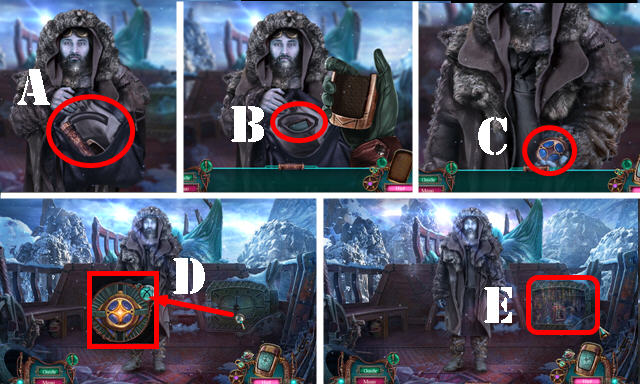
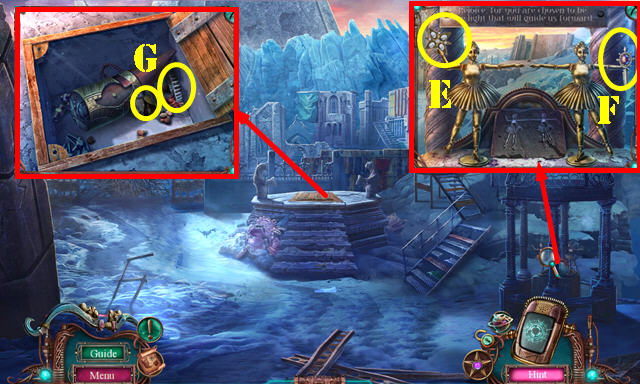
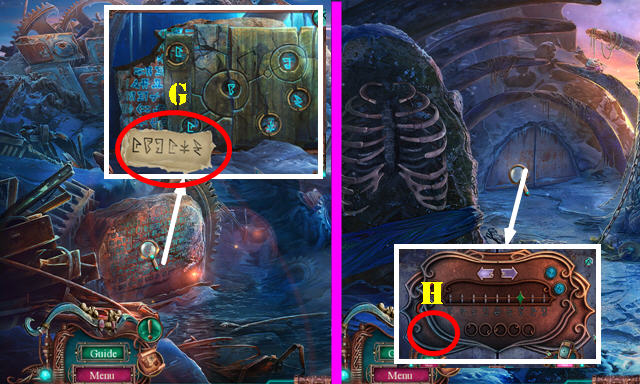
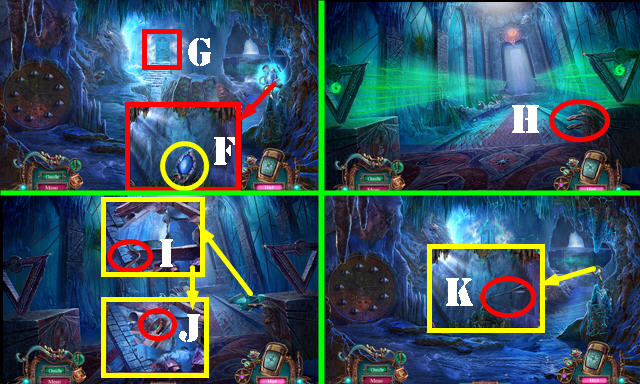
- Take the JACK (G) and Map (H).
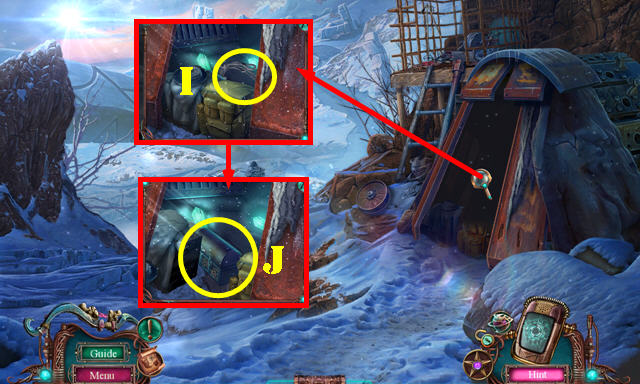
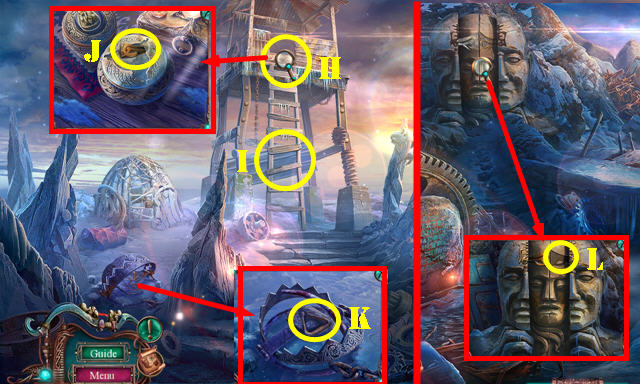
- Use the JACK; select 2x; take the ROUGH CARVED TABLET (I).
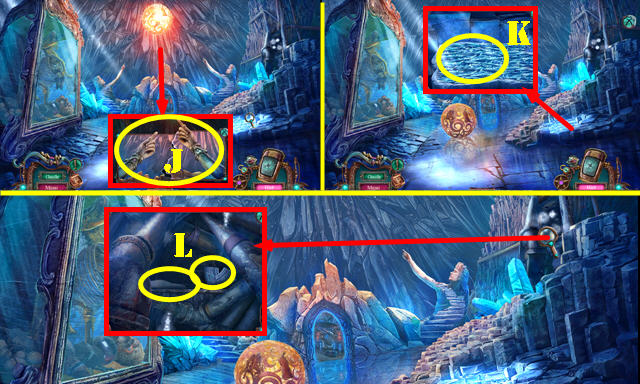
- Look down; take the RUNE STONE (J).
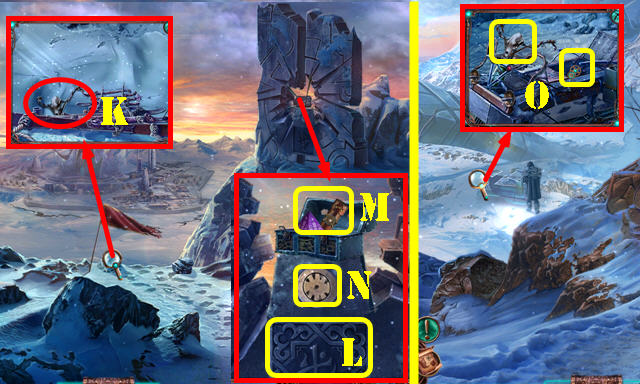
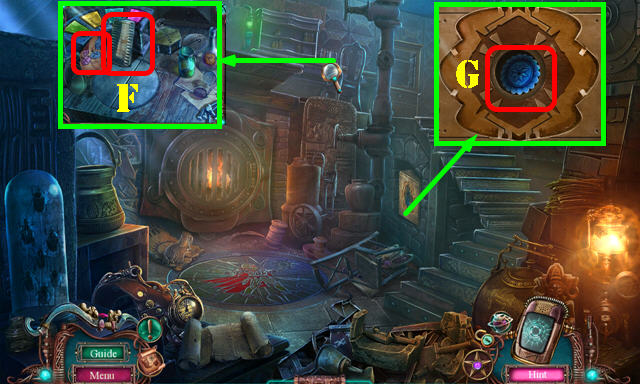
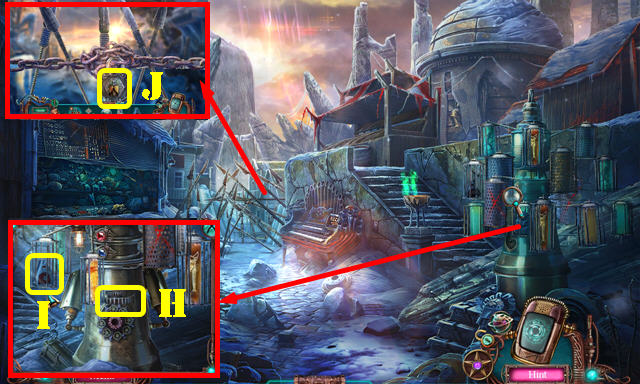
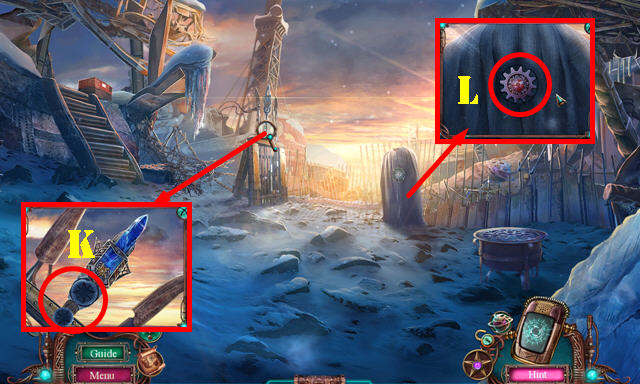
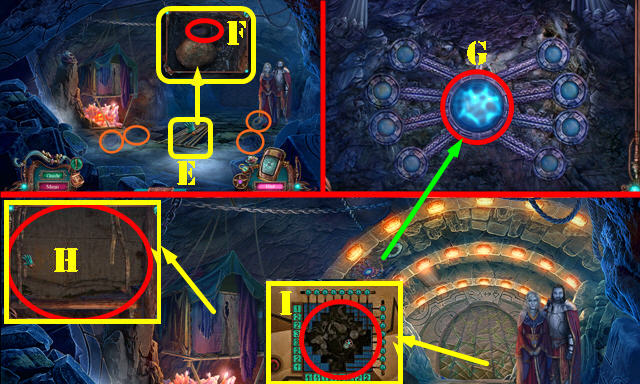
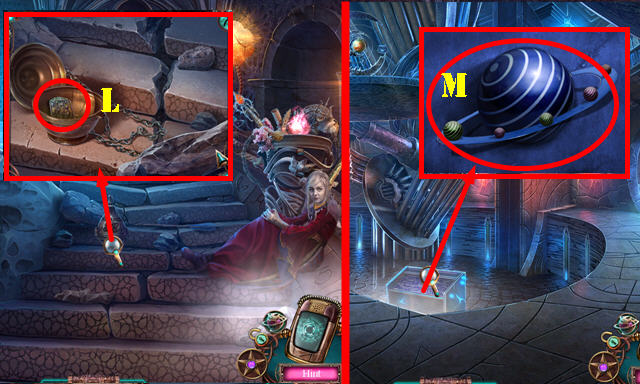
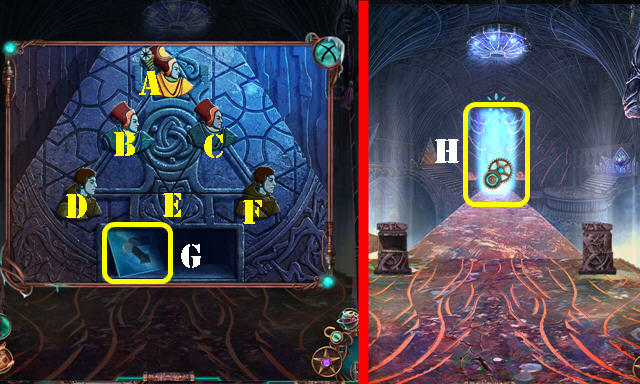
- Look at the note; take the GEAR BELT (K); remove the cover.
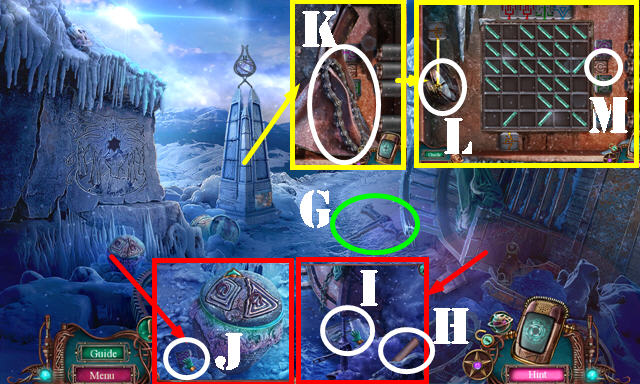
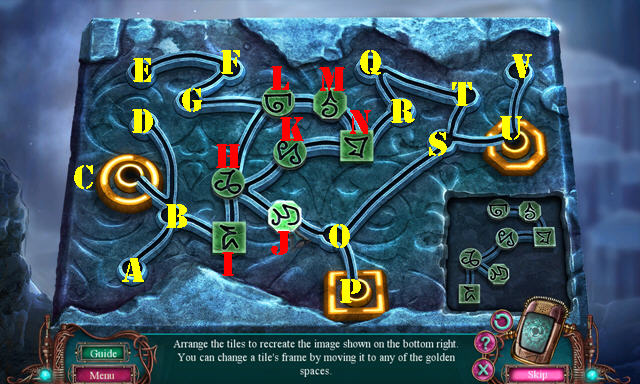
- Remove the broken disk; place the LIGHT REFRACTOR (L) and RUNE STONE (M) for a puzzle.
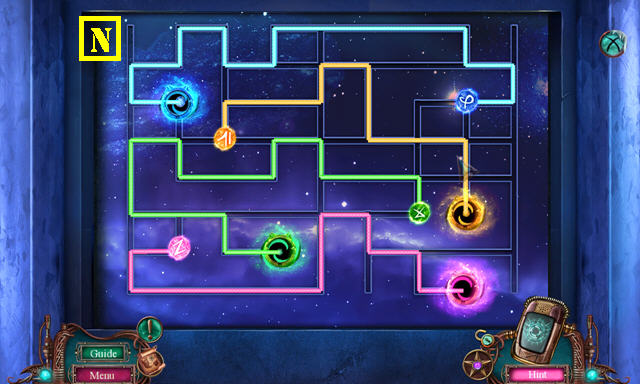
- Solution: select the marked red squares (N).
- Go forward.
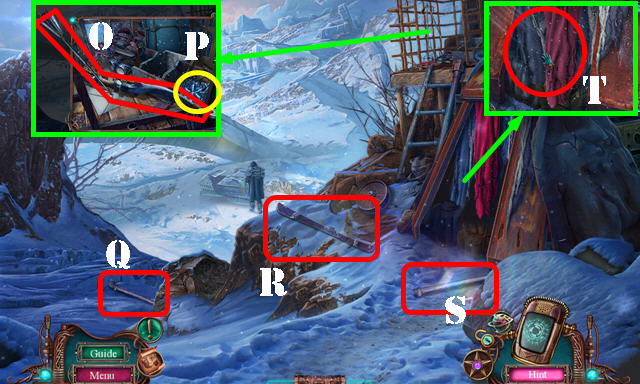
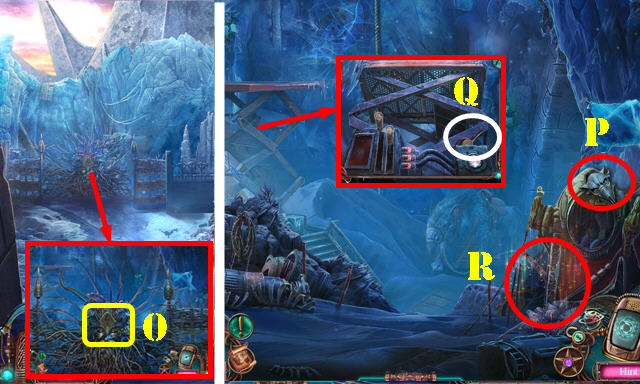
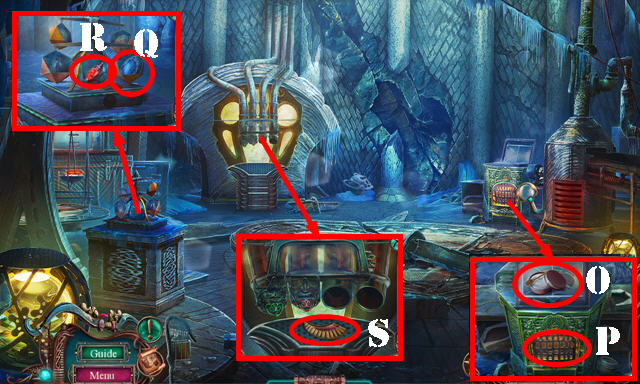
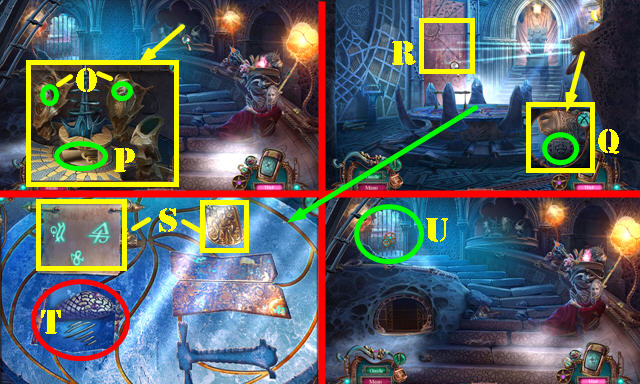
- Take the Bow and Arrow (O) and FROSTY JEWEL (P).
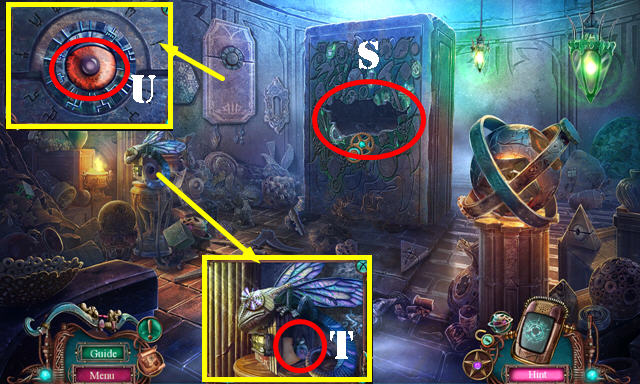
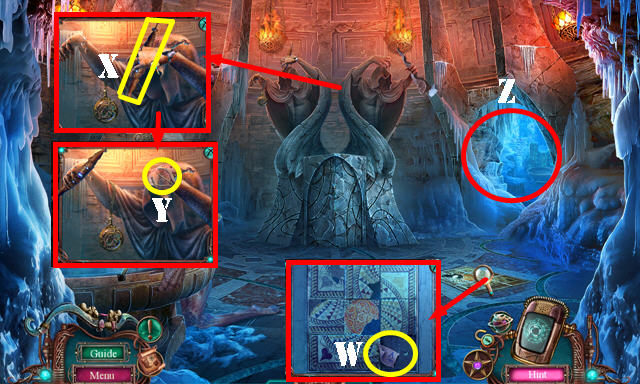
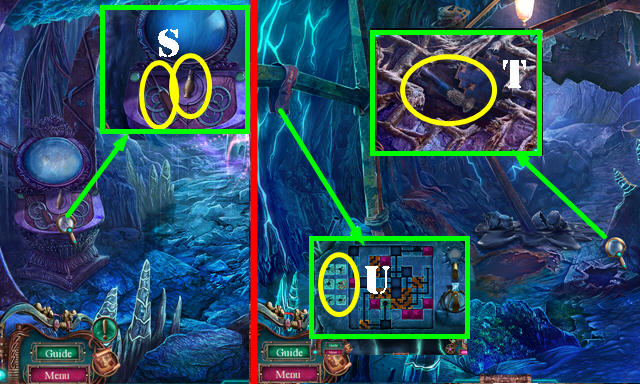
- Take the SKIS 1/5 (Q), SKIS 2/5 (R) and SKIS 3/5 (S).
- Select the furs twice (T).
- Go forward.
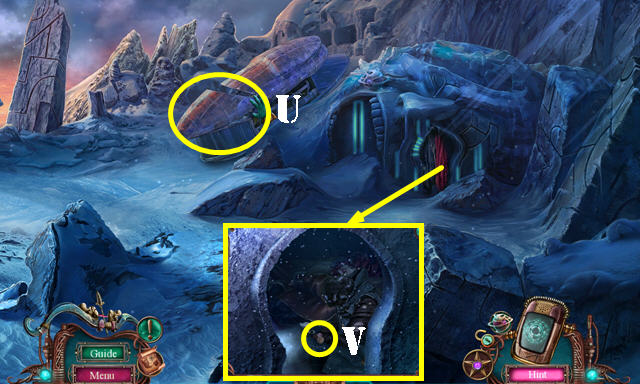
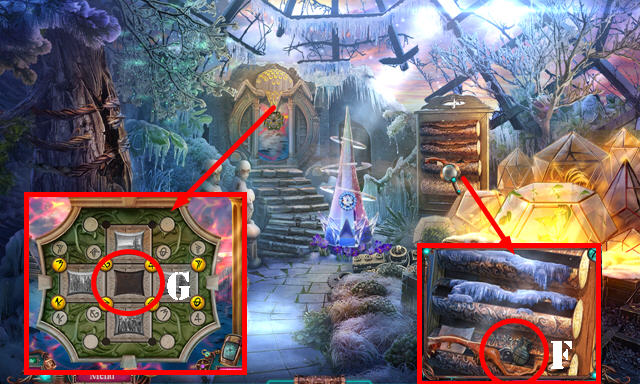
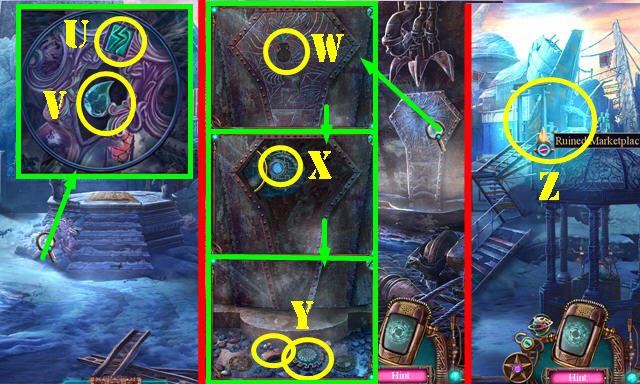
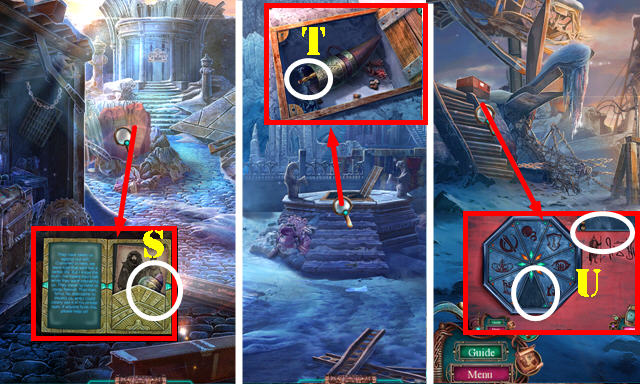
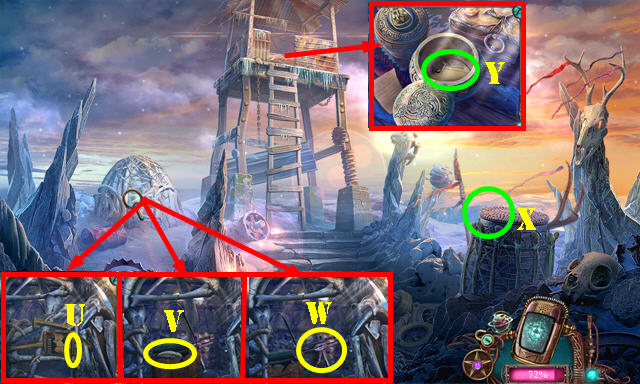
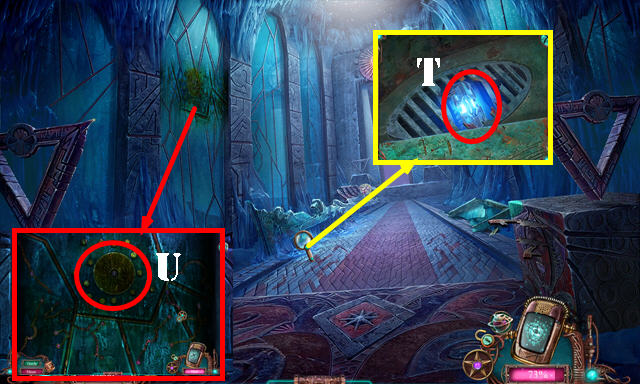
- Scroll right. Remove the top (U); play the HOP to receive the GRINDSTONE.
- Remove the fur; take the SCAVENGER SEAL (V).
- Go left.
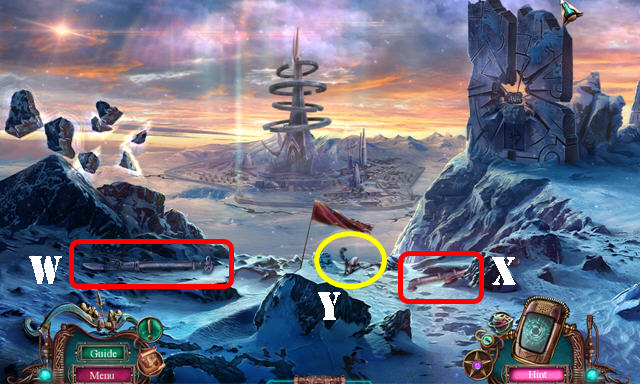
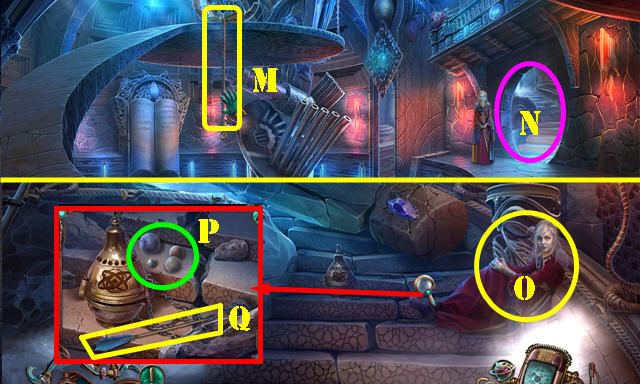
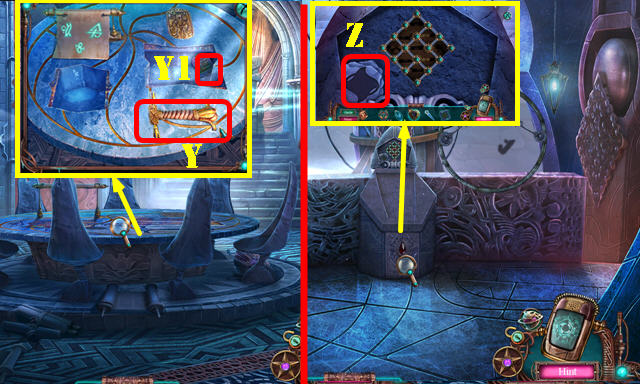
- Take the SKIS 4/5 (W) and SKIS 5/5 (X).
- Select the steering wheel (Y).
- Walk down.
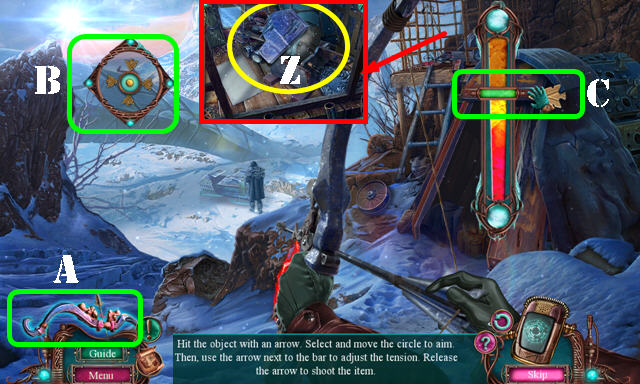
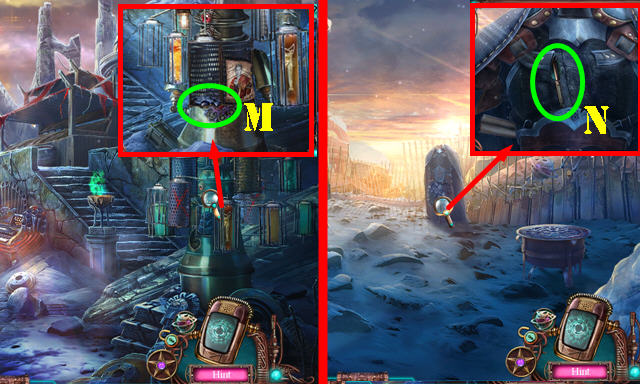
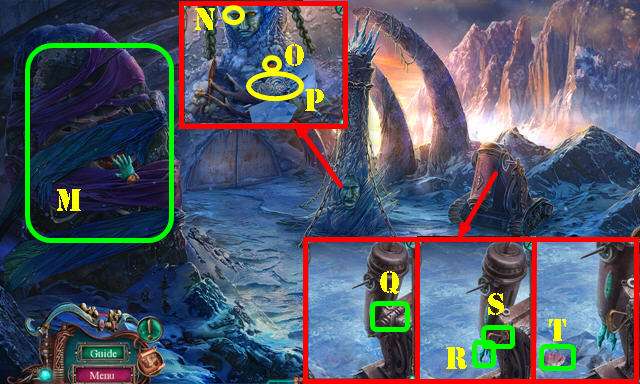
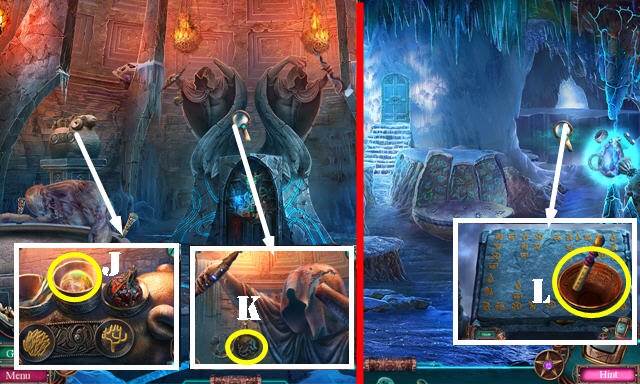
- Place the GRINDSTONE; pull the lever; use the ROUGH CARVED TABLET; take the CARVED TABLET 1/2 (Z).
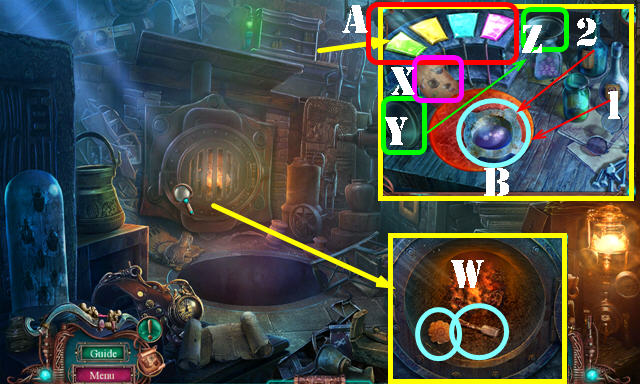
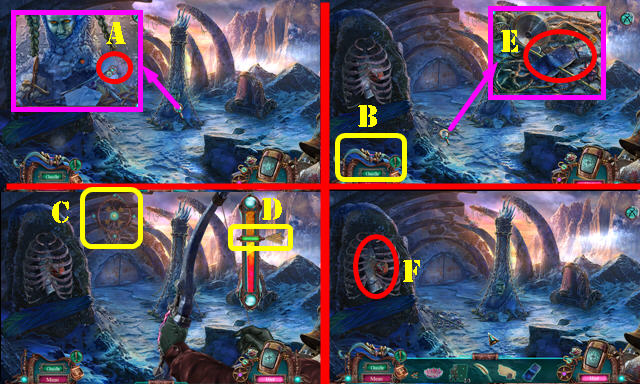
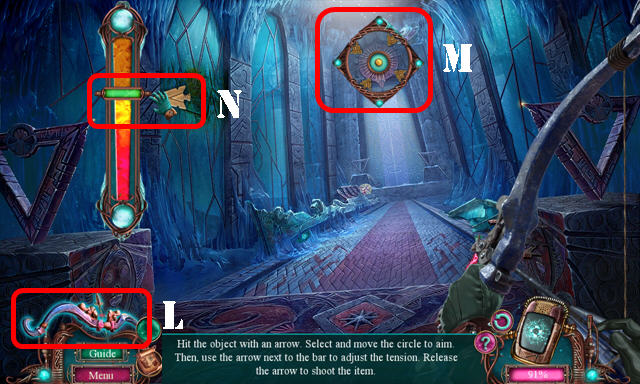
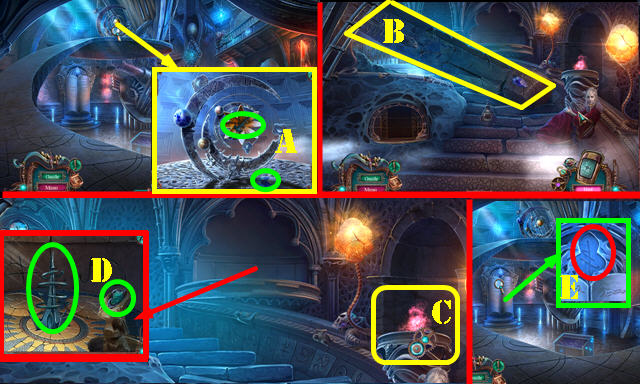
- Select the Bow and Arrow (A); place the circle over the target (B) and slide the arrow up (C) as shown to get the CURVED HANDLE.
- Walk down.
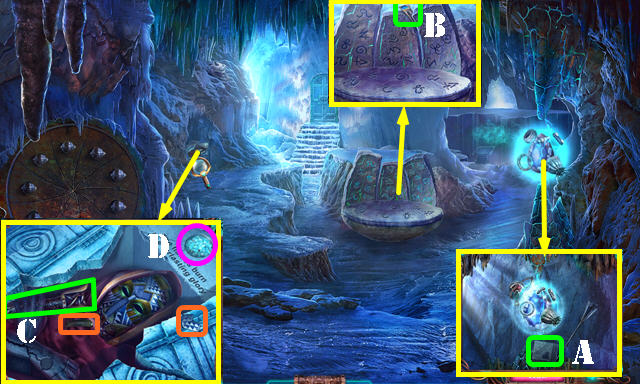
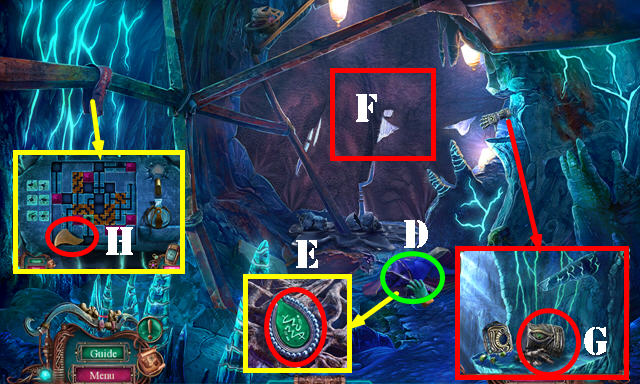
- Place the CARVED HANDLE; take the GLOWING CRYSTALS (D).
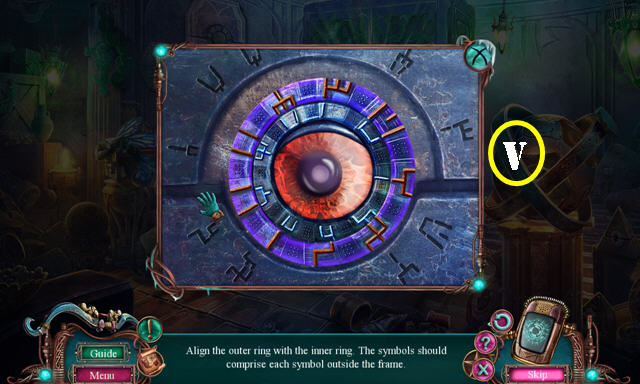
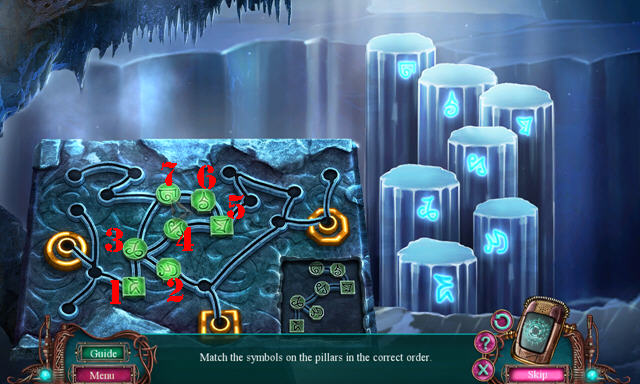
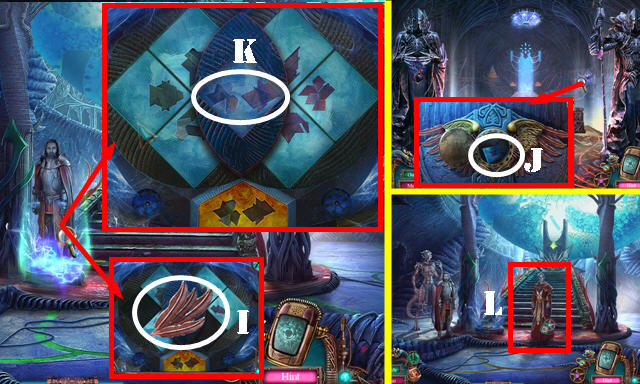
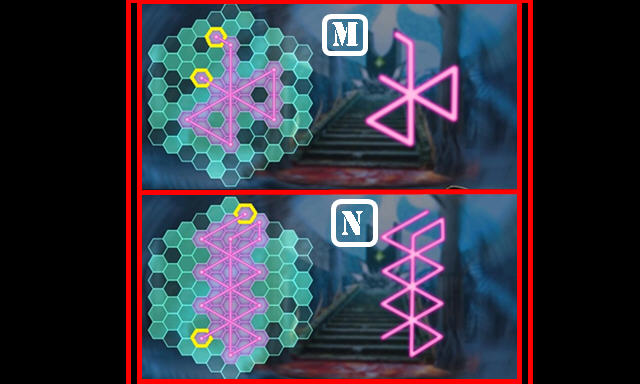
- Look up; place the FROSTY JEWEL (E) for a puzzle.
- Solution one (F).
- Solution two (G).
- Solution three (H).
- Take the MORPHING ARTIFACT 1/4 and CARVED TABLET 2/2.
- Go forward.
- Use the GLOWING CRYSTALS; take the KNOTTED ROPE (I). Select the items 3x; take the SEALED BOX (J).
- Place the SKIS 5/5 on the KNOTTED ROPE; receive the ROPE LADDER.
- Go forward.
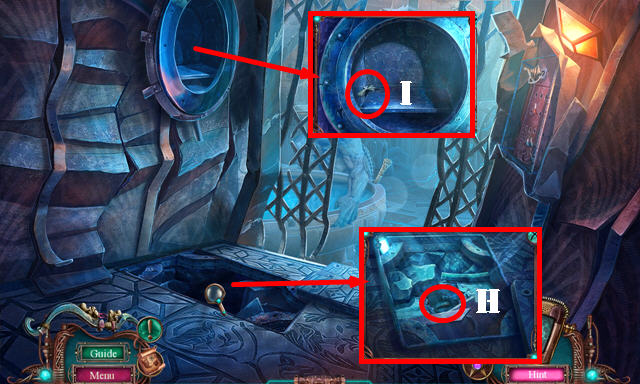
- Use the ROPE LADDER; take the STEERING WHEEL (K).
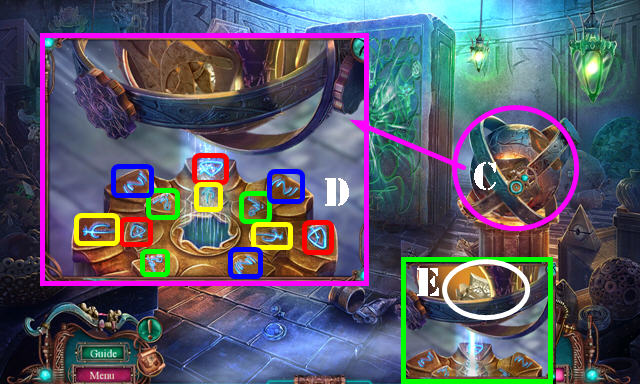
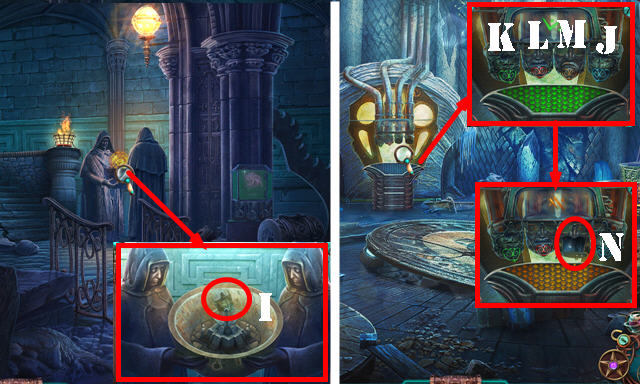
- Place the CARVED TABLET 2/2 (L) and SEALED BOX (M). Select the dial (N); take the WIND CONTROLLER and MAP TUBE.
- Place the SCAVENGER SEAL on the MAP TUBE; take the METAL RINGS and MOUNTAIN MAP.
- Walk down.
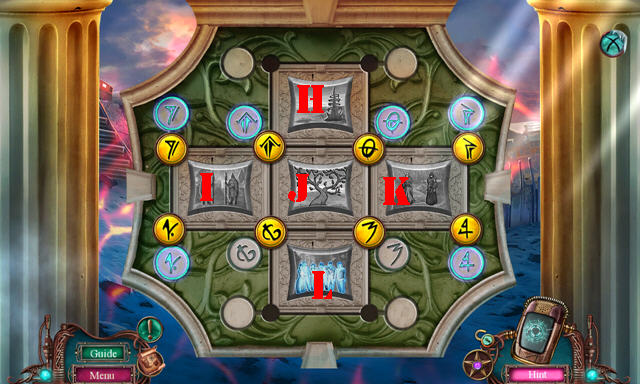
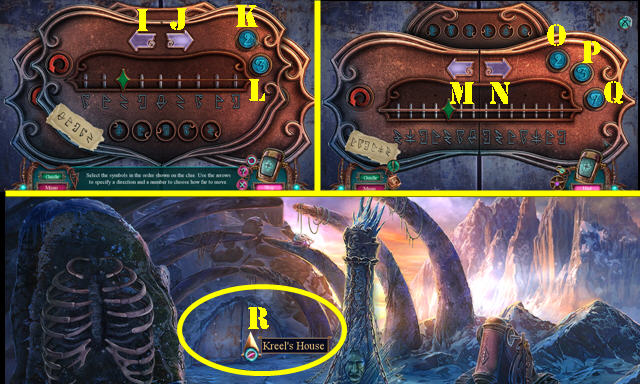
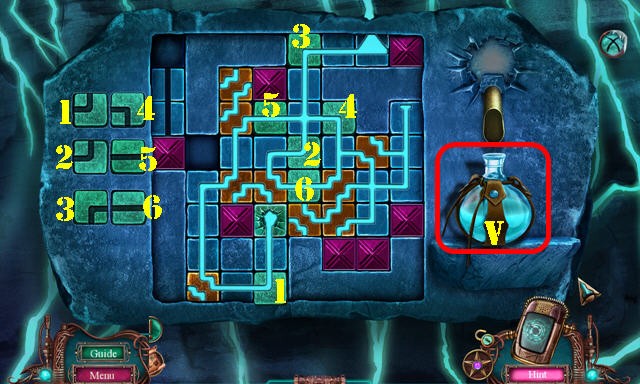
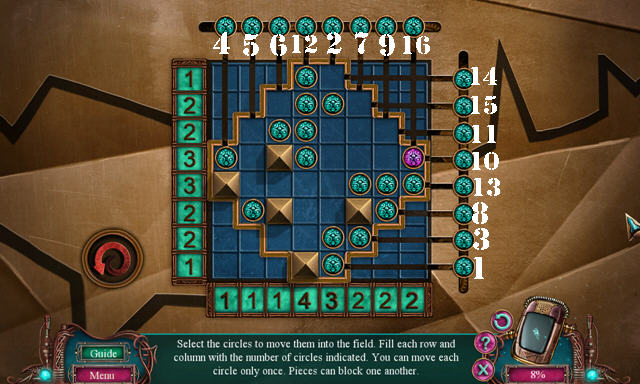
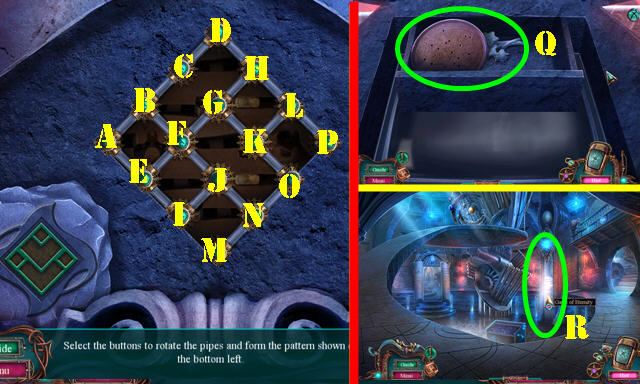
- Place the STEERING WHEEL and MOUNTAIN MAP (O) for a puzzle.
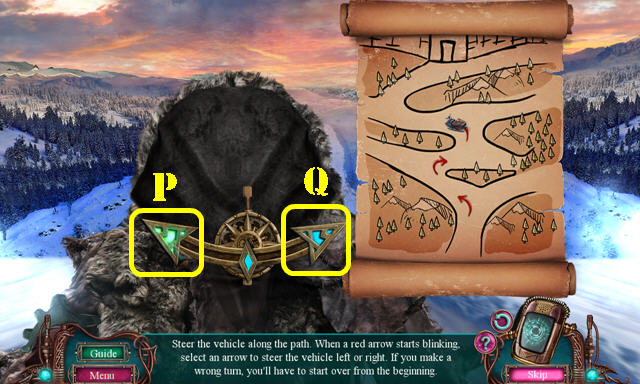
- Solution: P-Q-P-P-Q-P-Q.
Chapter 2: Frozen Gardens
- Remove the two covers (R).
- Remove the poster (S).
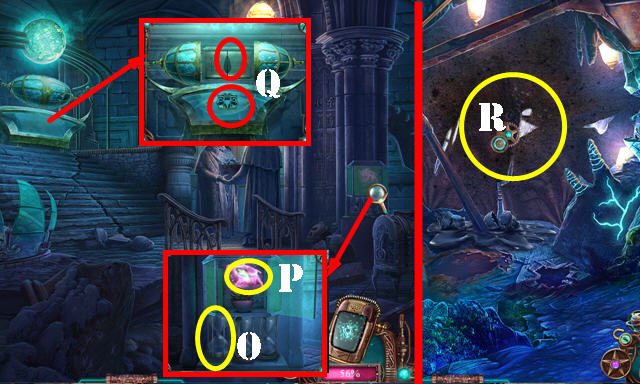
- Take the CRYSTAL IRIS DIAL (T); place the WIND CONTROLLER. Take the JAGGED CHAIN and ICE FLOWER 1/2 (U).
- Place the METAL RINGS on the JAGGED CHAIN; receive the IMPROVISED SAW.
- Go forward.
- Take the LOCK PIN (V).
- Use the IMPROVISED SAW; take the DOUBLE HOOK (W).
- Select the logs (X).
- Walk down.
- Place the GEAR BELT and LOCK PIN; select A-B-A. Take the BLUE LIQUID and MEMORY PROJECTOR (C).
- Use the DOUBLE HOOK (D); enter Kreel's House (E).
- Take the BATTERY FRAME; look at the note (F).
- Select the diary 3x; take the ICE FLOWER 2/2 (G).
- Return to Frozen Gardens.
- Place the ICE FLOWER 2/2 (H); take the MEMORY RING and INACTIVE PYLON SYMBOL (I).
- Select the button on the INACTIVE PYLON SYMBOL; receive the PYLON SYMBOL.
- Place the MEMORY RING on the MEMORY PROJECTOR; receive the CUBE ACTIVATOR.
- Walk down.
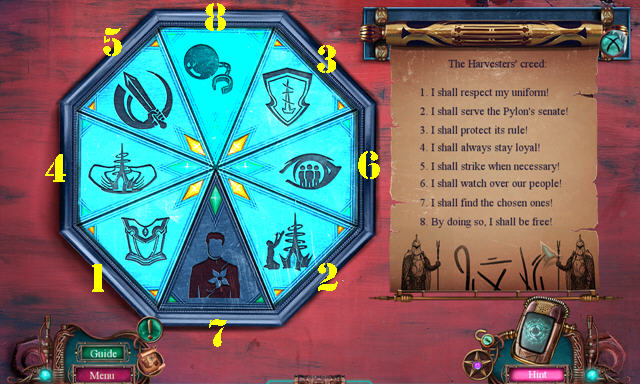
- Place the PYLON SYMBOL (J); select the lever 3x (K). Select the plaque 3x; receive ZEEMA'S PLAQUE (L).
- Go to Kreel's House.
- Use the CUBE ACTIVATOR for a puzzle (M).
- Solution (1-10) (N).
- Take the STONE TABLET PIECE and BATTERY.
- Walk down.
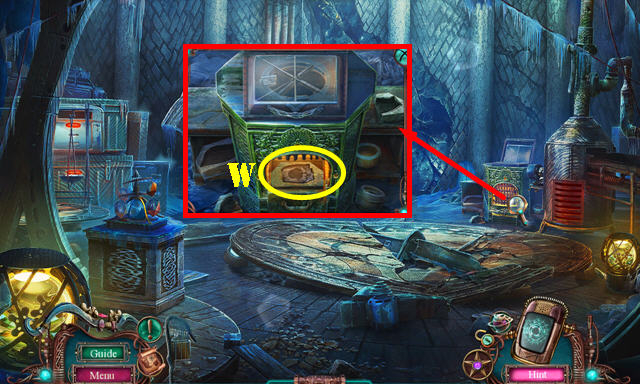
- Place the BATTERY FRAME and BATTERY (O); remove the globe; take the SUN ORNAMENT (P).
- Go to Kreel's House.
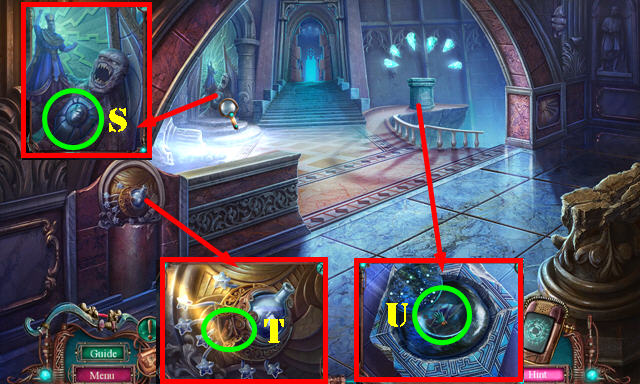
- Place the SUN ORNAMENT (Q); enter the Artifact Vault (R).
- Place the STONE TABLET PIECE (S); play the HOP to receive the PRECISION GRABBER.
- Place ZEEMA'S PLAQUE; look at the note; take the PEARL GRAINS (T).
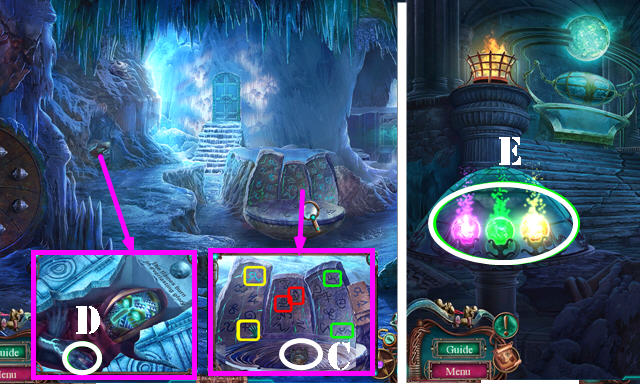
- Place the CRYSTAL IRIS DIAL for a puzzle (U).
- Solution (V).
- Take the HARVESTER FIGURINE and TREE PART 1/2.
- Walk down.
- Open the door; use the PRECISION GRABBER; take the MINIATURE SPATULA and GLOBE ACTIVATOR (W).
- Put down the BLUE LIQUID and PEARL GRAINS. Look at the note (X). Place the funnel (Y-Z). Pour 1-2 in the bowl. Select the purple, yellow, blue and green buttons (A). Select the bowl (B). Remove the funnel; take the SOLVENT.
- Go to the Artifact Vault.
- Use the GLOBE ACTIVATOR (C) for a puzzle.
- Solution: Red-Green-Yellow-Blue (D). Take the HAND VICE and TREE RELIEF (E).
- Return to the Frozen Gardens.
- Use the SOLVENT and read the note. Take the PITCHER ORNAMENT and TREE PART 2/2 (F).
- Place the TREE PART 2/2 on the TREE RELIEF; receive the TREE TILE.
- Place the TREE TILE for a puzzle (G).
- Solution: J-K-Jx2-K-Hx2-J-Ix3-Jx2-Lx2-I-Hx2-Lx2.
- Go through the door.
Chapter 3: City Courtyard
- Select the scene 3x.
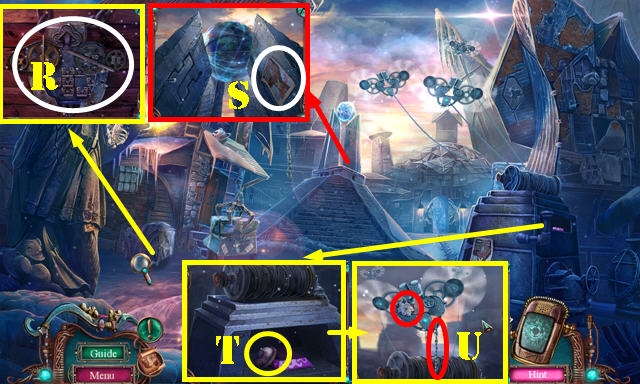
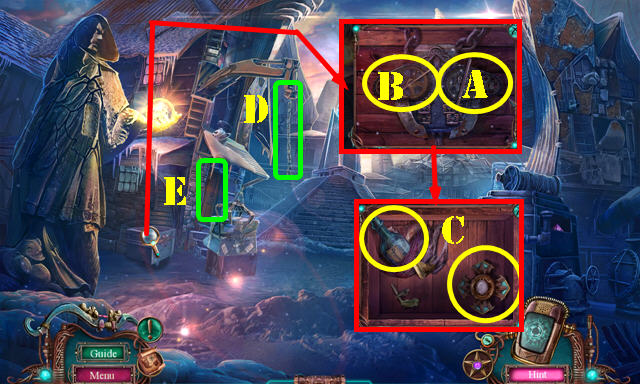
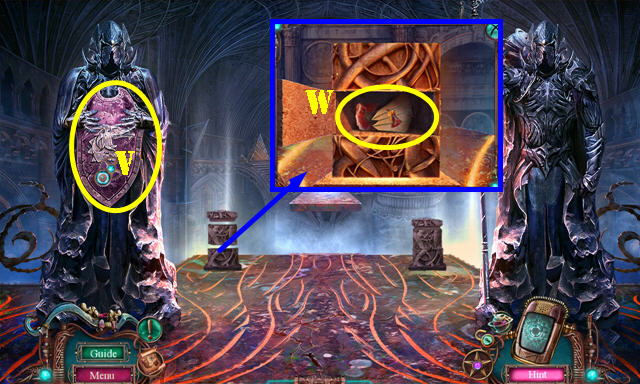
- Take the BROKEN ARTIFACT (M).
- Use the HAND VICE (N); receive the METAL SHARD and BANNER TOKEN.
- Enter the Preparation Grounds (O).

- Take the DANCER ENGRAVING (P).Use the MINIATURE SPATULA; take the DRY CLOTH (Q).
- Move the 2 coats; use the METAL SHARD; take the SIGNET RING; select the diary (R).
- Use the BANNER TOKEN and HARVESTER FIGURINE for a puzzle (S).
- Solution: B1-A2-A4-A1-B4-A2-A3-A1-A4-A1.
- Select the three items (orange). Take the STAR TRINKETS 1/2 and DANCER ARM (T).
- Walk down and go right.
- Use the SIGNET RING (U); take the WATER AMULET (V).
- Return to the Preparation Grounds.
- Place the PITCHER ORNAMENT (W) and WATER AMULET (X); take the WEALTH CHARM and GLUE (Y).
- Walk down, go right and enter the Ruined Marketplace (Z).
- Place the WEALTH CHARM and turn it 4x (A); play the HOP (B) to receive the LEATHER POUCH.
- Open the LEATHER POUCH; take the UTILITY BOMB; read the note and take the DANCER LEG.
- Use the GLUE on the DRY CLOTH; take the ADHESIVE PATCH.
- Select the bellows; use the ADHESIVE PATCH (C); select it and take the ORNATE FORK (D).
- Walk down.
- Place the DANCER ENGRAVING, DANCER LEG and DANCER ARM; select each dancer 3x; take the STAR TRINKETS 2/2 (E) and DIARY KEY (F).
- Use the ORNATE FORK; take the SOLDIER'S CREST and GEAR (G).
- Go to the Ruined Marketplace.
- Place the GEAR (H); take the BOARD TILE (I).
- Place the SOLDIER'S CREST (J); select the spears 3x.
- Use the UTILITY BOMB on the scene.
- Place the STAR TRINKETS 2/2 (K); receive the CRYSTAL SPEARHEAD.
- Take the COG BROOCH (L); look at the note.
- Walk down.
- Place the COG BROOCH; look at the note; take the ARMOR DECORATION (M).
- Go to the Harvester Outpost.
- Place the ARMOR DECORATION; take the TRANQUILIZER DART (N).
- Return to the City Courtyard.
- Use the CRYSTAL SPEARHEAD (O).
- Take the HEAD ORNAMENT (P) and OIL (Q).
- Play the HOP (R) to receive the NUT JAR.
- Return to the Preparation Grounds.
- Place the DIARY KEY; take the HORN EMBLEM (S).
- Walk down and go right.
- Place the HORN EMBLEM; take the HARVESTERS' OATH (T).
- Go to the Harvester Outpost.
- Place the BOARD TILE and HARVESTERS' OATH for a puzzle (U).
- Solution (1-8).
- Look at the note; take the ARTIFACT PART and GRAIN ORNAMENT.
- Walk down.

- Place the ARTIFACT PART on the BROKEN ARTIFACT; take the PROGENITOR LEXICON.
- Place the GRAIN ORNAMENT; look at the note; take the WINESKIN (V).
- Go to the Harvester Outpost.
- Use the WINESKIN; take the WOODEN BRUSH and TUBE (W).
- Return to the Wall Base.
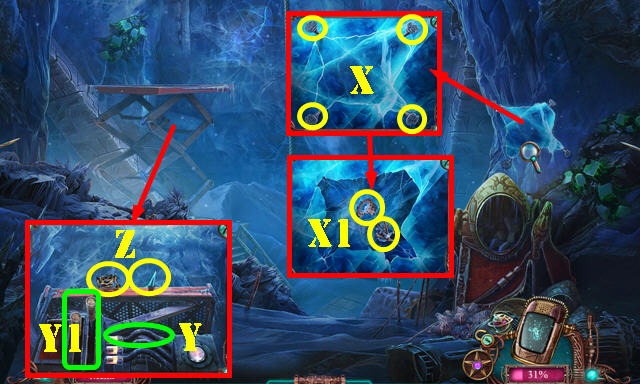
- Remove the four nails (X). Use the WOODEN BRUSH; take the PROJECTOR LENS and COPPER SCRAPS (X1).
- Place the TUBE (Y); pull the levers (Y1); take the MIND GLYPH and FOOTPRINT EMBLEM (Z).
- Go to the Ruined Marketplace.
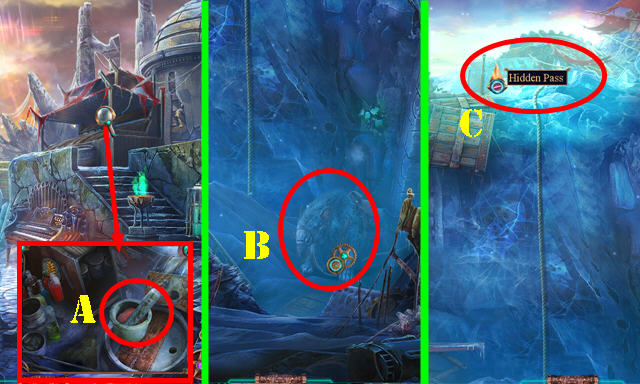
- Look at the note. Put down the NUT JAR and place the COPPER SCRAPS in the mortar. Select the pestle and take the BEAST FOOD (A).
- Use the TRANQUILIZER DART on the BEAST FOOD; take the SOPORIFIC SNACK.
- Return to the Wall Base.
- Use the SOPORIFIC SNACK (B). Look up. Go to the Hidden Pass (C).

- Place the FOOTPRINT EMBLEM and HEAD ORNAMENT; take the MORPHING ARTIFACT 2/4 and METAL CLAMP (D).
- Use the MIND GLYPH; take the BRONZE EYE (E).
- Place the PROJECTOR LENS for a puzzle (F).
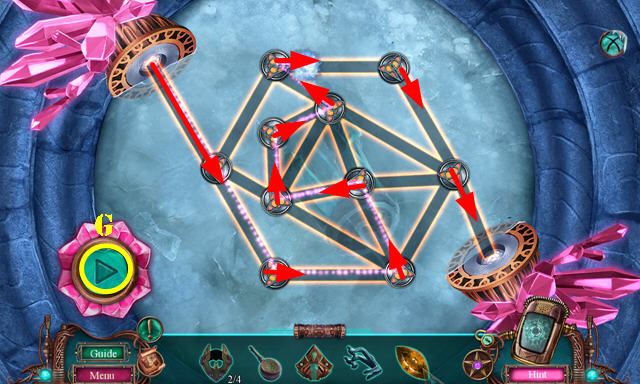
- Solution: position the arrows as shown and press the button (G).
- Take the CRYSTAL STARTER.
- Go right.
- Select the tower (H). Use the METAL CLAMP (I); take the CROWN HALF (J).
- Use the OIL; select the mechanism; take the DRILL PULL-CORD (K).
- Walk down.
- Place the CROWN HALF (L) and go through the door.
Chapter 4: Hideout Reach
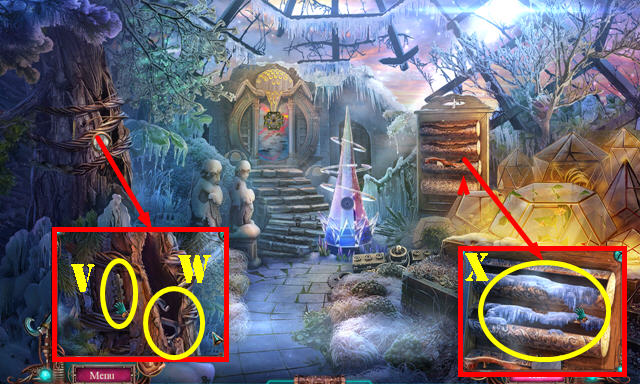
- Remove the cloth (M).
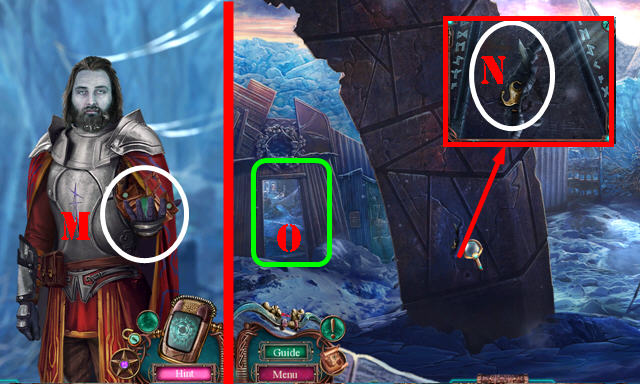
- Place the BRONZE EYE (N); select the button (O). Take the LID ORNAMENT and ANTLER ORNAMENT (P).
- Take the SPRING (Q).
- Place the CRYSTAL STARTER (R). Place the DRILL PULL-CORD and pull it 3x (S); take the LOTUS BOWL and DECODER PIECES 1/3 (T).
- Return to Frostpeak Knoll.
- Use the SPRING (U). Open the bag; take the QUILL (V) and HYDRAULIC SPREADER (W).
- Use the ANTLER ORNAMENT (X); play the HOP to get the CRESCENT ARROWHEAD.
- Place the LID ORNAMENT; look at the note; take the COAL WITH PAPER (Y).
- Go to Hideout Reach.
- Place the CRESCENT ARROWHEAD (A). Use the Bow and Arrow (B). Place the circle (C) and arrow (D) as shown.
- Take the SASH and DECODER PIECES 2/3 (E).
- Use the HYDRAULIC SPREADER; take the RUBY FRUIT and DECODER PIECES 3/3 (F).
- Walk down.
- Place the DECODER PIECES 3/3; select the three parts; place the COAL WITH PAPER. Select the sheets 3x; take the CODE (G).
- Go to the Hideout Reach.
- Place the CODE for a puzzle (H).
- Solution one: I-K-L-J-K-I-L-J-K
- Solution two: N-P-M-O-P-N-Ox2-M-Q.
- Enter Kreel's House (R).

- Use the PROGENITOR LEXICON (S).
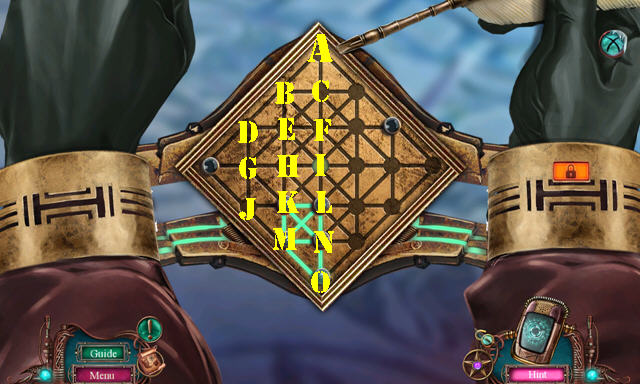
- Use the QUILL for a puzzle (T).
- Solution: (F-D)-(A-F)-(C-I)-(B-H)-(F-L)-(E-K)-(I-G)-(D-J)-(G-N)-(H-M)-(J-O).
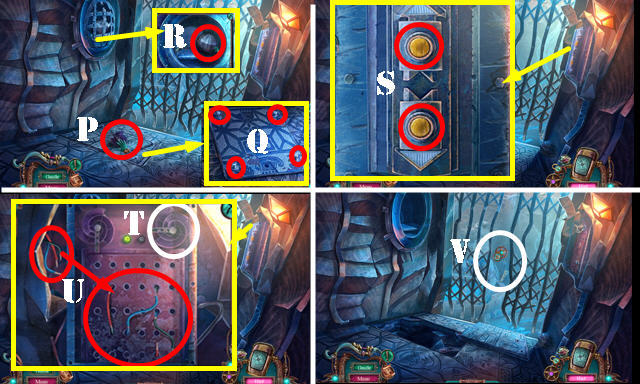
- Take the ELEVATOR HANDLE (P).
- Remove the four bolts and cover (Q).
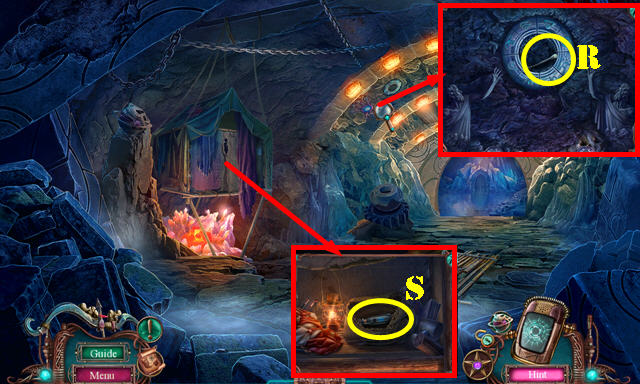
- Use the SASH to get the RUSTY BAR; take the STRONGBOX TRAP (R).
- Press the two buttons (S); use the ELEVATOR HANDLE (T). Place the three wires (U) and pull the elevator handle.
- Use the RUSTY BAR (V) and go forward.
- Take the SPELL NOTES 1/3 (W).
- Look at the scroll (X); select the hand twice; take the HAND CLAMP (Y).
- Go to the Derelict Chamber (Z).
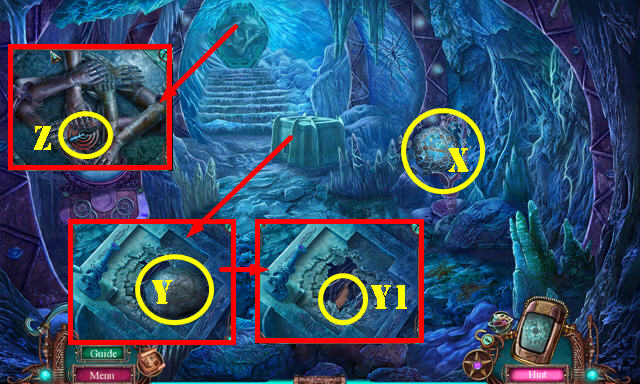
- Take the MOSAIC TILE (A).
- Try to get the comb. Use the HAND CLAMP to get the COMB (B).
- Take the SHORT STAFF (C); select the two pieces (orange). Use the LOTUS BOWL (D) to get the ENCHANTED FIRE.
- Walk down.

- Place the MOSAIC TILE; select two pieces and take the SINGING BOWL (E).
- Use the ENCHANTED FIRE (F).
- Play the HOP (G) to get the MOON LIGHT.
- Walk down.
- Use the MOON LIGHT; use the SHORT STAFF to get the BURROWER'S FANG (H).
- Use the COMB (I); take the FUR TUFT.
- Go forward.
- Place the RUBY FRUIT and FUR TUFT; take the ORBS 1/2 (J).
- Use the BURROWER'S FANG; take the BUNGEE CORD and SIGIL (K).
- Use the BUNGEE CORD on the STRONGBOX TRAP; take the SINGING STONE and SPELL NOTES 2/3.
- Go right.
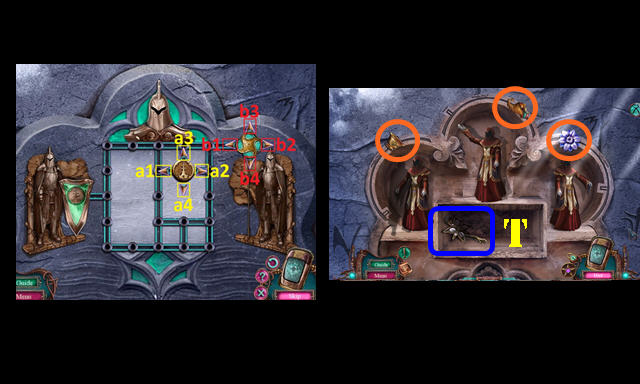
- Place the SINGING BOWL and SINGING STONE for a puzzle (L).
- Solution: (J-U)-(G-C)-(A-P)-(M-I)-(P-L)-(I-P)-(C-O)-(R-C)-(O-D).
- -(L-N)-(U-M)-(C-L)-(V-C)-(C-K)-(P-A)-(D-H)-(A-I)-(T-U)-(U-J).
- Select (1-7).
- Go right.
Chapter 5: Magecrafter Temple
- Take the SILK VEIL (A) and GAUNTLET FRAGMENT (B).
- Take the SPELL NOTES 3/3 (C); select the globe 6x.
- Walk down.
- Use the SPELL NOTES 3/3; select yellow-red-green; take the FROWNING MASK (C).
- Place the GAUNTLET FRAGMENT; take the ORBS 2/2 (D).
- Go right.
- Place the ORBS 2/2 (E) and select them 4x; play the HOP to get the ANTIMAGNETIC GRAINS.
- Walk down.
- Use the ANTIMAGNETIC GRAINS; take the FROSTY EGG and ZEEMA'S COLLAR (F).
- Go to the Hall of Mirrors (G).
- Select the two levers (H).Use the crowbar (I) 3x and move the books; take the GUNPOWDER and GEM ARROWHEAD (J).
- Walk down.
- Place the GEM ARROWHEAD (K).
- Go to the Hall of Mirrors.
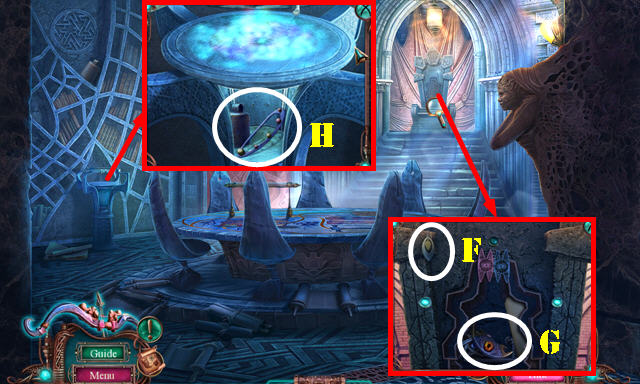
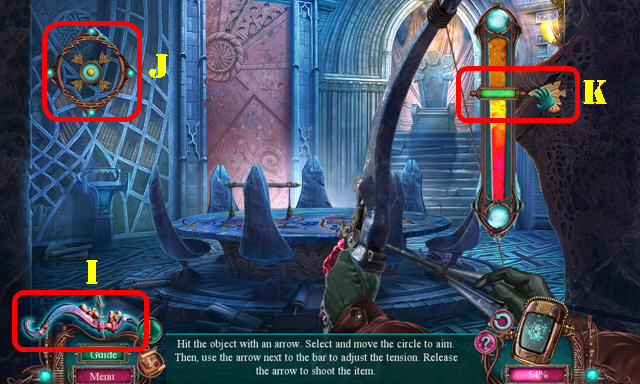
- Select the Bow and Arrow (L); place the circle over the target (M) and slide the arrow up (N) as shown.
- Go forward.
- Take the POLISHING PASTE (O). Open the door (P).
- Place the FROSTY EGG (Q); take the LAVA PHIAL (R).
- Take the COLLAR PIECE (S).
- Walk down.
- Use the LAVA PHIAL; select the area 4x; take the LEVITATION SPELL (T).
- Use the POLISHING PASTE and SILK VEIL for a puzzle (U).

- Solution one (V): place all the pieces except the two marked in purple.
- Solution two: W-Xx4-Yx6-W-Xx4-Yx2-W-Xx4-Yx4.
- Take the SEAL BREAKER.
- Go forward.
- Use the LEVITATION SPELL (A) and play the HOP to get the BLUEPRINT SEAL.
- Take the UNDERGROUND FLOOR PLAN (B).
- Place the BLUEPRINT SEAL on the UNDERGROUND FLOOR PLAN; select it and take the TUNNEL PLAN.
- Walk down twice.
- Place the TUNNEL PLAN (C) and enter the Sealed Tunnel.
- Take the HOOK (D). Remove the two covers; take the CORDU EMBLEM (E).
- Place the COLLAR PIECE and CORDU EMBLEM on ZEEMA'S COLLAR; remove the cover and take the CHARGED GEM.
- Use the GUNPOWDER (F).
- Touch the gauntlet; take the BROKEN GAUNTLET (G).
- Take the MARBLE PLAQUE 1/2 (H).
- Go to the Magecrafter Temple.
- Use the SEAL BREAKER; take the GRINNING MASK (I).
- Return to the Pillar of Ascension.
- Place the FROWNING MASK and GRINNING MASK. Select J-K-L-M. Take the HOURGLASS QUARTZ (N).
- Go to the Magecrafter Temple.
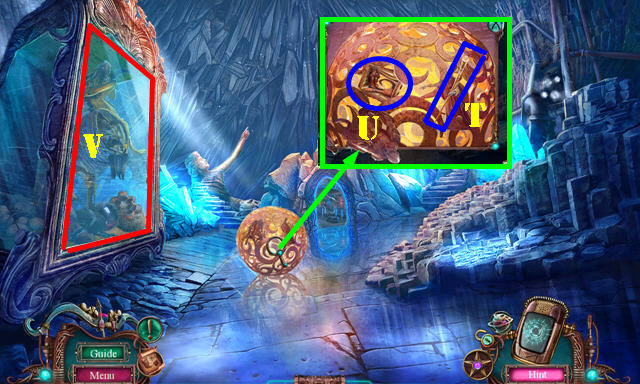
- Use the HOURGLASS QUARTZ (O); select twice. Open the door; take the PHANTASM EMBLEM (P).
- Place the SIGIL and PHANTASM EMBLEM (Q); take the MORPHING ARTIFACT 3/4 and PYROGEN BOMB.
- Return to the Sealed Tunnel.
- Throw the PYROGEN BOMB and go forward (R).
- Take the ROOT KILLER and ICE PICK (S).
- Walk down.
- Use the ROOT KILLER; take the FORGE HAMMER and ENIGMA TILE (T).
- Use the ICE PICK for a puzzle (U).
- Solution (1-6).
- Take the LIQUIFIED METAL (V).
- Return to the Pillar of Ascension.
- Place the LIQUIFIED METAL and FORGE HAMMER; take the GAUNTLET PLATE (W).
- Place the GAUNTLET PLATE and CHARGED GEM on the BROKEN GAUNTLET to get the MAGICAL GAUNTLET.
- Return to the Complex Atrium.
- Use the MAGICAL GAUNTLET (X); play the HOP to get the SCRIBING RINGS.
- Take the SHIELD (Y).
- Use the HOOK; take the MARBLE PLAQUE 2/2 (Y1).
- Take the CLOCKWORK TOKEN (Z); select the hands.
- Return to the Hall of Mirrors.
- Place the SCRIBING RINGS and MARBLE PLAQUE 2/2 to get the ENTRY BADGE (A).
- Go forward.
- Place the CLOCKWORK TOKEN; take the NAVIGATION DIAL and OBSIDIAN JEWELS (B).
- Return to the Complex Atrium.
- Place the NAVIGATION DIAL; take the SONIC TUNER (C).
- Place the ENTRY BADGE (D).
- Go forward.
Chapter 6: Underground Complex
- Remove the spikes. Talk to the couple.
- Move the door (E); place the SHIELD; take the PUNCTURED HELMET (F).
- Select the 4 items (orange). Select the button 8x (G).
- Take the LEATHER STRAPS (H).
- Place the ENIGMA TILE for a puzzle (I).
- Solution (1-16).
- Go forward.
- Use the OBSIDIAN JEWELS (J).
- Use the PUNCTURED HELMET 4x; receive the SONIC AMPLIFIER (K).
- Use the LEATHER STRAPS; take the RUNE STONES and SHANK (L).
- Go forward.
- Select the scene. Take the ROPE (M).
- Go right (N).
- Talk to the lady (O).
- Take the PLANETS (P). Use the ROPE (Q) to get the arrow.
- Return to the Underground Complex.
- Place the RUNE STONES; take the PYLON STAFF (R).
- Use the SHANK; take the SONIC DEVICE (S).
- Place the SONIC AMPLIFIER and SONIC TUNER on the SONIC DEVICE; select the tuner; receive the SONIC SHATTERING DEVICE.
- Go forward.
- Place the PYLON STAFF (T); take the RITUAL CLAPPER and SILENT FIGURINE (U).
- Use the SONIC SHATTERING DEVICE (V) and play the HOP to receive the RESONANCE STRIP.
- Go forward.
- Place the RESONANCE STRIP and RITUAL CLAPPER. Select (1-5). Take the BLIND FIGURINE and MAGICAL POWDER (W).
- Go right.
- Place the SILENT FIGURINE and BLIND FIGURINE; take the CRESCENT STONE and METEOR LATCH 1/2 (X).
- Walk down.
- Place the CRESCENT STONE and PLANETS; take the PYLON FIGURINE and PILLAR ACTIVATOR (A).
- Go right.
- Place the PILLAR ACTIVATOR (B).
- Use the MAGICAL POWDER (C) and play the HOP to receive the MAGE BRACELET.
- Take the METEOR LATCH 2/2 and STAINED-GLASS PIECE from the MAGE BRACELET.
- Place the PYLON FIGURINE; take the CORRAN SYMBOL (D).
- Walk down.
- Place the CORRAN SYMBOL (E) and go to the Hall of Wisdom.
- Take the EARRING (F).
- Place the METEOR LATCH 2/2; select the latch twice. Look at the note; take the MORPHING ARTIFACT 4/4 and INCENSE PENDANT (G).
- Place the STAINED-GLASS PIECE; take the ORBITING PLANETS and WEIGHTS 1/2 (H).
- Select the Bow and Arrow (I); place the circle over the target (J) and slide the arrow up (K) as shown to get the WEIGHTS 2/2.
- Return to the Rising Steps.
- Place the INCENSE PENDANT; take the LUCK CHARM (L).
- Walk down.
- Place the ORBITING PLANETS for a puzzle (M).
- Solution (N).
- Take the MONOCLE.
- Go to the Rising Steps.
- Place the EARRING and MONOCLE (O); take the ILLUSION INSIGNIA and SCROLL (P).
- Return to the Hall of Wisdom.
- Place the ILLUSION INSIGNIA (Q); play the HOP (R) to get the EXPANDING ORB.
- Place the LUCK CHARM and SCROLL (S). Select the 3 symbols. Take the SERPENTINE DECORATION and HEARTSTRINGS (T).
- Return to the Rising Steps.
- Use the EXPANDING ORB (U); go forward.
- Take the CELESTIAL LIQUID (V).
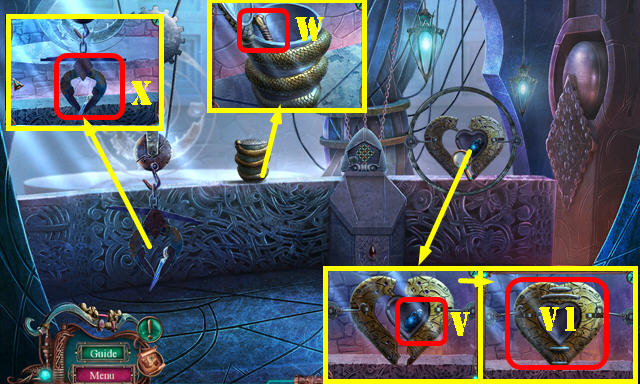
- Place the HEARTSTRINGS (V1) to get the CRAFTED HEART.
- Place the SERPENTINE DECORATION; take the SWORD HILT (W).
- Place the WEIGHTS 2/2 to receive the CELESTIAL SPIKE (X).
- Go to Hall of Wisdom.
- Place the SWORD HILT (Y); take the GATE TILE (Y1).
- Go to the Overseer Point.
- Place the GATE TILE for a puzzle (Z).
- Solution: I-M-Ix3-Mx2-N-J-Nx2-Jx2-O-K-Nx2-M-J-G-Cx2-Gx3-Cx2.
- Open the drawer; take the STAR GRID and TWINKLING STARS (Q).
- Walk down twice; enter the Gates of Eternity (R).
- Remove the chestpiece (S).
- Place the TWINKLING STARS and CELESTIAL LIQUID; take the GUARDIAN CLAW and PILLAR PARTS 1/2 (T).
- Place the STAR GRID and CELESTIAL SPIKE; take the PILLAR PARTS 2/2 (U).
- Try to go forward and then go forward.
- Use the GUARDIAN CLAW (V) and play the HOP to get the WARM-HEART EMBER.
- Place the WARM-HEART EMBER on the CRAFTED HEART; take the LIVING HEART.
- Place the PILLAR PARTS 2/2; take the SUNRAY FRAGMENTS and AMBER-ENCASED TRINKET (W).
- Walk down.
- Place the SUNRAY FRAGMENTS; take the NOBLE TRINKET (X).
- Place the LIVING HEART and AMBER-ENCASED TRINKET (Y); take the MONARCH TRINKET and DISPELLING AMULET.
- Go forward.
- Place the MONARCH TRINKET and NOBLE TRINKET for a puzzle (Z).
- Solution: A-C-F-E-B-D-E-B-A-C-E.
- Take the LEFT MECHANISM TILE (G).
- Use the DISPELLING AMULET (H).
- Go forward.
- Take the FEATHERS (I).
- Walk down.
- Place the FEATHERS; take the RIGHT MECHANISM TILE (J).
- Go forward.
- Place the LEFT MECHANISM TILE and RIGHT MECHANISM TILE for a puzzle; Solution (K).
- Use the MORPHING ARTIFACT 4/4 for a puzzle (L).

- Solution one (M).
- Solution two (N).
- Solution three (O).
- Solution four (P).
- Congratulations, you've completed Amaranthine Voyage: Winter Neverending!
Created at: 2016-05-21