

Walkthrough Menu
- General Tips
- Chapter 1: Entrance
- Chapter 2: Grand Salon
- Chapter 3: Library
- Chapter 4: Duke's Hangout
- Chapter 5: Garden Tree
- Chapter 6: Luxury Car Garage
- Chapter 7: Master Bedroom
General Tips
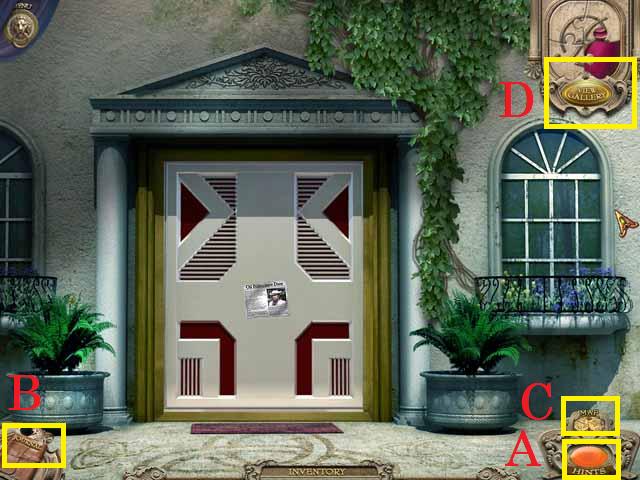 • This is the official guide for Antique Mysteries: Secrets of
Howard's Mansion. • You will not need to follow the exact path
of this guide; however, some actions are required before you
can complete another scene. • If you get stuck in your game
play you can use the Hint Button (A). • If you advance to a
scene that is sparkling, a Hidden Object Scene is available.
In this guide we will use the acronym ‘HOS' for Hidden Object
Scenes. • Trigger HOS by collecting scrolls. • All of the
items in the HOS are marked in green unless otherwise noted. •
Make sure to pick up notes along the way for additional hints
in the game. • The notes can be viewed in the journal (B). •
Once you have collected the map (C), you can use it for
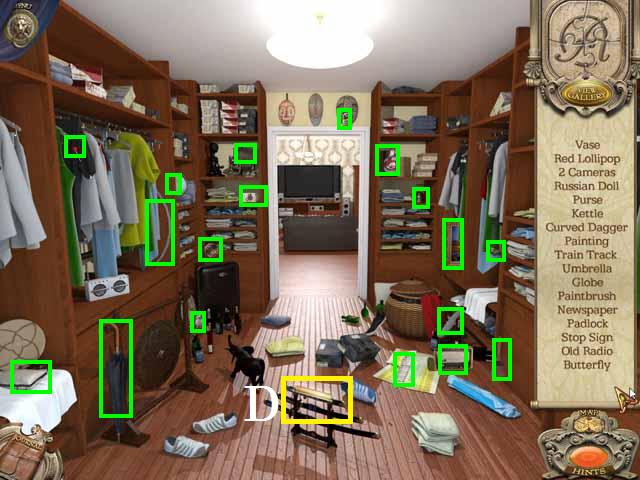
navigational help. • Use the View Gallery button (D) to enter
the Gallery. • After you have collected enough Gallery Items
you will be able to enter the Auction Room from the Gallery.
Here you can play and replay a mini-game to decorate the
Gallery.
• This is the official guide for Antique Mysteries: Secrets of
Howard's Mansion. • You will not need to follow the exact path
of this guide; however, some actions are required before you
can complete another scene. • If you get stuck in your game
play you can use the Hint Button (A). • If you advance to a
scene that is sparkling, a Hidden Object Scene is available.
In this guide we will use the acronym ‘HOS' for Hidden Object
Scenes. • Trigger HOS by collecting scrolls. • All of the
items in the HOS are marked in green unless otherwise noted. •
Make sure to pick up notes along the way for additional hints
in the game. • The notes can be viewed in the journal (B). •
Once you have collected the map (C), you can use it for
navigational help. • Use the View Gallery button (D) to enter
the Gallery. • After you have collected enough Gallery Items
you will be able to enter the Auction Room from the Gallery.
Here you can play and replay a mini-game to decorate the
Gallery.
Chapter 1: Entrance
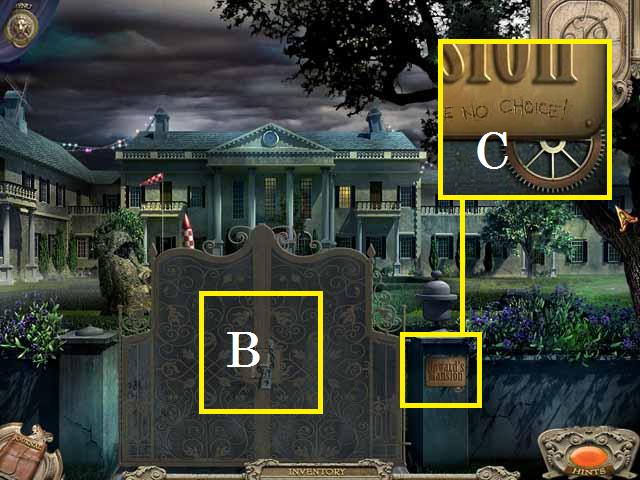 • Accept the GATE KEY from Seymour. • Zoom into the gate (B);
unlock the chain with the GATE KEY. • Zoom into the plaque;
pick up the GEAR (C). • Move forward to the Rocket and
Fountain.
• Accept the GATE KEY from Seymour. • Zoom into the gate (B);
unlock the chain with the GATE KEY. • Zoom into the plaque;
pick up the GEAR (C). • Move forward to the Rocket and
Fountain.
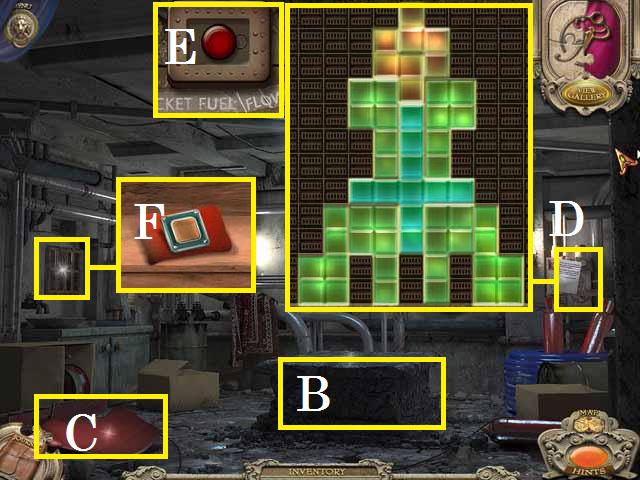
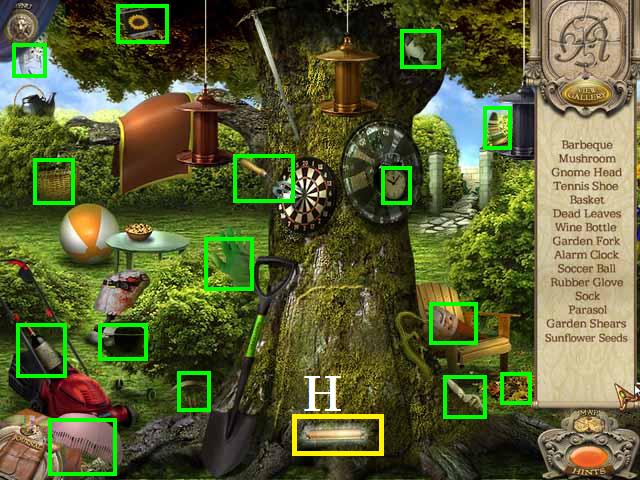
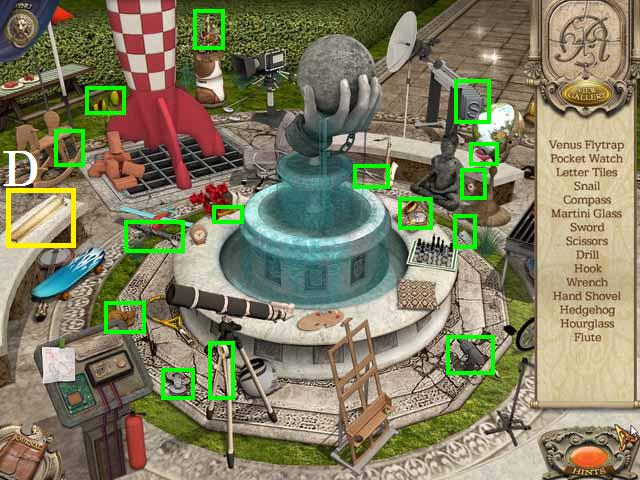 • Pick up the scroll (D) to trigger a HOS. • Collect all of
the items on the list marked in green in the screenshot. •
Receive the Gallery Item Civil War Sword and the inventory
items H, Y, E, L, S, L TILES and the TROWL. • Move forward to
the Entrance.
• Pick up the scroll (D) to trigger a HOS. • Collect all of
the items on the list marked in green in the screenshot. •
Receive the Gallery Item Civil War Sword and the inventory
items H, Y, E, L, S, L TILES and the TROWL. • Move forward to
the Entrance.
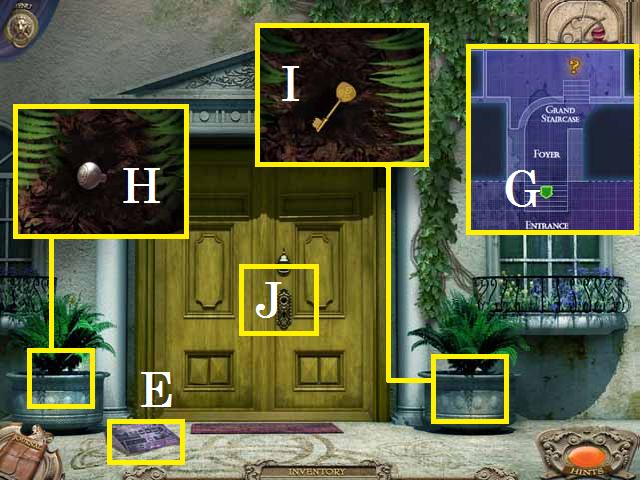 • Pick up the MAP (E). • Open the MAP; press the padlock to
open a new area then press the green arrow (G) to travel back
to the Entrance. • Zoom into the left planter; use the HAND
SHOVEL to uncover the DOOR KNOB (H). • Zoom into the right
planter; use the HAND SHOVEL to uncover the DOOR KEY (I). •
Place the DOOR KNOB on the door (J) and unlock it with the
DOOR KEY.
• Pick up the MAP (E). • Open the MAP; press the padlock to
open a new area then press the green arrow (G) to travel back
to the Entrance. • Zoom into the left planter; use the HAND
SHOVEL to uncover the DOOR KNOB (H). • Zoom into the right
planter; use the HAND SHOVEL to uncover the DOOR KEY (I). •
Place the DOOR KNOB on the door (J) and unlock it with the
DOOR KEY.
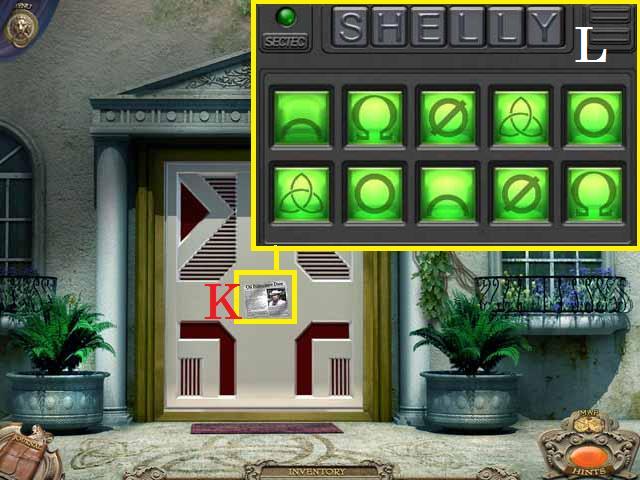 • Zoom into the newspaper clipping (K) then close the pop-up
window. • Zoom into the lock; place the letter TILES to spell
out S H E L L Y as shown in the screenshot. • Use the key (L),
as shown in the screenshot, to match the pairs. (Hint: tap a
symbol then wait for the squares to light up again to tap the
matching pair). • Enter the Foyer.
• Zoom into the newspaper clipping (K) then close the pop-up
window. • Zoom into the lock; place the letter TILES to spell
out S H E L L Y as shown in the screenshot. • Use the key (L),
as shown in the screenshot, to match the pairs. (Hint: tap a
symbol then wait for the squares to light up again to tap the
matching pair). • Enter the Foyer.
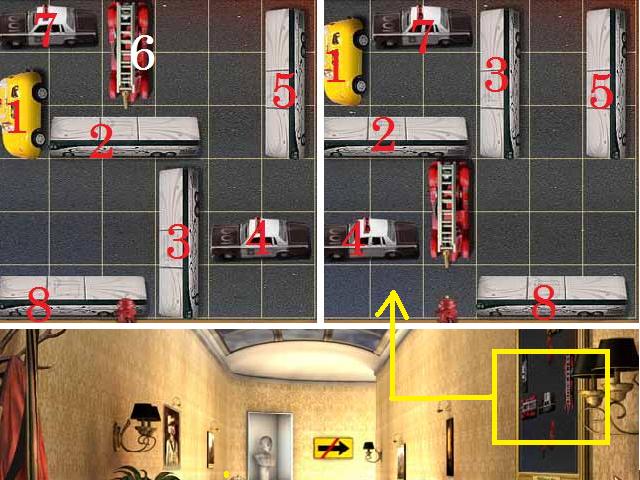 • Zoom into the painting; move the yellow car (1) down two
spaces, the (2) bus to the left one space, the (3) bus up
three spaces, the police car (4) to the left three spaces, and
buses (3) and (5) down three spaces. • Move the (2) bus three
spaces to the right, the fire engine (6) down two spaces, the
cop car (7) right four spaces, the yellow car (1) up three
spaces, the police car (4) to the left one space and the fire
engine down one space. • Move the (2) bus to the left three
spaces, buses (2) and (5) up two spaces, the (8) bus to the
right three spaces, then the fire engine down one space to
complete the puzzle.
• Zoom into the painting; move the yellow car (1) down two
spaces, the (2) bus to the left one space, the (3) bus up
three spaces, the police car (4) to the left three spaces, and
buses (3) and (5) down three spaces. • Move the (2) bus three
spaces to the right, the fire engine (6) down two spaces, the
cop car (7) right four spaces, the yellow car (1) up three
spaces, the police car (4) to the left one space and the fire
engine down one space. • Move the (2) bus to the left three
spaces, buses (2) and (5) up two spaces, the (8) bus to the
right three spaces, then the fire engine down one space to
complete the puzzle.
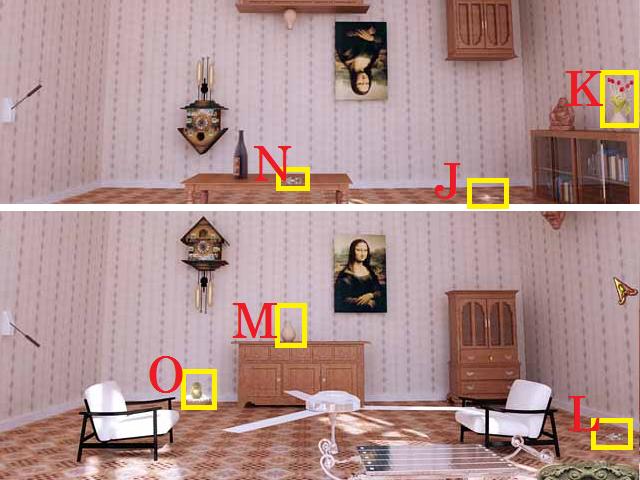
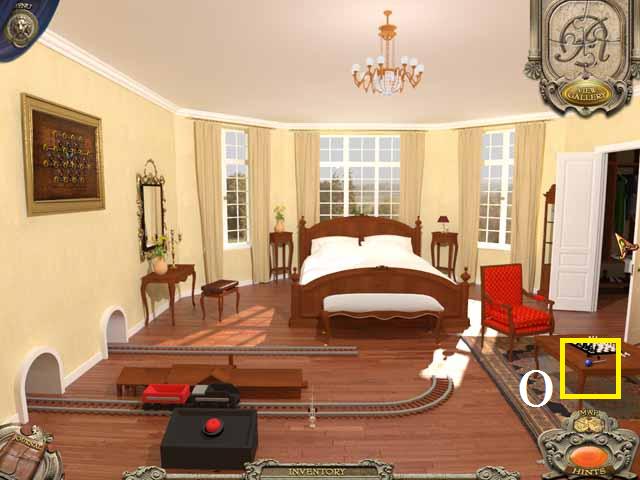
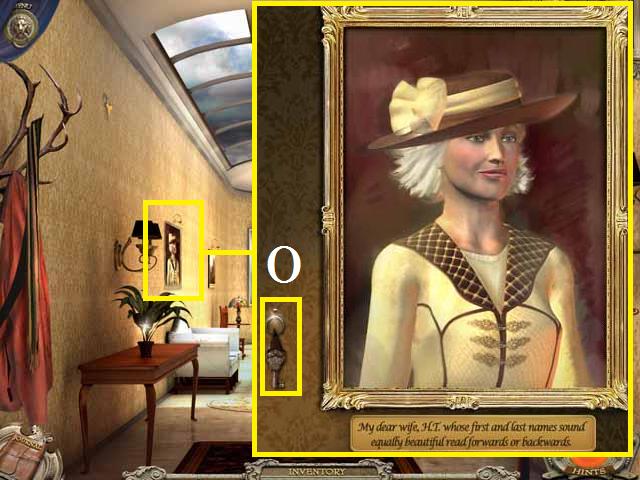 • Zoom into the painting; zoom into the note then close the
window and pick up the STAIRS KEY (O). (Hint: pay attention to
what the plaque says about Shelly's wife's name). • Move
forward to the Grand Staircase.
• Zoom into the painting; zoom into the note then close the
window and pick up the STAIRS KEY (O). (Hint: pay attention to
what the plaque says about Shelly's wife's name). • Move
forward to the Grand Staircase.
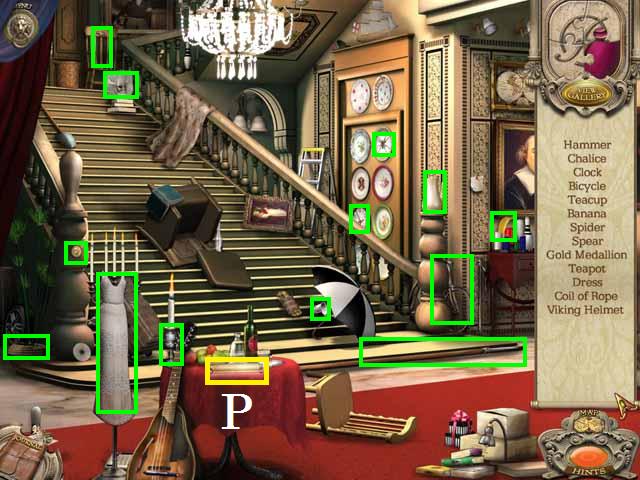 • Pick up the scroll (P) to trigger a HOS. • Receive the
diamond encrusted dress, VIKING HELMET ENCASED IN RESIN,
HAMMER, and EMPTY TEA CUP.
• Pick up the scroll (P) to trigger a HOS. • Receive the
diamond encrusted dress, VIKING HELMET ENCASED IN RESIN,
HAMMER, and EMPTY TEA CUP.
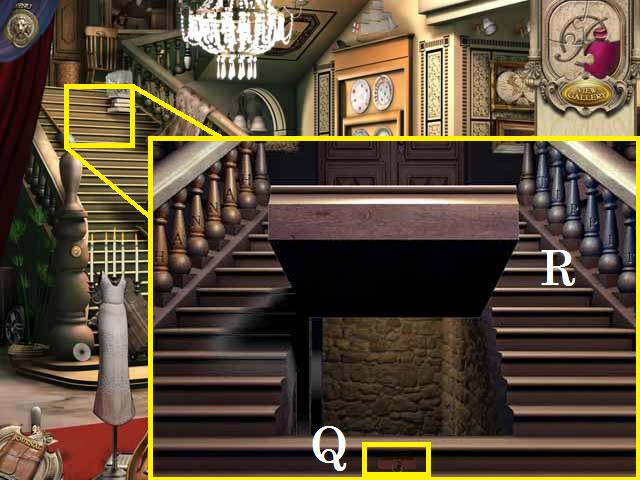 • Zoom into the staircase. • Place the banister pegs as shown
in the screenshot (R) to spell out HANNAH TIPPIT. • Place the
STAIRS KEY in the lock (Q). • Enter the Gear room.
• Zoom into the staircase. • Place the banister pegs as shown
in the screenshot (R) to spell out HANNAH TIPPIT. • Place the
STAIRS KEY in the lock (Q). • Enter the Gear room.
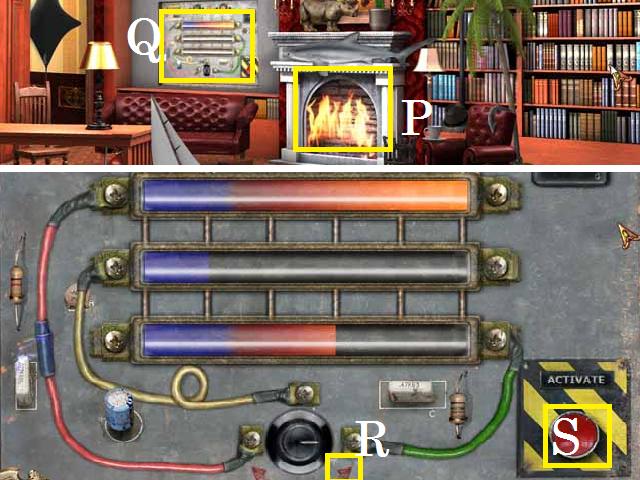
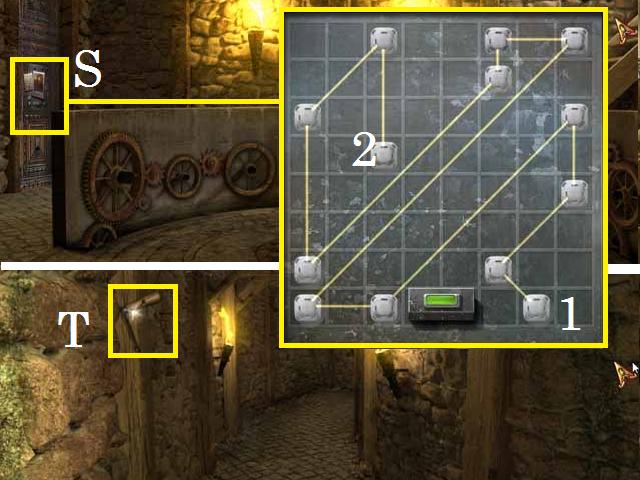 • Pick up the note (S) from the door and close the window. •
Zoom into the door; begin with circuit (1) and follow the path
shown in the screenshot ending with circuit (2). • Enter the
Tunnel. • Pick up the CRANK HANDLE (T). • Return to the Foyer.
• Pick up the note (S) from the door and close the window. •
Zoom into the door; begin with circuit (1) and follow the path
shown in the screenshot ending with circuit (2). • Enter the
Tunnel. • Pick up the CRANK HANDLE (T). • Return to the Foyer.
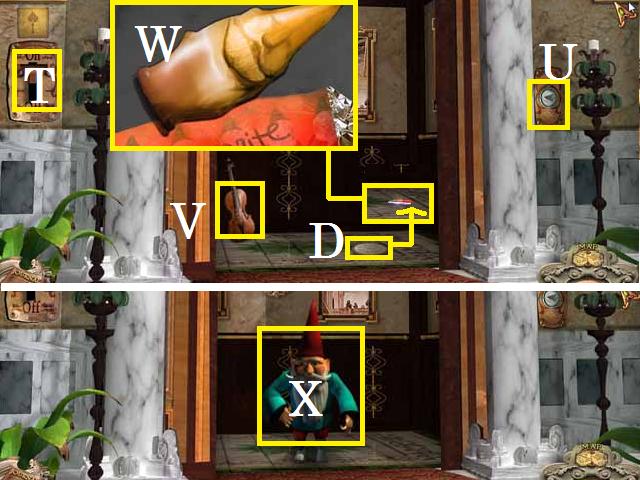
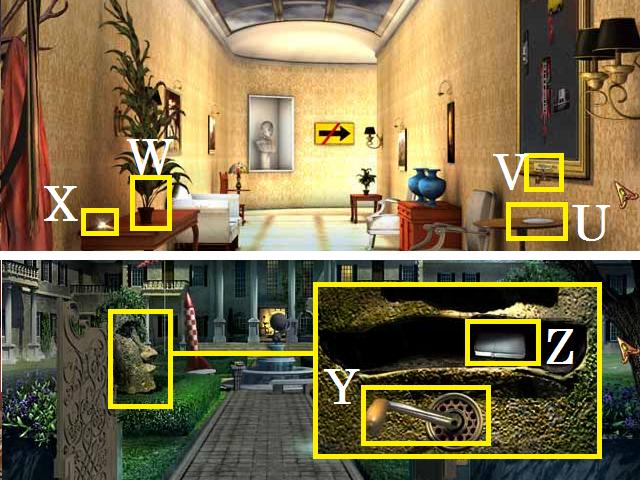 • Place the EMPTY TEA CUP on the saucer (U) and spin the
faucet (V); pick up the TEACUP WITH WATER. • Pour the TEACUP
WITH WATER on the plant (W) and pick up the ROCKET KEY (X). •
Back all the way out to the Front Garden. • Zoom into the
stone face; place and spin the CRANK HANDLE (Y). • Pick up the
LIGHTER (Z). • Return to the Tunnel and move forward to the
Stone Wall.
• Place the EMPTY TEA CUP on the saucer (U) and spin the
faucet (V); pick up the TEACUP WITH WATER. • Pour the TEACUP
WITH WATER on the plant (W) and pick up the ROCKET KEY (X). •
Back all the way out to the Front Garden. • Zoom into the
stone face; place and spin the CRANK HANDLE (Y). • Pick up the
LIGHTER (Z). • Return to the Tunnel and move forward to the
Stone Wall.
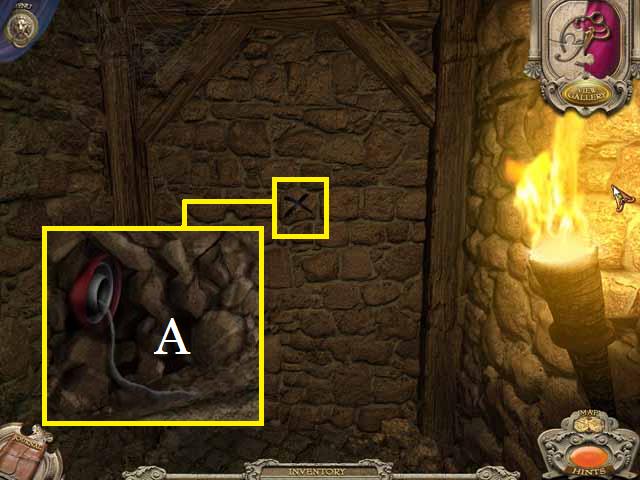 • Zoom into the wall; use the HAMMER on the “X” then light the
dynamite (A). • Enter the Blast off Room.
• Zoom into the wall; use the HAMMER on the “X” then light the
dynamite (A). • Enter the Blast off Room.
 • Place the VIKING HELMET ENCASED IN RESIN on the table (B). •
Pick up the ROCKET WING (C). • Pick the note (D) and zoom in.
• Place the pieces as shown in the screenshot and press the
red button (E). • Zoom into the shelf; pick up the MICROCHIP
(F). • Return to the Rocket and Fountain.
• Place the VIKING HELMET ENCASED IN RESIN on the table (B). •
Pick up the ROCKET WING (C). • Pick the note (D) and zoom in.
• Place the pieces as shown in the screenshot and press the
red button (E). • Zoom into the shelf; pick up the MICROCHIP
(F). • Return to the Rocket and Fountain.
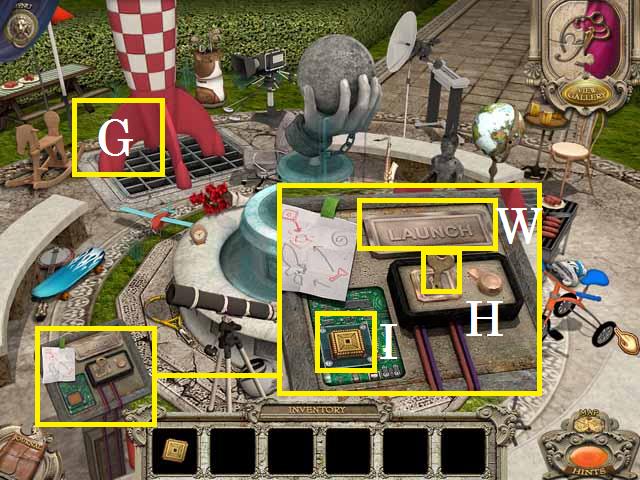 • Place the ROCKET WING (G). • Zoom into the control panel;
place the ROCKET KEY (H) and the MICROCHIP (I). Press the
launch button (W). • Move forward again to the Rocket and
Fountain.
• Place the ROCKET WING (G). • Zoom into the control panel;
place the ROCKET KEY (H) and the MICROCHIP (I). Press the
launch button (W). • Move forward again to the Rocket and
Fountain.
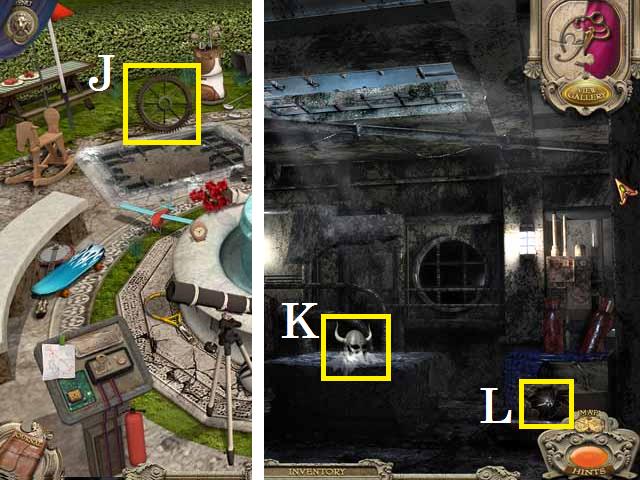 • Pick up the GEAR (J). • Return to the Blast off Room. • Pick
up the Gallery Item Viking Helmet (K) and the PAINTING KEY
(L). • Return to the Grand Staircase.
• Pick up the GEAR (J). • Return to the Blast off Room. • Pick
up the Gallery Item Viking Helmet (K) and the PAINTING KEY
(L). • Return to the Grand Staircase.
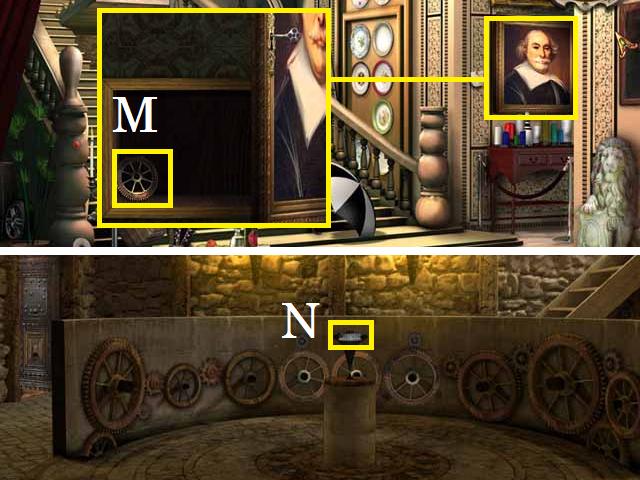 • Zoom into the painting; unlock it with the PAINTING KEY and
pick up the GEAR (M). • Return to the Gear Room. • Place the
three GEARS as shown in the screenshot and pick up the Diamond
Necklace (N).
• Zoom into the painting; unlock it with the PAINTING KEY and
pick up the GEAR (M). • Return to the Gear Room. • Place the
three GEARS as shown in the screenshot and pick up the Diamond
Necklace (N).
Chapter 2: Grand Salon
 • Tap the lock to open a new area and travel to the Grand
Salon. • Pick up the scroll (O) to trigger a HOS. • Receive
the EGYPTIAN URN.
• Tap the lock to open a new area and travel to the Grand
Salon. • Pick up the scroll (O) to trigger a HOS. • Receive
the EGYPTIAN URN.
 • The Auction Room is now open if you wish to play additional
mini-games. You can access the Action Room through the View
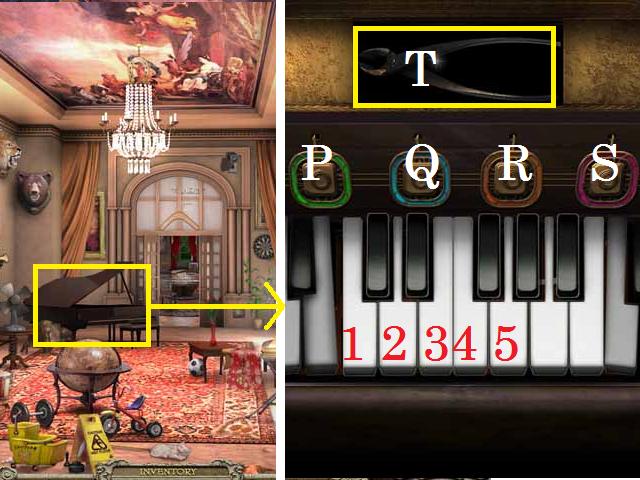
Gallery. • Zoom into the piano; press the play button (P) then
play 3, 3, 4, and 5. • Press the (Q) button then play 3, 3, 4,
5, 5, and 4. • Press the (R) button then play 3, 3, 4, 5, 5,
4, 3, and 2. • Press the (S) button then play 3, 3, 4, 5, 5,
4, 3, 2, 1, and 1. • Pick up the note then the CUTTER (T).
• The Auction Room is now open if you wish to play additional
mini-games. You can access the Action Room through the View
Gallery. • Zoom into the piano; press the play button (P) then
play 3, 3, 4, and 5. • Press the (Q) button then play 3, 3, 4,
5, 5, and 4. • Press the (R) button then play 3, 3, 4, 5, 5,
4, 3, and 2. • Press the (S) button then play 3, 3, 4, 5, 5,
4, 3, 2, 1, and 1. • Pick up the note then the CUTTER (T).
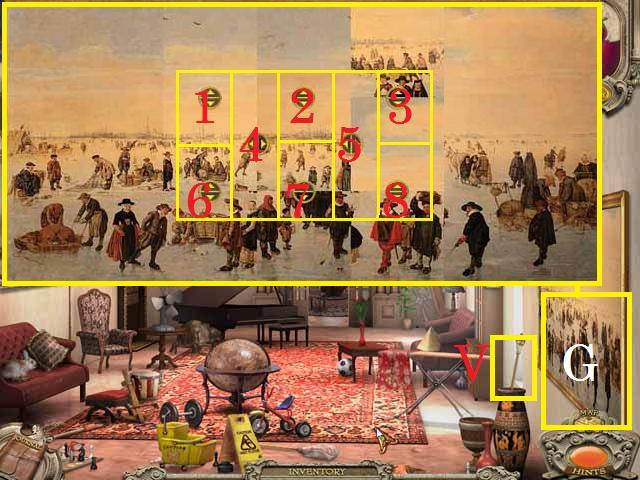 • Zoom into the painting (G). • The nine center tiles can be
swapped using the following sequence; 3, 8, 7; 5, 7, 8; 1, 2,
4; 1, 2, and 4. Rearrange the exterior slices to create the
image shown in the screenshot. • Pick up the SCEPTER (V). •
Enter the Dining Room.
• Zoom into the painting (G). • The nine center tiles can be
swapped using the following sequence; 3, 8, 7; 5, 7, 8; 1, 2,
4; 1, 2, and 4. Rearrange the exterior slices to create the
image shown in the screenshot. • Pick up the SCEPTER (V). •
Enter the Dining Room.
 • Pick up the note (W), pay attention to the clue. • Zoom into
the table; set the outer ring to 9, the second one in to 10,
the third 4, and the innermost ring to 7. • Place the SCEPTER
in the middle of the table (W). • Enter the Kitchen.
• Pick up the note (W), pay attention to the clue. • Zoom into
the table; set the outer ring to 9, the second one in to 10,
the third 4, and the innermost ring to 7. • Place the SCEPTER
in the middle of the table (W). • Enter the Kitchen.
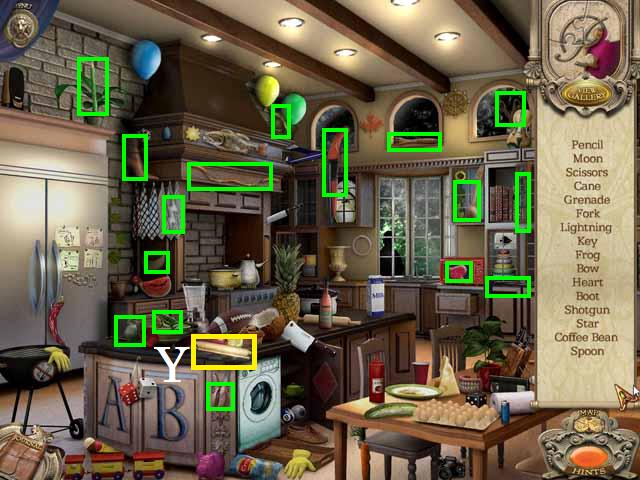 • Pick up the scroll (Y) to trigger a HOS. • Receive Marie
Antoinette's Boot.
• Pick up the scroll (Y) to trigger a HOS. • Receive Marie
Antoinette's Boot.
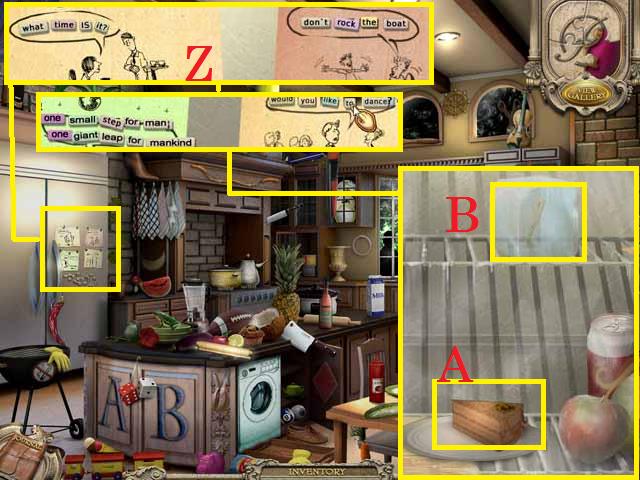 • Zoom into the fridge; spell out the sayings as shown in the
screenshot (Z). “what time is it?”. “don't rock the boat”.
“one small step for man, one giant leap for mankind”. “would
you like to dance?”. • Pick up the Royal Wedding Cake (A) and
the FROZEN KEY (B).
• Zoom into the fridge; spell out the sayings as shown in the
screenshot (Z). “what time is it?”. “don't rock the boat”.
“one small step for man, one giant leap for mankind”. “would
you like to dance?”. • Pick up the Royal Wedding Cake (A) and
the FROZEN KEY (B).
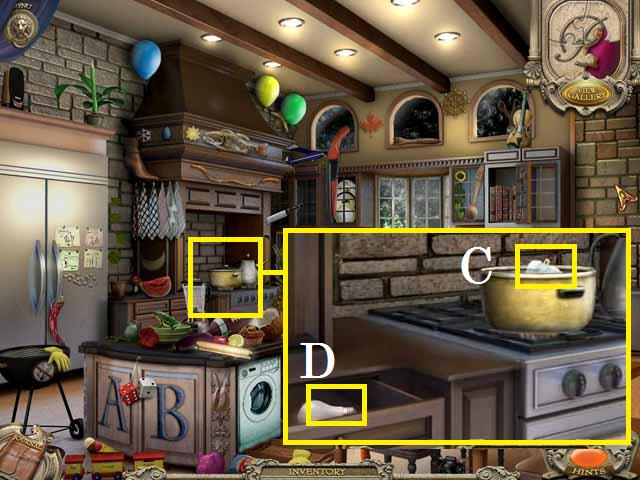 • Zoom into the stove; remove the pot's lid and place the
FROZEN KEY inside (C). • Pick up the KITCHEN DRAWER KEY from
the pot. • Pick up the photograph; unlock the drawer with the
KITCHEN DRAWER KEY and pick up the LIGHT BULB (D). • Back up
to the Dining Room.
• Zoom into the stove; remove the pot's lid and place the
FROZEN KEY inside (C). • Pick up the KITCHEN DRAWER KEY from
the pot. • Pick up the photograph; unlock the drawer with the
KITCHEN DRAWER KEY and pick up the LIGHT BULB (D). • Back up
to the Dining Room.
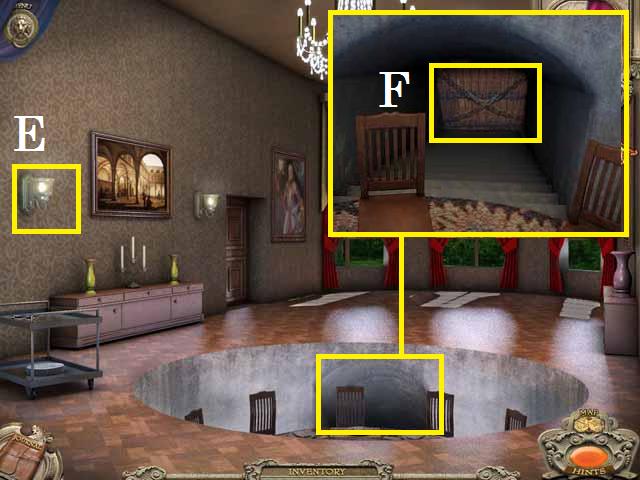 • Place the LIGHT BULB in the lamp (E). • Zoom into the
tunnel; use the CUTTER on the chain (F) and enter the Wine
Cellar.
• Place the LIGHT BULB in the lamp (E). • Zoom into the
tunnel; use the CUTTER on the chain (F) and enter the Wine
Cellar.
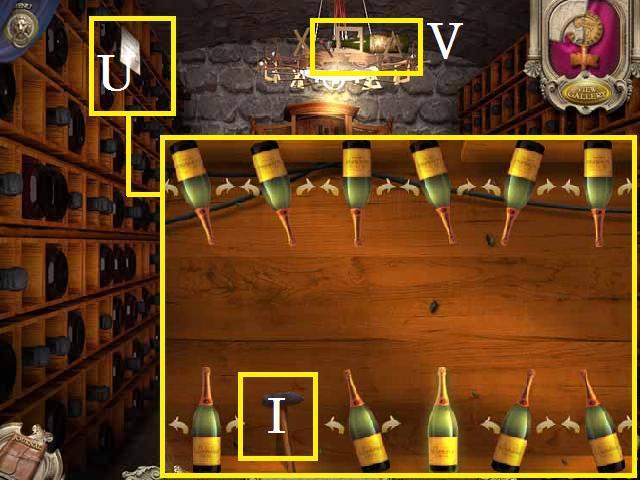 • Pick up the note (U) and zoom into the shelf. • Arrange the
bottles as shown in the screenshot then tap the hammer (I). •
Pick up the Vintage Wine Bottle (V).
• Pick up the note (U) and zoom into the shelf. • Arrange the
bottles as shown in the screenshot then tap the hammer (I). •
Pick up the Vintage Wine Bottle (V).
Chapter 3: Library
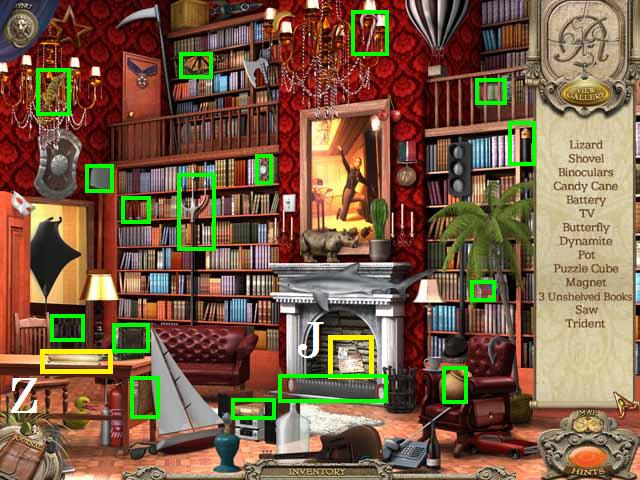 • Open the new area and travel to the Library. • Pick up the
note (J). • Pick up the scroll (Z) to trigger a HOS. • Receive
the Ancient Pot, BOOK 1, BOOK 2, and BOOK 3.
• Open the new area and travel to the Library. • Pick up the
note (J). • Pick up the scroll (Z) to trigger a HOS. • Receive
the Ancient Pot, BOOK 1, BOOK 2, and BOOK 3.
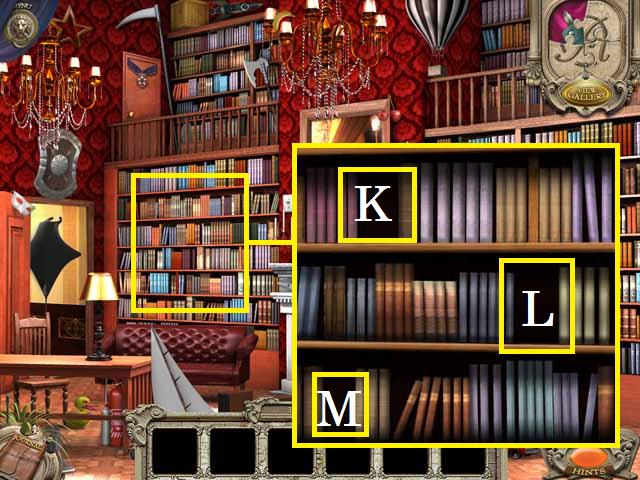 • Zoom into the bookshelf; place BOOK 1 on the second shelf
(K), BOOK 2 on the third (L), and BOOK 3 on the bottom shelf
(M). • Enter the Hallway.
• Zoom into the bookshelf; place BOOK 1 on the second shelf
(K), BOOK 2 on the third (L), and BOOK 3 on the bottom shelf
(M). • Enter the Hallway.
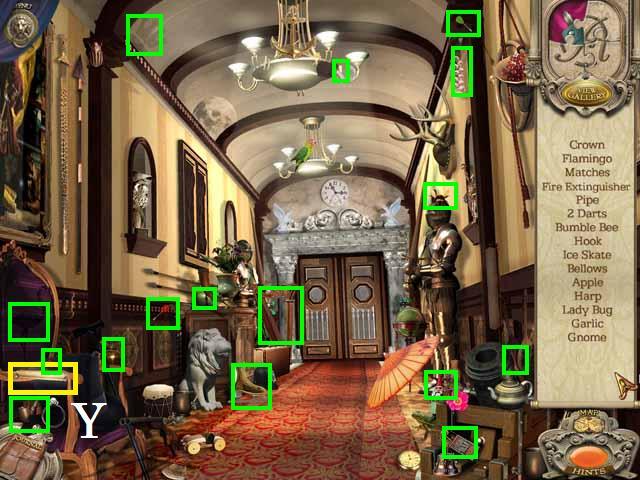 • Pick up the scroll (Y) to trigger a HOS. • Receive the
Vintage Gnome, MATCHES, BELLOWS, and FIRE EXTINGUISHER.
• Pick up the scroll (Y) to trigger a HOS. • Receive the
Vintage Gnome, MATCHES, BELLOWS, and FIRE EXTINGUISHER.
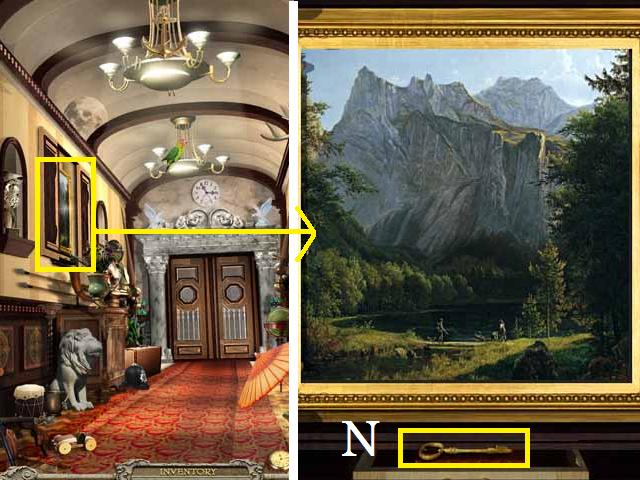 • Zoom into the painting; set the painting as shown in the
screenshot. • Pick up the ELEVATOR KEY (N). • Move forward to
the Outside Elevator.
• Zoom into the painting; set the painting as shown in the
screenshot. • Pick up the ELEVATOR KEY (N). • Move forward to
the Outside Elevator.
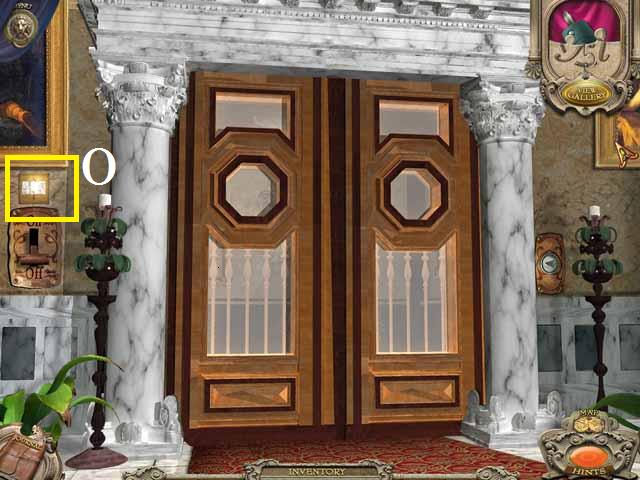 • Pick up the note (O); pay attention to the numbers. • Return
to the Library.
• Pick up the note (O); pay attention to the numbers. • Return
to the Library.
 • Light the fire (P) with the MATCHES, and then use the
BELLOWS on the fire four times. • Zoom into the gauges (Q)
revealed behind the shelf. • Press the arrow (R). • Zoom back
out; use the FIRE EXTINGUISHER on the fire then relight it
with the MATCHES. • Zoom back into the gauges; press the arrow
(R). • Zoom out; use the BELLOWS two times on the fire. • Zoom
into the gauges; press the activate button (S). • Return to
the Outside Elevator.
• Light the fire (P) with the MATCHES, and then use the
BELLOWS on the fire four times. • Zoom into the gauges (Q)
revealed behind the shelf. • Press the arrow (R). • Zoom back
out; use the FIRE EXTINGUISHER on the fire then relight it
with the MATCHES. • Zoom back into the gauges; press the arrow
(R). • Zoom out; use the BELLOWS two times on the fire. • Zoom
into the gauges; press the activate button (S). • Return to
the Outside Elevator.
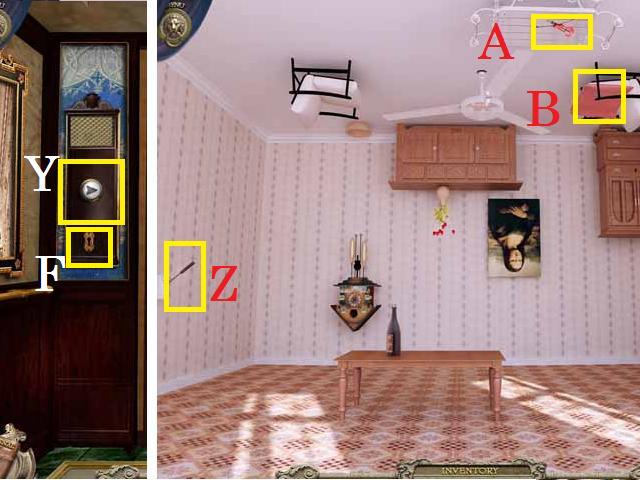
 • Flip the on switch (T) and press the call button (U). • Pick
up the Rare Violin (V), Viking Compass (D), and the note; eat
the treat (W). • Tap the gnome (X) to receive a letter. • Move
inside the Elevator.
• Flip the on switch (T) and press the call button (U). • Pick
up the Rare Violin (V), Viking Compass (D), and the note; eat
the treat (W). • Tap the gnome (X) to receive a letter. • Move
inside the Elevator.
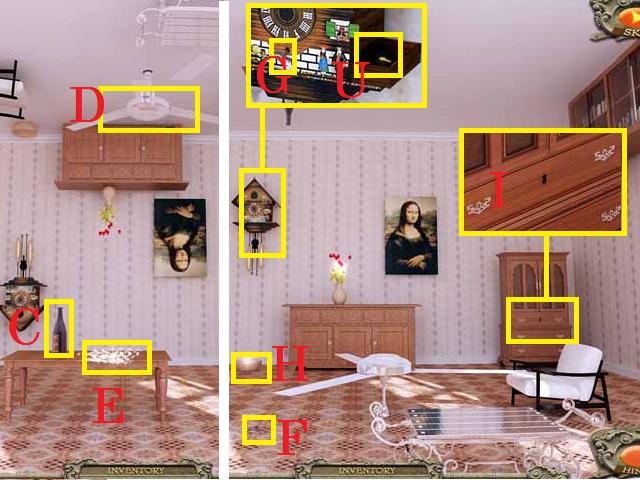
 • Place the ELEVATOR KEY in the keyhole (F). • Press the floor
button (Y). • Enter the Upside-down Room. • Pull the lever (Z)
to rotate the room. • Pick up the BOTTLE OPENER (A) and RED
PILLOW (B). • Rotate the room again.
• Place the ELEVATOR KEY in the keyhole (F). • Press the floor
button (Y). • Enter the Upside-down Room. • Pull the lever (Z)
to rotate the room. • Pick up the BOTTLE OPENER (A) and RED
PILLOW (B). • Rotate the room again.
 • Open the wine bottle (C) with the BOTTLE OPENER and throw
the RED PILLOW in the fan (D). • Pick up the FEATHERS (E) and
then rotate the room again. • Pick up the CLOCK WINDER (F). •
Zoom into the clock; place the CLOCK WINDER (G) and pick up
the DRESSER KEY (U). • Place the FEATHERS in the bowl (H). •
Zoom into the dresser; unlock the drawer (I) with the DRESSER
KEY.
• Open the wine bottle (C) with the BOTTLE OPENER and throw
the RED PILLOW in the fan (D). • Pick up the FEATHERS (E) and
then rotate the room again. • Pick up the CLOCK WINDER (F). •
Zoom into the clock; place the CLOCK WINDER (G) and pick up
the DRESSER KEY (U). • Place the FEATHERS in the bowl (H). •
Zoom into the dresser; unlock the drawer (I) with the DRESSER
KEY.
 • Rotate the room; pick up the SCISSORS (J). • Cut the flowers
(K) then rotate the room. • Pick up the CLOCK HAND AT 12 (L).
• Cut the flowers (M) then rotate the room again. • Pick up
the HAND AT 6 (N) and rotate the room again. • Zoom into the
clock; place the HAND AT 6 and HAND AT 12 on the clock's face.
• Pick up the Faberge Egg (O).
• Rotate the room; pick up the SCISSORS (J). • Cut the flowers
(K) then rotate the room. • Pick up the CLOCK HAND AT 12 (L).
• Cut the flowers (M) then rotate the room again. • Pick up
the HAND AT 6 (N) and rotate the room again. • Zoom into the
clock; place the HAND AT 6 and HAND AT 12 on the clock's face.
• Pick up the Faberge Egg (O).
Chapter 4: Duke's Hangout
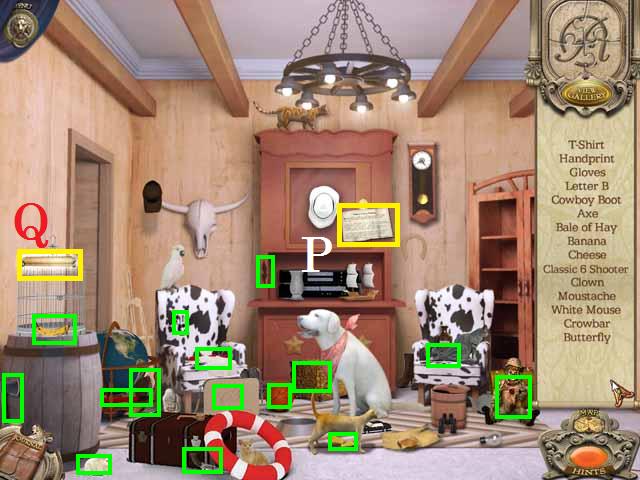 • Open the new area and travel to Duke's Hangout. • Pick up
the note (P). • Pick up the scroll (Q) to trigger a HOS. •
Receive the Classic 6-shooter, HAY BALE, MOUSTACHE, SHERRIFF'S
BOOT, GLOVE, and CROWBAR. • Enter the Reading Room and then
the Cactus Room.
• Open the new area and travel to Duke's Hangout. • Pick up
the note (P). • Pick up the scroll (Q) to trigger a HOS. •
Receive the Classic 6-shooter, HAY BALE, MOUSTACHE, SHERRIFF'S
BOOT, GLOVE, and CROWBAR. • Enter the Reading Room and then
the Cactus Room.
 • Pick up the scroll (R) to trigger a HOS. • Receive the
Golden Horseshoe, HOLSTERED GUN, DOG BISCUIT, SHERRIFF'S
BADGE, SUN, LETTER C, and LEFT SADDLE.
• Pick up the scroll (R) to trigger a HOS. • Receive the
Golden Horseshoe, HOLSTERED GUN, DOG BISCUIT, SHERRIFF'S
BADGE, SUN, LETTER C, and LEFT SADDLE.
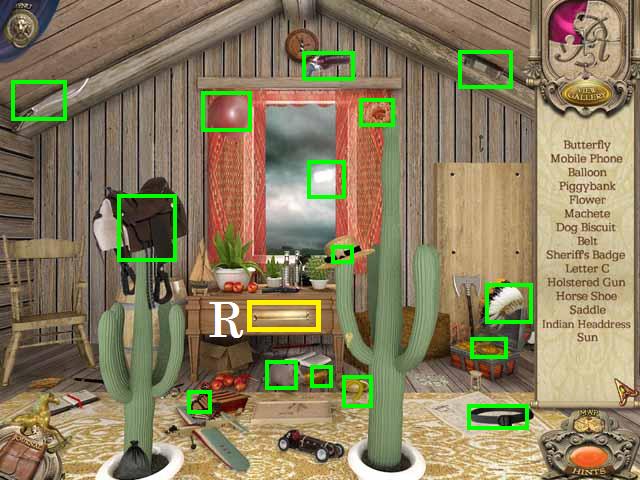
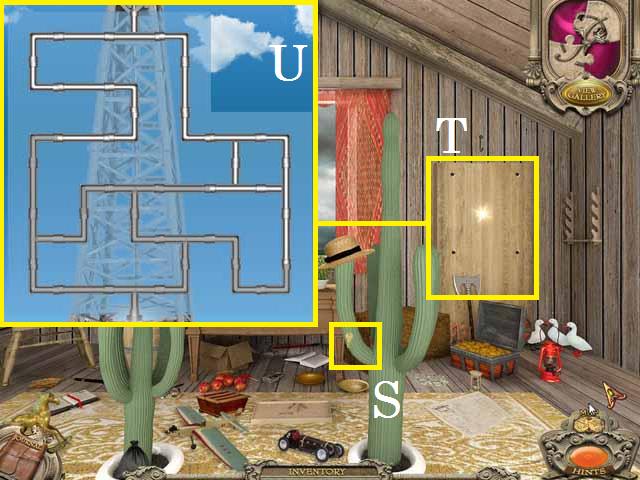 • Pick up the KEY (S) with the GLOVES. • Remove the board (T)
with the CROWBAR and zoom in. • Arrange the pipes as shown in
the screenshot (U). • Return to Duke's Hangout.
• Pick up the KEY (S) with the GLOVES. • Remove the board (T)
with the CROWBAR and zoom in. • Arrange the pipes as shown in
the screenshot (U). • Return to Duke's Hangout.
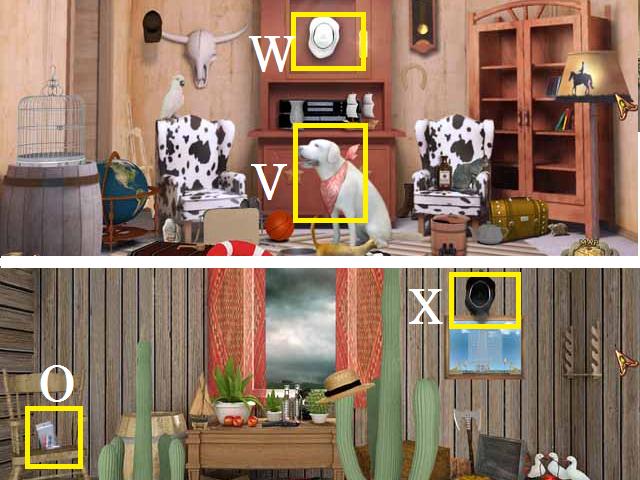 • Feed the DOG BISCUIT to the dog (V) to receive the BANDANA.
• Unlock the cabinet with the KEY; pick up the WHITE HAT (W).
• Return to the Cactus Room. • Hang the WHITE HAT on the nail
(X). • Tap the gnome; pick up the Zalexatrin (O). • Pick up
the now BLACK HAT (X). • Return to the Reading Room.
• Feed the DOG BISCUIT to the dog (V) to receive the BANDANA.
• Unlock the cabinet with the KEY; pick up the WHITE HAT (W).
• Return to the Cactus Room. • Hang the WHITE HAT on the nail
(X). • Tap the gnome; pick up the Zalexatrin (O). • Pick up
the now BLACK HAT (X). • Return to the Reading Room.
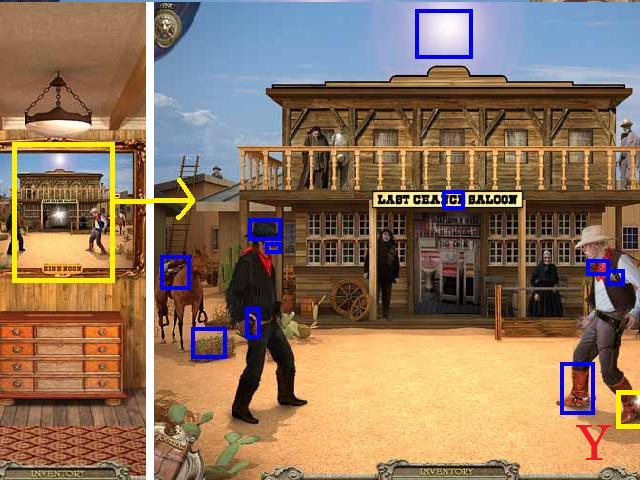 • Zoom into the painting and place the ten inventory items
marked in blue, shown in the screenshot. Note: there are two
items on the left face. • Pick up the SILVER SPUR (Y). • Enter
the Saloon.
• Zoom into the painting and place the ten inventory items
marked in blue, shown in the screenshot. Note: there are two
items on the left face. • Pick up the SILVER SPUR (Y). • Enter
the Saloon.
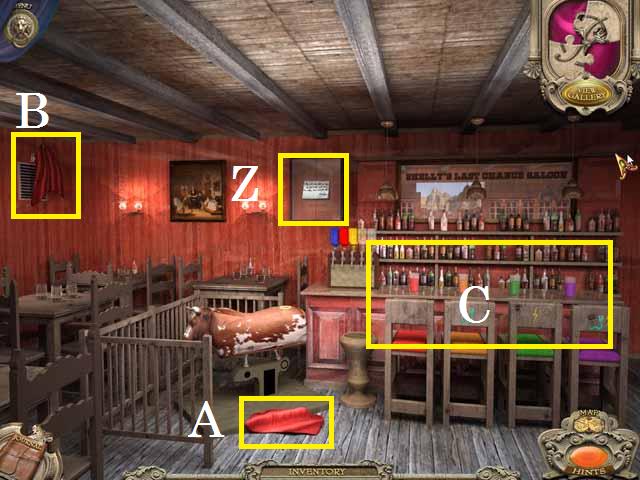 • Pick up the note (Z) and the RED CURTAIN (A). • Hang the RED
CURTAIN over the vent (B). • Zoom into the bar (C).
• Pick up the note (Z) and the RED CURTAIN (A). • Hang the RED
CURTAIN over the vent (B). • Zoom into the bar (C).
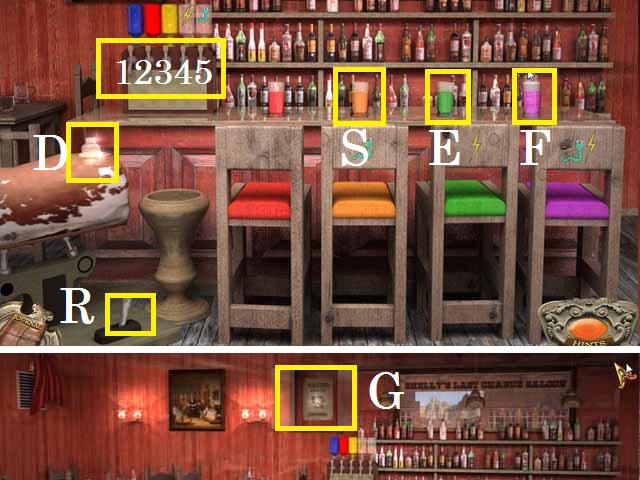 • Place the mixer (D) under the (2) dispenser and tap once,
then place it under the (3) and tap once, followed by (5) and
tap twice. Place the mixer back on the bull, pull the handle
(R), and then pour it into glass (S). • Place the mixer under
dispenser (1) and tap once, the dispenser (3) and tap once.
Finish the drink under dispenser (4). Mix it on the bull then
pour it into glass (E). • Use dispenser (1) once, (2) once,
(4) once, and (5) once. Mix the drink and pour into drink (F).
• Pick up the Vintage Wanted Poster (G).
• Place the mixer (D) under the (2) dispenser and tap once,
then place it under the (3) and tap once, followed by (5) and
tap twice. Place the mixer back on the bull, pull the handle
(R), and then pour it into glass (S). • Place the mixer under
dispenser (1) and tap once, the dispenser (3) and tap once.
Finish the drink under dispenser (4). Mix it on the bull then
pour it into glass (E). • Use dispenser (1) once, (2) once,
(4) once, and (5) once. Mix the drink and pour into drink (F).
• Pick up the Vintage Wanted Poster (G).
Chapter 5: Garden Tree
 • Open the new area and travel to the Garden Tree. • Pick up
the scroll (H) to trigger a HOS. • Receive the Parasol,
SEEDLING PACKET, and DEAD LEAVES. • Move forward to the Koi
Pond and enter the Shed.
• Open the new area and travel to the Garden Tree. • Pick up
the scroll (H) to trigger a HOS. • Receive the Parasol,
SEEDLING PACKET, and DEAD LEAVES. • Move forward to the Koi
Pond and enter the Shed.
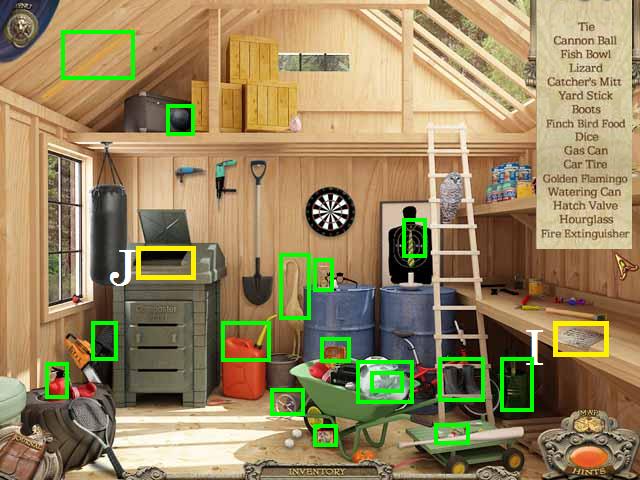 • Pick up the note (I). • Pick up the scroll (J) to trigger a
HOS. • Receive the Cannonball, GAS CAN, FISH BOWL, FINCH BIRD
FOOD, HATCH VALVE, and EMPTY WATER CAN. • Return to the Koi
Pond.
• Pick up the note (I). • Pick up the scroll (J) to trigger a
HOS. • Receive the Cannonball, GAS CAN, FISH BOWL, FINCH BIRD
FOOD, HATCH VALVE, and EMPTY WATER CAN. • Return to the Koi
Pond.
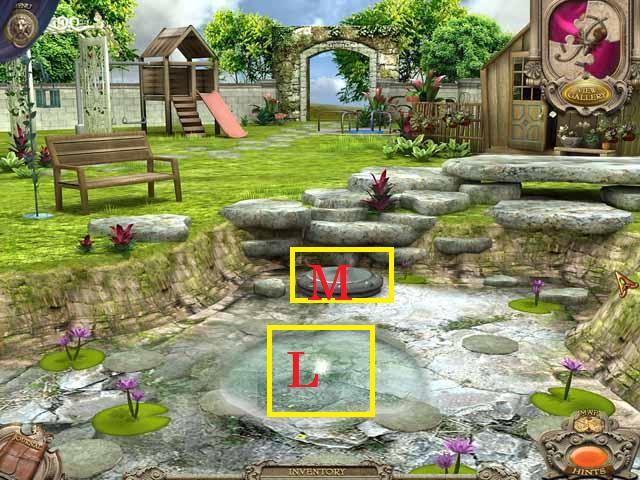
 • Catch the koi (K) with the FISH BOWL and zoom into the pond.
• Press the stone pillars in the following sequence: 2, 6, 8,
1, 4, 3, 5, 7, and 9.
• Catch the koi (K) with the FISH BOWL and zoom into the pond.
• Press the stone pillars in the following sequence: 2, 6, 8,
1, 4, 3, 5, 7, and 9.
 • Fill the EMPTY WATERING CAN with the water (L) to receive
the WATER CAN FULL. • Place the HATCH VALVE (M) and zoom in.
• Fill the EMPTY WATERING CAN with the water (L) to receive
the WATER CAN FULL. • Place the HATCH VALVE (M) and zoom in.
 • Find the differences, marked in blue in the screenshot. •
Receive the 18th Century Hand Fan and the VULTURE FOOD. • Move
forward to the Grassy Meadow.
• Find the differences, marked in blue in the screenshot. •
Receive the 18th Century Hand Fan and the VULTURE FOOD. • Move
forward to the Grassy Meadow.
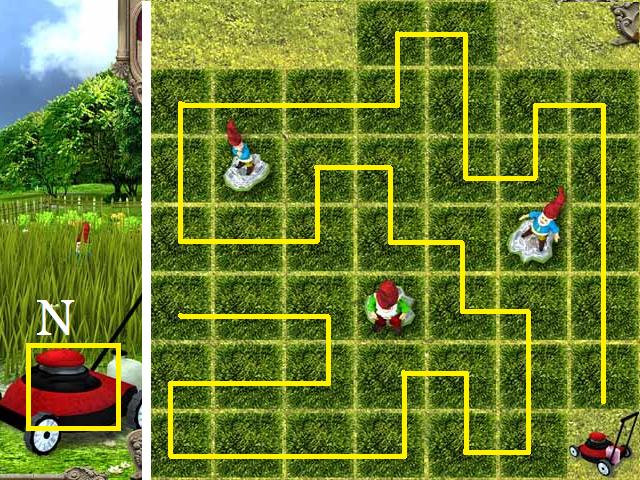 • Pour the GAS CAN in the lawnmower (N) and move it to the
high grass to trigger a mini-game. • Follow the path, marked
in yellow in the screenshot, to complete this puzzle.
• Pour the GAS CAN in the lawnmower (N) and move it to the
high grass to trigger a mini-game. • Follow the path, marked
in yellow in the screenshot, to complete this puzzle.
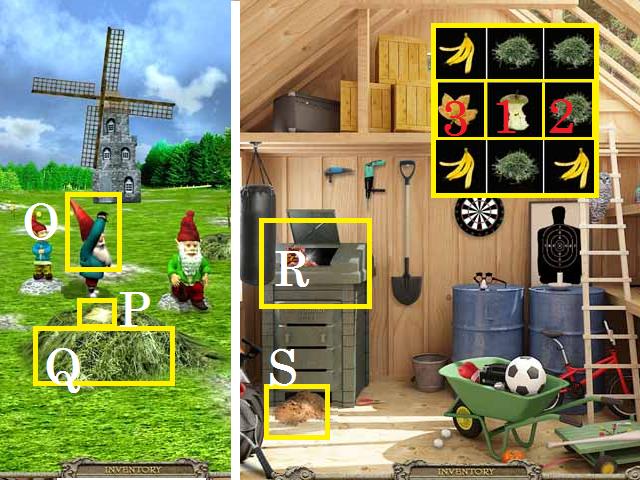 • Tap the dancing gnome (O) then pick up the note (P) and the
GRASS CLIPPINGS (Q). • Return to the Shed. • Place the DEAD
LEAVES and GRASS CLIPPINGS in the composter (R) then zoom in.
• Complete the mini-game then pick up the SOIL (S). (Hint:
swap (1) and (2) to collect a grass clippings match, also
collect the leaves (3)). • Return to the Grassy Meadow.
• Tap the dancing gnome (O) then pick up the note (P) and the
GRASS CLIPPINGS (Q). • Return to the Shed. • Place the DEAD
LEAVES and GRASS CLIPPINGS in the composter (R) then zoom in.
• Complete the mini-game then pick up the SOIL (S). (Hint:
swap (1) and (2) to collect a grass clippings match, also
collect the leaves (3)). • Return to the Grassy Meadow.
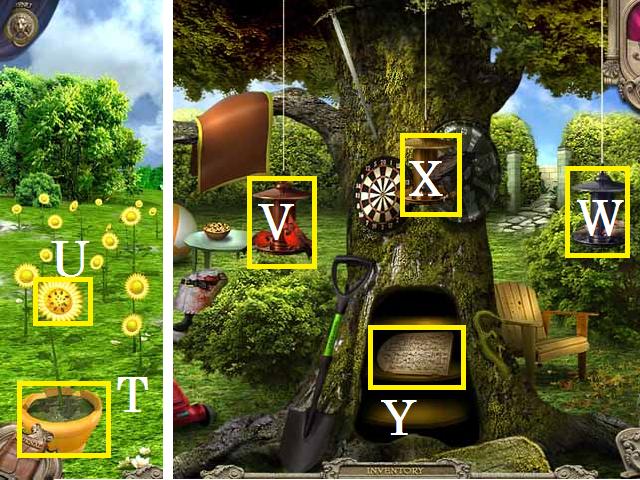 • Place the SOIL then the SEEDLING PACKET in the pot (T) and
water with the WATER CAN FULL. • Pick up the SUNFLOWER SEEDS
(U). • Return to the Garden Tree. • Place the SUNFLOWER SEEDS
(V), the FINCH BIRD FOOD (W), and the VULTURE FOOD (X). • Pick
up the Egyptian Tablet (Y).
• Place the SOIL then the SEEDLING PACKET in the pot (T) and
water with the WATER CAN FULL. • Pick up the SUNFLOWER SEEDS
(U). • Return to the Garden Tree. • Place the SUNFLOWER SEEDS
(V), the FINCH BIRD FOOD (W), and the VULTURE FOOD (X). • Pick
up the Egyptian Tablet (Y).
Chapter 6: Luxury Car Garage
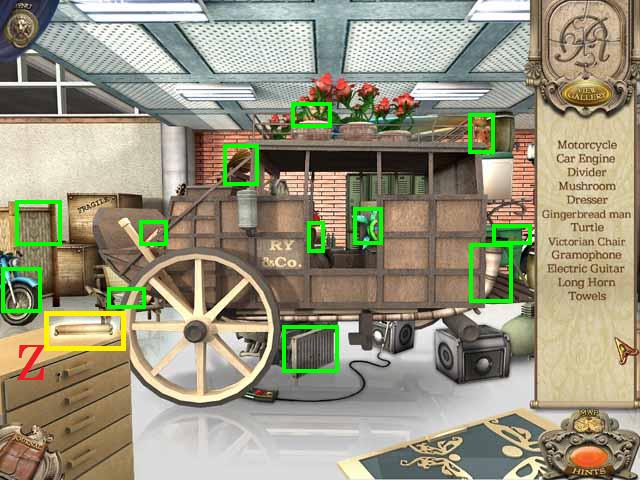 • Open the new area and travel to Luxury Car Garage. • Move
into the Stagecoach area. • Pick up the scroll (Z) to trigger
a HOS. l • Receive the Antique Russian Dresser and TOWELS. •
Enter the Workbench.
• Open the new area and travel to Luxury Car Garage. • Move
into the Stagecoach area. • Pick up the scroll (Z) to trigger
a HOS. l • Receive the Antique Russian Dresser and TOWELS. •
Enter the Workbench.
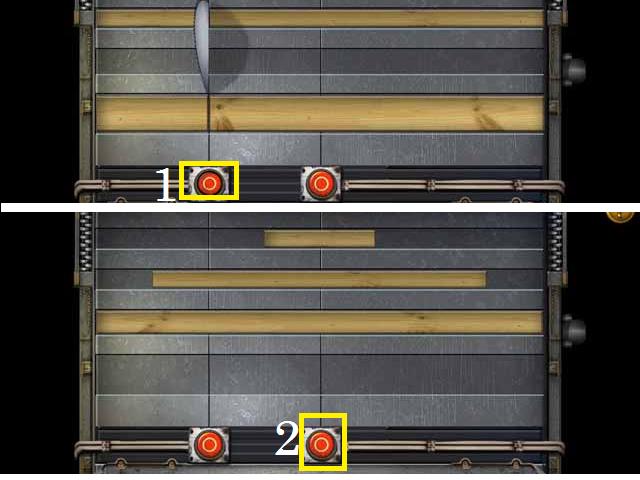
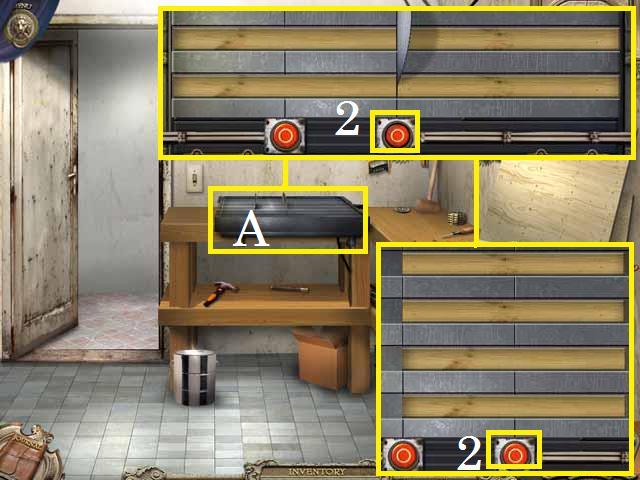 • Zoom into the saw (A). • Place the two pieces of wood on the
saw and press the (2) button. • Place all the pieces of wood
on the saw and press the (2) button. • Assemble the WHEEL.
• Zoom into the saw (A). • Place the two pieces of wood on the
saw and press the (2) button. • Place all the pieces of wood
on the saw and press the (2) button. • Assemble the WHEEL.
 • Place the two pieces of wood on the saw and press the (2)
button. • Place one of the larger pieces (B) and the two
thinner pieces on the saw and press the (2) button. • Assemble
the HORSE.
• Place the two pieces of wood on the saw and press the (2)
button. • Place one of the larger pieces (B) and the two
thinner pieces on the saw and press the (2) button. • Assemble
the HORSE.
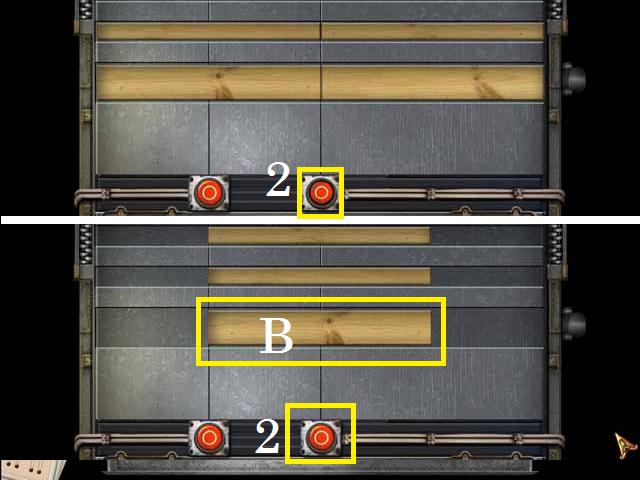
 • Place the skinniest and fattest pieces of wood on the saw,
as shown in the screenshot, and press the (1) button. • Place
the two skinniest pieces and the middle piece on the saw, as
shown in the screenshot, and press the (2) button. • Assemble
the DOLL. • Enter the Laundry.
• Place the skinniest and fattest pieces of wood on the saw,
as shown in the screenshot, and press the (1) button. • Place
the two skinniest pieces and the middle piece on the saw, as
shown in the screenshot, and press the (2) button. • Assemble
the DOLL. • Enter the Laundry.
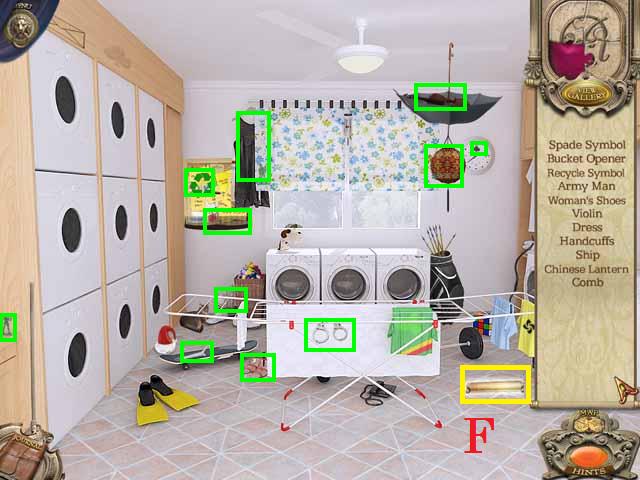 • Pick up the scroll (F) to trigger a HOS. • Receive the Pair
of Celebrity Shoes, BLACK DRESS, and the BUCKET OPENER.
• Pick up the scroll (F) to trigger a HOS. • Receive the Pair
of Celebrity Shoes, BLACK DRESS, and the BUCKET OPENER.
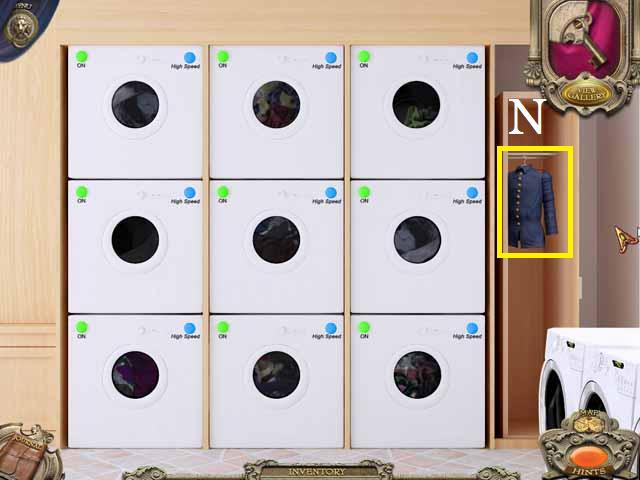
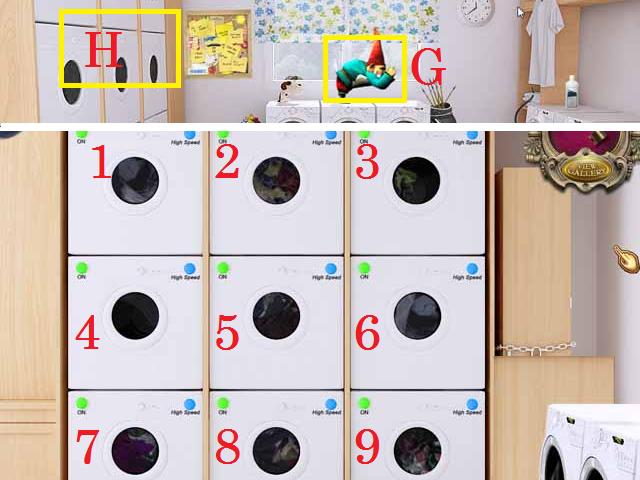 • Tap the dancing gnome (G) and pick up the note. • Zoom into
the dryers (H). • Place the TOWELS (3) and the BLACK DRESS (4)
in the open dryers. • Press the on buttons in the following
sequence: 5, 7, 4, 2, 6, 7, 8, 7, 9, 3, and 1. • Change the
speed using the following sequence; 3, 7, 5, and 1. • Return
to the Work Bench.
• Tap the dancing gnome (G) and pick up the note. • Zoom into
the dryers (H). • Place the TOWELS (3) and the BLACK DRESS (4)
in the open dryers. • Press the on buttons in the following
sequence: 5, 7, 4, 2, 6, 7, 8, 7, 9, 3, and 1. • Change the
speed using the following sequence; 3, 7, 5, and 1. • Return
to the Work Bench.
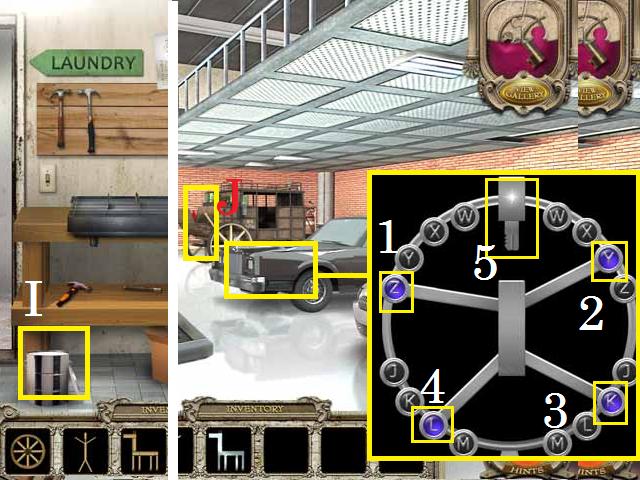 • Open the paint can (I) with the BUCKET OPENER and dip the
HORSE and DOLL in the paint to receive the SILVER HORSE and
SILVER DOLL. • Return to the Luxury Car Garage. • Zoom into
the limo hood; place the SILVER DOLL in the circle and press
the Z (1), Y (2), K (3), and L (4) letters then pick up the
DRAWER KEY (5). • Place the SILVER HORSE in front of the
stagecoach (J). • Move into the Stagecoach area.
• Open the paint can (I) with the BUCKET OPENER and dip the
HORSE and DOLL in the paint to receive the SILVER HORSE and
SILVER DOLL. • Return to the Luxury Car Garage. • Zoom into
the limo hood; place the SILVER DOLL in the circle and press
the Z (1), Y (2), K (3), and L (4) letters then pick up the
DRAWER KEY (5). • Place the SILVER HORSE in front of the
stagecoach (J). • Move into the Stagecoach area.
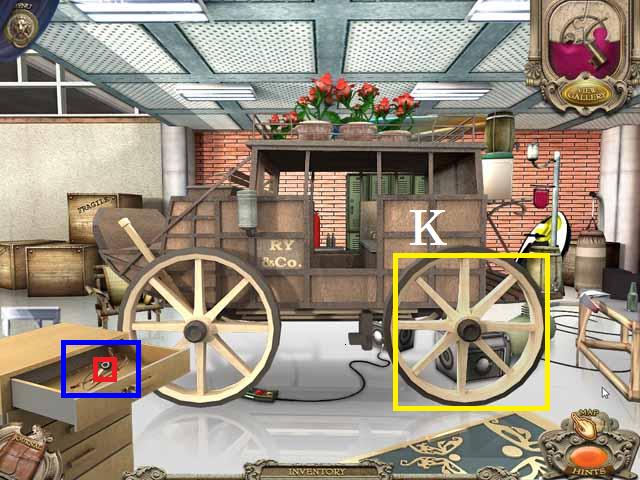 • Place the WHEEL on the coach (K). • Zoom into the dresser;
unlock the drawer with the DRAWER KEY and pick up the HORSE
REINS (blue) and the LIMO KEY (red). • Back out to the Luxury
car Garage.
• Place the WHEEL on the coach (K). • Zoom into the dresser;
unlock the drawer with the DRAWER KEY and pick up the HORSE
REINS (blue) and the LIMO KEY (red). • Back out to the Luxury
car Garage.
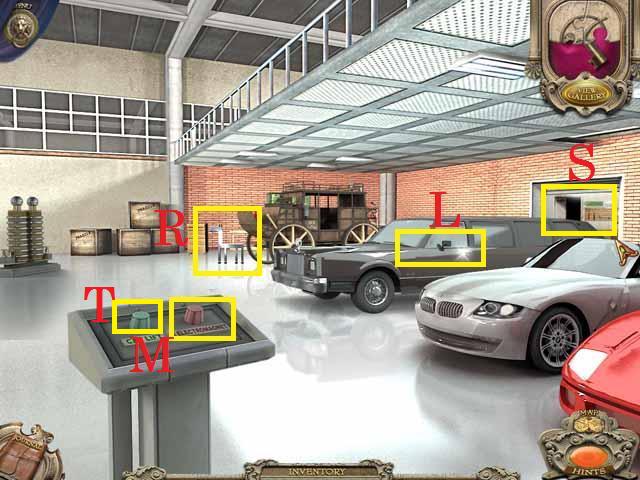 • Place the HORSE REINS on the SILVER HORSE (R) and the LIMO
KEY in the limo door (L). • Use the switch (M) to turn on the
magnet. • Tap Seymour hiding in the doorway (S). • Use the
switch (T) to lower the car lift. • Enter the Game Room.
• Place the HORSE REINS on the SILVER HORSE (R) and the LIMO
KEY in the limo door (L). • Use the switch (M) to turn on the
magnet. • Tap Seymour hiding in the doorway (S). • Use the
switch (T) to lower the car lift. • Enter the Game Room.
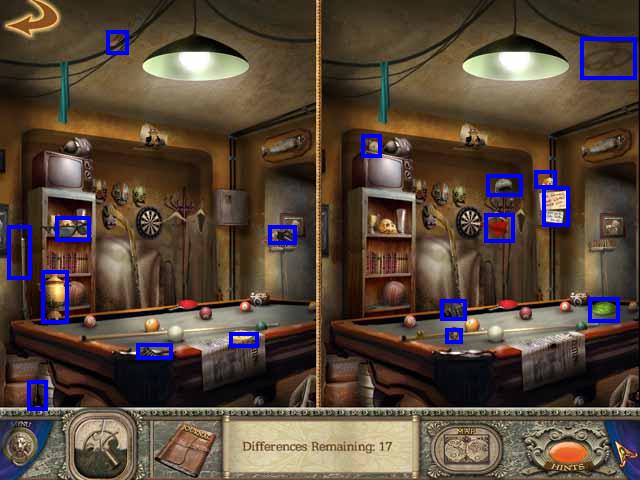 • Find the differences marked in blue in the screenshot. •
Receive the Samovar and the IRONING BOARD KEY.
• Find the differences marked in blue in the screenshot. •
Receive the Samovar and the IRONING BOARD KEY.
 • Return to the Laundry. • Zoom into the dryers; unlock the
cabinet with the IRONING BOARD KEY and pick up the Soldier's
Uniform (N).
• Return to the Laundry. • Zoom into the dryers; unlock the
cabinet with the IRONING BOARD KEY and pick up the Soldier's
Uniform (N).
Chapter 7: Master Bedroom
 • Open the new area and travel to the Master Bedroom. • Pick
up the BLUE LOLLIPOP (O). • Enter the Walk-in Closet.
• Open the new area and travel to the Master Bedroom. • Pick
up the BLUE LOLLIPOP (O). • Enter the Walk-in Closet.
 • Pick up the scroll (D) to trigger a HOS. • Receive the
Russian Doll, TRACK, and RED LOLLIPOP. • Enter the Media Room.
• Pick up the scroll (D) to trigger a HOS. • Receive the
Russian Doll, TRACK, and RED LOLLIPOP. • Enter the Media Room.
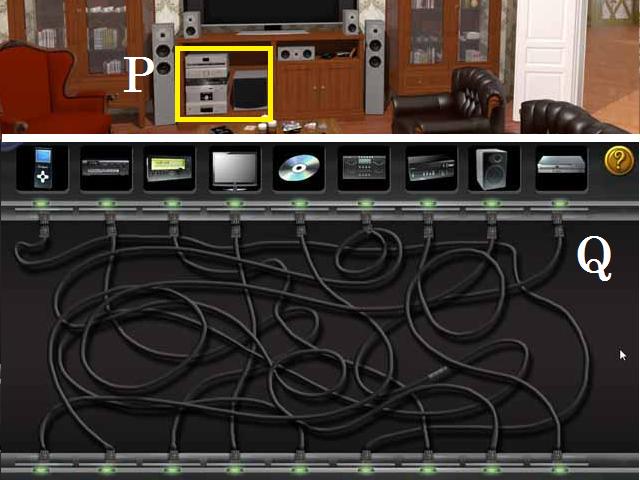 • Zoom into the stereo (P). • Place the appliances as shown in
the screenshot (Q).
• Zoom into the stereo (P). • Place the appliances as shown in
the screenshot (Q).
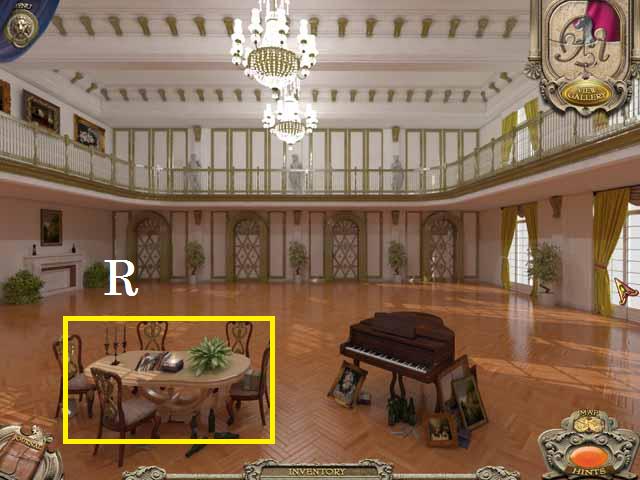 • Enter the Ballroom and zoom into the table (R).
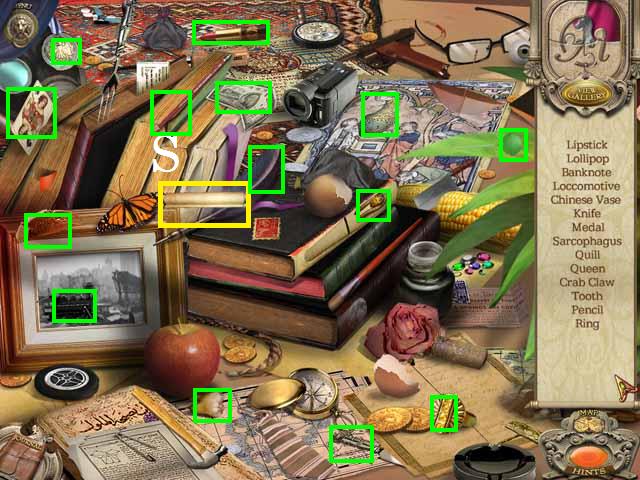 • Pick up the scroll (S) to trigger a HOS. • Receive the
Egyptian Sarcophagus, GREEN LOLLIPOP, and the ENGINE. • Return
to the Master Bedroom.
• Pick up the scroll (S) to trigger a HOS. • Receive the
Egyptian Sarcophagus, GREEN LOLLIPOP, and the ENGINE. • Return
to the Master Bedroom.
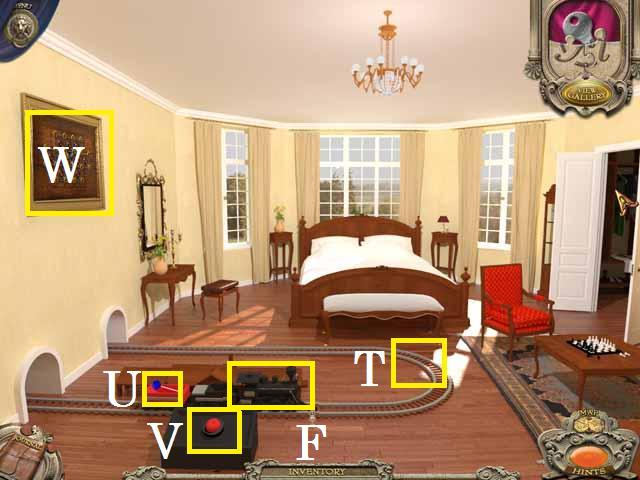 • Place the TRACK (T), ENGINE (F) and the BLUE LOLLIPOP in the
car (U); then press the button (V). • Pick up the BLUE KEY
from the car then repeat for the RED KEY and the GREEN KEY. •
Zoom into the painting (W).
• Place the TRACK (T), ENGINE (F) and the BLUE LOLLIPOP in the
car (U); then press the button (V). • Pick up the BLUE KEY
from the car then repeat for the RED KEY and the GREEN KEY. •
Zoom into the painting (W).
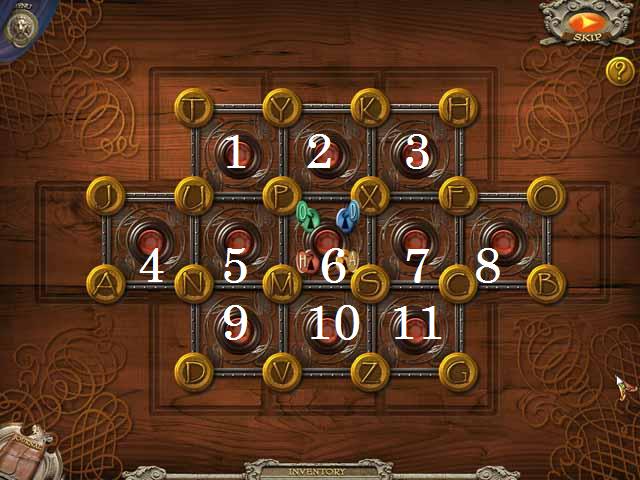 • Place the keys. You can use the following sequence to
complete this puzzle and place to letters next to the
corresponding lettered key. • Stage the O with 8, 8, 7, 6, 6,
and 2. • Stage the H with 3, 7, and 11. • Place the D with 9,
9, 6 and 6. • Stage the A with 4, 4, 4, and 9. • Place the H
and A with 11, 10, 9, 9, and 9. Finish the puzzle by placing
the O with 1. • Enter the Trampoline.
• Place the keys. You can use the following sequence to
complete this puzzle and place to letters next to the
corresponding lettered key. • Stage the O with 8, 8, 7, 6, 6,
and 2. • Stage the H with 3, 7, and 11. • Place the D with 9,
9, 6 and 6. • Stage the A with 4, 4, 4, and 9. • Place the H
and A with 11, 10, 9, 9, and 9. Finish the puzzle by placing
the O with 1. • Enter the Trampoline.
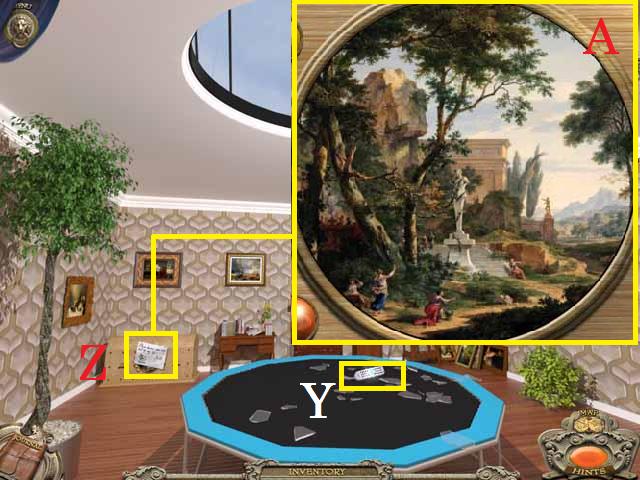 • Tap the gnome then pick up the TV REMOTE (Y). • Pick up the
note and zoom into the chest (Z). • Align the rings as shown
in the screenshot (A). • Pick up the Viking Shield from the
open chest and the VINYL RECORD (behind the Viking Shield). •
Return to the Media Room.
• Tap the gnome then pick up the TV REMOTE (Y). • Pick up the
note and zoom into the chest (Z). • Align the rings as shown
in the screenshot (A). • Pick up the Viking Shield from the
open chest and the VINYL RECORD (behind the Viking Shield). •
Return to the Media Room.
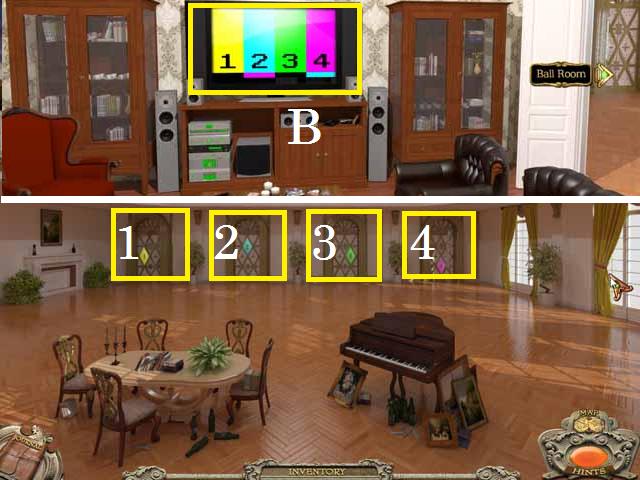 • Turn the TV (B) on with the TV REMOTE. (Note: pay attention
to the colors of the numbers). • Enter the Ball Room. • Zoom
into door (1) and press the yellow, door (2) blue, door (3)
green, and door (4) purple.
• Turn the TV (B) on with the TV REMOTE. (Note: pay attention
to the colors of the numbers). • Enter the Ball Room. • Zoom
into door (1) and press the yellow, door (2) blue, door (3)
green, and door (4) purple.
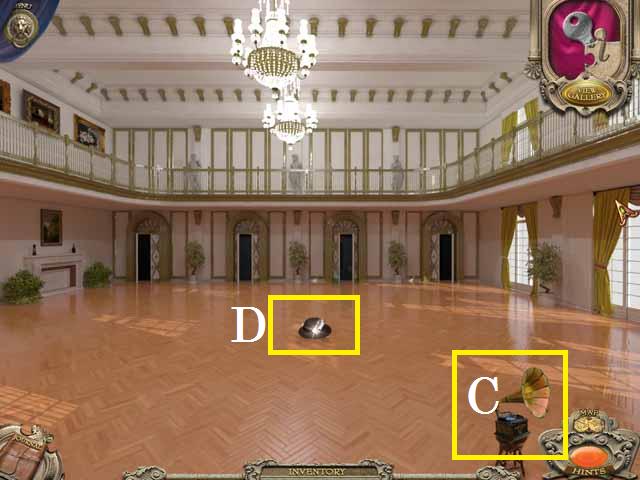 • Place the VINYL RECORD on the gramophone (C). • Pick up the
Celebrity Hat (D) and the purchase order underneath the hat. •
Congratulations! You have prevented Seymour from winning with
his greed and saved the Children's Hospital.
• Place the VINYL RECORD on the gramophone (C). • Pick up the
Celebrity Hat (D) and the purchase order underneath the hat. •
Congratulations! You have prevented Seymour from winning with
his greed and saved the Children's Hospital.
Created at: 2012-04-23