

Walkthrough Menu
- 1.Nicole’s apartment
- 2. Blake Avenue
- 3.The Cinema
- 4.The Platform
- 5.FBI Field Office
- 6.The Amusement Park
- 7.The Power Plant
- 8. FBI Field Office
- 9.Sheriff’s office, Detalion Town, Louisiana
- 10.Cabin at the swamp
- 11.The Steamer
- 12.FBI Field Office
- 13.Norwitch – Maine
- 14.The Church and the Cemetery
- 15.The Courthouse
- 16.The Coast
- 17.The Lighthouse
1.Nicole’s apartment:
After the phone call, look around the room. There’s a parcel at the desk by the window. Take it, examine it carefully, and try to open; you won’t be able to do it with your bare hands. Exit to the hall. Take a paper knife from a small table, and some cat food from the bench drill. Go back to the room, and use the paper knife to unwrap the parcel. You won’t be able to open the box, thus you will need a lock pick. Proceed to the mezzanine.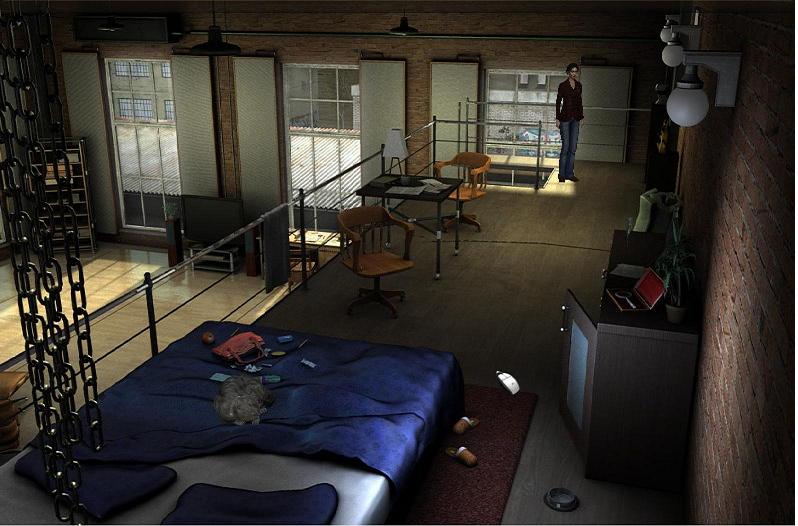 Take a file and a packaging of pills from the bed. Next, use
the file to open the metal box. Examine items taken out of it
— a light bulb and a rusty bolt. There are some inscription
traces, but you won’t be able to make it out. Take a
magnifying glass from a cabinet at the mezzanine. Use it to
examine the light bulb and the bolt more closely. Now you will
be able to read the inscription on the light bulb. The bolt is
rusty, so you won’t be able to read the inscription. First you
will need to clean the rust off it. Go to the kitchen. Take a
glass of water from the kitchen table, examine the pill
packaging, and put the pills from the packaging with the bolt
into the glass. This way you will be able to get a cleaned
bolt from the glass, and use the magnifying glass to read an
inscription from it. Approach the desk, pick up the phone and
call Wang. While waiting for him to pick up the call, go to a
small table by the door and take a marker from it. Next,
return to your desk, take some green notes from it, and pick
up the ringing phone. Write down the information Wang gave you
on green notes. Take out the map of New York from the drawer
inside the chair by the desk. Unfold the city plan on the
table next to the door. After that, place note cards with
pieces of information on different parts of the map of New
York. You have to place them at the correct locations.
Take a file and a packaging of pills from the bed. Next, use
the file to open the metal box. Examine items taken out of it
— a light bulb and a rusty bolt. There are some inscription
traces, but you won’t be able to make it out. Take a
magnifying glass from a cabinet at the mezzanine. Use it to
examine the light bulb and the bolt more closely. Now you will
be able to read the inscription on the light bulb. The bolt is
rusty, so you won’t be able to read the inscription. First you
will need to clean the rust off it. Go to the kitchen. Take a
glass of water from the kitchen table, examine the pill
packaging, and put the pills from the packaging with the bolt
into the glass. This way you will be able to get a cleaned
bolt from the glass, and use the magnifying glass to read an
inscription from it. Approach the desk, pick up the phone and
call Wang. While waiting for him to pick up the call, go to a
small table by the door and take a marker from it. Next,
return to your desk, take some green notes from it, and pick
up the ringing phone. Write down the information Wang gave you
on green notes. Take out the map of New York from the drawer
inside the chair by the desk. Unfold the city plan on the
table next to the door. After that, place note cards with
pieces of information on different parts of the map of New
York. You have to place them at the correct locations.
 Go back to the mezzanine. Put some cat food into the Hoover's
bowl. Next, proceed downstairs, leave to the hall, and exit
the apartment. Travel to Queens, the crossing point of two
locations.
Go back to the mezzanine. Put some cat food into the Hoover's
bowl. Next, proceed downstairs, leave to the hall, and exit
the apartment. Travel to Queens, the crossing point of two
locations.
2. Blake Avenue:
After looking around the neighborhood, approach the cinema entrance. Grab some batteries at the door. Afterwards, go to the bar. Talk to the bartender and some skirt-chaser. When a girl leaves for the toilet, follow her. Inside, talk to the girl, whose name is Patti. When you’ll have problems breathing, open the window. Now you will notice, that the grating behind the window is locked with a solid padlock. Take a sprinkler and some paper towels from the toilet. Go back to the bar, talk to Patti and give her the batteries. The girl will share a story about the person she looks after. Pick up a fork from the corner of the counter. Look under the counter and unstick a chewing gum with a fork from underneath it. Next, examine a foot rest. Unscrew a knob and use the fork with chewing gum to retrieve a key from there. Unstick it from the chewing gum. Go out of the bar and pick up a screwdriver from the street. Back in the bar, go to the toilet. Open the window and examine the grating. Try to open the padlock with the key found earlier before, however you will find it a bit rusty. Return to the bar, and take a bottle of oil from the table occupied by the bikers earlier before. It appears to be empty. Talk to the bartender, and ask him to give you some oil. Use a drop of oil with the key. Return to the Ladies’ Room and open the padlock with the greased key. Exit the toilet through the window.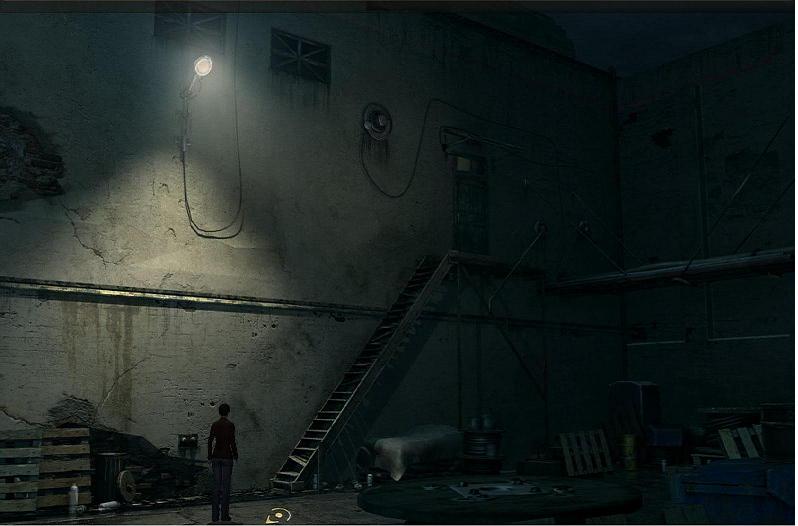 Look around the backyard of the bar and cinema. Pick up a
bucket, some bricks and a rod from next to the wall.
Afterwards, go upstairs to the back cinema entrance, insert
the screwdriver into the door handle hole, and raise the
window with the rod. Now you will be able to enter the cinema
through the window.
Look around the backyard of the bar and cinema. Pick up a
bucket, some bricks and a rod from next to the wall.
Afterwards, go upstairs to the back cinema entrance, insert
the screwdriver into the door handle hole, and raise the
window with the rod. Now you will be able to enter the cinema
through the window.
3.The Cinema
Approach the table in the hall, take a reel with film and a screwdriver from there. From the key locker next to the projectionist’s booth you will get a key. Enter the projection booth and look around. Take a film reel container and a reel from the table. Examine a rewinding crank and insert the screwdriver into the crank hole. Take the film from the container and mount it on the rewinding machine, placing an empty reel on the other side of the device. Next, rewind the film with the crank. Take the film on a reel from the rewinding machine and approach the projector. Mount the empty reel on the lower side of the projector, and the film on a reel at the top side of it. Open the projector lamp box and apply a bulb into it. Approach the small window used to project the movies, and pull the handle to retract the lever. Clean the window glass with a paper towel with a glass cleaner applied to it. Go behind the second projector and power on the amplifier. Return to the projector with film and try switching it on. Unfortunately, the bulb seems to have burnt out. Go to the second projector and take out another bulb from it. Replace the bulb and retry switching on the projector. Unfortunately, you won’t be able to watch the movie, because of the curtain obscuring the screen. Exit the operator’s booth and go downstairs to the auditorium, and from there to the back room. Get a flashlight and a cast-iron wheel from the back room. Approach the curtain mechanism and inspect it thoroughly. Afterwards, apply the cast-iron wheel to the revolving mechanism. Put the bricks into the bucket and rotate the wheel until the mechanism blocks. When it blocks, mount the wheel handle on the bucket with bricks. The curtain will slide aside. Return to the operator’s booth, switch on the projector and watch the movie. Next, proceed back to the auditorium and look around with a lit flashlight. Examine the seat plan, and you will notice a marking, the same as on the first parcel and the film — two squares with an exclamation mark. At the 4th seat of row “V” take a piece of metal with a ticket stuck to it. Unstick the ticket.. Approach the door, and try to open it, but you will find, that
they are closed. Use the piece of metal to open the door and
exit the cinema.
Approach the door, and try to open it, but you will find, that
they are closed. Use the piece of metal to open the door and
exit the cinema.
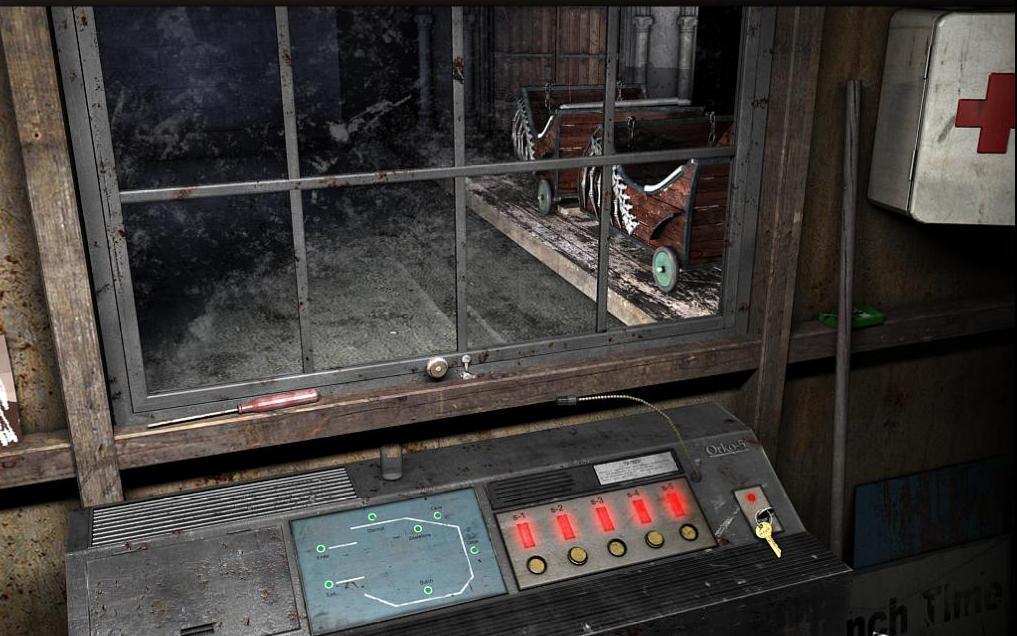
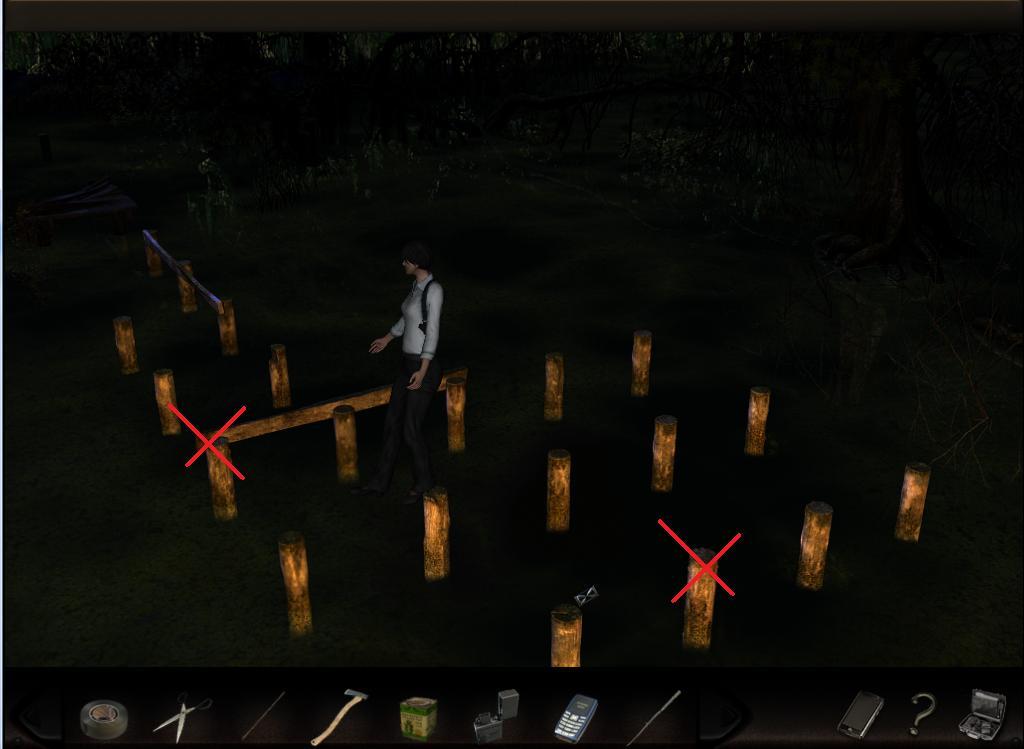
4.The Platform
When you get to the platform, a speeding train rams into a car blocked between the barriers. Soon the police arrives, with a technician named Wang. Look around the platform, question witnesses, talk to a policeman and the technician. Take a block of concrete from the platform. Following further on along the platform, you will notice a copper tube on the trash can. Take it. Approach the barrier, and you will notice a card stuck into it. When you look around the platform, you will notice a symbol on a box near the barrier — the same symbol, which appeared on the film and the parcel. The box will be closed. Near the barrier you will see a manhole. Stick the copper tube into it, and hit it with the block of concrete collected earlier. Next, pull out the deformed tube and take it to the wire box. Insert the tube into the box handle and open the box. Go to talk to Wang. He will let you to take the camera and evidence bags from the technician’s box. Return to the barrier. Take a picture of the card stuck on the barrier, and use an evidence bag to retrieve the evidence. Approach the box. Take a picture of the place where the newspaper clipping was found. Use an evidence bag to take out the newspaper clipping from the box. Make a picture of the mark on the box. Return to the cinema and retrieve the bulb found earlier in the parcel, plus the film reel. Also, take a picture of the mark found on the seat plan of the auditorium. Return to talk to Wang. Put the evidence bags and the camera into his box, and return the evidence to the technician. Approach Patti, talk to her, and after that give her a lift to her home in Jersey.5.FBI Field Office
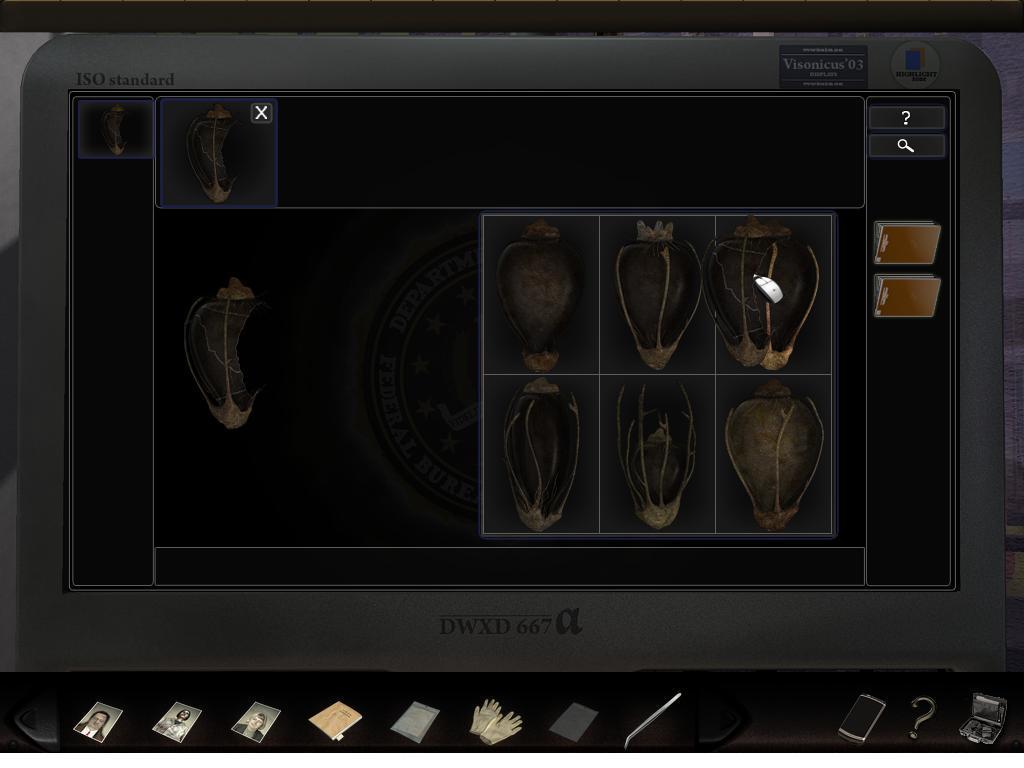
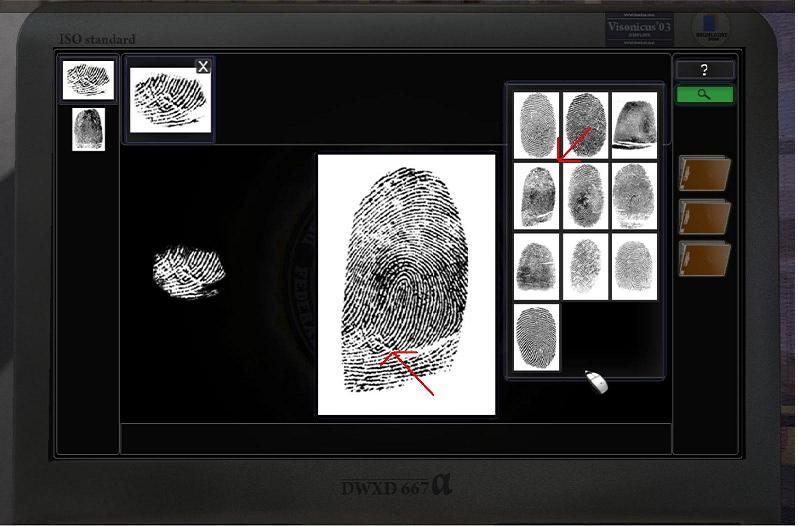
In the office talk to Wang. He will tell you about an expert waiting somewhere in the hall. Exit the lab and talk to the expert. Return to your office. Talk to Nick. Take your magnetic card and some calling cards. Look at those cards and you will find out, that they belong to Nick. Talk to your partner, who will give you your own calling card for his own. Go to the mezzanine and look for the expert. You will find him in the hall downstairs. Talk to him and present him with your calling card. Go back to see Wang. He will agree to help you under the condition, that you cover for him on the shooting range. Take his magnetic card and go out. Go to the shooting range at the ground level of the building at the right corner. Use Wang’s magnetic card to enter the shooting range. Approach the shooting spot, take the G17 and fire some shots. In case you’ll need to, replace the target and pick more clips. After firing enough shots, return to Wang and deal with the evidence. Pick up the Jack of hearts, evidence bags and some gloves from the worktable. Go to the scanner. Use gloves to pull out the Jack of hearts from the evidence bag. Open the scanner and put the card into it. Close the scanner and press the „Scan” button. Open the scanner and turn the piece of evidence on the other side, scan it, open the scanner again, and retrieve the evidence. After that, close the scanner. Put the evidence back to the evidence bag. Go to the computer. Click on the screen, and the computer will scan your fingerprint. Click „Enter”, drag and drop the reverse and obverse of the card into the drop area of the screen and press the „Analyze” button. On the reverse of the card, select the second area from the top. On the obverse — two first areas from the top.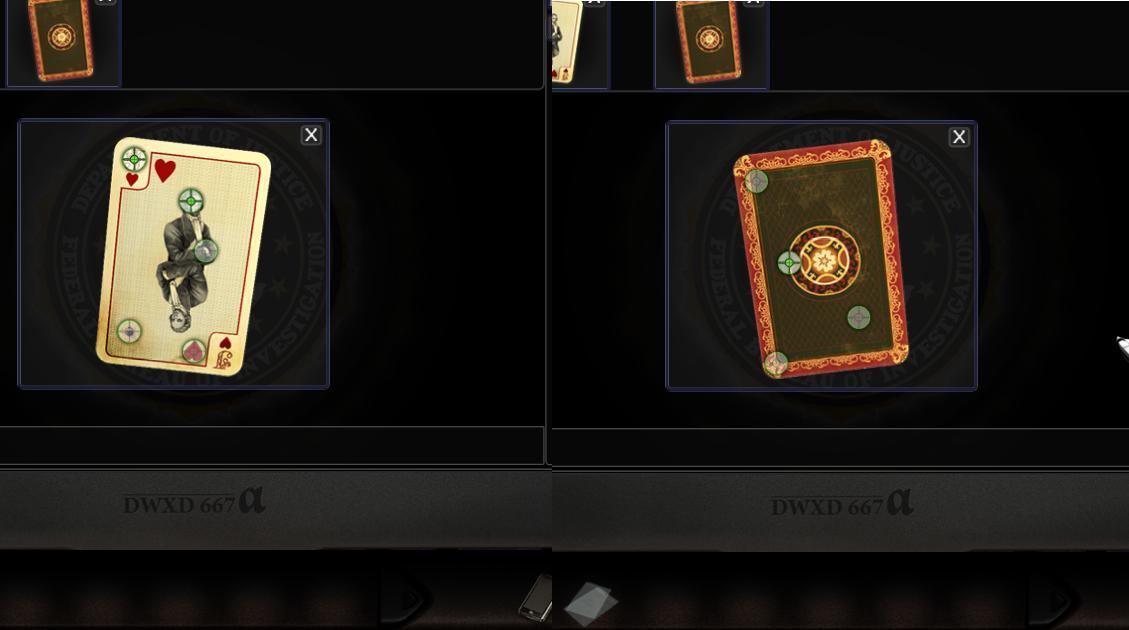 Next, press the „Search” button. There are 5 matches which you
will be able to view. Leave the computer and talk to Wang.
Return the evidence to the place where you took it from, and
go to talk to your boss. At the chief director’s office
entrance, have a conversation with Ruth. Next, enter the
office and brief your boss about the last incidents. He will
reply that the bomb squad guys are already dealing with a
parcel delivered for you. When you exit the building, you will
stumble upon the squad securing the dangerous delivery. Talk
to one of them, and you will learn that they have sent the
parcel wrapping to the lab. Pay a visit to Wang, and get the
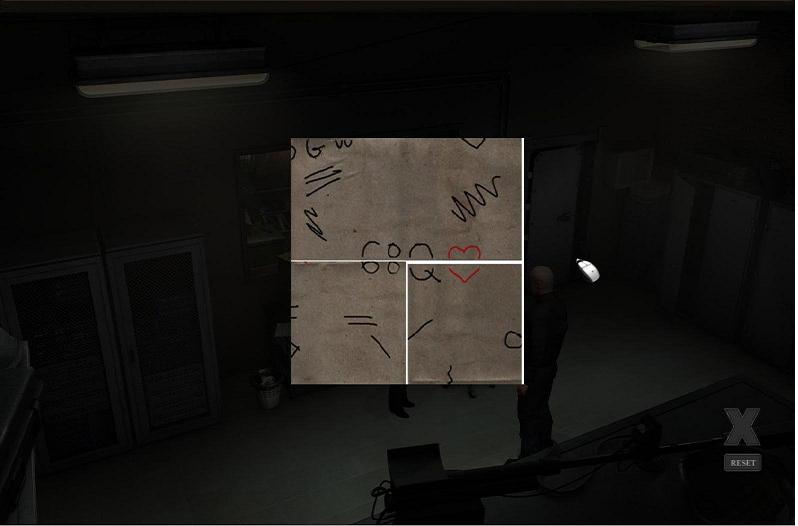
wrapping from him. After examining it thoroughly, make a
carbon copy at Ruth’s office. The whole packaging is covered
with writing, but you will be able to make out some numbers
and letters. Try folding the wrapping paper in search of any
clues. Eventually, you will discover a code — a number 68, a
letter Q and a symbol of heart.
Next, press the „Search” button. There are 5 matches which you
will be able to view. Leave the computer and talk to Wang.
Return the evidence to the place where you took it from, and
go to talk to your boss. At the chief director’s office
entrance, have a conversation with Ruth. Next, enter the
office and brief your boss about the last incidents. He will
reply that the bomb squad guys are already dealing with a
parcel delivered for you. When you exit the building, you will
stumble upon the squad securing the dangerous delivery. Talk
to one of them, and you will learn that they have sent the
parcel wrapping to the lab. Pay a visit to Wang, and get the
wrapping from him. After examining it thoroughly, make a
carbon copy at Ruth’s office. The whole packaging is covered
with writing, but you will be able to make out some numbers
and letters. Try folding the wrapping paper in search of any
clues. Eventually, you will discover a code — a number 68, a
letter Q and a symbol of heart.
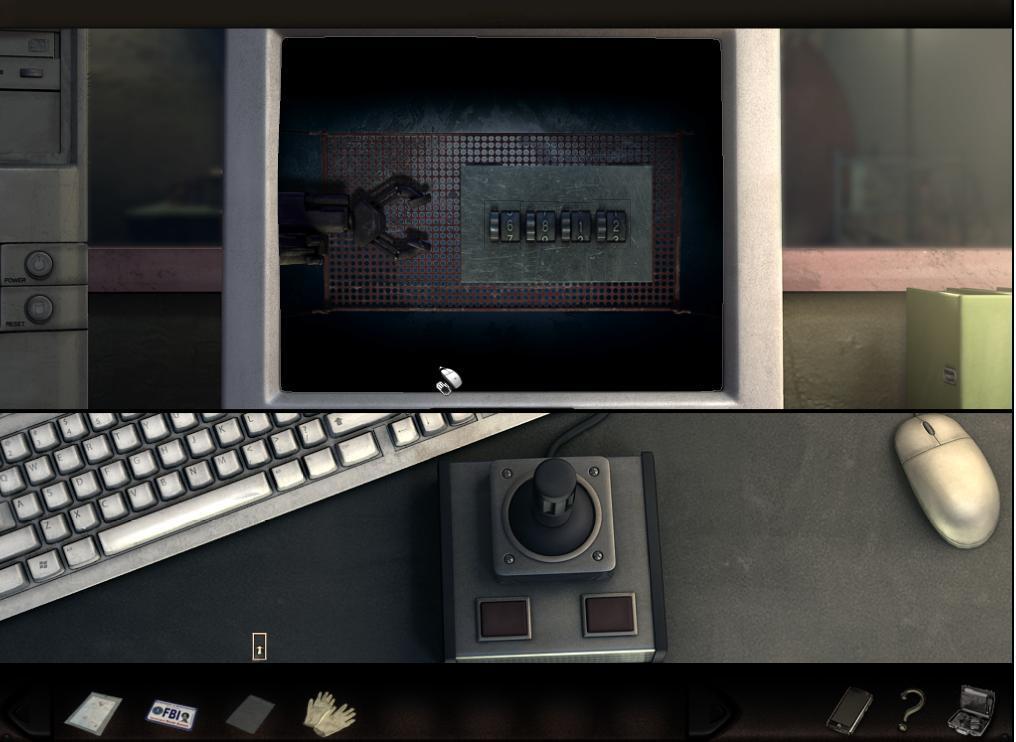
 Go and talk to the bomb squad officer, and he will explain to
you the meaning of symbols used in the code. After getting the
sequence of 6812, use it to open the box.
Go and talk to the bomb squad officer, and he will explain to
you the meaning of symbols used in the code. After getting the
sequence of 6812, use it to open the box.
 When you succeed, proceed to the detonation chamber and
retrieve some pieces of evidence from the box. Using rubber
gloves, put them into evidence bags. If you don’t have an
empty bag, go to the lab and take one from the worktable.
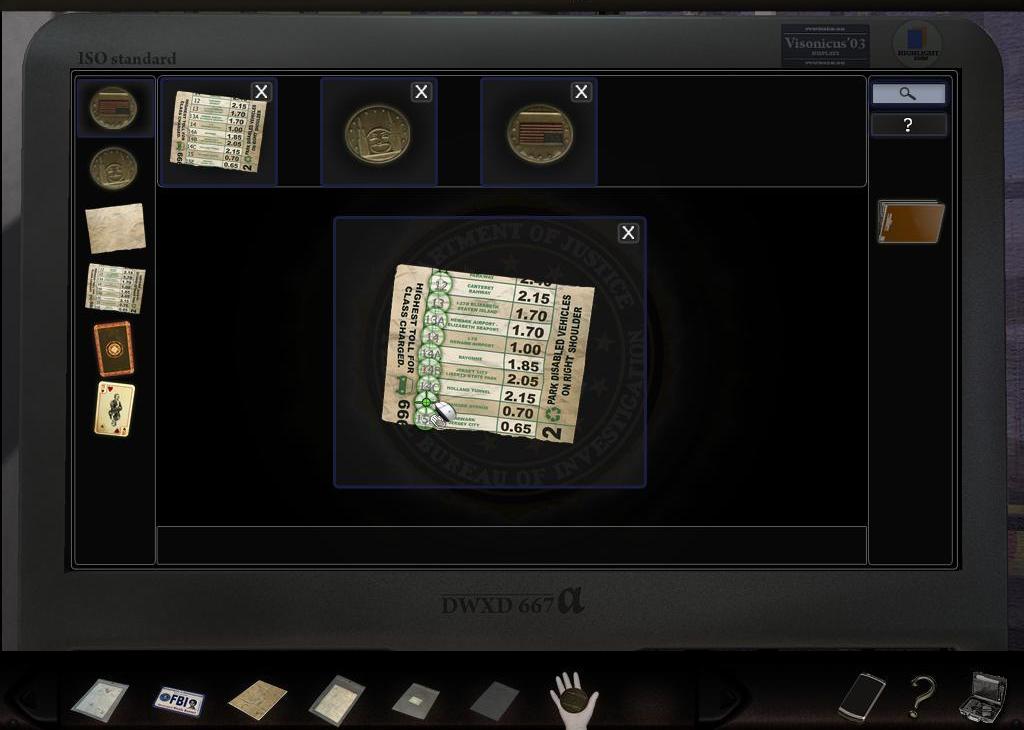
Next, take the evidence to Wang. Scan the highway ticket and a
token. The computer in the lab will help you analyze these
scans. Mark an appropriate part of the highway ticket: the
second one from the bottom.
When you succeed, proceed to the detonation chamber and
retrieve some pieces of evidence from the box. Using rubber
gloves, put them into evidence bags. If you don’t have an
empty bag, go to the lab and take one from the worktable.
Next, take the evidence to Wang. Scan the highway ticket and a
token. The computer in the lab will help you analyze these
scans. Mark an appropriate part of the highway ticket: the
second one from the bottom.
 The analysis will provide you with a location: the amusement
park at the highway exit. Talk to Wang and Dick, and then
travel to the location with your new partner.
The analysis will provide you with a location: the amusement
park at the highway exit. Talk to Wang and Dick, and then
travel to the location with your new partner.
6.The Amusement Park
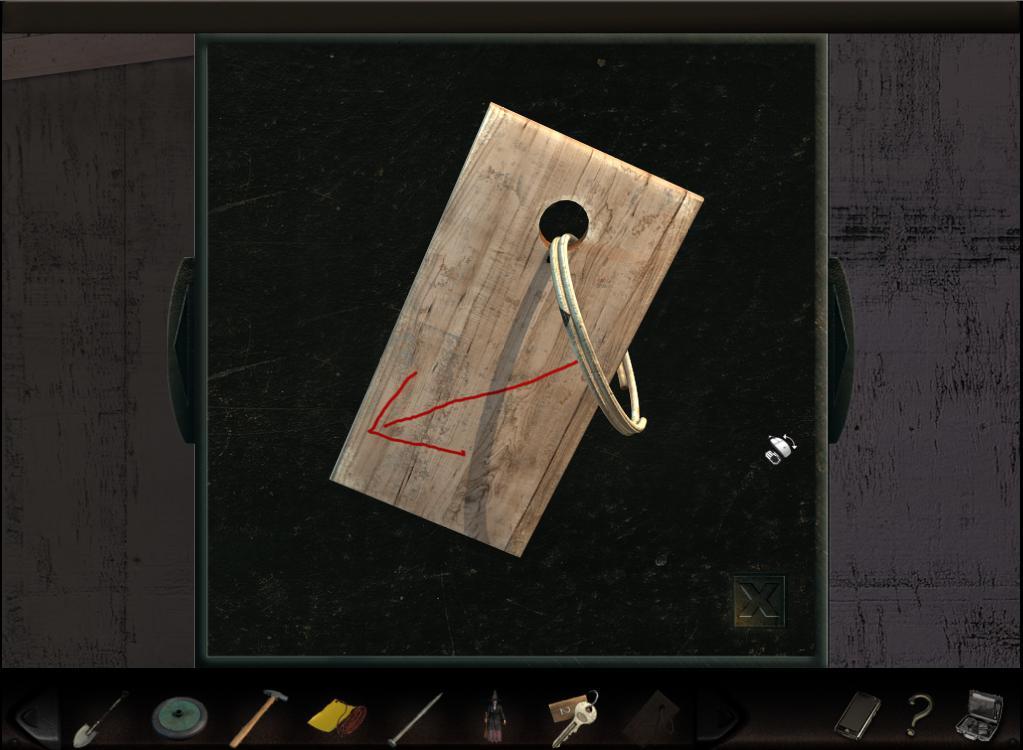
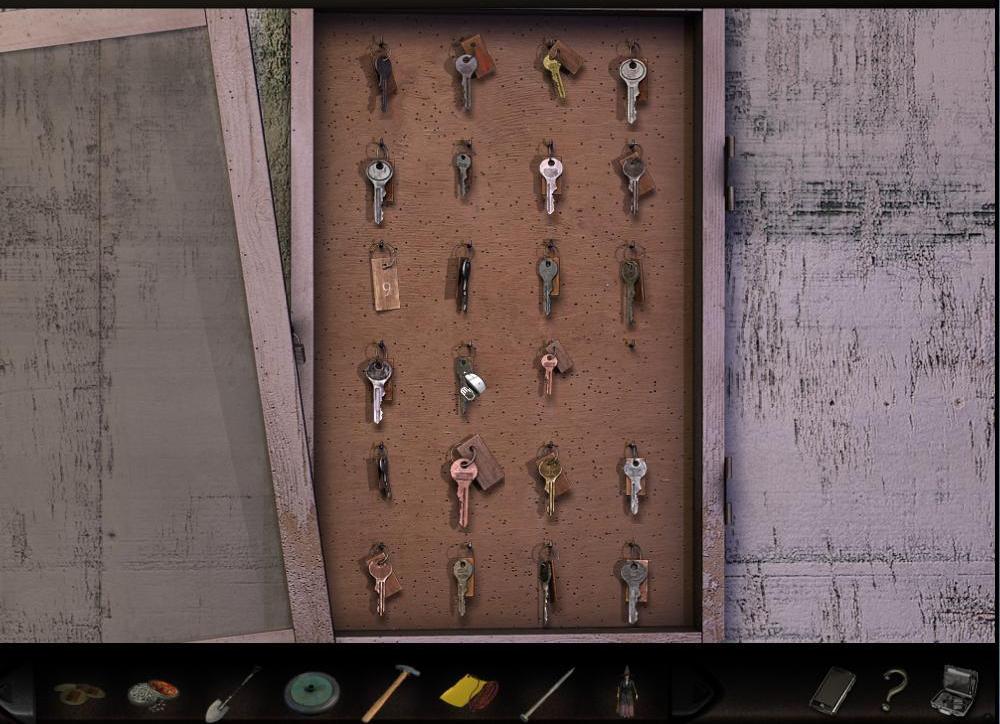
Talk to the SWAT team leader. Next, proceed towards the alley. Talk to the SWAT team member. Examine a set of binoculars standing next to the guardhouse. One of them is pointing at the shooting range, but you won’t be able to look through the other one, because you will lack the proper token. Afterwards, proceed to the alley to the right, and take an oil can from there. Approach the guardhouse door and pick up a wooden block from the door. Enter the guardhouse and take a look around. Open the drawer and take: some tokens, a bulb, a shooting range key, and some air gun shot. You will notice a cabinet with keys on the wall. When you try to open the fridge, you will notice that it’s locked with a padlock. Go outside and talk to a SWAT team member. Approach a closed shack and take a crank from there. Next, go to the alley in front of the shooting range. Lift the metal grating and approach the roller shutter mechanism. Install the crank at the crank arbor. Insert the key found in the guardhouse into the lock, and turn it. Try turning the crank, but it won’t move. Go to the front of the house of horrors. Take a shovel out of a wooden box found to the right of the ghost train control room door. Enter the control room. Examine the control panel. Pick up a prop from under the window and a storeroom key from a nail by the window. Exit the control room and proceed to the storeroom on the left from the ghost train. Check the door, only to find out that it’s locked. Use the key found in the control room to open the door. It will be dark inside. Use the bulb found in the guardhouse on the bulb socket and turn on the light. Pick up a hammer from the floor. Approach the workshop. Pick up an oil can, some string and a train car wheel. Return to the shooting range. Fill the oilcan. Place the metal grating next to the shooting range wall and rotate it to be able to climb on it. Climb onto the grating. Pour the oil from the oilcan on the roller shutter mechanism. Climb down the grating and turn the crank. The shutter will lift. Enter the shooting spot. Put tokens into the token slot. Shoot the animal targets until you win a doll. Examine it thoroughly and take a tag off it. Examine the tag, and you will notice an arrow on it. Pick up a piece of soft PCV from the counter. Go back to the guardhouse. Approach the key cabinet. It is locked with a padlock. After examining the cabinet, you will notice that the hinge can be easily dismantled. Take out a nail off it, and open the cabinet. Take off all the keys and examine them. Next, put the keys back in a correct order. The key with number 2 will have a down arrow written on the tag.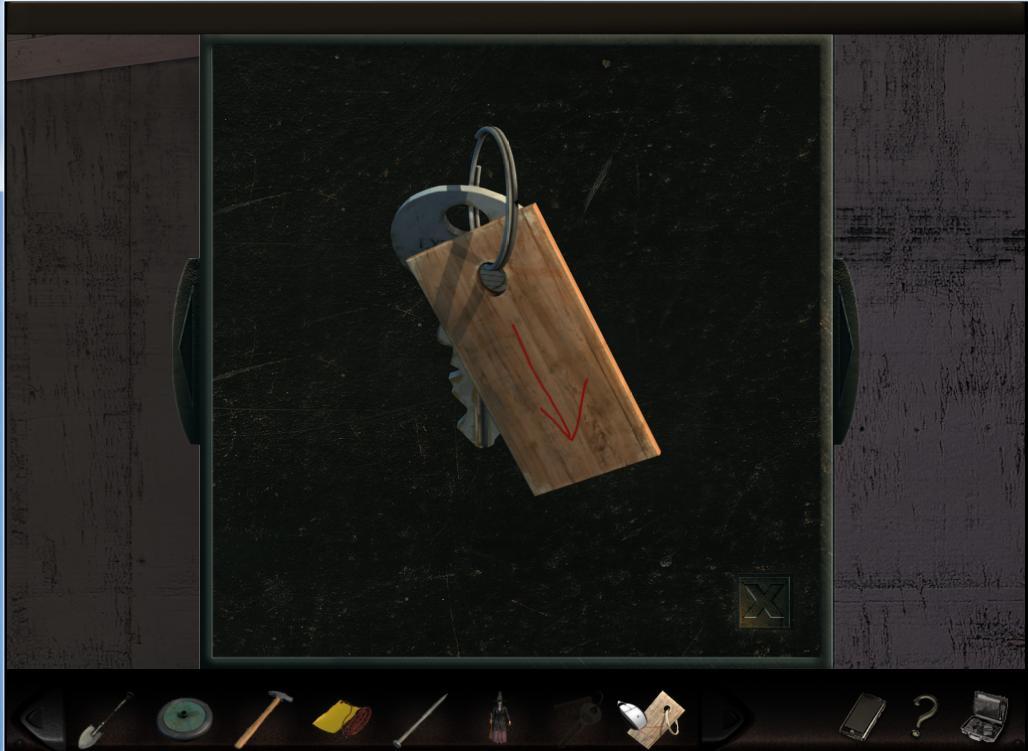 The tag with number 9 won at the shooting range, will be
appended with an arrow as well, along with an Ω symbol. After
you place the keys on their right places, those two arrows
will point at the key 14.
The tag with number 9 won at the shooting range, will be
appended with an arrow as well, along with an Ω symbol. After
you place the keys on their right places, those two arrows
will point at the key 14.
 By putting the keys in a correct order, and using the hints
from the tags, you will receive a code for the refrigerator
(2, 9 and 14).
By putting the keys in a correct order, and using the hints
from the tags, you will receive a code for the refrigerator
(2, 9 and 14).
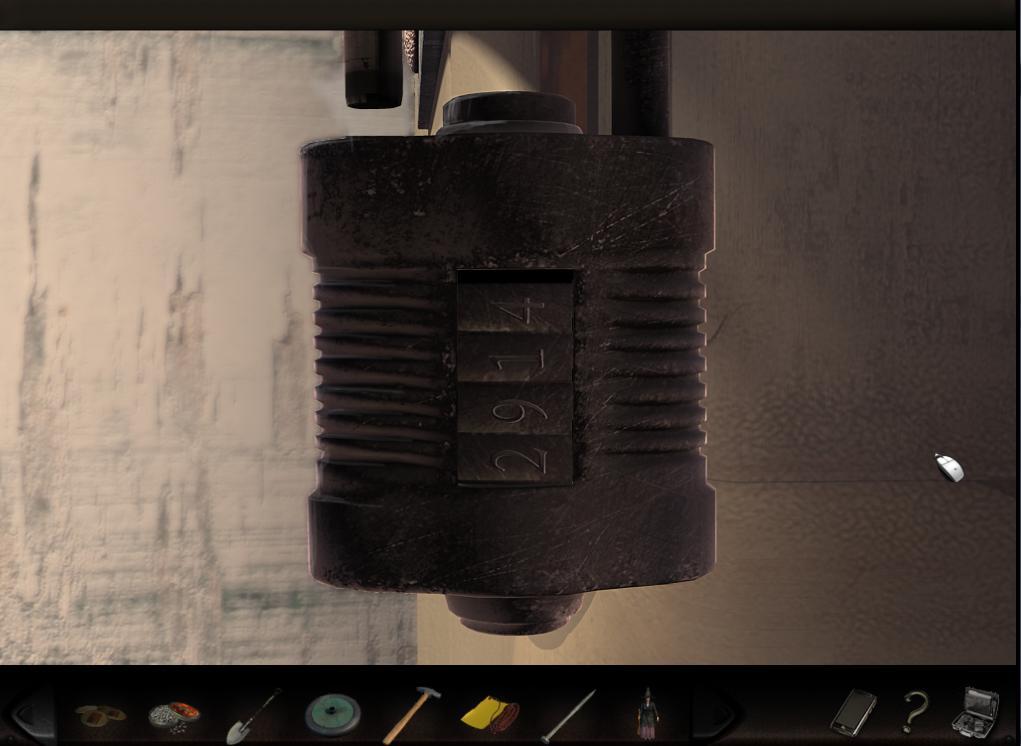
 Approach the fridge and open it by entering the correct
sequence on the combination lock.
Approach the fridge and open it by entering the correct
sequence on the combination lock.
 Inside the fridge, you will find a key to the control panel of
the house of horrors. Close the fridge back with the
combination lock, and proceed to the house of horrors. You
will meet your partner there. Talk to him. Pull out a bar from
the house railing. Enter the control room. Use the bar to pull
out a twisted nail from the wall (the one you took a storeroom
key from). Return to the workshop at the storeroom. Insert the
window prop into the vise. Put the plastic tile into the vise
screw, and straighten it, turning the prop. Pierce the plastic
tile inside the vise with a nail pulled out from the key
locker in the guardhouse. Unscrew the vise and take the
plastic tile. Thread the string through a hole in the plastic
tile. Next, straighten the twisted nail the same way you did
with the plastic tile. Exit the storeroom and approach the row
of cars of the ghost train. Examine a car. Mount the train car
wheel on the axle. Block the wheel with a makeshift pin (the
nail). Don’t forget to hit it with a hammer to bend it after
installing it. Look at the car underbody. Use the plastic tile
with a string to secure the car wheel from the rail. If you
don’t do this, the car will start without you. Go to the
control panel. Insert the key into the control panel and turn
it. Next you have to switch on all the lights, pressing the
appropriate combination of buttons. The correct sequence is
S2, S3.
Inside the fridge, you will find a key to the control panel of
the house of horrors. Close the fridge back with the
combination lock, and proceed to the house of horrors. You
will meet your partner there. Talk to him. Pull out a bar from
the house railing. Enter the control room. Use the bar to pull
out a twisted nail from the wall (the one you took a storeroom
key from). Return to the workshop at the storeroom. Insert the
window prop into the vise. Put the plastic tile into the vise
screw, and straighten it, turning the prop. Pierce the plastic
tile inside the vise with a nail pulled out from the key
locker in the guardhouse. Unscrew the vise and take the
plastic tile. Thread the string through a hole in the plastic
tile. Next, straighten the twisted nail the same way you did
with the plastic tile. Exit the storeroom and approach the row
of cars of the ghost train. Examine a car. Mount the train car
wheel on the axle. Block the wheel with a makeshift pin (the
nail). Don’t forget to hit it with a hammer to bend it after
installing it. Look at the car underbody. Use the plastic tile
with a string to secure the car wheel from the rail. If you
don’t do this, the car will start without you. Go to the
control panel. Insert the key into the control panel and turn
it. Next you have to switch on all the lights, pressing the
appropriate combination of buttons. The correct sequence is
S2, S3.
 Go back to the car and pull the string to release the tile
from between the rail and the car. Enter the train car and go
for a ride. Inside the house of horrors you will get a card.
When the ride is over, call Dick. Next, proceed to the
amusement park’s main alley, where you will meet the security
guard — one Benson. Talk to him. In exchange for the code to
the fridge, he will give you a handful of tokens. Use them to
unlock the binoculars. Put Benson’s tokens into the slot, pull
the handle and look through the binoculars. The view will be
obstructed by some barrels, but you will be able to make out a
blurred queen of hearts on one of them. Approach the barrels
and place a wooden block next to them. Use the spade to lift
the barrels. The whole stack will fall apart. Go back to the
binoculars and look through it again. You will see a building
in the distance. Return to the security guard and talk to him
about the building. He will explain to you, that it is a
derelict power plant. Drive there.
Go back to the car and pull the string to release the tile
from between the rail and the car. Enter the train car and go
for a ride. Inside the house of horrors you will get a card.
When the ride is over, call Dick. Next, proceed to the
amusement park’s main alley, where you will meet the security
guard — one Benson. Talk to him. In exchange for the code to
the fridge, he will give you a handful of tokens. Use them to
unlock the binoculars. Put Benson’s tokens into the slot, pull
the handle and look through the binoculars. The view will be
obstructed by some barrels, but you will be able to make out a
blurred queen of hearts on one of them. Approach the barrels
and place a wooden block next to them. Use the spade to lift
the barrels. The whole stack will fall apart. Go back to the
binoculars and look through it again. You will see a building
in the distance. Return to the security guard and talk to him
about the building. He will explain to you, that it is a
derelict power plant. Drive there.
7.The Power Plant
Take out a steel pipe from the minibus by the power plant. Enter the power plant building. Approach the generator wall and take a carbon dioxide extinguisher. Move to the right of the „Level 0” and approach the workshop. Open the right drawer of the worktable, and take: a round file, a triangle file and a small key. From the left drawer you will get: a screwdriver, a wrench and a flat file. Return to the main hall. Go up to the „Level 1” and proceed to the platform on top of the generator. Use the wrench to unscrew bolts of the turbine top cover. Insert the steel pipe into the top cover hole and turn it. Pick up wire cutters from the floor. Go to the beginning of “level1”, use the window to proceed to the ledge. Move through the ledge to a ladder and climb it to the top. Go through the window to the „Level 2”. Take the staircase on „Level 2”, to go to the „Level 1”, Go back to „Level 2”. You will find a diagram near the ladder. Pick it up and examine it closely. You will find laser system schematics on it. Approach the laser next to the ladder. Use the knob to change the direction of the beam. Now you will be able to proceed to the upper level.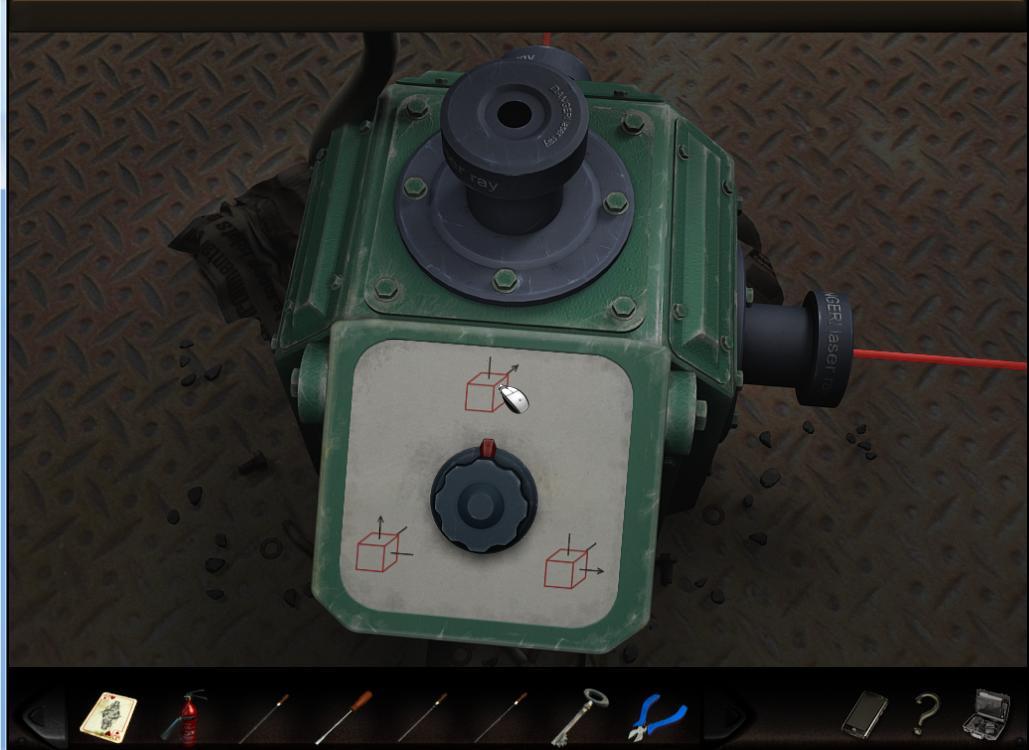 Go up the ladder to the „Level 3”. Climb the gantry and
examine the bomb. Use all files you have with the screwdriver.
Use the carbon dioxide extinguisher to freeze the mercury
sensor. Use the filed screwdriver to unscrew bolts. Freeze the
mercury sensor again and lift the bomb cover with the
screwdriver. With the wire cutters cut the wire connecting the
clock (the last one from the top).
Go up the ladder to the „Level 3”. Climb the gantry and
examine the bomb. Use all files you have with the screwdriver.
Use the carbon dioxide extinguisher to freeze the mercury
sensor. Use the filed screwdriver to unscrew bolts. Freeze the
mercury sensor again and lift the bomb cover with the
screwdriver. With the wire cutters cut the wire connecting the
clock (the last one from the top).
 Use the key to unscrew spacing sleeves, and take off the
cover. Stick the screwdriver into the clock mechanism. Go down
to the victim.
Use the key to unscrew spacing sleeves, and take off the
cover. Stick the screwdriver into the clock mechanism. Go down
to the victim.
8. FBI Field Office
Talk to the boss. Next, exit to the hall and talk to Dick. Proceed to the interrogation room and talk to the security guard suspect. Proceed to your office, and take photos from the files on the
table. Return to question the guard. Show him the pictures.
Exit to the hall to get some matches, and talk to Dick. He
will go to question the guard afterwards, and you should go to
see Ruth. You will meet her on her way to the secretary’s
office, and she will give you Benson’s files. Ruth will
suggest, that you should take some practice at the shooting
range. You can do it, when you have some free time. Return to
talk to your boss, and he will tell you to see Wang. Go to the
lab. During the conversation with Wang, Dick will pop up,
saying that there was a call from the Card Man. Go to the
monitoring room, and answer the phone to talk to the Card Man.
Exit the room afterwards. Back at the hall, talk to your boss,
who will direct you to see the bomb squad guys. The sapper
will give you the wrapping. Take it to Wang. The technician
will perform a microscope analysis and find some seed traces.
Use tweezers to place them on microscope slides. You can get
them from the worktable by the microscope.
Proceed to your office, and take photos from the files on the
table. Return to question the guard. Show him the pictures.
Exit to the hall to get some matches, and talk to Dick. He
will go to question the guard afterwards, and you should go to
see Ruth. You will meet her on her way to the secretary’s
office, and she will give you Benson’s files. Ruth will
suggest, that you should take some practice at the shooting
range. You can do it, when you have some free time. Return to
talk to your boss, and he will tell you to see Wang. Go to the
lab. During the conversation with Wang, Dick will pop up,
saying that there was a call from the Card Man. Go to the
monitoring room, and answer the phone to talk to the Card Man.
Exit the room afterwards. Back at the hall, talk to your boss,
who will direct you to see the bomb squad guys. The sapper
will give you the wrapping. Take it to Wang. The technician
will perform a microscope analysis and find some seed traces.
Use tweezers to place them on microscope slides. You can get
them from the worktable by the microscope.
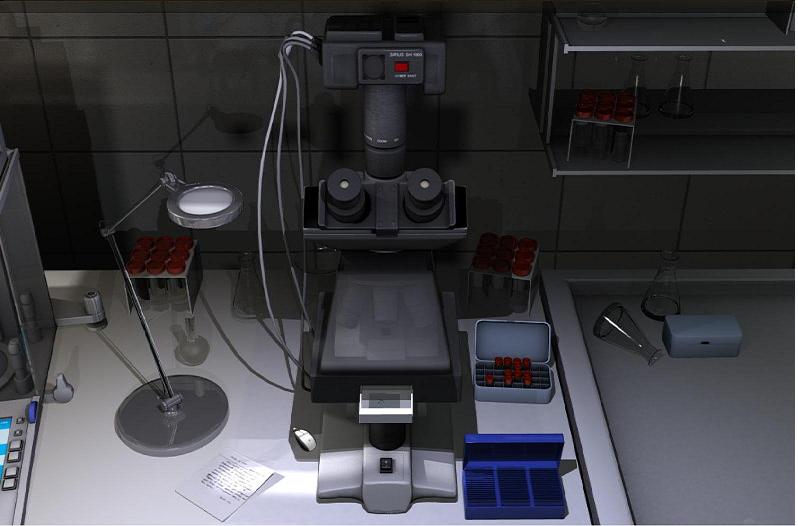 Slide the microscope stage and place the slide with the seed
fragments on it. Slide the stage back to its original
position. Switch on the microscope. Look through the eyepiece.
Adjust the focus with a knob on the right side. Put the seed
fragments together. Double click them to turn them over. Next,
use the red button on top of the eyepiece to send the whole
seed to Wang’s computer.
Slide the microscope stage and place the slide with the seed
fragments on it. Slide the stage back to its original
position. Switch on the microscope. Look through the eyepiece.
Adjust the focus with a knob on the right side. Put the seed
fragments together. Double click them to turn them over. Next,
use the red button on top of the eyepiece to send the whole
seed to Wang’s computer.
 Go to the computer and analyze the seed. Move the seed icon to
the drop area and press the „Analyze” button. Cross-match the
search results with the seed icon.
Go to the computer and analyze the seed. Move the seed icon to
the drop area and press the „Analyze” button. Cross-match the
search results with the seed icon.
 When you find the right result, click „Search”. A map will
appear. Print it. Scan the wrapping which Wang has given you
back, and analyze it using the computer. Drag and drop the
reverse and obverse of the wrapping to the drop area of the
computer screen, and press "Analyze", following with "Search"
buttons. Another map will appear. Print it and take your maps
from the printer nest to the scanner Return to your office.
Turn the lamp on. At this point, you won't be able to
determine anything. Talk to Dick. Go to the monitoring room,
and listen to the recording of the conversation with the Card
Man. In order to find the sounds of interest, you will need to
apply filters to the recording. Click the „Analyze” button.
Next, select the first range and click the „Filter” button.
When you find the right result, click „Search”. A map will
appear. Print it. Scan the wrapping which Wang has given you
back, and analyze it using the computer. Drag and drop the
reverse and obverse of the wrapping to the drop area of the
computer screen, and press "Analyze", following with "Search"
buttons. Another map will appear. Print it and take your maps
from the printer nest to the scanner Return to your office.
Turn the lamp on. At this point, you won't be able to
determine anything. Talk to Dick. Go to the monitoring room,
and listen to the recording of the conversation with the Card
Man. In order to find the sounds of interest, you will need to
apply filters to the recording. Click the „Analyze” button.
Next, select the first range and click the „Filter” button.
 Click the „Analyze” button again. Select the second range and
filter it. Press the „Analyze” button for the third time, and
select the third range. Filter and play it, by pressing the
„Play” button. You will discover a Louisiana radio jingle on
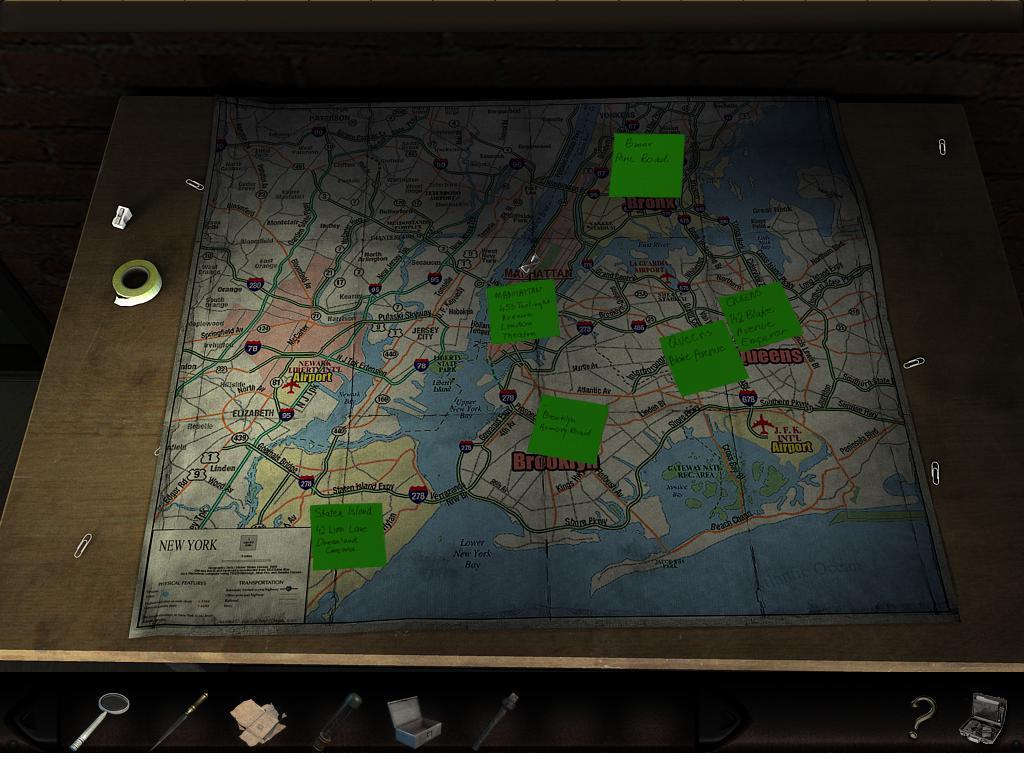
the recording. Go to your office. Talk to Dick about the radio
range. Approach the board, place both maps on it and mark it
with the printed maps of seed occurrence, plus the company
office locations. Take a marker from the desk and use it to
mark the appropriate area. Talk to Dick. Take your partner and
travel to Louisiana.
Click the „Analyze” button again. Select the second range and
filter it. Press the „Analyze” button for the third time, and
select the third range. Filter and play it, by pressing the
„Play” button. You will discover a Louisiana radio jingle on
the recording. Go to your office. Talk to Dick about the radio
range. Approach the board, place both maps on it and mark it
with the printed maps of seed occurrence, plus the company
office locations. Take a marker from the desk and use it to
mark the appropriate area. Talk to Dick. Take your partner and
travel to Louisiana.
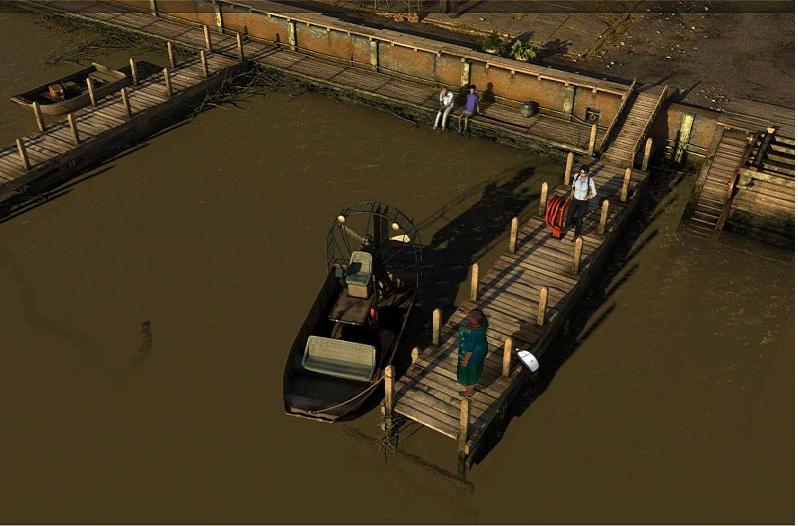
9.Sheriff’s office, Detalion Town, Louisiana
Talk to the Sheriff at his office. Next, go out to the street with Dick, and talk to him. Take a look around the town. Go to the bar and talk to Aaron, the local tramp. You will
learn about the mojo confiscated by the Sheriff. Go to the
pier, and talk to the woman standing there. Return to the
Sheriff’s office and talk to him. When he leaves, take
scissors, a post card and adhesive tape from his desk. Return
to Aaron and talk to him. Next, go to the pier, and talk to
the woman about boat rental. You will not be able to rent a
boat, though.
Go to the bar and talk to Aaron, the local tramp. You will
learn about the mojo confiscated by the Sheriff. Go to the
pier, and talk to the woman standing there. Return to the
Sheriff’s office and talk to him. When he leaves, take
scissors, a post card and adhesive tape from his desk. Return
to Aaron and talk to him. Next, go to the pier, and talk to
the woman about boat rental. You will not be able to rent a
boat, though.
 Return to Aaron and talk to him about the boat. You have to
promise him to get his mojo back from the Sheriff. Go to the
Sheriff's office. Approach the cabinet and use the scissors to
remove the wood slat holding the pane in place. Next, pull the
pane out. Take the copper tube out of a bag, and a string-tied
small bag — the mojo. Insert the pane back into place. Go to
Aaron and give him the mojo. During the conversation with the
tramp, you will get a wrapped chicken. He will tell you to
take the copper tube to the swamp, and suddenly start to feel
worse. The woman from the pier will show up at this point. Her
name is Momma Morton, and she is Aaron's sister. She agrees to
borrow you the boat, and explains to you the difficult way to
reach the cabin on the swamp. Go to the pier, and enter the
boat. When you try to start it, it won't go. Take a look at
the steering system, just to discover that there is a hole in
it, and it lacks braking fluid. Take out the brake fluid and a
funnel out of the toolbox. Disconnect the tube, rip off a
piece of tape and use it to cover the hole. Try to use the
funnel, only to discover that it is too large. Fold the post
card into a makeshift funnel, and use it to fill the steering
system with fluid. Reconnect the tube to it’s original place,
and try moving the rudder. At this point, you will realize,
that you don’t remember a complete set of directions provided
by Momma Morton. You will need a map. Go to the Sheriff’s
office, and pull the map off the wall. Return to the boat, and
travel to the cabin at the swamp.
Return to Aaron and talk to him about the boat. You have to
promise him to get his mojo back from the Sheriff. Go to the
Sheriff's office. Approach the cabinet and use the scissors to
remove the wood slat holding the pane in place. Next, pull the
pane out. Take the copper tube out of a bag, and a string-tied
small bag — the mojo. Insert the pane back into place. Go to
Aaron and give him the mojo. During the conversation with the
tramp, you will get a wrapped chicken. He will tell you to
take the copper tube to the swamp, and suddenly start to feel
worse. The woman from the pier will show up at this point. Her
name is Momma Morton, and she is Aaron's sister. She agrees to
borrow you the boat, and explains to you the difficult way to
reach the cabin on the swamp. Go to the pier, and enter the
boat. When you try to start it, it won't go. Take a look at
the steering system, just to discover that there is a hole in
it, and it lacks braking fluid. Take out the brake fluid and a
funnel out of the toolbox. Disconnect the tube, rip off a
piece of tape and use it to cover the hole. Try to use the
funnel, only to discover that it is too large. Fold the post
card into a makeshift funnel, and use it to fill the steering
system with fluid. Reconnect the tube to it’s original place,
and try moving the rudder. At this point, you will realize,
that you don’t remember a complete set of directions provided
by Momma Morton. You will need a map. Go to the Sheriff’s
office, and pull the map off the wall. Return to the boat, and
travel to the cabin at the swamp.
10.Cabin at the swamp
Enter the cabin. You will need to use handcuffs to restrain a man inside. Cuff him to a railing on the porch. Talk to him. He will turn out to be a writer, who allegedly was going to purchase the cabin. When you will try to enter the cabin, you will find out, that it is too dark. Go to the left part of the porch. Pick up a deckchair and a boat hook. Take a look at the battery. Go down to the pier, and call Dick to check the writer. Also, call Ruth and ask her to find out, whether there is a Prescott Crossby Moreau law office registered in Louisiana. It appears, there isn't. At this point, Dick calls and confirms the writer’s identity. Talk to Blake and uncuff him. Try again to enter the cabin, only to will find out, that it is still too dark. You need to get some power to turn on the light. Go to the left part of the pier, and take some copper wire off the post. Go back to the battery. Make a loop on the copper wire and connect it to the battery. Next, isolate the connection with a piece of adhesive tape. Go back to the cabin with the writer. Take an old calendar off the fridge. Go to the right side of the cabin. Take a basin and an empty can. Use the axe picked up from the floor to chop the box on the stump, in order to get some wood chunks. Take a bucket as well. Go to the left side of the pier, and get some water with the bucket. Return to the cabin. Put the calendar and wood chunks into the stove. Talk to the writer, and get a lighter from him. Use the lighter to make a fire in the stove. Approach the cupboard, and take two mugs and a tea can from it. Remove the kettle from the stove. Go to the left part of the porch, and pour some water into the kettle from the bottle found next to the battery. Return to the cabin and place the kettle filled with water on the stove, along with mugs. Put some tea to the mugs. Talk to the writer. At this point, your phone will ring. When you leave the cabin to pick up the call, it will turn out, that it wasn’t you cell phone. When you return to the cabin, the writer will offer you some tea. Take the mug from the stove. When you drink the tea, you will notice, that you're getting dizzy. Leave the cabin. When on the porch, you will black out. After you return to consciousness, you have to go back to the cabin. Take a look around inside, and go back to the porch again. The writer is nowhere to be found. On the pier you will find Blake’s phone. Use the boat hook to lower the drawbridge and proceed further to the pier. On your way there, you will stumble upon an alligator. Unfold the chicken which Aaron gave you, and feed the alligator with it. The reptile will move away to fetch his meal. Proceed further. When you reach the end of the pier, you will find out, that there are some stilts sticking out of the water. You will have to jump on them to proceed further. It’s dangerous, and it’s pitch black out there. Return to the cabin, take the lamp form the desk and try to light it. You have to do something to light your way. Try to refine some swamp water to get some fuel. Take some canvas off the deckchair. Apply the canvas on the funnel and trim it with scissors. Install the funnel with canvas on the kettle on the stove. Place a mug below, and connect the kettle to the mug with a copper tube. Pour some petroleum from the bucket to the kettle. Cover the spout of the kettle with some adhesive tape. Remove the canvas.Wait for the refining process to finish. Take the mug with the refined petroleum, and pour it into the lamp. Light the lamp, using the lighter. Go out of the cabin, and go to the last pier. Make the basin float on the water next to the pier, place the empty can on it, and put the lit lamp on top of it. The lamp will light your way, and you will be able to proceed further. You will have to be careful, because the stilts are rotten, and some dive underwater or simply break under your weight. You have to step on correct stilts, avoiding those crossed out.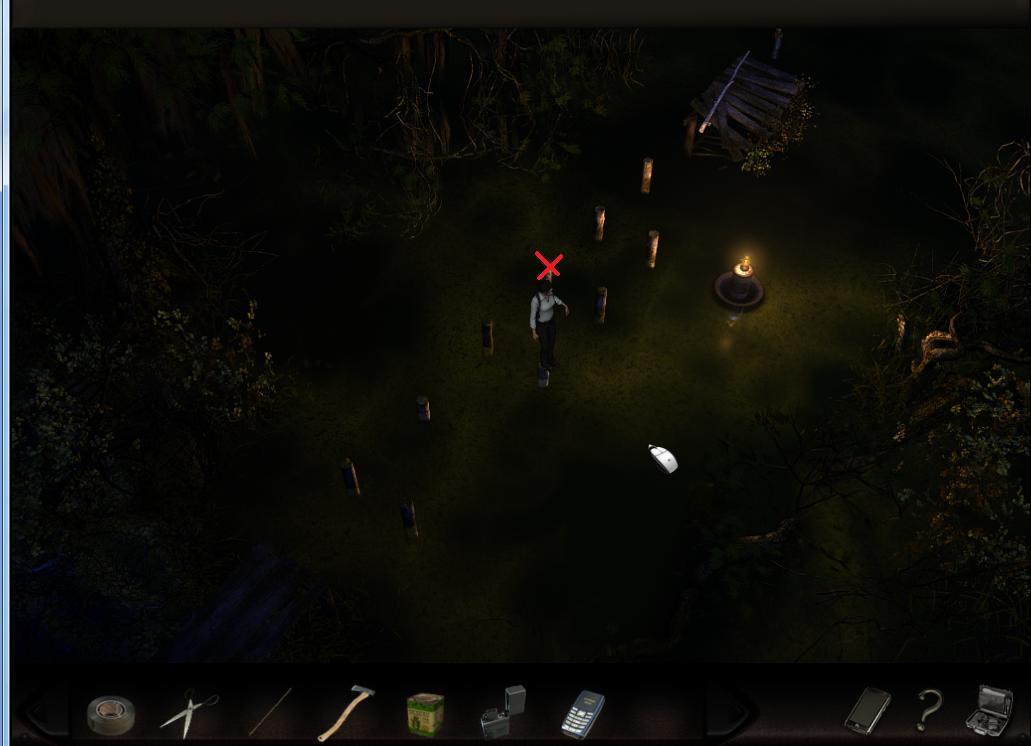 Next, jump on the pier. Take a stick from the pier. Use it to
lift the lamp, the can and the basin. Construct the lighting
assembly again on water after the second drawbridge. Jump on
the first stilt. Use the stick to move the board placed on
stilts. Take the makeshift gangway to move to the next stilt.
Again, take only the stilts, which are not crossed out.
Next, jump on the pier. Take a stick from the pier. Use it to
lift the lamp, the can and the basin. Construct the lighting
assembly again on water after the second drawbridge. Jump on
the first stilt. Use the stick to move the board placed on
stilts. Take the makeshift gangway to move to the next stilt.
Again, take only the stilts, which are not crossed out.
 When you reach the last stilt, pick up the lamp from the can.
Place the lamp on the peg on the right side. Place the can and
the basin in front of you, jump on them, and jump further to
the pier. Proceed to the steamer.
When you reach the last stilt, pick up the lamp from the can.
Place the lamp on the peg on the right side. Place the can and
the basin in front of you, jump on them, and jump further to
the pier. Proceed to the steamer.
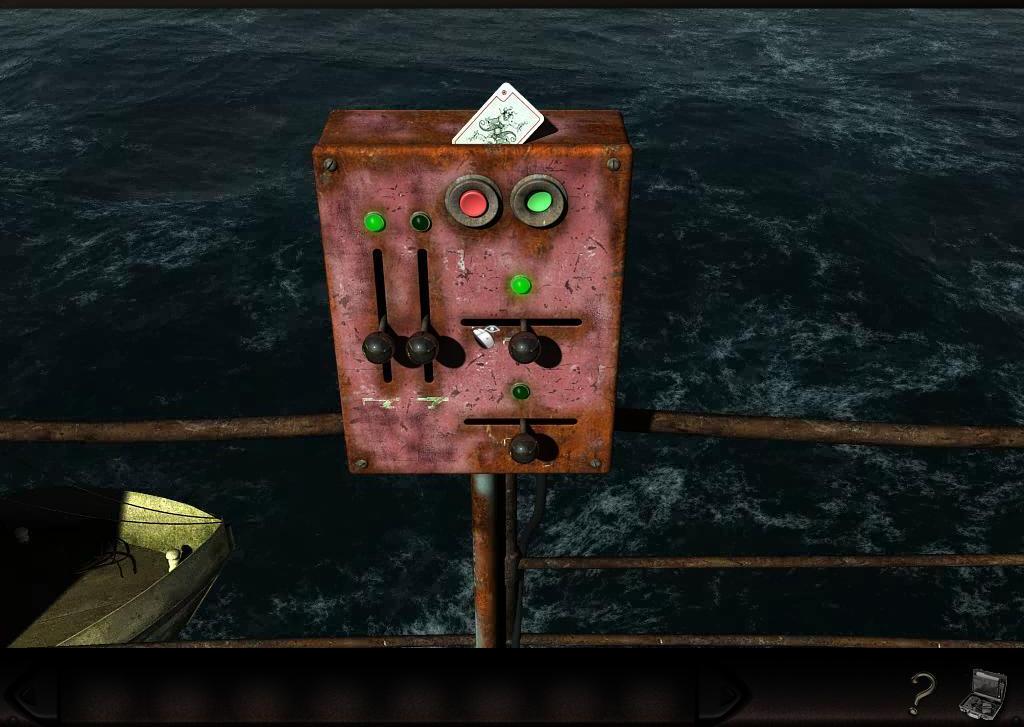
11.The Steamer
Go to the steamer. Climb to the top deck, and from there to the paddle wheel. You will notice the writer is tied up to the wheel. On the deck you will find a broken bell. Take the clapper of the bell, and go to the bridge. The door to the bridge is closed. Break the pane with the clapper and enter the bridge.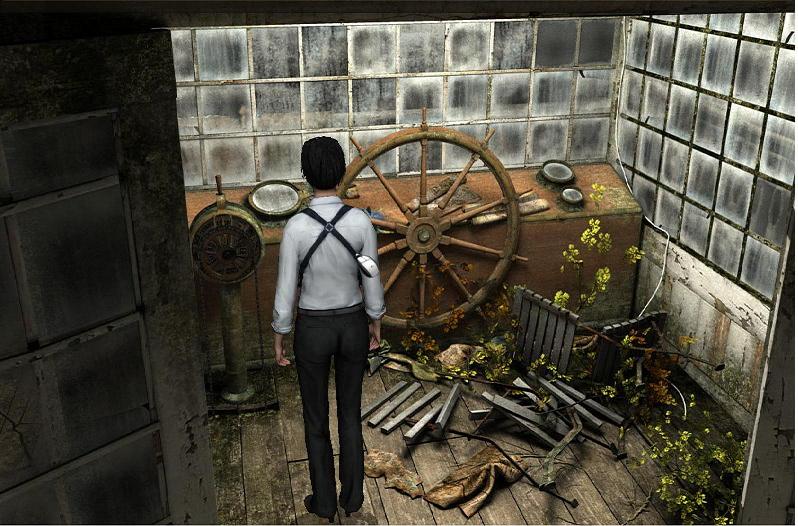 Take the captain’s hat and you will get an another card. Use
the lever of the telegraph to stop the paddle wheel. Go see
whether it stopped, and check if you can untie the writer.
Next, perform a search of the steamer's surroundings with your
partner and the Sheriff. You will find a journalist snooping
around. Bring him in to the FBI Office.
Take the captain’s hat and you will get an another card. Use
the lever of the telegraph to stop the paddle wheel. Go see
whether it stopped, and check if you can untie the writer.
Next, perform a search of the steamer's surroundings with your
partner and the Sheriff. You will find a journalist snooping
around. Bring him in to the FBI Office.
12.FBI Field Office
Interrogate the journalist. During his interrogation Dick will come in and present you with a newspaper featuring a picture of you next to the victim in the power plant. Go to the hall, and get some cola. Dick will follow you outside. Pick up a call, and you will learn from Wang, that he found a partial fingerprint in the car of the first victim. Talk to Dick, go to the cola vending machine, and pick up one can. Return to the interrogation room and talk to the journalist. When he drinks the cola, take the can, and bring it to Wang. The technician will take fingerprints off it. At this point, you will get a call from Ruth, telling that your father tried to reach you. Exit the lab, and call your father back. Afterwards, return to Wang. Perform a fingerprint analysis with the technician’s computer; drag and drop them to the drop area of the computer screen.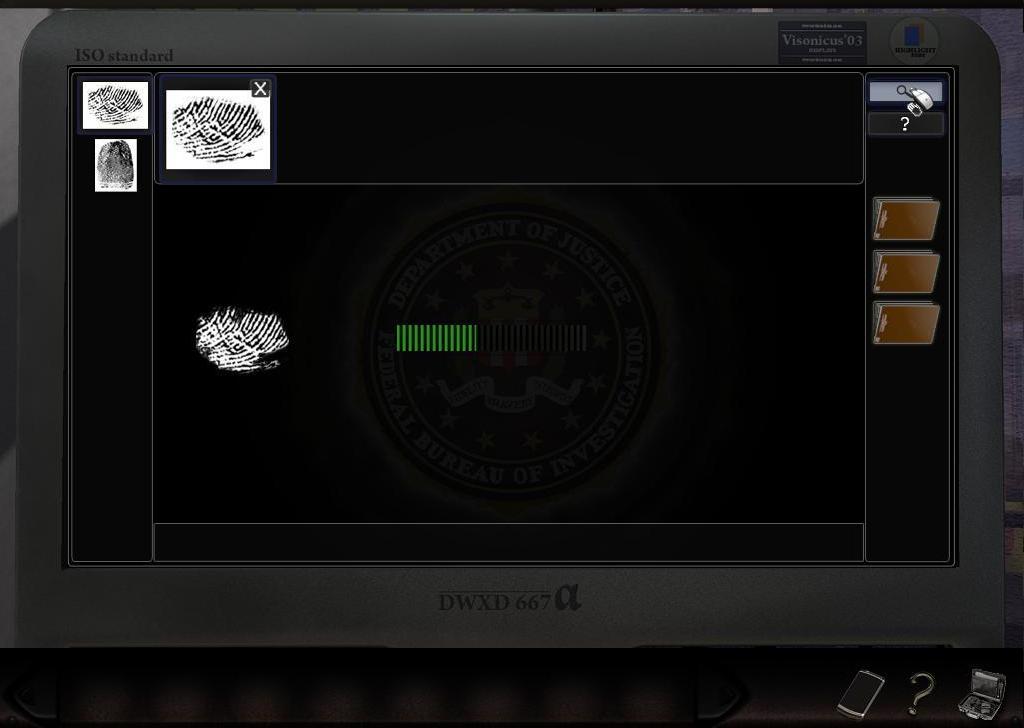 You will get an „access denied” message when trying to analyze
the partial fingerprint found at the victim’s car. Compare the
partial fingerprint with the journalist’s fingerprints.
Perform a comparison analysis until you find out, that they
don't match. Talk to Wang, and he will tell you to see the
boss. Go to the boss, and he will provide you with a military
database access. Return to the lab and analyze the partial
fingerprint again. Match it with one of ten samples, you might
need to turn partial fingerprint.
You will get an „access denied” message when trying to analyze
the partial fingerprint found at the victim’s car. Compare the
partial fingerprint with the journalist’s fingerprints.
Perform a comparison analysis until you find out, that they
don't match. Talk to Wang, and he will tell you to see the
boss. Go to the boss, and he will provide you with a military
database access. Return to the lab and analyze the partial
fingerprint again. Match it with one of ten samples, you might
need to turn partial fingerprint.
 You will learn, that the analyzed fingerprint belongs to one
Paul Reed. Talk to Wang. Exit the lab. You will meet your boss
at the hall. Talk to him. He will ask you to go see Ruth, who
was supposed to collect information about jurors at Benson’s
trial. Exit the secretary’s office, go to your room and talk
to your partner. Next, travel to Maine.
You will learn, that the analyzed fingerprint belongs to one
Paul Reed. Talk to Wang. Exit the lab. You will meet your boss
at the hall. Talk to him. He will ask you to go see Ruth, who
was supposed to collect information about jurors at Benson’s
trial. Exit the secretary’s office, go to your room and talk
to your partner. Next, travel to Maine.
13.Norwitch – Maine
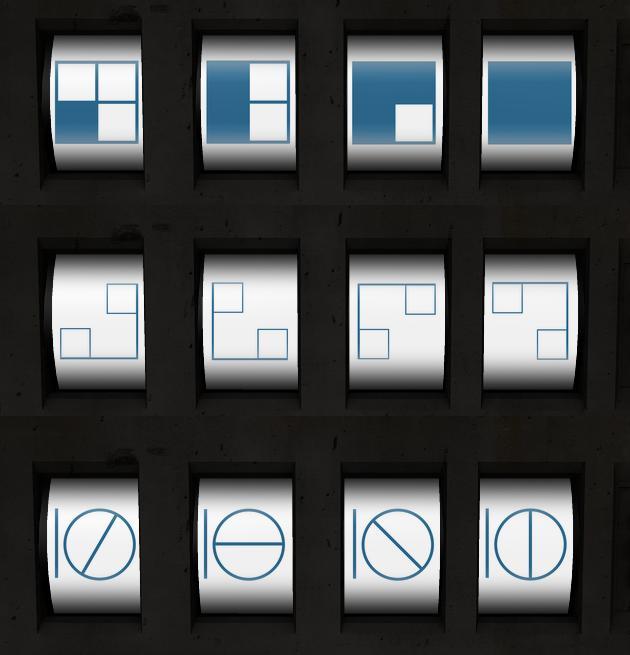
At Norwitch, you will talk to Dick, who is going to see the judge. You will stay to take a look at the surroundings of Reed’s house. Take mattress hanging from the fence. Go towards the barn door. Examine the stove. Take a pump, some salt and soap off it. Move to the side of the barn. Go to the conveyor belt, and take a board from there. Grease it with soap and apply it under the conveyor belt. Scatter salt around the conveyor belt to melt the snow. Apply the mattress under the board. Connect the pump to the valve of the mattress, and pump it up. Move the conveyor belt to the barn window. Get on the conveyor
belt and enter the barn. Look around. Approach the elevator
panel, and put symbols in an order which makes them fit
together. When you succeed in arranging the symbols thrice,
the elevator door will open. An example layout of the symbols:
Move the conveyor belt to the barn window. Get on the conveyor
belt and enter the barn. Look around. Approach the elevator
panel, and put symbols in an order which makes them fit
together. When you succeed in arranging the symbols thrice,
the elevator door will open. An example layout of the symbols:
 Go up and take a look around. You will notice some diagrams,
which resemble devices used to commit crimes up to this date.
Next, proceed downstairs. There you will meet the owners of
the barn. Talk to them. After an unpleasant conversation, exit
the barn. Call your partner and drive away.
Go up and take a look around. You will notice some diagrams,
which resemble devices used to commit crimes up to this date.
Next, proceed downstairs. There you will meet the owners of
the barn. Talk to them. After an unpleasant conversation, exit
the barn. Call your partner and drive away.
14.The Church and the Cemetery
Talk to the pastor. Climb the clock tower and take a look around. Take a brush from the prie-dieu. Approach the tower door, try to open it, but it is closed. Return to the pastor and talk to him.. He will give you the key. Go to the tower, open the door, and go upstairs. Look around the interior, but it is too dark. Get back to the pastor, and ask him to provide you with some light. He will give you a flashlight. Go back up the tower and take a look around. Connect the light, connecting the plug to the socket. Get a lever hanging next to the tower staircase. Look at the
floor. There you will see a board nailed to the floor. Use the
lever to pull the nails out, and lift up the board. You will
see a dusty surface. Clean it up with the brush, and read the
inscription under the dust. Exit the building and talk to the
pastor. Go to the cemetery and examine some tombstones. You
will notice a card symbol engraved on Finney’s tombstone: a
deuce of hearts.
Get a lever hanging next to the tower staircase. Look at the
floor. There you will see a board nailed to the floor. Use the
lever to pull the nails out, and lift up the board. You will
see a dusty surface. Clean it up with the brush, and read the
inscription under the dust. Exit the building and talk to the
pastor. Go to the cemetery and examine some tombstones. You
will notice a card symbol engraved on Finney’s tombstone: a
deuce of hearts.
 Return to the pastor and talk to him about this. Next, proceed
towards the car. At the car you will get a phone call from
Ruth. Talk to her. Next, get into the car, and drive to the
courthouse.
Return to the pastor and talk to him about this. Next, proceed
towards the car. At the car you will get a phone call from
Ruth. Talk to her. Next, get into the car, and drive to the
courthouse.
15.The Courthouse
You will get out of the car in front of the courthouse. It appears to be closed already. Go to the back of the courthouse. Look through the window. You can’t go in through there — the window is too high. Go to the lamppost. You will see an advertisement board chained to the lamppost. Get back to the street in front of the courthouse. Take a broken spade from the trash can. Proceed to the back of the courthouse, and approach the lamppost. Use the spade to break the chain connecting the board to the lamppost. Take the advertisement board and place it under the courthouse window.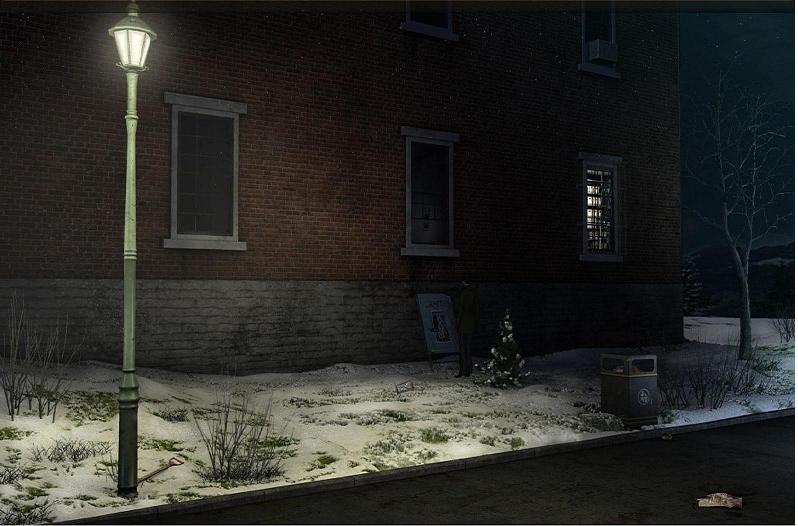 Climb the board to get inside the courthouse. Enter the
courthouse archives and take a look around. Proceed to the far
side of the archives. You will find Dick there. Talk to him.
You will get into an argument with him, ending up with you
trying to arrest your partner. You will not succeed though,
with Dick knocking you over and running away. Get in to your
car, and chase him. Dick’s car will fall off the road, and
Dick will die in the crash. However, before he dies, he will
manage to give you a clue about the murderer’s whereabouts.
Drive to the lighthouse.
Climb the board to get inside the courthouse. Enter the
courthouse archives and take a look around. Proceed to the far
side of the archives. You will find Dick there. Talk to him.
You will get into an argument with him, ending up with you
trying to arrest your partner. You will not succeed though,
with Dick knocking you over and running away. Get in to your
car, and chase him. Dick’s car will fall off the road, and
Dick will die in the crash. However, before he dies, he will
manage to give you a clue about the murderer’s whereabouts.
Drive to the lighthouse.
16.The Coast
Get out of the car at the coast. Go to the hut. Take a look around the surroundings. You will notice a car, which could take you to the lighthouse.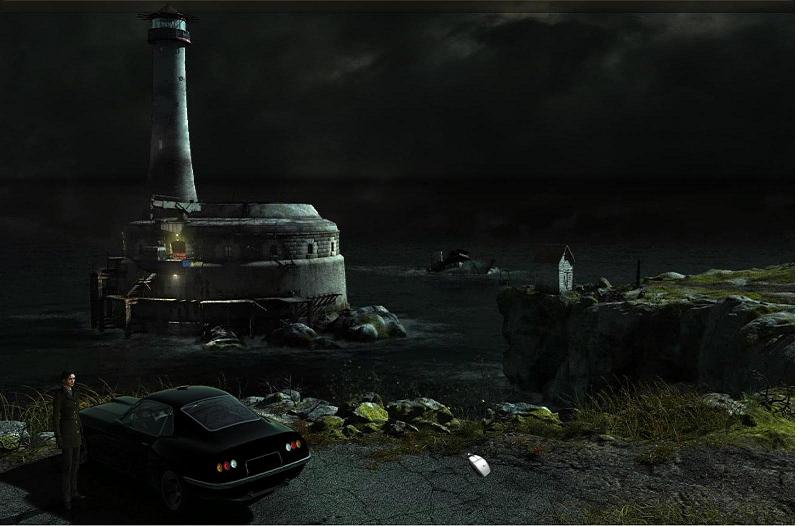 Go behind the hut, to the cableway. Go to the container. Pick
up a lever supporting the container. Move away the rock which
blocks the container, and lean it to the side. Enter the hut.
Take a look around inside. Take a work jacket hanging from the
wall, and a belt. Unscrew a hook used for hanging the jacket
and the belt. Pick up a metal cover from the floor. Take a nut
from the beam under the engine. Pick up a flywheel, and rod
reel from the floor under the engine, and a broken board from
the bench on the right. Attach the hook to the board. You will
see a crack in the floor. Approach it, and look through. You
will notice a key inside. Use the board with hook to pull the
key out of the crack. Approach the engine and examine it
carefully. Install the flywheel on the axle, and apply a nut
to secure the assembly. Examine the cylinder head and take a
shank out of it. Look at the fuel tank intake. Try to take off
the cap, but without success. Use the box-end wrench to loosen
the cap, and remove it. Search the jacket. From the right
pocket, you will get a pack of cigarettes, and from the left
one, a box of matches. Take a cigarette from the pack, and
light it with a match. Apply the lit cigarette into the
cylinder head shank. Insert the shank with the lit cigarette
into the cylinder head slot.
Go behind the hut, to the cableway. Go to the container. Pick
up a lever supporting the container. Move away the rock which
blocks the container, and lean it to the side. Enter the hut.
Take a look around inside. Take a work jacket hanging from the
wall, and a belt. Unscrew a hook used for hanging the jacket
and the belt. Pick up a metal cover from the floor. Take a nut
from the beam under the engine. Pick up a flywheel, and rod
reel from the floor under the engine, and a broken board from
the bench on the right. Attach the hook to the board. You will
see a crack in the floor. Approach it, and look through. You
will notice a key inside. Use the board with hook to pull the
key out of the crack. Approach the engine and examine it
carefully. Install the flywheel on the axle, and apply a nut
to secure the assembly. Examine the cylinder head and take a
shank out of it. Look at the fuel tank intake. Try to take off
the cap, but without success. Use the box-end wrench to loosen
the cap, and remove it. Search the jacket. From the right
pocket, you will get a pack of cigarettes, and from the left
one, a box of matches. Take a cigarette from the pack, and
light it with a match. Apply the lit cigarette into the
cylinder head shank. Insert the shank with the lit cigarette
into the cylinder head slot.
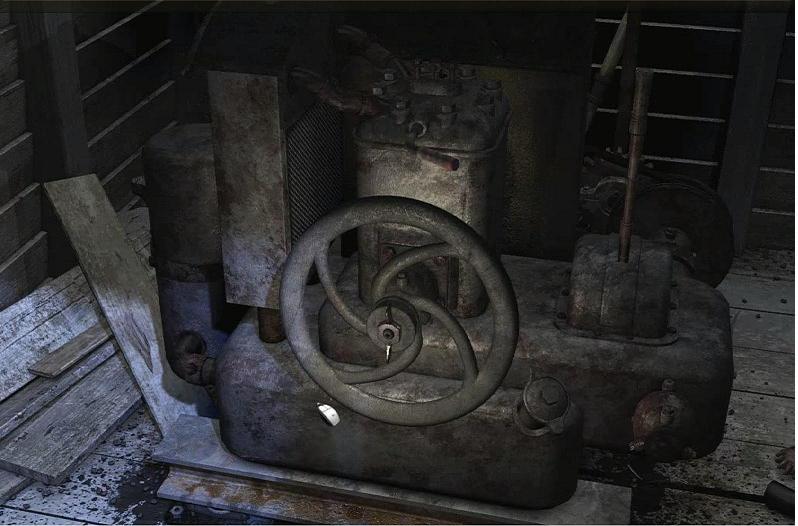 Look at the clutch. Insert the lever into the clutch lever
slot. Examine the rod reel and pull out some fishing line from
it. Wrap the fishing line around the clutch lever. Apply the
fuel tank intake cap on the metal cover. Go outside the hut,
and approach the container. Place the cover with the cap under
the valve, unscrew the valve, and pour some fuel to the cover.
Pick up the cover filled with fuel, and return to the hut.
Pour the fuel into the fuel tank, and cover the intake with a
cap taken from the cover. Wrap the belt around the axle. Pull
the belt to start up the engine. Exit the hut, and proceed
towards the car. Enter the car, and use it to enter the
lighthouse.
Look at the clutch. Insert the lever into the clutch lever
slot. Examine the rod reel and pull out some fishing line from
it. Wrap the fishing line around the clutch lever. Apply the
fuel tank intake cap on the metal cover. Go outside the hut,
and approach the container. Place the cover with the cap under
the valve, unscrew the valve, and pour some fuel to the cover.
Pick up the cover filled with fuel, and return to the hut.
Pour the fuel into the fuel tank, and cover the intake with a
cap taken from the cover. Wrap the belt around the axle. Pull
the belt to start up the engine. Exit the hut, and proceed
towards the car. Enter the car, and use it to enter the
lighthouse.
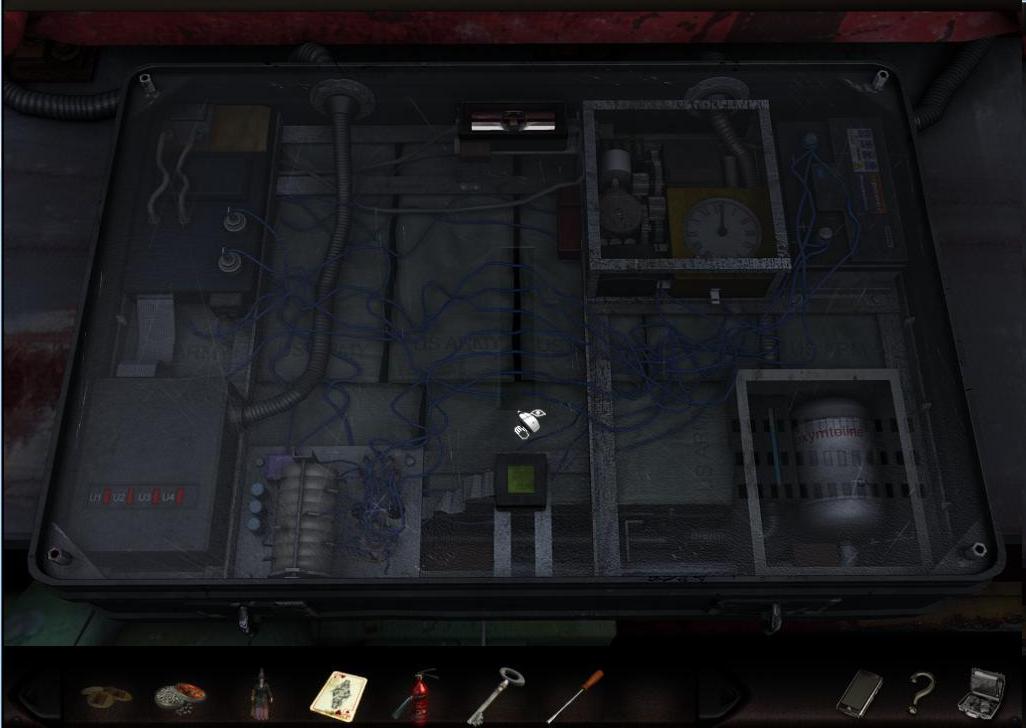
17.The Lighthouse
At the platform, connect the end of the steel rope with a hook to the metal ladder.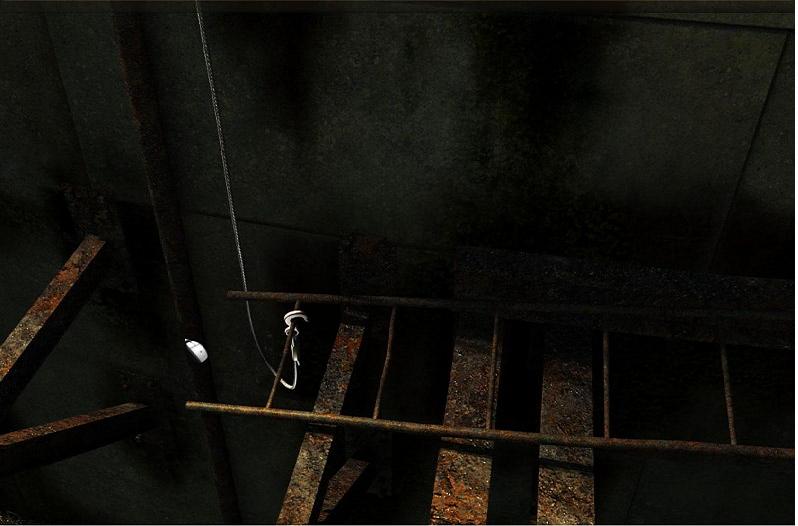 Next, jump on the platform. Take the staircase to the fort
entrance. Of course, you won't be able to open it. Take an oar
from the boat. Use it to throw the other end of the steel
rope, hanging above the fort entrance door on the other side,
over to the platform. Go down, and move to the next platform.
Tie up the steel rope to a mine. A beam will fall down. Return
to the platform, and pick up the beam. Put it under the mine,
and press the beam. It will cause the mine to fall down, and
lift the ladder tied up to the steel rope. Return to the fort
entrance. Climb up the ladder to the roof over the entrance.
Go to the lighthouse, and try to open the door. It can’t be
done, however, because they’re bolted shut. Go to the
storeroom hatch, and try to open it — again unsuccessfully.
Approach the crane, and take a look at its control panel. You
will notice a card stuck at the crane control panel — a JOKER.
Take it.
Next, jump on the platform. Take the staircase to the fort
entrance. Of course, you won't be able to open it. Take an oar
from the boat. Use it to throw the other end of the steel
rope, hanging above the fort entrance door on the other side,
over to the platform. Go down, and move to the next platform.
Tie up the steel rope to a mine. A beam will fall down. Return
to the platform, and pick up the beam. Put it under the mine,
and press the beam. It will cause the mine to fall down, and
lift the ladder tied up to the steel rope. Return to the fort
entrance. Climb up the ladder to the roof over the entrance.
Go to the lighthouse, and try to open the door. It can’t be
done, however, because they’re bolted shut. Go to the
storeroom hatch, and try to open it — again unsuccessfully.
Approach the crane, and take a look at its control panel. You
will notice a card stuck at the crane control panel — a JOKER.
Take it.
 Try to control the crane using the panel. Use the green button
to power up the crane. When you try and move the first
vertical lever from the left upwards, the crane arm will rise.
Move the first horizontal lever from the top twice to the
right (or left), in order to move the crane arm over the
hatch. Next, move the second horizontal lever from the top to
the left, and then the second vertical lever from the left —
twice downwards. Go to the hatch. Mount a hook on the hatch
handle and return to the crane control panel. Move the second
vertical lever from the left twice upwards. The hatch will
open. Approach the hatch, and go through it to the main
lighthouse storeroom. Talk to Benson. Pick up a broom, and a
big wrench from the floor, by the wall, on the left. Go
between the racks, and pick up a bucket and a small wrench.
There will be a box on the right side of the door. Approach
it, open it, and take out a broken blade and a medium wrench
out of it. Get to the duct grating, and try to open it -
unsuccessfully. Lever the grating with any wrench. Approach a
switch on the wall, on the right side of the door. Move to the
junction box above the switch. Use the blade to unscrew
screws, and take off the cover. When you examine it, you will
find instructions for connecting the wires.
Try to control the crane using the panel. Use the green button
to power up the crane. When you try and move the first
vertical lever from the left upwards, the crane arm will rise.
Move the first horizontal lever from the top twice to the
right (or left), in order to move the crane arm over the
hatch. Next, move the second horizontal lever from the top to
the left, and then the second vertical lever from the left —
twice downwards. Go to the hatch. Mount a hook on the hatch
handle and return to the crane control panel. Move the second
vertical lever from the left twice upwards. The hatch will
open. Approach the hatch, and go through it to the main
lighthouse storeroom. Talk to Benson. Pick up a broom, and a
big wrench from the floor, by the wall, on the left. Go
between the racks, and pick up a bucket and a small wrench.
There will be a box on the right side of the door. Approach
it, open it, and take out a broken blade and a medium wrench
out of it. Get to the duct grating, and try to open it -
unsuccessfully. Lever the grating with any wrench. Approach a
switch on the wall, on the right side of the door. Move to the
junction box above the switch. Use the blade to unscrew
screws, and take off the cover. When you examine it, you will
find instructions for connecting the wires.
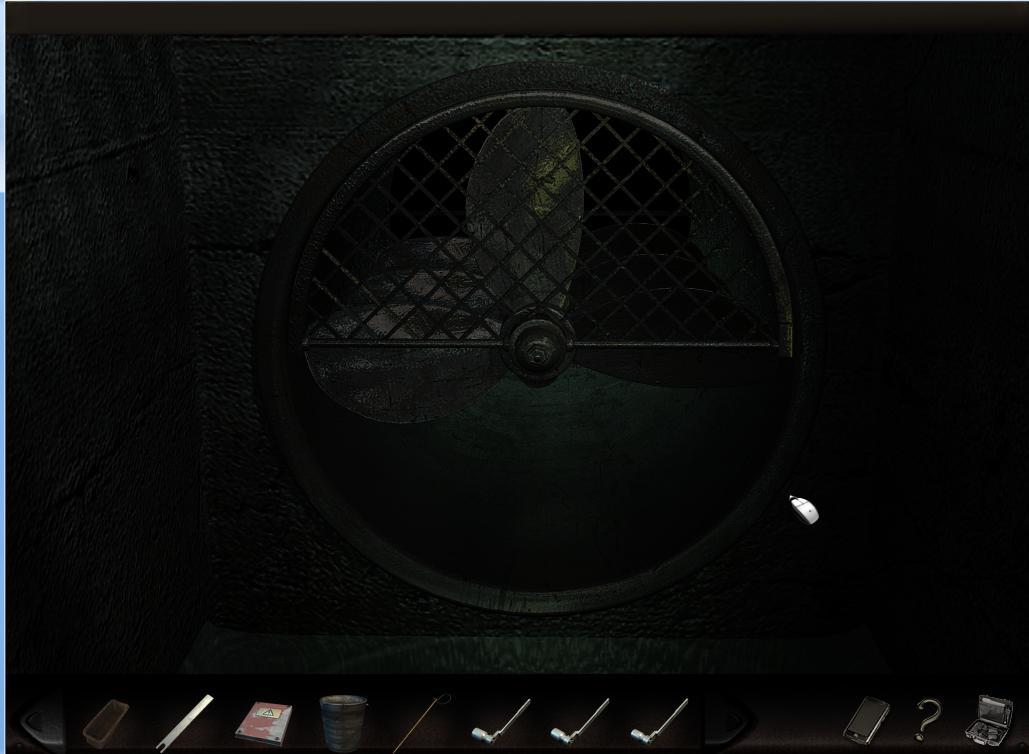
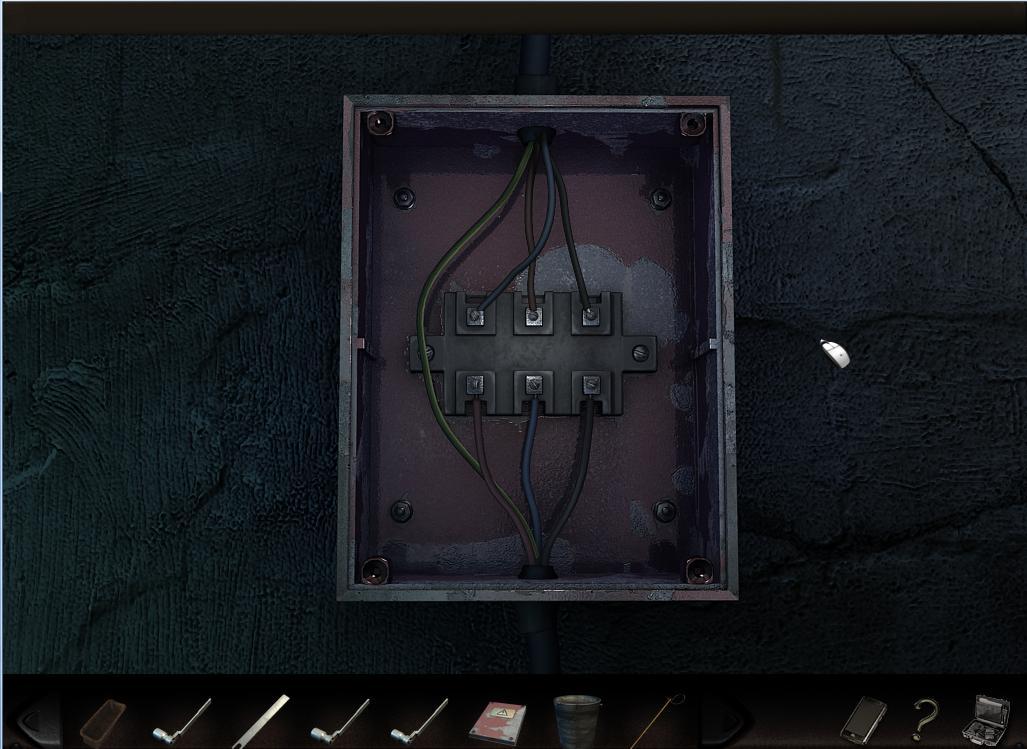 Connect the cables to appropriate junctions, by pointing a
wire and clicking a target junction. First, connect the blue
wire to the first junction on the left, then the brown wire to
the middle junction, and finally the black wire to the
rightmost junction. Change the switch position, and you will
flush the duct. Enter the duct. Apply the wrenches to the
impeller axle, and use them to rotate blades, until you clear
the way.
Connect the cables to appropriate junctions, by pointing a
wire and clicking a target junction. First, connect the blue
wire to the first junction on the left, then the brown wire to
the middle junction, and finally the black wire to the
rightmost junction. Change the switch position, and you will
flush the duct. Enter the duct. Apply the wrenches to the
impeller axle, and use them to rotate blades, until you clear
the way.
 Move under the blades to the platform. Take a metal handle
from the bucket. Bend it into a loop. Put the bucket on the
platform. Take the brush off the broom. Install a loop made
from the bucket handle on the broomstick. Stand on the bucket
and look inside the top room. You will see a door with handle.
Use the loop on the broomstick twice on the door handle to
open it. Go through the culvert to the storeroom. Open the
unlocked door, and proceed to the room with staircase. Go
upstairs, and talk to the killer.
Move under the blades to the platform. Take a metal handle
from the bucket. Bend it into a loop. Put the bucket on the
platform. Take the brush off the broom. Install a loop made
from the bucket handle on the broomstick. Stand on the bucket
and look inside the top room. You will see a door with handle.
Use the loop on the broomstick twice on the door handle to
open it. Go through the culvert to the storeroom. Open the
unlocked door, and proceed to the room with staircase. Go
upstairs, and talk to the killer.
Created at: 2010-12-16